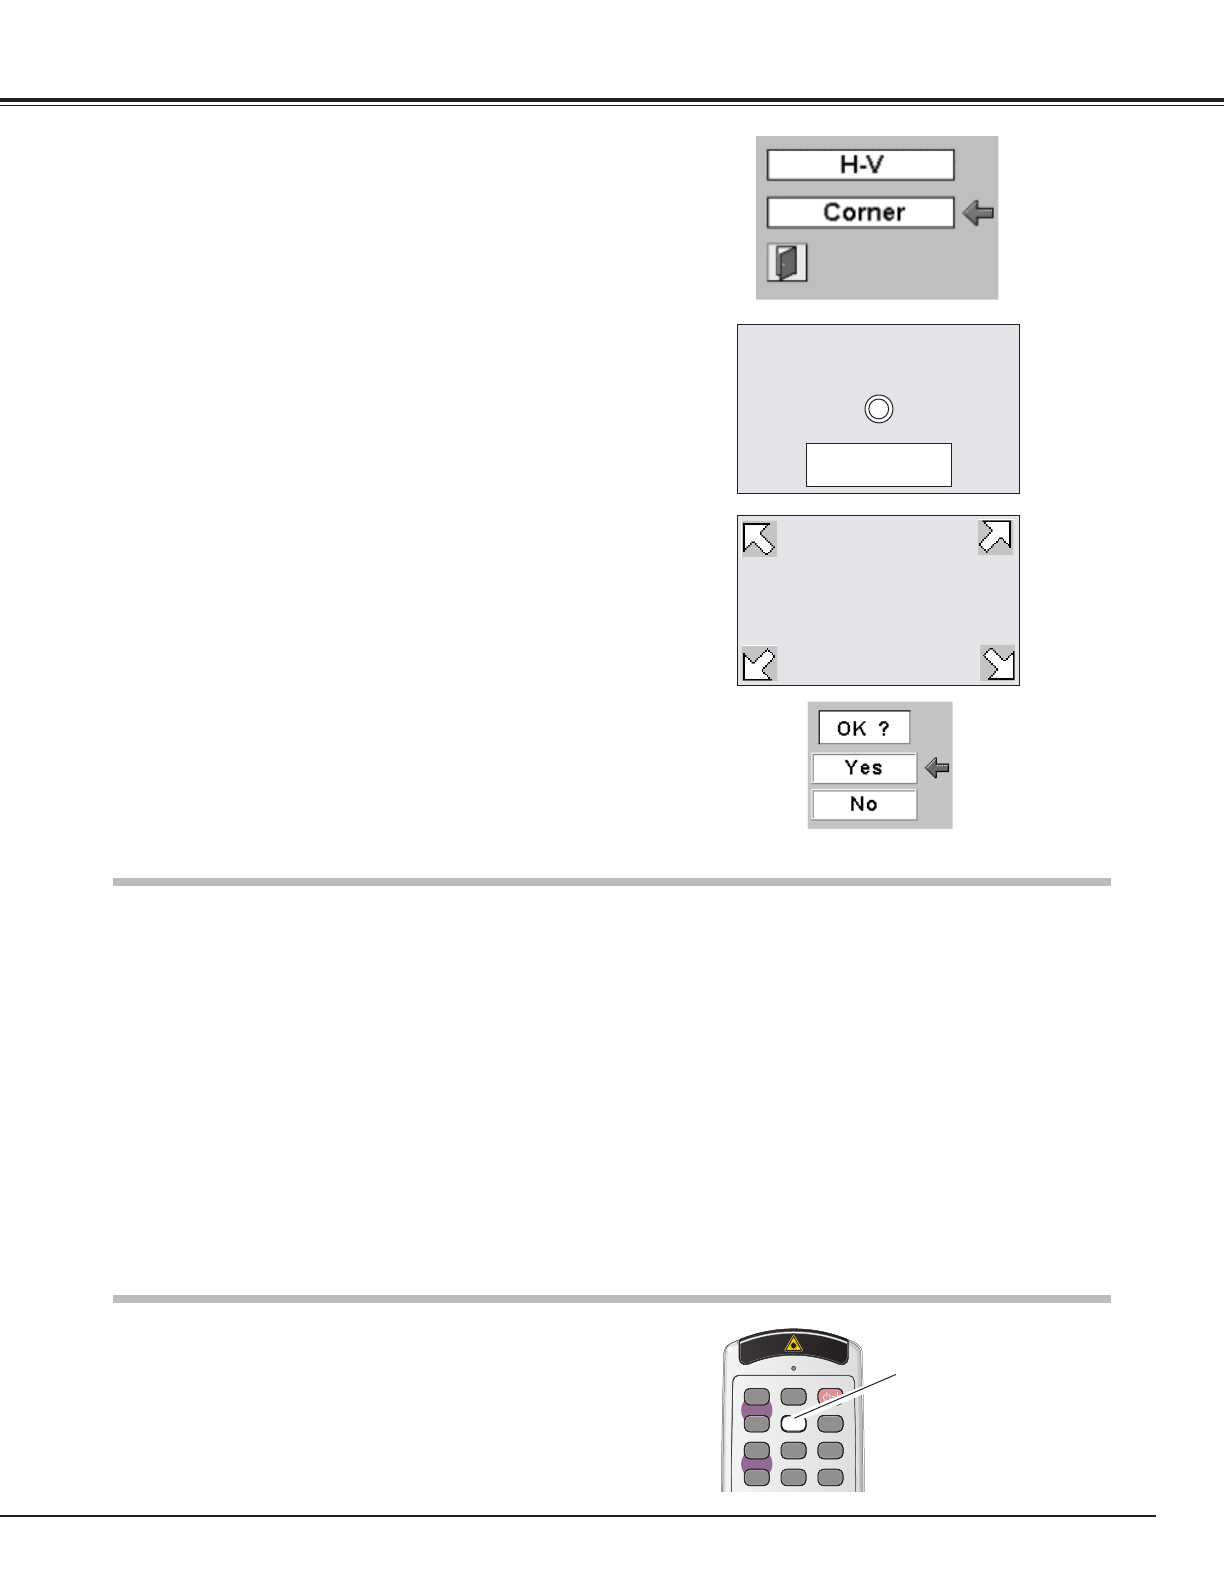
569922
21
Verklein
Vergroot
Pagina terug
1/60
Pagina verder
21
Basic Operation
Press the FREEZE button on the remote control to freeze the picture
on the screen. To cancel the FREEZE function, press the FREEZE
button again or press any other button.
Picture Freeze Function
MUT EPAGE
FREEZED.ZOOM NO SHOW
ONRESET ALL OFF
COMPUTER 1LASER
FOCUS
KEYSTONE
ZOOM
COMPUTER 2
VIDEO
MENU
R
-
CLICK
SELECT
IMAGE
AUTO SET
P
-
TIMER
AUTO PC ON
-
OFF
V
O
L
U
M
E
-
V
O
L
U
M
E
+
FREEZE button
1
Press the Point UP/DOWN button to move the red arrow pointer
to Corner and then press the SELECT button. The mark will
appear on the screen. Move the projector, align the mark with
the center of the desired screen and press the SELECT button.
An arrow will appear on the upper left corner of the screen.
2
Keystone correction (Corner)
Please set the projector
to take a lead in a screen
and push select.
The screen will not be corrected when points that exceed the
correction limit are selected.
If you select Corner and press the SELECT button, the keystone
adjustment by H-V keystone correction will be canceled.
Auto Set Up Function
Use the POINT UP/DOWN/LEFT/RIGHT button to set the upper
left positioning and press the SELECT button. Perform the same
procedure for the upper right, lower right and lower left
positioning and press the SELECT button. The message OK?
will appear on the screen. Selecting YES and pressing the
SELECT button will correct the alignment as per the 4 points set
on the screen.
Note:
Do not put any obstruction between the Auto Set Up sensor on the projector and the screen, otherwise the Auto Set Up
function may not work properly. Do not dirt face of the Auto Set Up sensor on the projector.
When adjusting Keystone with Auto Set Up button, set screen zoom maximum as Keystone cannot be properly corrected
under minimum zoom screen.
Auto Set Up function enables you to automatically adjust Focus, Keystone and the computer display parameters (Fine sync,
Total dots and Picture position) by just pressing the Auto Set Up button on the top control or on the remote control.
Auto Set Up function operates as follows:
By pressing Auto Set Up button, preparation display is projected on screen. The Auto Set Up sensor on the projector's front
panel will scan the projected image and automatically adjust Focus, Keystone and computer display parameters (when
computer signal is selected for input) to obtain an optimum screen. The preparation display will disappear after the
adjustment is completed.
Auto Set Up operation parameter can be selected in Setting of the main menu. (Refer to Auto set up in Setting on page 39.)
If the optimum screen is not obtained, adjust insufficient matters manually.
21

Hulp nodig? Stel uw vraag in het forum

Spelregels

Misbruik melden

Gebruikershandleiding.com neemt misbruik van zijn services uitermate serieus. U kunt hieronder aangeven waarom deze vraag ongepast is. Wij controleren de vraag en zonodig wordt deze verwijderd.

Product:

Bijvoorbeeld antisemitische inhoud, racistische inhoud, of materiaal dat gewelddadige fysieke handelingen tot gevolg kan hebben.

Bijvoorbeeld een creditcardnummer, een persoonlijk identificatienummer, of een geheim adres. E-mailadressen en volledige namen worden niet als privégegevens beschouwd.

Spelregels forum

Om tot zinvolle vragen te komen hanteren wij de volgende spelregels:

Belangrijk! Als er een antwoord wordt gegeven op uw vraag, dan is het voor de gever van het antwoord nuttig om te weten als u er wel (of niet) mee geholpen bent! Wij vragen u dus ook te reageren op een antwoord.

Belangrijk! Antwoorden worden ook per e-mail naar abonnees gestuurd. Laat uw emailadres achter op deze site, zodat u op de hoogte blijft. U krijgt dan ook andere vragen en antwoorden te zien.

Abonneren

Abonneer u voor het ontvangen van emails voor uw Sanyo PLC-XC10 bij:


U ontvangt een email met instructies om u voor één of beide opties in te schrijven.


Ontvang uw handleiding per email

Vul uw emailadres in en ontvang de handleiding van Sanyo PLC-XC10 in de taal/talen: Engels als bijlage per email.

De handleiding is 2,92 mb groot.


U ontvangt de handleiding per email binnen enkele minuten. Als u geen email heeft ontvangen, dan heeft u waarschijnlijk een verkeerd emailadres ingevuld of is uw mailbox te vol. Daarnaast kan het zijn dat uw internetprovider een maximum heeft aan de grootte per email. Omdat hier een handleiding wordt meegestuurd, kan het voorkomen dat de email groter is dan toegestaan bij uw provider.

Stel vragen via chat aan uw handleiding

Stel uw vraag over deze PDF

loading

Andere handleiding(en) van Sanyo PLC-XC10

Sanyo PLC-XC10 Gebruiksaanwijzing - Deutsch - 60 pagina's


Uw handleiding is per email verstuurd. Controleer uw email

Als u niet binnen een kwartier uw email met handleiding ontvangen heeft, kan het zijn dat u een verkeerd emailadres heeft ingevuld of dat uw emailprovider een maximum grootte per email heeft ingesteld die kleiner is dan de grootte van de handleiding.

Er is een email naar u verstuurd om uw inschrijving definitief te maken.

Controleer uw email en volg de aanwijzingen op om uw inschrijving definitief te maken

U heeft geen emailadres opgegeven

Als u de handleiding per email wilt ontvangen, vul dan een geldig emailadres in.

Uw vraag is op deze pagina toegevoegd

Wilt u een email ontvangen bij een antwoord en/of nieuwe vragen? Vul dan hier uw emailadres in.


Info