546086
54
Verklein
Vergroot
Pagina terug
1/229
Pagina verder
E-MANUAL
Thank you for purchasing this Samsung product.
To receive more complete service, please register
your product at
www.samsung.com/register
Model______________ Serial No.______________
12 13
HDMI Connection
Before connecting any external device or cable to the TV, first verify the TV's model number. A
sticker containing the model number is attached to the back of the TV. The connection method varies
depending on the model.
The following types of HDMI cables are recommended:
High-Speed HDMI Cable
High-Speed HDMI Cable with Ethernet
HDMI cables have certain requirements:
"
Use an HDMI cable with a thickness of 14 mm or less.
"
Using a non-certified HDMI cable may result in a blank screen or a connection error.
"
Some HDMI cables and devices may not be compatible with the TV due to different HDMI specifications.
"
This TV does not support HDMI Ethernet Channel. Ethernet is a LAN (Local Area Network) built with coaxial
cables standardised by the IEEE.
Refer to the diagram and connect the HDMI cable to the video device's HDMI output connector and the
TV's HDMI input connector.
"
The number of connectors and their names and locations may vary depending on the model.
Once the connection has been made, you will be able to select the connected external device using
the SOURCE button.
14
Component Connection
Before connecting any external devices and cables to the TV, first verify the model number of the
TV you purchased. A sticker containing the model number is attached to the back of the TV. The
connection method varies depending on the model.
Refer to the diagram and connect the Component cable to the TV's component input connectors and
the device's component output connectors.
Make sure the cable colours match the connector colours.
Once the connection has been made, you will be able to select the connected external device using
the SOURCE button.
14 15
External Input Connection
Before connecting any external device or cable to the TV, first verify the TV's model number. A
sticker containing the model number is attached to the back of the TV. The connection method varies
depending on the model.
Refer to the diagram and connect the AV cable to the TV's AV input connectors and the device's AV
output connectors.
If you are using the TV's AV input connectors, connect the video cable to the Y connector. Some
models feature a video connector as well. In this case, connect the cable to the video connector.
Once the connection has been made, you will be able to select the connected external device using
the SOURCE button.
16
SCART Connection
"
Availability depends on the specific model and area.
Before connecting any external devices and cables to the TV, first verify the model number of the
TV you purchased. A sticker containing the model number is attached to the back of the TV. The
connection method varies depending on the model.
Connect the TV’s SCART input connector to the device’s SCART output connector using a SCART
cable. An extra audio connection is not needed because SCART also carries audio.
"
SCART can only carry standard-definition video.
16 17
TV Audio through the External Speakers
Your TV has a variety of connectors for audio input from devices such as Blu-ray players and DVD
players and for audio output to such devices as amplifiers. The connectors are listed below.
ARC (Audio Return Channel)
Digital Audio (Optical)
There are several issues to bear in mind when using audio input:
For better audio quality, it is a good idea to use an AV receiver.
The number of connectors and their names and locations may vary depending on the model.
Refer to the external device's operating manual when connecting it to the TV. The number
of external device connectors and their names and locations may vary depending on the
manufacturer.
HDMI (ARC) Connection
"
Some models may not support ARC.
Before connecting any external devices and cables to the TV, first verify the model number of the TV
you purchased. A sticker showing the model number is attached to the back of the TV. The connection
method varies depending on the model.
ARC (Audio Return Channel) enables digital sound output using just an HDMI cable. However, ARC is
only available through the HDMI (ARC) port and only when the TV is connected to an ARC-enabled AV
receiver.
"
The number of connectors and their names and locations may vary depending on the model.
Connect an HDMI cable to the TV's HDMI (ARC) connector and the device's HDMI output connector.
18
Digital Audio (Optical) Connection
"
Availability depends on the specific model and area.
Before connecting any external device or cable to the TV, first verify the TV's model number. A sticker
showing the model number is attached to the back of the TV. The connection method varies depending
on the model.
Connecting an AV receiver to the TV via a digital audio (optical) connector lets you listen to digital
audio.
Connecting a device using an optical cable does not automatically turn off the TV speakers. To turn off
the TV's speakers, set TV Sound Output (Sound > Speaker Settings > TV Sound Output) to something
other than TV Speaker.
Adjust the audio device's volume using its remote control.
"
An unusual noise coming from the audio device while you are using it may indicate a problem with the
audio device itself. If this occurs, ask for assistance from the audio device manufacturer.
"
Digital audio is only available with 5.1-channel broadcasts.
Refer to the diagram and connect the optical cable to the TV's digital audio output connector and the
device's digital audio input connector.
18 19
Headphone Connection
"
Availability depends on the specific model and area.
Before connecting any external device or cable to the TV, first verify the TV's model number. A
sticker containing the model number is attached to the back of the TV. The connection method varies
depending on the model.
Refer to the diagram and connect the headphones to the headphone output connector. Only use
headphones with a 3-conductor TRS type jack. The headphone volume and the TV volume are
adjusted independently of each other. While the headphone is connected, the TV speakers are muted
and certain Sound options are deactivated.
"
The connectors may not be supported depending on the model.
20
Audio Output Connection
"
Availability depends on the specific model and area.
Before connecting any external device or cable to the TV, first verify the TV's model number. A
sticker containing the model number is attached to the back of the TV. The connection method varies
depending on the model.
"
The connectors names and locations may vary depending on the model.
Refer to the diagram and connect the audio cable to the TV's audio output connector and the device's
audio input connector.
20 21
Connecting to a Computer
You can directly connect a computer to the TV or to the network to view the computer screen or
content on the TV. Connect the computer to the TV as follows.
Connecting via HDMI Port
You can connect the computer to the TV using the HDMI cable to display the computer screen on
the TV.
Connecting with the HDMI (DVI) Port
You can connect a computer to the TV by connecting the computer's DVI port to the TV's HDMI
port with the DVI to HDMI cable to display the computer screen on the TV.
Connecting via Samsung Link
Quickly access the photo, video and music files saved on a computer on which Samsung Link
software is installed, even if you do not connect the TV directly to the computer.
Connecting via Home Network (DLNA)
Quickly access the photo, video and music files saved on a computer by connecting the TV and
the computer to the same router or AP.
44 45
Using the Mouse
Once a USB or Bluetooth mouse is connected to the TV, a pointer will appear on the TV's screen. You
can use this pointer to control the TV as you would a computer.
Selecting and Running an Item
Left-click on the mouse.
Displaying the Volume, Mute, and Channel Buttons
Select the volume/channel icon on the screen while watching TV. Use the onscreen buttons to
adjust the volume or switch the channel.
"
Select the volume/channel icon again to hide the buttons.
Showing Tools Buttons
Right-clicking shows the Tools buttons on the screen so that you can easily use the TV
functions.
"
The Tools buttons may vary depending on the function.
Displaying the Context-sensitive Menu on Smart Hub
On the Smart Hub screen, navigate to an item, and hold down the left mouse button for 1 second.
The Options menu available to the selected item appears.
"
The Options menu depends on the context.
Scrolling the TV Menu or Screen
Move the mouse wheel up or down. This scrolls the TV menu or screen up/down.
Exiting the TV Menu or Feature
Click on the X button. This closes the menu.
"
The X button appears when a mouse is being used. Left-clicking once while using a feature displays
the X button.
Changing Mice
Try Now
Select System > Device Manager > Mouse Settings > Select Mouse. Designate which mouse to use.
"
Only one mouse may be used at a time.
Changing Mouse Buttons and Pointer Speed
Try Now
Select System > Device Manager > Mouse Settings > Mouse Options. The following options are
available:
Primary Button
Choose which (left or right) button to use to select and run items.
Pointer Speed
Adjust the movement speed of the pointer that appears on the screen.
46
Establishing a Wired Internet Connection
Connecting the TV to the Internet gives you access to online services and SMART features, and lets
you update the TV's software quickly and easily through the Internet.
Connecting a LAN Cable
Use a LAN cable.
"
The TV will not be able to connect to the Internet if the network speed is below 10Mbps.
"
Use Cat 7 LAN cables to link your TV to the Internet Access Points.
There are three ways to connect the TV to the Internet. Refer to the diagrams and connect the LAN
cable to the LAN connector on the back of the TV.
External Modem
IP Router + ② External Modem
Wall-mounted LAN Outlet
Internet Connection
46 47
Connecting to a Wired Internet Network Automatically
Network > Network Settings
Try Now
Automatically connect to an available network.
1.
Set the Network Type to Wired, and then select Connect.
2.
The TV attempts to connect to an available network. Once successful, you will see a confirmation
message. Select OK. If the attempt fails, try again, or connect manually.
Connecting to a Wired Internet Network Manually
Network > Network Settings
With networks that require a static IP address, you will need to enter the IP address, subnet mask,
gateway, and DNS values manually to connect to the network. To get these values, contact your
Internet Service Provider (ISP).
"
Refer to the "Dynamic versus Static IP Addresses" section for more information on dynamic IP and static IP
addresses.
1.
Set the Network Type to Wired, and then select Connect.
Network Settings
Select your network type.
Network Type Wired
Connect
You can connect your TV
to the internet.
48
2.
Select Stop when the TV attempts to connect to the network. Once the network connection has
been interrupted, select IP Settings.
Network Settings
Connection verification cancelled.
Wired network connection test stopped.
Change Network IP Settings Retry
Close
3.
In the IP Settings screen, set the IP setting to Enter manually, enter the IP Address, Subnet
Mask, Gateway, and DNS Server values, and then select OK.
Use one of the following methods to enter the numerical values.
Set the numbers using the
u
and
d
buttons.
Using Samsung Smart Control: Press KEYPAD button and enter the numbers directly.
Using the remote control: Enter the numbers directly using numerical button.
IP Settings
IP setting Enter manually
IP Address 0.0.0.0
Subnet Mask 0.0.0.0
Gateway 0.0.0.0
DNS setting Enter manually
DNS Server 0.0.0.0
OK Cancel
4.
The TV attempts to connect to the network again using the specified settings. A confirmation
message appears once a connection is established. Select OK.
"
The network connection speed may differ depending on the DNS server settings.
"
For details on the DNS server settings, contact your Internet service provider (ISP).
48 49
Establishing a Wireless Internet Connection
Connecting the TV to the Internet gives you access to online services and SMART features, and lets
you update the TV's software quickly and easily through the Internet.
Connecting to a Wireless Internet Network Automatically
Network > Network Settings
Connect the TV to the Internet via a wireless router. Make sure you have the wireless router's SSID
(name) and security key settings before attempting to connect. The security key can be found on the
wireless router's configuration screen.
1.
On the Network Settings screen, set Network Type to Wireless. The TV automatically displays a
list of available wireless networks.
2.
Select a network (SSID). If the network you want doesn't appear in the list, select Add Network,
and enter the network's SSID manually.
3.
Enter the security key and select Done. If the selected network is not security-enabled, the TV
attempts to connect right away.
4.
A network connection will be attempted. Once a connection is established, the TV displays a
confirmation message. Select OK. If the attempt fails, try again, or connect manually.
50
Connecting to a Wireless Internet Network Manually
Network > Network Settings
With networks that require a static IP address, you will need to enter the IP address, subnet mask,
gateway and DNS values manually to connect to the network. To get the IP address, subnet mask,
gateway and DNS values, contact your Internet Service Provider (ISP).
"
Refer to the "Dynamic versus Static IP Addresses" section for more information on dynamic IP and static IP
addresses.
1.
Setting the Network Type to Wireless automatically displays a list of available wireless networks.
Network Settings
Select your network type.
Network Type Wireless
Wireless network
AP0000
You can connect your TV to the
internet. Please select which
wireless network to use.
AP0001
Add Network
Refresh WPS(PBC)
2.
Select the network (SSID) you want to connect to. If the wireless router doesn't appear in the list,
select Add Network, and enter the network's SSID manually.
3.
Enter the security key and select OK. If the selected network is not security-enabled, the TV
attempts to connect right away.
4.
Select Stop when the TV attempts to connect to the network. Once the network connection has
been interrupted, select IP Settings.
Network Settings
Connection verification cancelled.
Wireless network connection test stopped.
Change Network IP Settings Retry Close
50 51
5.
In the IP Settings screen, set the IP setting to Enter manually, enter the IP Address, Subnet
Mask, Gateway, and DNS Server values, and then select OK.
Use one of the following methods to enter the numerical values.
Set the numbers using the
u
and
d
buttons.
Using Samsung Smart Control: Press KEYPAD button and enter the numbers directly.
Using the remote control: Enter the numbers directly using numerical button.
IP Settings
IP setting Enter manually
IP Address 0.0.0.0
Subnet Mask 0.0.0.0
Gateway 0.0.0.0
DNS setting Enter manually
DNS Server 0.0.0.0
OK Cancel
6.
The TV attempts to connect to the network again using the specified settings. A confirmation
message appears once a connection is established. Select OK.
"
The network connection speed may differ depending on the DNS server settings.
"
For details on the DNS server settings, contact the Internet service provider (ISP).
Connecting to a Wireless Internet Network with WPS
Network > Network Settings
With wireless routers that support WPS (Wi-Fi Protected Setup) or PBC (Push Button Configuration),
it's possible to press a button on the router to connect the TV to the Internet.
"
This functionality is not available with wireless routers that do not support WPS. Check to see if your
wireless router supports WPS.
1.
Setting the Network Type to Wireless automatically displays a list of available wireless networks.
2.
Select WPS(PBC) and then press the WPS or PBC button located on the wireless router within two
minutes.
3.
The TV exchanges the network name (SSID) and security key automatically and then attempts to
connect to the Internet. A confirmation message appears once a connection is established. Select
OK.
52
Troubleshooting Internet Connectivity Issues
If you are not able to connect the TV to the Internet, read the information below.
Troubleshooting Wired Internet Connectivity Issues
No network cable found
Try Now
Try Now
Make sure the network cable is plugged in. If it is connected, make sure the router is turned on. If it is
on, try turning it off and on again.
IP auto setting failed
Try Now
Do the following or configure the IP Settings manually.
1.
Ensure that the DHCP server is enabled on the router and reset the router.
2.
If this does not work, contact your Internet Service Provider for more information.
Unable to connect to the network
Try Now
Do the following:
1.
Check all IP Settings.
2.
Ensure that the DHCP server is enabled on the router. Then, unplug the router and plug it back in.
3.
If this does not work, contact your Internet Service Provider for more information.
Connected to a local network, but not to the Internet
Try Now
1.
Make sure that the Internet LAN cable is connected to the router's external LAN port.
2.
Check the DNS values in the IP Settings.
3.
If the problem persists, contact your Internet Service Provider.
Network setup is complete, but unable to connect to the Internet
Try Now
If the problem persists, contact your Internet Service Provider.
52 53
Troubleshooting Wireless Internet Connectivity Issues
Wireless network connection failed,
Try Now
Try Now
Selected wireless router not found. Go to Network Settings and select the correct router.
Unable to connect to a wireless router
Try Now
Try Now
Check the following:
1.
Check if the router is turned on. If it is, turn it off and on again.
2.
Enter the correct security key if required.
IP auto setting failed
Try Now
Do the following or configure the IP Settings manually.
1.
Make sure that the DHCP server is enabled on the router. Then, unplug the router and plug it back
in.
2.
Enter the correct security key if required.
3.
If this does not work, contact your Internet Service Provider for more information.
Unable to connect to the network
Try Now
Do the following:
1.
Check all IP Settings.
2.
Enter the correct security key if required.
3.
If this does not work, contact your Internet Service Provider for more information.
Connected to a local network, but not to the Internet
Try Now
1.
Make sure that the Internet LAN cable is connected to the router's external LAN port.
2.
Check the DNS values in the IP Settings.
3.
If the problem persists, contact your Internet Service Provider.
Network setup is complete, but unable to connect to the Internet
Try Now
If the problem persists, contact your Internet Service Provider.
54
Checking the Internet Connection Status
Network > Network Status
Try Now
Network
Network Status
Network Settings
Wi-Fi Direct
Multimedia Device Settings
Screen Mirroring
Device Name [TV]Samsung LE...
"
Actual menu screen may differ depending on the TV model.
View the current network and Internet status.
55
Multiple Functions on a Single Screen
"
Availability depends on the specific model and area.
This allows you to search the Web, use apps, and much more while watching TV.
"
Before using Multi-Link Screen , make sure the TV is connected to the Internet. Using Multi-Link Screen
requires an Internet connection.
"
Before using Smart Hub with Multi-Link Screen , go to the On TV Settings (Smart Hub > On TV Settings
>On TV Setup) and finish configuring Smart Hub.
If the Multi-Link Screen launches while the TV did not configure the Smart Hub, a pop-up window
appears. To use the Multi-Link Screen, you need to configure the Smart Hub first. On the pop-up
window, select the Set Up Smart Hub to finish configuring the Smart Hub.
Launching Multi-Link Screen
Picture > Open Multi-Link Screen
From the Picture menu, select Open Multi-Link Screen.
"
Press M.SCREEN on the Samsung Smart Control to launch Multi-Link Screen.
Using Multi-Link Screen
"
UHD and FHD contents and channels cannot be viewed simultaneously.
"
Launching Smart Hub while using Multi-Link Screen automatically terminates Multi-Link Screen .
"
Certain TV features and apps may not be supported by Multi-Link Screen . If this is the case, exit from
Multi-Link Screen and then use the feature.
Selecting a Feature
1.
Press the Samsung Smart Control's M.SCREEN button while Multi-Link Screen is running. The
Options menu appears.
2.
Select a feature from the Options menu. This initialises the selected feature.
"
Features supported by Multi-Link Screen vary depending on the country.
Changing the Channel/Volume
1.
Place the pointer or focus over the screen for which you want to change the channel or adjust
the volume.
2.
Use the channel buttons to change the channel or the volume buttons to adjust the volume. This
changes the selected screen's channel/volume.
Smart Features
56
Pairing Bluetooth Headphones
"
Availability depends on the specific model and area.
Pairing Bluetooth Headphones to the TV makes it possible to hear the audio from a different screen
through the headphones.
"
Compatibility issues may arise. The mobile phone may not work.
"
Depending on the device, there may be audio and video sync problems.
"
The devices may disconnect depending on the distance between the TV and headphones.
"
When using Bluetooth headphones, SoundShare Settings is not available (Sound > Speaker Settings >
SoundShare Settings).
1.
Put the Bluetooth Headphones in the pairing-ready status.
"
Refer to the headphones' manual for instructions on enabling the pairing-ready status.
2.
Press the Samsung Smart Control's M.SCREEN button while Multi-Link Screen is running. The
Options menu appears.
3.
Select Settings from the Options menu.
4.
Select pair Connect Bluetooth Headphones from the Settings menu. The TV will display the
Bluetoothpairing window and then automatically scan for available headphones.
"
If the scan fails to locate your headphones, try placing the headphones closer to the TV and then select
Refresh. This will scan for the headphones again.
5.
Select your headphones from the list of scanned headphones and then select Pair and connect.
This pairs the headphones to the TV.
Selecting the Audio-Source Screen
It's possible to listen to audio from one screen through the speakers and audio from a different screen
through the Bluetooth Headphones.
1.
Press the Samsung Smart Control's M.SCREEN button while Multi-Link Screen is running. The
Options menu appears.
2.
Select Settings from the Options.
3.
Select Speaker Settings from the Settings menu.
4.
Select a screen for TV Speaker and another for Bluetooth Headphone.
"
The same screen cannot be selected for both TV Speaker and Bluetooth Headphone.
"
Auto is only supported by the TV speaker. Bluetooth headphones are not supported.
56 57
Smart Hub
Smart Hub > Open Smart Hub
With Smart Hub, you can surf the web, download apps, and stay in touch with family and friends
through social networking services. In addition, you can use photo, video, and music files stored on
external storage devices.
"
Some Smart Hub services are paid services. To purchase such a service, the service provider account or
Samsung Apps TV account (Samsung account) is required.
"
Make sure the TV is connected to the Internet. The TV must be connected to the Internet in order to use
Smart Hub.
"
Some features of Smart Hub require an Internet connection and may not be available depending on the
service provider, language, or region.
"
To use Smart Hub, you must agree to the end user agreement and privacy policy. Otherwise, you will not
be able to access the features and services related to them. You can view the entire content of the Terms &
Policy by navigating to Smart Hub > Terms & Policy. If you don't wish to use Smart Hub anymore, you can
withdraw the agreement.
Press to launch Smart Hub. Select an icon on top of the screen to use the services of the
corresponding panel.
"
Usability depends on the specific model and local region.
58
Games
Navigate to Smart Hub > Games to confirm the optimising game apps for Smart TV and detailed
information on Smart hub. This makes it easier to download and play games. In addition, you
can manage games that you have downloaded or purchased with your Samsung Account.
SAMSUNG APPS
You can enjoy variety of free and paid news, sports, weather, and gaming apps on the TV as you
would on a smart phone or tablet.
On TV
You can view the current programmes on TV at a glance and view the Programme
Recommendations by Channel and Programme Recommendations by Time from the programmes
that will be broadcasted. In addition, you can watch recorded videos.
FILMS AND TV SHOWS
You can directly purchase and view a movie or TV programme through the app provided by Smart
Hub without connecting an external video source such as a DVD or Blu-ray player.
MULTIMEDIA
You can play back photo, video, and music files from an external storage device or watch
recorded videos.
Using the Smart Hub Tutorial
Support > Smart Hub Tutorial
From the Support menu, select Smart Hub Tutorial. This will familiarise yourself with the basics of
Smart Hub and panels.
Resetting Smart Hub
Smart Hub > Reset Smart Hub
Try Now
Reset all saved information relating to Samsung accounts and linked service accounts, as well as
Smart Hub service agreements and applications.
58 59
Using Smart Hub with Samsung Account
Samsung Account
Log In
Edit profile
Link Service Accounts
Remove Accounts from TV
Create Account
Terms and Conditions, Privacy Policy
"
Actual menu screen may differ depending on the TV model.
Creating a Samsung Account
Smart Hub > Samsung Account
Some Smart Hub services are paid services. To purchase such a service, the service provider account
or Samsung Apps TV account (Samsung account) is required.
You can create a Samsung Account using your email address.
"
To create a Samsung Account, you must agree to the Samsung Account end user agreement and privacy
policy. Otherwise, you cannot create a Samsung Account. You can view the entire content of the agreement
by navigating to Smart Hub > Samsung Account > Terms and Conditions, Privacy Policy.
"
Alternatively, you can create a Samsung Account at http://content.samsung.com. You can use one ID for
both the TV and the website.
60
Creating a Samsung Account using Sign Up Samsung Account Menu
1.
Navigate to Smart Hub > Samsung Account > Create Account and select Create a Samsung
account.
2.
Agree to use a Samsung Account and select Next.
3.
Create a Samsung Account according to the instructions on the Create Account screen.
Once a Samsung Account is created, you will be automatically logged in to Smart Hub.
Creating a Samsung Account using a Facebook Account
A Facebook user can easily obtain necessary information from Facebook and create a Samsung
Account.
1.
Navigate to Smart Hub > Samsung Account and select Log In. The Sign In screen appears.
2.
Select
+
and select the Create with Facebook on the Sign In screen.
3.
Enter your Facebook ID and password and select Sign In.
4.
Agree to use a Samsung Account and select Next.
5.
Create a Samsung Account according to the instructions on the Create Account screen. Once a
Samsung Account is created, you will be automatically signed in.
"
If you create a Samsung Account using your Facebook account, they are automatically linked.
60 61
Signing into Samsung Account
Smart Hub > Samsung Account > Log In
Logging into and Saving a Samsung Account
If you haven't logged into your Samsung Account on the TV, you must save your Samsung Account on
the TV.
1.
Navigate to Smart Hub > Samsung Account and select Log In.
2.
Select
+
and select Sign In on the Sign In screen.
3.
Enter your ID and password and then select Sign In.
"
Check the Sign me in automatically option if you wish to log into Smart Hub automatically.
"
If you forgot your password, select Reset password to receive password reset instructions via email.
4.
Select an image to be used as the profile picture. The Samsung Account has been saved on the
TV.
5.
Select Done to log into your Samsung Account.
Easily Logging Into Your Samsung Account Saved on the TV
1.
Navigate to Smart Hub > Samsung Account and select Log In.
2.
Choose your Samsung Account on the Sign In screen and select Sign In.
3.
Using the login method configured for the selected Samsung Account, log into your Samsung
Account.
62
Linking My Samsung and App Accounts
Smart Hub > Samsung Account > Link Service Accounts
Linking your Samsung Account to accounts of apps installed on the TV lets you automatically log into
your linked app accounts when you log into your Samsung Account. For example, you can download
the Facebook app and link your Facebook account to your Samsung Account. In this case, logging into
your Samsung Account then automatically logs you into your Facebook account as well.
"
To use Link Service Accounts, you must first log into your Samsung Account.
Linking an App Account
1.
Navigate to Smart Hub > Samsung Account and select Link Service Accounts. A list of apps that
can be linked to your Samsung Account is shown.
2.
Select an app from the list. The Link to other accounts window appears on the screen.
3.
Enter the current ID and password of the app to log in. When the login is complete, the app
account is linked to the Samsung Account.
Disconnecting a Linked Account
1.
Navigate to Smart Hub > Samsung Account, select Link Service Accounts. Select an app to
unlink.
2.
A confirmation dialog box appears. Select Yes to unlink the app.
62 63
Changing and Adding Information to Samsung Account
Smart Hub > Samsung Account
Using the Samsung Account menu, you can manage your Samsung Account.
"
To change the account information, you must be logged into your Samsung Account.
1.
Navigate to Smart Hub > Samsung Account and select Edit profile.
2.
Enter the password and then select Done. The edit profile screen appears.
The profile editing screen provides the following features.
Changing Profile Image
If you select Edit Profile Picture on the login screen, you can change the profile image.
Registering Your Face to Samsung Account
If you select Register face on the login screen, you can register your face to your Samsung
Account. The registered face is used by the Sign-in Method.
"
This is available only if the optional TV camera is connected to the TV.
Choosing a Samsung Account Login Method for TV
Select Sign-in Method on the login screen and choose a login method. You can determine how
to log into the TV with the saved Samsung Account.
Setting Auto Login
Check the Sign me in automatically option if you wish to log into Smart Hub automatically.
Entering Basic User Information
You can enter your given name, surname, and date of birth.
Receiving e-mail about Samsung services
You can determine whether to receive e-mail about Samsung services. Containing the latest
information.
Deleting All Samsung Accounts from the TV
Smart Hub > Samsung Account > Remove Accounts from TV
Navigate to Smart Hub > Samsung Account and select Remove Accounts from TV. The account and
password information saved on the TV is deleted, and the account information of any linked apps are
also deleted.
"
To delete your account information, you must be signed in with your Samsung Account.
64
Using the Games Panel
Games
Recommended
My Page All Games
"
Actual menu screen may differ depending on the TV model.
"
This service or some of functions of it may be not available in some countries or region.
Navigate to Smart Hub > Games to confirm the optimising game apps for Smart TV and detailed
information on Smart hub. This makes it easier to download and play games. In addition, you can
manage games that you have downloaded or purchased with your Samsung Account.
"
Before you use the Games panel, check if the TV is connected to the Internet. The TV must be connected to
the Internet in order to use the Games panel.
"
To use the Games panel, you must log into your Samsung Account.
Using Pop-Up Menu Functions
In the Games panel, move the focus to a desired game and press and hold the Enter button. The
following functions are available:
Installing/Removing a Game
Installs or removes the game from the TV.
Viewing Detail Information of the Game
Displays detailed information of the selected game.
Installing and Running a Game
"
When the TV's internal memory is insufficient, you can install a game on a USB device.
"
You can play a game installed on a USB device only when the USB device is connected to the TV. If the
USB device is disconnected during a game playing, the game is terminated.
"
The game installed on the USB device cannot be played on a different TV, or a PC.
64 65
Quickly Installing Games
1.
Select All Games from the Games panel, navigate to a game from the list and press and hold the
Enter button.
"
On the All Games screen, select the button to view the guide about the game controller.
"
On the All Games screen, select the button and select a desired sorting criterion. Then, the items in
the list are accordingly rearranged.
2.
In the pop-up menu, select Download.
The selected game is installed on the TV.
Installing an App in the Detailed Game Information Screen
1.
On the Games panel screen, select a game you wish to install. If you cannot find a desired game,
select All Games at the bottom of the screen.
"
On the All Games screen, select the button to view the guide about the game controller.
"
On the All Games screen, select the button and select a sorting criteria. The games are sorted
according to the criteria.
2.
On the detailed information page of the selected game, select Download.
When installation is complete, the installation complete window appears.
Launching a Game
To run an installed game, select Play on the detailed game information screen.
66
Managing Downloaded or Purchased Games
In Smart Hub, move to the Games panel and select My Page at the bottom of the screen.
"
On the My Page screen, select the button to view the game controller guide.
"
On the My Page screen, select the button and select a desired sorting criterion. This rearranges the list
accordingly.
Updating a Game
Select Update Games at top of the My Page screen to update games installed on the TV.
"
The Update Games appears only when there is a game that needs to be updated.
"
To update games automatically, select the button at top of the My Page and set the Auto Update games
to On. Games will then be updated automatically when an update becomes available.
Removing a Game
1.
Press the button at top of the My Page screen and select Delete.
2.
Select all of the games you wish to remove. To select all games, select Select All.
3.
When the selection is complete, select Delete.
"
Navigate the game you wish to remove and press and hold the Enter button. Then you can easily
remove the game.
Rating/Sharing/Reviewing a Game
You can rate or share the game through a social network service or send a review to the developer on
the detailed information screen.
"
You can rate / share / review a game only when the game has installed on the TV.
66 67
Using SAMSUNG APPS Panel
SAMSUNG APPS
RECOMMENDED
MY APPS
Most Popular What's New Categories
"
Actual menu screen may differ depending on the TV model.
"
This service or some of functions of it may be not available in some countries or region.
Smart Hub offers a variety of free news, sports, weather, and gaming content you can install directly
on your TV the same way as you would on a smartphone or tablet.
"
Before you use SAMSUNG APPS, make sure the TV is connected to the Internet. Your TV must be
connected to the Internet in order to use SAMSUNG APPS.
"
Launching Smart Hub for the first time installs the default apps automatically. The default apps may differ
depending on the region.
68
Using Pop-Up Menu Functions
Move the focus to an app and press and hold the Enter button. You can use the following functions:
Move
Relocates the selected app.
Delete
Removes the selected app.
Delete Multiple
Removes multiple apps at once.
View Details
Move to the detailed information of the selected app.
Change view
You can change view mode sort by Custom view or Most Played.
Lock/Unlock
You can lock or unlock a selected app from the screen.
Update Apps
You can update the selected app.
68 69
Installing an App
"
When the TV's internal memory is insufficient, you can install an app on a USB device.
"
Only when the USB device is connected are the app icons installed on the USB viewable on the SAMSUNG
APPS screen. You can use an app installed on a USB device only when the USB device is connected to the
TV. If the USB device is disconnected while the app is running, the app is terminated.
"
The app installed on the USB device is not available on a different TV, or a PC.
Quick Installation
1.
On the SAMSUNG APPS screen, select Most Popular, What's New, or Categories.
"
The Most Popular and What's New show the most popular and newest Samsung Apps. To view the
entire app list, select Categories. You can view all Samsung Apps classified by genre.
2.
Move the focus to an app and press and hold the Enter button. A pop-up menu appears.
3.
On the pop-up menu on the screen, select Download.
"
While an app is being installed, the progress bar appears at the bottom of the app icon so that you can
easily figure out the installation progress.
4.
The selected app is installed on the TV.
"
You can view installed apps on the SAMSUNG APPS screen.
Installing an App from the Detailed App Information Screen
1.
On the SAMSUNG APPS screen, select Most Popular, What's New, or Categories.
"
The Most Popular and What's New show the most popular and the newest Samsung apps. To view the
entire app list, select Categories. You can view all Samsung Apps by category.
2.
Select an app from the list. Detailed information about your selection appears on the screen.
3.
Select Download on the detailed information screen to install the selected app on the TV.
"
When an app is being installed, a progress bar appears underneath the app icon.
4.
When the installation is complete, the Download button turns to Open.
"
You can view installed apps on the SAMSUNG APPS screen.
70
Launching an App
Select an app on the SAMSUNG APPS screen to launch it.
The icons indicate the following:
: The app supports motion control.
: The app supports voice control.
: The app is installed on a USB device.
Default Apps
e-Manual
The embedded e-manual contains information.
WebBrowser
Try Now
WebBrowser is an Internet browsing app. Using WebBrowser, you can surf the Internet on the TV in the
same manner as you would using a PC even while watching a TV programme on PIP. Use a keyboard
and mouse for a more convenient web browsing experience.
"
The browsing page may differ from that on a PC.
Rearranging Apps on the SAMSUNG APPS Screen
1.
On the SAMSUNG APPS screen, move to the app you wish to change the order.
2.
Press and hold the Enter button. A pop-up menu appears.
3.
On the pop-up menu, select Move.
4.
Move an app to a desired location and select the app again.
70 71
Removing an App from the TV
"
Note that if an app is removed, the data related to the app is also deleted.
Removing an App
1.
On the SAMSUNG APPS screen, move to the app you wish to remove.
2.
Press and hold the Enter button. A pop-up menu appears.
3.
On the pop-up menu on the screen, select Delete. A removal confirmation window appears.
Select Yes. The selected app is removed.
Removing Multiple Apps
1.
On the SAMSUNG APPS screen, move to the app you wish to remove.
2.
Press and hold the Enter button. A pop-up menu appears.
3.
On the pop-up menu on the screen, select Delete Multiple. A check box appears on the app
icons.
4.
Select all the apps you wish to remove and then select Delete. A removal confirmation window
appears. Select Yes. Selected apps are removed.
Rating/Reviewing an App
On the detailed app information screen, you can rate the app or send a review to the app developer.
"
To rate or review an app, you must log into your Samsung Account. You can only rate or review with a TV
purchasing apps and games.
72
Updating an App
1.
On the SAMSUNG APPS screen, move to the app you wish to update.
2.
Press and hold the Enter button. A pop-up menu appears.
3.
On the pop-up menu on the screen, select Update Apps. A pop-up window appears.
4.
Select all the apps you wish to update and then select Update. All the selected apps are updated
to the latest versions.
Setting Auto App Update
Smart Hub > Apps Settings
To update apps automatically, navigate to Smart Hub > Apps Settings and set Auto update to On.
The apps installed on the TV are automatically updated as updates become available.
SAMSUNG APPS Features
Smart Hub > Apps Settings
You can configure the features related to the apps installed on your TV.
Enabling Automatic Tickers
You can configure selected tickers to display automatically when the TV is turned on. Ticker Service
enables you to use other services while watching TV. You can receive news, stock, and weather
information and more in real-time while watching TV.
"
To use this feature, make sure that an app supporting the Auto Ticker function is installed on the TV.
1.
Navigate to Smart Hub > Apps Settings and select Auto Ticker. A list of installed apps that
support Ticker Autorun appears.
2.
From the list, select apps you wish to run automatically when the TV is turned on.
72 73
Setting Push Notification
Push notification function enables apps installed on the TV to send alerts and messages to the user.
1.
Navigate to Smart Hub > Apps Settings > Push Notification Settings and set the Push
Notification to On.
2.
Set the Push Notification setting of apps you wish to receive push notifications from to On. Push
notification function of the selected apps is activated.
"
The Push Notification app list only shows installed apps that support Push Notification Settings.
Using an App while Watching TV
If an app linked to a channel is installed on the TV, you can view programme information and use
related services offered by the app while watching TV.
Navigate to Smart Hub > Apps Settings and set Channel-Bound Apps to On.
"
This feature is only available with apps supporting Channel-Bound Apps installed on the TV.
74
Using On TV Panel
On TV
FOR YOU
Guide Timeline View Trending Recorded TV
"
Actual menu screen may differ depending on the TV model.
"
This service or some of functions of it may be not available in some countries or region.
Smart Hub's On TV panel lets you view programme lists for recommended channels while watching
TV. You can then switch to a programme in the recommendation list or set up Schedule Viewing /
Schedule Recording for an upcoming programme.
"
Before you use On TV, check if the TV is connected to the Internet. The TV must be connected to the
Internet in order to use On TV.
"
The channels or programmes recommended by On TV may differ from the actual ones depending on the
broadcast information provider.
"
On TV can be configured to launch automatically when the TV is turned on. Navigate to Smart Hub > On TV
Settings and set Auto Start to On.
Select a desired programme from the recommendation list. You can watch the selected programme
immediately if it is currently on air or move to the detailed programme information screen if it hasn't
aired yet.
"
Select from the screen to change the recommended content list.
"
For a programme being broadcasted, a progress bar appears. For an upcoming programme, the remaining
time to broadcast appears.
74 75
Move to the navigation bar at the bottom of the screen to access the following options:
Viewing the Programme Schedule of Digital Channels
Select Guide at the bottom of the screen to view the programme schedule of each digital channel
at a glance. You can check the programme schedule and even set up a Schedule Viewing or
Schedule Recording.
"
The Guide provides information only about digital channels. Analogue channels are not supported.
Programme Recommendations by Time
Select Timeline View at the bottom of the screen to view programme recommendations for
different times of the day.
Popular Videos
Select Trending at the bottom of the screen to view the most trendy or popular content in Twitter
and set up a Schedule Viewing or Schedule Recording.
Watching a Recorded Programme
Select Recorded TV at the bottom of the screen to watch a recorded programme.
76
Using Pop-Up Menu Functions
Move the focus to a desired programme and press and hold the Enter button. The following options
are available:
"
Available functions may differ depending on the selected programme.
Recording the Current Programme
You can instantly record a programme that is being broadcast on a different channel.
Viewing Detailed Information
You can move to the detail information screen about the selected programme.
Reserving
You can set up a Schedule Viewing or Schedule Recording for the programme.
Viewing Detailed Programme Information
1.
Move the focus to a desired programme and press and hold the Enter button. The Options menu
appears.
2.
From the Options menu on the screen, select Detailed Information. The detailed information
about the selected programme screen appears.
You can find more information about the selected programme in the detailed information screen and
you can easily use the following functions:
Moving to a Channel
Jump to the selected programme's channel.
Record
You can record the programme.
"
This function is only available for programmes that is being broadcasted.
Reserving
Set up a Schedule Viewing or Schedule Recording for the programme.
"
This function is only available for programmes that is being broadcasted.
76 77
Viewing Related Content
View a list of content related to the programme. If you select an item from the list, the detailed
screen of the selected item appears.
Rate
You can rate the programme.
Sharing
You can choose to like or dislike a selected programme or share information about the selected
programme via an SNS.
Configuring On TV Settings
"
Availability depends on the specific model and area.
Smart Hub > On TV Settings
You can set up the signal reception method, cable company, and other broadcast viewing environment
settings for On TV.
Navigate to Smart Hub > On TV Settings, select On TV Setup settings and set up the broadcast
viewing environment settings according to the onscreen instructions.
Receiving Automatic Notifications
You can configure the TV to display a notification when a frequently watched programme is broadcast.
Navigate to Smart Hub > On TV Settings and set Automatic Notifications to On.
Changing Recommendation Type
You can choose between personally preferred programmes and programmes preferred by the general
public as the type of recommendations you wish to receive.
Navigate to Smart Hub > On TV Settings, select Recommendation Type and set it to a desired type.
Removing Adult Content from the Recommended List
You can configure this setting so that recommended programmes that are rated for adults are blocked
automatically.
Navigate to Smart Hub > On TV Settings and set Block Adult Content to On.
78
Using FILMS AND TV SHOWS Panel
FILMS AND TV SHOWS
Recommended
Favourites Featured Movies TV Shows Trending
"
Actual menu screen may differ depending on the TV model.
"
This service or some of functions of it may be not available in some countries or region.
Use this feature to purchase and view movies and TV programmes recommended by FILMS AND TV
SHOWS without having to use an external device such as a DVD player or a Blu-ray player. FILMS
AND TV SHOWS provides an easy access to a collection of movies and TV programmes available in
Smart Hub.
"
Not all the FILMS AND TV SHOWS options may be available depending on the content you are trying to
access or your region.
"
Before you use FILMS AND TV SHOWS, make sure the TV is connected to the Internet. The TV must be
connected to the Internet in order to use FILMS AND TV SHOWS.
"
Select from the screen to change the recommended content list.
78 79
Move to the navigation bar at the bottom of the screen to access the following options:
"
To sort the content items in each menu, select the button at top of the screen and choose a sorting
criteria. However, depending on the selected menu, the
button may not appear.
"
Press in each menu's contents list screen to display only movies or TV programmes in the list. The button
may not be shown, depending on the selected menu.
"
Pressing in the Featured, Movies, or TV Shows menu's contents list screen allows you to add content to
the bookmarks. Added contents can be removed from the bookmarks using the Favourites menu list. The
button may not be shown, depending on the selected menu.
Viewing Configured Favourites at a Glance
Select Favourites to view the movies and TV shows that users have set as Favourites at a glance.
Enjoying Featured Movies and TV Programmes
Select Featured to view movies or TV programmes selected according to various themes such as
movies featuring an actor who went to Hollywood, completed TV series, and so on.
Viewing a Movie
Select Movies to view a movie from among the movies listed by new arrival, popularity, and
genre.
Viewing a TV Programme
Select TV Shows to view a TV show from among the TV shows listed by new arrival, popularity,
and genre.
Viewing Hot Movies and TV Shows at a Glance in Real-time
Select Trending to view movies and TV programmes that are the most trendy or popular.
Using Pop-Up Menu Functions
Move the focus to a desired movie or TV programme and press and hold the Enter button. The
following options are available:
"
Available options may differ depending on the selected programme.
Instant Content Playing
Select an app for the selected content to play it right away.
If the selected app is not installed, a pop-up window will appear. From the pop-up window, move
to the detailed app information page or install the app.
Adding to/Removing from Favourites
Register the selected content to Favourites.
80
Watching a Movie/TV Programme
"
If you are using FILMS AND TV SHOWS for the first time or have not logged into your Samsung Account,
new and popular movies and TV shows will be shown in the FILMS AND TV SHOWS list. To view a
customised recommendation list in FILMS AND TV SHOWS, first log into your Samsung Account. You
can view a list of frequently played content on FILMS AND TV SHOWS screen in addition to the default
recommended content list.
1.
On FILMS AND TV SHOWS screen, select a movie or TV programme you wish to watch. Detailed
information about your selection appears on the screen.
2.
On the detailed information screen, select an app to play the content. This launches the selected
app and displays detailed information about the content.
"
If the selected app is not installed, a pop-up window will appear. From the pop-up window, move to
the detailed app information page or install the app.
3.
You can play the content in the detailed information of the content.
"
If the selected content is free, you can instantly watch the content. If the content is a paid content, you
must first purchase the content in the app (In-App Purchase).
"
The purchasing procedures on the app may differ depending on the app. You may need to log into the
app or enter payment information.
Restricting Purchased Content Viewing
Smart Hub > VOD Rating Lock
You can lock content rated as adult content so that children cannot access the content.
Navigate to Smart Hub and set VOD Rating Lock to On.
"
To turn on or off the VOD Rating Lock, the password is required.
Registering Content to Favourites
1.
On FILMS AND TV SHOWS screen, select a movie or TV programme that you wish to register to
Favourites. Detailed information about your selection appears on the screen.
2.
Select button on the detailed information screen. The content is added to the Favourites.
"
Select Favourites at the lower part of the FILMS AND TV SHOWS screen to view your favourites
content list.
"
Select the button at the top of the content list in each menu to register multiple items to Favourites
at once.
80 81
Rating and Sharing a Purchased Content
Rating Content
1.
Select content in FILMS AND TV SHOWS. Detailed information about your selection appears on
the screen.
2.
Select button on the detailed information screen. A pop-up window appears.
3.
You can rate the item using the
¡
and
£
buttons in the pop-up window.
Sharing With SNS
1.
Select content in the FILMS AND TV SHOWS. Detailed information about your selection appears
on the screen.
2.
Select either or button in the detailed information screen. The login page of the selected
SNS appears.
"
If you have linked your Samsung Account to the SNS account, you were automatically logged into the
SNS account when you logged into your Samsung Account.
3.
On the SNS login screen, enter your SNS ID and password to log into the SNS.
"
If you have linked your Samsung Account to the SNS account, you can skip this step.
4.
In the pop-up window, type the article you wish to post to the SNS and select Post. The article is
posted to the SNS.
82
Playing Photos, Videos, and Music (MULTIMEDIA)
MULTIMEDIA
Most Popular
My Devices
Connect a USB
storage device
Connect a
Smartphone
Connect a
Smartphone
Connect a PC Connect to an
online storage
account
USB Drive Network Device Storage Service
"
Actual menu screen may differ depending on the TV model.
"
This service or some of functions of it may be not available in some countries or region.
You can play media content saved on a USB device, smartphone, camera, computer, or Storage Service
on the TV.
"
You cannot play media content if the content or the storage device are not supported by the TV. For more
information, refer to "Photo, Video, and Music File Limitations".
"
Backup important files before connecting a USB device. Samsung shall not be held responsible for damaged
or lost files.
82 83
Playing Media Content from a USB Device
1.
Press the button and select USB Drive in the MULTIMEDIA panel. USB devices connected to
the TV are listed.
2.
Select the device you wish to access. Folders and files of the selected USB device are listed.
3.
Select the media content you wish to play. This plays the selected content.
"
Alternatively, move to the media content to play and press the button to play the content.
"
If you connect a USB device to the TV while watching the TV, a pop-up window appears on the screen so
that you can easily navigate the folders and files of the USB device.
"
Alternatively, if you select a USB device on the Source screen, a pop-up window appears on the screen so
that you can easily navigate the folders and files of the USB device.
Safely Removing a USB Device
1.
Press the SOURCE button. The Source screen appears.
2.
Navigate the USB device you wish to remove, and press and hold the Enter button. An options
window appears.
3.
Select Disconnect USB Device from the list.
84
Playing Multimedia Content Saved in a Computer/Mobile Device
"
To view a guide about the PC connection, select Connecting to PC under Network Device.
"
To view a guide about a Smartphone or tablet connection, select Connect a Smartphone under Network
Device.
Allowing Connection with a Computer/Mobile Device
To play multimedia content in a computer or mobile device on the TV, you need to allow the
connection with the computer on the TV.
"
You can connect to a computer or mobile device on any DLNA DMC device. DLNA DMC function enables
users to connect a mobile device to the TV, search for multimedia content and control play operations on
the TV.
1.
Press the
button and select Network Device in the MULTIMEDIA panel. Devices connected to
the TV are listed.
2.
Select Options and then Multimedia device settings. Devices connected to the TV are listed.
"
Alternatively, select Multimedia Device Settings from the Network menu to see the list of the devices
connected to the TV. Try Now
3.
Allow connection with the desired device you wish to connect to the TV. You can only play
media files from devices that have been allowed to connect to the TV.
"
If a computer or mobile device requests the multimedia content play, the connection allowance
confirmation window appears on the TV so that you can easily connect the computer or mobile device.
84 85
When Connected through Home Network (DLNA)
"
To connect a computer through home network (DLNA).
"
To connect a mobile device through home network (DLNA).
"
You may experience compatibility issues when attempting to play media files via a third-party DLNA server.
"
However, the content shared by a computer of a mobile device may not play depending on the encoding
type and file format of the content. In addition, some functions may not be available.
"
The multimedia content may not smoothly play depending on the network status. If this is the case, use a
USB storage device.
1.
Press the
button and select Network Device in the MULTIMEDIA panel. Devices connected to
the TV are listed.
2.
Select a device connected via the home network (DLNA). Folders and files shared by the selected
device will be listed.
3.
Select a media content you wish to play from the list. This plays the selected content.
"
Alternatively, move to the media content and press to play.
When Connected through Samsung Link
"
To connect a computer through Samsung Link.
"
To connect a mobile device through Samsung Link.
"
However, the content shared by a computer of a mobile device may not play depending on the encoding
type and file format of the content. In addition, some functions may not be available.
"
The multimedia content may not smoothly play depending on the network status. If this is the case, use a
USB storage device.
1.
Navigate to Smart Hub
>
Samsung Account menu and select Log In
to sign in with your the
Samsung Account.
2.
Press the
button and select Network Device in the MULTIMEDIA panel. Devices connected to
the TV are listed.
3.
Select a device connected via Samsung Link. Folders and files shared by the selected device will
be listed.
4.
Select a media content you wish to play from the list. This plays the selected content.
"
Alternatively, move to the media content and press to play.
86
Playing Media Content from a Storage Service
Storage Services store user content such as photo, video, and music files on a server so that they can
be viewed/played on the TV over the Internet. It's also possible to view your media content saved on
Storage Services such as Dropbox and SkyDrive from the TV.
"
To play content from a Storage Service, you must log into your Samsung Account and link it to the Storage
Service account.
1.
Navigate to Smart Hub
>
Samsung Account menu and select Log In
to sign into your
Samsung
Account
.
2.
Press the button and select Storage Service in the MULTIMEDIA panel. Storage Services linked
to your Samsung Account appears.
3.
Select a Storage Service. Folders and files found in the selected Storage Service are listed.
4.
Select the media content you wish to play from the list. This plays the selected content.
"
Alternatively, move to the media content and press to play.
86 87
Buttons and Functions Available while Viewing Photos
Press enter to access the following buttons. Pressing RETURN hides the playback buttons.
Pause / Play
Start or stop the slide show. The slide show feature displays all the photos contained in the
selected folder, one photo at a time.
Previous / Next
View the previous/next photo in the queue.
Settings
Function Description
Slideshow Settings
Speed: Set the slide show speed.
Effects: Apply transition effects to the slide show.
Rotate
Rotate the photo.
Zoom
Zoom in by up to a factor of 4.
Picture Mode
Change Picture Mode.
Background Music
Listen to background music while viewing photos.
"
The music file must be located on the same device as the photo files.
"
A mini player appears on the screen when background music is played. Use the
mini player to pause the music or play a different music file.
Sound Mode
Change Sound Mode.
"
This option is supported only when background music is playing.
Select Speakers
Choose speakers for the background music.
Send
This function is the same as the "Copy" function of a computer. Use this function to
send the current photo to another storage device.
"
For information on storage devices supported by this feature, refer to "Storage
Device File Transfers".
Information
View detailed information about the current photo.
88
Buttons and Functions Available while Watching Video
Press enter to access the following buttons. Pressing RETURN hides the playback buttons.
Pause / Play
Pause or play the video.
When the video is paused, you can use the following functions. However, audio will not be heard
while the video is paused.
Step: Press
to scan the paused video one frame at a time.
Slow Motion: Select the
button to play the video at reduced speed (1/8, 1/4, 1/2).
Rewind / Fast Forward
Rewind or Fast Forward the video. Repeatedly select the button to make the rewind/fast forward
speed faster by up to 3 times. To restore normal playback speed, select
.
Previous / Next
Select
twice to play the previous video. Selecting
once reloads the current video from the
beginning.
To play the next video, select the
button.
88 89
Settings
Function Description
Select Scene
Thumbnails: Select a scene and play the video from the scene.
"
Thumbnails is not available when 1) the thumbnail of the video is not extracted
yet, 2) the video contains audio only or 3) the video play time is shorter than 60
seconds.
Chapter Titles: Select and play another video in the same folder.
Time Bar: You can use the
¡
,
£
buttons to scan through the video in 10 seconds
intervals or enter a specific time value to jump to that point in the video.
Subtitles
Control the subtitle of the video.
Language: Turn the subtitles on or off.
Sync: When the video and the subtitles are not synchronized, you can adjust the
synchronization.
Reset Sync: Reset the subtitle synchronization adjustment to 0.
Size: Choose the font size for the subtitles.
Encoding: If the subtitles are broken, you can change the encoding language.
Repeat
Set the repeat mode. Repeat One repeats the current programme only. Repeat All
repeats all programmes contained in the folder.
Rotate
Rotate the video.
Picture Size
Change the picture size. However, the supported picture size is determined by the
video content.
Picture Mode
Change the Picture Mode setting.
Sound Mode
Change the Sound Mode setting.
Select Speakers
Choose a speaker to play the audio.
Audio Language
Choose a desired audio language. This option works only when the video supports
multi-track sound.
Information
View detailed information about the video.
90
Buttons and Functions Available while Playing Music
Press enter to access the following buttons. Pressing RETURN hides the playback buttons.
Pause / Play
Pause or resume the music.
Rewind / Fast Forward
Rewind or fast forward the music. Repeatedly select the button to rewind/fast forward faster by
up to a factor of 3. To restore normal playback speed, select
.
Previous / Next
Select
twice to play the previous music file. Selecting
once reloads the current music file
from the beginning.
To play the next music file, select the
button.
Repeat
Set the repeat mode. Repeat One repeats the current music file only. Repeat All repeats all music
files contained in the folder.
Shuffle
Play the music files in order or randomly.
Select Speakers
Choose a speaker to play the audio.
Sound Mode
Change the Sound Mode setting.
90 91
Functions on the Media Content List Screen
The media content screen for the selected storage device includes the following functions.
Filter
Use this option to filter the list to see only the photo, video, or music files contained in the
storage device.
Sort by
Sort the list by content type.
"
This function is not available when Filter is set to All.
Options
"
This function is not available when Filter is set to All.
Function Description
Slide Show
Start the slide show.
"
This option is available for photo files. This option is not available with Sort by set
to Folder.
Play Selected
Play only the selected content.
Send
This function is the same as the "Copy" function of a computer. Use this function to
send the media content to another storage device.
"
For information on storage devices supported by this feature, refer to "Storage
Device File Transfers".
Encoding
If the media content's title is being displayed incorrectly, you can change the encoding
method.
"
This function is available only for music files.
Rename Playlist
Rename your playlist.
"
This function is available only when the media content is music.
Delete Playlist
Delete a playlist that you have created.
"
This function is available only for music files.
Add to Playlist
Add a file to an existing playlist or create a new playlist.
"
This function is available only for music files.
Index
If the content list is too long to navigate efficiently, select a letter to quickly skip to
that section of the list.
"
This is not available when Sort by is set to Folder.
92
TV Control using your Voice
"
Availability depends on the specific model and area.
System > Voice Control
You can access and select certain menu options and functions using voice commands. For more
effective voice recognition, speak slowly and clearly in the language specified in the System > Voice
Control > Language option.
"
Voice Control is classified into two: interactive voice control that enables conversational instructions, and
imperative voice control where only pre-defined instructions are used. Smart Hub setup, and time settings,
as well as the user's agreement on the use terms. Trying the interactive voice control without completing
any of these requirements will display a notification pop-up. Follow the onscreen instructions and complete
the necessary settings. The imperative voice control is available regardless of the interactive voice control
settings. Use only "pre-defined commands" in the imperative voice control mode.
"
Please read through the instructions before using Voice Control. For more information, refer to "Read Before
Using Voice, Motion, or Face Recognition".
"
If you use the Voice Control function interactively at least once, the TV will change the on-screen menu
name from Voice Control to Voice Interaction.
Enabling Voice Control
1.
Press the VOICE button on the Samsung Smart Control. The microphone icon appears on the
screen when Voice Control is enabled.
2.
Say a command. You can use Voice Control to operate the TV when you are watching the TV or
other videos.
"
Say the command from 10cm to 15cm away from the microphone on the Samsung Smart Control.
Voice commands may not be recognised properly if you speak too softly or loudly. The optimal volume
for voice commands is between 75 dB and 80dB.
Using the Voice Recognition Tutorial
Support > Voice Recognition Tutorial
This lets you familiarise yourself with the basics of using Voice Control. Run Voice Recognition
Tutorial from the Support menu, or run Voice Control and say "Tutorial".
92 93
Learning Voice Control Basics
Moving the focus
Say "Left", "Right", "Up", or "Down" to move the focus. However, these commands can only be
used in situations when the focus can be moved.
Selecting an item
Say "Select" to confirm the selection.
All Voice Commands
Say "Help" to display the complete list of voice commands, organised by category.
Deactivating Voice Control
Press VOICE button. This terminates Voice Control.
"
The TV recognises predefined voice commands only, and the voice commands may differ from the manual
depending on the version.
Changing Voice Control Language
System > Voice Control > Language
Navigate to System > Voice Control > Language, and select a preferred language from the list. Now
you can use Voice Control in the specified language.
"
Interactive Voice Control is not available in some languages. If this is the case, choose a different language.
94
Using the Voice Interaction function Interactively
"
Availability depends on the specific model and area.
Voice Control allows you to set up Schedule Recording/Schedule Viewing, access VODs, search and
launch applications, and execute various other commands using voice commands and without having
to remember specific commands or keywords. Saying "Turn off the TV in 30 minutes", for example,
instructs the TV to turn off after 30 minutes (Sleep Timer).
"
If you use the Voice Control function interactively at least once, the TV will change the on-screen menu
name from Voice Control to Voice Interaction.
Activate Voice Interaction and say a command. See the examples below:
When you don't know which channel a specific programme is on:
“Watch **** (Title)”. / “Play **** (Title)”. / “Run **** (Title)”
When you want to find a specific programme or content item:
"*** (Title)" / "Find *** (Title)."
When you want to reserve and record a programme:
"Remind me to watch *** (Title)." / "Set up a timer to record *** (Title).” / "Record *** (Title)."
When you want to know various daily information:
"What's the weather in *** (place name)." / "What is the *** (company) stock price?"
When you want programme recommendations:
"Recommend something to me." / "Are there any popular drama (genre) out?"
When you want to operate the TV:
"Volume ** (level)" / "Channel ** (Number) / ** (channel name)"
When you play an app for the camera, such as skype, or for fitness:
"Camera" / "Fitness" / "Skype"
When you log in or out of the Samsung Account:
"Sign In *** (User name)" / "Sign Out *** (User name)"
Enabling/Disabling TV Voice
Enable/disable the TV's voice responses to your Voice Control commands. Navigate to System > Voice
Control menu and select Use TV Voice.
Enabling TV Voice in Selected Voice Gender
Navigate to System > Voice Control > Voice Gender, and select a voice gender. Enjoy the TV voice in
the selected voice gender.
96
Activating Motion Control
System > Motion Control > Motion Control
To enable Motion Control, face the TV camera and raise your hand from a comfortable position with
the index finger spreading upwards, and move it left or right slowly. When your hand is successfully
recognised by the TV camera, Motion Control is activated and a pointer appears on the screen.
"
If Motion Control is activated, a pop-up window appears and guides you through basic use of Motion
Control.
"
Moving your hand out of the range of the TV camera deactivates Motion Control. To reactivate Motion
Control, simply raise your hand towards the TV camera within 3 seconds.
"
The recognition may be terminated if the index finger does not fully spread out or is moved too fast.
Using Motion Control Tutorial
Support > Motion Control Tutorial
This lets you familiarise yourself with the basics of using Motion Control. From the Support menu, run
Motion Control Tutorial.
"
If Motion Control is activated, a pop-up window appears and guides you through basic use of Motion
Control.
Learning Motion Control Basics
The following basic motion control commands are available:
Moving the pointer
Moving your hand moves the pointer accordingly.
96 97
Selecting an item
Fold and then spread your index finger as if clicking on a mouse. You can select a TV menu or
run a function. Keeping your index finger folded is like holding down the remote control button.
Returning to the previous menu
Make a large counterclockwise circle with your hand to return to the previous menu.
"
A small circle may not be recognised by the TV.
Moving to the Smart Hub panel
Move your hand from left to right or from right to left as you would turn a book page. You can
directly move from Smart Hub to another panel screen. (Example: SAMSUNG APPS panel→ On
TV panel)
98
Displaying Smart Hub's context menu
On the Smart Hub screen, fold your index finger for more than 1 second and spread it out. This
displays the selected item's context menu.
"
The screen's option menu differs depending on the selected lists.
Showing and Hiding Animated Motion Guide
Navigate to System > Motion Control, and select Animated Motion Guide from the menu. Now you
can display an animated guide when Motion Control is activated.
Adjusting Pointer Speed
Navigate to System > Motion Control > Pointer Speed, and select a pointer speed.
98 99
Motion Control Screen Layout
Motion Control Layout on the TV Screen
Activating Motion Control while watching the TV displays the following icons on the screen:
"
Icons appearing on the screen may vary depending on the model.
Icon Description
/
Adjusts the volume.
Mutes or unmutes the TV.
/
Changes the channel.
Launches Smart Hub.
You can split the TV screen and use variable functions such as watching the TV,
surfing the web and watching the video and so on.
"
Availability depends on the model.
100
Icon Description
Press this button to search for information through the search window in various
services.
The virtual remote control appears.
Changes the source.
Turns the TV off.
102
Displaying Hidden Icons When Using Smart Hub
When using Motion Control with Smart Hub, the icons will disappear automatically after 2 seconds of
inactivity. To display the hidden icons, move the pointer to one of the three edges shown below (marked
in blue) and then hold it there for 1 second. The icons will reappear on the screen.
Icon Description
/ / / /
/ /
/
106
Checking the Current Programme Info
While watching TV, select INFO to view information about the current programme.
"
In order to view the programme info, you must first set the TV's clock. Set the Clock (System > Time >
Clock).
"
The programme information may vary depending on the type of incoming signal and may not be available
at all for certain programmes.
In addition, select right button to view information about the next programme, and press enter, to set
up a Schedule Viewing or Schedule Recording for the upcoming programme.
Change the Broadcast Signal
Broadcasting > Aerial
Try Now
Choose your preferred method of receiving digital broadcasts.
Digital Signal Info and Strength
Support > Self Diagnosis > Signal Information
Try Now
Select Support > Self Diagnosis > Signal Information. Displays the digital channel's signal information
and strength.
"
If your TV is attached to a separate, over-the-air antenna, you can use the signal strength information to
adjust the antenna for increased signal strength and improved HD channel reception.
"
This is only available for digital channels.
114
Settings
Function Description
Search
Search Scene: This will take you to a scene in the video.
Search Scene cannot be used if 1) the extraction of the thumbnails from the file
(Recorded broadcast) being played back is not finished, 2) playing back a file with
audio only (recorded broadcast), or 3) the duration of the recorded file (recorded
broadcast) is less than 60 seconds.
Search Titles: Select and play a different file located in the same folder.
Search Time Bar: Press
¡
,
£
button to scan through the file in 1-minute increments or
enter a specific time value to jump to that point in the video.
Subtitle Settings
Subtitle: Turn the subtitles On or Off.
Subtitle Language: Used to change the language.
Repeat Mode
This changes the repeat mode. Choose Repeat One to repeat playing the current file
and Repeat All to repeat playing all files contained in the same folder.
Picture Size
Used to change the size of the screen. The supported picture sizes vary depending on
the video.
Picture Mode
Change the Picture Mode setting.
Sound Mode
Used to change the Sound Mode.
Select Speakers
Choose a speaker to play the audio.
Audio Language
Choose a desired audio language. This option works only when the video supports
multi-track sound.
Information
Displays detailed information about the current file.
114 115
Managing Recorded Files
"
Availability depends on the specific model and area.
> On TV > Recorded TV or > MULTIMEDIA > USB Drive
Select Recorded TV at the bottom of the On TV screen or USB Drive at the bottom of the
MULTIMEDIA screen to lock/unlock, rename, delete, and generally manage the recording files.
1.
Press to launch Smart Hub and then choose Recorded TV from the On TV screen or USB Drive
from the bottom of the MULTIMEDIA screen.
2.
Select a USB recording device. A list of recordings appears.
Saved File List Features
Sorting the Saved File List
Sorting with Sort by: Select Sort by at the top of the screen and then select a viewing mode. The
list is sorted based on the selected viewing mode.
Sorting with Filter: Select Filter at the top of the screen and then select a filter. The list is
refreshed to only show files that match the selected filter.
Options
Function Description
Play Selected
Select files from the file list and then select Play. You can create a playlist.
Lock
To prevent to delete the files (recorded program), you can lock the files (recorded
program). This locks all the selected files.
Unlock
Use this option to unlock any locked files. Select the files and then select Unlock. This
unlocks all selected files.
Delete
Deletes recording files. Select the files and then select Delete. This deletes all selected
files.
Rename
Renames the file. Enter the new name using the keypad and then select Done to finish.
The new name can be up to 29 characters long.
Index
When navigating a large number of media items, select a character. Media items
starting with that character appear.
Manage Devices
Used to manage USB recording devices connected to the TV.
116 117
Managing the Schedule Viewing List
Broadcasting > Schedule Manager
You can change the settings of Schedule Viewing sessions or cancel scheduled sessions altogether.
Deleting Schedule Viewing Sessions
You can delete Schedule Viewing sessions.
1.
Select Broadcasting > Schedule Manager.
2.
Select a session from the Schedule Manager. A pop-up window appears.
3.
Select Delete. This cancels the selected viewing session.
Editing Schedule Viewing Sessions
1.
You can change the settings of Schedule Viewing sessions. Select Broadcasting > Schedule
Manager.
2.
Select a session from the Schedule Manager. A pop-up window appears.
3.
Select Edit and change the settings of the selected session.
4.
Once finished, select OK. This applies the changes you made to the selected recording session.
180 181
How Does it Work?
Having a Samsung Tech remotely service your TV is easy.
Call the Samsung Contact Centre
and ask for remote support.
Open the menu on your TV and go
to the Support section.
Select Remote Management, and
then read and agree to the service
agreements. When the PIN screen
appears, provide the PIN number to
the agent.
The agent accesses your TV.
182
Finding the Information You Need for Service
Support > Contact Samsung
Try Now
Use this option to find the support service website's address and contact number, your TV's model
number, your TV's software version, the Smart Hub info, and other information you need to receive the
service support.
"
Press
a
to view the open source licence.
There is a problem with the screen
Testing the Picture
Support > Self Diagnosis > Picture Test
Try Now
Before you review the list of problems and solutions below, run the Picture Test to determine if the
problem is caused by the TV. The Picture Test displays a high definition picture you can examine for
flaws or faults. If the test picture does not appear or there is noise or distortion, the TV may have a
problem. Contact Samsung’s Call Centre for assistance. If the test picture is displayed properly, there
may be a problem with an external device. Please check the connections. If the problem persists,
check the signal strength or refer to the external device’s user manual.
"
If the test picture does not appear or there is noise or distortion, the TV may have a problem. Contact
Samsung’s Call Centre for assistance.
"
If the test picture is displayed properly, there may be a problem with the external device. Please check the
connections. If the problem persists, check the signal strength or refer to the external device’s user manual.
202 203
Motion Control
Motion Control uses the camera. For Motion Control to work, you must be within the camera's
recognition range. The camera's recognition range varies depending on the ambient light level
and other factors.
Run the Motion Control Environment Test before using Motion Control to determine the camera's
recognition range.
You may experience physical fatigue when using Motion Control for extended periods
Voice Control
Voice Control does not support signs such as the minus (-) symbol and special characters,
neither a word nor sentence that contains numbers or signs. It may be not available for certain
languages or dialects, or in some areas. It also differs in performance depending on the selected
language, pronunciation, voice sound level, and ambient noise.
Voice Text Input requires that you agree to any third-party app’s voice privacy policy and that
you provide Samsung with the your MAC address and other private information.
Voice Text Input lets you enter text using voice commands instead of a mouse, keyboard, or
remote control. This feature is particularly useful for searching, browsing the web, and using
applications.
You must agree to the following privacy notices before using Interactive Voice Control:
Voice Recognition Privacy Notice and Nuance Privacy Notice
204
Requirements for Using Voice, Motion, or Face Recognition
Requirements for Using Voice Recognition
The voice recognition rate varies depending on the volume/tone, pronunciation, and ambient
sound environment (TV sound and ambient noise).
Requirements for Using Motion Recognition
Before using motion recognition, make sure the TV's camera has been turned on.
You should be located between 1.5m and 3.5m from the camera. The actual recognition range
may vary depending on the camera angle and other factors.
Motion Control relies on the TV camera and therefore will not function if the camera is pointed up
or down. Adjust the camera's angle using the wheel on the back of the camera. Do not point the
camera directly at the sun or any other light source or obstruct its view.
For the camera to recognise movement, you have to stand out from the background.
The appropriate ambient brightness is 50 to 500 lux. (100 Lux: Bathroom, 400 Lux: Living Room)
Avoid direct sunlight when using Motion Control.
Run the Motion Control Environment Test to assess the camera's recognition range before using
Motion Control.
204 205
Requirements for using Face Recognition
You should be located between 1.5m and 4.0m from the camera. The actual recognition range
may vary depending on the camera angle and other factors.
The appropriate ambient brightness is 50 to 500 lux. (100 Lux: Bathroom, 400 Lux: Living Room)
Face Recognition can recognise up to 5 different users at a time.
The TV may have difficulty recognising twins and people with similar faces as two different
individuals.
Note the following when using Face Recognition:
Do not cover your face with a hat, a pair of sunglasses, or your hair.
Your entire face must be visible to the camera. Avoid shadows over your face. Shadows
prevent the camera from recognising your face accurately.
Keep your expression as neutral as possible. In addition, keep your mouth closed and as
neutral as possible.
When you log into your Samsung account, your facial expression must be the same as
the facial expression you had when you registered. Facial expression you had during the
registration process.
206
Read Before Using SAMSUNG APPS
Due to the product characteristics featured on the Samsung Smart Hub, as well as limitations in
available content, certain features, applications, and services may not be available on all devices
or in all territories. Some Smart Hub features may also require additional peripheral devices
or membership fees. Visit http://www.samsung.com for more information on specific device
information and content availability. Services and content availability are subject to change
without prior notice.
Samsung Electronics takes no legal responsibility whatsoever for any interruption of app services
caused by the service provider for any reason.
Application services may be provided in English only and available content may vary depending
on the area.
For more information about applications, visit the applicable service provider's website.
An unstable Internet connection may cause delays or interruptions. In addition, applications may
terminate automatically depending on the network environment. If this occurs, check your Internet
connection and try again.
Application services and updates may become unavailable.
Application content is subject to change by the service provider without prior notice.
Specific services may vary depending on the version of the application installed on the TV.
An application's functionality may change in future versions of the application. If this occurs, run
the application's tutorial or visit the service provider's website.
Depending on the service provider's policies, certain applications may not support multitasking.
206 207
WebBrowser Restrictions
Select WebBrowser. The browsing screen may differ from the one on your computer.
The web browser is not compatible with Java applications.
You cannot download files. If you attempt to download a file, you will receive an error message
instead.
The web browser may not be able to access certain websites.
Playing Flash videos may be restricted.
E-commerce for online purchases is not supported.
With websites that have scrollable windows, scrolling a window can result in corrupted
characters.
ActiveX is not supported.
Certain options are not accessible in Link Browsing mode. (Switch to Pointer Browsing to activate
those options.)
Only a limited number of fonts are supported. Certain symbols and characters may not be
displayed properly.
The response to remote commands and the resulting on-screen display may be delayed while a
webpage is loading.
Loading a webpage may be delayed or suspended completely with certain operating systems.
The copy and paste operations are not supported.
When composing an email or a simple message, certain functions such as the font size and
colour selection may not be available.
There is a limit to the number of bookmarks and the size of the log file that can be saved.
The number of windows that can be opened concurrently varies depending on the search
conditions and the TV model.
208
The web browsing speed will vary depending on the network environment.
Playing embedded video automatically disables PIP. Video playback may not commence after PIP
is disabled. In this case, you will have to reload the page.
The web browser supports .mp3 audio files only.
The web browser supports a specific file format for importing and exporting bookmarks.
(Compatible Format: Netscape-bookmark file- 1)
The folder tree information is not included when importing and exporting bookmarks.
Exporting bookmarks to a USB device connected to the TV saves the bookmarks under a folder
named "Samsung SmartTV Bookmark".
If the Clock (System > Time > Clock) has not been set, the browsing history will not be saved.
The browsing history is saved from latest to oldest, with the oldest entries being overwritten first.
Depending on the types of video/audio codecs supported, it might not be possible to play certain
video and audio files while playing Flash content.
Video sources from PC-optimised streaming service providers may not play properly on our
proprietary web browser.
Using the on-screen QWERTY keyboard automatically disables PIP. (Except when entering a URL.)
208 209
Photo, Video, and Music File Limitations
The TV supports MSC (Mass Storage Class) USB devices only. MSC is a class designation for
mass USB Drives. Types of MSC devices include external hard drives, flash card readers, and
digital cameras. (USB hubs are not supported.) These kinds of devices must be connected directly
to the TV's USB port. The TV may not be able to recognise the USB device or read the files on
the device if it is connected to the TV via a USB extension cable. Do not disconnect the USB
device while transferring files.
When connecting an external hard drive, use the USB (HDD) port. We recommend that you use an
external hard drive with its own power adapter.
Certain digital cameras and audio devices may not be compatible with the TV.
If there are multiple USB devices connected to the TV, the TV might not be able to recognise
some or all the devices. USB devices that use high-power input should be connect the USB [5V,
1A] port.
The TV supports the FAT, exFAT, and NTFS file systems.
After sorting files in the Folder view mode, the TV can display up to 1000 files per folder. If the
USB device contains more than 8,000 files and folders, however, some files and folders might not
be accessible.
The PTP (pier to pier) connection mode is available only for digital cameras. If you connect a
smartphone or tablet to the TV using PTP mode, the TV will not recognise it.
Storage Device File Transfers
Storage device containing media content Target device
USB Device
DLNA Device, SugarSync, Dropbox, SkyDrive, Mobile
Device
Camera DLNA Device
DLNA Device USB Device
SugarSync, Dropbox, SkyDrive USB Device
Mobile Device USB Device
210
Supported External Subtitles
"
Certain files, depending on how they were encoded, may not play on the TV.
Name Format
MPEG-4 Timed text .ttxt
SAMI .smi
SubRip .srt
SubViewer .sub
Micro DVD .sub or .txt
SubStation Alpha .ssa
Advanced SubStation Alpha .ass
Powerdivx .psb
SMPTE-TT Text .xml
Supported Internal Subtitles
"
Certain files, depending on how they were encoded, may not play on the TV.
Name Container
Xsub AVI
SubStation Alpha MKV
Advanced SubStation Alpha MKV
SubRip MKV
VobSub MKV
MPEG-4 Timed text MP4
TTML in smooth streaming MP4
SMPTE-TT TEXT MP4
SMPTE-TT PNG MP4
210 211
Supported Image Formats and Resolutions
"
Certain files, depending on how they were encoded, may not play on the TV.
File Extension Format Resolution
*.jpg
*.jpeg
JPEG 15360x8640
*.png PNG 4096x4096
*.bmp BMP 4096x4096
*.mpo MPO 15360x8640
Supported Music Formats and Codecs
"
Certain files, depending on how they were encoded, may not play on the TV.
File
Extension
Format Codec Note
*.mp3 MPEG MPEG1 Audio Layer 3
*.m4a
*.mpa
*.aac
MPEG4 AAC
*.flac FLAC FLAC Supports up to 2 channels
*.ogg OGG Vorbis Supports up to 2 channels
*.wma WMA WMA
Supports up to 10 Pro 5.1 channels
WMA lossless audio is not supported
Supports up to the M2 profile
*.wav wav wav
*.mid
*.midi
midi midi
Supports type 0 and type 1
"Seek" not supported
Available only on USB storage devices
*.ape ape ape NonSmart not supported
*.aif
*.aiff
AIFF AIFF
*.m4a ALAC ALAC
212
Supported Video Codecs
"
Certain files, depending on how they were encoded, may not play on the TV.
File
Format
Container Video Codecs Resolution
Frame Rate
(fps)
Bitrate
(Mbps)
Audio Codec
Motion JPEG 1280x720 30
HEVC(H.265)
*.avi
*.mkv
H.264 BP / MP / HP
*.asf
*.wmv
AVI
MKV
DivX 3.11 / 4 / 5 / 6
AC3
LPCM
*.mp4
*.mov
ASF
MP4
MPEG4 SP/ASP
ADPCM(IMA, MS)
AAC
*.3gp
*.vro
3GP
MOV
Window Media Video
v9(VC1)
1920x1080
FHD: MAX 30
HD: MAX 60
30
HE-AAC
WMA
*.mpg
*.mpeg
FLV
VRO
MVC
DD+
MPEG(MP3)
*.ts
*.tp
VOB
PS
MPEG2
DTS(Core, LBR)
G.711(A-Law,
μ-Law)
*.trp
*.mov
TS
SVAF
MPEG1
*.flv
*.vob
Microsoft MPEG-4 v1, v2,
v3
*.svi
*.m2ts
H.263 Sorrenson 1280x720 MAX 30
*.mts
*.divx
Window Media Video
v7(WMV1) ,v8(WMV2)
VP6
*.webm WebM VP8 1920x1080 6~30 20 Vorbis
54

Hulp nodig? Stel uw vraag in het forum

Spelregels
1

Forum

Samsung-UE48H6400
  • Ik heb een probleem met mij tv het probleem is dat hij uit zichzelf aan en uit gaat kan ook niet naar menu om daar te kijken of hij op eco staat zoals aanbevolen word ook heb ik hem al 30 seconden van het stroom afgehaald stekker eruit maar hij blijft aan en uit gaan wat moet ik doen? Gesteld op 26-6-2016 om 13:24

    Reageer op deze vraag Misbruik melden
  • Het is dus net of hij steeds vast loopt na een sec of 3 en dan start hij weer opnieuw op en dan weer hetzelfde, ik kan ook niet in het menu


    Geantwoord op 26-6-2016 om 14:46

    Waardeer dit antwoord Misbruik melden
  • Ik heb de tv na een paar honderd keer drukken op de aan en uit knop van de afstandbediening in de standby gekregen en het opstarten is gestopt, ik ben er ongeveer een uur afgebleven en toen geprobeerd en wat bleek daarna geen probleem meer.ik heb de tv een paar keer opnieuw aan en uit gezet en tot op heden geen probleem.
    Geantwoord op 26-6-2016 om 17:44

    Waardeer dit antwoord Misbruik melden
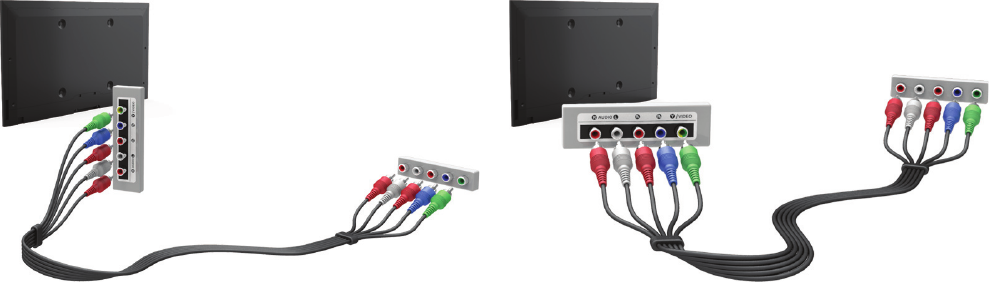
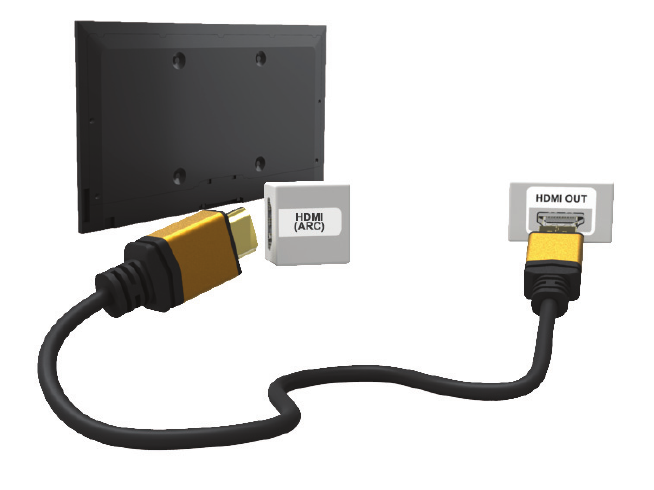
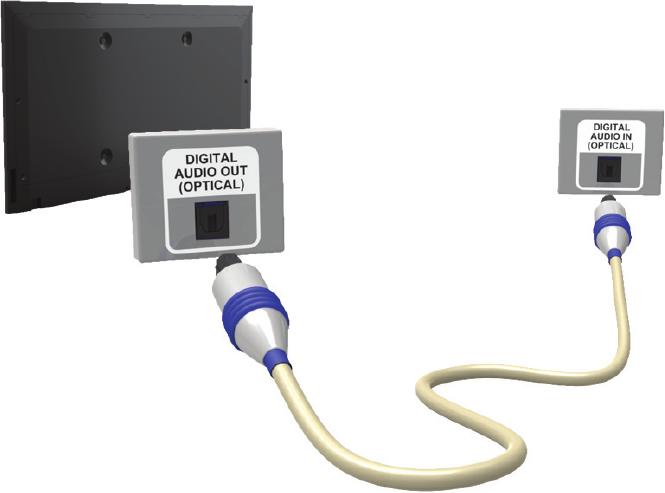
  • Kan ik via de av in component het geluid naar mijn home cinemaset overbrengen? Gesteld op 11-8-2014 om 19:50

    Reageer op deze vraag Misbruik melden

Misbruik melden

Gebruikershandleiding.com neemt misbruik van zijn services uitermate serieus. U kunt hieronder aangeven waarom deze vraag ongepast is. Wij controleren de vraag en zonodig wordt deze verwijderd.

Product:

Bijvoorbeeld antisemitische inhoud, racistische inhoud, of materiaal dat gewelddadige fysieke handelingen tot gevolg kan hebben.

Bijvoorbeeld een creditcardnummer, een persoonlijk identificatienummer, of een geheim adres. E-mailadressen en volledige namen worden niet als privégegevens beschouwd.

Spelregels forum

Om tot zinvolle vragen te komen hanteren wij de volgende spelregels:

Belangrijk! Als er een antwoord wordt gegeven op uw vraag, dan is het voor de gever van het antwoord nuttig om te weten als u er wel (of niet) mee geholpen bent! Wij vragen u dus ook te reageren op een antwoord.

Belangrijk! Antwoorden worden ook per e-mail naar abonnees gestuurd. Laat uw emailadres achter op deze site, zodat u op de hoogte blijft. U krijgt dan ook andere vragen en antwoorden te zien.

Abonneren

Abonneer u voor het ontvangen van emails voor uw Samsung UE48H6400 bij:


U ontvangt een email met instructies om u voor één of beide opties in te schrijven.


Ontvang uw handleiding per email

Vul uw emailadres in en ontvang de handleiding van Samsung UE48H6400 in de taal/talen: Engels als bijlage per email.

De handleiding is 7,82 mb groot.


U ontvangt de handleiding per email binnen enkele minuten. Als u geen email heeft ontvangen, dan heeft u waarschijnlijk een verkeerd emailadres ingevuld of is uw mailbox te vol. Daarnaast kan het zijn dat uw internetprovider een maximum heeft aan de grootte per email. Omdat hier een handleiding wordt meegestuurd, kan het voorkomen dat de email groter is dan toegestaan bij uw provider.

Stel vragen via chat aan uw handleiding

Stel uw vraag over deze PDF

Andere handleiding(en) van Samsung UE48H6400

Samsung UE48H6400 Gebruiksaanwijzing - Nederlands - 229 pagina's

Samsung UE48H6400 Gebruiksaanwijzing - Deutsch - 229 pagina's

Samsung UE48H6400 Gebruiksaanwijzing - Français - 229 pagina's


Uw handleiding is per email verstuurd. Controleer uw email

Als u niet binnen een kwartier uw email met handleiding ontvangen heeft, kan het zijn dat u een verkeerd emailadres heeft ingevuld of dat uw emailprovider een maximum grootte per email heeft ingesteld die kleiner is dan de grootte van de handleiding.

Er is een email naar u verstuurd om uw inschrijving definitief te maken.

Controleer uw email en volg de aanwijzingen op om uw inschrijving definitief te maken

U heeft geen emailadres opgegeven

Als u de handleiding per email wilt ontvangen, vul dan een geldig emailadres in.

Uw vraag is op deze pagina toegevoegd

Wilt u een email ontvangen bij een antwoord en/of nieuwe vragen? Vul dan hier uw emailadres in.


Info