681528
5
Verklein
Vergroot
Pagina terug
1/226
Pagina verder
User Guide
C401x series
Basic
This guide provides information concerning the installation, basic
operation and troubleshooting on Windows.
Advanced
This guide provides information about installation, advanced
configuration, operation and troubleshooting on various OS environments.
Some features may not be available depending on models or countries.
2
Basic
Introduction
Features by model 5
Useful to know 6
About this user guide 7
Safety information 8
Machine overview 15
Control panel overview 18
Turning on the machine 20
Installing the software 21
Menu Overview and
Basic Setup
Menu overview 25
Machine’s basic settings 28
Media and tray 29
Basic printing 40
Using USB memory device 46
Maintenance
Ordering supplies and accessories 49
Available supplies 50
Available accessories 51
Available maintenance parts 52
Storing the toner cartridge 53
Redistributing toner 55
Replacing the toner cartridge 57
Replacing the waste toner container 59
Installing accessories 61
Monitoring the supplies life 63
Setting the toner low alert 64
Cleaning the machine 65
Tips for moving & storing your machine 68
Troubleshooting
Tips for avoiding paper jams 70
Clearing paper jams 71
Understanding the status LED 78
Understanding display messages 80
Paper feeding problems 87
Power and cable connecting problems 88
Printing problems 89
Printing quality problems 92
Operating system problems 98
Wireless network problems 99
3
Appendix
Specifications 104
Regulatory information 111
Copyright 122
Introduction
This chapter provides information you need to know before using the machine.
• Features by model 5
• Useful to know 6
• About this user guide 7
• Safety information 8
• Machine overview 15
• Control panel overview 18
• Turning on the machine 20
• Installing the software 21
Features by model | 5
Features by model
Some features and optional goods may not be available depending on model or country.
(: supported, : optional, Blank: Not supported)
Features C401x series
Hi-Speed USB 2.0
Network Interface Ethernet 10/100/1000 Base TX wired
LAN
Network Interface 802.11b/g/n wireless LAN
a
a.Depending on your country, wireless LAN card may not be available. For some countries, only 802.11 b/g
can be applied. Contact your local Samsung dealer or the retailer where you bought your machine.
NFC (Near Field Communication)
Google Cloud Print
Samsung Cloud Print
PrinterOn
Mopria
Eco printing
Duplex (2-sided) printing
USB memory interface
Optional tray (Tray2, Tray3, Tray4)
Stand
Useful to know | 6
Useful to know
The machine does not print.
Open the print queue list and remove the document from the list (see "Canceling a print job"
on page 41).
• Remove the driver and install it again (see "Installing the software" on page 21).
Select your machine as your default machine in your Windows (see "Setting your machine as
a default machine" on page 182).
Where can I purchase accessories or supplies?
• Inquire at a Samsung distributor or your retailer.
• Visit www.samsung.com/supplies. Select your country/region to view product service
information.
The status LED flashes or remains constantly on.
• Turn the product off and on again.
• Check the meanings of LED indications in this manual and troubleshoot accordingly (see
"Understanding the status LED" on page 78).
A paper jam has occurred.
• Open and close the door (see "Front view" on page 16).
• Check the instructions on removing jammed paper in this manual and troubleshoot
accordingly (see "Clearing paper jams" on page 71).
Printouts are blurry.
The toner level might be low or uneven. Shake the toner cartridge (see "Redistributing toner"
on page 55).
• Try a different print resolution setting (see "Opening printing preferences" on page 41).
• Replace the toner cartridge (see "Replacing the toner cartridge" on page 57).
Where can I download the machine’s driver?
You can get help, support application, machine drivers, manuals, and order information from
the Samsung website, www.samsung.com > find your product > Support or Downloads.
About this user guide | 7
About this user guide
This user guide provides information for your basic understanding of the machine as well as
detailed steps to explain machine usage.
• Do not discard this manual, and keep it for future reference.
• Read the safety information before using the machine.
• If you have a problem using the machine, refer to the troubleshooting chapter.
• Terms used in this user guide are explained in the glossary chapter.
• All illustrations in this user guide may differ from your machine depending on its options or
model you purchased.
• The screenshots in this user guide may differ from your machine depending on the machine’s
firmware/driver version.
• The procedures in this user guide are mainly based on Windows 7.
• If you are a Mac, Linux or UNIX operating systems user, refer to the User Guide from the
Samsung website, http://www.samsung.com > find your product > Support or Downloads.
• If you have Internet access, you can get help, support application, machine drivers, manuals,
and order information from the Samsung website, www.samsung.com > find your product >
Support or Downloads.
Conventions
Some terms in this guide are used interchangeably, as below:
• Document is synonymous with original.
• Paper is synonymous with media, or print media.
• Machine refers to printer or MFP.
General icons
Icon Text Description
Warning Used to alert users to the possibility of personal injury.
Caution
Gives users information to protect the machine from possible
mechanical damage or malfunction.
Note
Provides additional information or detailed specification of the
machine function and feature.
Safety information | 8
Safety information
These warnings and precautions are included to prevent injury to you and others, and to prevent
any potential damage to your machine. Be sure to read and understand all of these instructions
before using the machine. After reading this section, keep it in a safe place for future reference.
Important safety symbols
Explanation of all icons and signs used in this chapter
Operating environment
Warning
Warning
Hazards or unsafe practices that may result in severe personal
injury or death.
Caution
Hazards or unsafe practices that may result in minor personal injury
or property damage.
Do not use if the power cord is damaged or if the electrical outlet is not grounded.
This could result in electric shock or fire.
Do not place anything on top of the machine (water, small metal or heavy objects,
candles, lit cigarettes, etc.).
This could result in electric shock or fire.
• If the machine gets overheated, it releases smoke, makes strange noises, or
generates an odd odor, immediately turn off the power switch or unplug the
machine.
• The user should be able to access the power outlet in case of emergencies that
might require the user to pull the plug out.
This could result in electric shock or fire.
Do not bend, or place heavy objects on the power cord.
Stepping on or allowing the power cord to be crushed by a heavy object could
result in electric shock or fire.
Do not remove the plug by pulling on the cord; do not handle the plug with wet
hands.
This could result in electric shock or fire.
Safety information | 9
Caution
During an electrical storm or for a period of non-operation, remove the power plug
from the electrical outlet.
This could result in electric shock or fire.
Be careful, the paper output area is hot.
Burns could occur.
If the machine has been dropped, or if the cabinet appears damaged, unplug the
machine from all interface connections and request assistance from qualified
service personnel.
Otherwise, this could result in electric shock or fire.
If the machine does not operate properly after these instructions have been
followed, unplug the machine from all interface connections and request
assistance from qualified service personnel.
Otherwise, this could result in electric shock or fire.
If the plug does not easily enter the electrical outlet, do not attempt to force it in.
Call an electrician to change the electrical outlet, or this could result in electric
shock.
Do not allow pets to chew on the AC power, telephone or PC interface cords.
This could result in electric shock or fire and/or injury to your pet.
Safety information | 10
Operating method
Caution
Do not forcefully pull the paper out during printing.
It can cause damage to the machine.
Be careful not to put your hand between the machine and paper tray.
You may get injured.
Be careful when replacing paper or removing jammed paper.
New paper has sharp edges and can cause painful cuts.
When printing large quantities, the bottom part of the paper output area may get
hot. Do not allow children to touch.
Burns can occur.
When removing jammed paper, do not use tweezers or sharp metal objects.
It can damage the machine.
Do not allow too many papers to stack up in the paper output tray.
It can damage the machine.
Do not block or push objects into the ventilation opening.
This could result in elevated component temperatures which can cause damage or
fire.
Use of controls or adjustments or performance of procedures other than those
specified herein may result in hazardous radiation exposure.
This machine's power reception device is the power cord.
To switch off the power supply, remove the power cord from the electrical outlet.
Safety information | 11
Installation / Moving
Warning
Caution
Do not place the machine in an area with dust, humidity, or water leaks.
This could result in electric shock or fire.
Place the machine in the environment where it meets the operating temperature
and humidity specification.
Do not use the machine when it is below freezing temperature or has recently
been moved from a location below freezing temperature. Doing so may damage
the machine. Only operate the machine when the internal temperature of the
machine is within the operating temperature and humidity specifications.
Otherwise, quality problems can occur and cause damage to the machine.
See "General specifications" on page 104.
Before moving the machine, turn the power off and disconnect all cords. The
information below are only suggestions based on the units weight.
If you have a medical condition that prevents you from lifting, do not lift the
machine. Ask for help, and always use the appropriate amount of people to lift the
device safety.
Then lift the machine:
• If the machine weighs under 20 kg (44.09 lbs), lift with 1 person.
• If the machine weighs 20 kg (44.09 lbs) - 40 kg (88.18 lbs), lift with 2 people.
• If the machine weighs more than 40 kg (88.18 lbs), lift with 4 or more people.
The machine could fall, causing injury or machine damage.
Choose a flat surface with enough space for ventilation to place the machine. Also
consider the space required to open the cover and trays.
The place should be well-ventilated and be far from direct light, heat, and
humidity.
When using the machine for a long period of time or printing a large number of
pages in a non-ventilated space, it could pollute the air and be harmful to your
health. Place the machine in a well-ventilated space or open a window to circulate
the air periodically.
Do not place the machine on an unstable surface.
The machine could fall, causing injury or machine damage.
Safety information | 12
Maintenance / Checking
Caution
Use only No.26 AWG
a
or larger, telephone line cord, if necessary.
Otherwise, it can cause damage to the machine.
Make sure you plug the power cord into a grounded electrical outlet.
Otherwise, this could result in electric shock or fire.
Use the power cord supplied with your machine for safe operation. If you are using
a cord which is longer than 2 meters (6 feet) with a 110V machine, then the gauge
should be 16 AWG or larger.
Otherwise, it can cause damage to the machine, and could result in electric shock
or fire.
Do not put a cover over the machine or place it in an airtight location, such as a
closet.
If the machine is not well-ventilated, this could result in fire.
Do not overload wall outlets and extension cords.
This can diminish performance, and could result in electric shock or fire.
The machine should be connected to
the power level which is specified on the label.
If you are unsure and want to check the power level you are using, contact the
electrical utility company.
a.AWG: American Wire Gauge
Unplug this product from the wall outlet before cleaning the inside of the machine.
Do not clean the machine with benzene, paint thinner or alcohol; do not spray
water directly into the machine.
This could result in electric shock or fire.
When you are working inside the machine replacing supplies or cleaning the inside,
do not operate the machine.
You could get injured.
Keep cleaning supplies away from children.
Children could get hurt.
Safety information | 13
Supply usage
Caution
Do not disassemble, repair or rebuild the machine by yourself.
It can damage the machine. Call a certified technician when the machine needs
repairing.
To clean and operate the machine, strictly follow the user's guide provided with the
machine.
Otherwise, you could damage the machine.
Keep the power cable and the contact surface of the plug clean from dust or water.
Otherwise, this could result in electric shock or fire.
• Do not remove any covers or guards that are fastened with screws.
• Fuser units should only be repaired by a certified service technician. Repair by
non-certified technicians could result in fire or electric shock.
• The machine should only be repaired by a Samsung service technician.
Do not disassemble the toner cartridge.
Toner dust can be dangerous if inhaled or ingested.
Do not burn any of the supplies such as toner cartridge or fuser unit.
This could cause an explosion or uncontrollable fire.
When storing supplies such as toner cartridges, keep them away from children.
Toner dust can be dangerous if inhaled or ingested.
Using recycled supplies, such as toner, can cause damage to the machine.
In case of damage due to the use of recycled supplies, a service fee will be
charged.
Safety information | 14
For supplies that contain toner dust (toner cartridge, waste toner bottle, imaging
unit, etc.) follow the instructions below.
When disposing of the supplies, follow the instructions for disposal. Refer to the
reseller for disposal instructions.
• Do not wash the supplies.
• For a waste toner bottle, do not reuse it after emptying the bottle.
If you do not follow the instructions above, it may cause machine malfunction and
environmental pollution. The warranty does not cover damages caused by a user's
carelessness.
When toner gets on your clothing, do not use hot water to wash it.
Hot water sets toner into fabric. Use cold water.
When changing the toner cartridge or removing jammed paper, be careful not to
let toner dust touch your body or clothes.
Toner dust can be dangerous if inhaled or ingested.
Machine overview | 15
Machine overview
Components
The actual component may differ from the illustration below. Some components may change
depending on the configuration.
Machine
a
a.This illustration may differ from your machine depending on your model. There are various types of
machine.
Quick installation guide
Software CD
b
b.The software CD contains the print drivers, user’s guide, and software applications.
Power cord
Misc. accessories
c
c.Miscellaneous accessories included with your machine may vary by country of purchase and specific
model.
Machine overview | 16
Front view
• This illustration may differ from your machine depending on your model. There are
various types of machine.
Some features and optional goods may not be available depending on model or country
(see "Features by model" on page 5).
1 Output support tray 10 Multi-purpose tray
2 Output tray 11 Front cover
3 Control panel 12 Push-release of front cover button
4 Control board cover 13 Toner cartridges
5 USB memory port 14 Toner cartridge handle
6 Tray 1 15 Intermediate Transfer Belt (ITB)
7
Stand
a
a.Optional device.
16
Paper width guides on a multi-purpose
tray
8
Optional tray
b
b.Install the optional tray if it is necessary.
17 Multi-purpose support tray
9 Push-release of Multi-purpose tray
1 2
3
4
56
8
9
10
11
17
16
13
14
15
7
12
Machine overview | 17
Rear view
• This illustration may differ from your machine depending on your model. There are
various types of machine.
Some features and optional goods may not be available depending on model or country
(see "Features by model" on page 5).
1 Rear cover handle
2 Rear cover
3 Waste toner container
4 Power receptacle
5 USB memory port
6 USB port
7 Network port
Control panel overview | 18
Control panel overview
• This control panel may differ from your machine depending on its model. There are
various types of control panels.
Some features and optional goods may not be available depending on model or country
(see "Features by model" on page 5).
1Display screen Shows the current status and prompts during an operation.
2Toner colors
Show the status of each toner cartridge (see "Toner-related
messages" on page 81).
3Menu
Enters menu mode and scrolls through the available
menus (see "Accessing the menu" on page 25).
4 Arrow
Navigates available values by moving to the next or
previous options.
5OK Confirms the selection on the screen.
6Back
Sends you back to the upper menu level.
Control panel overview | 19
7Cancel Stops current operation.
8
Power/Wak
eup
You can turn the power on and off with this button. Or wake
up from the power save mode.
9 Status LED
Indicates the status of your machine (see "Understanding
the status LED" on page 78).
10 Demo page Prints a demo page by pressing this button.
11 Eco
Turn on eco mode to reduce toner consumption and paper
usage (see "Eco printing" on page 44).
12 Numeric keypad
Use the keypad to enter numbers and characters (see
"Keypad letters and numbers" on page 180).
Turning on the machine | 20
Turning on the machine
Illustrations on this user’s guide may differ from your machine depending on its options
or models. Check your machine type (see "Front view" on page 16).
Keep in mind that you should use the power cord supplied with the machine. Otherwise,
it can cause damage or fire to the machine.
• Some parts inside of the machine may be hot when power is on, or after printing. Be
careful not to burn yourself when working inside the machine.
• Do not disassemble the machine when it is turned on or plugged in. Doing so may give
you an electric shock.
1 Connect the machine to the electricity supply first.
2 Power is turned on automatically.
If you want to turn the power off, press the (Power/Wakeup) button.
Installing the software | 21
Installing the software
After you have set up your machine and connected it to your computer, you must install the
printer software. If you are a Windows user, install the software from the supplied CD and if you
are a Mac, Linux, or UNIX OS user, download the software from the Samsung website and install
(http://www.samsung.com > find your product > Support or Downloads or
http://www.samsung.com/printersetup). Before installing, check whether your computer’s OS
support the software.
If you are a Mac, Linux or UNIX operating systems user, refer to the User Guide from the
Samsung website.
• The installation window in this User Guide may differ depending on the machine and
interface in use.
• Only use a USB cable no longer than 3 meters (118 inches).
Supplied software
Printer software are occasionally updated due to release of new operating system and etc. If
needed, download the latest version from the Samsung website.
Software Windows Mac
a
Linux
a
UNIX
a
SPL printer driver ●●
PCL printer driver ●●
PS printer driver
a
a.Download the software from the Samsung website and install it (http://www.samsung.com > find your
product > Support or Downloads or http://www.samsung.com/printersetup). Before installing, check
whether your computer’s OS support the software.
●●
XPS printer driver
a
Direct Printing Utility
a
SetIP
a
●●
Easy Capture Manager ●●
Samsung Easy Printer Manager ●●
Samsung Eco Driver Pack
b
b.To use the Easy Eco Driver features, the Eco Driver Pack must be installed.
Samsung Stylish Driver Pack
c
c.The printer driver includes a user interface that is optimized for touchscreens. To use this UI, click
Samsung Printer Center > Device Options and then select Stylish User Interface (see "Using Samsung
Printer Center" on page 198).
Samsung Printer Center
Samsung Printer Status
Installing the software | 22
Installing for Windows
1 Make sure that the machine is connected to your computer and powered on.
2 Insert the supplied software CD into your CD-ROM drive.
If the installation window does not appear, click Start > All programs > Accessories > Run.
X:\Setup.exe replacing “X” with the letter, which represents your CD-ROM drive and click
OK.
• For Windows 8
If the installation window does not appear, from Charms, select Search > Apps and search
for Run. Type in X:\Setup.exe, replacing “X” with the letter that represents your CD-ROM
drive and click OK.
If “Tap to choose what happens with this disc.” pop-up window appears, click the window
and select Run Setup.exe.
• For Windows 10 / Windows Server 2016
If the installation window does not appear, from task bar, type in X:\Setup.exe in Search
input area, replacing “X” with the letter that represents your CD-ROM drive and press the
Enter key.
3 Review and accept the installation agreements in the installation window, and then click
Next.
4 Select you want type on the Printer Setup Type screen, and then click Next.
5 Follow the instructions in the installation window.
Installing the software | 23
From the Windows 8 Start Screen
The V4 driver is automatically downloaded from the Windows Update if your computer
is connected to the Internet. Or, you can manually download the V4 driver from
Samsung website, www.samsung.com > find your product > Support or downloads.
You can download Samsung Printer Experience app from the Windows Store. You need
have a Microsoft account to use the Windows Store.
1. From Charms, select Search.
2. Click Store.
3. Search and click Samsung Printer Experience.
4. Click Install.
• If you install the driver using the supplied software CD, V4 driver is not installed. If you
want to use the V4 driver in the Desktop screen, you can download from the Samsung
website, www.samsung.com > find your product > Support or downloads.
• If you want to install Samsung’s printer management tools, you need to install them
using the supplied software CD.
1 Make sure that your computer is connected to the Internet and powered on.
2 Make sure that the machine is powered on.
3 Connect the computer and the machine with a USB cable.
The driver is automatically installed from the Windows Update.
If the printer driver does not work properly, follow the steps below to reinstall the driver.
From the Start menu, select Programs or All Programs > Samsung Printers > Uninstall
Samsung Printer Software .
• For Windows 8,
1. From Charms, select Search > Apps.
2. Search and click Control Panel.
3. Click Programs and Features.
4. Right-click the driver you want to uninstall and select Uninstall.
• For Windows 10 / Windows Server 2016
1. From task bar, type in Programs and Features in Search input area. Press the Enter
key.
OR
From the Start () icon, select All apps > Search > type in Programs and Features.
2. Right-click the driver you want to uninstall and select Uninstall.
Menu Overview and
Basic Setup
This chapter provides information about the overall menu structure and the basic setup options.
• Menu overview 25
• Machine’s basic settings 28
• Media and tray 29
• Basic printing 40
• Using USB memory device 46
Menu overview | 25
Menu overview
The control panel provides access to various menus to set up the machine or use the machine’s
functions.
• Some menus may not appear on the display depending on options or models. If so, it is
not applicable to your machine.
• Some menu names may differ from your machine depending on its options or the
models.
• The menus are described in the Advanced Guide (see "Useful Setting Menu" on page
160).
Accessing the menu
1 Press (Menu) button on the control panel.
2 Press the arrows until the needed menu item appears and press OK.
3 If the setting item has sub menus, repeat step 2.
4 Press OK to save the selection.
5 Press (Cancel) to return to the ready mode.
Menu overview | 26
Information
(see "Information" on page 162)
Layout
(see "Layout" on page 163)
Paper
(see "Paper" on page 165)
Menu Map
Configuration
Supplies Info.
Demo Page
PCL Font
PS Font
Usage Counter
Account
a
Network Conf.
a.This is used only available when Job Accounting is enabled from the SyncThru™ Web Admin Service.
Orientation
Portrait
Landscape
Margin
Common Margin
MP Tray
Tray 1
Tray 2
b
Tray 3
b
Tray 4
b
Emulation Mar.
Duplex
b.This option is available when the optional tray is installed.
Copies
MP Tray
Tray 1
Tray 2
b
Tray 3
b
Tray 4
b
Paper Source
Tray 1
Tray 2
b
Tray 3
b
Tray 4
b
MP Tray
Auto
Graphic
(see "Graphic" on page
166)
System Setup
(see "System Setup" on page 167)
Resolution
Clear Text
Edge Enhance
Auto CR
Screen
Trapping
Date & Time
Clock Mode
Language
Power Save
Wakeup Event
Job Timeout
Default Paper
Altitude Adj.
Humidity
Auto Continue
Auto Tray Swi.
Paper Substit.
Tray Protect.
Tray Mode
SkipBlankPages
Maintenance
CLR Empty Msg.
a
Supplies Life
Image Mgr.
TonerLow Alert
RAM Disk
Toner Save
Eco Settings
Quiet Mode
Stacking Mode
Smart Duplex
Vapor Mode
Auto Power Off
a.This option only appears when small amount of toner is left in the cartridge.
Menu overview | 27
Emulation
(see "Emulation" on
page 171)
Image Mgr.
(see "Image Mgr." on
page 172)
Network
(see "Network" on page 173)
Emulation Type
Setup
Custom Color
Default
Print Density
AutoColor Reg.
Tone Adjust.
Auto Tone Adj.
TCP/IP (IPv4)
DHCP
BOOTP
Static
TCP/IP (IPv6)
IPv6
Protocol
DHCPv6
Config
Ethernet
Ethernet
Port
Ethernet
Speed
802.1x
Wi-Fi
a
Wi-Fi On/Off
Wi-Fi Settings
WPS
Wi-Fi Direct
Wi-Fi Signal
CLR Wi-Fi Set.
Protocol Mgr.
NFC
a
Network Conf.
Clear Settings
a.This option is available when the optional Wi-Fi/NFC kit installed.
Direct USB
a
(see "Direct USB" on page
175)
a.This option is available when USB memory is inserted into the USB memory port on your machine.
Job Manage
b
(see "Job Manage" on page 176)
b.This option is available when the RAM disk is checked.
PrinterOn
c
(see "PrinterOn" on page
177)
c.This is available only when PrinterOn is enabled from SyncThru™ Web Service (see "Registering your
printer on the PrinterOn service" on page 155). The sub menus that appear in this menu may differ
based on whether or not the machine is connected to the PrinterOn server.
Print From
File Manage
Check Space
Active Job
Secured Job
Stored Job
Filing Policy
Machine’s basic settings | 28
Machine’s basic settings
You change the machine’s setting set in the machine from Samsung Easy Printer Manager
or SyncThru™ Web Service.
• If your machine is connected to the local, you can set the machine’s setting from
Samsung Easy Printer Manager > Advanced Setting > Device Settings (see "Using
Samsung Easy Printer Manager" on page 203).
• If your machine is connected to the network, you can set the machine’s setting from
SyncThru™ Web Service > Settings tab > Machine Settings (see "SyncThru™ Web
Service" on page 193).
After installation is complete, you may want to set the machine's default settings.
To change the machine’s default settings, follow these steps:
It may be necessary to press OK to navigate to lower-level menus for some models.
1 Select (Menu) button on the control panel.
2 Press System Setup.
3 Select the option (language, data & time, clock mode, power save, altitude adjustment, etc.)
you want, then press OK.
4 Select the detailed option you want, then press OK.
5 Press OK to save the selection.
6 Press (Cancel) to return to ready mode.
Refer to below links to set other settings useful for using the machine.
• See "Setting the paper size and type" on page 38.
• See "Keypad letters and numbers" on page 180.
Media and tray | 29
Media and tray
This chapter provides information on how to load print media into your machine.
Selecting print media
You can print on a variety of print media, such as plain paper, envelopes, and labels. Always use
print media that meet the guidelines for use with your machine.
Guidelines for select the print media
Print media that does not meet the guidelines outlined in this user’s guide may cause the
following problems:
• Poor print quality
• Increased paper jams
• Premature wear on the machine.
Properties, such as weight, composition, grain, and moisture content, are important factors that
affect the machine’s performance and the output quality. When you choose print materials,
consider the following:
• The type, size, and weight of the print media for your machine are described in print media
specifications (see "Print media specifications" on page 105).
• Desired outcome: The print media you choose should be appropriate for your project.
• Brightness: Some print media are whiter than others and produce sharper, more vibrant
images.
Surface smoothness: The smoothness of the print media affects how crisp the printing looks on
the paper.
• Some print media may meet all of the guidelines in this user’s guide and still not
produce satisfactory results. This may be the result of the sheets characteristics,
improper handling, unacceptable temperature and humidity levels, or other variables
over which cannot be controlled.
• Before purchasing large quantities of print media, ensure that it meets the
requirements specified in this user’s guide.
Media and tray | 30
• Using print media that does not meet these specifications may cause problems or
require repairs. Such repairs are not covered by Samsung’s warranty or service
agreements.
• The amount of paper put into the tray may differ according to media type used (see
"Print media specifications" on page 105).
• Make sure not to use the inkjet photo paper with this machine. It could cause damage
to the machine.
• Using flammable print media can cause a fire.
• Use designated print media (see "Print media specifications" on page 105).
The use of flammable media or foreign materials left in the printer may lead to over-
heating of the unit and, in rare cases may cause a fire.
The amount of paper put into the tray may differ according to media type used (see "Print media
specifications" on page 105).
Tray overview
1. Tray extend lever
2. Paper length guide
3. Paper width guide
4. Paper limit mark
If you do not adjust the guide, it may cause paper registration, image skew, or jamming of
the paper.
Media and tray | 31
Changing the tray size
To change the size, you need to adjust the paper guides.
To change the size to A4 or Letter
The tray is preset to Letter or A4 size, depending on your country. You must adjust the lever and
paper width guide properly.
1 Pull the tray out of the machine. Remove paper from the tray if necessary.
2 If you want to change the size to Letter, hold the lever at the back of the tray, and rotate the
lever clockwise.
3 Squeeze the paper width guide and slide it to the edge of the lever.
If you want to change the size to A4, first move the paper width guide to left and rotate
the lever counterclockwise. If you force the lever, it could damage the tray.
LT
R
A4
Media and tray | 32
To change the size to Legal (LGL)
Push button as shown and pull out the tray.
Loading paper in the tray
Illustrations on this user’s guide may differ from your machine depending on its options
or models. Check your machine type (see "Front view" on page 16).
Tray 1 / optional tray
• The procedure is same for all optional trays.
• Do not push the paper width guide too far causing the media to warp.
• If you do not adjust the paper width guide, it may cause paper jams.
• Do not use a paper with a leading-edge curl, it may cause a paper jam or the paper can
be wrinkled.
Media and tray | 33
When you print a document, set the paper type and size for the tray (see "Setting the paper size
and type" on page 38).
Media and tray | 34
Multi-purpose tray
The multi-purpose tray can hold special sizes and types of print material, such as postcards, note
cards, and envelopes (see "Print media specifications" on page 105).
Tips on using the multi-purpose tray
• Load only one type, size and weight of print media at a time in the multi-purpose tray.
• To prevent paper jams, do not add paper while printing when there is still paper in the
multi-purpose tray. This also applies to other types of print media.
• To prevent paper jams, do not pull out the paper tray while printing is in progress from the
multi-purpose tray or the printing will stop. Make sure that the paper tray is inserted.
Always load the specified print media only to avoid paper jams and print quality problems (see
"Print media specifications" on page 105).
• Flatten any curl on postcards, envelopes, and labels before loading them into the
multi-purpose tray.
• When printing the special media, you must follow the loading guideline (see "Printing
on special media" on page 35).
• When papers overlap when printing using multi-purpose tray, open tray 1 and remove
overlapping papers then try printing again.
When you print a document, set the paper type and size for the multi-purpose tray.
For information about setting the paper type and size on the control panel (see "Setting the paper
size and type" on page 38).
Media and tray | 35
Printing on special media
The paper setting in the machine and driver should match to print without a paper mismatch
error.
You change the paper setting set in the machine from Samsung Easy Printer Manager program
or SyncThru™ Web Service.
- If your machine is connected to the local, you can set the machine’s setting from Samsung
Easy Printer Manager > Advanced Setting > Device Settings (see "Using Samsung Easy
Printer Manager" on page 203).
- If your machine is connected to the network, you can set the machine’s setting from
SyncThru™ Web Service > Settings tab > Machine Settings (see "SyncThru™ Web Service" on
page 193).
• You change the paper setting set in the machine using control panel.
- Select (Menu) > System Setup > Paper Setup > Paper Size or Paper Type on the control
panel.
• You change the paper setting set in the machine using printer driver.
- Set the paper type from the Printing preferences window > Paper tab > Paper Type (see
"Opening printing preferences" on page 41).
• When using special media, we recommend you feed one sheet at a time (see "Print
media specifications" on page 105).
Illustrations on this user’s guide may differ from your machine depending on its options
or models. Check your machine type (see "Front view" on page 16).
To see for paper weights for each sheet, refer to "Print media specifications" on page 105.
Types Tray 1 Optional tray Multi-purpose tray
Plain ●●
Thick ●●
Heavy weight ●●
Extra Heavy weight ●●
Thin ●●
Cotton ●●
Color ●●
Preprinted ●●
Recycled ●●
Envelope ●●
Thick Envelope ●●
Labels ●●
CardStock ●●
Bond ●●
Archive ●●
Media and tray | 36
(: Supported, Blank: Not supported)
Envelope
Printing successfully on envelopes depends upon the quality of the envelopes.
To print an envelope, place it as shown in the following figure.
• When selecting envelopes, consider the following factors:
- Weight: should not exceed 90 g/m
2
otherwise; jams may occur.
- Construction: should lie flat with less than 6 mm curl and should not contain air.
- Condition: should not be wrinkled, nicked, nor damaged.
- Temperature: should resist the heat and pressure of the machine during operation.
• Use only well-constructed envelopes with sharp and well-creased folds.
• Do not use stamped envelopes.
• Do not use envelopes with clasps, snaps, windows, coated lining, self-adhesive seals, or other
synthetic materials.
• Do not use damaged or poorly made envelopes.
• Be sure the seam at both ends of the envelope extends all the way to the corner of the
envelope.
1. Acceptable
2. Unacceptable
Envelopes with a peel-off adhesive strip or with more than one flap that folds over to seal must
use adhesives compatible with the machine’s fusing temperature for 0.1 second about 170 °C
(338 °F). The extra flaps and strips might cause wrinkling, creasing, or jams, and may even
damage the fuser.
LetterHead ●●
Punched ●●
Glossy Photo ●●
Types Tray 1 Optional tray Multi-purpose tray
Media and tray | 37
• For the best print quality, position margins no closer than 15 mm from the edges of the
envelope.
• Avoid printing over the area where the envelope’s seams meet.
Labels
To avoid damaging the machine, use only labels designed for use in laser printers.
• When selecting labels, consider the following factors:
- Adhesives: Should be stable at your machine’s fusing temperature about 170 °C (338 °F).
- Arrangement: Only use labels with no exposed backing between them. Labels can peel off
sheets that have spaces between the labels, causing serious jams.
- Curl: Must lie flat with no more than 13 mm of curl in any direction.
- Condition: Do not use labels with wrinkles, bubbles, or other indications of separation.
Make sure that there is no exposed adhesive material between labels. Exposed areas can cause
labels to peel off during printing, which can cause paper jams. Exposed adhesive can also cause
damage to machine components.
• Do not run a sheet of labels through the machine more than once. The adhesive backing is
designed for only a single pass through the machine.
• Do not use labels that are separating from the backing sheet or are wrinkled, bubbled, or
otherwise damaged.
Card stock/ Custom-sized paper
• In the software application, set the margins to at least 6.4 mm (0.25 inches) away from the
edges of the material.
CLP-68xND Series/ CLP-68xDW Series
Media and tray | 38
Preprinted paper
When loading preprinted paper, the printed side should be facing up with an uncurled edge at the
front. If you experience problems with paper feeding, turn the paper around. Note that print
quality is not guaranteed.
• Must be printed with heat-resistant ink that will not melt, vaporize, or release hazardous
emissions when subjected to the machine’s fusing temperature for 0.1 second about 170 °C
(338 °F).
Preprinted paper ink must be non-flammable and should not adversely affect machine rollers.
• Before you load preprinted paper, verify that the ink on the paper is dry. During the fusing
process, wet ink can come off preprinted paper, reducing print quality.
Setting the paper size and type
After loading paper in the paper tray, set the paper size and type.
The paper setting in the machine and driver should match to print without a paper mismatch
error.
You change the paper setting set in the machine from Samsung Easy Printer Manager program
or SyncThru™ Web Service.
- If your machine is connected to the local, you can set the machine’s setting from Samsung
Easy Printer Manager > Advanced Setting > Device Settings (see "Using Samsung Easy
Printer Manager" on page 203).
- If your machine is connected to the network, you can set the machine’s setting from
SyncThru™ Web Service > Settings tab > Machine Settings (see "SyncThru™ Web Service" on
page 193).
• You change the paper setting set in the machine using control panel.
- Select (Menu) > System Setup > Paper Setup > Paper Size or Paper Type on the control
panel.
If you want to use special-sized paper such as billing paper, select the Paper tab > Size >
Edit... and set Custom Paper Size Settings in the Printing Preferences (see "Opening
printing preferences" on page 41).
Media and tray | 39
Using the output support
The surface of the output tray may become hot if you print a large number of pages at
once. Make sure that you do not touch the surface, and do not allow children near it.
The printed pages stack on the output support, and the output support will help the printed pages
to align. Unfold the output support.
Illustrations on this user’s guide may differ from your machine depending on its options
or models. Check your machine type (see "Front view" on page 16).
Basic printing | 40
Basic printing
For special printing features, refer to the Advanced Guide (see "Using advanced print
features" on page 183).
Printing
If you are a Mac, Linux or UNIX operating systems user, refer to the User Guide from the
Samsung website, http://www.samsung.com > find your product > Support or Downloads.
The following Printing Preferences window is for Notepad in Windows 7.
1 Open the document you want to print.
2 Select Print from the File menu.
3 Select your machine from the Select Printer list.
4 The basic print settings including the number of copies and print range are selected within
the Print window.
To take advantage of the advanced printing features, click Properties or Preferences
from the Print window (see "Opening printing preferences" on page 41).
5 To start the print job, click OK or Print in the Print window.
Basic printing | 41
Canceling a print job
If the print job is waiting in the print queue or print spooler, cancel the job as follows:
You can access this window by simply double-clicking the machine icon ( ) in the Windows
task bar.
• You can also cancel the current job by pressing (Cancel) on the control panel.
Opening printing preferences
• The Printing Preferences window that appears in this user’s guide may differ depending
on the machine in use.
• When you select an option in Printing Preferences, you may see a warning mark or
. An mark means you can select that certain option but it is not recommended,
and an mark means you cannot select that option due to the machine’s setting or
environment.
1 Open the document you want to print.
2 Select Print from the file menu. The Print window appears.
3 Select your machine from the Select Printer.
4 Click Properties or Preferences.
The screenshot may differ depending on model.
Basic printing | 42
• You can apply Eco features to save paper and toner before printing (see "Easy Eco
Driver" on page 44).
You can check the machine’s current status pressing the Printer Status button (see
"Using Samsung Printer Status" on page 206).
The printer driver includes a user interface that is optimized for touchscreen. To use
this UI, click Samsung Printer Center > Device Options and then select Stylish User
Interface (see "Using Samsung Printer Center" on page 198).
Using a favorite setting
The Favorites option, which is visible on each preferences tab except for the Favorites and
Samsung tab, allows you to save the current preferences for future use.
To save a Favorites item, follow these steps:
1 Change the settings as needed on each tab.
2 Enter a name for the item in the Favorites input box.
Basic printing | 43
3 Click Save.
4 Enter name and description, and then select the desired icon.
5 Click OK. When you save Favorites, all current driver settings are saved.
To use a saved setting, select it in the Favorites tab. The machine is now set to print
according to the settings you have selected.
To delete saved settings, select it in the Favorites tab and click Delete.
Using help
Click the option you want to know on the Printing Preferences window and press F1 on your
keyboard.
Basic printing | 44
Eco printing
The Eco function cuts toner consumption and paper usage. The Eco function allows you to save
print resources and lead you to eco-friendly printing.
You can change the eco setting set:
• From the Samsung Easy Printer Manager program or SyncThru™ Web Service.
- If your machine is connected to the local, you can set the machine’s setting from Samsung
Easy Printer Manager > Advanced Setting > Device Settings (see "Using Samsung Easy
Printer Manager" on page 203).
- If your machine is connected to the network, you can set the machine’s setting from
SyncThru™ Web Service > Settings tab > Machine Settings (see "SyncThru™ Web Service" on
page 193).
• From the control panel.
- Select (Menu) > System Setup > Eco Settings on the control panel.
If you press the Eco button from the control panel, eco mode is enabled. The default
setting of Eco mode is duplex, Multiple Pages per Side (2-up), Skip Blank Pages.
• From the printer driver.
- Set the paper type from the Printing preferences window > Eco tab (see "Opening printing
preferences" on page 41).
Easy Eco Driver
• Available for Windows OS users only.
• To use the Easy Eco Driver features, the Eco Driver Pack must be installed.
With the Easy Eco Driver, you can apply Eco features to save paper and toner before printing.
Easy Eco Driver also allows you simple editing such as removing images and texts, and more. You
can save frequently used settings as a favorite (preset).
How to use:
1 Open a document to print.
2 Open printing preference window.
3 From the Favorites tab, select Eco Preview Printing.
4 Click OK > Print in the window. A preview window appears.
5 Select the options you want to apply to the document.
You can see the preview of the applied features.
Basic printing | 45
6 Click Print.
• If you want to run Easy Eco Driver every time you print, check Start Easy Eco Driver
before printing job checkbox in the Basic tab of the printing preference window.
• To use this feature on Stylish User Interface, click Samsung Printer Center > Device
Options and then select Stylish User Interface (see "Using Samsung Printer Center" on
page 198).
Using USB memory device | 46
Using USB memory device
This chapter explains how to use a USB memory device with your machine.
About USB memory
USB memory devices are available with a variety of memory capacities to give you more room for
storing documents, presentations, downloaded music and videos, high resolution photographs or
whatever other files you want to store or move.
You can do the following tasks on your machine by using a USB memory device.
• Print data stored on a USB memory device
• Format the USB memory device
• Check the available memory space
Plugging in a USB memory device
The USB memory port on the front of your machine is designed for USB V1.1 and USB V2.0
memory devices. Your machine supports USB memory devices with FAT16/FAT32 and a sector
size of 512 bytes.
Check your USB memory device’s file system from your dealer.
You must use only an authorized USB memory device with an A plug connector.
Use only a metal-shielded USB memory device.
Only use a USB memory device that has obtained compatibility certification; otherwise, the
machine might not recognize it.
Insert a USB memory device into the USB memory port on your machine.
A B
Using USB memory device | 47
• Do not remove the USB memory device while the machine is in operation or writing to
or reading from USB memory. The machine warranty does not cover damage caused by
user’s misuse.
If your USB memory device has certain features such as security settings and password
settings, your machine may not automatically detect it. For details about these features,
see the user’s guide of the USB memory device.
Printing from a USB memory device
You can directly print files stored on a USB memory device.
File is supported by Direct Print option.
PRN: Only files created by provided driver with your machine are compatible. PRN files can be
created by selecting the Print to file check box when you print a document. The document will
be saved as a PRN file, rather than printed on paper. Only PRN files created in this fashion can
be printed directly from USB memory device.
TIFF: TIFF 6.0 Baseline
JPEG: JPEG Baseline
PDF: PDF 1.7 and below
XPS: XML Paper Specification 1.0
To print a document from a USB memory device:
Insert a USB memory device into the USB memory port on your machine, and then press Direct
USB > USB Print on the control panel.
Managing USB memory
You can delete image files stored on a USB memory device one by one or all at once by
reformatting the device.
If you see [+] or [D] in the front of a folder name, there are one or more files or folders in
the selected folder.
After deleting files or reformatting a USB memory device, files cannot be restored. There-
fore, confirm that you no longer need the data before deleting it.
To delete, format, or check space image files stored from a USB memory device:
Insert a USB memory device into the USB memory port on your machine, and then press Direct
USB > File Manage > Delete, Format, or Check Space.
Maintenance
This chapter provides information about purchasing supplies, accessories and maintenance parts
available for your machine.
• Ordering supplies and accessories 49
• Available supplies 50
• Available accessories 51
• Available maintenance parts 52
• Storing the toner cartridge 53
• Redistributing toner 55
• Replacing the toner cartridge 57
• Replacing the waste toner container 59
• Installing accessories 61
• Monitoring the supplies life 63
• Setting the toner low alert 64
• Cleaning the machine 65
• Tips for moving & storing your machine 68
Ordering supplies and accessories | 49
Ordering supplies and accessories
Available accessories may differ from country to country. Contact your sales representa-
tives to obtain the list of available supplies, and maintenance parts.
To order Samsung-authorized supplies, accessories, and maintenance parts, contact your local
Samsung dealer or the retailer where you purchased your machine. You can also visit
www.samsung.com/supplies, and then select your country/region to obtain the contact
information for service.
Available supplies | 50
Available supplies
When supplies reach the end of their life spans, you can order the followings of consumables for
your machine:
Depending on the options, percentage of image area and job mode used, the toner
cartridge’s lifespan may differ.
When purchasing new toner cartridges or other supplies, these must be purchased in the
same country as the machine you are using. Otherwise, new toner cartridges or other
supplies will be incompatible with your machine due to different configurations of toner
cartridges and other supplies according to the specific country conditions.
Samsung does not recommend using non-genuine Samsung toner cartridge such as
refilled or remanufactured toner. Samsung cannot guarantee non-genuine Samsung
toner cartridge's quality. Service or repair required as a result of using non-genuine
Samsung toner cartridges will not be covered under the machine’s warranty.
Type Average yield
a
a.Declared yield value in accordance with ISO/IEC 19798. The number of pages may be affected by
operating environment, printing interval, graphics, media type and media size.
Part name
Toner cartridge
• Average continuous black cartridge yield:
Approx. 15,000 standard pages (Black)
• Average continuous color cartridge yield:
Approx. 10,000 standard pages
(Yellow/Magenta/Cyan)
CLT-K603L: Black
CLT-M603L: Yellow
CLT-Y603L: Magenta
CLT-C603L: Cyan
CLT-K604L
b
: Black
CLT-Y604L
b
: Yellow
CLT-M604L
b
:
Magenta
CLT-C604L
b
: Cyan
b.The toner cartridge is available only for C4012 series.
Waste toner
container
Approx. 20,000 black pages or 5,000 color
pages
CLT-W506
Available accessories | 51
Available accessories
You can purchase and install accessories to enhance your machine’s performance and capacity.
Some features and optional goods may not be available depending on models or countries
(see "Features by model" on page 5).
Accessory Function Part name
Optional trays
(Tray2, Tray3, Tray4)
If you are experiencing frequent paper supply
problems, you can attach an additional 550
a
sheet
trays.
a.Plain paper 75 g/m
2
(20 lb bond).
SL-SCF3001
Stand
You can easily move the machine using the stand
with its wheels.
When using the optional Stand, you must
install the foot as shown in the Optional Stand
Installation Guide. Otherwise, the machine
could fall over if on incline and cause bodily
injury.
SL-DSK003S
Wi-Fi/NFC kit This kit lets you use your machine as a Wireless and
NFC machine.
SL-NWE001X
Available maintenance parts | 52
Available maintenance parts
You need to replace the maintenance parts at specific intervals to keep the machine in the best
condition and avoid print quality and paper feeding problems resulting from the worn-out parts.
Maintenance parts are mostly rollers, belts and pads. However, the replacement period and parts
may differ depending on the model. Replacing maintenance parts can be performed only by an
authorized service provider, dealer, or the retailer where you bought the machine. To purchase
maintenance parts, contact the retailer where you bought the machine. The replacement period
for the maintenance parts is informed by the "Samsung Printer Status" program. Or on the UI
(User Interface) if your machine supports a display screen. The replacement period varies based
on the operating system used, computing performance, application software, connecting
method, paper type, paper size, and job complexity.
Storing the toner cartridge | 53
Storing the toner cartridge
Toner cartridges contain components that are sensitive to light, temperature and humidity.
Samsung suggests users follow these recommendations to ensure optimal performance, highest
quality, and longest life from your new Samsung toner cartridge.
Store this cartridge in the same environment in which the printer will be used. This should be in
controlled temperature and humidity conditions. The toner cartridge should remain in its original
and unopened package until installation – if original packaging is not available, cover the top
opening of the cartridge with paper and store in a dark cabinet.
Opening the cartridge package prior to use dramatically shortens its useful shelf and operating
life. Do not store on the floor. If the toner cartridge is removed from the printer, follow the
instructions below to store the toner cartridge properly.
• Store the cartridge inside the protective bag from the original package.
Store lying flat (not standing on end) with the same side facing up as if it were installed in the
machine.
• Do not store consumables in any of the following conditions:
- Temperature greater than 40 °C (104 °F).
- Humidity range less than 20 % or greater than 80 %.
- An environment with extreme changes in humidity or temperature.
- Direct sunlight or room light.
-Dusty places.
- A car for a long period of time.
- An environment where corrosive gases are present.
- An environment with salty air.
Handling instructions
• Do not touch the surface of the photoconductive drum in the cartridge.
• Do not expose the cartridge to unnecessary vibrations or shock.
• Never manually rotate the drum, especially in the reverse direction; this can cause internal
damage and toner spillage.
Toner cartridge usage
Samsung Electronics does not recommend or approve the use of non-Samsung brand toner
cartridges in your printer including generic, store brand, refilled, or remanufactured toner
cartridges.
Samsung’s printer warranty does not cover damage to the machine caused by the use of
a refilled, remanufactured, or non-Samsung brand toner cartridges.
Storing the toner cartridge | 54
Estimated cartridge life
Estimated cartridge life (the toner cartridge yield) depends on the amount of toner that print jobs
require. The actual print yield may vary depending on the print density of the pages you print on,
operating environment, percentage of image area, printing interval, media type and/or media
size. For example, if you print a lot of graphics, the consumption of the toner is higher and you
may need to change the cartridge more often.
Redistributing toner | 55
Redistributing toner
When the toner cartridge is near the end of its life:
• White streaks or light printing occurs and/or density variation side to side.
• The toner-related message saying that the toner is low may appear on the display.
The computer’s Samsung Printing Status program window appears on the computer telling you
which color cartridge is low on toner (see "Using Samsung Printer Status" on page 206).
If this happens, you can temporarily improve print quality by redistributing the remaining toner
in the cartridge. In some cases, white streaks or light printing will still occur even after you have
redistributed the toner. Check the type of the toner cartridge for your machine (see "Available
supplies" on page 50).
Illustrations on this user’s guide may differ from your machine depending on its options
or models. Check your machine type (see "Front view" on page 16).
To prevent damage to the toner cartridge, do not expose it to light for more than a few
minutes. Cover it with a piece of paper, if necessary.
• Do not touch the green area of the toner cartridge. Use the handle on the cartridge to
avoid touching this area.
Do not use sharp objects such as a knife or scissors to open the toner cartridge package.
They might scratch the drum of the cartridge.
• If toner gets on your clothing, wipe it off with a dry cloth and wash clothing in cold
water. Hot water sets toner into fabric.
Redistributing toner | 56
Replacing the toner cartridge | 57
Replacing the toner cartridge
The machine uses four colors and has a different toner cartridge for each one: yellow (Y),
magenta (M), cyan (C), and black (K).
• The status LED and the toner-related message on the display indicate when each individual
toner cartridges should be replaced.
The computer’s Samsung Printing Status program window appears on the computer telling you
which color cartridge is empty on toner (see "Using Samsung Printer Status" on page 206).
Check the type of the toner cartridge for your machine (see "Available supplies" on page 50).
Shake the toner cartridge thoroughly side to side, it will increase the initial print quality.
Illustrations on this user’s guide may differ from your machine depending on its options
or models. Check your machine type (see "Front view" on page 16).
To prevent damage to the toner cartridge, do not expose it to light for more than a few
minutes. Cover it with a piece of paper, if necessary.
• Do not touch the green area of the toner cartridge. Use the handle on the cartridge to
avoid touching this area.
Do not use sharp objects such as a knife or scissors to open the toner cartridge package.
They might scratch the drum of the cartridge.
• If toner gets on your clothing, wipe it off with a dry cloth and wash clothing in cold
water. Hot water sets toner into fabric.
Replacing the toner cartridge | 58
1
2
3
Replacing the waste toner container | 59
Replacing the waste toner container
When the life span of the waste toner container has expired, waste toner container-related
message appears on the screen display of the control panel, indicating the waste toner container
needs to be replaced. Check the waste toner container for your machine (see "Available supplies"
on page 50).
Toner particles can be released inside the machine but it does not mean the machine is
damaged. Contact a service representative when print quality problems occur.
• When you pull out the waste toner container out of the machine, move the container
carefully not to drop it from your hands.
Make sure that you lay the waste toner container on a flat surface so that the toner does
not spill.
Do not tilt or turn over the container.
Replacing the waste toner container | 60
Installing accessories | 61
Installing accessories
Precautions
• Disconnect the power cord
Never remove the control board cover while the power is turned on.
To avoid the possibility of an electrical shock, always disconnect the power cord when installing
or removing ANY internal or external accessories.
• Discharge static electricity
The control board and internal accessories (network interface card or memory module) are
sensitive to static electricity. Before installing or removing any internal accessories, discharge
static electricity from your body by touching something metal, such as the metal back plate on
any device plugged into a grounded power source. If you walk around before finishing the in-
stallation, repeat this procedure to discharge any static electricity again.
When installing accessories, the battery inside the machine is a service component. Do not
change it by yourself. There is a risk of an explosion if battery is replaced by an incorrect
type. Your service provider should remove the old battery from your device and dispose
of in ordinance with state regulations.
Setting Device Options
When you install the optional devices such as optional tray, memory, etc, this machine
automatically detects and sets the optional devices. If you cannot use the optional devices you
installed in this driver, you can set the optional devices in Device Options.
1 For Windows XP Service Pack 3/Server 2003, from the Start menu, select Printer.
• For Windows Server 2008/Vista, from the Start menu, select Control Panel > Hardware
and Sound > Printers.
• For Windows 7, from the Start menu, select Control Panel > Devices and Printers.
For Windows 8, from the Charms, select Search > Settings > Control Panel > Devices and
Printers.
• For Windows Server 2008 R2, select Control Panel > Hardware > Devices and Printers.
• For Windows 10 / Windows Server 2016
From task bar, type in Devices and Printers in Search input area. Press the Enter key.
OR
From the Start () icon, select Settings > Devices > Printers & scanners >Devices and
Printers.
Right-click the Start ( ) icon, you can select Control Panel > Devices and Printers.
Installing accessories | 62
2 Right-click your machine.
3 For Windows XP Service Pack 3/2003/2008/Vista, press Properties.
For Windows 7/Windows 8/Windows Server 2008 R2/Windows 10 / Windows Server 2016,
from context menus, select the Printer properties.
If Printer properties item has mark, you can select other printer drivers connected
with selected printer.
4 Select Device Options.
The Properties window may differ depending on the driver or operating system you
are using.
5 Select the appropriate option.
6 Click OK until you exit the Properties or Printer properties window.
Monitoring the supplies life | 63
Monitoring the supplies life
If you experience frequent paper jams or printing problems, check the number of pages the
machine has printed or scanned. Replace the corresponding parts, if necessary.
• Accessing menus may differ from model to model (see "Accessing the menu" on page
25).
• Some menus may not appear in the display depending on options or models. If so, it is
not applicable to your machine.
• It may be necessary to press OK to navigate to lower-level menus for some models.
1 Select (Menu) > System Setup > Maintenance > Supplies Life on the control panel.
2 Select the option you want and press OK.
3 Press (Cancel) to return to ready mode.
Setting the toner low alert | 64
Setting the toner low alert
If the amount of toner in the cartridge is low, a message informing the user to change the toner
cartridge appears. You can set the option for whether or not this message appears.
Accessing menus may differ from model to model (see "Accessing the menu" on page 25).
1 Select (Menu) > System Setup > Maintenance > TonerLow Alert on the control panel.
2 Select the option you want and press OK.
3 Press (Cancel) to return to ready mode.
Cleaning the machine | 65
Cleaning the machine
If printing quality problems occur or if you use your machine in a dusty environment, you need to
clean your machine regularly to keep it in proper working order which will help to prolong its life.
• Cleaning the cabinet of the machine with cleaning materials containing large amounts
of alcohol, solvents, or other strong substances can discolor or distort the cabinet.
If your machine or the surrounding area is contaminated with toner, we recommend you
use a cloth or tissue dampened with water to clean it. If you use a vacuum cleaner, toner
blows in the air and might be harmful to you.
Cleaning the outside or the display screen
Clean the machine cabinet or the display screen with a soft, lint-free cloth. Dampen the cloth
slightly with water, but be careful not to let any water drip onto or into the machine.
Cleaning the inside
During the printing process, paper, toner, and dust particles can accumulate inside the machine.
This buildup can cause print quality problems, such as toner specks or smearing. Cleaning the
inside of the machine clears and reduces these problems.
To prevent damage to the toner cartridge, do not expose it to light for more than a few
minutes. Cover it with a piece of paper, if necessary.
• Do not touch the green area of the toner cartridge. Use the handle on the cartridge to
avoid touching this area.
• Use a dry lint free cloth when cleaning the inside of the machine, be careful not to
damage the transfer roller or any other inside parts. Do not use solvents such as
benzene or thinner. Printing quality problems can occur and cause damage to the
machine.
• Use a dry lint-free cloth to clean the machine.
• Turn the machine off and unplug the power cord. Wait for the machine to cool down. If
your machine has a power switch, turn the power switch off before cleaning the
machine.
Illustrations on this user’s guide may differ from your machine depending on its options
or models. Check your machine type (see "Front view" on page 16).
Cleaning the machine | 66
Cleaning the machine | 67
Cleaning the pickup roller
• Turn the machine off and unplug the power cord. Wait for the machine to cool down. If
your machine has a power switch, turn the power switch off before cleaning the
machine.
Illustrations on this user’s guide may differ from your machine depending on its options
or models. Check your machine type (see "Front view" on page 16).
Tips for moving & storing your machine | 68
Tips for moving & storing your machine
• When moving the machine, do not tilt or turn it upside down. Otherwise, the inside of the
machine may be contaminated by toner, which can cause damage to the machine or reduce
print quality.
• When moving the machine, make sure at least two people are holding the machine securely.
Troubleshooting
This chapter gives helpful information for what to do if you encounter an error.
• Tips for avoiding paper jams 70
• Clearing paper jams 71
• Understanding the status LED 78
• Understanding display messages 80
• Paper feeding problems 87
• Power and cable connecting problems 88
• Printing problems 89
• Printing quality problems 92
• Operating system problems 98
• Wireless network problems 99
This chapter gives helpful information for what to do if you encounter an error. If your machine has a
display screen, check the message on the display screen first to solve.
If you cannot find a solution in the User's Guide or the problem persists, call for service.
Tips for avoiding paper jams | 70
Tips for avoiding paper jams
By selecting the correct medias, most paper jams can be avoided. To avoid paper jams, refer to
the following guidelines:
• Ensure that the adjustable guides are positioned correctly (see "Tray overview" on page 30).
• Do not remove paper from the tray while your machine is printing.
• Flex, fan, and straighten paper before loading.
• Do not use creased, damp, or highly curled paper.
• Do not mix paper type and size in a tray.
• Use only recommended print media (see "Print media specifications" on page 105).
• Remove any substances (dust, pieces of paper, tape) in the path in which paper is loaded or
passes.
Clearing paper jams | 71
Clearing paper jams
To avoid tearing the paper, pull the jammed paper out slowly and gently.
In tray 1
Illustrations on this user’s guide may differ from your machine depending on its options
or models. Check your machine type (see "Front view" on page 16).
Clearing paper jams | 72
In optional tray
The procedure is same for all optional trays.
If you do not see the paper in this area, stop and go to next step:
Clearing paper jams | 73
In the multi-purpose tray
If you do not see the paper in this area, stop and go to next step:
Clearing paper jams | 74
1 2 3
Clearing paper jams | 75
Inside the machine
The fuser area is hot. Take care when removing paper from the machine in this area.
Illustrations on this user’s guide may differ from your machine depending on its options
or models. Check your machine type (see "Front view" on page 16).
Clearing paper jams | 76
In exit area
The fuser area is hot. Take care when removing paper from the machine in this area.
If you do not see the paper in this area, stop and go to next step:
Clearing paper jams | 77
In the duplex unit area
Understanding the status LED | 78
Understanding the status LED
The color of the LED indicates the machine's current status.
• Some LEDs may not be available depending on model or country (see "Control panel
overview" on page 18).
• To resolve the error, look at the error message and its instructions from the
troubleshooting part (see "Understanding display messages" on page 80).
You also can resolve the error with the guideline from the computer’s Samsung Printing
Status program window (see "Using Samsung Printer Status" on page 206).
• If the problem persists, call a service representative.
LED Status Description
(
Status
Off • The machine is off-line.
• The machine is in power save mode.
Blue
On The machine is on-line and can be used.
Blinking
When the backlight blinks, the machine is receiving or
printing data.
Orange
On
• The cover is opened. Close the cover.
• There is no paper in the tray when receiving or printing
data. Load paper in the tray.
The machine has stopped due to a major error. Check the
display message (see "Understanding display messages"
on page 80).
• A paper jam has occurred (see "Clearing paper jams" on
page 71).
The waste toner container is not installed in the machine
or it is full (see "Replacing the waste toner container" on
page 59).
• A toner cartridge has almost reached its estimated
cartridge life
a
. It is recommended to replace the toner
cartridge (see "Replacing the toner cartridge" on page
57).
Blinking
• A minor error has occurred and the machine is waiting
for the error to be cleared. Check the display message.
When the problem is cleared, the machine resumes.
()
Power/
Wakeup
Blue
On The machine is in power save mode.
Off The machine is in ready mode or machine’s power is off.
Understanding the status LED | 79
Eco Green
On Eco mode is on (see "Eco printing" on page 44).
Off Eco mode is off.
a.Estimated cartridge life means the expected or estimated toner cartridge life, which indicates the average
capacity of print-outs and is designed pursuant to ISO/IEC 19798. The number of pages may be affected
by operating environment, percentage of image area, printing interval, graphics, media and media size.
Some amount of toner may remain in the cartridge even when red LED is on and the printer stops printing.
LED Status Description
Understanding display messages | 80
Understanding display messages
Messages appear on the control panel display to indicate the machine’s status or errors. Refer to
the tables below to understand the messages’ and their meaning, and correct the problem, if
necessary.
• You can resolve the error with the guideline from the computer's Printing Status
program window (see "Using Samsung Printer Status" on page 206).
• If a message is not in the table, reboot the power and try the printing job again. If the
problem persists, call a service representative.
• When you call for service, provide the service representative with the contents of
display message.
• Some messages may not appear on the display depending on the options or models.
• [error number] indicates the error number.
• [tray number] indicates the tray number.
• [media type] indicates the media type.
• [media size] indicates the media size.
• [color] indicates the color of toner.
Paper Jam-related messages
Message Meaning Suggested solutions
Paper jam
in exit area
Paper has jammed in the exit
area.
Clear the jam (see "In exit area" on
page 76).
Paper jam
inside machine
Paper has jammed in the inside
machine.
Clear the jam (see "Inside the machine"
on page 75).
Paper jam
in tray1
Paper has jammed in the tray.
Clear the jam (see "In tray 1" on page
71).
Paper jam
in tray2
Paper has jammed in the
optional tray.
Clear the jam (see "In optional tray" on
page 72).
Paper jam
in tray3
Paper has jammed in the
optional tray.
Clear the jam (see "In optional tray" on
page 72).
Paper jam
in tray4
Paper has jammed in the
optional tray.
Clear the jam (see "In optional tray" on
page 72).
Paper jam
in MP tray
Paper has jammed in the
multi-purpose tray.
Clear the jam (see "In the
multi-purpose tray" on page 73).
Understanding display messages | 81
Toner-related messages
Paper Jam
inside of duplex
Paper has jammed during
duplex printing. This is
applicable only to machines
with this feature.
Clear the jam (see "In the duplex unit
area" on page 77).
Paper Jam
bottom of duplex
Message Meaning Suggested solutions
Install Toner
A toner cartridge is not
installed.
Reinstall the toner cartridge.
A toner cartridge is not being
detected.
Reinstall the toner cartridge two or
three times to confirm it is seated
properly. If the problem persists,
contact the service representatives.
Not Compatible
[color] toner cart.
The indicated toner cartridge
is not suitable for your
machine.
Install the corresponding toner
cartridge with a Samsung-genuine
cartridge (see "Replacing the toner
cartridge" on page 57).
Not Compatible
[color] Toner
Country
The indicated toner cartridge
is not available in the country
set in the machine.
Install new toner cartridge (see
"Replacing the toner cartridge" on page
57).
[color] toner cart.
Position error
The indicated toner
mismatch on toner cartridge
position.
Install again in the proper position.
Toner Low
Small amount of toner is left
in the indicated cartridge.
The estimated cartridge life
of toner is close.
a
Prepare a new cartridge for a
replacement. You may temporarily
increase the printing quality by
redistributing the toner (see
"Redistributing toner" on page 55).
Message Meaning Suggested solutions
Understanding display messages | 82
Samsung does not recommend using a non-genuine Samsung toner cartridge such as
refilled or remanufactured. Samsung cannot guarantee a non-genuine Samsung toner
cartridge's quality. Service or repair required as a result of using non-genuine Samsung
toner cartridges will not be covered under the machine warranty.
Tray-related messages
Toner Very Low
The indicated toner cartridge
has almost reached its
estimated cartridge life
a
.
• You can choose Stop or Continue as
shown on the control panel. If you
select Stop, the printer stops
printing. If you select Continue, the
printer keeps printing but the
printing quality cannot be
guaranteed.
• Replace the toner cartridge for the
best print quality when this message
appears. Using a cartridge beyond
this stage can result in printing
quality issues (see "Replacing the
toner cartridge" on page 57).
End of Life
The indicated toner cartridge
has reached its estimated
cartridge life
a
.
Replace the toner cartridge (see
"Replacing the toner cartridge" on page
57).
a.Estimated cartridge life means the expected or estimated toner cartridge life, which indicates the
average capacity of print-outs and is designed pursuant to ISO/IEC 19798 (see "Available supplies" on
page 50). The number of pages may be affected by operating environment, percentage of image area,
printing interval, media, percentage of image area, and media size. Some amount of toner may remain in
the cartridge even when replace new cartridge appears and the machine stops printing.
Message Meaning Suggested solutions
Paper empty
in [tray number]
There is no paper in the
indicated tray.
Load paper in the tray (see
"Loading paper in the tray" on
page 32).
Paper empty
in MP tray
There is no paper in the
indicated tray.
Load paper in the tray (see
"Loading paper in the tray" on
page 32).
Paper empty
in all trays
There is no paper in the
indicated tray.
Load paper in the tray (see
"Loading paper in the tray" on
page 32).
Pulled out
[tray number] cassette
Tray is pulled out. Insert tray properly.
Message Meaning Suggested solutions
Understanding display messages | 83
Network-related messages
[tray number]
Paper Mismatch
The paper size specified in
the printer properties does
not match the paper you are
loading.
Load the correct paper in the
tray.
MP Tray
Paper Mismatch
The paper size specified in
the printer properties does
not match the paper you are
loading.
Load the correct paper in the
tray.
Message Meaning Suggested solutions
Network Problem:
IP Conflict
The IP address is used
elsewhere.
Check the IP address or obtain a
new IP address.
Not found
Wireless network
A NOT FOUND SSID event
occurs when the printer cannot
connect to the wireless module
due to the absence of the
wireless SSID.
If the following problem occurs.
• The access point (or wireless
router) with the set SSID was
turned off.
• The access point (or wireless
router) with the set SSID is
too far away.
• The access point (or wireless
router) with the set SSID
malfunctions.
• The antenna of the wireless
module performs poorly.
• Check the wireless
environment. (Check the power
connection and settings of the
access point (or wireless
router).)
• Check the environment near
the printer. (Check for
microwaves, Bluetooth devices,
steel cabinets, or other items
that may affect wireless
communication.)
If the problem persists, please call
for service.
Services that use the wire-
less interface (copy, print,
and email) are unavail-
able.
Error: #S6-3113
Call for service
The network function does not
work due to a fault in the wired
network PHY chip.
Reboot the power and try the
printing job again. If the problem
persists, please call for service.
802.1x
Network Error
Fail to authenticate.
Check the network authentication
protocol. If the problem persists,
contact your network
administrator.
Message Meaning Suggested solutions
Understanding display messages | 84
Misc. messages
Not correct
Wireless setting
The wireless network options
are configured incorrectly for
the security method.
• The password entered in the
wireless security options is
incorrect.
• The machine does not
support the security method
used by the access point or
wireless router.
• The access point or wireless
router has malfunctioned.
Reconfigure the wireless options
in the machine, SWS, access point,
or wireless router. The
WPA2-PSK/AES security method
is recommended. If the problem
persists, please call for service.
Not connect
Wireless AP
The machine failed to connect
to the wireless access point (or
wireless router).
Check the status of the access
point, including its configuration
and power connections, as well as
any devices that may affect
wireless communication. If the
problem persists, please call for
service.
Fail connection
to WPS
The machine failed to connect
to the wireless access point (or
wireless router).
Check the status of the access
point or WPS, including its
configuration and power
connections, as well as any
devices that may affect wireless
communication. If the problem
persists, please call for service.
Wi-Fi Direct
is not ready
The machine failed to initialize
the Wi-Fi Direct connection.
Reboot the machine to initialize
the wireless settings. If the
problem persists, please call for
service.
Wi-Fi Direct
is not connect
The machine failed to connect
via Wi-Fi Direct.
Turn the Wi-Fi Direct feature off
and then back on or reboot the
machine or mobile device. If the
problem persists, please call for
service.
Message Meaning Suggested solutions
Adjusting Color
Registration...
The machine is adjusting the
color registration.
Wait a few minutes.
Calibrating
image density…
The machine is calibrating the
image density.
Wait a few minutes.
Message Meaning Suggested solutions
Understanding display messages | 85
Door Open
Close it
The cover is not securely
latched.
Close the cover until it locks into
place.
Error [error number]
Install [color] toner
The indicated toner cartridge is
installed improperly, or the
connector is polluted.
Reinstall the Samsung-genuine
toner cartridge two or three times
to confirm it is seated properly. If
the problem persists, please call
for service.
Error [error number]
Turn off then on
The machine unit cannot be
controlled.
Reboot the power and try the
printing job again. If the problem
persists, please call for service.
Error [error number]
Call for service
Install TR.
belt unit.
The transfer belt is not
installed.
Install a Samsung-genuine
transfer belt.
Not compatible
transfer belt
The transfer belt of the
machine is not for your
machine.
Install the Samsung-genuine part
designed for your machine.
Not Installed
Waste tank
The is waste toner container
not installed.
Install a Samsung-genuine waste
toner container.
Not proper room
temp. Move set
The machine is in a room with
improper room temperature.
Move the machine to a room with
proper room temperature.
Output bin Full
Remove paper
The output tray is full.
Remove papers from the output
tray, the machine resumes
printing. If the problem persists,
call for service.
Prepare new
Transfer belt
The life of the transfer belt will
expired soon.
Replace the transfer belt with a
new one. If the problem persists,
please call for service.
Replace new
Transfer belt
The life of the transfer belt has
expired.
Prepare
Fuser Soon
The life of the fuser unit will be
expired soon.
Replace the fuser unit with a new
one. If the problem persists,
please call for service.
Replace new
Fuser unit
The life of the fuser unit will be
expired.
Message Meaning Suggested solutions
Understanding display messages | 86
Replace new
tray1 roller
Replace new
tray2 roller
Replace new
tray3 roller
Replace new
tray4 roller
The life of the tray roller will
expired.
Replace the tray roller with a new
one. If the problem persists,
please call for service.
Transfer Belt
Error
The transfer belt cannot be
controlled.
Reboot the power and try the
printing job again. If the problem
persists, please call for service.
Waste toner Full
Replace new one
The waste toner container is
full.
Replace the waste toner
container.
Message Meaning Suggested solutions
Paper feeding problems | 87
Paper feeding problems
Condition Suggested solutions
Paper jams during printing. Clear the paper jam.
Paper sticks together.
• Check the maximum paper capacity of the tray.
• Make sure that you are using the correct type of paper.
• Remove paper from the tray and flex or fan the paper.
• Humid conditions may cause some paper to stick together.
Multiple sheets of paper do
not feed.
Different types of paper may be stacked in the tray. Load paper
of only one type, size, and weight.
Paper does not feed into
the machine.
• Remove any obstructions from inside the machine.
Paper has not been loaded correctly. Remove paper from the
tray and reload it correctly.
• There is too much paper in the tray. Remove excess paper
from the tray.
• The paper is too thick. Use only paper that meets the
specifications required by the machine.
The paper keeps jamming.
• There is too much paper in the tray. Remove excess paper
from the tray. If you are printing on special materials, use the
manual feeding in tray.
An incorrect type of paper is being used. Use only paper that
meets the specifications required by the machine.
There may be debris inside the machine. Open the front cover
and remove any debris.
Envelopes skew or fail to
feed correctly.
Ensure that the paper guides are against both sides of the
envelopes.
Power and cable connecting problems | 88
Power and cable connecting problems
Reboot the power. If the problem persists, please call for service.
Condition Suggested solutions
The machine is not
receiving power,
or the connection
cable between the
computer and the
machine is not
connected
properly.
1. Connect the machine to the electricity supply first. If the machine has
a (Power/Wakeup) button on the control, press it.
2. Check the USB cable or network cable in the machine’s rear.
3. Disconnect the USB cable or network cable in the machine’s rear and
then, reconnect it.
Printing problems | 89
Printing problems
Condition Suggested solutions
The machine
does not print.
Connect the machine to the electricity supply first. If the machine has a
(Power/Wakeup) button on the control, press it.
Select your machine as your default machine in Windows.
Check the machine for the following:
• The cover is not closed. Close the cover.
• Paper is jammed. Clear the paper jam (see "Clearing paper jams" on
page 71).
No paper is loaded. Load paper (see "Loading paper in the tray" on page
32).
• The toner cartridge is not installed. Install the toner cartridge (see
"Replacing the toner cartridge" on page 57).
• Make sure the protect cover and sheets are removed from the toner
cartridge (see "Replacing the toner cartridge" on page 57).
If a system error occurs, contact your service representative.
Disconnect the machine cable and reconnect it (see "Rear view" on page
17).
If possible, attach the cable to another computer that is working properly
and print a job. You can also try using a different machine cable.
Check the Windows printer settings to make sure that the print job is sent
to the correct port. If the computer has more than one port, make sure
that the machine is attached to the correct one.
Check the Printing Preferences to ensure that all of the print settings are
correct.
Install and reinstall the machine’s driver.
Check the display message on the control panel to see if the machine is
indicating a system error. Contact a service representative.
Get more hard disk space and print the document again.
Once the paper is removed from the output tray, the machine resumes
printing.
The machine
selects print
materials from
the wrong paper
source.
For many software applications, the paper source selection is found under
the Paper tab within the Printing Preferences (see "Opening printing
preferences" on page 41). Select the correct paper source. See the printer
driver help screen (see "Using help" on page 43).
Printing problems | 90
A print job is
extremely slow.
Reduce the complexity of the page or try adjusting the print quality
settings.
Half the page is
blank.
Change the page orientation in your application (see "Opening printing
preferences" on page 41). See the printer driver help screen (see "Using
help" on page 43).
Ensure that the paper size in the printer driver settings matches the paper
in the tray.
Or, ensure that the paper size in the printer driver settings matches the
paper selection in the software application settings you use (see "Opening
printing preferences" on page 41).
The machine
prints, but the
text is wrong,
garbled, or
incomplete.
Disconnect the machine cable and reconnect. Try a print job that you have
already printed successfully. If possible, attach the cable and the machine
to another computer that you know works and try a print job. Finally, try
a new machine cable.
Check the application’s printer selection menu to ensure that your
machine is selected.
Try printing a job from another application.
The operating system is malfunctioning. Exit Windows and reboot the
computer. Turn the machine off and back on again.
Pages print, but
they are blank.
Redistribute the toner, if necessary.
If necessary, replace the toner cartridge.
• See "Redistributing toner" on page 55.
• See "Replacing the toner cartridge" on page 57.
Check the file to ensure that it does not contain blank pages.
Contact a service representative.
The machine
does not print
PDF files
correctly. Some
parts of graphics,
text, or
illustrations are
missing.
Printing the PDF file as an image may enable the file to print. Turn on Print
As Image from the Acrobat printing options.
It will take longer to print when you print a PDF file as an image.
The print quality
of photos is not
good. Images are
not clear.
Reduce the photo size. If you increase the photo size in the software
application, the resolution will be reduced.
Condition Suggested solutions
Printing problems | 91
Before printing,
the machine
emits vapor near
the output tray.
Using damp/wet paper can cause vapor [white smoke] during printing.
This is not a problem, just keep printing. If you are bothered by the smoke
[vapor], then replace the paper with fresh paper from an unopened ream.
The machine
does not print
custom-sized
paper, such as
billing paper.
Set the correct paper size in the Custom in Paper tab in Printing
Preferences (see "Opening printing preferences" on page 41).
The printed
billing paper is
curled.
The paper type setting does not match. Change the printer option and try
again. Go to Printing Preferences, click Paper tab, and set type to Thin
(see "Opening printing preferences" on page 41).
Condition Suggested solutions
Printing quality problems | 92
Printing quality problems
If the inside of the machine is dirty or paper has been loaded improperly, there might be a
reduction in print quality. See the table below to clear the problem.
Ensure that the paper is not wet, try paper from a fresh ream.
Condition Suggested solutions
Light or faded
print
• If a vertical white streak or faded area appears on the page, the toner
supply is low. Install a new toner cartridge (see "Replacing the toner
cartridge" on page 57).
The paper may not meet paper specifications; for example, the paper may
be too moist or rough.
• If the entire page is light, the print resolution setting is too low or the
toner save mode is on. Adjust the print resolution and turn the toner save
mode off. See the help screen of the printer driver.
• A combination of faded or smeared defects may indicate that the toner
cartridge needs cleaning. Clean the inside of your machine (see "Cleaning
the machine" on page 65).
• The surface of the LSU part inside the machine may be dirty. Clean the
inside of your machine (see "Cleaning the machine" on page 65). If these
steps do not correct the problem, contact a service representative.
The top half of
the paper is
printed lighter
than the rest of
the paper
The toner might not adhere properly to this type of paper.
Change the printer option and try again. Go to Printing Preferences, click
the Paper tab, and set the paper type to Recycled (see "Opening printing
preferences" on page 41).
Toner specks The paper may not meet specifications; for example, the paper may be too
moist or rough.
• The transfer roller may be dirty. Clean the inside of your machine (see
"Cleaning the machine" on page 65).
• The paper path may need cleaning. Contact a service representative (see
"Cleaning the machine" on page 65).
Printing quality problems | 93
Dropouts
If faded areas, generally rounded, occur randomly on the page:
• A single sheet of paper may be defective. Try reprinting the job.
The moisture content of the paper is uneven or the paper has moist spots
on its surface. Try a different brand of paper.
• The paper lot is bad. The manufacturing processes can cause some areas
to reject toner. Try a different kind or brand of paper.
Change the printer option and try again. Go to Printing Preferences, click
the Paper tab, and set type to Thick (see "Opening printing preferences"
on page 41).
If these steps do not correct the problem, contact a service representative.
White Spots If white spots appear on the page:
• The paper is too rough and a lot of dirt from paper falls to the inner
components within the machine, so the transfer roller may be dirty. Clean
the inside of your machine (see "Cleaning the machine" on page 65).
The paper path may need cleaning. Clean the inside of your machine (see
"Cleaning the machine" on page 65).
If these steps do not correct the problem, contact a service representative.
Vertical lines
If black vertical streaks appear on the page:
• The surface (drum part) of the toner cartridge inside the machine has
probably been scratched. Remove the toner cartridge and install a new
one (see "Replacing the toner cartridge" on page 57).
If white vertical streaks appear on the page:
• The surface of the LSU part inside the machine may be dirty. Clean the
inside of your machine (see "Cleaning the machine" on page 65). If these
steps do not correct the problem, contact a service representative.
Black or color
background
If the amount of background shading becomes unacceptable:
• Change to a lighter weight paper.
Check the environmental conditions: very dry conditions or a high level of
humidity (higher than 80 % RH) can increase the amount of background
shading.
Remove the old toner cartridge and install a new one (see "Replacing the
toner cartridge" on page 57).
Thoroughly redistribute the toner (see "Redistributing toner" on page 55).
Toner smear • Clean the inside of the machine (see "Cleaning the machine" on page 65).
• Check the paper type and quality.
• Remove the toner cartridge and install a new one (see "Replacing the
toner cartridge" on page 57).
Condition Suggested solutions
Printing quality problems | 94
Vertical
repetitive
defects
If marks repeatedly appear on the printed side of the page at even intervals:
• The toner cartridge may be damaged. If you still have the same problem,
remove the toner cartridge and, install a new one (see "Replacing the
toner cartridge" on page 57).
Parts of the machine may have toner on them. If the defects occur on the
back of the page, the problem will likely correct itself after a few more
pages.
• The fusing assembly may be damaged. Contact a service representative.
Background
scatter
Background scatter results from bits of toner randomly distributed on the
printed page.
• The paper may be too damp. Try printing with a different batch of paper.
Do not open packages of paper until necessary so that the paper does not
absorb too much moisture.
• If background scatter occurs on an envelope, change the printing layout
to avoid printing over areas that have overlapping seams on the reverse
side. Printing on seams can cause problems.
Or select Thick from the Printing Preferences window (see "Opening
printing preferences" on page 41).
• If background scatter covers the entire surface area of a printed page,
adjust the print resolution through your software application or in
Printing Preferences (see "Opening printing preferences" on page 41).
Ensure the correct paper type is selected. For example: If Thicker Paper is
selected, but Plain Paper actually used, an overcharging can occur causing
this copy quality problem.
• If you are using a new toner cartridge, redistribute the toner first (see
"Redistributing toner" on page 55).
Toner particles
are around bold
characters or
pictures
The toner might not adhere properly to this type of paper.
Change the printer option and try again. Go to Printing Preferences, click
the Paper tab, and set the paper type to Recycled (see "Opening printing
preferences" on page 41).
Ensure the correct paper type is selected. For example: If Thicker Paper is
selected, but Plain Paper actually used, an overcharging can occur causing
this copy quality problem.
Condition Suggested solutions
Printing quality problems | 95
Misformed
characters
• If characters are improperly formed and producing hollow images, the
paper stock may be too slick. Try different paper.
Page skew • Ensure that the paper is loaded properly.
• Check the paper type and quality.
• Ensure that the guides are not too tight or too loose against the paper
stack.
Curl or wave • Ensure that the paper is loaded properly.
• Check the paper type and quality. Both high temperature and humidity
can cause paper curl.
• Turn the stack of paper over in the tray. Also try rotating the paper 180°
in the tray.
Wrinkles or
creases
• Ensure that the paper is loaded properly.
• Check the paper type and quality.
• Turn the stack of paper over in the tray. Also try rotating the paper 180°
in the tray.
Back of
printouts are
dirty
Check for leaking toner. Clean the inside of the machine (see "Cleaning the
machine" on page 65).
Condition Suggested solutions
Printing quality problems | 96
Solid color or
black pages
• The toner cartridge may not be installed properly. Remove the cartridge
and reinsert it.
• The toner cartridge may be defective. Remove the toner cartridge and
install a new one (see "Replacing the toner cartridge" on page 57).
• The machine may require repairing. Contact a service representative.
Loose toner • Clean the inside of the machine (see "Cleaning the machine" on page 65).
• Check the paper type, thickness, and quality.
• Remove the toner cartridge and then, install a new one (see "Replacing
the toner cartridge" on page 57).
If the problem persists, the machine may require repair. Contact a service
representative.
Character voids
Character voids are white areas within parts of characters that should be
solid black:
You may be printing on the wrong surface of the paper. Remove the paper
and turn it around.
• The paper may not meet paper specifications.
Horizontal
stripes
If horizontally aligned black streaks or smears appear:
• The toner cartridge may be installed improperly. Remove the cartridge
and reinsert it.
• The toner cartridge may be defective. Remove the toner cartridge and
install a new one (see "Replacing the toner cartridge" on page 57).
If the problem persists, the machine may require repairing. Contact a service
representative.
Curl
If the printed paper is curled or paper does not feed into the machine:
• Turn the stack of paper over in the tray. Also try rotating the paper 180°
in the tray.
• Change the printer’s paper option and try again. Go to Printing
Preferences, click the Paper tab, and set type to Thin (see "Opening
printing preferences" on page 41).
Condition Suggested solutions
Printing quality problems | 97
• An unknown
image
repetitively
appears on a
few sheets
• Loose toner
• Light print or
contaminatio
n occurs
Your machine is probably being used at an altitude of 1,000 m (3,281 ft) or
above.
The high altitude may affect the print quality, such as loose toner or light
imaging. Change the altitude setting for your machine (see "Altitude
adjustment" on page 179).
Condition Suggested solutions
Operating system problems | 98
Operating system problems
Common Windows problems
Refer to the Microsoft Windows User’s Guide that came with your computer for further
information on Windows error messages.
Condition Suggested solutions
“File in Use”
message appears
during
installation.
Exit all software applications. Remove all software from the startup group,
then restart Windows. Reinstall the printer driver.
“General
Protection
Fault”,
“Exception OE”,
“Spool 32”, or
“Illegal
Operation”
messages
appear.
Close all other applications, reboot Windows and try printing again.
“Fail To Print”, “A
printer timeout
error occurred”
message appear.
These messages may appear during printing. Just keep waiting until the
machine finishes printing. If the message appears in ready mode or after
printing has completed, check the connection and/or whether an error has
occurred.
Samsung Printer
Experience is not
shown when you
click more
settings.
Samsung Printer Experience is not installed. Download the app from the
Windows Store and install it.
Machine
information is
not displayed
when you click
the device in the
Devices and
Printers.
Check the Printer properties. Click the Ports tab.
(Control Panel > Devices and Printers > Right-click on your printer icon and
select Printer properties)
If the port is set to File or LPT, uncheck them and select TCP/IP, USB, or
WSD.
Wireless network problems | 99
Wireless network problems
Problems during setup or driver installation
Driver installa-
tion message
Suggested solutions
Printers Not
Found
• Your machine may not be turned on. Turn on your computer and the
machine.
• USB cable is not connected between your computer and machine.
Connect the machine to your computer using the USB cable.
• The machine does not support wireless networking. Check the
machine's user's guide included on the software CD supplied with your
machine and prepare a wireless network machine.
Connecting
Failure - SSID
Not Found
• The machine is unable to find the network name (SSID) you have
selected or entered. Check the network name (SSID) on your access
point and try connecting again.
• Your access point is not turned on. Turn on your access point.
Connecting
Failure - Invalid
Security
• Security is not configured correctly. Check the configured security on
your access point and machine.
Connecting
Failure - General
Connection Error
• Your computer is not receiving a signal from your machine. Check the
USB cable and your machine’s power.
Connecting
Failure -
Connected Wired
Network
• Your machine is connected with a wired network cable. Remove the
wired network cable from your machine.
Connecting
Failure -
Assigning the IP
address
• Cycle the power for the access point (or wireless router) and machine.
Wireless network problems | 100
PC Connection
Error
• The configured network address is unable to connect between your
computer and machine.
- For a DHCP network environment
The printer receives the IP address automatically (DHCP) when com-
puter is configured to DHCP.
If the printing job is not working in DHCP mode, the problem may
be caused by the automatically changed IP address. Compare the
IP address between the product's IP address and the printer port's
IP address.
How to compare:
1. Print the network information report of your printer, and
then check the IP address (see "Printing a network
configuration report" on page 127).
2. Check the printer port's IP address from your computer.
a. Click the Windows Start menu.
b. Select Start > Programs or All Programs > Samsung
Printers > Samsung Printer Center.
For Windows 8
From the Charms, select Search > Apps > Samsung Print-
ers > Samsung Printer Center.
Windows 10 / Windows Server 2016
From task bar, type in Samsung Printers in Search input
area. Press the Enter key and then select Samsung Print-
er Center.
OR
From the Start () icon, select All apps > Samsung
Printers> Samsung Printer Center.
c. Click your machine.
d. Press Properties.
e. Click Port tab.
f. Click Configure Port.. button.
g. Check if Printer Name or IP Address: is the IP address on
the network configuration Sheet.
3. Change the printer port's IP address if it is different from the
network information report's.
If you want to use the software installation CD to change the
port IP, connect to a network printer. Then reconnect the IP
address.
Driver installa-
tion message
Suggested solutions
Wireless network problems | 101
PC Connection
Error
• For a Static network environment
The machine uses the static address when the computer is configured to
static address.
For example,
If the computer’s network information is as shown below:
- IP address: 169.254.133.42
- Subnet Mask: 255.255.0.0
Then the machine’s network information should be as below:
- IP address: 169.254.133.43
- Subnet Mask: 255.255.0.0 (Use the computer’s subnet mask.)
- Gateway: 169.254.133.1
Driver installa-
tion message
Suggested solutions
Wireless network problems | 102
Other problems
If problems occur while using the machine on a network, check the following:
For information on the access point (or wireless router), refer to its own user's guide.
• Your computer, access point (or wireless router), or machine may not be turned on.
Check the wireless reception around the machine. If the router is far from the machine or there
is an obstacle, you might have difficulty receiving the signal.
• Cycle the power for the access point (or wireless router), machine, and computer. Sometimes
cycling the power can recover network communication.
• Check whether firewall software (V3 or Norton) is blocking the communication.
If the computer and the machine are connected on the same network and it cannot be found
when searching, firewall software might be blocking the communication. Refer to the user's
guide for the software to turn it off and try searching for the machine again.
Check whether the machine's IP address is allocated correctly. You can check the IP address by
printing the network configuration report.D
• Check whether the access point (or wireless router) has a configured security (password). If it
has a password, refer to the access point (or wireless router) administrator.
• Check the machine's IP address. Reinstall the machine driver and change the settings to
connect to the machine on the network. Due to the characteristics of DHCP, the allocated IP
address could change if the machine is not used for a long time or if the access point has been
reset.
Register the product's MAC address when you configure the DHCP server on the access point
(or wireless router). Then you can always use the IP address that is set with the MAC address.
You can identify the Mac address of your machine by printing a network configuration report.
• Check the wireless environment. You might not be able to connect to the network in the
infrastructure environment where you need to type in a user's information before connecting
to the access point (or wireless router).
• This machine only supports IEEE 802.11 b/g/n and Wi-Fi. Other wireless communication types
(e.g., Bluetooth) are not supported.
• The machine is within the range of the wireless network.
• The machine is located away from obstacles that could block the wireless signal.
Remove any large metal objects between the access point (or wireless router) and the machine.
Make sure the machine and wireless access point (or wireless router) are not separated by
poles, walls, or support columns containing metal or concrete.
The machine is located away from other electronic devices that may interfere with the wireless
signal.
Many devices can interfere with the wireless signal, including a microwave oven and some
Bluetooth devices.
Whenever the configuration of your access point (or wireless router) changes, you must do the
product's wireless network setup again.
• The maximum number of devices that can be connected via Wi-Fi Direct is 4.
• If the access point is set to work with the 802.11n standard only, it may not connect to your
machine.
Appendix
This chapter provides product specifications and information concerning applicable regulations.
• Specifications 104
• Regulatory information 111
• Copyright 122
Specifications | 104
Specifications
General specifications
These specifications are subject to change without notice. To see additional specifications
and information about changes to the specifications, please visit, www.samsung.com.
Items Description
Dimension
a
a.Dimensions and weight are measured without a other accessories.
Width x Depth x Height
420 x 453 x 385 mm (16.54 x 17.84 x 15.16 inches)
Weight
a
Machine with
consumables
22 kg (48.50 lbs)
Noise Level
b
c
b.Sound Pressure Level, ISO 7779. Configuration tested: basic machine installation, A4 paper, simplex
printing.
c.China only: If the equipment's noise is louder than 63 db (A), the equipment should be placed in region of
relatively independent advice.
Ready mode Less than 37 dB (A)
Print mode Less than 53 dB (A)
Temperature Operation 10 to 30 °C (50 to 86 °F)
Storage (packed) -20 to 40 °C (-4 to 104 °F)
Humidity Operation 20 to 80 % RH
Storage (packed) 10 to 90 % RH
Power rating
d
d.See the rating label on the machine for the correct voltage (V), frequency (hertz) and of current (A) for
your machine.
110 volt models AC 110 - 127 V
220 volt models AC 220 - 240 V
Power
consumption
e
e.The power consumption may be affected by the machine’s status, setting conditions, operating
environment, and measuring equipment and method the country uses.
Average operating
mode
Less than 600 W
Ready mode Less than 13 W
Power save mode Less than 0.8 W
Power off mode
f
f.Power consumption can be completely avoided only when the power cable is not connected.
Less than 0.1 W
| 105
Print media specifications
We recommend using recycled paper for saving energy.
Type Size Dimensions
Weight/Capacity
a
Tray1/ Optional tray Multi-purpose tray
Plain paper
b
c
Letter
216 x 279 mm (8.5 x
11 inches)
70 to 90 g/m
2
(19 to 24 lbs
bond)
• Tray1: 550 sheets of
75 g/m
2
(20 lbs bond)
• Optional tray: 550
sheets of 75 g/m
2
(20 lbs bond)
70 to 90 g/m
2
(19 to
24 lbs bond)
• 50 sheets
Legal
216 x 356 mm (8.5 x
14 inches)
Folio
216 x 330 mm (8.5 x
13 inches)
A4
210 x 297 mm (8.27
x 11.69 inches)
Oficio
216 x 343 mm (8.5 x
13.5 inches)
B5(JIS)
182 x 257 mm (7.17
x 10.12 inches)
B5(ISO)
176 x 250 mm (6.93
x 9.84 inches)
Executive
184 x 267 mm (7.25
x 10.5 inches)
Statement
140 x 216 mm (5.5 x
8.5 inches)
A5
148 x 210 mm (5.83
x 8.27 inches)
A6
105 x 148 mm (4.13
x 5.83 inches)
70 to 90 g/m
2
(19 to 24 lbs
bond)
• 150 sheets of 75 g/m
2
(20 lbs bond)
Not available in optional
tray.
Thick
Envelope
Envelope
Monarch
98 x 191 mm (3.87 x
7.5 inches)
91 to 120 g/m
2
(24 to
32 lbs bond)
• 20 sheets
Not available in optional
tray.
91 to 120 g/m
2
(24 to
32 lbs bond)
• 5 sheets
Specifications | 106
Envelope
Envelope No.
10
105 x 241 mm (4.12
x 9.5 inches)
75 to 90 g/m
2
(20 to
24 lbs bond)
• 20 sheets
Not available in optional
tray.
75 to 90 g/m
2
(20 to
24 lbs bond)
• 5 sheets
Envelope No.
9
98 x 225 mm (3.87 x
8.87 inches)
Envelope DL
110 x 220 mm (4.33
x 8.66 inches)
Envelope C5
162 x 229 mm (6.38
x 9.02 inches)
Envelope C6
114 x 162 mm (4.49
x 6.38 inches)
Thick paper
b
c
Refer to the
Plain paper
section
Refer to the Plain
paper section
91 to 105 g/m
2
(24 to 28
lbs bond)
• 50 sheets of 105 g/m
2
(28 lbs bond)
91 to 105 g/m
2
(24 to
28 lbs bond)
• 5 sheets
Heavy weight
Refer to the
Plain paper
section
Refer to the Plain
paper section
106 to 176 g/m
2
(28 to 47
lbs bond)
• 50 sheets
106 to 176 g/m
2
(28 to
47 lbs bond)
• 5 sheets
Extra Heavy
weight
Refer to the
Plain paper
section
Refer to the Plain
paper section
177 to 220 g/m
2
(47 to 59
lbs bond)
• 50 sheets
177 to 220 g/m
2
(47 to
59 lbs bond)
• 5 sheets
Thin paper Refer to the
Plain paper
section
Refer to the Plain
paper section
60 to 69 g/m
2
(16 to 19 lbs
bond)
• 550 sheets of 70 g/m
2
(19 lbs bond)
60 to 69 g/m
2
(16 to 19
lbs bond)
• 50 sheets
Cotton, Color,
Preprinted
Refer to the
Plain paper
section
Refer to the Plain
paper section
75 to 90 g/m
2
(20 to 24 lbs
bond)
• 550 sheets of 75 g/m
2
(20 lbs bond)
75 to 90 g/m
2
(20 to 24
lbs bond)
• 50 sheets
Recycled Refer to the
Plain paper
section
Refer to the Plain
paper section
70 to 90 g/m
2
(19 to 24 lbs
bond)
• 550 sheets of 75 g/m
2
(20 lbs bond)
70 to 90 g/m
2
(19 to 24
lbs bond)
• 50 sheets
Type Size Dimensions
Weight/Capacity
a
Tray1/ Optional tray Multi-purpose tray
Specifications | 107
Labels
b
c
d
Letter,
Legal, US
Folio, A4,
B5(JIS),
B5(ISO),
Executive,
A5,
Statement,
A6, Oficio
Refer to the Plain
paper section
120 to 150 g/m
2
(32 to 40
lbs bond)
• 50 sheets
Not available in optional
tray.
120 to 150 g/m
2
(32 to
40 lbs bond)
• 5 sheets
Card stock
b
c
Letter,
Legal, US
Folio, A4,
B5(JIS),
B5(ISO),
Executive,
A5,
Statement,
A6, Oficio
Refer to the Plain
paper section
121 to 163 g/m
2
(32 to 43
lbs bond)
• 50 sheets
121 to 163 g/m
2
(32 to
43 lbs bond)
• 5 sheets
Bond paper Refer to the
Plain paper
section
Refer to the Plain
paper section
105 to 120 g/m
2
(28 to 32
lbs bond)
• 50 sheets
105 to 120 g/m
2
(28 to
32 lbs bond)
• 5 sheets
Archive,
Punched
paper,
Letterhead
Refer to the
Plain paper
section
Refer to the Plain
paper section
• 550 sheets • 50 sheets
Glossy Photo
b
Letter, A4,
Postcard 4x6
Refer to the Plain
paper section
111 to 130 g/m
2
(30 to 35
lbs bond) for tray
• Tray1: 50 sheets
• Optional tray: 50 sheets
111 to 130 g/m
2
(30 to
35 lbs bond)
• 5 sheets
131 to 175 g/m
2
(35 to 47
lbs bond)
• Tray1: 50 sheets
• Optional tray: 50 sheets
131 to 175 g/m
2
(35 to
47 lbs bond)
• 5 sheets
176 to 220 g/m
2
(47 to 59
lbs bond)
• Tray1: 50 sheets
• Optional tray: 50 sheets
176 to 220 g/m
2
(47 to
59 lbs bond)
• 5 sheets
Type Size Dimensions
Weight/Capacity
a
Tray1/ Optional tray Multi-purpose tray
Specifications | 108
Minimum size (custom) Tray1: 98 x
149 mm (3.86 x
5.85 inches)
Optional tray: 98
x 210 mm (5.85 x
8.27 inches)
Multi-Purpose
tray: 76 x 127 mm
(3 x 5 inches)
• 60 to 220 g/m
2
(16 to 59
lbs bond) for tray1.
60 to 176 g/m
2
(16 to 47
lbs bond) for optional
tray.
60 to 220 g/m
2
(16 to
59 lbs bond)
Maximum size (custom) 216 x 356 mm (8.5 x
14 inches)
a.Maximum capacity may differ depending on media weight, thickness, and environmental conditions.
b.Post card 4 x 6 is supported for tray1 or Multi-purpose tray.
c.Index card (3 x 5) is supported for Multi-purpose tray.
d.The smoothness of the labels used in this machine is 100 to 250 (sheffield). This means the numeric level of smoothness.
Type Size Dimensions
Weight/Capacity
a
Tray1/ Optional tray Multi-purpose tray
Specifications | 109
System requirements
Printer software are occasionally updated due to release of new operating system and etc.
If needed, download the latest version from the Samsung website.
Microsoft
®
Windows
®
• Internet Explorer 6.0 or higher is the minimum requirement for all Windows operating
systems.
• Users who have administrator rights can install the software.
Windows Terminal Services is compatible with your machine.
Operating system
Requirement (Recommended)
CPU RAM
Free HDD
space
Windows
®
XP Service
Pack 3
Intel
®
Pentium
®
III 933 MHz
(Pentium IV 1 GHz)
128 MB (256
MB)
1.5 GB
Windows Server
®
2003 Intel
®
Pentium
®
III 933 MHz
(Pentium IV 1 GHz)
128 MB (512
MB)
1.25 GB to 2
GB
Windows Server
®
2008 Intel
®
Pentium
®
IV 1 GHz (Pentium
IV 2 GHz)
512 MB (2 GB) 10 GB
Windows Vista
®
Intel
®
Pentium
®
IV 3 GHz
512 MB (1 GB) 15 GB
Windows
®
7 Intel
®
Pentium
®
IV 1 GHz 32-bit or
64-bit processor or higher
1 GB (2 GB) 16 GB
• Support for DirectX
®
9 graphics with 128 MB memory (to enable
the Aero theme).
• DVD-R/W Drive
Windows Server
®
2008
R2
Intel
®
Pentium
®
IV 1.4 GHz (x64)
processors (2 GHz or faster)
512 MB (2 GB) 10 GB
Windows
®
8
Windows
®
8.1
Windows
®
10
Windows Server
®
2016
Intel
®
Pentium
®
IV 1 GHz 32-bit or
64-bit processor or higher
2 GB 20 GB
• Support for DirectX
®
9 graphics with 128 MB memory (to enable
the Aero theme).
• DVD-R/W Drive
Windows Server
®
2012
Windows Server
®
2012
R2
Intel
®
Pentium
®
IV 1.4 GHz (x64)
processors (2 GHz or faster)
512 MB (2 GB) 32 GB
Specifications | 110
Mac
Linux
Unix
Operating system
Requirements (Recommended)
CPU RAM Free HDD space
Mac OS X 10.6
Intel
®
processors
1 GB (2 GB) 1 GB
Mac OS X 10.7 - 10.11
Intel
®
processors
2 GB 4 GB
Items Requirements
Operating system
Red Hat Enterprise Linux 5, 6, 7
Fedora 16, 17, 18, 19, 20, 21, 22, 23, 24
OpenSUSE 12.1, 12.2, 12.3, 13.1, 13.2, 42.1
Ubuntu 11.10, 12.04, 12.10, 13.04, 13.10, 14.04, 14.10, 15.04, 15.10,
16.04
SUSE Linux Enterprise Desktop 11, 12
Debian 7, 8
Mint 13, 14, 15, 16, 17, 18
CPU Pentium IV 2.4 GHz (Intel Core™ 2)
RAM 512 MB (1 GB)
Free HDD space 1 GB (2 GB)
Items Requirements
Operating system
Sun Solaris 9, 10, 11 (x86, SPARC)
HP-UX 11.0, 11i v1, 11i v2, 11i v3 (PA-RISC, Itanium)
IBM AIX 5.1, 5.2, 5.3, 5.4, 6.1, 7.1 (PowerPC)
Free HDD space Up to 100 MB
Regulatory information | 111
Regulatory information
This machine is designed for a normal work environment and certified with several regulatory
statements.
Laser safety statement
The printer is certified in the U.S. to conform to the requirements of DHHS 21 CFR, chapter 1
Subchapter J for Class I(1) laser products, and elsewhere is certified as a Class I laser product
conforming to the requirements of IEC/EN 60825-1 : 2014.
Class I laser products are not considered to be hazardous. The laser system and printer are
designed so there is never any human access to laser radiation above a Class I level during normal
operation, user maintenance or prescribed service condition.
Warning
Never operate or service the printer with the protective cover removed from laser/scanner
assembly. The reflected beam, although invisible, can damage your eyes.
When using this product, these basic safety precautions should always be followed to reduce risk
of fire, electric shock, and injury to persons:
Below the warning label of Laser is attached on LSU cover.
Regulatory information | 112
For 110 volt models , “This product complies with 21 CFR Chapter 1, subchapter J.” is written on
the label of rear cover. And for 220 volt models, below image is applied on the label of rear cover.
Ozone safety
Perchlorate warning
This Perchlorate warning applies only to primary CR (Manganese Dioxide) Lithium coin cells in
the product sold or distributed ONLY in California USA.
Perchlorate Material - special handling may apply.
See www.dtsc.ca.gov/hazardouswaste/perchlorate. (U.S.A. only)
Power saver
Recycling
This product’s ozone emission rate is under 0.1 ppm. Because ozone is heavier
than air, keep the product in a place with good ventilation.
This printer contains advanced energy conservation technology that reduces
power consumption when it is not in active use.
When the printer does not receive data for an extended period of time, power
consumption is automatically lowered.
ENERGY STAR and the ENERGY STAR mark are registered U.S. marks.
For more information on the ENERGY STAR program see
http://www.energystar.gov
For ENERGY STAR certified models, the ENERGY STAR label will be on your
machine. Check if your machine is ENERGY STAR certified.
Recycle or dispose of the packaging material for this product in an
environmentally responsible manner.
Regulatory information | 113
Correct disposal of this product (Waste electrical & electronic
equipment)
(Applicable in countries with separate collection systems)
(The United States of America only)
Dispose unwanted electronics through an approved recycler. To find the nearest recycling
location, go to our website: www.samsung.com/recyclingdirect Or call, (877) 278 - 0799
EU REACH SVHC Declaration
For information on Samsung’s environmental commitments and product specific regulatory
obligations e.g. REACH visit:
samsung.com/uk/aboutsamsung/samsungelectronics/corporatecitizenship/data_corner.html.
State of California Proposition 65 Warning (USA Only)
Radio frequency emissions
FCC information to the user
This device complies with Part 15 of the FCC Rules. Operation is subject to the following two
conditions:
• This device may not cause harmful interference.
• This device must accept any interference received, including interference that may cause
undesired operation.
This marking on the product, accessories or literature indicates that the product
and its electronic accessories (e.g. charger, headset, USB cable) should not be
disposed of with other household waste at the end of their working life. To
prevent possible harm to the environment or human health from uncontrolled
waste disposal, please separate these items from other s of waste and recycle
them responsibly to promote the sustainable reuse of material resources.
Household users should contact either the retailer where they purchased this
product, or their local government office, for details of where and how they can
take these items for environmentally safe recycling.
Business users should contact their supplier and check the terms and conditions
of the purchase contract. This product and its electronic accessories should not
be mixed with other commercial wastes for disposal.
Regulatory information | 114
This equipment has been tested and found to comply with the limits for a Class A digital device,
pursuant to Part 15 of the FCC Rules. These limits are designed to provide reasonable protection
against harmful interference in a residential installation. This equipment generates, uses and can
radiate radio frequency energy and, if not installed and used in accordance with the instructions,
may cause harmful interference to radio communications. However, there is no guarantee that
interference will not occur in a particular installation. If this equipment does cause harmful
interference to radio or television reception, which can be determined by turning the equipment
off and on, the user is encouraged to try to correct the interference by one or more of the
following measures:
• Reorient or relocate the receiving antenna.
• Increase the separation between the equipment and receiver.
• Connect the equipment into an outlet on a circuit different from that to which the receiver is
connected.
• Consult the dealer or experienced radio TV technician for help.
Change or modifications not expressly approved by the manufacturer responsible for
compliance could void the user's authority to operate the equipment.
Canadian radio interference regulations
This digital apparatus does not exceed the Class A limits for radio noise emissions from digital
apparatus as set out in the interference-causing equipment standard entitled “Digital Apparatus”,
ICES-003 of the Industry and Science Canada.
Cet appareil numérique respecte les limites de bruits radioélectriques applicables aux appareils
numériques de Classe A prescrites dans la norme sur le matériel brouilleur: “Appareils
Numériques”, ICES-003 édictée par l’Industrie et Sciences Canada.
European Class A Warning
This is a Class A product. In a domestic environment this product may cause radio interference in
which case the user may be required to take adequate measures.
United States of America
Federal Communications Commission (FCC)
Intentional emitter per FCC Part 15
Low power, Radio LAN devices (radio frequency (RF) wireless communication devices), operating
in the 2.4 GHz Band, may be present (embedded) in your printer system. This section is only
applicable if these devices are present. Refer to the system label to verify the presence of
wireless devices.
Wireless devices that may be in your system are only qualified for use in the United States of
America if an FCC ID number is on the system label.
Regulatory information | 115
The FCC has set a general guideline of 20 cm (8 inches) separation between the device and the
body, for use of a wireless device near the body (this does not include extremities). This device
should be used more than 20 cm (8 inches) from the body when wireless devices are on. The
power output of the wireless device (or devices), which may be embedded in your printer, is well
below the RF exposure limits as set by the FCC.
This transmitter must not be collocated or operation in conjunction with any other antenna or
transmitter.
Operation of this device is subject to the following two conditions: (1) This device may not cause
harmful interference, and (2) this device must accept any interference received, including
interference that may cause undesired operation of the device.
Wireless devices are not user serviceable. Do not modify them in any way. Modification to
a wireless device will void the authorization to use it. Contact manufacturer for service.
FCC Statement for Wireless LAN use:
While installing and operating this transmitter and antenna combination the radio
frequency exposure limit of 1m W/cm2 may be exceeded at distances close to the antenna
installed. Therefore, the user must maintain a minimum distance of 20cm from the
antenna at all times. This device cannot be collocated with another transmitter and trans-
mitting antenna.
RFID (Radio Frequency Interface Device)
RFID operation is subject to the following two conditions:(1) this device may not cause
interference, and (2) this device must accept any interference, including interference that may
cause undesired operation of the device. (U.S.A., France, Taiwan only)
Taiwan only
Regulatory information | 116
Regulatory information | 117
Russia / Kazakhstan / Belaru only
Germany only
Turkey only
Thailand only
This telecommunication equipment conforms to NTC technical requirement.
Replacing the Fitted Plug (for UK Only)
Important
The mains lead for this machine is fitted with a standard (BS 1363) 13 amp plug and has a 13 amp
fuse. When you change or examine the fuse, you must re-fit the correct 13 amp fuse. You then
need to replace the fuse cover. If you have lost the fuse cover, do not use the plug until you have
another fuse cover.
Contact the people from you purchased the machine.
Regulatory information | 118
The 13 amp plug is the most widely used in the UK and should be suitable. However, some
buildings (mainly old ones) do not have normal 13 amp plug sockets. You need to buy a suitable
plug adaptor. Do not remove the moulded plug.
If you cut off the moulded plug, get rid of it straight away.
You cannot rewire the plug and you may receive an electric shock if you plug it into a
socket.
Important warning:
If the wires in the mains lead do not match the colors marked in your plug, do the following:
You must connect the green and yellow wire to the pin marked by the letter “E” or by the safety
‘Earth symbol’ or colored green and yellow or green.
You must connect the blue wire to the pin which is marked with the letter “N” or colored black.
You must connect the brown wire to the pin which is marked with the letter “L” or colored red.
You must have a 13 amp fuse in the plug, adaptor, or at the distribution board.
Declaration of conformity (European countries)
Approvals and Certifications
Council Directive 2014/35/EU, Approximation of the laws of the member states related to low
voltage equipment.
Council Directive 2014/30/EU, Approximation of the laws of the Member States related to
electromagnetic compatibility.
You must earth this machine.
The wires in the mains lead have the following color code:
Green and Yellow: Earth
Blue: Neutral
Brown: Live
Hereby, Samsung Electronics, declares that this [C401x series] is in compliance
with the essential requirements and other relevant provisions of Low Voltage
Directive (2014/35/EU), EMC Directive(2014/30/EU).
Hereby, Samsung Electronics, declares that this [C401x series] is in compliance
with the essential requirements and other relevant provisions of Radio
Equipment Directive (2014/53/EU).
The declaration of conformity may be consulted at www.samsung.com, go to
Support > Download center and enter your printer (MFP) name to browse the
EuDoC.
Regulatory information | 119
Council Directive 2014/53/EU on radio equipment and telecommunications terminal equipment
and the mutual recognition of their conformity. A full declaration, defining the relevant Directives
and referenced standards can be obtained from your Samsung Electronics Co., Ltd.
representative.
European radio approval information (for products fitted with
EU-approved radio devices)
Low power, Radio LAN type devices (radio frequency (RF) wireless communication devices),
operating in the 2.4 GHz band, may be present (embedded) in your printer system which is
intended for home or office use. This section is only applicable if these devices are present. Refer
to the system label to verify the presence of wireless devices.
The power output of the wireless device or devices that may be embedded in your printer is well
below the RF exposure limits as set by the European Commission through the Radio Equipment
Directive.
European states qualified under wireless approvals:
EU countries
European states with restrictions on use:
EU
EEA/EFTA countries
No limitations at this time
Regulatory compliance statements
Wireless guidance
Low power, Radio LAN devices (radio frequency (RF) wireless communication devices), operating
in the 2.4 GHz Band, may be present (embedded) in your printer system. The following section is
a general overview of considerations while operating a wireless device.
Additional limitations, cautions, and concerns for specific countries are listed in the specific
country sections (or country group sections). The wireless devices in your system are only
qualified for use in the countries identified by the Radio Approval Marks on the system rating
label. If the country you will be using the wireless device in, is not listed, contact your local Radio
Approval agency for requirements. Wireless devices are closely regulated and use may not be
allowed.
The power output of the wireless device or devices that may be embedded in your printer is well
below the RF exposure limits as known at this time. Because the wireless devices (which may be
embedded into your printer) emit less energy than is allowed in radio frequency safety standards
and recommendations, manufacturer believes these devices are safe for use. Regardless of the
power levels, care should be taken to minimize human contact during normal operation.
Wireless devices that may be in your system are only qualified for use in the
European Union or associated areas if a CE mark is on the system label.
Regulatory information | 120
As a general guideline, a separation of 20 cm (8 inches) between the wireless device and the body,
for use of a wireless device near the body (this does not include extremities) is typical. This device
should be used more than 20 cm (8 inches) from the body when wireless devices are on and
transmitting.
This transmitter must not be collocated or operation in conjunction with any other antenna or
transmitter.
Some circumstances require restrictions on wireless devices. Examples of common restrictions
are listed below:
China only
Radio frequency wireless communication can interfere with equipment on
commercial aircraft. Current aviation regulations require wireless devices to be
turned off while traveling in an airplane. IEEE 802.11 (also known as wireless
Ethernet) and Bluetooth communication devices are examples of devices that
provide wireless communication.
In environments where the risk of interference to other devices or services is
harmful or perceived as harmful, the option to use a wireless device may be
restricted or eliminated. Airports, Hospitals, and Oxygen or flammable gas laden
atmospheres are limited examples where use of wireless devices may be restricted
or eliminated. When in environments where you are uncertain of the sanction to use
wireless devices, ask the applicable authority for authorization prior to use or
turning on the wireless device.
Every country has different restrictions on the use of wireless devices. Since your
system is equipped with a wireless device, when traveling between countries with
your system, check with the local Radio Approval authorities prior to any move or
trip for any restrictions on the use of a wireless device in the destination country.
If your system came equipped with an internal embedded wireless device, do not
operate the wireless device unless all covers and shields are in place and the system
is fully assembled.
Wireless devices are not user serviceable. Do not modify them in any way.
Modification to a wireless device will void the authorization to use it. Contact
manufacturer for service.
Only use drivers approved for the country in which the device will be used. See the
manufacturer System Restoration Kit, or contact manufacturer Technical Support
for additional information.
Regulatory information | 121
Website:
http://www.samsung.com/cn/support/location/supportServiceLocation.do?page=SERVICE.L
OCATION
Copyright | 122
Copyright
© 2017 Samsung Electronics Co., Ltd. All rights reserved.
This user’s guide is provided for information purposes only. All information included herein is
subject to change without notice.
Samsung Electronics is not responsible for any direct or indirect damages, arising from or related
to use of this user’s guide.
• Samsung and the Samsung logo are trademarks of Samsung Electronics Co., Ltd.
• Microsoft, Windows XP, Windows Vista, Windows 7, Windows 8, and Windows Server 2008 R2,
Windows 10 and Windows Server 2016 are either registered trademarks or trademarks of
Microsoft Corporation.
• Mopria, the Mopria Logo and the Mopria Alliance logo are registered trademarks and service
marks of Mopria Alliance, Inc. in the United States and other countries. Unauthorized use is
strictly prohibited.
• Google, Picasa, Google Docs, Android and Gmail are either registered trademarks or
trademarks of Google Inc.
• Google Cloud Print is a trademark of Google Inc.
• iPad, iPhone, iPod touch, Mac and Mac OS are trademarks of Apple Inc., registered in the U.S.
and other countries. AirPrint and the AirPrint logo are trademarks of Apple Inc.
• All other brand or product names are trademarks of their respective companies or
organizations.
REV. 1.00
QR code
The software included in this product contains open source
software. You may obtain the complete corresponding source
code for a period of three years after the last shipment of this
product by sending an email to
mailto:oss.request@samsung.com. It is also possible to obtain
the complete corresponding source code in a physical medium
such as a CD-ROM; a minimal charge will be required.
The following URL
http://opensource.samsung.com/opensource/Samsung_C40
1x_Series/seq/0 leads to the download page of the source
code made available and open source license information as
related to this product. This offer is valid to anyone in receipt of
this information.
User Guide
C401x series
Advanced
This guide provides information about installation, advanced
configuration, operation and troubleshooting on various OS environments.
Some features may not be available depending on models or countries.
Basic
This guide provides information concerning the installation, basic
operation and troubleshooting on Windows.
124
Advanced
Using a Network-
Connected Machine
Useful network programs 126
Wired network setup 127
Wireless network setup (optional) 129
Using the NFC feature (optional) 141
Supported Mobile Apps 147
Mopria™ 148
AirPrint 150
Samsung Cloud Print 152
PrinterOn 155
Google Cloud Print™ 157
Useful Setting Menu
Before you begin reading a chapter 161
Information 162
Layout 163
Paper 165
Graphic 166
System Setup 167
Emulation 171
Image Mgr. 172
Network 173
Direct USB 175
Job Manage 176
PrinterOn 177
Special Features
Altitude adjustment 179
Entering various characters 180
Printing features 181
Useful Tools
Accessing management tools 192
SyncThru™ Web Service 193
Using Samsung Printer Center 198
Using Samsung Easy Printer Manager 203
Using Samsung Printer Status 206
Using Samsung Printer Experience 208
Using a Network-
Connected Machine
This chapter gives you step-by-step instructions for setting up a network connected machine and
software.
• Useful network programs 126
• Wired network setup 127
• Wireless network setup (optional) 129
• Using the NFC feature (optional) 141
• Supported Mobile Apps 147
• Mopria™ 148
• AirPrint 150
• Samsung Cloud Print 152
• PrinterOn 155
• Google Cloud Print™ 157
Supported optional devices and features may differ according to your model (see "Features by model"
on page 5).
Useful network programs | 126
Useful network programs
There are several programs available to setup the network settings easily in a network
environment. For the network administrator especially, managing several machines on the
network is possible.
Before using the programs below, set the IP address first.
SyncThru™ Web Service
The web server embedded on your network machine allows you to do the following tasks (see
"SyncThru™ Web Service" on page 193).
• Check the supplies information and status.
• Customize machine settings.
Set the email notification option. When you set this option, the machine status (toner cartridge
shortage or machine error) will be sent to a certain person's email automatically.
• Configure the network parameters necessary for the machine to connect to various network
environments.
SetIP wired network setup
This utility program allows you to select a network interface and manually configure the IP
addresses for use with the TCP/IP protocol.
• See "Setting IP address" on page 127.
The machine that does not support the network port, it will not be able to use this feature
(see "Rear view" on page 17).
Wired network setup | 127
Wired network setup
Printing a network configuration report
You can print Network Configuration Report from the machine’s control panel that will show the
current machine’s network settings. This will help you to set up a network.
Press the (Menu) button on the control panel and select Network > Network Conf.
Using this Network Configuration Report, you can find your machine’s MAC address and IP
address.
For example:
• MAC Address: 30:CD:A7:41:A2:78
• IP Address: 169.254.192.192
Setting IP address
When you connect your machine to a network, you must first configure the TCP/IP settings for
the machine. The settings shown below are the basic settings required for using your machine as
a network machine. You can set TCP/IP, DNS server, TCP/IPv6, Ethernet, and IP address allocation
methods.
First, you have to set up an IP address for network printing and managements. In most cases a
new IP address will be automatically assigned by a DHCP (Dynamic Host Configuration Protocol)
server located on the network.
IPv4 configuration
You can also set the TCP/IPv4 from SyncThru™ Web Service. When the SyncThru™ Web
Service window opens, move the mouse cursor over the Settings of the top menu bar and
then click Network Settings ("Settings tab" on page 195).
From the control panel
If you have a DHCPv4 server on your network, you can set one of the following options for default
dynamic host configuration.
1 Select (Menu) > Network > TCP/IP (IPv4) > DHCPv4 Config on the control panel.
2 Press OK to select the required value you want.
Wired network setup | 128
From SetIP program
Before using the SetIP program, disable the computer firewall.
• TCP/IPv6 is not supported by this program.
• The following instructions may vary from your model or operating systems.
1 Download the software from the Samsung website then unpack and install it:
(http://www.samsung.com > find your product > Support or Downloads).
2 Follow the instructions in the installation window.
For Linux, double-click the SetIPApplet.html file in
cdroot/Linux/noarch/at_opt/share/utils folder.
3 Run downloaded SetIP application.
Find the machine’s MAC address from the Network Configuration Report (see
"Printing a network configuration report" on page 127) and enter it without the colons.
For example, 30:CD:A7:29:51:A8 becomes 30CDA72951A8.
IPv6 configuration
IPv6 is supported properly only in Windows Vista or higher.
You can also set the TCP/IPv6 from SyncThru™ Web Service. When the SyncThru™ Web
Service window opens, move the mouse cursor over the Settings of the top menu bar and
then click Network Settings ("Settings tab" on page 195).
From the control panel
If you have a DHCPv6 server on your network, you can set one of the following options for default
dynamic host configuration.
1 Select (Menu) > Network > TCP/IP (IPv6) > DHCPv6 Config on the control panel.
2 Press OK to select the required value you want.
Wireless network setup (optional) | 129
Wireless network setup (optional)
• Check the option lists and contact the purchasing point to order (see "Available
accessories" on page 51). After installing the Wi-Fi/NFC kit (Optional), set the machine
to use this feature.
• Make sure your machine supports wireless networking. Wireless networking may not
be available depending on the model (see "Features by model" on page 5).
For errors that occur during the wireless software installation and settings, refer to the
troubleshooting chapter (see "Wireless network problems" on page 99).
Wireless networks require higher security, so when an access point is first set up, a network name
(SSID), the type of security used, and a Network Password are created for the network. Ask your
network administrator about this information before proceeding with the machine installation.
Introducing wireless set up methods
You can set wireless settings either from the machine or the computer. Choose the setting
method from the below table.
Some wireless network installation types may not be available depending on the model
or country.
• It is strongly recommended that you set the password on Access Points. If you do not
set the password on Access Points, they might be exposed to illegal access from
unknown machines including PCs, smart phones and printers. Refer to the Access Point
user' guide for password settings.
Set up method Connecting method Description & Reference
With Access
Point
From the computer
See "Setting up via USB cable" on page 132 for
Window.
See "Setting up via USB cable" on page 135 for Mac.
See "Using a network cable" on page 136.
From the machine’s
control panel
See "Using the WPS menu" on page 130.
See "Using the Wi-Fi Networks" on page 132.
Wi-Fi Direct setup
See "Setting the Wi-Fi Direct for mobile printing" on
page 139.
Wireless network setup (optional) | 130
Using the WPS menu
If your machine and access point (or wireless router) support Wi-Fi Protected Setup™ (WPS), then
you can easily configure the wireless network settings through the WPS menu without the need
for a computer.
• If you want to use the wireless network using the infrastructure mode, make sure that
the network cable is disconnected from the machine. Using the WPS(PBC) or entering
the PIN from the computer to connect to the access point (or wireless router) varies
depending on the access point (or wireless router) you are using. Refer to the user's
guide of the access point (or wireless router) you are using.
• When using the WPS to set the wireless network, security settings may change. To
prevent this, lock the WPS option for the current wireless security settings. The option
name may differ depending on the access point (or wireless router) you are using.
Items to prepare
• Check if the access point (or wireless router) supports Wi-Fi Protected Setup™ (WPS).
• Check if your machine supports Wi-Fi Protected Setup™ (WPS).
• Networked computer (PIN mode only)
Choosing your type
There are two methods available to connect your machine to a wireless network.
• The Push Button Configuration (PBC) method allows you to connect your machine to a wireless
network by pressing both the WPS menu on the control panel of your machine and the WPS
(PBC) button on a Wi-Fi Protected Setup™ WPS-enabled access point (or wireless router)
respectively.
• The Personal Identification Number (PIN) method helps you connect your machine to a
wireless network by entering the supplied PIN information on a Wi-Fi Protected Setup™
WPS-enabled access point (or wireless router).
Connecting WPS
Factory default in your machine is PBC mode, which is recommended for a typical wireless
network environment.
If the machine is connected to a wired network, then you cannot connect to it using the
WPS feature. If a network cable is plugged into the network port, remove it from the
network port.
Connecting in PBC mode
1 Select (Menu) > Network > Wi-Fi > WPS on the control panel.
2 Press PBC.
Wireless network setup (optional) | 131
3 Press OK when the confirmation window appears.
Information window appears showing 2 minutes connection processing time.
4 Press the WPS (PBC) button on the access point (or wireless router).
The messages are displayed on the display screen in the order below:
a. Connecting: The machine is connecting to the access point (or wireless router).
b. Connected: When the machine is successfully connected to the wireless network, the WPS
LED light stays on.
c. AP SSID: After completing the wireless network connection process, the AP’s SSID
information appears on the display.
5 Insert the supplied software CD into your CD-ROM drive, and follow the instructions in the
window to set up the wireless network.
Connecting in PIN mode
1 Select (Menu) > Network > Wi-Fi > WPS on the control panel.
2 Press PIN.
3 Press OK when the confirmation window appears.
4 The eight-digit PIN appears on the display.
You need to enter the eight-digit PIN within two minutes on the computer that is connected
to the access point (or wireless router).
The messages are displayed on the display screen in the order below:
a. Connecting: The machine is connecting to the wireless network.
b. Connected: When the machine is successfully connected to the wireless network, the WPS
LED light stays on.
c. Network Name(SSID): After completing the wireless network connection process, the
AP’s SSID information is displayed on the LCD display.
5 Insert the supplied software CD into your CD-ROM drive, and follow the instructions in the
window to set up the wireless network.
Wireless network setup (optional) | 132
Using the Wi-Fi Networks
Before starting, you will need to know the network name (SSID) of your wireless network and the
network key if it is encrypted. This information was set when the access point (or wireless router)
was installed. If you do not know about your wireless environment, please ask the person who set
up your network.
1 Select the (Menu) > Network > Wi-Fi > Wi-Fi Settings button on the control panel.
2 Press the OK to select the setup method you want.
Search List (recommended): In this mode, the setup is automatic. The machine will display
a list of available networks from which to choose. After a network is chosen then printer
will prompt for the corresponding security key.
Custom: In this mode, users can give or edit manually their own SSID, or choose the
security option in detail.
3 Follow the instructions to set up the wireless network.
Setup using Windows
Shortcut to the Samsung Easy Wireless Setup program without the CD: If you have
installed the printer driver once, you can access the Samsung Easy Wireless Setup
program without the CD.
Setting up via USB cable
Items to prepare
• Access point
• Network-connected computer
• Software CD that was provided with your machine
• A machine installed with a wireless network interface
• USB cable
Creating the infrastructure network
1 Check whether the USB cable is connected to the machine.
2 Turn on your computer, access point, and machine.
3 Insert the supplied software CD into your CD-ROM drive.
Wireless network setup (optional) | 133
If the installation window does not appear, click Start > All programs > Accessories > Run.
X:\Setup.exe replacing “X” with the letter, which represents your CD-ROM drive and click
OK.
• For Windows 8,
If the installation window does not appear, from Charms, select Search > Apps and search
for Run. Type in X:\Setup.exe, replacing “X” with the letter that represents your CD-ROM
drive and click OK.
If “Tap to choose what happens with this disc.” pop-up window appears, click the window
and select Run Setup.exe.
• For Windows 10 / Windows Server 2016
If the installation window does not appear, type in X:\Setup.exe in Search input area from
task bar, replacing “X” with the letter that represents your CD-ROM drive and press the En-
ter key.
4 Review and accept the installation agreements in the installation window. Then, click Next.
5 Select you want type on the Printer Setup Type screen, and then click Next.
6 Select Wireless on the Printer Connection Type screen. Then, click Next.
7 On the Are you setting up your printer for the first time? screen, select Yes, I will set up my
printer's wireless network. Then, click Next.
If your printer is already connected on the network, select No, my printer is already
connected to my network.
8 Select Using a USB cable on the Select the Wireless Setup Method screen. Then, click Next.
9 After searching, the window shows the wireless network devices. Select the name (SSID) of
the access point you want to use and click Next.
If you cannot find the network name you want to choose, or if you want to set the wire-
less configuration manually, click Advanced Setting.
Enter the wireless Network Name: Enter the SSID of the access point (SSID is
case-sensitive).
Operation Mode: Shows the Infrastructure.
Authentication: Select an authentication type.
Open System: Authentication is not used, and encryption may or may not be used,
depending on the need for data security.
Shared Key: Authentication is used. A device that has a proper WEP key can access
Wireless network setup (optional) | 134
the network.
WPA Personal or WPA2 Personal: Select this option to authenticate the print server
based on a WPA Pre-Shared Key. This uses a shared secret key (generally called Pre
Shared Key pass phrase), which is manually configured on the access point and each
of its clients.
Encryption: Select the encryption (None, WEP64, WEP128, TKIP, AES).
Network Password: Enter the encryption network password value.
Confirm Network Password: Confirm the encryption network password value.
WEP Key Index: If you are using WEP Encryption, select the appropriate WEP Key
Index.
The wireless network security window appears when the access point has security
settings.
Enter the Network Password of the access point (or router).
10If the Wi-Fi Direct feature is turned off in the machine, the following screen appears.
Click Next.
• Wi-Fi Direct option appears on the screen only if your printer supports this feature.
• You can start Wi-Fi Direct by using the control panel (see "Setting up Wi-Fi Direct"
on page 139).
Wi-Fi Direct Name: The default Wi-Fi Direct Name is the model name and the
maximum length is 23 characters.
Password setting is the numeric string, and the size is 8 ~ 64 characters.
11 When the wireless network set up is completed, disconnect the USB cable between the
computer and machine. Click Next.
12 Select the components to be installed.
13 Follow the instructions in the installation window.
Wireless network setup (optional) | 135
Setup using Mac
Items to prepare
• Access point
• Network-connected computer
• Software CD that was provided with your machine
• A machine installed with a wireless network interface
• USB cable
Setting up via USB cable
1 Make sure that the machine is connected to your computer and powered on.
2 Download the software from the Samsung website then unpack and install it:
(http://www.samsung.com > find your product > Support or Downloads).
3 Turn on the machine.
4 Double-click Install Software icon.
5 Read the license agreement and check installation agreement button.
6 Click Next.
7 Select Wireless on the Printer Connection Type.
8 Click Next.
9 On the Select the Wireless Setup Method screen, select Using a USB cable, and then click
Next.
If the screen dose not appear, go to step 14.
10After searching, the window shows the wireless network devices. Select the name (SSID) of
the access point you want to use and click Next.
When you set the wireless configuration manually, click Advanced Setting.
Enter the wireless Network Name: Enter the SSID of the access point (SSID is
case-sensitive).
Operation Mode: Shows the Infrastructure.
Authentication: Select an authentication type.
Open System: Authentication is not used, and encryption may or may not be used,
Wireless network setup (optional) | 136
depending on the need for data security.
Shared Key: Authentication is used. A device that has a proper WEP key can access
the network.
WPA Personal or WPA2 Personal: Select this option to authenticate the print server
based on the WPA Pre-Shared Key. This uses a shared secret key (generally called
Pre Shared Key pass phrase) that is manually configured on the access point and
each of its clients.
Encryption: Select the encryption. (None, WEP64, WEP128, TKIP, AES)
Network Key: Enter the encryption network key value.
Confirm Network Key: Confirm the encryption network key value.
WEP Key Index: If you are using WEP Encryption, select the appropriate WEP Key
Index.
The wireless network security window appears when the access point has security
enabled.
Enter the Network Key of the access point (or router).
11 The window showing the wireless network setting appears. Check the settings and click
Next.
• You can start Wi-Fi Direct by using the control panel (see "Setting up Wi-Fi Direct"
on page 139).
Wi-Fi Direct Name: The default Wi-Fi Direct Name is the model name and the
maximum length is 23 characters.
Password setting is the numeric string, and the size is 8 ~ 64 characters.
12 The Wireless Network Setting Complete window appears. Click Next.
13 When the wireless network settings are completed, disconnect the USB cable between the
computer and machine. Click Next.
14 Follow the instructions in the installation window.
Using a network cable
See your network administrator, or the person that set up your wireless network, for infor-
mation about your network configuration.
Your machine is a network compatible machine. To enable your machine to work with your
network, you will need to perform some configuration procedures.
Items to prepare
• Access point
Wireless network setup (optional) | 137
• Network-connected computer
• A machine installed with a wireless network interface
• Network cable
Printing a network configuration report
You can identify the network settings of your machine by printing a network configuration report.
See "Printing a network configuration report" on page 127.
IP setting using SetIP Program (Windows)
This program is used to manually set the network IP address of your machine using its MAC
address to communicate with the machine. The MAC address is the hardware serial number of
the network interface and can be found in the Network Configuration Report.
See "Setting IP address" on page 127.
Configuring the machine’s wireless network
Before starting, you will need to know the network name (SSID) of your wireless network and the
network key if it is encrypted. This information was set when the access point (or wireless router)
was installed. If you do not know about your wireless environment, please ask the person who set
up your network.
To configure wireless parameters, you can use SyncThru™ Web Service.
Using SyncThru™ Web Service
Before starting wireless parameter configuration, check the cable connection status.
1 Check whether the machine is connected to the network.
2 Start a web browser such as Internet Explorer, Safari, or Firefox and enter your machine’s
new IP address in the browser window.
For example,
3 Click Login in the upper right of the SyncThru™ Web Service website.
4 Type in the ID and Password, then click Login. If it’s your first time logging into SyncThru™
Web Service, type in the below default ID and password. We recommend you to change the
default password for security reasons.
ID: admin
Password: sec00000
5 When the SyncThru™ Web Service window opens, click Settings > Network Settings.
Wireless network setup (optional) | 138
6 Click Wi-Fi > Wizard.
7 Select the one Network Name(SSID) in the list.
8 Click Next.
If the wireless security setting window appears, enter the registered password (network
password) and click Next.
9 The confirmation window appears, please check your wireless setup. If the setup is right,
click Apply.
If a network cable is plugged into the network port, remove it from the network port.
Turning the Wi-Fi network on/off
1 Check whether the machine is connected to the network.
2 Start a web browser such as Internet Explorer, Safari, or Firefox and enter your machine’s
new IP address in the browser window.
For example,
3 Click Login in the upper right of the SyncThru™ Web Service website.
4 Type in the ID and Password, then click Login. If it’s your first time logging into SyncThru™
Web Service, type in the below default ID and password. We recommend you to change the
default password for security reasons.
ID: admin
Password: sec00000
5 When the SyncThru™ Web Service window opens, click Settings > Network Settings.
6 Click Wi-Fi.
7 You can turn the Wi-Fi network on/off.
Wireless network setup (optional) | 139
Setting the Wi-Fi Direct for mobile printing
Wi-Fi Direct is a secure and easy-to-use peer-to-peer connection between a Wi-Fi Direct-enabled
printer and mobile device.
With Wi-Fi Direct, you can connect your printer to a Wi-Fi Direct network while concurrently
connecting to an access point. You can also use a wired network and a Wi-Fi Direct network
simultaneously so multiple users can access and print documents both from Wi-Fi Direct and
from a wired network.
• You cannot connect your mobile device to the internet through the printer’s Wi-Fi
Direct.
• The supported protocol list may differ from your model, Wi-Fi Direct networks do NOT
support IPv6, network filtering, IPSec, WINS, and SLP services.
• The maximum number of devices that can be connected via Wi-Fi Direct is 4.
Setting up Wi-Fi Direct
You can enable Wi-Fi Direct feature by one of the following methods.
From the machine
1 Select (Menu) > Network > Wi-Fi > Wi-Fi Direct on the control panel.
2 Enable Wi-Fi Direct.
From the network-connected computer
If your printer is using a network cable or a wireless access point, you can enable and configure
Wi-Fi Direct from SyncThru™ Web Service.
1 Access SyncThru™ Web Service and select Settings > Network Settings > Wi-Fi > Wi-Fi
Direct™.
2 Enable Wi-Fi Direct™ and set other options.
Setting up the mobile device
After setting up Wi-Fi Direct from the printer, refer to the user manual of the mobile device you
are using to set its Wi-Fi Direct.
• After setting up Wi-Fi Direct, you need to download the mobile printing application (For
example: Samsung Mobile printer) to print from your smartphone.
Wireless network setup (optional) | 140
When you have found the printer you want to connect to from your mobile device, select
the printer and the printer's LED will blink. Press the option you want when the Wi-Fi
connection confirmed window appears from the display screen and it will be connected
to your mobile device.
If your mobile device does not support Wi-Fi Direct, you need to enter the "Network Key"
of a printer.
Using the NFC feature (optional) | 141
Using the NFC feature (optional)
If you want to add Wi-Fi/NFC feature to the machine, check the option lists and contact
the purchasing point to order (see "Available accessories" on page 51). After installing the
Wireless Kit (Wireless LAN Option), set the machine to use this feature.
The Wireless and NFC (Near Field Communication) printer allows you to directly print/scan/fax
from your mobile device just by holding your mobile device over the NFC tag on Wi-Fi/NFC Kit
(Wireless LAN Option). It does not require installing print driver or connecting to an access point.
You just need NFC supported mobile device. In order to use this feature, mobile apps needs to be
installed on your mobile device.
• Depending on the material of the mobile device cover, NFC recognition may not work
properly.
• Depending on the mobile device you are using, the transmission speed may differ.
• This feature is available only for the model with a NFC tag (see "Machine overview" on
page 15).
• Using a cover or a battery other than the ones that came with the mobile device, or a
metal cover/sticker can block NFC.
• If NFC devices keep failing to communicate,
- Remove the case or cover from the mobile device, then try again.
- Reinstall the battery from the mobile device, then try again.
Requirements
NFC and Wi-Fi Direct enabled, supported mobile apps installed mobile device with Android 4.0
or higher
Only Android OS 4.1 or higher will automatically enable the Wi-Fi Direct feature on your
mobile device when you enable the NFC feature. We recommend you to upgrade your
mobile device to Android OS 4.1 or higher to use the NFC feature.
• Wi-Fi Direct feature enabled printer (see "Setting up Wi-Fi Direct" on page 139).
Related Apps
There are some apps that can be used with the NFC feature. The apps can be downloaded from
the Google Play Store.
Samsung Mobile Print: Enables users to print, scan (Only users with multi-functional printers),
or fax (Only users with multi-functional printers) photos, documents, and web pages directly
from your smartphone or tablet (see "Using the Samsung Mobile Print App" on page 145).
Using the NFC feature (optional) | 142
Samsung Mobile Print Manager: Enables users to use cloning and wireless setup features
using your mobile device (see "Using the Samsung Mobile Print Manager App" on page 142).
Using the Samsung Mobile Print Manager App
If you have more than one printer and need to set the same settings on each printer, you can
easily do it using the Samsung Mobile Print Manager app. Touch your cellphone on the NFC tag
on your printer to copy the settings and tap on the printer you want to set the setting.
When exporting the data, you can save more than one data. When importing the data, you
can select the data from the list and import.
Exporting(Copying the setting to your mobile device)
1 Check that NFC and Wi-Fi Direct enabled features are on your mobile device and Wi-Fi Direct
feature is enabled on your printer.
2 Open Samsung Mobile Print Manager from your mobile device.
If you do not have Samsung Mobile Print Manager installed on your cellphone, go to
the application store (Samsung Apps, Play Store) on your mobile device, and just
search for download the app and try again.
3 Press Export.
4 Type in the ID and Password.
ID: admin
Password: sec00000
5 Tag your mobile device (usually located on the back of the mobile device) over the NFC
tag( ) on your printer.
Wait few seconds for the mobile device to connect to the printer.
Using the NFC feature (optional) | 143
• For some mobile devices, NFC tag might not be located at the back of the mobile
device. Check the location of the NFC antenna on your mobile device before tagging.
• While cloning, the machine is locked.
6 Select the settings you want to apply and press OK.
7 Follow the instruction on the mobile device’s screen.
Importing (Applying the settings to the machine)
1 Check that NFC and Wi-Fi Direct enabled features are on your mobile device and Wi-Fi Direct
feature is enabled on your printer.
2 Open Samsung Mobile Print Manager from your mobile device.
If you do not have Samsung Mobile Print Manager installed on your cellphone, go to
the application store (Samsung Apps, Play Store) on your mobile device, and just
search for download the app and try again.
3 Press Import.
4 Type in the ID and Password.
ID: admin
Password: sec00000
5 Select the settings you want to copy.
6 Follow the instruction on the mobile device’s screen.
Using the NFC feature (optional) | 144
7 Tag your mobile device (usually located on the back of the mobile device) over the NFC
tag( ) on your printer.
Wait few seconds for the mobile device to connect to the printer.
• For some mobile devices, NFC tag might not be located at the back of the mobile
device. Check the location of the NFC antenna on your mobile device before tagging.
• While cloning, the machine is locked.
• While importing, the machine is rebooted.
Wireless Setup
You can copy wireless setting from your phone to your printer by touching your mobile device on
the NFC tag on your printer.
1 Check that NFC and Wi-Fi Direct enabled features are on your mobile device and Wi-Fi Direct
feature is enabled on your printer.
2 Open Samsung Mobile Print Manager from your mobile device.
If you do not have Samsung Mobile Print Manager installed on your cellphone, go to
the application store (Samsung Apps, Play Store) on your mobile device, and just
search for download the app and try again.
3 Mobile device Samsung Mobile Print Manager screen appears.
Press Wi-Fi- Setup.
4 Type in the ID and Password.
ID: admin
Password: sec00000
Using the NFC feature (optional) | 145
5 If the access point (or wireless router) is connected to the connection confirmation window
appears, then click OK.
If the access point (or wireless router) not connection, select the desired access point (or
wireless router) and click OK, then OK.
6 Tag your mobile device (usually located on the back of the mobile device) over the NFC
tag( ) on your printer.
Wait few seconds for the mobile device to connect to the printer.
For some mobile devices, NFC tag might not be located at the back of the mobile
device. Check the location of the NFC antenna on your mobile device before tagging.
7 Follow the instruction on the mobile device’s screen.
Using the Samsung Mobile Print App
Samsung Mobile Print is a free application that enables users to print, scan (Only users with
multi-functional printers), or fax (Only users with multi-functional printers) photos, documents,
and web pages directly from your smartphone or tablet.
Printing
1 Check that NFC and Wi-Fi Direct features are enabled on your mobile device and Wi-Fi Direct
feature is enabled on your printer.
2 Open Samsung Mobile Print app.
If you do not have Samsung Mobile Print installed on your cellphone, go to the appli-
cation store (Samsung Apps, Play Store) on your mobile device, and just search for
download the app and try again.
Using the NFC feature (optional) | 146
3 Select print mode.
4 Select the content you want to print.
If necessary, change the print option by pressing the icon.
5 Tag your mobile device (usually located on the back of the mobile device) over the NFC
tag( ) on your printer.
Wait few seconds for the mobile device to connect to the printer.
For some mobile devices, NFC tag might not be located at the back of the mobile
device. Check the location of the NFC antenna on your mobile device before tagging.
6 The printer starts printing.
Supported Mobile Apps | 147
Supported Mobile Apps
Available Apps
Samsung Mobile Print: Samsung Mobile Print is a free application that enables users to print,
scan (Only users with multi-functional printers), or fax (Only users with multi-functional
printers) photos, documents, and web pages directly from your smartphone or tablet. Samsung
Mobile Print is not only compatible with your Android and iOS smart phones but also with your
iPod Touch and tablet PC. It connects your mobile device to a network connected Samsung
printer or to a wireless printer through a Wi-Fi access point. Installing a new driver or
configuring network settings isn’t necessary – just simply install the Samsung Mobile Print
application, and it will automatically detect compatible Samsung printers. Besides printing
photos, web pages, and PDFs, scanning is also supported. If you have a Samsung multifunction,
scan any document into a JPG, PDF, or PNG format for quick and easy viewing on your mobile
device (see "Using the Samsung Mobile Print App" on page 145).
Samsung Mobile Print Control: Helps users to get an authentication easily. This app provides
one way of getting a user authentication using your mobile device (see "Using the Samsung
Mobile Print App" on page 145).
Samsung Mobile Print Manager: Enables users to use cloning and wireless setup features
using your mobile device (see "Using the Samsung Mobile Print Manager App" on page 142,
"Wireless Setup" on page 144).
Downloading Apps
To download apps, go to the application store (Play Store, App Store) on your mobile device, and
just search for “Samsung Mobile Print /Samsung Mobile Print Control/Samsung Mobile Print
Manager.” You can also visit iTunes for Apple devices on your computer.
Samsung Mobile Print
- Android: Search for Samsung Mobile Print from Play Store, and then download the app.
- iOS: Search for Samsung Mobile Print from App Store, and then download the app.
Samsung Mobile Print Control/Samsung Mobile Print Manager
- Android: Search for Samsung Mobile Print Controls or Samsung Mobile Print Manager from
Play Store, and then download the app.
Supported Mobile OS
Samsung Mobile Print
- Android OS 4.0 or higher
- iOS 8.0 or higher
Samsung Mobile Print Control/Samsung Mobile Print Manager
- NFC and Wi-Fi Direct enabled, supported mobile apps installed mobile device with Android
4.0 or higher
Mopria™ | 148
Mopria
• Only Mopria-certified machines can use the Mopria feature. Check the box that your
machine came in for the Mopria-certified logo.
• Make sure that the printer and mobile device are connected to the same network and
the communication is available.
Setting up the machine for Mopria printing
Bonjour(mDNS) and IPP protocols are required on your machine to use the Mopria feature.
Perform the following steps to enable the Mopria feature.
1 Check whether the machine is connected to the network.
2 Start a web browser such as Internet Explorer, Safari, or Firefox and enter your machine’s
new IP address in the browser window.
For example,
3 Click Login in the top right corner of the SyncThru™ Web Service website.
4 Type in the ID and Password, then click Login. If it’s your first time logging into SyncThru™
Web Service, type in the below default ID and password. We recommend you to change the
default password for security reasons.
ID: admin
Password: sec00000
5 Click Settings > Network Settings > Standard TCP/IP, LPR, IPP > IPP. Then, select Enable.
6 Click Settings > Network Settings > mDNS. Then, select Enable.
Mopria™ Print Service is a mobile printing solution that enhances the new print
functionality on any Android phone or tablet (Android version 4.4 or later). With
this service, you can connect and print to any Mopria-certified printer on the
same network as your mobile device without additional set-up. Many native
Android apps support printing, including Chrome, Gmail, Gallery, Drive and
Quickoffice.
Mopria™ | 149
7 Click Security > System Security > Menu Management > Mopria. Then, select Enable.
Setting up Mopria on your mobile device
If you do not have Mopria Print Service app installed on your mobile device, open to the app store
(Play Store, App Store) on your mobile device, search for,Mopria Print Service, and then
download and install the app.
1 In the Settings menu of your Android device, tap Printing.
The location of this option may differ depending on your mobile device. If you cannot
locate the Printing option, refer to the user's manual for your mobile device.
2 Under Print Services, tap Mopria Print Service.
3 Tap the On/Off slider to enable the Mopria Print Service.
Printing via Mopria
To print via Mopria on an Android device:
1 Open the email, photo, web page, or document that you want to print.
2 Tap Print on the menu in the app.
3 Select your printer, and then configure the print options.
4 Touch Print again to print the document.
To cancel a print job: Select and delete the document from the print queue in the Notifi-
cation Bar.
AirPrint | 150
AirPrint
Only AirPrint certified machines can use the AirPrint feature. Check the box your machine
came in for the AirPrint certified mark.
Setting up AirPrint
Bonjour(mDNS) and IPP protocols are required on your machine to use the AirPrint feature. You
can enable the AirPrint feature by one of the following methods.
1 Check whether the machine is connected to the network.
2 Start a web browser such as Internet Explorer, Safari, or Firefox and enter your machine’s
new IP address in the browser window.
For example,
3 Click Login in the upper right of the SyncThru™ Web Service website.
4 Type in the ID and Password, then click Login. Type in the below default ID and password.
We recommend you to change the default password for security reasons.
ID: admin
Password: sec00000
5 Click Settings > Network Settings > Standard TCP/IP, LPR, IPP > IPP. Then, select Enable.
6 Click Settings > Network Settings > mDNS. Then, select Enable.
7 Click Security > System Security > Menu Management > AirPrint. Then, select Enable.
AirPrint allows you to print directly from Mac OS (MacBook Pro, MacBook Air,
and iMAC) and iOS (iPhone, iPad and iPod touch). Scan and Fax are available only
for Mac OS. (Only users with multi-functional printers)
Make sure that the printer and mobile device are connected to the same network
and the communication is available.
AirPrint | 151
Printing via AirPrint
For example, the iPad manual provides these instructions:
1 Open your email, photo, web page, or document you want to print.
2 Touch the action icon( ).
3 Select your printer driver name and option menu to set up.
4 Touch Print button. Print it out.
Cancelling print job: To cancel the printing job or view the print summary, click the print
center icon ( ) in multitasking area. You can click cancel in the print center.
Samsung Cloud Print | 152
Samsung Cloud Print
Samsung Cloud Print is a free cloud service that allows you to print or scan from your smartphone
or tablet to your Samsung printer or MFP. After installing the Samsung Cloud Print app, you can
register with the Samsung Cloud Print service just using your mobile number for authentication.
No other account login is required, although you can link the app to your Samsung Account if you
wish.
Refer to the Samsung website (www.samsungcloudprint.com) for more information about
Samsung Cloud Print.
If you press the ( ) button from Samsung Cloud Print app, Connect your mobile device
to a printer or MFP by using Wi-Fi, touching the Near Field Communication (NFC) tag,
scanning the QR code, or manually entering the printer's MAC address. Once paired, you
can print or scan from anywhere and everywhere.
Registering your Printer to Samsung Cloud server
To register your printer on the Samsung Cloud Print service, you must activate the Samsung
Cloud Print feature on the machine through the mobile device or SyncThru™ Web Service.
Registering a printer from an application on mobile device
If the printer supports the easy setup, you can use Samsung Cloud Print directly without any
additional configuration after registering a printer using Wi-Fi.
The following steps are an example of using the Samsung Cloud Print app from Android mobile
phone.
1 Open Samsung Cloud Print app.
If you do not have Samsung Cloud Print app installed on your cellphone, go to the
application store (Samsung Apps, Play Store, App Store) on your mobile device, and
just search for download the app and try again.
2 Press the ( ) button from Samsung Cloud Print app.
3 Connect your mobile device to a printer or MFP by using Wi-Fi, touching the Near Field
Communication (NFC) tag, scanning the QR code, or manually entering the printer's MAC
address.
Samsung Cloud Print | 153
Registering from Web Browser
Make sure the printer machine is turned on and connected to a wired or wireless network
that has access to the Internet.
1 Check whether the machine is connected to the network.
2 Start a web browser such as Internet Explorer, Safari, or Firefox and enter your machine’s
new IP address in the browser window.
For example,
3 Click Login in the upper right of the SyncThru™ Web Service website.
4 Type in the ID and Password, then click Login. If it’s your first time logging into SyncThru™
Web Service, type in the below default ID and password. We recommend you to change the
default password for security reasons.
ID: admin
Password: sec00000
5 When the SyncThru™ Web Service window opens, click Settings > Network Settings >
Samsung Cloud Print.
6 Select Samsung Cloud Print Public in the Operation Mode.
If a dialog box appears asking for permission to use your personal information, click Privacy
Policy to review the terms and conditions. Select the check box indicating you agree to the
terms, and then click Yes. When the dialog box closes, click Apply.
Web Connected Services is enabled automatically.
If Web Connected Services has been disabled, you cannot connect to the cloud
service. To enable Web Connected Services, go to Security > System Security >
Feature Management and select the Enable check box.
7 Now your printer is registered with Samsung Cloud Print service.
Samsung Cloud Print | 154
Using the Samsung Cloud Print
Make sure the printer is turned on and connected to a wired or wireless network that has
access to the Internet.
Printing from an application on mobile device
The following steps are an example of using the Samsung Cloud Print app from Android mobile
phone.
1 Open Samsung Cloud Print app.
If you do not have Samsung Cloud Print app installed on your cellphone, go to the
application store (Samsung Apps, Play Store, App Store) on your mobile device, and
just search for download the app and try again.
2 Tap the option check button of the document that you want to print.
3 Set the printing options if you want.
4 Tap Send Job.
PrinterOn | 155
PrinterOn
Registering your PrinterOn-enabled Samsung printer on the PrinterOn service allows you to
print documents on that printer from anywhere in the world. The PrinterOn service also enables
you to print directly from the PrinterOn Mobile app on your iOS or Android device.
To use the PrinterOn feature, you must register your printer on the PrinterOn website
(www.printeron.com).
Only administrators can register or configure a printer on the PrinterOn service.
This chapter does not explain all the features in the PrinterOn service. Instead, it explains how to
register a printer on the PrinterOn service from the SyncThru™ Web Service.
For more information about the PrinterOn service, visit the PrinterOn website
(www.printeron.com).
Registering your printer on the PrinterOn service
To register your printer on the PrinterOn service, you must activate the PrinterOn feature on the
machine through the SyncThru™ Web Service.
Registering from Web Browser
Before you begin this process, make sure that your printer is turned on and can connect
to the Internet.
1 Check whether the machine is connected to the network.
2 Start a web browser such as Internet Explorer, Safari, or Firefox and enter your machine’s
new IP address in the browser window.
For example,
3 Click Login in the upper right of the SyncThru™ Web Service website.
4 Type in the ID and Password, then click Login. If it’s your first time logging into SyncThru™
Web Service, type in the below default ID and password. We recommend you to change the
default password for security reasons.
ID: admin
Password: sec00000
PrinterOn | 156
5 When the SyncThru™ Web Service window opens, click Settings > Network Settings >
PrinterOn Cloud Print.
6 Select check box to enable PrinterOn Service.
If a dialog box appears asking for permission to use your personal information, click Privacy
Policy to review the terms and conditions. Select the check box indicating you agree to the
terms, and then click Yes. When the dialog box closes, click Apply.
Web Connected Services is enabled automatically.
If Web Connected Services has been disabled, you cannot connect to the cloud
service. To enable Web Connected Services, go to Security > System Security >
Feature Management and select the Enable check box.
7 Now your printer is registered with PrinterOn service.
Using the PrinterOn Service
For instruction on how to print using the PrinterOn service, refer to the PrinterOn service website
(www.printeron.com).
Google Cloud Print™ | 157
Google Cloud Print
Google Cloud Print™ is a service that allows you to print to a printer using your smart phone,
tablet, or any other web-connected devices. Just register your Google account with the printer,
and you are ready to use the Google Cloud Print service. You can print your document or email
with Chrome OS, Chrome browser, or a Gmail™/ Google Docs™ application on your mobile
device, so you don’t need to install the printer driver on the mobile device. Refer to the Google
website (http://google.com/cloudprint/learn/ or http://support.google.com/cloudprint) for
more information about Google Cloud Print™.
Registering your Google account to the printer
Registering from the Chrome Browser
• Make sure the printer machine is turned on and connected to a wired or wireless
network that has access to the Internet.
• You should create your Google account in the advance.
1 Open the Chrome browser.
2 Visit www.google.com.
3 Sign in to the Google website with your Gmail™ address.
4 Enter your printer’s IP address in the address field and press the Enter key or click Go.
5 Click Login in the upper right corner of the SyncThru™ Web Service website.
6 Type in the ID and Password, then click Login. If it’s your first time logging into SyncThru™
Web Service, type in the below default ID and password. We recommend you to change the
default password for security reasons.
ID: admin
Password: sec00000
If the network environment is using a proxy server, you need to configure the proxy’s
IP and port number from Settings > Network Settings > Google Cloud Print > Proxy
Settings. Contact your network service provider or network administrator for more
information.
Google Cloud Print™ | 158
7 When the SyncThru™ Web Service window opens, click Settings > Network Settings >
Google Cloud Print.
8 Enter your printer’s name and description.
9 Click Register.
The confirmation pop-up window appears.
If you set the browser to block pop-ups, the confirmation window will not appear.
Allow the site to show pop-ups.
10Click Finish printer registration.
11 Click Manage your printers.
Now your printer is registered with Google Cloud Print™ service.
Google Cloud Print™-ready devices will appear in the list.
Printing with Google Cloud Print
The printing procedure varies depending on the application or the device you are using. You can
see the application list that supports Google Cloud Print™ service.
Make sure the printer is turned on and connected to a wired or wireless network that has
access to the Internet.
Printing from an application on mobile device
The following steps are an example of using the Google Docs™ app from Android mobile phone.
1 Install the Cloud Print application on your mobile device.
If you do not have the application, download it from the application store such as
Android Market or App Store.
2 Access the Google Docs™ application from your mobile device.
3 Tap the option button of the document that you want to print.
Google Cloud Print™ | 159
4 Tap the send button.
5 Tap the Cloud Print button.
6 Set the printing options if you want.
7 Tap Click here to Print.
Printing from the Chrome browser
The following steps are an example of using the Chrome browser.
1 Run Chrome.
2 Open the document or email that you want to print.
3 Click the wrench icon in the browser’s top right corner.
4 Click Print. A new tab for printing appears.
5 Select Print with Google Cloud Print.
6 Click the Print button.
Useful Setting Menu
This chapter explains how to browse the current status of your machine, and the method of setting
for advanced machine setup.
• Before you begin reading a chapter 161
• Information 162
• Layout 163
• Paper 165
• Graphic 166
• System Setup 167
• Emulation 171
• Image Mgr. 172
• Network 173
• Direct USB 175
• Job Manage 176
• PrinterOn 177
Before you begin reading a chapter | 161
Before you begin reading a chapter
This chapter explains all the features available for this series' models to help users easily
understand the features. You can check the features available for each model in the Basic Guide
(see "Menu overview" on page 25).
The following are tips for using this chapter
The control panel provides access to various menus to set up the machine or use the machine’s
functions. These menus can be accessed by pressing (Menu).
• Some menus may not appear on the display depending on options or models. If so, it is not
applicable to your machine.
For models that do not have the (Menu) on the control panel, this feature is not applicable
(see "Control panel overview" on page 18).
• Some menu names may differ from your machine depending on its options or the models.
Information | 162
Information
Some menus may not appear in the display depending on options or models. If so, it is not
applicable to your machine (see "Menu overview" on page 25).
To change the menu options:
Press (Menu) > Information on the control panel.
Item Description
Menu Map
Prints the menu map which shows the layout and current settings of
this machine.
Configuration Prints a report on the machine's overall configuration.
Supplies Info. Prints supplies’ information page.
Demo Page
Prints the demo page to check whether your machine is printing
properly or not.
PCL Font Prints the PCL font list.
PS Font Prints the PS font list.
Usage Counter
Prints a usage page. The usage page contains the total number of
pages printed.
Account
This is used only available when Job Accounting is enabled from the
SyncThru™ Web Admin Service. You can print a report of printout
counts for each user.
Network Conf. Prints a report on the machine's current network configuration.
Layout | 163
Layout
Some menus may not appear in the display depending on options or models. If so, it is not
applicable to your machine (see "Menu overview" on page 25).
To change the menu options:
Press (Menu) > Layout on the control panel.
Item Description
Orientation
Selects the direction in which information is printed on a page.
Portrait
Landscape
Common Margin
Simplex Margin: Sets the margin for one-sided printing.
Duplex Margin: Sets the margin for double-sided printing.
Binding: When printing on both sides of the paper, side A's margin
closest to the binding will be the same as side B's margin closest to
the binding. Likewise, the sides' margins farthest from the binding
will be the same.
MP Tray Sets the paper margins in multi-purpose tray.
<Tray X> Sets the paper margins for the paper trays.
Emulation Mar. Sets the paper margins for emulation print page.
Layout | 164
Duplex
To print on both sides of the paper, choose the binding edge.
Off: Disables this option.
Long Edge
Short Edge
Item Description
Paper | 165
Paper
Some menus may not appear in the display depending on options or models. If so, it is not
applicable to your machine (see "Menu overview" on page 25).
To change the menu options:
Press (Menu) > Paper on the control panel.
Item Description
Copies Selects the number of copies.
MP Tray/ [Tray <x>]
Paper Size: Selects the default paper size.
Paper Type: Selects the paper type currently loaded in the tray.
Paper Source
Sets the default paper tray to use.
Auto: You can set the machine to automatically to the tray with
the same sized paper when the tray in use is empty.
Graphic | 166
Graphic
Some menus may not appear in the display depending on options or models. If so, it is not
applicable to your machine (see "Menu overview" on page 25).
To change the menu options:
Press (Menu) > Graphic on the control panel.
Item Description
Resolution
Specifies the number of dots printed per inch (dpi). The higher the
setting, the sharper printed characters and graphics.
Clear Text Prints text darker than on a normal document.
Edge Enhance
It allows user to enhance sharpness of text and graphics for improving
readability.
Auto CR
Allows you to append the required carriage return to each line feed,
which is useful for Unix or DOS users.
Screen
This option affect the resolution and clarity of your color output.
Normal: This mode will generate printouts with smooth tone over
the entire page.
Enhanced: This mode will generate printouts with sharp texts and
smooth graphic/photo objects in the page.
Detailed: This mode will generate printouts with sharp details over
the entire page.
Trapping
It reduces the white gap caused by misalignment of color channels in
color printing mode. Also black text will be overprinted on other
colors.
System Setup | 167
System Setup
Some menus may not appear in the display depending on options or models. If so, it is not
applicable to your machine (see "Menu overview" on page 25).
To change the menu options:
Press (Menu) > System Setup on the control panel.
Item Description
Date & Time Sets the date and time.
Clock Mode Selects the format for displaying time between 12 hr and 24 hr.
Language
Sets the language of the text that appears on the control panel
display.
Power Save
Sets how long the machine waits before going to power save
mode.
When the machine does not receive data for an extended period
of time, power consumption is automatically lowered.
Wakeup Event
When this option is On, you can wake up the machine from the
power saving mode with the following actions:
• Pressing any button on the control panel.
• Loading paper in a tray.
• Opening or closing the front cover.
• Pulling a tray out or pushing a tray in.
If the machine does not have the touch screen, you can
wake up the machine from the power saving mode by
pressing any button on the control panel regardless of
this option’s setting.
Job Timeout
When there is no input for a certain period of time, the machine
cancels the current job. You can set the amount of time the
machine will wait before canceling the job.
Default Paper Allows you to choose the default paper size.
Altitude Adj.
Optimize print quality according to the machine’s altitude
("Altitude adjustment" on page 179).
Humidity
Optimizes print quality according to the humidity in the
environment.
System Setup | 168
Auto Continue
Determine whether or not the machine continues printing when
it detects the paper does not match the paper settings.
Off: If a paper mismatch occurs, the machine waits until you
insert the correct paper.
On: If a paper mismatch occurs, the device chooses the most
appropriate paper size to print on and continues printing, even
if it is on the wrong size. For example, letter sent but only legal
available, so prints letter job on legal paper.
Auto Tray Swi.
Determine whether or not the machine continues printing when
it detects the paper does not match. For example, if both tray 1
and tray 2 are filled with the same size paper, the machine
automatically prints from tray 2 after the tray 1 runs out of
paper.
This option does not appear if you selected Auto for
Paper Source from printer driver.
Paper Substit.
Automatically substitutes the printer driver’s paper size to
prevent the paper mismatch between Letter and A4. For
example, if you have A4 paper in the tray but you set the paper
size to Letter in the printer driver, the machine prints on A4
paper and vice versa.
Tray Protect.
Decides to use or not use the Auto Tray Swi. feature. If you set
tray 1 to on, for example, then tray 1 is excluded during tray
switching.
Tray Mode
Specifies whether or not the machine automatically changes the
paper settings to the required settings when you close the tray.
Static: The tray settings do not change when you open and
close the tray.
Dynamic: If you open and close the tray when a paper
mismatch occurs, the paper settings (size and type) for that
tray automatically change to the settings required for the job.
(When you open and close the tray in the Dynamic mode, the
machine presumes that the paper in the tray was replaced
with the size and type required for the job.)
SkipBlankPages
The printer detects the printing data from computer whether a
page is empty or not. You can set to print or skip the blank page.
Item Description
System Setup | 169
Maintenance
CLR Empty Msg.: This option appears only when toner
cartridge is empty.
Supplies Life: Allows you to check how many pages are
printed and how much toner is left in the cartridge.
TonerLow Alert: If toner in the cartridge has run out, a
message informing the user to change the toner cartridge
appears. You can set the option for this message to appear or
not.
Image Mgr.: This menu allows you to adjust contrast.
RAM Disk: Enables/disables RAM disk to manage jobs.
Toner Save
Activating this mode extends the life of your toner cartridge and
reduces your cost per page beyond what one would experience
in the normal mode, but it reduces print quality.
Eco Settings
Allows you to save print resources and enables eco-friendly
printing (see "Eco printing" on page 44).
Default Mode: Select whether to turn the Eco mode on or off.
On Force: Sets the Eco mode on. If a user wants to turn
the Eco mode off, the user needs to enter the password.
Select Temp.: Selects the eco template set from the
SyncThru™ Web Service.
Vapor Mode
You can reduce the amount of water vapor produced during
printing.
On: Enables vapor mode.
Off: Disables vapor mode.
Auto: Automatically enters vapor mode according to time in
high humidity environments.
Enabling the Vapor Mode option can make the printing
speed slower.
Item Description
System Setup | 170
Auto Power Off
Turns power off automatically when the machine has been in
power save mode for the length of time set in Auto Power Off >
On > Timeout.
• To turn the machine on again, press the
(Power/Wakeup) button on the control panel.
• If you run the printer driver or Samsung Easy Printer
Manager, the time automatically extends.
• While the machine is connected to the network or
working on a print job, Auto Power Off feature doesn't
work.
Quiet Mode
You can reduce the printing noise by turning this menu on.
However the printing speed and quality maybe declined.
Stacking Mode
If you use a machine in a humid area, or you are using the damp
print media caused by a high humidity, the print-outs on the
output tray may be curled and may not be stacked properly. In
this case, you can set the machine to use this function to let
print-outs stacked firmly. But, using this function will make the
print speed slow.
Smart Duplex
Uses simplex mode when printing only one original page or a
blank page although the duplex option is enabled.
Item Description
Emulation | 171
Emulation
Some menus may not appear in the display depending on options or models. If so, it is not
applicable to your machine (see "Menu overview" on page 25).
To change the menu options:
Press (Menu) > Emulation on the control panel.
Item Description
Emulation Type
The machine language defines how the computer communicates
with the machine.
Setup Sets the detailed settings for the selected emulation type.
Image Mgr. | 172
Image Mgr.
Some menus may not appear in the display depending on options or models. If so, it is not
applicable to your machine (see "Menu overview" on page 25).
To change the menu options:
Press (Menu) > Image Mgr. on the control panel.
Option Description
Custom Color
This menu allows you to adjust contrast, color by color.
Default: Return to default value.
Print Density: Allows you to manually adjust color density for
print. Adjust the print density.
It is recommended to use the Default setting for best color quality.
AutoColor Reg.
The machine virtually prints certain patterned image to calibrate
the color printing position. This feature enhances the colored
image sharper and clearer, which means the machine prints the
colored image on the paper more like the one in the monitor.
If you have moved the machine, it is strongly recommended
to operate this menu manually.
Tone Adjust.
Auto Tone Adj.: Allows you to automatically adjust tone for the
best possible print quality.
Network | 173
Network
Some menus may not appear in the display depending on options or models. If so, it is not
applicable to your machine (see "Menu overview" on page 25).
To change the menu options:
Press (Menu) > Network on the control panel.
You can also use this feature from the SyncThru™ Web Service. Open the Web browser
from your networked computer and type the IP address of your machine. When
SyncThru™ Web Service opens, click Settings > Network Settings (see "SyncThru™ Web
Service" on page 193).
Option Description
TCP/IP (IPv4)
Selects the appropriate protocol and configure parameters to use
the network environment (see "Setting IP address" on page 127).
There are many of parameters to be set. If you are not sure,
leave as is, or consult the network administrator.
TCP/IP (IPv6)
Selects this option to use the network environment through IPv6
(see "IPv6 configuration" on page 128).
Ethernet
Configure the network transmission speed.
Turn the power off and on after you change this option.
802.1x
You can selects the user authentication for network
communication. For detailed information consult the network
administrator.
Wi-Fi
a
Selects this option to use the wireless network.
Clear Setting
Reverts the network settings to the default values.
Turn the power off and on.
NFC
a
Selects this option to use the NFC feature.
Network Conf.
This list shows information on your machine’s network connection
and configuration (see "Printing a network configuration report"
on page 127).
Network | 174
Protocol Mgr.
You can set protocol.
Turn the power off and on after you change this option.
a.This option is available when the optional Wi-Fi/NFC kit installed.
Option Description
Direct USB | 175
Direct USB
Some menus may not appear in the display depending on options or models. If so, it is not
applicable to your machine (see "Menu overview" on page 25).
If you want to use this feature, you need to insert a USB memory device into the USB memory port
on your machine.
To change the menu options:
Press (Menu) > Direct USB on the control panel (see "Using USB memory device" on page 46).
Item Description
Print From You can directly print files stored on a USB memory device.
File Manage
You can delete image files stored on a USB memory device one by
one or all at once by reformatting the device.
Check Space
You can check the amount of memory space available for saving
documents.
Job Manage | 176
Job Manage
Some menus may not appear in the display depending on options or models. If so, it is not
applicable to your machine (see "Menu overview" on page 25).
To change the menu options:
Press (Menu) > Job Manage on the control panel.
Item Description
Active Job Shows the print job lists that are waiting to be printed.
Secured Job Shows the print job lists that are secured on the disk.
Stored Job Shows the print job lists that are stored on the disk.
Filing Policy
If the memory already has the same name when you entered a new
file name, you can rename or overwrite it.
PrinterOn | 177
PrinterOn
Some menus may not appear in the display depending on options or models. If so, it is not
applicable to your machine (see "Menu overview" on page 25).
To register your printer on the PrinterOn service, you must activate the PrinterOn feature on the
machine through the SyncThru™ Web Service (see "Registering your printer on the PrinterOn
service" on page 155).
This is available only when PrinterOn is enabled. The sub menus that appear in this menu may
differ based on whether or not the machine is connected to the PrinterOn server.
Before you can use the PrinterOn feature, you must configure the network connection of
the machine. If you cannot connect to the machine after configuring its network connec-
tion, then you may have to check the external internet connection of the network.
When the PrinterOn feature is enabled, you can set it to Release Code mode or Auto mode.
These modes can be changed on the PrinterOn server.
Release Code: Users must enter a Release Code to print a document sent through
PrinterOn.
Auto: The machine automatically prints documents sent through PrinterOn without the
user entering a Release Code.
Special Features
This chapter explains special printing features.
• Altitude adjustment 179
• Entering various characters 180
• Printing features 181
Altitude adjustment | 179
Altitude adjustment
Print quality is affected by atmospheric pressure, which is determined by the height of the
machine above sea level. The following information will guide you on how to set your machine
for the best print quality.
Before you set the altitude value, determine the altitude where you are.
Normal: 0-1,000 m(3,280 ft)
High1: 1,000 m(3,280 ft)-2,000 m(6,561 ft)
High2: 2,000 m(6,561 ft)-3,000 m(9,842 ft)
High3: 3,000 m(9,842 ft)-4,000 m(13,123 ft)
High4: 4,000 m(13,123 ft)-5,000 m(16,404 ft)
You can set the altitude value from Device Settings in Samsung Easy Printer Manager program.
If your machine is connected to the local, you can set the machine’s setting from Samsung Easy
Printer Manager > Advanced Setting > Device Settings (see "Using Samsung Easy Printer
Manager" on page 203).
• If your machine is connected to the network, you can set the machine’s setting from
SyncThru™ Web Service > Settings tab > Machine Settings (see "SyncThru™ Web Service" on
page 193).
• If your machine is connected to the network, you can set the altitude via SyncThru™
Web Service (see "SyncThru™ Web Service" on page 193).
• You can also set the altitude in System Setup option on the machine’s display (see
"Machine’s basic settings" on page 28).
Entering various characters | 180
Entering various characters
As you perform various tasks, you may need to enter names and numbers.
Entering alphanumeric characters
Press the button until the correct letter appears on the display. For example, to enter the letter
O, press 6, labeled with MNO. Each time you press 6, the display shows a different letter, M, N, O,
m, n, o and finally 6. To find the letter that you want to enter, see "Keypad letters and numbers"
on page 180.
• You can enter a space by pressing 1 twice.
• To delete the last digit or character, press the arrow button.
Keypad letters and numbers
• Special character sets may differ from your machine depending on its options or the
models.
• Some of the follow key values may not appear depending on the job you are doing.
Key Assigned numbers, letters, or characters
1 @ / . 1
2 A B C a b c 2
3 D E F d e f 3
4 G H I g h i 4
5 J K L j k l 5
6 M N O m n o 6
7 P Q R S p q r s 7
8 T U V t u v 8
9 W X Y Z w x y z 9
0 & + - , 0
*
* % ^ _ ~ ! # $ ( ) [ ]
(These symbols are available when you type for network authentication.)
#
# = | ? " : { } < > ;
(These symbols are available when you type for network authentication.)
Printing features | 181
Printing features
• For basic printing features, refer to the Basic Guide (see "Basic printing" on page 40).
If you are a Mac, Linux or UNIX operating systems user, refer to the User Guide from the
Samsung website, http://www.samsung.com > find your product > Support or
Downloads.
Changing the default print settings
Most Windows applications will override settings you specify in the printer driver. Change
all print settings available in the software application first, and change any remaining
settings using the printer driver.
1 For Windows XP Service Pack 3/Server 2003, from the Start menu, select Printer and Faxes.
• For Windows Server 2008/Vista, from the Start menu, select Control Panel > Hardware
and Sound > Printers.
• For Windows 7, from the Start menu, select Control Panel > Devices and Printers.
For Windows 8, from the Charms, select Search > Settings > Control Panel > Devices and
Printers.
• For Windows Server 2008 R2, select Control Panel > Hardware > Devices and Printers.
• For Windows 10 / Windows Server 2016
From task bar, type in Devices and Printers in Search input area. Press the Enter key.
OR
From the Start () icon, select Settings > Devices > Printers & scanners >Devices and
Printers.
Right-click the Start ( ) icon, you can select Control Panel > Devices and Printers.
2 Right-click on your machine.
3 For Windows XP Service Pack 3/Server 2003/Server 2008/Vista, select Printing
Preferences.
For Windows 7/Windows 8/Windows Server 2008 R2/Windows 10/ Windows Server 2016,
from context menus, select Printing preferences.
Printing features | 182
If Printing preferences has a , you can select other printer drivers connected to the
selected printer.
4 Change the settings on each tab.
5 Click OK.
If you want to change the settings for each print job, change it in Printing Preferences.
Setting your machine as a default machine
1 For Windows XP Service Pack 3/Server 2003, from the Start menu, select Printer and Faxes.
• For Windows Server 2008/Vista, from the Start menu, select Control Panel > Hardware
and Sound > Printers.
• For Windows 7, from the Start menu, select Control Panel > Devices and Printers.
For Windows 8, from the Charms, select Search > Settings > Control Panel > Devices and
Printers.
• For Windows Server 2008 R2, select Control Panel > Hardware > Devices and Printers.
• For Windows 10 / Windows Server 2016
From task bar, type in Devices and Printers in Search input area. Press the Enter key.
OR
From the Start () icon, select Settings > Devices > Printers & scanners >Devices and
Printers.
Right-click the Start ( ) icon, you can select Control Panel > Devices and Printers.
2 Select your machine.
3 Right-click your machine and select Set as Default Printer.
For Windows 7 or Windows Server 2008 R2, if Set as default printer has a , you can
select other printer drivers connected to the selected printer.
Printing features | 183
Using advanced print features
XPS printer driver: used to print XPS file format.
• See "Features by model" on page 5.
• The XPS printer driver can be installed only on Windows Vista OS or higher.
• Install optional memory when an XPS job does not print because the printer is out of
memory.
• For models that provide XPS driver from the Samsung website,
http://www.samsung.com > find your product> Support or downloads.
Understanding special printer features
You can use advanced printing features when using your machine.
To take advantage of the printer features provided by your printer driver, click Properties or
Preferences in the application’s Print window to change the print settings. The machine name
that appears in the printer properties window may differ depending on the machine in use.
• Some menus may not appear on the display depending on options or models. If so, it is
not applicable to your machine.
• Select the Help menu or click the button from the window or press F1 on your
keyboard and click on any option you want to know about (see "Using help" on page 43).
Item Description
Multiple Pages per Side
Selects the number of pages to print on a single sheet of paper. To
print more than one page per sheet, the pages will be reduced in size
and arranged in the order you specify. You can print up to 16 pages
on one sheet.
Poster Printing
Prints a single-page document onto 4 (Poster 2x2), 9 (Poster 3x3), or
16 (Poster 4x4) sheets of paper, for the purpose of pasting the sheets
together to form one poster-size document.
Select the Poster Overlap value. Specify Poster Overlap in
millimeters or inches by selecting the radio button on the upper
right of Basic tab to make it easier to paste the sheets together.
Printing features | 184
Booklet Printing
a
Prints your document on both sides of a sheet of paper and arranges
the pages so that the paper can be folded in half after printing to
produce a booklet.
If you want to make a booklet, you need to print on Letter,
Legal, A4, US Folio, or Oficio sized print media.
• The Booklet Printing option is not available for all paper
sizes. Select the available paper Size option under the
Paper tab to see what paper sizes are available.
• If you select an unavailable paper size, this option can be
automatically canceled. Select only available paper (paper
without or mark).
Double-sided Printing
Print on both sides of a sheet of paper (duplex). Before printing,
decide how you want your document oriented.
You can use this feature with Letter, Legal, A4, US Folio or
Oficio sized paper
Item Description
Printing features | 185
Double-sided Printing
Some menus may not appear on the display depending on
options or models. If so, it is not applicable to your machine.
Printer Default: If you select this option, this feature is
determined by the settings you have selected on the control panel
of the machine.
None: Disables this feature.
Long Edge: This option is the conventional layout used in book
binding.
Short Edge: This option is the conventional layout used in
calendars.
Reverse Double-Sided Printing: Check this option to reverse the
print order when duplex printing.
Paper Options
Changes the size of a document to appear larger or smaller on the
printed page by entering in a percentage by which to enlarge or
decrease the document.
Watermark
The watermark option allows you to print text over an existing
document. For example, you use it when you want to have large gray
letters reading “DRAFT” or “CONFIDENTIAL” printed diagonally
across the first page or all pages of a document.
Item Description
CONFIDENTIAL
Printing features | 186
Watermark
(Creating a watermark)
a. To change the print settings from your software application,
access Printing Preferences.
b. Click the Advanced tab, select Edit from the Watermark
drop-down list. The Edit Watermarks window appears.
c. Enter a text message in the Watermark Message box.
You can enter up to 256 characters. The message displays in the
preview window.
Watermark
(Editing a watermark)
a. To change the print settings from your software application,
access Printing Preferences.
b. Click the Advanced tab, select Edit from the Watermark
drop-down list. The Edit Watermarks window appears.
c. Select the watermark you want to edit from the Current
Watermarks list and change the watermark message and options.
d. Click Update to save the changes.
e. Click OK or Print until you exit the Print window.
Watermark
(Deleting a watermark)
a. To change the print settings from your software application,
access Printing Preferences.
b. Click the Advanced tab, select Edit from the Watermark
drop-down list. The Edit Watermarks window appears.
c. Select the watermark you want to delete from the Current
Watermarks list and click Delete.
d. Click OK or Print until you exit the Print window.
Overlay
a
This option is available only when you use the PCL/SPL printer
driver.
An overlay is text and/or images stored in the computer hard disk
drive as a special file format that can be printed on any document.
Overlays are often used to take the place of letterhead paper.
Rather than using preprinted letterhead, you can create an overlay
containing exactly the same information that is currently on your
letterhead. To print a letter with your company’s letterhead, you do
not need to load preprinted letterhead paper in the machine: just
print the letterhead overlay on your document.
To use a page overlay, you must create a new page overlay
containing your logo or image.
• The overlay document size must be the same as the
document you print with the overlay. Do not create an
overlay with a watermark.
The resolution of the overlay document must be the same
as that of the document you will print with the overlay.
Item Description
Printing features | 187
Overlay
a
(Creating a new page
overlay)
To use a page overlay, you must create a new page overlay
containing your logo or image.
a. Create or open a document containing text or an image for use in
a new page overlay. Position the exactly as you wish them to
appear when printed as an overlay.
b. To save the document as an overlay, access Printing Preferences.
c. Click the Advanced tab, and select Create from the Overlay
drop-down list.
d. In the Save As window, type a name up to eight characters in the
File name box. Select the destination path, if necessary (The
default is C:\Formover).
e. Click Save.
f. Click OK or Print until you exit the Print window.
When a confirming message window appears, click Yes.
g. The file is not printed. Instead, it is stored on your computer hard
disk drive.
Overlay
a
(Using a page overlay)
After an overlay has been created, it is ready to be printed with your
document. To print an overlay with a document:
a. Create or open the document you want to print.
b. To change the print settings from your software application,
access Printing Preferences.
c. Click Advanced tab.
d. Select the Print Overlay from the Overlay drop-down list.
e. If the overlay file you want does not appear in the Overlay File 1
or Overlay File 2 drop-down list, select Load from the Overlay
List. Select the overlay file you want to use.
If you have stored the overlay file you want to use in an external
source, you can also load the file when you access the Open win-
dow.
After you select the file, click Open. The file appears in the Over-
lay List box and is available for printing. Select the overlay from
the Overlay List box.
f. If necessary, check Confirm Page Overlay When Printing box. If
this box is checked, a message window appears each time you
submit a document for printing, asking you to confirm your wish
to print an overlay on your document.
If this box is not checked and an overlay has been selected, the
overlay automatically prints with your document.
g. Click OK or Print until you exit the Print window.
The selected overlay prints on your document.
Item Description
Printing features | 188
Overlay
a
(Deleting a page
overlay)
You can delete page overlays that you no longer use.
a. In the Printing Preferences window, click the Advanced tab.
b. Select Print Overlay from the Overlay drop-down list.
c. Select the overlay you want to delete from the Overlay List box.
If the overlay file you want does not appear in the Overlay List, se-
lect Load from the Overlay List. Select the overlay file you want to
delete.
d. Click Delete.
e. When a confirming message window appears, click Yes.
f. Click OK or Print until you exit the Print window.
Job Accounting
This option allows you to print with the given permission.
User permission: If you check this option, only users with user
permission can start a print job.
Group permission: If you check this option, only groups with
group permission can start a print job.
• Select the Help menu or press F1 on your keyboard and
click on any option you want to know about (see "Using
help" on page 43).
• Administrators can enable job accounting and configure
permissions in the control panel or SyncThru™ Web Admin
Service.
a.This option is not available when you use XPS driver.
Item Description
Printing features | 189
Using Direct Printing Utility
Direct Printing Utility may not be available depending on model or optional goods (see
"About USB memory" on page 46).
• Available for Windows OS users only.
What is Direct Printing Utility?
Direct Printing Utility is a program that sends the PDF files directly to your machine to print
without having to open the file.
To install this program:
Download the software from the Samsung website then unpack and install it:
(http://www.samsung.com > find your product > Support or Downloads).
You cannot print PDF files that are restricted. Deactivate the printing restriction feature
and retry printing.
• You cannot print PDF files that are restricted by a password. Deactivate the password
feature, and retry printing.
• Whether or not a PDF file can be printed using the Direct Printing Utility program
depends on how the PDF file was created.
• The Direct Printing Utility program supports PDF version 1.7 and below. For higher
versions, you must open the file to print it.
Printing
There are several ways you can print using the Direct Printing Utility.
1 From the Start menu select Programs or All Programs > Samsung Printers.
• For Windows 8, from Charms, select Search > Apps.
• For Windows 10 / Windows Server 2016
From task bar, type in Samsung Printers in Search input area. Press the Enter key.
OR
From the Start () icon, select All apps > Samsung Printers.
2 Press Direct Printing Utility.
3 Select your machine from the Select Printer drop-down list and click Browse.
4 Select the file you wish to print and click Open.
The file is added in the Select Files section.
5 Customize the machine settings for your needs.
Printing features | 190
6 Click Print. The selected PDF file is sent to the machine.
Using the right-click menu
1 Right-click on the PDF file to print and select Direct Printing.
The Direct Printing Utility window appears with the PDF file is added.
2 Select the machine to use.
3 Customize the machine settings.
4 Click Print. The selected PDF file is sent to the machine.
Useful Tools
This chapter introduces management tools provided to help you make full use of your machine.
• Accessing management tools 192
• SyncThru™ Web Service 193
• Using Samsung Printer Center 198
• Using Samsung Easy Printer Manager 203
• Using Samsung Printer Status 206
• Using Samsung Printer Experience 208
Accessing management tools | 192
Accessing management tools
Samsung provides a variety of management tools for Samsung printers.
1 Make sure that the machine is connected to your computer and powered on.
2 From the Start menu, select Programs or All Programs.
• For Windows 8, from Charms, select Search > Apps.
• For Windows 10 / Windows Server 2016
From task bar, type in Samsung Printers in Search input area. Press the enter key.
OR
From the Start() icon, select All apps > Search > Samsung Printers.
3 Find Samsung Printers.
4 Under Samsung Printers, you can see installed management tools.
5 Click the management tool you want to use.
• After installing the driver, for some management tools, you can access them directly
from the Start menu > Programs or All Programs.
• For Windows 8, after installing the driver, for some management tools, you can access
them directly from the Start screen by clicking on the corresponding tile.
SyncThru™ Web Service | 193
SyncThru™ Web Service
This chapter gives you step-by-step instructions for setting up the network environment through
SyncThru™ Web Service.
• Internet Explorer® 8.0 or higher is the minimum requirement for SyncThru™ Web
Service.
• Some menus may not appear on the display screen depending on the settings or
models. If so, it is not applicable to your machine.
What is SyncThru™ Web Service?
If you have connected your machine to a network and set up TCP/IP network parameters
correctly, you can manage the machine via SyncThru™ Web Service. Use SyncThru™ Web Service
to:
• View the machine’s device information and check its current status.
• Change TCP/IP parameters and set up other network parameters.
• Change the printer preference.
• Set the email notifications advising of the machine’s status.
• Get support for using the machine.
• Upgrade machine software.
Required web browser
You need one of the following web browsers to use SyncThru™ Web Service.
• Internet Explorer® 8.0 or higher
• Chrome 27.0 or higher
• FireFox 21.0 or higher
• Safari 5.9.1 or higher
Connecting to SyncThru™ Web Service
IPv4 supported web browser
1 Start a web browser, such as Internet Explorer®, that supports IPv4 addressing as a URL.
Enter the machine’s IP address (http://xxx.xxx.xxx.xxx) in the address field and press the
Enter key or click Go.
You can get the machine’s IP address from the machine report (see"Printing a network
configuration report" on page 127).
SyncThru™ Web Service | 194
2 Your machine’s SyncThru™ Web Service website opens.
IPv6 supported web browser
1 Start a web browser, such as Internet Explorer®, that supports IPv6 addressing as a URL.
2 Select one of the IPv6 addresses (Stateless Address, Stateful Address, Manual Address)
from Network Configuration Report.
You can get the machine’s IPv6 address from the machine report (see"Printing a
network configuration report" on page 127).
3 Enter the IPv6 addresses (eg., http://[3ffe:10:88:194:213:77ff:fe82:75b]).
The address must be enclosed in '[ ]' brackets.
4 Your machine’s SyncThru™ Web Service website opens.
Accessing SyncThru™ Web Service
1 Access a web browser, such as Internet Explorer, from Windows.
Enter the machine IP address of your printer (http://xxx.xxx.xxx.xxx) in the address field and
press the Enter key or click Go.
2 Your machine’s embedded website opens.
Logging into SyncThru™ Web Service
Before configuring options in SyncThru™ Web Service, you need to log-in as an administrator.
You can still use SyncThru™ Web Service without logging in but you won’t have access to
Settings tab and Security tab.
1 Click Login on the upper right of the SyncThru™ Web Service website.
2 Type in the ID and Password then click Login. Type in the below default ID and password. We
recommend you to change the default password for security reasons.
ID: admin
Password: sec00000
SyncThru™ Web Service | 195
SyncThru™ Web Service overview
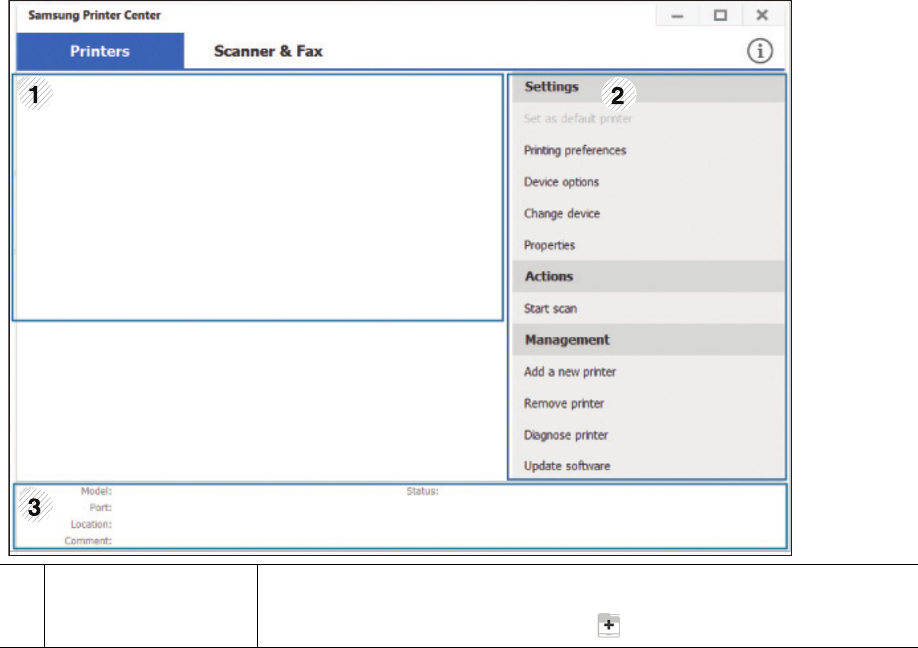
Information tab
This tab gives you general information about your machine. You can check things, such as the
machine’s status, supplies’ status, count information, network information, and more. You can
also print reports, such as configuration page.
Active Alerts: You can check the current alerts in the machine. Use this information to
troubleshoot machine errors.
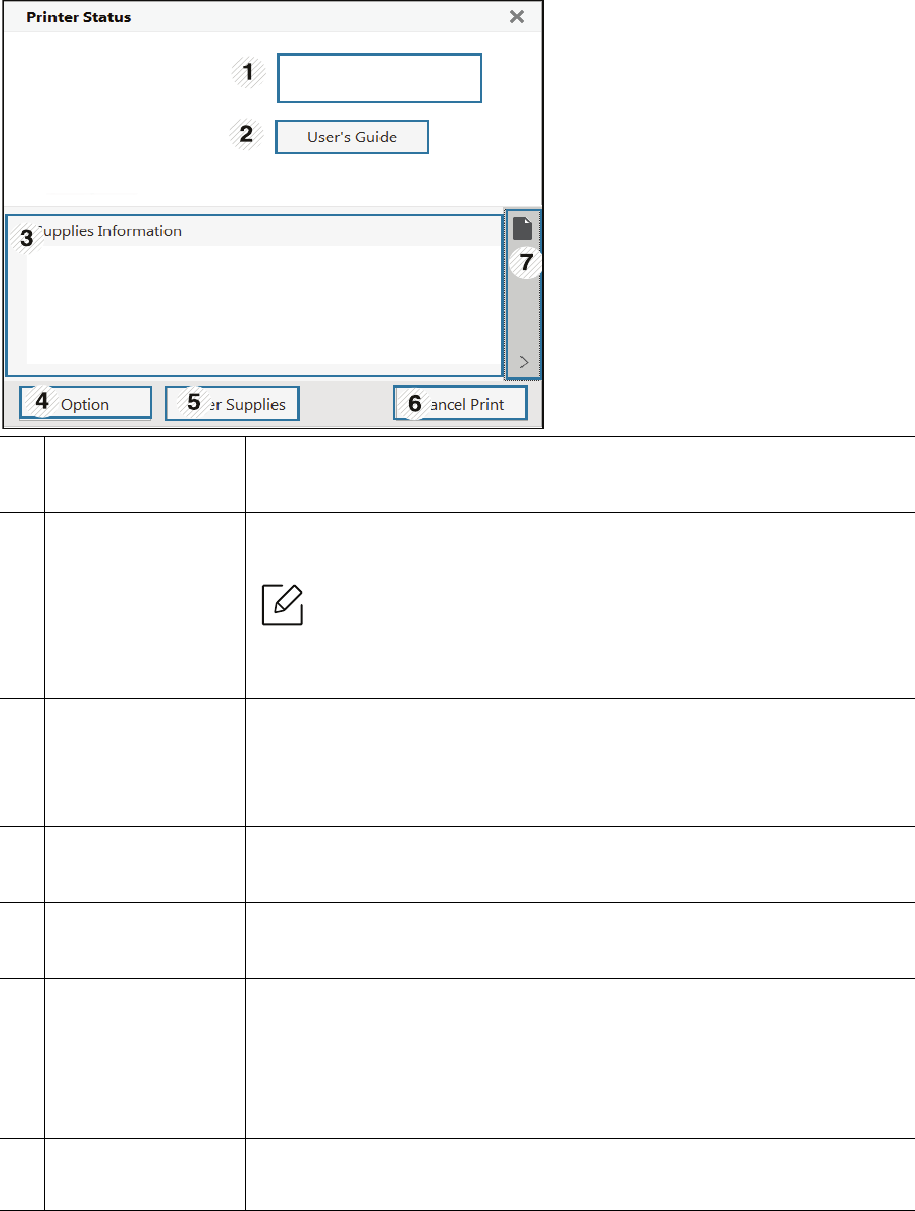
Supplies: You can check the supplies’ information. For toner cartridge, supplies’ status is
displayed with a visual graph showing you the amount of each supply left. Page counts are also
available which can help you predict when to change the supplies. This feature is also available
from the machine.
Usage Counters: You can check the billing information and usage counter of the machine. This
feature is also available from the machine.
Current Settings: Shows the current settings of the machine and network.
- Machine Information: Shows the current machine settings.
- Network Information: Shows the current network settings. Use this page as a reference and
change the necessary settings needed for using the network.
Security Information: Shows the current security settings of the machine and network.
Print Information: You can print all the reports provided by your machine. You can use these
reports to help you maintain your machine. This feature is also available in the machine.
Settings tab
Settings tab has sub menus, Machine Settings and Network Settings. You cannot view or access
this tab if you do not log-in as an administrator (see "Logging into SyncThru™ Web Service" on
page 194).
Machine Settings: You can set machine settings.
- System: You can set machine related settings.
- Printer: You can set print related settings such as darkness or adjust the background. This
feature is also available from the machine.
- Email Notification: When an error occurs or the consumables are running out, the machine
sends a notification to the administrator via email. You can set whether to use this feature or
not. You can also select which alerts to receive and when.
Network Settings: You can set up the network environment to use your machine as a network
machine. You can also set the settings from the machine. Refer to the network setup chapter.
- General: You can set general machine information to use in the network and set ethernet
settings. This feature is also available from the machine.
- TCP/IPv4, TCP/IPv6, Raw TCP/IP, LPR/LPD, IPP, Telnet, WSD, SLP, UPNP, SNMPv1/v2,
SNMPv3, FTP Print Server, AirPrint, ThinPrint®, Google Cloud Print, Samsung Cloud Print,
PrinterOn Cloud Print : You can set protocol settings.
- Outgoing Mail Server (SMTP): You can set server settings for outgoing emails. If this setting
is not configured, you cannot use scan to email feature. Outgoing emails will be sent through
SMTP server you set here.
- HTTP: You can allow or block users from accessing the SyncThru™ Web Service.
- Proxy: You can set proxy settings and enable authentication.
- Restore Default: Clicking the Clear button under the Restore Default section will clear
security and network configurations. Restoring the settings will take effect after the system
is rebooted.
SyncThru™ Web Service | 196
Security tab
The security tab has System Security, Network Security, User Access Control and System Log.
You cannot access this tab if you do not log-in as an administrator (see "Logging into SyncThru™
Web Service" on page 194).
System Security: From the SyncThru™ Web Service, select the Security tab > System Security.
- System Administrator: Enter the system administrator’s information. The machine sends
email notification to the email address set here. This feature is also available from the
machine.
- Feature Management: Specifies the services, PC application security, physical ports, and
network protocol features to use. Select the features to use, and then click Apply.
- Information Hiding: Specifies which information to hide. Select the amount of information
that you want to hide, and then click Apply.
- Restart Device: You can reboot your machine. Click the Restart Now button to reboot.
- Menu Management: You can enable/disable network menu. Check the menu you want to
enable, and then click Apply.
Network Security: From the SyncThru™ Web Service, select the Security tab > Network
Security.
- Digital Certificate: You can manage digital certificates. A digital certificate is an electronic
certificate that verifies the secure association between communication nodes. You need to
add the certificate for SSL communication.
- Secure Connection: You can enable or disable secure connection to use more enhanced
secure network channel. For secure communication, using the Secure Connection feature is
recommended.
- SNMPv3: You can set SNMPv3.
- IP Security: You can set IP security settings.
- IP/MAC Filtering: You can set filtering options for IP and MAC addresses. If the administrator
does not add a filtering rule for IPv4, IPv6, and MAC addresses, nothing is filtered. If the
administrator has added a filtering rule, filtering will be applied to the entered IPv4, IPv6, and
MAC addresses.
IPv4 Filtering: You can enable/disable IPv4 filtering as well as manage filtering rules.
IPv6 Filtering: You can enable/disable IPv6 filtering as well as manage filtering rules.
MAC Filtering: You can enable/disable Mac filtering as well as manage filtering rules.
- 802.1x(External): You can enable/disable 802.1x Security as well as manage filtering rules.
System Log: You can keep logs of events that have happened in the machine. The administrator
can record and manage the machine usage information by keeping the system log files. The
system log files are stored on the machine’s mass storage device (hard disk), and when it is full,
it will erase old data. Export and save the important audit data separately using the exporting
feature.
- Log configuration: You can enable or disable keeping logs. You can also backup log files by
periods and transfer to a repository server.
- Log Viewer: You can view, delete, and search log files.
SyncThru™ Web Service | 197
Maintenance tab
This tab allows you to maintain your machine by upgrading firmware, managing applications, and
setting contact information for sending emails. You can also connect to the Samsung website or
download manuals and drivers by selecting the Link menu.
Firmware Upgrade: You can check the firmware version used in the machine. Check the version
and update it if necessary.
Contact Information: You can view contact information.
Link: You can view links to useful websites where you can:
- view product information and get support (Samsung website).
- download manuals and drivers.
- order consumable supplies.
- register your machine on-line.
Samsung MIB Version: The version number of the MIB (Management Information Base).
License Management: License Management provides settings managing the licenses for
installed applications.
Wi-Fi Interface: You can enable or disable the Wi-Fi menu.
Using Samsung Printer Center | 198
Using Samsung Printer Center
Available for Windows users only.
The Samsung Printer Center allows you to manage all the printer drivers installed on your
computer from a single integrated application. You can use the Samsung Printer Center to add
and remove printer drivers, check the status of printers, update printer software, and configure
printer driver settings.
Understanding Samsung Printer Center
To open the program:
For Windows,
Select Start > Programs or All Programs > Samsung Printers > Samsung Printer Center.
• For Windows 8
From the Charms, select Search > Apps > Samsung Printers > Samsung Printer Center.
• For Windows 10 / Windows Server 2016
From task bar, type in Samsung Printers in Search input area. Press the enter key and then se-
lect Samsung Printer Center.
OR
From the Start() icon, select All apps > Samsung Printers > Samsung Printer Center.
Printers tab
The screenshot may differ depending on operating system, model, or options.
Using Samsung Printer Center | 199
1Printer list
Displays the printer drivers installed on your computer. To add a
printer driver to the list, click the button.
Using Samsung Printer Center | 200
2Quick links
Displays links to various printer driver management functions. The
quick links in the Printers tab link to the following functions:
Settings: Allows you to configure the settings for individual
printer driver.
- Set as default printer: Sets the selected printer driver as the
default printer. If the selected printer driver is already set as the
default printer, then this option is not activated.
- Printing preferences: Allows you to configure the default print
settings.
- Device options: Allows you to configure advanced options, such
as the settings for optional devices and additional features.
The option allows you to modify the Printer Status and
Stylish User Interface settings.
- Change device: Allows you to change the device into another
device.
- Properties: Allows you to configure the printer driver
properties, such as the name of the printer driver and its
location, or add comments about the printer driver.
Actions: Allows you to use the scan feature (this option is enabled
only if the selected device supports the scan feature).
Management: Allows you to manage the devices registered in
the program.
- Add a new printer / Remove printer: Adds a new device or
removes an existing device.
- Diagnose printer: Diagnoses problems in the selected device
and suggests solutions.
- Update Software: Downloads and applies the applicable
software updates.
3 Printer information
Provides general information about the selected device, such as its
model, IP address, port number, and status.
Using Samsung Printer Center | 201
Scanner & Fax Tab
• The screenshot may differ depending on operating system, model, option.
• Available for multifunction products only.
1Printer list
Displays the fax and scanner driver installed on your computer. To add
a fax or scanner driver to the list, click the (Add Fax) or (Add
Scanner) button.
Using Samsung Printer Center | 202
2Quick links
Displays links to the functions available for managing fax or scanner
drivers. The quick links in the Scanner & Fax tab offer the following
features:
To use this feature, the scanner driver and fax driver must be
installed on the computer.
Settings: Allows you to configure the settings for fax or scanner
drivers.
- Address Book (fax only): Opens the Address Book.
- Fax Transmission History (fax only): Opens the fax transmission
history.
- Fax preferences (fax only): Allows you to configure the default fax
settings.
- Change device: Allows you to change the devices into another
device.
- Properties: Allows you to configure the properties of a device,
such as location and add comments about the device.
Actions: Allows you to use the scan feature.
Management: Allows you to manage the devices registered in the
program.
- Remove fax or Remove scan: Removes the selected fax or scan
driver.
- Update Software: Downloads and applies the applicable software
updates.
3
Printer
information
Provides general information about the selected device, such as the
model, IP address, port number, and machine status.
Using Samsung Easy Printer Manager | 203
Using Samsung Easy Printer Manager
• Available for Windows and Mac OS users only.
For Windows, Internet Explorer 6.0 or higher is the minimum requirement for Samsung
Easy Printer Manager.
Samsung Easy Printer Manager is an application that combines Samsung machine settings into
one location. Samsung Easy Printer Manager combines device settings as well as printing
environments, settings/actions and launching. All of these features provide a gateway to
conveniently use your Samsung machine. Samsung Easy Printer Manager provides two different
user interfaces for the user to choose from: the basic user interface and the advanced user
interface. Switching between the two interfaces is easy: just click a button.
Also, Easy Capture Manager is installed automatically when you install the Samsung Easy Printer
Manager. You can also launch Easy Capture Manager manually. Capture your screen and launch
Easy Capture Manager by simply pressing the Print Screen key on the keyboard. Now you can
easily print your captured screen as captured or edited.
Understanding Samsung Easy Printer Manager
To open the program:
For Windows,
Select Start > Programs or All Programs > Samsung Printers > Samsung Easy Printer Manager.
• For Windows 8
From the Charms, select Search > Apps > Samsung Printers > Samsung Printer Manager.
• For Windows 10 / Windows Server 2016
From task bar, type in Samsung Printers in Search input area. Press the enter key and then se-
lect Samsung Printer Manager.
OR
From the Start() icon, select All apps > Samsung Printers > Samsung Printer Manager.
For Mac,
Open the Applications folder > Samsung folder > Samsung Easy Printer Manager.
The Samsung Easy Printer Manager interface is comprised of various basic sections as described
in the table that follows:
The screenshot may differ depending on operating system, model, or options.
Using Samsung Easy Printer Manager | 204
1Printer list
The Printer List displays printers installed on your computer and
network printers added by network discovery (Windows only).
2
Advanced
Setting
The advanced user interface is intended to be used by the person
responsible for managing the network and machines.
Some menus may not appear in the display depending on options
or models. If so, it is not applicable to your machine.
Device Settings: You can configure various machine settings such as
machine setup, paper, layout, emulation, network, and print
information.
If you connect your machine to a network, the SyncThru™ Web
Service icon is enabled.
Alert Settings (Windows only): This menu includes settings related to
error alerting.
- Printer Alert: Provides settings related to when alerts will be
received.
- Email Alert: Provides options relating to receiving alerts via email.
- Alert History: Provides a history of device and toner related alerts.
3
Application
information
Includes links for changing to the refresh, preference setting, help, and
about.
Using Samsung Easy Printer Manager | 205
Select the Help menu from the window and click on any option you want to know about.
4
Printer
information
This area gives you general information about your machine. You can
check information, such as the machine’s model name, IP address (or
Port name), and machine status.
This button opens the Troubleshooting Guide when an error
occurs. You can directly open the troubleshooting section in the
user’s guide.
5Quick links
Displays Quick links to machine specific functions. This section also
includes links to applications in the advanced settings.
If you connect your machine to a network, the SyncThru™ Web
Service icon is enabled.
6
Contents
area
Displays information about the selected machine, remaining toner level,
and paper. The information will vary based on the machine selected.
Some machines do not have this feature.
7
Order
supplies
Click on the Order button from the supply ordering window. You can
order replacement toner cartridge(s) from online.
Using Samsung Printer Status | 206
Using Samsung Printer Status
The Samsung Printer Status is a program that monitors and informs you the status of machine.
• The Samsung Printer Status window and its contents shown in this user’s guide may
differ depending on the machine or operating system in use.
• Check the operating system(s) that are compatible with your machine (see "System
requirements" on page 109).
• Available for Windows OS users only.
Samsung Printer Status overview
If an error occurs while operating, you can check the error from the Samsung Printer Status.
Samsung Printer Status is installed automatically when you install the machine software.
You can also launch Samsung Printer Status manually. Go to the Printing Preferences and click
the Printer Status button.
These icons appear on the Windows task bar:
The screenshot may differ depending on operating system, model, or options.
Icon Mean Description
Normal The machine is in ready mode and experiencing no errors or warnings.
Warning
The machine is in a state where an error might occur in the future. For
example, it might be in toner low status, which may lead to toner
empty status.
Error The machine has at least one error.
Using Samsung Printer Status | 207
1
Device
Information
You can view the device information.
2
User’s Guide
You can view the online User’s Guide.
This button opens the Troubleshooting Guide when an error
occurs. You can directly open the troubleshooting section in
the user’s guide.
3
Supplies
Information
You can view the percentage of toner remaining in each toner
cartridge. The machine and the number of toner cartridge(s) shown
in the above window may differ depending on the machine in use.
Some machines do not have this feature.
4
Option You can set printing job alert related settings.
5
Order Supplies You can order replacement toner cartridge(s) from online.
6
Cancel Print
or
Close
Cancel Print : If print job is waiting in the print queue or printer,
cancel all user's print jobs in the print queue or the printer.
Close : Depending on the status of the machine or the supported
functions, the Close button may appear to close the status
window.
7
Toner/Paper
Information
This button area for paper and toner info will be available based on
the device.
Using Samsung Printer Experience | 208
Using Samsung Printer Experience
Available for Windows 8 or higher users only.
Samsung Printer Experience is a Samsung application that combines Samsung machine settings
and machine management into one location. You can set device settings, order supplies, open
troubleshooting guides, visit Samsung’s web site, and check connected machine information. This
application will be automatically downloaded from the Windows Store if the machine is
connected to a computer with an Internet connection.
Understanding the Samsung Printer Experience
To open the application,
From the Start screen or Start( ) icon, select the Samsung Printer Experience () tile.
The Samsung Printer Experience interface comprises various useful features as described in the
following table:
The screenshot may differ depending on operating system, model, or options.
1 Printer Information
This area gives you general information about your machine. You
can check information, such as the machine’s status, location, IP
address, and remaining toner level.
Using Samsung Printer Experience | 209
Adding/Deleting Printers
If you do not have any printer added to the Samsung Printer Experience, or if you want to
add/delete a printer, follow the instructions below.
You can only add/delete network connected printers.
Adding a printer
1 Right-click the Samsung Printer Experience page and select Settings.
2 Select Add Printer.
3 Select the printer you want to add.
You can see the added printer.
If you see mark, you can also click mark to add printers.
2User Guide
You can view the online User’s Guide. You need to be connected
to the Internet to use this feature.
This button opens the Troubleshooting Guide when an
error occurs. You can directly open the troubleshooting
section in the user’s guide.
3
Order
Supplies
Click on this button to order replacement toner cartridges online.
You need to be connected to the Internet to use this feature.
4 Visit Samsung
Links to Samsung printer website. You need to be connected to
the Internet to use this feature.
5Printer Settings
You can configure various machine settings such as machine
setup, paper, layout, emulation, networking, and print
information through SyncThru™ Web Service. Your machine
needs to be connected to a network. This button will be disabled
if your machine is connected via USB cable.
6
Device List & Latest
Scanned Image
The scan list displays devices that supports Samsung Printer
Experience. Under the device, you can see the latest scanned
images. Your machine needs to be connected to a network to scan
from here.
This section is for the users with multi-functional printers.
Using Samsung Printer Experience | 210
Deleting a printer
1 Right-click the Samsung Printer Experience page and select Settings.
2 Select Remove Printer.
3 Right-click the Samsung Printer Experience page, and then click Settings.
4 Click Yes.
You can see that the deleted printer is removed from the screen.
Printing
This section explains common printing tasks from the Start screen.
The screenshot may differ depending on operating system, model, or options.
Basic printing
1 Open the document to print.
2 Select Print from the File menu.
3 Select your printer from the list.
4 Select the printer settings, such as the number of copies and orientation.
5 Click the Print button to start the print job.
Using Samsung Printer Experience | 211
Cancelling a print job
If the printing job is waiting in the print queue or print spooler, cancel the job as follows:
You can access this window by simply double-clicking the machine icon ( ) in the Windows
task bar.
• You can also cancel the current job by pressing (Cancel) button on the control panel.
Opening more settings
The screen may appear somewhat different depending on the model or options.
You can set up more printing parameters.
1 Open the document you want to print.
2 Select Print from the File menu.
3 Select your printer from the list.
4 Click More settings.
Using Samsung Printer Experience | 212
Using the sharing feature
Samsung Printer Experience allows you to print from other applications installed on the
computer using the sharing feature.
This feature is only available for printing jpeg, bmp, tiff, gif, and png file formats.
1 Select the content you want to print from other application.
2 Click Share menu or press Window key + H.
3 Select the printer settings, such as the number of copies and orientation.
4 Click the Print button to start the print job.
Glossary | 213
Glossary
The following glossary helps you get familiar with the product by understanding the terminologies
commonly used with printing as well as mentioned in this user’s guide.
802.11
802.11 is a set of standards for wireless local area network (WLAN) communication, developed by the IEEE
LAN/MAN Standards Committee (IEEE 802).
802.11b/g/n
802.11b/g/n can share same hardware and use the 2.4 GHz band. 802.11b supports bandwidth up to 11 Mbps,
802.11n supports bandwidth up to 150 Mbps. 802.11b/g/n devices may occasionally suffer interference from
microwave ovens, cordless telephones, and Bluetooth devices.
Access point
Access Point or Wireless Access Point (AP or WAP) is a device that connects wireless communication devices
together on wireless local area networks (WLAN), and acts as a central transmitter and receiver of WLAN radio
signals.
ADF
An Automatic Document Feeder (ADF) is a scanning unit that will automatically feed an original sheet of paper
so that the machine can scan some amount of the paper at once.
AppleTalk
AppleTalk is a proprietary suite of protocols developed by Apple, Inc for computer networking. It was included
in the original Mac (1984) and is now deprecated by Apple in favor of TCP/IP networking.
BIT Depth
A computer graphics term describing the number of bits used to represent the color of a single pixel in a
bitmapped image. Higher color depth gives a broader range of distinct colors. As the number of bits increases,
the number of possible colors becomes impractically large for a color map. 1-bit color is commonly called as
monochrome or black and white.
BMP
A bitmapped graphics format used internally by the Microsoft Windows graphics subsystem (GDI), and used
commonly as a simple graphics file format on that platform.
Glossary | 214
BOOTP
Bootstrap Protocol. A network protocol used by a network client to obtain its IP address automatically. This is
usually done in the bootstrap process of computers or operating systems running on them. The BOOTP servers
assign the IP address from a pool of addresses to each client. BOOTP enables 'diskless workstation' computers
to obtain an IP address prior to loading any advanced operating system.
CCD
Charge Coupled Device (CCD) is a hardware which enables the scan job. CCD Locking mechanism is also used
to hold the CCD module to prevent any damage when you move the machine.
Collation
Collation is a process of printing a multiple-copy job in sets. When collation is selected, the device prints an
entire set before printing additional copies.
Control Panel
A control panel is a flat, typically vertical, area where control or monitoring instruments are displayed. They are
typically found in front of the machine.
Coverage
It is the printing term used for a toner usage measurement on printing. For example, 5% coverage means that
an A4 sided paper has about 5% image or text on it. So, if the paper or original has complicated images or lots
of text on it, the coverage will be higher and at the same time, a toner usage will be as much as the coverage.
CSV
Comma Separated Values (CSV). A type of file format, CSV is used to exchange data between disparate appli-
cations. The file format, as it is used in Microsoft Excel, has become a de facto standard throughout the industry,
even among non-Microsoft platforms.
DADF
A Duplex Automatic Document Feeder (DADF) is a scanning unit that will automatically feed and turn over an
original sheet of paper so that the machine can scan on both sides of the paper.
Default
The value or setting that is in effect when taking a printer out of its box state, reset, or initialized.
DHCP
A Dynamic Host Configuration Protocol (DHCP) is a client-server networking protocol. A DHCP server provides
configuration parameters specific to the DHCP client host requesting, generally, information required by the
client host to participate on an IP network. DHCP also provides a mechanism for allocation of IP addresses to
client hosts.
Glossary | 215
DIMM
Dual Inline Memory Module (DIMM), a small circuit board that holds memory. DIMM stores all the data within
the machine like printing data, received fax data.
DLNA
The Digital Living Network Alliance (DLNA) is a standard that allows devices on a home network to share infor-
mation with each other across the network.
DNS
The Domain Name Server (DNS) is a system that stores information associated with domain names in a distrib-
uted database on networks, such as the Internet.
Dot Matrix Printer
A dot matrix printer refers to a type of computer printer with a print head that runs back and forth on the page
and prints by impact, striking an ink-soaked cloth ribbon against the paper, much like a typewriter.
DPI
Dots Per Inch (DPI) is a measurement of resolution that is used for scanning and printing. Generally, higher DPI
results in a higher resolution, more visible detail in the image, and a larger file size.
DRPD
Distinctive Ring Pattern Detection. Distinctive Ring is a telephone company service which enables a user to use
a single telephone line to answer several different telephone numbers.
Duplex
A mechanism that will automatically turn over a sheet of paper so that the machine can print (or scan) on both
sides of the paper. A printer equipped with a Duplex Unit can print on both sides of paper during one print cycle.
Duty Cycle
Duty cycle is the page quantity which does not affect printer performance for a month. Generally the printer
has the lifespan limitation such as pages per year. The lifespan means the average capacity of print-outs,
usually within the warranty period. For example, if the duty cycle is 48,000 pages per month assuming 20
working days, a printer limits 2,400 pages a day.
ECM
Error Correction Mode (ECM) is an optional transmission mode built into Class 1 fax machines or fax modems.
It automatically detects and corrects errors in the fax transmission process that are sometimes caused by tele-
phone line noise.
Emulation
Emulation is a technique of one machine obtaining the same results as another.
Glossary | 216
An emulator duplicates the functions of one system with a different system, so that the second system behaves
like the first system. Emulation focuses on exact reproduction of external behavior, which is in contrast to simu-
lation, which concerns an abstract model of the system being simulated, often considering its internal state.
Ethernet
Ethernet is a frame-based computer networking technology for local area networks (LANs). It defines wiring
and signaling for the physical layer, and frame formats and protocols for the media access control (MAC)/data
link layer of the OSI model. Ethernet is mostly standardized as IEEE 802.3. It has become the most widespread
LAN technology in use during the 1990s to the present.
EtherTalk
A suite of protocols developed by Apple Computer for computer networking. It was included in the original Mac
(1984) and is now deprecated by Apple in favor of TCP/IP networking.
FDI
Foreign Device Interface (FDI) is a card installed inside the machine to allow a third party device such as a coin
operated device or a card reader. Those devices allow the pay-for-print service on your machine.
FTP
A File Transfer Protocol (FTP) is a commonly used protocol for exchanging files over any network that supports
the TCP/IP protocol (such as the Internet or an intranet).
Fuser Unit
The part of a laser printer that fuses the toner onto the print media. It consists of a heat roller and a pressure
roller. After toner is transferred onto the paper, the fuser unit applies heat and pressure to ensure that the
toner stays on the paper permanently, which is why paper is warm when it comes out of a laser printer.
Gateway
A connection between computer networks, or between a computer network and a telephone line. It is very
popular, as it is a computer or a network that allows access to another computer or network.
Grayscale
A shades of gray that represent light and dark portions of an image when color images are converted to gray-
scale; colors are represented by various shades of gray.
Halftone
An image type that simulates grayscale by varying the number of dots. Highly colored areas consist of a large
number of dots, while lighter areas consist of a smaller number of dots.
Mass storage device (HDD)
Mass storage device (HDD), commonly referred to as a hard drive or hard disk, is a non-volatile storage device
which stores digitally-encoded data on rapidly rotating platters with magnetic surfaces.
Glossary | 217
IEEE
The Institute of Electrical and Electronics Engineers (IEEE) is an international non-profit, professional organi-
zation for the advancement of technology related to electricity.
IEEE 1284
The 1284 parallel port standard was developed by the Institute of Electrical and Electronics Engineers (IEEE).
The term "1284-B" refers to a specific connector type on the end of the parallel cable that attaches to the
peripheral (for example, a printer).
Intranet
A private network that uses Internet Protocols, network connectivity, and possibly the public telecommunica-
tion system to securely share part of an organization's information or operations with its employees. Some-
times the term refers only to the most visible service, the internal website.
IP address
An Internet Protocol (IP) address is a unique number that devices use in order to identify and communicate with
each other on a network utilizing the Internet Protocol standard.
IPM
The Images Per Minute (IPM) is a way of measuring the speed of a printer. An IPM rate indicates the number of
single-sided sheets a printer can complete within one minute.
IPP
The Internet Printing Protocol (IPP) defines a standard protocol for printing as well as managing print jobs,
media size, resolution, and so forth. IPP can be used locally or over the Internet to hundreds of printers, and
also supports access control, authentication, and encryption, making it a much more capable and secure
printing solution than older ones.
IPX/SPX
IPX/SPX stands for Internet Packet Exchange/Sequenced Packet Exchange. It is a networking protocol used by
the Novell NetWare operating systems. IPX and SPX both provide connection services similar to TCP/IP, with
the IPX protocol having similarities to IP, and SPX having similarities to TCP. IPX/SPX was primarily designed
for local area networks (LANs), and is a very efficient protocol for this purpose (typically its performance
exceeds that of TCP/IP on a LAN).
ISO
The International Organization for Standardization (ISO) is an international standard-setting body composed of
representatives from national standards bodies. It produces world-wide industrial and commercial standards.
ITU-T
The International Telecommunication Union is an international organization established to standardize and
regulate international radio and telecommunications. Its main tasks include standardization, allocation of the
radio spectrum, and organizing interconnection arrangements between different countries to allow interna-
tional phone calls. A -T out of ITU-T indicates telecommunication.
Glossary | 218
ITU-T No. 1 chart
Standardized test chart published by ITU-T for document facsimile transmissions.
JBIG
Joint Bi-level Image Experts Group (JBIG) is an image compression standard with no loss of accuracy or quality,
which was designed for compression of binary images, particularly for faxes, but can also be used on other
images.
JPEG
Joint Photographic Experts Group (JPEG) is a most commonly used standard method of lossy compression for
photographic images. It is the format used for storing and transmitting photographs on the World Wide Web.
LDAP
The Lightweight Directory Access Protocol (LDAP) is a networking protocol for querying and modifying direc-
tory services running over TCP/IP.
LED
A Light-Emitting Diode (LED) is a semiconductor device that indicates the status of a machine.
MAC address
Media Access Control (MAC) address is a unique identifier associated with a network adapter. MAC address is
a unique 48-bit identifier usually written as 12 hexadecimal characters grouped in pairs (e. g.,
00-00-0c-34-11-4e). This address is usually hard-coded into a Network Interface Card (NIC) by its manufac-
turer, and used as an aid for routers trying to locate machines on large networks.
MFP
Multi Function Peripheral (MFP) is an office machine that includes the following functionality in one physical
body, so as to have a printer, a copier, a fax, a scanner and etc.
MH
Modified Huffman (MH) is a compression method for decreasing the amount of data that needs to be trans-
mitted between the fax machines to transfer the image recommended by ITU-T T.4. MH is a codebook-based
run-length encoding scheme optimized to efficiently compress white space. As most faxes consist mostly of
white space, this minimizes the transmission time of most faxes.
MMR
Modified Modified READ (MMR) is a compression method recommended by ITU-T T.6.
Modem
A device that modulates a carrier signal to encode digital information, and also demodulates such a carrier
signal to decode transmitted information.
Glossary | 219
MR
Modified Read (MR) is a compression method recommended by ITU-T T.4. MR encodes the first scanned line
using MH. The next line is compared to the first, the differences determined, and then the differences are
encoded and transmitted.
NetWare
A network operating system developed by Novell, Inc. It initially used cooperative multitasking to run various
services on a PC, and the network protocols were based on the archetypal Xerox XNS stack. Today NetWare
supports TCP/IP as well as IPX/SPX.
OPC
Organic Photo Conductor (OPC) is a mechanism that makes a virtual image for print using a laser beam emitted
from a laser printer, and it is usually green or rust colored and has a cylinder shape.
An imaging unit containing a drum slowly wears the drum surface by its usage in the printer, and it should be
replaced appropriately since it gets worn from contact with the cartridge development brush, cleaning mech-
anism, and paper.
Originals
The first example of something, such as a document, photograph or text, etc, which is copied, reproduced or
translated to produce others, but which is not itself copied or derived from something else.
OSI
Open Systems Interconnection (OSI) is a model developed by the International Organization for Standardiza-
tion (ISO) for communications. OSI offers a standard, modular approach to network design that divides the
required set of complex functions into manageable, self-contained, functional layers. The layers are, from top
to bottom, Application, Presentation, Session, Transport, Network, Data Link and Physical.
PABX
A private automatic branch exchange (PABX) is an automatic telephone switching system within a private
enterprise.
PCL
Printer Command Language (PCL) is a Page Description Language (PDL) developed by HP as a printer protocol
and has become an industry standard. Originally developed for early inkjet printers, PCL has been released in
varying levels for thermal, dot matrix printer, and laser printers.
PDF
Portable Document Format (PDF) is a proprietary file format developed by Adobe Systems for representing two
dimensional documents in a device independent and resolution independent format.
PostScript
PostScript (PS) is a page description language and programming language used primarily in the electronic and
desktop publishing areas. - that is run in an interpreter to generate an image.
Glossary | 220
Printer Driver
A program used to send commands and transfer data from the computer to the printer.
Print Media
The media like paper, envelopes and labels which can be used in a printer, a scanner, a fax or, a copier.
PPM
Pages Per Minute (PPM) is a method of measurement for determining how fast a printer works, meaning the
number of pages a printer can produce in one minute.
PRN file
An interface for a device driver, this allows software to interact with the device driver using standard
input/output system calls, which simplifies many tasks.
Protocol
A convention or standard that controls or enables the connection, communication, and data transfer between
two computing endpoints.
PS
See PostScript.
PSTN
The Public-Switched Telephone Network (PSTN) is the network of the world's public circuit-switched telephone
networks which, on industrial premises, is usually routed through the switchboard.
RADIUS
Remote Authentication Dial In User Service (RADIUS) is a protocol for remote user authentication and
accounting. RADIUS enables centralized management of authentication data such as usernames and pass-
words using an AAA (authentication, authorization, and accounting) concept to manage network access.
Resolution
The sharpness of an image, measured in Dots Per Inch (DPI). The higher the dpi, the greater the resolution.
SMB
Server Message Block (SMB) is a network protocol mainly applied to share files, printers, serial ports, and
miscellaneous communications between nodes on a network. It also provides an authenticated Inter-process
communication mechanism.
SMTP
Simple Mail Transfer Protocol (SMTP) is the standard for e-mail transmissions across the Internet. SMTP is a
relatively simple, text-based protocol, where one or more recipients of a message are specified, and then the
Glossary | 221
message text is transferred. It is a client-server protocol, where the client transmits an email message to the
server.
SSID
Service Set Identifier (SSID) is a name of a wireless local area network (WLAN). All wireless devices in a WLAN
use the same SSID in order to communicate with each other. The SSIDs are case-sensitive and have a maximum
length of 32 characters.
Subnet Mask
The subnet mask is used in conjunction with the network address to determine which part of the address is the
network address and which part is the host address.
TCP/IP
The Transmission Control Protocol (TCP) and the Internet Protocol (IP); the set of communications protocols
that implement the protocol stack on which the Internet and most commercial networks run.
TCR
Transmission Confirmation Report (TCR) provides details of each transmission such as job status, transmission
result and number of pages sent. This report can be set to print after each job or only after failed transmissions.
TIFF
Tagged Image File Format (TIFF) is a variable-resolution bitmapped image format. TIFF describes image data
that typically come from scanners. TIFF images make use of tags, keywords defining the characteristics of the
image that is included in the file. This flexible and platform-independent format can be used for pictures that
have been made by various image processing applications.
Toner Cartridge
A kind of bottle or container used in a machine like a printer which contains toner. Toner is a powder used in
laser printers and photocopiers, which forms the text and images on the printed paper. Toner can be fused by
by a combination of heat/pressure from the fuser, causing it to bind to the fibers in the paper.
TWAIN
An industry standard for scanners and software. By using a TWAIN-compliant scanner with a TWAIN-compliant
program, a scan can be initiated from within the program. It is an image capture API for Microsoft Windows and
Apple Mac operating systems.
UNC Path
Uniform Naming Convention (UNC) is a standard way to access network shares in Window NT and other Micro-
soft products. The format of a UNC path is: \\<servername>\<sharename>\<Additional directory>
Glossary | 222
URL
Uniform Resource Locator (URL) is the global address of documents and resources on the Internet. The first
part of the address indicates what protocol to use, the second part specifies the IP address or the domain name
where the resource is located.
USB
Universal Serial Bus (USB) is a standard that was developed by the USB Implementers Forum, Inc., to connect
computers and peripherals. Unlike the parallel port, USB is designed to concurrently connect a single computer
USB port to multiple peripherals.
Watermark
A watermark is a recognizable image or pattern in paper that appears lighter when viewed by transmitted light.
Watermarks were first introduced in Bologna, Italy in 1282; they have been used by papermakers to identify
their product, and also on postage stamps, currency, and other government documents to discourage counter-
feiting.
WEP
Wired Equivalent Privacy (WEP) is a security protocol specified in IEEE 802.11 to provide the same level of secu-
rity as that of a wired LAN. WEP provides security by encrypting data over radio so that it is protected as it is
transmitted from one end point to another.
WIA
Windows Imaging Architecture (WIA) is an imaging architecture that is originally introduced in Windows Me
and Windows XP. A scan can be initiated from within these operating systems by using a WIA-compliant
scanner.
WPA
Wi-Fi Protected Access (WPA) is a class of systems to secure wireless (Wi-Fi) computer networks, which was
created to improve upon the security features of WEP.
WPA-PSK
WPA-PSK (WPA Pre-Shared Key) is special mode of WPA for small business or home users. A shared key, or
password, is configured in the wireless access point (WAP) and any wireless laptop or desktop devices.
WPA-PSK generates a unique key for each session between a wireless client and the associated WAP for more
advanced security.
WPS
The Wi-Fi Protected Setup (WPS) is a standard for establishing a wireless home network. If your wireless access
point supports WPS, you can configure the wireless network connection easily without a computer.
XPS
XML Paper Specification (XPS) is a specification for a Page Description Language (PDL) and a new document
format, which has benefits for portable document and electronic document, developed by Microsoft. It is an
XML-based specification, based on a new print path and a vector-based device-independent document format.
Index | 224
Index
A
accessing
management tools
192
accessories
installing
61
ordering
51
AirPrint
150
B
buttons
eco
19
print screen
19
C
certificate 196
cleaning
inside
65
outside
65
pickup roller
67
cleaning a machine
65
color settings
172
control panel
18
convention
7
D
default settings
tray setting
38
device options
61
direct printing utility
189
E
eco printing 44
entering character
180
error message
80
F
favorites settings, for printing 42
features
machine features
160
print media feature
105
filtering
196
IPv6
196
MAC
196
firmware
197
G
general icons 7
general settings
167
glossary
213
google cloud printing
157
H
HTTP settings 195
I
IPP settings 195
Index | 225
J
jam
clearing paper
71
tips for avoiding paper jams
70
L
layout 163
link
197
loading
paper in multi-purpose (or manual feeder) tray
34
paper in the tray1
32
paper in the tray1 / optional trays
32
special media
35
log
196
LPR/LPD settings
195
M
Mac
system requirements
110
machine overview
front view
16
rear view
17
maintenance parts
52
menu
emulation
171
information
162
job management
176
printeron
177
menu map
162
menu overview
25
Mopria
148
multi-purpose (or manual feeder) tray
loading
34
tips on using
34
using special media
35
N
network
general setup
173
introducing network programs
126
IPv6 configuration
128
SetIP program
137
wired network setup
127
wireless network setup
129
numeric keypad
19
O
optional
stand
51
Wi-Fi/NFC
51
optional tray
ordering
51
output support
39
overlay printing
create
187
delete
188
print
187
P
paper 165
placing a machine
adjusting the altitude
179
print
mobile OS
147
mobileprint
147
print media
card stock
37
envelope
36
guidelines
29
labels
37
output support
105
preprinted paper
38
setting the paper size
38
Index | 226
setting the paper type 38
special media
35
printer status
general information
206
PrinterOn
155
printing
changing the default print settings
181
duplex
195
margin
195
paper orientation
195
printing a document
Windows
40
setting as a default machine
182
special printer features
183
USB memory
47
using direct printing utility
189
printing feature
181
problem
operating system problems
98
problems
paper feeding problems
87
power problems
88
printing problems
89
printing quality problems
92
R
Raw TCP/IP settings 195
register
PrinterOn
155
regulatory information
111
requirements
SyncThruTM Web Service
193
S
safety
information
8
symbols
8
samsung cloud printing
152
samsung printer experience
208
Samsung Printer Status
206
scan
email server
195
security
system
196
SetIP program
137
settings
current
195
HTTP
195
machine
195
margin
195
network
195
printer
195
security
196
network
196
SyncThruTM Web Service
195
Special features
178
specifications
104
print media
105
status
19
supplies
available supplies
50
estimated toner cartridge life
54
machine information
162
monitoring the supplies life
63
ordering
50
replacing toner cartridge
57
SyncThruTM Web Service 193
configuring
195
connecting to
193
information tab
195
log
196
maintenance tab
197
network
195
printer
195
requirements
193
security tab
196
settings
195
settings tab
195
what is
193
Index | 227
T
toner cartridge
estimated life
54
handling instructions
53
non-Samsung and refilled
53
redistributing toner
55
replacing the cartridge
57
storing
53
tray
adjusting the width and length
30
changing the tray size
30
loading paper in multi-purpose (or manual feeder) tray
34
ordering an optional tray
51
setting the paper size and type
38
U
understanding the status LED 78
Unix
system requirements
110
usage
counter
195
supplies
195
USB cable
driver installation
21
USB flash memory
managing
47
printing
47
using
PrinterOn
156
using help
43
W
waste toner container 59
replacing the waste toner container
59
watermark
create
186
delete
186
edit
186
Wi-Fi/NFC
51
Windows
common Windows problems
98
driver installation for USB cable connected
21
system requirements
109
using SetIP
137
wireless
WPS
disconnecting
131
PBC mode
130
wireless network
network cable
136
WSD settings
195
5

Hulp nodig? Stel uw vraag in het forum

Spelregels

Misbruik melden

Gebruikershandleiding.com neemt misbruik van zijn services uitermate serieus. U kunt hieronder aangeven waarom deze vraag ongepast is. Wij controleren de vraag en zonodig wordt deze verwijderd.

Product:

Bijvoorbeeld antisemitische inhoud, racistische inhoud, of materiaal dat gewelddadige fysieke handelingen tot gevolg kan hebben.

Bijvoorbeeld een creditcardnummer, een persoonlijk identificatienummer, of een geheim adres. E-mailadressen en volledige namen worden niet als privégegevens beschouwd.

Spelregels forum

Om tot zinvolle vragen te komen hanteren wij de volgende spelregels:

Belangrijk! Als er een antwoord wordt gegeven op uw vraag, dan is het voor de gever van het antwoord nuttig om te weten als u er wel (of niet) mee geholpen bent! Wij vragen u dus ook te reageren op een antwoord.

Belangrijk! Antwoorden worden ook per e-mail naar abonnees gestuurd. Laat uw emailadres achter op deze site, zodat u op de hoogte blijft. U krijgt dan ook andere vragen en antwoorden te zien.

Abonneren

Abonneer u voor het ontvangen van emails voor uw Samsung SL-C4010 bij:


U ontvangt een email met instructies om u voor één of beide opties in te schrijven.


Ontvang uw handleiding per email

Vul uw emailadres in en ontvang de handleiding van Samsung SL-C4010 in de taal/talen: Engels als bijlage per email.

De handleiding is 19,91 mb groot.


U ontvangt de handleiding per email binnen enkele minuten. Als u geen email heeft ontvangen, dan heeft u waarschijnlijk een verkeerd emailadres ingevuld of is uw mailbox te vol. Daarnaast kan het zijn dat uw internetprovider een maximum heeft aan de grootte per email. Omdat hier een handleiding wordt meegestuurd, kan het voorkomen dat de email groter is dan toegestaan bij uw provider.

Stel vragen via chat aan uw handleiding

Stel uw vraag over deze PDF

Andere handleiding(en) van Samsung SL-C4010

Samsung SL-C4010 Gebruiksaanwijzing - Nederlands - 226 pagina's

Samsung SL-C4010 Gebruiksaanwijzing - Deutsch - 231 pagina's


Uw handleiding is per email verstuurd. Controleer uw email

Als u niet binnen een kwartier uw email met handleiding ontvangen heeft, kan het zijn dat u een verkeerd emailadres heeft ingevuld of dat uw emailprovider een maximum grootte per email heeft ingesteld die kleiner is dan de grootte van de handleiding.

Er is een email naar u verstuurd om uw inschrijving definitief te maken.

Controleer uw email en volg de aanwijzingen op om uw inschrijving definitief te maken

U heeft geen emailadres opgegeven

Als u de handleiding per email wilt ontvangen, vul dan een geldig emailadres in.

Uw vraag is op deze pagina toegevoegd

Wilt u een email ontvangen bij een antwoord en/of nieuwe vragen? Vul dan hier uw emailadres in.


Info