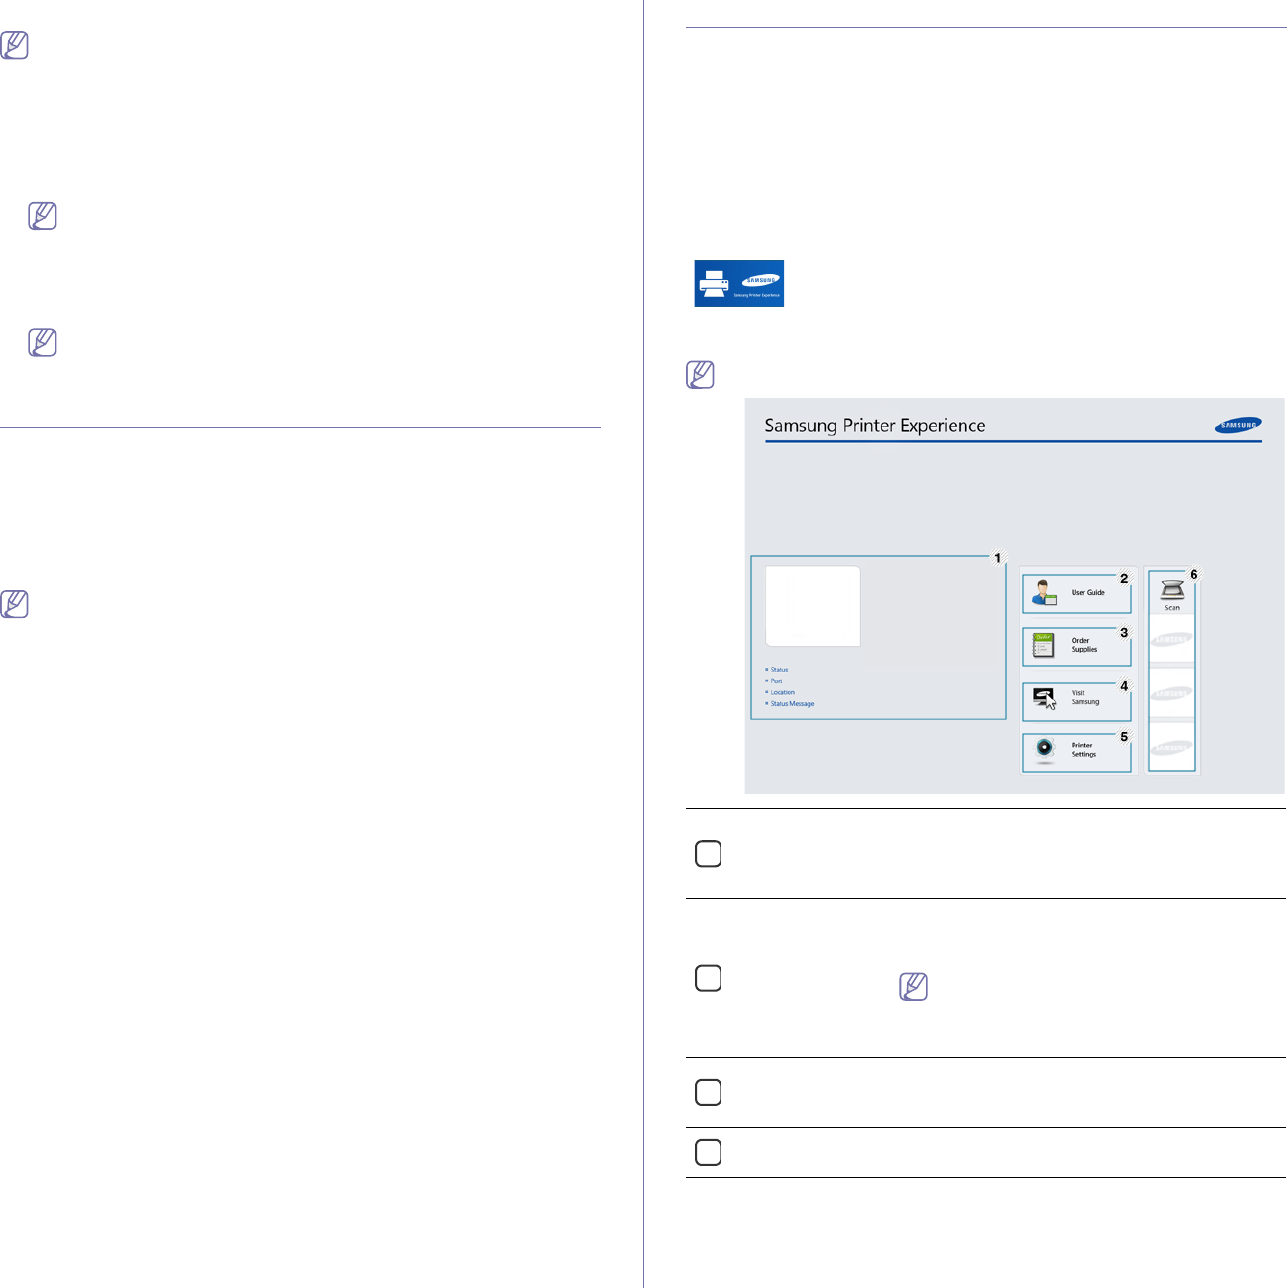
7.In printer driver properties, set the necessary options.
8.Click OK.
INSTALLING A WIRELESS NETWORK INTER-
FACE CARD
Depending on your country, wireless LAN cards may not be available.
Contact your local Samsung dealer or the retailer where you bought
your printer.
The machine is equipped with a network interface which
allows you to use
your machine on a network. You can also purchase a wireless network
interface card to enable the use of the machine in wireless network environ-
ments (See "Available accessories" on page97).
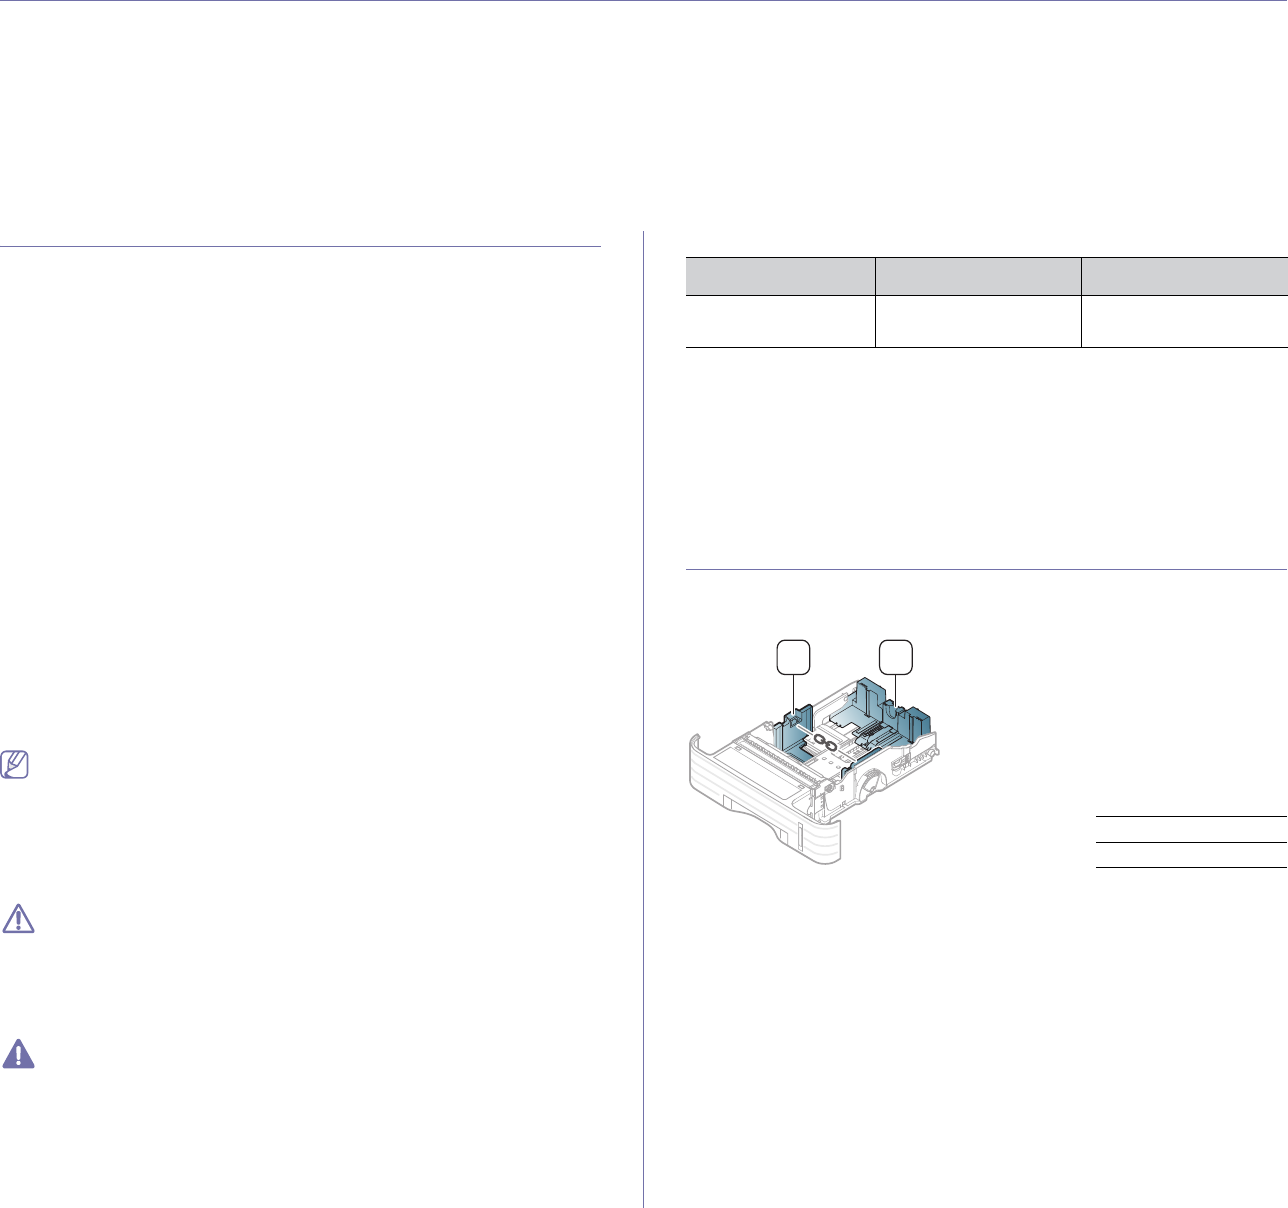
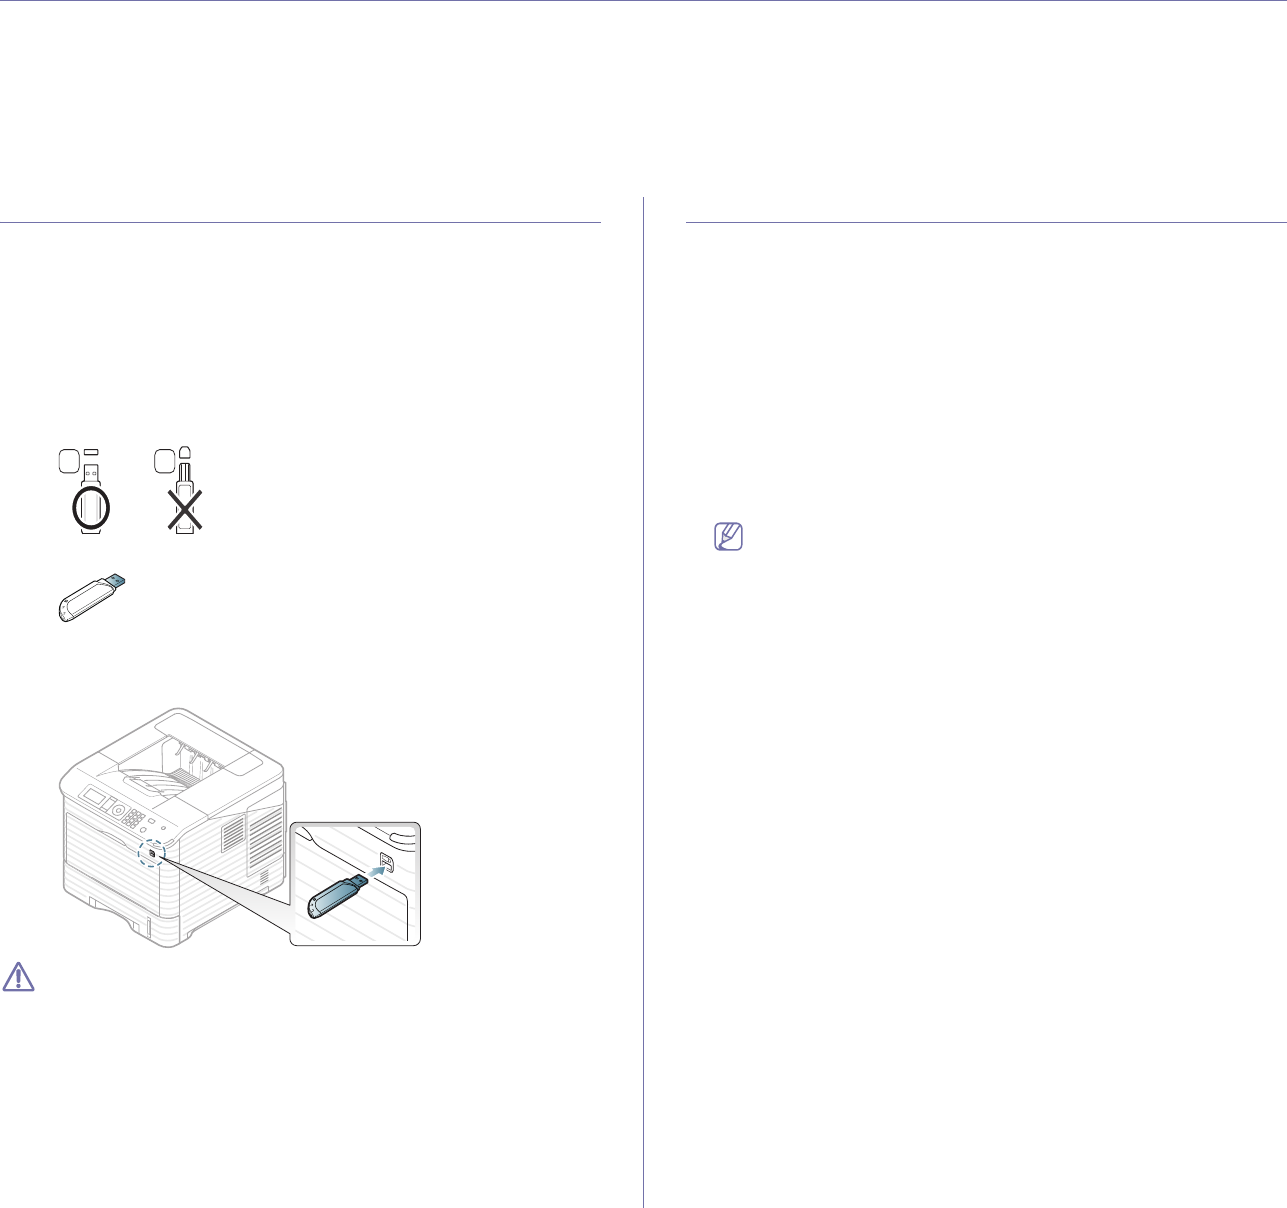
Installing a wireless network interface card
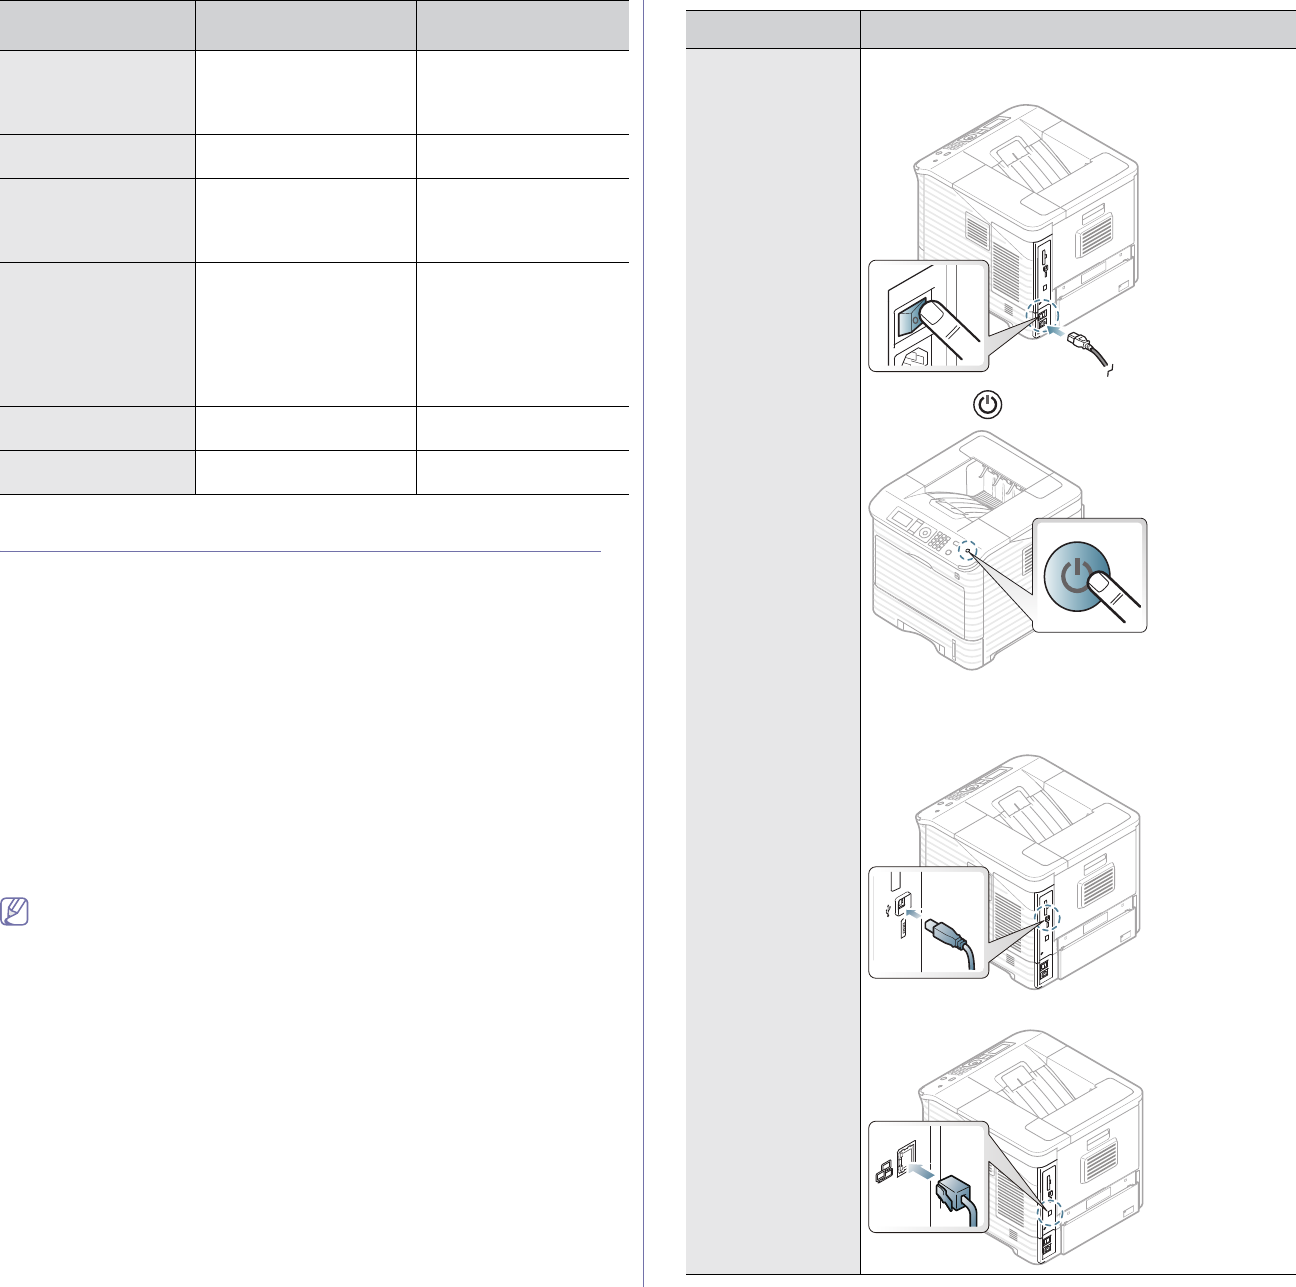
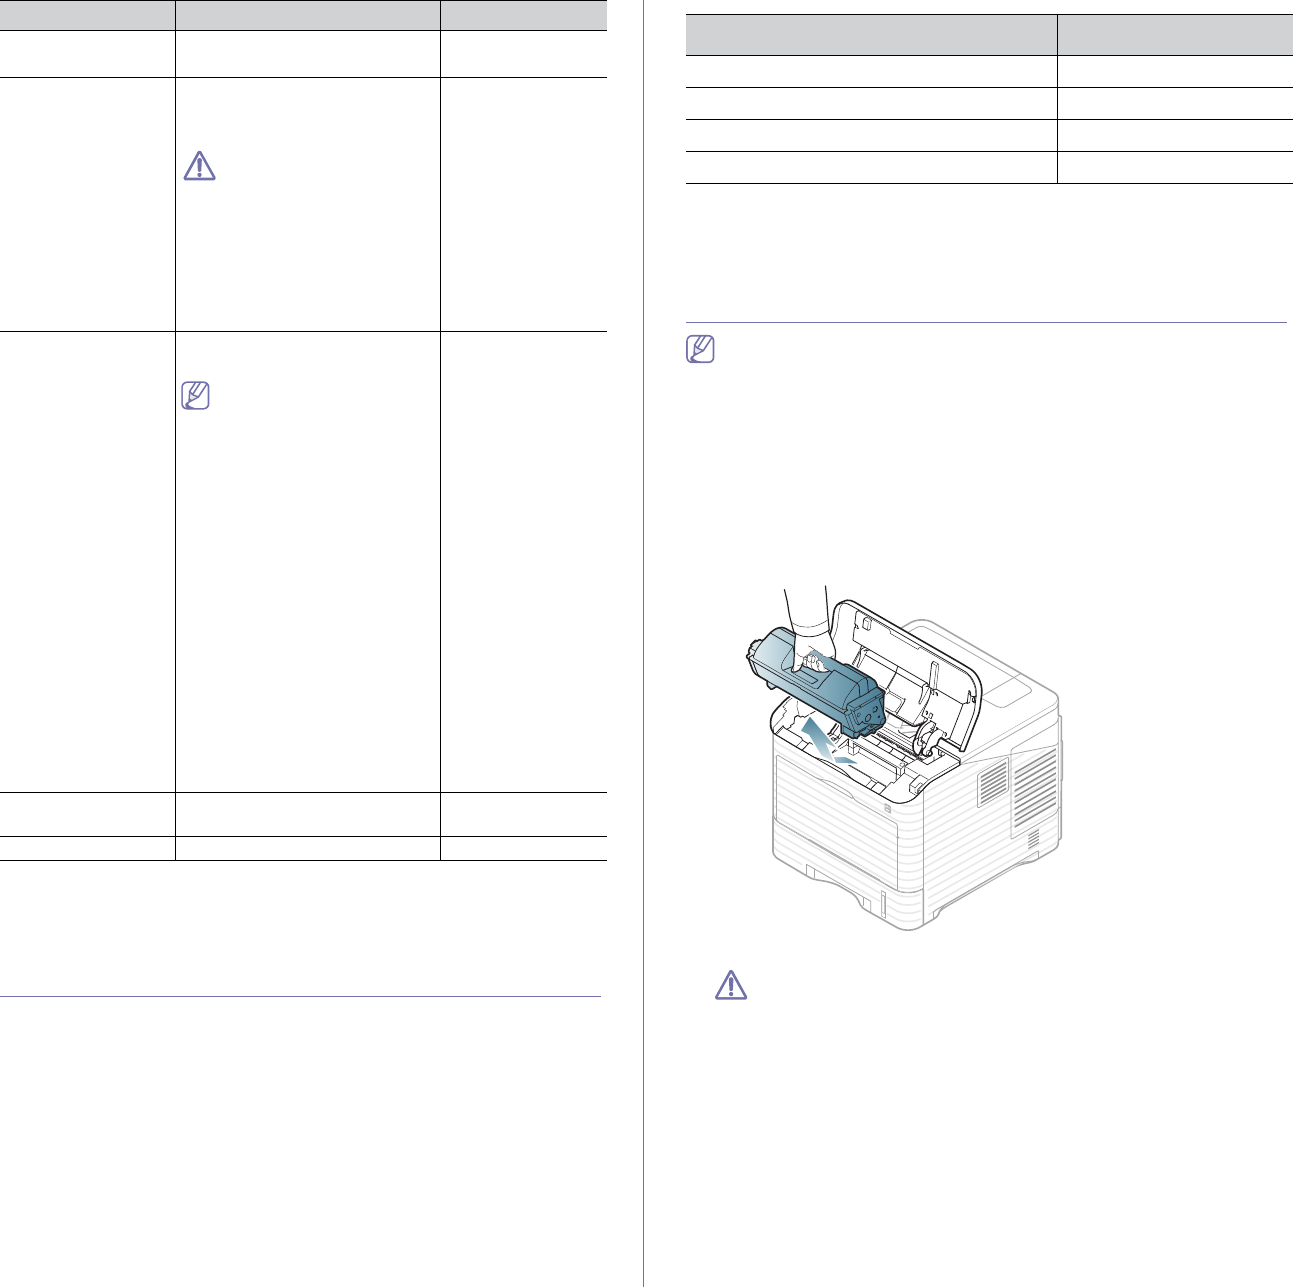
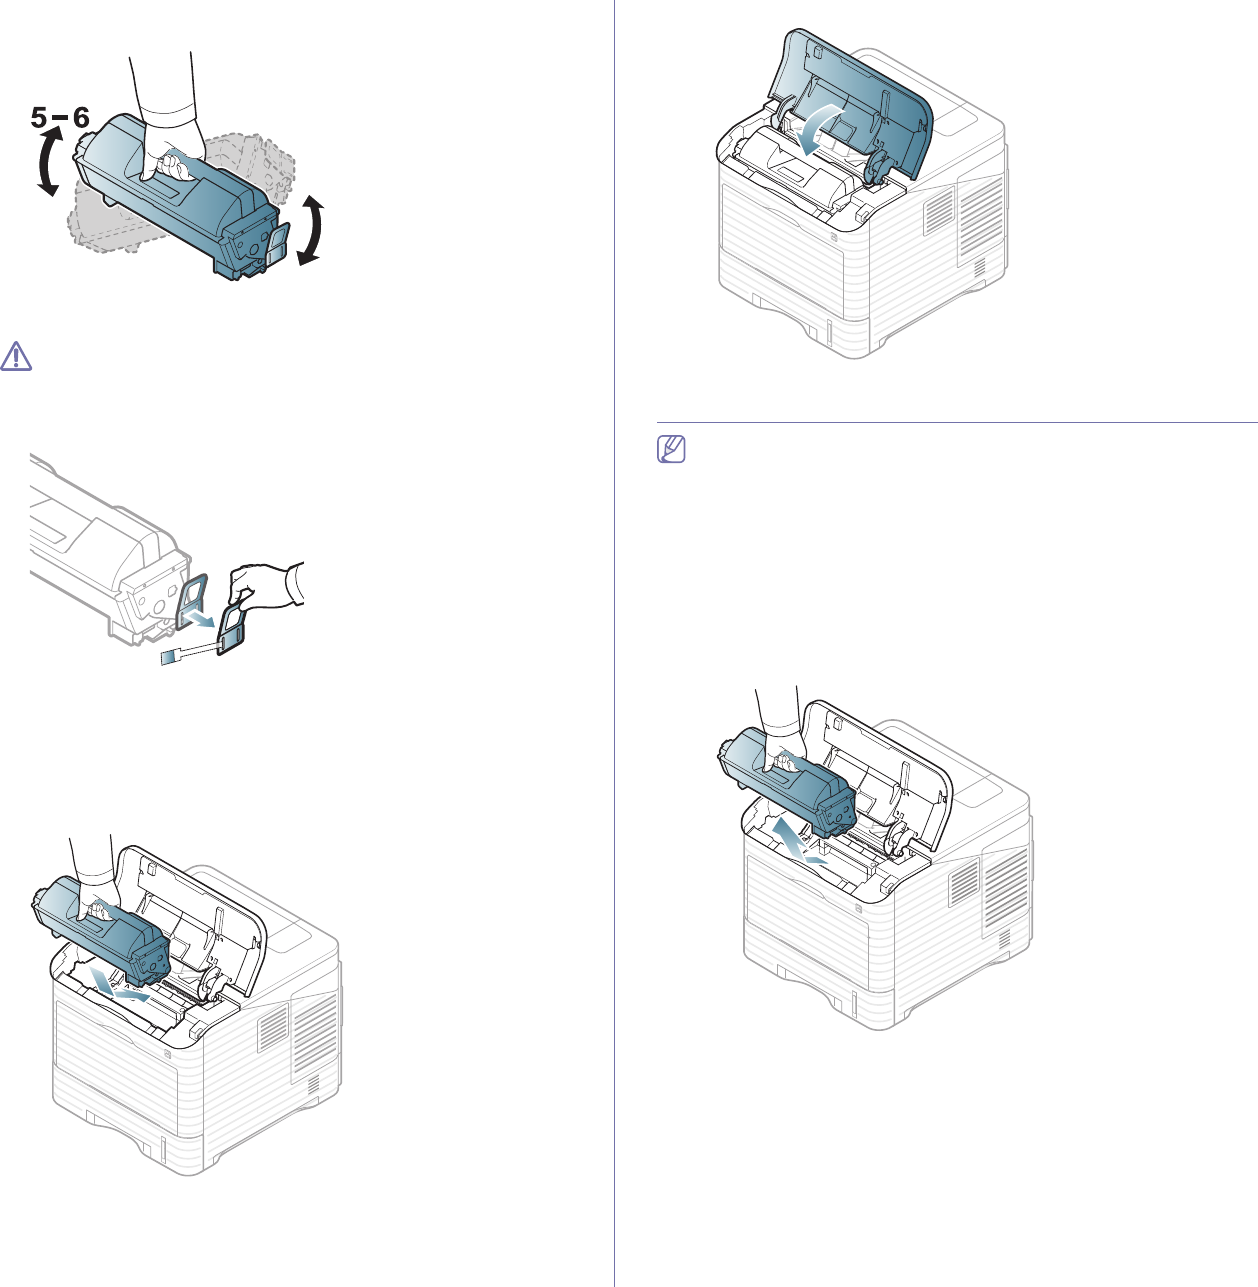
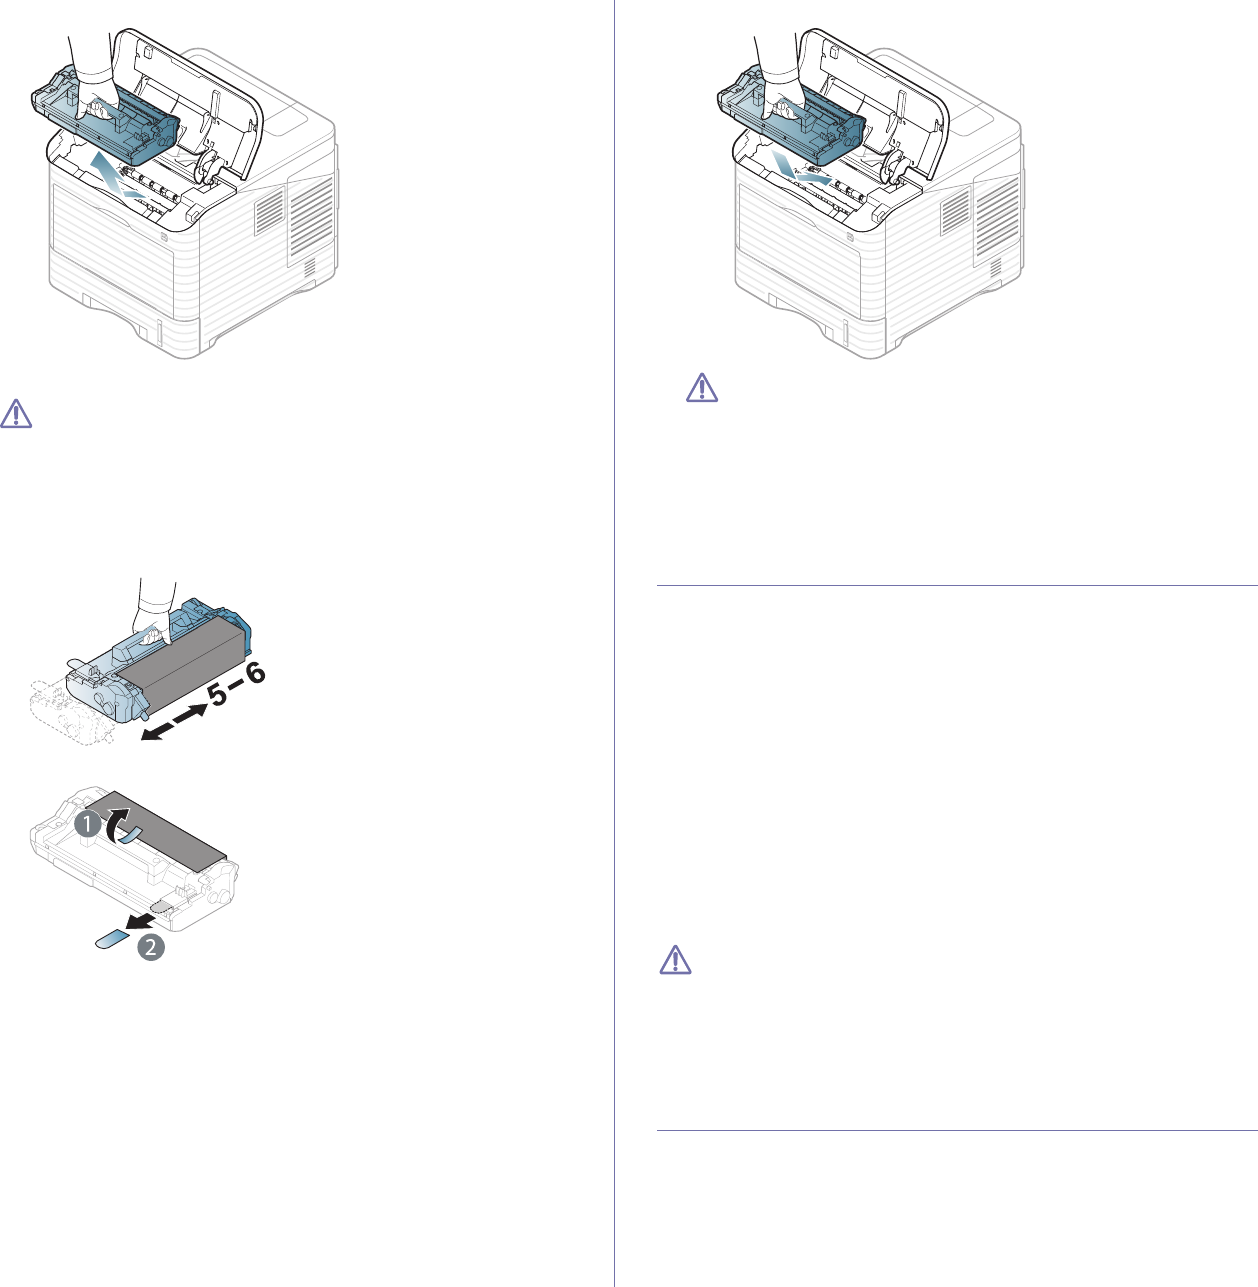
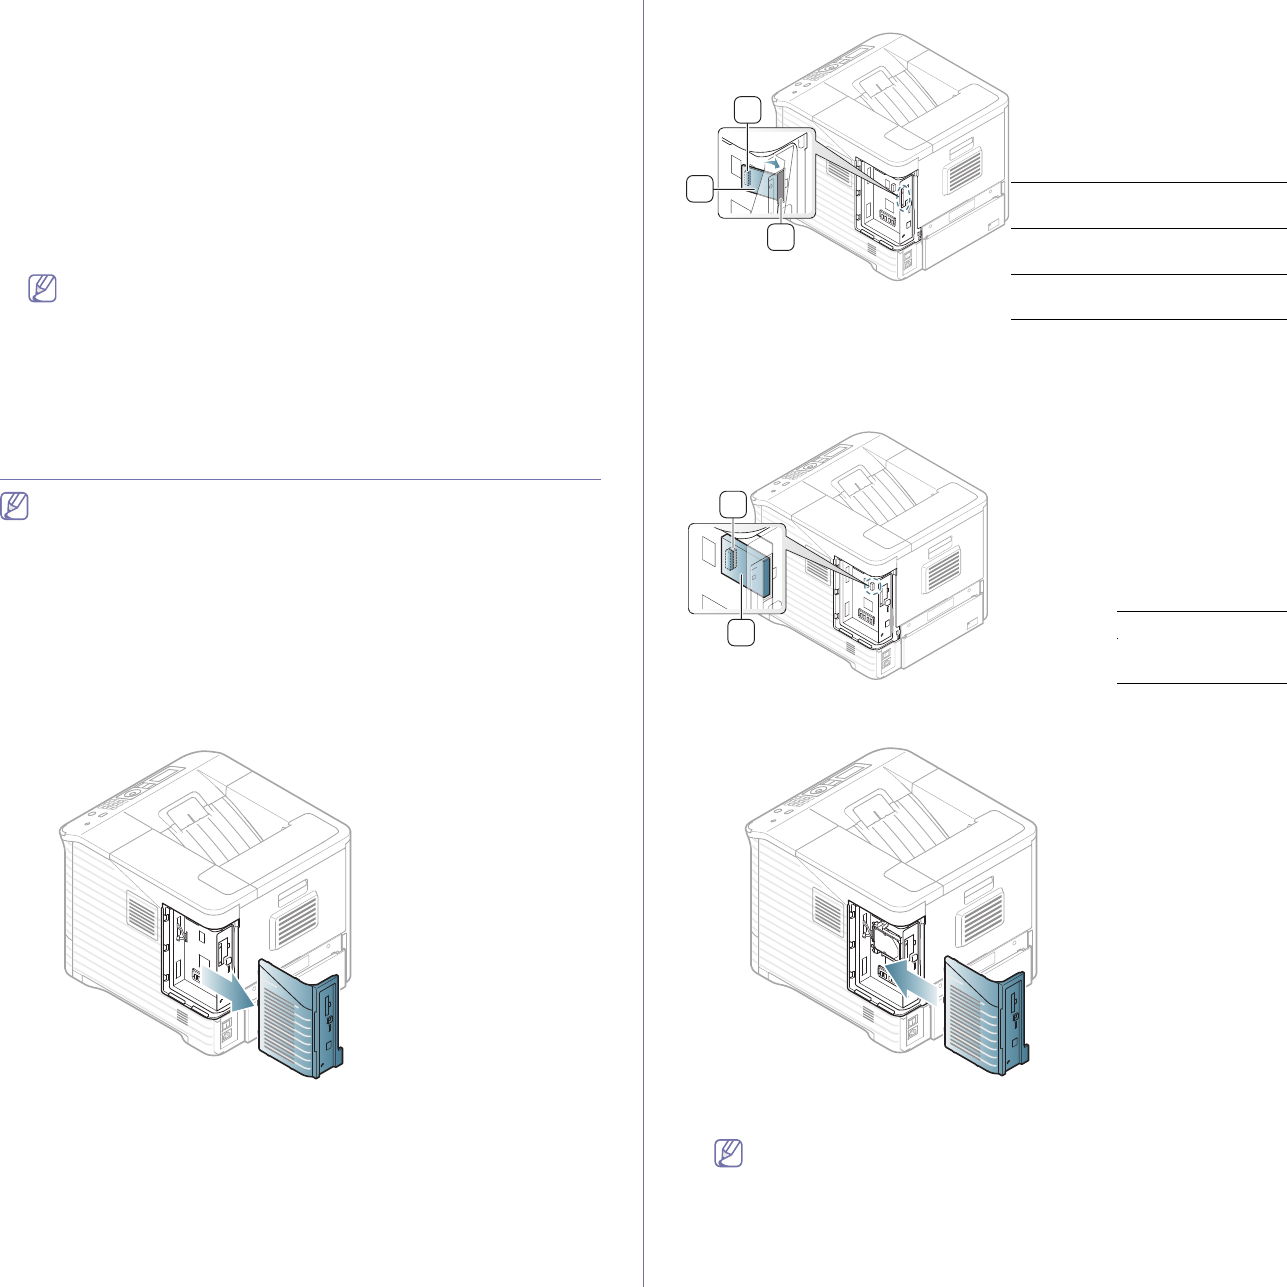
1.Turn the machine off and unplug all cables from the machine.
2.Grasp the control board cover and remove it.
3.Take out a new wireless interface card from its bag.
4.Place the wireless network interface card into the card guide [below item
3], ensu
re the connector side of the card is to the right.
1
2
3
1wireless network interface
card connector
2wireless network interface
card
3wireless network interface
card guide
5.Align the wireless network card connector on the right side of the card
with the connector on the control board [1].
Press the wireless interface card [2] down firmly into the main connector
[1] until it is
co
mpletely and securely in place.
2
1
1Connector
2Wireless inter-
face card
6. Close the control board cover by aligning the groove on it with the notch
on the printer and sliding it.
7.Plug all the cables back into the machine, and turn the machine on.
8.Set the wireless network environment.
For information about configuring and using the printer on a wire-
less network environment, refer to the Wireless network instal
l
guide provided with the wireless network interface card. You can
also configure the network parameters on the control panel; see
the next column.
Supplies and accessories_ 102
Configuring the machine’s wireless network
Before starting you will need to know the network name(SSID) of your wire-
less network and the network key if it is encrypted. This information was set
w
hen the wireless router(access point) was installed. If you do not know
about your wireless environment, please ask the person who has set up
your network.
To configure wireless parameters, you can use both control panel and
Syn
cThru™ Web Service.
Using the control panel
1.Press Menu on the control panel.
2.Press the
up/down arrow to highlight Network and press OK.
3.Press the
up/down arrow to highlight Wireless and press OK.
4.Press th
e up/down arrow to highlight WLAN Settings and press OK.
5.Press the
up/down arrow to highlight the setting option you want
appearsand press OK.
•Wizard: The wireless network interface card in your printer
searches for wireless networks in the area and shows the results
(see "Wizard mode" on page102).
•Custom: You can
configure the wireless settings according to
your needs (see "Custom mode" on page102).
Wizard mode
1.The wireless network interface card on your machine searches for
wireless network in the area and shows the results.
2.Press the lef
t/right arrow to select a network you want to use in
Search List and press OK. You can select a network using SSID.
3.When None appears in WLAN Security on the display, press OK to
save your selection. go to step 6.
If you see another messages, go to the next step.
4.Dep
ending on the network you select, WLAN security encryption
type will be WEP or WPA.
•In case of WEP, Press the l
eft/right arrow to select Open System
or SharedKey.
-Open System: Authentication is not used, and Encryption
may or may not be used, depending on the need for data
security. Enter the WEP Key using number keypad after
selecting Open System.
-SharedKey: Authentication i
s used. A device that has a
proper WEP Key can access the network. Enter the WEP
Key using number keypad after selecting SharedKey.
•In case of WPA, Ent
er the WPA Key using number keypad. The
Key length should be between 8 to 63 characters long.
5.Press OK.
6.Press Stop/Clear to return to ready mode.
•SSID: SSID (Service Set Identifier) is a name that identifies a
wireless network. Access points and wireless devices attempt-
ing to connect to a specific wireless network must use the
same SSID. The SSID is case-sensitive.
•WEP: W
EP (Wired Equivalent Privacy) is a security protocol
preventing unauthorized access to your wireless network.
WEP encrypts the data portion of each packet exchanged on a
wireless network using a 64-bit or 128-bit WEP encryption key.
•WPA: WPA authorize
s and identifies users based on a secret
key that changes automatically at regular intervals. WPA also
uses TKIP (Temporal Key Integrity Protocol) and AES
(Advanced Encryption Standard) for data encryption.
Custom mode
1.Enter the SSID when Edit SSID appears on the top line of the dis-
play, the name that identifies a wire
less network. SSID is case-sensi-
tive so you need to enter it carefully. Press OK.
2.Select
the type of wireless connections. Press the left/right arrow to
select the method of Operation Mode you want and press OK.
•Ad-hoc: Allows wireless devices to communicate directly with
each other in a peer-to-peer environment. Go to step 3.
•Infrastructure: Allo
ws wireless devices to communicate with
each other through an access point. Go to step 4.
3.Pre
ss the left/right arrow to select the method of Channel you want
and press OK. If you select Auto, the wireless network interface card
on your machine will automatically adjust the channels.
4.Pre
ss the left/right arrow to select the method of WLAN Security
you want and press OK.
•None: Thi
s is used when the validation of a wireless device’s
identity and data encryption are not required for your network.
Open system is used for IEEE 802.11 authentication.
•Static WE
P: This uses the WEP (Wired Equivalent Privacy) algo-
rithm suggested by IEEE 802.11 standard for security. Static
WEP security
mode requires a proper WEP key for data encryp-
tion, decryption, and IEEE 802.11 authentication. Press the
left/right arrow to select the setup method you want in Authenti-
cation and press OK.
-Open
System: Authentication is not used, and encryption
may or may not be used, depending on the need for data
security. Enter the WEP Key using number keypad after
selecting Open System and then press OK.
-Sh
aredKey: Authentication is used. A device that has a
proper WEP Key can access the network. Enter the WEP
Key using number keypad after selecting SharedKey and
then press OK.
•WPA-PSK or WPA2-PSK: You can sele
ct WPA-PSK or
WPA2-PSK to authenticate the print server based on WPA
Pre-Shared Key. This uses a shared secret key (generally called
Pre Shared Key passphrase) which is manually configured on
the access point and each of its clients.
a. Press OK w
hen WPA-PSK or WPA2-PSK appears on the bot-
tom line of the display.
b. Press the up/down arrow to select TKIP or AES in
Encryption
and press OK. If you select WPA2-PSK, press the left/right arrow
to select AES or TKIP + AES in Encryption and press OK.
c. Enter the WPA Key usi
ng number keypad and press OK.
5.Whe
n you have finished, press Stop/Clear to return to the ready
mode. If you do not know about your wireless environment, please
ask the network administrator.
Disconnect the network cable (standard or crossover). Your
machine should then start communicating wirelessly with the net-
work. In case of Ad-hoc mode, you can use a wireless LAN and
wired LAN simultaneously.
Now go to "Installing network connected machine’s driver" on page38.
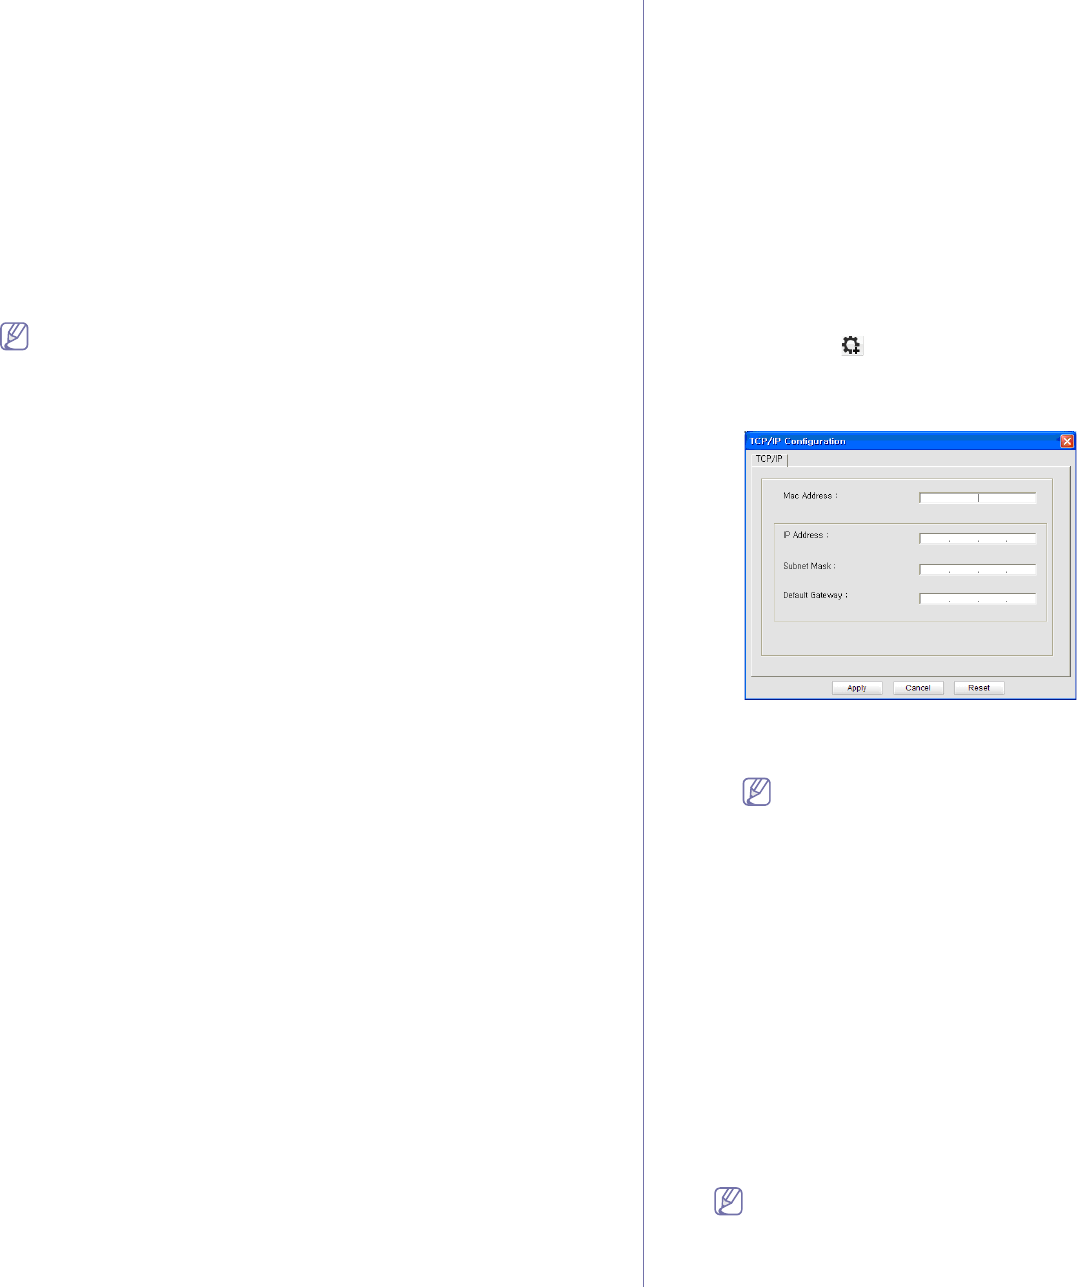
Using SyncThru™ Web Service
For information about configuring and using the machine on a wireless
network environment, refer to the Wireless network install guide pro-
vided with the wireless network interface card. You can also configure
the network parameters on the SyncThru™ Web Service.
Supplies and accessories_ 103
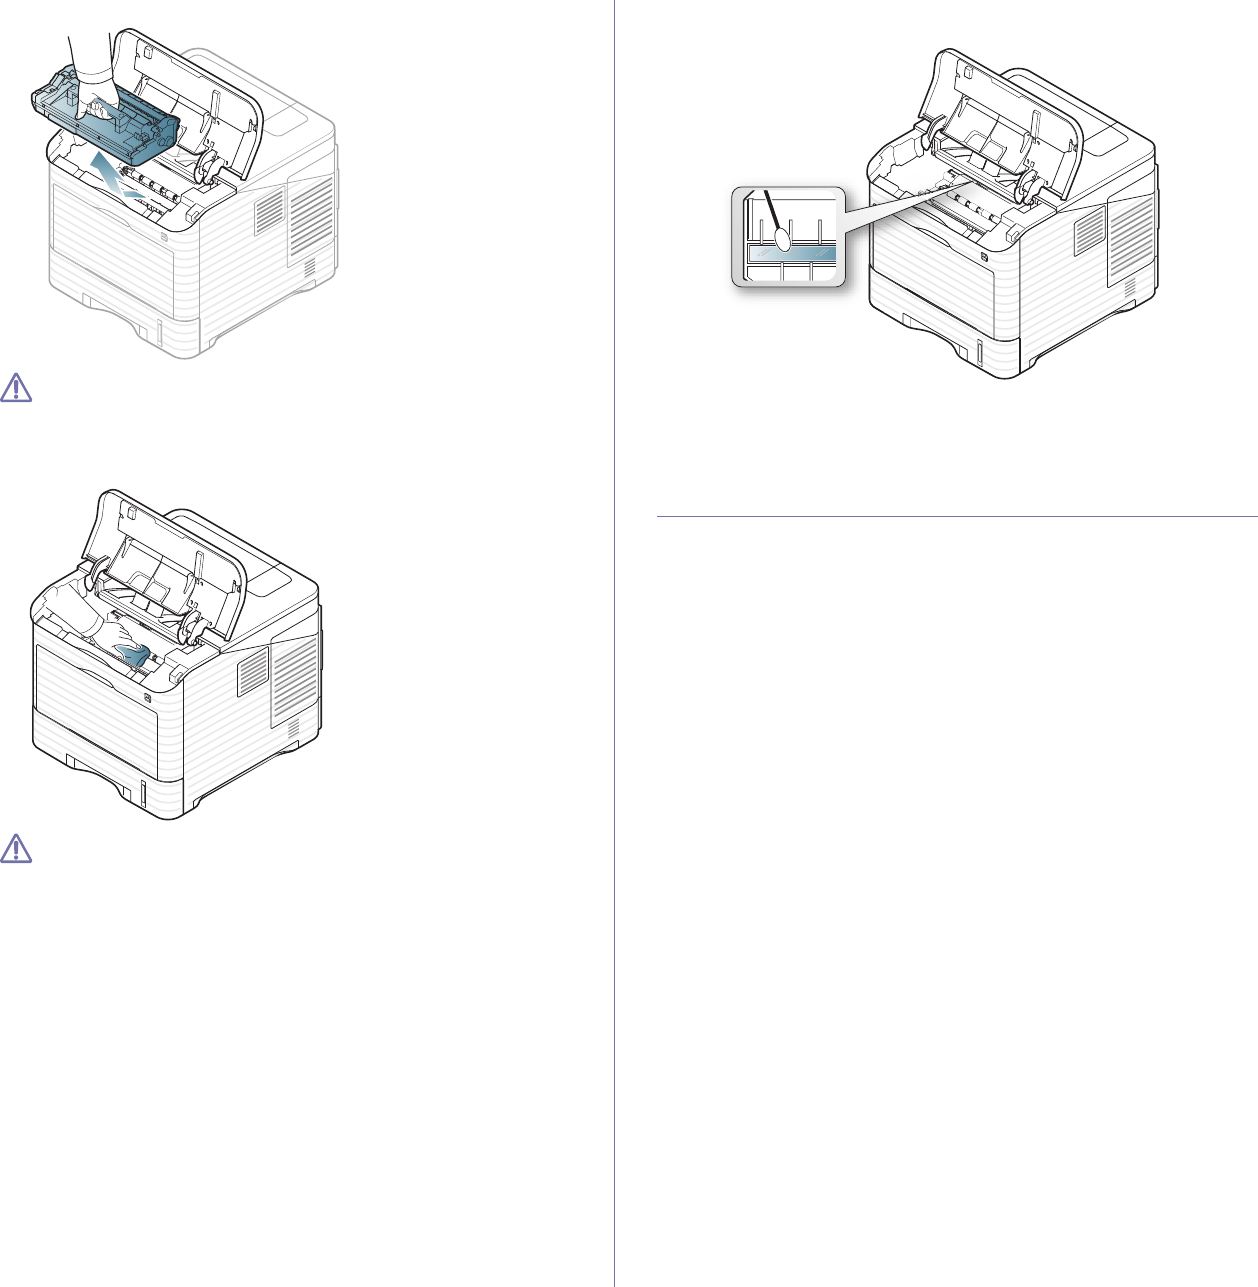
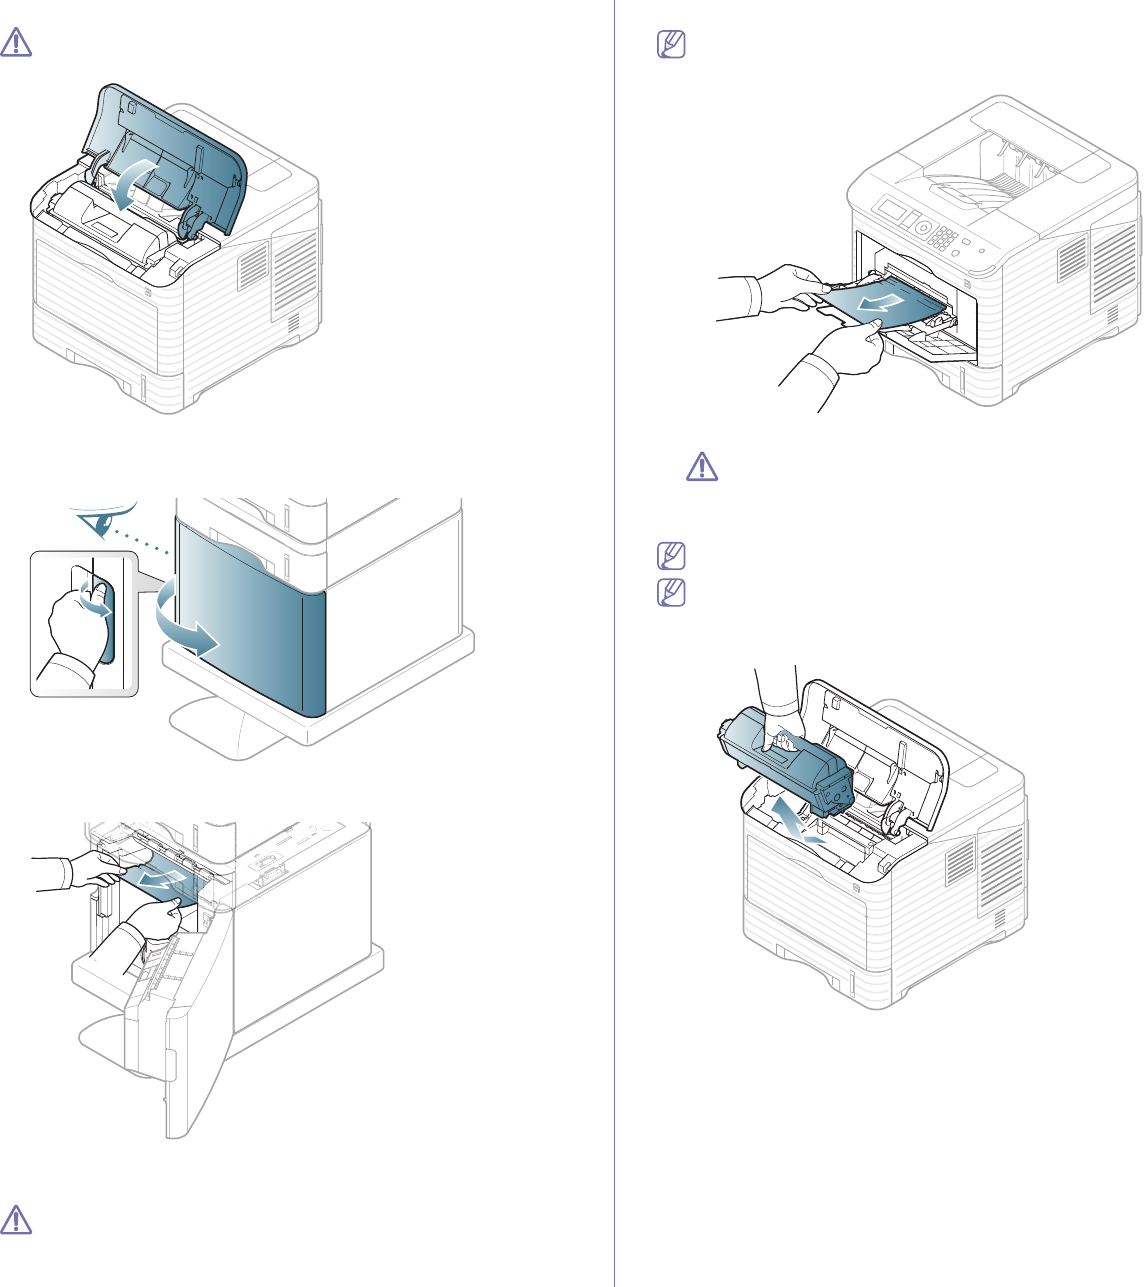
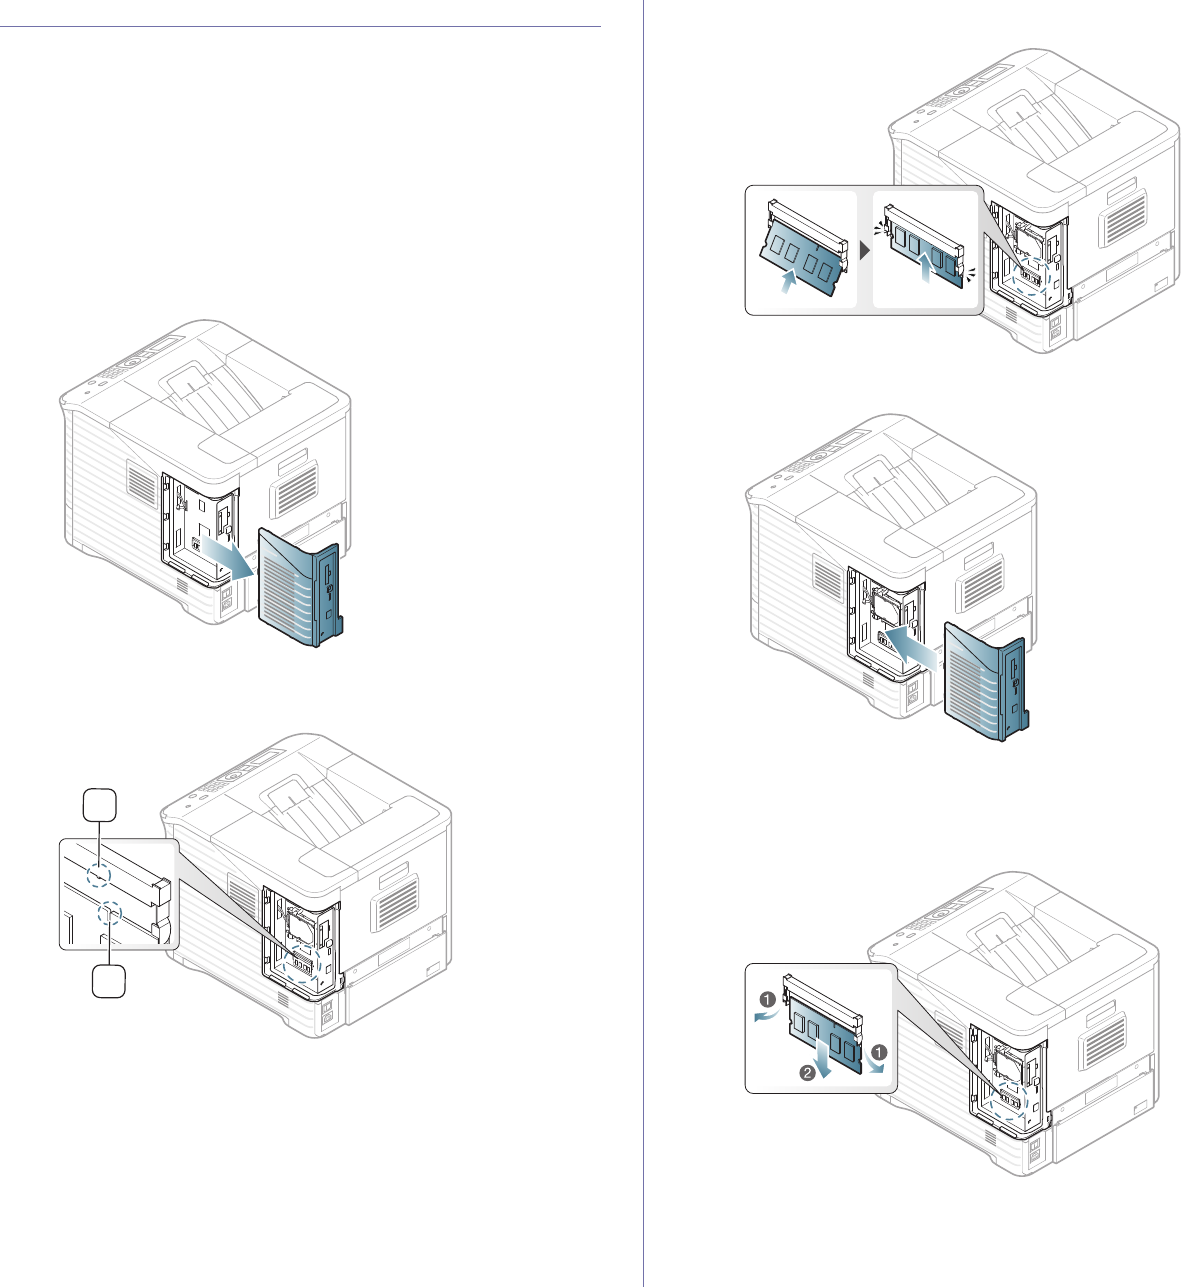
UPGRADING A MEMORY MODULE
Your machine supports DIMM (Dual Inline Memory Module). Use this
memory module slot to install additional memory.
When you are expanding the memory capacity, you can add a memory
mo
dule
to the vacant memory slot (See "Available accessories" on
page97).
We recommend the use of only genuine Samsung DIMM's. You may void
your warranty if it is determine
d that your machine problem is being caused
by third party DIMM's.
Installing a memory module
1.Turn the machine off and unplug all cables from the machine.
2.Grasp the control board cover and remove it.
3. Take out a new DIMM from its plastic bag.
4.Locate the DMM sl
ot and align the notch on the DIMM with the groove at
the DIMM slot, holding the DIMM by its edges.
2
1
5.Push the DIMM into the machine until it snaps into place. Make sure that
the latches fit over the notches located on either side of the DIMM.
6. Close the control board cover by aligning the groove on it with the notch
on the machine and sliding it.
7.Reconnect the power cord and printer cable, and turn the machine on.
Removing a memory
Push the latches at both ends of the DIMM slot away to remove the DIMM
and pull out the DIMM.
Supplies and accessories_ 104
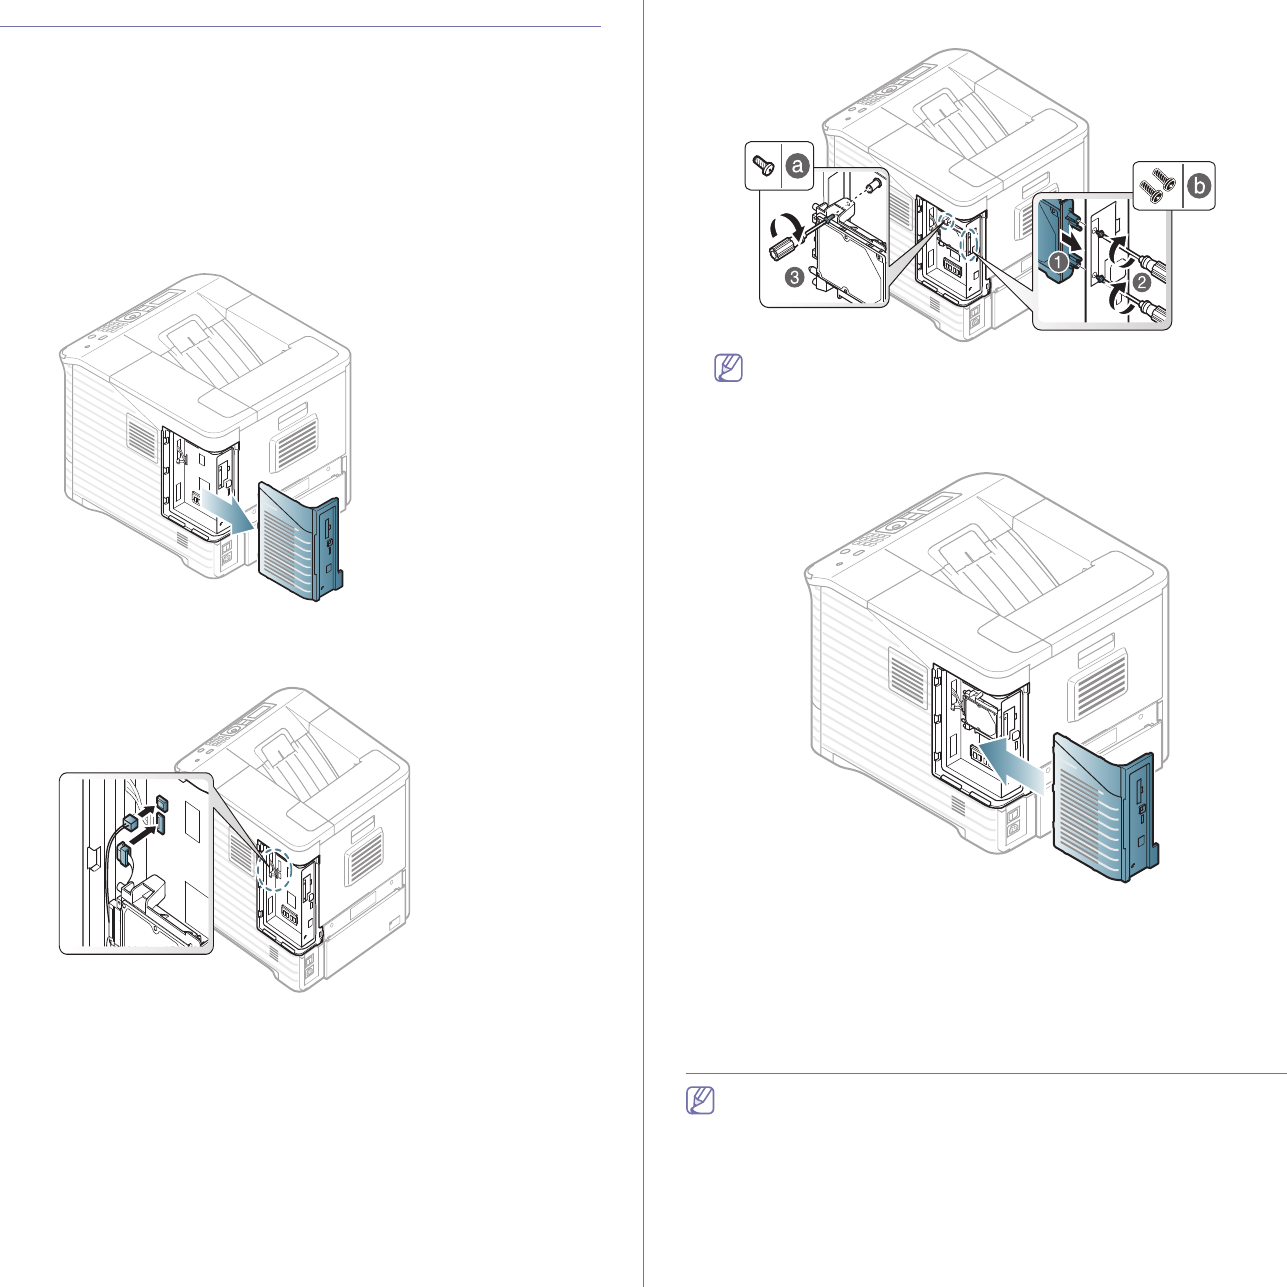
INSTALLING A HARD DISK
Installing the hard disk allows the data from your computer to be sent to the
print queue of the printer hard disk. This decreases the workload of the com-
puter. You can also use various print features, such as storing a job in the
hard disk, proofing a job, and printing private documents.
The order information is provided for optional hard disk (See "Available
accessories" on page97).
Installing a hard disk
1.Turn the machine off and unplug all cables from the machine.
2.Grasp the control board cover and remove it.
3.Take out a new hard disk from its plastic bag.
4.Align the connector on the hard disk with the connector on the control
boa
rd. Push the hard disk in until it is latched into place.
5.Fasten down the hard disk with the screws supplied with your new hard
disk.
You only need two b-type screws out of three. Keep the extra one
in a safe place.
6. Close the control board cover by aligning the groove on it with the notch
on the printer and sliding it.
7.Plug all the cables back into the machine, and turn the machine on.
8.You must activate the added hard disk in the driver properties
(See "Activa
ting the added accessories in printer properties" on
page100).
PRINTING WITH THE OPTIONAL MEMORY OR
HARD DISK DRIVE
•Some menus may not appear in the display depending on options
or models. If so, it is not applicable to your machine.
•After installing the optional hard disk, you can use advanced print-
ing features, such as storing or spo
oling a print job to the hard
disk, proofing a job, and specifying of printing a private job in the
printer properties window.
Once you have stored files in the hard di
sk, you can easily print or
delete the stored files using the control panel of your printer.
Supplies and accessories_ 105
From the printer driver
After installing the optional memory or HDD, you can use advanced printing
features, such as proofing a job and specifying of printing a private job in the
printer properties window.
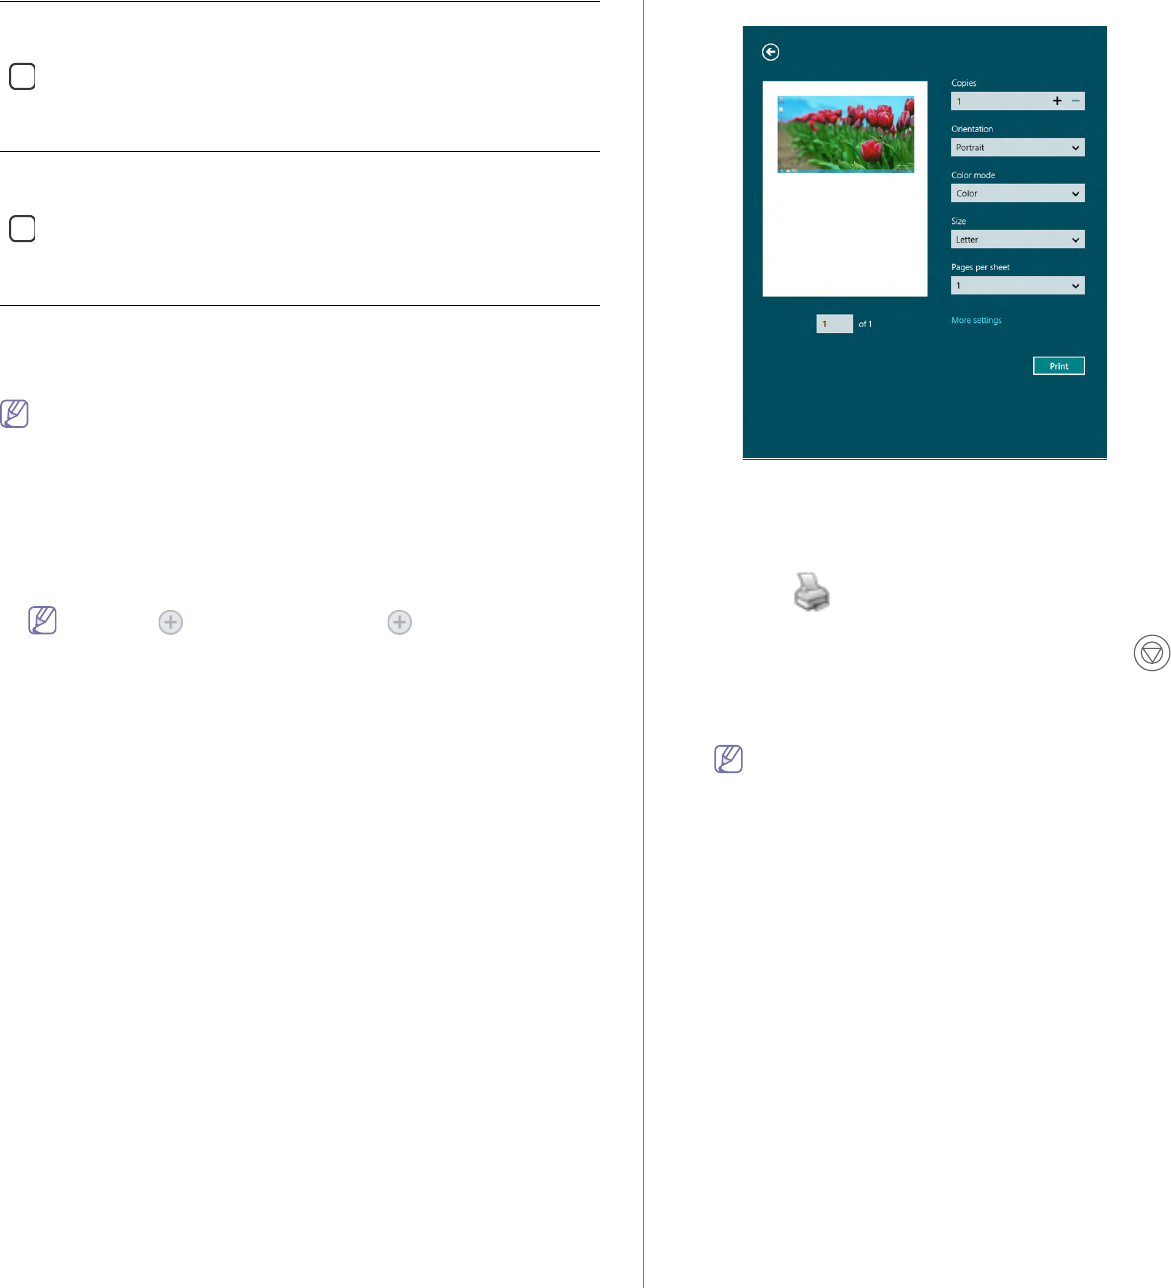
1.Open the document you want to print.
2.Select Print from the File menu. The Print window appears.
3.Select your printer driver fro
m the Select Printer list.
The basic print settings including the number of copies and print range
are selected within the Print window.
4.Ac
cess Printin
g Preferences (See "Opening printing preferences" on
page52).
5.(See "Print Mo
de" on page56).
Controlling the active job queue
All of the print jobs waiting to be printed are listed in the active job queue in
the order you sent them to the printer. You can delete a job from the queue
before printing, or promote a job to print sooner.
1.Press Menu on
the control panel.
2.Press the up/down arrow to highlight J
ob Management and press OK.
3.Press the up/down arrow to highlight Ac
tive Job and press OK.
4.Press the up/down arrow to highlight the user’s name and file name you
want
to use appears and press OK.
If the select file is a confidential print job, enter the specified 4-digit
password.
Use the up/down arrow to enter digits. When you press OK, the
cursor
w
ill move to the next character. When you finish entering
the password, press OK.
If you enter the incorrect password, Inva
lid Password appears.
Re-enter the correct password.
5.Pre
ss the up/down arrow to highlight the setting option you want
app
earsand press OK.
•Cancel:You can de
lete a file from the queue.
•Promote:You can select a job waiting in the active job queue and
change its
print order so that it can be printed sooner.
•Relea
se:You can
print a job scheduled to be printed at a specified
time immediately. In this case, the job currently printing is stopped
and the selected job will be printed. This function is available when
the job is scheduled for later printing.
6.Whe
n Ye
s appears, press OK.
File Policy
You can choose the file policy for generating file name before you proceed
with the job through optional HDD or enabled Ram disk. If the optional mem-
ory or HDD already has the same name when you entered a new file name,
you can rename or overwrite it.
1.Press Menu on the control panel.
2.Press the up/down arrow to highlight Jo
b Management and press OK.
3.Press the up/down arrow to highlight F
ile Policy and press OK.
4.Press the up/down arrow to highligh
t the setting option you want
appearsand press OK.
•Rename :If the optional memory already has the same name when
you enter a new file
name, the file will be saved as a different name
that is automatically programmed.
•Ove
rwrite :You can set the machine to delete previous job informa-
tion on optional memory as you store new job information.
Storing a job
You can store jobs on the optional HDD or enabled Ram disk.
1.Open the document you want to print.
2.Select Print from the file menu. The Print window appears.
3.Select your machine from Select Printer list.
4.Click Prop
erties or Preferences.
5.Select the print mode you want from the drop-down list
(See "Using he
lp" on page53).
6.En
ter the user’s name and file name and click OK.
7.Click OK until the Print window is displayed.
8.Click OK or Print to start prin
ting.
Printing or deleting a stored job
You can print or delete jobs stored on the optional HDD or enabled Ram
disk.
1.Press Menu on the control panel.
2.Press the up/down arrow to highlight Jo
b Management and press OK.
3.Press the up/down arrow to highlight Stored Job and
press OK.
4.Press the up/down arrow to highlight th
e user’s name and file name you
want to use and press OK.
If the select file is a confidential print job, enter the specified 4-digit
password.
Use the up/down arrow to enter digits. When you press OK, the
cursor will move to the next character. When you finish entering
the password, press OK.
If you enter the incorrect password, In
valid Password appears.
Re-enter the correct password.
5.Press the up/down arrow to highlight the setting option you want and
press OK.
•Print:You can print a stored job.
•Delete:You can delete a stored job.
6.W
hen Yes a
ppears, press OK.
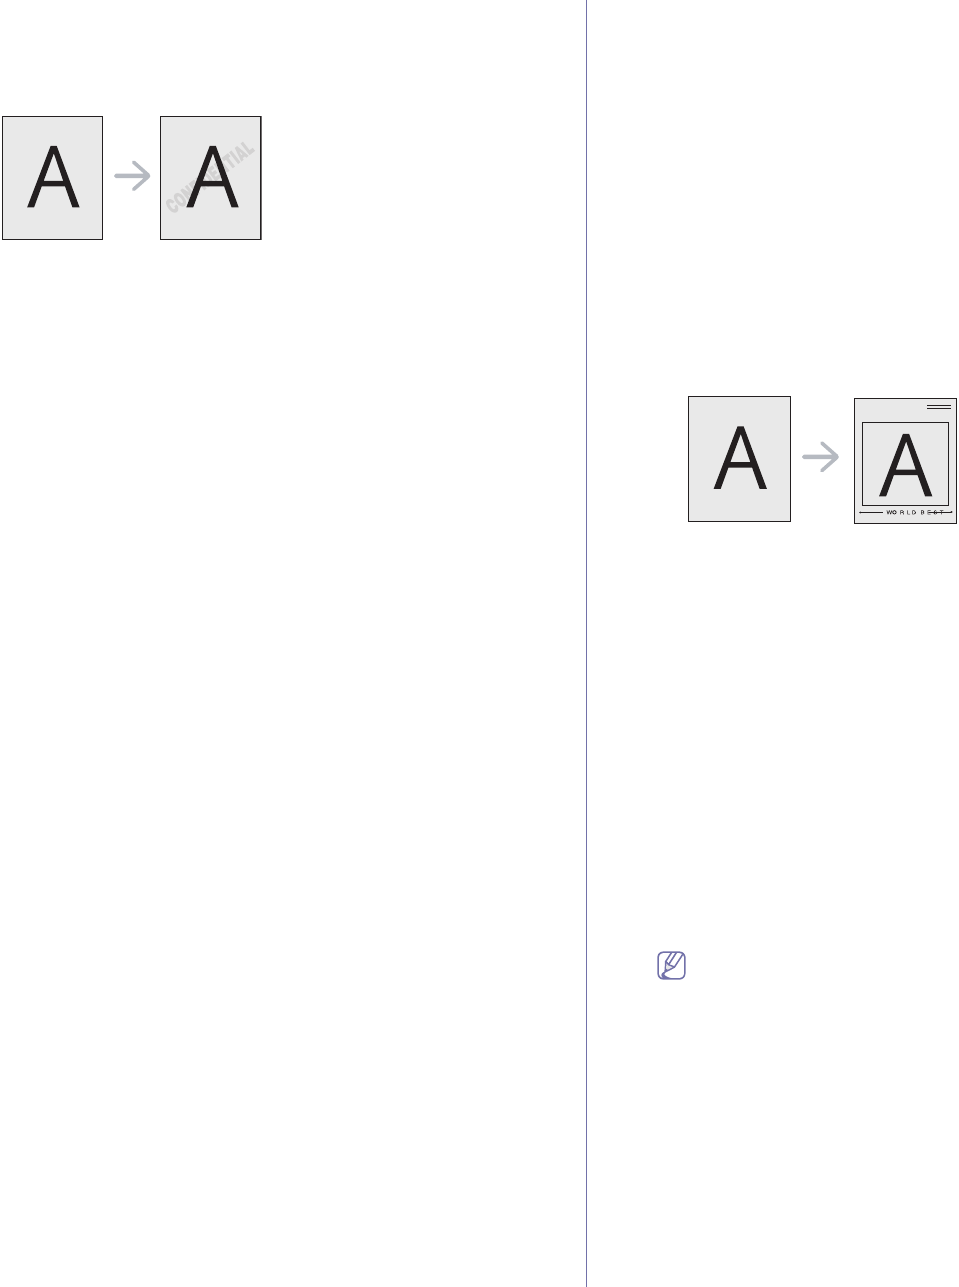
Form file
Form overlay are images stored in the printer hard disk drive (HDD) as a
special file format that can be printed in layers on any document.
Creating new form files
Use the steps below to create a new form overlay.
Supplies and accessories_ 106
1.Create or open a document containing text or an image for use in a
new form file.
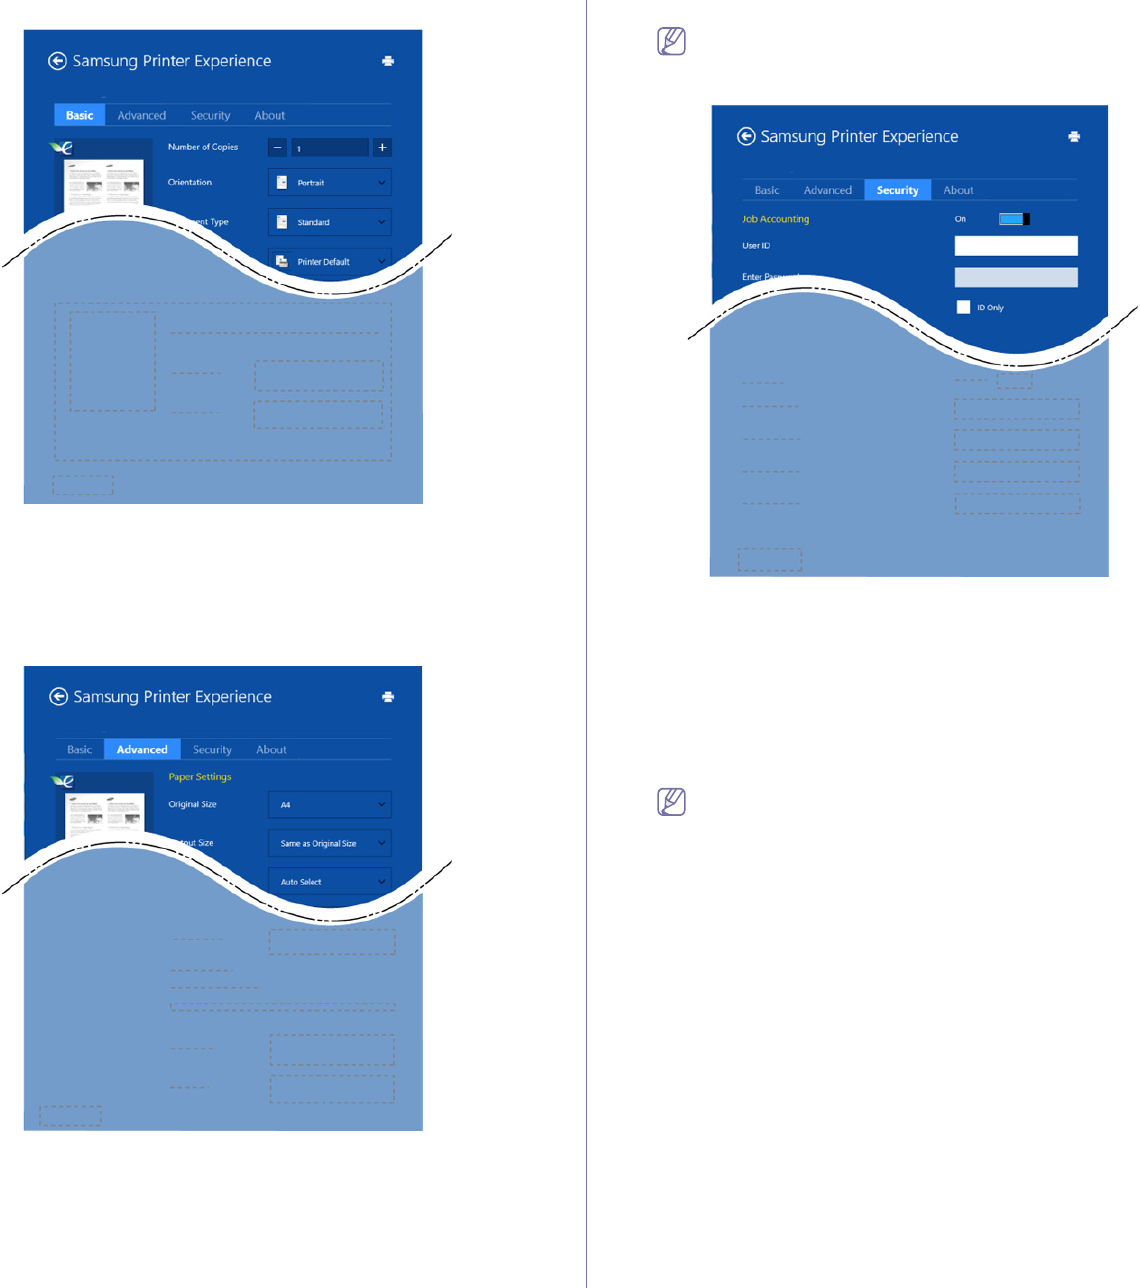
2.To save the document as a form file, access Printing Preferences
(See "Opening printing preferences" on page52).
3.Cli
ck the Ad
vanced tab, and select Edit from the Text drop-down
list. Edit Overlay window appears.
4.In the Ed
it Ov
erlay window, click Create.
5.In the Save As win
dow, type a name of up to eight characters in the
File name box. Select the destination path, if necessary. (The
default is C:\Formover.)
6.Click Save. T
he name appears on the Overlay List.
7.Click OK or
Print until you exit the Print window.
8. A confirm message appears, click Yes to
save.
The file is not printed. Instead, it is stored on
your computer hard disk
drive.
If you click NO, the machine prints your form without saving.
9.A confirm message appears, click Yes to s
ave.
The form file size must be the same as the document you print with
the form file.
Using form files on your machine’s hard disk drive
1.Press Menu on the control panel.
2.Press the u
p/down arrow to highlight System Setup and press OK.
3.Press the u
p/down arrow to highlight Form Menu and press OK.
4.Press the up
/down arrow to highlight the setting option you want and
press OK.
•Off:Prints in normal
mode.
•Single Form:Pri
nts all page using the first form.
•Double Form
:Prints the front page using the first form and the
back page using the second form.
5.Press B
ack.
6.Press the up/down arrow to highlight Select Form and press OK.
7.Press the u
p/down arrow to highlight the form you want and press
OK.
Deleting residual image data
Some menus may not appear in the display depending on options or
models. If so, it is not applicable to your machine.
Image Overwrite is a security measure fo
r customers who are con
cerned
about unauthorized access and duplication of classified or private docu-
ment.
1.Pr
ess Menu on
the control panel.
2.Press the up/down arrow to highlight J
ob Management and press OK.
3.Press the up/down arrow to highlight Imag
e Overwrite and press OK.
4.Press the up/down arrow to highlight the setting option you want and
press OK.
•Automatic :All resid
ual image data from the machine will be erased
immediately after each job has been processed.
•Manual :This option provides an on-dem
a
nd facility for a system
administrator to erase all the real image data remained in hard disk
drive (HDD) after this option is enabled. All existing jobs will be
deleted regardless of their status and all job submissions will be pro-
hibited for the duration of the overwrite.
5.Press the up/down arrow to select On or
Off for Automatic.
Press the up/down arrow to select Enab
le or Disable for Manual.
If you select Enable for Manual, the machine asks if the overwrite
feature should starts now. Press the left/right arrow to select Yes
or No. If you select Yes, On Demand overwrite starts as soon as
you select Yes. If you select No, this feature will just be enabled.
6.Press OK.
Held Job Time-out
The machine can automatically delete a stored job after a certain period of
time. You can set the time the machine will wait before deleting the stored
job.
1.Press Menu on the control pa
nel.
2.Press the up/down arrow to highlight Jo
b Management and press OK.
3.Press the up/down arrow to highlight Hel
d Job Timeout and press OK.
4.Press the up/down arrow to highligh
t the setting option you want and
press OK.
•On :Select to automatically delete a stored job. You can set the
time the machine will wait before deleting the job.
•Off :Select not to automatically delete a stored job.
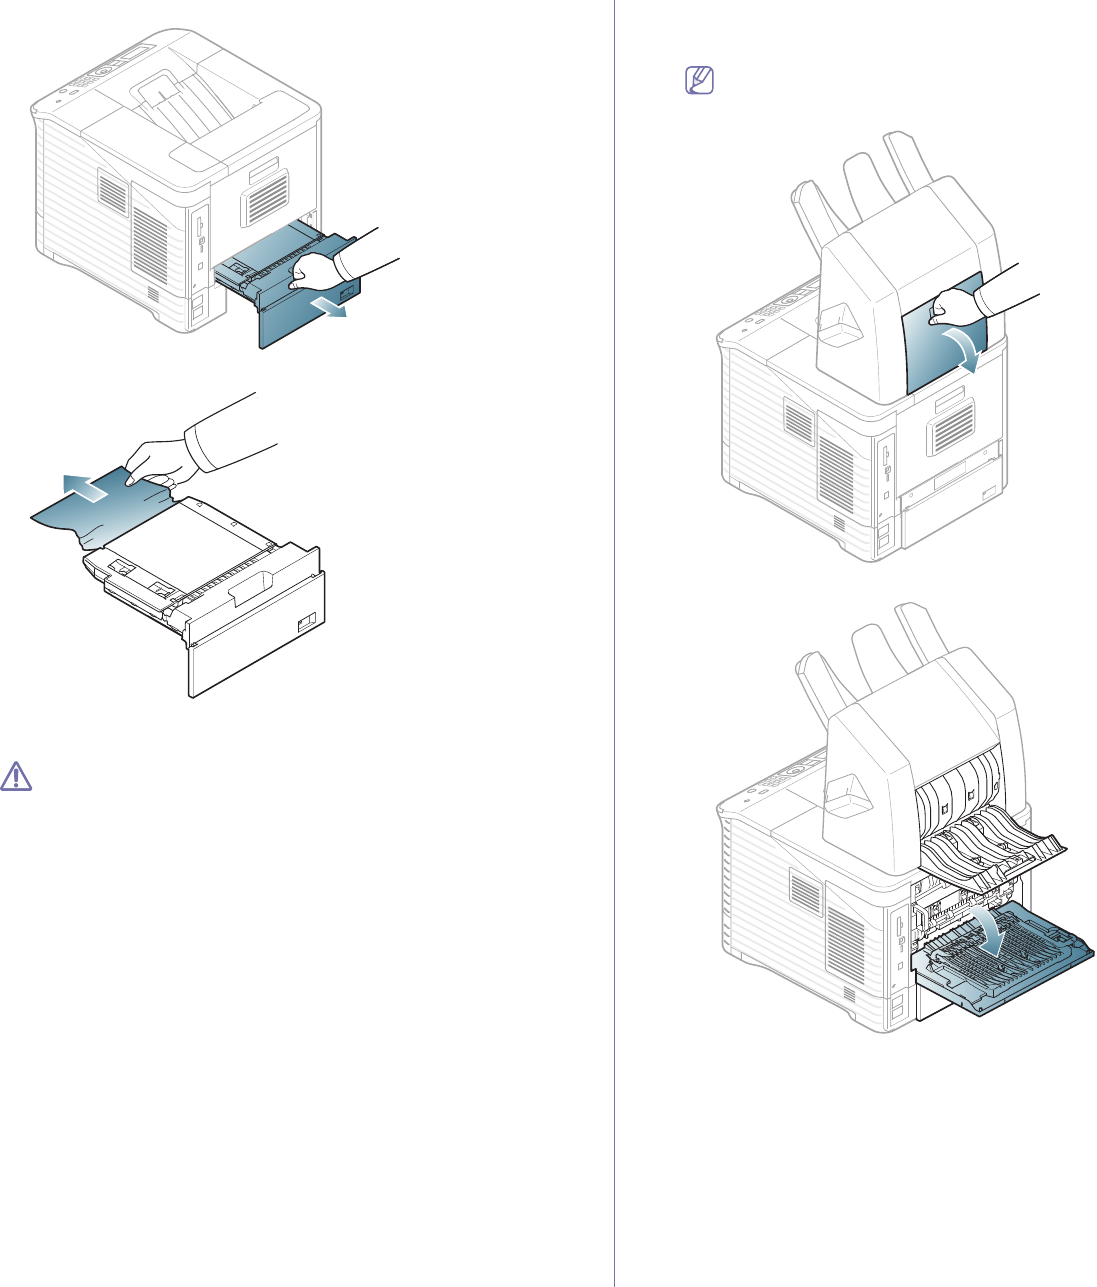
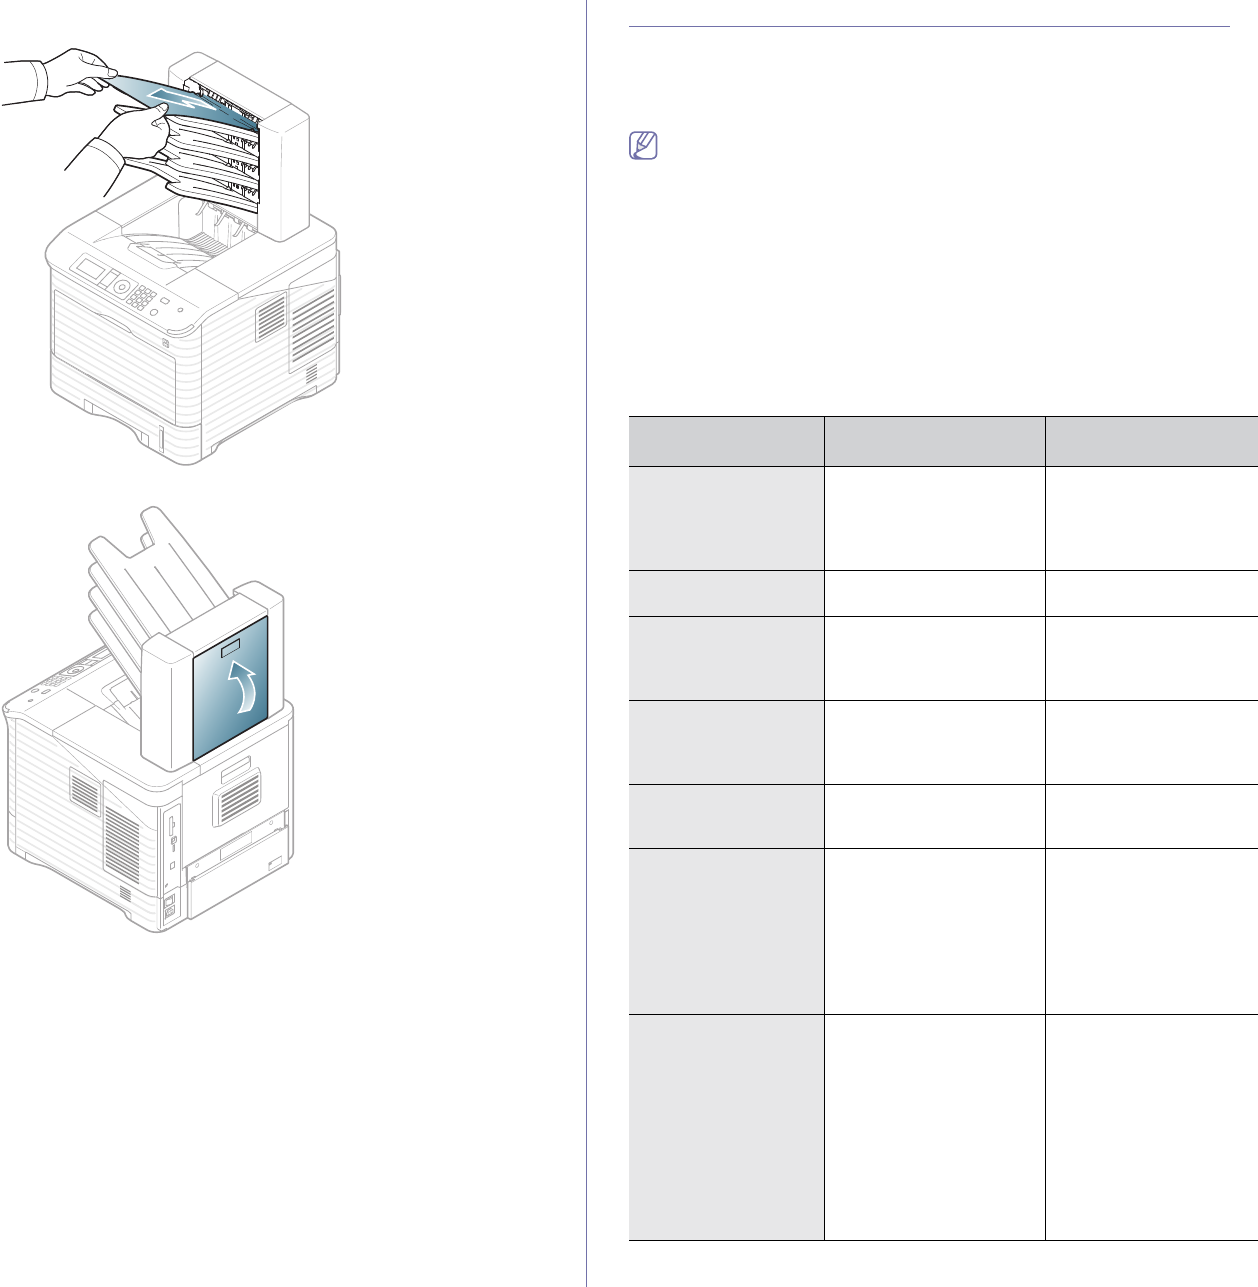
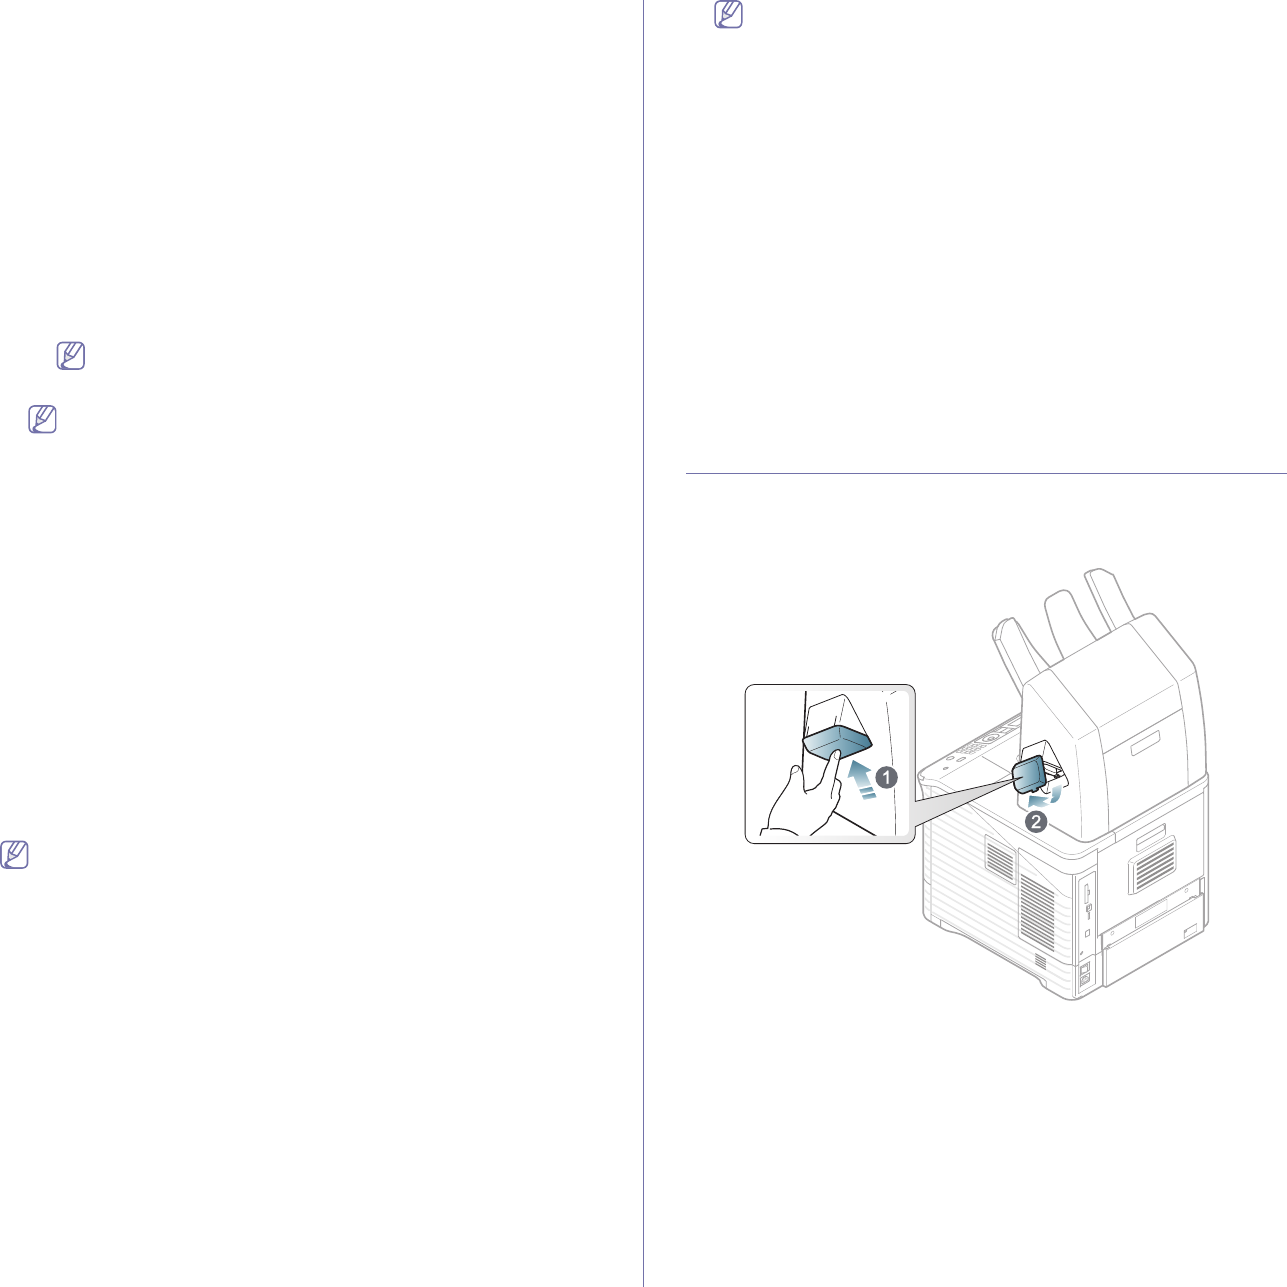
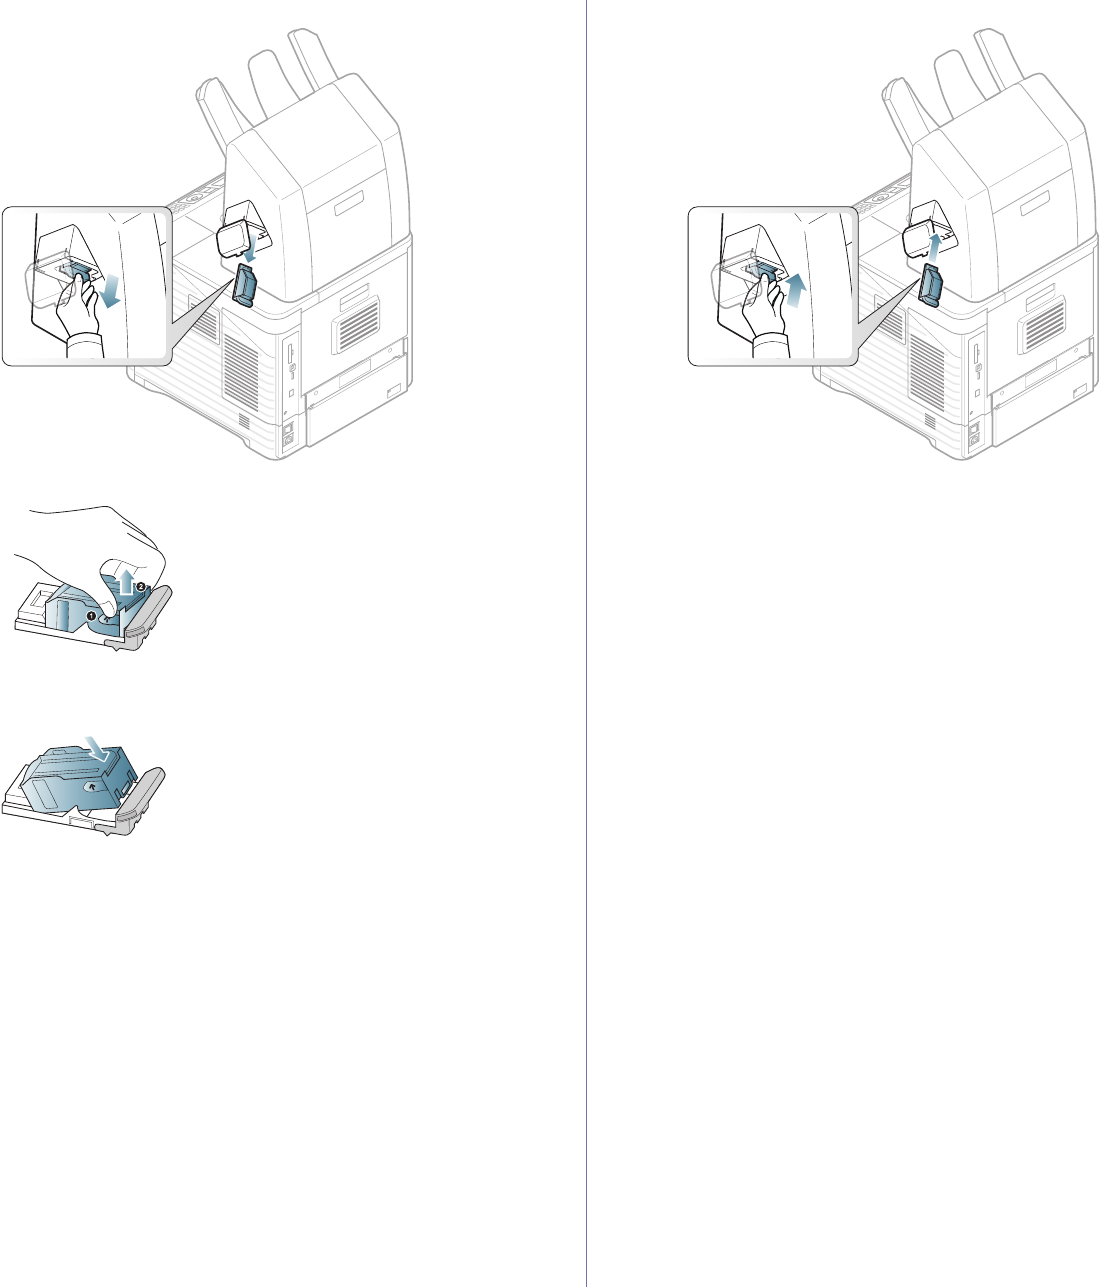
REPLACING THE STAPLERCARTRIDGE
When the optional stapler is completely empty, the message for installing
the staple cartridge appears on the LCD display.
1.Pre
ss the stapler cover at the side of the optional finisher
to open.
Supplies and accessories_ 107
2.Pull the stapler unit out.
3.Lift the empty staple cartridge from the stapler unit.
4.Unpack the new staple cartridge. Make sure that all tape and packing
materials are removed from inside the staple cartridge.
5.Place the stap
le cartridge back into the stapler unit.
6.Slide the stapler unit in until it locks in place.
7.Close the stapler cover.
Specifications_ 108
specifications
This chapter guides you about this machine’s specifications.
This chapter includes:
•Hardware specifications
•Environmental specifications
•Electrical specifications
•Print media specifications
The specification values are listed below, specification are subject to change without notice. See www.samsung.com/printer for possible changes in infor-
mation.
HARDWARE SPECIFICATIONS
ITEMDESCRIPTION
DimensionHeight420 mm (16.54 inches)
Depth540 mm (21.28 inches)
Width
464 mm (18.27 inches)
WeightMachine with consumables•ML-5510ND/ML-5512ND/ML-5515ND Series, ML-651x Series: 34.8kg
Gebruikershandleiding.com neemt misbruik van zijn services uitermate serieus. U kunt hieronder aangeven waarom deze vraag ongepast is. Wij controleren de vraag en zonodig wordt deze verwijderd.
Product:
Spelregels forum
Om tot zinvolle vragen te komen hanteren wij de volgende spelregels:
lees eerst de handleiding door;
controleer of uw vraag al eerder door iemand anders is gesteld;
probeer uw vraag zo duidelijk mogelijk te stellen;
heeft u een probleem en al geprobeerd om dit op te lossen, vermeld dit erbij aub;
heeft u een oplossing gekregen van een bezoeker dan horen wij dat graag in dit forum;
wilt u een reactie geven op een vraag of antwoord, gebruik dan niet dit formulier maar klik op de knop 'reageer op deze vraag';
uw vraag wordt direct op de website gezet; vermijd daarom persoonlijke gegevens in te vullen;
Belangrijk! Als er een antwoord wordt gegeven op uw vraag, dan is het voor de gever van het antwoord nuttig om te weten als u er wel (of niet) mee geholpen bent! Wij vragen u dus ook te reageren op een antwoord.
Belangrijk! Antwoorden worden ook per e-mail naar abonnees gestuurd. Laat uw emailadres achter op deze site, zodat u op de hoogte blijft. U krijgt dan ook andere vragen en antwoorden te zien.
Abonneren
Abonneer u voor het ontvangen van emails voor uw Samsung ML-6515 bij:
nieuwe vragen en antwoorden
nieuwe handleidingen
U ontvangt een email met instructies om u voor één of beide opties in te schrijven.
Ontvang uw handleiding per email
Vul uw emailadres in en ontvang de handleiding van Samsung ML-6515 in de taal/talen: Engels als bijlage per email.
De handleiding is 34,59 mb groot.
U ontvangt de handleiding per email binnen enkele minuten. Als u geen email heeft ontvangen, dan heeft u waarschijnlijk een verkeerd emailadres ingevuld of is uw mailbox te vol. Daarnaast kan het zijn dat uw internetprovider een maximum heeft aan de grootte per email. Omdat hier een handleiding wordt meegestuurd, kan het voorkomen dat de email groter is dan toegestaan bij uw provider.
Uw handleiding is per email verstuurd. Controleer uw email
Als u niet binnen een kwartier uw email met handleiding ontvangen heeft, kan het zijn dat u een verkeerd emailadres heeft ingevuld of dat uw emailprovider een maximum grootte per email heeft ingesteld die kleiner is dan de grootte van de handleiding.
Er is een email naar u verstuurd om uw inschrijving definitief te maken.
Controleer uw email en volg de aanwijzingen op om uw inschrijving definitief te maken
U heeft geen emailadres opgegeven
Als u de handleiding per email wilt ontvangen, vul dan een geldig emailadres in.
Uw vraag is op deze pagina toegevoegd
Wilt u een email ontvangen bij een antwoord en/of nieuwe vragen? Vul dan hier uw emailadres in.