Figures and illustrations in this User Manual are provided for reference only and may differ from actual product appearance.
Product design and specifications may be changed without notice.
Digital TV notice
1. Functionalities related to Digital TV (DVB) are only available in countries/areas where DVB-T (MPEG2 and MPEG4 AVC) digital terrestrial signals are
broadcasted or where you are able to access to a compatible DVB-C (MPEG2 and MPEG4 AAC) cable-TV service. Please check with your local
dealer the possibility to receive DVB-T or DVB-C signal.
2. DVB-T is the DVB European consortium standard for the broadcast transmission of digital terrestrial television and DVB-C is that for the broadcast
transmission of digital TV over cable. However, some differentiated features like EPG (Electric Programme Guide), VOD (Video On Demand) and so
on, are not included in this specification. So, they cannot be workable at this moment.
3. Although this TV set meets the latest DVB-T and DVB-C standards, as of [August, 2008], the compatibility with future DVB-T digital terrestrial and
DVB-C digital cable broadcasts cannot be guaranteed.
4. Depending on the countries/areas where this TV set is used some cable-TV providers may charge an additional fee for such a service and you may
be required to agree to terms and conditions of their business.
5. Some Digital TV functions might be unavailable in some countries or regions and DVB-C might not work correctly with some cable service providers.
6. For more information, please contact your local Samsung customer care centre.
The reception quality of TV may be affected due to differences in broadcasting method between the countries. Please check the TV performance in
✎
the local SAMSUNG Authorized Dealer, or the Samsung Call Centre whether it can be improved by reconfiguring TV setting or not.
Still image warning
Avoid displaying still images (like jpeg picture files) or still image element (like TV programme logo, panorama or 4:3 image format, stock or news bar at
screen bottom etc.) on the screen. Constant displaying of still picture can cause ghosting of LCD screen, which will affect image quality. To reduce risk of
this effect, please follow below recommendations:
Avoid displaying the same TV channel for long periods.•
Always try do display any image on full screen, use TV set picture format menu for best possible match.•
Reduce brightness and contrast values to minimum required to achieve desired picture quality, exceeded values may speed up the burnout process.•
Frequently use all TV features designed to reduce image retention and screen burnout, refer to proper user manual section for details.•
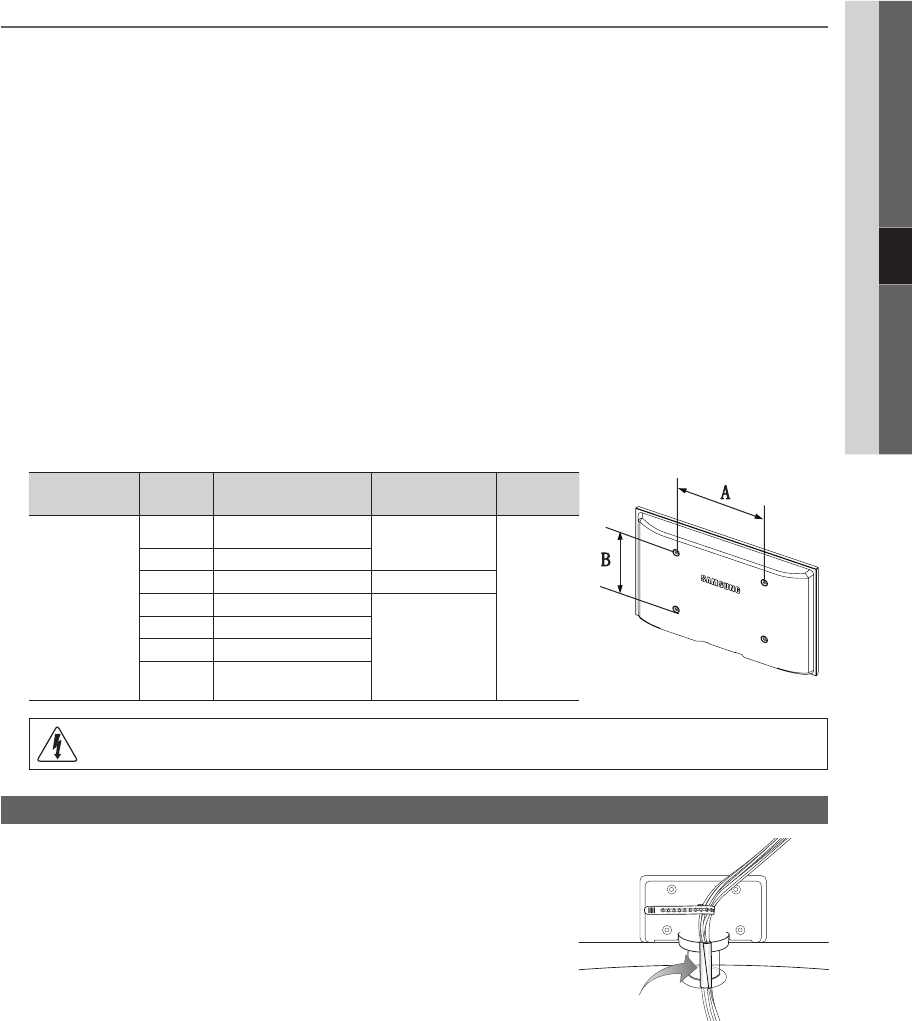
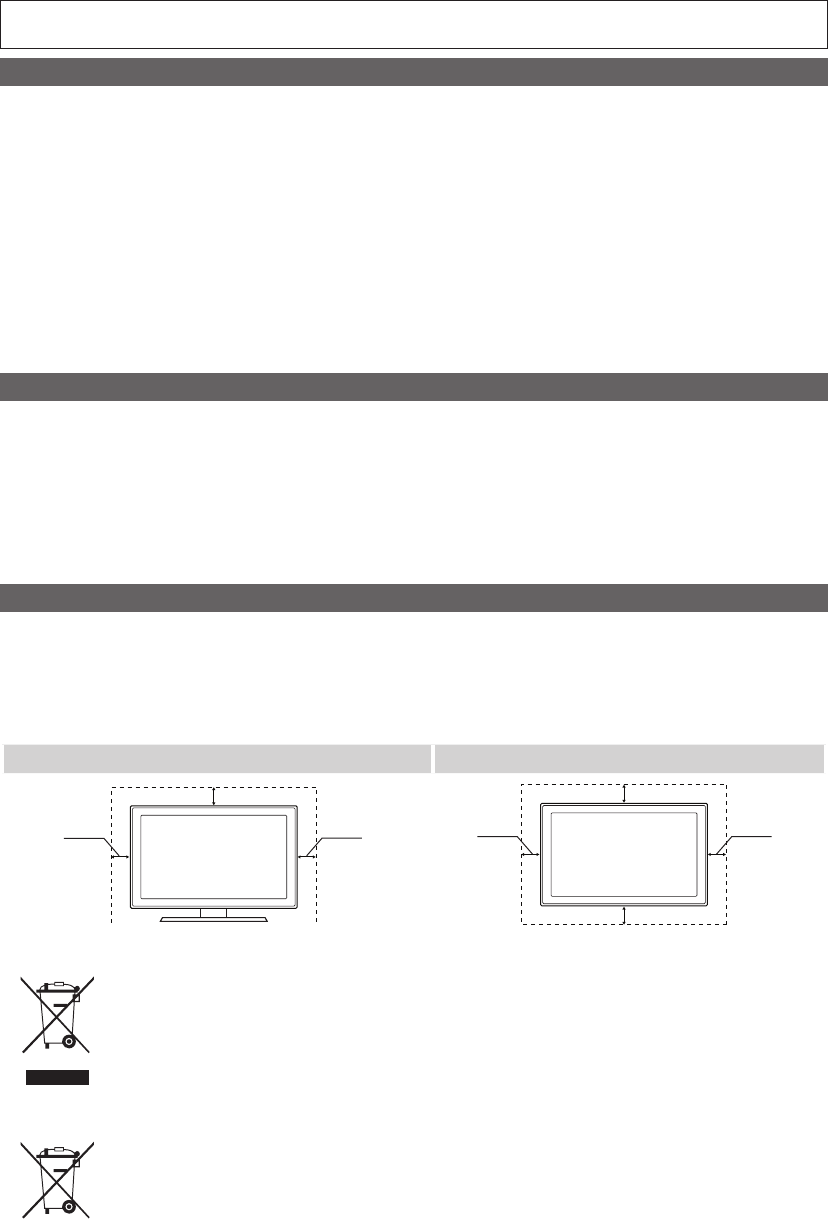
Securing the Installation Space
Keep the required distances between the product and other objects (e.g. walls) to ensure proper ventilation.
Failing to do so may result in fire or a problem with the product due to an increase in the internal temperature of the product.
When using a stand or wall-mount, use parts provided by Samsung Electronics only.
✎
If you use parts provided by another manufacturer, it may result in a problem with the product or an injury due to the product falling.
x
The appearance may differ depending on the product.
✎
Installation with a stand.Installation with a wall-mount.
10 cm
10 cm
10 cm
10 cm
10 cm
10 cm
10 cm
Correct Disposal of This Product (Waste Electrical & Electronic Equipment)
(Applicable in the European Union and other European countries with separate collection systems)
This marking on the product, accessories or literature indicates that the product and its electronic accessories (e.g. charger,
headset, USB cable) should not be disposed of with other household waste at the end of their working life. To prevent possible
harm to the environment or human health from uncontrolled waste disposal, please separate these items from other types of waste
and recycle them responsibly to promote the sustainable reuse of material resources. Household users should contact either the
retailer where they purchased this product, or their local government office, for details of where and how they can take these items
for environmentally safe recycling. Business users should contact their supplier and check the terms and conditions of the purchase
contract. This product and its electronic accessories should not be mixed with other commercial wastes for disposal.
Correct disposal of batteries in this product
(Applicable in the European Union and other European countries with separate battery return systems)
This marking on the battery, manual or packaging indicates that the batteries in this product should not be disposed of with other
household waste at the end of their working life. Where marked, the chemical symbols Hg, Cd or Pb indicate that the battery
contains mercury, cadmium or lead above the reference levels in EC Directive 2006/66. If batteries are not properly disposed of,
these substances can cause harm to human health or the environment. To protect natural resources and to promote material
reuse, please separate batteries from other types of waste and recycle them through your local, free battery return system.
BN68-02689J_Eng.indb 22010-03-07 �� 5:34:09
3
English
Contents
Getting Started
4
4 Accessories
4 Viewing the Control Panel
5 Viewing the Remote Control
6 Connecting to an Antenna
6 Plug & Play (Initial Setup)
Connections
7
7 Connecting to an AV Device
8 Connecting to an Audio Device
9 Changing the Input Source
Basic Features
9
9 How to Navigate Menus
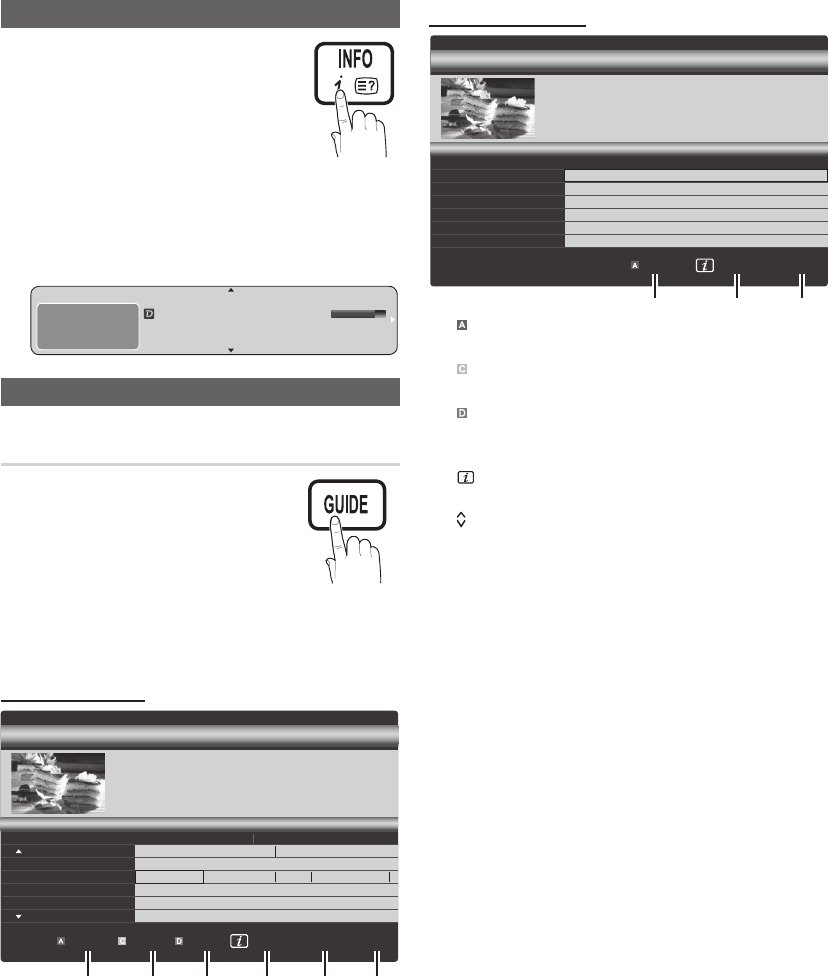
10 Using the INFO button (Now & Next guide)
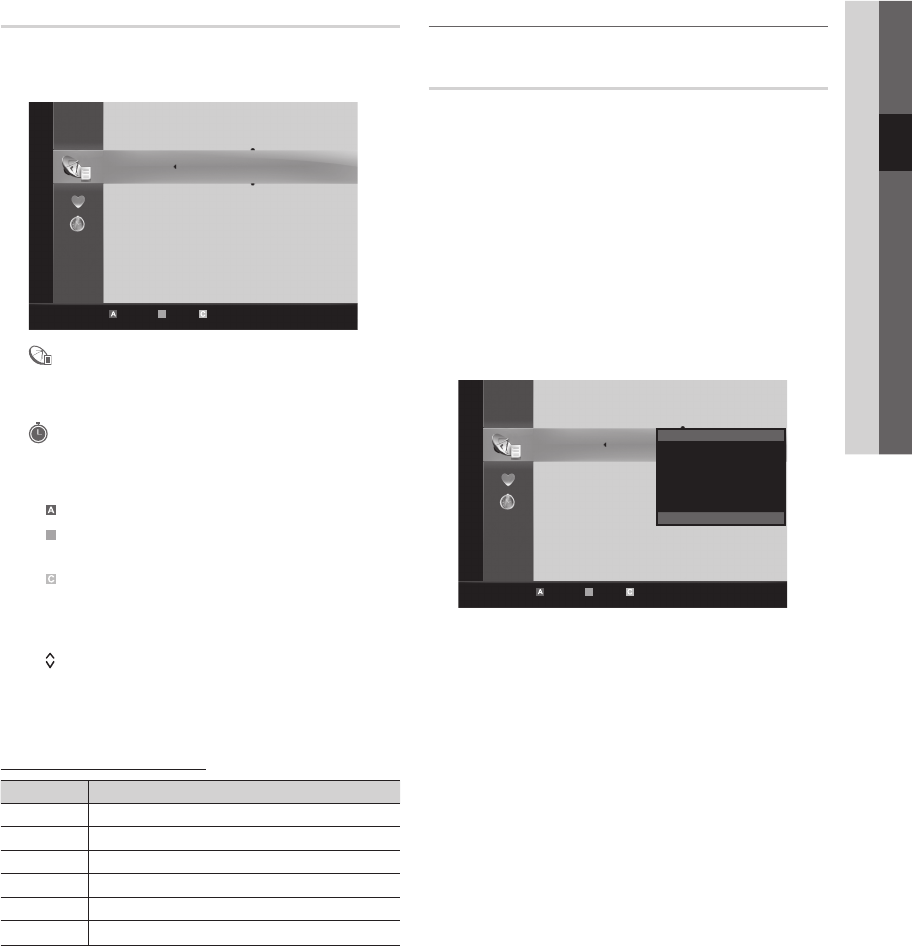
10 Planning Your Viewing
12 Channel Menu
13 Picture Menu
16 Sound Menu
18 Setup Menu
21 Support Menu
Advanced Features
22
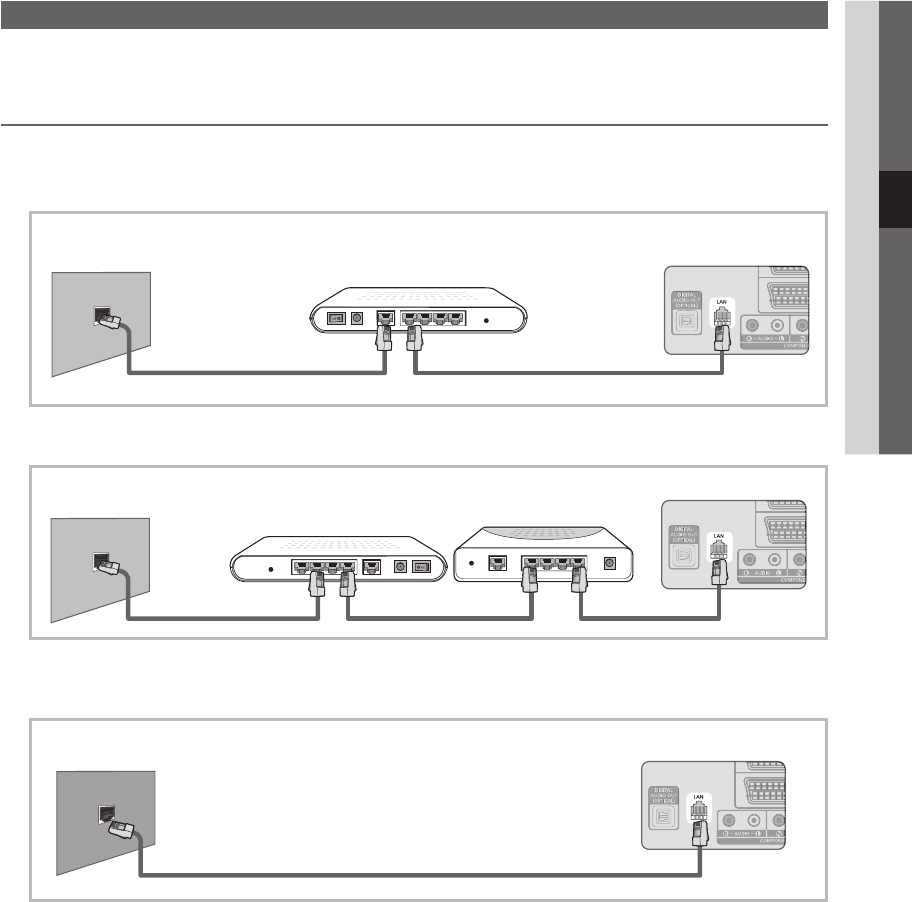
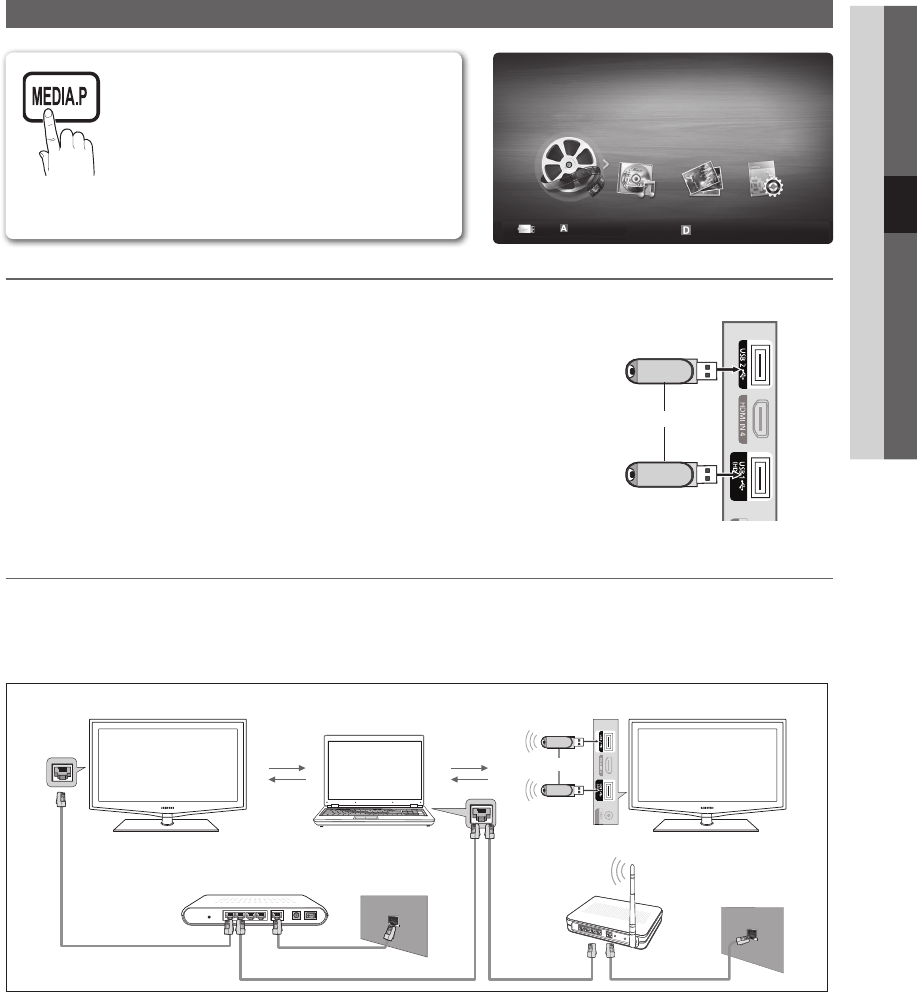
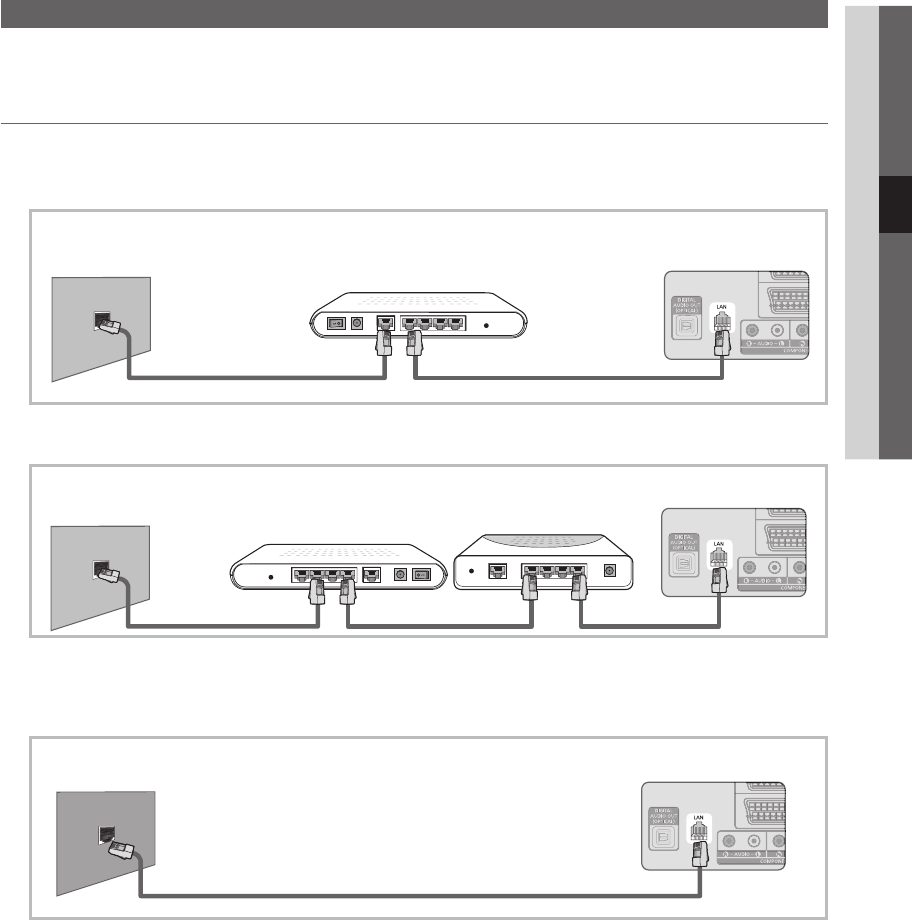
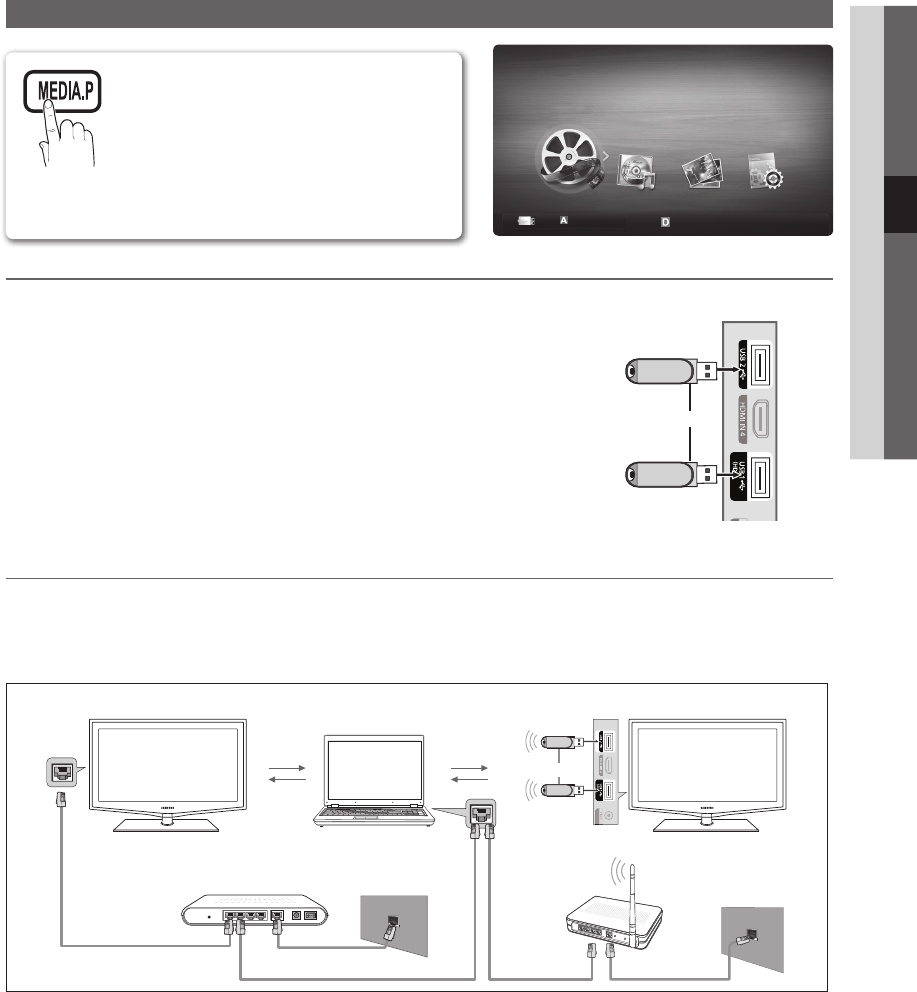
22 Connecting to a PC
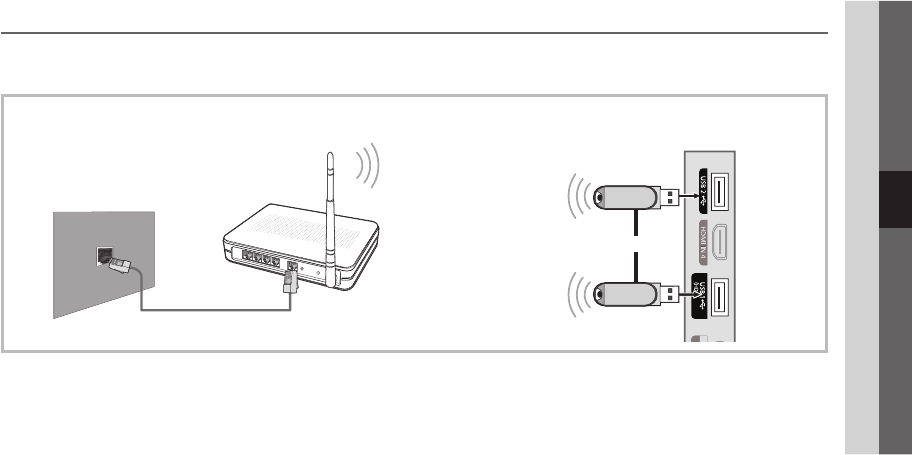
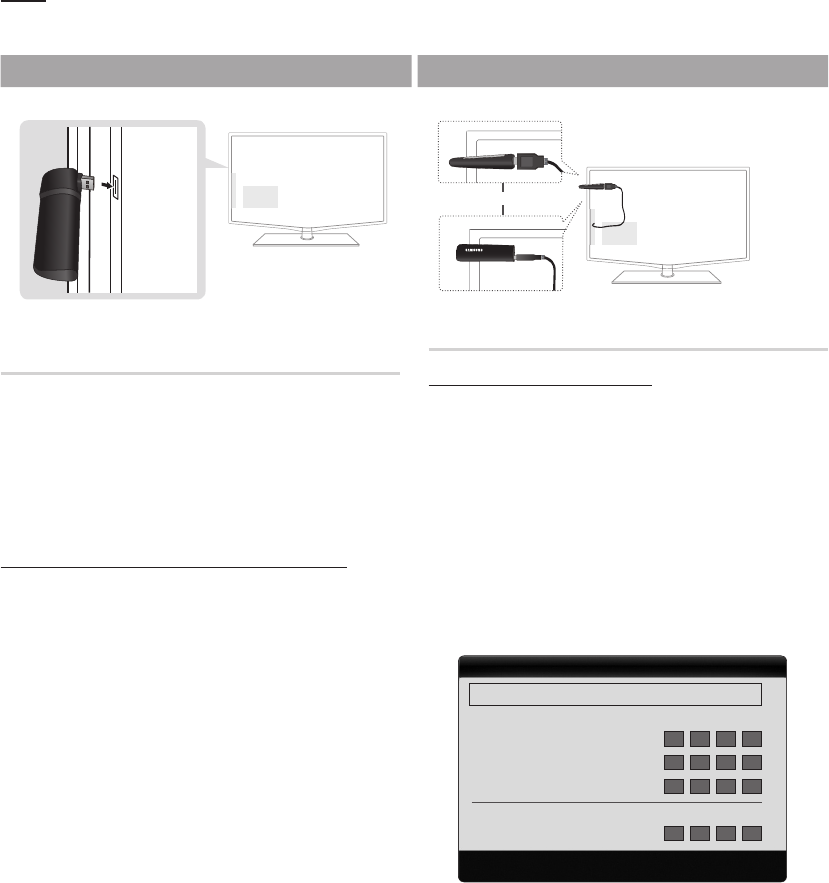
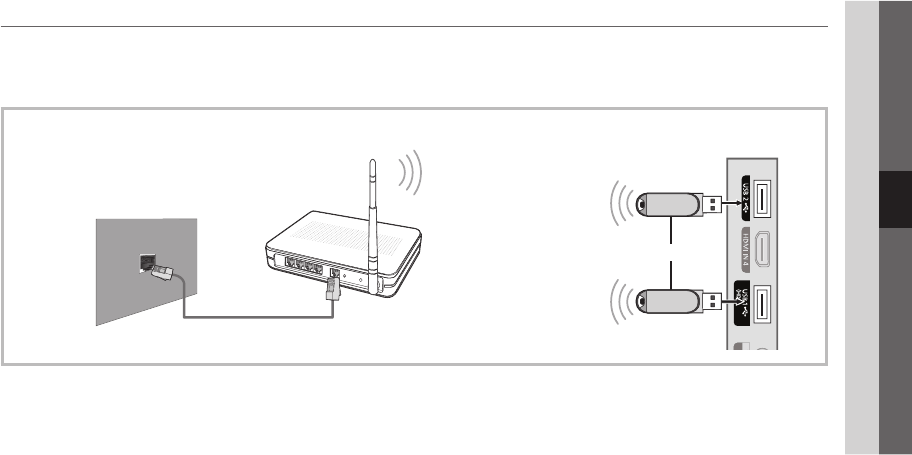
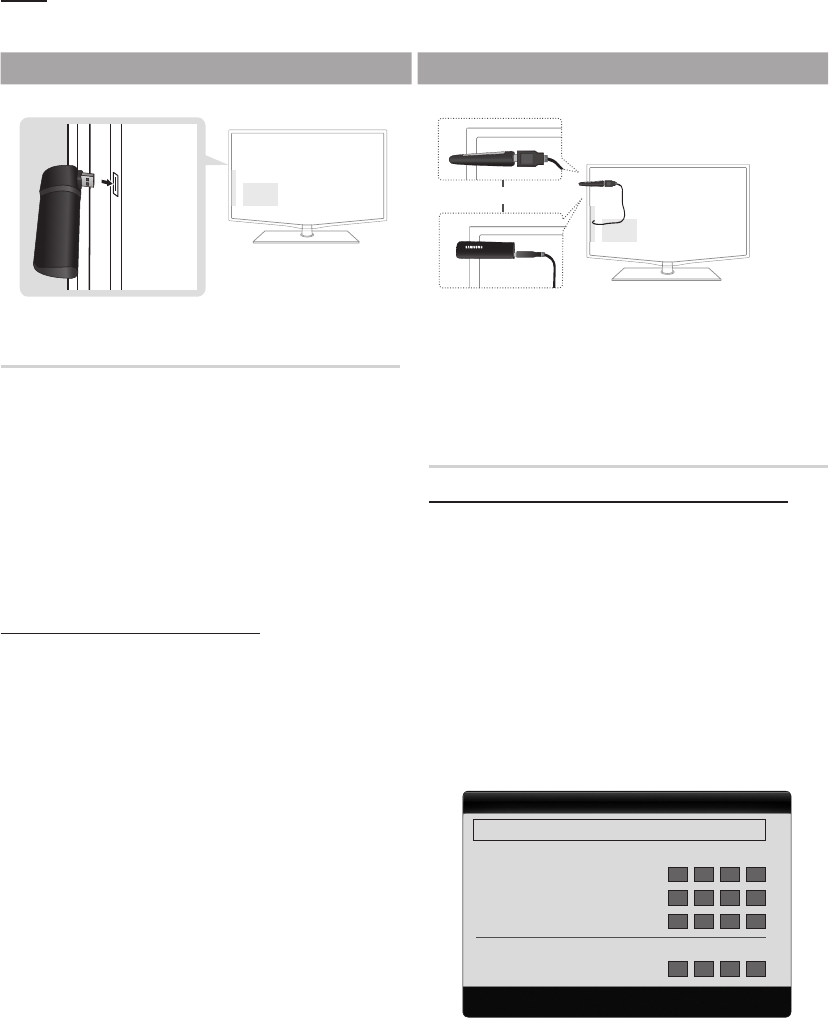
23 Network Connection
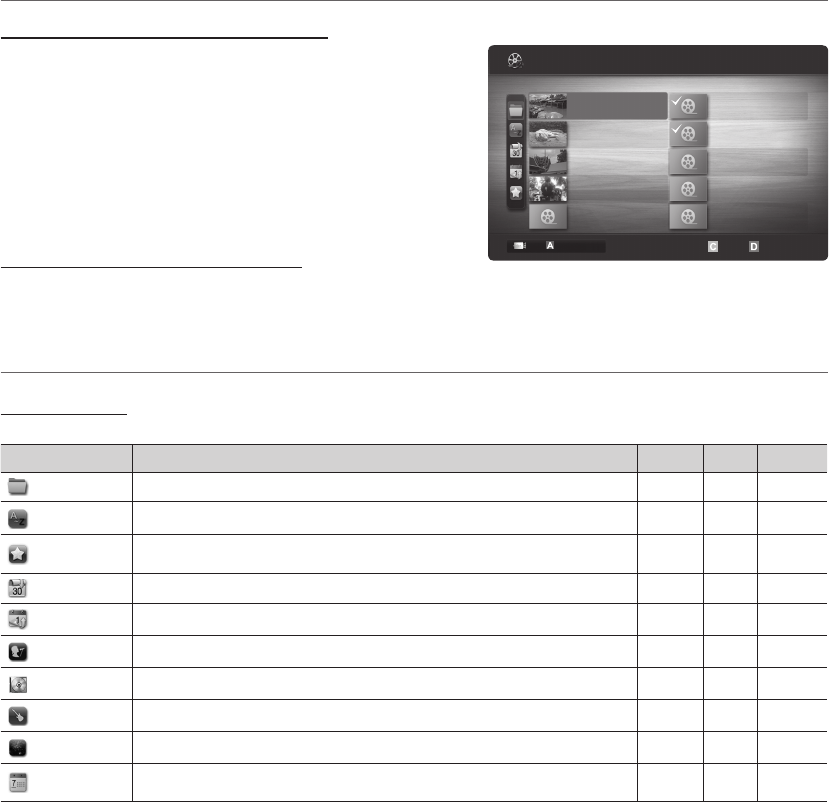
29 Media Play
36 Anynet
+
39 AllShare
Other Information
41
41 Analogue Channel Teletext Feature
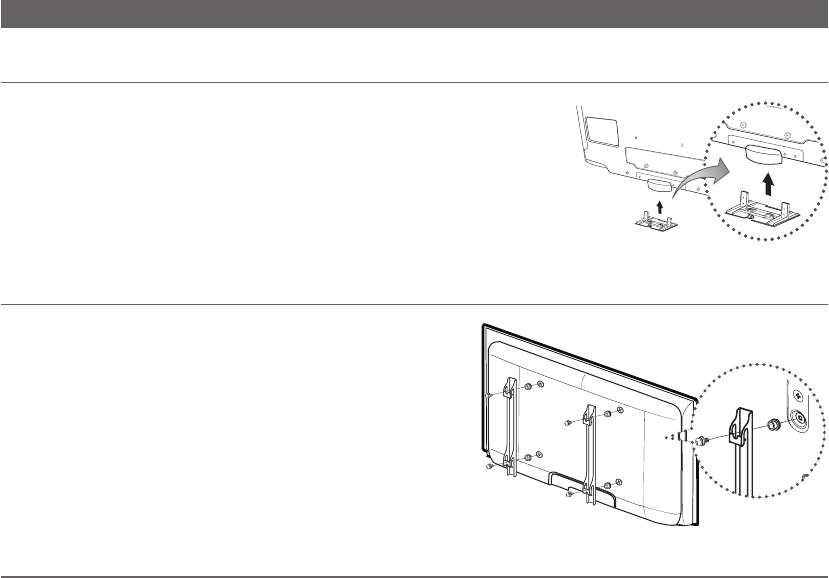
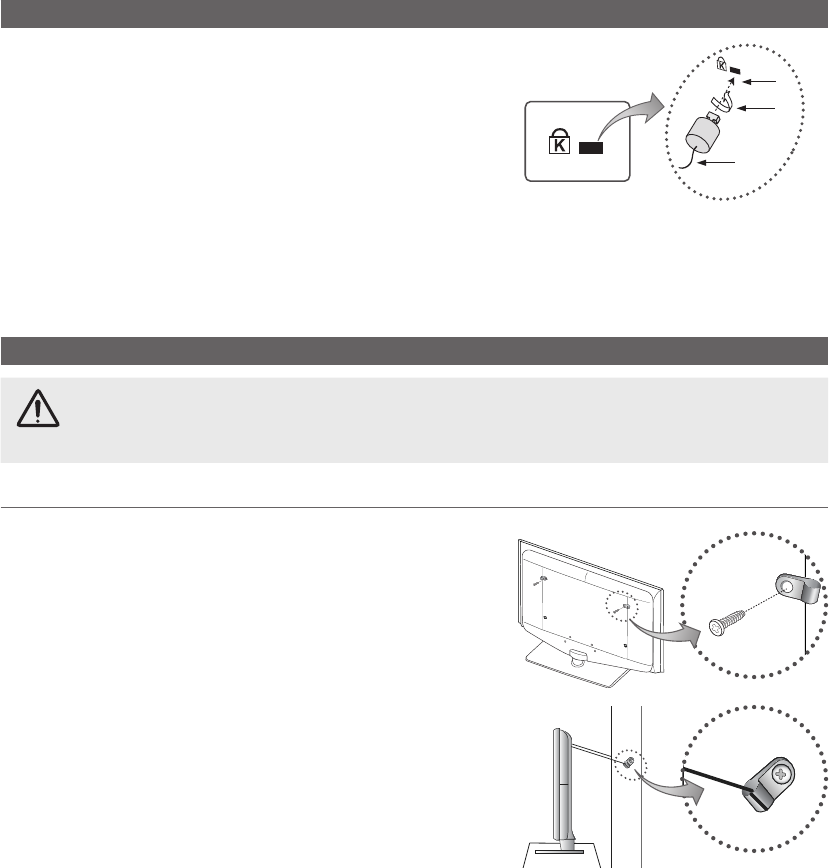
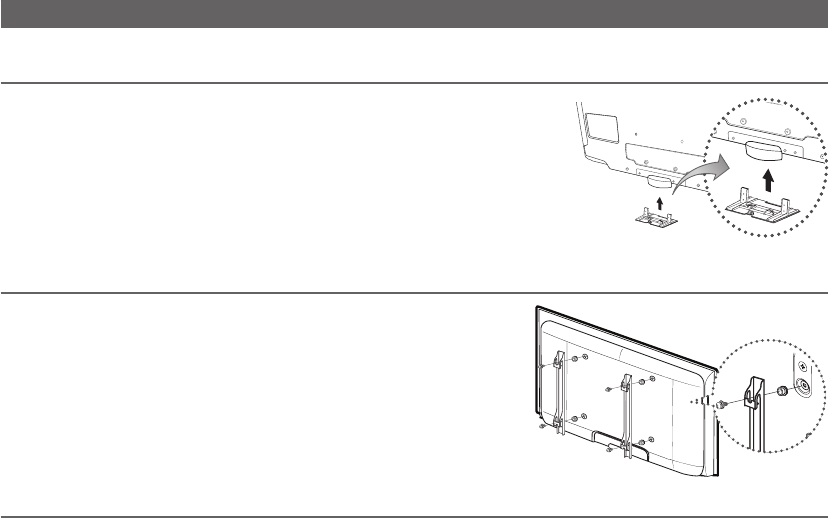
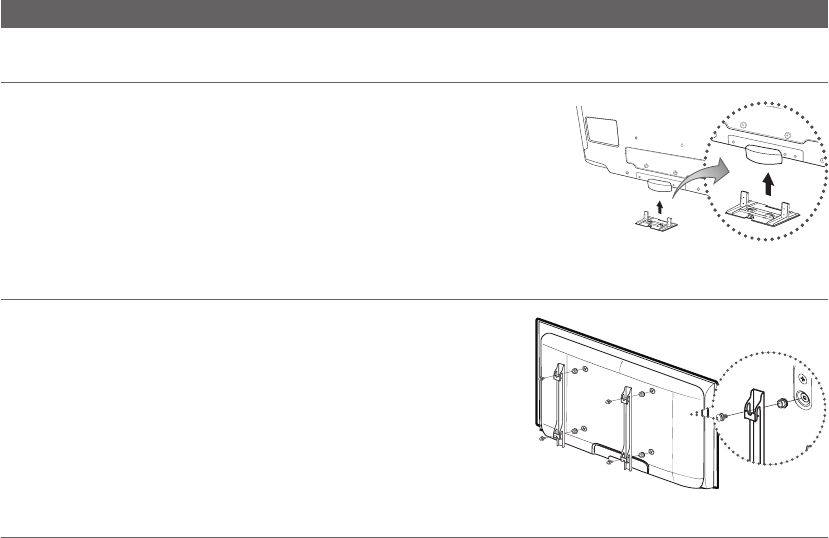
42 Installing the Wall Mount
43 Assembling the Cables
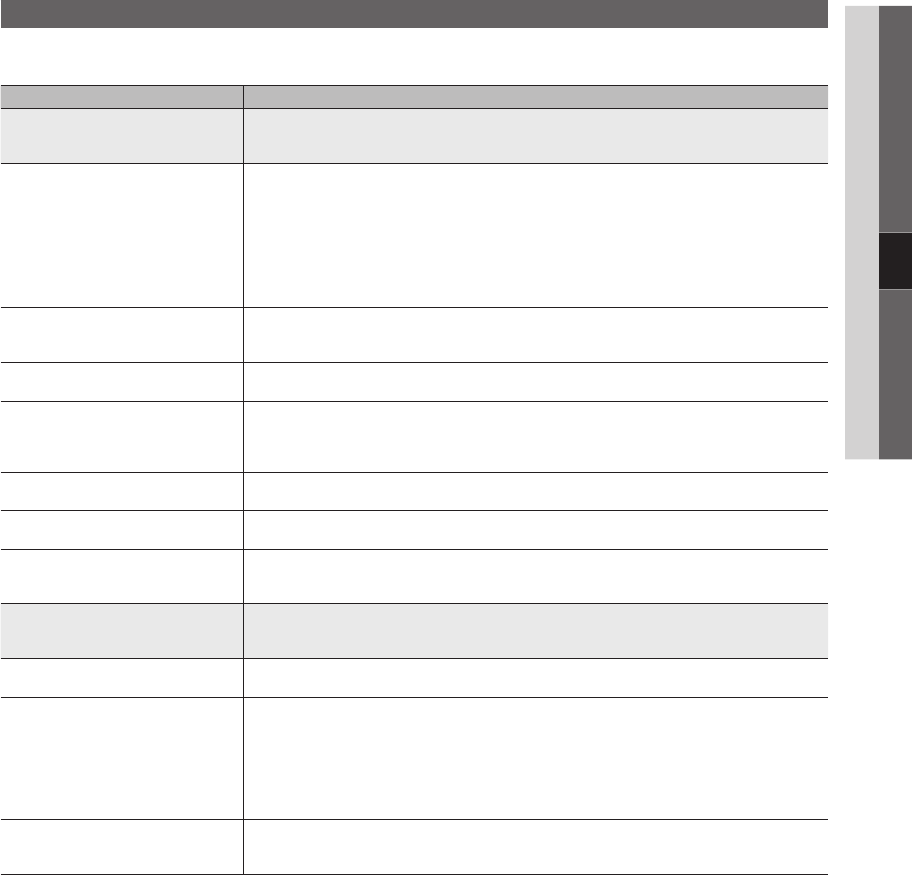
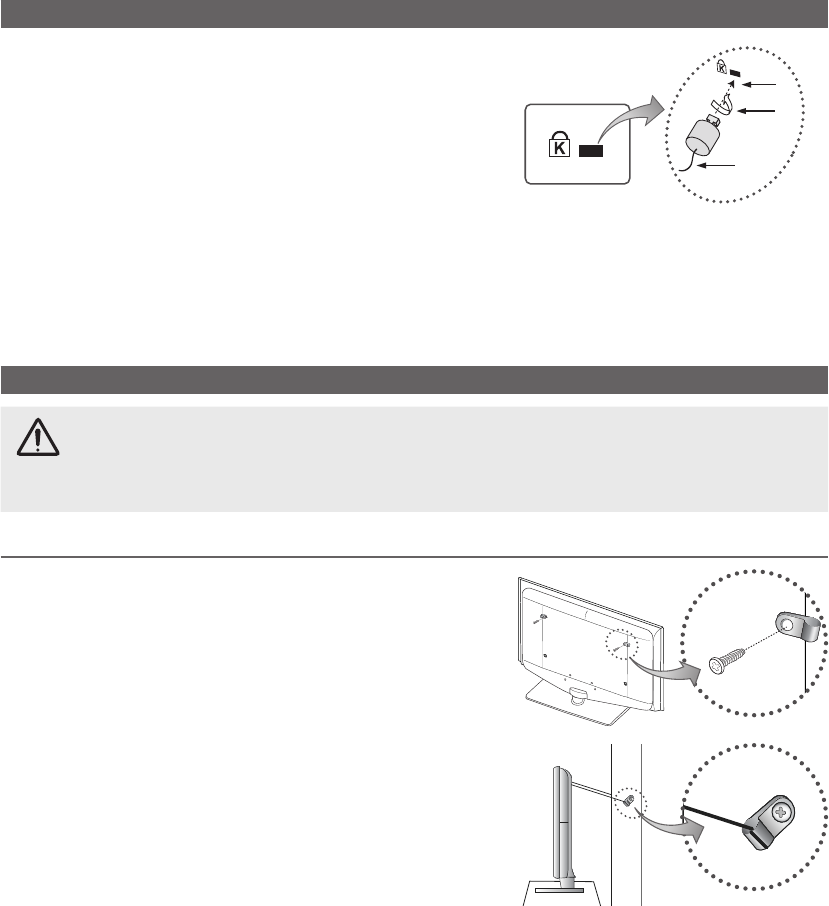
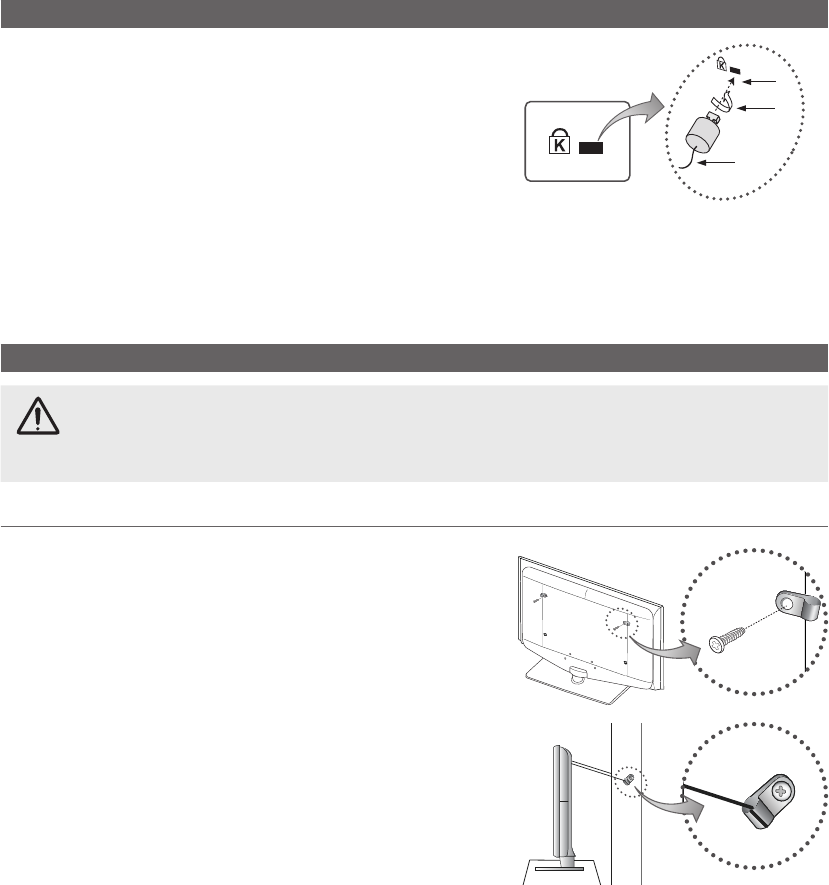
44 Anti-Theft Kensington Lock
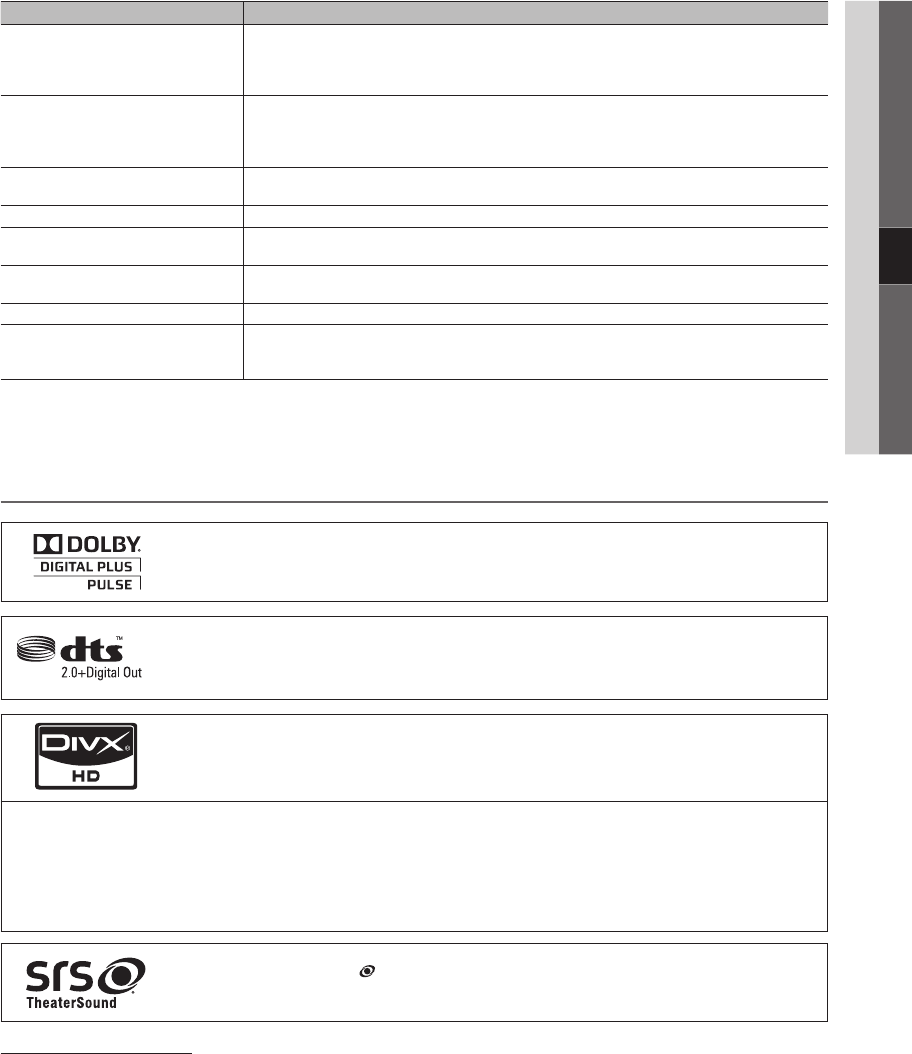
44 Securing the TV to the Wall
45 Troubleshooting
48 Specifications
49 Index
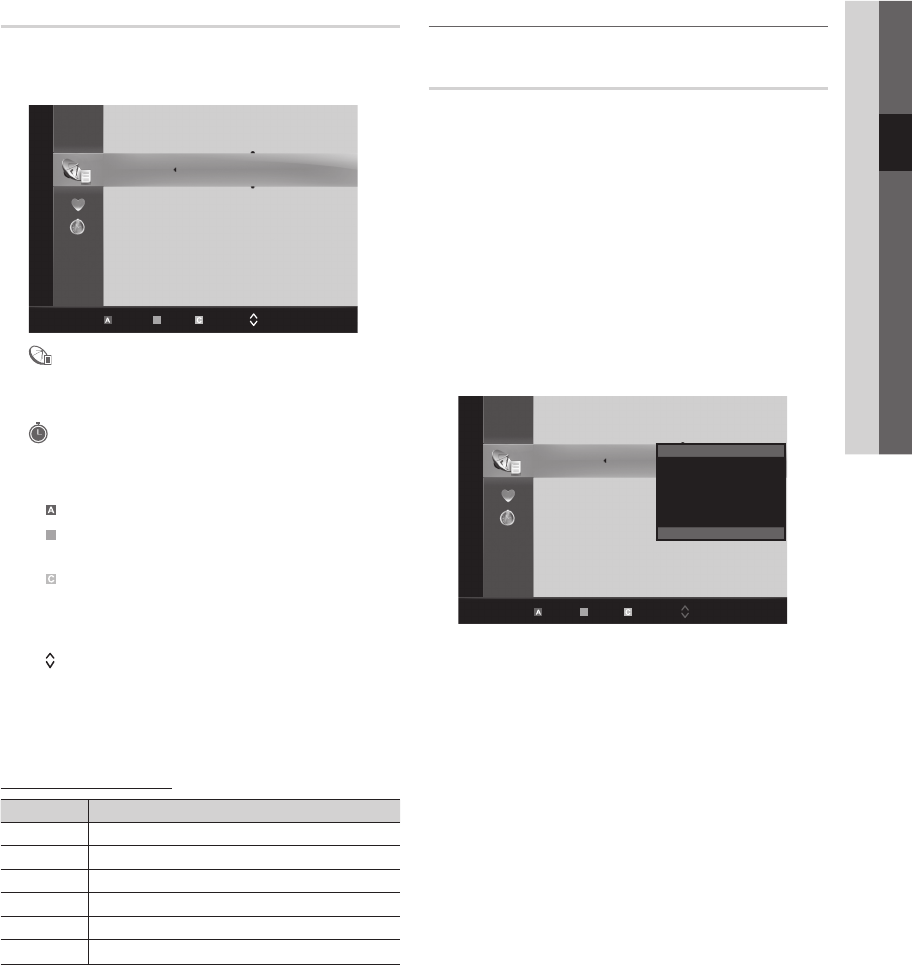
Check the Symbol!
t
O
This function can be used by
pressing the TOOLS button on the
remote control.
NoteOne-Touch Button
S.MODE
P.MODE
BN68-02689J_Eng.indb 32010-03-07 �� 5:34:11
4
English
Getting Started
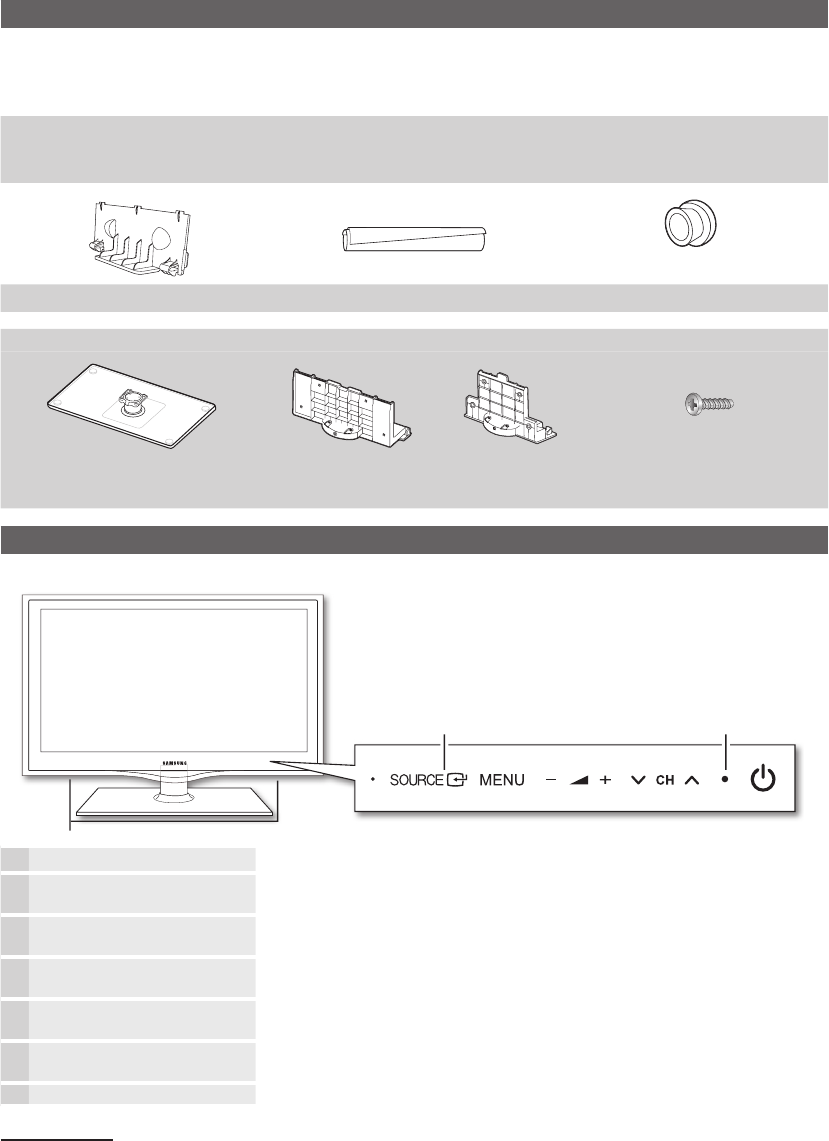
Accessories
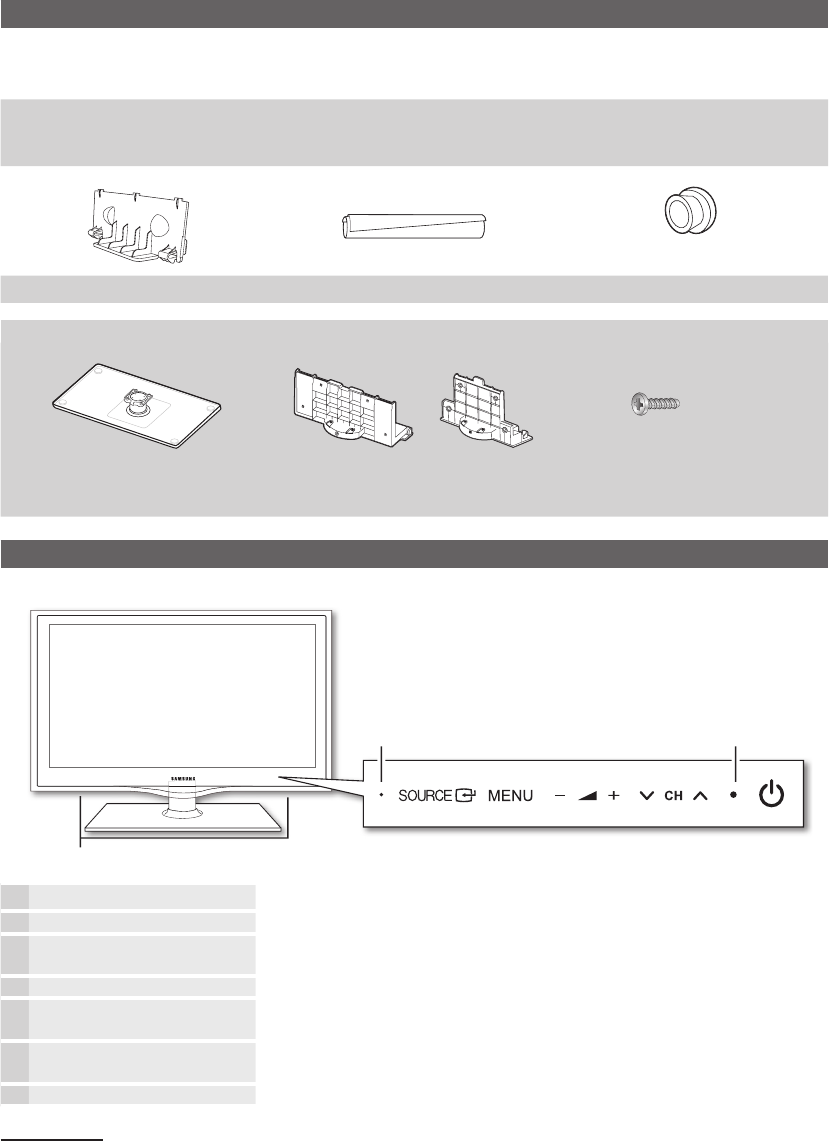
Please make sure the following items are included with your LCD TV. If any items are missing, contact your dealer.
✎
The items’ colours and shapes may vary depending on the models.
✎
Remote Control & Batteries (AAA x 2) y
Owner’s Instructions y
Warranty Card / Safety Guide (Not available in some locations) y
Cleaning Cloth y
Power Cord y
(46 inch TV)
Blanking Bracket yCable tie yHolder-Ring (4ea) y
See separate guide for installing the stand.
or
(M4 X L12)
Stand (1EA) yGuide Stand (1EA) yScrews (9EA) y
(32 inch model only: 8EA)
Viewing the Control Panel
The product colour and shape may vary depending on the model.
✎
P
(Power)
Turns the TV on or off.
Power IndicatorBlinks and turns off when the power is on and lights up in standby mode.
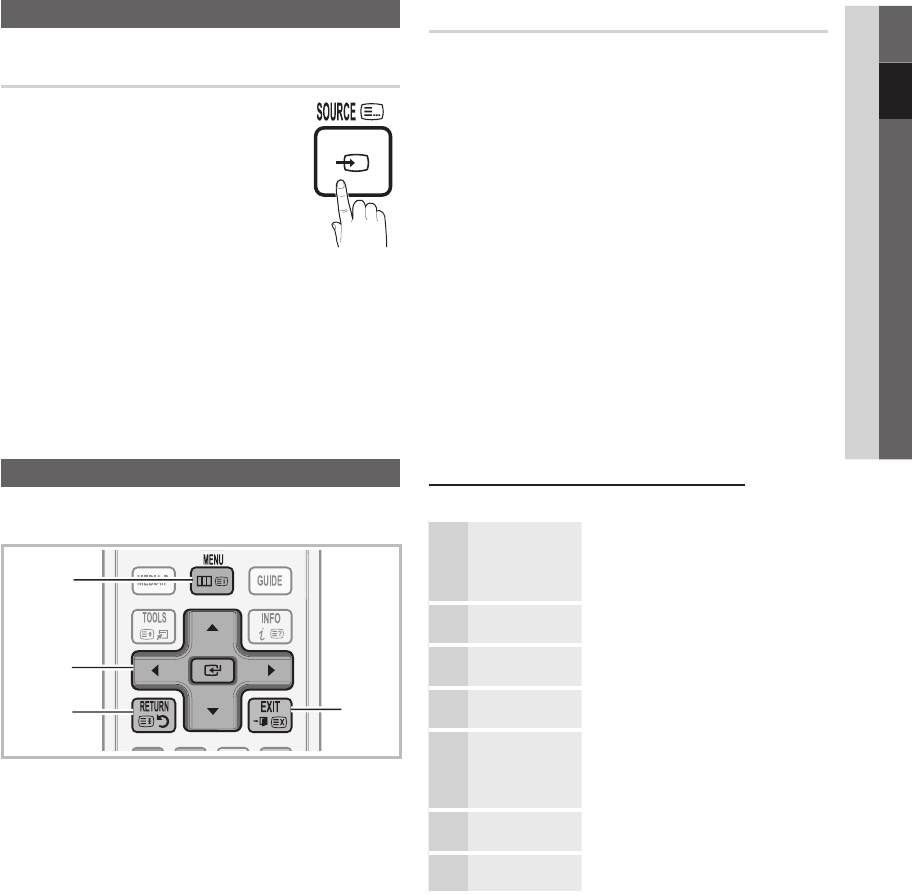
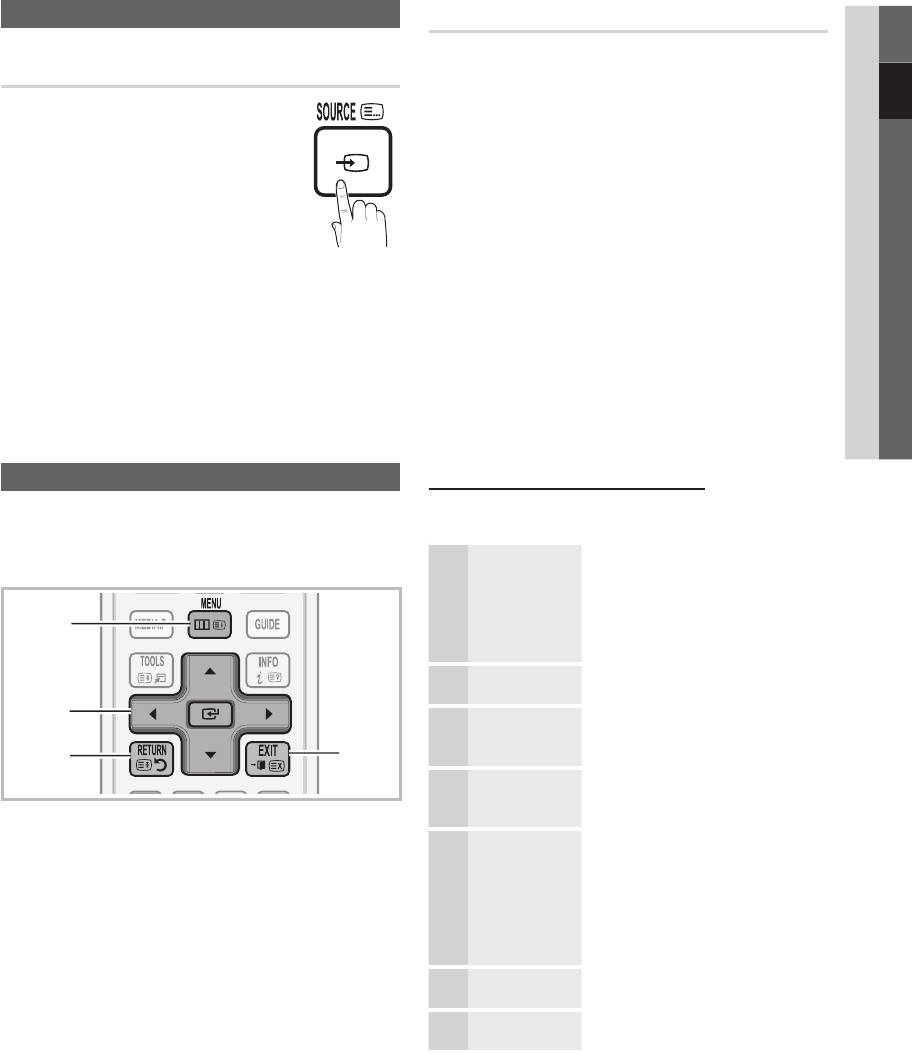
SOURCE
E
Toggles between all the available input sources. In the on-screen menu, use this
button as you would use the ENTER
E
button on the remote control.
MENUDisplays an on-screen menu, the OSD (on screen display), of your TV’s features.
Y
Adjusts the volume. In the OSD, use the Y buttons as you would use the
and buttons on the remote control.
z
Changes the channels. In the OSD, use the z buttons as you would use the
and buttons on the remote control.
Remote control sensorAim the remote control towards this spot on the TV.
Standby mode
Do not leave your TV in standby mode for long periods of time (when you are away on a holiday, for example). A small amount
of electric power is still consumed even when the power button is turned off. It is best to unplug the power Cord.
Speakers
Power IndicatorRemote control sensor
BN68-02689J_Eng.indb 42010-03-07 �� 5:34:14
5
01Getting Started
English
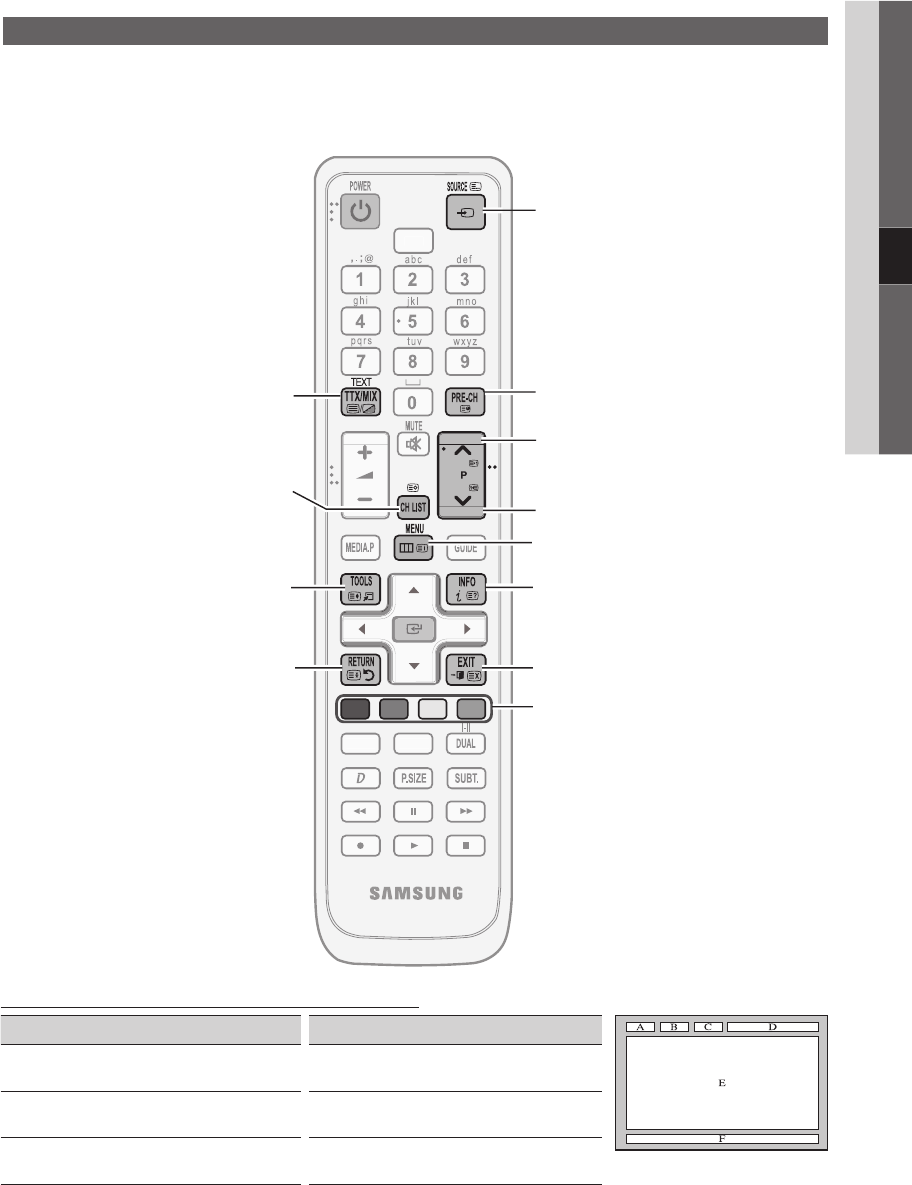
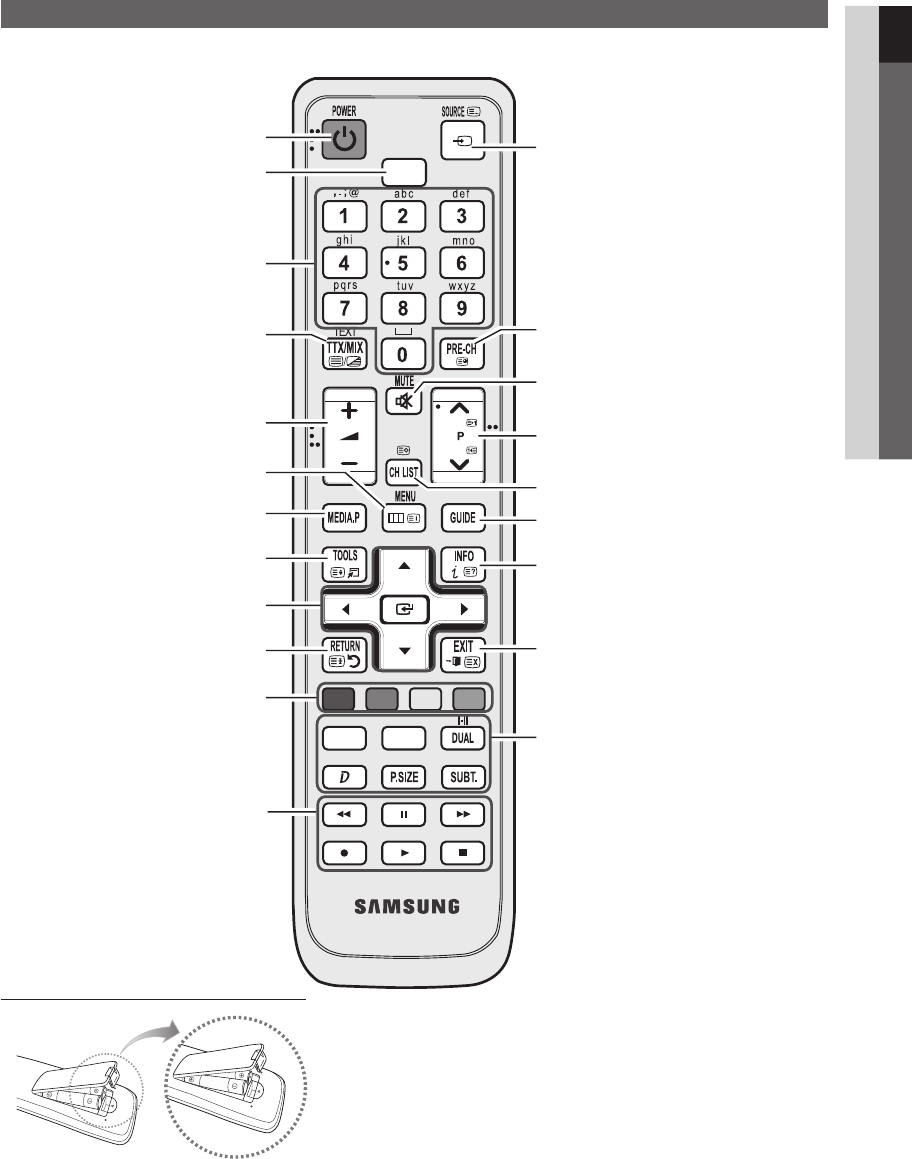
Viewing the Remote Control
This is a special remote control for the visually impaired persons and has Braille points on the Power, Channel, and
✎
Volume buttons.
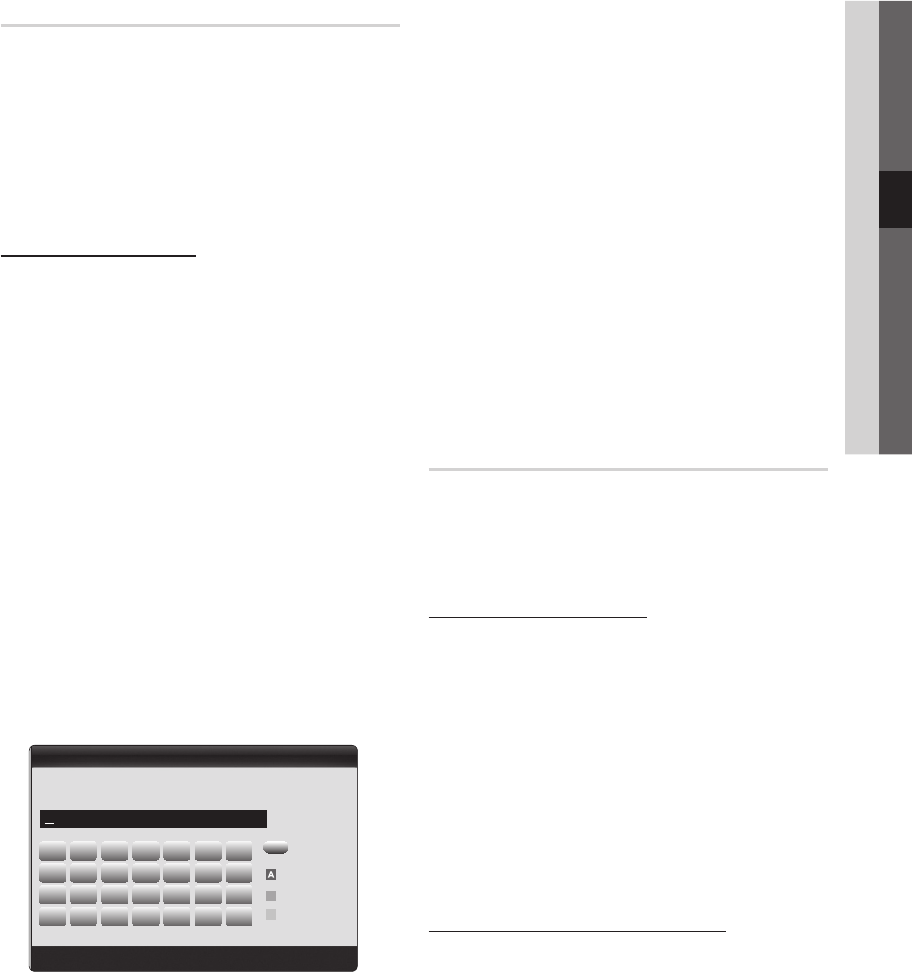
Installing batteries (Battery size: AAA)
NOTE
✎
Use the remote control within 23 feet from the TV.
x
Bright light may affect the performance of the remote
x
control. Avoid using nearby special fluorescent light or neon
signs.
The colour and shape may vary depending on the model.
x
ABCD
P.MODES.MODE
HDMI
Selects the HDMI mode directly. (P. 7)
Displays and selects the available video sources.
(P.9)
Turns the TV on and off. (P. 6)
Press to directly access to channels.
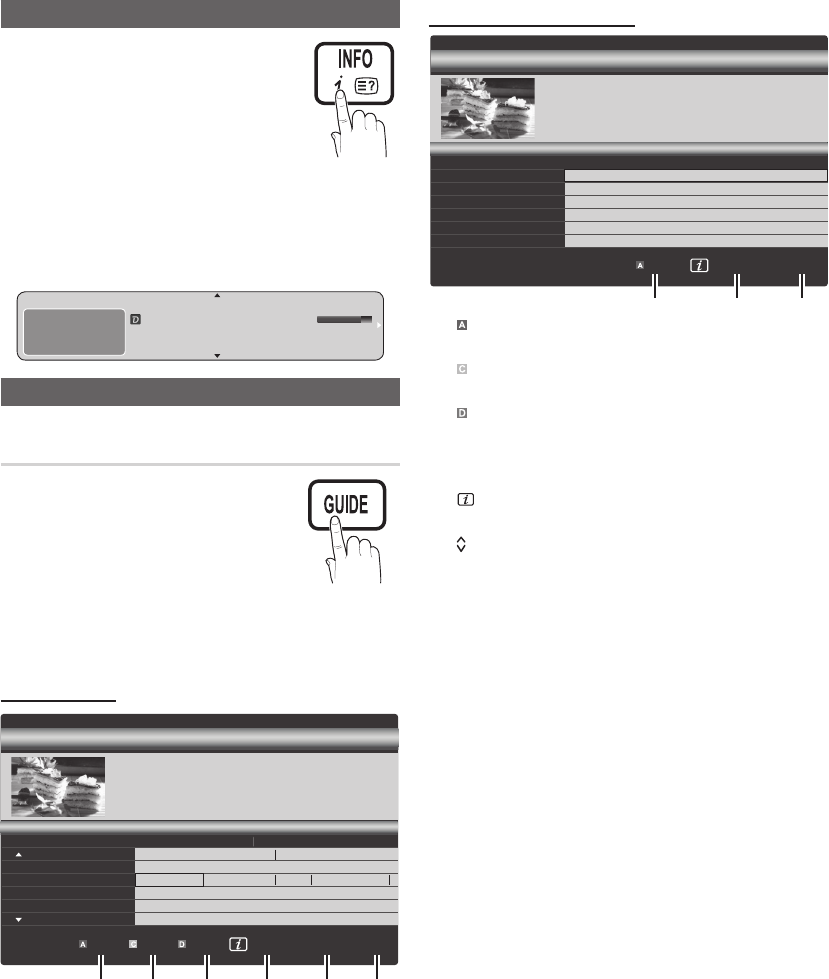
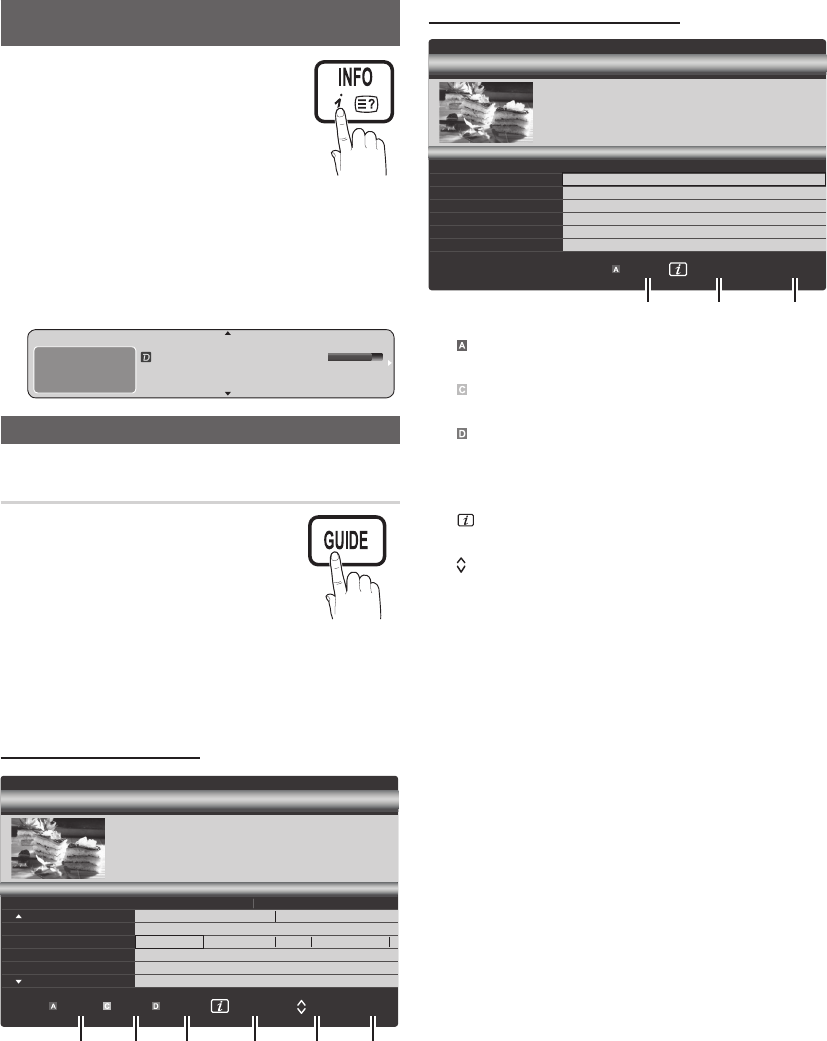
Displays the EPG (Electronic Programme Guide).
(P. 10)
Changes channels.
Quickly select frequently used functions.
Displays information on the TV screen. (P. 10)
Displays the main on-screen menu.
(P. 9)
Adjusts the volume.
Returns to the previous channel.
Buttons in the Channel Manager,
Media Play menu, etc.
Use these buttons in the Media Play and
Anynet+ modes. (P. 29, 36)
(: controls recording on Samsung recorders
with the Anynet+ feature)
Cuts off the sound temporarily.
Returns to the previous menu.
Selects on-screen menu items and change
menu values.
Exits the menu.
P.MODE: Selects picture mode. (P. 13)
S.MODE: Selects the sound mode. (P. 16)
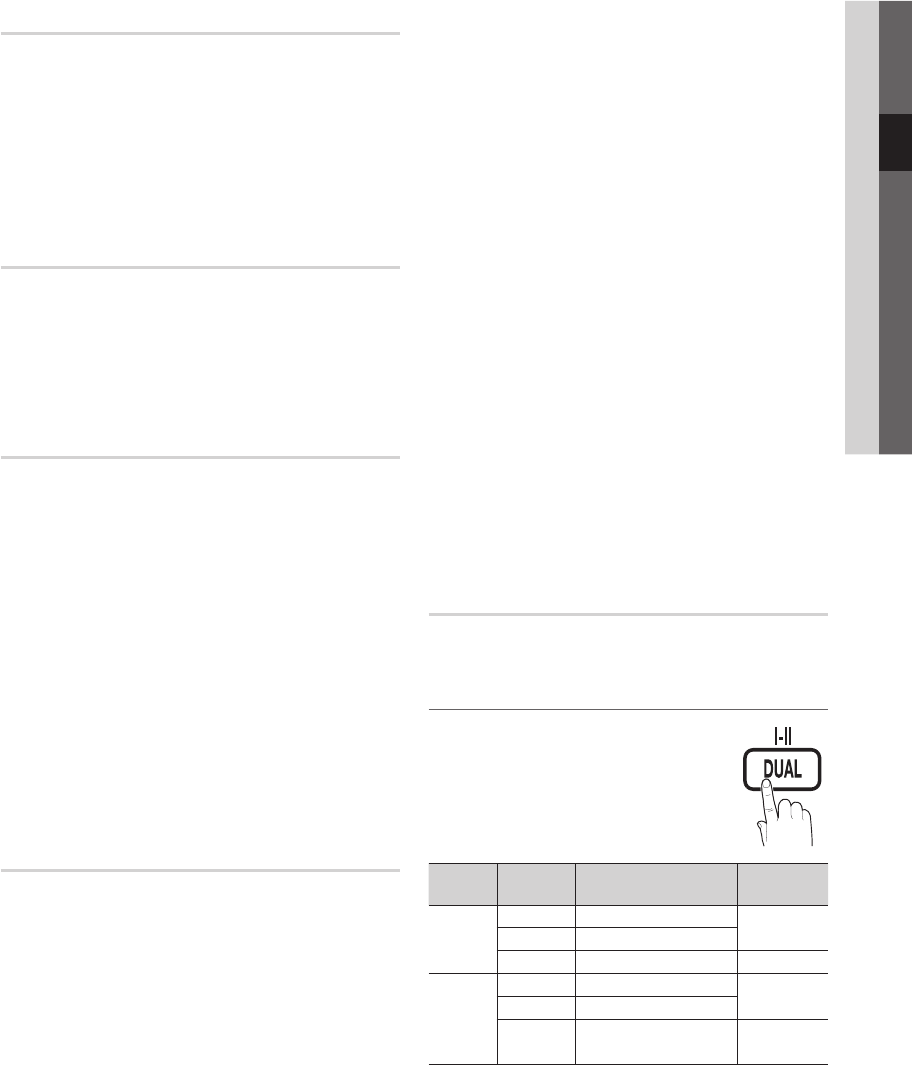
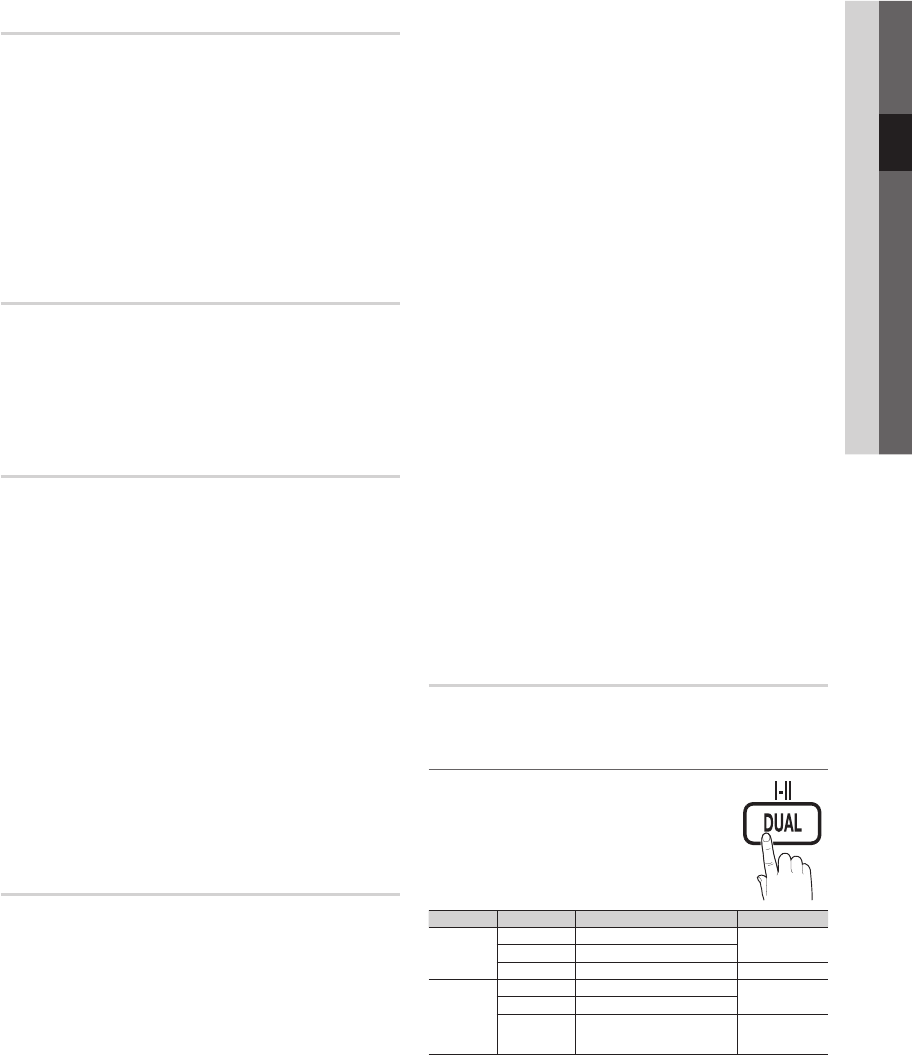
DUAL I-II: Selects sound mode. (P. 17)
D (Data Service): Use this button when using data
broadcast service (p . 20).
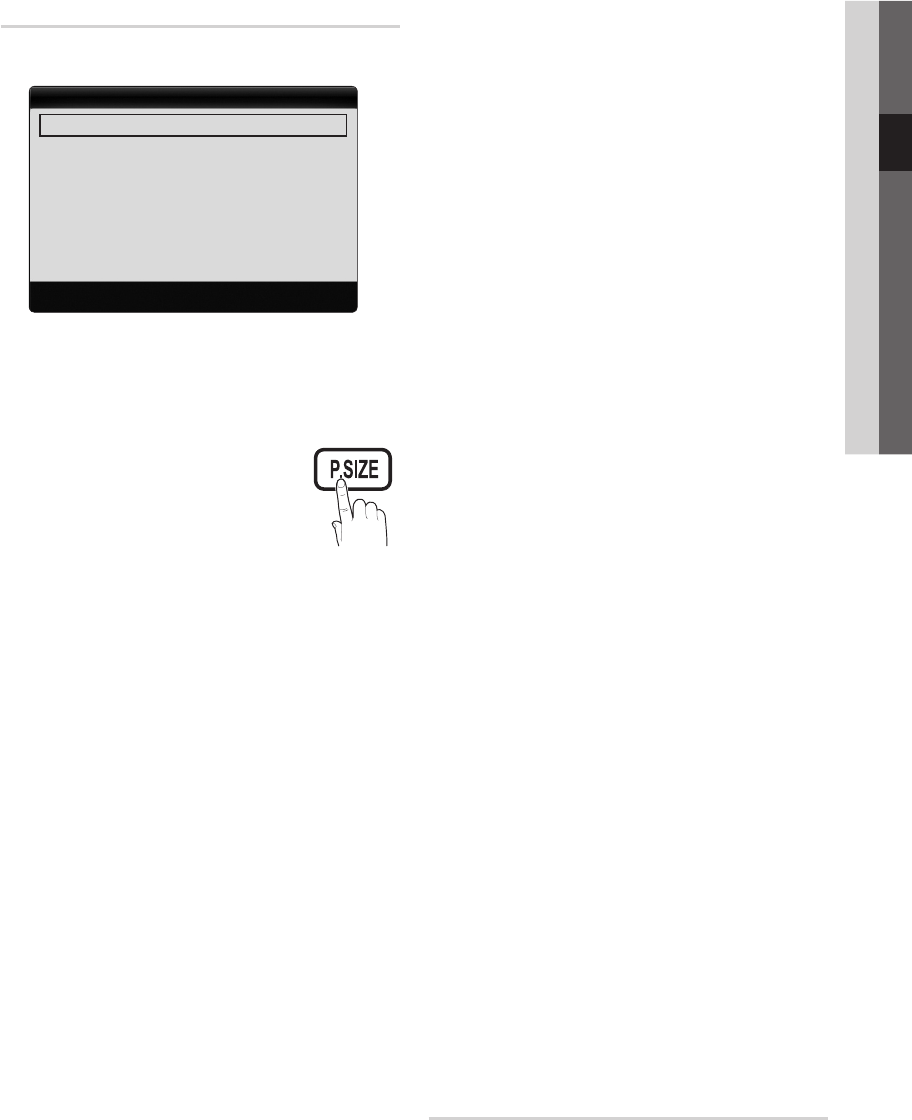
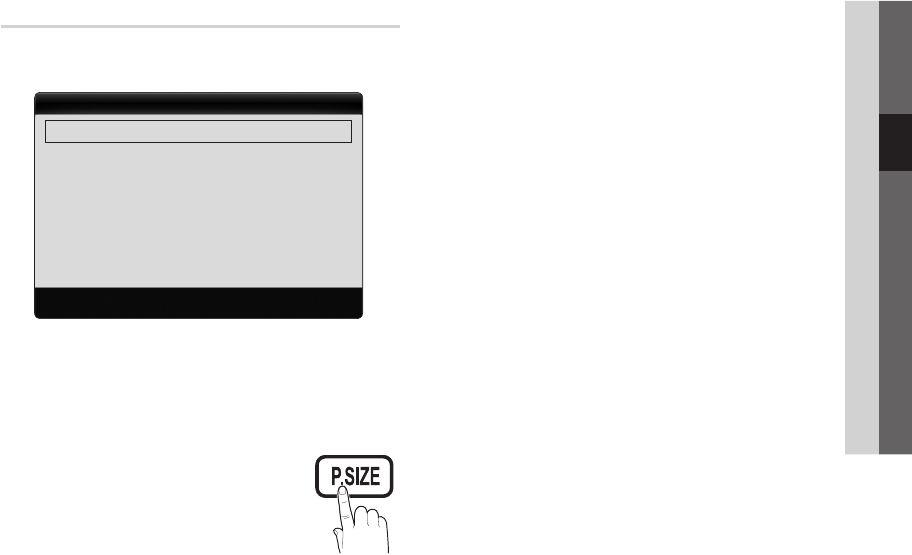
P.SIZE: Choose the picture size. (P. 15)
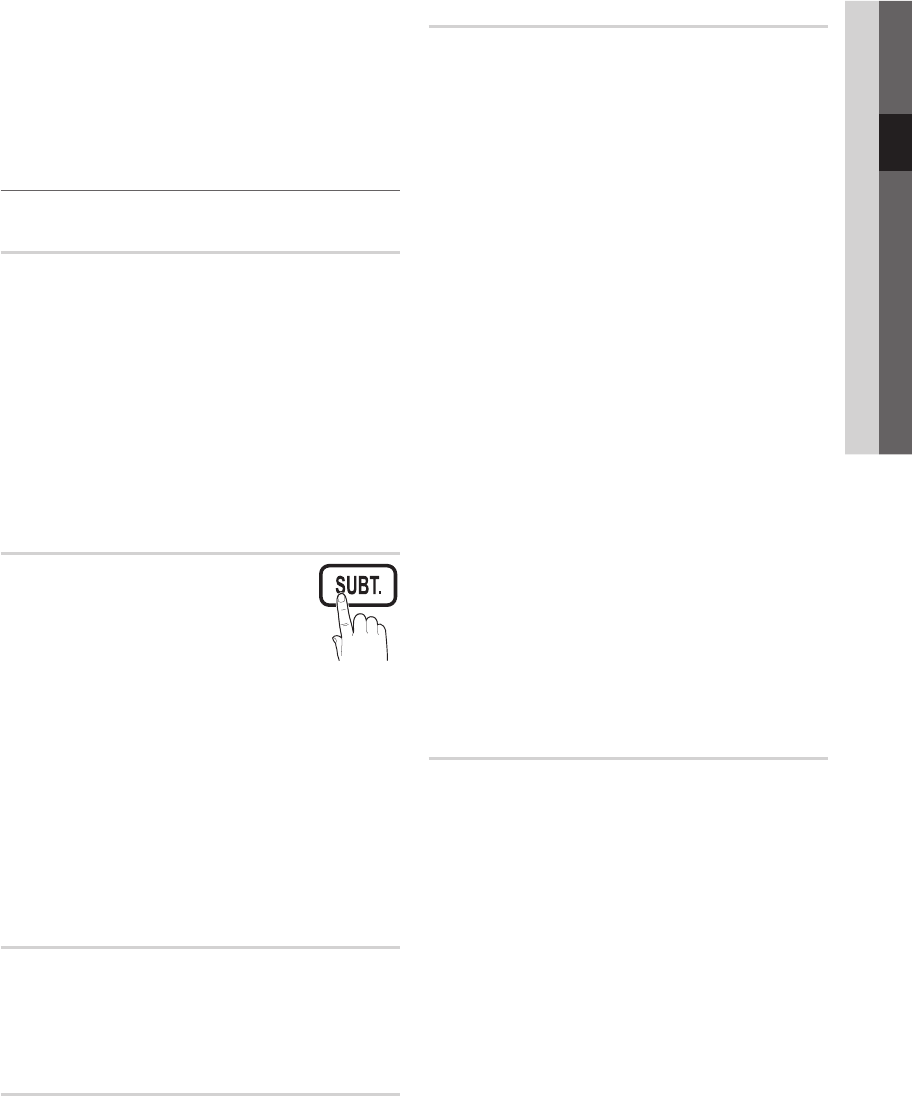
SUBT.: Digital subtitle display (P. 19)
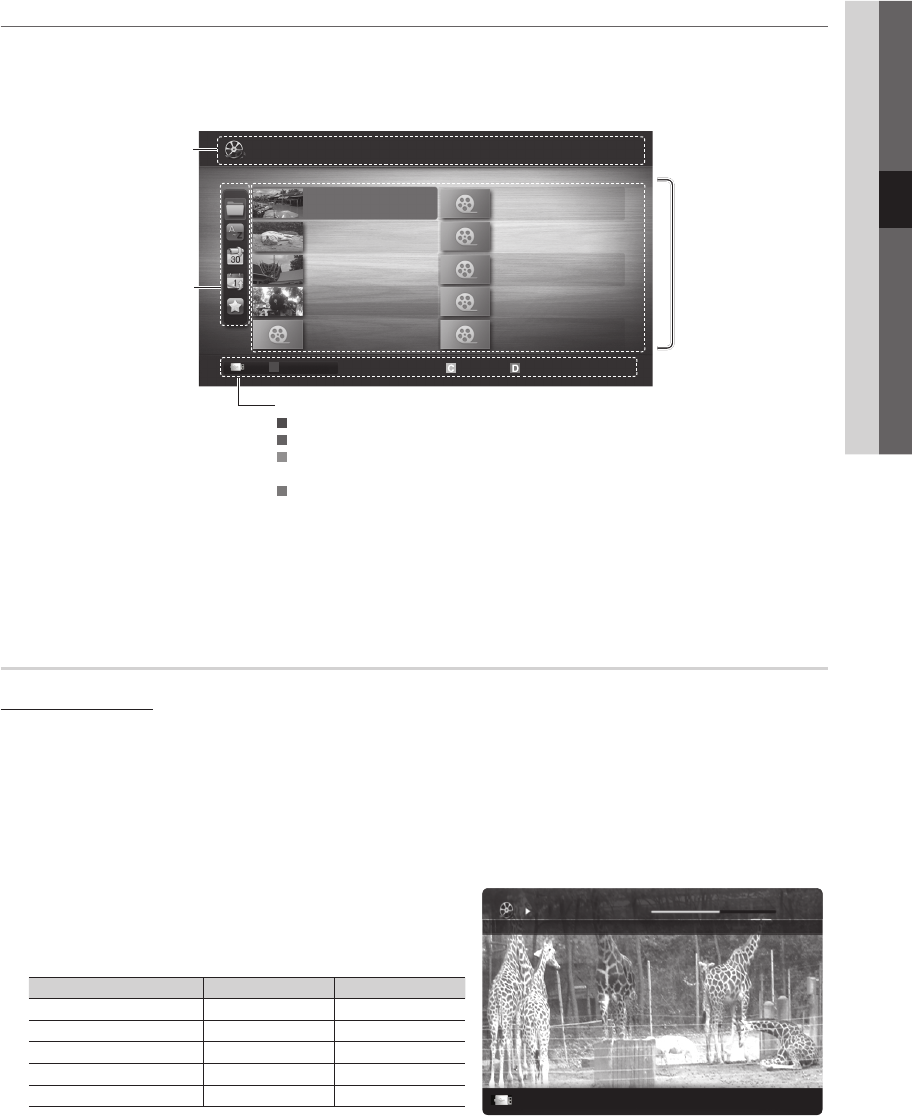
Views Media Play. (P. 29)
Alternately select Teletext, Double
or MiX.
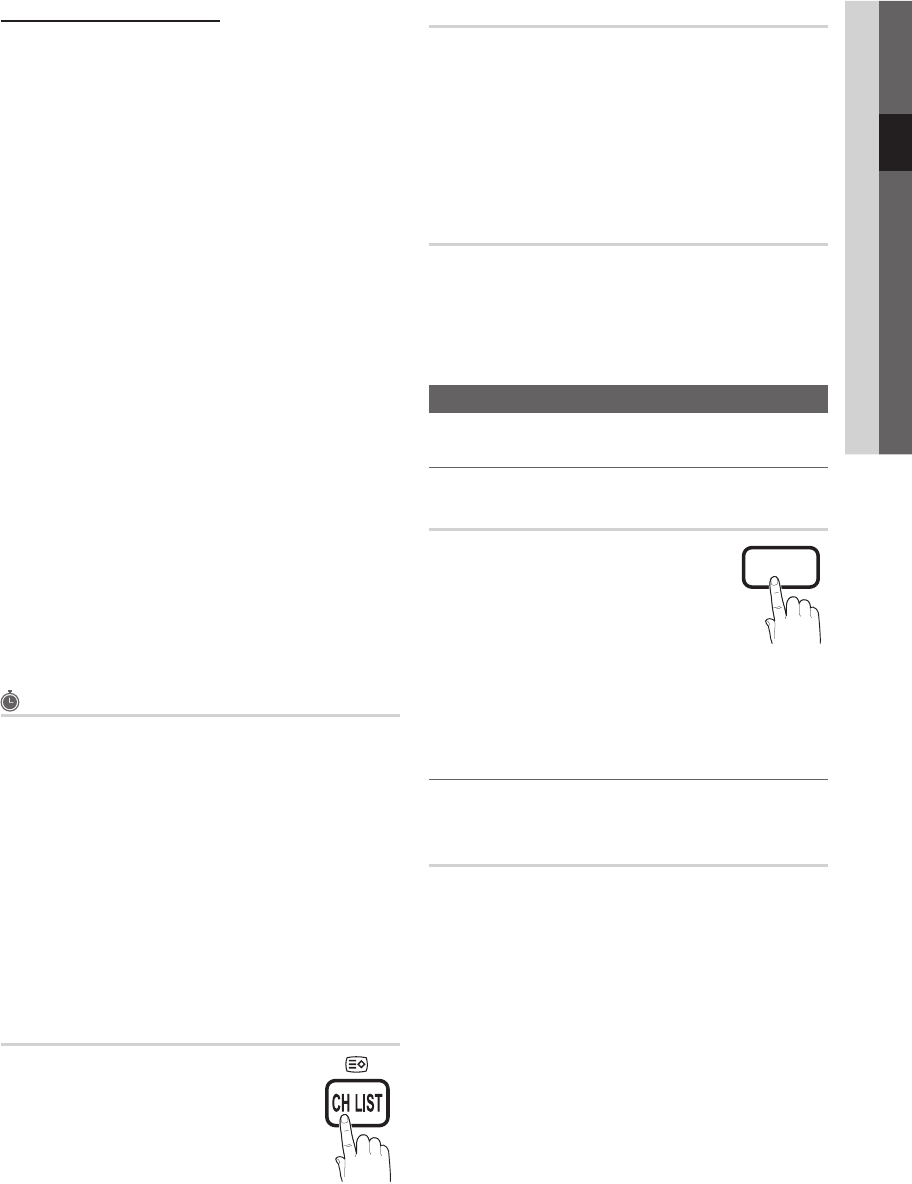
Displays channel list on the screen. (P. 13)
BN68-02689J_Eng.indb 52010-03-07 �� 5:34:15
6
Getting Started
English
Connecting to an Antenna
When the TV is initially powered on, basic settings proceed automatically.
Preset: Connecting the mains and antenna.
✎
Plug & Play (Initial Setup)
When the TV is initially powered on, a sequence of on-screen prompts will assist in configuring basic settings. Press the
POWER
P
button. Plug & Play is available only when the Input source is set to TV.
To return to the previous step, press the red button.
✎
1
Selecting a language
Press the or button, then press the ENTER
E
button.
Select the desired OSD (On Screen Display) language.
2
Selecting Store Demo
or Home Use
Press the or button, then press the ENTER
E
button.
Select the Home Use mode. Store Demo Mode is for retail
environments.
Select the yHome Use mode. Store Demo Mode is for retail
environments.
Return the unit’s settings from yStore Demo to Home Use
(standard): Press the volume button on the TV. When the OSD
volume is displayed, press and hold MENU for 5 sec.
3
Selecting an antenna
Press the or button, then press the ENTER
E
button.
Select Air or Cable.
4
Selecting a channel
Press the or button, then press the ENTER
E
button.
Select the channel source to memorise. When setting the antenna source to Cable, a step
appears allowing you to assign numerical values (channel frequencies) to the channels.
For more information, refer to ChannelAuto Store.(P. 12)
Press the
✎
ENTER
E
button at any time to interrupt the memorisation process.
5
Setting the Clock
Mode
Set the Clock Mode automatically or manually.
6
Viewing the HD
Connection Guide.
The connection method for the best HD screen quality is displayed.
7
Enjoy your TV.
Press the ENTER
E
button.
If You Want to Reset This Feature...
Select Setup - Plug & Play (Initial Setup). Enter your 4 digit PIN number. The default PIN number is “0-0-0-0.” If you want to
change the PIN number, use the Change PIN function.
or
S.MODE
P.MODE
Power Input
VHF/UHF Antenna
Cable
R-AUDIO-L
P
RPBY
ANT OUT
BN68-02689J_Eng.indb 62010-03-07 �� 5:34:17
7
English
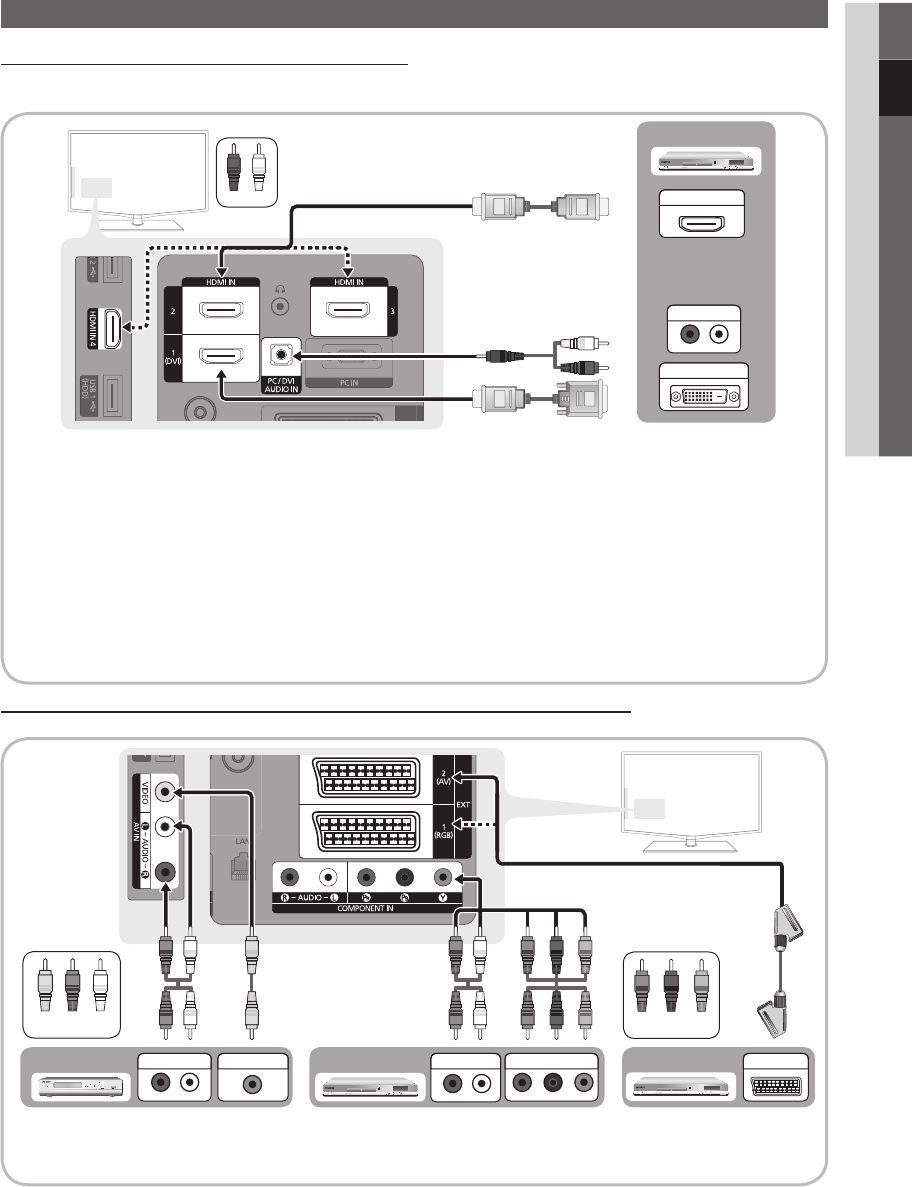
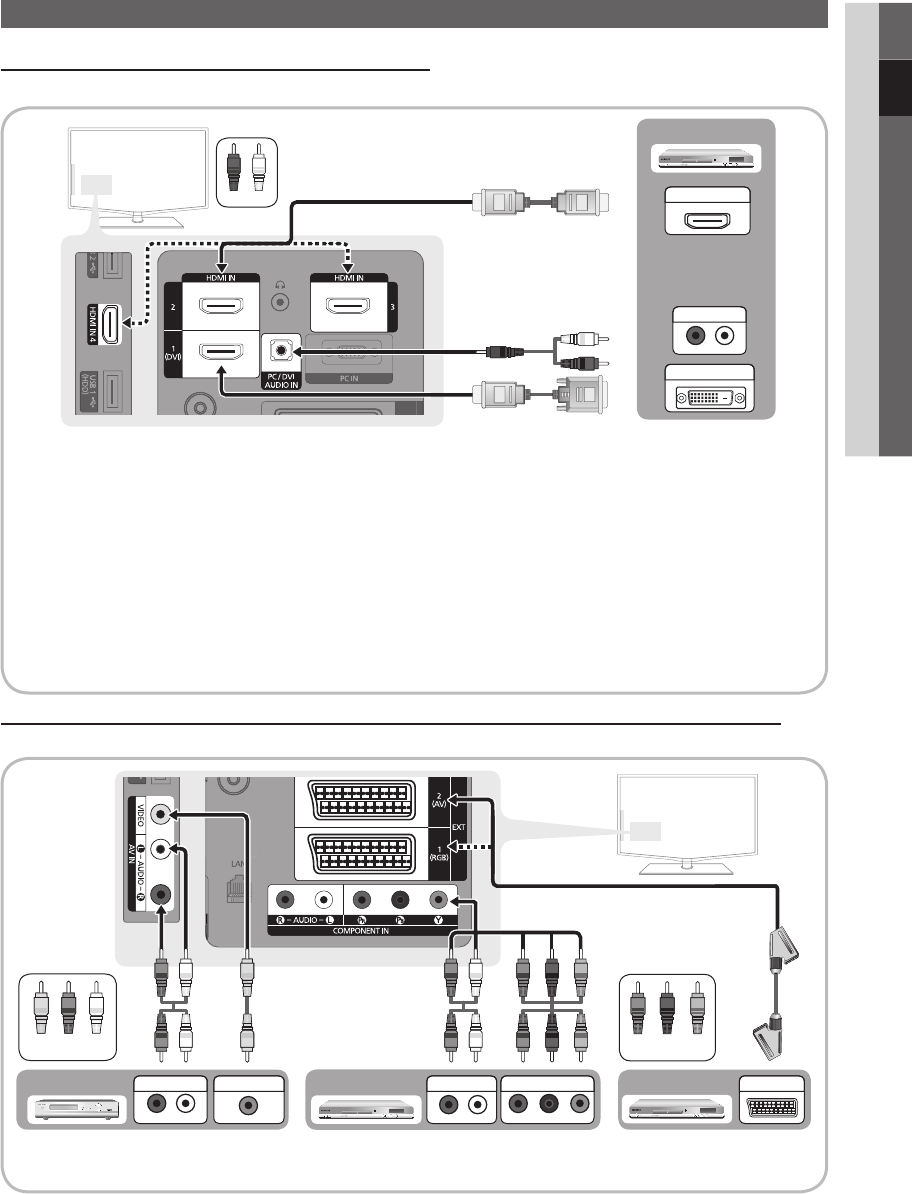
02Connections
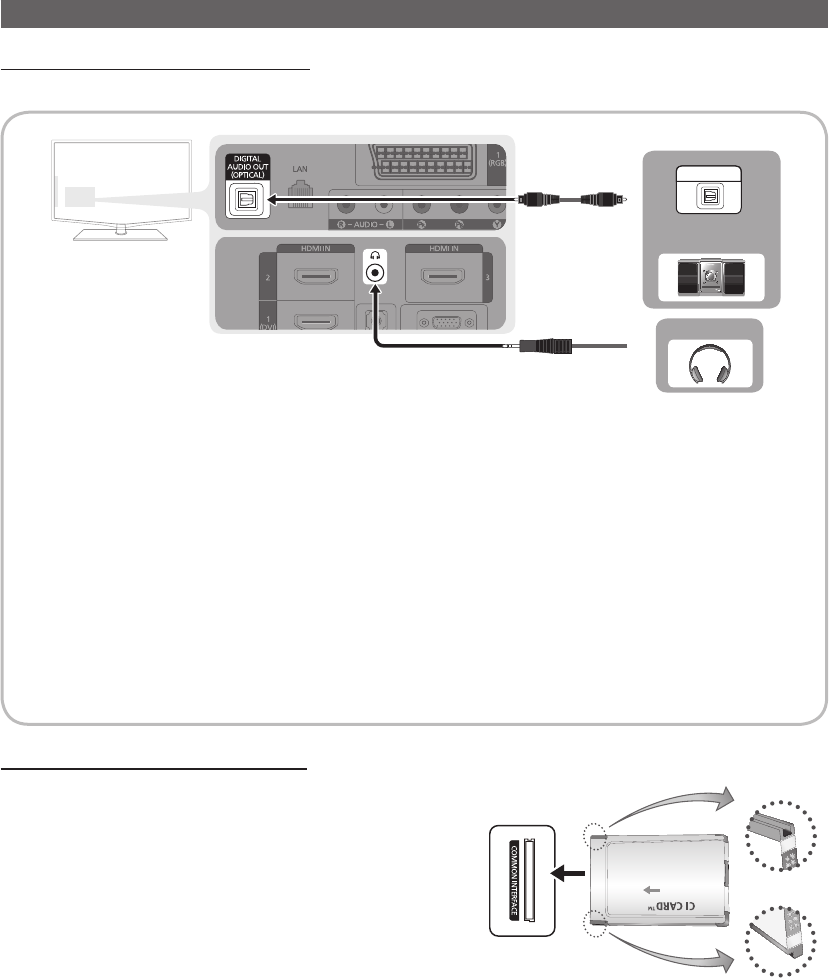
Connections
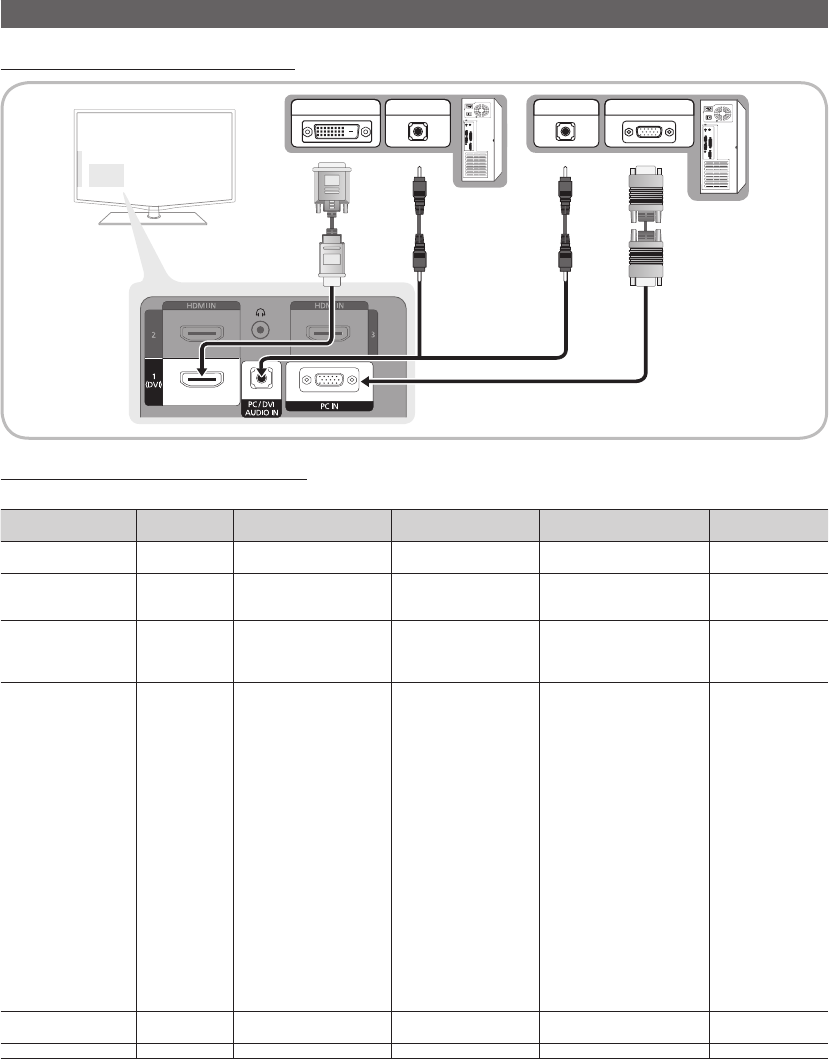
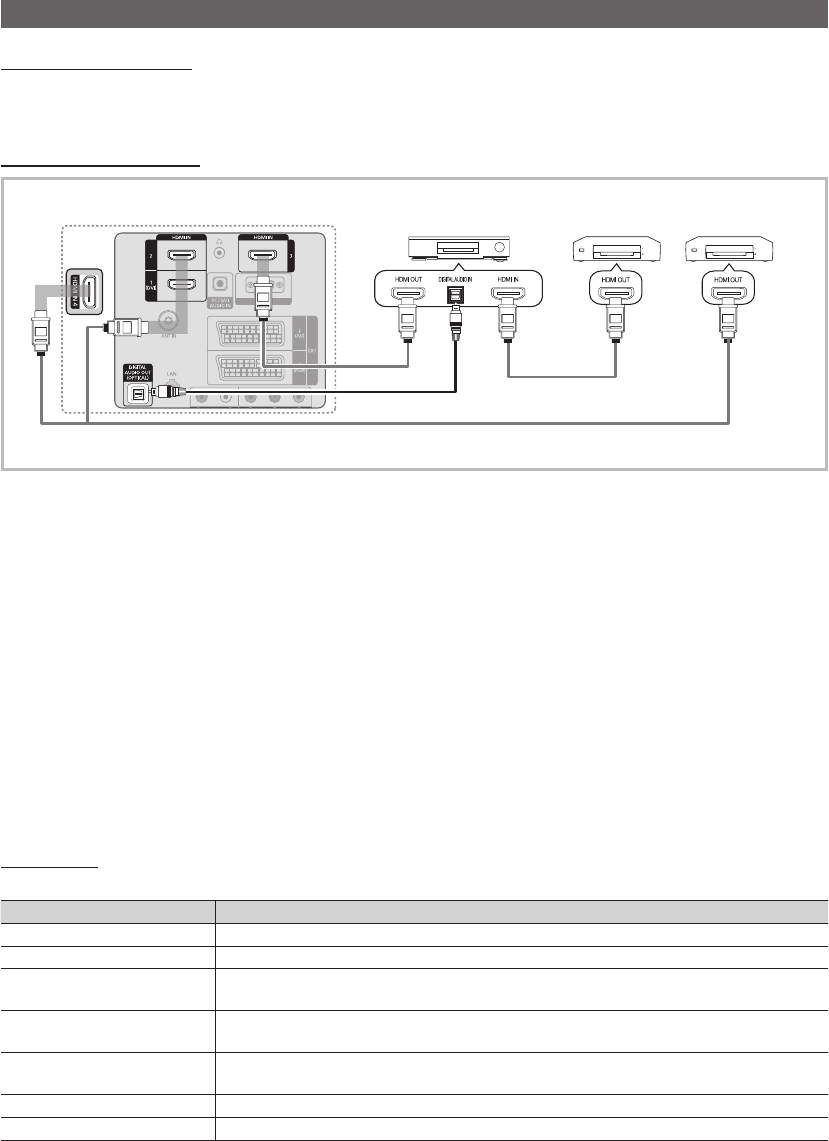
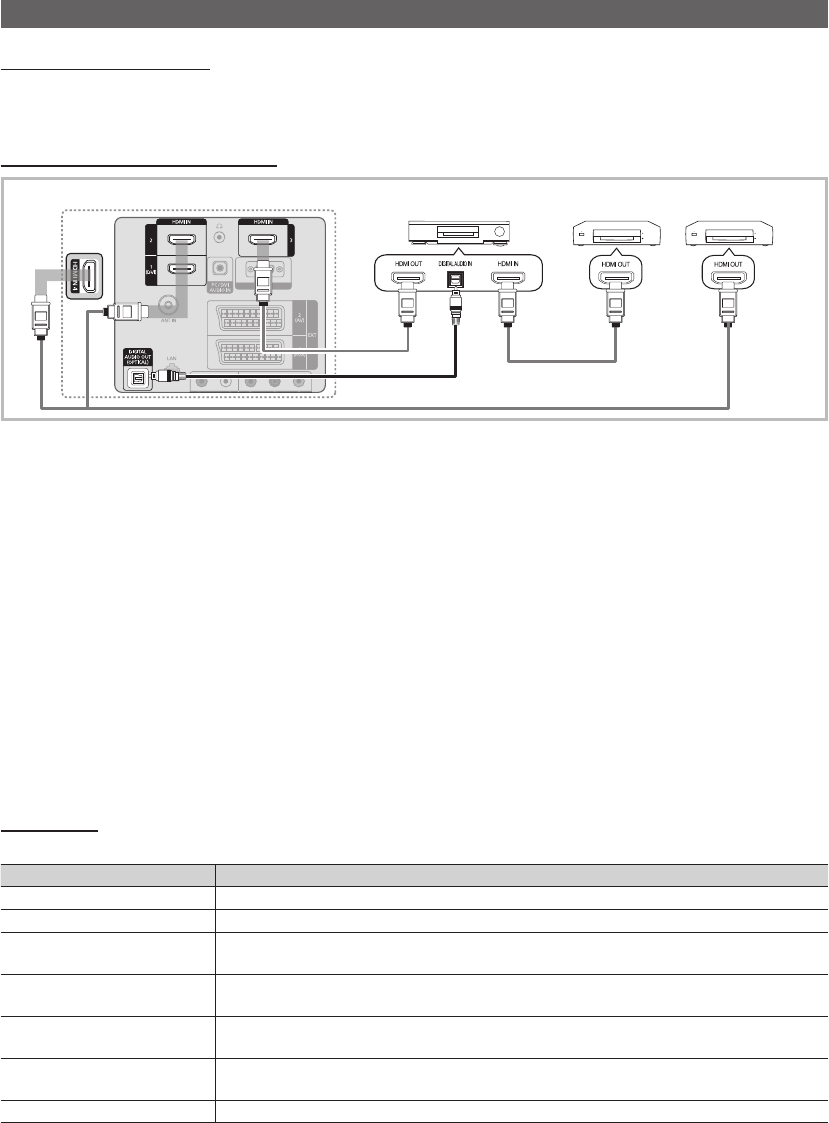
Connecting to an AV Device
Using an HDMI / DVI Cable: HD connection (up to 1080p)
Available devices: DVD, Blu-ray player, HD cable box, HD STB (Set-Top-Box) satellite receiver, cable box, satellite receiver (STB)
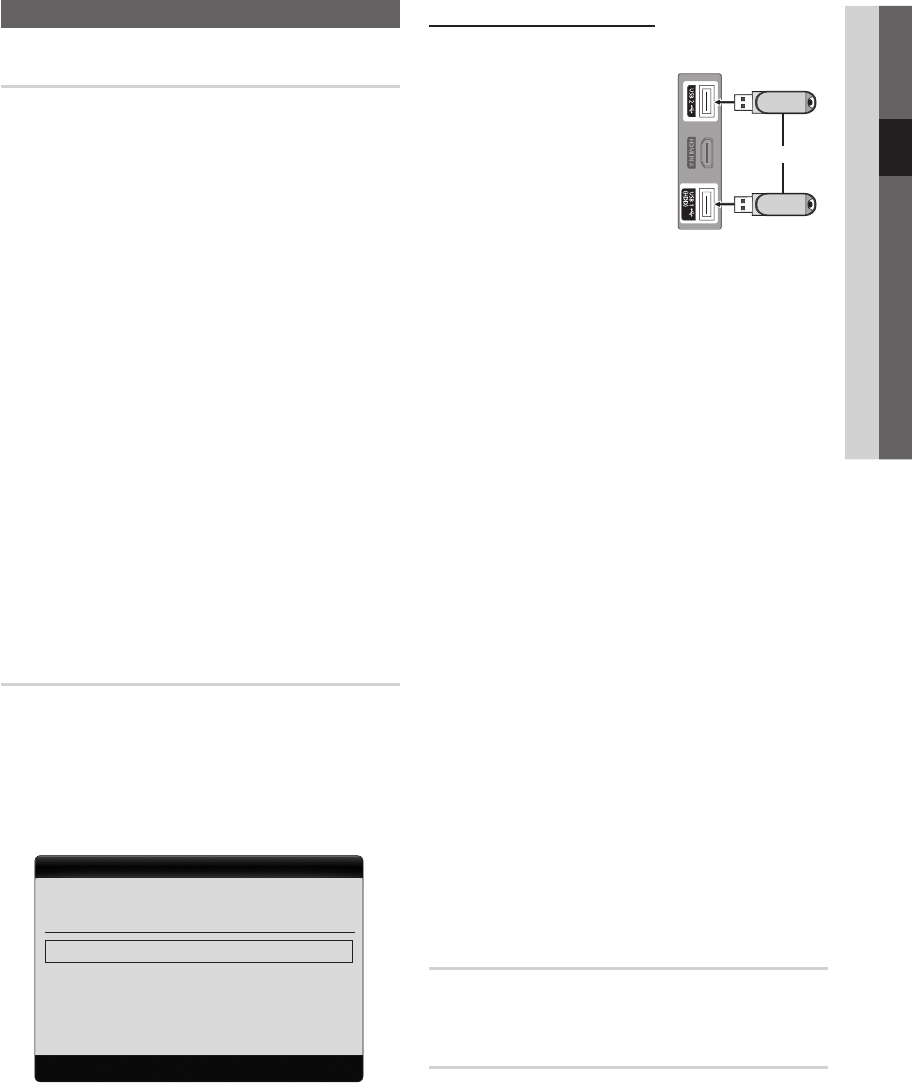
HDMI IN 1(DVI), 2, 3, 4 / PC/DVI
✎
AUDIO IN
When using an HDMI/DVI cable connection, you must use the
x
HDMI IN 1(DVI) jack. For the DVI cable
connection, use a DVI to HDMI cable or DVI-HDMI (DVI to HDMI) adapter for video connection and the DVI
AUDIO IN jacks for audio.
If an external device such as a DVD / Blu-ray player / cable box /
x
STB satellite receiver supporting a HDMI
versions older than 1.3 is connected, the TV may operate abnormally (e.g. no screen display / no sound /
annoying flicker / abnormal colour).
If there is no sound after connecting an HDMI cable, check the HDMI version of the external device. If you
x
suspect the version is older than 1.3, contact the provider of the device to confirm the HDMI version and
request an upgrade.
It
x
is recommended you purchase an HDMI-certified cable. Otherwise, the screen may appear blank or a
connection error may occur.
Using a Component (up to 1080p) or Audio / Video (480i only) Cable and Using a Scart Cable
Available devices: VCR, DVD, Blu-ray player, cable box, STB satellite receiver
In
✎
Ext. mode, DTV Out supports MPEG SD Video and Audio only.
To obtain the best picture quality, the Component connection is recommended over the A/V connection.
✎
R-AUDIO-L
P
RPBY
DVI OUT
R-AUDIO-L
P
RPBY
HDMI OUT
WR
RedWhite
WW
B
G
RR
W
Y
R-AUDIO-L
P
RPBY
AUDIO OUT
R
G
BWR
W
RG
R
WR
B
RW
WY
W
Y
R-AUDIO-L
P
RPBY
COMPONENT OUT
R-AUDIO-L
P
RPBY
AUDIO OUT
R-AUDIO-L
P
RPBY
EXT
R-AUDIO-L
P
RPBY
AUDIO OUT
R-AUDIO-L
P
RPBY
VIDEO OUT
WW
B
G
RR
W
Y
YellowRedWhite
WW
B
G
RR
W
Y
RedBlueGreen
Blu-ray player DVDVCR
DVD
BN68-02689J_Eng.indb 72010-03-07 �� 5:34:26
8
English
Connections
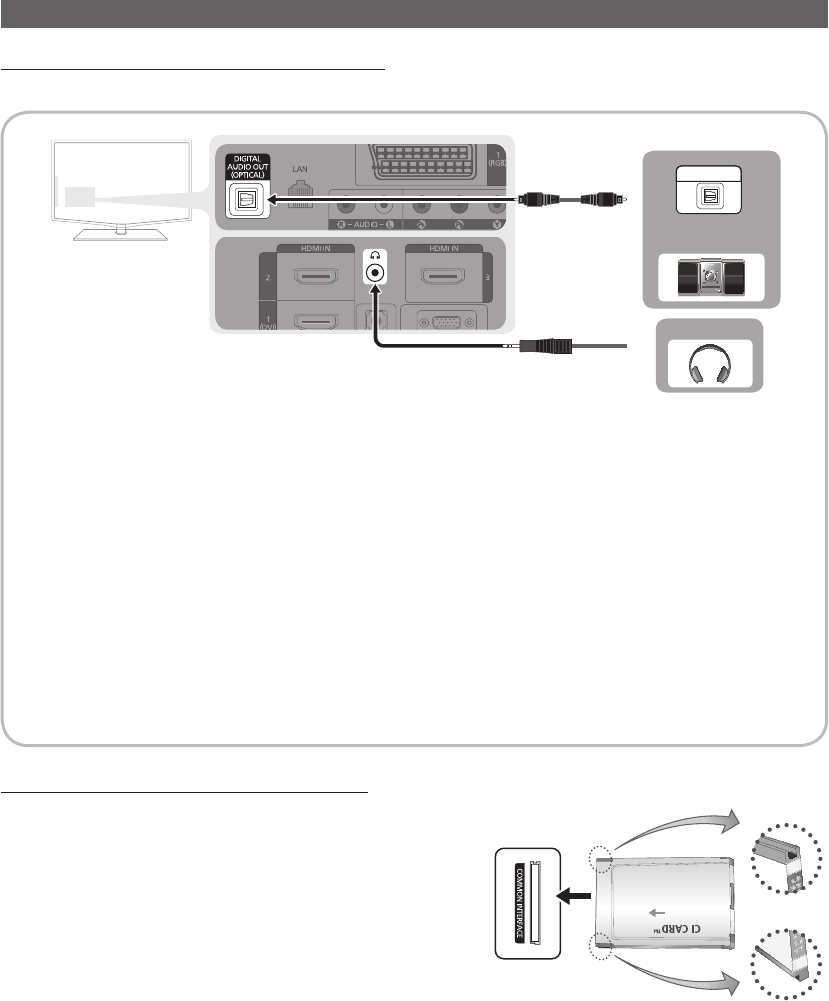
Connecting to an Audio Device
Using an Optical or Audio Cable Connection
Available devices: digital audio system, amplifier, DVD home theatre
✎
DIGITAL AUDIO OUT (OPTICAL)
When a digital audio system is connected to the
x
DIGITAL AUDIO OUT (OPTICAL) jack, decrease the volume
of both the TV and the system.
5.1 CH (channel) audio is available when the TV is connected to an external device supporting 5.1 CH.
x
When the receiver (home theatre) is set to on, you can hear sound output from the TV’s
x
optical jack. When the
TV is receiving a DTV signal, the TV will send 5.1 CH sound to the home theatre receiver. When the source is
a digital component such as a DVD / Blu-ray player / cable box / STB (Set-Top-Box) satellite receiver and is
connected to the TV via HDMI, only 2 CH audio will be heard from the home theatre receiver. If you want to
hear 5.1 CH audio, connect the digital audio out jack from your DVD / Blu-ray player / cable box / STB satellite
receiver directly to an amplifier or home theatre.
Headphones
✎H
: You can connect your headphones to the headphones output on your set. While the
headphones are connected, the sound from the built-in speakers will be disabled.
Sound function may be restricted when connecting headphones to the TV.
x
Headphone volume and TV volume are adjusted separately.
x
CONNECTIONS COMMON INTERFACE Slot
To watch paid channels, the “CI or CI+ CARD” must be inserted.
If you don’t insert the “CI or CI+ CARD,” some channels will y
display the message “Scrambled Signal”.
The pairing information containing a telephone number, the “CI or y
CI+ CARD” ID the Host ID and other information will be displayed
in about 2~3 minutes. If an error message is displayed, please
contact your service provider.
When the configuration of channel information has finished, the y
message “Updating Completed” is displayed, indicating the
channel list is updated.
NOTE
✎
You must obtain a “CI or CI+ CARD” from a local cable service provider.
x
When removing the “CI or CI+ CARD”, carefully pull it out with your hands since dropping the “CI or CI+ CARD” may
x
cause damage to it.
Insert the “CI or CI+ CARD” in the direction marked on the card.
x
The location of the
x
COMMON INTERFACE slot may be different depending on the model.
“CI or CI+ CARD” is not supported in some countries and regions; check with your authorized dealer.
x
If you have any problems, please contact a service provider.
DivX Certified to play DivX video up to HD 1080p, including premium content.
ABOUT DIVX VIDEO: DivX® is a digital video format created by DivX,Inc. This is an official DivX Certified device that
plays DivX video. Visit www.divx.com for more information and software tools to convert your files into DivX video.
ABOUT DIVX VIDEO-ON-DEMAND: This DivX Certified® device must be registered in order to play DivX Video-on-
Demand (VOD) content. To generate the registration code, locate the DivX VOD section in the device setup menu.
Go to vod.divx.com with this code to complete the registration process and learn more about DivX VOD.
Pat. 7,295,673; 7,460,688; 7,519,274
TheaterSound, SRS and the symbol are trademarks of SRS Labs, Inc.
TheaterSound technology is incorporated under licence form SRS Lab, Inc.
Open source licence notice
In the case of using open source software, Open Source Licences are available on the product menu.
BN68-02689J_Eng.indb 472010-03-07 �� 5:35:39
48
English
Other Information
Specifications
Panel native1920 x 1080 @ 60 Hz
Environmental Considerations
Operating Temperature
Operating Humidity
Storage Temperature
Storage Humidity
10°C to 40°C (50°F to 104°F)
10% to 80%, non-condensing
-20°C to 45°C (-4°F to 113°F)
5% to 95%, non-condensing
TV System Analogue : Depending on your country selection
Digital : DVB-T/DVB-C
Colour/video systemAnalogue : PAL. SECAM, NT443
Digital : MPEG2, MPEG4 ....
Sound SystemBG. OK NICAM. MPEGl
HDMI IN 1 ~ 4Video : 1080/24p, 1080p, 1080i ....
Audio : Two Channel Linear PCM 32,44 1kHz ....
Analogue audio input (HDMI IN1 only)
PC Input
Stand Swivel
(Left / Right)-20˚ ~ 20˚
Model Name LE32C630LE37C630LE40C630LE46C630
Screen Size
(Diagonal)32 inch37 inch40 inch46 inch
Sound
Output10W X 2
Dimensions (WxDxH)
Body
With stand
793.7 X 78 X 494.3 mm
793.7 X 239 X 557.5 mm
911.6 X 78.2 X 559.4 mm
911.6 X 255 X 622.8 mm
977.8 X 80.3 X 595.0 mm
977.8 X 255.0 X 660.1 mm
1110.2 X 80.3 X 670.5 mm
1110.2 X 275.0 X 735.3 mm
Weight
Body
With Stand
9.4 kg
12.1 kg
12 kg
15.4 kg
14.2 kg
17.6 kg
18.0 kg
21.8 kg
Design and specifications are subject to change without prior notice.
✎
For the power supply and power consumption, refer to the label attached to the product.
✎
BN68-02689J_Eng.indb 482010-03-07 �� 5:35:39
49
English
05Other Information
Index
A
AllShare 39
Amplify 16
Antenna 12
Anynet+ 36
Audio Out 8, 36
Auto Adjustment 16
Auto Volume 17
B
Background Music 35
Balance L/R 16
Basic View 34
Batteries 5
Black Tone 14
Blanking Bracket 42
Brightness 13
C
Cable Tie 43
Change PIN 6, 19
Channel Manager 11
Clock 18
Colour Tone 15
Component 7
Connecting to a PC 22
Connecting to an Audio Device 8
D
Digital Audio Out 8, 36
DivX® VOD 35
D-sub 23
Dynamic 13
Dynamic Contrast 14
E
Eco Sensor 14
Edit Name 9
Editing Channels 12
Energy Saving 14
Equalizer 16
External Speaker 17
EPG 10
F
Favourites Channel 11
Film Mode 15
Fine Tune 13
Flesh Tone 14
Frequency 12
H
HDMI 7, 35
Headphones 8
Home Theatre 8, 36
I
Installation Space 2
L
Language 19
Licence 47
Lock 44
M
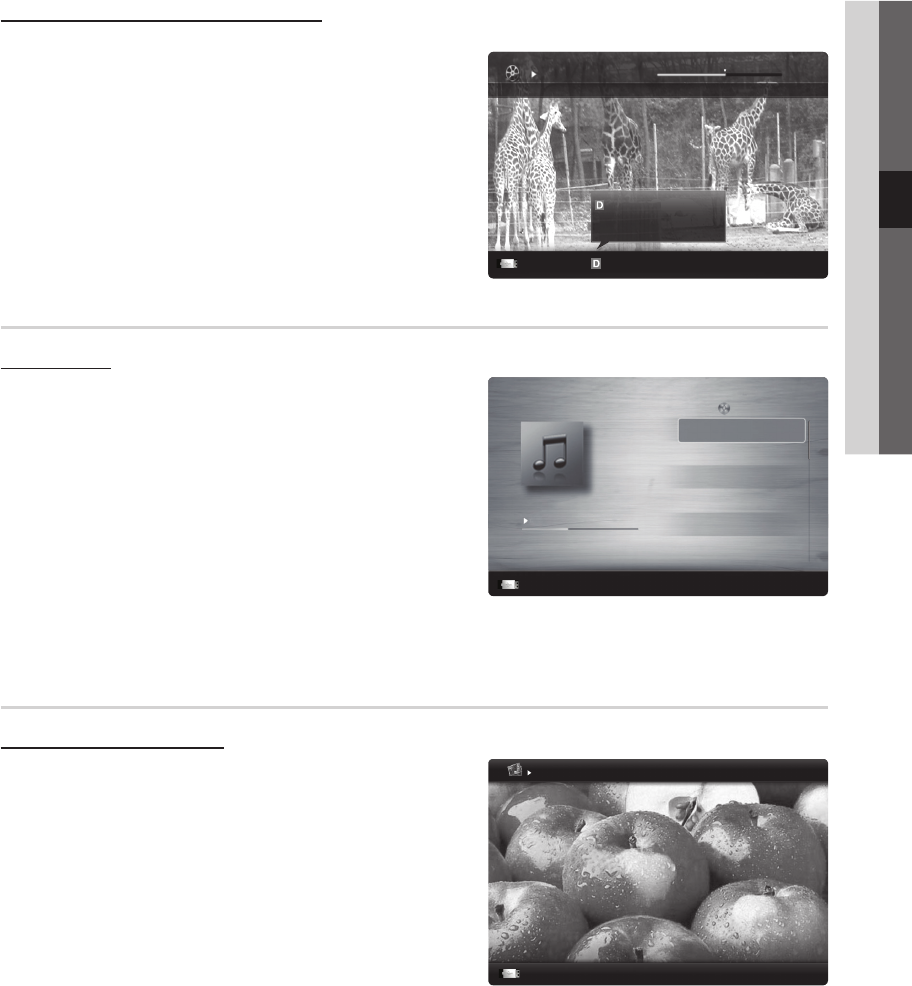
Media Play 29
Melody 19
Menu Transparency 19
Music 32
N
Navigate 9
Network Connection 23
Network Setup 24, 26
Now & Next guide 10
O
ON/OFF button 5
Optimal resolution 22
P
Password 28
Photos 33
Picture Size 15, 35
PIP (Picture in Picture) 21
Plug & Play 6
Power Indicator 4
R
Receiver 36
Recording 36
Remote Control 5
Repeat Mode 35
RGB Only Mode 14
Rotate 35
S
Select All 13
Self Diagnosis 21
Sharpness 13
Signal Information 21
Sleep Timer 18
Slide Show 33
Software Upgrade 21
Source List 9
Speaker Select 17
Specifications 48
Standby mode 4
Subtitle 19
Symbol 3
T
Timer 18
Title 35
Tools 3
Troubleshooting 45
TV Speaker 17
U
USB 21, 30
Using Channel View 10
Using Scheduled View 10
Using Favourite Channels 11
V
VCR 9
Video Formats 32
Videos 31
Volume 4, 5, 17
W
Wall Mount 42, 43
Warm 14
White Balance 14
BN68-02689J_Eng.indb 492010-03-07 �� 5:35:39
This page is intention-
ally left blank.
BN68-02689J_Eng.indb 502010-03-07 �� 5:35:39
2
Italiano
Le figure e le illustrazioni presenti in questo Manuale dell’utente sono fornite unicamente a titolo di riferimento e possono
differire da quelle del prodotto attuale. Le specifiche e il design del prodotto possono variare senza preavviso.
Avviso relativo alla trasmissione TV digitale
1. Le funzioni relative alla televisione digitale (DVB) sono disponibili solo nelle nazioni o nelle aree in cui viene trasmesso il segnale digitale terrestre DVB-T
(MPEG2 e MPEG4 AVC) o laddove si abbia accesso a un servizio TV via cavo compatibile DVB-C (MPEG2 e MPEG4 AAC). Verificare con il rivenditore
locale la possibilità di ricevere segnali DVB-T o DVB-C.
2. DVB-T è lo standard del consorzio europeo DVB per la trasmissione della televisione digitale terrestre mentre DVB-C è lo standard per la trasmissione
della televisione digitale via cavo. Tuttavia, alcune funzioni quali EPG (Electric Program Guide), VOD (Video on Demand) e altre non sono incluse in
queste specifiche. Per questo motivo, al momento non sono disponibili.
3. Sebbene questo apparecchio TV soddisfi i più recenti standard DVB-T e DVB-C, aggiornati a [Agosto, 2008], la compatibilità con future trasmissioni
digitali via cavo DVB-C e terrestri DVB-T non può essere garantita.
4. In base al paese o all’area in cui si utilizza questo televisore, alcuni fornitori di trasmissioni TV via cavo potrebbero applicare una tariffa aggiuntiva per
tali servizi e richiedere all’utente di accettare i termini e le condizioni della loro offerta.
5. Alcune funzioni della trasmissione TV digitale potrebbero non essere disponibili in alcune nazioni o regioni e DVB-C potrebbe non funzionare
correttamente con alcuni fornitori di servizi via cavo.
6. Per maggiori informazioni, contattare il locale centro assistenza clienti Samsung.
La qualità di ricezione del televisore può essere influenzata dai diversi metodi di trasmissione esistenti nei vari paesi. Verificare le prestazioni del
✎
televisore presso un Rivenditore autorizzato SAMSUNG o presso un Call Centre Samsung per sapere se la qualità di ricezione può essere migliorata o
meno riconfigurando le impostazioni dell’apparecchio.
Avvertenza per la visualizzazione di immagini fisse
Evitare la visualizzazione di immagini fisse (per es. file jpeg) o di elementi grafici fissi (come ad esempio il logo di un programma TV, il formato panorama o
4:3, la barra dei titoli di borsa o delle notizie nella parte inferiore dello schermo). La visualizzazione continua di una immagine fissa può causare immagini
residue sullo schermo LCD e influenzare la qualità della riproduzione. Per ridurre il rischio di tale effetto, seguire le raccomandazioni:
Evitare la visualizzazione dello stesso canale televisivo per lunghi periodi di tempo.•
Visualizzare sempre le immagini a schermo pieno, usando il menu del formato immagini per impostarlo al valore più appropriato.•
Ridurre la luminosità e il contrasto al minimo necessario per ottenere la qualità visiva desiderata; valori troppo elevati possono accelerare il processo •
di bruciatura dello schermo.
Usare frequentemente tutte le funzioni TV progettate per ridurre la ritenzione delle immagini e la bruciatura dello schermo. Per maggiori informazioni •
consultare l’apposita sezione del manuale dell’utente.
Messa in sicurezza della posizione di installazione
Mantenere le distanze indicate tra il prodotto e gli altri elementi presenti (per esempio le pareti) per garantire un’adeguata ventilazione.
Il mancato rispetto di questa precauzione può comportare un incendio o un malfunzionamento provocato dall’aumento della temperatura interna del prodotto.
Se si usa un piedistallo o un sistema di montaggio a parete, utilizzare solo componenti forniti da Samsung Electronics.
✎
L’uso di parti di altre marche può causare un malfunzionamento o lesioni provocate da una eventuale caduta del prodotto.
x
L’aspetto del prodotto può differire in base al modello.
✎
Installazione con piedistallo.Installazione con supporto a parete.
10 cm
10 cm
10 cm
10 cm
10 cm
10 cm
10 cm
Corretto smaltimento di questo prodotto (WEEE / RAEE, Rifiuti da apparecchiature elettriche ed elettroniche)
(applicabile nei paesi dell’Unione Europea e in quelli con sistemi di raccolta differenziata)
Questo simbolo riportato sul prodotto, sugli accessori e sulla documentazione indica che il prodotto e i suoi accessori elettronici
(es. caricatore, cuffie, cavo USB) non devono essere smaltiti unitamente ai rifiuti domestici al termine del loro ciclo vitale. Per
prevenire eventuali danni all’ambiente o alla salute delle persone derivanti da uno smaltimento non appropriato, separarli da altri
tipi di rifiuti e riciclarli in modo responsabile per promuovere il riutilizzo sostenibile delle risorse materiali. Gli utenti residenziali sono
invitati a contattare il rivenditore presso il quale hanno acquistato il prodotto, o l’ufficio locale preposto, per richiedere le informazioni
relative alla raccolta differenziata e al riciclaggio di questo tipo di prodotto. Gli utenti aziendali sono invitati a contattare il proprio
fornitore e verificare i termini e le condizioni del contratto d’acquisto. Questo prodotto e i suoi accessori elettronici non devono
essere smaltiti insieme agli altri rifiuti commerciali.
Corretto smaltimento delle batterie utilizzate in questo prodotto
(applicabile nei paesi dell’Unione Europea e in quelli con sistemi di raccolta differenziata delle batterie)
Questo contrassegno posto sulla batteria, sul manuale o sull’imballaggio, indica che le batterie contenute in questo prodotto non
devono essere smaltite insieme ai rifiuti domestici una volta esauste. Laddove presenti, i simboli chimici Hg, Cd o Pb indicano che
le batterie contengono mercurio, cadmio o piombo sopra i limiti stabiliti nell’ambito della Direttiva CE 2006 / 66. Se le batterie non
vengono smaltite in modo corretto, tali sostanze possono causare danni alla salute o all’ambiente. Per proteggere le risorse naturali
e promuovere il riutilizzo dei materiali, separare le batterie dagli altri rifiuti e riciclarle utilizzando il sistema locale gratuito di ritiro delle
batterie esauste.
BN68-02689J-Ita.indb 23/7/2010 5:18:42 PM
3
Italiano
Contenuti
Per iniziare
4
4 Accessori
4 Vista del Pannello di controllo
5 Vista del telecomando
6 Collegamento all’antenna
6 Plug & Play (Impostazione iniziale)
Collegamenti
7
7 Collegamento a un dispositivo AV
8 Collegamento a un dispositivo audio
9 Cambiare la sorgente di ingresso
Funzioni base
9
9 Come scorrere i menu
10 Uso del tasto INFO (Guida Now & Next)
10 Pianificare la visione
12 Menu Canale
13 Menu Immagine
16 Menu Suono
18 Menu Impostazione
21 Menu Supporto
Funzioni avanzate
22
22 Collegamento a un PC
23 Connessione di rete
29 Media Play
36 Anynet
+
39 AllShare
Altre informazioni
41
41 Funzione Teletext canali analogici
42 Installazione del supporto a parete
43 Assemblaggio dei cavi
44 Blocco antifurto Kensington
44 Fissaggio del televisore alla parete
45 Risoluzione dei problemi
48 Specifiche
49 Indice
50 Schema blocco
Controllate il simbolo!
t
O
Questa funzione è utilizzabile
premendo il tasto TOOLS sul
telecomando.
NotaGuida passo-passo
Questo apparecchio è fabbricato in conformità al
D.M.28.08.95 n.548 ed in particolare a quanto specificato nell
Art.2, comma 1. Questo apparecchio è fabbricato nella U.E.
in conformità al D.M.28.08.95 n.548 Art.2, comma 1 ed al
D.M.26.03.92 Art.1
BN68-02689J-Ita.indb 33/7/2010 5:18:43 PM
4
Italiano
Per iniziare
Accessori
Controllare che nella confezione del TV LCD siano contenuti i seguenti componenti. Se eventuali componenti
✎
risultassero mancanti, contattare il rivenditore.
La forma e il colore dei componenti possono variare in base al modello.
✎
Telecomando e batterie (2 tipo AAA) y
Istruzioni per l’utente y
Scheda di garanzia / Guida alla sicurezza (non disponibili in tutti i paesi) y
Panno per la pulizia y
Cavo di alimentazione y
(per televisori da 46 pollici)
yStaffa preforataFermacavi yAnello di ritenuta (4ea) y
Vedere la guida separata per l’installazione del piedistallo.
o
Piedistallo (1EA) yGuida piedistallo (1EA) yViti (9EA) y
(solo modello da 32 pollici: 8EA)
Vista del Pannello di controllo
La forma e il colore del prodotto possono variare in base al modello.
✎
P
(Alimentazione / Power)
Accende o spegne il televisore.
Indicatore di alimentazione
Lampeggia e si spegne quando l’alimentazione è attiva, si accende in modalità standby.
SOURCE
E
Alterna tutte le sorgenti d’ingresso disponibili. Nel menu OSD, utilizzare questo tasto
come si usa il tasto ENTER
E
del telecomando.
MENUVisualizza un menu a schermo, l’OSD (on screen display), delle funzioni del televisore.
Y
Regola il volume. Nel menu OSD, utilizzare i tasti
Y
così come si usano i tasti
◄ e ► del telecomando.
z
Cambia i canali. Nel menu OSD, utilizzare i tasti
z
così come si usano i tasti
▼ e ▲ del telecomando.
Sensore del telecomandoPuntare il telecomando in direzione di questo punto sul televisore.
Modalità Standby
Non lasciare il televisore in modalità standby per un lungo periodo di tempo (quando si parte per le vacanze, ad esempio).
Anche quando il tasto di accensione è disattivo, l’apparecchio consuma una piccola quantità di energia elettrica. Si consiglia
quindi di scollegare il cavo di alimentazione.
(M4 X L12)
Altoparlanti
Sensore del telecomando
Indicatore di
alimentazione
BN68-02689J-Ita.indb 43/7/2010 5:18:45 PM
5
01Per iniziare
Italiano
Vista del telecomando
Questo speciale telecomando, progettato per aiutare chi ha problemi di vista, presenta punti in Braille sui tasti Power,
✎
Channel e Volume.
Inserimento delle batterie (tipo: AAA)
NOTA
✎
Usare il telecomando entro un raggio di 7 metri dal
x
televisore.
Una illuminazione intensa può influenzare le prestazioni del
x
telecomando. Evitare l’uso del telecomando nelle immediate
vicinanze di lampade fluorescenti o insegne al neon.
La forma e il colore possono variare in base al modello.
x
ABCD
P.MODES.MODE
HDMI
Seleziona direttamente la modalità HDMI. (P. 7)
Visualizzazione e selezione delle sorgenti video
disponibili. (P. 9)
Spegne e accendere il televisore. (P. 6)
Premere per accedere direttamente ai canali.
Visualizza la EPG (Electronic Programme Guide).
(P. 10)
Cambia canali.
Scelta rapida delle funzioni usate più di
frequente.
Visualizza le informazioni sullo schermo TV.
(P. 10)
Visualizza il menu OSD principale.
(P. 9)
Regola il volume.
Ritorna al canale precedente.
Tasti dei menu Gestione canali,
Media Play, ecc.
Usare questi tasti in modalità Media Play e
Anynet
+
. (P. 29, 36)
(: controlla la registrazione nei registratori
Samsung dotati della funzione Anynet
+
)
Esclude temporaneamente l’audio.
Ritorna al menu precedente.
Seleziona le voci del menu OSD e ne modifica
i valori.
Esce dal menu.
P.MODE: Seleziona la modalità immagine. (P. 13)
S.MODE: Seleziona la modalità suono. (P. 16)
DUAL I-II: Seleziona la modalità suono. (P. 17)
D (Servizio dati): Utilizzare questo tasto quando
si usa il servizio di trasmissione
dati. (P. 17)
P.SIZE: Seleziona la dimensione dell’immagine.
(P. 15)
SUBT.: Visualizza i sottotitoli digitali (P. 19)
Visualizza Media Play.(P. 29).
Seleziona alternativamente le
modalità Teletext, Double o Mix.
Visualizza l’elenco canali sullo schermo. (P. 13)
BN68-02689J-Ita.indb 53/7/2010 5:18:46 PM
6
Per iniziare
Italiano
Collegamento all’antenna
Quando il televisore viene acceso per la prima volta, le impostazioni di base vengono visualizzate automaticamente.
Preimpostato: Collegare l’alimentazione e l’antenna.
✎
Plug & Play (Impostazione iniziale)
Alla prima accensione del televisore, vengono visualizzate alcune schermate che aiutano l’utente a configurare le impostazioni
di base. Premere il tasto POWER
P
. Plug & Play è disponibile solo quando sul televisore è impostata la sorgente Ingressi.
Per tornare al passaggio precedente, premere il tasto Rosso.
✎
1
Selezione della lingua
Premere il tasto ▲ o ▼, quindi premere ENTER
E
.
Selezionare la lingua OSD (On Screen Display) desiderata.
P
POWER
2
Selezionare Demo
Negozio o Uso dom.
Premere il tasto ◄ o ► , quindi premere ENTER
E
.
Selezionare la modalità yUso dom. La modalità Demo Negozio è
dedicata a un uso commerciale.
Ripristinare le impostazioni dell'unità da yDemo Negozio a Uso
dom. (standard): Premere il tasto Volume del televisore. Quando il
menu Volume viene visualizzato a schermo, tenere premuto il tasto
MENU per 5 secondi.
3
Selezionare una
antenna
Premere il tasto ▲ o ▼, quindi premere ENTER
E
.
Selezionare Antenna o Cavo.
4
Selezionare un canale
Premere il tasto ▲ o ▼, quindi premere ENTER
E
.
Selezionare la sorgente del canale da memorizzare. Quando si imposta la sorgente antenna
su Cavo, viene visualizzata una procedura che consente di impostare un valore per la
ricerca dei canali digitali (frequenza del canale). Per ulteriori informazioni, vedere Canale →
Memoriz. automatica (P. 12).
Premere
✎
ENTER
E
in qualsiasi momento per interrompere il processo di
memorizzazione.
5
Impostare la Modalità
orologio
Impostare la Modalità orologio automaticamente o manualmente.
6
Visualizzare la Guida
alla connessione HD.
Viene quindi visualizzata la descrizione relativa al metodo di connessione che fornisce la
migliore qualità di visione HD.
7
Buon divertimento.
Premere il tasto ENTER
E
.
Per reimpostare questa funzione...
Selezionare Impostazione - Plug & Play (Impostazione iniziale) Digitare il PIN a quattro cifre. Il PIN preimpostato è “0-0-0-0.”
Per cambiare il codice PIN, utilizzare la funzione Cambia PIN.
Antenna VHF/UHF
o
Cavo
R-AUDIO-L
P
RPBY
ANT OUT
Ingresso Alimentazione
BN68-02689J-Ita.indb 63/7/2010 5:18:47 PM
7
Italiano
02Collegamenti
Collegamenti
Collegare un dispositivo AV
Usare un cavo HDMI / DVI: Connessione HD (fino a 1080p)
Dispositivi disponibili: DVD, lettore Blu-ray, ricevitore via cavo HD, ricevitore satellitare HD STB (Set-Top-Box), ricevitore via
cavo, ricevitore satellitare (STB)
HDMI IN 1(DVI), 2, 3, 4 / PC / DVI AUDIO IN
✎
Quando si effettua una connessione mediante cavo HDMI / DVI, è necessario utilizzare la porta
x
HDMI IN
1(DVI). Per la connessione via cavo DVI / HDMI, utilizzare un cavo o una scheda DVI-HDMI per la connessione
video e la porta DVI AUDIO IN per l’audio.
Collegando al televisore un dispositivo esterno quale un DVD / lettore Blu-ray / ricevitore via cavo /
x
ricevitore
satellitare STB che supporta versioni HDMI precedenti alla 1.3, il televisore potrebbe non funzionare
Audio: Due canali lineari PCM 32/44.1/48 kHz, 16/20/24bits
Ingresso audio analogico (solo HDMI IN1)
Ingresso PC
Piedistallo ruotabile
(Sinistra / Destra)-20˚ ~ 20˚
Nome modello LE32C630LE37C630LE40C630LE46C630
Dimensione schermo
(Diagonale)32 inch37 inch40 inch46 inch
Suono
Uscita10W X 2
Dimensioni (Lar x Pro x Alt)
Corpo
Con piedistallo
793.7 X 78 X 494.3 mm
793.7 X 239 X 557.5 mm
911.6 X 78.2 X 559.4 mm
911.6 X 255 X 622.8 mm
977.8 X 80.3 X 595.0 mm
977.8 X 255.0 X 660.1 mm
1110.2 X 80.3 X 670.5 mm
1110.2 X 275.0 X 735.3 mm
Peso
Corpo
Con piedistallo
9.4 kg
12.1 kg
12 kg
15.4 kg
14.2 kg
17.6 kg
18.0 kg
21.8 kg
Design e specifiche sono soggetti a modifiche senza preavviso.
✎
Per l’alimentazione elettrica e il consumo di corrente, consultare l’etichetta apposta al prodotto.
✎
BN68-02689J-Ita.indb 483/7/2010 5:19:33 PM
49
Italiano
05Altre informazioni
Indice
A
Aggiornamento software 21
AllShare 39
Altoparlante est 17
Altoparlante TV 17
Amplificazione 16
Antenna 12
Anynet
+
36
Audio Out 8, 36
Auto diagnosi 21
B
Batterie 5
Bilan bianco 14
Bilanciamento 16
Blocco 13
C
Caldo 15
Cambia PIN 6, 19
Canali preferiti 11
Collegamento di un dispositivo
audio 8
Collegamento a un PC 22
Component 7
Connessione di rete 23
Contrasto Dinamico 14
Cuffie 8
D
Digital Audio Out 8, 36
Dinamica 13
Divx
®
VOD 35
D-sub 22
E
Elenco sorgenti 9
EPG 10
Equalizzatore 16
F
Fermacavi 43
Formato immagine 15, 35
Foto 33
Frequenza 12
G
Gestione canali 11
Guida Now & Next 10
H
HDMI 7, 36
Home Theater 8, 36
I
Impostazione rete 24, 27
Incarnato 14
Indicatore di alimentazione 4
Informazioni sul segnale 21
L
Licenza 47
Luminosità 13
M
Media Play 29
Melodia 19
Modalità Film 15
Modalità Ripeti 35
Modalità Standby 4
Modifica dei canali 12
Modifica Nome 9
Musica 33
Musica di sottof 35
N
Nitidezza 13
O
Orologio 18
P
PIP 20
Plug & Play 6
Posizione di installazione 2
Proiezione di diapositive 33
R
Registrazione 37
Regolazione auto 16
RGB 14
Risoluzione dei problemi 45
Ricevitore 38
Riproduzione Video 32
Risoluzione ottimale 22
Risp. energia 14
Ruota 35
S
Scorrere 9
Seleziona altoparlante 17
Seleziona tutto 13
Sensore Eco 14
Simbolo 3
Sintonia fine 13
Sottotitoli 19
Specifiche 48
Staffa preforata 42
Strumenti 3
Supporto a parete 47
T
Tasto ON/OFF 5
Telecomando 5
Timer 18
Timer stand-by 18
Titolo 34
Tonalità nero 14
Toni colore 15
Trasparenza menu 19
U
USB 21, 29
Usare Vis. canali 10
Uso dei Canali Preferiti 11
Uso di Vista programmazione 10
V
VCR 9
Video 31
Visual base 34
Volume 4, 5, 17
Volume auto 17
BN68-02689J-Ita.indb 493/7/2010 5:19:34 PM
50
Italiano
Altre informazioni
Schema blocco
DDR2(64MB)
DDR2(64MB)
DDR2(64MB)
DDR2(64MB)
DDR2(64MB)
DDR2-800
(32MBX16)
TS parallel
ONENAND
(MONO) 1GB
IC1101
•Scaler
•Audio DSP
•CPU
IC901
• SD AFE
• SIF Decoder
• 165MHz ADC
• VSB & QAM Decoder
• HDMI Decoder
SUB MICOM
IR/Key
DDR2 I/F
Hotel/Wall
IC-UART
DEBUG
SPDIF
Optical
UART
Wise Link
(HDD)
USB 2.0 *2
HDMI
4x1 SW
TMDS
EMAC_PHY
533MHz
Audio AMP
SPK
VAL_I2STX1_SPK
IIC
RTL8201
Audio
S/W, A/D
D/A*2, AMP
LVDS
SIF_I2S
VAL_SPDIF
SD VIDEO
HD VIDEO
Interrupt
Local BUS
YPbPr
RGB HV
SCART1 LR
DTV CVBS OUT
(SCART1/2 LR OUT)
Audio AMP
Woofer
DIF
ATV CVBS OUT
PCM_I2S_DATA
VAL_I2STX1_MONITOR
H/P
FRC
PC
PC/DVI Audio
CI
Tuner
SCART2 LR
Ext1
Ext2
AV
Component
HDMI
(4ea)
Service
LAN
64MB
CVBS
SCART1 RGB
CVBS
switch
CVBS
INTER
SWITCH
DDR2-800
(32MBX16)
DDR2(64MB)
DDR2-1066
(128MB 16bX2,
128MB 8bX4)
BN68-02689J-Ita.indb 503/7/2010 5:19:34 PM
Questa pagina è stata
lasciata intenzional-
mente bianca.
BN68-02689J-Ita.indb 513/7/2010 5:19:35 PM
2
Deutsch
Die Abbildungen und Illustrationen in diesem Handbuch dienen nur zur Information und können vom tatsächlichen Aussehen
des Geräts abweichen. Änderungen an Ausführung und technischen Daten vorbehalten.
Hinweis zu Digitalfernsehen
1. Die Funktionalitäten für Digitalfernsehen (DVB) stehen nur in Ländern/Regionen zur Verfügung, in denen digitale terrestrische DVB-T-Signale (MPEG2 und
MPEG4 AVC) gesendet werden oder in denen Sie Zugang zu einem kompatiblen Kabelfernsehdienst mit DVB-C (MPEG2 und MPEG4 AAC) haben können.
Fragen Sie Ihren örtlichen Händler, wenn Sie Informationen über die Verfügbarkeit von DVB-T oder DVB-C in Ihrer Gegend benötigen.
2. DVB-T ist der Standard des europäischen DVB-Konsortiums für die terrestrische Versorgung mit digitalem terrestrischem Fernsehen, und DVB-C ist das
Konsortium für die Versorgung mit digitalem Kabelfernsehen. Allerdings werden manche Unterscheidungsmerkmale wie EPG (elektrische Programmzeitschrift),
VOD (Video on Demand) usw. in dieser Spezifikation nicht berücksichtigt. Deshalb können sie zum jetzigen Zeitpunkt noch nicht eingesetzt werden.
3. Zwar hält dieses Fernsehgerät die aktuellen Standards der DVB-T- und DVB-C-Spezifikationen [Version August 2008] ein, aber es kann nicht garantiert
werden, dass die Kompatibilität mit zukünftigen digitalen terrestrischen DVB-T und DBV-C-Signalen gewahrt bleibt.
4. In Abhängigkeit von den Ländern/Regionen, in denen dieses Fernsehgerät eingesetzt wird, verlangen manche Kabelfernsehanbieter zusätzliche Gebühren für
solch einen Dienst, und möglicherweise wird verlangt, dass Sie den Vertragsbedingungen des Unternehmens zustimmen.
5. Manche Digitalfernsehfunktionen sind in einigen Ländern oder Regionen möglicherweise nicht verfügbar, und DVB-C-Signale kann das Gerät bei manchen
Kabelfernsehanbietern möglicherweise nicht fehlerfrei verarbeiten.
6. Für weitere Informationen setzen Sie sich bitte mit dem Samsung-Kundendienstzentrum in Verbindung.
Die Empfangsqualität des Fernsehgeräts kann durch Unterschiede bei den Sendeverfahren in verschiedenen Ländern beeinträchtigt werden. Kontrollieren
✎
Sie die Leistung des Fernsehgeräts bei Ihrem örtlichen SAMSUNG-Händler oder wenden Sie sich an das Samsung-Callcenter um festzustellen, ob sich die
Empfangsqualität durch Ändern der Fernseheinstellungen verbessern lässt.
Warnung bei Standbildern
Vermeiden Sie die Anzeige von Standbildern (wie z. B. JPEG-Bilddateien) oder Standbildelementen (wie z. B. Senderlogos, Panorama- oder 4:3-Bilder, Aktien- oder
Laufschriften mit Nachrichten am unteren Bildschirmrand usw.) auf dem Bildschirm. Durch lang anhaltende Anzeige von Standbildern kann es zu Schattenbildern
auf dem LCD-Bildschirm kommen, wodurch die Bildqualität beeinträchtigt wird. Um die Gefahr dieses Effekts zu vermindern, befolgen Sie bitte die nachfolgenden
Empfehlungen:
Vermeiden Sie es, für lange Zeit denselben Fernsehsender anzuzeigen.•
Versuchen Sie immer, Abbildung als Vollbild anzuzeigen. Verwenden Sie das Bildformatmenü des Fernsehgeräts um die beste Anzeigemöglichkeit zu finden.•
Reduzieren Sie die Helligkeits- und Kontrastwerte soweit wie möglich, um immer noch die gewünschte Bildqualität zu erreichen. Zu hohe Werte können das •
Ausbrennen beschleunigen.
Verwenden Sie häufiger alle Funktionen Ihres Fernsehgeräts, die dazu dienen, das Einbrennen von Bildern und das Ausbrennen des Bildschirms zu reduzieren. •
Weitere Informationen hierzu finden Sie in den entsprechenden Abschnitten des Benutzerhandbuchs.
Absichern des Aufstellbereichs
Halten Sie die erforderlichen Abstände zwischen dem Gerät und anderen Objekten (z.B. Wänden) ein, um ausreichende Lüftung sicherzustellen.
Wenn Sie dies nicht tun, besteht die Gefahr, dass aufgrund eines Anstiegs der Temperatur im Innern des Geräts ein Brand ausbricht oder andere Probleme mit dem
Gerät auftreten.
Wenn Sie einen Standfuß oder eine Wandhalterung einsetzen, verwenden Sie ausschließlich Teile von Samsung Electronics.
✎
Wenn Sie Teile eines anderen Herstellers verwenden, kann es zu Problemen mit dem Gerät oder zu Verletzungen kommen, weil das Gerät herunterfällt.
x
Das Aussehen kann sich je nach Gerät unterscheiden.
✎
Aufstellen des Geräts mit dem StandfußInstallation des Geräts mit der Wandhalterung
10 cm
10 cm
10 cm
10 cm
10 cm
10 cm
10 cm
Ordnungsgemäße Entsorgung dieses Geräts (Elektro- und Elektronik-Altgeräte)
(Anzuwenden in den Ländern der Europäischen Union und anderen europäischen Ländern mit einem separaten Sammelsystem)
Diese Kennzeichnung auf dem Gerät, dem Zubehör oder der Dokumentation bedeutet, dass das Gerät sowie das elektronische Zubehör
(z. B. Ladegerät, Headset, USB-Kabel) am Ende ihrer Lebensdauer nicht im normalen Hausmüll entsorgt werden dürfen. Entsorgen
Sie diese Geräte bitte getrennt von anderen Abfällen, um der Umwelt bzw. der menschlichen Gesundheit nicht durch unkontrollierte
Müllbeseitigung zu schaden. Recyceln Sie das Gerät, um die nachhaltige Wiederverwertung von stofflichen Ressourcen zu fördern. Private
Nutzer sollten den Händler, bei dem das Produkt gekauft wurde, oder die zuständigen Behörden kontaktieren, um in Erfahrung zu bringen,
wie sie das Gerät auf umweltfreundliche Weise recyceln können. Gewerbliche Benutzer wenden sich an ihren Lieferanten und überprüfen
die Konditionen Ihres Kaufvertrags. Dieses Gerät und seine elektronischen Zubehörteile dürfen nicht zusammen mit anderem Gewerbemüll
entsorgt werden.
Ordnungsgemäße Entsorgung der Batterien dieses Produkts
(Anwendbar in der Europäischen Union und anderen europäischen Staaten mit Systemen zur getrennten Sammlung von Batterien.)
Diese Kennzeichnung auf der Batterie, dem Handbuch oder der Verpackung bedeutet, dass die Batterie am Ende ihrer Lebensdauer nicht
im normalen Hausmüll entsorgt werden darf. Die Kennzeichnung mit den chemischen Symbolen für Hg, Cd oder Pb bedeutet, dass die
Batterie Quecksilber, Cadmium oder Blei in Mengen enthält, die die Grenzwerte der EU-Direktive 2006/66 übersteigen. Wenn Batterien
nicht ordnungsgemäß entsorgt werden, können diese Substanzen die Gesundheit von Menschen oder die Umwelt gefährden. Zum Schutz
der natürlichen Ressourcen und zur Förderung der Wiederverwertung von Materialien trennen Sie die Batterien von anderem Müll und
führen Sie sie Ihrem örtlichen Recyclingsystem zu.
BN68-02689J_Ger.indb 23/7/2010 5:11:15 PM
3
Deutsch
Achten Sie auf das Symbol!
t
Diese Funktion können Sie durch
Drücken der Taste TOOLS auf der
Fernbedienung aufrufen.
HinweisSchrittweise Darstellung der
Vorgehensweisen
Inhalt
Erste Schritte
4
4 Zubehör
4 Bedienfeld
5 Fernbedienung
6 Verbinden mit einer Antenne
6 Plug & Play (Anfangseinstellung)
Anschlüsse
7
7 Anschließen an ein AV-Gerät
8 Anschließen an ein Audiogerät
9 Signalquellen wählen
Grundfunktionen
9
9 Navigieren in den Menüs
10 Verwenden der INFO-Taste
(Elektronische Programmzeitschrift)
10 Fernsehplanung
12 Kanalmenü
13 Bildmenü
16 Tonmenü
18 Einstellungsmenü
21 Unterstützungsmenü
Erweiterte Funktionen
22
22 Anschließen an einen PC
23 Netzwerkverbindung
29 Media Play
36 Anynet
+
39 AllShare
Weitere Informationen
41
41 Teletext für Analogkanäle
42 Anbringen der Wandhalterung
43 Verlegen der Kabel
44 Kensington-Schloss als Diebstahlsicherung
44 Befestigen des Fernsehgeräts an der Wand
45 Fehlerbehebung
48 Technische Daten
49 Index
P
POWER
BN68-02689J_Ger.indb 33/7/2010 5:11:17 PM
4
Deutsch
Erste Schritte
Zubehör
Überprüfen Sie die Verpackung Ihres LCD-Fernsehgeräts auf Vollständigkeit. Falls Komponenten fehlen sollten, setzen
✎
Sie sich bitte mit Ihrem Händler in Verbindung.
Die Farbe und die Form der Teile können sich je nach Modell unterscheiden.
✎
Fernbedienung und 2 Batterien (Typ AAA) y
Bedienungsanleitung y
Garantiekarte / Sicherheitshinweise (nicht überall verfügbar) y
Reinigungstuch y
Netzkabel y
(46 Zoll TV)
Montagehalterung yKabelbinder yHaltering (4 Stück) y
Weitere Informationen finden Sie im Installationshandbuch für den Standfuß.
Standfuß (1 Stck) yLeitschiene (1 Stck) ySchrauben (9 Stk.) y
(Nur 32-Zoll-Modell: 8 Stk.)
Bedienfeld
Form und Farbe des Geräts können sich je nach Modell unterscheiden.
✎
P
(Netz)
Ein- und Ausschalten des Fernsehgeräts.
NetzanzeigeBeim Einschalten des Fernsehgeräts blinkt die Netzleuchte kurz und erlischt
anschließend. Im Standbymodus leuchtet die Anzeige permanent.
SOURCE
E
Schaltet zwischen allen verfügbaren Signalquellen um. Im Bildschirmmenü können Sie
diese Taste wie die ENTER
E
auf der Fernbedienung verwenden.
MENUDrücken Sie diese Taste, um die Funktionen des Fernsehgeräts in einem
Bildschirmmenü anzuzeigen.
Y
Hiermit stellen Sie die Lautstärke ein. Im Bildschirmmenü können Sie die
Y-Schaltflächen wie die Tasten ◄ und ► auf der Fernbedienung verwenden.
z
Wechseln des Kanals. Im Bildschirmmenü können Sie die z-Schaltflächen
wie die Tasten ▼ und ▲ auf der Fernbedienung verwenden.
FernbedienungssensorRichten Sie die Fernbedienung auf diesen Sensor am Fernsehgerät.
Standby-Modus
Der Standby-Modus ist nicht für längere Phasen der Abwesenheit gedacht (z. B. wenn Sie verreist sind). Eine kleine Menge
Strom wird auch dann noch verbraucht, wenn das Gerät mit dem Netzschalter ausgeschaltet wurde. Es ist am besten, das
Netzkabel aus der Steckdose zu ziehen.
des
(M4 X L12)
Lautsprecher
Netzanzeige
Fernbedienungssensor
BN68-02689J_Ger.indb 43/7/2010 5:11:20 PM
5
01Erste Schritte
Deutsch
Fernbedienung
Dies ist eine spezielle Fernbedienung für Personen mit eingeschränktem Sehvermögen. Die Netztaste sowie die Tasten
✎
zum Einstellen des Senders und der Lautstärke sind in Braille beschriftet.
Einlegen von Batterien (Batteriegröße: AAA)
HINWEIS
✎
Setzen Sie die Fernbedienung bis zu einer Entfernung von
x
maximal 7 m ein.
Helles Licht kann die Leistung der Fernbedienung
x
verschlechtern. Vermeiden Sie Leuchtstoffröhren oder ein
Neonschild in der Nähe der Fernbedienung.
Form und Farbe können sich je nach Modell unterscheiden.
x
Batterien und Akkus gehören nicht in den Hausmüll. Als Verbraucher sind Sie verpflichtet, alte Batterien und Akkus zur
✎
umweltschonenden Entsorgung zurückzugeben. Sie können alte Batterien und Akkus bei den öffentlichen Sammelstellen in
Ihrer Gemeinde oder überall dort abgeben, wo Batterien und Akkus der betreffenden Art verkauft werden.
ABCD
P.MODES.MODE
HDMI
HDMI-Modus direkt aufrufen. (P. 7)
Anzeigen und Auswählen aller verfügbaren
Videosignalquellen. (Seite 9)
Ein- und Ausschalten des Fernsehgeräts.
(Seite 6)
Hiermit wechseln Sie direkt zu einem Kanal.
Anzeigen des elektronischen Programmführers
(Seite 10)
Wechseln des Kanals
Hiermit können Sie häufig verwendete
Funktionen schnell auswählen.
Anzeigen von Informationen auf dem Bildschirm
(Seite 10)
Bildschirmmenü anzeigen.
(Seite 9)
Lautstärke einstellen
Zurück zum vorherigen Kanal.
Tasten in den Menüs Kanal-Manager,
Media Play usw.
Verwenden Sie diese Tasten im Media Play-
und Anynet
+
-Modus. (Seite 29, 36)
(�: Steuern von Aufnahmen auf Samsung-
Rekordern, die mit der Anynet
+
-Funktion
ausgerüstet sind.)
Drücken Sie diese Taste, um den Ton
vorübergehend auszuschalten.
Zurück zum vorherigen Menü.
Auswählen von Optionen im Bildschirmmenü
und Ändern von Menüwerten.
Schließen des Menüs
P.MODE: Wählen Sie einen Bildmodus. (P. 13)
S.MODE: Wählen Sie einen Tonmodus. (P. 16)
DUAL I-II: Wählen Sie den Tonmodus DUAL. (Seite 17)
D (Datendienst): Verwenden Sie diese Taste, wenn
Sie eine Datensendung verwenden
möchten
P.SIZE: Wählen des Bildformats. (Seite 15)
SUBT.: Anzeigen der digitalen Untertitel (Seite 19)
Anzeigen von Media Play. (Seite 29)
Abwechselnde Auswahl von
„Teletext“, „Doppel“ oder „Mix“.
Displays channel list on the screen. (P. 13)
BN68-02689J_Ger.indb 53/7/2010 5:11:21 PM
6
Erste Schritte
Deutsch
Verbinden mit einer Antenne
Wenn das Fernsehgerät zum ersten Mal eingeschaltet wird, werden automatisch die Grundeinstellungen vorgenommen.
Voreinstellung: Anschließen ans Stromnetz und an die Fernsehantenne.
✎
Plug & Play (Anfangseinstellung)
Wenn das Fernsehgerät erstmals eingeschaltet wird, helfen eine Reihe aufeinanderfolgender Abfragen beim Durchführen der
Grundeinstellungen. Drücken Sie die POWER
P
. Plug & Play ist nur verfügbar, wenn die Eingangsquelle auf TV eingestellt ist.
Um zum vorherigen Schritt zurückzukehren, drücken Sie die rote Taste.
✎
1
Auswählen der Sprache
Drücken Sie die Taste ▲ oder ▼, und drücken Sie dann auf die
ENTER
E
.
2
Auswählen von
Shop-Demo oder
Privatgebrauch
Drücken Sie die Taste ◄ oder ►, und drücken Sie dann auf die
ENTER
E
.
Wählen Sie den Modus yPrivatgebrauch. Der Modus Shop-Demo
ist für den Betrieb in Einzelhandelsgeschäften bestimmt.
Zurückstellen des Geräts von yShop-Demo auf Privatgebrauch
(Standard): Drücken Sie die Lautstärketaste am Fernsehgerät.
Wenn das Menü Lautstärke angezeigt wird, halten Sie die Taste
MENU 5 Sekunden lang gedrückt.
3
Auswählen einer
Antenne
Drücken Sie die Taste ▲ oder ▼, und drücken Sie dann auf die ENTER
E
.
Wählen Sie Terrestrisch oder Kabel.
4
Auswählen eines
Senders
Drücken Sie die Taste ▲ oder ▼, und drücken Sie dann auf die ENTER
E
.
Wählen Sie den Sendertyp zum Speichern aus. Wenn Sie den Sendertyp auf
Kabel einstellen, können Sie den Sendern im nächsten Schritt einen Zahlenwert
(Senderfrequenzen) zuweisen. Weitere Informationen hierzu finden Sie unter
Kanal→Autom. Senderspeich. (Seite 12)
Zum Unterbrechen des Speichervorgangs zu einem beliebigen Zeitpunkt drücken Sie
✎
die ENTER
E
.
5
Einstellen des
Uhr-Modus
Stellen Sie den Uhr-Modus automatisch oder manuell ein.
6
Anzeigen des HD-
Anschlussplans.
Die Verbindungsmethode für optimale HD-Bildqualität wird angezeigt.
7
Gute
Fernsehunterhaltung!
Drücken Sie die Taste ENTER
E
.
So setzen Sie diese Funktion zurück...
Wählen Sie Einstell. - Plug & Play (Anfangseinstellung). Geben Sie nun Ihre vierstellige PIN ein. Die Standard-PIN lautet
„0-0-0-0“. Wenn Sie die PIN ändern möchten, verwenden Sie die Funktion PIN ändern.
Netzanschluss
VHF/UHF-Antenne
oder
Kabel
R-AUDIO-L
P
RPBY
ANT OUT
BN68-02689J_Ger.indb 63/7/2010 5:11:23 PM
7
Deutsch
02Anschlüsse
Anschlüsse
Anschließen an ein AV-Gerät
Mit Hilfe eines HDMI/DVI-Kabels: HD-Anschluss (max. 1080p)
Gebruikershandleiding.com neemt misbruik van zijn services uitermate serieus. U kunt hieronder aangeven waarom deze vraag ongepast is. Wij controleren de vraag en zonodig wordt deze verwijderd.
Product:
Spelregels forum
Om tot zinvolle vragen te komen hanteren wij de volgende spelregels:
lees eerst de handleiding door;
controleer of uw vraag al eerder door iemand anders is gesteld;
probeer uw vraag zo duidelijk mogelijk te stellen;
heeft u een probleem en al geprobeerd om dit op te lossen, vermeld dit erbij aub;
heeft u een oplossing gekregen van een bezoeker dan horen wij dat graag in dit forum;
wilt u een reactie geven op een vraag of antwoord, gebruik dan niet dit formulier maar klik op de knop 'reageer op deze vraag';
uw vraag wordt direct op de website gezet; vermijd daarom persoonlijke gegevens in te vullen;
Belangrijk! Als er een antwoord wordt gegeven op uw vraag, dan is het voor de gever van het antwoord nuttig om te weten als u er wel (of niet) mee geholpen bent! Wij vragen u dus ook te reageren op een antwoord.
Belangrijk! Antwoorden worden ook per e-mail naar abonnees gestuurd. Laat uw emailadres achter op deze site, zodat u op de hoogte blijft. U krijgt dan ook andere vragen en antwoorden te zien.
Abonneren
Abonneer u voor het ontvangen van emails voor uw Samsung LE 55C670 bij:
nieuwe vragen en antwoorden
nieuwe handleidingen
U ontvangt een email met instructies om u voor één of beide opties in te schrijven.
Ontvang uw handleiding per email
Vul uw emailadres in en ontvang de handleiding van Samsung LE 55C670 in de taal/talen: Duits, Engels, Italiaans als bijlage per email.
De handleiding is 33,66 mb groot.
U ontvangt de handleiding per email binnen enkele minuten. Als u geen email heeft ontvangen, dan heeft u waarschijnlijk een verkeerd emailadres ingevuld of is uw mailbox te vol. Daarnaast kan het zijn dat uw internetprovider een maximum heeft aan de grootte per email. Omdat hier een handleiding wordt meegestuurd, kan het voorkomen dat de email groter is dan toegestaan bij uw provider.
Uw handleiding is per email verstuurd. Controleer uw email
Als u niet binnen een kwartier uw email met handleiding ontvangen heeft, kan het zijn dat u een verkeerd emailadres heeft ingevuld of dat uw emailprovider een maximum grootte per email heeft ingesteld die kleiner is dan de grootte van de handleiding.
Er is een email naar u verstuurd om uw inschrijving definitief te maken.
Controleer uw email en volg de aanwijzingen op om uw inschrijving definitief te maken
U heeft geen emailadres opgegeven
Als u de handleiding per email wilt ontvangen, vul dan een geldig emailadres in.
Uw vraag is op deze pagina toegevoegd
Wilt u een email ontvangen bij een antwoord en/of nieuwe vragen? Vul dan hier uw emailadres in.