Figures and illustrations in this User Manual are provided for reference only and may differ from actual product appearance.
Product design and specifications may be changed without notice.
Digital TV notice
1. Functionalities related to Digital TV (DVB) are only available in countries/areas where DVB-T (MPEG2 and MPEG4 AVC) digital terrestrial signals are
broadcasted or where you are able to access to a compatible DVB-C (MPEG2 and MPEG4 AAC) cable-TV service. Please check with your local
dealer the possibility to receive DVB-T or DVB-C signal.
2. DVB-T is the DVB European consortium standard for the broadcast transmission of digital terrestrial television and DVB-C is that for the broadcast
transmission of digital TV over cable. However, some differentiated features like EPG (Electric Programme Guide), VOD (Video On Demand) and so
on, are not included in this specification. So, they cannot be workable at this moment.
3. Although this TV set meets the latest DVB-T and DVB-C standards, as of [August, 2008], the compatibility with future DVB-T digital terrestrial and
DVB-C digital cable broadcasts cannot be guaranteed.
4. Depending on the countries/areas where this TV set is used some cable-TV providers may charge an additional fee for such a service and you may
be required to agree to terms and conditions of their business.
5. Some Digital TV functions might be unavailable in some countries or regions and DVB-C might not work correctly with some cable service providers.
6. For more information, please contact your local Samsung customer care centre.
The reception quality of TV may be affected due to differences in broadcasting method between the countries. Please check the TV performance in
✎
the local SAMSUNG Authorized Dealer, or the Samsung Call Centre whether it can be improved by reconfiguring TV setting or not.
Still image warning
Avoid displaying still images (like jpeg picture files) or still image element (like TV programme logo, panorama or 4:3 image format, stock or news bar at
screen bottom etc.) on the screen. Constant displaying of still picture can cause ghosting of LCD screen, which will affect image quality. To reduce risk of
this effect, please follow below recommendations:
Avoid displaying the same TV channel for long periods.•
Always try do display any image on full screen, use TV set picture format menu for best possible match.•
Reduce brightness and contrast values to minimum required to achieve desired picture quality, exceeded values may speed up the burnout process.•
Frequently use all TV features designed to reduce image retention and screen burnout, refer to proper user manual section for details.•
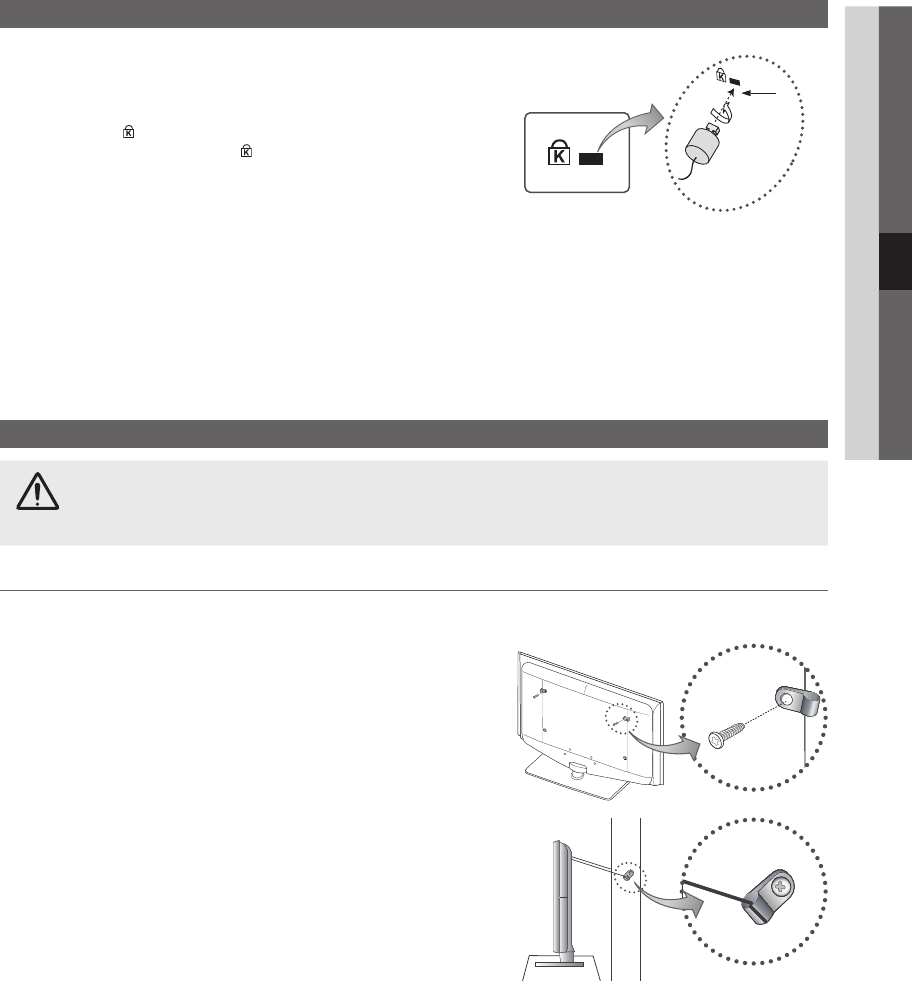
Securing the Installation Space
Keep the required distances between the product and other objects (e.g. walls) to ensure proper ventilation.
Failing to do so may result in fire or a problem with the product due to an increase in the internal temperature of the product.
When using a stand or wall-mount, use parts provided by Samsung Electronics only.
✎
If you use parts provided by another manufacturer, it may result in a problem with the product or an injury due to the product falling.
x
The appearance may differ depending on the product.
✎
Installation with a stand.Installation with a wall-mount.
10 cm
10 cm
10 cm
10 cm
10 cm
10 cm
10 cm
Correct Disposal of This Product (Waste Electrical & Electronic Equipment)
(Applicable in the European Union and other European countries with separate collection systems)
This marking on the product, accessories or literature indicates that the product and its electronic accessories (e.g. charger,
headset, USB cable) should not be disposed of with other household waste at the end of their working life. To prevent possible
harm to the environment or human health from uncontrolled waste disposal, please separate these items from other types of waste
and recycle them responsibly to promote the sustainable reuse of material resources. Household users should contact either the
retailer where they purchased this product, or their local government office, for details of where and how they can take these items
for environmentally safe recycling. Business users should contact their supplier and check the terms and conditions of the purchase
contract. This product and its electronic accessories should not be mixed with other commercial wastes for disposal.
Correct disposal of batteries in this product
(Applicable in the European Union and other European countries with separate battery return systems)
This marking on the battery, manual or packaging indicates that the batteries in this product should not be disposed of with other
household waste at the end of their working life. Where marked, the chemical symbols Hg, Cd or Pb indicate that the battery
contains mercury, cadmium or lead above the reference levels in EC Directive 2006/66. If batteries are not properly disposed of,
these substances can cause harm to human health or the environment. To protect natural resources and to promote material
reuse, please separate batteries from other types of waste and recycle them through your local, free battery return system.
BN68-02558MNPRTQ_00Eng.indb 22010-5-19 14:13:51
3
English
Contents
Getting Started
4
4 Accessories
4 Viewing the Control Panel
5 Viewing the Remote Control
6 Connecting to an Antenna
6 Plug & Play (Initial Setup)
Connections
7
7 Connecting to an AV Device
8 Connecting to an Audio Device
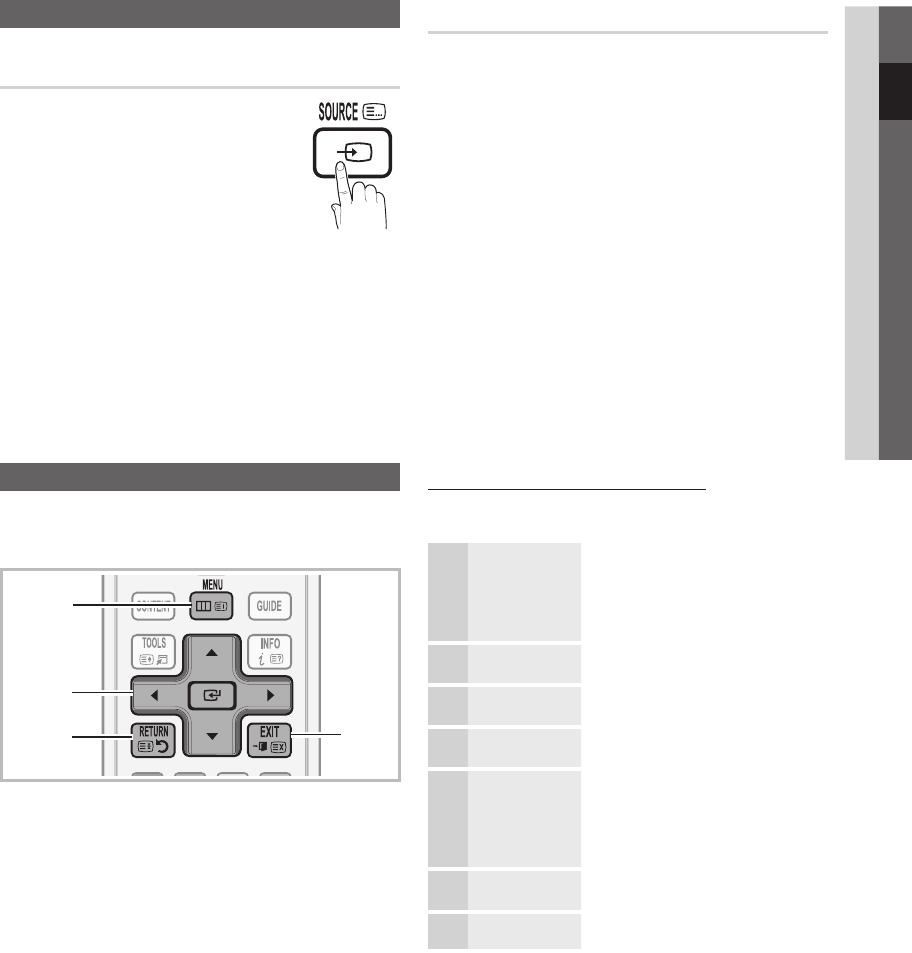
9 Changing the Input Source
Basic Features
9 How to Navigate Menus
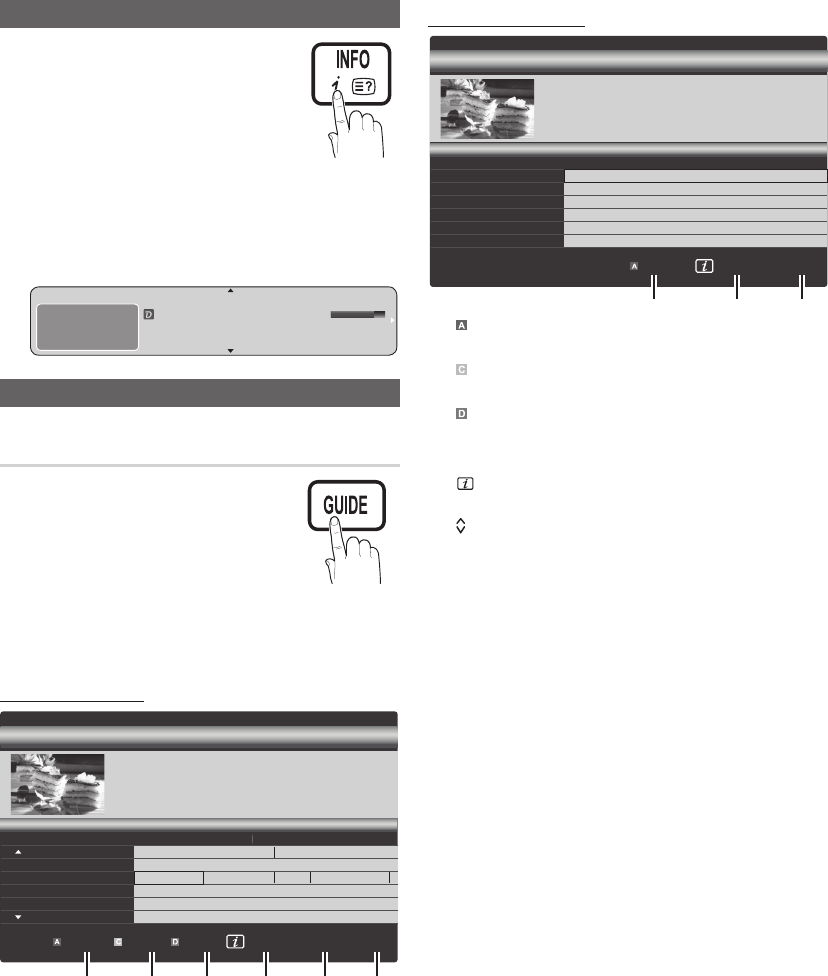
10 Using the INFO button (Now & Next guide)
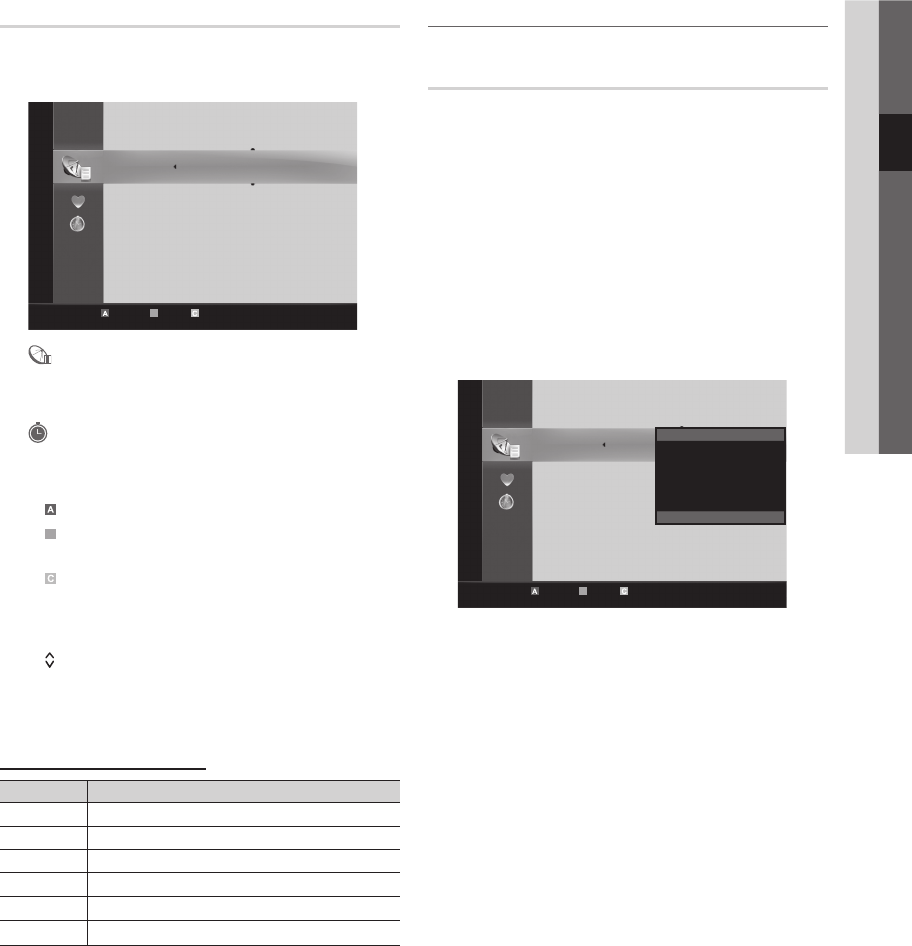
10 Planning Your Viewing
12 Channel Menu
13 Picture Menu
16 Sound Menu
18 Setup Menu
20 Support Menu
Advanced Features
22
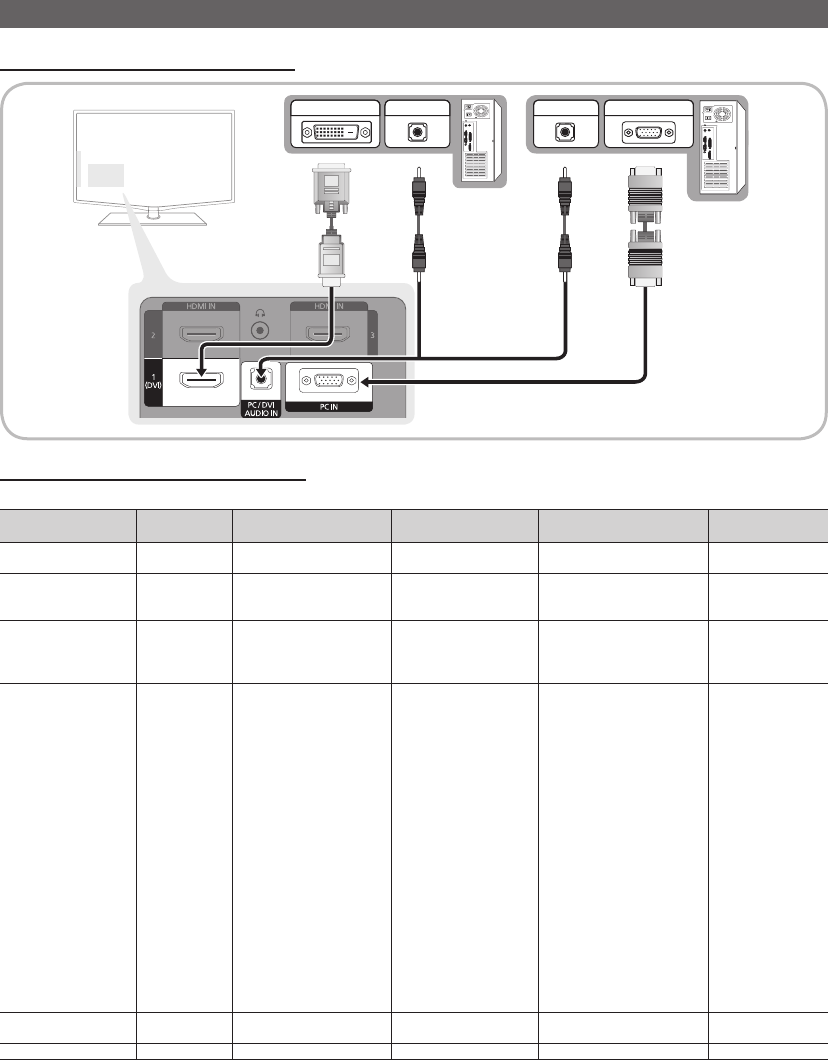
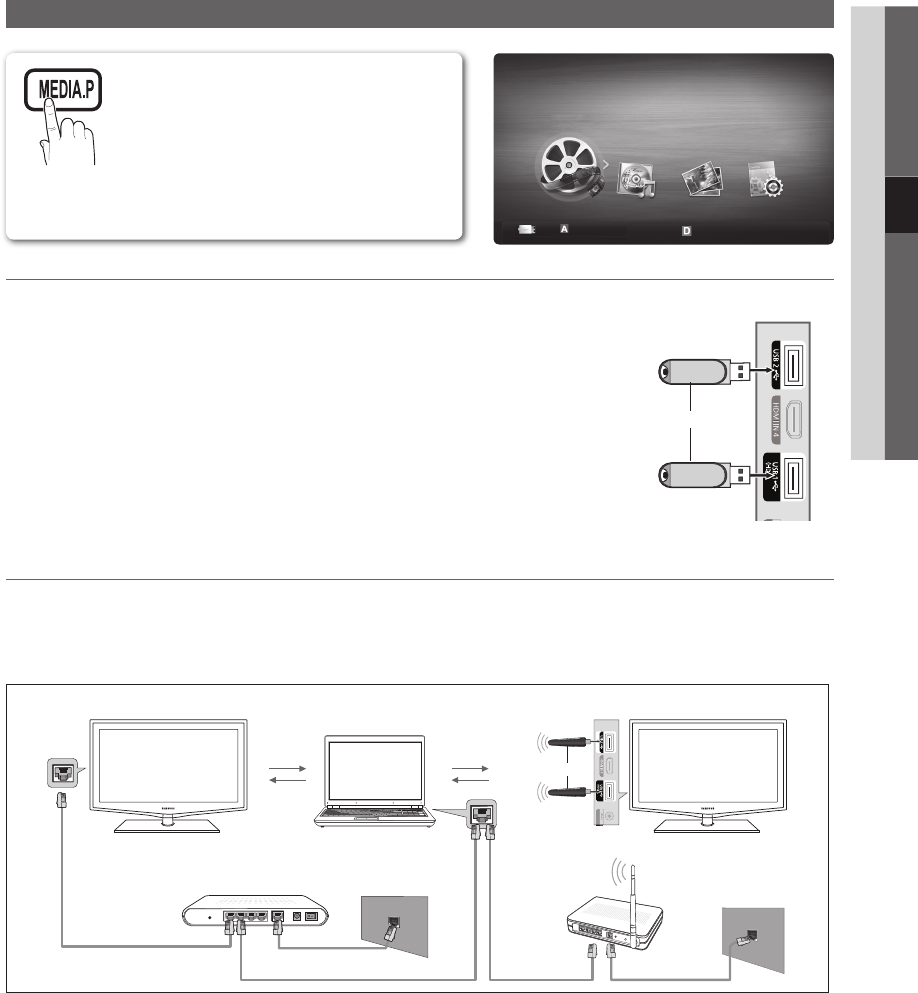
22 Connecting to a PC
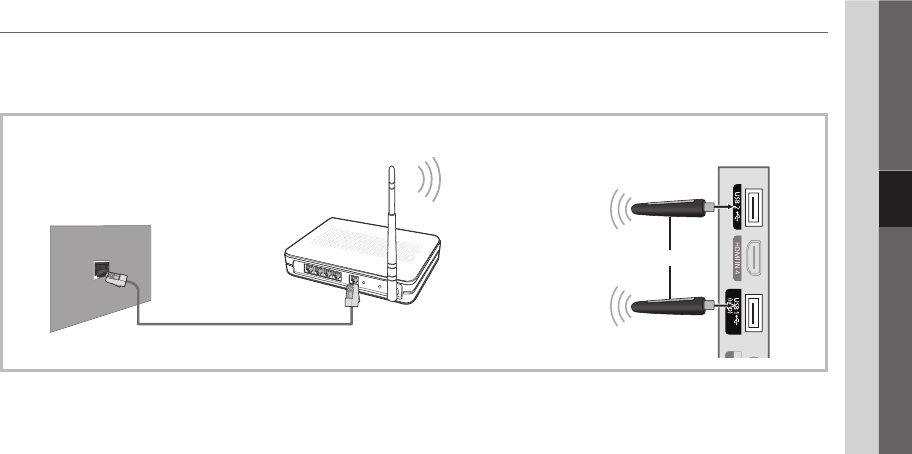
23 Network Connection
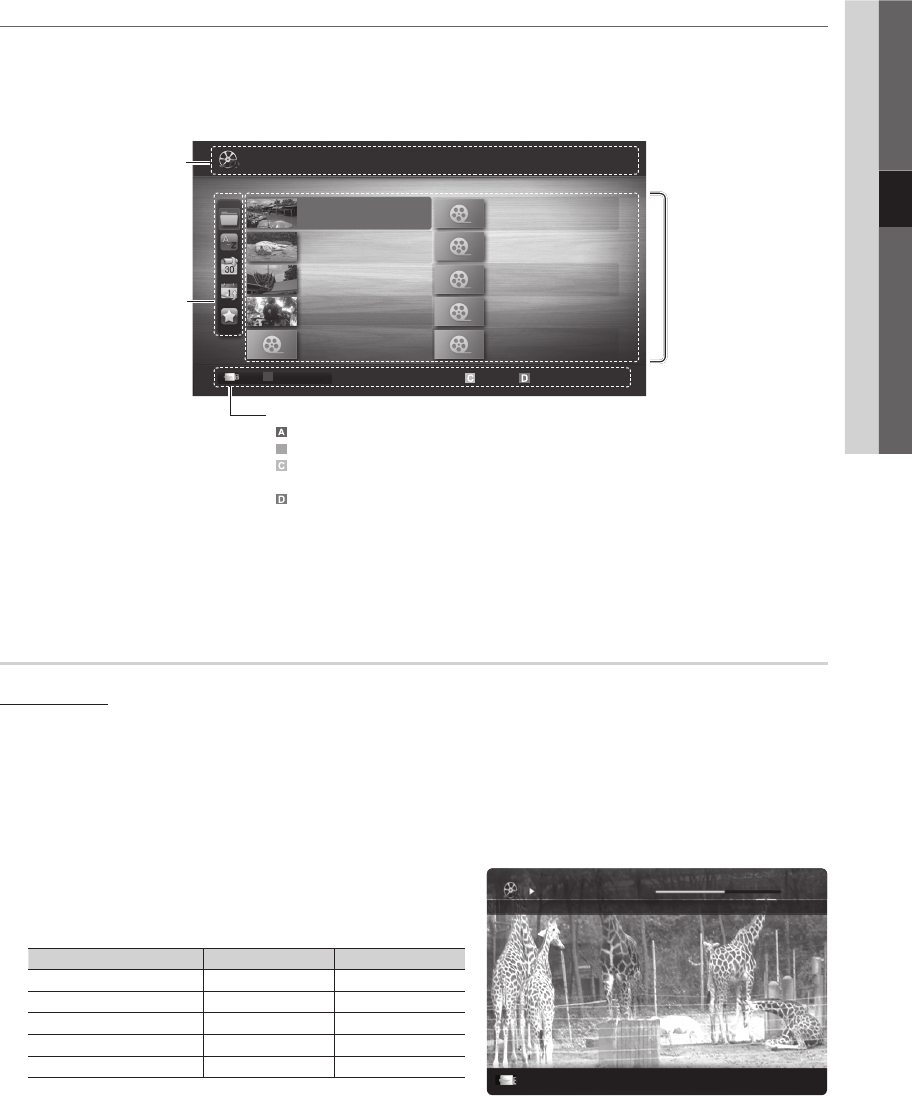
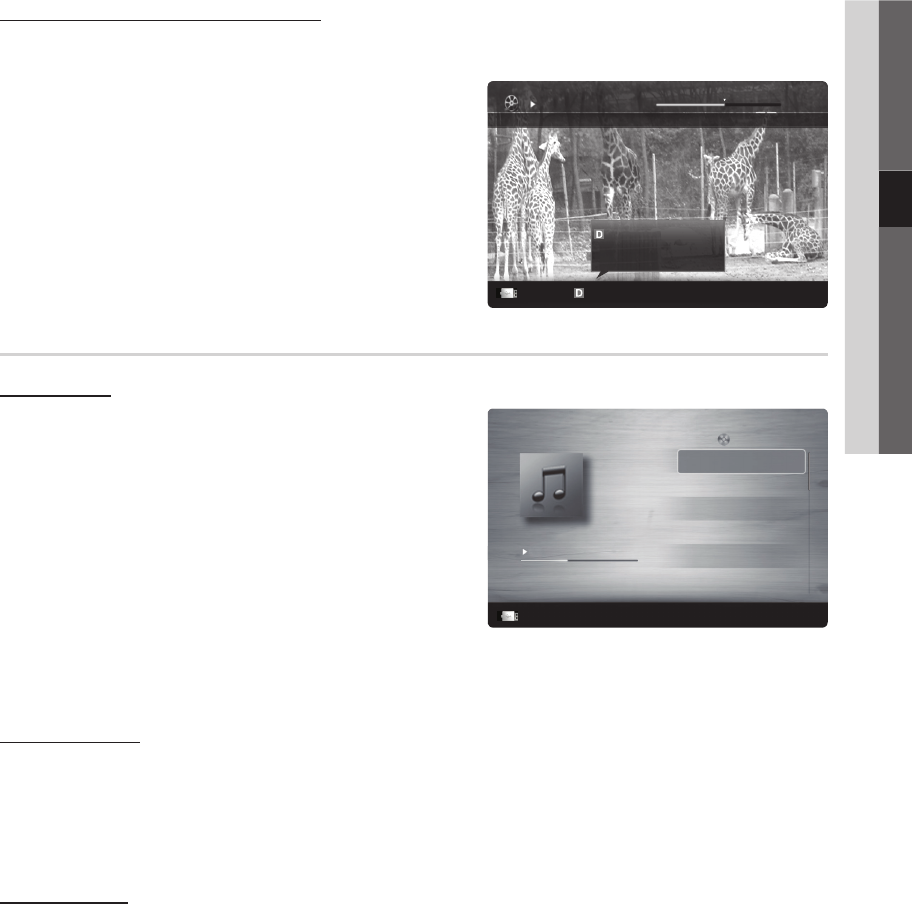
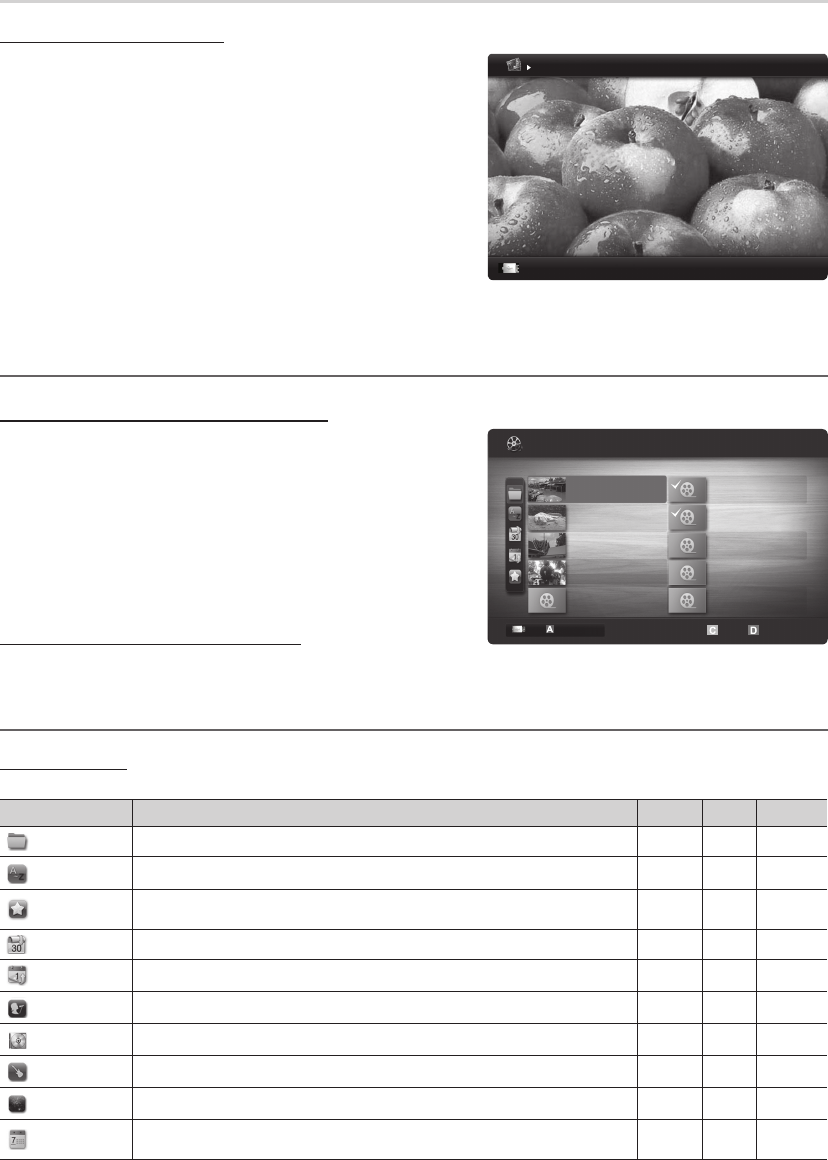
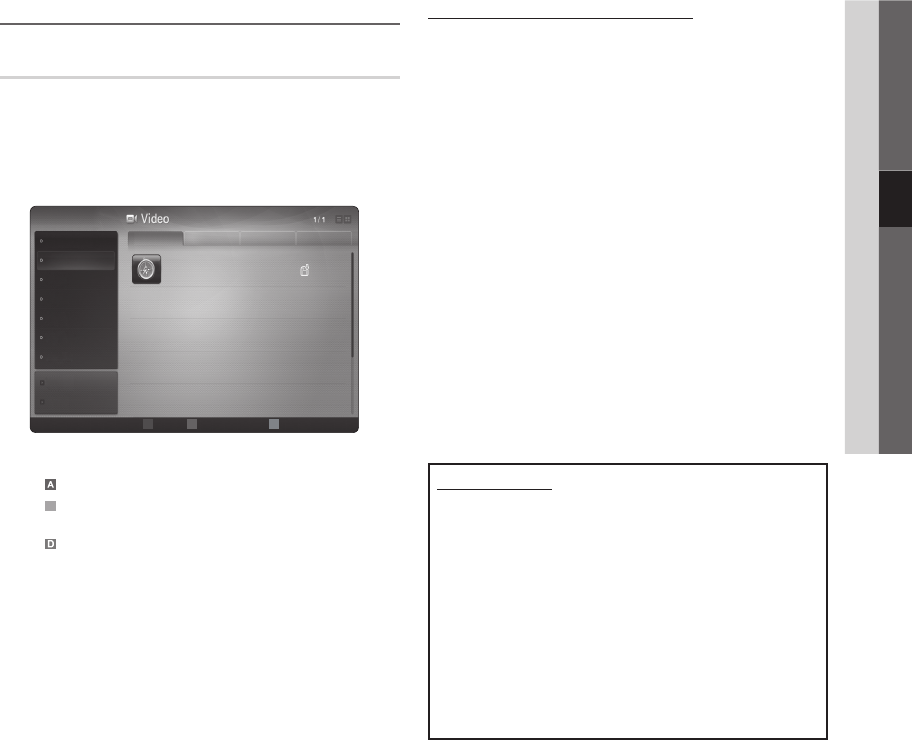
29 Media Play
36 Anynet
+
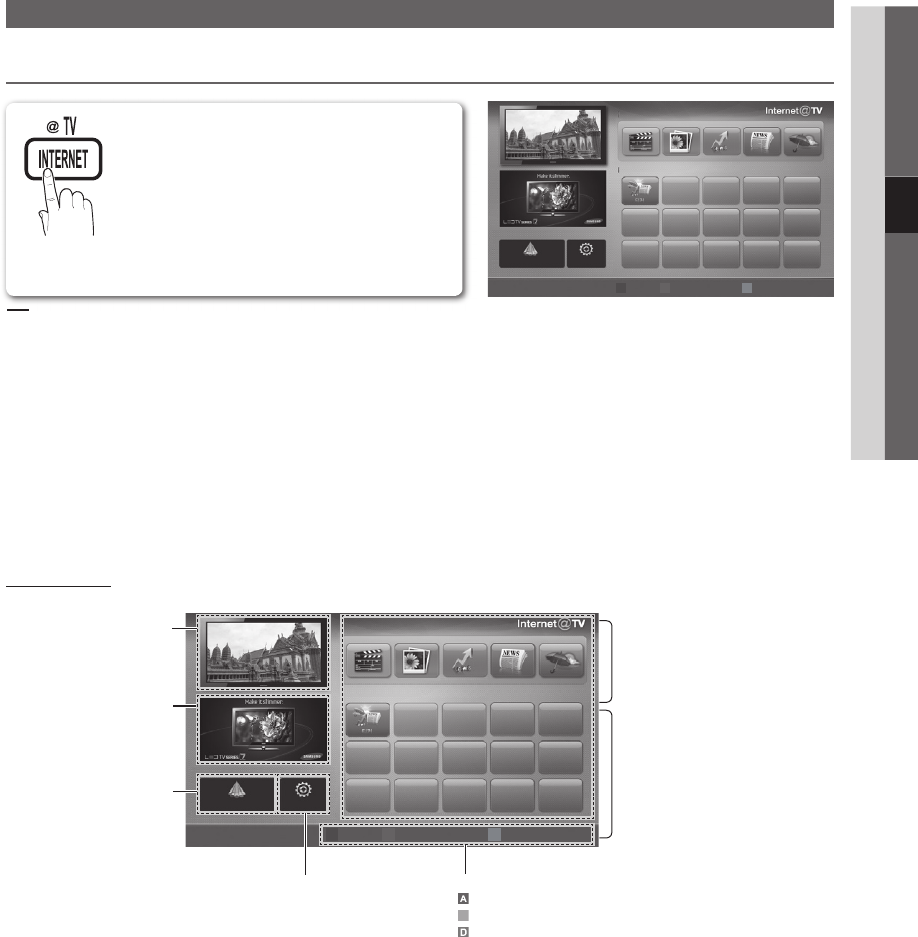
39 Internet@TV
42 AllShare
Other Information
44
44 Analogue Channel Teletext Feature
45 Installing the Wall Mount
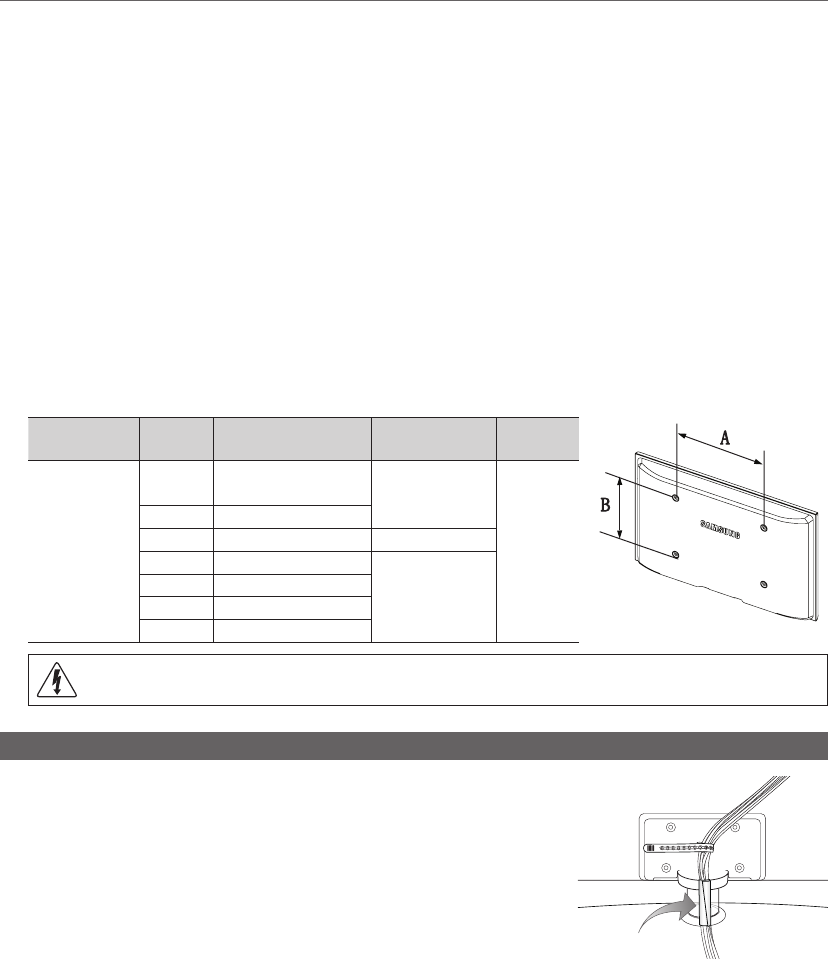
46 Assembling the Cables
47 Anti-Theft Kensington Lock
47 Securing the TV to the Wall
48 Troubleshooting
51 Specifications
52 Index
Check the Symbol!
t
O
This function can be used by
pressing the TOOLS button on the
remote control.
NoteOne-Touch Button
BN68-02558MNPRTQ_00Eng.indb 32010-5-19 14:13:52
4
English
Getting Started
Accessories
Please make sure the following items are included with your LCD TV. If any items are missing, contact your dealer.
✎
The items’ colours and shapes may vary depending on the models.
✎
Remote Control & Batteries (AAA x 2)
Owner’s Instructions
Warranty Card / Safety Guide (Not available in some locations)
Cleaning Cloth
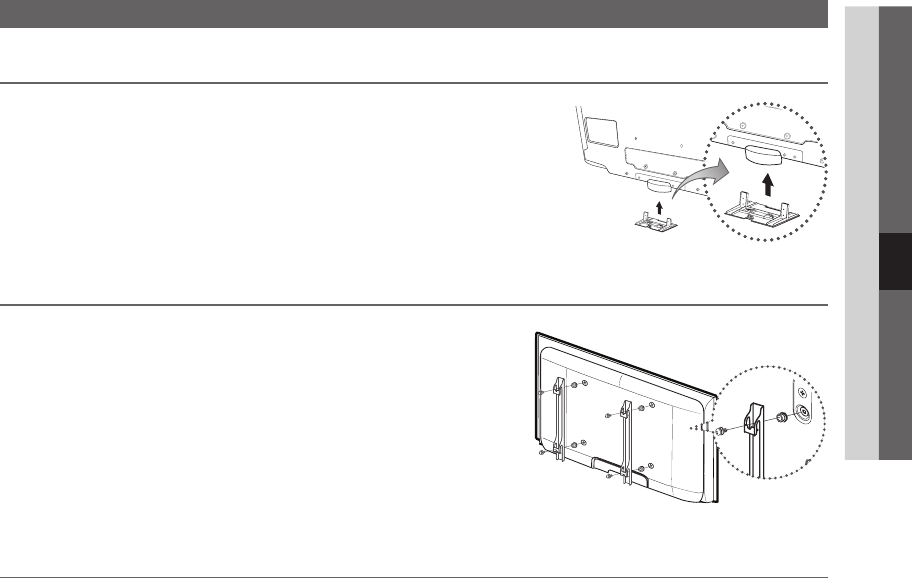
Power Cord
(46 ~ 60 inch TVs)
Blanking Bracket Cable tie Holder-Ring (4ea)
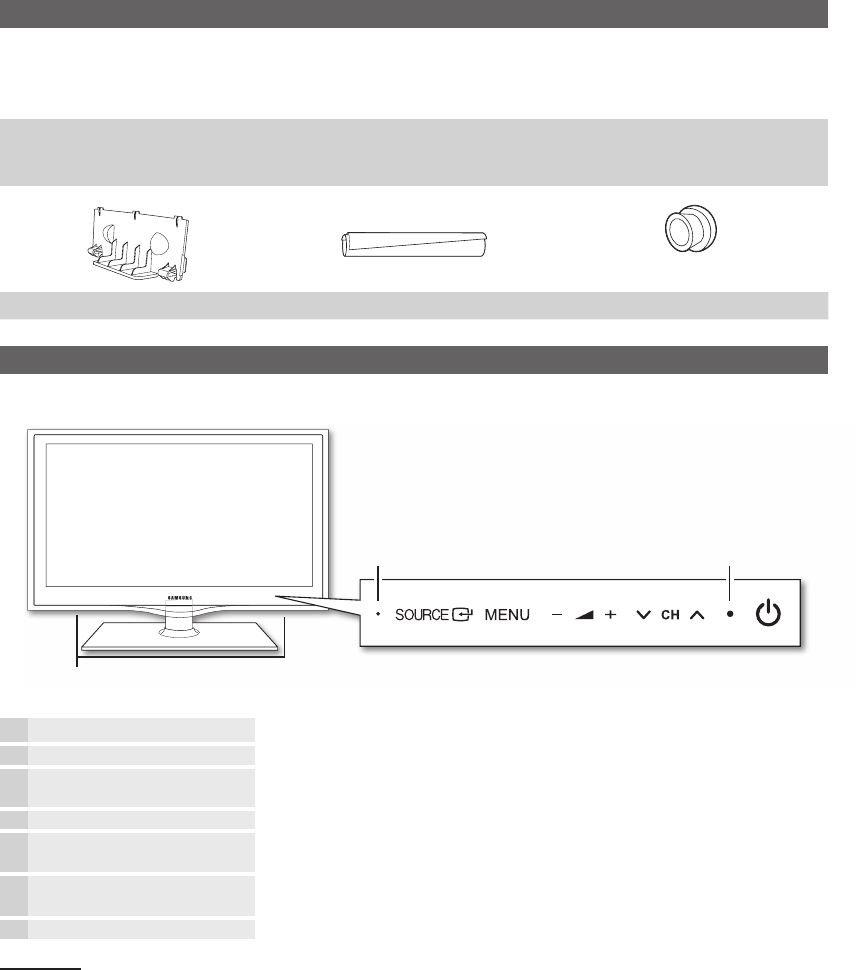
Viewing the Control Panel
The product colour and shape may vary depending on the model.
✎
P
(Power)
Turns the TV on or off.
Power IndicatorBlinks and turns off when the power is on and lights up in standby mode.
SOURCE
E
Toggles between all the available input sources. In the on-screen menu, use this
button as you would use the ENTER
E
button on the remote control.
MENUDisplays an on-screen menu, the OSD (on screen display), of your TV’s features.
Y
Adjusts the volume. In the OSD, use the Y buttons as you would use the
◄ and ► buttons on the remote control.
z
Changes the channels. In the OSD, use the z buttons as you would use the
▼ and ▲ buttons on the remote control.
Remote control sensorAim the remote control towards this spot on the TV.
Standby mode
Do not leave your TV in standby mode for long periods of time (when you are away on a holiday, for example). A small amount
of electric power is still consumed even when the power button is turned off. It is best to unplug the power cord.
Speakers
Power IndicatorRemote control sensor
BN68-02558M_00Eng(1-25).indd 42010-5-19 20:12:57
5
01Getting Started
English
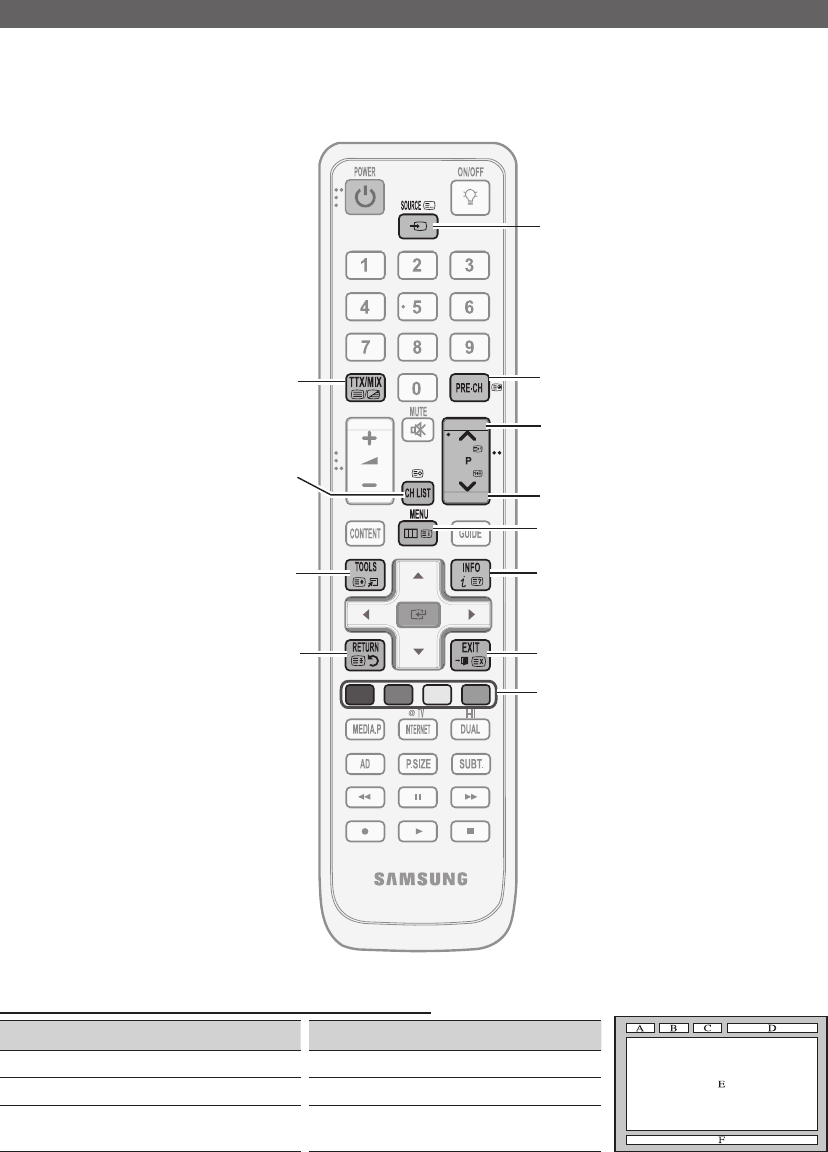
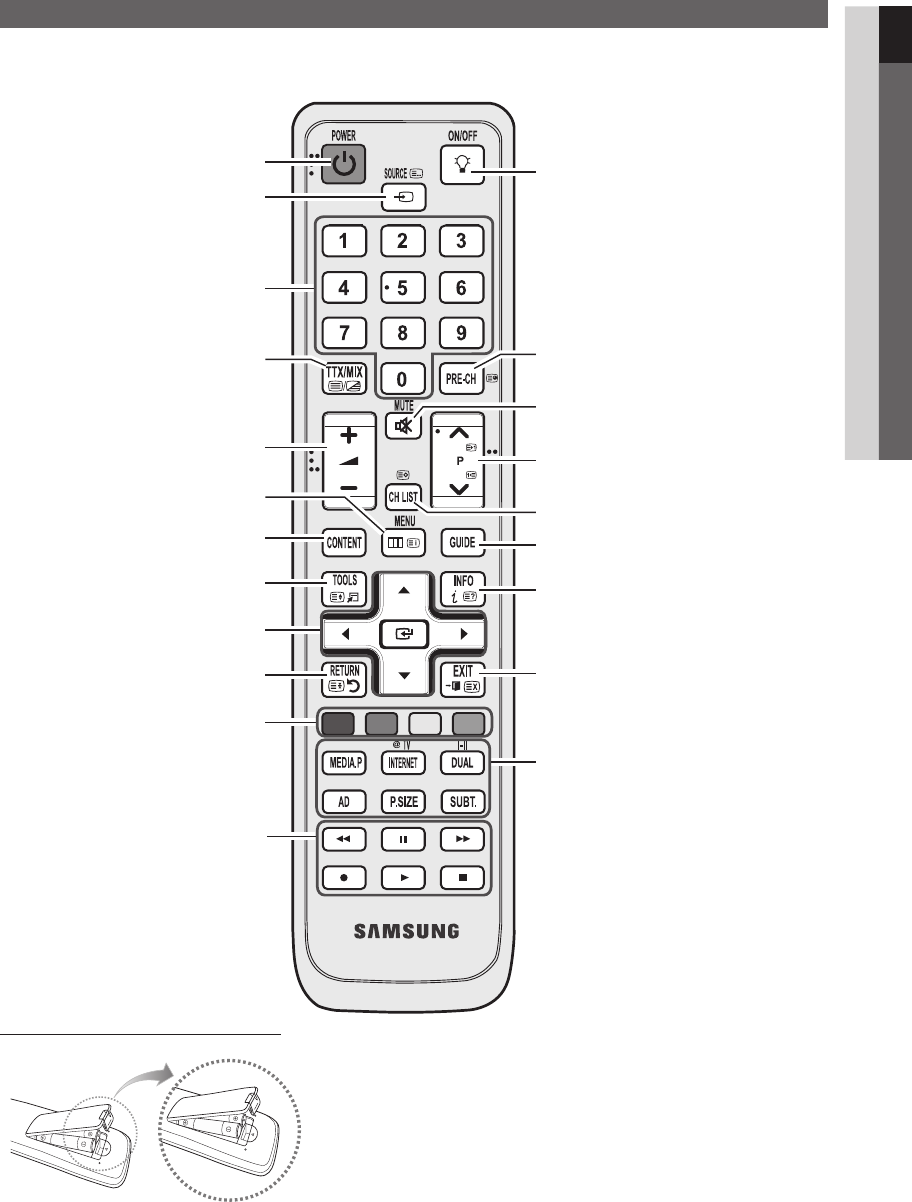
Viewing the Remote Control
This is a special remote control for the visually impaired persons and has Braille points on the Power, Channel, and
✎
Volume buttons.
Installing batteries (Battery size: AAA)
NOTE
✎
Use the remote control within 23 feet from the TV.
x
Bright light may affect the performance of the remote
x
control. Avoid using nearby special fluorescent light or neon
signs.
The colour and shape may vary depending on the model.
x
ABCD
Displays and selects the available video
sources. (P. 9)
When the ON/OFF light button is set to ON and a
certain button is pressed, the remote control buttons
will be lit for a moment.
(Using the remote control with this button set to On
will reduce the battery usage time.)
Turns the TV on and off. (P. 6)
Press to directly access to channels.
Displays the EPG (Electronic Programme Guide).
(P. 10)
Changes channels.
Quickly selects frequently used functions.
Displays information on the TV screen. (P. 10)
Displays the main on-screen menu.
(P. 9)
Adjusts the volume.
Returns to the previous channel.
Buttons in the Channel Manager, Internet@
TV, Media Play menu, etc.
Use these buttons in the Media Play and
Anynet+ modes. (P. 29, 36)
(∏: controls recording on Samsung recorders
with the Anynet+ feature)
Cuts off the sound temporarily.
Returns to the previous menu.
Selects on-screen menu items and change
menu values.
Exits the menu.
MEDIA.P: Views the Media play. (P. 29)
INTERNET: Links to various Internet services.
(P. 39)
DUAL I-II: Selects sound mode. (P. 17)
AD: Audio Description selection. (Not available in
some locations) (P. 17)
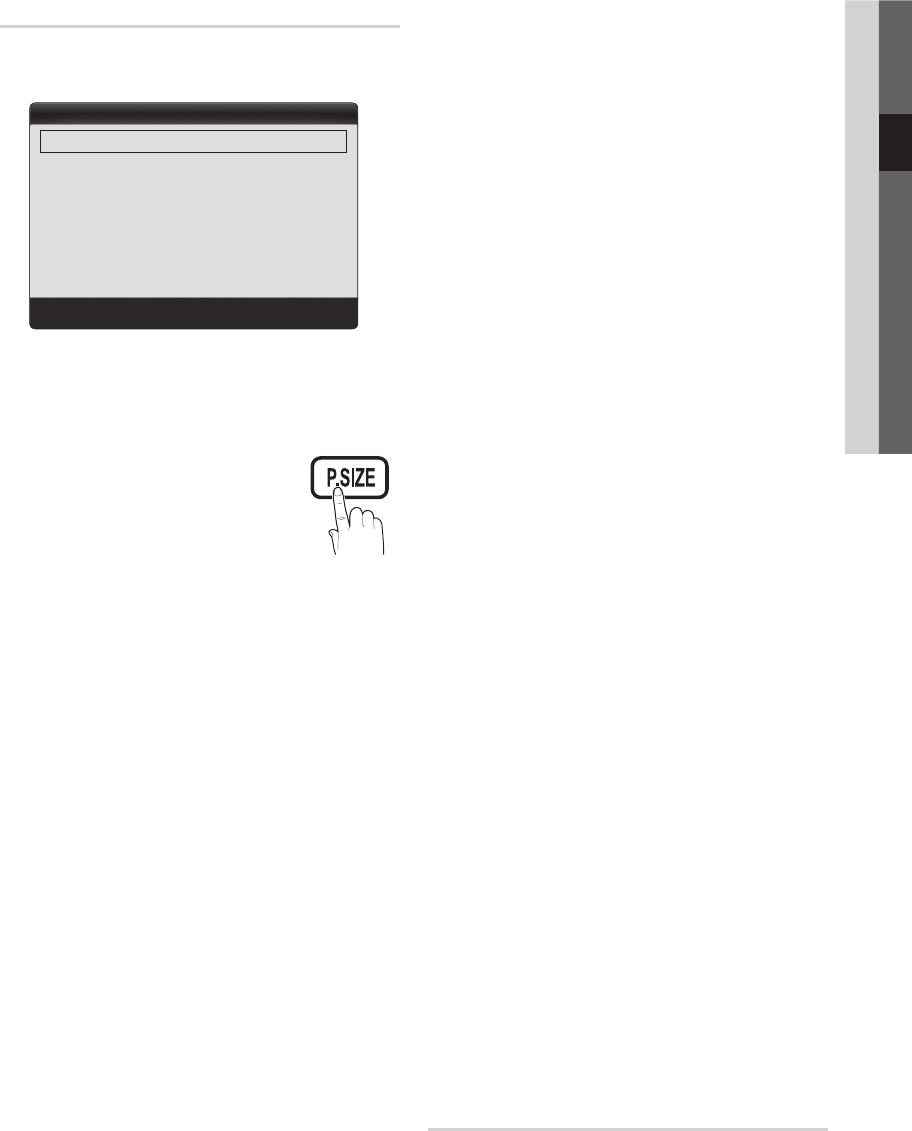
P.SIZE: Choose the picture size. (P. 15)
SUBT.: Digital subtitle display (P. 19)
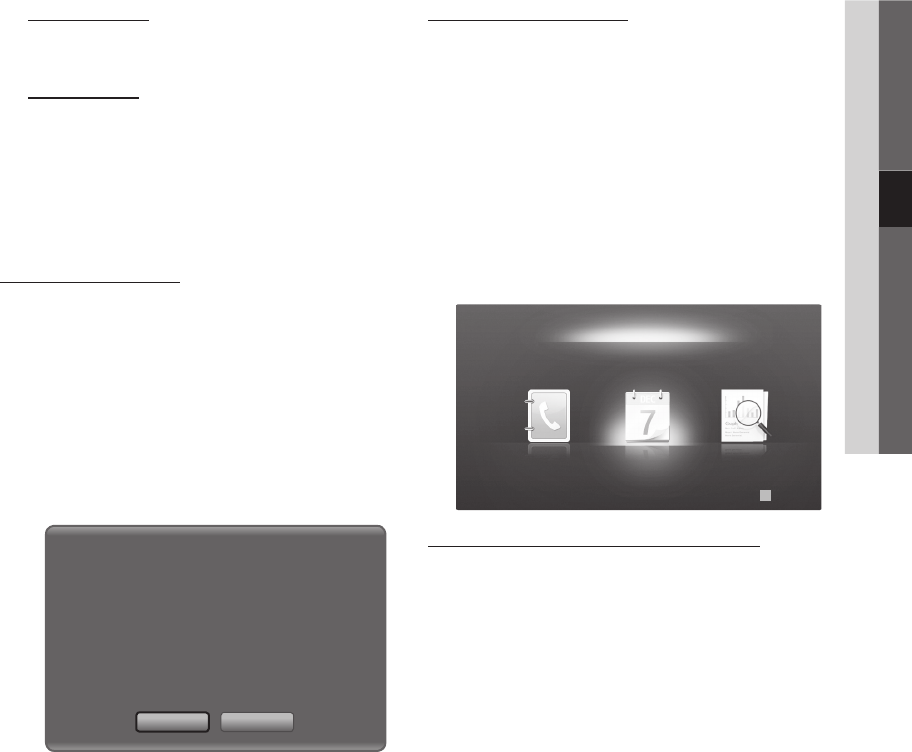
Displays the Content View, which includes
Guide, Internet@TV, Media Play, and AllShare.
Alternately select Teletext ON, Double,
Mix or OFF.
Displays channel list on the screen. (P. 13)
BN68-02558MNPRTQ_00Eng.indb 52010-5-19 14:13:54
6
Getting Started
English
Connecting to an Antenna
When the TV is initially powered on, basic settings proceed automatically.
Preset: Connecting the mains and antenna.
✎
Plug & Play (Initial Setup)
When the TV is initially powered on, a sequence of on-screen prompts will assist in confi guring basic settings. Press the
POWER
P
button. Plug & Play is available only when the Input source is set to TV.
To return to the previous step, press the red button.
✎
1
Selecting a language
Press the or button, then press the ENTER
E
button.
Select the desired OSD (On Screen Display) language.
2
Selecting Store Demo
or Home Use
Press the or button, then press the ENTER
E
button.
Select the yHome Use mode. Store Demo Mode is for retail
environments.
Return the unit’s settings from yStore Demo to Home Use
(standard): Press the volume button on the TV. When the OSD
volume is displayed, press and hold MENU for 5 sec.
3
Selecting a country
Press the or button, then press the ENTER
E
button.
Select the appropriate country. If the desired country does not exist on the menu, select
Others.
After selecting the country in the
✎
Country menu, some models may proceed with an
additional option to setup the pin number.
When you input the PIN number,
✎
0-0-0-0 is not available.
4
Selecting an antenna
Press the or button, then press the ENTER
E
button.
Select Air or Cable.
5
Selecting a channel
Press the or button, then press the ENTER
E
button.
Select the channel source to memorise. When setting the antenna source to Cable, a step
appears allowing you to assign numerical values (channel frequencies) to the channels.
For more information, refer to ChannelAuto Store (P. 12).
Press the
✎
ENTER
E
button at any time to interrupt the memorization process.
6
Setting the Clock
Mode
Set the Clock Mode automatically or manually.
If you select the
✎
Auto, select the time zone which you live.
7
Viewing the HD
Connection Guide.
The connection method for the best HD screen quality is displayed.
8
Enjoy your TV.
Press the ENTER
E
button.
If You Want to Reset This Feature...
Select Setup - Plug & Play (Initial Setup). Enter your 4 digit PIN number. The default PIN number is “0-0-0-0.” If you want to
change the PIN number, use the Change PIN function.
or
Power Input
VHF/UHF Antenna
Cable
R-AUDIO-L
P
RPBY
ANT OUT
BN68-02558MNPRTQ_00Eng.indb 62010-5-19 14:13:55
7
English
02Connections
Connections
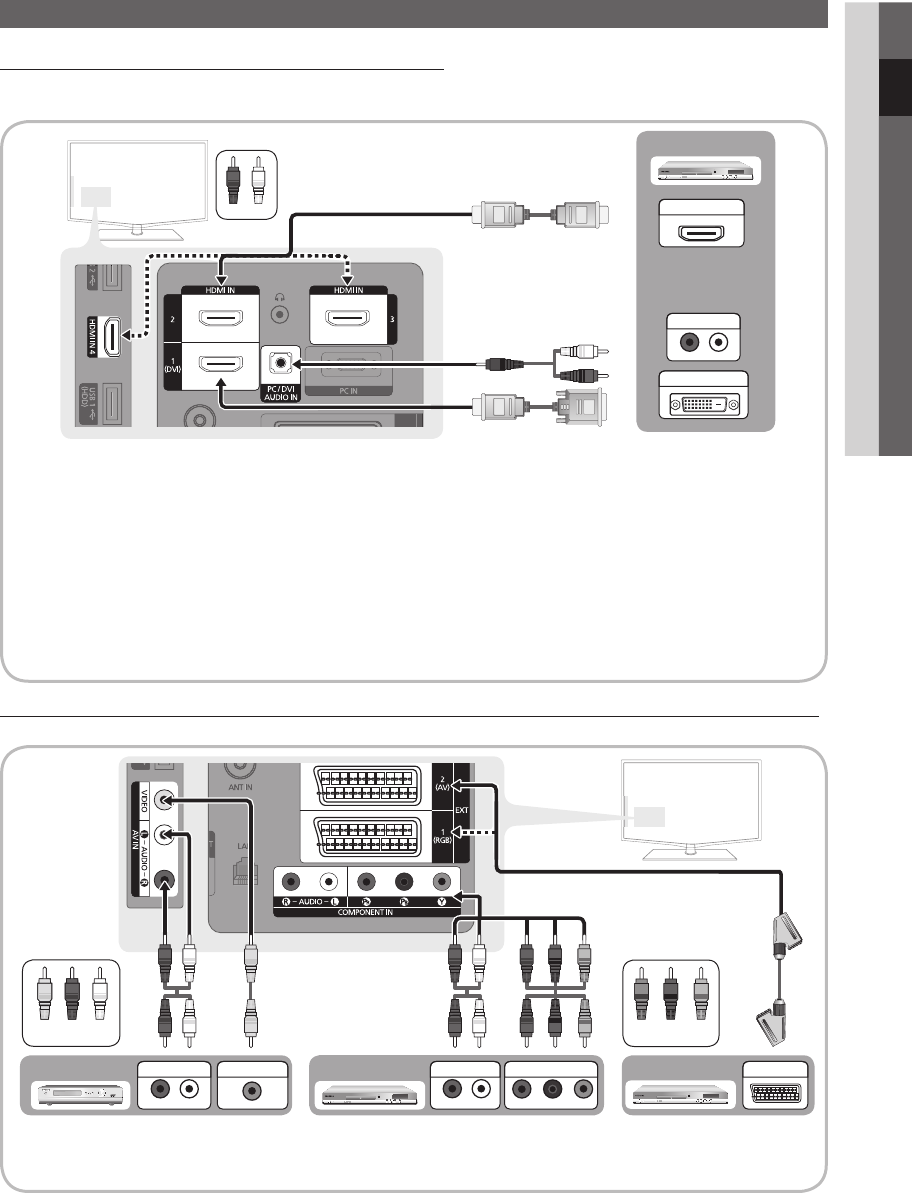
Connecting to an AV Device
Using an HDMI / DVI Cable: HD connection (up to 1080p)
Available devices: DVD, Blu-ray player, HD cable box, HD STB (Set-Top-Box) satellite receiver, cable box, satellite receiver (STB)
HDMI IN 1
✎
(DVI), 2, 3, 4 / PC/DVI AUDIO IN
For better picture and audio quality, connect to a digital device using an HDMI cable.
An HDMI cable supports digital video and audio signals, and does not require an audio cable.
- To connect the TV to a digital device that does not support HDMI output, use an HDMI/DVI and audio cables.
The picture may not display normally (if at all) or the audio may not work if an external device that uses an
olderversion of HDMI mode is connected to the TV. If such a problem occurs, ask the manufacturer of the
external device about the HDMI version and, if out of date, request an upgrade.
Be sure to purchase a certified HDMI cable. Otherwise, the picture may not display or a connection error may occur.
A basic high-speed HDMI cable or one with ethernet is recommended. This product does not support the ethernet
function via HDMI.
Using a Component (up to 1080p) or Audio / Video (480i only) Cable and Using a Scart Cable
Available devices: VCR, DVD, Blu-ray player, cable box, STB satellite receiver
In
✎
Ext. mode, DTV Out supports MPEG SD Video and Audio only.
To obtain the best picture quality, the Component connection is recommended over the A/V connection.
✎
R-AUDIO-L
P
RPBY
DVI OUT
R-AUDIO-L
P
RPBY
HDMI OUT
WR
RedWhite
WW
B
G
RR
W
Y
R-AUDIO-L
P
RPBY
AUDIO OUT
DVD
W
W
G
G
W
W
Y
Y
R
R
R
R
R
R
B
B
R-AUDIO-L
P
RPBY
COMPONENT OUT
R-AUDIO-L
P
RPBY
AUDIO OUT
R-AUDIO-L
P
RPBY
EXT
R-AUDIO-L
P
RPBY
AUDIO OUT
R-AUDIO-L
P
RPBY
VIDEO OUT
WW
B
G
RR
W
Y
YellowRedWhite
WW
B
G
RR
W
Y
RedBlueGreen
Blu-ray player DVDVCR
BN68-02558M_00Eng(1-25).indd 72010-5-19 17:22:11
8
English
Connections
Connecting to an Audio Device
Using an Optical or Audio Cable Connection
Available devices: digital audio system, amplifi er, DVD home theatre
✎
DIGITAL AUDIO OUT (OPTICAL)
When a digital audio system is connected to the
x
DIGITAL AUDIO OUT (OPTICAL) jack, decrease the volume
of both the TV and the system.
5.1 CH (channel) audio is available when the TV is connected to an external device supporting 5.1 CH.
x
When the receiver (home theatre) is set to on, you can hear sound output from the TV’s
x
optical jack. When the
TV is receiving a DTV signal, the TV will send 5.1 CH sound to the home theatre receiver. When the source is
a digital component such as a DVD / Blu-ray player / cable box / STB (Set-Top-Box) satellite receiver and is
connected to the TV via HDMI, only 2 CH audio will be heard from the home theatre receiver. If you want to
hear 5.1 CH audio, connect the digital audio out jack from your DVD / Blu-ray player / cable box / STB satellite
receiver directly to an amplifier or home theatre.
Headphones
✎H
: You can connect your headphones to the headphones output on your set. While the
headphones are connected, the sound from the built-in speakers will be disabled.
Sound function may be restricted when connecting headphones to the TV.
x
Headphone volume and TV volume are adjusted separately.
x
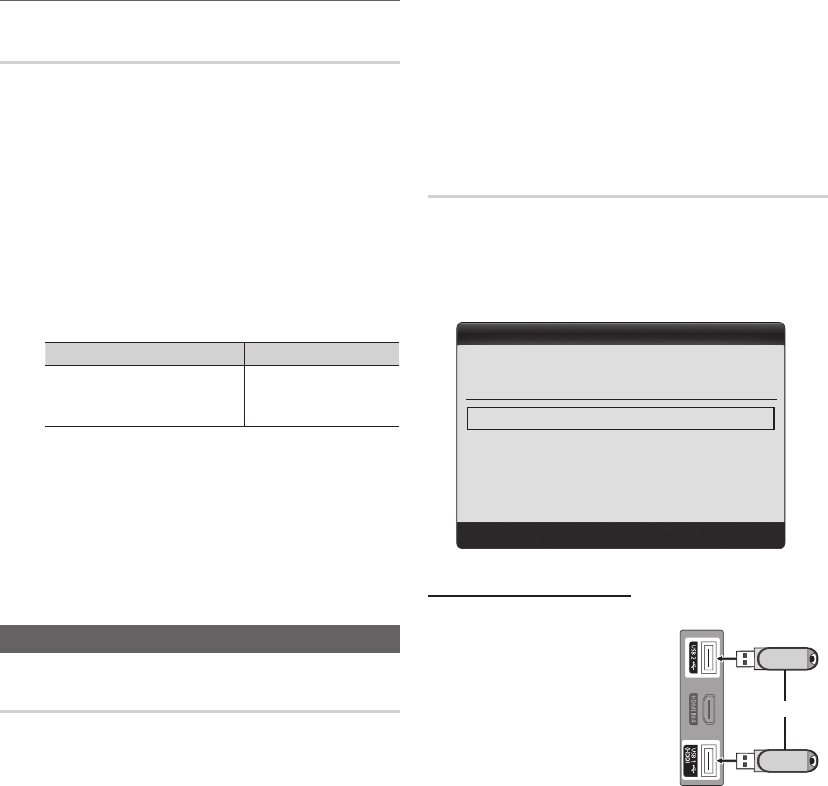
CONNECTIONS COMMON INTERFACE Slot
To watch paid channels, the “CI or CI+ CARD” must be inserted.
If you do not insert the “CI or CI+ CARD,” some channels will y
display the message “Scrambled Signal”.
The pairing information containing a telephone number, the “CI or y
CI+ CARD” ID the Host ID and other information will be displayed
in about 2~3 minutes. If an error message is displayed, please
contact your service provider.
When the confi guration of channel information has fi nished, the y
message “Updating Completed” is displayed, indicating the
channel list is updated.
NOTE
✎
You must obtain a “CI or CI+ CARD” from a local cable service provider.
x
When removing the “CI or CI+ CARD”, carefully pull it out with your hands since dropping the “CI or CI+ CARD” may
x
cause damage to it.
Insert the “CI or CI+ CARD” in the direction marked on the card.
x
The location of the
x
COMMON INTERFACE slot may be different depending on the model.
“CI or CI+ CARD” is not supported in some countries and regions; check with your authorized dealer.
x
If you have any problems, please contact a service provider.
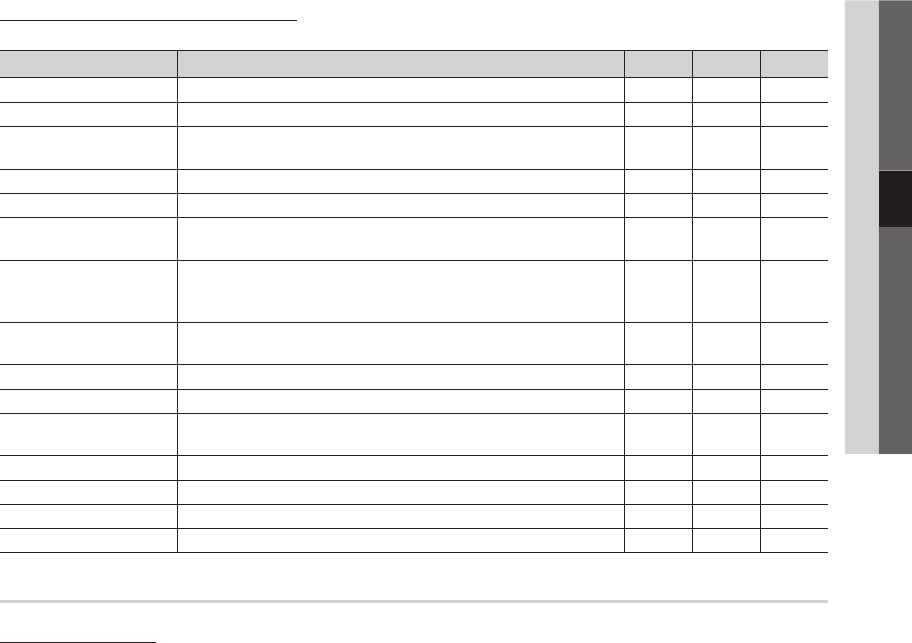
Audio : Two Channel Linear PCM 32/44.1/48 kHz, 16/20/24bits
Analogue audio input (HDMI IN1 only)
PC Input
Stand Swivel
(Left / Right)-20˚ ~ 20˚
Model Name
LE32C650
LE32C652
LE37C650
LE40C650
LE40C652
LE46C650
LE46C652
LE55B650
Screen Size
(Diagonal)32 inch37 inch40 inch46 inch55 inch
Sound
Output10W X 215W X 2
Dimensions (WxDxH)
Body
With stand
789.2 X 77.8 X 509.9 mm
789.2 X 240 X 555.9 mm
907.6 X 78.5 X 574.4 mm
907.6 X 255 X 621.2 mm
976.2 X 80.4 X 614.9 mm
976.2 X 255 X 659.3 mm
1108.6 X 80.3 X 689.7 mm
1108.6 X 275 X 734.5 mm
1301.6 X 85.3 X 801.2 mm
1301.6 X 305 X 845.3 mm
Weight
Body
With Stand
9.1 kg
11.8 kg
11.6 kg
15 kg
14.3 kg
17.7 kg
18.1 kg
21.9 kg
28.1 kg
32.7 kg
Model Name
LE32C653
LE32C654
LE40C653
LE40C654
LE46C653
LE46C654
LE60C650
Screen Size
(Diagonal)32 inch40 inch46 inch60 inch
Sound
Output10W X 215W X 2
Dimensions (WxDxH)
Body
With stand
794.5 X 77.8 X 495.4 mm
794.5 X 240 X 558.6 mm
981.5 X 80.4 X 598.5 mm
981.5 X 255 X 661.9 mm
1113.9 X 80.3 X 674.1 mm
1113.9 X 275 X 737.1 mm
1560 X 432 X 1070 mm
1428.1 X 108.5 X 885.5 mm
Weight
Body
With Stand
9.3 kg
12 kg
13.5 kg
16.9 kg
18.1 kg
21.9 kg
37.9 kg
44.7 kg
Design and specifications are subject to change without prior notice.
✎
For the power supply and power consumption, refer to the label attached to the product.
✎
BN68-02558MNPRTQ_00Eng.indb 512010-5-19 14:14:35
52
English
Other Information
Index
A
AllShare 42
Amplify 16
Antenna 12
Anynet
+
36
Audio Out 8, 36
Auto Adjustment 16
Auto Volume 17
B
Background Music 35
Balance L/R 16
Basic View 34
Batteries 5
Black Tone 14
Blanking Bracket 45
Brightness 13
C
Cable Tie 46
Change PIN 6, 19
Channel Manager 11
Clock 18
Colour Tone 15
Component 7
Connecting to a PC 22
Connecting to an Audio Device 8
D
Digital Audio Out 8, 36
DivX
®
VOD 35
D-sub 22
Dynamic 13
Dynamic Contrast 14
E
Eco Sensor 14
Edit Name 9
Editing Channels 12
Energy Saving 14
Equalizer 16
External Speaker 17
EPG 10
F
Favourites Channel 11
Film Mode 15
Fine Tune 13
Flesh Tone 14
Frequency 12
H
HDMI 7, 36
Headphones 8
Home Theatre 8, 36
I
Installation Space 2
Internet@TV 39
L
Language 19
Licence 50
Lock 13
M
Media Play 29
Melody 19
Menu Transparency 19
Music 33
N
Navigate 9
Network Connection 23
Network Setup 24, 26
Now & Next guide 10
O
ON/OFF button 5
Optimal resolution 22
P
Password 40
Photos 34
Picture Size 15, 35
PIP (Picture in Picture) 20
Plug & Play 6
Power Indicator 4
R
Receiver 38
Recording 37
Remote Control 5
Repeat Mode 35
RGB Only Mode 14
Rotate 35
S
Select All 13
Self Diagnosis 20
Sharpness 13
Signal Information 20
Sleep Timer 18
Slide Show 34
Software Upgrade 20
Source List 9
Speaker Select 17
Specifications 51
Standby mode 4
Subtitle 19
Symbol 3
T
Timer 18
Title 34
Tools 3
Troubleshooting 48
TV Speaker 17
U
USB 20, 29
Using Channel View 10
Using Scheduled View 10
Using the Favourite Channels 11
V
VCR 9
Video Formats 32
Videos 31
Volume 4, 5, 17
W
Wall Mount 45
Warm 15
White Balance 14
BN68-02558MNPRTQ_00Eng.indb 522010-5-19 14:14:35
This page is intention-
ally left blank.
BN68-02558MNPRTQ_00Eng.indb 532010-5-19 14:14:35
2
Français
Les figures et illustrations contenues dans ce mode d’emploi sont fournies pour référence uniquement. Elles peuvent différer
de l’aspect réel du produit. La conception et les spécifications du produit sont susceptibles d’être modifiées sans préavis.
Avis concernant le téléviseur numérique
1. Les fonctions relatives à la télévision numérique (DVB) ne sont disponibles que dans les pays ou régions où des signaux terrestres numériques de
type DVB-T (MPEG2 et MPEG4 AVC) sont diffusés ou dans lesquels vous avez accès à un service de télévision par câble compatible DVB-C (MPEG2
et MPEG4 AAC). Consultez votre distributeur local pour connaître les possibilités en matière de réception des signaux DVB-T ou DVB-C.
2. DVB-T est la norme du consortium européen DVB pour la diffusion de signaux terrestres de télévision numérique. La norme DVB-C est, quant à
elle, prévue pour la diffusion des signaux de télévision numérique par câble. Certaines fonctions particulières, telles que le guide électronique des
programmes (Electric Program Guide - EPG) ou encore la vidéo à la demande (Video On Demand - VOD), ne sont toutefois pas incluses dans cette
spécification. Dès lors, elles ne seront pas traitées pour l’instant.
3. Bien que ce téléviseur soit conforme aux dernières normes DVB-T et DVB-C (août 2008), il n’est pas garanti qu’il soit compatible avec les futures
diffusions de signaux numériques terrestres DVB-T et par câble DVB-C.
4. En fonction du pays ou de la région où vous vous trouvez, certains opérateurs de télévision par câble peuvent facturer des frais supplémentaires pour
un tel service. Il se peut également que vous deviez accepter les termes et conditions de ces sociétés.
5. Il se peut que certaines fonctions de TV numérique ne soient pas disponibles dans certains pays ou certaines régions et que la réception des signaux
DVB-C ne soit pas correcte avec tous les opérateurs.
6. Pour plus d’informations, contactez votre service client Samsung.
Les différentes méthodes de diffusion adoptées en fonction des pays peuvent affecter la qualité de réception du téléviseur. Vérifiez le fonctionnement
✎
du téléviseur chez votre revendeur agréé SAMSUNG ou contactez le centre d’appel de Samsung pour savoir s’il est possible d’en améliorer les
performances en reconfigurant les réglages.
Avertissement d’image fixe
Evitez d’afficher sur l’écran des images fixes (telles que des photos au format JPEG) ou des éléments d’images fixes (tels que des logos de programmes
TV, un format d’image 4:3 ou panoramique, bandeaux d’actualités ou d’informations boursières au bas de l’écran, etc.). L’affichage permanent d’images
fixes risque, en effet, d’entraîner une usure irrégulière du phosphore d’écran, ce qui peut se traduire par une dégradation de la qualité d’image. Pour
atténuer les risques, suivez scrupuleusement les recommandations suivantes :
Evitez d’afficher le même canal de télévision pendant de longues périodes.•
Essayez toujours d’afficher l’image en plein écran ; pour obtenir une correspondance optimale, utilisez le menu de format d’image du téléviseur.•
Réduisez les valeurs de luminosité et de contraste sur le minimum requis pour obtenir la qualité d’image souhaitée. L’utilisation de valeurs trop •
élevées risque d’accélérer le processus de brûlure.
Utilisez fréquemment toutes les fonctions du téléviseur conçues pour réduire le phénomène de rémanence et la brûlure d’écran. Pour plus •
d’informations à ce sujet, consultez la section appropriée du mode d’emploi.
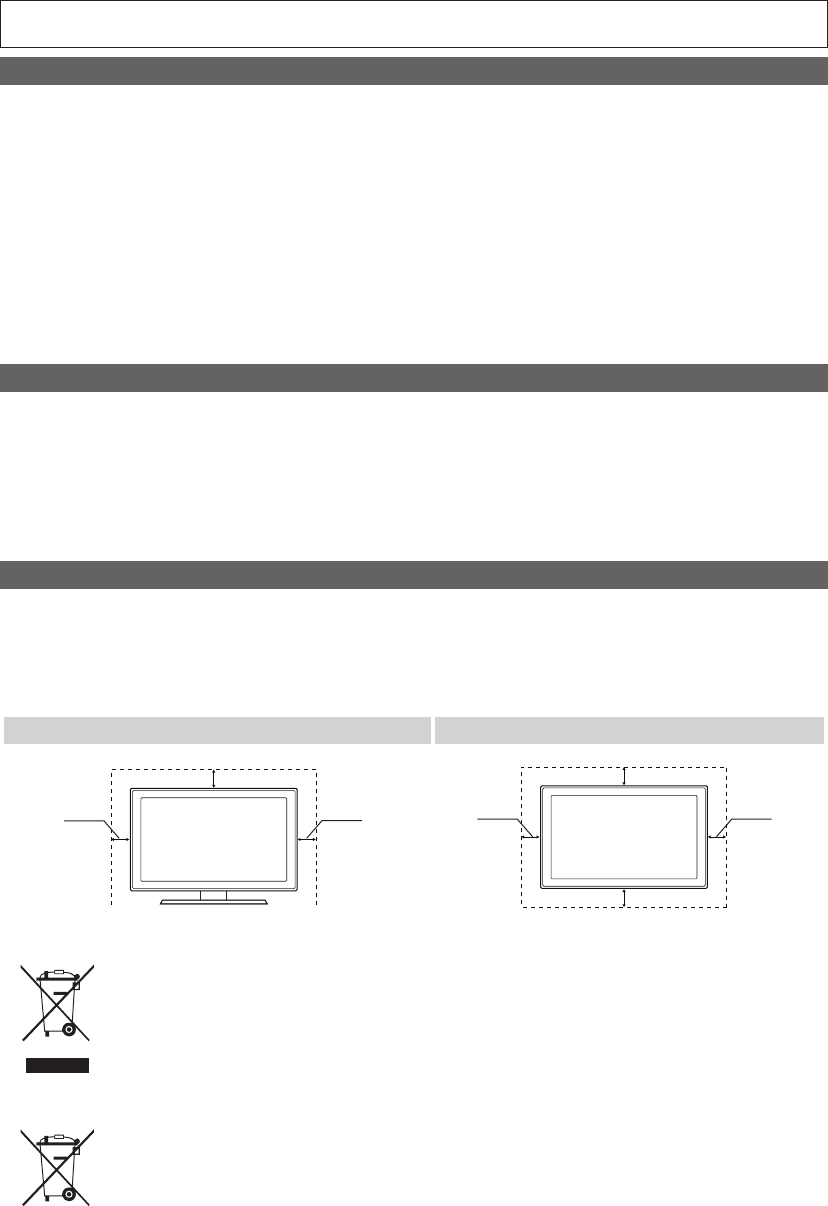
Sécurisation de l’espace d’installation
Maintenez les distances requises entre le produit et les autres objets (par exemple, les murs) afin de garantir une ventilation adaptée.
Le non-respect de ces distances peut provoquer un incendie ou un problème au produit en raison d’une augmentation de la température interne de celui-ci.
Lors de l’utilisation d’un pied ou d’un support mural, utilisez uniquement les pièces fournies par Samsung Electronics.
✎
L’utilisation de pièces fournies par un autre fabricant peut occasionner un problème au niveau du produit ou la chute de celui-ci, ce qui pourrait
x
vous blesser.
L’aspect peut varier en fonction du produit.
✎
Installation avec un pied.Installation avec un support de montage mural.
10 cm
10 cm
10 cm
10 cm
10 cm
10 cm
10 cm
Instructions de mise au rebut de ce produit (Déchets d'équipements électriques et électroniques)
(
Applicable dans les pays de l'Union Européenne et dans d'autres pays européens pratiquant la collecte sélective de déchets)
Ce symbole sur le produit, ses accessoires ou sa documentation indique que ni le produit, ni ses accessoires électroniques usagés
(chargeur, casque audio, câble USB, etc.) ne peuvent être jetés avec les autres déchets ménagers. La mise au rebut incontrôlée
des déchets présentant des risques pour l'environnement et la santé publique, veuillez séparer vos produits et accessoires usagés
des autres déchets. Vous favoriserez ainsi le recyclage de la matière qui les compose dans le cadre d'un développement durable.
Les particuliers sont invités à contacter le magasin leur ayant vendu le produit ou à se renseigner auprès des autorités locales pour
connaître les procédures et les points de collecte de ces produits en vue de leur recyclage. Les utilisateurs professionnels doivent
contacter leur fournisseur et consulter les conditions générales du contrat d'achat. Ce produit et ses accessoires ne peuvent être
jetés avec les autres déchets professionnels et commerciaux.
Élimination des batteries de ce produit
(Applicable aux pays de l'Union européenne et aux autres pays européens dans lesquels des systèmes de collecte
sélective sont mis en place.)
Le symbole sur la pile, le manuel ou l'emballage indique que les batteries de ce produit ne doivent pas être éliminées en fin
de vie avec les autres déchets ménagers. L'indication éventuelle des symboles chimiques Hg, Cd ou Pb signifie que la pile ou
l'accumulateur contient des quantités de mercure, de cadmium ou de plomb supérieures aux niveaux de référence stipulés dans la
directive CE 2006/66. Si les piles ne sont pas correctement éliminées, ces substances peuvent porter préjudice à la santé humaine
ou à l'environnement. Afin de protéger les ressources naturelles et de favoriser la réutilisation du matériel, veillez à séparer les
batteries des autres types de déchets et à les recycler via votre système local de collecte gratuite des piles et accumulateurs.
BN68-02558MNR-00Fre.indb 22010-5-19 10:21:46
3
Français
Sommaire
Mise en route
4
4 Accessoires
4 Présentation du panneau de commande
5 Présentation de la télécommande
6 Raccordement à une antenne
6 Plug & Play (configuration initiale)
Connexions
7
7 Connexion à un périphérique AV
8 Connexion à un système audio
9 Changement de la source d’entrée
Fonctions de base
9
9 Navigation dans les menus
10 Utilisation du bouton INFO (Guide Now & Next)
10 Planification des émissions à regarder
12 Menus Chaîne
13 Menu Image
16 Menu Son
18 Menu Configuration
20 Menu Assistance
Fonctions avancées
22
22 Connexion à un ordinateur
23 Connexion réseau
29 Media Play
36 Anynet
+
39 Internet@TV
42 AllShare
Informations supplémentaires
44
44 Fonction Télétexte de chaîne analogique
45 Installation du support mural
46 Assemblage des câbles
47 Verrou antivol Kensington
47 Fixation du téléviseur au mur
48 Dépannage
51 Caractéristiques techniques
52 Index
Vérifiez la présence du symbole !
t
O
Vous pouvez utiliser cette fonction en
appuyant sur le bouton TOOLS de la
télécommande.
RemarqueGuide étape par étape
BN68-02558MNR-00Fre.indb 32010-5-19 10:21:47
4
Français
Mise en route
Accessories
Vérifiez que les éléments suivants sont inclus avec votre téléviseur LCD. S’il manque des éléments, contactez votre
✎
revendeur.
La couleur et la forme des éléments peuvent varier en fonction du modèle.
✎
Télécommande et piles (AAA x 2)
Instructions d’utilisation
Carte de garantie / Manuel de sécurité (non disponible dans certains pays)
Chiffon de nettoyage
Câble d’alimentation
(46~60
pouces
TVs)
Cache Attache de câble Holder-Ring (4ea)
Présentation du panneau de commande
La couleur et la forme du produit peuvent varier en fonction du modèle.
✎
Haut-parleurs
Témoin d’alimentationCapteur de la télécommande
P
(Alimentation)
Permet d’allumer ou d’éteindre le téléviseur.
Témoin d’alimentationClignote, puis s'arrête lorsque le téléviseur est allumé. S'allume en mode Veille.
SOURCE
E
Bascule entre toutes les sources d'entrée disponibles. Dans le menu à l'écran, utilisez
ce bouton de la même façon que le bouton ENTER
E
de la télécommande.
MENUAffi che un menu à l'écran (ou OSD) reprenant les fonctions de votre téléviseur.
Y
Règle le volume. Dans le menu à l'écran, utilisez les boutons
Y
de la même
façon que les boutons ◄ et ► de la télécommande.
z
Permet de modifi er les chaînes. Dans le menu à l'écran, utilisez les boutons z
de la même façon que les boutons ▼ et ▲ de la télécommande.
Capteur de la télécommandeDirigez la télécommande vers ce point du téléviseur.
Mode Veille
Ne laissez pas le téléviseur en mode Veille pendant de longues périodes (lorsque vous partez en vacances, par exemple).
L’appareil consomme toujours une petite quantité d’énergie, même lorsque le bouton marche/arrêt est en position Off. Il est
préférable de débrancher le cordon d’alimentation.
BN68-02558MNR-00Fre.indd 42010-5-19 18:08:09
5
01Mise en route
Français
Présentation de la télécommande
Ceci est une télécommande spéciale destinée aux malvoyants. Elle dispose de points Braille sur les boutons Power,
✎
Channel et Volume.
Installation des piles (type de pile : AAA)
REMARQUE
✎
Utilisez la télécommande à une distance maximale de
x
7 mètres du téléviseur.
Une lumière intense peut affecter le bon fonctionnement de
x
la télécommande. Evitez de l’utiliser à proximité d’une lampe
fluorescente spéciale ou d’une enseigne au néon.
La couleur et la forme peuvent varier en fonction du modèle.
x
ABCD
Permet d’affi cher et de sélectionner les sources
vidéo disponibles. (P. 9)
Lorsque le bouton ON/OFF représentant une
ampoule est en position ON et qu’un bouton est
enfoncé, les boutons de la télécommande restent
allumés pendant un certain temps.
(Utiliser la télécommande lorsque ce bouton est
réglé sur ON réduit la durée de vie de la pile.)
Permet d’allumer et éteindre la télévision. (P. 6)
Appuyez pour atteindre les chaînes directement.
Permet d’affi cher le Guide électronique des
programmes (EPG). (P. 10)
Permet de changer de chaîne.
Permet de sélectionner rapidement les
fonctions fréquemment utilisées.
Permet d’affi cher des informations sur l’écran
du téléviseur. (P. 10)
Permet d’affi cher le menu principal à l’écran.
(P. 9)
Permet de régler le volume.
Permet de revenir à la chaîne précédente.
Boutons des menus Gestion chaînes,
Internet@TV, Media Play, etc.
Utilisez ces boutons avec les modes Media Play
et Anynet
+
. (P. 29, 36)
(∏ : permet de contrôler les enregistreurs
Samsung avec la fonction Anynet
+
)
Permet de couper temporairement le son.
Permet de revenir au menu précédent.
Permettent de sélectionner des éléments de
menu à l’écran et de modifi er les valeurs des
menus.
Permet de quitter le menu.
: permet d’affi cher l’application Media Play. (P. 29)
: permet d’accéder à divers services Internet. (P. 39)
: sélection du mode son Dual. (P. 17)
: sélection de la description audio.
(Non disponible dans certains pays) (P. 17)
: permet de choisir la taille d’image. (P. 15)
: affi chage numérique des sous-titres (P. 19)
Affi che le menu Aff. contenu, ce qui comprend
Guide, Internet@TV, Media Play et AllShare.
Choisissez Télétexte activé,
double, mix ou désactivé.
Affi che la liste des chaînes à l’écran. (P. 13)
BN68-02558MNR-00Fre.indb 52010-5-19 10:21:49
6
Mise en route
Français
Raccordement à une antenne
Lorsque vous allumez le téléviseur pour la première fois, des réglages de base s’effectuent de manière automatique.
Préréglage : connexion du câble d’alimentation et de l’antenne.
✎
Plug & Play (confi guration initiale)
Lorsque le téléviseur est allumé pour la première fois, plusieurs invites s’affi chent pour vous aider à confi gurer les réglages de
base. Appuyez sur le bouton POWER
P
. Plug & Play est disponible uniquement si la source Entrée est défi nie sur TV.
Pour revenir à l'étape précédente, appuyez sur le bouton rouge.
✎
1
Choix d’une langue
Appuyez sur le bouton ▲ ou ▼, puis sur ENTER
E
.
Sélectionnez la langue de votre choix pour le menu à l'écran.
2
Sélection du mode
Démo. magasin ou
Util. domicile
Appuyez sur le bouton ◄ ou ►, puis sur ENTER
E
.
Sélectionnez le mode yUtil. domicile. Le mode Démo. magasin est
prévu pour un usage en magasin.
Rétablissez les paramètres du téléviseur de yDémo. magasin
sur Util. domicile (standard) : appuyez sur le bouton Volume du
téléviseur. Lorsque le menu du volume s'affi che, appuyez pendant
5 secondes sur le bouton MENU.
3
Sélection d'un pays
Appuyez sur le bouton ▲ ou ▼, puis sur ENTER
E
.
Sélectionnez le pays de votre choix. Si le pays ne fi gure pas dans le menu, sélectionnez
Autre.
Après la sélection du pays dans le menu
✎
Pays, certains modèles peuvent demander, en
plus, le code PIN.
Lors de l'entrée du code PIN,
✎
0-0-0-0 n'est pas disponible.
4
Sélection d'une antenne
Appuyez sur le bouton ▲ ou ▼, puis sur ENTER
E
.
Sélectionnez Hertzien ou Câble.
5
Sélection d'une chaîne
Appuyez sur le bouton ▲ ou ▼, puis sur ENTER
E
.
Sélectionnez la source de la chaîne à mémoriser. Lors du réglage de la source d'antenne
sur Câble, une fenêtre s'affi che pour vous permettre d'attribuer des valeurs numériques
(fréquences de station) aux chaînes. Pour plus d'informations, reportez-vous au menu
Chaîne→Mémorisation Auto (P. 12).
Appuyez sur le bouton
✎
ENTER
E
à tout moment pour interrompre la mémorisation.
6
Réglage du Mode
Horloge
Réglez le Mode Horloge automatiquement ou manuellement.
Si vous choisissez l'option
✎
Auto., sélectionnez votre fuseau horaire.
7
Affi chage du Guide de
connexion HD
La méthode de connexion assurant la meilleure qualité d'image en HD s'affi che à l'écran.
8
Profi tez de votre
téléviseur.
Appuyez sur le bouton ENTER
E
.
Si vous souhaitez réinitialiser cette fonction...
Sélectionnez Confi guration - Plug & Play (Confi guration initiale). Entrez votre code PIN à quatre chiffres. Le code PIN par
défaut est "0-0-0-0". Si vous souhaitez modifi er le code PIN, utilisez la fonction Modifi er PIN.
R-AUDIO-L
P
RPBY
ANT OUT
P
POWER
Prise D'alimentation
Antenne VHF/UHF
ou
Câble
BN68-02558MNR-00Fre.indb 62010-5-19 10:21:50
7
Français
02Connexions
Connexions
Connexion à un périphérique AV
Utilisation d’un câble HDMI/DVI : connexion HD (jusqu’à 1080p)
Gebruikershandleiding.com neemt misbruik van zijn services uitermate serieus. U kunt hieronder aangeven waarom deze vraag ongepast is. Wij controleren de vraag en zonodig wordt deze verwijderd.
Product:
Spelregels forum
Om tot zinvolle vragen te komen hanteren wij de volgende spelregels:
lees eerst de handleiding door;
controleer of uw vraag al eerder door iemand anders is gesteld;
probeer uw vraag zo duidelijk mogelijk te stellen;
heeft u een probleem en al geprobeerd om dit op te lossen, vermeld dit erbij aub;
heeft u een oplossing gekregen van een bezoeker dan horen wij dat graag in dit forum;
wilt u een reactie geven op een vraag of antwoord, gebruik dan niet dit formulier maar klik op de knop 'reageer op deze vraag';
uw vraag wordt direct op de website gezet; vermijd daarom persoonlijke gegevens in te vullen;
Belangrijk! Als er een antwoord wordt gegeven op uw vraag, dan is het voor de gever van het antwoord nuttig om te weten als u er wel (of niet) mee geholpen bent! Wij vragen u dus ook te reageren op een antwoord.
Belangrijk! Antwoorden worden ook per e-mail naar abonnees gestuurd. Laat uw emailadres achter op deze site, zodat u op de hoogte blijft. U krijgt dan ook andere vragen en antwoorden te zien.
Abonneren
Abonneer u voor het ontvangen van emails voor uw Samsung LE 46C650 bij:
nieuwe vragen en antwoorden
nieuwe handleidingen
U ontvangt een email met instructies om u voor één of beide opties in te schrijven.
Ontvang uw handleiding per email
Vul uw emailadres in en ontvang de handleiding van Samsung LE 46C650 in de taal/talen: Nederlands, Duits, Engels, Frans als bijlage per email.
De handleiding is 33,55 mb groot.
U ontvangt de handleiding per email binnen enkele minuten. Als u geen email heeft ontvangen, dan heeft u waarschijnlijk een verkeerd emailadres ingevuld of is uw mailbox te vol. Daarnaast kan het zijn dat uw internetprovider een maximum heeft aan de grootte per email. Omdat hier een handleiding wordt meegestuurd, kan het voorkomen dat de email groter is dan toegestaan bij uw provider.
Stel vragen via chat aan uw handleiding
Stel uw vraag over deze PDF
Uw handleiding is per email verstuurd. Controleer uw email
Als u niet binnen een kwartier uw email met handleiding ontvangen heeft, kan het zijn dat u een verkeerd emailadres heeft ingevuld of dat uw emailprovider een maximum grootte per email heeft ingesteld die kleiner is dan de grootte van de handleiding.
Er is een email naar u verstuurd om uw inschrijving definitief te maken.
Controleer uw email en volg de aanwijzingen op om uw inschrijving definitief te maken
U heeft geen emailadres opgegeven
Als u de handleiding per email wilt ontvangen, vul dan een geldig emailadres in.
Uw vraag is op deze pagina toegevoegd
Wilt u een email ontvangen bij een antwoord en/of nieuwe vragen? Vul dan hier uw emailadres in.