Vorsicht bei Verwendung von Kopfhörern......................................................................................................................4
Gerät und Zubehör ...................................................................................................................5
Erste Schritte...........................................................................................................................5
Ansicht von vorn.............................................................................................................................................................5
Fernbedienung bei Fernsehempfang.............................................................................................................................6
Fernbedienung bei digitalem Fernsehempfang/USB-Wiedergabe................................................................................7
Fernbedienung bei Videotext .........................................................................................................................................8
Batterien in die Fernbedienung einlegen.......................................................................................................................9
Handhabung der Fernbedienung ...................................................................................................................................9
PC-Verbindung über VGA- bzw. HDMI-Kabel...............................................................................................................11
Mit einer Stereoanlage verbinden................................................................................................................................ 12
3. Film .......................................................................................................................................................................... 29
Entsorgung von Altgeräten ....................................................................................................31
Richtige Entsorgung des Produktes.............................................................................................................................31
Where to install..............................................................................................................................................................4
LED Screen.....................................................................................................................................................................4
Unit and Accessories................................................................................................................5
Front view.......................................................................................................................................................................5
Remote control instructions in TV mode........................................................................................................................6
Remote control instructions in DTV/USB mode.............................................................................................................7
Remote control instructions in TELETEXT mode...........................................................................................................8
Installing Batteries in the Remote Control ....................................................................................................................9
Using the Remote Control..............................................................................................................................................9
Connecting the TV Antenna............................................................................................................................................9
PC connection............................................................................................................................................................... 11
VGA, HDMI PC Connection............................................................................................................................................11
Connecting an audio system ........................................................................................................................................ 12
Connecting a DVD player..............................................................................................................................................13
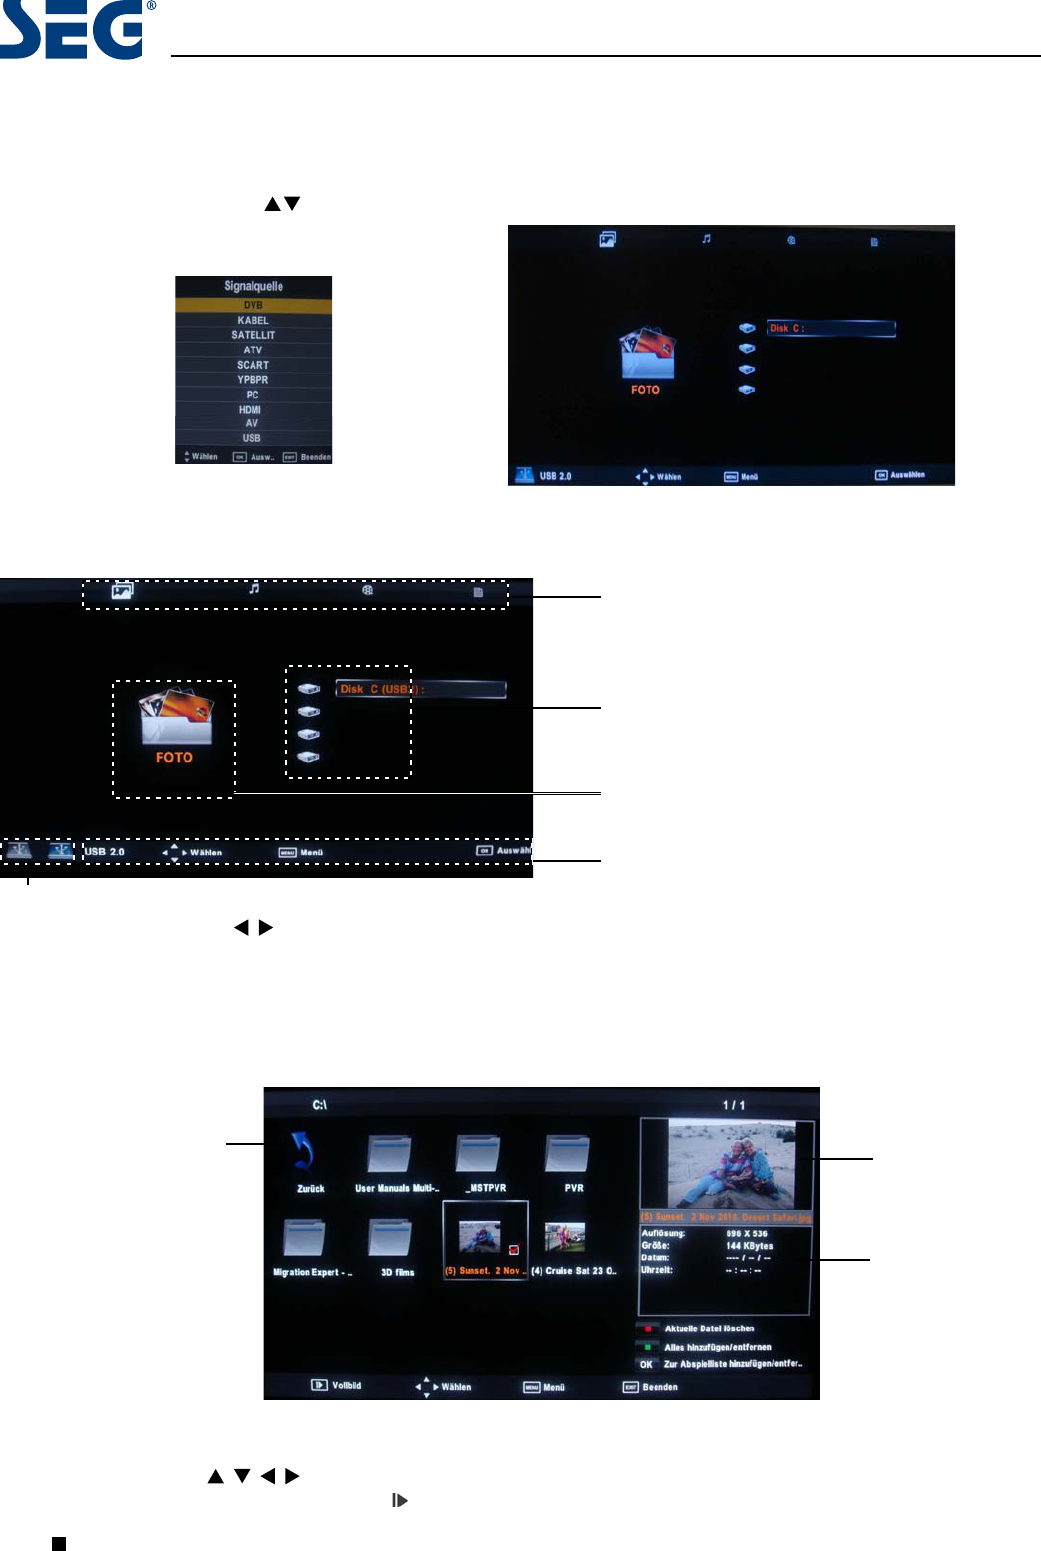
USB Connection............................................................................................................................................................ 13
AV Connection .............................................................................................................................................................. 14
Common Interface Slot...........................................................................................................15
USING YOUR COMMON INTERFACE SLOT.................................................................................................................... 15
Auto installation setup...........................................................................................................15
Power On / Off the LED TV............................................................................................................................................15
TV SETTINGS Menu.................................................................................................................16
Signal Source ...............................................................................................................................................................16
Auto Scan .....................................................................................................................................................................16
Signal Information........................................................................................................................................................ 18
3. Movie ........................................................................................................................................................................28
Correct disposal of Product..........................................................................................................................................30
Vancouver 58 cm (23”) LED BLU-TV
Calgary 58 cm (23”) LED BLU-TV
3
EN
Introduction
Thankyoufor purchasing this LED BLU-TV which has been designed and manufacturedto giveyou many years of trouble
free service.
You may already be familiar with using a similar product but pleasetake time to read these instructions which have
been writtento ensureyou get the very best from your purchase.
HDMI
terface) is the next generation of digital interface. Unlikeconventionalconnec-
tions, it transmits uncompressed digital and audio signals using a single cabl
input via the HDMI socket on the back of the TV.
Safety is important
To ensureyour safety and the safety of others, pleaseread the safety precautions BEFOREyou operate this product.
Disclaimer
The illustrations of the LCD-TV, accessories and menus shown in this User’s Manual may dier from the actual prod-
uct.
SAFETY INFORMATION
IMPORTANT SAFETY INSTRUCTIONS - READ CAREFULLY BEFORE USE.
Take note of the following safety information which appears on the back of the TV.
CAUTION:TO PREVENT ELECTRICAL SHOCK, DO NOT REMOVE ANY COVER SCREWS, NO USER
SERVICEABLEPARTS INSIDE, REFER SERVICING TO QUALIFIED SERVICE PERSONNEL.
This symbol indicates that there are important operating maintenance instructions in the literature
accompanying this unit.
This symbol indicates that dangerousvoltageconstituting a risk of electric shock is present within this
unit.
Keep these instructions
Do not use this TV near water.
Clean only with a slightly damp cloth.
Do not block any ventilation openings.
Install in accordance with the supplied Quick Start Guide and this User Guide.
Protect the power chord from being walked on or pinched, particularly at plugs, and the point where it exits from
the TV.
Do not allow the power chord tooverhang the edge of a table.
Unplug this TV during lighteningstorms or when unused for long periods of time.
WARNING!TO REDUCE THE RISK OF FIRE OR ELECTRICAL SHOCK, DO NOT EXPOSE THIS TV TO RAIN
OR MOISTURE. THE TV MUST NOT BE EXPOSED TO DRIPPING AND SPLASHING AND NO OBJECTS
FILLED WITH LIQUIDS SHOULD BE PLACED ON THE TV.
NOTE: No nak
candles should be placed on the TV.
NOTE: When displaying the same still picture for more than 2 hours without any interruption, the picturecontours of
thecontinuously displayedcontents may remain visible on screen, i.e. a persistant image remains. The same applies,
when displaying for more than 2 hours:
the same background/wallpaper
logos, video games, computer images, Teletext
contratio (e.g. 4:3 format)
These do not represent any malfunction and will not be covered by the manufacturer’s warranty
Calgary 58 cm (23”) LED BLU-TV
4
This unit has been produced according to all current
safety regulations. The following safety tips should
safeguard users against careless use and the dangers
connected with such use.
àAlthough this appliance has been carefully manufac-
tured and rigorously checked prior leaving the fac-
tory, as with all electrical appliances it is possible for
problems to develop. If you notice smoke, an excessive
build up of heat or any other unexpected phenomena,
you should disconnect the plug from the mains power
socket immediately.
àEnsurHWKDWWKHXQLWLVVXIéFLHQWly ventilated! Never
place next to or underneath curtains!
àThe mains plug or appliance coupler is used as the
disconnect device, the disconnect device shall remain
readily operable.
àThis set should only be connected to a mains power
supply which matches that stated on the label on the
rear of the TV - do not attempt to connect it to any
other type of supply.
àThe socket - outlet must be installed near the equip-
ment and easily accessible.
àTo prevent overload, don’t share the same mains sup-
ply socket with too many other items of equipment.
àApparatus with Class 1 construction shall be con-
nected to a mains socket outlet with a protective earth
connection.
àKeep away from rodents. Rodents enjoy biting into
elHFWULFêexes.
àAlways hold the plug when pulling out the plug from
the mains supply sockHW'RQRWSXOORQWKHêex, the
êex can become overloaded and cause a short circuit.
àSet up the unit so that no one is able to trip over the
êex.
àDo not place heavy itHPVRQWKHêex, which may dam-
age it.
àTake notHWKDWWKHêex cannot be reached and pulled
by young children, avoiding injury
.
àDo not set up the unit near to heat sources. The casing
DQGWKHêex could be damaged by the impact of heat.
àThe screen is made of plastic and can break if damage
is done to it. Be careful when collecting sharp edged
plastic splinters to avoid injury.
àAvoid placing the unit on any surfaces that may be
subject to vibrations or shocks.
àTo protect the unit during a thunderstorm unplug the
AC power cable and disconnect the aerial. Caution: Do
not touch the aerial (RF) connector.
àWhen you leave your home for long periods of time,
unplug the AC power cable for safety reasons.
àThe unit becomes warm when in operation. Do not
place any covers or blankets on the unit in order to
prevent overheating. The ventilation holes are not to
be blocked. Do not set up near radiators. Do not place
in direct sunshine. When placing on a shelf leave 5 cm
(2“) free space around the whole unit.
àDo not allow water or moisture to enter the TV. Do
NOT use in wet or moist areas such as Bathrooms,
steamy kitchens or near swimming pools.
àDo not use this unit when moisture condensation may
occur
àAny repairs must be cDUULHGRXWE\TXDOLéHGSHrsonnel
only.
àDo not open this unit. A non-expert attempting to re-
pair the unit could be dangerous and potentially cause
Dére hazard.
àLiquids spilt into the unit can cause serious damage.
Switch the set OFF and disconnect the mains power
supply, then cRQVXOWDTXDOLéHGVHUYLce person before
attempting to use the unit again.
àDo NOT remove the safety covers. There are no use-
able or serviceable parts inside. You may invalidate the
warranty4XDOLéHGSHrsonnel must only service this
apparatus.
àDo NOT tap or shake the screen, you may damage the
internal circuits.
Take good care of the remote contr
ol,
do not dr
op.
àNever placHKRWREMHFWVRURSHQêDPHVRXrces on or
close to the TV.
àHigh temperatures can melt plastic and lead tRéres.
àTo clean the TV use a soft dry cloth. Do NOT use sol
-
vents or petrROEDVHGêXLGVFor stubborn stains, you
may use a damp cloth with dilute detergent.
Headphone Warning
Loud music can damage your hearing
irreversibly, therefore do not set the volume
to a high level when listening through
headphones, particularly for lengthy
listening periods.
Where to install
Locate the television away from direct sunlight and
strong lights, soft indirect lighting is recommended for
comfortable viewing. Use curtains or blinds to prevent
direct sunlight falling on the screen. Place the TV on a
sturdy platform of which the surfacHVKRXOGEHêDWDQG
steady. This will prevent it from falling over.
Make sure the television is located in a position where it
cannot be pushed or hit by objects, as pressure will break
or damage the screen, and so that small objects cannot
be inserted into the ventilation slots or openings in the
cabinet.
LED Screen
The LED display panels are manufactured using an
extremely high level of precision technology, however
sometimes some parts of the screen may be missing
picture elements or have luminous spots. This is not a
sign of malfunction.
Calgary 58 cm (23”) LED BLU-TV
TV/AV MENU CH+ CH- VOL+ VOL- POWER
5
EN
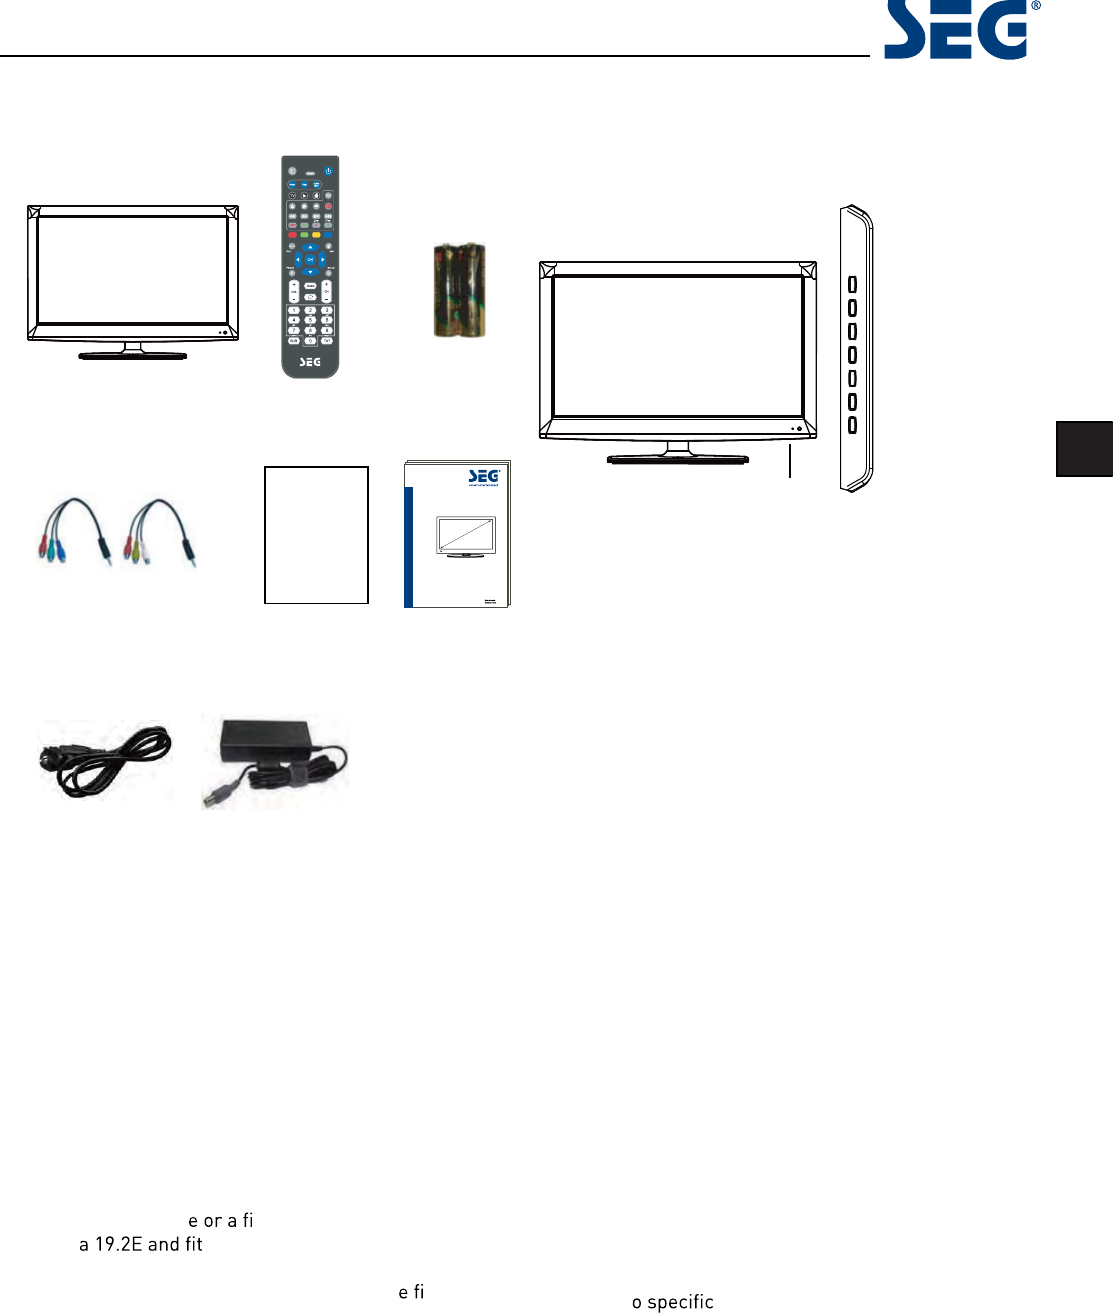
Unit and Accessories
TV set
Remote ControlBatteries
for Remote
Control
Converter cable for
AV and YPbPr video
Quick StartGuide
Getting Started
Front view
Packaging materials are no toys. Please keep away from
children. Plastic bags can cause suffocation when pulled
over the head.
User Guide
This Television is designed to work with any DTT Antenna,
Analog or Digital cabl
xed Satellite Dish aligned
with Astr
ted with a universal LNB.
Other Dishes and LNBs can be used but full set up is
required. The Television is preset for the abov
xed
dish/LNB and when quickstart is used Astra 19.2E will be
instantly tuned without need of a “search“
Note about digital TV: Digital TV (DVB) is available only
where digitalterrestrial television (DVB-T) is broad-
casted or where a compatiblecable TV service (DVB-C)
is provided. Please ask your dealer if you need further
information about the local availability of these services.
DVB-T is the standardforterrestrial digital TV and DVB-C
designates the digitalcable TV service. Despite this TV set
conforms with all current DVB-T und DVB-Cstandards,
wecannot guaranteecompatibility with any future digital
terrestrialDVB-T and DVB-C signals. Some cable TV
providers charge additional fees and external hardware is
required for their oer, and a subscription for the related
services may be necessary. Some digital TV functions may
be limitedt
regions and for DVB-C it is possible
that the device will not perform as expected with certain
providers. For more information, please do not hesitate to
contact our Customer Service.
Quick Start
Guide
LED Indicator
Remote Control Window
(keep clear)
Mains adapter
Power cablel
Mains adapter
Bedienungsanleitung
Operating Instructions
26”
Calgary 58 cm (23”) LED BLU-TV
6
Remote Control
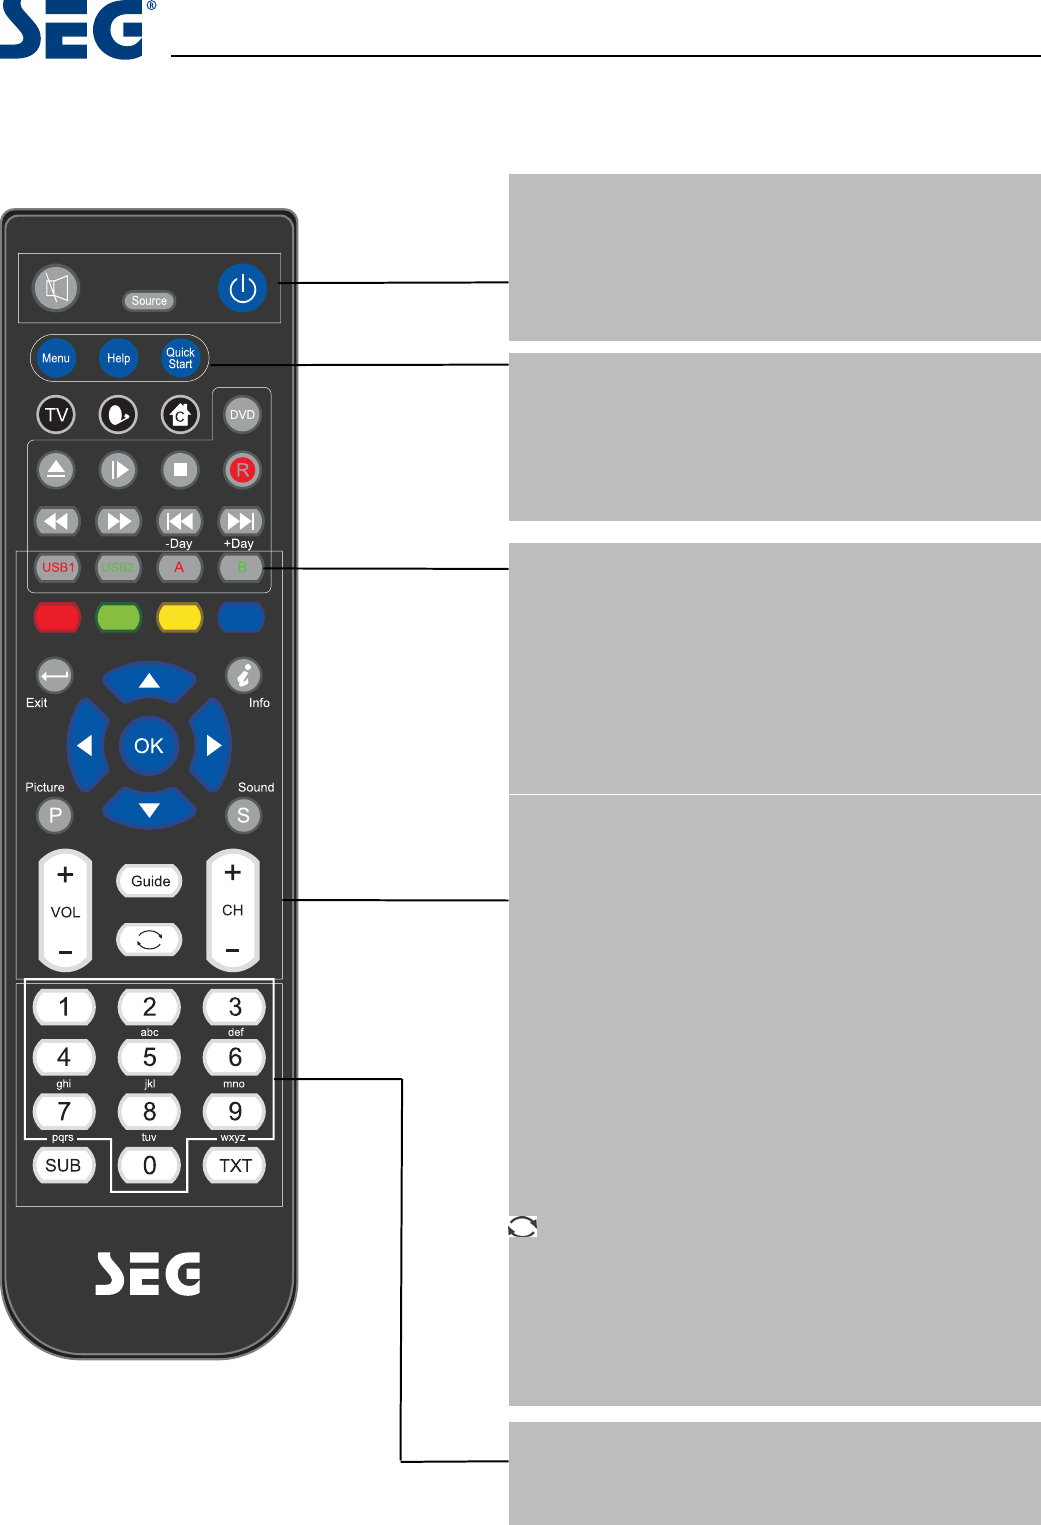
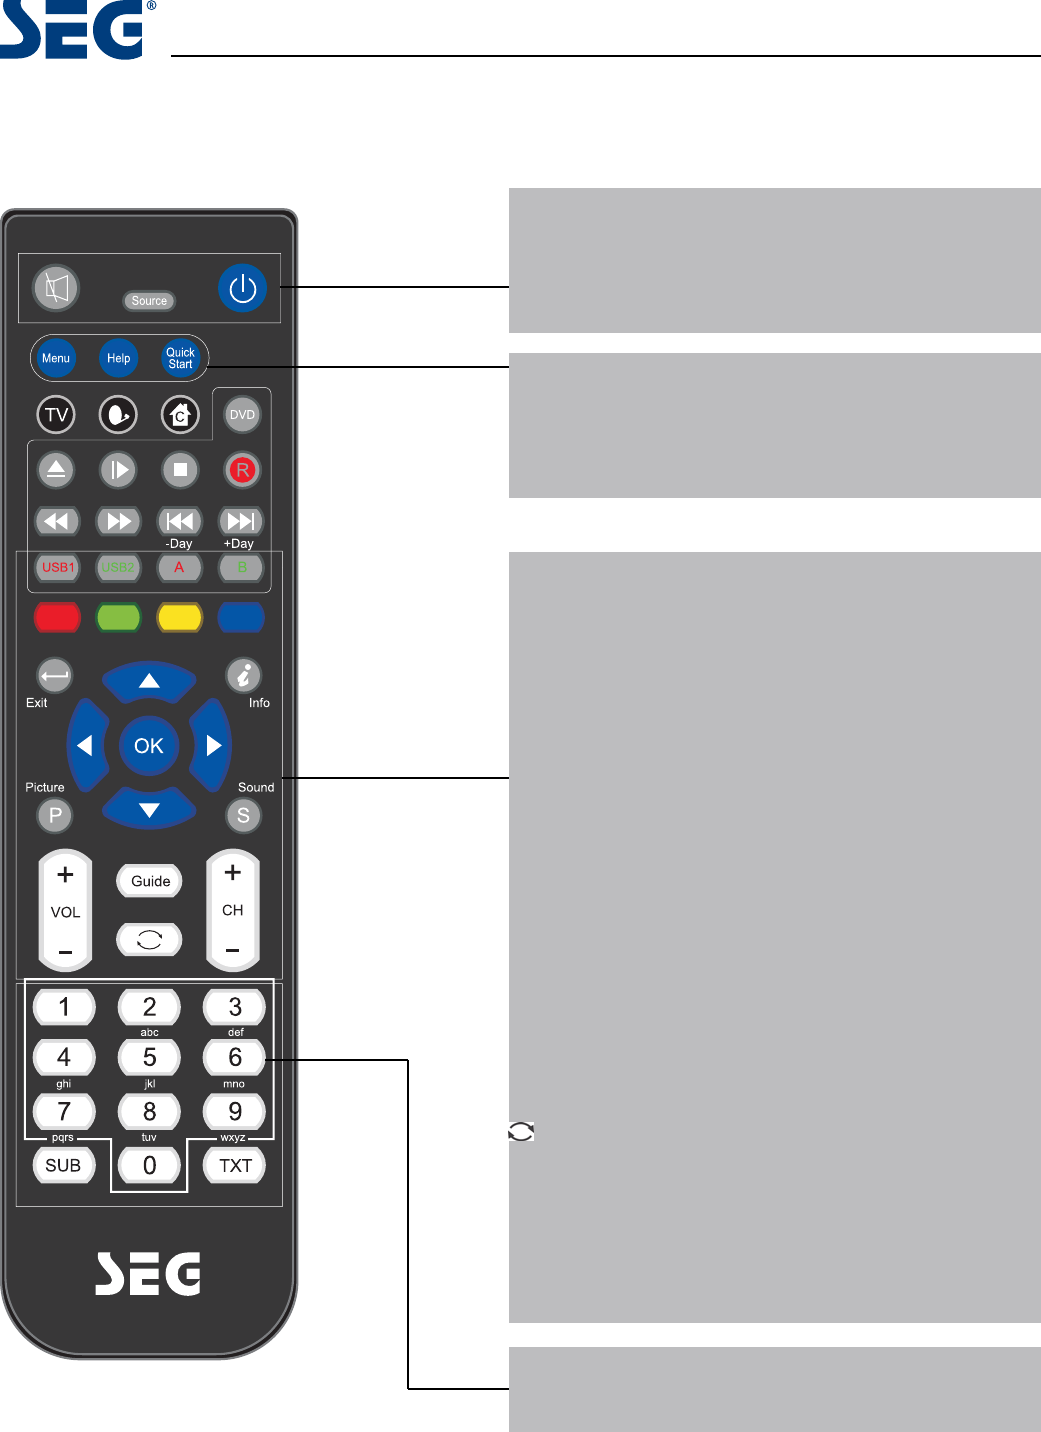
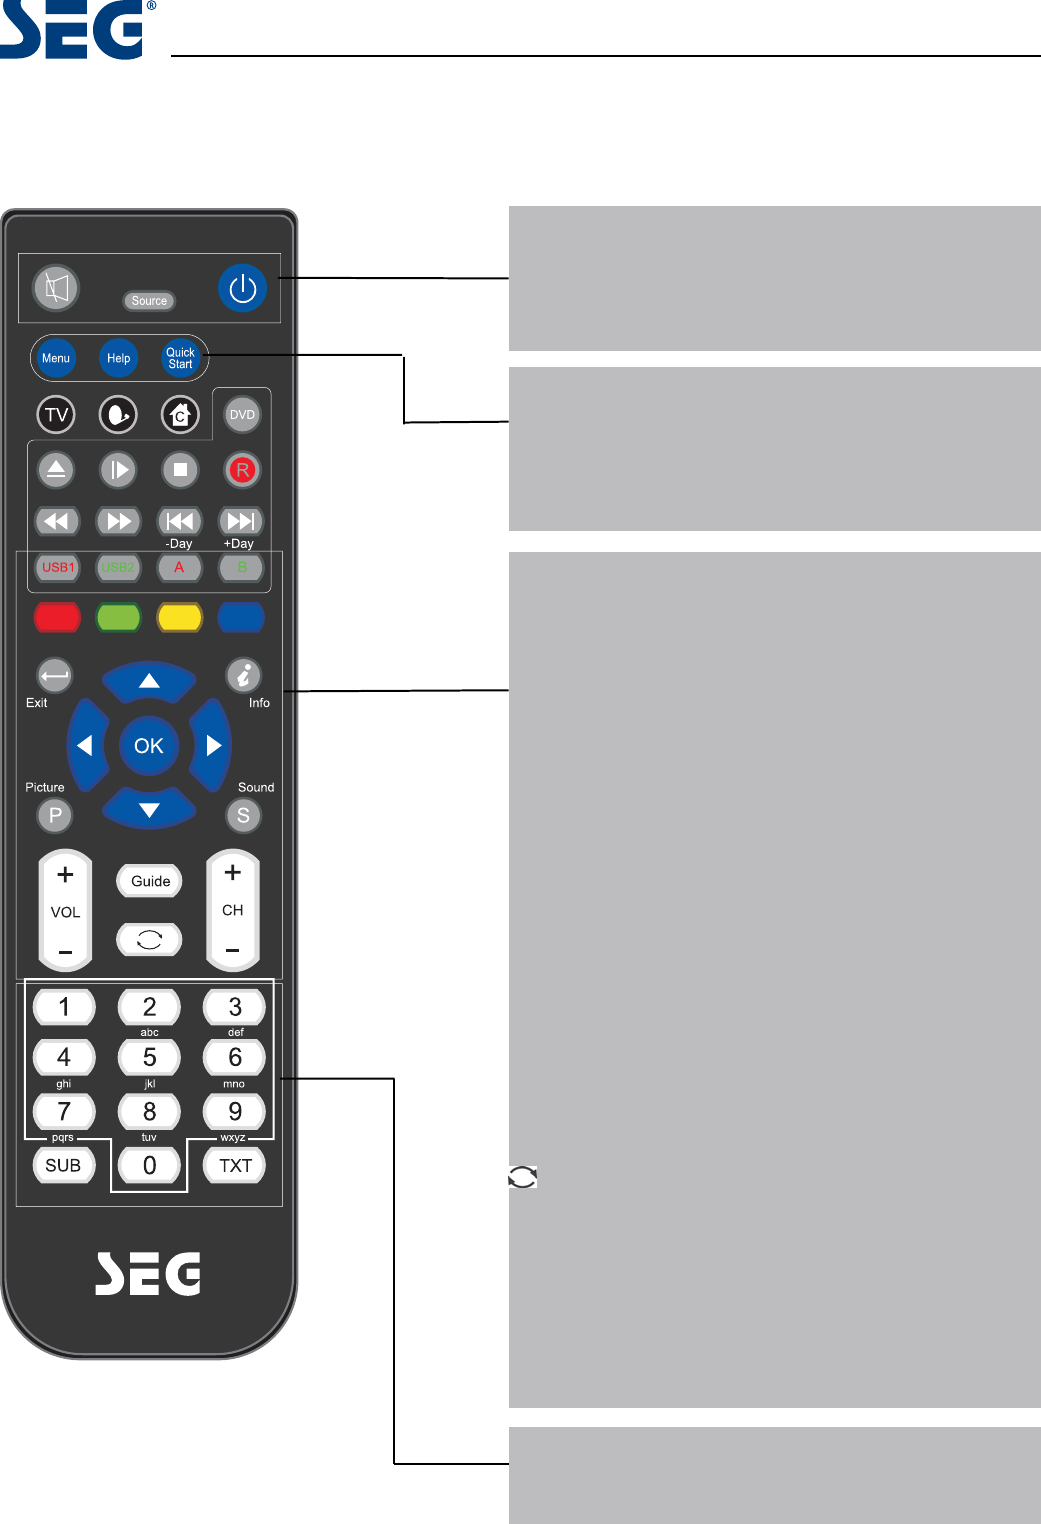
Remote control instructions in TV mode
Mute
Unmute sound Available in all modes.
SOURCE
Display / Hide Source Menu.
Power button
On/Off Standby mode.
Menu
Display / Hide main menu, step back one menu, exit menu.
Help
Display / Hide the Help Menu.
Quick start
Display / Hide the Quick start menu.
USB1
Display / Hide list of recorded programs* on USB1 (PVR*
USB Memory)
USB2*
Display / Hide multimedia menu
A
display / Hide the schedule list* for USB1.
B
display / Hide the schedule list* for USB2*.
COLOR BUTTONS
Color buttons (respectively red, green, yellow and blue) used
in a few sub-menus.
Exit
Exit all menus.
Info
info TV modes, index in Teletext mode.
Picture
Picture settings / Aspect settings (available in any mode).
Sound
Sound settings, available in all modes / to select a different
audio channel.
Guide
Show/hide the Electronic Program Guide (EPG). Toggles
from time to channel display in EPG.
Last Channel display. In Guide mode Changes from Time
to channel display.
VOL+/VOL-
Press to increase / decrease the sound level.
CH+/CH-
When watching a channel, changes the channel.
In Channel List mode, step 10 channels.
NUMBER BUTTONS
Press 0-9 to select a TV channel directly when you are
watching TV. The channel change after 2 seconds.
* depending on the model
Calgary 58 cm (23”) LED BLU-TV
7
EN
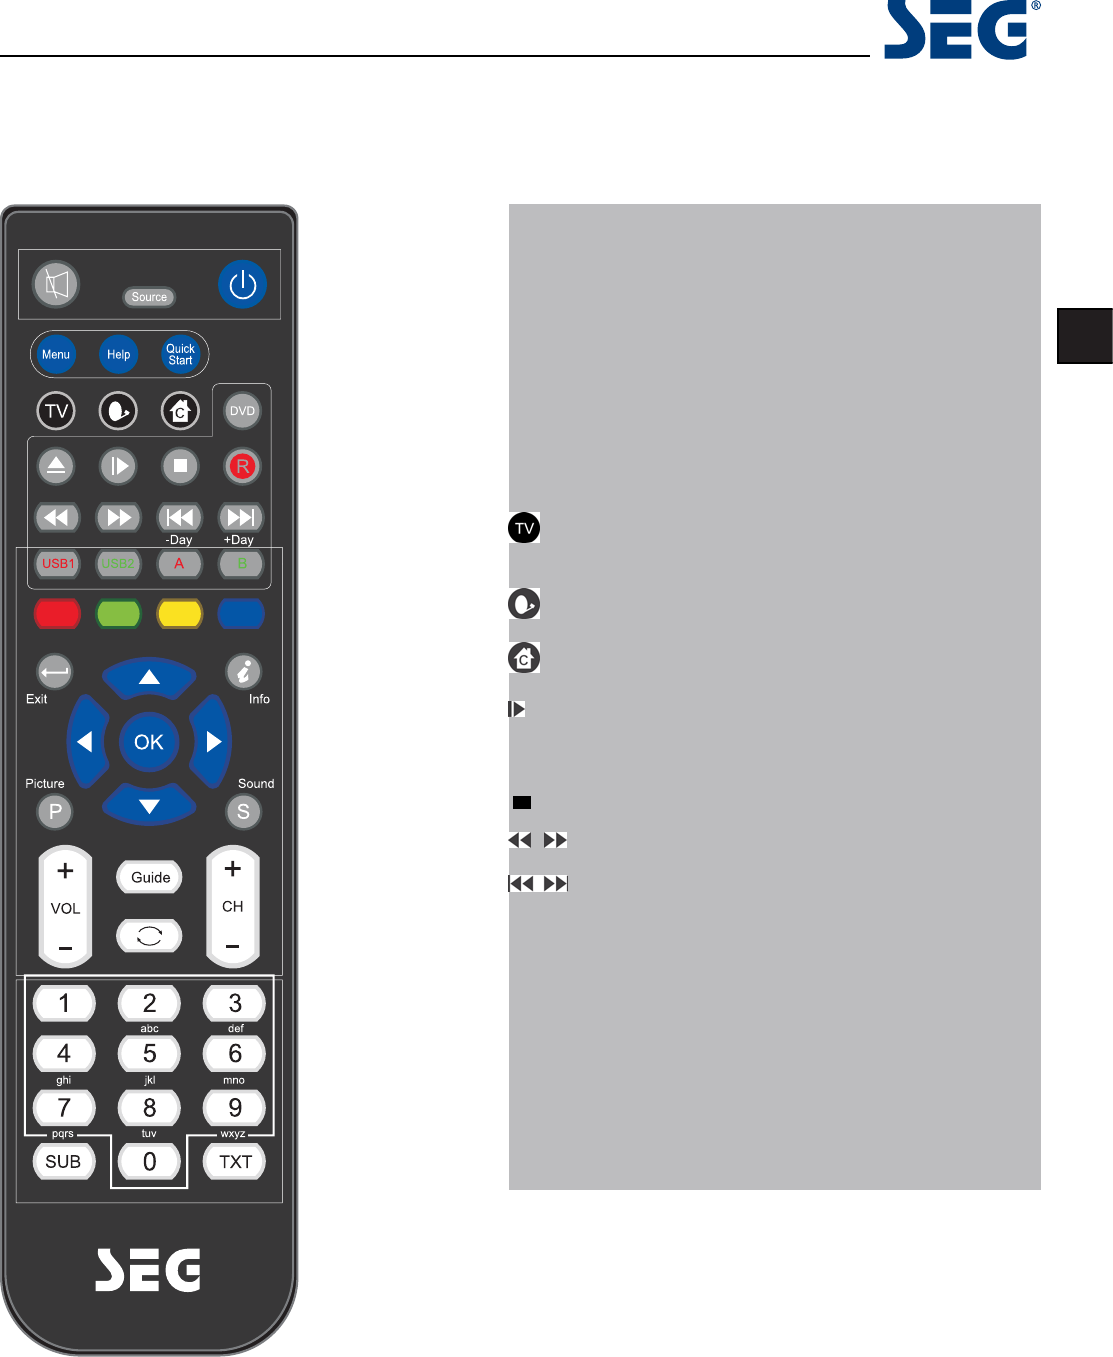
Remote control instructions in DTV/USB mode
Mute
Unmute sound Available in all modes.
SOURCE
Display / Hide Source Menu.
Power button
On/Off Standby mode.
Menu
Display / Hide main menu, step back one menu, exit menu.
Help
Display / Hide the Help Menu.
Quick start
Display / Hide the Quick start menu.
Short cut to ATV source. Sequences ATV,DVBT-TV, DVBT-
Radio, ATV
Shortcut to DVBS/DVBS2 source.
Shortcut to DVBC source
(Timeshift)*
Play or pause.
Press to enter Timeshift, the image paused and it start
record from the paused position.
Stop playing or stop recording*.
Fast reverse and Fast forward.
Previous / next chapter in USB mode or play the Previous
/next scene of the recorded programs*, jump by 30 seconds.
VOL+/VOL-
Press to increase / decrease the sound level.
CH+/CH-
When watching a channel, changes the channel.
NUMBER BUTTONS
Press 0-9 to select a TV channel directly when you are
watching TV. The channel change after 2 seconds.
* depending on the model
Calgary 58 cm (23”) LED BLU-TV
8
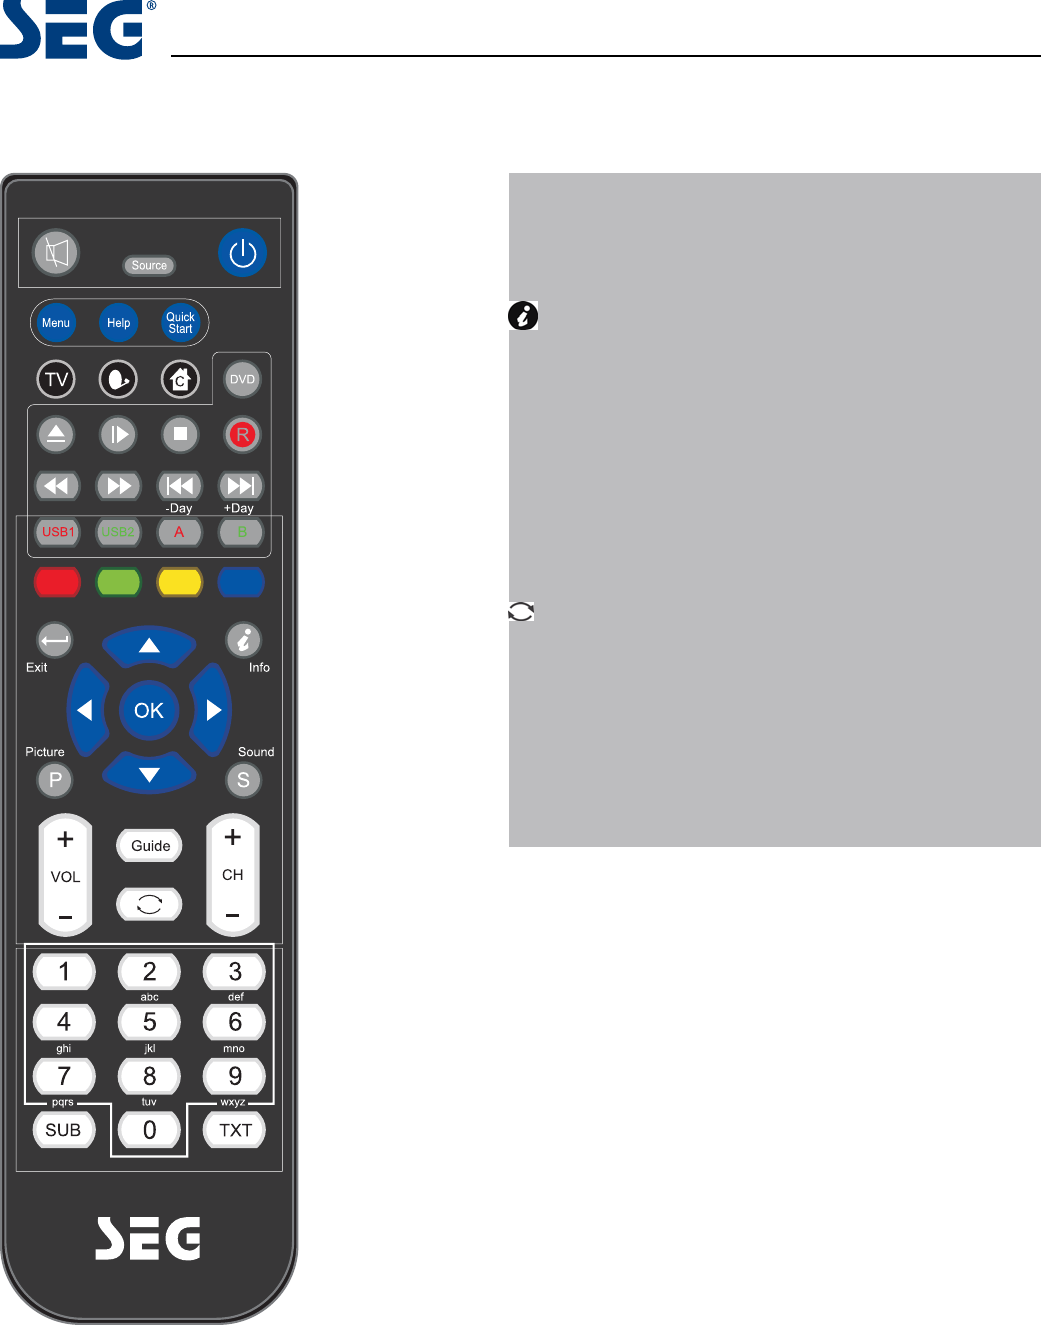
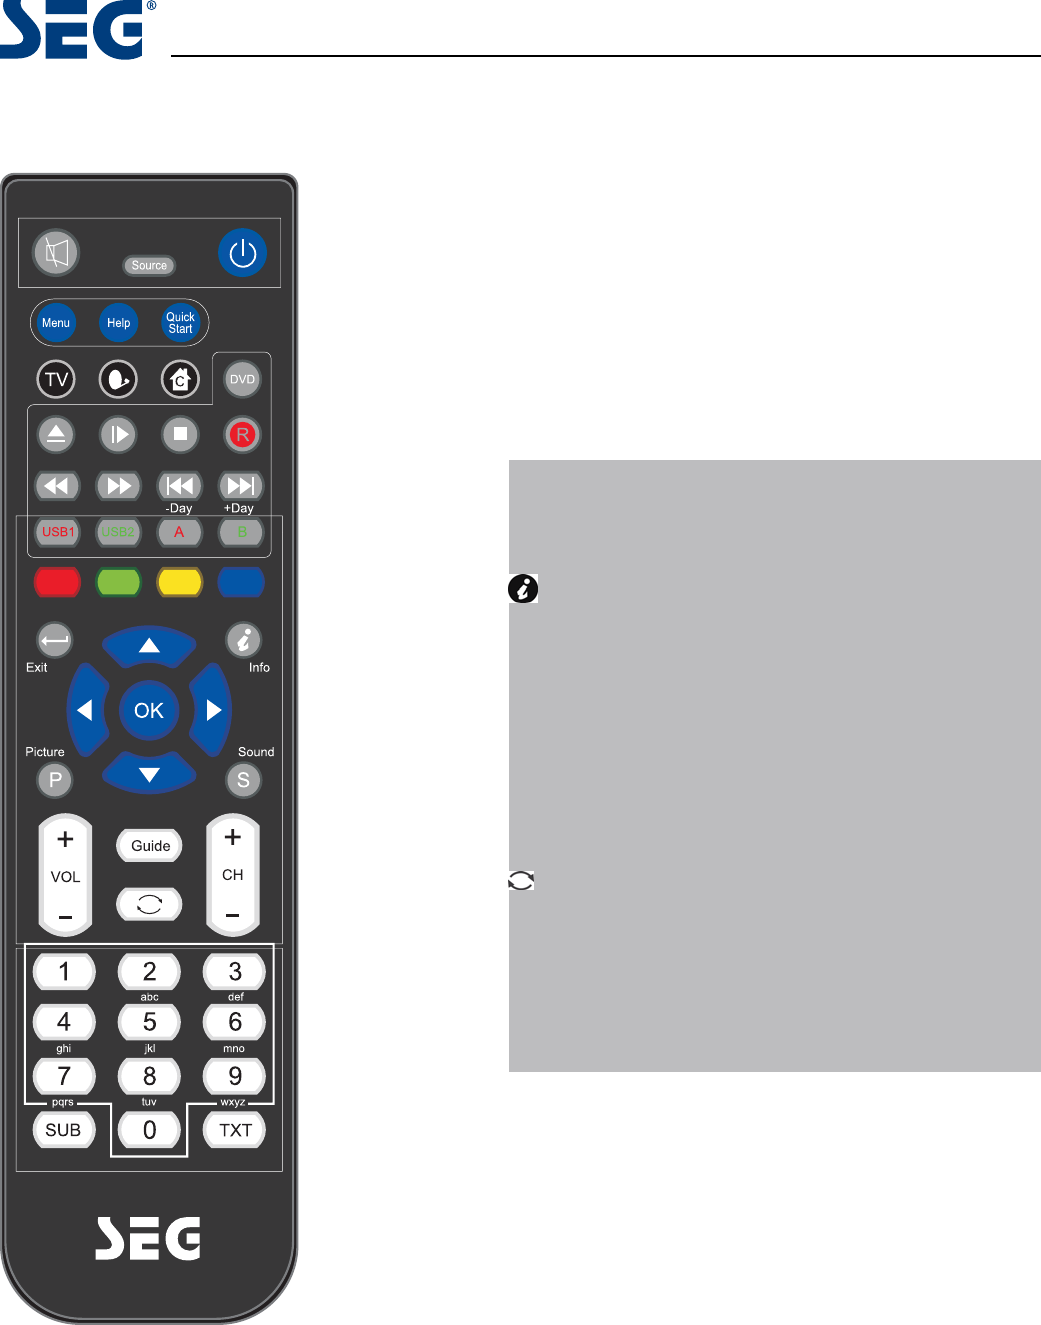
Remote control instructions in TELETEXT mode
Coloured
Fast text when in update mode and fast text links present.
Can be used for other functions in Hold mode.
Exit
Exit text mode.
(Index)
Index page (page 100)
Up/Down
Select +/- Page in Hold mode.
Left / Right
Hold main page and select sub pages using Red / Green
soft.
OK
Hold page and Expand TOP / Bottom / Full , Use TXT for
Update.
NUMBER BUTTONS
Press 0-9 to select a teletext page.
Press this button to show hidden text (e.g. the solutions for
TV quiz shows). Press it again to hide the text.
SUB
Subtitle display/ select button (can display/Hide a menu).
TXT
Text / Mix / TV( always in Update mode)
Calgary 58 cm (23”) LED BLU-TV
9
EN
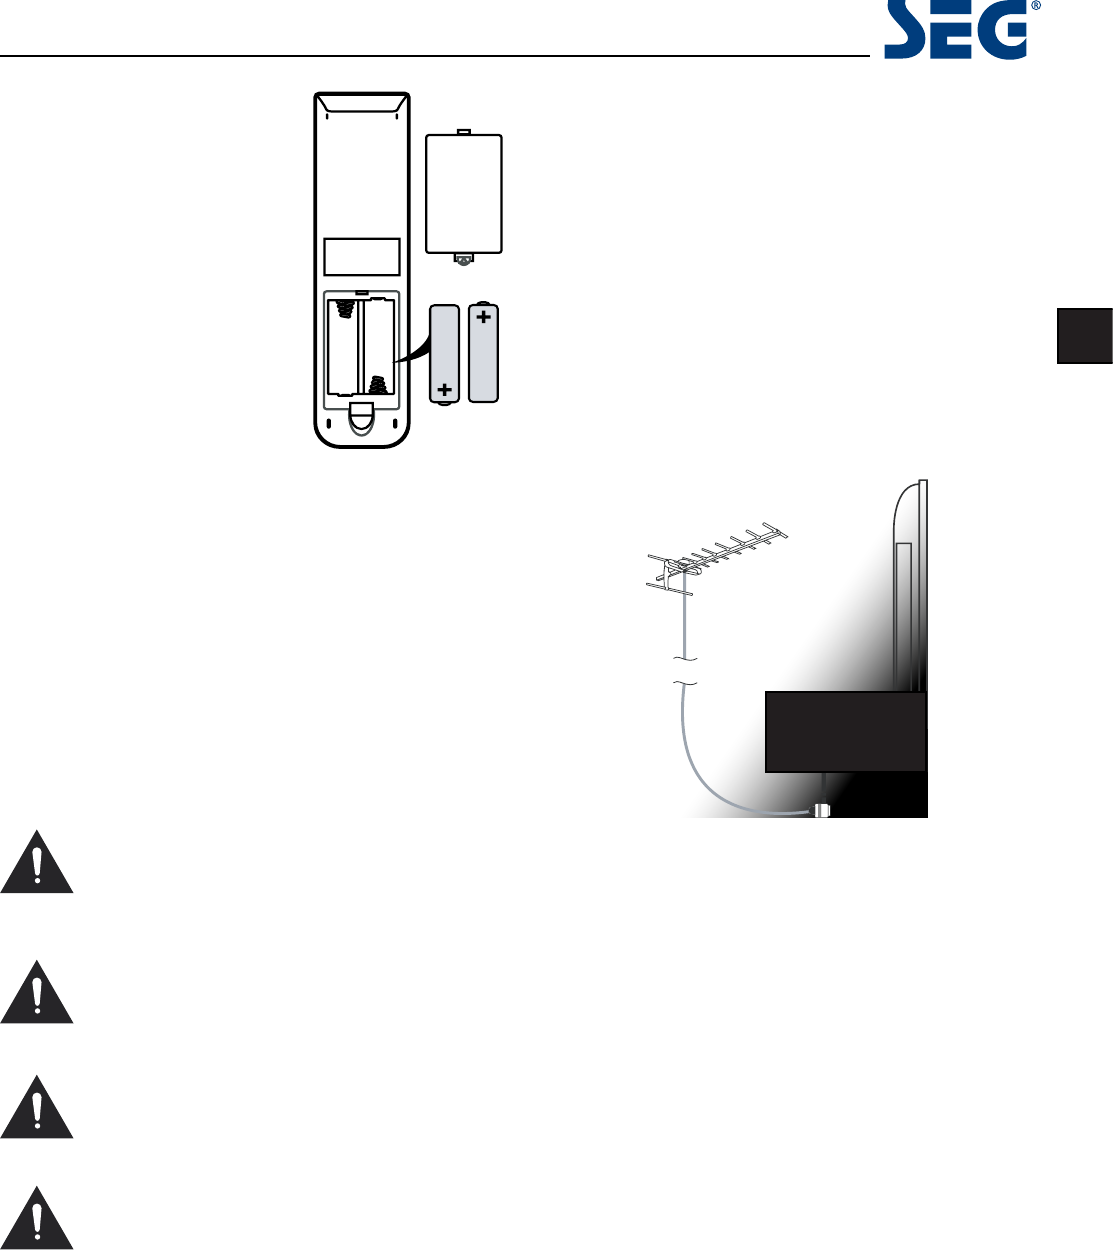
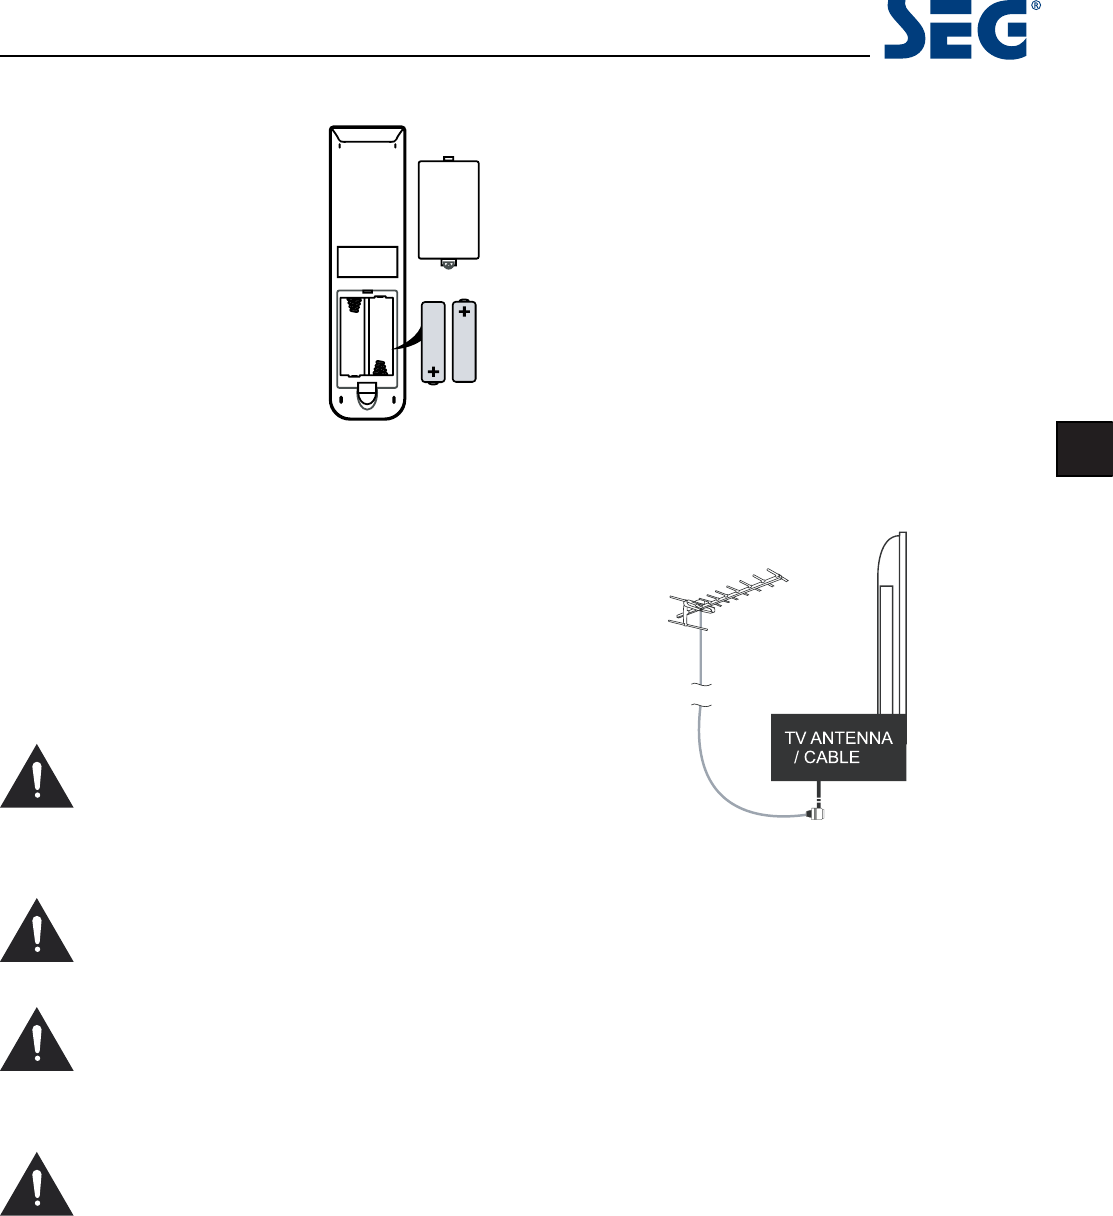
Installing Batteries in the
Remote Control
1.Remove the battery compart-
ment cover at the rear of the
remote control by pushing
the retaining clip forward and
pulling up.
2.Install the supplied batter-
ies, ensuring the polarity
matches what is shown in the
battery compartment.
3.Replace the battery compart-
ment cover.
Aerial connection
WARNING! ENSURE THE TV AND ALL ANCILLARY
EQUIPMENT IS UNPLUGGED FROM THE MAINS BEFORE
MAKING ANY CONNECTIONS!
Connecting the TV Antenna
Connect the TV antenna to the aerial socket with a 75
ohm co-axial plug. For best results use a high gain TV
aerial, preferably roof or loft mounted.
àTo improve picture quality in a poor signal area, pur-
chase and instDOODVLJQDODPSOLéHr.
àIf the antenna needs to be split for two TVs, use a 2-
Way Signal Splitter (not supplied).
Using the Remote Control
To use the remote control point it at the TV and press the
required buttons. You must be within 6 meters and at an
angle of less than 30 degrees from the center of the TV.
NOTE: Sunshine or other strong light sources may inter-
fere with the signal from the remote control. In this situa-
tion turn the TV away from the light source.
WARNING! DO NOT LEAVE BATTERIES IN
THE REMOTE CONTROL FOR EXTENDED
PERIODS AS THEY CAN LEAK OR CORRODE
CAUSING DAMAGE TO THE REMOTE CON-
TROL. CHECK THEM PERIODICALLY AND
REPLACE THEM AS REQUIRED.
WARNING! DO NOT MIX BATTERY TYPES.
WHEN INSERTING BATTERIES, REPLACE
ALL BATTERIES AT THE SAME TIME. DO
NOT MIX OLD AND NEW BATTERIES.
WARNING! EXHAUSTED BATTERIES MUST
BE TREATED WITH CARE AND DISPOSED
OF ACCORDING TO ANY SAFETY OR RECY-
CLING REGULATIONS IN FORCE IN YOUR
LOCAL AREA, NEVER DISPOSE OF BATTER-
IES INTO GENERAL WASTE, OR FIRE.
WARNING! NEVER EXPOSE BATTERIESTO
EXCESSIVE HEAT SUCH AS SUNSHINE, FIRE
OR THE LIKE.
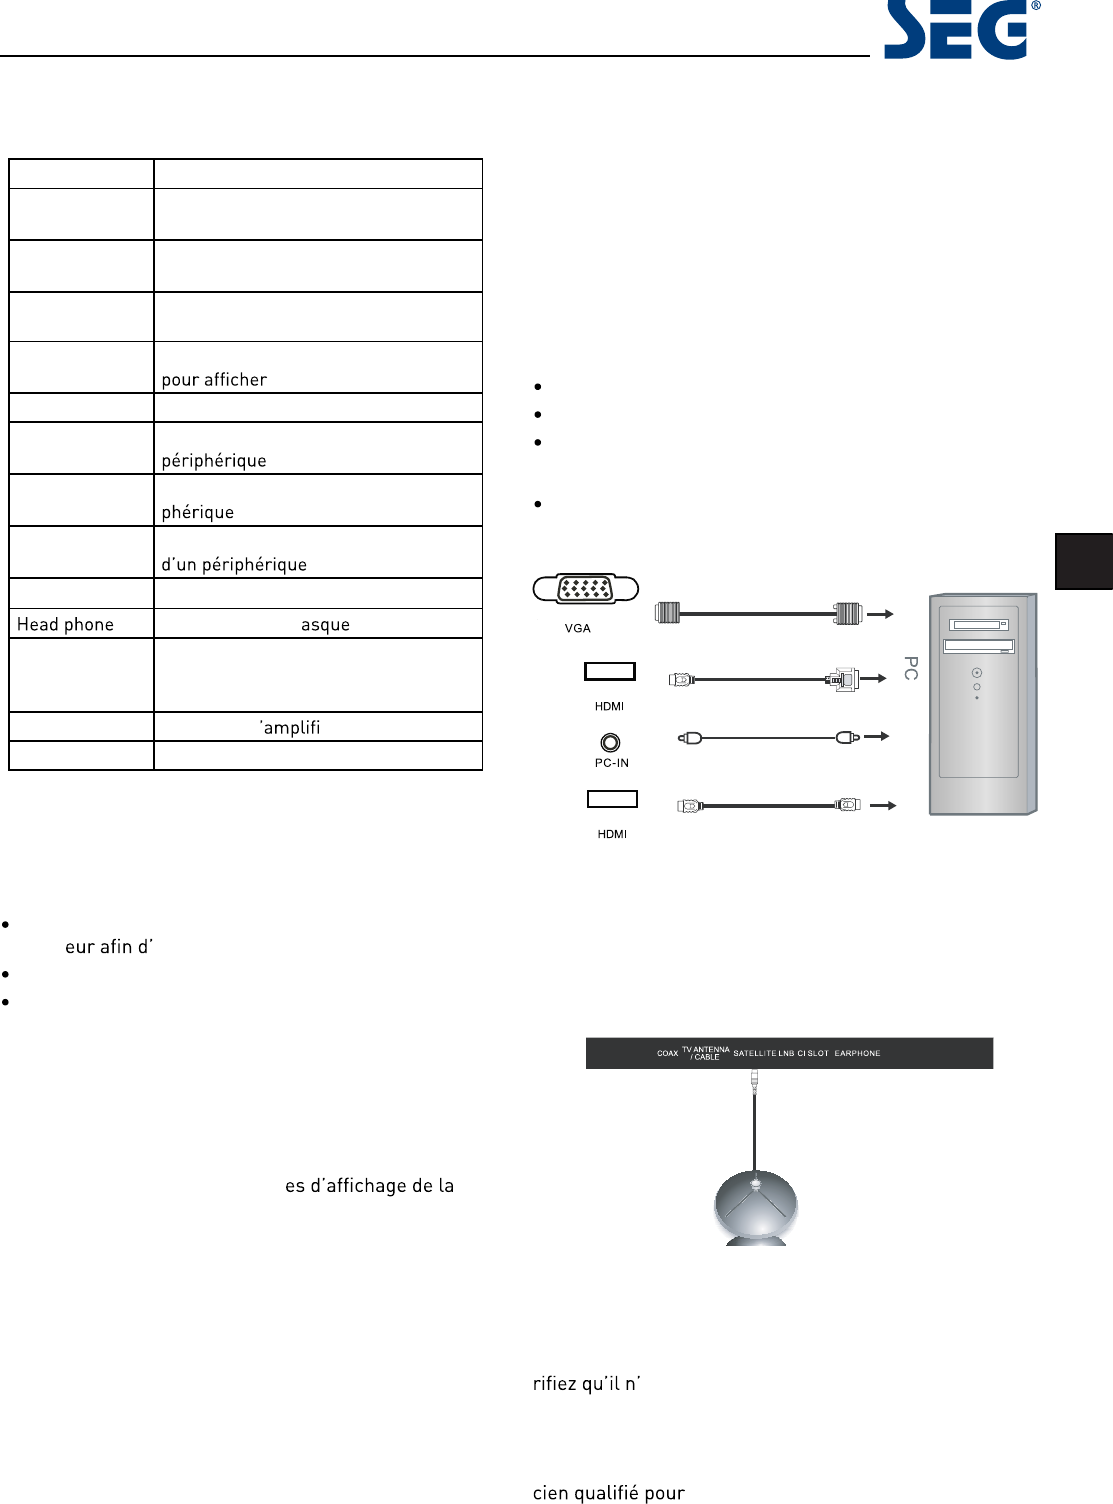
Connecting external devices
This instruction manual shows the simplest and most ef-
fective way of connecting your TV to ancillary equipment.
Alternate methods are listed below.
HDMI Lead
You can connect this TV to a compatible device using a
HDMI lead. This method will give the best picture.
Connect the cable from the HDMI equipment to the TV
HDMI socket.
SCART Lead
You can connect this TV to a compatible device using
a SCART lead. The connection uses component video
signals, i.e. the red, green and blue (RGB) content of the
video are sent on separate signals.
VGA Cable
You can use your TV as a monitor for your personal com-
puter by using a VGA cable. Sound from your personal
computer may also be played through the TV.
Calgary 58 cm (23”) LED BLU-TV
10
Connecting external devices (continued)
DVBS-2
YPbPr AV
MINI
MINI
POWER USBHDMI SCART PC-IN VGA
Calgary 58 cm (23”) LED BLU-TV
11
EN
Connecting external devices (continued)
CONNECTIONS
Caution:
Before connecting external devices:
Makes sure to disconnect the appliances from the
power supply in order to avoid any potential damage
from occurring.
Make sure to establish the required connection.
Make sure that the connectors are properly and cor
-
rectly attached before connecting the appliances to the
power supply.
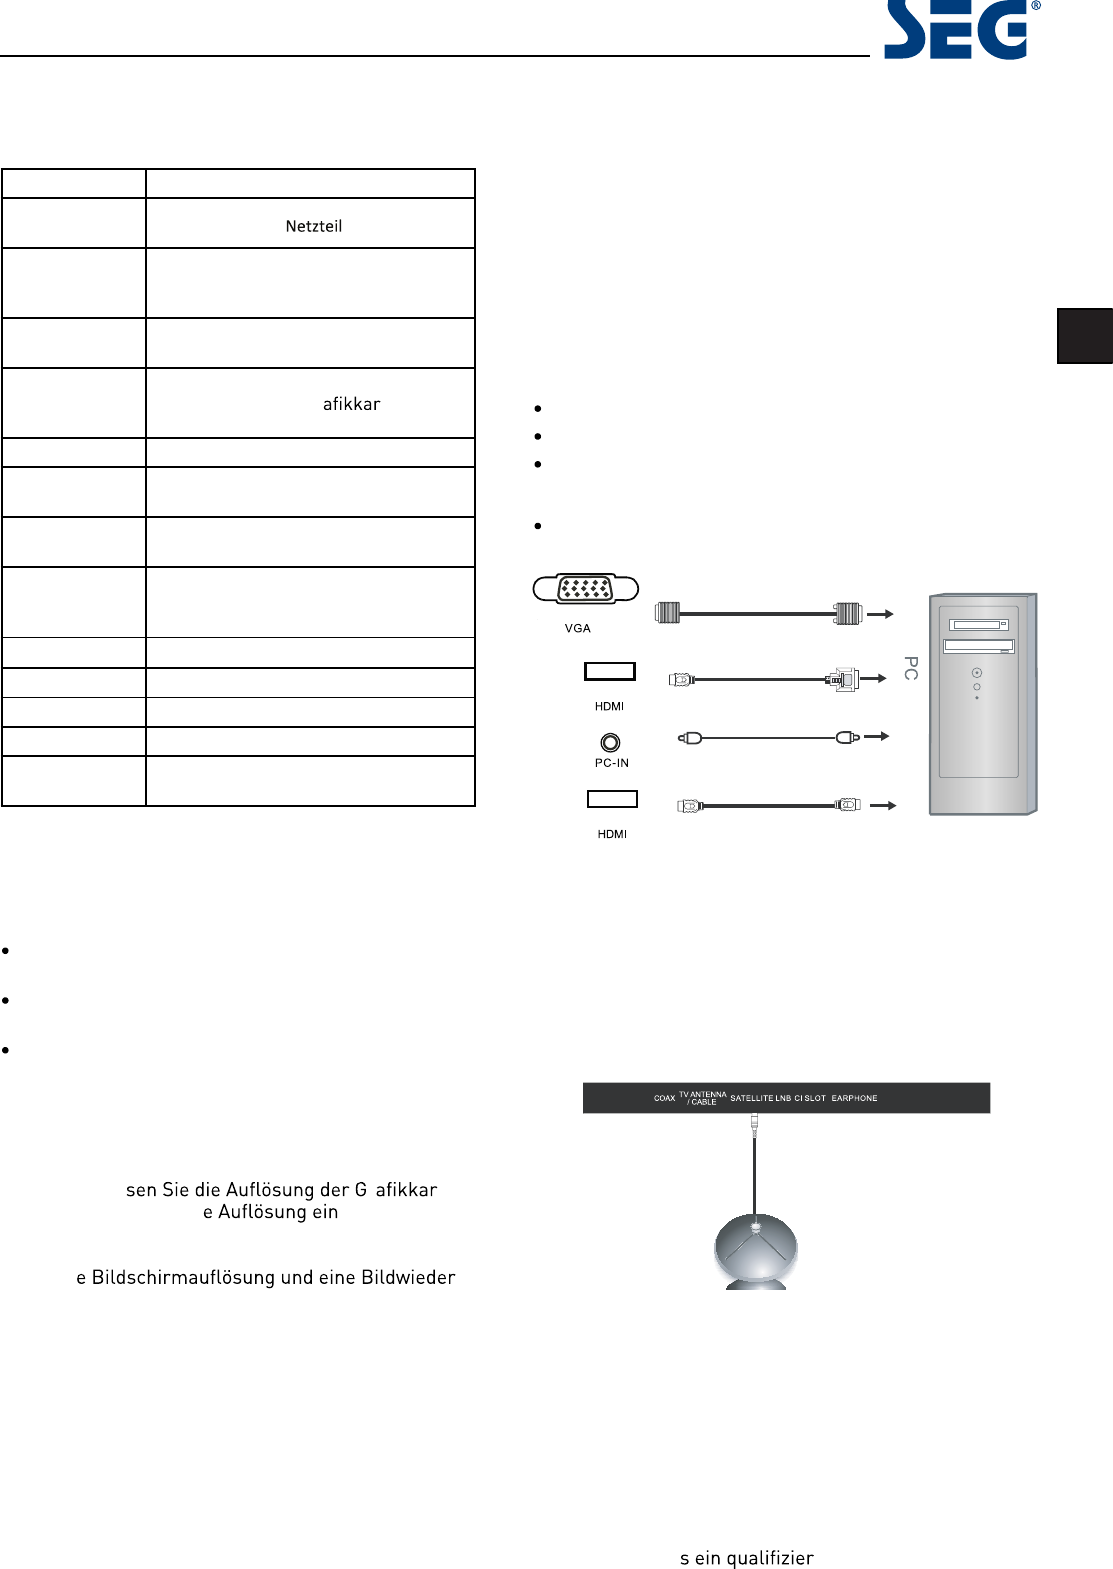
PC connection
As PCs are sometimes still supplied with a ‘conventional’
CRT monitor, you may need to adjust the display set-
tings of your PCs graphics card, otherwise the pictures
may not appear correctly. Switch on your PC (still with
your original monitor connected) now select the screen
resolution, and select 60Hz refresh rate. Switch off your
PC, then connect it to your TV while both appliances are
still switched off.
VGA, HDMI PC Connection
Use a PC-VGA cable (not supplied) to connect the TV to
your PC. You can also use an HDMI cable to connect to
your PC (if your PC Graphic card supports HDMI). When
the HDMI cable is used, the PC audio cable is no longer
required. If you use the HDMI to DVI cable, you will need
to use the PC audio cable. Connect all cables carefully
and do not bend or break the connector pins.
When using the VGA cable
Switch on the TV
Switch on the PC
Select PC/VGA as input source
When using the HDMI cable
Select HDMI as input source
VGA cable
HDMI to DVI cable
Audio cable
HDMI to HDMI
(All illustrated cables are not supplied)
Satellite connection
DVB-S/DVB-S2 Signal
Connect the DVB-S/DVB-S2 signal to the SATELLITE LNB
on the TV SET. Select the SATELLITE input source using
the DVBS/DVBS2 button on the remote control.
Note: If there is no DVBS(S2) reception, please check
whether there is any problem (such as a short-circuit) on
the F-type connector, on the LNB cable, the multi-switch
etc. of your satellite antenna system. In this case, please
disconnect the TV set from the antenna system. If neces-
sary, c
technician to solve the problem.
NameFunction Description
HDMI
Connect to the HDMI output of your
DVD or Satellite Box
SAT LNB Con-
nection
Connect to Satellite signal
VGA (PC IN)
Connect to the PC VGA output to dis-
play PC graphics
PC-INPC Audio input
Mini YpbPr
Connect to the YPbPr output on exter-
nal devices
Mini AV
Connect to AV output onexternal
devices
SCART
Connect to the SCART input / output
of external devices
RFConnect to TV signal cable
Head phoneConnect Head phone
CI / CI+CI slot (Pay as you view card slot)
CoaxOutput t
USBMedia playback
POWER Connectto power supply
Calgary 58 cm (23”) LED BLU-TV
12
Connecting Video camera and Video recorder
Video camera
Connect the AV cable to the TV and to the video cam-
era.
Turn on both video camera and the TV.
Select AV/CVBS source
You can now see the playback picture from the video
camera. Note:
To connect the video camera using other cables, refer
to the video camera instruction manual.
Video recorder
Connect the Scart cable to the TV and video recorder.
Turn on both video recorder and the TV.
Select Scart source
You can now see the playback picture from the video
recorder.
Note:
To connect the video recorder using other cables, refer to
the video recorder instruction manual.
Scart cable
Video recorder
Video camera
(Mini AV cables are supplied)
Use Scart adapter cable
Mini Audio and Video transfer
cable
(
A)
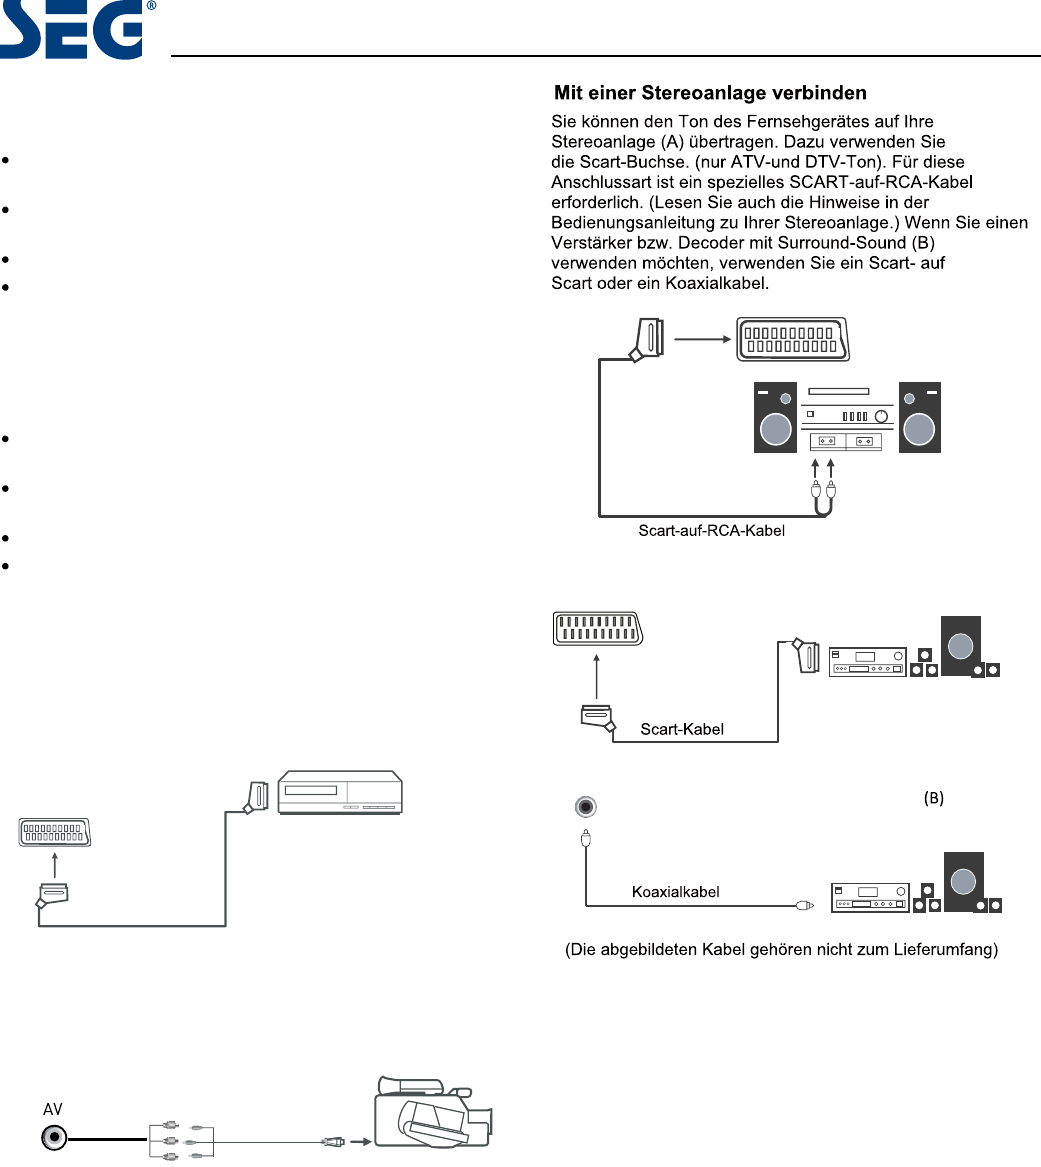
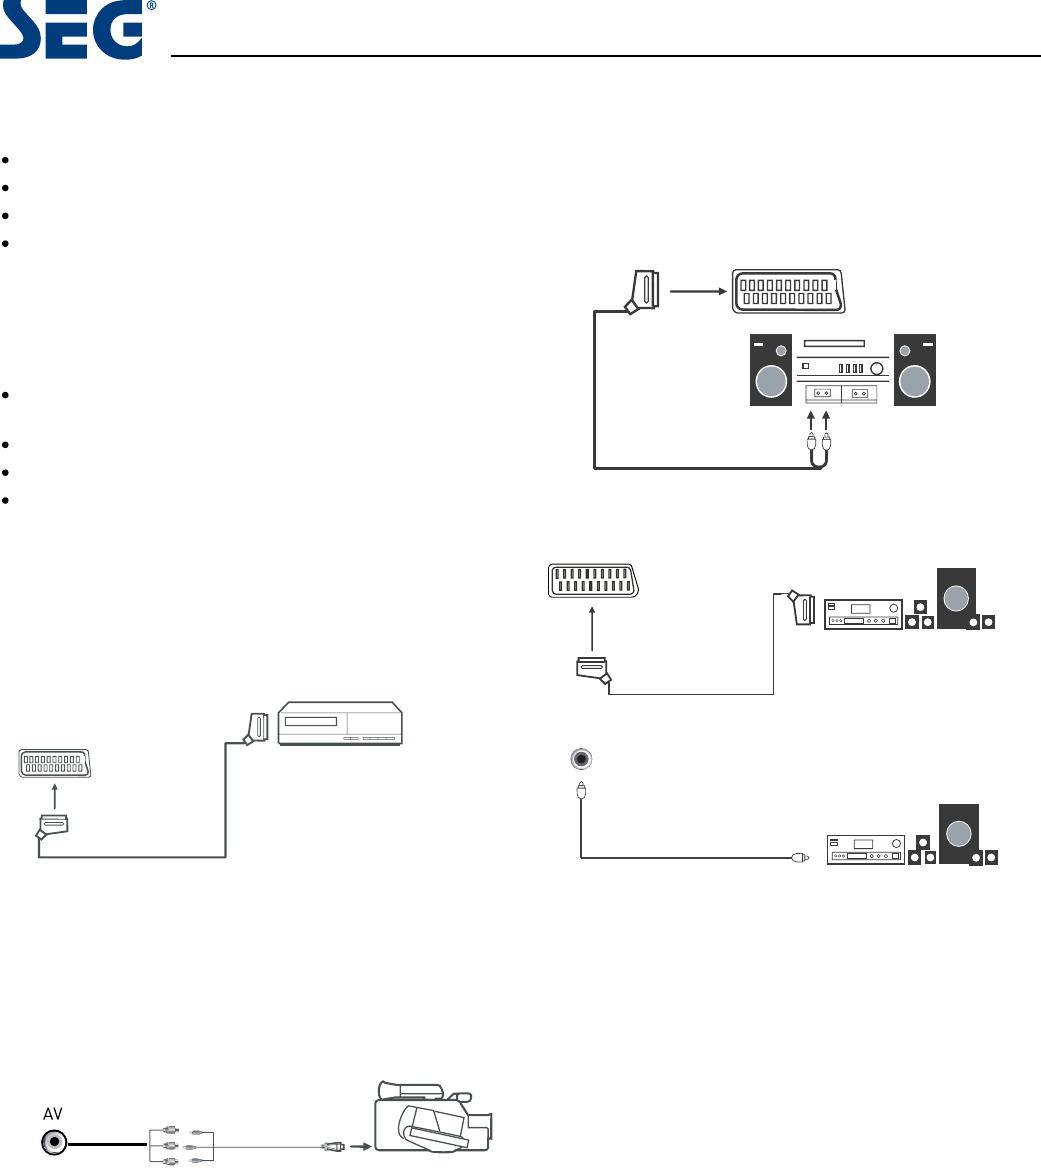
Connecting an audio system
You can supply the TV sound to the stereo system (A) with
the Scart socket. Use a special Scart cable SCART to RCA.
(Please consult y
structions for details). If you
have a surr
coder (B) Use the
Scart cable or the special Scart cable Scart to RCA.
Scart to RCA cable
Scart cabl
Coax cable
e
(All illustrated cables are not supplied)
Calgary 58 cm (23”) LED BLU-TV
13
EN
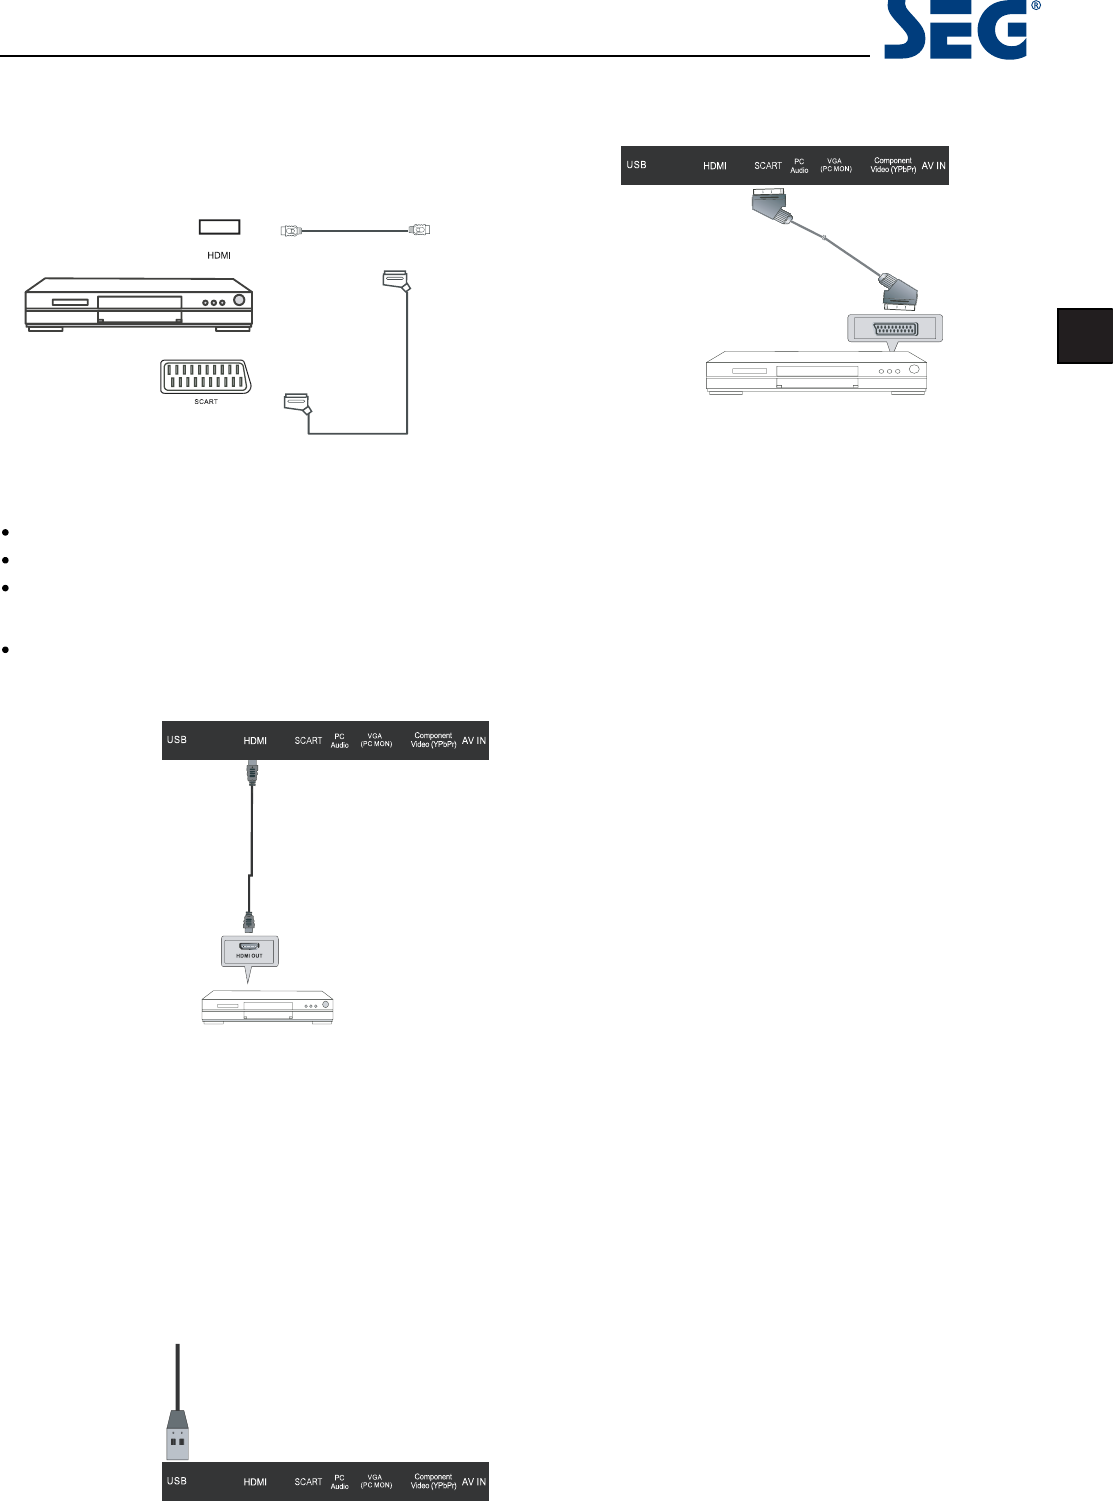
Connecting a DVD player
Connect a DVD player using either a SCART cable or the
HDMI cable. (only if your external equipment supports
HDMI).
HDMI to HDMI
SCART
(All illustrated cables are not supplied)
When using the SCART cable
Switch on the TV
Switch on the DVD player
Select SCART as input source
When using the HDMI cable
Select HDMI as input source
HDMI Connection
TV Back
elbaC IMDH
DVD or VCR Back
HDMI connection allows the user to transfer all audio/video/control signals through one cable only. These signals are
transferred in digital.
SCART Connection
USB Port
TV Back
DVD or VCR
Scart cable
DVD or VCR Back
DVD or VCR
Connect the SCART connector to the external video item
and the SCART connector on the TV. The SCART lead
operates as an Input/Output connection. If the tv does not
select the SCART input automatically, press the SOURCE
button on the remote control and select the SCART signal
source.
USB Connection
ve in to the USB port, Select the USB channel source using the SOURCE button on the remote
control. The maximum supported capacity of external storage devices (e.g. USB memory stick or USB hard disk) is
1TB. However, not all available storage media may be compatible.
Calgary 58 cm (23”) LED BLU-TV
14
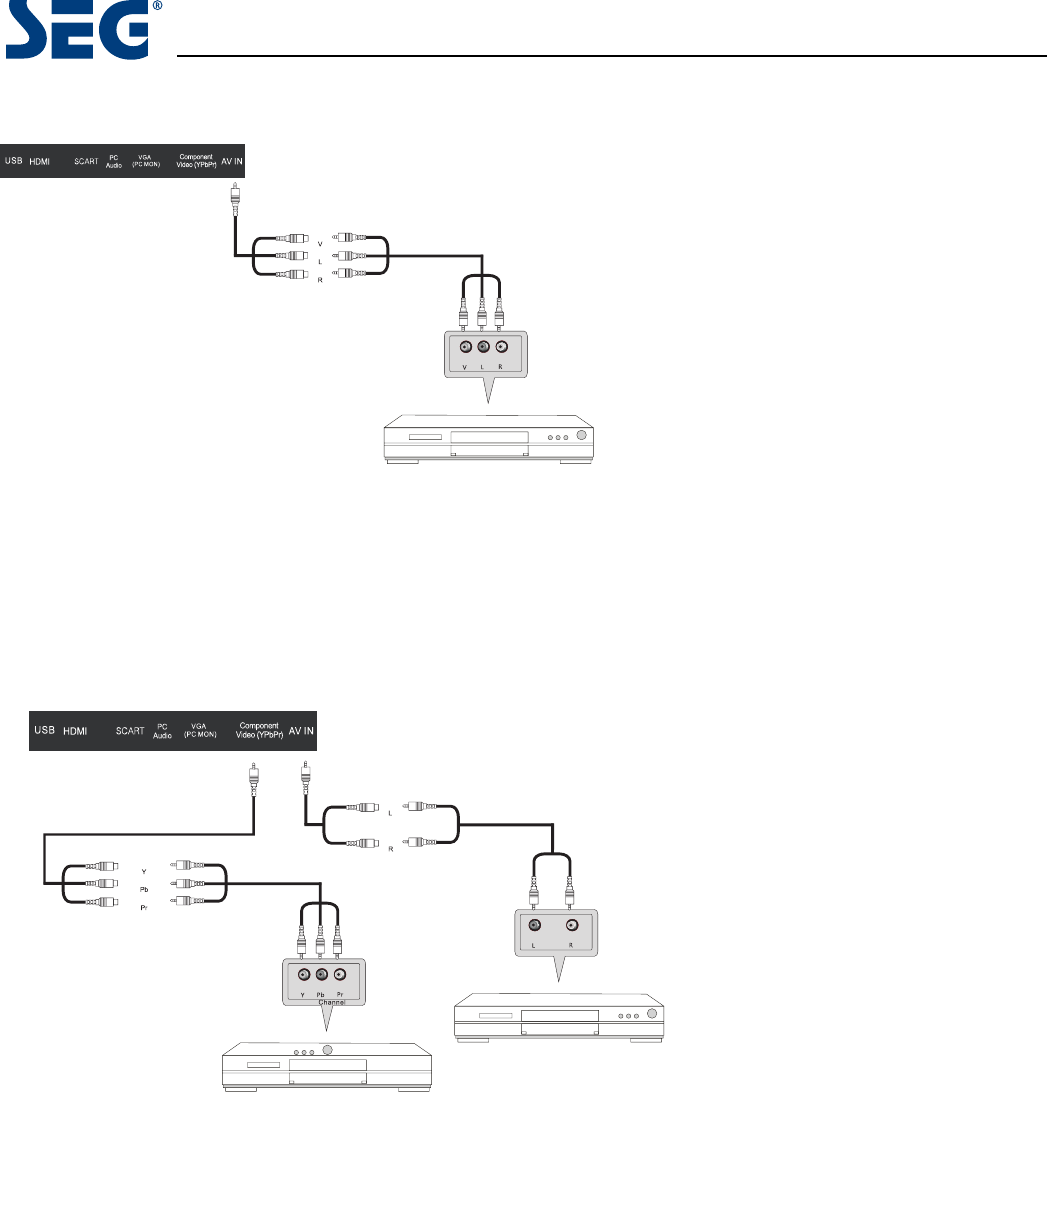
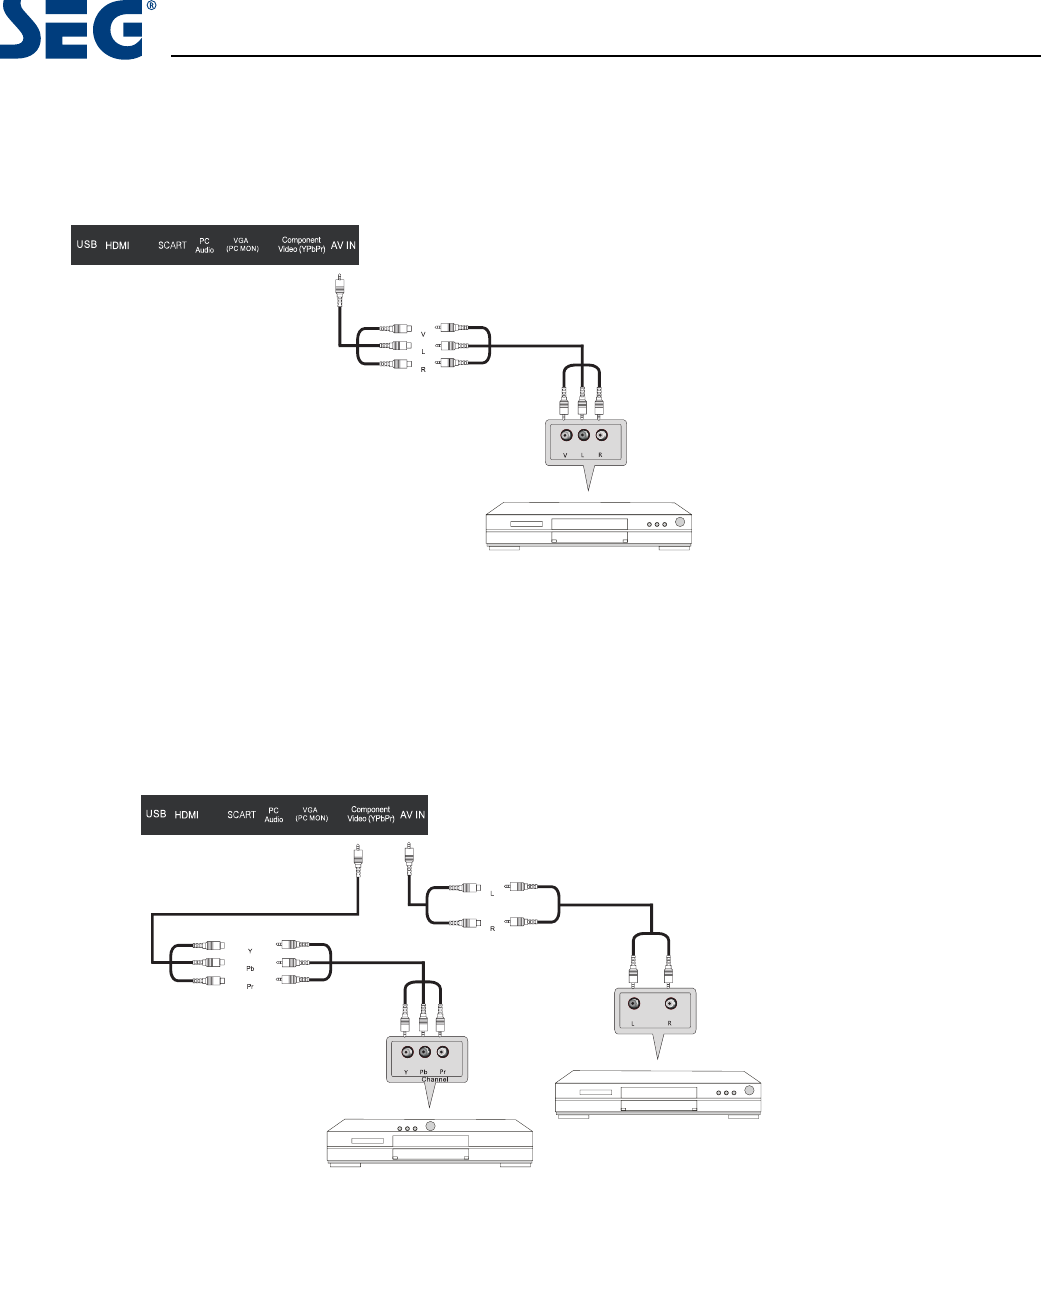
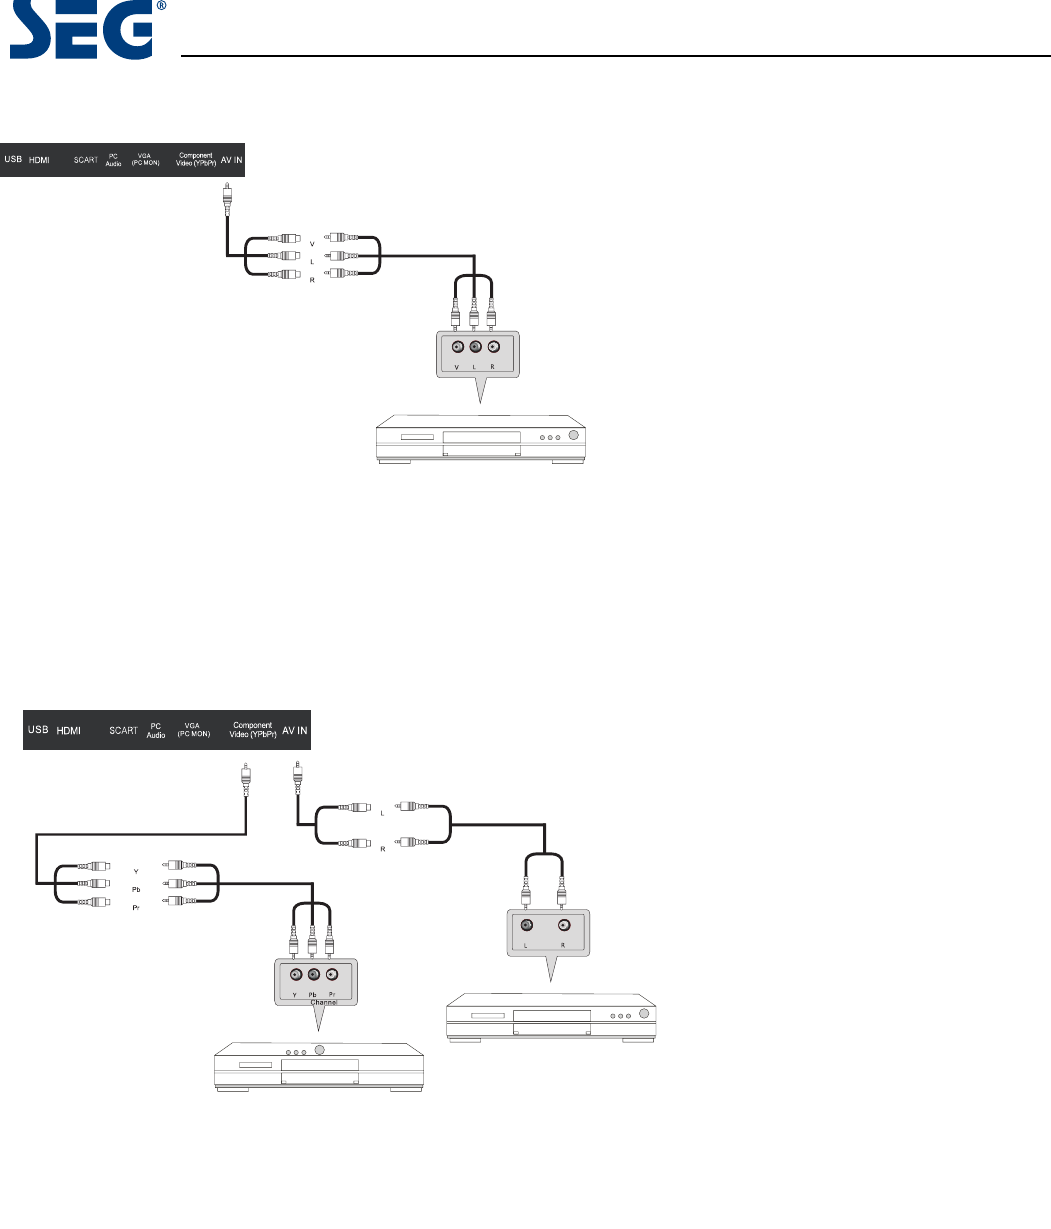
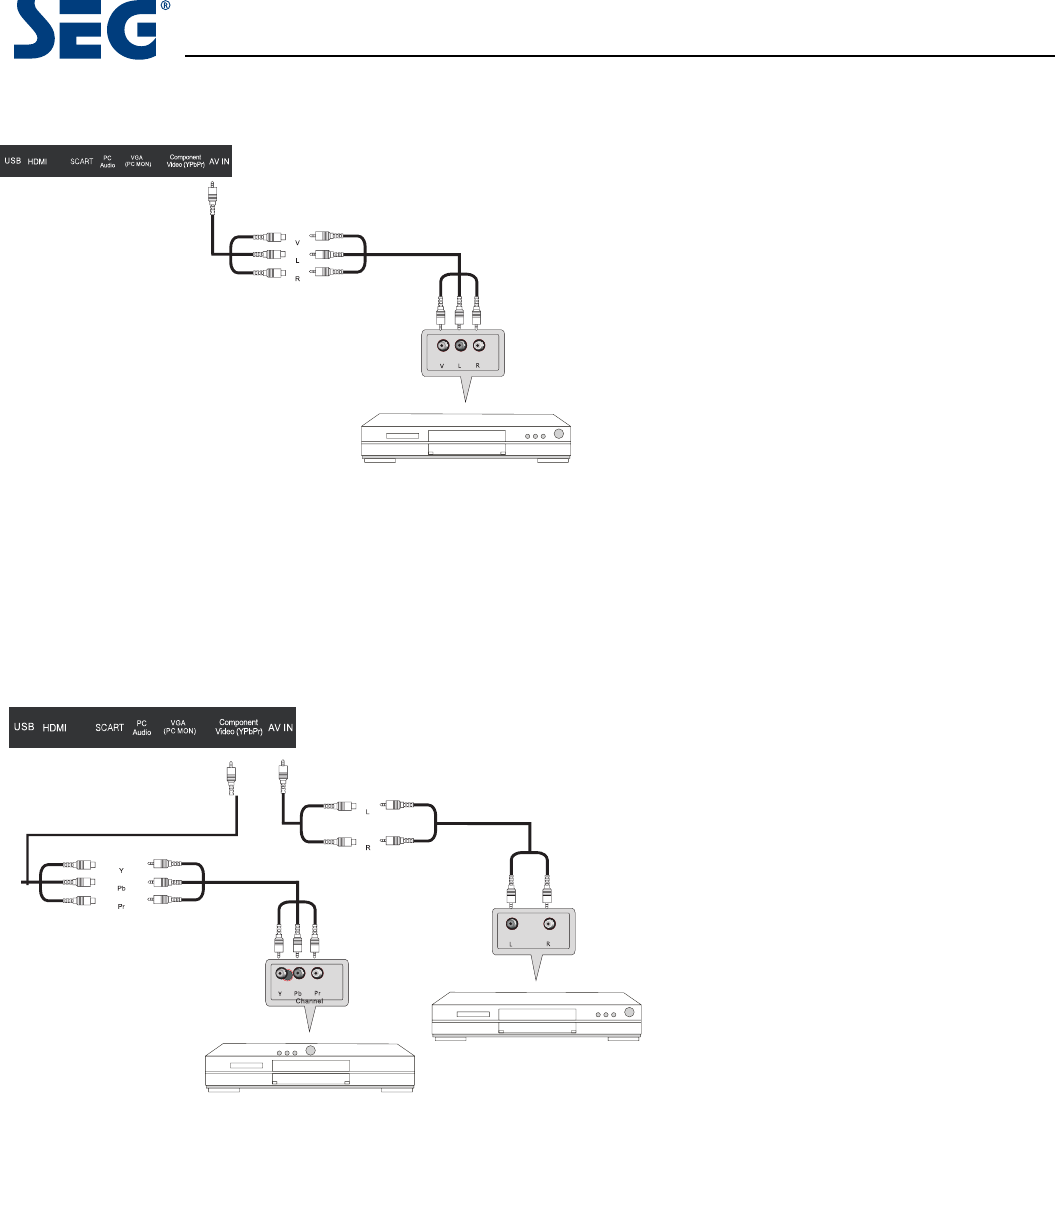
AV Connection
TV Back
Audio and video cable (RCA)
Mini audio and video
transfer cable
DVD or VCR back
Connect the VIDEO and AUDIO output jack of the DVD or VCR to the VIDEO jacks on the TV set using the supplied YPbPr
converter cable and an RCA cable (not supplied). Match the jack colors: Video is yellow, Audio left is white, and Audio
right is red. Press the SOURCE button on the remote control and select the AV input source.
YPbPr Connection
Connect the YPbPr output of the DVD or VCR to the YPbPr input on the TV set. Connect the Audio output of the DVD or
VCR to the Audio input jacks on the TV set using two RCA cables together with the supplied converter cables.
Match the jacks colors : Y is green, Pb is blue, Pr is red, Audio left is white, and Audio right is red. Press the SOURCE
button on the remote control and select the YPbPr input source.
TV Back
Audio cable (RCA)
Audio cable
Mini video transfer cable
DVD or VCR back
DVD or VCR
DVD or VCR back
DVD or VCR
DVD or VCR
Calgary 58 cm (23”) LED BLU-TV
Select Language
Deutsch Francais English Itallano
Select your service
ATV
DVB
Cable
Satellite
Now press
OK
Installation Guide
Quick Start
Please ensure the aerial,cable or dish
is plugged into the TV.
Your dish must be oriented to Astra 19.2 East.
To scan other satellites use the Dish set up menu.
Now press
The TV will tune all channels,please wait.
OK
EXIT
Quit
OK
Auto Scan
Press the OK button on the remote control to start the
Tuning process.This Process will find all available ATV and
DTV channels and store them.
Select Home mode and confirm with OK button.
Calgary 58 cm (23”) LED BLU-TV
CADTV Manual Tuning
TV SETTINGS
TV SETTINGS
TV SETTINGS
TV SETTINGS
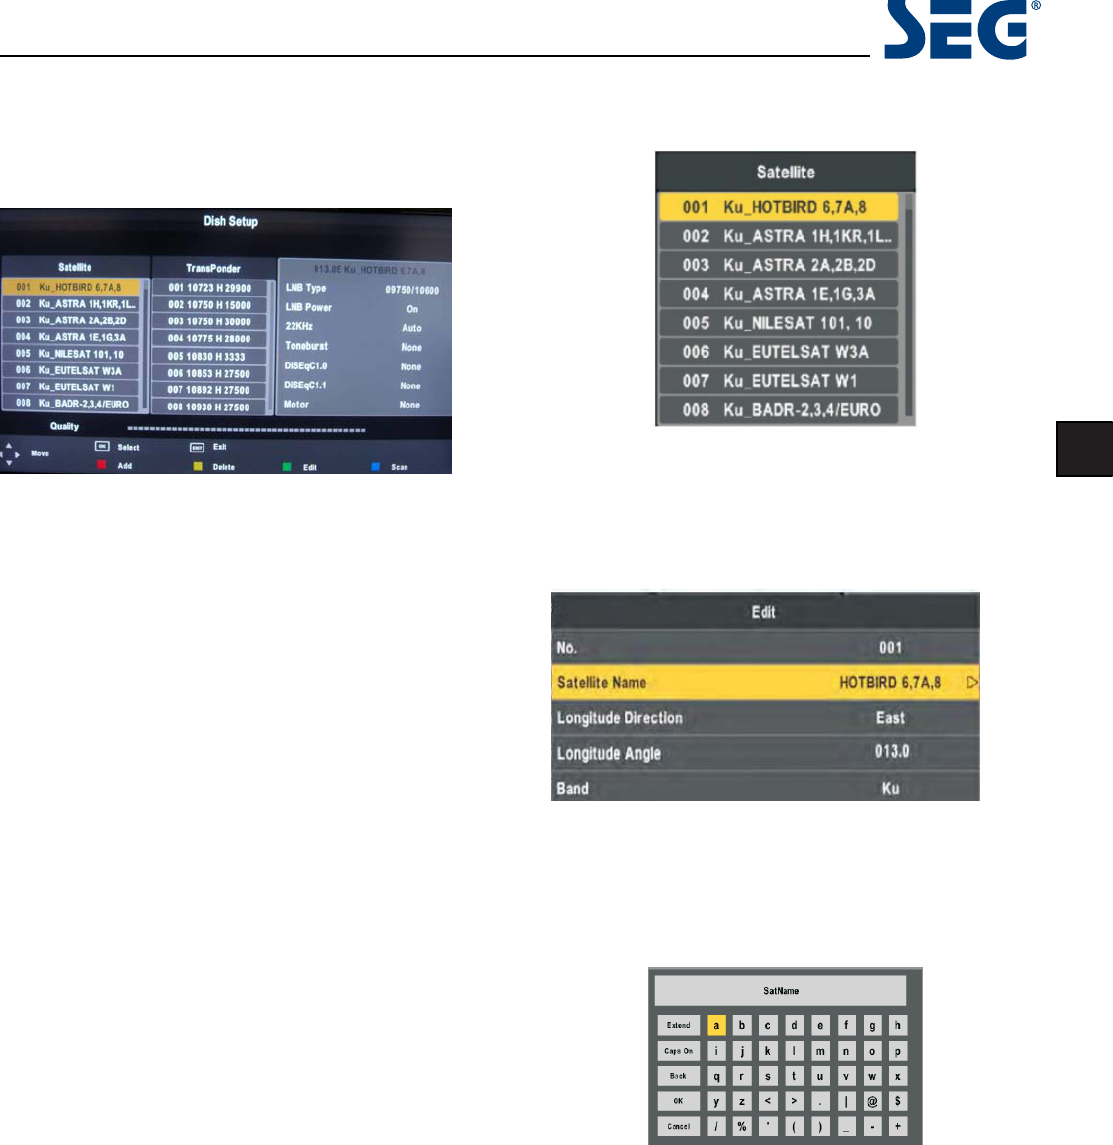
Dish Setup
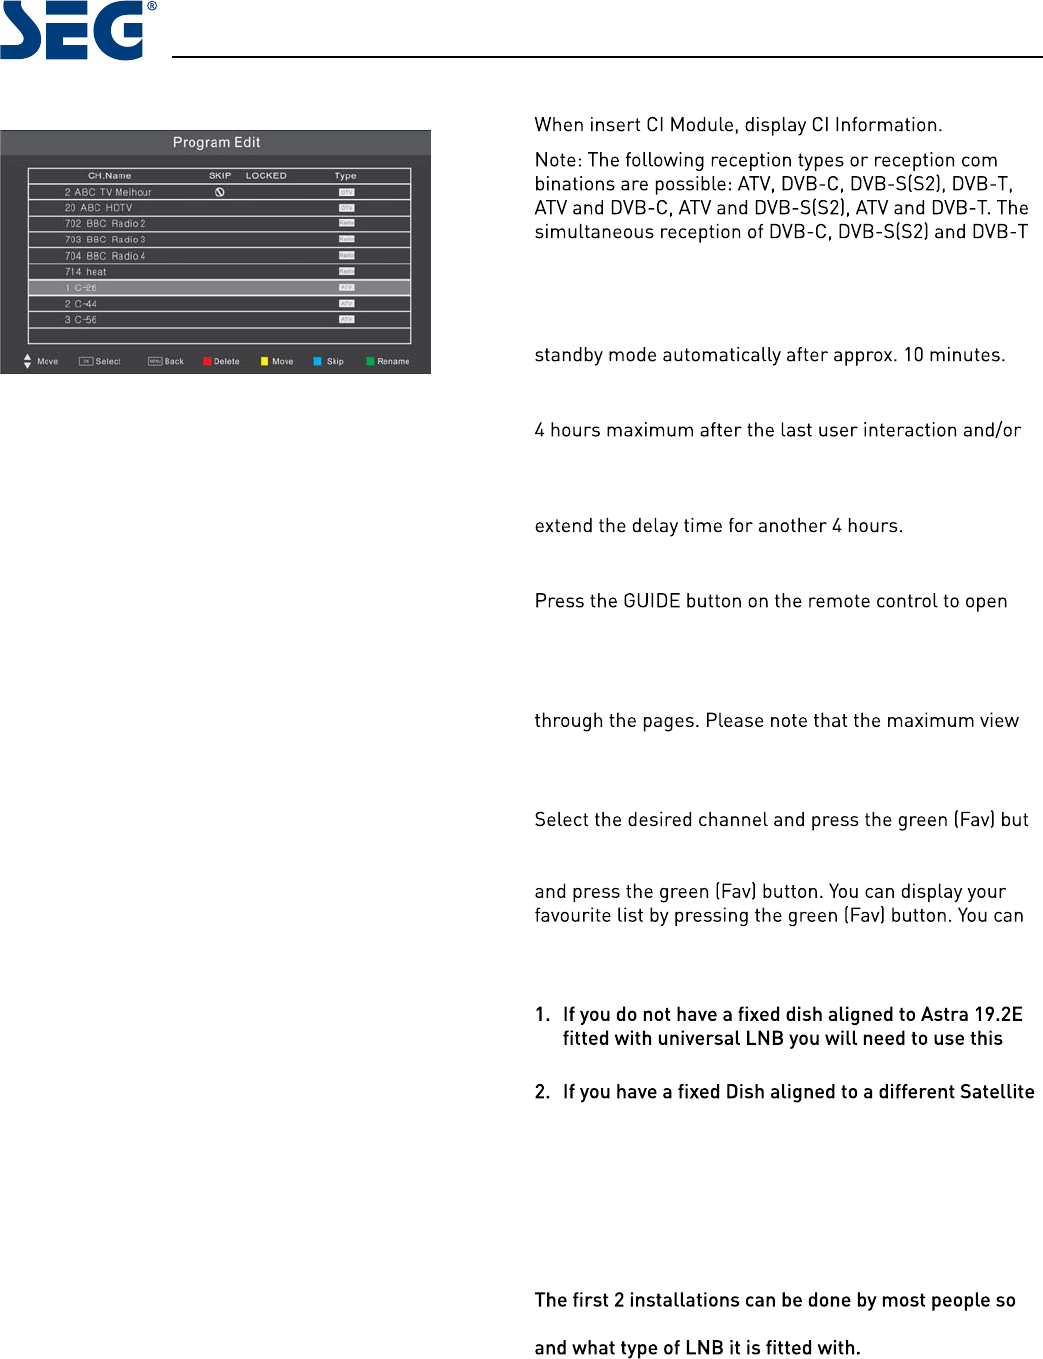
Programme Edit
Programme Edit
Programme Edit
Programme Edit
Auto Scan
MOVE
OK
MENU
EXIT
OK
DVB Select type AIR
County Gemany
Tune Type ATV + DTV
Cable Scan Menu
Scan type Full
Frequency Auto
Network ID Auto
Symbol(ks/s) Auto
5V antenna Power On
5V antenna Power On
5V antenna Power On
5V antenna Power On
Calgary 58 cm (23”) LED BLU-TV
17
EN
Unlike QUICKSTART the satellite search will search the
whole satellite for channels and will not be instant.
Also the channels will appear in the order on the satellite
and not the pre-set order.
Auto search replaces any previous searched channels
with those of the new search. To add an extra satellite if
you have a suitable Dish/LNB/Switch you must use the
Dish Installation menu.
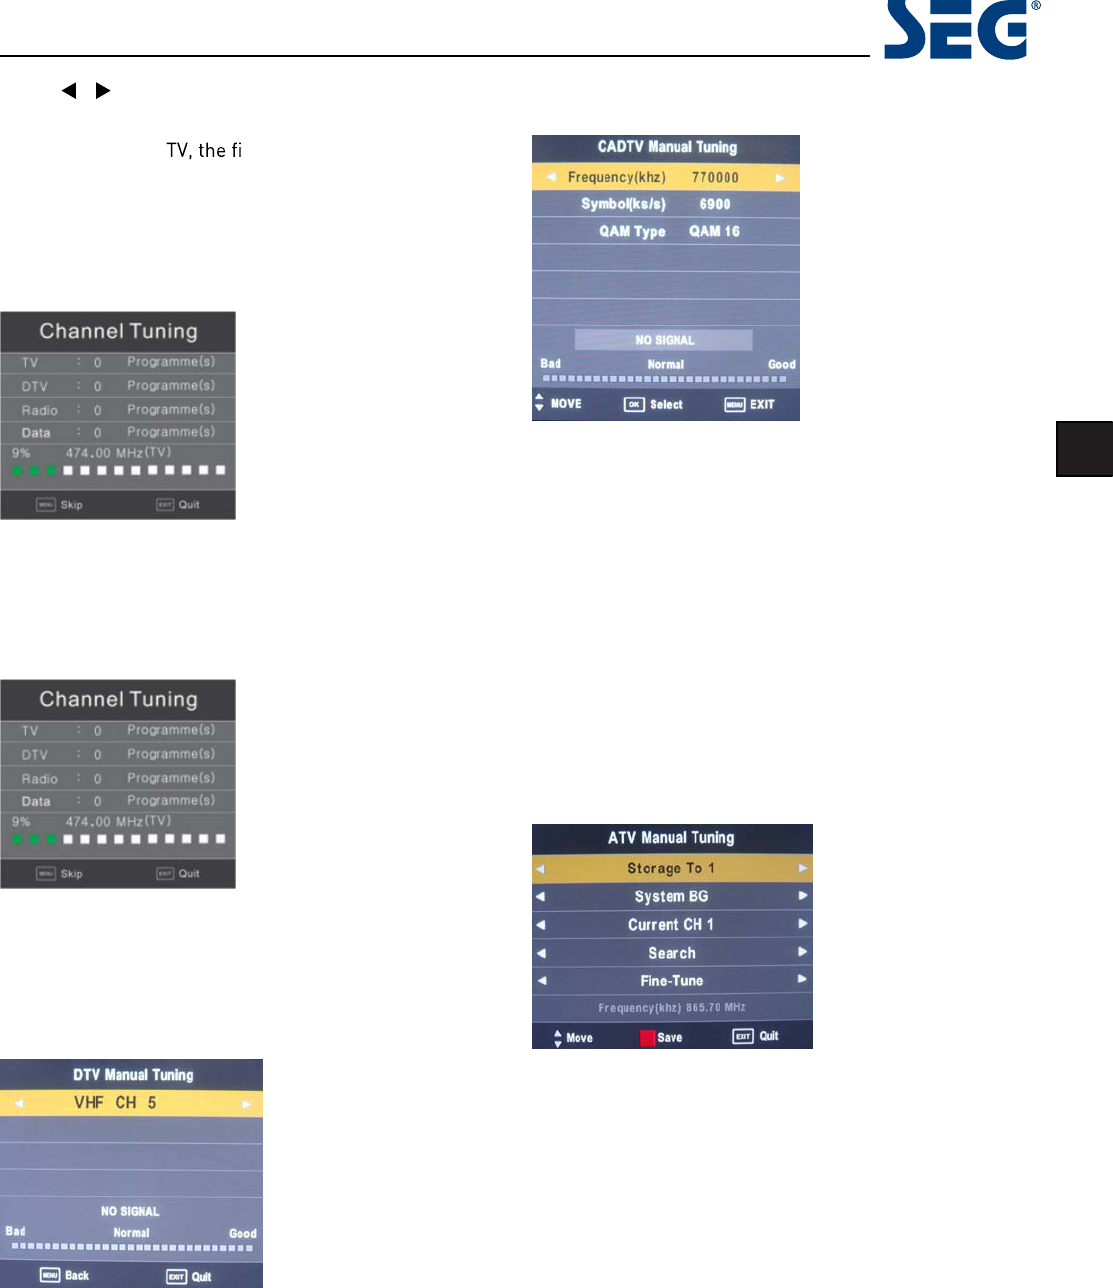
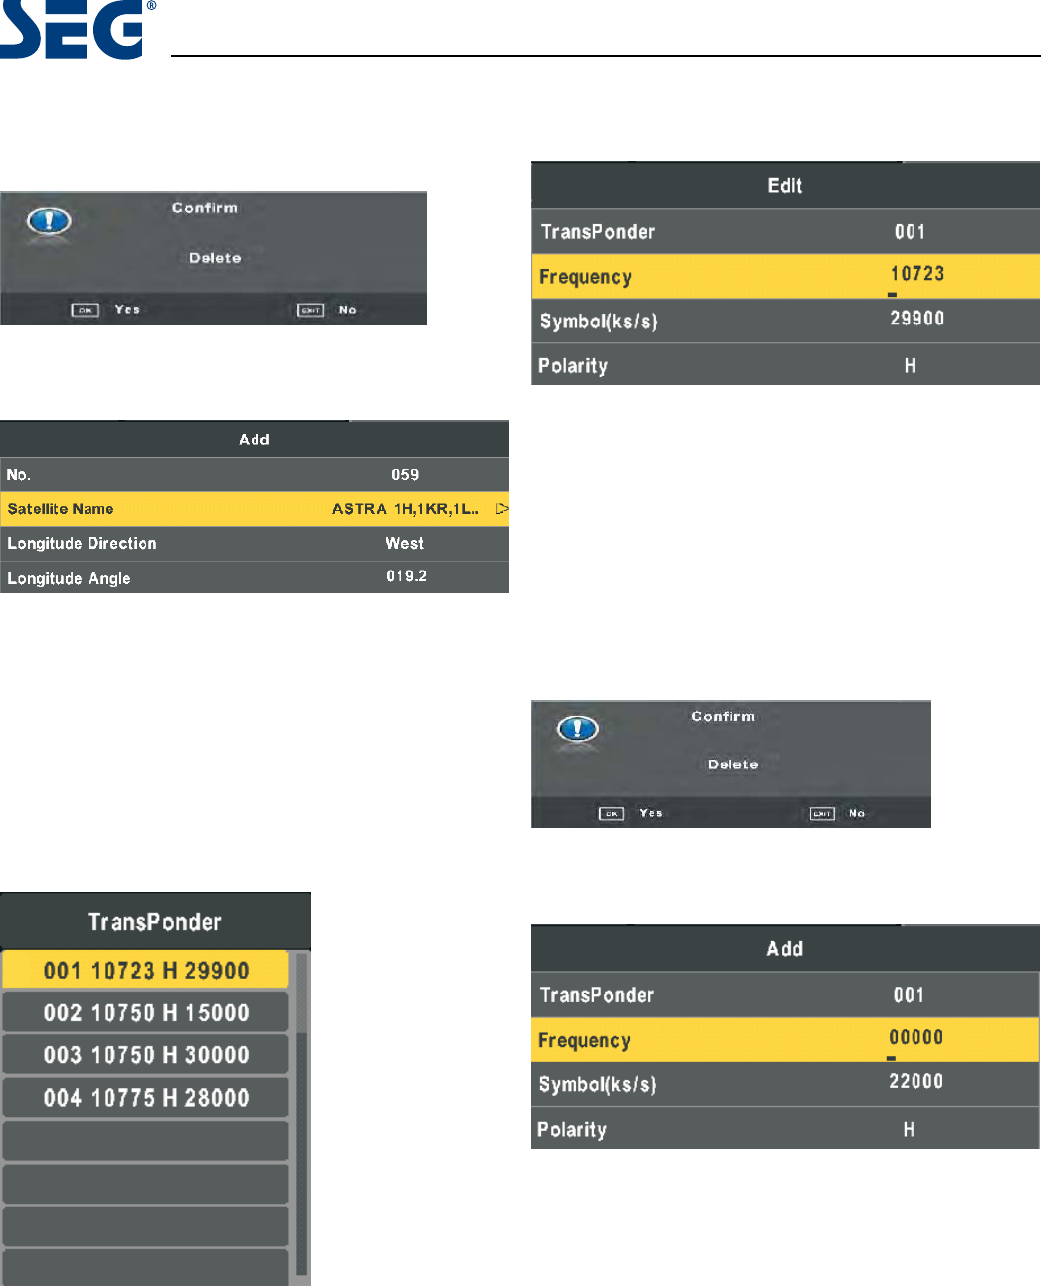
DTV (DVBT) Manual Tuning
You can manually tune DTV channels in the TV SETTINGS
menu. Press the Left/Right arrow buttons to select the
channel you wish to tune, then press OK button to scan
for the channel.
You can manually tune CADTV channels in the TV SET-
TINGS menu.
Note: for more information about the channel parameters
(frequency, symbol rate and QAM type), please check with
your cable TV provider.
Frequency
Select Frequency using the WX buttons.
Symbol (ks/s)
Select the Symbol (ks/s) using the WX buttons.
QAM Type
Select the QAM Type using the WX buttons
ATV (analogue cable TV) Manual Tuning
You can manually tune ATV channels in the TV SETTINGS
menu.
Storage to
Press the WX buttons to change the numbered location
of the found channel.
System
Select the system using the WX buttons.
Current CH
Displays the current channel number, press the buttons
to choose the channel you wish to modify.
Search
Press the WX buttons to scan through the frequencies to
éQGQew channels.
Fine tune
In case of bad reception, you can press the WX buttons to
makHéQHDGMXstments to the tuning. After manual tun-
ing is complete, please press the RED button to save any
found channels.
Press / to selectDVB Select type, Country and Tune
Type, press OK to start scanning.
Ifyou select ATV+D
rst 50% of the processing is
for ATV tuning, while the second 50% represent DTV tun-
ing. When ATV tuning, youcan press MENU to Skip ATV
tuning and start DTV tuning or press EXIT toexit tuning.
During the channel search a preview of the already-found
Avertissement concernant l’utilisation d’un casque......................................................................................................4
Lieu d’installation...........................................................................................................................................................4
Instructions relatives à la télécommande en mode TV..................................................................................................6
Instructions relatives à la télécommande en mode DTV/USB .......................................................................................7
Instructions relatives à la télécommande en mode TÉLÉTEXTE...................................................................................8
Insertion des piles dans la télécommande ....................................................................................................................9
Utilisation de la télécommande .....................................................................................................................................9
Connexion de l’antenne............................................................................................................9
Connexion de l’antenne TV.............................................................................................................................................9
Connexion à un ordinateur........................................................................................................................................... 11
Connexion à un ordinateur par VGA ou HDMI............................................................................................................... 11
Connexion de l’antenne parabolique............................................................................................................................11
Connexion à un système audio.....................................................................................................................................12
Connexion à un lecteur DVD......................................................................................................................................... 13
Connexion à la prise PÉRITEL......................................................................................................................................13
Emplacement Common Interface............................................................................................15
UTILISATION DE VOTRE EMPLACEMENT COMMON INTERFACE.................................................................................15
&RQéJXration automatique lors de l’installation.....................................................................15
Allumer/éteindre le téléviseur avec éclairage LED en arrière-plan ........................................................................... 15
Menu RÉGLAGES TV...............................................................................................................16
Source du signal........................................................................................................................................................... 16
Recherche auto ............................................................................................................................................................16
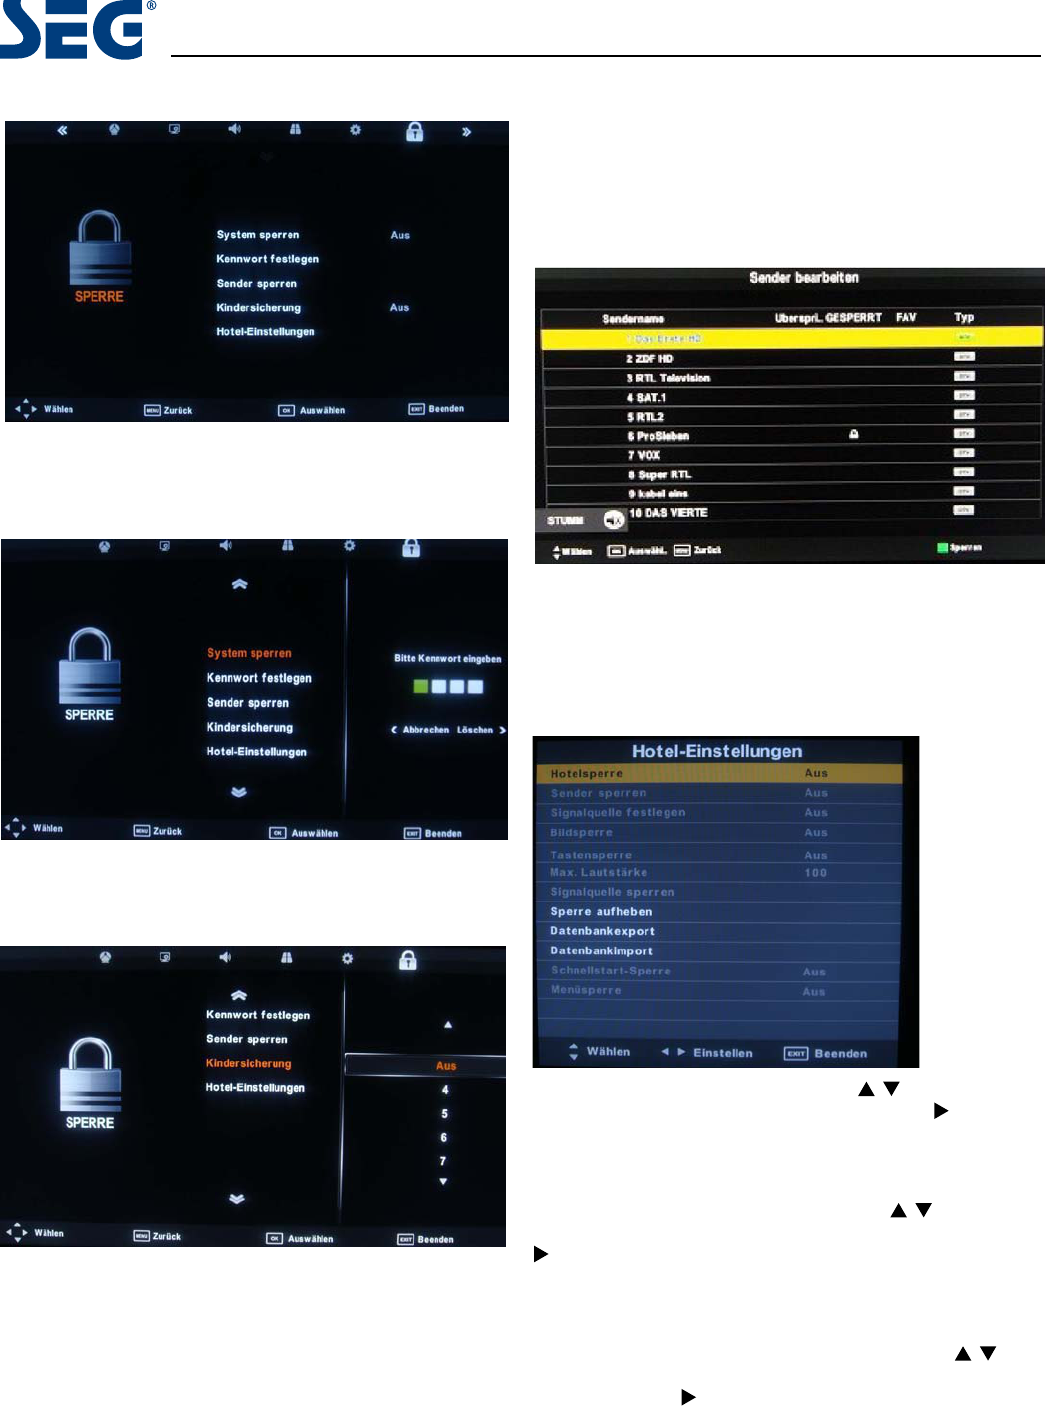
MODIFICATION DES CHAÎNES......................................................................................................................................18
Mise hors tension – Aucun signal.................................................................................................................................18
Mise hors tension automatique.................................................................................................................................... 18
EPG (Guide électronique des programmes)................................................................................................................. 18
Listes des favoris ......................................................................................................................................................... 18
Menu Image..................................................................................................................................................................24
Menu SON.....................................................................................................................................................................24
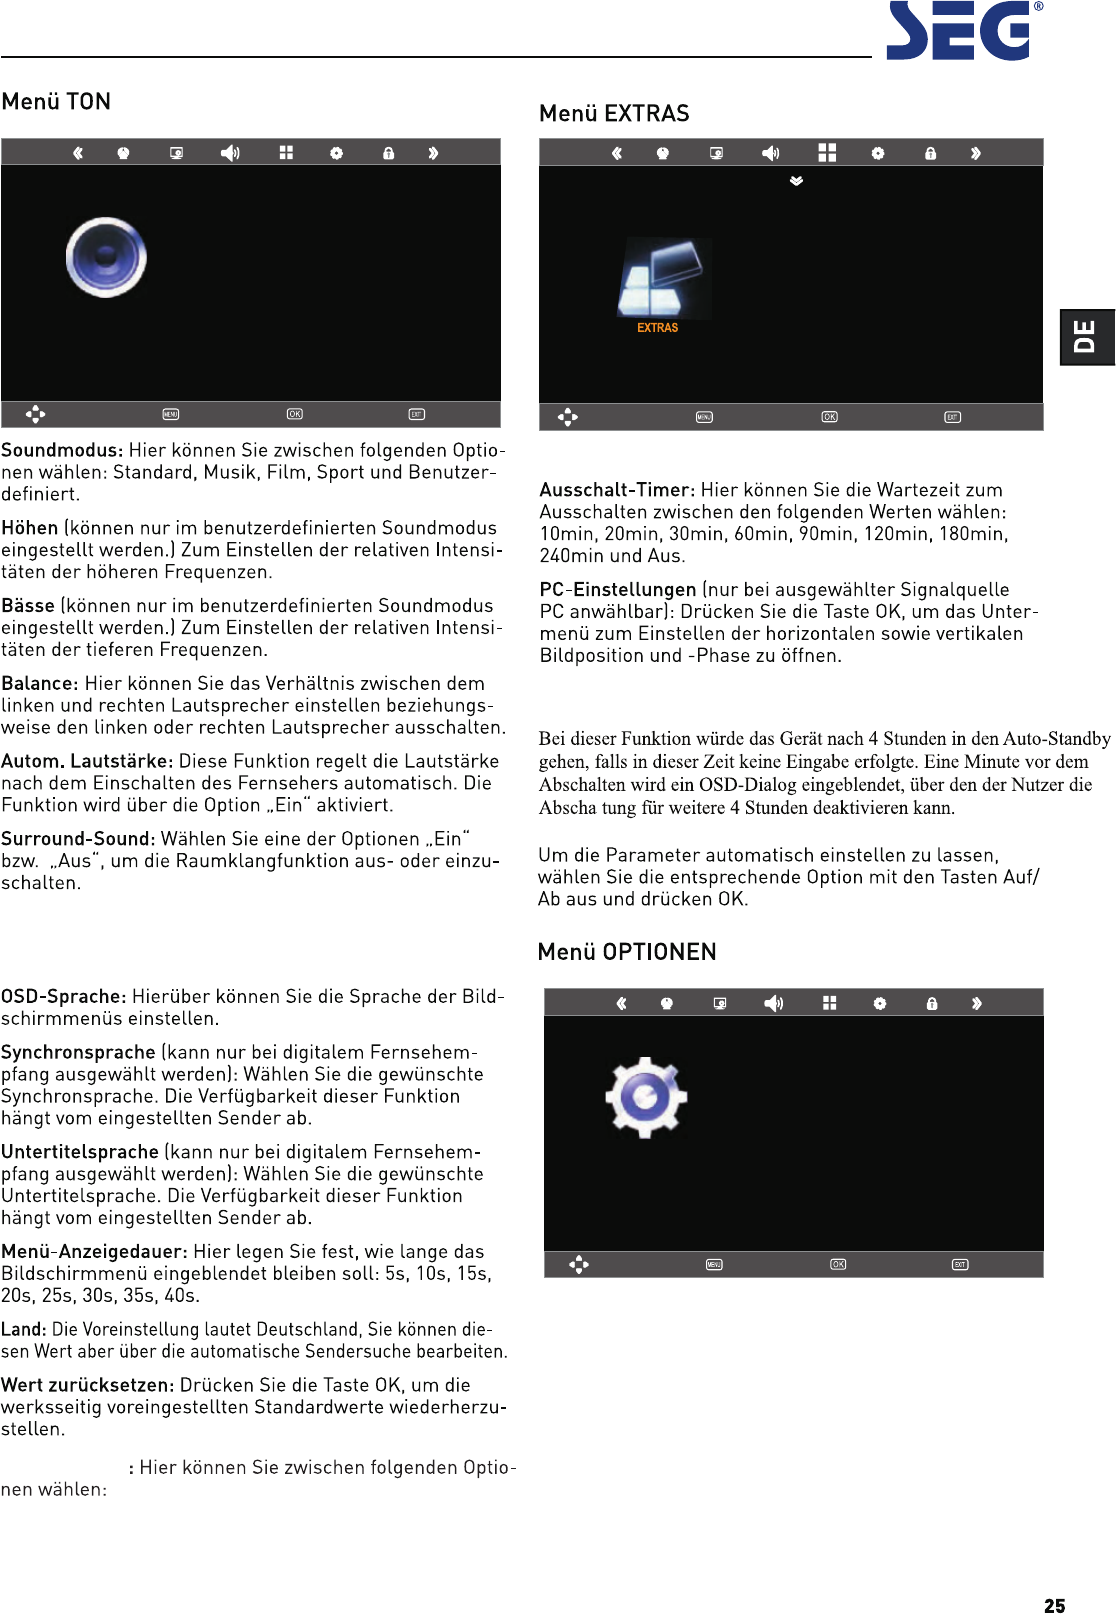
Menu EXTRAS............................................................................................................................................................... 24
Menu OPTIONS............................................................................................................................................................. 25
Menu VERROUILLAGE..................................................................................................................................................25
Vancouver 58 cm (23”) LED BLU-TV
Calgary 58 cm (23”) LED BLU-TV
2
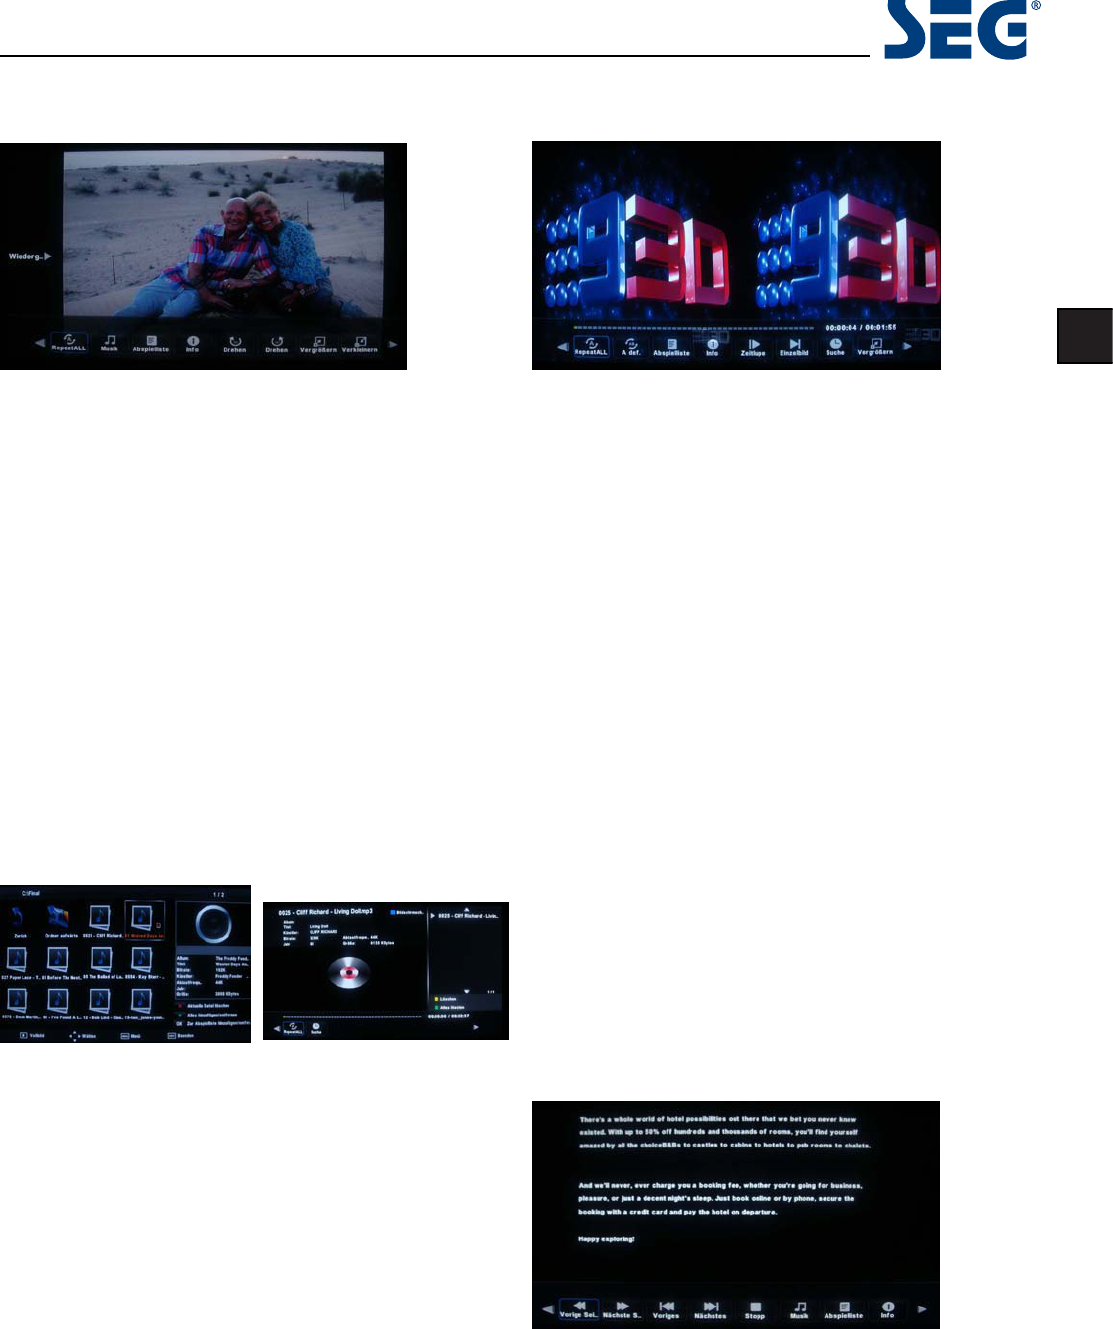
Utilisation des fonctions multimédia......................................................................................27
Fonctionnement de base.............................................................................................................................................. 27
6S¬FLêcations du téléviseur.........................................................................................................................................29
Montage au mur .....................................................................................................................30
Recyclage des déchets électriques.........................................................................................30
Mise au rebut correcte du produit................................................................................................................................ 30
Garantie du fabricant.............................................................................................................31
Vancouver 58 cm (23”) LED BLU-TV
Calgary 58 cm (23”) LED BLU-TV
3
FR
Introduction
Nousvousremercions d'avoir acheté ce téléviseur avec éclairage LED BLU-TV en arrière-plan, qui a été conçu et fabriqué
pourvous orir de longues années d'utilisation.
Vous savezcertainement déjà comment utiliser ce type de produit mais nous vous demandons de prendre letemps de
lireces instructions qui ont été r
vous puissiez prter au mieux de votre nouveau téléviseur.
HDMI
L’interfacterface) est la dernière génération d’interface numérique. Contraire-
ment aux connexionsconventionnelles,cette interface permet la transmission de signaux numériques et audio non
compressés par le biais d’un seul et unique câble. Ce téléviseurvous permettra de pr
ter de la vidéo en haut-
tion grâce à la prise HDMI située à l’arrière.
La sécurité est importante
Pour assurer votre sécurité et la sécurité des autres personnes, veuillez lireles consignes de sécurité AVANT d’utili-
serce produit.
Avis de non-responsabilité
Les illustrations du téléviseur LED, de ses accessoires et de ses menus présentes dans ce Manuel d’utilisation peu-
vent diérer du produitréel.
PRÉCAUTIONS D'EMPLOI
CONSIGNES DE SÉCURITÉ IMPORTANTE – À LIRE ATTENTIVEMENTAVANT L’UTILISATION
Veuillez prendre note des consignes de sécurité ci-dessous qui apparaissent à l’arrière du téléviseur.
ATTENTION : POUR ÉVITER TOUT RISQUE D’ÉLECTROCUTION, NE RETIREZ PAS LES VIS DU BOÎTIER
DEL’APPAREIL. CE DERNIER NE CONTIENT AUCUNE PIÈCE POUVANT ÊTRE REMPLACÉEPAR
L'UTILISATEUR. EN CAS DE BESOIN DE RÉPARATION, FAITES APPEL À UN PERSONNEL TECHNIQUE
QUALIFIÉ.
Ce symbole indique que des instructions importantesrelatives à la maintenance sont présentes dans la
Dove installare...............................................................................................................................................................4
Istruzioni per il telecomando in modalità TV..................................................................................................................6
Istruzioni per il telecomando in modalità DTV/USB.......................................................................................................7
Istruzioni per il telecomando in modalità TELETEXT.....................................................................................................8
Istallazione delle batterie nel telecomando...................................................................................................................9
Uso del telecomando......................................................................................................................................................9
Collegamentoal PC tramite VGA, HDMI.......................................................................................................................11
Collegamentoa un impianto audio............................................................................................................................... 12
Accendere/spegnere il televisore ................................................................................................................................ 15
Menu IMPOSTAZIONI TV..........................................................................................................16
Fonte del segnale.........................................................................................................................................................16
Ricerca automatica.......................................................................................................................................................16
MODIFICA PROGRAMMA ..............................................................................................................................................18
Spegnimento in assenza di segnale............................................................................................................................. 18
Guida elettronica ai programmi (EPG) ......................................................................................................................... 18
Impostazioni del menu...........................................................................................................23
Menu Immagine............................................................................................................................................................23
Menu SUONO................................................................................................................................................................ 24
Menu EXTRA.................................................................................................................................................................24
Menu OPZIONI..............................................................................................................................................................24
Menu BLOCCA ..............................................................................................................................................................24
Vancouver 58 cm (23”) LED BLU-TV
Calgary 58 cm (23”) LED BLU-TV
2
Funzioni multimediali............................................................................................................27
2. Musica ......................................................................................................................................................................28
3. Film .......................................................................................................................................................................... 28
Gebruikershandleiding.com neemt misbruik van zijn services uitermate serieus. U kunt hieronder aangeven waarom deze vraag ongepast is. Wij controleren de vraag en zonodig wordt deze verwijderd.
Product:
Spelregels forum
Om tot zinvolle vragen te komen hanteren wij de volgende spelregels:
lees eerst de handleiding door;
controleer of uw vraag al eerder door iemand anders is gesteld;
probeer uw vraag zo duidelijk mogelijk te stellen;
heeft u een probleem en al geprobeerd om dit op te lossen, vermeld dit erbij aub;
heeft u een oplossing gekregen van een bezoeker dan horen wij dat graag in dit forum;
wilt u een reactie geven op een vraag of antwoord, gebruik dan niet dit formulier maar klik op de knop 'reageer op deze vraag';
uw vraag wordt direct op de website gezet; vermijd daarom persoonlijke gegevens in te vullen;
Belangrijk! Als er een antwoord wordt gegeven op uw vraag, dan is het voor de gever van het antwoord nuttig om te weten als u er wel (of niet) mee geholpen bent! Wij vragen u dus ook te reageren op een antwoord.
Belangrijk! Antwoorden worden ook per e-mail naar abonnees gestuurd. Laat uw emailadres achter op deze site, zodat u op de hoogte blijft. U krijgt dan ook andere vragen en antwoorden te zien.
Abonneren
Abonneer u voor het ontvangen van emails voor uw SEG Calgary bij:
nieuwe vragen en antwoorden
nieuwe handleidingen
U ontvangt een email met instructies om u voor één of beide opties in te schrijven.
Ontvang uw handleiding per email
Vul uw emailadres in en ontvang de handleiding van SEG Calgary in de taal/talen: Duits, Engels, Frans, Italiaans als bijlage per email.
De handleiding is 11,12 mb groot.
U ontvangt de handleiding per email binnen enkele minuten. Als u geen email heeft ontvangen, dan heeft u waarschijnlijk een verkeerd emailadres ingevuld of is uw mailbox te vol. Daarnaast kan het zijn dat uw internetprovider een maximum heeft aan de grootte per email. Omdat hier een handleiding wordt meegestuurd, kan het voorkomen dat de email groter is dan toegestaan bij uw provider.
Stel vragen via chat aan uw handleiding
Stel uw vraag over deze PDF
Uw handleiding is per email verstuurd. Controleer uw email
Als u niet binnen een kwartier uw email met handleiding ontvangen heeft, kan het zijn dat u een verkeerd emailadres heeft ingevuld of dat uw emailprovider een maximum grootte per email heeft ingesteld die kleiner is dan de grootte van de handleiding.
Er is een email naar u verstuurd om uw inschrijving definitief te maken.
Controleer uw email en volg de aanwijzingen op om uw inschrijving definitief te maken
U heeft geen emailadres opgegeven
Als u de handleiding per email wilt ontvangen, vul dan een geldig emailadres in.
Uw vraag is op deze pagina toegevoegd
Wilt u een email ontvangen bij een antwoord en/of nieuwe vragen? Vul dan hier uw emailadres in.