533497
41
Verklein
Vergroot
Pagina terug
1/48
Pagina verder
021095 Preon Magnetic Rowtrainer
Gebruikersaanwijzing
User manual
Mode d’ emploi
Garantie
Montage
Computerinstructies
Algemene  tnesstips
Warranty
Assembly Instructions
Computer Instruction
General fitness tips
Pour bé cier de la garantie
Montage
Console électronique
Conseils généraux fitness
- 2 -
Inhoudsopgave
Algemene veiligheidsvoorschriften . . . . . . . . . . . . . . . . . . . . . 3
Garantie . . . . . . . . . . . . . . . . . . . . . . . . . . . . . . . . . . . . . . . . . . . . . . . . 5
Overzichtstekening . . . . . . . . . . . . . . . . . . . . . . . . . . . . . . . . . . . . . 6
Onderdelenlijst . . . . . . . . . . . . . . . . . . . . . . . . . . . . . . . . . . . . . . . . . 7
Montagehandleiding . . . . . . . . . . . . . . . . . . . . . . . . . . . . . . . . . . . 9
Computerhandleiding . . . . . . . . . . . . . . . . . . . . . . . . . . . . . . . . . 13
Onderhoud en probleemoplossing . . . . . . . . . . . . . . . . . . . . . 13
Algemene fi tnesstips . . . . . . . . . . . . . . . . . . . . . . . . . . . . . . . . . . 15
Table of contents
General safety instructions. . . . . . . . . . . . . . . . . . . . . . . . . . . . . 18
Warranty . . . . . . . . . . . . . . . . . . . . . . . . . . . . . . . . . . . . . . . . . . . . . . 20
General reference drawing. . . . . . . . . . . . . . . . . . . . . . . . . . . . . 21
Parts list . . . . . . . . . . . . . . . . . . . . . . . . . . . . . . . . . . . . . . . . . . . . . . . 22
Assembly Instructions . . . . . . . . . . . . . . . . . . . . . . . . . . . . . . . . . 24
Computer Instruction. . . . . . . . . . . . . . . . . . . . . . . . . . . . . . . . . . 28
Maintenance and Treatment . . . . . . . . . . . . . . . . . . . . . . . . . . . 29
General fi tness tips . . . . . . . . . . . . . . . . . . . . . . . . . . . . . . . . . . . . 30
TABLE DES MATIÈRES
Consignes de sécurité générales . . . . . . . . . . . . . . . . . . . . . . . 33
Pour bénéfi cier de la garantie . . . . . . . . . . . . . . . . . . . . . . . . . . 35
Vue explosée . . . . . . . . . . . . . . . . . . . . . . . . . . . . . . . . . . . . . . . . . . 36
Liste des pièces . . . . . . . . . . . . . . . . . . . . . . . . . . . . . . . . . . . . . . . 37
Instructions de montage . . . . . . . . . . . . . . . . . . . . . . . . . . . . . . . 39
Utilisation de la console électronique . . . . . . . . . . . . . . . . . . 43
Maintenance et dépannage . . . . . . . . . . . . . . . . . . . . . . . . . . . . 44
Conseils généraux de condition physique . . . . . . . . . . . . . . 45
- 3 -
Algemene veiligheidsvoorschriften
Bij het ontwerp en de productie van dit fi tnessapparaat is veel aandacht besteed aan veiligheid. U dient echter altijd bepaalde
veiligheidsvoorschriften in acht te nemen. Zorg ervoor dat u de gehele handleiding uitvoerig heeft doorgelezen voordat u
het apparaat in gebruik neemt. Houd daarbij rekening met onderstaande punten:
1 Dit apparaat is geen speelgoed en dient alleen gebruikt te worden voor doeleinden zoals beschreven in deze
gebruiksaanwijzing. Lees de onderstaande voorschriften zorgvuldig door voordat u dit apparaat in gebruik neemt.
2 Houd uw kinderen en huisdieren uit de buurt van de apparatuur. Het enthousiasme van kinderen kan leiden tot onjuist
gebruik van het apparaat. Indien kinderen toestemming krijgen dit apparaat te gebruiken, dan dient men de kinderen
te controleren en instructies te geven over het juiste gebruik van het apparaat. Onder geen geval is het apparaat te
gebruiken als speelgoed.
3 Raadpleeg altijd eerst uw arts voordat u dit apparaat of andere fi tnessapparaten in gebruik neemt.
4 Draag altijd veilige en makkelijke kleding als u gebruik maakt van fi tnessapparatuur. Draag bij voorkeur sportschoenen
of aerobicschoenen.
5 Indien u zich niet goed voelt of andere klachten krijgt, dient u onmiddellijk met de oefening te stoppen. U dient tevens
te stoppen als u pijn of druk op uw gewrichten voelt.
6 Zorg dat nooit meer dan één gebruiker met het apparaat bezig is. Plaats het apparaat op een vlakke ondergrond, de
benodigde ruimte is ongeveer 3 x 3 meter.
7 Zorg dat het apparaat juist is geïnstalleerd voordat het in gebruik wordt genomen. Wees er zeker van dat alle schroeven,
bouten en moeren op de juiste wijze zijn geplaatst en vastgedraaid. Gebruik alleen onderdelen die door de importeur
worden aanbevolen en zijn meegeleverd.
8 Gebruik het apparaat niet indien het beschadigd of kapot is.
9 Let in het bijzonder op de reactie van uw lichaam na gebruik. Duizeligheid geeft aan dat u te intensief met het apparaat
bezig bent geweest. Als u zich duizelig voelt, ga dan op de grond liggen en kom niet eerder overeind totdat u zich weer
beter voelt.
10 Gebruik het apparaat altijd op een gladde en schone ondergrond. Gebruik het nooit buiten of in het water.
11 Houd goed in de gaten dat uw armen en benen niet te dicht bij bewegende onderdelen komen. Stop geen materialen
in bestaande openingen van het apparaat.
12 Gebruik dit apparaat alleen voor doeleinden zoals beschreven in deze gebruiksaanwijzing. Gebruik geen onderdelen die
niet door de fabrikant worden aanbevolen.
13 Zorg dat zich geen scherpe objecten in de buurt van dit fi tnessapparaat bevinden.
14 Wij adviseren gehandicapte of mindervalide personen dit apparaat alleen te gebruiken in bijzijn van gekwalifi ceerde
begeleiders.
15 Het apparaat dient eerst stil te staan, alvorens u het apparaat verlaat.
16 Gebruik het apparaat op de juiste wijze. Onjuist gebruik van het apparaat kan leiden tot lichamelijk letsel.
17 Dit apparaat is geproduceerd overeenkomstig EN-norm 957-5 Klasse HA. Maximaal belastbaar gewicht: 100kg.
18 Dit apparaat is niet geschikt voor revalidatie doeleinden.
19 Een incorrecte en te intensieve workout kan blessures veroorzaken.
- 4 -
Waarschuwing
Raadpleeg uw arts voordat u met oefeningen begint. Een frequent en inspannend trainingsprogramma moet eerst door uw
huisarts worden goedgekeurd. Dit is met name belangrijk voor mensen die 35 jaar of ouder zijn of mensen die lichamelijke
problemen hebben. Lees de gehele handleiding zorgvuldig door voordat u met de training begint. Wij staan in geen geval
in voor persoonlijk letsel of lichamelijke klachten die zijn ontstaan door gebruik van dit apparaat en kunnen derhalve niet
aansprakelijk worden gesteld. Bewaar deze instructies zorgvuldig. Letsel kan ontstaan door incorrect of buitensporig gebruik.
Let op: het maximale toelaatbare gewicht op dit apparaat is 100 kg.
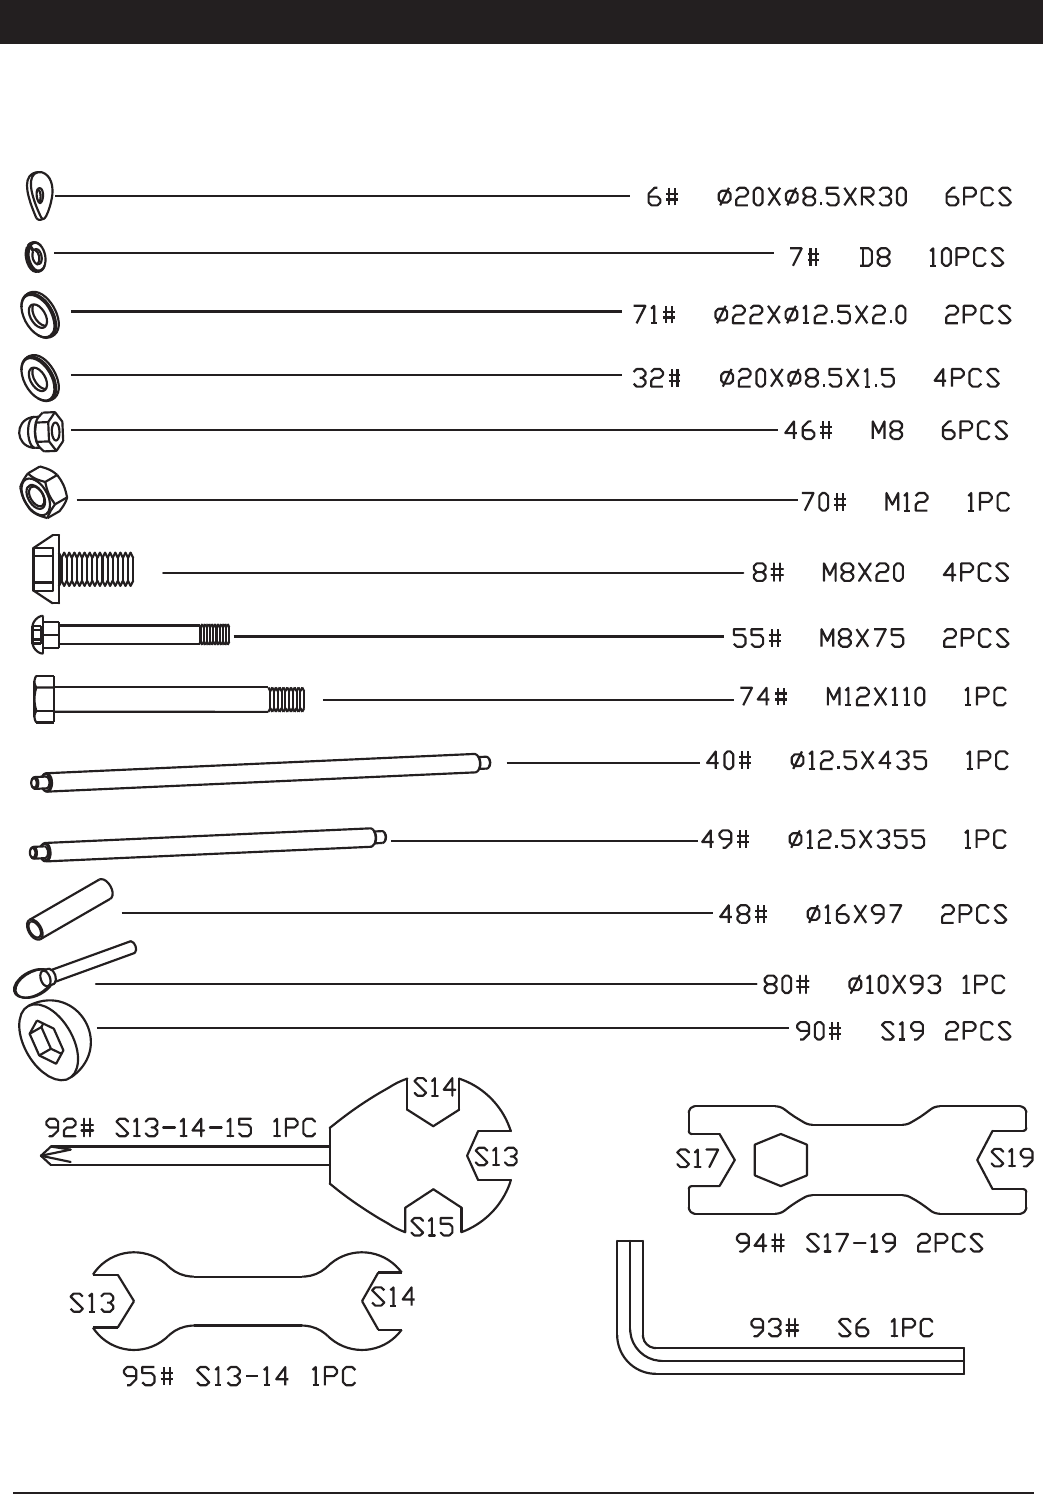
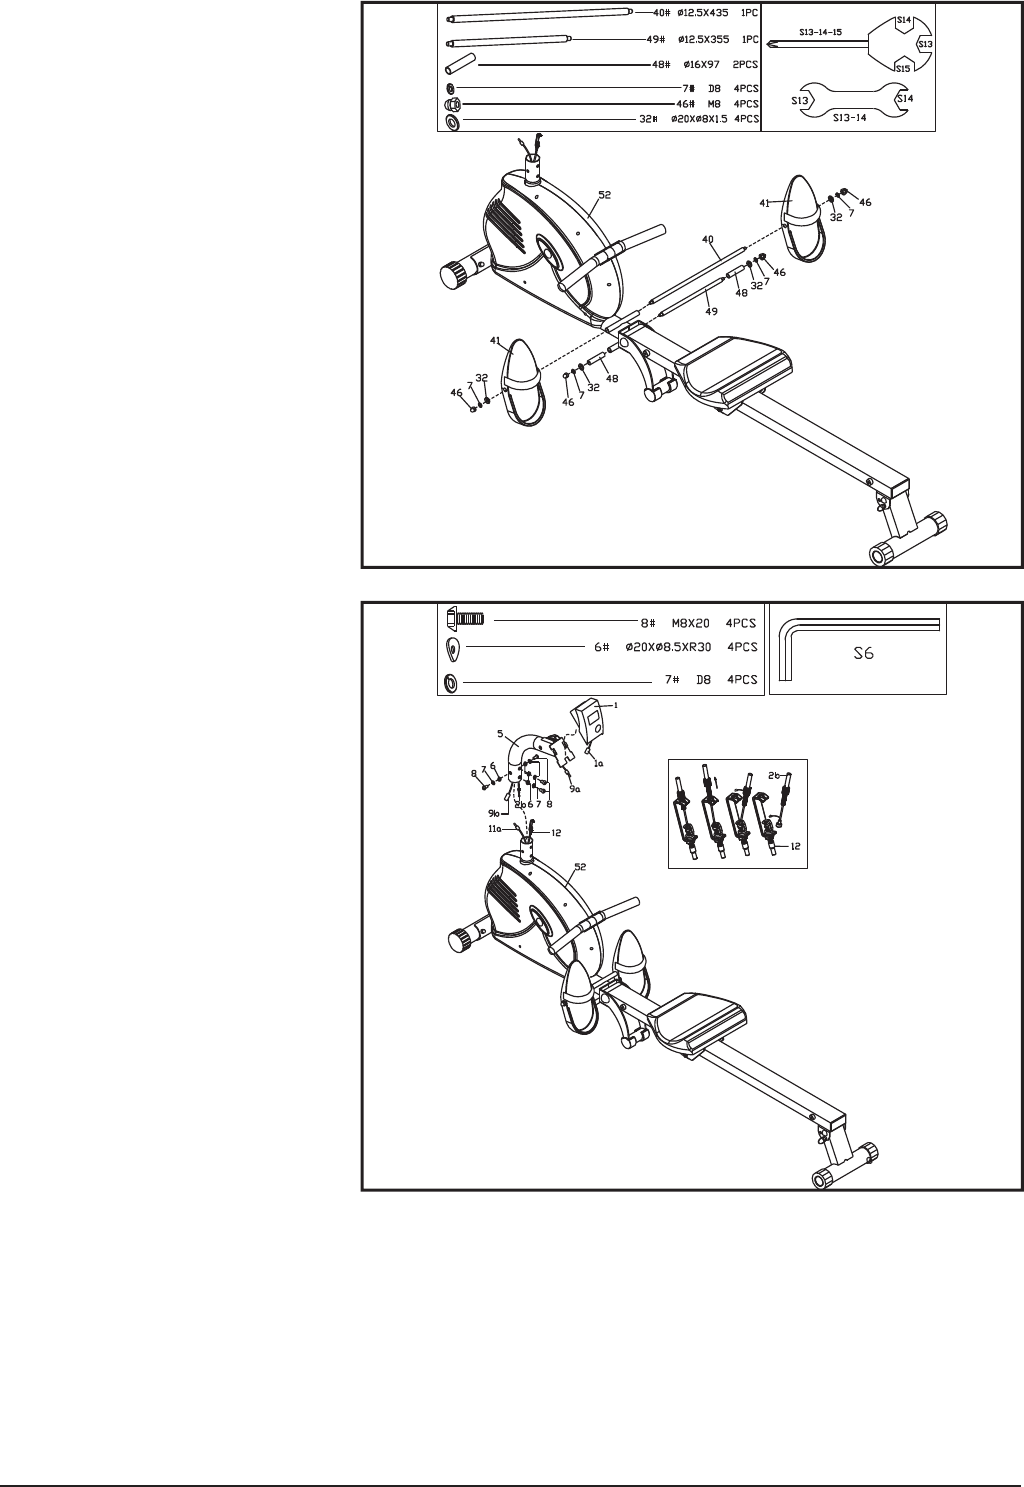
Montage
Deze gebruikershandleiding is samengesteld om het monteren van dit apparaat éénvoudiger te maken en tevens het juiste
gebruik uit te leggen. Zorg ervoor dat u de handleiding uitvoerig leest. Om u zelf bekend te maken met de onderdelen en het
apparaat, raden wij u aan alvorens tot montage en gebruik over te gaan, eerst de overzichtstekening nauwkeurig te bestuderen.
Leg alle montagematerialen overzichtelijk op de grond en verwijder alle verpakkingsmaterialen. Bekijk de onderdelenlijst
om te verifi ëren welke onderdelen aanwezig zijn. Voor de montage verwijzen wij u naar de volgende paginas.
Hartelijk dank
Wij danken u voor de aanschaf van dit apparaat. Dit apparaat zal u helpen uw conditie op peil te brengen en uw spieren op
de juiste wijze te ontwikkelen. En van dit alles kunt u in uw eigen omgeving genieten.
Onderhoud en gebruik
Raadpleeg uw arts voordat u met oefeningen begint. Een frequent en inspannend trainingsprogramma moet eerst door uw
huisarts worden goedgekeurd.
Het apparaat dient regelmatig nagekeken te worden om lichamelijk letsel te voorkomen. Dit betekent ook dat men
regelmatig dient te kijken of bouten en moeren goed zijn aangedraaid, of er beginnende scheuren geconstateerd
worden en of er geen scherpe randen e.d. zijn wat tot lichamelijk letsel kan leiden.
Defecte onderdelen dienen direct vervangen te worden. Indien dit niet direct mogelijk is, dient de apparatuur buiten
gebruik gesteld te worden tot reparatie heeft plaatsgevonden.
Let op! U dient geen sigaretten, vuur e.d. te gebruiken in de buurt van het apparaat, daar sommige kunststof onderdelen
brandbaar zijn.
Gebruik het apparaat niet voor een hete kachel en/of open haard.
Indien men allergisch is voor kunststof, dient men eerst een arts te raadplegen alvorens het apparaat te gebruiken.
Indien u het apparaat wat weer uit elkaar wenst te halen volgt u de montage aanwijzingen in omgekeerde richting.
VERPAKKING
Milieu vriendelijke recyclebare materialen
Buitenverpakking is van karton
Onderdelen van foam zijn CPC-vrij polystyrene(PS)
Folies en zakjes zijn gemaakt van polyethylene (PE)
Weerstandsbanden zijn gemaakt van polypropylene (PP)
AFVAL
Gooi uw afval op de juiste milieuvriendelijke manier weg.
Voor meer inforamtie hierover kunt u contact opnemen
met de gemeentelijke reinigingsdienst.
GARANTIEBEWIJS KLANT
Uw servicemelding kan via:
77
7777
77
7
Internet http://www. etsservicenederland.nl/service.html
777
.,
Servicetelefoon +31 (0)
570 - 606 939
777
E-mail*: info@ etsservicenederland.nl
Bereikbaar van maandag tot en met vrijdag van 9.00 tot 12.30 uur
777
Fax*: +31 (0)570 - 677 014
777
Postadres: Bicycle Industry Group (BIG)
Solingenstraat 49
7421 ZR Deventer, Nederland
* O.v.v. naam, adresgegevens, telefoon/mobiel overdag, model/type (6 cijferig artikelnummer op blauwe/rode sticker), gekocht bij, probleemomschrijving, evt. met vermelding van desbetreffend
onderdeel.
Bicycle Industry Group (BIG) garandeert de goede werking van het geleverde product met inachtneming van
de op dit garantiebewijs vermelde bepalingen.
Naam: Aankoopdatum:
Adres: Model/type:
Postcode / Woonplaats:
Gekocht bij:
Telefoonnummer: Framenummer*:
Om op garantie aanspraak te kunnen maken, verzoeken wij u binnen twee weken na aankoop, te registreren via onze site www.fi etsservicenederland.nl.
Indien u niet in de gelegenheid bent om zich on-line te registreren, kunt u ook een kopie van dit formulier, samen met een kopie van de aankoopbon sturen
naar het onderstaande adres.
Dit deel samen met de aankoopbon zorgvuldig bewaren. Dit garantie bewijs is alleen geldig als u zich heeft aangemeld via de site www. etsservicenederland.nl en dit deel
volledig ingevuld kan overleggen met de originele aankoopbon in geval van benodigde reparatie.
Artikel 1 Garantiebepalingen
1.1. Bicycle Industry Group (BIG) garandeert dat alle Producten
waarop dit garantiebewijs betrekking heeft vrij zijn van
constructie- en/of materiaalfouten conform hetgeen in deze
bepalingen is opgenomen.
1.2 Garantie wordt door Bicycle Industry Group (BIG) gegeven
aan de eerste eigenaar van de Producten. Voor elke volgende
eigenaar vervalt de aan de eerste eigenaar verstrekte garantie.
Iedere eigenaar, met uitzondering van de eerste eigenaar,
zal zijn schade moeten verhalen op de verkoper van de ets /
tness apparaat. Garantie is niet overdraagbaar.
1.3 De duur van de garantie, alsmede het vervallen van de
garantie, wordt bepaald in de volgende artikelen.
Artikel 2 Duur van de garantie
2.1 Bicycle Industry Group (BIG) geeft voor de volgende
onderdelen van de ets de volgende garantieduur:
a. Frame 5 jaar ( niet van toepassing op tness apparatuur )
b. Overige onderdelen: 2 jaar.
2.2 Op onderdelen die aan slijtage onderhevig zijn wordt
geen garantie gegeven, tenzij sprake is van constructie en/
of materiaalfouten. Hieronder vallen onder andere (binnen-)
banden, kettingen, kettingbladen, freewheel, remblokken,
achtertandwiel, kabels, verlichting, handvatten, etc.
Artikel 3 Garantie-uitsluitingen
3.1 De garantie vervalt uitdrukkelijk in de volgende gevallen:
a. Indien de schade is ontstaan door slijtage, onjuiste mon-tage
en montage van niet-originele onderdelen, alsmede niet verricht
noodzakelijk onderhoud en foutieve afstel-lingen van onderdelen
van de ets / tness apparatuur;
b. Indien de schade is ontstaan door ongelukken, misbruik,
vernieling, incorrect dan wel onvoldoende onderhoud
en het incorrect opvolgen van de aanwijzingen uit de
gebruikershandleiding, alsmede door het niet tijdig of niet
vakkundig vervangen van onderdelen van de ets of tness
apparaat;
c. Indien de schade is ontstaan door ander dan normaal
gebruik waaronder in ieder geval verstaan wordt: gebruik in
competitieverband, stunten, springen, het vervoeren van zware
lading, commerciële doeleinden, etsenverhuur of activiteiten
welke in de beoordeling van Bicycle Industry Group (BIG) gelijk
staan aan voornoemde situaties en gevallen;
d. In geval de ets / het tness apparaat niet conform de
gebruikersaanwijzingen van bijbehorend handleiding is
onderhouden;
e. Indien schade is ontstaan door klimatologische invloeden,
zoals verwering van lak en roestvorming.
3.2 Kosten voor het vervoer en (de-)montage van de ets
naar en van Bicycle Industry Group (BIG) vallen buiten de
garantie en komen voor rekening van de eigenaar van de ets.
Hetzelfde geldt voor eventuele verzendkosten en arbeidskosten
voortvloeiende uit de garantieclaim.
Artikel 4 Garantieonderdelen
4.1 Gedurende de garantieperiode zullen de onder deze
garantievoorwaarden vallende onderdelen waarvan door
Fiets Service Nederland is vastgesteld dat er sprake is van
een materiaal en/of constructiefout, worden gerepareerd
of indien nodig vervangen, dan wel worden vergoed. Fiets
Service Nederland bepaalt zelf of de onderdelen zullen worden
gerepareerd, dan wel vervangen, dan wel vergoed.
4.2 Indien een bepaald onderdeel van de ets / tness apparaat
voor garantie in aanmerking komt, dan zal het onderdeel worden
vervangen door een origineel onderdeel of, indien niet leverbaar,
door een minimaal gelijkwaardig alternatief. Een nieuw
onderdeel kan verschillen van originele onderdelen.
Artikel 5 Indienen van de claim
5.1 Claims onder deze garantievoorwaarden dienen via de
Fiets Service Nederland te worden ingediend. Fiets Service
Nederland bepaalt in samenspraak met Bicycle Industry Group
(BIG) of u al dan niet in aanmerking komt voor garantie. De
beoordeling van de dealer houdt niet in dat uw claim onder deze
garantievoorwaarden wordt toegekend.
5.2 Fiets Service Nederland houdt zich het recht voor om zelf te
bepalen of de eigenaar al dan niet in aanmerking komt voor een
claim onder deze garantievoorwaarden.
5.3 De toegezonden onderdelen dienen schoon te zijn, waarbij
de onderdelen van de ets / het tness apparaat die niet onder
de garantievoorwaarden vallen en waarvan geen sprake is
van een constructie- en/of materiaalfout dienen te worden
gedemonteerd. De eigenaar van de ets / het tness apparaat
dient bij het aanvragen van garantie de originele aankoopbon
te overleggen bij een of cieel door Fiets Service Nederland
geautoriseerde dealer.
5.4 De onderdelen waarbij sprake is van een constructie- en/
of materiaalfout worden na honorering van de garantie niet
geretourneerd aan de eigenaar.
Artikel 6 Aansprakelijkheid
6.1 Een door Fiets Service Nederland gehonoreerde
garantieclaim betekent niet dat Fiets Service Nederland
aansprakelijkheid aanvaard voor eventueel geleden schade. De
aansprakelijkheid van Fiets Service Nederland strekt zich nooit
verder uit dan is omschreven in deze garantievoorwaarden.
Iedere aansprakelijkheid van Fiets Service Nederland voor
gevolgschade wordt uitgesloten.
Artikel 7 Toepasselijk recht
7.1 Op deze garantievoorwaarden is Nederlands recht
van toepassing. Voor het geval enige bepaling in de
garantievoorwaarden nietig dan wel vernietigbaar is, dan laat
dat onverlet dat de overige garantievoorwaarden van toepassing
zijn.
*indien aanwezig
- 6 -
Overzichtstekening
- 7 -
Onderdelenlijst
Nr. Omschrijving Aantal Nr. Omschrijving Aantal
1 Computer 1 51 38 Eind kap 2
2 Spanningscontroler 1 52 Hoofdframe 1
3 Boogring 1 53 Eind kap 2
4 Bout 1 54 Voor stabilisator 1
5 Stuur 1
55
Bout M8x75 2
6 Boogring 20x8,5xR30 4 56L/R Behuizing 1sets
7 Ring D8 14
57
Bout ST4,2x20 12
8 Bout M8x20 8 58 Smallekap voor behuizing 1
9
Draad 1 1
59
Plastic kap 2
10 Hole Plugs 3 60 Zadel 1
11 Draad 2 1 61 Bout 2sets
12 Spanning draad 2 1 62 Rechter achter plaat 1
13 Bout M10x55 1 63 Bus 11x8,1x2,7 6
14 Sluitring 20x10x1,5 4 64 Lager 12
15 Lager 2 65 PU wiel 42x33x27 6
16 Katrol 1 66 Wielbehuizing 3
17 Bus 15x10,2x19 1 67 Linker achter plaat 1
18 Moer M10 1 68 Bout M8x122 3
19 Moer M10 2 69 Ronde magneet 1
20 Moer M10 3 70 Moer M12 1
21 Aluminum roller 1 71 Sluitring 22x12,5x2,0 2
22 ywheel 1 72 Glijrail 2
23 Bus 1 73 Bout 1
24 Moer M5 1 74 Bout M12x110 1
25 Sluitingsring 10x5x1,2 2 75 Sluitring M6x10 4
26 Bout M5x45 1 76 Voet 12x6x1,0 4
27 Weerstands 1 77 Limit kleppen 4
28 Magneet houder 1 78 Behuizing 12x80 2
29 Bevestiging magneet 1 79 Boutpin M10x100 1
30 Vierkante magneet 8 80 Eindkap 10x93 1
31 Moer M8 3 81 Eindkap 1
32 Sluitingsring 20x8x1,5 12 82 Buis 2
33 Bout M6x40 1 83 Sensor 1
34 Sluitingsring 12x6x1,2 2 84 Moer 1
35 Lager 2 85 Moer ST3x10 2
36 roller 15x27,5 1 86 Moer M6xL55 1
37 Moer M6 1 87 U-vorm M6 1
38 Grip holder 1 88 U-vormige plaat 2
39 Bout M5x10 2 89 Ronde stekkers 1
40 Voetplaat as 12,5x435 1 90 Kleine fi tting S19 2
41 Voetplaat 2 91 Kleine fi tting S17 2
42 Eind kap 2 92 Tien kantige sleutel S=13,1 / 14,1 / 15,1 / 5 diam 1
43 Foam 2 93 Inbussleutel S6 1
44 Stuur 1 94 Moersleutel S17 / 19 2
45 Riem 1 95 Moersleutel S13 / S14 1
46 Moer M8 6 96 Naafbus 1
47 Voetplaat beugel 2 97 Sluitring D6 2
48 Voetplaat houder 16x97 2 98 Veerring D6 2
49 Korte voetplaat as 12,5x355 1 99 Bout sluitring M6*16 2
50 Knop M16x24 1 100 Limit kleppen D12 2
- 8 -
Onderdelen
- 9 -
Montagehandleiding
LET OP;
De meeste onderdelen zijn afzonderlijk verpakt, maar sommige onderdelen zijn vooraf gemonteerd in de aangegeven
montagedelen. Verwijder deze onderdelen en monteer ze opnieuw wanneer dat vereist is.
Volg de verschillende stappen voor de montage en noteer alle vooraf gemonteerde onderdelen.
VOORBEREIDING: Zorg dat u genoeg ruimte hebt voor de montage en maak gebruik van het aanwezige gereedschap.
Controleer voordat u aan de montage begint of alle onderdelen aanwezig zijn.
Het wordt sterk aanbevolen dit apparaat met twee of meer personen te monteren om mogelijk letsel te voorkomen.
Stap 1:
1) Maak de voor stabilisatiestang
(54) vast aan het hoofdframe (52)
met de bouten (55), boog ring (6),
sluitingsringen (7) en moeren (46).
Stap 2:
1) Bevestig de achterste
stabilisatiestang (83) aan de glijrail (73
met de pin (80) ;
2) Sluit de sensorkabel (84) van glijrail
aan (73) met de romp draad 2 (11) van
het frame (52);
3) Monteer glijrail (73) in het
hoofdframe en vergrendel met bout
(74), ring (71) en moer (70), bevestig
als laatste de afdekdoppen (90);
4) Vergrendel de glijrail en het
hoofdframe (52) met knop (50)
- 10 -
Stap 3:
1) Plaats de korte voetplaat as (49) in
het frame (52), bevestig de voetplaat
(48) stevig aan twee kanten van korte
voetplaat, vergrendel deze met de ring
(32), ring (7) en de moer (46);
2) Plaats de voetplaat as (40) in het
frame (52), hecht de voetplaat (41) aan
de twee kanten van korte voetplaat as,
sluit dit stevig aan met ring (32), ring (7)
en de moer (46).
Stap 4:
1) Sluit de romp draad 1 (9b) met de
romp draad 2 (11b);
2) Sluit de spanning controle lijn (2b)
met de spankabel 2 (12), zoals op het
plaatje hierboven;
3) Plaats het stuur (5) in het hoofdframe,
vergrendel deze met bout (8), ring (7)
en boog-ring;
4)sluit de computer draad (1a) aan
op de computer en plaats deze op de
computer houder van het stuur(5)
deze sluit zich aan bij het laatste romp
draad 1 door (9a) te verbinden met de
computer draad (1a).;
5) Gemonteerd! ..... Zorg ervoor dat alle
onderdelen strak voor gebruik.
- 11 -
Functionele Instructies
Glijrail instructies;
De glijstang (73) kan gevouwen
wanneer the machine niet gebruikt
wordt, zodat het geen ruimte inneemt
Instructies
1, Trek de achterste glijrail (73)
voordat de machine wordt gevouwen,
zoals weergegeven in Afbeelding A.
Draai de knop (50) totdat de taper
volledig terugtrekt uit de Aluminium
spoorverbinding (73), en op hetzelfde
moment draai de knop naar beneden
totdat deze niet meer kan bewegen.
Dan trek je achterste glijrail (73) met
de andere hand in een hoek totdat de
Knop (50) losraakt van de glijrail (73),
nu kunt u de knop (50) weer los zoals in
de afbeelding B.;
2, Wanneer de glijrail (73) draait om
een bepaalde hoek van zal de Knop
(50) automatisch in het gat passen op
de glijrail (73), na dat, schroef de knop
(50) vast zoals aangegeven in fi g F.
LET OP;
Het zadel zal naar beneden glijden bij het vouwen van de aluminium rail!
Doe de pin in een ander opening, Na
aanpassing, blijft de staande stang
LET OP;
Het is gemak- kelijk uw hoofd te
bezeren als het apparaat.
- 12 -
Neerzetten glijrail;
De aluminium rail kan worden
neergezet als u de machine wil
gebruiken Volg de instructies:
3, Draai de knop (50) totdat de conus
volledig uit de glijrail (73) trekt, en op
hetzelfde de knop naar beneden totdat
deze niet meer kan bewegen. Dan trek
je de achterzijde van de glijrail (73)
met de andere hand in een hoek totdat
de Knop (50) meegaat met de glijrail
(73),laat nu de Knop weer los (50), zoals
aangegeven in D.
4, Wanneer de glijrail (73) naar
beneden wordt gezet op de vloer, zal
de Knop (50) automatisch in het gat van
de glijrail73) passen, ( schroef daarna
de knop (50) vast zoals aangegeven in
g E
Plaats de pin (80) in een andere
opening na dat de glijrail (73) op de
vloer staat, en vervolgens doe de voet
(83) naar boven.
- 13 -
Computerhandleiding
SPECIFICATIES:
Functies: Tijd 00:00-99:59 M:S
Roeibeweging 0.00-999.9
Totale roeibeweging 0.00-999.9
Roeibeweging p. min 0-1200
Kjoule 0.0-99.9kjoule
Calrorieën (CAL) 0-9999 KCAL
Batterij type 2 stuks AA type
Bedrijfstemperatuur 0˚C ~ +40˚C (32˚F ~ 104˚F)
Opslagtemperatuur -10˚C ~ +60˚C (14˚F ~ 140˚F)
BELANGRIJKSTE FUNCTIES:
MODE: Toets voor het selecteren en vastzetten van een bepaalde functie.
GEBRUIKSPROCEDURES:
1. AUTO ON/OFF:
* Het systeem gaat aan als op een willekeurige toets wordt gedrukt of als het een signaal ontvangt van de snelheidssensor.
* Het systeem wordt automatisch uitgeschakeld als de sensor 4 minuten lang geen signaal ontvangt of er niet op een
toets wordt gedrukt.
2. RESET:
Door de batterijen te vervangen of door de modustoets 3 seconden ingedrukt te houden kunt u de unit resetten.
3. MODE:
Gebruik MODE om een bepaalde functie vast te zetten. Druk op MODE totdat de wijzer op de functie staat die u wilt. Deze
functie begint dan te knipperen.
4. FUNCTIES:
TIJD: Druk op MODE totdat de wijzer ( ) op TIME staat.
Voor weergave van de totale trainingstijd.
SNELHEID: Druk op MODE totdat de wijzer ( ) op SPEED staat.
Voor weergave van de snelheid tijdens de training.
AFSTAND: Druk op MODE totdat de wijzer ( ) op DISTANCE staat.
De afstand afgelegd tijdens de training wordt weergegeven.
KM-TELLER: Druk op MODE totdat de wijzer ( ) op ODOMETER staat.
Elke afgelegde afstand wordt bijgehouden en getotaliseerd.
HARTSLAG: Druk op MODE totdat de wijzer ( ) op PULSE staat.
Uw hartslag wordt weergegeven op het scherm in slagen per minuut.
Plaats uw handpalmen op de contactplaatjes (of bevestig de oorclip aan uw oor) en wacht 30 seconden.
CALORIEËN: Druk op MODE totdat de wijzer ( ) op CALORIES staat.
Voor weergave van de calorieën die tijdens de training worden verbrand.
SCAN: Voor automatische weergave van de waarden volgens onderstaand schema:
SNELHEID----AFSTAND---- TIJD ------- KM-TELLER-----CALORIEËN ----HARTSLAG.
BATTERIJEN
Het display maakt gebruik van een of twee batterijen. Als de weergave van het display niet goed is, moeten de batterijen
worden vervangen.
- 14 -
Onderhoud en probleemoplossing
1. Controleer of alle bouten en moeren goed zijn aangedraaid en of alle draaiende onderdelen vrij kunnen bewegen.
2. Reinig het apparaat met een zachte doek en een oplossing van water en zachte zeep.
Gebruik geen oplossingmiddelen.
Probleemoplossing
Probleem Oorzaak Oplossing
Hoofdframe is
instabiel.
1. De vloer is niet vlak of er bevindt
zich een voorwerp onder een van
de stabilisatoren.
2. De eindkappen op de
achterstabilisator zijn niet waterpas
gesteld tijdens de montage.
1. Verwijder het voorwerp.
2. Verstel de eindkappen op de
achterstabilisator.
Veel lawaai door
bewegende
onderdelen.
De onderdelen zijn niet goed
aangedraaid.
Verwijder de afdekkappen en stel de
onderdelen in.
Geen weerstand
tijdens de training.
1. De interval van de magnetische
weerstand loopt op.
2. De weerstandsregeling is onjuist.
3. De riem slipt.
4. De lagers zijn defect.
1. Verwijder de afdekkappen en stel de
weerstand in.
2. Pas de weerstand aan.
3. Verwijder de afdekkappen en stel
de riem in.
4. Vervang de lagers.
- 15 -
Algemene fi tnesstips
Raadpleeg uw huisarts
Voordat u dit fi tnessapparaat gaat gebruiken, is het zeer verstandig u eerst uitvoerig te laten onderzoeken
door uw eigen huisarts of specialist. Voor regelmatig oefenen met dit apparaat dient u eerst goedkeuring van
uw huisarts te hebben gekregen. Indien u tijdens het gebruik van dit apparaat klachten krijgt, dient u direct
uw huisarts te raadplegen. Verstandig gebruik c.q. verantwoord gebruik van dit apparaat is van essentieel
belang. Zorg dat tijdens het gebruik van het apparaat geen kinderen in de buurt zijn. Tevens dient het apparaat
te worden opgeborgen op een plek waar geen kinderen bij kunnen komen.
Draag gemakkelijke kleding
Draag altijd gemakkelijke kleding als u gebruik maakt van dit apparaat, waaronder gymschoenen. Draag geen
losse kleding die tijdens gebruik kan scheuren.
Controleer uw apparaat
Wees ervan overtuigd dat voor gebruik alle schroeven en bouten van het apparaat goed zijn vastgedraaid.
Regelmatig onderhoud is zeer belangrijk voor de conditie van het apparaat.
Bepaal uw eigen tempo
De mate van oefenen op dit apparaat is afhankelijk van uw eigen conditie. Als u gedurende enkele jaren niet
heeft getraind of u heeft last van overgewicht is het verstandig om langzaam te beginnen met slechts een
paar minuten per week.
In eerste instantie zult u deze oefeningen maar enkele minuten volhouden maar dit zal binnen 6 tot 8 weken
verbeteren. Raak niet ontmoedigd als dit enkele weken langer duurt. Het is belangrijk uw eigen tempo te
bepalen. Uiteindelijk zult u de oefening langer dan 30 minuten kunnen volhouden. Hoe beter uw conditie
wordt, hoe moeilijker het zal worden om dit niveau vast te houden. Let echter wel op het volgende:
Raadpleeg uw huisarts voordat u start met uw trainingsprogramma. Laat u door hem rustig adviseren
over het programma met betrekking tot de oefeningen maar ook over uw eetpatroon.
Start de training rustig en stel uw eisen niet te hoog. Neem naast deze oefeningen extra beweging, bijv.
lopen, zwemmen, dansen en fi etsen. Controleer regelmatig uw hartslag. Indien u geen hartslagmeter
heeft, kunt u aan uw huisarts vragen op welke manier u dit het beste kunt doen. Bepaal uw gewenste
hartslagniveau. Houd hierbij rekening met uw leeftijd en conditie.
Zorg dat u tijdens de oefeningen op dit apparaat voldoende drinkt. U moet zorgen dat uw vochtgehalte
op niveau blijft en uitdroging wordt voorkomen. Hetgeen dat u drinkt, dient op kamertemperatuur te zijn.
Drink niet te veel koude vloeistof.
Controleer uw hartslag
Om uw hartslag te kunnen controleren, moet u eerst weten hoe u deze kunt meten. De gemakkelijkste manier
is om uw vingers op de slagader in uw nek, tussen de spieren en de luchtwegen, te leggen. Tel het aantal
kloppingen gedurende 10 seconden en vermenigvuldig dit aantal met 6. Dit geeft de hartslag per minuut aan.
Oefeningen binnen uw eigen gestelde doel
Hoe hoog of laag dient uw hartslag te zijn gedurende de oefeningen? Uw arts kan u informeren over de
richtlijnen die voor u gelden.
Leeftijd
Hartslagniveau 50-
75%
(slagen per minuut)
Maximale
hartslag 100%
20 Jaar 100-150 200
25 Jaar 98-146 195
30 Jaar 95-142 190
35 Jaar 93-138 185
40 Jaar 90-135 180
45 Jaar 88-131 175
50 Jaar 85-127 170
55 Jaar 83-123 165
60 Jaar 80-120 160
65 Jaar 78-116 155
70 Jaar 75-113 150
- 16 -
Warming-up – Cooling down
Een succesvolle oefening begint met een warming-up en wordt afgesloten met een cooling down. Doe alle oefeningen twee
tot drie keer per week en neem tussen de oefendagen een rustdag. Binnen enkele maanden kunt u het aantal oefeningen
uitbreiden naar 5 tot 6 keer per week. De warming-up is van essentieel belang voordat u met een oefening begint. Je lichaam
wordt voorbereid om inspanningen te verrichten. Om spierproblemen te voorkomen, dient u na de oefening tevens een
cooling down te doen. Wij raden u aan de volgende warming-up en cooling down te doen.
Hoofdoefeningen
Draai uw hoofd naar rechts en voel de spanning in uw nek. Draai uw kin richting het plafond
en doe hierbij uw mond open. Draai uw hoofd naar rechts en laat uiteindelijk uw hoofd zakken
tot op uw borst. Dit kunt u meerdere malen herhalen.
Schouderoefeningen
Til uw linkerschouder op en vervolgens uw rechterschouder waarbij u tegelijkertijd uw
linkerschouder weer laat zakken.
Strekoefeningen met uw armen
Strek uw linkerarm uit, richting het plafond en vervolgens uw rechterarm, terwijl u uw
linkerarm weer laat zakken. Voel de spanning in uw rechter- en linkerzij. Herhaal dit meerdere
malen.
Dijbeenoefeningen
Plaats 1 hand tegen de muur en reik achter u naar uw voet en til uw rechtervoet omhoog.
Breng uw hiel zo dicht mogelijk bij uw billen.
Binnenkant van dijbeen en benen strekken
Ga op de grond zitten en zet uw voeten tegen elkaar zodat uw knieën naar buiten wijzen. Trek
uw voeten zo dicht mogelijk naar uw liezen. Druk uw knieën voorzichtig naar buiten tegen de
grond. Herhaal dit indien mogelijk 15 keer.
- 17 -
Tenen aanraken
Buig langzaam voorover en probeer met uw handen uw voeten aan te raken. Reik zover
mogelijk en herhaal dit 15 keer.
Hamstrings oefeningen
Ga op de grond zitten en strek uw rechterbeen. Buig uw linkerbeen en zet uw voet tegen uw
rechterbovenbeen. Reik met uw rechterarm naar uw rechtervoet. Doe dit 15 keer en herhaal
dezelfde oefening met uw linkerbeen.
Kuit/achilles oefeningen
Zet beide handen tegen de muur en leun met het gehele lichaam op uw handen. Plaats uw
benen om beurten naar achteren. Het achterste been kunt u hierbij uitrekken. Doe dit voor elk
been 15 keer.
Aerobic oefeningen & gewicht
Aerobic oefeningen
Aerobic oefeningen zorgen voor een goede zuurstofvoorziening aan uw spieren via uw hart en longen: de belangrijkste
spieren van uw lichaam. Het is een essentieel onderdeel van alle oefeningen en dient ook werkelijk in acht te worden
genomen bij elke sportieve activiteit.
Gewichttraining
Aerobicoefeningen kunnen u helpen om het overtollige vetgehalte in uw lichaam te verminderen. Gewichttraining
daarentegen helpt bij de opbouw en versteviging van uw spieren.
Maar denk erom: raadpleeg altijd uw huisarts voordat u met trainen begint.
- 18 -
General safety instructions
In the design and the production of this fi tness equipment, much attention has been paid to safety. Nevertheless, you need
at all times to remain conscious of certain safety measures. Make certain that you have carefully read through the whole user
manual prior to your use of the equipment. Keep in mind the following points:
1. This equipment has not been designed to be used as a toy and must only be used for the purposes described in this
manual. Read the instructions below carefully before using this equipment.
2. Keep children and animals away from the equipment. Childrens enthusiasm may well lead to incorrect use of the
equipment. If children are allowed to use the equipment, they should only do so under supervision and after receiving
instructions regarding its proper use. Under no circumstances should the equipment be used as a toy.
3. Always consult with your physician prior to making use of this equipment or any other fi tness equipment.
4. Always wear safe and comfortable clothing when you are using fi tness equipment. Preferably, wear sports shoes or
aerobic footwear.
5. In the event you should feel faint or suffer other discomforts, stop using the equipment. You also need to stop when
you experience pain in or pressure on your joints.
6. Make certain that no more than one user is occupying the equipment at one time. Place the equipment on a level
surface; the space required is approximately 2 x 1 metres.
7. Make certain that the equipment has been correctly assembled prior to its use. Ensure that all screws, nuts and bolts
have been fi tted correctly and tightened properly. Use only the parts that are recommended by the importer and that
have been delivered with the equipment.
8. Do not use the equipment if it is damaged or has broken down.
9. Pay attention to how your body reacts after using the equipment. Dizziness is a sign that you worked out too intensely.
If you feel dizzy, stretch out on the fl oor and do not try to get back on your feet until the dizziness has disappeared.
10. Always use the equipment on a level and clean surface. Never use the equipment outdoors or in water.
11. Avoid that your arms and legs come too close to the moving parts. Do not stuff articles inside the existing openings
in the equipment.
12. Use this equipment only for the purposes as described in this user manual. Do not use parts that were not recommended
by the manufacturer.
13. Ascertain that there are no sharp and pointed objects in the immediate vicinity of the equipment.
14. We advise physically challenged individuals to use this fi tness equipment only under the supervision of qualifi ed
instructors.
15. The equipment must have come to a complete standstill before stepping down.
16. Use the equipment as laid down in the manual. Misuse of the equipment can lead to physical injuries.
17. This tness equipment has been produced in accordance with EN-norm 957-5 class HA. Up to taxable weight : 100
kilogrammes.
18. This tness equipment is not suitable for rehabilitation goals.
19. Excessive and incorrect training may result to injuries and health problems.
- 19 -
Warning
Consult with your physician prior to starting your exercises. A frequent and intensive training programme should fi rst
be approved by your family physician. This is especially important for individuals above 35 years of age or for those with
physical problems. Carefully read through the entire user manual before you start exercising. We are in no wise responsible
for personal injury or physical strains and discomforts that are caused by the use of this equipment and cannot be held liable
in case of their occurrence. Carefully save these instructions. Incorrect or extreme use may lead to personal injury.
Note: the maximum permissible weight on this equipment is 100 kg.
Assembly
This user manual has been put together in order to simplify the assembly of the equipment and at the same time to explain
its correct use. Please make certain to carefully read through this manual. In order to familiarise yourself with the parts of the
equipment, we recommend that you carefully study the general reference drawing prior to starting the assembly and the
use of the equipment.
Place all parts needed for the assembly on the fl oor in an orderly manner and remove all packing material. Check the list of
parts to verify what items are present. For the actual assembly we make referral to the following pages.
Thank you for your purchase
We thank you for your purchase of this fi tness equipment. This equipment will help you in improving your general conditioning
and in developing your muscles in the correct way. In addition, you can now enjoy all of these benefi ts inside your own home.
Maintenance and use
Consult your physician before starting the exercises. A frequent and strenuous workout program must be approved by your
physician fi rst.
The equipment requires a regular check-up to prevent physical injury. This means that bolts and nuts should be frequently
checked for their proper tightening and that the equipment in general should be checked for cracks and sharp edges etc.
Defective components must be replaced immediately. If this is not feasible, the equipment must be put out of order until
the required repairs have been made.
NB! Do not smoke or use fi re near the equipment, as some of the plastic components are fl ammable.
Do not use the equipment in front of a burning stove and/or fi re place.
Persons suffering from a plastics allergy should consult their physician before using the equipment.
Do not touch any cylinders on the equipment as they become extremely hot during use.
If you wish to dissemble the device, reverse the procedure given in the assembly instructions.
PACKAGING
Environmentally friendly, recyclable materials
Outer packaging of the cardboard
Form parts of foamed, CPC-free polystyrene(PS)
Foils and bag of polyethylene (PE)
Tension bands of polypropylene (PP)
DISPOSAL
Please undertake environmentally friendly disposal.
For further guidance contact your local authority refuse department.
Bicycle Industry Group (BIG) guarantees that the product supplied will work as intended, according to the
conditions given in this warranty.
Name:
Purchase date:
Address: Model/type:
Post code / Town:
Purchased from:
Telephone number: Frame number:
WARRANTY customer
In order for the warranty to be valid, please register on our website to use the warranty, within two weeks of purchase www. etsservicnederland.nl. Save the purchase
receipt yourself ot he bicycle/ tness.
Store this section carefully, together with the purchase receipt. This warranty is only valid if you have register on our website, within two weeks of purchase www.
etsservicnederland.nl. This section must be completed and provided together with the original purchase receipt in the event of repairs being necessary.
Your service request can be made via:
77
7777
77
7
Internet http://www. etsservicenederland.nl/service.html
777
.,
Servicetelephone
+31 (0)570 - 606 939
777
E-mail*: info@ etsservicenederland.nl
Available from Monday to Friday From 9.00 to 12.30 hours
777
Fax*: +31 (0)570 - 677 014
777
Postadres: Bicycle Industry Group (BIG)
Solingenstraat 49
7421 ZR Deventer, The Netherlands
* Please mention name, address, phone/mobielphone, model/type, bought from, problem description, evt. with reference to relevant part.
Supplementary conditions of guarantee.
Article 1 Guarantee conditions
1.1. Bicycle Industry Group (BIG) guarantees that all Products
to which this guarantee certi cate is related are free from faults
in the design and/or material, in accordance with the provisions
of these terms and conditions.
1.2 Bicycle Industry Group (BIG) will issue a guarantee to the
rst owner of the Products. With each subsequent owner, the
guarantee issued to the rst owner will lapse. Each owner, with
the exception of the rst owner, will have to recover any damage
from the seller of the bicycle. The guarantee is not transferable.
1.3 The period of validity of the guarantee, as well as the
expiration of the guarantee, is set out in the following articles.
Article 2 Validity of the guarantee
2.1 The guarantees issued by Bicycle Industry Group (BIG)
are valid for the following periods for the following parts of the
bicycle:
a. Frame 5 years (not applicable to tness equipment)
b. Other parts: 2 years.
2.2 No guarantee will be issued for parts that are liable to wear,
unless there are any faults in the design and/or material. This
will include, inter alia, tubes, tyres, chains, chain rings, free
wheel, brake pads, sprocket wheel, cables, light ttings, handle
bars, etc.
Article 3 Guarantee exclusions
3.1 The guarantee will explicitly not be valid in the following
cases:
a. If the damage is caused by wear, incorrect assembly and
assembly of non-original parts, as well as any omitted necessary
maintenance and faulty settings of parts of the bicycle / tness
equipment;
b. If the damage is caused by accidents, misuse, destruction,
incorrect or insuf cient maintenance and the incorrect following
of instructions from the user manual, as well as the late or
unprofessional replacement of parts of the bicycle or tness
equipment;
c. If the damage is caused by abnormal use, which will include,
in any event: use on a competitive level, stunts, jumping,
transport of heavy loads, commercial purposes, bicycle hire
or any other activities which, in the opinion of Bicycle Industry
Group (BIG), are equal to the aforementioned situations and
cases;
d. If the bicycle / the tness equipment has not been maintained
in accordance with the instructions for use of the accompanying
manual;
e. If the damage is caused by climatological in uences, such as
weather-staining of the paintwork and rust formation;
3.2 The costs of transport and (dis-)assembly of the bicycle
from and to Bicycle Industry Group (BIG) are not covered by
the guarantee and will be at the bicycle owner’s expense. This
also applies to any shipping and labour costs arising from the
guarantee claim.
Article 4 Parts covered by guarantee
4.1 Whilst the guarantee is valid, the parts covered by these
guarantee conditions, of which Fiets Service Nederland has
established that they have a fault in the design and/or material,
will be repaired or, if necessary, replaced, or will be reimbursed.
Fiets Service Nederland will decide, at its sole discretion,
whether the parts will be repaired, replaced or reimbursed.
4.2 If a certain part of the bicycle / tness equipment is covered
by the guarantee, the part will be replaced by an original part or,
if unavailable, by an alternative part that is at least equivalent.
New parts may differ from original parts.
Article 5 Submission of the claim
5.1 Claims under these guarantee conditions must be submitted
through Fiets Service Nederland. Fiets Service Nederland
will decide, in consultation with Bicycle Industry Group (BIG),
whether or not you are entitled to claim for compensation under
the guarantee. The dealer’s assessment does not mean that
your claim under these guarantee conditions will be allowed.
5.2 Fiets Service Nederland reserves the right to decide at its
sole discretion whether or not the owner will be entitled to claim
for compensation under these guarantee conditions
5.3 The parts that are sent must be clean, whilst any parts of
the bicycle / the tness equipment that are not covered by the
guarantee conditions and which do not have any faults in the
design and/or material must be disassembled. When applying
for a guarantee, the owner of the bicycle / tness equipment
must submit the original proof of purchase to an of cial dealer,
authorised by Fiets Service Nederland.
5.4 The parts that have a fault in the design and/or material
will not be returned to the owner after the guarantee has been
honoured.
Article 6 Liability
6.1 A guarantee claim accepted by Fiets Service Nederland
does not imply that Fiets Service Nederland accepts liability for
any damage suffered. The liability of Fiets Service Nederland will
never extend beyond that which is set down in these guarantee
conditions. Any liability on the part of Fiets Service Nederland for
indirect damage is excluded.
Article 7 Applicable law
7.1 These guarantee conditions are subject to Dutch law. If
any provision of these guarantee conditions is null and void
or annullable, it shall not affect the validity of the rest of these
guarantee conditions.
- 21 -
General reference drawing
- 22 -
Parts List
NO. Name QTY Nr. Omschrijving Aantal
1 computer 1 51 38 end cap 2
2 Tension control 1 52 Main frame 1
3 Arc-washer 1 53 End cap 2
4 bolt 1 54 Front stabilizer 1
5 Handlebar post join 1
55
Bolt 2
6 Arc-washer 4 56L/R Housing 1sets
7 Washer 14
57
Bolt 12
8 bolt 8 58 Small cover for housing 1
9
Trunk wire 1 1
59
plastic cover 2
10 Hole Plugs 3 60 Saddle 1
11 Trunk wire 2 1 61 Bolt 2sets
12 Tension wire 2 1 62 Right backing plate 1
13 Bolt 1 63 Bushing 6
14 washer 4 64 bearing 12
15 Bearing 2 65 PU wheel 6
16 Pulley 1 66 roller casing 3
17 Bushing 1 67 Left backing plate 1
18 Nut 1 68 Bolt 3
19 Nut 2 69 Round magnet 1
20 Nut 3 70 Nut 1
21 Aluminum belt roller 1 71 Washer 2
22 ywheel 1 72 Bushing 2
23 Bushing 1 73 sliding rail join 1
24 Nut 1 74 Bolt 1
25 Washer 2 75 Bolt 4
26 Bolt 1 76 Washer 4
27 tension spring 1 77 foot pad 4
28 Magnet shelf 1 78 Limit valves 2
29 location grid of magnet 1 79 Bolt 1
30 Square magnet 8 80 Broaching 1
31 nut 3 81 End cap 1
32 Washer 12 82 End cap 2
33 Bolt 1 83 stay tube join 1
34 washer 2 84 Sensor 1
35 bearing 2 85 Nut 2
36 roller bush 1 86 Nut 1
37 nut 1 87 Nut 1
38 Grip holder 1 88 U shape 2
39 bolt 2 board Ronde stekkers 1
40 Footplate axis 1 89 Round plugs 2
41 Footplate 2 90 Small cap 2
42 End cap 2 91 Small cap 1
43 Sponge tube 2 92 Ten headed wrench 1
44 handlebar 1 93 hex wrench 2
45 Belt 1 94 Wrench 1
46 Nut 6 95 Wrench 1
47 Foot plate strap 2 97 Washer 2
48 Footplate sack 2 98 Spring washer 2
49 Short footplate axis 1 99 Bolt 2
50 Knob 1 100 Washer 2
- 23 -
ASSEMBLY PARTS OF ROWING MACHINE
- 24 -
Montagehandleiding
Most of the listed assembly hardware has been packaged separately, but some hardware items have been preinstalled in
the identi ed assembly parts. In these instances, simply remove and reinstall the hardware as assembly is required.
Please reference the individual assembly steps and make note of all preinstalled hardware.
PREPARATION: Before assembling, make sure that you will have enough space around the item; Use the present tooling for
assembling; before assembling please check whether all needed parts are available.
It is strongly recommended this machine to be assembled by two or more people to avoid possible injury.
Step 1:
1) Assemble the Front stabilizer(54)
to main frame(52) using the bolts(55),
arc-washers(6), washers (7) and
nuts(46).
Step 2:
1)Turn the stay tube join(83) in
support space,fi x it to the sliding rail
join(73) with the broaching(80);
2)Connect the sensor line(84) of
Sliding rail join(73) with the trunk wire
2(11) of main frame(52);
3)Assemble Sliding rail join(73) into
the main frame and then lock with
bolt(74),washer(71)and nut(70), last
cover the small cap(90);
4)Lock the sliding rail and main
frame(52) with knob(50) in order to fi x
the sliding rail join.
- 25 -
Step 3:
1) Place the short footplate axis
(49) into main frame(52), attach the
footplate sack (48) to the two sides
of short footplate, lock it tightly with
washer(32),washer(7)and nut(46);
2) Place the footplate axis(40)
into main frame(52),attach the
footplate(41) to the two sides of short
footplate axis, lock it tightly using
washer(32),washer(7)and nut(46).
Step 4:
1) Connect the trunk wire 1(9b)with
the trunk wire 2(11b);
2) Connect the tension control line
(2b) with the tension wire 2(12), as per
picture above;
3) Insert the handlebar post join
(5) to the main frame, lock it with
bolt(8),washer(7)and arc-washer;
4) Put the computer wire (1a) through
slot on the computer table, and
then insert it the computer table of
handlebar post joins(5),last connect
the trunk wire 1 (9a)with computer
wire (1a).;
5) Assemble  nished! …..Please ensure
all parts are fully tight before using.
- 26 -
FUNCTIONAL INSTRUCTIONS OF ROWING MACHINE
The sliding rail folding
instructions:
The sliding rail join
(73) can be folded when the machine
is unused, so as not to take up space.
Directions as follows:
1. Pull up rear sliding rail join (73) before
the machine is folded, as displayed in
Picture A. Unscrew the Knob (50) until
the taper completely withdraws from
the Aluminum rail link (73), and at the
same time draw the Knob down until
it cannot move anymore. Then pull up
rear sliding rail join (73) by the other
hand to an angle until the Knob (50)
breaks away from the sliding rail join
(73), you can now release the Knob (50)
as shown in picture B.
2. When the sliding rail join (73) rotates
to a certain angle the Knob(50) will
automatically fi t into the hole on the
sliding rail join (73), after that, screw the
Knob(50) tight as shown in fi g F.
Attention! The saddle will slide down when folding the Aluminum rail.
Adjust the broaching into another
positioning hole, when adjustment is
nished leave the stay tube join (83)
folded.
Attention! It is easy to hit your head
when the rail is standing upright.
- 27 -
The sliding rail put-down
instructions: The Aluminum rail
can be put down when the machine
is used. Operation as follows:
3. Unscrew the Knob (50) until the
taper completely withdraws from the
sliding rail join (73), and at the same
time draw the Knob down until it can-
not move anymore. Then pull up rear
the sliding rail join (73) by the other
hand to an angle until the Knob (50)
breaks away from the sliding rail join
link (73), you can now release the Knob
(50) as shown in D.
4. When the sliding rail join(73) is put
downward to the fl oor, the Knob(50)
will automatically fi t into the hole on
the sliding rail join(73), after that, screw
the Knob(50) tight as shown in fi g E.
Place the broaching (80) into another
positioning hole after the sliding rail
join (73) is put-down to the  oor, and
then adjust the stay tube join (83)
upward at rear
- 28 -
Computer Instruction
SPECIFICATIONS:
Functions: AUTO CYCLE Every 6 seconds
TIME 0:00~99:59(MINUTE:Second)
STROKES 0~9999
STROKES/ OVERALL 0~9999
STROKES/MIN 0~1200
KJOULE 0.0~999.9kjoule
Battery type 2 pcs AA type
Operating temperature 0˚C ~ +40˚C (32˚F ~ 104˚F)
Storage temperature -10˚C ~ +60˚C (14˚F ~ 140˚F)
KEY FUNCTIONS:
MODE Press it to select functions. Hold it for 3 seconds to reset time, distance and calories.
OPERATUION PROCEDURES:
1. AUTO ON/OFF:
* The system turns on when any key is pressed or when it receives an signal input from the speed sensor.
* The system turns o automatically when the sensor has no signal input or no key are pressed for approximately 4 minutes.
2. RESET:
The unit can be reset by either changing the battery or pressing the mode key for 3 seconds.
3. MODE:
To choose the SCAN or LOCK if you do not want the scan mode, press the MODE key when the pointer on the function you
want which begins blinking..
4. FUNCTIONS:
SCAN: Display changes according to the next diagram every 4 seconds.
SCAN ---TIME---SPEED---DISTANCE---CALORIE---ODOMETER---PULSE
TIME: Press the MODE key until pointer () lock in to TIME.
The total working time will be shown when starting exercise.
SPEED: Press the MODE key until pointer () lock on to SPEED.
Display current speed during working time.
DISTANCE: Press the MODE key until pointer () lock on to DISTANCE.
The distance of each workout will be displayed when starting exercise.
CALORIE: Press the MODE key until pointer () lock on to CALORIE.
The calorie burned will be displayed when starting exercise.
ODOMETER: Press the MODE key until pointer () lock on to ODO (Total distance) Automatically accumulates workout
distance when starting exercise.
PULSE: Please press the MODE key until pointer () lock on to the PULSE” function.
Through the heart rate sensor, measuring the number of beats per minute
BATTERY
This monitor uses one or two batteries. If improper display on monitor, please reinstall the batteries to have a good result.
Use size AA batteries.
- 29 -
Maintenance and Treatment
1. Verify that all the bolts and nuts are locked properly and the turning parts should be turned
freely without damaged parts.
2. Clean the equipment with soap and slightly damp cloth only. Please do not use any solvent to clean the equipment.
Malfunctions and treatment
Malfunction Reason Treatment
Base is unstable.
1. Floor is not at or there is small
object under the front or rear
stabilizer.
2. The rear stabilizer end caps
have not been leveled when
assembling.
1. Remove the object.
2. Adjust the rear stabilizer end caps.
Loud noise from the
moving parts.
The interval of the parts is improper
tighten.
Open the covers to adjust.
No resistance while using
the crosstrainer.
1. The interval of the magnetic
resistance increases.
2. Tension control is damaged.
3. Running belt slips.
4. The bearing set is damaged
1. Open the covers to adjust.
2. Change the tension control.
3. Open the covers to adjust.
4. Change the bearing set.
- 30 -
General fi tness tips
Consult your physian
Before you start using this fi tness equipment, it is recommended that you fi rst get a physical examination
by your family physician or by a specialist. Before starting regular exercises on this equipment, you must
rst get your doctor’s approval. When you feel discomfort during your training on the equipment, you need
to immediately consult your family physician. Intelligent use, meaning responsible use of this equipment is
crucial. Make sure that no children are near you when you are using this equipment. Moreover, make sure to
store the equipment in a safe place away from children.
Wear comfortable clothing
Always wear comfortable clothing when you are using the equipment, including gym shoes. Do not wear
loose clothing that can tear during use.
Inspect your equipment
Prior to using your equipment, make sure that all nuts and bolts are properly tightened. Regular maintenance
is very important to keep the equipment in good condition.
Set your own pace
The intensity level of your workout on this equipment depends on your own condition. If you have not been
in training for some years or if you are overweight, it is recommended that you start slowly with only a few
minutes per week.
At fi rst you will be able to do the exercises for only a few minutes but this will improve within 6 to 8 weeks. Do
not let yourself get discouraged if this takes a few weeks more. It is important for you to set your own pace. In
the end you will be able to keep on exercising for more than 30 minutes. The better your condition, the more
diffi cult it will become to stay at this level. But be aware of the following:
Consult with your physician before you start your training programme. Let him/her advise you about the
training programme as well as about your diet.
Start your training at an easy pace and do not aim too high at fi rst. Aside from this exercise with the
equipment, also engage in extra activities, for instance, jogging, swimming, dancing, and biking. Regularly
check your heart rate. If you do not have a counter, ask your family physician how you can best check your
heart rate. Determine your desired heart rate. Take into consideration your age and condition.
Make sure that you drink enough when training on this equipment. You need to keep drinking to prevent
dehydration. The liquids you take in must be at room temperature. Limit your intake of cold drinks.
Check your heart rate
To be able to check your heart rate, you fi rst need to know how to measure it. The easiest way is to press your
ngertips against the artery in your neck, between the muscles and the air passages. Count the number of
pulses for 10 seconds and multiply by 6. This will give you your heart rate per minute.
Exercise within your own capabilities
What level of heart rate do you have to maintain during your exercises? Ask your physician to give you
guidelines that are relevant for you.
Age
Heartbeat level 50-
75%
(beats per minute)
Maximum
heart rate
100%
20 Jaar 100-150 200
25 Jaar 98-146 195
30 Jaar 95-142 190
35 Jaar 93-138 185
40 Jaar 90-135 180
45 Jaar 88-131 175
50 Jaar 85-127 170
55 Jaar 83-123 165
60 Jaar 80-120 160
65 Jaar 78-116 155
70 Jaar 75-113 150
- 31 -
Warming-up – Cooling down
A successful exercise starts with a warm-up and is completed with a cool-down. Run through all of the exercises two or three
times a week and take a day o in between the exercise days. After a few months you can extend the number of exercises
to 5 to 6 times a week. The warm-up is of crucial importance before starting your workout. You will be preparing your body
for the e ort you are about to exert. In order to prevent muscle problems, you need to cool down after the exercises. We
recommend the following warm-up and cool-down exercises.
Head exercises
Turn your head to the right and feel the tension in your neck. Turn your chin up to the ceiling while opening your mouth.
Turn your head to the right and  nally let it drop to your chest. Repeat this exercise several
times.
Shoulder exercises
Raise your left shoulder and then your right shoulder while you are dropping your left shoulder
down again at the same time.
Stretching exercises for your arms
Stretch your left arm towards the ceiling. Then do the same with your right arm while you drop
your left arm down again at the same time. Feel the tension in your right and left sides. Repeat
this several times.
Thigh stretching exercises
Sit on the  oor and place your feet together so that your knees are pointing outwards. Pull your
feet as closely as possible against and into your groin area. Carefully push outwards on your
knees towards the  oor. If you can, repeat 15 times.
Stretch inner thigh and legs
Place one hand against the wall and reach back with your other hand to lift up your right foot.
Bring your heel as closely as possible against your thigh. Repeat this 15 times, then do the same
with your left foot.
- 32 -
Touching your toes
Slowly bend forward and try to reach your feet with your hands. Stretch down as far as possible
and repeat this 15 times.
Hamstring exercises
Sit on the  oor and stretch your right leg. Bend your left leg and place your foot against your
right upper leg. Reach for your right foot with your right arm. Repeat this 15 times and do the
same exercise with your left leg.
Calf/achilles exercises
Place both hands against a wall and lean the weight of your whole body on your hands. Move
your legs to the rear, alternating one with the other. The leg in the rear position will be stretched.
Repeat this for each leg 15 times.
Aerobic exercises & Weights
Aerobic exercises
Aerobic exercises promote a good oxygen supply to your muscles via your heart and lungs, the most important muscles in
your body. It is an essential part of all exercises and needs to be considered when engaging in any sports activity.
Weight training
Aerobic exercises are useful in assisting you to reduce excessive body fat. In contrast, weight training helps you to build up
and  rm your muscles.
But one last warning: always consult with your physician before you start your training
- 33 -
Consignes de sécurité générales
Lors de la conception et la fabrication de cet appareil de remise en forme nous avons prêté beaucoup d’attention à la
sécurité. Vous devez cependant toujours respecter certaines consignes de sécurité. Lisez attentivement le manuel entier
avant d’utiliser l’appareil. Observez les points suivants :
1 Cet appareil nest pas un jouet et ne doit être utilisé qu’à des  ns telles que décrites dans cette notice. Lisez
attentivement les consignes ci-dessous avant d’utiliser l’appareil.
2 Tenez vos enfants ou animaux domestiques à l’écart de l’appareil. Lenthousiasme des enfants peut entraîner une
mauvaise utilisation de l appareil. Dans le cas où les enfants reçoivent l’autorisation d’utiliser cet appareil, ces derniers
doivent être serveillés et des consignes doivent leur être données quant à l’utilisation appropriée de l’appareil. Cet
appareil ne doit en aucun cas être utilisé comme un jouet.
3 Consultez toujours votre médecin avant d’utiliser cet appareil ou d’autre matériel de remise en forme.
4 Portez toujours des vêtements sûrs et confortables quand vous utilisez le matériel de remise en forme. Portez de
préférence des chaussures de sport ou des souliers aérobic.
5 Arrêtez immédiatement l’exercice si vous ne vous sentez pas bien ou si vous avez d’autres symptômes. Vous devez
également vous arrêter si vous avez des douleurs articulaires ou si vous sentez une pression sur vos articulations.
6 Ne jamais laisser l’appareil utiliser par plus d’un utilisateur. Posez l’appareil sur une surface plane, l’espace nécessaire
est d’environ 2 x 1 mètres.
7 Assurez-vous que l’appareil est correctement installé avant de l’utiliser. Véri ez si tous les vis, boulons et écrous
sont bien installés et serrés. Utilisez seulement des pièces qui ont été conseillées par l’importateur et fournies avec
l’appareil.
8 Ne pas utiliser l’appareil quand celui-ci est endommagé ou défectueux.
9 Faites surtout attention à la réaction de votre corps après l’utilisation. Les étourdissements indiquent que vous vous
êtes entraîné trop intensément. En cas d’étourdissement, allongez vous par terre et ne vous levez pas avant de vous
sentir mieux.
10 Utilisez toujours l’appareil sur une surface lisse et propre. Ne jamais utiliser l’appareil dehors ou dans l’eau.
11 Surveillez si vos bras et vos jambes ne risquent pas de faire contact avec les pièces mobiles. Ne pas introduire de
matériaux dans les ouvertures de l’appareil.
12 Utilisez cet appareil seulement aux  ns recommandés dans ce mode d’emploi. Ne pas utiliser des pièces non
conseillées par le fabricant.
13 Assurez-vous quil n’y a pas d’objets pointus dans les alentours de l’appareil de remise en forme.
14 Nous conseillons aux personnes handicapées de n’utiliser cet appareil que sous la surveillance d’accompagnateurs
quali és.
15 Ne descendez de l’appareil qu’une fois quil est ä l’arrêt.
- 34 -
Mise en garde
Consultez votre médecin avant de commencer les exercices. Un programme d’entraînement fréquent et intensif doit d’abord
être approuvé par votre médecin. Ceci est en particulier important pour les personnes âgées de 35 ans ou plus ou pour
les personnes avec des problèmes physiques. Lisez attentivement le manuel entier avant de commencer l’entraînement.
Nous ne sommes en aucun cas responsables des blessures individuelles ou des troubles physiques dus à l’utilisation de cet
appareil et ne pouvons donc être tenus responsables. Conservez ces instructions dans un endroit sûr. Des blessures peuvent
résulter d’une utilisation incorrecte ou excessive.
Attention: le poids maximal autorisé sur cet appareil est de 110 kg.
Montage
Ce manuel d’utilisation a été rédigé a n de faciliter le montage de cet appareil et d’expliquer son utilisation correcte.
Lisez attentivement le manuel. A n de vous familiariser avec les pièces et l’appareil, nous vous conseillons d’étudier la vue
d’ensemble en détail avant d’assembler ou d’utiliser l’appareil.
Posez tous les matériaux de montage sur le sol de façon bien ordonnée et enlevez tous les emballages. Véri ez à l’aide de la
liste des pièces si toutes les pièces ont été fournies. Nous vous référons aux pages suivantes pour les instructions de montage.
Remerciements
Nous vous remercions d’avoir choisi cet appareil. Cet appareil vous aidera à vous remettre en forme et à développer vos
muscles proprement. Et vous pouvez l’utiliser dans votre propre environnement.
Entretien et utilisation
Consultez votre médecin avant de commencer les exercices. Un programme d’entraînement fréquent et demandant
beaucoup d’e orts doit d’abord être approuvé par votre médecin.
L’appareil doit être contrôlé régulièrement a n de prévenir des blessures corporelles. Cela signi e également qu’une
véri cation régulière doit avoir lieu a n de s’assurer que les boulons et les écrous sont bien vissés et de pouvoir constater
des débuts d’usure, des bords coupants et d’autres choses de ce genre susceptibles pouvant entraîner des blessures
corporelles.
Les pièces défectueuses doivent être remplacées sur-le champ. Si cela nest pas possible, l’appareil doit alors être mis
hors service jusqu’à ce que la réparation ait eu lieu.
Attention ! Certaines pièces en matières plastiques étant in ammables, ne fumez pas et n’utilisez aucune  amme ou feu
dans le voisinage de l’appareil.
N’utilisez l’appareil ni près d’un poêle chaud ni d’une cheminée.
Dans le cas d’allergies aux matières plastiques, vous devez consulter un médecin avant d’utiliser l’appareil.
Dans le cas où l’appareil est équipé de cylindres et étant donné que ces derniers deviennent très chauds pendant l’utilisation,
ne les touchez pas après un exercice
EMBALLAGE
Matériaux recyclables, respectueux de lenvironnement
Emballage externe en carton
Parties en mousse de polystyrène (PS)
Emballages plastiques et sac en polyéthylène (PE)
Bandes de serrage en polypropylène (PP)
ELIMINATION
Eliminez en respectant l’environnement. Pour plus de conseils,
contacter le service des ordures des autorités locales.
Certi cat de garantie
Bicycle Industry Group (BIG) garantit l’appareil fourni contre tout vice de fonctionnement sous
réserve du respect des conditions stipulées sur le présent certi cat de garantie.
Nom:
Date d’ achat:
Adresse: Modèle/type:
Code postal / Ville:
Fournisseur:
Numéro de Téléphone: Numéro de cadre:
Conservez soigneusement cette partie du certi cat de garantie avec le bon d’achat. Vous pouvez béné cier de la garantie uniquement si vous
avez envoyé la dans les deaux semaines de la date, vous inscrire en ligne à www. etsservicenederland.nl, présenter cette partie dûment avec
le bon d’achat original en cas de réparations nécessaires.
Conditions de garantie complémentaires
Article 1 Clauses de garantie
1.1.
Bicycle Industry Group (BIG)
garantit que tous les Produits
auxquels se rapporte le présent certi cat de garantie ne comportent
aucun défaut de construction et/ou de matériau, conformément aux
dispositions des présentes clauses de garanties.
1.2
Bicycle Industry Group (BIG)
accorde la garantie au premier
propriétaire des Produits. La garantie accordée au premier
propriétaire s’annule pour chaque propriétaire lui succédant. Chaque
propriétaire, à l’exception du premier, devra s’adresser au vendeur
du vélo s’il désire se faire rembourser les dommages qu’il a subis. La
garantie n’est pas transmissible.
1.3 La durée de la garantie ainsi que les conditions de son annulation
sont stipulées dans les articles suivants.
Article 2 Durée de la garantie
2.1
Bicycle Industry Group (BIG)
accorde la durée de garantie
ci-après indiquée pour les pièces suivantes du vélo :
a. Cadre 5 ans (ne s’applique pas aux équipements de tness)
b. Autres pièces : 2 ans.
2.2 Les pièces sujettes à usure ne sont pas couvertes par la garantie,
sauf en cas de défauts de construction et/ou de matériau. Cela
concerne notamment les pièces suivantes : pneus, chambres à
air, chaînes, plateaux de pédalier, roue libre, blocs de frein, pignon
arrière, câbles, éclairage, poignées, etc.
Article 3 Exclusions de garantie
3.1 La garantie s’annule exclusivement dans les cas suivants :
a. Si le dommage est le résultat de l’usure, d’un montage incorrect
et d’un montage de pièces autres que les pièces d’origine, ainsi que
de la non-réalisation de l’entretien requis et de mauvais réglages des
pièces du vélo/de l’équipement de tness ;
b. Si le dommage est le résultat d’accidents, d’un mauvais usage,
d’une destruction, d’un entretien incorrect ou insuf sant et du non-
respect des indications gurant dans le mode d’emploi, ainsi que du
remplacement de pièces du vélo ou de l’équipement de tness non
effectué par un professionnel ;
c. Si le dommage est le résultat d’un usage autre que l’usage normal,
à savoir en tout cas : utilisation dans le cadre d’une compétition,
cascades, sauts, transport d’une charge lourde, utilisation à des ns
commerciales, location de vélos ou activités que
Bicycle Industry
Group (BIG)
juge similaires aux situations et cas précités ;
d. Si le vélo/l’équipement de tness n’a pas été entretenu
conformément aux indications gurant dans le mode d’emploi fourni ;
e. Si le dommage est le résultat de l’effet des intempéries, tel que
l’altération de la peinture et la formation de rouille.
3.2 Les frais afférents au transport et au (dé)montage du vélo à
destination et en provenance de
Bicycle Industry Group (BIG)
ne
sont pas couverts par la garantie et sont à la charge du propriétaire
du vélo. Il en est de même pour les frais d’expédition éventuels et les
frais de main-d’œuvre découlant de la réclamation de garantie.
Article 4 Pièces couvertes par la garantie
4.1 Pendant la période de garantie, les pièces couvertes par les
présentes conditions de garantie et sur lesquelles Fiets Service
Nederland a constaté un défaut de matériau et/ou de construction,
seront réparées ou, le cas échéant, remplacées ou remboursées.
C’est la société Fiets Service Nederland qui détermine elle-même si
ces pièces doivent être réparées, remplacées ou remboursées.
4.2 Si une pièce particulière du vélo/de l’équipement de tness est
prise en charge par la garantie, cette pièce sera remplacée par
une pièce originale ou bien, si celle-ci n’est pas disponible, par une
alternative de qualité au moins équivalente. Une nouvelle pièce peut
différer des pièces originales.
Article 5 Introduction de la réclamation
5.1 Les réclamations couvertes par les présentes conditions de
garantie devront être introduites par le biais Fiets Service Nederland.
Fiets Service Nederland détermine en concertation avec
Bicycle
Industry Group (BIG)
pouvez prétendre à une prestation de
garantie. L’appréciation du Fiets Service Nederland n’implique pas
que votre réclamation sera accordée aux termes des présentes
conditions de garantie.
5.2 La société Fiets Service Nederland se réserve le droit de
déterminer elle-même si le propriétaire peut prétendre à la prise en
charge d’une réclamation aux termes des présentes conditions de
garantie.
5.3 Les pièces envoyées devront être propres, les pièces du vélo/
de l’équipement de tness qui ne sont pas couvertes par les
présentes conditions de garantie et ne font pas l’objet d’un défaut
de construction et/ou de matériel devront être démontées. Lors de
la demande de garantie, le propriétaire du vélo/de l’équipement de
tness devra présenter le bon d’achat d’origine obtenu auprès d’un
revendeur of ciel autorisé par Fiets Service Nederland.
5.4 Les pièces faisant l’objet d’un défaut de construction et/ou de
matériau ne seront pas retournées au propriétaire après la prestation
de garantie.
Article 6 Responsabilité
6.1 Une réclamation de garantie retenue par Fiets Service
Nederland n’entraîne pas l’acceptation par Fiets Service Nederland
de la responsabilité des dommages éventuellement subis. La
responsabilité de Fiets Service Nederland n’excède en aucun cas
les limites stipulées dans les présentes conditions de garantie.
Toute responsabilité de Fiets Service Nederland. concernant de
quelconques dommages consécutifs est exclue.
Article 7 Droit applicable
7.1 Les présentes conditions de garantie sont régies par le droit
néerlandais. Dans le cas où une quelconque disposition des
présentes conditions de garantie serait nulle ou susceptible
d’annulation, cela n’affectera en rien l’applicabilité des autres
conditions de garantie.
Pour les réparations vous pouvez nous contacter par:
77
7777
77
7
Internet http://www. etsservicenederland.nl/service-french.html
777
.,
Service téléphone
+31 (0)570 - 606 939
777
E-mail: info@ etsservicenederland.nl
Le service après-vente est à votre disposition du lundi au vendredi inclus, de 09h00 à 12h30.
777
Fax*: +31 (0)570 - 677 014
777
Postadres: Bicycle Industry Group (BIG)
Solingenstraat 49
7421 ZR Deventer, Pays Bas
Pour béné cier de la garantie, nous vous prions de bien vouloir dans les deux semaines de la date d’achat, vous inscrire en ligne à www.
etsservicenederland.nl. Si vous n’êtes pas en mesure de s’inscrire en ligne, vous pouvez aussi avoir une copie de ce formulaire, accompagné
d’une copie de l’envoi de réception achat à l’adresse ci-dessous.
- 36 -
Vue explosée
- 37 -
Liste des pièces
NO. NOM QTY NO. NOM Aantal
1 ordinateur 1 51 38 embout 2
2 contrôle de la tension 1 52 cadre principal 1
3 Arc-vaisselle 1 53 embout 2
4 boulonner 1 54 stabilisatrice avant 1
5 Montant de guidon rejoindre 1
55
boulonner 2
6 Arc-vaisselle 4 56L/R logement 1sets
7 rondelle 14
57
boulonner 12
8 boulonner 8 58 Petit couvercle pour le logement 1
9
1 fi l Trunk 1
59
pochette plastique 2
10 Obturateurs 3 60 selle 1
11 Fil coffre 2 1 61 boulonner 2sets
12 2 fi ls de tension 1 62 Plaque de support droit 1
13 boulonner 1 63 bague 6
14 rondelle 4 64 roulement 12
15 roulement 2 65 roue PU 6
16 poulie 1 66 rouleau boîtier 3
17 bague 1 67 Plaque de support gauche 1
18 écrou 1 68 boulonner 3
19 écrou 2 69 aimant rond 1
20 écrou 3 70 écrou 1
21 Aluminium courroie à rouleaux 1 71 rondelle 2
22 volant 1 72 bague 2
23 bague 1 73 glissière rejoindre 1
24 écrou 1 74 boulonner 1
25 rondelle 2 75 boulonner 4
26 boulonner 1 76 rondelle 4
27 Ressort de tension 1 77 coussinet plantaire 4
28 étagère magnétique 1 78 vannes de fi n de course 2
29 grille de localisation de l'aimant 1 79 boulonner 1
30 aimant carré 8 80 Abordant 1
31 écrou 3 81 embout 1
32 rondelle 12 82 embout 2
33 boulonner 1 83 rester tube de rejoindre 1
34 rondelle 2 84 capteur 1
35 roulement 2 85 écrou 2
36 rouleau de brousse 1 86 écrou 1
37 écrou 1 87 écrou 1
38 porte-Grip 1 88 U 2
39 boulonner 2 89 bord 1
40 axe du repose-pieds 1 90 ches rondes 2
41 Repose-pieds 2 91 à petit culot 2
42 embout 2 92 à petit culot 1
43 Tube éponge 2 93 Dix clé à tête 1
44 guidon 1 94 clé hexagonale 2
45 ceinture 1 95 clé 1
46 écrou 6 96 clé 1
47 Sangle de repose-pieds 2 97 buisson 2
48 sac repose-pieds 2 98 rondelle 2
49 Axe platine courte 1 99 rondelle élastique 2
50 bouton 1 100 boulonner 2
- 38 -
PIECES DE MONTAGE DE RAMEUR
- 39 -
Instructions de montage
La plupart du matériel de montage a été emballée séparément, mais certains éléments ont été montés au préalable dans
les ensembles de montage identi és. Si tel est le cas et que le montage est nécessaire, il vous su t de retirer et de monter à
nouveau le matériel.
Veuillez consulter les étapes de montage individuelles et noter tout le matériel monté au préalable.
PRÉPARATION : Avant de procéder au montage, véri ez que vous disposer d’assez d’espace autour de l’article. Utilisez les
outils présents pour le montage. Avant de procéder au montage, veuillez véri er que toutes les pièces nécessaires sont
présentes. Il est fortement conseillé d’e ectuer le montage de cet appareil à deux personnes ou plus a n d’éviter le risque
de blessures.
Étape 1:
1) Monter le stabilisateur avant (54)
au châssis principal (52) à l’aide
des boulons (55), arc-rondelles (6),
rondelles (7) et les écrous (46).
Étape 2:
1) Tournez le tube séjour jointure (83)
dans l’espace support, le fi xer sur le
rail coulissant de jointure (73) avec le
brochage (80);
2) Branchez le câble du capteur (84) de
jointure coulissante sur rail (73) avec le
l 2 tronc (11) du châssis principal (52);
3) Monter le rail coulissant de jointure
(73) dans le cadre principal et
verrouiller avec la vis (74), la rondelle
(71) et l’écrou (70), dernière couvrir le
petit capuchon (90);
4) de verrouillage de la glissière et le
cadre principal (52) avec un bouton
(50) pour fi xer la glissière rejoindre.
- 40 -
Étape 3:
1) Placez l’axe platine courte (49) dans
le châssis principal (52),  xez le sac
repose-pieds (48) des deux côtés du
repose-pieds courts, verrouillez bien
avec la rondelle (32), la rondelle (7) et
l’écrou (46) ;
2) Placez l’axe platine (40) dans le
châssis principal (52),  xez la platine
(41) sur les deux côtés de l’axe palette
courte, serrure, il étroitement aide de
la rondelle (32), la rondelle (7) et l’écrou
(46).
Étape 4:
1) Reliez le  l de ligne 1 (9b) avec le  l 2
tronc (11b);
2) Branchez le câble de commande de
traction (2b) avec le  l 2 tension (12),
selon photo ci-dessus;
3) Insérez le montant du guidon
rejoindre (5) sur le châssis principal, le
verrouiller avec la vis (8), la rondelle (7)
et l’arc-vaisselle;
4) Placez le  l de l’ordinateur (1a) dans
la fente sur la table d’ordinateur, puis
insérez la table d’ordinateur de guidon
rejoint après (5), dernière connecter
le  l de ligne 1 (9a) avec du  l de
l’ordinateur (1a).;
5) Monter  ni! ..... S’il vous plaît
s’assurer que toutes les pièces sont
entièrement serrées avant d’utiliser.
- 41 -
Les instructions coulissantes pliantes ferroviaires:
La glissière de jointure (73) peut être
pliée lorsque la machine n’est pas
utilisée, afi n de ne pas prendre de la
place.
Itinéraire de la manière suivante:
1, Tirer vers le haut arrière coulissante
sur rail jointure (73) avant que la
machine est repliée, tel qu’il apparaît
dans l’image A. Dévisser le bouton
(50) jusqu’à ce que le cône se retire
complètement de la liaison ferroviaire
en aluminium (73), et dans le même
temps attirer l’bouton vers le bas
jusqu’à ce qu’il ne bouge plus. Ensuite,
prenez arrière coulissante sur rail
jointure (73) de l’autre main à un
angle jusqu’à ce que le bouton (50) se
détache de la glissière de jointure (73),
vous pouvez maintenant relâcher le
bouton (50) comme dans la fi gure B.
2, Lorsque la glissière de jointure (73)
tourne à un certain angle le bouton
(50) est automatiquement s’insérer
dans le trou de la glissière rejoindre (73), après cela, visser le bouton (50) serré comme le montre la fi gure F .
Attention! La selle se glisser vers le bas
Réglez le brochage dans un autre trou
de positionnement, lorsque le réglage
est terminé laisser le tube séjour
jointure (83) plié.
Attention! Il est facile de frapper votre
tête lorsque le rail est debout.
- 42 -
The sliding rail put-down
instructions: Le rail en aluminium
peut être posé lorsque la machine est
utilisée. Fonctionnement comme suit:
3, dévisser le pommeau (50) jusqu’à ce
que le cône se retire complètement
de la jointure coulissante sur rail (73),
et en même temps tirer le bouton vers
le bas jusqu’à ce qu’il ne bouge plus.
Puis tirez la glissière arrière jointure
(73) de l’autre main à un angle jusqu’à
ce que le bouton (50) se détache de la
glissière joindre lien (73), vous pouvez
maintenant relâcher le bouton (50)
comme indiqué dans D.
4, Lorsque la glissière de jointure (73)
est mis à la baisse sur le sol, le bouton
(50) est automatiquement s’insérer
dans le trou de la glissière de jointure
(73), après cela, visser le bouton (50)
serrés comme indiqué dans fi g E.
Placez le brochage (80) dans un autre
trou de positionnement après le rail
jointure coulissante (73) est mis vers le
bas sur le sol, puis ajustez le tube séjour
jointure (83) vers le haut à l’arrière
- 43 -
Utilisation de la console électronique
SPÉCIFICATIONS:
Functions:
AUTO CYCLE
Every 6 seconds
TIME 0:00~99:59(MINUTE:Second)
STROKES 0~9999
STROKES/ OVERALL
0~9999
STROKES/MIN 0~1200
KJOULE 0.0~999.9kjoule
Type de batterie 2x AA type
Température de fonctionnement 0˚C ~ +40˚C (32˚F ~ 104˚F)
Température de stockage -10˚C ~ +60˚C (14˚F ~ 140˚F)
FONCTIONS DES TOUCHES :
MODE : Cette touche vous permet de sélectionner la fonction de votre choix.
PROCÉDURES D’UTILISATION :
1. AUTO ON/OFF (MARCHE/ARRÊT AUTOMATIQUE)
* Le système se met en marche quand l’utilisateur appuie sur une touche quelconque ou après avoir reçu un
signal du capteur de vitesse.
* Le système s’arrête automatiquement quand le capteur ne reçoit aucun signal ou quand l’utilisateur na pas appuyé
sur une touche pendant environ 4 minutes.
2. RESET (REMISE À ZÉRO) :
La console électronique peut être remise à zéro par le remplacement des piles ou en appuyant sur la touche MODE pendant
3 secondes.
3. MODE :
Pour sélectionner les modes SCAN ou LOCK, si vous ne souhaitez pas utiliser le mode SCAN, appuyez sur la touche MODE
lorsque la  èche sur la fonction souhaitée commence à clignoter.
4. FONCTIONS :
TEMPS : Appuyez sur la touche MODE jusqu’à ce que la  èche () indique TIME.
Lécran a che la durée totale d’entraînement.
VITESSE : Appuyez sur la touche MODE jusqu’à ce que la  èche () indique SPEED.
Lécran a che la vitesse actuelle.
DISTANCE : Appuyez sur la touche MODE jusqu’à ce que la  èche () indique DISTANCE.
Lécran a che la distance de chaque entraînement.
ODOMÈTRE : Appuyez sur la touche MODE jusquà ce que la  èche () indique ODOMETER.
Lécran a che la distance totale accumulée.
FRÉQUENCE CARDIAQUE :
Appuyez sur la touche MODE jusqu’à ce que la  èche () indique PULSE.
Lécran a che la fréquence cardiaque actuelle de l’utilisateur en battements par minute.
Placez la paume de vos mains sur les deux coussinets des capteurs (ou  xez le clip d’oreille sur
votre oreille), et patientez 30 secondes pour obtenir la lecture la plus précise.
CALORIES : Appuyez sur la touche MODE jusqu’à ce que la  èche () indique CALORIES.
Lécran a che la quantité de calories brûlées.
SCAN : Les fonctions suivantes sont a chées automatiquement dans l’ordre suivant :
SCAN - DISTANCE - TEMPS - ODOMÈTRE - CALORIES - FRÈQUENCE CARDIAQUE
PILES
Cette console électronique utilise une ou deux piles. Il faut réinstaller les piles si l’a chage à l’écran nest pas satisfaisant.
- 44 -
Maintenance et dépannage
1. Véri ez que tous les boulons et écrous sont bien serrés et que les pièces tournantes tournent avec souplesse et ne sont
pas endommagées.
2. Nettoyez l’appareil uniquement avec une solution nettoyante douce et un chi on légèrement humide. N’utilisez aucun
solvant pour nettoyer l’appareil.
Pannes et remèdes
Panne Cause Remède
Base non stable
1. Le sol n'est pas plan ou il y un
petit objet présent sous l'un des
stabilisateurs
2. Les bouchons d'extrémité du
stabilisateur arrière n'ont pas été
mis à niveau lors du montage
1. Retirez l'objet
2. Réglez les bouchons d'extrémité du
stabilisateur arrière
Le guidon ou la selle
vibre.
Les boulons ou le bouton de la tige
de selle sont desserrés
Resserrez les boulons et le bouton de la
tige de selle
Bruit important
provenant des pièces
tournantes
Les pièces ne sont pas bien montées Ouvrez les carters et ajustez les pièces
Absence de
résistance pendant
l'utilisation du vélo
droit
1. L'intervalle de résistance
magnétique augmente
2. Le réglage de résistance est
endommagé
La courroie d'entraînement patine
Les roulements sont endommagés
Ouvrez les carters et ajustez les pièces
Remplacez le réglage de résistance
Ouvrez les carters et ajustez les pièces
Remplacez les roulements
- 45 -
Conseils généraux de condition physique
Consultez votre médecin de famille
Avant d’utiliser ce matériel de remise en forme, il est prudent de vous faire examiner par votre propre
médecin généraliste ou spécialiste. Avant de vous entraîner régulièrement avec ce matériel il faut demander
la permission de votre médecin de famille. Si vous présentez des symptômes pendant l’utilisation de ce
matériel, il faut immédiatement consulter votre médecin de famille. Une utilisation avisée ou réfl échie de cet
appareil est d’une importance essentielle. Assurez-vous qu’il n’y a pas d’enfants dans les alentours lors de
l’utilisation de l’appareil. L’appareil doit être entreposé dans un endroit inaccessible aux enfants.
Portez des vêtements confortables
Portez toujours des vêtements confortables quand vous utilisez cet appareil et des chaussures de gymnastique.
Ne portez pas des vêtements amples qui peuvent se déchirer lors de l’entraînement.
Contrôlez votre appareil
Vérifi ez si toutes les vis et tous les boulons de l’appareil ont été bien serrés avant l’utilisation. Un entretien
régulier est très important pour la condition de l’appareil.
Déterminez votre propre rythme
Le degré d’entraînement sur cet appareil dépend de votre condition physique. Si vous n’avez pas pratiqué
d’exercice physique régulier pendant quelques années ou si vous avez quelques kilos de trop, il est plus
sage de commencer lentement avec quelques minutes par semaine. Dans un premier temps vous ne pourrez
soutenir les exercices que pendant quelques minutes mais vous améliorerez votre endurance dans 6 à 8
semaines. Ne soyez pas déçu si cela prend quelques semaines de plus. Il est important de déterminer son
propre rythme. A la fi n vous pourrez suivre l’exercice pendant plus de 30 minutes. Meilleure est votre condition
physique, plus diffi cile il est de la préserver. Mais attention, suivez les conseils suivants : Consultez votre
médecin avant de commencer le programme d’entraînement. Laisser le vous conseiller quant aux exercices
du programme mais également quant à votre régime alimentaire. Commencez l’entraînement à un rythme
calme et ne soyez pas trop exigeant. En plus de ces exercices, pratiquez d’autres sports comme la marche,
la natation, la danse et du vélo par exemple. Contrôlez régulièrement votre fréquence cardiaque. Si vous
n’avez pas de pulsomètre, vous pouvez demander à votre médecin comment procéder. Déterminez votre
fréquence cardiaque. Prenez votre âge et condition physique en compte. Buvez toujours suffi samment de
liquides pendant les exercices sur cet appareil. Assurez-vous que votre bilan d’eau reste équilibré afi n d’éviter
la déshydratation. Les boissons doivent être à température ambiante. Ne buvez pas trop de liquide froid.
Contrôlez votre fréquence cardiaque
Pour contrôler votre fréquence cardiaque il faut d’abord savoir comment procéder. La façon la plus facile est
de mettre les doigts sur l’artère dans le cou, entre les muscles et les voies respiratoires. Comptez le nombre
de pulsations pendant 10 secondes et multipliez le nombre obtenu par 6. Ceci vous donne les pulsations
cardiaques par minute.
Exercices a votre rythme
Quel doit être votre fréquence cardiaque pendant les exercices ? Votre médecin peut vous renseigner sur
votre fréquence cardiaque.
Âge
Fréquence cardiaque
50-75%
(pulsations par
minute)
Fréquence
cardiaque
maximale100%
20 Ans 100-150 200
25 Ans 98-146 195
30 Ans 95-142 190
35 Ans 93-138 185
40 Ans 90-135 180
45 Ans 88-131 175
50 Ans 85-127 170
55 Ans 83-123 165
60 Ans 80-120 160
65 Ans 78-116 155
70 Ans 75-113 150
- 46 -
Echau ement détente
Un exercice réussi commence avec l’échau ement et se termine avec la détente. Faites tous les exercices deux ou trois fois
par semaine et prenez un jour de repos entre les jours d’entraînement. En l’espace de quelques mois vous pouvez augmenter
le nombre de sessions d’entraînement à 5 ou 6 fois par semaine. Léchau ement est très important avant de commencer un
exercice. Ainsi votre corps se prépare pour e ectuer des e orts. A n d’éviter des problèmes musculaires, vous devez également
faire des exercices de détente après l’entraînement. Nous vous conseillons de faire les exercices d’échau ement et de détente
suivants.
Exercices de la tête
Tournez la tête à droite et sentez la tension dans le cou. Tournez le menton vers le plafond
et gardez la bouche ouverte. Tournez la tête à droite et baissez-la sur la poitrine. Répétez ces
exercices plusieurs fois.
Exercices d’épaule
Levez l’épaule gauche puis l’épaule droite en baissant l’épaule gauche en même temps.
Exercices de stretching avec les bras
Etendez le bras gauche vers le plafond et ensuite le bras droit en baissant le bras gauche en
même temps. Sentez la tension dans la hanche droite et gauche. Répétez ces exercices plusieurs
fois.
Exercices abdo-fessiers
Placez une main contre le mur et attrapez le pied et levez le pied droit. Rapprochez le talon le plus
proche possible des fesses. Faites l’exercice 15 fois et répétez-le avec le pied gauche.
Etirer l’intérieur des cuisses et des jambes
Asseyez-vous par terre et posez vos pieds l’un contre l’autre avec les genoux orientés vers
l’extérieur. Rapprochez les pieds le plus proche possible des aines. Poussez vos genoux
prudemment vers l’extérieur contre le sol. Répétez cet exercice si possible 15 fois.
- 47 -
Toucher les orteils
Penchez-vous vers l’avant lentement et essayez de toucher les pieds avec les mains. Penchez-
vous le plus loin possible et répétez cet exercice 15 fois.
Exercices des tendons du jarret
Asseyez-vous par terre et étendez la jambe droite. Pliez la jambe gauche et posez le pied contre
la cuisse droite. Touchez le pied droit avec le bras droit. Faites l’exercice 15 fois et répétez le
même exercice avec la jambe gauche.
Exercices des mollets/tendons d’achillée
Posez les deux mains contre le mur et appuyez avec tout votre corps sur les mains. Placez les
jambes vers l’arrière à tour de rôle. Vous pouvez tendre la jambe arrière. Répétez cet exercice 15
fois pour chaque jambe.
Exercices aérobic et poids
Exercices aérobic
Les exercices aérobic facilitent un bon approvisionnement en oxygène des muscles par votre cœur et vos poumons : les
muscles les plus importants de votre corps. Les exercices aérobic constituent un élément essentiel de tous les exercices
physiques et ils doivent être e ectué avant chaque activité sportive.
Haltérophilie
Les exercices aérobic vous aident à perdre la graisse super ue de votre corps. L’haltérophilie par contre vous aide à édi er et
renforcer les muscles.
Mais attention : avant de commencer l’entraînement, consultez d’abord votre médecin.
- 48 -
41

Hulp nodig? Stel uw vraag in het forum

Spelregels
1

Forum

Rossler-021095-Preon-Magnetic

Misbruik melden

Gebruikershandleiding.com neemt misbruik van zijn services uitermate serieus. U kunt hieronder aangeven waarom deze vraag ongepast is. Wij controleren de vraag en zonodig wordt deze verwijderd.

Product:

Bijvoorbeeld antisemitische inhoud, racistische inhoud, of materiaal dat gewelddadige fysieke handelingen tot gevolg kan hebben.

Bijvoorbeeld een creditcardnummer, een persoonlijk identificatienummer, of een geheim adres. E-mailadressen en volledige namen worden niet als privégegevens beschouwd.

Spelregels forum

Om tot zinvolle vragen te komen hanteren wij de volgende spelregels:

Belangrijk! Als er een antwoord wordt gegeven op uw vraag, dan is het voor de gever van het antwoord nuttig om te weten als u er wel (of niet) mee geholpen bent! Wij vragen u dus ook te reageren op een antwoord.

Belangrijk! Antwoorden worden ook per e-mail naar abonnees gestuurd. Laat uw emailadres achter op deze site, zodat u op de hoogte blijft. U krijgt dan ook andere vragen en antwoorden te zien.

Abonneren

Abonneer u voor het ontvangen van emails voor uw Rossler 021095 Preon Magnetic bij:


U ontvangt een email met instructies om u voor één of beide opties in te schrijven.


Ontvang uw handleiding per email

Vul uw emailadres in en ontvang de handleiding van Rossler 021095 Preon Magnetic in de taal/talen: Nederlands, Engels, Frans als bijlage per email.

De handleiding is 3,16 mb groot.


U ontvangt de handleiding per email binnen enkele minuten. Als u geen email heeft ontvangen, dan heeft u waarschijnlijk een verkeerd emailadres ingevuld of is uw mailbox te vol. Daarnaast kan het zijn dat uw internetprovider een maximum heeft aan de grootte per email. Omdat hier een handleiding wordt meegestuurd, kan het voorkomen dat de email groter is dan toegestaan bij uw provider.

Stel vragen via chat aan uw handleiding

Stel uw vraag over deze PDF

Uw handleiding is per email verstuurd. Controleer uw email

Als u niet binnen een kwartier uw email met handleiding ontvangen heeft, kan het zijn dat u een verkeerd emailadres heeft ingevuld of dat uw emailprovider een maximum grootte per email heeft ingesteld die kleiner is dan de grootte van de handleiding.

Er is een email naar u verstuurd om uw inschrijving definitief te maken.

Controleer uw email en volg de aanwijzingen op om uw inschrijving definitief te maken

U heeft geen emailadres opgegeven

Als u de handleiding per email wilt ontvangen, vul dan een geldig emailadres in.

Uw vraag is op deze pagina toegevoegd

Wilt u een email ontvangen bij een antwoord en/of nieuwe vragen? Vul dan hier uw emailadres in.


Info