574286
72
Verklein
Vergroot
Pagina terug
1/75
Pagina verder
Gebrauchsanleitung
Instruction Manual
Manuel d’Utilisation
Manual del Usuario
Rollei Prego dp5200
Downloaded from www.Manualslib.com manuals search engine
Digital Camera >>
2-E
FCC STATEMENT
This device complies with Part 15 of the FCC Rules. Operation is subject to the
following two conditions:
(1) This device may not cause harmful interference, and
(2) This device must accept any interference received, including interference
that may cause undesired operation.
Note:
This equipment has been tested and found to comply with the limits for
Class B digital devices, pursuant to Part 15 of the FCC rules. These limits
are designed to provide reasonable protection against harmful interference
in a residential installation. This equipment generates, uses and can radiate
radio frequency energy and, if not installed and used in accordance with
the instructions, may cause harmful interference to radio communications.
However, there is no guarantee that interference will not occur in a particular
installation. If this equipment does cause harmful interference to radio or
television reception, which can be determined by turning the equipment off
and on, the user is encouraged to try to correct the interference by one or
more of the following measures:
Reorient or relocate the receiving antenna
Increase the separation between the equipment and receiver
Connect the equipment into an outlet on a circuit different from that to which
the receiver is connected
Consult the dealer or an experienced radio/TV technician for help
Use of shielded cable is required to comply with Class B limits in Subpart B of
Part 15 of the FCC rules. Do not make any changes or modifications to the
equipment unless otherwise specified in the manual. If such changes or
modifications should be made, you could be required to stop operation of the
equipment.
Downloaded from www.Manualslib.com manuals search engine
User’s Manual >>
E-3
TRADEMARK INFORMATION
Microsoft
®
and Windows
®
are U.S. registered trademarks of Microsoft
Corporation.
Pentium
®
is a registered trademark of Intel Corporation.
Macintosh is a trademark of Apple Computer, Inc.
SD
TM
is a trademark.
Other names and products may be trademarks or registered trademarks of
their respective owners.
READ THIS FIRST
Notice:
1. Product design and specifications are subject to change without notice.
This includes primary product specifications, software, software drivers,
and user’s manual. This User Manual is a general reference guide for the
product.
2. The product and accessories that come with your camera may be different
from those described in this manual. This is due to the fact that different
retailers often specify slightly different product inclusions and accessories
to suit their market requirements, customer demographics, and geographical
preferences. Products very often vary between retailers especially with
accessories such as batteries, chargers, AC adapters, memory cards, cables,
carrying cases/pouches, and language support. Occasionally a retailer will
specify a unique product color, appearance, and internal memory capacity.
Contact your dealer for precise product definition and included accessories.
3. The illustrations in this manual are for the purpose of explanation and may
differ from the actual design of your camera.
4. The manufacturer assumes no liability for any errors or discrepancies in
this user manual.
5. For driver updates, refer to our website.
Downloaded from www.Manualslib.com manuals search engine
Digital Camera >>
4-E
Safety Instructions
Read and understand all Warnings and Cautions before using this product.
WARNING
If foreign objects or water have entered the camera, turn the power
OFF and remove the battery and the AC power adapter.
Continued use in this state might cause fire or electric shock. Consult
the store of purchase.
If the camera has fallen or its case has been damaged, turn the
power OFF and remove the battery and the AC power adapter.
Continued use in this state might cause fire or electric shock. Consult
the store of purchase.
Do not disassemble, change or repair the camera.
This might cause fire or electric shock. For repair or internal inspection,
ask the store of purchase.
Use the specified AC power adapter only with the indicated power
supply voltage.
Use with any other power supply voltage might cause fire or electric
shock.
Do not use the camera in areas near water.
This might cause fire or electric shock. Take special care during rain,
snow, on the beach, or near the shore.
Do not place the camera on inclined or unstable surfaces.
This might cause the camera to fall or tilt over, causing injury.
Keep the battery out of the reach of children.
Swallowing battery might cause poisoning. If the battery is accidentally
swallowed, immediately consult a physician.
Do not use the camera while you are walking, driving or riding a
vehicle.
This might cause you to fall over or result in traffic accident.
Downloaded from www.Manualslib.com manuals search engine
User’s Manual >>
E-5
CAUTION
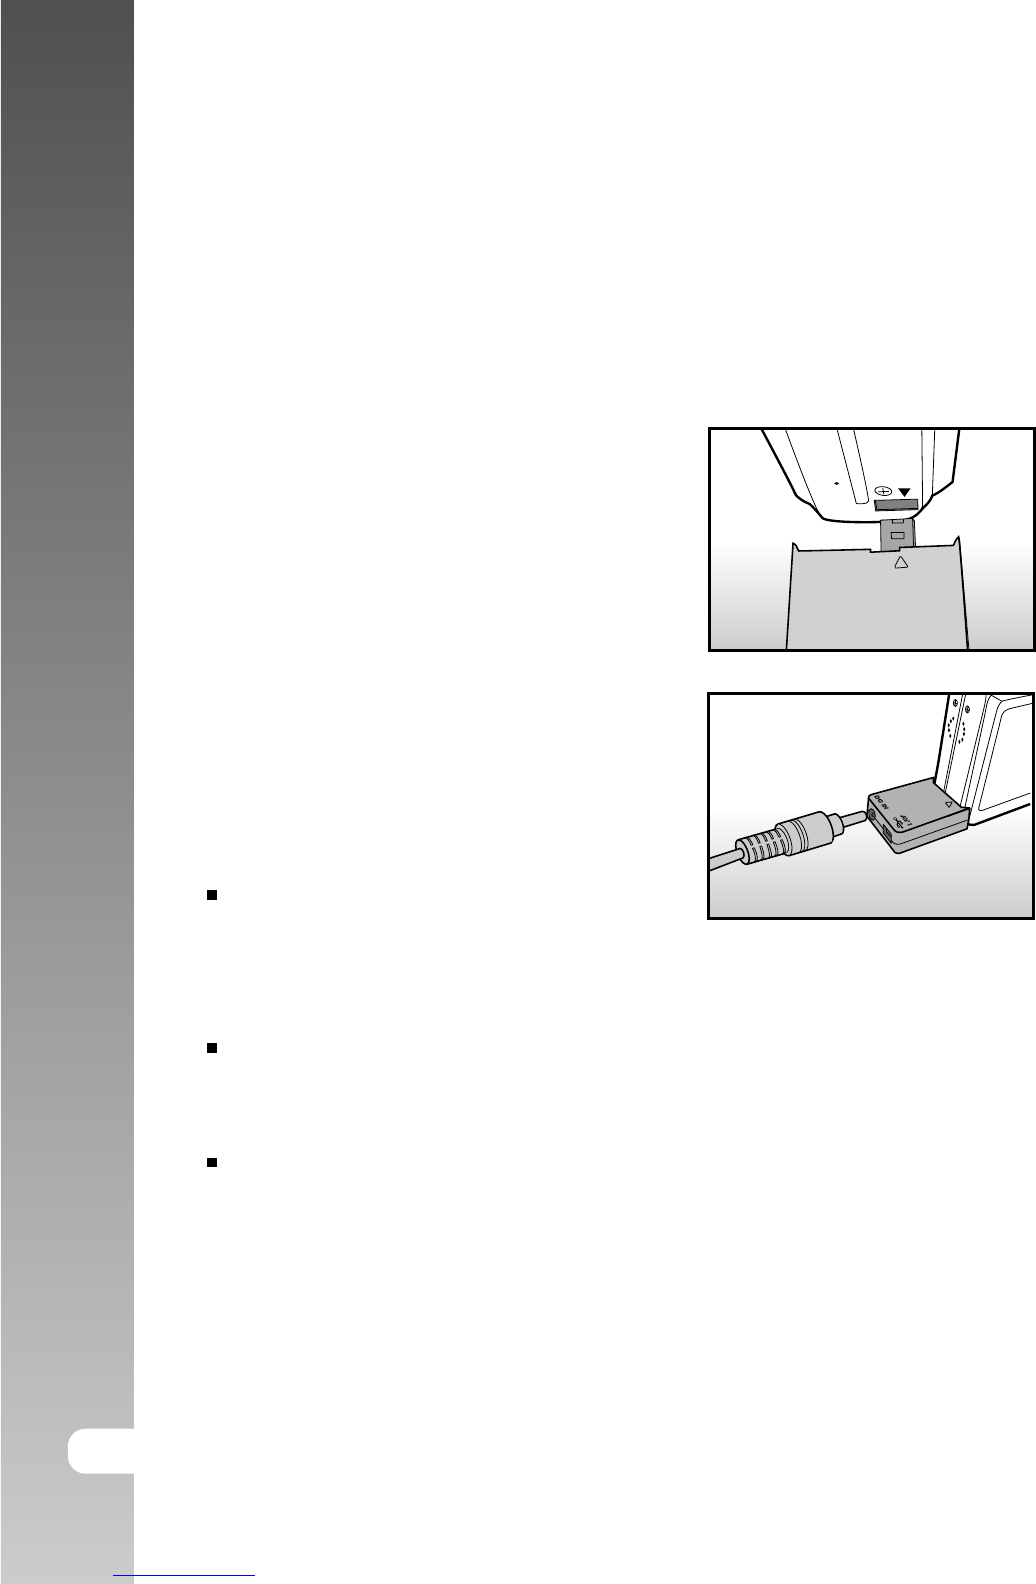
Insert the battery paying careful attention to the polarity (+ or –) of
the terminals.
Inserting the battery with its polarities inverted might cause fire and
injury, or damage to the surrounding areas due to the battery rupturing
or leaking.
Do not fire the flash close to anyone’s eyes.
This might cause damage to the person’s eyesight.
Do not subject the LCD monitor to impact.
This might damage the glass on the screen or cause the internal fluid
to leak. If the internal fluid enters your eyes or comes into contact with
your body or clothes, rinse with fresh water. If the internal fluid has
entered your eyes, consult a physician to receive treatment.
A camera is a precision instrument. Do not drop it, strike it or use
excessive force when handling the camera.
This might cause damage to the camera.
Do not use the camera in humid, steamy, smoky, or dusty places.
This might cause fire or electric shock.
Do not remove the battery immediately after long period of
continuous use.
The battery becomes hot during use. Touching a hot battery might
cause burns.
Do not wrap the camera or place it in cloth or blankets.
This might cause heat to build up and deform the case, resulting in fire.
Use the camera in a well-ventilated place.
Do not leave the camera in places where the temperature may rise
significantly, such as inside a car.
This might adversely affect the case or the parts inside, resulting in fire.
Before you move the camera, disconnect cords and cables.
Failure to do this might damage cords and cables, resulting in fire and
electric shock.
Downloaded from www.Manualslib.com manuals search engine
Digital Camera >>
6-E
Notes on Battery Usage
When you use the battery, carefully read and strictly observe the Safety
Instructions and the notes described below:
Use only the specified battery (3.7V).
Avoid using the battery in extremely cold environments as low temperatures
can shorten the battery life and reduce camera performance.
When you are using the new rechargeable battery or rechargeable battery
that has not been used for an extended period of time (the battery that
passed the expiry date is an exception) might affect the number of pictures
that can be taken. Therefore, to maximize its performance and lifetime, we
recommend that you fully charge the battery and discharge it for at least
one complete cycle before use.
The battery may feel warm after long period of continuous use of the camera
or the flash. This is normal and not a malfunction.
The camera may feel warm after long period of continuous use. This is
normal and not a malfunction.
If the battery is not to be used for a long period of time, remove it from the
camera to prevent leakage or corrosion.
If the battery is not to be used for a long period of time, store it after no
battery power left. If the battery is stored for a long time in a fully charged
state, its performance may be impaired.
Always keep the battery terminals in a clean state.
Downloaded from www.Manualslib.com manuals search engine
User’s Manual >>
E-7
CONTENTS
9 INTRODUCTION
9 Overview
11 Package Contents
12 GETTING TO KNOW THE CAMERA
12 Front View
13 Rear View
15 Status LED Indicator
16 LCD Monitor Icons
18 GETTING STARTED
18 Attaching the Camera Strap
19 Inserting and Removing the Battery (Optional Accessory)
20 Charging the Battery
22 Inserting and Removing the SD Card (Optional Accessory)
23 Turning the Power On/Off
24 Setting the Date and Time
25 Choosing the Language
26 Formatting the SD Card
27 Setting Image Resolution and Quality
29 PHOTOGRAPHY MODE
29 [ ] Still Image Mode
30 Recording Voice Memos
31 Using the Optical Zoom
32 Using the Digital Zoom
33 Setting the Flash
35 Setting the Focus
36 Setting the Self-timer
37 Exposure Compensation/Backlight Correction
39 [ ] Movie Mode
Downloaded from www.Manualslib.com manuals search engine
Digital Camera >>
8-E
40 [ ] PLAYBACK MODE
40 Playing Back Still Images
41 Playing Back Video Clips
43 Playing Back Still Images/Video Clips on a TV
44 Attaching Voice Memos
45 Thumbnail Display
46 Zoom Playback
47 Slideshow Display
48 Protecting Images
50 DPOF Settings
52 [ ] Erasing Images
54 MENU OPTIONS
54 Still Image Menu (Picture)
57 Still Image Menu (Function)
60 Movie Menu (Picture)
61 Movie Menu (Function)
62 Playback Menu
63 Setup Menu (In Photography Mode)
65 Setup Menu (In Playback Mode)
67 TRANSFERRING RECORDED IMAGES AND VIDEOS TO YOUR
COMPUTER
68 Step 1: Installing the USB Driver
69 Step 2: Connecting the Camera to Your Computer
70 Step 3: Downloading Images and Video Files
71 INSTALLING PHOTOSUITE
72 INSTALLING PHOTOVISTA
73 CONNECTING THE CAMERA TO OTHER DEVICES
74 CAMERA SPECIFICATIONS
Downloaded from www.Manualslib.com manuals search engine
User’s Manual >>
E-9
INTRODUCTION
Overview
Congratulations on your purchase of the new digital camera.
Capturing high-quality digital pictures is fast and easy with this state-of-the-art
smart camera. Equipped with a 5.2 Mega pixels CCD, this camera is capable of
capturing pictures with a resolution of up to 2560 x 1920 pixels.
Other cool features provided by the camera include the following:
LCD monitor - 2.5" LTPS TFT color LCD monitor makes it easy
to frame your subject when taking pictures. It also
displays the pictures you have taken.
Recording media - External memory supports SD card up to 512MB.
Optical zoom - 3x optical lens allows you to take telephoto and
wide-angle pictures.
Digital zoom - 4x digital zoom and 3x optical zoom permit zoom
photography of up to 12 times; 2x and 4x playback
captured images to enlarge a selected portion of
an image.
Flexible flash settings - Change the flash setting according to your
lighting environment and photography mode setting.
Focus mode - Photographs can be taken with the distance to the
subject set by auto focus, macro or infinity.
Self-timer mode - Time selectable between 10 seconds, 2 seconds
and 10+2 seconds.
Capture mode - Take different still images including single, a series
of 3 images with different exposures, and 3 images
continuously.
Movie mode - Record video clips with voice.
Downloaded from www.Manualslib.com manuals search engine
Digital Camera >>
10-E
Voice memo - A voice memo can be recorded once for 30
seconds at photography mode immediately
following a still image captured or at playback
mode while viewing the picture.
Camera settings - Have more control over picture quality by adjusting
the menu options.
Thumbnail display - Display in sets of nine pictures on the LCD monitor
for easier and quicker selection of pictures.
TV and PC connection - View pictures on a television monitor or computer
while connected to the USB or A/V cable.
DPOF settings - Allow you to embed printing information on your
SD card and to print your images on a DPOF
compatible printer by simply inserting it.
Downloaded from www.Manualslib.com manuals search engine
User’s Manual >>
E-11
Package Contents
Carefully unpack your camera and ensure that you have the following items.
Common Product Components:
Digital camera
A/V cable
User’s manual
USB cable
Software CD-ROM
Camera strap
Camera pouch
Conversion adapter
Common (Optional) Accessories:
SD card
AC power adapter
Rechargeable lithium-ion battery
Battery charger
Downloaded from www.Manualslib.com manuals search engine
Digital Camera >>
12-E
GETTING TO KNOW THE CAMERA
Front View
# Name Description
1. Shutter button Focuses and locks the exposure of the camera when
pressed halfway down, and takes the picture when
pressed all the way down.
2. POWER button Turns the camera power on and off.
3. Flash Provides flash illumination.
4. Mode switch Sets the camera mode.
Selects this when taking still images.
Selects this when recording video clips.
Performs image playback and deletion.
5. Self-timer LED Blinks red during Self-timer mode until picture is
(AF auxiliary light) taken.
6. Speaker Produces camera sounds and plays recorded audio.
7. Lens 3x optical zoom lens allows you to take telephoto and
wide-angle pictures.
8. Conversion adapter Allows you to connect the conversion adapter to an AC
terminal power adapter to the camera to operate the camera
without battery, or to charge rechargeable lithium-ion
battery or to connect a USB cable or an A/V cable to
the camera.
9. Microphone Records audio clips.
Downloaded from www.Manualslib.com manuals search engine
User’s Manual >>
E-13
Rear View
# Name Description
1. LCD monitor Provides menu information to operate the camera,
and previews the picture before taking it and review
it afterwards.
2. Display button Turns the LCD monitor display and live view on
and off.
3. Status LED Displays the camera current state.
4. Zoom in button Zooms the lens to telephoto position.
Zoom out button Zooms the lens to wide-angle position.
5. MENU button Toggles OSD menu on and off.
6.
Erase button Allows you to erase the picture.
7. Strap holder Camera strap attachment.
8. SET /Direction button Allows you to scroll through menus and pictures,
and then select choices.
9. Battery/SD card cover Allows access to the battery and insert or remove
the memory card.
10. Tripod socket Allows tripod mounting.
Downloaded from www.Manualslib.com manuals search engine
Digital Camera >>
14-E
SET /Direction button
# Name Description
1. button Scrolls upwards.
Focus button Allows you to choose the appropriate focus
setting.
2. button Scrolls right.
Flash button Allows you to choose the appropriate flash
setting.
3. button Scrolls downwards.
Self-timer button Allows you to toggle the self-timer on and
off, selects the desired self-timer mode.
4.
button Scrolls left.
Exposure compensation Allows you to toggle the exposure
/ Backlight correction button compensation / backlight correction on and
off.
5. SET button Enters the menu page and confirms the
chosen setting.
Downloaded from www.Manualslib.com manuals search engine
User’s Manual >>
E-15
Status LED Indicator
This describes the color and state of the status LED.
During
connection to a
PC
-
-
In communication
to PC. (SD card
is inserted.)
-
-
SD card is not
inserted.
Color
Green
Red
Orange
State
On
Flashing
On
Flashing
On
Flashing
During power
off
The completion
of battery charge.
Battery charging
in progress.
Battery charging
error.
-
-
-
During
photography
AE or AF is locked
with the shutter
button held halfway.
-
Writing to SD card
in progress.
When the image is
not in focus.
Charging of the
flash in progress.
Hardware
malfunction.
Downloaded from www.Manualslib.com manuals search engine
Digital Camera >>
16-E
LCD Monitor Icons
Photography mode [ ]
1. Zoom status
2. Voice memo
3. Remaining battery status
[
] Full battery power
[
] Medium battery power
[
] Low battery power
[
] No battery power
4. Flash icon
[Blank] Auto
[
] Red-eye Reduction
[
] Forced Flash
[
] Suppressed Flash
[
] Night Scene
5. [
] Histogram
6. Focus area (When the shutter
button is pressed halfway.)
7. Capture mode icon
[Blank] Single
[
] Continuous
[ AEB ] Auto Exp.
8. Image size
[
] 2560 x 1920
[
] 2048 x 1536
[
] 1280 x 960
[
] 640 x 480
9. Possible number of shots
10. Quality
[
] Fine
[
] Standard
[
] Economy
11. Date and time
12. Self-timer icon
[
10s] 10 sec.
[
2s ] 2 sec.
[
10+2s ] 10+2 sec.
13. Unsteady hold warning icon
14. [
] Exposure compensation
[
] Backlight correction
15. Metering icon
[ Blank ]Multi
[
] Spot
16. White balance icon
[ Blank ]Auto
[
] Incandescent
[
1
] Fluorescent 1
[
2
] Fluorescent 2
[
] Day Light
[
] Cloudy
[
] Manual
17. Focus icon
[Blank] Auto focus
[
] Macro
[
] Infinity
18. [
] Still image mode
Each press of the button switches one step in the sequence of Normal
display (displaying the icons, etc), Normal and Histogram, display OFF,
LCD monitor OFF.
Downloaded from www.Manualslib.com manuals search engine
User’s Manual >>
E-17
Photography mode [ ]
1. [ ] Movie mode
2. Zoom status
3. Remaining battery status
4. Image size
5. Possible recording time
/ elapsed time
6. Quality
7. Recording indicator
8. Self-timer icon
9. Focus icon
Playback mode [ ] -Still image playback
1. Mode icon
2. File number
3. Folder number
4. Protect icon
5. Voice memo
Playback mode [ ]-Video playback
1. Video status bar
2. Elapsed time
3. File number
4. Folder number
5. Protect icon
6. Mode icon
7. Play mode
8. Sound off icon (When the
[ ] button is pressed
during video playback.)
9. Total time
Downloaded from www.Manualslib.com manuals search engine
Digital Camera >>
18-E
GETTING STARTED
Attaching the Camera Strap
Attach the camera strap as shown in the illustration.
Downloaded from www.Manualslib.com manuals search engine
User’s Manual >>
E-19
Inserting and Removing the Battery (Optional
Accessory)
We highly recommend using specified rechargeable lithium-ion battery (3.7V)
to fully demonstrate this camera’s function. Charge the battery before using the
camera. Make sure that the power of the camera is off before inserting or
removing the battery.
Inserting the Battery
1. Open the battery/SD card cover.
2. Insert the battery in the correct orientation
shown.
Tilt the battery lock lever in the direction
of the arrow and orient the battery so
that its label is facing to the rear side of
the camera, and then insert the battery.
3. Close the battery/SD card cover.
Removing the Battery
Open the battery/SD card cover and then release the battery lock lever. When
the battery has come out a little, slowly pull it out the rest of the way.
Downloaded from www.Manualslib.com manuals search engine
Digital Camera >>
20-E
Charging the Battery
Using the optional AC power adapter may charge the battery or operate the
camera as power supply. Make sure that the power of the camera is off and
then insert the battery before starting.
1. Insert the conversion adapter into the
conversion adapter terminal of the camera
as shown in the illustration.
2. Insert one end of the AC power adapter
into the DC IN terminal of the conversion
adapter.
3. Insert the other end of the AC power
adapter into a wall outlet.
The status LED flashes green when
charging is started and lights green when
charging is completed. It lights red when
a charging error occurs.
It is recommended to fully discharge or
exhaust the battery before being
charged.
Charging time varies according to the
ambient temperature and the status of
battery.
Downloaded from www.Manualslib.com manuals search engine
User’s Manual >>
E-21
This camera must be used with specified AC power adapter. Damage
caused by the use of an incorrect adapter is not covered under the
warranty.
When the charging is not started even if following the above procedure,
turn the power on at any mode after LCD monitor turns on, and then turn
the power off.
The battery may feel warm after it has been charged or immediately
after being used. This is normal and not a malfunction.
When using the camera in cold areas, keep the camera and battery
warm by holding them inside your outer cloth.
If you open the battery cover without removing the battery, the power
will not be terminated. If you remove the battery, you have to insert the
battery again in a period of 2 hours in order to make sure that the date
and time will not be reset.
Downloaded from www.Manualslib.com manuals search engine
Digital Camera >>
22-E
Inserting and Removing the SD Card (Optional
Accessory)
Images photographed with this camera will be stored on the SD card. Without
inserting the SD card, you cannot take photographs using the camera. Before
inserting or removing the SD card, make sure that the power of the camera is
off.
Inserting the SD card
1. Open the battery/SD card cover.
2. Insert the SD card in the correct orientation
shown.
Hold the SD card with its front side of
the SD card (printed arrow) facing the
rear side of the camera, and then insert
the card as far as it can go.
3. Close the battery /SD card cover.
Removing the SD card
Open the battery/SD card cover, press lightly on the edge of the SD card and it
will eject.
If the camera is powered on without an SD card inserted into the camera,
the “NO CARD” message appears on the LCD monitor.
To prevent valuable data from
being accidentally erased from an
SD card you can slide the write-
protected tab (on the side of the SD
card) to “LOCK”.
To save, edit or erase data on an SD card, you must unlock the card.
This camera does not support MultiMediaCard
TM
.
Downloaded from www.Manualslib.com manuals search engine
User’s Manual >>
E-23
Turning the Power On/Off
Load the battery and insert an SD card before starting.
Turning the power on
Press the POWER button to turn the power on.
The status LED lights green and the
camera is initiated.
When the power is turned on, the camera
will start in the mode that was set.
Turning the power off
Press the POWER button to turn the power off.
The power is turned off automatically when the camera has not been
operated for a fixed period time. To resume the operation condition, turn
the power on again. Refer to section in this manual titled “Auto OFF” in
the Setup Menu (In Photography Mode) for further details.
After the power is turned on, it may take several seconds to charge the
flash. While the flash is being charged, the status LED lights orange,
and then the camera is not yet ready for photography. Start photography
after the status LED is turned off.
Downloaded from www.Manualslib.com manuals search engine
Digital Camera >>
24-E
Setting the Date and Time
The date/time needs to be set if/when:
Camera is turned on for the first time.
Camera is turned on after leaving the camera without the battery for an
extended period of time.
When the date and time information is not
displayed on the LCD monitor, follow these
steps to set the correct date and time.
1. Slide the mode switch to [ ] or [ ].
2. Press the MENU button and select [Setup]
menu with the button
3. Select [Date/Time] with the / buttons
and press the SET button.
The Date/Time setting screen will be
displayed.
4. Select the item’s field with the
/ buttons
and adjust the value for the date and time
with the / buttons.
The date and time is set in the order
year-month-day-hour-minute.
The time is displayed in 24-hours format.
5. After confirming all settings are correct,
press the SET button.
The setting will be stored and the screen
will return to the set-up menu.
Adjust
Change Value
Select Item
Set : Adjust
Date / Time
01 01
01 01
2004
Menu:Exit
Downloaded from www.Manualslib.com manuals search engine
User’s Manual >>
E-25
Choosing the Language
Specify in which language menus and messages are to be displayed on the
LCD monitor.
1. Slide the mode switch to [
] or [ ] or
[ ].
2. Press the MENU button and select [Setup]
menu with the button.
If no images/video clips are recorded on
the SD card, press the MENU button and
then [Setup] menu is displayed.
3. Select [Language] with the / buttons
and press the SET button.
The Language setting screen will be
displayed.
4. Select the displayed language with the /
buttons and press the SET button.
The setting will be stored.
Beep
Fr. No. Reset
Date/Time
Auto OFF
Adjust
Adjust
Play
Select Item
Select Page
Adjust
Select Item
[ ] / [ ] Mode
[ ] Mode with Images/Video
Clips on SD card
[ ] Mode without Images/Video
Clips on SD card
Downloaded from www.Manualslib.com manuals search engine
Digital Camera >>
26-E
Formatting the SD Card
This erases all of the images and folders that have been recorded on the SD
card. Formatting is not possible when the SD card in the locked condition.
1. Slide the mode switch to [ ].
2. Press the MENU button.
[Setup] menu is displayed.
If images/video clips are recorded on the
SD card, press the
button after the
MENU button is pressed.
3. Select [Format] with the / buttons, then
press the SET button.
4. Select [Execute] with the / buttons,
and press the SET button.
To cancel formatting, select [Cancel] and
press the SET button.
You need to format an SD card before using it for the first time.
Formatting the SD card also erases the protected images. All data other
than images are also erased. Before formatting the card, make sure
that all the images are unnecessary.
Formatting is an irreversible action and data cannot be recovered at a
later time.
An SD card having any problem cannot be properly formatted.
OFF
Adjust
Select Item
Enter
OFF
Adjust
Play
Select Item
Select Page
Downloaded from www.Manualslib.com manuals search engine
User’s Manual >>
E-27
Setting Image Resolution and Quality
Resolution and quality settings determine the pixel size (dimension), image file
size, and compression ratio for your images. These settings affect the number
of images that can be stored on a memory card. As you get to know the camera,
it is recommended that you try each quality and resolution setting to get an
appreciation for the effects that these settings will have on your images.
Higher resolution and higher quality images offer the best photographic results
but produce large file sizes. Therefore, few images will take up a lot of memory
space.
High resolution and quality settings are recommended for printed output and
situations requiring the finest detail. Lower resolution/quality images take up
less memory space and may be quite suitable for sharing images via e-mail, in
a report, or on a web page.
To change image resolution or image quality,
perform these steps below:
1. Slide the mode switch to [
] or [ ].
2. Press the MENU button.
[Picture] of the photography menu is displayed.
3. Select [Size] with the / buttons, and
press the SET button.
4. Select the desired setting with the /
buttons, and press the SET button.
5. Select [Quality] with the / buttons, and
press the SET button.
6. Select the desired setting with the /
buttons, and press the SET button.
7. To exit from the photography menu, press
the MENU button.
Adjust
Adjust
Adjust
Fine
640 x 480
Normal
Standard
Size
[ ] Mode
[ ] Mode
Downloaded from www.Manualslib.com manuals search engine
Digital Camera >>
28-E
Possible number of shots (still image)
The table shows the approximate shots that you can take at each setting based
on an optional SD card.
Image size Quality
SD card capacity
32MB 64MB 128MB 256MB 512MB
(5M)
2560 x 1920
(3M)
2048 x 1536
(1.2M)
1280 x 960
(VGA)
640 x 480
Possible recording time / sec (video clip)
Image size Quality
SD card capacity
32MB 64MB 128MB 256MB 512MB
640 x 480
Fine
Standard
Economy
Fine
Standard
Economy
Fine
Standard
Economy
Fine
Standard
Economy
Fine
Standard
13
22
42
22
36
72
42
72
126
145
210
379
27
46
86
46
74
149
86
149
258
298
430
775
55
93
174
93
150
301
174
301
552
602
870
1566
110
185
346
185
300
600
346
600
1040
1200
1734
3121
222
374
698
374
604
1208
698
1208
2094
2417
3491
6284
00:40
00:54
01:22
01:51
02:46
03:44
05:32
07:27
11:08
15:00
* The data shows the standard testing results. The actual capacity varies
according to the shooting conditions and settings.
320 x 240
Fine
Standard
01:45
02:36
03:34
05:20
07:13
10:46
14:23
21:28
28:59
43:13
Downloaded from www.Manualslib.com manuals search engine
User’s Manual >>
E-29
PHOTOGRAPHY MODE
[ ] Still Image Mode
Auto photography is a typical method of photography. Photographs can be
taken simply because the exposure (the combination of shutter speed and
aperture setting) is controlled automatically to suit the photographic conditions.
You can use the 2.5" LCD monitor to compose the images.
Make sure that the battery and SD card are inserted before taking photographs.
1. Press the POWER button to turn the power
on.
2. Slide the mode switch to [ ].
By default, the LCD monitor setting is on.
3. Compose your image in the LCD monitor.
4. Press the shutter button.
Pressing the shutter button down
halfway automatically focuses and
adjusts the exposure, and pressing the
shutter button down fully takes the
photographs.
The focus area frame turns blue and the
status LED lights green when the camera
is in focus and the exposure is calculated.
When the focus or exposure is not
suitable, the frame of the focus area
turns yellow and the status LED flashes
red.
If the photographic preview is set to “ON”, the preview image (captured
image) will be displayed while the image is being recorded onto the SD
card.
1
Press down halfway
2
Press down fully
Downloaded from www.Manualslib.com manuals search engine
Digital Camera >>
30-E
Recording Voice Memos
A voice memo can be recorded once for 30 seconds at still image mode
immediately following a still image captured or at playback mode while viewing
the picture.
1. Slide the mode switch to [ ].
2. Press the MENU button, and select the
[Function] menu with the button.
[Function] of the still image menu is
displayed.
3. Select [VOICE MEMO] with the /
buttons, and press the SET button.
4. Select [ON] with the / buttons, and
press the SET button.
5. Press the MENU button to exit from the still image menu.
[ ] icon is displayed on the screen.
6. Compose the picture, press the shutter button down halfway, then press it
down fully.
[VOICE RECORDING] is displayed on the screen immediately, and the
voice memo recording starts.
7. Press the shutter button one more time during recording, or wait for 30
seconds
[VOICE RECORD END] will be displayed and the recording will end.
A [ ] icon is displayed with images that have been recorded with a
voice memo.
Voice memo is only available in the still single image capture mode.
Adjust
Downloaded from www.Manualslib.com manuals search engine
User’s Manual >>
E-31
Using the Optical Zoom
Zoom photography allows you to take zoom photographs up to 3 times the size
or wide-angle photography depending on the distance up to the subject. You
can also enlarge the center of the screen and take photographs in the digital
zoom mode.
1. Slide the mode switch to [
] or [ ].
2. If required, turn on the LCD monitor by
pressing the button.
3. Compose the picture with the zoom button.
Pressing the button zooms in on the
subject, and enlarges the subject on the
LCD monitor.
Pressing the button provides a wider
angle picture.
The lens position moves according to the
zoom button setting.
4. Press the shutter button down halfway,
then press it down fully.
Downloaded from www.Manualslib.com manuals search engine
Digital Camera >>
32-E
Using the Digital Zoom
Using a combination of 3 times optical zoom and 4.0 times digital zoom permits
zoom photography of up to 12 times to suit the subject and the distance. The
digital zoom is a compelling feature, the more an image is enlarged (zoomed),
the more pixilated (grainer) the image will appear.
1. Slide the mode switch to [
] or [ ].
2. Turn on the LCD monitor by pressing the button.
3. To enable the digital zoom:
a. Press the MENU button.
b. Select [Function] with the
/ buttons.
c. Select [Digital Zoom] with the / buttons, and press the SET button.
d. Select [ON] with the / buttons again, and press the SET button.
e. Press the MENU button to exit from the menu screen
f. To activate the digital zoom, press and hold the
button completely
until the image on the LCD monitor expands.
4. Press the shutter button to capture a “zoomed” image.
The digital zoom is cancelled when the button is pressed and the
LCD monitor is turned off.
The zoom setting is automatically cancelled by either turning the camera
off or the activation of the Auto OFF function.
Downloaded from www.Manualslib.com manuals search engine
User’s Manual >>
E-33
Setting the Flash
Set the flash for taking photographs. The flash firing mode can be set to suit for
the photographic conditions.
1. Slide the mode switch to [ ].
2. Toggle the
button to select the desired
flash mode.
Each press of the button moves the
icon one step through the sequence and
displays it on the screen.
[ Blank ] Auto [ ] Red-eye Reduction [ ] Forced Flash
[ ] Night Scene [ ] Suppressed Flash
Downloaded from www.Manualslib.com manuals search engine
Digital Camera >>
34-E
The table below will help you choose the appropriate flash mode:
Flash mode Description
[ Blank] Auto The flash fires automatically to suit the
photographic conditions.
[ ] Red-eye Reduction Use this mode to reduce the red-eye
phenomenon when you want to take natural-
looking photographs of people and animals in
low-light conditions.
When taking photographs, the red-eye
phenomenon can be reduced by asking the
subject (person) to look at the camera or get
as close to the camera as possible.
The flash always fires twice, and the
photograph is taken at the second firing.
[ ] Forced Flash In this mode, the flash always fires. Use this
mode for photographing under artificial light
such as backlighting, fluorescent lighting, etc.
[ ] Suppressed Flash Use this mode when taking pictures using
indoor lighting, for stages and indoor
competitions, and when the subject is too far
away for the flash to be effective.
[ ] Night Scene Use this mode when taking pictures of people
at dark or night-time background.
When the Night Scene is selected, the flash
mode is fixed to Slow Synchronization. (the
flash is fired at a slower shutter speed.)
In the [ ] focus mode and capture mode [Continuous] and [Auto
Exp.], the flash mode is fixed to [
] Suppressed Flash.
The flash cannot be set in the [ ] mode.
Downloaded from www.Manualslib.com manuals search engine
User’s Manual >>
E-35
Setting the Focus
Photographs can be taken with the distance to the subject set by auto focus,
[
] macro or [ ] infinity.
The settings will be maintained even when the power is turned off or when Auto
OFF is activated.
1. Slide the mode switch to [
] or [ ].
2. Toggle the
button to select the desired
focus mode.
Each press of the button moves
the icon one step through the sequence
and displays it on the screen.
The table below will help you choose the appropriate focus mode:
Focus mode Description
[ Blank]Auto Focus Selects this when you want to leave the settings up to
the camera so that you can take photographs without
paying attention to settings.
Approximately 50 cm to infinity (both Wide and Tele)
[ ] Macro Selects this when you want to takes a close up photography.
Wide (zoom off) : Approximately 6 cm to infinity
Tele (at optical zoom 3x) : Approximately 35 cm to infinity
[ ] Infinity Selects this when you want to take photographs of
subjects at a distance of infinity.
[Blank] Auto focus [ ] Macro [ ] Infinity
Downloaded from www.Manualslib.com manuals search engine
Digital Camera >>
36-E
Setting the Self-timer
This setting allows photographs to be taken with the self-timer.
1. Slide the mode switch to [ ] or [ ].
2. Toggle the
button to select the setting.
Each press of the button moves the
icon one step through the sequence and
displays it on the screen.
OFF [
10s] 10 sec. [ 2s ] 2 sec.
[ 10+2s ] 10+2 sec.
For the [ ] mode and capture mode
([Continuous] and [Auto Exp.])
OFF [ 10s ] 10 sec. [ 2s ] 2 sec.
3. Compose the picture, press the shutter button down halfway, then press it
down fully.
The self-timer LED flashes and the photograph is taken after the preset
time has elapsed.
The countdown is displayed on the LCD monitor.
To cancel the self-timer during operation, press the SET button.
The table below will help you choose the appropriate self-timer mode:
Self-timer mode Description
[ 10s] 10 sec. The picture is taken about 10 seconds after the shutter
button is pressed.
[ 2s] 2 sec. The picture is taken about 2 seconds after the shutter
button is pressed.
[ 10+2s]10+2 sec. One picture is taken about 10 seconds after the shutter
button is pressed, and the other photograph is taken
again after 2 seconds. This is convenient when taking
group photographs in succession.
The self-timer setting is automatically cancelled after a photograph is
taken.
Downloaded from www.Manualslib.com manuals search engine
User’s Manual >>
E-37
Exposure Compensation/Backlight Correction
Photographs can be taken with the overall screen intentionally made brighter
or darker. These settings are used when a suitable brightness (exposure) cannot
otherwise be obtained in circumstance where the difference in brightness
between the subject and the background (the contrast) is large, or when the
subject that you want to photograph is very small within the screen. Exposure
can be set in 0.3 EV units.
1. Slide the mode switch to [ ] and press
the
button.
Each press of the button displays
the setting in the order of [Blank], [ ]
Backlight Correction, and [ ] Exposure
Compensation.
2. Set the exposure value with the /
buttons.
Press the button to increase the value.
Press the button to decrease the value.
The setting range of the exposure
compensation is as follows.
-2.0, -1.7, -1.3, -1.0, -0.7, -0.3, 0, +0.3,
+0.7, +1.0, +1.3, +1.7, +2.0
The larger the value, the brighter the
image. The smaller the value, the darker
the image. The set value is displayed
on the screen.
Downloaded from www.Manualslib.com manuals search engine
Digital Camera >>
38-E
Effective Subjects and Set Values
+ (positive) compensation
* Printed matter comprising black text on whitish paper
* Backlighting
* Bright scenes or strong reflected light such as ski slopes
* When the sky accounts for a large area on the screen
- (negative) compensation
* People illuminated by a spotlight, in particular, against dark background
* Printed matter comprising white text on blackish paper
* Weak reflecting bodies such as evergreen trees or darkish leaves
Backlight correction (+1.3, fixed)
* When the background is bright and the subject is dark.
* When subjects (people) have a light source such as the sun to their backs.
Downloaded from www.Manualslib.com manuals search engine
User’s Manual >>
E-39
[ ] Movie Mode
This mode allows you to record video clips at a resolution of 320 x 240 / 640 x 480
pixels. Voice can also be recorded.
1. Slide the mode switch to [ ].
2. Compose the picture with the zoom button.
3. Press the shutter button.
The recording of the video clip will start.
Pressing the shutter button one more time will end the recording of the
video clip, and record the image into the SD card.
The recording time depends on the storage size and the subject of the
image to be recorded.
Zoom function cannot be used while a video clip is recording.
In the [ ] mode, the LCD monitor cannot be turned off.
When recording a video clip, flash photography is not possible.
While the image is being recorded into the SD card, do not open the
battery/SD card cover, nor remove the battery or SD card. Doing so
might damage the SD card or destroy the data of the SD card.
While composing the image, optical zoom and digital zoom functions
can be used at the resolution of 320 x 240 pixels. However, digital zoom
function cannot be activated at the resolution of 640 x 480 pixels.
Downloaded from www.Manualslib.com manuals search engine
Digital Camera >>
40-E
[ ] PLAYBACK MODE
Playing Back Still Images
You can play back the still images on an LCD monitor. Insert the SD card into
the camera and turn on the power before starting.
1. Slide the mode switch to [ ].
The last image appears on the screen.
2. The images can be fed in reverse or fed
forward with the
/ buttons.
Image Display Information
You can switch the state of the information
display by pressing the button when playing
back images. Each press of the
button
switches the information display state in the
following order:
Pressing the / buttons during image playback will result in a 90
degree rotated display. The
button rotates the image clockwise and
displays it, whereas the
button rotates the image counterclockwise
and displays it. A press of the button opposite to the direction in which
the image was rotated will return the image to the normal display.
[ ] icon is displayed with the video data. Video clips cannot be rotated.
A [ ] icon is displayed with images which have an audio memo
recorded.
Press the SET button to playback the voice memo data.
The condition of the information display cannot be switched with video
clips.
1853KB
Downloaded from www.Manualslib.com manuals search engine
User’s Manual >>
E-41
Playing Back Video Clips
You can play back video clips recorded on the camera. You can also play back
voice.
1. Slide the mode switch to [ ].
The last image appears on the screen.
2. Select the desired video clip with the / buttons.
3. Press the SET button.
A press of the / buttons during playback allows fast forward play /
fast reverse play.
To stop video playback:
Press the button.
This stops playback and returns to the start of the video clip.
To pause video playback
Press the SET button.
This pauses video playback.
To cancel pause, press the SET button again.
Downloaded from www.Manualslib.com manuals search engine
Digital Camera >>
42-E
Button Operations
During Playback During a Pause During a Stop
button
button
button
button
SET
button
Video clips cannot be displayed rotated or enlarged.
Forward play
Each press of the button
moves the operation one step
in the sequence of 2 times
fast forward play, 4 times fast
forward play, and regular play.
Reverse play
Each press of the button
moves the operation one step
in the sequence of 2 times
fast reverse play, 4 times fast
reverse play, and regular
play.
Sound On/Off
Pause
Stop (The display returns to
the 1st frame playback)
1-frame feed
Reverse
1-frame feed
Sound On/Off
Canceling pause
The next image
is displayed.
Regular
forward play
The previous image
is displayed.
Downloaded from www.Manualslib.com manuals search engine
User’s Manual >>
E-43
Playing Back Still Images/Video Clips on a TV
You can also playback your images on a TV screen. Before connecting to any
devices, make sure to select NTSC / PAL system to match the video output
system of the video equipment you are going to connect to the camera, then
turn all connected devices off. It is also recommended to use the AC power
adapter while transferring the recorded images and video files.
1. Slide the mode switch to [ ].
2. Connect one end of the A/V cable to the
conversion adapter terminal of the camera.
If you use the conversion adapter to
connect the A/V cable, insert the
conversion adapter into the conversion
adapter terminal of the camera first, and
then connect one end of the A/V cable
to the A/V terminal of the conversion
adapter.
3. Connect the other end to the A/V input socket of the TV set.
4. Turn the TV and camera on.
5. Play back the still images / video clips.
The method of operation is the same as playing back still images and
video clips on the camera.
In the case of the PAL system, images are surrounded by a black frame.
Refer to section in this manual titled “Video Output” in the Setup Menu
(In Playback Mode) for further details.
Downloaded from www.Manualslib.com manuals search engine
Digital Camera >>
44-E
Attaching Voice Memos
A maximum of 30 seconds of audio can be recorded like a memo for
photographed still images. The voice memo can be recorded only once.
1. Slide the mode switch to [ ].
The last image appears on the screen.
2. Select the image that you want to attach the voice memo with the /
buttons.
3. Press the shutter button.
[VOICE RECORDING] is displayed on the screen and recording starts.
4. To stop recording voice memo during recording, press the shutter button
again.
[VOICE RECORD END] will be displayed and the recording will end. A
[
] icon is displayed with images that have been recorded with a voice
memo.
Playing back voice memo
A press of the SET button displays [VOICE PLAYBACK] and plays back the
voice memo.
Voice memo is only available in the still single image capture mode.
Downloaded from www.Manualslib.com manuals search engine
User’s Manual >>
E-45
Thumbnail Display
This function allows you to view 9 thumbnail images on the LCD monitor at the
same time, which can quickly search for the image that you want.
1. Slide the mode switch to [ ].
The last image appears on the screen.
2. Press the
button.
The images are displayed in the
thumbnail display.
Images that have been selected with the
/ / / buttons will be indicated by
a green frame.
When there are ten or more images,
scroll the screen with the / buttons.
3. Press the / / / buttons to select
the image to be displayed at regular size.
4. Press the SET button.
The selected image is displayed at its
regular size.
A [ ], [ ], [ ] icon will be displayed in a thumbnail display.
Downloaded from www.Manualslib.com manuals search engine
Digital Camera >>
46-E
Zoom Playback
Images that are being play back can be enlarged and displayed in 2 levels of 2
times and 4 times enlargement. This mode also allows you to enlarge your
image on the selected portion of the image to check for small details.
1. Slide the mode switch to [ ].
2. Press the / buttons to select the image
you want to enlarge.
You can also select the image you want
to enlarge from the thumbnail display.
3. Adjust the zoom ratio with the
/
buttons.
Pressing the button enlarges the
image.
To return to normal magnification, press the button.
The image is displayed enlarged, and a white frame and green frame are
displayed on the LCD monitor.
The white frame indicates the entire image, while the green frame shows
the location of the currently enlarged area.
4. Press the / / / buttons to select the area to enlarge.
5. To return to regular display, toggle the button until the regular display
appears on the screen.
Pressing the button magnifies the image from 1x —>2x—> 4x.
Pressing the button reduces the image from 4x —>2x—> 1x.
Downloaded from www.Manualslib.com manuals search engine
User’s Manual >>
E-47
Slideshow Display
The slideshow function enables you to playback your still images automatically
in order one image at a time.
1. Slide the mode switch to [ ].
2. Press the MENU button.
The playback menu is displayed.
3. Select [Slide Show] with the / buttons,
and press the SET button.
The slideshow starts.
4. To stop the slide show during playback,
press the SET button.
The image is displayed on screen when
you press the SET button.
The Auto OFF function does not operate during slide show.
All still images in the folder are automatically played back.
: Select Page
: Select Item
Adjust
Downloaded from www.Manualslib.com manuals search engine
Digital Camera >>
48-E
Protecting Images
Set the data to read-only to prevent images from being erased by mistake.
Protecting Images
1. Slide the mode switch to [ ].
2. Select the image that you want to protect
with the / buttons.
3. Press the MENU button.
The playback menu is displayed.
4. Select [Protect] with the / buttons, and
press the SET button.
5. Select [Single] or [All] with the /
buttons, and press the SET button.
6. Select [Set] with the / buttons, and
press the SET button.
Protect is executed and the camera
returns to the play mode.
The protect icon [ ] is displayed with
protected images. When [All] has been
selected, [ ] is displayed with all the
images.
Select Item
Select Page
Adjust
Select
Enter
Downloaded from www.Manualslib.com manuals search engine
User’s Manual >>
E-49
Canceling the Protection
To cancel protection for only one image, display the image that you want to
remove the image protection.
1. Select [Protect] with the / buttons from the playback menu, and press
the SET button.
2. Select [Single] or [All] with the / buttons, and press the SET button.
3. Select [Cancel Protect] with the / buttons, and press the SET button.
The removal of image protection is executed and the camera returns to
the play mode.
Protecting multiple images simultaneously
1. Select [Protect] with the / buttons from the playback menu, and press
the SET button.
2. Select [Select] with the / buttons, and press the SET button.
The images are displayed in the thumbnail display.
3. Select the image you want to protect with the / / / buttons, and
press the button.
The protect icon [ ] is displayed with protected images. Selecting a
protected image and pressing the button again will cancel the
protection. This procedure is repeated to select multiple images.
4. Press the SET button.
Protection and cancellation the protection are executed and the camera
returns to the play mode.
Formatting the SD card undoes the protection, and erases all images.
Downloaded from www.Manualslib.com manuals search engine
Digital Camera >>
50-E
DPOF Settings
DPOF is the abbreviation for Digital Print Order Format, which allows you to
embed printing information on your memory card. You can select the images to
be printed and how many prints to make with the DPOF menu in the camera
and insert the memory card to the card compatible printer. When the printer
starts printing, it will read the embedded information on the memory card and
print the specified images.
1. Slide the mode switch to [ ].
2. Select the image that you want to set DPOF
with the / buttons.
3. Press the MENU button.
The playback menu is displayed.
4. Select [DPOF] with the / buttons, and
press the SET button.
The DPOF setting screen is displayed.
5. Select [Single] or [All] with the /
buttons, and press the SET button.
Single: Sets DPOF for each individual
image.
All: Sets DPOF for all images at once.
6. Select [Print Num.] with the / buttons,
and press the SET button.
This displays the number of prints setting
screen.
7. Set the number of prints with the /
buttons, and press the SET button.
You can set up to 9 prints for each image.
8. Select [Date] with the / buttons, and
press the SET button.
The date setting screen appears.
Select Page
Select Item
Adjust
Select Item
Select Page
Adjust
Select Item
Select Page
Adjust
Downloaded from www.Manualslib.com manuals search engine
User’s Manual >>
E-51
9. Select date to [ON] or [OFF] with the / buttons, and press the SET
button.
ON: The date of the photograph will also be printed.
OFF: The date of the photograph will not be printed.
10. Select [Print Enable] with the / buttons, and press the SET button.
11. Select [Execute] with the / buttons, and press the SET button.
This creates a file containing the DPOF information, and when the
operation is finished, the screen returns to the playback screen.
The date that is printed on the photo is the date set on the camera. To
print the correct date on the photo, set the date on the camera before
you photograph the image. Refer to section in this manual titled “Setting
the Date and Time” for further details.
Downloaded from www.Manualslib.com manuals search engine
Digital Camera >>
52-E
[ ] Erasing Images
Erasing at Photography Mode (Quick Delete Function)
Quick delete function enables you to erase the image during photography. The
quick delete menu provides you to directly erase the last image without further
settings.
1. Slide the mode switch to [
] or [ ].
2. Press the button.
The last image and quick delete menu
appear on the screen.
3. Press the SET button to erase the image.
To not erase, select [Cancel], and press
the SET button.
Erasing at Playback Mode
Erasing single image / Erasing all images
1. Slide the mode switch to [ ].
The last image will be displayed on the screen.
2. Select the image you want to erase with the / buttons..
3. Press the
button.
The deletion menu will be displayed.
4. Select [Single] or [All] with the /
buttons, and press the SET button.
Single: Erases the selected image or the
last image.
All: Erases all of the images on the
SD card except for the protected
images.
Select: Erases a number of selected
images.
: Select
Enter
Downloaded from www.Manualslib.com manuals search engine
User’s Manual >>
E-53
5. Select [Execute] with the / buttons, and press the SET button.
To not erase, select [Cancel], and press the SET button.
Even if you take photographs after erasing an image, the file number is
assigned the next number of the very last one before the image was
erased.
Erasing selected images
This erases a number of selected images.
1. Slide the mode switch to [ ].
2. Press the
button.
The deletion menu will be displayed.
3. Select [Select] with the / buttons, and
press the SET button.
The images are displayed in the
thumbnail display.
4. Select the image you want to erase with the / / / buttons, and press
the
button.
The [ ] icon will be displayed. One more press of the erase button will
cancel the operation. Repeat this procedure and select all the images
that you want to erase.
5. Press the SET button.
Downloaded from www.Manualslib.com manuals search engine
Digital Camera >>
54-E
MENU OPTIONS
Still Image Menu (Picture)
This menu is for the basic settings to be used when taking still images.
1. Slide the mode switch to [
].
2. Press the MENU button.
[Picture] of the still image menu is
displayed.
3. Select the desired [Picture] option item with
the / buttons, and press the SET
button to enter its respective menu.
4. Select the desired setting with the /
buttons, and press the SET button.
5. To exit from the still image menu, press
the MENU button.
Adjust
Adjust
Downloaded from www.Manualslib.com manuals search engine
User’s Manual >>
E-55
Size
This sets the size of the image that will be photographed.
[ ] 2560 x 1920: 2560 x 1920 pixels (5M)
[
] 2048 x 1536: 2048 x 1536 pixels (3M)
[
] 1280 x 960: 1280 x 960 pixels (1.2M)
[ ] 640 x 480: 640 x 480 pixels (VGA)
Quality
This sets the quality (compression rate) at which the image is taken.
[
] Fine: Low compression rate.
[
] Standard: Normal
[ ] Economy: High compression rate
Sharpness
This sets the sharpness of the image that will be photographed.
Hard: Hard touch
Normal: Normal touch
Soft: Soft touch
Contrast
This sets the difference between the bright and dark portions of the image that
will be photographed.
Hard: Increases the contrast.
Normal: Set the contrast automatically.
Soft: Decreases the contrast.
Color
This sets the color of the image that will be photographed.
Standard: Standard color
Vivid: Bright color
Sepia: Sepia
Monochrome: Black-and-white
Downloaded from www.Manualslib.com manuals search engine
Digital Camera >>
56-E
White Balance
This sets the white balance photographing under a variety of lighting conditions
and permits photographs to be taken that approach the conditions that are
seen by the human eye.
[ Blank ] Auto: Automatic adjustment.
[
] Incandescent: Photography under incandescent lighting.
[
1
] Fluorescent 1: Photography under a daylight fluorescent tube with a
bluish cast.
[
2
] Fluorescent 2: Photography under a daylight white fluorescent tube with
a reddish cast.
[
] Day Light: Outdoor photography.
[
] Cloudy: Photography under a cloudy sky.
[ ] Manual: Photography with a Manual WB.
Manual WB
This manually sets the white balance and stores it. Use of this is convenient
when the white balance does not offer a good match.
Before select [Execute] determine the subject (such as a white paper) that will
be used to set the white balance.
Cancel: Disable manual white balance.
Execute: Enable manual white balance.
ISO
This sets the sensitivity for taking pictures. When the sensitivity is raised (and
the ISO figure is increased), photography will become possible even in dark
locations, but the more pixilated (grainer) the image will appear.
50: Equivalent to ISO50.
100: High-sensitive photography equivalent to ISO100.
200: High-sensitive photography equivalent to ISO200.
Auto: Automatic adjustment.
Metering
This sets the metering method for calculating the exposure.
[Blank] Multi: The entire area of the screen is measured, and the exposure is
calculated.
[ ] Spot: A very small portion of the center of the screen is measured,
and the exposure is calculated.
Downloaded from www.Manualslib.com manuals search engine
User’s Manual >>
E-57
Still Image Menu (Function)
1. Slide the mode switch to [ ].
2. Press the MENU button, and select the
[Function] menu with the button.
[Function] of the still image menu is
displayed.
3. Select the desired [Function] option item
with the / buttons, and press the SET
button to enter its respective menu.
4. Select the desired setting with the /
buttons, and press the SET button.
5. To exit from the still image menu, press
the MENU button.
Capture Mode
This sets the recording method at the time of taking pictures.
[Blank] Single: Takes one photograph at a time.
[
] Continuous: Permits continuous photography of 3 pictures max, at
the fastest interval of 0.6 seconds.
[AEB] Auto Exp.: Effective when it is difficult to determine the exposure for
continuous photography with exposure at the 3 levels of
standard exposure (0), underexposure (-0.67) and
overexposure (+0.67) compensation.
In continuous photography, press and hold the shutter button until 3
images have been captured. If the shutter button is released earlier,
the continuous photography will end at that point.
Adjust
Downloaded from www.Manualslib.com manuals search engine
Digital Camera >>
58-E
Voice Memo
A voice memo can be recorded for 30 seconds immediately following still single
image photography. This feature is also available during playback mode.
Refer to section in this manual titled "Recording Voice Memos" for further
details.
ON: Enable voice memo.
OFF: Disable voice memo.
When voice memo is set to on, the preview setting is also fixed to on.
LCD Bright.
Select a brightness level for the LCD monitor.
The LCD becomes brighter with the button
and darker with the button. The adjustment
range is from -5 to +5.
Digital Zoom
This sets whether or not to use digital zoom at the time of photography.
ON: Enable digital zoom.
OFF: Disable digital zoom.
: Select
Enter
Downloaded from www.Manualslib.com manuals search engine
User’s Manual >>
E-59
Preview
This sets whether or not to display the photographed image on the screen
immediately after the picture is taken.
ON: Displayed when images are being recorded on the SD card.
OFF: Does not display.
A photographed image is displayed on the LCD monitor for 2 seconds.
Pressing the shutter button during preview cancels the operation.
When preview is set to off, the voice memo setting is also fixed to off.
Date Print
The date of recording can be printed directly
on the still images. This function must be
activated before the image is taken.
ON: Imprints the date on the still images when
taking pictures.
OFF: Does not imprint the date on the still
images when taking pictures.
Downloaded from www.Manualslib.com manuals search engine
Digital Camera >>
60-E
Movie Menu (Picture)
This menu is for the basic settings to be used when recording video clips.
1. Slide the mode switch to [ ].
2. Press the MENU button.
[Picture] of the movie menu is displayed.
3. Select the desired [Picture] option item with
the / buttons, and press the SET
button to enter its respective menu.
4. Select the desired setting with the /
buttons, and press the SET button.
5. To exit from the movie menu, press the
MENU button.
Size
This sets the size of the image that will be photographed.
[ ] 640 x 480: 640 x 480 pixels
[ ] 320 x 240: 320 x 240 pixels
Quality
This sets the quality (compression rate) at which the image is taken.
[ ] Fine: Low compression rate.
[ ] Standard: Normal
Contrast
This sets the difference between the bright and dark portions of the image that
will be photographed.
Hard: Increases the contrast.
Normal: Set the contrast automatically.
Soft: Decreases the contrast.
Color
This sets the color of the image that will be photographed.
Standard: Standard color
Vivid: Bright color
Sepia: Sepia
Monochrome: Black-and-white
Adjust
Size
Quality
Contrast
Color Standard
Normal
Fine
640 x 480
Downloaded from www.Manualslib.com manuals search engine
User’s Manual >>
E-61
Movie Menu (Function)
1. Slide the mode switch to [ ].
2. Press the MENU button, and select the
[Function] menu with the
button.
[Function] of the movie menu is displayed.
3. Select the desired [Function] option item
with the / buttons, and press the SET
button to enter its respective menu.
4. Select the desired setting with the /
buttons, and press the SET button.
5. To exit from the movie menu, press the
MENU button.
LCD Bright.
Adjust the brightness of the LCD monitor. This function does not adjust the
brightness of recorded images.
Refer to section in this manual titled “LCD Bright.” in Still Image Menu
(Function) for further details.
Digital Zoom
This sets whether or not to use digital zoom at the time of photography.
ON: Enable digital zoom.
OFF: Disable digital zoom.
Digital Zoom
Adjust
Downloaded from www.Manualslib.com manuals search engine
Digital Camera >>
62-E
Playback Menu
In the [ ] mode, set which settings are to be used for playback.
1. Slide the mode switch to [
].
2. Press the MENU button.
The playback menu is displayed.
3. Select the desired option item with the
/
buttons, and press the SET button to enter
its respective menu.
4. Select the desired setting with the
/
buttons, and press the SET button.
5. To exit from the playback menu, press the
MENU button.
Slide Show
Automatically plays back still images in order one image at a time.
Refer to section in this manual titled “Slideshow Display” for further details.
DPOF
Set the number of prints and date display in DPOF format to images that you
want to print. (This function is available for still images only.) You can print
images easily just by inserting the SD card to a DPOF-compatible printer or a
print shop.
Refer to section in this manual titled “DPOF Settings” for further details.
Protect
Set the data to read-only to prevent images from being erased by mistake.
Refer to section in this manual titled “Protecting Images” for further details.
LCD Bright.
Adjust the brightness of the LCD monitor. This function does not adjust the
brightness of recorded images.
Refer to section in this manual titled “LCD Bright.” in Still Image Menu
(Function) for further details.
Select Page
Select Item
Adjust
Downloaded from www.Manualslib.com manuals search engine
User’s Manual >>
E-63
Setup Menu (In Photography Mode)
Set your camera’s operating environment.
1. Slide the mode switch to [
] or [ ].
2. Press the MENU button, and select the
[Setup] menu with the button.
[Setup] of the photography menu is
displayed.
3. Select the desired [Setup] option item with
the / buttons, and press the SET
button to enter its respective menu.
4. Select the desired setting with the /
buttons, and press the SET button.
5. To exit from the photography menu, press
the MENU button.
Beep
This sets whether or not to mute the startup sound, and the camera sound
each time you press the camera button.
ON: Sounds the beep tone.
OFF: Does not sound the beep tone.
Fr. No. Reset
This creates a new folder. The photographed images are recorded to the newly
created folder from number 0001.
Cancel: Does not reset the file number.
Execute: Resets the file number and creates a new folder.
I
Adjust
Downloaded from www.Manualslib.com manuals search engine
Digital Camera >>
64-E
Date/Time
This sets the date and the time.
Refer to section in this manual titled “Setting the Date and Time” for further
details.
Auto OFF
If no operation is performed for a specific period of time, the power to the
camera is automatically turned off. This feature is useful to reduce battery wear.
1 Min.: When the camera has not been operated, it turns the power off after 1
minute.
2 Min.: When the camera has not been operated, it turns the power off after 2
minutes.
3 Min.: When the camera has not been operated, it turns the power off after 3
minutes.
This function does not operate during a slideshow or during PC
connection.
Sys. Reset
This returns all basic settings to the camera’s default settings. The time setting
will not be reset.
Cancel: Does not return to the default settings.
Execute: Returns to the default settings.
Language
This sets the language that is displayed on the LCD monitor.
Refer to section in this manual titled “Choosing the Language” for further details.
English: English
Français: French
Deutsch: German
Español: Spanish
Italiano: Italian.
: Chinese (Traditional)
: Chinese (Simplified)
Downloaded from www.Manualslib.com manuals search engine
User’s Manual >>
E-65
Setup Menu (In Playback Mode)
1. Slide the mode switch to [ ].
2. Press the MENU button.
[Setup] of the playback menu is displayed.
If images/video clips are recorded on the
SD card, press the button after the
MENU button is pressed.
3. Select the desired [Setup] option item with
the / buttons, and press the SET
button to enter its respective menu.
4. Select the desired setting with the /
buttons, and press the SET button.
5. To exit from the playback menu, press the
MENU button.
Beep
This sets whether or not to mute the startup sound, and the camera sound
each time you press the camera button.
ON: Sounds the beep tone.
OFF: Does not sound the beep tone.
Format
This function erases all images and reformats the SD card loaded in your camera.
Protected images are also erased. SD card cannot be formatted if it is write-
protected.
Refer to section in this manual titled “Formatting the SD Card” for further
details.
Adjust
Adjust
OFF
Downloaded from www.Manualslib.com manuals search engine
Digital Camera >>
66-E
Fr. No. Reset
This creates a new folder. The photographed images are recorded to the newly
created folder from number 0001.
Cancel: Does not reset the file number.
Execute:Resets the file number and creates a new folder.
Card Info.
This allows a check of the free capacity of the SD card as well as other
information.
System Info.
This displays the firmware version of the camera.
Language
This sets the language that is displayed on the LCD monitor.
Refer to section in this manual titled “Choosing the Language” for further
details.
English: English
Français: French
Deutsch: German
Español: Spanish
Italiano: Italian.
: Chinese (Traditional)
: Chinese (Simplified)
Video Output
This sets video output system of the video equipment that you are going to
connect to the camera.
NTSC: NTSC system.
PAL: PAL system.
Downloaded from www.Manualslib.com manuals search engine
User’s Manual >>
E-67
TRANSFERRING RECORDED IMAGES
AND VIDEOS TO YOUR COMPUTER
To transfer images/video clips from the camera to your computer, follow these
steps:
Step 1: Installing the USB driver (Windows 98 and Mac OS 8.6 users only)
Step 2: Connecting the camera to your computer
Step 3: Downloading images and video files
System Requirements (Windows)
Pentium 166 MHz or higher
Windows 98/98SE/Me/2000/XP
64MB RAM
128MB hard disk space
CD-ROM drive
Available USB port
System Requirements (Macintosh)
PowerPC G3/G4
OS 8.6 or later
64MB RAM
128MB hard disk space
CD-ROM drive
Available USB port
Downloaded from www.Manualslib.com manuals search engine
Digital Camera >>
68-E
Step 1: Installing the USB Driver
Windows 98 computers
The USB driver on the CD-ROM is exclusively for Windows 98 computers.
Installing the USB driver on computers running Windows 2000/ME/XP is not
necessary.
1. Insert the CD-ROM that came with the
camera into your CD-ROM drive. The
welcome screen appears.
2. Click “INSTALL USB DRIVER”. Follow the
on-screen instructions to complete the
installation. After the USB driver has been
installed, restart your computer.
Macintosh OS 8.6 computers
Mac OS 8.6 users must install a USB driver. For Mac OS 9.0 or higher, the
computer will automatically recognize the camera and load its own USB drivers.
1. Insert the CD-ROM that came with the camera into the CD-ROM drive.
2. Select and double-click “Digital Camera Driver Installer “.
3. Select “Install Location” and click “Install”.
4. Follow the on-screen instructions to complete the installation and restart
your computer.
Downloaded from www.Manualslib.com manuals search engine
User’s Manual >>
E-69
Step 2: Connecting the Camera to Your Computer
1. Connect one end of the USB cable to the
conversion adapter terminal of the camera.
If you use the conversion adapter to
connect the USB cable, insert the
conversion adapter into the conversion
adapter terminal of the camera first, and
then connect one end of the USB cable
to the USB terminal of the conversion
adapter.
2. Connect the other end of the USB cable to
an available USB port on your computer.
3. Turn on your camera.
4. From the Windows desktop, double click on “My Computer”.
5. Look for a new “Removable disk” icon. This “Removable disk” is actually
the memory card in your camera. Typically, the camera will be assigned
drive letter “e” or higher.
6. Double click on the removable disk and locate the DCIM folder.
7. Double click on the DCIM folder to open it to find more folders.
Your recorded images and video clips will be inside these folders.
Copy & Paste or Drag-N-Drop image and video files to a folder on your
computer.
Mac users: Double-click the “untitled” or “unlabeled” disk drive icon on our
desktop. iPhoto may automatically launch.
The data saved to the SD card may be damaged if the power to the
camera is cut off during image transfer. We recommend that you use
the AC power adapter when connecting the camera to the PC.
Downloaded from www.Manualslib.com manuals search engine
Digital Camera >>
70-E
Step 3: Downloading Images and Video Files
When the camera is turned on and connected to your computer, it is considered
to be a disk drive, just like a floppy disk or CD. You can download (transfer)
images by copying them from the “Removable disk” (“untitled” or “unlabeled”
disk on a Macintosh) to your computer hard drive.
Windows
Open the “removable disk” and subsequent folders by double clicking on them.
Your images are inside these folder(s). Select the images that you want, and
then choose “Copy” from the “Edit” menu. Open the destination location (folder)
and choose “Paste” from the “Edit” menu. You may also drag and drop image
files from the camera to a desired location.
Macintosh
Open the “untitled” disk icon, and the destination location on your hard disk.
Drag and drop from the camera to the desired destination.
Do not open the battery cover during USB cable connection.
Memory card users may prefer to use a memory card reader (highly
recommended).
Video playback application is not included with the package. Make sure
that video playback application has been installed in your computer.
Downloaded from www.Manualslib.com manuals search engine
User’s Manual >>
E-71
INSTALLING PHOTOSUITE
PC users will find that PhotoSuite is a very user-friendly image-editing program.
With PhotoSuite, you can retouch, compose, and organize your images. It
includes a variety of templates, such as photo frames, birthday cards, calendars
and more. Get your images ready and explore this amazing program.
To install PhotoSuite:
1. Insert the CD-ROM that came with the
camera into your CD-ROM drive. The
welcome screen appears.
2. Click “INSTALL PHOTO SUITE”. Follow
the onscreen instructions to complete the
installation.
To use PhotoSuite to edit and retouch your recorded images, please
refer to the on-line help.
For Windows 2000/XP users, please make sure to install and use the
PhotoSuite in “Administrator” mode.
PhotoSuite is not supported on the Mac. iPhoto or iPhoto2 is
recommended.
Downloaded from www.Manualslib.com manuals search engine
Digital Camera >>
72-E
INSTALLING PHOTOVISTA
PC users will find that PhotoVista is an easy-to-use program that lets you create
spectacular 360 degree panoramic images in a snap. When you view these
panoramas, you get the experience of being totally immersed in a realistic
environment. PhotoVista’s powerful engine quickly and automatically stitches
images together, and its intuitive interface will let even a novice get great results
in minutes.
To install PhotoVista:
1. Insert the CD-ROM that came with the
camera into your CD-ROM drive. The
welcome screen appears.
2. Click “INSTALL PHOTO VISTA”. Follow
the onscreen instructions to complete the
installation.
To use PhotoVista to create spectacular 360 degree panoramic images,
please refer to the on-line help for this software.
For Windows 2000/XP users, please make sure to install and use the
PhotoVista in Administrator” mode.
PhotoVista is not supported on the Mac.
Windows XP users who have not installed XP Service Pack 1, be sure
to link to http://www.java.com/en/download/windows_automatic.jsp first
and download the Java Virtual Machine installation. For more information
about Java, please refer to its on-line help at http://java.sun.com/getjava/
help.html After this Java installation, you can install iSee Media
PhotoVista.
PhotoVista System Requirements are:
* Windows 98, Windows NT 4 (Service Pack 3 or higher)
* Windows 2000, Windows Me, Windows XP (Service Pack 1 or higher)
Downloaded from www.Manualslib.com manuals search engine
User’s Manual >>
E-73
CONNECTING THE CAMERA TO
OTHER DEVICES
Downloaded from www.Manualslib.com manuals search engine
Digital Camera >>
74-E
CAMERA SPECIFICATIONS
Item Description
1/2.5" CCD sensor
Image sensor Total number of pixels: approx. 5.2 mega pixels
Number of effective pixels: approx. 4.9 mega pixels
<Still image>
Image resolution
2560 x 1920, 2048 x 1536, 1280 x 960, 640 x 480
< Video clip>
640 x 480, 320 x 240
LCD monitor 2.5" LTPS TFT color LCD
Image quality Fine / Standard / Economy
Recording media External memory: Supports SD card (optional, up to 512MB)
Compression format JPEG compliant
Image file format DCF 1.0, DPOF 1.1, EXIF 2.2, AVI
3x optical zoom lens
Lens
F=2.8 - 4.8
f=5.4 mm - 16.2 mm (equivalent to 32 mm - 96 mm
on a 35 mm camera)
Approx. 50 cm to infinity (both Wide and Tele)
Focus range Approx. 6 cm to infinity (Macro Wide)
Approx. 35 cm to infinity (Macro Tele)
Auto-Focus TTL method AF
Shutter speed 1/2 -1/1000 sec.
Image capturing
Single / 3 images with -0.67, 0, +0.67EV / 3 images
continuously
Digital zoom
4x (Photography mode)
2x and 4x (Playback mode)
Metering system Multi / Spot
Exposure
compensation -2EV - +2EV (in 0.3EV increments)
White balance
Auto / Incandescent / Fluorescent 1/ Fluorescent 2 /
Daylight / Cloudy / Manual
Downloaded from www.Manualslib.com manuals search engine
User’s Manual >>
E-75
Item Description
Flash
Auto Flash / Red-eye Reduction / Night Scene /
Suppressed Flash / Forced Flash
Flash effective range 0.5 m -2.7 m
ISO sensitivity Equivalent to ISO 50/100/200/Auto
Self-timer 10 sec. / 2 sec. / 10+2 sec.
Video output NTSC/PAL
DC IN 5V terminal (Via conversion adapter)
Interface A/V OUT terminal (Via conversion adapter)
USB 2.0 (Full speed)
Power supply
Rechargeable Lithium-ion battery (3.7V, optional)
AC power adapter (5V, optional)
Dimension (WxHxD) Approx. 88.5 x 54.5 x 24mm (without protruding parts)
Weight Approx. 130 g (without the battery & SD card)
*Design and specifications are subject to change without notice.
Downloaded from www.Manualslib.com manuals search engine
72

Hulp nodig? Stel uw vraag in het forum

Spelregels

Misbruik melden

Gebruikershandleiding.com neemt misbruik van zijn services uitermate serieus. U kunt hieronder aangeven waarom deze vraag ongepast is. Wij controleren de vraag en zonodig wordt deze verwijderd.

Product:

Bijvoorbeeld antisemitische inhoud, racistische inhoud, of materiaal dat gewelddadige fysieke handelingen tot gevolg kan hebben.

Bijvoorbeeld een creditcardnummer, een persoonlijk identificatienummer, of een geheim adres. E-mailadressen en volledige namen worden niet als privégegevens beschouwd.

Spelregels forum

Om tot zinvolle vragen te komen hanteren wij de volgende spelregels:

Belangrijk! Als er een antwoord wordt gegeven op uw vraag, dan is het voor de gever van het antwoord nuttig om te weten als u er wel (of niet) mee geholpen bent! Wij vragen u dus ook te reageren op een antwoord.

Belangrijk! Antwoorden worden ook per e-mail naar abonnees gestuurd. Laat uw emailadres achter op deze site, zodat u op de hoogte blijft. U krijgt dan ook andere vragen en antwoorden te zien.

Abonneren

Abonneer u voor het ontvangen van emails voor uw Rollei Prego dp5200 bij:


U ontvangt een email met instructies om u voor één of beide opties in te schrijven.


Ontvang uw handleiding per email

Vul uw emailadres in en ontvang de handleiding van Rollei Prego dp5200 in de taal/talen: Engels als bijlage per email.

De handleiding is 6,85 mb groot.


U ontvangt de handleiding per email binnen enkele minuten. Als u geen email heeft ontvangen, dan heeft u waarschijnlijk een verkeerd emailadres ingevuld of is uw mailbox te vol. Daarnaast kan het zijn dat uw internetprovider een maximum heeft aan de grootte per email. Omdat hier een handleiding wordt meegestuurd, kan het voorkomen dat de email groter is dan toegestaan bij uw provider.

Stel vragen via chat aan uw handleiding

Stel uw vraag over deze PDF

Uw handleiding is per email verstuurd. Controleer uw email

Als u niet binnen een kwartier uw email met handleiding ontvangen heeft, kan het zijn dat u een verkeerd emailadres heeft ingevuld of dat uw emailprovider een maximum grootte per email heeft ingesteld die kleiner is dan de grootte van de handleiding.

Er is een email naar u verstuurd om uw inschrijving definitief te maken.

Controleer uw email en volg de aanwijzingen op om uw inschrijving definitief te maken

U heeft geen emailadres opgegeven

Als u de handleiding per email wilt ontvangen, vul dan een geldig emailadres in.

Uw vraag is op deze pagina toegevoegd

Wilt u een email ontvangen bij een antwoord en/of nieuwe vragen? Vul dan hier uw emailadres in.


Info