IMPORTANT: THE WIRES IN THIS MAINS LEAD ARE COLOURED IN ACCORDANCE WITH THE FOLLOWING CODE.
BLUE:
BROWN:
As the colours of the wires in the mains lead of this apparatus may not correspond with the coloured markings identifying
the terminals in your plug, proceed as follows:
The wire which is coloured BLUE must be connected to the terminal which is marked with the letter N or coloured BLACK.
The wire which is coloured BROWN must be connected to the terminal which is marked with the letter L or coloured RED.
Under no circumstances must either of the above wires be connected to the earth terminal of a three pin plug.
NEUTRAL
LIVE
For the U.K.
For the USA
DECLARATION OF CONFORMITY
Compliance Information Statement
Model Name :
Type of Equipment :
Responsible Party :
Address :
Telephone :
GP607
Digital Piano
Roland Corporation U.S.
5100 S. Eastern Avenue Los Angeles, CA 90040-2938
(323) 890-3700
Owner’s Manual
Before using this unit, carefully read “USING THE UNIT SAFELY” and “IMPORTANT NOTES” (leaet “USING THE UNIT SAFELY” and Owner’s Manual (p. 28)). After reading, keep the
document(s) including those sections where it will be available for immediate reference.
Sound GeneratorPiano Sound: SuperNATURAL Piano Modeling
KeyboardPHA-50 Keyboard: Wood and Plastic Hybrid Structure, with Escapement and
Ebony/Ivory Feel (88 keys)
BluetoothAudio: Bluetooth Ver 3.0 (Supports SCMS-T content protection)
MIDI, Turning music sheet: Bluetooth Ver 4.0
Power SupplyAC Adaptor
Power
Consumption12 W
Dimensions
Top opened:
1,407 (W) x 949 (D) x 1,521 (H) mm
55-7/16 (W) x 37-3/8 (D) x 59-15/16 (H) inches
Top closed:
1,407 (W) x 949 (D) x 927 (H) mm
55-7/16 (W) x 37-3/8 (D) x 36-1/2 (H) inches
Weight86 kg/189 lbs 10 oz
Accessories
Owner’s Manual, Leaet “Stand Assembly”, Leaet “USING THE UNIT SAFELY”,
Roland Classical Piano Masterpieces, Roland Piano Arrange Collections “Let’s
Enjoy Piano”, AC Adaptor, Power Cord, Headphone Hook
Option
(sold separately)
Headphones, USB Flash Memory (*1)
*1: Use USB Flash Memory sold by Roland. We cannot guarantee operation if
other products are used.
* This document explains the specications of the product at the time that the
document was issued. For the latest information, refer to the Roland website.
Main Specications Roland GP607: Digital Piano
4
° Before You Play
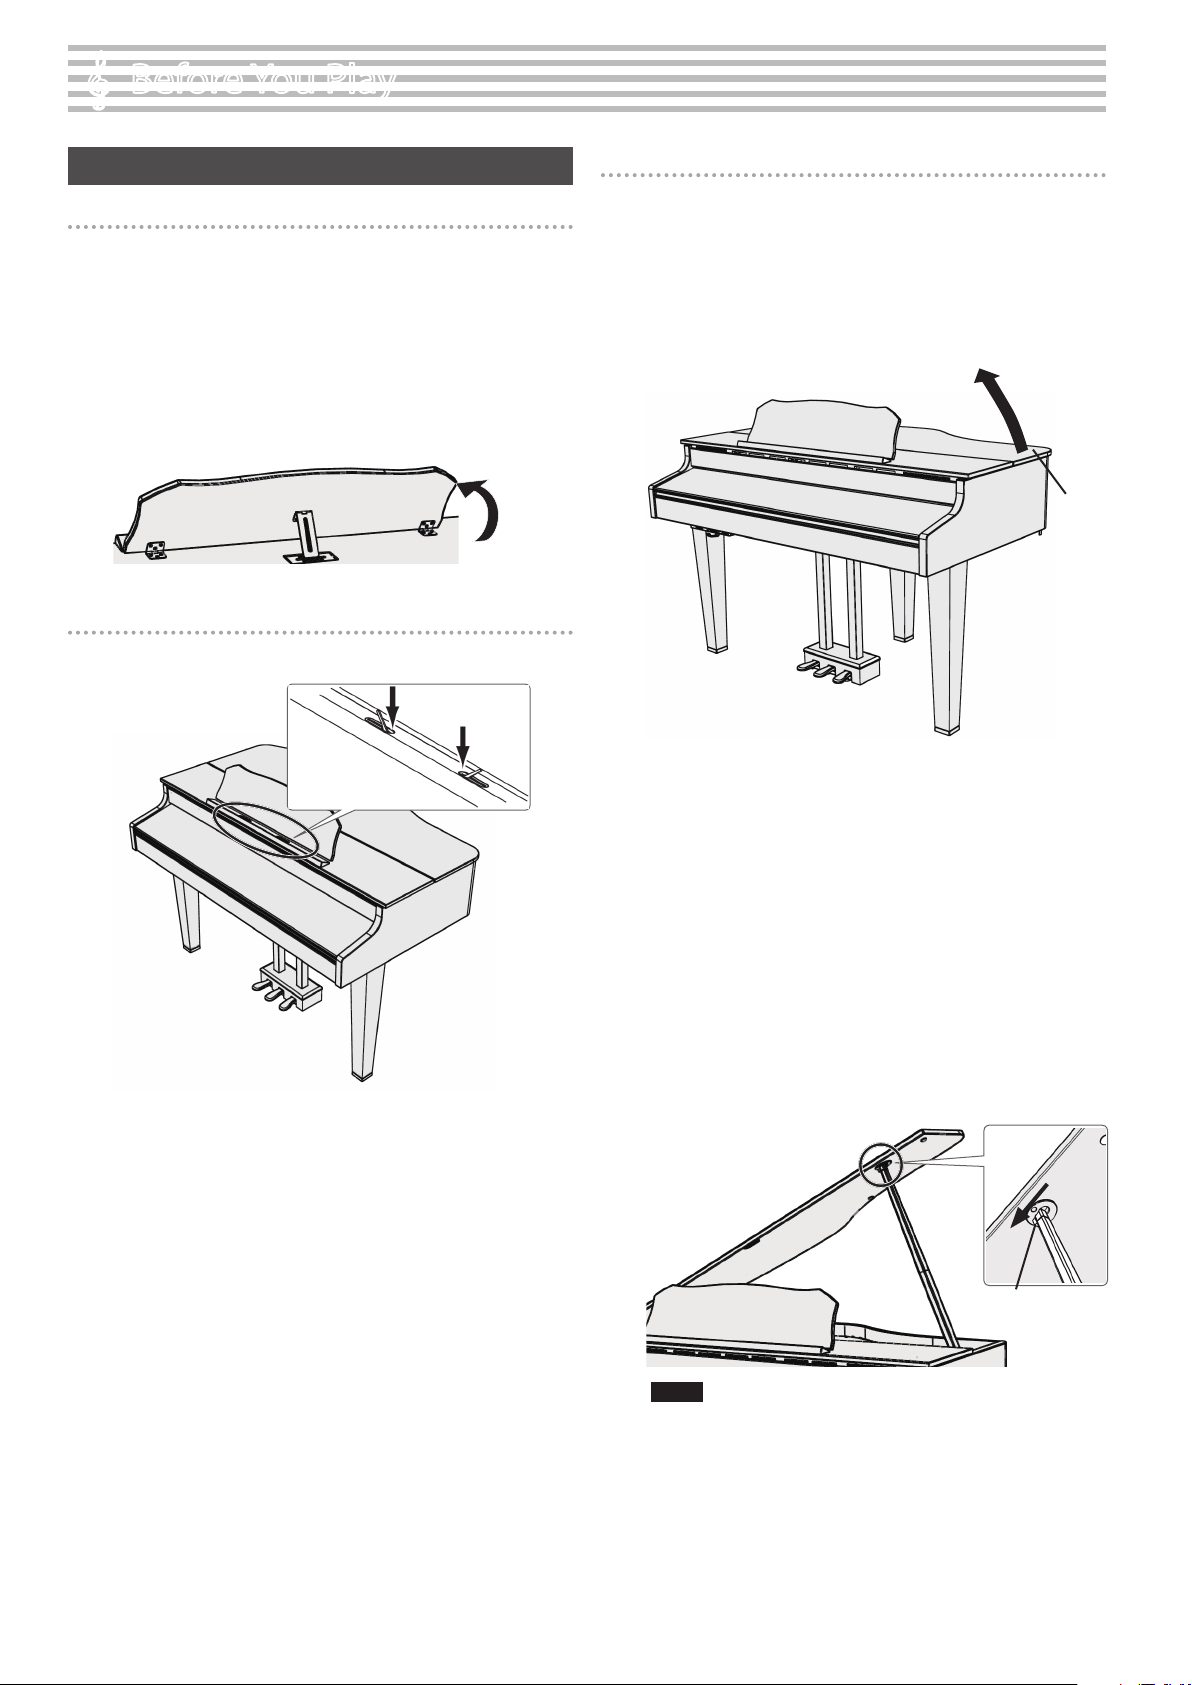
Opening/Closing the Top
Raising the music rest
* Raise the music rest before you open the piano top. Close the
piano top before you lower the music rest.
1. Gently raise the music rest.
* When raising the music rest, take care not to pinch your ngers
between the moving part and the body of the unit. In places
where small children are present, make sure that an adult
provides supervision and guidance.
2. Fit the latch into one of the slots so that the music rest is at
the desired angle.
1.
2.
Using the music holders
You can use the holders to hold pages in place.
When not using the holders, leave them folded down.
Push
Opening the top
* The top must be opened or closed by an adult.
* When opening the top, take care not to pinch your ngers
between the moving part and the body of the unit. In places
where small children are present, make sure that an adult
provides supervision and guidance.
3. Use both hands to rmly grasp the right side of the top
(toward the high notes: position A in the illustration), and
slowly raise it.
A
* When opening the top, take care not to open it too far. An angle
of about 30 degrees is appropriate. Opening the top signicantly
beyond this angle may damage the piano, or cause the top to fall.
Before you open the top, make sure that no one is in the direction
toward which the top opens.
* Do not transport the piano with the top opened. Doing so may
cause the top stick to come out of its socket, allowing the top to
fall.
4. Using one hand to support the top, raise the top stick and
t it into its socket.
* When raising the top stick, please be careful not to get your
ngers pinched between the movable part and the panel. In
places where small children are present, make sure that an adult
provides supervision and guidance.
5. Move the tip of the top stick to position B of the socket,
locking it into place.
B
NOTE
The top stick must be locked into the socket to prevent the top
from falling.
Do not release the top until the top stick is completely locked.
* To close the top, reverse the procedure by which you opened it.
5
Before You Play
Turning the Power On/O (Opening/Closing the Lid)
* Once everything is properly connected (p. 7), be sure to follow
the procedure below to turn on their power. If you turn on
equipment in the wrong order, you risk causing malfunction or
equipment failure.
* Before turning the unit on/o, always be sure to turn the volume
down. Even with the volume turned down, you might hear some
sound when switching the unit on/o. However, this is normal
and does not indicate a malfunction.
You can turn the power on/o simply by opening/closing the lid.
Turning the power on
1. Minimize the volume of the connected devices.
2. Open the lid.
To open the lid, use both hands to lift it lightly, and slide it away from
yourself.
3. Use the [Volume] buttons to adjust the volume.
* This unit is equipped with a protection circuit. A brief interval
(a few seconds) after turning the unit on is required before it will
operate normally.
Turning the power o
1. Close the lid.
To close the lid, pull it gently toward yourself, and lower it softly after
it has been fully extended.
MEMO
5By pressing the [L] button you can turn the power on/o
while leaving the lid open (p. 6).
5You can specify that the power not turn o even when you
close the lid (p. 22).
* When opening or closing the lid, take care not to pinch your
ngers between the moving part and the body of the unit. In
places where small children are present, make sure that an adult
provides supervision and guidance.
* If you have any objects (papers, metal objects, etc.) placed on top
of the lid, do not open the lid. Otherwise, such objects may slip
inside the instrument, and then become irrecoverable.
* When turning o the power, do not disconnect the power cord
while the Phones jack “Phones” indicator is lit.
Using the lid to conceal the panel (Classic Position)
You can use the lid to conceal the panel. This allows you to
concentrate on performing without being distracted by the buttons
or the display.
Lid
Concerning the Auto O function
The power to this unit will be turned o automatically after a predetermined
amount of time has passed since it was last used for playing music, or its
buttons or controls were operated (Auto O function).
If you do not want the power to be turned o automatically, disengage the
Auto O function (p. 22).
5Settings that are not saved will be lost when the power is turned o. If you
have any settings that you want to keep, you should save them beforehand.
5To restore power, turn the power on again.
6
° Panel Descriptions
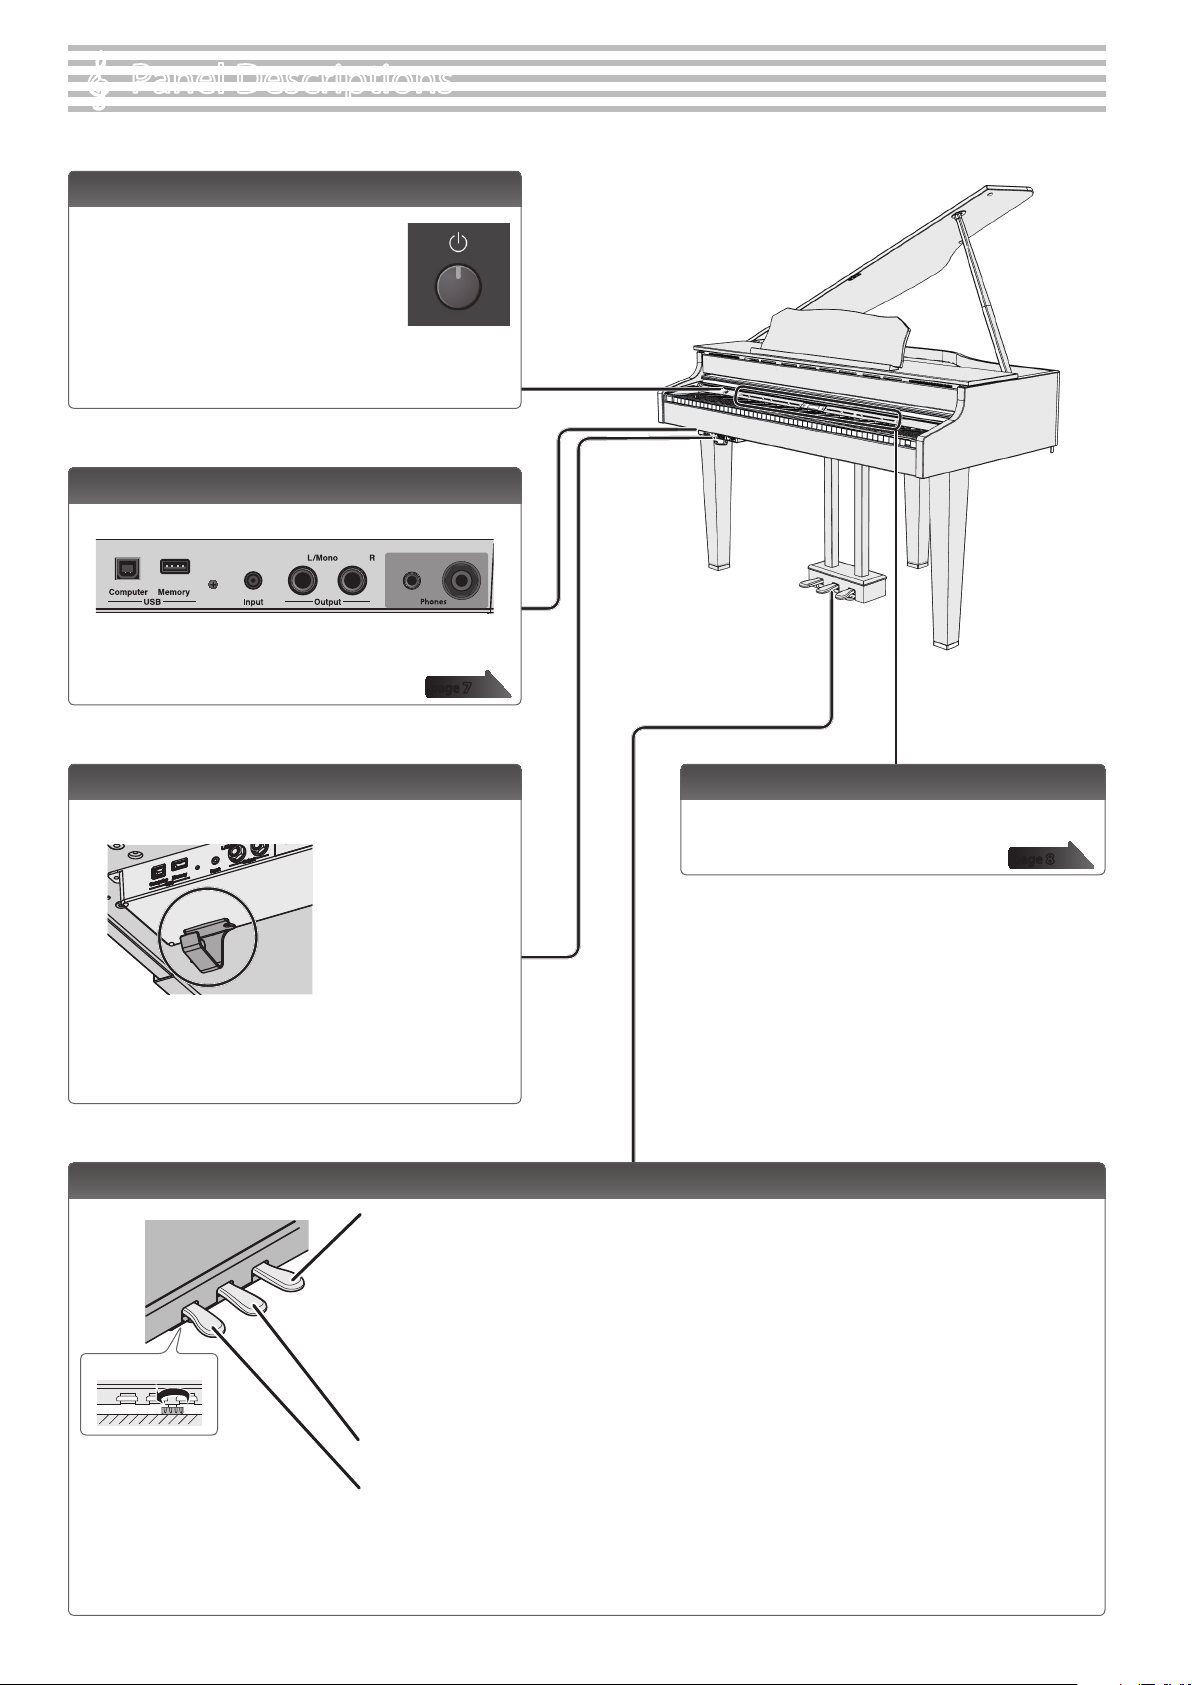
[L] Button
The power turns on/o when you open/close
the lid.
If you want to turn the power on/o with the
lid left open, press the [L] button.
To turn the power o, long-press the [L]
button.
* Never disconnect the power cord while the screen
indicates “Don’t disconnect the power.”
Headphone Hook
Whenever you are not using the headphones, you can hang
them on the headphone hook.
* Don’t hang anything other than headphones on this hook, and don’t
apply excessive force to it. Doing so may damage the headphone hook.
Damper Pedal
Use this pedal to sustain the sound. While this pedal is held down, notes will be sustained for an extended time even if you
release your ngers from the keyboard.
With the damper pedal on an acoustic piano, when you step on the pedal it will at rst oer only a slight amount of
resistance, but as you press down further it will start to feel much heavier. On the unit, this change in the feeling of resistance
is simulated.
On an acoustic piano, when you step on the damper pedal, you’ll rst hear the sound of the dampers releasing the strings.
Then, you should also be able to hear the sound of strings adjacent to the ones for the notes actually played resonate
sympathetically, resulting in a rich, resounding tone.
Additionally, when using half-pedaling techniques, the core of the sound disappears rapidly while a rich, spacious resonance
remains, producing a unique form of reverberation. On the unit, the unique, lingering tones produced by the half-pedaling
technique are reproduced in addition to released-string sounds (Damper Noise) and resonating sounds (Damper Resonance).
Sostenuto Pedal
The notes you are pressing when this pedal is depressed will be sustained.
Soft Pedal
This pedal is used to make the sound softer. Playing with the soft pedal depressed produces a sound that is not as strong
as when otherwise played with the equivalent strength. This is the same function as the left pedal of a grand piano. The
softness of the tone can be varied subtly by the depth to which you press the pedal.
Turn the adjuster to lower it
until the adjuster is in rm
contact with the oor. In
particular, when you’ve placed
the piano on carpet, you must
turn the adjuster until it is
pressing rmly against the oor.
Adjuster
Pedal
Front Panel
This is where you operate the unit.
* When operating the pedal, take care not to pinch your ngers between the moving part and the body of the unit. Pay special attention to this when using the unit where
children are present.
page 8
Bottom Panel
Connect headphones and USB ash drive.
page 7
7
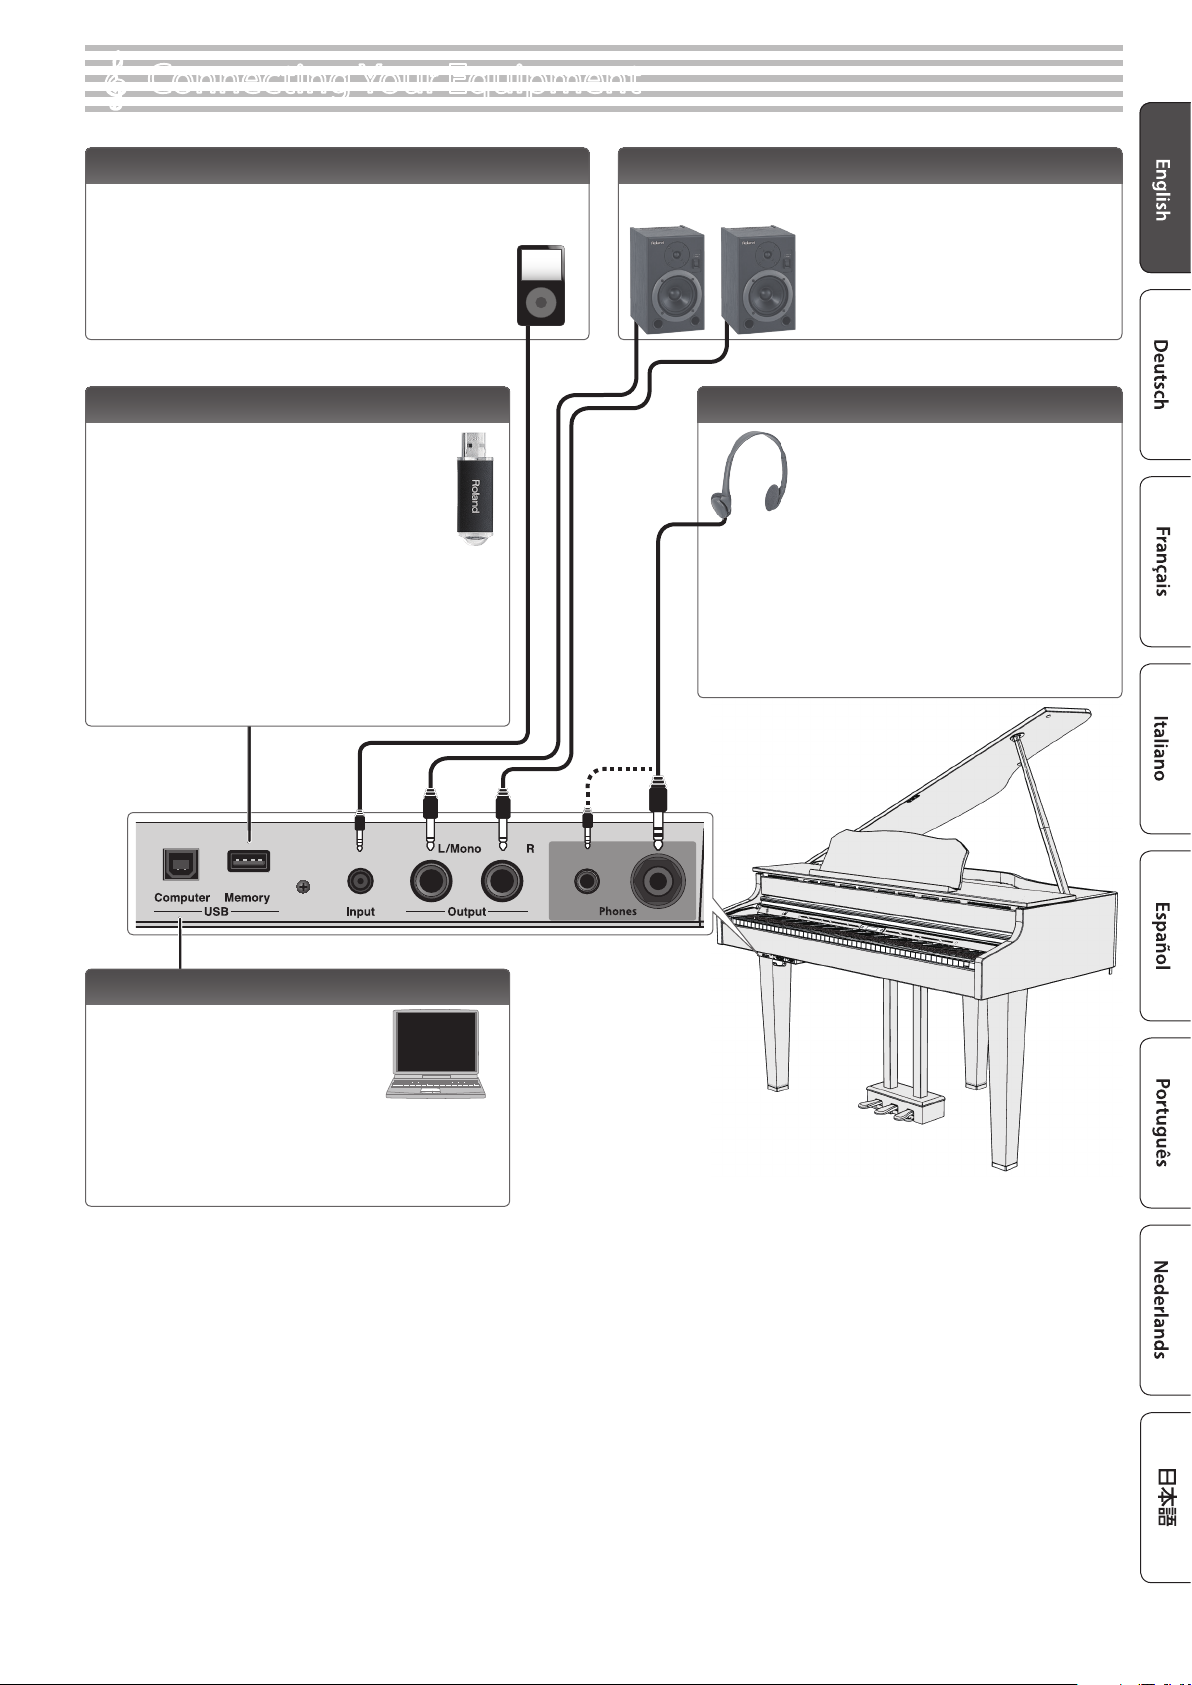
° Connecting Your Equipment
Phones Jacks
Here you can connect stereo headphones.
This unit has two headphone jacks,
two people can also use headphones
simultaneously.
A Headphones 3D Ambience eect will be
applied, producing the sensation that the
sound is emanating from the piano itself
even when using headphones.
* The Headphones 3D Ambience eect applies only to piano sounds;
it does not apply to other sounds.
* You can also turn the Headphones 3D Ambience eect o (p. 8).
* You can use the [Ambience] button to adjust the Headphones 3D
Ambience eect.
Input Jack
By connecting an audio player or other audio playback device here,
you can play back the sound of the audio playback device via the unit.
Use the Input Volume (p. 20) to adjust the volume of the device that’s
connected to the Input jack.
Output Jacks
If you connect these jacks to amplied speakers, the sound of the unit
will be heard through them.
* Before turning o the power of the unit, you
must rst turn o the power of the devices that
are connected to the Output jacks.
* To prevent malfunction and equipment failure, always turn down the volume, and turn o all the units before making any connections.
USB Memory Port
You can do the following things using a USB ash
drive.
5WAVE les or MIDI les (SMF) data copied from your
computer can be played back by the unit.
5You can make audio recordings of your performances on
the unit.
5The audio recordings of songs that you’ve made can be
played on your computer.
* Carefully insert the USB ash drives all the way in—until it is rmly
in place.
* Never turn o the power or disconnect a USB ash drive or the
power cord while the USB memory access indicator is blinking.
* Use a USB ash drive sold by Roland. We cannot guarantee
operation if any other USB ash drive is used.
USB Computer Port
If you use a commercially available USB
cable to connect the unit’s USB Computer
port to your computer’s USB connector,
you’ll be able to do the following things.
5SMF data played back by MIDI-compatible
software can be sounded by the unit.
5MIDI data can be transferred between the unit and your sequencer
software, opening up a wide range of possibilities for music
production and editing.
8
° Operation Guide
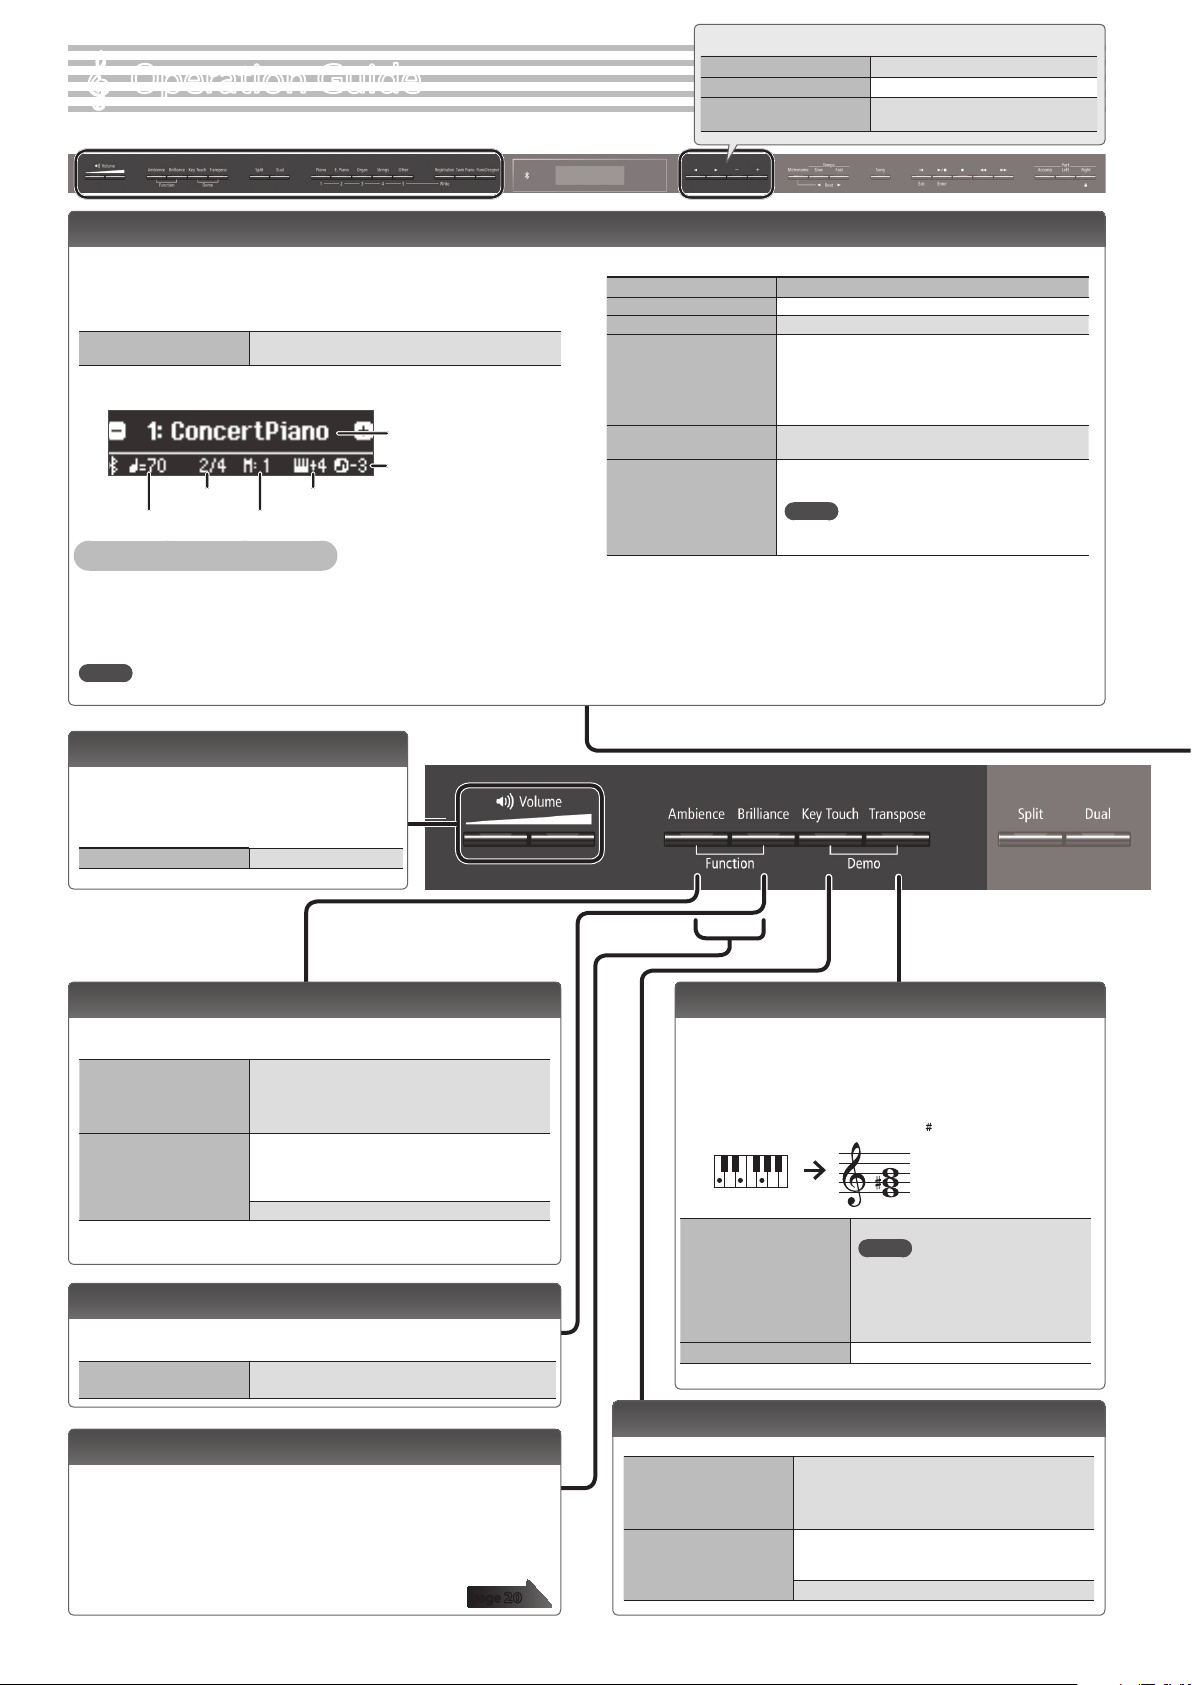
Adjusting the Overall Volume
You can adjust the speaker volume
when using the internal speakers, or the
headphone volume when headphones are
connected.
Adjusting the volume0–100
Basic operations
Select a setting itemUse the [K] [J] buttons.
Edit a valueUse the [–] [+] buttons.
Restore the default valuePress the [–] [+] buttons
simultaneously.
Transposing the Pitch (Transpose)
The keyboard or song can be transposed in semitone
steps.
For example if a song is in the key of E major but you want
to play it using the ngering of the C major scale, you
would set the keyboard transpose setting to “4.”
If you play C E G0It will sound E GB
Kbd Transpose
-6–0–5 (default value: 0)
MEMO
You can also change the keyboard
transpose setting by holding down
the [Transpose] button and pressing
the note that will be the tonic
(root note) of the transposed key.
Song Transpose-12–0–12 (default value: 0)
Adding Reverberation to the Sound (Ambience)
The reverberation that is characteristic of a performance in a concert
hall can be added to the sound.
Adjusting the
reverberation (Ambience)
0–10 (default value: 2)
* If Headphones 3D Ambience is “on,” you can
adjust the depth of the Headphones 3D
Ambience eect.
Headphones 3D Ambience
You can apply a Headphones 3D Ambience eect
that creates the impression that the sound is being
heard from the piano itself even when you’re using
headphones.
O, On (default value: On)
* The reverberation eect is not applied to audio les.
Adjusting the Brightness of the Sound (Brilliance)
You can adjust the brightness of the sound when you play the
keyboard or when you play back a song.
Adjusting the brightness
of the sound-10–0–10 (default value: 0)
Making Various Settings (Function Mode)
You can make detailed settings for the unit.
1. Simultaneously press the [Ambience] button and [Brilliance]
button.
2. Use the [K] [J] buttons to select the item that you want to set.
3. Use the [–] [+] buttons to edit the setting.
page 20
Changing the Playing Feel of the Keyboard (Key Touch)
You can change the playing feel (touch) of the keyboard.
Adjusting the key touch
Fix, 1–100 (default value: 50)
* If this is set to “Fix,” each note sounds at the
same volume regardless of how strongly you
play the keyboard.
Hammer Response
Adjusts the time from when you play the key until
the piano sound is heard. Higher values produce a
greater delay.
O, 1–10 (default value: 1)
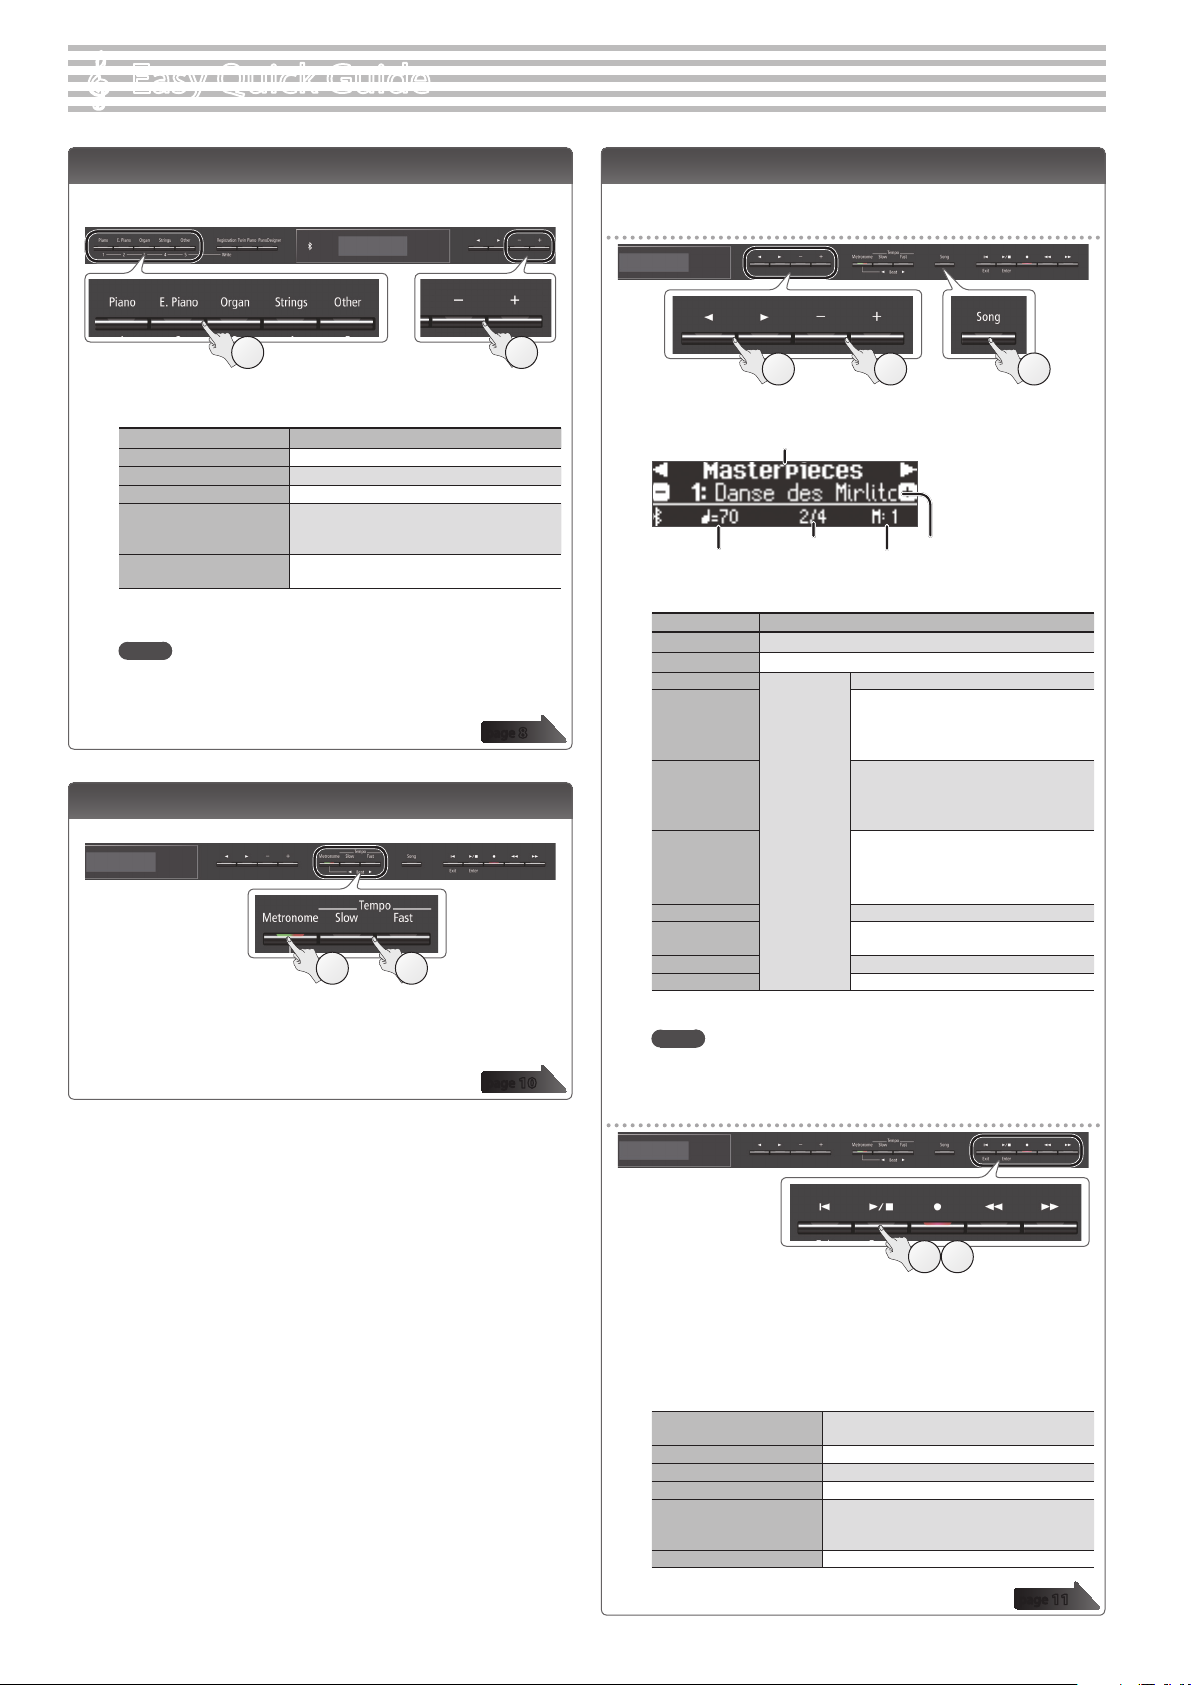
In addition to piano sounds, the unit lets you enjoy performing with
many other sounds.
These sounds are called “Tones.” The Tones are divided into ve groups,
each of which is assigned to a dierent Tone button.
To select a tonePress a tone button (e.g., [Piano]) and then use the
[–] [+] buttons.
Viewing the display
Tempo
Time signature
Measure
Tone name
Keyboard transposition
Song
transposition
Auditioning the tones (Tone Demo)
1. Hold down the [Key Touch] button and press the [Transpose] button.
2. Select a tone.
You can hear a tone demo of the rst tone in each tone group.
3. To end the tone demo, press the [u] button.
MEMO
For more about the sounds, refer to “Tone List” at the end of this manual.
Tone groups
ButtonExplanation
[Piano] buttonGrand piano tones
[E. Piano] buttonElectric piano tones
[Organ] button
Organ tones
* If you’ve selected an organ sound that provides
a rotary eect (*1), such as a Combo Jz. Org or a
Ballad Organ, pressing the [Organ] button will
switch the speed of the rotary eect.
[Strings] buttonThe tones of string instruments such as violins, as
well as other instruments used in orchestras.
[Other] button
Selects a variety of sounds such as bass or
accompaniment sounds.
MEMO
You can use the [K] [J] buttons to select sounds
of the next category.
*1 Rotary is an eect which simulates the sound of rotating speakers. There is a
choice of two settings: Fast and Slow.
Selecting a Tone
9
Operation Guide
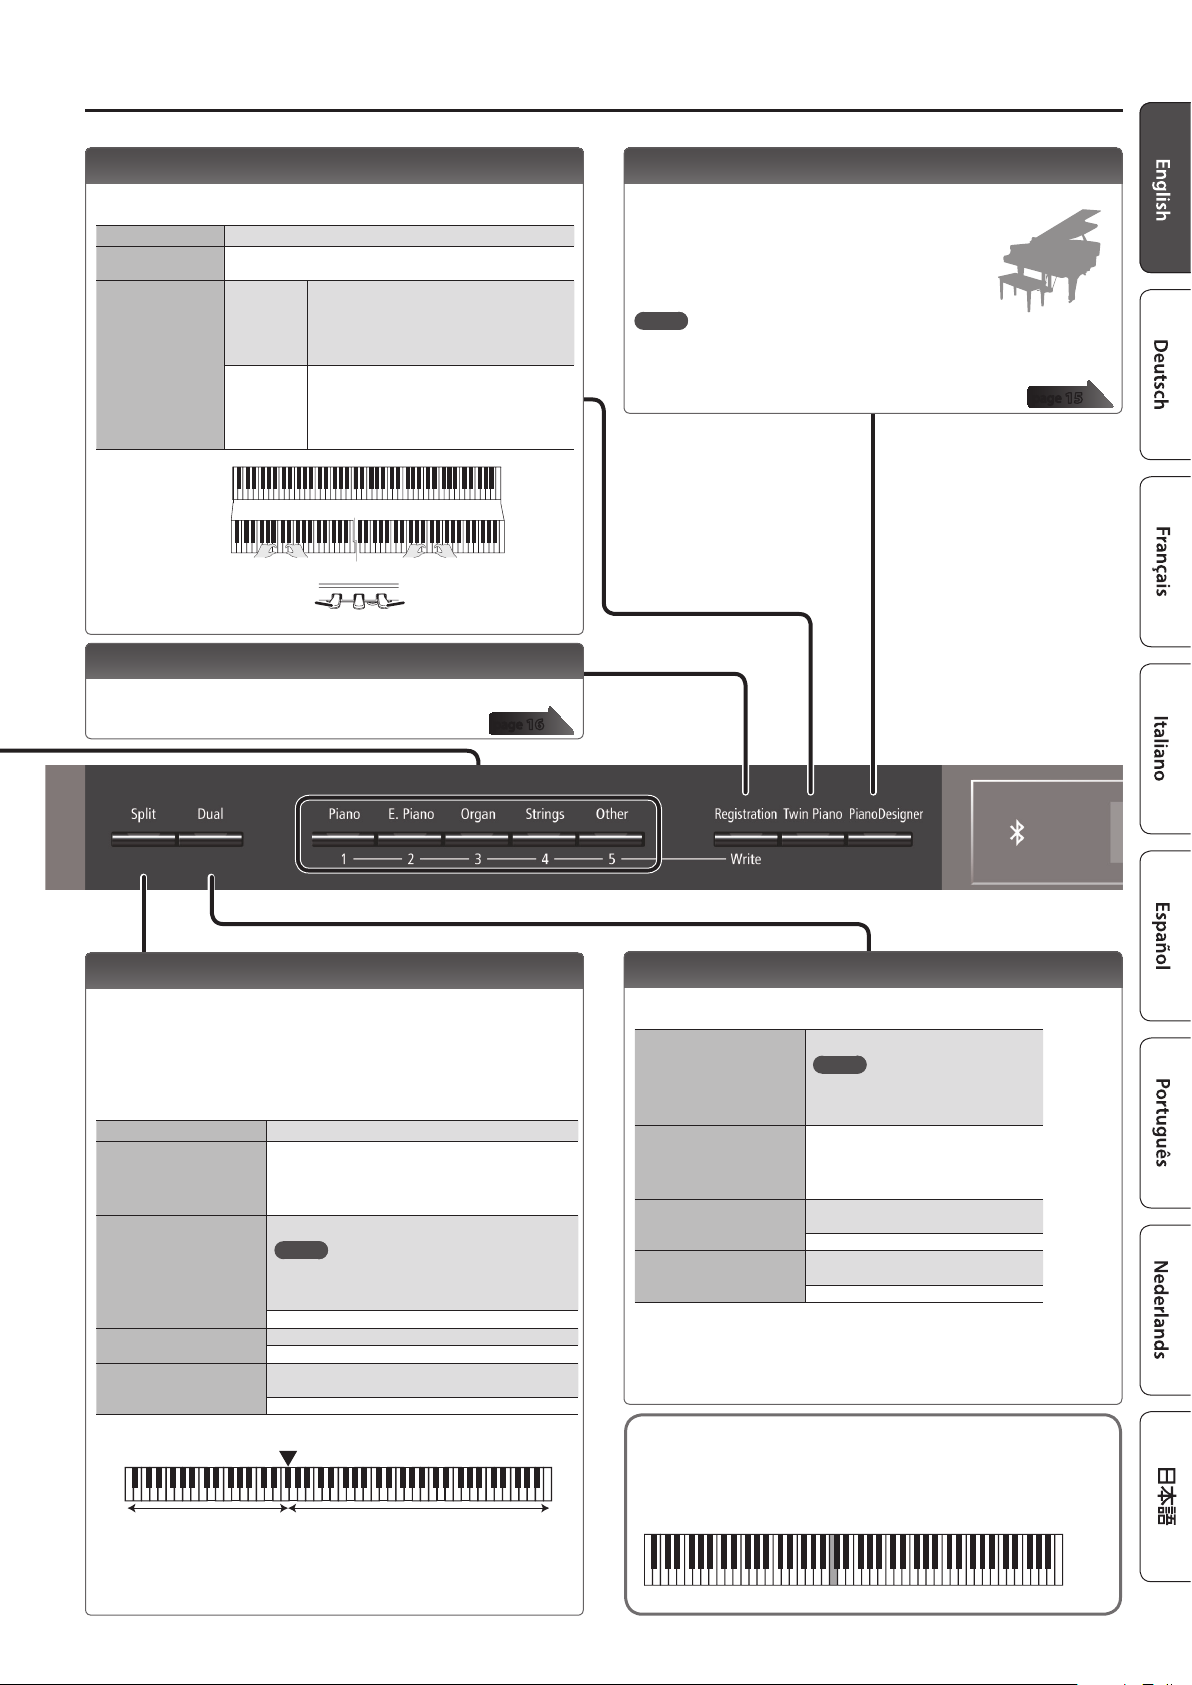
Creating Your Own Piano Tone (Piano Designer)
You can create your own piano tone by customizing the elements of
the grand piano sound to your taste.
1. Press the [Piano Designer] button.
2. Use the [K] [J] buttons to select the item that
you want to edit.
3. Use the [–] [+] buttons to edit the value.
MEMO
Piano Designer can be used to customize the sound only for [Piano] button
tones.
page 15
Playing Dierent Tones with the Left and Right Hands
(Split Play)
You can play dierent tones in the areas at the left and right of a
specied key. For example, you can use your left hand to play a bass
tone and use your right hand to play a piano tone.
This feature is called “Split Play,” and the point at which the keyboard
is divided is called the “split point.”
Turning Split onTurn the [Split] button on.
Changing the right-hand
tone and left-hand tone
1. Use the [K] [J] buttons to select “right-hand tone”
or “left-hand tone.”
2. Press a tone button.
3. Use the [–] [+] buttons.
Split Point
Changes the split point.
MEMO
You can also specify the split point by holding
down the [Split] button and pressing the key
where you want to split the keyboard.
B1–B6 (default value: F#3)
BalanceChanges the volume balance of Split Play.
9:1–9:9–1:9 (default value: 9:9)
Left Shift
Changes the pitch of the left-hand tone in units of
one octave.
-2–0–2 (default value: 0)
Left-hand toneRight-hand tone
Split point (Power-up default): F#3
F#3
* If you select a sound from the [Piano] button as the left-hand tone, it might
sound dierent than usual.
Layering Two Sounds (Dual Play)
You can play two tones simultaneously from a single key. This
function is called “Dual Play.”
Turning Dual on
Turn the [Dual] button on.
MEMO
You can also use Dual Play by
pressing two tone buttons
simultaneously.
Changing tone 1 and
tone 2
1. Use the [K] [J] buttons to select
“tone 1” or “tone 2.”
2. Press a tone button.
3. Use the [–] [+] buttons.
Balance
Adjusts the volume balance
(tone 1: tone 2) for Dual Play.
9:1–9:9–1:9 (default value: 9:4)
Tone 2 Shift
Changes the pitch of tone 2 in units of
one octave.
-2–0–2 (default value: 0)
* Depending on the combination of tones, the eect might not apply to tone 2,
causing the sound to appear dierently than usual.
* If you select a sound from the [Piano] button as tone 2, it might sound dierent
than usual.
Dividing the Keyboard for Two People (Twin Piano)
You can divide the keyboard into left and right areas so that two
people can play the same range of pitches.
Turning Twin Piano on
Turn the [Twin Piano] button on.
Changing the Twin
Piano tone
1. Press a tone button.
2. Use the [–] [+] buttons.
Changing the way
the sound is heard
(Mode)
Pair
Notes played in the right area are louder in
the right speaker; notes played in the left
area are louder in the left speaker.
When using headphones, you’ll be able to
hear the other person’s playing.
Individual
Notes played in the right area are heard only
from the right speaker; notes played in the left
area are heard only from the left speaker.
When using headphones, you won’t be able
to hear the other person’s playing.
The damper pedal
for the left area
The damper pedal
for the right area
Conventional
keyboard
Twin Piano
divide point
C4C5C6C7C8C3C2C1
C4C5C6C3C4C5C3C6
Saving Your Performance Settings (Registration)
You can save tone settings and performance settings such as Dual
Play or Split Play, and easily recall them when you wish.
page 16
Reading the note name (e.g., C4)
The alphabetical indication for settings such as Split Point shows
the name of the note.
For example, the indication “C4” means “the fourth ‘C’ from the left
edge of the keyboard.”
C4C5C6C7C8C3C2C1
10
Operation Guide
Using the Bluetooth Function
Sound from a Bluetooth-equipped audio playback device can be
played through this unit, and use the pedal of this unit to turn pages
of a music score shown on a Bluetooth-equipped display device.
When you turn on the power of this instrument, the Bluetooth
indicator lights.
When pairing is taking place, or when connected or disconnected, the
Bluetooth indicator blinks.
Display
This shows information such as the tone name, song name, tempo,
and time signature.
Tempo
Time signature
Measure
Tone name or
song name
Bluetooth
connection
status
Keyboard
transpositionSong
transposition
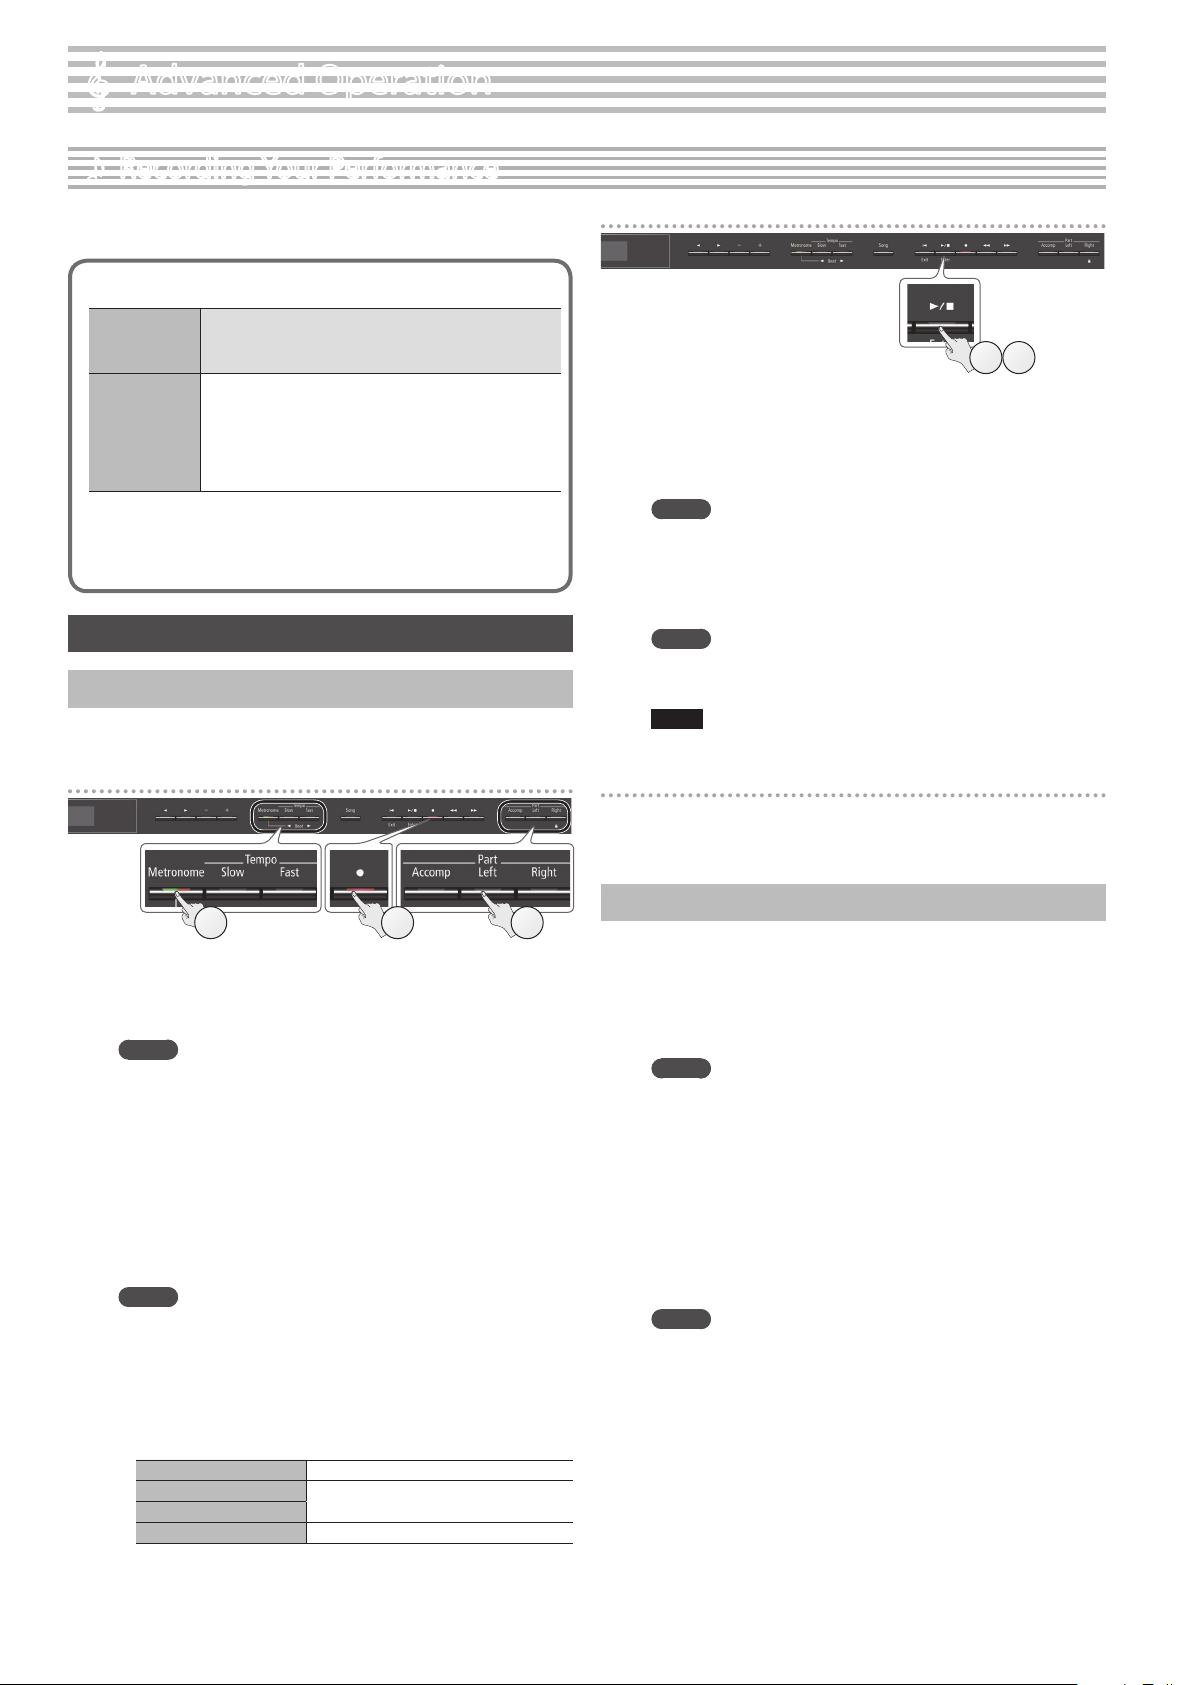
Sounding the Metronome
You can sound a metronome while you perform. You can also change
the tempo and time signature of the metronome.
If a song is playing, the metronome sounds at the tempo and time
signature of that song.
Sound the metronomeTurn the [Metronome] button on.
If the keyboard is no longer shown on the mobile device
In some cases, depending on the mobile device app that you’re
using, the keyboard might stop being displayed (i.e., the keyboard
might become unavailable).
If you want the mobile device’s keyboard to be shown while you’re
using the page turning function, hold down this unit’s [Accomp]
button and press the [Left] button.
To hide the mobile device’s keyboard, once again hold down the
[Accomp] button and press the [Left] button.
Connecting an Already-Paired Mobile Device
1. Turn on the Bluetooth function of the mobile device.
This unit will be wirelessly connected to the mobile device.
MEMO
5If the above steps do not succeed in establishing a
connection, tap the model name (“GP607”) that is shown in
the Bluetooth device screen of the mobile device.
5To disconnect, either turn this unit’s Bluetooth Page
Turn function “O” (Function mode0“Bluetooth Turn/
MIDI”0“Bluetooth Turn&MIDI (*1)” O) or turn the mobile
device’s Bluetooth function o.
(*1) Depending on the Function mode “Bluetooth Turn/MIDI” setting, the
screen might indicate “Bluetooth Page Turn” or “Bluetooth MIDI.”
Changing the Operating Keys of the Page Turning
Function
The key operations for turning pages will dier depending on the
music score display app that you’re using. You can choose which keys
of this unit will operate the page turning function.
1. Proceed with steps 2–3 of “Using the Pedal to Turn Pages
on a Music Score App” (p. 24).
2. Use the [K] [J] buttons to select “Page Turn Assign,” and
use the [–] [+] buttons to select the function.
SettingExplanation
Cursor Up/
Down
The [.] [/] keys of the keyboard are used by the page
turning app.
Page Up/DownThe [Page Up] [Page Down] keys of the keyboard are used
by the page turning app.
Cursor Left/
Right
The [1] [0] keys of the keyboard are used by the page
turning app.
3. Simultaneously press the [Ambience] button and
[Brilliance] button to exit Function mode.
Changing the Page-Turn Operation
You can select the type of pedal operation that turns pages.
1. Proceed with steps 2–3 of “Using the Pedal to Turn Pages
on a Music Score App” (p. 24).
2. Use the [K] [J] buttons to select “Page Turn Mode” and use
the [–] [+] buttons to select the function.
ValueExplanation
OnceThe page turns when you press the pedal once.
Twice
The page turns when you press the pedal twice in quick
succession.
If you press the pedal once, it performs the usual pedal function.
3. Simultaneously press the [Ambience] button and
[Brilliance] button to exit Function mode.
25
Advanced Operation
Transferring MIDI Data
Here’s how to make settings for transmitting and receiving MIDI data
between this unit and the mobile device.
Note when using an already-paired iOS device
The following operation is required after each time that you
switch the Bluetooth page-turning/MIDI function or execute
a factory reset.
1Disconnect “GP607.”2
Turn o.
For details, refer to the owner’s manual of your iOS device.
iOS
1. Place the mobile device that you want to connect nearby
this unit.
MEMO
If you have more than one unit of this model, power-on only the
unit that you want to pair (power-o the other units).
2. Press the [Ambience] button and [Brilliance] button
simultaneously.
3. Use the [K] [J] buttons to select “Bluetooth Page Turn/
MIDI,” and then press the [s] (Enter) button.
4. Use the [K] [J] buttons to select “Bluetooth Turn/MIDI,”
and use the [+] button to select “MIDI.”
5. Turn on the Bluetooth function of the mobile device.
MEMO
The explanation here uses the iPhone as an example. For details,
refer to the owner’s manual of your mobile device.
6. In the mobile device’s app (e.g., GarageBand), establish a
connection with this unit.
NOTE
Do not tap the “GP607” that is shown in the Bluetooth settings of
the mobile device.
Connection status between this unit and the mobile device
Depending on the functionality of the mobile device that’s
connected, this unit’s display will show the following icons.
FunctionDisplayed icon
Bluetooth audio function (AUDIO)
Page turning function (PAGE)
MIDI data transmit/receive (MIDI)
Page turning function and MIDI
data transmit/receive (P+MID)
26
° Troubleshooting
ProblemItems to checkActionPage
Reverberation
remains even if
you defeat the
Ambience eect
Even if the Ambience eect is o, the acoustic piano’s own
resonance remains.
You can reduce this reverberation by adjusting the Cabinet
Resonance.
p. 15
The sound
of the higher
notes suddenly
changes from a
certain key
This simulates the characteristics of an acoustic piano, and is
not a malfunction.
The sound will change where there is a change in the number
of strings per key or a transition from wound strings to
unwound strings.
–
High-pitched
ringing is heard
If you don’t hear it through headphones: It may be that
the unit has malfunctioned. Please contact your dealer or a
Roland customer service center.
If you also hear it through headphones: To decrease the
metallic ringing, adjust the following settings.
5Duplex Scale (p. 15)
5Full Scale String Res. (p. 15)
5Ambience (p. 8)
–
Low notes
sound wrong, or
are buzzy
Could the volume be
set to maximum?Lower the volume.p. 8
If you also hear it through headphones: It may be that the
unit has malfunctioned. Please contact your dealer or a
Roland customer service center.
If you don’t hear it through headphones: Objects near the
unit are resonating because of the high volume of sound
coming from the speakers. You can take the following
measures to minimize resonances.
5 Locate the speakers 10–15 cm (4–6 inch) away from walls
or other surfaces.
5 Keep the volume down.
5 Move away from the objects that are resonating.
–
The selected
sound changes
when you play
back a song
Could the SMF Play
Mode be set to
“Internal”?
Set the SMF Play Mode to “External.”p. 21
Song does not play correctly
The piano’s
tonal character
changes when
you record
Could you be
recording with a tone
that you created in
Piano Designer?
Some of the Piano Designer settings
might not be reproduced when you
play back a song.
–
Could you be playing
back the audio-
recorded sound?
Record as SMF.p. 12
Only the sound
of a particular
instrument in a
song does not
play
Could the part button
be unlit?
Press the part button so the indicator
is illuminated.p. 11
Song volume is
too low / Volume
diers between
recording and
playback
Could the song volume be set too low?p. 20
Can’t play back
a song saved in
USB ash drive
Could the Audio les of the format be played?
Audio les of the following format can be played back.
5 File extension “.WAV”
5 16-bit linear
5 “44.1 kHz” sampling rate
–
Is the lename extension “.MID”?–
Song name in
USB ash drive
is not shown
Could the song name information in the le be blank or
consist of only spaces?–
Is the lename extension “.MID”?–
Can’t record
Can’t record SMFHas one of the part buttons for recording been selected?p. 12
Can’t record
audioIs a USB ash drive connected to the USB Memory port?–
ProblemItems to checkActionPage
Even though
you’re using
headphones
and the sound
is muted, a
thumping sound
is heard when
you play the
keyboard
Could you be hearing
the sound of the
hammers inside
the keyboard, or
vibrations in the oor
or walls?
Playing the keyboard causes internal
hammers to operate, and the
vibrations may be transmitted to
the oor or walls. To minimize such
vibrations, you can move the piano
away from the wall, or lay down a
commercially available anti-vibration
mat designed for use with pianos.
–
Power turns o
on its own
Could the auto-o
setting be something
other than “O”?
If you don’t need the power to turn
o automatically, turn the Auto O
setting “O.”
p. 22
Power turns on
unexpectedly
This unit powers-on when you open the lid, and powers-o
when you close the lid.p. 5
Power does not
turn onIs the AC adaptor connected correctly?–
Can’t perform
operations
Could Panel Lock be
activated?Disengage the Panel Lock setting.p. 11
Pedal does
not work, or is
“stuck”
Is the pedal connected correctly?–
Could you have
disconnected or
connected the pedal
cord while the power
was on?
Power-o the unit before you connect
or disconnect the pedal cord.–
Could the Damper pedal part be set to “Right” or “Left”?p. 21
Could Twin Piano be turned on?
If Twin Piano is on, the right pedal will aect only the right-
hand keyboard zone and the left pedal will aect only the
left-hand keyboard zone.
p. 9
Could you have
changed the function
of the pedal?
Return the pedal function (Center
Pedal, Left Pedal, Reg. Pedal Shift) to
its previous setting.
p. 21
Unable to read
from/write to
USB ash drive
Are you using
(optional) Roland USB
ash drive?
Use a USB ash drive sold by Roland.–
“Buzz” is heard
from external
devices
Are the external
devices connected
to more than one AC
power outlet?
If you connect external devices, be
sure to connect them to the same AC
outlet.
–
The volume
level of the unit
connected to
Input jack is too
low
Could the Input Volume be turned down?p. 20
Could the volume of the connected device be turned down?–
No sound
Are your amp, speakers, headphones, etc., connected
correctly?p. 7
Is the volume turned down?p. 8
Could headphones or an adaptor plug be inserted in the
Phones jacks?
The speakers will not produce sound if headphones or plug
are connected to the Phones jacks.
–
Has Local Control
been set to “O”?Set Local Control to “On.”p. 22
Could Twin Piano mode be set to “Individual”?
If headphones are connected when Twin Piano is On and
the mode is set to Individual, notes played in the left-hand
keyboard zone will not be heard from the headphones
connected to the right Phones jack. Similarly, notes played
in the right-hand keyboard zone will not be heard from the
headphones connected to the left Phones jack.
p. 9
No sound when
you play back a
song
Could the song volume be set to “0”?p. 20
Notes don’t sound right
Pitch of the
keyboard or
song is incorrect
Could you have made Transpose settings?p. 8
Is the Master Tune setting appropriate?p. 20
Is the setting for the Temperament correct?p. 20
Is the Single Note Tuning setting appropriate?p. 15
Notes are
interrupted
Could you be holding down the damper pedal and sounding
a large number of notes?
Could you be using Dual Play or playing along with a song?
–
Sounds are
heard twice
(doubled) when
the keyboard is
played
Is the unit in Dual
Play?
Press the [Dual] button to turn o
Dual Play.p. 9
Could the unit be
connected to an
external sequencer?
If you don’t want the other sound
module to produce sound, turn your
DAW’s soft thru function “o.”
–
If Local Control is turned “On,” set
Local Control to “O.”p. 22
Eect does not
apply
For some combinations of tones, the eect does not apply to
Dual Play tone 2 or to the left-hand tone of Split Play.–
27
Error Messages
Problems with Bluetooth functionality
ProblemItems to check/ActionPage
This unit does not appear
in the Bluetooth device list
of your mobile device
Could the Bluetooth function be turned “O”?
Turn the Bluetoothfunction “On.”
Bluetooth Audio function:
Function mode0“Bluetooth audio”0turn“Bluetooth audio” On
Bluetooth Turn/MIDI function:
Function mode0“Bluetooth Turn/MIDI”0turn “Bluetooth Turn & MIDI (*1)” On
(*1) Depending on the Function mode “Bluetooth Turn/MIDI” setting, the screen might indicate
“Bluetooth Page Turn” or “Bluetooth MIDI.”
p. 23
If Bluetooth Audio function is “On”A device named “GP607 Audio” appears.
–
If the Bluetooth Page Turn function is “On” and
the Bluetooth Turn/MIDI function is “Page Turn” or
“Page Turn&MIDI”
A device named “GP607” appears.
If the Bluetooth Page Turn function is “On” and the
Bluetooth Turn/MIDI function is set to “MIDI” or
“Page Turn&MIDI”
You can check this from a setting inside your app such as GarageBand.
Can’t connect to Bluetooth
audio
If this unit is visible as a device in the mobile
device’s Bluetooth settings
Delete the device’s registration, turn the Bluetooth Audio function “O” and then “On”
again, and establish pairing once again.p. 23
If this unit is not visible as a deviceTurn the mobile device’s Bluetooth function o and then on again, and initiate pairing
from this unit to re-establish pairing.
Can’t connect to Bluetooth
page turning
In some cases, the connection with the mobile device might become unavailable when you switch the Bluetooth Turn/MIDI function.
–
If this unit is not visible as a device in the mobile
device’s Bluetooth settings
After unpairing the “GP607” that is registered on the mobile device, turn the mobile
device’s Bluetooth function o and then on again, and reconnect it.
If this unit is not visible as a deviceTurn the mobile device’s Bluetooth function o and on again, and then reestablish the
connection.
Can’t connect to Bluetooth
MIDI
In some cases when you switch the Bluetooth Turn/MIDI function, the connection with the mobile device might become unavailable.
After unpairing the “GP607” that is registered on the mobile device, turn the mobile device’s Bluetooth function o and then on again, and
reconnect it.
Can’t connect via MIDIYou must make the connection not from the mobile device’s Bluetooth setting but from the setting within GarageBand or other app that
you’re using.
Can’t establish pairing with
the page turning function
and MIDI function
The page turning function and MIDI function are paired when you rst select a device on the mobile device and establish a connection. There
is no need to initiate pairing from this unit.
Can’t use the page turning
function and MIDI function
simultaneously
Set the Bluetooth Turn/MIDI function to “Page Turn&MIDI.”
Can’t connect a paired
mobile device
If the connection breaks immediately after it is established, or when you switch the page turning function and MIDI data transmit/receive
function, turning the Bluetooth device’s Bluetooth switch o and then on again may allow connection to occur.
Keyboard no longer
appears (becomes
unavailable) on the mobile
device
When using the page turning function, the keyboard might not be shown (might be unavailable) depending on the mobile device that you’re
using.
If you want the mobile device’s keyboard to be shown while you’re using the page turning function, hold down this unit’s [Accomp] button
and press the [Left] button.
To hide the mobile device’s keyboard, hold down the [Accomp] button and press the [Left] button.
° Error Messages
IndicationMeaning
Error 2
An error occurred during writing. The external media may be corrupted.
Insert other external media and try again. Alternatively, you can initialize the external media (p. 19).
The internal memory might be damaged. Format the internal memory (p. 19).
Error 10No external media is inserted. Insert the external media and try again.
The internal memory might be damaged. Format the internal memory (p. 19).
Error 11There is not sucient free memory in the save destination.
Either insert other external media or delete unneeded les and try again.
Error 14
An error occurred during reading. The external media may be corrupted.
Insert other external media and try again. Alternatively, you can initialize the external media (p. 19).
The internal memory might be damaged. Format the internal memory (p. 19).
Error 15The le is unreadable. The data format is not compatible with the unit.
Error 18This audio format is not supported.
Please use 44.1 kHz 16-bit linear WAV format audio les.
Error 30Internal memory capacity of the unit is full.
Error 40The unit cannot deal with the excessive MIDI data sent from the external MIDI device.
Reduce the amount of MIDI data sent to the unit.
Error 43A MIDI transmission error has occurred. Check the MIDI cable and connected MIDI device.
Error 51There may be a problem with the system. Repeat the procedure from the beginning. If it is not solved after you have tried several times, contact the Roland
service center.
Error 65The USB ash drive connector was subjected to excessive current. Make sure that there is no problem with the external media, then turn the power o, then
on again.
28
° USING THE UNIT SAFELY
° IMPORTANT NOTES
Placement
• Do not allow lighting devices that normally are used while their
light source is very close to the unit (such as a piano light), or
powerful spotlights to shine upon the same area of the unit for
extended periods of time. Excessive heat can deform or discolor
the unit.
• Do not allow objects to remain on top of the keyboard. This can
be the cause of malfunction, such as keys ceasing to produce
sound.
Maintenance
• The pedal and hinge of this unit are made of brass. Brass
eventually darkens as the result of the natural oxidization process.
If the brass becomes tarnished, polish it using commercially
available metal polisher.
Care of the Keyboard
• Do not write on the keyboard with any pen or other implement,
and do not stamp or place any marking on the instrument. Ink will
seep into the surface lines and become unremovable.
• Do not ax stickers on the keyboard. You may be unable to
remove stickers that use strong adhesives, and the adhesive may
cause discoloration.
• To remove stubborn dirt, use a commercially available keyboard
cleaner that does not contain abrasives. Start by wiping lightly.
If the dirt does not come o, wipe using gradually increasing
amounts of pressure while taking care not to scratch the keys.
Concerning the Care of the Unit (Mirror Finish)
• The surface of this unit has been polished so as to create a high-
gloss, mirror-like nish. Since this beautiful nish is as delicate
as that of the highest quality, wood-crafted furniture, it needs to
be cared for at regular intervals. Please make sure to observe the
following when caring for the unit.
• For routine care, gently clean the surface using a soft cloth or
a piano-use feather duster. You must avoid applying any force,
since even the tiniest particles of sand or grit can produce
scratches if you wipe too hard.
• If the nish loses its luster, use a soft cloth dampened with
some polishing liquid to evenly wipe the surface of the unit.
• Avoid using detergents or other cleaners, as they can
cause the surface nish to deteriorate. This may lead to the
formation of cracks or other imperfections. Also, do not use
chemically-enhanced cleaning cloths.
WARNING
Concerning the Auto O function
The power to this unit will be turned o automatically
after a predetermined amount of time has passed
since it was last used for playing music, or its buttons
or controls were operated (Auto O function). If you
do not want the power to be turned o automatically,
disengage the Auto O function (p. 22).
Use only the supplied AC adaptor and the correct
voltage
Be sure to use only the AC adaptor supplied with the
unit. Also, make sure the line voltage at the installation
matches the input voltage specied on the AC
adaptor’s body. Other AC adaptors may use a dierent
polarity, or be designed for a dierent voltage, so their
use could result in damage, malfunction, or electric shock.
Use only the supplied power cord
Use only the attached power cord. Also, the supplied
power cord must not be used with any other device.
Use due care when handling the lid
• The lid should be opened and closed only by an
adult.
• The lid must not be opened too far (we
recommend that you do not open it by more than
about 30 degrees). If opened to an extreme degree,
you risk damaging the piano or having the lid fall
unexpectedly. Also, when opening the lid, make
sure that no one is in the way.
CAUTION
Cautions when moving this unit
Since this product is very heavy, you must make
sure that a sucient number of people are on hand
to help, so you can lift and move it safely, without
causing strain. Make sure to have a rm grip, to protect
yourself from injury and the instrument from damage.
If you need to move the instrument, take note of the
precautions listed below.
• Check to make sure the screws securing the unit to the stand have
not become loose. Fasten them again securely whenever you
notice any loosening.
• Disconnect the power cord.
• Disconnect all cords coming from external devices.
• Raise the adjusters on the pedal (p. 6).
• Close the lid.
• Close the top.
• Fold down the music stand.
Take care so as not to get ngers pinched
When handling the following moving parts, take care
so as not to get ngers, etc., pinched. An adult should
always be in charge of handling these items.
• Top (p. 4)
• Music rest (p. 4)
• Top stick (p. 4)
• Lid (p. 5)
Keep small items out of the reach of children
To prevent accidental ingestion of the parts listed
below, always keep them out of the reach of small
children.
• Included Parts
Screws
• Precautions concerning the use of polishing agents
• Refer to the instructions that came with the polishing agent
for instructions on its proper use.
• Use only polishing agents that are designed specically for use
on the mirror nishes of pianos. By using any other product,
you risk causing scratches, deformation, discoloration, etc. To
purchase an appropriate product, please consult the nearest
musical instrument store.
• Use the product only on the portions of this unit that have a
mirror-like nish, and using an even touch, apply it equally
over the entire surface. If you apply more force in one place
over another, you risk losing some of the luster of the nish.
• Store in a location that is out of the reach of small children. If
accidentally ingested, induce vomiting immediately. Then, see
a doctor to obtain a diagnosis.
Repairs and Data
• Before sending the unit away for repairs, be sure to make a
backup of the data stored within it; or you may prefer to write
down the needed information. Although we will do our utmost to
preserve the data stored in your unit when we carry out repairs,
in some cases, such as when the memory section is physically
damaged, restoration of the stored content may be impossible.
Roland assumes no liability concerning the restoration of any
stored content that has been lost.
Additional Precautions
• Note when placing a mobile device such as a smartphone or
tablet on this unit
• Handle your device with care to avoid scratching the unit or
the mobile device.
• To prevent your mobile device from overturning or falling, do
not move the music rest or the cover.
• Any data stored within the unit can be lost as the result of
equipment failure, incorrect operation, etc. To protect yourself
against the irretrievable loss of data, try to make a habit of
creating regular backups of the data you’ve stored in the unit.
• Roland assumes no liability concerning the restoration of any
stored content that has been lost.
• Never strike or apply strong pressure to the display.
• The sound of keys being struck and vibrations produced by
playing an instrument can be transmitted through a oor or wall
to an unexpected extent. Please take care not to cause annoyance
to others nearby.
• Do not apply undue force to the music stand while it is in use.
• Do not use connection cables that contain a built-in resistor.
Using External Memories
• Please observe the following precautions when handling external
memory devices. Also, make sure to carefully observe all the
precautions that were supplied with the external memory device.
• Do not remove the device while reading/writing is in progress.
• To prevent damage from static electricity, discharge all static
electricity from your person before handling the device.
Caution regarding radio frequency emissions
• The following actions may subject you to penalty of law.
• Disassembling or modifying this device.
• Removing the certication label axed to the back of this
device.
Intellectual Property Right
• It is forbidden by law to make an audio recording, video
recording, copy or revision of a third party’s copyrighted work
(musical work, video work, broadcast, live performance, or other
work), whether in whole or in part, and distribute, sell, lease,
perform, or broadcast it without the permission of the copyright
owner.
• Do not use this product for purposes that could infringe on a
copyright held by a third party. We assume no responsibility
whatsoever with regard to any infringements of third-party
copyrights arising through your use of this product.
• The copyright of content in this product (the sound waveform
Gebruikershandleiding.com neemt misbruik van zijn services uitermate serieus. U kunt hieronder aangeven waarom deze vraag ongepast is. Wij controleren de vraag en zonodig wordt deze verwijderd.
Product:
Spelregels forum
Om tot zinvolle vragen te komen hanteren wij de volgende spelregels:
lees eerst de handleiding door;
controleer of uw vraag al eerder door iemand anders is gesteld;
probeer uw vraag zo duidelijk mogelijk te stellen;
heeft u een probleem en al geprobeerd om dit op te lossen, vermeld dit erbij aub;
heeft u een oplossing gekregen van een bezoeker dan horen wij dat graag in dit forum;
wilt u een reactie geven op een vraag of antwoord, gebruik dan niet dit formulier maar klik op de knop 'reageer op deze vraag';
uw vraag wordt direct op de website gezet; vermijd daarom persoonlijke gegevens in te vullen;
Belangrijk! Als er een antwoord wordt gegeven op uw vraag, dan is het voor de gever van het antwoord nuttig om te weten als u er wel (of niet) mee geholpen bent! Wij vragen u dus ook te reageren op een antwoord.
Belangrijk! Antwoorden worden ook per e-mail naar abonnees gestuurd. Laat uw emailadres achter op deze site, zodat u op de hoogte blijft. U krijgt dan ook andere vragen en antwoorden te zien.
Abonneren
Abonneer u voor het ontvangen van emails voor uw Roland GP607 bij:
nieuwe vragen en antwoorden
nieuwe handleidingen
U ontvangt een email met instructies om u voor één of beide opties in te schrijven.
Ontvang uw handleiding per email
Vul uw emailadres in en ontvang de handleiding van Roland GP607 in de taal/talen: Engels als bijlage per email.
De handleiding is 8.32 mb groot.
U ontvangt de handleiding per email binnen enkele minuten. Als u geen email heeft ontvangen, dan heeft u waarschijnlijk een verkeerd emailadres ingevuld of is uw mailbox te vol. Daarnaast kan het zijn dat uw internetprovider een maximum heeft aan de grootte per email. Omdat hier een handleiding wordt meegestuurd, kan het voorkomen dat de email groter is dan toegestaan bij uw provider.
Uw handleiding is per email verstuurd. Controleer uw email
Als u niet binnen een kwartier uw email met handleiding ontvangen heeft, kan het zijn dat u een verkeerd emailadres heeft ingevuld of dat uw emailprovider een maximum grootte per email heeft ingesteld die kleiner is dan de grootte van de handleiding.
Er is een email naar u verstuurd om uw inschrijving definitief te maken.
Controleer uw email en volg de aanwijzingen op om uw inschrijving definitief te maken
U heeft geen emailadres opgegeven
Als u de handleiding per email wilt ontvangen, vul dan een geldig emailadres in.
Uw vraag is op deze pagina toegevoegd
Wilt u een email ontvangen bij een antwoord en/of nieuwe vragen? Vul dan hier uw emailadres in.