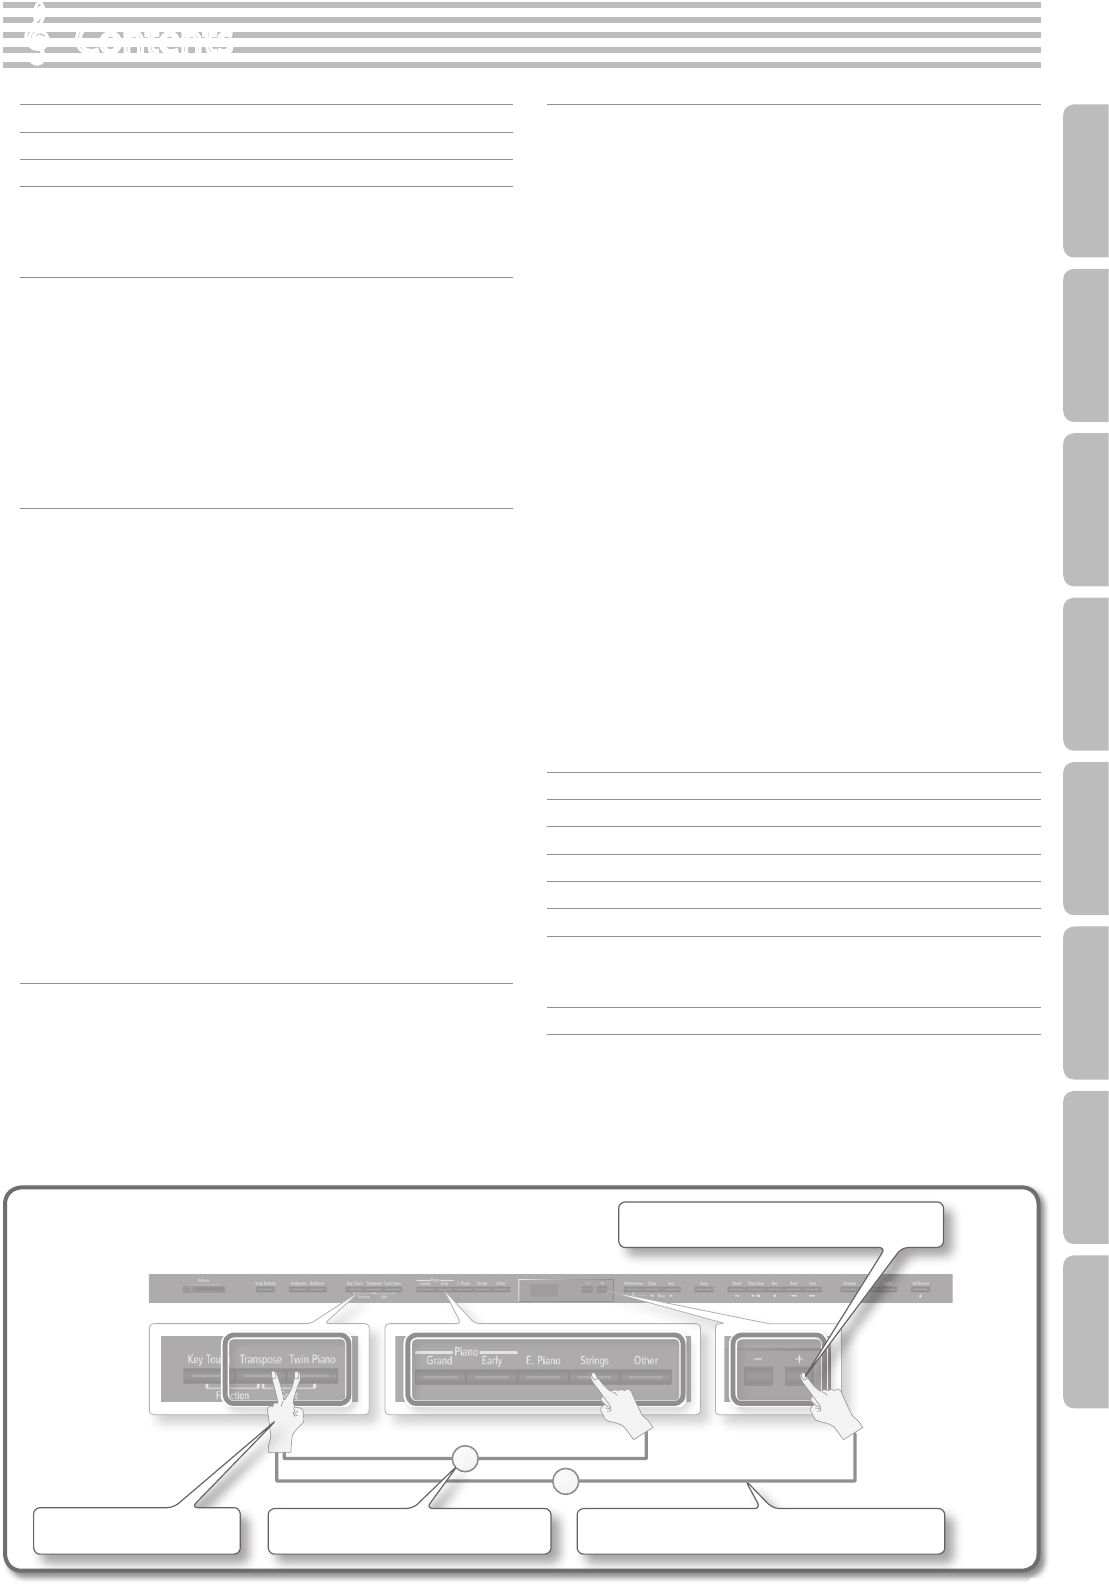
While holding down a button, press another button.
1
2
Numerals indicate the sequence of steps.
Press one of the enclosed buttons.
Press two buttons.
5
Operation GuidePanel DescriptionsBefore You PlayPerformingPracticing
Convenient Functions
Appendix
Function Mode
Operation Guide
Adjusting the Brightness of the Sound (Brilliance)
You can adjust the brightness of the sound you play
from the keyboard or the sounds of a song you play
back.
To turn brilliance on
Press the [Brilliance] button so it’s lit.
To adjust the brilliance
While holding down the [Brilliance] button, press the [–] [+]
buttons.
page 18
Adding Reverberation (Ambience)
You can add a pleasant reverberation to the sounds,
producing the impression that you are performing in
a concert hall.
To turn ambience on
Press the [Ambience] button so it’s lit.
To adjust the ambience
While holding down the [Ambience] button, press the [–] [+]
buttons.
page 18
Retaining the settings even after power-o (memory backup)
The unit allows you to adjust numerous settings, but these settings will return to their default values as soon as you turn o the
power.
However, by using the Memory Backup feature, you can have the changes you’ve made in settings be retained.
page 39
Transposing Your Performance
(Transpose)
You can transpose the
notes you play on the
keyboard or the notes of a
song you play back.
To turn transpose on
Press the [Transpose] button so it’s lit.
To adjust the amount of transposition
While holding down the [Transpose]
button, press the [–] [+] buttons.
page 21
Adjusting the Keyboard Touch
(Key Touch)
You can adjust the way
in which the keyboard
responds to your playing.
To turn key touch on
Press the [Key Touch] button so it’s lit.
To adjust the key touch
While holding down the [Key Touch]
button, press the [–] [+] buttons.
page 19
Adjusting the Song Volume
(Song Balance)
By modifying the
playback volume of the
song, you can adjust the balance
between the song and your keyboard
performance.
To turn song balance on
Press the [Song Balance] button so it’s lit.
To adjust the song balance
While holding down the [Song Balance]
button, press the [–] [+] buttons.
page 25
1. While holding down the [Key Touch]
button, press the [Transpose] button.
2. Use the [ ] [ ] (Slow/Fast) buttons to select
“Memory Backup.”
3. Press the [Song] button.
4. Use the [ ] (Fast) button to select “Y.”
Adjusting the Overall Volume
Adjust the volume.
MaxMin
6
Operation Guide
Dividing the Keyboard for Two-person Performance (Twin Piano)
This function divides the keyboard into left and right, allowing two
people to play the same range of pitches.
To turn twin piano on
Press the [Twin Piano] button so it’s lit.
To change how the sounds are heard
While holding down the [Twin Piano] button, press the [–] [+]
buttons.
1
The sound of the right-hand keyboard zone will be heard more
loudly from the right speaker than from the left speaker.
The sound of the left-hand keyboard zone will be heard more
loudly from the left speaker than from the right speaker.
2
The sound of the right-hand keyboard zone will be heard only
from the right speaker.
The sound of the left-hand keyboard zone will be heard only
from the left speaker.
page 20
Playing Dierent Tones with the Right and Left Hands (Split Play)
This function divides the keyboard into left and right zones,
allowing you to play a dierent tone in each zone.
To turn split on
While holding down the [Transpose] button, press the [Twin Piano]
button.
To change the tones
Right-hand Tone
1. Press a tone button.
2. Press the [–] [+] buttons.
Left-hand Tone
1. While holding down the [Transpose] button and
[Twin Piano] button, press a tone button.
2. While holding down the [Transpose] button and
[Twin Piano] button, use the [–] [+] buttons.
Changing the keyboard’s split point
While holding down the [Transpose] button and [Twin Piano]
button, play the key that you want to specify as the split point.
page 16
Selecting the Tone
To select a single tone
Press one of the tone buttons, and then use the [–] [+] buttons.
Press one
To layer two tones (dual play)
Press two tone buttons.
Press two
To change the tones
Tone 1Press the [–] [+] buttons.
Tone 2
Hold down the right-most of the lit tone button, and then use
the [–] [+] buttons.
page 14
page 15
7
Operation GuidePanel DescriptionsBefore You PlayPerformingPracticing
Convenient Functions
Appendix
Function Mode
Operation Guide
Selecting a Song
You can select songs.
To select a song
1. Press the [Song] button.
Category
Song Name
Song Number
2. Use the [–] [+] buttons to select a song.
To select a song that’s saved on the USB ash drive
1. Press the [Song] button.
2. While holding down the [Song] button, use
the [–] [+] buttons to select “S.”
USB ash drive
3. Use the [–] [+] buttons to select a song.
page 24
Using the Metronome
Here’s how to sound the metronome.
To turn the metronome on
Press the [Metronome] button so it’s lit.
To adjust the metronome’s volume
While holding down the [Metronome] button, use the [–] [+]
buttons.
page 22
Changing the Tempo or Time Signature
You can adjust the tempo of the metronome or
song.
To change the tempo
Use the [ ] [ ] (Slow/Fast) buttons.
To change the time signature
While holding down the [Metronome] button, use the [ ] [ ]
(Slow/Fast) buttons.
page 22
Display
This shows various information such as tone names, song names,
and the values of settings.
Tone NameTone Number
Selecting Variation Tones/Adjusting the Settings
You can select tone variations or songs, and adjust various settings.
• Holding down the [–] [+] buttons will make the value change
continuously.
• To rapidly increase the value, hold down the [+] button and press
the [–] button.
• To rapidly decrease the value, hold down the [–] button and press
the [+] button.
• To return the value to its default setting, press the [+] and [–] buttons
simultaneously.
8
Operation Guide
Disabling the Buttons (Panel Lock)
Hold down the [AB Repeat] button until the
display shows “Lock.”
To cancel panel lock
Hold down the [AB Repeat] button once again for a while.
page 43
Recording/Playback
Here’s how to play back or record a
song.
Return to the begin-
ning of the song
Press the [
] (Reset) button.
Play/Stop
Press the [
] (Play/Stop) button.
Enter recording-
standby mode
While stopped, press the [
] (Rec) button.
Record
While in recording-standby mode, press the
[
] (Play/Stop) button.
Rewind
Press the [
] (Bwd) button.
Fast-forward
Press the [
] (Fwd) button.
To play all songs
While holding down the [Song] button, press the [ ] (Play/
Stop) button.
To make a new recording
1. Select the tone that you want to play.
2. Press the [ ] (Rec) button.
3. Press the [ ] (Play/Stop) button to start
recording.
4. Press the [ ] (Play/Stop) button to stop
recording.
To overdub
1. Select the tone to be played.
2. Select the song to be dubbed.
3. Press the [ ] (Rec) button.
4. Press the [+] button.
5. Press the button of the part that you want to record,
making it blink.
6. Press the [ ] (Play/Stop) button to start
recording.
7. Press the [ ] (Play/Stop) button to stop
recording.
page 29page 24
page 25
page 29
page 30
Selecting the Parts that will Play (Part Mute)
Here’s how to select the parts that will play.
To select the right-hand partPress the [Right] button so it’s lit.
To select the left-hand partPress the [Left] button so it’s lit.
To select the other partsPress the [Accomp] button so it’s lit.
To adjust the mute volume of a part
Hold down the button of the part whose volume you want to adjust,
and use the [–] [+] buttons.
page 26
Repeatedly Practicing a Portion of a Song (AB Repeat)
Here’s how you can make a specic portion of a
song play back repeatedly.
1. Press the [ ] (Play/Stop) button to play back
the song.
2. At the beginning of the portion to be repeated, press
the [AB Repeat] button.
3. At the end of the portion to be repeated, press the [AB
Repeat] button once again.
page 28
9
Operation GuidePanel DescriptionsBefore You PlayPerformingPracticing
Convenient Functions
Appendix
Function Mode
Panel Descriptions
Damper Pedal
Use this pedal to sustain the sound. While this pedal is held down, notes will be sustained for an extended time even if you
release your ngers from the keyboard.
On an acoustic piano, when you step on the damper pedal, you’ll rst hear the sound of the dampers releasing the strings. Then,
you should also be able to hear the sound of strings adjacent to the ones for the notes actually played resonate sympathetically,
resulting in a rich, resounding tone. Additionally, when using half-pedaling techniques, the core of the sound disappears rapidly
while a rich, spacious resonance remains, producing a unique form of reverberation. On the unit, the unique, lingering tones
produced by the half-pedaling technique are reproduced in addition to released-string sounds (Damper Noise) and resonating
sounds (Damper Resonance).
Sostenuto Pedal
The notes you are pressing when this pedal is depressed will be sustained.
Soft Pedal
This pedal is used to make the sound softer.
Playing with the soft pedal depressed produces a sound that is not as strong as when otherwise played with the equivalent
strength. This is the same function as the left pedal of an acoustic piano.
The softness of the tone can be varied subtly by the depth to which you press the pedal.
Pedals
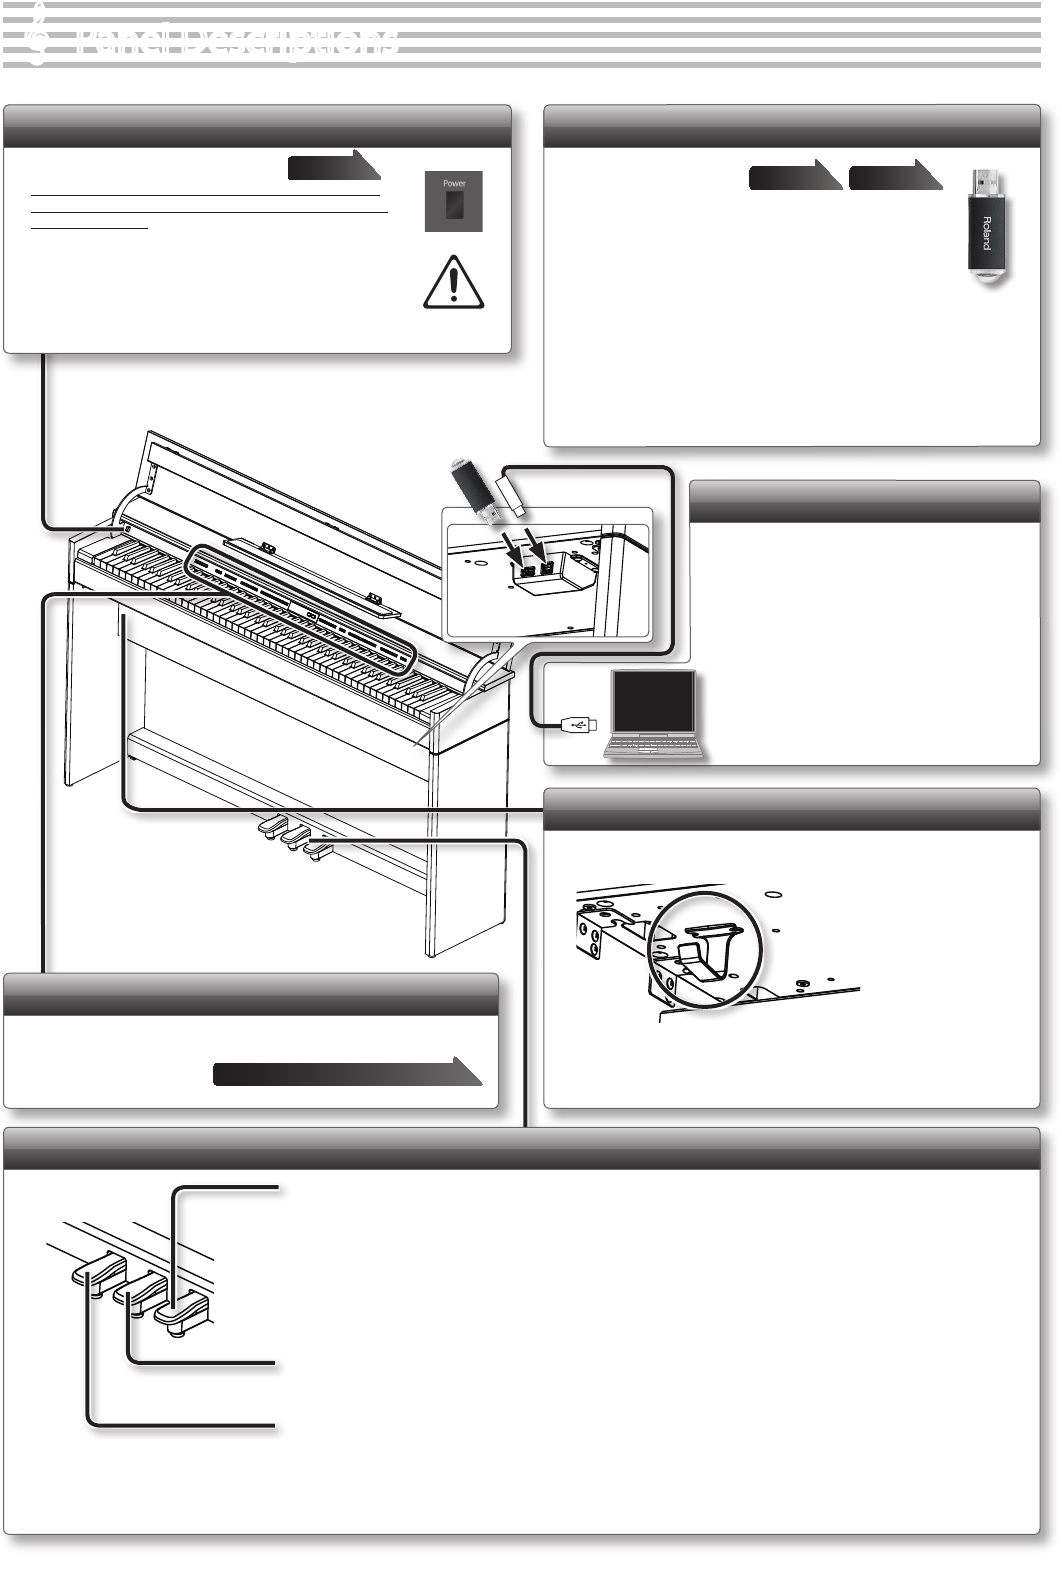
Headphone Hook
Whenever you are not using the headphones, you can hang them
on the headphone hook.
* Don’t hang anything other than headphones on this hook, and don’t apply
excessive force to it.
Doing so may damage the headphone hook.
Front Panel
These buttons and sliders are used to operate the unit.
“Operation Guide” page 6–9
USB Memory Port
If a USB ash drive is
connected, you can
use it to save or play back songs.
You can do the following things using a USB ash
drive.
• WAVE les or MIDI les (SMF) data copied from your computer
can be played back by the unit.
• You can make audio recordings of your performances on the unit.
• The audio recordings of songs that you’ve made can be played on your
computer, or burned to a CD.
* Carefully insert the USB ash drives all the way in-until it is rmly in place.
* Use a USB ash drive sold by Roland. We cannot guarantee operation if any
other USB ash drive is used.
page 24page 37
USB Port
If you use a commercially available USB
cable to connect the unit’s USB port to
your computer’s USB port, you’ll be able to
do the following things.
• SMF data played back by MIDI-compatible
software can be sounded by the unit.
• MIDI data can be transferred between the unit
and your sequencer software (sold separately),
opening up a wide range of possibilities for
music production and editing.
[Power] Switch
This turns the power on/o.
* With the factory settings, the unit’s power will automati-
cally be switched o 30 minutes after you stop playing or
operating the unit.
If the unit’s power has been turned o automatically, you can use
the [Power] switch to turn the unit back on again.
If you don’t want the power to turn o automatically, change the
“Auto O” setting to “OFF” as described on “Making the Power
Automatically Turn O After a Time (Auto O)” (p. 39).
page 13
10
Panel Descriptions
Phones Jacks
Here you can connect stereo headphones.
The unit has two headphone jacks, two people can
also use headphones simultaneously.
Input Jacks
If a digital audio player
or other audio playback
device is connected here,
you’ll be able to listen to
its playback through the
unit.
Use the controls of your
audio playback device to
adjust the volume.
Don’t forget to remove your headphone adaptor plug!
A headphone adapter plug is included with some
headphones. If you leave a headphone adaptor plug
inserted in the headphone jack, no sound will be heard
from the piano. If you don’t hear sound from the piano,
check the headphone jacks.
* To prevent malfunction and equipment failure, always turn down the volume, and turn o all the units before making any connections.
* When connection cables with resistors are used, the volume level of equipment connected to the Input jacks may be low. If this happens, use connection cables that
do not contain resistors.
Output Jacks
If you connect these jacks to
amplied speakers, the sound of
unit will be heard through them.
MIDI Connectors
You can connect these
to external MIDI devices
(p. 47).
DC In Jack
Connect the
included AC
adaptor here.
* Before making this connection,
you must make sure that the
[Power] switch is o.
Pedal Connector
Connect
the pedal
cord of the
dedicated stand to this
connector.
page 55
page 55
Rear side
Ground Terminal
Depending on the circumstances of a
particular setup, you may experience a
discomforting sensation, or perceive that
the surface feels gritty to the touch when
you touch this device. This is due to an
innitesimal electrical charge, which is
absolutely harmless. However, if you are
concerned about this, connect the ground
terminal (see gure) with an external
ground. When the unit is grounded, a slight hum may occur, depending
on the particulars of your installation. If you are unsure of the connection
method, contact the nearest Roland Service Center, or an authorized
Roland distributor.
Unsuitable places for connection
• Water pipes (may result in shock or electrocution)
• Gas pipes (may result in re or explosion)
• Telephone-line ground or lightning rod (may be dangerous in the event
of lightning)
11
Operation GuidePanel DescriptionsBefore You PlayPerformingPracticing
Convenient Functions
Appendix
Function Mode
Before You Play
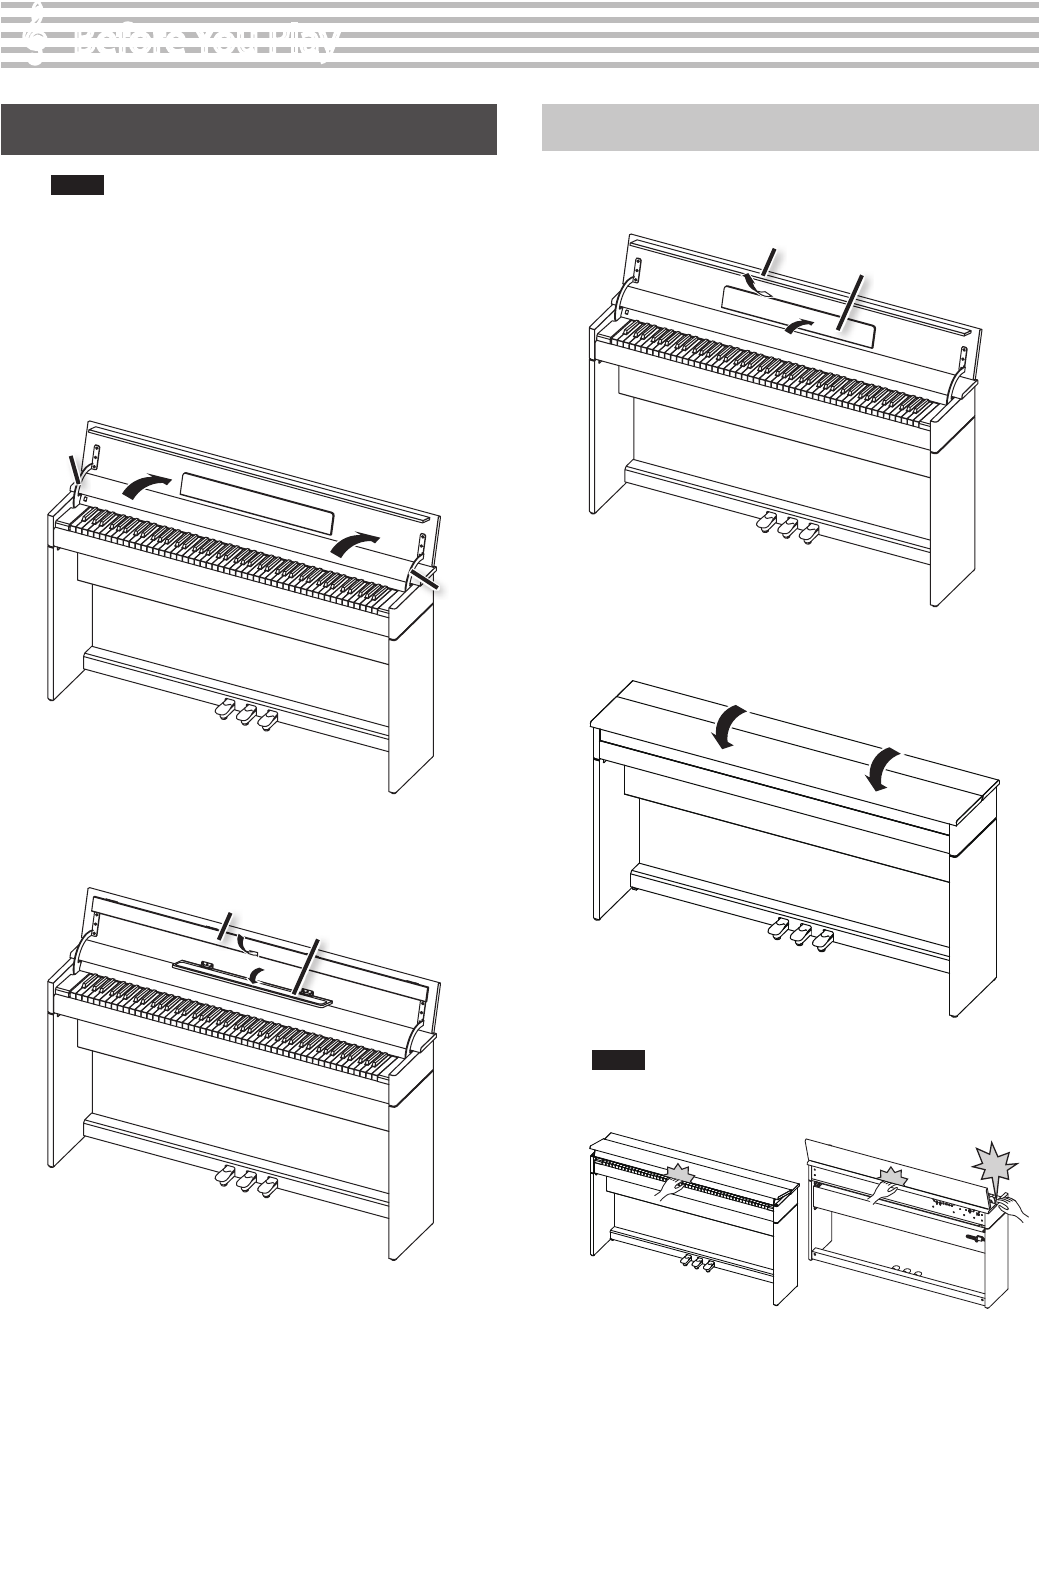
Opening the Lid
NOTE
• Always use two hands to open and close the lid.
Although the unit’s lid is designed to close slowly and gently
when it is released, the lid immediately closes if it has been
opened only slightly. Take care not to allow your ngers to
become pinched by the lid.
• If small children will be using the unit, adult supervision should
be provided.
• For safety, be sure to close the lid before transporting the piano.
1. Grasp and lift the lid with both hands.
Arm
Arm
2. Close the blind and open the music rest as shown in the
gure.
Blind
Music Rest
Closing the Lid
1. When closing the lid, be sure to close the music rest and
open the blind.
Blind
Music Rest
2. Grasp and gently lower the lid with both hands.
NOTE
When opening or closing the lid, take care not to pinch your
nger in the lid or the arms.
12
Before You Play
Turning the Power On/O
Once everything is properly connected (p. 11), be sure to follow the
procedure below to turn on their power. If you turn on equipment
in the wrong order, you risk causing malfunction or equipment
failure.
NOTE
Before turning the unit on/o, always be sure to turn the volume
down. Even with the volume turned down, you might hear some
sound when switching the unit on/o. However, this is normal
and does not indicate a malfunction.
On
O
1
3
2
MinMax
Turning the power on
1. Move the [Volume] slider all the way to the left to
minimize the volume.
2. Press the [Power] switch.
After a brief interval, you’ll be able to produce sounds by playing
the keyboard.
* This unit is equipped with a protection circuit. A brief interval (a
few seconds) after turning the unit on is required before it will
operate normally.
3. Use the [Volume] slider to adjust the volume.
Adjust the volume while playing something on the keyboard, so
you can hear how it sounds.
The volume increases when you slide it to the right, and decreases
when you slide it to the left.
MEMO
The unit is designed so that nuances in the dynamics of your
playing will be clearly heard even at low volume, and that the
sound will remain clear even at high volume.
Turning the power o
1. Move the [Volume] slider all the way to the left to
minimize the volume.
2. Press the [Power] switch.
The power is turned o.
If you don’t want the power to turn o
automatically, change the “Auto O” setting to
“OFF”!
With the factory settings, the unit’s power will
automatically be switched o 30 minutes after you stop
playing or operating the unit.
If the unit’s power has been turned o
automatically, you can use the [Power] switch to
turn the unit back on again.
If you don’t want the power to turn o
automatically, change the “Auto O” setting
to “OFF” as described on “Making the Power
Automatically Turn O After a Time (Auto O)” (p. 39).
NOTE
When the power is turned o, the settings of the unit will
be initialized. If you want to still be retained the next time
you turn on the power, you should refer to “Storing Your
Settings (Memory Backup)” (p. 48) and save your settings.
13
Operation GuidePanel DescriptionsBefore You PlayPerformingPracticing
Convenient Functions
Appendix
Function Mode
Performing
Performing with Various Sounds
In addition to piano sounds, the unit lets you enjoy performing with many other sounds (347 types).
These sounds are called Tones. The Tones are categorized into ve groups, each of which is assigned to a dierent Tone button.
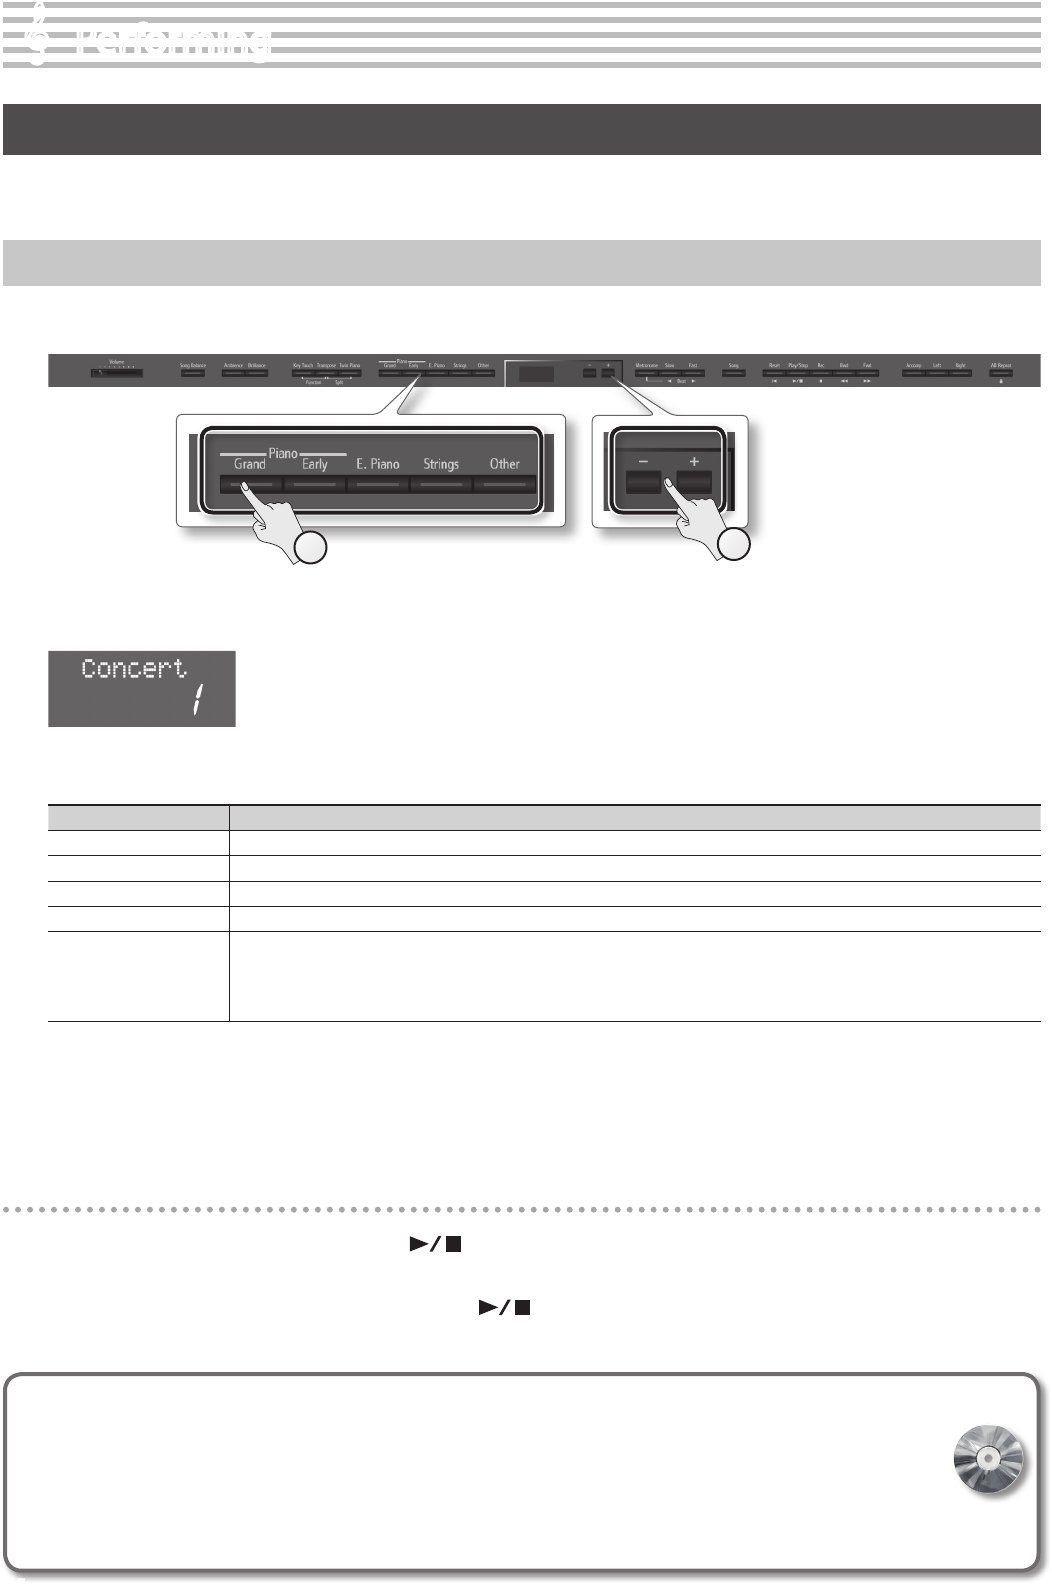
Selecting Tones
Let’s start by performing with a piano tone.
When you turn on the power, the Concert (Concert Piano) tone is selected.
1
2
1. Press a tone button to select the tone group.
The currently selected tone number and tone name are displayed.
Tone groups
Tone buttonDescription
Piano [Grand] buttonSelects grand piano sounds.
Piano [Early] buttonSelects sounds of early historical pianos.
[E. Piano] buttonSelects various electric piano sounds used in pop or rock.
[Strings] buttonSelects the sounds of string instruments such as violins, as well as other instruments used in orchestras.
[Other] button
Selects a variety of sounds such as organ, bass, or accompaniment sounds.
* If you select tone numbers 43–51, you’ll be able to use the keyboard to play the sounds of a drum set or SFX.
* If you’ve selected an organ sound that provides a rotary eect (*1), such as a Jazz Org or a Balad Or, pressing the [Other] button will
switch the speed of the rotary eect.
For details on the tones, refer to “Tone List” (p. 52).
*1 Rotary is an eect which simulates the sound of rotating speakers. There is a choice of two settings: Fast and Slow.
2. Use the [–] [+] buttons to select a variation within the tone group.
* If you’ve selected a drum set tone or an SFX set tone, some notes of the keyboard will not produce sound.
Auditioning tones (tone demo)
1. While holding down a tone button, press the [ ] (Play/Stop) button.
A tone demo that uses the rst tone of each tone group will begin playing back.
2. To stop the tone demo, press the [Song] button or the [ ] (Play/Stop) button.
If you are using the VIMA TUNES
You can connect a USB CD drive (sold separately) to the unit (p. 59), and play back separately sold CD-ROMs created for the VIMA.
Songs on VIMA CD-ROM (VIMA TUNES) are programmed with recommended tones suitable for each song.
When you select a song from a VIMA CD-ROM (VIMA TUNES), recommended tones will be assigned to the unit’s [E. Piano], [Strings],
and [Other] tone buttons, and these three tone buttons will blink. When you press a ashing Tone button, the recommended tone
is then selected, enabling you to perform the selected song using a tone matched to that song as it plays back.
14
Performing
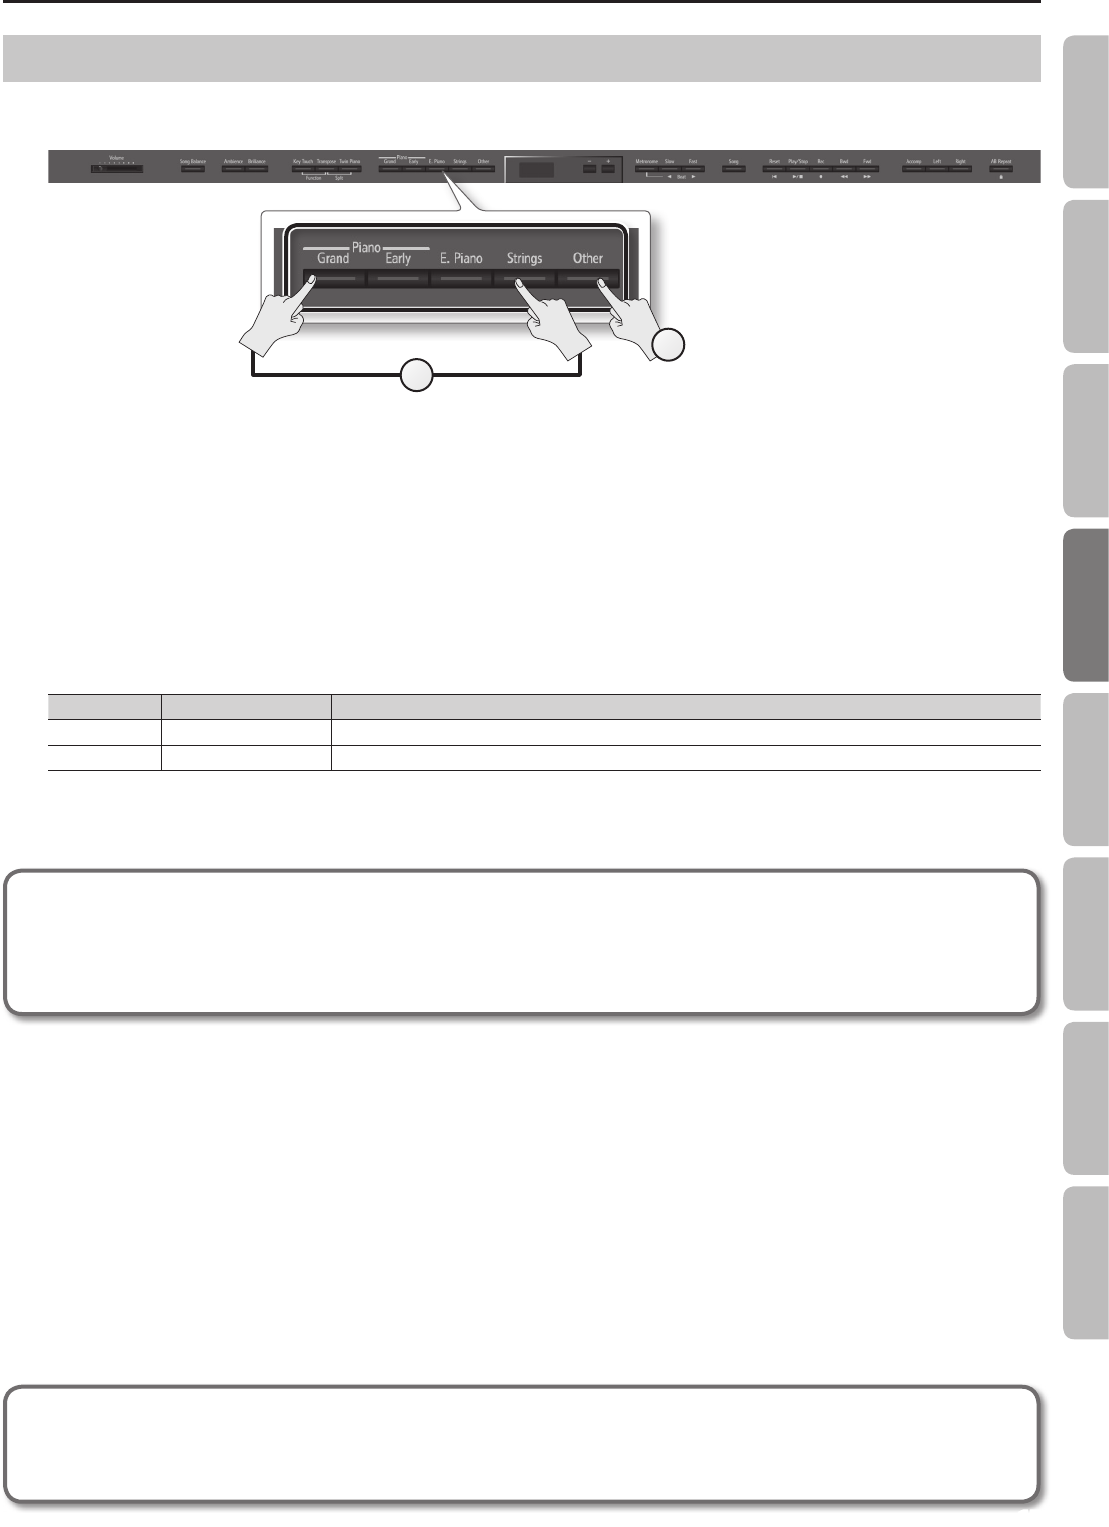
Performing with Two Layered Tones (Dual Play)
You can play two tones simultaneously from each note of the keyboard. This feature is called Dual Play.
As an example, here’s how to layer piano and strings tones.
1
2
1. While holding down the Piano [Grand] button, press the [Strings] button.
Both buttons will light.
When you play the keyboard, you’ll hear both the piano and the strings tones.
* Dual play is not available if Split Play (p. 16) or Twin Piano (p. 20) are turned on.
* For some combinations of sounds, the eect is not applied to tone 2, and this may aect how the tone sounds.
* It’s not possible to layer Piano [Grand] and Piano [Early] tones together.
Selecting tones for dual play
Tone nameCorresponding buttonHow to select tones
Tone 1Left tone buttonPress the [–] [+] buttons.
Tone 2Right tone buttonWhile holding down the tone button for Tone 2 (the right-most of the lit Tone buttons), and press the [–] [+] buttons.
2. To exit Dual Play, press one of the tone buttons.
Advanced techniques
Changing the pitch of tone 2 in steps of an octave: Octave Shift (p. 45)
Specifying the part(s) aected by the damper pedal: Damper Pedal Part (p. 45)
Adjusting the volume balance of the two tones: Dual Balance (p. 44)
What are eects?
Some of the tones provide a wide variety of other eects that can modify the sound in various ways.
The rotary eect is one of these eects.
15
Operation GuidePanel DescriptionsBefore You PlayPerformingPracticing
Convenient Functions
Appendix
Function Mode
Performing
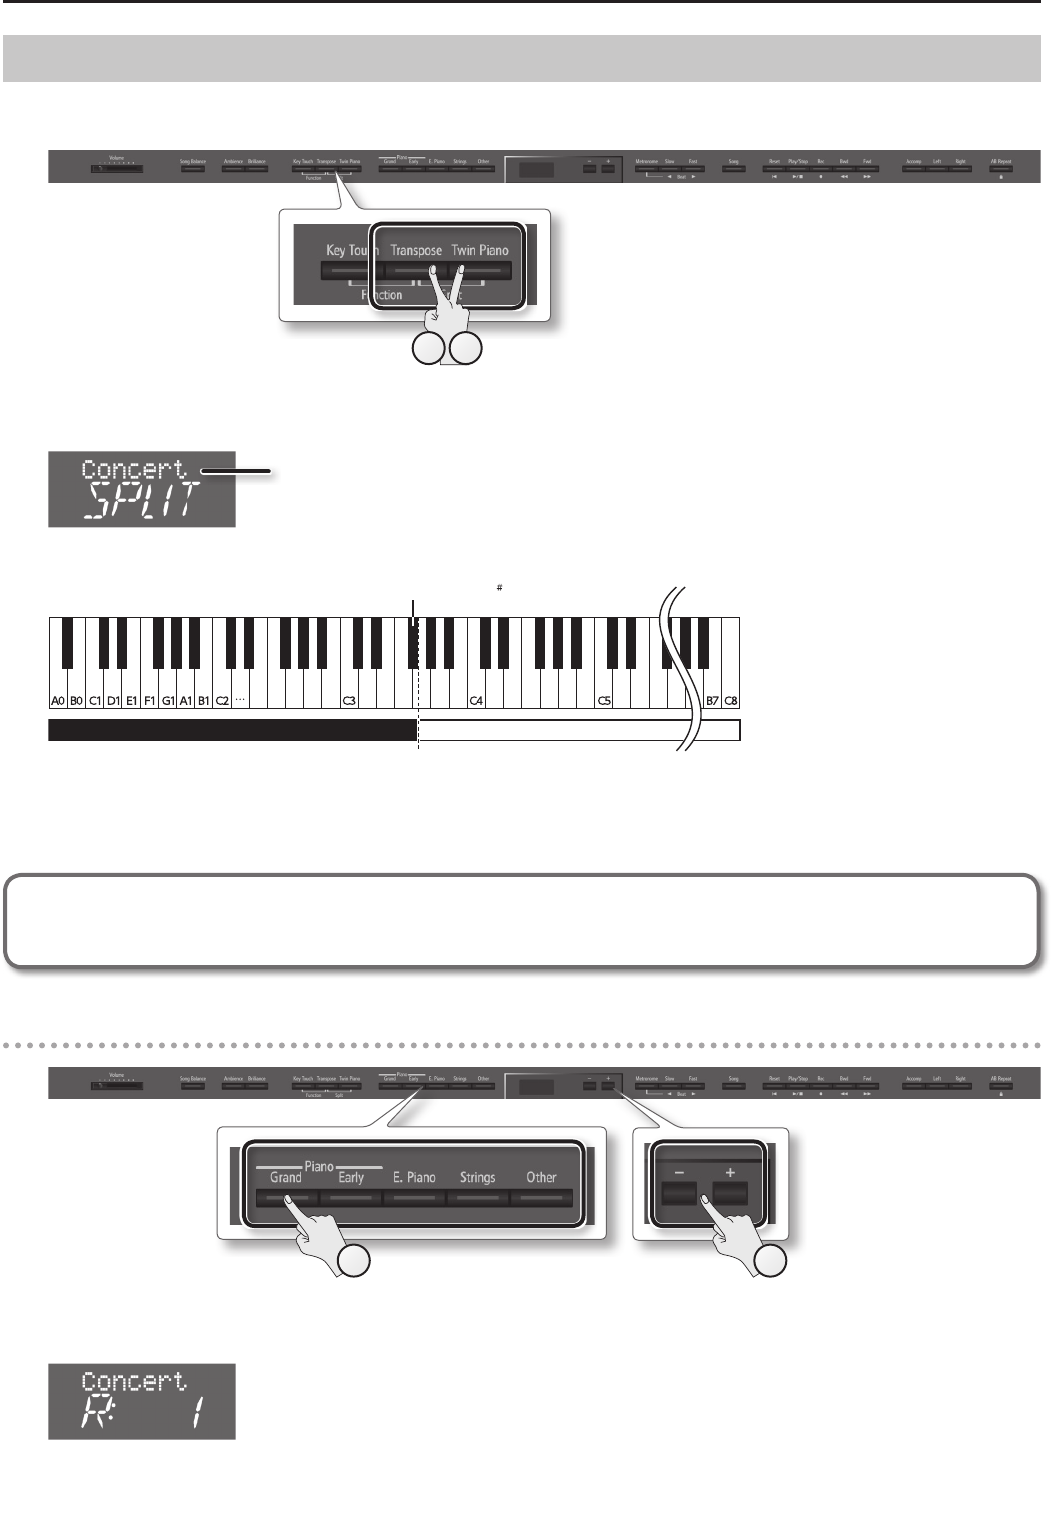
Playing Dierent Tones with the Right and Left Hands (Split Play)
You can play dierent tones in the left and right sides of the keyboard, divided at a certain key.
This feature is called Split Play, and the key at which the keyboard is divided is called the Split Point.
21
1. While holding down the [Transpose] button, press the [Twin Piano] button.
The display will indicate SPLIT.
Name of the right-hand tone
When Split is turned on, the keyboard settings will be as follows.
Split Point (Power-up default: F 3)
Left-hand ToneRight-hand Tone
2. To exit Split Play, hold down the [Transpose] button and press the [Twin Piano] button once again.
* Depending on which tones are being used together, the tones might sound dierent because no eect is applied to the left-hand tone.
Advanced technique
Specifying the part(s) aected by the damper pedal: Damper Pedal Part (p. 45)
Changing the right-hand tone
1
2
1. Press a tone button.
The number and name of tone currently selected for the right-hand zone are shown.
2. Press the [–] [+] buttons.
A dierent tone is selected.
16
Performing
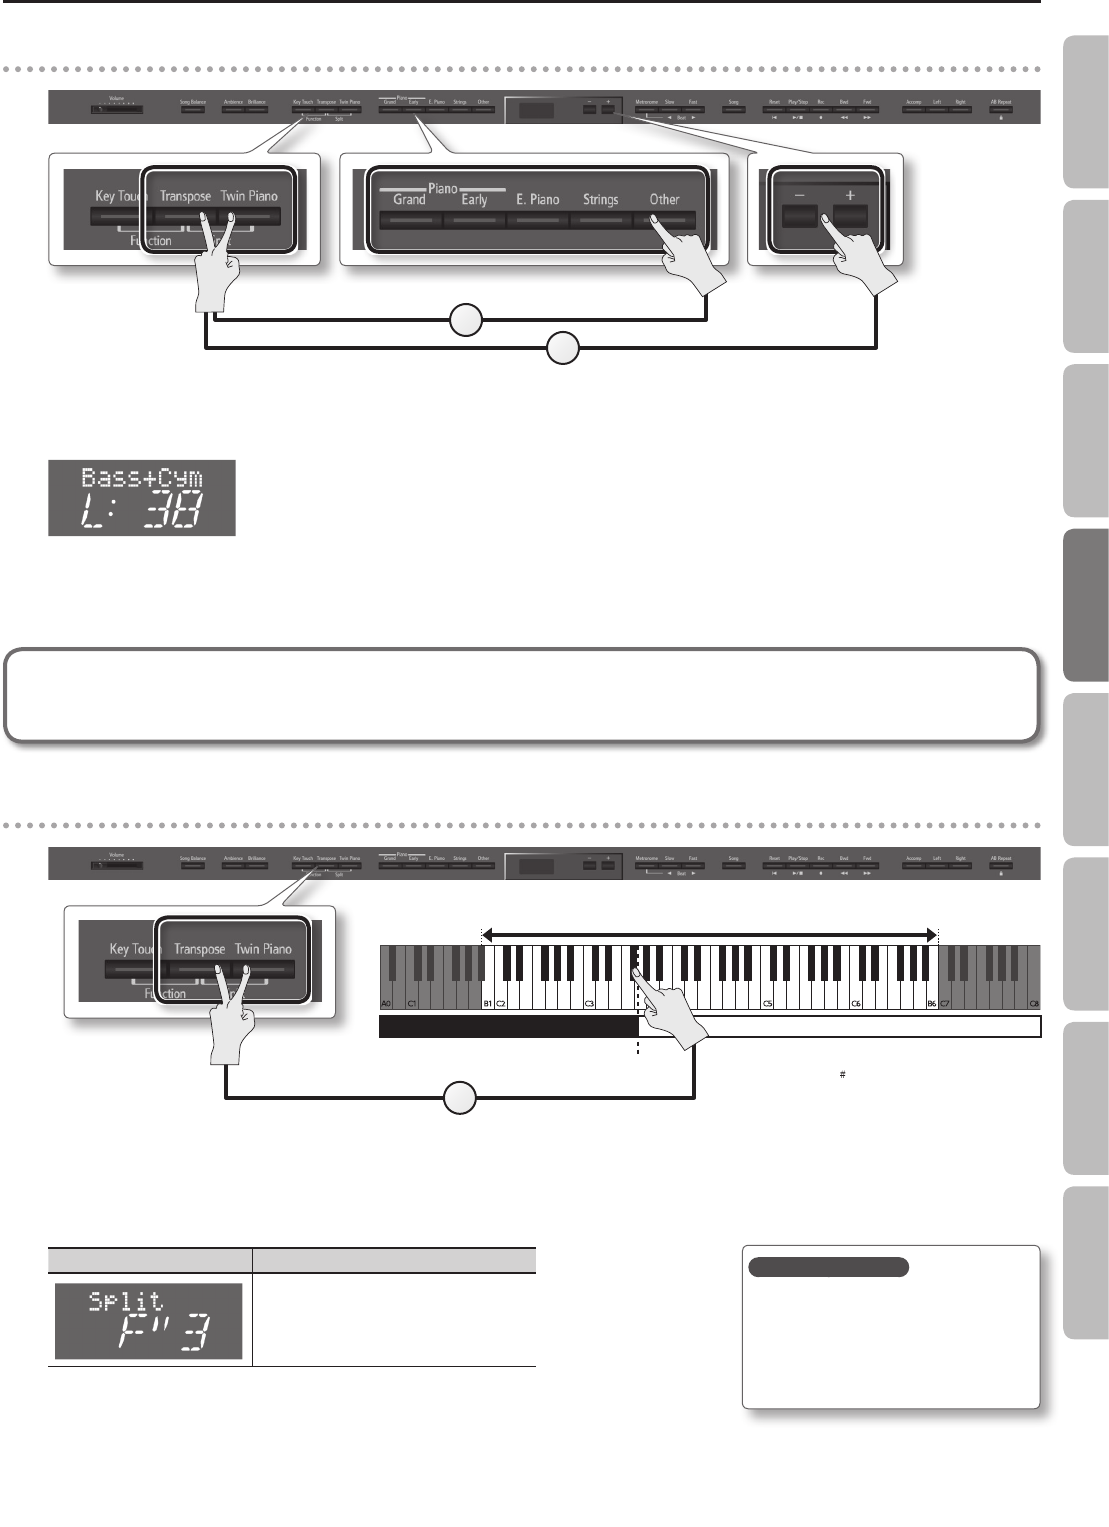
Changing the left-hand tone
1
2
1. While holding down the [Transpose] button and [Twin Piano] button, press a tone button.
The number and name of the tone currently selected for the left-hand zone are shown.
2. While holding down the [Transpose] button and [Twin Piano] button, press the [–] [+] buttons.
A dierent tone is selected.
Advanced technique
Changing the pitch of the left-hand tone in steps of an octave: Octave Shift (p. 45)
Changing the keyboard’s split point
Power-up default: F 3
The split point you specify becomes the
highest note of the left-hand section.
Split Point
Range in which you can specify the split point (B1–B6)
Left-hand Tone
Right-hand Tone
1
1. While holding down the [Transpose] button and [Twin Piano] button, press the key that you want to assign as the split point.
The key you pressed becomes the new split point, and that key will be shown in the display.
ScreenValue
B1–B6
(default: F#3)
* In the display, a quotation mark (“) signies a sharp (#).
Saving your settings
The unit’s settings will revert to the
default values when you turn o the
power, but you can save them as
described in “Retaining the Settings
Even After Power-o (Memory Backup)”
(p. 39).
17
Operation GuidePanel DescriptionsBefore You PlayPerformingPracticing
Convenient Functions
Appendix
Function Mode
Performing
Adjusting the Sound to Your Taste
The unit lets you add reverberation or modify the brightness of the sound.
Adding Reverberation to the Sound (Ambience)
You can add a pleasant reverberation to the sounds of the unit, producing the impression that you are performing in a concert hall.
This eect is called Ambience.
2
13
1. Press the [Ambience] button.
The [Ambience] button will light.
2. While holding down the [Ambience] button, press the [–] [+] buttons.
The display will indicate the depth of the ambience eect values.
ScreenValueExplanation
1–10
(default: 5)
Higher values apply deeper ambience.
3. To turn o the ambience eect, press the [Ambience] button once again.
The [Ambience] button will go out.
* It’s not possible to specify the depth of ambience individually for each tone. The eect will be applied in the same way to each tone.
Adjusting the Brightness of the Sound (Brilliance)
You can adjust the brightness of the sounds played on the keyboard or played back by a song.
2
13
1. Press the [Brilliance] button.
The [Brilliance] button will light.
Saving your settings
The unit’s settings will revert to the
default values when you turn o the
power, but you can save them as
described in “Retaining the Settings
Even After Power-o (Memory Backup)”
(p. 39).
18
Performing
2. While holding down the [Brilliance] button, press the [–] [+] buttons.
The display will indicate the depth of the brilliance eect values.
ScreenValueExplanation
-10–0–10
(default: 5)
Positive (+) values make the sound brighter; negative (-) values make the sound more mellow.
3. To turn o the brilliance eect, press the [Brilliance] button once again.
The [Brilliance] button will go out.
Adjusting the Keyboard Response (Key Touch)
The way in which the keyboard responds to your playing strength can be adjusted to your personal taste.
2
13
1. Press the [Key Touch] button.
The [Key Touch] button will light.
2. While holding down the [Key Touch] button, press the [–] [+] buttons.
The display will indicate the key touch setting.
ScreenValueExplanation
FIXThe sound plays at one set volume, regardless of the force used to play the keys.
L2This setting produces the lightest keyboard touch.
L1
You can achieve fortissimo () play with a less forceful touch than M, so the keyboard feels lighter. This setting
makes it easy to play, even for children.
M
This sets the standard keyboard touch. You can play with the most natural touch. This is the closest to the
touch of an acoustic piano.
This setting is used if the [Key Touch] button is unlit.
H1
(default)
You have to nger the keyboard more forcefully than M in order to play fortissimo (), so the keyboard touch
feels heavier. Dynamic ngering adds even more feeling to what you play.
H2This setting produces the heaviest keyboard touch.
3. To cancel key touch, press the [Key Touch] button once again.
The [Key Touch] button will go out.
Saving your settings
The unit’s settings will revert to the
default values when you turn o the
power, but you can save them as
described in “Retaining the Settings
Even After Power-o (Memory Backup)”
(p. 39).
Saving your settings
The unit’s settings will revert to the
default values when you turn o the
power, but you can save them as
described in “Retaining the Settings
Even After Power-o (Memory Backup)”
(p. 39).
19
Operation GuidePanel DescriptionsBefore You PlayPerformingPracticing
Convenient Functions
Appendix
Function Mode
Performing
Dividing the Keyboard for Two-person Performance (Twin Piano)
You can divide the keyboard into left and right zones so that two people can play the same range of pitches, just as though there were two pianos.
This function is called Twin Piano.
For example, you could use Twin Piano to allow a student to play along with their teacher.
31
1. Press the [Twin Piano] button.
The [Twin Piano] button will light, and the Concert (Concert Piano) tone
will be selected.
When you turn Twin Piano on, the keyboard and pedal settings will be as
shown in the illustration.
NOTE
If Twin Piano is on, damper resonance will not be applied; this may cause the piano to sound dierent.
2. Select the tone to be played (p. 14).
The left and right sections will have the same tone.
3. To cancel Twin Piano, press the [Twin Piano] button once again.
The [Twin Piano] button will go out.
Changing the way in which the sound is heard (Twin Piano mode)
1
1. While holding down the [Twin Piano] button, press the [–] [+] buttons.
The display will indicate Twin Piano mode.
ScreenValueExplanation
1
(default)
The sound of the right-hand keyboard zone will be heard more loudly from the right speaker than from the
left speaker.
The sound of the left-hand keyboard zone will be heard more loudly from the left speaker than from the right
speaker.
When using headphones, you’ll be able to hear the other person’s playing.
2
The sound of the right-hand keyboard zone will be heard only from the right speaker.
The sound of the left-hand keyboard zone will be heard only from the left speaker.
If you’re using headphones, the sound of the right-hand keyboard zone will be heard in your right ear, and
the sound of the left-hand keyboard zone will be heard in your left ear.
* Ambience will turn o.
* For some tones, the sound might not be divided to left and right.
The damper pedal for
the left area
The damper pedal for
the right area
Conventional
keyboard
Twin Piano
divide point
20
Performing
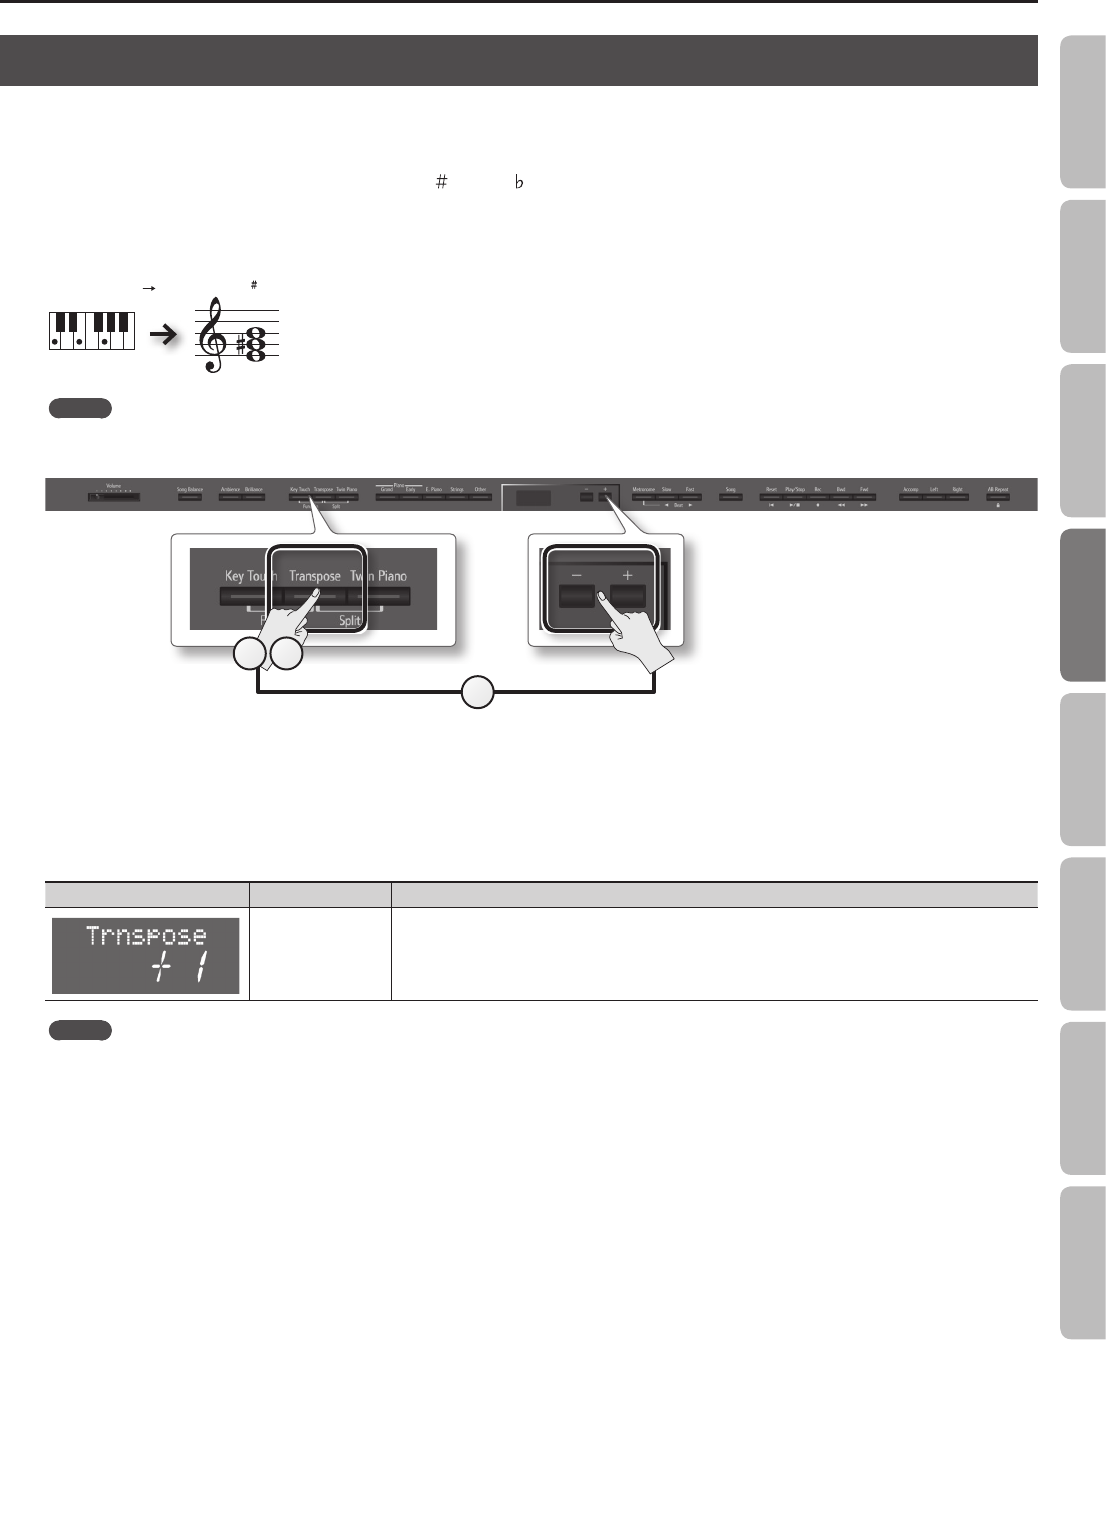
Shifting the Pitch (Transpose)
Transpose means to shift the pitches of songs and the keyboard.
The Transpose function makes it easy to do the following.
• You can use unchanged ngering to accompany a singer who is singing in a key dierent than the original music.
• A song written in a dicult key with numerous sharps (
) or ats () can be performed in a key that’s easier for you to play.
• Notation of a transposing instrument such as trumpet or sax can be played as written, while hearing the transposed pitches.
For example if the song is written in E major but you want to play it using the ngering of the key of C major, you would set Transpose to 4.
If you play C E G It will sound E G B
MEMO
With the factory settings, both the song and the keyboard will be transposed. If you want to transpose only the keyboard or only the song, make
the appropriate setting as described in “Specifying What the Transpose will Aect (Transpose Mode)” (p. 45).
2
13
1. Press the [Transpose] button.
The [Transpose] button will light.
2. While holding down the [Transpose] button, press the [–] [+] buttons.
The display will indicate the amount of transposition.
ScreenValueExplanation
-6–0–+5
(semitone units)
(default: +1)
Positive (+) values raise the pitch in semitone steps, and negative (-) values lower the pitch in semitone steps.
MEMO
You can also specify this value by holding down the [Transpose] button and playing the note that is the tonic of the key to which you want to
transpose.
* If you select a dierent song, the transposition setting will be canceled.
3. To cancel the transposition, press the [Transpose] button once again.
The [Transpose] button will go out.
21
Operation GuidePanel DescriptionsBefore You PlayPerformingPracticing
Convenient Functions
Appendix
Function Mode
Practicing
Practicing with the Metronome
You can sound the metronome while you practice.
While the song selects, the metronome will sound at the tempo and time signature of the song.
1. Press the [Metronome] button.
The [Metronome] button will blink, and the metronome will sound.
The [Metronome] button will blink red and green according to the currently
selected time signature; red indicates the strong beats, and green indicates the
weak beats.
2. To stop the metronome, press the [Metronome] button once again.
The [Metronome] button will go out.
Changing the Tempo
1. Press the [ ] [ ] (Slow/Fast) buttons.
When you select or play back a song (p. 24), the tempo of the metronome will be set to that song’s tempo.
Changing the Time Signature
1. While holding down the [Metronome] button, press the [ ] [ ]
(Slow/Fast) buttons.
If you specify “0/4” only the weak beats will sound.
When you play back a song, the metronome’s time signature will be set to the time signature of that song.
* You can’t change the metronome’s time signature while a song is playing.
* If you record using 0/4, the song’s time signature will be set to 4/4 when you save it.
21
1
1
22
Practicing
Adjusting the Metronome’s Volume
1. While holding down the [Metronome] button,
press the [–] [+] buttons.
The display will indicate the metronome’s volume.
ScreenValueExplanation
0–10
(default: 5)
When the volume of the metronome is set to “0,” the metronome won’t sound, but the [Metronome] button
will blink.
Adding a Count-in to Synchronize Your Performance
A series of sounds rhythmically played to indicate the tempo before a song starts is called a “count-in.”
If you sound a count-in, it will be easier for you to synchronize your own performance to the tempo of the playback.
1. Press the [Metronome] button.
The metronome will sound.
2. Press the [ ] (Play/Stop)
button.
A two-measure count sound will
be produced before the song starts
playing.
1
12
23
Operation GuidePanel DescriptionsBefore You PlayPerformingPracticing
Convenient Functions
Appendix
Function Mode
Practicing
Practicing with a Song
You can practice by playing along with a song.
Selecting and Playing a Song
Here’s how to listen to the built-in songs.
You can also play back songs stored on a separately sold USB ash drive.
1. Press the [Song] button.
2. While holding down the [Song] button,
use the [–] [+] buttons to select the
category.
Category
Song Name
DisplayExplanation
SSongs saved on the USB ash drive
USongs saved in the internal memory
a
Songs built into the unit
Piano Masterpieces
ASelections
bCzerny
cHanon
Song Number
* If an audio le is selected, a “ . ” (dot) is displayed following the song number.
3. Use the [–] [+] buttons to select a song.
MEMO
“Fld” is shown for folders.
Use the following operations to select a song from a folder.
• To enter a folder, use the [–] [+] buttons to select that folder, and then press the [
] (Play/Stop) button.
• To select a song within a folder, use the [–] [+] buttons.
• To exit a folder, use the [–] button to select “Fld. UP,” and then press the [
] (Play/Stop) button.
* If one folder contains more than 500 les or folder, some of the les or folders might not be displayed.
4. Press the [ ] (Play/Stop) button.
When the song has played to its end, playback will stop.
To pause the playback, press the [
] (Play/Stop) button once again.
The next time you press the [
] (Play/Stop) button, playback will resume from where you paused.
Button operations
[ ] (Reset) button
Returns you to the beginning of the song.
[
] (Play/Stop) button
Plays/stops the song.
Starts/stops recording.
[
] (Rec) button
Enter recording – standby mode.
[
] (Bwd) button
Rewinds the song.
[
] (Fwd) button
Fast-forwards the song.
MEMO
When the song number is displayed, you can press the [Song] button to see the song playback position (the measure number or the time).
Press the [Song] button once again to return to the song number indication.
2
314
24
Practicing
Song formats that can be played by the unit
The unit can play back data in the following formats.
• SMF formats 0/1
• Roland Piano Digital format (i-format)
• Audio les: WAV format, 44.1 kHz, 16-bit linear
Playing Songs Consecutively (All Songs Play)
You can consecutively play back the built-in songs or the songs saved in the internal memory or on the USB ash drive repetitively.
This function is called “All Songs Play.”
1. While holding down the [Song] button, use the [–] [+] buttons to select the category.
2. While holding down the [Song] button, press the [ ] (Play/Stop) button.
All Songs Play will be selected, and the [ ] (Play/Stop) button will blink.
* All Song Play will be cancelled if you stop playback or turn o the power.
Adjusting the Volume Balance of the Song and the Keyboard Performance (Song Balance)
You can adjust the balance between the song and your keyboard performance by changing the volume of the song.
2
13
1. Press the [Song Balance] button.
The [Song Balance] button will light.
2. While holding down the [Song Balance] button, press the [–] [+] buttons.
The display will show the song balance.
ScreenValueExplanation
0–9
(default: 5)
The song’s volume decreases the more you lower this value, and at the same time the keyboard performance
will take on more prominence.
The song’s volume increases the more you raise this value, and at the same time the keyboard performance
will become less prominent.
3. To cancel the Song Balance function, press the [Song Balance] button once again.
The [Song Balance] button will go out.
25
Operation GuidePanel DescriptionsBefore You PlayPerformingPracticing
Convenient Functions
Appendix
Function Mode
Practicing
Adjusting a Song’s Tempo for Easier Practicing
You can change the tempo at which a song plays back.
When you’re practicing along with a song, this allows you to slow down the tempo of a dicult song in order to play it more comfortably.
1. Press the [ ] [ ] (Slow/Fast) buttons.
The tempo will be indicated.
MEMO
If an audio le is selected, you can adjust the tempo in the range of 75–100–125%.
2. To return the tempo to its original setting, press the [ ] (Slow)
and [ ] (Fast) buttons simultaneously.
Playing back at a xed tempo (tempo mute)
With some of the internal songs, the tempo will change during the song. If desired, you can make these songs play back at a xed, unchanging tempo.
1. With the tempo displayed, holding down the [ ] (Play/Stop) button and press the [ ] [ ] (Slow/Fast) buttons to
adjust the tempo.
The screen will show the tempo and “ . ” (dot). This “ . ” indicates that the tempo is muted.
2. To cancel tempo mute, once again hold down the [ ] (Play/Stop) button and press the [ ] [ ] (Slow/Fast) buttons.
Practicing One Hand at a Time (Part Mute)
Here’s how to have only the selected part play back. This allows you to practice playing the left or right-hand part of a song while listening to the
other hand played automatically.
Part button
Accompaniment part
Left-hand
part
Right-hand
part
Part
Each part is assigned to the part buttons as shown in the
illustration.
Muting
You can “mute” a specic part so that it will not be heard.
* If you’ve selected a song that does not contain an
accompaniment, the [Accomp] button will not light even if
you press it.
1. Press the part button for the part that you don’t want to be played.
The light for the button you pressed will go out, and the selected part will not be heard.
MEMO
• If the accompaniment part is muted, playback will skip the introduction.
• The mute setting will be cancelled when you switch songs.
• Although the Part Mute function cannot be used with respect to the playback of an audio le, you can reduce the volume during playback of
sounds that are localized at the center of the sound eld, such as vocals or bass. Refer to “Center Cancel” (p. 35).
2. To un-mute the sound, press the part button once again so it’s lit.
1
2
26
Practicing
Using the sound of a specic part as a “guide” (mute volume)
If desired, you can specify that the sound of a part will play at a reduced volume rather than going completely silent when you press a part button
and turn o its indicator.
This setting lets you play a specic part at a reduced volume and use it as a “guide” for your playing.
1. While holding down the part button, press the [–] [+] buttons.
ScreenValueExplanation
0–10
(default: 0)
Higher values make the sound louder.
1
27
Operation GuidePanel DescriptionsBefore You PlayPerformingPracticing
Convenient Functions
Appendix
Function Mode
Practicing
Repeatedly Practicing a Portion of a Song (AB Repeat)
Here’s how you can repeatedly play back a specied portion of the song. You can use this function to repeatedly practice that portion.
Section to repeat
A (Repeat Start)
B (Repeat End)
Time
2
1
34
1. Press the [ ] (Play/Stop) button.
The song will play back.
2. Press the [AB Repeat] button at the point where you want to start repeating (point A).
The [AB Repeat] button will blink.
3. Press the [AB Repeat] button at the point where you want to stop repeating (point B).
The [AB Repeat] button will light, and playback will begin repeating.
4. To cancel the repeat function, press the [AB Repeat] button once again.
The [AB Repeat] button will go out, the repeat points you specied will be cleared.
MEMO
• The repeat points can be set at the beginning of each measure for an SMF song, or in 1/100th of a second for audio.
• Instead of playing back the song, you can also specify the portion to repeat by using the [
] [ ] buttons.
Moving the portion to repeat forward or backward
When AB Repeat is on, you can move the repeated portion forward or backward.
1
Section to repeat
Section to repeat
A (Repeat Start)
B (Repeat Start)
Time
1. While holding down the [AB Repeat] button, press the [–] [+] buttons.
The repeated portion will be moved without its length being changed.
28
Practicing
Recording the Song You’re Practicing
It’s easy to record your own performances.
You can play back a recorded performance to check your playing, or perform along with a recorded performance.
The unit lets you record in the following ways.
Type of recordingExplanation
SMF recording
Parts will be separate.
You can re-record a specic portion of the song.
You can overdub.
* Normally, you should use SMF recording.
Audio recording
Your performance will be recorded as audio data. The recorded song can be used on your computer.
* In order to use audio recording, you must connect a USB ash drive (sold separately) to the USB memory port (p. 10).
* SMFs (Standard MIDI Files) use a standard format for music le that was formulated so that les containing music le could be widely compatible,
regardless of the manufacturer of the listening device. An enormous variety of music is available, whether it be for listening, for practicing musical
instruments, for Karaoke, etc.
SMF Recording
To record a new song, proceed as follows.
This method is convenient when you simply want to record your performance as easily as possible.
Getting ready to record
1.
Select the tone that you want to use for performing (p. 14).
2. Press the [ ] (Rec) button.
The [ ] (Rec) button will light, the [ ] (Play/Stop) button will blink, and the unit will enter
recording-standby mode.
If you decide not to record, press the [
] (Rec) button once again.
3. If desired, sound the metronome (p. 22).
MEMO
If you change the metronome’s tempo and time signature, they will be recorded with the song, allowing the metronome to sound correctly during
playback.
Starting/stopping recording
1.
Press the [ ] (Play/Stop) button.
A two-measure count will be heard (the measure number will be shown as “-2”
then “-1” in the lower right of the display), and then recording will start.
When recording starts, the [
] (Rec) button and [ ] (Play/Stop) button
will light.
MEMO
You can also initiate recording by simply playing the keyboard. If you initiate recording by playing the keyboard, a count will not be sounded.
2. Press the [ ] (Play/Stop) button.
Recording will stop, and a message will ask whether you want to save your performance.
2
12
29
Operation GuidePanel DescriptionsBefore You PlayPerformingPracticing
Convenient Functions
Appendix
Function Mode
Practicing
Saving a performance you’ve recorded
* If you want to save to the USB ash drive (sold separately), connect your USB ash drive to the USB memory port before you continue.
1. Press the [ ] (Play/Stop) button to stop recording (p. 29).
Recording will stop, and a message will ask whether you want to save your performance.
2. To save your performance, press the [ ] (Fast) button to select “Y.”
The performance will be saved.
The recorded performance is saved at the earliest vacant song number.
The song is automatically given a name in this format: “Song nnn,” where “nnn” is the song number.
NOTE
Never turn o the power while the screen indicates “Working...”
If you don’t want to save your performance, press the [
] (Slow) button to select “N.”
A message will ask you to conrm that you want to erase the song.
If you’re sure that it’s OK to erase your performance, press the [
] (Fast) button to select “Y.”
If you decide not to carry out the erasure, press the [
] (Slow) button to select “N.”
Saving to a specic memory, song number, or song name
If you press the [Song] button instead of the [] (Fast) button in step 2, you’ll be able to specify the save-destination memory, song number,
and song name used for saving the performance.
For details on the procedure, refer to “Saving a Song with the Name You Specify” (p. 37).
Listening to a performance you’ve recorded
You can listen to the recorded performance before you save it.
1. In step 1 of “Saving a performance you’ve recorded” (p. 30), press the [] (Play/Stop) button.
Playback will start from the beginning of the performance you recorded.
Overdubbing a Recorded Song
When recording an SMF, you can overdub each part separately. For example, you can record the left-hand and right-hand parts separately, or record
along with a song.
Recording each hand separately
You can separately record your left-hand performance to the [Left] button and your right-hand performance to the [Right] button. You can also
separately re-record each hand afterward.
Getting ready to record
1.
Select the tone that you want to use for performing (p. 14).
2. Press the [ ] (Rec) button.
The [ ] (Rec) button will light, the [ ] (Play/Stop) button will blink, and the unit will enter
recording-standby mode.
If you decide not to record, press the [
] (Rec) button once again.
3. If desired, sound the metronome (p. 22).
MEMO
If you change the metronome’s tempo and time signature, they will be recorded with the song, allowing the metronome to sound correctly during
playback.
2
30
Practicing
Recording the left hand
1.
Press the [Right] button and the [Accomp] button so
their illumination is turned o.
The [Left] button alone will start blinking, meaning that
the unit is ready to record to the [Left] button.
* If you don’t specify a part at this time, the recorded performance will be recorded in this order: [Right] button
[Left] button [Accomp] button.
* If you’re using Twin Piano or Split Play, the left side or left-hand tone will be recorded to the [Left] button, and the right side or right-hand tone will
be recorded to the [Right] button.
2. Press the [ ] (Play/Stop) button.
A two-measure count will sound (the measure number in the lower right of the display will indicate “-2,” then “-1”), and then recording will start.
When recording starts, the [
] (Rec) button and [ ] (Play/Stop) button will light.
MEMO
You can also initiate recording by playing the keyboard. In this case, the count will not sound.
3. Press the [ ] (Play/Stop) button.
Recording will stop, and a conrmation message will ask whether you want to save the recording.
4. Either save the performance or erase it (p. 30).
Overdubbing the right hand
1.
Press the [ ] (Rec) button.
The [ ] (Rec) button will light, and
the unit will enter recording-standby
mode.
At this time, New Song will be selected.
If you decide not to record, press the [
]
(Rec) button once again.
2. Reselect the song you saved earlier by pressing the [+] button.
MEMO
The song’s tempo and time signature will be as they were when you recorded the left hand.
3. Press the [Right] button so it’s blinking.
In this state, the right-hand performance will be recorded to the [Right] button. Leave the [Left] button lit.
NOTE
If you select a previously recorded part and then record, your new performance will overwrite that part; the previously recorded performance will
be lost.
4. Press the [ ] (Play/Stop) button.
A two-measure count will be heard (the measure number will be shown as “-2” then “-1” in the lower right of the display), and then recording will start.
The previously recorded performance for the left hand will be played back, so you can listen to it while you play the right-hand part.
When recording starts, the [
] (Rec) button and [ ] (Play/Stop) button will light.
MEMO
You can also initiate recording by playing the keyboard. In this case, the count will not sound.
5. Press the [ ] (Play/Stop) button.
Recording will stop, and a conrmation message will ask whether you want to save the recording.
6. Either save the performance or erase it (p. 30).
23
11
4
12
5
3
31
Operation GuidePanel DescriptionsBefore You PlayPerformingPracticing
Convenient Functions
Appendix
Function Mode
Practicing
Recording a performance you play along with a song
Here’s how you can record a performance that you play along with a song.
Getting ready to record
1.
Select the tone that you want record (p. 14).
2. Select the song to be dubbed (p. 24).
3. Press the [ ] (Rec) button.
The [ ] (Rec) button will light, and the
unit will enter recording-standby mode.
At this time, New Song will be selected.
If you decide not to record, press the [
]
(Rec) button once again.
4. Reselect the song selected in step 2 by pressing the [+] button.
MEMO
The song’s tempo and time signature will be according to the settings of the song you selected.
5. Press the part button of the part that you want to record, so it’s blinking.
Parts whose buttons are lit will play back during recording.
MEMO
At this point, you can use the [
] [ ] (Bwd/Fwd) buttons to move to a desired measure, and record from that measure.
Starting/stopping recording
1.
Press the [ ] (Play/Stop) button.
A two-measure count will be heard (the measure number will be shown as “-2”
then “-1” in the lower right of the display), and then recording will start.
When recording starts, the [
] (Rec) button and [ ] (Play/Stop) button
will light.
MEMO
You can also initiate recording by simply playing the keyboard. If you initiate recording by playing the keyboard, a count will not be sounded.
2. Press the [ ] (Play/Stop) button.
Recording will stop, and a conrmation message will ask whether you want to save the recording.
3. Either save the performance or erase it (p. 30).
3
5
4
12
32
Practicing
Converting a Song Recorded as an SMF to Audio
By converting a song recorded in the form of an SMF to audio, you’ll be able to listen to it on your computer. You can also use your computer to burn
the song to a music CD, or upload it to the Internet.
Copying an audio recording of a song to your computer
page 36
If you save an audio recording of a song on the
USB ash drive, you'll be able to listen to it on your
computer.
In order for an SMF song recording to be used on your
computer, you’ll need to convert it to audio (WAV le).
Audio recordings of songs are saved as WAVE les
(16-bit, 44.1 kHz).
You can use your computer to burn them to a music
CD or upload them to the Internet.
WAV
Use computer software (such as
iTunes) to burn the song to a CD.
A song recorded on the unit can be
copied to your computer by means of a
USB ash drive.
1. Connect a USB ash drive (sold separately) to the USB memory
port (p. 10).
* Audio data cannot be saved in the unit itself.
2. Select the song that you want to convert to audio (p. 24).
3. While holding down the [ ] (Rec) button, press the [–] [+] buttons
to select “Audio.”
4. Press the [ ] (Rec) button.
The [ ] (Rec) button will light, and the [ ] (Play/Stop) button will blink; the unit will enter converting-standby mode.
At this time, New Song will be selected.
If you decide not to convert, press the [
] (Rec) button once again.
5. Reselect the song selected in step 2 by pressing the [+] button.
6. Press the [ ] (Play/Stop) button.
The song will play back, and the conversion will begin.
MEMO
If you play the keyboard or input data via the MIDI IN connector during conversion, all of the notes (including those you play or input) will be
included in the conversion. Muted parts will not be converted.
NOTE
• Never turn o the power or disconnect the USB ash drive during conversion.
• For some SMF recordings, it might not be possible to perfectly convert the recording in its original form.
7. To end conversion, press the [ ] (Play/Stop) button.
A conrmation message will ask whether you want to save the le.
MEMO
Conversion will continue until you press the [
] (Play/Stop) button.
8. Either save the performance or erase it (p. 30).
476
3
5
33
Operation GuidePanel DescriptionsBefore You PlayPerformingPracticing
Convenient Functions
Appendix
Function Mode
Practicing
Audio Recording
Here’s how to record what you play on the unit as audio data. The recorded song can be used on your computer.
Preparing to record
1.
Connect a USB ash drive (sold separately) to the
USB memory port (p. 10).
* Audio data cannot be saved in the unit itself.
2. Select the tone that you want perform (p. 14).
3. While holding down the [ ] (Rec) button, press the [–] [+] buttons to select “Audio.”
4. Press the [ ] (Rec) button.
The [ ] (Rec) button will light, the [ ] (Play/Stop) button will blink, and the unit will enter recording-standby mode.
If you decide not to record, press the [
] (Rec) button once again.
5. If desired, sound the metronome (p. 22).
Starting/stopping recording
1.
Press the [ ] (Play/Stop) button.
Recording will start.
When recording starts, the [
] (Rec) button and [ ] (Play/Stop) button
will light.
NOTE
Never turn o the power or disconnect the USB ash drive during recording.
2. Press the [ ] (Play/Stop) button.
Recording will stop, and a conrmation message will ask whether you want to save the recording.
3. Either save the performance or erase it (p. 30).
4
3
12
34
Practicing
Transposing a Song for Easier Performance (Audio Transpose)
You can change the key when playing back an audio le. You can play the keyboard while listening to the transposed sound.
1. Press the [Transpose] button.
The [Transpose] button will light.
2. While holding down the [Transpose] button, press the [–] [+] buttons.
The display will indicate the amount of transposition.
ScreenValueExplanation
-6–0–+5
(semitone units)
(default: +1)
Positive (+) values raise the pitch in semitone steps, and negative (-) values lower the pitch in semitone steps.
MEMO
With the factory settings, both the audio le and the keyboard will be transposed. If you want transposition to aect only the keyboard or only the
audio le, make the appropriate setting as described in “Specifying What the Transpose will Aect (Transpose Mode)” (p. 45).
* If you select a dierent song, the audio transposition setting will be canceled.
3. To cancel the transposition, press the [Transpose] button once again.
The [Transpose] button will go out.
Enjoying Karaoke with an Audio File (Center Cancel)
When playing back an audio le, you can minimize the sounds that are heard from the center. For example, this allows you to minimize the melody or
vocal on a music CD, so that you can play or sing that part instead.
* For some songs, it might not be possible to completely eliminate the melody sound.
1. Press the [Right] button.
The [Right] button will go out, and the melody sound will be minimized.
* The Center Cancel setting will turn o if you select a dierent song.
2. When you want the sound to be heard, press the [Right] button once again.
The [Right] button will light.
35
Operation GuidePanel DescriptionsBefore You PlayPerformingPracticing
Convenient Functions
Appendix
Function Mode
Practicing
Burning an Audio Recording of a Song (WAV le) to a CD
After an audio recording of a song has been saved to
the USB ash drive, you can copy it to your computer
and burn it to a CD. If you want to burn a CD from
a song that you recorded as an SMF, you must rst
convert it to audio (WAV le) (p. 33).
In order to burn a CD on your computer, you’ll need
software such as “iTunes.”
For details, refer to the owner’s manual or the online
help of your software.
WAV
Use computer software (such as
iTunes) to burn the song to a CD.
A song recorded on the unit can be
copied to your computer by means of a
USB ash drive.
The following explanation uses iTunes 10 for Windows. If you’re
using a dierent version or other software, refer to its online help
or owner’s manual.
1. From the Start menu, click [All Programs] - [iTunes].
2. From the iTunes [File] menu, click [New Playlist] to create
a playlist.
Newly created
playlist
3. From the desktop (or other location) where you copied
it, drag and drop the song (WAV le) to add it to the
playlist you created in step 2.
Drag & drop
4. Insert a blank CD-R into your computer.
5. Select the playlist that you created in step 2, and in the
[File] menu, click [Burn playlist to Disc].
6. Make the appropriate settings in the disc creation dialog
box, and then click the [Burn] button.
1. Connect the USB ash drive
containing the song to your
computer.
If you’re using Windows, a
“Removable disk” icon will appear in “Computer.” If you’re using
Mac OS X, a “NO NAME” icon will appear on the desktop.
2. Double-click the icon that appeared.
The contents of the USB ash drive will be displayed.
The audio recording of the song (WAV le) will be among the
contents.
3. Copy the song (WAV le) that you want to burn to CD to
your computer’s desktop or another location where you
can easily nd it.
Copy to desktop
Copy the recorded song to your computer
Use iTunes to burn a CD
36
Practicing
1.
Make sure that you’ve nished recording, and that the
screen shown at the right is displayed.
2. Press the [Song] button.
The media select screen will appear.
3. Use the [–] [+] buttons to select the save-destination
media.
DisplaySave-destination media
UInternal memory
SUSB ash drive
* If a USB ash drive (sold separately) is not connected, you won’t
be able to select “USB Memory.”
4. Press the [ ] (Fast) button.
A screen will appear, allowing you to select the song number of
save destination.
5. Use the [–] [+] buttons to select the song number of save
destination.
No song has been saved in song numbers shown as (Empty) in the
song name column.
Choose a song number in which no song has been saved.
If you want to save your song by overwriting an existing song you
no longer need, select the song number of that unwanted song.
6. Press the [ ] (Fast) button.
A screen will appear, allowing you to specify a name for your song.
7. Edit the name using the buttons shown in the illustration
below.
Select the character to changeChange the character
Use the [ ] (Fast) button to select the position at which you want
to specify a character.
Use the [–] [+] buttons to change the character.
8. Press the [Song] button to save the song.
If you decide not to save the song, press the [Metronome] button.
NOTE
Never turn o the power or disconnect the USB ash drive while
the screen indicates “Working...”
Saving a Song with the Name You Specify
Immediately after you’ve nished recording, you can save the song to the memory, song number, and song name that you specify.
* If you want to save to the USB ash drive (sold separately), connect your USB ash drive to the USB memory port before you continue.
764
573
8
2
37
Operation GuidePanel DescriptionsBefore You PlayPerformingPracticing
Convenient Functions
Appendix
Function Mode
Practicing
Renaming a Song
Here’s how to rename a song you’ve saved.
* You can’t rename an audio le.
9863
11
2
975
10
4
1. Select the song that you want to rename (p. 24).
2. While holding down the [Key Touch] button, press the [Transpose] button.
The [Key Touch] button and [Transpose] button will light, and the unit will enter Function mode.
3. Use the [ ] [ ] (Slow/Fast) buttons to select “SaveSong.”
4. Press the [Song] button.
The media select screen will appear.
If you decide not to rename the song, press the [Metronome] button.
5. Use the [–] [+] buttons to select the save-destination media.
DisplaySave-destination media
UInternal memory
SUSB ash drive
6. Press the [ ] (Fast) button.
A screen will appear, allowing you to select the song number of save destination.
7. Use the [–] [+] buttons to select the song number of save destination.
No song has been saved in song numbers shown as (Empty) in the song name column.
If you want to save the song as a new song, choose a song number in which no song has been saved.
If you want to save your song by overwriting an existing song you no longer need, select the song number of that unwanted song.
8. Press the [ ] (Fast) button.
A screen will appear, allowing you to specify the song name.
9. Edit the song name using the buttons shown in the illustration below.
Use the [ ] button to select the position at which you want
to specify a character.
Use the [–] [+] buttons to change the character.
10. Press the [Song] button to save the song.
If you decide not to rename the song, press the [Metronome] button.
When the song has been renamed, you will return to the screen of step 3.
NOTE
Never turn o the power or disconnect the USB ash drive while the screen indicates “Working...”
11. Press the [Key Touch] button or the [Transpose] button to nish the procedure.
Select the character to changeChange the character
38
Convenient Functions
Making the Power Automatically
Turn O After a Time (Auto O)
With the factory settings, the unit’s power will automatically be
switched o 30 minutes after you stop playing or operating the
unit.
If you don’t need the power to turn o automatically, set “Auto O”
to the “OFF” setting as described below.
1. While holding down the [Key Touch] button, press the
[Transpose] button.
2. Use the [ ] [ ] (Slow/Fast) buttons to select “Auto
O.”
3. Use the [–] [+] buttons to change the setting.
ValueExplanation
OFFThe power will not turn o automatically.
10
The power will automatically turn o if no
operation is performed for 10 minutes.
30 (default)
The power will automatically turn o if no
operation is performed for 30 minutes.
240
The power will automatically turn o if no opera-
tion is performed for 240 minutes (4 hours).
* This setting is automatically stored in the unit.
4. Press the [Key Touch] button or the [Transpose] button to
nish the procedure.
Retaining the Settings Even After
Power-o (Memory Backup)
The settings of the unit will return to their factory-set state when
you turn o the power. However, you can store the settings so that
they will be retained even after the power is turned o.
This is called the “memory backup” function.
Parameters Stored in Memory BackupPage
Split Pointp. 17
Ambience (on/o, depth)p. 18
Brilliance (on/o, depth)p. 18
Key Touch (on/o, value)p. 19
Twin Piano modep. 20
Dual Balancep. 44
Master Tuningp. 44
Temperamentp. 44
Temperament Keyp. 44
Stretch Tuningp. 44
Damper Resonancep. 44
String Resonancep. 45
Key O Resonancep. 45
Cabinet Resonancep. 45
SoundBoard Behaviorp. 45
Transpose Modep. 45
Damper Pedal Partp. 45
MIDI Transmit Channelp. 46
Visual Control Channelp. 47
1. While holding down the [Key Touch] button, press the
[Transpose] button.
2. Use the [ ] [ ] (Slow/Fast) buttons to select “Backup.”
3. Press the [Song] button.
A screen will appear, allowing you to execute the backup.
4. Press the [ ] (Fast) button to select “Y.”
Memory backup will begin.
If you decide to cancel without executing, press the [
] (Slow)
button to select “N.”
When the memory backup has been completed, the screen of step
2 will appear.
NOTE
Never turn o the power while the screen indicates “Working...”
5. Press the [Key Touch] button or the [Transpose] button to
nish the procedure.
39
Operation GuidePanel DescriptionsBefore You PlayPerformingPracticing
Convenient Functions
Appendix
Function Mode
Convenient Functions
Restoring the Factory Settings
(Factory Reset)
Settings that you’ve stored using the Memory Backup function (p. 39)
can be returned to their factory-set state. This is called the “factory
reset” function.
NOTE
When you execute “Factory Reset,” all stored settings will be
erased and returned to the factory settings.
MEMO
This function will not erase the songs from the internal memory
or the USB ash drive (sold separately).
If you want to erase the internal memory or the USB ash drive,
“Initializing the Memory (Format Media)” (p. 42).
1. While holding down the [Key Touch] button, press the
[Transpose] button.
2. Use the [ ] [ ] (Slow/Fast) buttons to select
“FctReset.”
3. Press the [Song] button.
A screen will appear, allowing you to execute factory reset.
4. Press the [ ] (Fast) button to select “Y.”
Factory reset will begin.
If you decide to cancel without executing, press the [
] (Slow)
button to select “N.”
When the factory reset has been completed, the screen will indicate
“END.”
NOTE
Never turn o the power while the screen indicates “Working...”
5. Turn the power o, then on again (p. 13).
Copying a Saved Song (Copy Song)
Songs that have been saved in the internal memory can be copied
to USB ash drive (sold separately). Alternatively, songs stored on
the USB ash drive can be copied to the internal memory.
* Audio les cannot be copied.
* If a USB ash drive (sold separately) is not connected, you won’t
be able to perform this operation.
1. While holding down the [Key Touch] button, press the
[Transpose] button.
2. Press the [ ] [ ] (Slow/Fast) button to choose “Copy
Song.”
3. Press the [Song] button.
A screen will appear, allowing you to select the copy-source and
destination memory locations.
If you decide not to copy the song, press the [Metronome] button.
4. Use the [–] [+] buttons to select the copy-source and copy-
destination memory locations.
5. Press the [ ] (Fast) button.
6. Press the [–] [+] button to select the song that you want
to copy.
MEMO
If you choose “ALL,” all songs except for audio les in the copy-
source memory will be copied.
7. Press the [ ] (Fast) button.
8. Use the [–] [+] buttons to select the copy-destination
number.
No song has been saved at song numbers for which (Empty) is
shown as the song name.
Select a song number at which no song has been saved.
If you want to delete an unwanted song and replace it with the
song you’re copying, select the unwanted song number.
40
Convenient Functions
9. Press the [Song] button to copy the song.
If you decide not to copy, press the [Metronome] button.
Once the song has been copied, you’ll be returned to the screen of
step 2.
NOTE
Never turn o the power or disconnect the USB ash drive while
the screen indicates “Working...”
10. Press the [Key Touch] button or the [Transpose] button to
nish the procedure.
Deleting a Saved Song (Delete Song)
Here’s how to delete a song that you saved on the internal memory
or the USB ash drive (sold separately).
MEMO
• If you want to delete all songs that have been saved to the
internal memory, initialize the memory.
• If you want to delete a song on the USB ash drive (sold
separately), connect your USB ash drive to the USB memory
port before you continue.
1. While holding down the [Key Touch] button, press the
[Transpose] button.
2. Use the [ ] [ ] (Slow/Fast) buttons to select “Del
Song.”
3. Press the [Song] button.
A screen will appear, allowing you to select the memory location
that contains the song you want to delete.
If you decide not to delete the song, press the [Metronome] button.
4. Use the [–] [+] buttons to select the memory location that
contains the song you want to delete.
5. Press the [ ] (Fast) button.
6. Use the [–] [+] buttons to select the song that you want to
delete.
7. Press the [Song] button.
A conrmation message will appear.
8. Press the [ ] (Fast) button to select “Y.”
Deletion of the song will begin.
If you decide to cancel without deleting, press the [
] (Slow)
button to select “N.”
Once the song is deleted, you’ll be returned to the screen you were
in at step 2.
NOTE
Never turn o the power or disconnect the USB ash drive while
the screen indicates “Working...”
9. Press the [Key Touch] button or the [Transpose] button to
nish the procedure.
41
Operation GuidePanel DescriptionsBefore You PlayPerformingPracticing
Convenient Functions
Appendix
Function Mode
Convenient Functions
Initializing the Memory
(Format Media)
Here’s how you can completely erase all songs that were
saved in the internal memory or the USB ash drive (sold
separately).
NOTE
• Once an initialization is performed, all songs that
have been saved in the internal memory or the USB
ash drive will be erased. The erased data cannot
be recovered, so we recommend that you check the
contents of memory before you proceed.
• If you’re using new USB ash drive (sold separately) with the unit
for the rst time, you’ll need to initialize (format) the USB ash
drive before using it. The unit can’t use USB ash drive that has
not been initialized.
If you want to format USB ash drive, connect the USB ash drive to
the USB memory port (p. 10).
1. While holding down the [Key Touch] button, press the
[Transpose] button.
2. Use the [ ] [ ] (Slow/Fast) buttons to select “Format.”
3. Press the [Song] button.
A screen will appear, allowing you to proceed with the format.
If you decide not to proceed with the format, press the
[Metronome] button.
4. Use the [–] [+] buttons to select the memory that you
want to initialize.
5. Press the [Song] button.
A conrmation message will appear.
6. Press the [ ] (Fast) button to select “Y.”
Formatting of the media will begin.
If you decide not to initialize, press the [
] (Slow) button.
Once the initialization is nished, you’ll be returned to the screen
you were in at step 2.
7. Press the [Key Touch] button or the [Transpose] button to
nish the procedure.
Caution when initializing the memory
• Never turn o the power while “Working...” is shown in the
display.
• If the screen indicates “Error,” please refer to “Error Messages”
(p. 51).
• Initializing the unit’s internal memory will not initialize
settings other than the contents of the internal memory. If
you want to return settings other than the contents of the
internal memory to their factory-set condition, execute the
Factory Reset operation (p. 40).
• Don’t disconnect the USB ash drive until USB ash drive
initialization has been completed.
42
Convenient Functions
Disabling the Buttons (Panel Lock)
When you activate Panel Lock, all buttons will be disabled.
This prevents the tones or settings from being changed if you
inadvertently press a button.
1. Hold down the [AB Repeat] button until the following
display appears.
Panel Lock will be activated.
All button operations will be disabled.
2. To cancel Panel Lock, once again hold down the [AB
Repeat] button for a while.
Panel Lock will also be cancelled when you turn o the power.
MEMO
• If you activate Panel Lock while a song is playing, playback will
stop.
• You can’t activate Panel Lock during recording, while in Function
mode (p. 44), or during Tone Demo (p. 14).
43
Operation GuidePanel DescriptionsBefore You PlayPerformingPracticing
Convenient Functions
Appendix
Function Mode
IndicationValueExplanation
Dual Bal (*1)
Adjusting the Dual Play Volume Balance (Dual Balance)
When using Dual Play, you can adjust the volume balance between tone 1 and tone 2.
9-1 (tone 1 is louder)–9-9 (same volume)–1-9 (tone 2 is louder)
Tuning (*1)
Matching the Pitch with Other Instruments (Master Tuning)
When playing ensemble with other instruments and in other such instances, you can match the standard pitch to another instrument.
The standard pitch generally refers to the pitch of the note that’s played when you nger the middle A key (A4). For a cleaner ensemble sound while
performing with one or more other instruments, ensure that each instrument’s standard pitch is in tune with that of the other instruments. This
tuning of all the instruments to a standard pitch is called “master tuning.”
415.3–440.0–466.2 Hz
Temprmnt (*1)
Changing the Tuning Method (Temperament)
You can play classical styles such as Baroque using historic temperaments (tuning methods).
Most modern songs are composed for and played in equal temperament, the most common tuning in use today. But at one time, there were a wide
variety of other tuning systems in existence. By playing in the temperament that was in use when a composition was created, you can experience
the sonorities of chords originally intended for that song.
ScreenExplanationQualities
EQUEqual
In this tuning, each octave is divided into twelve equal steps. Every interval produces about the same amount of
slight dissonance.
MAJJust Major
This tuning eliminates ambiguities in the fths and thirds. It is unsuited to playing melodies and cannot be
transposed, but is capable of beautiful sonorities.
MINJust Minor
The Just tunings dier from major and minor keys. You can get the same eect with the minor scale as with the major
scale.
PYTHPythagorean
This tuning, devised by the philosopher Pythagoras, eliminates dissonance in fourths and fths.
Dissonance is produced by third-interval chords, but melodies are euphonious.
KIRNKirnberger
This is an improvement of the Meantone and Just tunings that provides a high degree of freedom of modulation.
Performances are possible in all keys (III).
MEANMeantoneThis scale makes some compromises in just intonation, enabling transposition to other keys.
WERCWerckmeister
This temperament combines the Meantone and Pythagorean tunings. Performances are possible in all keys (rst
technique, III).
ARBArabicThis tuning is suitable for the music of Arabia.
Tmpr Key (*1)
Specifying a Song’s Tonic (Temperament Key)
When playing with tuning other than equal temperament, you need to specify the temperament key for tuning the song to be performed (that is,
the note that corresponds to C for a major key or to A for a minor key).
If you choose an equal temperament, there’s no need to select a temperament key.
C, C
, D, E , E, F, F,G, A , A, B, B
* In the display, a quotation mark (“) signies a sharp (#).
Stretch (*1)
Using a Piano’s Unique Tuning (Stretch Tuning)
This lets you specify the amount of “stretch tuning,” a tuning method specically for pianos, in which the high range is tuned slightly sharper, and
the low range is tuned slightly atter.
If you select “ON,” a standard tuning curve created for the unit will be used.
OFF, ON
Dmpr Res (*1)
Producing Sympathetic Resonance When You Press the Damper Pedal
(Damper Resonance)
This adjusts the damper resonance of the acoustic piano sound (the sympathetic vibration produced in strings other than those actually played
when you press the damper pedal).
Higher settings will make the sympathetic vibration louder.
OFF, 1–10
Various Settings (Function Mode)
The same procedure is used for all settings in Function mode.
1. While holding down the [Key Touch] button, press the
[Transpose] button.
The [Key Touch] button and [Transpose] button will light; the unit
will be in Function mode.
2. Press the [ ] [ ] (Slow/Fast) buttons to select the
function setting that you want to change.
3. Press the [–] [+] button to edit the value of the setting.
4. Press the [Key Touch] button or the [Transpose] button to
exit Function mode.
44
Various Settings (Function Mode)
IndicationValueExplanation
Strg Res (*1)
Producing the Resonance of the Strings When the Keys Are Played
(String Resonance)
This adjusts the string resonance of the acoustic piano sound (the sympathetic vibrations of strings for previously played notes that occur when you
play another note).
Higher settings will make the sympathetic vibration louder.
OFF, 1–10
KO Res (*1)
Playing Sounds When the Keys Are Released (Key O Resonance)
This adjusts sympathetic vibrations such as an acoustic piano’s key-o sound (the subtle sound that occurs when you release a note).
Higher settings will make the sympathetic vibration louder.
OFF, 1–10
Cabinet (*1)
Adjusting the Sympathetic Resonance of the Grand Piano Body
(Cabinet Resonance)
Adjusts the body resonance of the grand piano itself.
Higher values will produce a larger body resonance.
OFF, 1–10
SoundBrd (*1)
Adjusting the Clarity of Individual Notes in a Chord
(SoundBoard Behavior)
When you play a chord, this setting improves the clarity of the individual notes in the chord, creating a more beautiful resonance.
Higher settings produce a clearer resonance.
OFF, 1–10
Trnspose (*1)
Specifying What the Transpose will Aect (Transpose Mode)
This setting species what the transpose will aect. You can use the transpose to change the
pitch of both the song and the keyboard, only the pitch of the song, or only the pitch of the
keyboard.
KBDThe sound of the keyboard
SONGThe song being played back
BOTHThe sound of the keyboard and the song being played back
Oct Shft
Changing the Pitch of the Tone in Octave Steps (Octave Shift)
You can change the pitch of the Tone 2 in Dual Play (p. 15) and Lower tone in Split Play (p. 16) an octave at a time.
Altering the pitch in one-octave units in this way is called “Octave Shift.”
For example, you can raise the pitch of the Lower Tone to the same pitch of the Upper Tone in Split Play.
-2–0–+2 (octave)
Rec Mode
Selecting the Format for Recording (Recording Mode)
You can choose whether to record as SMF or as audio.
MEMO
You can also switch the recording mode by holding down the [ ] (Rec) button and using the [–] [+] buttons.
SMFSMF parts will be recorded separately. This allows you to re-record just a single part, or to overdub dierent parts.
AudioThe recording will be made as audio data. The recorded song can be used in your computer.
DPdl Prt (*1)
Changing How the Pedal Eects Are Applied (Damper Pedal Part)
When you press the damper pedal during Dual play or Split play, the pedal eect is normally
applied to both tones, but you can also select the tone to which the eect is to be applied.
R+LAll enabled
RApplied only to the Tone 1 (in dual mode)/Right-hand Tone (in split mode)
LApplied only to the Tone 2 (in dual mode)/Left-hand Tone (in split mode)
MEMO
(*1) This parameter can be saved by the “Memory Backup” operation (p. 39).
45
Operation GuidePanel DescriptionsBefore You PlayPerformingPracticing
Convenient Functions
Appendix
Function Mode
Various Settings (Function Mode)
IndicationValueExplanation
CPdl Fnc
Changing How the Pedals Work (Center Pedal)
When you turn on the power, the center pedal functions as the sostenuto pedal (p. 10).
You can change the function of the pedal to a variety of other operations.
SOSTSets function to sostenuto pedal.
PLAY
The pedal will have the same function as the [
] (Play/Stop) button.
LAYR
Pressing the pedal will layer on Tone 2, used for Dual play.
* The Layer function can be applied only when using Dual play.
OCT
Pressing the pedal will layer on a sound one octave higher.
* The Octave function cannot be applied while using Twin Piano, Dual play, or Split play.
LocalCtl
Preventing Doubled Notes When Connected to a Sequencer
(Local Control)
When you have a MIDI sequencer connected, set this parameter to Local O.
Since most sequencers have their Thru function turned on, notes you play on the
keyboard may be sounded in duplicate, or get dropped. To prevent this, you can
enable the “Local O” setting so that the keyboard and internal sound generator will be
disconnected.
OFF
Local Control is o.
The keyboard and composer are disconnected from the internal sound generator. Playing the keyboard will not produce sound.
ON
Local Control is on.
The keyboard and composer are connected to the internal sound generator.
This setting species the MIDI channel on which the unit will transmit.
MIDI uses sixteen “MIDI channels,” which are numbered 1 through 16. By connecting MIDI
devices and specifying the appropriate MIDI channel for each device, you can play or select
sounds on those devices.
The unit will receive all sixteen channels (1–16).
OFF, 1–16
CD/A Typ
Setting the Type of CD To be Played Back (CD/Audio Type)
The unit may be unable to correctly recognize the type of CD being used. In such instances, you can specify the type of CD manually.
When the unit left the factory, this was set to “STRO” (Stereo). Normally, there is no need to make this setting.
MEMO
This setting is automatically saved in the unit.
AUTO, A, B, STRO
SaveSong
Renaming a Song (Save Song)
Here’s how to rename a song you’ve saved (p. 38).
CopySong
Copying a Saved Song (Copy Song)
A song you’ve saved to the internal memory can be copied to the USB ash drive. Alternatively, a song saved to the USB ash drive can be copied to
the internal memory. (p. 40)
Del Song
Deleting a Saved Song (Delete Song)
You can delete a saved song from the internal memory or the USB ash drive. (p. 41)
Format
Initializing the Memory (Format Media)
You can delete all songs from the internal memory or a separately sold USB ash drive. (p. 42)
MIDI
Sequencer
Local Control
Sound Generator
MIDI
In
MIDI
Out
46
Various Settings (Function Mode)
IndicationValueExplanation
USB Drv
Changing the USB Driver Settings (USB Driver)
Normally, you don’t need to install a driver in order to connect the unit to your computer. However, if some problem occurs, or if
the performance is poor, using the Roland original driver may solve the problem.
In this case, set the unit’s “USB Driver” setting to “ORG,” and then install the driver in your computer.
After changing this setting, you need to turn o the unit, then turn it back on again.
MEMO
This setting is automatically saved in the unit.
For details on downloading and installing the Roland original driver, refer to the Roland website.
Roland website:
http://www.roland.com/
GENChoose this if you want to use the generic USB driver that was included with your computer. Normally, you should use this mode.
ORGChoose this if you want to use a USB driver downloaded from the Roland website.
USB Mode
Changing the USB ash drive Setting (USB Memory Mode)
In some cases, when USB ash drive is connected to the USB memory port, it may take longer for data to be loaded, or data may fail to be loaded
successfully. If this occurs, you may be able to solve the problem by changing the USB ash drive setting.
When the unit left the factory, this was set to “2” Normally, there is no need to make this setting.
After changing this setting, you need to turn o the unit, then turn it back on again.
MEMO
This setting is automatically saved in the unit.
1, 2
VC Mode
Controlling Video Equipment (Visual Control Mode)
Visual Control is a function that lets you control images along with your performance. If you’ve set Visual Control mode to MVC or VLNK, playing the
keyboard of unit will control the images produced by the Visual Control device connected to unit using a MIDI cable.
OFFVisual Control is o.
MVCMIDI Visual Control mode is selected.
VLNKV-LINK mode is selected.
VC Ch (*1)
Specifying the Visual Control Channel
Here’s how to specify the channel on which messages used to control video will be sent.
1–16Species the MIDI channel used to transmit MIDI messages to the Visual Control device.
What is MIDI Visual Control?
MIDI Visual Control is an internationally-used
recommended practice that was added to the
MIDI specication so that visual expression
could be linked with musical performance. Video equipment
that is compatible with MIDI Visual Control can be connected to
electronic musical instruments via MIDI in order to control video
equipment in tandem with a performance.
What is V-LINK?
V-LINK is Roland’s proprietary specication that allows visual
expression to be linked with musical performance. Video
equipment that is compatible with V-LINK can be connected to
electronic musical instruments via their MIDI ports, making it
easy to enjoy a variety of visual eects that are linked with the
performance.
Connection examples
Connect a MIDI cable from this unit’s MIDI Out connector (p. 11) to
the MIDI In connector of your Visual Control compatible device.
* You’ll need a MIDI cable (sold separately) in order to connect
this unit to a device that supports Visual Control.
Visual control function chart
Playing the lowest 12 keys of this unit (A0–G#1) will transmit the
following MIDI messages.
Visual Control
function
Transmitted MIDI messageUnit’s operation
Switch images
CC 0 (Bank Select): 0–4Play black keys
Program Change: 1–7Play white keys
Visual Control
compatible video
equipment
MIDI In connector
MIDI Out connector
MEMO
(*1) This parameter can be saved by the “Memory Backup” operation (p. 39).
47
Operation GuidePanel DescriptionsBefore You PlayPerformingPracticing
Convenient Functions
Appendix
Function Mode
Various Settings (Function Mode)
IndicationValueExplanation
Auto O
Making the Power Automatically Turn O After a Time (Auto O)
With the factory settings, the unit’s power will automatically be switched o 30 minutes after you stop playing or operating the unit.
If you don’t want the power to turn o automatically, change the “Auto O” setting to “OFF” as follows. (p. 39)
MEMO
This setting is automatically saved in the unit.
Backup
Storing Your Settings (Memory Backup)
The unit’s settings will return to their default settings when you turn o the power, but you can store these settings so that they will retain the
changes you made even after the power is turned o, then on again. (p. 39)
FctReset
Restoring the Factory Settings (Factory Reset)
When you execute the “Factory Reset” function, the settings you’ve edited in Function mode will be restored to their factory-set state. (p. 40)
48
SymptomCause/ActionPage
Even though you’re using head-
phones and the sound is muted,
a thumping sound is heard when
you play the keyboard
The unit uses a hammer action keyboard in order to simulate an acoustic piano’s playing touch as realistically as possible. For
this reason, you’ll hear the hammers thump when you play the keyboard, just as you would when playing an acoustic piano.
Since this unit allows you to adjust its volume, you might notice the sound of the hammers in certain situations, but this does
not indicate a malfunction. If vibration transmitted to the oor or walls is a concern, you may be able to minimize the vibration
by moving the piano away from the wall, or by laying down a commercially available anti-vibration mat designed for use with
pianos.
–
Power turns o on its own
When 30 minutes have elapsed since you last played or operated this unit, the power will turn o automatically. (This is the
factory setting).
If you don’t need the power to turn o automatically, turn the “Auto O” setting “OFF.”
p. 39
Power does not turn on
Is the AC adaptor connected correctly?p. 55
Could the power have been turned o by the auto-o function?
If you want to turn on the power after the auto-o function has turned it o, operate the [Power] switch to turn the power on
again.
p. 39
Nothing appears in the display
Since the unit uses a liquid-crystal display, you may nd that it is unable to display letters or other things in environments where
temperatures go below 0 degrees Celsius (32 degrees Fahrenheit).
–
Can’t perform operationsCould Panel Lock be activated? Disengage the Panel Lock setting.p. 43
Pedal does not work, or is “stuck”
Is the pedal connected correctly?
Plug the cable rmly into the pedal connector.
p. 55
If you disconnect the pedal cord from the unit while the power is on, the pedal eect may remain “stuck” in the On condition.
You must power-o the unit before connecting or disconnecting the pedal cord.
p. 55
Could you have changed how the pedal eect is applied?
If the damper pedal part is set to “R,” the pedal will apply only to the right tone; if it is set to “L,” the pedal will apply only to the left
tone.
p. 45
Could Twin Piano be turned on?
If Twin Piano is on, the right pedal will aect only the right-hand keyboard zone and the left pedal will aect only the left-hand
keyboard zone.
p. 20
Could you have changed the function of the pedal?
If you’ve reassigned the function of the center pedal, this pedal will not operate as the sostenuto pedal.
p. 46
Unable to read from/write to USB
ash drive
Are you using (optional) Roland USB ash drive?
Reliable performance cannot be guaranteed if you use non-Roland USB ash drive products.
–
If you are unable to read or write USB ash drive successfully, change the USB memory mode.p. 47
“Buzz” is heard from external
devices
Are the external devices connected to more than one AC power outlet?
If you connect external devices, be sure to connect them to the same AC outlet.
–
The volume level of the instru-
ment connected to Input jacks is
too low.
Raise the volume of the connected device.–
Could you be using a connection cable that contains a resistor?
Use a connection cable that does not contain a resistor.
–
Connected MIDI device does not
operate correctly
If turn o the unit, or the power is disrupted due to a power failure while you’re connected to a MIDI device, the settings of
that MIDI device may be altered. If this occurs, power-o the unit and your MIDI device. Then power-on the unit rst, and next
power-on your MIDI device.
–
No sound
No sound
Could the unit’s volume or the volume of the connected equipment be turned down?p. 6, p. 13
Could headphones be connected?
Could there be a plug inserted in a headphone jack?
The speakers will not produce sound if headphones or plug are connected to the headphone jacks.
p. 11
Has Local Control been set to “OFF”?
When Local Control is set to “OFF,” no sound is produced by playing the keyboard. Set Local Control to “ON.”
p. 46
No sound when you play back
a song
Has Local Control been set to “OFF”?
When Local Control is set to “OFF,” no sound is produced by playing the song. Set Local Control to “ON.”
p. 46
Could the Song Balance be set to “0”?p. 25
No sound from the left most
notes of the keyboard
Could the Visual Control mode be set to “MVC” or” VLNK”?
If the Visual Control mode is set to “MVC” or “VLNK,” the lowest 12 keys of the keyboard (A0–G#1) are used to control images; they
will not produce sound.
p. 47
No sound (when a MIDI device is
connected)
Are all devices powered on?–
Are the MIDI cables connected correctly?p. 11
Do the MIDI channels of the unit and the connected device match?p. 46
Notes don’t sound right
Pitch of the keyboard or song is
incorrect
Could you have made Transpose settings?
p. 21
p. 35
Is the Master Tune setting appropriate?p. 44
Is the setting for the Temperament correct?p. 44
If stretch tuning is “ON,” the piano will be tuned in a unique way; notes in the piano’s upper range will be tuned slightly sharper,
while notes in the lower range will be tuned slightly lower. For this reason, certain pitches may seem to be o, but this is actually
the way that an acoustic piano should sound.
p. 44
Not all the notes you play are
sounded
The maximum simultaneous polyphony is 128 voices. If you’re using Dual Play, or playing along with a song, or making heavy
use of the damper pedal, the number of notes being requested by the performance data may exceed the maximum available
polyphony, causing notes to drop out.
–
Sounds are heard twice (doubled)
when the keyboard is played
Is the unit in Dual play?p. 15
When the unit is connected to an external sequencer, set the Local Control to o. Alternatively, the sequencer could be set so its
Soft Thru feature is O.
p. 46
Troubleshooting
49
Operation GuidePanel DescriptionsBefore You PlayPerformingPracticing
Convenient Functions
Appendix
Function Mode
Troubleshooting
SymptomCause/ActionPage
The wrong instrument is selected
when you press the [E. Piano],
[Strings], or [Other] button
Tone buttons [E. Piano] [Strings] [Other] also operate as buttons that select “Recommended Tones.”
Connecting a commercially-available CD-ROM drive to the USB memory port and selecting a song from a CD-ROM produced for
the VIMA (VIMA TUNES) will automatically cause sounds appropriate for that song to be assigned to the [E. Piano], [Strings], and
[Other] Tone buttons, so that you can select “recommended” sounds by pressing one of these buttons.
p. 14
Eect does not apply
When you are using Dual play or Split play, and dierent eects are specied for the two selected tones, the eect will not be
applied to Tone 2 (when using Dual play) or the left-hand tone (when using Split play).
–
Reverberation remains even if You
defeat the Ambience eect
The unit’s piano sound faithfully simulates the depth and resonance of an acoustic piano, and this may give the impression of
reverberation even if you’ve defeated the Ambience eect.
Also, you may be able to eliminate some reverberation by reducing the value set for “Cabinet Resonance.”
p. 45
The sound of the higher notes
suddenly changes from a certain
key
On an acoustic piano, the approximately one and a half octaves of notes at the top of the keyboard will continue sounding
regardless of the damper pedal. These notes also have a somewhat dierent tonal character. The unit faithfully simulate this
characteristic of acoustic pianos. On the unit, the range that is unaected by the damper pedal will change according to the key
transpose setting.
–
High-pitched ringing is heard
If you hear this in headphones:
Piano sounds that have a brilliant and crisp character contain substantial high-frequency components that may sound as though
a metallic ringing has been added. This is because the character of an actual piano is being faithfully reproduced, and is not a
malfunction.
This sound can be adjusted by modifying the following settings.
• String Resonance (p. 45)
• Ambience (p. 18)
If you don’t hear this in headphones:
It is likely that there is some other reason (such as resonances within the unit). Please contact your dealer or a nearby Roland
service center.
–
Low notes sound wrong, or are
buzzy
If you set the volume to the maximum setting, the sound may be distorted depending on how you perform.
If this occurs, turn down the volume.
–
If you don’t hear this in headphones:
Performing at high volumes may cause the speakers or objects near the unit to resonate. Fluorescent lights or glass doors may
also resonate sympathetically. In particular, this is more likely to occur for lower notes and higher volumes. You can take the
following measures to minimize resonances.
• Locate the speakers 10–15 cm (4–6 inch) away from walls or other surfaces.
• Keep the volume down.
• Move away from the objects that are resonating.
If you hear this in headphones:
It is likely that there is some other reason. Please contact your dealer or a nearby Roland service center.
–
Song does not play correctly
Only the sound of a particular
instrument in a song does not
play
Could a part be muted?
If the button indicator is out, the music on that part is not heard. Press the part button so the indicator is illuminated.
p. 26
Sound is heard from a muted part
Could the part mute volume be set to other than “0”?
If you set this to “0,” the sound of a muted part will be completely inaudible.
p. 27
Song volume is low /
Volume diers between recording
and playback
Could the Song Balance volume be lowered?p. 25
Can’t play back a song saved in
USB ash drive
Could the Audio les of the format be played?
Audio les of the following format can be played back.
• File extension “.WAV”
• 16-bit linear
• “44.1 kHz” sampling rate
p. 25
Is the lename extension “MID”?
Files with other lename extensions cannot be handled as song data.
–
Song tempo becomes unstableWhen playing a song from USB ash drive, the tempo may become unstable if there is an excessive amount of performance data.–
Song name in USB ash drive is
not shown
The song name will not be shown if the song information in the le is empty or consists only of spaces.–
Is the lename extension “MID”?
Files with other lename extensions cannot be handled as song data.
–
Song names can consist only of English letters, numerals, certain symbols, and single-byte characters from the Japanese
syllabary; the unit is unable to correctly display the name if other characters are used.
–
Can’t record / play back
Can’t record SMFHas one of the part buttons for recording been selected?p. 29
Can’t record audioIs a USB ash drive connected to the USB memory port?–
The recorded performance
disappeared
Your recorded performance will disappear if you switch o the unit’s power or select a song.
There is no way to recover the lost performance. Before you turn o the power, save your recorded performance in the internal
memory or the USB ash drive.
–
Limitations regarding audio les
• Ambience will not be applied to audio les (p. 18).
• The Part Mute function cannot be used when playing audio les (p. 26).
• Audio data cannot be saved in the unit’s internal memory. In order to record audio, you must connect a USB ash drive (separately sold) (p. 29, p. 33, p. 34).
• You can’t rename an audio le (p. 38).
• Audio les cannot be copied (p. 40).
50
Error Messages
IndicationMeaning
Error 1You can only read the music le. It can not be saved.
Error 2
An error occurred during writing. The external media may be corrupted.
Insert other external media and try again. Alternatively, you can initialize the external media.
The external media’s protect tab may be in the “Protect” (writing prohibited) position may not yet be initialized.
Error 10No external media is inserted. Insert the external media and try again.
Error 11
There is not sucient free memory in the save destination.
Either insert other external media or delete unneeded les and try again.
Error 14
An error occurred during reading. The external media may be corrupted.
Insert other external media and try again. Alternatively, you can initialize the external media.
Error 15The le is unreadable. The data format is not compatible with the unit.
Error 16
Data was not called up in time for playback of the song. After waiting several seconds, you may be able to play back the song by pressing the [
]
(Play/Stop) button again.
Error 18
This audio format is not supported.
Please use 44.1 kHz 16-bit linear WAV format audio les.
Error 30The internal memory capacity of the unit is full.
Error 40
The unit cannot deal with the excessive MIDI data sent from the external MIDI device.
Reduce the amount of MIDI data sent to the unit.
Error 41A MIDI cable has been disconnected. Connect it properly and securely.
Error 43A MIDI transmission error has occurred. Check the MIDI cable and connected MIDI device.
Error 51
There may be a problem with the system. Repeat the procedure from the beginning. If it is not solved after you have tried several times, contact the Roland
service center.
Error 65The USB memory port was subjected to excessive current. Make sure that there is no problem with the external media, then turn the power o, then on again.
* External Media: USB ash drive, CD-ROM, etc.
51
Operation GuidePanel DescriptionsBefore You PlayPerformingPracticing
Convenient Functions
Appendix
Function Mode
Piano–Grand
No.Tone NameExplanation
1Concert
The sound of a splendid concert grand piano. This piano sound has our highest recommendation, and can be used for any style of
music.
2Ballade A mellow grand piano sound, recommended for quiet songs.
3BrightA brilliant grand piano sound, recommended when you want the piano to stand out in an ensemble.
4Magical A charming sound that layers synth bells with Concert.
5Pno+Str Strings layered with Concert.
6Pno+Pad A pad layered with Concert.
7Pno+Cho A choir layered with Concert.
8Pure PnoA grand piano sound notable for its clarity.
9Rock PnoA robust piano sound, recommended for boogie-woogie playing.
10RagtimeA honky-tonk piano sound, recommended for ragtime playing.
Piano–Early
No.Tone NameExplanation
1FortePnoAn early type of piano with a distinctive sound that’s somewhat dierent than today’s pianos.
Gebruikershandleiding.com neemt misbruik van zijn services uitermate serieus. U kunt hieronder aangeven waarom deze vraag ongepast is. Wij controleren de vraag en zonodig wordt deze verwijderd.
Product:
Spelregels forum
Om tot zinvolle vragen te komen hanteren wij de volgende spelregels:
lees eerst de handleiding door;
controleer of uw vraag al eerder door iemand anders is gesteld;
probeer uw vraag zo duidelijk mogelijk te stellen;
heeft u een probleem en al geprobeerd om dit op te lossen, vermeld dit erbij aub;
heeft u een oplossing gekregen van een bezoeker dan horen wij dat graag in dit forum;
wilt u een reactie geven op een vraag of antwoord, gebruik dan niet dit formulier maar klik op de knop 'reageer op deze vraag';
uw vraag wordt direct op de website gezet; vermijd daarom persoonlijke gegevens in te vullen;
Belangrijk! Als er een antwoord wordt gegeven op uw vraag, dan is het voor de gever van het antwoord nuttig om te weten als u er wel (of niet) mee geholpen bent! Wij vragen u dus ook te reageren op een antwoord.
Belangrijk! Antwoorden worden ook per e-mail naar abonnees gestuurd. Laat uw emailadres achter op deze site, zodat u op de hoogte blijft. U krijgt dan ook andere vragen en antwoorden te zien.
Abonneren
Abonneer u voor het ontvangen van emails voor uw Roland DP90S bij:
nieuwe vragen en antwoorden
nieuwe handleidingen
U ontvangt een email met instructies om u voor één of beide opties in te schrijven.
Ontvang uw handleiding per email
Vul uw emailadres in en ontvang de handleiding van Roland DP90S in de taal/talen: Engels als bijlage per email.
De handleiding is 33,2 mb groot.
U ontvangt de handleiding per email binnen enkele minuten. Als u geen email heeft ontvangen, dan heeft u waarschijnlijk een verkeerd emailadres ingevuld of is uw mailbox te vol. Daarnaast kan het zijn dat uw internetprovider een maximum heeft aan de grootte per email. Omdat hier een handleiding wordt meegestuurd, kan het voorkomen dat de email groter is dan toegestaan bij uw provider.
Uw handleiding is per email verstuurd. Controleer uw email
Als u niet binnen een kwartier uw email met handleiding ontvangen heeft, kan het zijn dat u een verkeerd emailadres heeft ingevuld of dat uw emailprovider een maximum grootte per email heeft ingesteld die kleiner is dan de grootte van de handleiding.
Er is een email naar u verstuurd om uw inschrijving definitief te maken.
Controleer uw email en volg de aanwijzingen op om uw inschrijving definitief te maken
U heeft geen emailadres opgegeven
Als u de handleiding per email wilt ontvangen, vul dan een geldig emailadres in.
Uw vraag is op deze pagina toegevoegd
Wilt u een email ontvangen bij een antwoord en/of nieuwe vragen? Vul dan hier uw emailadres in.