or other countries. iPhone and iPod are trademarks of Apple Inc., registered in the U.S. and other countries. The Bluetooth
®
word mark and logos are registered trademarks owned
by Bluetooth SIG, Inc. and any use of such marks by Rockford Corporation is under license. All other trademarks are the property of their respective owners. Specifications subject to
change without notice.
“Made for iPod” and “Made for iPhone” mean that an electronic accessory has been designed to connect specifically to iPod, or iPhone, respectively, and has been certified by the
developer to meet Apple performance standards. Apple is not responsible for the operation of this device or its compliance with safety and regulatory standards. Please note that the
use of this accessory with iPod or iPhone may affect wireless performance.
Pandora, the Pandora logo, and the Pandora trade dress are trademarks or registered trademarks of Pandora Media, Inc. Used with permission. Pandora is only available in certain
countries. Please visit http://www.pandora.com/legal for more information.
Sirius, XM and all related marks and logos are trademarks of Sirius XM Radio Inc. All rights reserved.
3
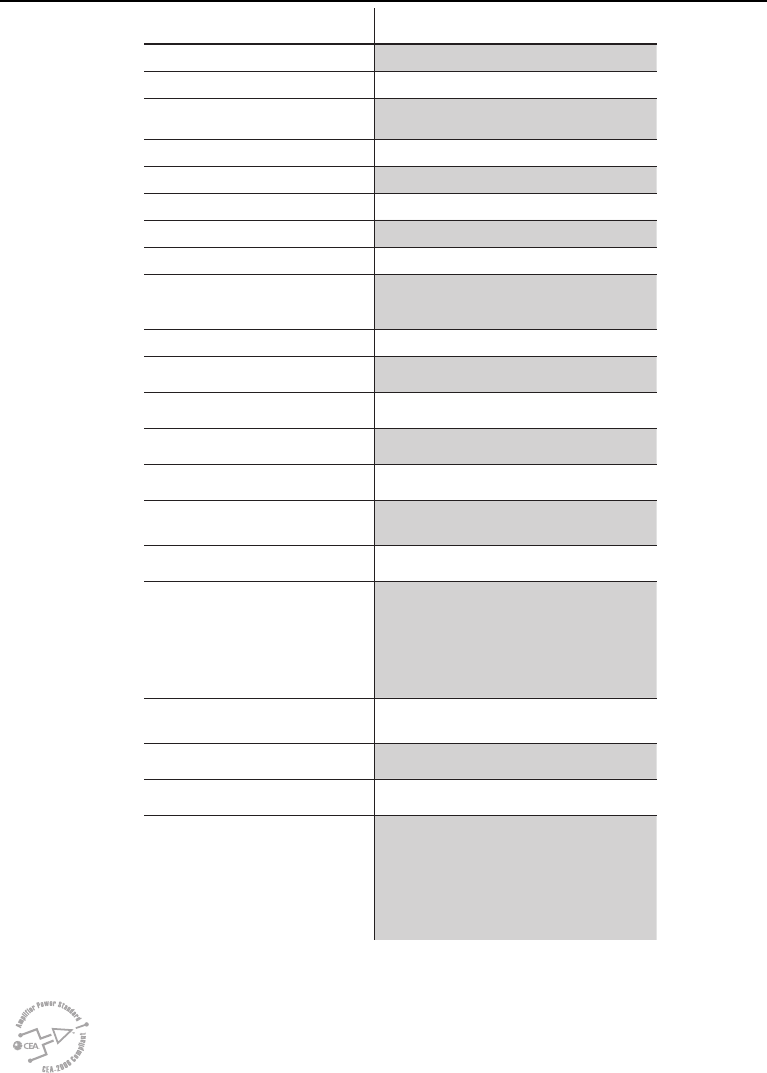
Specifications
CEA 2006
Power ratings on Rockford Fosgate source units conform to CEA-2006 industry standards. These guide-
lines mean your source unit’s output power ratings are REAL POWER numbers, not inflated marketing
ratings.
ModelPMX-8BB
Operating Voltage10.5V - 16V
Fuse Rating15A
Power Output
25 W X 4 @ 4 Ohms RMS
50 W x 4 @ 2 Ohms Peak
Max. RCA Output Voltage4V
Output Impedance500Ω
Frequency Response20 - 20kHz
FM Frequency Range87.5MHz - 107.9MHz
AM Frequency Range530kHz - 1710kHz
WB Frequency Range
162.40 - 162.55
(US & Canada)
Tuner Presets18 FM / 12 AM / 6 WB / 18 SXM
ClockNo Clock
DisplayN/A
Bluetooth3.0+EDR, A2DP 1.3
USB Compatibility2.0
USB Capacity
32 GB max, 255 Folders max,
999 Songs max
USB Output1A
Made for iPhone Model Names-
iPhone 6s Plus
iPhone 6s
iPhone 6 Plus
iPhone 6
iPhone 5S
iPhone 5C
iPhone 5
Made for iPod Model Names
iPod Touch (6th generation)
iPod Touch (5th generation)
Android CompatibilityBluetooth
®
Only
Audio File CompatibilityMP3, WMA, FLAC
Compatible Wired Remotes
PMX-8DH, PMX-1R & PMX-0R
(3 Remote Limit,
100 ft Total Wired Distance)
NOTE: When using a PMX-8DH as your main
display. It will only work when connected with
a PMX10C extension cable. It will not work
with a cable longer than 10 feet in length.
4
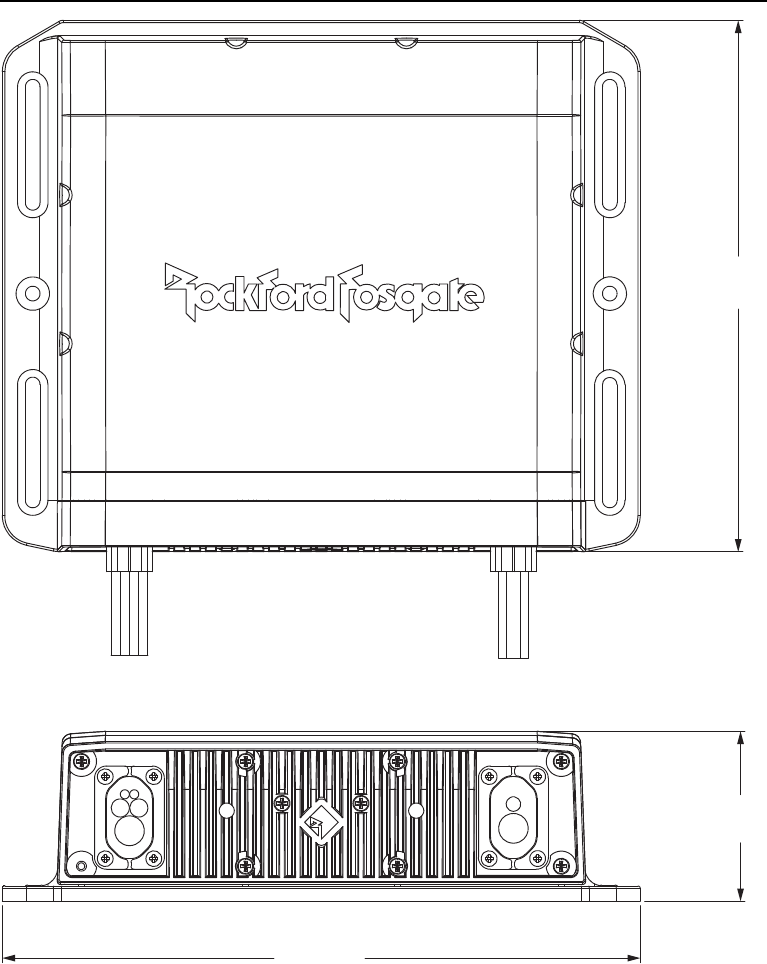
Dimensions
8.3”
(210mm)
2.2”
(56mm)
6.9”
(175mm)
Fig. 1
5
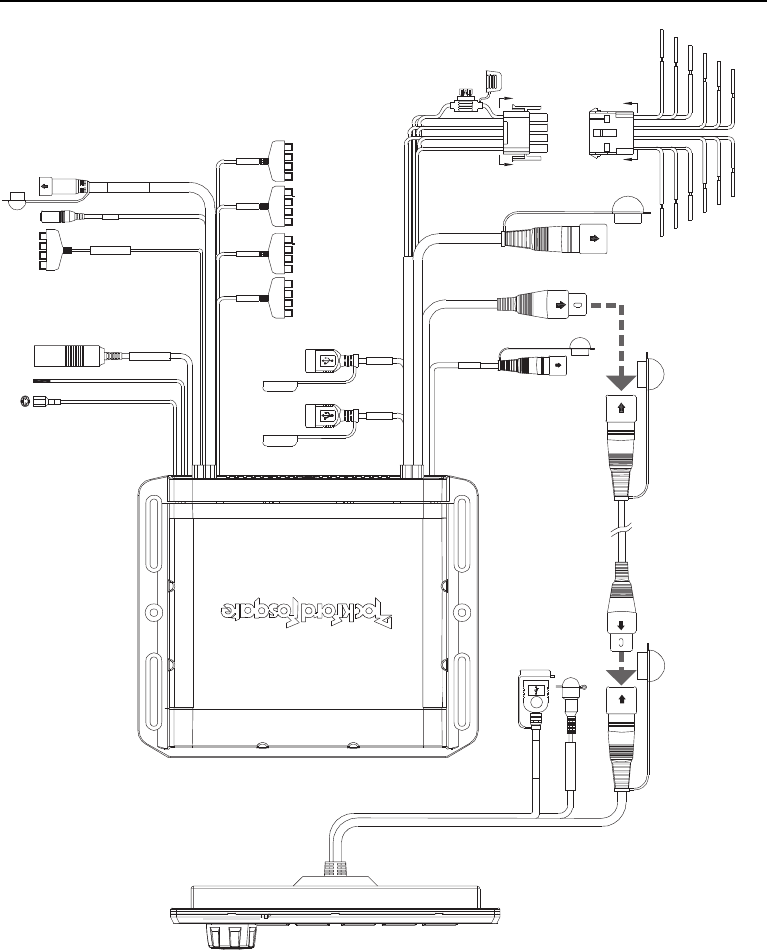
Wiring Diagram
1
4
7
10
2
5
8
11
3
6
9
12
SECTION A-A
1
4
7
10
2
5
8
11
3
6
9
12
SECTION B-B
ORIENTATION
SPEAKER REAR LEFT (+)
REMOTE (+)
ACC (+12V)
1
RED
7
12
11
10
9
8
4
5
6
3
2
BLACKGROUND (-)
PURPLE/BLACK
BLUE/WHITE
PURPLE
GREEN/BLACK
GREEN
ORANGE/WHITE
GREY/BLACK
GREY
WHITE/BLACK
WHITE
PIN NO.
WIRE COLORWIRE DEFINITION
ILLUMINATION
SPEAKER REAR LEFT (-)
SPEAKER FRONT LEFT (+)
SPEAKER FRONT LEFT (-)
SPEAKER FRONT RIGHT (+)
SPEAKER FRONT RIGHT (-)
SPEAKER REAR RIGHT (+)
SPEAKER REAR RIGHT (-)
AWG
20
20
16
20
20
20
16
20
20
20
20
20
WHITE
WHITE/BLACK
GREEN/BLACK
ORANGE/WHITE
RED
GREEN
B
B
A
A
GRAY
GRAY/BLACK
PURPLE/BLACK
BLUE/WHITE
BLACK
PURPLE
FEMALEMALE13 DIN EXT. CABLE
VIDEO IN
UPDATE ONLY
ANTENNA
BLACK
12 PIN MOLEX
CONNECTOR
FUSE
15A
RED
SXM
BLACK
USB
BLACK
BT ANTENNA
BLACK
ZONE1
ZONE2
ZONE3
ZONE4
13 DIN MALE
BLACK
GREY
13 DIN FEMALE
BLACK
USB INPUT
BLACK
BLACK
ORANGE
CAN BUS
BLACK
ANTENNA INPUT
ZONE 1 LINE OUT
SWI INPUT
SIRIUSXM INPUT
ZONE 2 LINE OUT
ZONE 3 LINE OUT
ZONE 4 LINE OUT
CAN INTERFACE
REVERSE CAMERA
TRIGGER INPUT (+) - PURPLE/WHITE
USB
WHITE
USB 1A CHARGE
PURPLE
AUX IN
RED
AUX INPUTS
AUX 1
AUX 2
L
R
L
R
LINE OUT LEFT
LINE OUT RIGHT
SUB-W OUT 1
SUB-W OUT 2
L
R
SUB
SUB
LINE OUT LEFT
LINE OUT RIGHT
SUB-W OUT 1
SUB-W OUT 2
L
R
SUB
SUB
LINE OUT LEFT
LINE OUT RIGHT
SUB-W OUT 1
SUB-W OUT 2
L
R
SUB
SUB
LINE OUT LEFT
LINE OUT RIGHT
SUB-W OUT 1
SUB-W OUT 2
L
R
SUB
SUB
SiriusXM Connect Tuner and subscription required to access SiriusXM Radio Features
(Sold separately)
For vehicles with Steering Wheel Control the use of the PAC SWI-RC or Metra Axxess
ASWC-1 interface module is required. When the PAC unit is being used, set the radio
selection settings for Rockford. If the Metra unit is being used, it settings are automatically
set up.(Sold separately)
Fig. 2
6
Wiring Diagram
1
4
7
10
2
5
8
11
3
6
9
12
SECTION A-A
1
4
7
10
2
5
8
11
3
6
9
12
SECTION B-B
ORIENTATION
SPEAKER REAR LEFT (+)
REMOTE (+)
ACC (+12V)
1
RED
7
12
11
10
9
8
4
5
6
3
2
BLACKGROUND (-)
PURPLE/BLACK
BLUE/WHITE
PURPLE
GREEN/BLACK
GREEN
ORANGE/WHITE
GREY/BLACK
GREY
WHITE/BLACK
WHITE
PIN NO.
WIRE COLORWIRE DEFINITION
ILLUMINATION
SPEAKER REAR LEFT (-)
SPEAKER FRONT LEFT (+)
SPEAKER FRONT LEFT (-)
SPEAKER FRONT RIGHT (+)
SPEAKER FRONT RIGHT (-)
SPEAKER REAR RIGHT (+)
SPEAKER REAR RIGHT (-)
AWG
20
20
16
20
20
20
16
20
20
20
20
20
WHITE
WHITE/BLACK
GREEN/BLACK
ORANGE/WHITE
RED
GREEN
B
B
A
A
GRAY
GRAY/BLACK
PURPLE/BLACK
BLUE/WHITE
BLACK
PURPLE
FEMALEMALE13 DIN EXT. CABLE
VIDEO IN
UPDATE ONLY
ANTENNA
BLACK
12 PIN MOLEX
CONNECTOR
FUSE
15A
RED
SXM
BLACK
USB
BLACK
BT ANTENNA
BLACK
ZONE1
ZONE2
ZONE3
ZONE4
13 DIN MALE
BLACK
GREY
13 DIN FEMALE
BLACK
USB INPUT
BLACK
BLACK
ORANGE
CAN BUS
BLACK
ANTENNA INPUT
ZONE 1 LINE OUT
SWI INPUT
SIRIUSXM INPUT
ZONE 2 LINE OUT
ZONE 3 LINE OUT
ZONE 4 LINE OUT
CAN INTERFACE
REVERSE CAMERA
TRIGGER INPUT (+) - PURPLE/WHITE
USB
WHITE
USB 1A CHARGE
PURPLE
AUX IN
RED
AUX INPUTS
AUX 1
AUX 2
L
R
L
R
LINE OUT LEFT
LINE OUT RIGHT
SUB-W OUT 1
SUB-W OUT 2
L
R
SUB
SUB
LINE OUT LEFT
LINE OUT RIGHT
SUB-W OUT 1
SUB-W OUT 2
L
R
SUB
SUB
LINE OUT LEFT
LINE OUT RIGHT
SUB-W OUT 1
SUB-W OUT 2
L
R
SUB
SUB
LINE OUT LEFT
LINE OUT RIGHT
SUB-W OUT 1
SUB-W OUT 2
L
R
SUB
SUB
7
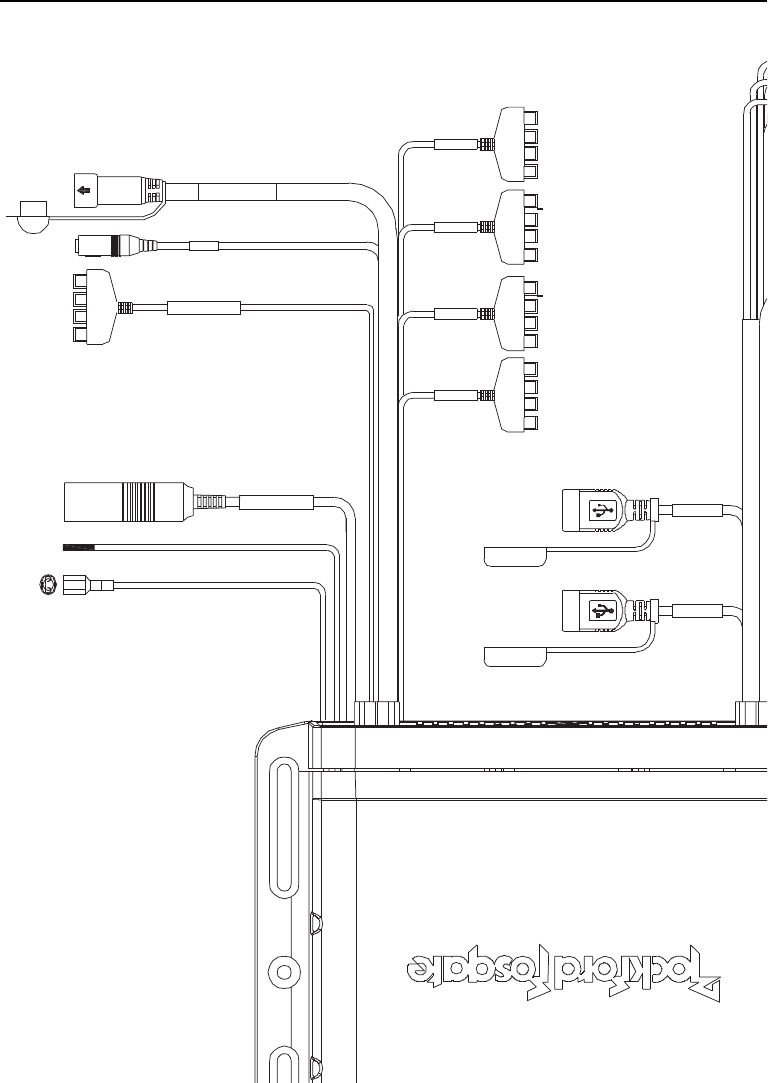
Wiring Diagram
1
4
7
10
2
5
8
11
3
6
9
12
SECTION A-A
1
4
7
10
2
5
8
11
3
6
9
12
SECTION B-B
ORIENTATION
SPEAKER REAR LEFT (+)
REMOTE (+)
ACC (+12V)
1
RED
7
12
11
10
9
8
4
5
6
3
2
BLACKGROUND (-)
PURPLE/BLACK
BLUE/WHITE
PURPLE
GREEN/BLACK
GREEN
ORANGE/WHITE
GREY/BLACK
GREY
WHITE/BLACK
WHITE
PIN NO.
WIRE COLORWIRE DEFINITION
ILLUMINATION
SPEAKER REAR LEFT (-)
SPEAKER FRONT LEFT (+)
SPEAKER FRONT LEFT (-)
SPEAKER FRONT RIGHT (+)
SPEAKER FRONT RIGHT (-)
SPEAKER REAR RIGHT (+)
SPEAKER REAR RIGHT (-)
AWG
20
20
16
20
20
20
16
20
20
20
20
20
WHITE
WHITE/BLACK
GREEN/BLACK
ORANGE/WHITE
RED
GREEN
B
B
A
A
GRAY
GRAY/BLACK
PURPLE/BLACK
BLUE/WHITE
BLACK
PURPLE
FEMALEMALE13 DIN EXT. CABLE
VIDEO IN
UPDATE ONLY
ANTENNA
BLACK
12 PIN MOLEX
CONNECTOR
FUSE
15A
RED
SXM
BLACK
USB
BLACK
BT ANTENNA
BLACK
ZONE1
ZONE2
ZONE3
ZONE4
13 DIN MALE
BLACK
GREY
13 DIN FEMALE
BLACK
USB INPUT
BLACK
BLACK
ORANGE
CAN BUS
BLACK
ANTENNA INPUT
ZONE 1 LINE OUT
SWI INPUT
SIRIUSXM INPUT
ZONE 2 LINE OUT
ZONE 3 LINE OUT
ZONE 4 LINE OUT
CAN INTERFACE
REVERSE CAMERA
TRIGGER INPUT (+) - PURPLE/WHITE
USB
WHITE
USB 1A CHARGE
PURPLE
AUX IN
RED
AUX INPUTS
AUX 1
AUX 2
L
R
L
R
LINE OUT LEFT
LINE OUT RIGHT
SUB-W OUT 1
SUB-W OUT 2
L
R
SUB
SUB
LINE OUT LEFT
LINE OUT RIGHT
SUB-W OUT 1
SUB-W OUT 2
L
R
SUB
SUB
LINE OUT LEFT
LINE OUT RIGHT
SUB-W OUT 1
SUB-W OUT 2
L
R
SUB
SUB
LINE OUT LEFT
LINE OUT RIGHT
SUB-W OUT 1
SUB-W OUT 2
L
R
SUB
SUB
8
Installation / Mounting
Contents
Installation Considerations
The following is a basic list of tools needed for installation:
This section focuses on some of the vehicle considerations for installing
your new source unit. Pre-planning your system layout and best wiring
routes will save installation time. When deciding on the layout of your
new system, be sure that each component will be easily accessible for
making adjustments.
If you feel unsure about installing this system yourself, have it installed
by a qualified Rockford Audio technician.
Before installation, disconnect the battery negative (-) terminal to prevent
damage to the unit, fire and/or possible injury.
Before beginning any installation, follow these simple rules:
1. Be sure to carefully read and understand the instructions before
attempting to install the unit.
2. For safety, disconnect the negative lead from the battery prior to
beginning the installation.
3. For easier assembly, we suggest you run all wires prior to mounting
your unit in place.
4. Route all of the RCA cables close together and away from any high
current wires.
5. Use high quality connectors for a reliable installation and to minimize
signal or power loss.
6. Think before you drill! Be careful not to cut or drill into gas tanks, fuel
lines, brake or hydraulic lines, vacuum lines or electrical wiring when
working on any vehicle.
7. Never run wires underneath the vehicle. Running the wires inside the
vehicle provides the best protection.
8. Avoid running wires over or through sharp edges. Use rubber
or plastic grommets to protect any wires routed through metal,
especially the firewall.
9. ALWAYS protect the battery and electrical system from damage with
proper fusing. Install the appropriate fuse holder and fuse on the
+12V power wire within 18” (45.7 cm) of the battery terminal.
10. When grounding to the chassis of the vehicle, scrape all paint from
the metal to ensure a good, clean ground connection. Grounding
connections should be as short as possible and always be connected
to metal that is welded to the main body, or chassis, of the vehicle.
Seatbelt bolts should never be used for connecting to ground.
• Volt/Ohm meter
• Wire strippers
• Wire crimpers
• Wire cutters
• #2 Phillips screwdriver
• Battery post wrench
• Hand held drill w/ assorted
bits
• Heat shrink tubing
• Soldering iron
• Solder
• Heat gun
• 7mm wrench
• Source Unit
• 13-pin Extension Cable
(PMX10C)
• Installation & Operation
Manual
Mounting
To mount the unit, you will need to find a flat surface with adequate sup-
port material that provides a secure mounting location.
1. Once you have determined a mounting location, you will need to
mount the unit vertically with the wire harnesses facing down.
Note: Mounting the unit vertically is the best for water resistance.
2. To secure the unit, use the (4) supplied mounting screws and attach
to sturdy, flat surface.
Mounting Screws
Source Unit
Fig. 3
9
Settings
Source Unit Settings
To access the source unit’s settings, long press the MENU button until
the options appear. Rotate the encoder to scroll through the list of
settings and short press the encoder button to select the setting you wish
to change. (ZONES>BALANCE>FADER>AUDIO>VOLTAGE GAUGE>BT
DEVICE PAIRING>BEEP>TUNER REGION>SOFTWARE>PMX-
CAN>FACTORY DEFAULT)
This source unit has a zero current draw when turned off. All of your
settings and presets will be saved along with your boat’s battery during
storage.
ZONES
ZONE 1 / ZONE 2 / ZONE 3 / ZONE 4
To setup ZONE 1, 2, 3 or 4, short press the encoder button or press the
ZONE button to access the submenu. Rotate the encoder button to select
the ZONE options. (SOURCE > RENAME > ENABLE/DISABLE/LOCK)
NOTE: During regular listening, long press the encoder button to switch
between zones.
SOURCE
To select the source, short press the encoder button to access the
submenu. Use the rotary encoder to scroll through SOURCE Settings.
(FM TUNER > AM TUNER > WB TUNER > USB > AUX1>AUX2 >
BLUETOOTH > PANDORA > SiriusXM>CAMERA)
RENAME
To rename ZONE, short press the encoder button to set the first letter of
the new name. Once active, rotate encoder to adjust letters. Short press
the encoder button again to set the next letter. Repeat until ZONE has
been renamed. Short press MENU to exit and go back up one level.
ENABLE / DISABLE / LOCK
Short press the encoder button to access. Rotate the encoder button to
select ENABLE/DISABLE/LOCK. Selecting LOCK will enable ZONE 2 and
LOCK the source of ZONE 2 to ZONE 1.
BALANCE
Short press the encoder button to access BALANCE adjustment settings.
Rotate the encoder button to set output BALANCE.
FADER
Short press the encoder button to access FADER adjustment settings.
Rotate the encoder button to set output FADER.
AUDIO
To access the AUDIO settings, short press the AUDIO option from
the MENU screen. Rotate the encoder to scroll through the list of
settings and short press the encoder button to select the setting you
wish to change. (7 BAND EQ>CROSSOVER>PEQ>REAR RCA>AUX1
INPUT>AUX2 INPUT>SOURCE GAIN>INTERNAL AMPLIFIER)
7 BAND EQ
Short press the encoder button to access the 7 BAND EQ settings. Use
the rotary encoder to scroll through the EQ settings. (FLAT > ROCK
Compositori>Libri audio>Podcast). Questa funzione consente di ricercare
tracce o brani in base a vari tipi di categoria.
REPEAT (Ripeti)
Premere brevemente il pulsante dell’encoder per accedere alle opzioni
della funzione REPEAT (OFF>ONE>ALL) (DISATTIVA>UNO>TUTTI). Questa
funzione consente di impostare le preferenze riguardo il numero di volte
che una traccia o un brano verrà ripetuto.
SHUFFLE (Riproduzione casuale)
Premere brevemente il pulsante dell’encoder per accedere alle opzioni della
funzione SHUFFLE (OFF>ONE>ALL) (DISATTIVA>TUTTI). Questa funzione
consente di impostare le preferenze riguardo la riproduzione casuale di
tracce o brani.
Pandora®
Questa funzione consente di controllare l’app Pandora® direttamente
dall’unità di fonte (gli utenti Android devono usare Bluetooth, gli utenti
iOS possono usare sia USB sia Bluetooth). Occorre prima avviare l’app
Pandora® sul dispositivo, e quindi selezionare l’opzione fonte Pandora®
sull’unità di fonte. Per usare la funzione “Pollice su” premere a lungo il
pulsante SUB+. Per usare la funzione “Pollice già” premere a lungo il
pulsante SUB-.
Per riprodurre o sospendere un brano, premere brevemente il pulsante
PLAY/PAUSE.
Per saltare avanti di un brano, premere brevemente il pulsante FWD.
Per accedere alle impostazioni specifiche Pandora®, pre-
mere brevemente il pulsante MENU per l’elenco delle im-
postazioni (STATIONS>BOOKMARKS>STATIONS MANAGE)
(STAZIONI>SEGNALIBRI>GESTISCI STAZIONI). Usare l’encoder per
selezionare l’opzione da modificare.
STAZIONI
Per regolare premere brevemente il pulsante dell’encoder e accedere.
Ruotare il pulsante dell’encoder per selezionare le opzioni (SHUFFLE>SORT
DATE/A-Z>STATIONS) (RIPRODUZIONE CASUALE>ORDINE PER DATA/A-
Z>STAZIONI). Selezionando l’opzione SHUFFLE le stazioni verranno
riprodotte casualmente, e selezionando l’opzione SORT le stazioni verranno
ordinate per data di aggiunta o alfabeticamente. Si possono anche selezion-
are le stazioni salvate direttamente da questo elenco.
BOOKMARKS (Segnalibri)
Per aggiungere un segnalibro a un artista o una traccia riprodotta, premere
brevemente il pulsante dell’encoder per visualizzare le opzioni BOOKMARK
(ARTIST>TRACK) (ARTISTA>TRACCIA). Selezionare l’opzione che si
desidera usare per i segnalibri.
STATIONS MANAGE (Gestisci stazioni)
Per creare stazioni premere brevemente il pulsante dell’encoder per visu-
alizzare le opzioni STATION MANAGE (CREATE FROM ARTIST> CREATE
FROM TRACK> CREATE FROM GENRE>DELETE) (CREA DA ARTISTA>
CREA DA TRACCIA> CREA DA GENERE>CANCELLA). Selezionando CRE-
ATE FROM ARTIST OPTION (opzione Crea da artista) consente di creare
una stazione dell’artista che si sta ascoltando. CREATE FROM TRACK (Crea
da traccia) funziona in modo simile creando una stazione dalla traccia
attualmente riprodotta. Se la stazione è stata creata selezionando CREATE
FROM GENRE (Crea da genere), sarà possibile selezionare i generi di
musica da scegliere per creare la stazione. Selezionando DELETE (Cancella)
verrà cancellata la stazione riprodotta attualmente.
Pandora, il logo Pandora e il marchio commerciale Pandora sono marchi
o marchi registrati di Pandora Media, Inc. Usati con permesso. Pandora è
disponibile solo in alcuni paesi. Visitare http://www.pandora.com/legal per
ulteriori informazioni.
SiriusXM®
Solo SiriusXM® ti porta più di quello che vuoi ascoltare, tutto in un unico
posto. Accedi a più di 140 canali, compreso musica senza pubblicità
e il meglio di sport, notizie, interviste, serie comedy e intrattenimento.
Benvenuto nel mondo della radio satellitare. Sono richiesti SiriusXM
Connect Tuner e l’abbonamento. Per maggiori informazioni visitare www.
siriusxm.com.
ATTIVARE L’ABBONAMENTO SiriusXM
Dopo l’installazione di SiriusXM Connect Tuner e antenna, accendere l’unità
di fonte e selezionare la modalità SiriusXM. Si dovrebbe potere ascoltare il
canale SiriusXM Preview su Canale 1. Se non si riesce ad ascoltare i canali
in anteprima Preview, controllare le istruzioni per l’installazione e accertarsi
che SiriusXM Connect Tuner sia installato correttamente.
Una volta che il canale Preview funziona e lo si può ascoltare, sintoniz-
zarsi sul Canale 0 per trovare la Radio ID del tuner. La Radio ID si trova
anche sul fondo di SiriusXM Connect Tuner e della confezione. Per
attivare l’abbonamento occorre questo numero. Segnare il numero come
41
riferimento.
Nota: SiriusXM Radio ID non include le lettere I, O, S o F.
Negli USA è possibile attivare online o chiamando il servizio SiriusXM
Listener Care:
• Visitare www.siriusxm.com/activatenow
• Chiamare SiriusXM Listener Care al 1-866-635-2349
Per gli abbonati in Canada preghiamo di contattare:
• Visitare www.siriusxm.ca/activatexm
• Chiamare XM Customer Care al 1-877-438-9677
Durante il processo di attivazione i satelliti SiriusXM inviano un messaggio
di attivazione al tuner. Quando la radio rileva che il tuner ha ricevuto il
messaggio di attivazione, il display della radio visualizza: “Subscription
Updated” (Abbonamento aggiornato). Una volta abbonati è possibile
sintonizzarsi sui canali del programma di abbonamento. Si prega di notare
che il processo di attivazione generalmente richiede 10-15 minuti, ma può
anche durare un’ora. Occorrerà riaccendere la radio e ricevere il segnale
SiriusXM per ricevere il messaggio di attivazione.
SETTINGS (IMPOSTAZIONI)
Per accedere alle impostazioni della banda SiriusXM SETTINGS, premere
brevemente il MENU durante l’uso della fonte SiriusXM. Questo da
accesso alle impostazioni specifiche di SiriusXM (SXM>PRESETS>ADD
PRESETS>REMOVE PRESETS>CHANNELS>CATEGORY)
(SXM>PREDEFINITI>AGGIUNGI PREDEFINITI>RIMUOVI
PREDEFINITI>CANALI>CATEGORIA).
BANDE SiriusXM PRESET (SXM)
Premere brevemente il pulsante dell’encoder per accedere alle opzioni Siri-
usXM PRESET (SXM1>SXM2>SXM3). Questa funzione consente diavere
gruppi predefiniti distinti del satellite dai quali selezionare. Usare i pulsanti
FWD e REV per scorrere attraverso i gruppi TUNER.
PRESETS (Predefiniti)
Premere brevemente il pulsante dell’encoder per accedere all’elenco
PRESETS. Questa funzione consente di visualizzare i PRESETS salvati
sull’unità.
ADD PRESETS (Aggiungi predefiniti)
Premere brevemente il pulsante dell’encoder sull’opzione ADD PRESETS.
Bisogna essere sia sul canale sia sul gruppo PRESET che si desidera ag-
giungere prima (SXM1>SXM2>SXM3). Questa funzione consente di salvare
i canali sull’unità. Dopo la selezione usare l’encoder rotativo per selezionare
il numero PRESET (1-6) sul quale si desidera salvare il canale.
REMOVE PRESETS (Rimuovi predefiniti)
Premere brevemente il pulsante dell’encoder sull’opzione REMOVE PRE-
SETS. Bisogna essere sul gruppo PRESET che si desidera regolare prima
(SXM1>SXM2>SXM3). Questa funzione consente di rimuovere i canali
salvati sull’unità. Dopo la selezione usare l’encoder rotativo per selezionare
il numero PRESET (1-6) del canale che si desidera rimuovere.
CHANNEL (CANALE)
Premere brevemente il pulsante dell’encoder sull’opzione CHANNEL per
selezionare questa funzione. Questa funzione visualizza l’elenco intero dei
canali.
CATEGORY (CATEGORIA)
Premere brevemente il pulsante dell’encoder sull’opzione CATEGORY per
selezionare questa funzione. Questa funzione consente di ricercare i canali
in base al tipo di CATEGORY.
DIRECT TUNING (SINTONIZZAZIONE DIRETTA)
Premere brevemente il pulsante dell’encoder sull’opzione DIRECT TUNING
per selezionare questa funzione. Questa funzione consente di sintonizzarsi
direttamente su un canale se si conosce già il numero del canale. Ruotare
l’encoder fino al numero desiderato e premere per digitare la selezione.
Ripetere fino a quando il numero del canale è completato.
PARENTAL CONTROLS (CONTROLLO GENITORI)
Premere brevemente il pulsante dell’encoder sull’opzione PARENTAL
CONTROL per selezionare questa funzione. Questa funzione consente di
bloccare e sbloccare facilmente canali con contenuti per adulti. Per attivare
questa funzione, premere brevemente l’encoder su PARENTAL CONTROLS
per selezionarla. Occorre digitare un codice per attivarla. Digitare il codice
“1111”. Dopo l’immissione del codice corretto si avrà accesso alle funzioni
PARENTAL CONTROL (LOCK CHANNELS>CHANGE MY CODE) (BLOCCA
CANALI>CAMBIA IL MIO CODICE). Usare la manopola dell’encoder
rotativo per scorrere attraverso le opzioni e premere brevemente per
selezionare.
LOCK CHANNELS (BLOCCA CANALI)
Premere brevemente il pulsante dell’encoder sull’opzione LOCK CHAN-
NELS per selezionare questa funzione. Questa funzione consente di
selezionare determinati canali da bloccare per l’ascolto. Per potere ascoltare
i canali bloccati occorre digitare il codice di accesso corretto. Usare
l’encoder rotativo per immettere il codice.
CHANGE MY CODE (CAMBIA IL MIO CODICE)
Premere brevemente il pulsante dell’encoder sull’opzione CHANGE MY
CODE per reimpostare il codice di accesso PARENTAL CONTROL. Usare
l’encoder rotativo per immettere il codice.
OPERAZIONE CAMERA
Questa caratteristica consente di collegare una fotocamera esterna e
visualizzare attraverso il PMX-3. Un trigger inverso è fornito per attivare la
fotocamera quando mettere il veicolo in retromarcia o si può selezionare la
telecamera dal menu fonte.
Italiano
42
Sintomo / DescrizioneDiagnosiSoluzione
Di base
L'unità di fonte non si accende.
Fusibile bruciato
Controllare il fusibile sull'unità, cambiarlo con la portata
corretta.
L'accensione del veicolo è spenta
Se collegata seguendo le istruzioni, l'unità non funzionerà con
l'accensione spenta.
La tensione applicata al cavo rosso non
è tra 10,5 e 16 Volt o non vi è tensione
presente.
Controllare la batteria, i collegamenti e i fusibili e riparare o
cambiare se necessario. Se la tensione supera +16 volt, fare
ispezionare il sistema da un centro di assistenza autorizzato.
L'unità non ha la messa a terra adeguataControllare i cavi e riparare se necessario.
Tuner Radio
Il tuner non si sintonizza su nessuna
stazione
Non c'è l'antenna, oppure collegamento
sconnesso o aperto nel cavo
Controllare tutti i collegamenti e riparare se necessario.
Impossibile sintonizzare stazioni nella
modalità di ricerca
Zona con segnale deboleAccertarsi che la modalità LOC del tuner sia spenta (OFF).
Dispositivi USB
Impossibile inserire il dispositivo
USB
Il dispositivo USB è stato inserito nella
direzione sbagliata
Invertire la direzione di collegamento del dispositivo USB e
provare a reinserirlo.
Il connettore del dispositivo USB è rottoSostituire con un nuovo dispositivo USB.
Dispositivo USB non riconosciuto
Il dispositivo USB è danneggiato.
Disconnettere il dispositivo USB e riconnetterlo. Se il
dispositivo continua a non essere riconosciuto, sostituirlo con
un altro dispositivo USB. USB non funziona con dispositivi
Android.
I connettori sono allentati.
Non vi è suono con il display visual-
izzato "No File"
Sul dispositivo USB non ci sono file
MP3/WMA salvati.
Salvare questi file correttamente sul dispositivo USB. USB
non funziona con dispositivi Android.
Il suono salta o è rumoroso
I file MP3/WMA non sono stati creati
correttamente.
Usare i file MP3/WMA che sono codificati correttamente.
AUX
MP3 non viene riprodotto
Errore di scrittura. Il formato MP3 non è
compatibile.
Accertarsi che l'MP3 sia stato scritto in un formato supportato.
Italiano
43
Italiano
SiriusXM
Controllare l’antenna
La radio ha rilevato un guasto
dell’antenna SiriusXM. Il cavo
dell’antenna potrebbe
Verificare che il cavo dell’antenna sia collegato a SiriusXM
Connect Tuner.
Ispezionare il cavo dell’antenna per verificare eventuali
danni e attorcigliamenti. Sostituire l’antenna se il cavo è
danneggiato.
I prodotti SiriusXM sono in vendita dal rivenditore car audio
locale o online a www.shop.siriusxm.com.
Controllare il tuner
La radio ha difficoltà a comunicare
con SiriusXM Connect Tuner. Il tuner
potrebbe essere staccato o danneg-
giato.
Verificare che il cavo del SiriusXM Connect Tuner sia
saldamente collegato alla radio.
Nessun segnale
Il SiriusXM Connect Tuner ha dif-
ficoltà a ricevere il segnale satellitare
SiriusXM.
Verificare che il veicolo si trovi all’esterno e disponga di una
visione chiara del cielo.
Verificare che l’antenna SiriusXM con base magnetica sia
montata su una superficie di metallo sulla parte esterna del
veicolo.
Spostare l’antenna SiriusXM e allontanarla da qualsiasi
ostruzione.
Ispezionare il cavo dell’antenna per verificare eventuali danni
e attorcigliamenti.
Consultare il manuale d’installazione del SiriusXM Con-
nect Tuner per maggiori informazioni sull’installazione
dell’antenna. Sostituire l’antenna se il cavo è danneggiato. I
prodotti SiriusXM sono in vendita dal rivenditore car audio
locale o online a www.shop.siriusxm.com.
Subscription Updated (Abbonamen-
to aggiornato).
La radio ha rilevato un cambiamento
dello stato dell’abbonamento SiriusXM.
Premere il pulsante dell’encoder per
cancellare il messaggio.
Nel U.S.A., visitare www.siriusxm.com o chiamare
1-866-635-2349 se avete domande relative al pacchetto
di abbonamento o vorrebbe iscriversi a questo canale.
In Canada, visitare il sito o chiamare il www.siriusxm.ca
1-877-438-9677.
Channel Not Available (Canale non
disponibile)
Il canale richiesto non è un canale
SiriusXM valido, o il canale che si
stava ascoltando non è più disponibile.
Questo messaggio può anche essere
visualizzato brevemente quando si col-
lega un nuovo SiriusXM Connect Tuner
per la prima volta.
Visitare www.siriusxm.com maggiori informazioni sulla serie
dei canali SiriusXM.
Channel Not Subscribed (Canale
non abbonato)
Il canale richiesto non è un canale
incluso nel pacchetto di abbonamento
SiriusXM, o il canale che si stava
ascoltando non è più incluso nel
pacchetto di abbonamento SiriusXM.
Nel U.S.A., visitare www.siriusxm.com o chiamare
1-866-635-2349 se avete domande relative al pacchetto
di abbonamento o vorrebbe iscriversi a questo canale.
In Canada, visitare il sito o chiamare il www.siriusxm.ca
1-877-438-9677.
Channel Locked (Canale bloccato)
Il canale richiesto è bloccato dalla
funzione Parental Control (Controllo
genitori) della radio.
Vedere pagina 10 per maggiori informazioni sulla funzione
Parental Control e come accedere a canali bloccati.
Bluetooth
Volume è basso
Volume sul dispositivo collegato non è
in tutto il modo.
Abbassare il volume tutta la strada fino sul dispositivo
collegato.
Zone
modifiche di origine
Shared Source passa da una zona
diversa.
Le fonti che sono condivise tra più zone giocheranno la
fonte da l’ultima zona che ha selezionato. L’ultima zona ha
la priorità.
Fader non funziona
uscite degli altoparlanti non sono
collegati.
Fader lavora con uscite per i diffusori sulla zona 1 solo.
uscite RCA non hanno il controllo fader.
44
Rockford Corporation offers a limited warranty on Rockford Fosgate products on the following terms:
Length of Warranty
POWER Amplifiers – 2 Years
BMW® Direct Fit Speakers – 2 Years
PUNCH® & PRIME® Amplifiers – 1 Year
Speakers, Signal Processors, Accessories and Capacitors – 1 Year
All marine, motorcycle, motorsport products - 2 Years
Any Factory Refurbished Product – 90 Days (receipt required)
What is Covered
This warranty applies only to Rockford Fosgate products sold to consumers by authorized Rockford Fosgate dealers in the United States of America.
Products purchased by consumers from an Authorized Rockford Fosgate Dealer in another country are covered only by that country’s Distributor and not by
Rockford Corporation.
Who is Covered
This warranty covers only the original purchaser of Rockford product purchased from an authorized Rockford Fosgate dealer in the United States. In order
to receive service, the purchaser must provide Rockford with a copy of the receipt stating the customer name, dealer name, product purchased and date of
purchase.
Products found to be defective during the warranty period will be repaired or replaced (with a product deemed to be equivalent) at Rockford’s discretion.
What is Not Covered
1. Damage caused by accident, abuse, improper installation, operations, theft, water (on non-Element Ready products).
2. Any cost or expense related to the removal or reinstallation of product.
3. Service performed by anyone other than Rockford or an authorized Rockford Fosgate service center.
4. Any product which has had the serial number defaced, altered, or removed.
5. Subsequent damage to other components.
6. Any product purchased outside the U.S.
7. Any product not purchased from an authorized Rockford Fosgate dealer. Refer to rockfordfosgate.com dealer locator for more detail.
Limit on Implied Warranties
Any implied warranties including warranties of fitness for use and merchantability are limited in duration to the period of the express warranty set forth
above. Some states do not allow limitations on the length of an implied warranty, so this limitation may not apply. No person is authorized to assume for
Rockford Fosgate any other liability in connection with the sale of the product.
How to Obtain Service
Please call 1-800-669-9899 for Rockford Customer Service. You must obtain an RA# (Return Authorization number) to return any product to Rockford
Fosgate. You are responsible for shipment of product to Rockford.
EU Warranty
This product meets the current EU warranty requirements, see your Authorized dealer for details.
Gebruikershandleiding.com neemt misbruik van zijn services uitermate serieus. U kunt hieronder aangeven waarom deze vraag ongepast is. Wij controleren de vraag en zonodig wordt deze verwijderd.
Product:
Spelregels forum
Om tot zinvolle vragen te komen hanteren wij de volgende spelregels:
lees eerst de handleiding door;
controleer of uw vraag al eerder door iemand anders is gesteld;
probeer uw vraag zo duidelijk mogelijk te stellen;
heeft u een probleem en al geprobeerd om dit op te lossen, vermeld dit erbij aub;
heeft u een oplossing gekregen van een bezoeker dan horen wij dat graag in dit forum;
wilt u een reactie geven op een vraag of antwoord, gebruik dan niet dit formulier maar klik op de knop 'reageer op deze vraag';
uw vraag wordt direct op de website gezet; vermijd daarom persoonlijke gegevens in te vullen;
Belangrijk! Als er een antwoord wordt gegeven op uw vraag, dan is het voor de gever van het antwoord nuttig om te weten als u er wel (of niet) mee geholpen bent! Wij vragen u dus ook te reageren op een antwoord.
Belangrijk! Antwoorden worden ook per e-mail naar abonnees gestuurd. Laat uw emailadres achter op deze site, zodat u op de hoogte blijft. U krijgt dan ook andere vragen en antwoorden te zien.
Abonneren
Abonneer u voor het ontvangen van emails voor uw Rockford Fosgate PMX-8BB bij:
nieuwe vragen en antwoorden
nieuwe handleidingen
U ontvangt een email met instructies om u voor één of beide opties in te schrijven.
Ontvang uw handleiding per email
Vul uw emailadres in en ontvang de handleiding van Rockford Fosgate PMX-8BB in de taal/talen: Duits, Engels, Frans, Italiaans, Spaans als bijlage per email.
De handleiding is 1,37 mb groot.
U ontvangt de handleiding per email binnen enkele minuten. Als u geen email heeft ontvangen, dan heeft u waarschijnlijk een verkeerd emailadres ingevuld of is uw mailbox te vol. Daarnaast kan het zijn dat uw internetprovider een maximum heeft aan de grootte per email. Omdat hier een handleiding wordt meegestuurd, kan het voorkomen dat de email groter is dan toegestaan bij uw provider.
Stel vragen via chat aan uw handleiding
Stel uw vraag over deze PDF
Uw handleiding is per email verstuurd. Controleer uw email
Als u niet binnen een kwartier uw email met handleiding ontvangen heeft, kan het zijn dat u een verkeerd emailadres heeft ingevuld of dat uw emailprovider een maximum grootte per email heeft ingesteld die kleiner is dan de grootte van de handleiding.
Er is een email naar u verstuurd om uw inschrijving definitief te maken.
Controleer uw email en volg de aanwijzingen op om uw inschrijving definitief te maken
U heeft geen emailadres opgegeven
Als u de handleiding per email wilt ontvangen, vul dan een geldig emailadres in.
Uw vraag is op deze pagina toegevoegd
Wilt u een email ontvangen bij een antwoord en/of nieuwe vragen? Vul dan hier uw emailadres in.