Putting into Operation .............................................................................................................................................................................4
First Steps .................................................................................................................................................................................................4
HOME - Main Menu .............................................................................................................................................................................5
Main Menu Levels ...................................................................................................................................................................................5
Heating Time Programme .......................................................................................................................................................................6
INFO - Main Menu ................................................................................................................................................................................7
INFO – Inputs .........................................................................................................................................................................................7
INFO – Outputs ......................................................................................................................................................................................7
INFO – Parameters ..................................................................................................................................................................................8
Additional Information ............................................................................................................................................................................8
Convection Fan - Control ........................................................................................................................................................................9
Convection Fan - Model Interno .............................................................................................................................................................9
The stove has a modern programmable microprocessor control. The individual
stove functions can be set by the user via the touch display.
Note
Manipulation of hardware components may only be performed by trained
specialist dealers and service. Incorrect handling of these parts leads to
loss of warranty and guarantee claims!
Basics
All settings and functions can be made via the integrated touch screen. Actions
are initiated by touching the symbolic buttons. The touch display reacts to both
finger touch and touch display pen.
Note
Please do not use any sharp objects to prevent damage to the touch display.
Operation
Each input button has the status inactive, active and depressed. If an input
button on the display is greyed-out, i.e. inactive, then it only reserves space
and cannot be selected. This is the case if no response can be expected from
pressing this input button (e.g. increasing the heat output if it is already at
100%; switching on if the stove is already switched on, …)
Active input buttons can be pressed at any time, in confirmation the status
changes to depressed; this status is retained as long as the button is pressed.
After pressing the input button, the status returns to active or inactive.
activedepressedinactive
Input Possibilities
OFF-Button
Pressing the OFF button switches off the stove.
ON-Button
Pressing the ON button switches on the stove.
If the stove is switched off, the OFF button can’t be pressed a second time and
is therefore grayed out (inactive), only the ON button is active.
It is the same for an active stove, then only the OFF button is active.
Note
The stove is switched ON or OFF in the HOME main menu. The respective
button must be depressed for 2 seconds to prevent inadvertent switching
on or off.
MINUS-Button
Pressing the MINUS button reduces the value in the display box
concerned.
PLUS-Button
Pressing the PLUS button increases the value in the display box
concerned.
NAVIGATION-Button
Pressing the NAVIGATION button takes the user to the
corresponding main menu.
##:##
INPUT-BOX
This is an input box for input of a multi-digit, numerical value.
A number inserted in the field is deleted, if you touch the field.
|
NUMERICAL
A number pad appears for input of a multi-digit, numerical value.
ENTER-Button
The input value is confirmed by pressing the ENTER button.
CANCEL-Button
The value displayed is deleted by pressing the CANCEL button.
Heating Times
SUBMENU-Button
Pressing the SUBMENU button takes the
user to the corresponding submenu.
Output
ACTIVE-Button
The option shown is selected by pressing
the ACTIVE button.
Displays
Flame Temp [C°]
INFO-box
This box provides information via the
adjacent value in the display box.
ON
DISPLAY box (ON/OFF)
A display box with ON or OFF is shown for options that can be
switched ON or OFF.
328
DISPLAY box (numerical)
A number is shown for values represented numerically.
4
Putting into Operation
Note
The unit may only be put into operation when assembled completely!
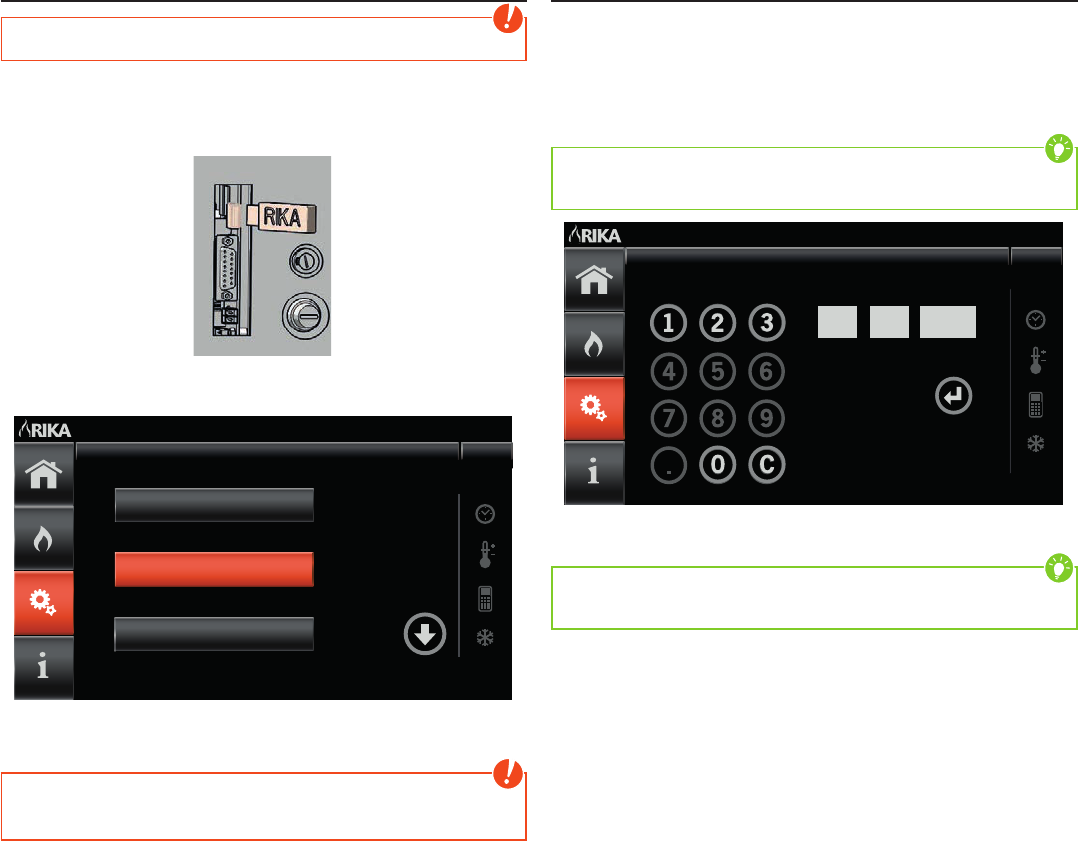
The USB stick supplied must be plugged into the interface on the rear of the
stove before the unit can be taken into service for the first time.
USB Connection
A start screen appears after connection to the mains supply. The language
selected is changed by pressing respective language button on the screen.
Français
Deutsch
English
Language Select
The software is automatically updated after language selection. This process
takes approx. 2 min.
Note
An interruption of the power supply must be strictly avoided during the
software update.
A confirmation display appears after successful software update; the stove
must be disconnected from the mains and the USB stick removed.
First Steps
Once the stove has been reconnected to the mains, the display changes to the
date and time setting by pressing the screen.
The input specified here only has to be made on first use; however it may be
changed at any time in the main menu SETUP settings.
The date and time setting is made numerically using the number pad.
Tip
Only the permissible numbers are released for each input step to prevent
incorrect input.
Date
03
|
2015
DDMMYYYY
The C button acts as back button and deletes the input in the display box
selected.
Tip
The individual input boxes are selected by touching the display boxes and the
content is reset by direct selection.
Once all data has been entered correctly, an ENTER button appears which
confirms the input and saves the data.
|5
EN
4
HOME - Main Menu
The HOME main menu is the starting point of the stove control system and is
divided into three sections.
Manual ModeTh 15.03.2015
15:55
Heating Power
Start
IIIIII
I NAVIGATION SECTION
Navigation among the individual main menu levels.
Tip
The current main menu is marked in colour to ease navigation.
II SETTINGS SECTION
Setting the heat output and the room temperature as well as ON and OFF switch
for stove.
III DISPLAY SECTION
Display of the current date and time, operating status and mode as well as
additional information symbols.
Note
If the stove is switched off during ignition or starting phase, it takes some
time until the display changes to “Burn-OFF” since the individual phases must
be performed first.
Main Menu Levels
The complete control system of the stove is divided into 4 main menu levels
(HOME, MODE, SETUP und INFO; these levels are differentiated based on the
following functions:
HOME - Status Level
Stove start/stop, setting heat output, room set temperature,
current stove status display
MODE - Operating Mode Level
Selection of the required operating mode (manual, automatic,
comfort)
SETUP - Setting Level
Setting of heating times, settings for various options, …
INFO - Information Level
Software version, pellet consumption, hours in operation,
information on the individual components,…
MODE - Mode Selection
The various heating modes are selected in this display.
Comfort Mode
Manual Mode
Automatic Mode
Mode SelectTh 15.03.2015
15:55
Manual Mode
The stove is operated at a pre-set heat output.
Automatic Mode
The stove operates at a pre-set heat output to the specific heating times. The
heating time program regulates the change between STANDBY-status and
CONTROL MODE automatically.
Tip
If there are no heating times stored, the icon „heating times“ flashes and the
stove is in standby.
Comfort Mode
Regulation to the pre-set room temperature is automatic in this selection.
Heating times may also be activated. A decreasing temperature can be set in
between the heating times.
Note
The comfort mode can only be selected if a functioning room sensor is
connected!
6
SETUP – Settings
In the SETUP – Settings main menu, heating times can be programmed, options
activated or then date and time set etc.
The required submenu is selected by pressing the corresponding button.
GSM
PIN-Code
GSMTh 15.03.2015
15:55
OFF
1234
Note
If functions are inactive due to lack of the respective module, they cannot be
selected.
SUBMENU ITEMS
Heating times
The heating times can be programmed in this submenu.
A decreasing temperature for the comfort mode can also be set.
Convection Fan
(only stoves with a built-in convection fan)
For detailled information please see page 9.
Frost Protection
(only with connected roomsensor)
This function allows selection of a minimum temperature at which the stove
starts to heat. The frost protection function is independent of any external
requirements and any set room temperatures. The function has top priority.
Room Sensor Calib. (Calibration)
(only with connected roomsensor)
Any deviation between the current displayed and actual room temperature can
be compensated for.
GSM
If a modem is connected, the stove GSM function can be activated and the
PinCode required entered numerically.
Screen saver
The waiting interval until the screen saver is activated is set in this submenu.
Child Lock
To prevent undesired operation, a code can be determined to be entered every
time the screen saver is left.
Date/Time
Date and time settings can be made.
Resets
This button is only available when the stove‘s temperature is below 80°C. After
finishing the service press the button „reset“ to reset the „Feed Rate Service”.
With “Enter” you reset the feed rate service to 700kg, quit with “X”. The button
“Factory Setting” will reset the complete stove settings, reset with „Enter“, quit
with „X“.
Service
(not accessible to final customers)
Additional information for the specialist dealer or service.
Heating Time Programme
The heating time programme operates the stove time-controlled. As soon
as the heating time function has been activated (ON) the buttons decreasing
temperature (only with room sensor) and heating time programme can be
selected.
Set Heating Times
Heating Times
Set Back Temp
Heating TimesTh 15.03.2015
15:55
ON
14
Individual or several days can be selected at the same time and programmed
individually in the heating time programme (Automatic and Comfort Mode).
The week days selected are marked ORANGE.
By selecting the now active heating time buttons (heating time I and heating
time II), the required ON and OFF switching times can be entered numerically.
The week day buttons are shown GREEN after confirmation.
Repeat pressing of week day buttons already programmed permit viewing of
the defined heating times or these can be deleted again using the cancel button
(right next to the time displayed).
Heating Time II
Heating Time I
Heating TimesTh 15.03.2015
15:55
ONOFF
##:####:##
MoTuWeFrThSaSu
20:1521:45
Tip
In the case of selected week days on which identical heating times have been
programmed, the respective settings of heating time I and/or heating time II
are shown.
If week days with different heating times have been selected then the hash
symbol appears in the time display (##:##).
|7
EN
6
INFO - Main Menu
The most important current parameters can be viewed in INFO – main menu.
Parameters
InfoTh 15.03.2015
15:55
Input
Output
SUBMENU ITEMS
Inputs
All available sensor data and switch statuses are shown.
Outputs
All components controlled by the microprocessor are shown.
Parameters
All operating parameters are shown.
INFO – Inputs
328
22
ON
InputTh 15.03.2015
15:55
Flame Temp [°C]
Room Temp [°C]
External Request
Flame Temp [°C] (Flame Temperature)
Display of the current temperature of the combustion chamber [°C]
Room Temp [°C] (Room Temperature)
(only with connected room sensor)
Display of the current ACTUAL temperature in the room in degree celsius.
External Request
Displays whether an external demand is active (ON) or inactive (OFF).
Grid Contact
(only stoves with turning grid)
Displays whether the dump grate is in the horizontal position (ON).
Pressure Switch
Shows „ON“, if the negative pressure in the combustion chamber is below a
defined threshold. Displays „OFF“ at a normal negative pressure.
INFO – Outputs
404
64
0
OutputTh 15.03.2015
15:55
Discharge Motor [‰]
Discharge Current
Dischargem. Error
Discharge Motor [‰]
Current output of screw motor conveying pellets out of the container
(range: 0…1000)
Discharge Current
The current consumption of the discharge motor, shown in milliampere
(range 0-120)
Dischargem. Error (Discharge Motor Error)
The current consumption of the discharge motor was exceeding the maximum
value for normal operation, each second is counted. Reaching 10 seconds the
error „Dischargemotor jammed“ is shown.
ID Fan [1/s] (Induced Draft Fan)
Current speed of the flue gas blower. (Range: 0…2500)
Conv. Fan
(only stoves with a built-in convection fan)
Shows whether the convection fan is actuated (ON) or not (OFF).
Grid motor
(only stoves with turning grid)
Shows whether the turning grid motor is actuated (ON) or not (OFF).
Ignition
Shows whether the ignition is actuated (ON) or not (OFF).
8
INFO – Parameters
9
2
698
ParametersTh 15.03.2015
15:55
Operat. Pellets
Feed Rate Total [kg]
Feed Rate Service [kg]
Operation Pellets
Display of previous total operating hours.
Feed Rate total [kg]
Display of total pellet amount supplied up to present.
Feed Rate Service [kg]
Display of the amount of pellets to be conveyed until the next cleaning.
Ignition Counter
Current number of all previous pellet ignitions.
Main State
Operating status of main control process.
Sub State
Operating status of sub control process.
Stove Type
Name of the stove type
Software Stove
Current stove control software version.
Software Display
Current software version of the touch display.
ON/OFF Cycles
Displays the total number of interruptions of the power supply.
Screen Saver
Depending on the interval set without touching the display, the lighting is
dimmed and power-saving mode is activated, a freeze image appears.
Renewed touching of the display activates the lighting and switches to the
HOME main menu.
Tip
The interval to activation of the power-saving mode can be set under Setup
– screen saver.
Additional Information
In nearly all the menu levels there are four symbols in the right outer display
area showing the activated settings
HEATING TIMES
This symbol is highlighted if individual heating times are
activated.
ROOM SENSOR
This symbol is highlighted if a functioning room sensor is
connected.
FROST PROTECTION
This symbol is highlighted if the integrated frost protection is
activated.
Note
The frost protection function can only be activated with connected room
sensor. If activated, it is executed in all operating modes (also in MANUAL
and AUTOMATIC).
GSM
This symbol is highlighted if a functioning GSM module has been
connected and activated.
Note
The additional information symbols can only be highlighted if the corresponding
modules have been connected to the stove and activated.
|9
EN
8
2. MODES
Note
When operating correctly, the stove may not be overheated. However
improper operation can shorten the life expectancy of electrical components
(blowers, motors and electrical control) and is not allowed!
Operation Modes Manual/Automatic/Comfort
MANUAL MODE
The pellet burner start and stop (ON / OFF buttons) and set the desired heat
output (PLUS / MINUS buttons) can be done on the touch screen directly at the
HOME main menu.
AUTOMATIC MODE
The change from the operating status “STOVE OFF“ to STANDBY-status (ON
button) and from STANDBY-status to STOVE OFF (OFF button) is made by
pressing the screen buttons directly in the HOME - main menu. The desired heat
output (PLUS / MINUS buttons) is also set here.
The heating time program regulates the change between STANDBY-status and
CONTROL MODE automatically.
Tip
If no heating times are stored the icon „heating times“ flashes and the stove
remains in standby.
The pellet burner start is within the heating times.
The pellet burner stop is outside the heating times.
In the operating status STOVE OFF no automatic pellet burner start is possible,
the system is turned off.
COMFORT MODE
The change from the operating status “STOVE OFF“ to STANDBY-status (ON
button) and from STANDBY-status to STOVE OFF (OFF button) is made by
pressing the screen buttons directly in the HOME - main menu. The desired
room temperature (PLUS / MINUS buttons) is also set here.
In the COMFORT mode heating times can be activated additionally.
The pellet burner start is within the heating times (or always with heating
times deactivated) if the actual room temperature is below the desired room
temperature. In between the heating times the pellet burner starts if the actual
room temperature is below the decreasing temperature preset or if the frost
protection is activated.
The pellet burner stops either outside the heating periods, or if the actual room
temperature is higher than the desired room temperature.
In the operating status STOVE OFF no automatic pellet burner start is possible,
the system is turned off.
Convection Fan - Control
(only for devices with convection fan, except type Interno)
Settings in the Setup menu
Convection Fan
You can switch on or off the convection fan as needed.
Conv. Fan Level
from level 5 (max.) to level 1 (min.). If you continue to press the „minus“ button,
you’ll set to AUTO. The convection fan speed will be adjusted automatically
depending on the heating power (30 - 100%). This setting should be chosen
as standard.
Tip for MultiAir stoves
The manually speed settings are useful if, for example, the second room
needs to be heated up quickly or heat needs to be removed from the stove.
Conv. Fan Area
You can also adapt the convection fan speed (+/- 30% fan speed). This is applied
for manual and for the AUTO setting. The fan speed can be reduced if the noise
is perceived as too loud. Conversely, for MultiAir stoves, the performance can
be increased when generally too little heated air is passed into the next room.
Convection Fan - Model Interno
To prevent overheating of the stove, the convection fan in the model Interno
can not be switched off. Once the stove is in operation, the convection fan
starts for safety reasons. The „AUTO“ setting can not be changed. A fan speed
adjustment can still be made.
10
3. WARNING AND ERROR MESSAGES
During operation, unforeseen circumstances or intervention by the user may lead to malfunctions or interruptions of the control process. There is a differentiation
between warnings and error messages. Warnings are interruptions caused by the user; they can be eliminated by correct actions. Error messages are malfunctions
of components or discharges during operation. These must be acknowledged by the user so that operation can continue.
Note
If error messages recur directly, customer service is to be notified immediately.
Warnings
displaymeaningaction to be taken
Please Close Door
ADVICE
PELLET HOPPER
LID OPEN
Display for open pellet container lid.Close the the pellet container lid.
Please Close Doors
ADVICE
PELLET HOPPER
LID OR
DOOR OPEN
Display for open combustion chamber door and/or
pellet container lid.
Only for model TopoII
Close the combustion chamber door and/or the
pellet container lid.
Only for model TopoII
NOT ENOUGH
LOW PRESSURE
check vacuum
ADVICE
The negative pressure in the combustion chamber
is below a defined limit value.
Check if the combustion chamber door is closed.
ADVICE
ROOMSENSOR
SIGNAL LOST
Manual Mode
There is no valid signal between the stove control
system and the room sensor.
Check if the sensor is plugged in correctly. Check
the LED-control of the receiver and, if necessary,
change the battery of the transmitter.
ADVICE
PLEASE PERFORM
SERVICE
Please perform service (maintenance)Perform service (see CLEANING AND MAIN-
TENANCE), after finishing the service press the
button „Feed Rate Service” at “Resets” at the setup
menu.
|11
EN
10
Errors
displaymeaningaction to be taken
ERROR
NO
PELLETS
There are no longer sufficient pellets in the cont-
ainer.
Acknowledge error message and refill pellets.
Note: the following ignition can take a longer time
because the screw has to be filled up with pellets.
ERROR
NOT
IGNITED
Ignition cannot be concluded due to lack of ignition
detection.
Acknowledge error message and check pellet
supply container. Open combustion chamber door
and clean fire trough if necessary. Stove can then
be restarted.
ERROR
GRID
DEFECT
The dump grate cannot complete the dump process
provided for.
Acknowledge error message and check for any
blockage of the dump grate at the fire trough.
ERROR
DISCHARGE MOTOR
DEFECT
The discharge motor for pellet conveying can no
longer be actuated.
Acknowledge error message and restart stove.
ERROR
FLAME SENSOR
DEFECT
The flame temperature sensor in the combustion
chamber does not give a realistic temperature to
the stove control system.
Acknowledge error message and restart stove.
ERROR
FAN
DEFECT
The flue gas blower specified speed was not
reached.
Acknowledge error message and restart stove.
ERROR
DISCHARGE MOTOR
JAMMED
The discharge motor can not be controlled because
of a blockade.
Remove any encrustations in the burn pot.
Acknowledge error message and restart stove.
ERROR
NOT ENOUGH
LOW PRESSURE
The negative pressure in the combustion chamber
is permanently below a defined threshold.
Acknowledge the error message and check the
stove for possible leaks. (combustion chamber
door, cleaning lid, etc.)
Check your chimney ( draft ).
ERROR
STOVE
OVERHEATED
Only for model TopoII
The STL (safety temperature limiter) has activated.
The stove overheated and switched off automati-
cally due to a safety risk.
Manually deblock STL at stove rear wall (press)
acknowledge error message and restart stove
Only for model Interno
The stove overheated and switched off automati-
cally due to a safety risk.
Let the stove cool down completely.
Check if all convection outlets are free.
Acknowledge error message and restart stove.
Ensure that the convection fan is running.
RIKA Innovative Ofentechnik GmbH
4563 Micheldorf / Austria, Müllerviertel 20
Telefon: +43 7582 686 - 41, Fax-DW: 43
E-Mail: verkauf@rika.at
RIKA.AT
Technical and design changes, as well as typesetting and printing errors reserved
Gebruikershandleiding.com neemt misbruik van zijn services uitermate serieus. U kunt hieronder aangeven waarom deze vraag ongepast is. Wij controleren de vraag en zonodig wordt deze verwijderd.
Product:
Spelregels forum
Om tot zinvolle vragen te komen hanteren wij de volgende spelregels:
lees eerst de handleiding door;
controleer of uw vraag al eerder door iemand anders is gesteld;
probeer uw vraag zo duidelijk mogelijk te stellen;
heeft u een probleem en al geprobeerd om dit op te lossen, vermeld dit erbij aub;
heeft u een oplossing gekregen van een bezoeker dan horen wij dat graag in dit forum;
wilt u een reactie geven op een vraag of antwoord, gebruik dan niet dit formulier maar klik op de knop 'reageer op deze vraag';
uw vraag wordt direct op de website gezet; vermijd daarom persoonlijke gegevens in te vullen;
Belangrijk! Als er een antwoord wordt gegeven op uw vraag, dan is het voor de gever van het antwoord nuttig om te weten als u er wel (of niet) mee geholpen bent! Wij vragen u dus ook te reageren op een antwoord.
Belangrijk! Antwoorden worden ook per e-mail naar abonnees gestuurd. Laat uw emailadres achter op deze site, zodat u op de hoogte blijft. U krijgt dan ook andere vragen en antwoorden te zien.
Abonneren
Abonneer u voor het ontvangen van emails voor uw Rika Touch Display V2-00 bij:
nieuwe vragen en antwoorden
nieuwe handleidingen
U ontvangt een email met instructies om u voor één of beide opties in te schrijven.
Ontvang uw handleiding per email
Vul uw emailadres in en ontvang de handleiding van Rika Touch Display V2-00 in de taal/talen: Engels als bijlage per email.
De handleiding is 1,94 mb groot.
U ontvangt de handleiding per email binnen enkele minuten. Als u geen email heeft ontvangen, dan heeft u waarschijnlijk een verkeerd emailadres ingevuld of is uw mailbox te vol. Daarnaast kan het zijn dat uw internetprovider een maximum heeft aan de grootte per email. Omdat hier een handleiding wordt meegestuurd, kan het voorkomen dat de email groter is dan toegestaan bij uw provider.
Stel vragen via chat aan uw handleiding
Stel uw vraag over deze PDF
Andere handleiding(en) van Rika Touch Display V2-00
Uw handleiding is per email verstuurd. Controleer uw email
Als u niet binnen een kwartier uw email met handleiding ontvangen heeft, kan het zijn dat u een verkeerd emailadres heeft ingevuld of dat uw emailprovider een maximum grootte per email heeft ingesteld die kleiner is dan de grootte van de handleiding.
Er is een email naar u verstuurd om uw inschrijving definitief te maken.
Controleer uw email en volg de aanwijzingen op om uw inschrijving definitief te maken
U heeft geen emailadres opgegeven
Als u de handleiding per email wilt ontvangen, vul dan een geldig emailadres in.
Uw vraag is op deze pagina toegevoegd
Wilt u een email ontvangen bij een antwoord en/of nieuwe vragen? Vul dan hier uw emailadres in.