Explanations to symbols ���������������������������������������������������������������������������������������������������������������������������������������������������������������������������3
Spare part overview exploded diagram �����������������������������������������������������������������������������������������������������������������������������������������������������4
Spare part overview article numbers ���������������������������������������������������������������������������������������������������������������������������������������������������������6
Amount of fuel �����������������������������������������������������������������������������������������������������������������������������������������������������������������������������������������7
Technical data �������������������������������������������������������������������������������������������������������������������������������������������������������������������������������������������7
General warning and safety information ��������������������������������������������������������������������������������������������������������������������������������������������������8
First heating����������������������������������������������������������������������������������������������������������������������������������������������������������������������������������������������8
Prior to set up �������������������������������������������������������������������������������������������������������������������������������������������������������������������������������������������9
What are pellets? ������������������������������������������������������������������������������������������������������������������������������������������������������������������������������������10
Wood pellet specification according to ENplus – A1 �����������������������������������������������������������������������������������������������������������������������������10
Pellet container refilling during operation ����������������������������������������������������������������������������������������������������������������������������������������������10
Electrical excess current protection ���������������������������������������������������������������������������������������������������������������������������������������������������������11
Auger motor monitoring ������������������������������������������������������������������������������������������������������������������������������������������������������������������������11
Power failure (during heating) ����������������������������������������������������������������������������������������������������������������������������������������������������������������11
Power failure (during the initial stage)����������������������������������������������������������������������������������������������������������������������������������������������������11
5. INSTALLING THE STOVE 12
General information �������������������������������������������������������������������������������������������������������������������������������������������������������������������������������12
Connection to the chimney ��������������������������������������������������������������������������������������������������������������������������������������������������������������������12
Connecting to a steel chimney ���������������������������������������������������������������������������������������������������������������������������������������������������������������12
Combustion air ���������������������������������������������������������������������������������������������������������������������������������������������������������������������������������������12
Feeding in external combustion air ���������������������������������������������������������������������������������������������������������������������������������������������������������12
Convection air conduction����������������������������������������������������������������������������������������������������������������������������������������������������������������������13
6. ASSEMBLY/DISMANTLING STONE AND OPTIONS 14
Dismantling top stone ����������������������������������������������������������������������������������������������������������������������������������������������������������������������������14
Dismantling bottom stone ����������������������������������������������������������������������������������������������������������������������������������������������������������������������15
7. COMFORT OPTIONS 16
Room sensor, Radio room sensor ������������������������������������������������������������������������������������������������������������������������������������������������������������16
GSM Control �����������������������������������������������������������������������������������������������������������������������������������������������������������������������������������������16
Interface for various options �������������������������������������������������������������������������������������������������������������������������������������������������������������������16
Open the combustion chamber door ������������������������������������������������������������������������������������������������������������������������������������������������������17
Cleaning of the burn pot - daily �������������������������������������������������������������������������������������������������������������������������������������������������������������17
Cleaning the flame temperature sensor ��������������������������������������������������������������������������������������������������������������������������������������������������17
Empty the ash drawer �����������������������������������������������������������������������������������������������������������������������������������������������������������������������������17
Cleaning the door glass ��������������������������������������������������������������������������������������������������������������������������������������������������������������������������17
Cleaning the convection air openings �����������������������������������������������������������������������������������������������������������������������������������������������������18
Combustion air - intake �������������������������������������������������������������������������������������������������������������������������������������������������������������������������18
Cleaning the pellet container ������������������������������������������������������������������������������������������������������������������������������������������������������������������18
Checking door seal ���������������������������������������������������������������������������������������������������������������������������������������������������������������������������������18
Cleaning the flue pipes ���������������������������������������������������������������������������������������������������������������������������������������������������������������������������18
Problem 1 �����������������������������������������������������������������������������������������������������������������������������������������������������������������������������������������������20
Problem 2 �����������������������������������������������������������������������������������������������������������������������������������������������������������������������������������������������20
Problem 3 �����������������������������������������������������������������������������������������������������������������������������������������������������������������������������������������������20
11. INSTRUCTIONS FOR COMMISSIONING PROTOCOL 21
12. WARRANTY 23
4
Spare part overview exploded diagram
27
25
24
31
33
32
4430
29
39
40
38
3835
34
36
43
37
41
42
45
4628
26
1
3
4
10
10
5
5
6
6
11
12
14
15
7
7
8
8
13
19
23
21
22
18
16
2
20
6
9
9
17
99
|5
EN
4
47
48
495053
5152545558
56575960
70
67
68
66
71
63
64
64
76
65
69
62
77
72
7372
74
75
68
78
96
81
82
88
80
83
85
87
86
9189
84
90
94
92
95
93
97
85
98
79
6
Spare part overview article numbers
Nr.Art.Nr.Description
1Z34847Combustion chamber
door black
2N112551Round sealing strip grey
D11
3N103693Flat seal black 8x2
4Z34877Door glass (ceramic
glass)
5Z34855Hinge plate
6N103964Hexagonal screw
7 *1Z30550Hinge
7 *2Z34441Hinge
8 *1N108656Hexagonal nut M08
8 *2N105179Hexagonal nut M10
9L00475Glass holder
10N111799Hexagonal screw
M05x08
11L02221Stop angle
12N111990Hexagon socket
13L02217Stopper holder
14Z34854Hinge shaft
15N110501Circlips
16N111950Hexagonal screw
M05x10
17N100170Washer
18L02220Lock tongue
19Z34857Locking bolt
20L02216Closure flap
21L02219Holder plate
22N111856Hexagonal countersunk
screw M04x12
23N111882Grub screw
24N112047Hexagon socket screw
M08x35
25Z34846Cover
26N103066Round sealing strip
black D06
27Z35062Spacer
28N100485Round sealing strip
black D12
29 *3Z34872Baffle 2
29 *4Z36343Baffle plate 2
30Z35095Baffle plate 1
31Z36574Cast rear panel
32Z36594Firebrick lining rear right
33Z36592Firebrick lining front
right
34N103066Round sealing strip
black D06
35B16310Fire trough holder
36N111846Hexagon socket 06x12
37L02215Ash drawer
38N111959Square nut M05
39N103693Flat seal black 8x2
40 *1Z35059Cleaning cover
40 *2B17282Cleaning cover assy
41Z35096Pressure Pipe
42N100141Hexagonal nut M05
43Z35060Fire trough
44Z36593Firebrick lining front left
45Z36595Firebrick lining rear left
46B16053Sensor tube
47L01445Switch spacer
Nr.Art.Nr.Description
48N111733Solenoid switch bottom
part
49N111842Hexagon socket
M03x10
50N111732Magnetic switch top
part
51L01502Lock washer
52N110461Double ball catch
53L01446Lock washer
54LB00543Lid metallic
LB00542Lid black
55L02243Hinge lid
56Z34854Hinge shaft
57N110501Circlips
58L02244Hinge stove
59LB00545Convection cover
metallic
LB00544Convection cover black
60B17879Rear wall metallic
B17878Rear wall black
62B17231Telescopic rail top
63N111645Spring plug
64Z35098Latching bolt
65N111983Carriage bolt M06x20
66Z35237Cover panel
67LB00549Right side panel metallic
LB00548Right side panel black
68N111730Grommet
69 *5N111695Height adjustment
screw
69 *6N112490Levelling screw black
70L02274Cocer rear wall metallic
L02272Cover rear wall black
71B17232Telescopic rail bottom
72B17016Stone holder
B17390Stone retainer assy
73Z34879Soapstone bottom
Z35205Stone bottom white
Z35203Sandstone bottom
74B17020Decorative sliding door
75LB00547Left side panel metallic
LB00546Left side panel black
76N111982Hexagonal screw
M06x18
77Z34880Soapstone top
Z35204Stone top white
Z35202Sandstone top
78N111731Container seal
79Z35108Combustion fan cover
80B16114Temperature sensor
81Z35183Friction bearing Di10
82B12301Auger
83B17014Ceramic ignition
84N111058Setscrew with pin
85B16155Induced draft fan
housing
86N105627Self-tapping screw
87N111581Induced draft fan motor
88 *7Z35182Friction bearing Di16
89Z11915Lock ring conveyer
screw
90N112102Differential pressure
switch
Nr.Art.Nr.Description
91N112030Screw motor, stepless
92B16561Mainboard USB11
93N111604Fuse 2,5 A
94N111989USB cable
95B16030Add. board motor
96L01495Cover
97B16574Touch-display plug-in
98N112000Convection fan motor
99N112017Key
B17023Wiring harness
N111551Silicon hose
L00797Motor plate
Z35018Cable for touch-screen
1,25 m
Z36454Protective plate
*8B18056Combustion chamber
kit
*1till serial number
1320321
*2from serial number
1320322
*3till serial number
1354806
*4from serialnr.: 1354807
*5till serial number
1350547
*6from serial number
1350548
*7
up to serial number
1331613 the motor
plate (L00797) must
be supplied as a spare
part when replacing the
plastic bearing Di16
(Z35182).
*8till serial number
1377003
Note: Please consider the powdercoated parts can differ slightly in colour and colour effects though they are elaborated in high quality.
|7
EN
6
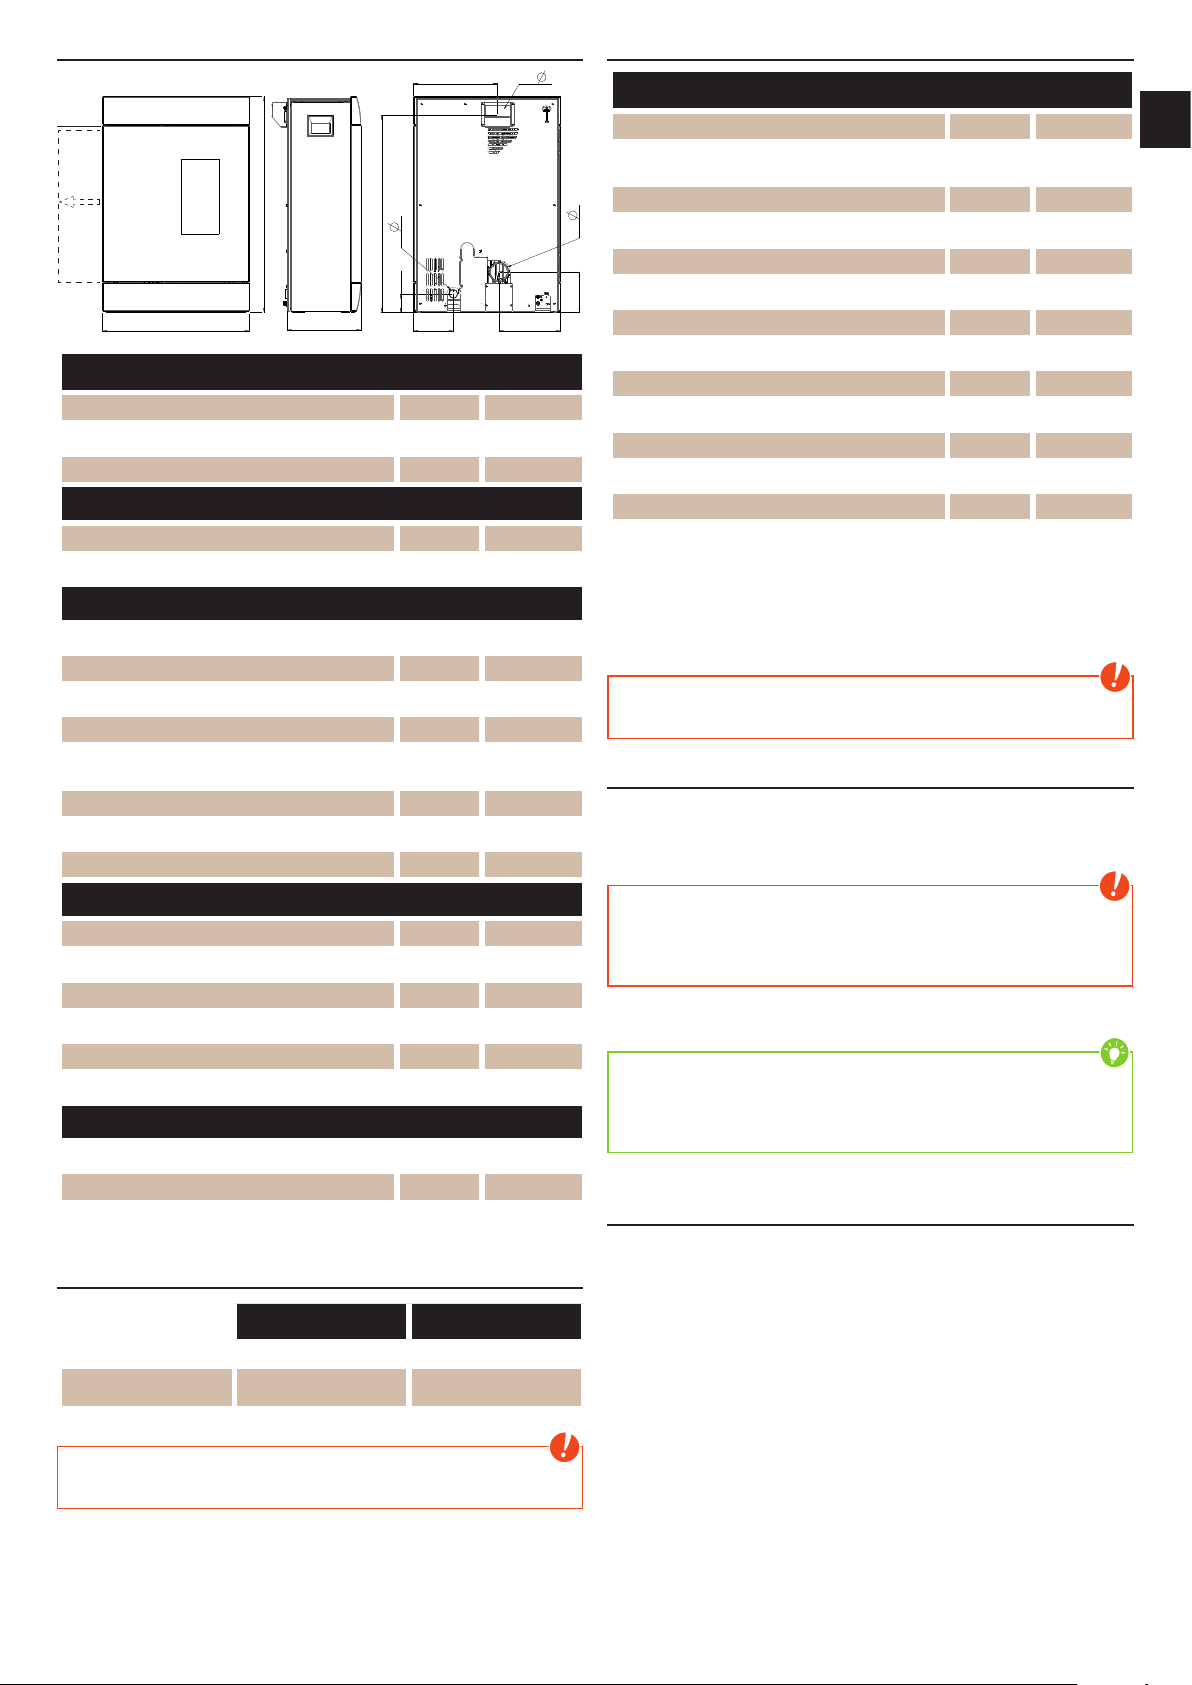
Dimensions
B
H
K-S
K-H
R-S
R-H
F-S
F-H
T
R-
F-
K-
~43cm
Dimensions
Height[mm]1138
Width[mm]773
Corpus depth[mm]389
Weight
Weight without shell[kg]200
Weight with shell[kg]230
Flue pipe connection
R - Ø flue pipe outlet[mm]100
RO - H original angle pipe connection height[cm]-
RO - T1 original angle pipe total depth[cm]-
RO - T2 original angle pipe distance to rear wall[cm]-
RO - T3 deapth from rear wall to middle of flue
pipe[cm]-
RO - S original angle pipe side distance[cm]-
R - H rear connection height[cm]21
R - S rear connection side distance[cm]32
Fresh air connection
F - Ø diameter[mm]50
F - H connection height[cm]10
F - S side distance[cm]21
F - H (*) connection height[cm]34(*)
F - S (*) side distance[cm]28(*)
till serial number (*)1324556
Convection air connection
K - Ø diameter[mm]100
K - H connection height[cm]104
K - S side distance[cm]44
Amount of fuel
Nominal loadPart load
Amount of fuel~1,9kg*~0,6kg*
Burn time at full pellet
hopperca. 17hca. 41h
*Practical values may vary depending on pellet quality.
Note
Pellet consumption depends on the size of the pellets. The larger the pellet,
the slower the feed and vice versa.
Technical data
Technical data
Heating power range[kW]2,5 - 8
Room heating capacity (depending on house
insulation)[m³]50 - 220
Fuel consumption[kg/h]till 1,9
Pellet container capacity*[l/kg]49/~32
Electric supply[V]/[Hz]230/50
Average electrical input[W]~ 20
Fuse[A]2,5 AT
Efficiency[%]90,4
CO2[%]13,3
CO-emission on 13% OO[mg/mN3]118,5
Dust emission[mg/mN3]15,5
Exhaust[g/s]4,8
Exhaust temperature[°C]197,8
Chimney draft requirement[Pa]3
*e capacity in kg may deviate due to different pellet bulk densities.
The owner of small firing systems or the person authorised for the small
firing system is to keep the technical documentation and is to submit it to the
authorities or the chimney sweep on request.
Note
Please observe the national and European standards as well as local
regulations concerning the installation and operation of firing installations!
Packaging
Your first impression is important to us!
The packaging of your new stove provides excellent protection against damage.
However damage to the stove and accessories may still occur during transport.
Note
Therefore please check your stove on receipt for damage and completeness!
Report any deficiencies to your dealer immediately! Pay particular attention
during unpacking that the stone panels remain intact. Scratches to the
material can easily occur. Stone panels are excluded from the warrant.
The packaging of your new stove is environmentally neutral to a great extent.
Tip
The wood used in the packaging has not been surface treated and may
therefore be burnt in your woodburning stove (not in al pellet stove). The
cardboard and film (PE) can be disposed of via the municipal waste collection
for recycling.
Electrical connection
The stove is supplied with an approx. 2m long connecting cable with a Euro-
plug. This cable is to be connected to a 230Volt/50Hz socket. The average
electrical power consumption is some 20 Watt in heating operation and approx.
150 Watt during automatic ignition. The connection cable must be laid in a way
that there is no contact to any sharp edges or hot surfaces of the stove.
8
2. IMPORTANT INFORMATION
General warning and safety information
Observance of the introductory general warning information is imperative.
QRead the entire manual thoroughly before installing and putting the stove into
service. Observe the national provisions and laws as well as the regulations
and rules applicable locally.
QRIKA stoves should only be installed in rooms with normal humidity (dry
areas according to VDE 0100 Part 200). The furnaces are not splash water
protected and may not be installed in wet areas.
QOnly approved transport equipment with sufficient load carrying capacity
may be used with your heating appliance.
QYour heating appliance is not suitable for use as a ladder or stationary
scaffolding.
QThe burning of fuel releases heat energy that lead to extensive heating of
the stove surfaces, doors, door and operating handles, glass, flue pipes
and possibly the front wall. Refrain from touching these parts without
appropriate protective clothing or equipment e.g. heat-resistant gloves or
means of operation (operating handle).
QMake your children aware of this particular danger and keep them away from
the stove during heating.
QOnly burn approved heating materials.
QThe combustion or introduction of highly flammable or explosive materials
such as empty spray cans etc. in the combustion chamber and storing them
near the stove is strictly prohibited due to the danger of explosion.
QNo light or inflammable clothing is to be worn when post-heating.
QUse the heat-resistant gloves supplied to open the doors of your stove.
QMake sure that no embers fall out of the combustion chamber onto
inflammable material.
QPlacing non-heat resistant objects on the stove or near it is prohibited.
QDo not place clothing on the stove to dry.
QLaundry racks etc. must be placed at a sufficient distance to the stove –
ACUTE DANGER OF FIRE!
QWhen your stove is burning, the use of highly inflammable and explosive
materials in the same or adjacent rooms is prohibited.
QIf the stove is heated in continuous operation, the cleaning intervals are
shorter. Increased wear, especially of the thermally stressed parts, is the
result. Please therefore strictly follow the requirements for cleaning and
maintenance!
Note
Waste and liquids may not be burnt in the stove!
Note
To prevent your stove from overheating of the internal components,
do never cover the convection fins!
Note
CAUTION when filling the pellet container. The opening of the pellet container
is sufficiently dimensioned to ensure easy filling. Take great care that no
pellets drop to the convection fins and the hot stove body. This can cause a
lot of smoke.
Tip
Therefore we recommend refilling the pellet container at a cold stove.
Note
Your stove will expand and contract during the heating and cooling phase.
This can sometimes lead to slight bending or cracking noises. This is normal
and is no reason for a complaint.
First heating
The stove body, just as various steel parts, cast iron parts and the flue pipes
are painted with a heat resistant paint. During the first heating the paint dries
out completely. This may cause a slight smell. Touching or cleaning the painted
surfaces during the curing should be avoided. The hardening of the paint is
finished after the first heating with high power.
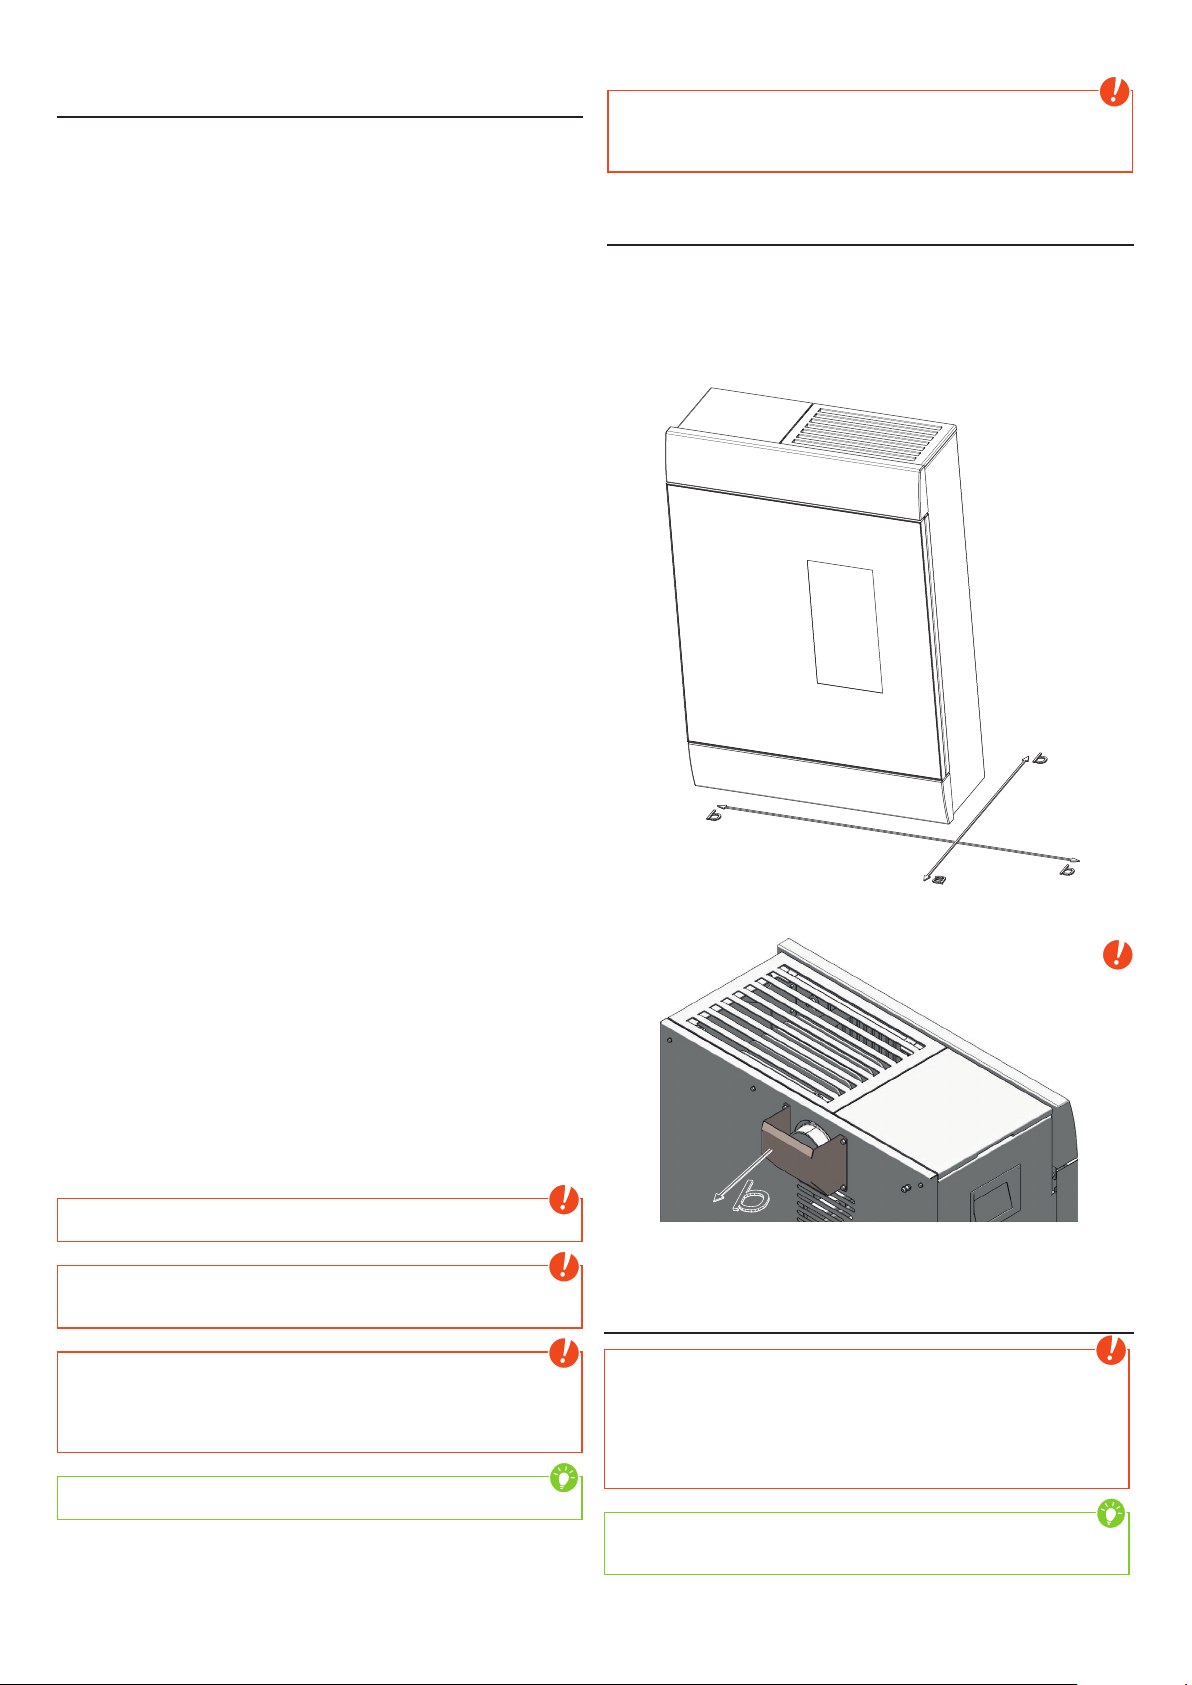
Safety distances
Note
1. To non-combustible objects
a > 40 cm, b > 10 cm
2. To combustible objects and reinforced concrete load-bearing walls
a > 80 cm, b > 10 cm
3. to open the sliding door
b > 43cm
Tip
Please observe a minimum distance of 20 cm behind and sideways the stove
for maintenance.
|9
EN
8
Prior to set up
Floor bearing capacity
Ensure that the substructure is capable of bearing the weight of the stove prior
to set-up.
Note
No modifications may be made to the firing installation. This also leads to loss
of warranty and guarantee.
Floor protection
A base is recommended (glass, sheet steel or ceramic) if the floor is combustible
(wood, carpet, etc.). Please observe the respective local regulations and rules.
Flue pipe connection
QFlue pipes pose a particular source of hazard regarding gas leaks and
fire. Get the advice of an authorised specialist company for the layout and
assembly.
QPlease observe the corresponding installation guidelines for walls panelled
with wood when connecting your flue pipes to the stove,
QObserve the formation of flue gas (atmospheric inversion) and draughts
when the weather is unfavourable.
QInfeed of too little combustion air can lead to smoke in the rooms or to flue
gas leaks. Hazardous deposits in the stove and chimney may also occur.
QIf flue gas escapes, let the fire burn out and check whether all the air inlet
openings are free and the flue gas pipes and the stove pipe are clean. If in
doubt notify the master chimney sweep since draught malfunctions may be
connected to your chimney.
The correct chimney connection
There are several ways to connect your stove to the chimney, eg:
*1
*2
*3
*1
*2
*3
1) wind break, 2) chimney, 3) inspection opening
For the selection of the connection and to ensure a proper connection between
the stove and chimney, please read the guide „INSTALLING THE STOVE“ or ask
your local chimney sweep.
Stoves type 1 (BA 1):
QSuitable for multiple occupancy. (Note the different country regulations.)
QThese may only be operated with the combustion chamber door closed.
QThe combustion chamber door is to be kept closed when the stove is not
in operation.
QFouling of the chimney i.e. deposits of highly inflammable materials such as
soot and tar and subsequently fire in the chimney may occur if the chimney
is miscalculated and dimensioned wrong.
QIf this occurs, disconnect the mains plug. Phone the fire brigade and get
yourself and other residents out of harm’s way.
Note
Your pellet stove has been tested as a room-air independent stove according
to EN14785. It can be operated room air dependent or room air independent.
ROOM-AIR INDEPENDENT OPERATION:
The stove is certificated for type FC52x / FC62x of the approval principles for
the inspection and evaluation of ambient air independent fireplaces specified
by the Deutsches Institut für Bautechnik (DIBT) (German Institute for Building
Technology). Thanks to an air-tight configuration of the air supply line and flue
pipes the stove may be operated in air-tight rooms and in rooms with room-air
installations (e.g. controlled ventilation and venting systems, extractors etc.).
ROOM-AIR DEPENDENT OPERATION:
In combination with room-air installations (e.g. controlled ventilation and
venting systems (extractors etc.) it must be ensured that the stove and
the room air system are monitored and safeguarded mutually (e.g. via
a differential pressure controller). The combustion air infeed of approx.
20 m3/h must be ensured.
Please observe the respective local regulations and rules in consultation with
your master chimney sweep. For changes after the printing of this manual, we
can not assume any liability. We reserve the right to change without notice.
10
3. BRIEF INFORMATION ON FUEL - PELLETS
What are pellets?
Wood pellets are a standardised fuel. Every manufacturer must adhere to certain
conditions in order to enable flawless, energy-efficient heating. Pellets are made
from wooden waste, from sawmills and planning workshops, as well as from
residue from forestry operations. These “starting products” are crushed, dried,
and pressed into Pellet “Fuel” without any bonding agent.
ENplus – Pellets
This ENplus standard sets benchmarks in the European pellet market. The
traceability of pellets is ensured thanks to the use of identification numbers.
The pellet manufacturers’ production facilities and manufacturing processes
are reviewed every year. A quality assurance system ensures the pellets comply
with the requirements of the new standard and that the conditions for trouble-
free heating are guaranteed
Wood pellet specification according to ENplus –
A1
ParameterMeasureENplus-A1
diametermm6 (±1)2)
lengthmm3,15 bis 403)
buld densitykg/m3≥600
calorific valueMJ/kg≥16,5
water contentMa.-%≤10
fine fraction (<3,15mm)Ma.-%≤ 1
mechanical rigidityMa.-%≥97,54)
ash contentMa.-%1)≤0,7
ash softening temperature(DT) °C≥1200
chlorine contentMa.-% 1)≤0,02
sulphur contentMa.-% 1)≤0,03
nitrogen contentMa.-% 1)≤0,3
copper contentmg/kg 1)≤10
chrome contentmg/kg 1)≤10
arsenic contentmg/kg 1)≤1
cadmium contentmg/kg 1)≤0,5
mercury contentmg/kg 1)≤0,1
lead contentmg/kg 1)≤10
nickel contentmg/kg 1)≤10
zinc contentmg/kg 1)≤100
1) in an anhydrous state
2) diameter must be specified
3) a maximum of 1% of the pellets may be longer than 40 mm,
max. length is 45 mm
4) the limit value of ≥97,7 Ma.-% applies when conducting measurements with a
lignotester (internal control)
Your pellet stove is only approved for the burning of pellets of tested quality.
Please ask your pellet stove dealer for tested fuel and a list of monitored fuel
manufacturers.
Note
Only burn pellets that have been inspected according to ENplus-A1. Using
poor quality or prohibited pellet fuel will have a negative effect on the function
of your pellet stove and can also lead to the warranty becoming null and void,
as well as the product liability connected with this.
Note
Burning straw, maize, woodchips etc. is not permitted! Observe waste
incineration legislation! Non-observance of these regulations makes void all
warranty and guarantee claims and may impair the safety of the unit!
Pellet container refilling during operation
Note
CAUTION when filling! Avoid direct contact between the plastic bag and the
hot stove. Immediately remove all pellets that have fallen on the hot stove or
next to the container!
We recommend always having a suitable amount of pellets in the container
to prevent the fire from extinguishing due to a lack of fuel. Check the level
frequently. However the container lid should be kept closed, except during
filling.
If you refill the container during operation (open the container lid), the fan will
speed up and the pellet auger will stop; operation will only be continued once
the container lid is closed again (see WARNING AND ERROR MESSAGES)
Pellet container capacity (see Technical Data).
Pellet storage
In order to guarantee problem free burning of the wooden pellets, it is imperative
necessary to store the fuel as dry as possible and free from impurities.
Pellets should not be kept in sacks outdoors or stored in a manner where
they are exposed to the environment. This can lead to blockages in the screw
conveyor.
Note
“Screw stoppers” are excluded from the warranty.
|21
EN
20
11. INSTRUCTIONS FOR COMMISSIONING PROTOCOL
FOR PELLET AND COMBI STOVES
The commissioning protocol is to be treated as a documents and serves as
the basis for the warranty and guarantee terms. It is to be completed entirely,
in particular the stove data and addresses, the work to be performed is to be
ticked off after completion. The signatories confirm with their signatures that all
the items on the list have been concluded properly.
Note
Please return 1 completed protocol for putting into service to
Gebruikershandleiding.com neemt misbruik van zijn services uitermate serieus. U kunt hieronder aangeven waarom deze vraag ongepast is. Wij controleren de vraag en zonodig wordt deze verwijderd.
Product:
Spelregels forum
Om tot zinvolle vragen te komen hanteren wij de volgende spelregels:
lees eerst de handleiding door;
controleer of uw vraag al eerder door iemand anders is gesteld;
probeer uw vraag zo duidelijk mogelijk te stellen;
heeft u een probleem en al geprobeerd om dit op te lossen, vermeld dit erbij aub;
heeft u een oplossing gekregen van een bezoeker dan horen wij dat graag in dit forum;
wilt u een reactie geven op een vraag of antwoord, gebruik dan niet dit formulier maar klik op de knop 'reageer op deze vraag';
uw vraag wordt direct op de website gezet; vermijd daarom persoonlijke gegevens in te vullen;
Belangrijk! Als er een antwoord wordt gegeven op uw vraag, dan is het voor de gever van het antwoord nuttig om te weten als u er wel (of niet) mee geholpen bent! Wij vragen u dus ook te reageren op een antwoord.
Belangrijk! Antwoorden worden ook per e-mail naar abonnees gestuurd. Laat uw emailadres achter op deze site, zodat u op de hoogte blijft. U krijgt dan ook andere vragen en antwoorden te zien.
Abonneren
Abonneer u voor het ontvangen van emails voor uw Rika Roco Multiair bij:
nieuwe vragen en antwoorden
nieuwe handleidingen
U ontvangt een email met instructies om u voor één of beide opties in te schrijven.
Ontvang uw handleiding per email
Vul uw emailadres in en ontvang de handleiding van Rika Roco Multiair in de taal/talen: Engels als bijlage per email.
De handleiding is 11,51 mb groot.
U ontvangt de handleiding per email binnen enkele minuten. Als u geen email heeft ontvangen, dan heeft u waarschijnlijk een verkeerd emailadres ingevuld of is uw mailbox te vol. Daarnaast kan het zijn dat uw internetprovider een maximum heeft aan de grootte per email. Omdat hier een handleiding wordt meegestuurd, kan het voorkomen dat de email groter is dan toegestaan bij uw provider.
Uw handleiding is per email verstuurd. Controleer uw email
Als u niet binnen een kwartier uw email met handleiding ontvangen heeft, kan het zijn dat u een verkeerd emailadres heeft ingevuld of dat uw emailprovider een maximum grootte per email heeft ingesteld die kleiner is dan de grootte van de handleiding.
Er is een email naar u verstuurd om uw inschrijving definitief te maken.
Controleer uw email en volg de aanwijzingen op om uw inschrijving definitief te maken
U heeft geen emailadres opgegeven
Als u de handleiding per email wilt ontvangen, vul dan een geldig emailadres in.
Uw vraag is op deze pagina toegevoegd
Wilt u een email ontvangen bij een antwoord en/of nieuwe vragen? Vul dan hier uw emailadres in.