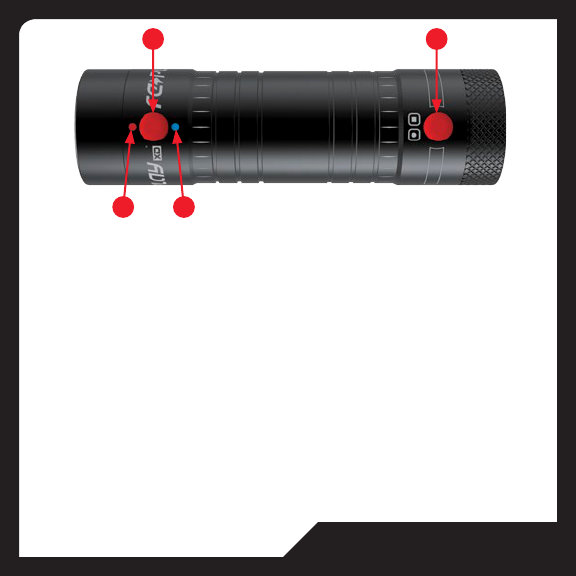
583591
85
Verklein
Vergroot
Pagina terug
1/94
Pagina verder
QUICK START GUIDE
Replay XD 1080 Mini Camera
(A) Power On/O,
(B) Record, Stop
(C) Removable Lens Cover
(D) Removable End Cap
(E) 15 Degree Markings
(F) Power On/O Blue LED
(G) Record On/O Red LED
(H) Horizontal Sight Line
(I) Vertical Sight Line
(J) microSDHC Slot up to 32GB
(K) Charging Green LED, No SD Card Red LED
(L) Video Mode: 1080p 30, 720p 60 (or Photo)
(M) Internal Mic/Audio Line-In Switch (Ext. Mic-In)
(N) Mini USB Port
(
*
) Master Reset
ORIENTATION
C
H
I
DE
M
N
J
K
L
*
G F
A B
RECORDING
Press A to Power On/Power O. Press B to START/STOP Recording. You’re Done.
Power On (Standby & Mode Setting Selection): Hold down front button (A) for 2 sec. & release, the Replay
XD 1080 Mini will vibrate 3 times & illuminate the blue power LED.
Note: Camera will turn o after 5 seconds if no SD card is present. Camera will turn o after 5 minutes of no activity.
Start Recording: Hold down rear button (B) for 2 sec. & release, the Replay XD 1080 Mini will vibrate 3 times,
illuminate the red LED & automatically start recording or capturing.
Note: The red LED on the rear will blink when the memory card is not inserted properly. Make sure the memory card
is fully inserted with the gold contacts face-down unttil it clicks. Use only Replay XD approved SD cards.
Visit www.replayxd.com for SD card compatibility list.
Stop Recording: Hold down the rear button (B) for 4 sec. & release, the Replay XD 1080 Mini will vibrate 1 time to
notify you that it is saving the le.
Power O: Hold down the front button (A) for 4 sec. and release, the Replay XD 1080 Mini will vibrate 1 time &
power o.
Note: The power button will not function when recording. This is normal to prevent accidental powering o.
Clip File (Available in Advanced text File): While recording quickly press the rear button (B) and release, the Replay XD
1080 Mini will vibrate 1 time to notify you that it is clipping & saving the le, then automatically starts recording. This feature
allow you to start a new le without starting or stopping the recording.
G F
A B
MODES & SETTINGS
1080p Video Mode / Frames Per Second
1. Slide the Video Mode switch (L) to change video resolution frames per second.
a. 1080p 30 FPS (Full HD)
b. 720p 60 FPS (Smooth HD), Photo Mode can be enabled in the Advanced Text File
Audio Option
1. Slide the INT./EXT. switch (M) to choose audio option.
a. Internal Mic (Default)
b. External Line-in, disables internal Mic
External Line-in is compatible with Replay XD 1080 Mini Audio Adapter or
Replay XD 1080 Mini HW Kit, available at www.replayxd.com
For Advanced Users and Setting Proles visit www.replayxd.com/replay-XD1080MINI-advanced/
REAR VIEW
M
L
1. Find the best mounting location for your Replay XD 1080 Mini and check your angles.
Rigid surfaces are ideal for the best video quality. Note: You can make a test recording and check
it on your Mac or PC.
2. Snap Replay XD 1080 Mini into u-shape camera holder and rotate 360º to desired rotation.
3. Attach VHB SnapTray adhesive mount to a clean smooth surface.
-Flat SnapTray’s are good for at smooth surfaces.
-Curved SnapTray’s are good for curved surfaces such as Helmets & Radius surfaces.
The 3M VHB adhesive is not recommended for textured surfaces.
4. Slide HeimLock mount into SnapTray until it is fully seated and clicks.
5. Adjust swivel 360º or tilt ~8º by releasing the heim cam lever and position Replay XD
1080 Mini in desired direction, then lock the cam lever. Make sure the cam lever is tight.
There is an adjustable tension wheel and phillips screw (
*
) to make sure you always have
a positive tight lock. You can tighten the screw clockwise in 1/4 turn increments to nd
the desired tension when the cam lever is locked.
HEIMLOCK MOUNT
See our full range of mounts at www.Replayxd.com
*
VHB SnapTray HeimLock Mount
Unlock
Lock
Tighten
Set screw
TiltSwivel
IMPORTANT
Use rubbing alcohol to clean
the mounting surface. Wipe
dry the surface. Apply your
VHB mount to surface. Press
and hold for sixty seconds to
allow adhesive to bond to
the surface. Bond strength
will increase through time.
At room temperature,
wait for at least 24 hours
to achieve 90% bonding
strength, and 72 hours for
100% bonding strength.
1. Find the best mounting location for your Replay XD 1080 Mini and check your angles.
Rigid surfaces are ideal for the best video quality. Note: You can make a test recording and
check it on an iPad/Mac/PC.
2. Flip LowBoy mount upside down and carefully spread, insert Replay XD 1080 Mini
into holder with buttons passing through the cut-out.
3. With the Replay XD 1080 Mini centered in LowBoy mount, rotate 360º to desired
rotation.
4. Slide LowBoy mount into SnapTray until it is fully seated and clicks. The LowBoy mount has
rubber strips to hold your Replay XD 1080 Mini from rotating when seated, make sure your
rotation angle is ideal. You can make ne adjustments by sliding the LowBoy in/out of the
SnapTray.
5. Attach VHB SnapTray adhesive mount to a clean smooth surface.
The 3M VHB adhesive is not recommended for textured surfaces.
LOWBOY MOUNT
See our full range of mounts at www.Replayxd.com
VHB SnapTray LowBoy Mount
Unlock
Lock
IMPORTANT
Use rubbing alcohol to clean
the mounting surface. Wipe
dry the surface. Apply your
VHB mount to surface. Press
and hold for sixty seconds to
allow adhesive to bond to
the surface. Bond strength
will increase through time.
At room temperature,
wait for at least 24 hours
to achieve 90% bonding
strength, and 72 hours for
100% bonding strength.
ALIGNMENT
There are a few references for accurately aiming and aligning your Replay XD 1080 Mini.
1. The Start and REC button should always point up or at the 12 oclock position for a level horizon.
2. The front silver sight markers are horizontal and vertical which act as a level.
3. The laser etched marks on the side of the Replay XD 1080 Mini are spaced every 15 degrees to give you ne
adjustment.
4. To make sure you are aiming your Replay XD 1080 Mini in the desired direction, simply look down the length of
the housing from the rear–forward as if you’re looking through a telescope. It’s that easy.
12
9
6
3
RIDING HEAD POSITION
ACTUAL LINE OF SIGHT
ACTUAL LINE OF SIGHT (HORIZON LINE)
MOUNTING
HEIMLOCK SWIVEL/TILT MOUNT
LOWBOY MOUNT
Mounting angle and setup:
1. When using a HeimLock mount or LowBoy mount it is important to mount them at an optimal position.
Please reference the illustration on this page for possible positions.
2. When mounting to a helmet, most people have a tendency to lower their head from 15º to and excess of 20º.
It is important to recognize what the natural angle or active position of your mounting locations are on items
such as: helmets, hats, handlebars, vehicle bodies, etc. This will help you to achieve the best angle and capture
professional looking video.
3. For best results have a friend look at your active riding & head position to choose your optimal camera angle
based on your riding position before applying your VHB SnapTray.
Note: You can make a test recording and check it on an a Mac or PC.
See our full range of mounts and mounting ideas at www.Replayxd.com
1. Remove rear protective cap and connect the supplied mini USB
cable into the Replay XD 1080 Mini USB port.
2. Plug the USB cable into your PC or Mac USB 2.0 port, or our USB
Wall Adapter accessory.
3. The green charging status LED at the rear of the Replay XD 1080
Mini will illuminate to tell you its charging. When the green LED
turns o, the battery is full and charging is complete
Note: Charging through the PC/Mac USB port will take approximately
twice as long as using the USB Wall Adapter or Car Adapter. It is not
recommended to record while charging through the PC/Mac USB port
as the Replay XD 1080 Mini uses approximately the same power draw
as the PC/Mac USB port, damage to the Replay XD 1080 Mini or your
computer may occur.
The Replay XD 1080 Mini will record for approx. 130 min. on a full charge
in optimal conditions. Extreme heat or cold can aect battery life.
SIDE VIEW REAR VIEW
PC/MAC
CHARGING
PC/MAC
MINI USB 2.0
CHARGE/SYNC
CABLE
DOWNLOAD
1. Remove rear protective cap and use option (1) or option (2).
2. Option (1): Take the microSDHC out of the Replay XD 1080 Mini
and use a SDHC compatible card reader to transfer your les to your
computer.
3. Option (2): Download from the Replay XD 1080 Mini USB port.
4. Plug USB cable into Replay XD 1080 Mini and a PC/Mac USB 2.0
port.
5. Press and hold the Start/Stop (B) and Power On your Replay XD 1080
Mini.
6. On a PC/Mac your Replay XD 1080 Mini will mount to your
computer as a mass storage device. You may download your video
les from the DCIM folder created on the microSDHC card.
(Always Eject device from PC/Mac)
Note: Option (2) may exhibit slower transfer speeds.
Playback through USB is not recommended as choppy
playback may occur. Download footage to PC/Mac rst.
PC/MACPC/MAC
MINI USB 2.0
CHARGE/SYNC
CABLE
SIDE VIEW
HOW TO ERASE FILES
1. Move selected video files or folders to your Trash Can
or Recycle Bin
2. For Mac: Go to Finder and select Empty Trash...
Note: Simply moving files or folders to the Trash does not
erase files from your memory card, it just moves them
(referenced in the Trash). Files are invisibly stored on
your memory card until the Trash is emptied.
REAR VIEW
B
SOFTWARE
PC - Windows XP and later
For Easy Viewing:
Windows Media Player, Apple Quicktime, or VLC Player
For Quick Editing: (e.g. trimming and converting)
Apple Quicktime or Adobe Premier Elements
For Full Editing: (we have tried these with success)
Adobe Premier Pro or Sony Vegas 8
Your Replay XD 1080 Mini records and saves to a le called a MOV. Your video le is compatible with most current
media players on a PC or Mac. Many video editing software titles are compatible out of the box such as: Adobe
Premier, Apple Final Cut, iMovie, & Windows Movie Maker.
There are many computer congurations, editing software programs, and other variables that are associated with
computers. We have provided the list of hints above to get you started. These suggestions work in most cases but we
are not responsible if they don’t work for you. Please consult your users manual for your computer and video editing
software to see if they are compatible.
For common troubleshooting questions and answers please visit out website at www.Replayxd.com
MAC - Mac OS X 10.4 and later
For Easy Viewing:
Apple Quicktime, VLC Player
For Quick Editing: (e.g. trimming and converting)
Apple Quicktime or iMovie
For Full Editing: (we have tried these with success)
Apple Final Cut Pro, Adobe Premier Pro, or iMovie
STABLE IMAGING SOLUTIONS, LLC. LIMITED WARRANTY
WHAT THE WARRANTY COVERS
Stable Imaging Solutions, LLC. (SIS) warrants for 180 days from the date of purchase of product it will be free from defects in material
and workmanship.
WHAT IT DOES NOT COVER
This warranty does not cover damage due to:
Accidents of any kind
Exposure to pressure, extreme temperatures (outside of -20ºC to 45ºC), and submersion in water. This product is water resistant but
not waterproof, shock resistant but not shock proof, and its performance can be hindered in extreme temperatures.
Installation and operation contrary to the instructions which come with the product, including misuse ,abuse, and negligence.
Cosmetic damage.
Modication of or to any part of the product.
This warranty does not cover any product for which the factory applied serial number has been altered or removed or any damage due to
improper maintenance. This warranty is valid in any countries SIS sells the product or is legally represented. SIS reserves the right to determine
if the product is within the guidelines of this warranty. SIS, at its sole discretion may service, repair, or replace this product after determining the
cause of failure. For Returns: Original sales receipt must be produced for any warranty service, and a Return Merchandise Authorization (RMA)
number must be obtained from customer service at 1-805-480-9800 prior to returning product. Products will not be accepted without an RMA.
EXCEPT TO THE EXTENT PROHIBITED BY APPLICABLE LAW, ANY IMPLIED WARRANTY OF MERCHANTABILITY OR FITNESS FOR A PARTICULAR
PURPOSE ON THIS PRODUCT IS LIMITED IN DURATION TO THE DURATION OF THIS WARRANTY. REPAIR OR REPLACEMENT AS PROVIDED
UNDER THIS WARRANTY IS THE EXCLUSIVE REMEDY OF THE CONSUMER, SIS SHALL NOT BE LIABLE FOR ANY INDIRECT, INCIDENTAL OR
CONSEQUENTIAL DAMAGES OF ANY KIND CAUSED BY BREACH OF ANY EXPRESS OR IMPLIED WARRANTY ON THIS PRODUCT.
REV. 2011.6.15.0
WARRANTY
STABLE IMAGING SOLUTIONS, LLC. DISCLAIMER
All purchasers, users, and any or all parties involved or engaging in the use of Stable Imaging Solutions, LLC. (“SIS”) products agree to the following:
SIS does not promote or endorse careless and or dangerous actions when using its products.
SIS is not liable for any use or misuse of SIS products in applications other than those for which it was designed.
SIS does not take any responsibility in relation to the use of our products or any video captured that may be considered illegal.
SIS is not responsible for any illegal actions taken while recording, attempting to record, or editing video that was captured with our products.
SIS products primary purpose is for recording legal action sports or any other activities as seen by all Local, State, Federal, and Country laws.
SIS camera accessories, including mounts, lanyards and other accessory items are provided as attachment options and are sold as is. They
must be used with extreme caution and care when the camera is mounted to a helmet, person, or any kind of property during any activity in
the event that it comes loose or stays put in which it could cause harm, injury, or death.
SIS is indemnied from consequential or indirect loss, damage, injury, or death resulting from the use of SIS products.
All trademarks and registered trademarks mentioned herein are recognized as the property of their respective holders.
Replay XD
®
, Replay XD 1080 Mini is a product of Stable Imaging Solutions, LLC. in California.
www.Replayxd.com
©2013 Stable Imaging Solutions, LLC., Replay XD
®
All rights reserved.
REV. 2011.6.15.0
DISCLAIMER
FCC Compliance Statement
This device complies with part 15 of the FCC Rules. Operation is subject to the following two conditions:
(1) This device may not cause harmful interference, and
(2) this device must accept any interference received, including interference that may cause undesired operation.
Radio and TV Interference This equipment has been tested and found to comply with the limits for a Class B digital device in accordance
with the specications in Part 15 of FCC rules. These specications are designed to provide reasonable protection against harmful
interference in a residential installation. This equipment generates, uses, and can radiate radio frequency energy and, if not installed
and used in accordance with the manufacturer’s instructions, may cause harmful interference to radio communications. However, there
is no guarantee that interference will not occur in a particular installation. If this equipment does cause harmful interference to radio
or television reception, which can be determined by turning the equipment off and on, the user is encouraged to try to correct the
interference by one or more of the following measures:
• Reorient or relocate the receiving antenna.
• Increase the separation between the equipment and the receiver.
• Connect the equipment into an outlet on a circuit different from that to which the receiver is connected.
• Consult the dealer or an experienced radio/television technician for help. The supplied interface cable must be used with the equipment
in order to comply with the limits for a digital device pursuant to Subpart B of Part 15 of FCC Rules.
Canadian ICES-003 Statement
This Class B digital apparatus complies with Canadian ICES-003.
RoHS
This device complies with European Union’s ROHS directive 2002/95/EC and similar regulations that may be adopted by other European
countries for European Sales.
CE Certied
COMPLIANCE
REV. 2011.6.15.0
ALIGNMENT
FRANÇAIS
Caméra Replay XD 1080 Mini
(A) Marche/Arrêt
(B) Enregistrer, Stop
(C) Couvercle de l’objectif amovible
(D) Couvercle arrière amovible
(E) 15 marques de diplômes
(F) DEL bleu d’alimentation Marche/Arrêt
(G) DEL rouge d’enregistrement Marche/Arrêt
(H) Ligne visuelle horizontale
(I) Ligne visuelle verticale
(J) Fente Micro SDHC
(K) DEL vert de chargement, DEL rouge d’aucune carte SD
(L) Vidéo Mode: 1080p 30, 720p 60 (or Photo)
(M) Bouton Entrée ligne audio (Entrée Micro ext.)
(N) Port Mini USB
(
*
) Réinitialisation complète
SENS
C
H
I
DE
M
N
J
K
L
*
G F
A B
ALIGNMENT
FRANÇAIS
RECORDING
Appuyez sur A pour allumer/éteindre. Appuyez sur B pour COMMENCER/ARRÊTER l’enregistrement. Vous avez ni.
Allumer (Veille & Sélection du mode de réglage) : Appuyez sur le bouton (A) à l’avant pendant 2 sec. & arrêtez d’appuyer, le
Replay XD 1080 Mini vibrera 3 fois & le voyant DEL bleu d’alimentation s’allumera.
Commencer à enregistrer : Appuyez sur le bouton (B) à l’arrière pendant 2 sec. & arrêtez d’appuyer, le Replay XD 1080 Mini vibrera 3
fois, le voyant DEL rouge s’allumera & l’enregistrement ou la capture commencera automatiquement.
Remarque : Le voyant DEL rouge à l’arrière clignotera lorsque aucune carte mémoire n’a été insérée.
Assurez-vous que la carte mémoire est insérée dans le fond de la fente avec les contacts dorés vers le bas, jusqu’à ce qu’il y est
un déclic. Utilisez uniquement recommandée avec les cartes SD XD Replay. Visitez www.replayxd.com pour voir une liste des
cartes SD compatibles.
Arrêter d’enregistrer : Appuyez sur le bouton (B) à l’arrière pendant 4 sec. & arrêtez d’appuyer, le Replay XD 1080 Mini vibrera 1 fois
pour vous avertir que le chier est en train d’être enregistré.
Eteindre : Appuyez sur le bouton (A) à l’avant pendant 4 sec. & arrêtez d’appuyer, le Replay XD 1080 Mini vibrera 1 fois & s’éteindra
automatiquement.
Remarque : Le bouton d’alimentation ne marche pas pendant un enregistrement. Cela est normal pour éviter de l’éteindre accidentelle-
ment.
G F
A B
ALIGNMENT
FRANÇAIS
MODES & RÉGLAGES
Mode Vidéo ou Mode Photo / Images par seconde
1. Faites glisser le commutateur de mode vidéo (L) pour changer cadres de résolution vidéo par seconde.
a. 1080p 30 FPS (Full HD)
b. 720p 60 FPS (Smooth HD), Mode photo peut être activé dans le chier de texte avancé
Audio Option
1. Faites glisser l’INT. / EXT. SWITCH (M) pour choisir l’option audio.
a. Micro interne (défaut)
b. Entrée Micro externe, éteint automatiquement le micro interne.
Lentrée Micro externe est compatible avec l’adaptateur audio XD 1080 Mini ou
le kit Replay XD 1080 Mini HW, disponible sur www.replayxd.com
For Advanced Users and Setting Proles visit www.replayxd.com/replay-XD1080MINI-advanced/
VUE DE DERRIÈRE
M
L
ALIGNMENT
FRANÇAIS
HEIMLOCK MOUNT
*
VHB SnapTray
serrer
la vis
Pivot
IMPORTANT
Utilisez de l'alcool pour nettoyer la
surface avant d'installer. Essuyez
la surface jusqu'à ce qu'elle soit
sèche. Posez le support de mon-
tage VHB sur la surface. Appuyez
sans arrêter pendant 60 secondes
pour permettre à l'adhésif de bien
s'attacher àla surface. La force
d'adhérence augmente après
un certain temps. A une tem-
pérature normale, attendez
au moins 24 heures pour une
force d'adhérence de 90%, et
72 heures pour une force d'ad-
hérence de 100%.
Déverrouiller
Verrouiller
1. Choisissez le meilleur endroit pour installer votre caméra Replay XD 1080 Mini et vériez les angles.
Des surfaces sont idéales et produisent une meilleure qualité vidéo.
2. Attachez la caméra Replay XD 1080 Mini dans le support de caméra en forme U, et tournez par 360º
dans le sens désiré.
3. Attachez le support adhésif VHB SnapTray sur une surface douce et propre.
-SnapTray plat est idéal avec les surfaces douces.
-SnapTray courbé est meilleur avec les surfaces courbées comme sur un casque ou une surface arrondie.
L'adhésif 3M VHB n'est pas recommandé avec les surfaces texturées.
4. Insérez le support de montage HeimLock sur le SnapTray jusqu'à ce qu'il rentre et qu'il y ait un clic.
5. Ajustez l'angle de 360º ou l'inclinaison de ~8º en ouvrant le levier de cam heim et placez la caméra
Replay XD 1080 Mini dans le sens désiré, puis fermez le levier de cam. Assurez-vous que le levier de cam
est bien fermé. Il y a une roue de tension ajustable (
*
) pour s'assurer d'un verrouillage fort positif.
Support de montage HeimLock
Inclinaison
ALIGNMENT
FRANÇAIS
IMPORTANT
Utilisez de l'alcool pour nettoyer la
surface avant d'installer. Essuyez
la surface jusqu'à ce qu'elle soit
sèche. Posez le support de mon-
tage VHB sur la surface. Appuyez
sans arrêter pendant 60 secondes
pour permettre à l'adhésif de bien
s'attacher àla surface. La force
d'adhérence augmente après
un certain temps. A une tem-
pérature normale, attendez
au moins 24 heures pour une
force d'adhérence de 90%, et
72 heures pour une force d'ad-
hérence de 100%.
1. Choisissez le meilleur endroit pour installer votre caméra Replay XD 1080 Mini et vériez les angles.
Des surfaces sont idéales et produisent une meilleure qualité vidéo.
2. Retournez le support de montage LowBoy et étalez-le gentiment, insérez la caméra Replay XD 1080 Mini
dans le support avec les boutons passant dans les trous.
3. Lorsque la caméra Replay XD 1080 Mini est au centre du support LowBoy, tournez par 360º dans le sens désiré.
4. Insérez le support de montage LowBoy sur le SnapTray jusqu’à ce qu’il rentre et qu’il y ait un clic. Le support de
montage LowBoy a des attaches en caoutchouc pour empêcher votre caméra Replay XD 1080 Mini de tourner une
fois installée, assurez-vous donc que l’angle de rotation est comme désiré. Vous pouvez ajuster précisément en
faisant glisser le LowBoy dans/hors du SnapTray.
5. Attachez le support adhésif VHB SnapTray sur une surface douce et propre.
L’adhésif 3M VHB n’est pas recommandé avec les surfaces texturées.
LOWBOY MOUNT
VHB SnapTray Support de montage LowBoy
Déverrouiller
Verrouiller
ALIGNMENT
FRANÇAIS
ALIGNEMENT
Il y a quelques références que vous pouvez utiliser pour pointer et aligner précisément votre caméra Replay XD 1080 Mini.
1. Le bouton Commencer ENR doit toujours être dans la direction 12 heures sur un niveau horizontal.
2. Les marqueurs de visée d’argent avant sont horizontale et verticale qui agissent comme un niveau.
3. Les marques gravées au laser sur le côté de la rediusion XD 1080 Mini sont espacés tous les 15 degrés pour vous donner un réglage n.
4. Pour vous assurer que vous pointez bien votre Replay XD 1080 Mini dans le sens désiré, regardez la longueur du boîtier de l’arrière
vers l’avant - comme si vous regardiez dans un téléscope. C’est si facile que ça.
12
9
6
3
ALIGNMENT
FRANÇAIS
HEIMLOCK SWIVEL/TILT MOUNT
LOWBOY MOUNT
Angle de montage et installation :
1. Lorsque vous utilisez le support de montage HeimLock ou LowBoy, il est important de les monter dans la position optimale
Référez-vous à l'illustration sur cette page pour des exemples des positions.
2. Lorsque vous l'installez sur un casque, la plupart des personnes inclinent normalement leur tête de 15º à plus de 20º.
Il est important de prendre en compte l'angle naturel ou la position active de l'emplacement de montage sur les éléments
, par ex. : casques, chapeaux, guidons, corps de véhicule, etc. Cela aidera à obtenir le meilleur angle possible et une vidéo de qualité
professionnelle.
3. Pour des meilleurs résultats, demandez à un ami de vérier la position de votre tête & corps pour choisir l'angle de caméra optimal
en fonction de votre position normale, lorsque vous appliquez le VHB SnapTray.
RIDING HEAD POSITION
ACTUAL LINE OF SIGHT
ACTUAL LINE OF SIGHT (HORIZON LINE)
MONTAGE
ALIGNMENT
FRANÇAIS
PC/MACPC/MAC
VUE DE CO VUE DE DERRIÈRE
CHARGEMENT
MINI USB 2.0
CHARGEMENT/SYNC
CÂBLE
1. Enlevez le couvercle de protection arrière et branchez le câble mini USB fourni
sur le port USB du Replay XD 1080 Mini.
2. Branchez le câble USB sur l'adaptateur mural CA fourni, un adaptateur pour
voiture ou un port USB2.0 d'un PC/Mac.
3. Le voyant DEL d'état du chargement, à l'arrière du Replay XD 1080 Mini
s'allumera pour indiquer le chargement en cours. Lorsque le voyant DEL vert
s'éteint, la batterie est pleine et complètement chargée.
Remarque : Charging through the PC/Mac USB port will take approximately twice
as long as using the AC Wall Adapter or Car Adapter. It is not recommended to
record while charging through the PC/Mac USB port as the Replay XD 1080 Mini
uses approximately the same power draw as the PC/Mac USB port, damage to the
Replay XD 1080 Mini or your computer may occur.
Le Replay XD 1080 Mini peut enregistrer pendant environ 130 min avec une batterie
pleine sous des conditions optimales. Des températures très faibles ou élévées peuvent
aecter la durée de la batterie.
ALIGNMENT
FRANÇAIS
PC/MACPC/MAC
B
TELECHARGEMENT
MINI USB 2.0
CHARGEMENT/SYNC
CÂBLE
VUE DE CO
COMMENT FAIRE POUR EFFACER DES FICHIERS
1. Déplacez les fichiers vidéo sélectionnés ou les dossiers sur votre
Poubelle ou Corbeille.
2. Avec un Mac : Allez dans Chercher et sélectionnez Vider la poubelle...
Remarque : Déplacer des fichiers ou des dossiers sur la Poubelle
n'efface pas automatiquement les fichiers sur votre carte mémoire,
cela les déplace seulement (référenciés dans la Poubelle). Les
fichiers sont gardées invisiblement sur votre car te mémoire jusqu'à
ce que vous vidiez la poubelle.
VUE DE DERRIÈRE
1. Enlevez le couvercle de protection arrière et utilisez option (1) ou option (2).
2. Option (1) : Retirez la carte micro SDHC du Replay XD 1080 Mini et utilisez un
lecteur de cartes SDHC compatible pour transférer vos chiers sur un ordinateur.
3. Option (2) : Téléchargez les chiers en utilisant le port USB du Replay XD 1080 Mini.
4. Plug USB cable into Replay XD 1080 Mini and a PC/Mac USB 2.0 port.
5. Press and hold the Start/Stop button (B) and Power On your Replay XD1080.
6. Sur un PC/Mac, votre Replay XD 1080 Mini apparaîtra sur votre ordinateur
en tant que périphérique de stockage externe. Vous pouvez télécharger les
chiers vidéo dans le dossier DCIM sur la carte micro SDHC.
(Ejectez toujours l'appareil du PC/Mac)
Remarque : Option (2) peut résulter en des vitesses de transfert plus lentes.
La lecture via USB n'est pas recommandée car la lecture
peut être instable. Téléchargez en premier les vidéos sur le PC/Mac.
ALIGNMENT
FRANÇAIS
LOGICIEL
PC - Windows XP et versions ultérieures
Pour regarder facilement :
Windows Media Player, Apple Quicktime, ou VLC Player
Pour éditer rapidement : (par ex. couper ou couvertir)
Apple Quicktime ou Adobe Premier Elements
Pour éditer en détails : (nous les avons testés sans problème)
Adobe Premier Pro ou Sony Vegas 8
Votre Replay XD 1080 Mini enregistre et sauvegarde dans un chier appelé MOV. Votre chier vidéo est compatible avec la plupart des
lecteurs multimédia sur un PC ou Mac. De nombreux logiciels d'édition sont directement compatibles, par ex. : Adobe Premier, Apple
Final Cut, iMovie, & Windows Movie Maker.
Il y a de nombreuses congurations d'ordinateur, logiciels d'édition et d'autres variables associés avec les ordinateurs. Nous avons fourni
une liste d'astuces pour vous aider à commencer rapidement. Ces recommandations marchent la plupart du temps, mais nous ne sommes
pas responsable si elles ne marchent pas. Consultez le manuel d'utilisateur de votre ordinateur et du logiciel d'édition vidéo pour vérier
s'ils sont compatibles.
Pour les questions et réponses aux problèmes les plus fréquents, visitez notre site Web www.Replayxd.com
MAC - Mac OS X 10.4 et versions ultérieures
Pour regarder facilement :
Apple Quicktime, VLC Player
Pour éditer rapidement : (par ex. couper ou couvertir)
Apple Quicktime ou iMovie
Pour éditer en détails : (nous les avons testés sans problème)
Apple Final Cut Pro, Adobe Premier Pro, ou iMovie
ALIGNMENT
FRANÇAIS
REV. 2011.6.15.0
STABLE IMAGING SOLUTIONS, LLC. GARANTIE LIMITÉE
CE QUI EST COUVERT PAR LA GARANTIE
Stable Imaging Solutions, LLC. (SIS) garantie que ce produit est exempt de défaut matériel et de fabrication pendant une
période de 180 jours à partir de la date d'achat.
CE QYU N'EST PAS COUVERT :
Cette garantie ne couvre pas les dommages suite à :
Des accidents, de n'importe quel type
L'exposition à des pression ou des températures extrêmes (hors de -20ºC et 45ºC), et l'immersion dans de l'eau. Ce
produit est résistant à l'eau mais pas étanche, il est résistant aux chocs mais pas antichoc, et les performances seront
aectées dans des températures extrêmes.
L'installation ou l'utilisation contrairement aux instructions fournies avec le produit, y compris l'abus, la négligence et
les utilisations inappropriées.
Les dommages cosmétiques.
Les modications de, ou d'une partie du, produit.
Cette garantie ne couvre pas les produits sur lesquelles le numéro de série de l'usine a été modié ou eacé ou qui ont été
endommagé à cause d'un manque de maintenance. Cette garantie est valide dans tous les pays où SIS vend le produit, ou où
il y a un représentant autorisé. SIS se réserve le droit de décider si le produit est dans les limites dénies par cette garantie. SIS,
selon son choix, peut réparer, faire un entretien ou remplacer ce produit après avoir déterminé la raison de la panne. Pour les
renvois : Le ticket de caisse original doit être fourni pour pouvoir obtenir le service de garantie, et un numéro RMA (autorisation
de retour de marchandise) doit être obtenu avant de renvoyer ce produit, en contactant le service clientèle : 1-805-480-9800.
Les produits sans un numéro RMA ne seront pas acceptés.
DANS LES LIMITES AUTORISEES PAR LA LOI LOCALE APPLICABLE, TOUTE GARANTIE OU CONDITION IMPLICITE DE BONNE
QUALITE MARCHANDE OU D'ADAPTATION A UN USAGE PARTICULIER DE CE PRODUIT, EST LIMITEE A LA DUREE DE LA GA-
RANTIE MENTIONNEE CI-DESSUS. LA REPARATION OU LE REMPLACEMENT FOURNI SOUS CETTE GARANTIE EST L'UNIQUE
RECOURS DU CLIENT, SIS NE POURRA PAS ACCEPTER DE RESPONSABILITE EN CAS DE DOMMAGE INDIRECT, CONSECUTIF
OU INCIDENTEL CAUSE PAR LE NON-RESPECT DE LA GARANTIE IMPLICITE OU EXPRESSE DE CE PRODUIT.
GARANTIE
ALIGNMENT
FRANÇAIS
REV. 2011.6.15.0
STABLE IMAGING SOLUTIONS, LLC. DÉCLARATION DE NON-RESPONSABILITÉ
Tous les acheteurs, utilisateurs ou autres parties concernés ou engagé dans l'utilisation des produits de Stable Imaging Solutions,
LLC. (“SIS”) acceptent ce qui suit :
SIS n'encourage pas et n'approuve pas les actions dangereuses ou négligentes lors de l'utilisation de ses produits.
SIS n'est pas responsable en cas d'une utilisation incorrecte des produits de SIS dans des applications pour lesquelles ils n'ont
pas été conçus.
SIS n'assume aucune responsabilité pour l'utilisation de ses produits ou des vidéos enregistrées qui peuvent être déclarées
illégales.
SIS n'est pas responsable de toute action illégale lors de l'enregistrement, tentative d'enregistrement, ou édition des vidéos
enregistrées avec ses produits.
Les produits de SIS sont principalement pour l'enregistrement légal des sports ou de toute autre activité acceptable sous les
lois locales, fédérales, régionales et du pays.
Les accessoires de caméra de SIS, y compris les supports de montage, les rides et les autres accessoires sont fournis en tant
qu'option d'attachement, et vendus tel-quel. Ils doivent être utilisés avec grande prudence et soin lorsque la caméra est
installé sur un casque, une personne ou n'importe quel type de propriété pendant des activités, pour éviter qu'elle ne tombe
ou se détache et cause des blessures légères, graves ou mortelles.
SIS n'assume aucune responsabilité en cas de perte consécutive ou indirecte, dommage, blessure ou mort résultant de
l'utilisation des produits de SIS.
Toutes les marques commerciales et les marques déposées mentionnées sont la propriété de leurs propriétaires respectifs.
Replay XD
®
, Replay XD1080 est un produit de Stable Imaging Solutions, LLC., Californie.
www.Replayxd.com
©2013 Stable Imaging Solutions, LLC., Replay XD
®
Tous droits réservés.
DISCLAIMER
ALIGNMENT
FRANÇAIS
REV. 2011.6.15.0
Déclaration de conformité à la FCC
Cet appareil est conforme à la section 15 du règlement de la FCC. Son fonctionnement est soumis aux deux conditions
suivantes :
(1) Cet appareil ne doit pas provoquer d’interférence nuisibles, et
(2) cet appareil doit accepter les interférences reçues, y compris les interférences qui peuvent causer un fonctionnement
indésirable.
Interférences radio et TV - Cet appareil a été testé et jugé conforme aux limites applicables aux périphériques numériques
de classe B, dénies dans la partie 15 du règlement de la FCC. Ces limites sont conçues pour fournir une protection
raisonnable contre les interférences nuisibles dans les installations résidentielles. Cet appareil génère, utilise et peut
irradier de l’énergie de radiofréquence et, s’il n’est pas utilisé et installé conformément aux instructions du fabricant, peut
causer des interférences nuisibles aux radiocommunications. Cependant, nous ne pouvons garantir que des interférences
ne se produiront pas dans une installation particulière. Si cet appareil cause des interférences indésirables à la réception
de la radio ou de la télévision, ce que vous pouvez facilement observer en éteignant et en rallumant l’appareil, nous vous
encourageons à prendre une ou plusieurs des mesures correctives suivantes :
• Réorienter ou déplacer l’antenne de réception.
• Augmenter la distance entre l'appareil et le récepteur.
• Branchez l'appareil sur la prise d'un circuit auquel le récepteur n'est pas relié.
• Consulter le revendeur ou un technicien radio/télévision expérimenté pour l’aide. Le câble d'interface fourni doit être
utilisé avec cet appareil pour qu'il soit conforme aux limites applicables aux appareils numériques de sous-classe B, Partie
15 du règlement de la FCC.
Déclaration ICES-003 pour le Canada
Cet appareil numérique de la classe B est conforme à la norme NMB-003 du Canada.
RoHS
Cet appareil est conforme à la directive ROHS 2002/95/EC de l'Union Européenne, et les règlements similaires qui peuvent
avoir été adoptés par d'autres pays Européens pour la vente en Europe.
Certication CE
CONFORMITÉ
ALIGNMENT
DEUTSCH
Übersicht
Replay XD 1080 Mini-Kamera
(A) Ein-/Ausschalten
(B) Aufnahme, Stopp
(C) Abnehmbare Objektivabdeckung
(D) Abnehmbare rückseitige Kappe
(E) 15 Grad Markierungen
(F) Blaue Betrieb-LED
(G) Rote Aufnahme-LED
(H) Horizontale Sichtlinie
(I) Vertikale Sichtlinie
(J) microSDHC-Schlitz
(K) Grüne Lade-LED, rote SD-Karte-LED
(L) Video-Modus: 30 1080p, 720p 60 (oder Photo)
(M) Interne Mic / Audio Line-In-Schalter (Ext. Mic-In)
(N) Mini-USB-Port
(*) Reset-Taste
C
H
I
DE
M
N
J
K
L
*
G F
A B
ALIGNMENT
DEUTSCH
G F
A B
Aufnahme
Drücken Sie zum Ein-/Ausschalten die Taste A. Drücken Sie zum Starten/Beenden der Aufnahme die Taste B. Fertig.
Einschalten (Bereitschaftsmodus & Modusauswahl): Halten Sie die Taste an der Vorderseite (A) zwei Sekunden gedrückt und
lassen sie dann los; die Replay XD 1080 Mini vibriert dreimal und die blaue Betrieb-LED leuchtet auf.
Aufnahme starten: Halten Sie die Taste an der Rückseite (B) zwei Sekunden gedrückt und lassen sie dann los; die Replay XD 1080 Mini
vibriert dreimal, die rote LED leuchtet auf und die Aufnahme startet automatisch.
Hinweis: Die rote LED an der Rückseite blinkt, wenn die Speicherkarte nicht richtig eingesteckt ist.
Achten Sie darauf, voll einsetzen, die die Speicherkarte mit den Goldkontakten nach unten, bis es mit einem Klick einrastet.
Verwenden Sie nur zugelassene von Replay XD SD-Karte. Eine Liste kompatibler SD-Karten nden Sie www.replayxd.com.
Aufnahme beenden: Halten Sie die Taste an der Rückseite (B) vier Sekunden gedrückt und lassen sie dann los; die Replay XD 1080 Mini
vibriert einmal und zeigt dadurch an, dass die Datei gespeichert wird.
Ausschalten: Halten Sie die Taste an der Vorderseite (A) vier Sekunden gedrückt und lassen sie dann los; die Replay XD 1080 Mini vibriert
einmal und schaltet sich aus.
Hinweis: Während der Aufnahme funktioniert die Ein-/Austaste nicht. Dies ist normal und soll eine versehentliche Abschaltung verhindern.
ALIGNMENT
DEUTSCH
Modi & Einstellungen
1080p Videomodus / Frames Per Second
1. Schieben Sie den Video-Modus-Schalter (L), um Video-Auösung Bilder pro Sekunde ändern.
a. 1080p 30 FPS (Full HD)
b. 720p 60 FPS (Smooth HD), Foto-Modus kann in der erweiterten Text-Datei aktiviert werden
Audiooption
1. Schieben Sie die INT. / EXT. wechseln (M), Audio-Option wählen.
a. Internes Mikrofon (Standard)
b. Externer Mikrofoneingang, internes Mikrofon wird deaktiviert
Der externe Mikrofoneingang ist mit dem Replay XD 1080 Mini Audio Adapter bzw. dem
Replay XD 1080 Mini HW Kit kompatibel, erhältlich unter www.replayxd.com.
Hinweise zu erweiterten Benutzereinstellungen und Einstellungsprolen nden Sie unter www.replayxd.com/replay-
xd1080-advanced/.
M
L
Rückansicht
ALIGNMENT
DEUTSCH
HeimLock-Halterung
Wichtig
Säubern Sie die
Montageoberfläche mit
Reinigungsalkohol. Wischen Sie
die Oberfläche trocken. Bringen
Sie die VHB-Halterung an der
Oberfläche an. Halten Sie die
Halterung sechzig Sekunden
angedrückt, damit der Kleber eine
Verbindung mit der Oberfläche
eingeht. Die Klebefestigkeit
erhöht sich mit der Zeit. Be i
Zimmertemperatur erreicht
die Klebefestigkeit nach 24
Stunden 90 % bzw. nach 72
Stunden 100 %.
*
VHB SnapTray
Ziehen
Stellschraube
1. Wählen Sie eine gewünschte Montageposition für Ihre Replay XD 1080 Mini, prüfen Sie den Winkel.
Starre Oberächen eignen sich zur Erzielung einer optimalen Videoqualität am besten. Hinweis: Sie
können eine Probeaufnahme machen und überprüfen Sie es auf Ihrem Mac oder PC.
2. Befestigen Sie die Replay XD 1080 Mini an der U-förmigen Kamerahalterung und drehen sie um 360 °
in die gewünschte Position.
3. Bringen Sie die haftende VHB SnapTray-Halterung auf einer sauberen, glatten Oberfläche an.
-Flache SnapTray-Halterungen eignen sich für flache, glatte Oberflächen.
-Gebogene SnapTray-Halterungen eignen sich für gebogene Oberflächen, wie Helme oder
Radiusoberflächen.
Der 3M VHB-Kleber wird bei strukturierten Oberflächen nicht empfohlen.
4. Schieben Sie die HeimLock-Halterung vollständig in die SnapTray-Vorrichtung, bis sie mit einem
Klickgeräusch einrastet.
5. Passen Sie die Position (um 360 ° schwenkbar, um 8 ° neigbar) an, indem Sie den Kamerafreigabehebel
lösen und die Replay XD 1080 Mini wie gewünscht ausrichten; verriegeln Sie den Kamerafreigabehebel
anschließend. Achten Sie darauf, den Hebel sicher zu verriegeln. Über ein einstellbares Spannrad (
*
)
können Sie die Befestigung zusätzlich sichern.
KippenSchwenken
Freigeben
Sperren
HeimLock-Halterung
ALIGNMENT
DEUTSCH
VHB SnapTray
Wichtig
Säubern Sie die
Montageoberfläche mit
Reinigungsalkohol. Wischen Sie
die Oberfläche trocken. Bringen
Sie die VHB-Halterung an der
Oberfläche an. Halten Sie die
Halterung sechzig Sekunden
angedrückt, damit der Kleber eine
Verbindung mit der Oberfläche
eingeht. Die Klebefestigkeit
erhöht sich mit der Zeit. Be i
Zimmertemperatur erreicht
die Klebefestigkeit nach 24
Stunden 90 % bzw. nach 72
Stunden 100 %.
1. Wählen Sie eine gewünschte Montageposition für Ihre Replay XD 1080 Mini, prüfen Sie den Winkel.
Starre Oberächen eignen sich zur Erzielung einer optimalen Videoqualität am besten. Hinweis: Sie
können zur einfachen Erfassung den HDMI-Ausgang nutzen oder eine Testaufnahme durchführen und diese
an einem iPad/Mac/PC prüfen.
2. Drehen Sie die LowBoy-Halterung um und spreizen sie vorsichtig; stecken Sie die Replay XD 1080
Mini in die Halterung, wobei Sie die Tasten an den Aussparungen ausrichten.
3. Wenn die Replay XD 1080 Mini in der LowBoy-Halterung zentriert ist, drehen Sie sie um 360 ° auf die
gewünschte Position.
4. Schieben Sie die LowBoy-Halterung vollständig in die SnapTray-Vorrichtung, bis sie mit einem Klickgeräusch
einrastet. Die LowBoy-Halterung verfügt über Gummistreifen, die nach dem Einsetzen ein Drehen Ihrer Replay
XD 1080 Mini verhindern; achten Sie also darauf, dass der Winkel entsprechend eingestellt ist. Sie können
Feineinstellungen vornehmen, indem Sie die LowBoy-Halterung in die/aus der SnapTray-Vorrichtung schieben.
5. Bringen Sie die haftende VHB SnapTray-Halterung an einer sauberen, glatten Oberfläche an.
Der 3M VHB-Kleber wird bei strukturierten Oberflächen nicht empfohlen.
LowBoy-Halterung
LowBoy-Halterung
Freigeben
Sperren
ALIGNMENT
DEUTSCH
12
9
6
3
Ausrichtung
Es gibt einige Orientierungspunkte zur exakten Ausrichtung Ihrer Replay XD 1080 Mini.
1. Die Aufnahmestarttaste sollte zur horizontalen Ausrichtung immer nach oben zeigen bzw. auf der 12-Uhr-Position stehen.
2. Die vorderen Silber Anblick Marker sind horizontal und vertikal, die wirken als Ebene.
3. Die gelaserten Logos an der Seite der Replay XD 1080 Mini sind auf gleichem Level und dienen als Anzeige des Neigungswinkels.
4. Zur Überprüfung der Ausrichtung Ihrer Replay XD 1080 Mini blicken Sie einfach an einem Gebäude entlang – als würden Sie durch
ein Teleskop schauen. So einfach ist das.
ALIGNMENT
DEUTSCH
RIDING HEAD POSITION
ACTUAL LINE OF SIGHT
ACTUAL LINE OF SIGHT (HORIZON LINE)
Montage
Schwenk-/neigbare HeimLock-
Halterung
LowBoy-Halterung
Montagewinkel und Einrichtung:
1. Beim Einsatz einer HeimLock- oder LowBoy-Halterung ist es wichtig, diese an einer optimalen Position zu montieren.
Mögliche Positionen entnehmen Sie bitte der Abbildung auf dieser Seite.
2. Bei Montage an einem Helm neigen die meisten Menschen dazu, ihren Kopf von 15 ° auf 20 ° und mehr zu senken.
Es ist wichtig, den natürlichen Winkel oder die aktive Position Ihrer Montagepositionen an Gegenständen zu beachten, bspw. bei:
Helmen, Hüten, Lenkstangen, Karosserien etc. Dies hilft Ihnen bei der Auswahl eines optimalen Winkels und bei der Aufnahme
professioneller Videos.
3. Zur Gewährleistung bestmöglicher Ergebnisse sollte ein Freund Ihre aktive Fahr- und Kopfhaltung beobachten und Ihnen vor dem
Anbringen Ihrer VHB SnapTray-Vorrichtung bei der Auswahl des optimalen Kamerawinkels entsprechend Ihrer Fahrposition helfen.
Hinweis: Sie können zur einfachen Erfassung den HDMI-Ausgang nutzen oder eine Testaufnahme durchführen und diese an einem iPad/
Mac/PC prüfen.
Unser vollständiges Angebot an Halterungen und Montageideen nden Sie unter www.replayxd.com.
ALIGNMENT
DEUTSCH
PC/MACPC/MAC
1. Entfernen Sie die rückseitige Schutzkappe und schließen das mitgelieferte Mini-
USB-Kabel am USB-Port der Replay XD 1080 Mini an.
2. Verbinden Sie das USB-Kabel mit dem mitgelieferten Netzteil, Fahrzeugadapter
oder dem USB 2.0-Port eines PCs/Mac.
3. Die grüne Lade-LED an der Rückseite der Replay XD 1080 Mini leuchtet, das
Gerät lädt. Sobald die grüne LED erlischt, ist der Akku vollständig geladen; der
Ladevorgang ist abgeschlossen.
Hinweis: Der Ladevorgang per USB-Port (PC/Mac) erfordert etwa doppelt so viel Zeit
wie der Einsatz des Netzteils oder Fahrzeugadapters. Wir raten davon ab, während des
Ladevorgangs per USB (PC/Mac) eine Aufnahme durchzuführen, da die Replay XD1080
dabei etwa so viel Strom verbraucht wie Sie per USB-Port (PC/Mac) bezieht; dies kann
Schäden an der Replay XD 1080 Mini oder Ihrem Computer verursachen.
Die Replay XD 1080 Mini nimmt unter optimalen Bedingungen bei voller Akkuladung
etwa 130 Minuten lang auf. Extreme Wärme oder Kälte können sich auf die
Akkulaufzeit auswirken.
Seitenansicht Rückansicht
Aufladen
Mini-USB 2.0-
Lade-/
Synchronisierungs-
kabel
ALIGNMENT
DEUTSCH
DOWNLOAD
PC/MACPC/MAC
B
1. Entfernen Sie die rückseitige Schutzkappe und nutzen Option (1)
oder Option (2).
2. Option (1): Entfernen Sie die microSDHC-Karte aus der Replay XD 1080 Mini und
übertragen die Dateien mit Hilfe eines SDHC-kompatiblen Kartenlesers auf Ihren
Computer.
3. Option (2): Laden Sie die Dateien über den USB-Port der Replay XD 1080 Mini
herunter.
4. Schließen Sie das USB-Kabel an der Replay XD 1080 Mini und dem USB 2.0-Port
eines PCs/Mac an.
5. Halten Sie die Start/Stop (B) gedrückt und schalten Ihre Replay XD 1080 Mini ein.
6. An einem PC/Mac wird Ihre Replay XD 1080 Mini als
Massenspeichergerät eingebunden. Sie können Ihre Videodateien aus dem auf der
microSDHC-Karte erstellten DCIM-Ordner herunterladen.
(Werfen Sie das Gerät vor dem Trennen stets vom PC/Mac aus)
Hinweis: Option (2) weist möglicherweise langsame
Übertragungsgeschwindigkeiten auf.
Eine Wiedergabe per USB wird nicht empfohlen, da diese
meist nicht üssig erfolgt. Laden Sie die Bild-/Videodaten zuerst auf den PC/
Mac herunter.
Seitenansicht
So löschen Sie Dateien
1. Verschieben Sie die ausgewählten Videodateien oder
Ordner in Ihren Papierkorb.
2. Mac: Rufen Sie den Finder auf und wählen Papierkorb
entleeren...
Hinweis: Durch bloßes Verschieben von Dateien oder Ordnern
in den Papierkorb werden die Dateien nicht von Ihrer
Speicherkarte gelöscht; sie werden lediglich verschoben (im
Papierkorb referenziert). Die Dateien bleiben unsichtbar auf
Ihrer Speicherkarte erhalten, bis Sie den Papierkorb leeren.
Rückansicht
Mini-USB 2.0-
Lade-/
Synchronisierungs-
kabel
ALIGNMENT
DEUTSCH
SOFTWARE
PC – Windows XP oder aktueller
Einfache Ansicht:
Windows Media Player, Apple Quicktime oder VLC Player
Schnelle Bearbeitung: (z. B. Schnitt und Konvertierung)
Apple Quicktime oder Adobe Premier Elements
Vollständige Bearbeitung: (erfolgreich getestet)
Adobe Premier Pro oder Sony Vegas 8
Ihre Replay XD 1080 Mini nimmt eine Datei auf und speichert diese als MOV. Ihre Videodatei ist mit den meisten aktuellen
Medienwiedergabeprogrammen für PC oder Mac kompatibel. Viele Videobearbeitungsprogramme sind kompatibel und ohne Weiteres
einsetzbar, z. B.: Adobe Premier, Apple Final Cut, iMovie und Windows Movie Maker.
Es gibt zahlreiche Computerkongurationen, Bearbeitungsprogramme und andere Computer-relevante Variablen. Wir haben oben eine
Liste mit Tipps als Hilfestellung bereitgestellt. Diese Empfehlungen funktionieren in den meisten Fällen; wir übernehmen jedoch keine
Verantwortung, falls sie bei Ihnen nicht funktionieren. Hinweise zur Kompatibilität entnehmen Sie bitte der Bedienungsanleitung Ihres
Computers und der Videobearbeitungssoftware.
Allgemeine Fragen und Antworten zur Problemlösung nden Sie auf unserer Webseite unter
www.replayxd.com.
Mac – Mac OS X 10.4 oder aktueller
Einfache Ansicht:
Apple Quicktime, VLC Player
Schnelle Bearbeitung: (z. B. Schnitt und Konvertierung)
Apple Quicktime oder iMovie
Vollständige Bearbeitung: (erfolgreich getestet)
Apple Final Cut Pro, Adobe Premier Pro oder iMovie
ALIGNMENT
DEUTSCH
REV. 2011.6.15.0
Stable Imaging Solutions, LLC. Beschränkte Garantie
Was unter die Garantie fällt
Stable Imaging Solutions, LLC. (SIS) garantiert für die Dauer von 180 Tagen ab Kaufdatum des Produktes, dass dieses frei
von Material- und Verarbeitungsfehlern ist.
Was nicht unter die Garantie fällt
Diese Garantie deckt Schäden aufgrund folgender Ursachen nicht ab:
Jegliche Unfälle
Aussetzung von Druck und extremen Temperaturen (außerhalb von -20 °C bis 45 °C) sowie Eintauchen in Wasser.
Dieses Produkt ist wasserabweisend, aber nicht wasserfest, nur begrenzt stoßfest, seine Leistung kann unter
extremen Temperaturen beeinträchtigt werden.
Installation und Betrieb unter Missachtung der dem Produkt beigefügten Anweisungen, inklusive Missbrauch,
unsachgemäßem Gebrauch und Fahrlässigkeit.
Kosmetische Schäden.
Modikationen an oder von jeglichen Produktkomponenten.
Diese Garantie deckt keine Produkte ab, bei denen die werkseitig angebrachte Seriennummer verändert oder entfernt bzw.
Schäden durch unsachgemäße Wartungsarbeiten verursacht wurden. Diese Garantie gilt nur in Ländern, in denen SIS das
Produkt verkauft oder juristisch vertreten ist. SIS behält sich das Recht vor, zu bestimmen, ob das Produkt die Richtlinien dieser
Garantie erfüllt. SIS kann das Gerät nach Bestimmung der Fehlerursache nach eigenem Ermessen warten, reparieren oder
ersetzen. Rückgabe: Damit die Garantieleistung in Anspruch genommen werden kann, ist der Originalkaufbeleg erforderlich;
zudem muss der Kunde vor der Rückgabe des Produktes eine RMA-Nummer (Return Merchandise Authorization) beim
Kundendienst unter 1-805-480-9800 anfordern. Produkte ohne RMA-Nummer werden nicht angenommen.
Sofern nicht gesetzlich verboten, werden jegliche implizierten Garantien zur Marktgängigkeit oder Eignung zu
einem bestimmten Zweck dieses Produktes auf die Dauer dieser Garantie beschränkt. Die im Rahmen dieser Garantie
durchgeführten Reparatur- bzw. Ersatzleistungen sind das ausschließliche Recht des Verbrauchers; SIS haftet nicht für
jegliche indirekten, beiläugen oder Folgeschäden, die durch Verletzung jeglicher ausdrücklicher oder implizierter
Garantien dieses Produktes verursacht werden.
Garantie
ALIGNMENT
DEUTSCH
REV. 2011.6.15.0
Stable Imaging Solutions, LLC. Haftungsausschluss
Alle Käufer, Benutzer und andere Parteien, die in die Nutzung von Produkten von Stable Imaging Solutions, LCC. („SIS“) involviert
sind, stimmen Folgendem zu:
SIS befürwortet keine und ermutigt nicht zu unvorsichtigen und/oder gefährlichen Aktionen unter Einsatz seiner Produkte.
SIS haftet nicht für jeglichen Gebrauch oder Missbrauch von SIS-Produkten in Einsatzbereichen, für die diese Produkte nicht
entwickelt wurden.
SIS übernimmt keine Verantwortung in Bezug auf eine illegale Nutzung unserer Produkte oder jegliche illegalen
Videoaufnahmen.
SIS haftet nicht für jegliche illegalen Handlungen, die bei der Aufnahme, beim Versuch einer Aufnahme oder bei der
Bearbeitung eines mit unseren Produkten aufgenommenen Videos begangen werden.
SIS-Produkte dienen primär der Aufnahme legaler Sportaktivitäten oder jeglicher anderer gemäß örtlicher, staatlicher und
bundesstaatlicher Anerkennung legaler Aktivitäten.
SIS-Kamerazubehör, inklusive Halterungen, Tragebändern und anderen Artikeln, dienen als Erweiterungen und werden ohne
Mängelgewähr verkauft. Sie müssen mit besonderer Vorsicht genutzt werden, wenn die Kamera während einer Aktivität
an einem Helm, einer Person oder anderen Gegenständen angebracht ist und eine Lockerung oder ein Verlust der Kamera
Gefährungen, Verletzungen oder Tod zur Folge haben kann.
SIS kann bei Folgeschäden sowie indirektem Verlust, Schäden, Verletzungen oder Tod infolge der Nutzung von SIS-Produkten
nicht haftbar gemacht werden.
Alle hierin genannten Marken und eingetragenen Marken sind das Eigentum ihrer jeweiligen Inhaber.
Replay XD
®
, Replay XD 1080 Mini ist ein Produkt von Stable Imaging Solutions, LLC. in Kalifornien.
www.replayxd.com
©2013 Stable Imaging Solutions, LLC., Replay XD
®
Alle Rechte vorbehalten.
Haftungsausschluss
ALIGNMENT
DEUTSCH
REV. 2011.6.15.0
FCC-Erklärung
Dieses Gerät erfüllt Teil 15 der FCC-Regularien. Der Betrieb unterliegt den folgenden beiden Voraussetzungen:
(1) Dieses Gerät darf keine Funkstörungen verursachen, und
(2) Dieses Gerät muss jegliche empfangenen Funkstörungen hinnehmen, einschließlich Störungen, die zu
unbeabsichtigtem Betrieb führen können.
Störungen des Radio- und Fernsehempfangs: Dieses Gerät wurde getestet und als mit den Spezikationen für
Digitalgeräte der Klasse B gemäß Teil 15 der FCC-Regularien übereinstimmend befunden. Diese Spezikationen wurden
geschaen, um angemessenen Schutz gegen Störungen beim Betrieb in Wohngebieten zu gewährleisten. Diese
Ausrüstung erzeugt, verwendet und kann Hochfrequenzenergie abstrahlen und kann - falls nicht in Übereinstimmung
mit den Bedienungsanweisungen installiert und verwendet - Störungen der Funkkommunikation verursachen.
Allerdings ist nicht gewährleistet, dass es in bestimmten Installationen nicht zu Störungen kommt. Falls diese Ausrüstung
Störungen des Radio- oder Fernsehempfangs verursachen sollte, was leicht durch Aus- und Einschalten der Ausrüstung
herausgefunden werden kann, wird dem Anwender empfohlen, die Störung durch eine oder mehrere der folgenden
Maßnahmen zu beseitigen:
• Neuausrichtung oder Neuplatzierung der Empfangsantenne(n).
• Vergrößern des Abstands zwischen Ausrüstung und Empfänger.
• Anschluss der Ausrüstung an einen vom Stromkreis des Empfängers getrennten Stromkreis.
• Hinzuziehen des Händlers oder eines erfahrenen Radio-/Fernsehtechnikers. Das mitgelieferte Schnittstellenkabel muss
zur Übereinstimmung mit den Grenzwerten für Digitalgeräte der Klasse B gemäß Teil 15 der FCC-Regularien mit dem
Gerät verwendet werden.
Canadian ICES-003-Erklärung
Dieses Digitalgerät der Klasse B erfüllt die Richtlinien der Canadian ICES-003.
RoHS
Dieses Gerät stimmt mit der europäischen RoHS-Richtlinie 2002/95/EG und ähnlichen Richtlinien ein, die möglicherweise
von anderen europäischen Ländern für den Vertrieb in Europa übernommen wurden.
CE-zertiziert
Konformität
ALIGNMENT
ESPAÑOL
C
H
I
DE
M
N
J
K
L
*
G F
A B
Cámara Replay XD 1080 Mini
(A) Encendido y apagado
(B) Grabar, Detener
(C) Tapa de la lente extraíble
(D) Tapa del extremo posterior extraíble
(E) 15 marcas de grados
(F) LED azul de encendido y apagado
(G) LED rojo de activación y desactivación de la grabación
(H) Línea de visión horizontal
(I) Línea de visión vertical
(J) Ranura para tarjetas micro SDHC
(K) LED verde de carga, LED rojo de ausencia de tarjeta SD
(L) Modo de vídeo: 1080p 30, 720 60 (o fotos)
(M) Interna Mic / Audio Line-In Switch (Ext. Mic-In)
(N) Puerto mini USB
(
*
) Restablecimiento maestro
ORIENTACIÓN
ALIGNMENT
ESPAÑOL
G F
A B
GRABACIÓN
Presione A para encender o apagar la cámara. Presione B para INICIAR o DETENER la grabación. Eso es todo.
Encender el dispositivo (espera y selección de la configuración de modo): mantenga presionado el botón frontal (A)
durante 2 segundos y suéltelo. La cámara Replay XD 1080 Mini vibrará 3 veces y el LED de encendido se iluminará en azul.
Iniciar grabación: mantenga presionado el botón posterior (B) durante 2 segundos y suéltelo. La cámara Replay XD 1080 Mini vibrará 3
veces, el LED de color rojo se iluminará y la grabación o captura se iniciará automáticamente.
Nota: el LED de color rojo situado en la parte posterior parpadeará cuando la tarjeta de memoria no esté insertada correctamente.
Asegúrese de que la tarjeta de memoria se inserta completamente con los contactos dorados hacia abajo hasta que oiga un
clic. Utilice sólo tarjetas SD aprobadas para XD Replay. Visite el sitio Web para obtener una lista www.replayxd.com compatible
con tarjetas SD.
Detener grabación: Mantenga presionado el botón posterior (B) durante 4 segundos y suéltelo. La cámara Replay XD 1080 Mini vibrará
1 vez para noticarle que está guardando el archivo.
Apagar el dispositivo: mantenga presionado el botón frontal (A) durante 4 segundos y suéltelo. La cámara Replay XD 1080 Mini vibrará
1 vez y se apagará.
Nota: el botón de encendido y apagado no funcionará durante la grabación. Se trata de una característica normal para evitar apagados
accidentales.
ALIGNMENT
ESPAÑOL
MODOS Y CONFIGURACIÓN
1080p Modo Vídeo o modo Fotografía
1. Deslice el interruptor de modo de vídeo (L) para cambiar los marcos de resolución de vídeo por segundo.
a. 1080p 30 FPS (Full HD)
b. 720p 60 FPS (Smooth HD), modo de foto se pueden habilitar en el archivo de texto avanzada
Opción de audio
1. Deslice el INT. / EXT. cambiar (M) para seleccionar la opción de audio.
a. Micrófono interno (predeterminado)
b. La entrada de micrófono externa, deshabilita el micrófono interno
La entrada de micrófono externa es compatible con el adaptador de audio
HDMI de la cámara Replay XD 1080 Mini, disponible en www.replayxd.com.
Para usuarios avanzados y obtener información sobre perles de conguración visite el sitio Web www.replayxd.com/
replay-xd1080mini-advanced/.
VISTA POSTERIOR
M
L
ALIGNMENT
ESPAÑOL
*
VHB SnapTray
apretar
El tornillo de
ajuste
1. Busque la mejor ubicación de montaje para la cámara Replay XD 1080 Mini y compruebe los ángulos.
Las supercies rígidas son ideales para obtener la mejor calidad de vídeo. Nota: Usted puede tomar una
fotografía de prueba y comprobar que funciona. En su Mac o PC
2. Ajuste la cámara Replay XD 1080 Mini en su soporte con forma de U y gire 360º hasta tener la posición que desee.
3. Acople el soporte adhesivo VHB SnapTray en una superficie suave y limpia.
-Los soportes SnapTray planos son buenos para superficies suaves planas.
-Los soportes SnapTray curvos son buenos para superficies curvas, como por ejemplo cascos y
superficies radiales.
El adhesivo 3M VHB no es recomendable para superficies con relieve.
4. Deslice el soporte HeimLock introduciéndolo en el soporte SnapTray hasta que quede totalmente
asentado y se escuche un clic.
5. Ajuste la posición de giro 360º o inclinación ~8º soltando la palanca de la leva de la junta y coloque la
cámara Replay XD 1080 Mini en la posición que desee. A continuación, bloquee la palanca de la leva.
Asegúrese de que la palanca de la leva está apretada. Dispone de una rueda de tensión ajustable (
*
) para
asegurarse de que siempre tiene un bloqueo rme positivo.
SOPORTE HEIMLOCK
Soporte HeimLock
Desbloquear
Bloquear
InclinaciónGiro
IMPORTANTE
Utilice alcohol medicinal para
limpiar la superficie de montaje.
Pase un paño seco por la super-
ficie. Aplique el soporte VHB a la
superficie. Presione sin soltar du-
rante 60 segundos para permitir
que el adhesivo se adhiera a la
supercie. La intensidad de ad-
hesión aumentará con el paso
del tiempo. A temperatura
ambiente, espere al menos
24 horas para lograr una in-
tensidad de adhesión del 90%
y 72 horas para que dicha
intensidad llegue al 100%.
ALIGNMENT
ESPAÑOL
VHB SnapTray
1. Busque la mejor ubicación de montaje para la cámara Replay XD 1080 Mini y compruebe los ángulos.
Las supercies rígidas son ideales para obtener la mejor calidad de vídeo. Nota: Usted puede tomar una
fotografía de prueba y comprobar que funciona. En su Mac o PC
2. Dé la vuelta al soporte LowBoy para ponerlo al revés y extiéndalo con cuidado; inserte la cámara
Replay XD 1080 Mini en el soporte de forma que los botones sobrepasen la superficie recortada.
3. Con la cámara Replay XD 1080 Mini centrada en el soporte LowBoy, gírela 360º hasta conseguir el
giro deseado.
4. Deslice el soporte LowBoy introduciéndolo en el soporte SnapTray hasta que quede totalmente asentado y
se escuche un clic. El soporte LowBoy tiene cintas de goma para evitar que la cámara Replay XD 1080 Mini
gire cuando se asiente, lo que garantiza un ángulo de giro ideal. Puede ajustar de forma precisa la cámara
deslizando el soporte LowBoy hacia dentro y hacia fuera del soporte SnapTray.
5. Acople el soporte adhesivo VHB SnapTray en una superficie suave y limpia.
El adhesivo 3M VHB no es recomendable para superficies con relieve.
SOPORTE LOWBOY
Soporte LowBoy
Desbloquear
Bloquear
IMPORTANTE
Utilice alcohol medicinal para
limpiar la superficie de montaje.
Pase un paño seco por la super-
ficie. Aplique el soporte VHB a la
superficie. Presione sin soltar du-
rante 60 segundos para permitir
que el adhesivo se adhiera a la
supercie. La intensidad de ad-
hesión aumentará con el paso
del tiempo. A temperatura
ambiente, espere al menos
24 horas para lograr una in-
tensidad de adhesión del 90%
y 72 horas para que dicha
intensidad llegue al 100%.
ALIGNMENT
ESPAÑOL
12
9
6
3
ALINEACIÓN:
Hay pocas referencias para dirigir y alinear de forma precisa la cámara Replay XD 1080 Mini.
1. El botón Iniciar GRABACIÓN siempre debe estar señalando hacia arriba o en la posición de las 12 en punto para un nivel horizontal.
2. Los marcadores de la vista frontal de plata son horizontales y verticales que actúan como un nivel.
3. Las marcas grabadas con láser en el lado de la repetición XD 1080 Mini están espaciados cada 15 grados para darle un ajuste no.
4. Para asegurarse de que dirige la cámara Replay XD1080 hacia la posición deseada, simplemente mire a lo largo de su carcasa desde la
parte posterior hacia delante como si estuviera mirando a través de un telescopio. Es muy sencillo.
ALIGNMENT
ESPAÑOL
RIDING HEAD POSITION
ACTUAL LINE OF SIGHT
ACTUAL LINE OF SIGHT (HORIZON LINE)
INSTALACIÓN
SOPORTE HEIMLOCK
SOPORTE LOWBOY
Ángulo de instalación y colocación:
1. Cuando utilice un soporte HeimLock o un soporte LowBoy, es importante instalarlos en la posición correcta.
Consulte la ilustración de esta página para conocer las diferentes posiciones.
2. Cuando se instala la cámara en un casco, la mayoría de las personas tienden a bajar su cabeza entre 15º y 20º, o incluso más.
Es importante reconocer cuál es el ángulo natural o la posición activa de las ubicaciones de instalación en
elementos como los siguientes: Esta información le ayudará a lograr el mejor ángulo y a grabar vídeos de calidad profesional.
3. Para obtener los mejores resultados pida un amigo que mire a la su posición en la que practica su actividad y a la posición de su
cabeza para elegir el ángulo de cámara óptimo basándose en aquella posición antes de aplicar el soporte VHB SnapTray.
Consulte la gama completa de soportes e ideas de instalación en www.Replayxd.com.
ALIGNMENT
ESPAÑOL
PC/MACPC/MAC
1. Quite la tapa protectora posterior y conecte el cable mini USB proporcionado
en el puerto USB de la cámara Replay XD 1080 Mini.
2. Enchufe el cable USB al adaptador de CA proporcionado, al adaptador para
vehículo o a un puerto USB 2.0 de su PC o Mac.
3. El LED de estado de carga de color verde situado en la parte posterior de la
cámara Replay XD 1080 Mini se iluminará para indicarle que dicha cámara
se está cargando. Cuando el LED de color verde se apague, la batería estará
completamente cargada y la carga habrá nalizado.
Nota: Charging through the PC/Mac USB port will take approximately twice as
long as using the AC Wall Adapter or Car Adapter. It is not recommended to record
while charging through the PC/Mac USB port as the Replay XD 1080 Mini uses
approximately the same power draw as the PC/Mac USB port, damage to the
Replay XD 1080 Mini or your computer may occur.
En condiciones normales, la cámara Replay XD 1080 Mini tiene una
autonomía de aproximadamente 130 minutos cuando la batería está
completamente cargada. El calor o frío extremo puede afectar a la autonomía
de la batería.
VISTA LATERAL VISTA POSTERIOR
CARGA
MINI USB 2.0
CARGA/SINCRONIZACIÓN
CABLE
ALIGNMENT
ESPAÑOL
PC/MACPC/MAC
B
DESCARGAR
1. Quite la tapa protectora posterior y utilice la opción (1) o (2).
2. Opción (1): extraiga la tarjeta micro SDHC de la cámara Replay XD1080 y utilice
un lector de tarjetas compatible con SDHC para transferir los archivos al equipo.
3. Opción (2): descargue los archivos desde el puerto USB de la cámara Replay
XD 1080 Mini.
4. Plug USB cable into Replay XD 1080 Mini and a PC/Mac USB 2.0 port.
5. Press and hold the Start/Stop button (B) and Power On your Replay XD 1080 Mini.
6. En un PC o Mac, la cámara Replay XD 1080 Mini se montará en el equipo
como un dispositivo de almacenamiento masivo. Puede descargar archivos de
vídeo desde la carpeta DCIM creada en la tarjeta micro SDHC.
(Expulse siempre el dispositivo de su PC o Mac)
Nota: en la Opción (2) las velocidades de transferencia pueden ser lentas.
La reproducción a través de USB no es recomendable, ya
que la reproducción resultante puede no ser homogénea. Descargue primero
las secuencias a su PC o Mac.
MINI USB 2.0
CARGA/SINCRONIZACIÓN
CABLE
VISTA LATERAL
CÓMO BORRAR ARCHIVOS
1. Mueva los archivos o carpetas de vídeo seleccionadas a la papel-
era o a la papelera de reciclaje.
2. Para Mac: Vaya a Finder y seleccione Vaciar papelera...
Nota: el simple hecho de mover los archivos o carpetas a la papelera
no borra los archivos de la tarjeta de memoria, sino que simple-
mente los mueve (se encuentran en la papelera). Los archivos se
almacenan de forma invisible en la tarjeta de memoria hasta que
la papelera se vacía.
VISTA POSTERIOR
ALIGNMENT
ESPAÑOL
SOFTWARE
PC - Windows XP y posterior.
Para visualización sencilla:
Reproductor de Windows Media, Apple Quicktime o VLC Player
Para edición rápida: (por ejemplo recorte y conversión)
Apple Quicktime o Adobe Premier Elements
Para edición completa: (se han probado estas aplicaciones
con éxito)
Adobe Premier Pro o Sony Vegas 8
La cámara Replay XD 1080 Mini graba y guarda en un archivo denominado MOV. El archivo de vídeo es compatible con la mayoría de
reproductores multimedia actuales de PC o Mac. Muchos títulos de software de edición de vídeo son directamente compatibles, como
por ejemplo Adobe Premier, Apple Final Cut, iMovie y Windows Movie Maker.
Existen numerosas conguraciones de equipo, programas de edición de software y otras variables asociadas a los equipos. La lista de sug-
erencias anterior se proporciona para empezar. Estas sugerencias funcionan en la mayoría de los casos pero no es nuestra responsabilidad
si a usted no le funcionan. Consulte los manuales de usuario de su equipo y software de edición de vídeo para ver si son compatibles.
Para obtener información sobre preguntas y respuestas relacionadas con la solución de problemas comunes, visite nuestro
sitio Web en www.Replayxd.com.
MAC - Mac OS X 10.4 y posterior
Para visualización sencilla:
Apple Quicktime y VLC Player
Para edición rápida: (por ejemplo recorte y conversión)
Apple Quicktime o iMovie
Para edición completa: (se han probado estas aplicaciones con
éxito)
Apple Final Cut Pro, Adobe Premier Pro o iMovie
ALIGNMENT
ESPAÑOL
REV. 2011.6.15.0
STABLE IMAGING SOLUTIONS, LLC. GARANTÍA LIMITADA
QUÉ CUBRE LA GARANTÍA
Stable Imaging Solutions, LLC. (SIS) garantiza que el producto no presentará defectos materiales ni de mano de obra durante los 180 días posteriores a la fecha
de compra.
QUÉ NO CUBRE LA GARANTÍA
Esta garantía no cubre los daños causados por:
Accidentes de cualquier tipo
Exposición a presión, temperaturas extremas (fuera del intervalo comprendido entre -20 ºC y 45 ºC) e inmersión en agua. Este producto es resistente al agua
pero no es impermeable, resiste impactos pero no es irrompible y su rendimiento puede verse seriamente afectado ante temperaturas extremas.
Instalación y uso incumpliendo las instrucciones proporcionadas con el mismo, lo que incluye mal uso, abuso y negligencia.
Daños cosméticos.
Modicación del producto o de cualquier parte del mismo.
Esta garantía no cubre ningún producto cuyo número de serie de fábrica se haya alterado, quitado o dañado de cualquier forma debido a un mantenimiento inadecuado.
Esta garantía es válida en cualquier país en el que SIS venda el producto o tenga representación legal. SIS se reserva el derecho de determinar si el producto cumple las
condiciones de esta garantía. SIS, según estime oportuno, puede proporcionar servicio, reparar o reemplazar este producto una vez determinada la causa de la avería. Para
devoluciones: se debe proporcionar el recibo de venta original para tener derecho a cualquier servicio de garantía y debe obtener un número de autorización de devolución
de mercancía (RMA, Return Merchandise Authorization) del servicio de atención al cliente llamando al 1-805-480-9800 antes de devolver el producto. Los productos no se
aceptarán sin un RMA.
EXCEPTO HASTA DONDE LO PERMITA LA LEY, NINGUNA GARANTÍA IMPLÍCITA DE COMERCIABILIDAD O IDONEIDAD PARA UN FIN DETERMINADO DE ESTE PRODUCTO
TIENE UNA DURACIÓN LIMITADA RESPECTO A LA DURACIÓN DE ESTA GARANTÍA. EL CLIENTE SERÁ EL RESPONSABLE DE LA REPARACIÓN O SUSTITUCIÓN SEGÚN LAS
CONDICIONES DE ESTA GARANTÍA. SIS NO SE RESPONSABILIZARÁ DE NINGÚN DAÑO INDIRECTO, INCIDENTAL O CONSECUENTE DE NINGÚN TIPO CAUSADO POR
INCUMPLIMIENTO DE CUALQUIERA DE LAS GARANTÍAS EXPRESAS O IMPLÍCITAS DE ESTE PRODUCTO.
GARANTÍA
ALIGNMENT
ESPAÑOL
REV. 2011.6.15.0
RENUNCIA
STABLE IMAGING SOLUTIONS, LLC. RENUNCIA DE RESPONSABILIDAD
Todos los compradores, usuarios y cualquier parte implicadas o relacionada con el uso de productos de Stable Imaging Solutions, LLC. aceptan lo siguiente:
SIS no promueve o refrenda acciones negligentes o peligrosas al utilizar sus productos.
SIS no asume ninguna responsabilidad por ningún uso o mal uso de sus productos en aplicaciones distintas para las que han sido diseñados
SIS no asume ninguna responsabilidad relacionada con el uso de nuestros productos o de ningún vídeo grabado que pueda ser considerado ilegal.
SIS no asume ninguna responsabilidad por ninguna acción ilegal llevada a cabo durante la grabación, intento de grabación o edición de vídeos grabados con nuestros
productos.
Los productos de SIS están principalmente diseñados para grabar deportes de acción legales o cualquier otra actividad aplicando las leyes locales, estatales, federales o
nacionales.
Los accesorios de la cámara de SIS, incluidos los soportes, cordones y otros accesorios se proporcionan como opciones complementarias y se venden como están. Se deben
utilizar con extremo cuidado y precaución cuando la cámara se instala en un casco, persona o cualquier tipo de propiedad durante cualquier actividad, ya que, en el caso
de que se aoje o permanezca en su sitio, podrían provocar daños, lesiones o, incluso, la muerte.
SIS será indemnizado por la pérdida indirecta, daño, lesión o muerte que resulte del uso de los productos de SIS.
Todas las marcas comerciales y marcas registradas mencionadas en el presente documento son propiedad de sus respectivos propietarios.
Replay XD
®
, Replay XD 1080 Mini es un producto de Stable Imaging Solutions, LLC. en California.
www.Replayxd.com
©2013 Stable Imaging Solutions, LLC., Replay XD
®
Reservados todos los derechos.
ALIGNMENT
ESPAÑOL
REV. 2011.6.15.0
Declaración de cumplimiento de las normas FCC
Este dispositivo cumple la Sección 15 de la Normativa de la FCC. Su funcionamiento se encuentra sujeto a las dos condiciones siguientes:
(1) Este dispositivo no puede causar interferencias perjudiciales, y
(2) Este dispositivo debe aceptar cualquier interferencia recibida, incluyendo aquellas que pudieran provocar un funcionamiento no deseado.
Interferencias de radio y TV.Este equipo se ha probado y cumple los límites correspondientes a un dispositivo digital de Clase B, conforme a las especicaciones del
Apartado 15 de las Normas FCC. Estas especicaciones están diseñadas para proporcionar una protección razonable contra las interferencias en una instalación
residencial. Este equipo genera, utiliza y puede emitir energía de radiofrecuencia y, si no se instala y utiliza de acuerdo con las instrucciones del fabricante, podría
causar interferencias perjudiciales en las comunicaciones de radio. Sin embargo, no existen garantías de que el equipo no provoque interferencias en una instalación
particular. Si este equipo provoca interferencias perjudiciales a la recepción de radio o televisión, lo que puede determinarse encendiéndolo y apagándolo, es
recomendable intentar corregir dichas interferencias mediante una o varias de las siguientes medidas:
• Reorientar o colocar en otro lugar la antena receptora.
• Aumentar la separación entre el equipo y el receptor.
• Conectar el equipo a una toma de corriente de un circuito diferente al que está conectado el receptor.
• Consultar a un vendedor o técnico experimentado de radio/TV para obtener ayuda. El cable de interfaz proporcionado se debe utilizar con el equipo para cumplir
los límites correspondientes a un dispositivo digital conforme al Subapartado B de la Parte 15 de la normativa FCC.
Declaración ICES-003 canadiense
Este aparato digital de Clase B cumple la norma Canadiense ICES-003.
RoHS
Este dispositivo cumple la directiva ROHS de la Unión Europea 2002/95/EC y regulaciones similares que pueden ser adoptadas por otros países europeos para las
ventas en Europa.
Certicación CE
CERTIFICACIONES
ALIGNMENT
PORTUGUÊS
C
H
I
DE
M
N
J
K
L
*
G F
A B
Câmara Replay XD 1080 Mini
(A) Ligar/Desligar
(B) Gravar, Parar
(C) Tampa da lente amovível
(D) Tampa de protecção amovível
(E) 15 marcações de grau
(F) LED azul de alimentação Ligado/Desligado
(G) LED vermelho de gravação Ligado/Desligado
(H) Linha de visão horizontal
(I) Linha de visão vertical
(J) Ranhura para cartões microSDHC
(K) LED verde de carregamento, LED vermelho indicador de cartão
SD não inserido
(L) Modo de vídeo: 1080p, 30, 60 720p (ou foto)
(M) Internal Mic / Audio Line-In Switch (Ext. Mic-In)
(N) Porta Mini USB
(
*
) Repor predenições
ORIENTAÇÃO
ALIGNMENT
PORTUGUÊS
GRAVAÇÃO
G F
A B
Prima A para Ligar/Desligar. Prima B para INICIAR/PARAR a gravação. Concluído.
Ligar (Suspensão e Selecção de Modo): Mantenha premido o botão frontal (A) durante 2 segundos e liberte-o. A câmara
Replay XD 1080 Mini irá vibrar 3 vezes e acenderá o LED azul de alimentação.
Nota: A câmera será desligada depois de 5 segundos, se nenhum cartão SD está presente. Câmara desliga-se após 5 minutos de
inatividade.
Iniciar a gravação: Mantenha premido o botão traseiro (B) durante 2 segundos e liberte-o. A câmara Replay XD 1080 Mini irá vibrar 3
vezes, acenderá o LED vermelho e iniciará a gravação ou captura.
Nota: O LED vermelho na traseira irá piscar se o cartão de memória não estiver correctamente inserido.
Certique-se de que o cartão de memória está totalmente inserido com os contatos dourados voltados para baixo. Utilize
apenas cartões SD aprovados pela XD repetição. Visite www.replayxd.com para ver a lista de cartões SD compatíveis.
Parar a gravação: Mantenha premido o botão traseiro (B) durante 4 segundos e liberte-o. A câmara Replay XD 1080 Mini irá vibrar 1 vez
para noticar que está a guardar o cheiro.
Desligar: Mantenha premido o botão frontal (A) durante 4 segundos e liberte-o. A câmara Replay XD 1080 Mini irá vibrar 1 vez e irá
desligar-se. Nota: O botão de alimentação não funcionará durante a gravação. Isso é normal, e destina-se a impedir que a câmara seja
desligada acidentalmente.
Arquivo Clip (disponível em arquivo de texto avançado): Durante a gravação prima e liberte rapidamente o botão traseiro (B). A câmara
Replay XD 1080 Mini irá vibrar 1 vez para noticar que está a recortar e a guardar o cheiro, e começará automaticamente a gravar ou a capturar
novamente. Esta funcionalidade permite criar um novo cheiro sem iniciar ou parar a gravação.
ALIGNMENT
PORTUGUÊS
M
L
MODOS E DEFINIÇÕES
Modo de Vídeo ou Modo de Foto
1. Deslize o botão de Modo Vídeo (L) para alterar quadros de resolução de vídeo por segundo.
a. 1080p 30 FPS (Full HD)
b. 720p 60 FPS (Suave HD), modo de foto pode ser habilitado no arquivo de texto avançada
Opções de áudio
1. Deslize o INT. / EXT. switch (M) para escolher a opção de áudio.
a. Mic Interno (Padrão)
b. External Line-in, desabilita Mic interno
External Line-in é compatível com a repetição XD 1080 adaptador de áudio Mini ou
Repetir XD 1080 HW Mini Kit, disponível em www.replayxd.com
Para utilizadores avançados e conguração de pers, visite
www.replayxd.com/replay-xd1080mini-advanced/
VISTA TRASEIRA
ALIGNMENT
PORTUGUÊS
*
VHB SnapTray
apertar
o parafuso de
ajuste
1. Encontre a melhor localização para a sua câmara Replay XD 1080 Mini e verique os ângulos. As
superfícies rígidas são ideais para obter a melhor qualidade de vídeo. Nota: Você pode fazer um teste de
gravação e verique se no seu Mac ou PC.
2. Encaixe a câmara Replay XD 1080 Mini no suporte em forma de U e rode 360º para a colocar na posição
desejada.
3. Fixe o suporte autocolante VHB SnapTray numa superfície lisa e limpa.
- O suporte SnapTray plano é ideal para superfícies planas.
- O suporte SnapTray curvo é ideal para superfícies curvas, como por exemplo, capacetes e
superfícies tubulares.
O autocolante 3M VHB não é recomendado para superfícies com textura.
4. Deslize o suporte HeimLock para encaixar no SnapTray até que esteja totalmente encaixado.
5. Ajuste a rotação 360º ou a inclinação, até 8º, abra a alavanca, coloque a câmara Replay XD 1080 Mini na
posição desejada e feche a alavanca. Certique-se de que a alavanca está apertada. Existe uma roda de
ajuste de tensão (
*
) para garantir que o suporte se encontra devidamente bloqueado.
SUPORTE HEIMLOCK
SUPORTE Heimlock
Desbloquear
Bloquear
InclinaçãoRotação
IMPORTANTE
Utilize álcool para limpar a
superfície de montagem. Seque
a superfície. Coloque o suporte
VHB na superfície. Mantenha
pressionado durante sessenta
segundos para permitir que o
autocolante se fixe à super fície. A
aderência aumentará ao longo
do tempo. À temperatura
ambiente, aguarde pelo
menos 24 horas para atingir
90% da aderência e 72 horas
para 100% de aderência.
ALIGNMENT
PORTUGUÊS
VHB SnapTray
1. Encontre a melhor localização para a sua câmara Replay XD 1080 Mini e verique os ângulos.As
superfícies rígidas são ideais para obter a melhor qualidade de vídeo. Nota: Você pode fazer um teste de
gravação e verique se no seu Mac ou PC.
2. Inverta o suporte LowBoy e abra-o cuidadosamente, insira a câmara Replay XD 1080 Mini no
suporte passando os botões pela ranhura.
3. Centre a câmara Replay XD 1080 Mini no suporte LowBoy e rode 360º para a posição desejada.
4. Deslize o suporte LowBoy para encaixar no SnapTray até que esteja totalmente encaixado. O suporte LowBoy
possui faixas de borracha para impedir que a câmara Replay XD 1080 Mini rode quando estiver montada.
Certique-se de que o ângulo de rotação é o ideal. Pode efectuar pequenos ajustes deslizando o LowBoy para
dentro/fora do suporte SnapTray.
5. Fixe o suporte autocolante VHB SnapTray numa superfície lisa e limpa.
O autocolante 3M VHB não é recomendado para superfícies com textura.
SUPORTE LOWBOY
Suporte LowBoy
Desbloquear
Bloquear
IMPORTANTE
Utilize álcool para limpar a
superfície de montagem. Seque
a superfície. Coloque o suporte
VHB na superfície. Mantenha
pressionado durante sessenta
segundos para permitir que o
autocolante se fixe à super fície. A
aderência aumentará ao longo
do tempo. À temperatura
ambiente, aguarde pelo
menos 24 horas para atingir
90% da aderência e 72 horas
para 100% de aderência.
ALIGNMENT
PORTUGUÊS
12
9
6
3
ALINHAMENTO
Existem algumas referências para apontar e alinhar com precisão a sua câmara Replay XD 1080 Mini.
1. O botão Iniciar Gravação deverá estar sempre apontado para cima ou para a posição das 12 horas, para que a câmara esteja nivelada.
2. Os marcadores de vista de prata dianteiros são horizontal e vertical, que atuam como um nível.
3. As marcas gravadas a laser na lateral o replay XD 1080 Mini são espaçadas a cada 15 graus, para dar-lhe um ajuste no.
4. Para se certicar de que está a apontar a câmara Replay XD1080 na direcção desejada, olhe da traseira para a frente da câmara, tal
como se estivesse a olhar por um telescópio. É extremamente fácil.
ALIGNMENT
PORTUGUÊS
RIDING HEAD POSITION
ACTUAL LINE OF SIGHT
ACTUAL LINE OF SIGHT (HORIZON LINE)
MONTAGEM
SUPORTE HEIMLOCK COM ROTAÇÃO/
INCLINAÇÃO
SUPORTE LOWBOY
Ângulo de montagem e conguração:
1. É importante que os suportes HeimLock ou LowBoy sejam montados numa posição ideal. Consulte a ilustração nesta página onde se
apresentam possíveis posições.
2. Ao montar a câmara num capacete, a maioria das pessoas tem tendência a baixar a cabeça entre 15º a 20º.
É importante conhecer qual o ângulo natural ou a posição activa dos locais de montagem nos objectos,
como por exemplo: capacetes, chapéus, guiadores, quadros dos veículos, etc. Isso ajudará a conseguir o melhor ângulo e uma captura
de vídeo prossional.
3. Para obter melhores resultados, peça a um amigo para vericar a posição activa da sua cabeça para escolher o ângulo ideal da
câmara de acordo com a sua posição antes de aplicar o suporte VHB SnapTray.
Nota: Você pode fazer um teste de gravação e vericá-lo em um Mac ou PC.
Consulte a nossa gama total de suportes e sugestões de montagem em www.Replayxd.com
ALIGNMENT
PORTUGUÊS
PC/MACPC/MAC
1. Retire a tampa de protecção traseira e ligue o cabo mini USB fornecido à porta
USB da câmara Replay XD 1080 Mini.
2. Ligue o cabo USB ao transformador AC fornecido, ao adaptador para veículo ou
à porta USB 2.0 de um PC/Mac.
3. O LED verde de estado de carregamento existente na traseira da câmara Replay
XD 1080 Mini irá acender para indicar que a bateria está a ser carregada.
Quando o LED verde se desligar a bateria estará totalmente carregada.
Nota: A carregamento através da porta USB de um PC/Mac demorará
aproximadamente o dobro do tempo do carregamento com o transformador AC ou
o adaptador para veículo.Não recomendamos a gravação durante o carregamento
através da porta USB de um PC/Mac, pois a câmara Replay XD 1080 Mini utiliza
aproximadamente a mesma quantidade de energia fornecida pela porta USB
do PC/Mac. Poderão ocorrer danos na câmara Replay XD 1080 Mini ou no seu
computador.
A câmara Replay XD 1080 Mini irá gravar durante aproximadamente 130 min. com
uma carga completa em condições ideais. O calor ou frio extremos podem afectar
a duração da bateria.
VISTA LATERAL VISTA TRASEIRA
CARREGAMENTO
MINI USB 2.0
CABO DE
CARREGAMENTO/
SINCRONIZAÇÃO
ALIGNMENT
PORTUGUÊS
TRANSFERÊNCIA
PC/MACPC/MAC
B
1. Retire a tampa de protecção traseira e utilize a opção (1) ou a opção (2).
2. Opção (1): Retire o cartão microSDHC da câmara Replay XD 1080 Mini e utilize
um leitor de cartões compatível com SDHC para transferir os cheiros para o
seu computador.
3. Opção (2): Transra utilizando a porta USB da câmara Replay XD 1080 Mini.
4. Ligue o cabo USB à câmara Replay XD 1080 Mini e à porta USB 2.0 de um PC/Mac.
5. Pressione e segure o botão Start / Stop (B) e Power On sua repetição XD 1080 Mini.
6. Num PC/Mac a câmara Replay XD1080 será identicada como
um dispositivo de armazenamento em massa. Poderá transferir os seus
cheiros de vídeo a partir da pasta DCIM criada no cartão microSDHC.
(Ejecte sempre o dispositivo do PC/Mac)
Nota: A Opção (2) poderá apresentar velocidades de transferência lentas.
A reprodução através de USB não é recomendada, pois poderão ocorrer
cortes na reprodução. Transra primeiro os vídeos para o PC/Mac.
VISTA LATERAL
COMO APAGAR FICHEIROS
1. Mova os ficheiros de vídeos ou pastas seleccionadas para o Lixo
ou a Reciclagem
2. Para Mac: Vá ao Finder e seleccione Esvaziar Lixo...
Nota: Ao mover os ficheiros ou pastas para o Lixo não apagará
os ficheiros do cartão de memória, apenas os move para o lixo
(referenciados no Lixo). Os ficheiros permanecem armazenados de
forma invisível no cartão de memória até que o Lixo seja esvaziado.
VISTA TRASEIRA
MINI USB 2.0
CABO DE
CARREGAMENTO/
SINCRONIZAÇÃO
ALIGNMENT
PORTUGUÊS
SOFTWARE
PC - Windows XP e mais recente
Para visualização simples:
Windows Media Player, Apple Quicktime ou VLC Player
Para edição rápida: (por exemplo, recortar e converter)
Apple Quicktime ou Adobe Premier Elements
Para edição total: (tentámos estes programas com sucesso)
Adobe Premier Pro ou Sony Vegas 8
A câmara Replay XD 1080 Mini grava e guarda para um cheiro MOV. O cheiro de vídeo é compatível com a maioria dos leitores
multimédia num PC ou Mac. Existem diversos programas de edição de vídeo que são totalmente compatíveis, tais como: Adobe
Premier, Apple Final Cut, iMovie e o Windows Movie Maker.
Existem diversas congurações de computadores, programas de edição e outras variáveis que estão associadas aos computadores.
Fornecemos a lista acima para sugerir alguns programas. Estas sugestões funcionam na maioria dos casos, mas não poderemos ser res-
ponsabilizados caso os mesmos não funcionem no seu caso particular. Consulte o manual do utilizador do seu computador e do software
de edição de vídeo para vericar se ambos são compatíveis.
Para perguntas e respostas sobre resolução de problemas comuns , visite a nossa página em www.Replayxd.com
MAC - Mac OS X 10.4 e mais recente
Para visualização simples:
Apple Quicktime, VLC Player
Para edição rápida: (por exemplo, recortar e converter)
Apple Quicktime ou iMovie
Para edição total: (tentámos estes programas com sucesso)
Apple Final Cut Pro, Adobe Premier Pro ou iMovie
ALIGNMENT
PORTUGUÊS
REV. 2011.6.15.0
STABLE IMAGING SOLUTIONS, LLC. GARANTIA LIMITADA
O QUE COBRE A GARANTIA
A Stable Imaging Solutions, LLC. (SIS) oferece garantia durante 180 dias a partir da data da compra do produto para
defeitos de material e de fabrico.
O QUE NÃO COBRE
Esta garantia não cobre danos devido a:
Qualquer tipo de acidentes
Exposição a pressão, temperaturas extremas (inferiores a -20ºC e superiores a 45ºC) e imersão em água. Este produto
é resistente à água, no entanto não é impermeável, é resistente a choques, mas não é à prova de choques e o seu
desempenho pode ser afectado quando exposto a temperaturas extremas.
Instalação e utilização contrária às instruções fornecidas com o produto, incluindo utilização imprópria, abuso e
negligência.
Danos cosméticos.
Modicações em qualquer componente do produto.
Esta garantia não cobre qualquer produto no qual o número de série tenha sido alterado ou removido ou tenham ocorrido
quaisquer danos devido a manutenção inadequada. Esta garantia é válida em todos os países onde a SIS vende o produto ou
está legalmente representada. A SIS reserva o direito de determinar se o produto se encontra dentro das orientações desta
garantia. A SIS, a seu exclusivo critério, poderá prestar assistência, reparar ou substituir este produto após a determinação da
causa da avaria. Para devoluções: O recibo de venda original deverá ser apresentado para qualquer assistência durante o perío-
do de garantia e deverá ser obtido um número de Autorização de Devolução de Mercadoria (RMA) a partir da linha de apoio ao
cliente 1-805-480-9800 antes de devolver o produto. Os produtos não serão aceites sem um número RMA.
COM EXCEPÇÃO DO ESPECIFICAMENTE PROIBIDO POR LEI, QUALQUER GARANTIA IMPLÍCITA DE COMERCIALIZAÇÃO OU
ADEQUAÇÃO A UMA FINALIDADE ESPECÍFICA SOBRE ESTE PRODUTO ESTÁ LIMITADA AO PERÍODO DE DURAÇÃO DESTA
GARANTIA. A REPARAÇÃO OU SUBSTITUIÇÃO PREVISTAS NESTA GARANTIA É RECURSO EXCLUSIVO DO CONSUMIDOR, A
SIS NÃO SERÁ RESPONSÁVEL POR QUAISQUER TIPO DANOS INDIRECTOS, ACIDENTAIS OU PREJUÍZOS CAUSADOS PELA
VIOLAÇÃO DE QUALQUER GARANTIA EXPRESSA OU IMPLÍCITA PARA ESTE PRODUTO.
GARANTIA
ALIGNMENT
PORTUGUÊS
REV. 2011.6.15.0
STABLE IMAGING SOLUTIONS, LLC. EXCLUSÃO DE RESPONSABILIDADE
Todos os compradores, utilizadores e todas as partes envolvidas ou participantes na utilização dos produtos da Stable Imaging
Solutions, LLC. (“SIS”) concordam com o seguinte:
A SIS não promove nem patrocina acções negligentes e/ou perigosas durante a utilização dos seus produtos.
A SIS não é responsável por qualquer utilização ou utilização imprópria dos produtos SIS em aplicações diferentes daquelas
para as quais foram concebidos.
A SIS não assume qualquer responsabilidade em relação à utilização dos seus produtos ou de qualquer vídeo capturado que
possa ser considerado ilegal.
A SIS não é responsável por quaisquer acções ocorridas durante a gravação, tentativa de gravação ou edição de vídeos
capturados com os seus produtos.
A nalidade principal dos produtos SIS é a gravação de desportos de acção ou quaisquer outras actividades legais previstas
pela legislação local, estatal, federal ou nacional.
Os acessórios para câmaras SIS, incluindo suportes, cabos e outros itens são fornecidos como opções de anexo e são
vendidas como tal. Eles devem ser utilizados com extremo cuidado quando a câmara estiver montada num capacete, pessoa
ou qualquer tipo de objecto durante qualquer actividade para evitar que a câmara se solte, caso contrário poderá causar
danos, ferimentos ou morte.
SIS oferecerá compensações por perdas consequentes ou indirectas, danos, ferimentos ou morte resultantes da utilização
dos produtos SIS.
Todas as marcas comercias e marcas comerciais registadas aqui mencionadas são reconhecidas como propriedade dos
respectivos proprietários.
Replay XD
®
, Replay XD 1080 Mini é um produto da Stable Imaging Solutions, LLC. na Califórnia.
www.Replayxd.com
©2011 Stable Imaging Solutions, LLC., Replay XD
®
Todos os direitos reservados.
EXCLUSÃO DE RESPONSABILIDADE
ALIGNMENT
PORTUGUÊS
REV. 2011.6.15.0
Declaração de compatibilidade com as regras da FCC
Este dispositivo está de acordo com o Artigo 15º das Normas da FCC. O seu funcionamento está sujeito às duas condições
seguintes:
(1) Este dispositivo não pode causar interferências prejudiciais, e
(2) este dispositivo deve aceitar qualquer tipo de interferência recebida, incluindo interferências que possam causar um
funcionamento indesejado.
Interferências de Rádio e TV. Este equipamento foi testado e vericou-se que é compatível com os limites estipulados
para um dispositivo digital de Classe B, segundo o Artigo 15º das normas da FCC. Estas especicações foram concebidas
para proporcionar uma protecção razoável contra interferências prejudiciais numa instalação doméstica. Este
equipamento gera, utiliza e pode emitir energia de radiofrequência e, se não for instalado e utilizado de acordo com
as instruções do fabricante, pode interferir prejudicialmente com as comunicações via rádio. No entanto, não existe
qualquer garantia de que a interferência não ocorra numa determinada instalação. Caso este equipamento cause
interferências prejudiciais à recepção via rádio ou televisão, o que pode ser determinado desligando e ligando o aparelho,
o utilizador deve tentar corrigir a interferência adoptando uma ou mais das seguintes medidas:
Reorientar ou mudar o local da antena receptora.
Aumentar a distância entre o equipamento e o receptor.
Ligar o equipamento a uma tomada que faça parte de um circuito diferente daquele onde o receptor está ligado.
Consultar o fornecedor ou um técnico de rádio/televisão para obter ajuda. O cabo de interface fornecido deverá ser
utilizado com o equipamento para cumprir os limites estipulados para um dispositivo digital, de acordo com a Alínea B
do Artigo 15º das Normas da FCC.
Declaração da norma canadiana ICES-003
Este dispositivo digital da Classe B satisfaz os requisitos da norma canadiana ICES-003.
RoHS
Este dispositivo é compatível com a directiva ROHS 2002/95/CE da União Europeia e regulamentos semelhantes que
podem ser adoptados por outros países europeus para vendas na Europa.
Certicação CE
CONFORMIDADE
ALIGNMENT
ITALIANO
C
H
I
DE
M
N
J
K
L
*
G F
A B
Videocamera Replay XD 1080 Mini
(A) Accensione/spegnimento
(B) Registrazione, Stop
(C) Coperchio obiettivo rimovibile
(D) Coperchio terminale rimovibile
(E) 15 Marcature di laurea
(F) LED blu alimentazione attiva/disattiva
(G) LED rosso registrazione attiva/disattiva
(H) Linea visiva orizzontale
(I) Linea visiva verticale
(J) Alloggio microSDHC
(K) LED verde caricamento, LED rosso scheda SD assente
(L) Modalità video: 1080p 30, 720p 60 (o Foto)
(M) Internal Mic / Audio Line-In Switch (Ext. Mic-In)
(N) Porta mini USB
(
*
) Ripristino generale
ORIENTAMENTO
ALIGNMENT
ITALIANO
G F
A B
REGISTRAZIONE
Premere il tasto A accendere/spegnere. Premere il tasto B per avviare/terminare la registrazione. Fatto.
Accensione (standby e selezione modalità): Tenere premuto per 2 secondi il tasto anteriore (A), Replay XD 1080 Mini vibrerà
3 volte ed il LED blu si accenderà. Nota: fotocamera si spegne dopo 5 secondi se nessuna scheda SD è presente. Fotocamera si
spegne dopo 5 minuti di inattività.
Avviare la registrazione: Tenere premuto per 2 secondi il tasto posteriore (B), Replay XD 1080 Mini vibrerà 3 volte, il LED rosso si
accenderà e si avvierà automaticamente la registrazione o l’acquisizione.
Nota: Il LED rosso sulla parte terminale lampeggerà quando la scheda di memoria non è inserita in modo appropriato.
Assicurarsi che la scheda di memoria sia inserita completamente no a quando non scatta e che i contatti dorati siano rivolti
verso il basso. Usare solo carta approvata da Replay XD SD. Visita www.replayxd.com per un elenco di schede SD compatibili.
Terminare la registrazione: Tenere premuto per 4 secondi il tasto posteriore (B), Replay XD 1080 Mini vibrerà 1 volta per avvisare che
sta salvando il le.
Spegnimento:Tenere premuto per 4 secondi il tasto frontale (A), Replay XD 1080 Mini vibrerà 1 volta e si spegnerà.
Nota: Durante la registrazione il tasto d’alimentazione non funziona. Questo fenomeno è normale e serve a prevenire lo spegnimento
accidentale.
File Clip (disponibile in le di testo avanzato): Durante la registrazione, premere rapidamente il tasto posteriore (B), Replay XD 1080 Mini
vibrerà 3 per avvisare che sta tagliando e salvando il le, poi riavvia automaticamente la registrazione o acquisizione. Questa funzione permette di
iniziare la registrazione di un uovo le senza dovere arrestare ed avviare la registrazione.
ALIGNMENT
ITALIANO
M
L
MODALITÀ E IMPOSTAZIONI
1080p Video Mode / Frames Per Second
1. Far scorrere l’interruttore di modalità Video (L) per cambiare risoluzione video fotogrammi al secondo.
a. 1080p 30 FPS (Full HD)
b. 720p 60 fps (Smooth HD), modalità foto possono essere abilitati nel le di testo avanzato
Opzione Audio
1. Far scorrere l’INT. / EXT. passare (M) per scegliere l’opzione audio.
a. Internal Mic (Default)
b. External Line-in, disabilita microfono interno
External Line-in è compatibile con Replay XD 1080 Mini adattatore audio o
Replay XD 1080 Mini Kit HW, disponibile presso www.replayxd.com
Visitare il sito www.replayxd.com/replay-xd1080mini-advanced/ per informazioni sulle impostazioni
avanzate
VEDUTA TERMINALE
ALIGNMENT
ITALIANO
Sblocca
Blocca
*
VHB SnapTray
serrare
vite di ssaggio
1. Trovare la migliore posizione d’installazione per Replay XD 1080 Mini e controllare le angolazioni.
Le superci rigide sono l’ideale per ottenere la migliore qualità video. Nota: È possibile eettuare una
registrazione di prova e controllare il vostro Mac o PC.
2. Fissare Replay XD 1080 Mini nel supporto a U e ruotare di 360° sulla posizione voluta.
3. Attaccare il supporto adesivo SnapTray VHB ad una superficie liscia e pulita.
- I supporti piatti SnapTray vanno bene per tutte le superfici lisce e piatte.
- I supporti curvi SnapTray vanno bene per superfici curve, come caschi e superfici arrotondate.
L’adesivo 3M VHB non è consigliato per le superfici ruvide.
4. Fare scorrere il supporto HeimLock nel supporto SnapTray nché è completamente inserito e scatta.
5. Regolare la rotazione di 360° o l’inclinazione di +8º sbloccando la leva e collocando Replay XD 1080 Mini
nella posizione voluta, quindi bloccare la leva. Assicurarsi che la leva sia bloccata con fermezza. C’è una
rotella di regolazione della tensione (
*
) che permette di avere sempre una chiusura ermetica.
SUPPORTO HEIMLOCK
Supporto HeimLock
IMPORTANTE
Pulire la superficie d’installazione
con alcol, e poi asciugare la super-
ficie. Collocare il supporto VHB sul-
la superficie. Tenerlo premuto per
sessanta secondi per permettere
all’adesivo di incollarsi alla super-
cie. L’aderenza aumenterà col
tempo. At temperatura am-
biente, attendere almeno 24
ore per ottenere un’aderenza
del 90% e 72 ore per ottenere
un’aderenza del 100%.
InclinazioneRotazione
ALIGNMENT
ITALIANO
VHB SnapTray
1. Trovare la migliore posizione d’installazione per Replay XD 1080 Mini e controllare le angolazioni.
Le superci rigide sono l’ideale per ottenere la migliore qualità video. Nota: È possibile eettuare una
registrazione di prova e controllare il vostro Mac o PC.
2. Capovolgere il supporto LowBoy ed aprirlo con delicatezza, inserire Replay XD 1080 Mini nel
supporto facendo passare i tasti attraverso l’apertura.
3. Con Replay XD 1080 Mini centrata sul supporto LowBoy, ruotare di 360° sulla posizione voluta.
4. Fare scorrere il supporto LowBoy nel supporto SnapTray nché è completamente inserito e scatta. Il supporto
LowBoy è dotato di strisce di gomma che impediscono a Replay XD 1080 Mini di ruotare quando è installata,
assicurando così l’angolazione ideale. Si possono eseguire regolazioni di precisione facendo scorrere il supporto
LowBoy sul supporto SnapTray.
5. Attaccare il supporto adesivo VHB SnapTray su una superficie liscia e pulita.
L’adesivo 3M VHB non è consigliato per le superfici ruvide.
SUPPORTO LOWBOY
Supporto LowBoy
Sblocca
Blocca
IMPORTANTE
Pulire la superficie d’installazione
con alcol, e poi asciugare la super-
ficie. Collocare il supporto VHB sul-
la superficie. Tenerlo premuto per
sessanta secondi per permettere
all’adesivo di incollarsi alla super-
cie. L’aderenza aumenterà col
tempo. At temperatura am-
biente, attendere almeno 24
ore per ottenere un’aderenza
del 90% e 72 ore per ottenere
un’aderenza del 100%.
ALIGNMENT
ITALIANO
12
9
6
3
ALLINEAMENTO
Ci sono alcuni punti di riferimento per puntare ed allineare con accuratezza Replay XD 1080 Mini.
1. Il tasto di registrazione (B) deve sempre puntare verso le ore 12 per ottenere un orizzonte a livello.
2. I marcatori vista frontale argento sono orizzontali e verticali che agiscono come un livello.
3. Il laser incisi segni sul lato dei Replay XD 1080 Mini sono distanziati di 15 gradi per dare una regolazione ne.
4. Per accertarsi di puntare Replay XD 1080 Mini nella direzione voluta, guardare lungo la telecamera da dietro a davanti come se si
guardasse attraverso un telescopio. È davvero così semplice.
ALIGNMENT
ITALIANO
RIDING HEAD POSITION
ACTUAL LINE OF SIGHT
ACTUAL LINE OF SIGHT (HORIZON LINE)
INSTALLAZIONE
SUPPORTO HEIMLOCK
SUPPORTO LOWBOY
Installazione e regolazione dell’angolazione:
1. Quando si usa un supporto HeimLock o LowBoy, è importante eseguire l’installazione nella posizione ottimale.
Usare l’illustrazione di questa pagina come riferimento per le possibili posizioni d’installazione.
2. Quando si esegue l’installazione su un casco, tenere presente che la maggior parte delle persone ha la tendenza ad abbassare la testa
dai 15° no and un massimo di 20°.
È importante riconoscere l’angolazione naturale o la posizione quando si esegue l’installazione su superci
quali: In questo modo si può ottenere l’angolazione migliore ed acquisire video che assomigliano a quelli professionali.
3. Per ottenere i risultati migliori, chiedere ad un amico di osservare la postura della guida attiva e la posizione dalla testa per scegliere
l’angolazione della telecamera in base alla posizione di guida prima di attaccare il supporto VHB SnapTray.
Andare al sito www.Replayxd.com per la serie completa di supporti e suggerimenti per l’installazione
ALIGNMENT
ITALIANO
PC/MACPC/MAC
1. Rimuovere il coperchio terminale e collegare il cavo mini USB alla porta USB
di Replay XD 1080 Mini.
2. Collegare il cavo USB all’adattatore AC fornito in dotazione, ad un adattatore
per veicoli, oppure ad una porta USB 2.0 del PC/Mac.
3. Il LED verde, sulla parte posteriore di Replay XD 1080 Mini, si accenderà per
avvisare che è in corso la procedura di caricamento. Quando il LED verde si
spegne, signica che la batteria è stata caricata e che la procedura è terminata.
Nota: Charging through the PC/Mac USB port will take approximately twice as
long as using the AC Wall Adapter or Car Adapter. It is not recommended to record
while charging through the PC/Mac USB port as the Replay XD 1080 Mini uses
approximately the same power draw as the PC/Mac USB port, damage to the
Replay XD 1080 Mini or your computer may occur.
In condizioni ottimali, Replay XD 1080 Mini registrerà per circa 130 minuti quando
la batteria è ompletamente carica. Caldo o freddo estremo inuiscono sulla durata
della batteria.
VEDUTA LATERALE VEDUTA TERMINALE
CARICAMENTO
CAVO
CARICAMENTO/SYNC
MINI USB 2.0
ALIGNMENT
ITALIANO
DOWNLOAD
PC/MACPC/MAC
B
1. Rimuovere il coperchio terminale ed usare l’opzione (1) o l’opzione (2).
2. Opzione (1): Estrarre la scheda microSDHC da Replay XD 1080 Mini ed usare un
lettore di schede compatibile SDHC per trasferire i le al computer.
3. Opzione (2): Eseguire il download dalla porta USB di Replay XD 1080 Mini.
4. Plug USB cable into Replay XD 1080 Mini and a PC/Mac USB 2.0 port.
5. Premere e tenere premuto il pulsante Start / Stop (B) e Power On Replay XD 1080
Mini.
6. Sul PC/Mac, Replay XD 1080 Mini sarà montata sul computer
come dispositivo d’archiviazione di massa. Scaricare i le video
dalla cartella DCIM creata nella scheda microSDHC.
(Eseguire sempre la rimozione sicura dell’hardware sul PC/Mac)
Nota: Lopzione (2) può manifestare lentezza nel trasferimento.
Si sconsiglia la riproduzione via USB perché può essere
irregolare. Prima scaricare i lmati sul PC/Mac.
VEDUTA LATERALE
COME SI CANCELLANO I FILE
1. Spostare i le video o le cartelle selezionate nel Cestino
del computer
2. Per Mac: Andare a Finder e selezionare Empty Trash...
(Svuota cestino...) Nota: Il solo spostamento dei le o
delle cartelle nel Cestino non cancella i le dalla scheda di
memoria, semplicemente li sposta (e fanno riferimento al
Cestino). I le sono archiviati in modo invisibile nella sche-
da di memoria nché è svuotato il Cestino.
VEDUTA TERMINALE
CAVO
CARICAMENTO/SYNC
MINI USB 2.0
ALIGNMENT
ITALIANO
SOFTWARE
PC - Windows XP e versioni successive
Visualizzazione semplice:
Windows Media Player, Apple Quicktime o lettore VLC
Elaborazione rapida: (e.g. ritaglio e conversione)
Apple Quicktime o Adobe Premier Elements
Elaborazione articolata: (abbiamo testato questi con successo)
Adobe Premier Pro o Sony Vegas 8
Replay XD 1080 Mini registra e salva le registrazioni in un le chiamato MOV. Il le video è compatibile con la maggior parte dei
lettori multimediali correnti installati su PC o Mac. Molti software d’elaborazione video sono immediatamente compatibili, come:
Adobe Premier, Apple Final Cut, iMovie e Windows Movie Maker.
Ci sono molte congurazioni dei computer, programmi software d’elaborazione e altre variabili che sono associate ai computer. Abbiamo
fornito il precedente elenco di suggerimenti per permettervi di iniziare. Questi suggerimenti funzionano nella maggior parte dei casi e
non possiamo garantire che funzioneranno per voi. Consultare il manuale d’uso del computer e del software delaborazione video per
vedere se sono compatibili.
Per domande e risposte per la risoluzione di problemi comuni visitare il nostro sito all’indirizzo: www.Replayxd.com
MAC - Mac OS X 10.4 e versioni più recenti
Visualizzazione semplice:
Apple Quicktime, lettore VLC
Elaborazione rapida: (e.g. ritaglio e conversione)
Apple Quicktime o iMovie
Elaborazione articolata: (abbiamo testato questi con successo)
Apple Final Cut Pro, Adobe Premier Pro o iMovie
ALIGNMENT
ITALIANO
REV. 2011.6.15.0
STABLE IMAGING SOLUTIONS, LLC. GARANZIA LIMITATA
CHE COSA COPRE LA GARANZIA
Stable Imaging Solutions, LLC. (SIS) garantisce per 180 giorni dalla data di acquisto che il prodotto sarà esente da difetti
dei materiale e di fabbricazione.
CHE COSA NON È COPERTO
Questa garanzia non copre danni provocati da:
Incidenti di qualsiasi tipo
L'esposizione a pressione, temperature estreme (al di fuori di -20° C +45° C) ed immersione in acqua. Questo prodotto
è resistente all'acqua ma non è impermeabile; è resistente agli urti ma non è antiurto, e le sue prestazioni possono
essere ostacolate a temperature estreme.
L’installazione e l’uso in modo non conforme alle istruzioni che accompagnano il prodotto, includendo cattivo uso,
abuso e negligenza.
Danni cosmetici.
Modica del prodotto o di qualsiasi sua parte.
Questa garanzia non copre i prodotti per i quali il numero di serie applicato in fabbrica sia stato alterato o rimosso o eventuali
danni dovuti a manutenzione impropria. Questa garanzia è valida in tutti i paesi in cui SIS vende il prodotto oppure è legalmen-
te rappresentata. SIS si riserva il diritto di determinare se il prodotto è corrispondente alle linee guida di questa garanzia. SIS, a
sua discrezione, potrà eseguire l’assistenza, la riparazione o la sostituzione di questo dopo aver determinato la causa del guasto.
Per i resi: Deve essere esibita la ricevuta di acquisto originale per qualsiasi servizio di garanzia, e prima di restituire il prodotto
deve essere ottenuto un numero RMA (Return Merchandise Authorization) dall’Assistenza clienti, chiamando il numero 1-805-
480-9800. Senza RMA, i prodotti non saranno accettati.
FATTA ECCEZIONE PER QUANTO VIETATO DALLE LEGGI IN VIGORE, TUTTE LE GARANZIE IMPLICITE DI COMMERCIABILITÀ
O IDONEITÀ AD UNO SCOPO SPECIFICO DI QUESTO PRODOTTO SONO LIMITATE ALLA DURATA DI QUESTA GARANZIA.
LA RIPARAZIONE O LA SOSTITUZIONE, COME PREVISTO DALLA PRESENTE GARANZIA, SONO L'UNICO RIMEDIO DEL
CONSUMATORE, SIS NON SARÀ RESPONSABILE PER DANNI INDIRETTI, ACCIDENTALI O CONSEGUENTI DI QUALSIASI TIPO,
CAUSATI DA VIOLAZIONE DI QUALSIASI GARANZIA ESPLICITA O IMPLICITA DI QUESTO PRODOTTO.
GARANZIA
ALIGNMENT
ITALIANO
REV. 2011.6.15.0
STABLE IMAGING SOLUTIONS, LLC. DISCLAIMER
Tutti gli acquirenti, utenti e qualsiasi soggetto coinvolto nell’uso dei prodotti Stable Imaging Solutions, LLC. (“SIS”) accetta quanto
segue:
SIS non promuove né sostiene azioni negligenti o pericolose quando si usano i suoi prodotti.
SIS non è responsabile per qualsiasi uso o per l'abuso di prodotti SIS in applicazioni diverse da quelle per cui è stato
progettato.
SIS non si assume alcuna responsabilità in relazione all'uso dei suoi prodotti o di qualsiasi video acquisito che potrebbe
essere considerato illegale.
SIS non è responsabile di eventuali azioni illegali intraprese durante la registrazione, il tentativo di registrazione o elaborazio-
ne video acquisito con i suoi prodotti.
Lo scopo principale dei prodotti SIS è la registrazione di azioni sportive legali o qualsiasi altra attività legale come previsto
dalle leggi locali, statali, federali e nazionali.
Gli accessori della telecamera SIS, includendo supporti, cordini ed altri accessori, sono forniti come opzioni e sono venduti
così come sono. Devono essere usati con estrema cautela e attenzione quando la telecamera è installata su caschi, persone
o qualsiasi tipo di proprietà durante qualsiasi attività, perché potrebbero allentarsi o bloccarsi e provocare danni, lesioni o
morte.
SIS è assicurata dalla perdita conseguente o diretta, da danni, lesioni o morte derivante dall'uso dei prodotti SIS.
Tutti i marchi e i marchi registrati qui citati sono riconosciuti come proprietà dei loro rispettivi titolari.
Replay XD
®
, Replay XD 1080 Mini è un prodotto della Stable Imaging Solutions, LLC. in California.
www.Replayxd.com
©2013 Stable Imaging Solutions, LLC., Replay XD
®
Tutti i diritti riservati.
DISCLAIMER
ALIGNMENT
ITALIANO
REV. 2011.6.15.0
Dichiarazione di conformità FCC:
Questo prodotto è conforme alla Parte 15 delle Norme FCC. Il funzionamento è soggetto alle seguenti due condizioni:
(1) Questo dispositivo non può provocare interferenze dannose, e
(2) Questo dispositivo deve accettare tutte le interferenze ricevute, incluse le interferenze che possono provocare
operazioni indesiderate.
Interferenze Radio e TV Questa attrezzatura è stata collaudata e trovata conforme ai limiti di un apparecchio di Classe
B, in conformità alle speciche della parte 15 delle Normative FCC. Queste speciche sono designate a fornire una
protezione ragionevole da interferenze dannose in una installazione privata. Questa attrezzatura genera, utilizza e
può irradiare energia di frequenza radio e, se non è installata ed utilizzata in accordo alle istruzioni del produttore, può
provocare interferenze dannose alle comunicazioni radio. Tuttavia, non esiste garanzia che l’interferenza non si verichi
in una particolare installazione. Se questa apparecchiatura causa interferenze dannose alla ricezione radio-televisiva,
individuate accendendo e spegnendo l'apparecchiatura stessa, l’utente è invitato a cercare rimedio adottando una o più
delle seguenti misure:
• Riorientare o ricollocare l’antenna di ricezione.
• Aumentare la distanza tra l'attrezzatura ed il ricevitore.
• Collegare l'attrezzatura ad una presa di corrente su di un circuito diverso da quello a cui è collegata l'antenna.
• Consultare il rivenditore o un tecnico specializzato radio / TV per aiuto. Con l’attrezzatura deve essere utilizzato il cavo
di interfaccia fornito in dotazione per rispettare i limiti di un dispositivo digitale, secondo la Sezione B della Parte 15 delle
Normative FCC.
Dichiarazione ICES-003 Canadese
Questo apparato digitale di Classe B è conforme alla Normativa Canadese ICES-003.
RoHS
Questo dispositivo è conforme alla Direttiva 2002/95/CE ROHS dell'Unione Europea ed a normative simili che possono
essere adottate da altri paesi europei per le vendite in Europa.
Certicazione CE
CONFORMITÀ
ALIGNMENT
SVENSK
C
H
I
DE
M
N
J
K
L
*
G F
A B
ORIENTERING
Kamera Replay XD 1080 Mini
(A) På/Av
(B) Inspelning, Stopp
(C) Borttagbart linsskydd
(D) Borttagbart skyddslock
(E) 15 Degree Märkningar
(F) På/Av - blå LED-indikator
(G) Inspelning På/Av - röd LED-indikator
(H) Horisontell siktlinje
(I) Vertikal siktlinje
(J) microSDHC-plats
(K) Laddning - grön LED-indikator, inget SD-kort - röd LED-indikator
(L) Videoläge: 1080p 30, 720 60 (eller foto)
(M) Intern Mic / Audio Line-In Switch (Ext. Mic-In)
(N) Mini USB
(
*
) Huvudåterställning
ALIGNMENT
SVENSK
G F
A B
INSPELNING
Tryck på A för start/avstängning. Tryck på B för att starta/stoppa en inspelning. Klart.
Start (val av vänteläge och lägesinställning): Håll ner främre knappen (A) i 2 sekunder. Replay XD 1080 Mini vibrerar 3
gånger och den blå strömindikatorn tänds. Obs: Kameran stängs av efter 5 sekunder om inget SD-kort finns. Kameran stängs av
efter fem minuter utan aktivitet.
Starta inspelningen: Håll ner den bakre knappen (B) i 2 sekunder och släpp. Replay XD 1080 Mini vibrerar 3 gånger, den röda LED-
indikatorn tänds och inspelningen eller fotograferingen startar.
Obs!: Den röda LED-indikatorn blinkar om minneskortet inte är isatt ordentligt. Skjut in minneskortet helt tills det klickar
(guldkontakterna nedåt). Använd endast SD-kort som är godkända för användning med Replay XD. På www.replayxd.com är
en lista över kompatibla SD-kort.
Avsluta inspelningen: Håll ner den bakre knappen (B) i 4 sekunder. Replay XD 1080 Mini vibrerar 1 gång för att meddela att len
sparas.
Stänga av: Håll ner den främre knappen (A) i 4 sekunder. Replay XD1080 vibrerar 1 gång och stängs av.
Obs! Av/på-knappen fungerar inte under inspelning. Detta är normalt och avsett att förhindra oavsiktlig avstängning.
Clip File (endast tillgängligt i avancerat textl): Tryck ner den bakre knappen (B) snabbt under inspelning. Replay XD 1080 Mini vibrerar 3
gånger för att meddela att lmklippet sparas som en l och återupptar sedan inspelningen eller fotograferingen. Med den här funktionen kan du
starta en ny l utan att starta eller stoppa inspelningen.
ALIGNMENT
SVENSK
M
L
LÄGEN OCH INSTÄLLNINGAR
1080p videoläge / Frames Per Second
Ett. Skjut omkopplaren Videoläge (L) för att ändra ramar video upplösning per sekund.
a. 1080p 30 FPS (Full HD)
b. 720p 60 FPS (Smooth HD), foto-läget kan aktiveras i Advanced Text File
Ljud Option
Ett. Skjut INT. / EXT. byta (M) för att välja ljud alternativ.
a. Intern Mic (standard)
b. Extern Line-in, inaktiverar intern Mic
Extern Line-in är kompatibel med Replay XD 1080 Mini Audio Adapter eller
Replay XD 1080 Mini HW Kit, nns på www.replayxd.com
Avancerade användare kan besöka www.replayxd.com/replay-xd1080mini-advanced/ för t.ex.
inställningsproler
VY BAKIFRÅN
ALIGNMENT
SVENSK
*
VHB SnapTray
Drag
Ställ skruv
1. Hitta den bästa uppställningsplatsen för Replay XD 1080 Mini och kontrollera kameravinklarna.
Solida ytor är idealiska för bästa lmkvalitet. Obs: Du kan göra en provinspelning och kontrollera det på
din Mac eller PC.
2. Sätt fast Replay XD 1080 Mini i den u-formade kamerahållaren och vrid den i önskad vinkel (kan
vridas 360º).
3. Sätt fast det självhäftande VHB SnapTray-fästet på en ren, slät yta.
-Platta SnapTray-fästen är bra för platta, släta ytor.
-Böjda SnapTray-fästen passar för kurvade ytor, som t.ex. Hjälmar och Radius.
Självhäftande 3M VHB rekommenderas inte för ytor med struktur.
4. Skjut in HeimLock-fästet i SnapTray tills det klickar i läge.
5. Ställ in riktningen (kan vridas 360º) och/eller lutningen ~8º genom att lossa låsspaken och placera
Replay XD 1080 Mini i önskad riktning och vinkel. Lås sedan fästet med låsspaken. Se till att låsspaken är
helt intryckt . Det nns ett justerbart spännhjul (
*
) för att säkra låset ordentligt.
HEIMLOCK-FÄSTE
HeimLock-fäste
Lås upp
Lås
VinklaVrid
VIKTIGT
Använd tvättsprit för att rengöra
fästytan. Torka av ytan. Sätt dit
VHB-fästet på ytan. Tryck och
håll ned i sextio (60) sekunder
för att låta limmet fästa på ytan.
Fogens styrka ökar med tiden.
nta minst 24 timmar i
rumstemperatur för att uppnå
90 % styrka i fogen, och 72
timmar för 100 % styrka.
ALIGNMENT
SVENSK
VHB SnapTray
1. Hitta den bästa platsen att fästa Replay XD 1080 Mini på och kontrollera kameravinklarna.
Solida ytor är idealiska för bästa lmkvalitet. Obs: Du kan göra en provinspelning och kontrollera det på
din Mac eller PC.
2. Vänd LowBoy-fästet upp och ned och sprid ut försiktigt. För in Replay XD 1080 Mini i hållaren så
att knapparna passerar genom skåran.
3. Vrid Replay XD 1080 Mini i önskad vinkel (360º) med Replay XD 1080 Mini centrerad i LowBoy-fästet.
4. Skjut in LowBoy-fästet i SnapTray tills det klickar i läge. LowBoy-fästet har gummiremsor som förhindrar att
Replay XD 1080 Mini vrids runt och säkerställer att rotationsvinkeln är idealisk. Du kan njustera genom att
skjuta LowBoy-fästet in/ut ur SnapTray.
5. Sätt fast det självhäftande VHB SnapTray-fästet på en ren, slät yta.
Det självhäftande 3M VHB rekommenderas inte för ytor med struktur.
LOWBOY-STE
LowBoy-fäste
Lås upp
Lås
VIKTIGT
Använd tvättsprit för att rengöra
fästytan. Torka av ytan. Sätt dit
VHB-fästet på ytan. Tryck och
håll ned i sextio (60) sekunder
så att limmet fäster på ytan.
Fogens styrka ökar med tiden.
nta minst 24 timmar i
rumstemperatur för att uppnå
90 % styrka i fogen och 72
timmar för 100 % styrka.
ALIGNMENT
SVENSK
12
9
6
3
INRIKTNING
Det nns ett antal referenspunkter som hjälp vid inriktning av Replay XD 1080 Mini.
1. Start REC-knappen ska alltid peka uppåt (mot klockan 12) för horisontellt läge.
2. De främre silver sight markörer är horisontell och vertikal som fungerar som en nivå.
3. De laseretsad märken på sidan av Replay XD 1080 Mini är placerade var 15 grader för att ge dig njustering.
4. För att kontrollera kamerariktningen tittar du bara längs kamerahuset bakifrån som om du tittade i ett teleskop. Det är så enkelt.
85

Hulp nodig? Stel uw vraag in het forum

Spelregels

Misbruik melden

Gebruikershandleiding.com neemt misbruik van zijn services uitermate serieus. U kunt hieronder aangeven waarom deze vraag ongepast is. Wij controleren de vraag en zonodig wordt deze verwijderd.

Product:

Bijvoorbeeld antisemitische inhoud, racistische inhoud, of materiaal dat gewelddadige fysieke handelingen tot gevolg kan hebben.

Bijvoorbeeld een creditcardnummer, een persoonlijk identificatienummer, of een geheim adres. E-mailadressen en volledige namen worden niet als privégegevens beschouwd.

Spelregels forum

Om tot zinvolle vragen te komen hanteren wij de volgende spelregels:

Belangrijk! Als er een antwoord wordt gegeven op uw vraag, dan is het voor de gever van het antwoord nuttig om te weten als u er wel (of niet) mee geholpen bent! Wij vragen u dus ook te reageren op een antwoord.

Belangrijk! Antwoorden worden ook per e-mail naar abonnees gestuurd. Laat uw emailadres achter op deze site, zodat u op de hoogte blijft. U krijgt dan ook andere vragen en antwoorden te zien.

Abonneren

Abonneer u voor het ontvangen van emails voor uw Replay XD 1080Mini bij:


U ontvangt een email met instructies om u voor één of beide opties in te schrijven.


Ontvang uw handleiding per email

Vul uw emailadres in en ontvang de handleiding van Replay XD 1080Mini in de taal/talen: Duits, Engels, Frans, Italiaans, Portugees, Spaans, Zweeds als bijlage per email.

De handleiding is 21,76 mb groot.


U ontvangt de handleiding per email binnen enkele minuten. Als u geen email heeft ontvangen, dan heeft u waarschijnlijk een verkeerd emailadres ingevuld of is uw mailbox te vol. Daarnaast kan het zijn dat uw internetprovider een maximum heeft aan de grootte per email. Omdat hier een handleiding wordt meegestuurd, kan het voorkomen dat de email groter is dan toegestaan bij uw provider.

Stel vragen via chat aan uw handleiding

Stel uw vraag over deze PDF

Andere handleiding(en) van Replay XD 1080Mini

Replay XD 1080Mini Snelstart handleiding - English - 12 pagina's


Uw handleiding is per email verstuurd. Controleer uw email

Als u niet binnen een kwartier uw email met handleiding ontvangen heeft, kan het zijn dat u een verkeerd emailadres heeft ingevuld of dat uw emailprovider een maximum grootte per email heeft ingesteld die kleiner is dan de grootte van de handleiding.

Er is een email naar u verstuurd om uw inschrijving definitief te maken.

Controleer uw email en volg de aanwijzingen op om uw inschrijving definitief te maken

U heeft geen emailadres opgegeven

Als u de handleiding per email wilt ontvangen, vul dan een geldig emailadres in.

Uw vraag is op deze pagina toegevoegd

Wilt u een email ontvangen bij een antwoord en/of nieuwe vragen? Vul dan hier uw emailadres in.


Info