This device has left the factory in perfect condition. To maintain this condition and to ensure a risk-free operation the user must observe the safety
instructions and warnings contained in this operation manual.
For reasons of safety and certication (CE) the unauthorised conversion and/or modication of the device is prohibited. Please note that in the
event of damage caused by the manual modication to this device any warranty claims are excluded.
The inside of the device does not contain any parts which require maintenance, with the exception of wear parts that can be exchanged from the
outside. Only qualied staff must carry out maintenance, otherwise warranty does not apply!
The fuse must exclusively be exchanged against fuses of the same class, with the same trigger features and nominal current rating.
Only use cables that comply with regulations. Make sure that all jacks and bushes are tightened and correctly hooked up. Refer to your dealer if
you have any questions.
Ensure that when setting up the product the USB cable is not squashed or damaged by sharp edges.
Prevent the mains cable from coming into contact with other cables! Exercise great care when handling mains cables and connections. Never touch
these parts with wet hands!
Disconnect the device from the supply outlet when not in use and before cleaning! Be sure to hold the USB cord by the body. Never pull the cord!
Position the device on a horizontal and stable low-ame base.
Avoid any concussions or violent impact when installing or operating the device.
When selecting the location of installation make sure that the device is not exposed to excessive heat, humidity, and dust. Be sure that no cables
lie around openly. You will endanger your own safety and that of others!
Do not rest any containers lled with liquid that could easily spill onto the device or in its immediate vicinity. If, however, uids should access
the inside of the device, immediately disconnect the USB cord. Have the device checked by a qualied service technician before re-use. Damage
caused by uids inside the device is excluded from the warranty.
Do not operate the device under extremely hot (in excess of 35° C) or extremely cold (below 5° C) conditions. Keep the device away from direct
exposure to the sun and heat sources such as radiators, ovens, etc. (even during transport in a closed vehicle). Never cover the cooling fan or vents.
Always ensure sufcient ventilation.
The device must not be operated after being taken from a cold environment into a warm environment. The condensation caused hereby may des-
troy your device. Do not switch on or operate the device until it has reached ambient temperature!
Controls and switches should never be treated with spray-on cleaning agents and lubricants. This device should only be cleaned with a damp cloth.
Never use solvents or cleaning uids with a petroleum base for cleaning.
When relocating, the device should be transported in its original packaging.
Devices supplied by voltage should not be left in the hands of children. Please exercise particular care when in the presence of children.
At commercial facilities the regulations for the prevention of accidents as stipulated by the organization of professional associations must be
observed.
At schools, training facilities, hobby and self-help workshops the operation of the device must be monitored with responsibility by trained staff.
Keep this operation manual in a safe place for later reference in the event of questions or problems.
This device is a professional DJ MIDI controller with integrated 4-channel soundcard that can control software. The device should be connected
via USB cable to a computer.
If the device is used for any other purposes than those described in the operation manual, damage can be caused to the product, leading to ex-
clusion of warranty rights. Moreover, any other application that does not comply with the speci ed purpose harbours risks such as short circuit,
re, electrical shock, etc.
The serial number determined by the manufacturer must never be removed to uphold the warranty rights.
Check the technical safety of the device regularly for damage to the USB cord or the casing, as well as for wearout of wear parts such as rotary
knobs and sliding faders.
If it is to be assumed that a safe operation is no longer feasible, then the device must be disconnected and secured against accidental use. Always
disconnect the USB cord!
It must be assumed that a safe operation is no longer feasible, if the device bears visible defects, if the device no longer functions, following longer
storage under unfavourable conditions or after major transport stress.
ENGLISH
14
15
ENGLISH
T1Pitch Fader
T2Effect ChangeSample Change
T3Effect Parameter 2Sample Volume
T4FilterEffect Parameter 1
T5Loop LengthLoop Adjustment
T6FX On ButtonSampler On Button
T7Beat Mash ButtonLoop-In Button
T8Auto LoopLoop-Out Button
T9Monitor-CUE Button
T10Jog Mode: Scratch
T11Jog Mode: Search
T12Jog Wheel
T13Pitch Bend ButtonsBeat Jump Buttons
T14Shift Button
T15Hot Cue Buttons
T16Sync ButtonTrack Beginning Button
T17Cup ButtonTAP Button
T18Cue ButtonFader Start Button
T19Play/Pause ButtonKeylock
T20Gain Dial
T21EQ Dial
T22Load ButtonView Button
T23Master Volume
T24Headphones Volume
T25CUE-Mix Dial
T26Track NavigationFolder Navigation
T27Linefader
T28Crossfader
B29Kensington Lock
B30Jog Wheel Sensitivity Dial
B31 RCA Master Unbalanced Output
B32Rec/Booth Output
B33USB-Port
F346.3 mm Jack Microphone Connection
F35Microphone Volume
F36Microphone Routing Switch
F376.3 mm Jack Headphones Connection
ENGLISH
16
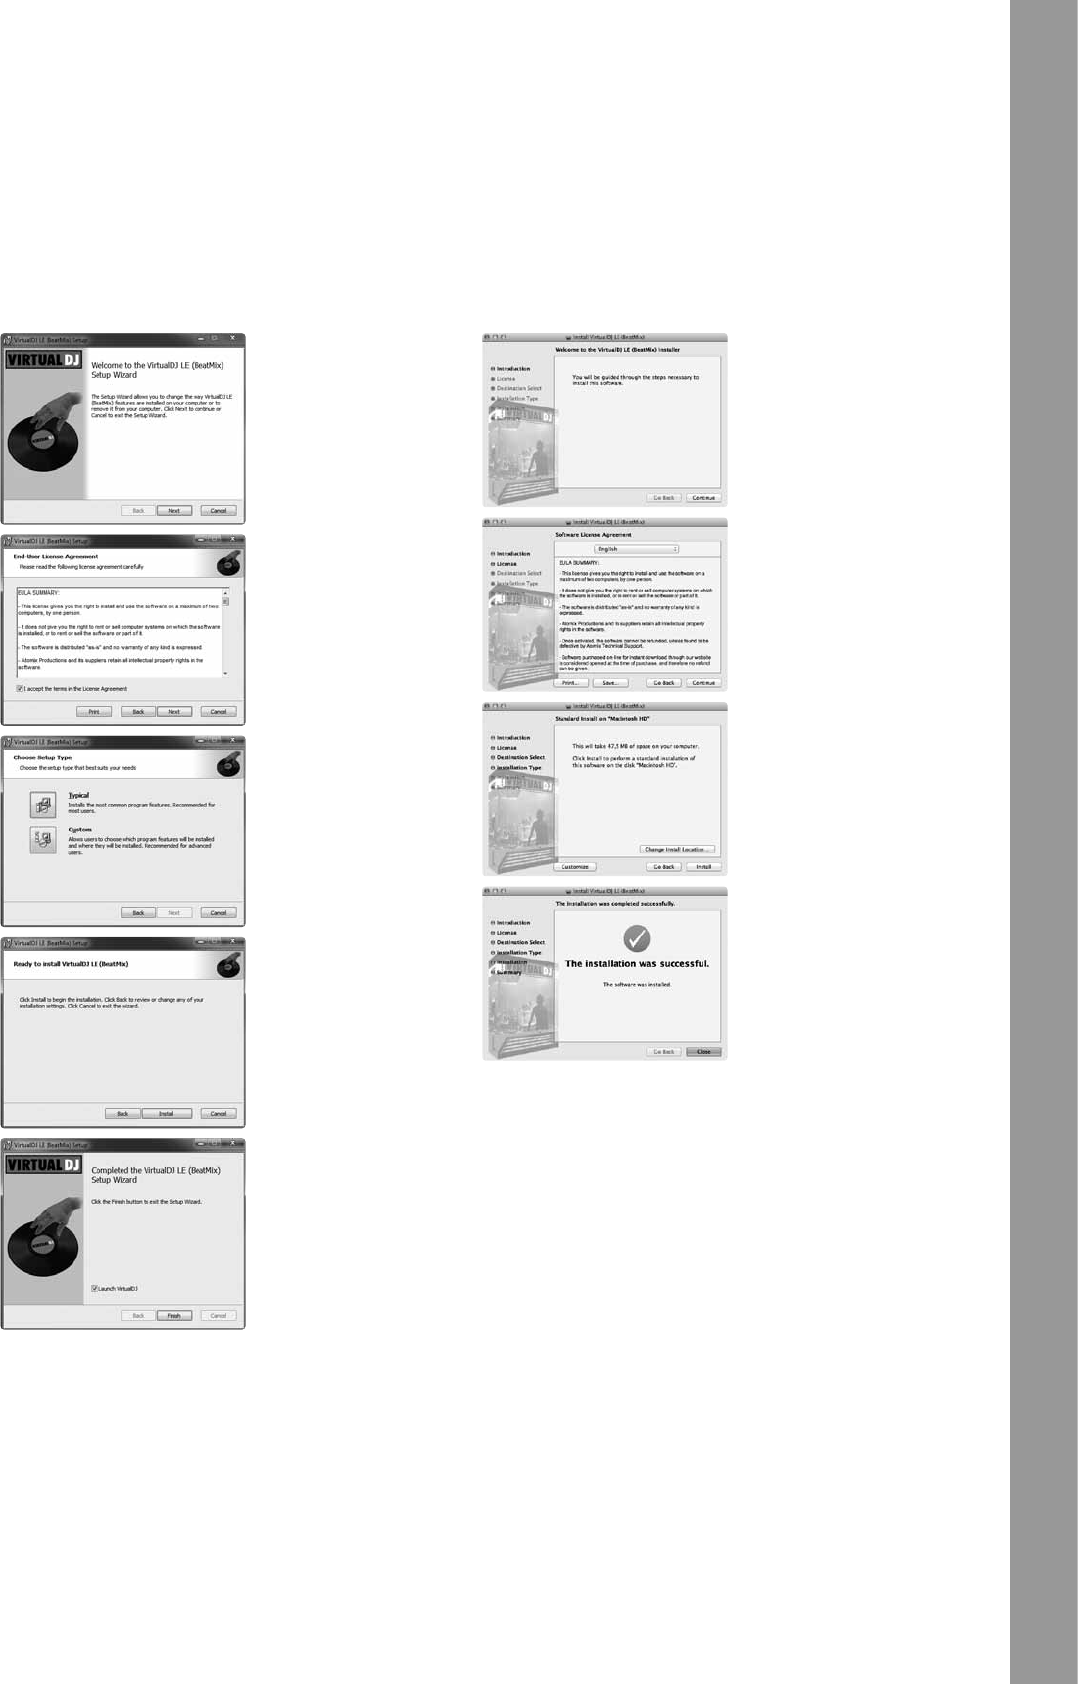
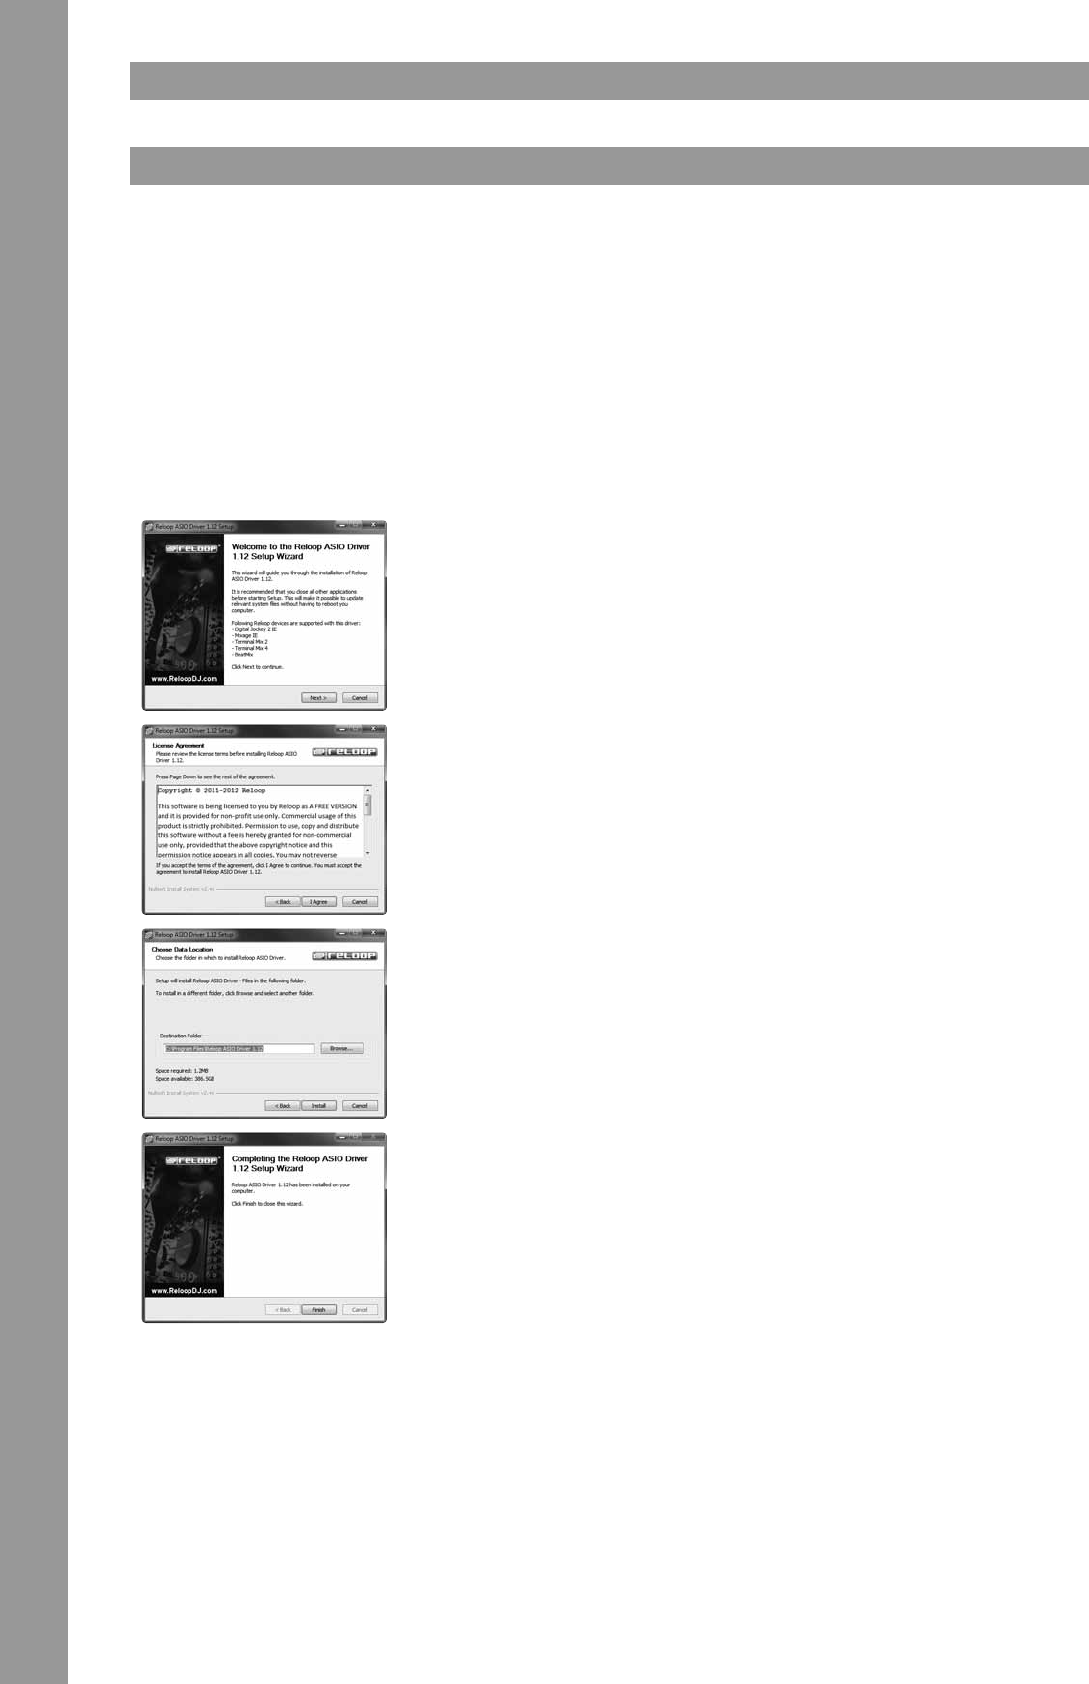
Connect the included USB cable to the connection -B33- on the device‘s rear panel and a free USB port of your computer.
It is necessary to install a driver to guarantee a awless operation under Windows. Under Mac OSX a driver installation is not necessary. Moreover,
make sure that all other programs are closed. Please especially observe the following items.
Insert the included installation CD into your drive. In the folder “Drivers“ select the included ASIO driver and start the installation via a double
Reloop Beatmix disposes of two stereo outputs on the rear side. Master 1 -B31-, as well as Rec/Booth -B32- are available as RCA outputs. The
master volume can be adjusted via the volume Encoder -T23-. The Rec/Booth putput -B32- emits a constant volume.
Several adjustments and tests can be carried out with Beatmix without the help of a computer. In the following a few of these items are explained
in detail.
Reloop Beatmix offers the possibility to adjust the jog wheel sensitivity -B30- at the device‘s rear side. There are two dials; each one controls one
side of the controller. If the dial is in minimum position, the jog wheel will loose its scratching ability as now it is no longer touch-sensitive. If the
dial is in maximum position, a simple push on the jog wheel sufces to activate touch-sensitivity.
It is possible to update the Beatmix‘s rmware. This way changes can be carried out later and new features can be added. The latest rmware and
the Update Tool can be found under:
www.reloopdj.com/forum
T25
CUE-Mix Fading
With the Cue-Mix Fader a pre-mix can be simulated via headphones. In the right position
the master signal is audible, in the left position the CUE signal is audible.
T26
Track Navigation
By turning it is possible to browse in track view. By pressing playlist view can be enlarged.
Folder Navigation
By turning it is possible to browse in folder view. By
pressing you can open/close a folder.
T27
Linefader
With the linefader it is possible to adjust the channel volume.
T28
Crossfader
Fade between the decks via this fader.
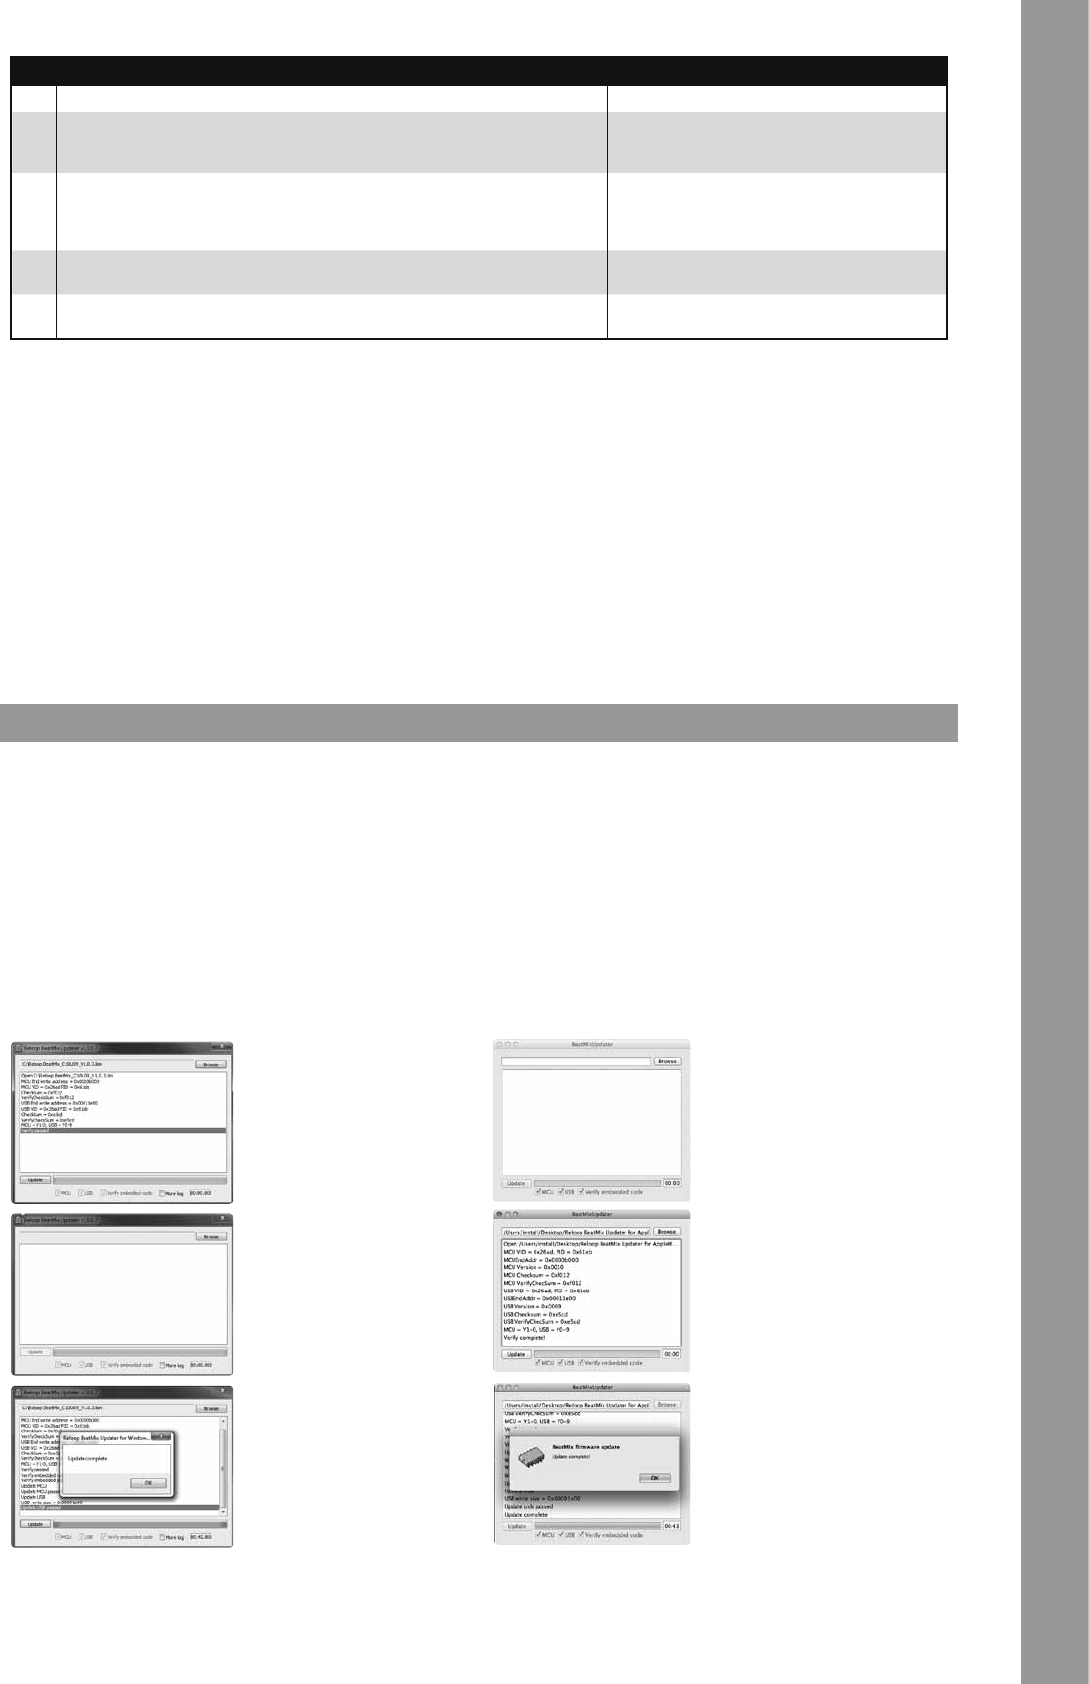
1. Make sure that your Reloop Be-
atmix is connected to the com-
puter via USB.
2. Start the Beatmix Update Tool
and open the rmaware that ts
your device by clicking “Brow-
se”.
3. Carry out the rmware update
by clicking “Update”.
The new rmware will now be
transmitted to your device; this
may take a few minutes. When
the update has been carried out
successfully the message “Up-
date Complete” will appear.
4. Now close the Update Tool and disconnect the USB cord in order to
reboot your device.
1. Make sure that your Reloop Beat-
mix is connected to the computer
via USB.
2. Start the Beatmix Update Tool and
open the rmaware that ts your
device by clicking “Browse”.
3. Carry out the rmware update by
clicking “Update”.
The new rmware will now be trans-
mitted to your device; this may take
a few minutes. When the update has
been carried out successfully the
message “Update Complete” will
appear.
4. Now close the Update Tool and disconnect the USB cord in order to
Cet appareil a quitté l‘usine de fabrication en parfait état. An de conserver cet état et assurer la sécurité de fonctionnement, l‘utilisateur doit
absolument respecter les consignes de sécurité et les avertissements indiqués dans ce mode d‘emploi.
Pour des raisons de sécurité et de certication (CE), il est interdit de transformer ou modier cet appareil. Tous les dégâts dus à une modication
de cet appareil ne sont pas couverts par la garantie.
Le boîtier ne contient aucune pièce nécessitant un entretien, à l‘exception de pièces d‘usure pouvant être remplacées de l‘extérieur. La mainte-
nance doit exclusivement être effectuée par du personnel qualié an de conserver les droits de garantie !
Les fusibles doivent uniquement être remplacés par des fusibles de même type, dotés de caractéristiques de déclenchement et d‘un ampérage
identique.
Utilisez uniquement des câbles conformes. Veillez à ce que toutes les ches et douilles soient bien vissées et correctement connectées. Si vous
avez des questions, contactez votre revendeur.
Veillez à ne pas coincer ou endommager le cordon USB par des arêtes tranchantes lorsque vous installez l‘appareil.
Prenez garde à ce que le cordon électrique n‘entre pas en contact avec d‘autres câbles et soyez prudent lorsque vous manipulez des lignes ou des
prises électriques. Ne touchez jamais ces éléments avec des mains humides!
Débranchez l‘appareil lorsque vous ne l‘utilisez pas ou pour le nettoyer ! Pour débrancher l‘appareil, tirez toujours sur la prise, jamais sur le câble !
Placez l‘appareil sur une surface plane, stable et difcilement inammable. En cas de larsen, éloignez les enceintes de l‘appareil.
Évitez tous les chocs et l‘emploi de la force lors de l‘installation et l‘utilisation de l‘appareil.
Installez l‘appareil dans un endroit à l‘abri de la chaleur, de l‘humidité et de la poussière. Ne laissez pas traîner les câbles pour votre sécurité
personnelle et celle de tiers!
Ne placez jamais des récipients de liquides susceptibles de se renverser sur l‘appareil ou à proximité directe. En cas d‘inltration de liquides dans
le boîtier, retirez immédiatement la che électrique. Faites contrôler l‘appareil par un technicien qualié avant de le réutiliser. La garantie exclu
tous les dégâts dus aux inltrations de liquides.
N‘utilisez pas l‘appareil dans un environnement extrêmement chaud (plus de 35°C) ou froid (sous 5° C). N‘exposez pas l‘appareil directement aux
rayons solaires ou à des sources de chaleur telles que radiateurs, fours, etc. (également valable lors du transport). Veillez à ne pas obstruer les
ventilateurs ou les fentes de ventilation. Assurez toujours une ventilation convenable.
N‘utilisez pas l‘appareil lorsqu‘il est amené d‘une pièce froide dans une pièce chaude. L‘eau de condensation peut détruire votre appareil. Laissez
l‘appareil hors tension jusqu‘à ce qu‘il ait atteint la température ambiante !
Ne nettoyez jamais les touches et curseurs avec des produits aérosols ou gras. Utilisez uniquement un chiffon légèrement humide, jamais de
solvants ou d‘essence.
Utilisez l‘emballage original pour transporter l‘appareil.
Les directives de prévention des accidents de l‘association des fédérations professionnelles doivent être respectées dans les établissements
commerciaux.
Dans les écoles, instituts de formation, ateliers de loisirs etc. l‘utilisation de l‘appareil doit être effectuée sous la surveillance de personnel qualié.
Conservez ce mode d‘emploi pour le consulter en cas de questions ou de problèmes.
Cet appareil est un contrôleur MIDI professionnel avec carte son à 4 voies permettant de commander le logiciel. L‘appareil doit pour cela être
raccordé à un ordinateur par un câble USB.
Toute utilisation non conforme peut endommager le produit et annuler les droits de garantie. En outre, toute utilisation autre que celle décrite dans
ce mode d‘emploi peut être source de courts-circuits, incendies, décharge électrique, etc.
Le numéro de série attribué par le fabricant ne doit jamais être effacé sous peine d‘annuler les droits de garantie.
Contrôlez régulièrement le bon état de l‘appareil (boîtier, cordon) et l‘usure éventuelle des molettes et curseurs.
Si vous supposez que l‘appareil ne peut plus être utilisé en toute sécurité, mettez l‘appareil hors-service et assurez-le contre toute réutilisation
involontaire. Débranchez la che électrique de la prise de courant !
La sécurité d‘emploi est susceptible d‘être affectée lorsque l‘appareil est visiblement endommagé, ne fonctionne plus correctement, après un
stockage prolongé dans des conditions défavorable ou après une forte sollicitation de transport.
Reloop Beatmix dispone de más de dos canales de salida estéreo en la parte trasera. La salida maestra 1 -B31 y la salida REC/Cabina -B32- están
concebidas como salidas RCA. El volumen maestro se regula por medio del codicador de volumen maestro -T23-. La salida REC/Cabina -B32-
emite un volumen constante.
Se pueden realizar algunos ajustes directamente en el Reloop Beatmix sin necesidad de un ordenador. A continuación, se detallarán algunos
puntos.
Reloop Beatmix permite ajustar la sensibilidad de la rueda de desplazamiento -B30- en la parte trasero del equipo. Para ello, encontrará dos reguladores
y cada uno controla un lado del equipo. Si el regulador se encuentra en la posición mínima, la rueda de desplazamiento pierde la habilidad para el rayado
porque ahora ya no es sensible al tacto. Gire el regulador a la posición máxima de manera para que una ligera presión en la rueda de desplazamiento
active su sensibilidad al tacto.
Es posible actualizar el rmware de Beatmix. Para así poder realizar modicaciones posteriores y añadir nuevas características. La versión más
actual del rmware y la herramienta de actualización la encontrará en: www.reloopdj.com/forum
T25
Mezcla CUE/MIX
Con el regulador Cue/Mix, se puede simular una premezcla en los auriculares. En la posici-
ón derecha se escucha la señal maestra y en la izquierda la señal cue.
T26
Navegación por pistas
Al girarla, se puede navegar por la vista de la lista de reproducción. Al pulsarla, se puede
aumentar la vista de la lista de reproducción.
Navegación por carpetas
Al girarla, se puede navegar por la vista de carpetas. Al
pulsarla, se puede abrir o cerrar una carpeta.
T27
Linefader
Con el Linefader, se regula el volumen del canal.
T28
Crossfader
Con este regulador, se hacen transiciones entre los platos.
1. Asegúrese de que Reloop Beat-
mix está conectado al ordena-
dor por medio del cable USB.
2. Inicie la herramienta de actua-
lización para Beatmix y abra el
rmware adecuado a su equipo
haciendo clic en „Browse“.
3. Lleve a cabo la actualización
haciendo clic en el botón „Up-
date“. Se transere el nuevo
rmware a su equipo. Este pro-
ceso puede durar varios minu-
tos. Después de haber naliz-
ado con éxito la actualización,
aparece el mensaje „Update
complete“.
4. Ahora cierre la herramienta de actualización y desconecte el cable
USB para reiniciar el equipo.
1. Asegúrese de que Reloop Beatmix
está conectado al ordenador por
medio del cable USB.
2. Inicie la herramienta de actualiza-
ción para Beatmix y abra el rmwa-
re adecuado a su equipo haciendo
clic en „Browse“.
3. Lleve a cabo la actualización haci-
endo clic en el botón „Update“. Se
transere el nuevo rmware a su
equipo. Este proceso puede durar
varios minutos. Después de haber
nalizado con éxito la actualiza-
ción, aparece el mensaje „Update
complete“.
4. Ahora cierre la herramienta de actualización y desconecte el cable
Gebruikershandleiding.com neemt misbruik van zijn services uitermate serieus. U kunt hieronder aangeven waarom deze vraag ongepast is. Wij controleren de vraag en zonodig wordt deze verwijderd.
Product:
Spelregels forum
Om tot zinvolle vragen te komen hanteren wij de volgende spelregels:
lees eerst de handleiding door;
controleer of uw vraag al eerder door iemand anders is gesteld;
probeer uw vraag zo duidelijk mogelijk te stellen;
heeft u een probleem en al geprobeerd om dit op te lossen, vermeld dit erbij aub;
heeft u een oplossing gekregen van een bezoeker dan horen wij dat graag in dit forum;
wilt u een reactie geven op een vraag of antwoord, gebruik dan niet dit formulier maar klik op de knop 'reageer op deze vraag';
uw vraag wordt direct op de website gezet; vermijd daarom persoonlijke gegevens in te vullen;
Belangrijk! Als er een antwoord wordt gegeven op uw vraag, dan is het voor de gever van het antwoord nuttig om te weten als u er wel (of niet) mee geholpen bent! Wij vragen u dus ook te reageren op een antwoord.
Belangrijk! Antwoorden worden ook per e-mail naar abonnees gestuurd. Laat uw emailadres achter op deze site, zodat u op de hoogte blijft. U krijgt dan ook andere vragen en antwoorden te zien.
Abonneren
Abonneer u voor het ontvangen van emails voor uw Reloop Beatmix bij:
nieuwe vragen en antwoorden
nieuwe handleidingen
U ontvangt een email met instructies om u voor één of beide opties in te schrijven.
Ontvang uw handleiding per email
Vul uw emailadres in en ontvang de handleiding van Reloop Beatmix in de taal/talen: Duits, Engels, Frans als bijlage per email.
De handleiding is 1,81 mb groot.
U ontvangt de handleiding per email binnen enkele minuten. Als u geen email heeft ontvangen, dan heeft u waarschijnlijk een verkeerd emailadres ingevuld of is uw mailbox te vol. Daarnaast kan het zijn dat uw internetprovider een maximum heeft aan de grootte per email. Omdat hier een handleiding wordt meegestuurd, kan het voorkomen dat de email groter is dan toegestaan bij uw provider.
Stel vragen via chat aan uw handleiding
Stel uw vraag over deze PDF
Uw handleiding is per email verstuurd. Controleer uw email
Als u niet binnen een kwartier uw email met handleiding ontvangen heeft, kan het zijn dat u een verkeerd emailadres heeft ingevuld of dat uw emailprovider een maximum grootte per email heeft ingesteld die kleiner is dan de grootte van de handleiding.
Er is een email naar u verstuurd om uw inschrijving definitief te maken.
Controleer uw email en volg de aanwijzingen op om uw inschrijving definitief te maken
U heeft geen emailadres opgegeven
Als u de handleiding per email wilt ontvangen, vul dan een geldig emailadres in.
Uw vraag is op deze pagina toegevoegd
Wilt u een email ontvangen bij een antwoord en/of nieuwe vragen? Vul dan hier uw emailadres in.