296633
15
Verklein
Vergroot
Pagina terug
1/186
Pagina verder
Pocket PC Phone
Pocket PC Phone User Manual2
Contents
Pocket PC Phone User Manual
3
Contents
Pocket PC Phone User Manual2
Contents
Pocket PC Phone User Manual
3
Contents
Welcome
Congratulations on the purchase of a new Windows Mobile
TM
-based Pocket
PC Phone. The integrated wireless voice and data capabilities mean that as well as
keeping your important PIM information up-to-date and close at hand, you can make
calls, send and receive e-mail, and look up valuable information from the Internet or
your company’s network anytime, anywhere. Also, with Microsoft ActiveSync
the power of your device is increased by allowing you to synchronize the information
on your PC with your device.
Before getting started to use and explore your new device, some warning notes here
are very important for you to get through.
Warnings! Please Read Before Operating your Device
THE DEVICE IS NOT CHARGED WHEN YOU TAKE IT OUT OF THE
BOX. (For information, see Chapter 1 : Getting Started)
DO NOT REMOVE THE BATTERY PACK WHEN THE DEVICE IS
CHARGING.
WHEN INSERT A SIM CARD, MAKE SURE THE DEVICE IS TURNED
OFF THEN CLICK IT INTO PLACE. (For more information, see
Chapter 3 : Using Your Phone)
IN MANY COUNTRIES YOU ARE REQUIRED BY LAW TO TURN OFF
YOUR PHONE WHEN YOU FLY. TURNING OFF YOUR POCKET PC
DOESN’T TURN OFF YOUR PHONE; YOU MUST TURN OFF YOUR
WIRELESS CONNECTION TO YOUR OPERATOR’S NETWORK.
YOUR WARRANTY IS INVALIDATED IF YOU OPEN OR TAMPER
WITH THE DEVICE’S OUTER CASING. (For more information, see
the enclosed warranty information)
Pocket PC Phone User Manual4
Contents
Pocket PC Phone User Manual
5
Contents
Contents
Chapter 1 Getting Started ---------------------- 11
1.1 Knowing Your Device------------------------- 12
Front , Top and Left Side Panel Components ----------- 12
Back, Bottom and Right Side Panel Components------- 13
1.2 Battery----------------------------------------- 14
Data Retention--------------------------------------------- 14
To recharge your device ---------------------------------- 15
When Your Battery is Low -------------------------------- 16
1.3 Accessories ------------------------------------ 16
USB/Serial Cradle ----------------------------------------- 16
AC Adapter Converter ------------------------------------- 17
USB/Serial Sync cable------------------------------------- 17
Stereo headset --------------------------------------------- 17
Backpack (Optional)--------------------------------------- 17
Chapter 2 Knowing Your Pocket PC------------ 19
2.1 Starting Up ------------------------------------ 20
Screen tapping, Calibration and Re-calibration -------- 20
Today Screen----------------------------------------------- 20
Indicators -------------------------------------------------- 21
Programs --------------------------------------------------- 22
Navigation Bar and Command Bar ----------------------- 24
Pop-Up Menus --------------------------------------------- 24
Notications
----------------------------------------------- 25
2.2 Entering Information --------------------------- 25
Using the Input Panel ------------------------------------- 26
2.3 Writing on the Screen ------------------------ 30
To write on the screen ------------------------------------ 30
To select writing ------------------------------------------ 30
Converting writing to text -------------------------------- 31
To get good recognition ---------------------------------- 31
2.4 Drawing on the Screen ----------------------- 32
To create a drawing -------------------------------------- 32
Pocket PC Phone User Manual4
Contents
Pocket PC Phone User Manual
5
Contents
2.5 Recording a Message------------------------- 33
2.6 Finding and Organizing Information-------- 34
Chapter 3 Using Your Phone-------------------- 35
3.1 About Your Phone ---------------------------- 36
About SIM cards ------------------------------------------- 36
About The Dialer Screen ---------------------------------- 38
Indicators -------------------------------------------------- 38
The Navigation Pad and Dialing -------------------------- 39
Entering Your PIN ----------------------------------------- 39
Checking Your Connection-------------------------------- 40
Turning The Phone On and Off --------------------------- 40
Adjusting The Phone Volume----------------------------- 41
3.2 Making a Call ---------------------------------- 42
To make a call from the Dialer --------------------------- 42
To make a call from Contacts ---------------------------- 43
To make a call from Speed Dial -------------------------- 44
To make a call from the Call History -------------------- 45
To make a call from SIM Manager: ---------------------- 45
3.4 In-Call Options-------------------------------- 46
Putting a call on hold-------------------------------------- 46
3.3 Receiving a Call ------------------------------- 46
To answer an incoming call------------------------------- 46
To end a call ----------------------------------------------- 46
To swap between calls ----------------------------------- 47
To set up conference calls -------------------------------- 47
Making a Note---------------------------------------------- 47
Enabling the Speakerphone Mode ----------------------- 48
Checking Your Voice Mail --------------------------------- 49
3.5 Contacts Information ------------------------ 49
SIM Manager ----------------------------------------------- 50
Call History ------------------------------------------------- 51
Manage Your Call History --------------------------------- 52
Pocket PC Phone User Manual6
Contents
Pocket PC Phone User Manual
7
Contents
3.6 Photo Contacts-------------------------------- 53
To create a new photo contact --------------------------- 53
To preview and adjust settings -------------------------- 54
Toolbar Icons ---------------------------------------------- 54
To assign a photo from the camera ---------------------- 55
To unassign a photo --------------------------------------- 55
To view your contacts by photo -------------------------- 55
To disable the displaying of photos ---------------------- 56
To manage your groups ----------------------------------- 56
To assign a contact to a group --------------------------- 56
Show Contact Names Only-------------------------------- 57
Set Default Photos----------------------------------------- 57
3.7 Additional Dialing Information -------------- 58
To make an emergency call------------------------------- 58
To make an international call ---------------------------- 58
3.8 Secure Your Phone --------------------------- 58
Locking the keypad---------------------------------------- 59
Locking your phone --------------------------------------- 59
Locking the SIM card-------------------------------------- 60
Chapter 4 Synchronizing Information --------- 61
4.1 Using ActiveSync ----------------------------- 62
Installing ActiveSync-------------------------------------- 62
Creating a Partnership ------------------------------------ 63
4.2 Synchronizing information------------------- 64
Synchronizing Inbox -------------------------------------- 64
Synchronizing Calendar ----------------------------------- 65
Synchronizing Contacts ----------------------------------- 65
Synchronizing Tasks--------------------------------------- 65
4.3 Synchronizing Using an Infrared Connection66
Transferring Items Using Infrared----------------------- 66
4.4 ActiveSync Errors ----------------------------- 67
To view ActiveSync error information ------------------- 67
Pocket PC Phone User Manual6
Contents
Pocket PC Phone User Manual
7
Contents
Chapter 5 Personalizing Your Pocket PC Phone69
5.1 Device Settings ------------------------------- 70
Buttons ----------------------------------------------------- 72
Input -------------------------------------------------------- 72
Menus------------------------------------------------------- 73
Owner Information ---------------------------------------- 74
Password --------------------------------------------------- 74
Sounds and Notications
--------------------------------- 75
Today ------------------------------------------------------- 75
Backlight --------------------------------------------------- 76
Clock -------------------------------------------------------- 77
Memory ----------------------------------------------------- 77
Power ------------------------------------------------------- 78
5.2 Phone Settings -------------------------------- 78
Sounds ------------------------------------------------------ 79
Services----------------------------------------------------- 80
Network ---------------------------------------------------- 80
Chapter 6 Scheduling and Communicating
- Microsoft Pocket Outlook --------- 81
6.1 Calendar --------------------------------------- 82
To Create an Appointment -------------------------------- 83
Using the Summary Screen ------------------------------- 83
Creating Meeting Requests ------------------------------- 84
To schedule a meeting ------------------------------------ 84
6.2 Contacts --------------------------------------- 84
To create a contact --------------------------------------- 85
To Find a contact ------------------------------------------ 86
Using the Summary Screen ------------------------------- 87
6.3 Tasks : Keeping a To Do List ----------------- 87
To create a task-------------------------------------------- 88
Using the Summary Screen ------------------------------- 88
6.4 Notes ------------------------------------------ 89
To create a note ------------------------------------------- 89
Pocket PC Phone User Manual8
Contents
Pocket PC Phone User Manual
9
Contents
Chapter 7 Getting Connected------------------- 91
7.1 About Connections --------------------------- 92
7.2 Connect to the Internet ---------------------- 93
CSD Line Type---------------------------------------------- 94
To change a CSD Line Type: ------------------------------ 94
GPRS Settings---------------------------------------------- 94
Set up a WAP gateway ------------------------------------ 95
7.3 Pocket Internet Explorer--------------------- 96
To switch to Pocket Internet Explorer------------------- 96
To browse the Internet ----------------------------------- 97
To view mobile favorites and channels------------------ 97
The Mobile Favorites Folder ------------------------------ 98
Using AvantGo Channels --------------------------------- 100
7.4 Terminal Services Client ------------------- 101
To connect to a Terminal Server ------------------------ 101
7.5 Wireless Modem ---------------------------- 102
7.6 Bluetooth ------------------------------------ 102
Bluetooth modes------------------------------------------ 103
Bonds ------------------------------------------------------ 104
Beaming Information with Bluetooth ------------------ 106
Receiving a Bluetooth Beam----------------------------- 107
Using a Bluetooth Phone as a Modem ------------------ 107
Chapter 8 Messaging Features ---------------- 109
8.1 E-mail Messages : Using Inbox------------ 110
To set up an e-mail service ----------------------------- 110
Sending and Receiving E-mail--------------------------- 112
8.2 SMS Messages ------------------------------ 115
To send SMS in phone dialer----------------------------- 115
8.3 MSN Messenger : Instant Messaging ----- 116
To switch to MSN Messenger ---------------------------- 116
Setting Up and Signing In ------------------------------- 117
Working with Contacts----------------------------------- 117
Pocket PC Phone User Manual8
Contents
Pocket PC Phone User Manual
9
Contents
Chatting with Contacts----------------------------------- 118
8.4 MMS Messages ------------------------------ 119
Message Boxes-------------------------------------------- 119
Menu Commands ----------------------------------------- 122
Viewing a Message --------------------------------------- 122
Sending a Message --------------------------------------- 123
8.5 Managing Messages and Folders ---------- 124
Chapter 9 Companion Programs -------------- 127
9.1 Pocket Word--------------------------------- 128
To create a new le -------------------------------------- 128
Entering Information in a New File --------------------- 129
9.2 Pocket Excel--------------------------------- 131
To Create a new Pocket Excel File ---------------------- 131
Tips for Working in Pocket Excel------------------------ 132
9.3 Windows Media Player for Pocket PC----- 133
9.4 Microsoft Reader---------------------------- 133
Getting Books on Your Device--------------------------- 134
Reading a Book ------------------------------------------- 135
Using Reader Features ----------------------------------- 136
Removing a Book ----------------------------------------- 137
9.5 Pictures -------------------------------------- 138
Transferring Pictures------------------------------------- 138
Finding and listing pictures------------------------------ 138
Viewing Pictures ------------------------------------------ 138
Sorting Pictures------------------------------------------- 139
Edit Pictures----------------------------------------------- 139
Set Pictures as Background------------------------------ 140
Customizing Pictures ------------------------------------- 140
Chapter 10 Using Your Camera ----------------- 141
10.1 Before Using the Camera ------------------- 142
File formats supported ----------------------------------- 142
Pocket PC Phone User Manual10
Contents
10.2 Camera -------------------------------------- 143
Usage of Buttons in Camera Mode ---------------------- 144
Image Capture submode--------------------------------- 145
Zooming In/Out ------------------------------------------ 146
Video Capture submode---------------------------------- 147
Composition Capture submode-------------------------- 148
Camera Settings screen---------------------------------- 150
10.3 Album --------------------------------------- 154
Thumbnail View Mode------------------------------------ 154
To make an annotation on your le:
-------------------- 155
Sending MMS, E-mail in Album -------------------------- 156
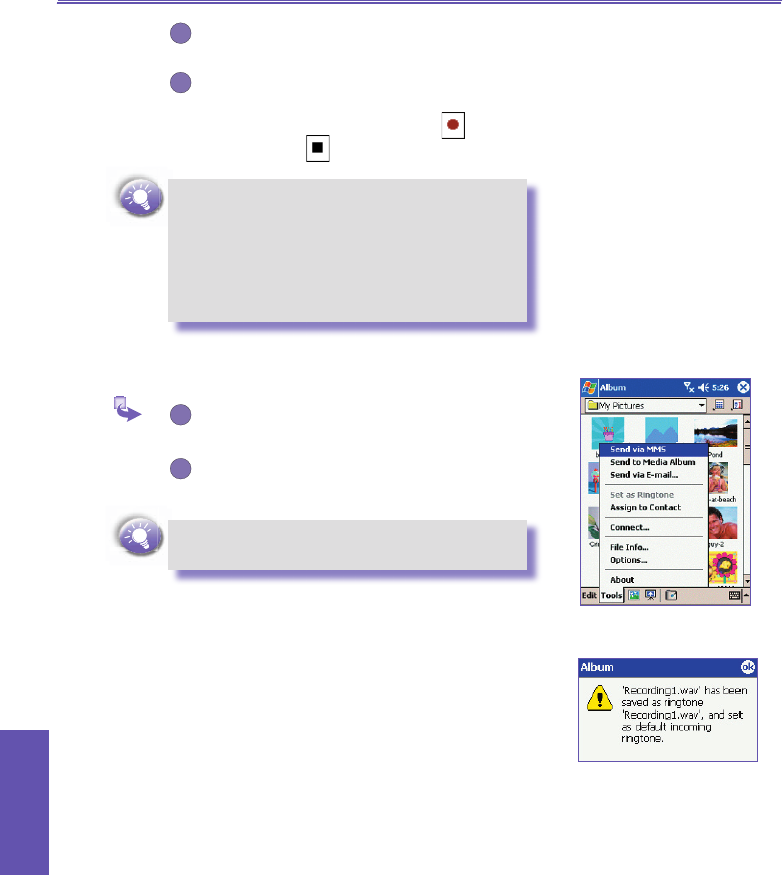
To set audio les as Ring Tones:
------------------------ 156
Assign to Contact ----------------------------------------- 157
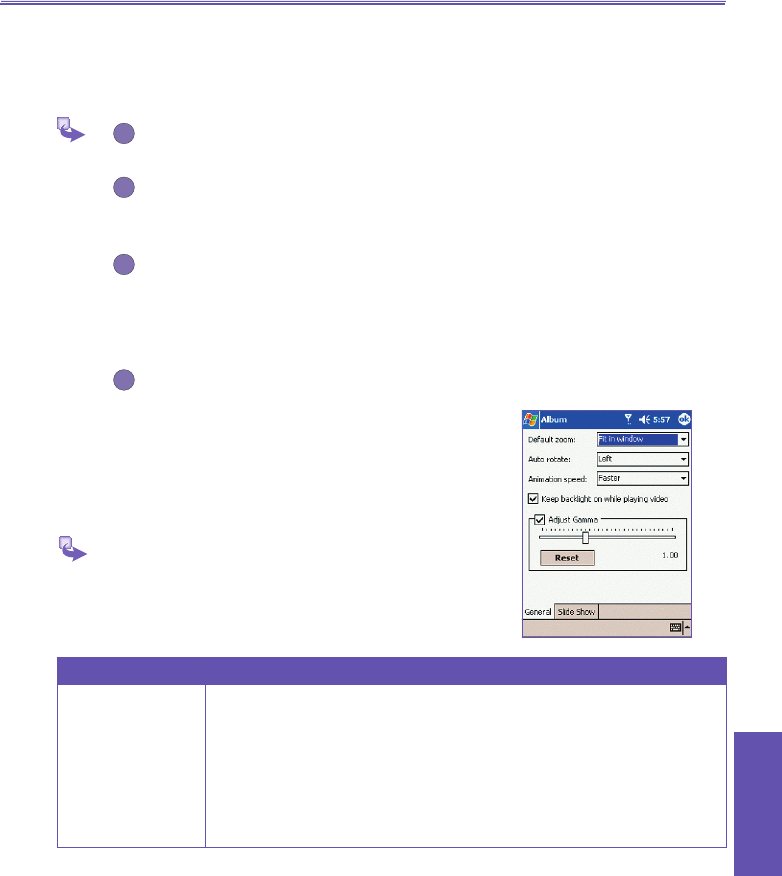
Options in Album Settings ------------------------------- 157
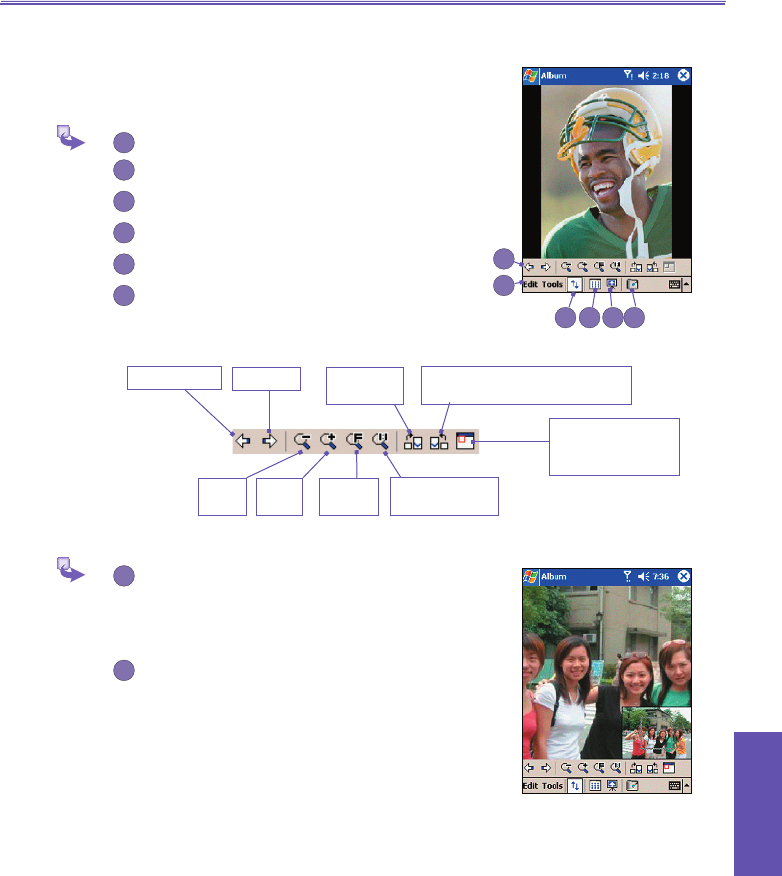
Detailed View Mode -------------------------------------- 159
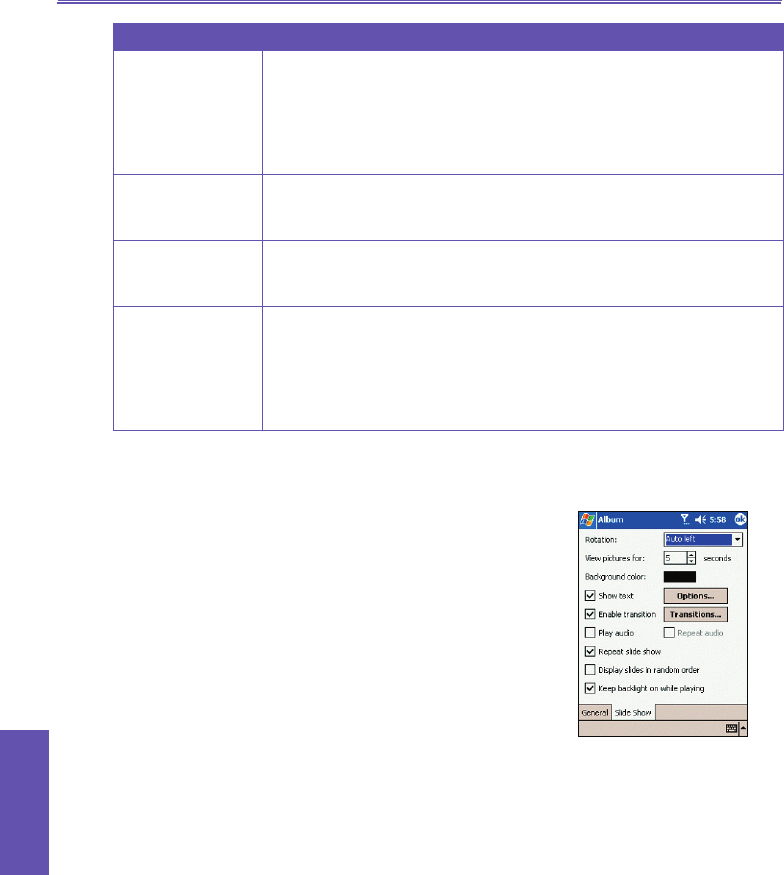
Slide Show View ------------------------------------------ 161
Appendix A Maintaining Your Pocket PC ------- 163
Adding or Removing Programs -------------------------- 164
Managing Memory ---------------------------------------- 166
Backing Up Files ------------------------------------------ 168
Reset the Pocket PC Phone and Clear Memory ------- 169
Appendix B Regulatory Notice ------------------ 171
Troubleshooting ----------------------------------179
Index-----------------------------------------------184
Chapter 1
Getting Started
1.1 Knowing your device
1.2 Battery
1.3 Accessories
Getting
Started
Pocket PC Phone User Manual12
Getting
Started
Pocket PC Phone User Manual 13
1.1 Knowing Your Device
Front , Top and Left Side Panel Components
Contacts
Press for quick access to your
Contacts.
Record
Press to record a voice note.
Volume
Press up/down to adjust the
volume of your device.
Camera
Press to launch camera
capture utility. Press again
to take a picture.
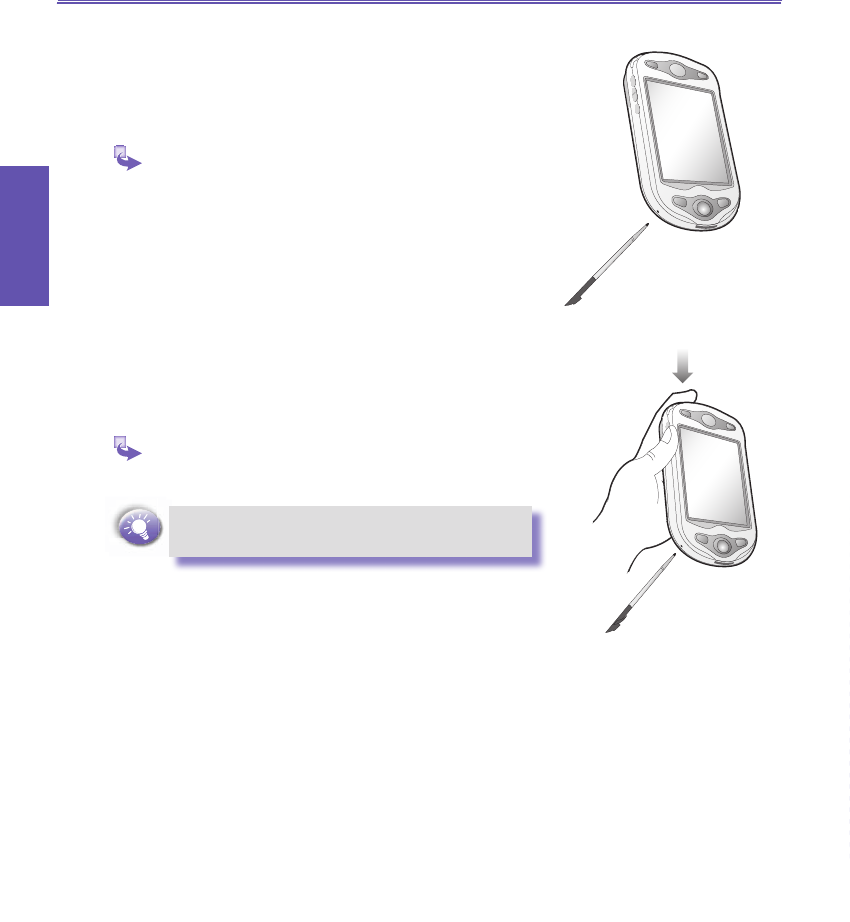
Soft Reset
Press into the hole with the
stylus to reset your device.
Send
Press to answer and incoming
call or to dial a number.
Microphone
Speak here when receiving or
making a phone call or voice
recording.
MMC/SD cards or SDIO
accessories slot
Insert either MMC/SD cards or
SDIO accessories in this slot.
Infrared port
Enables you to exchange le(s)
or data with other devices
without cables/ wires.
Speaker
Listen to audio media or a
phone call from here.
Calendar
Press for quick Calendar
access.
Touch Screen
For handwriting, drawing
or for making a selection
with the stylus.
End
Press to end a call.
Power Button/Backlight
Press to turn your pocket PC or backlight
on or off.
Notication LED
See the description
on opposite page.
Navigation Pad
Press to move up/down and left/right
through any of the drop down menus or
program instructions; select by pressing in
the center. When in the dialer screen :
Left - Press once to access the Speed
Dial feature.
Right- Press once to access the Call Log
feature.
Getting
Started
Pocket PC Phone User Manual12
Getting
Started
Pocket PC Phone User Manual 13
Back, Bottom and Right Side Panel Components
Camera Lens
Car Antenna
Connector
If available, you can attach
your phone to its antenna and
utilize its superior reception
quality.
Preview Mirror
Back Cover
Fixing Lock
Press to release the back
cover.
Earphone Jack
Allows you to listen to audio
media or use the phone's
hands-free kit.
Stylus and Stylus Slot
Notication LED
Bi-color LED on the right :
For GSM standby, GSM
message, GSM network status,
PDA notication, PDA charging
status.
Blue LED on the left :
For Bluetooth system notication
of powered-on and ready to
transmit RF signal.
Soft Reset
Press into the hole with the
stylus to reset your device.
Sync Connector
Use this connector when
synchronizing / transmitting data
or recharging.
Getting
Started
Pocket PC Phone User Manual14
Getting
Started
Pocket PC Phone User Manual 15
1.2 Battery
Warning : To reduce risk of re or burns, do
not disassemble, crush, puncture, short external
contacts, heat above 100 (212), or dispose
of in re or water. Replace only with manufacturer
specied batteries. Recycle or dispose of used
batteries to the local regulations.
Your Pocket PC Phone contains a rechargeable Li-ion poly-
mer battery under the back cover. Battery power depends on
whether you are talking on the phone, using the PDA functions
or if the device is on standby.
Battery life estimates :
n Talk-time : 2 ~ 4 hrs,
n PDA : 13 hrs (approx.),
n Standby : 150 ~ 170 hrs (approx.),
n Data retention time : 72 hrs.
The above times are based on using one function at a time,
interchanging between functions will vary the battery life.
Data Retention
It is vital to keep your battery charged. Because your Pocket
PC does not have a hard drive, all data and any new programs
you install are stored in RAM. If the battery completely drains
any data or new programs you installed will be erased. Only
the default programs on the device when you bought it will
remain.
To prevent this kind of data loss, a portion of the main battery
will keep your data safe for 72 hours if your device runs out of
power. An additional battery, the backup battery, is designed
to keep your data safe when you remove the main battery. It
will keep this data safe for 20 minutes.
WARNING : BE SURE TO CHECK THE BACKUP
BATTERY POWER REMAINS AT LEAST AT
50% OR ABOVE BEFORE YOU REMOVE THE
MAIN BATTERY BY TAPPING
Settings
System tab → Power
F
Getting
Started
Pocket PC Phone User Manual14
Getting
Started
Pocket PC Phone User Manual 15
To recharge your device
You can recharge your device in the following ways :
1
Place your Pocket PC Phone in the cradle and
connect it to an external power source with the
AC Adapter. Before using your Pocket PC,
charge the battery for at least
8 hours for the
rst time. Then, place it in the cradle for a short
time each day to recharge it to its full capacity.
2
Plug the AC adapter into the optional USB/Serial
cable head and then connect your Pocket PC
Phone directly to an external power source.
3
Plug the AC adapter into the optional AC Adapter
Converter and then connect to sync connector
of your Pocket PC Phone directly to an external
power source without using the cradle.
4
If you have spare battery for your Pocket PC
Phone, you can also put the battery into the slot
in the cradle for recharging.
AC Adapter plugs
into the back of the
cradle
To your Pocket
PC Phone
Plug the AC adapter
into a socket
USB synchronization
cable, connect to
your PC
To the sync
connector of your
Pocket PC Phone
To AC adapter
AC Adapter plugs
into the back of the
cradle
Put an spare
unit into
the slot for
recharging
Getting
Started
Pocket PC Phone User Manual16
Getting
Started
Pocket PC Phone User Manual 17
When Your Battery is Low
When the low battery-warning message appears, immediately
save any data you are working on, perform a synchronization
with your PC, then turn off your Pocket PC. If your device
does shut down, the backup portion of your main battery will
protect data for about 72 hours.
To view the battery status:
Tap Settings System tab Power.
ALWAYS TO KEEP THE POWER STATUS OF
THE BACKUP BATTERY REMAINS AT LEAST
AT 50% OR ABOVE.
1.3 Accessories
USB/Serial Cradle
Your Pocket PC Phone comes with a USB cradle. This allows
you to recharge your Pocket PC Phone with the AC Adapter,
as well as synchronize information between your Pocket PC
and a PC using ActiveSync.
GPRS will not work when your device is plugged
into the cradle.
To synchronize the USB Cradle must be plugged
into an available USB port on your PC.
For battery recharging, you must plug the AC
Adapter into the back of cradle.
An optional cradle with Audio
output is available,
please contact your operator/dealer for the
purchase.
AC Adapter plugs into
the back of the cradle for
battery recharging
Audio output is
available in an
optional unit.
F
Getting
Started
Pocket PC Phone User Manual16
Getting
Started
Pocket PC Phone User Manual 17
AC Adapter Converter
AC adaptor converter in combination with the AC adapter
allows you to recharge your device without the cradle.
USB/Serial Sync cable
The USB / Serial cable allows you to synchronize
with your desktop without the cradle. The DC con-
verter in the head also allows you, in combination
with an AC adapter, to recharge your device.
Stereo headset
The stereo wired headset has a volume control jog dial
and buttons to pick up and hang up incoming and outgoing
calls.
Backpack (Optional)
This optional backpack is an expansion pack for CF cards
type I and II and VGA/TV output. The CF expansion card is
a most popular interface card currently on the market. It can
support a VGA/CRT output for a Microsoft Powerpoint presen-
tation or Mirror image from the LCD display of your device.
For CF and VGA/TV applications, the Backpack has a built-
in extended battery. This extended battery will recharge the
main battery when attached.
A Backpack tab will be available by tapping
Settings System tab Power once you
have attached an optional backpack unit on your
device.
Resolution supports
n For LCD display : XGA 1024x768, VGA 800x600 and
640x480.
n For TV output : 640x480 NTSC and PAL system.
USB Cable
Serial Cable
Insert your
CF card here.
For VGA/TV
output
Getting
Started
Pocket PC Phone User Manual18
VGA
Output
Video
Output
S-Video
Output
To attach the backpack:
1
Remove the back cover.
2
First slot the hooks at the top of
the pack into the device, similar
to with the back cover.
3
Hold in the grey buttons on the
side of the pack and gently push
down so that the connector
clicks into place.
4
To remove press the side buttons and pull up.
VGA/TV Adapter
The VGA/TV adapter allows you to play video and presenta-
tions through your computer (VGA socket), or TV (Video and
S-Video).
To attach the cable:
1
Attach the USB head to your device.
2
For VGA attach the VGA/TV adapter directly
into your computer or projector. For TV plug an
S-Video or Video Output cable into the relevant
socket then into the back of your TV.
1
2
3
3
For VGA/TV
output
Chapter 2
Knowing Your Pocket PC
2.1 Starting Up
2.2 Entering Information
2.3 Writing on the Screen
2.4 Drawing on the Screen
2.5 Recording a Message
2.6 Finding and Organizing Information
Pocket PC Phone User Manual 20
Knowing your
pocket PC
Pocket PC Phone User Manual 21
Knowing your
pocket PC
2.1 Starting Up
Screen tapping, Calibration and
Re-calibration
When you rst start up your Pocket PC Phone, you will be
asked to calibrate the screen by tapping the center of a cross
with your stylus as it moves around the screen. This process
ensures that when you tap the screen with your stylus the item
tapped is activated.
If your device does not accurately respond to screen taps, you
will need to re-calibrate it.
To re-calibrate the screen :
1
Tap Settings System Screen.
2
As described above, tap the center of the cross to
with your stylus as it moves around the screen.
Today Screen
The Today screen displays important information, such as
today’s appointments and status icons for your device. Tap
the information listed on the Today screen to open the asso-
ciated program.
Access the Today screen by tapping Today.
To customize the Today screen display, including the back-
ground image, tap Today at the top of the Today screen or
tap SettingsPersonal tab → Today.
Pocket PC Phone User Manual 20
Knowing your
pocket PC
Pocket PC Phone User Manual 21
Knowing your
pocket PC
Indicators Meaning
Turns all sounds on and off.
Main battery low.
Main battery very low.
Connection is active.
Synchronization is beginning or ending.
Synchronization is occurring.
Notication that one or more instant messages were received.
Notication that one or more mobile e-mail / SMS messages were received.
Indicates the connection to your mobile phone service provider is on and the
strength of the signal.
Indicates your phone is switched off.
If more notication icons need to be displayed and there is no room to display
them, this indicator will display. Tap the icon to view all notication icons.
Tap to go to a program.
Tap to view notication information.
Tap to view network status and options.
Tap to change volume or mute all sounds.
Tap and hold to change time format.
Tap to change date and time.
Tap to change owner information.
Your day at a glance. Tap to open the associated
program
Tap to create a new item.
Tap to disconnect from ActiveSync or
Bluetooth .
6
7
8
Indicators
Following are some of the status icons you may see.
1
2
3
4
5
9
10
1
2
3
4
5
6
7
8
9
10
Pocket PC Phone User Manual 22
Knowing your
pocket PC
Pocket PC Phone User Manual 23
Knowing your
pocket PC
Icon Program Description
ActiveSync Synchronizes information between your device and PC.
Calendar Keeps track of your appointments and creates meeting
requests.
Contacts Keeps track of your friends and colleagues.
Inbox Sends and receives e-mail/ SMS messages.
Pocket IE Pocket Internet Explorer browses Web and WAP sites, and
downloads new programs and les from the Internet.
Notes Creates handwritten or typed notes, drawings, and record-
ings.
Phone Makes and receives calls, switches between calls and sets
up conference calling.
Tasks Keeps track of your tasks.
Windows
Media Player
Enables the multimedia function on your Pocket PC
Phone.
Pocket Excel Creates new workbooks or view and edit Excel work-
books.
Pocket Word Creates new documents or view and edit MS-Word docu-
ments.
MSN
Messenger
Sends and receives instant messages with your MSN Mes-
senger contacts.
Microsoft
Reader
Collects and reads e-Books on your device.
Programs
n You can switch from one program to another by selecting
it from the menu. To access some programs, tap
Programs, and then the program name.
n The following table contains a partial list of programs that
are on your device. Look on the Pocket PC Companion
CD for additional programs that you can install onto your
device.
Pocket PC Phone User Manual 22
Knowing your
pocket PC
Pocket PC Phone User Manual 23
Knowing your
pocket PC
Icon Program Description
Camera Snaps photos or shoots video clips with accompanying
audio.
Album Collects, organizes and sorts .JPG/.BMP/.GIF picture les
on your Pocket PC phone from Camera or ActiveSync.
Photo
Contacts
Input the image les according to your Contacts list and
set up the Caller-ID function
MMS Send and receive MMS messages.
Calculator Performs basic arithmetic, such as addition, subtraction,
multiplication, and division.
Games Two games, Jawbreaker and Solitaire are included in this
folder by default.
Wireless
Modem
Enable your device as an external modem for a PC or
Notebook by using a serial/USB port, or infrared.
SIM
Manager
Collects, organizes and sorts the Contacts list stored in
your SIM card.
xBackup Back up your Pocket PC Phone les to ROM or an SD
card
Pictures Collects, organizes and sorts .jpg picture les on your
Pocket PC phone or on a storage card.
n You can also switch to some pro-
grams by pressing a program but-
ton. Your device has one or more
program buttons located on the front
or side of the device. The icons on
the buttons identify the programs
they turn on . For more information
about the
Button settings, please
see Chapter 5.
Pocket PC Phone User Manual 24
Knowing your
pocket PC
Pocket PC Phone User Manual 25
Knowing your
pocket PC
Navigation Bar and Command Bar
The navigation bar, located at the top of the screen, displays
active programs and current time, enables you to switch to
programs and close screens.
1
Use the command bar at the bottom of the
screen to perform tasks in programs.
2
The command bar includes menu names,
buttons, and the Input Panel button. To create
a new item in the current program, tap
New. To
see the name of a button, tap and hold the stylus
on the button. Drag the stylus off the button so
that the command is not carried out.
Pop-Up Menus
Use pop-up menus to quickly perform an action on an item.
For example, you can use a pop-up menu to delete or make
a copy of an item. To access a pop-up menu, tap and hold
the item that you want to perform the action on. When the
menu appears, tap the action you want to perform, or tap
anywhere outside the menu to close it without performing
an action.
1
Tap and hold to display the pop-up menu.
2
Lift the stylus and tap the action you want.
3
Tap outside the menu to close it without
performing an action.
Tap to switch to a
program that you
recently used.
Tap to switch to a
program.
Tap to see more
programs.
Tap to change device
settings.
Tap to see a Help topic
for the current screen.
Tap to select
menu commands
Tap to select
button commands
Tap to display the
input panel
1
2
3
Pocket PC Phone User Manual 24
Knowing your
pocket PC
Pocket PC Phone User Manual 25
Knowing your
pocket PC
Notications
Your device reminds you in a variety of ways when you have
something to do or receive a SMS. For example, if you’ve
set up an appointment in Calendar, a task with a due date
in Tasks, or an alarm in Clock, you will be notied in any of
the following ways:
n A message box appears on the screen.
n A sound, which you can specify, is played.
n A light ashes on your device.
n The device vibrates.
To choose reminder types and sounds for your
device, tap Settings Personal Sounds
& Notications. The options you choose here apply
throughout the device.
2.2 Entering Information
You can enter information on your device in several ways,
depending on the type of device you have and the program
you are using.
n Synchronizing - Using ActiveSync, exchange infor-
mation between your PC and device.
n Typing - Using the input panel, enter typed text into
the device. You can do this by tapping keys on the soft
keyboard or by using the handwriting recognition soft-
ware.
n Writing - Using the stylus, write directly on the screen.
n Drawing - Using the stylus, draw directly on the
screen.
n Recording - Create a stand-alone recording or embed
a recording into a document or note.
For more information on ActiveSync, see Chapter 4.
Pocket PC Phone User Manual 26
Knowing your
pocket PC
Pocket PC Phone User Manual 27
Knowing your
pocket PC
Using the Input Panel
Use the input panel to enter information in any program on
your device. You can either type using the soft Keyboard
or write using Letter Recognizer, Block Recognizer, or
Transcriber. In either case, the characters appear as typed
text on the screen.
To show or hide the input panel, tap the Input Panel button
. To see your choices tap the arrow next to the Input
Panel button.
a. To type with the soft keyboard
1
Tap the arrow next to the Input Panel button
and then Keyboard
.
2
To type lowercase letters, tap the keys with the
stylus.
3
To type a single uppercase letter or symbol, tap
the Shift key. To tap multiple uppercase letters
or symbols, tap the CAP key.
4
For uppercase, tap and hold the stylus on the
key and drag up.
5
To add a space, tap and hold any key and then
drag the stylus to the right across at least two
others.
6
To backspace one character, tap and hold any
key and then drag the stylus to the left across
at least two others.
7
To insert a carriage return, tap and hold the stylus
anywhere on the keyboard and drag down.
When you use the input panel, your device anticipates the
word you are typing or writing and displays it above the input
panel. When you tap the displayed word, it is automatically
inserted into your text at the insertion point. The more you use
your device, the more words it learns to anticipate.
If you want to use larger keys, tap the arrow next
to the Input Panel button then tap Options
select Keyboard in Input method and then
select Large Keys.
Tap here if this
is the right word.
Tap to change
input panel
options.
Tap to select an
input panel.
Tap to see the
lists of input
panels.
Tap to open the selected
input panel.
F
Pocket PC Phone User Manual 26
Knowing your
pocket PC
Pocket PC Phone User Manual 27
Knowing your
pocket PC
b. Using Letter Recognizer
With Letter Recognizer you can write letters using the stylus
just as you would on paper.
1
Tap the arrow next to the Input Panel button
and then Letter Recognizer.
2
Write a letter in the box.
When you write a letter, it is converted to typed text that ap-
pears on the screen. For specic instructions on using Letter
Recognizer, with Letter Recognizer open, tap the question
mark next to the writing area.
c. Using Block Recognizer
With Block Recognizer you can input character strokes using
the stylus that are similar to those used on other devices.
1
Tap the arrow next to the Input Panel button
and then Block Recognizer.
2
Write a letter in the box.
When you write a letter, it is converted to typed text that ap-
pears on the screen. For specic instructions on using Block
Recognizer, with Block Recognizer open, tap the question
mark next to the writing area.
F
Pocket PC Phone User Manual 28
Knowing your
pocket PC
Pocket PC Phone User Manual 29
Knowing your
pocket PC
d. Switching to Transcriber
With Transcriber you can write anywhere on the screen using
the stylus just as you would on paper. Unlike Letter Recog-
nizer and Block Recognizer, you can write a sentence or
more of information. Then, pause and let Transcriber change
the written characters to typed characters.
1
Tap the arrow next to the Input Panel button
and then Transcriber.
2
Write anywhere on the screen.
For specic instructions on using Transcriber, with Tran-
scriber
open, tap the question mark in the lower right hand
corner of the screen.
e. To punctuate in Transcriber :
1
Tap the keyboard button on the toolbar.
2
Tap the desired punctuation.
3
Tap OK to hide the keyboard.
f. To learn about writing in Transcriber :
1
Tap button on the toolbar.
2
In the screen that appears, select the letter you
want to learn about, and then tap on one of the
examples given above.
For specic instructions on using Transcriber, with Tran-
scriber
open, tap the question mark in the right hand
corner of the tool bar.
Click on a letter
for a demonstration
F
Pocket PC Phone User Manual 28
Knowing your
pocket PC
Pocket PC Phone User Manual 29
Knowing your
pocket PC
g. To select typed text :
If you want to edit or format typed text, you must select it
rst.
Drag the stylus across the text you want to select.
You can cut, copy, and paste text by tapping and
holding the selected words and then tapping an
editing command on the pop up menu, or by tapping
the command on the Edit menu
To change word suggestion options, such as the
number of words suggested at one time,
Tap Setting Personal tab Input
Word Completion tab
h. Editing text
Each input program provides curser keys to move through text
and backspace so that you can correct spelling, grammar or
insert additional information. Alternatively, you can use your
stylus to make an insert.
After you have made an insert, you can use any of the in-
put methods described above to add additional text at the
insertion point.
Pocket PC Phone User Manual 30
Knowing your
pocket PC
Pocket PC Phone User Manual 31
Knowing your
pocket PC
2.3 Writing on the Screen
In any program that accepts writing, such as the Notes
program, and in the Notes tab in Calendar, Contacts,
and Tasks, you can use your stylus to write directly on the
screen. Write the way you do on paper. You can edit and
format what you have written and convert the information to
text at a later time.
To write on the screen :
Tap the pen button to switch to writing mode.
This action displays lines on the screen to help you
write.
Some programs that accept writing may not
have the pen button. See the documentation for
that program to nd out how to switch to writing
mode.
To select writing :
If you want to edit or format writing, you must select it rst.
1
Tap and hold the stylus next to the text you want
to select until the insertion point appears.
2
Without lifting, drag the stylus across the text
you want to select.
If you accidentally write on the screen, tap Tools, then Undo
and try again. You can also select text by tapping the Pen
button to deselect it and then drag the stylus across the
screen.
You can cut, copy, and paste written text in the same way
you work with typed text: tap and hold the selected words
and then tap an editing command on the pop up menu, or
tap the command on the Edit menu.
Tap the Pen button and
use your stylus like a pen.
Tap the Pen button again to select
the writing you want
Pocket PC Phone User Manual 30
Knowing your
pocket PC
Pocket PC Phone User Manual 31
Knowing your
pocket PC
Converting writing to text
1
Tap Tools and then Recognize.
2
If you want to convert only certain words, select
them before tapping Recognize on the Tools
menu (or tap and hold the selected words and
then tap
Recognize on the pop up menu). If a
word is not recognized, it will be left as writing.
If the conversion is incorrect, you can select different words
from a list of alternates or return to the original writing.
Tap and hold the incorrect word (tap one word at a
time). On the pop up menu, tap
Alternates. A menu
with a list of alternate words appears. Tap the word
you want to use, or tap the writing at the top of the
menu to return to the original writing.
To get good recognition :
1
Write neatly.
2
Write on the lines and draw descanters below the
line. Write the cross of the “t” and apostrophes
below the top line so that they are not confused
with the word above. Write periods and commas
above the bottom line.
3
For better recognition, use the Tools menu to
increase the zoom to 300%.
4
Write the letters of a word closely and leave
big gaps between words so that the device can
easily tell where words begin and end.
5
Hyphenated words, foreign words that use
special characters such as accents, and some
punctuation cannot be converted.
If you edit or add to a word after attempting to recognize it,
the new writing will not be included if you attempt to recog-
nized it again.
Tap the word you want to use
or, tap to return to your original
writing.
The writing is turned
into text.
Pocket PC Phone User Manual 32
Knowing your
pocket PC
Pocket PC Phone User Manual 33
Knowing your
pocket PC
2.4 Drawing on the Screen
You can draw on the screen in the same way that you write
on the screen. The difference between writing and drawing
on the screen is how you select items and how they can be
edited. For example, selected drawings can be re-sized,
while writing cannot.
To create a drawing :
Cross three ruled lines on your rst stroke. A drawing
box appears. Subsequent strokes in or touching the
drawing box become part of the drawing. Drawings
that do not cross three ruled lines will be treated as
writing.
To select a drawing :
If you want to edit or format a drawing, you must select it
rst.
1
Tap and hold the stylus on the drawing until the
selection handle appears. To select multiple
drawings, deselect the pen button and then
drag to select the drawings you want.
2
You can cut, copy, and paste selected drawings
by tapping and holding the selected drawing and
then tapping an editing command on the pop
up menu, or by tapping the command on the
Edit menu. To re-size a drawing, make sure the
Pen button is not selected, and drag a selection
handle.
To change the zoom level so it is easier to work
or view your drawing, tap Tools and then select
a zoom level.
Pen button
The drawing box indicates
the boundaries of the drawing.
Pocket PC Phone User Manual 32
Knowing your
pocket PC
Pocket PC Phone User Manual 33
Knowing your
pocket PC
2.5 Recording a Message
In any program where you can write or draw on the screen,
you can also quickly capture thoughts, reminders, and phone
numbers by recording a message. In Calendar, Tasks, and
Contacts, you can include a recording in the Notes tab. In the
Notes program, you can either create a stand-alone recording
or include a recording in a written note. If you want to include
the recording in a note, open the note rst. In the Inbox pro-
gram, you can add a recording to an e-mail message.
To create a recording
1
Hold your device’s microphone near your mouth
or other source of sound.
2
Tap Notes
3
To start recording, tap . A beep will sound.
4
To stop recording, tap . Two beeps will sound.
The new recording appears in the note list or as
an embedded icon.
You can also make a recording by tapping the
Record button on the Recording toolbar.
Indicates an embedded
recording.
Tap to begin recording
Tap to show or hide
the Recording toolbar
Pocket PC Phone User Manual 34
Knowing your
pocket PC
The Find feature on your device helps you quickly locate
information.
1
On the tap Find.
2
In Find, enter the le name, word, or other
information you want to search for. If you have
looked for this item before, tap the
Find arrow
and select the item from the list.
3
To help narrow your search select a data type
under Type.
4
Tap Go. The My Documents folder and sub-
folders are searched.
5
In the Results list, tap the item you want to
open.
To quickly nd information that is taking up storage
space on your device, select Larger than 64 KB
in Type.
2.6 Finding and Organizing
Information
Chapter 3
Using Your Phone
3.1 About Your Phone
3.2 Making a Call
3.3 Receiving a Call
3.4 In-call Options
3.5 Contacts Information
3.6 Photo Contacts
3.7 Additional Dialing Information
3.8 Secure Your Phone
Pocket PC Phone User Manual36
Using Your
Phone
Pocket PC Phone User Manual 37
Using Your
Phone
3.1 About Your Phone
Like a standard mobile phone you can use your Pocket PC
to keep track of calls and send SMS messages. You can also
take notes while talking, dial directly from Microsoft Contacts
and easily transfer contacts between your SIM card and the
RAM of your device.
About SIM cards
The Subscriber Identication Module (SIM) card, also referred
to as a smart card, ts into your device. It can contain:
n Mobile phone service provider account details.
n Information regarding service access and preferences.
n Contact information, which can be moved to Contacts on
your device.
n Any additional services to which you may have a sub-
scription.
For more information regarding SIM cards, see your mobile
phone service provider’s documentation.
To install a SIM cards :
1
Turn over your device and press the xing lock
button to remove the back cover.
REMOVING THE BATTERY WILL TURN OFF
YOUR DEVICE, MAKE SURE YOU HAVE SAVED
ANY DATA IN OPENED PROGRAMS.
BE SURE TO CHECK THE BACKUP BATTERY
POWER REMAINS AT LEAST AT
50% OR
ABOVE
BEFORE YOU REMOVE THE MAIN
BATTERY BY TAPPING
Settings
System tab → Power.
G
F
Pocket PC Phone User Manual36
Using Your
Phone
Pocket PC Phone User Manual 37
Using Your
Phone
F
2
To unlock and remove the battery, press the
stylus into the slot under the bottom end of the
battery.
3
Lift up the SIM card case and insert the SIM.
Push the SIM holder down, then push towards
the middle until it clicks.
4
Replace the battery and back cover. Remember
to push back the red lock point to clip it into place
at the bottom.Push it forward and pull back to
secure the SIM.
IF YOU REMOVE THE MAIN BATTERY, THE
BACKUP BATTERY CAN ONLY KEEP YOUR
DATA SAFE FOR 20 MINUTES WHEN IT IS 100%
CHARGED, BE SURE TO REPLACE THE MAIN
BATTERY BACK INTO PLACE RIGHT AFTER
THE SIM CARD IS INSERTED.
Press to
unlock and
remove the
battery.
F
F
Press to lock
and x the
battery.
Pocket PC Phone User Manual38
Using Your
Phone
Pocket PC Phone User Manual 39
Using Your
Phone
About The Dialer Screen
To access the Dialer Screen, tap , then Phone, or press
on your device. From this screen, you can access Call
Log, Speed Dial and Phone Setting. Signal status informa-
tion and important icons that tell you about your call include
:
1
The icon indicates the strength of the signal.
2
Last number details are displayed here.
3
Keypad for inputting.
4
Task bar to access phone setting.
5
View all history including all received, dialed and
missed calls.
6
Stores numbers you call often.
7
Tap to make a call.
Indicators
Below are some of the status icons you may see.
1
2
3
4
5
6
7
Indicator Meaning
Phone off or out of network service. Tap this
icon to turn on the phone
In network service, tap this icon to turn off
the phone.
Call Missed. Tap this icon to view the call(s)
you missed.
Unread E-mail or SMS. Tap the icon to view
unread SMS or E-mail.
Connecting in progress. The icon will dis-
appear when you are connected to your
ISP.
Indicates your connection is at full
strength.
Pocket PC Phone User Manual38
Using Your
Phone
Pocket PC Phone User Manual 39
Using Your
Phone
The Navigation Pad and Dialing
1
Take Call - Press to take an incoming call.
Dialer Screen -Press to activate the dialer
screen.
Speakerphone - During a call, press and hold
to turn the speakerphone on or off.
Dial - Press to dial a number.
2
Scroll Up - Press to scroll up through a list.
3
End Call - Press to end a call.
Phone Signal - Press and hold to turn phone
on or off.
4
Call Log - After launching the dialer screen,
press to enter the Call Log feature.
5
Scroll Down - Press to scroll down through a
list.
6
Center - Press to select a menu item.
7
Speed Dial - After launching the dialer screen,
press to enter the Speed Dial feature.
Entering Your PIN
Most SIM cards are preset with a PIN ( Personal Identi-
cation Number), provided by your mobile service provider,
which you need to enter whenever you use your device.
1
Enter the preset PIN assigned to you by your
mobile phone service provider (please contact
your mobile service provider).
2
Tap button.
If your
PIN is entered incorrectly three times, the
SIM card will be blocked. If this happens, you can
unblock it with the PIN Unblocking Key from your
mobile phone service provider.
1
2
3
4
5
6
7
Pocket PC Phone User Manual40
Using Your
Phone
Pocket PC Phone User Manual 41
Using Your
Phone
Checking Your Connection
The default settings for your device are programmed to as-
sume that you want to use your phone. Provided you have
inserted a SIM card, your device will automatically connect
your mobile phone to your service provider’s network.
The icon indicates that you are connected to your service
provider's network. A full strength signal is indicated by .
As the strength of the signal diminishes so will the number of
vertical bars in the icon, with no bars indicating no signal.
IN MANY COUNTRIES YOU ARE REQUIRED BY
LAW TO TURN OFF YOUR PHONE WHEN YOU
FLY. TURNING OFF YOUR POCKET PC DOESN'T
TURN OFF YOUR PHONE; YOU MUST TURN
OFF YOUR WIRELESS CONNECTION TO YOUR
OPERATOR’S NETWORK.
Turning The Phone On and Off
You can turn your phone on and off while keeping your actual
device turned on.
1
While using any program on your device, tap
in the title bar at the top of the phone’s display.
2
Tap Turn on or Turn off option in the pop-up
menu.
3
To receive calls when your device is turned off,
leave the Phone turned on.
You can use other programs on your device during
a call. To quickly switch back to Phone, tap
,
or tap Phone.
Pocket PC Phone User Manual40
Using Your
Phone
Pocket PC Phone User Manual 41
Using Your
Phone
Adjusting The Phone Volume
1
During a call, tap or press the volume on
the side of your device.
2
You can select to adjust the phone volume
(ring) or device volume (notication levels
and MP3) on the pop-up menu.
3
If you select Vibrate mode, will appear in
the title bar at the top of the phone display.
4
Turn off the volume by choosing the Off
option.
To adjust the conversation phone volume, you
must do it during a call. Adjusting the volume at
another time will affect the ring, notication and
MP3 levels.
Pocket PC Phone User Manual42
Using Your
Phone
Pocket PC Phone User Manual 43
Using Your
Phone
3.2 Making a Call
With your Pocket PC Phone, you can make a call from
the Dialer, Contacts, Speed Dial, Call History, and SIM
Manager.
To make a call from the Dialer :
The most direct method is by using the Phone keypad.
1
Press to bring up the dialer screen.
2
Tap the number on the keypad then tap
or press button.
Back Spacing and Deleting
If you tap a wrong number, you can back space to
erase individual numbers one at a time.
You can also delete all the numbers in the window by
tapping Edit and then Clear.
Pocket PC Phone User Manual42
Using Your
Phone
Pocket PC Phone User Manual 43
Using Your
Phone
To make a call from Contacts :
You can make a call from Contacts in the following ways :
Option 1
Press the Microsoft Contacts Button, nd the contact
and then tap twice -- once to send to the dialer
screen and once to call.
The pop up menu and button will by default
display Call Work Tel. However, you can
customize it so that the mobile number or e-mail
is displayed instead, see Option 3 below for
specic details.
Option 2
Select a contact in the contacts list and then press
left or right on the navigation pad -- the number on
the screen will change.
Option 3
1
In the contacts list, tap the w in the right column
next to the contact you want to customize. A
pop-up menu will display the phone numbers
and e-mail addresses for this contact with a dot
next to the priority number.
2
In the pop-up menu select a priority -- If you
selected mobile number,
m should now be in
the right column next to the contact.
tap the w here to pop-up all the phoned
numbers and e-mail for this contact
G
Pocket PC Phone User Manual44
Using Your
Phone
Pocket PC Phone User Manual 45
Using Your
Phone
To make a call from Speed Dial :
Create speed dials to call frequently-used numbers with a
single tap. Before you can create a speed dial entry for a
phone number, that number must already exist in Contacts.
1
From the Phone keypad, tap
New.
2
Tap the desired contact name and number.
3
In the Location eld, tap the Up/Down arrows to
select an available location to assign as the new
speed dial entry. The rst speed dial location is
reserved for your voice mail.
By memorizing the position in the Speed Dial list of a number,
you can dial the number by entering its position number.
For example:
In the picture on the up-right, Alex Liang is at position 3. To
dial his number simply tap and hold 3 on the dialer keypad; if
the number holds a position of 10 or more, tap the rst number,
and then tap and hold the second to dial.
By default the Location function will give you the
next available position in the Speed Dial list. If you
want to put a number in a position that is already
occupied, the new number will replace the number
already there.
Tips for Speed Dial setting
To create a speed dial entry from Contacts, tap and
hold the contact name, tap Add to Speed Dial, and
then tap the Up/Down arrows to select an available
location to assign as the new speed dial entry.
To delete a speed dial entry, go to the
Speed Dial
list, tap and hold the contact name in the box to the
right of the assigned speed dial number, and then
tap Delete.
Pocket PC Phone User Manual44
Using Your
Phone
Pocket PC Phone User Manual 45
Using Your
Phone
To make a call from the Call
History :
1
Go to Phone and press the right side of the
navigation pad or tap
2
Find the call details by rst selecting the category
it is led under. For example, if it is in All calls
select All calls from the drop down menu in the
top-left corner.
3
Use the navigation pad to nd the number and
then tap
or the icon to the left of the number
you wish to call.
4
Call History icons include :
incoming calls ; outgoing calls;
missed calls.
To make a call from SIM Manager :
1
Tap Programs SIM Manager -- wait
for your SIM card contents to load.
2
Tap and hold the name or phone number of the
person you wish to call, and then select
Call
from the pop-up menu.
Pocket PC Phone User Manual46
Using Your
Phone
Pocket PC Phone User Manual 47
Using Your
Phone
3.3 Receiving a Call
To answer an incoming call :
1
Tap Answer, or press on your device.
2
Tap Ignore or press to reject the call.
If you reject a call the busy tone will be sent out.
To end a call :
Once an incoming or outgoing call is proceeding, you
can press or tap to end the call.
3.4 In-Call Options
Your device noties you when you have another incoming
call and gives you the choice of rejecting or accepting the
call. If you accept, you can choose to switch between the two
callers or set up a conference call between all three parties.
A conference call can include up to six people. See page 47
for more details.
Putting a call on hold
1
Tap Answer to the take the 2
nd
call and put the
1
st
on hold.
2
To end the 2
nd
call and go back to the 1
st
, tap
or press .
Pocket PC Phone User Manual46
Using Your
Phone
Pocket PC Phone User Manual 47
Using Your
Phone
To swap between calls :
You can choose to swap backwards and forwards
between 2 callers by pressing .
To set up conference calls :
1
Either put a call on hold, dial a 2
nd
number and
wait for it to be picked up. Or, accept a 2nd
incoming call when you already have one in
progress.
2
In the screen that appears tap .
3
If the conference connection is successful the
word Conference will appear at the top of the
phone dialer screen (see right).
4
To add additional people to your conference
call tap
, key in the number, and then
to return and continue.
Making a Note
Regardless of whether you call from the Dialer, Contacts,
Call Log, Speed Dial or SIM Manager, you can take notes
during a call. After you have nished the note it will be saved
as an attachment to your call in one of the Call Log folders.
a. To make a note :
1
After you have entered a number and tapped
or , tap the icon at the bottom
of the screen.
2
Use any of the input methods to record your note
and then tap OK. You can nish your note during
or after the call.
Pocket PC Phone User Manual48
Using Your
Phone
Pocket PC Phone User Manual 49
Using Your
Phone
Making a Note (Cont’d.)
b. To view a note :
1
Press the right side of the navigation pad or tap
, tap and hold the call, and then from
the pop up menu tap view note. (The icon
indicates a note).
2
Or, go to Notes, and then tap the name of the le
from the list. (For more information, see Chapter
2 Entering information.)
If you decide to create a contact for this caller -- see
Adding and Transferring Contacts information
in section 3.5 later in this chapter -- the call and
le names will be amended to the name of the new
contact; the le will be unaffected.
Enabling the Speakerphone Mode
Your device has a speakerphone allowing you to talk hands-
free and/or let other people listen to the caller.
1
Wait until the phone is ringing.
2
Hold down until the speakerphone comes
on and the icon appears in the top toolbar.
3
To turn off the speakerphone hold down
again.
DO NOT LEAVE THE PHONE IN SPEAKER-
PHONE MODE AND HOLD IT ON YOUR EAR;
THE SOUND WILL DAMAGE YOUR EAR.
tap here to view the notes
F
Pocket PC Phone User Manual48
Using Your
Phone
Pocket PC Phone User Manual 49
Using Your
Phone
Checking Your Voice Mail
The rst speed dial location defaults as your voice mailbox.
When you insert your SIM card into your Pocket PC Phone, it
will automatically detect and set as default the voice mailbox
number of your mobile service provider.
To retrieve your voice mail :
On the Phone screen, tap or press the left
side of the navigation pad, select Voice Mail
and then press .
3.5 Contacts Information
Contacts can be imported in the following different ways:
1
Your SIM card - You interchange your SIM card
between your Pocket PC Phone and another
device; while using the other device you create
one or more new contacts on the SIM card.
2
Call History - New contact numbers can be
found in incoming or missed calls.
Important to import contacts -
1 Backup your SIM numbers to your device.
2 Speed Dial numbers must be set in Contacts,
not on the SIM card.
3 Creating Contacts in Microsoft Contacts
creates more detailed records.
Pocket PC Phone User Manual50
Using Your
Phone
Pocket PC Phone User Manual 51
Using Your
Phone
SIM Manager
To open SIM manager, tap Programs SIM Manager
-- wait for your SIM card contents to load.
a. To create a SIM contact :
1
After the SIM contents have loaded, tap New.
2
Fill in the Name and Phone details then tap
Add.
b. To transfer contacts from SIM to
Contacts :
Option 1
On SIM Manager display, tap Tools Select All
and then Save to Contacts.
Option 2
Press and hold the center of the navigation pad - or
tap and hold a contact from the list - and then select
Save to Contacts from the pop up menu.
Pocket PC Phone User Manual50
Using Your
Phone
Pocket PC Phone User Manual 51
Using Your
Phone
c. To save personal numbers :
You can choose to save your personal phone numbers in a
separate screen in SIM Manager.
1
Tap Programs SIM Manager Tools
and then List of Own Numbers.
2
Add a number to the screen and then tap OK.
Call History
Tap on the phone screen to pop-up the call history
list to the right :
To add a record to Contacts from Call
History :
1
Find the call details you want to add.
2
Press and hold the stylus or press and hold the
navigation pad center; select
Save to Contacts
in the pop-up menu that appears .
3
In the Save to Contacts screen, add additional
contact details and press the navigation pad
center or tap OK.
The call details in the Call History will then be amended
and displayed under the name of the contact, not their tele-
phone number.
Pocket PC Phone User Manual52
Using Your
Phone
Pocket PC Phone User Manual 53
Using Your
Phone
Manage Your Call History
Call History details all incoming, outgoing, and missed calls
and also provides a summary of total calls. Call History can
also tell you when a call was initiated, how long it lasted, and
provides easy access to any notes taken during the call.
a. Viewing calls details
Tap in the top left corner of the screen and then select a
category from the drop down menu.
Calls are categorized as follows:
n All Calls - displays all calls made to and from the
phone in chronological order.
n Missed - displays calls that were not
answered.
n Outgoing - displays calls made from the
phone.
n Incoming - displays calls made to the
phone.
n By Caller - list calls alphabetically
according to caller.
b. To view duration of calls :
Go to Call History, nd the call you are looking in,
and then tap it once.
c. To delete Individual calls from Call
History :
Tap and hold the stylus on the call to be deleted, and
then select delete from the pop up menu.
d. To delete all calls from Call History :
Tap Tools and then Delete all Calls.
Pocket PC Phone User Manual52
Using Your
Phone
Pocket PC Phone User Manual 53
Using Your
Phone
e. To set limits on the size of your Call
History :
1
Tap Call Timers and then the box
under Delete call history items older than.
2
In the drop down menu select a time period then
tap OK.
3.6 Photo Contacts
Photo Contacts makes using your Pocket PC more fun
and practical than ever before. It allows you to assign still
or animated photos to the entries in your Contacts. Then
when a person calls you (for whom you have previously as-
signed a photo ID in Contacts), that photo ID will appear
on your Pocket PC’s incoming call screen. Use the rich set
of features to get the photos displayed with the size, position,
and animated ID template you want.
To create a new photo contact:
1
Tap Programs Photo Contacts .
2
Select a contact from the list, or create a new
one by tapping Edit → then New.
Contacts here fully mirror those in Microsoft
Contacts.
3
Tap Edit → then Assign Photo...
4
Tap next to Type to select the type of les you
want listed, ie, jpeg, bmp, gif or all Tap next
to Find in: to select the location of a le.
You can use
JPEG, BMP, still GIF, or animated
GIF les for your Photo IDs.
5
Tap a picture le, then OK, and OK again until
you return to the
Contacts screen. You can see
the photo at the bottom of the screen.
Pocket PC Phone User Manual54
Using Your
Phone
Pocket PC Phone User Manual 55
Using Your
Phone
To preview and adjust settings:
In step 5 above, after you tap OK once you will arrive at the
preview and display settings screen.
In Display Settings you can:
1
Add extra style by assigning a template to the
photo.
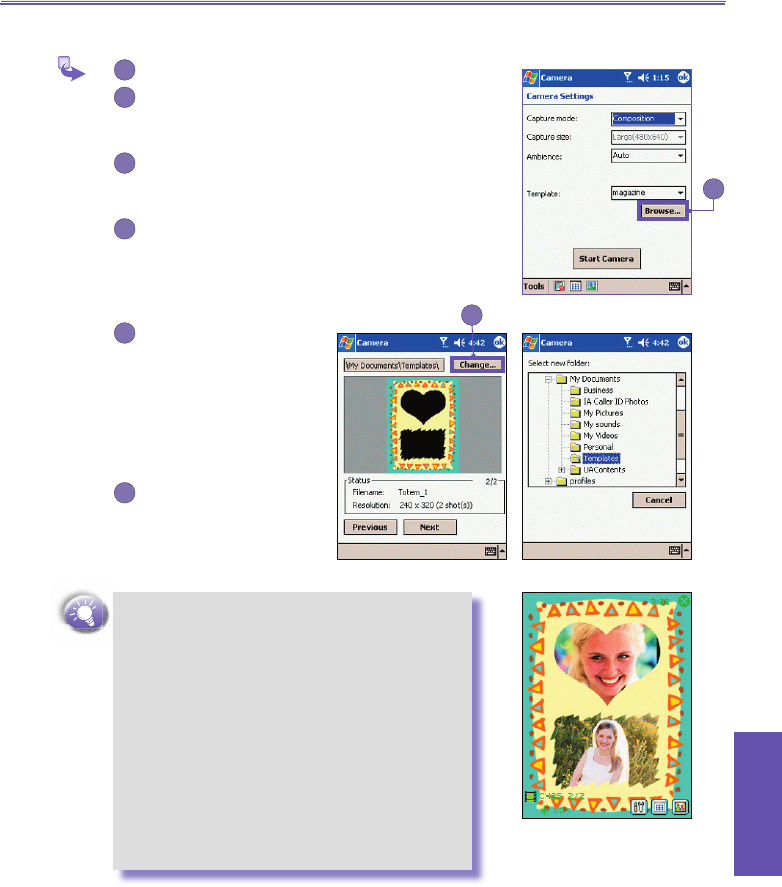
A few sample Photo Contacts templates
(animated graphical templates that can frame your
assigned photos) are included in your Pocket PC’s
local storage in the \My Documents\Templates
folder. For more templates go to IA Style website
http://www.iastyle.com
2
Choose how you want the photo to t to the
window.
3
Enlarge the photo if it is smaller than the
window.
4
Choose a size and position for the picture.
5
Preview all of these changes by tapping
Preview.
Toolbar Icons
The Toolbar provides a convenient way for you to select fre-
quently-used commands. Each is explained in more detail
in its own subsection later in this Manual. From left to right,
the functions of the icons on the Toolbar are:
n Create a new Contact entry (same as
New...
on the Edit Menu).
n Modify data for the selected Contact entry
(same as Edit... on the Edit Menu).
n Delete the selected Contact entry (same
as Delete on the Edit Menu).
n Assign a Photo ID to a Contact entry
(same as Assign Photo... on the Edit
Menu).
1
2
3
4
5
Preview with a selected
template.
Pocket PC Phone User Manual54
Using Your
Phone
Pocket PC Phone User Manual 55
Using Your
Phone
n Remove a Photo ID assignment (same as
Unassign Photo on the Edit Menu).
n Preview the current Photo/template as-
signment (same as Preview... on the View
Menu).
n Invokes “Detailed View for the current
entry (same as Properties... on the View
Menu).
n Opens the Options screen (same as Op-
tions... on the Tools Menu).
To assign a photo from the camera:
1
Tap Programs Photo Contacts.
2
Select a contact from the list, or create a new
one by tapping
Edit, then New. Contacts here
fully mirror those in Microsoft Contacts.
3
Tap Edit then Assign Photo From Camera.
4
After you take the picture, you will be returned
to the Display Settings and Preview screen.
To unassign a photo:
1
Tap Programs Photo Contacts..
2
Select an existing contact entry that you want to
remove.
3
Tap Edit then Unassign Photo Tap yes in
the pop-up box.
To view your contacts by photo:
1
Tap Programs Photo Contacts.
2
Tap -- on the Command Bar; Or, tap View
then Photo Dialer View.
Pocket PC Phone User Manual56
Using Your
Phone
Pocket PC Phone User Manual 57
Using Your
Phone
When in Photo Dialer view mode, the View Menu contains
three additional commands that allow you to specify the
size of the thumbnail images: Large Thumbnails, Normal
Thumbnails and Small Thumbnails.)
You can enter the Detailed View of Photo Contact using
any of these methods:
n Select the desired Contact entry then select Proper-
ties... on the View Menu.
n Select the desired Contact entry then tap the Proper-
ties icon on the Toolbar.
n Select the desired Contact entry then press the Action
button on your Pocket PC.
n Double-tap a Contact entry.
To disable the displaying of photos:
1
Tap Programs Photo Contacts..
2
Tap Tools Options then uncheck the
Display photo during incoming or waiting
call box.
To manage your groups:
You can create a new group, rename, delete, and assign and
unassign a photo to a group.
Tap Tools → then Manage group.
To assign a contact to a group:
1
Tap Programs Photo Contacts..
2
Select a contact from the list, or create a new
one by tapping
Edit, then New. Contacts here
fully mirror those in Microsoft Contacts.
3
Tap Edit → then Assign Group.
4
Select a group from the list, then tap OK.
5
To unassign tap Unassign Group on the Edit
menu.
Pocket PC Phone User Manual56
Using Your
Phone
Pocket PC Phone User Manual 57
Using Your
Phone
Show Contact Names Only
When Show Contact Names Only is selected on the View
menu, only the name of each Contact entry (no phone num-
ber or other data) will be listed. The Photo ID (if any) will
still be displayed.
Set Default Photos...
The Set Default Photos screen lets you assign, unassign,
and preview default Photo IDs to appear for these three
situations:
Unknown photo This photo will display whenever the phone number of the incoming call is
not known to Caller ID because no phone number was “passed in” to your
Pocket PC. This would occur if the person calling you has blocked their
phone number from being displayed to the receiver, or has not enabled
the broadcast of their Caller ID.
Not-found photo This option in the Set Default Photos screen lets you assign a generic
Photo ID to any incoming call from a person whose number is not found in
your Contacts. That is, the phone number of the incoming call is known,
but has no matching entry in your Contacts.
Default photo This photo will display when the incoming call is found to be from a
matching entry in your Contacts database, but so far there is no individu-
ally-assigned Photo ID for either that individual Contact entry, or for the
Group it belongs to.
1
To select Set Default Photos...tap Tools then
select Set Default Photos.
2
Check a circle next to one of the categories, then
tap Assign.
3
Select a picture, then assign settings.
Pocket PC Phone User Manual58
Using Your
Phone
Pocket PC Phone User Manual 59
Using Your
Phone
3.7 Additional Dialing
Information
To make an emergency call :
Enter the international emergency number 112 then
or press button.
n Some mobile phone service providers may
require that a
SIM card is inserted and/or a
PIN entered in order to 112. Consult with your
service provider for more information.
n Additional emergency numbers may be
included on your
SIM card. Consult with your
mobile service provider for more information.
To make an international call :
1
Tap and hold the key until the+ sign
appears. The + replaces the international prex
of the country of where you are calling.
2
Enter the full phone number you want to dial. It
includes country code, area code (without the
leading zero) and phone number.
3
Tap or press .
3.8 Secure Your Phone
You can customize the level of security you want to have on
your Pocket PC phone by locking the keypad, the entire device,
or the SIM card.
Pocket PC Phone User Manual58
Using Your
Phone
Pocket PC Phone User Manual 59
Using Your
Phone
Locking the keypad
The keypad lock turns off the keypad functionality. This is a
helpful feature if, for example, your Pocket PC phone is turned
off and in your pocket, and you want to prevent accidental
keypress from pressing a button etc .
1
Tapping Settings System tab
Button Lock
2
Select Lock all buttons except Power
button.
3
To unlock your keypad, tap Do not lock
buttons.
Locking your phone
Locking your Pocket PC phone prevents access to personal
data. When you enable this feature, your Pocket PC phone
will automatically lock after a specied time of inactivity. A
screen will be displayed requiring your Pocket PC phone lock
password before access is granted.
1
Tap Settings Personal
Password.
2
Select the type of password you would like
to use : Simple 4 digit password or Strong
alphanumeric password.
A strong password must have at least 7 characters
that are a combination of uppercase and lowercase
letters, numerals, and punctuation.
3
Enter the password and, if necessary, conrm
the password.
4
Select how long your mobile device must be
turned off before the password is required for
using the device by tapping Prompt if device
unused for.
Pocket PC Phone User Manual60
Using Your
Phone
Locking the SIM card
You can protect your Pocket PC phone from unauthorized
use by assigning a PIN (Personal Identication Number).
Your rst PIN will be given to you by your mobile phone
service provider.
1
From the Phone keypad, tap Tools Options
Phone tab.
2
Select Require PIN when phone is used.
3
To change the PIN at any time, tap Change
PIN.
Emergency calls can be placed at any time,
without requiring a PIN.
Chapter 4
Synchronizing Information
4.1 Using ActiveSync
4.2 Synchronizing Information
4.3 Synchronizing by Using an Infrared
Connection
4.4 ActiveSync Errors
Pocket PC Phone User Manual62
Synchronizing
Information
Pocket PC Phone User Manual 63
Synchronizing
Information
4.1 Using ActiveSync
Using Microsoft ActiveSync you can synchronize the
information on your PC with the information on your Pocket
PC Phone. Synchronization compares the data on your device
with your PC and updates both with the most recent informa-
tion. With ActiveSync, you can:
n Keep Pocket Outlook data up-to-date by synchronizing
your device with Microsoft Outlook data on your PC.
n Choose to synchronize Inbox, Calendar, and Contacts
with a server so that you have the latest information, even
when your desktop computer is turned off.
n Copy (rather than synchronize) les between your device
and your desktop PC.
n Control when synchronization occurs by selecting a syn-
chronization mode.
n Select which information types are synchronized and
control how much data is synchronized.
By default, ActiveSync does not automatically
synchronize all types of information. Use
ActiveSync options to turn synchronization on
and off for specic information types.
Using Server ActiveSync, you can synchronize
information directly with a Microsoft Exchange
Server if your company is running Microsoft
®
Mobile Information Server 2002 or later.
Installing ActiveSync
Before you begin synchronization, install ActiveSync on
your desktop computer from the Pocket PC Phone 2003
Companion CD
. ActiveSync is already installed on your
Pocket PC Phone.
Pocket PC Phone User Manual62
Synchronizing
Information
Pocket PC Phone User Manual 63
Synchronizing
Information
Creating a Partnership
After the installation is complete, the New
Partnership Wizard helps you set up a part-
nership between your phone and your desktop
computer and/or a server so that you can start
synchronizing information and customizing your
synchronization settings.
In the New Partnership Wizard
select Synchronize with this desk-
top computer. Unless you are
certain that your company is running
Microsoft Mobile Information Server
2002 or later and you know the server
name, then choose Synchronize
with Microsoft Mobile Information
Server and/or this desktop
compute. For more information,
contact your network administrator
or service provider.
Select the items you want in the synchronization setting
then you can start to synchronize your data between
your device and your PC.
Your rst synchronization will automatically begin
when you nish using the wizard. After the rst
synchronization, you will notice that your Out-
look information now appears on your pocket
PC phone.
Tap to synchronized via IR or change
synchronization settings.
View connection status.
Tap to connect and
synchronize
Tap to stop
synchronization
View synchronization
status.
Pocket PC Phone User Manual64
Synchronizing
Information
Pocket PC Phone User Manual 65
Synchronizing
Information
4.2 Synchronizing information
This section provides an overview of the types of Outlook
information you can synchronize. By default, ActiveSync
does not automatically synchronize all types of Outlook in-
formation. Use ActiveSync options to turn synchronization
on and off for specic information types.
Synchronizing Inbox
When you select Inbox for synchronization in ActiveSync,
e-mail messages are synchronized as part of the general
synchronization process. During synchronization, the fol-
lowing events occur :
n Messages are copied from the Outlook Inbox folder on
your desktop computer, or from a Microsoft Exchange
Server, to the Inbox folder on your Pocket PC Phone.
n By default, when synchronizing Inbox information with
your desktop computer, you will receive only messages
from the last three days and the rst 500 bytes of each
new message. You can also choose to download le at-
tachments.
n The messages on your phone and on your desktop com-
puter are linked. When you delete a message on your
phone, it is deleted from your desktop computer the next
time you synchronize, and vice versa.
n Messages in subfolders in other e-mail folders in Outlook
are synchronized only if the folders have been selected
for synchronization in the Inbox on your Pocket PC
Phone.
SMS messages are not received in your Inbox
through synchronization. Instead, they are sent
to your phone by way of your service provider.
For more details, please see Message Features
in Chapter 8.
Pocket PC Phone User Manual64
Synchronizing
Information
Pocket PC Phone User Manual 65
Synchronizing
Information
Synchronizing Calendar
n Calendar items stored on your Pocket PC
Phone can be synchronized with calendar
items stored on your desktop PC and/or on
a Microsoft Exchange Server. By default,
calendar items from the last two weeks will
be synchronized.
n Calendar items created on your Pocket
PC Phone are copied to your desktop PC
and/or server during synchronization, and
vice versa. Similarly, Calendar items that are
deleted from your phone are deleted from your
desktop computer and/or server during syn-
chronization, and vice versa. This keeps your information
up-to-date in all locations.
Synchronizing Contacts
n Contacts stored on your phone can be synchronized with
contacts stored on your desktop computer or on a Micro-
soft Exchange Server. By default, all of your contacts will
be synchronized.
n Contacts created on your phone are copied to your desk-
top computer and/or server during synchronization, and
vice versa. Similarly, contacts that are deleted from your
phone are deleted from your desktop computer and/or
server during synchronization, and vice versa. This keeps
your information up-to-date in all locations.
Synchronizing Tasks
n Tasks stored on your phone can be synchronized with
tasks stored on your desktop computer. Task synchroniz-
ation is automatically selected in ActiveSync. By default,
all of your incomplete tasks will be synchronized.
n Tasks created on your phone are copied to your desktop
computer during synchronization, and vice versa. Simi-
larly, tasks that are deleted from your phone are deleted
from your desktop computer during synchronization, and
vice versa. This keeps your information up-to-date in all
locations.
Tasks can be synchronized only with your desktop
computer. They cannot be synchronized with a
server.
Pocket PC Phone User Manual66
Synchronizing
Information
Pocket PC Phone User Manual 67
Synchronizing
Information
4.3 Synchronizing Using an
Infrared Connection
You can use an infrared connection to create a direct con-
nection between your phone and another mobile device or
desktop computer quickly. This method is ideal for quickly
switching between multiple devices since there are no
cables or adapters to change. When creating a partner-
ship, you must connect using infrared, a cable, or a cradle
connection.
For more information about synchronizing using an infrared
connection or other connection types, see ActiveSync Help
on your desktop computer.
Transferring Items Using Infrared
Using infrared (IR), you can also send and receive information,
such as contacts and appointments, between two devices.
a. To send information :
1
Switch to the program where you created the
item you want to send and locate the item in the
list.
2
Align the IR ports so that they are unobstructed
and within close range.
3
Tap and hold the item, and tap Beam Item on
the pop up menu.
You can send items, but not folders, from File
Explorer. Tap and hold the item you want to send,
and then tap Beam File on the pop up menu.
b. To receive information :
1
Align the IR ports so that they are unobstructed
and within close range.
2
Have the owner of the other device send the
information to you. Your device will automatically
receive it.
Pocket PC Phone User Manual66
Synchronizing
Information
Pocket PC Phone User Manual 67
Synchronizing
Information
4.4 ActiveSync Errors
Whenever ActiveSync cannot successfully synchronize your
information, it displays an error on your phone.
To view ActiveSync error
information
Press the Action button when the error text is
displayed. ActiveSync will then display more
information about the error that occurred.
Some types of errors can interfere with automatic
synchronization. If you suspect that a scheduled
automatic synchronization has not occurred, you
should attempt to manually synchronize your
information. Successfully completing manual
synchronization will reset automatic synchronization.
For more information, see the Synchronizing
Information
section of ActiveSync Help on
your desktop computer.
Pocket PC Phone User Manual68
Synchronizing
Information
Chapter 5
Personalizing Your Pocket PC
Phone
5.1 Device Settings
5.2 Phone Settings
Pocket PC Phone User Manual70
Personalizing
Pocket PC Phone User Manual 71
Personalizing
Icon Program
About
Displays important device information.
Add ring tone
To listen to and select new ring tones.
Icon Program
Button
Assigns an application program to hard
ware button.
Input
Sets up the input portion of your device.
Menus
Customizes the menu appearance and enables
a pop up menu from the New button.
Owner Information
Displays your contact information.
Password
Limits access to your device.
Phone
Sets up the phone function of your wireless
feature.
Sounds and notications
Sets the notication type, event and volume.
Today
Customizes the look and the information that
appears on the Today screen.
5.1 Device Settings
You can adjust device settings to suit the way you work. To
see available options, tap Settings Personal or
System tab located at the bottom of the screen.
Personal Tab
System Tab
Pocket PC Phone User Manual70
Personalizing
Pocket PC Phone User Manual 71
Personalizing
Icon Program
Backlight
Customizes the backlight and brightness for
power saving purpose.
Button Lock
Enables you to lock the buttons on your device
except Power button when device is off.
Certicates
Displays the name of the certicate issuer and
the expiration date.
Clock
Changes the time and sets alarms
Device information
Find information about version, hardware,
identity and call duration.
Memory
Displays the memory allocation status and cur-
rent running programs.
Microphone AGC
Adjusts the volume automatically when you
are recording
Permanent save
Saves contacts to permanent ash memory.
Power
Maximizes battery life.
Regional settings
Customizes the region and relative format for
the region you use.
Remove programs
Creates more memory by removing pro-
grams.
Screen
Re-calibrates the screen and enable/disable
Clear Type feature.
Pocket PC Phone User Manual72
Personalizing
Pocket PC Phone User Manual 73
Personalizing
1
2
4
3
Buttons
To change the assignments for your device's four program
buttons :
1
Tap Settings Personal Buttons.
2
Select a button, a program in Button
Assignment, and then tap OK.
3
In the Up/Down Control tab Delay before rst
repeat
changes the time elapsed before scrolling
begins. Repeat rate
changes the time it takes
to scroll from one item to the next.
Input
1
Tap Settings Personal tabInput.
2
Select an input method and change desired
options on the Input Method tab; Select
desired option for word completion on the
Word Completion tab, and options for writing
and recording on the Options tab. These options
apply to any program on the device where you
can record or write.
You can also change input
Options by tapping
the arrow and then options.
Pocket PC Phone User Manual72
Personalizing
Pocket PC Phone User Manual 73
Personalizing
Menus
To add the programs you use most often to Start .
1
Tap Settings Personal tab
Menus.
2
Select the programs you want, then tap OK.
3
On the New Menu tab, you can select Turn on
New button menu
and then select the items
to appear on the menu. When you do this, an
arrow appears next to New in the command
bar of certain programs such as Pocket Word,
Pocket Excel, Contacts, Calendar and Tasks.
You can tap this arrow and then tap a new item
to create.
You can create subfolders and shortcuts to appear
under
. In ActiveSync on your desktop PC, click
Explore Double-click My Pocket PC click
Windows
click Start Menu then create the
folders and shortcuts that you want.
Pocket PC Phone User Manual74
Personalizing
Pocket PC Phone User Manual 75
Personalizing
Owner Information
1
Tap Settings Personal tab Owner
Information.
2
On the Identication tab, enter your personal
information. Select Show information when
device is turned on so that if you lose your
device, it can be returned to you.
3
On the Notes tab, enter any additional text you
want to display when the device is turned on,
such as: Reward if found.
Password
1
Tap Settings Personal
Password.
2
To select how long your mobile device must be
turned off before a password must be entered,
check Prompt if device unused for.
3
Select the type of password you would like
to use. A strong password must have at
least 7 characters that are a combination of
uppercase and lowercase letters, numerals, and
punctuation.
4
Enter the password and, if necessary, conrm
the password.
n If your device is congured to connect to a
network, use a strong password to help protect
network security.
n If you forget your password, you must clear the
memory before you can access your device.
This will erase all les and data you have
created and programs you have installed.
For more information about clearing memory,
please see Appendix A.
Pocket PC Phone User Manual74
Personalizing
Pocket PC Phone User Manual 75
Personalizing
Sounds and Notications
1
Tap Settings Personal tab Sounds
& Notications
.
2
On the Volume tab, you can select the actions
for which you want to hear sounds. If you don’t
want to hear sounds, move the System volume
slider to Silent.
3
On the Notications tab, you can customize
how you are notied about different events.
Select the event name and then select the type
of reminder. You can select a special sound, a
message, or a ashing light.
n Turning off sounds and the notication light
helps conserve battery power.
n Use Phone settings to change the ring type
and volume for your phone. For more details
see the Phone Setting section in Chapter
3.
Today
You can customize the Today screen the following ways:
a. To change the background :
1
Tap Settings Personal tab
Today.
2
On the Appearance tab, select the desired
theme for the background. To use your own
background, select
Use this picture as the
background
then tap Browse to locate the
desired le.
3
Choose a folder and tap the le you want then
tap OK.
Pocket PC Phone User Manual76
Personalizing
Pocket PC Phone User Manual 77
Personalizing
b. To customize the information you want
displayed :
1
Tap SettingsPersonal tab Today
→ then Items tab.
2
Uncheck a box to remove its information.
3
To change an item's position select it then tap
Move Up or Move Down.
4
To choose how long the Today screen is
displayed, select/deselect Display Today
screen if device is not used for, then the
number of hours.
c. To customize Tasks or Calendar :
Select Tasks or Calendar, and then Options to
further customize.
n You can find additional pictures on the
Pictures
companion program. See detailed
information in Chapter 9.
n Recommend picture size is 240x320 pixels in
.jpg le.
Backlight
Using the backlight while on battery power
substantially reduces battery life.
1
Tap Settings System tab
Backlight.
2
Tap Battery power tab to turn on/off the back-
light when using battery power.
3
Tap External power tab to turn on/off the back-
light when using external power.
4
Tap Brightness tab to adjust the brightness
level.
Pocket PC Phone User Manual76
Personalizing
Pocket PC Phone User Manual 77
Personalizing
Clock
Tap SettingsSystem tab Clock.
n If you visit a particular time zone often, select it as your
Visiting time zone on the Time tab so that you can quickly
see the correct date and time.
n You can use your device as a travel alarm clock by setting
a wake-up alarm on the ACs tab. Tap the alarm icon to
select the type of alarm you want.
n To change the appearance of the date and time, go to
Regional by tapping SettingsSystem tab
Regional Settings.
Memory
Tap Settings System tab Memory.
n The Main tab displays the amount of memory the system
has allocated to le and data storage versus program
storage. This tab also displays the amount of memory in
use versus the available memory. For information about
making memory available, see Free Memory in Appen-
dix A.
n The Storage Card tab displays how much memory is
available on the storage card that is inserted into your
device. If you have more than one card inserted, tap the
list box and then the name of the storage card whose
information you want to view.
n The Running Programs tab displays the list of currently
active programs. You can stop a program by selecting it in
the list and tapping Stop. You may need to stop a program
if it becomes unstable or program memory is low.
Pocket PC Phone User Manual78
Personalizing
Pocket PC Phone User Manual 79
Personalizing
Power
Tap Settings System tab Power.
n The Battery tab displays the amount of battery power
remaining. Battery power depends on the battery type
and how the device is being used.
n On the Advanced tab you can select options for turning
off your device to conserve battery power. To conserve
the most power, select the option that turns off the device
after 3 minutes or less.
5.2 Phone Settings
You can easily view and change settings, such as the ring
type and ring tone to be used for incoming calls, and the
keypad tone to be used when entering phone numbers. You
can also protect your phone from unauthorized use. There
are two ways to change phone settings:
1
Tap Settings Personal tab
Phone.
Pocket PC Phone User Manual78
Personalizing
Pocket PC Phone User Manual 79
Personalizing
2
To change phone settings from the Phone keypad
Tap ToolsOptions Phone tab
Sounds
a. Ring Type
You can change the way that you are notied of incoming
calls. For example, you can choose to be notied by a ring,
a vibration, or a combination of both.
Tap the Ring type list, then select the desired
option.
b. Ring Tone
Tap the Ring tone list, then select the sound you
want to use.
To use .wav, .mid, or .wma les as ring tones, use ActiveSync
on your PC to copy the le to the /Windows/Rings folder on
your device. Then, select the sound from the Ring tone list.
c. Keypad Tone
You can change the tone you hear when entering a phone
number on the keypad. If set to Tones, the tone is heard
continuously for as long as the number on the keypad is
pressed. If set to Beep, the tone is heard only for one or
two seconds.
Tap the Keypad list, then select the option you
want.
To prevent tones from being heard when entering a phone
number, select Off.
Pocket PC Phone User Manual80
Personalizing
Services
Services settings on the Settings Phone Services tab
are primarily used to set options for incoming calls, such as
Call Forwarding, Call Waiting, and Caller ID.
Tap Get Settings to access the settings for a
service.
To change service settings from the phone keypad,
tap Tools Options Services tab tap a
service Get Settings.
Network
With network settings, you can view available networks,
determine the order in which your phone accesses another
network if the current one is unavailable, and specify whether
you want to change networks manually or automatically. The
current network will remain active until you change it, lose
your signal, or change your SIM card.
n The network currently in use will be listed at
the top of the screen.
n When your current network is unavailable, tap
Select Network to select an alternate.
G
Current network used
on your device.
Feature Function
Call Barring Enables you to block incoming and/or
outgoing calls.
Caller ID Identies caller by displaying their
name and/or phone number.
Call Forwarding Enables you to forward all or selected
incoming calls to a different number.
Call Waiting Noties you of an incoming calls while
you're already on the phone .
Chapter 6
Scheduling and Communicating
- Microsoft Pocket Outlook
6.1 Calendar
6.2 Contacts
6.3 Tasks
6.4 Notes
Pocket PC Phone User Manual82
Microsoft
Pocket Outlook
Pocket PC Phone User Manual 83
Microsoft
Pocket Outlook
MicrosoftPocket Outlook includes Calendar, Contacts,
Tasks, Inbox, and Notes. You can use these programs in-
dividually or together. For example, e-mail addresses stored
in Contacts can be used to address e-mail messages in
Inbox.
Using ActiveSync, you can synchronize information
in Microsoft Outlook or Microsoft Exchange on your PC
with your device. You can also synchronize this information
directly with a Microsoft Exchange server. Each time you
synchronize, ActiveSync compares the changes you made
on your device and PC or server and updates both PC with
the latest information.
For information on using ActiveSync, see Chapter 4 Syn-
chronizing Information or ActiveSync Help on the PC.
6.1 Calendar : Scheduling
Appointments and Meetings
Use Calendar to schedule appointments, including meetings
and other events. You can check your appointments in one
of several views (Agenda, Day, Week, Month, and Year) and
easily switch views by using the View menu.
You can customize the Calendar display, such
as changing the rst day of the week, by tapping
Options on the Tools menu.
1
Tap to go to today.
2
Tap to display or edit the appointment details.
3
Tap to create a new appointment.
4
Tap to change the rst day of the week.
Tap here to switch to any of these
programs.
1
2
3
4
Pocket PC Phone User Manual82
Microsoft
Pocket Outlook
Pocket PC Phone User Manual 83
Microsoft
Pocket Outlook
To Create an Appointment
If you are in Day or Week view, tap the desired date and time
for the appointment, then tap New :
1
Tap tab appropriate elds, then using the input
panel, enter a description and a location.
2
If needed, tap the date and time to change
them.
3
Enter other desired information. You will need to
hide the input panel to see all available elds.
4
To add notes, tap the Notes tab. You can enter
text, draw, or create a recording. For more
information on creating notes, see Notes:
Capturing Thoughts and Ideas later in this
chapter.
5
When finished, tap OK to return to the
calendar.
If you select Remind me in an appointment, your
device will remind you according to the options set
in Settings Personal tab Sounds &
Notications
.
Using the Summary Screen
When you tap an appointment in Calendar, a
summary screen is displayed. To change the
appointment, tap Edit.
1
2
3
4
5
Pocket PC Phone User Manual84
Microsoft
Pocket Outlook
Pocket PC Phone User Manual 85
Microsoft
Pocket Outlook
Creating Meeting Requests
You can use Calendar to set up meetings with users of
Outlook or Pocket Outlook. The meeting request will be
created automatically and sent either when you synchronize
Inbox or when you connect to your e-mail server. Indicate how
you want meeting requests sent by tapping Tools and then
Options. If you send and receive e-mail messages through
ActiveSync, select ActiveSync.
To schedule a meeting :
1
Create an appointment.
2
Hide the input panel, and then tap Attendees.
3
Select the meeting attendees from the list of
e-mail addresses you’ve entered in Contacts.
4
The meeting notice is created automatically and
placed in the Outbox folder.
For more information on sending and receiving meeting re-
quests, see Calendar Help and Inbox Help on the device.
6.2 Contacts : Tracking
Friends and Colleagues
Contacts maintains a list of your friends and colleagues so
that you can easily nd the information you are looking for,
whether you are at home or on the road. Using the device 's
infrared (IR) port, you can quickly share Contacts information
with other device users.
If you send and receive e-mail messages
through ActiveSync, select ActiveSync.
Pocket PC Phone User Manual84
Microsoft
Pocket Outlook
Pocket PC Phone User Manual 85
Microsoft
Pocket Outlook
1
Select the category of contacts you want
displayed in the list.
2
Tap and enter part of a name to quickly nd it in
the list.
3
Tap to see additional phone numbers and e-mail
addresses.
4
Tap to display or edit the contact details.
5
Tap and hold to display a pop-up menu of
actions.
6
Tap to create a new contact.
To change the way information appears in the list,
tap Tools and then Options.
To create a contact :
1
Tap Contacts New.
2
Using the input panel, enter a name and other
contact information. You will need to scroll down
to see all available elds.
3
To assign the contact to a category, scroll to and
tap Categories and select a category from the
list. In the contact list, you can display contacts
by category.
4
To add notes, tap the Notes tab. You can enter
text, draw, or create a recording. For more
information on creating notes, see Notes:
Capturing Thoughts and Ideas later in this
chapter.
5
When nished, tap OK to return to the contact
list.
2
1
5
6
4
3
Pocket PC Phone User Manual86
Microsoft
Pocket Outlook
Pocket PC Phone User Manual 87
Microsoft
Pocket Outlook
To Find a contact :
There are 6 ways to nd a contact:
1
Press and hold the top of the navigation pad
until alphabetical letters appear on the screen in
large type. Then use the navigation pad to scroll
through the alphabet and select a letter.
2
Tap one of the grouping of letters displayed
across the top of the screen.
3
In the contact list, enter a contact name in the box
under the navigation bar. To show all contacts
again, clear text from the box or tap the arrow
button to the right of the box.
4
In the contact list, tap the category list (labeled
All Contacts by default) and select the type of
contact that you want displayed. To show all
contacts again, select
All Contacts. To view a
contact not assigned to a category, select
No
Categories.
5
To view the names of companies your contacts
work for, in the contact list, tap View By
Company. The number of contacts that work
for that company will be displayed to the right
of the company name.
Pocket PC Phone User Manual86
Microsoft
Pocket Outlook
Pocket PC Phone User Manual 87
Microsoft
Pocket Outlook
6
Tap Find, enter
the contact name,
select Contacts for
the type, and then
tap Go.
Using the Summary Screen
When you tap a contact in the contact list, a
summary screen is displayed. To change the contact
information, tap Edit.
6.3 Tasks : Keeping a To Do
List
Use Tasks to keep track of what you have to do.
To change the way information is displayed in the
list, tap Tools and then Options.
Pocket PC Phone User Manual88
Microsoft
Pocket Outlook
Pocket PC Phone User Manual 89
Microsoft
Pocket Outlook
To create a task :
1
Tap Tasks New.
2
Using the input panel, enter a description.
3
You can enter a start date and due date or enter
other information by rst tapping the eld. If the
input panel is open, you will need to hide it to
see all available elds.
4
To assign the task to a category, tap Categories
and select a category from the list. In the task
list, you can display tasks by category.
5
To add notes, tap the Notes tab. You can enter
text, draw, or create a recording. For more
information on creating notes, see Notes:
Capturing Thoughts and Ideas later in this
chapter.
6
When nished, tap OK to return to the task list.
To quickly create a task with only a subject, tap
Entry Bar on the Tools menu. Then, tap Tap
here to add a new task and enter your task
information.
Using the Summary Screen
When you tap a task in the task list, a summary screen
is displayed. To change the task, tap Edit.
Pocket PC Phone User Manual88
Microsoft
Pocket Outlook
Pocket PC Phone User Manual 89
Microsoft
Pocket Outlook
6.4 Notes : Capturing
Thoughts and Ideas
Notes quickly capture thoughts, reminders, ideas, drawings,
and phone numbers. You can create a written note or a record-
ing, or include a recording in a note. If the note list is displayed,
it will be created as a stand-alone recording.
To create a note :
1
Tap Notes New.
2
Create your note by writing, drawing, typing,
and recording. For more information about
using the input panel, writing and drawing on the
screen, and creating recordings, see Chapter 2
Entering Information.
Pocket PC Phone User Manual90
Microsoft
Pocket Outlook
Chapter 7
Getting Connected
7.1 About Connection
7.2 Connect to the Internet
7.3 Pocket Internet Explorer
7.4 Terminal Services Client
7.5 Wireless Modem
7.6 Bluetooth
Pocket PC Phone User Manual92
Getting
Connected
Pocket PC Phone User Manual 93
Getting
Connected
7.1 About Connections
You can set up connections to the Internet and to your corpo-
rate network at work in order to do such activities as browse
the Internet or intranet, send and receive e-mail and instant
messages, and synchronize information using ActiveSync.
Connections can be made using a modem, wireless network,
or network (Ethernet) card. A modem connection can be used
to set up connections with an external modem, or through
your mobile phone network using a cellular line or GPRS.
You have the following connection options:
n Use the infrared (IR) port on your device to send and
receive les between two devices.
n Connect to your mobile Internet service provider (ISP)
and you can send and receive e-mail messages by using
Inbox and view Web or WAP pages by using Microsoft
Pocket Internet Explorer
. The communication software
for creating a wireless ISP connection is already installed
on your device. Your service provider will provide software
needed to install other services, such as paging and fax
services.
n Connect to the network at your company or organization,
and you can send and receive e-mail messages by using
Inbox and view Web or WAP pages by using Microsoft
Pocket Internet Explorer
, and synchronize with your
PC.
n Connect to your virtual private network (VPN) at the
company or organization where you work, where the
added security means that you can access the full re-
sources of your company’s network. For example, you
can use File Explorer to access the les of computers
on that network.
Your device has two groups of connection settings: My ISP
and My Work Network. My ISP settings are used to connect
to the Internet, and My Work Network settings can be used to
connect to any private network, such as the corporate network
you use at work. Simply ll in the settings and you’ll be ready
to start connecting.
Pocket PC Phone User Manual92
Getting
Connected
Pocket PC Phone User Manual 93
Getting
Connected
7.2 Connect to the Internet
You can use GPRS to connect to your mobile ISP, and use
the connection to send and receive e-mail messages and
view Web or WAP pages.
1
Obtain the following information from your ISP:
ISP server phone number, user name, and
password.
2
Tap Setting Connections tab
Connections
3
In My ISP, tap Add a new modem
connection
.
4
Create a modem connection.
Wireless connections can be made via a mobile
phone network or GPRS. If you are using a mobile
phone network to connect, in the Select a modem
list, tap Cellular Line. If you are using GPRS, tap
Cellular Line (GPRS).
5
To start the connection, begin using the desired
program. For example, switch to Pocket Internet
Explorer and browse to a Web page. Your device
will automatically connect.
n To set up a network card or wireless network
connection to your ISP, then add a new
connection under My Work Network.
n To change modem connection settings, in
either My ISP or My Work Network, tap
Manage existing connections. Select the
desired modem connection, tap Settings
,
and follow the instructions on the screen.
To view additional information for any screen,
tap .
G
Pocket PC Phone User Manual94
Getting
Connected
Pocket PC Phone User Manual 95
Getting
Connected
CSD Line Type
This program allow you to choose the line type when you
make a circuit switch data connection.
The default setting on this device is customized
as the best setting for use. Don't change this
setting unless you have trouble on circuit switch
data connection.
To change a CSD Line Type:
1
Tap Settings Connections then
CSD Line Type
.
2
Tap under Data rate and select a value, then tap
under Connection element and choose a type
from that drop-down menu. Tap
OK.
GPRS Settings
This program allow you to choose the GPRS setting method
when you make a GPRS connection. There 2 authentication
methods required to be set up :
n PAP authentication
Password Authentication Protocol, protocol used in
authentication which users clear text passwords and is
the least sophisticated of authentication protocols.
n CHAP authentication
Challenge Handshake Authentication Protocol, proto-
col used to negotiate the most secure form of encrypted
authentication supported by both server and client.
Changing these setting may cause your data
communications to no longer operate. Please
consult your service provider before altering
these settings.
Pocket PC Phone User Manual94
Getting
Connected
Pocket PC Phone User Manual 95
Getting
Connected
Set up a WAP gateway
To access WAP sites through Pocket Internet Explorer, con-
gure your device to use a WAP gateway. Use the following
steps to create a new set of connections to the Internet with
WAP gateway settings.
1
Get the following information from your ISP :
ISP server phone number, user name, and
password. Also, contact your mobile phone
service provider and ask for your WAP gateway
server name and port number.
2
Tap Settings Connections tab
Connections Tasks tab.
3
Tap Edit my proxy server. If a proxy server has
not been set up, tap Set up my proxy server.
4
In Programs that automatically connect to the
Internet should connect using, tap New and enter
a name for the ISP connection.
5
On the Proxy Settings tab, select This
network connects to the Internet and This
network uses a proxy server to connect to
the Internet.
6
If necessary, in the Proxy server box, enter the
proxy server name.
7
Tap Advanced.
8
In the WAP box, enter the WAP gateway server
name. Under
Port, enter the port number. The
most common WAP port number is 9201.
9
Create a modem connection. Also, if necessary,
set dailing rules.
Pocket PC Phone User Manual96
Getting
Connected
Pocket PC Phone User Manual 97
Getting
Connected
7.3 Pocket Internet Explorer
Once connected, you can use Microsoft Pocket Internet
Explorer
to view Web HTML, cHTML, xHTML and WAP
pages. You can browse in either of these ways:
n During synchronization with your PC, download your
favorite links and mobile favorites that are stored in the
Mobile Favorites folder in Internet Explorer on the
PC.
To synchronize and download your favorite links
from your desktop computer, tap the sync option
Favorites in ActiveSync on your desktop PC.
n Connect to an Internet service provider (ISP) or network
and browse the Web. To do this, you will need to create
the connection rst, as described in section 7.2 Connect
to the Internet.
When connected to an ISP or network, you can also download
les and programs from the Internet or intranet.
To switch to Pocket Internet
Explorer :
Tap Internet Explorer.
You can use Pocket Internet Explorer to browse mobile
favorites and channels that have been downloaded to your
device without connecting to the Internet. You can also con-
nect to the Internet through an ISP or a network connection
and browse the Web/ WAP page(s).
G
Pocket PC Phone User Manual96
Getting
Connected
Pocket PC Phone User Manual 97
Getting
Connected
To browse the Internet :
1
In the address bar that appears at the top of
the screen, enter the Web address you want to
visit.
2
Tap to go to the web address you entered.
3
Tap , the Favorites button, then tap the
favorite you want to view.
4
Tap to go back to the Homepage you set.
5
Tap to refresh the web page on the
screen.
6
Tap the arrow to choose from previously
entered addresses.
To view mobile favorites and
channels :
1
To display your list of favorites, tap .
2
Tap the page you want to view.
3
You will see the page that was downloaded the
last time you synchronized with your PC. If the
page is not on your device, the favorite will be
dimmed. To download the page to your device,
you will need to synchronize with your PC again,
or connect to the Internet to view the page.
To add a favorite link while using the device, go
to the page you want to add, tap and hold on the
page, and tap Add to Favorites.
1
2
3
4
5
6
Pocket PC Phone User Manual98
Getting
Connected
Pocket PC Phone User Manual 99
Getting
Connected
The Mobile Favorites Folder
Only items stored in the Mobile Favorites folder in the
Favorites folder in Internet Explorer on your PC will
be synchronized with your device. This folder was cre-
ated automatically when you installed ActiveSync.
Favorite Links
During synchronization, the list of favorite links in the
Mobile Favorites folder on your PC is synchronized
with Pocket Internet Explorer on your device. Both
your PC and your device are updated with changes
made to either list each time you synchronize. Unless
you mark the favorite link as a mobile favorite, only
the link will be downloaded to your device, and you
will need to connect to your ISP or network to view
the content. For more information on synchronization,
see ActiveSync Help on the PC.
Mobile Favorites
If you are using Microsoft Internet Explorer 5.0 or
higher on your PC, you can download mobile favor-
ites to your device. Synchronizing mobile favorites
downloads Web content to your device so that you
can view pages while you are disconnected from your
ISP and PC.
a. To create a mobile favorite :
1
In Internet Explorer on your desktop
computer, click Tools and then
Create
Mobile Favorite.
2
To change the link name, enter a new
name in the Name box.
3
In Update, select a desired update
schedule.
4
Click OK. Internet Explorer downloads
the latest version of the page to your
desktop computer.
5
To limit the number of download links,
open Internet Explorer on your desktop
PC then Favorites.
1
2
3
4
Pocket PC Phone User Manual98
Getting
Connected
Pocket PC Phone User Manual 99
Getting
Connected
Move your mouse through Mobile Favorites to
the mobile favorite you want to change. Right-
click the mobile favorite and then Properties; in
the Download tab, specify 0 or 1 for the number
of linked pages you want to download.
6
Synchronize your device and desktop computer.
Mobile favorites that are stored in the Mobile
Favorites folder in Internet Explorer are now
downloaded to your device.
If you did not specify an update schedule in step
3, you will need to manually download content
to keep the information updated on your desktop
computer and device. Before synchronizing
with your device, open Internet Explorer on
your desktop computer, click Tools and then
Synchronize. You will see the last time content
was downloaded to the desktop computer, and you
can manually download content if needed.
b. Saving Device Memory
Mobile favorites take up storage memory on your device. To
minimize the amount of memory used:
In ActiveSync on your desktop click Options
select Favorites tap Settings and then
Customize.
You can then deselect Synchronize Images
, Synchronize
Sound and/or Synchronize ofine content pages to stop
pictures and sounds, or some mobile favorites from being
downloaded to the device.
G
You can add a button to the Internet Explorer toolbar
for creating mobile favorites.
Open Internet Explorer on your desktop
computer click View Toolbars and
then Customize.
G
Pocket PC Phone User Manual100
Getting
Connected
Pocket PC Phone User Manual 101
Getting
Connected
Using AvantGo Channels
AvantGo is a free interactive service that gives you access to
personalized content and thousands of popular Web sites. You
can subscribe to AvantGo channels directly from your device.
Then, you synchronize your device and PC, or connect to the
Internet to download the content. For more information, visit
the AvantGo Web site http://avantgo.com/help.
To sign up for AvantGo :
1
In ActiveSync options on the desktop computer,
turn on synchronization for AvantGo.
2
Open Pocket Internet Explorer on your device,
then tap the Favorites button to display your list
of favorites.
3
Tap the AvantGo Channels link.
4
Follow the directions on the screen. You will need
to synchronize your device with your desktop
computer and then tap the My Channels button
to complete the AvantGo setup.
When synchronization is complete, tap the AvantGo Chan-
nels link in your list of favorites to see a few of the most
popular channels. To add or remove channels, tap the Add
or Remove link.
G
Pocket PC Phone User Manual100
Getting
Connected
Pocket PC Phone User Manual 101
Getting
Connected
7.4 Terminal Services Client
Using the Terminal Services Client, you can log onto a Win-
dows NT server type PC that is running Terminal Services
software and use all of the programs that are available on
that PC from your mobile device. For example, instead of
running Microsoft Pocket Word, you can run the PC version
of Microsoft Word and access all of the .doc les on that PC
from your device.
You cannot use Transcriber when entering
information in Terminal Services. You must
use Keyboard, Block Recognizer, or Letter
Recognizer.
To connect to a Terminal Server :
Start a remote connection to the server via your wireless
modem connection.
1
Tap Programs Terminal Services
Client.
2
If connecting to a server you have previously
connected used, tap its name in Recent
Servers.
3
To connect to a new server, enter the server’s
name in the
Server box. Select the Limit size
of desktop to t on the screen check box
only when using applications that have been
specically sized for use with Pocket PC.
4
Tap Connect.
If the network administrator has configured
Terminal Services Client
to reconnect to
disconnected sessions, and you previously
disconnected from a Terminal Server without
ending the session, the Terminal Services Client
reconnects to that session.
For more information about the connection of Terminal Ser-
vices Client
, tap Help.
Pocket PC Phone User Manual102
Getting
Connected
Pocket PC Phone User Manual 103
Getting
Connected
7.5 Wireless Modem
This utility will simulate your device as a wireless modem, and
let your PC/Notebook be connected to a wireless network.
Before creating a new modem via IrDA, you need install the
software "IrCOMM2K" to tranform IrDA port as a COM port
on your PC/Notebook. You can download it from the web site
http://www.ircomm2k.de.
1
Tap Programs then tap Wireless
Modem.
2
Select a connection type :
3
Connect your device via
infrared or serial to a
note-book or PC, and then
tap Start.
Before you press the Start button, please make sure your
device is with a GPRS SIM card and you have connected this
device to your PC/Notebook by Serial or IrDA connection and
disabled the Activesync.
7.6 Bluetooth
Bluetooth is a short-range wireless communications tech-
nology. Devices with Bluetooth capabilities can exchange
information over a distance of about 10 meters without
requiring a physical connection.
Unlike infrared, you don't need to line up the devices to beam
information with Bluetooth. The devices only need to be within
a range of about 10 meters. You can even beam information
to a device in a different room, as long as it's within range.
The software included with your Pocket PC Phone allows you
to use Bluetooth in the following ways :
n Beam information, such as les, appointments, tasks,
and contact cards, between devices that have Bluetooth
capabilities. For example, if you and a co-worker each
have a device with Bluetooth, you can beam items
between your devices, such as les, contact cards, ap-
pointments, tasks, and so forth.
n Create a dial-up modem connection between your
device and a Bluetooth phone. You can then use the
Bluetooth phone as a modem.
Pocket PC Phone User Manual102
Getting
Connected
Pocket PC Phone User Manual 103
Getting
Connected
Bluetooth modes
Bluetooth operates in three different modes:
a. On
The Bluetooth radio is turned on and you can use Bluetooth
features.
b. Off
The Bluetooth radio is turned off. In this mode, you can neither
send nor receive information by using Bluetooth. You might
want to turn the radio off at times in order to conserve bat-
tery power, or in situations where radio use is prohibited, for
example on airplanes and in hospitals.
To turn your Bluetooth on or off:
1
Tap SettingConnections tab
2
Tap Bluetooth.
3
Select On or Off. The Bluetooth radio is turned
on or off according to your selection.
By default the Bluetooth radio is turned off. If
you turn it on, and then turn off your device,
the Bluetooth radio also turns off. When you
turn on your device again, the
Bluetooth radio
automatically turns on .
c. Discoverable
The Bluetooth radio is turned on, and all of the other Bluetooth
devices within range (about 10 meters) can detect your device
and attempt to beam information to it, establish a bond, or use
a Bluetooth service. In this mode, other devices can detect
your device whether or not a bond has been created; however,
in order to receive a beam from another device, you must ac-
cept it on your device. To make your device discoverable:
Pocket PC Phone User Manual104
Getting
Connected
Pocket PC Phone User Manual 105
Getting
Connected
1
Tap Setting Connections tab
2
Tap Bluetooth.
3
Select Discoverable.
Other Bluetooth devices can now detect your device and
attempt to beam information to it, establish a bond, or use a
Bluetooth service. Note that to receive beamed information,
you must accept it on your device.
Selecting Discoverable also turns on your
Bluetooth radio.
If you no longer want your device to be discoverable, tap Off
to turn off the radio or On to leave the radio on, but not allow
detection by other devices.
Bonds
A bond is a relationship that you create between your Pocket
PC and another Bluetooth device in order to exchange infor-
mation in a secure manner. Creating a bond involves entering
the same personal identication number (PIN) on the two
devices you want to bond. You need only create a bond once
between two devices. Once a bond is created, the devices
recognize the bond and are able to exchange information
without your entering a PIN again.
a. To create a Bond :
You can create a bond between your device and another de-
vice that has Bluetooth. Once you do this, Bluetooth doesn’t
need to be in discoverable mode in order for you to beam
information between the two devices; the Bluetooth radio only
needs to be turned on.
1
Make sure that the two devices are within 10
meters of one another and that Bluetooth is in
discoverable mode on both devices.
2
Tap Settings Connections tab.
Pocket PC Phone User Manual104
Getting
Connected
Pocket PC Phone User Manual 105
Getting
Connected
3
Tap Bluetooth Bonded Devices tab New.
Your device searches for other Bluetooth devices
and displays them in the list.
4
Tap the name of the other device in the list, and
then Next.
5
In PIN, enter a PIN of between 1 and 16
characters and tap Next.
6
Enter the same PIN on the other device.
7
If you want, in Name, edit the name of the other
device.
8
Tap Finish.
b. To accept a Bond :
1
Make sure that Bluetooth is turned on and in
discoverable mode.
2
When prompted to bond with the other device,
tap OK.
3
In PIN, enter a PIN of between 1 and 16
characters, and tap Next. You must enter
the same PIN that was entered on the device
requesting the bond.
4
If you want, in Name, edit the name of the device
requesting the bond.
5
Tap Finish.
The bond is created. You can now exchange information with
the other device.
Pocket PC Phone User Manual106
Getting
Connected
Pocket PC Phone User Manual 107
Getting
Connected
c. To rename a Bond :
1
Tap Settings Connections tab.
2
Tap Bluetooth Bonded Devices tab.
3
Tap the bond to rename.
4
In Name, enter a new name for the bond.
5
Tap Finish.
d. To delete a Bond :
1
Tap Settings Connections tab.
2
Tap Bluetooth Bonded Devices tab.
3
Tap and hold the bond to delete.
4
Tap Delete.
Beaming Information with
Bluetooth
1
Tap and hold an item to beam, such as an
appointment in Calendar, a task in Tasks,
a contact card in Contacts, or a file in File
Manager.
2
Tap Beam [type of item].
3
Tap the device to which you want to send the
beam.
The item is beamed to the device you selected.
If the device that you want to beam to doesn’t
appear in the list, make sure that it is turned on,
in discoverable mode, and within 10 meters (10
meters) of your device. Also, make sure that your
Bluetooth radio is turned on.
Pocket PC Phone User Manual106
Getting
Connected
Pocket PC Phone User Manual 107
Getting
Connected
Receiving a Bluetooth Beam
1
Make sure that your device is congured to
receive incoming beams and that
Bluetooth is
in discoverable mode.
2
Make sure that your device is within 10 meters
of the device beaming the information.
3
When prompted to receive an incoming beam,
tap Yes.
The information is now stored on your device.
Using a Bluetooth Phone as a
Modem
You can use a phone that has Bluetooth capabilities as a mo-
dem for your device. To do this, you create a Bluetooth modem
connection on your device and then send information to the
phone by using Bluetooth. The phone relays the information
over the phone line and then sends back to your device any
information that you had requested over the connection.
Once you create a modem connection to the Bluetooth phone,
you can reuse it whenever you want to use the phone as a
modem.
1
Make sure that the Bluetooth phone is turned
on, that your device’s and the phone’s Bluetooth
radios are turned on, and that your device and
the phone are within 10 meters (10 meters) of
one another.
2
If you have not already done so, create a
Bluetooth phone connection by following steps
3 through 16. Otherwise, skip to step 17.
3
Tap Settings Connections tab.
4
Tap Connections Add a new modem
connection.
5
Enter a name for the connection.
6
In the Select a modem list, tap Bluetooth
Next.
Pocket PC Phone User Manual108
Getting
Connected
7
Make sure that the phone is discoverable. Some
phones may also need to be pairable in order to
accept a bonding request. For more information,
see your phone documentation.
8
If the phone appears in the My Connections
list, skip to step 14. If not, tap New and follow
the remaining steps.
9
In the list, tap the phone and then Next.
10
In PIN, enter a PIN of between 1 and 16
characters, and tap Next.
11
Enter the same PIN on the phone.
12
If you want, in Name, edit the name of the
phone.
13
Tap Finish.
14
In the My Connections list, tap the phone, and
then Next.
15
Enter the phone number to dial for this connection
and tap Next.
16
In User name, Password, and Domain, enter
the logon information for this connection and tap
Finish.
17
Start using the program that uses the Bluetooth
phone connection; for example Inbox to send
and receive e-mail, or Internet Explorer to
browse the Web.
Chapter 8
Messaging Features
8.1 E-Mail Messages
8.2 SMS Messages
8.3 MSN Messenger
8.4 MMS Messages
8.5 Managing Messages and Folders
Pocket PC Phone User Manual110
Messaging
Features
Pocket PC Phone User Manual 111
Messaging
Features
You can set up a connection to an e-mail server so that you
can send and receive e-mail messages by using a modem or
network connection and Inbox on your device.
The ISP or network must use a POP3 or IMAP4
e-mail server and an SMTP gateway.
You can use multiple e-mail services to receive your mes-
sages. For each e-mail service you intend to use, rst set
up and name the e-mail service. If you use the same service
to connect to different mailboxes, set up and name each
mailbox connection.
To set up an e-mail service :
1
Open Inbox on your device, tap Accounts, and
then New Account. Follow the directions in the
New Account Wizard
.
2
Fill in you e-mail address then tap Next.
Next will initiate
auto-configuration which
attempts to connect your Pocket PC Phone to
your e-mail server and automatically download
the necessary e-mail connection settings.
n If auto-configuration is successful you
can immediately begin sending/receiving e-
mails.
n If auto-conguration is unsuccessful you will
need to manually enter the settings.
8.1 E-mail Messages : Using Inbox
Pocket PC Phone User Manual110
Messaging
Features
Pocket PC Phone User Manual 111
Messaging
Features
3
Enter Your name, User name and Password,
then tap Next.
4
From the drop down menu select the Account
type that your e-mail provider supports (POP3
or IMAP4).
5
Enter a Name for your e-mail account then tap
Next.
6
Enter the your e-mail provider’s server name
information for Incoming mail and Outgoing mail,
then tap
Finish. When nished, to connect to
your e-mail server, tap Accounts
and then
Connect.
For an explanation of a screen, tap
and then
Help.
Pocket PC Phone User Manual112
Messaging
Features
Pocket PC Phone User Manual 113
Messaging
Features
Sending and Receiving E-mail
You can use Inbox to send and receive e-mail messages in
either of these ways:
n Synchronize e-mail messages with Microsoft Exchange
or Microsoft Outlook on your PC.
n Connect directly to an e-mail server through an Internet
service provider (ISP) or a network.
You also can use Inbox to send and receive SMS; it supports
8 bits of data with class 0, 1, 2, 3, and Unstructured Supple-
mentary Service Data (USSD) as well.
G
a. Synchronizing E-mail Messages
E-mail messages can be synchronized as part of
the general synchronization process. You will need
to enable Inbox synchronization in ActiveSync. For
information on enabling Inbox synchronization, see
ActiveSync Help on the PC.
During synchronization:
n Messages are copied from the mail folders of Ex-
change or Outlook on your PC to the ActiveSync
folder in Inbox on your device. By default, you will
receive messages from the past ve days only, and
the rst 100 lines of each message.
n E-mail messages in the Outbox folder on your device are
transferred to Exchange or Outlook, and then sent from
those programs.
E-mail messages in folders must be selected in ActiveSync
on your PC in order to be transferred
Pocket PC Phone User Manual112
Messaging
Features
Pocket PC Phone User Manual 113
Messaging
Features
b. Connecting Directly to an E-mail Server
n Once your e-mail account is set up and you're connected,
new messages will be downloaded to the device's Inbox
folder, and messages in the device Outbox folder will be
sent.
n When you delete a message on your device that was
downloaded from your e-mail server, it will also be deleted
from the e-mail server the next time you connect.
n You can work online or ofine. When working online, you
read and respond to messages while connected. Mes-
sages are sent as soon as you tap Send, which saves
space on your device.
n When working ofine, once you have downloaded new
message headers or partial messages, you can dis-
connect from the e-mail server and then decide which
messages to download completely. The next time you
connect, Inbox downloads the complete messages you
have marked for retrieval and sends the messages you
have composed.
c. Using the Message List
n Messages you receive are displayed in the message
list. By default, the most recently received messages
are displayed rst in the list.
n When you receive a message, tap to open it. Unread
messages are displayed in bold.
Pocket PC Phone User Manual114
Messaging
Features
Pocket PC Phone User Manual 115
Messaging
Features
c. Using the Message List (Cont’d)
n You can mark the messages that you want to retrieve
in full during your next synchronization or e-mail server
connection. In the message list, tap and hold the message
you want to retrieve. On the pop up menu, tap Mark for
Download. The icons in the Inbox message list provide
visual indication of message status.
n Specify your downloading preferences when you set up
the service or select your synchronization options. You
can change them at any time:
1
Change options for Inbox synchronization using
ActiveSync options. For more information, see
ActiveSync Help.
2
Change options for direct e-mail server connections
in Inbox on your device. Tap Tools and then tap Op-
tions. On the Account tab, tap the service you want
to change. Tap and hold the service and select Delete
to remove a service.
d. Creating an E-mail message
1
Tap New.
2
In the To eld, enter either e-mail address of
one or more recipients, separating them with
a semicolon, or select a name from the contact
list by tapping the Address Book button. All
e-mail addresses entered in the e-mail elds in
Contacts appear in the Address Book.
SMS messages can be sent by entering the SMS
numbers in the To eld.
3
Compose your message. To enter preset or
frequently used messages, tap My Text and
select a message.
4
Tap button when you have nished the
message. If you are working ofine, the message
is moved to the Outbox folder and will be sent
the next time you connect.
Pocket PC Phone User Manual114
Messaging
Features
Pocket PC Phone User Manual 115
Messaging
Features
Swap between e-mail accounts and SMS by
tapping Account.
8.2 SMS Messages
SMS messages can be sent in two ways :
n Go to Inbox, open a new e-mail message and select
SMS account in the Account type options.
n Or you can directly send in phone dialer in the Tools menu
bar.
To send SMS in phone dialer :
1
In phone dialer screen, tap Tools, and then
Send SMS. A new message screen appears in
Inbox.
2
In the To eld, enter the SMS number of one
or more recipients, separating them with a
semicolon, or select a name from the contact
list by tapping the Address Book button.
3
Compose your message. To enter preset or
frequently used messages, tap My Text and
select a message.
4
Tap when you have nished the message.
If you are working ofine, the message is moved
to the
Outbox folder and will be sent the next
time you connect.
SMS cannot be used to send e-mail messages.
You can tap the double arrows next to the subject
eld to show the complete header. From the
Account list, select an e-mail account.
If you are sending an
SMS message and want to
know if it was received, tap
Edit, Options, and
select Request SMS text message delivery
notication
before sending the message.
Pocket PC Phone User Manual116
Messaging
Features
Pocket PC Phone User Manual 117
Messaging
Features
8.3 MSN Messenger : Instant
Messaging
MSNMessenger on your mobile device is an instant mes-
saging program that lets you:
n See who is online.
n Send and receive instant messages.
n Have an instant message conversations with groups of
contacts.
n Noties contacts of your on-line status.
n Block contacts from seeing your status or sending you
messages.
To use MSN Messenger, you must have a Microsoft Pass-
port
TM
account or a Microsoft Exchange e-mail account.
Once you have obtained one of these accounts, you are
ready to sign in to MSN Messenger.
If you have a Hotmail or MSN account, you
already have a Passport.
n To set up a Microsoft Passport account, go
to http://www.passport.com
n To set up a Hotmail account, go to
http://www.hotmail.com
To switch to MSN Messenger :
Tap Program MSN Messenger
Pocket PC Phone User Manual116
Messaging
Features
Pocket PC Phone User Manual 117
Messaging
Features
Setting Up and Signing In
1
Connect to the Internet using any methods
outlined in Chapter 7 Getting Connected.
2
Tap anywhere on the MSN Messenger screen,
enter your sign-in name and password then tap
Sign in.
Or tap Tools Options Accounts tab to
set your sign-in name and password by selecting
Enable MSN Messenger Service
Your sign-in name is usually in the form :
username@domain.com .
If you already use MSN Messenger on your PC,
your contacts will automatically appear on your
device.
Working with Contacts
The MSN Messenger window displays all of your messen-
ger contacts at a glance, divided into Online and Not Online
categories. From this view, while connected, you can chat,
send e-mail, block a contact from chatting with you, or delete
contacts from your list using the pop-up menu.
To see others online without being seen, open the
Tools menu, tap My Status and select Appear
Ofine. If you block a contact, you will appear
ofine but will remain on the blocked contact’s list.
To unblock a contact, tap and hold the contact,
then tap Unblock on the pop up menu.
Tap and hold to display a pop-up
menu of actions
G
Pocket PC Phone User Manual118
Messaging
Features
Pocket PC Phone User Manual 119
Messaging
Features
Chatting with Contacts
Tap a contact name to open a chat window. Enter your mes-
sage in the text entry area at the bottom of the screen, or tap
My Text to enter a preset message, then tap Send. To invite
another contact to multi-user chat, open the Tools menu, tap
Invite then tap the contact you want to invite.
To know if the contact you are chatting with is responding,
look for the message under the text entry area.
For more information on using MSN Messenger, tap
and then Help.
Enter message here.
Tap to send message
View status of the chat.
View full chat.
Pocket PC Phone User Manual118
Messaging
Features
Pocket PC Phone User Manual 119
Messaging
Features
8.4 MMS Messages
With MMS Composer, you can create and share your own
MMS messages, complete with photos, videos, text, and
audio.
To access MMS Composer:
1
Tap Programs MMS Composer.
2
The Today screen offers another way
of accessing MMS Composer. You are
automatically notied on this page if you have
any new messages. All you need to do is tap
the MMS messages line and the program will
launch.
Message Boxes
To view message folders:
When the program starts, it will take you to your message box-
es. Use the pull-down to select the one you wish to view.
To view message options:
Within each message box, you can tap and hold on an indi-
vidual message to see various options
Options Explanations
New Creates a new message.
Delete Removes the message.
Reply Lets you respond to the message by send-
ing one of your own.
Reply All Responds to everyone included in the
initial message.
Forward Sends the message to someone else.
Mark as
Unread
Makes the message appear as if it is a
newly received message.
Message Info Displays various message information,
such as the sender, the subject, the date
and time it was sent, and the size.
Pocket PC Phone User Manual120
Messaging
Features
Pocket PC Phone User Manual 121
Messaging
Features
To view and alter program settings:
1
Tap Programs MMS Composer.
2
Tap Tools Options Preferences tab .You
have the following options:
Options Explanations
Connect Via Select your type of Internet connection
from the pull-down list.
Connect to
Server
Select your wireless server here.
Retrieve
Messages
Immediately
Typically, you receive a notication when-
ever a new message is available. Check-
ing this box bypass the notication and
download new messages automatically.
Size Limita-
tions
You can sent the maximum size limit for
messages that you send and receive.
No. of
attempts be-
fore aborting
This value sets the number of times the
program will attempt to send your mes-
sage before stopping.
Creating a Message
Messages are created by combining various slides. Each
slide can consist of a photo or video, audio, and text.
To add a picture or video clip:
1
Tap the blue box to select a specic location that
contains photos/videos.
2
Choose either Photos or Videos from this pull-
down. You can only add either a single photo
or video clip to each individual slide.
3
Tap the specic photo or video clip that you want
to add, then tap Select.
4
To take a new picture or video clip press the
Camera icon . The picture or video clip will
be automatically inserted.
4
2
1
3
Pocket PC Phone User Manual120
Messaging
Features
Pocket PC Phone User Manual 121
Messaging
Features
To add text:
You can add text to any slide. You can either enter in new
text with the keyboard, or use “canned” text. Canned text are
previously saved words or phrases.
Tap in the Insert text here box then enter the text
you want to send.
To insert canned text:
1
Tap and hold in the Insert text
here
box until a menu pops
up..
2
Tap Insert canned text from the
pop-up menu.
3
Select a phrase from the list and
tap Select.
4
To add new, edit or delete
existing canned text, tap
and hold on the canned text
screen.
To add audio clips:
Single audio clips can be added to each slide. You can either
include an existing sound le, or record a new one.
1
Tap in the Tap here to insert an audio clip
box.
2
From the drop-down menu select a location that
contains audio les.
3
Preview the audio les by tapping on them. Use
the toolbar below to Stop and Play the le.
4
To insert the clip tap . Otherwise, tap .
5
To record a new audio clip tap the Record
icon, then tap to start recording and to
nish. The clip will be automatically inserted.
Pocket PC Phone User Manual122
Messaging
Features
Pocket PC Phone User Manual 123
Messaging
Features
Menu Commands
The following commands are available along the bottom of
the screen:
1
Edit
New Slide To add a new slide, tap Edit, then New Slide.
Delete Slide To delete a slide, tap Edit, then Delete Slide..
Organize Slides To change the order of the slides in a message, tap Edit,
Organize Slides..., then use your stylus to drag the slides
to their new positions.
Save in Drafts To save as a draft, tap Edit, Save in Drafts
2
Tools
Send Message
To send your message when you’re ready (same as
)
Preview Message
Previews your message (same as )
3
- Previews your message (as mentioned
directly above).
4
- Tap here when you’re ready to send your
message.
5
- These buttons let you navigate through
the various slides in your message.
Viewing a Message
You have several options when viewing a message that
you receive:
1
Use the playback controls (Play/Pause, Stop)
to view the message. You can pause it anytime
during playback.
1
2
3
4
5
Pocket PC Phone User Manual122
Messaging
Features
Pocket PC Phone User Manual 123
Messaging
Features
2
Tap Objects to see a list of each le. If you’d
like to save a particular le, tap it, then choose
Save from the Tools menu
3
You can also view the message
components manually. Use the
navigation buttons to scroll through
the message. Use the options in
the Save menu to save individual
components you like.
Sending a Message
Now that you’ve nished creating your message and you’ve
tapped the Send button, all you need to do is enter a little
bit of information:
1
Enter in the recipient’s phone number Tap To
Phone to see your phone book.
2
Enter in the recipient’s e-mail address Tap
To E-mail to see your address book.
3
Enter in a subject of your message.
4
When you’re ready, tap Send. Otherwise, tap
Cancel.
Pocket PC Phone User Manual124
Messaging
Features
Pocket PC Phone User Manual 125
Messaging
Features
8.5 Managing Messages and
Folders
By default, messages are displayed in one of ve folders for
each service you have created: Inbox, Deleted Items, Drafts,
Outbox, and Sent Items. The Deleted Items folder contains
messages that have been deleted on the device. The behavior
of the Deleted and Sent Items folders depends on the options
you have chosen. In the message list, tap Tools and then
Options. On the Message tab, select your options.
To organize messages into additional folders, create new
folders by tapping Tools, then Manage Folders. To move a
message to another folder, in the message list, tap and hold
the message and then tap Move to on the pop up menu.
Folder behavior with a direct
connection to an e-mail server
The behavior of the folders you create depends on whether
you are using ActiveSync, SMS, POP3, or IMAP4.
Sending Options
n To manually set the date and time you want the message
sent, uncheck the Send the message now box.
n To select how long you would like the message stored on
the server, tap next to Expiration. The server will stop at-
tempting to deliver the message once the time expires.
n To hide your identity, check the Send anonymously
box.
n To change the resolution of a message, tap under Photo
Resolution.
Pocket PC Phone User Manual124
Messaging
Features
Pocket PC Phone User Manual 125
Messaging
Features
n If you use ActiveSync, e-mail messages in the Inbox
folder in Outlook will automatically be synchronized with
your device. You can select to synchronize additional
folders by designating them for ActiveSync. The folders
you created and the messages you moved will then be
mirrored on the server. For example, if you move two
messages from the Inbox folder to a folder named Family
and you have designated Family for synchronization, the
server creates a copy of the Family folder and copies the
messages into that folder. You can then read the mes-
sages while away from your PC.
n If you use SMS, messages are stored in the Inbox folder
of SMS category.
n If you use POP3 and you move e-mail messages to a
folder you created, the link is broken between the mes-
sages on the device and their copies on the mail server.
The next time you connect, the mail server will see that
the messages are missing from the device Inbox and de-
lete them from the server. This prevents you from having
duplicate copies of a message, but it also means that you
will no longer have access to messages that you move
to folders created from anywhere except the device.
n If you use IMAP4, the folders you created and the e-
mail messages you moved are mirrored on the server.
Therefore, messages are available to you anytime you
connect to your mail server, whether it is from your device
or PC. This synchronization of folders occurs whenever
you connect to your mail server; create new folders, or
rename/delete folders when connected.
Pocket PC Phone User Manual126
Messaging
Features
Chapter 9
Companion Programs
9.1 Pocket Word
9.2 Pocket Excel
9.3 Windows Media Player
9.4 Microsoft Reader
9.5 Pictures
9.6 Document Viewers
Pocket PC Phone User Manual128
Companion
Programs
Pocket PC Phone User Manual 129
Companion
Programs
Companion programs consist of MicrosoftPocket Word,
MicrosoftPocket Excel, Windows Media Player for
Pocket PC, and Microsoft Reader and Pictures.
To switch to a companion program on your device,
tap Programs on the menu, and then tap the
program name.
9.1 Pocket Word
Pocket Word works with Microsoft Word on your PC to give
you easy access to copies of your documents. You can create
new documents on your device, or you can copy documents
from your PC to your device. Synchronize documents between
your PC and your device so that you have the most up-to-date
content in both locations.
To create a new le :
1
Tap Programs Pocket Word and
then New. A blank document appears.
2
If you have selected a template for new
documents in the Tool
Options dialog box,
that template appears with appropriate text and
formatting already provided.
You can open only one document at a time; when
you open a second document, you will be asked
to save the rst. You can save a document you
create or edit in a variety of formats, including
Word
(.doc), Pocket Word (.psw), Rich Text
Format (.rtf), and Plain Text (.txt).
Pocket Word
contains a list of the les stored on your device.
Tap a le in the list to open it. To delete, make copies of, and
send les, tap and hold a le in the list. Then, select the ap-
propriate action on the pop up menu.
Pocket PC Phone User Manual128
Companion
Programs
Pocket PC Phone User Manual 129
Companion
Programs
1
Select the folder type you want displayed in the
list.
2
Tap to change the sort order of the list.
3
Tap to open a document.
4
Tap and hold an item to see a pop-up menu of
actions.
5
Tap to create a new documents.
You can change the zoom magnification by
tapping View and then Zoom. Select a higher
percentage to enter text and a lower one to see
more of your document.
If you are opening a Word document created on
a PC, select Wrap to Window on the View menu
so that you can see the entire document.
Entering Information in a New File
You can enter information in Pocket Word in one of four
modes (typing, writing, drawing, and recording), which are
displayed on the View menu. Each mode has its own toolbar,
which you can show and hide by tapping the Show/Hide
Toolbar
button on the command bar.
a. Typing Mode
n Using the input panel, enter typed text into the document.
For more information on entering typed text, see Chapter
2.
n To format or edit existing text, rst select it by using your
stylus to drag through the text. You can search a docu-
ment for text by tapping Edit and then Find/Replace.
1
2
3
4
5
Pocket PC Phone User Manual130
Companion
Programs
Pocket PC Phone User Manual 131
Companion
Programs
b. Writing Mode
In writing mode, use your stylus to write directly on the screen.
Ruled lines are displayed as a guide, and the zoom magni-
cation is greater than in typing mode to allow you to write
more easily. For more information on writing and selecting
writing, see Chapter 2.
If you cross three ruled lines in a single stylus
stroke, the writing becomes a drawing and can
be edited and manipulated as described in the
following section.
Written words are converted to graphics (metales)
when a Pocket Word document is converted to a
Word document on your PC.
c. Drawing Mode
In drawing mode, use your stylus to draw on the screen.
Gridlines appear as a guide. When you lift your stylus off
the screen after the rst stroke, you’ll see a drawing box
indicating the boundaries of the drawing. Every subsequent
stroke within or touching the drawing box becomes part of
the drawing. For more information on drawing and selecting
drawings, see Chapter 2.
d. Recording Mode
In recording mode, you can embed a recording into your
document. Recordings are saved as .wav les. For more
information on recording, see Making a Recording in Chap-
ter 2. For more information on using Pocket Word, tap
and then Help.
Entering Information in a New File
(Cont’d.)
Pocket PC Phone User Manual130
Companion
Programs
Pocket PC Phone User Manual 131
Companion
Programs
9.2 Pocket Excel
Pocket Excel works with Microsoft Excel on your PC to
provide easy access to copies of your workbooks. You can
create new workbooks on your device, or you can copy work-
books from your PC to your device. Synchronize workbooks
between your PC and your device so that you have the most
up-to-date content in both locations.
To Create a new Pocket Excel File
1
Tap Programs Pocket Excel and
then New. A blank workbook appears.
2
If you have selected a template for new
workbooks in the Options dialog box, that
template appears with appropriate text and
formatting already provided.
Pocket Excel provides fundamental spreadsheet tools, such
as formulas, functions, sorting, and ltering. To display the
toolbar, tap View and then Toolbar.
You can open only one workbook at a time; when
you open a second workbook, you will be asked
to save the rst. You can save a workbook you
create or edit in a variety of formats, including
Pocket Excel (.pxl) and Excel (.xls).
If yo ur wo rkb oo k c on t ai ns se nsi ti v e
in for mat io n , you can p ro tec t it with a
password. To do so, open the workbook; tap
Edit, and then Password. Every time you open
the workbook, you will need to enter the password,
so choose one that is easy for you to remember
but hard for others to guess.
Pocket PC Phone User Manual132
Companion
Programs
Pocket PC Phone User Manual 133
Companion
Programs
Tips for Working in Pocket Excel
Note the following when working in large worksheets in
Pocket Excel:
n View in full screen mode to see as much of your worksheet
as possible. Tap View and then Full Screen. To exit full
screen mode, tap Restore.
n Show and hide window elements. Tap View and then tap
the elements you want to show or hide.
n Freeze panes on a worksheet. First select the cell where
you want to freeze panes. Tap View and then Freeze
Panes. You might want to freeze the top and leftmost
panes in a worksheet to keep row and column labels
visible as you scroll through a sheet.
n Split panes to view different areas of a large worksheet.
Tap View and then Split. Then drag the split bar to where
you want it. To remove the split, tap View and then Re-
move Split.
n Show and hide rows and columns. To hide a hidden row
or column, select a cell in the row or column you want to
hide. Then tap Format, then Row or Column, and then
Hide. To show a hidden row or column, tap Tools, then
Go To, and then type a reference that are in the hidden
row or column. Then tap Format, then Row or Column,
and then Unhide.
Pocket PC Phone User Manual132
Companion
Programs
Pocket PC Phone User Manual 133
Companion
Programs
9.3 Windows Media Player for
Pocket PC
Use Microsoft Windows Media Player for Pocket PC to play
digital audio and video les that are stored on your device or
on a network. To switch to Windows Media Player for Pocket
PC, tap Windows Media.
Use Microsoft Windows Media Player on your PC
to copy digital audio and video les to your Pocket
PC. Your Pocket PC can play Windows Media and
MP3 les.
For more information about using Windows Media Player for
Pocket PC, tap → and then tap Help.
9.4 Microsoft Reader
Use Microsoft Reader to read e-Books on your device.
Download books from your favorite e-Book web site to your
PC, then use ActiveSync to copy the les to your activated
device. To open a book, tap it's title in the MS Reader Li-
brary.
n To switch to Microsoft Reader, tap Programs, and
then → Microsoft Reader.
n Page through the book by using the Up/Down control
on your device or by tapping the page number on each
page.
n Annotate the book with highlighting, bookmarks, notes,
and drawings.
n Search for text and look up denitions for words.
n The Guide-book contains all the information you need
to use the software. To open the Guide-book, tap Help
n Reader command bar. Or, on a book page, tap and hold on
the book title, and then tap Help on the pop up menu.
Pocket PC Phone User Manual134
Companion
Programs
Pocket PC Phone User Manual 135
Companion
Programs
Getting Books on Your Device
You can purchase and download book les from the Web to
your PC and then synchronize them with your Pocket PC.
However, before you can do this, you must
n Activated your device
n Have an activated copy of MS Reader on your PC
n Set up synchronization for Files in ActiveSync.
1
Open ActiveSync on your PC then check that
you have selected synchronize Files. If you have
done so it will appear under Information Type;
if you have not, click Options, Sync options
tap Files and then OK from the pop-up
menu. (The pop-up menu is telling your
computer will create a folder in which you
must put les you wish to synchronize)
2
If you have not already activated your
device, open your web browser, go to
http://das.Microsoft.com/activate and
follow the instructions.
3
Go to www.microsoft.com/reader/shop.asp for
a list of retailers selling MS Reader e-Books.
4
If you do not have a copy of MS Reader on
your PC, go to one of the retailers listed above
and download a free copy from their site; then
activate it as described above.
5
Go to one of the MS Reader e-Book sites, and
follow the instructions for choosing, purchasing
and downloading a book to your desktop.
6
Use Windows Explorer on your desktop to
locate the MS Reader’s My Library folder
and the Pocket_PC My Documents folder.
Find
the book title in My Library
and then copy it
to Pocket_PC My Documents.
ActiveSync
will then download the les from your PC to your
activated device.
Pocket PC Phone User Manual134
Companion
Programs
Pocket PC Phone User Manual 135
Companion
Programs
Sample books and a dictionary are also included in the MS
Reader folder in the Extras folder on the Pocket PC Com-
panion CD.
Using the Library
The Library, your MS Reader home page, displays a list of all
books stored on your device or storage card.
a. To open the Library :
1
Tap ProgramsMicrosoft Reader.
2
On a book page, tap the book title, and then tap
Library on the pop up menu.
b. To open a book :
Tap its title in the Library list.
Reading a Book
n Each book consists of a cover page, an optional table of
contents, and the pages of the book. Navigation options
are listed in the bottom portion of the cover page.
n Subsequently, whenever you open the book, you’ll be
automatically taken to the last page read.
n In addition to the text, each book page includes a page
number and book title.
n Page through a book by using the Up/Down control on
your device.
Pocket PC Phone User Manual136
Companion
Programs
Pocket PC Phone User Manual 137
Companion
Programs
Using Reader Features
Reading a book electronically gives you several options not
available with paper books. These options are available from
any book page.
n Select text by dragging across the text on the page. Then,
tap an option on the pop up menu, as described below:
n Search for Text. Find text in a book by tapping Find on
the pop up menu. Enter the word you want to search for,
and tap the desired Find option. Reader highlights found
text on the page. To close Find, tap outside the box. To
return to your original page, tap the title and then tap
Return on the pop up menu.
n Copy Text. You can copy text from books that support
this feature into any program that accepts text. On a book
page, select the text you want to copy. Then, tap Copy
Text on the pop up menu. The text can be pasted into
the program of your choice.
n Bookmarks. When you add a bookmark to a book, a
color-coded bookmark icon appears in the right margin.
You can add multiple bookmarks to a book. Then, from
anywhere in the book, tap the bookmark icon to go to the
bookmarked page.
n Highlights. When you highlight text, it appears with a
colored background.
When you attach a note to text, you enter the text
in a note pad that appears on top of the book page.
A Note icon will display in the left margin. To show
or hide the note, tap the icon.
Bookmarks have
been made
Tap here to see the
notes you have made.
Highlight the sentence
you need, color can be
changed as you like.
Pocket PC Phone User Manual136
Companion
Programs
Pocket PC Phone User Manual 137
Companion
Programs
n Drawings. When you add a drawing, a Drawing icon ap-
pears in the bottom-left corner of the page, and drawing
tools appear across the bottom of the page. Draw by
dragging your stylus.
n To see a list of a book’s annotations, including book-
marks, highlights, text notes, and drawings, tap Go to
Annotations Index on the book’s cover page. You can
tap an entry in the list to go to the annotated page.
Removing a Book
When you nish reading a book, you can delete it to conserve
space on your device. If a copy of the book is stored on your
PC, you can download it again at any time.
To remove a book from your device, tap and hold
the title in the Library list, and then tap Delete on the
pop up menu.
Tap here to change the
color of pen you would
like to draw.
Pocket PC Phone User Manual138
Companion
Programs
Pocket PC Phone User Manual 139
Companion
Programs
9.5 Pictures
Pictures collects, organizes and sorts .jpg picture les on
your device. You can download images to your PC, and then
use ActiveSync to copy the les to your Pocket PC Phone.
After that, you can view the images as a slide show.
Pictures can also be stored and transferred to your
device from an MMC, SD or digital camera card.
Insert a card into the memory card slot and then
copy or drag the pictures from your PC to the My
Documents directory
on the memory card (If the
memory card does not have a My Documents
directory you must create one rst).
Transferring Pictures
Pictures stored on your PC can be synchronized with Pictures
on your device. Picture synchronization is not automatically
selected in ActiveSync, you need to tap the sync option Files
in ActiveSync on your desktop PC to activate this function.
Finding and listing pictures
1
Tap Programs Pictures.
2
Tap My Pictures and select a folder from the
drop-down menu.
Viewing Pictures
1
In picture, tap to view pictures as a slide
show.
2
Tap to view pictures stored in your My
Picture folder.
3
Tap to view pictures stored on a storage
card.
G
1
2
3
Pocket PC Phone User Manual138
Companion
Programs
Pocket PC Phone User Manual 139
Companion
Programs
n Tap anywhere on the screen to display the
Slide show toolbar, which you can use to
pause the slide show, rotate the view, and
more.
n Press the Left / Right controls to move
forward or backward through the slides.
Sorting Pictures
1
Tap Programs Pictures.
2
Tap Name and select an option from the drop-
down menu.
Deleting an Image
Hold the stylus rmly on the le name of the picture
you want to delete, and then select
Delete from the
pop up menu.
Edit Pictures
You can rotate, crop, zoom and adjust the brightness and
color contrast of your .jpg pictures.
1
Tap to rotate a picture 90 degrees counter-
clockwise.
2
Tap to crop a picture by dragging and
selecting the crop area. Tap outside of the box
to stop cropping.
3
Tap to display the Zoom panel, from which
you can zoom in or out of a picture, or return a
picture to full-screen size.
4
Tap Edit Brightness and Contrast to adjust
the brightness and contrast levels of a picture.
Tap
Edit Undo to undo an edit.
1
2
3
Pocket PC Phone User Manual140
Companion
Programs
Set Pictures as Background
You can use one of your own .jpg pictures as the background
on the Today screen, and specify how you want it displayed
on the screen, such as adjusting the transparency level.
1
In Pictures, tap the picture you want to set as
the background.
2
Tap Tools Set as Today Wallpaper.
The default setting for the transparency level of the
background picture is 65%. To change the setting,
tap the option Set as Today Wallpaper.
Customizing Pictures
You can opt to launch the Pictures program automatically
when a digital camera storage card is inserted and decide
on a time delay length between slides when showing a slide
show.
a. To select launch automatically:
1
Tap Programs Pictures.
2
Tap Tools Options then General.
3
Then check the box next to Detect digital
camera storage cards.
b. To select the time delay between slides :
1
Tap Programs Pictures.
2
Tap Tools Options then Slide Show.
3
Select a number of seconds then tap OK.
Chapter 10
Using Your Camera
10.1 Before Using the Camera
10.2 Camera
10.3 Album
Pocket PC Phone User Manual142
Using Your
Camera
Pocket PC Phone User Manual 143
Using Your
Camera
10.1 Before Using the Camera
With Camera Wizard, you can use the attached camera on
the back of your device to snap new photos or shoot video
clips with accompanying audio. With Album, it provides many
powerful features to manage, organize, and manipulate the
image, video, and audio les.
When in Image Capture mode, you can capture standard still
images. In Composition Capture mode, you can place your
captured images into attractive frames (templates). Or, switch
to Video Capture mode and capture “live” video streams (with
audio if desired), then share them with others or play them on
your own Pocket PC phone, desktop PC, or whenever you
want. You can even send the captured les via E-mail, or
via MMS. Just Snap and Send a newly-captured image, or
Select and Send an existing image.
Of course, you can also get image, video, and audio les
from received E-mail, a Storage Card, infrared beaming, or
synchronized from a PC via ActiveSync, and organize them
into albums and Slide Shows.
File formats supported
File formats that you can browse and view / play in Album
include:
File Type Formats
Still-image formats BMP
GIF
JPEG
Animation format Animated GIF
Video formats Motion-JPEG AVI (.avi)
MPEG-4 Simple prole (.mp4)
3GPP-H.263 baseline (.3gp)
Audio formats MPEG-4 AAC
(Advanced Audio Coding in .mp4 format)
AMR-Narrow Band
(in .mp4 and .3gp format)
WAV
MIDI (standard MIDI type 0,1, and SP-MIDI)
Pocket PC Phone User Manual142
Using Your
Camera
Pocket PC Phone User Manual 143
Using Your
Camera
You can set an audio le to be used as your Pocket
PC phone s ring tone. For more information about
ring tone settings, please see Chapter 5.
You can use Camera to capture les in the following formats :
File Type Formats
Still-image formats BMP
JPEG
Video formats Motion-JPEG AVI (.avi)
MPEG-4 Simple prole (.mp4)
3GPP-H.263 baseline (.3gp)
Audio formats AMR-NB
(Adaptive Multi-Rate Narrow Band)
10.2 Camera
There are two ways to enter the Camera mode :
1
Tap Program Camera.
2
Or just press the lowest button on the left side
of your device.
When you initially enter Camera mode, the Image Capture
submode will be active. The icon at the right side of the LCD
Display area indicates the current submode. After starting
one, you can easily switch to the other, if desired.
n Image Capture submode (capture still images)
n Video Capture submode (capture video clips )
n Composite submode (capture still images and place
in frame)
Press to enter the Camera mode
Pocket PC Phone User Manual144
Using Your
Camera
Pocket PC Phone User Manual 145
Using Your
Camera
Usage of Buttons in Camera Mode
When in Camera mode, you can press the following buttons on your Pocket PC Phone as a shortcut
to performing various functions.
Orientation toggle
By default, the orientation of the LCD
Display Panel and the incoming video
stream are arranged in a Portrait
display. Press this button to change
to a Landscape orientation.
Camera Settings screen
Press to toggle the Camera Settings
screen open and closed. If the
screen is open and you have made
changes to the settings, press to
save the settings before closing
the screen.
Capture button
Press to launch camera capture
utility. Press again to take a
picture in still image capture
mode. If in Video Capture
submode, press this button to
start recording the incoming
video stream, and press it again
to stop the recording process.
Capture/Selects
Camera mode - Capture:
Press to capture a still image.
If in Video Capture submode,
press to start recording,
and press again to stop the
recording.
Conrm mode - Selects icons:
Press to conrm the options
you have select.
Up and Down Buttons
Press to Zoom In/Out the incoming
video stream.
Left and Right Buttons
Select template:
If in Composition Capture submode, press to
select the previous or next template.
Select icons:
If in Conrm mode (after capturing
an image or video), press to highlight the
previous or next icon.
Pocket PC Phone User Manual144
Using Your
Camera
Pocket PC Phone User Manual 145
Using Your
Camera
Image Capture submode
When in Image Capture submode, you can capture a single still image by either pressing the Capture
button on your Pocket PC, or by pressing the Action button. This captures the current content shown
on your screen, and saves it to a le immediately using your currently specied lename convention
in Options. You can choose JPEG or BMP as the output format for saved image les, among other
settings in Options.
Components of the LCD Display Panel in Image Capture submode are identied below.
Incoming video stream is shown
using the entire Pocket PC screen.
(Icons superimposed on the screen
are not saved with your captured
images/videos.)
The Camera Wizard automatically calculates how
many more photos you can capture, according to
your current settings and how much memory you
have left. In this example, 141 more images can
be captured with the current settings and space
available. This counter automatically updates
after you take a picture, or if you change the
Capture Size setting.
A green icon indicates a camera-
ready state. If red (when in Image
Capture submode), it indicates that
an image capture is currently in
progress.
The current Capture Size:
n L = Large (480x640)
n M = Medium (240x320)
n S = Small (120x160)
Exits Camera
mode and returns
to the previous
Screen.
Indicates that you
are currently in
Image Capture
submode. Tap to
switch to :
Video Capture
Composite
Tap to switch to
Thumbnail View of
Album mode.
Opens the
Camera Settings
screen.
The current Zoom setting.
1.0x indicates normal size (see
the Zooming In/Out section).
The current Ambience setting.
In this example, A indicates
that it is set to Automatic (the
default).
Most of the above settings in the LCD Display Panel can be changed using the
Camera Settings screen. Tap on the Camera Settings icon shown above to display
the Camera Settings screen (illustrated and explained later).
Pocket PC Phone User Manual146
Using Your
Camera
Pocket PC Phone User Manual 147
Using Your
Camera
1
2
3
4
Submode Capture Size Setting Zoom Available Remarks
Video
Capture
Large (240 x 320) 1.0x to 2.0x 1x = normal size (no Zoom)
2x = double enlargement
3x = triple enlargement
4x = quadruple enlargement
Medium (144 x 176) 1.0x to 3.0x
Small (96 x 128) 1.0x to 4.0x
Image
Capture
Large (480 x 640) 1.0x (no Zoom
available)
Medium (240 x 320) 1.0x to 2.0x
Small (120 x 160) 1.0x to 4.0x
Composition
Capture
N/A 1.0x to 2.0x
If the Review le after capture checkbox is currently checked
in the Options General screen, then immediately after you
capture an image, it will be displayed on the screen along
with four icons.
1
To return to the previous screen, tap the Camera
icon.
2
To immediately send a
captured image/video,
tap the mail icon then
select an option from the
Send File dialog box.
3
To delete the image press
the rubbish bin option.
4
To view and edit the picture tap the Album icon
(for edit options see Album.)
Zooming In/Out
When in Video Capture submode or Image Capture sub-
mode, you can press the Up navigational button on your
Pocket PC to Zoom In the incoming video stream. Each time
you press the “Up” button, the enlargement increases by .2
(1.0, 1.2, 1.4, etc.). When the Zoom limit has been reached
for the current mode/capture size, a beep will sound.
Different maximum limits are available for Zooming, depend-
ing on the current Capture mode, and also depending on the
current Capture Size. The table below summarizes the Zoom
function availability.
Conrm mode screen:
Pocket PC Phone User Manual146
Using Your
Camera
Pocket PC Phone User Manual 147
Using Your
Camera
Video Capture submode
To start video recording :
1
Tap the Camera or composite icons until the video capture icon appears.
2
Press the Capture button on the left side of your Pocket PC, or the Action
button.
3
To stop recording, press it again. The rst frame of the newly-captured video le will
be displayed, and the four icons (shown and explained earlier) will be available.
Video capture output format: Motion-JPEG AVI le format, or H.263, or MPEG4, depending on
what you specify in the Video tab of Options. Components of the LCD Display Panel in Video
Capture submode are identied below.
The Camera Wizard calculates how much time
is still available for capturing more video clips,
according to your current settings and how
much memory you have left. In this example,
7 minutes and 8 seconds are available for
new video capture. This counter automatically
updates after you capture a video, or if you
change the Capture Size setting.
When video capture is in progress, this
indicator functions as a time counter
which displays the number of minutes/
seconds that have elapsed during the
current recording
A green icon indicates a camera-
ready state. If red (when in Video
Capture submode), it indicates
that video recording is currently in
progress.
The current Capture Size:
n L = Large 240x320
n M = Medium 144x176
n S = Small 96 x128
Exits Camera
mode and returns
to the previous
Screen.
Indicates that you
are currently in
Video Capture
submode. Tap to
switch to :
Camera mode
Composite
Tap to switch to
Thumbnail View of
Album mode.
Opens the
Camera Settings
screen.
The current Zoom setting. In this
example, the display has been
enlarged to 2.6 times the normal
size.
The current Ambience setting. In this example,
the icon indicates that it is set to Daylight.
Incoming video stream is shown
using the entire Pocket PC screen.
Pocket PC Phone User Manual148
Using Your
Camera
Pocket PC Phone User Manual 149
Using Your
Camera
Composition Capture submode
The Composition submode lets you choose a template in which you can place one or more images.
You can think of a template as a type of frame in which you would insert a photograph. A few
templates are already included with your Camera Wizard, in the subfolder named \My Documents\
Templates. You can download additional templates for free from http://www.iastyle.com.
Components of the LCD Display Panel in Composition Capture submode are identied below.
This particular template happens
to require two captured images. In
this example, “1 / 2” indicates that
the next capture will be Capture #1
and will ll the rst Place Holder
that currently has the focus.
A green icon indicates a camera-
ready state. If red, it indicates that
an image capture is currently in
progress.
Exits Camera
mode and returns
to the previous
screen.
Indicates that
you are currently
in Composition
Capture submode.
Tap to switch to :
Camera mode
Video Capture
Tap to switch to
Thumbnail View of
Album mode.
Opens the
Camera Settings
screen.
1.0x indicates normal size. In Composition mode,
you can zoom to a maximum of 2.0x. Press the Up
button on your Pocket PC to Zoom In.
The current Ambience setting.
In this example, the icon
indicates that it is currently set to
Incandescent.
Most of the above settings in the LCD Display Panel can be changed using the Quick
Camera Settings screen. Tap on the Quick Camera Settings icon shown above to
display the Quick Camera Settings screen (illustrated and explained later).
The Camera Wizard automatically calculates
how many more photos you can capture,
according to your current settings and how
much memory you have left. In this example,
494 more images can be captured with the
current settings and space available.
Pocket PC Phone User Manual148
Using Your
Camera
Pocket PC Phone User Manual 149
Using Your
Camera
To change the template:
1
Enter Composition Capture submode.
2
Press the Right navigational button on your
Pocket PC to load the next sequential template,
or the Left button to display the previous.
3
Or, tap the Camera Settings icon in the LCD
Display Panel to display the Camera Settings
screen.
4
The Template eld is available in the screen only
when the screen is opened from Composition
Capture mode. You can select the desired
template from the drop-down list in the Template
eld.
5
You can tap the Browse
button to view the
detailed information of
the template name along
with the resolution in
pixels, and the number of
pictures needed to ll that
template.
6
To change the folders
so that you can access
templates from a different
folder, tap the Change..
button.
n If the chosen template requires more than
one captured image, the incoming video
stream will be visible in only one of the Place
Holders. The rst captured image will be put
into the active Place Holder. The focus will
then switch to another Place Holder in the
template. Likewise, the next captured image
will then be placed into that Place Holder.
n If, for example, the template requires two
captured images, the LCD Display Panel will
display "1/2" initially. After capturing the rst
image, the LCD Display Panel will display
"2/2" to indicate that the next captured image
will be the second only.
6
5
Pocket PC Phone User Manual150
Using Your
Camera
Pocket PC Phone User Manual 151
Using Your
Camera
Camera Settings screen
When in any of the capture submodes (Image, Video, or
Composition), you can tap to display the Camera Set-
tings screen. Or, you can press the upper right button on
the front of your Pocket PC .
The Template drop-down list and the Browse...
button are available in the Camera Settings
screen only when Composition is selected in
the Capture mode eld.
Icons on the menu bar
1
Access the Help Messages for Camera Wizard
and automatically displays an illustration of the
usage of the buttons on your Pocket PC.
2
Switches to the Thumbnail View of Album
mode.
3
Switches to the Detailed View of Album mode.
Settings Explanation
Capture Mode
Select the mode - Image, Video, or Composition - you want to create
settings for.
Capture Size
The choices for Capture Size will be different, depending on whether
you are in Image Capture submode or Video Capture submode. Higher
Capture Size settings produce larger le sizes.
Ambience
Open a drop-down list that lets you easily adjust the Capture screen to
look its best in various environments.
If you select Effects in the Ambience eld, an additional drop-down list
of options is available. These options also affect the appearance of the
incoming video stream :
n Grayscale (black and white)
n Sepia (reddish tint)
n Cool (bluish tint)
n Negative (darkness and lightness reversed)
After you have adjusted the settings as described below, you
can either tap the OK button or the Start Camera button to
return to the previous (capture) mode.
1
2
3
Pocket PC Phone User Manual150
Using Your
Camera
Pocket PC Phone User Manual 151
Using Your
Camera
Tools Menu
The Tools Menu provides many more settings that let you
customize the behavior of Camera mode functions.
a) Adjust...
1
Tap Tools and then Adjust... below. In the drop-
down list of the Property eld, you can select
Contrast, Saturation, Brightness, Gamma or
Sharpness.
2
Use the Slider Bar to adjust the value.
The incoming video stream displayed on your
screen will immediately show the effect of any
changes you make.
3
Select Reset if you wish to reset all properties
to their original default values. Tap OK to save
changes and return to the Camera Settings
screen.
b) Options...
The Options screen contains three tabs: General, Image,
and Video.
- General tab
The General tab is shown below. These options are mostly
self-explanatory. However, note that Flicker Adjustment
refers to the electrical voltage used in your country.
The drop-down list of the Ambience:
Pocket PC Phone User Manual152
Using Your
Camera
Pocket PC Phone User Manual 153
Using Your
Camera
- Image tab
These options affect only your still im-
age captures.
Options Function
Prex Type and
Prex String
By default, the lename of each new captured image le will be image
followed by a sequential number, for example: image_00001.jpg. If
you wish to change this prex to a different arbitrary text string, select
String in the Prex Type eld and type the desired characters into the
Prex String eld. For example, entering partyin the Prex String
eld would produce the lename party_00001.jpg.
Alternatively, you can choose Date or Date and Time as the Prex
Type.
Capture Format
You can choose for your captured still images to be saved in either the
JPEG le format or the BMP le format.
Counter Index
By default, sequential numbers are automatically incorporated into
each lename for all new image les you capture, such as 00000,
00001, 00002, etc. The number follows the Prex (explained above).
To reset the numbering to “00000” for your captured image les, tap
Reset counter.
Folder
By default, your captured image les will be saved to your \My
Documents\My Pictures folder. The current Save folder is displayed
in the Image tab. If you wish to change the Save folder, tap the
Change... button. Select the desired folder, then tap OK.
Pocket PC Phone User Manual152
Using Your
Camera
Pocket PC Phone User Manual 153
Using Your
Camera
Options Function
Prex Type and
Prex String
By default, the lename of each new captured video le will be “video
followed by a sequential number, for example: video_00001.avi.
If you wish to change this prex to a different arbitrary text string,
select String in the Prex Type eld and type the desired characters
into the Prex String eld. For example, entering vacation in the
Prex String eld would produce the lename vacation_00001.jpg.
Alternatively, you can choose Date or Date and Time as the Prex
Type.
Format
You can choose for your captured video clips to be saved in either the
Motion-JPEG AVI, H.263 (3GP), or MPEG4 le formats.
Counter Index
By default, sequential numbers are automatically incorporated into
each lename for all new video les you capture, such as 00000,
00001, 00002, etc. The number follows the Prex (explained above).
To reset the numbering to “00000” for your captured video les, tap
Reset counter.
Recording
Limitation of
Video Size
If you wish to limit video captures so that the capture automatically
stops when a certain le size is reached, select the Limited to
Kilobytes button, then enter the desired number in the text box.
If you don’t want to limit the le size, select the Limited by available
storage space button (the default). This means video capture will
continue until your available storage space is all consumed.
Recording with
Audio
When this checkbox is checked, audio will be recorded with your
captured video clips. It is checked by default. Any videos captured
when the checkbox is not checked would be silent (no accompanying
audio).
Folder
By default, your captured video les will be saved to your \My
Documents folder. The current “Save” folder is displayed in the Video
tab. If you wish to change the “Save” folder, tap the Change... button.
A “tree view” of your existing folders will be displayed. Select the
desired folder, then tap OK.
- Video tab
The options on the Video tab affect only your captured
video les.
Pocket PC Phone User Manual154
Using Your
Camera
Pocket PC Phone User Manual 155
Using Your
Camera
10.3 Album
Select the Album icon in your Pocket PC Phone Edition’s
Programs group to view image and video les, and to play
audio les. Three view modes are available: Thumbnail
view, Detailed view, and Slide Show view.
To enter Album mode,
1
Tap Program then tap
2
Or, tap the Album icon in Camera mode.
Thumbnail View Mode
The rst time you enter Album mode, Camera Wizard’s
Thumbnail View mode will be invoked. By default, your \My
Documents\My Pictures folder will be searched initially.
n You can manually change the position of a
thumbnail simply by pressing your stylus on it
and then dragging it to the desired location.
n To select multiple thumbnails, press your stylus
in an empty part of the screen, then drag your
stylus across all thumbnails you want to include
in the multi-selection.
1
Current folder is shown here. Tap this eld if you
want to search a different folder.
2
Tap to select a different thumbnail
size.
3
To change the way the thumbnails are sorted,
tap here.
4
This speaker icon indicates
that audio annotation has been
recorded and associated with
this le.
1
2
3
4
5
6
8
Pocket PC Phone User Manual154
Using Your
Camera
Pocket PC Phone User Manual 155
Using Your
Camera
5
Tap to switch to Camera mode.
6
Tap to switch to Slide Show view.
7
Tap to switch to Detailed view. (Or, tap directly
on a thumbnail to load that le into Detailed
View.) If an audio or video le, it will begin
playing.
8
A letter icon in lower left corner of thumbnail
indicates various meanings:
A - indicates that text annotation has been
associated with this le.
G - indicates an animated GIF le.
V - indicates that it is a video le.
n To open a convenient pop-up menu that
contains frequently used commands, press
your stylus on the thumbnail you want to
operate on.
n To see a still image full-screen, or to play a
video or audio le, tap the desired thumbnail
To make an annotation on your
le:
This command lets you add (or remove) text or audio annota-
tion for a le. The associated text and/or audio recording can
then be set to display/play during a Slide Show.
1
In the Thumbnail View mode screen, Select
the desired le then select the Annotate...
command from Edit menu.
n After text annotation has been added, an
icon will be shown in the thumbnail. A separate
text le will be created for that text.
n After audio annotation has been added, an
icon will be shown in the thumbnail. A
separate audio le, in the WAV le format, will
be created.
The pop up menu when you tap and
hold on a thumbnail.
List View:
Pocket PC Phone User Manual156
Using Your
Camera
Pocket PC Phone User Manual 157
Using Your
Camera
2
If you wish to associate text with the le, enter
it in the text box.
3
To create an audio recording (either voice
or music) as an annotation using your built-
in Pocket PC microphone,tap to begin
recording, tap to stop recording.
If an audio recording already exists and you
then tap the Record button, there is no warning
conrmation. Your previous recording will be
instantly lost and overwritten by the new recording.
If you have tapped Remove Voice by accident,
simply tap Cancel (this cancels the removal
operation so that the audio is retrieved).
Sending MMS, E-mail in Album
1
First select the desired le tap Tools then
select an option from the menu.
2
Follow the relevant procedures for sending that
type of message.
In addition, if you have an MMS client, the menu
will contain the Send via MMS command.
To set audio les as Ring Tones:
Simply select the desired le, then select Set as Ring Tone
from the Tools Menu (or the menu that pops up when you
tap-and-hold on a thumbnail). The previous ring tone will be
immediately replaced. A message will display the lename
and conrm that the operation was successful.
Pocket PC Phone User Manual156
Using Your
Camera
Pocket PC Phone User Manual 157
Using Your
Camera
Assign to Contact
This command allows you to assign an image as a Photo ID
to a Contact entry in your Pocket Contacts.
1
Choose the image you want to use as a Photo
ID.
2
Select Assign to Contact. The Photo Contacts
application will be invoked. The Contact entries
in your Pocket Contacts will be displayed.
3
Select the Contact entry to which you want to
assign the Photo ID, and assign the desired
attributes as you normally would in Photo
Contacts (Photo only, or photo with template,
etc.).
4
The Photo Contacts Preview screen will show
you a preview of how the Photo ID setup looks.
After you save it, Photo Contacts will exit, and
you will automatically be returned to Camera
Wizard.
Options in Album Settings
To change the settings when using Album, tap
Options from the Tools menu. Two tabs are
comprised: General and Slide Show.
- General tab
Function Explanation
Default zoom
The setting in the Default Zoom eld controls the size of the selected
le when it is initially displayed in Detailed View. If set to Smart, the
Camera Wizard will automatically calculate the best size in which to
display the le on the screen. However, if you want les to always
be initially displayed in their original size, select Original Size from
the drop-down list box. If you want Camera Wizard to automatically
display selected les so that they t within the screen, select Fit In
Window.
Pocket PC Phone User Manual158
Using Your
Camera
Pocket PC Phone User Manual 159
Using Your
Camera
Function Explanation
Auto rotate If None is selected, no automatic rotation will take place when a le
is displayed in Detailed View (but you can still rotate the display
manually using the Rotate Clockwise and Rotate Counterclockwise
icons on the Toolbar in Detailed View). Select Left to automatically
rotate images 90 degrees to the left in Detailed View, or Right if you
want rotation to occur 90 degrees to the right.
Animation speed The setting in the Animation Speed eld controls the speed at which
animated GIF les will be played. By default, this is set to Normal.
You can select Faster, Slower, or No Delay from the drop-down list.
Keep backlight
on while playing
video
If you have set your Backlight to dim after a certain number of seconds,
you can override it by checking this checkbox. This ensures that the
Backlight will not dim during your video playbacks.
Adjust Gamma The Adjust Gamma setting controls image brightness/darkness.
The minimum setting of 0.01 will cause images to display very dark.
The maximum setting of 3.00 will cause them to display very light
(“wash out”). If you change this setting, you can conveniently reset it to
1.00 by tapping the Reset button. This feature assists you in viewing
an image more easily under different lighting conditions.
Slide Show tab
These settings control only the behavior of Slide Show view
mode. These options are mostly self-explanatory, just choose
the item you need and follow the relevant procedures for the
way you want the Slide Show to work.
Pocket PC Phone User Manual158
Using Your
Camera
Pocket PC Phone User Manual 159
Using Your
Camera
Detailed View Mode
Detailed View mode displays the selected le in an enlarged
view, and you can further manipulate the view in various ways
(zoom, rotate, pan, etc.).
1
Toolbar
2
Command Bar
3
Hide or display the Toolbar.
4
Switch to Thumbnail view.
5
Switch to Slide Show view.
6
Switch to Camera mode.
Icons on the Toolbar
Images too big for screen
1
Whenever the image is too large to be shown
in the display area in its entirety, you can simply
press your stylus anywhere in the display area
and drag, to interactively quick-pan the image
to any desired position.
2
Alternatively, you can open the Quick View
window as shown on the right, by tapping the
Quick View icon on the Toolbar. The dotted
outline within the Quick View window shows
the currently displayed portion, in relation to
the entire image. Drag the outline within the
Quick View window to the desired position, or
tap within the Quick View window to jump the
outline to a different position. When satised
with the position, tap the Quick View icon again
to close the Quick View window.
1
2
3
4
5
6
Previous le
Next le
Rotate
Clockwise
Rotate Counterclockwise
(90 degrees each time tapped)
Toggles the Quick
View window open
and closed
Zoom
Out
Zoom
In
Fit to
window
Actual size (1:1
pixel ratio)
Pocket PC Phone User Manual160
Using Your
Camera
Pocket PC Phone User Manual 161
Using Your
Camera
To set as Today Wallpaper:
This command allows you to change the background image
of the Today screen on your Pocket PC to any image you
want.
1
In Album, tap to open a video le or image you
want to use as the image for the wallpaper.
2
If desired, you can manipulate it in any way
you wish: Zoom In or Out, Rotate, Pan, etc.
The exact state of the image as displayed on
your screen will be used as the Today screen
image.
Likewise, if you have chosen a video le and do
not wish to use the rst frame of the video as the
wallpaper, you can start playing the video and
then open the Tools Menu at the frame you want
to use. (The video is paused when the menu is
open.)
3
Select Set as Today Wallpaper. The message
“The Today screen background image has
been successfully changed” will display.
To Reset the Today Screen back to the
Default Wallpaper:
If you later decide that you want to re-set the Today screen
back to the original default background,
Tap Settings Today icon in the Personal
tab Select Windows Default in the list then
make sure the Use this picture as the background
checkbox is checked → Tap OK.
Pocket PC Phone User Manual160
Using Your
Camera
Pocket PC Phone User Manual 161
Using Your
Camera
Slide Show View
When in Thumbnail View or Detailed View, you can tap the
icon in the Command Bar to enter Slide Show mode.
In Slide Show mode, all image, video, and audio les will
automatically be displayed/played, one after another. If video
and audio les are encountered during a Slide Show, they
will be played once, and then the next le in the Slide Show
will be displayed/played. However, you can play it over again
manually if desired.
Tapping anywhere on the screen will momentarily display
the Toolbar.
Tap once (or
repeatedly) to Fast
Forward to the next
sequential les.
Tap to resume playing a
Slide Show that has been
stopped.
Exits Slide Show
mode and enters
Detailed View
mode.
Exits Slide Show mode
and enters Thumbnail
View mode
Slide Show Properties. Lets you set
Transition Effects, Rotation, Text
display, Audio, Delay Time between
slides (for image les), Random or
forward-sequential display, etc. in the
Slide Show Options screen..
Stops playback and
stays on the current
slide, but does not
exit Slide Show mode
(pseudo-pause).
You can choose to display
your annotated text during a
Slide Show, or the lename,
or no text at all. You can
also change font color, size,
position, etc., as we have
done in this example.
Tap to re-display the previous
le. Tap repeatedly to quickly
Rewind to the desired le.
(The three leftmost icons
become available after Stop
has been tapped.)
Pocket PC Phone User Manual162
Using Your
Camera
Appendix : A
Maintaining Your Pocket PC
n Adding or Removing Program
n Managing Memory
n Backing Up Files
n Resetting your Pocket PC Phone and
Clearing Memory
Appendix A
Maintaining
Pocket PC Phone User Manual164
Appendix A
Maintaining
Pocket PC Phone User Manual
165
Adding or Removing Programs
Programs added to your device at the factory by default are
stored in ROM (read only memory). You cannot remove them,
and you will never accidentally lose them. You can install
any other programs created for your device, as long as your
device has enough memory. The most popular place to nd
software for your device is on the Pocket PC Web site http:
//www.microsoft.com/mobile/pocketpc.
To add programs using ActiveSync :
You will need to install the appropriate software for your device
on your PC before installing it on your device.
1
Download the program to your PC (or insert the
CD or disk that contains the program into your
PC). Be sure to select the program designed
for the Pocket PC and your device process or
type.
2
Read any installation instructions, or
documentation that comes with the program.
Many programs provide special installation
instructions.
3
Connect your device and PC.
4
Double click the .exe le.
n If the le is an installer, the installation wizard
will begin. Follow the directions on the screen.
Once the software has been installed on your
PC, the installer will automatically transfer the
software to your device.
n If the le is not an installer, you will see an
error message stating that the program is
valid but it is designed for a different type of
PC. You will need to move this le to your
device. If you cannot nd any installation
instructions for the program in the Read Me le
or documentation, use ActiveSync Explore
to copy the program le to the Program Files
folder on your device.
Once installation is complete, tap
Programs
and then its program icon.
Appendix A
Maintaining
Pocket PC Phone User Manual164
Appendix A
Maintaining
Pocket PC Phone User Manual
165
To add a program directly from the
Internet :
1
Determine your device and processor type so
that you know which version of the software to
install.
2
Download the program to your device directly
from the Internet using Pocket Internet
Explorer. You may see a single *.xip, *.exe or
*.zip le, a setup.exe le, or several versions of
les for different device types and processors.
Be sure to select the program designed for the
Pocket PC and your device processor type.
3
Read any installation instructions, Read Me les,
or documentation that comes with the program.
Many programs provide special installation
instructions.
4
Tap the file, such as a *.xip or *.exe file.
The installation wizard will begin. Follow the
directions on the screen.
To remove a program :
Tap Settings System Remove
Programs
.
n You can only remove programs that you
installed in storage memory. Programs that
came with your device cannot be removed.
n You can quickly return your device to the
factory default conguration by clearing all
memory. All data will be lost. For instructions,
see the details later in this chapter.
Appendix A
Maintaining
Pocket PC Phone User Manual166
Appendix A
Maintaining
Pocket PC Phone User Manual
167
Managing Memory
Memory on your Pocket PC Phone is shared between storage
memory and program memory. Storage memory is used to
store the information you created and programs you installed.
Program memory is used to run programs on your Pocket PC
Phone. Pocket PC Phone automatically manages the allo-
cation between storage and program memory.
To view memory allocation and
availability :
Tap Settings System tab and then tap
Memory icon.
Finding Space in Storage memory
In some situations, such as when memory is low, your Pocket
PC Phone may not be able to automatically adjust the alloca-
tion. If you receive a message stating that storage or program
memory is unavailable, try the following solution :
a. Move data to a SD storage card
1
Tap Programs and then File Explorer.
2
Tap and hold the le you want to move, and
tap Cut. Open the
My Documents folder in
the storage card folder, tap
Edit, and then tap
Paste.
Files stored in folders other than My Documents or stored
in folders within sub-folders in My Documents may not show
up in the list view of some programs. When using Notes,
Pocket Word, or Pocket Excel, you can also move les
by opening the item and tapping Tools or Edit and then
Rename/Move.
Appendix A
Maintaining
Pocket PC Phone User Manual166
Appendix A
Maintaining
Pocket PC Phone User Manual
167
b. Move e-mail attachments
1
On Inbox tap Tools and then Options.
2
On the Storage tab, select Store attachments
on storage card then tap OK. All existing
attachments are moved to the storage card,
and new attachments are automatically stored
on the storage card.
c. Save new items on the storage card
Set programs such as Notes, Pocket Word, and Pocket
Excel to automatically save new items on the storage card.
1
In the program tap Tools and then
Options.
2
In the Save to eld select Storage Card.
d. Delete unnecessary les
1
Tap Programs and then File Explorer.
2
Tap and hold the le, and then tap Delete on the
pop up menu.
To nd your largest les, tap
and then Find.
In the Type
list, tap Larger than 64 KB, and then
tap Go.
e. Delete all les and clear history in
Internet Explore
In Internet Explorer, tap Tools and then Options. Tap
Delete Files and Clear History.
G
Appendix A
Maintaining
Pocket PC Phone User Manual168
Appendix A
Maintaining
Pocket PC Phone User Manual
169
Backing Up Files
Because any new programs or data are stored in RAM, and
therefore will be lost if your device loses power for any reason,
it is critical that you backup les to your computer, or a mem-
ory card. When you are at your desktop you can synchronize
with your computer to backup les, however, if you are going
outside and unable to access your desktop, you will need to
backup les to an SD or MMC card. Your device enables you
to backup individual les in Word or Excel or all les in SD
backup. Further more, you can also backup and then restore
Contacts, Calendar, Internet and E-mail Settings.
SD and MMC Cards
Your device has an expansion slot compatible with a range
of SD and MMC Memory cards, which are primarily used to
backup or transfer les and data.
To insert or remove a memory card:
1
Push the memory card into slot until it clicks into
place. The card is secure when it is not protruding
from the base.
2
To remove the card push it in and then release,
letting the card spring out.
When you receive your device there will be a piece of plastic
in the slot; remove as described in "2" above.
To save Word or Excel les to a
memory card :
1
Push the memory card into the slot until it
clicks into place. The card is secure when it is
not protruding from the base.
2
In application programs (e.g. Pocket Word or
Excel), press Tools Options.
3
Tap the drop down menu box under Save To and
select Storage Card.
Appendix A
Maintaining
Pocket PC Phone User Manual168
Appendix A
Maintaining
Pocket PC Phone User Manual
169
Backup or restore your system
using xBackup :
1
Tap Programs xBackup then the
Backup or Restore tab.
2
If you have inserted the SD card properly it will
appear next to
Target by tapping Open and
select Storage Card under the task bar.
3
Make sure there are no application programs
running, then tap Start.
Backup or restore your system via
ActiveSync
1
Double click the icon of ActiveSync
in the task bar of your PC.
2
Select Backup/Restore option in the drop-
down menu of Tool in ActiveSync.
3
Select the Backup tap to backup your
system; if necessary; Select the
Restore
tab to restore your system if necessary.
Reset the Pocket PC Phone
and Clear Memory
You can perform a soft reset or a full reset. During a soft
reset, the device is restarted and only some data in open
programs may be lost. However, a full reset turns the battery
off and returns the device to its original factory settings and
deletes all programs, les, contacts and other information you
have saved to the device. Therefore it is extremely important
to backup data to a storage card or your computer on a regular
basis in the event that a full reset has to be performed.
G
Appendix A
Maintaining
Pocket PC Phone User Manual170
To perform a soft reset :
If your Pocket PC Phone responds slowly stops responding or
freezes, try a soft reset. A soft reset causes the Pocket PC
Phone to restart and re-adjust memory allocation. Unsaved
data in open windows may be lost.
Use the stylus to press and hold the Reset button.
To perform a full reset :
A full device reset clears memory, deletes all data and restores
the Pocket PC Phone to its default settings. Programs installed
at the factory remain, while data you have created and pro-
grams you have installed are all erased.
Press and hold the power button, and then use stylus
to press the soft reset button at he same time.
Be sure you have backup all your data in a SD card
or in your PC before performing a full reset.
Press and
hold the power
button.
Appendix A
Maintaining
Pocket PC Phone User Manual170
Appendix : B
Regulatory Notice
n Regulatory Agency Identication
n European Union Notice
n Important Safety Information
n General Precautions
n Safety Precautions for Power Supply
Unit
Appendix B
Regulatory
Pocket PC Phone User Manual172
Appendix B
Regulatory
Pocket PC Phone User Manual 173
Regulatory Agency
Identication Numbers
For regulatory identication purposes your product
is assigned a model number PH10x.
The following accessories have been approved for
use with your device. Their assigned model numbers
listed below can identify these approved accessories.
To ensure continued reliable and safe operation of
your Pocket PC Phone, use only the accessories
listed below with your PH10x.
Accessories Model Number
Cradle PH15x
CF Back Pack PH16x
Battery Pack PH17x
n The above X may be any
alphanumeric character or blank
denoting external cosmetic
changes.
n This product is intended for use
with certied Class 2 Limited Power
Source, rated 5 VDC, minimum 2A
power supply unit.
European Union Notice
Products with CE marking comply with the R&TTE
Directive (99/5/EC), the EMC Directive (89/336/
EEC) and the Low Voltage Directive (73/23/EEC)
issued by the Commission of the European
Community.
Compliance with these directives implies conformity
to the following European Norms (in brackets are
the equivalent international standards):
n EN 60950 (IEC 60950)
Safety of InformationTechnology Equipment.
n ETSI EN 301 511
Global system for mobile communications
(GSM); Harmonized EN for mobile stations in
the GSM 900 and GSM 1800 bands covering
essential requirements of article 3.2 of the
R&TTE directive (1995/5/EC )
n ETSI EN 301 489-1
Electromagnetic compatibility and Radio
spectrum Matters (ERM); ElectroMagnetic
Compatibility (EMC) standard for radio
equipment and services; Part 1: Common
technical requirements
n ETSI EN 301 489-7
Electromagnetic compatibility and Radio
spectrum Matters (ERM); ElectroMagnetic
Compatibility (EMC) standard for radio
equipment and services; Part 7: Specific
conditions for mobile and protable radio
and ancillary equipment of digital cellular
radio telecommunications systems (GSM
and DCS)
n ETSI EN 301 489-17
Electromagnetic compatibility and Radio
spectrum Matters (ERM); ElectroMagnetic
Compatibility (EMC) standard for radio
equipment and services; Part 17: Specic
conditions for 2.4 GHz wideband transmission
systems and 5 GHz high performance RLAN
equipment.
n ETSI EN 300 328
Electromagnetic compatibility and Radio
spectrum Matters (ERM); Wideband
Transmission systems; data transmission
equipment operating in the 2.4 GHz ISM
band and using spread spectrum modulation
techniques.
n GSM11.10
n ANSI/IEEE C.95.1-1992
Specific absorption rate in mobile phone
emission condition for body health
n EN50360, EN50361 for SAR
n SAR : 0.271 mW/10g
Appendix B
Regulatory
Pocket PC Phone User Manual172
Appendix B
Regulatory
Pocket PC Phone User Manual 173
FCC Compliance
Statement
n FCC part 15 and part 24
This device complies with Part 15 of the FCC
Rules. Operation is subject to the following two
conditions : (!) this device may not cause harmful
interference, and (2) this device must accept any
interference received, including interference that
may cause undesired operation.
n FCC ID : NM8 HIMALAYAS
n Statement according to FCC part 15.105
NOTE :
This equipment has been tested and found
to comply with the limits for a Class B digital device,
pursuant to Part 15 of the FCC Rules. These limits
are designed to provide reasonable protection
against harmful interference in a residential
installation. This equipment generates, uses
and can radiate radio frequency energy and, if
not installed and used in accordance with the
instructions, may cause harmful interference
to radio communications. However, there is no
guarantee that interference will not occur in a
particular installation. If this equipment does
cause harmful interference to radio or television
reception, which can be determined by turning the
equipment off and on, the user is encouraged to
try to correct the interference by one or more of
the following measures .
n Reorient or relocate the receiving
antenna.
n Increase the separation between the
equipment and receiver.
n Consult the dealer or an experienced radio/
TV technician for help.
n Connect the equipment into an outlet on
a circuit different from that to which the
receiver is connected.
RF exposures
Tests for SAR are conducted using standard
operating positions specied by the FCC with the
phone transmitting at its highest certied power
level in all tested frequency bands. Although the
SAR is determined at the highest certied power
level, the actual SAR level of the phone while
operation can be well below the maximum value.
This is because the phone is designed to operate
at multiple power levels so as to use only the
power required to reach the network. In general,
the closer you are to a wireless base station
antenna, the lower the power output.
Before a phone model is available for sale to the
public, it must be tested and certied to the FCC
that it does not exceed the limit established by
the government-adopted requirement for safe
exposure. The tests are performed in positions and
locations (e.g., at the ear and worn on the body) as
required by the FCC for each model. (Body-worn
measurements may differ among phone models,
depending upon available accessories and FCC
requirements). While there may be differences
between the SAR levels of various phones and at
various positions, they all meet the government
requirement for safe exposure.
For body worn operation, to maintain compliance
with FCC RF exposure guidelines, use only High
Tech computer, Corp. approved accessories.
When carrying the phone while it is on, use the
specic High Tech computer, Corp. supplied or
approved carrying case, holster, or other body-
worn accessory.
Use of non High Tech computer, Corp. approved
accessories may violate FCC RF exposure
guidelines and should be avoided.
Appendix B
Regulatory
Pocket PC Phone User Manual174
Appendix B
Regulatory
Pocket PC Phone User Manual 175
n Avoid pushing objects into product
Never push objects of any kind into cabinet
slots or other openings in the product. Slots
and openings are provided for ventilation.
These openings must not be blocked or
covered.
n Mounting Accessories
Do not use the product on an unstable
table, cart, stand, tripod, or bracket. Any
mounting of the product should follow the
manufacturer's instructions, and should use
a mounting accessory recommended by the
manufacturer.
n Avoid unstable mounting
Do not place the product with an unstable
base.
n Use product with approved equipment
This product should be used only with personal
computers and options identied as suitable
for use with your equipment.
n Adjust the volume
Turn down the volume before using
headphones or other audio devices.
n Cleaning
Unplug the product from the wall outlet before
cleaning. Do not use liquid cleaners or aerosol
cleaners. Use a damp cloth for cleaning, but
NEVER use water to clean the LCD screen.
b) Safety Precautions for
Power Supply Unit
n Use the correct external power source
A product should be operated only from
the type of power source indicated on the
electrical ratings label. If you are not sure of
the type of power source required, consult your
authorized service provider or local power
company. For a product that operates from
battery power or other sources, refer to the
operating instructions that are included with
the product
Important Health and
Safety Information
Retain and follow all product safety and operating
instructions. Observe all warn and in the operating
instructions on the product
To reduce the risk of bodily injury, electric shock,
re, and damage to the equipment observe the
following precautions.
a) General Precautions
n Heed service markings
Except as explained elsewhere in the
Operating or Service documentation, do not
service any product yourself. Service needed
on components inside these compartments
should be done by an authorized service
technicians or provider.
n Damage requiring service
Unplug the product from the electrical outlet
and refer servicing to an authorized service
technicians or provider under the following
conditions:
l Liquid has been spilled or an object has
fallen into the product.
l The product has been exposed to rain or
water.
l The product has been dropped or dama-
ged.
l There are noticeable signs of overheat-
ing.
l The product does not operate normally
when you follow the operating
instructions.
n Avoid hot areas
The product should be placed away from heat
sources such as radiators, heat registers,
stoves, or other products (including ampliers)
that produce heat.
n Avoid wet areas
Never use the product in a wet location.
Appendix B
Regulatory
Pocket PC Phone User Manual174
Appendix B
Regulatory
Pocket PC Phone User Manual 175
n International Commission on Non-Ionizing
Radiation Protection (ICNIRP) 1996
n Ministry of Health (Canada), Safety Code
6. The standards include a substantial safety
margin designed to assure the safety of all
persons, regardless of age and health.
The exposure standard for wireless mobile
phones employs a unit of measurement known
as the Specic Absorption Rate, or SAR. The
SAR limit set by the FCC is 1.6W/kg *.
*In the U.S. and Canada, the SAR limit for mobile
phones used by the public is 1.6 watts/kg (W/kg)
averaged over one gram of tissue. The standard
incorporates a substantial margin of safety to give
additional protection for the public and to account
for any variations in.
d) SAR Information
THIS MODEL DEVICE MEETS THE GOVERN-
MENT'S REQUIREMENTS FOR EXPOSURE TO
RADIO WAVES.
Your wireless mobile GSM phone is a radio
transmitter and receiver. It is designed and
manufactured not to exceed the emission limits
for exposure to radio frequency (RF) energy set
by the Federal Communications Commission of
the U.S. Government. These limits are part of
comprehensive guidelines and establish permitted
levels of RF energy for the general population.
The guidelines are based on the safety standards
previously set by both U.S. and international
standards bodies :
n American National Standards Institute
(ANSI) IEEE. C95.1-1992
n National Council on Radiation Protection
and Measurement (NCRP). Report 86. 1986
n International Commission on Non-Ionizing
Radiation Protection (ICNIRP) 1996
n Handle battery packs carefully
This product contains a Li-ion Polymer battery.
There is a risk of re and burns if the battery
pack is handled improperly. Do not attempt to
open or service the battery pack.
Do not disassemble, crush, puncture, short
external contacts or circuits, dispose of in
fire or water, or expose a battery pack to
temperatures higher than 60¢XC (140¢XF).
Warning: DANGER OF EXPLOSION
IF BATTERY IS INCORRECTLY
RE-PLACED. TO REDUCE RISK
OF FIRE OR BURNS, DO NOT
DISASSEMBLE, CRUSH, PUNCTURE,
SHORT EXTERNAL CONTACTS,
HEAT ABOVE 100
(212℉), OR
DISPOSE OF IN FIRE OR WATER.
REPLACE ONLY WITH SPECIFIED
BATTERIES. RECYCLE OR DISPOSE
OF USED BATTERIES ACCORDING
TO THE LOCAL RE-GULATIONS
OR REFERENCE GUIDE SUPPLIED
WITH YOUR PRODUCT.
c) Exposure to Radio
Frequency (RF) Signals
Your wireless phone is a radio transmitter and
receiver. It is designed and manufactured not
to exceed the emission limits for exposure
to radio frequency (RF) energy set by the
Federal Communications Commission of the
U.S. Government. These limits are part of
comprehensive guidelines and establish permitted
levels of RF energy for the general population.
The guidelines are based on the safety standards
previously set by both U.S. and international
standards bodies:
n American National Standards Institute
(ANSI) IEEE. C95.1-1992
n National Council on Radiation Protection
and Measurement (NCRP). Report 86. 1986
Appendix B
Regulatory
Pocket PC Phone User Manual176
Hardware
Specications
Pocket PC Phone User Manual 177
n Ministry of Health (Canada), Safety
Code 6. The standards include a substantial
safety margin designed to assure the safety
of all persons, regardless of age and health.
The exposure standard for wireless mobile GSM
phone employs a unit of measurement known as
the Specic Absorption Rate, or SAR. The SAR
limit set by the FCC is 1.6W/kg*.
For body worn operation, this phone has been
tested and meets the FCC RF exposure guidelines
when used with an accessory that contains
no metal and that position the antenna of the
GSM phone a minimum of 1.5cm from the body.
The SAR values of this GSM phone are 0.726
W/g (body) and 0.362 W/g (head). Use of other
accessories may not ensure compliance with the
FCC RF exposure guidelines.
The FCC has granted an Equipment Authorization
for this model device with all reported SAR levels
evaluated as in compliance with the FCC RF
exposure guidelines. SAR information on this
model device is on le with the FCC and can be
found under the Display Grant section of http:
//www.fcc.gov/oet/fccid after searching on FCC
ID: NM8 HIMALAYAS. Additional information
on Specific Absorption Rates (SAR) can be
found on the Cellular Telecommunications &
Internet Association (CTIA) web-site as http:
//www.devicefacts.net.
* In the U.S. and Canada, the SAR limit for mobile
GSM phone used by the public is 1.6Watts/kg
(W/kg) averaged over one gram of tissue. The
standard incorporates a substantial margin of
safety to give additional protection for the public
and to account for any variations in.
Appendix B
Regulatory
Pocket PC Phone User Manual176
Hardware
Specications
Pocket PC Phone User Manual 177
Specications
System Information
Processor Intel XScale CPU at 400MHz
Memory - ROM : 64MB
- RAM : 128MB
Operating System Windows Mobile
TM
software
Display
Type TFT-LCD 16bit, touch-sensitive, 3.5 inches
Resolution 240 x 320 at 65,536 colors
GSM/GPRS (Tri-band) Module
GSM900 880 ~ 915, 925 ~960 MHz
DCS1800 1710 ~ 1785, 18-5 ~ 1880 MHz
PCS1900 1850 ~ 1910, 1930 ~ 1990 MHz
Camera Module
Type Color CMOS camera module
Resolution VGA 480 x 640 with JPEG encoder
Image Process - ALC (Auto Light Control)
- AWB (Auto White Balance)
Physical
Dimensions (typical) 69.9mm (w) x 130mm (h) x 19mm (l)
Weight (typical) 190g
Expansion Slots
SDIO/MMC supports Yes
Hardware
Specications
Pocket PC Phone User Manual178
Trouble
shooting
Pocket PC Phone User Manual 179
Controls and Lights
Navigation 5-way navigation pad
Buttons - 4 program buttons : Calendar, Contacts, Camera, Record
- 2 phone function : Call, End
- Volume control button (up, down)
- Power on / off
- Reset button
LED Lights - Event notication
- Charge status
- GSM/GPRS signals
Connection
Infrared SIR
I/O port 22-pin individual port for signals (for USB, Serial, and power)
Audio Stereo headphone jack (2.5Ø)
Bluetooth 1.1 compliant, power class 2
Audio
Audio controller AGC
Microphone/Speaker Built-in
Headphone WAV/WMA/MP3 stereo
Power Supply
Battery - Main : 1200mAh (typical) Li-ion Polymer removable,
rechargeable battery, data retention time : 72 hrs
- Backup : 25mAh rechargeable,
data retention time : 20 mins. (in full charge)
AC adapter - AC input / Frequency :100 ~ 240 VAC / 50 ~ 60Hz
- Rated Output : 5V / 2A DC (typical)
Hardware
Specications
Pocket PC Phone User Manual178
Trouble
shooting
Pocket PC Phone User Manual 179
Troubleshooting
If you encounter any problems with your Pocket PC Phone, consult the following Trouble
Guide. If you are still having problems after reviewing these, contact Technical Support
or your dealer.
Problem
n My Pocket PC Phone keeps
turning itself off.
n My Pocket PC Phone is not
making any sound.
n My Pocket PC Phone does
not vibrate when the phone
rings or alarms occur.
n Screen freezes or no re-
sponse
n Screen is blank.
Solution
Your Pocket PC Phone is designed by default to turn itself
off if not used for 3 minutes. This period can be set up to
5 minutes. Check the auto-off function on the Advanced
tab on Power setting in Chapter 5.
1 Tap at the right corner of title bar to check the
volume status.
2 Check the settings of Sound and Notications on
the Personal tab by tapping Settings.
1 Tap in the right corner of title bar to check if the
vibrate function is activate.
2 Check the setting of Sound and Notications on
the Personal tab by tapping Settings.
3 Check the event note in your Calendar to see if the
Reminder has been activated.
Reset your device. See Reset your Pocket PC Phone
and clear memory section in Appendix A.
If your Pocket PC does not respond when you briey
press the Power button, press and hold the button for a
full second. If that does not work :
1 Plug the AC power into the device to charge it.
2 Reset the device. See Reset your Pocket PC Phone
and clear memory section in Appendix A.
Operating Problems
Trouble
shooting
Pocket PC Phone User Manual180
Trouble
shooting
Pocket PC Phone User Manual 181
Solution
1 Check the Brightness setting by tapping
Settings System tab Backlight Brightness
tab.
2 Prolonged exposure to direct sunlight may also
cause your Pocket PC Phone screen to temporarily
darken. This is normal for LCD screens and is not
permanent.
Memory on you Pocket PC Phone is shared between
storage memory and program memory :
1 Delete any unnecessary information you have
entered to release storage memory space.
2 Delete the unnecessary programs you have installed
to release program memory space.
See Managing memory section in Appendix A.
Plug the AC power in to your device to charge it.
If you are having a hard time viewing a document in
Notes, try changing the size of the view, just tap a zoom
percentage on the Tools menu.
1 In Pocket Word and Pocket Excel, on the
View menu, tap Zoom and then select a zoom
percentage.
2 In Pocket Internet Explorer, on the View menu, tap
Text Size and then select a size.
3 In Pocket Outlook data, try enlarging the display
font. To do this within Calendar, Tasks or Contacts,
tap Tools, then Options, and then select Use large
font.
Problem
n Screen is dark.
n A warning message about
Running out of memory
pops up on the screen.
n The warning message about
Battery low pops up on the
screen.
n Screen is hard to read, or
the text on the screen is too
small for you.
Trouble
shooting
Pocket PC Phone User Manual180
Trouble
shooting
Pocket PC Phone User Manual 181
Tapping and Writing Problems
Problem
n Device buttons do not re-
spond or bring up the wrong
program.
n Inaccurate response to stylus
taps.
n Pocket PC does not recog-
nize handwriting.
Solution
Check the Buttons setting to see if the program
assignment for each function button is set as you want.
Tap Settings Personal tab Buttons.
For detailed information about Button settings, see
Chapter 5.
Adjust the touch screen to respond more accurately to
screen taps. Tap Settings System tab
Screen Align Screen.
For your Pocket PC to recognize your handwriting input
with the stylus, you need to use Transcriber writing. To
learn how to write in Transcriber, see Chapter 2.
ActiveSync Problems
Problem
n ActiveSync operation cannot
be performed or connected.
Solution
1 Make sure the ActiveSync cradle/cable is connected
securely.
2 Make sure you have installed the ActiveSync
software included on the Pocket PC Phone 2003
companion CD.
3 Make sure you selected Local USB or Local Serial,
as appropriate, from the Connection Settings
on ActiveSync Manager menu on your desktop
computer.
4 If you are using the optional serial cradle/cable, make
sure you are not running another program which also
works with the serial port you selected when installed.
5 If ActiveSync still doesn't work, remove the ActiveSync
software from your desktop computer then re-install
it.
Trouble
shooting
Pocket PC Phone User Manual182
Trouble
shooting
Pocket PC Phone User Manual 183
Connection Problems
Problem
n Unable to use Infrared (IR)
to transfer information.
n Cannot connect to Internet,
web surng doesn't work.
Solution
Try the following:
1 Line up the IR ports so that they are unobstructed
and within a close range with 20cm.
2 Make sure nothing is between the two IR ports.
3 Adjust the room lighting. Some types of light interfere
with IR connections. Try moving to a different location
or turning off some lights.
Try the following :
1 Check that you have set up and connected to an
Internet service provider.
2 Check that your wireless connection to your mobile
service provider is switched on and the signal is un-
obstructed.
3 Verify with your Internet service provider that your
user name and password are correct.
See Chapter 7 Getting Connected. Additional
information is also available in Connections Help on the
Pocket PC Phone and ActiveSync Help on the PC.
Problem
n ActiveSync is connected, but
data or information cannot
be transferred.
Solution
On your desktop computer, check the Sync Options on
ActiveSync Manager menu to see if the information
type for the program you want has been selected for
synchronizing. See more detail s about synchronizing
information in Chapter 4.
Trouble
shooting
Pocket PC Phone User Manual182
Trouble
shooting
Pocket PC Phone User Manual 183
Problem
n Problems in cable and
cradle connection.
Solution
1 Ensure your Pocket PC Phone is turned on.
2 Ensure that you do not have any other active
connections . Tap Today, and then tap
or at the bottom of the screen and then
Disconnect.
3 Ensure the cable is securely plugged into the COM
port on the back of your PC. Use the cable that came
with the Pocket PC Phone without any extra cables
or extenders attached.
4 Plug the other end of the cable securely into the
correct port on your Pocket PC Phone. If you are
using a cradle, push your Pocket PC Phone securely
into the cradle.
Index
Pocket PC Phone User Manual184
Index
Pocket PC Phone User Manual 185
Index
A
about 70
accessories 16
ActiveSync 62,164
activesync 22
activeSync errors 67
AC adapter converter 17
adding programs 164
add ring tone 70
album 23,154
album settings 157
annotation 137,155
auto-conguration 110
AvantGo 100
B
background 140
backing up 168
backlight 71,76
backpack 17
backup 169
back side panel 13
battery 14
Beam 106
block recognizer 27
bluetooth 102
Bluetooth Modem 107
bluetooth modes 103
bonds 104
bottom side panel 13
buttons 70,72
C
calculator 23
calendar 22,82
calibration 20
caller ID 80
call barring 80
call forwarding 80
call history 51
call waiting 80
camera 23,143
camera settings 144,150
capture button 144
cellular line 93
certicates 71
CHAP authentication 94
clear memory 169
clock 71,77
command bar 24
composition capture submode
148
conference call 47
connections 92
connect to the internet 93
contact 157
contacts 22,84
contacts information 49
converting writing 31
CSD line type 94
D
data retention 14
detailed view mode 159
device information 71
device settings 70
dialer screen 38
drawing on the screen 32
E
E-mail 156
e-mail attachments 167
e-mail service 110
earphone jack 13
editing text 29
emergency call 58
entering information 25,129
European Union notice 172
F
FCC compliance 173
le formats 142
nd 34,86
front side panel 12
full reset 170
G
games 23
general precautions 174
GPRS settings 94
H
health and safety information
174
I
image capture submode 145
in-call options 46
inbox 22,110
indicators 21,38
infrared connection 66
infrared port 13
input 70,72
input panel 26
installing ActiveSync 62
international call 58
K
keypad lock 59
keypad tone 79
Index
Pocket PC Phone User Manual184
Index
Pocket PC Phone User Manual 185
L
LED 13
left side panel 12
letter recognizer 27
M
making calls 42
Media Player 133
memory 71,77,166
memory card 168
menus 70,73
messages 110
microphone 12
microphone AGC 71
Microsoft Reader 22,133
MMS 23,119,156
mobile favorites 97,98
MSN 116
MSN Messenger 22
N
navigation nar 24
navigation pad 12,39
network 80
notes 22,89
notications 25
notication LED 13
O
orientation toggle 144
owner information 70,74
P
PAP authentication 94
password 70,74
permanent save 71
Personal 70
phone 22,36,70
phone lock 59
phone security 58
phone settings 78
phone volume 41
photo contacts 23,53
photo ID 53
pictures 23,138
PIN 39
pocket Excel 22,131
pocket IE 22,96
pocket Word 22,128
pop-up menus 24
power 71,78
programs 22
punctuate in transcriber 28
R
re-calibration 20
receiving e-mail 112
recharge 15
recording 33
regional settings 71
regulatory notice 171
remove programs 71
removing programs 164
reset 169
RF exposures 173
right side panel 13
ring tone 79
ring tones 156
ring type 79
S
safety precautions 174
SAR information 175
screen 71
SD and MMC cards 168
secure your phone 58
services 80
SIM card 36
SIM card lock 60
SIM manager 23,45,50
slide show 158,161
SMS 64,115
soft keyboard 26
soft reset 12,170
sounds 79
sounds and notications 70,75
speakerphone mode 48
specications 177
speed dial 44
stereo headset 17
storage card 166
synchronizing 112
synchronizing calendar 65
synchronizing contacts 65
synchronizing inbox 64
synchronizing tasks 65
sync connector 13
T
tasks 22,87
template 149
terminal services client 101
thumbnail view mode 154
today 70,75
today screen 20
today wallpaper 140,160
top side panel 12
transcriber 28
troubleshooting 179
turning phone on and off 40
U
USB/Serial Cradle 16
Index
Pocket PC Phone User Manual186
USB/Serial sync cable 17
V
vibrate mode 41
video capture submode 147
voice mail 49
W
WAP gateway 95
Windows Media Player 22
wireless modem 23,102
writing on the screen 30
X
xBackup 23,169
Z
zooming in/out 146
15

Hulp nodig? Stel uw vraag in het forum

Spelregels

Misbruik melden

Gebruikershandleiding.com neemt misbruik van zijn services uitermate serieus. U kunt hieronder aangeven waarom deze vraag ongepast is. Wij controleren de vraag en zonodig wordt deze verwijderd.

Product:

Bijvoorbeeld antisemitische inhoud, racistische inhoud, of materiaal dat gewelddadige fysieke handelingen tot gevolg kan hebben.

Bijvoorbeeld een creditcardnummer, een persoonlijk identificatienummer, of een geheim adres. E-mailadressen en volledige namen worden niet als privégegevens beschouwd.

Spelregels forum

Om tot zinvolle vragen te komen hanteren wij de volgende spelregels:

Belangrijk! Als er een antwoord wordt gegeven op uw vraag, dan is het voor de gever van het antwoord nuttig om te weten als u er wel (of niet) mee geholpen bent! Wij vragen u dus ook te reageren op een antwoord.

Belangrijk! Antwoorden worden ook per e-mail naar abonnees gestuurd. Laat uw emailadres achter op deze site, zodat u op de hoogte blijft. U krijgt dan ook andere vragen en antwoorden te zien.

Abonneren

Abonneer u voor het ontvangen van emails voor uw Qtek 2020 gps bij:


U ontvangt een email met instructies om u voor één of beide opties in te schrijven.


Ontvang uw handleiding per email

Vul uw emailadres in en ontvang de handleiding van Qtek 2020 gps in de taal/talen: Nederlands, Engels als bijlage per email.

De handleiding is 26,98 mb groot.


U ontvangt de handleiding per email binnen enkele minuten. Als u geen email heeft ontvangen, dan heeft u waarschijnlijk een verkeerd emailadres ingevuld of is uw mailbox te vol. Daarnaast kan het zijn dat uw internetprovider een maximum heeft aan de grootte per email. Omdat hier een handleiding wordt meegestuurd, kan het voorkomen dat de email groter is dan toegestaan bij uw provider.

Stel vragen via chat aan uw handleiding

Stel uw vraag over deze PDF

Uw handleiding is per email verstuurd. Controleer uw email

Als u niet binnen een kwartier uw email met handleiding ontvangen heeft, kan het zijn dat u een verkeerd emailadres heeft ingevuld of dat uw emailprovider een maximum grootte per email heeft ingesteld die kleiner is dan de grootte van de handleiding.

Er is een email naar u verstuurd om uw inschrijving definitief te maken.

Controleer uw email en volg de aanwijzingen op om uw inschrijving definitief te maken

U heeft geen emailadres opgegeven

Als u de handleiding per email wilt ontvangen, vul dan een geldig emailadres in.

Uw vraag is op deze pagina toegevoegd

Wilt u een email ontvangen bij een antwoord en/of nieuwe vragen? Vul dan hier uw emailadres in.


Info