This statement replaces any reference to warranty which may be contained
elsewhere within this manual.
What do you need to do now?
• Keep your proof of purchase as evidence of your purchase date. This proof of
purchase would need to be presented if warranty service was ever required.
•
Register your pur
chase on-line at:
http://www.pure.com/au/product-registration/ for free technical support.
If you have any questions about your warranty you can call us toll free on
1800 988 268.
What’s covered by this warranty?
• Pure agrees to refund, repair or replace, at your election, without charge to
you, any part found to be defective during the warranty period.
•
If equipment has been used accor
ding to its accompanying instruction
manual and is used in a domestic situation, a three year warranty period
applies (excludes rechargeable ChargePAK where fitted. A one year
warranty period applies to all ChargePAKs).
How do you make your claim?
Call 1800 988 268 for instructions on how to return your Pure product for
warranty service or go to http://support.pure.com/au/ and complete the contact
us form.
What’s NOT covered by this warranty?
Under this express warranty Pure will not be liable for loss or damage of any
kind whatsoever, whether direct, indirect, incidental, consequential or otherwise.
• Replacement of parts due to normal wear and tear.
• Products with serial number defacement, modification or removal.
• Water damage or corrosion caused by dampness.
• Any damage or deterioration due to shipment.
• Any product which has been subjected to misuse, abuse or accident.
Australian consumers — The benefits to the consumer given by this express
warranty are in addition to other rights and remedies of the consumer under
a law in relation to the goods or services to which this warranty relates. Our
goods come with guarantees that cannot be excluded under the Australian
Consumer Law, You are entitled to a replacement or refund for a major failure
and for compensation for any other reasonably foreseeable loss or damage. You
are also entitled to have the goods repaired or replaced if the goods fail to be of
acceptable quality and the failure does not amount to a major failure.
Pure is distributed and supported in Australia by PIONEER ELECTRONICS
AUSTRALIA PTY LTD, 5 ARCO LANE, HEATHERTON, VICTORIA, 3202.
1
Pop Midi
Thank you for choosing Pop Midi. This manual will help
you get your product up and running in no time and
explains how to get the best out of all its great features.
If you need any further assistance, please visit the
support pages on our website at support-uk.pure.com.
2
1. WARNING: Do not use the included power supply (with model number ZDD055200 or
ZDD055200BS) to power up another apparatus as this may cause damage.
2.
Use only power supplies listed in the user manual/user instructions (supplied by
Pure with model number ZDD055200 or ZDD055200BS).
3.
Fit the mains adapter to an easily accessible socket, located near the radio and ONL
Y use
the mains power adapter supplied
4. WARNING: To reduce the risk of fire or electric shock, do not expose this apparatus to rain
or moisture. The apparatus shall not be exposed to dripping or splashing and objects filled
with liquids, such as vases, shall not be placed on apparatus.
5.
CAUTION: Danger of explosion if batter
y is incorrectly replaced. Replace only with the same
or equivalent type.
6.
WARNING: The battery (battery or batteries or battery pack) shall not be exposed to excessive
heat such as sunshine, fire or similar.
7. WARNING: The direct plug-in adapter is used as a disconnect device, the disconnect
device shall remain readily operable.
8.
Keep the radio away from heat sources such as radiators, heaters or other appliances that
produce heat.
9.
Do not expose the unit to direct sunlight.
10. Do not use the radio near water.
11. Avoid objects or liquids getting into the radio.
12. Do not remove screws from or open the radio casing.
13.
Always switch the radio off and disconnect it from mains power before inserting or removing
a ChargeP
AK.
14. Should not be immersed in water, used in shower or bathroom if plugged into the mains.
15. The mark label is on the exterior of the bottom of the apparatus.
Safety instructions
3
Contents
4 Introduction
4 Top panel
5
Rear panel
6
Display
7 Getting started
7 Quick set up
9 Using your Pop
9 Listening to digital radio
9 Listening to FM radio
10 Storing and selecting presets
10 To quick-store a station to a preset button (1–4)
10 To store a station to the preset list (1–10)
10
T
o recall a preset when listening to a digital or FM radio station
11 Using the auxiliary input
12 Alarms and timers
12 Setting an alarm
13
Cancelling a sounding alarm
13
Snoozing a sounding alarm
13 Disabling an alarm
13 Setting the sleep timer
13 Setting the kitchen timer
14 Options and settings
14 General settings
15
Audio settings
15
Display settings
16 Clock settings
18 FM stereo
19 Appendix
19 Installing a ChargePAK D1 or four AA batteries
20 Changing Pop Midi’s removable sleeve
21 Help and advice
22 Technical specifications
4
Top panel
Introduction
A. Power/Volume dial: Push to switch Pop on/off. Turn to adjust volume.
B. Menu button: Press to change various settings on Pop (see page 14
for more information).
C. Select buttons: Press to change radio stations (see page 9) or press
to scroll and select menu options.
D. Source: Press to switch between listening to digital radio, FM radio and
auxiliary input.
E. Presets 1 - 5+:Store up to 10 digital or 10 FM radio preset stations (see
page 10 for more information).
E
A
B
D
C
5
.
Rear panel
F. Aerial: Rotate the aerial and fully extend it for best reception.
G. Stereo headphone socket (3.5mm)
H. Autotune button: Press to automatically scan for new digital radio
stations and remove inactive ones.
I. Auxiliary input (3.5mm): Analogue stereo input for iPod, MP3 player, etc.
J. Micro-B USB 5.5V power connector: Connect to supplied mains
adapter only.
F
GH
J
I
6
Display
1. Displays current time.
2. ChargePAK or battery indicator.
3.
S
ource indicator (DR= digital radio, FM= FM radio, AUX= auxiliary input).
4. Station name.
5. Signal strength.
6.
V
olume indicator.
7. Displays date, scrolling text, settings and station information (see page 16).
8. AM/PM indicator.
9. Alarm set indicator (see page 12).
10.
S
leep and kitchen timer indicator (see page 13).
11. Snooze indicator (page 13).
7:00
BBC R2
TOP 40
7
Quick set up
Getting started
1
Note: If you have a ChargePAK D1 rechargeable battery (sold separately) or AA
rechargeable batteries fit them now before plugging Pop in. See page 19 for
more information.
2
• Plug the mains adapter into the
mains supply (D).
1
2
• Plug the mains adapter into the
mains supply (D).
C
A
B
D
• Rotate the aerial and fully extend it
(steps A and B).
•
Insert the jack of the supplied mains
adapter into the socket on the rear
of the radio (C).
8
3
• Push down and release the power button to
switch Pop on.
4
• Wait for Pop to complete an Autotune for all
available digital
radio stations.
• When the Autotune is complete, a digital radio
station will be selected.
DR FM AUX BTDR FM AUX BTDR FM AUX BTDR FM AUX BTDR FM AUX BTDR FM AUX BTDR FM AUX BTDR FM AUX BTDR FM AUX BTDR FM AUX BTDR FM AUX BTDR FM AUX BTDR FM AUX BTDR FM AUX BTDR FM AUX BTDR FM AUX BTDR FM AUX BTDR FM AUX BTDR FM AUX BTDR FM AUX BTDR FM AUX BTDR FM AUX BTDR FM AUX BTDR FM AUX BTDR FM AUX BTDR FM AUX BTDR FM AUX BTDR FM AUX BTDR FM AUX BTDR FM AUX BTDR FM AUX BTDR FM AUX BTDR FM AUX BTDR FM AUX BTDR FM AUX BTDR FM AUX BTDR FM AUX BTDR FM AUX BTDR FM AUX BTDR FM AUX BTDR FM AUX BTDR FM AUX BTDR FM AUX BTDR
SCAN 14
******
09:59
DR
1
min
DR FM AUX BTDR FM AUX BTDR FM AUX BTDR FM AUX BTDR FM AUX BTDR FM AUX BTDR FM AUX BTDR FM AUX BTDR FM AUX BTDR FM AUX BTDR FM AUX BTDR FM AUX BTDR FM AUX BTDR FM AUX BTDR FM AUX BTDR FM AUX BTDR FM AUX BTDR FM AUX BTDR FM AUX BTDR FM AUX BTDR FM AUX BTDR FM AUX BTDR FM AUX BTDR FM AUX BTDR FM AUX BTDR FM AUX BTDR FM AUX BTDR FM AUX BTDR FM AUX BTDR FM AUX BTDR FM AUX BTDR FM AUX BTDR FM AUX BTDR FM AUX BTDR FM AUX BTDR FM AUX BTDR FM AUX BTDR FM AUX BTDR FM AUX BTDR FM AUX BTDR FM AUX BTDR FM AUX BTDR FM AUX BTDR
BBC R2
TOP 40
10:00
DR
9
Using your Pop
Listening to digital radio
Press the Source button to switch to digital radio.
Changing digital stations
1. Press the < > buttons to scroll through the list of
stations.
2.
When you have found the station that you want to
listen to, pr
ess the Selectbutton to tune in.
DR FM AUX BTDR FM AUX BTDR FM AUX BTDR FM AUX BTDR FM AUX BTDR FM AUX BTDR FM AUX BTDR FM AUX BTDR FM AUX BTDR FM AUX BTDR FM AUX BTDR FM AUX BTDR FM AUX BTDR FM AUX BTDR FM AUX BTDR FM AUX BTDR FM AUX BTDR FM AUX BTDR FM AUX BTDR FM AUX BTDR FM AUX BTDR FM AUX BTDR FM AUX BTDR FM AUX BTDR FM AUX BTDR FM AUX BTDR FM AUX BTDR FM AUX BTDR FM AUX BTDR FM AUX BTDR FM AUX BTDR FM AUX BTDR FM AUX BTDR FM AUX BTDR FM AUX BTDR FM AUX BTDR FM AUX BTDR FM AUX BTDR FM AUX BTDR FM AUX BTDR FM AUX BTDR FM AUX BTDR FM AUX BTDR
STATIONS
BBC R3
10:00
DR
Listening to FM radio
Press the Source button to switch to FM radio.
Changing FM stations
Manual tuning
Press the < > buttons to step up or down 0.05 MHz.
Seek tuning
Press and hold the < > buttons to seek to the next or
previous FM radio station that has a strong signal.
DR FM AUX BTDR FM AUX BTDR FM AUX BTDR FM AUX BTDR FM AUX BTDR FM AUX BTDR FM AUX BTDR FM AUX BTDR FM AUX BTDR FM AUX BTDR FM AUX BTDR FM AUX BTDR FM AUX BTDR FM AUX BTDR FM AUX BTDR FM AUX BTDR FM AUX BTDR FM AUX BTDR FM AUX BTDR FM AUX BTDR FM AUX BTDR FM AUX BTDR FM AUX BTDR FM AUX BTDR FM AUX BTDR FM AUX BTDR FM AUX BTDR FM AUX BTDR FM AUX BTDR FM AUX BTDR FM AUX BTDR FM AUX BTDR FM AUX BTDR FM AUX BTDR FM AUX BTDR FM AUX BTDR FM AUX BTDR FM AUX BTDR FM AUX BTDR FM AUX BTDR FM AUX BTDR FM AUX BTDR FM AUX BTDR
BBC R2
TOP 40
10:00
DR
the latest news
BBC Radio 2
PM
DR
DR FM AUX BTDR FM AUX BTDR FM AUX BTDR FM AUX BTDR FM AUX BTDR FM AUX BTDR FM AUX BTDR FM AUX BTDR FM AUX BTDR FM AUX BTDR FM AUX BTDR FM AUX BTDR FM AUX BTDR FM AUX BTDR FM AUX BTDR FM AUX BTDR FM AUX BTDR FM AUX BTDR FM AUX BTDR FM AUX BTDR FM AUX BTDR FM AUX BTDR FM AUX BTDR FM AUX BTDR FM AUX BTDR FM AUX BTDR FM AUX BTDR FM AUX BTDR FM AUX BTDR FM AUX BTDR FM AUX BTDR FM AUX BTDR FM AUX BTDR FM AUX BTDR FM AUX BTDR FM AUX BTDR FM AUX BTDR FM AUX BTDR FM AUX BTDR FM AUX BTDR FM AUX BTDR FM AUX BTDR FM AUX BTDR
BBC R3
TUNING
10:00
DR
DR FM AUX BTDR FM AUX BTDR FM AUX BTDR FM AUX BTDR FM AUX BTDR FM AUX BTDR FM AUX BTDR FM AUX BTDR FM AUX BTDR FM AUX BTDR FM AUX BTDR FM AUX BTDR FM AUX BTDR FM AUX BTDR FM AUX BTDR FM AUX BTDR FM AUX BTDR FM AUX BTDR FM AUX BTDR FM AUX BTDR FM AUX BTDR FM AUX BTDR FM AUX BTDR FM AUX BTDR FM AUX BTDR FM AUX BTDR FM AUX BTDR FM AUX BTDR FM AUX BTDR FM AUX BTDR FM AUX BTDR FM AUX BTDR FM AUX BTDR FM AUX BTDR FM AUX BTDR FM AUX BTDR FM AUX BTDR FM AUX BTDR FM AUX BTDR FM AUX BTDR FM AUX BTDR FM AUX BTDR FM AUX BTDR FM
106\20
10:00
DR
PM
DRF
M
87.50MHz
DR FM AUX BTDR FM AUX BTDR FM AUX BTDR FM AUX BTDR FM AUX BTDR FM AUX BTDR FM AUX BTDR FM AUX BTDR FM AUX BTDR FM AUX BTDR FM AUX BTDR FM AUX BTDR FM AUX BTDR FM AUX BTDR FM AUX BTDR FM AUX BTDR FM AUX BTDR FM AUX BTDR FM AUX BTDR FM AUX BTDR FM AUX BTDR FM AUX BTDR FM AUX BTDR FM AUX BTDR FM AUX BTDR FM AUX BTDR FM AUX BTDR FM AUX BTDR FM AUX BTDR FM AUX BTDR FM AUX BTDR FM AUX BTDR FM AUX BTDR FM AUX BTDR FM AUX BTDR FM AUX BTDR FM AUX BTDR FM AUX BTDR FM AUX BTDR FM AUX BTDR FM AUX BTDR FM AUX BTDR FM AUX BTDR FM
106\20
10:00
DR
DR FM AUX BTDR FM AUX BTDR FM AUX BTDR FM AUX BTDR FM AUX BTDR FM AUX BTDR FM AUX BTDR FM AUX BTDR FM AUX BTDR FM AUX BTDR FM AUX BTDR FM AUX BTDR FM AUX BTDR FM AUX BTDR FM AUX BTDR FM AUX BTDR FM AUX BTDR FM AUX BTDR FM AUX BTDR FM AUX BTDR FM AUX BTDR FM AUX BTDR FM AUX BTDR FM AUX BTDR FM AUX BTDR FM AUX BTDR FM AUX BTDR FM AUX BTDR FM AUX BTDR FM AUX BTDR FM AUX BTDR FM AUX BTDR FM AUX BTDR FM AUX BTDR FM AUX BTDR FM AUX BTDR FM AUX BTDR FM AUX BTDR FM AUX BTDR FM AUX BTDR FM AUX BTDR FM AUX BTDR FM AUX BTDR FM
107\60
10:00
SCANNING
DR
10
Storing and selecting presets
To quick-store a station to a preset
button (1–4)
Tune in to the digital or FM radio station that you want
to store. Press and hold one of the numbered preset
buttons (1–4) for two seconds to save the current station
as a preset. You can save over existing presets.
To store a station to the preset list
(1–10)
1. Tune in to the digital radio or FM radio station you
want to store.
2.
Press and hold the 5+ button to view the numerical list
of stored presets, then press < > to choose any preset
number between 1 and 10.
You can overwrite existing presets.
3. Press the Select button until you see the ‘Preset
stored’ message.
To recall a preset when listening to
a digital or FM radio station
To tune to presets 1 to 4, press the corresponding
numbered button on Pop (1 to 4).
To access the full list of presets (from 1 to 10):
1. Press and release the 5+ button.
2. Press < > to scroll through the list of presets and push
the Select button to tune to the selected preset.
You can store up to 10 digital and 10 FM radio stations for quick access.
DR FM AUX BTDR FM AUX BTDR FM AUX BTDR FM AUX BTDR FM AUX BTDR FM AUX BTDR FM AUX BTDR FM AUX BTDR FM AUX BTDR FM AUX BTDR FM AUX BTDR FM AUX BTDR FM AUX BTDR FM AUX BTDR FM AUX BTDR FM AUX BTDR FM AUX BTDR FM AUX BTDR FM AUX BTDR FM AUX BTDR FM AUX BTDR FM AUX BTDR FM AUX BTDR FM AUX BTDR FM AUX BTDR FM AUX BTDR FM AUX BTDR FM AUX BTDR FM AUX BTDR FM AUX BTDR FM AUX BTDR FM AUX BTDR FM AUX BTDR FM AUX BTDR FM AUX BTDR FM AUX BTDR FM AUX BTDR FM AUX BTDR FM AUX BTDR FM AUX BTDR FM AUX BTDR FM AUX BTDR FM AUX BTDR
BBC R2
TOP 40
10:00
DR
DR FM AUX BTDR FM AUX BTDR FM AUX BTDR FM AUX BTDR FM AUX BTDR FM AUX BTDR FM AUX BTDR FM AUX BTDR FM AUX BTDR FM AUX BTDR FM AUX BTDR FM AUX BTDR FM AUX BTDR FM AUX BTDR FM AUX BTDR FM AUX BTDR FM AUX BTDR FM AUX BTDR FM AUX BTDR FM AUX BTDR FM AUX BTDR FM AUX BTDR FM AUX BTDR FM AUX BTDR FM AUX BTDR FM AUX BTDR FM AUX BTDR FM AUX BTDR FM AUX BTDR FM AUX BTDR FM AUX BTDR FM AUX BTDR FM AUX BTDR FM AUX BTDR FM AUX BTDR FM AUX BTDR FM AUX BTDR FM AUX BTDR FM AUX BTDR FM AUX BTDR FM AUX BTDR FM AUX BTDR FM AUX BTDR
PRESET 2
STORED
10:00
DR
DR FM AUX BTDR FM AUX BTDR FM AUX BTDR FM AUX BTDR FM AUX BTDR FM AUX BTDR FM AUX BTDR FM AUX BTDR FM AUX BTDR FM AUX BTDR FM AUX BTDR FM AUX BTDR FM AUX BTDR FM AUX BTDR FM AUX BTDR FM AUX BTDR FM AUX BTDR FM AUX BTDR FM AUX BTDR FM AUX BTDR FM AUX BTDR FM AUX BTDR FM AUX BTDR FM AUX BTDR FM AUX BTDR FM AUX BTDR FM AUX BTDR FM AUX BTDR FM AUX BTDR FM AUX BTDR FM AUX BTDR FM AUX BTDR FM AUX BTDR FM AUX BTDR FM AUX BTDR FM AUX BTDR FM AUX BTDR FM AUX BTDR FM AUX BTDR FM AUX BTDR FM AUX BTDR FM AUX BTDR FM AUX BTDR
CLASSIC
MOZART
10:00
DR
DR FM AUX BTDR FM AUX BTDR FM AUX BTDR FM AUX BTDR FM AUX BTDR FM AUX BTDR FM AUX BTDR FM AUX BTDR FM AUX BTDR FM AUX BTDR FM AUX BTDR FM AUX BTDR FM AUX BTDR FM AUX BTDR FM AUX BTDR FM AUX BTDR FM AUX BTDR FM AUX BTDR FM AUX BTDR FM AUX BTDR FM AUX BTDR FM AUX BTDR FM AUX BTDR FM AUX BTDR FM AUX BTDR FM AUX BTDR FM AUX BTDR FM AUX BTDR FM AUX BTDR FM AUX BTDR FM AUX BTDR FM AUX BTDR FM AUX BTDR FM AUX BTDR FM AUX BTDR FM AUX BTDR FM AUX BTDR FM AUX BTDR FM AUX BTDR FM AUX BTDR FM AUX BTDR FM AUX BTDR FM AUX BTDR
PRESET 6
EMPTY
10:00
DR
DR FM AUX BTDR FM AUX BTDR FM AUX BTDR FM AUX BTDR FM AUX BTDR FM AUX BTDR FM AUX BTDR FM AUX BTDR FM AUX BTDR FM AUX BTDR FM AUX BTDR FM AUX BTDR FM AUX BTDR FM AUX BTDR FM AUX BTDR FM AUX BTDR FM AUX BTDR FM AUX BTDR FM AUX BTDR FM AUX BTDR FM AUX BTDR FM AUX BTDR FM AUX BTDR FM AUX BTDR FM AUX BTDR FM AUX BTDR FM AUX BTDR FM AUX BTDR FM AUX BTDR FM AUX BTDR FM AUX BTDR FM AUX BTDR FM AUX BTDR FM AUX BTDR FM AUX BTDR FM AUX BTDR FM AUX BTDR FM AUX BTDR FM AUX BTDR FM AUX BTDR FM AUX BTDR FM AUX BTDR FM AUX BTDR
RECALL
6 CLASS
10:00
DR
DR FM AUX BTDR FM AUX BTDR FM AUX BTDR FM AUX BTDR FM AUX BTDR FM AUX BTDR FM AUX BTDR FM AUX BTDR FM AUX BTDR FM AUX BTDR FM AUX BTDR FM AUX BTDR FM AUX BTDR FM AUX BTDR FM AUX BTDR FM AUX BTDR FM AUX BTDR FM AUX BTDR FM AUX BTDR FM AUX BTDR FM AUX BTDR FM AUX BTDR FM AUX BTDR FM AUX BTDR FM AUX BTDR FM AUX BTDR FM AUX BTDR FM AUX BTDR FM AUX BTDR FM AUX BTDR FM AUX BTDR FM AUX BTDR FM AUX BTDR FM AUX BTDR FM AUX BTDR FM AUX BTDR FM AUX BTDR FM AUX BTDR FM AUX BTDR FM AUX BTDR FM AUX BTDR FM AUX BTDR FM AUX BTDR
PRESET 6
STORED
10:00
DR
DR FM AUX BTDR FM AUX BTDR FM AUX BTDR FM AUX BTDR FM AUX BTDR FM AUX BTDR FM AUX BTDR FM AUX BTDR FM AUX BTDR FM AUX BTDR FM AUX BTDR FM AUX BTDR FM AUX BTDR FM AUX BTDR FM AUX BTDR FM AUX BTDR FM AUX BTDR FM AUX BTDR FM AUX BTDR FM AUX BTDR FM AUX BTDR FM AUX BTDR FM AUX BTDR FM AUX BTDR FM AUX BTDR FM AUX BTDR FM AUX BTDR FM AUX BTDR FM AUX BTDR FM AUX BTDR FM AUX BTDR FM AUX BTDR FM AUX BTDR FM AUX BTDR FM AUX BTDR FM AUX BTDR FM AUX BTDR FM AUX BTDR FM AUX BTDR FM AUX BTDR FM AUX BTDR FM AUX BTDR FM AUX BTDR
CLASSIC
MOZART
10:00
DR
11
Using the auxiliary input
You can use Pop’s auxiliary input to play any music from your phone or tablet on
to Pop.
Note:
When playing music using Pop’s auxiliary input, you will need to use your
phone or tablet’s volume controls to change Pop’s volume.
Connecting an auxiliary device to Pop
Connect the line out or headphone socket of your auxiliary device to the Aux In
socket on your Pop using a suitable cable.
Selecting the auxiliary input
1.
Press and release the Source button until you see
‘AUX’ on Pop’s display.
2. On your auxiliary device, select the content that
you want to listen to
on Pop.
Pop will start to play the content that you selected on
your auxiliary device.
DR FM AUX BTDR FM AUX BTDR FM AUX BTDR FM AUX BTDR FM AUX BTDR FM AUX BTDR FM AUX BTDR FM AUX BTDR FM AUX BTDR FM AUX BTDR FM AUX BTDR FM AUX BTDR FM AUX BTDR FM AUX BTDR FM AUX BTDR FM AUX BTDR FM AUX BTDR FM AUX BTDR FM AUX BTDR FM AUX BTDR FM AUX BTDR FM AUX BTDR FM AUX BTDR FM AUX BTDR FM AUX BTDR FM AUX BTDR FM AUX BTDR FM AUX BTDR FM AUX BTDR FM AUX BTDR FM AUX BTDR FM AUX BTDR FM AUX BTDR FM AUX BTDR FM AUX BTDR FM AUX BTDR FM AUX BTDR FM AUX BTDR FM AUX BTDR FM AUX BTDR FM AUX BTDR FM AUX BTDR FM AUX BTDR FM AUX
AUX
10:00
DR
DR FM AUX BTDR FM AUX BTDR FM AUX BTDR FM AUX BTDR FM AUX BTDR FM AUX BTDR FM AUX BTDR FM AUX BTDR FM AUX BTDR FM AUX BTDR FM AUX BTDR FM AUX BTDR FM AUX BTDR FM AUX BTDR FM AUX BTDR FM AUX BTDR FM AUX BTDR FM AUX BTDR FM AUX BTDR FM AUX BTDR FM AUX BTDR FM AUX BTDR FM AUX BTDR FM AUX BTDR FM AUX BTDR FM AUX BTDR FM AUX BTDR FM AUX BTDR FM AUX BTDR FM AUX BTDR FM AUX BTDR FM AUX BTDR FM AUX BTDR FM AUX BTDR FM AUX BTDR FM AUX BTDR FM AUX BTDR FM AUX BTDR FM AUX BTDR FM AUX BTDR FM AUX BTDR FM AUX BTDR FM AUX BTDR FM AUX
AUX
10:00
2-4-2015
12
Alarms and timers
Setting an alarm
Pop has two alarms which can switch the radio on
and tune to a digital or FM radio station or sound an
alarm tone.
1. Press the Menu button and scroll
< > to ‘Alarm’.
2. Scroll < > to ‘Alarm1’ or ‘Alarm2’ and press the
Select button.
3. Scroll < > to ‘On’ and press the Select button.
4. Scroll < > to set the hour for the alarm and press
the Select button. Repeat to set the minute for the
alarm.
5. Scroll < > to set the duration of the alarm and press
the Select button.
6.
Scroll < > to specify ‘FM’, ‘Digital’ or ‘Tone’ and
press the Select button to confirm. If you are
specifying a tone alarm, skip to step 8.
7. Scroll < > to specify which station should be played
when the alarm goes off. You have the option of
selecting one of your preset stations or you can
select ‘Last Used’ to select the station that you were
last listening to. Press Select to confirm.
8. Scroll < > to specify one of the following alarm
repeat options:
‘Daily’, ‘Weekdays’, ‘Weekends’ or ‘Once’ and
pr
ess the Select button to confirm.
9. Use < > to set the volume that the radio will play at
when the alarm sounds and press the Select button
to confirm.
10
. The alarm icon will light steadily on the display to
show that the alarm has set.
Note: If Pop is running on batteries or a ChargePAK, Pop’s alarm function will not
work if you turn Pop off after setting an alarm.
7:00
MENU
ALARM
7:00
ALARM
ALARM 1
7:00
ALARM 1
ON
11-25PM
7:00
ON TIME
7:00
DURATION
45 MIN5
7:00
SOURCE
DIGITAL
7:00
STATION
LAST USE
7:00
REPEAT
DAILY
7:00
VOLUME
2
7:00
ALARM 1
SAVED
DR FM AUX BTDR FM AUX BTDR FM AUX BTDR FM AUX BTDR FM AUX BTDR FM AUX BTDR FM AUX BTDR FM AUX BTDR FM AUX BTDR FM AUX BTDR FM AUX BTDR FM AUX BTDR FM AUX BTDR FM AUX BTDR FM AUX BTDR FM AUX BTDR FM AUX BTDR FM AUX BTDR FM AUX BTDR FM AUX BTDR FM AUX BTDR FM AUX BTDR FM AUX BTDR FM AUX BTDR FM AUX BTDR FM AUX BTDR FM AUX BTDR FM AUX BTDR FM AUX BTDR FM AUX BTDR FM AUX BTDR FM AUX BTDR FM AUX BTDR FM AUX BTDR FM AUX BTDR FM AUX BTDR FM AUX BTDR FM AUX BTDR FM AUX BTDR FM AUX BTDR FM AUX BTDR FM AUX BTDR FM AUX BT
PRESET 5
EMPTY
DR
ALARM 1
SAVED
10:00
DR
13
Cancelling a sounding alarm
To cancel a sounding alarm, press the Source, <Select> or Menu buttons.
Snoozing a sounding alarm
To snooze a sounding alarm, press one of the Preset buttons. By default, Pop‘s
snooze time is set to eight minutes. To change the Pop’s default snooze time see
page 17.
Disabling an alarm
To disable an alarm after it has been set:
1. Press the Menu button and scroll < > to ‘Alarm’ and press the Select button.
2. Scroll < > to the alarm that you want to disable (‘Alarm1’ or ‘Alarm2’) and press
the Select button.
3.
Scroll < > to ‘Off’ and press the Select button.
4
.
The alarm icon will turn off on Pop’s display to show that the alarm has
been disabled.
Setting the sleep timer
The sleep timer can be set to switch Pop off after a specific period of time.
Note: If Pop is running on batteries or a ChargePAK, Pop’s sleep function is disabled.
1. Press the Menu button.
2. Scroll < > to ‘Sleep’ and press the Select button.
3. Scroll < > and press the Select button to set the timer for up to 90 minutes or
choose ‘Off’ to cancel.
Setting the kitchen timer
Pop has a countdown kitchen timer which will sound an alarm after a set time period.
1. Press the Menu button.
2. Scroll < > to ‘Timer’ and press the Select button.
3. Scroll < > to change the hours and press the Select button.
4. Scroll < > again to change the minutes and push to confirm and start the
countdown timer.
The alarm will sound after the time period you have set whether the radio is on or in
standby. Cancel the beeping alarm tone by pressing either the Source, <Select>
or Menu buttons.
14
Options and settings
General settings
Changing the language shown on the display
To switch the display language on Pop between English, French, German, Italian
and Spanish:
1. Press the Menu button.
2. Scroll < > to ‘Settings’ and press the Select button.
3.
Scr
oll < > to ‘Lang.’ and press the Select button.
4.
Scr
oll < > and press the Select button to choose the language that you want
Pop to display.
Resetting Pop to factory settings
Resetting your Pop radio removes all presets, clears the station list and resets all
options to defaults. To carry out a factory reset:
1. Press the Menu button.
2. Scroll < > to ‘Settings’ and press the Select button.
3. Scroll < > to ‘Reset’ and press the Select button.
4.
Scr
oll < > to ‘Yes’ and press the Select button.
Displaying Pop’s software version
To display software version that is currently running on Pop:
1. Press the Menu button.
2. Scroll < > to ‘Settings’ and press the Select button.
3. Scroll < > to ‘Version’ and press the Select button.
Updating Pop to the latest version of software
Contact Pure technical support (http://support-uk.pure.com) for more
information on how to update Pop to the latest software version.
15
Audio settings
You can use Pop’s audio menu to adjust the bass and treble.
1.
Pr
ess the Menu button.
2. Scroll < > to ‘Audio’ and press the Select button.
3. Scroll < > to ‘Bass’ or ‘Treble’ and press the Select button.
4.
Scr
oll < > to adjust the bass or treble levels. You can choose a level between
‘-3’ and ‘+3’.
5.
Pr
ess the Select button to confirm the bass or treble level.
Display settings
Adjusting the display brightness
You can adjust the brightness of the display when Pop is switched on or in
standby. To change the brightness of Pop’s display:
1. Press the Menu button.
2. Scroll < > to ‘Display’ and press the Select button.
3. Scroll < > to ‘Backlight’ and press the Select button.
4. Scroll < > to ‘Active’ and press the Select button to change the settings that
apply when Pop is switched on, or scroll to < > ‘Standby’ and press the Select
button to change settings that apply in standby.
5. Scroll < > to ‘Level’ and press the Select button.
6.
Scr
oll < > to choose a brightness level between ‘1’ and ‘5’.
7. Press the Select button to confirm the brightness setting.
Adjusting how long the display backlight stays on for
You can adjust how long Pop’s display backlight stays on for:
1.
Pr
ess the Menu button.
2. Scroll < > to ‘Display’ and press the Select button.
3. Scroll < > to ‘Backlight’ and press the Select button.
4. Scroll < > to ‘Active’ and press the Select button to change the settings that
apply when Pop is switched on, or scroll to < > ‘Standby’ and press the Select
button to change settings that apply in standby.
5. Scroll < > to ‘Duration’ and press the Select button.
6. Scroll < > and press the Select button to choose one of the following options:
On: Choose this option if you want the backlight to always stay on.
Off: Choose this option if you want the backlight to turn off after 10 seconds
16
Changing the information shown on Pop’s display
If you are listening to a digital or FM radio station, you can change the information
that is shown on Pop’s display:
1.
Pr
ess the Menu button.
2. Scroll < > to ‘Display’ and press the Select button.
3. Scroll < > to ‘Info’ and press the Select button.
4. Scroll < > and press the Select button to choose one of the following options:
T
ext: Choose this option if you want to display the information broadcast
by the station you are currently listening to. The information displayed may
include song titles, programme details, news, etc.
Str
ength: Choose this option if you want to display the signal strength of the
radio station you ar
e currently listening to. The number of asterisks indicate
the reliable reception level.
Date: Choose this option if you want to display the current date.
Clock settings
Setting the time and date
The time and date on Pop are automatically set by the FM or digital radio signal. If
the time/date on Pop is not updating automatically, you can manually set it.
1. Press the Menu button.
2. Scroll < > to ‘Clock’ and press the Select button.
3. Scroll < > to ‘Time/date’ and press the Select button.
4. Scroll < > to set the hour and press the Select button. Repeat to set the minutes.
5. Scroll < > to set the day and press the Select button. Repeat to set the month
and the year.
Changing the time format
1. Press the Menu button.
2. Scroll < > to ‘Clock’
and press the Select button.
3. Scroll < > to ‘12/24 hr’ and press the
Select
button.
4. Scroll < > to choose between ‘12 hour’ and ‘24 hour’ and press the
Select
button to confirm.
17
Changing the date format
1. Press the Menu button.
2. Scroll < > to ‘Clock’ and press the Select button.
3. Scroll < > to ‘Format’ and press the Select button.
4. Scroll < > to choose between displaying the date in day, month and year
order ‘DD-MM-YYYY’ or in month, day and year order ‘MM-DD-YYYY’ and
press the
Select
button to confirm.
Clock synchronization options
You can select the radio sources that you want to use for setting the time. By
default, Pop uses both the FM and digital radio signals to synchronize the time.
To specify the clock synchronization options:
1.
Pr
ess the Menu button.
2.
Scr
oll < > to ‘Clock’ and press the Select button.
3. Scroll < > to ‘Sync to’ and press the Select button.
4.
Scr
oll < > to choose the required clock synchronization option and press the
Select
button to confirm.
Changing the snooze time
You can change the amount of time an alarm will snooze for when you press one
of Pop’s preset buttons during a sounding alarm. By default, Pop’s snooze time is
set to eight minutes.
To change Pop’s snooze time:
1. Press the Menu button.
2. Scroll < > to ‘Clock’ and press the Select button.
3. Scroll < > to ‘Snooze’ and press the Select button.
4. Scroll < > to choose a snooze time between ‘5’ and ‘59’ minutes and press
the
Select
button to confirm.
18
FM stereo
You can use the FM stereo menu to make switch between stereo and mono
reception. You may want to select ‘Mono’ to try and improve weaker reception.
Note: The ‘FM stereo’ option is only visible when you have selected ‘FM’ as the
radio source.
To change Pop’s FM stereo setting:
1. Press Menu.
2. Scroll < > to ‘FM stereo’ and press the Select button.
3.
Scr
oll < > to choose between ‘Stereo’ and ‘Mono’ and press the Select
button to confirm.
19
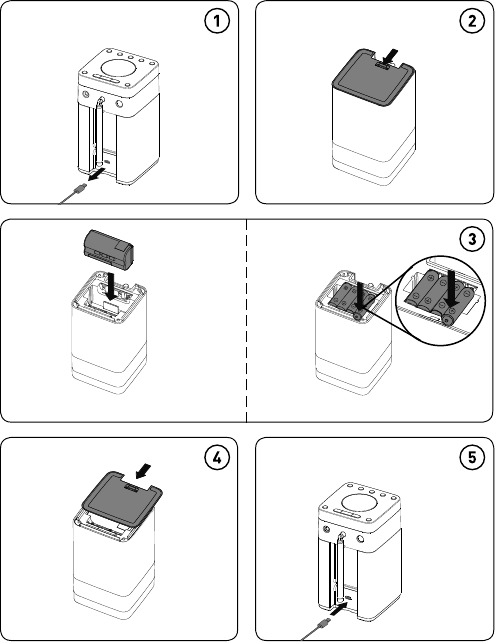
Appendix
Installing a ChargePAK D1 or four AA batteries
ChargePAK D14x AA batteries
20
Changing Pop Midi’s removable sleeve
21
Help and advice
Secondary and inactive stations
(</>) Secondary digital radio services
Some stations have accompanying secondary services which provide extra
information or alternative content and may only be broadcast at certain times. If a
station has a secondary service available, the station shows ‘>’ next to its name in
the station list and the secondary service appears next to the station in the list. A
secondary service has a ‘<’ before its name in the station list.
(?) Inactive or unavailable digital radio stations
Inactive or unavailable stations appear on the station list preceded by ‘?’ and
cannot be tuned to. A station may be inactive or unavailable because the station
is not broadcasting at the current time (check with the station) or has stopped
broadcasting altogether. Also, you may not have a strong enough signal to receive
the Multiplex on which the station is broadcast.
Hints and tips
Display says ‘No stations available’
Press the Autotune button on the back of your Pop to search for digital stations.
Try adjusting your aerial or radio position.
Receiving new digital radio stations that have started broadcasting
Press the Autotune button on the back of your Pop to search for new digital
stations. Try adjusting your aerial or radio position.
22
Technical specifications
RadioDigital and FM radio
Frequencies
DAB/DAB+, FM radio 87.5-108 MHz
Speaker
Full-range 3
" drive unit
Audio power output
4.3W RMS
Input connectors
5.5V DC power adaptor socket (230V supplied)
Output connectors
3.5mm ster
eo headphone socket
Presets10 digital radio and 10 FM radio presets
Power supply
230V AC to 5.5V (2.0A) DC exter
nal power adapter
(supplied), optional ChargeP
AK D1 rechargeable battery
pack or four AA batteries)
Power consumption
Standby with clock display: 0.55W
, Active: 0.92W
Dimensions93 mm wide x 173 mm high x 102 mm deep
Aerial
T
elescopic aerial
Approvals
CE marked. Compliant with the EMC and Low V
oltage
Dir
ectives (2004/108 EC and 2006/95/EC). ETSI EN 300 401
compliant. Australian C-Tick N1600 and Electrical Safety.
Copyright
Copyright 2015 by Imagination Technologies Limited. All rights reserved.
No part of this publication may be copied or distributed, transmitted,
transcribed, stored in a retrieval system, or translated into any human or
computer language, in any form or by any means, electronic, mechanical,
magnetic, manual or otherwise, or disclosed to third parties without the
express written permission of Imagination Technologies Limited.
Version 1 April 2015.
Trademarks
Pop Midi, ChargePAK, Pure, the Pure logo, Imagination Technologies,
and the Imagination Technologies logo are trademarks or registered
trademarks of Imagination Technologies Limited. All other product names
are trademarks of their respective companies.
Warranty Information
Imagination Technologies Limited warrants to the end user that this product
will be free from defects in materials and workmanship in the course
of normal use for a period of three years from the date of purchase. This
guarantee covers breakdowns due to manufacturing or design faults; it
does not apply in cases such as accidental damage, however caused,
wear and tear, negligence, adjustment, modification or repair not authorised
by us. Please visit www.pure.com/product-registration from the UK or
www.pure.com/au/product-registration from Australia to register your
product with us. Should you have a problem with your unit please contact
your supplier or contact Pure Support at the address shown on the rear of
this manual.
Disclaimer
Imagination Technologies Limited makes no representation or warranties
with respect to the content of this document and specifically disclaims any
implied warranties of merchantability or fitness for any particular purpose.
Further, Imagination Technologies Limited reserves the right to revise this
publication and to make changes in it from time to time without obligation
of Imagination Technologies Limited to notify any person or organisation of
such revisions or changes.
Correct disposal of this product
This marking indicates that this product should not be disposed
with other household waste throughout the EU. To prevent
possible harm to the environment or human health from
uncontrolled waste disposal, recycle it responsibly to promote
the sustainable reuse of material resources. To return your used
device, please use the return and collection system or contact
the retailer where the product was purchased. They can take this
Gebruikershandleiding.com neemt misbruik van zijn services uitermate serieus. U kunt hieronder aangeven waarom deze vraag ongepast is. Wij controleren de vraag en zonodig wordt deze verwijderd.
Product:
Spelregels forum
Om tot zinvolle vragen te komen hanteren wij de volgende spelregels:
lees eerst de handleiding door;
controleer of uw vraag al eerder door iemand anders is gesteld;
probeer uw vraag zo duidelijk mogelijk te stellen;
heeft u een probleem en al geprobeerd om dit op te lossen, vermeld dit erbij aub;
heeft u een oplossing gekregen van een bezoeker dan horen wij dat graag in dit forum;
wilt u een reactie geven op een vraag of antwoord, gebruik dan niet dit formulier maar klik op de knop 'reageer op deze vraag';
uw vraag wordt direct op de website gezet; vermijd daarom persoonlijke gegevens in te vullen;
Belangrijk! Als er een antwoord wordt gegeven op uw vraag, dan is het voor de gever van het antwoord nuttig om te weten als u er wel (of niet) mee geholpen bent! Wij vragen u dus ook te reageren op een antwoord.
Belangrijk! Antwoorden worden ook per e-mail naar abonnees gestuurd. Laat uw emailadres achter op deze site, zodat u op de hoogte blijft. U krijgt dan ook andere vragen en antwoorden te zien.
Abonneren
Abonneer u voor het ontvangen van emails voor uw Pure Pop Midi bij:
nieuwe vragen en antwoorden
nieuwe handleidingen
U ontvangt een email met instructies om u voor één of beide opties in te schrijven.
Ontvang uw handleiding per email
Vul uw emailadres in en ontvang de handleiding van Pure Pop Midi in de taal/talen: Engels als bijlage per email.
De handleiding is 3,72 mb groot.
U ontvangt de handleiding per email binnen enkele minuten. Als u geen email heeft ontvangen, dan heeft u waarschijnlijk een verkeerd emailadres ingevuld of is uw mailbox te vol. Daarnaast kan het zijn dat uw internetprovider een maximum heeft aan de grootte per email. Omdat hier een handleiding wordt meegestuurd, kan het voorkomen dat de email groter is dan toegestaan bij uw provider.
Uw handleiding is per email verstuurd. Controleer uw email
Als u niet binnen een kwartier uw email met handleiding ontvangen heeft, kan het zijn dat u een verkeerd emailadres heeft ingevuld of dat uw emailprovider een maximum grootte per email heeft ingesteld die kleiner is dan de grootte van de handleiding.
Er is een email naar u verstuurd om uw inschrijving definitief te maken.
Controleer uw email en volg de aanwijzingen op om uw inschrijving definitief te maken
U heeft geen emailadres opgegeven
Als u de handleiding per email wilt ontvangen, vul dan een geldig emailadres in.
Uw vraag is op deze pagina toegevoegd
Wilt u een email ontvangen bij een antwoord en/of nieuwe vragen? Vul dan hier uw emailadres in.