37225
1
Verklein
Vergroot
Pagina terug
1/2
Pagina verder
2 HAND BUTTONS OVERVIEW
OK button
Correction button, to delete the last input;
briey press and hold to switch between
displaying the handset name and display-
ing the time
: to open the Caller-ID memory
: to open the phonebook memory
/ : buttons: to scroll settings and
memories
Call button: to answer incoming calls
End button: briey press to end a call;
press and hold to switch off the handset
to open the menu
R/Flash function button, see paragraph 5.6
Redial button
Keypad
Key-lock button
(press and hold for 2 sec.)
Speed-dial button
(press and hold for 2 sec.)
-2-
9 TIME & DATE
9.1 Introduction:
In standby mode, you can have the display show the
actual time (briey press the button) and when
receiving any incoming calls, the time and date of
the call are registered. You can set the time and date
as follows:
9.2 Time and date setup:
open the menu and select CLOCK
& ALARM
press the OK button and select
DATE/TIME
press the OK button and use the key-
pad to enter the following in order:
- the last 2 digits of the year
- the month (use 2 digits)
- the date (use 2 digits)
press the OK button and use the key-
pad to enter the following in order:
- the hours (use 2 digits)
- the minutes (use 2 digits)
press the OK button and the End
button to return the handset to
standby mode
When using multiple handsets: you only have to program
the time and date in one handset. This setting will be used
by the other handsets.
Select [ SET FORMAT ] to set the month display to DD/MM
or MM/DD and the clock display to 12-hours or 24-hours
format.
10 ALARM (WAKE-UP) FUNCTION
10.1 Introduction:
You can set the handset to sound an alarm tone at a
preset time.
10.2 Alarm time setup:
open the menu and select CLOCK
& ALARM
press the OK button and select
ALARM
press the OK button and select
‘OFF’ to disable the alarm function,
‘ON ONCE’ to have the alarm sound
only once or ‘ON DAILY’ to have the
alarm sound every day
after selecting ‘ON ONCE’ or ‘ON
DAILY’: press the OK button and
enter the alarm time
press the OK button and the End
button to return the handset to
standby mode
when the alarm function is enabled,
the alarm symbol will appear in the
display
10.3 Alarm signal setup:
open the menu and select CLOCK
& ALARM
press the OK button and select
ALARM TONE
press the OK button to select the
desired tone
(you can choose from 3 different signals
with a xed volume)
press the OK button and the End
button to return the handset to
standby mode
10.4 Operation:
At the preset time, the alarm signal will sound
for 60 seconds or until you press a random but-
ton to stop the alarm beforehand.
You can switch off the alarm also when the
key-lock function is enabled.
The alarm signal has a xed volume.
When you’re currently on a call when the alarm
sounds, the receiver will emit three short noti-
cation tones. After disconnecting the call, the
alarm signal will continue.
5.10 To switch off the handset:
You can completely switch off the handset to save
battery power or in case you don’t want to be dis-
turbed:
to switch off:
pick up the handset from the base or
charger and press and hold the End
button for 2 seconds to completely
switch off the handset
to switch on:
press and hold the End button for
2 seconds to switch the handset on
again
The handset also switches on when replacing it onto the
base or charger.
5.11 Call:
During the phone call, the elapsed
call duration is displayed on the
handset display.
10 seconds after disconnecting the call, the call duration
timer will disappear from the display.
5.7 Mute (microphone off):
To disable the microphone, shortly
press the key during the call,
You can still hear the other party, but they
cannot hear you.
To enable the microphone again,
shortly press the key again.
5.8 Handset search function:
In case you’ve misplaced the handset, you can eas-
ily nd it again as follows:
briey press the button at the bottom
of the base.
The handset will start ringing for 30 seconds while the text
‘PAGING’ appears in the display.
The handset will stop ringing after 30 seconds or after
pressing a random button (handset) or when pressing the
button (basis) again to manually stop the signal earlier.
5.9 Voicemail notication: (*)
In case the carrier left a Voicemail
message for you, a notication symbol
will appear in the display of the
handset.
This symbol goes off as soon as you have listened
to this message. This symbol also disappears after
resetting the phone (see paragraph 12.2).
*: This function is only available on the FSK system and
when this is supported by the carrier.
5.4 Speaker volume:
You can only adjust the speaker volume during a
call. You can choose from 5 levels.
use the and buttons to increase
or decrease the volume
5.5 Key lock:
You can lock the keypad to prevent pressing any but-
tons by accident:
press and hold the button for at
least 2 seconds
until the text ‘KEYS LOCKED’ appears in
the display to enable the key-lock function
to disable the key lock, keep the key
pressed for more than 2 seconds
again.
Incoming calls can still be answered in the usual way, even
when the key-lock function is enabled.
5.6 R/Flash:
R/FLASH means you can briey interrupt the tele-
phone connection. This function is used by certain
home or ofce switchboards to forward calls or for
activating certain telephone services such as ‘Call
Waiting’.
during the call, shortly press the key
R to give a FLASH pulse.
The interruption time of the FLASH pulse is adjustable; for
this, see in paragraph 12.2
dialing from the phonebook memory:
press the Phonebook button
search for the desired contact
press the phone-on key; the number
will be dialed
See paragraph 7.2 for programming the phonebook memories.
dialing from the Caller-ID memory:
press the button, the name and
number of the last received call will
appear in the display
search for the desired call registra-
tion
press the phone-on key; the number
will be dialed
dialing from the last dialed number
memory:
press the redial button
the last number you’ve dialed will
appear in the display
search for the desired recently dialed
number
press the phone-on key; the number
will be dialed
The handset saves the 5 last dialed numbers.
5 CALLING
5.1 Answering calls:
Press the key phone-on to accept
a call.
5.2 End the call:
press the key phone-off to end a call
The end the call, you can also place the handset back on
the base station or the cradle/charger.
5.3 Dialing numbers:
Direct dialing:
Press the phone-on key.
Enter the phone number through the
keyboard; this number will be dialed
directly.
Block dialing:
Enter the phone number through the
keyboard.
press and hold the # button for at least
2 seconds to insert a dialing pause
press the button to delete any
incorrect input
press the phone-on key; the number
will be dialed
4 INSTALLATION
4.1 Base station:
Telephone connection:
1. insert the small plug of the telephone cable
into the TEL.LINE input at the rear of the base
(depress the plug until you hear a click)
2. Plug the phone connector into the phone
socket.
Power supply:
1. insert the adaptor plug into the DC 6V input at
the bottom of the base
2. plug the adaptor into a 230 Volts wall socket
4.2 Cradle/charger:
If your phone has been delivered with multiple hand-
sets, 2 batteries and a cradle/charger with adapter
will be included for every handset. Plug the adapter
of these chargers in a 230 Volt mains socket.
4.3 Handset:
1. Open the battery compartment of the handset,
by sliding the battery cover down.
2. insert the supplied batteries into the battery
compartment according to the markings.
3. Slide the battery cover back onto the handset
and place the handset on the base/charger
station.
4. Leave the handset continuously during
15 hours on the base station, to cradle/charge
the batteries properly.
to mute the microphone
Intercom button (only when using multiple
handsets)
3 DISPLAY OVERVIEW
remains lit: batteries are full, ashing: batter-
ies are nearly empty
remains lit: during a call, ashing: incoming
call
you’ve received a Voicemail message (only
when using the FSK system)
you’ve received new calls (only available
when subscribed to the ‘Caller-ID’ service)
illuminates when the phonebook is opened
the alarm function is enabled
the ringtone of the handset is disabled
remains lit when within range of the base,
ashes while searching for the base
use / to display other options or memo-
ries
illuminates when conrming a selection by
pressing the OK button
illuminates when pressing the button to
go back a step in the menu or to delete any
input
8 CALLER IDENTIFICATION
8.1 Introduction:
If you have the service Caller Identication at your
disposal, the number of the calling party is displayed
on the display of your handset(s). If your carrier
also transmits names, or you have programmed this
number including name and the phone book memory
of the handset, the name is also displayed on the
display.
The PDX-900 series is suitable for both the DTMF
system, offered by the Dutch PTT and for the FSK
system, offered by the Belgian PTT and by cable
companies in the Netherlands and Belgium for as
far as this service is offered. See paragraphs 8.6 for
more information.
8.2 Indication new calls:
indicates you’ve received on or more
new calls you haven’t checked yet
8.3 View memory:
the last received call appears in the
display
scroll through the memory
press the key OK to view the time
and date of the call
(when a name is displayed, press 2x the OK button to show
the time and date)
8.4 Callback:
the last received call appears on the
display
search for the desired call
press the phone-on key; the number
will be dialed
8.5 Copying / deleting:
open the Caller-ID memory and
search for the desired call
press the MENU button and select:
SAVE NUMBER to save the selected
number in the handset
DELETE to delete the call
DELETE ALL to delete all last incom-
ing calls
press the OK button and follow the
on-screen instructions
8.6 Additional information:
The Caller-ID service often requires an addi-
tional subscription; please contact your tele-
phone service provider for more information.
Each PDX-900 series handset has a memory
capacity for the last 10 received number.
Name display:
- the DTMF system doesn’t send any names;
the name will only appear in the display when
you’ve programmed it in the phonebook
memory of the handset
- the FSK system does send names (ask
your telephone service provider for more
information)
- when you’ve saved a name and number
in the phonebook memory, this name has
priority over the name the telephone service
provider might send
Time and date of calls:
- the FSK system sends the date and time of
the calls
- the DTMF system does NOT send time /
date information, but uses the time and date
you’ve set yourself (see paragraph 9.2)
If the display shows [UNKNOWN], [PRIVATE]
or [0000000000], the calling subscriber has
blocked sending his or her name and number.
The names/numbers of the calls you’ve
answered are also saved.
6 REDIALLING
Each handset memorizes the 5 last numbers you’ve
dialed with the handset. You can redial these num-
bers as follows:
press the Redial button
the last dialed number will appear in
the display
search for the desired recently dialed
number
press the phone-on key; the number
will be dialed
copying to the phonebook
memory / deleting
press the Redial button
search for the desired number
press the MENU button and select:
SAVE NUMBER to save the selected
number
EDIT ENTRY to edit the selected
number
DELETE to delete the selected
number
DELETE ALL to delete all last dialed
numbers
press the OK button and follow the
on-screen instructions
7 PHONEBOOK
7.1 Introduction:
The handset is provided with a phonebook memory
with a capacity of 50 contacts, each with a pho-
nenumber of up to 24 digits and a name of up to
12 characters.
The phone book memory in the handset is con-
nected to the function Caller Identication. When you
are called by somebody, whose name and number
you have programmed in the memory, the name of
this person is also displayed beside the number on
the display of your handset.
7.2 Programming:
press the MENU button and then the
OK button
press the OK button and enter the
name using the keypad
press the button to delete any incor-
rect input
press the OK button and use the
keypad to enter the phone number
press and hold the # button for 2 seconds
to insert a dialing pause
press the button to delete any incor-
rect input
press the OK button
7.3 Checking and dialing memory contacts:
press the honebook button and
search for the desired contact
press the phone-on key; the number
will be dialed
7.4 Correcting:
press the MENU button
press the OK button and select EDIT
ENTRY
press the OK button and search for
the desired contact
press the OK button and press the
button to delete the name
use the keypad to enter the new
name and press the OK button
repeat this for the number and press
the OK button
7.5 Deleting:
press the MENU button
press the OK button and select
DELETE (to only delete the selected
number) or DELETE ALL
press the OK button and search for
the desired contact
press 2x the OK button to delete the
selected or all contacts
-5--4--3- -9--8--7--6-
-11- -14--13--12- -18--17--16--15--10-
USER’S MANUAL
PDX-900
PDX-920
PDX-930
2 sec
2 sec
2 sec
2 sec
2x
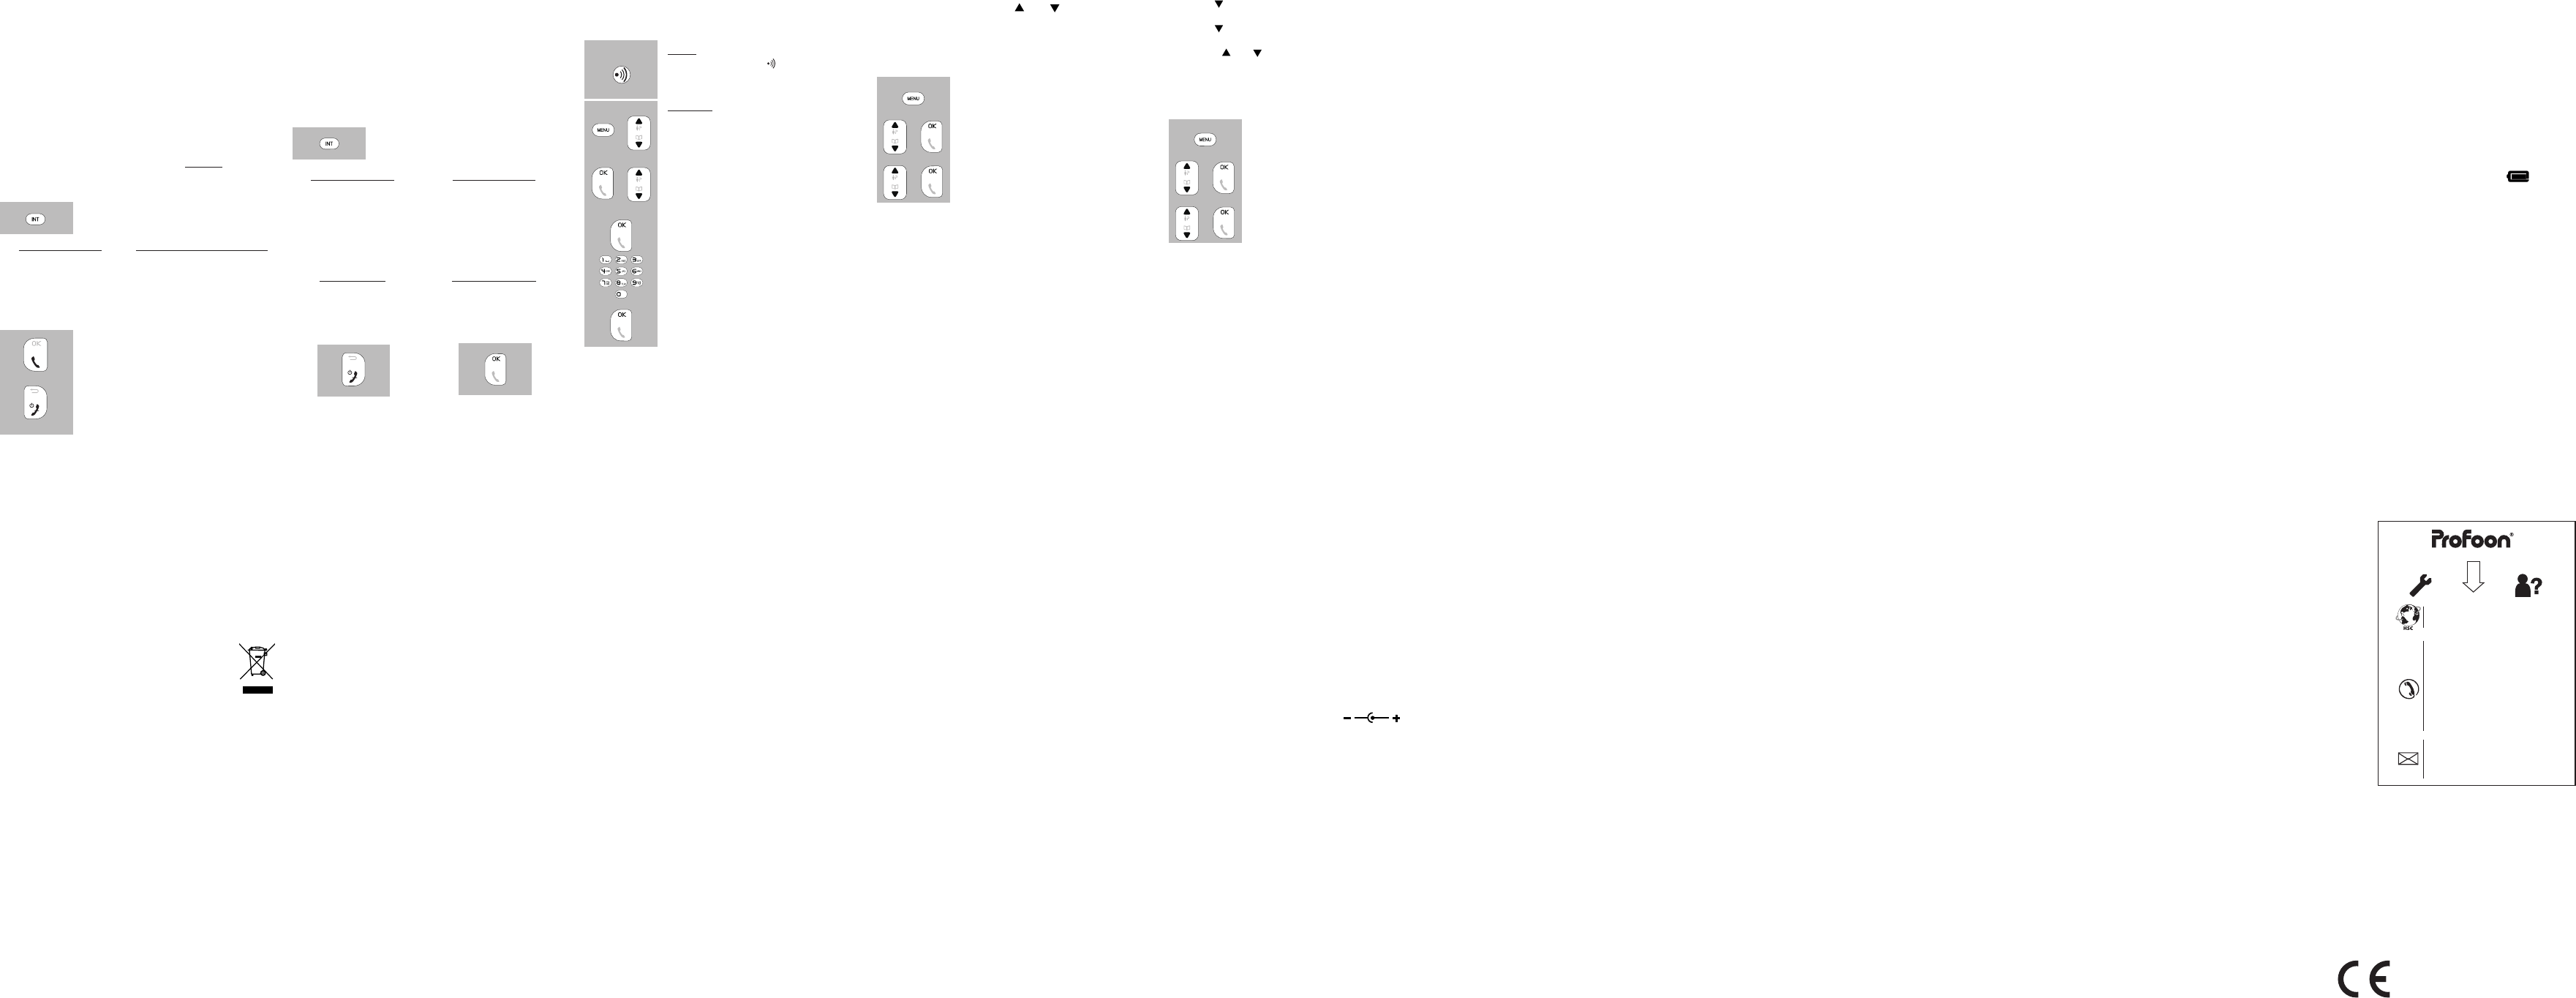
When receiving a call from an outside line during
an intercom call, the handsets will emit a special
notication tone. You can end your call, wait for the
normal ringtone and then answer the outside call.
When you’ve registered more than 2 handsets to the
base, you can also answer the outside call using one
of the other handsets
11.3 Forwarding / conference:
During the call with the outside line,
press the key INT
2 handsets in use:
In case 2 handsets have
been registered with your
phone, the other handset
will ring immediately.
2 handsets in use:
In case 2 handsets have been
registered with your phone,
the other handset will ring im-
mediately.
Press the INT button again to pick up the outside line again
in case the dialed handset doesn’t answer.
Call transfer:
after the call is
answered, press the
End button to transfer
the call
Conference call:
after the call is answered,
press the OK button to start
a 3-way conference call
-20-
13.6 Hearing aids:
Users of older generation hearing aids always shall
keep into account a possible uncomfortable buzzing
tone when using DECT phones.
13.7 Medical equipment:
It is possible that enabled DECT phones interfere with
sensitive medical equipment. When the phone is kept in
the vicinity of the medical device, interference can occur.
Do not place a DECT phone on or near a medical device,
not even when it is in standby mode.
13.8 Power supply handset:
The display of the handset is provided with
a built-in battery capacity ( ). When the
battery symbol lit continuously, the battery
is fully charged; when the battery symbol is
ashes, the battery should be charged. While
charging, the symbol will keep scrolling until
the battery is fully charged.
We recommend placing the handset every
evening on the base station or charger, for
optimal use. This does not have an adverse
effect on the rechargeable batteries.
Rechargeable batteries or battery packs shall
not be exposed to re or extreme heat.
Never cut open batteries of battery packs. The
content is chemical and poisonous.
13.9 Eavesdropping:
Eavesdropping on a DECT phone is virtually
impossible. Not only shall one be within reach of the
DECT phone, one also needs expensive equipment.
13.3 Power failure:
This phone obtains its power supply from the mains
power. In case of failure of the mains power, this
phone cannot be used. Therefore it is advisable to
keep a wired phone in reserve.
13.4 Placement:
Do not place the phone in the direct vicinity of other
phones or other electronic (medical) devices, TL
tubes and other gas discharge lamps; the emitted
radio waves of these (and other) wireless phone(s)
may disrupt the functioning of the equipment, or
the emitted signals of the equipment disrupt the
functioning of the phone.
13.5 Range:
The range of the phone is up to 300 meters in the
open field and up to 50 meters inside; the range
depends on local circumstances. When you get out of
range of the base, the antenna symbol will disappear
and the text [ SEARCHING ] starts flashing in the
display. In case the power supply adapter of the
base station is unplugged from the mains socket, the
handset will lose contact with the base station, the
display will display [SEARCHING], and the antenna
symbol will start flashing. The handset will restore
contact with the base station within several minutes
after the power supply adapter has been plugged in
again.
13 TIPS AND WARNINGS
13.1 General:
Read the user manual carefully and follow all
instructions.
Never place or use the phone in a wet or moist
room or environment.
Take care of proper heat dissipation; never
cover the phone and/or the power supply
adapter(s), and do not place them directly
beside a heat source.
Use only the included adapter(s); connecting
another type of adapter may cause damage to
the electronics.
Take care that the cable of the phone and the
adapter do not get damaged, and prevent that
they cause tripping or falling.
Never disassemble the phone and the
adapter(s). This may only be done by qualified
personnel.
13.2 Installation:
Connect or disconnect the cables of the phone
and the power supply adapter only to the base
station when the power supply adapter has
been unplugged from the mains socket, and
the phone connector has been disconnected
from the phone socket.
Do not install the phone during a lightning
storm.
Do not install a phone connection point in a wet
or moist environment.
Do not touch uninsulated phone or adapter
cables, unless they are disconnected from the
phone network or the mains power.
[ RESET ]
In case you’ve forgotten your personal settings or
the PIN code, you can use this option to restore the
default factory settings.
Keep in mind that in addition to resetting your
settings, the PIN code will be 0000 again and the
Caller-ID memory and last dialed number memory
will be empty again. The phonebook memory will not
be deleted.
[ RECALL TIME ]
You can set the interruption time of the R/FLASH
pulse on SHORT (100 ms), MEDIUM (270 ms) or
LONG (600 ms).
Refer to the user manual of your home or ofce switchboard
or consult your carrier concerning the desired interruption
time. 100 ms is the standardized interruption time, and this
time is set at the factory.
1. Press the key ‘phone-off 3 times.
2. Press the key MENU once.
3. Press key once.
4. Press the key OK once.
5. Press key twice.
6. Press the key OK once.
7. use the and buttons to select the English language
and press the OK button to conrm this language
8. press the End button once.
12.2 BASE SETUP:
press the MENU button to open the
menu
select the option [ ADVANCED SET ]
and press the OK button
select the desired option and press
the OK button
[ CHANGE PIN ]
A PIN code is required for registering or de-register-
ing additional handsets and for certain other func-
tions. The default PIN code set in the factory is 0000,
but you can use this menu option to change the code
into a personal code.
See item [ RESET ] if you’ve forgotten your PIN code.
[ REGISTER ]
This function is described in detail in chapter 11.4.
[ UNREGISTER ]
This option allows you to unregister lost or faulty
handsets.
12 TELEPHONE SETUP
You can fully customise the telephone according to
your preferences. Use the and buttons to select
the various options and press the OK button to save
your settings.
12.1 HANDSET SETUP:
press the MENU button to open the
menu
select the option [ PERSONAL SET ]
and press the OK button
select the desired option and press
the OK button
[ HANDSET NAME ]
You can assign a personal name to the handset.
When the handset is in standby mode, this name will
be shown in the display of the handset.
[ MELODY ]
Use this option to set the ringtone and ring volume
and whether a sound must be emitted when pressing
on of the buttons
[ LANGUAGE ]
The various instructions in the display can be shown
in different languages. This option allows you to set
the desired language.
In case you’ve set an unknown language and don’t know
how to restore the English language, please see below:
11.4
Registering (re-registering) (additional) handsets:
Newly purchased handsets or handsets that have
lost contact with the base due to any problem,
should be registered (re-registered) on the base.
base:
press and hold the button on the
base for 8 seconds
handset:
open the menu and select the option
[ ADVANCED SET ]
press the OK button and select the
option [ REGISTER ]
press the OK button and use the
keypad to enter the PIN code (fac-
tory code 0000 or your personal
code)
press the OK button, the handset will
now start searching for the base
After several seconds, the handset will have found
the base and the internal handset number will
appear at the right side in the display
11.5 De-registering wireless handsets:
To de-register, select the option [ UNREGISTER ] in
the menu [ ADVANCED SET ].
The batteries get low too fast:
- Check the charging contacts of the base
station or the charger and of the handset,
and clean them if necessary.
- The batteries shall be replaced; insert new
batteries.
The handset does not have contact with the
base station:
- You are too far from the base station;
reduce the distance.
- The base station has been switched off
(adaptor removed from the wall socket or
bottom of the base); correct this.
- The handset is not registered with the base
station (anymore); register it (again). (see
paragraph 11.4)
In case the failure has not been solved with
aforementioned solutions:
Remove the batteries from the handset, and
unplug the power supply adapter and the
phone connector from their sockets; connect
everything again after several minutes.
You can also contact the Profoon service center at
WWW.PROFOON.COM or the supplier of this phone.
15 SPECIFICATIONS
Protocol: DECT / GAP
4 handsets
Call history: DTMF & FSK,
auto selection
10 memories
Dialing: TONE
FLASH: 100, 270 & 600mS
Phonebook memory: 50 memories
Power supply charger: 2x 1.2V 300mAh
NiMH battery,
format AAA
Power supply base station: Power supply
6VDC, 500mA,
Range: 50 m indoors /
300 m outdoors
Operational life
Standby:> 100 hours
(with full batteries): use:> 10 hours
Connection factor: ETSI 12.5
(in accordance with
0.5 according to
the old measuring
method)
Operational temperature: 0°C to 40°C
Storage temperature: -20°C to 60°C
16 DECLARATION OF CONFORMITY
This device meets the essential requirements
and other relevant provisions as stipulated by the
European Guideline 1999/5/EC. The declaration of
conformity is available on the website
WWW.PROFOON.COM
17 WARRANTY
For the PDX-8400 series DECT telephone you have
a warranty of 24 months from the date of purchase.
During this period, we guarantee the free repair of
defects caused by material and workmanship errors.
All this subjected to the final assessment of the
importer.
HOW TO HANDLE: If you notice any defect, first
refer to the user’s manual. Please contact the
supplier of this telephone or contact customer
service of Profoon on WWW.PROFOON.COM
THE WARRANTY BECOMES NULL AND VOID:
In case of improper use, incorrect connections,
leaking and/or incorrectly installed batteries, use
of unoriginal parts or accessories, negligence
and in case of defects caused by moisture, fire,
flooding, lightning and natural disasters. In case of
unauthorised modifications and/or repairs performed
by third parties. In case of incorrect transportation
of the device without adequate packaging and when
the device is not accompanied by this warranty card
and proof of purchase.
The warranty does not cover connecting cables,
plugs and batteries. All further liability, especially
concerning any consequential damages, is excluded.
13.10 Maintenance:
Clean the phone only with a moist cloth; do
not use any chemical detergents.
The adapter and the phone cable shall be
disconnected before cleaning.
13.11 Environment:
The packaging of this telephone can
be collected as old paper. However, we
recommend you to save it, to adequately
protect the phone during transport.
When replacing this telephone, please
return it to the supplier to ensure
environment-friendly processing.
14 POSSIBLE PROBLEMS AND SOLUTIONS
14.1 Problems with outgoing calls:
The key-lock function is enabled.
- Please disable this function (see
paragraph 5.5)
There’s no dialing tone.
- Another handset registered on the PDX-9xx
base is currently on a call. Wait until this call
has ended and try again.
- Check the connection between the base
and your telephone network (when in
doubt, connect a different telephone to the
telephone socket)
14.2 Problems with incoming calls:
No notification of incoming calls:
- The ringtone is disabled, please enable it
(see paragraph 12.1)
- Check the connection between the base
and your telephone network (when in
doubt, connect a different telephone to the
telephone socket)
You are continuously busy:
- Check whether the receiver of another
telephone is off the hook.
- Check whether a 2nd handset that has
been registered with the phone, is using the
line.
- Connect another phone to your phone
connection, and use this to check whether
the malfunction originates from your
connection or your carrier.
14.3 Problems during calling:
Beep tones during an intercom call:
- You are called from outside during an
intercom call; end this call, wait until the
phone rings normally and answer the call.
Beep tones during a call:
- The battery pack is running low; disconnect
the call and replace to handset onto the
base or charger to charge the batteries.
Noise and other distortions:
- You are getting out of reach of the base
station; reduce the distance.
- There are other electrical devices in the
vicinity that interfere with the radio waves of
your phone; try another location.
14.4 Problems with Caller Identification:
You do not receive Name or Caller Identification
information on the display of your handset.
- Check whether your carrier transmits these
signals (you shall subscribe to this service
with some providers).
You do receive the numbers on the display of
your phone, but not the name.
- The carrier does not forward names; consult
your carrier for this. (see paragraph 7.2)
- The name has not been programmed in the
memory of your handset; program it.
- The name has been programmed in the
memory, but the accompanying phone
number has been programmed without area
code; program the number including area
code.
14.5 Other:
The display stays blank:
- The batteries are empty. Place the handset
on the base station or on the cradle/
charger to charge the batteries, and let the
handset charge during at least 15 hours
uninterrupted. Keep in mind that when you
place the handset onto the base or cradle/
charger, it can take several minutes before
the display illuminates.
The handset does not switch on:
- The battery voltage is too low; place the
handset on the base station or the charger
and charge the batteries for 15 hour.
- The batteries have not been inserted; check
this.
-23--22--21- -27--26--25--24-
-29- -32--31--30- -36--35--34--33--28-
11 MULTIPLE HANDSETS
11.1 Introduction:
You can connect (register) up to 4 handsets to the
base station of the PDX-900 series. With multiple
registered handsets, you can call each other for free
in and around the house and forward calls or even
call with three people.
If the phone has been delivered with one handset,
u can purchase extra handsets (*), which you shall
register your phone rst (see paragraph 11.4). If the
phone has been delivered with multiple handsets,
you can use the following functions directly:
11.2 Intercom:
Press the key INT
2 handsets in use:
In case 2 handsets have
been registered with your
phone, the other handset
will ring immediately.
more than 2 handsets in use:
In case more than 2 handsets
have been registered with your
phone, you need to enter the
number of the desired handset
(of press key 9 to call all
handsets)
as soon as the dialed device an-
swers, you can start the internal
conversation
press the End button to disconnect
the call
-19-
8 sec
ver 1.0
Service
Help
Service Help
WWW.PROFOON.COM
SERVICE@PROFOON.NL
NL 073 6411 355
(Lokaal tarief)
BE 03 238 5666
(Lokaal tarief)
(Tarif local)
DE 0180 503 0085
Lokale Festnetzkosten
Hesdo, Australiëlaan 1
5232 BB, ‘s-Hertogenbosch
The Netherlands
WWW.PROFOON.COM
SERVICE@PROFOON.NL
NL 073 6411 355
BE 03 238 5666
DE 0180 503 0085
Hesdo, Australiëlaan 1, 5232 BB,
‘s-Hertogenbosch,
The Netherlands
(Lokaal tarief)
(Tarif local)
(Lokaal tarief)
(Lokale Festnetzkosten)
1

Hulp nodig? Stel uw vraag in het forum

Spelregels
1

Forum

Profoon-PDX900

Misbruik melden

Gebruikershandleiding.com neemt misbruik van zijn services uitermate serieus. U kunt hieronder aangeven waarom deze vraag ongepast is. Wij controleren de vraag en zonodig wordt deze verwijderd.

Product:

Bijvoorbeeld antisemitische inhoud, racistische inhoud, of materiaal dat gewelddadige fysieke handelingen tot gevolg kan hebben.

Bijvoorbeeld een creditcardnummer, een persoonlijk identificatienummer, of een geheim adres. E-mailadressen en volledige namen worden niet als privégegevens beschouwd.

Spelregels forum

Om tot zinvolle vragen te komen hanteren wij de volgende spelregels:

Belangrijk! Als er een antwoord wordt gegeven op uw vraag, dan is het voor de gever van het antwoord nuttig om te weten als u er wel (of niet) mee geholpen bent! Wij vragen u dus ook te reageren op een antwoord.

Belangrijk! Antwoorden worden ook per e-mail naar abonnees gestuurd. Laat uw emailadres achter op deze site, zodat u op de hoogte blijft. U krijgt dan ook andere vragen en antwoorden te zien.

Abonneren

Abonneer u voor het ontvangen van emails voor uw Profoon PDX900 bij:


U ontvangt een email met instructies om u voor één of beide opties in te schrijven.


Ontvang uw handleiding per email

Vul uw emailadres in en ontvang de handleiding van Profoon PDX900 in de taal/talen: Engels als bijlage per email.

De handleiding is 2,27 mb groot.


U ontvangt de handleiding per email binnen enkele minuten. Als u geen email heeft ontvangen, dan heeft u waarschijnlijk een verkeerd emailadres ingevuld of is uw mailbox te vol. Daarnaast kan het zijn dat uw internetprovider een maximum heeft aan de grootte per email. Omdat hier een handleiding wordt meegestuurd, kan het voorkomen dat de email groter is dan toegestaan bij uw provider.

Stel vragen via chat aan uw handleiding

Stel uw vraag over deze PDF

Andere handleiding(en) van Profoon PDX900

Profoon PDX900 Gebruiksaanwijzing - Nederlands - 48 pagina's

Profoon PDX900 Gebruiksaanwijzing - Deutsch - 2 pagina's

Profoon PDX900 Gebruiksaanwijzing - Français - 48 pagina's


Uw handleiding is per email verstuurd. Controleer uw email

Als u niet binnen een kwartier uw email met handleiding ontvangen heeft, kan het zijn dat u een verkeerd emailadres heeft ingevuld of dat uw emailprovider een maximum grootte per email heeft ingesteld die kleiner is dan de grootte van de handleiding.

Er is een email naar u verstuurd om uw inschrijving definitief te maken.

Controleer uw email en volg de aanwijzingen op om uw inschrijving definitief te maken

U heeft geen emailadres opgegeven

Als u de handleiding per email wilt ontvangen, vul dan een geldig emailadres in.

Uw vraag is op deze pagina toegevoegd

Wilt u een email ontvangen bij een antwoord en/of nieuwe vragen? Vul dan hier uw emailadres in.


Info