636668
16
Verklein
Vergroot
Pagina terug
1/40
Pagina verder
PM-2050 SWF
Owners Manual
2
Making a Distress Call
Speak slowly - clearly - calmly.
For future reference, write your boat’s name & call sign here:
1. Make sure your radio is on.
2. On the radio, press the 16/9-Tri button to switch to Channel 16 (156.8
MHz). (If the corner of the display does not show 16, press the 16/9-Tri
button again until it does.)
3. Press the push to talk button and say: “MAYDAY – MAYDAY – MAY-
DAY.”
4. Say “THIS IS {name of your boat (three times) and call sign/boat registra-
tion number (once)}.
5. Say “MAYDAY {name or call sign of your boat}.
6. Tell where you are: (what navigational aids or landmarks are near, or read
the latitude and longitude from your GPS).
7. State the nature of your distress, (e.g. are you sinking, medical emer-
gency, man overboard, on re, adrift, etc.
8. State the type of assistance you need (medical, towing, pumps, etc.).
9. Give number of persons aboard and conditions of any injured persons.
10. Estimate present seaworthiness of your ship (e.g. how immediate is the
danger due to ooding or re or proximity to shore).
11. Briey describe your ship, giving the ship name (e.g. “Blue Duck is 32 foot
cabin cruiser, white hull, blue deck house”).
12. Say: “I WILL BE LISTENING ON CHANNEL 16.”
13. End message by saying “THIS IS {name or call sign of your boat}, OVER.”
14. Release the push to talk button and listen.
If you do not get an answer after 30 seconds, repeat your call, beginning
at step 3, above.
3
Table of Contents
Making a Distress Call .......................................................(inside front cover)
Introduction .................................................................................................... 4
Features .......................................................................................................... 4
Getting Started ............................................................................................... 6
What’s Included ............................................................................................... 6
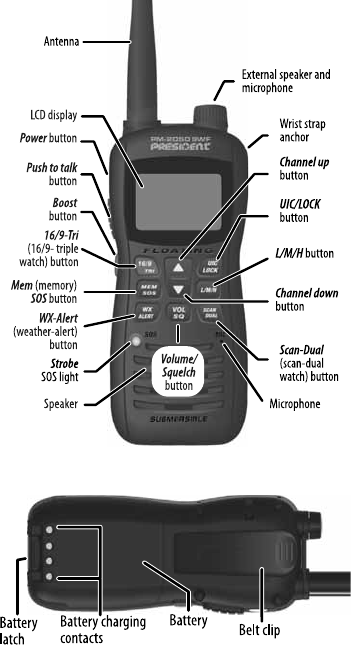
Parts of the PM-2050 SWF.............................................................................. 7
Front view ......................................................................................... 7
Back view .......................................................................................... 7
Charger ............................................................................................. 9
Reading the Display ........................................................................................ 9
Display icons and what they mean ................................................. 10
How It Works .................................................................................................11
Normal Mode Operation ................................................................................ 12
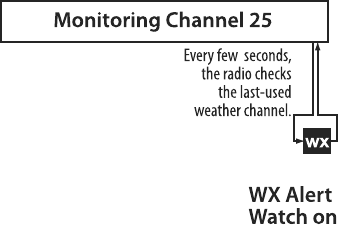
Normal mode with Weather Alert Watch ......................................... 12
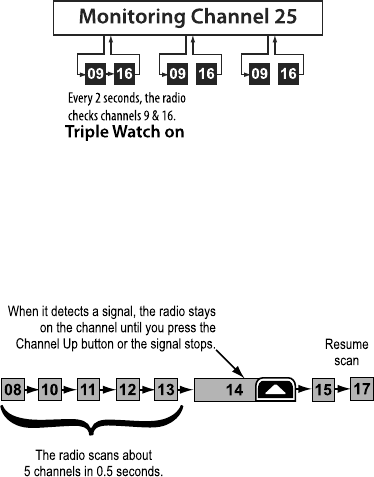
Normal mode with Triple Watch or Dual Watch .............................. 13
Scan Mode Operation.................................................................................... 13
Using the radio in Scan mode ......................................................... 14
Scan mode with Weather Alert Watch ............................................. 14
Scan mode with Triple Watch or Dual Watch .................................. 15
Both Weather Alert and Triple/Dual Watch in Scan mode............... 15
Weather Mode ............................................................................................... 16
Using the radio in weather mode .................................................... 16
Weather mode with Weather Alert Watch ....................................... 16
Weather mode with Triple Watch or Dual Watch ............................ 16
Setting Up the Hardware ............................................................................. 17
Attaching the Antenna ................................................................................... 17
Installing the Battery ...................................................................................... 17
Using the Alkaline Battery Tray...................................................................... 17
Mounting the Charger .................................................................................... 18
Charging the Battery...................................................................................... 18
Important notes on charging the battery ......................................... 19
Attaching the Belt Clip ................................................................................... 19
Using Your Radio ......................................................................................... 20
Turning It On .................................................................................................. 20
Setting It Up ................................................................................................... 20
Changing the volume ...................................................................... 20
Setting the Squelch level ................................................................ 20
4
Reading volume and squelch level on battery icon......................... 21
Setting the UIC channel mode (USA/CAN/INT) .............................. 21
Using the WX Mode....................................................................................... 21
Making a Transmission .................................................................................. 22
Selecting a channel ......................................................................... 22
Making a transmission .................................................................... 22
Boosting the transmission power .................................................... 22
Saving Channels to Memory ......................................................................... 23
Special Features............................................................................................ 23
Using the Strobe SOS Light/Flashlight ........................................... 23
Turning the key beep on and off ..................................................... 23
Setting Key Lock ............................................................................. 23
Using the external speaker/Mic jack ............................................... 24
Using the Battery Save feature ....................................................... 24
Maintenance and Troubleshooting ............................................................ 25
Common Questions ....................................................................................... 25
Spécications .............................................................................................. 27
Channels and Frequencies (MHz) .............................................................. 28
US Channel Frequencies and Names ........................................................... 28
Canadian Channel Frequencies and Names................................................. 29
International Channel Frequencies and Names ............................................ 31
Weather Channel Frequencies and Names .................................................. 33
Regulations and Safety Warnings ............................................................. 34
Basic Radio Guidelines ................................................................................. 34
Three Year Limited Warranty ......................................................................... 35
Introduction
Features
Your radio provides the following key features:
© Submersible design. Complies with oating JIS8/IPX8 water-resistant
standards, which means the radio can be submerged in 1.5 meters of water
for 1 hour without damage.
Notes:
The radio will only meet this rating if fully assembled and all rubber
seals and sealing plugs are well maintained and correctly tted. This
means that the speaker microphone is attached or the sealing plug
is tted, and the battery pack (or tray) and antenna are attached and
securely fastened.
-
5
After your radio is submerged in water, you might notice that the
sound is distorted. This is because there is still water remaining in and
around the speaker and microphone. Just shake the radio to clear
excess water, and the sound will return to normal.
If your radio is exposed to salt water, clean it thoroughly with fresh
water and dry it before turning it on.
The charger is not waterproof.
© Memory Scan mode. Lets you save channels to memory and monitor them
in quick succession.
© Transmitter power level select/Boost. Lets you boost the transmitter pow-
er from 1W to 2.5W or 6W for added transmission distance.
© Battery level display and low battery alert.
© Dual and Triple Watch operation. These different Watch modes let you
monitor up to one Coast Guard Distress/Hailing channel and one weather
channel along with one regular marine channel.
© All marine VHF channels for the U.S., Canada, and international wa-
ters.
© Battery Save. The Battery Save feature automatically turns off RX power at
regular intervals to save battery power.
© National Oceanic and Atmospheric Administration (NOAA) Weather
Channel watch. Sounds a warning tone when a hazard alert is issued.
© SOS Strobe/Flashlight. A high intensity strobe LED can be set to blink an
SOS pattern or to be steady on.
© Emergency 16/9 Channel monitoring. Set unit to scan one or both of
these emergency channels regularly within normal scanning cycles.
© Key Lock. Locks keys to prevent accidentally changing channels or enter-
ing data.
© Nine weather channels.
© Selectable Volume (0 - 9) and Squelch (0 - 3) levels.
6
Getting Started
What’s Included
Antenna Charging Cradle
Lithium Ion Poly
Battery
Alkaline Battery Tray
(batteries not included)
PM-2050 SWF Radio
DC Charging
Adapter
AC-DC Charging
Adapter
Screws for Charging
Cradle
Wrist Strap Belt Clip
If any pieces are missing or damaged, contact PRESIDENT Customer
Care (see back cover for contact information).
7
Parts of the PM-2050 SWF
Front view
Back view
8
Button Press to... Press and hold to...
Power
PTT (Push
to Talk)
Boost
16/9/TRI
MEM/SOS
WX/ALERT
Channel
Up
UIC/LOCK
L/M/H
Channel
Down
SCAN/
DUAL
VOL/SQ
NA
NA
NA
1st press: Go to channel 16.
2nd press: Go to channel 9.
3rd press: Go back to the
starting channel.
Save a channel into memory
or delete a channel from
memory.
Places radio into Weather
mode so you can listen to the
weather channels.
Move up one channel or
squelch/volume step at a
time.
Switch from US to Canadian
or International channels.
Change the transmit power
(see page 22).
Move down one channel or
squelch/volume step at a
time.
Start scanning channels
saved in memory.
Increase or decrease the
volume.
Turn the radio on or off.
Talk/transmit on a channel.
Transmit with a higher power
level.
Turn Triple Watch on and off.
Turn on the SOS signal.
Press and hold again to turn
on ashlight. Press and hold
again to turn off the LED light.
Turn Weather Alert Watch on
and off.
Move quickly up the chan-
nels/ squelch/volume steps.
Lock the keys; press and hold
again to unlock.
NA
Move quickly down the chan-
nels/squelch/volume steps.
Turn Dual Watch on and off.
Increase or decrease the
squelch level.
9
Charger
Reading the Display
The LCD display shows different information depending on what you are doing.
This sample screen shows some of this information. The following table shows
all the possible icons and what they mean.
10
LO, MID, HI
LOCK
US, CAN, or INT
TRI or DUAL
MEM
SCAN
WX
You are currently transmitting.
The transmitter power is set to L (Low - 1W),
M (Mid - 2.5W), or H (HIGH - 6W).
The keys are locked.
Indicates if the radio is set for US channels,
CANadian channels, or INTernational chan-
nels.
TRIple Watch or DUAL Watch is turned on.
The current channel is saved in memory.
The radio is in Scan mode.
The radio is in Weather mode.
Weather Alert Watch is turned on.
The battery is fully charged, mostly charged,
half charged, mostly empty, or completely
empty.
Current channel number.
Display icons and what they mean
Icon What it means
11
How It Works
Your radio has three main operation modes: Normal, Scan, and Weather.
Mode
Normal
Scan
Weather
What it does
Monitors a single
marine channel and
lets you talk on that
channel.
Monitors all the chan-
nels you save into
memory.
Monitors the selected
NOAA weather chan-
nel.
Use it when you
want to...
Monitor a channel or
talk to another radio.
Check a small group of
regularly-used chan-
nels for trafc.
Hear the current or
forecasted weather.
To turn it
on/off
(default
mode)
Press
SCAN/
DUAL.
Press WX/
ALERT.
In addition to the three operation modes, your radio provides three different
watch modes which you can activate during any operation mode. In the watch
modes, the radio briey checks for activity on a specic channel, then returns
to its previous operation.
Watch mode
Weather Alert
Watch
Dual Watch
Triple Watch
What it does
Checks the last-used weather
channel for hazard alerts
every 7 seconds.
Checks channel 16 for activity
every 2 seconds.
Checks channels 16 and 9 for
activity every 2 seconds.
To turn it on/off
Press and hold WX/
ALERT for 2 seconds.
Press and hold SCAN/
DUAL for 2 seconds.
Press and hold 16/9/TRI
for 2 seconds.
Private boats must monitor channel 16 whenever they are un-
derway. Water-going vessels should have either Triple Watch or
Dual Watch on at all times.
-
12
Normal Mode Operation
© To transmit, remove the radio from the charger, then press and hold Push to
Talk. Release the button when you are nished talking.
© For the best sound quality, hold the microphone about two inches from your
mouth while you’re talking.
© Press Channel up to move up one channel at a time. Press and hold the
button to scroll quickly up the channels.
© Press Channel down to move down one channel at a time. Press and hold
the button to scroll quickly down the channels.
© To change the transmit power, press L/M/H. The transmit power switches to
the next transmit power each time you press this button.
Normal mode with Weather Alert Watch
If you activate
Weather Alert
Watch while
operating in
Normal mode,
the radio checks the most recently used
weather channel every few seconds.
If it detects a weather or other hazard alert,
it will switch to that weather channel.
(If you are actively transmitting the radio waits
until you nish your transmission before
checking the weather channel.)
13
Normal mode with Triple Watch or Dual Watch
If you activate Triple Watch while operating in Normal mode, the radio checks
channels 16 and 9 every two seconds; with Dual Watch turned on, the radio
only checks channel 16. The radio will not check channels 16 or 9 while you
are actively transmitting; it waits until your transmission is nished and then
checks the channels.
Scan Mode Operation
You can save channels into memory and then use Scan mode to monitor those
channels from lowest to highest. If the radio detects a signal on a channel, it
stays on that channel as long as the signal is received; when the signal stops,
the radio continues scanning.
14
Using the radio in Scan mode
© To activate Scan mode, press SCAN/DUAL.
© You must have at least two channels in memory to start a scan. However,
you cannot save marine channel 70 or Weather channels.
© You cannot transmit while in Scan mode.
© To save a channel into memory, select the channel, then press MEM/SOS.
The MEM icon displays whenever you tune to that channel.
© To remove a channel from memory, set the radio to that channel, then press
MEM/SOS. The MEM icon no longer displays.
© When the radio stays on a channel, press Channel Up to leave that channel
and resume scanning.
© To end the Scan, press the SCAN/DUAL button again; the radio remains on
the last scanned channel.
Scan mode with Weather Alert Watch
If you activate Weather Alert Watch while in Scan mode, the radio checks the
most recently/used weather channel every seven seconds, then continues
scanning the next channel in memory:
15
Scan mode with Triple Watch or Dual Watch
If you activate Triple Watch while operating in Scan mode, the radio checks
channels 16 and 9 every two seconds, then goes on to scan the next channel;
with Dual Watch turned on, the radio only checks channel 16:
Both Weather Alert and Triple/Dual Watch in Scan mode
You can activate Weather Alert Watch and Triple/Dual Watch at the same time.
The radio performs both checks at their scheduled time:
16
Weather Mode
The NOAA weather channels cooperate with the FCC to alert you of other
hazards besides weather (child abduction alerts, nuclear, biological, etc.). In
Weather mode, the radio monitors one of the nine NOAA weather channels.
If any type of alert is received, the radio sounds an alert tone and the display
blinks.
Using the radio in weather mode
Press the WX/ALERT button to access Weather mode. WX displays. Press
to scroll through the weather channels.To cancel Weather and return to the
previous marine channel, press the WX/ALERT button again. The last active
weather channel displays the next time you access Weather mode.
You cannot transmit while in Weather mode.
When the radio detects a WX Alert signal, it sounds a siren tone three times.
Press any button to turn off the tone.
Weather mode with Weather Alert Watch
Because Weather mode already monitors the weather channels, you don’t
need Weather Alert Watch to check the weather channel every seven seconds.
If you activate Weather Alert Watch while operating in Weather mode, it oper-
ates as a type of “sleep mode;” the radio stays on the weather channel and
mutes the speaker. If an alert is detected, the radio sounds an alert tone and
turns the speaker back on. This mode is very useful when you are anchoring
for the night but want to keep informed of hazards.
Weather mode with Triple Watch or Dual Watch
If you activate Triple
Watch while operating
in Weather mode, the
radio checks channels
16 and 9 every two
seconds; with Dual
Watch turned on, the
radio only checks channel 16.
-
17
Setting Up the Hardware
Attaching the Antenna
The antenna detaches from the radio for easy ship-
ping or storage. To attach the antenna to your radio,
screw it tightly onto the anchor post at the top of
the radio.
Installing the Battery
Your radio comes with a rechargeable Li-Ion Polymer battery; for shipping
safety, the battery is not installed at the factory.
The empty alkaline battery tray is installed as a placeholder.
1) Insert the tabs on the battery into the notches at the top of the battery com-
partment.
Each time you remove the battery, check the rubber seal around
the battery compartment. Make sure the seal is seated in the
groove and there is no dirt or debris on it. If the seal looks worn
or damaged, contact customer service to order a replacement.
2) Lower the battery until it rests at in the compartment.
3) Bring the battery latch up and snap it into place.
Using the Alkaline Battery Tray
The radio also comes with an alkaline battery tray that holds four AAA-type
alkaline batteries (not included). You can use alkaline batteries as a backup
for the Li-Ion Polymer battery so you can still use your radio while your Li-Ion
Polymer battery is recharging.
CAUTION: If you are using your radio in a cold-weather environ-
ment, PRESIDENT recommends using nonrechargeable Lithium
batteries.
-
When using alkaline batteries, transmit power is limited to a
maximum of 2.5W.
Follow these steps to use the alkaline battery tray:
-
18
1) Hold the lower part of the tray in one hand with the three battery contacts
facing down. Use your thumb to hold the notch on the lower part of the tray.
2) With your other hand, grip the upper part of the
tray and lift the cover open.
3) Align the batteries’ positive and negative terminals
with the drawing on the tray and snap each bat-
tery into place.
4) Insert the two hooks
on the lower part
of the tray into the
notches on the cover;
close the cover. (The cover ts snugly but you
should not have to force it closed.)
5) Install the alkaline battery tray in your radio just
as you do the Li-Ion Polymer battery (see page
17).
WARNING! The tray is designed to prevent the accidental charg-
ing of alkaline batteries. Never use alkaline batteries in the radio
without the alkaline battery tray. Do not attempt to modify the
battery tray design.
Mounting the Charger
You can mount the charger on any at surface.
1) Use the two holes at the base of the charger as a
template to mark the drill holes.
2) Using a 1/8-inch (or 3 mm) drill bit, drill two holes
1/2 inch (13mm) deep.
3) Use the provided screws to attach the charger to
the surface.
Charging the Battery
Your radio includes a charger and a rechargeable battery
pack. Place your radio in the charger with the display facing
forward. Make sure that the CHARGE LED on the charger
turns orange.
19
Cautions:
© Use only the battery and charger supplied with this radio. Us-
ing a different charger or battery can damage the radio and
create a risk of re or shock.
© The charger is not waterproof. If the charger falls into the wa-
ter, unplug it before attempting to remove it from the water.
After you remove the charger from the water, please contact
your retailer.
© Wipe off dirt or shake water from your radio before placing in
the charger if your radio gets dirty or wet.
Important notes on charging the battery
© Charge the battery fully before using the radio. When the battery is com-
pletely charged, the CHARGE LED turns green.
© Don’t use the charger when the ambient temperature is below 0° C (32° F)
or above 45° C (113° F).
© If the radio is powered down, the battery can charge in about seven hours.
(If the radio is powered on, the battery takes longer to charge.)
Attaching the Belt Clip
To attach the belt clip:
1) Rotate the belt clip so that the nger indentation
is towards the top of the radio.
2) Align the center of the clip with the anchor post.
3) Place the clip on the post and slide the clip up-
wards until it clicks into place.
To remove the belt clip:
1) Rotate the clip so that the nger indentation is
towards the bottom of the radio.
2) Slide the clip up until it comes free of the an-
chor post.
20
Using Your Radio
Turning It On
Press and hold POWER for at least two seconds to turn the radio on. Press and
hold POWER again to turn the unit off.
Setting It Up
Even though you can change your radio’s settings at any time, you will prob-
ably want to establish initial settings after you have turned it on for the rst
time. You will adjust some of these settings on an as-needed basis, but some
settings might only need to be set once.
Changing the volume
To change the speaker volume, press VOL/SQ to enter Volume Setting mode.
0 (for volume level 0 - 9) displays. Press CHANNEL UP or CHANNEL DOWN
to increase or decrease the volume levels. Press VOL/SQ to save.
Setting the Squelch level
The PM-2050 SWF recognizes signals as transmissions if they exceed a signal
strength threshold.
Adjusting the squelch sets this threshold level. Increasing squelch requires a
signal to be stronger to be seen as a transmission. If you set the squelch too
high, you will risk not receiving transmissions that are lower than that threshold.
Reducing the squelch allows weaker signals to be accepted. However, if you
lower the squelch too much, you will hear white noise all the time.
21
While listening to a channel, press and hold VOL/SQ to enter Squelch Setting
mode. The SQUELCH Level (S0) number displays on the LCD. Press CHAN-
NEL UP or CHANNEL DOWN to increase or decrease the squelch levels (0
- 3). Press VOL/SQ to save the setting.
Note: Setting the squelch level too high may prevent you from
hearing weaker transmissions. If you are having difculty hear-
ing a transmission, try setting the squelch level lower.
Reading volume and squelch level on battery icon
When you adjust the volume or squelch levels, the 4 bars on the battery icon
display according to the volume and squelch levels. For example, two bars
display for VOL levels 3 and 4, and Squelch level 2.
-
Setting the UIC channel mode (USA/CAN/INT)
You can select marine channels for the USA, Canada, or International waters.
Press UIC/LOCK to scroll through USA, CANada, or INTernational channel
options.
Using the WX Mode
Press WX/ALERT to switch to WX mode; you can then listen to one of the 9
weather channels. Press and hold WX/ALERT to turn on Weather Alert mode.
The radio then monitors the current weather channel and alerts you to any
broadcast weather alerts or notications. The
icon displays to indicate that
WX Alert is on.
22
Making a Transmission
Selecting a channel
Press Channel Up and Channel Down briey to scroll through the channels
one channel at a time. Press and hold Channel Up or Channel Down to quick-
ly scroll through the channels.
Making a transmission
Press and hold Push to Talk.
displays while you are transmitting. Release
Push to Talk when you’re nished talking to let the other party respond.
© To prevent stuck microphone problems or situations where Push to Talk is
pushed accidentally, the radio limits your talk time to 5 minutes in a single
transmission.
© For the best sound quality, hold the microphone about two inches away from
your mouth.
© Some marine channels and Weather mode channels are Receive Only. See
page 28 for a list of receive-only channels.
There is a 5 minute limit for continuous transmission. After 5
minutes the unit goes into a PTT error condition; the timeout
tone sounds, TX displays, and the channel indicators blink.
Boosting the transmission power
In most situations, 1W transmission power is all you need. If you nd yourself
far away from other stations and have trouble getting a response, you may
need to boost the transmission power from 1W to 2.5W or 6W.
Alkaline battery boost is limited to 2.5W
Channels 75 and 76 are 1W only and do not have power override
capability.
1) Select the channel you want to transmit on.
2) Press L/M/H to switch to the next transmission power level (for example,
from 1W to 2.5W; from 2.5W to 6W, or from 6W back to 1W).
3) The display shows the new transmission power. The transmit power re-
mains at the new setting until you change it again.
Don’t forget to change the transmission setting back to 1W when
you move close to other stations.
© Some channels (for example, channels 13 and 67) limit the transmission
power to 1W. When you tune to a limitedpower channel, the radio automati-
cally switches to 1W. See page 28 for a list of power-restricted channels.
-
-
-
-
23
Saving Channels to Memory
If you nd a channel you like and want to listen to it again, save it to memory.
Press MEM/SOS; the active channel is stored in memory and MEM displays.
Press SCAN DUAL to scan the channels in memory.
You must have at least 2 channels in memory in order to use
Scan mode. Channel 70 and WX channels cannot be stored into
memory.
Press SCAN/DUAL again to remove the channel from memory.
Special Features
Using the Strobe SOS Light/Flashlight
You can use this radio in an emergency. If you turn on the strobe SOS high-
intensity LED light on your radio, your radio will blink “S O S” in international
Morse Code. This will make it easier for rescuers to nd you faster.
Your radio operates normally when the SOS LED strobe is ac-
tivated.
-
-
With the SOS LED
in this state -
OFF
SOS
Continuous
Do This -
Press and hold Mem/
SOS for 2 seconds.
Press and hold Mem/SOS
for 2 seconds.
Press and hold Mem/SOS
for 2 seconds
For this -
SOS LED signals SOS in
Morse code
SOS LED remains on
continuously (Flashlight
mode)
SOS LED turns off
Turning the key beep on and off
Key beep is the tone that sounds when you press a key or a button. You cannot
change the key beep volume.
To turn key beep on or off, press and hold Channel up or Channel down while
turning on the radio. You may need to turn off the radio rst.
Setting Key Lock
You can lock and unlock the keypad by pressing and holding UIC/LOCK. If Key
Lock is on, only PTT, Boost, and power on/ off will operate. Key Lock remains
in memory when the radio is turned off.
24
Key Lock will automatically turn off if a WX Alert signal is received.
Using the external speaker/Mic jack
You can connect an optional external speaker-mic to this watertight jack. Un-
screw the cap, which is held by the rubber cap-keeper to prevent loss. Insert
the special gasketed plug and screw down the shell, which prevents water from
entering the jack.
For details, consult your dealer or contact PRESIDENT Customer Care directly
(see back cover for contact information).
Using the Battery Save feature
The Battery Save feature automatically turns off receive power at regular inter-
vals to save battery power. Battery Save turns of when receiving transmissions
or transmitting a response. It reactivates after 3 seconds of no activity (transmit
or receive).
Battery Save does not work while in Scan mode or in Triple/Dual
watch, and while WX alert is active.
-
25
Maintenance and Troubleshooting
Due to its rugged design, your radio requires very little maintenance. However,
it is a precision electronic instrument, so you should follow a few precautions:
© If the antenna has been damaged, do not transmit except in an emergency
situation. Transmitting with a defective antenna may cause further radio
damage.
© You are responsible for continued FCC technical compliance of your radio.
Common Questions
Problem
The radio won’t turn on
The power LED on the
charger doesn’t turn on
The radio won’t transmit
I can’t hear anything from
the speaker
The sound is mufed or
the volume is low
Noise comes out of the
speaker all the time
I can transmit, but no one
can hear me
I’m not getting hazard
alerts
Things to Try
Charge the radio
- Don’t use the charger when the ambient tem-
perature is below 0° C (32° F) or above 45° C
(113° F)
- Make sure the charging contacts on the radio
and charger are clean
- Replace the battery
Make sure you are not in Weather or Scan
mode
Make sure you are not trying to transmit on a
receive-only channel or transmit at the wrong
power level for this channel (see the channel
lists starting on page 28)
Check the battery power level; if it’s low, charge
the battery before trying to transmit
Make sure the duration of each transmission is
less than 5 minutes
Adjust the squelch level; it is probably too high
Clear water from the speaker grill
Adjust the squelch level; it is probably too low
Check your UIC channel settings: does the area
you are in use different channel assignments?
Make sure Weather Alert Watch is turned on
26
Problem
The display ashes, and I
don’t know why
Where can I nd my
radio’s serial number?
Things to Try
The channel number on the display will ash if
the radio is in a Watch mode or in Scan mode.
Try turning off scanning, Weather Alert Watch,
Triple Watch, or Dual Watch (seet page 13).
The serial number is on a plate inside the bat-
tery compartment
27
Specications
General
- Channels : All US/International/Canada marine
channels 9 Weather channels
- Frequency Control : PLL
- Frequency Tolerance : Transmit: 0.5 PPM (at 25°C) nominal
Receive: 0.5 PPM (at 25°C) nominal
- Operating Temperature : -4°F (-20°C) to +122°F(+50°C)
- Antenna : Flexible Whip
- Microphone : Built-in Electret type
- Display : Liquid Crystal Display
- Speaker : 8Ω 1.0 Watt
- Power Source : Rechargeable Lithium Ion Battery 7.4V
1160 mAh
- Size (without antenna) : 5.95 (H) x 2.40 (W) x 1.69 (D) inch
142 (H) x 61 (W) x 43 (D) mm
- Weight : 9.9 oz (281g) (w/battery and antenna)
Transmitter
- Frequency Range : 156~158 MHz
- Frequency Stability : ±3 PPM (nominal)
- Power Output : 1.0 W & 2.5W & 6W
- Spurious Emissions : 70 dBm
- Current Drain : 1400 mA (6W) nominal
Receiver
- Type : Double Conversion Super Heterodyne
Phase Locked Loop system for Local
Oscillator
- Frequency Range : 156~164 MHz
- Sensitivity : 0.22 μV for 12dB SINAD (nominal)
- Squelch Sensitivity : Threshold 0.18 μV (nominal)
- Audio Frequency Response : +5.0 dB @ 500 Hz; -6 dB @ 2000Hz
(nominal)
- Adjacent Channel Selectivity : 80 dB @ ±25 kHz (nominal)
- Audio Output Power : 1.0 W @10% THD (nominal)
- Current Drain : Squelched: 38 mA; Max. Audio: 230 mA
(nominal)
28
Channels and Frequencies (MHz)
US Channel Frequencies and Names
US Marine Channels
Ch RX Freq TX Freq Status Name
1A 156.050 156.050 Simplex Vessel trafc system/commercial
5A 156.250 156.250 Simplex Vessel trafc system/commercial
6 156.300 156.300 Simplex Inter-shipsafety
7A 156.350 156.350 Simplex Commercial
8 156.400 156.400 Simplex Commercial
9 156.450 156.450 Simplex Non commercial
10 156.500 156.500 Simplex Commercial
11 156.550 156.550 Simplex Vessel trafc system
12 156.600 156.600 Simplex Vessel trafc system
13 156.650 156.650 Simplex,1W Bridge to bridge
14 156.700 156.700 Simplex Vessel trafc system
15 156.750 Inhibit Receiveonly Environmental
16 156.800 156.800 Simplex Distress, safety and calling
17 156.850 156.850 Simplex,1W Govt maritime control
18A 156.900 156.900 Simplex Commercial
19A 156.950 156.950 Simplex Commercial
20 161.600 157.000 Duplex Port operation
20A 157.000 157.000 Simplex Port operation
21A 157.050 157.050 Simplex Coast guard only
22A 157.100 157.100 Simplex Coast guard
23A 157.150 157.150 Simplex Coast guard only
24 161.800 157.200 Duplex Marine operator
25 161.850 157.250 Duplex Marine operator
26 161.900 157.300 Duplex Marine operator
27 161.950 157.350 Duplex Marine operator
28 162.000 157.400 Duplex Marine operator
63A 156.175 156.175 Simplex Vessel trafc system
65A 156.275 156.275 Simplex Port operation
66A 156.325 156.325 Simplex Port operation
67 156.375 156.375 Simplex,1W Bridge To Bridge
29
US Marine Channels
Ch RX Freq TX Freq Status Name
68 156.425 156.425 Simplex Non Commercial
69 156.475 156.475 Simplex Non Commercial
70 156.525 Inhibit Receive only Digital Selective Calling
71 156.575 156.575 Simplex Non Commercial
72 156.625 156.625 Simplex Non Commercial (Ship-Ship)
73 156.675 156.675 Simplex Port Operation
74 156.725 156.725 Simplex Port Operation
75 156.775 156.775 Simplex,1W Port Operation
76 156.825 156.825 Simplex, 1W Port Operation
77 156.875 156.875 Simplex,1W Port Operation (Ship-Ship)
78A 156.925 156.925 Simplex Non Commercial
79A 156.975 156.975 Simplex Commercial
80A 157.025 157.025 Simplex Commercial
81A 157.075 157.075 Simplex Coast Guard
82A 157.125 157.125 Simplex Coast Guard
83A 157.175 157.175 Simplex Government
84 161.825 157.225 Duplex Marine Operator
85 161.875 157.275 Duplex Marine Operator
86 161.925 157.325 Duplex Marine Operator
87 157.375 157.375 Simplex Marine Operator
88 157.425 157.425 Simplex Commercial (Ship-Ship)
Canadian Channel Frequencies and Names
Canadian Marine Channels
Ch RX Freq TXFreq Status Name
1 160.650 156.050 Duplex Marine Operator
2 160.700 156.100 Duplex Marine Operator
3 160.750 156.150 Duplex Marine Operator
4A 156.200 156.200 Simplex Canadian Coast Guard
5A 156.250 156.250 Simplex Vessel Trafc System
6 156.300 156.300 Simplex Inter-Ship Safety
7A 156.350 156.350 Simplex Commercial
8 156.400 156.400 Simplex Commercial
30
Canadian Marine Channels
Ch RX Freq TX Freq Status Name
9 156.450 156.450 Simplex Boater Calling Channel
10 156.500 156.500 Simplex Commercial
11 156.550 156.550 Simplex Vessel Trafc System
12 156.600 156.600 Simplex Vessel Trafc System
13 156.650 156.650 Simplex, 1W Bridge To Bridge
14 156.700 156.700 Simplex Vessel Trafc System
15 156.750 156.750 Simplex, 1W Environmental
16 156.800 156.800 Simplex Distress, safety, calling
17 156.850 156.850 Simplex, 1W State Control
18A 156.900 156.900 Simplex Commercial
19A 156.950 156.950 Simplex Canadian Coast Guard
20 161.600 157.000 Duplex,1W Port Operation
21A 157.050 157.050 Simplex Canadian Coast Guard
22A 157.100 157.100 Simplex Canadian Coast Guard
23 161.750 157.150 Duplex Canadian Coast Guard
24 161.800 157.200 Duplex Marine Operator
25 161.850 157.250 Duplex Marine Operator
26 161.900 157.300 Duplex Marine Operator
27 161.950 157.350 Duplex Marine Operator
28 162.000 157.400 Duplex Marine Operator
60 160.625 156.025 Duplex Marine Operator
61A 156.075 156.075 Simplex Canadian Coast Guard
62A 156.125 156.125 Simplex Canadian Coast Guard
63A 156.175 156.175 Simplex Port Operation
64 160.825 156.225 Duplex Marine Operator
64A 156.225 156.225 Simplex Port Operation
65A 156.275 156.275 Simplex Port Operation
66A 156.325 156.325 Simplex, 1W Port Operation
67 156.375 156.375 Simplex Bridge To Bridge
68 156.425 156.425 Simplex Non Commercial
69 156.475 156.475 Simplex Non Commercial
70 156.525 Inhibit Receive only Digital Selective Calling
71 156.575 156.575 Simplex Non Commercial
72 156.625 156.625 Simplex Non Commercial
31
Canadian Marine Channels
Ch RX Freq TX Freq Status Name
73 156.675 156.675 Simplex Port Operation
74 156.725 156.725 Simplex Port Operation
75 156.775 156.775 Simplex, 1W Port Operation
76 156.825 156.825 Simplex, 1W Port Operation
77 156.875 156.875 Simplex, 1W Port Operation
78A 156.925 156.925 Simplex Inter Ship
79A 156.975 156.975 Simplex Inter Ship
80A 157.025 157.025 Simplex Inter Ship
81A 157.075 157.075 Simplex Canadian Coast Guard
82A 157.125 157.125 Simplex Canadian Coast Guard
83 161.775 157.175 Duplex Canadian Coast Guard
83A 157.175 157.175 Simplex Canadian Coast Guard
84 161.825 157.225 Duplex Marine Operator
85 161.875 157.275 Duplex Marine Operator
86 161.925 157.325 Duplex Marine Operator
87 157.375 157.375 Simplex Port Operation
88 157.425 157.425 Simplex Port Operation
International Channel Frequencies and Names
International Marine Channels
Ch RX Freq TX Freq Status Name
1 160.650 156.050 Duplex Marine operator
2 160.700 156.100 Duplex Marine operator
3 160.750 156.150 Duplex Marine operator
4 160.800 156.200 Duplex Marine operator
5 160.850 156.250 Duplex Marine operator
6 156.300 156.300 Simplex Inter-ship safety
7 160.950 156.350 Duplex Marine operator
8 156.400 156.400 Simplex Commercial (ship-ship)
9 156.450 156.450 Simplex Boater calling channel
10 156.500 156.500 Simplex Commercial
11 156.550 156.550 Simplex Vessel trafc system
12 156.600 156.600 Simplex Vessel trafc system
13 156.650 156.650 Simplex Bridge to bridge
32
International Marine Channels
Ch RX Freq TX Freq Status Name
14 156.700 156.700 Simplex Vessel trafc system
15 156.750 156.750 Simplex, 1W Environmental
16 156.800 156.800 Simplex Distress, safety, calling
17 156.850 156.850 Simplex, 1W Govt maritime control
18 161.500 156.900 Duplex Port operation
19 161.550 156.950 Duplex Commercial
20 161.600 157.000 Duplex Port operation
21 161.650 157.050 Duplex Port operation
22 161.700 157.100 Duplex Port operation
23 161.750 157.150 Duplex Marine operator
24 161.800 157.200 Duplex Marine operator
25 161.850 157.250 Duplex Marine operator
26 161.900 157.300 Duplex Marine operator
27 161.950 157.350 Duplex Marine operator
28 162.000 157.400 Duplex Marine operator
60 160.625 156.025 Duplex Marine operator
61 160.675 156.075 Duplex Marine operator
62 160.725 156.125 Duplex Marine operator
63 160.775 156.175 Duplex Marine operator
64 160.825 156.225 Duplex Marine operator
65 160.875 156.275 Duplex Marine operator
66 160.925 156.325 Duplex Marine operator
67 156.375 156.375 Simplex Bridge to bridge
68 156.425 156.425 Simplex Non commercial
69 156.475 156.475 Simplex Non commercial
70 156.525 Inhibit Receive only Digital Selective Calling
71 156.575 156.575 Simplex Non commercial
72 156.625 156.625 Simplex Non commercial
73 156.675 156.675 Simplex Port operation
74 156.725 156.725 Simplex Port operation
75 156.775 156.775 Simplex, 1W Port operation
76 156.825 156.825 Simplex, 1W Port operation
77 156.875 156.875 Simplex Port operation (ship-ship)
78 161.525 156.925 Duplex Port operation
33
International Marine Channels
Ch RX Freq TX Freq Status Name
79 161.575 156.975 Duplex Port operation
80 161.625 157.025 Duplex Port operation
81 161.675 157.075 Duplex Port operation
82 161.725 157.125 Duplex Port operation
83 161.775 157.175 Duplex Port operation
84 161.825 157.225 Duplex Marine operator
85 161.875 157.275 Duplex Marine operator
86 161.925 157.325 Duplex Marine operator
87 157.375 157.375 Simplex Marine operator
88 157.425 157.425 Simplex Marine operator
Weather Channel Frequencies and Names
Channel RX Channel RX
WX01 162.5500 WX06 162.5000
WX02 162.4000 WX07 162.5250
WX03 162.4750 WX08 161.6500
WX04 162.4250 WX09 161.7750
WX05 162.4500
34
Regulations and Safety Warnings
Basic Radio Guidelines
If you have a VHF radio on your boat, you must maintain a watch on channel 16
(156.800 MHz) whenever the radio is not being used to communicate. Starting
in 2004, if a radio is carried, it must be on and set to channel 16. Whenever
your boat is underway.
If you hear a distress call, wait a few minutes to let a shore station or Coast
Guard vessel respond. If no other station has responded after 5 minutes, you
must respond to the distress call.
Do not make false mayday or distress calls as a prank or to test your radio.
(This is essentially like making a false 9-1-1 call; you may be subject to nes.)
FCC/Industry Canada Information
Certication: FCC Part 80 or RSS-182
Output Power: 6W
Emission: 16K0F3E
Transmitter Frequency Range: 156.025-157.425 MHz
This device complies with Part 15 of the FCC Rules. Operation is subject to the
condition that this device does not cause harmful interference.
Unauthorized changes or modications to this equipment may void compliance
with the FCC Rules. Any change or modication must be approved in writing
by PRESIDENT. Changes or modications not approved by PRESIDENT could
void the user’s authority to operate the equipment.
FCC RF Exposure Information
In August 1996 the Federal Communications Commission (FCC) of the United
States with its action in Report and Order FCC 96-326 adopted an updated
safety standard for human exposure to radio frequency electromagnetic en-
ergy emitted by FCC regulated transmitters. Those guidelines are consistent
with the safety standard previously set by both U.S. and international stand-
ards bodies. The design of the radio complies with the FCC guidelines and
these international standards.
Never allow children to operate the radio without adult supervision and the
knowledge of the following guidelines.
WARNING! It is up to the user to properly operate this radio transmitter to
insure safe operation. Please adhere to the following:
35
Use only the supplied or an approved antenna. Unauthorized antennas, modi-
cations, or attachments could impair call quality, damage the radio, or violate
FCC regulations.Do not use the radio with a damaged antenna. If a damaged
antenna comes into contact with the skin, a minor burn may result. Please
contact your local dealer for a replacement antenna.
Body-Worn Operation
This device was tested for typical body-worn operations using the supplied
belt-clip. To maintain compliance with FCC RF exposure requirements, body-
worn operations are restricted to the supplied belt-clip. For handheld operation,
the radio should be held 1 inch from the user’s face. The use of accessories
that do not satisfy these requirements may not comply with FCC RF exposure
requirements and should be avoided.
Lithium-Ion Polymer Battery Warning
This equipment contains a rechargeable Lithium-Ion Polymer battery. The re-
chargeable Lithium-Ion Polymer battery contained in this equipment may ex-
plode if disposed of in a re.
Do not short-circuit the battery.
Do not charge the rechargeable battery used in this equipment in any charger
other than the one specied in the owner’s manual. Using another charger may
damage the battery or cause the battery to explode.
NOTE: Li-Ion Polymer batteries must be recycled or disposed
of properly.
Avoid exposing the battery (whether attached to the radio or not) to direct
sunlight, heated cars, or temperatures below -4°F (-20°C) or above +140°F
(+60°C). Exposing the chemical contained within the battery pack to tempera-
tures above +140°F (+60°C) may cause the battery to rupture, fail, or reduce
performance.
In case of exposure to the cell contents, wash the affected area thoroughly, and
seek medical attention.
Three Year Limited Warranty
This transceiver has a 3 years warranty for materials and workmanship in its
country of purchase against any manufacturing defect recognized by our tech-
nical department. It is recommended to read carefully following conditions and
to respect them in order not to loose it.
Any repair under warranty will be free of charge and the transport costs for
sending back will be on charge of our company.
-
36
A proof of purchase must compulsorily be added to the transceiver in need
of repair.
Don’t install your transceiver without having read this instructions manual.
Our technical department won’t send nor exchange any spare parts as part
of warranty.
Are not covered
The battery pack.
Damages caused by accident , shock , inadequate packing or the use of
accessories that are not in conformity.
Interventions that modied the conformity features, repairs or modications
done by third parties which are not agreed by our company.
Any opening of the housing cancels the warranty.
GOUPE PRESIDENT ELECTRONICS
SIÈGE SOCIAL / HEAD OFFICE - FRANCE
Route de Sète - BP 100 - 34540 BALARUC
Email: groupe@president-electronics.com
37
Notes
38
Notes
SIÈGE SOCIAL / HEAD OFFICE - FRANCE
Route de Sète - BP 100 - 34540 BALARUC
Site internet : http:\\www.president-electronics.com
Email : groupe@president-electronics.com
U01UT644BZZ(0)
1369/07-13
16

Hulp nodig? Stel uw vraag in het forum

Spelregels

Misbruik melden

Gebruikershandleiding.com neemt misbruik van zijn services uitermate serieus. U kunt hieronder aangeven waarom deze vraag ongepast is. Wij controleren de vraag en zonodig wordt deze verwijderd.

Product:

Bijvoorbeeld antisemitische inhoud, racistische inhoud, of materiaal dat gewelddadige fysieke handelingen tot gevolg kan hebben.

Bijvoorbeeld een creditcardnummer, een persoonlijk identificatienummer, of een geheim adres. E-mailadressen en volledige namen worden niet als privégegevens beschouwd.

Spelregels forum

Om tot zinvolle vragen te komen hanteren wij de volgende spelregels:

Belangrijk! Als er een antwoord wordt gegeven op uw vraag, dan is het voor de gever van het antwoord nuttig om te weten als u er wel (of niet) mee geholpen bent! Wij vragen u dus ook te reageren op een antwoord.

Belangrijk! Antwoorden worden ook per e-mail naar abonnees gestuurd. Laat uw emailadres achter op deze site, zodat u op de hoogte blijft. U krijgt dan ook andere vragen en antwoorden te zien.

Abonneren

Abonneer u voor het ontvangen van emails voor uw President PM-2050 SWF bij:


U ontvangt een email met instructies om u voor één of beide opties in te schrijven.


Ontvang uw handleiding per email

Vul uw emailadres in en ontvang de handleiding van President PM-2050 SWF in de taal/talen: Engels als bijlage per email.

De handleiding is 0,81 mb groot.


U ontvangt de handleiding per email binnen enkele minuten. Als u geen email heeft ontvangen, dan heeft u waarschijnlijk een verkeerd emailadres ingevuld of is uw mailbox te vol. Daarnaast kan het zijn dat uw internetprovider een maximum heeft aan de grootte per email. Omdat hier een handleiding wordt meegestuurd, kan het voorkomen dat de email groter is dan toegestaan bij uw provider.

Stel vragen via chat aan uw handleiding

Stel uw vraag over deze PDF

Andere handleiding(en) van President PM-2050 SWF

President PM-2050 SWF Gebruiksaanwijzing - Français - 36 pagina's


Uw handleiding is per email verstuurd. Controleer uw email

Als u niet binnen een kwartier uw email met handleiding ontvangen heeft, kan het zijn dat u een verkeerd emailadres heeft ingevuld of dat uw emailprovider een maximum grootte per email heeft ingesteld die kleiner is dan de grootte van de handleiding.

Er is een email naar u verstuurd om uw inschrijving definitief te maken.

Controleer uw email en volg de aanwijzingen op om uw inschrijving definitief te maken

U heeft geen emailadres opgegeven

Als u de handleiding per email wilt ontvangen, vul dan een geldig emailadres in.

Uw vraag is op deze pagina toegevoegd

Wilt u een email ontvangen bij een antwoord en/of nieuwe vragen? Vul dan hier uw emailadres in.


Info