CAUTION:Before beginning any fitness program, see your physician for a thorough examination. Ask your physician about the appropriate target heart rate for your fitness level.
Drawn
to crop
1.75” H
Line
Weights
Approx
.5 pt
.25 pt
Drawn for Hydra Manual / Quickstart Card 03.07.14 0 - Jen
Drawn for Hydra Manual / Quickstart Card 03.07.14 0 - Jen
Drawn
to crop
1.75” H
Line
Weights
Approx
.5 pt
.25 pt
Drawn for Hydra Manual / Quickstart Card 03.07.14 0 - Jen
As you get to know your new Precor Elliptical Fitness Crosstrainer
™
(EFX
®
) and your own tness goals, you’ll use the advanced features
of the equipment more often. To begin with, though, here’s an easy
way to start out.
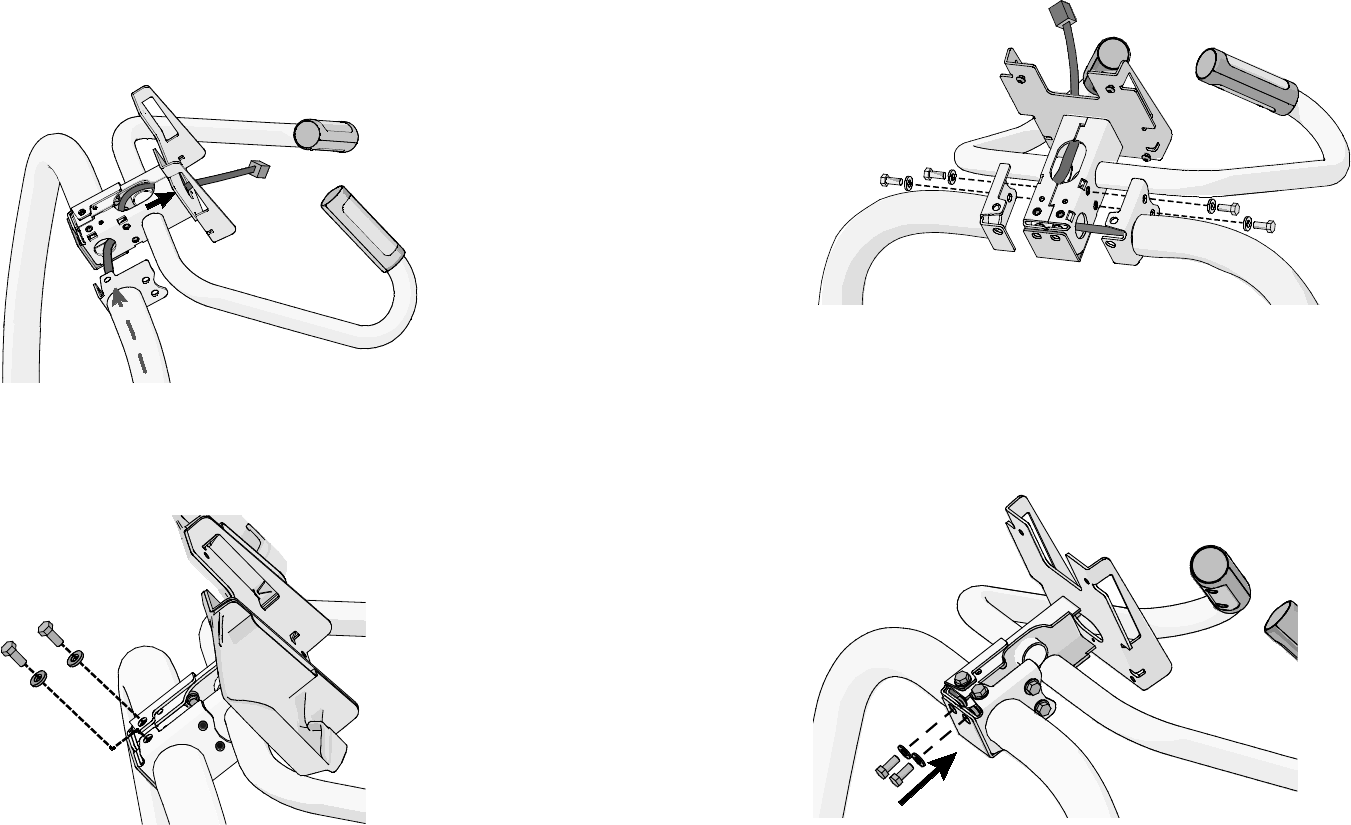
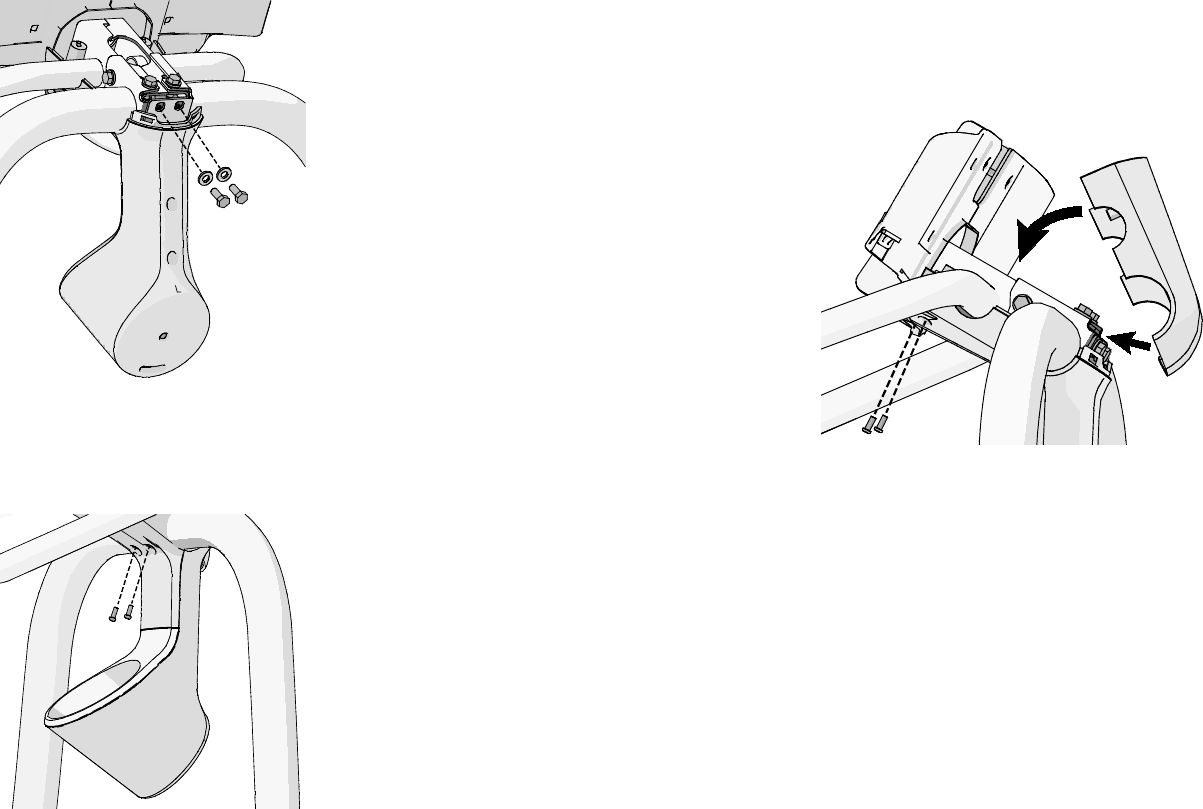
NOTE:These instructions assume that your EFX has been completely
installed and set up.
WARNING: Read through ALL of the safety information
in the Owner’s Manual, and make sure that the EFX is
properly connected to the electrical supply in your house,
before you use the EFX.
GETTING sTARTED
PRECISION SERIES AND ENERGY SERIES ELLIPTICALS
GO
RESET
GO
RESET
GO
RESET
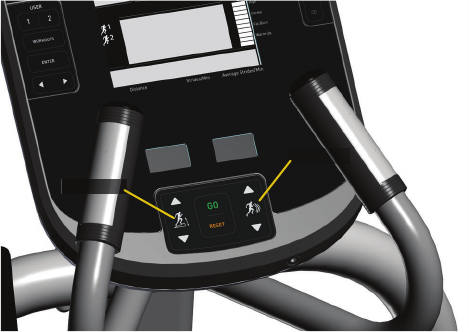
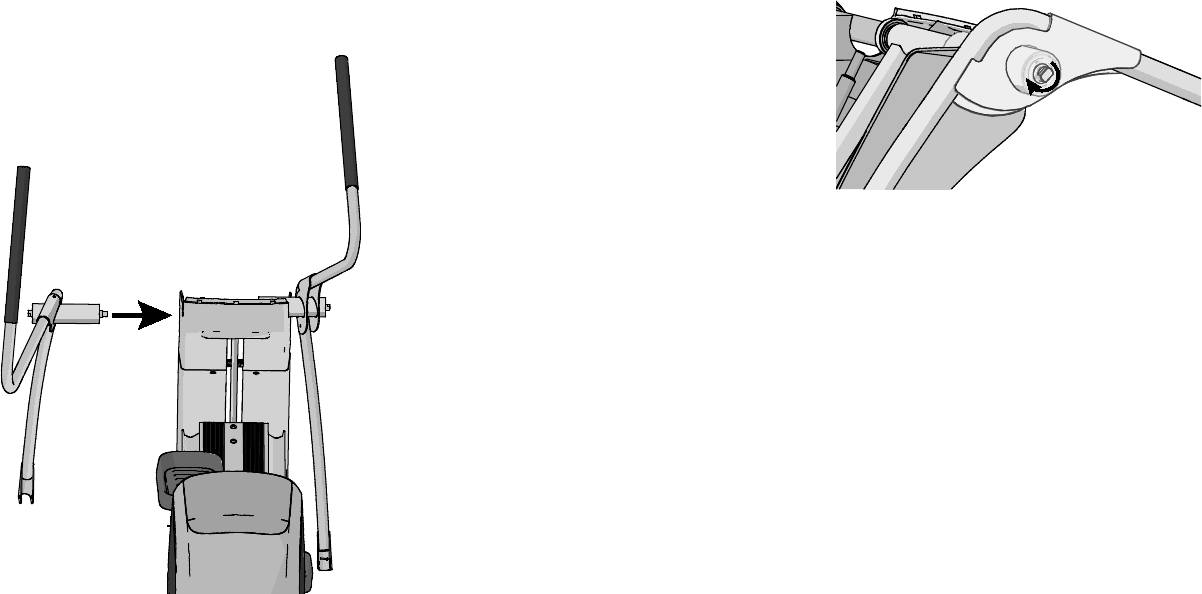
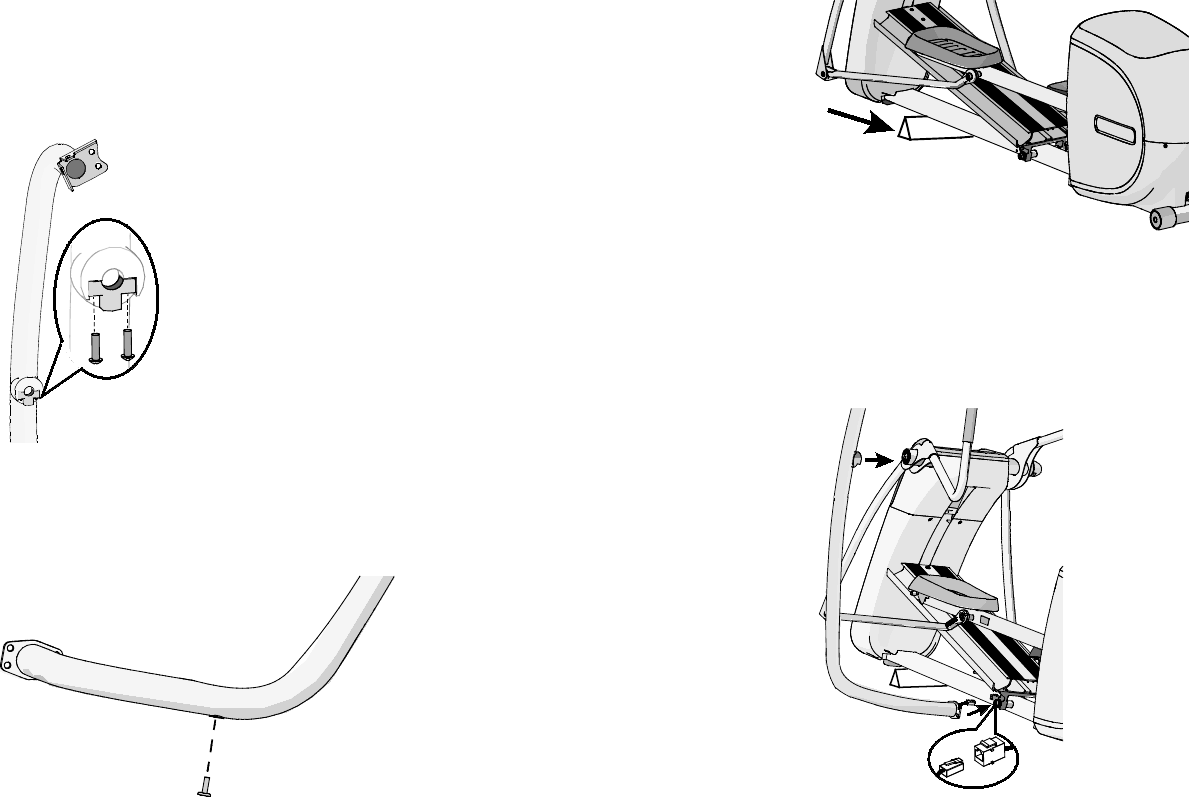
sTEP 4: Grasp handles rmly with
both hands.
sTEP 7: Use the control on the console
to adjust the amount of resistance. If
the equipment includes a motorized
CrossRamp® adjustment, use the control on
the left to adjust the CrossRamp height, and
the control on the right for the resistance.
sTEP 6: Press the GO key
(manual operation).
sTEP 8: If you need to end your workout early, press the RESET key three times.
Refer to your owner’s manual for complete operational instructions
and troubleshooting. See reverse for important heart rate information.
sTEP 5: Begin pedaling.
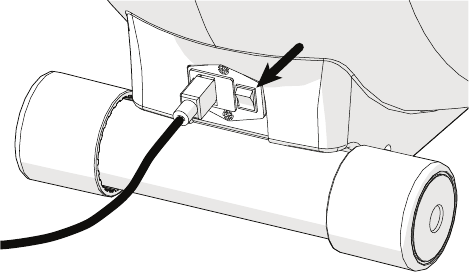
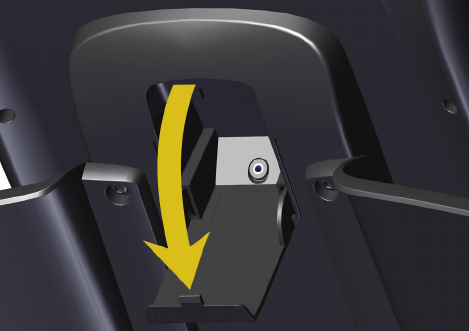
sTEP 1: Turn the equipment on.sTEP 2: If the locking pin is engaged,
release it.
sTEP 3: Hold one handrail and step
onto the pedals.
TO GET sTARTED WITH YOUR NEW PRECOR EFX:
WELCOME TO A PERSONALIZED FITNESS EXPERIENCE FOR YOUR HOME
Quick
Start
Card
PRECISION
™
SERIES
AND ENERGY
™
SERIES
ELLIPTICALS
HEART RATE INFORMATION
CHOOsE A WORKOUT
• Determine your level of tness: beginner,
intermediate, or advanced.
• Determine your immediate goal: endurance
training, cardio-conditioning, or weight loss.
If you are a beginner, start with a cardio-conditioning
workout to gradually adjust your body to the demands of
exercise. Over a recommended eight-week period, you will
increase your endurance and strength.
For all tness levels, plan to exercise at an appropriately
challenging pace for 20 to 30 minutes a day. Wear a chest
strap to monitor your heart rate. Supplement your plans
with tness workouts from the Precor web site
(www.precor.com). The Precor web site also provides
expert advice to help you reach your tness goals.
MONITOR YOUR HEART RATE
The SmartRate and heart rate displays provide visual cues
that help you adjust your tness routine to reach your
goals. Use these features to keep your heart rate within
the target zones.
Wear a Chest Strap
During a workout, the heart rate features appear on
the display when you wear a chest strap. To receive an
accurate reading, the chest strap needs to be in direct
contact with your skin. After you put on the chest strap,
face the display console for a minimum of 15 seconds. This
allows the receiver in the console to recognize the signal
from the chest strap.
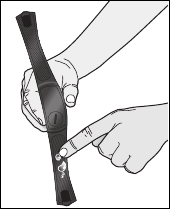
1. Carefully dampen the back of the strap with tap
water (Diagram A).
IMPORTANT: Do not use deionized water. It does
not have the proper minerals and salts to conduct
electrical impulses.
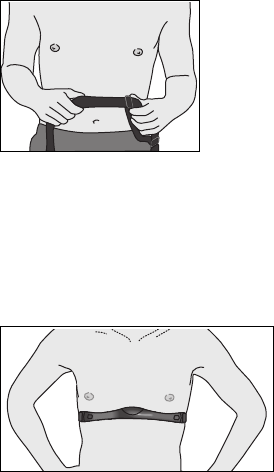
2. Adjust the strap and fasten it around your chest.
The strap should feel snug, not restrictive
(Diagram B).
3. Make sure that the chest strap is right side up, lies
horizontally across your chest, and is centered in
the middle of your chest (Diagram C).
When these steps are complete, you are ready to view
your heart rate.
Touch-Sensitive Handrail Grips
Several Precor products incorporate touch-sensitive
heart rate grips on the handrails. If you prefer to use
the touch-sensitive handrail grips, use both hands.
Make sure both hands are moist (not dry) and avoid
grasping the sensors too tightly.
Note: For the best heart rate monitoring results, wear a
chest strap.
sMARTRATE® FEATUREs
When you begin an exercise session, a blinking
segment in the SmartRate display appears if you
entered your age during the setup phase. The blinking
segment indicates the current zone of your heart rate.
The calculation used for the heart rate target zone is
your maximum aerobic heart rate:
207 - (age x 0.67), multiplied by a percentage.
For the ideal weight loss range, your heart rate should
remain between 55% and 69% of your maximum
aerobic heart rate. To improve your overall
cardiovascular and respiratory tness level, maintain
your heart rate between 70% and 85% of your
maximum aerobic heart rate. For the greatest benets,
maintain your heart rate in either zone for 30 minutes or
more at least three times a week.
CAUTION: Your heart rate should never exceed
85% of your maximum aerobic heart rate or go
above your target zone (Diagram D).
COOl DOWN AFTER YOUR WORKOUT
Cooling down is an important aspect of your workout
because it helps reduce muscle stiness and
soreness by transporting excess lactic acid out of the
working muscles. Cooling down for at least three
minutes helps provide a smooth transition that allows
your heart rate to return to its normal, non-exercising state.
CAUTION:Before beginning any fitness program, see your physician for a thorough examination. Ask your physician about the appropriate target heart rate for your fitness level.
OWNER’S MANUAL
Precision
™
& Energy
™
SERIES
ELLIPTICALS
EFX®425 • EFX® 423
EFX®225 • EFX® 222
EFX® 221
WELCOME TO A PERSONALIZED FITNESS EXPERIENCE FOR YOUR HOME
Important Safety Instructions 1
Important Safety
Instructions
When using the equipment, always take basic
precautions, including the following:
Read all instructions before using the equipment.
These instructions are written for your safety and
to protect the unit.
Before beginning any fitness program, see your
physician for a complete physical examination.
Il est conseillé de subir un examen médical complet
avant d’entreprendre tout programme d’exercise. Si
vous avez des étourdissements ou des faiblesses,
arrêtez les exercices immédiatement.
DANGER
To reduce the risk of electrical
shock always unplug the unit from
the electrical outlet immediately
after using and before cleaning.
WARNING
To reduce the risk of burns, fire,
electric shock, or injury, take the
following precautions:
Do not allow children, or those unfamiliar with the
operation of the equipment, on or near it. Do not
leave children unsupervised around the unit.
Never leave the equipment unattended when it is
plugged in. Unplug the equipment from the power
source when it is not in use, before cleaning it, and
before acquiring authorized service.
When the equipment is not in use, disconnect it by
turning the power switch to the Off position, and
then remove the power plug from the power outlet.
Assemble and operate the equipment on a solid,
level surface. Locate the equipment a few feet from
walls or furniture. Keep the area behind the
equipment clear.
Precision Series / Energy Series Elliptical Fitness Crosstrainer Owner's Manual: EFX 425 / 423 / 225 / 222 / 221 2
Never operate the unit if it is damaged, not
working properly, when it has been dropped, or has
been dropped in water. Return the equipment to a
service center for examination and repair.
DANGER
The unit must be connected to a
properly grounded circuit (refer to
Grounding Instructions).
Keep the power cord and plug away from heated
surfaces.
Keep all electrical components, such as the power
cord and power switch, away from liquids to
prevent shock.
Do not operate the equipment where aerosol
(spray) products are being used or where oxygen
is being administered.
Do not use outdoors.
Maintain the equipment in good working condition.
Make sure that all fasteners are secure and the
running belt is clean and running smoothly.
Do not attempt to service the equipment yourself
except to follow the maintenance instructions
found in this manual.
Never drop or insert objects into any opening.
Keep hands away from moving parts.
Use the equipment only for its intended purpose as
described in this manual. Do not use accessory
attachments that are not recommended by the
manufacturer, as such attachments may cause
injuries.
Do not set anything on the handrails or hood. Place
liquids, magazines, and books in the appropriate
receptacles.
Do not rock the unit. Do not lean or pull on the
console at any time.
Wear proper exercise clothing and shoes for your
workout and avoid loose clothing. Do not wear
shoes with heels or leather soles. Check the soles
of your shoes and remove any dirt and embedded
stones. Tie long hair back.
Keep your body and head facing forward. Never
attempt to turn around on the EFX.
Do not overexert yourself or work to exhaustion. If
you feel any pain or abnormal symptoms, stop
your workout immediately and consult your
physician.
Important Safety Instructions 3
Safety Approvals for
Cardiovascular Equipment
Precor equipment has been tested and found to
comply with the following applicable safety standards.
Cardiovascular Type Equipment:
CAN/CSA, IEC 60335-1 (Household and similar
electrical appliances - Safety)
Grounding Instructions
The equipment must be grounded. If the equipment
malfunctions or breaks down, grounding provides a
path of least resistance for electric current, which
reduces the risk of electrical shock. The equipment is
equipped with a power cord having an
equipment-grounding conductor and a grounding plug.
The plug must be inserted into an outlet that is
properly installed and grounded in accordance with all
local codes and ordinances. Failure to properly ground
the equipment could void the Precor Limited Warranty.
DANGER
Improper connection of the
equipment-grounding conductor can
result in a risk of electric shock. Check
with a qualified electrician or service
person if you are in doubt as to whether
the unit is properly grounded. Do not
modify the plug provided with the
equipment. If it does not fit the outlet, get
a proper outlet installed by a qualified
electrician.
120 V Units Designated for North
American Markets
The unit must be connected to a grounded circuit. The
power outlet must have the same configuration as the
plug. No adapter should be used with this product.
Precision Series / Energy Series Elliptical Fitness Crosstrainer Owner's Manual: EFX 425 / 423 / 225 / 222 / 221 4
Radio Frequency Interference
(RFI)
Federal Communications Commission,
Part 15
This fitness equipment has been tested and found to
comply with the limits for a Class B digital device,
pursuant to Part 15 of the FCC Rules. These limits are
designed to provide reasonable protection against
harmful interference in a residential installation. The
equipment generates, uses, and can radiate radio
frequency energy and, if not installed and used in
accordance with the owner’s manual instructions, may
cause harmful interference to radio communications.
If the equipment does cause harmful interference to
radio or television reception, which can be determined
by turning the unit off and on, you are encouraged to
try to correct the interference using one or more of the
following measures:
Reorient or relocate the receiving antenna for your
TV, radio, VCR, DVR, etc.
Increase separation between the unit and the
receiver (TV, radio, etc.).
Connect the equipment into a different power
outlet on a dedicated circuit different from the one
used by the receiver (TV, radio, etc.). No other
appliance should be plugged into the same power
outlet as the equipment.
Consult an experienced radio/TV technician for
help.
WARNING
Per FCC rules, changes or
modifications not expressly
approved by Precor could void the
user’s authority to operate the
equipment.
Important Safety Instructions 5
Canadian Department of Communications
This digital apparatus does not exceed the Class B
limits for radio noise emissions from digital apparatus
set out in the Radio Interference Regulations of the
Canadian Department of Communications.
Le présent appareil numérique n’émet pas de bruits
radioélectriques dépassant les limites applicables aux
appareils numériques de la class B prescrites dans le
Règlement sur le brouillage radioélectrique édicté par le
ministére des Communications du Canada.
ATTENTION: Haute Tension
Débranchez avant de réparer
Precision Series / Energy Series Elliptical Fitness Crosstrainer Owner's Manual: EFX 425 / 423 / 225 / 222 / 221 6
Obtaining Service
You should not attempt to service the equipment
except for maintenance tasks as described in this
manual. The equipment does not contain any
user-serviceable parts that require lubrication. For
information about product operation or service, see the
Precor web site at www.precor.com.
Should you need more information regarding customer
support numbers or a list of Precor authorized service
centers, visit the Precor web site at www.precor.com.
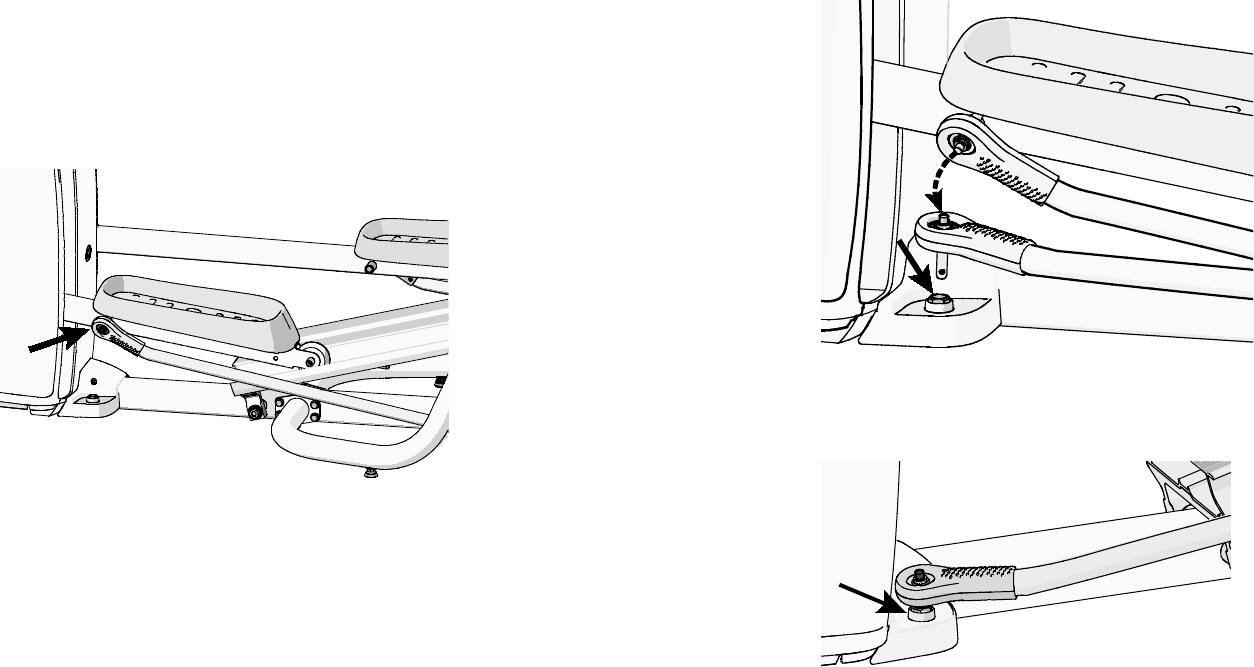
Note: A thin protective sheath covers the roller arm
wheels on your EFX. As you exercise, the roller arms
move up and down the ramp and the wheels tend to
squeak until the protective sheath wears off. Noise
from the wheels during this break-in period is normal
and will stop once the break-in period is complete
(usually after about ten hours of use). Please allow ten
hours of use for the wheel noise to subside before
calling Precor Customer Support.
For future reference, write the model number,
equipment serial number, console serial number, and
date of purchase for your unit in the space provided.
Model number:
Equipment serial number:
Console serial number:
Date purchased:
Important Safety Instructions 7
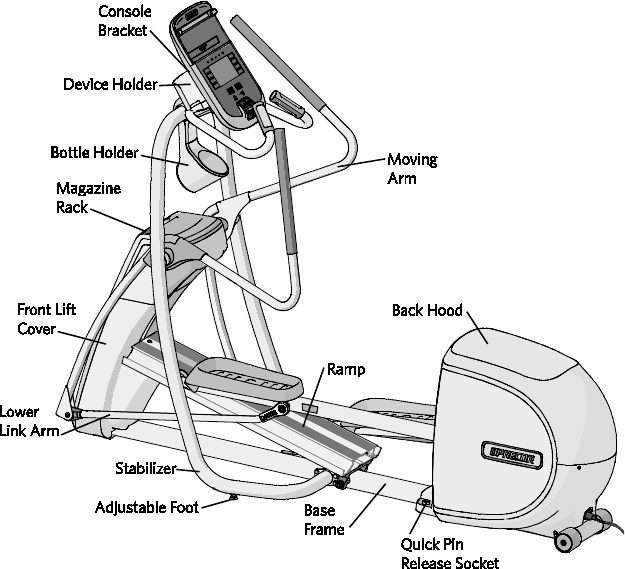
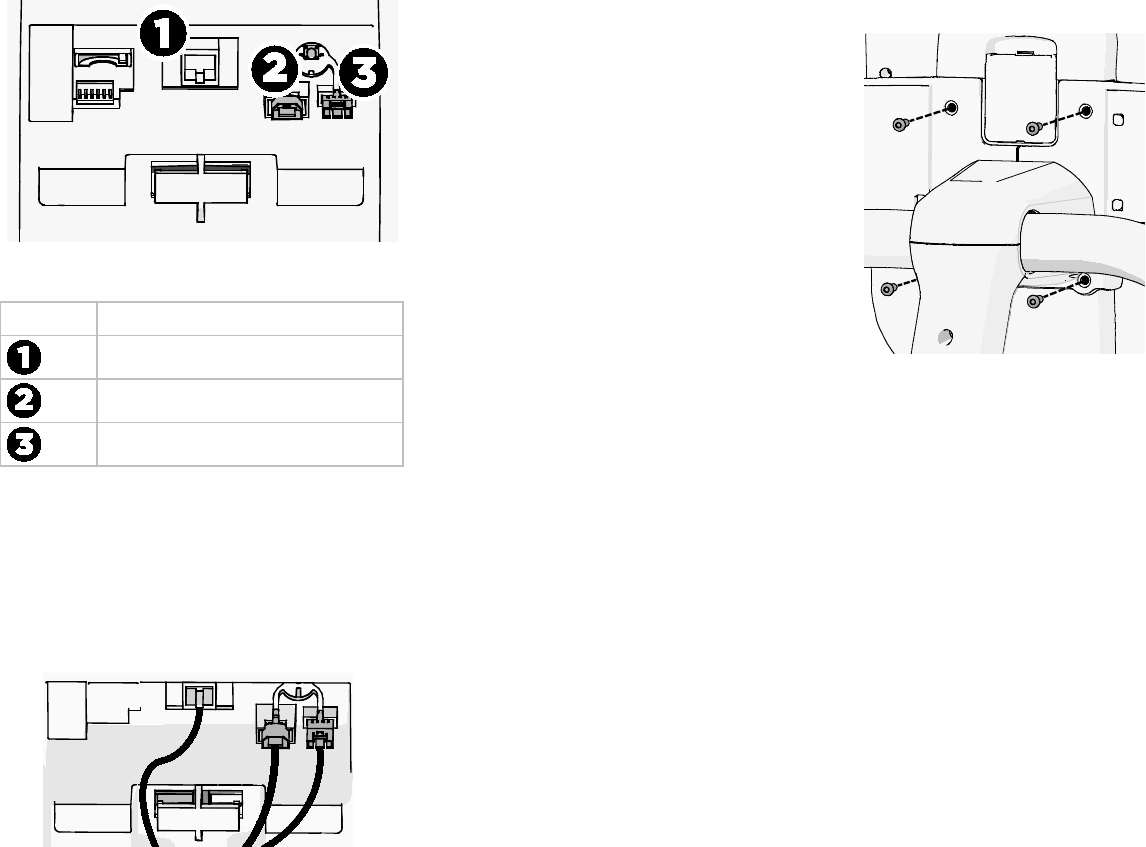
The equipment serial number is located on the rear
stabilizer bar, just below the power switch.
Figure 1: EFX serial number label position
The console serial number is located inside the audio
connector compartment on the back of the console.
You will need to open the cover of this compartment to
see the number.
Figure 2: Console serial number label position
Precision Series / Energy Series Elliptical Fitness Crosstrainer Owner's Manual: EFX 425 / 423 / 225 / 222 / 221 8
Table of Contents
Important Safety Instructions ........................... 1
Gebruikershandleiding.com neemt misbruik van zijn services uitermate serieus. U kunt hieronder aangeven waarom deze vraag ongepast is. Wij controleren de vraag en zonodig wordt deze verwijderd.
Product:
Spelregels forum
Om tot zinvolle vragen te komen hanteren wij de volgende spelregels:
lees eerst de handleiding door;
controleer of uw vraag al eerder door iemand anders is gesteld;
probeer uw vraag zo duidelijk mogelijk te stellen;
heeft u een probleem en al geprobeerd om dit op te lossen, vermeld dit erbij aub;
heeft u een oplossing gekregen van een bezoeker dan horen wij dat graag in dit forum;
wilt u een reactie geven op een vraag of antwoord, gebruik dan niet dit formulier maar klik op de knop 'reageer op deze vraag';
uw vraag wordt direct op de website gezet; vermijd daarom persoonlijke gegevens in te vullen;
Belangrijk! Als er een antwoord wordt gegeven op uw vraag, dan is het voor de gever van het antwoord nuttig om te weten als u er wel (of niet) mee geholpen bent! Wij vragen u dus ook te reageren op een antwoord.
Belangrijk! Antwoorden worden ook per e-mail naar abonnees gestuurd. Laat uw emailadres achter op deze site, zodat u op de hoogte blijft. U krijgt dan ook andere vragen en antwoorden te zien.
Abonneren
Abonneer u voor het ontvangen van emails voor uw Precor EFX 425 bij:
nieuwe vragen en antwoorden
nieuwe handleidingen
U ontvangt een email met instructies om u voor één of beide opties in te schrijven.
Ontvang uw handleiding per email
Vul uw emailadres in en ontvang de handleiding van Precor EFX 425 in de taal/talen: Engels als bijlage per email.
De handleiding is 9,62 mb groot.
U ontvangt de handleiding per email binnen enkele minuten. Als u geen email heeft ontvangen, dan heeft u waarschijnlijk een verkeerd emailadres ingevuld of is uw mailbox te vol. Daarnaast kan het zijn dat uw internetprovider een maximum heeft aan de grootte per email. Omdat hier een handleiding wordt meegestuurd, kan het voorkomen dat de email groter is dan toegestaan bij uw provider.
Stel vragen via chat aan uw handleiding
Stel uw vraag over deze PDF
Uw handleiding is per email verstuurd. Controleer uw email
Als u niet binnen een kwartier uw email met handleiding ontvangen heeft, kan het zijn dat u een verkeerd emailadres heeft ingevuld of dat uw emailprovider een maximum grootte per email heeft ingesteld die kleiner is dan de grootte van de handleiding.
Er is een email naar u verstuurd om uw inschrijving definitief te maken.
Controleer uw email en volg de aanwijzingen op om uw inschrijving definitief te maken
U heeft geen emailadres opgegeven
Als u de handleiding per email wilt ontvangen, vul dan een geldig emailadres in.
Uw vraag is op deze pagina toegevoegd
Wilt u een email ontvangen bij een antwoord en/of nieuwe vragen? Vul dan hier uw emailadres in.