1. Dit apparaat is geen speelgoed en dient alleen gebruikt te worden voor doeleinden zoals beschreven
in deze gebruiksaanwijzing. Lees de onderstaande voorschriften zorgvuldig door voordat u dit apparaat in
gebruik neemt.
2. Dit apparaat is niet bedoeld voor gebruik door personen (waaronder kinderen) met verminderde
lichamelijke, zintuiglijke of geestelijke vermogens, of die gebrek aan ervaring of kennis hebben, tenzij
iemand die verantwoordelijk is voor hun veiligheid toezicht op hen houdt of hen heeft uitgelegd hoe het
apparaat dient te worden gebruikt.
3. Houd uw kinderen en huisdieren uit de buurt van de apparatuur. Het enthousiasme van kinderen kan
leiden tot onjuist gebruik van het apparaat. Indien kinderen toestemming krijgen dit apparaat te gebruiken,
dan dient men de kinderen te controleren en instructies te geven over het juiste gebruik van het apparaat.
Onder geen geval is het apparaat te gebruiken als speelgoed.
4. Raadpleeg altijd eerst uw arts voordat u dit apparaat of andere fitnessapparaten in gebruik neemt.
5. Draag altijd veilige en gemakkelijke kleding als u gebruik maakt van fitnessapparatuur. Draag bij voorkeur
sportschoenen of aerobicsschoenen.
6. Indien u zich niet goed voelt of andere klachten krijgt, dient u onmiddellijk met de oefening te stoppen. U
dient tevens te stoppen als u pijn of druk op uw gewrichten voelt.
7. Zorg dat het apparaat juist is geïnstalleerd voordat het in gebruik wordt genomen. Wees er zeker van
dat alle schroeven, bouten en moeren op de juiste wijze zijn geplaatst en vastgedraaid. Gebruik alleen
onderdelen die door de importeur worden aanbevolen en zijn meegeleverd.
8. Gebruik het apparaat niet indien het beschadigd of kapot is.
9. Let in het bijzonder op de reactie van uw lichaam na gebruik. Duizeligheid geeft aan dat u te intensief met
het apparaat bezig bent geweest. Als u zich duizelig voelt, ga dan op de grond liggen en kom niet eerder
overeind totdat u zich weer beter voelt.
10. Gebruik het apparaat altijd op een gladde en schone ondergrond. Gebruik het nooit buiten.
11. Gebruik geen onderdelen die niet door de fabrikant worden aanbevolen.
12. Zorg dat zich geen scherpe objecten in de buurt van dit fitnessapparaat bevinden.
13. Wij adviseren gehandicapte of mindervalide personen dit apparaat alleen te gebruiken in bijzijn van
gekwalificeerde begeleiders.
14. Het apparaat dient eerst stil te staan, alvorens u het apparaat verlaat.
15. Het maximaal toelaatbare gewicht op dit apparaat is 120 KG.
WAARSCHUWING
Raadpleeg uw arts voordat u met oefeningen begint. Een frequent en inspannend trainingsprogramma
moet eerst door uw huisarts worden goedgekeurd. Dit is vooral belangrijk voor mensen die 35 jaar of ouder zijn
of mensen die lichamelijke problemen hebben. Lees de gehele gebruiksaanwijzing zorgvuldig door voordat u
met de training begint. Wij zijn in geen geval verantwoordelijk voor persoonlijk letsel of lichamelijke klachten die
zijn ontstaan door gebruik van dit apparaat en kunnen derhalve niet aansprakelijk worden gesteld. Bewaar deze
instructies zorgvuldig. Letsel kan ontstaan door incorrect of buitensporig gebruik. Let op: het maximale
toelaatbare gewicht op dit apparaat is 120 KG. De gebruiksaanwijzing is samengesteld om het monteren van dit
apparaat eenvoudiger te maken en tevens het juiste gebruik uit te leggen. Zorg ervoor dat u de handleiding
uitvoerig leest. Om u zelf bekend te maken met de onderdelen van het apparaat, raden wij u aan alvorens tot
montage en gebruik over te gaan, eerst de overzichtstekening nauwkeurig te bestuderen. Leg alle
montagematerialen overzichtelijk op de grond en verwijder alle verpakkingsmaterialen. Bekijk de onderdelenlijst
om te verifiëren welke onderdelen aanwezig zijn. Voor montage verwijzen wij naar de volgende pagina's.
ONDERHOUD EN GEBRUIK
Raadpleeg uw arts voordat u met oefeningen begint. Een frequent en inspannend trainingsprogramma
moet eerst door uw huisarts worden goedgekeurd.
- Het apparaat dient regelmatig nagekeken te worden om lichamelijk letsel te voorkomen. Dit betekent ook
dat men regelmatig dient te kijken of bouten en moeren goed zijn aangedraaid, of er beginnende scheuren
geconstateerd worden en of er geen scherpe randen e.d. zijn wat tot lichamelijk letsel kan leiden.
- Defecte onderdelen dienen direct vervangen te worden. Indien dit niet direct mogelijk is, dient het apparaat
direct buiten gebruik gesteld te worden tot reparatie heeft plaatsgevonden.
4
BELANGRIJK
1. Zorg ervoor dat het apparaat stabiel staat voordat u met trainen begint. Hiervoor kunt u gebruik maken van
de stabilisatievoeten (17).
2. U kunt zowel de zadel- alsook de stuurhoogte aanpassen. Hierover worden in het kopje “Montage” nadere
instructies gegeven.
3. Stel de door u gewenste weerstand in met behulp van de weerstandknop (14).
4. Het apparaat beschikt over een directe aandrijving. Gebruik de rem om te stoppen en stap nooit van het
apparaat af, voordat het wiel compleet stil staat.
HET PRODUCT
5
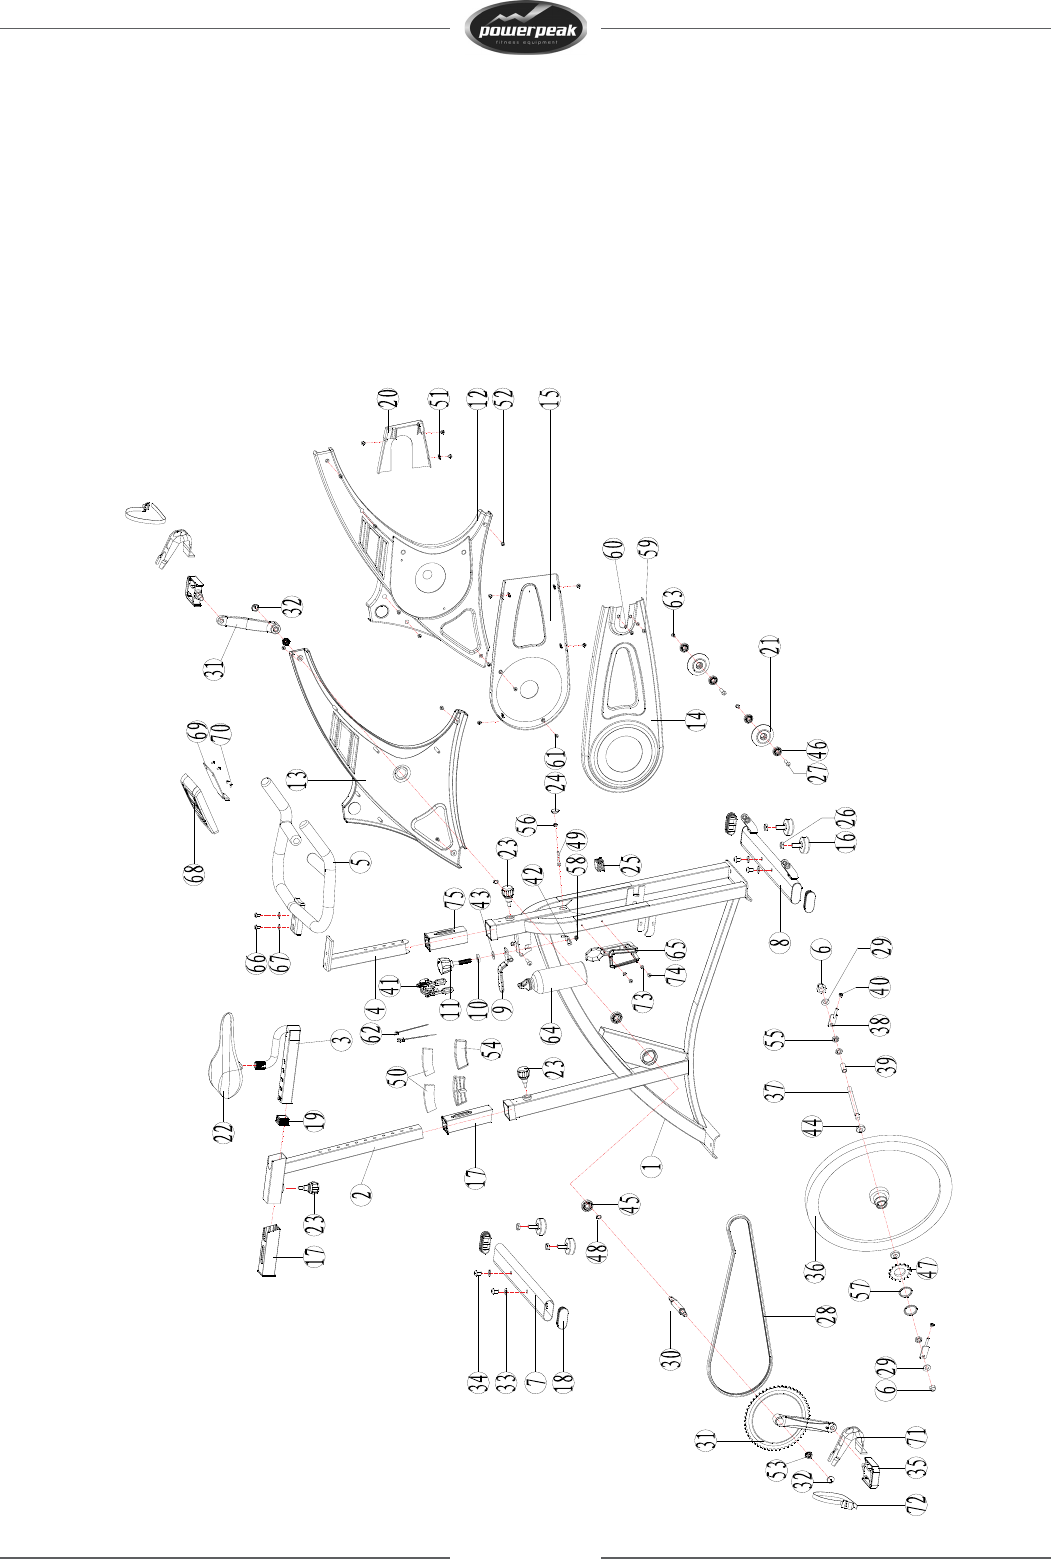
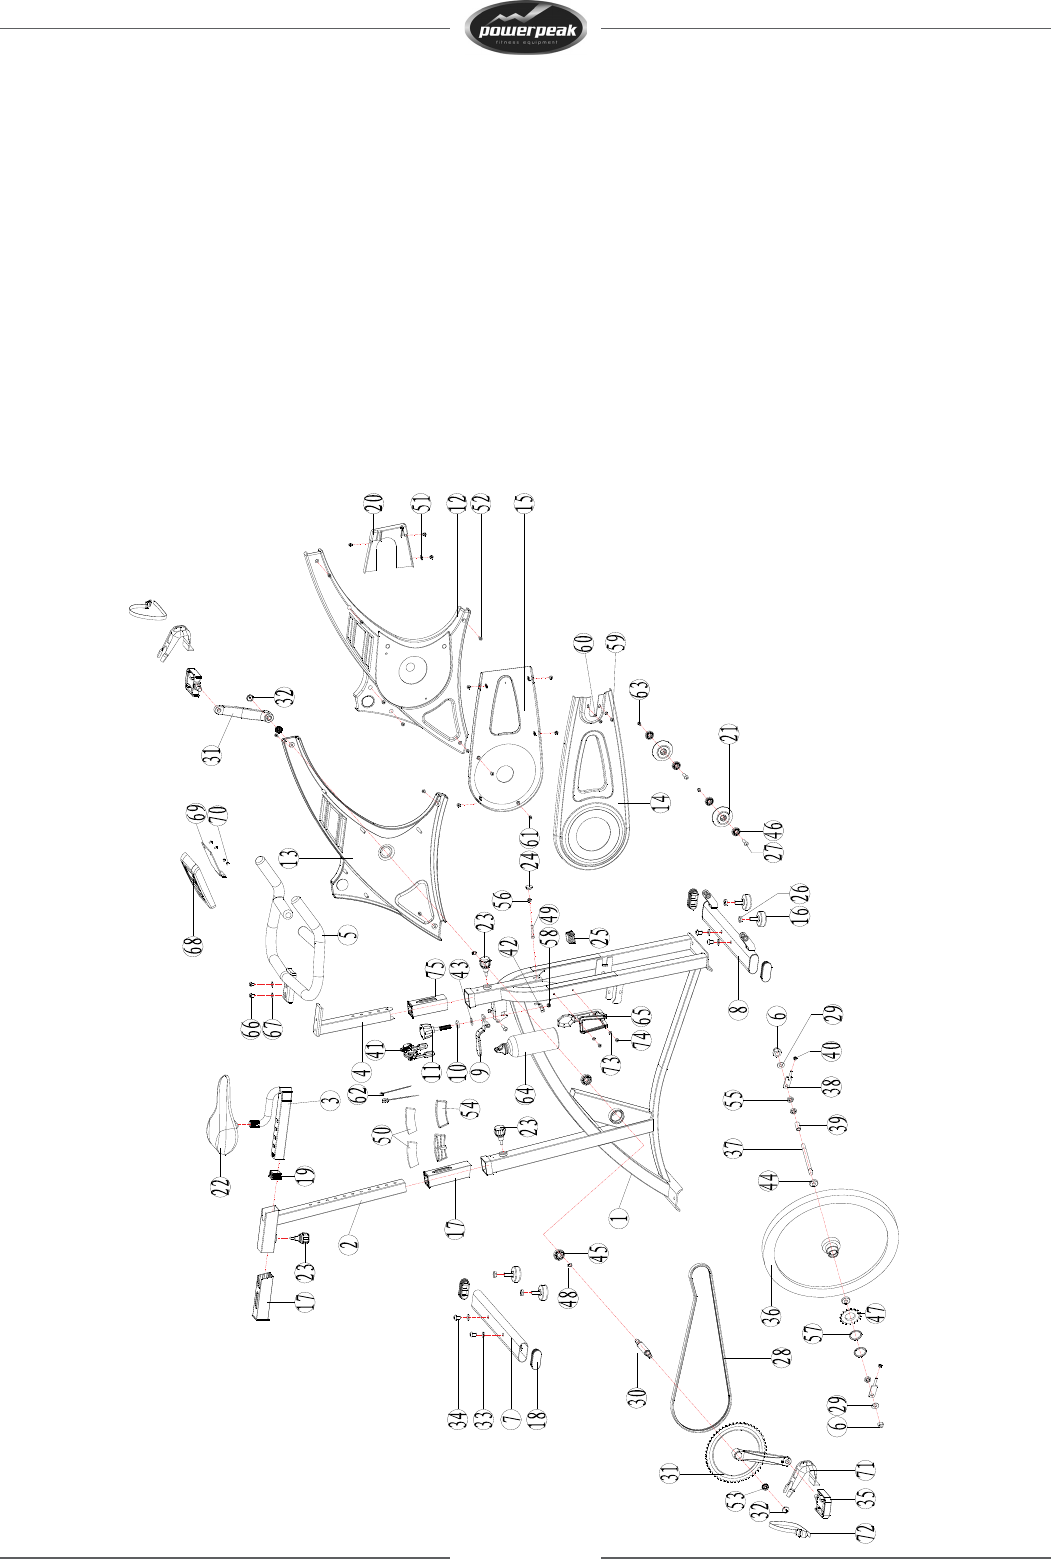
Onderdelenlijst
Nummer Omschrijving Hoeveelheid
01 Hoofdframe 1
02 Zadelpen 1
03 Horizontale zadelbuis 1
04 Stuurbuis 1
05 Stuur 1
06 Dopmoer M12*1.0 2
07 Achtersteun 1
08 Voorsteun 1
09 Hendel rem 1
10 Ring Ø10x Ø25xT5 1
11 Weerstandsknop 1
12 Afdekkap rechts 1
13 Afdekkap links 1
14 Afdekkap ketting rechts 1
15 Afdekkap ketting links 1
16 Stabilisator 1
17 Kunststof binnenhuls buis 2
18 Afdekkap voetsteunen 4
19 Kap van zadelglijder 1
20 Voorste afdekkap voor kettingaandrijfsysteem 1
21 Transportwieltje 2
22 Zadel 1
23 Verstelknop 3
24 Moer Ȝ21 1
25 Kap van binnenste buis 45*45*1.5T 1
26 Zeshoekige moer M8 4
27 Zeshoekige holle bout Ȝ8*M6*30 3
28 Stille ketting 1
29 Platte ring Ȝ12*1.5 2
30 As 1
31 Linker en rechter crank + groot kettingwiel 1 set
32 Afdekkap crank 2
33 Platte ring Ȝ20*Ȝ10*1.5 4
34 Schroef M10*25 4
35 Linker en rechter pedaal 1
36 Vliegwiel (18 KG) 1
37 Vliegwielas 1
38 Lassing voor afstellen ketting 2
39 Huls Ø18*Ø12*20L 1
40 Nylon moer M8 2
41 Remblok 1
42 Remblokhouder 1
43 Platte ring Ø10.2- Ø25*T1.5 1
44 6001 2
45 6004 2
46 608 4
47 Tandwiel twee richtingen 1
48 C-shaped buckle Ȝ20 2
49 Binnenste zeshoekige kolombout M6x40 1
50 Wrijvingsplaatje 2
51 Moer 5
52 Bout met gekruiste onderkant ST4.8*15 17
53 Zeshoekige kransmoer M12*P1.25*8 2
54 Remblokhouder 2
6
55 Zeshoekige dunne moer M12*1.0 3
56 Zeshoekige kransmoer M6 1
57 Slotmoer 2
58 Nylon moer M10*P1.25 1
59 Gekruiste uitsparende hoofdbout M5*12 4
60 Platte ring Ȝ5.2*1.0 4
61 Gekruiste uitsparende verzonken bout M6*12 2
62 Remdraad 2
63 Binnenste zeshoekige platte rond bout M6*12 3
64 Bidon 1
65 Bidonhouder 1
66 Schroef 2
67 Platte ring Ȝ20*10*1.5TȜ 2
68 Computer 1
69 Computerhouder 1
70 Kruiskopschroef M6*12L 2
71 Voetpedaalbeugel (gemonteerd aan pedaal) 2
72 Pedaalbandje (gemonteerd aan pedaal) 2
73Platte ring5.2*1.0Ȝ 2
74 Bout M5*12L 2
75 Kunststof binnenhuls buis (kort) 1
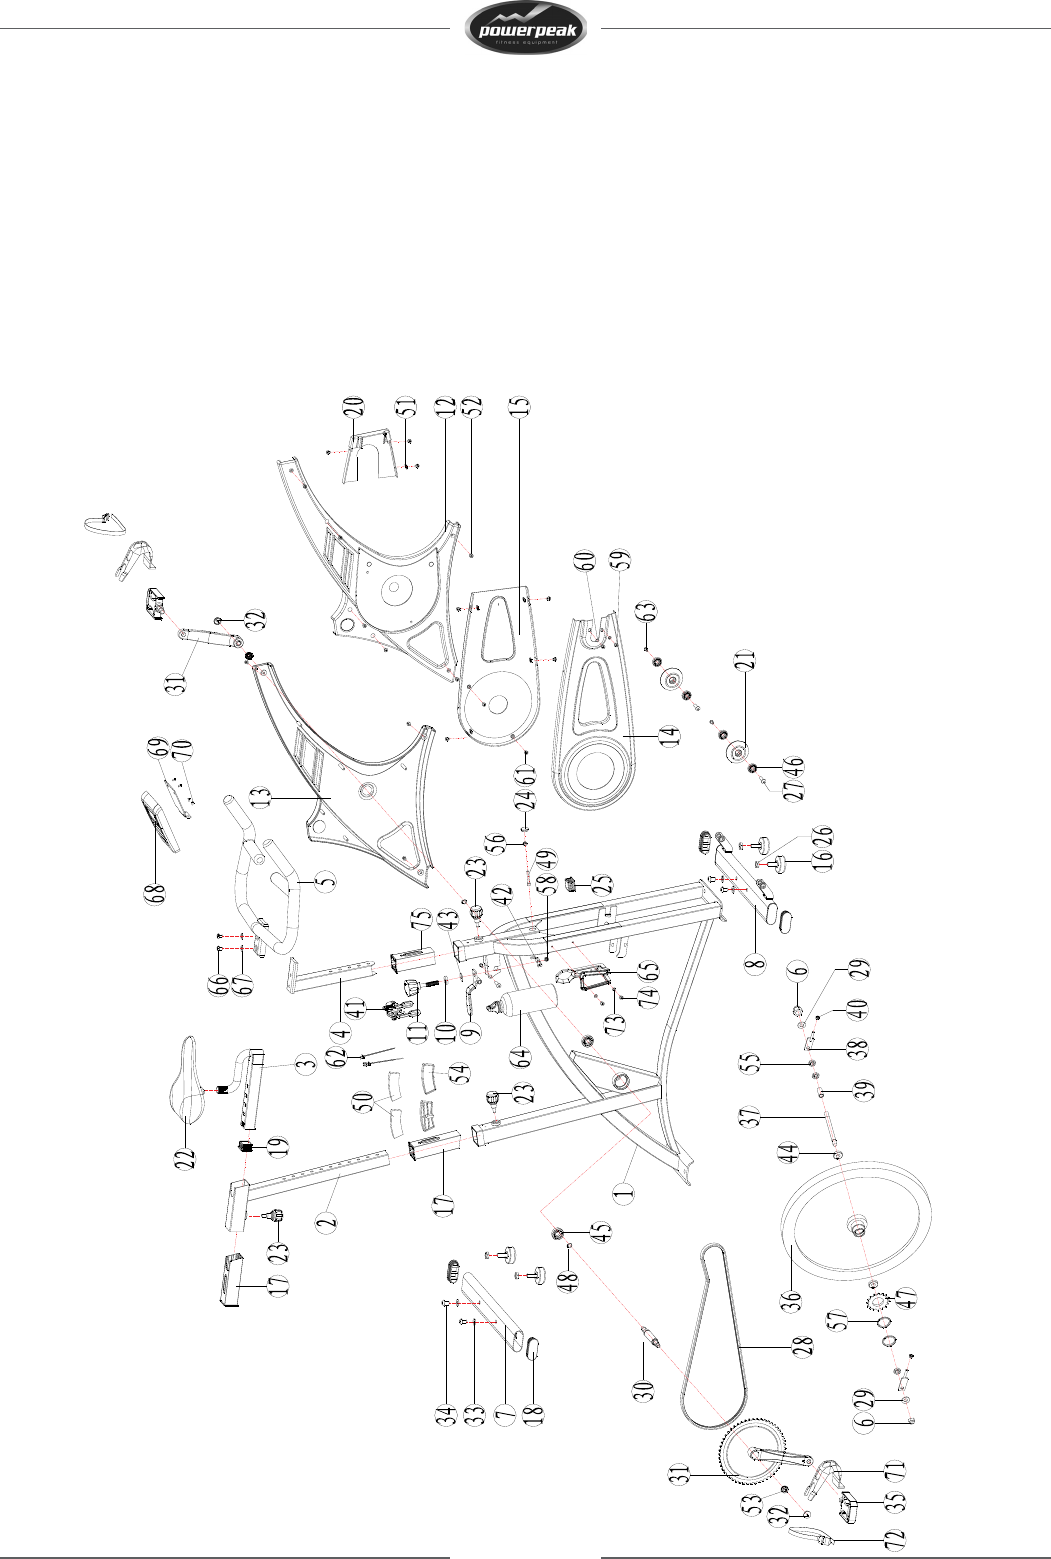
MONTAGE
Stap 1
Neem alle onderdelen uit de verpakking en leg het overzichtelijk op de grond.
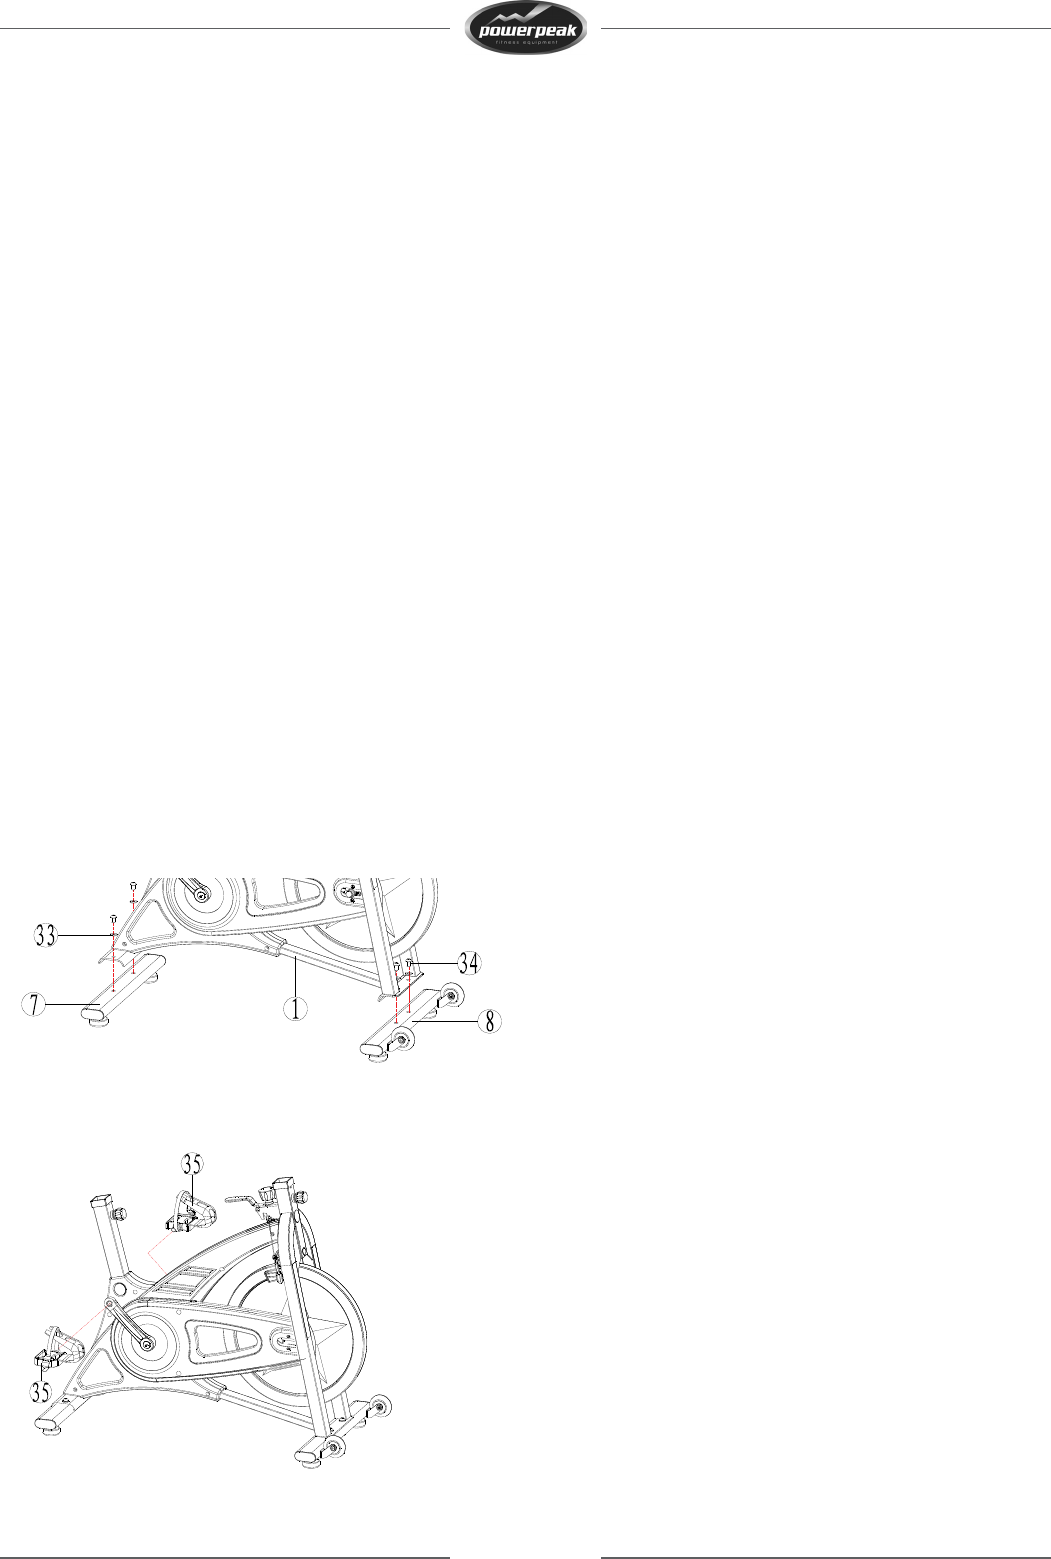
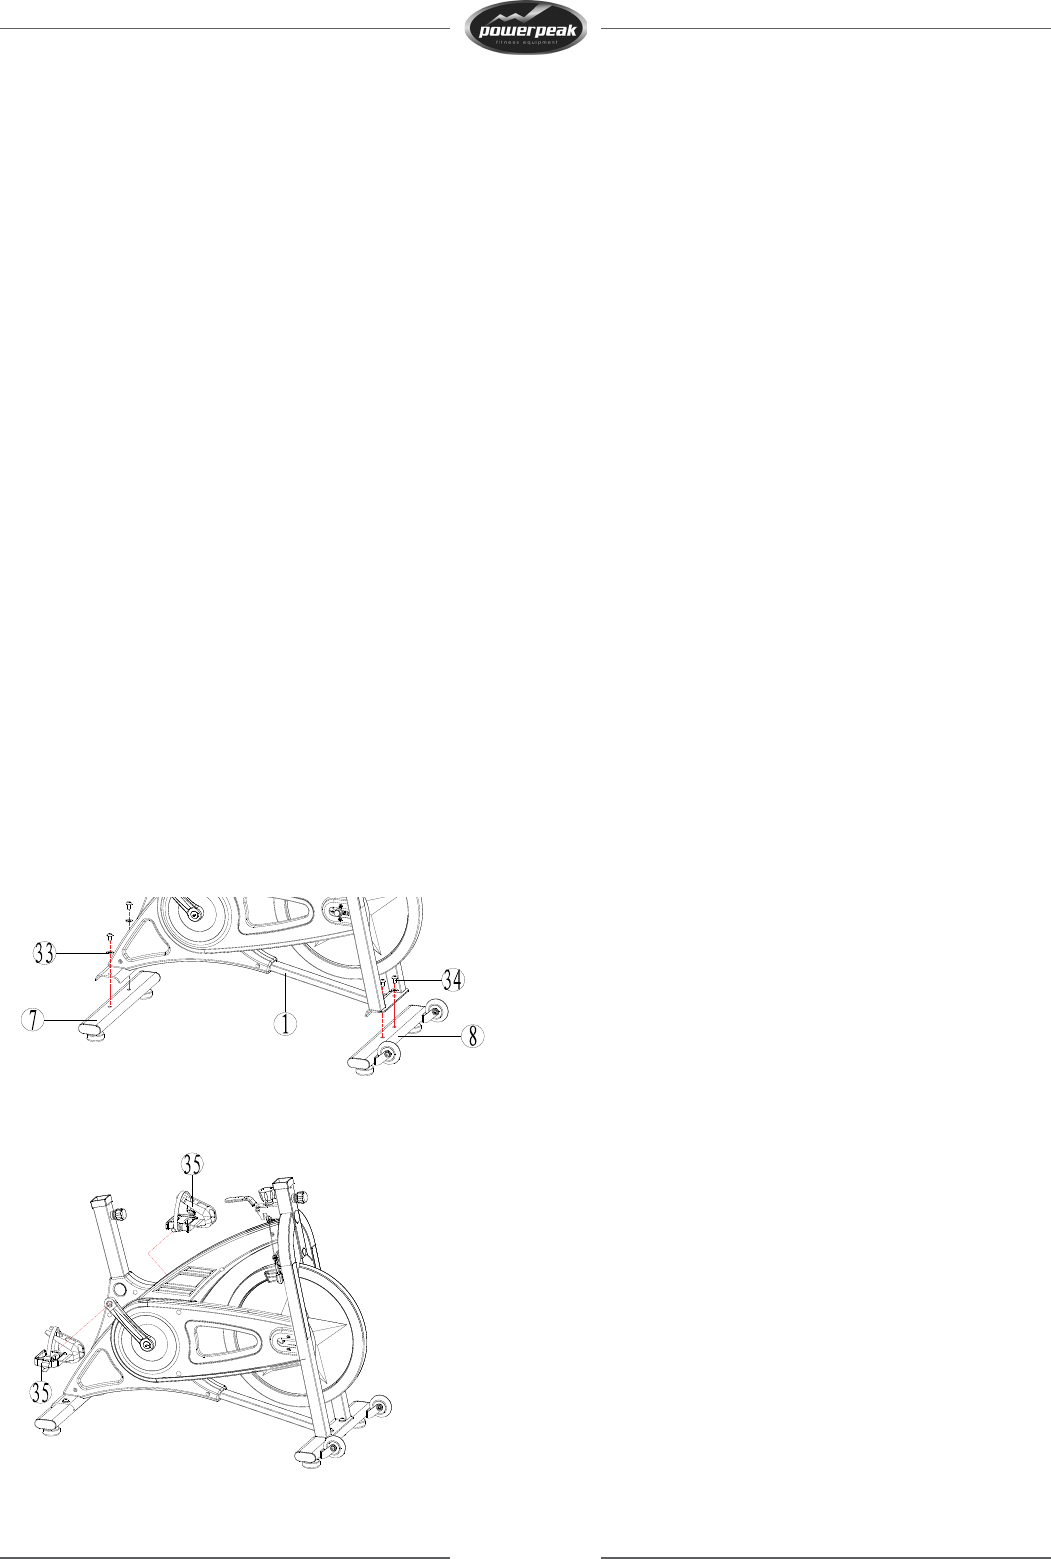
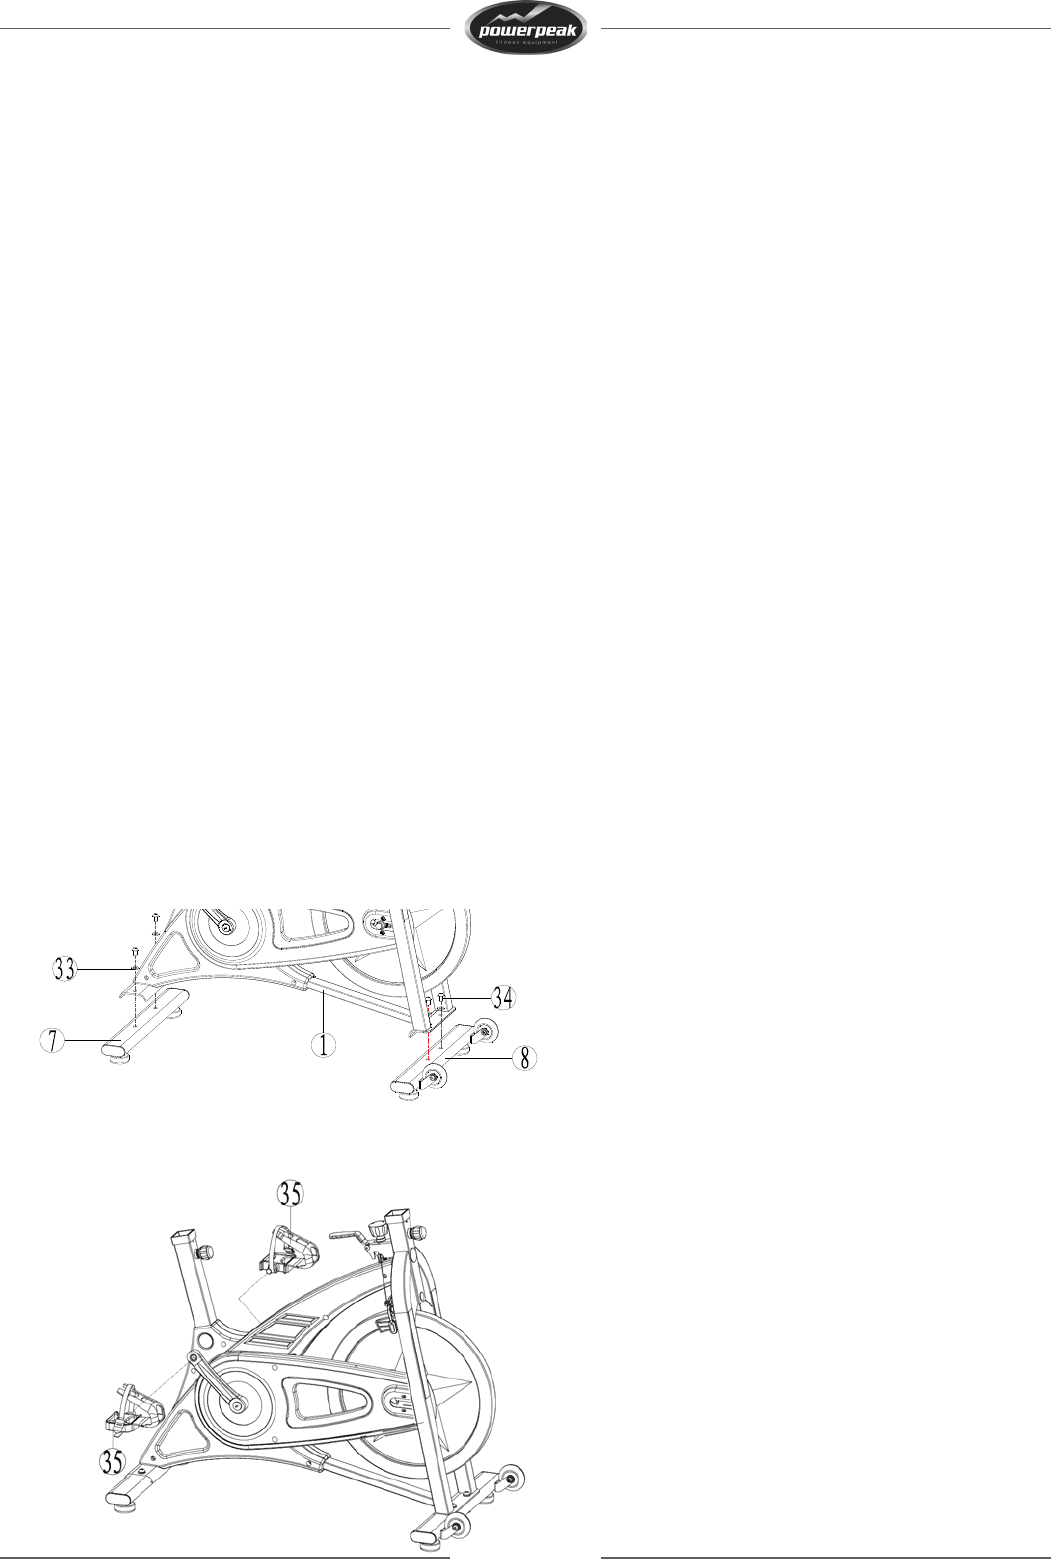
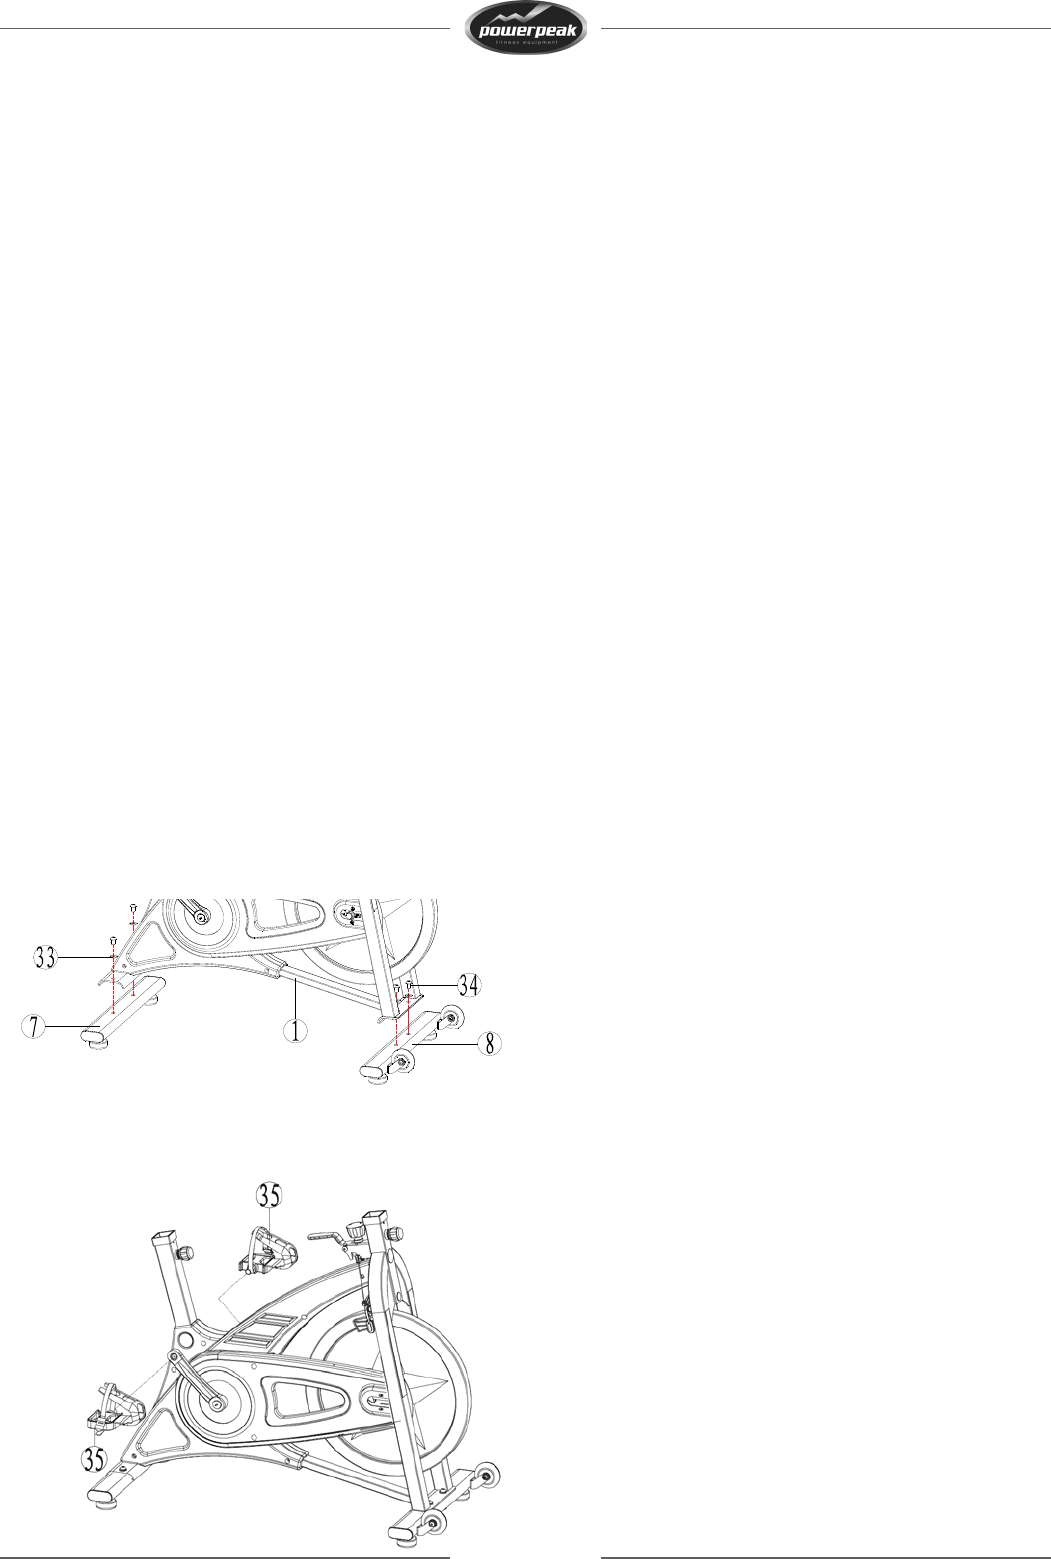
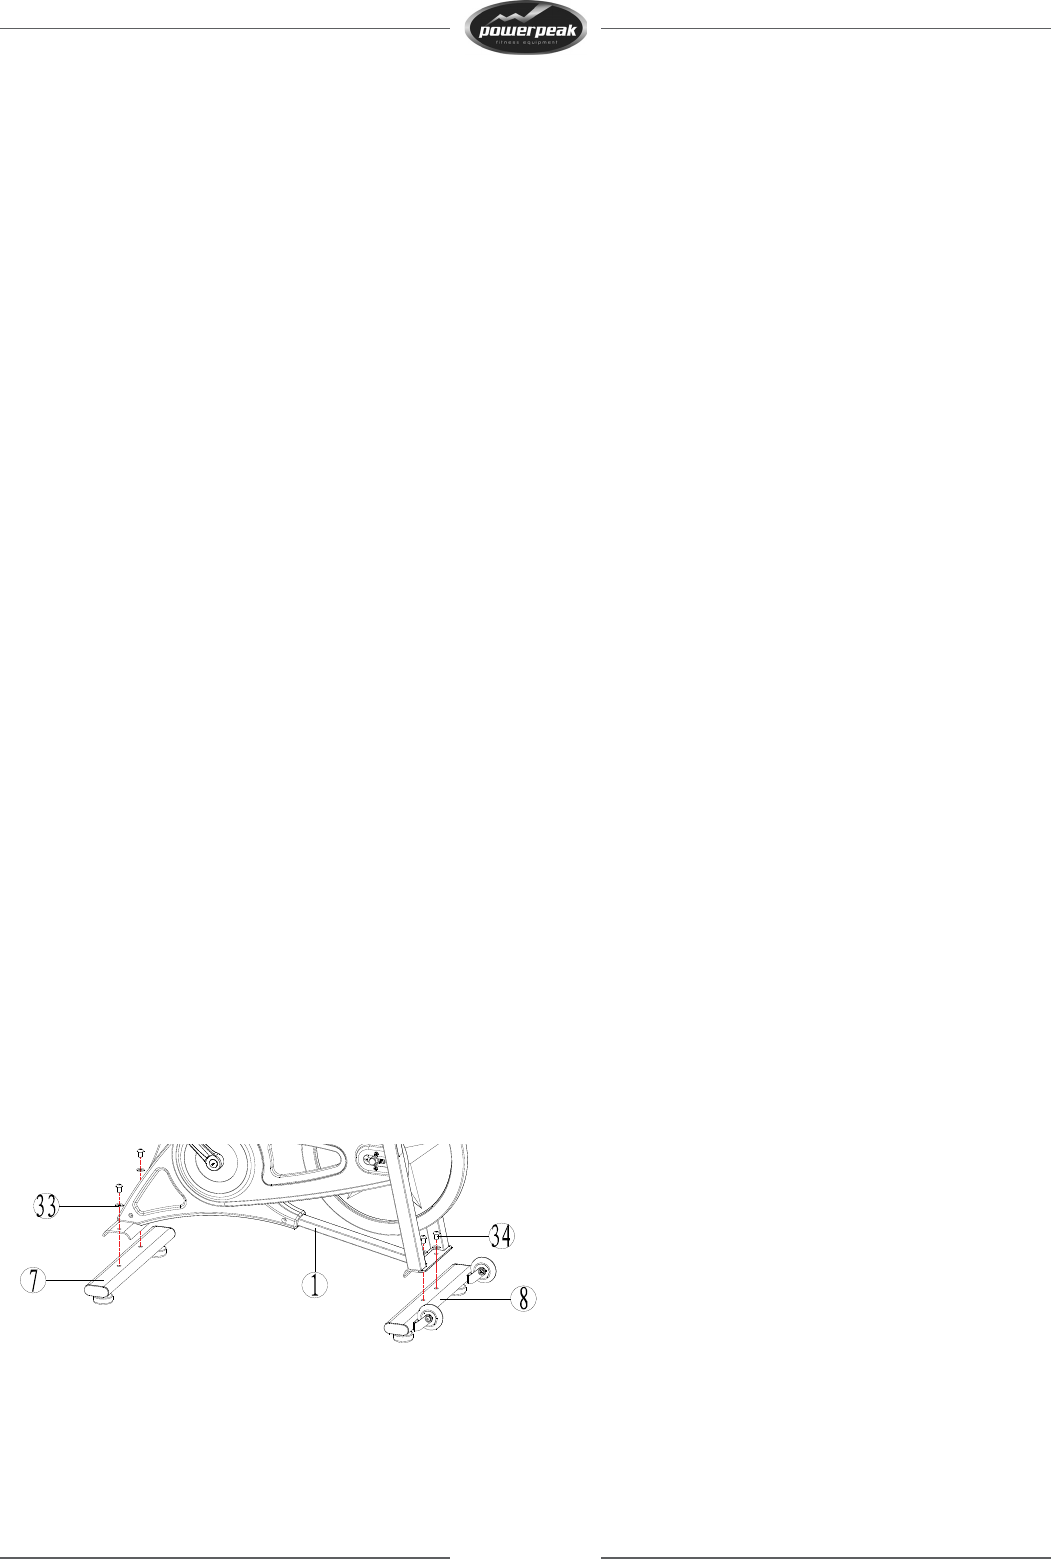
Stap 2
Monteer de achtersteun (7) en de voorsteun (8) aan het hoofdframe (1) met gebruik van 4 stuks inbusbouten
M10*25 (34) en 4 stuks platte ringen 20*10*1.5 (33).ȜȜ
Stap 3
Draai het linker- en rechter pedaal (35) in de crank. Bevestig vervolgens aan het hoofdframe (1).
7
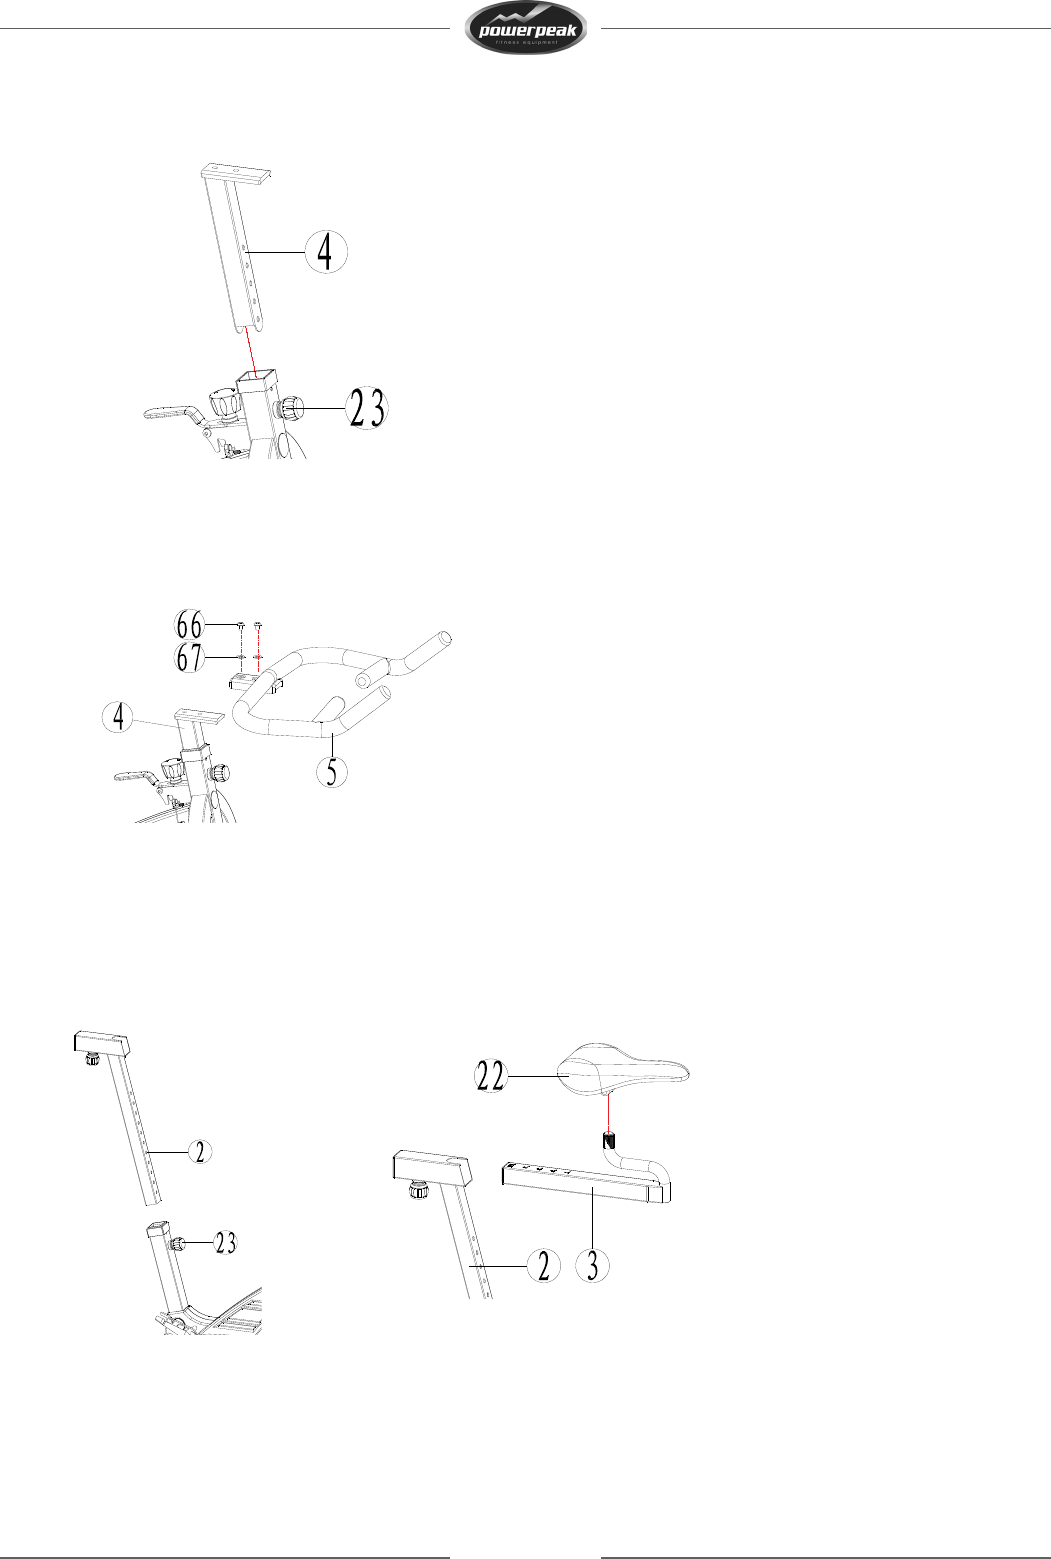
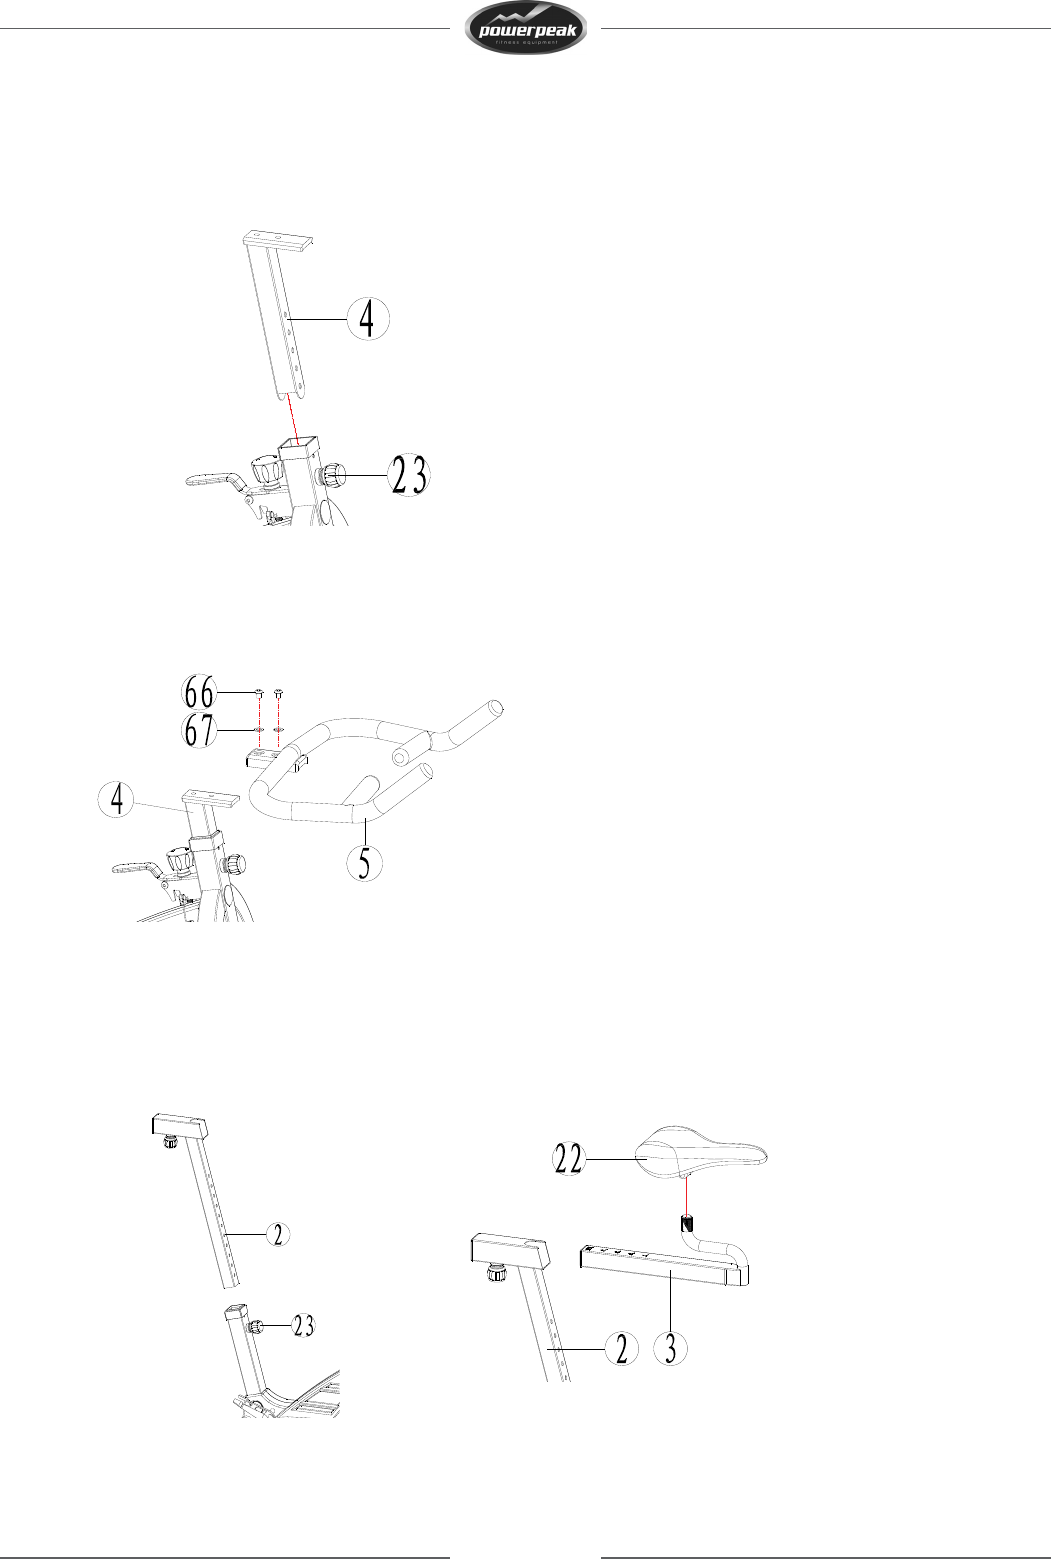
Stap 4
Draai de verstelknop (23) open en plaats de stuurbuis (4) in de voorbuis van het hoofdframe (1). Kies de goede
hoogte en zet het vast met de verstelknop (23).
Stap 5
Monteer het stuur (5) op de stuurbuis met gebruik van 2 stuks Platte ringȜ20*10*1.5TȜ (67) en 2 stuks
schroeven (66).
Stap 6
Draai de verstelknop (23) open en plaats de horizontale verstelbuis (3) in de zadelpen (2). Monteer vervolgens
het zadel (22) en zet het goed vast.
8
Stap 7
Monteer de bidonhouder (65) aan het hoofdframe (1) met behulp van gereedschap. Plaats de bidon (64) in de
bidonhouder (65).
Stap 8
Bevestig de computerhouder (69) op het stuur (5) met 2 stuks M6x12L kruiskop schroeven (70). Bevestig
vervolgens de computer (68) op de computerhouder (69) en verbind de computer (68) met de verbindingsplug.
U doet dit door de verbindingsplug in het aansluitpunt te bevestigen. Het aansluitpunt hiervoor bevindt zich
aan de onderzijde van de gebogen framestang tegenover de snelheidshendel.
Stap 9
Als u klaar bent met het monteren van het apparaat, kijk dan goed na of alles goed gemonteerd is en alles goed
vast zit.
Opmerking
1. Voor gebruik steeds alle bevestigingen goed controleren en bij een afwijking eerst alles goed vastzetten
voordat u gaat trainen.
2. Houd altijd goed de toestand van de remblokken (41) in de gaten. Deze zijn namelijk aan slijtage
onderhevig, dit is normaal. Indien u slijtage aan de remblokken constateert, deze altijd vervangen
(
www.muppa.nl).
3. Indien de ketting niet meer goed strak zit, draait u dan de moer los en span vervolgens de ketting aan met
een nylon moer en met een 10mm steeksleutel. Zet de moer vervolgens weer goed vast.
9
COMPUTERBEVELEN
Specificaties:
Time: 00:00-99:59
Speed (SPD): 0.01-99.9 km per uur
Distance (DIST): 0.00-99.99 KM
Total distance (ODO): 0.00-9999 KM
Calories: 0.1-99,9 KCAL
Let op
- De computer schakelt zich in indien een willekeurige toets ingedrukt wordt of wanneer een signaal
afgegeven wordt door de snelheidssensor.
- Indien gedurende 4 minuten geen signaal aan de display wordt doorgegeven, schakelt de display
automatisch uit en worden alle functiewaarden gewist. (m.u.v. total distance)
Mode:
Hiermee kunt u de verschillende functies op de monitor selecteren.
Reset:
Zet de functie(s) terug op nul.
Noot: Dit gebeurt ook bij het wisselen van de batterijen.
Set:
Hiermee kunt u gewenste waarden instellen.
Functies
SCAN: Laat om de 4 seconden de verschillende metingen zien
TIME: De huidige trainingstijd
SPEED: De huidige snelheid
DISTANCE: De afstand van de work-out wordt getoond
ODO: Telt de totale trainingsafstand bij elkaar op.
CALORIES: Geeft de verbrande calorieën weer
Vooraf in te stellen waarden
U kunt trainingstijd, afstand en calorieverbruik vooraf instellen.
Via de MODE knop gaat u naar de gewenste voorinstelling.
Met SET stelt u de waarde in.
Na het starten van uw oefening telt de computer af naar de 0-stand. Zodra deze stand bereikt is hoort u
een signaal voor ongeveer 10 seconden.
De computer werkt op batterijen. Wanneer het beeld op de monitor in kwaliteit afneemt, dient u de
batterijen opnieuw te plaatsen.
Computer werkt op 1 AAA batterij, deze is NIET INBEGREPEN.
10
BELANGRIJK TRAININGSADVIES
- Alvorens met training te beginnen, moet u door een arts laten bepalen in welke mate een training met dit
toestel aangewezen is voor u. Een onjuiste of te grote training kan tot schade aan de gezondheid leiden.
- Vermijd een overbelasting van uw lichaam. Train niet als u zich moe of uitgeput voelt. Start uw
trainingsprogramma langzaam als u niet gewend bent aan lichamelijke activiteiten.
- Dertig minuten voor en na de training mag men geen voedsel tot zich nemen.
- Controleer tijdens de training of u gelijkmatig en rustig ademt. Om blessures te vermijden, moet u zich
altijd goed opwarmen voor de training en afkoelen na de training. Gebruik de oefeningen die beschreven
zijn in deze handleiding.
- Zorg ervoor dat u tijdens de training genoeg drinkt. Denk erom dat u door de lichamelijke belasting
meer dan de aanbevolen hoeveelheid van 2 liter per dag zult moeten drinken. De drank die u
inneemt moet op kamertemperatuur zijn.
- Draag gemakkelijk zittende kledij terwijl u het fitnesstoestel gebruikt en draag bij voorkeur sport- of
aerobicschoenen. Vermijd wijde kledingstukken; deze kunnen immers in de bewegende onderdelen van het
toestel vastraken.
OPWARMEN/STREKKEN/AFKOELEN
Een succesvolle trainingssessie begint met opwarmoefeningen en eindigt met oefeningen om af te koelen en te
ontspannen. Deze opwarmoefeningen bereiden uw lichaam voor op de navolgende eisen die u eraan gaat
stellen. De afkoel- / ontspanningsperiode na de trainingsessie zorgt ervoor dat u geen spierklachten krijgt na de
training. Let alstublieft op de volgende punten:
- Warm elke spiergroep die u in de trainingssessie gaat gebruiken 5-10 minuten op. De rekoefeningen zijn
goed uitgevoerd als u een comfortabele spanning voelt in de betreffende spier.
- Snelheid speelt geen rol tijdens de rekoefeningen. Snelle en plotselinge bewegingen moeten vermeden
worden.
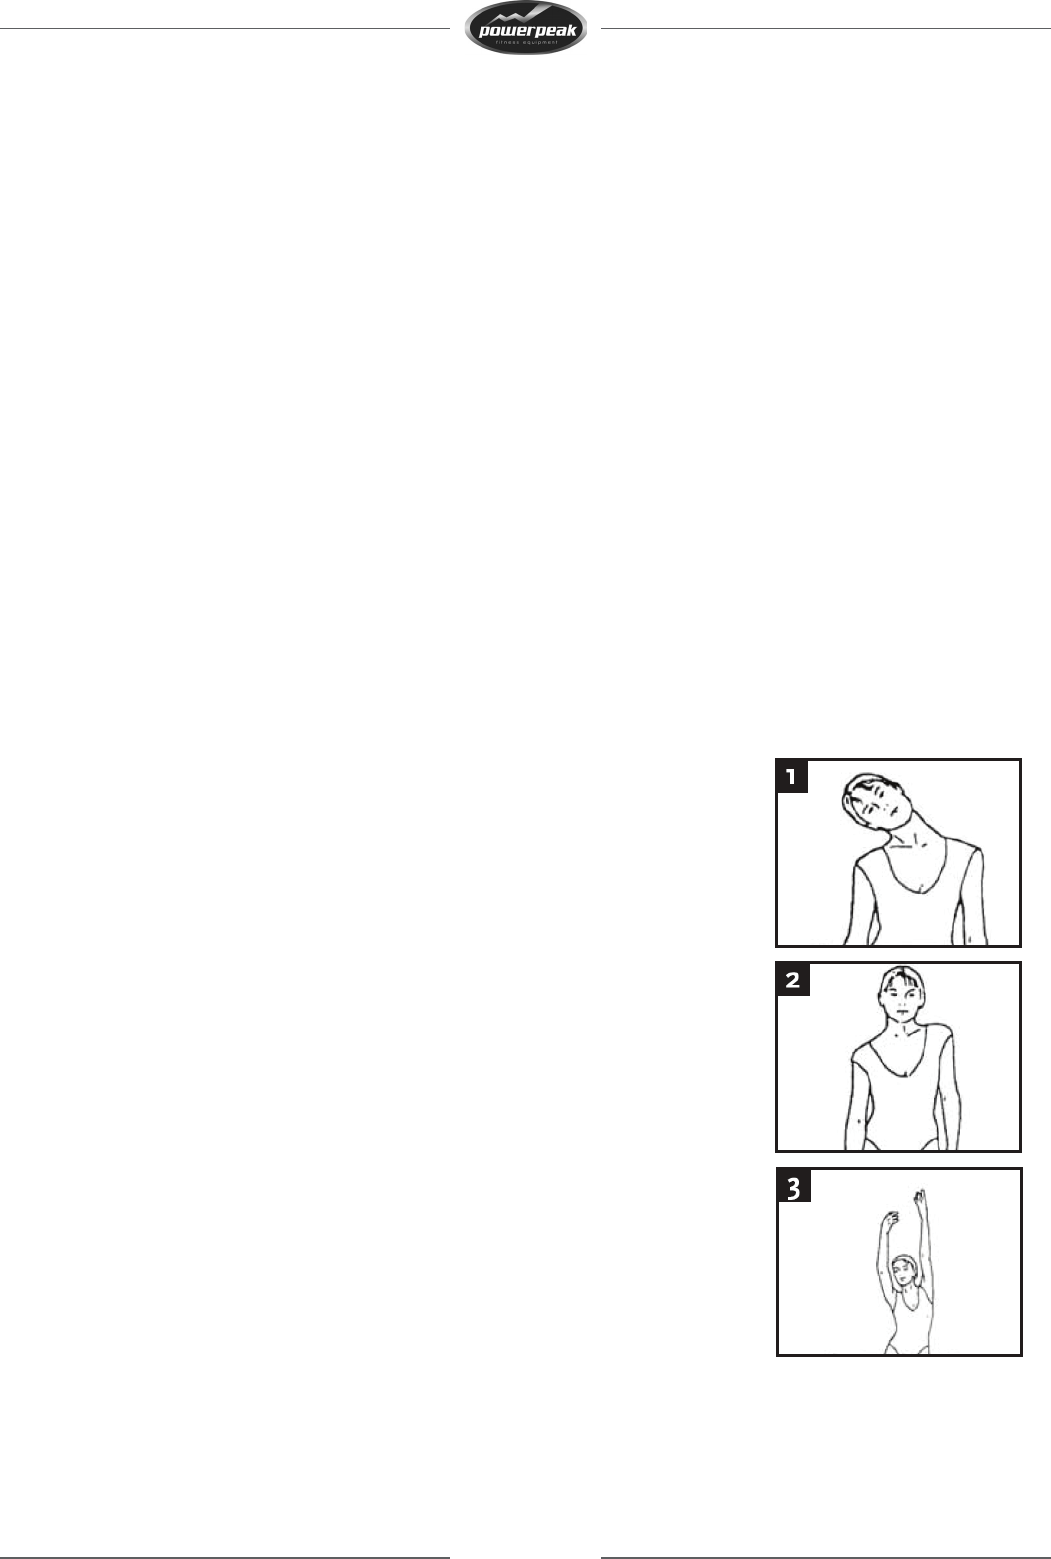
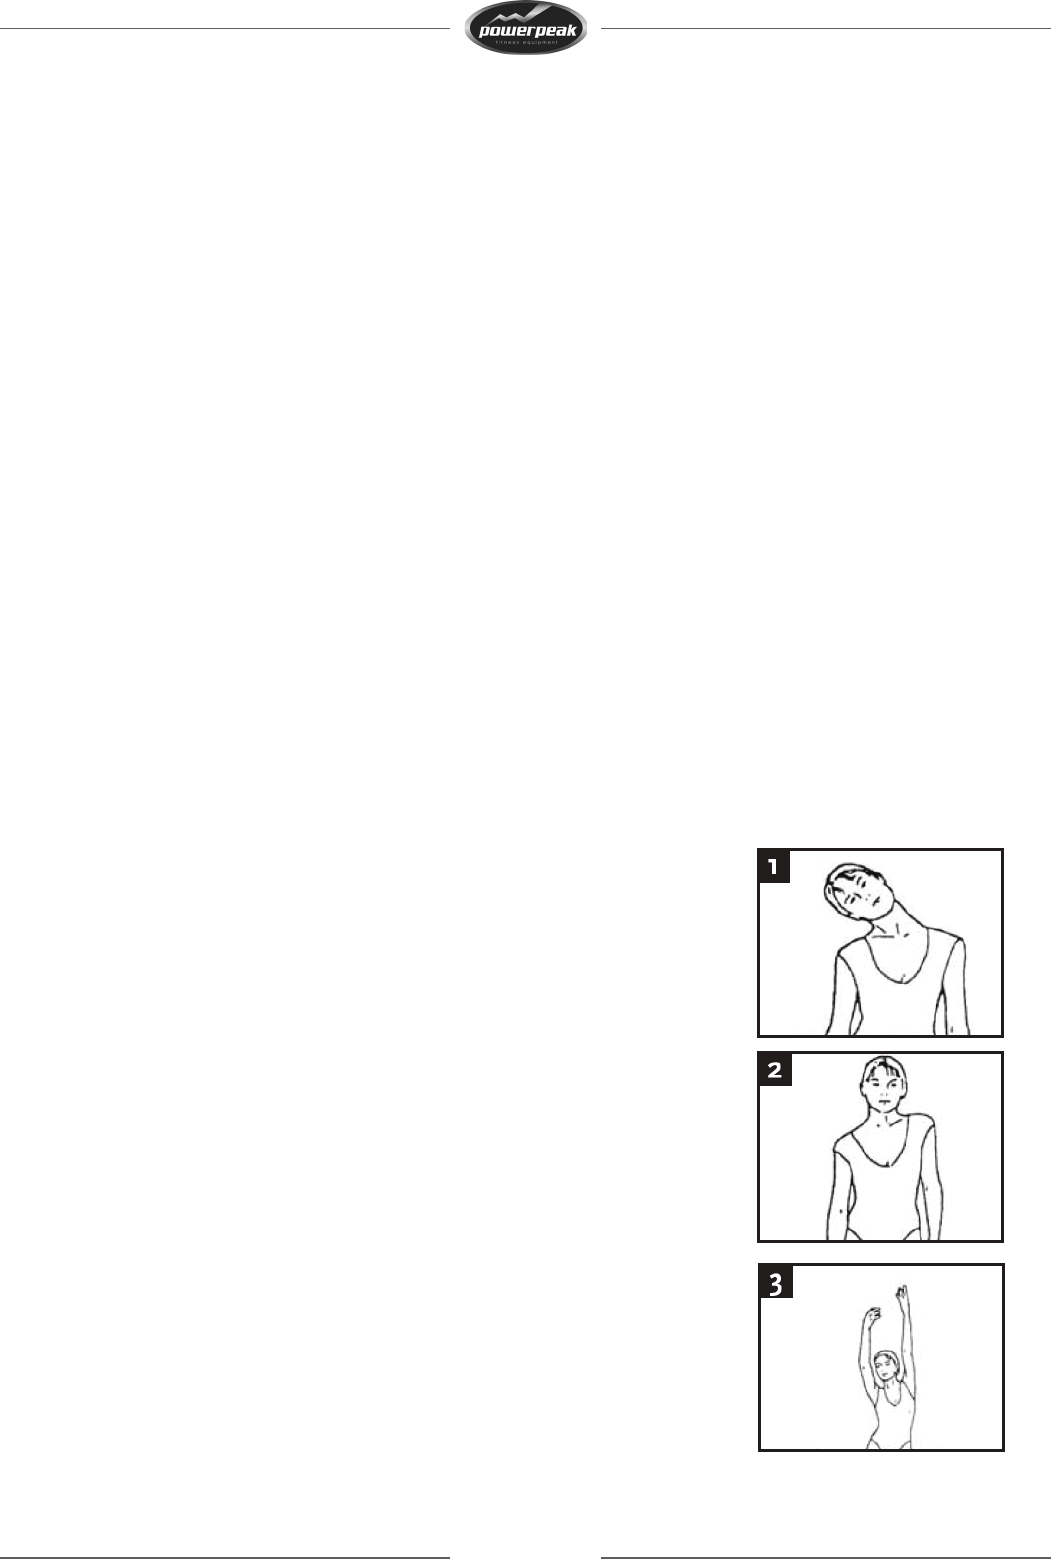
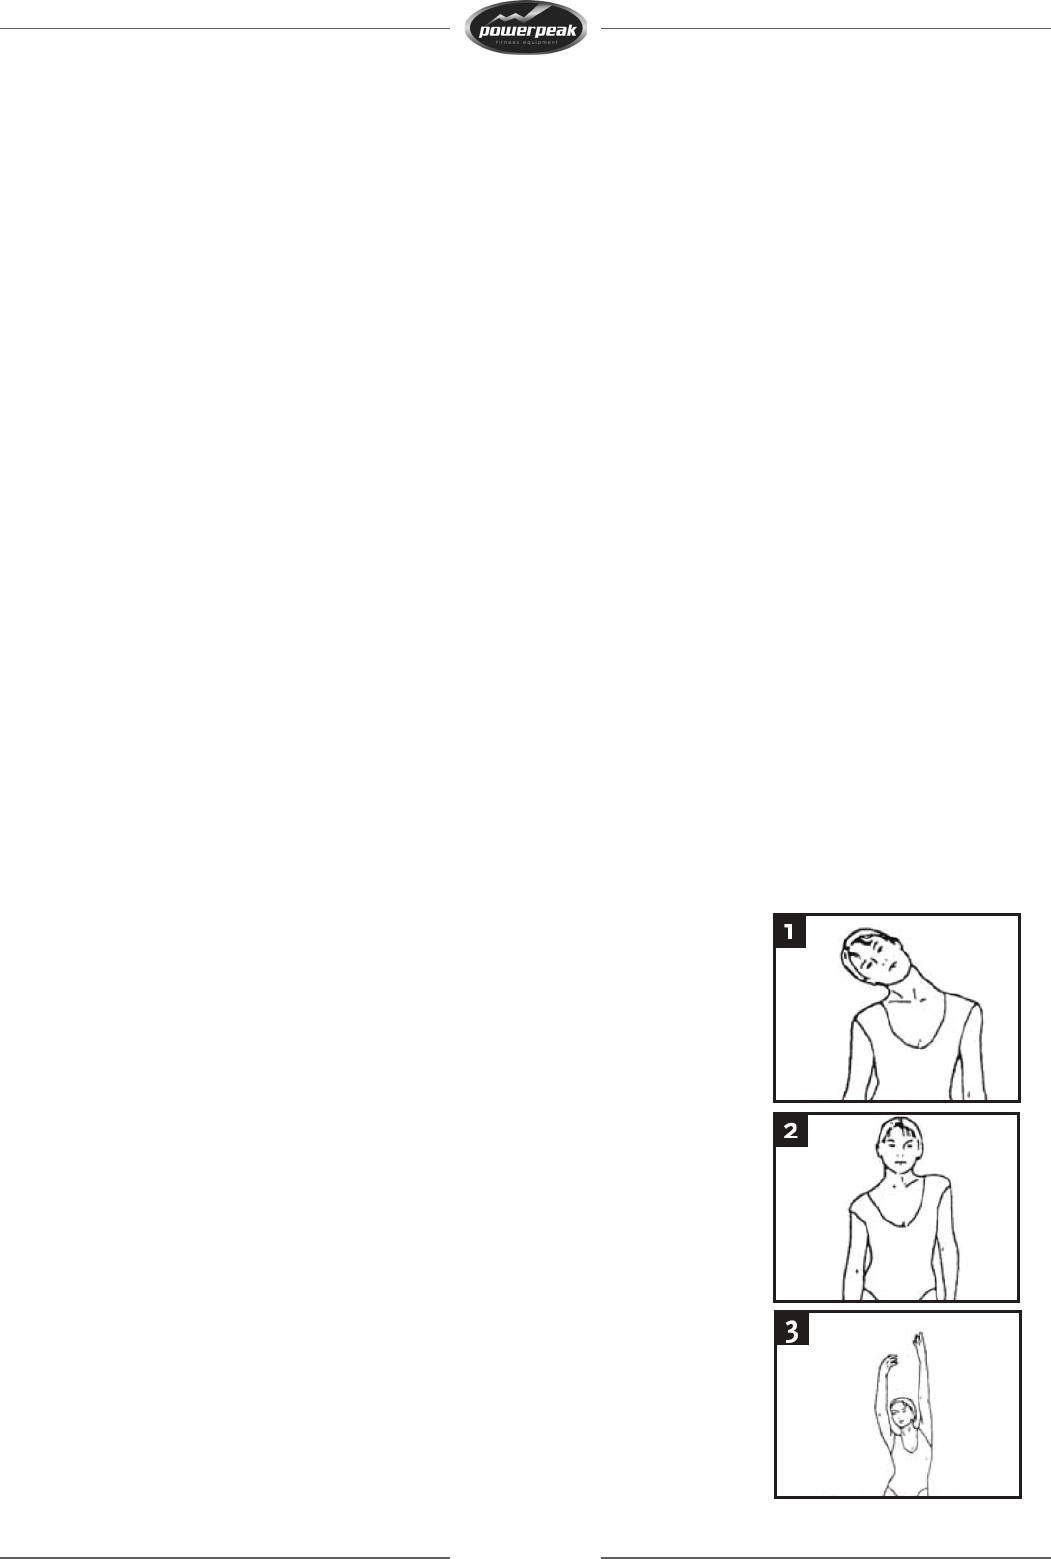
Nekoefeningen (1)
Buig uw hoofd naar rechts en voel de spanning in uw nek. Laat uw hoofd
langzaam zakken tot op uw borst in een halve cirkel en draai dan uw hoofd
naar links. U voelt de weer de comfortabele spanning in uw nek.
Oefeningen voor het schoudergebied (2)
Hef de linker- en rechterschouder afwisselend op of hef ze beide tegelijk op.
Rekoefeningen voor de armen (3)
Strek afwisselend uw linker- en rechterarm in de richting van het plafond. Voel
de spanning in uw linker en rechter zijde. Herhaal deze oefening meerdere
keren.
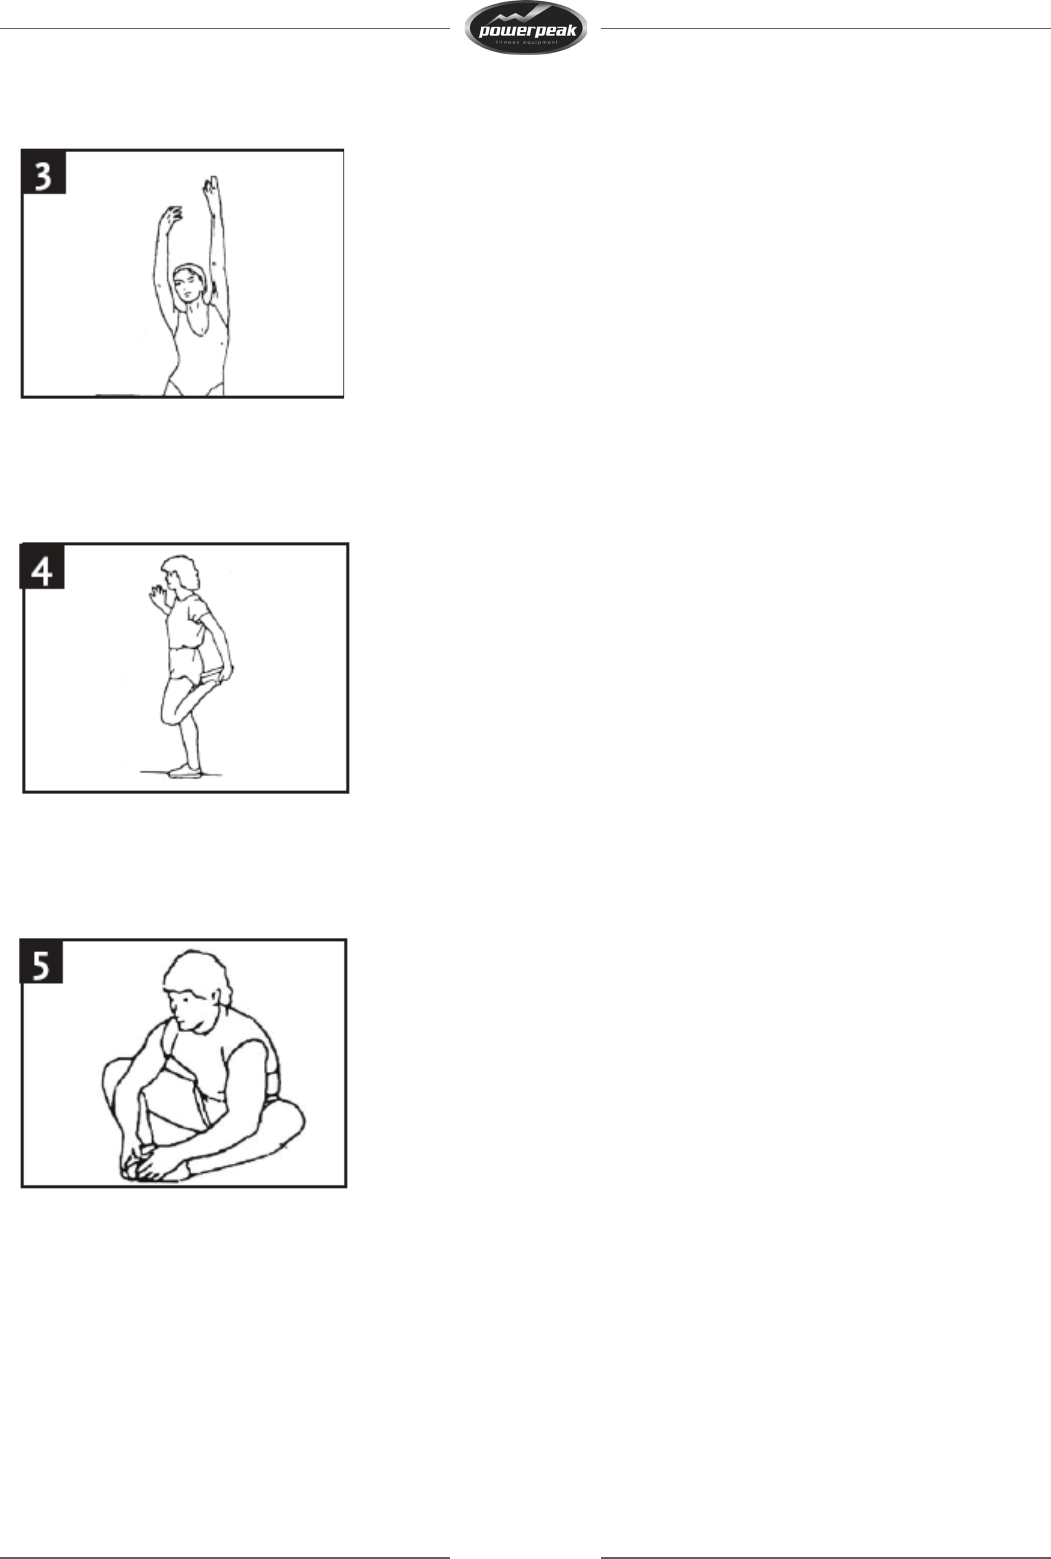
11
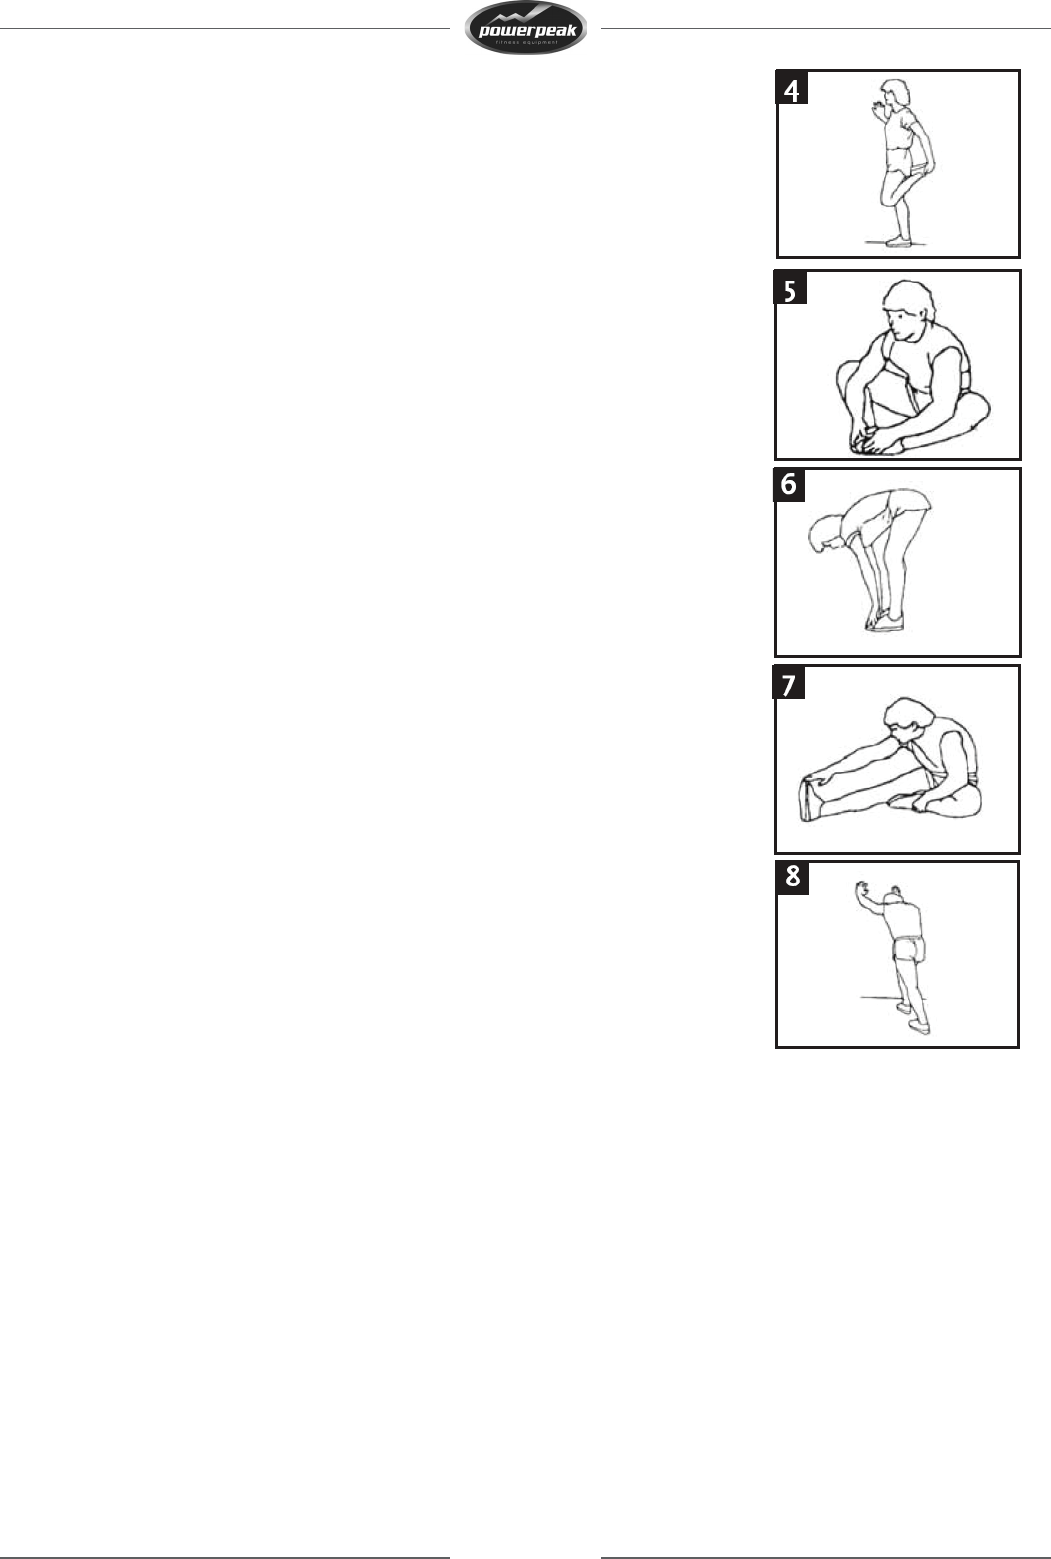
Oefeningen voor de dijen (4)
Ondersteun uzelf door uw hand op de muur te plaatsen. Reik naar beneden
achter u en trek uw linker- of rechtervoet op, zo dicht mogelijk tegen uw billen.
Voel een comfortabele spanning in de voorkant van uw dijbeen. Houd deze
positie 30 seconden vast en herhaal deze oefening 2 keer voor elk been.
Binnenkant dijbeen (5)
Ga op de vloer zitten en plaats uw voeten zodanig dat uw knieën naar buiten
gericht zijn. Trek uw voeten zo dicht mogelijk naar uw kruis toe. Druk hierna
uw knieën voorzichtig naar beneden. Houd deze positie indien mogelijk 30-40
seconden aan.
Tenen aanraken (6)
Buig uw lichaam langzaam naar voren en probeer uw voeten met uw handen
aan te raken. Reik zo ver mogelijk naar uw tenen. Houd deze positie indien
mogelijk 20-30 seconden aan.
Knie oefeningen (7)
Ga op de vloer zitten en strek uw rechterbeen. Buig uw linkerbeen en plaats uw
voet op uw rechterdijbeen. Probeer nu uw rechter voet aan te raken met uw
rechter arm. Houd deze positie indien mogelijk 20-30 seconden aan.
Oefeningen voor kuiten/achillespees (8)
Plaats beide handen tegen de muur en steun erop met uw hele
lichaamsgewicht. Beweeg dan uw linkerbeen naar achteren en wissel dit af met
uw rechterbeen. Dit rekt de achterkant van uw benen uit. Houd deze positie
indien mogelijk 30-40 seconden aan.
12
INFORMATIEPLICHT INZAKE BATTERIJVERORDENING
Batterijen en accu’s behoren niet tot het huisvuil. Verbruikers zijn wettelijk verplicht om gebruikte batterijen en
accu’s terug te geven. Voor het van de hand doen van batterijen zijn er speciale containers in gespecialiseerde
winkels en gemeentelijke inzamelpunten. Dit is een concrete bijdrage aan de bescherming van het milieu. Sinds
1998 verplicht de batterijverordening alle burgers om gebruikte batterijen en accu’s uitsluitend via de
gespecialiseerde winkels of de daarvoor speciaal ingerichte inzamelpunten te verwijderen (wettelijke
teruggaveplicht). Gespecialiseerde winkels en fabrikanten zijn verplicht deze batterijen terug te nemen en
volgens de verordening te gebruiken of als gevaarlijke afvalstoffen te verwijderen (wettelijke terugnameplicht).
Indien u uw batterijen en accu’s bij ons in wilt leveren, stuurt u deze dan voldoende gefrankeerd op naar ons
adres.
Batterijen die volgens de wet geëtiketteerd moeten zijn, zijn van één van onderstaande symbolen voorzien,
bestaande uit een doorgekruiste afvalbak en het chemische symbool voor de classificatie als schadelijke-stoffen-
behoudende doorslaggevende zware metalen. Het chemische symbool (Cd, Hg of Pb) wordt onder het symbool
afgebeeld.
De volgende tekens vindt u op schadelijke-stoffen-
behoudende batterijen en accu’s:
Pb: Batterij of accu bevat lood
Cd: Batterij of accu bevat cadmium
Hg: Batterij of accu bevat kwik
Powerpeak is een gedeponeerde merknaam van:
Van den Berg Products BV
IJzerwerf 10-12
6641 TK Beuningen
Nederland
www.vdbergproducts.com
13
GARANTIEBEWIJS
Dit garantiebewijs dekt uw product voor een periode van 24 maanden vanaf de datum van aankoop op defecten
aan het product, op voorwaarde dat u het product correct heeft gebruikt zoals omschreven in de
gebruiksaanwijzing.
Gebreken die ontstaan door ondeskundige behandeling, beschadiging of reparatiepogingen van derden, vallen
niet onder de garantie.
De garantie geldt niet voor de bijgeleverde accessoires, en andere delen van het product die aan slijtage
onderhevig zijn. Mocht u deze willen nabestellen, dan is dat mogelijk via www.muppa.nl
Dit product is alleen bestemd voor huishoudelijk gebruik. Schade en/of storingen door bedrijfsmatig gebruik
worden uitgesloten van garantie.
U kunt gebruik maken van de garantie indien:
• Het product volgens de gebruiksaanwijzing is gebruikt;
• U in het bezit bent van een geldig origineel aankoopbewijs welke niet is veranderd of onleesbaar gemaakt;
• Het serviceformulier duidelijk en compleet is ingevuld;
• Er geen ingrepen zijn verricht door niet bevoegde personen of werkplaatsen;
• De schade aan het product niet is te wijten aan een oorzaak vreemd aan het apparaat, zoals: brandschade,
waterschade, transportschade, atmosferische ontladingen of verkeerd of onvoldoende onderhoud.
Mocht ondanks onze zorgvuldige kwaliteitscontrole uw product niet goed functioneren, dan kunt u een beroep
doen op onze service. Om een beroep te doen op onze service, verzoeken wij u om een duidelijk ingevuld
serviceformulier, inclusief aankoopbon, naar ons op te sturen. Het serviceformulier kunt u verderop in de deze
gebruiksaanwijzing vinden.
Om ongerief te voorkomen, raden wij u aan de gebruiksaanwijzing zorgvuldig na te lezen alvorens u tot ons te
wenden.
14
SERVICEFORMULIER
Vult u onderstaand serviceformulier zo volledig en duidelijk mogelijk in. Aan de hand van het door u
ingevulde serviceformulier zullen wij zo spoedig mogelijk contact met u opnemen.
Het product:
Artikelnummer: FBS8296P
Artikelomschrijving: Powerpeak Speed Bike
Winkel van aankoop:................................................................................................................................................
Aankoopdatum (zoals op de aankoopbon):............................................................................................................
Dit formulier kunt u, samen met de aankoopbon sturen naar:
Van den Berg Products BV
Afdeling Service
IJzerwerf 10-12
6641 TK Beuningen
of faxen naar: 024 - 345 44 29
Servicenummer: +31 (0)24 675 27 86
Accessoires en delen van het product die aan slijtage onderhevig zijn vallen niet binnen deze garantie. Mocht u
deze willen nabestellen, dan is dat mogelijk via www.muppa.nl.
LET OP: EEN SERVICEFORMULIER WAARBIJ HET AANKOOPBEWIJS ONTBREEKT KAN HELAAS NIET IN
BEHANDELING WORDEN GENOMEN.
15
SAFETY REGULATIONS
1. This equipment is not designed to be used as a toy and must only be used for the purposes described in
this manual. Read the instructions below carefully before using this equipment.
2. This appliance is not intended for use by persons (including children) with reduced physical, sensory or
mental capabilities, or lack of experience and knowledge, unless they have been given supervision or
instruction regarding the use of the appliance by a person responsible for their safety.
3. Keep children and animals away from the equipment. Children's enthusiasm may lead to the incorrect use
of the equipment. If children are allowed to use the equipment, they should only do so under supervision
and after receiving instructions regarding its proper use. Under no circumstances should the equipment
be used as a toy.
4. Always consult with your physician prior to making use of this equipment or any other fitness equipment.
5. Always wear safe and comfortable clothing when you are using fitness equipment. Preferably wear sport
shoes or aerobic footwear.
6. In the event you feel faint or suffer other discomforts, stop using the equipment. You also need to stop
when you experience pain in or pressure on your joints.
7. Make certain that the equipment has been correctly assembled prior to its use. Ensure that all screws, nuts
and bolts have been fitted correctly and tightened properly. Use only the parts that are recommended by
the importer and that have been delivered with the equipment.
8. Do not use the equipment if it is damaged or has broken down.
9. Pay attention to how your body reacts after using the equipment. Dizziness is a sign that you worked out
too intensely. If you feel dizzy, stretch out on the floor and do not try to get back on your feet until the
dizziness has disappeared.
10. Always use the equipment on a level and clean surface. Never use the equipment outdoors.
11. Do not use parts that were not recommended by the manufacturer.
12. Ascertain that there are no sharp and pointed objects in the immediate vicinity of the equipment.
13. We advise physically challenged individuals to use this fitness equipment only under the supervision of
qualified instructors.
14. The equipment must have come to a complete standstill before stepping down.
15. The maximum permissible weight on this equipment is 120 KG.
WARNING
Consult with your physician prior to starting your exercises. A frequent and intensive training programme
should first be approved by your family physician. This is especially important for individuals above 35 years of
age or for those with physical problems. Carefully read through the entire user manual before you start
exercising. We are in no wise responsible for personal injury or physical strains and discomforts that are caused
by the use of this equipment and cannot be held liable in case of their occurrence. Keep these instructions in a
safe place. Incorrect or extreme use may lead to personal injury. Note: the maximum permissible weight on this
equipment is 120 kg. This user manual has been put together in order to simplify the assembly of the
equipment and at the same time to explain its correct use. Please make sure to carefully read this manual. In
order to familiarise yourself with the parts of the equipment, we recommend that you carefully study the
general reference drawing prior to starting the assembly and the use of the equipment. Place all parts needed
for the assembly on the floor in an orderly manner and remove all packing material. Check the list of parts to
verify all items are present. For the actual assembly we make referral to the following pages.
MAINTENANCE AND USE
Consult your physician before starting the exercises. A frequent and strenuous work-out program must be
approved by your physician first.
- The equipment requires a regular check-up to prevent physical injury. This means that bolts and nuts
should be frequently checked for cracks and sharp edges etc.
- Defective components must be replaced immediately. If this is not possible, the equipment must be put out
of order until the required repairs have been made.
16
IMPORTANT
1. Make sure the equipment is stable, before you start to exercise. If the ground is not plain, you can adjust
the four adjustable feet (17) to plain state.
2. By adjusting the height of seat stand pipe (10), slide the seat support pipe (11) to a proper position, after
that please adjust the height of gripe (19) according to your body size.
3. Set the right resistance for yourself by adjusting the adjusting knob (14). You may do exercise three times a
week, every time it takes an hour to exercise, the best working effect is that the HBF reaches 110-150
times/min.
4. The drive mode equipment is bi-directive drive. Please press speediness handle to brake, when aggressive
exercise is performed, it will stop immediately. Never leave the seat pad until all the sporting parts are
completely stopped.
THE PRODUCT
17
Parts list
Number Description Quantity
01 Main frame 1
02 Seat post 1
03 Seat slider 1
04 Handlebar post 1
05 Handlebar 1
06 Cap Nut M12*1.0 2
07 Rear base 1
08 Front base 1
09 Break handle 1
10 Washer Ø10x Ø25xT5 1
11 Resistance knob 1
12 Cover right 1
13 Cover left 1
14 Chain cover right 1
15 Chain cover left 1
16 Base leveler M8 1
17 Plastic sheath-inner pipe 2
18 Cap of bases 4
19 Cap of seat slider 1
20 Front cover for chain drive system 1
21 Pulley 2
22 Saddle 1
23 Adjusting knob 3
24 Mat Ȝ21 1
25 Cap of inner pipe 45*45*1.5T 1
26 Hexagon nut M8 4
27 Hexagon hollow bolt Ȝ8*M6*30 3
28 Silent chain 1
29 Flat washer Ȝ12*1.5 2
30 Axe 1
31 Left & right crank + big chain Wheel 52T 1 set
32 Crank cover 2
33 Flat washer Ȝ20*Ȝ10*1.5 4
34 Inner hexagon flat round head screw M10*25 4
35 Left & right pedal 1
36 Flywheel (18 KG) 1
37 Flywheel spindle M12*1.0*162 1
38 Chain adjusting welding 2
39 Sleeve Ø18*Ø12*20L 1
40 Nylon nut M8 2
41 Clamp break 1
42 Clamp break holder T4.0*M10*P1.25 1
43 Flat washer Ø10.2- Ø25*T1.5 1
44 6001 2
45 6004 2
46 608 4
47 Bi-direction chain wheel 1
48 C-shaped buckle Ȝ20 2
49 Inner hexagon column bolt M6x40 1
50 Friction mat 2
51 Shrapnel nut 5
52 Cross pan self-tapping bolt ST4.8*15 17
53 Hexagon flange nut M12*P1.25*8 2
18
54 Break pad holder 2
55 Hexagon thin nut M12*1.0 3
56 Hexagon flange nut M6 1
57 Lock nut 2
58 Nylon nut M10*P1.25 1
59 Cross recessed pan head bolt M5*12 4
60 Flat washer Ȝ5.2*1.0 4
61 Cross recessed countersunk bolt M6*12 2
62 Break string 2
63 Inner hexagon flat round bolt M6*12 3
64 Water bottle 1
65 Water bottle holder 1
66 Inner Hexagon Flat Round Head Screw 2
67 Flat washer Ȝ20*10*1.5TȜ 2
68 Computer 1
69 Computer holder 1
70 Cross recessed pan head bolt M6*12L 2
71 Pedal feet sheath (assembled to pedal) 2
72 Pedal strip (assembled to pedal) 2
73
Flat washer Ȝ5.2*1.0 2
74 Cross Recessed Pan Head Bolt M5*12L 2
75 Plastic Sheath-inner Pipe (short) 1
ASSEMBLY
Step 1
Remove all parts from the carton according the drawing and parts list and make sure that all parts are present.
Step 2
According to the drawing, fix the rear base (7) and the front base (8) to the main frame (1) by using 4pcs of
M10*25 screw (34) and 4 pcs of flat washer Ȝ20*Ȝ10*1.5 (33).
Step 3
Insert the right and left pedals (35) to the crank and fasten them to the main frame (1).
19
Step 4
Turn the adjusting knob (23), insert the handlebar post (4) into the front pipe of the main frame (1), choose the
right height and fasten.
Step 5
Attach the handlebar (5) to the handlebar post by using 2pcs of flat washer Ȝ20*10*1.5TȜ (67) and 2pcs of
inner hexagon flat round head screw M10*25L (66).
Step 6
Turn the adjusting knob (23), insert the seat slider (3) into the seat post (2). Insert saddle (22) and fasten.
20
Step 7
Assemble the water bottle holder (65) to the main frame (1) with the help of some tools. Insert the water bottle
(64) into the water bottle holder (65).
Step 8
Fasten the computer holder (69) to the handlebar (5) by using 2pcs of M6x12L cross recessed pan head bolt
(70). Fasten the computer (68) to the computer holder (69) and link the computer (68) with connector plug.
Attach the connector plug to the connection point. You can find the connection point on the underside of the
bent frame opposite the speed handle.
Step 9
When the installation is completed, please carefully check and ensure all the screws and nuts are fastened firmly.
Note:
1. Check all the nuts, nut caps and pedals to be in good order regularly. If you find any defective parts, do not
exercise until the equipment is repaired.
2. Pay extra attention to easily damaged parts, such as the clamp break (41). If you find it does not work
adequately or is loose, do not use the equipment until it is repaired.
3. If you find the chain is loose, loosen nut cap, and adjust Nylon nut by using 10mm-sleeve-spanner. When it
is tightened, fasten nut cap.
21
COMPUTER
Specifications:
Time: 00:00-99:59
Speed (SPD): 0.01-99.9 KM
Distance (DIST): 0.00-99.99 KM
Total distance (ODO): 0.00-9999 KM
Calories: 0.1-99,9 KCAL
Please note
- The display turns on automatically if it receives input.
- If no signal is forthcoming for 4 minutes, the LCD-display shuts off automatically and all settings
will be erased, except total distance.
Mode:
Allows you to select different modes on the display.
Reset:
Resets functions to zero.
Note: This also happens when the batteries are taken out.
Set:
Allows you to set values.
Functions
SCAN: Shows the various measuring every 4 seconds
TIME: Press the MODE-key until the pointer locks on to TIME. The total exercise length will be
shown as you start exercising.
SPEED: Press the MODE-key until the pointer locks on to SPEED. The speed will be shown as you
start exercising.
DISTANCE: Press the MODE-key until the pointer locks on to DISTANCE. The distance of each workout
will be displayed as you start your exercise.
ODO: Adds up the total training distance
CALORIE: Press the MODE-key until the pointer locks on to CALORIE. The estimated amount of
burnt calories will be displayed as you start exercising.
Values to be set in advance
TIME, DISTANCE, CAL may be set in advance; Select the desired function through the
MODE-key. You can adjust the value with the SET-key.
At the beginning of the exercise the computer counts down to zero. At reaching zero a sound will be
emitted for about 10 seconds.
If the display does not function properly, please replace the batteries.
Computer operates on 1 AAA battery which is NOT INCLUDED.
22
IMPORTANT ADVICE FOR TRAINING
- Before you start the training, consult your doctor. Ask what kind of training is suitable for you. Wrong or
excessive training can cause health defects.
- Avoid over training. Do not train if you are tired or feeling faint. If you are not used to physical activity, start
the training slowly at the beginning.
- Stop exercising immediately if you feel pain or any other troubles.
- Do not eat 30 minutes before and after training.
- Pay attention to your breathing during training.
- To avoid injuries, begin the training with an extensive warm up and finish it with a cool-down phase. Use
the exercises described in this manual. You can also refer to exercises mentioned in other sports guides.
- Make sure you drink enough liquids during training. Keep in mind that the recommended amount of 2 litres
might increase during physical workout. Liquid should be at room temperature.
- Use the product only with sport clothes and suitable shoes, which are equipped with non-slip soles. Avoid
wide clothes, because they can get caught in moving parts of the product.
WARM-UP/STRETCHING/COOL-DOWN
A successful exercise session begins with warming up exercises and ends with exercises for cooling
down and relaxing. These warming up exercises prepare your body for the subsequent demands made
upon it. The cooling down/relaxation period after the exercise session ensures that you do not
experience any muscular problems. In the following, you will find stretching exercise instructions for
warming up and cooling down. Please pay attention to the following points:
- Carefully warm up every muscle group you will be using in the exercise session for about 5 to 10
minutes. The stretching exercises are carried out correctly if you feel a comfortable tension in the
corresponding muscle.
- Speed does not play a role during the stretching exercises. Fast and jerky movements must be avoided.
Neck exercises (1)
Tilt your head to the right and feel the tension in your neck. Slowly drop your
head down to your chest in a semi circle and then turn your head to the left.
You will feel a comfortable tension in your neck again. You can repeat this
exercise alternately several times.
Exercises for the shoulder area (2)
Lift the left and right shoulders alternately, or lift both shoulders
simultaneously.
Arm stretching exercises (3)
Stretch the left and right arms alternately towards the ceiling. Feel the tension
in the left and right sides of your body. Repeat this exercise several times.
23
Exercises for the upper thigh (4)
Support yourself by placing your hand on the wall, then reach down behind you
and lift up your right or left foot as close to your buttocks as possible. Feel a
comfortable tension in your front upper thigh. Maintain this position for 30
seconds if possible and repeat this exercise 2 times for each leg.
Inside upper thigh (5)
Sit on the floor and place your feet in such a way that your knees are facing
outwards. Pull your feet as close as possible to your groin. Now press your
knees carefully downwards. Maintain this position for 30-40 seconds if
possible.
Touch toes (6)
Bend your trunk slowly forwards and try to touch your feet with your hands.
Reach down as far as possible to your toes. Maintain this position for 20-30
seconds if possible.
Exercises for the knees (7)
Sit on the floor and stretch out your right leg. Bend your left leg and place your
foot on your right upper thigh. Now try to reach your right foot with your right
arm. Maintain this position for 30-40 seconds if possible.
Exercises for the calves achilles tendon (8)
Place both your hands on the wall and support your full body weight. Then
move your left and right leg alternately backwards. This stretches the back part
of the leg. Maintain this position for 30-40 seconds if possible.
24
COMPULSORY INFORMATION REGARDING THE DECREE ON BATTERIES
Batteries do not belong in your household waste. Users are required by law to return used batteries.
For proper disposal of batteries, you can find designated disposal containers in specialized shops as
well as in municipal collecting facilities. This is a solid contribution to the protection of the
environment. Since 1998, the decree on batteries requires all citizens to dispose used batteries only via
these specialized shops or collecting facilities (legal obligation to dispose). Specialized shops and
manufactures are obliged to accept used batteries in return and re-use them in accordance to the
decree or dispose of them as dangerous waste (legal obligation to accept). If you wish to return your
used batteries to us, you can mail them to our address in an adequately stamped envelope.
Batteries that need to be labelled by law are provided with one of the illustrations below, being a
crossed-out wheeled bin and the chemical symbol for the classification of pollutants-containing heavy
metals. The chemical symbol (Cd, Hg or Pb) will be shown under the illustration.
The following text can be found on the pollutants-
containing batteries:
Pb: Battery contains lead
Cd: Battery contains cadmium
Hg: Battery contains mercury
Powerpeak is a registered brand name of:
Van den Berg Products BV
IJzerwerf 10-12
6641 TK Beuningen
The Netherlands
www.powerpeak.com
25
GUARANTEE
This warranty covers your unit for a period of 24 months from the date of purchase for service and replacement
of parts, on the condition that you have used the machine correctly as described in the user manual. This
warranty does not exclude national legislation that may exist in the country of purchase in regards to warranty
regulations.
When you make a claim under this warranty, you must submit the original invoice or receipt with clear mention
of the date of purchase, name of retailer and the description and model number of the appliance. You are
advised to keep these documents in a safe place.
This device is intended for domestic use only. Damage and / or malfunctions as the result of industrial or
commercial use are excluded from the warranty.
The warranty for this appliances expires if:
- The original invoice or receipt has in one way or another been changed or made illegible,
- The model or serial number on the product has been changed, removed, deleted or made illegible,
- Repairs have been executed by unauthorized repair workshops or persons who are not authorized to do so.
- The damage is the result of an external cause, such as fire damage, water damage, transport damage,
atmospheric discharges, insufficient or improper maintenance;
- The appliance has been operated in another country than for which originally designed, approved, released
and produced, as well as defects occurred as the result of such modifications.
- The appliance has not been used according to the guidelines and directions in the user manual supplied
with the product.
In the unlikely event your appliance is not functioning well or shows any defect, please contact your retailer. To
avoid any inconvenience, we advise you to read the user manual carefully before contacting them.
26
SERVICE FORM
Unfortunately we CANNOT handle any service forms that have been completed unclearly or partly. Therefore
please always fill in the service form as clearly and completely as possible!
THE PRODUCT
Article number: FBS8296P
Article description: Powerpeak Speed Bike
Shop of purchase:.........................................................................................................................…………………......
Date of purchase:.....................................................................................................................…………………...........
Postal code:.................................................................................................................................……………………......
Date d'achat: (indiquée sur le ticket de caisse):.......................................................................................................
Gebruikershandleiding.com neemt misbruik van zijn services uitermate serieus. U kunt hieronder aangeven waarom deze vraag ongepast is. Wij controleren de vraag en zonodig wordt deze verwijderd.
Product:
Spelregels forum
Om tot zinvolle vragen te komen hanteren wij de volgende spelregels:
lees eerst de handleiding door;
controleer of uw vraag al eerder door iemand anders is gesteld;
probeer uw vraag zo duidelijk mogelijk te stellen;
heeft u een probleem en al geprobeerd om dit op te lossen, vermeld dit erbij aub;
heeft u een oplossing gekregen van een bezoeker dan horen wij dat graag in dit forum;
wilt u een reactie geven op een vraag of antwoord, gebruik dan niet dit formulier maar klik op de knop 'reageer op deze vraag';
uw vraag wordt direct op de website gezet; vermijd daarom persoonlijke gegevens in te vullen;
Belangrijk! Als er een antwoord wordt gegeven op uw vraag, dan is het voor de gever van het antwoord nuttig om te weten als u er wel (of niet) mee geholpen bent! Wij vragen u dus ook te reageren op een antwoord.
Belangrijk! Antwoorden worden ook per e-mail naar abonnees gestuurd. Laat uw emailadres achter op deze site, zodat u op de hoogte blijft. U krijgt dan ook andere vragen en antwoorden te zien.
Abonneren
Abonneer u voor het ontvangen van emails voor uw Powerpeak FBS8296P Exclusive Line bij:
nieuwe vragen en antwoorden
nieuwe handleidingen
U ontvangt een email met instructies om u voor één of beide opties in te schrijven.
Ontvang uw handleiding per email
Vul uw emailadres in en ontvang de handleiding van Powerpeak FBS8296P Exclusive Line in de taal/talen: Nederlands, Duits, Engels, Frans, Pools als bijlage per email.
De handleiding is 2,74 mb groot.
U ontvangt de handleiding per email binnen enkele minuten. Als u geen email heeft ontvangen, dan heeft u waarschijnlijk een verkeerd emailadres ingevuld of is uw mailbox te vol. Daarnaast kan het zijn dat uw internetprovider een maximum heeft aan de grootte per email. Omdat hier een handleiding wordt meegestuurd, kan het voorkomen dat de email groter is dan toegestaan bij uw provider.
Stel vragen via chat aan uw handleiding
Stel uw vraag over deze PDF
Uw handleiding is per email verstuurd. Controleer uw email
Als u niet binnen een kwartier uw email met handleiding ontvangen heeft, kan het zijn dat u een verkeerd emailadres heeft ingevuld of dat uw emailprovider een maximum grootte per email heeft ingesteld die kleiner is dan de grootte van de handleiding.
Er is een email naar u verstuurd om uw inschrijving definitief te maken.
Controleer uw email en volg de aanwijzingen op om uw inschrijving definitief te maken
U heeft geen emailadres opgegeven
Als u de handleiding per email wilt ontvangen, vul dan een geldig emailadres in.
Uw vraag is op deze pagina toegevoegd
Wilt u een email ontvangen bij een antwoord en/of nieuwe vragen? Vul dan hier uw emailadres in.