The Pioneer DJ support site shown above offers FAQs, information on software and various other types of
information and services to allow you to use your product in greater comfort.
Le site de support DJ de Pioneer indiqué ci-dessus propose une FAQ, des informations sur le logiciel et divers
types d’informations et de services qui permettent une utilisation plus confortable de ce produit.
Die oben gezeigte Pioneer DJ-Support-Website enthält häufig gestellte Fragen, Informationen über Software
und andere wichtige Informationen und Dienste, die Ihnen helfen, Ihr Produkt optimal zu verwenden.
Il sito di supporto DJ Pioneer indicato qui sopra offre una sezione FAQ, informazioni sul software ed
informazioni e servizi di vario tipo, per permettere un uso più confortevole dei nostri prodotti.
De bovengenoemde Pioneer DJ ondersteuningswebsite biedt een overzicht van de vaak gestelde vragen,
informatie over software en allerlei andere soorten informatie en diensten die u in staat stellen dit product met
meer gemak te gebruiken.
El sitio de asistencia Pioneer DJ mostrado arriba ofrece las preguntas frecuentes, información del software y
varios otros tipos de información y servicios que le permitirán usar su producto con mayor confort.
На указанном выше сайте поддержки Pioneer DJ содержатся раздел часто задаваемых вопросов,
информация по программному обеспечению, а также различные другие типы информации и услуг,
позволяющие использовать ваше изделие более лучшим образом.
Operating Instructions
Mode d’emploi
Bedienungsanleitung
Istruzioni per l’uso
Handleiding
Manual de instrucciones
Инструкции по эксплуатации
http://serato.com/
For the latest version of the Serato DJ software, access Serato.com and download the software from there.
Pour la toute dernière version du logiciel Serato DJ, accédez à Serato.com et téléchargez le logiciel de ce site.
Für die neueste Version der Serato DJ-Software gehen Sie zu Serato.com und laden die Software von dort
herunter.
Per ottenere la più recente versione di Serato DJ, raggiungere Serato.com e scaricare il software di lì.
Ga voor de nieuwste versie van de Serato DJ-software naar Serato.com en download de software van deze site.
Para la versión más reciente del software Serato DJ, acceda a Serato.com y descargue el software desde allí.
Относительно самой последней версии программного обеспечения Serato DJ зайдите на Serato.com и
загрузите оттуда программное обеспечение.
http://rekordbox.com/
For various types of information and services regarding rekordbox™, see the Pioneer website above.
Pour les différents types d’informations et de services concernant rekordbox™, consultez le site Pioneer ci-dessus.
Weitere Informationen und Dienste bezüglich rekordbox™ finden Sie auf der oben angegebenen Pioneer-Website.
Per quanto riguarda vari tipi di informazione e servizi riguardanti rekordbox™, vedere il sito Pioneer menzionato qui sopra.
Zie de hierboven genoemde Pioneer website voor allerlei soorten informatie en diensten met betrekking tot rekordbox™.
Para varios tipos de información y servicios acerca del rekordbox™, visite el sitio web de Pioneer indicado arriba.
Относительно различных типов информации и услуг относительно rekordbox™ смотрите вебсайт Pioneer выше.
DJM-900SRT
DJM-900SRT Serato DJ Edition
DJ MIXER
TABLE DE MIXAGE
DJ-MISCHPULT
MIXER PER DJ
DJ MENGPANEEL
MESA DE MEZCLAS DJ
DJ
микшерный
пульт
2
En
Thank you for buying this Pioneer product. Please read through these operating instructions so you will know how to operate your model properly. After you have finished read-
ing the instructions, put them away in a safe place for future reference.
In some countries or regions, the shape of the power plug and power outlet may sometimes differ from that shown in the explanatory drawings. However the method of con-
necting and operating the unit is the same.
If you want to dispose this product, do not mix it with general household waste. There is a separate collection system for used
electronic products in accordance with legislation that requires proper treatment, recovery and recycling.
Private households in the member states of the EU, in Switzerland and Norway may return their used electronic products free of charge to
designated collection facilities or to a retailer (if you purchase a similar new one).
For countries not mentioned above, please contact your local authorities for the correct method of disposal.
By doing so you will ensure that your disposed product undergoes the necessary treatment, recovery and recycling and thus prevent potential
negative effects on the environment and human health.
K058b_A1_En
CAUTION
TO PREVENT THE RISK OF ELECTRIC SHOCK, DO NOT
REMOVE COVER (OR BACK). NO USER-SERVICEABLE
PA
RTS INSIDE. REFER SERVICING TO QUALIFIED
SERVICE PERSONNEL.
D3-4-2-1-1_B1_En
NOTE:
This equipment has been tested and found to comply with the limits for a Class B digital device, pursuant to Part 15
of the FCC Rules. These limits are designed to provide reasonable protection against harmful interference in a
residential installation. This equipment generates, uses, and can radiate radio frequency energy and, if not installed
and used in accordance with the instructions, may cause harmful interference to radio communications. However,
there is no guarantee that interference will not occur in a particular installation. If this equipment does cause
harmful interference to radio or television reception, which can be determined by turning the equipment off and on,
the user is encouraged to try to correct the interference by one or more of the following measures:
— Reorient or relocate the receiving antenna.
— Increase the separation between the equipment and receiver.
— Connect the equipment into an outlet on a circuit different from that to which the receiver is connected.
— Consult the dealer or an experienced radio/TV technician for help.
D8-10-1-2_A1_En
FEDERAL COMMUNICATIONS COMMISSION DECLARATION OF CONFORMITY
This device complies with part 15 of the FCC Rules. Operation is subject to the following two conditions: (1) This
device may not cause harmful interference, and (2) this device must accept any interference received, including
interference that may cause undesired operation.
Product Name: DJ MIXER
Model Number: DJM-900SRT
Responsible Party Name: PIONEER ELECTRONICS (USA) INC.
SERVICE SUPPORT DIVISION
Address: 1925 E. DOMINGUEZ ST. LONG BEACH, CA 90810-1003, U.S.A.
Phone: 1-800-421-1404
URL: http://www.pioneerelectronics.com
D8-10-4*_C1_En
WARNING
This equipment is not waterproof. To prevent a fire or
shock hazard, do not place any container filled with
liquid near this equipment (such as a vase or flower
pot) or expose it to dripping, splashing, rain or
moisture.
D3-4-2-1-3_A1_En
WARNING
To prevent a fire hazard, do not place any naked flame
sources (such as a lighted candle) on the equipment.
D3-4-2-1-7a_A1_En
VENTILATION CAUTION
When installing this unit, make sure to leave space
around the unit for ventilation to improve heat radiation
(at least 5 cm at rear, and 3 cm at each side).
WARNING
Slots and openings in the cabinet are provided for
ventilation to ensure reliable operation of the product,
and to protect it from overheating. To prevent fire
hazard, the openings should never be blocked or
covered with items (such as newspapers, table-cloths,
curtains) or by operating the equipment on thick carpet
or a bed.
D3-4-2-1-7b*_A1_En
CAUTION
The POWER switch on this unit will not completely
shut off all power from the AC outlet. Since the power
cord serves as the main disconnect device for the
unit, you will need to unplug it from the AC outlet to
shut down all power. Therefore, make sure the unit
has been installed so that the power cord can be
easily unplugged from the AC outlet in case of an
accident. To avoid fire hazard, the power cord should
also be unplugged from the AC outlet when left
unused for a long period of time (for example, when
on vacation).
D3-4-2-2-2a*_A1_En
Operating Environment
Operating environment temperature and humidity:
+5 °C to +35 °C (+41 °F to +95 °F); less than 85 %RH
(cooling vents not blocked)
Do not install this unit in a poorly ventilated area, or in
locations exposed to high humidity or direct sunlight (or
strong artificial light).
D3-4-2-1-7c*_A2_En
3
En
POWER-CORD CAUTION
Handle the power cord by the plug. Do not pull out the
plug by tugging the cord and never touch the power
cord when your hands are wet as this could cause a
short circuit or electric shock. Do not place the unit, a
piece of furniture, etc., on the power cord, or pinch the
cord. Never make a knot in the cord or tie it with other
cords. The power cords should be routed such that they
are not likely to be stepped on. A damaged power cord
can cause a fire or give you an electrical shock. Check
the power cord once in a while. When you find it
damaged, ask your nearest PIONEER authorized
service center or your dealer for a replacement.
S002*_A1_En
For Taiwan exclusively
Taiwanese two pin flat-bladed plug
K056_A1_En
WARNING
Store small parts out of the reach of children and
infants. If accidentally swallowed, contact a doctor
immediately.
D41-6-4_A1_En
Information to User
Alterations or modifications carried out without
appropriate authorization may invalidate the user’s
right to operate the equipment.
D8-10-2_A1_En
CAUTION
This product satisfies FCC regulations when shielded
cables and connectors are used to connect the unit
to other equipment. To prevent electromagnetic
interference with electric appliances such as radios
and televisions, use shielded cables and connectors
for connections.
D8-10-3a_A1_En
4
En
Contents
For those operating Serato DJ for the first time using this unit
See the “Quick Start Guide - Serato DJ Edition” for the procedure for making the
initial settings required to use the CONTROL CD or CONTROL VINYL in order to
operate Serato DJ. The “Quick Start Guide - Serato DJ Edition” can be downloaded
from the Pioneer DJ support site (http://pioneerdj.com/support/). For downloading
instructions, see Downloading the latest versions of the operating instructions and
the Quick Start Guide - Serato DJ Edition in this manual (p.28).
For users of CONTROL VINYL
If you use CONTROL VINYL, use a shop that handles Serato DJ products or an
online shop such as that of Serato (http://serato.com/).
How to read this manual
Be sure to read both this manual and the “Quick Start Guide – Serato DJ Edition”.
Both contain important information that you should understand before using this
product.
For instructions on obtaining the Serato DJ software’s manual, see Acquiring the
manual (p.28).
This manual consists mainly of descriptions of the functions of this unit as hard-
ware. For details about operating the Serato DJ software, see the Serato DJ soft-
ware’s manual and the “Quick Start Guide – Serato DJ Edition”.
The Serato DJ software manual can be downloaded from “Serato.com”. For
details, see Downloading the Serato DJ software manual (p. 28).
The latest version of the operating instructions (this manual) and the “Quick
Start Guide – Serato DJ Edition” can be downloaded from the Pioneer support
site. For details, see Downloading the latest versions of the operating instruc-
tions and the Quick Start Guide - Serato DJ Edition (p.28).
In this manual, names of channels and buttons indicated on the product, names
of menus in the software, etc., are indicated within square brackets ([ ]). (e.g.
[MASTER] channel, [ON/OFF], [File] menu)
Please note that the screens and specifications of the software described in this
manual as well as the external appearance and specifications of the hardware
are currently under development and may differ from the final specifications.
Please note that depending on the operating system version, web browser set-
tings, etc., operation may differ from the procedures described in this manual.
Before start
Features .............................................................................................................................5
What’s in the box ..............................................................................................................5
Installing the software
Installing the driver software ...........................................................................................6
Installing the Serato DJ software ....................................................................................7
Simplified Chinese, Traditional Chinese, Korean, and Japanese
When using operating systems in other languages, follow the instructions on the
screen to select [English (English)].
Installation Procedure (Windows)
Read Cautions on Installation carefully before installing the driver software.
To install or uninstall the driver software, you need to be authorized by the
administrator of your computer. Log on as the administrator of your computer
before proceeding with the installation.
1 Insert the included CD-ROM into the computer’s CD drive.
The CD-ROM menu is displayed.
If the CD-ROM menu does not appear when the CD-ROM is inserted, double-
click the CD drive from the [Start] menu – [Computer] (or [My Computer]).
2 From the menu that appears, select [Install Driver
Software], then click [Start].
3 “Download the latest version? An internet environment is
required to access the site.” is displayed. Click [Yes].
The web browser is launched and the Pioneer DJ support site is displayed.
4 Click [Software Download] under [DJM-900SRT] on the
Pioneer DJ support site.
5 Click [Driver Software].
6 From the download page, download the driver software
for Windows (DJM-900SRT_X.XXX.exe).
7 Double-click the downloaded file.
The driver installation screen appears.
8 Carefully read the Software end user license agreement
and if you consent to the provisions, put a check mark in [I
agree.] and click [OK].
If you do not consent to the provisions of the Software end user license agreement,
click [Cancel] and stop installation.
9 Proceed with installation according to the instructions on
the screen.
If [Windows Security] appears on the screen while the installation is in progress,
click [Install this driver software anyway] and continue with the installation.
When installing on Windows XP
If [Hardware Installation] appears on the screen while the installation is in
progress, click [Continue Anyway] and continue with the installation.
When the installation program is completed, a completion message appears.
Installation procedure (Mac OS X)
Read Cautions on Installation carefully before installing the driver software.
To install or uninstall the driver software, you need to be authorized by the
administrator of your computer. Have the name and password of the administra-
tor of your computer ready in advance.
1 Insert the included CD-ROM into the computer’s CD drive.
The CD-ROM folder appears.
Double-click the CD icon on the desktop when folders are not displayed after a
CD-ROM has been loaded.
2 Double-click [CD_menu.app].
3 From the menu that appears, select [Install Driver
Software], then click [Start].
4 “Download the latest version? An internet environment is
required to access the site.” is displayed. Click [Yes].
The web browser is launched and the Pioneer DJ support site is displayed.
5 Click [Software Download] under [DJM-900SRT] on the
Pioneer DJ support site.
6 Click [Driver Software].
7 From the download page, download the driver software
for Mac OS (DJM-900SRT_M_X.X.X.dmg).
8 Double-click the downloaded file.
The [DJM-900SRT_AudioDriver] menu screen appears.
9 Double-click [DJM-900SRT_AudioDriver.pkg].
The driver installation screen appears.
10 Check the details on the screen and click [Continue
Anyway].
11 When the end user license agreement appears, read
Software end user license agreement carefully, then click
[Continue Anyway].
12 If you consent to the provisions of the Software end user
license agreement, click [Agree].
If you do not consent to the provisions of the Software end user license agreement,
click [I disagree] and stop installation.
13 Proceed with installation according to the instructions on
the screen.
Click [Cancel] to cancel installation after it has started.
Installing the Serato DJ software
Serato DJ is a DJ software application by Serato. DJ performances are possible by
connecting the computer on which this software is installed to this unit.
See the “Quick Start Guide - Serato DJ Edition” for the procedure for making the
initial settings required to use the CONTROL CD or CONTROL VINYL in order to
operate Serato DJ. The “Quick Start Guide - Serato DJ Edition” can be downloaded
from the Pioneer DJ support site (http://pioneerdj.com/support/). For downloading
instructions, see Downloading the latest versions of the operating instructions and
the Quick Start Guide - Serato DJ Edition in this manual (p.28).
For the latest version of the Serato DJ software, access Serato.com and download
the software from there. A software download link is also provided on the included
CD-ROM.
Please note that the software screens and specifications used for explanations in
this manual are under development and may differ from the final specifications.
For instructions on operating the Serato DJ software, see the Serato DJ software’s
manual.
The Serato DJ software’s manual can be downloaded from “Serato.com”. For
details, see Downloading the Serato DJ software manual (p.28).
Minimum operating environment
Supported operating systemsCPU and required memory
Mac OS X: 10.6.8, 10.7.4 and
10.8
32-bit
version
Intel
®
processor, Core™ 2 Duo 2.0 GHz or
better
1 GB or more of RAM
64-bit
version
Intel
®
processor, Core™ 2 Duo 2.4 GHz or
better
4 GB or more of RAM
Windows: Windows 7
32-bit
version
Intel
®
processor, Core™ 2 Duo 2.0 GHz or
better
2 GB or more of RAM
64-bit
version
Intel
®
processor, Core™ 2 Duo 2.4 GHz or
better
4 GB or more of RAM
Others
USB portA USB 2.0 port is required to connect the computer with this unit.
Display resolutionResolution of 1 280 x 720 or greater
Internet connection
An Internet connection is required for registering the “Serato.
com” user account and downloading the software.
For the latest information on the required operating environment and compatibility as well as
to acquire the latest operating system, refer to “Software Info” under “DJM-900SRT” on the
Pioneer DJ support site below.
http://pioneerdj.com/support/
8
En
Operation is not guaranteed on all computers, even if all the required operating environment
conditions indicated here are fulfilled.
Depending on the computer’s power-saving settings, etc., the CPU and hard disk may not
provide sufficient processing capabilities. For notebook computers in particular, make sure
the computer is in the proper conditions to provide constant high performance (for example
by keeping the AC power connected) when using Serato DJ.
Use of the Internet requires a separate contract with a provider offering Internet services and
payment of provider fees.
Installation Procedure (Windows)
Do not connect this unit and the computer until installation is completed.
Log on as the user which was set as the computer’s administrator before
installing.
If any other programs are running on the computer, quit them.
1 Insert the CD-ROM into the computer’s CD drive.
The CD-ROM menu is displayed.
If the CD-ROM menu does not appear when the CD-ROM is inserted, open the
CD drive from [Computer (or My Computer)] in the [Start] menu, then double-
click the [CD_menu.exe] icon.
2 When the CD-ROM’s menu appears, select [Download
Serato DJ Software.], then click [Start].
To close the CD-ROM menu, click [Exit].
3 “An internet environment is required to access the site.
Connected to the internet?” is displayed. Click [Yes].
The web browser is launched and the Pioneer DJ support site is displayed.
4 Click [Software Info] under [DJM-900SRT] on the Pioneer DJ
support site.
[Serato DJ Support Information] is displayed.
5 Click the link to the Serato DJ download page.
The Serato DJ download page is displayed.
6 Log in to your “Serato.com” user account.
If you have already registered a user account on “Serato.com”, proceed to
step 8.
If you have not completed registering your user account, do so following the
procedure below.
—Following the instructions on the screen, input your e-mail address and
the password you want to set, then select the region in which you live.
—If you check [E-mail me Serato newsletters], newsletters providing the
latest information on Serato products will be sent from Serato.
—Once user account registration is completed, you will receive an e-mail at
the e-mail address you have input. Check the contents of the e-mail sent
from “Serato.com”.
Be careful not to forget the e-mail address and password specified when you
performed user registration. They will be required for updating the software.
The personal information input when registering a new user account may
be collected, processed and used based on the privacy policy on the Serato
website.
7 Click the link in the e-mail message sent from “Serato.com”.
This takes you to the Serato DJ download page. Proceed to step 9.
8 Log in.
Input the e-mail address and password you have registered to log in to “Serato.com”.
9 Download the Serato DJ software from the download
page.
Unzip the downloaded file, then double-click the unzipped file to launch the installer.
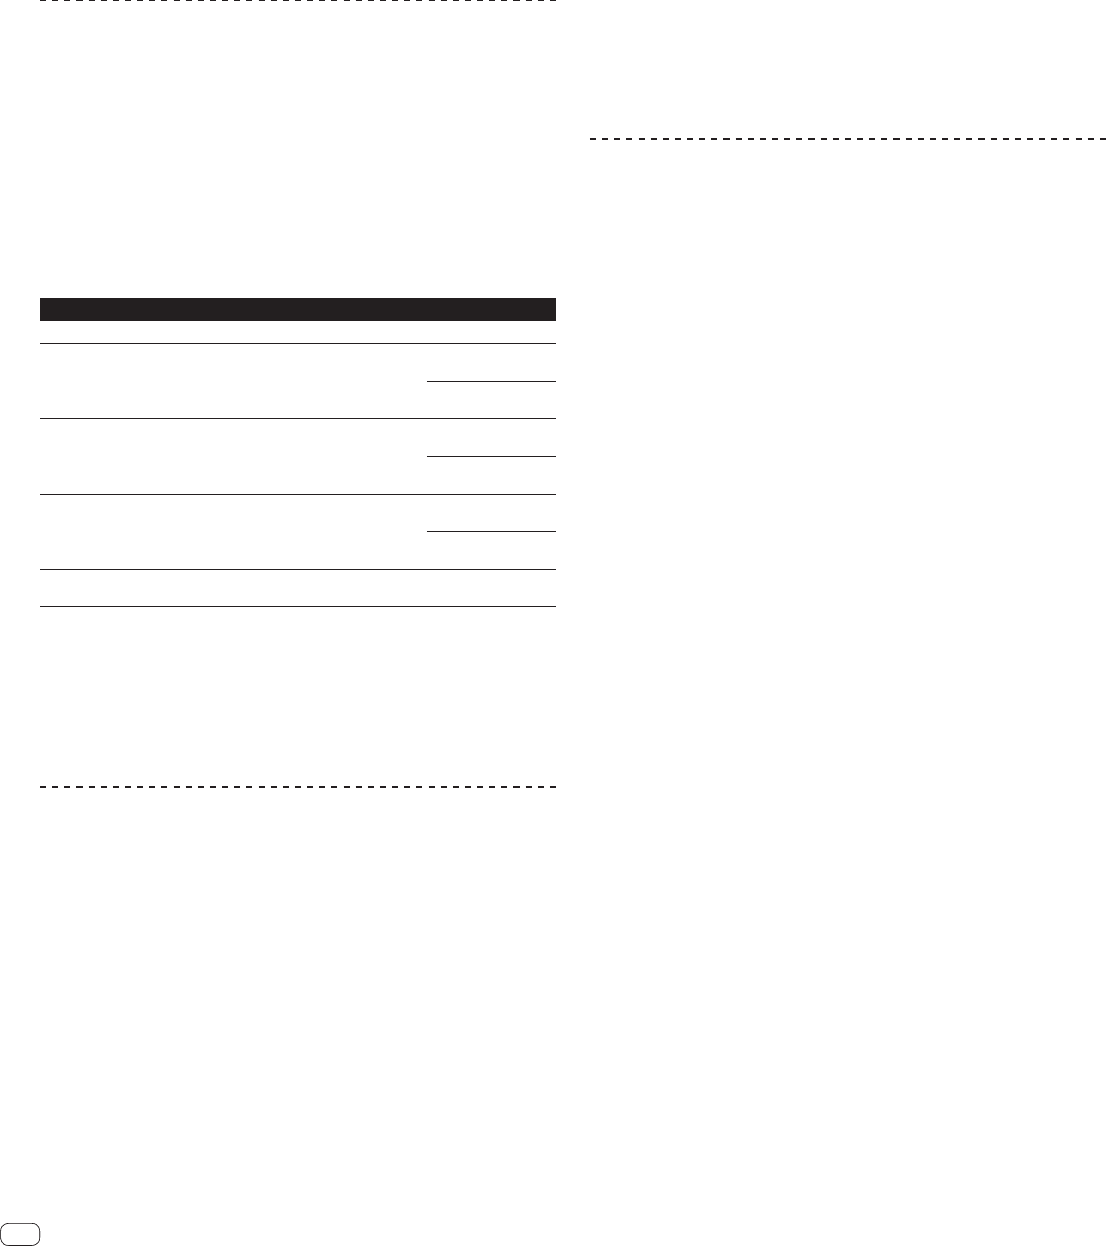
10 Read the terms of the license agreement carefully, and if
you agree, select [I agree to the license terms and conditions],
then click [Install].
If you do not agree to the contents of the usage agreement, click [Close] to
cancel installation.
Installation begins.
The message of successful installation appears once installation is completed.
11 Click [Close] to quit the Serato DJ installer.
Installation procedure (Mac OS X)
Do not connect this unit and the computer until installation is completed.
If any other programs are running on the computer, quit them.
1 Insert the CD-ROM into the computer’s CD drive.
The CD-ROM menu is displayed.
Double-click the CD icon on the desktop when folders are not displayed after a
CD-ROM has been loaded.
2 Double-click [CD_menu.app].
3 Select [Download Serato DJ Software.] from the CD-ROM’s
menu, then click [Start].
4 “An internet environment is required to access the site.
Connected to the internet?” is displayed. Click [Yes].
The web browser is launched and the Pioneer DJ support site is displayed.
5 Click [Software Info] under [DJM-900SRT] on the Pioneer DJ
support site.
[Serato DJ Support Information] is displayed.
6 Click the link to the Serato DJ download page.
The Serato DJ download page is displayed.
7 Log in to your “Serato.com” user account.
If you have already registered a user account on “Serato.com”, proceed to
step 8.
If you have not completed registering your user account, do so following the
procedure below.
—Following the instructions on the screen, input your e-mail address and
the password you want to set, then select the region in which you live.
—If you check [E-mail me Serato newsletters], newsletters providing the
latest information on Serato products will be sent from Serato.
—Once user account registration is completed, you will receive an e-mail at
the e-mail address you have input. Check the contents of the e-mail sent
from “Serato.com”.
Be careful not to forget the e-mail address and password specified when you
performed user registration. They will be required for updating the software.
The personal information input when registering a new user account may
be collected, processed and used based on the privacy policy on the Serato
website.
8 Click the link in the e-mail message sent from “Serato.com”.
This takes you to the Serato DJ download page. Proceed to step 9.
9 Log in.
Input the e-mail address and password you have registered to log in to “Serato.com”.
10 Download the Serato DJ software from the download
page.
Unzip the downloaded file, then double-click the unzipped file to launch the installer.
9
En
English
11 Read the terms of the license agreement carefully, and if
you agree, click [Agree].
If you do not agree to the contents of the usage agreement, click [Disagree]
to cancel installation.
12 If the following screen appears, drag and drop the [Serato
DJ] icon on the [Applications] folder icon.
10
En
Connections
Be sure to turn off the power and unplug the power cord from the power outlet whenever making or changing connections.
Connect the power cord after all the connections between devices have been completed.
Be sure to use the included power cord.
Refer to the operating instructions for the component to be connected.
When creating a DVS (Digital Vinyl System) combining a computer, audio interface, etc., be careful in connecting the audio interface to this unit’s input terminals and in
the settings of the input selector switches.
Also refer to the operating instructions of the DJ software and audio interface.
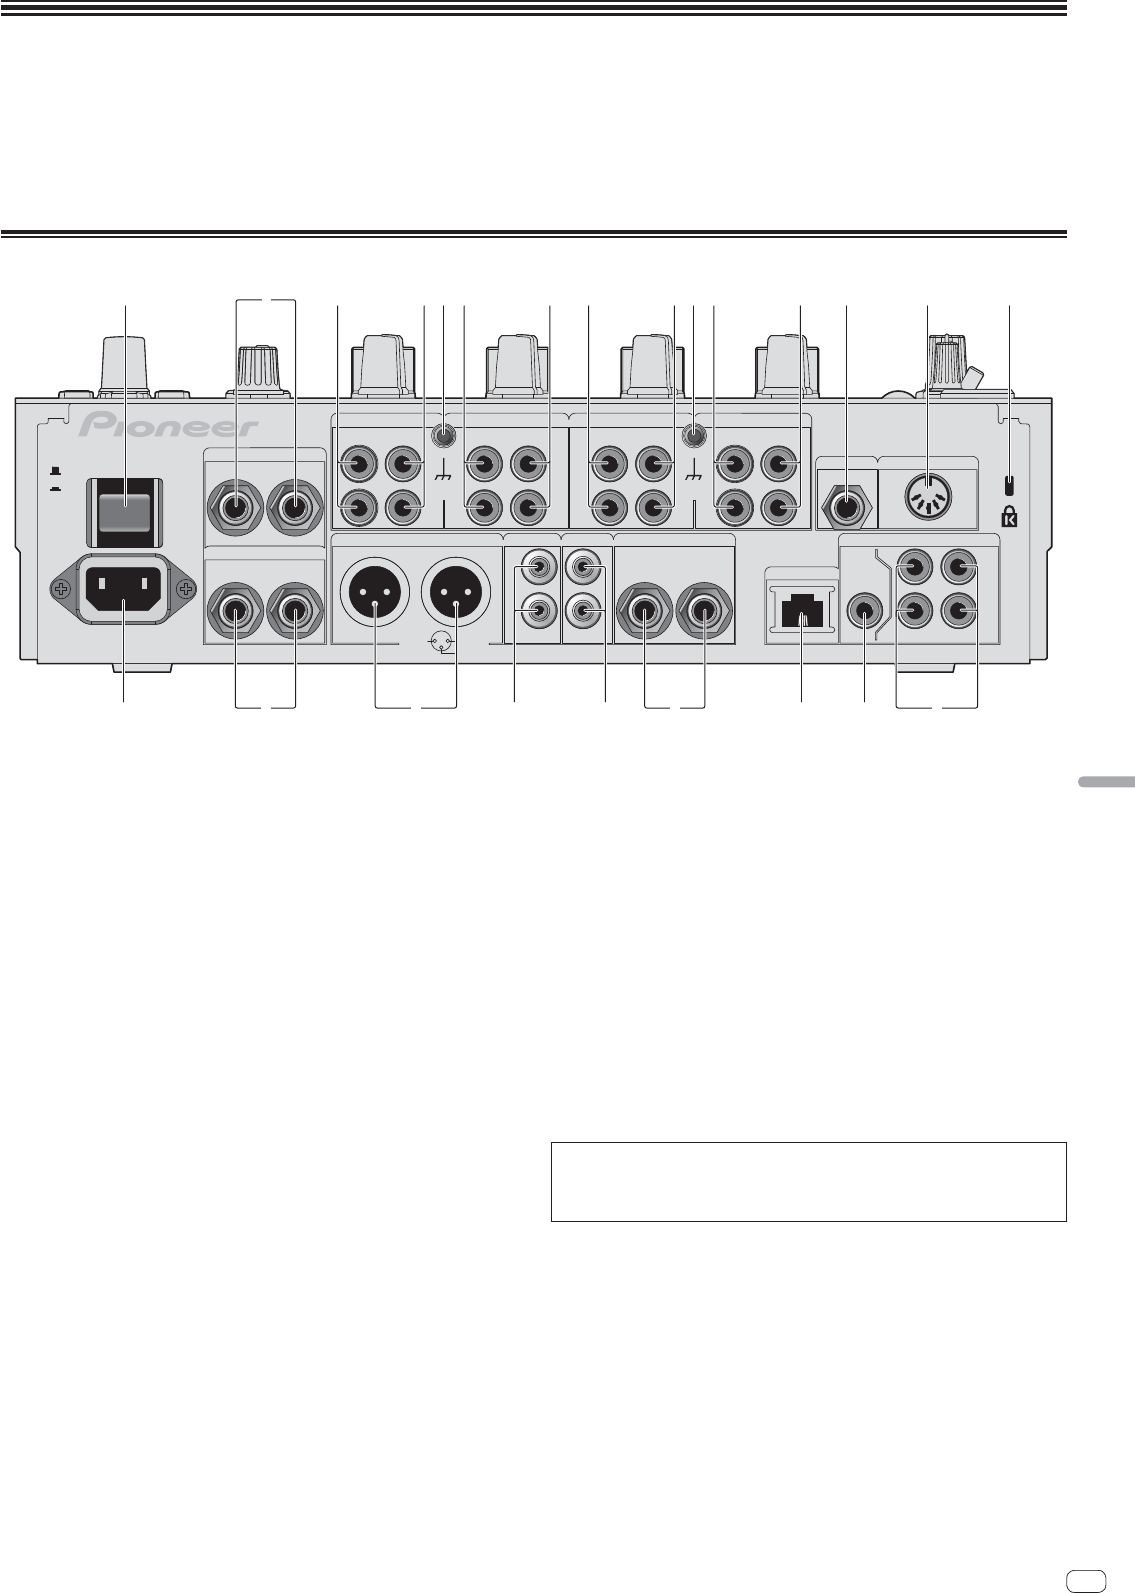
Rear panel
OFF
RETURN
L
L
L
1 GND
2 HOT
3 COLD
L
R
L
L
IN
CH3
CH4
CH1CH2
R
R
R
R
L
R
R
PHONOPHONOPHONO
CH 4CH 3
CD/LINE
L
R
PHONO
CH 1
CD/LINE
SIGNAL GNDSIGNAL GND
TRS
CD/LINE
MASTER1MASTER2
REC OUT
BOOTH
MIC2
MIDI OUT
DIGITAL
MASTER
OUT
LINK
L
R
CH 2
CD/LINE
(MONO)
LR
(MONO)
SEND
POWER
AC IN
ON
134344343556782
deabh9cgf
1 POWER button (page 14)
Turns this unit’s power on and off.
2 RETURN terminals (page 11)
Connect to the output terminal of an external effector. When the [L (MONO)]
channel only is connected, the [L (MONO)] channel input is simultaneously
input to the [R] channel.
3 PHONO terminals (page 11)
Connect to a phono level (MM cartridge) output device. Do not input line level
signals.
To connect a device to the [PHONO] terminals, remove the short-circuit pin plug
inserted in the terminals.
Insert this short-circuit pin plug into the [PHONO] terminals when nothing is
connected to them to cut external noise.
4 CD/LINE terminals (page 11)
Connect to a DJ player or a line level output component.
5 SIGNAL GND terminal (page 11)
Connects an analog player’s ground wire here. This helps reduce noise when the
analog player is connected.
6 MIC2 terminal (page 11)
Connects a microphone here.
7 MIDI OUT terminal (page 11)
Connects this to the MIDI IN terminal on an external MIDI sequencer.
8 Kensington security slot
9 DIGITAL IN terminal (page 11)
Connect these to the digital coaxial output terminals on DJ players, etc. The
sound may be momentarily interrupted when the output signal sampling fre-
quency is switched.
a DIGITAL MASTER OUT terminal (page 11)
Outputs the master channel audio signals.
b LINK terminal (page 11)
Connect these to the LINK terminals on Pioneer DJ players or the LAN ports of
computers on which rekordbox is installed (PRO DJ LINK).
To connect multiple devices, use a switching hub (commercially available).
Use a 100Base-TX-compatible switching hub. Some switching hubs may not
operate properly.
c BOOTH terminals (page 11)
These are output terminals for a booth monitor.
d REC OUT terminals (page 11)
These are output terminals for recording.
e MASTER2 terminals (page 11)
Connect to a power amplifier, etc.
f MASTER1 terminals (page 11)
Connect to a power amplifier, etc.
Be sure to use these as balanced outputs. Be careful not to accidentally
insert the power cord of another unit.
g SEND terminals (page 11)
Connect to the input terminal of an external effector. When the [L (MONO)]
channel only is connected, a monaural audio signal is output.
h AC IN
Connects to a power outlet using the included power cord. Wait until all connec-
tions between the equipment are completed before connecting the power cord.
Be sure to use the included power cord.
WARNING
The short-circuit pin plugs out of the reach of children and infants. If accidentally
swallowed, contact a doctor immediately.
11
En
English
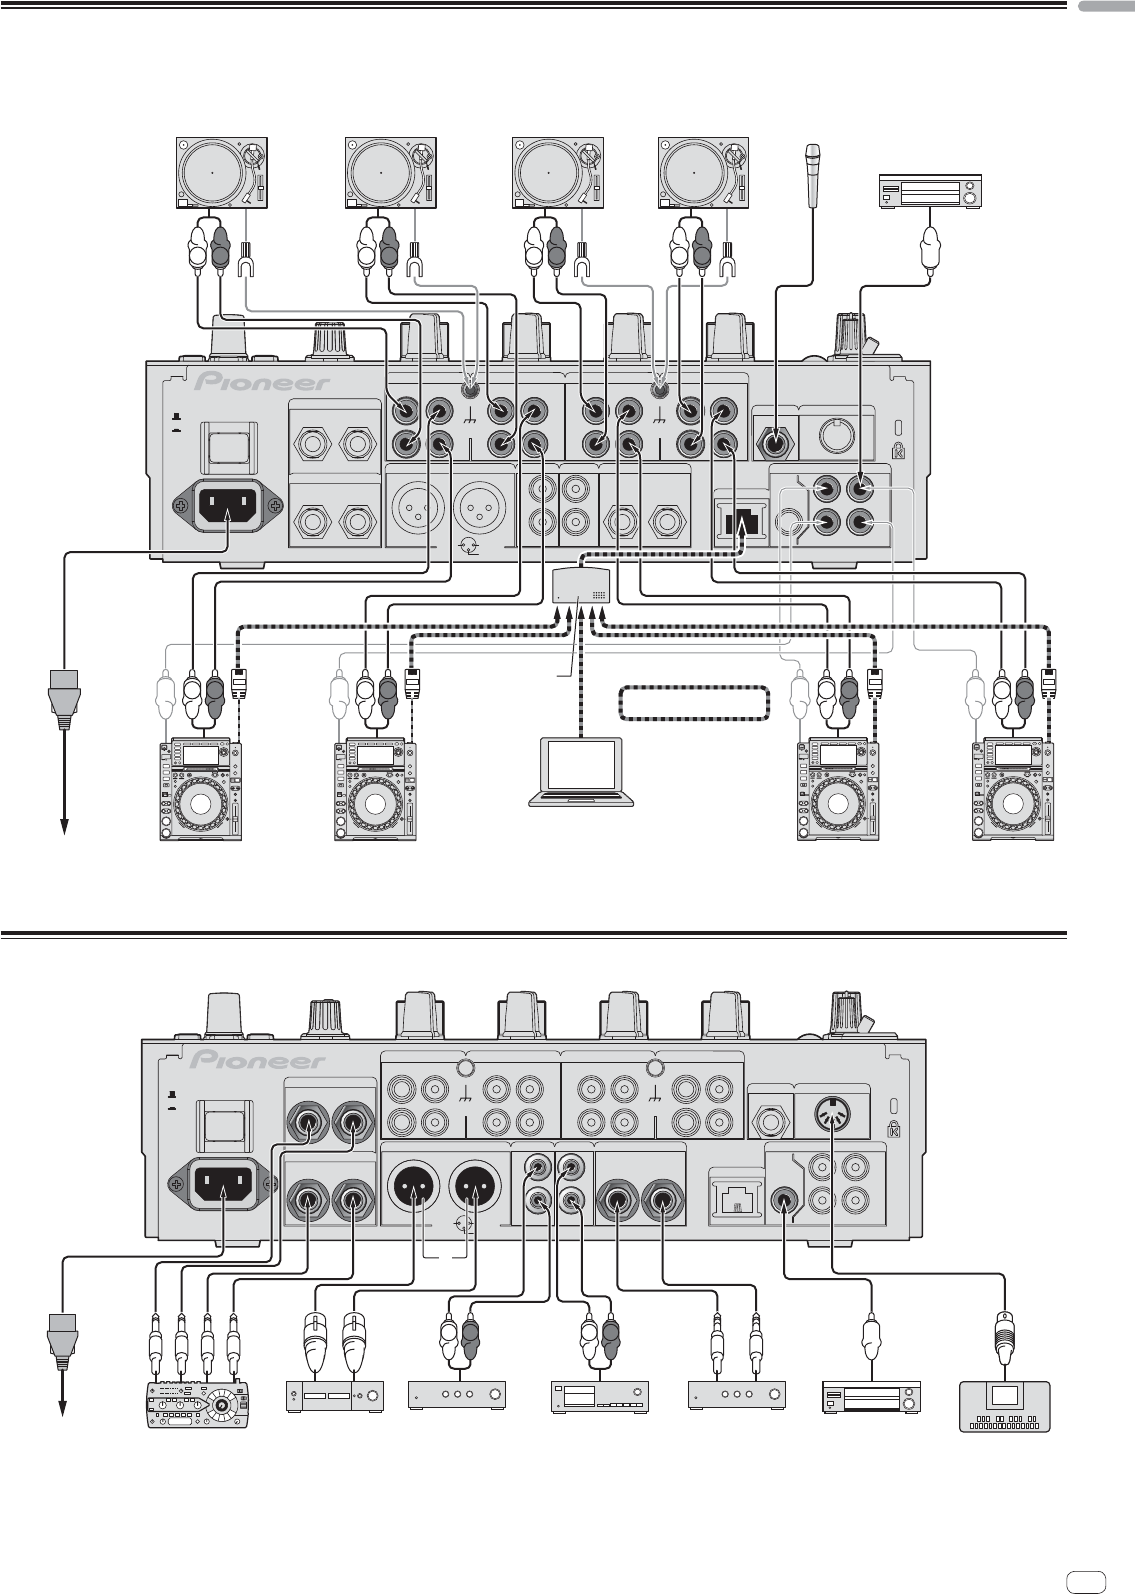
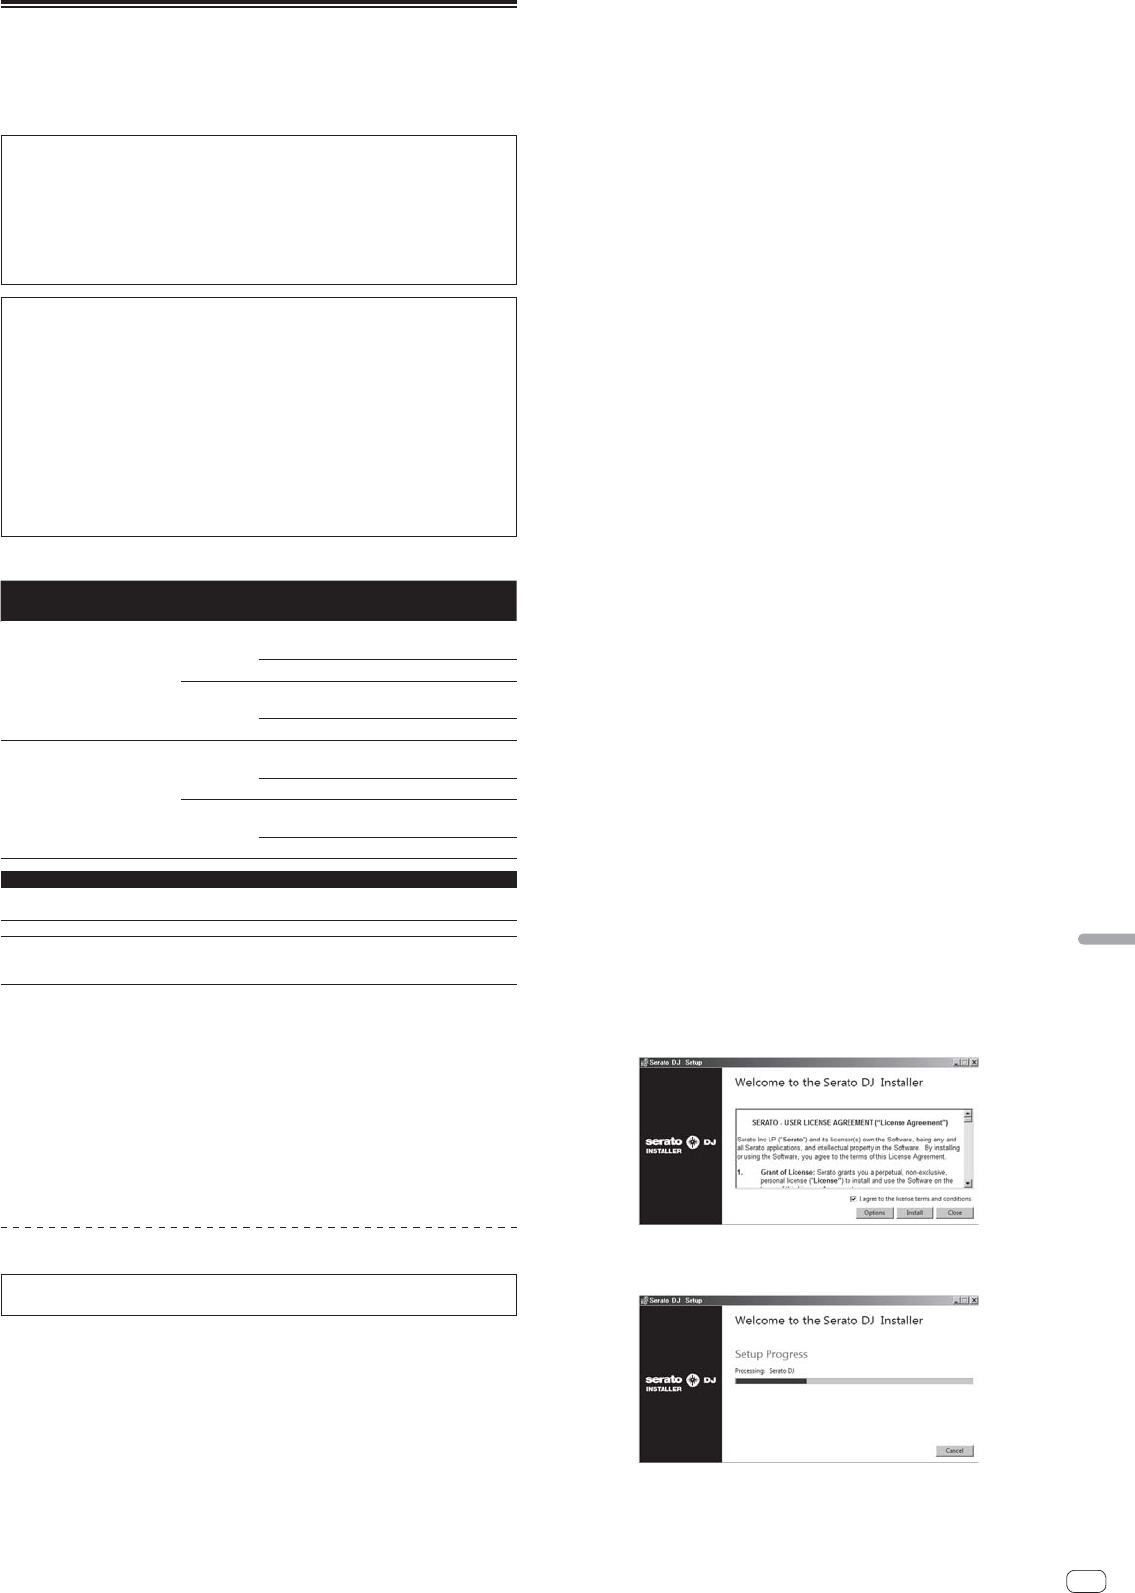
Connecting input terminals
When creating a DVS (Digital Vinyl System) combining a computer, audio interface, etc., be careful in connecting the audio interface to this unit’s input terminals and in
the settings of the input selector switches.
Also refer to the operating instructions of the DJ software and audio interface.
OFF
RETURN
L
L
L
1 GND
2 HOT
3 COLD
L
R
L
L
IN
CH3
CH4
CH1CH2
R
R
R
R
L
R
R
PHONOPHONOPHONO
CH 4CH 3
CD/LINE
L
R
PHONO
CH 1
CD/LINE
SIGNAL GNDSIGNAL GND
TRS
CD/LINE
MASTER1MASTER2
REC OUT
BOOTH
MIC2
MIDI OUT
DIGITAL
MASTER
OUT
LINK
L
R
CH 2
CD/LINE
(MONO)
LR
(MONO)
SEND
POWER
AC IN
ON
Pioneer DJ players
2
Pioneer DJ players
2
L
R
L
R
L
R
L
R
L
R
L
R
L
R
L
R
PRO DJ LINK
1
To power outlet
Switching hub
Computers
Analog playerAnalog playerAnalog player
Analog player
rekordbox
Microphones
Digital audio output device
1For details on PRO DJ LINK, see About PRO DJ LINK on page 15.
2To use the fader start function with PRO DJ LINK, connect a LAN cable (page 16).
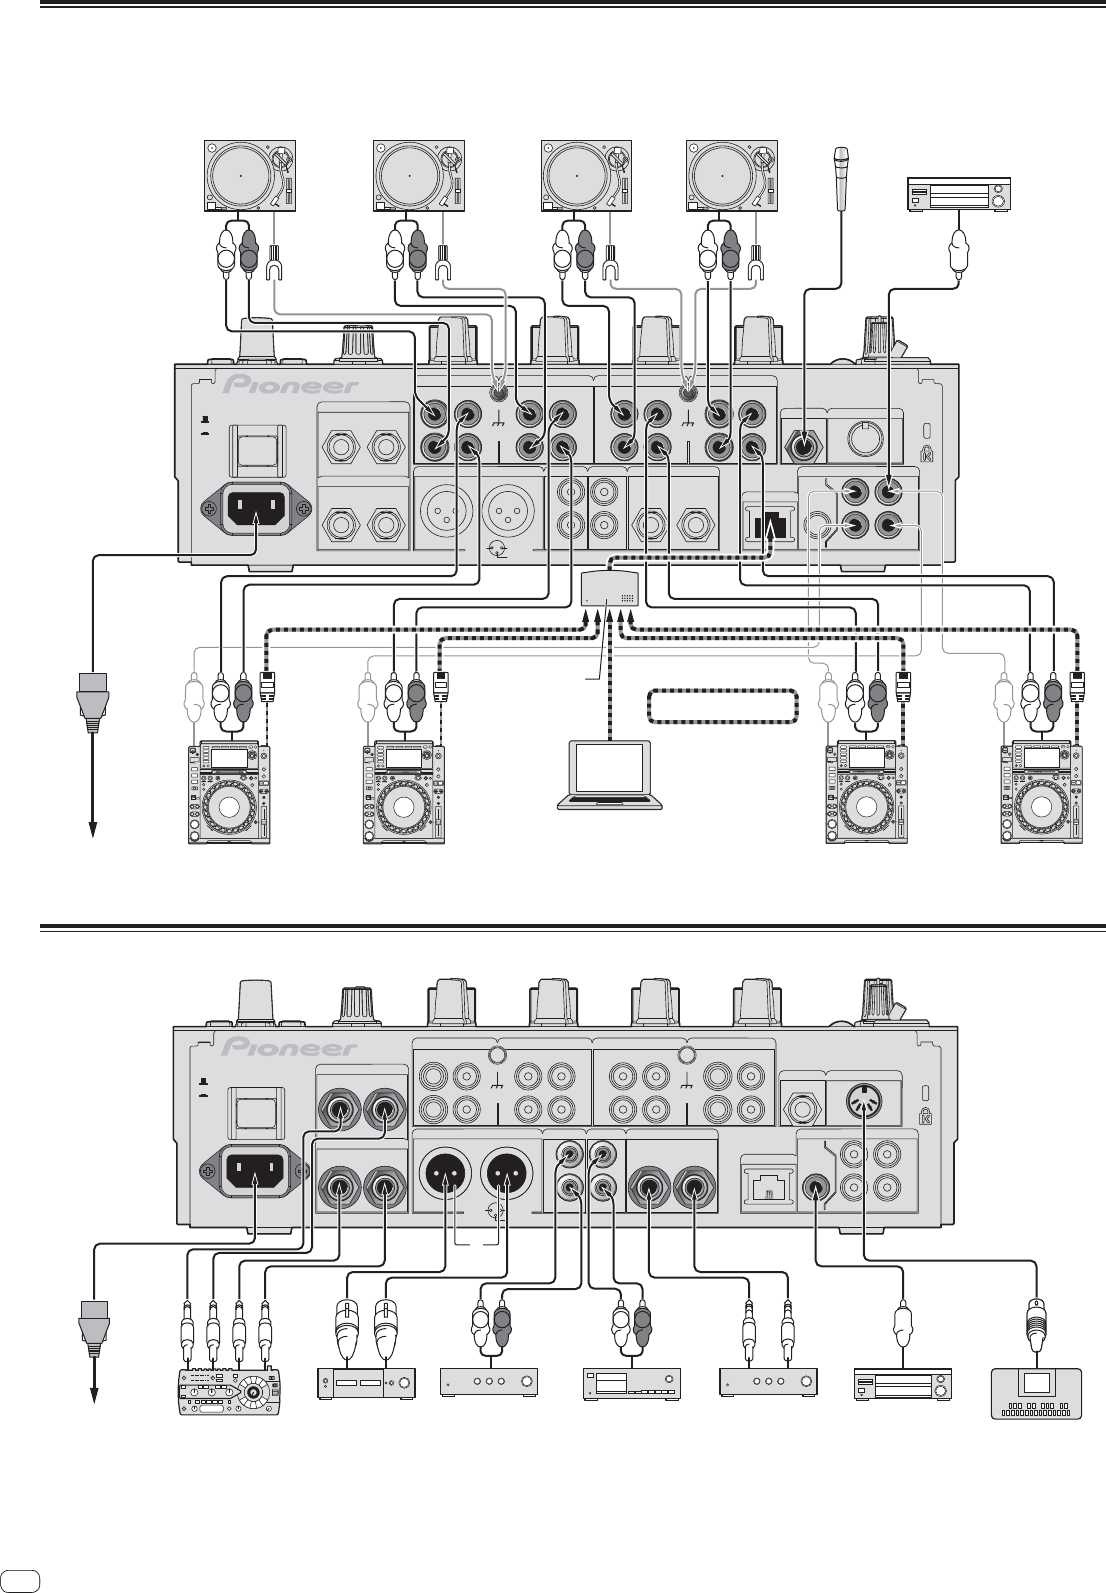
Connecting output terminals
OFF
RETURN
L
L
L
1 GND
2 HOT
3 COLD
L
R
L
L
IN
CH3
CH4
CH1CH2
R
R
R
R
L
R
R
PHONO
CH 4CH 3
CD/LINE
L
R
PHONO
CH 1
CD/LINE
SIGNAL GNDSIGNAL GND
TRS
CD/LINEPHONO
MASTER1MASTER2
REC OUT
BOOTH
MIC2
MIDI OUT
DIGITAL
MASTER
OUT
LINK
L
R
CH 2
CD/LINEPHONO
(MONO)
LR
(MONO)
SEND
POWER
AC IN
ON
L
R
L
R
Power amplifier
2
To power outlet
Digital audio
input device
Power amplifier
(for booth monitor)
External effector
1
MIDI sequencer
Cassette deck, etc.
(analog input recording device)
Power amplifier
2
3
1Also connect the external effector to the [RETURN] terminal (input terminal).
2Be sure to use the [MASTER1] terminals only for a balanced output. Connection with an unbalanced input (such as RCA) using an XLR to RCA converter cable (or con-
verter adapter), etc., may lower the sound quality and/or result in noise.
For connection with an unbalanced input (such as RCA), use the [MASTER2] terminals.
3Be careful not to accidentally insert the power cord of another unit to [MASTER1] terminal.
12
En
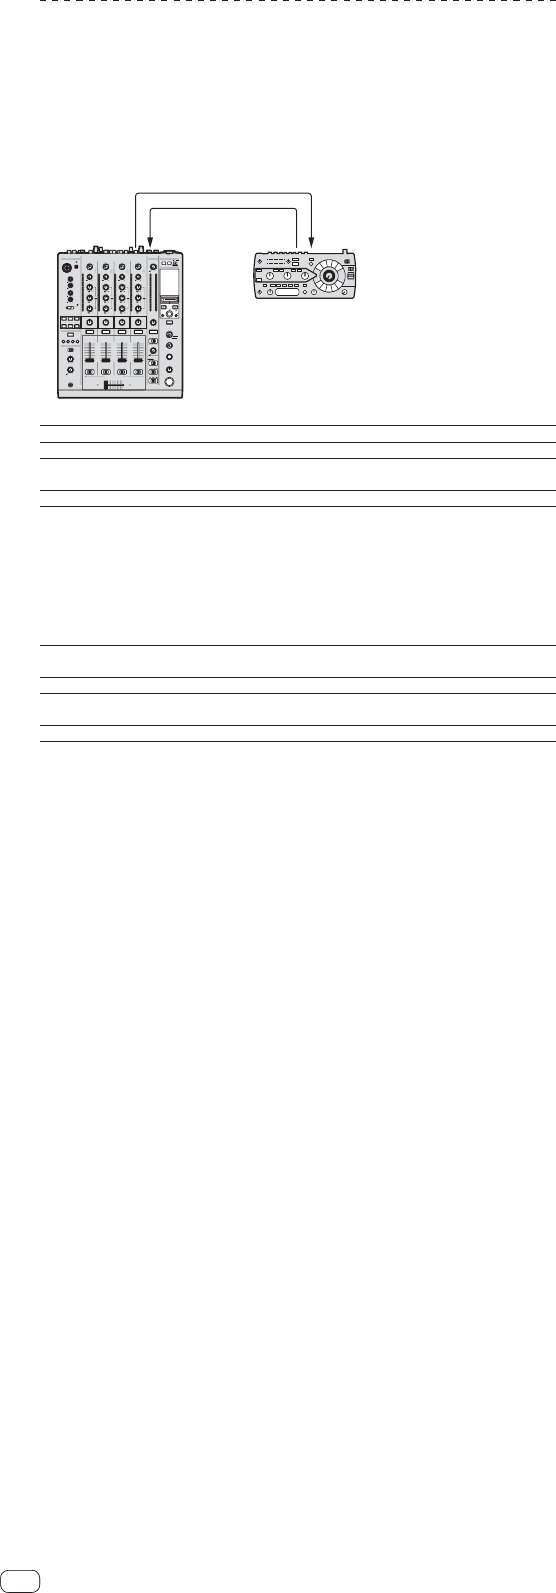
Connecting to the control panel
B
ATHRU
MASTER
0
MIXING
LEVEL
PHONES
CUE
LEVEL
DIGITAL
CD/ LINEPHO
HI
MIC 1
MIC 2
0
0
TRIM
OVER
10
7
4
2
1
0
MICUSB
MIC1
Be sure to connect using the
included USB cable.
Headphones
Microphones
Computers
1
2
3
4
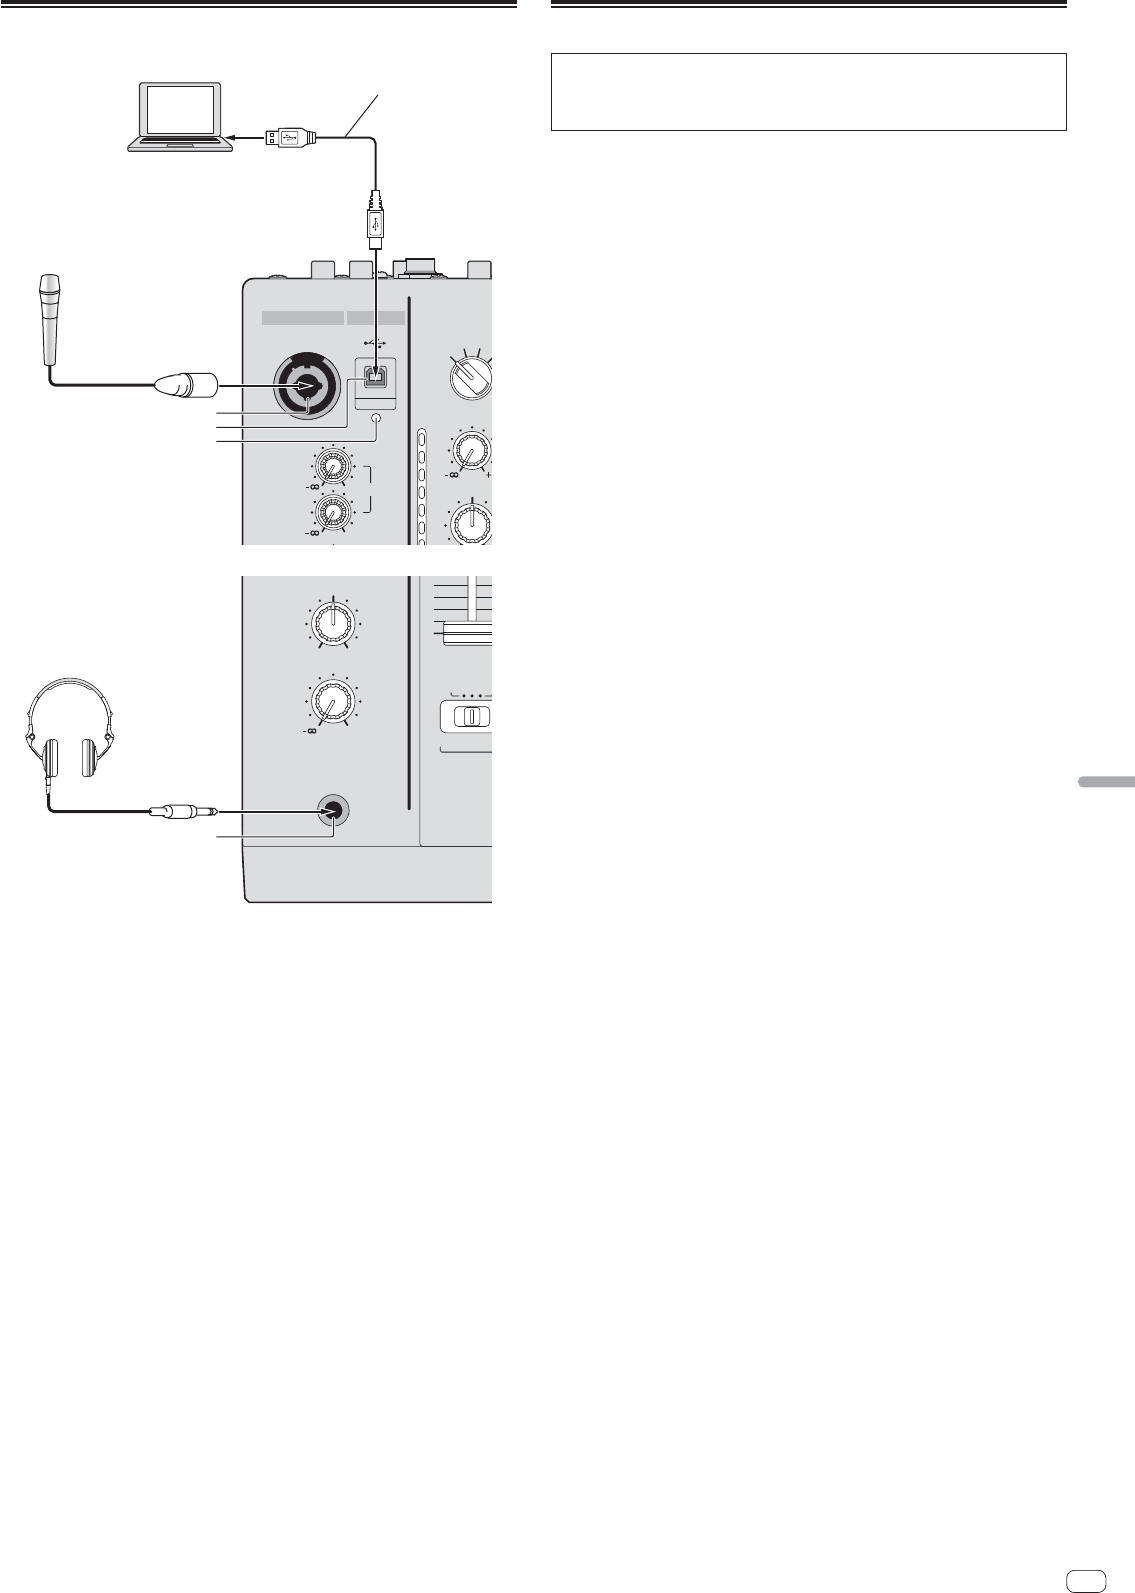
1 MIC1 terminal (page 15)
Connects a microphone here.
2 USB terminal (page 12)
Connect the computer.
3 USB connection indicator
Lights when signals are being exchanged with the computer.
4 PHONES terminal (page 14)
Connect headphones here.
Connecting this unit and computer
For instructions on operating in combination with Serato DJ, see the “Quick Start
Guide – Serato DJ Edition”. For details, see Downloading the latest versions of the
operating instructions and the Quick Start Guide - Serato DJ Edition (p.28).
1 Connect this unit to your computer via a USB cable.
This unit functions as an audio device conforming to the ASIO standards.
This operation does not work with computers that do not support USB 2.0.
When using DirectX-compatible applications, only [USB DECK 3] can be used as
the input.
The computer’s recommended operating environment depends on the DJ appli-
cation. Be sure to check the recommended operating environment for the DJ
application you are using.
When another USB audio device is connected to the computer at the same time,
it may not operate or be recognized normally.
We recommend only connecting the computer and this unit.
When connecting the computer and this unit, we recommend connecting
directly to this unit’s USB port.
2 Press [POWER] button.
Turn on the power of this unit.
For Windows
—The message [Installing device driver software] may appear when this
unit is first connected to the computer or when it is connected to a different
USB port on the computer. Wait a while until the message [Your devices
are ready for use] appears.
When installing on Windows XP
— [Can Windows connect to Windows Update to search for software?]
may appear while the installation is in progress. Select [No, not this time],
then click [Next] to continue installation.
— [What do you want the wizard to do?] may appear while the instal-
lation is in progress. Select [Install the software automatically
(Recommended)], then click [Next] to continue installation.
— If [Windows Security] appears on the screen while the installation is in
progress, click [Install this driver software anyway] and continue with the
installation.
13
En
English
Operation
Control Panel
USB
DECK
3
USB
DECK
1
USB
DECK
2
USB
DECK
4
LEVEL
DIGITAL
CD/ LINEPHONO
HI
MIC 1
MIC 2
HI
LOW
EQ
EQ /
1212
1212
0
0
ON
TALK
OVER
OFF
SPACE
NOISE
CUE
CUE
CUE
CRUSHFILTER
DUB
ECHO
GATE/
COMP
1
234
BATHRU
TRIM
9
6
-
26
/
MID
6
-
26
/
LOW
6
-
26
/
COLOR
ISO
OVER
10
10
9
8
7
6
5
4
3
2
1
7
4
2
1
-
1
-
2
-
3
-
5
-
7
-
10
-
15
-
24
dB
0
HILOW
TRIM
DIGITAL
CD/ LINEPHONO
HI
EQ /
CUE
BATHRU
9
6
-
26
/
MID
6
-
26
/
LOW
6
-
26
/
COLOR
ISO
OVER
10
7
4
2
1
-
1
-
2
-
3
-
5
-
7
-
10
-
15
-
24
dB
0
HILOW
CUE
TRIM
DIGITAL
CD/ LINEPHONO
HI
EQ /
CUE
BATHRU
9
6
-
26
/
MID
6
-
26
/
LOW
6
-
26
/
COLOR
ISO
OVER
10
10
9
8
7
6
5
4
3
2
1
7
4
2
1
-
1
-
2
-
3
-
5
-
7
-
10
-
15
-
24
dB
0
HILOW
TRIM
DIGITAL
CD/ LINEPHONO
HI
EQ /
CUE
BATHRU
MONOSTEREO
9
6
-
26
/
MID
6
-
26
/
LOW
6
-
26
/
COLOR
ISO
OVER
10
10
9
8
7
6
5
4
3
2
1
000
7
4
2
1
-
1
-
2
-
3
-
5
-
7
-
10
-
15
-
24
dB
dBRL
0
OVER
10
7
4
2
1
-
1
-
2
-
3
-
5
-
7
-
10
-
15
-
24
0
HILOW
EQISOLATOR
AB
CROSS FADER ASSIGN
LEVEL
POWER
BALANCE
0
AUTO
GRID
TA P
AUTO
/ TAP
BPM
%
ms
CH SELECT
START
/STOP
RL
WAKE UP
PARAMETER
1234
MICMST
AB
TIME
MAX
LEVEL / DEPTH
ON/ OFF
MIN
MICMASTERMIDI
BEAT EFFECTS
BEAT
TAP
LINK
SOUND COLOR FX
HEADPHONES
FADER START
STEREO
MASTER
0
MIXING
LEVEL
BOOTH MONITOR
EQ CURVE
CH FADER
CROSS FADER
PHONES
CUE
MONO SPLIT
USB
MIC1
QUAN-
TIZE
MASTER
CF.B
CF.A
MIC
4
3
2
1
0
ON/OFFLFO FORM
UTILITY
X
-
PAD
ROBOT
REVERB
PHASER
SLIP ROLL
ROLL
FLANGER
FILTER
REV ROLL
SND/ RTN
MELODICTRANS
ECHO
SPIRAL
MIDI LFO
DELAY
1
2
4
6
8
9
a
u
w
z
6
B
C
D
E
F
A
t
y
s
5
7
3
v
x
e
j
d
f
g
6
h
i
c
l
666
k
m
n
o
p
q
r
6
e
d
f
g
h
i
c
e
d
f
g
h
i
c
e
d
f
g
h
i
c
bbbb
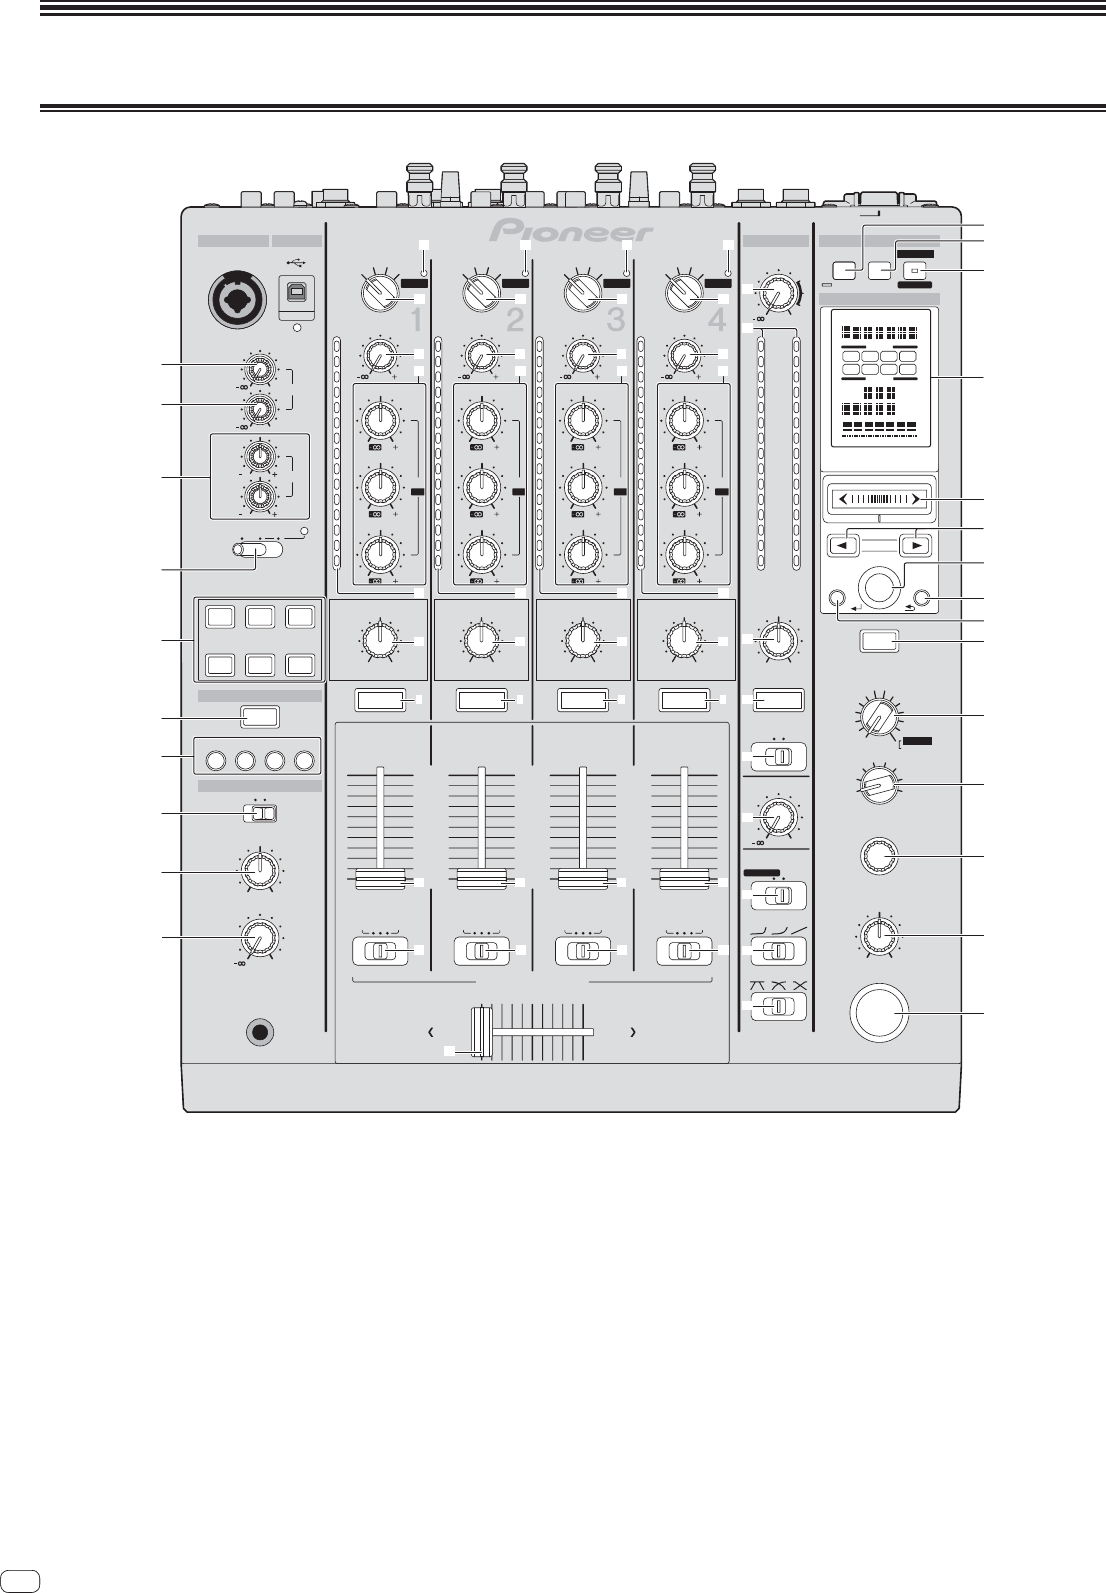
1 MIC1 LEVEL control (page 15)
Adjusts the sound level output from the [MIC1] channel.
2 MIC2 LEVEL control (page 15)
Adjusts the sound level output from the [MIC2] channel.
3 EQ (HI, LOW) controls (page 15)
These adjust the tone quality of the [MIC1] and [MIC2] channels.
4 OFF, ON, TALK OVER selector switch (page 15)
Turns the microphone on/off.
5 SOUND COLOR FX buttons (page 16)
These turn the SOUND COLOR FX effects on/off.
6 CUE button (page 14)
Presses the [CUE] button(s) for the channel(s) you want to monitor.
7 FADER START (1, 2, 3, 4) buttons (page 16)
These turn the fader start function on/off.
8 MONO SPLIT, STEREO selector switch (page 14)
Switches how the monitor sound output from the headphones is distributed.
9 MIXING control (page 14)
This adjusts the monitor volume balance of the sound of channels for which the
[CUE] button is pressed and the sound of the [MASTER] channel.
a LEVEL control (page 14)
Adjusts the sound level output from the headphones.
b USB audio input indicator
Lights when sound is being input from the computer to the various channels.
c Input selector switches (page 14)
Selects the input source of each channel from the components connected to
this unit.
d TRIM control (page 14)
Adjusts the level of audio signals input in each channel.
e EQ/ISO (HI, MID, LOW) controls (page 14)
These adjust the sound quality of the respective channels.
f Channel Level Indicator (page 14)
Displays the sound level of the respective channels before passing through the
channel faders.
14
En
g COLOR control (page 16)
This changes the parameters of the SOUND COLOR FX of the different channels.
h Channel Fader (page 14)
Adjusts the level of audio signals output in each channel.
i CROSS FADER ASSIGN (A, THRU, B) selector switch (page 14)
Sets the output destination of each channel to [A] or [B].
j Crossfader (page 14)
Outputs audio signals assigned by the crossfader assign switch correspond-
ing to the curve characteristics selected by [CROSS FADER] (Crossfader Curve
Selector Switch).
k MASTER LEVEL control (page 14)
Adjusts the audio level output from the [MASTER1] and [MASTER2] terminals.
l Master Level Indicator (page 14)
Displays the audio level output from the [MASTER1] and [MASTER2] terminals.
m BALANCE control (page 15)
Adjusts the left/right balance of the sound output from the [MASTER1] termi-
nals, etc.
n MONO, STEREO selector switch (page 15)
Switches the sound output from the [MASTER1] terminals, etc., between mon-
aural and stereo.
o BOOTH MONITOR control (page 15)
Adjusts the level of audio signals output from the [BOOTH] terminal.
p EQ CURVE (ISOLATOR, EQ) selector switch (page 14)
Switches the function of the [EQ/ISO (HI, MID, LOW)] controls.
q CH FADER (, , ) selector switch (page 15)
Switches the channel fader’s curve characteristics.
r CROSS FADER (, , ) selector switch (page 15)
This switches the crossfader curve characteristics.
s ON/OFF (UTILITY) button
—ON/OFF: Turns the MIDI function on/off (page 17).
—UTILITY: Displays the [USER SETUP] or [CLUB SETUP] screen (page 24).
t START/STOP button (page 18)
Sends the MIDI start/MIDI stop signals.
u LFO FORM (WAKE UP) button
—LFO FORM: When [MIDI LFO] is selected at BEAT EFFECT, the MIDI signal’s
waveform switches each time the button is pressed (page 20).
—WAKE UP: Cancels the auto standby mode.
v Main unit display
w X-PAD (page 17)
Adjusts the quantitative parameter of the BEAT EFFECT function.
x BEAT , buttons (page 16)
Set the beat fraction for synchronizing the effect sound.
y TAP (ENTER) button
—TAP: When the BPM measurement mode is set to [TAP], the BPM is input
manually by tapping the button with a finger (page 16).
—ENTER: Used to change this unit’s settings (page 24).
z QUANTIZE button
When the QUANTIZE function is turned on for BEAT EFFECT, the effect is applied
to the sound without going off tempo when the currently playing track. (page 15).
A AUTO/TAP button (page 16)
Switches the BPM measurement mode.
B Beat effect selector switch (page 16)
Switches the BEAT EFFECT effect type.
C Effect channel selector switch (page 16)
Switches the channel to which the BEAT EFFECT is to be applied.
D TIME control (page 16)
Adjusts the BEAT EFFECT’s time parameter.
E LEVEL/DEPTH control (page 16)
Adjusts the BEAT EFFECT’s quantitative parameter.
F ON/OFF button (page 16)
Turns the BEAT EFFECT function on/off.
Do not pull on the channel fader and crossfader knobs with excessive force. The
knobs have a structure by which they cannot be pulled off easily. Pulling the knobs
strongly may result in damaging the unit.
Basic Operation
Outputting sound
1 Press [POWER] button.
Turn on the power of this unit.
2 Switch the input selector switches.
Selects the input sources for the different channels from among the devices con-
nected to this unit.
— [DIGITAL]: Selects the DJ player connected to the [DIGITAL] terminals.
— [PHONO]: Selects the analog player connected to the [PHONO] terminals.
— [CD/LINE]: Selects the cassette deck or CD player connected to the [CD/
LINE] terminals.
— [USB]: Selects the sound of the computer connected to the [USB] port.
3 Turn the [TRIM] control.
Adjusts the level of audio signals input in each channel.
The corresponding channel level indicator lights when audio signals are being
properly input to that channel.
4 Move the channel fader away from you.
Adjusts the level of audio signals output in each channel.
5 Switch the [CROSS FADER ASSIGN (A, THRU, B)] selector
switch.
Switches the output destination of each channel.
— [A]: Assigns to [A] (left) of the crossfader.
— [B]: Assigns to [B] (right) of the crossfader.
— [THRU]: Selects this when you do not want to use the crossfader. (The sig-
nals do not pass through the crossfader.)
6 Set the crossfader.
This operation is not necessary when the [CROSS FADER ASSIGN (A, THRU, B)]
selector switch is set to [THRU].
7 Turn the [MASTER LEVEL] control.
Audio signals are output from the [MASTER1] and [MASTER2] terminals.
The master level indicator lights.
Adjusting the sound quality
1 Switch the [EQ CURVE (ISOLATOR, EQ)] selector switch.
— [ISOLATOR]: Functions as an isolator.
— [EQ]: The equalizer function is set.
2 Turn the [EQ/ISO (HI, MID, LOW)] controls for the respective
channels.
The adjustable ranges for the respective controls are as shown below.
—HI: –26 dB to +6 dB (13 kHz)
—MID: –26 dB to +6 dB (1 kHz)
—LOW: –26 dB to +6 dB (70 Hz)
Monitoring sound with headphones
1 Connect headphones to the [PHONES] terminal.
2 Press the [CUE] button(s) for the channel(s) you want to
monitor.
3 Switch the [MONO SPLIT, STEREO] selector switch.
— [MONO SPLIT]: The sound of the channels for which the [CUE] button is
pressed is output from the headphones output’s left channel, the [MASTER]
channel sound is output from the right channel.
— [STEREO]: The sound of the channels for which the [CUE] button is pressed
is output from the headphones in stereo.
4 Turn the [MIXING] control.
This adjusts the monitor volume balance of the sound of channels for which the
[CUE] button is pressed and the sound of the [MASTER] channel.
5 Turn the [LEVEL] control for [HEADPHONES].
The sound of the channels for which the [CUE] button is pressed is output from the
headphones.
When the [CUE] button is pressed again, monitoring is canceled.
15
En
English
Switching the fader curve
䢢Select the channel fader curve characteristics
Switch the [CH FADER (, , )] selector switch.
— []: The curve rises suddenly at the back side.
— []: A curve between the ones above and below is set.
— [
]: The curve rises gradually (the sound gradually increases as the chan-
nel fader is moved away from the front side).
䢢Select the crossfader curve characteristics
Switch the [CROSS FADER (, , )] selector switch.
— []: Makes a sharply increasing curve (if the crossfader is moved away
from the [A] side, audio signals are immediately output from the [B] side).
— []: Makes a curve shaped between the two curves above and below.
— []: Makes a gradually increasing curve (if the crossfader is moved away
from the [A] side, the sound on the [B] side gradually increases, while the
sound on the [A] gradually decreases).
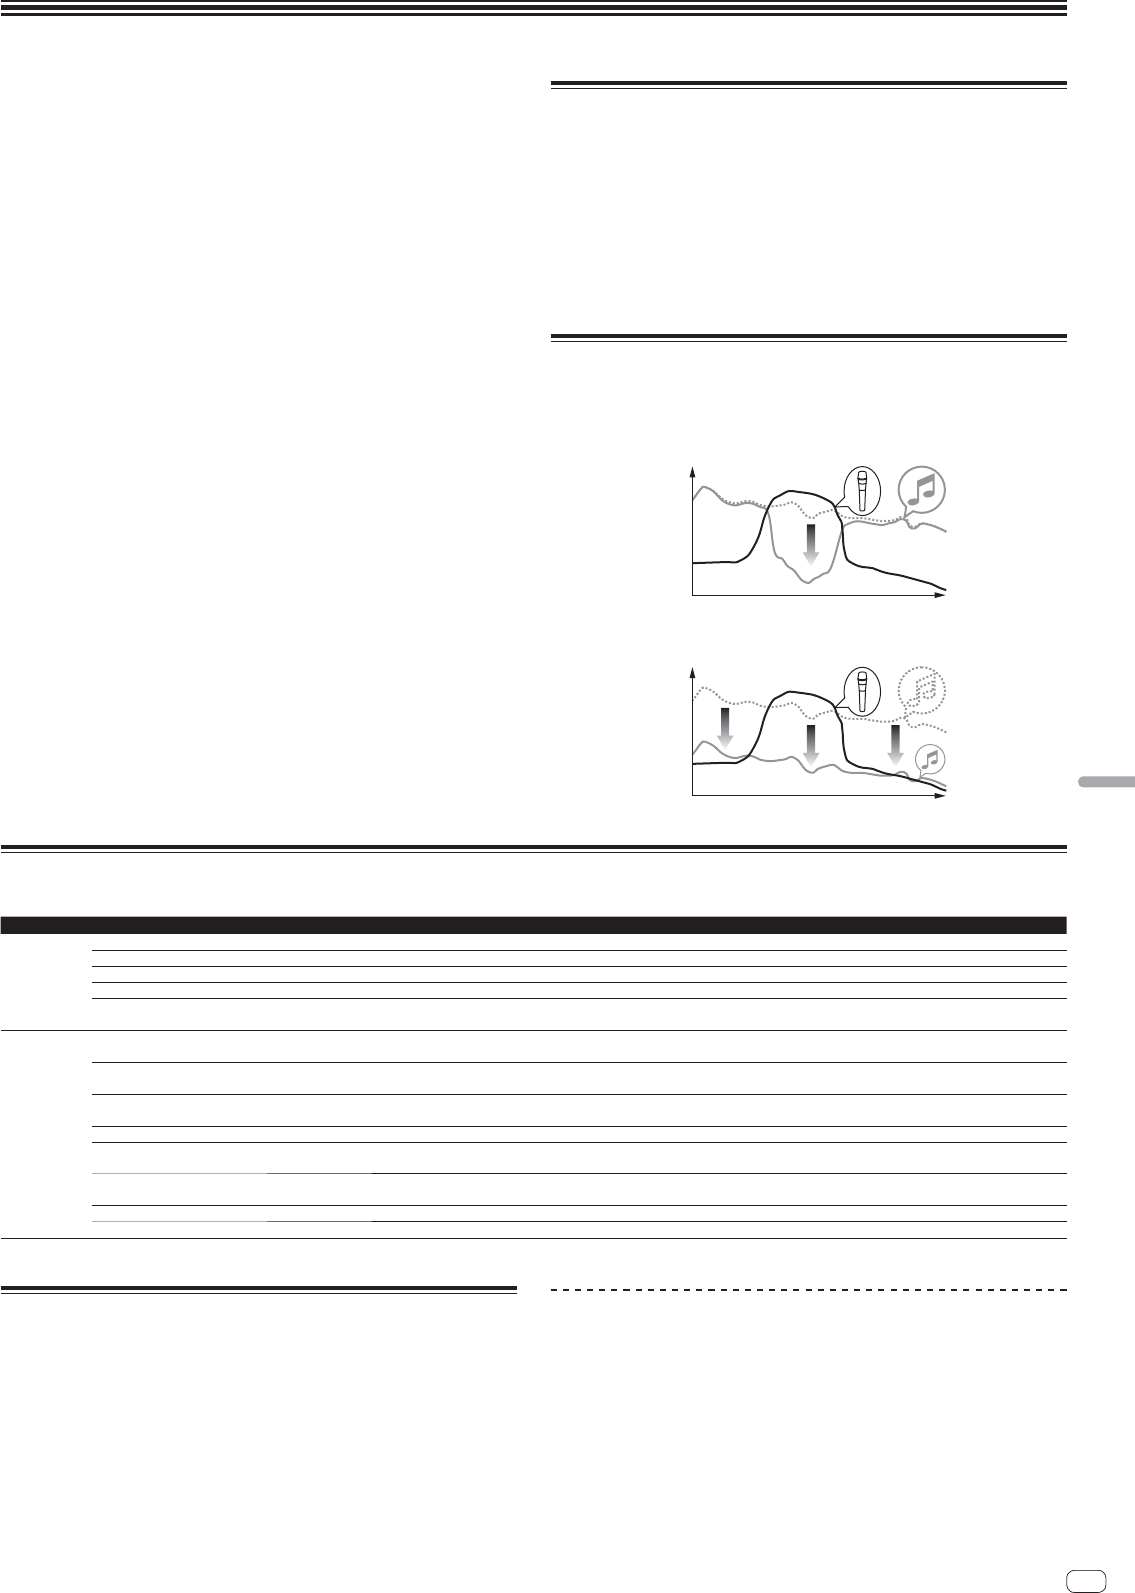
Using a microphone
1 Connect a microphone to the [MIC1] or [MIC2] terminal.
2 Set the [OFF, ON, TALK OVER] selector switch to [ON] or
[TALK OVER].
— [ON]: The indicator lights.
— [TALK OVER]: The indicator flashes.
When set to [TALK OVER], the sound of channels other than the [MIC] channel
is attenuated by 18 dB (default) when a sound of –10 dB or greater is input to the
microphone.
The [TALK OVER] sound attenuation level can be changed at [USER SETUP]. For
instructions on changing this, see Changing the settings on page 24.
The talk over mode can be switched to the normal mode or the advanced mode.
For instructions on changing it, see Changing the settings on page 24.
3 Turn the [MIC1 LEVEL] or [MIC2 LEVEL] control.
Adjust the level of the sound output from the [MIC] channel.
Pay attention that rotating to the extreme right position outputs a very loud
sound.
4 Input audio signals to the microphone.
䢢Adjusting the sound quality
Turn the [MIC] channels’ [EQ (HI, LOW)] controls.
The adjustable ranges for the respective controls are as shown below.
—HI: –12 dB to +12 dB (10 kHz)
—LOW: –12 dB to +12 dB (100 Hz)
Switching between monaural and stereo audio
This switches the sound output from the [MASTER1], [MASTER2], [BOOTH], [REC
OUT], [PHONES], [DIGITAL MASTER OUT] and [USB] terminals between monaural
and stereo.
To adjust the sound output from the [USB] terminals, select [MIX (REC OUT)] at
[Mixer Audio Output] in the setting utility.
Switch the [MONO, STEREO] selector switch.
— [MONO]: Outputs monaural audio.
— [STEREO]: Outputs stereo audio.
䢢Adjusting the L/R balance of audio
The left/right balance of the sound output from the [MASTER1], [MASTER2],
[BOOTH], [REC OUT], [PHONES], [DIGITAL MASTER OUT] and [USB] terminals can
be adjusted.
To adjust the sound output from the [USB] terminals, select [MIX (REC OUT)] at
[Mixer Audio Output] in the setting utility.
1 Set the [MONO, STEREO] selector switch to [STEREO].
2 Turn the [BALANCE] control.
The sound’s left/right balance changes according to the direction in which the
[BALANCE] control is turned and its position.
Rotating to the rightmost position outputs only the right sound of stereo audio.
Rotating to the leftmost position outputs only the left sound of stereo audio.
Audio is output from the [BOOTH] terminal
Turn the [BOOTH MONITOR] control.
Adjusts the level of audio signals output from the [BOOTH] terminal.
Advanced Operations
Using Serato DJ-supported functions
When this unit and a computer on which Serato DJ is running are connected by
USB cable, the functions below can be used.
䢢QUANTIZE
When tracks that have been analyzed with Serato DJ are used, tracks are put on
beat even if the [BEAT EFFECTS] [ON/OFF] button is pressed or the [X-PAD] is
touched roughly.
䢢FADER START
Playback of tracks in Serato DJ can be started by operating this unit’s fader (Fader
Start Play).
About PRO DJ LINK
When a Pioneer DJ player supporting PRO DJ LINK (e.g. CDJ-2000nexus, CDJ-2000,
CDJ-900), a computer on which rekordbox is installed and this unit are connected by
LAN cable, the PRO DJ LINK functions below can be used.
For more details on the PRO DJ LINK function, also refer to the DJ player’s handling
instructions and rekordbox’s operating instructions.
For instructions on connections, see Connecting input terminals on page 11.
When connected using a switching hub, up to 4 DJ players and 2 computers can
be connected.
Use a 100Base-TX-compatible switching hub. Some switching hubs may not
operate properly.
Set the DJ player’s player number to the same number as the channel to which
the audio cable is connected.
䢢QUANTIZE
When tracks analyzed with rekordbox are used, the track is put on beat even when
the [ON/OFF] button of [BEAT EFFECTS] is pressed or the [X-PAD] is touched
roughly.
䢢FADER START
Playback on the DJ player can be started by operating this unit’s fader (Fader Start
Play).
䢢LINK MONITOR
With this function, rekordbox music files stored on the computer can be quickly
monitored over the headphones.
䢢STATUS INFORMATION
This function informs the DJ players of the connected channel status (on-air status,
channel number, etc.).
Using the QUANTIZE function
Effects can be applied to the sound in tempo with the currently playing track
based on the GRID information of tracks that have been analyzed with Serato DJ or
rekordbox.
To use the QUANTIZE function with PRO DJ LINK, connect this unit and a PRO DJ
LINK-compatible Pioneer DJ player beforehand. For instructions on connecting, see
Connecting input terminals on page 11.
In addition, music files must have been analyzed with rekordbox beforehand in order
to use the QUANTIZE function. For instructions on analyzing music files with rekord-
box, also see rekordbox’s operating instructions.
When using in combination with the CDJ-2000nexus, first update the firmware
to version 1.02 or later.
To use in combination with the CDJ-2000 or CDJ-900, first update the firmware to
version 4.0 or later.
1 Press the [QUANTIZE] button.
The QUANTIZE function turns on.
[GRID] lights on this unit’s main unit display when the GRID information has been
properly received from Serato DJ or the DJ player and the QUANTIZE function can
be used. [GRID] flashes if the GRID information has not been properly received.
16
En
Depending on the playing status of Serato DJ or the DJ player (off air, scratch-
ing, playing in reverse, etc.), it may not be possible to receive the GRID
information.
2 Press the [ON/OFF] button of [BEAT EFFECTS] or touch the
[X-PAD].
The effect is added to the sound in tempo with the track being played.
When the [QUANTIZE] button is pressed again, the QUANTIZE function turns
off.
Using the FADER START function
When this unit and a computer on which Serato DJ is running are connected by
USB cable, such operations as starting playback of tracks in Serato DJ can be con-
trolled using this unit’s fader.
Connect this unit and a computer on which Serato DJ is running beforehand.
In the same way, when this unit and a Pioneer DJ player are connected by LAN
cable, such operations as starting playback of the DJ player can be controlled using
this unit’s fader.
Connect the Pioneer DJ player and this unit beforehand. For instructions on con-
necting, see Connecting input terminals on page 11.
For instructions on setting the player numbers of Pioneer DJ players, see About PRO
DJ LINK on page 15.
The fader start function can be switched on and off for all DJ players all at once. For
the switching procedure, see Changing the settings on page 24.
The FADER START function cannot be used when attempting to perform
DVS control while Serato DJ is set to the Absolute mode. When one of the
[FADER START (1, 2, 3, 4)] buttons is pressed while the Absolute mode is set,
that button flashes then turns off.
䢢Start playback using the channel fader
1 Set the [CROSS FADER ASSIGN (A, THRU, B)] selector switch
to [THRU].
2 Press one of the [FADER START (1, 2, 3, 4)] buttons.
Select the channel to be started with the fader start function.
For Serato DJ
— [Fader Start 1] button: Selects [DECK 3].
— [Fader Start 2] button: Selects [DECK 1].
— [Fader Start 3] button: Selects [DECK 2].
— [Fader Start 4] button: Selects [DECK 4].
3 Set the channel fader to the nearest position towards you.
4 Set a cue in Serato DJ or on the DJ player.
The track cues to the cue point and the pause mode is set.
5 Move the channel fader away from you.
Playback of the track in Serato DJ or the DJ player starts.
If you set the channel fader back to the original position, the player instanta-
neously returns to the cue point already set and pauses playback (back cue).
䢢Start playback using the crossfader
1 Set the [CROSS FADER ASSIGN (A, THRU, B)] selector switch
to [A] or [B].
2 Press one of the [FADER START (1, 2, 3, 4)] buttons.
Select the channel to be started with the fader start function.
For Serato DJ
— [Fader Start 1] button: Selects [DECK 3].
— [Fader Start 2] button: Selects [DECK 1].
— [Fader Start 3] button: Selects [DECK 2].
— [Fader Start 4] button: Selects [DECK 4].
3 Set the crossfader.
Set to the edge opposite the side on which the channel you want to use with the
fader start function is set.
4 Set a cue in Serato DJ or on the DJ player.
The track cues to the cue point and the pause mode is set.
5 Set the crossfader.
Playback of the track in Serato DJ or the DJ player starts.
If you set the crossfader back to the original position, the player instantaneously
returns to the cue point already set and pauses playback (back cue).
Using the LINK MONITOR function
Check [Use “LINK MONITOR” of Pioneer DJ Mixers.] at [File] > [Preferences]
> [Audio] in rekordbox beforehand. Also refer to the rekordbox operating
instructions.
1 Connect headphones to the [PHONES] terminal.
2 Connect a computer on which rekordbox is installed.
For instructions on connections, see Connecting input terminals on page 11.
3 Selecting the track to be monitored with rekordbox.
4 Press the [CUE] button for [LINK].
The track selected with rekordbox is output from the headphones.
When the [CUE] button is pressed again, monitoring is canceled.
The same operation as at Monitoring sound with headphones (steps 3 to 5) can
be performed.
Using the SOUND COLOR FX function
These are effects that change in association with the [COLOR] control.
1 Press one of the [SOUND COLOR FX] selection buttons.
This selects the type of effect.
The button that was pressed flashes.
Even if one of the [SOUND COLOR FX] selection buttons is already selected,
when a different button is selected and pressed, that button is selected.
For the types of effects, see Types of SOUND COLOR FX effects on page 19.
The same effect is set for [CH1] to [CH4].
2 Turn the [COLOR] control.
The effect is applied to the channel(s) for which the control(s) was (were) pressed.
䢢Canceling the SOUND COLOR FX effect
Press the [SOUND COLOR FX] selection button that is flashing.
The effect is canceled.
Using the BEAT EFFECT function
This function lets you instantaneously set various effects according to the tempo
(BPM = Beats Per Minute) of the currently playing track.
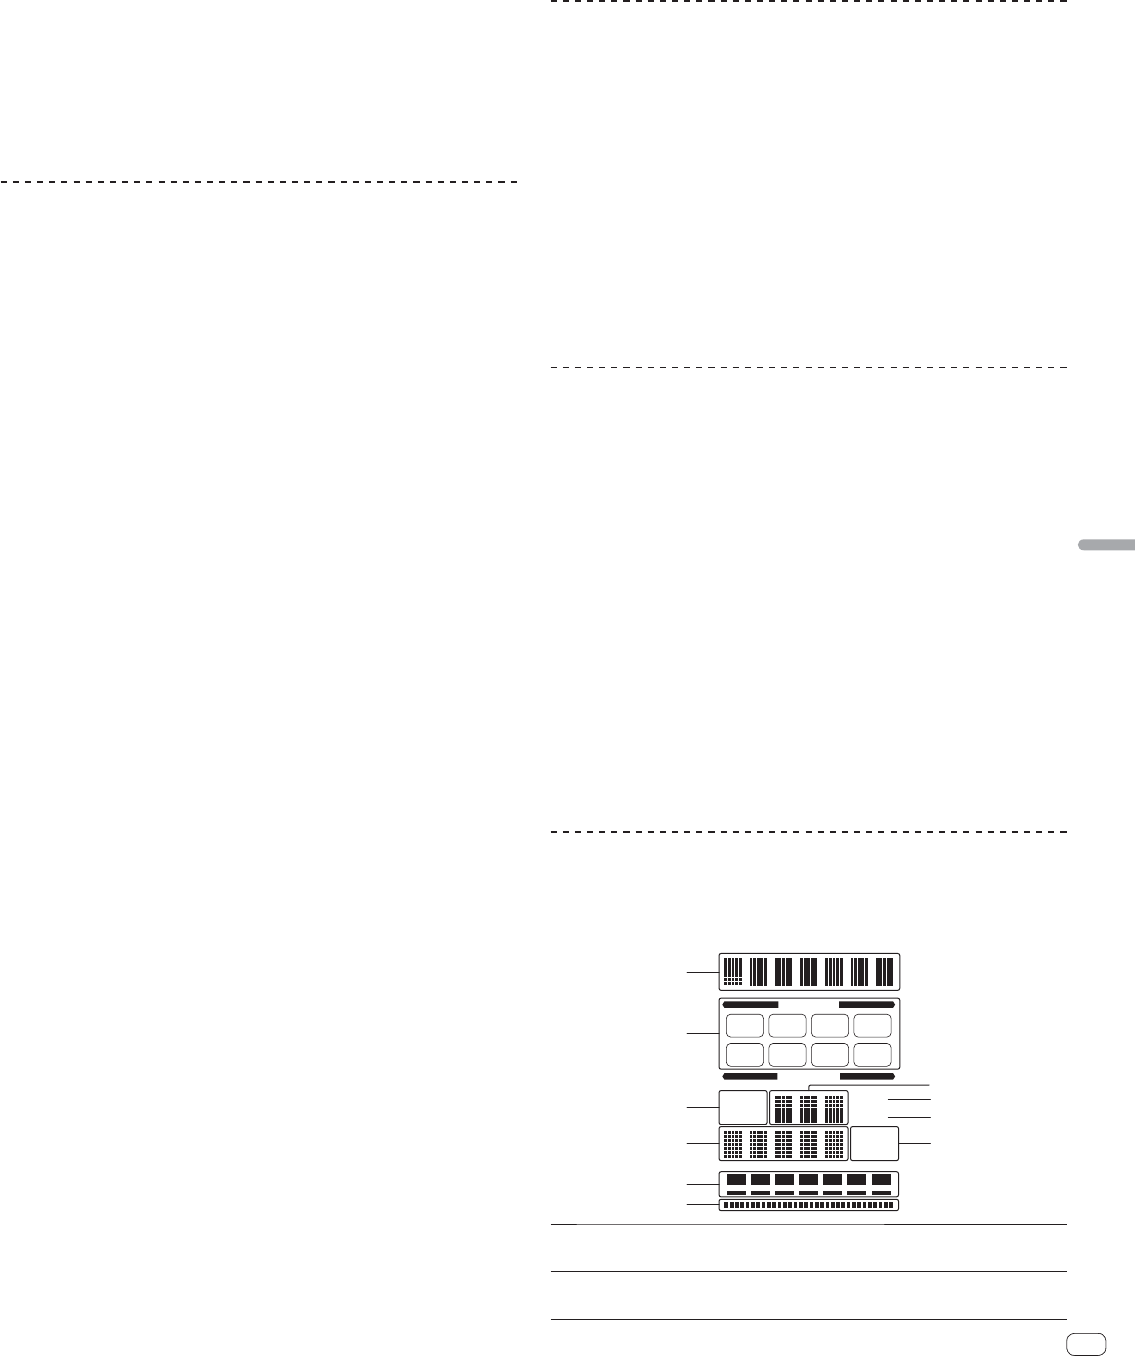
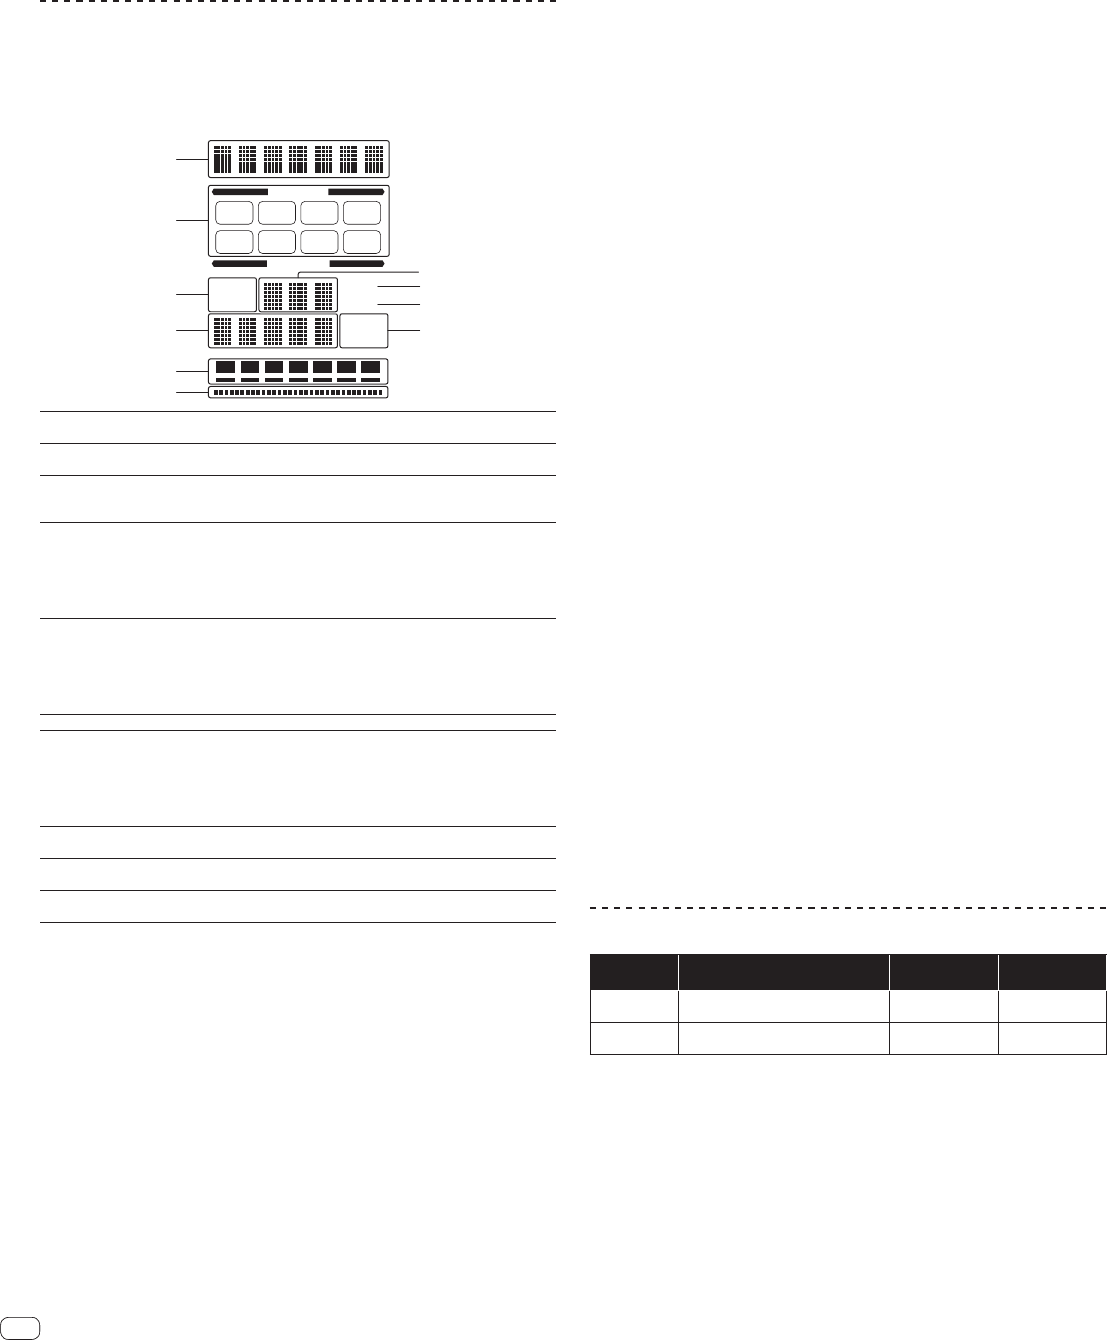
Main unit display
1
2
3
7
9
a
5
4
6
8
AUTO
GRID
TAPBPM
%
ms
CH SELECT
PARAMETER
1234
MICMST
AB
1
Effect display
section
The name of the selected effect is displayed.
2
Channel select
display section
The name of the channel to which the effect is applied is displayed.
3
AUTO (TAP)
[AUTO] lights when the BPM measurement mode is set to the auto
mode.
[TAP] lights when in the manual input mode.
4
BPM value display
(3 digits)
When in the auto mode, this displays the automatically detected
BPM value.
When the BPM cannot be detected, the previously detected BPM
value is displayed and flashes.
When in the manual input mode, this displays the BPM value that
was input manually.
5
GRID
This lights when Serato DJ is running and the QUANTIZE func-
tion can be used. It also lights when playing a track that has been
analyzed with rekordbox and the QUANTIZE function can be used
in combination with the DJ player. It flashes or is off when the
QUANTIZE function cannot be used.
6
BPM
This is always lit.
7
Parameter display
section
This displays the parameters specified for the individual effects.
When the [BEAT, ] button is pressed, the corresponding beat
fraction is displayed for 1 second.
When a value outside the parameter range is specified with the
[BEAT, ] button, the value does not change and the display
flashes.
8
% (ms)These light according to the units for the different effects.
9
Beat display
section
This lights according to the selected beat number position.
a
Touch display
section
This lights when the [X-PAD] is touched.
1 Press [AUTO/TAP] button.
Select the BPM measurement mode.
17
En
English
— [AUTO]: The BPM is measured automatically from the audio signal that is
being input. The [AUTO] mode is set when this unit’s power is turned on.
— [TAP]: The BPM is input manually by tapping the [TAP] button with a finger.
The [AUTO] BPM measurement range is BPM = 70 to 180. With some tracks it
may not be possible to measure the BPM correctly. If the BPM cannot be mea-
sured, the BPM value on the display flashes. In such cases, use the [TAP] button
to input the BPM manually.
2 Turn the beat effect selector switch.
This selects the type of effect.
For the types of effects, see Types of BEAT EFFECT on page 19.
To use [SND/RTN], see Using the external effector below.
To use [MIDI LFO], see Using the MIDI LFO on page 17.
3 Turn the effect channel selector switch.
This selects the channel to which the effect is applied.
— [1] – [4]: The effect is applied to the sound of the respective channel.
— [MIC]: The effect is applied to the sound of [MIC] channel.
— [CF.A], [CF.B]: The effect is applied to the sound of the crossfader’s [A] (left)
or [B] (right) side.
— [MASTER]: The effect is applied to the sound of the [MASTER] channel.
This operation is not necessary when [MIDI LFO] is selected.
4 Press the [BEAT , ] button.
Set the beat fraction for synchronizing the effect sound.
The effect time corresponding to the beat fraction is set automatically.
5 Press the [ON/OFF] button for [BEAT EFFECTS].
The effect is applied to the sound.
The effect’s time parameter can be adjusted by turning the [TIME] control.
The effect’s quantitative parameter can be adjusted by turning the [LEVEL/DEPTH]
control.
The [ON/OFF] button flashes when the effect is on.
When the [ON/OFF] button is pressed again, the effect turns off.
䢢Inputting the BPM manually
Tap the [TAP] button at least 2 times in rhythm with the beat
(in quarter notes) of the sound being played.
The average value of the interval at which the [TAP] button was tapped by finger is
set as the BPM.
When the BPM is set using the [TAP] button, the beat fraction is set to [1/1] and
the time of one beat (quarter note) is set as the effect time.
The BPM can be set manually by turning the [TIME] control while pressing the
[TAP] button.
The BPM can be set in units of 0.1 by pressing the [AUTO/TAP] button while
pressing the [TAP] button and turning the [TIME] control while pressing the two
buttons.
䢢Using the external effector
1 Connect this unit and external effector.
For instructions on connections, see Connecting output terminals on page 11.
2 Turn the beat effect selector switch.
Select [SND/RTN (MIDI LFO)].
3 Turn the effect channel selector switch.
This selects the channel to which the effect is applied.
4 Press the [ON/OFF] button for [BEAT EFFECTS].
The sound that has passed through the external effector is output from the
[MASTER] channel.
When the [ON/OFF] button is pressed again, the effect turns off.
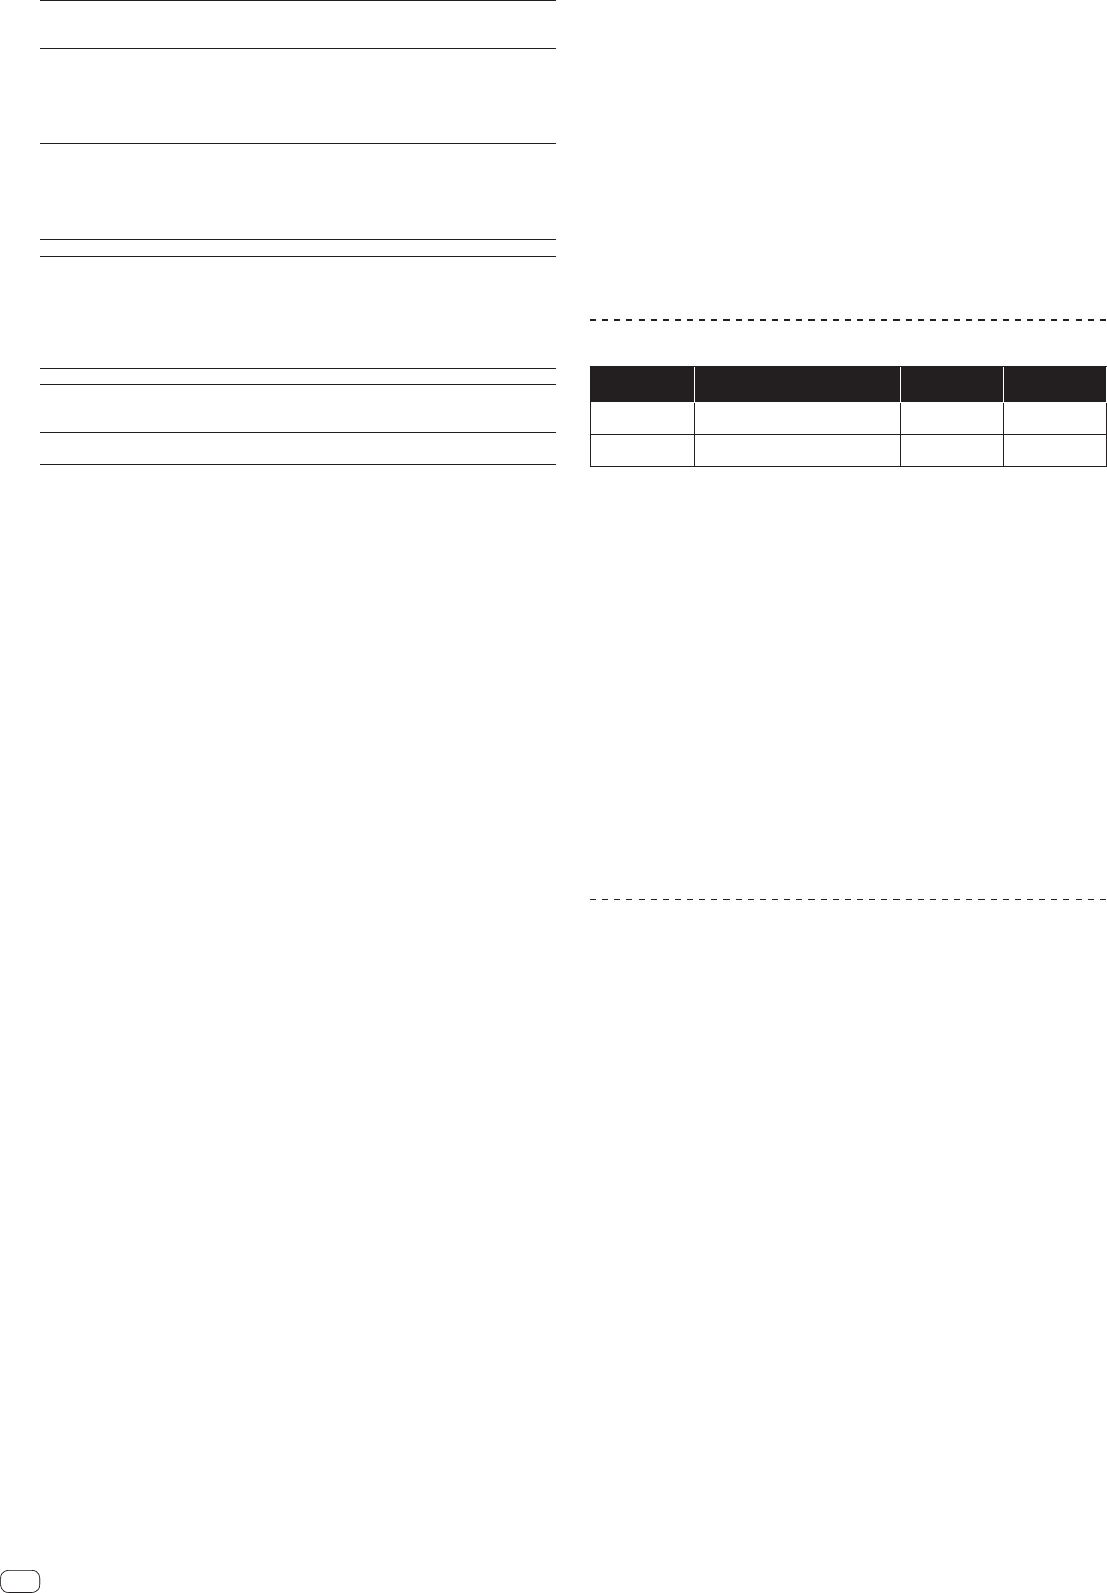
Operating the [X-PAD]
Operating
procedure
[ON/OFF] button status of [BEAT
EFFECTS]
X-PAD
Effect
1
Off (lit)
Release K TouchOff K On
2
On (flashing)
Release K TouchOn K On
䢢Operating procedure 1
1 Perform steps 1 to 4 of the Using the BEAT EFFECT function
procedure.
2 Touch the [X-PAD].
The [X-PAD] turns the effect on and off and changes the quantitative parameter.
When you release your finger from the [X-PAD], the effect turns off.
To keep the effect on when you release your finger from the [X-PAD], while
touching the [X-PAD] press the [ON/OFF] button of [BEAT EFFECTS], then
release your finger from the [X-PAD].
䢢Operating procedure 2
1 Perform steps 1 to 5 of the Using the BEAT EFFECT function
procedure.
2 Touch the [X-PAD].
The [X-PAD] changes the effect’s quantitative parameter.
Operating DJ software using the MIDI function
This unit outputs the operation information of buttons and controls in universal MIDI
format.
When connected by USB cable to a computer on which a MIDI-compatible DJ soft-
ware program is installed, the DJ software can be operated from this unit.
Install the DJ software on your computer in advance. Also, adjust the audio and
MIDI settings for the DJ software.
For MIDI channel setting instructions, see Changing the settings on page 24.
For the messages output by this unit, see MIDI assignment map on page 22.
1 Connect this unit’s [USB] terminal to the computer.
For details about connections, see Connecting to the control panel on page 12.
2 Launch the DJ software.
3 Press the [ON/OFF (UTILITY)] button.
Turn the MIDI function on.
Transmission of the MIDI messages begin.
When a fader or control is moved, a message corresponding to the position is
sent.
When the [START/STOP] button is pressed and held in for more than 2 seconds,
a set of MIDI messages corresponding to the button, fader or control positions is
sent (Snapshot).
When the [ON/OFF (UTILITY)] button is pressed again, sending of the MIDI mes-
sages is stopped.
The MIDI timing clock (BPM information) is sent regardless of the status of the
[ON/OFF (UTILITY)] button.
䢢Making the preparations to use the MIDI LFO function
The MIDI-compatible software, devices, etc. (referred to as the “MIDI signal recep-
tion side” below) must be prepared (“learned”) before using the MIDI LFO function.
Perform the learning operations on the MIDI signal reception side.
For the messages output by this unit, see MIDI assignment map on page 22.
1 Press the [ON/OFF (UTILITY)] button.
Turn the MIDI function on.
2 Turn the beat effect selector switch.
Select [SND/RTN (MIDI LFO)].
[S/RELFO] flashes on the effect display section, then [SND/RTN] is displayed.
3 Press the [ON/OFF] button for [BEAT EFFECTS].
Learn the [ON/OFF] button’s MIDI message of the [BEAT EFFECTS] in the MIDI
signal reception side.
The MIDI message sent from the [ON/OFF] button of the [BEAT EFFECTS] dif-
fers when [SND/RTN (MIDI LFO)] is selected and when anything other than
[SND/RTN (MIDI LFO)] is selected.
The [ON/OFF] button’s MIDI message of [BEAT EFFECTS] when [SND/RTN
(MIDI LFO)] is selected is only sent when the operation is performed following
this procedure.
4 Press the [LFO FORM (WAKE UP)] button.
Learn the [LFO FORM (WAKE UP)] button’s MIDI message in the MIDI signal recep-
tion side.
[1/7] and [1/7LFO] are displayed alternately on the effect display section.
If necessary, set the MIDI mapping for other buttons and controls.
Because the [LFO FORM (WAKE UP)] button’s MIDI message is sent sequen-
tially, depending on the MIDI signal reception side’s settings, it may not be
possible to learn the MIDI message.
To set the MIDI mapping for other buttons and controls, press the
[LFO FORM(WAKE UP)] button to switch to [SND/RTN].
䢢Using the MIDI LFO
Make the preparations following the procedure at Making the preparations to use the
MIDI LFO function beforehand.
1 Turn the beat effect selector switch.
Select [SND/RTN (MIDI LFO)].
[S/RELFO] flashes on the effect display section, then [SND/RTN] is displayed.
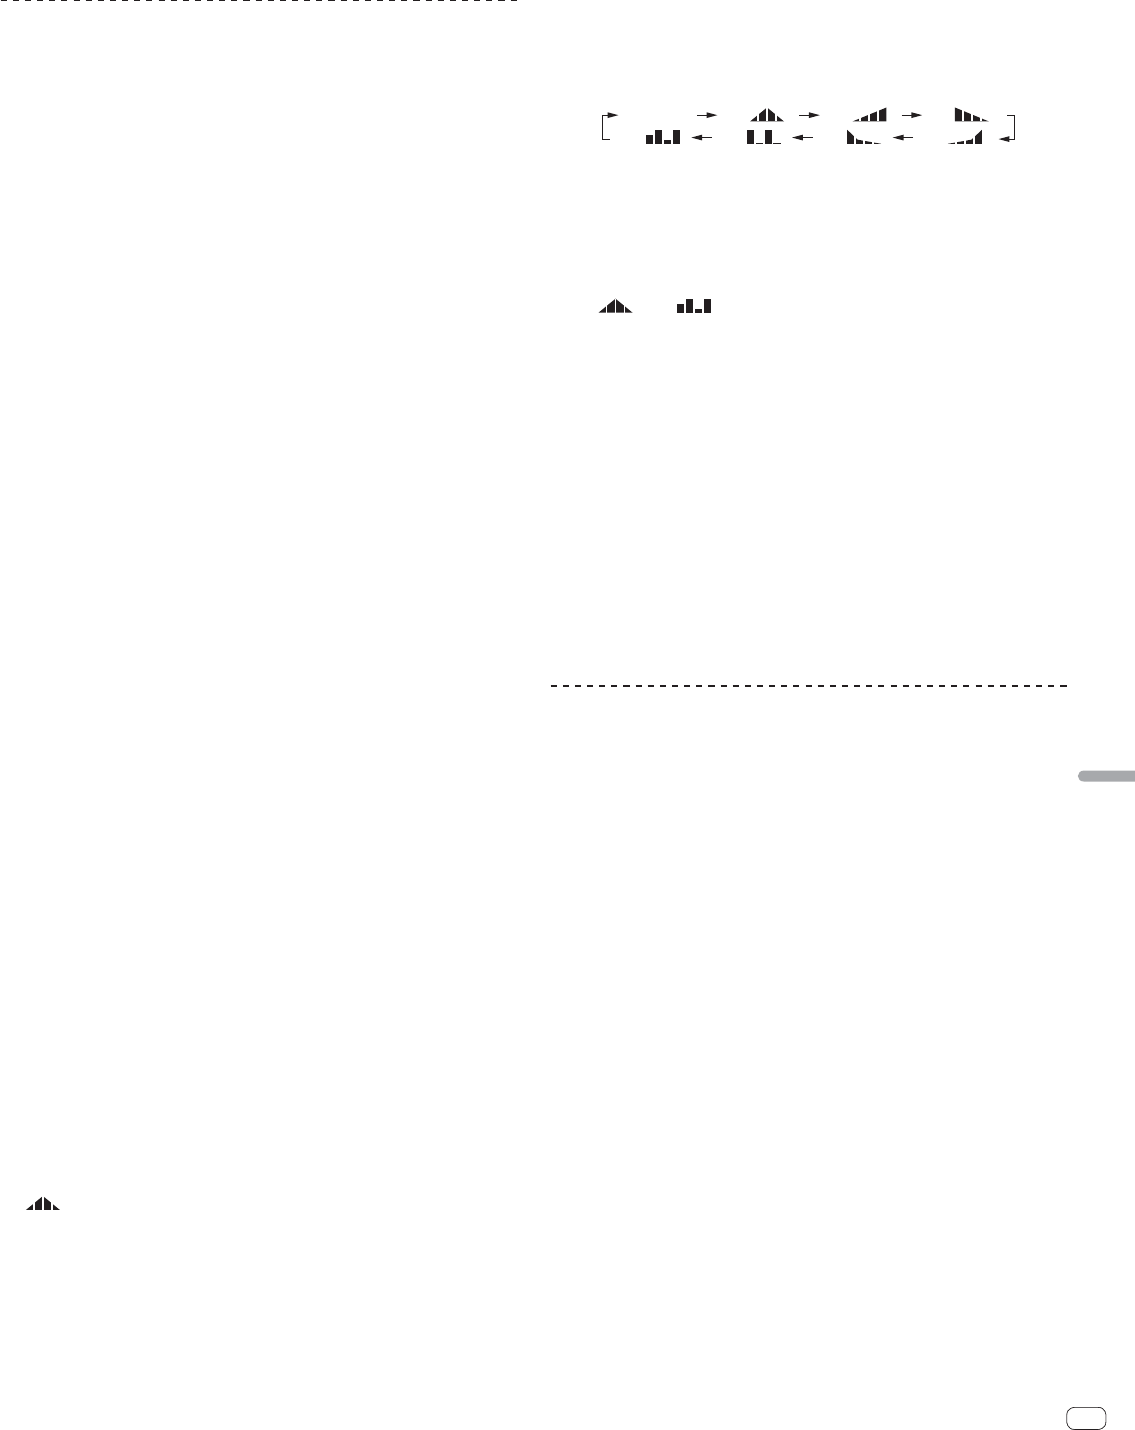
2 Press the [LFO FORM (WAKE UP)] button.
Transmission of the MIDI signals begins.
The MIDI signal waveform pattern switches each time the [LFO FORM (WAKE UP)]
button is pressed.
18
En
SND/RTN1/7 2/7 3/7
4/7 5/7 6/7 7/7
3 Press the [BEAT , ] button.
Set the MIDI signal’s waveform output time.
4 Press the [ON/OFF] button of [BEAT EFFECTS] or touch the
[X-PAD].
The MIDI message for turning the effect on is sent.
When the [LFO FORM (WAKE UP)] button is pressed and a setting from
[1/7] – [7/7] is selected, the MIDI message for the buttons and con-
trols below can be sent even when the MIDI mode is turned off.
— [X-PAD] (Touch K Release)
— [CUE] button of [BEAT EFFECTS]
—Effect channel selector switch
— [LEVEL/DEPTH] control
— [ON/OFF] button of [BEAT EFFECTS]
When the [LFO FORM (WAKE UP)] button is pressed to switch between
[SND/RTN] and [MIDI LFO], BEAT EFFECT automatically turns off.
It is not possible to switch between [SND/RTN] and [MIDI LFO] while touching
the [X-PAD].
䢢Sending the MIDI start and MIDI stop messages
Press the [START/STOP] button for [MIDI].
The MIDI start and MIDI stop messages are sent alternatively each time the
[START/STOP] button is pressed, regardless of whether the MIDI function is on
or off.
Operating an external MIDI sequencer
This unit outputs the operation information of buttons and controls in universal MIDI
format.
This unit sends the tempo of the currently playing source (BPM information) as the
MIDI timing clock. This can be used to synchronize an external MIDI sequencer with
the tempo of the source.
For the messages output by this unit, see MIDI assignment map on page 22.
External MIDI sequencers not supporting MIDI timing clocks cannot be
synchronized.
External MIDI sequencers cannot be synchronized for sources for which the
BPM cannot be measured stably.
The MIDI timing clock is output even with BPM values input manually by tapping
the [TAP] button with a finger. The MIDI timing clock output range is 40 BPM to
250 BPM.
1 Connect the [MIDI OUT] terminal to the external MIDI
sequencer’s MIDI IN terminal using a commercially available
MIDI cable.
2 Set the external MIDI sequencer’s sync mode to Slave.
3 Press the [START/STOP] button for [MIDI].
The MIDI start message is sent.
4 Press [ON/OFF] in the [MIDI] section.
Transmission of the MIDI messages begin.
19
En
English
Types of effects
Types of SOUND COLOR FX effects
Effect NameDescriptions[COLOR] control
SPACE
Applies a reverberation effect to
the original sound.
Turn counterclockwise: Applies the
reverberation effect to the mid- and
low ranges.
Turn clockwise: Applies the rever-
beration effect to the mid- and high
ranges.
DUB ECHO
Applies an echo effect, with the
sound delayed slightly after the
original sound output several
times and gradually attenuated.
Turn counterclockwise: Applies the
echo effect to the mid-range only.
Turn clockwise: Applies the echo
effect to the high range only.
GATE/COMP
Changes the texture of the overall
sound.
Turn counterclockwise: A gate
effect makes the sound tighter,
with a reduced sense of volume.
Turn clockwise: A compressor
effect makes the sound fatter, with
an increased sense of volume.
NOISE
White noise generated inside
this unit is mixed in to the sound
of the channel via the filter and
output.
The volume can be adjusted
by turning the [TRIM]
controls for the respective
channels. The sound quality
can be adjusted by turning
the [EQ/ISO (HI, MID, LOW)]
controls.
Turn counterclockwise: The cut-
off frequency of the filter through
which the white noise passes
gradually decreases.
Turn clockwise: The cut-off fre-
quency of the filter through which
the white noise passes gradually
increases.
CRUSH
Changes the original sound to a
crushed-like sound for output.
Turn counterclockwise: Increases
the sound’s distortion.
Turn clockwise: The sound is
crushed before passing through
the high pass filter.
FILTER
Outputs sound that has passed
through a filter.
Turn counterclockwise: Gradually
decreases the low-pass filter’s
cutoff frequency.
Turn clockwise: Gradually
increases the high-pass filter’s
cutoff frequency.
Types of BEAT EFFECT
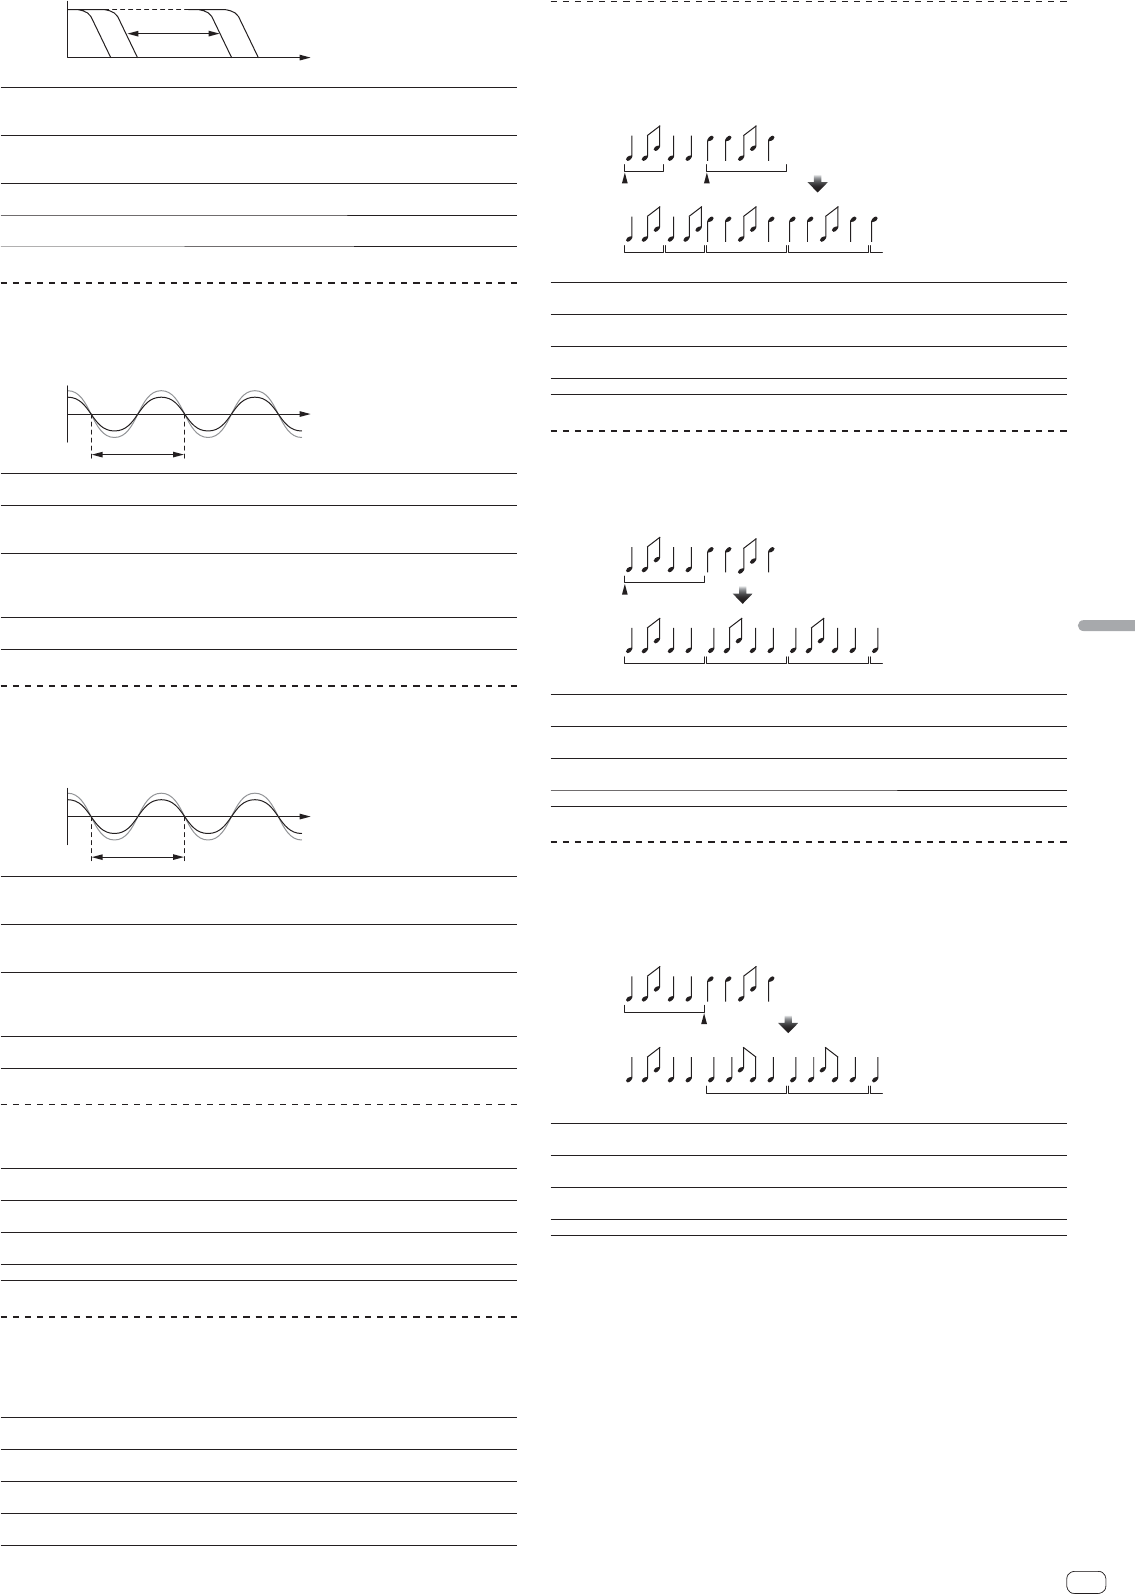
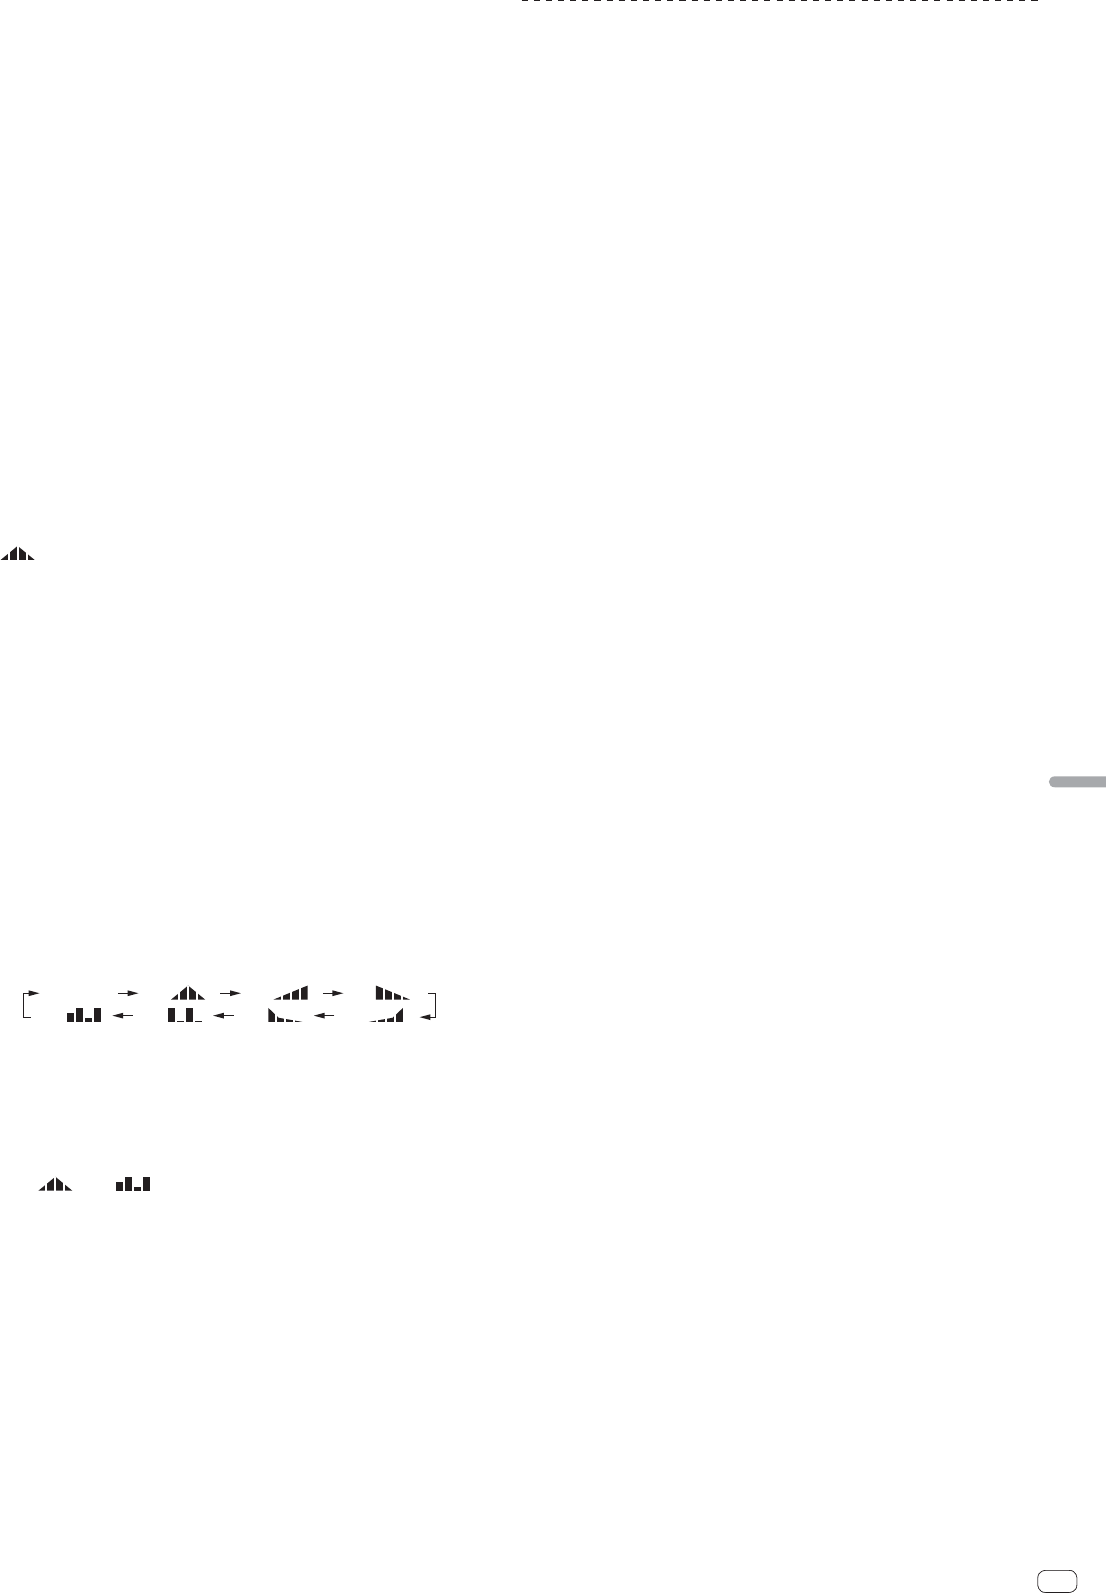
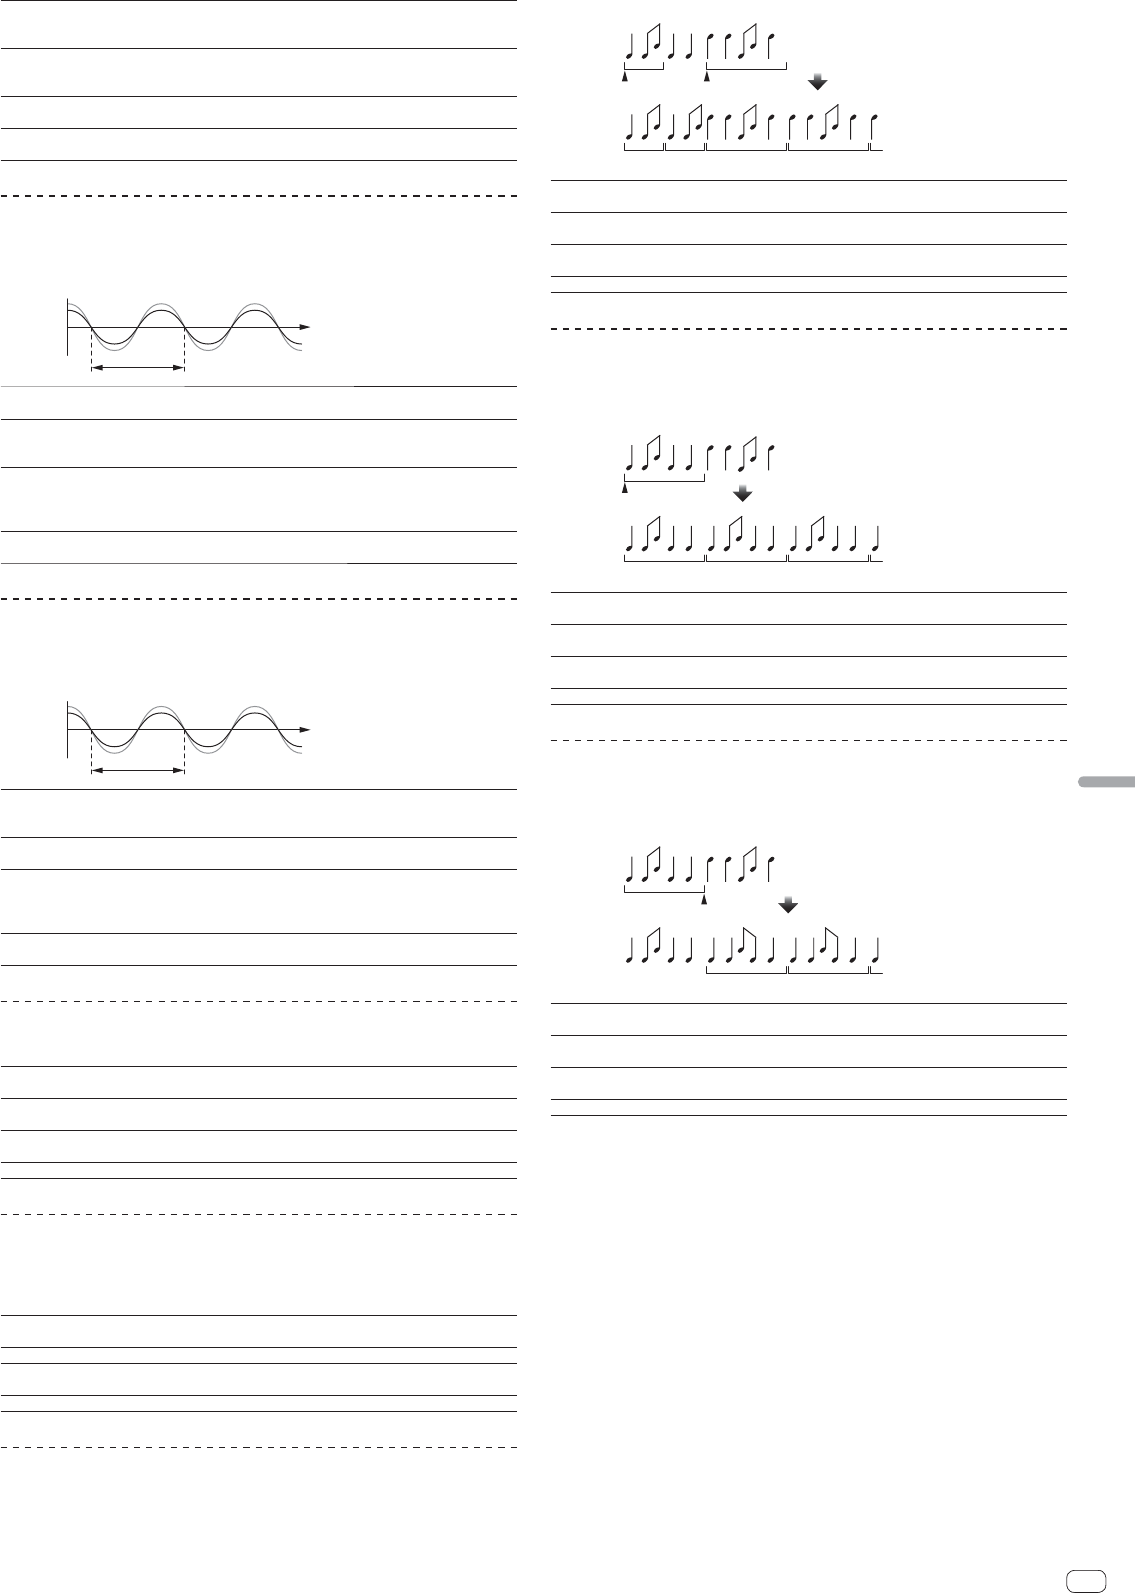
DELAY
1
A delay sound is output once according to the beat fraction set with the [BEAT,
] buttons.
When 1/2 beat delay sound is added, 4 beats become 8 beats.
Original
(4 beats)
1/2 delay
(8 beats)
BEAT, buttons (parameter 1)
Use these to set a time delay of 1/8 – 16/1 with respect to the
time of one beat of the BPM.
TIME control (parameter 2)
Use this to set the delay time.
1 to 4000 (ms)
LEVEL/DEPTH control (param-
eter 3)
Use this to set the balance between the original sound and the
delay sound.
X-PAD (parameter 4)Use this to set the delay time.
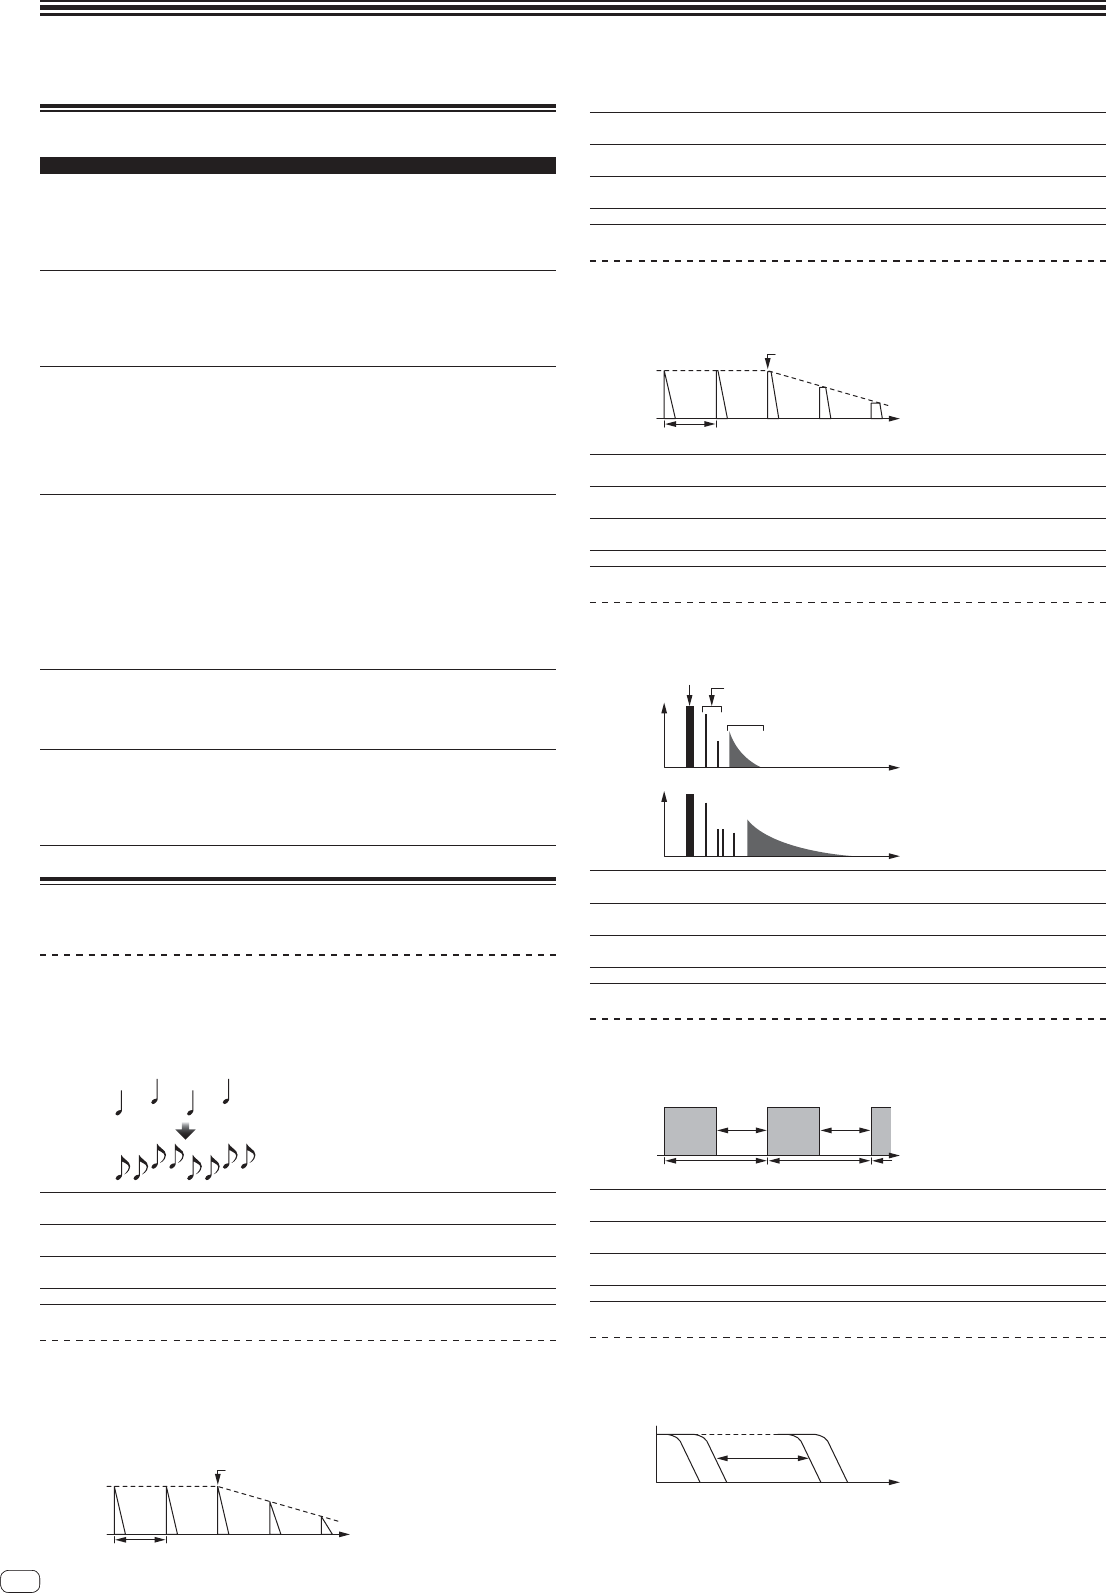
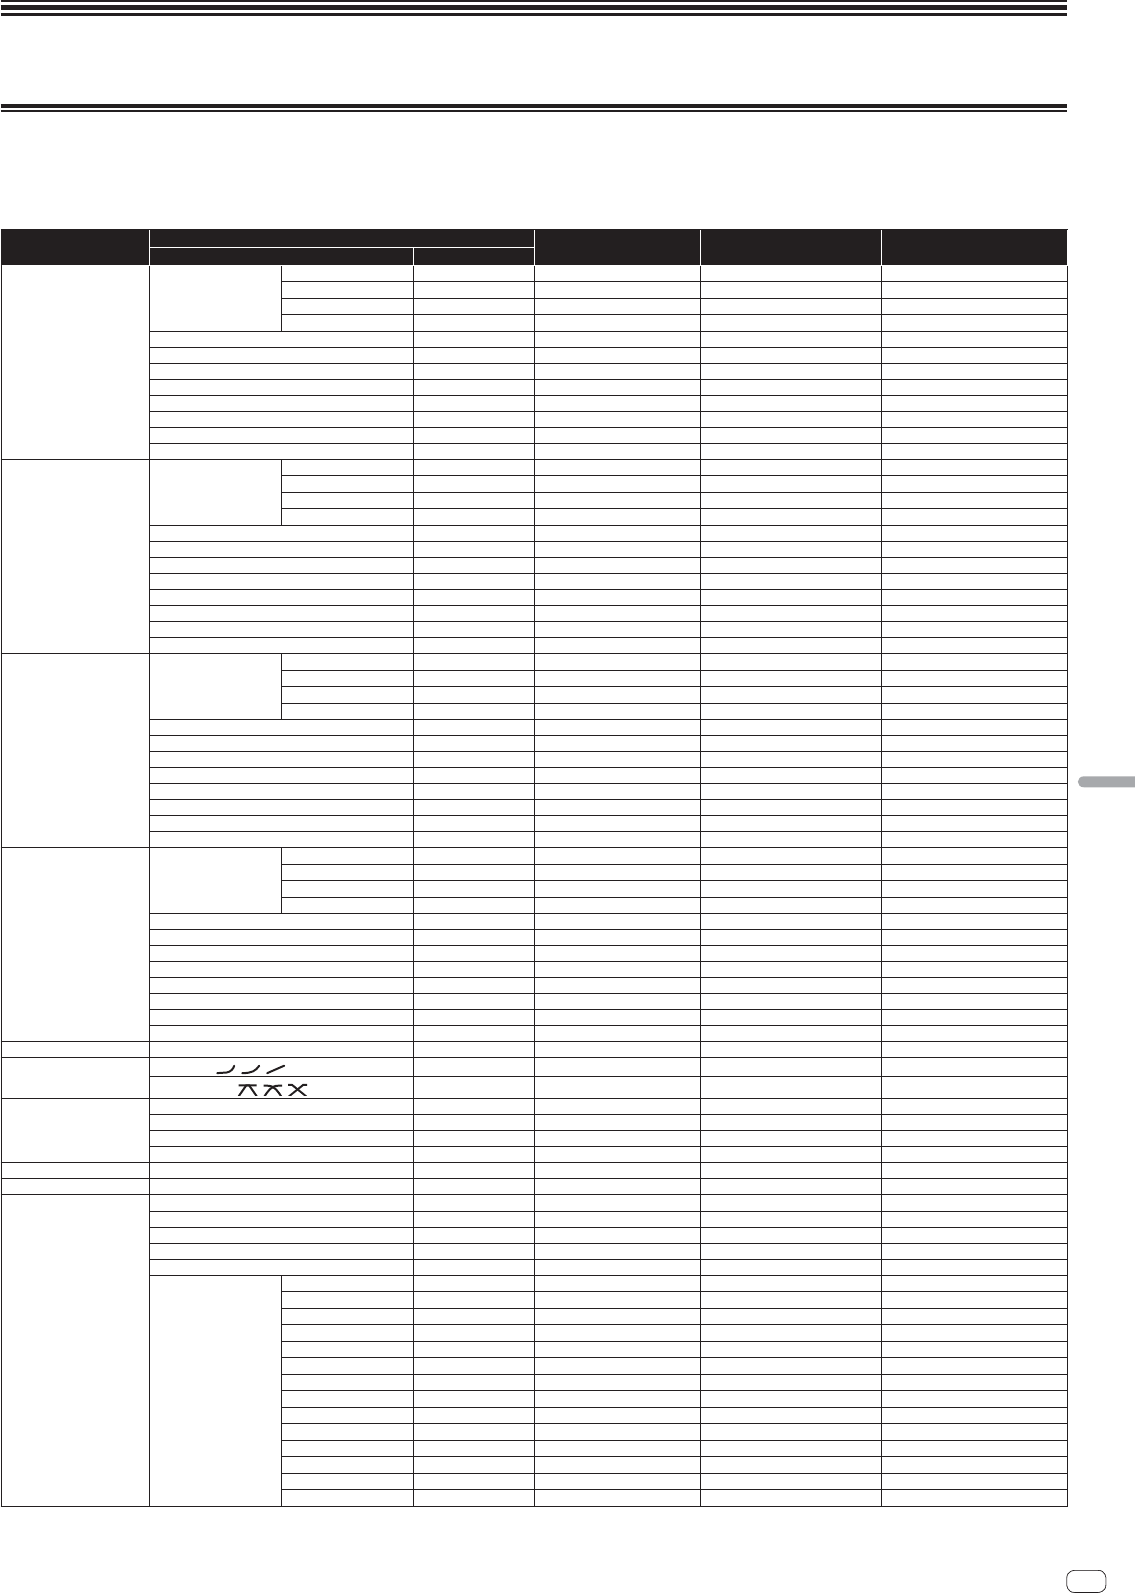
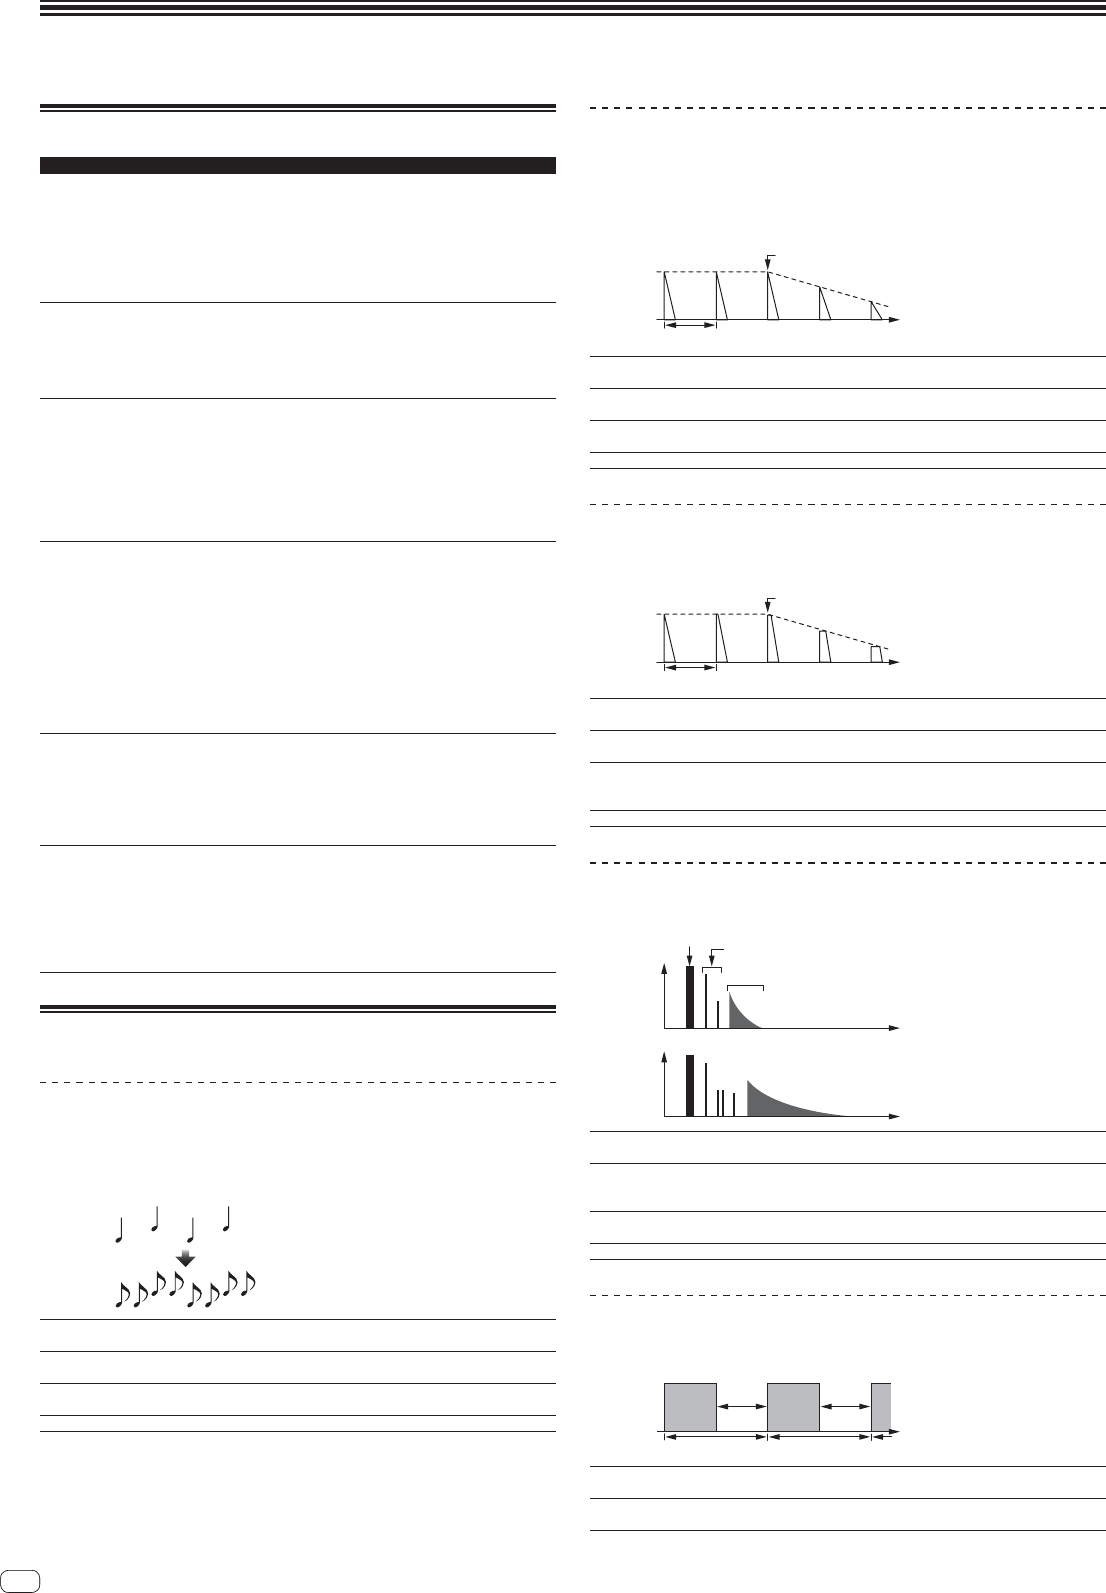
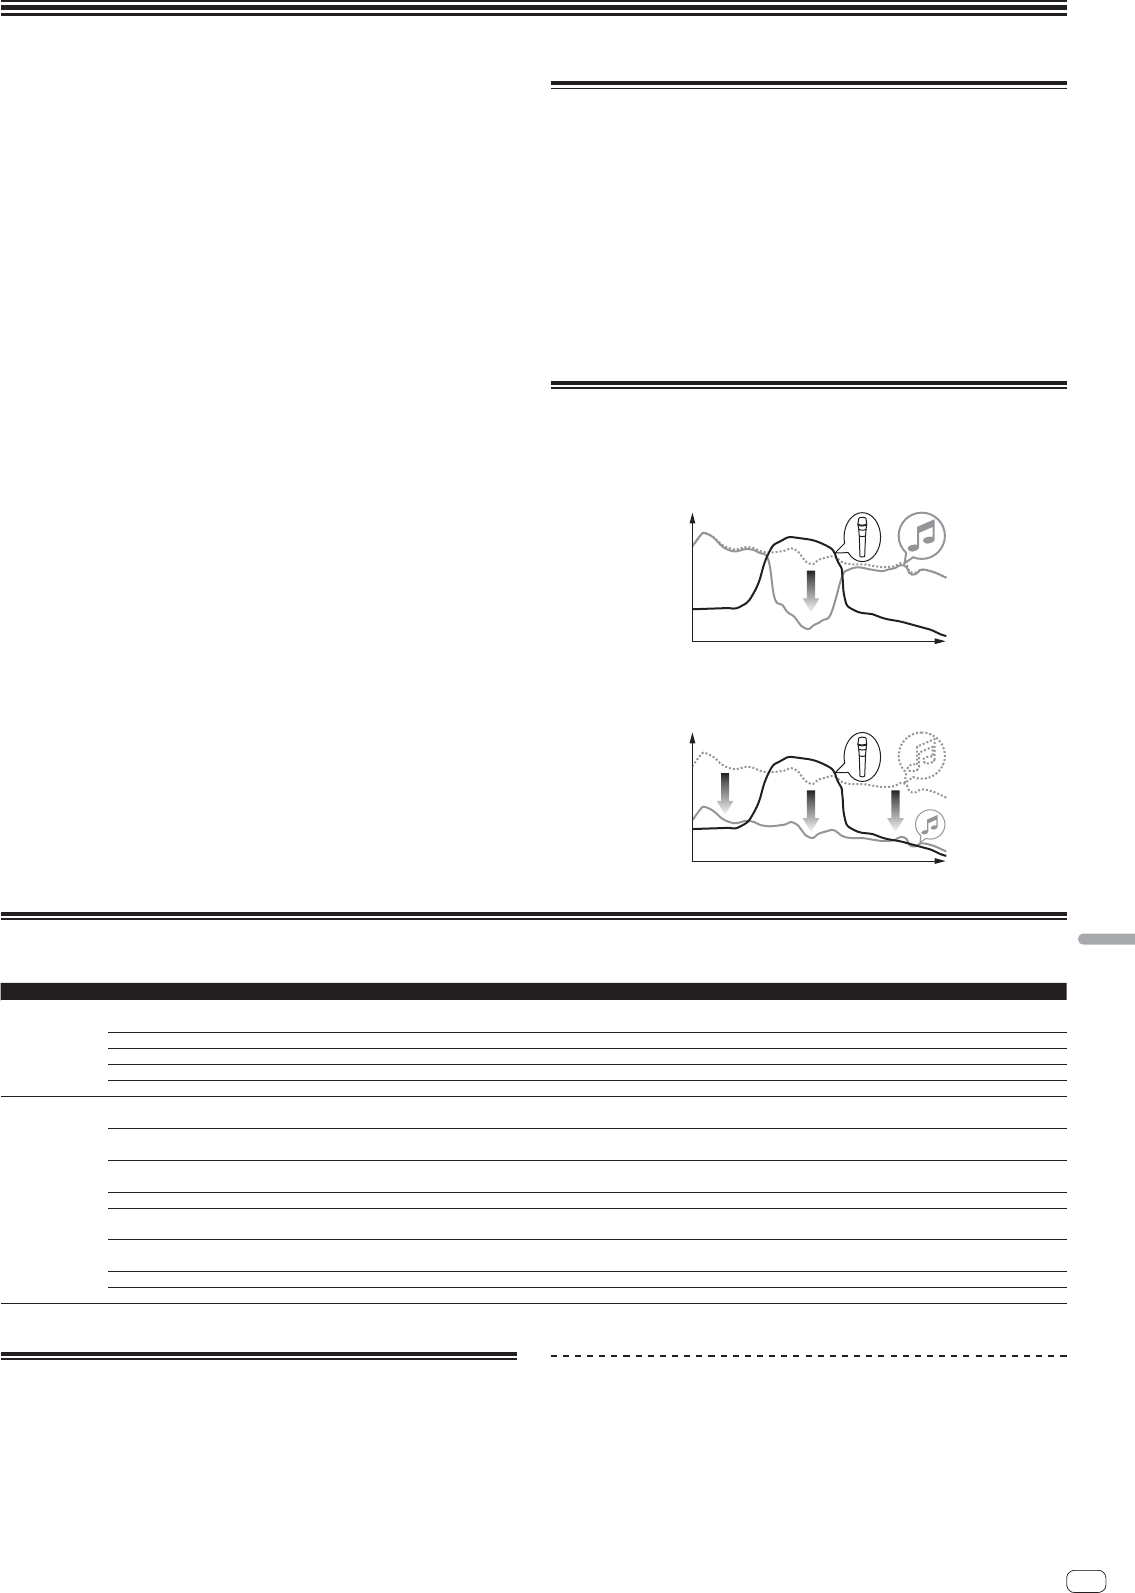
ECHO
1
2
A delay sound is output several times and gradually attenuated according to the
beat fraction set with the [BEAT, ] buttons.
With 1/1 beat echoes, the delay sounds are faded out according to the track’s tempo
even after the input sound has been cut.
Input sound turned off
Time
Fade-out
1 beat
BEAT, buttons (parameter 1)
Use these to set a time delay of 1/8 – 16/1 with respect to the
time of one beat of the BPM.
TIME control (parameter 2)
Use this to set the delay time.
1 to 4000 (ms)
LEVEL/DEPTH control (param-
eter 3)
Use this to set the balance between the original sound and the
echo sound.
X-PAD (parameter 4)Use this to set the delay time.
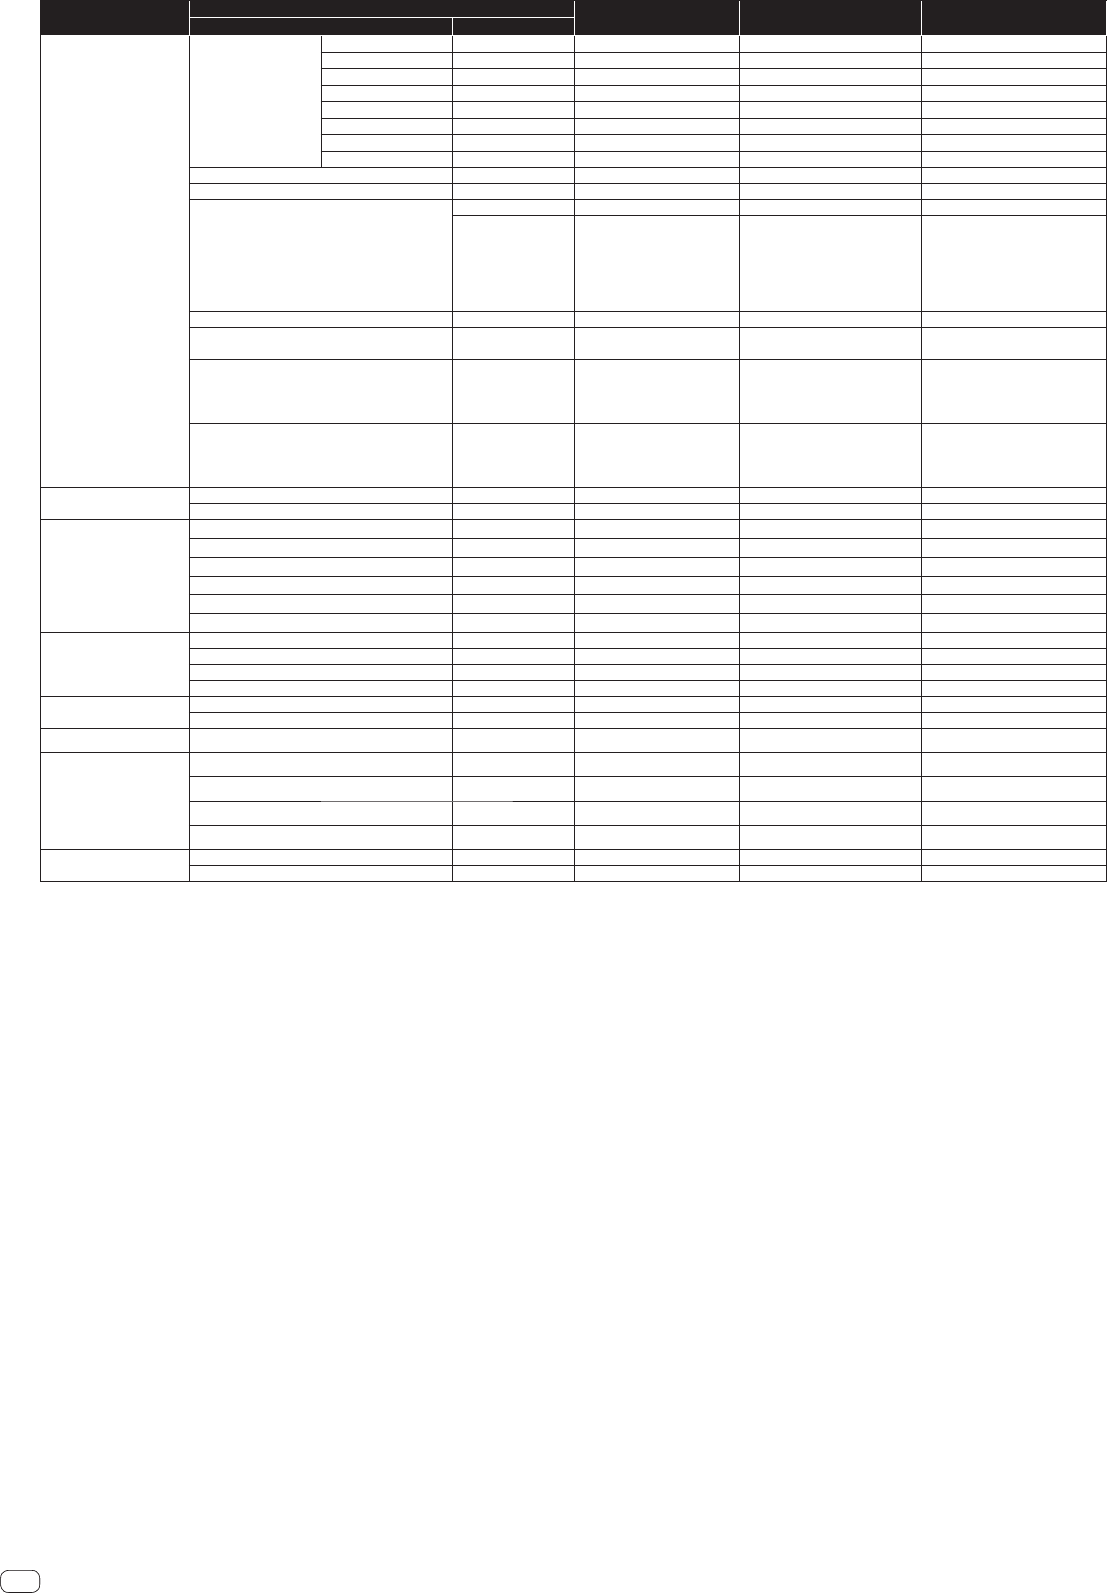
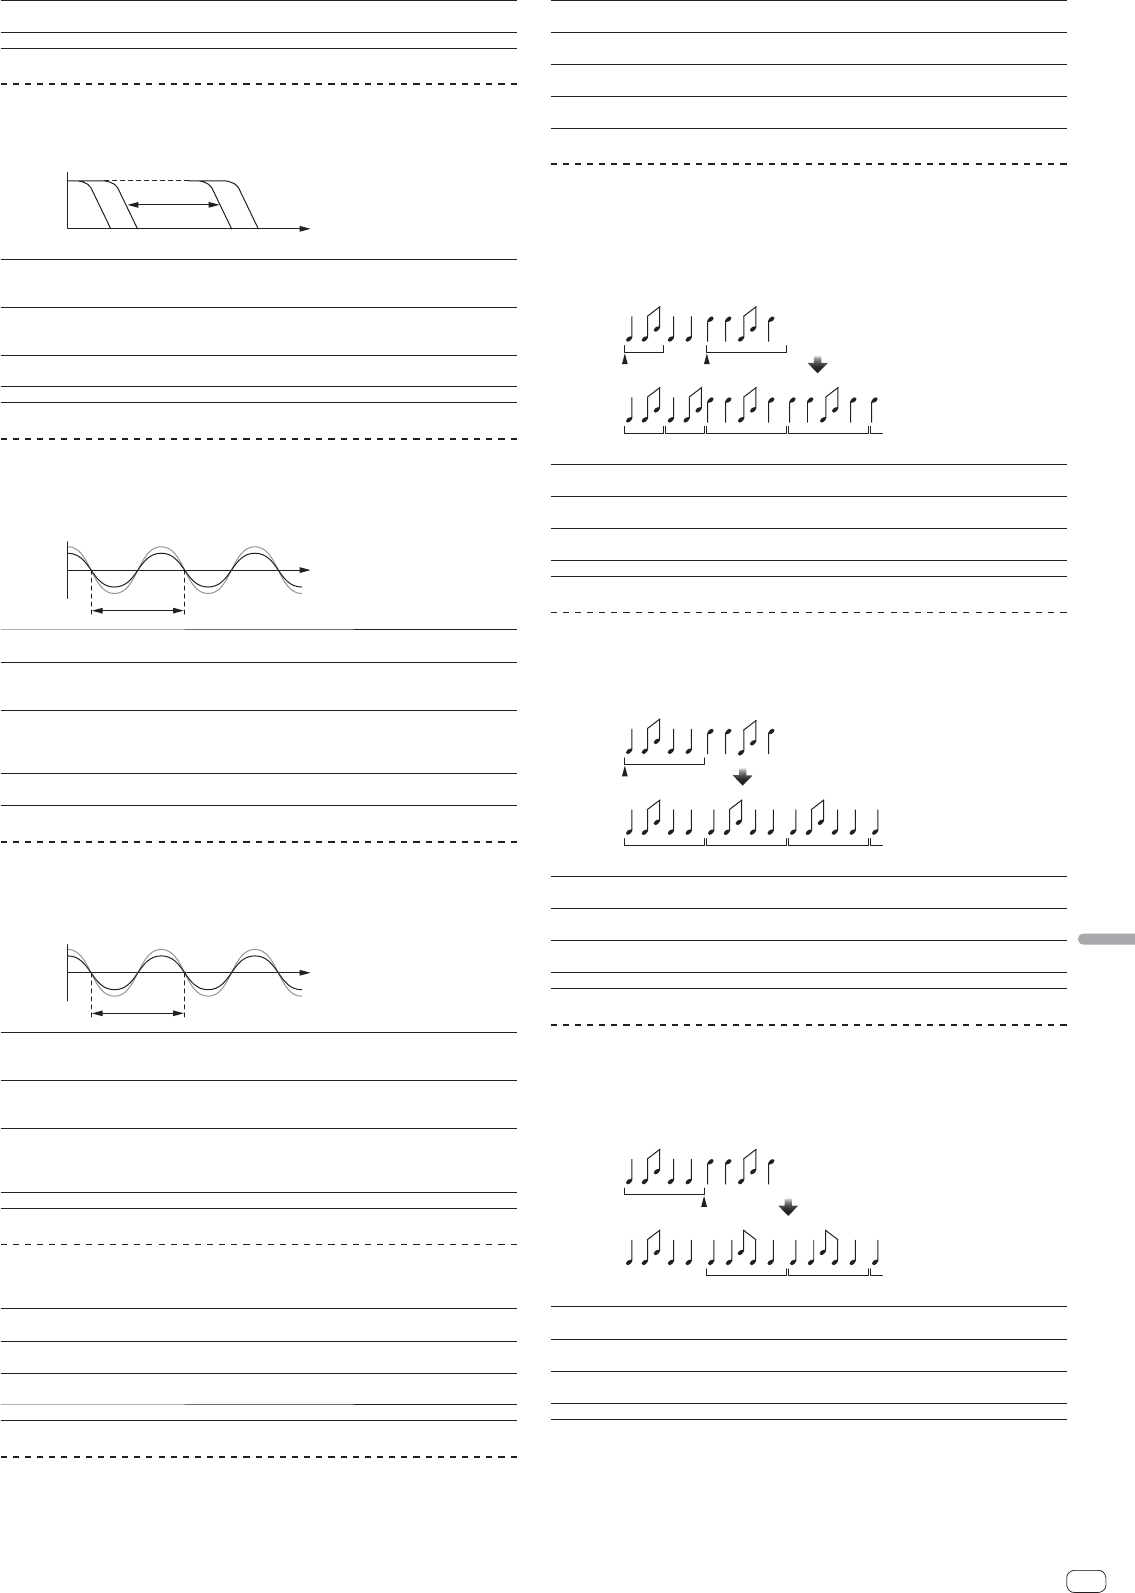
SPIRAL
1
2
This function adds a reverberation effect to the input sound.
When the delay time is changed, the pitch changes simultaneously.
Input sound turned off
Time
Fade-out
1 beat
BEAT, buttons (parameter 1)
Use these to set a time delay of 1/8 – 16/1 with respect to the
time of one beat of the BPM.
TIME control (parameter 2)
Use this to set the delay time.
10 to 4000 (ms)
LEVEL/DEPTH control (param-
eter 3)
Use this to set the balance between the original sound and the
effect sound and to set the quantitative parameter.
X-PAD (parameter 4)Use this to set the delay time.
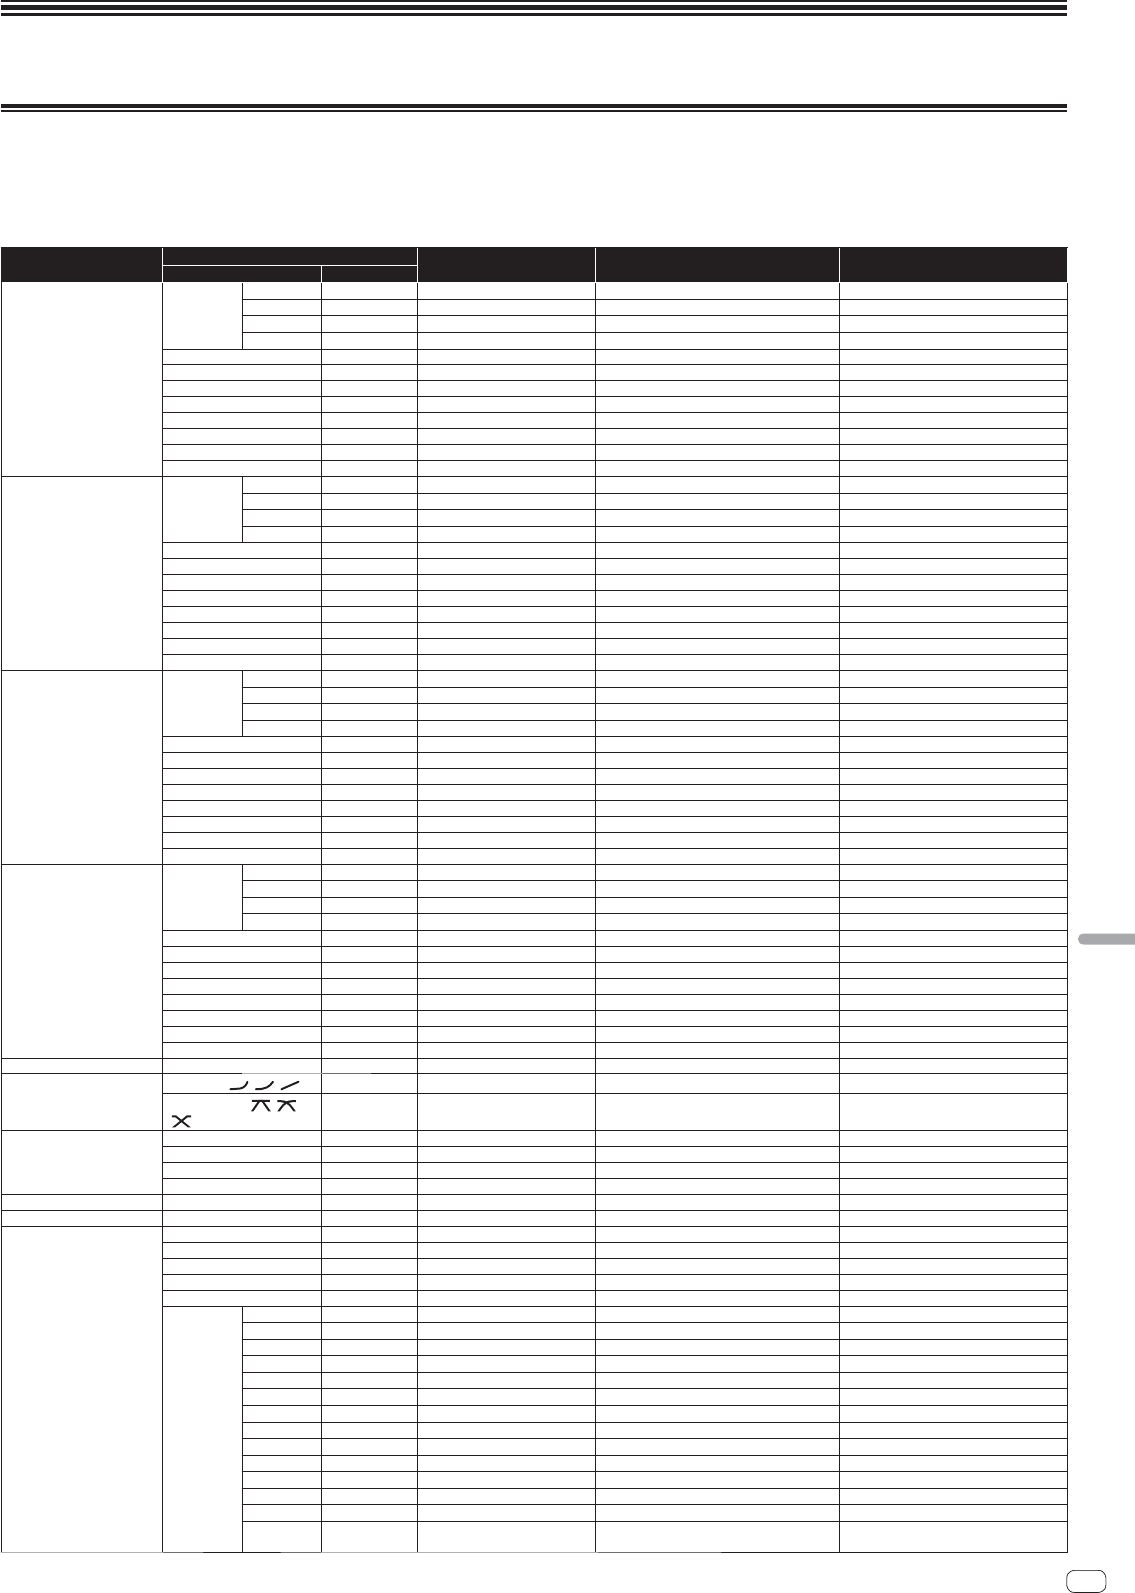
REVERB
1
2
This function adds a reverberation effect to the input sound.
Level
Direct sound
Early reflected sound
Reverberations
1%
100%
Time
BEAT, buttons (parameter 1)
Use these to set the extent of the reverberation effect, from
1 – 100 %.
TIME control (parameter 2)
Use this to set the degree of the reverb effect.
1 – 100 (%)
LEVEL/DEPTH control (param-
eter 3)
Sets the balance between the original sound and the effect
sound.
X-PAD (parameter 4)Sets the filter’s cut-off frequency.
TRANS
1
The sound is cut according to the beat fraction set with the [BEAT, ] buttons.
CutCut
1/1 beat
Time
BEAT, buttons (parameter 1)
Use these to set a cut time of 1/16 – 16/1 with respect to the
time of one beat of the BPM.
TIME control (parameter 2)
Use this to set the effect time.
10 to 16000 (ms)
LEVEL/DEPTH control (param-
eter 3)
Sets the balance between the original sound and the effect
sound.
X-PAD (parameter 4)This sets the cut time.
FILTER
1
The filter’s cutoff frequency changes according to the beat fraction set with the
[BEAT, ] buttons.
Frequency
BEAT, buttons (parameter 1)
Use these to set the cycle for moving the cut-off frequency
as a time of 1/4 – 64/1 with respect to the time of one beat of
the BPM.
TIME control (parameter 2)
Use this to set the cycle at which the cut-off frequency is
moved.
10 to 32000 (ms)
LEVEL/DEPTH control (param-
eter 3)
The further the control is turned clockwise, the more the effect
is stressed.
20
En
X-PAD (parameter 4)
The cycle at which the cut-off frequency is moved fluctuates
finely.
FLANGER
1
A 1-cycle flanger effect is produced according to the beat fraction set with the [BEAT
, ] buttons.
Short delay
Cycle
Time
BEAT, buttons (parameter 1)
Use these to set the 1/4 – 64/1 effect time with respect to the
time of one beat of the BPM.
TIME control (parameter 2)
Use this to set the cycle by which the flanger effect moves.
10 to 32000 (ms)
LEVEL/DEPTH control (param-
eter 3)
The further the control is turned clockwise, the more the effect
is stressed.
When turned all the way counterclockwise, only the original
sound is output.
X-PAD (parameter 4)The cycle at which the flanger effect is moved fluctuates finely.
PHASER
1
The phaser effect changes according to the beat fraction set with the [BEAT, ]
buttons.
Cycle
Phase shift
Time
BEAT, buttons (parameter 1)
Use these to set the cycle for moving the phaser effect as of
time of 1/4 – 64/1 with respect to the time of one beat of the
BPM.
TIME control (parameter 2)
This sets the cycle by which the phaser effect is moved.
10 to 32000 (ms)
LEVEL/DEPTH control (param-
eter 3)
The further the control is turned clockwise, the more the effect
is stressed.
When turned all the way counterclockwise, only the original
sound is output.
X-PAD (parameter 4)The cycle at which the phaser effect is moved fluctuates finely.
ROBOT
1
The original sound is changed to a sound like one produced by a robot.
BEAT, buttons (parameter 1)
Use this to set the degree of the effect sound.
-100–100 (%)
TIME control (parameter 2)
Use this to set the degree of the effect sound.
-100–100 (%)
LEVEL/DEPTH control (param-
eter 3)
Sets the balance between the original sound and the effect
sound.
X-PAD (parameter 4)This changes the degree of the effect sound.
MELODIC
1
2
The mid-range of the sound being input at the point when the [ON/OFF] button is
pressed is recorded, and the recorded sound is output according to the level of the
sound being input.
BEAT, buttons (parameter 1)
This sets the way in which the recorded sound is played.
TIME control (parameter 2)This sets the way in which the recorded sound is played.
LEVEL/DEPTH control (param-
eter 3)
This sets the balance between the original sound and the
recorded sound.
X-PAD (parameter 4)This sets the way in which the recorded sound is played.
SLIP ROLL
1
2
The sound being input at the point when the [ON/OFF] is pressed is recorded, and
the recorded sound is output repeatedly according to the beat fraction set with the
[BEAT, ] buttons.
When the effect time changes, the input sound is recorded again.
1/1 repeat1/2 repeat
Original
Roll
Changed from 1/2
to 1/1
Effect turned on
BEAT, buttons (parameter 1)
Use these to set an effect time of 1/16 – 16/1 with respect to
the time of one beat of the BPM.
TIME control (parameter 2)
Use this to set the effect time.
10 to 4000 (ms)
LEVEL/DEPTH control (param-
eter 3)
Use this to set the balance between the original sound and
ROLL.
X-PAD (parameter 4)Use this to set the effect time.
ROLL
1
2
The sound being input at the point when the [ON/OFF] is pressed is recorded, and
the recorded sound is output repeatedly according to the beat fraction set with the
[BEAT, ] buttons.
Effect turned on
Repeated
Original
1/1 roll
BEAT, buttons (parameter 1)
Use these to set an effect time of 1/16 – 16/1 with respect to
the time of one beat of the BPM.
TIME control (parameter 2)
Use this to set the effect time.
10 to 4000 (ms)
LEVEL/DEPTH control (param-
eter 3)
Use this to set the balance between the original sound and
ROLL.
X-PAD (parameter 4)Use this to set the effect time.
REV ROLL
1
2
The sound being input at the point when the [ON/OFF] button is pressed is
recorded, and the recorded sound is reversed then output repeatedly according to
the beat fraction set with the [BEAT, ] buttons.
Effect turned on
Reversed and repeated
Original
1/1 reverse
roll
BEAT, buttons (parameter 1)
Use these to set an effect time of 1/16 – 16/1 with respect to
the time of one beat of the BPM.
TIME control (parameter 2)
Use this to set the effect time.
10 to 4000 (ms)
LEVEL/DEPTH control (param-
eter 3)
Use this to set the balance between the original sound and
ROLL.
X-PAD (parameter 4)Use this to set the effect time.
SND/RTN (MIDI LFO)
Connect an external effector, etc., here.
By pressing the [LFO FORM (WAKE UP)] button, MIDI-compatible software and
devices can be controlled using MIDI signals.
䢢SND/RTN
1
Connect an external effector, etc., here.
SEND
RETURN
Effector
DJM-900SRT Serato DJ Edition
1212
1212
0
0
ON
TALK
OVER
OFF
9
6
-
26
/
6
-
26
/
6
-
26
/
9
6
-
26
/
6
-
26
/
6
-
26
/
9
6
-
26
/
6
-
26
/
6
-
26
/
9
6
-
26
/
6
-
26
/
6
-
26
/
0
BEAT, buttons (parameter 1)
—
TIME control (parameter 2)—
LEVEL/DEPTH control (param-
eter 3)
This adjusts the sound level input to the [RETURN] terminal.
X-PAD (parameter 4)—
䢢MIDI LFO
The MIDI signal (0 – 127) waveform is changed according to the track’s tempo.
21
En
English
The MIDI signal waveform pattern switches each time the [LFO FORM (WAKE UP)]
button is pressed.
BEAT, buttons (parameter 1)
Use these to set a waveform output time of 1/4 – 64/1 with
respect to one beat of the BPM.
TIME control (parameter 2)Use this to set the waveform output time.
LEVEL/DEPTH control (param-
eter 3)
—
X-PAD (parameter 4)This changes the MIDI signal’s waveform pattern.
When [MIDI LFO] is selected, the sound of the external effector connected to the [RETURN]
terminal is not input.
1 When [CF.A], [CF.B] or [MASTER] is selected with the effect channel selector
switch, if the sound of the channel you want to monitor is not being output to
the [MASTER] channel, the effect sound cannot be monitored even if the [CUE]
button for [BEAT EFFECTS] is pressed.
2If the effect is off, the effect sound cannot be monitored even by pressing the
[CUE] button for [BEAT EFFECTS].
22
En
MIDI assignment map
MIDI assignment map
“CC” is the abbreviation of “control change”. A control change is a type of MIDI signal used to transmit various types of control information, such as timbre, volume, etc.
On this unit, values from 0 to 127 are output as CC mainly when controls and faders are operated. CC are also output when certain buttons are operated.
“Note” is a MIDI term used when pressing or releasing notes on a piano or other keyboard.
Category
Button/Control/Switch
MIDI assignmentTrigger/ToggleTransmitted data
NameType
CH1
Input Selector Switch
DIGITAL
SwitchNote 050
2
OFF=0, ON=127
CD/LINE
SwitchNote 051
2
OFF=0, ON=127
PHONO
SwitchNote 052
2
OFF=0, ON=127
USB DECK 3
SwitchNote 053
2
OFF=0, ON=127
TRIM
ControlCC 001—0-127
HI
ControlCC 002—0-127
MID
ControlCC 003—0-127
LOW
ControlCC 004—0-127
COLOR
ControlCC 005—0-127
CUE
ButtonCC 070Trigger/ToggleOFF=0, ON=127
Channel faderControlCC 017—0-127
CROSS FADER ASSIGN
SwitchCC 065—0, 64, 127
CH2
Input Selector Switch
DIGITAL
SwitchNote 054
2
OFF=0, ON=127
CD/LINE
SwitchNote 055
2
OFF=0, ON=127
PHONO
SwitchNote 056
2
OFF=0, ON=127
USB DECK 1
SwitchNote 057
2
OFF=0, ON=127
TRIM
ControlCC 006—0-127
HI
ControlCC 007—0-127
MID
ControlCC 008—0-127
LOW
ControlCC 009—0-127
COLOR
ControlCC 010—0-127
CUE
ButtonCC 071Trigger/ToggleOFF=0, ON=127
Channel faderControlCC 018—0-127
CROSS FADER ASSIGN
SwitchCC 066—0, 64, 127
CH3
Input Selector Switch
DIGITAL
SwitchNote 058
2
OFF=0, ON=127
CD/LINE
SwitchNote 059
2
OFF=0, ON=127
PHONO
SwitchNote 060
2
OFF=0, ON=127
USB DECK 2
SwitchNote 061
2
OFF=0, ON=127
TRIM
ControlCC 012—0-127
HI
ControlCC 014—0-127
MID
ControlCC 015—0-127
LOW
ControlCC 021—0-127
COLOR
ControlCC 022—0-127
CUE
ButtonCC 072Trigger/ToggleOFF=0, ON=127
Channel faderControlCC 019—0-127
CROSS FADER ASSIGN
SwitchCC 067—0, 64, 127
CH4
Input Selector Switch
DIGITAL
SwitchNote 062
2
OFF=0, ON=127
CD/LINE
SwitchNote 063
2
OFF=0, ON=127
PHONO
SwitchNote 064
2
OFF=0, ON=127
USB DECK 4
SwitchNote 065
2
OFF=0, ON=127
TRIM
ControlCC 080—0-127
HI
ControlCC 081—0-127
MID
ControlCC 092—0-127
LOW
ControlCC 082—0-127
COLOR
ControlCC 083—0-127
CUE
ButtonCC 073Trigger/ToggleOFF=0, ON=127
Channel faderControlCC 020—0-127
CROSS FADER ASSIGN
SwitchCC 068—0, 64, 127
CrossfaderCrossfaderControlCC 011—0-127
Fader curve
CH FADER (
, , )
SwitchCC 094—0, 64, 127
CROSS FADER (, , )
SwitchCC 095—0, 64, 127
Master
MASTER LEVEL
ControlCC 024—0-127
BALANCE
ControlCC 023—0-127
CUE
ButtonCC 074Trigger/ToggleOFF=0, ON=127
EQ CURVE (ISOLATOR, EQ)SwitchCC 033—0, 127
BOOTH MONITORBOOTH MONITOR
ControlCC 025—0-127
LINKCUE
ButtonCC 115Trigger/ToggleOFF=0, ON=127
BEAT EFFECTS
ButtonCC 076Trigger/ToggleOFF=0, ON=127
ButtonCC 077Trigger/ToggleOFF=0, ON=127
AUTO/TAP
ButtonCC 069Trigger/ToggleOFF=0, ON=127
TAP
ButtonCC 078Trigger onlyOFF=0, ON=127
CUE
ButtonCC 075Trigger/ToggleOFF=0, ON=127
EFFECT SELECT
DELAY
SwitchCC 042
2
OFF=0, ON=127
ECHO
SwitchCC 055
2
OFF=0, ON=127
SPIRAL
SwitchCC 043
2
OFF=0, ON=127
REVERB
SwitchCC 054
2
OFF=0, ON=127
TRANS
SwitchCC 053
2
OFF=0, ON=127
FILTER
SwitchCC 059
2
OFF=0, ON=127
FLANGER
SwitchCC 050
2
OFF=0, ON=127
PHASER
SwitchCC 057
2
OFF=0, ON=127
ROBOT
SwitchCC 051
2
OFF=0, ON=127
MELODIC
SwitchCC 061
2
OFF=0, ON=127
SLIP ROLL
SwitchCC 058
2
OFF=0, ON=127
ROLL
SwitchCC 046
2
OFF=0, ON=127
REV ROLL
SwitchCC 047
2
OFF=0, ON=127
SND/RTN (MIDI LFO)SwitchCC 062
2
OFF=0, ON=127
23
En
English
Category
Button/Control/Switch
MIDI assignmentTrigger/ToggleTransmitted data
NameType
BEAT EFFECTS
CH SELECT
CH1
SwitchCC 034
2
OFF=0, ON=127
CH2
SwitchCC 035
2
OFF=0, ON=127
CH3
SwitchCC 036
2
OFF=0, ON=127
CH4
SwitchCC 037
2
OFF=0, ON=127
MIC
SwitchCC 038
2
OFF=0, ON=127
CF.A
SwitchCC 039
2
OFF=0, ON=127
CF.B
SwitchCC 040
2
OFF=0, ON=127
MASTER
SwitchCC 041
2
OFF=0, ON=127
MIDI LFO
ControlCC 118—0-127
QUANTIZE
ButtonNote 118Trigger/Toggle—
TIME
SwitchCC 013——
SwitchCC 045—
TIME value (When FLANGER,
PHASER or FILTER is selected, the
value is halved. When a negative
value is selected, it is set to a posi-
tive value.)
LEVEL/DEPTHControlCC 091—0-127
X-PAD
ControlCC 116—
Sends the [X-PAD] position
information.
ON/OFF
X-PAD (touch)
When an effect other than [SND/RTN (MIDI
LFO)] is selected at BEAT EFFECT
ButtonCC 114
2
OFF=0, ON=127
ON/OFF
X-PAD (touch)
When [SND/RTN (MIDI LFO)] is selected at
BEAT EFFECT
ButtonCC 064
2
OFF=0, ON=127
MIC
HI
ControlCC 030—0-127
LOW
ControlCC 031—0-127
SOUND COLOR FX
NOISE
ButtonCC 085
Trigger/Toggle
1
OFF=0, ON=127
SPACE
ButtonCC 105
Trigger/Toggle
1
OFF=0, ON=127
GATE/COMP
ButtonCC 106
Trigger/Toggle
1
OFF=0, ON=127
DUB ECHO
ButtonCC 107
Trigger/Toggle
1
OFF=0, ON=127
CRUSH
ButtonCC 086
Trigger/Toggle
1
OFF=0, ON=127
FILTER
ButtonCC 087
Trigger/Toggle
1
OFF=0, ON=127
Fader Start
Fader Start 1
ButtonCC 088Trigger/ToggleOFF=0, ON=127
Fader Start 2
ButtonCC 089Trigger/ToggleOFF=0, ON=127
Fader Start 3
ButtonCC 090Trigger/ToggleOFF=0, ON=127
Fader Start 4
ButtonCC 093Trigger/ToggleOFF=0, ON=127
HEADPHONES
MIXING
ControlCC 027—0-127
LEVEL
ControlCC 026—0-127
Timing Clock
—Timing Clock——
Fader Start operation
3
Channel fader 1 or crossfaderNote 102—BACK CUE = 0, PLAY = 127
Channel fader 2 or crossfaderNote 103—BACK CUE = 0, PLAY = 127
Channel fader 3 or crossfaderNote 104—BACK CUE = 0, PLAY = 127
Channel fader 4 or crossfaderNote 105—BACK CUE = 0, PLAY = 127
MIDI
START
ButtonSTART——
STOP
ButtonSTOP——
1When turning one button on switches another button from on to off, MIDI on and off messages are sent from the two buttons.
When there is no button that switches off, only the MIDI on message is sent from the button that was pressed.
2When switched from one position to another position, the MIDI ON and OFF signals are sent respectively from both positions.
—When the [START/STOP] button is pressed for over 1 second, MIDI messages corresponding to the positions of the buttons, faders and controls are sent in a bundle (Snapshot).
The MIDI Snapshot sends all MIDI messages other than MIDI start and MIDI stop.
3Operation differs depending on the setting of the [CROSS FADER ASSIGN (A, THRU, B)] selector switch.
—When the [CROSS FADER ASSIGN (A, THRU, B)] selector switch is set to [THRU]: MIDI messages are sent when the [FADER START] button is set to [ON] and the channel fader is moved away
from you from the nearest position towards you and when it is moved back to the nearest position towards you.
—When the [CROSS FADER ASSIGN (A, THRU, B)] selector switch is set to [A]: MIDI messages are sent when the [FADER START] button is set to [ON] and the crossfader is moved from the far
edge of the [B] side and when it is moved back to the far edge of the [B] side.
—When the [CROSS FADER ASSIGN (A, THRU, B)] selector switch is set to [B]: MIDI messages are sent when the [FADER START] button is set to [ON] and the crossfader is moved from the far
edge of the [A] side and when it is moved back to the far edge of the [A] side.
24
En
Changing the settings
1 Press the [ON/OFF (UTILITY)] button for over 1 second.
The [USER SETUP] mode setting screen is displayed.
To display the [CLUB SETUP] mode setting screen, first turn this unit’s power off,
then press the [POWER] button while pressing the [ON/OFF (UTILITY)] button.
2 Press the [BEAT , ] button.
Select the setting item.
3 Press the [TAP] button.
The screen switches to the setting item’s setting value change screen.
4 Press the [BEAT , ] button.
Change the setting value.
5 Press the [TAP] button.
Enter the setting value.
The previous screen reappears.
To return to the previous screen without changing the settings, press the
[QUANTIZE] button.
6 Press the [ON/OFF (UTILITY)] button.
Close the [USER SETUP] mode setting screen.
To close the [CLUB SETUP] mode setting screen, press the [POWER] button to
turn this unit’s power off.
About the auto standby function
When [Auto Standby] is set to [ON], the standby mode is set automatically if 4
hours pass with all of the conditions shown below met.
—That none of this unit’s buttons or controls are operated.
—That no audio signals of –10 dB or greater are input to this unit’s input terminals.
—That no PRO DJ LINK connections are made.
When the [LFO FORM (WAKE UP)] button is pressed, the standby mode is
canceled.
This unit is shipped with the auto standby function turned on. If you do not want
to use the auto standby function, set [Auto Standby] to [OFF].
About the talk over function
The talk over function has the two modes described below.
— [ADV] (advanced talk over): The mid-range only of the sound of channels other
than the [MIC] channel is attenuated according to the [Talk Over LEVEL] setting
value and output.
dB
Frequency
— [NOR] (normal talk over): The sound of channels other than the [MIC] channel is
attenuated according to the [Talk Over LEVEL] setting value and output.
When Serato DJ is running and using this unit as the default audio device, set the
audio data output in Serato DJ.
Display the setting utility before starting.
1 Click the [MIXER OUTPUT] tab.
2 Click the [Mixer Audio Output] pull-down menu.
Select and set the audio data to be output to the computer from the flow of audio
signals inside this unit.
CH1CH2CH3CH4
CH1 Control Tone
PHONO
1
CH2 Control Tone
PHONO
1
CH3 Control Tone
PHONO
1
CH4 Control Tone
PHONO
1
CH1 Control Tone
CD/LINE
1
CH2 Control Tone
CD/LINE
1
CH3 Control Tone
CD/LINE
1
CH4 Control Tone
CD/LINE
1
CH1 Control Tone
DIGITAL
1
CH2 Control Tone
DIGITAL
1
CH3 Control Tone
DIGITAL
1
CH4 Control Tone
DIGITAL
1
Post CH1 Fader
2
Post CH2 Fader
2
Post CH3 Fader
2
Post CH4 Fader
2
Cross Fader A
2
Cross Fader A
2
Cross Fader A
2
Cross Fader A
2
Cross Fader B
2
Cross Fader B
2
Cross Fader B
2
Cross Fader B
2
MICMICMICMIC
MIX (REC OUT)
2
MIX (REC OUT)
2
MIX (REC OUT)
2
MIX (REC OUT)
2
1The audio data is output with the same volume at which it is input to this unit, regardless of
the [USB Output Level] setting.
2When using for applications other than recording, pay attention to the DJ application’s set-
tings so that no audio loops are generated. If audio loops are generated, sound may be input
or output at unintended volumes.
3 Click the [USB Output Level] pull-down menu.
Adjust the volume of the audio data output from this unit.
The [USB Output Level] setting is applied equally to all audio data. However,
when 1 on the table at step 2 is selected, the audio data is output with the same
volume at which it is input to this unit.
If not enough volume can be achieved with the DJ software’s volume adjustment
alone, change the [USB Output Level] setting to adjust the volume of the audio
data output from this unit. Note that the sound will be distorted if the volume is
raised too high.
Adjusting the buffer size (when using Windows
ASIO)
If an application using this unit as the default audio device (DJ software, etc.) is run-
ning, quit that application before adjusting the buffer size.
Display the setting utility before starting.
Click the [ASIO] tab.
If the buffer size is made large, drops in audio data (breaks in the sound)
occur less easily, but the time lag due to the delay in the transfer of the audio
data (latency) increases.
Checking the version of the driver software
Display the setting utility before starting.
Click the [About] tab.
Checking the latest information on the
driver software
For the latest information on the driver software for exclusive use with this unit, visit
our website shown below.
http://pioneerdj.com/support/
Operation cannot be guaranteed when multiple units of this mixer are con-
nected to a single computer.
26
En
Additional information
Troubleshooting
Incorrect operation is often mistaken for trouble or malfunction. If you think that there is something wrong with this component, check the points below. Sometimes the
trouble may lie in another component. Inspect the other components and electrical appliances being used. If the trouble cannot be rectified after checking the items
below, ask your nearest Pioneer authorized service center or your dealer to carry out repair work.
The player may not operate properly due to static electricity or other external influences. In such cases, normal operation may be restored by unplugging the power cord
then plugging it back in.
ProblemCheckRemedy
The power is not turned on.Is the power cord properly connected?Plug in the power cord to an AC outlet.
No sound or small sound.Is the input selector switch set to the proper position?Switch the input selector switch to switch the channel’s input source. (page 14)
Are the connection cables properly connected?Connect the connection cables properly. (page 11)
Are the terminals and plugs dirty?Clean the terminals and plugs before making connections.
Is [MASTER ATT.] set to [–6 dB], etc.?At the [USER SETUP] screen, switch [MASTER ATT.]. (page 24)
Digital sound cannot be output.Is the digital audio output’s sampling frequency (fs) suited
for the specifications of the connected device?
On the [CLUB SETUP] screen, set [Digital Master Out Sampling Rate] according to the
specifications of the connected equipment. (page 24)
Distorted sound.Is the sound level output from the [MASTER] channel
appropriately set?
Adjust the [MASTER LEVEL] control so that the master channel level indicator lights at
around [0 dB] at the peak level. (Page 14)
Set [MASTER ATT.] to [–3 dB] or [–6 dB]. (page 24)
Is the level of audio input to each channel properly set?Adjust the [TRIM] control so that the channel level indicator lights at about [0 dB] at the peak
level. (Page 14)
Can’t crossfade.Are the [CROSS FADER ASSIGN (A, THRU, B)] selector
switches properly set?
Set the [CROSS FADER ASSIGN (A, THRU, B)] selector switches for the different channels
properly. (Page 14)
Can’t fader start a DJ player.Is [FADER START] set to [OFF]?At the [USER SETUP] screen, set [FADER START] to [ON]. (page 24)
Is the DJ player properly connected to the [LINK] terminal?Connect the DJ player to the [LINK] terminal properly using a LAN cable. (page 11)
Are the audio cables properly connected?Connect this unit’s audio input terminals and the DJ player’s audio output terminals by audio
cable. (page 11)
Is the DJ player’s player number properly set?Set the DJ player’s player number to the same number as the channel to which the audio
cable is connected.
[BEAT EFFECTS] does not work.Is the effect channel selector switch set to the proper
position?
Turn the effect channel selector switch to select the channel to which you want to apply the
effect.
[SOUND COLOR FX] does not work.Is the [COLOR] control set to an appropriate position?Turn the [COLOR] control clockwise or counterclockwise. (page 16)
Can’t use an external effector.Is the [ON/OFF] button for [BEAT EFFECTS] set to [ON]?Press the [ON/OFF] button for [BEAT EFFECTS] to set [SND/RTN] to [ON]. (page 16)
Is the external effector properly connected to the [SEND]
or [RETURN] terminal?
Connect the external effector to the [SEND] and [RETURN] terminals. (page 11)
Distorted sound from an external effector.Is the external effector’s audio output level set to an
appropriate level?
Adjust the external effector’s audio output level.
Tempo (BPM) cannot be measured or
measurement value of tempo (BPM) is
implausible.
Is the audio input level too high or too low?Adjust the [TRIM] control so that the channel level indicator lights at about [0 dB] at the peak
level. (Page 14)
For some tracks, it may not be possible to measure the tempo (BPM). Use the [TAP] button to
input the tempo manually. (page 16)
Measured tempo (BPM) differs from tempo
indicated on CD.
—The values may differ slightly due to the different ways in which the BPM is measured.
MIDI sequencer does not synchronize.Is the MIDI sequencer’s sync mode set to Slave?Set the MIDI sequencer’s sync mode to Slave.
Does the MIDI sequencer you are using support MIDI
timing clocks?
MIDI sequencers not supporting MIDI timing clocks cannot be synchronized.
MIDI control does not work.Is the MIDI channel turned on?Press the [ON/OFF] button for [MIDI]. (page 17)
Are the MIDI settings properly set?To operate DJ software with this unit, this unit’s MIDI messages must be assigned to the
DJ software you are using. For instructions on assigning messages, see your DJ software’s
operating instructions.
This unit is not recognized after it has been
connected to a computer.
USB indicator is off or flashing.
Is the driver software properly installed on your computer?Install the driver software. If it is already installed, reinstall it. (page 6)
Sound of a computer cannot be output from
this unit.
Are this unit and computer properly connected?Connect this unit and the computer directly using the included USB cable. (page 12)
Are the audio output device settings properly set?Select this unit with the audio output device settings. For instructions on making settings for
your application, see your application’s operating instructions.
Is the input selector switch set to the proper position?Set the input selector switch to the [USB] position. (Page 14)
Effect sound cannot be monitored even
when the [CUE] button for [BEAT EFFECTS]
is pressed.
—The circuit that generates the echo for the [ECHO], [REVERB], [ROLL], [SLIP ROLL] and
[REV ROLL] effect sounds is positioned after the effect circuit, so the effect sound cannot be
monitored. This is not a malfunction.
Sound is distorted when an analog player is
connected to this unit’s [PHONO] terminals.
Or, lighting of the channel level indicator
does not change even when the [TRIM]
control is turned.
Have you connected an analog player with a built-in phono
equalizer?
Connect the analog player with built-in phono equalizer to the [CD/LINE] terminals. (page 11)
If the analog player with built-in phono equalizer has a PHONO/LINE selector switch, switch
it to PHONO.
Is an audio interface for computers connected between
the analog player and this unit?
If the output of the audio interface for computers is line level, connect it to the [CD/LINE]
terminals. (page 11)
If the analog player has a PHONO/LINE selector switch, switch it to PHONO.
27
En
English
Block Diagram
Master
Limiter
[BEAT EFFECT
(
SND/RTN]
Effect CH Select
Effect CH Select
Effect Out
CableCheck
RETURN
SEND Out
CHx
CF A/B
MIC
Master
CHx
CF A/B
MIC
Master
Return Level
No Cable
Effect SW
Cable Exist
Effect_CUE
Effect_CUE
[Mono Split / Stereo SWITCH & MIXING]
Mono Split
Stereo
2posi
MIXING
MONO SPLIT/
STEREO SWITCH
[BEAT EFFECT(Others)]
Effect CH Select
Effect CH Select
Effect Out
CHx
CF A/B
MIC
Master
CHx
CF A/B
MIC
Master
Effect SW
Level Depth
CHx Cue On/Off SW
CHx_CUE
Effect Cue On/Off SW
Effect_CUE
Link Cue On/Off SW
Link_CUE
CUE
Mixing
L
R
SEL
Mono Split
Stereo
Master Cue On/Off SW
Master_CUE
Master
Mixing
L
R
H.P. MIX R Out
H.P. MIX L Out
SEL
SEL
3posi
2posi
SOUND
COLOR
EFFECT
CHx
SOUND
COLOR
EFFECT
CHx
3Band
EQ/
ISOLATOR
CHx
BEAT
EFFECT
CHx
BEAT
EFFECT
CHx
BEAT
EFFECT
CHx
BPM Detect CHx Select
Level meter CHx
BEAT
Effect
(SND/RTN)
Send/
Return
CHx
CUE
Monitor
CHx
Link
CUE
Phono
AMP
Analog_PHONO
Analog_CD LINE
Digital/USB
CF Assign
3posi
Assign A
CHx
Assign Thru
CH1-4
Assign B
CHx
CH Fader
3posi
CH
Fader
Curve
Switch
3posi
2posi
2para4para
Cross
Fader
Curve
Switch
Thru
CF A
CF B
MIC Monitor SW
CHx in
CHx Control Tone
2Band
MIC EQ
MIC1,2
MIC1/2 in
LINK in
Return in
Send out
Post CHx Fader
TalkOver ON/OFF
MIX (REC OUT)
Master_CUE
MIC_Out
MIC
MIC_Out
Cross Fader B
Cross Fader A
BPM Detect Master
Level meter Master
CH1-4 COMMON
CH1-4 COMMON
MIC1,2 COMMON
Digital Trim
CHx _CUE
Link_CUE
BPM Detect CF A
BPM Detect CF B
BPM Detect MIC
Send/
Return
CF A
BEAT
EFFECT
MIC
Send/
Return
MIC
BEAT
EFFECT
CF B
Send/
Return
CF B
Cross
Fader
BEAT
EFFECT
Master
Talk
Over
Master
CUE
Talk
Over
Level
Talk Over
Mode
Advanced
/Normal
Master
Mono/
STEREO
Send/
Return
Master
Master
Balance
Master
Balance
Master
Level
HP Level
Booth
Level
SEL
MIC Output
to Booth Monitor
On/Off SW
Booth Out
REC out
USB Common out
Digital out
Master
H.P. out
CHx_CUE
Effect_CUE
Link_CUE
CHx Control Tone
Post CHx Fader
Cross Fader A
Cross Fader B
MIC
MIX (REC OUT)
Master_CUE
Boost
Boost
ATT
Mono Split/
Stereo
SWITCH
& MIXING
Mixer
Audio
Output
Select
MIC
FILTER
MIC In
Level
detect
TalkOver ON/OFF
MIC 1,2
MIX
Off
On
TalkOver
MIC1
MIC2
LANDigital MASTER
RETURN
CH_1_Digital/USB1/2
PHONES
MASTER
BOOTH
REC
SEND
USB1/2
USB3/4
USB5/6
USB7/8
DSP
MIC
ADC
ETHER SW IC
I/Fcom
USB
I/Fcom
Ether
DAC
DAC
PHONES
LAN
MASTER 1
REC
DAC
SEND
MUTE
DAC
BOOTH
MUTE
DAC
MUTE
MASTER 2
MUTE
DIGITAL
MASTER
SRC
DIT
MIC1 LEVEL
MIC2 LEVEL
CH1_Analog
ADC
CD/LINE
PHONO
DIGITAL
ADC
DIR
CH1
TRIM
Control Tone
ADC
CD/LINE
PHONO
DIGITAL
ADC
DIR
CH2
TRIM
Control Tone
ADC
CD/LINE
PHONO
DIGITAL
ADC
DIR
CH3
TRIM
Control Tone
ADC
CD/LINE
PHONO
DIGITAL
ADC
DIR
CH4
TRIM
Control Tone
CH2_Analog
CH3_Analog
CH4_Analog
SRC
SRC
SRC
SRC
RETURN
CH_2_Digital/USB3/4
CH_3_Digital/USB5/6
CH_4_Digital/USB7/8
USB
CH1 Digital IN
Control Tone
Control Tone
Control Tone
Control Tone
CH2 Digital IN
CH3 Digital IN
CH4 Digital IN
CH1 USB1/2 IN
CH1 USB1/2 OUT
CH2 USB3/4 IN
CH3 USB5/6 IN
CH4 USB7/8 IN
CH2 USB3/4 OUT
CH3 USB5/6 OUT
CH4 USB7/8 OUT
SRC
SRC
SRC
SRC
USB
Type B
BEAT
EFFECT
CF A
ADC
BEAT
EFFECT
Processing
SOUND
COLOR
EFFECT
CHx
28
En
Acquiring the manual
The operating instructions may be in a file in PDF format. Adobe
®
Reader
®
must
be installed to read files in PDF format. If you do not have Adobe Reader, please
install it from the download link on the CD-ROM’s menu screen.
Downloading the latest versions of the
operating instructions and the Quick Start
Guide - Serato DJ Edition
1 Insert the CD-ROM into the computer’s CD drive.
The CD-ROM menu is displayed.
If the CD-ROM’s menu does not appear when the CD-ROM is inserted, perform the
operations below.
For Windows
From the [Start] menu – [Computer] (or [My Computer]), open the CD drive
and double-click the [CD_menu.exe] icon.
For Mac OS X
In Finder, double-click the [CD_menu.app] icon directly.
2 When the CD-ROM’s menu is displayed, select [DJM-
900SRT: Download the Operating Instructions (PDF file)], then
click [Start].
3 “An internet environment is required to access the site.
Connected to the internet?” is displayed. Click [Yes].
The web browser is launched and the Pioneer DJ support site is displayed.
http://pioneerdj.com/support/
4 On the Pioneer DJ support site, click “Manuals” under
“DJM-900SRT”.
5 From the download page, click the language for the
documents you require.
Downloading of the operating instructions/Quick Start Guide - Serato DJ Edition
starts.
Downloading the Serato DJ software manual
1 Insert the CD-ROM into the computer’s CD drive.
The CD-ROM menu is displayed.
If the CD-ROM’s menu does not appear when the CD-ROM is inserted, perform the
operations below.
For Windows
From the [Start] menu – [Computer] (or [My Computer]), open the CD drive
and double-click the [CD_menu.exe] icon.
For Mac OS X
In Finder, double-click the [CD_menu.app] icon directly.
2 When the CD-ROM’s menu is displayed, select [Serato DJ:
Download the Software Manual (PDF file)], then click [Start].
3 “An internet environment is required to access the site.
Connected to the internet?” is displayed. Click [Yes].
The web browser is launched and the Pioneer DJ support site is displayed.
4 Click [Software Info] under [DJM-900SRT] on the Pioneer DJ
support site.
[Serato DJ Support Information] is displayed.
5 Click the link to the Serato DJ download page.
The Serato DJ download page is displayed.
http://serato.com/
6 Log in to your “Serato.com” user account.
Input the e-mail address and password you have registered to log in to “Serato.com”.
7 From “More Downloads” on the right side of the download
page, click “Serato DJ x.x User Manual”.
Downloading of the Serato DJ software manual starts.
About trademarks and registered
trademarks
Pioneer and rekordbox are trademarks or registered trademarks of the PIONEER
CORPORATION.
Microsoft, Windows and Windows Vista are either registered trademarks or
trademarks of Microsoft Corporation in the United States and/or other countries.
Apple, Macintosh and Mac OS are trademarks of Apple Inc., registered in the
U.S. and other countries.
ASIO is a trademark of Steinberg Media Technologies GmbH.
Serato DJ is a registered trademark of Serato Audio Research Ltd., registered in
the U.S. and other countries.
The names of companies and products mentioned herein are the trademarks of their
respective owners.
29
Specifications
General
Power requirements ....................................................... AC 110 V to 240 V, 50 Hz/60 Hz
Power consumption ...................................................................................................41 W
Power consumption (standby) .................................................................................0.4 W
Main unit weight ...................................................................................................... 7.1 kg
Max. external dimensions .......331 mm (width) x 107.9 mm (height) x 404 mm (depth)
Tolerable operating temperature ........................................................... +5 °C to +35 °C
Tolerable operating humidity ..........................................5 % to 85 % (no condensation)
Nous vous remercions d’avoir acquis un produit Pioneer. Veuillez lire attentivement ce mode d’emploi afin de connaître la manière d’utiliser l’appareil comme il convient. Cela
fait, conservez le mode d’emploi de façon à pouvoir vous y référer en cas de nécessité.
Dans certains pays ou certaines régions, la forme de la fiche et de la prise d’alimentation est un peu différente de ce qui est montré dans les illustrations. Toutefois, l’appareil
se raccorde et fonctionne de la même façon.
AVERTISSEMENT
Cet appareil n’est pas étanche. Pour éviter les risques
d’incendie et de décharge électrique, ne placez près de
lui un récipient rempli d’eau, tel qu’un vase ou un pot
de fleurs, et ne l’exposez pas à des gouttes d’eau, des
éclaboussures, de la pluie ou de l’humidité.
D3-4-2-1-3_A1_Fr
AVERTISSEMENT
Pour éviter les risques d’incendie, ne placez aucune
flamme nue (telle qu’une bougie allumée) sur
l’appareil.
D3-4-2-1-7a_A1_Fr
PRÉCAUTION DE VENTILATION
Lors de l’installation de l’appareil, veillez à laisser un
espace suffisant autour de ses parois de manière à
améliorer la dissipation de chaleur (au moins 5 cm à
l’arrière et 3 cm de chaque côté).
AVERTISSEMENT
Les fentes et ouvertures du coffret sont prévues pour la
ventilation, pour assurer un fonctionnement stable de
l’appareil et pour éviter sa surchauffe. Pour éviter les
risques d’incendie, ne bouchez jamais les ouvertures et
ne les recouvrez pas d’objets, tels que journaux, nappes
ou rideaux, et n’utilisez pas l’appareil posé sur un tapis
épais ou un lit.
D3-4-2-1-7b*_A1_Fr
Milieu de fonctionnement
Température et humidité du milieu de fonctionnement :
De +5 °C à +35 °C (de +41 °F à +95 °F) ; Humidité
relative inférieure à 85 % (orifices de ventilation non
obstrués)
N’installez pas l’appareil dans un endroit mal ventilé ou
un lieu soumis à une forte humidité ou en plein soleil
(ou à une forte lumière artificielle).
D3-4-2-1-7c*_A1_Fr
ATTENTION
L’interrupteur POWER de cet appareil ne coupe pas
complètement celui-ci de sa prise secteur. Comme le
cordon d’alimentation fait office de dispositif de
déconnexion du secteur, il devra être débranché au
niveau de la prise secteur pour que l’appareil soit
complètement hors tension. Par conséquent, veillez à
installer l’appareil de telle manière que son cordon
d’alimentation puisse être facilement débranché de
la prise secteur en cas d’accident. Pour éviter tout
risque d’incendie, le cordon d’alimentation sera
débranché au niveau de la prise secteur si vous
prévoyez une période prolongée de non utilisation
(par exemple avant un départ en vacances).
D3-4-2-2-2a*_A1_Fr
NOTE IMPORTANTE SUR LE CABLE
D’ALIMENTATION
Tenir le câble d’alimentation par la fiche. Ne pas
débrancher la prise en tirant sur le câble et ne pas
toucher le câble avec les mains mouillées. Cela risque
de provoquer un court-circuit ou un choc électrique. Ne
pas poser l’appareil ou un meuble sur le câble. Ne pas
pincer le câble. Ne pas faire de noeud avec le câble ou
l’attacher à d’autres câbles. Les câbles d’alimentation
doivent être posés de façon à ne pas être écrasés. Un
câble abîmé peut provoquer un risque d’incendie ou un
choc électrique. Vérifier le câble d’alimentation de
temps en temps. Contacter le service après-vente
PIONEER le plus proche ou le revendeur pour un
remplacement.
S002*_A1_Fr
Si vous souhaitez vous débarrasser de cet appareil, ne le mettez pas à la poubelle avec vos ordures ménagères. Il existe un système de
collecte séparé pour les appareils électroniques usagés, qui doivent être récupérés, traités et recyclés conformément à la législation.
Les habitants des états membres de l’UE, de Suisse et de Norvège peuvent retourner gratuitement leurs appareils électroniques usagés aux
centres de collecte agréés ou à un détaillant (si vous rachetez un appareil similaire neuf).
Dans les pays qui ne sont pas mentionnés ci-dessus, veuillez contacter les autorités locales pour savoir comment vous pouvez vous débarrasser
de vos appareils.
Vous garantirez ainsi que les appareils dont vous vous débarrassez sont correctement récupérés, traités et recyclés et préviendrez de cette façon
les impacts néfastes possibles sur l’environnement et la santé humaine.
K058b_A1_Fr
ATTENTION
POUR ÉVITER TOUT RISQUE D’ÉLECTROCUTION, NE
PAS ENLEVER LE COUVERCLE (NI LE PANNEAU
ARRIÈRE). AUCUNE PIÈCE RÉPARABLE PAR
L’UTILISATEUR NE SE TROUVE À L’INTÉRIEUR.
CONFIER TOUT ENTRETIEN À UN PERSONNEL
QUALIFIÉ UNIQUEMENT.
D3-4-2-1-1_B1_Fr
AVERTISSEMENT
Gardez les pièces de petite taille hors de la portée des
bébés et des enfants. En cas d’ingestion accidentelle,
veuillez contacter immédiatement un médecin.
D41-6-4_A1_Fr
3
Fr
Sommaire
Pour ceux qui utilisent Serato DJ pour la première fois avec cet
appareil
Reportez-vous au “Guide de démarrage rapide - Édition Serato DJ” pour effectuer
les réglages initiaux nécessaires à l’utilisation du CONTROL CD ou CONTROL
VINYL pour utiliser Serato DJ. Le “Guide de démarrage rapide - Édition Serato DJ”
peut être téléchargé depuis le site de support DJ de Pioneer
(http://pioneerdj.com/support/). Pour les instructions relatives au téléchargement,
reportez- vous à Téléchargement des dernières versions du mode d’emploi et du
Guide de démarrage rapide - Édition Serato DJ dans ce manuel (p.27).
Pour les utilisateurs du CONTROL VINYL
Si vous utilisez le CONTROL VINYL, utilisez un magasin qui vend des produits
Serato DJ ou un magasin en ligne tel que Serato (http://serato.com/).
Comment lire ce manuel
Prière de lire ce manuel et le “Guide de démarrage rapide – Édition Serato DJ”. Ces
deux documents contiennent des informations importantes que vous devez com-
prendre avant d’utiliser ce produit.
Pour les instructions sur l’acquisition du manuel du logiciel Serato DJ, reportez-
vous à Obtention du manuel (p.27).
Ce manuel contient essentiellement les descriptions des fonctions de l’appareil
proprement dit. Pour les instructions détaillées sur le fonctionnement du logiciel
Serato DJ, reportez-vous au manuel du logiciel Serato DJ et au “Guide de démar-
rage rapide – Édition Serato DJ”.
Le manuel du logiciel Serato DJ peut être téléchargé de “Serato.com”. Pour le
détail, reportez-vous à Téléchargement du manuel du logiciel Serato DJ (p. 27).
La dernière version des instructions d’emploi (ce manuel) et du “Guide de
démarrage rapide – Édition Serato DJ” peut être téléchargée du site de sup-
port de Pioneer. Pour plus de détails, reportez-vous à Téléchargement des
dernières versions du mode d’emploi et du Guide de démarrage rapide - Édition
Serato DJ (p.27).
Dans ce manuel, les noms de canaux et de touches indiqués sur le produit, les
noms de menus dans le logiciel, etc. sont indiqués entre crochets ([ ]). (ex. canal
[MASTER], menu [ON/OFF], menu [File])
Veuillez noter que les écrans et les caractéristiques techniques du logiciel décrit
dans ce manuel, ainsi que l’aspect externe et les caractéristiques techniques
du matériel sont en cours de développement de sorte que les caractéristiques
finales peuvent être différentes.
Veuillez noter que selon la version du système d’exploitation, les réglages du
navigateur web, etc., le fonctionnement peut être différent des marches à suivre
Chinois simplifié, Chinois traditionnel, Coréen et Japonais
Les personnes qui utilisent des systèmes d’exploitation dans d’autres langues
doivent suivre les instructions à l’écran et sélectionner [English (anglais)].
Marche à suivre (Windows)
Lisez attentivement Précautions à prendre lors de l’installation avant d’installer le
pilote.
Pour installer ou désinstaller le pilote, vous devez avoir l’autorisation de l’admi-
nistrateur de votre ordinateur. Connectez-vous comme administrateur de votre
ordinateur avant de procéder à l’installation.
1 Insérez le CD-ROM fourni dans le lecteur CD de l’ordinateur.
Le menu du CD-ROM apparaît.
Si le menu du CD-ROM n’apparaît pas après l’insertion du CD-ROM, double-cli-
quez sur le lecteur CD à partir du menu [Démarrer] – [Ordinateur] (ou [Poste
de travail]).
2 Sur le menu qui apparaît, sélectionnez [Installer le Logiciel
de pilotage], puis cliquez sur [Demarrer].
3 “Télécharger la toute dernière version ? Une connexion
internet est nécessaire pour pouvoir accéder au site.”
apparaît. Cliquez sur [Oui].
Le navigateur web démarre et le site de support DJ de Pioneer apparaît.
4 Cliquez sur [Software Download] dans [DJM-900SRT] sur le
site de support DJ de Pioneer.
5 Cliquez sur [Driver Software].
6 Depuis la page de téléchargement, téléchargez le pilote
pour Windows (DJM-900SRT_X.XXX.exe).
7 Double-cliquez sur le fichier téléchargé.
L’écran d’installation du pilote apparaît.
8 Lisez attentivement le Accord de licence du logiciel, puis
cochez [D'accord.] et cliquez sur [OK] si vous en acceptez les
conditions.
Si vous n’acceptez pas les conditions de l’Accord de licence du logiciel, cliquez sur
[Annuler] et arrêtez l’installation.
9 Procédez à l’installation en suivant les instructions qui
apparaissent à l’écran.
Si [Sécurité de Windows] apparaît à l’écran au cours de l’installation, cliquez sur
[Installer ce pilote quand même] et continuez l’installation.
Installation sur Windows XP
Si [Installation matérielle] apparaît à l’écran au cours de l’installation, cliquez
sur [Continuer] et continuez l’installation.
Lorsque le programme d’installation est terminé, le message Installation termi-
née apparaît.
Marche à suivre (Mac OS X)
Lisez attentivement Précautions à prendre lors de l’installation avant d’installer le
pilote.
Pour installer ou désinstaller le pilote, vous devez avoir l’autorisation de l’admi-
nistrateur de votre ordinateur. Ayez à disposition le nom et le mot de passe de
l’administrateur de votre ordinateur.
1 Insérez le CD-ROM fourni dans le lecteur CD de l’ordinateur.
Le dossier du CD-ROM apparaît.
Double-cliquez sur l’icône du CD sur le bureau si les dossiers n’apparaissent
pas après l’insertion du CD-ROM.
2 Double-cliquez sur [CD_menu.app].
3 Sur le menu qui apparaît, sélectionnez [Installer le Logiciel
de pilotage], puis cliquez sur [Demarrer].
4 “Télécharger la toute dernière version ? Une connexion
internet est nécessaire pour pouvoir accéder au site.”
apparaît. Cliquez sur [Oui].
Le navigateur web démarre et le site de support DJ de Pioneer apparaît.
5 Cliquez sur [Software Download] dans [DJM-900SRT] sur le
site de support DJ de Pioneer.
6 Cliquez sur [Driver Software].
7 Depuis la page de téléchargement, téléchargez le pilote
pour Mac OS (DJM-900SRT_M_X.X.X.dmg).
8 Double-cliquez sur le fichier téléchargé.
L’écran du menu [DJM-900SRT_AudioDriver] apparaît.
9 Double-cliquez sur [DJM-900SRT_AudioDriver.pkg].
L’écran d’installation du pilote apparaît.
10 Vérifiez les détails sur l’écran et cliquez sur [Continuer].
11 Lorsque l’écran du contrat de licence apparaît, lisez
Accord de licence du logiciel attentivement, puis cliquez sur
[Continuer].
12 Si vous acceptez les conditions du Accord de licence du
logiciel, cliquez sur [D'accord.].
Si vous n’acceptez pas les conditions de l’Accord de licence du logiciel, cliquez sur
[N'accepte pas] et arrêtez l’installation.
13 Procédez à l’installation en suivant les instructions qui
apparaissent à l’écran.
Cliquez sur [Annuler] pour annuler l’installation lorsqu’elle a démarré.
Installation du logiciel Serato DJ
Serato DJ est une application logicielle DJ de Serato. En reliant l’ordinateur sur
lequel ce logiciel est installé à cet appareil, il est possible d’effectuer des perfor-
mances DJ.
Reportez-vous au “Guide de démarrage rapide - Édition Serato DJ” pour effectuer
les réglages initiaux nécessaires à l’utilisation du CONTROL CD ou CONTROL
VINYL pour utiliser Serato DJ. Le “Guide de démarrage rapide - Édition Serato DJ”
peut être téléchargé depuis le site de support DJ de Pioneer
(http://pioneerdj.com/support/). Pour les instructions relatives au téléchargement,
reportez- vous à Téléchargement des dernières versions du mode d’emploi et du
Guide de démarrage rapide - Édition Serato DJ dans ce manuel (p.27).
Pour la toute dernière version du logiciel Serato DJ, accédez à Serato.com et télé-
chargez le logiciel de ce site. Vous trouverez aussi un lien pour le téléchargement
du logiciel sur le CD-ROM fourni.
Veuillez noter que les écrans et les spécifications de logiciel utilisés dans ce
manuel sont en cours d’élaboration et peuvent être différents des spécifications
définitives.
Pour les instructions sur le fonctionnement du logiciel Serato DJ, reportez-vous au
manuel du logiciel Serato DJ.
Le manuel du logiciel Serato DJ peut être téléchargé de “Serato.com”. Pour
plus de détails, reportez-vous à Téléchargement du manuel du logiciel Serato DJ
(p.27).
Environnement fonctionnel minimal
Systèmes d’exploitation pris en
charge
Processeur et mémoire requise
Mac OS X : 10.6.8, 10.7.4 et 10.8
Version à 32
bits
Processeur Intel
®
Core™ 2 Duo 2,0 GHz ou
plus
1 Go ou plus de RAM
Version à 64
bits
Processeur Intel
®
, Core™ 2 Duo 2,4 GHz ou
plus
4 Go ou plus de RAM
7
Fr
Français
Systèmes d’exploitation pris en
charge
Processeur et mémoire requise
Windows : Windows 7
Version à 32
bits
Processeur Intel
®
, Core™ 2 Duo 2,0 GHz ou
plus
2 Go ou plus de RAM
Version à 64
bits
Processeur Intel
®
, Core™ 2 Duo 2,4 GHz ou
plus
4 Go ou plus de RAM
Divers
Port USB
Un port USB 2.0 est indispensable pour raccorder cet ordinateur
à cet appareil.
Résolution de l’écranRésolution de 1 280 x 720 ou plus
Connexion Internet
Une connexion Internet est nécessaire pour l’enregistrement du
compte utilisateur sur “Serato.com” et pour le téléchargement
du logiciel.
Pour les toutes dernières informations sur l’environnement opérationnel et la compatibilité
ainsi que pour acquérir le tout dernier système d’exploitation, reportez-vous à “Software
Info” dans “DJM-900SRT” sur le site de support DJ de Pioneer ci-dessous :
http://pioneerdj.com/support/
Le fonctionnement sur tous les ordinateurs n’est pas garanti, même lorsque les conditions de
fonctionnement mentionnées ci-dessus sont remplies.
Selon les réglages d’économie d’énergie de l’ordinateur, etc. la capacité de traitement du
processeur et du disque dur peut être insuffisante. Lorsque vous utilisez Serato DJ, assurez-
vous que l’ordinateur est en état de fournir sa performance optimale (par exemple en laissant
le cordon d’alimentation raccordé), surtout s’il s’agit d’un ordinateur portable.
L’emploi d’Internet exige la signature d’un contrat séparé avec un fournisseur de services
Internet et le paiement de droits.
Marche à suivre (Windows)
Ne raccordez cet appareil et l’ordinateur que lorsque l’installation est terminée.
Connectez-vous sous le nom de l’utilisateur spécifié comme administrateur de
l’ordinateur avant l’installation.
Si des programmes sont ouverts sur l’ordinateur, fermez-les.
1 Insérez le CD-ROM dans le lecteur CD de l’ordinateur.
Le menu du CD-ROM apparaît.
Si le menu du CD-ROM n’apparaît pas après l’insertion du CD-ROM, ouvrez
le lecteur CD dans [Ordinateur (ou Poste de travail)] à partir du menu
[Démarrer], puis double-cliquez sur l’icône [CD_menu.exe].
2 Lorsque le menu du CD-ROM apparaît, sélectionnez
[Télécharger le logiciel Serato DJ.], puis cliquez sur [Demarrer].
Pour fermer le menu du CD-ROM, cliquez sur [Quitter].
3 “Une connexion internet est nécessaire pour pouvoir
accéder au site. Connecté à internet ?” apparaît. Cliquez sur
[Oui].
Le navigateur web démarre et le site de support DJ de Pioneer apparaît.
4 Cliquez sur [Software Info] dans [DJM-900SRT] sur le site de
support DJ de Pioneer.
[Serato DJ Support Information] apparaît.
5 Cliquez sur le lien vers la page de téléchargement de Serato
DJ.
La page de téléchargement de [Serato DJ] apparaît.
6 Connectez-vous à votre compte utilisateur sur “Serato.
com”.
Si vous possédez déjà un compte utilisateur sur “Serato.com”, passez au
point 8.
Si vous ne possédez pas déjà un compte utilisateur, procédez de la façon
suivante.
—Suivez les instructions à l’écran, saisissez votre adresse de messagerie et
le mot de passe souhaité, puis sélectionnez votre région de résidence.
—Si vous cochez [E-mail me Serato newsletters], Serato vous enverra
des newsletters avec les toutes dernières informations sur les produits
Serato.
—Lorsque l’enregistrement du compte utilisateur est terminé, vous rece-
vrez un message à l’adresse de messagerie indiquée. Vérifiez le contenu
du message envoyé par “Serato.com”.
Veillez à ne pas oublier l’adresse de messagerie et le mot de passe spécifiés
lors de votre enregistrement. Ils seront nécessaires pour la mise à jour du
logiciel.
Les informations personnelles entrées lors de l’enregistrement d’un nouveau
compte utilisateur peuvent être collectées, traitées et utilisées selon les
règles de la politique de confidentialité consultables sur le site Serato.
7 Cliquez sur le lien dans le message envoyé par “Serato.
com”.
Ceci vous conduit à la page de téléchargement de Serato DJ. Passez au point 9.
8 Connectez-vous.
Saisissez l’adresse de messagerie et le mot de passe enregistrés pour la connexion
à “Serato.com”.
9 Téléchargez le logiciel Serato DJ de la page de
téléchargement.
Décompressez le fichier téléchargé, puis double-cliquez sur le fichier décompressé
pour démarrer l’installateur.
10 Lisez attentivement les termes du contrat de licence et, si
vous acceptez, sélectionnez [I agree to the license terms and
conditions] puis cliquez sur [Install].
Si vous n’acceptez pas le contenu du contrat d’utilisation, cliquez sur [Close]
pour annuler l’installation.
L’installation commence.
Lorsqu’elle est terminée, le message d’installation réussie apparaît.
11 Cliquez sur [Close] pour fermer l’installateur Serato DJ.
Marche à suivre (Mac OS X)
Ne raccordez cet appareil et l’ordinateur que lorsque l’installation est terminée.
Si des programmes sont ouverts sur l’ordinateur, fermez-les.
1 Insérez le CD-ROM dans le lecteur CD de l’ordinateur.
Le menu du CD-ROM apparaît.
Double-cliquez sur l’icône du CD sur le bureau si les dossiers n’apparaissent
pas après l’insertion du CD-ROM.
2 Double-cliquez sur [CD_menu.app].
3 Sélectionnez [Télécharger le logiciel Serato DJ.] dans le
menu du CD-ROM, puis cliquez sur [Demarrer].
4 “Une connexion internet est nécessaire pour pouvoir
accéder au site. Connecté à internet ?” apparaît. Cliquez sur
[Oui].
Le navigateur web démarre et le site de support DJ de Pioneer apparaît.
5 Cliquez sur [Software Info] dans [DJM-900SRT] sur le site de
support DJ de Pioneer.
[Serato DJ Support Information] apparaît.
6 Cliquez sur le lien vers la page de téléchargement de Serato
DJ.
La page de téléchargement de [Serato DJ] apparaît.
7 Connectez-vous à votre compte utilisateur sur “Serato.
com”.
Si vous possédez déjà un compte utilisateur sur “Serato.com”, passez au
point 8.
Si vous ne possédez pas déjà un compte utilisateur, procédez de la façon
suivante.
8
Fr
—Suivez les instructions à l’écran, saisissez votre adresse de messagerie et
le mot de passe souhaité, puis sélectionnez votre région de résidence.
—Si vous cochez [E-mail me Serato newsletters], Serato vous enverra
des newsletters avec les toutes dernières informations sur les produits
Serato.
—Lorsque l’enregistrement du compte utilisateur est terminé, vous rece-
vrez un message à l’adresse de messagerie indiquée. Vérifiez le contenu
du message envoyé par “Serato.com”.
Veillez à ne pas oublier l’adresse de messagerie et le mot de passe spécifiés
lors de votre enregistrement. Ils seront nécessaires pour la mise à jour du
logiciel.
Les informations personnelles entrées lors de l’enregistrement d’un nouveau
compte utilisateur peuvent être collectées, traitées et utilisées selon les
règles de la politique de confidentialité consultables sur le site Serato.
8 Cliquez sur le lien dans le message envoyé par “Serato.
com”.
Ceci vous conduit à la page de téléchargement de Serato DJ. Passez au point 9.
9 Connectez-vous.
Saisissez l’adresse de messagerie et le mot de passe enregistrés pour la connexion
à “Serato.com”.
10 Téléchargez le logiciel Serato DJ de la page de
téléchargement.
Décompressez le fichier téléchargé, puis double-cliquez sur le fichier décompressé
pour démarrer l’installateur.
11 Lisez attentivement les termes du contrat de licence et, si
vous acceptez, cliquez sur [Agree].
Si vous n’acceptez pas le contenu du contrat d’utilisation, cliquez sur
[Disagree] pour annuler l’installation.
12 Si l’écran suivant apparaît, tirez et déposez l’icône [Serato
DJ] dans l’icône de dossier [Applications].
9
Fr
Français
Raccordements
Veillez à toujours éteindre les appareils et à débrancher le cordon d’alimentation de la prise secteur avant de raccorder un appareil ou de changer les liaisons.
Lorsque tous les appareils ont été raccordés, vous pouvez brancher le cordon d’alimentation.
Veillez à utiliser le cordon d’alimentation fourni.
Reportez-vous au mode d’emploi de l’appareil devant être raccordé.
Lorsque vous établissez un DVS (Système Vinyle Numérique) comprenant un ordinateur, une interface audio, etc., faites attention au raccordement de l’interface audio
aux prises d’entrée de cet appareil et aux réglages des sélecteurs d’entrée.
Reportez-vous aussi au mode d’emploi du logiciel DJ et de l’interface audio.
Panneau arrière
OFF
RETURN
L
L
L
1 GND
2 HOT
3 COLD
L
R
L
L
IN
CH3
CH4
CH1CH2
R
R
R
R
L
R
R
PHONOPHONOPHONO
CH 4CH 3
CD/LINE
L
R
PHONO
CH 1
CD/LINE
SIGNAL GNDSIGNAL GND
TRS
CD/LINE
MASTER1MASTER2
REC OUT
BOOTH
MIC2
MIDI OUT
DIGITAL
MASTER
OUT
LINK
L
R
CH 2
CD/LINE
(MONO)
LR
(MONO)
SEND
POWER
AC IN
ON
134344343556782
deabh9cgf
1 Touche POWER (page 13)
Pour allumer et éteindre cet appareil.
2 Prises RETURN (page 10)
À raccorder à la prise de sortie d’un processeur d’effets externe. Lorsque le
canal [L (MONO)] seulement est raccordé, l’entrée du canal [L (MONO)] est
transmise simultanément au canal [R].
3 Prises PHONO (page 10)
Pour raccorder un appareil de type tourne-disque (cartouche phono MM). Ne
pas pourvoir des signaux de ligne.
Pour raccorder un dispositif aux prises [PHONO], retirez la fiche de court-circui-
tage insérée dans les prises.
Insérez la fiche de court-circuitage dans les prises [PHONO] si rien ne leur est
raccordé pour couper le bruit externe.
4 Prises CD/LINE (page 10)
Pour raccorder un lecteur DJ ou un appareil avec sortie niveau ligne.
5 Prise SIGNAL GND (page 10)
Pour raccorder le fil de terre d’un lecteur analogique. Ceci permet de réduire le
bruit lorsqu’un lecteur analogique est raccordé.
6 Prise MIC2 (page 10)
Pour raccorder un microphone.
7 Prise MIDI OUT (page 10)
À raccorder à la prise MIDI IN d’un séquenceur MIDI externe.
8 Fente de sécurité Kensington
9 Prise DIGITAL IN (page 10)
Ces prises doivent être reliées aux prises de sortie coaxiales numériques des lec-
teurs DJ, etc. Le son peut être momentanément interrompu lorsque la fréquence
d’échantillonnage des signaux de sortie est changée.
a Prise DIGITAL MASTER OUT (page 10)
Transmet les signaux audio du canal principal.
b Prise LINK (page 10)
Ces prises doivent être reliées aux prises LINK des lecteurs DJ Pioneer ou aux
ports LAN d’ordinateurs sur lesquels rekordbox est installé (PRO DJ LINK).
Pour raccorder plusieurs dispositifs, utilisez un concentrateur-commutateur (en
vente dans le commerce).
Utilisez un concentrateur-commutateur compatible 100Base-TX. Certains
concentrateurs-commutateurs peuvent ne pas fonctionner correctement.
c Prises BOOTH (page 10)
Ce sont des prises de sortie pour la surveillance en cabine.
d Prises REC OUT (page 10)
Ce sont des prises de sortie pour l’enregistrement.
e Prises MASTER2 (page 10)
À raccorder à un amplificateur de puissance, etc.
f Prises MASTER1 (page 10)
À raccorder à un amplificateur de puissance, etc.
Elles doivent être utilisées comme sorties équilibrées. Attention de ne pas
insérer le cordon d’alimentation d’un autre appareil par erreur.
g Prises SEND (page 10)
À raccorder à la prise d’entrée d’un processeur d’effets externe. Lorsque le
canal [L (MONO)] seulement est raccordé, un signal audio monophonique est
transmis.
h AC IN
À relier à une prise d’alimentation avec le cordon d’alimentation fourni. Avant de
brancher le cordon d’alimentation, assurez-vous que tous les autres appareils
sont raccordés.
Veillez à utiliser le cordon d’alimentation fourni.
AVERTISSEMENT
Rangez les fiches de court-circuitage hors de portée des enfants et bébés. Si une
fiche devait être avalée accidentellement, contactez immédiatement un médecin.
10
Fr
Raccordement des prises d’entrée
Lorsque vous établissez un DVS (Système Vinyle Numérique) comprenant un ordinateur, une interface audio, etc., faites attention au raccordement de l’interface audio
aux prises d’entrée de cet appareil et aux réglages des sélecteurs d’entrée.
Reportez-vous aussi au mode d’emploi du logiciel DJ et de l’interface audio.
1Pour le détail sur PRO DJ LINK, reportez-vous à la page 14, À propos de PRO DJ LINK.
2Pour lancer la lecture par le fader avec PRO DJ LINK, raccordez un câble LAN (page 15).
Raccordement des prises de sortie
OFF
RETURN
L
L
L
1 GND
2 HOT
3 COLD
L
R
L
L
IN
CH3
CH4
CH1CH2
R
R
R
R
L
R
R
PHONO
CH 4CH 3
CD/LINE
L
R
PHONO
CH 1
CD/LINE
SIGNAL GNDSIGNAL GND
TRS
CD/LINEPHONO
MASTER1MASTER2
REC OUT
BOOTH
MIC2
MIDI OUT
DIGITAL
MASTER
OUT
LINK
L
R
CH 2
CD/LINEPHONO
(MONO)
LR
(MONO)
SEND
POWER
AC IN
ON
L
R
L
R
Amplificateur de
puissance
2
À la prise
électrique
Appareil audio
numérique
Amplificateur de
puissance (pour le
contrôle en cabine)
Générateur d’effets
externe
1
Séquence MIDI
Platine à cassette, etc.
(enregistreur à entrée
analogique)
Amplificateur de
puissance
2
3
1Raccordez aussi le générateur d’effets externe à la prise [RETURN] (prise d’entrée).
2Veillez à utiliser les prises [MASTER1] seulement pour une sortie symétrique. Le raccordement à une entrée asymétrique (par exemple RCA) avec un câble de conversion
XLR à RCA (ou un adaptateur), etc. peut réduire la qualité du son et/ou produire du bruit.
Pour le raccordement à une entrée asymétrique (par exemple RCA), utilisez les prises [MASTER2].
3Attention de ne pas insérer le cordon d’alimentation d’un autre appareil par erreur dans la prise [MASTER1].
11
Fr
Français
Raccordement au panneau de commande
B
ATHRU
MASTER
0
MIXING
LEVEL
PHONES
CUE
LEVEL
DIGITAL
CD/ LINEPHO
HI
MIC 1
MIC 2
0
0
TRIM
OVER
10
7
4
2
1
0
MICUSB
MIC1
Veillez à utiliser le câble USB
fourni pour le raccordement.
Casques d’écoute
Microphones
Ordinateurs
1
2
3
4
1 Prise MIC1 (page 14)
Pour raccorder un microphone.
2 Prise USB (page 11)
Raccordez l’ordinateur.
3 Indicateur de liaison USB
S’éclaire lorsque des signaux sont échangés avec l’ordinateur.
4 Prise PHONES (page 13)
Pour raccorder un casque d’écoute.
Raccordement de cet appareil à un
ordinateur
Pour les instructions sur le fonctionnement avec Serato DJ, reportez-vous au
“Guide de démarrage rapide – Édition Serato DJ”. Pour plus de détails, reportez-
vous à Téléchargement des dernières versions du mode d’emploi et du Guide de
démarrage rapide - Édition Serato DJ (p.27).
1 Raccordez cet appareil à votre ordinateur avec un câble
USB.
Cet appareil est un dispositif audio conforme aux normes ASIO.
Cette opération ne fonctionne pas avec les ordinateurs ne prenant pas en
charge l’USB 2.0.
Lorsque des applications compatibles ASIO sont utilisées, [USB DECK 3], [USB
DECK 1], [USB DECK 2] et [USB DECK 4] peuvent être utilisées comme entrées.
Lorsque des applications compatibles DirectX sont utilisées, seule [USB DECK
3] peut être utilisé comme entrée.
L’environnement opérationnel recommandé pour l’ordinateur dépend de l’appli-
cation DJ. Veillez à vérifier l’environnement opérationnel recommandé pour
l’application DJ que vous utilisez.
Si un autre appareil audio USB est raccordé en même temps à l’ordinateur, il
peut ne pas fonctionner ou ne pas être reconnu normalement.
Il est conseillé de raccorder seulement l’ordinateur et cet appareil.
L’ordinateur et cet appareil devraient être raccordés directement au port USB de
cet appareil.
2 Appuyez sur la touche [POWER].
Allumez cet appareil.
Pour Windows
—Le message [Installation du pilote logiciel de périphérique] peut appa-
raître la première fois que cet appareil est raccordé à l’ordinateur ou lorsqu’il
est raccordé à un autre port USB de l’ordinateur. Attendez un instant que le
message [Vos périphériques sont prêts à être utilisés.] apparaisse.
Installation sur Windows XP
— [Autorisez-vous Windows à se connecter à Windows Update pour
rechercher des mise à jour ?] peut apparaître au cours de l’installation.
Sélectionnez [Non, pas pour cette fois] et cliquez sur [Suivant] pour conti-
nuer l’installation.
— [Quelle tâche voulez-vous que l'Assistant exécute ?] peut apparaître au
cours de l’installation. Sélectionnez [Installer le logiciel automatiquement
(recommandé)] et cliquez sur [Suivant] pour continuer l’installation.
— Si [Sécurité de Windows] apparaît à l’écran au cours de l’installation,
cliquez sur [Installer ce pilote quand même] et continuez l’installation.
12
Fr
Fonctionnement
Panneau de commande
USB
DECK
3
USB
DECK
1
USB
DECK
2
USB
DECK
4
LEVEL
DIGITAL
CD/ LINEPHONO
HI
MIC 1
MIC 2
HI
LOW
EQ
EQ /
1212
1212
0
0
ON
TALK
OVER
OFF
SPACE
NOISE
CUE
CUE
CUE
CRUSHFILTER
DUB
ECHO
GATE/
COMP
1
234
BATHRU
TRIM
9
6
-
26
/
MID
6
-
26
/
LOW
6
-
26
/
COLOR
ISO
OVER
10
10
9
8
7
6
5
4
3
2
1
7
4
2
1
-
1
-
2
-
3
-
5
-
7
-
10
-
15
-
24
dB
0
HILOW
TRIM
DIGITAL
CD/ LINEPHONO
HI
EQ /
CUE
BATHRU
9
6
-
26
/
MID
6
-
26
/
LOW
6
-
26
/
COLOR
ISO
OVER
10
7
4
2
1
-
1
-
2
-
3
-
5
-
7
-
10
-
15
-
24
dB
0
HILOW
CUE
TRIM
DIGITAL
CD/ LINEPHONO
HI
EQ /
CUE
BATHRU
9
6
-
26
/
MID
6
-
26
/
LOW
6
-
26
/
COLOR
ISO
OVER
10
10
9
8
7
6
5
4
3
2
1
7
4
2
1
-
1
-
2
-
3
-
5
-
7
-
10
-
15
-
24
dB
0
HILOW
TRIM
DIGITAL
CD/ LINEPHONO
HI
EQ /
CUE
BATHRU
MONOSTEREO
9
6
-
26
/
MID
6
-
26
/
LOW
6
-
26
/
COLOR
ISO
OVER
10
10
9
8
7
6
5
4
3
2
1
000
7
4
2
1
-
1
-
2
-
3
-
5
-
7
-
10
-
15
-
24
dB
dBRL
0
OVER
10
7
4
2
1
-
1
-
2
-
3
-
5
-
7
-
10
-
15
-
24
0
HILOW
EQISOLATOR
AB
CROSS FADER ASSIGN
LEVEL
POWER
BALANCE
0
AUTO
GRID
TA P
AUTO
/ TAP
BPM
%
ms
CH SELECT
START
/STOP
RL
WAKE UP
PARAMETER
1234
MICMST
AB
TIME
MAX
LEVEL / DEPTH
ON/ OFF
MIN
MICMASTERMIDI
BEAT EFFECTS
BEAT
TAP
LINK
SOUND COLOR FX
HEADPHONES
FADER START
STEREO
MASTER
0
MIXING
LEVEL
BOOTH MONITOR
EQ CURVE
CH FADER
CROSS FADER
PHONES
CUE
MONO SPLIT
USB
MIC1
QUAN-
TIZE
MASTER
CF.B
CF.A
MIC
4
3
2
1
0
ON/OFFLFO FORM
UTILITY
X
-
PAD
ROBOT
REVERB
PHASER
SLIP ROLL
ROLL
FLANGER
FILTER
REV ROLL
SND/ RTN
MELODICTRANS
ECHO
SPIRAL
MIDI LFO
DELAY
1
2
4
6
8
9
a
u
w
z
6
B
C
D
E
F
A
t
y
s
5
7
3
v
x
e
j
d
f
g
6
h
i
c
l
666
k
m
n
o
p
q
r
6
e
d
f
g
h
i
c
e
d
f
g
h
i
c
e
d
f
g
h
i
c
bbbb
1 Commande MIC1 LEVEL (page 14)
Ajuste le niveau du son provenant du canal [MIC1].
2 Commande MIC2 LEVEL (page 14)
Ajuste le niveau du son provenant du canal [MIC2].
3 Commandes EQ (HI, LOW) (page 14)
Ajustent la qualité du timbre des canaux [MIC1] et [MIC2].
4 Sélecteur OFF, ON, TALK OVER (page 14)
Allume/éteint le microphone.
5 Touches SOUND COLOR FX (page 15)
Mettent en ou hors service les effets SOUND COLOR FX.
6 Touche CUE (page 13)
La(les) touche(s) [CUE] du(des) canal(canaux) que vous voulez surveiller doi(ven)
t être pressée(s).
7 Touches FADER START (1, 2, 3, 4) (page 15)
Mettent en/hors service la fonction de lancement par le fader.
8 Sélecteur MONO SPLIT, STEREO (page 13)
Change la façon dont le son de contrôle provenant du casque d’écoute est
réparti.
9 Commande MIXING (page 13)
Ajuste la balance du volume du son des canaux pour lesquels la touche [CUE]
est pressée et le son du canal [MASTER].
a Commande LEVEL (page 13)
Ajuste le niveau du son provenant du casque d’écoute.
b Indicateur d’entrée audio USB
S’éclaire lorsque le son de l’ordinateur est transmis aux divers canaux.
c Sélecteurs d’entrée (page 13)
Sélectionne la source d’entrée de chaque canal parmi les composants raccor-
dés à cet appareil.
d Commande TRIM (page 13)
Règle le niveau des signaux audio présents à l’entrée de chaque canal.
e Commandes EQ/ISO (HI, MID, LOW) (page 13)
Ajustent la qualité du son des différents canaux.
13
Fr
Français
f Indicateur de niveau de canal (page 13)
Indique le niveau sonore des différents canaux avant de passer par les faders de
canaux.
g Commande COLOR (page 15)
Change les paramètres de SOUND COLOR FX des différents canaux.
h Fader de canal (page 13)
Règle le niveau des signaux audio présents à la sortie de chaque canal.
i Sélecteur CROSS FADER ASSIGN (A, THRU, B) (page 13)
Règle la destination du signal de chaque canal sur [A] ou [B].
j Crossfader (page 13)
Restitue les signaux audio affectés par le commutateur d’affectation de
crossfader correspondant aux caractéristiques de la courbe sélectionnée par
[CROSS FADER] (Sélecteur de courbe de crossfader).
k Commande MASTER LEVEL (page 13)
Ajuste le niveau du son provenant des prises [MASTER1] et [MASTER2].
l Indicateur de niveau principal (page 13)
Affiche le niveau du son provenant des prises [MASTER1] et [MASTER2].
m Commande BALANCE (page 14)
Ajuste la balance gauche/droite du son présent à la sortie des prises
[MASTER1], etc.
n Sélecteur MONO, STEREO (page 14)
Commute le son présent à la sortie des prises [MASTER1], etc., entre mono et
stéréo.
o Commande BOOTH MONITOR (page 14)
Règle le niveau des signaux audio présents en sortie à la prise [BOOTH].
p Sélecteur EQ CURVE (ISOLATOR, EQ) (page 13)
Commute la fonction des commandes [EQ/ISO (HI, MID, LOW)].
q Sélecteur CH FADER (, , ) (page 14)
Commute les caractéristiques de la courbe du fader de canal.
r Sélecteur CROSS FADER (, , ) (page 14)
Les caractéristiques de la courbe du crossfader changent.
s Touche ON/OFF (UTILITY)
—ON/OFF : Met la fonction MIDI en/hors service (page 16).
—LFO FORM : Lorsque [MIDI LFO] est sélectionné dans BEAT EFFECT, la
forme d’onde du signal MIDI change chaque fois que la touche est pressée
(page 20).
—WAKE UP : Annule le mode de veille automatique.
v Écran de l’appareil principal
w X-PAD (page 16)
Ajuste le paramètre quantitatif de la fonction BEAT EFFECT.
x Touches BEAT , (page 15)
Spécifient la fraction de temps utilisée pour synchroniser le son auquel l’effet
est appliqué.
y Touche TAP (ENTER)
—TAP : Lorsque le mode de mesure du BPM est réglé sur [TAP], le BPM est
spécifié en tapant du doigt sur la touche (page 15).
—ENTER : Sert à changer les réglages de cet appareil (page 23).
z Touche QUANTIZE
Lorsque la fonction QUANTIZE est activée pour BEAT EFFECT, l’effet est appliqué
au son sans perte de tempo pour la plage en cours de lecture. (page 14).
A Touche AUTO/TAP (page 15)
Commute le mode de mesure du BPM.
B Sélecteur d’effet calé sur le tempo (page 15)
Commute le type d’effet BEAT EFFECT.
C Sélecteur de canal d’effet (page 15)
Commute le canal auquel le BEAT EFFECT doit être appliqué.
D Commande TIME (page 15)
Ajuste le paramètre temporel de BEAT EFFECT.
E Commande LEVEL/DEPTH (page 15)
Ajuste le paramètre quantitatif de BEAT EFFECT.
F Touche ON/OFF (page 15)
Met en/hors service la fonction BEAT EFFECT.
N’exercez pas de force excessive lorsque vous tirez les boutons de fader de canal
et de crossfader. Les boutons ont une structure qui ne permet pas de les détacher
facilement. L’appareil peut être endommagé par une force excessive.
Opérations de base
Restitution du son
1 Appuyez sur la touche [POWER].
Allumez cet appareil.
2 Commutez les sélecteurs d’entrée.
Sélectionnez parmi les dispositifs raccordés à cet appareil les sources d’entrée
prévues pour les différents canaux.
— [DIGITAL] : Sélectionne le lecteur DJ raccordé aux prises [DIGITAL].
— [PHONO] : Sélectionne le lecteur analogique raccordé aux prises [PHONO].
— [CD/LINE] : Sélectionne la platine à cassette ou le lecteur CD raccordé aux
prises [CD/LINE].
— [USB] : Sélectionne le son de l’ordinateur raccordé au port [USB].
3 Tournez la commande [TRIM].
Règle le niveau des signaux audio présents à l’entrée de chaque canal.
L’indicateur de niveau du canal approprié s’allume lorsque des signaux audio sont
transmis correctement à ce canal.
4 Poussez le fader de canal loin de vous.
Règle le niveau des signaux audio présents à la sortie de chaque canal.
5 Commutez le sélecteur [CROSS FADER ASSIGN (A, THRU,
B)].
Commute la destination de la sortie de chaque canal.
— [A]: Affectation à [A] (gauche) du crossfader.
— [B]: Affectation à [B] (droite) du crossfader.
— [THRU] : Cette touche doit être sélectionnée si le crossfader ne doit pas être
utilisé. (Les signaux ne passent pas par le crossfader.)
6 Réglez le crossfader.
Cette opération est inutile si le sélecteur [CROSS FADER ASSIGN (A, THRU, B)] est
réglé sur [THRU].
7 Tournez la commande [MASTER LEVEL].
Les signaux audio sont restitués par les prises [MASTER1] et [MASTER2].
L’indicateur de niveau principal s’allume.
Réglage de la qualité du son
1 Commutez le sélecteur [EQ CURVE (ISOLATOR, EQ)].
— [ISOLATOR] : Fonctionne comme isolateur.
— [EQ] : La fonction d’égalisation est spécifiée.
2 Tournez les commandes [EQ/ISO (HI, MID, LOW)] des
différents canaux.
Les plages de réglage des différentes commandes sont indiquées ci-dessous.
—HI: –26 dB à +6 dB (13 kHz)
—MID: –26 dB à +6 dB (1 kHz)
—LOW: –26 dB à +6 dB (70 Hz)
Contrôle du son par un casque
1 Raccordez le casque à la prise [PHONES].
2 Appuyez sur la(les) touche(s) [CUE] du(des) canal(canaux)
que vous voulez surveiller.
3 Commutez le sélecteur [MONO SPLIT, STEREO].
— [MONO SPLIT] : Le son des canaux pour lesquels la touche [CUE] est
pressée provient du canal gauche du casque d’écoute tandis que le son de
[MASTER] provient du canal droit.
— [STEREO] : Le son des canaux pour lesquels la touche [CUE] est pressée
provient du casque d’écoute et est restitué en stéréo.
4 Tournez la commande [MIXING].
Ajuste la balance du volume du son des canaux pour lesquels la touche [CUE] est
pressée et le son du canal [MASTER].
14
Fr
5 Tournez la commande [LEVEL] de [HEADPHONES].
Le son des canaux pour lesquels la touche [CUE] est pressée provient du casque
d’écoute.
Le contrôle s’annule par une nouvelle pression sur la touche [CUE] de casque.
Commutation de la courbe du fader
䢢Sélectionnez les caractéristiques de la courbe du fader
de canal
Commutez le sélecteur [CH FADER (, , )].
— [] : La courbe s’élève subitement à l’arrière.
— [] : Une des courbes précédente et suivante est spécifiée.
— [] : La courbe s’élève graduellement (le son augmente graduellement
lorsque le fader de canal s’éloigne de l’avant).
䢢Sélectionnez les caractéristiques de la courbe du
crossfader
Commutez le sélecteur [CROSS FADER (, , )].
— []: Courbe croissant rapidement (quand le crossfader est éloigné du côté
[A], les signaux audio sortent immédiatement du côté [B]).
— []: Courbe se situant entre les deux courbes précédente et suivante.
— []: Courbe croissant graduellement (quand le crossfader est éloigné du
côté [A], le son du côté [B] augmente graduellement tandis que le son du
côté [A] diminue graduellement).
Utilisation d’un microphone
1 Raccordez un microphone à la prise [MIC1] ou [MIC2].
2 Réglez le sélecteur [OFF, ON, TALK OVER] sur [ON] ou
[TALK OVER].
— [ON] : L’indicateur s’éclaire.
— [TALK OVER] : L’indicateur clignote.
Lorsque [TALK OVER] est spécifié, le son des canaux autres que le canal [MIC]
est atténué de 18 dB (défaut) si un son de –10 dB ou plus est transmis au
microphone.
Le niveau d’atténuation du son [TALK OVER] peut être changé dans
[USER SETUP]. Pour les instructions sur le réglage, reportez-vous à la page 23,
Changement des réglages.
Il est possible de basculer sur le mode normal ou le mode avancé de la fonc-
tion talk over. Pour les instructions à ce sujet, reportez-vous à la page 23,
Changement des réglages.
3 Tournez la commande [MIC1 LEVEL] ou [MIC2 LEVEL].
Ajustez le niveau du son provenant du canal [MIC].
Attention, car une rotation jusqu’à la position extrême droite produit un son très
fort.
4 Fournissez des signaux audio au microphone.
䢢Réglage de la qualité du son
Tournez les commandes [EQ (HI, LOW)] des canaux [MIC].
Les plages de réglage des différentes commandes sont indiquées ci-dessous.
—HI: –12 dB à +12 dB (10 kHz)
—LOW: –12 dB à +12 dB (100 Hz)
Commutation du son entre mono et stéréo
Permet de commuter le son provenant des prises [MASTER1], [MASTER2],
[BOOTH], [REC OUT], [PHONES], [DIGITAL MASTER OUT] et [USB] entre une
restitution en monophonie et en stéréophonie.
Pour régler le son à la sortie des prises [USB], sélectionnez [MIX (REC OUT)]
dans [Mixer Audio Output] de l’utilitaire de réglage.
Commutez le sélecteur [MONO, STEREO].
— [MONO] : Le son est en mono.
— [STEREO] : Le son est en stéréo.
䢢Réglage de la balance G/D du son
La balance gauche/droite du son provenant des prises [MASTER1], [MASTER2],
[BOOTH], [REC OUT], [PHONES], [DIGITAL MASTER OUT] et [USB] peut être
ajustée.
Pour régler le son à la sortie des prises [USB], sélectionnez [MIX (REC OUT)]
dans [Mixer Audio Output] de l’utilitaire de réglage.
1 Réglez le sélecteur [MONO, STEREO] sur [STEREO].
2 Tournez la commande [BALANCE].
La balance gauche/droite du son change selon le sens de rotation de la commande
[BALANCE] et selon sa position.
La voie droite d’un son stéréo est restituée lorsque la commande est tournée
complètement vers la droite. La voie gauche d’un son stéréo est restituée
lorsque la commande est tournée complètement vers la gauche.
Le son est restitué par la prise [BOOTH]
Tournez la commande [BOOTH MONITOR].
Règle le niveau des signaux audio présents en sortie à la prise [BOOTH].
Opérations avancées
Utilisation des fonctions prises en charge par
Serato DJ
Lorsque cet appareil et un ordinateur sur lequel Serato DJ est installé sont reliés par
un câble USB, les fonctions suivantes peuvent être utilisées.
䢢QUANTIZE
Lorsque des morceaux analysés avec Serato DJ sont utilisés, ils se mettent au
rythme même si la touche [BEAT EFFECTS] [ON/OFF] est pressée ou le [X-PAD] est
touché approximativement.
䢢FADER START
La lecture des morceaux dans Serato DJ peut être lancée par le fader de cet appareil
(Lancement de la lecture par le fader).
À propos de PRO DJ LINK
Lorsqu’un lecteur DJ Pioneer compatible PRO DJ LINK (par ex. CDJ-2000nexus,
CDJ-2000, CDJ-900), un ordinateur sur lequel rekordbox est installé et cet appareil
sont reliés par un câble LAN, les fonctions PRO DJ LINK suivantes peuvent être
utilisées.
Pour de plus amples informations sur la fonction PRO DJ LINK, reportez-vous aussi
au mode d’emploi du lecteur DJ et au mode d’emploi de rekordbox.
Pour les instructions sur le raccordement, reportez-vous à la page 10, Raccordement
des prises d’entrée.
Lorsqu’un concentrateur-commutateur est utilisé, 4 lecteurs DJ et 2 ordinateurs
au maximum peuvent être raccordés.
Utilisez un concentrateur-commutateur compatible 100Base-TX. Certains
concentrateurs-commutateurs peuvent ne pas fonctionner correctement.
Réglez le numéro du lecteur DJ sur le même numéro que le canal auquel le
câble audio est raccordé.
䢢QUANTIZE
Lorsqu’un morceau analysé avec rekordbox est utilisé, le morceau est mis au temps
même lorsque la touche [ON/OFF] de [BEAT EFFECTS] est pressée ou le [X-PAD]
est touché grossièrement.
䢢FADER START
La lecture sur le lecteur DJ peut être lancée par le fader de cet appareil (Lancement
de la lecture par le fader).
䢢LINK MONITOR
Avec cette fonction, les fichiers de musique rekordbox enregistrés sur l’ordinateur
peuvent rapidement être contrôlés par le casque d’écoute.
䢢STATUS INFORMATION
Cette fonction indique aux lecteurs DJ l’état du canal raccordé (l’état d’émission, le
numéro de canal, etc.).
Utilisation de la fonction QUANTIZE
Les effets peuvent être appliqués au son au rythme du morceau en cours de lec-
ture selon les informations de GRID des morceaux analysés avec Serato DJ ou
rekordbox.
Pour utiliser la fonction QUANTIZE avec PRO DJ LINK, raccordez cet appareil à un
lecteur DJ Pioneer compatible PRO DJ LINK. Pour les instructions sur le raccorde-
ment, reportez-vous à la page 10, Raccordement des prises d’entrée.
15
Fr
Français
En outre, les fichiers de musique doivent d’abord être analysés avec rekordbox pour
que la fonction QUANTIZE puisse être utilisée. Pour les instructions sur l’analyse
de fichiers de musique avec rekordbox, reportez-vous aussi au mode d’emploi de
rekordbox.
Lors de l’utilisation avec CDJ-2000nexus, réactualisez le microprogramme à la
version 1.02 ou à une version ultérieure.
Pour l’utiliser avec CDJ-2000 ou CDJ-900, réactualisez le microprogramme à la
version 4.0 ou à une version ultérieure.
1 Appuyez sur la touche [QUANTIZE].
La fonction QUANTIZE est activée.
[GRID] s’éclaire dans l’afficheur principal de cet appareil lorsque les informations
de GRID ont été reçues correctement de Serato DJ ou du lecteur DJ et la fonction
QUANTIZE peut être utilisée. [GRID] clignote si les informations de GRID n’ont pas
été reçues correctement.
Selon l’état de lecture de Serato DJ ou du lecteur DJ (hors antenne, scratching,
lecture arrière, etc.), il peut être impossible de recevoir les informations de GRID.
2 Appuyez sur la touche [ON/OFF] de [BEAT EFFECTS] ou
touchez le [X-PAD].
L’effet s’ajoute au son au tempo du morceau en cours de lecture.
La fonction QUANTIZE se désactive par une nouvelle pression sur la touche
[QUANTIZE].
Utilisation de la fonction FADER START
Lorsque cet appareil est relié par un câble USB à un ordinateur sur lequel Serato
DJ est installé, la lecture des morceaux dans Serato DJ et d’autres opérations de ce
type peuvent être lancées par le fader de cet appareil.
Raccordez d’abord cet appareil à un ordinateur sur lequel Serato DJ est installé.
De même, lorsque cet appareil est raccordé à un lecteur DJ Pioneer par un câble
LAN, le lancement de la lecture sur le lecteur DJ et d’autres opérations de ce type
peuvent être lancées par le fader de cet appareil.
Raccordez le lecteur DJ Pioneer et cet appareil au préalable. Pour les instructions
sur le raccordement, reportez-vous à la page 10, Raccordement des prises d’entrée.
Pour le réglage de numéros des lecteurs DJ Pioneer, reportez-vous à la page 14, À
propos de PRO DJ LINK.
Le lancement par le fader peut être activé et désactivé pour l’ensemble des lecteurs
DJ. Pour la marche à suivre, reportez-vous à la page 23, Changement des réglages.
La fonction FADER START ne peut pas être utilisée si Serato DJ est réglé sur le
mode Absolute quand on essaie d’effectuer un contrôle DVS. Si vous appuyez
sur une des touches [FADER START (1, 2, 3, 4)] quand le mode Absolute est
spécifié, cette touche clignote puis s’éteint.
䢢Lancer la lecture en utilisant le fader de canal
1 Réglez le sélecteur [CROSS FADER ASSIGN (A, THRU, B)] sur
[THRU].
2 Appuyez sur une des touches [FADER START (1, 2, 3, 4)].
Sélectionnez le canal concerné par le lancement par le fader.
Pour Serato DJ
— Touche [Fader Start 1] : Sélectionne [DECK 3].
— Touche [Fader Start 2] : Sélectionne [DECK 1].
— Touche [Fader Start 3] : Sélectionne [DECK 2].
— Touche [Fader Start 4] : Sélectionne [DECK 4].
3 Réglez le fader de canal à la position la plus proche de
vous.
4 Spécifiez un repère dans Serato DJ ou sur le lecteur DJ.
Le morceau localise le point de repère et se met en pause.
5 Poussez le fader de canal loin de vous.
La lecture du morceau dans Serato DJ ou du lecteur DJ commence.
Si vous ramenez le fader de canal à la position originale, le lecteur revient ins-
tantanément au point de repère déjà spécifié et interrompt la lecture (repère
arrière).
䢢Lancer la lecture en utilisant le crossfader
1 Réglez le sélecteur [CROSS FADER ASSIGN (A, THRU, B)] sur
[A] ou [B].
2 Appuyez sur une des touches [FADER START (1, 2, 3, 4)].
Sélectionnez le canal concerné par le lancement par le fader.
Pour Serato DJ
— Touche [Fader Start 1] : Sélectionne [DECK 3].
— Touche [Fader Start 2] : Sélectionne [DECK 1].
— Touche [Fader Start 3] : Sélectionne [DECK 2].
— Touche [Fader Start 4] : Sélectionne [DECK 4].
3 Réglez le crossfader.
Réglez-le sur le côté opposé à celui sur lequel est réglé le canal que vous voulez
utiliser pour le lancement au fader.
4 Spécifiez un repère dans Serato DJ ou sur le lecteur DJ.
Le morceau localise le point de repère et se met en pause.
5 Réglez le crossfader.
La lecture du morceau dans Serato DJ ou du lecteur DJ commence.
Si vous ramenez le crossfader à la position originale, le lecteur revient instanta-
nément au point de repère déjà spécifié et interrompt la lecture (repère arrière).
Utilisation de la fonction LINK MONITOR
Vérifiez [Utiliser la fonction « LINK MONITOR » de table de mixage DJ
Pioneer.] sous [Fichier] > [Préférences] > [Audio] dans rekordbox au préa-
lable. Reportez-vous aussi au mode d’emploi de rekordbox.
1 Raccordez le casque à la prise [PHONES].
2 Raccordez un ordinateur sur lequel rekordbox est installé.
Pour les instructions sur le raccordement, reportez-vous à la page 10, Raccordement
des prises d’entrée.
3 Sélection du morceau devant être contrôlé avec rekordbox.
4 Appuyez sur la touche [CUE] de [LINK].
Le morceau sélectionné avec rekordbox est restitué par le casque d’écoute.
Le contrôle s’annule par une nouvelle pression sur la touche [CUE] de casque.
La même opération que dans Contrôle du son par un casque (étapes 3 à 5) peut
être effectuée.
Utilisation de la fonction SOUND COLOR FX
Ces effets changent en association avec la rotation de la commande [COLOR].
1 Appuyez sur une des touches de sélection
[SOUND COLOR FX].
Le type d’effet est sélectionné.
La touche sur laquelle une pression a été exercée clignote.
Même si une des touches de sélection [SOUND COLOR FX] est déjà sélection-
née, lorsqu’une autre touche est sélectionnée et pressée, cette touche reste
sélectionnée.
Pour les types d’effets, reportez-vous à la page 18, Types d’effets SOUND COLOR
FX.
Le même effet est spécifié pour les canaux [CH1] à [CH4].
2 Tournez la commande [COLOR].
L’effet est appliqué à ou aux canaux correspondant aux commandes sur lesquelles
une pression a été exercée.
䢢Annulation de l’effet SOUND COLOR FX
Appuyez sur la touche de sélection [SOUND COLOR FX]
clignotante.
L’effet est annulé.
Utilisation de la fonction BEAT EFFECT
Cette fonction permet de régler instantanément divers effets en fonction du tempo
(BPM = Battements par minute) du morceau en cours de lecture.
Écran de l’appareil principal
1
2
3
7
9
a
5
4
6
8
AUTO
GRID
TAPBPM
%
ms
CH SELECT
PARAMETER
1234
MICMST
AB
1
Section d’affi-
chage des effets
Le nom de l’effet sélectionné est affiché.
2
Section d’affi-
chage des canaux
sélectionnés
Le nom du canal auquel l’effet est appliqué est affiché.
16
Fr
3
AUTO (TAP)
[AUTO] s’éclaire lorsque le mode auto est spécifié comme mode
de mesure BPM.
[TAP] s’éclaire en mode de saisie manuelle.
4
Indication de la
valeur du BPM (3
chiffres)
En mode auto, la valeur du BPM détectée automatiquement est
indiquée.
Lorsque le BPM ne peut pas être détecté, la valeur du BPM détecté
antérieurement est indiquée et clignote.
En mode de saisie manuelle, la valeur du BPM saisie manuellement
est indiquée.
5
GRID
S’éclaire lorsque Serato DJ est ouvert et la fonction QUANTIZE peut
être utilisée. S’éclaire aussi lors de la lecture d’un morceau analysé
avec rekordbox et lorsque la fonction QUANTIZE peut être utilisée
en combinaison avec le lecteur DJ. Il clignote ou reste éteint
lorsque la fonction QUANTIZE ne peut pas être utilisée.
6
BPM
Cette indication reste allumée.
7
Section
d’affichage des
paramètres
Cet affichage contient les paramètres spécifiés pour les différents
effets.
Lorsque la touche [BEAT, ] est pressée, la fraction de temps
correspondant est indiquée pendant 1 seconde.
Lorsqu’une valeur hors de la plage du paramètre est spécifiée
avec la touche [BEAT, ], la valeur ne change pas et l’affichage
clignote.
8
% (ms)Ces indications s’éclairent selon l’unité des différents effets.
9
Section d’affi-
chage des temps
S’éclaire en fonction de la position du numéro de temps
sélectionné.
a
Section d’affi-
chage tactile
S’éclaire lorsque le [X-PAD] est touché.
1 Appuyez sur la touche [AUTO/TAP].
Sélectionnez le mode de mesure du BPM.
— [AUTO] : Le BPM est automatiquement mesuré à l’entrée du signal audio. Le
mode [AUTO] est spécifié lorsque l’appareil est allumé.
— [TAP] : Le BPM est spécifié en tapant du doigt sur la touche [TAP].
La plage de mesure du BPM [AUTO] va de BPM = 70 à 180. Avec certains mor-
ceaux, il peut être impossible de mesurer correctement le BPM. Si le BPM ne
peut pas être mesuré correctement, la valeur du BPM clignote sur l’écran. Dans
ce cas, utilisez la touche [TAP] pour spécifier le BPM manuellement.
2 Tournez le sélecteur d’effet calé sur le tempo.
Cette touche sélectionne le type d’effet.
Pour les types d’effets, reportez-vous à la page 18, Types de BEAT EFFECT.
Pour utiliser [SND/RTN], reportez-vous à Utilisation du processeur d’effets
externe ci-dessous.
Pour utiliser [MIDI LFO], reportez-vous à la page 17, Utilisation de MIDI LFO.
3 Tournez le sélecteur de canal d’effet.
Cette touche sélectionne le canal auquel l’effet sera appliqué.
— [1] – [4] : L’effet est appliqué au son du canal approprié.
— [MIC] : L’effet est appliqué au son du canal [MIC].
— [CF.A], [CF.B] : L’effet est appliqué au son du côté [A] (gauche) ou [B] (droit)
du crossfader.
— [MASTER] : L’effet est appliqué au son du canal [MASTER].
Cette opération est inutile lorsque [MIDI LFO] est sélectionné.
4 Appuyez sur la touche [BEAT , ].
Spécifient la fraction de temps utilisée pour synchroniser le son auquel l’effet est
appliqué.
La durée de l’effet correspondant à la fraction de battement se règle
automatiquement.
5 Appuyez sur la touche [ON/OFF] de [BEAT EFFECTS].
L’effet est appliqué au son.
La durée de l’effet peut être ajustée par une rotation de la commande [TIME].
Le paramètre quantitatif de l’effet peut être ajusté par une rotation de la commande
[LEVEL/DEPTH].
La touche [ON/OFF] clignote lorsque l’effet est activé.
L’effet se désactive par une nouvelle pression sur la touche [ON/OFF].
䢢Saisie manuelle du BPM
Tapez au moins 2 fois sur la touche [TAP] au rythme du
battement (noires) du son reproduit.
La valeur moyenne de l’intervalle auquel la touche [TAP] est frappée par le doigt est
spécifiée comme BPM.
Lorsque le BPM est spécifié avec la touche [TAP], la fraction de temps se règle
sur [1/1], et la durée d’un temps (noire) est spécifiée comme durée pour l’effet.
Le BPM peut être spécifié manuellement en tournant la commande [TIME] tout
en tenant la touche [TAP] enfoncée.
Le BPM peut être réglé par incréments de 0,1 en appuyant simultanément sur
les touches [AUTO/TAP] et [TAP] et tournant la commande [TIME].
䢢Utilisation du processeur d’effets externe
1 Reliez cet appareil et le générateur d’effets externe.
Pour les instructions sur le raccordement, reportez-vous à la page 10, Raccordement
des prises de sortie.
2 Tournez le sélecteur d’effet calé sur le tempo.
Sélectionnez [SND/RTN (MIDI LFO)].
3 Tournez le sélecteur de canal d’effet.
Cette touche sélectionne le canal auquel l’effet sera appliqué.
4 Appuyez sur la touche [ON/OFF] de [BEAT EFFECTS].
Le son transitant par le générateur d’effets externe est restitué par le canal
[MASTER].
L’effet se désactive par une nouvelle pression sur la touche [ON/OFF].
Fonctionnement du [X-PAD]
Marche à
suivre
État de la touche [ON/OFF] de
[BEAT EFFECTS]
X-PAD
Effet
1
Désactivée (éclairée)
Relâchez K
Touchez
Désactivée K
Activée
2
Activée (clignotante)
Relâchez K
Touchez
Activée K Activée
䢢Marche à suivre 1
1 Effectuez les points 1 à 4 de la procédure Utilisation de la
fonction BEAT EFFECT.
2 Touchez le [X-PAD].
Le [X-PAD] met en et hors service l’effet et change le paramètre quantitatif.
Lorsque vous relâchez le doigt de [X-PAD], l’effet s’arrête.
Pour maintenir l’effet lorsque vous relâchez le doigt de [X-PAD], appuyez sur la
touche [ON/OFF] de [BEAT EFFECTS] tout en touchant le [X-PAD], puis relâchez
le doigt de [X-PAD].
䢢Marche à suivre 2
1 Effectuez les points 1 à 5 de la procédure Utilisation de la
fonction BEAT EFFECT.
2 Touchez le [X-PAD].
Le [X-PAD] change le paramètre quantitatif de l’effet.
Fonctionnement du logiciel DJ avec la fonction
MIDI
Cet appareil fournit les informations concernant le fonctionnement des touches et
des commandes dans le format universel MIDI.
Lorsqu’il est raccordé par un câble USB à un ordinateur sur lequel un logiciel DJ
compatible MIDI est installé, le logiciel DJ peut être utilisé depuis cet appareil.
Installez le logiciel DJ au préalable sur votre ordinateur. Effectuez aussi les réglages
audio et MIDI pour le logiciel DJ.
Pour les instructions sur le réglage du canal MIDI, reportez-vous à la page 23,
Changement des réglages.
Pour les messages fournis par cet appareil, reportez-vous à la page 21, Tableau
des attributions MIDI.
1 Raccordez la prise [USB] de cet appareil à l’ordinateur.
Pour le détail sur les raccordements, reportez-vous à la page 11, Raccordement au
panneau de commande.
2 Lancez le logiciel DJ.
3 Appuyez sur la touche [ON/OFF (UTILITY)].
Mettez la fonction MIDI en service.
La transmission des messages MIDI commence.
Lorsqu’un fader ou une commande est bougé, un message correspond à la
nouvelle position est envoyé.
Lorsque la touche [START/STOP] est pressée et maintenue enfoncée plus de
2 secondes, un ensemble de messages MIDI correspondant aux positions des
touches, faders ou commandes est envoyé (Instantané).
Une nouvelle pression sur la touche [ON/OFF (UTILITY)] arrête l’envoi des mes-
sages MIDI.
L’horloge de synchronisation MIDI (infos de BPM) est envoyée quel que soit
l’état de la touche [ON/OFF (UTILITY)].
䢢Préparatifs avant d’utiliser la fonction MIDI LFO
Le logiciel, dispositif, etc. compatible MIDI (mentionné ci-dessous comme “côté
réception du signal MIDI”) doit être préparé (“appris”) pour pouvoir utiliser la fonc-
tion MIDI LFO.
Effectuez l’apprentissage sur le côté réception du signal MIDI.
Pour les messages fournis par cet appareil, reportez-vous à la page 21, Tableau
des attributions MIDI.
17
Fr
Français
1 Appuyez sur la touche [ON/OFF (UTILITY)].
Mettez la fonction MIDI en service.
2 Tournez le sélecteur d’effet calé sur le tempo.
Sélectionnez [SND/RTN (MIDI LFO)].
[S/RELFO] clignote sur la section d’affichage des effets, puis [SND/RTN] s’affiche.
3 Appuyez sur la touche [ON/OFF] de [BEAT EFFECTS].
Apprenez le message MIDI de la touche [ON/OFF] de [BEAT EFFECTS] du côté
réception du signal MIDI.
Le message MIDI envoyé par la touche [ON/OFF] de [BEAT EFFECTS] est diffé-
rent lorsque [SND/RTN (MIDI LFO)] est sélectionné et lorsqu’autre chose que
[SND/RTN (MIDI LFO)] est sélectionné.
Le message MIDI de la touche [ON/OFF] de [BEAT EFFECTS] lorsque [SND/RTN
(MIDI LFO)] est sélectionné n’est envoyé que lorsque l’opération est effectué
selon cette procédure.
4 Appuyez sur la touche [LFO FORM (WAKE UP)].
Apprenez le message MIDI de la touche [LFO FORM (WAKE UP)] du côté réception
du signal MIDI.
[1/7
] et [1/7LFO] apparaissent en alternance dans la section d’affichage des
effets.
Si nécessaire, réglez le mappage MIDI des autres touches et commandes.
Comme le message MIDI de la touche [LFO FORM (WAKE UP)] est envoyé
séquentiellement, selon les réglages du côté réception du signal MIDI, le mes-
sage MIDI peut ne pas être appris.
Pour régler le mappage MIDI d’autres touches et commandes, appuyez sur la
touche [LFO FORM(WAKE UP)] pour basculer sur [SND/RTN].
䢢Utilisation de MIDI LFO
Au préalable, faites les préparatifs mentionnés dans Préparatifs avant d’utiliser la
fonction MIDI LFO.
1 Tournez le sélecteur d’effet calé sur le tempo.
Sélectionnez [SND/RTN (MIDI LFO)].
[S/RELFO] clignote sur la section d’affichage des effets, puis [SND/RTN] s’affiche.
2 Appuyez sur la touche [LFO FORM (WAKE UP)].
La transmission des signaux MIDI commence.
Le motif de la forme d’onde du signal MIDI change à chaque pression sur la touche
[LFO FORM (WAKE UP)].
SND/RTN1/7 2/7 3/7
4/7 5/7 6/7 7/7
3 Appuyez sur la touche [BEAT , ].
Spécifiez la durée d’émission de la forme d’onde du signal MIDI.
4 Appuyez sur la touche [ON/OFF] de [BEAT EFFECTS] ou
touchez le [X-PAD].
Le message MIDI d’activation de l’effet est envoyé.
Lorsque la touche [LFO FORM (WAKE UP)] est pressée et un réglage de
[1/7] – [7/7] est sélectionné, le message MIDI des touches et
commandes suivantes peut être envoyé même lorsque le mode MIDI est hors
service.
— [X-PAD] (Touchez K Relâchez)
— Touche [CUE] de [BEAT EFFECTS]
—Sélecteur de canal d’effet
— Commande [LEVEL/DEPTH]
— Touche [ON/OFF] de [BEAT EFFECTS]
Lorsque la touche [LFO FORM (WAKE UP)] est pressée pour basculer entre
[SND/RTN] et [MIDI LFO], BEAT EFFECT se met automatiquement hors service.
Il n’est pas possible de basculer entre [SND/RTN] et [MIDI LFO] tout en tou-
chant le [X-PAD].
䢢Envoi de messages de démarrage MIDI et d’arrêt MIDI
Appuyez sur la touche [START/STOP] de [MIDI].
Les messages de mise en marche MIDI et d’arrêt MIDI sont envoyés en alter-
nance chaque fois que la touche [START/STOP] est pressée, que la fonction
MIDI soit en ou hors service.
Fonctionnement d’un séquenceur MIDI externe
Cet appareil fournit les informations concernant le fonctionnement des touches et
des commandes dans le format universel MIDI.
Cet appareil envoie le tempo de la source en cours de lecture (les informations
BPM) sous forme d’horloge de synchronisation MIDI. Il peut être utilisé pour syn-
chroniser un séquenceur MIDI externe sur le tempo de la source.
Pour les messages fournis par cet appareil, reportez-vous à la page 21, Tableau
des attributions MIDI.
Les séquenceurs MIDI externes ne prenant pas en charge les horloges de syn-
chronisation MIDI ne peuvent pas être synchronisés.
Les séquenceurs MIDI externes ne peuvent pas être synchronisés sur les
sources dont le BPM ne peut pas être mesuré de manière stable.
Les horloges de synchronisation MIDI sont fournies même si les valeurs du BPM
ont été spécifiées manuellement en tapant du doigt la touche [TAP]. La plage de
l’horloge de synchronisation MIDI va de 40 BPM à 250 BPM.
1 Raccordez la prise [MIDI OUT] à la prise MIDI IN du
séquenceur MIDI externe avec un câble MIDI du commerce.
2 Réglez le mode sync du séquenceur MIDI externe sur le
mode Slave.
3 Appuyez sur la touche [START/STOP] de [MIDI].
Le message de démarrage MIDI est envoyé.
4 Appuyez sur [ON/OFF] dans la section [MIDI].
La transmission des messages MIDI commence.
18
Fr
Types d’effets
Types d’effets SOUND COLOR FX
Nom de l’effetDescriptionsCommande [COLOR]
SPACE
Applique un effet de réverbération
au son original.
Rotation antihoraire : Applique
un effet de réverbération aux
médiums et graves.
Rotation horaire : Applique un effet
de réverbération aux médiums
et aigus.
DUB ECHO
Applique un effet d’écho, avec
un léger retard de son après le
son original émis plusieurs fois et
s’atténuant graduellement.
Rotation antihoraire : Applique
un effet d’écho aux médiums
seulement.
Rotation horaire : Applique un effet
d’écho aux aigus seulement.
GATE/COMP
Change la texture du son dans
son ensemble.
Rotation antihoraire : Un effet de
gate rend le son plus serré, avec
une impression de volume réduit.
Rotation horaire : Un effet de
compresseur rend le son plus
lourd, avec une impression de
volume accru.
NOISE
Du bruit blanc provenant de l’inté-
rieur de l’appareil est mixé au son
du canal via le filtre et émis.
Il est possible de régler le
volume en tournant les com-
mandes [TRIM] des canaux
respectifs. Il est possible
d’ajuster la qualité du son
en tournant les commandes
[EQ/ISO (HI, MID, LOW)].
Rotation antihoraire : La fréquence
de coupure du filtre par lequel
le bruit blanc passe diminue
graduellement.
Rotation horaire : La fréquence
de coupure du filtre par lequel
le bruit blanc passe augmente
graduellement.
CRUSH
Change le son original en un son
simulant un écrasement.
Rotation antihoraire : Augmente la
distorsion du son.
Rotation horaire : Le son est écrasé
avant de transiter par le filtre
passe-haut.
FILTER
Restitue le son ayant transité par
un filtre.
Rotation antihoraire : Réduit
graduellement la fréquence de
coupure du filtre passe-bas.
Rotation horaire : Augmente
graduellement la fréquence de
coupure du filtre passe-haut.
Types de BEAT EFFECT
DELAY
1
Un retard sonore est produit une fois selon la fraction de temps spécifiée avec les
touches [BEAT, ].
Lorsqu’un son avec un retard d’un 1/2 temps est ajouté, 4 temps deviennent 8
temps.
Original
(4 temps)
1/2 retard
(8 temps)
Touches BEAT, (paramètre
1)
Servent à spécifier un retard de 1/8 – 16/1 selon la durée d’un
temps du BPM.
Commande TIME (paramètre 2)
Sert à régler le retard.
1 à 4000 (ms)
Commande LEVEL/DEPTH
(paramètre 3)
Sert à régler la balance entre le son original et le son auquel le
retard est appliqué.
X-PAD (paramètre 4)Sert à régler le retard.
ECHO
1
2
Un retard sonore est produit plusieurs fois et graduellement selon la fraction de
temps spécifiée avec les touches [BEAT, ].
Avec des échos à 1/1 temps, les sons avec retard s’affaiblissent selon le tempo du
morceau même après la coupure du son entrant.
Coupure du son entrant
Temps
Fondu
1 temps
Touches BEAT, (paramètre
1)
Servent à spécifier un retard de 1/8 – 16/1 selon la durée d’un
temps du BPM.
Commande TIME (paramètre 2)
Sert à régler le retard.
1 à 4000 (ms)
Commande LEVEL/DEPTH
(paramètre 3)
Sert à régler la balance entre le son original et l’écho.
X-PAD (paramètre 4)Sert à régler le retard.
SPIRAL
1
2
Cette fonction ajoute un effet de réverbération au son entrant.
Lorsque le retard change, la hauteur du son change simultanément.
Coupure du son entrant
Temps
Fondu
1 temps
Touches BEAT, (paramètre
1)
Servent à spécifier un retard de 1/8 – 16/1 selon la durée d’un
temps du BPM.
Commande TIME (paramètre 2)
Sert à régler le retard.
10 à 4000 (ms)
Commande LEVEL/DEPTH
(paramètre 3)
Sert à régler la balance entre le son original et le son auquel
l’effet est appliqué et à régler les paramètres quantitatifs.
X-PAD (paramètre 4)Sert à régler le retard.
REVERB
1
2
Cette fonction ajoute un effet de réverbération au son entrant.
Niveau
Son direct
Premières réflexions
Réverbérations
1%
100%
Temps
Touches BEAT, (paramètre
1)
Servent à spécifier l’étendu de l’effet de réverbération, de
1 – 100 %.
Commande TIME (paramètre 2)
Sert à régler le degré de réverbération.
1 – 100 (%)
Commande LEVEL/DEPTH
(paramètre 3)
Régle la balance entre le son original et le son sur lequel l’effet
est appliqué.
X-PAD (paramètre 4)Régle la fréquence de coupure du filtre.
TRANS
1
Le son est coupé selon la fraction de temps spécifiée avec les touches [BEAT, ].
CoupureCoupure
1/1 temps
Temps
Touches BEAT, (paramètre
1)
Servent à spécifier une durée de coupure de 1/16 – 16/1 selon
la durée d’un temps du BPM.
Commande TIME (paramètre 2)
Sert à régler la durée de l’effet.
10 à 16000 (ms)
Commande LEVEL/DEPTH
(paramètre 3)
Régle la balance entre le son original et le son sur lequel l’effet
est appliqué.
X-PAD (paramètre 4)Sert à déterminer le temps de coupure.
FILTER
1
La fréquence de coupure du filtre change selon la fraction de temps spécifiée avec
les touches [BEAT, ].
Fréquence
Touches BEAT, (paramètre
1)
Servent à spécifier un temps de 1/4 – 64/1 pour le cycle de
déplacement de la fréquence de coupure selon la durée d’un
temps du BPM.
Commande TIME (paramètre 2)
Sert à déterminer le cycle selon lequel la fréquence de cou-
pure est déplacée.
10 à 32000 (ms)
19
Fr
Français
Commande LEVEL/DEPTH
(paramètre 3)
Plus la commande est tournée dans le sens horaire, plus l’effet
est marqué.
X-PAD (paramètre 4)
Le cycle selon lequel la fréquence de coupure se déplace
fluctue finement.
FLANGER
1
Un effet de flanger à 1 cycle est produit selon la fraction de temps spécifiée avec les
touches [BEAT, ].
Cycle
Temps
Bref retard
Touches BEAT, (paramètre
1)
Servent à spécifier la durée de l’effet de 1/4 – 64/1 selon la
durée d’un temps du BPM.
Commande TIME (paramètre 2)
Set à spécifier le cycle selon lequel l’effet de flanger se
déplace.
10 à 32000 (ms)
Commande LEVEL/DEPTH
(paramètre 3)
Plus la commande est tournée dans le sens horaire, plus l’effet
est marqué.
Lorsque la commande est entièrement tournée à gauche, le
son original seulement est émis.
X-PAD (paramètre 4)
Le cycle selon lequel l’effet de flanger se déplace fluctue
finement.
PHASER
1
L’effet de phaseur change selon la fraction de temps spécifiée avec les touches
[BEAT, ].
Cycle
Décalage de phase
Temps
Touches BEAT, (paramètre
1)
Servent à spécifier un temps de 1/4 – 64/1 pour le cycle de
déplacement de l’effet de phaseur selon la durée d’un temps
du BPM.
Commande TIME (paramètre 2)
Sert à déterminer le cycle selon lequel l’effet du déphaseur se
déplace.
10 à 32000 (ms)
Commande LEVEL/DEPTH
(paramètre 3)
Plus la commande est tournée dans le sens horaire, plus l’effet
est marqué.
Lorsque la commande est entièrement tournée à gauche, le
son original seulement est émis.
X-PAD (paramètre 4)
Le cycle selon lequel l’effet de phaseur se déplace fluctue
finement.
ROBOT
1
Le son original est changé en un son imitant celui produit par un robot.
Touches BEAT, (paramètre
1)
Sert à régler le degré de l’effet.
-100–100 (%)
Commande TIME (paramètre 2)
Sert à régler le degré de l’effet.
-100–100 (%)
Commande LEVEL/DEPTH
(paramètre 3)
Régle la balance entre le son original et le son sur lequel l’effet
est appliqué.
X-PAD (paramètre 4)Change le degré de l’effet sonore.
MELODIC
1
2
Les médiums du son entrant à l’endroit où la touche [ON/OFF] est pressée sont
enregistrés et le son enregistré est restitué selon le niveau du son entrant.
Touches BEAT, (paramètre
1)
Précise la manière selon laquelle le son enregistré est lu.
Commande TIME (paramètre 2)Précise la manière selon laquelle le son enregistré est lu.
Commande LEVEL/DEPTH
(paramètre 3)
Règle la balance entre le son original et le son enregistré.
X-PAD (paramètre 4)Précise la manière selon laquelle le son enregistré est lu.
SLIP ROLL
1
2
Le son présent au moment où la touche [ON/OFF] est pressée est enregistré, et le
son enregistré est reproduit de manière répétée selon la fraction de temps spécifiée
avec les touches [BEAT, ].
Lorsque la durée de l’effet change, le son entrant est de nouveau enregistré.
Répétition 1/1 Répétition 1/2
Original
Roulement
Passe de 1/2 à 1/1
Effet activé
Touches BEAT, (paramètre
1)
Servent à spécifier la durée de l’effet de 1/16 – 16/1 selon la
durée d’un temps du BPM.
Commande TIME (paramètre 2)
Sert à régler la durée de l’effet.
10 à 4000 (ms)
Commande LEVEL/DEPTH
(paramètre 3)
Sert à régler la balance entre le son original et ROLL.
X-PAD (paramètre 4)Sert à régler la durée de l’effet.
ROLL
1
2
Le son présent au moment où la touche [ON/OFF] est pressée est enregistré, et le
son enregistré est reproduit de manière répétée selon la fraction de temps spécifiée
avec les touches [BEAT, ].
Effet activé
Répété
Original
Roulement
1/1
Touches BEAT, (paramètre
1)
Servent à spécifier la durée de l’effet de 1/16 – 16/1 selon la
durée d’un temps du BPM.
Commande TIME (paramètre 2)
Sert à régler la durée de l’effet.
10 à 4000 (ms)
Commande LEVEL/DEPTH
(paramètre 3)
Sert à régler la balance entre le son original et ROLL.
X-PAD (paramètre 4)Sert à régler la durée de l’effet.
REV ROLL
1
2
Le son présent au moment où la touche [ON/OFF] est pressée est enregistré, et le
son enregistré est inversé puis reproduit de manière répétée selon la fraction de
temps spécifiée avec les touches [BEAT, ].
Effet activé
Inversé et répété
Original
1/1
roulement
inversé
Touches BEAT, (paramètre
1)
Servent à spécifier la durée de l’effet de 1/16 – 16/1 selon la
durée d’un temps du BPM.
Commande TIME (paramètre 2)
Sert à régler la durée de l’effet.
10 à 4000 (ms)
Commande LEVEL/DEPTH
(paramètre 3)
Sert à régler la balance entre le son original et ROLL.
X-PAD (paramètre 4)Sert à régler la durée de l’effet.
SND/RTN (MIDI LFO)
Raccordez un générateur d’effets externe, etc. ici.
La touche [LFO FORM (WAKE UP)] permet la commande du logiciel et des disposi-
tifs compatibles MIDI à l’aide des signaux MIDI.
䢢SND/RTN
1
Raccordez un générateur d’effets externe, etc. ici.
SEND
RETURN
Générateur d’effets
DJM-900SRT Serato DJ Edition
1212
1212
0
0
ON
TALK
OVER
OFF
9
6
-
26
/
6
-
26
/
6
-
26
/
9
6
-
26
/
6
-
26
/
6
-
26
/
9
6
-
26
/
6
-
26
/
6
-
26
/
9
6
-
26
/
6
-
26
/
6
-
26
/
0
20
Fr
Touches BEAT, (paramètre
1)
—
Commande TIME (paramètre 2)—
Commande LEVEL/DEPTH
(paramètre 3)
Sert à ajuster le niveau sonore à l’entrée de la prise [RETURN].
X-PAD (paramètre 4)—
䢢MIDI LFO
L’onde du signal MIDI (0 – 127) change selon le tempo du morceau.
Le motif de la forme d’onde du signal MIDI change à chaque pression sur la touche
[LFO FORM (WAKE UP)].
Touches BEAT, (paramètre
1)
Servent à régler la durée d’émission de la forme d’onde de 1/4
– 64/1 selon un temps du BPM.
Commande TIME (paramètre 2)Sert à régler la durée de sortie de la forme d’onde.
Commande LEVEL/DEPTH
(paramètre 3)
—
X-PAD (paramètre 4)Change le motif de la forme d’onde du signal MIDI.
Lorsque [MIDI LFO] est sélectionné, le son de la boîte à effets externe raccordée à la prise
[RETURN] n’entre pas.
1 Lorsque [CF.A], [CF.B] ou [MASTER] est sélectionné avec le sélecteur de canal
d’effet, le son auquel l’effet est appliqué ne peut pas être contrôlé même en
appuyant sur la touche [CUE] de [BEAT EFFECTS] si le son du canal que vous
voulez contrôler ne provient pas du canal [MASTER].
2Si l’effet est désactivé, le son auquel l’effet est appliqué ne peut pas être contrôlé
même en appuyant sur la touche [CUE] de [BEAT EFFECTS].
21
Fr
Français
Tableau des attributions MIDI
Tableau des attributions MIDI
“CC” est l’abréviation de “control change”. Un changement de commande est un type de signal MIDI utilisé pour transmettre les différents types d’informations de com-
mande, concernant par exemple le timbre, le volume, etc.
Sur cet appareil, les valeurs 0 à 127 sont fournies sous forme CC principalement lorsque les commandes et les faders sont actionnés. Des signaux CC sont également
fournis lorsque certaines touches sont actionnées.
“Note” est le terme MIDI utilisé pour indiquer les touches pressées ou relâchées d’un piano ou clavier.
Fader de canal 1 ou crossfaderNote 102—BACK CUE = 0, PLAY = 127
Fader de canal 2 ou crossfaderNote 103—BACK CUE = 0, PLAY = 127
Fader de canal 3 ou crossfaderNote 104—BACK CUE = 0, PLAY = 127
Fader de canal 4 ou crossfaderNote 105—BACK CUE = 0, PLAY = 127
MIDI
START
ToucheMARCHE——
STOP
ToucheARRÊT——
1L’activation d’une touche désactive l’autre touche activée, et des messages de mise en/hors service de MIDI sont envoyés par les deux touches.
Quand aucune touche n’est désactivée, seul le message de mise en service de MIDI est envoyé à la touche pressée.
2Lors du changement de position, les signaux MIDI ON et OFF sont envoyés respectivement par les deux positions.
—Lorsque la touche [START/STOP] est pressée plus d’une seconde, les messages MIDI correspondant aux positions des touches, faders et commandes sont envoyés en groupe (Instantané).
L’instantané MIDI envoie tous les messages MIDI sauf les messages de démarrage MIDI et d’arrêt MIDI.
3Le fonctionnement dépend du réglage du sélecteur [CROSS FADER ASSIGN (A, THRU, B)].
—Lorsque le sélecteur [CROSS FADER ASSIGN (A, THRU, B)] est réglé sur [THRU] : Des messages MIDI sont envoyés lorsque la touche [FADER START] est réglée sur [ON] et que le fader de canal
est éloigné de la position tout près de vous et lorsqu’il est ramené à la position tout près de vous.
—Lorsque le sélecteur [CROSS FADER ASSIGN (A, THRU, B)] est réglé sur [A] : Des messages MIDI sont envoyés lorsque la touche [FADER START] est réglée sur [ON] et que le fader de canal est
déplacé du bord le plus éloigné du côté [B] et lorsqu’il est ramené au bord le plus éloigné du côté [B].
—Lorsque le sélecteur [CROSS FADER ASSIGN (A, THRU, B)] est réglé sur [B] : Des messages MIDI sont envoyés lorsque la touche [FADER START] est réglée sur [ON] et que le fader de canal est
déplacé du bord le plus éloigné du côté [A] et lorsqu’il est ramené au bord le plus éloigné du côté [A].
23
Fr
Français
Changement des réglages
1 Appuyez plus d’une seconde sur la touche [ON/OFF
(UTILITY)].
L’écran de réglage du mode [USER SETUP] apparaît.
Pour afficher l’écran de réglage de mode [CLUB SETUP], éteignez d’abord cet
appareil, puis appuyez sur la touche [POWER] tout en tenant la touche [ON/OFF
(UTILITY)] enfoncée.
2 Appuyez sur la touche [BEAT , ].
Sélectionnez le paramètre à régler.
3 Appuyez sur la touche [TAP].
L’écran de changement de la valeur du réglage du paramètre s’affiche.
4 Appuyez sur la touche [BEAT , ].
Changez la valeur du réglage.
5 Appuyez sur la touche [TAP].
Validez la valeur du réglage.
L’écran précédent réapparaît.
Pour revenir à l’écran précédent sans changer les réglages, appuyez sur la
touche [QUANTIZE].
6 Appuyez sur la touche [ON/OFF (UTILITY)].
Fermez l’écran de réglage du mode [USER SETUP].
Pour fermer l’écran de réglage du mode [CLUB SETUP], appuyez sur la touche
[POWER] pour éteindre cet appareil.
À propos de la mise en veille automatique
Lorsque [Auto Standby] est réglé sur [ON], l’appareil se met automatiquement en
veille au bout de 4 heures dans la mesure où les conditions suivantes sont remplies.
—Aucune des touches ou commandes de l’appareil ne sont actionnées.
—Aucun signal audio de –10 dB ou plus n’est transmis aux prises d’entrée de cet
appareil.
—Aucun connexion PRO DJ LINK n’est effectuée.
Le mode de veille s’annule par une pression sur la touche [LFO FORM
(WAKE UP)].
En usine, la veille automatique a été mise en service sur cet appareil. Si vous ne
voulez pas utiliser la veille automatique, réglez [Auto Standby] sur [OFF].
À propos de la fonction talkover
La fonction talkover présente les deux modes suivants.
— [ADV] (talkover avancé) : Les médiums seulement du son des canaux autres que
le canal [MIC] sont atténués selon la valeur du réglage de [Talk Over LEVEL] et
reproduits.
dB
Fréquence
— [NOR] (talkover normal) : Le sont des canaux autres que le canal [MIC] est atté-
nué selon la valeur du réglage de [Talk Over LEVEL] et reproduit.
dB
Fréquence
Réglage des préférences
*: Réglage après l’achat
Mode
Réglages des
options
Affichage sur écran
Valeur du
réglage
Descriptions
USER SETUP
Fader StartF.S.
ON, OFF*Met à la fois en et hors service le démarrage par le fader.
MIDI CHMIDI CH
1* à 16Régle le canal MIDI.
MIDI Button TypeMIDI BT
TGL*, TRGSélectionne le mode de transmission du signal MIDI, [TGL (TOGGLE)] ou [TRG (TRIGGER)].
Talk Over ModeTLK MOD
ADV*, NORSélectionne le mode de la fonction talkover, [ADV(ADVANCED)] ou [NOR(NORMAL)].
Talk Over LEVELTLK LVL
–6 dB, –12 dB,
–18 dB*, –24 dB
Règle le niveau d’atténuation du son de la fonction talkover.
CLUB SETUP
Digital Master Out
Level
DOUT LV
–19 dB*, –15 dB,
–10 dB, –5 dB
Règle le niveau maximal du son provenant des prises [DIGITAL MASTER OUT].
1
Digital Master Out
Sampling Rate
DOUT FS
48 kHz, 96 kHz*Règle la fréquence d’échantillonnage du signal numérique.
MASTER ATT.MST ATT
–6 dB, –3 dB, 0 dB*Règle le niveau d’atténuation du son provenant des prises [MASTER1] et [MASTER2].
Auto StandbyAUTOSTB
ON*, OFFMet en et hors service la mise en veille automatique.
Mic Output To Booth
Monitor
MIC BTH
ON*, OFFDétermine si les signaux audio du microphone doivent provenir des prises [BOOTH].
PC UTILITYPC UTLY
ON, OFF*
Spécifie si l’utilitaire de réglage de l’ordinateur doit être ou non lancé automatiquement lorsqu’un
câble USB est raccordé.
Peak LimiterPKLIMIT
ON*, OFFRéduit l’écrêtage numérique subit et désagréable de la sortie maître.
Factory ResetINITIAL
YES, NO*Rétablit tous les réglages par défaut effectués en usine.
1Notez que le son sortant peut être déformé même si l’indicateur de niveau principal ne s’éclaire pas tout en haut.
À propos de l’utilitaire de réglage
L’utilitaire de réglage peut être utilisé pour effectuer les contrôles et réglages
suivants.
—Vérification de l’état des sélecteurs d’entrée de cet appareil
—Réglage de la sortie des données audio de cet appareil vers l’ordinateur
—Réglage de la taille de la mémoire (lorsque ASIO de Windows est utilisé)
—Vérification de la version du pilote
Affichage de l’utilitaire de réglage
Pour Windows
Cliquez sur le menu [Démarrer] > [Tous les programmes] > [Pioneer] > [DJM-
Affichez l’utilitaire de réglage avant de commencer.
Cliquez sur l’onglet [MIXER INPUT].
Réglage de la sortie des données audio de cet
appareil vers l’ordinateur
Lorsque Serato DJ est ouvert et cet appareil est le dispositif audio utilisé par défaut,
réglez la sortie audio dans Serato DJ.
Affichez l’utilitaire de réglage avant de commencer.
1 Cliquez sur l’onglet [MIXER OUTPUT].
2 Cliquez sur le menu déroulant de [Mixer Audio Output].
Sélectionnez et spécifiez les données audio devant être transmises à l’ordinateur
parmi les signaux audio présents sur cet appareil.
CH1CH2CH3CH4
CH1 Control Tone
PHONO
1
CH2 Control Tone
PHONO
1
CH3 Control Tone
PHONO
1
CH4 Control Tone
PHONO
1
CH1 Control Tone
CD/LINE
1
CH2 Control Tone
CD/LINE
1
CH3 Control Tone
CD/LINE
1
CH4 Control Tone
CD/LINE
1
CH1 Control Tone
DIGITAL
1
CH2 Control Tone
DIGITAL
1
CH3 Control Tone
DIGITAL
1
CH4 Control Tone
DIGITAL
1
Post CH1 Fader
2
Post CH2 Fader
2
Post CH3 Fader
2
Post CH4 Fader
2
Cross Fader A
2
Cross Fader A
2
Cross Fader A
2
Cross Fader A
2
Cross Fader B
2
Cross Fader B
2
Cross Fader B
2
Cross Fader B
2
MICMICMICMIC
MIX (REC OUT)
2
MIX (REC OUT)
2
MIX (REC OUT)
2
MIX (REC OUT)
2
1Le son est au volume du son entrant dans cet appareil, quel que soit le réglage de [USB
Output Level].
2Lors de l’utilisation pour d’autres applications que l’enregistrement, faites attention aux
réglages de l’application DJ pour que des boucles audio ne soient pas générées. Si des
boucles audio sont générées, le son peut entrer et sortir à des volumes non souhaités.
3 Cliquez sur le menu déroulant de [USB Output Level].
Réglez le volume des données audio provenant de cet appareil.
Le réglage de [USB Output Level] s’applique à tous les sons. Toutefois, lorsque
1 du tableau de l’étape 2 est sélectionné, le son sort au volume auquel il entre
dans cet appareil.
Si le volume n’est pas suffisant avec le réglage de volume du logiciel DJ seu-
lement, changez le réglage de [USB Output Level] pour obtenir un volume
suffisant à la sortie de cet appareil. Notez toutefois que le son sera déformé si le
volume est trop augmenté.
Réglage de la taille de la mémoire (lorsque ASIO
de Windows est utilisé)
Si une application utilisant cet appareil comme appareil audio par défaut (logiciel
DJ, etc.) est ouverte, fermez-la avant de régler la taille de la mémoire.
Affichez l’utilitaire de réglage avant de commencer.
Cliquez sur l’onglet [ASIO].
Le risque de perte sonore (interruption du son) diminue si une mémoire suf-
fisamment grande est attribuée mais le retard (latence) dans la transmission
du signal audio augmente.
Vérification de la version du pilote
Affichez l’utilitaire de réglage avant de commencer.
Cliquez sur l’onglet [About].
Vérification des toutes dernières
informations concernant le pilote
Les toutes dernières informations sur le pilote dédié exclusivement à cet appareil se
trouve sur notre site à l’adresse suivante.
http://pioneerdj.com/support/
Le fonctionnement ne peut pas être garanti lorsque plusieurs modèles de cette
console de mixage sont raccordés à un seul ordinateur.
25
Fr
Français
Informations supplémentaires
En cas de panne
Une erreur de commande est souvent prise pour une anomalie de fonctionnement ou une panne. Si vous estimez que cet appareil ne fonctionne pas correctement, vérifiez
les points ci-dessous. Parfois, le problème peut provenir d’un autre composant. Examinez les autres composants et les appareils électriques utilisés. Si le problème per-
siste malgré les vérifications des points suivants, confiez les réparations au service après-vente Pioneer le plus proche ou à votre revendeur.
De l’électricité statique ou des interférences externes ont peut être déréglé le lecteur. Dans ce cas, il suffit probablement de débrancher puis de rebrancher le cordon
d’alimentation pour que le lecteur fonctionne de nouveau.
ProblèmeVérificationSolution
L’appareil ne s’allume pas.Est-ce que le cordon d’alimentation est correctement
raccordé ?
Branchez le cordon d’alimentation sur une prise secteur.
Aucun son ou son faible.Est-ce que le sélecteur d’entrée est à la bonne position ?Réglez le sélecteur d’entrée pour changer la source d’entrée du canal. (page 13)
Est-ce que les câbles de liaison sont correctement rac-
cordés ?
Raccordez correctement les câbles de liaison. (page 10)
Est-ce que les prises et fiches sont sales ?Nettoyez les prises et les fiches avant d’effectuer les raccordements.
Est-ce que [MASTER ATT.] est réglé sur [–6 dB], etc. ?Sur l’écran [USER SETUP], changez [MASTER ATT.]. (page 23)
Le son numérique ne peut pas être restitué.Est-ce que la fréquence d’échantillonnage (fs) de la sortie
audio numérique correspond aux spécifications du dispo-
sitif raccordé ?
Sur l’écran [CLUB SETUP], réglez [Digital Master Out Sampling Rate] en fonction des
spécifications de l’équipement raccordé. (page 23)
Distorsion du son.Est-ce que le niveau du son provenant du canal [MASTER]
est réglé convenablement?
Réglez la commande [MASTER LEVEL] de sorte que l’indicateur de niveau du canal maître
s’éclaire autour de [0 dB] au niveau de crête. (Page 13)
Réglez [MASTER ATT.] sur [–3 dB] ou [–6 dB]. (page 23)
Est-ce que le niveau du son transmis à chaque canal est
réglé correctement ?
Réglez la commande [TRIM] de sorte que l’indicateur de niveau du canal s’éclaire à environ
[0 dB] au niveau de crête. (Page 13)
Impossible de faire un fondu enchaîné.Est-ce que les sélecteurs [CROSS FADER ASSIGN (A,
THRU, B)] sont réglés correctement ?
Réglez les sélecteurs [CROSS FADER ASSIGN (A, THRU, B)] correctement pour les diffé-
rentes canaux. (Page 13)
Départ au crossfader d’un lecteur DJ
impossible.
Est-ce que [FADER START] est réglé sur [OFF] ?Sur l’écran [USER SETUP], réglez [FADER START] sur [ON]. (page 23)
Est-ce que le lecteur DJ est raccordé correctement à la
prise [LINK] ?
Raccordez correctement le lecteur DJ à la prise [LINK] à l’aide d’un câble LAN. (page 10)
Est-ce que les câbles audio sont correctement raccordés ?Raccordez les prises d’entrée audio de cet appareil et les prises de sortie audio du lecteur DJ
par un câble audio. (page 10)
Est-ce que le numéro de lecteur DJ est spécifié correcte-
ment ?
Réglez le numéro du lecteur DJ sur le même numéro que le canal auquel le câble audio est
raccordé.
[BEAT EFFECTS] ne fonctionne pas.Est-ce que le sélecteur de canal d’effet est à la bonne
position ?
Tournez le sélecteur de canal d’effet pour sélectionner le canal auquel vous voulez appliquer
l’effet.
[SOUND COLOR FX] ne fonctionne pas.Est-ce que la commande [COLOR] est à la position appro-
priée ?
Tournez la commande [COLOR] dans le sens horaire ou antihoraire. (page 15)
Impossible d’utiliser un processeur d’effets
externe.
Est-ce que la touche [ON/OFF] de [BEAT EFFECTS] est
réglée sur [ON] ?
Appuyez sur la touche [ON/OFF] de [BEAT EFFECTS] pour régler [SND/RTN] sur [ON]. (page
15)
Est-ce que le processeur d’effets externe est raccordé
correctement à la prise [SEND] ou [RETURN] ?
Raccordez le générateur d’effets externe aux prises [SEND] et [RETURN]. (page 10)
Distorsion du son provenant du processeur
d’effets externe.
Est-ce que la sortie audio du générateur d’effets externe
est à un niveau approprié ?
Réglez le niveau de sortie audio du générateur d’effets externe.
Le tempo (BPM) ne peut pas être mesuré ou
la valeur obtenue (BPM) n’est pas plausible.
Est-ce que le niveau d’entrée audio est trop élevé ou trop
faible ?
Réglez la commande [TRIM] de sorte que l’indicateur de niveau du canal s’éclaire à environ
[0 dB] au niveau de crête. (Page 13)
Pour certains morceaux, il peut être impossible de mesurer le tempo (BPM). Utilisez la
touche [TAP] pour spécifier manuellement le tempo. (page 15)
Le tempo mesuré (BPM) diffère du tempo
indiqué sur le CD.
—Les valeurs peuvent être légèrement différentes selon la façon dont le BPM est mesuré.
Le séquenceur MIDI ne se synchronise pas.Est-ce que le mode sync du séquenceur MIDI est le mode
Slave ?
Réglez le mode sync du séquenceur MIDI sur le mode Slave.
Est-ce que le séquenceur MIDI utilisé prend en charge les
horloges de synchronisation MIDI ?
Les séquenceurs MIDI ne prenant pas en charge les horloges de synchronisation MIDI ne
peuvent pas être synchronisés.
La commande MIDI ne fonctionne pas.Est-ce que le canal MIDI est en service ?Appuyez sur la touche [ON/OFF] de [MIDI]. (page 16)
Est-ce que les réglages MIDI sont corrects ?Pour employer un logiciel DJ avec cet appareil, les messages MIDI de cet appareil doivent
être affectés au logiciel DJ utilisé. Pour les instructions sur l’affectation des messages,
reportez-vous au mode d’emploi de votre logiciel DJ.
Cet appareil n’est pas reconnu après avoir
été raccordé à un ordinateur.
L’indicateur USB est éteint ou clignote.
Est-ce que le pilote a été installé correctement sur votre
ordinateur ?
Installez le logiciel pilote. S’il est déjà installé, réinstallez-le. (page 5)
Le son d’un ordinateur ne peut pas être
restitué par cet appareil.
Est-ce que cet appareil et l’ordinateur sont raccordés
correctement ?
Raccordez cet appareil et l’ordinateur directement avec le câble USB fourni. (page 11)
Est-ce que les réglages du dispositif de sortie audio sont
corrects ?
Sélectionnez cet appareil dans les réglages de dispositif de sortie audio. Pour les instructions
sur les réglages à effectuer dans votre application, reportez-vous au mode d’emploi de votre
application.
Est-ce que le sélecteur d’entrée est à la bonne position ?Réglez le sélecteur d’entrée sur la position [USB]. (Page 13)
Le son auquel l’effet est appliqué ne peut
pas être surveillé lorsque la touche [CUE] de
[BEAT EFFECTS] est pressée.
—Le circuit qui génère l’écho pour les sons auxquels les effets [ECHO], [REVERB], [ROLL],
[SLIP ROLL] et [REV ROLL] sont appliqués est situé après le circuit d’effets, si bien que le
contrôle n’est pas possible. Il ne s’agit pas d’un dysfonctionnement.
Le son est déformé lorsqu’un lecteur analo-
gique est raccordé aux prises [PHONO] de
cet appareil.
Ou bien, l’éclairage de l’indicateur de niveau
du canal ne change pas même lorsque la
commande [TRIM] est tournée.
Avez-vous raccordé un lecteur analogique avec égaliseur
phono ?
Raccordez le lecteur analogique à égaliseur phono aux prises [CD/LINE]. (page 10)
Si le lecteur analogique pourvu d’un égaliseur phono présente un sélecteur PHONO/LINE,
réglez celui-ci sur PHONO.
Est-ce qu’une interface audio pour ordinateurs est raccor-
dée entre le lecteur analogique et cet appareil ?
Si la sortie de l’interface audio des ordinateurs est une sortie de ligne, reliez celle-ci aux
prises [CD/LINE]. (page 10)
Si le lecteur analogique présente un sélecteur PHONO/LINE, réglez celui-ci sur PHONO.
26
Fr
Schéma fonctionnel
Master
Limiter
[BEAT EFFECT
(
SND/RTN]
Effect CH Select
Effect CH Select
Effect Out
CableCheck
RETURN
SEND Out
CHx
CF A/B
MIC
Master
CHx
CF A/B
MIC
Master
Return Level
No Cable
Effect SW
Cable Exist
Effect_CUE
Effect_CUE
[Mono Split / Stereo SWITCH & MIXING]
Mono Split
Stereo
2posi
MIXING
MONO SPLIT/
STEREO SWITCH
[BEAT EFFECT(Others)]
Effect CH Select
Effect CH Select
Effect Out
CHx
CF A/B
MIC
Master
CHx
CF A/B
MIC
Master
Effect SW
Level Depth
CHx Cue On/Off SW
CHx_CUE
Effect Cue On/Off SW
Effect_CUE
Link Cue On/Off SW
Link_CUE
CUE
Mixing
L
R
SEL
Mono Split
Stereo
Master Cue On/Off SW
Master_CUE
Master
Mixing
L
R
H.P. MIX R Out
H.P. MIX L Out
SEL
SEL
3posi
2posi
SOUND
COLOR
EFFECT
CHx
SOUND
COLOR
EFFECT
CHx
3Band
EQ/
ISOLATOR
CHx
BEAT
EFFECT
CHx
BEAT
EFFECT
CHx
BEAT
EFFECT
CHx
BPM Detect CHx Select
Level meter CHx
BEAT
Effect
(SND/RTN)
Send/
Return
CHx
CUE
Monitor
CHx
Link
CUE
Phono
AMP
Analog_PHONO
Analog_CD LINE
Digital/USB
CF Assign
3posi
Assign A
CHx
Assign Thru
CH1-4
Assign B
CHx
CH Fader
3posi
CH
Fader
Curve
Switch
3posi
2posi
2para4para
Cross
Fader
Curve
Switch
Thru
CF A
CF B
MIC Monitor SW
CHx in
CHx Control Tone
2Band
MIC EQ
MIC1,2
MIC1/2 in
LINK in
Return in
Send out
Post CHx Fader
TalkOver ON/OFF
MIX (REC OUT)
Master_CUE
MIC_Out
MIC
MIC_Out
Cross Fader B
Cross Fader A
BPM Detect Master
Level meter Master
CH1-4 COMMON
CH1-4 COMMON
MIC1,2 COMMON
Digital Trim
CHx _CUE
Link_CUE
BPM Detect CF A
BPM Detect CF B
BPM Detect MIC
Send/
Return
CF A
BEAT
EFFECT
MIC
Send/
Return
MIC
BEAT
EFFECT
CF B
Send/
Return
CF B
Cross
Fader
BEAT
EFFECT
Master
Talk
Over
Master
CUE
Talk
Over
Level
Talk Over
Mode
Advanced
/Normal
Master
Mono/
STEREO
Send/
Return
Master
Master
Balance
Master
Balance
Master
Level
HP Level
Booth
Level
SEL
MIC Output
to Booth Monitor
On/Off SW
Booth Out
REC out
USB Common out
Digital out
Master
H.P. out
CHx_CUE
Effect_CUE
Link_CUE
CHx Control Tone
Post CHx Fader
Cross Fader A
Cross Fader B
MIC
MIX (REC OUT)
Master_CUE
Boost
Boost
ATT
Mono Split/
Stereo
SWITCH
& MIXING
Mixer
Audio
Output
Select
MIC
FILTER
MIC In
Level
detect
TalkOver ON/OFF
MIC 1,2
MIX
Off
On
TalkOver
MIC1
MIC2
LANDigital MASTER
RETURN
CH_1_Digital/USB1/2
PHONES
MASTER
BOOTH
REC
SEND
USB1/2
USB3/4
USB5/6
USB7/8
DSP
MIC
ADC
ETHER SW IC
I/Fcom
USB
I/Fcom
Ether
DAC
DAC
PHONES
LAN
MASTER 1
REC
DAC
SEND
MUTE
DAC
BOOTH
MUTE
DAC
MUTE
MASTER 2
MUTE
DIGITAL
MASTER
SRC
DIT
MIC1 LEVEL
MIC2 LEVEL
CH1_Analog
ADC
CD/LINE
PHONO
DIGITAL
ADC
DIR
CH1
TRIM
Control Tone
ADC
CD/LINE
PHONO
DIGITAL
ADC
DIR
CH2
TRIM
Control Tone
ADC
CD/LINE
PHONO
DIGITAL
ADC
DIR
CH3
TRIM
Control Tone
ADC
CD/LINE
PHONO
DIGITAL
ADC
DIR
CH4
TRIM
Control Tone
CH2_Analog
CH3_Analog
CH4_Analog
SRC
SRC
SRC
SRC
RETURN
CH_2_Digital/USB3/4
CH_3_Digital/USB5/6
CH_4_Digital/USB7/8
USB
CH1 Digital IN
Control Tone
Control Tone
Control Tone
Control Tone
CH2 Digital IN
CH3 Digital IN
CH4 Digital IN
CH1 USB1/2 IN
CH1 USB1/2 OUT
CH2 USB3/4 IN
CH3 USB5/6 IN
CH4 USB7/8 IN
CH2 USB3/4 OUT
CH3 USB5/6 OUT
CH4 USB7/8 OUT
SRC
SRC
SRC
SRC
USB
Type B
BEAT
EFFECT
CF A
ADC
BEAT
EFFECT
Processing
SOUND
COLOR
EFFECT
CHx
27
Fr
Français
Obtention du manuel
Le mode d’emploi peut se trouver sous forme de fichier PDF. Adobe
®
Reader
®
doit être installé pour pouvoir lire les fichiers de format PDF. Si vous ne possédez
pas Adobe Reader, veuillez l’installer en utilisant le lien de téléchargement sur le
menu du CD-ROM.
Téléchargement des dernières versions du mode
d’emploi et du Guide de démarrage rapide -
Édition Serato DJ
1 Insérez le CD-ROM dans le lecteur CD de l’ordinateur.
Le menu du CD-ROM apparaît.
Si le menu du CD-ROM n’apparaît pas lorsque le CD-ROM est inséré, procédez de la
façon suivante.
Pour Windows
Depuis le menu [Démarrer] – [Ordinateur] (ou [Poste de travail]), ouvrez le
lecteur CD et double-cliquez sur l’icône [CD_menu.exe].
Pour Mac OS X
Dans le Finder, double-cliquez directement sur l’icône [CD_menu.app].
2 Lorsque le menu du CD-ROM apparaît, sélectionnez [DJM-
900SRT: Télécharger le Mode d’emploi (fichier PDF) ], puis
cliquez sur [Demarrer].
3 “Une connexion internet est nécessaire pour pouvoir
accéder au site. Connecté à internet ?” apparaît. Cliquez sur
[Oui].
Le navigateur web démarre et le site de support DJ de Pioneer apparaît.
http://pioneerdj.com/support/
4 Sur le site de support DJ de Pioneer, cliquez sur “Manuals”
dans “DJM-900SRT”.
5 Depuis la page de téléchargement, cliquez sur la langue des
documents souhaités.
Le téléchargement du mode d’emploi/Guide de démarrage rapide - Éditions Serato
DJ commence.
Téléchargement du manuel du logiciel Serato DJ
1 Insérez le CD-ROM dans le lecteur CD de l’ordinateur.
Le menu du CD-ROM apparaît.
Si le menu du CD-ROM n’apparaît pas lorsque le CD-ROM est inséré, procédez de la
façon suivante.
Pour Windows
Depuis le menu [Démarrer] – [Ordinateur] (ou [Poste de travail]), ouvrez le
lecteur CD et double-cliquez sur l’icône [CD_menu.exe].
Pour Mac OS X
Dans le Finder, double-cliquez directement sur l’icône [CD_menu.app].
2 Lorsque le menu du CD-ROM apparaît, sélectionnez [Serato
DJ: Télécharger le Manuel du logiciel (fichier PDF) ], puis
cliquez sur [Demarrer].
3 “Une connexion internet est nécessaire pour pouvoir
accéder au site. Connecté à internet ?” apparaît. Cliquez sur
[Oui].
Le navigateur web démarre et le site de support DJ de Pioneer apparaît.
4 Cliquez sur [Software Info] dans [DJM-900SRT] sur le site de
support DJ de Pioneer.
[Serato DJ Support Information] apparaît.
5 Cliquez sur le lien vers la page de téléchargement de Serato
DJ.
La page de téléchargement de [Serato DJ] apparaît.
http://serato.com/
6 Connectez-vous à votre compte utilisateur sur “Serato.
com”.
Saisissez l’adresse de messagerie et le mot de passe enregistrés pour la connexion
à “Serato.com”.
7 Depuis “More Downloads” sur le côté droit de la page de
téléchargement, cliquez sur “Serato DJ x.x User Manual”.
Le téléchargement du manuel du logiciel Serato DJ commence.
À propos des marques commerciales et
des marques déposées
Pioneer et rekordbox sont des marques commerciales ou des marques dépo-
sées de PIONEER CORPORATION.
Microsoft, Windows et Windows Vista sont soit des marques déposées ou des
marques de commerce de Microsoft Corporation aux Etats-Unis et/ou dans
d’autres pays.
Apple, Macintosh et Mac OS sont des marques commerciales d’Apple Inc.,
enregistrées aux États-Unis et dans d’autres pays.
ASIO est une marque commerciale de Steinberg Media Technologies GmbH.
Serato DJ est une marque déposée de Serato Audio Research Ltd. aux États-
Unis et dans d’autres pays.
Les noms de sociétés et de produits mentionnés ici sont des marques commer-
ciales de leurs détenteurs respectifs.
28
Fr
Spécifications
Général
Alimentation ......................................................................CA 110 V à 240 V, 50 Hz/60 Hz
Consommation ...........................................................................................................41 W
Consommation (en veille) .........................................................................................0,4 W
Poids de l’appareil principal .................................................................................... 7,1 kg
Dimensions maximales .............................. 331 mm (L) × 107,9 mm (H) × 404 mm (P)
Température de fonctionnement tolérée .................................................+5 °C à +35 °C
Humidité de fonctionnement tolérée ..........................5 % à 85 % (sans condensation)
Vielen Dank, dass Sie sich für dieses Pioneer-Produkt entschieden haben. Bitte lesen Sie diese Bedienungsanleitung gründlich durch, um sich mit der Bedienung des Geräts
vertraut zu machen. Nachdem Sie die Bedienungsanleitung gelesen haben, legen Sie sie griffbereit zum Nachschlagen ab.
In manchen Ländern oder Regionen können sich die Formen von Netzstecker und Netzsteckdose von denen in den Erklärungszeichnungen unterscheiden. Das Verfahren
zum Anschließen und Bedienen des Geräts sind aber gleich.
WARNUNG
Dieses Gerät ist nicht wasserdicht. Zur Vermeidung der
Gefahr von Brand und Stromschlag keine Behälter mit
Flüssigkeiten (z.B. Blumenvasen und -töpfe) in die
Nähe des Gerätes bringen und dieses vor Tropfwasser,
Spritzwasser, Regen und Nässe schützen.
D3-4-2-1-3_A1_De
WARNUNG
Keine Quellen offener Flammen (z.B. eine brennende
Kerze) auf dieses Gerät stellen.
D3-4-2-1-7a_A1_De
VORSICHTSHINWEIS ZUR BELÜFTUNG
Bei der Aufstellung dieses Gerätes muss für einen
ausreichenden Freiraum gesorgt werden, um eine
einwandfreie Wärmeabfuhr zu gewährleisten
(mindestens 5 cm hinter dem Gerät und jeweils 3 cm
an der Seite des Gerätes).
WARNUNG
Im Gerätegehäuse sind Ventilationsschlitze und andere
Öffnungen vorgesehen, die dazu dienen, eine
Überhitzung des Gerätes zu verhindern und einen
zuverlässigen Betrieb zu gewährleisten. Um
Brandgefahr auszuschließen, dürfen diese Öffnungen
auf keinen Fall blockiert oder mit Gegenständen (z.B.
Zeitungen, Tischdecken und Gardinen) abgedeckt
werden, und das Gerät darf beim Betrieb nicht auf
einem dicken Teppich oder Bett aufgestellt sein.
D3-4-2-1-7b*_A1_De
Betriebsumgebung
Betriebstemperatur und Betriebsluftfeuchtigkeit:
+5 °C bis +35 °C, 85 % rel. Feuchte max.
(Ventilationsschlitze nicht blockiert)
Eine Aufstellung dieses Gerät an einem unzureichend
belüfteten, sehr feuchten oder heißen Ort ist zu
vermeiden, und das Gerät darf weder direkter
Sonneneinstrahlung noch starken Kunstlichtquellen
ausgesetzt werden.
D3-4-2-1-7c*_A1_De
ACHTUNG
Der POWER-Schalter dieses Gerätes trennt das Gerät
nicht vollständig vom Stromnetz. Um das Gerät
vollständig vom Netz zu trennen, muss der
Netzstecker aus der Netzsteckdose gezogen werden.
Daher sollte das Gerät so aufgestellt werden, dass
stets ein unbehinderter Zugang zur Netzsteckdose
gewährleistet ist, damit der Netzstecker in einer
Notsituation sofort abgezogen werden kann. Um
Brandgefahr auszuschließen, sollte der Netzstecker
vor einem längeren Nichtgebrauch des Gerätes,
beispielsweise während des Urlaubs, grundsätzlich
von der Netzsteckdose getrennt werden.
D3-4-2-2-2a*_A1_De
VORSICHT MIT DEM NETZKABEL
Fassen Sie das Netzkabel immer am Stecker. Ziehen Sie
nicht am Kabel selbst, und fassen Sie das Netzkabel
niemals mit nassen Händen an, da dies einen
Kurzschluss oder elektrischen Schlag verursachen
kann. Stellen Sie nicht das Gerät, Möbelstücke o.ä. auf
das Netzkabel; sehen Sie auch zu, dass es nicht
eingeklemmt wird. Machen Sie niemals einen Knoten
in das Netzkabel, und binden Sie es nicht mit anderen
Kabeln. Das Netzkabel sollte so gelegt werden, dass
niemand darauf tritt. Ein beschädigtes Netzkabel kann
einen Brand oder elektrischen Schlag verursachen.
Prüfen Sie das Netzkabel von Zeit zu Zeit. Sollte es
beschädigt sein, wenden Sie sich an Ihre nächste
autorisierte PIONEER-Kundendienststelle oder Ihren
Händler, um es zu ersetzen.
S002*_A1_De
Mischen Sie dieses Produkt, wenn Sie es entsorgen wollen, nicht mit gewöhnlichen Haushaltsabfällen. Es gibt ein getrenntes
Sammelsystem für gebrauchte elektronische Produkte, über das die richtige Behandlung, Rückgewinnung und Wiederverwertung
gemäß der bestehenden Gesetzgebung gewährleistet wird.
Privathaushalte in den Mitgliedsstaaten der EU, in der Schweiz und in Norwegen können ihre gebrauchten elektronischen Produkte an
vorgesehenen Sammeleinrichtungen kostenfrei zurückgeben oder aber an einen Händler zurückgeben (wenn sie ein ähnliches neues Produkt
kaufen).
Bitte wenden Sie sich in den Ländern, die oben nicht aufgeführt sind, hinsichtlich der korrekten Verfahrensweise der Entsorgung an die örtliche
Kommunalverwaltung.
Auf diese Weise stellen Sie sicher, dass das zu entsorgende Produkt der notwendigen Behandlung, Rückgewinnung und Wiederverwertung
unterzogen wird, und so mögliche negative Einflüsse auf die Umwelt und die menschliche Gesundheit vermieden werden.
K058b_A1_De
ACHTUNG
UM SICH NICHT DER GEFAHR EINES ELEKTRISCHEN
SCHLAGES AUSZUSETZEN, DÜRFEN SIE NICHT DEN
DECKEL (ODER DIE RÜCKSEITE) ENTFERNEN. IM
GERÄTEINNEREN BEFINDEN SICH KEINE VOM
BENUTZER REPARIERBAREN TEILE. ÜBERLASSEN
SIE REPARATUREN DEM QUALIFIZIERTEN
KUNDENDIENST.
D3-4-2-1-1_B1_De
WARNUNG
Kleine Teile außerhalb der Reichweite von Kleinkindern
und Kindern aufbewahren. Bei unbeabsichtigtem
Verschlucken ist unverzüglich ein Arzt aufzusuchen.
D41-6-4_A1_De
3
De
Inhalt
Für Anwender, die Serato DJ zum ersten Mal mithilfe dieser Einheit
bedienen
Siehe “Kurzanleitung - Serato DJ Edition” für das Verfahren zum Vornehmen
der anfänglichen Einstellungen, die zur Verwendung von CONTROL CD
oder CONTROL VINYL zur Bedienung von Serato DJ erforderlich sind. Die
“Kurzanleitung - Serato DJ Edition” kann von der Pioneer DJ Support-Website
(http://pioneerdj.com/support/) heruntergeladen werden. Anweisungen zum
Herunterladen finden Sie unter Herunterladen der neuesten Versionen der
Bedienungsanleitungen und der Kurzanleitung - Serato DJ Edition in dieser
Anleitung (S. 27).
Für Benutzer von CONTROL VINYL
Wenden Sie sich bei der Verwendung von CONTROL VINYL an ein Fachgeschäft,
das Serato DJ-Produkte vertreibt, oder an einen Online-Shop wie den von Serato
(http://serato.com/).
Zum Lesen dieser Anleitung
Lesen Sie immer sowohl diese Anleitung als auch die „Kurzanleitung – Serato
DJ Edition“. Beide enthalten wichtige Informationen, mit denen Sie sich vor dem
Gebrauch dieses Produktes vertraut machen sollten.
Für Anweisungen zum Erhalten des Handbuchs der Serato DJ-Software siehe
Übernehmen der Anleitung (S.27).
Diese Anleitung besteht im Wesentlichen aus Beschreibungen der Funktionen
dieser Einheit als Hardware. Einzelheiten über die Bedienung der Serato
DJ Software finden Sie in der Anleitung der Serato DJ Software und in der
„Kurzanleitung – Serato DJ Edition“.
Das Handbuch der Serato DJ-Software kann von „Serato.com“ herunter-
geladen werden. Einzelheiten siehe Herunterladen des Serato DJ Software-
Handbuchs (S. 27).
Die neueste Version der Bedienungsanleitung (diese Anleitung) und die
„Kurzanleitung – Serato DJ Edition“ können von der Pioneer Support-Website
heruntergeladen werden. Einzelheiten siehe Herunterladen der neuesten
Versionen der Bedienungsanleitungen und der Kurzanleitung - Serato DJ Edition
(S. 27).
In dieser Anleitung werden die Namen von auf dem Produkt angezeigten
Kanälen und Tasten, Namen von Menüs in der Software usw. in Klammern
angegeben ([ ]). (z.B. Kanal [MASTER], Menü [ON/OFF], [File]-Menü)
Bitte beachten Sie, dass die Bildschirme und Spezifikationen der in dieser
Anleitung beschriebenen Software ebenso wie die äußere Erscheinung und die
Spezifikationen der Hardware aktuell in der Entwicklung sind und sich von den
endgültigen Spezifikationen unterscheiden können.
Bitte beachten Sie, dass je nach der Version des Betriebssystems, den
Webbrowser-Einstellungen usw. die Bedienung sich von den in dieser Anleitung
beschriebenen Verfahren leicht unterscheiden kann.
Bei der Verwendung von Betriebssystemen in anderen Sprachen folgen Sie
den Anweisungen auf dem Bildschirm, um die Option [English (Englisch)] zu
wählen.
Installationsverfahren (Windows)
Lesen Sie den Abschnitt Vorsichtshinweise zur Installation vor der Installation der
Treibersoftware sorgfältig durch.
Zum Installieren oder Deinstallieren der Treibersoftware müssen Sie
vom Administrator Ihres Computers autorisiert sein. Melden Sie sich als
Administrator Ihres computers an, bevor Sie mit der Installation fortfahren.
1 Setzen Sie die mitgelieferte CD-ROM in das CD-Laufwerk
Ihres Computers ein.
Die CD-ROM-Menü wird angezeigt.
Wenn das CD-ROM-Menü nicht angezeigt wird, wenn die CD-ROM einge-
setzt wird, doppelklicken Sie auf das CD-Laufwerk aus dem [Start]-Menü –
[Computer] (oder [Arbeitsplatz]).
2 Aus dem erscheinenden Menü wählen Sie [Treiber-
Software installieren ], und klicken Sie dann auf [Start].
3 „Die neueste Version herunterladen? Eine Internet-
Umgebung ist zum Zugriff auf die Site erforderlich.“ wird
angezeigt. Klicken Sie auf [Ja].
Der Webbrowser wird gestartet, und die globale Pioneer DJ-Support-Website wird
angezeigt.
4 Klicken Sie auf [Software Download] unter [DJM-900SRT]
auf der Pioneer DJ-Support-Website.
5 Klicken Sie auf [Driver Software].
6 Laden Sie die Treiber-Software für Windows (DJM-
900SRT_X.XXX.exe) von der Download-Seite herunter.
7 Doppelklicken Sie auf die heruntergeladene Datei.
Der Treiber-Installationsbildschirm erscheint.
8 Lesen Sie sorgfältig die Software-Lizenzvereinbarung
durch, und markieren Sie, wenn Sie den Bedingungen
zustimmen, das Kontrollkästchen [Ich stimme zu.] und klicken
auf [OK].
Wenn Sie den Bedingungen der Software-Lizenzvereinbarung nicht zustimmen,
klicken Sie auf [Abbrechen] und brechen die Installation ab.
9 Fahren Sie mit der Installation entsprechend den
Anweisungen auf dem Bildschirm fort.
Wenn während der Installation [Windows-Sicherheit] auf dem Bildschirm
erscheint, klicken Sie auf [Diese Treibersoftware trotzdem installieren] und
fahren mit der Installation fort.
Bei Installation unter Windows XP
Wenn während der Installation [Hardwareinstallation] auf dem Bildschirm
erscheint, klicken Sie auf [Installation fortsetzen] und fahren mit der
Installation fort.
Wenn das Installationsprogramm fertiggestellt wird, erscheint eine
Fertigstellungsmeldung.
Installationsverfahren (Mac OS X)
Lesen Sie den Abschnitt Vorsichtshinweise zur Installation vor der Installation der
Treibersoftware sorgfältig durch.
Zum Installieren oder Deinstallieren der Treibersoftware müssen Sie vom
Administrator Ihres Computers autorisiert sein. Halten Sie den Namen und das
Passwort des Administrators Ihres Computers bereit.
1 Setzen Sie die mitgelieferte CD-ROM in das CD-Laufwerk
Ihres Computers ein.
Der CD-ROM-Order erscheint.
Doppelklicken Sie auf das CD-Symbol auf dem Desktop, wenn nach dem Laden
einer CD-ROM keine Ordner angezeigt werden.
2 Doppelklicken Sie [CD_menu.app].
3 Aus dem erscheinenden Menü wählen Sie [Treiber-
Software installieren ], und klicken Sie dann auf [Start].
4 „Die neueste Version herunterladen? Eine Internet-
Umgebung ist zum Zugriff auf die Site erforderlich.“ wird
angezeigt. Klicken Sie auf [Ja].
Der Webbrowser wird gestartet, und die globale Pioneer DJ-Support-Website wird
angezeigt.
5 Klicken Sie auf [Software Download] unter [DJM-900SRT]
auf der Pioneer DJ-Support-Website.
6 Klicken Sie auf [Driver Software].
7 Laden Sie die Treiber-Software für Mac OS (DJM-
900SRT_M_X.X.X.dmg) von der Download-Seite herunter.
8 Doppelklicken Sie auf die heruntergeladene Datei.
Wenn der Menübildschirm [DJM-900SRT_AudioDriver] erscheint.
9 Doppelklicken Sie [DJM-900SRT_AudioDriver.pkg].
Der Treiber-Installationsbildschirm erscheint.
10 Prüfen Sie die Details auf dem Bildschirm und klicken Sie
auf auf [Installation fortsetzen].
11 Wenn die Endbenutzer-Lizenzvereinbarung erscheint, lesen
Sie Software-Lizenzvereinbarung sorgfältig durch und klicken
dann auf [Installation fortsetzen].
12 Wenn Sie den Bedingungen der Software-
Lizenzvereinbarung zustimmen, klicken Sie auf [Ich stimme
zu.].
Wenn Sie den Bedingungen der Software-Lizenzvereinbarung nicht zustimmen,
klicken Sie auf [Ich stimme nicht zu] und brechen die Installation ab.
13 Fahren Sie mit der Installation entsprechend den
Anweisungen auf dem Bildschirm fort.
Klicken Sie auf [Abbrechen], um die Installation nach dem Start abzubrechen.
Installieren der Serato DJ Software
Serato DJ ist eine DJ-Software-Anwendung von Serato. DJ-Auftritte sind möglich,
indem ein Computer an dieses Gerät angeschlossen wird, auf dem diese Software
installiert ist.
Siehe “Kurzanleitung - Serato DJ Edition” für das Verfahren zum Vornehmen
der anfänglichen Einstellungen, die zur Verwendung von CONTROL CD
oder CONTROL VINYL zur Bedienung von Serato DJ erforderlich sind. Die
“Kurzanleitung - Serato DJ Edition” kann von der Pioneer DJ Support-Website
(http://pioneerdj.com/support/) heruntergeladen werden. Anweisungen zum
Herunterladen finden Sie unter Herunterladen der neuesten Versionen der
Bedienungsanleitungen und der Kurzanleitung - Serato DJ Edition in dieser
Anleitung (S. 27).
7
De
Deutsch
Für die neueste Version der Serato DJ-Software gehen Sie zu Serato.com und
laden die Software von dort herunter. Ein Download-Link für die Software befindet
sich auch auf der mitgelieferten CD-ROM.
Bitte beachten Sie, dass die in dieser Anleitung beschriebenen Software-
Bildschirme und Spezifikationen sich noch in der Entwicklung befinden und in der
endgültigen Version leicht unterschiedlich sein können.
Für Anweisungen zur Bedienung der Serato DJ-Software siehe Anleitung für die
Serato DJ-Software.
Das Handbuch der Serato DJ-Software kann von „Serato.com“ herunter-
geladen werden. Einzelheiten siehe Herunterladen des Serato DJ Software-
Handbuchs (S. 27).
Minimale Betriebsumgebung
Unterstützte Betriebssysteme
CPU und erforderlicher
Arbeitsspeicher
Mac OS X: 10.6.8, 10.7.4 und
10.8
32-Bit-
Version
Intel
®
Prozessor, Core™ 2 Duo 2,0 GHz oder
besser
Mindestens 1 GB RAM
64-Bit-
Version
Intel
®
Prozessor, Core™ 2 Duo 2,4 GHz oder
besser
Mindestens 4 GB RAM
Windows: Windows 7
32-Bit-
Version
Intel
®
Prozessor, Core™ 2 Duo 2,0 GHz oder
besser
Mindestens 2 GB RAM
64-Bit-
Version
Intel
®
Prozessor, Core™ 2 Duo 2,4 GHz oder
besser
Mindestens 4 GB RAM
Sonstiges
USB-Anschluss
Ein USB 2.0-Port ist zum Anschluss des Computers an dieses
Gerät erforderlich.
Display-AuflösungAuflösung von 1 280 x 720 oder höher
Internet-Verbindung
Eine Internetverbindung ist für die Registrierung des „Serato.
com“-Benutzerkontos und zum Herunterladen der Software
erforderlich.
Für die neuesten Informationen über die erforderliche Betriebsumgebung und Kompatibilität
ebenso wie zum Erhalten des neuesten Betriebssystems siehe „Software Info“ unter „DJM-
900SRT“ auf der Pioneer DJ-Support-Website unten.
http://pioneerdj.com/support/
Die richtige Funktion kann nicht auf allen Computern garantiert werden, auch wenn diese mit
den hier beschriebenen Betriebsbedingungen übereinstimmen.
Je nach den Energieeinstellungen des Computers, usw. kann die CPU und Festplatten nicht
ausreichende Verarbeitungs-Kapazität bieten. Besonders bei Notebook-Computern müssen
Sie sicherstellen, dass der Computer im richtigen Zustand ist, um konstante hohe Leistung zu
bieten (zum Beispiel indem die Netzstromversorgung angeschlossen bleibt), wenn Sie Serato
DJ verwenden.
Die Verwendung des Internets erfordert einen separaten Vertrag mit einem Internet-Provider
und Bezahlung der Provider-Gebühren.
Installationsverfahren (Windows)
Verbinden Sie dieses Gerät und den Computer nicht, bevor die Installation abge-
schlossen ist.
Melden Sie sich vor der Installation als der als Benutzer an, der als
Administrator des Computers registriert war.
Falls andere Programme auf dem Computer laufen, beenden Sie diese.
1 Setzen Sie die CD-ROM in das CD-Laufwerk Ihres
Computers ein.
Die CD-ROM-Menü wird angezeigt.
Wenn das CD-ROM-Menü nicht angezeigt wird, wenn die CD-ROM eingesetzt
wird, öffnen Sie das CD-Laufwerk von [Computer (oder Arbeitsplatz)] im Menü
[Start], und doppelklicken Sie auf das [CD_menu.exe]-Icon.
2 Wenn das CD-ROM-Menü erscheint, wählen Sie [Laden
Sie die Serato DJ-Software herunter.] und klicken dann auf
[Start].
Zum Schließen des CD-ROM-Menüs klicken Sie auf [Verlassen].
3 „Eine Internet-Umgebung ist zum Zugriff auf die Site
erforderlich. Internetverbindung vorhanden?“ wird
angezeigt. Klicken Sie auf [Ja].
Der Webbrowser wird gestartet, und die globale Pioneer DJ-Support-Website wird
angezeigt.
4 Klicken Sie auf [Software Info] unter [DJM-900SRT] auf der
Pioneer DJ-Support-Website.
[Serato DJ Support Information] wird angezeigt.
5 Klicken Sie auf den Link zur Serato DJ-Download-Seite.
Die Serato DJ-Download-Seite wird angezeigt.
6 Melden Sie sich bei Ihrem „Serato.com“-Benutzerkonto an.
Wenn Sie bereits ein Benutzerkonto bei „Serato.com“ registriert haben,
gehen Sie zu Schritt 8 weiter.
Wenn Sie die Registrierung Ihres Benutzerkontos nicht abgeschlossen
haben, tun Sie dies auf unten beschriebene Weise.
—Folgen Sie den Anweisungen auf dem Bildschirm und geben Sie Ihre
E-Mail-Adresse und das gewünschte Passwort ein, und wählen Sie dann
Ihre Region.
—Wenn Sie [E-mail me Serato newsletters] markieren, werden
Rundschreiben mit den neuesten Informationen über Serato-Produkte
von Serato gesendet.
—Wenn die Kontoregistrierung fertig ist, erhalten Sie eine E-Mail bei der
E-Mail-Adresse, die Sie eingegeben haben. Prüfen Sie die Inhalte der von
„Serato.com“ gesendeten E-Mail.
Achten Sie auch darauf, dass Sie nicht die bei der Benutzer-Registrierung
eingegebene E-Mail-Adresse und das Passwort vergessen. Diese sind zum
Aktualisieren der Software erforderlich.
Die persönliche Information, die beim Registrieren eines neuen
Benutzerkontos eingegeben wird, kann entsprechend den auf der Website
von Serato angegebenen Datenschutzregeln gesammelt, verarbeitet und
verwendet werden.
7 Klicken Sie auf den Link in der von „Serato.com“
gesendeten E-Mail.
Dies bringt Sie zur Serato DJ-Download-Seite. Gehen Sie zu Schritt 9 weiter.
8 Melden Sie sich an.
Geben Sie die registrierte E-Mail-Adresse und das Passwort ein, um sich bei „Serato.
com“ anzumelden.
9 Laden Sie die Serato DJ-Software von der Download-Seite
herunter.
Entpacken Sie die heruntergeladene Datei, und doppelklicken Sie dann auf die
entpackte Datei, um das Installationsprogramm zu starten.
10 Lesen Sie die Bedingungen der Lizenzvereinbarung
sorgfältig durch, und wenn Sie zustimmen markieren Sie [I
agree to the license terms and conditions] und klicken dann
auf [Install].
Wenn Sie den Bedingungen der Benutzungsvereinbarung nicht zustimmen,
klicken Sie auf [Close], um die Installation abzubrechen.
Die Installation beginnt.
Die Meldung über die erfolgreiche Installation erscheint, wenn die Installation fertig
gestellt ist.
11 Klicken Sie auf [Close], um das Installationsprogramm
Serato DJ zu beenden.
Installationsverfahren (Mac OS X)
Verbinden Sie dieses Gerät und den Computer nicht, bevor die Installation abge-
schlossen ist.
Falls andere Programme auf dem Computer laufen, beenden Sie diese.
8
De
1 Setzen Sie die CD-ROM in das CD-Laufwerk Ihres
Computers ein.
Die CD-ROM-Menü wird angezeigt.
Doppelklicken Sie auf das CD-Symbol auf dem Desktop, wenn nach dem Laden
einer CD-ROM keine Ordner angezeigt werden.
2 Doppelklicken Sie [CD_menu.app].
3 Wählen Sie [Laden Sie die Serato DJ-Software herunter.]
aus dem CD-ROM-Menü, und klicken Sie dann auf [Start].
4 „Eine Internet-Umgebung ist zum Zugriff auf die Site
erforderlich. Internetverbindung vorhanden?“ wird
angezeigt. Klicken Sie auf [Ja].
Der Webbrowser wird gestartet, und die globale Pioneer DJ-Support-Website wird
angezeigt.
5 Klicken Sie auf [Software Info] unter [DJM-900SRT] auf der
Pioneer DJ-Support-Website.
[Serato DJ Support Information] wird angezeigt.
6 Klicken Sie auf den Link zur Serato DJ-Download-Seite.
Die Serato DJ-Download-Seite wird angezeigt.
7 Melden Sie sich bei Ihrem „Serato.com“-Benutzerkonto an.
Wenn Sie bereits ein Benutzerkonto bei „Serato.com“ registriert haben,
gehen Sie zu Schritt 8 weiter.
Wenn Sie die Registrierung Ihres Benutzerkontos nicht abgeschlossen
haben, tun Sie dies auf unten beschriebene Weise.
—Folgen Sie den Anweisungen auf dem Bildschirm und geben Sie Ihre
E-Mail-Adresse und das gewünschte Passwort ein, und wählen Sie dann
Ihre Region.
—Wenn Sie [E-mail me Serato newsletters] markieren, werden
Rundschreiben mit den neuesten Informationen über Serato-Produkte
von Serato gesendet.
—Wenn die Kontoregistrierung fertig ist, erhalten Sie eine E-Mail bei der
E-Mail-Adresse, die Sie eingegeben haben. Prüfen Sie die Inhalte der von
„Serato.com“ gesendeten E-Mail.
Achten Sie auch darauf, dass Sie nicht die bei der Benutzer-Registrierung
eingegebene E-Mail-Adresse und das Passwort vergessen. Diese sind zum
Aktualisieren der Software erforderlich.
Die persönliche Information, die beim Registrieren eines neuen
Benutzerkontos eingegeben wird, kann entsprechend den auf der Website
von Serato angegebenen Datenschutzregeln gesammelt, verarbeitet und
verwendet werden.
8 Klicken Sie auf den Link in der von „Serato.com“
gesendeten E-Mail.
Dies bringt Sie zur Serato DJ-Download-Seite. Gehen Sie zu Schritt 9 weiter.
9 Melden Sie sich an.
Geben Sie die registrierte E-Mail-Adresse und das Passwort ein, um sich bei „Serato.
com“ anzumelden.
10 Laden Sie die Serato DJ-Software von der Download-Seite
herunter.
Entpacken Sie die heruntergeladene Datei, und doppelklicken Sie dann auf die
entpackte Datei, um das Installationsprogramm zu starten.
11 Lesen Sie die Bedingungen der Lizenzvereinbarung
sorgfältig durch, und wenn Sie zustimmen, klicken auf
[Agree].
Wenn Sie den Bedingungen der Benutzungsvereinbarung nicht zustimmen,
klicken Sie auf [Disagree], um die Installation abzubrechen.
12 Wenn der folgende Bildschirm erscheint, bringen Sie das
Icon [Serato DJ] mit Ziehen und Ablegen auf das Icon des
[Applications]-Ordners.
9
De
Deutsch
Anschlüsse
Schalten Sie die Stromversorgung aus und ziehen Sie das Netzkabel aus der Netzsteckdose, bevor Sie Geräte anschließen oder die Anschlüsse ändern.
Schließen Sie das Netzkabel an, nachdem alle Anschlüsse zwischen den Geräten vorgenommen wurden.
Verwenden Sie immer das mitgelieferte Netzkabel.
Beachten Sie die Bedienungsanleitung der angeschlossenen Komponente.
Beim Erstellen eines DVS (Digital Vinyl System) durch Kombination mit einem Computer, einer Audioschnittstele usw. seien Sie beim Anschließen der Audioschnittstelle
an die Eingänge dieses Geräts und den Einstellungen der Eingangswahlschalter vorsichtig.
Beachten Sie auch die Bedienungsanleitungen der DJ-Software und der Audioschnittstelle.
Rückseite
OFF
RETURN
L
L
L
1 GND
2 HOT
3 COLD
L
R
L
L
IN
CH3
CH4
CH1CH2
R
R
R
R
L
R
R
PHONOPHONOPHONO
CH 4CH 3
CD/LINE
L
R
PHONO
CH 1
CD/LINE
SIGNAL GNDSIGNAL GND
TRS
CD/LINE
MASTER1MASTER2
REC OUT
BOOTH
MIC2
MIDI OUT
DIGITAL
MASTER
OUT
LINK
L
R
CH 2
CD/LINE
(MONO)
LR
(MONO)
SEND
POWER
AC IN
ON
134344343556782
deabh9cgf
1 POWER-Taste (Seite 13)
Schalten Sie die Stromversorgung dieses Geräts ein und aus.
2 RETURN-Buchsen (Seite 10)
Schließen Sie an die Ausgangsbuchse eines externen Effektors an. Wenn nur
der Kanal [L (MONO)] angeschlossen ist, wird der Kanaleingang [L (MONO)]
gleichzeitig zu dem Kanal [R] ausgegeben.
3 PHONO-Buchsen (Seite 10)
Schließen Sie ein Ausgabegerät mit auf Phono-Ebene (MM-Tonabnehmer) an
dieses Gerät an. Legen Sie nicht Line-Signale an.
Zum Anschließen eines Geräts an die [PHONO]-Buchsen ziehen Sie den
Kurzschluss-Klinkenstecker ab, der in den Buchsen steckt.
Setzen Sie diesen Kurzschluss-Klinkenstecker in die [PHONO]-Buchsen wenn
nichts angeschlossen ist, um externes Rauschen abzublocken.
4 CD/LINE-Buchsen (Seite 10)
Schließen Sie einen DJ-Player oder eine Komponente mit Line-Ausgangspegel
an.
5 SIGNAL GND-Buchse (Seite 10)
Hier wird der Massedraht eines Plattenspielers angeschlossen. Dadurch wird
Rauschen beim angeschlossenem Plattenspieler vermieden.
6 MIC2-Buchse (Seite 10)
Hier wird ein Mikrofon angeschlossen.
7 MIDI OUT-Buchse (Seite 10)
Dies wird an die Buchse MIDI IN am externen MIDI-Sequenzer angeschlossen.
8 Kensington-Diebstahlsicherung
9 DIGITAL IN-Buchse (Seite 10)
Verbinden Sie diese mit den digitalen Koax-Ausgangsbuchsen an DJ-Playern
usw. Der Ton kann kurzzeitig unterbrochen werden, wenn die Ausgangssignal-
Abtastfrequenz umgeschaltet wird.
a DIGITAL MASTER OUT-Buchse (Seite 10)
Gibt die Masterkanal-Audiosignale aus.
b LINK-Buchse (Seite 10)
Schließen Sie diese an die LINK-Buchsen an Pioneer DJ-Playern oder den LAN-
Anschlüssen von Computern an, auf denen rekordbox installiert ist (PRO DJ
LINK).
Zum Anschließen mehrere Geräte verwenden Sie einen Switching Hub (im
Fachhandel erhältlich).
Verwenden Sie einen 100Base-TX-kompatiblen Switching Hub. Manche
Switching Hubs arbeiten möglicherweise nicht ordnungsgemäß.
c BOOTH-Buchsen (Seite 10)
Dies sind Ausgangsbuchsen für einen Kabinenmonitor.
d REC OUT-Buchsen (Seite 10)
Dies sind Ausgangsbuchse zur Aufnahme.
e MASTER2-Buchsen (Seite 10)
Schließen Sie einen Endstufenverfstärker usw. an.
f MASTER1-Buchsen (Seite 10)
Schließen Sie einen Endstufenverfstärker usw. an.
Verwenden Sie immer diese symmetrischen Ausgänge. Stecken Sie nicht
versehentlich das Netzkabel eines anderen Geräts ein.
g SEND-Buchsen (Seite 10)
Schließen Sie an die Eingangsbuchse eines externen Effektors an. Wenn nur der
Kanal [L (MONO)] angeschlossen ist, wird ein Mono-Audiosignal ausgegeben.
h AC IN
Stellt die Verbindung zum Stromnetz mit dem mitgelieferten Netzkabel her.
Warten Sie, bis alle Verbindungen zwischen den Geräten hergestellt sind, bevor
Sie das Netzkabel anschließen.
Verwenden Sie immer das mitgelieferte Netzkabel.
WARNUNG
Die Kurzschluss-Klinkenstecker immer außer Reichweiter von Kindern und
Kleinkindern halten. Bei versehentlichem Verschlucken sofort einen Arzt
aufsuchen.
10
De
Anschließen der Eingangsbuchsen
Beim Erstellen eines DVS (Digital Vinyl System) durch Kombination mit einem Computer, einer Audioschnittstele usw. seien Sie beim Anschließen der Audioschnittstelle
an die Eingänge dieses Geräts und den Einstellungen der Eingangswahlschalter vorsichtig.
Beachten Sie auch die Bedienungsanleitungen der DJ-Software und der Audioschnittstelle.
OFF
RETURN
L
L
L
1 GND
2 HOT
3 COLD
L
R
L
L
IN
CH3
CH4
CH1CH2
R
R
R
R
L
R
R
PHONOPHONOPHONO
CH 4CH 3
CD/LINE
L
R
PHONO
CH 1
CD/LINE
SIGNAL GNDSIGNAL GND
TRS
CD/LINE
MASTER1MASTER2
REC OUT
BOOTH
MIC2
MIDI OUT
DIGITAL
MASTER
OUT
LINK
L
R
CH 2
CD/LINE
(MONO)
LR
(MONO)
SEND
POWER
AC IN
ON
Pioneer DJ-Player
2
Pioneer DJ-Player
2
L
R
L
R
L
R
L
R
L
R
L
R
L
R
L
R
PRO DJ LINK
1
Zur
Netzsteckdose
Switching hub
Computer
PlattenspielerPlattenspielerPlattenspieler
Plattenspieler
rekordbox
Mikrofone
Gerät mit digitalem
Audioausgang
1Einzelheiten über PRO DJ LINK siehe Über PRO DJ LINK auf Seite 14.
2Zur Verwendung der Fader-Startfunktion mit PRO DJ LINK schließen Sie ein LAN-Kabel an (Seite 15).
Anschließen der Ausgangsbuchsen
OFF
RETURN
L
L
L
1 GND
2 HOT
3 COLD
L
R
L
L
IN
CH3
CH4
CH1CH2
R
R
R
R
L
R
R
PHONO
CH 4CH 3
CD/LINE
L
R
PHONO
CH 1
CD/LINE
SIGNAL GNDSIGNAL GND
TRS
CD/LINEPHONO
MASTER1MASTER2
REC OUT
BOOTH
MIC2
MIDI OUT
DIGITAL
MASTER
OUT
LINK
L
R
CH 2
CD/LINEPHONO
(MONO)
LR
(MONO)
SEND
POWER
AC IN
ON
L
R
L
R
Zur
Netzsteckdose
Gerät mit digitalem
Audioeingang
Endstufenverstärker
(für Kabinenmonitor)
Externer Effektor
1
MIDI-Sequenzer
Kassettendeck usw.
(Aufnahmegerät mit
analogem Eingang)
Endstufenverstärker
2
Endstufenverstärker
2
3
1Schließen Sie auch den externen Effektor an die Buchse [RETURN] (Eingangsbuchse) an.
2Verwenden Sie die [MASTER1]-Buchsen nur für symmetrische Ausgabe. Verbindung mit unsymmetrischer Eingabe (wie Cinch) mit einem XLR/Cinch-Wandlerkabel (oder
Wandleradapter) kann die Klangqualität verringern und/oder Rauschen verursachen.
Für Verbindung mit unsymmetrischer Eingabe (wie Cinch) verwenden Sie die [MASTER2]-Buchsen.
3Stecken Sie nicht versehentlich das Netzkabel eines anderen Geräts in die [MASTER1]-Buchse ein.
11
De
Deutsch
Anschließen an das Steuerpult
B
ATHRU
MASTER
0
MIXING
LEVEL
PHONES
CUE
LEVEL
DIGITAL
CD/ LINEPHO
HI
MIC 1
MIC 2
0
0
TRIM
OVER
10
7
4
2
1
0
MICUSB
MIC1
Schließen Sie immer das
mitgelieferte USB-Kabel an.
Kopfhörer
Mikrofone
Computer
1
2
3
4
1 MIC1-Buchse (Seite 14)
Hier wird ein Mikrofon angeschlossen.
2 USB-Buchse (Seite 11)
Schließen Sie den Computer an.
3 USB-Anschlussanzeige
Leuchtet auf, wenn Signale mit dem Computer ausgetauscht werden.
4 PHONES-Buchse (Seite 13)
Schließen Sie hier Kopfhörer an.
Verbinden dieses Geräts mit dem
Computer
Anweisungen zur Bedienung in Kombination mit Serato DJ von siehe
„Kurzanleitung – Serato DJ Edition“. Einzelheiten siehe Herunterladen der neues-
ten Versionen der Bedienungsanleitungen und der Kurzanleitung - Serato DJ Edition
(S. 27).
1 Schließen Sie dieses Gerät über ein USB-Kabel an Ihren
Computer an.
Dieses Gerät fungiert als ein Audiogerät, das den ASIO-Standards entspricht.
Dieses Verfahren funktioniert nicht mit Computern, die nicht USB 2.0
unterstützen.
Bei Verwendung von Anwendungen mit Unterstützung für ASIO können [USB
DECK 3], [USB DECK 1], [USB DECK 2] und [USB DECK 4] als Eingänge verwen-
det werden.
Bei Verwendung von Anwendungen, die mit DirectX kompatibel sind, kann nur
[USB DECK 3] als Eingang verwendet werden.
Die empfohlene Betriebsumgebung des Computers hängt von der
DJ-Anwendung ab. Prüfen Sie immer die empfohlene Betriebsumgebung für die
verwendete DJ-Anwendung.
Wenn ein anderes USB-Audiogerät gleichzeitig an den Computer angeschlos-
sen ist, kann es nicht arbeiten oder normal erkannt werden.
Wir empfehlen, nur den Computer und dieses Gerät anzuschließen.
Beim Verbinden des Computers und dieses Geräts empfehlen wir, die
Verbindung direkt am USB-Anschluss dieses Geräts herzustellen.
2 Drücken Sie die Taste [POWER].
Schalten Sie die Stromversorgung dieses Geräts ein.
Bei Windows
—Die Meldung [Installieren von Gerätetreibersoftware] kann erscheinen,
wenn Sie dieses Gerät zuerst an dem Computer anschließen oder wenn Sie
die Verbindung zu einem anderen USB-Anschluss am Computer herstellen.
Warten Sie kurz, bis die Meldung [Die Geräte können jetzt verwendet
werden.] erscheint.
Bei Installation unter Windows XP
— [Soll eine Verbindung mit Windows Update hergestellt werden, um
nach Software zu suchen?] kann erscheinen, während die Installation
abläuft. Wählen Sie [Nein, diesmal nicht] und klicken Sie auf [Weiter], um
mit der Installation fortzufahren.
— [Wie möchten Sie vorgehen?] kann erscheinen, während die Installation
abläuft. Wählen Sie [Software automatisch installieren (empfohlen)] und
klicken Sie auf [Weiter], um mit der Installation fortzufahren.
—Wenn während der Installation [Windows-Sicherheit] auf dem Bildschirm
erscheint, klicken Sie auf [Diese Treibersoftware trotzdem installieren]
und fahren mit der Installation fort.
12
De
Bedienung
Bedienpult
USB
DECK
3
USB
DECK
1
USB
DECK
2
USB
DECK
4
LEVEL
DIGITAL
CD/ LINEPHONO
HI
MIC 1
MIC 2
HI
LOW
EQ
EQ /
1212
1212
0
0
ON
TALK
OVER
OFF
SPACE
NOISE
CUE
CUE
CUE
CRUSHFILTER
DUB
ECHO
GATE/
COMP
1
234
BATHRU
TRIM
9
6
-
26
/
MID
6
-
26
/
LOW
6
-
26
/
COLOR
ISO
OVER
10
10
9
8
7
6
5
4
3
2
1
7
4
2
1
-
1
-
2
-
3
-
5
-
7
-
10
-
15
-
24
dB
0
HILOW
TRIM
DIGITAL
CD/ LINEPHONO
HI
EQ /
CUE
BATHRU
9
6
-
26
/
MID
6
-
26
/
LOW
6
-
26
/
COLOR
ISO
OVER
10
7
4
2
1
-
1
-
2
-
3
-
5
-
7
-
10
-
15
-
24
dB
0
HILOW
CUE
TRIM
DIGITAL
CD/ LINEPHONO
HI
EQ /
CUE
BATHRU
9
6
-
26
/
MID
6
-
26
/
LOW
6
-
26
/
COLOR
ISO
OVER
10
10
9
8
7
6
5
4
3
2
1
7
4
2
1
-
1
-
2
-
3
-
5
-
7
-
10
-
15
-
24
dB
0
HILOW
TRIM
DIGITAL
CD/ LINEPHONO
HI
EQ /
CUE
BATHRU
MONOSTEREO
9
6
-
26
/
MID
6
-
26
/
LOW
6
-
26
/
COLOR
ISO
OVER
10
10
9
8
7
6
5
4
3
2
1
000
7
4
2
1
-
1
-
2
-
3
-
5
-
7
-
10
-
15
-
24
dB
dBRL
0
OVER
10
7
4
2
1
-
1
-
2
-
3
-
5
-
7
-
10
-
15
-
24
0
HILOW
EQISOLATOR
AB
CROSS FADER ASSIGN
LEVEL
POWER
BALANCE
0
AUTO
GRID
TA P
AUTO
/ TAP
BPM
%
ms
CH SELECT
START
/STOP
RL
WAKE UP
PARAMETER
1234
MICMST
AB
TIME
MAX
LEVEL / DEPTH
ON/ OFF
MIN
MICMASTERMIDI
BEAT EFFECTS
BEAT
TAP
LINK
SOUND COLOR FX
HEADPHONES
FADER START
STEREO
MASTER
0
MIXING
LEVEL
BOOTH MONITOR
EQ CURVE
CH FADER
CROSS FADER
PHONES
CUE
MONO SPLIT
USB
MIC1
QUAN-
TIZE
MASTER
CF.B
CF.A
MIC
4
3
2
1
0
ON/OFFLFO FORM
UTILITY
X
-
PAD
ROBOT
REVERB
PHASER
SLIP ROLL
ROLL
FLANGER
FILTER
REV ROLL
SND/ RTN
MELODICTRANS
ECHO
SPIRAL
MIDI LFO
DELAY
1
2
4
6
8
9
a
u
w
z
6
B
C
D
E
F
A
t
y
s
5
7
3
v
x
e
j
d
f
g
6
h
i
c
l
666
k
m
n
o
p
q
r
6
e
d
f
g
h
i
c
e
d
f
g
h
i
c
e
d
f
g
h
i
c
bbbb
1 MIC1 LEVEL-Regler (Seite 14)
Stellt den Soundpegelausgang vom Kanal [MIC1] ein.
2 MIC2 LEVEL-Regler (Seite 14)
Stellt den Soundpegelausgang vom Kanal [MIC2] ein.
3 EQ (HI, LOW)-Regler (Seite 14)
Diese stellen die Klangqualität von den Kanälen [MIC1] und [MIC2] ein.
4 OFF, ON, TALK OVER-Wahlschalter (Seite 14)
Schaltet das Mikrofon ein/aus.
5 SOUND COLOR FX-Tasten (Seite 15)
Diese schalten die SOUND COLOR FX-Effekte ein/aus.
6 CUE-Taste (Seite 13)
Drücken Sie die Taste(n) [CUE] für den Kanal (Kanäle) das (den) Sie mithören
wollen.
7 FADER START (1, 2, 3, 4)-Tasten (Seite 15)
Diese schalten die Fader-Start-Funktion ein/aus.
8 MONO SPLIT, STEREO-Wahlschalter (Seite 13)
Schaltet um, wie der Mithörsoundausgang von den Kopfhörern verteilt wird.
9 MIXING-Regler (Seite 13)
Dies stellt die Balance der Mithörlautstärke zwischen dem Sound der Kanäle, für
die die Taste [CUE] gedrückt wird und dem Sound des Kanals [MASTER] um.
a LEVEL-Regler (Seite 13)
Stellt den Audiopegelausgang von den Kopfhörern ein.
b USB-Audio-Eingangsanzeige
Leuchtet, wenn Sound vom Computer zu den verschiedenen Kanälen eingege-
ben wird.
c Eingabe-Wahlschalter (Seite 13)
Wählt die Eingangsquelle jedes Kanals unter den an dieses Gerät angeschlosse-
nen Komponenten.
d TRIM-Regler (Seite 13)
Stellen Sie den Pegel der Audiosignale ein, die in jedem Kanal angelegt werden.
e EQ/ISO (HI, MID, LOW)-Regler (Seite 13)
Diese stellen die Soundqualität von verschiedenen Kanälen ein.
f Kanalpegelanzeige (Seite 13)
Zeigt den Soundpegel der verschiedenen Kanäle ein, bevor Sie durch die
Kanalfader gehen.
13
De
Deutsch
g COLOR-Regler (Seite 15)
Dies ändert die Parameter von SOUND COLOR FX der verschiedenen Kanäle.
h Kanalfader (Seite 13)
Stellt den Pegel der Audiosignale ein, die in jedem Kanal ausgegeben werden.
i CROSS FADER ASSIGN (A, THRU, B)-Wahlschalter (Seite 13)
Stellt das Ausgabeziel jedes Kanals auf [A] oder [B].
j Crossfader (Seite 13)
Gibt vom Crossfader-Asign-Schalter zugewiesene Audiosignale aus, die den
Kurveneigenschaften entsprechend, die vom [CROSS FADER] (Crossfader-
Curve-Wahlschalter) gewählt sind.
k MASTER LEVEL-Regler (Seite 13)
Stellt den Audiopegelausgang von den Buchsen [MASTER1] und [MASTER2]
ein.
l Master-Pegelanzeige (Seite 13)
Zeigt den Audiopegelausgang von den Buchsen [MASTER1] und [MASTER2]
an.
m BALANCE-Regler (Seite 14)
Stellt die Links/Rechts-Balance der Soundausgabe von den Buchsen
[MASTER1] usw. ein.
n MONO, STEREO-Wahlschalter (Seite 14)
Schaltet die Soundausgabe von den Buchsen [MASTER1] usw. zwischen Mono
und Stereo um.
o BOOTH MONITOR-Regler (Seite 14)
Stellen Sie den Pegel der Audiosignale ein, die an der Buchse [BOOTH] ausge-
geben werden.
p EQ CURVE (ISOLATOR, EQ)-Wahlschalter (Seite 13)
Schaltet die Funktion der [EQ/ISO (HI, MID, LOW)]-Regler ein.
q CH FADER (, , )-Wahlschalter (Seite 14)
Schaltet die Eigenschaften der Kanalfader-Kurve um.
r CROSS FADER (, , )-Wahlschalter (Seite 14)
Dadurch werden die Crossfader-Curve-Eigenschaften umgeschaltet.
s ON/OFF (UTILITY)-Taste
—ON/OFF: Schaltet die MIDI-Funktion ein/aus (Seite 16).
—UTILITY: Zeigt den [USER SETUP] oder [CLUB SETUP] -Bildschirm (Seite 23)
an.
t START/STOP-Taste (Seite 17)
Sendet die MIDI-Start-/MIDI-Stopp-Signale.
u LFO FORM (WAKE UP)-Taste
—LFO FORM: Wenn [MIDI LFO] bei BEAT EFFECT gewählt ist, schaltet die
Wellenform des MIDI-Signals bei jedem Tastendruck von (Seite 20) um.
—WAKE UP: Hebt den Auto-Standby-Modus auf.
v Hauptgerät-Display
w X-PAD (Seite 16)
Stellt die quantitativen Parameter der Funktion BEAT EFFECT ein.
x BEAT , -Tasten (Seite 16)
Stellen Sie die Beat-Fraktion zum Synchronisieren des Effektsounds ein.
y TAP (ENTER)-Taste
—TAP: Wenn der BPM-Messmodus auf [TAP] gestellt ist, wird der BPM manu-
ell durch Antippen der Taste mit einem Finger (Seite 16) eingegeben.
—ENTER: Dient zum Ändern der Einstellungen dieses Geräts (Seite 23).
z QUANTIZE-Taste
Wenn die Funktion QUANTIZE für BEAT EFFECT eingeschaltet ist, wird der Effekt
auf den Sound angewendet, ohne das Tempo des aktuell spielenden Tracks zu
verlassen. (Seite 15).
A AUTO/TAP-Taste (Seite 16)
Schaltet den BPM-Messungsmodus um.
B Beat-Effekt-Wahlschalter (Seite 16)
Schaltet den BEAT EFFECT-Effekttyp um.
C Effektkanal-Wahlschalter (Seite 16)
Schaltet den Kanal um, für den der BEAT EFFECT übernommen wird.
D TIME-Regler (Seite 16)
Stellt die Zeitparameter von BEAT EFFECT ein.
E LEVEL/DEPTH-Regler (Seite 16)
Stellt die quantitativen Parameter von BEAT EFFECT ein.
F ON/OFF-Taste (Seite 16)
Schaltet die Funktion BEAT EFFECT ein/aus.
Ziehen Sie nicht gewaltsam an den Kanal-Fader- und Crossfader-Knöpfen. Die
Knöpfe haben eine Struktur, die verhindert, dass sie leicht herausgezogen wer-
den. Durch starkes Ziehen an den Knöpfen kann das Gerät beschädigt werden.
Grundlegender Betrieb
Tonausgabe
1 Drücken Sie die Taste [POWER].
Schalten Sie die Stromversorgung dieses Geräts ein.
2 Schalten Sie die Eingangswahlschalter ein.
Wählt die Eingangsquellen für verschiedene Kanäle unter den an dieses Gerät
angeschlossenen Geräten.
— [DIGITAL]: Wählt den DJ-Player, der an die Buchsen [DIGITAL] angeschlos-
sen ist.
— [PHONO]: Wählt den Plattenspieler, der an die Buchsen [PHONO] ange-
schlossen ist.
— [CD/LINE]: Wählt das Cassettendeck oder den CD-Player, der an die
Buchsen [CD/LINE] angeschlossen ist.
— [USB]: Wählt den Ton des Computers, der an die Buchse [USB] angeschlos-
sen ist.
3 Drehen Sie den Regler [TRIM].
Stellen Sie den Pegel der Audiosignale ein, die in jedem Kanal angelegt werden.
Die entsprechende Kanalpegelanzeige leuchtet auf, wenn Audiosignale richtig an
den Kanal angelegt werden.
4 Bewegen Sie den Kanal-Fader von Ihnen weg.
Stellt den Pegel der Audiosignale ein, die in jedem Kanal ausgegeben werden.
5 Schalten Sie den [CROSS FADER ASSIGN (A, THRU, B)]-
Wahlschalter um.
Schaltet das Ausgabeziel jedes Kanals um.
— [A]: Weist zu [A] (links) des Crossfader zu.
— [B]: Weist zu [B] (rechts) des Crossfader zu.
— [THRU]: Wählt diese Option, wenn Sie den Crossfader nicht verwenden
möchten. (Die Signale laufen nicht durch den Crossfader.)
6 Stellen Sie den Crossfader ein.
Diese Bedienung ist nicht erforderlich, wenn der [CROSS FADER ASSIGN (A, THRU,
B)]-Wahlschalter auf [THRU] gestellt ist.
7 Drehen Sie den Regler [MASTER LEVEL].
Audiosignale werden von den Buchsen [MASTER1] und [MASTER2] ausgegeben.
Die Master-Pegelanzeige leuchtet.
Abstimmen der Tonqualität
1 Schalten Sie den [EQ CURVE (ISOLATOR, EQ)]-Wahlschalter
um.
— [ISOLATOR]: Fungiert als Isolator.
— [EQ]: Die Equalizerfunktion ist eingestellt.
2 Drehen Sie die Regler [EQ/ISO (HI, MID, LOW)] zum Steuern
unterschiedlicher Kanäle.
Die justierbaren Bereiche für die betreffenden Regler sind wie unten gezeigt.
—HI: –26 dB bis +6 dB (13 kHz)
—MID: –26 dB bis +6 dB (1 kHz)
—LOW: –26 dB bis +6 dB (70 Hz)
Mithören von Ton mit Kopfhörern
1 Schließen Sie Kopfhörer an die Buchse [PHONES] an.
2 Drücken Sie die Taste(n) [CUE] für den Kanal (Kanäle) das
(den) Sie mithören wollen.
3 Schalten Sie den [MONO SPLIT, STEREO]-Wahlschalter um.
— [MONO SPLIT]: Der Ton des Kanals, für den die Taste [CUE] gedrückt
wird, wird vom linken Kopfhörerkanal ausgegeben, und der Ton vom Kanal
[MASTER] vom rechten Kopfhörerkanal.
— [STEREO]: Der Ton des Kanals, für den die Taste [CUE] gedrückt wird, wird in
Stereo vom Kopfhörer ausgegeben.
4 Drehen Sie den Regler [MIXING].
Dies stellt die Balance der Mithörlautstärke zwischen dem Sound der Kanäle, für die
die Taste [CUE] gedrückt wird und dem Sound des Kanals [MASTER] um.
14
De
5 Drehen Sie den Regler [LEVEL] für [HEADPHONES].
Der Sound der Kanäle, für die die [CUE]-Taste gedrückt ist, wird von den Kopfhörern
ausgegeben.
Wenn die Taste [CUE] erneut gedrückt wird, wird die Mithörfunktion
aufgehoben.
Umschalten der Faderkurve
䢢Wählen Sie die Eigenschaften der Kanalfader-Kurve
Schalten Sie den [CH FADER (, , )]-Wahlschalter um.
— []: Die Kurve steigt abrupt im hinteren Bereich an.
— []: Eine Kurve, die zwischen den darüber und darunter liegenden liegt,
wird eingestellt.
— []: Die Kurve steigt allmählich an (der Ton nimmt allmählich zu, während
der Kanalfader von der Vorderseite wegbewegt wird).
䢢Wählen Sie die Crossfader-Kurve-Eigenschaften
Schalten Sie den [CROSS FADER (, , )]-Wahlschalter um.
— []: Bewirkt eine scharf ansteigende Kurve (wenn der Crossfader von der
Seite [A] weg gestellt wird, werden Audiosignale sofort von der Seite [B]
ausgegeben).
— []: Bewirkt eine Kurve, die zwischen den zwei Kurven darüber und darun-
ter geformt ist.
— []: Bewirkt eine allmählich ansteigende Kurve (wenn der Crossfader von
der Seite [A] weg gestellt wird, nimmt der Klang auf der Seite [B] allmählich
zu, während der Klang auf der Seite [A] allmählich schwächer wird).
Verwendung eines Mikrofons
1 Schließen Sie ein Mikrofon an die Buchse [MIC1] oder
[MIC2] an.
2 Stellen Sie den [OFF, ON, TALK OVER]-Wahlschalter auf
[ON] oder [TALK OVER].
— [ON]: Die Anzeige leuchtet.
— [TALK OVER]: Die Anzeige blinkt.
Bei Einstellung auf [TALK OVER] wird der Sound anderer Kanäle als der des
[MIC]-Kanals um 18 dB (Standard) gedämpft, wenn ein Sound von –10 dB oder
mehr am Mikrofon anliegt.
Die [TALK OVER]-Sounddämpfung kann bei [USER SETUP] geändert werden.
Anweisungen zur Änderung siehe Ändern der Einstellungen auf Seite 23.
Der Talk-Over-Modus kann auf normalen Modus oder erweiterten Modus umge-
schaltet werden. Anweisungen zur Änderung siehe Ändern der Einstellungen auf
Seite 23.
3 Drehen Sie den Regler [MIC1 LEVEL] oder [MIC2 LEVEL].
Stellen Sie den Pegel des Soundausgangs vom Kanal [MIC] ein.
Achten Sie darauf, dass bei Drehen auf die ganz rechte Position ein sehr lauter
Ton kommt.
4 Geben Sie Audiosignale zum Mikrofon ein.
䢢Abstimmen der Tonqualität
Drehen Sie die Regler [EQ (HI, LOW)] des [MIC]-Kanals.
Die justierbaren Bereiche für die betreffenden Regler sind wie unten gezeigt.
—HI: –12 dB bis +12 dB (10 kHz)
—LOW: –12 dB bis +12 dB (100 Hz)
Umschalten zwischen Mono- und Stereo-Audio
Dies schaltet die Tonausgabe von den Buchsen [MASTER1], [MASTER2], [BOOTH],
[REC OUT], [PHONES], [DIGITAL MASTER OUT] und [USB] zwischen Mono und
Stereo um.
Zur Einstellung des von den Buchsen [USB] ausgegebenen Sounds wählen Sie
[MIX (REC OUT)] bei [Mixer Audio Output] im Einstellung-Dienstprogramm.
Schalten Sie den [MONO, STEREO]-Wahlschalter um.
— [MONO]: Gibt Mono-Audio aus.
— [STEREO]: Gibt Stereo-Audio aus.
䢢Einstellen der L/R-Balance von Audio
Die Links/Rechts-Balance von den Buchsen [MASTER1], [MASTER2], [BOOTH],
[REC OUT], [PHONES], [DIGITAL MASTER OUT] und [USB] ausgegebenen Tons
kann eingestellt werden.
Zur Einstellung des von den Buchsen [USB] ausgegebenen Sounds wählen Sie
[MIX (REC OUT)] bei [Mixer Audio Output] im Einstellung-Dienstprogramm.
1 Stellen Sie den [MONO, STEREO]-Wahlschalter auf
[STEREO].
2 Drehen Sie den Regler [BALANCE].
Die Links/Rechts-Balance ändert sich entsprechend der Richtung, in der
[BALANCE]-Regler gedreht wird und seiner Position.
Durch Drehen auf ganz rechte Position wird nur der rechte Ton von Stereo-Audio
ausgegeben. Durch Drehen auf ganz linke Position wird nur der linke Ton von
Stereo-Audio ausgegeben.
Audio wird von der Buchse [BOOTH] ausgegeben
Drehen Sie den Regler [BOOTH MONITOR].
Stellen Sie den Pegel der Audiosignale ein, die an der Buchse [BOOTH] ausgege-
ben werden.
Erweiterte Bedienungen
Verwendung von Serato DJ-unterstützten
Funktionen
Wenn dieses Gerät und ein Computer, auf dem Serato DJ läuft, über ein USB-Kabel
verbunden sind, können die untenstehenden Funktionen verwendet werden.
䢢QUANTIZE
Wenn mit Serato DJ analysierte Tracks verwendet werden, werden Tracks auf Beat
gelegt, auch wenn die [BEAT EFFECTS] [ON/OFF]-Taste gedrückt oder der [X-PAD]
rau berührt wird.
䢢FADER START
Die Wiedergabe von Tracks im Serato DJ kann gestartet werden, indem der Fader
dieser Einheit berührt wird (Fader Start Play).
Über PRO DJ LINK
Wenn ein PRO DJ LINK unterstützender Pioneer DJ-Player (z.B. CDJ-2000nexus,
CDJ-2000, CDJ-900), ein Computer, auf dem rekordbox installiert ist und dieses
Gerät über ein LAN-Kabel verbunden sind, können die untenstehenden PRO DJ
LINK-Funktionen verwendet werden.
Weitere Einzelheiten über die Funktion PRO DJ LINK finden Sie in der
Bedienungsanleitung des DJ-Players und der Dokumentation von rekordbox.
Anweisungen zu Verbindungen siehe Anschließen der Eingangsbuchsen auf Seite
10.
Bei Anschließen mit einem Switching Hub können bis zu 4 DJ-Player und 2
Computer angeschlossen werden.
Verwenden Sie einen 100Base-TX-kompatiblen Switching Hub. Manche
Switching Hubs arbeiten möglicherweise nicht ordnungsgemäß.
Stellen Sie die Player-Nummer des DJ-Players auf die gleiche Nummer wie der
Kanal, an dem das Audiokabel angeschlossen ist.
䢢QUANTIZE
Wenn mit rekordbox analysierte Tracks verwendet werden, wird der Track aufgelegt,
auch wenn die Taste [ON/OFF] von [BEAT EFFECTS] gedrückt oder der [X-PAD]
rauh berührt wird.
䢢FADER START
Die Wiedergabe auf dem DJ-Player kann durch Betrieb des Faders dieses Geräts
gestartet werden (Fader Start Play).
䢢LINK MONITOR
Mit dieser Funktion können auf dem Computer gespeicherte rekordbox
Musikdateien schnell über den Kopfhörer mitgehört werden.
䢢STATUS INFORMATION
Diese Funktion informiert die DJ-Player über den angeschlossenen Kanalstatus
(On-Air-Status, Kanalnummer usw.).
15
De
Deutsch
Verwendung der QUANTIZE-Funktion
Effekte können auf den Sound im Tempo mit dem aktuell spielenden Track ange-
wendet werden, basierend auf der GRID-Information über Tracks, die mit Serato DJ
oder rekordbox analysiert wurden.
Zur Verwendung der QUANTIZE-Funktion mit PRO DJ LINK schließen Sie diese
Einheit und einen PRO DJ LINK-kompatiblen Pioneer DJ-Player im Voraus an.
Anweisungen zum Anschließen siehe Anschließen der Eingangsbuchsen auf Seite
10.
Außerdem müssen Musikdateien im Voraus mit rekordbox analysiert worden sein,
um die QUANTIZE-Funktion zu verwenden. Für Anweisungen zum Analysieren von
Musikdateien mit rekordbox siehe auch Bedienungsanleitung von rekordbox.
Bei Verwendung in Kombination mit CDJ-2000nexus aktualisieren Sie die
Firmware zuerst auf Version 1.02 oder höher.
Zur Verwendung in Kombination mit CDJ-2000 oder CDJ-900 aktualisieren Sie
die Firmware zuerst auf Version 4.0 oder höher.
1 Drücken Sie die Taste [QUANTIZE].
Die QUANTIZE-Funktion schaltet sich ein.
[GRID] leuchtet im Display des Hauptgeräts dieser Einheit auf, wenn die GRID-
Information richtig vom Serato DJ oder vom DJ-Player empfangen wurde, und
die QUANTIZE-Funktion kann verwendet werden. [GRID] blinkt, wenn die GRID-
Information nicht richtig empfangen wurde.
Je nach dem Wiedergabestatus des Serato DJ oder des DJ-Players (Off-Air,
Scratching, Reverse-Wiedergabe usw.), kann es unmöglich sein, die GRID-
Information zu empfangen.
2 Drücken Sie die Taste [ON/OFF] von [BEAT EFFECTS] oder
berühren Sie das [X-PAD].
Der Effekt wird zu dem Sound in dem Tempo, mit dem der Track gespielt wird,
hinzugefügt.
Wenn die Taste [QUANTIZE] erneut gedrückt wird, wird die Funktion QUANTIZE
ausgeschaltet.
Verwendung der FADER START-Funktion
Wenn dieses Gerät und ein Computer, auf dem Serato DJ läuft, über ein USB-Kabel
verbunden sind, Bedienungen wie Starten der Wiedergabe von Tracks im Serato DJ
mit dem Fader dieser Einheit gesteuert werden.
Verbinden Sie dieses Gerät und einen Computer, auf dem Serato DJ läuft, im
Voraus.
Entsprechend können Bedienungen wie Starten der Wiedergabe des DJ-Players
mit dem Fader dieser Einheit gesteuert werden, wenn diese Einheit und ein Pioneer
DJ-Player über LAN-Kabel verbunden sind.
Verbinden Sie den Pioneer DJ-Player im Voraus mit dieser Einheit. Anweisungen
zum Anschließen siehe Anschließen der Eingangsbuchsen auf Seite 10.
Für Anweisungen zum Einstellen der Player-Nummern von Pioneer DJ-Playern siehe
Über PRO DJ LINK auf Seite 14.
Die Fader-Start-Funktion kann für alle DJ-Player gleichzeitig ein- und ausgeschaltet
werden. Zum Einschaltverfahren siehe Ändern der Einstellungen auf Seite 23.
Die FADER START-Funktion kann nicht verwendet werden, wenn versucht wird,
DVS-Steuerung auszuführen, während Serato DJ auf Absolute-Modus gestellt
ist. Wenn eine der [FADER START (1, 2, 3, 4)]-Tasten gedrückt wird, während der
Absolute-Modus eingestellt ist, blinkt die betreffende Taste und erlischt dann.
䢢Starten Sie die Wiedergabe mit dem Kanal-Fader
1 Stellen Sie den [CROSS FADER ASSIGN (A, THRU, B)]-
Wahlschalter auf [THRU].
2 Drücken Sie eine der [FADER START (1, 2, 3, 4)]-Tasten.
Wählen Sie den zu startenden Kanal mit der Fader-Startfunktion.
Für Serato DJ
— [Fader Start 1]-Taste: Wählt [DECK 3].
— [Fader Start 2]-Taste: Wählt [DECK 1].
— [Fader Start 3]-Taste: Wählt [DECK 2].
— [Fader Start 4]-Taste: Wählt [DECK 4].
3 Stellen Sie den Kanalfader auf die nächste Position zu
Ihnen.
4 Stellen Sie einen Cue in Serato DJ oder auf dem DJ-Player
ein.
Der Track geht mit Cue zu dem Cue-Punkt und schaltet auf Pause.
5 Bewegen Sie den Kanal-Fader von Ihnen weg.
Die Wiedergabe des Tracks in Serato DJ oder auf dem DJ-Player beginnt.
Wenn Sie den Kanal-Fader zurück in Ausgangsposition stellen, kehrt der
Player sofort auf den bereits eingestellten Cue-Punkt zurück und pausiert die
Wiedergabe (Back Cue).
䢢Starten Sie die Wiedergabe mit dem Crossfader
1 Stellen Sie den [CROSS FADER ASSIGN (A, THRU, B)]-
Wahlschalter auf [A] oder [B].
2 Drücken Sie eine der [FADER START (1, 2, 3, 4)]-Tasten.
Wählen Sie den zu startenden Kanal mit der Fader-Startfunktion.
Für Serato DJ
— [Fader Start 1]-Taste: Wählt [DECK 3].
— [Fader Start 2]-Taste: Wählt [DECK 1].
— [Fader Start 3]-Taste: Wählt [DECK 2].
— [Fader Start 4]-Taste: Wählt [DECK 4].
3 Stellen Sie den Crossfader ein.
Stellen Sie auf die Randposition entgegengesetzt der Seite, auf der der Kanal, der
mit der Fader-Startfunktion verwendet werden soll, eingestellt ist.
4 Stellen Sie einen Cue in Serato DJ oder auf dem DJ-Player
ein.
Der Track geht mit Cue zu dem Cue-Punkt und schaltet auf Pause.
5 Stellen Sie den Crossfader ein.
Die Wiedergabe des Tracks in Serato DJ oder auf dem DJ-Player beginnt.
Wenn Sie den Crossfader zurück in Ausgangsposition stellen, kehrt der
Player sofort auf den bereits eingestellten Cue-Punkt zurück und pausiert die
Wiedergabe (Back Cue).
Verwendung der LINK MONITOR-Funktion
Markieren Sie vorher [„LINK MONITOR“ von Pioneer DJ-Mixern verwenden.]
bei [Datei] > [Voreinstellungen] > [Audio] in rekordbox. Lesen Sie auch in der
Bedienungsanleitung von rekordbox nach.
1 Schließen Sie Kopfhörer an die Buchse [PHONES] an.
2 Schließen Sie einen Computer an, auf dem rekordbox
installiert ist.
Anweisungen zu Verbindungen siehe Anschließen der Eingangsbuchsen auf Seite
10.
3 Auswählen des mit rekordbox mitzuhörenden Tracks.
4 Drücken Sie die Taste [CUE] für [LINK].
Der mit rekordbox gewählte Track wird vom Kopfhörer ausgegeben.
Wenn die Taste [CUE] erneut gedrückt wird, wird die Mithörfunktion
aufgehoben.
Das gleiche Verfahren wie bei Mithören von Ton mit Kopfhörern (Schritt 3 bis 5)
kann ausgeführt werden.
Verwendung der SOUND COLOR FX-Funktion
Dies sind Effekte, die sich im Zusammenhang mit dem [COLOR]-Regler ändern.
1 Drücken Sie eine der [SOUND COLOR FX]-Wahltasten.
Dies wählt den Typ des Effekts.
Die Taste, die gedrückt wurde, blinkt.
Auch wenn eine der [SOUND COLOR FX]-Wahltasten bereits gewählt ist, wird
beim Wählen und Drücken einer anderen Taste diese gewählt.
Für die Typen der Effekte siehe Typen von SOUND COLOR FX-Effekten auf Seite
18.
Der gleiche Effekt ist für [CH1] bis [CH4] eingestellt.
2 Drehen Sie den Regler [COLOR].
Der Effekt wird auf den Kanal bzw. die Kanäle angelegt, für den (die), der (die)
Regler gedrückt wurde(n).
䢢Abbrechen des SOUND COLOR FX-Effekts
Drücken Sie die blinkende [SOUND COLOR FX]-Wahltaste.
Der Effekt wird aufgehoben.
16
De
Verwendung der BEAT EFFECT-Funktion
Diese Funktion erlaubt es Ihnen, sofort verschiedene Effekte entsprechend dem
Tempo (BPM = Taktschläge pro Minute) des laufenden Tracks einzustellen.
Hauptgerät-Display
1
2
3
7
9
a
5
4
6
8
AUTO
GRID
TAPBPM
%
ms
CH SELECT
PARAMETER
1234
MICMST
AB
1
Effektanzeige-SektionDer Name des gewählten Effekts wird angezeigt.
2
Kanalwahlwahlanzeige-
Sektion
Der Name des Kanals, für den der Effekt übernommen wird, wird
angezeigt.
3
AUTO (TAP)
[AUTO] leuchtet, wenn der BPM-Messungsmodus auf Auto-
Modus gestellt ist.
[TAP] leuchtet, wenn im manuellen Eingangsmodus.
4
BPM-Wert-Anzeige (3
Stellen)
Wenn im Auto-Modus wird der automatisch erkannte BPM-Wert
angezeigt.
Wenn der BPM nicht erkannt werden kann, wird der vorher
erkannte BPM-Wert angezeigt und blinkt.
Wenn im manuellen Eingangsmodus wird der manuell eingege-
bene BPM-Wert angezeigt.
5
GRID
Dies leuchtet auf, wenn Serato DJ läuft und die QUANTIZE-
Funktionen verwendet werden kann. Leuchtet auch auf, wenn
ein Track abgespielt wird, der mit rekordbox analysiert wurde
und die QUANTIZE-Funktion in Kombination mit dem DJ-Player
verwendet werden kann. Blinkt oder bleibt erloschen, wenn die
QUANTIZE-Funktion nicht verwendet werden kann.
6
BPM
Dies leuchtet immer.
7
Parameteranzeige-
Sektion
Dies zeigt die Parameter an, die für die einzelnen Effekte festge-
legt sind.
Wenn die Taste [BEAT, ] gedrückt wird, wird die entspre-
chende Beat-Fraktion 1 Sekunde lang angezeigt.
Wenn ein Wert außerhalb des Parameterbereichs mit der Taste
[BEAT, ] festgelegt ist, ändert sich der Wert nicht, und die
Anzeige blinkt.
8
% (ms)
Diese leuchten entsprechend den Einheiten für die verschiede-
nen Effekte auf.
9
Beatanzeige-Sektion
Diese leuchtet entsprechend der gewählten Beatnummer-
Position auf.
a
Berührungsanzeige-
Sektion
Diese leuchtet, wenn [X-PAD] berührt wird.
1 Drücken Sie die Taste [AUTO/TAP].
Wählen Sie den BPM-Messungsmodus.
— [AUTO]: Der BPM wird automatisch von dem angelegten Audiosignal
gemessen. Der Modus [AUTO] ist eingestellt, wenn die Stromversorgung
dieses Geräts eingeschaltet wird.
— [TAP]: Der BPM wird manuell durch Antippen der Taste [TAP] mit einem
Finger eingeben.
Der [AUTO] BPM-Messbereich beträgt BPM = 70 bis 180. Bei manchen Tracks
kann es unmöglich sein, den BPM richtig zu messen. Wenn der BPM nicht
gemessen werden kann, blinkt der BPM-Wert im Display. In solchen Fällen
verwenden Sie die Taste [TAP] zur manuellen Eingabe des BPM.
2 Drehen Sie den Schwebungseffekt-Wahlschalter.
Dies wählt den Typ des Effekts.
Für die Typen der Effekte siehe Typen von BEAT EFFECT auf Seite 18.
Zur Verwendung von [SND/RTN] siehe Verwendung des externen Effektors unten.
Zur Verwendung von [MIDI LFO] siehe Verwenden von MIDI LFO auf Seite 17.
3 Drehen Sie den Effektkanal-Wahlschalter.
Dies wählt den Kanal, für den der Effekt übernommen wird.
— [1] – [4]: Der Effekt wird auf den Sound des betreffenden Kanals angelegt.
— [MIC]: Der Effekt wird auf den Sound des Kanals [MIC] angelegt.
— [CF.A], [CF.B]: Der Effekt wird auf den Ton der Seite [A] (links) oder [B]
(rechts) des Crossfaders angelegt.
— [MASTER]: Der Effekt wird auf den Sound des Kanals [MASTER] angelegt.
Diese Bedienung ist nicht erforderlich, wenn der [MIDI LFO] gewählt ist.
4 Drücken Sie die Taste [BEAT , ].
Stellen Sie die Beat-Fraktion zum Synchronisieren des Effektsounds ein.
Die Effektzeit entsprechend der Taktschlagfraktion wird automatisch eingestellt.
5 Drücken Sie die Taste [ON/OFF] für [BEAT EFFECTS].
Der Effekt wird auf den Ton angelegt.
Der Zeitparameter des Effekts kann durch Drehen des Reglers [TIME] eingestellt
werden.
Der quantitative Parameter des Effekts kann durch Drehen des Reglers [LEVEL/
DEPTH] eingestellt werden.
Die Taste [ON/OFF] blinkt, wenn der Effekt eingeschaltet ist.
Wenn die Taste [ON/OFF] erneut gedrückt wird, wird der Effekt ausgeschaltet.
䢢Manuelle Eingabe des BPM
Tippen Sie mindestens zweimal im Rhythmus mit dem Beat
(in Viertelnoten) des aktuell spielenden Sounds auf die Taste
[TAP].
Der Durchschnittswert des Intervalls, bei dem die Taste [TAP] angetippt wurde, wird
als BPM eingestellt.
Wenn der BPM mit der Taste [TAP] eingestellt wird, wird die Beat-Fraktion
auf [1/1] gestellt, und die Zeit für einen Beat (Viertelnote) wird als Effektzeit
eingestellt.
Der BPM kann manuell durch Drehen des Reglers [TIME] eingestellt werden,
während gleichzeitig die Taste [TAP] gedrückt wird.
Der BPM kann in Einheiten von 0,1 durch Drücken der Taste [AUTO/TAP] ein-
gestellt werden, während gleichzeitig die Taste [TAP] gedrückt und der Regler
[TIME] gedreht wird, während die beiden Tasten gedrückt werden.
䢢Verwendung des externen Effektors
1 Verbinden Sie dieses Gerät und den externen Effektor.
Anweisungen zu Verbindungen siehe Anschließen der Ausgangsbuchsen auf Seite
10.
2 Drehen Sie den Schwebungseffekt-Wahlschalter.
Wählen Sie [SND/RTN (MIDI LFO)].
3 Drehen Sie den Effektkanal-Wahlschalter.
Dies wählt den Kanal, für den der Effekt übernommen wird.
4 Drücken Sie die Taste [ON/OFF] für [BEAT EFFECTS].
Der durch den externen Effektor geführte Ton wird von dem Kanal [MASTER]
ausgegeben.
Wenn die Taste [ON/OFF] erneut gedrückt wird, wird der Effekt ausgeschaltet.
Bedienen von [X-PAD]
Bedienungsverfahren
[ON/OFF]-Taste Status von
[BEAT EFFECTS]
X-PAD
Effekt
1
Aus (leuchtet)
Loslassen K
Berühren
Aus K Ein
2
Ein (blinkt)
Loslassen K
Berühren
Ein K Ein
䢢Bedienungsverfahren 1
1 Führen Sie Schritt 1 bis 4 des Verwendung der BEAT
EFFECT-Funktion-Verfahrens aus.
2 Berühren Sie das [X-PAD].
Das [X-PAD] schaltet den Effekt ein und aus und ändert den quantitativen
Parameter.
Wenn Sie Ihren Finger vom [X-PAD] nehmen, schaltet der Effekt aus.
Un den Effekt zu bewahren, wenn Sie die Finger vom [X-PAD] nehmen, während
das [X-PAD] berührt wird, drücken Sie die Taste [ON/OFF] am [BEAT EFFECTS]
und lassen dann den Finger vom [X-PAD] los.
䢢Bedienungsverfahren 2
1 Führen Sie Schritt 1 bis 5 des Verwendung der BEAT
EFFECT-Funktion-Verfahrens aus.
2 Berühren Sie das [X-PAD].
Das [X-PAD] ändert den quantitativen Parameter des Effekts.
Bedienung der DJ-Software mit der
MIDI-Funktion
Dieses Gerät gibt die Bedienungsinformationen von Tasten und Reglern im univer-
salen MIDI-Format aus.
Beim Anschluss über USB-Kabel an einen Computer, auf dem MIDI-kompatible
DJ-Software installiert ist, kann die DJ-Software von diesem Gerät gesteuert werden.
Installieren Sie die DJ-Software vorher auf Ihrem Computer. Stellen Sie außerdem
Audio- und MIDI-Einstellungen für die DJ-Software ein.
Anweisungen zur MIDI-Kanaleinstellung siehe Ändern der Einstellungen auf
Seite 23.
17
De
Deutsch
Für die von diesem Gerät ausgegebenen Meldungen siehe MIDI-Zuweisungskarte
auf Seite 21.
1 Verbinden Sie die Buchse [USB] dieses Geräts mit dem
Computer.
Einzelheiten über Verbindungen siehe Anschließen an das Steuerpult auf Seite 11.
2 Starten Sie die DJ-Software.
3 Drücken Sie die Taste [ON/OFF (UTILITY)].
Schalten Sie die MIDI-Funktion ein.
Die Übertragung der MIDI-Meldungen beginnt.
Wenn ein Fader oder Regler bewegt wird, wird eine Meldung entsprechend der
Position ausgegeben.
Wenn die Taste [START/STOP] gedrückt und länger als 2 Sekunden gedrückt
gehalten wird, wird ein Satz von MIDI-Meldungen entsprechend der Tasten-,
Fader, oder Reglerpositionen gesendet (Snapshot).
Wenn die Taste [ON/OFF (UTILITY)] erneut gedrückt wird, wird das Senden von
MIDI-Meldungen gestoppt.
Die MIDI Timing Clock (BPM-Information) wird ungeachtet des Status von
[ON/OFF (UTILITY)] gesendet.
䢢Vorbereitungen zur Verwendung der Funktion MIDI LFO
treffen
Die MIDI-kompatible Software, Geräte usw. (im Folgenden als “MIDI-
Signalempfangsseite” bezeichnet) müssen vor der Verwendung der Funktion MIDI
LFO vorbereitet (“gelernt”) werden.
Ausführen der Lernfunktionen auf der MIDI-Signalempfangsseite.
Für die von diesem Gerät ausgegebenen Meldungen siehe MIDI-Zuweisungskarte
auf Seite 21.
1 Drücken Sie die Taste [ON/OFF (UTILITY)].
Schalten Sie die MIDI-Funktion ein.
2 Drehen Sie den Schwebungseffekt-Wahlschalter.
Wählen Sie [SND/RTN (MIDI LFO)].
[S/RELFO] blinkt in der Effektanzeigesektion, und dann wird [SND/RTN] angezeigt.
3 Drücken Sie die Taste [ON/OFF] für [BEAT EFFECTS].
Lernen Sie die MIDI-Meldung der Taste [ON/OFF] unter [BEAT EFFECTS] auf der
MIDI-Signalempfangsseite.
Die von der Taste [ON/OFF] des [BEAT EFFECTS] gesendete MIDI-Meldung
ist unterschiedlich, wenn [SND/RTN (MIDI LFO)] gewählt ist und ein anderer
Eintrag als [SND/RTN (MIDI LFO)] gewählt ist.
Die MIDI-Meldung der Taste [ON/OFF] des [BEAT EFFECTS] wenn [SND/RTN
(MIDI LFO)] gewählt ist, wird nur gesendet, wenn die Bedienung entsprechend
diesem Verfahren ausgeführt wird.
4 Drücken Sie die Taste [LFO FORM (WAKE UP)].
Lernen Sie die MIDI-Meldung der Taste [LFO FORM (WAKE UP)] auf der
MIDI-Signalempfangsseite.
[1/7] und [1/7LFO] werden abwechselnd in der Effektanzeigesektion
angezeigt.
Wenn erforderlich, stellen Sie das MIDI-Mapping für andere Tasten und Regler
ein.
Da die MIDI-Meldung der Taste [LFO FORM (WAKE UP)] sequentiell gesendet
wird, kann es je nach den Einstellungen der MIDI-Signalempfangsseite nicht
möglich sein, die MIDI-Meldung zu lernen.
Zum Einstellen des MIDI-Mapping für andere Tasten und Regler drücken Sie die
Taste [LFO FORM(WAKE UP)], um auf [SND/RTN] zu schalten.
䢢Verwenden von MIDI LFO
Treffen Sie die Vorbereitungen entsprechend dem Verfahren unter Vorbereitungen
zur Verwendung der Funktion MIDI LFO treffen im voraus.
1 Drehen Sie den Schwebungseffekt-Wahlschalter.
Wählen Sie [SND/RTN (MIDI LFO)].
[S/RELFO] blinkt in der Effektanzeigesektion, und dann wird [SND/RTN] angezeigt.
2 Drücken Sie die Taste [LFO FORM (WAKE UP)].
Die Übertragung der MIDI-Signale beginnt.
Das MIDI-Signal-Wellenformmuster schaltet bei jedem Drücken der Taste
[LFO FORM (WAKE UP)] um.
SND/RTN1/7 2/7 3/7
4/7 5/7 6/7 7/7
3 Drücken Sie die Taste [BEAT , ].
Stellen Sie die Ausgabezeit der MIDI-Signal-Wellenform ein.
4 Drücken Sie die Taste [ON/OFF] von [BEAT EFFECTS] oder
berühren Sie das [X-PAD].
Die MIDI-Meldung zum Einschalten des Effekts wird gesendet.
Wenn die Taste [LFO FORM (WAKE UP)] gedrückt wird und eine Einstellung von
[1/7] – [7/7] gewählt ist, kann die MIDI-Meldung für die Tasten und
Regler unten gesendet werden, auch wenn der MIDI-Modus ausgeschaltet ist.
— [X-PAD] (Berühren K Loslassen)
— [CUE]-Taste von [BEAT EFFECTS]
— Effektkanal-Wahlschalter
— [LEVEL/DEPTH]-Regler
— [ON/OFF]-Taste von [BEAT EFFECTS]
Wenn die Taste [LFO FORM (WAKE UP)] gedrückt wird, um zwischen
[SND/RTN] und [MIDI LFO] umzuschalten, schaltet BEAT EFFECT automatisch
aus.
Es ist nicht möglich, zwischen [SND/RTN] und [MIDI LFO] umzuschalten, wäh-
rend das [X-PAD] berührt wird.
䢢Senden der MIDI-Start- und MIDI Stopp-Meldungen
Drücken Sie die Taste [START/STOP] für [MIDI].
Die MIDI-Start- und MIDI-Stopp-Meldungen werden abwechselnd bei jedem
Drücken der Taste [START/STOP] gesendet, ungeachtet ob die MIDI-Funktion
eingeschaltet oder ausgeschaltet ist.
Bedienen eines externen MIDI-Sequenzers
Dieses Gerät gibt die Bedienungsinformationen von Tasten und Reglern im univer-
salen MIDI-Format aus.
Dieses Gerät sendet das Tempo der aktuellen Quelle (die BPM-Information) als MIDI
Timing Clock. Dies kann verwendet werden, um einen externen MIDI-Sequenzer mit
dem Tempo der Quelle zu synchronisieren.
Für die von diesem Gerät ausgegebenen Meldungen siehe MIDI-Zuweisungskarte
auf Seite 21.
Externe MIDI-Sequenzer, die nicht MIDI Timing Clocks unterstützen, können
nicht synchronisiert werden.
Externe MIDI-Sequenzer können nicht für Quellen synchronisiert werden, auf
denen BPM nicht stabil gemessen werden kann.
Die MIDI Timing Clocks wird auch für BPM-Werte ausgegeben, die manuell
durch Antippen der Taste [TAP] mit einem Finger eingegeben wurden. Der
Ausgabebereich der MIDI Timing Clock beträgt 40 BPM bis 250 BPM.
1 Verbinden Sie die Buchse [MIDI OUT] mit der Buchse MIDI
IN des externen MIDI-Sequenzers mit einem handelsüblichen
MIDI-Kabel.
2 Stellen Sie den Sync-Modus des externen MIDI-Sequenzers
auf Slave.
3 Drücken Sie die Taste [START/STOP] für [MIDI].
Die MIDI-Start-Meldung wird gesendet.
4 Drücken Sie [ON/OFF] in der Sektion [MIDI].
Die Übertragung der MIDI-Meldungen beginnt.
18
De
Typen von Effekten
Typen von SOUND COLOR FX-Effekten
Effekt-NameBeschreibungen[COLOR] Regler
SPACE
Legt einen Nachhalleffekt auf den
Originalsound an.
Gegen den Uhrzeigersinn drehen:
Legt einen Nachhalleffekt auf die
Mitten- und Tiefenbereiche an.
Im Uhrzeigersinn drehen: Legt
einen Nachhalleffekt auf die
Mitten- und Höhenbereiche an.
DUB ECHO
Legt einen Echoeffekt an, wobei
der Sound mehrmals leicht nach
dem Originalsound Originalsound
verzögert wiederholt und dabei
allmählich gedämpft wird.
Gegen den Uhrzeigersinn drehen:
Legt den Echoeffekt nur auf den
Mittenbereich an.
Im Uhrzeigersinn drehen: Legt
den Echoeffekt nur auf den
Höhenbereich an.
GATE/COMP
Ändert die Textur des
Gesamtsounds.
Gegen den Uhrzeigersinn drehen:
Ein Gate-Effekt macht den Sound
dichter, mit einem verringerten
Volumengefühl.
Im Uhrzeigersinn drehen: Ein
Kompressor-Effekt macht den
Sound fetter, mit einem gesteiger-
ten Volumengefühl.
NOISE
Im Gerät erzeugtes weißes
Rauschen wird mit dem Kanalton
über den Filter gemischt und
ausgegeben.
Die Lautstärke kann durch
Drehen der Regler [TRIM]
für die betreffenden Kanäle
eingestellt werden. Die
Soundqualität kann durch
Drehen der Regler [EQ/ISO
(HI, MID, LOW)] eingestellt
werden.
Gegen den Uhrzeigersinn dre-
hen: Die Schwellenfrequenz für
den Filter, durch den das weiße
Rauschen läuft, nimmt allmäh-
lich ab.
Im Uhrzeigersinn drehen: Die
Schwellenfrequenz für den Filter,
durch den das weiße Rauschen
läuft, nimmt allmählich zu.
CRUSH
Ändert den Kanalsound auf einen
crush-ähnlichen Sound für die
Ausgabe.
Gegen den Uhrzeigersinn dre-
hen: Steigert die Verzerrung des
Sounds.
Im Uhrzeigersinn drehen: Der
Sound wird gecrusht, bevor er
durch den Hochpassfilter geführt
wird.
FILTER
Gibt den Sound aus, der durch
einen Filter geführt wurde.
Gegen den Uhrzeigersinn
drehen: Senkt allmählich
die Schwellenfrequenz des
Tiefpassfilters.
Im Uhrzeigersinn drehen: Steigert
allmählich die Schwellenfrequenz
des Hochpassfilters.
Typen von BEAT EFFECT
DELAY
1
Ein Verzögerungssound wird entsprechend der mit den Tasten [BEAT, ] einge-
stellten Beat-Fraktion einmal ausgegeben.
Wenn 1/2 Beat Delay Sound hinzugefügt wird, werden 4 Taktschläge zu 8
Taktschlägen.
Original
(4 Beats)
1/2
Verzögerung
(8 Beats)
BEAT, -Tasten (Parameter 1)
Verwenden Sie diese, um eine Zeitverzögerung von 1/8 – 16/1
im Hinblick auf die Zeit eines Beats von BPM einzustellen.
TIME-Regler (Parameter 2)
Verwenden Sie dies, um die Verzögerungszeit einzustellen.
1 bis 4000 (ms)
LEVEL/DEPTH-Regler
(Parameter 3)
Verwenden Sie dies, um die Balance zwischen Originalsound
und Verzögerungssound einzustellen.
X-PAD (Parameter 4)Verwenden Sie dies, um die Verzögerungszeit einzustellen.
ECHO
1
2
Ein Verzögerungssound wird entsprechend der mit den Tasten [BEAT, ] einge-
stellten Beat-Fraktion mehrmals ausgegeben und dabei allmählich gedämpft.
Mit 1/1 Beat-Echos werden die Verzögerungssounds entsprechend dem Tempo des
Tracks ausgeblendet, auch nachdem der Eingabesound abgeschnitten ist.
Eingabeton ausgeschaltet
Zeit
Fade-out
1 Beat
BEAT, -Tasten (Parameter 1)
Verwenden Sie diese, um eine Zeitverzögerung von 1/8 – 16/1
im Hinblick auf die Zeit eines Beats von BPM einzustellen.
TIME-Regler (Parameter 2)
Verwenden Sie dies, um die Verzögerungszeit einzustellen.
1 bis 4000 (ms)
LEVEL/DEPTH-Regler
(Parameter 3)
Verwenden Sie dies, um die Balance zwischen Originalsound
und Echosound einzustellen.
X-PAD (Parameter 4)Verwenden Sie dies, um die Verzögerungszeit einzustellen.
SPIRAL
1
2
Diese Funktion fügt einen Nachhalleffekt zum Eingabeton hinzu.
Wenn sich die Verzögerungszeit ändert, ängert sich die Tonlage entsprechend.
Eingabeton ausgeschaltet
Zeit
Fade-out
1 Beat
BEAT, -Tasten (Parameter 1)
Verwenden Sie diese, um eine Zeitverzögerung von 1/8 – 16/1
im Hinblick auf die Zeit eines Beats von BPM einzustellen.
TIME-Regler (Parameter 2)
Verwenden Sie dies, um die Verzögerungszeit einzustellen.
10 bis 4000 (ms)
LEVEL/DEPTH-Regler
(Parameter 3)
Verwenden Sie dies, um die Balance zwischen dem
Originalsound und dem Effektsound einzustellen und die
quantitativen Parameter einzustellen.
X-PAD (Parameter 4)Verwenden Sie dies, um die Verzögerungszeit einzustellen.
REVERB
1
2
Diese Funktion fügt einen Nachhalleffekt zum Eingabeton hinzu.
Pegel
Direkt-Ton
Früh reflektierter Ton
Nachhal
1%
100%
Zeit
BEAT, -Tasten (Parameter 1)
Verwenden Sie diese, um den Grad des Nachhalleffekts von
1 – 100 % einzustellen.
TIME-Regler (Parameter 2)
Verwenden Sie dies, um den Grad des Nachhalleffekts
einzustellen.
1 – 100 (%)
LEVEL/DEPTH-Regler
(Parameter 3)
Stellt die Balance zwischen Originalsound und Effektsound
ein.
X-PAD (Parameter 4)Stellt die Schwellenfrequenz für den Filter ein.
TRANS
1
Der Sound wird entsprechend der mit den Tasten [BEAT, ] eingestellten Beat-
Fraktion abgeschnitten.
CutCut
1/1 Beat
Zeit
BEAT, -Tasten (Parameter 1)
Verwenden Sie diese, um eine Abschnittzeit von 1/16 – 16/1
im Hinblick auf einen Beat von BPM einzustellen.
TIME-Regler (Parameter 2)
Verwenden Sie dies, um die Effektzeit einzustellen.
10 bis 16000 (ms)
LEVEL/DEPTH-Regler
(Parameter 3)
Stellt die Balance zwischen Originalsound und Effektsound
ein.
X-PAD (Parameter 4)Dies stellt die Abschnittzeit ein.
FILTER
1
Die Schwellenfrequenz des Filters ändert sich entsprechend der mit den Tasten
[BEAT, ] eingestellten Beat-Fraktion.
19
De
Deutsch
Frequenz
BEAT, -Tasten (Parameter 1)
Verwenden Sie diese, um den Zyklus zum Verschieben der
Schwellenfrequenz als eine Zeit von 1/4 – 64/1 im Hinblick auf
die Zeit eines Beats von BPM einzustellen.
TIME-Regler (Parameter 2)
Verwenden Sie dies, um einen Zyklus einzustellen, bei dem die
Cutoff-Frequenz verschoben wird.
10 bis 32000 (ms)
LEVEL/DEPTH-Regler
(Parameter 3)
Je weiter der Regler im Uhrzeigersinn gedreht wird, desto
mehr wird der Effekt betont.
X-PAD (Parameter 4)
Der Zyklus, bei dem die Cutoff-Frequenz verschoben wird,
schwankt leicht.
FLANGER
1
Ein 1-Zyklus-Flangereffekt wird entsprechend der mit den Tasten [BEAT, ] einge-
stellten Beat-Fraktion produziert.
Zyklus
Zeit
Kurze Verzögerung
BEAT, -Tasten (Parameter 1)
Verwenden Sie diese, um die Effektzeit 1/4 – 64/1 im Hinblick
auf die Zeit eines Beats von BPM einzustellen.
TIME-Regler (Parameter 2)
Verwenden Sie dies, um den Zyklus der Bewegung des
Flangereffekts einzustellen.
10 bis 32000 (ms)
LEVEL/DEPTH-Regler
(Parameter 3)
Je weiter der Regler im Uhrzeigersinn gedreht wird, desto
mehr wird der Effekt betont.
Wenn ganz gegen den Uhrzeigersinn gedreht, wird nur der
Originalsound ausgegeben.
X-PAD (Parameter 4)
Der Zyklus, bei dem der Flanger-Effekt verschoben wird,
schwankt leicht.
PHASER
1
Der Phasereffekt wird entsprechend der mit den Tasten [BEAT, ] eingestellten
Beat-Fraktion geändert.
Zyklus
Phasenverschiebung
Zeit
BEAT, -Tasten (Parameter 1)
Verwenden Sie diese, um den Zyklus zum Verschieben des
Phasereffekts als eine Zeit von 1/4 – 64/1 im Hinblick auf die
Zeit eines Beats von BPM einzustellen.
TIME-Regler (Parameter 2)
Dies stellt den Zyklus ein, um den der Phaser-Effekt verscho-
ben wird.
10 bis 32000 (ms)
LEVEL/DEPTH-Regler
(Parameter 3)
Je weiter der Regler im Uhrzeigersinn gedreht wird, desto
mehr wird der Effekt betont.
Wenn ganz gegen den Uhrzeigersinn gedreht, wird nur der
Originalsound ausgegeben.
X-PAD (Parameter 4)
Der Zyklus, bei dem der Phaser-Effekt verschoben wird,
schwankt leicht.
ROBOT
1
Der Originalsound wird geändert, um zu klingen wie der Sound eines Roboters.
BEAT, -Tasten (Parameter 1)
Verwenden Sie dies, um den Grad des Effektsounds
einzustellen.
-100–100 (%)
TIME-Regler (Parameter 2)
Verwenden Sie dies, um den Grad des Effektsounds
einzustellen.
-100–100 (%)
LEVEL/DEPTH-Regler
(Parameter 3)
Stellt die Balance zwischen Originalsound und Effektsound
ein.
X-PAD (Parameter 4)Dies ändert den Grad des Effektsounds.
MELODIC
1
2
Der Mittenbereich des Sounds, der an der Stelle wo [ON/OFF] gedrückt wird einge-
geben wird, wird aufgezeichnet, und der aufgenommene Sound wird entsprechend
dem Pegel des eingegebenen Sounds ausgegeben.
BEAT, -Tasten (Parameter 1)
Dies stellt die Weise ein, in der der aufgezeichnete Sound
abgespielt wird.
TIME-Regler (Parameter 2)
Dies stellt die Weise ein, in der der aufgezeichnete Sound
abgespielt wird.
LEVEL/DEPTH-Regler
(Parameter 3)
Dies stellt die Balance zwischen Originalsound und aufge-
nommenen Sound ein.
X-PAD (Parameter 4)
Dies stellt die Weise ein, in der der aufgezeichnete Sound
abgespielt wird.
SLIP ROLL
1
2
Der an der Stelle wo [ON/OFF] gedrückt wird eingegeben wird, wird aufgezeichnet,
und der aufgenommene Sound wird wiederholt entsprechend der mit den Tasten
[BEAT, ] eingegebenen Beat-Fraktion ausgegeben.
Wenn sich die Effektzeit ändert, wird der Eingabesound erneut aufgezeichnet.
1/1 Wiederholung1/2 Wiederholung
Original
Roll
Geändert von
1/2 zu 1/1
Effekt
eingeschaltet
BEAT, -Tasten (Parameter 1)
Verwenden Sie diese, um eine Effektzeit von 1/16 – 16/1 im
Hinblick auf die Zeit eines Beats von BPM einzustellen.
TIME-Regler (Parameter 2)
Verwenden Sie dies, um die Effektzeit einzustellen.
10 bis 4000 (ms)
LEVEL/DEPTH-Regler
(Parameter 3)
Verwenden Sie dies, um die Balance zwischen Originalsound
und ROLL einzustellen.
X-PAD (Parameter 4)Verwenden Sie dies, um die Effektzeit einzustellen.
ROLL
1
2
Der an der Stelle wo [ON/OFF] gedrückt wird eingegeben wird, wird aufgezeichnet,
und der aufgenommene Sound wird wiederholt entsprechend der mit den Tasten
[BEAT, ] eingegebenen Beat-Fraktion ausgegeben.
Effekt eingeschaltet
Wiederholt
Original
1/1 Roll
BEAT, -Tasten (Parameter 1)
Verwenden Sie diese, um eine Effektzeit von 1/16 – 16/1 im
Hinblick auf die Zeit eines Beats von BPM einzustellen.
TIME-Regler (Parameter 2)
Verwenden Sie dies, um die Effektzeit einzustellen.
10 bis 4000 (ms)
LEVEL/DEPTH-Regler
(Parameter 3)
Verwenden Sie dies, um die Balance zwischen Originalsound
und ROLL einzustellen.
X-PAD (Parameter 4)Verwenden Sie dies, um die Effektzeit einzustellen.
REV ROLL
1
2
Der an der Stelle wo die Taste [ON/OFF] gedrückt wird eingegeben wird, wird aufge-
zeichnet, und der aufgenommene Sound wird umgekehrt und wiederholt entspre-
chend der mit den Tasten [BEAT, ] eingegebenen Beat-Fraktion ausgegeben.
Effekt eingeschaltet
Reversiert und wiederholt
Original
1/1 Reverse
Roll
BEAT, -Tasten (Parameter 1)
Verwenden Sie diese, um eine Effektzeit von 1/16 – 16/1 im
Hinblick auf die Zeit eines Beats von BPM einzustellen.
TIME-Regler (Parameter 2)
Verwenden Sie dies, um die Effektzeit einzustellen.
10 bis 4000 (ms)
LEVEL/DEPTH-Regler
(Parameter 3)
Verwenden Sie dies, um die Balance zwischen Originalsound
und ROLL einzustellen.
X-PAD (Parameter 4)Verwenden Sie dies, um die Effektzeit einzustellen.
SND/RTN (MIDI LFO)
Schließen Sie einen externen Effektor usw. hier an.
Durch Drücken der Taste [LFO FORM (WAKE UP)] können MIDI-kompatible
Software und Geräte mit MIDI-Signalen gesteuert werden.
䢢SND/RTN
1
Schließen Sie einen externen Effektor usw. hier an.
20
De
SEND
RETURN
Effektor
DJM-900SRT Serato DJ Edition
1212
1212
0
0
ON
TALK
OVER
OFF
9
6
-
26
/
6
-
26
/
6
-
26
/
9
6
-
26
/
6
-
26
/
6
-
26
/
9
6
-
26
/
6
-
26
/
6
-
26
/
9
6
-
26
/
6
-
26
/
6
-
26
/
0
BEAT, -Tasten (Parameter 1)
—
TIME-Regler (Parameter 2)—
LEVEL/DEPTH-Regler
(Parameter 3)
Dies stellt die Soundpegeleingabe zur Buchse [RETURN] ein.
X-PAD (Parameter 4)—
䢢MIDI LFO
Die MIDI-Signal (0 – 127) Wellenform wird entsprechend dem Tempo des Tracks
geändert.
Das MIDI-Signal-Wellenformmuster schaltet bei jedem Drücken der Taste
[LFO FORM (WAKE UP)] um.
BEAT, -Tasten (Parameter 1)
Verwenden Sie diese, um eine Wellenform-Ausgabezeit von
1/4 – 64/1 im Hinblick auf einen Beat von BPM einzustellen.
TIME-Regler (Parameter 2)
Verwenden Sie dies, um die Wellenform-Ausgabezeit
einzustellen.
LEVEL/DEPTH-Regler
(Parameter 3)
—
X-PAD (Parameter 4)
Dies ändert die Ausgabezeit des
MIDI-Signal-Wellenformmusters.
Wenn [MIDI LFO] gewählt ist, wird der Sound des externen Effektors, der an die Buchse
[RETURN] angeschlossen ist, nicht angelegt.
1 Wenn [CF.A], [CF.B] oder [MASTER] mit dem Effekt-Kanalwahlschalter gewählt
ist, wenn der Sound des Kanals, den Sie mithören wollen, nicht zum [MASTER]-
Kanal ausgegeben wird, kann der Effektsound nicht mitgehört werden, auch
wenn die [CUE]-Taste für [BEAT EFFECTS] gedrückt wird.
2Wenn der Effekt ausgeschaltet ist, kann der Effektsound nicht mitgehört wer-
den, auch wenn die Taste [CUE] für [BEAT EFFECTS] gedrückt wird.
21
De
Deutsch
MIDI-Zuweisungskarte
MIDI-Zuweisungskarte
“CC” ist die Abkürzung von “control change”. Eine Steueränderung ist ein Typ von MIDI-Signal, das zum Übertragen verschiedener Arten von Steuerinformationen, wie
Timbre, Lautstärke usw. verwendet wird.
Bei diesem Gerät werden Werte von 0 bis 127 hauptsächlich als CC ausgegeben, wenn Regler und Fader bedient werden. CC werden auch ausgegeben, wenn bestimmte
Tasten betätigt werden.
“Note” ist ein MIDI-Ausdruck, der beim Drücken oder Loslassen von Noten auf einem Klavier oder anderen Tastaturinstrument verwendet wird.
Kategorie
Taste/Regler/Schalter
MIDI-ZuweisungTrigger/ToggleÜbertragene Daten
NameTyp
CH1
Eingabe-Wahlschalter
DIGITAL
SchalterNote 050
2
OFF=0, ON=127
CD/LINE
SchalterNote 051
2
OFF=0, ON=127
PHONO
SchalterNote 052
2
OFF=0, ON=127
USB DECK 3
SchalterNote 053
2
OFF=0, ON=127
TRIM
ReglerCC 001—0-127
HI
ReglerCC 002—0-127
MID
ReglerCC 003—0-127
LOW
ReglerCC 004—0-127
COLOR
ReglerCC 005—0-127
CUE
TasteCC 070Trigger/ToggleOFF=0, ON=127
KanalfaderReglerCC 017—0-127
CROSS FADER ASSIGN
SchalterCC 065—0, 64, 127
CH2
Eingabe-Wahlschalter
DIGITAL
SchalterNote 054
2
OFF=0, ON=127
CD/LINE
SchalterNote 055
2
OFF=0, ON=127
PHONO
SchalterNote 056
2
OFF=0, ON=127
USB DECK 1
SchalterNote 057
2
OFF=0, ON=127
TRIM
ReglerCC 006—0-127
HI
ReglerCC 007—0-127
MID
ReglerCC 008—0-127
LOW
ReglerCC 009—0-127
COLOR
ReglerCC 010—0-127
CUE
TasteCC 071Trigger/ToggleOFF=0, ON=127
KanalfaderReglerCC 018—0-127
CROSS FADER ASSIGN
SchalterCC 066—0, 64, 127
CH3
Eingabe-Wahlschalter
DIGITAL
SchalterNote 058
2
OFF=0, ON=127
CD/LINE
SchalterNote 059
2
OFF=0, ON=127
PHONO
SchalterNote 060
2
OFF=0, ON=127
USB DECK 2
SchalterNote 061
2
OFF=0, ON=127
TRIM
ReglerCC 012—0-127
HI
ReglerCC 014—0-127
MID
ReglerCC 015—0-127
LOW
ReglerCC 021—0-127
COLOR
ReglerCC 022—0-127
CUE
TasteCC 072Trigger/ToggleOFF=0, ON=127
KanalfaderReglerCC 019—0-127
CROSS FADER ASSIGN
SchalterCC 067—0, 64, 127
CH4
Eingabe-Wahlschalter
DIGITAL
SchalterNote 062
2
OFF=0, ON=127
CD/LINE
SchalterNote 063
2
OFF=0, ON=127
PHONO
SchalterNote 064
2
OFF=0, ON=127
USB DECK 4
SchalterNote 065
2
OFF=0, ON=127
TRIM
ReglerCC 080—0-127
HI
ReglerCC 081—0-127
MID
ReglerCC 092—0-127
LOW
ReglerCC 082—0-127
COLOR
ReglerCC 083—0-127
CUE
TasteCC 073Trigger/ToggleOFF=0, ON=127
KanalfaderReglerCC 020—0-127
CROSS FADER ASSIGN
SchalterCC 068—0, 64, 127
CrossfaderCrossfaderReglerCC 011—0-127
Faderkurve
CH FADER (
, , )
SchalterCC 094—0, 64, 127
CROSS FADER (
, , )
SchalterCC 095—0, 64, 127
Master
MASTER LEVEL
ReglerCC 024—0-127
BALANCE
ReglerCC 023—0-127
CUE
TasteCC 074Trigger/ToggleOFF=0, ON=127
EQ CURVE (ISOLATOR, EQ)SchalterCC 033—0, 127
BOOTH MONITORBOOTH MONITOR
ReglerCC 025—0-127
LINKCUE
TasteCC 115Trigger/ToggleOFF=0, ON=127
BEAT EFFECTS
TasteCC 076Trigger/ToggleOFF=0, ON=127
TasteCC 077Trigger/ToggleOFF=0, ON=127
AUTO/TAP
TasteCC 069Trigger/ToggleOFF=0, ON=127
TAP
TasteCC 078Nur TriggerOFF=0, ON=127
CUE
TasteCC 075Trigger/ToggleOFF=0, ON=127
EFFECT SELECT
DELAY
SchalterCC 042
2
OFF=0, ON=127
ECHO
SchalterCC 055
2
OFF=0, ON=127
SPIRAL
SchalterCC 043
2
OFF=0, ON=127
REVERB
SchalterCC 054
2
OFF=0, ON=127
TRANS
SchalterCC 053
2
OFF=0, ON=127
FILTER
SchalterCC 059
2
OFF=0, ON=127
FLANGER
SchalterCC 050
2
OFF=0, ON=127
PHASER
SchalterCC 057
2
OFF=0, ON=127
ROBOT
SchalterCC 051
2
OFF=0, ON=127
MELODIC
SchalterCC 061
2
OFF=0, ON=127
SLIP ROLL
SchalterCC 058
2
OFF=0, ON=127
ROLL
SchalterCC 046
2
OFF=0, ON=127
REV ROLL
SchalterCC 047
2
OFF=0, ON=127
SND/RTN (MIDI LFO)SchalterCC 062
2
OFF=0, ON=127
22
De
Kategorie
Taste/Regler/Schalter
MIDI-ZuweisungTrigger/ToggleÜbertragene Daten
NameTyp
BEAT EFFECTS
CH SELECT
CH1
SchalterCC 034
2
OFF=0, ON=127
CH2
SchalterCC 035
2
OFF=0, ON=127
CH3
SchalterCC 036
2
OFF=0, ON=127
CH4
SchalterCC 037
2
OFF=0, ON=127
MIC
SchalterCC 038
2
OFF=0, ON=127
CF.A
SchalterCC 039
2
OFF=0, ON=127
CF.B
SchalterCC 040
2
OFF=0, ON=127
MASTER
SchalterCC 041
2
OFF=0, ON=127
MIDI LFO
ReglerCC 118—0-127
QUANTIZE
TasteNote 118Trigger/Toggle—
TIME
SchalterCC 013——
SchalterCC 045—
TIME-Wert (Wenn FLANGER,
PHASER oder FILTER gewählt ist,
wird der Wert halbiert. Wenn ein
negativer Wert gewählt ist, wird er
auf einen positiven Wert gesetzt.)
LEVEL/DEPTHReglerCC 091—0-127
X-PAD
ReglerCC 116—
Sendet die
[X-PAD]-Positionsinformation.
ON/OFF
X-PAD (berühren)
Wenn ein anderer Effekt als [SND/RTN (MIDI
LFO)] bei BEAT EFFECT gewählt ist
TasteCC 114
2
OFF=0, ON=127
ON/OFF
X-PAD (berühren)
Wenn [SND/RTN (MIDI LFO)] bei gewählt ist
BEAT EFFECT
TasteCC 064
2
OFF=0, ON=127
MIC
HI
ReglerCC 030—0-127
LOW
ReglerCC 031—0-127
SOUND COLOR FX
NOISE
TasteCC 085
Trigger/Toggle
1
OFF=0, ON=127
SPACE
TasteCC 105
Trigger/Toggle
1
OFF=0, ON=127
GATE/COMP
TasteCC 106
Trigger/Toggle
1
OFF=0, ON=127
DUB ECHO
TasteCC 107
Trigger/Toggle
1
OFF=0, ON=127
CRUSH
TasteCC 086
Trigger/Toggle
1
OFF=0, ON=127
FILTER
TasteCC 087
Trigger/Toggle
1
OFF=0, ON=127
Fader Start
Fader Start 1
TasteCC 088Trigger/ToggleOFF=0, ON=127
Fader Start 2
TasteCC 089Trigger/ToggleOFF=0, ON=127
Fader Start 3
TasteCC 090Trigger/ToggleOFF=0, ON=127
Fader Start 4
TasteCC 093Trigger/ToggleOFF=0, ON=127
HEADPHONES
MIXING
ReglerCC 027—0-127
LEVEL
ReglerCC 026—0-127
Timing Clock
—Timing Clock——
Fader Start-Bedienung
3
Kanalfader 1 oder CrossfaderNote 102—BACK CUE = 0, PLAY = 127
Kanalfader 2 oder CrossfaderNote 103—BACK CUE = 0, PLAY = 127
Kanalfader 3 oder CrossfaderNote 104—BACK CUE = 0, PLAY = 127
Kanalfader 4 oder CrossfaderNote 105—BACK CUE = 0, PLAY = 127
MIDI
START
TasteSTART——
STOP
TasteSTOP——
1Wenn eine Taste eingeschaltet wird, wird eine andere Taste von Ein auf Aus geschaltet, und MIDI-Ein- und Aus-Meldungen werden von den beiden Tasten gesendet.
Wenn keine Taste vorhanden ist, die ausschaltet, wird nur die MIDI-Ein-Meldung von der gedrückten Taste gesendet.
2Wenn von einer Position auf eine andere Position umgeschaltet wird, werden MIDI-Ein- und Aus-Signale jeweils von beiden Positionen gesendet.
—Wenn die Taste [START/STOP] länger als 1 Sekunde gedrückt gehalten wird, werden MIDI-Meldung entsprechend den Tasten-, Fader, oder Reglerpositionen in einem Bündel gesendet
(Snapshot).
Der MIDI-Snapshot sendet alle MIDI-Meldungen mit Ausnahme von MIDI-Start und MIDI-Stop.
3Die Bedienung ist je nach Einstellung des [CROSS FADER ASSIGN (A, THRU, B)]-Wahlschalters unterschiedlich.
—Wenn der [CROSS FADER ASSIGN (A, THRU, B)]-Wahlschalter auf [THRU] gestellt ist: MIDI-Meldungen werden gesendet, wenn die [FADER START]-Taste auf [ON] gestellt ist und Sie den
Kanalfader von der Ihnen am nächsten liegenden Position weg und dann wieder zu dieser Position hin bewegen.
—Wenn der [CROSS FADER ASSIGN (A, THRU, B)]-Wahlschalter auf [A] gestellt ist: MIDI-Meldungen werden gesendet, wenn die [FADER START]-Taste auf [ON] gestellt ist und Sie den Crossfader
von dem extremen Rand der [B]-Seite weg und dann wieder zum extremen Rand der [B]-Seite hin bewegen.
—Wenn der [CROSS FADER ASSIGN (A, THRU, B)]-Wahlschalter auf [B] gestellt ist: MIDI-Meldungen werden gesendet, wenn die [FADER START]-Taste auf [ON] gestellt ist und Sie den Crossfader
von dem extremen Rand der [A]-Seite weg und dann wieder zum extremen Rand der [A]-Seite hin bewegen.
23
De
Deutsch
Ändern der Einstellungen
1 Drücken Sie die Taste [ON/OFF (UTILITY)] länger als 1
Sekunde.
Der Moduseinstellung-Bildschirm [USER SETUP] wird angezeigt.
Zum Anzeigen des Moduseinstellung-Bildschirms [CLUB SETUP] schalten
Sie zuerst das Gerät aus und drücken dann [POWER], während Sie [ON/OFF
(UTILITY)] gedrückt halten.
2 Drücken Sie die Taste [BEAT , ].
Wählen Sie das Einstell-Element.
3 Drücken Sie die Taste [TAP].
Der Bildschirm schaltet auf den Einstellwert-Änderungsbildschirm des Einstell-
Elements um.
4 Drücken Sie die Taste [BEAT , ].
Ändern Sie den Einstellwert.
5 Drücken Sie die Taste [TAP].
Geben Sie den Einstellwert ein.
Der vorherige Bildschirm erscheint wieder.
Zum Zurückkehren zum vorherigen Bildschirm ohne Änderung der
Einstellungen drücken Sie die Taste [QUANTIZE].
6 Drücken Sie die Taste [ON/OFF (UTILITY)].
Schließen Sie den Moduseinstellung-Bildschirm [USER SETUP].
Zum Schließen des Moduseinstellung-Bildschirms [CLUB SETUP] drücken Sie
die Taste [POWER], um das Gerät auszuschalten.
Über die Auto-Standby-Funktion
Wenn [Auto Standby] auf [ON] gestellt ist, wird der Standby-Modus automatisch
eingestellt, nachdem 4 Stunden mit allen im Folgenden gezeigten Bedingungen
abgelaufen sind.
—Das keine der Tasten oder Regler dieses Geräts bedient wird.
—Dass keine Audiosignale von –10 dB oder größer an die Eingangsbuchsen die-
ses Geräts angelegt werden.
—Dass keine PRO DJ LINK-Verbindungen hergestellt werden.
Wenn die Taste [LFO FORM (WAKE UP)] erneut gedrückt wird, wird der
Standby-Modus aufgehoben.
Dieses Gerät ist werkseitig auf aktivierte Auto-Standby-Funktion eingestellt.
Wenn Sie die Auto-Standby-Funktion nicht verwenden wollen, stellen Sie [Auto
Standby] auf [OFF].
Über die Talk-Over-Funktion
Die Talk-Over-Funktion enthält die beiden unten beschriebenen Modi.
— [ADV] (weiterführendes Talk-Over): Nur der Mittenbereich des Sounds
anderer Kanäle als des [MIC]-Kanals wird entsprechend dem Einstellwert
[Talk Over LEVEL] gedämpft und ausgegeben.
dB
Frequenz
— [NOR] (normales Talk-Over): Der Sound anderer Kanäle als des [MIC]-Kanals
wird entsprechend dem Einstellwert [Talk Over LEVEL] gedämpft und
Schaltet die Fader-Start-Funktion gleichzeitig ein und
aus.
MIDI CHMIDI CH
1* bis 16Stellt den MIDI-Kanal ein.
MIDI Button TypeMIDI BT
TGL*, TRG
Wählt den MIDI-Signal-Übertragungsmodus, [TGL
(TOGGLE)] oder [TRG (TRIGGER)].
Talk Over ModeTLK MOD
ADV*, NOR
Wählt den Modus der Talk-Over-Funktion,
[ADV(ADVANCED)] oder [NOR(NORMAL)].
Talk Over LEVELTLK LVL
–6 dB, –12 dB, –18 dB*, –24 dB
Stellt den Dämpfungspegel für die Talk-Over-Funktion
ein.
CLUB SETUP
Digital Master Out LevelDOUT LV
–19 dB*, –15 dB, –10 dB, –5 dB
Stellt den Maximalpegel des Tonausgangs von den
Buchsen [DIGITAL MASTER OUT] ein.
1
Digital Master Out Sampling RateDOUT FS
48 kHz, 96 kHz*Stellt die Digitalsignal-Samplingrate ein.
MASTER ATT.MST ATT
–6 dB, –3 dB, 0 dB*
Stellt den Dämpfungspegel des Tonausgangs von den
Buchsen [MASTER1] und [MASTER2] ein.
Auto StandbyAUTOSTB
ON*, OFFSchaltet die Auto-Standby-Funktion ein und aus.
Mic Output To Booth MonitorMIC BTH
ON*, OFF
Stellt ein, ob die Audiosignale des Mikrofons von den
Buchsen [BOOTH] ausgegeben werden oder nicht.
PC UTILITYPC UTLY
ON, OFF*
Stellt ein, ob die Einstellung-Dienstsoftware des
Computers automatisch gestartet werden soll, wenn
ein USB-Kabel angeschlossen wird.
Peak LimiterPKLIMIT
ON*, OFF
Verringert plötzliches, unangenehmes digitales
Clipping vom Master-Ausgang.
Factory ResetINITIAL
YES, NO*Setzt alle Einstellungen auf die Standardwerte zurück.
1Beachten Sie, dass der Ausgangssound verzerrt sein kann, auch wenn die Master-Pegelanzeige nicht bis ganz nach oben aufleuchtet.
Über die Einstellung-Dienstsoftware
Die Einstellung-Dienstsoftware kann verwendet werden, um die unten aufgeführten
Prüfungen und Einstellungen auszuführen.
—Prüfen des Status der Eingangswahl-Schalter dieses Geräts
—Einstellung der Audiodaten-Ausgabe von diesem Gerät zum Computer
—Einstellen der Puffergröße (bei Verwendung von Windows ASIO)
—Prüfen der Version der Treibersoftware
Anzeige der Einstellung-Dienstsoftware
Bei Windows
Klicken Sie auf das [Start]-Menü > [Alle Programme] > [Pioneer] > [DJM-
900SRT] > [DJM-900SRTEinstellung-Dienstprogramm].
24
De
Für Mac OS X
Klicken Sie auf das [Macintosh HD]-Icon > [Application] > [Pioneer] > [DJM-
900SRT] > [DJM-900SRTEinstellung-Dienstprogramm].
Prüfen des Status der Eingangswahl-Schalter
dieses Geräts
Zeigen Sie die Einstellung-Dienstsoftware vor dem Start an.
Klicken Sie auf das Register [MIXER INPUT].
Einstellung der Audiodaten-Ausgabe von
diesem Gerät zum Computer
Wenn Serato DJ läuft und diese Einheit als Standard-Audiogerät verwendet wird,
stellen Sie die Audio-Datenausgabe in Serato DJ ein.
Zeigen Sie die Einstellung-Dienstsoftware vor dem Start an.
1 Klicken Sie auf das Register [MIXER OUTPUT].
2 Klicken Sie das Pulldown-Menü [Mixer Audio Output].
Wählen und bestimmen Sie die Audiodaten, die zum Computer aus dem Strom der
Audiosignale in diesem Gerät ausgegeben werden.
CH1CH2CH3CH4
CH1 Control Tone
PHONO
1
CH2 Control Tone
PHONO
1
CH3 Control Tone
PHONO
1
CH4 Control Tone
PHONO
1
CH1 Control Tone
CD/LINE
1
CH2 Control Tone
CD/LINE
1
CH3 Control Tone
CD/LINE
1
CH4 Control Tone
CD/LINE
1
CH1 Control Tone
DIGITAL
1
CH2 Control Tone
DIGITAL
1
CH3 Control Tone
DIGITAL
1
CH4 Control Tone
DIGITAL
1
Post CH1 Fader
2
Post CH2 Fader
2
Post CH3 Fader
2
Post CH4 Fader
2
Cross Fader A
2
Cross Fader A
2
Cross Fader A
2
Cross Fader A
2
Cross Fader B
2
Cross Fader B
2
Cross Fader B
2
Cross Fader B
2
MICMICMICMIC
MIX (REC OUT)
2
MIX (REC OUT)
2
MIX (REC OUT)
2
MIX (REC OUT)
2
1Die Audiodaten werden mit der gleichen Lautstärke ausgegeben, mit der sie an diesem Gerät
angelegt werden, ungeachtet der Einstellung von [USB Output Level].
2Bei Verwendung für andere Zwecke als Aufnahme achten Sie auf die Einstellungen der
DJ-Anwendung, damit keine Audio-Loops erzeugt werden. Wenn Audio-Loops erzeugt wer-
den, kann Sound mit unerwarteter Lautstärke ein- oder ausgegeben werden.
3 Klicken Sie das Pulldown-Menü [USB Output Level].
Stellen Sie die Lautstärke der Audiodaten-Ausgabe von diesem Gerät ein.
Die Einstellung [USB Output Level] wird gleich auf alle Audiodaten angelegt.
Wenn aber 1 in der Tabelle in Schritt 2 gewählt ist, werden die Audiodaten
mit der gleichen Lautstärke ausgegeben, mit der sie an diesem Gerät angelegt
werden.
Wenn nicht genug Lautstärke mit der Lautstärkeeinstellung der DJ-Software
alleine erreicht werden kann, ändern Sie die Einstellung [USB Output Level]
zum Einstellen der Lautstärke der Audiodaten-Ausgabe von diesem Gerät.
Beachten Sie, dass der Sound verzerrt ist, wenn die Lautstärke zu hoch angeho-
ben wird.
Einstellen der Puffergröße (bei Verwendung
von Windows ASIO)
Wenn Anwendungen dieses Gerät verwenden, während das Standard-Audiogerät
läuft (DJ-Software usw.) läuft, beenden Sie diese Anwendung vor dem Anpassen der
Puffergröße.
Zeigen Sie die Einstellung-Dienstsoftware vor dem Start an.
Klicken Sie auf das Register [ASIO].
Eine ausreichend großer Pufferspeicher verringert die Gefahr von
Sound-Droputs (Tonaussetzern), aber steigert die Audiosignal-
Übertragungsverzögerung (Latenz).
Prüfen der Version der Treibersoftware
Zeigen Sie die Einstellung-Dienstsoftware vor dem Start an.
Klicken Sie auf das Register [About].
Prüfen der neuesten Informationen über
die Treibersoftware
Für die neuesten Informationen zur Treibersoftware zur exklusiven Verwendung mit
diesem Gerät besuchen Sie unsere Website wie unten gezeigt.
http://pioneerdj.com/support/
Betrieb kann nicht garantiert werden, wenn mehrere Einheiten dieses Mixers an
einen einzigen Computer angeschlossen sind.
25
De
Deutsch
Zusätzliche Informationen
Störungssuche
Bedienungsfehler werden oft irrtümlich für Störungen oder Ausfälle gehalten. Wenn Sie den Eindruck haben, dass diese Komponente nicht ordnungsgemäß funkti-
oniert, überprüfen Sie bitte die folgenden Punkte. Manchmal wird eine Störung auch durch ein externes Gerät verursacht. Überprüfen Sie die anderen verwendeten
Komponenten und elektrischen Geräte. Wenn Sie die Störung nicht beheben können, wenden Sie sich an die nächste Pioneer-Kundendienststelle oder an Ihren Händler.
Der Spieler kann möglicherweise aufgrund von statischer Elektrizität oder anderen externen Einflüssen nicht richtig arbeiten. In solchen Fällen kann normaler Betrieb
durch Abziehen des Netzsteckers und erneutes Einstecken wieder hergestellt werden.
ProblemPrüfenAbhilfe
Das Gerät schaltet nicht ein.Ist das Netzkabel richtig angeschlossen?Stecken Sie den Netzstecker in eine Netzsteckdose.
Es wird kein oder nur sehr schwacher Ton
erzeugt.
Ist der Eingangswahl-Schalter Schalter richtig eingestellt?Stellen Sie den Eingangswahl-Schalter auf die Eingangsquelle des Kanals. (Seite 13)
Sind die Verbindungskabel richtig angeschlossen?Schließen Sie die Verbindungskabel richtig an. (Seite 10)
Sind Buchsen und Stecker verschmutzt?Reinigen Sie Buchsen und Stecker vor dem Herstellen von Verbindungen.
Ist [MASTER ATT.] auf [–6 dB] usw. gestellt?Im Bildschirm [USER SETUP] schalten Sie auf [MASTER ATT.]. (Seite 23)
Digitalton kann nicht ausgegeben werden.Ist die Digital-Audioausgang-Samplingfrequenz (fs) für die
Spezifikationen des angeschlossenen Geräts geeignet?
Stellen Sie im [CLUB SETUP]-Bildschirm [Digital Master Out Sampling Rate] entsprechend
den Spezifikationen des angeschlossenen Geräts ein. (Seite 23)
Verzerrter Ton.Ist der Soundpegelausgang vom Kanal [MASTER] richtig
eingestellt?
Stellen Sie den Regler [MASTER LEVEL] so ein, dass die Masterpegel-Anzeige bei etwa [0 dB]
beim Spitzenpegel aufleuchtet. (Seite 13)
Stellen Sie [MASTER ATT.] auf [–3 dB] oder [–6 dB]. (Seite 23)
Ist der Pegel der Audioeingabe zu jedem Kanal richtig
eingestellt?
Stellen Sie den Regler [TRIM] so ein, dass die Kanalpegel-Anzeige bei etwa [0 dB] beim
Spitzenpegel aufleuchtet. (Seite 13)
Crossfade ist unmöglich.Sind die [CROSS FADER ASSIGN (A, THRU, B)]-
Wahlschalter richtig eingestellt?
Stellen Sie die [CROSS FADER ASSIGN (A, THRU, B)]-Wahlschalter richtig für die verschiede-
nen Kanäle ein. (Seite 13)
Fader-Start eines DJ-Players ist unmöglich.Ist [FADER START] auf [OFF] gestellt?Im Bildschirm [USER SETUP] schalten Sie [FADER START] auf [ON]. (Seite 23)
Ist der DJ-Player richtig an die Buchse [LINK]
angeschlossen?
Schließen Sie den DJ-Player richtig an die Buchse [LINK] mit einem LAN-Kabel an. (Seite 10)
Sind die Audiokabel richtig angeschlossen?Verbinden Sie die Audioeingangsbuchsen dieses Geräts und die Audioausgangsbuchsen des
DJ-Players mit einem Audiokabel. (Seite 10)
Ist die DJ-Player-Nummer richtig eingestellt?Stellen Sie die Player-Nummer des DJ-Players auf die gleiche Nummer wie der Kanal, an
dem das Audiokabel angeschlossen ist.
[BEAT EFFECTS] arbeitet nicht.Ist der Effekt-Kanalwahlschalter richtig eingestellt?Stellen Sie den Effekt-Kanalwahlschalter ein, um den Kanal zu wählen, für den der Effekt
angelegt werden soll.
[SOUND COLOR FX] arbeitet nicht.Ist der Regler [COLOR] in eine geeignete Stellung gestellt?Drehen Sie den Regler [COLOR] im Uhrzeigersinn oder gegen den Uhrzeigersinn. (Seite 15)
Verwendung eines externen Effektors ist
unmöglich.
Ist die Taste [ON/OFF] für [BEAT EFFECTS] auf [ON]
gestellt?
Drücken Sie die Taste [ON/OFF] für [BEAT EFFECTS], um [SND/RTN] auf [ON] zu stellen.
(Seite 16)
Ist der externe Effektor richtig an die Buchse [SEND] oder
[RETURN] angeschlossen?
Schließen Sie den externen Effektor an die Buchsen [SEND] und [RETURN] an. (Seite 10)
Verzerrter Ton von einem externen Effektor.Ist der Audio-Ausgangspegel des externen Effektors auf
einen geeigneten Pegel eingestellt?
Stellen Sie den Audio-Ausgangspegel des externen Effektors ein.
Tempo (BPM) kann nicht gemessen werden,
oder der Messwert des Tempos (BPM) ist
implausible.
Ist der Audio-Eingangspegel zu hoch oder zu niedrig?Stellen Sie den Regler [TRIM] so ein, dass die Kanalpegel-Anzeige bei etwa [0 dB] beim
Spitzenpegel aufleuchtet. (Seite 13)
Bei einigen Tracks kann es umöglich sein, das Tempo (BPM) richtig zu messen. Verwenden
Sie die Taste [TAP] zur manuellen Eingabe des Tempos. (Seite 16)
Das gemessene Tempo (BPM) unterscheidet
sich von dem auf CD angezeigten Tempo.
—Die Werte können sich aufgrund der unterschiedlichen Messweisen für BPM unterscheiden.
Der MIDI-Sequenzer synchronisiert nicht.Ist der Sync-Modus des MIDI-Sequenzers auf Slave
gestellt?
Stellen Sie den Sync-Modus des MIDI-Sequenzers auf Slave.
Unterstützt der von Ihnen verwendete MIDI-Sequenzer
Timing Clocks?
MIDI-Sequenzer, die nicht MIDI Timing Clocks unterstützen, können nicht synchronisiert
werden.
MIDI Control arbeitet nicht.Ist der MIDI-Kanal eingeschaltet?Drücken Sie die Taste [ON/OFF] für [MIDI]. (Seite 16)
Sind die MIDI-Einstellungen richtig eingestellt?Zum Betreiben von DJ-Software mit diesem Gerät müssen die MIDI-Meldungen dieses
Geräts zur verwendeten DJ-Software zugewiesen werden. Anweisungen zum Zuweisen von
Meldungen siehe Bedienungsanleitung für Ihre DJ-Software.
Dieses Gerät wird nach dem Anschluss an
einen Computer nicht erkannt.
USB-Anzeige ist erloschen oder blinkt.
Ist die Treibersoftware im Computer richtig installiert?Installieren Sie die Treibersoftware. Wenn sie bereits installiert ist, installieren Sie sie neu.
(Seite 5)
Der Sound von einem Computer kann nicht
von diesem Gerät ausgegeben werden.
Sind dieses Gerät und der Computer richtig verbunden?Verbinden Sie dieses Gerät und den Computer direkt mit dem mitgelieferten USB-Kabel.
(Seite 11)
Sind die Audio-Ausgabegerät-Einstellungen richtig
eingestellt?
Wählen Sie dieses Gerät mit den Audio-Ausgabegerät-Einstellungen. Anweisungen zum
Vornehmen von Einstellungenen für Ihre Anwendunge siehe Bedienungsanleitung für Ihre
Anwendung.
Ist der Eingangswahl-Schalter Schalter richtig eingestellt?Stellen Sie den Eingangswahl-Schalter auf die Stellung [USB]. (Seite 13)
Effektsound kann nicht mitgehört werden,
auch wenn die Taste [CUE] für [BEAT
EFFECTS] gedrückt ist.
—Der Schaltkreis, der das Echü für die Effektsounds [ECHO], [REVERB], [ROLL], [SLIP ROLL]
und [REV ROLL] generiert, wird hinter dem Effektschaltkreis positioniert, so dass der
Effektsound mitgehört werden kann. Dies ist keine Funktionsstörung.
Sound wird verzerrt, wenn ein Plattenspieler
an die Buchsen [PHONO] dieses Geräts
angeschlossen ist.
Oder die Beleuchtung der Kanalpegel-
Anzeige ändert sich nicht, auch wenn der
Regler [TRIM] gedreht wird.
Haben Sie einen Plattenspieler mit eingebautem Phono-
Entzerrer angeschlossen?
Schließen Sie den Plattenspielers mit eingebautem Phono-Entzerrer an die Buchsen [CD/
LINE] an. (Seite 10)
Wenn der Plattenspieler mit eingebautem Phono-Entzerrer einen PHONO/LINE-Wahlschalter
hat, stellen Sie diesen auf PHONO.
Ist eine Audioschnittstelle für Computer zwischen den
Plattenspieler und dieses Gerät geschaltet?
Wenn die Ausgabe von der Audioschnittstelle für Computers auf Line-Pegel ist, schließen Sie
diese an die Buchsen [CD/LINE] an. (Seite 10)
Wenn der Plattenspieler einen PHONO/LINE-Wahlschalter hat, stellen Sie diesen auf
PHONO.
Blockdiagramm
Master
Limiter
[BEAT EFFECT
(
SND/RTN]
Effect CH Select
Effect CH Select
Effect Out
CableCheck
RETURN
SEND Out
CHx
CF A/B
MIC
Master
CHx
CF A/B
MIC
Master
Return Level
No Cable
Effect SW
Cable Exist
Effect_CUE
Effect_CUE
[Mono Split / Stereo SWITCH & MIXING]
Mono Split
Stereo
2posi
MIXING
MONO SPLIT/
STEREO SWITCH
[BEAT EFFECT(Others)]
Effect CH Select
Effect CH Select
Effect Out
CHx
CF A/B
MIC
Master
CHx
CF A/B
MIC
Master
Effect SW
Level Depth
CHx Cue On/Off SW
CHx_CUE
Effect Cue On/Off SW
Effect_CUE
Link Cue On/Off SW
Link_CUE
CUE
Mixing
L
R
SEL
Mono Split
Stereo
Master Cue On/Off SW
Master_CUE
Master
Mixing
L
R
H.P. MIX R Out
H.P. MIX L Out
SEL
SEL
3posi
2posi
SOUND
COLOR
EFFECT
CHx
SOUND
COLOR
EFFECT
CHx
3Band
EQ/
ISOLATOR
CHx
BEAT
EFFECT
CHx
BEAT
EFFECT
CHx
BEAT
EFFECT
CHx
BPM Detect CHx Select
Level meter CHx
BEAT
Effect
(SND/RTN)
Send/
Return
CHx
CUE
Monitor
CHx
Link
CUE
Phono
AMP
Analog_PHONO
Analog_CD LINE
Digital/USB
CF Assign
3posi
Assign A
CHx
Assign Thru
CH1-4
Assign B
CHx
CH Fader
3posi
CH
Fader
Curve
Switch
3posi
2posi
2para4para
Cross
Fader
Curve
Switch
Thru
CF A
CF B
MIC Monitor SW
CHx in
CHx Control Tone
2Band
MIC EQ
MIC1,2
MIC1/2 in
LINK in
Return in
Send out
Post CHx Fader
TalkOver ON/OFF
MIX (REC OUT)
Master_CUE
MIC_Out
MIC
MIC_Out
Cross Fader B
Cross Fader A
BPM Detect Master
Level meter Master
CH1-4 COMMON
CH1-4 COMMON
MIC1,2 COMMON
Digital Trim
CHx _CUE
Link_CUE
BPM Detect CF A
BPM Detect CF B
BPM Detect MIC
Send/
Return
CF A
BEAT
EFFECT
MIC
Send/
Return
MIC
BEAT
EFFECT
CF B
Send/
Return
CF B
Cross
Fader
BEAT
EFFECT
Master
Talk
Over
Master
CUE
Talk
Over
Level
Talk Over
Mode
Advanced
/Normal
Master
Mono/
STEREO
Send/
Return
Master
Master
Balance
Master
Balance
Master
Level
HP Level
Booth
Level
SEL
MIC Output
to Booth Monitor
On/Off SW
Booth Out
REC out
USB Common out
Digital out
Master
H.P. out
CHx_CUE
Effect_CUE
Link_CUE
CHx Control Tone
Post CHx Fader
Cross Fader A
Cross Fader B
MIC
MIX (REC OUT)
Master_CUE
Boost
Boost
ATT
Mono Split/
Stereo
SWITCH
& MIXING
Mixer
Audio
Output
Select
MIC
FILTER
MIC In
Level
detect
TalkOver ON/OFF
MIC 1,2
MIX
Off
On
TalkOver
MIC1
MIC2
LANDigital MASTER
RETURN
CH_1_Digital/USB1/2
PHONES
MASTER
BOOTH
REC
SEND
USB1/2
USB3/4
USB5/6
USB7/8
DSP
MIC
ADC
ETHER SW IC
I/Fcom
USB
I/Fcom
Ether
DAC
DAC
PHONES
LAN
MASTER 1
REC
DAC
SEND
MUTE
DAC
BOOTH
MUTE
DAC
MUTE
MASTER 2
MUTE
DIGITAL
MASTER
SRC
DIT
MIC1 LEVEL
MIC2 LEVEL
CH1_Analog
ADC
CD/LINE
PHONO
DIGITAL
ADC
DIR
CH1
TRIM
Control Tone
ADC
CD/LINE
PHONO
DIGITAL
ADC
DIR
CH2
TRIM
Control Tone
ADC
CD/LINE
PHONO
DIGITAL
ADC
DIR
CH3
TRIM
Control Tone
ADC
CD/LINE
PHONO
DIGITAL
ADC
DIR
CH4
TRIM
Control Tone
CH2_Analog
CH3_Analog
CH4_Analog
SRC
SRC
SRC
SRC
RETURN
CH_2_Digital/USB3/4
CH_3_Digital/USB5/6
CH_4_Digital/USB7/8
USB
CH1 Digital IN
Control Tone
Control Tone
Control Tone
Control Tone
CH2 Digital IN
CH3 Digital IN
CH4 Digital IN
CH1 USB1/2 IN
CH1 USB1/2 OUT
CH2 USB3/4 IN
CH3 USB5/6 IN
CH4 USB7/8 IN
CH2 USB3/4 OUT
CH3 USB5/6 OUT
CH4 USB7/8 OUT
SRC
SRC
SRC
SRC
USB
Type B
BEAT
EFFECT
CF A
ADC
BEAT
EFFECT
Processing
SOUND
COLOR
EFFECT
CHx
26
De
27
De
Deutsch
Übernehmen der Anleitung
Die Bedienungsanleitung kann in Form einer PDF-Datei vorliegen. Adobe
®
Reader
®
muss installiert sein, um Dateien im PDF-Format zu lesen. Wenn Sie
Adobe Reader nicht haben, installieren Sie die Software bitte vom Download-Link
im Menübildschirm der CD-ROM.
Herunterladen der neuesten Versionen der
Bedienungsanleitungen und der Kurzanleitung -
Serato DJ Edition
1 Setzen Sie die CD-ROM in das CD-Laufwerk Ihres
Computers ein.
Die CD-ROM-Menü wird angezeigt.
Wenn das Menü der CD-ROM nicht erscheint, wenn die CD-ROM eingesetzt wird,
führen Sie die folgenden Schritte aus.
Bei Windows
Aus dem [Start]-Menü – [Computer] (oder [Arbeitsplatz]) öffnen Sie das
CD-Laufwerk und doppelklicken Sie auf das [CD_menu.exe]-Icon.
Für Mac OS X
Im Finder doppelklicken Sie direkt auf das [CD_menu.app]-Icon.
2 Wenn das CD-ROM-Menü angezeigt wird, wählen Sie
[DJM-900SRT: Laden Sie die Bedienungsanleitung herunter
(PDF-Datei)] und klicken dann auf [Start].
3 „Eine Internet-Umgebung ist zum Zugriff auf die Site
erforderlich. Internetverbindung vorhanden?“ wird
angezeigt. Klicken Sie auf [Ja].
Der Webbrowser wird gestartet, und die globale Pioneer DJ-Support-Website wird
angezeigt.
http://pioneerdj.com/support/
4 Auf der Pioneer DJ-Support-Website klicken Sie auf
„Manuals“ unter „DJM-900SRT“.
5 Aus der heruntergeladenen Seite klicken Sie auf die
Sprache der benötigten Dokumente.
Der Download der Bedienungsanleitung/Kurzanleitung - Serato DJ-Edition beginnt.
Herunterladen des Serato DJ
Software-Handbuchs
1 Setzen Sie die CD-ROM in das CD-Laufwerk Ihres
Computers ein.
Die CD-ROM-Menü wird angezeigt.
Wenn das Menü der CD-ROM nicht erscheint, wenn die CD-ROM eingesetzt wird,
führen Sie die folgenden Schritte aus.
Bei Windows
Aus dem [Start]-Menü – [Computer] (oder [Arbeitsplatz]) öffnen Sie das
CD-Laufwerk und doppelklicken Sie auf das [CD_menu.exe]-Icon.
Für Mac OS X
Im Finder doppelklicken Sie direkt auf das [CD_menu.app]-Icon.
2 Wenn das CD-ROM-Menü angezeigt wird, wählen Sie
[Serato DJ: Laden Sie die Anleitung für die Software herunter
(PDF-Datei)] und klicken dann auf [Start].
3 „Eine Internet-Umgebung ist zum Zugriff auf die Site
erforderlich. Internetverbindung vorhanden?“ wird
angezeigt. Klicken Sie auf [Ja].
Der Webbrowser wird gestartet, und die globale Pioneer DJ-Support-Website wird
angezeigt.
4 Klicken Sie auf [Software Info] unter [DJM-900SRT] auf der
Pioneer DJ-Support-Website.
[Serato DJ Support Information] wird angezeigt.
5 Klicken Sie auf den Link zur Serato DJ-Download-Seite.
Die Serato DJ-Download-Seite wird angezeigt.
http://serato.com/
6 Melden Sie sich bei Ihrem „Serato.com“-Benutzerkonto an.
Geben Sie die registrierte E-Mail-Adresse und das Passwort ein, um sich bei „Serato.
com“ anzumelden.
7 Von „More Downloads“ auf der rechten Seite der
Download-Seite klicken Sie auf „Serato DJ x.x User Manual“.
Der Download des Serato DJ Software-Handbuchs beginnt.
Über Markenzeichen und eingetragene
Markenzeichen
Pioneer und rekordbox sind eingetragene Markenzeichen der PIONEER
CORPORATION.
Bei Microsoft, Windows und Windows Vista handelt es sich um eingetragene
Marken bzw. Marken der Microsoft Corporation in den Vereinigten Staaten und/
oder anderen Ländern.
Apple, Macintosh und Mac OS sind Warenzeichen der Apple Inc., die in den
USA und anderen Ländern eingetragen sind.
ASIO ist ein Markenzeichen von Steinberg Media Technologies GmbH.
Serato DJ ist eine in den USA und anderen Ländern eingetragene Marke von
Serato Audio Research Ltd.
Die hier erwähnten Produkt- oder Firmennamen sind Markenzeichen der jeweiligen
Eigentümer.
Technische Daten
Allgemeine
Stromanforderungen ..........................110 V bis 240 V Wechselspannung, 50 Hz/60 Hz
Leistungsaufnahme ................................................................................................... 41 W
Leistungsaufnahme (Standby) .................................................................................0,4 W
Gewicht des Hauptgeräts ........................................................................................ 7,1 kg
Max. Abmessungen .................................... 331 mm (B) × 107,9 mm (H) × 404 mm (T)
Betriebstemperatur ...............................................................................+5 °C bis +35 °C
Betriebsluftfeuchtigkeit ............................................5 % bis 85 % (keine Kondensation)
Vi ringraziamo per avere acquistato questo prodotto Pioneer. Vi preghiamo di leggere queste queste istruzioni per l’uso in modo da sapere usare correttamente il proprio
modello. Dopo aver letto queste istruzioni, riporle in un luogo sicuro per poterle consultare di nuovo al momento del bisogno.
In alcuni paesi o regioni, la forma della spina di alimentazione e della presa di corrente possono non essere quelle delle illustrazioni. Il metodo di collegamento e di uso dell’u-
nità però non cambia.
ATTENZIONE
Questo apparecchio non è impermeabile. Per prevenire
pericoli di incendi o folgorazioni, non posizionare nelle
vicinanze di questo apparecchio contenitori pieni di
liquidi (quali vasi da fiori, o simili), e non esporre
l’apparecchio a sgocciolii, schizzi, pioggia o umidità.
D3-4-2-1-3_A1_It
ATTENZIONE
Per evitare il pericolo di incendi, non posizionare
sull’apparecchio dispositivi con fiamme vive (ad
esempio una candela accesa, o simili).
D3-4-2-1-7a_A1_It
AVVERTENZA PER LA VENTILAZIONE
Installare l’apparecchio avendo cura di lasciare un
certo spazio all’intorno dello stesso per consentire una
adeguata circolazione dell’aria e migliorare la
dispersione del calore (almeno, 5 cm sul retro, e 3 cm
su ciascuno dei lati).
ATTENZIONE
L’apparecchio è dotato di un certo numero di fessure e
di aperture per la ventilazione, allo scopo di garantirne
un funzionamento affidabile, e per proteggerlo dal
surriscaldamento. Per prevenire possibili pericoli di
incendi le aperture non devono mai venire bloccate o
coperte con oggetti vari (quali giornali, tovaglie, tende o
tendaggi, ecc.), e l’apparecchio non deve essere
utilizzato appoggiandolo su tappeti spessi o sul letto.
D3-4-2-1-7b*_A1_It
Condizioni ambientali di funzionamento
Gamma ideale della temperatura ed umidità
dell’ambiente di funzionamento:
da +5 °C a +35 °C, umidità relativa inferiore all‘85 %
(fessure di ventilazione non bloccate)
Non installare l’apparecchio in luoghi poco ventilati, o
in luoghi esposti ad alte umidità o alla diretta luce del
sole (o a sorgenti di luce artificiale molto forti).
D3-4-2-1-7c*_A1_It
AVVERTENZA
L’interruttore principale (POWER) dell’apparecchio
non stacca completamente il flusso di corrente
elettrica dalla presa di corrente alternata di rete. Dal
momento che il cavo di alimentazione costituisce
l’unico dispositivo di distacco dell’apparecchio dalla
sorgente di alimentazione, il cavo stesso deve essere
staccato dalla presa di corrente alternata di rete per
sospendere completamente qualsiasi flusso di
corrente. Verificare quindi che l’apparecchio sia stato
installato in modo da poter procedere con facilità al
distacco del cavo di alimentazione dalla presa di
corrente, in caso di necessità. Per prevenire pericoli
di incendi, inoltre, il cavo di alimentazione deve
essere staccato dalla presa di corrente alternata di
rete se si pensa di non utilizzare l’apparecchio per
periodi di tempo relativamente lunghi (ad esempio,
durante una vacanza).
D3-4-2-2-2a*_A1_It
AVVERTIMENTO RIGUARDANTE IL FILO DI
ALIMENTAZIONE
Prendete sempre il filo di alimentazione per la spina.
Non tiratelo mai agendo per il filo stesso e non toccate
mai il filo con le mani bagnati, perchè questo potrebbe
causare cortocircuiti o scosse elettriche. Non collocate
l’unità, oppure dei mobili sopra il filo di alimentazione e
controllate che lo stesso non sia premuto. Non
annodate mai il filo di alimentazione nè collegatelo con
altri fili. I fili di alimentazione devono essere collocati in
tal modo che non saranno calpestati. Un filo di
alimentazione danneggiato potrebbe causare incendi o
scosse elettriche. Controllate il filo di alimentazione
regolarmente. Quando localizzate un eventuale danno,
rivolgetevi al più vicino centro assistenza autorizzato
della PIONEER oppure al vostro rivenditore per la
sostituzione del filo di alimentazione.
S002*_A1_It
Se si vuole eliminare questo prodotto, non gettarlo insieme ai rifiuti domestici. Esiste un sistema di raccolta differenziata in conformità
alle leggi che richiedono appositi trattamenti, recupero e riciclo.
I privati cittadini dei paesi membri dell’UE, di Svizzera e Norvegia, possono restituire senza alcun costo i loro prodotti elettronici usati ad appositi
servizi di raccolta o a un rivenditore (se si desidera acquistarne uno simile).
Per i paesi non citati qui sopra, si prega di prendere contatto con le autorità locali per il corretto metodo di smaltimento.
In questo modo, si è sicuri che il proprio prodotto eliminato subirà il trattamento, il recupero e il riciclo necessari per prevenire gli effetti
potenzialmente negativi sull’ambiente e sulla vita dell’uomo.
K058b_A1_It
ATTENZIONE
Conservare i piccoli ricambi fuori dalla portata dei
bambini e dei bebé. Se inghiottiti accidentalmente,
recarsi immediatemente dal medico.
D41-6-4_A1_It
AVVERTENZA
PER EVITARE IL RISCHIO DI SCOSSE ELETTRICHE,
NON RIMUOVERE IL COPERCHIO (O IL RETRO). NON
CI SONO PARTI INTERNE LA CUI MANUTENZIONE
POSSA ESSERE EFFETTUATA DALL’UTENTE. IN CASO
DI NECESSITÀ, RIVOLGERSI ESCLUSIVAMENTE A
PERSONALE DI SERVIZIO QUALIFICATO.
D3-4-2-1-1_B2_It
3
It
Indice
Per chi usa Serato DJ per la prima volta insieme a questa unità
Per quanto riguarda le impostazioni iniziali richieste per l’uso di CONTROL CD
o CONTROL VINYL per controllare Serato DJ, vedere la “Guida di avvio veloce -
Edizione Serato DJ”. La “Guida di avvio veloce - Edizione Serato DJ” è scaricabile
presso il sito di supporto DJ Pioneer (http://pioneerdj.com/support/). Per quanto
riguarda le istruzioni per il download, vedere Download della versione più recente
delle istruzioni per l’uso e della Guida di avvio veloce – Edizione Serato DJ in questo
manuale (p.27).
Per gli utenti di CONTROL VINYL
Se si utilizza CONTROL VINYL, servirsi di un negozio che vende prodotti Serato DJ
o un negozio online che vende prodotti Serato (http://serato.com/).
Come leggere questo manuale
Leggere sempre sia questo manuale che la “Guida di avvio veloce – Edizione Serato
DJ”. I due documenti includono informazioni importanti che devono venire com-
prese prima di usare questo prodotto.
Per sapere come ottenere le istruzioni per l’uso di Serato DJ, vedere Acquisizione del
manuale (p.27).
Questo manuale consiste principalmente della descrizione delle funzioni dell’har-
dware di questa unità. Per dettagli sull’uso di Serato DJ consultarne il manuale e
la “Guida di avvio veloce – Edizione Serato DJ”.
Le Istruzioni per l’uso di Serato DJ possono venire scaricate presso “Serato.
com”. Per dettagli, vedere Come scaricare le istruzioni per l’uso di Serato DJ (p.
27).
L’ultima versione delle istruzioni per l’uso (questo manuale) e la “Guida di
avvio veloce – Edizione Serato DJ” sono disponibili presso il sito di supporto
Pioneer. Per dettagli, vedere Download della versione più recente delle istruzioni
per l’uso e della Guida di avvio veloce – Edizione Serato DJ (p.27).
In questo manuale, i nomi dei canali e dei pulsanti indicati sul prodotto, i nomi
dei menu nel sooftware, ecc. sono indicati fra parentesi quadre ([ ]), ad esempio
canale [MASTER], [ON/OFF], menu [File].
Tenere presente che le schermate e la caratteristiche del software descritto in
questo manuale, oltre all’aspetto esterno e alle caratteristiche del software, sono
in fase di sviluppo e possono differire da quelle finali.
Tenere presente che le procedure di uso possono differire da quanto descritto
in questo manuale a seconda del sistema operativo, delle impostazioni del
cinese semplificato, cinese tradizionale, coreano e giapponese
Se si usano sistemi operativi in altre lingue, seguire le istruzioni sullo schermo e
scegliere [English (inglese)].
Procedura di installazione (Windows)
Prima di installare il driver, leggere attentamente Precauzioni per l’installazione.
Per installare o disinstallare il driver si devono possedere diritti di amministra-
zione. Entrare nel sistema (log on) come amministratore del computer prima di
procedere con l’installazione.
1 Inserire il CD-ROM accluso nell’unità disco del computer.
Viene visualizzato il menu del CD-ROM.
Se il menu del CD-ROM non appare quando questo viene inserito, fare doppio
clic sull’unità CD dal menu [Start] – [Computer] (o [Risorse del computer]).
2 Scegliere [Installare il driver] dal menu che appare, quindi
fare clic su [Avvio].
3 Viene visualizzato “Scarico la versione più recente?
L’accesso al sito richiede una connessione a Internet.”. Fare clic
su [Si].
Il Web browser si apre ed il sito di supporto DJ Pioneer appare.
4 Fare clic su [Software Download] in [DJM-900SRT] del sito
di supporto DJ Pioneer.
5 Fare clic su [Driver Software].
6 Dalla pagina di download, scaricare il driver per Windows
(DJM-900SRT_X.XXX.exe).
7 Fare doppio clic sul file scaricato.
La schermata di installazione del driver appare.
8 Leggere attentamente l’Contratto di licenza d’uso del
software e, se si è d’accordo col suo contenuto, spuntare
[Accetto.] e fare clic su [OK].
Se non si è d’accordo con il contenuto dell’Contratto di licenza d’uso del software,
fare clic su [Annulla] e fermare l’installazione.
9 Procedere con l’installazione seguendo le istruzioni sullo
schermo.
Se [Protezione di Windows] appare sullo schermo durante l’installazione, far clic
su [Installa il software del driver] e continuare l’installazione.
Installazione in Windows XP
Se [Installazione hardware] appare sullo schermo durante l’installazione, far
clic su [Continua] e continuare l’installazione.
Ad installazione completa, appare un messaggio di conferma.
Procedura di installazione (Mac OS X)
Prima di installare il driver, leggere attentamente Precauzioni per l’installazione.
Per installare o disinstallare il driver si devono possedere diritti di amministra-
zione. Avere pronti il nome ed il password dell’amministratore del computer.
1 Inserire il CD-ROM accluso nell’unità disco del computer.
La cartella del CD-ROM appare.
Se le cartelle non vengono visualizzate quando un CD-ROM è stato caricato, fare
doppio clic sull’icona del CD sul desktop.
2 Fare doppio clic su [CD_menu.app].
3 Scegliere [Installare il driver] dal menu che appare, quindi
fare clic su [Avvio].
4 Viene visualizzato “Scarico la versione più recente?
L’accesso al sito richiede una connessione a Internet.”. Fare clic
su [Si].
Il Web browser si apre ed il sito di supporto DJ Pioneer appare.
5 Fare clic su [Software Download] in [DJM-900SRT] del sito
di supporto DJ Pioneer.
6 Fare clic su [Driver Software].
7 Dalla pagina di download, scaricare il driver per Mac OS
(DJM-900SRT_M_X.X.X.dmg).
8 Fare doppio clic sul file scaricato.
Appare la schermata del menu [DJM-900SRT_AudioDriver].
9 Fare doppio clic su [DJM-900SRT_AudioDriver.pkg].
La schermata di installazione del driver appare.
10 Controllare il contenuto della schermata e fare clic su
[Continua].
11 Quando appare l’accordo di licenza dell’utente finale,
leggere Contratto di licenza d’uso del software attentamente,
quindi fare clic su [Continua].
12 Se si è d’accordo col contenuto dell’Contratto di licenza
d’uso del software, fare clic su [Accetto.].
Se non si è d’accordo con il contenuto dell’Contratto di licenza d’uso del software,
fare clic su [Non sono d’accordo] e fermare l’installazione.
13 Procedere con l’installazione seguendo le istruzioni sullo
schermo.
Fare clic su [Annulla] per cancellare l’installazione quando è in corso.
Installazione del software Serato DJ
Serato DJ è un software DJ di Serato. Le prestazioni DJ sono possibili collegando il
computer che contiene questo software a questa unità.
Per quanto riguarda le impostazioni iniziali richieste per l’uso di CONTROL CD
o CONTROL VINYL per controllare Serato DJ, vedere la “Guida di avvio veloce -
Edizione Serato DJ”. La “Guida di avvio veloce - Edizione Serato DJ” è scaricabile
presso il sito di supporto DJ Pioneer (http://pioneerdj.com/support/). Per quanto
riguarda le istruzioni per il download, vedere Download della versione più recente
delle istruzioni per l’uso e della Guida di avvio veloce – Edizione Serato DJ in questo
manuale (P.27).
Per ottenere la più recente versione di Serato DJ, raggiungere Serato.com e sca-
ricare il software di lì. Il CD-ROM accluso contiene un collegamento di download
del programma.
Tenere presente che le schermate e le specifiche del software usate per le spiega-
zioni di questo manuale sono in evoluzione e possono differire da quelle finali.
Per istruzioni dettagliate sull’uso di Serato DJ, leggerne le istruzioni per l’uso.
Le istruzioni per l’uso di Serato DJ possono venire scaricate presso “Serato.
com”. Per dettagli, vedere Come scaricare le istruzioni per l’uso di Serato DJ
(p.27).
Ambiente operativo minimo richiesto
Sistemi operativi supportatiCPU e memoria richiesti
Mac OS X: 10.6.8, 10.7.4 e 10.8
Versione a
32 bit
Processore Intel
®
Core™ 2 Duo 2,0 GHz o più
1 GB o più di RAM
Versione a
64 bit
Processore Intel
®
, Core™ 2 Duo 2,4 GHz o più
4 GB o più di RAM
Windows: Windows 7
Versione a
32 bit
Processore Intel
®
, Core™ 2 Duo 2,0 GHz o più
2 GB o più di RAM
Versione a
64 bit
Processore Intel
®
, Core™ 2 Duo 2,4 GHz o più
4 GB o più di RAM
Altri
Porta USB
Il collegamento del computer a questa unità richiede una porta
USB 2.0.
Risoluzione del displayRisoluzione da 1 280 x 720 pixel o più
Collegamento Internet
La registrazione dell’account utente di “Serato.com” ed il down-
load del software richiedono un collegamento Internet.
Per ottenere informazioni recenti sull’ambiente operativo e sulla compatibilità ed ottenere il
sistema operativo più recente, vedere “Software Info” in “DJM-900SRT” del sito di supporto
DJ Pioneer riportato di seguito.
7
It
Italiano
http://pioneerdj.com/support/
Non si garantisce il funzionamento su tutti i computer, anche se soddisfano le condizioni di
ambiente operativo minime qui indicate.
Con certe impostazioni di risparmio energetico del computer, ecc., la capacità di elaborazione
della CPU e del disco fisso potrebbe essere insufficiente. In particolare con i notebook, con-
trollare che siano in grado di fornire prestazioni sufficienti e costanti (ad esempio tenendoli
collegati ad una presa di corrente) durante l’uso di Serato DJ.
L’uso di Internet richiede un contratto separato con un operatore che offra servizi di Internet
ed il pagamento delle relative tariffe.
Procedura di installazione (Windows)
Non collegare questa unità ed il computer se non ad installazione terminata.
Prima dell’installazione, eseguire il log on come l’utente amministratore del
computer.
Se altri programmi sono avviati nel computer, chiuderli.
1 Inserire il CD-ROM nell’unità CD del computer.
Viene visualizzato il menu del CD-ROM.
Se il menu del CD-ROM non appare quando viene inserito il CD-ROM, aprire il
CD da [Computer (o Risorse del computer)] nel menu [Start] e quindi fare clic
due volte sull’icona [CD_menu.exe].
2 Quando viene visualizzato il menu del CD-ROM,
selezionare [Scarica il software Serato DJ. ] e quindi fare clic su
[Avvio].
Per chiudere il menu del CD-ROM fare clic su [Esci].
3 Viene visualizzato “L’accesso al sito richiede una
connessione a Internet. Siete collegati a Internet?”. Fare clic su
[Si].
Il Web browser si apre ed il sito di supporto DJ Pioneer appare.
4 Fare clic su [Software Info] in [DJM-900SRT] del sito di
supporto DJ Pioneer.
[Serato DJ Support Information] viene visualizzato.
5 Fare clic sul link della pagina di download di Serato DJ.
Viene visualizzata la pagina di download di Serato DJ.
6 Accedere al proprio account utente di “Serato.com”.
Se si è già registrato un account utente per “Serato.com”, passare alla fase
8.
Se non si possiede ancora un account utente, farlo nel modo seguente.
—Seguendo le istruzioni sullo schermo, digitare il proprio indirizzo di
mail ed il password desiderato, quindi scegliere la propria regione di
residenza.
— Spuntando [E-mail me Serato newsletters], mail informativi riguardanti
le ultime informazioni su prodotti legati a Serato vi verranno inviati da
Serato.
—Completata la propria iscrizione come utente, si riceverà un mail all’indi-
rizzo fornito. Leggere il mail ricevuto da “Serato.com”.
Fare attenzione a non dimenticare l’indirizzo mail ed il password specificati
al momento della registrazione. Saranno poi necessari per aggiornare il
software.
Le informazioni date durante la registrazione del nuovo account possono
venire raccolte, elaborate ed usate sulla base della politica di privacy del sito
Web di Serato.
7 Fare clic sul collegamento contenuto nel mail ricevuto da
“Serato.com”.
Esso vi porterà alla pagina di download di Serato DJ. Procedere con la fase 9.
8 Registrarsi.
Digitare l’indirizzo mail ed il password precedentemente registrati per accedere a
“Serato.com”.
9 Scaricare Serato DJ dalla pagina di download.
Decomprimere il file scaricato e fare doppio clic sul file che ne risulta per iniziare
l’installazione.
10 Leggere attentamente i termini dell’accordo di licenza e,
se li si accettano, scegliere [I agree to the license terms and
conditions] e poi fare clic su [Install].
Se non si è d’accordo con l’accordo di licenza d’uso, fare clic su [Close] e
fermare l’installazione.
L’installazione ha inizio.
Il messaggio di installazione avvenuta appare una volta che questa è terminata.
11 Fare clic su [Close] per chiudere l’installatore di Serato DJ.
Procedura di installazione (Mac OS X)
Non collegare questa unità ed il computer se non ad installazione terminata.
Se altri programmi sono avviati nel computer, chiuderli.
1 Inserire il CD-ROM nell’unità CD del computer.
Viene visualizzato il menu del CD-ROM.
Se le cartelle non vengono visualizzate quando un CD-ROM è stato caricato, fare
doppio clic sull’icona del CD sul desktop.
2 Fare doppio clic su [CD_menu.app].
3 Scegliere [Scarica il software Serato DJ. ] dal menu del
CD-ROM, poi fare clic su [Avvio].
4 Viene visualizzato “L’accesso al sito richiede una
connessione a Internet. Siete collegati a Internet?”. Fare clic su
[Si].
Il Web browser si apre ed il sito di supporto DJ Pioneer appare.
5 Fare clic su [Software Info] in [DJM-900SRT] del sito di
supporto DJ Pioneer.
[Serato DJ Support Information] viene visualizzato.
6 Fare clic sul link della pagina di download di Serato DJ.
Viene visualizzata la pagina di download di Serato DJ.
7 Accedere al proprio account utente di “Serato.com”.
Se si è già registrato un account utente per “Serato.com”, passare alla fase
8.
Se non si possiede ancora un account utente, farlo nel modo seguente.
—Seguendo le istruzioni sullo schermo, digitare il proprio indirizzo di
mail ed il password desiderato, quindi scegliere la propria regione di
residenza.
— Spuntando [E-mail me Serato newsletters], mail informativi riguardanti
le ultime informazioni su prodotti legati a Serato vi verranno inviati da
Serato.
—Completata la propria iscrizione come utente, si riceverà un mail all’indi-
rizzo fornito. Leggere il mail ricevuto da “Serato.com”.
Fare attenzione a non dimenticare l’indirizzo mail ed il password specificati
al momento della registrazione. Saranno poi necessari per aggiornare il
software.
Le informazioni date durante la registrazione del nuovo account possono
venire raccolte, elaborate ed usate sulla base della politica di privacy del sito
Web di Serato.
8 Fare clic sul collegamento contenuto nel mail ricevuto da
“Serato.com”.
Esso vi porterà alla pagina di download di Serato DJ. Procedere con la fase 9.
9 Registrarsi.
Digitare l’indirizzo mail ed il password precedentemente registrati per accedere a
“Serato.com”.
10 Scaricare Serato DJ dalla pagina di download.
Decomprimere il file scaricato e fare doppio clic sul file che ne risulta per iniziare
l’installazione.
8
It
11 Leggere attentamente i termini dell’accordo di licenza e, se
li si accettano, fare clic su [Agree].
Se non si è d’accordo con l’accordo di licenza d’uso, fare clic su [Disagree]
e fermare l’installazione.
12 Se apparisse la seguente schermata, trascinare
l’icona [Serato DJ] e farla cadere sull’icona della cartella
[Applications].
9
It
Italiano
Collegamenti
Prima di fare o modificare collegamenti, non mancare di spegnere l’apparecchio e di scollegare il cavo di alimentazione.
Collegare il cavo di alimentazione dopo che tutti i collegamenti fra dispositivi sono stati fatti.
Usare solo il cavo di alimentazione accluso.
Consultare le istruzioni per l’uso del componente da collegare.
Nel creare un DVS (Digital Vinyl System, sistema vinile digitale) combinando un computer, un interfaccia audio, ecc., fare attenzione nel collegare l’interfaccia audio ai
terminali di ingresso di questa unità e fare attenzione alle impostazioni dei selettori di ingresso.
Consultare anche le istruzioni per l’uso del software DI e dell’interfaccia audio.
Pannello posteriore
OFF
RETURN
L
L
L
1 GND
2 HOT
3 COLD
L
R
L
L
IN
CH3
CH4
CH1CH2
R
R
R
R
L
R
R
PHONOPHONOPHONO
CH 4CH 3
CD/LINE
L
R
PHONO
CH 1
CD/LINE
SIGNAL GNDSIGNAL GND
TRS
CD/LINE
MASTER1MASTER2
REC OUT
BOOTH
MIC2
MIDI OUT
DIGITAL
MASTER
OUT
LINK
L
R
CH 2
CD/LINE
(MONO)
LR
(MONO)
SEND
POWER
AC IN
ON
134344343556782
deabh9cgf
1 Pulsante POWER (pagina 13)
Accende e spegne questa unità.
2 Terminali RETURN (pagina 10)
Collegare al terminale di uscita di un’unità effetti esterna. Se si è collegato solo
il canale [L (MONO)], l’ingresso del canale viene mandato simultaneamente al
canale [L (MONO)] [R].
3 Terminali PHONO (pagina 10)
Collegare un dispositivo di riproduzione fono (con puntina MM). Non ricevere
segnali a livello di linea.
Per collegare un dispositivo ai terminali [PHONO], togliere lo spinotto a spillo di
corto circuito inserito nei terminali.
Inserire lo spinotto a spillo di corto circuito nei terminali [PHONO] quando non
sono in uso per eliminare il rumore dall’esterno.
4 Terminali CD/LINE (pagina 10)
Collegare un lettore DJ o un componente di uscita a livello di linea.
5 Terminale SIGNAL GND(pagina 10)
Collega qui il filo di terra di lettori analogici. Questo aiuta a ridurre il rumore
quando si usano lettori analogici.
6 Terminale MIC2(pagina 10)
Collega un microfono qui.
7 Terminale MIDI OUT(pagina 10)
Collega questo al terminale MIDI IN di un sequencer MIDI esterno.
8 Slot di sicurezza Kensington
9 Terminale DIGITAL IN(pagina 10)
Collegare questi ai terminali di uscita digitali coassiali di lettori DJ, ecc. L’audio
potrebbe temporaneamente interrompersi quando la frequenza di campiona-
mento del segnale in uscita viene cambiata.
a Terminale DIGITAL MASTER OUT (pagina 10)
Emette i segnali audio del canale principale.
b Terminale LINK(pagina 10)
Vanno collegati al terminali LINK di lettori DJ Pioneer o alle porte LAN di compu-
ter su cui è installato rekordbox (PRO DJ LINK).
Per collegare vari dispositivi, usare un hub con selettore (da acquistarsi
separatamente).
Usare un hub con selettore compatibile con 100Base-TX. Alcuni hub con selet-
tore potrebbero non funzionare correttamente.
c Terminali BOOTH (pagina 10)
Questi sono terminali di uscita per un monitor da cabina.
d Terminali REC OUT (pagina 10)
Questi sono i terminali di uscita per la registrazione.
e Terminali MASTER2 (pagina 10)
Da collegare ad un amplificatore di potenza, ecc.
f Terminali MASTER1 (pagina 10)
Da collegare ad un amplificatore di potenza, ecc.
Usare queste uscite come uscite bilanciate. Fare attenzione a non collegare
accidentalmente il cavo di alimentazione di un’altra unità.
g Terminali SEND (pagina 10)
Collegare al terminale di ingresso di un’unità effetti esterna. Collegando il solo
canale [L (MONO)] si emette un segnale monofonico.
h AC IN
Si collega ad una presa di corrente col cavo di alimentazione accluso. Collegare
il cavo di alimentazione solo a collegamenti fra unità completati.
Usare solo il cavo di alimentazione accluso.
AVVERTENZA
Tenere gli spinotti a spillo di corto circuito fuori dalla portata di bambini e lattanti.
Se vengono inghiottiti accidentalmente, chiamare subito un medico.
10
It
Collegamento dei terminali di ingresso
Nel creare un DVS (Digital Vinyl System, sistema vinile digitale) combinando un computer, un interfaccia audio, ecc., fare attenzione nel collegare l’interfaccia audio ai
terminali di ingresso di questa unità e fare attenzione alle impostazioni dei selettori di ingresso.
Consultare anche le istruzioni per l’uso del software DI e dell’interfaccia audio.
1Per dettagli su PRO DJ LINK, vedere Informazioni su PRO DJ LINK a pagina 14.
2Per usare la funzione fader start con PRO DJ LINK, collegare un cavo LAN (pagina 15).
Collegamento dei terminali di uscita
OFF
RETURN
L
L
L
1 GND
2 HOT
3 COLD
L
R
L
L
IN
CH3
CH4
CH1CH2
R
R
R
R
L
R
R
PHONO
CH 4CH 3
CD/LINE
L
R
PHONO
CH 1
CD/LINE
SIGNAL GNDSIGNAL GND
TRS
CD/LINEPHONO
MASTER1MASTER2
REC OUT
BOOTH
MIC2
MIDI OUT
DIGITAL
MASTER
OUT
LINK
L
R
CH 2
CD/LINEPHONO
(MONO)
LR
(MONO)
SEND
POWER
AC IN
ON
L
R
L
R
Amplificatore di
potenza
2
Ad una presa
di corrente
Dispositivo con
ingresso audio
digitale
Amplificatore di
potenza (permonitor
da cabina)
Unità per effetti
esterna
1
Sequencer MIDI
Registratore a cassette, ecc.
(dispositivo di registrazione
di segnale analogico)
Amplificatore di
potenza
2
3
1Collegare anche un’unità effetti esterna al terminale [RETURN] (terminale di ingresso).
2Non mancare di usare i terminali [MASTER1] solo per una uscita bilanciata. Il collegamento ad un ingresso non bilanciato (ad esempio RCA) facendo uso di un cavo
convertitore da XLR a RCA (o di un adattatore di conversione), ecc., può far abbassare la qualità dell’audio e/o causare rumore.
Per il collegamento con un ingresso non bilanciato (ad esempio RCA), usare i terminali [MASTER2].
3Fare attenzione a non collegare accidentalmente il cavo di alimentazione di un’altra unità al terminale [MASTER1].
11
It
Italiano
Collegamento ad un pannello di controllo
B
ATHRU
MASTER
0
MIXING
LEVEL
PHONES
CUE
LEVEL
DIGITAL
CD/ LINEPHO
HI
MIC 1
MIC 2
0
0
TRIM
OVER
10
7
4
2
1
0
MICUSB
MIC1
Per i collegamenti, usare solo
il cavo USB accluso.
Microfoni
Computer
Cuffia
1
2
3
4
1 Terminale MIC1 (pagina 14)
Collega un microfono qui.
2 Terminale USB (pagina 11)
Collegare il computer.
3 Indicatore di collegamento USB
Si illumina durante scambi di segnale col computer.
4 Terminale PHONES (pagina 13)
Collegare qui una cuffia.
Collegamento di questa unità al computer
Per quanto riguarda l’uso insieme a Serato DJ, vedere la “Guida di avvio veloce –
Edizione Serato DJ”. Per dettagli, vedere Download della versione più recente delle
istruzioni per l’uso e della Guida di avvio veloce – Edizione Serato DJ (p.27).
1 Collegare questa unità al computer via cavi USB.
Questa unità funziona come un dispositivo audio conforme agli standard ASIO.
Questa operazione non è possibile con computer non dotati di USB 2.0.
Se si usano applicativi che supportano ASIO, [USB DECK 3], [USB DECK 1],
[USB DECK 2] e [USB DECK 4] possono venire usati come ingressi.
Se si usano applicativi che supportano DirectX, è possibile usare come ingresso
solo [USB DECK 3].
L’ambiente operativo raccomandato del computer dipende dall’applicativo DJ da
usare. Controllare sempre l’ambiente operativo raccomandato per l’applicativo
DJ che state usando.
Se un altro dispositivo audio USB è collegato al computer nello stesso momento,
potrebbe non funzionare e venire riconosciuto correttamente.
Si raccomanda di collegare solo il computer e questa unità.
Se si collega un computer a questa unità, collegarlo direttamente alla porta USB
di questa unità.
2 Premere il pulsante [POWER].
Accendere questa unità.
In Windows
—Quando questa unità viene collegata la prima volta al computer oppure
quando viene collegata ad una porta USB diversa del computer potrebbe
apparire il messaggio [Installazione driver di dispositivo in corso].
Attendere che il messaggio [È ora possibile utilizzare i dispositivi] appaia.
Installazione in Windows XP
— [Consentire la connessione a Windows Update per la ricerca di sof-
tware?] potrebbe apparire nel corso dell’installazione. Scegliere [ No, non
ora] e fare clic su [Avanti] per continuare l’installazione.
— [Scegliere una delle seguenti opzioni:] potrebbe apparire nel corso dell’in-
stallazione. Scegliere [Installa il software automaticamente (scelta consi-
gliata)] e fare clic su [Avanti] per continuare l’installazione.
— Se [Protezione di Windows] appare sullo schermo durante l’installazione,
far clic su [Installa il software del driver] e continuare l’installazione.
12
It
Impiego
Pannello di controllo
USB
DECK
3
USB
DECK
1
USB
DECK
2
USB
DECK
4
LEVEL
DIGITAL
CD/ LINEPHONO
HI
MIC 1
MIC 2
HI
LOW
EQ
EQ /
1212
1212
0
0
ON
TALK
OVER
OFF
SPACE
NOISE
CUE
CUE
CUE
CRUSHFILTER
DUB
ECHO
GATE/
COMP
1
234
BATHRU
TRIM
9
6
-
26
/
MID
6
-
26
/
LOW
6
-
26
/
COLOR
ISO
OVER
10
10
9
8
7
6
5
4
3
2
1
7
4
2
1
-
1
-
2
-
3
-
5
-
7
-
10
-
15
-
24
dB
0
HILOW
TRIM
DIGITAL
CD/ LINEPHONO
HI
EQ /
CUE
BATHRU
9
6
-
26
/
MID
6
-
26
/
LOW
6
-
26
/
COLOR
ISO
OVER
10
7
4
2
1
-
1
-
2
-
3
-
5
-
7
-
10
-
15
-
24
dB
0
HILOW
CUE
TRIM
DIGITAL
CD/ LINEPHONO
HI
EQ /
CUE
BATHRU
9
6
-
26
/
MID
6
-
26
/
LOW
6
-
26
/
COLOR
ISO
OVER
10
10
9
8
7
6
5
4
3
2
1
7
4
2
1
-
1
-
2
-
3
-
5
-
7
-
10
-
15
-
24
dB
0
HILOW
TRIM
DIGITAL
CD/ LINEPHONO
HI
EQ /
CUE
BATHRU
MONOSTEREO
9
6
-
26
/
MID
6
-
26
/
LOW
6
-
26
/
COLOR
ISO
OVER
10
10
9
8
7
6
5
4
3
2
1
000
7
4
2
1
-
1
-
2
-
3
-
5
-
7
-
10
-
15
-
24
dB
dBRL
0
OVER
10
7
4
2
1
-
1
-
2
-
3
-
5
-
7
-
10
-
15
-
24
0
HILOW
EQISOLATOR
AB
CROSS FADER ASSIGN
LEVEL
POWER
BALANCE
0
AUTO
GRID
TA P
AUTO
/ TAP
BPM
%
ms
CH SELECT
START
/STOP
RL
WAKE UP
PARAMETER
1234
MICMST
AB
TIME
MAX
LEVEL / DEPTH
ON/ OFF
MIN
MICMASTERMIDI
BEAT EFFECTS
BEAT
TAP
LINK
SOUND COLOR FX
HEADPHONES
FADER START
STEREO
MASTER
0
MIXING
LEVEL
BOOTH MONITOR
EQ CURVE
CH FADER
CROSS FADER
PHONES
CUE
MONO SPLIT
USB
MIC1
QUAN-
TIZE
MASTER
CF.B
CF.A
MIC
4
3
2
1
0
ON/OFFLFO FORM
UTILITY
X
-
PAD
ROBOT
REVERB
PHASER
SLIP ROLL
ROLL
FLANGER
FILTER
REV ROLL
SND/ RTN
MELODICTRANS
ECHO
SPIRAL
MIDI LFO
DELAY
1
2
4
6
8
9
a
u
w
z
6
B
C
D
E
F
A
t
y
s
5
7
3
v
x
e
j
d
f
g
6
h
i
c
l
666
k
m
n
o
p
q
r
6
e
d
f
g
h
i
c
e
d
f
g
h
i
c
e
d
f
g
h
i
c
bbbb
1 Controllo MIC1 LEVEL (pagina 14)
Regola il volume del suono emesso dal canale [MIC1].
2 Controllo MIC2 LEVEL (pagina 14)
Regola il volume del suono emesso dal canale [MIC2].
3 Controlli EQ (HI, LOW) (pagina 14)
Regolano la qualità dei toni dei canali [MIC1] e [MIC2].
4 Selettore OFF, ON, TALK OVER (pagina 14)
Accende/spegne il microfono.
5 Pulsanti SOUND COLOR FX (pagina 15)
Attivano/disattivano gli effetti SOUND COLOR FX.
6 Pulsante CUE (pagina 13)
Premere il pulsante o pulsanti [CUE] del canale o canali da monitorare.
7 Pulsanti FADER START (1, 2, 3, 4) (pagina 15)
Attivano/disattivano la funzione fader start.
8 Selettore MONO SPLIT, STEREO (pagina 13)
Determina il modo in cui l’audio di monitoraggio delle cuffie viene distribuito.
9 Controllo MIXING (pagina 13)
Regola il bilanciamento del volume di monitoraggio dell’audio dei canali il cui
pulsante [CUE] viene premuto e l’audio del canale [MASTER].
a Controllo LEVEL (pagina 13)
Regola il volume del suono emesso dalla cuffia.
b Indicatore di ingresso audio USB
Si illumina quando dell’audio viene mandato dal computer ai vari canali.
c Selettori d’ingresso (pagina 13)
Sceglie la sorgente di segnale di ciascun fra i componenti collegati a questa
unità.
d Controllo TRIM (pagina 13)
Regola il livello dei segnali audio ricevuti da ciascun canale.
e Controlli EQ/ISO (HI, MID, LOW) (pagina 13)
Regolano la qualità dei toni dei vari canali.
f Indicatore del livello del canali (pagina 13)
Visualizza il livello audio dei differenti canali prima che passino attraverso i fader
dei canali.
13
It
Italiano
g Controllo COLOR (pagina 15)
Modifica i parametri di SOUND COLOR FX dei vari canali.
h Fader canali (pagina 13)
Regola il livello dei segnali audio emessi da ciascun canale.
i Selettore CROSS FADER ASSIGN (A, THRU, B) (pagina 13)
Imposta la destinazione di uscita di ciascun canale su [A] o [B].
j Crossfader (pagina 13)
Emette i segnali audio assegnati dall’interruttore di assegnazione del crossfader
corrispondente alle caratteristiche di curva scelte con [CROSS FADER] (selettore
della curva del crossfader).
k Controllo MASTER LEVEL (pagina 13)
Regola il livello di uscita audio dei terminali [MASTER1] e [MASTER2].
l Indicatore del livello principale (pagina 13)
Visualizzano il livello di uscita audio dei terminali [MASTER1] e [MASTER2].
m Controllo BALANCE (pagina 14)
Regolano il bilanciamento di sinistra/destra del suono emesso dai terminali
[MASTER1], ecc.
n Selettore MONO, STEREO (pagina 14)
Consente di scegliere la modalità mono o stereo del segnale audio emesso dai
terminali [MASTER1], ecc.
o Controllo BOOTH MONITOR (pagina 14)
Regola il livello dei segnali audio emessi dal terminale [BOOTH].
p Selettore EQ CURVE (ISOLATOR, EQ) (pagina 13)
Commuta la funzione dei controlli [EQ/ISO (HI, MID, LOW)].
q Selettore CH FADER (, , ) (pagina 14)
Sceglie le caratteristiche della curva del fader.
r Selettore CROSS FADER (, , ) (pagina 14)
Cambia la caratteristiche della curva del crossfader.
s Pulsante ON/OFF (UTILITY)
—ON/OFF: Attiva/disattiva la funzione MIDI (pagina 16).
—UTILITY: Visualizza la schermata [USER SETUP] o [CLUB SETUP] (pagina
23).
t Pulsante START/STOP (pagina 17)
Invia segnali di avvio MIDI/arresto MIDI.
u Pulsante LFO FORM (WAKE UP)
—LFO FORM: Se [MIDI LFO] è scelto con BEAT EFFECT, la forma d’onda del
segnale MIDI cambia ad ogni pressione del pulsante (pagina 20).
—WAKE UP: Cancella la modalità di auto standby.
v Display unità principale
w X-PAD (pagina 16)
Regola il parametro quantitativo della funzione BEAT EFFECT.
x Pulsanti BEAT , (pagina 15)
Scegliere la frazione di battuta per sincronizzare il suono di un effetto.
y Pulsante TAP (ENTER)
—TAP: Se la modalità di misurazione BPM è impostata su [TAP], il valore BPM
viene impostato manualmente picchiettando il pulsante con un dito (pagina
15).
—ENTER: Usato per cambiare le impostazioni di questa unità (pagina 23).
z Pulsante QUANTIZE
Se la funzione QUANTIZE viene attivata per l’effetto BEAT EFFECT, questo viene
applicato al suono senza andare fuori tempo durante la riproduzione del brano
attuale. (pagina 14).
A Pulsante AUTO/TAP (pagina 15)
Sceglie la modalità di misurazione BPM.
B Selettori degli effetti di battuta (pagina 15)
Cambia il tipo di effetto BEAT EFFECT.
C Selettore degli effetti di canale (pagina 15)
Cambia il canale cui viene applicato BEAT EFFECT.
D Controllo TIME (pagina 15)
Regola il parametro del tempo di BEAT EFFECT.
E Controllo LEVEL/DEPTH (pagina 15)
Regola il parametro quantitativo di BEAT EFFECT.
F Pulsante ON/OFF (pagina 15)
Attiva/disattiva la funzione BEAT EFFECT.
Non tirare le manopole del fader dei canali e del crossfader con forza eccessiva.
Le manopole sono costruite in modo da non poter venir tolte facilmente. Tirandole
con forza le si possono quindi danneggiare.
Uso di base
Emissione di suono
1 Premere il pulsante [POWER].
Accendere questa unità.
2 Impostare i selettori d’ingresso.
Sceglie le sorgenti di segnale per i vari canali fra i vari dispositivi collegati a questa
unità.
— [DIGITAL]: Sceglie il lettore DJ collegato ai terminali [DIGITAL].
— [PHONO]: Sceglie il lettore analogico collegato ai terminali [PHONO].
— [CD/LINE]: Sceglie il lettore a cassette o lettore CD collegato ai terminali
[CD/LINE].
— [USB]: Sceglie l’audio del computer collegato alla porta [USB].
3 Girare il controllo [TRIM].
Regola il livello dei segnali audio ricevuti da ciascun canale.
L’indicatore del livello dei canali corrispondente si accende quando i segnali audio
vengono regolarmente ricevuti da quel canale.
4 Allontanare da sé il fader del canale.
Regola il livello dei segnali audio emessi da ciascun canale.
5 Cambiare di posizione il selettore [CROSS FADER ASSIGN
(A, THRU, B)].
Cambia la destinazione di uscita di ciascun canale.
— [A]: Assegnazione a [A] (sinistra ) del crossfader.
— [B]: Assegnazione a [B] (destra) del crossfader.
— [THRU]: Scegliere questa opzione per non fare uso del crossfader. (Il segnale
non passa per il crossfader.)
6 Regolazione del crossfader.
Questa operazione non è necessaria se [CROSS FADER ASSIGN (A, THRU, B)]
(selettore della curva del crossfader) si trova su [THRU].
7 Girare il controllo [MASTER LEVEL].
I terminali [MASTER1] e [MASTER2] emettono segnale audio.
L’indicatore del livello principale si illumina.
Regolazione della qualità dell’audio
1 Cambiare di posizione il selettore [EQ CURVE (ISOLATOR,
EQ)].
— [ISOLATOR]: Funziona da isolatore.
— [EQ]: La funzione equalizzatore è impostata.
2 Girare i controlli [EQ/ISO (HI, MID, LOW)] dei vari canali.
Le gamme di regolabilità dei vari controlli sono le seguenti.
—HI: Da –26 dB a +6 dB (13 kHz)
—MID: Da –26 dB a +6 dB (1 kHz)
—LOW: Da –26 dB a +6 dB (70 Hz)
Monitoraggio audio in cuffia
1 Collegare una cuffia al terminale [PHONES].
2 Premere il pulsante o pulsanti [CUE] del canale o canali da
monitorare.
3 Cambiare di posizione il selettore [MONO SPLIT, STEREO].
— [MONO SPLIT]: L’audio dei canali per cui pulsante [CUE] è premuto viene
emesso dal canale sinistro in cuffia, mentre l’audio del canale [MASTER]
viene emesso dal destro.
— [STEREO]: L’audio dei canali per cui il pulsante [CUE] è premuto viene
emesso in stereo in cuffia.
4 Girare il controllo [MIXING].
Regola il bilanciamento del volume di monitoraggio dell’audio dei canali il cui pul-
sante [CUE] viene premuto e l’audio del canale [MASTER].
5 Girare il controllo [LEVEL] per [HEADPHONES].
L’audio dei canali il cui pulsante della cuffia [CUE] è stato premuto viene riprodotto
in cuffia.
14
It
Se il pulsante della cuffia [CUE] viene premuto di nuovo, il monitoraggio viene
cancellato.
Commutazione della curva del fader
䢢Scegliere le caratteristiche della curva del fader
Cambiare di posizione il selettore [CH FADER (, , )].
— []: La curva sale improvvisamente sul retro.
— []: Viene impostata una curva fra quelle sopra e quelle sotto.
— []: La curva sale gradualmente (l’audio sale gradualmente mentre il fader
dei canali viene allontanato all’indietro).
䢢Scegliere le caratteristiche della curva del crossfader
Cambiare di posizione il selettore [CROSS FADER (, , )].
— []: Produce una curva che sale rapidamente (se il crossfader viene allon-
tanato da [A], i segnali vengono immediatamente emessi dal lato [B]).
— []: Produce una curva intermedia fra quella precedente e quella seguente.
— []: Produce una curva che sale gradualmente (se crossfader viene allonta-
nato dal lato [A], l’audio del lato [B] aumenta gradualmente e quello del lato
[A] diminuisce gradualmente).
Uso di un microfono
1 Collegare un microfono al terminale [MIC1] o [MIC2].
2 Portare il selettore [OFF, ON, TALK OVER] su [ON] o
[TALK OVER].
— [ON]: L’indicatore si illumina.
— [TALK OVER]: L’indicatore lampeggia.
Se regolato su [TALK OVER], l’audio diverso da quello del canale [MIC] viene
attenuato di 18 dB (default) quando al microfono arriva segnale da –10 dB o più.
Il livello di attenuazione audio [TALK OVER] è modificabile con [USER SETUP].
Per sapere come modificarlo, vedere Modifica delle impostazioni a pagina 23.
La modalità talk over può venire sostituita con quella normale o quella avanzata.
Per sapere come modificarlo, vedere Modifica delle impostazioni a pagina 23.
3 Girare il controllo [MIC1 LEVEL] o [MIC2 LEVEL].
Regola il volume del suono emesso dal canale [MIC].
Tenere presente che scegliendo la posizione più a destra si produce un volume
estremamente alto.
4 Vengono ricevuti segnali audio dal microfono.
䢢Regolazione della qualità dell’audio
Girare i controlli [EQ (HI, LOW)] dei canali [MIC].
Le gamme di regolabilità dei vari controlli sono le seguenti.
—HI: Da –12 dB a +12 dB (10 kHz)
—LOW: Da –12 dB a +12 dB (100 Hz)
Passaggio dall’audio mono a quello stereo
Fa passare l’audio emesso dai terminali [MASTER1], [MASTER2], [BOOTH], [REC
OUT], [PHONES], [DIGITAL MASTER OUT] e [USB] dalla modalità mono a quella
stereo.
Per regolare l’audio emesso dai terminali [USB], scegliere [MIX (REC OUT)] in
[Mixer Audio Output] della utility di impostazione.
Cambiare di posizione il selettore [MONO, STEREO].
— [MONO]: L’audio emesso è mono.
— [STEREO]: L’audio emesso è stereo.
䢢Regolazione del bilanciamento dei canali audio L/R
Il bilanciamento sinistro/destro dell’uscita audio dei terminali [MASTER1],
[MASTER2], [BOOTH], [REC OUT], [PHONES], [DIGITAL MASTER OUT] e [USB] è
regolabile.
Per regolare l’audio emesso dai terminali [USB], scegliere [MIX (REC OUT)] in
[Mixer Audio Output] della utility di impostazione.
1 Portare il selettore [MONO, STEREO] su [STEREO].
2 Girare il controllo [BALANCE].
Il bilanciamento sinistra/destra cambia a seconda della direzione in cui viene girato
il controllo [BALANCE] e della sua posizione.
Raggiungendo l’estremità destra si emette solo il canale stereo destro.
Raggiungendo l’estremità sinistra si emette solo il canale stereo sinistro.
L’audio viene emesso dal terminale [BOOTH]
Girare il controllo [BOOTH MONITOR].
Regola il livello dei segnali audio emessi dal terminale [BOOTH].
Uso avanzato
Uso delle funzioni supportate da Serato DJ
Se quest’unità ed un computer su cui è installato Serato DJ sono collegati fra loro
via cavo USB, si possono usare le seguenti funzioni.
䢢QUANTIZE
Se si usano brani analizzati con Serato DJ, i brani vengono portati a tempo anche
quando il pulsante [ON/OFF] di [BEAT EFFECTS] è premuto o [X-PAD] viene toccato
leggermente.
䢢FADER START
La riproduzione di brani in Serato DJ può essere iniziata con il fader di questa unità
(Fader Start Play).
Informazioni su PRO DJ LINK
Se un lettore DJ Pioneer che supporta PRO DJ LINK (ad es. CDJ-2000nexus, CDJ-
2000, CDJ-900), un computer su cui rekordbox sia installato e questa unità sono
collegati via cavi LAN, le funzioni PRO DJ LINK che seguono possono venire usate.
Per maggiori dettagli sulla funzione PRO DJ LINK, consultare anche le istruzioni per
l’uso del lettore DJ e quelle di rekordbox.
Per istruzioni sui collegamenti, vedere Collegamento dei terminali di ingresso a
pagina 10.
Facendo uso di un hub con selettore è possibile collegarsi con fino a 4 lettori DJ
e 2 computer.
Usare un hub con selettore compatibile con 100Base-TX. Alcuni hub con selet-
tore potrebbero non funzionare correttamente.
Impostare il numero di lettore del lettore DJ sulla cifra del canale cui il cavo
audio è collegato.
䢢QUANTIZE
Se si usano brani analizzati con rekordbox, il brano viene portato a tempo anche
quando il pulsante [ON/OFF] di [BEAT EFFECTS] è premuto o [X-PAD] viene toccato
leggermente.
䢢FADER START
La riproduzione del lettore DJ può essere iniziata con il fader di questa unità (Fader
Start Play).
䢢LINK MONITOR
Con questa funzione, i file audio rekordbox memorizzati nel computer possono
venire rapidamente ascoltati in cuffia.
䢢STATUS INFORMATION
Questa funzione informa i lettori DJ dello status dei canali collegati (in uso, numero
del canale, ecc.).
Uso della funzione QUANTIZE
Gli effetti possono essere applicati all’audio a tempo in sincronia col brano in uso
sulla base delle informazioni GRID di brani analizzati con Serato DJ o rekordbox.
Per usare la funzione QUANTIZE con PRO DJ LINK, collegare prima questa unità
a un lettore DJ Pioneer PRO DJ LINK compatibile. Per istruzioni sui collegamenti
vedere Collegamento dei terminali di ingresso a pagina 10.
Inoltre, l’uso della funzione QUANTIZE richiede la previa analisi dei file audio con
rekordbox. Per quanto riguarda l’analisi di file audio con rekordbox, consultare
anche le istruzioni per l’uso di rekordbox.
Per l’uso insieme a CDJ-2000nexus, prima aggiornare il firmware alla versione
1.02 o successiva.
Per l’uso insieme a CDJ-2000 o CDJ-900, prima aggiornare il firmware alla ver-
sione 4.0 o successiva.
1 Premere il pulsante [QUANTIZE].
La funzione QUANTIZE si attiva.
[GRID] si illumina nel display principale di questa unità quando le informazioni
GRID sono state correttamente ricevute da Serato DJ o dal lettore DJ e la funzione
15
It
Italiano
QUANTIZE è utilizzabile. [GRID] lampeggia se le informazioni GRID non sono state
ricevute correttamente.
A seconda della condizione operativa di Serato DJ o lettore DJ (off air,
scratching, reverse playing, ecc.,), potrebbe non essere possibile ricevere le
informazioni GRID.
2 Premere il pulsante [ON/OFF] di [BEAT EFFECTS] o toccare il
[X-PAD].
L’effetto viene aggiunto al suono a tempo con il brano riprodotto.
Premendo il pulsante [QUANTIZE] di nuovo si disattiva la funzione QUANTIZE.
Uso della funzione FADER START
Quando questa unità ed un computer che gira Serato DJ sono in funzione e colle-
gati via cavo USB, operazioni come l’avvio della riproduzione di brani in Serato DJ
sono controllabili col fader di questa unità.
Collegare questa unità ad un computer su cui Serato DJ sia già in funzione.
Analogamente, se si è collegata questa unità ad un lettore DJ Pioneer via cavo LAN,
certe operazioni come l’inizio della riproduzione con il lettore DJ possono venire
controllate con un fader di questa unità.
Collegare anticipatamente questa unità ed il lettore DJ Pioneer. Per istruzioni sui
collegamenti vedere Collegamento dei terminali di ingresso a pagina 10.
Per sapere come impostare il numero di lettori DJ Pioneer, vedere Informazioni su
PRO DJ LINK a pagina 14.
La funzione fader start può venire attivata o disattivata per tutti i lettori DJ in una
volta. Per quanto riguarda la procedura di commutazione, vedere Modifica delle
impostazioni a pagina 23.
La funzione FADER START non è utilizzabile se si tenta di effettuare il controllo
DVS mentre Serato DJ si trova in modalità Absolute. Premendo uno dei pulsanti
[FADER START (1, 2, 3, 4)] in modalità Absolute esso lampeggia e poi si spegne.
䢢Inizio della riproduzione con il fader di canale
1 Portare il selettore [CROSS FADER ASSIGN (A, THRU, B)] su
[THRU].
2 Premere uno dei pulsanti [FADER START (1, 2, 3, 4)].
Scegliere il canale da avviare con la funzione fader start.
Per Serato DJ
— Pulsante [Fader Start 1]: Sceglie il [DECK 3].
— Pulsante [Fader Start 2]: Sceglie il [DECK 1].
— Pulsante [Fader Start 3]: Sceglie il [DECK 2].
— Pulsante [Fader Start 4]: Sceglie il [DECK 4].
3 Portare il fader di canale sulla posizione più vicina a sé.
4 Impostare un cue in Serato DJ o nel lettore DJ.
Il brano si porta nel cue point e si porta in pausa.
5 Allontanare da sé il fader del canale.
La riproduzione del brano in Serato DJ o nel lettore DJ inizia.
Portando il fader di canale sulla sua posizione originaria, il lettore torna istanta-
neamente al punto cue già impostato e si porta in pausa di riproduzione (back
cue).
䢢Inizio della riproduzione col crossfader
1 Portare il selettore [CROSS FADER ASSIGN (A, THRU, B)] su
[A] o [B].
2 Premere uno dei pulsanti [FADER START (1, 2, 3, 4)].
Scegliere il canale da avviare con la funzione fader start.
Per Serato DJ
— Pulsante [Fader Start 1]: Sceglie il [DECK 3].
— Pulsante [Fader Start 2]: Sceglie il [DECK 1].
— Pulsante [Fader Start 3]: Sceglie il [DECK 2].
— Pulsante [Fader Start 4]: Sceglie il [DECK 4].
3 Regolazione del crossfader.
Regolarlo sul lato opposto a quello sul quale è regolato il canale da usare con la
funzione volete usare l’avvio con i cursori.
4 Impostare un cue in Serato DJ o nel lettore DJ.
Il brano si porta nel cue point e si porta in pausa.
5 Regolazione del crossfader.
La riproduzione del brano in Serato DJ o nel lettore DJ inizia.
Portando il crossfader sulla sua posizione originaria, il lettore torna istantanea-
mente al punto cue già impostato e si porta in pausa di riproduzione (back cue).
Uso della funzione LINK MONITOR
Controllare anticipatamente [Usare “LINK MONITOR” dei mixer DJ Pioneer] di
[File] > [Preferenze] > [Audio] in rekordbox. Consultare anche le istruzioni per
l’uso di rekordbox.
1 Collegare una cuffia al terminale [PHONES].
2 Collegarsi ad un computer su cui rekordbox è installato.
Per istruzioni sui collegamenti, vedere Collegamento dei terminali di ingresso a
pagina 10.
3 Scelta del brano da monitorare con rekordbox.
4 Premere il pulsante [CUE] di [LINK].
Il brano scelto con rekordbox viene riprodotto in cuffia.
Se il pulsante della cuffia [CUE] viene premuto di nuovo, il monitoraggio viene
cancellato.
La stessa operazione vista in Monitoraggio audio in cuffia (fasi da 3 a 5) può
venire eseguita.
Uso della funzione SOUND COLOR FX
Questi effetti vengono cambiati dall’uso del comando [COLOR].
1 Premere uno dei selettori [SOUND COLOR FX].
Questo sceglie il tipo di effetto.
Il pulsante premuto lampeggia.
Anche se uno dei selettori [SOUND COLOR FX] fosse già attivato, premendone
uno differente viene scelto quest’ultimo.
Per quanto riguarda i tipi di effetto, vedere Tipi di effetto SOUND COLOR FX a
pagina 18.
Lo stesso effetto viene impostato per i canali da [CH1] a [CH4].
2 Girare il controllo [COLOR].
L’effetto viene applicato al canale o canali il cui controllo era stato premuto.
䢢Cancellazione dell’effetto SOUND COLOR FX
Premere il selettore [SOUND COLOR FX] che lampeggia.
L’effetto viene cancellato.
Uso della funzione BEAT EFFECT
Questa funzione permette di impostare istantaneamente vari effetti a seconda del
tempo (BPM = Battute Per Minuto) del brano riprodotto.
Display unità principale
1
2
3
7
9
a
5
4
6
8
AUTO
GRID
TAPBPM
%
ms
CH SELECT
PARAMETER
1234
MICMST
AB
1
Sezione di display
degli effetti
Viene visualizzato il nome dell’effetto scelto.
2
Sezione di display
del canale scelto
Viene visualizzato il nome del canale cui è applicato un effetto.
3
AUTO (TAP)
[AUTO] si accende quando la modalità di misurazione BPM è
impostata su automatico.
[TAP] si illumina nella modalità di digitazione manuale.
4
Display del valore
BPM (3 cifre)
Nella modalità automatica, questo visualizza il valore BPM rilevato
automaticamente.
Se il valore BPM non è misurabile, quello rilevato precedentemente
viene visualizzato e lampeggia.
In modalità di digitazione manuale, visualizza il valore BPM intro-
dotto manualmente.
5
GRID
Questo si illumina quando Serato DJ è in funzione e la funzione
QUANTIZE può essere usata. Si illumina inoltre quando si riproduce
un brano già analizzato con rekordbox e la funzione QUANTIZE può
essere usata insieme al lettore DJ. Lampeggia o rimane spento se
la funzione QUANTIZE non è utilizzabile.
6
BPM
È sempre acceso.
16
It
7
Sezione di display
dei parametri
Visualizza i parametri scelti per un particolare effetto.
Se viene premuto il pulsante [BEAT, ], la frazione di battuta
corrispondente viene visualizzata per 1 secondo.
Specificando un valore di parametro fuori gamma con il pulsante
[BEAT, ], il valore non cambia ed il display lampeggia.
8
% (ms)Si accendono a seconda delle unità per effetti diversi.
9
Sezione display
delle battute
Si illumina a seconda della posizione del numero di battuta scelta.
a
Sezione display a
sfioramento
Si illumina quando [X-PAD] viene toccato.
1 Premere il pulsante [AUTO/TAP].
Scegliere la modalità di misurazione BPM.
— [AUTO]: Misura automaticamente le BPM dei segnali audio riprodotti. La
modalità [AUTO] viene impostata all’accensione di questa unità.
— [TAP]: Il valore BPM viene impostato automaticamente picchiettando il
pulsante [TAP] con un dito.
La gamma di misurazione BPM di [AUTO] è BPM = da 70 a 180. Il valore BPM di
alcuni brani può non poter essere misurato correttamente. Se il valore BPM non
è misurabile, esso lampeggia sul display. In questi casi, usare il pulsante [TAP]
per digitare manualmente il valore BPM.
2 Girare il selettore degli effetti di canale.
Sceglie il tipo di effetto.
Per quanto riguarda i tipi di effetto, vedere Tipi di BEAT EFFECT a pagina 18.
Per usare [SND/RTN], vedere Uso di unità effetti esterne di seguito.
Per usare [MIDI LFO], vedere Uso di MIDI LFO a pagina 17.
3 Girare il selettore degli effetti di canale.
Sceglie il canale cui si applica l’effetto.
— [1] – [4]: L’effetto viene applicato al suono dei vari canali.
— [MIC]: L’effetto viene applicato al suono del canale [MIC].
— [CF.A], [CF.B]: L’effetto viene applicato al suono del lato [A] (sinistro) o [B]
(destro) del crossfader.
— [MASTER]: L’effetto viene applicato al suono del canale [MASTER].
Questa operazione non è necessaria se [MIDI LFO] viene scelto.
4 Premere il pulsante [BEAT , ].
Scegliere la frazione di battuta per sincronizzare il suono di un effetto.
Il tempo di effetto corrispondente alla frazione della battuta viene impostato
automaticamente.
5 Premere il pulsante [ON/OFF] di [BEAT EFFECTS].
L’effetto viene applicato al suono.
Il parametro di tempo dell’effetto è regolabile girando il controllo [TIME].
Il parametro di quantità dell’effetto è regolabile girando il controllo [LEVEL/DEPTH].
Il pulsante [ON/OFF] lampeggia quando l’effetto è attivato.
Premendo il pulsante [ON/OFF] di nuovo si disattiva l’effetto.
䢢Introduzione manuale delle BPM
Picchiettare il pulsante [TAP] almeno due volte a ritmo (in
note da un quarto) col suono da riprodurre.
Il valore medio degli intervalli presso cui il pulsante [TAP] è stato premuto con un
dito viene fissato come BPM.
Se il valore BPM viene impostato col pulsante [TAP], la frazione della battuta
viene impostata su [1/1], e la durata di una battuta (un quarto di nota) viene
impostato come durata dell’effetto.
Il BPM può venire regolato manualmente girando il controllo [TIME] mentre si
preme il pulsante [TAP].
Il valore BPM è impostabile in unità da 0,1 tenendo premuti il pulsante
[AUTO/TAP] e il pulsante [TAP], e poi girando il controllo [TIME].
䢢Uso di unità effetti esterne
1 Collegare questa unità ed un’unità effetti esterna.
Per istruzioni sui collegamenti, vedere Collegamento dei terminali di uscita a pagina
10.
2 Girare il selettore degli effetti di canale.
Scegliere [SND/RTN (MIDI LFO)].
3 Girare il selettore degli effetti di canale.
Sceglie il canale cui si applica l’effetto.
4 Premere il pulsante [ON/OFF] di [BEAT EFFECTS].
Il suono passato attraverso l’unità effetti esterna viene emesso dal canale
[MASTER].
Premendo il pulsante [ON/OFF] di nuovo si disattiva l’effetto.
Uso di [X-PAD]
Procedura
di uso
Stato del pulsante [ON/OFF] di
[BEAT EFFECTS]
X-PAD
Effetto
1
Via (acceso)
Solleva K ToccaVia K Su
2
Su (lampeggia)
Solleva K ToccaSu K Su
䢢Procedura di uso 1
1 Effettuare le fasi da 1 a 4 della procedura Uso della
funzione BEAT EFFECT.
2 Toccare [X-PAD].
Il [X-PAD] attiva o disattiva l’effetto e cambia il parametro quantitativo.
Se si lascia andare il dito dal [X-PAD], l’effetto cessa.
Perché l’effetto continui dopo aver tolto il dito dal [X-PAD], mentre si tocca il
[X-PAD], premere il pulsante [ON/OFF] di [BEAT EFFECTS], poi togliere il dito
dal [X-PAD].
䢢Procedura di uso 2
1 Effettuare le fasi da 1 a 5 della procedura Uso della
funzione BEAT EFFECT.
2 Toccare [X-PAD].
Il [X-PAD] cambia il parametro quantitativo dell’effetto.
Uso del software DJ con la funzione MIDI
Questa unità emette le informazioni sull’uso dei pulsanti ed i comandi in un formato
MIDI universale.
Collegandosi via cavo USB ad un computer che contiene software DJ MIDI compati-
bile, il software DJ è controllabile con questa unità.
Installare anticipatamente il software DJ nel proprio computer. Regolare anche i
parametri audio e MIDI del software per DJ.
Per istruzioni sulle impostazioni dei canali MIDI, vedere Modifica delle imposta-
zioni a pagina 23.
Per quanto riguarda i messaggi emessi da quest’unità, vedere Mappa di asse-
gnazione MIDI a pagina 21.
1 Collegare il terminale [USB] di questa unità al computer.
Per dettagli sui collegamenti, vedere Collegamento ad un pannello di controllo a
pagina 11.
2 Lanciare il software DJ.
3 Premere il pulsante [ON/OFF (UTILITY)].
Attivare la funzione MIDI.
La trasmissione di segnali MIDI inizia.
Se un fader o un comando viene mosso, viene inviato un messaggio corrispon-
dente alla posizione.
Se il pulsante [START/STOP] viene tenuto premuto per oltre 2 secondi, viene
mandata una sequenza di segnali MIDI corrispondente alle posizioni del pul-
sante, del fader o del controllo (istantanea).
Premendo di nuovo il pulsante [ON/OFF (UTILITY)], l’invio di messaggi MIDI
cessa.
Il segnale di clock di sincronizzazione MIDI (informazioni BPM) viene mandato a
prescindere dalla condizioni del pulsante [ON/OFF (UTILITY)].
䢢Preparativi per l’uso della funzione MIDI LFO
I software, dispositivi ecc. compatibili con MIDI (chiamati più oltre “lato di ricezione
del segnale MIDI”) devono venire predisposti (“appresi”) prima dell’uso della fun-
zione MIDI LFO.
Le operazioni di apprendimento vanno fatte sul lato di ricezione del segnale MIDI.
Per quanto riguarda i messaggi emessi da quest’unità, vedere Mappa di asse-
gnazione MIDI a pagina 21.
1 Premere il pulsante [ON/OFF (UTILITY)].
Attivare la funzione MIDI.
2 Girare il selettore degli effetti di canale.
Scegliere [SND/RTN (MIDI LFO)].
[S/RELFO] la sezione di indicazione degli effetti, poi [SND/RTN] appare.
3 Premere il pulsante [ON/OFF] di [BEAT EFFECTS].
Apprendere il messaggio MIDI del pulsante [ON/OFF] di [BEAT EFFECTS] sul lato di
ricezione del segnale MIDI.
Il messaggio MIDI inviato dal pulsante [ON/OFF] di [BEAT EFFECTS] differisce
se [SND/RTN (MIDI LFO)] è scelto e si sceglie qualsiasi cosa non sia [SND/RTN
(MIDI LFO)].
17
It
Italiano
Il messaggio MIDI del pulsante [ON/OFF] di [BEAT EFFECTS] quando [SND/RTN
(MIDI LFO)] è scelto viene mandato solo quando viene fatta la procedura
seguente.
4 Premere il pulsante [LFO FORM (WAKE UP)].
Apprendere il messaggio MIDI del pulsante [LFO FORM (WAKE UP)] sul lato di
ricezione del segnale MIDI.
[1/7] e [1/7LFO] vengono visualizzati alternamente nella sezione del display
degli effetti.
Se necessario, fare il mapping degli altri pulsanti e comandi.
Dato che il messaggio MIDI del pulsante [LFO FORM (WAKE UP)] viene inviato
sequenzialmente, con certe impostazioni del lato di ricezione del segnale MIDI
potrebbe essere impossibile apprendere il messaggio MIDI.
Per fare il mapping MIDI di altri pulsanti e controlli, premere il pulsante
[LFO FORM(WAKE UP)] per passare a [SND/RTN].
䢢Uso di MIDI LFO
Fare anticipatamente i preparativi necessari con la procedura Preparativi per l’uso
della funzione MIDI LFO.
1 Girare il selettore degli effetti di canale.
Scegliere [SND/RTN (MIDI LFO)].
[S/RELFO] la sezione di indicazione degli effetti, poi [SND/RTN] appare.
2 Premere il pulsante [LFO FORM (WAKE UP)].
La trasmissione di segnali MIDI inizia.
La forma d’onda del segnale MIDI cambia ad ogni pressione del pulsante
[LFO FORM (WAKE UP)].
SND/RTN1/7 2/7 3/7
4/7 5/7 6/7 7/7
3 Premere il pulsante [BEAT , ].
Impostare il tempo di uscita della forma d’onda del segnale MIDI.
4 Premere il pulsante [ON/OFF] di [BEAT EFFECTS] o toccare il
[X-PAD].
Viene mandato il messaggio MIDI di attivazione dell’effetto.
Premendo il pulsante [LFO FORM (WAKE UP)] e scegliendo una impostazione
da [1/7] – [7/7], il messaggio MIDI dei pulsanti e comandi seguenti
può essere inviato anche a modalità MIDI disattivata.
— [X-PAD] (Toccare K Lasciare)
— Pulsante [CUE] di [BEAT EFFECTS]
—Selettore degli effetti di canale
— Comando [LEVEL/DEPTH]
— Pulsante [ON/OFF] di [BEAT EFFECTS]
Se il pulsante [LFO FORM (WAKE UP)] viene premuto per passare
da [SND/RTN] a [MIDI LFO] o viceversa, BEAT EFFECT si disattiva
automaticamente.
Non è possibile scegliere [SND/RTN] o [MIDI LFO] mentre si tocca [X-PAD].
䢢Invio di messaggi di avvio MIDI e arresto MIDI
Premere il pulsante [START/STOP] di [MIDI].
I messaggi di inizio MIDI e fine MIDI vengono mandati alternatamente ogni volta
che il pulsante [START/STOP] viene premuto a prescindere che la funzione MIDI
sia attivata o meno.
Uso di un sequencer MIDI esterno
Questa unità emette le informazioni sull’uso dei pulsanti ed i comandi in un formato
MIDI universale.
Questa unità manda il tempo del brano riprodotto (informazioni BPM) per l’orologio
di sincronizzazione MIDI. Può venire usato per sincronizzare un sequencer MIDI
esterno col tempo di una sorgente.
Per quanto riguarda i messaggi emessi da quest’unità, vedere Mappa di asse-
gnazione MIDI a pagina 21.
I sequencer MIDI esterni che non supportano gli orologi di sincronizzazione
MIDI non sono sincronizzabili.
I sequencer MIDI esterni non sono sincronizzabili per brani il cui BPM non è
misurabile con esattezza.
Il clock di sincronizzazione MIDI viene emesso con i valori BPM digitati manual-
mente picchiettando il pulsante [TAP] con un dito. La gamma di uscita del clock
di sincronizzazione MIDI va da 40 BPM a 250 BPM.
1 Collegare il terminale [MIDI OUT] al terminale MIDI IN del
sequencer MIDI esterno con un cavo MIDI standard.
2 Impostare la modalità di sincronizzazione Slave del
sequencer MIDI esterno.
3 Premere il pulsante [START/STOP] di [MIDI].
Il messaggio MIDI di inizio viene inviato.
4 Premere [ON/OFF] della sezione [MIDI].
La trasmissione di segnali MIDI inizia.
18
It
Tipi di effetto
Tipi di effetto SOUND COLOR FX
Nome dell’effettoDescrizioniControllo [COLOR]
SPACE
Aggiunge al suono originale del
riverbero.
Girando in senso antiorario:
Aggiunge del riverbero alle gamme
dei medi e dei bassi.
Girando in senso orario: Aggiunge
del riverbero alle gamme dei medi
e degli acuti.
DUB ECHO
Applicare un effetto di eco col
suono leggermente ritardato
emesso varie volte dopo quello
originale, e gradualmente
attenuato.
Girando in senso antiorario:
Aggiunge dell’eco alla sola gamma
dei medi.
Girando in senso orario: Aggiunge
dell’eco alla sola gamma degli
acuti.
GATE/COMP
Cambia la coloritura del suono in
generale.
Girando in senso antiorario:
L’effetto gate rende il suono più
compatto, con un senso di volume
ridotto.
Girando in senso orario: L’effetto
compressor rende il suono più
grasso, con un senso di volume
maggiore.
NOISE
Del rumore bianco viene generato
da questa unità e missato con
il suono del canale attraverso il
filtro, quindi viene emesso.
Il volume è regolabile girando
i controlli [TRIM] dei vari
canali. I parametri dell’effetto
sono regolabili girando i
controlli [EQ/ISO (HI, MID,
LOW)].
Girando in senso antiorario: La
frequenza di taglio del filtro attra-
verso cui passa il rumore bianco
diminuisce gradualmente.
Girando in senso orario: La
frequenza di taglio del filtro attra-
verso cui passa il rumore bianco
aumenta gradualmente.
CRUSH
Sottopone il suono originale
del canale all’effetto crush, e lo
emette.
Girando in senso antiorario: Viene
aumentata la distorsione del
suono.
Girando in senso orario: Viene
applicato l’effetto crush prima di
passare per il filtro passa alto.
FILTER
Viene emesso un suono passato
per un filtro.
Girando in senso antiorario:
Viene gradualmente diminuita la
frequenza di taglio del filtro passa
basso.
Girando in senso orario: Viene gra-
dualmente aumentata la frequenza
di taglio del filtro passa alto.
Tipi di BEAT EFFECT
DELAY
1
Viene emesso una volta un suono ritardato in accordo con la frazione di battuta
impostata con i pulsanti [BEAT, ].
Se viene aggiunto il suono ritardato di 1/2 battuta, 4 battute divengono 8.
Originale
(4 battute)
1/2 ritardo
(8 battute)
Pulsanti BEAT, (parame-
tro 1)
Usare questi controlli per impostare un tempo di ritardo di 1/8
– 16/1 rispetto al tempo di una battuta del valore BPM.
Controllo TIME (parametro 2)
Usare questo per impostare il tempo di ritardo.
1 a 4000 (ms)
Controllo LEVEL/DEPTH (para-
metro 3)
Usare questo per regolare il bilanciamento fra il suono origi-
nale e quello ritardato.
X-PAD (parametro 4)Usare questo per impostare il tempo di ritardo.
ECHO
1
2
Viene emesso varie volte un suono ritardato attenuato gradualmente in accordo con
la frazione di battuta impostata con i pulsanti [BEAT, ].
Con gli eco da 1/1 di battuta, i suoni ritardati vengono chiusi in dissolvenza in
accordo col tempo del brano anche dopo che il suono in ingresso è stato eliminato.
Segnale audio in
ingresso disattivato
Tempo
Uscita in
dissolvenza
1 battuta
Pulsanti BEAT, (parame-
tro 1)
Usare questi controlli per impostare un tempo di ritardo di 1/8
– 16/1 rispetto al tempo di una battuta del valore BPM.
Controllo TIME (parametro 2)
Usare questo per impostare il tempo di ritardo.
1 a 4000 (ms)
Controllo LEVEL/DEPTH (para-
metro 3)
Usare questo per regolare il bilanciamento fra il suono origi-
nale e quello di eco.
X-PAD (parametro 4)Usare questo per impostare il tempo di ritardo.
SPIRAL
1
2
Questa funzione aggiunge riverbero al suono in ingresso.
Se si aumenta il tempo di ritardo, cambia anche l’altezza.
Segnale audio in
ingresso disattivato
Tempo
Uscita in
dissolvenza
1 battuta
Pulsanti BEAT, (parame-
tro 1)
Usare questi controlli per impostare un tempo di ritardo di 1/8
– 16/1 rispetto al tempo di una battuta del valore BPM.
Controllo TIME (parametro 2)
Usare questo per impostare il tempo di ritardo.
10 a 4000 (ms)
Controllo LEVEL/DEPTH (para-
metro 3)
Usare questo per regolare il bilanciamento fra il suono
originale e quello di effetto e per impostare il parametro
quantitativo.
X-PAD (parametro 4)Usare questo per impostare il tempo di ritardo.
REVERB
1
2
Questa funzione aggiunge riverbero al suono in ingresso.
Livello
Suono diretto
Primo suono riflesso
Riverberi
1%
100%
Tempo
Pulsanti BEAT, (parame-
tro 1)
Usare questi controlli per determinare l’estensione dell’effetto
di riverbero, da 1 – 100 %.
Controllo TIME (parametro 2)
Usare questo comando per regolare il grado di riverbero
applicato.
1 – 100 (%)
Controllo LEVEL/DEPTH (para-
metro 3)
Imposta il bilanciamento fra suono originale ed effetto.
X-PAD (parametro 4)Imposta la frequenza di taglio del filtro.
TRANS
1
Il suono viene tagliato in accordo con la frazione di battuta impostata con i pulsanti
[BEAT, ].
TaglioTaglio
1/1 battuta
Tempo
Pulsanti BEAT, (parame-
tro 1)
Usare questi controlli per impostare un tempo di taglio di 1/16
– 16/1 rispetto al tempo di una battuta del valore BPM.
Controllo TIME (parametro 2)
Usare questo per impostare il tempo di effetto.
10 a 16000 (ms)
Controllo LEVEL/DEPTH (para-
metro 3)
Imposta il bilanciamento fra suono originale ed effetto.
X-PAD (parametro 4)Imposta il tempo di taglio.
FILTER
1
La frequenza di taglio del filtro cambia in accordo con la frazione di battuta impo-
stata con i pulsanti [BEAT, ].
Frequenza
19
It
Italiano
Pulsanti BEAT, (parame-
tro 1)
Usarli per impostare il ciclo di movimento della frequenza di
taglio come un tempo di 1/4 – 64/1 rispetto al tempo di una
battuta del valore BPM.
Controllo TIME (parametro 2)
Usare questo per impostare il ciclo nel quale la frequenza di
taglio viene mossa.
10 a 32000 (ms)
Controllo LEVEL/DEPTH (para-
metro 3)
Più il comando viene girato in senso orario, più forte è l’effetto.
X-PAD (parametro 4)
Il ciclo con cui si muove la frequenza di taglio fluttua
leggermente.
FLANGER
1
Un effetto flanger da 1 ciclo viene prodotto in accordo con la frazione di battuta
impostata con i pulsanti [BEAT, ].
Ciclo
Tempo
Breve ritardo
Pulsanti BEAT, (parame-
tro 1)
Usare questi controlli per impostare il tempo di effetto 1/4 –
64/1 rispetto al tempo di una battuta del valore BPM.
Controllo TIME (parametro 2)
Usare questo per impostare il ciclo di movimento dell’effetto
flanger.
10 a 32000 (ms)
Controllo LEVEL/DEPTH (para-
metro 3)
Più il comando viene girato in senso orario, più forte è l’effetto.
Se girato del tutto in senso antiorario, viene emesso solo il
suono originale.
X-PAD (parametro 4)Il ciclo con cui si muove l’effetto flanger fluttua leggermente.
PHASER
1
L’effetto phaser cambia in accordo con la frazione di battuta impostata con i pul-
santi [BEAT, ].
Ciclo
Spostamento di fase
Tempo
Pulsanti BEAT, (parame-
tro 1)
Usarli per impostare il ciclo di movimento dell’effetto phaser
come un tempo di 1/4 – 64/1 rispetto al tempo di una battuta
del valore BPM.
Controllo TIME (parametro 2)
Imposta il ciclo secondo cui si muove l’effetto phaser.
10 a 32000 (ms)
Controllo LEVEL/DEPTH (para-
metro 3)
Più il comando viene girato in senso orario, più forte è l’effetto.
Se girato del tutto in senso antiorario, viene emesso solo il
suono originale.
X-PAD (parametro 4)Il ciclo con cui si muove l’effetto phaser fluttua leggermente.
ROBOT
1
Il suono originale viene reso simile a quello della voce di un robot.
Pulsanti BEAT, (parame-
tro 1)
Usare questo controllo per regolare il grado di effetto
applicato.
-100–100 (%)
Controllo TIME (parametro 2)
Usare questo controllo per regolare il grado di effetto
applicato.
-100–100 (%)
Controllo LEVEL/DEPTH (para-
metro 3)
Imposta il bilanciamento fra suono originale ed effetto.
X-PAD (parametro 4)Questo cambia il grado dell’effetto audio.
MELODIC
1
2
La gamma dei medi del suono ricevuto nel momento in cui il pulsante [ON/OFF]
viene premuto viene registrata ed il segnale registrato viene emesso a seconda del
livello audio di ingresso.
Pulsanti BEAT, (parame-
tro 1)
Imposta il modo in cui il segnale registrato viene riprodotto.
Controllo TIME (parametro 2)Imposta il modo in cui il segnale registrato viene riprodotto.
Controllo LEVEL/DEPTH (para-
metro 3)
Imposta il bilanciamento fra suono originale e registrato.
X-PAD (parametro 4)Imposta il modo in cui il segnale registrato viene riprodotto.
SLIP ROLL
1
2
Il suono ricevuto nel punto in cui [ON/OFF] viene premuto viene registrato, e tale
suono registrato viene emesso varie volte in accordo con la frazione di battuta impo-
stata con i pulsanti [BEAT, ].
Quando il tempo dell’effetto cambia, il suono in ingresso viene riregistrato.
Ripetizione 1/1Ripetizione 1/2
Originale
Roll
Cambiato da
1/2 a 1/1
Effetto attivato
Pulsanti BEAT, (parame-
tro 1)
Usare questi controlli per impostare un tempo di effetto di
1/16 – 16/1 rispetto al tempo di una battuta del valore BPM.
Controllo TIME (parametro 2)
Usare questo per impostare il tempo di effetto.
10 a 4000 (ms)
Controllo LEVEL/DEPTH (para-
metro 3)
Usare questo per regolare il bilanciamento fra il suono origi-
nale e quello ROLL.
X-PAD (parametro 4)Usare questo per impostare il tempo di effetto.
ROLL
1
2
Il suono ricevuto nel punto in cui [ON/OFF] viene premuto viene registrato, e tale
suono registrato viene emesso varie volte in accordo con la frazione di battuta impo-
stata con i pulsanti [BEAT, ].
Effetto attivato
Ripetuto
Originale
1/1 roll
Pulsanti BEAT, (parame-
tro 1)
Usare questi controlli per impostare un tempo di effetto di
1/16 – 16/1 rispetto al tempo di una battuta del valore BPM.
Controllo TIME (parametro 2)
Usare questo per impostare il tempo di effetto.
10 a 4000 (ms)
Controllo LEVEL/DEPTH (para-
metro 3)
Usare questo per regolare il bilanciamento fra il suono origi-
nale e quello ROLL.
X-PAD (parametro 4)Usare questo per impostare il tempo di effetto.
REV ROLL
1
2
Il suono ricevuto nel punto in cui il pulsante [ON/OFF] viene premuto viene regi-
strato, e tale suono registrato viene invertito ed emesso varie volte in accordo con la
frazione di battuta impostata con i pulsanti [BEAT, ].
Effetto attivato
Rovesciato e ripetuto
Originale
1/1 reverse
roll
Pulsanti BEAT, (parame-
tro 1)
Usare questi controlli per impostare un tempo di effetto di
1/16 – 16/1 rispetto al tempo di una battuta del valore BPM.
Controllo TIME (parametro 2)
Usare questo per impostare il tempo di effetto.
10 a 4000 (ms)
Controllo LEVEL/DEPTH (para-
metro 3)
Usare questo per regolare il bilanciamento fra il suono origi-
nale e quello ROLL.
X-PAD (parametro 4)Usare questo per impostare il tempo di effetto.
SND/RTN (MIDI LFO)
Collegare qui una unità effetti esterna o altro.
Premendo il pulsante [LFO FORM (WAKE UP)] è possibile controllare con segnale
MIDI del software e dispositivi MIDI compatibili.
䢢SND/RTN
1
Collegare qui una unità effetti esterna o altro.
SEND
RETURN
Unità di effetto
DJM-900SRT Serato DJ Edition
1212
1212
0
0
ON
TALK
OVER
OFF
9
6
-
26
/
6
-
26
/
6
-
26
/
9
6
-
26
/
6
-
26
/
6
-
26
/
9
6
-
26
/
6
-
26
/
6
-
26
/
9
6
-
26
/
6
-
26
/
6
-
26
/
0
20
It
Pulsanti BEAT, (parame-
tro 1)
—
Controllo TIME (parametro 2)—
Controllo LEVEL/DEPTH (para-
metro 3)
Regola il livello dell’audio che arriva al terminale [RETURN].
X-PAD (parametro 4)—
䢢MIDI LFO
La forma d’onda del segnale MIDI (0 – 127) viene cambiata a seconda del tempo del
brano.
La forma d’onda del segnale MIDI cambia ad ogni pressione del pulsante
[LFO FORM (WAKE UP)].
Pulsanti BEAT, (parame-
tro 1)
Usare questi per impostare un tempo di uscita di forma d’onda
per 1/4 – 64/1 rispetto ad una battuta delle BPM.
Controllo TIME (parametro 2)
Usare questo per impostare il tempo di uscita della forma
d’onda.
Controllo LEVEL/DEPTH (para-
metro 3)
—
X-PAD (parametro 4)
Questo cambia la configurazione della forma d’onda del
segnale MIDI.
Se [MIDI LFO] è scelto, il suono dell’unità effetti esterna collegata al terminale [RETURN] non
viene ricevuto.
1 Scegliendo [CF.A], [CF.B] o [MASTER] col selettore degli effetti di canale, se l’au-
dio del canale che volete monitorare non viene emesso dal canale [MASTER],
l’effetto non può essere monitorato neppure premendo il pulsante [CUE] per
[BEAT EFFECTS].
2Se un effetto è disattivato, il suo suono non è monitorabile neppure premendo il
pulsante [CUE] di [BEAT EFFECTS].
21
It
Italiano
Mappa di assegnazione MIDI
Mappa di assegnazione MIDI
“CC” è l’abbreviazione di “control change”. Un cambio comando è un tipo di segnale MIDI usato per trasmettere vari tipi di informazione di comando, ad esempio timbro,
volume, ecc.
In questa unità, i valori da 0 a 127 vengono emessi come CC principalmente quando comandi e fader sono usati. I CC vengono emessi anche quando certi pulsanti ven-
gono usati.
“Note” è un termine MIDI usato quando si premono o lasciano andare tasti di un piano o tastiera.
Categoria
Pulsante/controllo/interruttore
Assegnazione MIDITrigger/ToggleDati trasmessi
NomeTipo
CH1
Selettore d’ingresso
DIGITAL
InterruttoreNote 050
2
OFF=0, ON=127
CD/LINE
InterruttoreNote 051
2
OFF=0, ON=127
PHONO
InterruttoreNote 052
2
OFF=0, ON=127
USB DECK 3
InterruttoreNote 053
2
OFF=0, ON=127
TRIM
ControlloCC 001—0-127
HI
ControlloCC 002—0-127
MID
ControlloCC 003—0-127
LOW
ControlloCC 004—0-127
COLOR
ControlloCC 005—0-127
CUE
PulsanteCC 070Trigger/ToggleOFF=0, ON=127
Fader canaliControlloCC 017—0-127
CROSS FADER ASSIGN
InterruttoreCC 065—0, 64, 127
CH2
Selettore d’ingresso
DIGITAL
InterruttoreNote 054
2
OFF=0, ON=127
CD/LINE
InterruttoreNote 055
2
OFF=0, ON=127
PHONO
InterruttoreNote 056
2
OFF=0, ON=127
USB DECK 1
InterruttoreNote 057
2
OFF=0, ON=127
TRIM
ControlloCC 006—0-127
HI
ControlloCC 007—0-127
MID
ControlloCC 008—0-127
LOW
ControlloCC 009—0-127
COLOR
ControlloCC 010—0-127
CUE
PulsanteCC 071Trigger/ToggleOFF=0, ON=127
Fader canaliControlloCC 018—0-127
CROSS FADER ASSIGN
InterruttoreCC 066—0, 64, 127
CH3
Selettore d’ingresso
DIGITAL
InterruttoreNote 058
2
OFF=0, ON=127
CD/LINE
InterruttoreNote 059
2
OFF=0, ON=127
PHONO
InterruttoreNote 060
2
OFF=0, ON=127
USB DECK 2
InterruttoreNote 061
2
OFF=0, ON=127
TRIM
ControlloCC 012—0-127
HI
ControlloCC 014—0-127
MID
ControlloCC 015—0-127
LOW
ControlloCC 021—0-127
COLOR
ControlloCC 022—0-127
CUE
PulsanteCC 072Trigger/ToggleOFF=0, ON=127
Fader canaliControlloCC 019—0-127
CROSS FADER ASSIGN
InterruttoreCC 067—0, 64, 127
CH4
Selettore d’ingresso
DIGITAL
InterruttoreNote 062
2
OFF=0, ON=127
CD/LINE
InterruttoreNote 063
2
OFF=0, ON=127
PHONO
InterruttoreNote 064
2
OFF=0, ON=127
USB DECK 4
InterruttoreNote 065
2
OFF=0, ON=127
TRIM
ControlloCC 080—0-127
HI
ControlloCC 081—0-127
MID
ControlloCC 092—0-127
LOW
ControlloCC 082—0-127
COLOR
ControlloCC 083—0-127
CUE
PulsanteCC 073Trigger/ToggleOFF=0, ON=127
Fader canaliControlloCC 020—0-127
CROSS FADER ASSIGN
InterruttoreCC 068—0, 64, 127
CrossfaderCrossfaderControlloCC 011—0-127
Curva fader
CH FADER (
, , )
InterruttoreCC 094—0, 64, 127
CROSS FADER (
, , )
InterruttoreCC 095—0, 64, 127
Principale
MASTER LEVEL
ControlloCC 024—0-127
BALANCE
ControlloCC 023—0-127
CUE
PulsanteCC 074Trigger/ToggleOFF=0, ON=127
EQ CURVE (ISOLATOR, EQ)InterruttoreCC 033—0, 127
BOOTH MONITORBOOTH MONITOR
ControlloCC 025—0-127
LINKCUE
PulsanteCC 115Trigger/ToggleOFF=0, ON=127
BEAT EFFECTS
PulsanteCC 076Trigger/ToggleOFF=0, ON=127
PulsanteCC 077Trigger/ToggleOFF=0, ON=127
AUTO/TAP
PulsanteCC 069Trigger/ToggleOFF=0, ON=127
TAP
PulsanteCC 078Solo triggerOFF=0, ON=127
CUE
PulsanteCC 075Trigger/ToggleOFF=0, ON=127
EFFECT SELECT
DELAY
InterruttoreCC 042
2
OFF=0, ON=127
ECHO
InterruttoreCC 055
2
OFF=0, ON=127
SPIRAL
InterruttoreCC 043
2
OFF=0, ON=127
REVERB
InterruttoreCC 054
2
OFF=0, ON=127
TRANS
InterruttoreCC 053
2
OFF=0, ON=127
FILTER
InterruttoreCC 059
2
OFF=0, ON=127
FLANGER
InterruttoreCC 050
2
OFF=0, ON=127
PHASER
InterruttoreCC 057
2
OFF=0, ON=127
ROBOT
InterruttoreCC 051
2
OFF=0, ON=127
MELODIC
InterruttoreCC 061
2
OFF=0, ON=127
SLIP ROLL
InterruttoreCC 058
2
OFF=0, ON=127
ROLL
InterruttoreCC 046
2
OFF=0, ON=127
REV ROLL
InterruttoreCC 047
2
OFF=0, ON=127
SND/RTN (MIDI LFO)InterruttoreCC 062
2
OFF=0, ON=127
22
It
Categoria
Pulsante/controllo/interruttore
Assegnazione MIDITrigger/ToggleDati trasmessi
NomeTipo
BEAT EFFECTS
CH SELECT
CH1
InterruttoreCC 034
2
OFF=0, ON=127
CH2
InterruttoreCC 035
2
OFF=0, ON=127
CH3
InterruttoreCC 036
2
OFF=0, ON=127
CH4
InterruttoreCC 037
2
OFF=0, ON=127
MIC
InterruttoreCC 038
2
OFF=0, ON=127
CF.A
InterruttoreCC 039
2
OFF=0, ON=127
CF.B
InterruttoreCC 040
2
OFF=0, ON=127
MASTER
InterruttoreCC 041
2
OFF=0, ON=127
MIDI LFO
ControlloCC 118—0-127
QUANTIZE
PulsanteNote 118Trigger/Toggle—
TIME
InterruttoreCC 013——
InterruttoreCC 045—
Valore TIME (quando FLANGER,
PHASER o FILTER viene scelto, il
valore si dimezza. Scegliendo un
valore negativo, viene impostato
un valore positivo.)
LEVEL/DEPTHControlloCC 091—0-127
X-PAD
ControlloCC 116—
Manda le informazioni di posi-
zione di [X-PAD].
ON/OFF
X-PAD (tocco)
Se si sceglie un effetto diverso da [SND/
RTN (MIDI LFO)] con BEAT EFFECT
PulsanteCC 114
2
OFF=0, ON=127
ON/OFF
X-PAD (tocco)
Se [SND/RTN (MIDI LFO)] viene scelto con
BEAT EFFECT
PulsanteCC 064
2
OFF=0, ON=127
MIC
HI
ControlloCC 030—0-127
LOW
ControlloCC 031—0-127
SOUND COLOR FX
NOISE
PulsanteCC 085
Trigger/Toggle
1
OFF=0, ON=127
SPACE
PulsanteCC 105
Trigger/Toggle
1
OFF=0, ON=127
GATE/COMP
PulsanteCC 106
Trigger/Toggle
1
OFF=0, ON=127
DUB ECHO
PulsanteCC 107
Trigger/Toggle
1
OFF=0, ON=127
CRUSH
PulsanteCC 086
Trigger/Toggle
1
OFF=0, ON=127
FILTER
PulsanteCC 087
Trigger/Toggle
1
OFF=0, ON=127
Fader Start
Fader Start 1
PulsanteCC 088Trigger/ToggleOFF=0, ON=127
Fader Start 2
PulsanteCC 089Trigger/ToggleOFF=0, ON=127
Fader Start 3
PulsanteCC 090Trigger/ToggleOFF=0, ON=127
Fader Start 4
PulsanteCC 093Trigger/ToggleOFF=0, ON=127
HEADPHONES
MIXING
ControlloCC 027—0-127
LEVEL
ControlloCC 026—0-127
Timing Clock
—Clock di sincronizzazione——
Fader Start operazione
3
Fader del canale 1 o crossfaderNote 102—BACK CUE = 0, PLAY = 127
Fader del canale 2 o crossfaderNote 103—BACK CUE = 0, PLAY = 127
Fader del canale 3 o crossfaderNote 104—BACK CUE = 0, PLAY = 127
Fader del canale 4 o crossfaderNote 105—BACK CUE = 0, PLAY = 127
MIDI
START
PulsanteAVVIO——
STOP
PulsanteARRESTO——
1Se attivando un tasto se ne disattiva un altro, ambedue i pulsanti mandano messaggi MIDI di attivazione e disattivazione.
Se nessun tasto si disattiva, viene mandato solo il messaggio MIDI di attivazione dal pulsante premuto.
2Se si passa da una posizione ad un’altra, dei segnali MIDI ON e OFF vengono mandati dalla rispettiva posizione.
—Se il pulsante [START/STOP] rimane premuto per più di 1 secondo, i segnali MIDI corrispondenti alle posizioni dei pulsanti, fader e controlli vengono mandati insieme (Snapshot).
MIDI Snapshot manda tutti i messaggi MIDI diversi da MIDI start e MIDI stop.
3Le operazioni da farsi dipendono dalla posizione del selettore [CROSS FADER ASSIGN (A, THRU, B)].
—Se il selettore [CROSS FADER ASSIGN (A, THRU, B)] si trova su [THRU]: I messaggi MIDI vengono inviati quando il pulsante [FADER START] si trova su [ON] ed il fader dei canali viene tolto dalla
posizione più vicina a sé o vi viene riportato.
—Se il selettore [CROSS FADER ASSIGN (A, THRU, B)] si trova su [A]: I messaggi MIDI vengono inviati quando il pulsante [FADER START] viene portato su [ON] ed il crossfader viene tolto dall’e-
stremità del lato [B] o vi viene riportato.
—Se il selettore [CROSS FADER ASSIGN (A, THRU, B)] si trova su [B]: I messaggi MIDI vengono inviati quando il pulsante [FADER START] viene portato su [ON] ed il crossfader viene tolto dall’e-
stremità del lato [A] o vi viene riportato.
23
It
Italiano
Modifica delle impostazioni
1 Premere il pulsante [ON/OFF (UTILITY)] per più di 1
secondo.
Viene visualizzata la schermata di impostazione della modalità [USER SETUP].
Per visualizzare la schermata di impostazione [CLUB SETUP], prima spegnere
questa unità e poi premere il pulsante [POWER] mentre si preme il pulsante
[ON/OFF (UTILITY)].
2 Premere il pulsante [BEAT , ].
Scegliere un elemento da impostare.
3 Premere il pulsante [TAP].
Si passa alla schermata di modifica del valore impostato.
4 Premere il pulsante [BEAT , ].
Cambiare il valore dell’impostazione.
5 Premere il pulsante [TAP].
Digitare il nuovo valore dell’impostazione.
La schermata precedente riappare.
Per tornare alla schermata precedente senza fare modifiche, premere il pulsante
[QUANTIZE].
6 Premere il pulsante [ON/OFF (UTILITY)].
Chiudere la schermata di impostazione della modalità [USER SETUP].
Per chiudere la schermata di impostazione della modalità [CLUB SETUP], pre-
mere il pulsante [POWER] per spegnere questa unità.
La funzione auto standby
Se [Auto Standby] si trova su [ON], la modalità di standby inizia automaticamente
se 4 ore passano dal verificarsi di tutto quanto segue.
—Nessun pulsante o controllo di questa unità viene usato.
—Nessun segnale audio di –10 dB o più arriva ai terminali di ingresso di questa
unità.
—Nessun collegamento PRO DJ LINK è stato fatto.
Se il pulsante [LFO FORM (WAKE UP)] viene premuto, lo standby viene
cancellato.
Questa unità viene posta in vendita con la modalità auto standby attivata. Se non
si desidera utilizzare la funzione auto standby, impostare [Auto Standby] su
[OFF].
La funzione talk-over
La funzione talk over ha le due modalità descritte di seguito.
— [ADV] (talk over avanzato): La sola gamma dei medi dell’audio dei canali
diversi dal canale [MIC] viene attenuata secondo il valore impostato di
[Talk Over LEVEL] ed emessa.
dB
Frequenza
— [NOR] (talk over normale): L’audio dei canali diversi dal canale [MIC] viene
attenuata secondo il valore impostato di [Talk Over LEVEL] ed emessa.
dB
Frequenza
Impostazione delle preferenze
*: Impostazioni al momento dell’acquisto
ModalitàImpostazione delle opzioniVisualizzazione sullo schermoValore impostatoDescrizioni
USER SETUP
Fader StartF.S.
ON, OFF*Attiva e disattiva la funzione Fader Start allo stesso tempo.
MIDI CHMIDI CH
1* a 16Imposta il canale MIDI.
MIDI Button TypeMIDI BT
TGL*, TRG
Sceglie la modalità di trasmissione dei segnali MIDI, [TGL
(TOGGLE)] o [TRG (TRIGGER)].
Talk Over ModeTLK MOD
ADV*, NOR
Sceglie la modalità della funzione di talk over,
[ADV(ADVANCED)] o [NOR(NORMAL)].
Talk Over LEVELTLK LVL
–6 dB, –12 dB, –18 dB*,
–24 dB
Imposta il livello di attenuazione audio della funzione di talk
over.
CLUB SETUP
Digital Master Out LevelDOUT LV
–19 dB*, –15 dB, –10 dB,
–5 dB
Imposta il livello massimo dell’audio emesso dai terminali
[DIGITAL MASTER OUT].
1
Digital Master Out Sampling RateDOUT FS
48 kHz, 96 kHz*Imposta la frequenza di campionamento digitale del segnale.
MASTER ATT.MST ATT
–6 dB, –3 dB, 0 dB*
Imposta il livello di attenuazione dell’audio emesso dai termi-
nali [MASTER1] e [MASTER2].
Auto StandbyAUTOSTB
ON*, OFFAttiva e disattiva la funzione di auto standby.
Mic Output To Booth MonitorMIC BTH
ON*, OFF
Determina se viene emesso o no il segnale audio del microfono
dai terminali [BOOTH].
PC UTILITYPC UTLY
ON, OFF*
Determina se lanciare automaticamente o meno il software
utility di impostazione del computer quando viene collegato un
cavo USB.
Peak LimiterPKLIMIT
ON*, OFF
Allevia l’improvviso e sgradevole taglio digitale dell’uscita
master.
Factory ResetINITIAL
YES, NO*Riporta tutte le impostazioni ai valori predefiniti.
1Notare che il segnale in uscita può essere distorto anche se l’indicatore di livello principale non si illumina fino in cima.
Il software utility di impostazione
L’utility di impostazione è utilizzabile per fare i controlli e le impostazioni descritti di
seguito.
—Controllo dello stato dei selettori di ingresso di questa unità
—Impostazione dell’uscita dati audio da questa unità al computer
—Regolazione delle dimensioni del buffer (se si usa l’ASIO Windows)
—Controllo delle dimensioni del driver
Visualizzazione della utility di impostazione
In Windows
Fare clic sul menu [Start] > [Tutti i programmi] > [Pioneer] > [DJM-900SRT] >
Controllo dello stato dei selettori di ingresso di
questa unità
Visualizzazione dell’utility di impostazione.
Fare clic sulla scheda [MIXER INPUT].
Impostazione dell’uscita dati audio da questa
unità al computer
Se Serato DJ è avviato e si usa questa unità come dispositivo audio predefinito,
scegliere l’ingresso dati audio in Serato DJ.
Visualizzazione dell’utility di impostazione.
1 Fare clic sulla scheda [MIXER OUTPUT].
2 Fare clic sul menu a comparsa [Mixer Audio Output].
Scegliere e confermare i dati audio da mandare al computer dal flusso di segnali
audio all’interno di questa unità.
CH1CH2CH3CH4
CH1 Control Tone
PHONO
1
CH2 Control Tone
PHONO
1
CH3 Control Tone
PHONO
1
CH4 Control Tone
PHONO
1
CH1 Control Tone
CD/LINE
1
CH2 Control Tone
CD/LINE
1
CH3 Control Tone
CD/LINE
1
CH4 Control Tone
CD/LINE
1
CH1 Control Tone
DIGITAL
1
CH2 Control Tone
DIGITAL
1
CH3 Control Tone
DIGITAL
1
CH4 Control Tone
DIGITAL
1
Post CH1 Fader
2
Post CH2 Fader
2
Post CH3 Fader
2
Post CH4 Fader
2
Cross Fader A
2
Cross Fader A
2
Cross Fader A
2
Cross Fader A
2
Cross Fader B
2
Cross Fader B
2
Cross Fader B
2
Cross Fader B
2
MICMICMICMIC
MIX (REC OUT)
2
MIX (REC OUT)
2
MIX (REC OUT)
2
MIX (REC OUT)
2
1I dati audio vengono emessi col volume con cui vengono emessi da questa unità a prescin-
dere dall’impostazione [USB Output Level].
2Nell’usare applicativi diversi dalla registrazione, fare attenzione a che le impostazioni dell’ap-
plicativo DJ siano tali da non generare loop audio. Se vengono generati loop audio, l’audio
può venire ricevuto o emesso a volumi indesiderati.
3 Fare clic sul menu a comparsa [USB Output Level].
Regolare il volume dei dati audio in uscita da questa unità.
L’impostazione [USB Output Level] viene applicata in misura uguale a tutti i
dati audio. Tuttavia, quando 1 della tabella 2 viene scelto, i dati audio vengono
emessi col volume che avevano al momento di ingresso in questa unità.
Se la regolazione del software DJ da sola non ha volume sufficiente, cambiare
l’impostazione [USB Output Level] per regolate il volume dei dati audio emessi
da questa unità. Notare che, a volume troppo alto, l’audio viene distorto.
Regolazione delle dimensioni del buffer (se si
usa l’ASIO Windows)
Se gli applicativi che fanno uso di questa unità come dispositivo audio predefinito
(applicativi per DJ, ecc.) sono in uso, chiuderli prima di cambiare le dimensioni del
buffer.
Visualizzazione dell’utility di impostazione.
Fare clic sulla scheda [ASIO].
Una dimensione grande del buffer diminuisce la probabilità che il suono
si interrompa, ma aumenta il ritardo di trasmissione del segnale audio
(latenza).
Controllo delle dimensioni del driver
Visualizzazione dell’utility di impostazione.
Fare clic sulla scheda [About].
Controllo dell’ultima versione del driver
Per informazioni sull’ultima versione del driver ad uso esclusivo con questa unità,
visitare il nostro sito Web indicato di seguito.
http://pioneerdj.com/support/
Il corretto funzionamento non viene garantito se varie unità mixer come questa
vengono collegate ad uno stesso computer.
25
It
Italiano
Informazioni aggiuntive
Diagnostica
L’uso scorretto dell’apparecchio viene spesso scambiato per un guasto. Se si ritiene che questo componente non funzioni bene, controllare la sezione che segue. A volte il
problema risiede in un altro componente. Controllare tutti i componenti ed apparecchi elettronici usati. Se il problema non può venire eliminato neppure dopo aver fatto i
controlli suggeriti, chiedere assistenza tecnica al più vicino centro assistenza o rivenditore autorizzato Pioneer.
Il lettore non funziona a causa di elettricità statica o altre influenze esterne. In tali casi, il funzionamento normale può venire ripristinato scollegando il cavo di alimenta-
zione e ricollegandolo.
ProblemaControllareRimedio
L’apparecchio non è acceso.Il cavo di alimentazione è collegato correttamente?Collegare il cavo di alimentazione ad una presa di c.a.
Audio assente o insufficiente.Il selettore d’ingresso è in posizione corretta?Regolare il selettore d’ingresso sul canale di ingresso desiderato. (pagina 13)
I cavi di collegamento sono collegati correttamente?Collegare correttamente i cavi di collegamento. (pagina 10)
I terminali o gli spinotti sono sporchi?Pulire i terminali e gli spinotti prima di procedere con i collegamenti.
[MASTER ATT.] è su [–6 dB], ecc.?Nella schermata [USER SETUP], attivare [MASTER ATT.]. (pagina 23)
Non viene emesso suono digitale.La frequenza di campionamento (fs) dell’uscita audio digi-
tale è adatta alle caratteristiche del dispositivo collegato?
Nella schermata [CLUB SETUP] , regolare [Digital Master Out Sampling Rate] a seconda
delle caratteristiche tecniche del dispositivo collegato. (pagina 23)
Audio distorto.Il volume del suono emesso dal canale [MASTER] è
regolato correttamente?
Regolare controllo [MASTER LEVEL] in modo che l’indicatore del livello del canale principale
si illumini a circa [0 dB] al livello di picco. (Pagina 13)
Portare [MASTER ATT.] su [–3 dB] o [–6 dB]. (pagina 23)
Il livello dell’ingresso audio di ciascun canale è regolato
correttamente?
Regolare controllo [TRIM] in modo che l’indicatore del livello del canale si illumini vicino a
[0 dB] al livello di picco. (Pagina 13)
Il crossfader non funziona.I selettori [CROSS FADER ASSIGN (A, THRU, B)] sono
regolati correttamente?
Regolare correttamente i selettori [CROSS FADER ASSIGN (A, THRU, B)] dei vari canali.
(Pagina 13)
L’apertura in dissolvenza con un lettore DJ
è impossibile.
[FADER START] è su [OFF]?Nella schermata [USER SETUP], portare [FADER START] su [ON]. (pagina 23)
Il lettore DJ è collegato correttamente al terminale [LINK]?Collegare correttamente il lettore DJ al terminale [LINK] usando un cavo LAN. (pagina 10)
I cavi audio sono collegati correttamente?Collegare i terminali di ingresso audio di questa unità e quelli di uscita audio del lettore DJ
con un cavo audio. (pagina 10)
Il numero di lettore del lettore DJ è impostato
correttamente?
Impostare il numero di lettore del lettore DJ sulla cifra del canale cui il cavo audio è collegato.
[BEAT EFFECTS] non funziona.Il selettore degli effetti di canale è in posizione corretta?Girare il selettore degli effetti di canale per scegliere il canale cui applicare l’effetto.
[SOUND COLOR FX] non funziona.Il controllo [COLOR] è in posizione corretta?Girare il controllo [COLOR] in senso orario o antiorario. (pagina 15)
Non è possibile usare unità effetti esterne.Il pulsante [ON/OFF] di [BEAT EFFECTS] è impostato su
[ON]?
Premere il pulsante [ON/OFF] di [BEAT EFFECTS] per impostare [SND/RTN] su [ON]. (pagina
15)
L’unità effetti esterna è collegata correttamente al termi-
nale [SEND] o [RETURN]?
Collegare l’unità effetti esterna correttamente al terminale [SEND] e a quello [RETURN].
(pagina 10)
L’audio di un’unità effetti esterna è distorto.Il livello di uscita audio dell’unità effetti esterna è regolata
su valori appropriati?
Regolare il livello di uscita audio dell’unità effetti esterna.
Il tempo (BPM) non è misurabile o la misura
ottenuta (BPM) è sospetta.
Il livello audio è troppo basso o alto?Regolare controllo [TRIM] in modo che l’indicatore del livello del canale si illumini vicino a
[0 dB] al livello di picco. (Pagina 13)
Il tempo (BPM) di alcuni brani potrebbe non essere misurabile. Usare il pulsante [TAP] per
impostare il tempo manualmente. (pagina 15)
Il tempo misurato (BPM) differisce da quello
indicato sul CD.
—I valori possono differire leggermente a causa dei differenti modi in cui il valore BPM viene
misurato.
Il sequencer MIDI non sincronizza.La modalità di sincronizzazione Slave del sequencer MIDI
esterno è impostata?
Impostare la modalità di sincronizzazione Slave del sequencer MIDI esterno.
Il sequencer MIDI che usate supporta i clock di sincroniz-
zazione MIDI?
I sequencer MIDI esterni che non supportano gli orologi di sincronizzazione MIDI non sono
sincronizzabili.
Il controllo MIDI non funziona.Il canale MIDI funziona?Premere il pulsante [ON/OFF] di [MIDI]. (pagina 16)
Le impostazioni MIDI sono corrette?Per usare software DJ con questa unità, i messaggi MIDI di questa devono venire assegnati
al software DJ usato. Per ulteriori dettagli sull’assegnazione di messaggi, vedere il manuale
di istruzioni del software DJ.
Questa unità non viene riconosciuta da un
computer cui è collegata.
L’indicatore USB è spento o lampeggia.
Il driver è stato installato nel computer?Installare il driver software. Se è già installato, reinstallarlo. (pagina 5)
Questa unità non può riprodurre il segnale
di un computer.
Questa unità ed il computer sono collegati bene?Collegare questa unità ed il computer direttamente col cavo USB accluso. (pagina 11)
Le impostazioni del dispositivo di uscita audio sono
corrette?
Scegliere questa unità con le impostazioni del dispositivo di uscita audio. Per istruzioni sulle
impostazioni per il proprio applicativo, consultarne le istruzioni per l’uso.
Il selettore d’ingresso è in posizione corretta?Portare il selettore di ingresso sulla posizione [USB]. (Pagina 13)
Il suono di un effetto non è monitorabile
neppure se il pulsante [CUE] di [BEAT
EFFECTS] è premuto.
—Il circuito che genera l’eco per gli effetti [ECHO], [REVERB], [ROLL], [
SLIP ROLL] e
[REV ROLL] si trova dopo il circuito di effetto, così il segnale di effetto non è monitorabile. Ciò
non è dovuto ad un guasto.
Il suono risulta distorto quando un lettore
analogico viene collegato ai terminali
[PHONO] di questa unità.
Oppure, la modalità di accensione dell’in-
dicatore del livello dei canali non cambia
neppure quando il controllo [TRIM] viene
girato.
Si è collegato un lettore analogico con un equalizzatore
fono incorporato?
Collegare il lettore analogico con equalizzatore fono incorporato ai terminali [CD/LINE].
(pagina 10)
Se il lettore analogico con equalizzatore fono incorporato possiede un selettore PHONO/
LINE, portarlo su PHONO.
Un interfaccia audio per computer è collegato fra il lettore
analogico e questa unità?
Se l’interfaccia audio per computer ha un’uscita a livello di linea, collegarla ai terminali [CD/
LINE]. (pagina 10)
Se il lettore analogico possiede un selettore PHONO/LINE, portarlo su PHONO.
26
It
Diagramma a blocchi
Master
Limiter
[BEAT EFFECT
(
SND/RTN]
Effect CH Select
Effect CH Select
Effect Out
CableCheck
RETURN
SEND Out
CHx
CF A/B
MIC
Master
CHx
CF A/B
MIC
Master
Return Level
No Cable
Effect SW
Cable Exist
Effect_CUE
Effect_CUE
[Mono Split / Stereo SWITCH & MIXING]
Mono Split
Stereo
2posi
MIXING
MONO SPLIT/
STEREO SWITCH
[BEAT EFFECT(Others)]
Effect CH Select
Effect CH Select
Effect Out
CHx
CF A/B
MIC
Master
CHx
CF A/B
MIC
Master
Effect SW
Level Depth
CHx Cue On/Off SW
CHx_CUE
Effect Cue On/Off SW
Effect_CUE
Link Cue On/Off SW
Link_CUE
CUE
Mixing
L
R
SEL
Mono Split
Stereo
Master Cue On/Off SW
Master_CUE
Master
Mixing
L
R
H.P. MIX R Out
H.P. MIX L Out
SEL
SEL
3posi
2posi
SOUND
COLOR
EFFECT
CHx
SOUND
COLOR
EFFECT
CHx
3Band
EQ/
ISOLATOR
CHx
BEAT
EFFECT
CHx
BEAT
EFFECT
CHx
BEAT
EFFECT
CHx
BPM Detect CHx Select
Level meter CHx
BEAT
Effect
(SND/RTN)
Send/
Return
CHx
CUE
Monitor
CHx
Link
CUE
Phono
AMP
Analog_PHONO
Analog_CD LINE
Digital/USB
CF Assign
3posi
Assign A
CHx
Assign Thru
CH1-4
Assign B
CHx
CH Fader
3posi
CH
Fader
Curve
Switch
3posi
2posi
2para4para
Cross
Fader
Curve
Switch
Thru
CF A
CF B
MIC Monitor SW
CHx in
CHx Control Tone
2Band
MIC EQ
MIC1,2
MIC1/2 in
LINK in
Return in
Send out
Post CHx Fader
TalkOver ON/OFF
MIX (REC OUT)
Master_CUE
MIC_Out
MIC
MIC_Out
Cross Fader B
Cross Fader A
BPM Detect Master
Level meter Master
CH1-4 COMMON
CH1-4 COMMON
MIC1,2 COMMON
Digital Trim
CHx _CUE
Link_CUE
BPM Detect CF A
BPM Detect CF B
BPM Detect MIC
Send/
Return
CF A
BEAT
EFFECT
MIC
Send/
Return
MIC
BEAT
EFFECT
CF B
Send/
Return
CF B
Cross
Fader
BEAT
EFFECT
Master
Talk
Over
Master
CUE
Talk
Over
Level
Talk Over
Mode
Advanced
/Normal
Master
Mono/
STEREO
Send/
Return
Master
Master
Balance
Master
Balance
Master
Level
HP Level
Booth
Level
SEL
MIC Output
to Booth Monitor
On/Off SW
Booth Out
REC out
USB Common out
Digital out
Master
H.P. out
CHx_CUE
Effect_CUE
Link_CUE
CHx Control Tone
Post CHx Fader
Cross Fader A
Cross Fader B
MIC
MIX (REC OUT)
Master_CUE
Boost
Boost
ATT
Mono Split/
Stereo
SWITCH
& MIXING
Mixer
Audio
Output
Select
MIC
FILTER
MIC In
Level
detect
TalkOver ON/OFF
MIC 1,2
MIX
Off
On
TalkOver
MIC1
MIC2
LANDigital MASTER
RETURN
CH_1_Digital/USB1/2
PHONES
MASTER
BOOTH
REC
SEND
USB1/2
USB3/4
USB5/6
USB7/8
DSP
MIC
ADC
ETHER SW IC
I/Fcom
USB
I/Fcom
Ether
DAC
DAC
PHONES
LAN
MASTER 1
REC
DAC
SEND
MUTE
DAC
BOOTH
MUTE
DAC
MUTE
MASTER 2
MUTE
DIGITAL
MASTER
SRC
DIT
MIC1 LEVEL
MIC2 LEVEL
CH1_Analog
ADC
CD/LINE
PHONO
DIGITAL
ADC
DIR
CH1
TRIM
Control Tone
ADC
CD/LINE
PHONO
DIGITAL
ADC
DIR
CH2
TRIM
Control Tone
ADC
CD/LINE
PHONO
DIGITAL
ADC
DIR
CH3
TRIM
Control Tone
ADC
CD/LINE
PHONO
DIGITAL
ADC
DIR
CH4
TRIM
Control Tone
CH2_Analog
CH3_Analog
CH4_Analog
SRC
SRC
SRC
SRC
RETURN
CH_2_Digital/USB3/4
CH_3_Digital/USB5/6
CH_4_Digital/USB7/8
USB
CH1 Digital IN
Control Tone
Control Tone
Control Tone
Control Tone
CH2 Digital IN
CH3 Digital IN
CH4 Digital IN
CH1 USB1/2 IN
CH1 USB1/2 OUT
CH2 USB3/4 IN
CH3 USB5/6 IN
CH4 USB7/8 IN
CH2 USB3/4 OUT
CH3 USB5/6 OUT
CH4 USB7/8 OUT
SRC
SRC
SRC
SRC
USB
Type B
BEAT
EFFECT
CF A
ADC
BEAT
EFFECT
Processing
SOUND
COLOR
EFFECT
CHx
27
It
Italiano
Acquisizione del manuale
Le Istruzioni per l’uso possono assumere la forma di file PDF. La lettura di file PDF
richiedere l’installazione di Adobe
®
Reader
®
. Se non si possiede Adobe Reader,
scaricarlo dal collegamento della schermata del menu del CD-ROM ed installarlo.
Download della versione più recente delle
istruzioni per l’uso e della Guida di avvio veloce
– Edizione Serato DJ
1 Inserire il CD-ROM nell’unità CD del computer.
Viene visualizzato il menu del CD-ROM.
Se il menu del CD-ROM non appare quando questo viene inserito, fare quanto
segue.
In Windows
Dal menu [Start] – [Computer] (o [Risorse del computer]), aprire l’unità CD
e far doppio clic sull’icona [CD_menu.exe].
In Mac OS X
Dal Finder, fare doppio clic sull’icona [CD_menu.app].
2 Quando viene visualizzato il menu del CD-ROM, selezionare
[DJM-900SRT: Scarica le istruzioni per l’uso (file PDF)] e quindi
fare clic su [Avvio].
3 Viene visualizzato “L’accesso al sito richiede una
connessione a Internet. Siete collegati a Internet?”. Fare clic su
[Si].
Il Web browser si apre ed il sito di supporto DJ Pioneer appare.
http://pioneerdj.com/support/
4 Nel sito di supporto DJ Pioneer, fare clic su “Manuals” in
“DJM-900SRT”.
5 Nella pagina di download, fare clic sulla lingua richiesta per
i documenti.
Il download delle istruzioni per l’uso/Guida di avvio veloce - Serato DJ Edition inizia.
Come scaricare le istruzioni per l’uso di Serato
DJ
1 Inserire il CD-ROM nell’unità CD del computer.
Viene visualizzato il menu del CD-ROM.
Se il menu del CD-ROM non appare quando questo viene inserito, fare quanto
segue.
In Windows
Dal menu [Start] – [Computer] (o [Risorse del computer]), aprire l’unità CD
e far doppio clic sull’icona [CD_menu.exe].
In Mac OS X
Dal Finder, fare doppio clic sull’icona [CD_menu.app].
2 Quando viene visualizzato il menu del CD-ROM, selezionare
[Serato DJ: Scarica il manuale del software (file PDF)] e quindi
fare clic su [Avvio].
3 Viene visualizzato “L’accesso al sito richiede una
connessione a Internet. Siete collegati a Internet?”. Fare clic su
[Si].
Il Web browser si apre ed il sito di supporto DJ Pioneer appare.
4 Fare clic su [Software Info] in [DJM-900SRT] del sito di
supporto DJ Pioneer.
[Serato DJ Support Information] viene visualizzato.
5 Fare clic sul link della pagina di download di Serato DJ.
Viene visualizzata la pagina di download di Serato DJ.
http://serato.com/
6 Accedere al proprio account utente di “Serato.com”.
Digitare l’indirizzo mail ed il password precedentemente registrati per accedere a
“Serato.com”.
7 Da “More Downloads” sul lato destro della pagina di
download, fare clic su “Serato DJ x.x User Manual”.
Il download delle istruzioni per l’uso di Serato DJ inizia.
A proposito del marchi di fabbrica o
marchi di fabbrica depositati
Pioneer e rekordbox sono marchi di fabbrica o marchi di fabbrica depositati
della PIONEER CORPORATION.
Microsoft, Windows e Windows Vista sono marchi di fabbrica depositati o mar-
chi di fabbrica della Microsoft Corporation negli Stati Uniti e/o altri paesi.
Apple, Macintosh e Mac OS sono marchi di fabbrica di Apple Inc., registrati
negli Stati Uniti ed in altri Paesi.
ASIO è un marchio di fabbrica della Steinberg Media Technologies GmbH.
Serato DJ è un marchio registrato di Serato Audio Research Ltd., registrato negli
Stati Uniti ed in altri paesi.
I nomi delle aziende e dei prodotti menzionati sono marchi di fabbrica dei rispettivi
proprietari.
28
It
Dati tecnici
Generale
Requisiti di alimentazione ...........................................CA da 110 V a 240 V, 50 Hz/60 Hz
Consumo di corrente .................................................................................................41 W
Consumo di corrente (in attesa) ..............................................................................0,4 W
Peso unità principale ............................................................................................... 7,1 kg
Dimensioni massime ...................................331 mm (L) × 107,9 mm (A) × 404 mm (P)
Temperature di funzionamento tollerabili .........................................Da +5 °C a +35 °C
Umidità di funzionamento tollerabile .........................Da 5 % a 85 % (senza condensa)
Sezione audio
Frequenza di campionamento ...............................................................................96 kHz
Convertitore MASTER D/A ........................................................................................32 bit
Altri convertitori A/D e D/A .......................................................................................24 bit
Caratteristiche di frequenza
Da CD/LINE ..........................................................................................20 Hz a 20 kHz
Rapporto S/R (uscita dichiarata)
PHONO................................................................................................................88 dB
CD/LINE .............................................................................................................105 dB
MIC1, MIC2 .........................................................................................................84 dB
Hartelijk dank voor uw aankoop van dit Pioneer product. Lees deze gebruiksaanwijzing aandachtig door om bekend te raken met de juiste bediening van uw apparaat. Na het
doorlezen van de gebruiksaanwijzing dient u deze te bewaren op een veilige plaats, voor latere naslag.
In bepaalde landen of gebieden kan de vorm van de netsnoerstekker en het stopcontact verschillen van de afbeeldingen bij de onderstaande uitleg. De aansluitmethode blijft
overigens gelijk, evenals de bediening van het apparaat.
WAARSCHUWING
Dit apparaat is niet waterdicht. Om brand of een
elektrische schok te voorkomen, mag u geen voorwerp
dat vloeistof bevat in de buurt van het apparaat zetten
(bijvoorbeeld een bloemenvaas) of het apparaat op
andere wijze blootstellen aan waterdruppels,
opspattend water, regen of vocht.
D3-4-2-1-3_A1_Nl
WAARSCHUWING
Om brand te voorkomen, mag u geen open vuur (zoals
een brandende kaars) op de apparatuur zetten.
D3-4-2-1-7a_A1_Nl
BELANGRIJKE INFORMATIE BETREFFENDE
DE VENTILATIE
Let er bij het installeren van het apparaat op dat er
voldoende vrije ruimte rondom het apparaat is om een
goede doorstroming van lucht te waarborgen
(tenminste 5 cm achter en 3 cm aan de zijkanten van
het apparaat).
WAARSCHUWING
De gleuven en openingen in de behuizing van het
apparaat zijn aangebracht voor de ventilatie, zodat een
betrouwbare werking van het apparaat wordt verkregen
en oververhitting wordt voorkomen. Om brand te
voorkomen, moet u ervoor zorgen dat deze openingen
nooit geblokkeerd worden of dat ze afgedekt worden
door voorwerpen (kranten, tafelkleed, gordijn e.d.) of
door gebruik van het apparaat op een dik tapijt of een
bed.
D3-4-2-1-7b*_A1_Nl
Gebruiksomgeving
Temperatuur en vochtigheidsgraad op de plaats van
gebruik:
+5 °C tot +35 °C, minder dan 85 % RH
(ventilatieopeningen niet afgedekt)
Zet het apparaat niet op een slecht geventileerde plaats
en stel het apparaat ook niet bloot aan hoge
vochtigheid of direct zonlicht (of sterke kunstmatige
verlichting).
D3-4-2-1-7c*_A1_Nl
LET OP
De POWER schakelaar van dit apparaat koppelt het
apparaat niet volledig los van het lichtnet. Aangezien
er na het uitschakelen van het apparaat nog een
kleine hoeveelheid stroom blijft lopen, moet u de
stekker uit het stopcontact halen om het apparaat
volledig van het lichtnet los te koppelen. Plaats het
apparaat zodanig dat de stekker in een noodgeval
gemakkelijk uit het stopcontact kan worden gehaald.
Om brand te voorkomen, moet u de stekker uit het
stopcontact halen wanneer u het apparaat langere
tijd niet denkt te gebruiken (bijv. wanneer u op
vakantie gaat).
D3-4-2-2-2a*_A1_Nl
WAARSCHUWING NETSNOER
Pak het netsnoer beet bij de stekker. Trek de stekker er
niet uit door aan het snoer te trekken en trek nooit aan
het netsnoer met natte handen aangezien dit
kortsluiting of een elektrische schok tot gevolg kan
hebben. Plaats geen toestel, meubelstuk o.i.d. op het
netsnoer, en klem het niet vast. Maak er nooit een
knoop in en en verbind het evenmin met andere
snoeren. De netsnoeren dienen zo te worden geleid dat
er niet per ongeluk iemand op gaat staan. Een
beschadigd netsnoer kan brand of een elektrische
schok veroorzaken. Kontroleer het netsnoer af en toe.
Wanneer u de indruk krijgt dat het beschadigd is, dient
u bij uw dichtstbijzijnde erkende PIONEER
onderhoudscentrum of uw dealer een nieuw snoer te
kopen.
S002*_A1_Nl
Deponeer dit product niet bij het gewone huishoudelijk afval wanneer u het wilt verwijderen. Er bestaat een speciaal wettelijk
voorgeschreven verzamelsysteem voor de juiste behandeling, het opnieuw bruikbaar maken en de recycling van gebruikte
elektronische producten.
In de lidstaten van de EU, Zwitserland en Noorwegen kunnen particulieren hun gebruikte elektronische producten gratis bij de daarvoor
bestemde verzamelplaatsen of een verkooppunt (indien u aldaar een gelijkwaardig nieuw product koopt) inleveren.
Indien u zich in een ander dan bovengenoemd land bevindt kunt u contact opnemen met de plaatselijke overheid voor informatie over de juiste
verwijdering van het product.
Zodoende zorgt u ervoor dat het verwijderde product op de juiste wijze wordt behandeld, opnieuw bruikbaar wordt gemaakt, t gerecycleerd en het
niet schadelijk is voor de gezondheid en het milieu.
K058b_A1_Nl
WAARSCHUWING
Berg kleine onderdelen op buiten het bereik van
kinderen en peuters. Raadpleeg onmiddellijk een arts
indien kleine onderdelen per ongeluk worden ingeslikt.
D41-6-4_A1_Nl
LET OP
OM HET GEVAAR VOOR EEN ELEKTRISCHE SHOCK TE
VOORKOMEN, DEKSEL (OF RUG) NIET
VERWIJDEREN. AAN DE BINNENZIJDE BEVINDEN
ZICH GEEN ELEMENTEN DIE DOOR DE GEBRUIKER
KUNNEN BEDIEND WORDEN. ENKEL DOOR
GEKWALIFICEERD PERSONEEL TE BEDIENEN.
D3-4-2-1-1_B2_Nl
33
Nl
Inhoud
Als u Serato DJ voor het eerst met dit toestel gebruikt
Zie de “Snelstartgids - Serato DJ Editie” voor de procedure voor het maken van
de vereiste begininstellingen voor CONTROL CD of CONTROL VINYL voor bedie-
ning van Serato DJ. U kunt de “Snelstartgids - Serato DJ Editie” downloaden
van de ondersteuningssite van Pioneer DJ (http://pioneerdj.com/support/). Zie
Downloaden van de nieuwste versies van de handleiding en de Snelstartgids - Serato
DJ Editie in deze handleiding voor instructies voor het downloaden (blz. 28).
Voor gebruikers van CONTROL VINYL
Als u met CONTROL VINYL werkt, gebruik dan een winkel die Serato DJ-producten
voert of een onlinewinkel zoals die van Serato (http://serato.com/).
Opmerkingen over deze handleiding
Lees eerst zowel deze handleiding en de “Snelstartgids – Serato DJ Editie”. Beide
bevatten belangrijke informatie die u moet begrijpen voor u dit product gaat
gebruiken.
Zie voor instructies over het verkrijgen van de Serato DJ-softwarehandleiding
Verkrijgen van de handleiding (blz.28).
Deze handleiding bestaat hoofdzakelijk uit beschrijvingen van de functies met
betrekking tot de hardware van dit toestel. Zie voor details over de bediening
van de Serato DJ-software de handleiding van de Serato DJ-software en de
“Snelstartgids – Serato DJ Editie”.
De softwarehandleiding voor Serato DJ kan worden gedownload van “Serato.
com”. Zie Downloaden van de Serato DJ-softwarehandleiding (blz. 28) voor
details.
De nieuwste versie van de handleiding (deze handleiding) en de “Snelstartgids
– Serato DJ Editie” kan worden gedownload van de Pioneer ondersteu-
ningssite. Zie Downloaden van de nieuwste versies van de handleiding en de
Snelstartgids - Serato DJ Editie (blz.28) voor details.
In deze handleiding worden namen van kanalen en toetsen die staan aangege-
ven op het product, namen van menu’s in de software enz. aangegeven in vier-
Vereenvoudigd Chinees, Traditioneel Chinees, Koreaans en Japans
Als u gebruikt maakt van een besturingssysteem in een andere taal, volgt u dan
de aanwijzingen op het scherm om in te stellen op [English (Engels)].
Installatieprocedure (Windows)
Lees eerst aandachtig Voorzorgen bij het installeren door alvorens een sturpro-
gramma te installeren.
Voor het installeren of verwijderen van het stuurprogramma zult u wellicht toe-
stemming nodig hebben van de beheerder van uw computer. Meld u aan als de
beheerder van uw computer voordat u begint met het installeren.
1 Plaats de bijgeleverde CD-ROM in het CD-station van de
computer.
Dan verschijnt het menu van de CD-ROM.
Als na het laden van de CD-ROM het menu van de CD-ROM niet verschijnt, moet
u dubbelklikken op het CD-station via het [Starten]-menu – [Computer] (of
[Deze computer]).
2 Selecteer [Stuurprogramma installeren] van het menu dat
zal verschijnen en klik dan op [Beginnen].
3 “De nieuwste versie downloaden? Er is een werkende
internetomgeving vereist om toegang te kunnen krijgen tot
de site.” verschijnt. Klik op [Ja].
De webbrowser wordt opgestart en de Pioneer DJ-ondersteuningssite zal worden
geopend.
4 Klik op [Software Download] onder [DJM-900SRT] op de
Pioneer DJ-ondersteuningssite.
5 Klik op [Driver Software].
6 Download de stuurprogrammatuur (driver) voor Windows
(DJM-900SRT_X.XXX.exe) van de downloadpagina.
7 Dubbelklik op het bestand dat u gedownload heeft.
Het installatiescherm voor het stuurprogramma verschijnt.
8 Lees zorgvuldig de Licentie-overeenkomst voor deze
Software en als u akkoord gaat met de voorwaarden, plaats u
een vinkje in [Akkoord.] en klikt u op [OK].
Als u niet akkoord gaat met de voorwaarden in de Licentie-overeenkomst voor deze
Software, klikt u op [Annuleren] om het installeren te stoppen.
9 Volg voor de installatieprocedure de aanwijzingen die op
uw scherm verschijnen.
Als er [Windows-beveiliging] op het scherm verschijnt tijdens het installation-
proces, klikt u op [Dit stuurprogramma toch installeren] om door te gaan met
installeren.
Bij installeren onder Windows XP
Als er [Hardware-installatie] op het scherm verschijnt tijdens het installation-
proces, klikt u op [Toch doorgaan] om door te gaan met installeren.
Wanneer het installatieproces voltooid is, verschijnt er een mededeling ter
afsluiting.
Installatieprocedure (Mac OS X)
Lees eerst aandachtig Voorzorgen bij het installeren door alvorens een sturpro-
gramma te installeren.
Voor het installeren of verwijderen van het stuurprogramma zult u wellicht
toestemming nodig hebben van de beheerder van uw computer. Zorg dat u van
tevoren de naam en het wachtwoord van uw beheerder paraat heeft.
1 Plaats de bijgeleverde CD-ROM in het CD-station van de
computer.
De CD-ROM map verschijnt.
Dubbelklik op het CD-pictogram op uw bureaublad als er na het laden van een
CD-ROM geen mappen worden aangegeven.
2 Dubbelklik op [CD_menu.app].
3 Selecteer [Stuurprogramma installeren] van het menu dat
zal verschijnen en klik dan op [Beginnen].
4 “De nieuwste versie downloaden? Er is een werkende
internetomgeving vereist om toegang te kunnen krijgen tot
de site.” verschijnt. Klik op [Ja].
De webbrowser wordt opgestart en de Pioneer DJ-ondersteuningssite zal worden
geopend.
5 Klik op [Software Download] onder [DJM-900SRT] op de
Pioneer DJ-ondersteuningssite.
6 Klik op [Driver Software].
7 Download de stuurprogrammatuur (driver) voor Mac OS
(DJM-900SRT_M_X.X.X.dmg) van de downloadpagina.
8 Dubbelklik op het bestand dat u gedownload heeft.
Het [DJM-900SRT_AudioDriver] menuscherm verschijnt.
9 Dubbelklik op [DJM-900SRT_AudioDriver.pkg].
Het installatiescherm voor het stuurprogramma verschijnt.
10 Controleer de details op het scherm en klik op [Toch
doorgaan].
11 Wanneer de eindgebruikerslicentie-overeenkomst
verschijnt, moet u Licentie-overeenkomst voor deze Software
zorgvuldig lezen, waarna u op [Toch doorgaan] moet klikken.
12 Als u akkoord gaat met de voorwaarden in de Licentie-
overeenkomst voor deze Software, klikt u op [Akkoord.].
Als u niet akkoord gaat met de voorwaarden in de Licentie-overeenkomst voor deze
Software, klikt u op [Niet akkoord] om het installeren te stoppen.
13 Volg voor de installatieprocedure de aanwijzingen die op
uw scherm verschijnen.
Klik op [Annuleren] om het installeren te stoppen, nadat het al is begonnen.
Installeren van de Serato DJ-software
Serato DJ is een DJ-applicatie van Serato. DJ-optredens zijn mogelijk door de com-
puter waarop deze software is geïnstalleerd te verbinden met dit toestel.
Zie de “Snelstartgids - Serato DJ Editie” voor de procedure voor het maken van
de vereiste begininstellingen voor CONTROL CD of CONTROL VINYL voor bedie-
ning van Serato DJ. U kunt de “Snelstartgids - Serato DJ Editie” downloaden
van de ondersteuningssite van Pioneer DJ (http://pioneerdj.com/support/). Zie
Downloaden van de nieuwste versies van de handleiding en de Snelstartgids - Serato
DJ Editie in deze handleiding voor instructies voor het downloaden (blz. 28).
Ga voor de nieuwste versie van de Serato DJ-software naar Serato.com en down-
load de software van deze site. Er staat ook een downloadkoppeling op de meege-
leverde CD-ROM.
Let op, want de softwareschermen en de specificaties gebruikt voor de uitleg in
deze handleiding zijn op het moment van schrijven nog in ontwikkeling en kunnen
dus afwijken van de uiteindelijke versie.
Voor aanwijzingen voor de bediening van de Serato DJ-software, verwijzen we u
naar de handleiding van Serato DJ.
De handleiding voor de Serato DJ software kan worden gedownload van
“Serato.com”. Zie Downloaden van de Serato DJ-softwarehandleiding (blz.28)
voor details.
77
Nl
Nederlands
Minimum eisen gebruiksomgeving
Geschikte besturingssystemenCPU en vereist geheugen
Mac OS X: 10.6.8, 10.7.4 en 10.8
32-bit versie
Intel
®
processor, Core™ 2 Duo 2,0 GHz of
sneller
1 GB of meer aan RAM-geheugen
64-bit versie
Intel
®
processor, Core™ 2 Duo 2,4 GHz of
sneller
4 GB of meer aan RAM-geheugen
Windows: Windows 7
32-bit versie
Intel
®
processor, Core™ 2 Duo 2,0 GHz of
sneller
2 GB of meer aan RAM-geheugen
64-bit versie
Intel
®
processor, Core™ 2 Duo 2,4 GHz of
sneller
4 GB of meer aan RAM-geheugen
Overige
USB-aansluiting
Er is een USB 2.0-aansluiting vereist om dit toestel aan te kunnen
sluiten op de computer.
SchermresolutieResolutie van 1 280 x 720 of meer
Internetverbinding
Er is verbinding met het Internet vereist om uw “Serato.com”
gebruikersaccount te kunnen registreren en de software te
downloaden.
Voor de nieuwste informatie over de vereiste gebruiksomgeving en compatibiliteit met de
nieuwste besturingssystemen verwijzen we u naar “Software Info” onder “DJM-900SRT” op
de Pioneer DJ-ondersteuningssite hieronder.
http://pioneerdj.com/support/
De werking kan niet worden gegarandeerd op alle computers, ook niet als aan alle hier aange-
geven eisen wat betreft de gebruiksomgeving wordt voldaan.
Afhankelijk van de instellingen voor stroombesparing e.d. van de computer bestaat de kans
dat de CPU en de vaste schijf niet volledig toereikend zijn. Vooral bij laptops moet u ervoor zor-
gen dat de computer in de juiste toestand verkeert om doorlopend hoge prestaties te kunnen
leveren (door bijvoorbeeld de netstroomadapter aangesloten te houden) wanneer u Serato DJ
gebruikt.
Gebruik van het Internet vereist een aparte overeenkomst met een aanbieder van
Internetdiensten en betaling van de daaraan verbonden kosten.
Installatieprocedure (Windows)
Sluit dit toestel niet op de computer aan voor de installatie voltooid is.
Meld u aan als gebruiker met de rechten van computerbeheerder voordat u met
installeren begint.
Als er andere programma’s geopend zijn op de computer, sluit u die dan.
1 Plaats de CD-ROM in het CD-station van de computer.
Dan verschijnt het menu van de CD-ROM.
Als na het laden van de CD-ROM het menu van de CD-ROM niet verschijnt,
opent u het CD-station via [Computer (of Deze computer)] in het [Starten]-
menu, en dubbelklikt u vervolgens op het [CD_menu.exe]-pictogram.
2 Wanneer het menu van de CD-ROM verschijnt, selecteert u
[Download de Serato DJ-software.] en klikt u op [Beginnen].
Om het menu van de CD-ROM te sluiten, klikt u op [Afsluiten].
3 “Er is een werkende internetomgeving vereist om toegang
te kunnen krijgen tot de site. Heeft u verbinding met het
internet?” verschijnt. Klik op [Ja].
De webbrowser wordt opgestart en de Pioneer DJ-ondersteuningssite zal worden
geopend.
4 Klik op [Software Info] onder [DJM-900SRT] op de Pioneer
DJ-ondersteuningssite.
[Serato DJ Support Information] verschijnt.
5 Klik op de koppeling naar de downloadpagina voor Serato
DJ.
De downloadpagina voor [Serato DJ] verschijnt.
6 Meld uzelf aan op uw gebruikersaccount voor “Serato.
com”.
Als u al een geregistreerde gebruikersaccount hebt op “Serato.com”, kunt u
doorgaan naar stap 8.
Als u de registratie van uw gebruikersaccount niet voltooid hebt, moet u dat
alsnog doen via de procedure hieronder.
—Volg de instructies op uw scherm, voer uw e-mailadres in en het wacht-
woord dat u wilt gebruiken en selecteer vervolgens de regio waar u
woont.
—Als u [E-mail me Serato newsletters] aanvinkt, krijgt u nieuwsbrieven
met alle nieuwtjes over Serato producten toegestuurd van Serato.
—Wanneer de registratie van uw gebruikersaccount voltooid is, zult u een
e-mail ontvangen op het e-mailadres dat u hebt ingevoerd. Controleer de
inhoud van de e-mail die u heeft ontvangen van “Serato.com”.
Wees voorzichtig dat u het e-mailadres en het wachtwoord dat u gebruikt
hebt bij de gebruikersregistratie niet vergeet. Deze hebt u weer nodig voor
het updaten van de software.
De persoonlijke gegevens die u heeft ingevoerd voor het registreren van uw
nieuwe gebruikersaccount mogen worden verzameld, verwerkt en gebruikt
op basis van het privacybeleid zoals uiteengezet op de Serato website.
7 Klik op de koppeling in de e-mail die u heeft ontvangen
van “Serato.com”.
U zult nu naar de downloadpagina voor Serato DJ worden gebracht. Ga door naar
stap 9.
8 Meld uzelf aan.
Voer het e-mailadres en het wachtwoord in dat u hebt geregistreerd om uzelf aan te
melden op “Serato.com”.
9 Download de Serato DJ-software van de downloadpagina.
Pak het bestand dat u gedownload hebt uit en dubbelklik het uitgepakte bestand om
het installatieprogramma op te starten.
10 Lees de voorwaarden van de licentie-overeenkomst
zorgvuldig door, klik op [I agree to the license terms and
conditions] als u daarmee akkoord gaat en klik dan op
[Install].
Als u niet akkoord gaat met de eindgebruikersovereenkomst, klikt u op
[Close] om de installatie te annuleren.
De installatie zal nu beginnen.
Wanneer de installatie met succes is voltooid, zal er een melding van die strekking
verschijnen.
11 Klik op [Close] om het Serato DJ installatieprogramma af te
sluiten.
Installatieprocedure (Mac OS X)
Sluit dit toestel niet op de computer aan voor de installatie voltooid is.
Als er andere programma’s geopend zijn op de computer, sluit u die dan.
1 Plaats de CD-ROM in het CD-station van de computer.
Dan verschijnt het menu van de CD-ROM.
Dubbelklik op het CD-pictogram op uw bureaublad als er na het laden van een
CD-ROM geen mappen worden aangegeven.
2 Dubbelklik op [CD_menu.app].
3 Selecteer [Download de Serato DJ-software.] van het menu
van de CD-ROM en klik op [Beginnen].
4 “Er is een werkende internetomgeving vereist om toegang
te kunnen krijgen tot de site. Heeft u verbinding met het
internet?” verschijnt. Klik op [Ja].
De webbrowser wordt opgestart en de Pioneer DJ-ondersteuningssite zal worden
geopend.
88
Nl
5 Klik op [Software Info] onder [DJM-900SRT] op de Pioneer
DJ-ondersteuningssite.
[Serato DJ Support Information] verschijnt.
6 Klik op de koppeling naar de downloadpagina voor Serato
DJ.
De downloadpagina voor [Serato DJ] verschijnt.
7 Meld uzelf aan op uw gebruikersaccount voor “Serato.
com”.
Als u al een geregistreerde gebruikersaccount hebt op “Serato.com”, kunt u
doorgaan naar stap 8.
Als u de registratie van uw gebruikersaccount niet voltooid hebt, moet u dat
alsnog doen via de procedure hieronder.
—Volg de instructies op uw scherm, voer uw e-mailadres in en het wacht-
woord dat u wilt gebruiken en selecteer vervolgens de regio waar u
woont.
—Als u [E-mail me Serato newsletters] aanvinkt, krijgt u nieuwsbrieven
met alle nieuwtjes over Serato producten toegestuurd van Serato.
—Wanneer de registratie van uw gebruikersaccount voltooid is, zult u een
e-mail ontvangen op het e-mailadres dat u hebt ingevoerd. Controleer de
inhoud van de e-mail die u heeft ontvangen van “Serato.com”.
Wees voorzichtig dat u het e-mailadres en het wachtwoord dat u gebruikt
hebt bij de gebruikersregistratie niet vergeet. Deze hebt u weer nodig voor
het updaten van de software.
De persoonlijke gegevens die u heeft ingevoerd voor het registreren van uw
nieuwe gebruikersaccount mogen worden verzameld, verwerkt en gebruikt
op basis van het privacybeleid zoals uiteengezet op de Serato website.
8 Klik op de koppeling in de e-mail die u heeft ontvangen
van “Serato.com”.
U zult nu naar de downloadpagina voor Serato DJ worden gebracht. Ga door naar
stap 9.
9 Meld uzelf aan.
Voer het e-mailadres en het wachtwoord in dat u hebt geregistreerd om uzelf aan te
melden op “Serato.com”.
10 Download de Serato DJ-software van de downloadpagina.
Pak het bestand dat u gedownload hebt uit en dubbelklik het uitgepakte bestand om
het installatieprogramma op te starten.
11 Lees de voorwaarden van de licentie-overeenkomst
zorgvuldig door en klik op [Agree] als u daarmee akkoord
gaat.
Als u niet akkoord gaat met de eindgebruikersovereenkomst, klikt u op
[Disagree] om de installatie te annuleren.
12 Als het volgende scherm verschijnt, kunt u het [Serato DJ]-
pictogram naar het [Applications]-mappictogram slepen.
99
Nl
Nederlands
Aansluitingen
Schakel altijd eerst de stroom uit en trek de stekker uit het stopcontact alvorens u enige aansluiting maakt of verbreekt.
Sluit het netnoer pas aan nadat alle aansluitingen tussen de apparatuur volledig zijn gemaakt.
Gebruik alleen het bijgeleverde netsnoer.
Zie tevens de gebruiksaanwijzingen van de aan te sluiten apparatuur.
Wanneer u een DVS (Digital Vinyl System) maakt door een computer, audio-interface enz. met elkaar te combineren, moet u goed opletten bij het verbinden van de audio-
interface verbinden met de ingangsaansluitingen van dit toestel en bij het instellen van de ingangskeuzeschakelaars.
Zie tevens de handleiding van de DJ-software en de audio-interface in kwestie.
Achterpaneel
OFF
RETURN
L
L
L
1 GND
2 HOT
3 COLD
L
R
L
L
IN
CH3
CH4
CH1CH2
R
R
R
R
L
R
R
PHONOPHONOPHONO
CH 4CH 3
CD/LINE
L
R
PHONO
CH 1
CD/LINE
SIGNAL GNDSIGNAL GND
TRS
CD/LINE
MASTER1MASTER2
REC OUT
BOOTH
MIC2
MIDI OUT
DIGITAL
MASTER
OUT
LINK
L
R
CH 2
CD/LINE
(MONO)
LR
(MONO)
SEND
POWER
AC IN
ON
134344343556782
deabh9cgf
1 POWER toets (bladzijde13)
Voor aanzetten en uitschakelen van dit apparaat.
2 RETURN aansluitingen (bladzijde 10)
Voor aansluiten van de uitgang van een externe effectgenerator. Wanneer alleen
het [L (MONO)]-kanaal is aangesloten, wordt het ingangssignaal van het [L
(MONO)]-kanaal tegelijkertijd doorgegeven aan het [R]-kanaal.
3 PHONO aansluitingen (bladzijde 10)
Voor aansluiten op de phono-aansluiting (MM-element) van een weergave-appa-
raat. Geen lijnniveau-ingangssignalen op aansluiten.
Om apparatuur te kunnen verbinden met de [PHONO] aansluitingen, moet de
kortsluitstekker uit de aansluitingen verwijderd worden.
Steek deze kortsluitstekker in de [PHONO] aansluitingen wanneer er niets op is
aangesloten om externe ruis te verminderen.
4 CD/LINE aansluitingen (bladzijde 10)
Aansluiten op een DJ-speler of een lijnuitgangscomponent.
5 SIGNAL GND aansluiting (bladzijde 10)
Sluit hierop de aardingsdraad van een analoge platenspeler aan. Dit vermindert
storende geluiden bij aansluiten van een analoge platenspeler.
6 MIC2 aansluiting (bladzijde 10)
Sluit hierop een microfoon aan.
7 MIDI OUT aansluiting (bladzijde 10)
Verbind deze met de MIDI IN-aansluiting van een externe MIDI-sequencer.
8 Kensington-beveiligingsgleuf
9 DIGITAL IN aansluiting (bladzijde 10)
Sluit deze aan op de coaxiale digitale uitgangsaansluitingen van DJ-spelers, enz.
Bij omschakelen van de bemonsteringsfrequentie van het uitgangssignaal kan
het geluid een ogenblik wegvallen.
a DIGITAL MASTER OUT aansluiting (bladzijde 10)
Voor uitsturen van de hoofdkanaal-audiosignalen.
b LINK aansluiting (bladzijde 10)
Verbind deze met de LINK-aansluiting van Pioneer DJ-spelers of de LAN-
aansluiting van een computer waarop rekordbox is geinstalleerd (PRO DJ LINK).
Om meerdere apparaten aan te kunnen sluiten, kunt u gebruik maken van een
Gebruik een switching hub die geschikt is voor 100Base-TX-verbindingen. Het is
mogelijk dat bepaalde switching hubs niet goed werken.
c BOOTH aansluitingen (bladzijde 10)
Dit zijn uitgangsaansluitingen voor een boothmonitor.
d REC OUT aansluitingen (bladzijde 10)
Dit zijn uitgangsaansluitingen voor opname.
e MASTER2 aansluitingen (bladzijde 10)
Voor aansluiten van een eindversterker e.d.
f MASTER1 aansluitingen (bladzijde 10)
Voor aansluiten van een eindversterker e.d.
U moet deze gebruiken als gebalanceerde uitgangsaansluitingen. Wees voor-
zichtig dat u niet per ongeluk het stroomsnoer van een ander toestel
probeert aan te sluiten.
g SEND aansluitingen (bladzijde 10)
Voor aansluiten van de ingang van een externe effectgenerator. Wanneer alleen
het [L (MONO)]-kanaal is aangesloten, wordt er alleen een mono-geluidssignaal
uitgestuurd.
h AC IN
Aansluiten op een stopcontact met het bijgeleverde netsnoer. Wacht met aan-
sluiten van het netsnoer totdat eerst alle aansluitingen tussen de apparatuur
onderling compleet zijn gemaakt.
Gebruik alleen het bijgeleverde netsnoer.
WAARSCHUWING
Houd de kortsluitstekkers buiten bereik van kinderen. Raadpleeg onmiddellijk een
arts indien er onverhoopt één wordt ingeslikt.
1010
Nl
Aansluiten van ingangsaansluitingen
Wanneer u een DVS (Digital Vinyl System) maakt door een computer, audio-interface enz. met elkaar te combineren, moet u goed opletten bij het verbinden van de audio-
interface verbinden met de ingangsaansluitingen van dit toestel en bij het instellen van de ingangskeuzeschakelaars.
Zie tevens de handleiding van de DJ-software en de audio-interface in kwestie.
1Nadere informatie over PRO DJ LINK vindt u op Omtrent PRO DJ LINK op bladzijde 14.
2Voor het gebruik van de fader-startfunctie met PRO DJ LINK moet u een LAN-kabel aansluiten (bladzijde 15).
Aansluiten van uitgangsaansluitingen
OFF
RETURN
L
L
L
1 GND
2 HOT
3 COLD
L
R
L
L
IN
CH3
CH4
CH1CH2
R
R
R
R
L
R
R
PHONO
CH 4CH 3
CD/LINE
L
R
PHONO
CH 1
CD/LINE
SIGNAL GNDSIGNAL GND
TRS
CD/LINEPHONO
MASTER1MASTER2
REC OUT
BOOTH
MIC2
MIDI OUT
DIGITAL
MASTER
OUT
LINK
L
R
CH 2
CD/LINEPHONO
(MONO)
LR
(MONO)
SEND
POWER
AC IN
ON
L
R
L
R
Eindversterker
2
Naar
stopcontact
Digitaal
audio-ingangsapparaat
Eindversterker
(voor dj-booth
monitor)
Externe
effectgenerator
1
MIDI-sequencer
Cassettedeck, e.d.
(analoog geluidsopname-
apparaat)
Eindversterker
2
3
1Sluit tevens een externe effectgenerator aan op de [RETURN]-aansluiting (ingangsaansluiting).
2Gebruik de [MASTER1]-aansluitingen alleen voor gebalanceerde uitgangssignalen. Verbinding met een ongebalanceerde signaalbron (bijv. via tulp (RCA) aansluitingen)
met behulp van een XLR-RCA adapterkabel (of adapterstekker) enz. kan de geluidskwaliteit verlagen en/of resulteren in ruis.
Voor verbinding met een ongebalanceerde signaalbron (bijv. via tulp (RCA) aansluitingen) dient u de [MASTER2]-aansluitingen te gebruiken.
3Wees voorzichtig dat u niet per ongeluk het stroomsnoer van een ander toestel probeert aan te sluiten op de [MASTER1] aansluiting.
1111
Nl
Nederlands
Aansluiten op het bedieningspaneel
B
ATHRU
MASTER
0
MIXING
LEVEL
PHONES
CUE
LEVEL
DIGITAL
CD/ LINEPHO
HI
MIC 1
MIC 2
0
0
TRIM
OVER
10
7
4
2
1
0
MICUSB
MIC1
U moet de meegeleverde USB-kabel
gebruiken voor de aansluiting.
Computers
Microfoons
Hoofdtelefoon
1
2
3
4
1 MIC1-aansluiting (bladzijde 14)
Sluit hierop een microfoon aan.
2 USB aansluiting (bladzijde 11)
Sluit de computer aan.
3 USB verbindingsindicator
Licht op wanneer er signalen worden uitgewisseld met de computer.
4 PHONES-aansluiting (bladzijde 13)
Sluit hierop een hoofdtelefoon aan.
Verbinding maken tussen dit toestel en
een computer
Voor instructies over gebruik in combinatie met Serato DJ verwijzen we u naar de
“Snelstartgids – Serato DJ Editie”. Zie Downloaden van de nieuwste versies van de
handleiding en de Snelstartgids - Serato DJ Editie (blz.28) voor details.
1 Sluit dit apparaat aan op uw computer via een USB-kabel.
Dit apparaat functioneert als een audio-apparaat volgens de ASIO-normen.
Deze functie werkt niet met computers die geen ondersteuning bieden voor USB
2.0.
Tijdens het gebruik van applicaties die geschikt zijn voor ASIO, kunt u [USB
DECK 3], [USB DECK 1], [USB DECK 2] en [USB DECK 4] gebruiken als
ingangsbronnen.
Tijdens het gebruik van applicaties die geschikt zijn voor DirectX, kunt u alleen
[USB DECK 3] gebruiken als ingangsbron.
De aanbevolen werkomgeving voor de computer is afhankelijk van het
DJ-applicatieprogramma. Controleer altijd de aanbevolen computer-werkomge-
ving voor het DJ-applicatieprogramma dat u gebruikt.
Wanneer er tegelijkertijd een ander USB-geluidsapparaat op de computer is
aangesloten, kan dat niet altijd werken of naar behoren herkend worden.
Wij raden u aan om alleen de computer en dit apparaat aan te sluiten.
Bij aansluiten van de computer en dit apparaat raden we u aan om de aanslui-
ting rechtstreeks op de USB-aansluitbus van dit apparaat te maken.
2 Druk op de [POWER] toets.
Schakel dit apparaat in.
Voor Windows
—De melding [Apparaatstuurprogramma installeren] kan verschijnen wan-
neer dit toestel voor het eerst op de computer wordt aangesloten of wanneer
het wordt aangesloten op een andere USB-poort van de computer. Wacht
eventjes tot de mededeling [De apparaten zijn gereed voor gebruik]
verschijnt.
Bij installeren onder Windows XP
— [Mag Windows verbinding met Windows Update maken om te zoeken
naar software?] kan verschijnen tijdens de installatieprocedure. Kies dan [
Nee, nu niet] en klik op [Volgende] om door te gaan met installeren.
— [Wat moet de wizard doen?] kan verschijnen tijdens de installatieproce-
dure. Kies dan [ De software automatisch installeren (aanbevolen)] en
klik op [Volgende] om door te gaan met installeren.
—Als er [Windows-beveiliging] op het scherm verschijnt tijdens het instal-
lationproces, klikt u op [Dit stuurprogramma toch installeren] om door te
gaan met installeren.
1212
Nl
Bediening
Regelpaneel
USB
DECK
3
USB
DECK
1
USB
DECK
2
USB
DECK
4
LEVEL
DIGITAL
CD/ LINEPHONO
HI
MIC 1
MIC 2
HI
LOW
EQ
EQ /
1212
1212
0
0
ON
TALK
OVER
OFF
SPACE
NOISE
CUE
CUE
CUE
CRUSHFILTER
DUB
ECHO
GATE/
COMP
1
234
BATHRU
TRIM
9
6
-
26
/
MID
6
-
26
/
LOW
6
-
26
/
COLOR
ISO
OVER
10
10
9
8
7
6
5
4
3
2
1
7
4
2
1
-
1
-
2
-
3
-
5
-
7
-
10
-
15
-
24
dB
0
HILOW
TRIM
DIGITAL
CD/ LINEPHONO
HI
EQ /
CUE
BATHRU
9
6
-
26
/
MID
6
-
26
/
LOW
6
-
26
/
COLOR
ISO
OVER
10
7
4
2
1
-
1
-
2
-
3
-
5
-
7
-
10
-
15
-
24
dB
0
HILOW
CUE
TRIM
DIGITAL
CD/ LINEPHONO
HI
EQ /
CUE
BATHRU
9
6
-
26
/
MID
6
-
26
/
LOW
6
-
26
/
COLOR
ISO
OVER
10
10
9
8
7
6
5
4
3
2
1
7
4
2
1
-
1
-
2
-
3
-
5
-
7
-
10
-
15
-
24
dB
0
HILOW
TRIM
DIGITAL
CD/ LINEPHONO
HI
EQ /
CUE
BATHRU
MONOSTEREO
9
6
-
26
/
MID
6
-
26
/
LOW
6
-
26
/
COLOR
ISO
OVER
10
10
9
8
7
6
5
4
3
2
1
000
7
4
2
1
-
1
-
2
-
3
-
5
-
7
-
10
-
15
-
24
dB
dBRL
0
OVER
10
7
4
2
1
-
1
-
2
-
3
-
5
-
7
-
10
-
15
-
24
0
HILOW
EQISOLATOR
AB
CROSS FADER ASSIGN
LEVEL
POWER
BALANCE
0
AUTO
GRID
TA P
AUTO
/ TAP
BPM
%
ms
CH SELECT
START
/STOP
RL
WAKE UP
PARAMETER
1234
MICMST
AB
TIME
MAX
LEVEL / DEPTH
ON/ OFF
MIN
MICMASTERMIDI
BEAT EFFECTS
BEAT
TAP
LINK
SOUND COLOR FX
HEADPHONES
FADER START
STEREO
MASTER
0
MIXING
LEVEL
BOOTH MONITOR
EQ CURVE
CH FADER
CROSS FADER
PHONES
CUE
MONO SPLIT
USB
MIC1
QUAN-
TIZE
MASTER
CF.B
CF.A
MIC
4
3
2
1
0
ON/OFFLFO FORM
UTILITY
X
-
PAD
ROBOT
REVERB
PHASER
SLIP ROLL
ROLL
FLANGER
FILTER
REV ROLL
SND/ RTN
MELODICTRANS
ECHO
SPIRAL
MIDI LFO
DELAY
1
2
4
6
8
9
a
u
w
z
6
B
C
D
E
F
A
t
y
s
5
7
3
v
x
e
j
d
f
g
6
h
i
c
l
666
k
m
n
o
p
q
r
6
e
d
f
g
h
i
c
e
d
f
g
h
i
c
e
d
f
g
h
i
c
bbbb
1 MIC1 LEVEL instelling (bladzijde 14)
Regelt het uitgangsniveau van de geluidsweergave via het [MIC1] kanaal.
2 MIC2 LEVEL instelling (bladzijde 14)
Regelt het uitgangsniveau van de geluidsweergave via het [MIC2] kanaal.
3 EQ (HI, LOW) instellingen (bladzijde 14)
Deze regelen de toonweergave van de [MIC1] en [MIC2] kanalen.
4 OFF, ON, TALK OVER keuzeschakelaar (bladzijde 14)
Zet de microfoon aan/uit.
5 SOUND COLOR FX toetsen (bladzijde 15)
Deze zetten de SOUND COLOR FX effecten aan/uit.
6 CUE toets (bladzijde 13)
Druk op de [CUE] toets(en) voor het kanaal (de kanalen) waarmee u wilt
meeluisteren.
7 FADER START (1, 2, 3, 4) toetsen (bladzijde 15)
Hiermee kunt u de fader-startfunctie aan/uit zetten.
2 Druk op een van de [FADER START (1, 2, 3, 4)]-toetsen.
Selecteer het kanaal dat gestart moet worden met de fader-startfunctie.
Voor Serato DJ
— [Fader Start 1]-toets: Selecteert [DECK 3].
— [Fader Start 2]-toets: Selecteert [DECK 1].
— [Fader Start 3]-toets: Selecteert [DECK 2].
— [Fader Start 4]-toets: Selecteert [DECK 4].
3 Zet de kanaalfader zoveel mogelijk naar uzelf toe.
4 Stel een cue in in Serato DJ of op de DJ-speler.
Het muziekstuk keert terug naar het cue-punt en de pauzestand wordt ingeschakeld.
5 Beweeg de kanaalfader van u af.
Het afspelen van het muziekstuk in Serato DJ of op de DJ-speler begint.
Wanneer u de kanaal-fader terugzet in de oorspronkelijke stand, keert de speler
onmiddellijk terug naar het eerder ingestelde cue-punt, om daar de weergave te
pauzeren (back-cue).
䢢Beginnen met afspelen met de crossfader
1 Stel de [CROSS FADER ASSIGN (A, THRU, B)]
keuzeschakelaar in op [A] of [B].
2 Druk op een van de [FADER START (1, 2, 3, 4)]-toetsen.
Selecteer het kanaal dat gestart moet worden met de fader-startfunctie.
Voor Serato DJ
— [Fader Start 1]-toets: Selecteert [DECK 3].
— [Fader Start 2]-toets: Selecteert [DECK 1].
— [Fader Start 3]-toets: Selecteert [DECK 2].
— [Fader Start 4]-toets: Selecteert [DECK 4].
3 Stel de crossfader in.
Schuif de regelaar naar de tegenovergestelde rand van het kanaal waarvoor u de
fader-startfunctie wilt gebruiken.
4 Stel een cue in in Serato DJ of op de DJ-speler.
Het muziekstuk keert terug naar het cue-punt en de pauzestand wordt ingeschakeld.
5 Stel de crossfader in.
Het afspelen van het muziekstuk in Serato DJ of op de DJ-speler begint.
Wanneer u de crossfader terugzet in de oorspronkelijke stand, keert de speler
onmiddellijk terug naar het eerder ingestelde cue-punt, om daar de weergave te
pauzeren (back-cue).
Gebruik van de LINK MONITOR-functie
Controleer [Gebruik de “LINK MONITOR” functie van Pioneer
DJ-mengpanelen.] bij [bestand] > [Voorkeuren] > [Audio] in rekordbox van
tevoren. Raadpleeg ook de handleiding van de rekordbox.
1 Sluit een hoofdtelefoon aan op de [PHONES]-aansluiting.
2 Sluit een computer aan waarop rekordbox is geinstalleerd.
Nadere aanwijzingen voor het aansluiten vindt u onder Aansluiten van ingangsaan-
sluitingen op bladzijde 10.
3 Keuze van een muziekstuk ter controle met rekordbox.
4 Druk op de [CUE] toets voor [LINK].
Het muziekstuk dat u kiest met rekordbox wordt weergegeven via de hoofdtelefoon.
Wanneer er nog een keer op [CUE] toets wordt gedrukt, wordt het meeluisteren
geannuleerd.
U kunt nu dezelfde procedure volgen als voor Meeluisteren via een hoofdtelefoon
(stappen 3 t/m 5).
Gebruik van de SOUND COLOR FX-functie
Dit zijn effecten die veranderen door middel van de [COLOR]-instelling.
1 Druk op één van de [SOUND COLOR FX]-keuzetoetsen.
Hiermee kiest u het soort effect.
De ingedrukte toets gaat knipperen.
Als één van de [SOUND COLOR FX]-keuzetoetsen al geselecteerd is, maar
er een andere toets geselecteerd en ingedrukt wordt, zal die toets worden
geselecteerd.
Een overzicht van de soorten effecten vindt u op Soorten SOUND COLOR FX
effecten op bladzijde 18.
Het zelfde effect wordt ingesteld voor [CH1] tot [CH4].
2 Draai aan de [COLOR] instelling.
Het effect wordt toegepast op elk kanaal waarvoor de knop werd ingedrukt.
䢢Annuleren van het SOUND COLOR FX-effect
Druk op de [SOUND COLOR FX]-keuzetoets die knippert.
Het effect wordt geannuleerd.
1616
Nl
Gebruik van de BEAT EFFECT-functie
Met deze functie kunt u onmiddellijk diverse effecten instellen volgens het tempo
(BPM = beats per minuut) van het op dat moment weergegeven muziekstuk.
Hoofdbeeldscherm
1
2
3
7
9
a
5
4
6
8
AUTO
GRID
TAPBPM
%
ms
CH SELECT
PARAMETER
1234
MICMST
AB
1
Effect-schermdeelDe naam van het geselecteerde effect wordt weergegeven.
2
Kanaalkeuze-
schermdeel
De naam van het kanaal waarop het effect wordt toegepast wordt
weergegeven.
3
AUTO (TAP)
[AUTO] licht op wanneer de BPM-meting staat ingesteld op auto-
matische werking.
[TAP] licht op bij gebruik van de handmatige invoerstand.
4
Aanduiding van
de BPM-waarde (3
cijfers)
In de automatische stand wordt hier de automatisch gemeten
BPM-waarde aangegeven.
Wanneer de BPM-waarde niet gemeten kan worden, knippert hier
de laatst waargenomen BPM-waarde.
In de handmatige invoerstand wordt hier de handmatig ingevoerde
BPM-waarde getoond.
5
GRID
Dit licht op wanneer Serato DJ actief is en de QUANTIZE-functie
kan worden gebruikt. Dit licht ook op wanneer er een muziek-
stuk wordt afgespeeld dat geanalyseerd is met rekordbox en de
QUANTIZE-functie kan worden gebruikt met de DJ-speler. Dit
knippert of blijft uit wanneer de QUANTIZE-functie niet kan worden
gebruikt.
6
BPM
Deze blijft steeds verlicht.
7
Parameter-
schermdeel
Hier worden de parameters weergegeven die zijn opgegeven voor
de individuele effecten.
Wanneer [BEAT, ] wordt ingedrukt, wordt de corresponderende
beatfractie 1 seconde lang getoond.
Wanneer er een waarde buiten het parameterbereik wordt opgege-
ven met de [BEAT, ] toets, verandert de waarde niet en gaat het
display knipperen.
8
% (ms)
Deze lichten op volgens de eenheden voor de verschillende
effecten.
9
Beat-schermdeelDit licht op aan de hand van de geselecteerde beatnummerpositie.
a
Aanraak-
schermdeel
Dit licht op wanneer het [X-PAD] wordt aangeraakt.
1 Druk op de [AUTO/TAP] toets.
Kies de BPM-metingsstand.
— [AUTO]: Het BPM-tempo van het binnenkomende geluidssignaal wordt auto-
matisch gemeten. De [AUTO]-functie wordt ingesteld wanneer dit apparaat
wordt ingeschakeld.
— [TAP]: De BPM-waarde wordt handmatig gekozen door met een vinger te
tikken op [TAP] toets.
Het BPM-meetbereik in de [AUTO]-stand loopt van 70 tot 180 BPM. Voor som-
mige muziekstukken is het mogelijk dat het BPM-tempo niet correct bepaald kan
worden. Als het BPM-tempo niet gemeten kan worden, knippert de BPM-waarde
op het scherm. In dergelijke gevallen voert u de BPM-waarde handmatig in met
de [TAP] toets.
2 Verdraai de beateffect-keuzeschakelaar.
Hiermee kiest u het soort effect.
Een overzicht van de soorten effecten vindt u op Soorten BEAT EFFECT op blad-
zijde 18.
Om [SND/RTN] te gebruiken, zie Gebruik van een externe effectgenerator
hieronder.
Om [MIDI LFO] te gebruiken, zie Gebruiken van MIDI LFO op bladzijde 17
hieronder.
3 Verdraai de effectkanaal-keuzeschakelaar.
Hiermee kiest u het kanaal om het effect op toe te passen.
— [1] – [4]: Het effect wordt toegepast op het geluid van het corresponderende
kanaal.
— [MIC]: Het effect wordt toegepast op het geluid van het [MIC]-kanaal.
— [CF.A], [CF.B]: Het effect wordt toegepast op het geluid van de crossfader’s
[A] (linker)- of [B] (rechterkant).
— [MASTER]: Het effect wordt toegepast op het geluid van het
[MASTER]-kanaal.
Deze handeling is niet nodig wanneer [MIDI LFO] is geselecteerd.
4 Druk op de [BEAT , ] toets.
Bepaal de beatfractie voor het synchroniseren van het effectgeluid.
De effecttijd die overeenkomt met de beat-fractie wordt automatisch ingesteld.
5 Druk op de [ON/OFF] toets voor [BEAT EFFECTS].
Het effect wordt toegepast op het geluid.
De tijdparameter van het effect is instelbaar door te draaien aan de
[TIME]-instelling.
De kwantitatieve parameter van het effect is instelbaar door te draaien aan de
[LEVEL/DEPTH]-instelling.
De [ON/OFF] toets knippert wanneer het effect wordt ingeschakeld.
Wanneer er opnieuw op de [ON/OFF] toets wordt gedrukt, wordt het effect
uitgeschakeld.
䢢Handmatig invoeren van het aantal BPM
Tik minstens 2 keer op [TAP] toets op de maat van de beat (in
kwart noten) van de weergegeven muziek.
De gemiddelde waarde van de tussenpozen waarmee de [TAP] toets werd aangetikt,
wordt ingesteld als het BPM-tempo.
Wanneer het BPM-tempo is ingesteld met de [TAP] toets, wordt de beatfractie
ingesteld op [1/1] en dan wordt de tijd van een enkele beat (kwart noot) ingesteld
als de effecttijd.
Het BPM-tempo is handmatig instelbaar door een de [TIME]-instelling te draaien
terwijl u de [TAP] toets indrukt.
De BPM kan worden ingesteld in stappen van 0,1 door op [AUTO/TAP] te druk-
ken terwijl [TAP] ingedrukt wordt gehouden en [TIME] wordt verdraaid terwijl de
twee toetsen ingedrukt worden gehouden.
䢢Gebruik van een externe effectgenerator
1 Sluit dit apparaat aan op een externe effectgenerator.
Nadere aanwijzingen voor het aansluiten vindt u onder Aansluiten van uitgangsaan-
sluitingen op bladzijde 10.
2 Verdraai de beateffect-keuzeschakelaar.
Selecteer [SND/RTN (MIDI LFO)].
3 Verdraai de effectkanaal-keuzeschakelaar.
Hiermee kiest u het kanaal om het effect op toe te passen.
4 Druk op de [ON/OFF] toets voor [BEAT EFFECTS].
Het geluid dat door de externe effectgenerator is gegaan wordt uitgestuurd via de
[MASTER]-kanaal.
Wanneer er opnieuw op de [ON/OFF] toets wordt gedrukt, wordt het effect
uitgeschakeld.
Bediening van [X-PAD]
Bedieningsprocedure
[ON/OFF] knop status van
[BEAT EFFECTS]
X-PAD
Effect
1
Uit (brandt)
Loslaten K
aanraken
Uit K Aan
2
Aan (knippert)
Loslaten K
aanraken
Aan K Aan
䢢Bedieningsprocedure 1
1 Voer stappen 1 t/m 4 van de Gebruik van de BEAT EFFECT-
functie-procedure uit.
2 Raak het [X-PAD] aan.
Het [X-PAD] zet het effect aan en uit en wijzigt de kwantitatieve parameter.
Wanneer uw vinger los komt van het [X-PAD], gaat het effect uit.
Om het effect aan te laten wanneer uw vinger los komt van het [X-PAD], moet u
terwijl u het [X-PAD] aanraakt op de [ON/OFF] knop van [BEAT EFFECTS] druk-
ken voor u uw het [X-PAD] loslaat.
䢢Bedieningsprocedure 2
1 Voer stappen 1 t/m 5 van de Gebruik van de BEAT EFFECT-
functie-procedure uit.
2 Raak het [X-PAD] aan.
Het [X-PAD] wijzigt de kwantitatieve parameter van het effect.
Bedienen van DJ-software met de MIDI-functie
Dit toestel geeft ook informatie door over de stand van knoppen en schuifregelaars
via het universele MIDI-protocol.
Indien aangesloten via een USB-kabel op een computer met MIDI-compatibele
DJ-software, kan de DJ-software vanaf dit toestel worden bediend.
Installeer van tevoren de DJ-software op uw computer. Maak bovendien de nodige
audio- en MIDI-instellingen voor de DJ-software.
1717
Nl
Nederlands
Aanwijzingen voor het instellen van de MIDI-kanalen vindt u op Instellingen
aanpassen op bladzijde 23.
Zie voor de berichten die dit toestel doorgeeft MIDI-toewijzingstabel op bladzijde
21.
1 Verbind de [USB]-aansluiting van dit apparaat met de
computer.
Zie Aansluiten op het bedieningspaneel op bladzijde 11 voor nadere details over de
aansluitingen.
2 Start de DJ-software op.
3 Druk op de [ON/OFF (UTILITY)] knop.
Schakel de MIDI-functie in.
De verzending van MIDI-berichten begint.
Wanneer een fader of andere regelaar wordt verplaatst, zal er een bericht wor-
den verstuurd dat de nieuwe positie doorgeeft.
Wanneer de [START/STOP] toets wordt ingedrukt en meer dan 2 seconden
ingedrukt wordt gehouden, wordt er een set MIDI-meldingen die corresponderen
met de toets, fader of de posities van de instellingen verstuurd (Snapshot).
Wanneer er nog eens op [ON/OFF (UTILITY)] wordt gedrukt, wordt het versturen
van MIDI-meldingen gestopt.
De MIDI-tijdklok (met BPM-informatie) wordt altijd verzonden, ongeacht de
status van de [ON/OFF/UTILITY] knop.
䢢Voorbereidingen voor het gebruiken van de MIDI
LFO-functie
De MIDI-compatibele software, apparatuur enz. (hieronder de “MIDI-ontvangstkant”
genoemd) moet worden voorbereid (“geleerd”) voor de MIDI LFO-functie gebruikt
kan worden.
Voer de juiste handelingen voor het “leren” uit aan de MIDI-ontvangstkant.
Zie voor de berichten die dit toestel doorgeeft MIDI-toewijzingstabel op bladzijde
21.
1 Druk op de [ON/OFF (UTILITY)] knop.
Schakel de MIDI-functie in.
2 Verdraai de beateffect-keuzeschakelaar.
Selecteer [SND/RTN (MIDI LFO)].
[S/RELFO] knippert op het effectgedeelte van het display, waarna [SND/RTN] zal
verschijnen.
3 Druk op de [ON/OFF] toets voor [BEAT EFFECTS].
Laat de MIDI-ontvangstkant de MIDI-melding van de [ON/OFF]-toets met betrekking
tot het [BEAT EFFECTS] leren.
De MIDI-melding die door de [ON/OFF]-toets wordt verstuurd met betrekking tot
het [BEAT EFFECTS] verschilt wanneer [SND/RTN (MIDI LFO)] is geselecteerd
en wanneer iets anders dan [SND/RTN (MIDI LFO)] is geselecteerd.
De MIDI-melding van de [ON/OFF]-toets met betrekking tot het [BEAT EFFECTS]
wanneer [SND/RTN (MIDI LFO)] is geselecteerd, wordt alleen verzonden wan-
neer de handeling wordt uitgevoerd volgens deze procedure.
4 Druk op de [LFO FORM (WAKE UP)] knop.
Laat de MIDI-ontvangstkant de MIDI-melding van de [LFO FORM (WAKE UP)]-toets
leren.
[1/7] en [1/7LFO] verschijnen om en om op het effectgedeelte van het
display.
Stel indien nodig de MIDI-mapping in voor andere toetsen en
bedieningsorganen.
Omdat de MIDI-melding van de [LFO FORM (WAKE UP)]-toets als een reeks
instructies wordt verzonden, kan het zijn dat, mede afhankelijk van de instellin-
gen aan de MIDI-ontvangstkant, de MIDI-melding niet “geleerd” kan worden.
Druk op de [LFO FORM(WAKE UP)]-toets en schakel over naar [SND/RTN] om
de MIDI-mapping voor andere toetsen en bedieningsorganen in te stellen.
䢢Gebruiken van MIDI LFO
Maak van tevoren de voorbereidingen volgens de procedure onder Voorbereidingen
voor het gebruiken van de MIDI LFO-functie.
1 Verdraai de beateffect-keuzeschakelaar.
Selecteer [SND/RTN (MIDI LFO)].
[S/RELFO] knippert op het effectgedeelte van het display, waarna [SND/RTN] zal
verschijnen.
2 Druk op de [LFO FORM (WAKE UP)] knop.
De verzending van MIDI-signalen begint.
Het golfvormpatroon van het MIDI-signaal verandert telkens wanneer er op
[LFO FORM (WAKE UP)] wordt gedrukt.
SND/RTN1/7 2/7 3/7
4/7 5/7 6/7 7/7
3 Druk op de [BEAT , ] toets.
Stel de uitvoertijd voor de golfvorm van het MIDI-signaal in.
4 Druk op [ON/OFF] of [BEAT EFFECTS], of raak het [X-PAD]
aan.
De MIDI-melding voor het inschakelen van het effect wordt verstuurd.
Wanneer de [LFO FORM (WAKE UP)]-toets wordt ingedrukt en een instelling
van [1/7] – [7/7] wordt geselecteerd, kan de MIDI-melding voor de
onderstaande toetsen en bedieningsorganen ook worden verzonden wanneer de
MIDI-stand is uitgeschakeld.
— [X-PAD] (Aanraken K loslaten)
— [CUE]-toets voor het [BEAT EFFECTS]
— Effectkanaal-keuzeschakelaar
— [LEVEL/DEPTH] instelling
— [ON/OFF]-toets voor het [BEAT EFFECTS]
Wanneer de [LFO FORM (WAKE UP)]-toets wordt ingedrukt om te schakelen
tussen [SND/RTN] en [MIDI LFO], zal BEAT EFFECT automatisch worden
uitgeschakeld.
Het is niet mogelijk te schakelen te schakelen tussen [SND/RTN] en [MIDI LFO]
terwijl het [X-PAD] wordt aangeraakt.
䢢Verzenden van de berichten voor MIDI-start en MIDI-stop
Druk op de [START/STOP] toets voor [MIDI].
De berichten voor MIDI-start en MIDI-stop worden beurtelings verzonden, tel-
kens wanneer u op de [START/STOP] toets drukt, ongeacht of de MIDI-functie
aan of uit staat.
Bediening van een externe MIDI-sequencer
Dit toestel geeft ook informatie door over de stand van knoppen en schuifregelaars
via het universele MIDI-protocol.
Dit apparaat geeft het tempo van de weergegeven geluidsbron (de BPM-informatie)
door als de MIDI-tijdklok. Dit kan worden gebruikt voor het synchroniseren van een
externe MIDI-sequencer met het tempo van de geluidsbron.
Zie voor de berichten die dit toestel doorgeeft MIDI-toewijzingstabel op bladzijde
21.
Externe MIDI-sequencers die niet geschikt zijn voor de MIDI-tijdklok kunnen niet
worden gesynchroniseerd.
Externe MIDI-sequencers kunnen niet worden gesynchroniseerd voor geluids-
bronnen waarvan het BPM-tempo niet betrouwbaar kan worden gemeten.
MIDI-tijdkloksignalen worden ook doorgegeven bij BPM-waarden die handmatig
zijn ingevoerd door het aantikken van de [TAP] toets met een vinger. Het bereik
van de MIDI-tijdklok loopt van 40 BPM tot 250 BPM.
1 Verbind de [MIDI OUT]-aansluiting met de MIDI IN-
aansluiting van de externe MIDI-sequencer met een in de
handel verkrijgbare MIDI-kabel.
2 Stel de synchronisatiefunctie van de externe MIDI-
sequencer in op “Slave”.
3 Druk op de [START/STOP] toets voor [MIDI].
Het MIDI-startbericht wordt verzonden.
4 Druk op [ON/OFF] in het [MIDI]-gedeelte.
De verzending van MIDI-berichten begint.
1818
Nl
Soorten effecten
Soorten SOUND COLOR FX effecten
EffectnaamBeschrijving[COLOR] instelling
SPACE
Voegt een nagalmeffect toe aan
het oorspronkelijke geluid.
Tegen de klok in draaien: Voegt het
nagalmeffect toe aan de midden-
en lage tonen.
Met de klok mee draaien: Voegt het
nagalmeffect toe aan de midden-
en hoge tonen.
DUB ECHO
Voegt een echo-effect toe, waarbij
het geluid een korte tijd na het
oorspronkelijke geluid herhaal-
delijk wordt weergegeven en
wegsterft.
Tegen de klok in draaien: Voegt
het echo-effect alleen toe aan de
middentonen.
Met de klok mee draaien: Voegt
het echo-effect alleen toe aan de
hoge tonen.
GATE/COMP
Verandert de textuur van het
algehele geluid.
Tegen de klok in draaien: Een gate-
effect maakt het geluid strakker,
met een verminderd gevoel van
volume.
Met de klok mee draaien: Een
compressoreffect maakt het geluid
vetter, met een verhoogd gevoel
van volume.
NOISE
Witte ruis geproduceerd bin-
nenin dit apparaat wordt samen-
gemengd met het geluid van
het kanaal via een filter en dan
weergegeven.
Het volume kan worden
aangepast door de [TRIM]-
instellingen voor de respectie-
velijke kanalen te verdraaien.
De geluidskwaliteit kan
worden ingesteld door de
[EQ/ISO (HI, MID, LOW)]-
instellingen te verdraaien.
Tegen de klok in draaien: De grens-
frequentie voor het filter waardoor
de witte ruis passeert wordt gelei-
delijk lager.
Met de klok mee draaien: De grens-
frequentie voor het filter waardoor
de witte ruis passeert wordt gelei-
delijk hoger.
CRUSH
Comprimeert het oorspronkelijke
geluid voor weergave.
Tegen de klok in draaien: Vergroot
de vervorming van het geluid.
Met de klok mee draaien: Het
geluid wordt gecomprimeerd voor
het door het hoogdoorlaatfilter
passeert.
FILTER
Produceert geluid dat door een
filter is gegaan.
Tegen de klok in draaien:
Vermindert de afsnijfrequentie van
het laagdoorlaatfilter geleidelijk.
Met de klok mee draaien: Verhoogt
de afsnijfrequentie van het hoog-
doorlaatfilter geleidelijk.
Soorten BEAT EFFECT
DELAY
1
Een vertraagd geluid wordt één keer geproduceerd overeenkomstig de beatfractie
die is ingesteld met de [BEAT, ] toetsen.
Wanneer een 1/2 beat vertraagd geluid wordt toegevoegd, worden 4 beats nu 8
beats.
Origineel
(4 beats)
1/2-beat
vertraging
(8 beats)
BEAT, toetsen (parameter 1)
Gebruik deze om een vertraging in te stellen van 1/8 – 16/1 in
verhouding tot de tijd voor één beat van de BPM.
TIME instelling (parameter 2)
Gebruik deze om de vertragingstijd in te stellen.
1 tot 4000 (ms)
LEVEL/DEPTH instelling (para-
meter 3)
Gebruik deze om de balans te regelen van het oorspronkelijke
geluid en het vertraagde geluid.
X-PAD (parameter 4)Gebruik deze om de vertragingstijd in te stellen.
ECHO
1
2
Een vertraagd geluid wordt verschillende keren geleidelijk verzwakt geproduceerd
overeenkomstig de beatfractie die is ingesteld met de [BEAT, ] toetsen.
Met 1/1 beat-echo’s zullen de vertraagde geluiden wegsterven volgens het tempo
van het muziekstuk, ook nadat het inkomend geluid al is afgekapt.
Inkomend geluid
weggedraaid
Tijd
Uitfaden
1 beat
BEAT, toetsen (parameter 1)
Gebruik deze om een vertraging in te stellen van 1/8 – 16/1 in
verhouding tot de tijd voor één beat van de BPM.
TIME instelling (parameter 2)
Gebruik deze om de vertragingstijd in te stellen.
1 tot 4000 (ms)
LEVEL/DEPTH instelling (para-
meter 3)
Gebruik deze om de balans te regelen van het oorspronkelijke
geluid en het echogeluid.
X-PAD (parameter 4)Gebruik deze om de vertragingstijd in te stellen.
SPIRAL
1
2
Deze functie voegt een nagalmeffect toe aan het inkomend geluid.
Wanneer de vertraging wordt gewijzigd, verandert tegelijkertijd de toonhoogte.
Inkomend geluid
weggedraaid
Tijd
Uitfaden
1 beat
BEAT, toetsen (parameter 1)
Gebruik deze om een vertraging in te stellen van 1/8 – 16/1 in
verhouding tot de tijd voor één beat van de BPM.
TIME instelling (parameter 2)
Gebruik deze om de vertragingstijd in te stellen.
10 tot 4000 (ms)
LEVEL/DEPTH instelling (para-
meter 3)
Gebruik dit om de balans te regelen van het oorspronkelijke
geluid en het effectgeluid en om de kwantitatieve parameter
in te stellen.
X-PAD (parameter 4)Gebruik deze om de vertragingstijd in te stellen.
REVERB
1
2
Deze functie voegt een nagalmeffect toe aan het inkomend geluid.
Niveau
Direct geluid
Vroege weerkaatsingen
Nagalm
1%
100%
Tijd
BEAT, toetsen (parameter 1)
Gebruik deze om de hoeveelheid nagalmeffect in te stellen,
van 1 – 100 %.
TIME instelling (parameter 2)
Gebruik deze om de hoeveelheid nagalmeffect te regelen.
1 – 100 (%)
LEVEL/DEPTH instelling (para-
meter 3)
Regelt de balans tussen het oorspronkelijke geluid en het
effectgeluid.
X-PAD (parameter 4)Bepaalt de grensfrequentie voor het filter.
TRANS
1
Het geluid wordt afgesneden overeenkomstig de beatfractie die is ingesteld met de
[BEAT, ] toetsen.
GekaptGekapt
1/1 beat
Tijd
BEAT, toetsen (parameter 1)
Gebruik deze om een afsnijtijd in te stellen van 1/16 – 16/1 in
verhouding tot de tijd voor één beat van de BPM.
TIME instelling (parameter 2)
Gebruik deze om de effecttijd in te stellen.
10 tot 16000 (ms)
LEVEL/DEPTH instelling (para-
meter 3)
Regelt de balans tussen het oorspronkelijke geluid en het
effectgeluid.
X-PAD (parameter 4)Deze regelt de afsnijtijd.
FILTER
1
De afsnijfrequentie van het filter wordt gewijzigd overeenkomstig de beatfractie die
is ingesteld met de [BEAT, ] toetsen.
1919
Nl
Nederlands
Frequentie
BEAT, toetsen (parameter 1)
Gebruik deze om de cyclus in te stellen voor het verplaatsen
van de afsnijfrequentie als tijd, 1/4 – 64/1, in verhouding tot de
tijd voor één beat van de BPM.
TIME instelling (parameter 2)
Gebruik deze om de plaats in te stellen waar de grensfrequen-
tie verplaatst wordt.
10 tot 32000 (ms)
LEVEL/DEPTH instelling (para-
meter 3)
Hoe verder u de regelknop naar rechts draait, des te gepronon-
ceerder klinkt het effect.
X-PAD (parameter 4)
De cyclus waarmee de grensfrequentie fluctueert, verandert
met kleine beetjes.
FLANGER
1
Een flangereffect van 1-cyclus lang wordt geproduceerd overeenkomstig de beat-
fractie die is ingesteld met de [BEAT, ] toetsen.
Cyclus
Tijd
Korte vertraging
BEAT, toetsen (parameter 1)
Gebruik deze om een effecttijd in te stellen van 1/4 – 64/1 in
verhouding tot de tijd voor één beat van de BPM.
TIME instelling (parameter 2)
Gebruik dit om de cyclus in te stellen waarmee het flangeref-
fect wordt verplaatst.
10 tot 32000 (ms)
LEVEL/DEPTH instelling (para-
meter 3)
Hoe verder u de regelknop naar rechts draait, des te gepronon-
ceerder klinkt het effect.
Wanneer u de knop geheel naar links draait, wordt alleen het
oorspronkelijk geluid weergegeven.
X-PAD (parameter 4)
De cyclus waarmee het flangereffect fluctueert, verandert met
kleine beetjes.
PHASER
1
Het phasereffect wordt gewijzigd overeenkomstig de beatfractie die is ingesteld met
de [BEAT, ] toetsen.
Cyclus
Faseverschuiving
Tijd
BEAT, toetsen (parameter 1)
Gebruik deze om de cyclus in te stellen voor het verplaatsen
van phasereffect als tijd, 1/4 – 64/1, in verhouding tot de tijd
voor één beat van de BPM.
TIME instelling (parameter 2)
Deze bepaalt de cyclus waarmee het phaser-effect wordt
verplaatst.
10 tot 32000 (ms)
LEVEL/DEPTH instelling (para-
meter 3)
Hoe verder u de regelknop naar rechts draait, des te gepronon-
ceerder klinkt het effect.
Wanneer u de knop geheel naar links draait, wordt alleen het
oorspronkelijk geluid weergegeven.
X-PAD (parameter 4)
De cyclus waarmee het phasereffect fluctueert, verandert met
kleine beetjes.
ROBOT
1
Het oorspronkelijke geluid wordt veranderd in een geluid als van een robot.
BEAT, toetsen (parameter 1)
Gebruik deze om de hoeveelheid effectgeluid te regelen.
-100–100 (%)
TIME instelling (parameter 2)
Gebruik deze om de hoeveelheid effectgeluid te regelen.
-100–100 (%)
LEVEL/DEPTH instelling (para-
meter 3)
Regelt de balans tussen het oorspronkelijke geluid en het
effectgeluid.
X-PAD (parameter 4)Dit verandert de hoeveelheid effectgeluid.
MELODIC
1
2
Het middenbereik van het geluid dat binnenkomt op het punt waar de [ON/OFF]-
toets wordt ingedrukt zal worden opgenomen en het opgenomen geluid wordt gere-
produceerd aan de hand van het niveau van het binnenkomende geluid.
BEAT, toetsen (parameter 1)
Dit stelt de manier in waarop het opgenomen geluid wordt
afgespeeld.
TIME instelling (parameter 2)
Dit stelt de manier in waarop het opgenomen geluid wordt
afgespeeld.
LEVEL/DEPTH instelling (para-
meter 3)
Dit regelt de balans tussen het oorspronkelijke geluid en het
opgenomen geluid.
X-PAD (parameter 4)
Dit stelt de manier in waarop het opgenomen geluid wordt
afgespeeld.
SLIP ROLL
1
2
Het geluid dat wordt ingevoerd op het punt waar er op [ON/OFF] wordt gedrukt
wordt opgenomen en het opgenomen geluid wordt herhaaldelijk gereproduceerd
overeenkomstig de beatfractie die is ingesteld met de [BEAT, ] toetsen.
Wanneer de effecttijd verandert, wordt het inkomend geluid opnieuw opgenomen.
1/1 herhaling1/2 herhaling
Origineel
Herhaling
Gewijzigd van
1/2 naar 1/1
Effect
ingeschakeld
BEAT, toetsen (parameter 1)
Gebruik deze om een effecttijd in te stellen van 1/16 – 16/1 in
verhouding tot de tijd voor één beat van de BPM.
TIME instelling (parameter 2)
Gebruik deze om de effecttijd in te stellen.
10 tot 4000 (ms)
LEVEL/DEPTH instelling (para-
meter 3)
Gebruik deze om de balans te regelen van het oorspronkelijke
geluid en de ROLL.
X-PAD (parameter 4)Gebruik deze om de effecttijd in te stellen.
ROLL
1
2
Het geluid dat wordt ingevoerd op het punt waar er op [ON/OFF] wordt gedrukt
wordt opgenomen en het opgenomen geluid wordt herhaaldelijk gereproduceerd
overeenkomstig de beatfractie die is ingesteld met de [BEAT, ] toetsen.
Effect ingeschakeld
Herhaald
Origineel
1/1
herhaling
BEAT, toetsen (parameter 1)
Gebruik deze om een effecttijd in te stellen van 1/16 – 16/1 in
verhouding tot de tijd voor één beat van de BPM.
TIME instelling (parameter 2)
Gebruik deze om de effecttijd in te stellen.
10 tot 4000 (ms)
LEVEL/DEPTH instelling (para-
meter 3)
Gebruik deze om de balans te regelen van het oorspronkelijke
geluid en de ROLL.
X-PAD (parameter 4)Gebruik deze om de effecttijd in te stellen.
REV ROLL
1
2
Het geluid dat wordt ingevoerd op het punt waar er op [ON/OFF] wordt gedrukt
wordt opgenomen en het opgenomen geluid wordt omgekeerd en dan herhaaldelijk
gereproduceerd overeenkomstig de beatfractie die is ingesteld met de [BEAT, ]
toetsen.
Effect ingeschakeld
Omgekeerd en herhaald
Origineel
1/1 omkeer-
herhaling
BEAT, toetsen (parameter 1)
Gebruik deze om een effecttijd in te stellen van 1/16 – 16/1 in
verhouding tot de tijd voor één beat van de BPM.
TIME instelling (parameter 2)
Gebruik deze om de effecttijd in te stellen.
10 tot 4000 (ms)
LEVEL/DEPTH instelling (para-
meter 3)
Gebruik deze om de balans te regelen van het oorspronkelijke
geluid en de ROLL.
X-PAD (parameter 4)Gebruik deze om de effecttijd in te stellen.
2020
Nl
SND/RTN (MIDI LFO)
Hierop kunt u een externe effectgenerator, enz. aansluiten.
Door op de [LFO FORM (WAKE UP)]-toets te drukken, kunnen MIDI-compatibele
software en apparatuur worden aangestuurd via MIDI-signalen.
䢢SND/RTN
1
Hierop kunt u een externe effectgenerator, enz. aansluiten.
SEND
RETURN
Effectgenerator
DJM-900SRT Serato DJ Edition
1212
1212
0
0
ON
TALK
OVER
OFF
9
6
-
26
/
6
-
26
/
6
-
26
/
9
6
-
26
/
6
-
26
/
6
-
26
/
9
6
-
26
/
6
-
26
/
6
-
26
/
9
6
-
26
/
6
-
26
/
6
-
26
/
0
BEAT, toetsen (parameter 1)
—
TIME instelling (parameter 2)—
LEVEL/DEPTH instelling (para-
meter 3)
Regelt het niveau van de geluidssignalen die binnenkomen via
de [RETURN]-aansluiting.
X-PAD (parameter 4)—
䢢MIDI LFO
Het MIDI-signaal (0 – 127) golfvorm wordt gewijzigd overeenkomstig het tempo van
het fragment.
Het golfvormpatroon van het MIDI-signaal verandert telkens wanneer er op
[LFO FORM (WAKE UP)] wordt gedrukt.
BEAT, toetsen (parameter 1)
Gebruik deze om een uitvoertijd voor de golfvorm in te stellen
van 1/4 – 64/1 ten opzichte van 1 beat van de BPM.
TIME instelling (parameter 2)Gebruik deze om de uitvoertijd voor de golfvorm in te stellen.
LEVEL/DEPTH instelling (para-
meter 3)
—
X-PAD (parameter 4)Dit wijzigt het golfvormpatroon van het MIDI-signaal.
Wanneer [MIDI LFO] is geselecteerd, wordt het geluid van de externe effectgenerator die is
verbonden met de [RETURN]-aansluiting niet ontvangen.
1 Wanneer [CF.A], [CF.B] of [MASTER] is geselecteerd met de effectkanaal-keuze-
schakelaar en als het geluid van het kanaal dat u wilt volgen niet wordt geprodu-
ceerd via het [MASTER]-kanaal, kan het effectgeluid niet worden gevolgd, ook
niet als er op de [CUE]-toets voor [BEAT EFFECTS] wordt gedrukt.
2Als het effect uit is, kan er niet worden meegeluisterd, ook niet als er op de [CUE]
toets voor [BEAT EFFECTS] wordt gedrukt.
2121
Nl
Nederlands
MIDI-toewijzingstabel
MIDI-toewijzingstabel
“CC” is de afkorting voor “control change”. Een control change is een type MIDI-signaal voor het verzenden van diverse soorten bedieningsinformatie, zoals timbre, volume
enz.
Op dit toestel worden waarden van 0 t/m 127 voornamelijk geproduceerd als CC wanneer instellingen en faders worden gebruikt. CC-signalen worden ook geproduceerd
wanneer bepaalde toetsen worden gebruikt.
“Note” is een MIDI term die wordt gebruikt wanneer er tonen worden aangeslagen of losgelaten op een piano of ander toetsenbord.
InstellingCC 116—Verstuurt de [X-PAD] positie-informatie.
ON/OFF
X-PAD (aanraken)
Wanneer er een ander effect dan [SND/
RTN (MIDI LFO)] is geselecteerd bij BEAT
EFFECT
ToetsCC 114
2
OFF=0, ON=127
ON/OFF
X-PAD (aanraken)
Wanneer [SND/RTN (MIDI LFO)] is
geselecteerd bij BEAT EFFECT
ToetsCC 064
2
OFF=0, ON=127
MIC
HI
InstellingCC 030—0-127
LOW
InstellingCC 031—0-127
SOUND COLOR FX
NOISE
ToetsCC 085
Trigger/Alterneren
1
OFF=0, ON=127
SPACE
ToetsCC 105
Trigger/Alterneren
1
OFF=0, ON=127
GATE/COMP
ToetsCC 106
Trigger/Alterneren
1
OFF=0, ON=127
DUB ECHO
ToetsCC 107
Trigger/Alterneren
1
OFF=0, ON=127
CRUSH
ToetsCC 086
Trigger/Alterneren
1
OFF=0, ON=127
FILTER
ToetsCC 087
Trigger/Alterneren
1
OFF=0, ON=127
Fader Start
Fader Start 1
ToetsCC 088Trigger/AlternerenOFF=0, ON=127
Fader Start 2
ToetsCC 089Trigger/AlternerenOFF=0, ON=127
Fader Start 3
ToetsCC 090Trigger/AlternerenOFF=0, ON=127
Fader Start 4
ToetsCC 093Trigger/AlternerenOFF=0, ON=127
HEADPHONES
MIXING
InstellingCC 027—0-127
LEVEL
InstellingCC 026—0-127
Timing Clock
—Timingklok——
Fader Start bediening
3
Kanaalfader 1 of crossfader-regelaarNote 102—BACK CUE = 0, PLAY = 127
Kanaalfader 2 of crossfader-regelaarNote 103—BACK CUE = 0, PLAY = 127
Kanaalfader 3 of crossfader-regelaarNote 104—BACK CUE = 0, PLAY = 127
Kanaalfader 4 of crossfader-regelaarNote 105—BACK CUE = 0, PLAY = 127
MIDI
START
ToetsSTART——
STOP
ToetsSTOP——
1Wanneer het inschakelen van een toets de stand van een andere toets omschakelt van aan naar uit, worden de MIDI aan- en uit-signalen van de beide toetsen doorgegeven.
Wanneer er geen toets is die wordt uitgeschakeld, wordt alleen het MIDI aan-signaal van de ingedrukte toets doorgegeven.
2Bij omschakelen van de ene stand naar de andere, worden de MIDI ON en OFF signalen verstuurd voor de respectievelijke standen.
—Wanneer de [START/STOP]-toets meer dan 1 seconde ingedrukt wordt gehouden, worden MIDI-meldingen die corresponderen met de standen van de toetsen, faders en bedieningsorganen
gebundeld verstuurd (Snapshot).
Het MIDI Snapshot verstuurt alle MIDI-meldingen behalve MIDI Start en MIDI Stop.
3De bediening verschilt afhankelijk van de instelling van de [CROSS FADER ASSIGN (A, THRU, B)]-keuzeschakelaar.
—Wanneer de [CROSS FADER ASSIGN (A, THRU, B)]-keuzeschakelaar is ingesteld op [THRU]: MIDI-meldingen worden verzonden wanneer de [FADER START]-toets is ingesteld op [ON] en de
kanaalfader van u vandaan wordt bewogen vanaf de positie die het dichtst bij u is en wanneer deze terug wordt bewogen naar de positie die het dichtst bij u is.
—Wanneer de [CROSS FADER ASSIGN (A, THRU, B)]-keuzeschakelaar is ingesteld op [A]: MIDI-meldingen worden verzonden wanneer de [FADER START]-toets is ingesteld op [ON] en de crossfa-
der-regelaar van de verste rand van de [B]-kant vandaan wordt bewogen en wanneer deze terug wordt bewogen naar de verste rand van de [B]-kant.
—Wanneer de [CROSS FADER ASSIGN (A, THRU, B)]-keuzeschakelaar is ingesteld op [B]: MIDI-meldingen worden verzonden wanneer de [FADER START]-toets is ingesteld op [ON] en de crossfa-
der-regelaar van de verste rand van de [A]-kant vandaan wordt bewogen en wanneer deze terug wordt bewogen naar de verste rand van de [A]-kant.
2323
Nl
Nederlands
Instellingen aanpassen
1 Houd [ON/OFF (UTILITY)] tenminste 1 seconde ingedrukt.
Het [USER SETUP]-instelscherm verschijnt.
Om het [CLUB SETUP]-instelscherm te openen, moet u dit toestel eerst uitscha-
kelen, waarna u [POWER] weer indrukt terwijl u [ON/OFF (UTILITY)] ingedrukt
houdt.
2 Druk op de [BEAT , ] toets.
Kies het in te stellen item.
3 Druk op de [TAP] toets.
Het scherm schakelt over naar het instelscherm voor de waarde van het item in
kwestie.
4 Druk op de [BEAT , ] toets.
Verander de ingestelde waarde.
5 Druk op de [TAP] toets.
Voer de ingestelde waarde in.
Het vorige scherm verschijnt weer.
Druk op [QUANTIZE] om terug te keren naar het vorige scherm zonder de instel-
lingen te veranderen.
6 Druk op de [ON/OFF (UTILITY)] knop.
Sluit het [USER SETUP]-instelscherm.
Om het [CLUB SETUP]-instelscherm te sluiten, drukt u op de [POWER] toets om
dit toestel uit te schakelen.
Omtrent de automatische
ruststandfunctie
Wanneer [Auto Standby] staat ingesteld op [ON], wordt het toestel automatisch uit
(standby) gezet als er meer dan 4 uur verstrijken en aan al de onderstaande voor-
waarden is voldaan.
—Als geen van de bedieningsknoppen of regelaars wordt bediend.
—Als er geen geluidssignalen van –10 dB of meer binnenkomen via de ingangs-
aansluitingen van dit apparaat.
—Als er geen PRO DJ LINK-aansluitingen worden gemaakt.
Wanneer [LFO FORM (WAKE UP)] wordt ingedrukt, wordt de paraatstand
geannuleerd.
Bij aflevering van dit apparaat staat de energiebesparingsfunctie ingeschakeld.
Als u de energiebesparingsfunctie niet wilt gebruiken, zet u [Auto Standby] op
[OFF].
Over de talk-over functie (inspreekniveau)
De talk-over functie (inspreekniveau) heeft de twee hieronder beschreven standen.
— [ADV] (Geavanceerd inspreekniveau (talk-over)): Alleen de middentonen van het
geluid van de kanalen anders dan het [MIC] kanaal worden verzwakt overeen-
komstig de ingestelde [Talk Over LEVEL] waarde en de weergave.
dB
Frequentie
— [NOR] (normaal inspreekniveau (talk-over)): Het geluid van de kanalen
anders dan het [MIC] kanaal wordt verzwakt overeenkomstig de ingestelde
ON, OFF*Schakelt de Fader Start functie zowel in als uit.
MIDI CHMIDI CH
1* tot 16Voor instellen van het MIDI-kanaal.
MIDI Button TypeMIDI BT
TGL*, TRG
Selecteert de MIDI-signaalverzendmethode, [TGL (TOGGLE)] of
[TRG (TRIGGER)].
Talk Over ModeTLK MOD
ADV*, NOR
Selecteert de stand van de talk-over functie (inspreekniveau),
[ADV(ADVANCED)] of [NOR(NORMAL)].
Talk Over LEVELTLK LVL
–6 dB, –12 dB, –18 dB*,
–24 dB
Stelt het verzwakkingsniveau in voor de talk-over functie
(inspreekniveau).
CLUB SETUP
Digital Master Out LevelDOUT LV
–19 dB*, –15 dB, –10 dB,
–5 dB
Stelt het maximum niveau in van het geluid dat wordt weergege-
ven via de [DIGITAL MASTER OUT]-aansluitingen.
1
Digital Master Out Sampling
Rate
DOUT FS
48 kHz, 96 kHz*Stelt de digitale signaalbemonsteringswaarde in.
MASTER ATT.MST ATT
–6 dB, –3 dB, 0 dB*
Stelt het verzwakkingsniveau in van het geluid dat wordt weerge-
geven via de [MASTER1] en [MASTER2]-aansluitingen.
Auto StandbyAUTOSTB
ON*, OFFActiveert en deactiveert de automatische ruststandfunctie.
Mic Output To Booth
Monitor
MIC BTH
ON*, OFF
Bepaalt of er wel of geen microfoongeluiden worden uitgestuurd
via de [BOOTH]-aansluitingen.
PC UTILITYPC UTLY
ON, OFF*
Stelt in of het instelhulpprogramma van de computer automa-
tisch moet worden opgestart wanneer er een USB-kabel wordt
aangesloten.
Peak LimiterPKLIMIT
ON*, OFF
Vermindert plotseling, onplezierig digitaal overslaan van het
master uitgangssignaal.
Factory ResetINITIAL
YES, NO*Alle instellingen in de beginstand terugzetten.
1Let op, want het weergegeven geluid kan ook vervormd raken wanneer de masterniveau-indicator niet helemaal tot boven toe oplicht.
Over de hulpprogrammatuur voor het
instellen
Het instelhulpprogramma kan worden gebruikt voor de hieronder beschreven con-
troles en instellingen.
—Controleren van de status van de ingangskeuzeschakelaars van dit toestel
—Instellen van het uitgangssignaal voor audiogegevens van dit toestel naar de
computer
—Aanpassen van de buffergrootte (bij gebruik van Windows ASIO)
—Controleren welke versie van het stuurprogramma u heeft
2424
Nl
Openen van het instelhulpprogramma
Voor Windows
Klik op het [Starten]-menu > [Alle programma's] > [Pioneer] > [DJM-900SRT] >
[DJM-900SRTInstelfunctie].
Voor Mac OS X
Klik op het [Macintosh HD]-pictogram > [Application] > [Pioneer] > [DJM-
900SRT] > [DJM-900SRTInstelfunctie].
Controleren van de status van de
ingangskeuzeschakelaars van dit toestel
Open het instelhulpprogramma voor u begint.
Klik op de [MIXER INPUT] tab.
Instellen van het uitgangssignaal voor
audiogegevens van dit toestel naar de
computer
Wanneer Serato DJ actief is en dit toestel gebruikt wordt als het standaard audio-
apparaat, moet u het uitgangssignaal voor audiogegevens instellen in Serato DJ.
Open het instelhulpprogramma voor u begint.
1 Klik op de [MIXER OUTPUT] tab.
2 Klik op de [Mixer Audio Output] van het afrolmenu.
Selecteer de audiogegevens die naar de computer moeten worden gestuurd uit de
beschikbare geluidssignalen binnenin dit toestel en maak de vereiste instellingen
daarvoor.
CH1CH2CH3CH4
CH1 Control Tone
PHONO
1
CH2 Control Tone
PHONO
1
CH3 Control Tone
PHONO
1
CH4 Control Tone
PHONO
1
CH1 Control Tone
CD/LINE
1
CH2 Control Tone
CD/LINE
1
CH3 Control Tone
CD/LINE
1
CH4 Control Tone
CD/LINE
1
CH1 Control Tone
DIGITAL
1
CH2 Control Tone
DIGITAL
1
CH3 Control Tone
DIGITAL
1
CH4 Control Tone
DIGITAL
1
Post CH1 Fader
2
Post CH2 Fader
2
Post CH3 Fader
2
Post CH4 Fader
2
CH1CH2CH3CH4
Cross Fader A
2
Cross Fader A
2
Cross Fader A
2
Cross Fader A
2
Cross Fader B
2
Cross Fader B
2
Cross Fader B
2
Cross Fader B
2
MICMICMICMIC
MIX (REC OUT)
2
MIX (REC OUT)
2
MIX (REC OUT)
2
MIX (REC OUT)
2
1De audiogegevens worden geproduceerd met hetzelfde volume waarmee het door dit toestel
wordt ontvangen, ongeacht de [USB Output Level]-instelling.
2Bij gebruik voor andere applicaties dan opnemen, moet u letten op de instellingen van de
DJ-applicatie zodat er geen audiolussen worden aangemaakt. Als er audiolussen worden
aangemaakt, kan er geluid worden ingevoerd of geproduceerd met onbedoelde volumes.
3 Klik op de [USB Output Level] van het afrolmenu.
Regel het volume van de door dit toestel geproduceerde audiogegevens.
De [USB Output Level]-instelling wordt op alle audiogegevens op dezelfde
manier toegepast. Wanneer echter 1 is geselecteerd in de tabel bij stap 2,
worden de audiogegevens geproduceerd met hetzelfde volume als waarmee ze
door dit toestel ontvangen worden.
Als er alleen met de volumeregeling van de DJ-software niet voldoende volume
geproduceerd kan worden, moet u de [USB Output Level]-instelling veranderen
om het volume van de door dit toestel geproduceerde audiogegevens aan te pas-
sen. Let op dat het geluid niet vervormd raakt wanneer het volume te hoog wordt
gezet.
Aanpassen van de buffergrootte (bij gebruik
van Windows ASIO)
Als er applicatieprogramma’s dit apparaat gebruiken als hun vaste audio-apparaat
(zoals DJ-programma’s, enz.), sluit u die programma’s dan voordat u de buffercapa-
citeit aanpast.
Open het instelhulpprogramma voor u begint.
Klik op de [ASIO] tab.
Een ruime buffercapaciteit is nuttig om de kans op het wegvallen van geluid
(dropouts) te voorkomen, maar verhoogt daarentegen de geringe vertraging
in de audiosignaaltransmissie (latency).
Controleren welke versie van het
stuurprogramma u heeft
Open het instelhulpprogramma voor u begint.
2525
Nl
Nederlands
Klik op de [About] tab.
Controleren van de meest recente
informatie over het stuurprogramma
Bezoek onze webiste, hieronder vermeld, voor de meest recente informatie over het
stuurprogramma voor exclusief gebruik met dit apparaat.
http://pioneerdj.com/support/
De werking kan niet worden gegarandeerd wanneer er meerdere van deze meng-
panelen zijn aangesloten op een enkele computer.
2626
Nl
Aanvullende informatie
Verhelpen van storingen
Verkeerde bediening kan vaak de oorzaak zijn van een schijnbare storing of foutieve werking. Wanneer u denkt dat er iets mis is met dit apparaat, controleert u eerst de
onderstaande punten. Soms ligt de oorzaak van het probleem bij een ander apparaat. Controleer daarom ook de andere componenten en elektrische apparatuur die
gebruikt wordt. Als u het probleem aan de hand van de onderstaande controlepunten niet kunt verhelpen, verzoekt u dan uw dichtstbijzijnde officiële Pioneer onderhouds-
dienst of uw vakhandelaar om het apparaat te laten repareren.
De disc-speler kan soms niet goed werken vanwege statische elektriciteit of andere externe invloeden. In dergelijke gevallen kunt u de normale werking herstellen door de
stekker even uit het stopcontact te trekken en die even later weer in te steken.
ProbleemControleOplossing
De stroom wordt niet ingeschakeld.Is het netsnoer naar behoren aangesloten?Steek de netsnoerstekker in het stopcontact.
Er klinkt niet of nauwelijks geluid.Staat de ingangskeuzeschakelaar in de juiste stand?Schakel de ingangskeuzeschakelaar om en schakel de ingangsbron voor het kanaal om.
(bladzijde 13)
Zijn de aansluitsnoeren goed aangesloten?Zorg dat de aansluitsnoeren juist zijn aangesloten. (bladzijde 10)
Zijn de aansluitbussen en de stekkers vuil?Maak de aansluitbussen en de stekkers schoon voordat u aasluitingen gaat maken.
Staat [MASTER ATT.] ingesteld op [–6 dB], enz.?Ga naar het [USER SETUP] scherm en wijzig [MASTER ATT.]. (bladzijde 23)
Er wordt geen digitaal geluid weergegeven.Is de bemonsteringsfrequentie (fs) voor de digitale audio-
uitgang wel geschikt voor het aangesloten apparaat?
In het [CLUB SETUP]-scherm stelt u [Digital Master Out Sampling Rate] in volgens de
specificaties van de aangesloten apparatuur. (bladzijde 23)
Vervorming in het geluid.Is het uitgangsniveau van de geluidsweergave via het
[MASTER] kanaal correct ingesteld?
Verstel de [MASTER LEVEL]-instelling zodanig dat de hoofdkanaalniveau-indicator oplicht tot
ongeveer [0 dB] bij het pieksignaalniveau. (bladzijde 13)
Stel [MASTER ATT.] in op [–3 dB] of [–6 dB]. (bladzijde 23)
Is het niveau van het inkomend geluid voor elk kanaal goed
ingesteld?
Verstel de [TRIM]-instelling zodanig dat de kanaalniveau-indicator oplicht tot ongeveer [0 dB]
bij het pieksignaalniveau. (bladzijde 13)
De crossfader werkt niet.Zijn de [CROSS FADER ASSIGN (A, THRU, B)] keuzescha-
kelaars correct ingesteld?
Stel de [CROSS FADER ASSIGN (A, THRU, B)] keuzeschakelaar correct in voor de diverse
kanalen. (bladzijde 13)
Het starten van de DJ-spaler via de fader
lukt niet.
Staat [FADER START] ingesteld op [OFF]?Ga naar het [USER SETUP] scherm en stel [FADER START] in op [ON]. (bladzijde 23)
Is de DJ-speler juist aangesloten op de [LINK]-aansluiting?Zorg dat de DJ-speler juist is aangesloten op de [LINK]-aansluiting via een LAN-kabel. (blad-
zijde 10)
Zijn de audiosnoeren goed aangesloten?Sluit de audio-ingangsaansluitingen van dit apparaat met een audiosnoer aan op de audio-
uitgangsaansluitingen van de DJ-speler. (bladzijde 10)
Is het nummer van de DJ-speler correct ingesteld?Stel voor de DJ-speler hetzelfde nummer in als voor het kanaal waarmee de audiokabel is
verbonden.
De [BEAT EFFECTS] werkt niet.Staat de effectkanaal-keuzeschakelaar in de juiste stand?Draai de effectkanaal-keuzeschakelaar en selecteer het kanaal waarop u het effect wilt
toepassen.
[SOUND COLOR FX] werkt niet.Staat de [COLOR]-instelling in een geschikte stand?Draai de [COLOR
]-instelling met de klok mee of er tegenin. (bladzijde 15)
De externe effectgenerator is niet te
gebruiken.
Is de [ON/OFF] toets voor [BEAT EFFECTS] ingesteld op
[ON]?
Druk op de [ON/OFF] toets voor [BEAT EFFECTS] om [SND/RTN] in te stellen op [ON]. (blad-
zijde 16)
Is de externe effectgenerator juist aangesloten op de
[SEND] of [RETURN]-aansluiting?
Sluit een externe effectgenerator aan op de [SEND] en de [RETURN]-aansluitingen. (bladzijde
10)
Vervorming in het geluid van een externe
effectgenerator.
Is het audio-uitgangsniveau van de externe effectgenerator
wel juist ingesteld?
Verstel het audio-uitgangsniveau van de externe effectgenerator.
Het tempo (BPM) is niet meetbaar of de
gemeten waarde van het tempo (BPM) is
onwaarschijnlijk.
Staat het audio-ingangsniveau te hoog of te laag
ingesteld?
Verstel de [TRIM]-instelling zodanig dat de kanaalniveau-indicator oplicht tot ongeveer [0 dB]
bij het pieksignaalniveau. (bladzijde 13)
Bij sommige muziekstukken kan het niet goed mogelijk zijn om het tempo (BPM) te meten.
Gebruik de [TAP] toets om het tempo met de hand in te voeren. (bladzijde 16)
Het gemeten tempo (BPM) verschilt van het
tempo dat staat aangegeven op de CD.
—De waarden kunnen wel eens ietwat verschillen, vanwege de verschillende meetmethoden
voor het BPM.
De MIDI-sequencer laat zich niet
synchroniseren.
Is de synchronisatiefunctie van de MIDI-sequencer inge-
steld op “Slave”?
Stel de synchronisatiefunctie van de MIDI-sequencer in op “Slave”.
Is de MIDI-sequencer die u gebruikt wel geschikt voor de
MIDI-tijdklok?
MIDI-sequencers die niet geschikt zijn voor de MIDI-tijdklok kunnen niet worden
gesynchroniseerd.
De MIDI-bedieningsfunctie werkt niet.Staat het MIDI-kanaal wel ingeschakeld?Druk op de [ON/OFF] toets voor [MIDI]. (bladzijde 16)
Zijn alle MIDI-instellingen naar behoren gemaakt?Voor het gebruik van DJ-programma’s met dit apparaat moeten de MIDI-berichten worden
toegewezen aan het DJ-programma dat u gebruikt. Zie voor nadere aanwijzingen voor het
toewijzen van berichten de handleiding van uw DJ-software.
Dit apparaat wordt niet herkend nadat het is
aangesloten op een computer.
USB-indicator is uit of knippert.
Is het stuurprogramma wel goed geïnstalleerd op uw
computer?
Installeer het stuurprogramma. Als het reeds geïnstalleerd is, moet u het opnieuw instal-
leren. (pagina 5)
Het geluid van een computer wordt niet
weergegeven door dit apparaat.
Zijn dit apparaat en de computer wel juist aangesloten?Sluit dit toestel en de computer direct op elkaar aan met behulp van de meegeleverde USB-
kabel. (bladzijde 11)
Zijn de instellingen voor de geluidsweergave-apparatuur
naar behoren gemaakt?
Stel in op dit apparaat onder de instellingen voor de geluidsweergave-apparatuur. Zie voor
nadere aanwijzingen over de instellingen voor uw applicatie de gebruiksaanwijzing voor uw
applicatie.
Staat de ingangskeuzeschakelaar in de juiste stand?Stel de ingangskeuzeschakelaar in op de [USB
]-stand. (bladzijde 13)
Er kan niet worden meegeluisterd met
effectgeluid, ook niet wanneer er op de
[CUE] toets voor [BEAT EFFECTS] wordt
gedrukt.
—Het circuit dat de echo voor de [ECHO], [REVERB], [ROLL], [SLIP ROLL] en [REV ROLL]-
effectgeluiden genereert, bevindt zich achter het effectcircuit, dus het effectgeluid kan niet
worden gecontroleerd. Dit is geen storing.
Het geluid zal worden vervormd wanneer
een analoge speler wordt verbonden met de
[PHONO] aansluitingen van dit toestel.
Het is ook mogelijk dat de indicator voor het
kanaalniveau niet veranderd, ook niet wan-
neer er aan [TRIM] wordt gedraaid.
Heeft u een analoge speler aangesloten met een inge-
bouwde phono-equalizer?
Verbind de analoge speler met de ingebouwde phono equalizer met op de [CD/LINE]-
aansluitingen. (bladzijde 10)
Als de analoge speler met ingebouwde phono-equalizer een PHONO/LINE keuzeschakelaar
heeft, moet u deze op PHONO zetten.
Is er een audio-interface voor computers aangesloten tus-
sen de analoge speler en dit toestel?
Als de audio-interface voor computers een uitgangssignaal op lijnniveau heeft, moet u deze
verbinden met de [CD/LINE]-aansluitingen. (bladzijde 10)
Als de analoge speler een PHONO/LINE keuzeschakelaar heeft, moet u deze op PHONO
zetten.
2727
Nl
Nederlands
Blokschema
Master
Limiter
[BEAT EFFECT
(
SND/RTN]
Effect CH Select
Effect CH Select
Effect Out
CableCheck
RETURN
SEND Out
CHx
CF A/B
MIC
Master
CHx
CF A/B
MIC
Master
Return Level
No Cable
Effect SW
Cable Exist
Effect_CUE
Effect_CUE
[Mono Split / Stereo SWITCH & MIXING]
Mono Split
Stereo
2posi
MIXING
MONO SPLIT/
STEREO SWITCH
[BEAT EFFECT(Others)]
Effect CH Select
Effect CH Select
Effect Out
CHx
CF A/B
MIC
Master
CHx
CF A/B
MIC
Master
Effect SW
Level Depth
CHx Cue On/Off SW
CHx_CUE
Effect Cue On/Off SW
Effect_CUE
Link Cue On/Off SW
Link_CUE
CUE
Mixing
L
R
SEL
Mono Split
Stereo
Master Cue On/Off SW
Master_CUE
Master
Mixing
L
R
H.P. MIX R Out
H.P. MIX L Out
SEL
SEL
3posi
2posi
SOUND
COLOR
EFFECT
CHx
SOUND
COLOR
EFFECT
CHx
3Band
EQ/
ISOLATOR
CHx
BEAT
EFFECT
CHx
BEAT
EFFECT
CHx
BEAT
EFFECT
CHx
BPM Detect CHx Select
Level meter CHx
BEAT
Effect
(SND/RTN)
Send/
Return
CHx
CUE
Monitor
CHx
Link
CUE
Phono
AMP
Analog_PHONO
Analog_CD LINE
Digital/USB
CF Assign
3posi
Assign A
CHx
Assign Thru
CH1-4
Assign B
CHx
CH Fader
3posi
CH
Fader
Curve
Switch
3posi
2posi
2para4para
Cross
Fader
Curve
Switch
Thru
CF A
CF B
MIC Monitor SW
CHx in
CHx Control Tone
2Band
MIC EQ
MIC1,2
MIC1/2 in
LINK in
Return in
Send out
Post CHx Fader
TalkOver ON/OFF
MIX (REC OUT)
Master_CUE
MIC_Out
MIC
MIC_Out
Cross Fader B
Cross Fader A
BPM Detect Master
Level meter Master
CH1-4 COMMON
CH1-4 COMMON
MIC1,2 COMMON
Digital Trim
CHx _CUE
Link_CUE
BPM Detect CF A
BPM Detect CF B
BPM Detect MIC
Send/
Return
CF A
BEAT
EFFECT
MIC
Send/
Return
MIC
BEAT
EFFECT
CF B
Send/
Return
CF B
Cross
Fader
BEAT
EFFECT
Master
Talk
Over
Master
CUE
Talk
Over
Level
Talk Over
Mode
Advanced
/Normal
Master
Mono/
STEREO
Send/
Return
Master
Master
Balance
Master
Balance
Master
Level
HP Level
Booth
Level
SEL
MIC Output
to Booth Monitor
On/Off SW
Booth Out
REC out
USB Common out
Digital out
Master
H.P. out
CHx_CUE
Effect_CUE
Link_CUE
CHx Control Tone
Post CHx Fader
Cross Fader A
Cross Fader B
MIC
MIX (REC OUT)
Master_CUE
Boost
Boost
ATT
Mono Split/
Stereo
SWITCH
& MIXING
Mixer
Audio
Output
Select
MIC
FILTER
MIC In
Level
detect
TalkOver ON/OFF
MIC 1,2
MIX
Off
On
TalkOver
MIC1
MIC2
LANDigital MASTER
RETURN
CH_1_Digital/USB1/2
PHONES
MASTER
BOOTH
REC
SEND
USB1/2
USB3/4
USB5/6
USB7/8
DSP
MIC
ADC
ETHER SW IC
I/Fcom
USB
I/Fcom
Ether
DAC
DAC
PHONES
LAN
MASTER 1
REC
DAC
SEND
MUTE
DAC
BOOTH
MUTE
DAC
MUTE
MASTER 2
MUTE
DIGITAL
MASTER
SRC
DIT
MIC1 LEVEL
MIC2 LEVEL
CH1_Analog
ADC
CD/LINE
PHONO
DIGITAL
ADC
DIR
CH1
TRIM
Control Tone
ADC
CD/LINE
PHONO
DIGITAL
ADC
DIR
CH2
TRIM
Control Tone
ADC
CD/LINE
PHONO
DIGITAL
ADC
DIR
CH3
TRIM
Control Tone
ADC
CD/LINE
PHONO
DIGITAL
ADC
DIR
CH4
TRIM
Control Tone
CH2_Analog
CH3_Analog
CH4_Analog
SRC
SRC
SRC
SRC
RETURN
CH_2_Digital/USB3/4
CH_3_Digital/USB5/6
CH_4_Digital/USB7/8
USB
CH1 Digital IN
Control Tone
Control Tone
Control Tone
Control Tone
CH2 Digital IN
CH3 Digital IN
CH4 Digital IN
CH1 USB1/2 IN
CH1 USB1/2 OUT
CH2 USB3/4 IN
CH3 USB5/6 IN
CH4 USB7/8 IN
CH2 USB3/4 OUT
CH3 USB5/6 OUT
CH4 USB7/8 OUT
SRC
SRC
SRC
SRC
USB
Type B
BEAT
EFFECT
CF A
ADC
BEAT
EFFECT
Processing
SOUND
COLOR
EFFECT
CHx
2828
Nl
Verkrijgen van de handleiding
De handleiding kan in een bestand in PDF-formaat geleverd worden. Adobe
®
Reader
®
moet zijn geïnstalleerd om bestanden in PDF-formaat te kunnen lezen.
Als u Adobe Reader niet heeft, moet u dit installeren via de downloadkoppeling op
het menuscherm van de CD-ROM.
Downloaden van de nieuwste versies van de
handleiding en de Snelstartgids - Serato DJ
Editie
1 Plaats de CD-ROM in het CD-station van de computer.
Dan verschijnt het menu van de CD-ROM.
Als het menu van de CD-ROM niet verschijnt wanneer de CD-ROM wordt inge-
bracht, moet u de handelingen hieronder uitvoeren.
Voor Windows
Open het CD-station via het [Starten]-menu – [Computer] (of [Deze compu-
ter]) en dubbelklik op het [CD_menu.exe]-pictogram.
Voor Mac OS X
Dubbelklik in het bestandsbeheer direct op het [CD_menu.app]-pictogram.
2 Wanneer het menu van de CD-ROM verschijnt, selecteert
u [DJM-900SRT: Download de Handleiding (PDF-bestand)] en
klikt u op [Beginnen].
3 “Er is een werkende internetomgeving vereist om toegang
te kunnen krijgen tot de site. Heeft u verbinding met het
internet?” verschijnt. Klik op [Ja].
De webbrowser wordt opgestart en de Pioneer DJ-ondersteuningssite zal worden
geopend.
http://pioneerdj.com/support/
4 Klik op de Pioneer DJ-ondersteuningssite op “Manuals”
onder “DJM-900SRT”.
5 Klik op de downloadpagina op de gewenste taal voor de
documenten die u nodig hebt.
Het downloaden van de handleiding/Snelstartgids - Serato DJ Editie zal nu
beginnen.
Downloaden van de Serato
DJ-softwarehandleiding
1 Plaats de CD-ROM in het CD-station van de computer.
Dan verschijnt het menu van de CD-ROM.
Als het menu van de CD-ROM niet verschijnt wanneer de CD-ROM wordt inge-
bracht, moet u de handelingen hieronder uitvoeren.
Voor Windows
Open het CD-station via het [Starten]-menu – [Computer] (of [Deze compu-
ter]) en dubbelklik op het [CD_menu.exe]-pictogram.
Voor Mac OS X
Dubbelklik in het bestandsbeheer direct op het [CD_menu.app]-pictogram.
2 Wanneer het menu van de CD-ROM verschijnt, selecteert u
[Serato DJ: Download de Softwarehandleiding (PDF-bestand)]
en klikt u op [Beginnen].
3 “Er is een werkende internetomgeving vereist om toegang
te kunnen krijgen tot de site. Heeft u verbinding met het
internet?” verschijnt. Klik op [Ja].
De webbrowser wordt opgestart en de Pioneer DJ-ondersteuningssite zal worden
geopend.
4 Klik op [Software Info] onder [DJM-900SRT] op de Pioneer
DJ-ondersteuningssite.
[Serato DJ Support Information] verschijnt.
5 Klik op de koppeling naar de downloadpagina voor Serato
DJ.
De downloadpagina voor [Serato DJ] verschijnt.
http://serato.com/
6 Meld uzelf aan op uw gebruikersaccount voor “Serato.
com”.
Voer het e-mailadres en het wachtwoord in dat u hebt geregistreerd om uzelf aan te
melden op “Serato.com”.
7 Klik bij “More Downloads” aan de rechterkant van de
downloadpagina op “Serato DJ x.x User Manual”.
Het downloaden van de Serato DJ-softwarehandleiding zal nu beginnen.
Over handelsmerken en gedeponeerde
handelsmerken
Pioneer en rekordbox zijn handelsmerken of gedeponeerde handelsmerken van
PIONEER CORPORATION.
Microsoft, Windows en Windows Vista zijn handelsmerken of gedeponeerde
handelsmerken van Microsoft Corporation in de Verenigde Staten en/of andere
landen.
Apple, Macintosh en Mac OS zijn handelsmerken van Apple Inc., geregistreerd
in de V.S. en andere landen.
ASIO is een handelsmerk van Steinberg Media Technologies GmbH.
Serato DJ is een gedeponeerd handelsmerk van Serato Audio Research Ltd.,
gedeponeerd in de VS en andere landen.
De hierin vermelde namen van bedrijven en hun producten zijn de handelsmerken
van hun respectieve eigenaars.
2929
Nl
Nederlands
Specificaties
Algemene
Stroomvereisten ............................................110 V tot 240 V wisselstroom, 50 Hz/60 Hz
Stroomverbruik ..........................................................................................................41 W
Stroomverbruik (in de ruststand) .............................................................................0,4 W
Gewicht hoofdapparaat .......................................................................................... 7,1 kg
Buitenafmetingen ...................................... 331 mm (B) × 107,9 mm (H) × 404 mm (D)
Toegestane bedrijfstemperatuur...........................................................+5 °C tot +35 °C
Toegestane luchtvochtigheid ....................................5 % tot 85 % (zonder condensatie)
Le damos las gracias por la adquisición de este producto Pioneer. Lea a fondo estas instrucciones de utilización para que aprenda a utilizar correctamente su modelo.
Después de haber terminado de leer estas instrucciones, guárdelas en un lugar seguro para, en caso de ser necesario, consultarlas en el futuro.
En algunos países o regiones, la forma de la clavija de alimentación y de la toma de corriente pueden ser algunas veces diferentes de la mostrada en las ilustraciones explica-
tivas. Sin embargo, el método de conexión y funcionamiento de la unidad es el mismo.
ADVERTENCIA
Este aparato no es impermeable. Para evitar el riesgo
de incendio y de descargas eléctricas, no ponga ningún
recipiente lleno de líquido (como pueda ser un vaso o
un florero) cerca del aparato ni lo exponga a goteo,
salpicaduras, lluvia o humedad.
D3-4-2-1-3_A1_Es
ADVERTENCIA
Para evitar el peligro de incendio, no ponga nada con
fuego encendido (como pueda ser una vela) encima del
aparato.
D3-4-2-1-7a_A1_Es
PRECAUCIÓN PARA LA VENTILACIÓN
Cuando instale este aparato, asegúrese de dejar
espacio en torno al mismo para la ventilación con el fin
de mejorar la disipación de calor (por lo menos 5 cm
detrás, y 3 cm en cada lado).
ADVERTENCIA
Las ranuras y aberturas de la caja del aparato sirven
para su ventilación para poder asegurar un
funcionamiento fiable del aparato y para protegerlo
contra sobrecalentamiento. Para evitar el peligro de
incendio, las aberturas nunca deberán taparse ni
cubrirse con nada (como por ejemplo, periódicos,
manteles, cortinas) ni ponerse en funcionamiento el
aparato sobre una alfombra gruesas o una cama.
D3-4-2-1-7b*_A1_Es
Entorno de funcionamiento
Temperatura y humedad del entorno de funcionamiento
+5 °C a +35 °C; menos del 85 % de humedad relativa
(rejillas de refrigeración no obstruidas)
No instale este aparato en un lugar mal ventilado, ni en
lugares expuestos a alta humedad o a la luz directa del
sol (o de otra luz artificial potente).
D3-4-2-1-7c*_A1_Es
PRECAUCIÓN
El interruptor de la alimentación POWER de este
aparato no corta por completo toda la alimentación
de la toma de corriente de CA. Puesto que el cable de
alimentación hace las funciones de dispositivo de
desconexión de la corriente para el aparato, para
desconectar toda la alimentación del aparato deberá
desenchufar el cable de la toma de corriente de CA.
Por lo tanto, asegúrese de instalar el aparato de
modo que el cable de alimentación pueda
desenchufarse con facilidad de la toma de corriente
de CA en caso de un accidente. Para evitar correr el
peligro de incendio, el cable de alimentación también
deberá desenchufarse de la toma de corriente de CA
cuando no se tenga la intención de utilizarlo durante
mucho tiempo seguido (por ejemplo, antes de irse de
vacaciones).
D3-4-2-2-2a*_A1_Es
PRECAUCIONES CONCERNIENTES A LA
MANIPULACIÓN DEL CABLE DE
ALIMENTACIÓN
Tome el cable de alimentación por la clavija. No
extraiga la clavija tirando del cable. Nunca toque el
cable de alimentación cuando sus manos estén
mojadas, ya que esto podría causar cortocircuitos o
descargas eléctricas. No coloque la unidad, algún
mueble, etc., sobre el cable de alimentación.
Asegúrese de no hacer nudos en el cable ni de unirlo a
otros cables. Los cables de alimentación deberán ser
dispuestos de tal forma que la probabilidad de que
sean pisados sea mínima. Una cable de alimentación
dañado podrá causar incendios o descargas eléctricas.
Revise el cable de alimentación está dañado, solicite el
reemplazo del mismo al centro de servicio autorizado
PIONEER más cercano, o a su distribuidor.
S002*_A1_Es
Si desea deshacerse de este producto, no lo mezcle con los residuos generales de su hogar. De conformidad con la legislación
vigente, existe un sistema de recogida distinto para los productos electrónicos que requieren un procedimiento adecuado de
tratamiento, recuperación y reciclado.
Las viviendas privadas en los estados miembros de la UE, en Suiza y Noruega pueden devolver gratuitamente sus productos electrónicos usados
en las instalaciones de recolección previstas o bien en las instalaciones de minoristas (si adquieren un producto similar nuevo).
En el caso de los países que no se han mencionado en el párrafo anterior, póngase en contacto con sus autoridades locales a fin de conocer el
método de eliminación correcto.
Al actuar siguiendo estas instrucciones, se asegurará de que el producto de desecho se somete a los procesos de tratamiento, recuperación y
reciclaje necesarios, con lo que se previenen los efectos negativos potenciales para el entorno y la salud humana.
K058b_A1_Es
ADVERTENCIA
Guarde las piezas pequeñas fuera del alcance de los
niños. Si las ingirieran accidentalmente, póngase de
inmediato en contacto con un médico.
D41-6-4_A1_Es
PRECAUCIÓN
PARA PREVENIR EL PELIGRO DE CHOQUE ELÉCTRICO
NO REMOVER LA TAPA NI LAS PARTES DENTRO NO
UTILIZADAS, LLAMAR UNA PERSONA CUALIFICADA.
D3-4-2-1-1_B2_Es
33
Es
Contenido
Para los que utilizan Serato DJ por primera vez mediante esta
unidad
Consulte la “Guía de inicio rápido - Edición Serato DJ” para conocer el proce-
dimiento para realizar la configuración inicial necesaria para utilizar CONTROL
CD o CONTROL VINYL para utilizar Serato DJ. La “Guía de inicio rápido - Edición
Serato DJ” se puede descargar en el sitio web de asistencia de Pioneer DJ
(http://pioneerdj.com/support/). Para conocer las instrucciones de descarga, con-
sulte, Descarga de las versiones más recientes de los manuales de instrucciones y
de la Guía de inicio rápido - Edición Serato DJ en este manual (pág.27).
Para usuarios de CONTROL VINYL
Si utiliza CONTROL VINYL, vaya a una tienda que maneje productos Serato DJ o
visite una tienda en línea tal como la de Serato (http://serato.com/).
Cómo leer este manual
Asegúrese de leer este manual y la “Guía de inicio rápido – Edición Serato DJ”.
Ambos contienen información importante que usted debería entender antes de usar
este producto.
Para instrucciones sobre cómo obtener el manual del software Serato DJ, vea
Adquisición del manual (pág.27).
Este manual consiste principalmente en descripciones de las funciones de esta
unidad como hardware. Para detalles de la operación del software Serato DJ, vea
el manual del software Serato DJ y la “Guía de inicio rápido – Edición Serato DJ”.
El manual del software Serato DJ se puede descargar desde “Serato.com”.
Para detalles, vea Descarga del manual del software Serato DJ (página 27).
La versión más reciente del manual de instrucciones (este manual) y la “Guía
de inicio rápido – Edición Serato DJ” se pueden descargar del sitio de asis-
tencia Pioneer. Para detalles, vea Descarga de las versiones más recientes de
los manuales de instrucciones y de la Guía de inicio rápido - Edición Serato DJ
(pág.27).
En este manual, los nombres de canales y botones indicados en el producto, los
nombres de menús del software, etc., se indican dentro de corchetes ([ ]). (p. ej.:
Canal [MASTER], [ON/OFF], menú [File])
Note que las pantallas y las especificaciones del software descritas en este
manual, así como también la apariencia externa y las especificaciones del
hardware, están actualmente en fase de desarrollo y pueden ser distintas de las
especificaciones finales.
Note que dependiendo de la versión del sistema operativo, los ajustes del
navegador web, etc., la operación puede que sea distinta de los procedimientos
simplificado, chino tradicional, coreano y japonés
Cuando usa sistemas operativos en otros idiomas, siga las instrucciones de la
pantalla para seleccionar [English (inglés)].
Procedimiento de instalación (Windows)
Lea cuidadosamente Cuidados para la instalación antes de instalar el software
controlador.
Para instalar o desinstalar el software controlador necesitará la autorización del
administrador de su ordenador. Inicie la sesión como el administrador de su
ordenador antes de proseguir con la instalación.
1 Inserte el CD-ROM incluido en la unidad de CD del
ordenador.
El menú del CD-ROM se visualiza.
Si el menú del CD-ROM no aparece cuando se inserta el CD-ROM, haga doble
clic en la unidad de CD desde el menú [Iniciar] – [Equipo] (o [Mi PC]).
2 Desde el menú que aparece, seleccione [Instale el software
del controlador musical], y luego haga clic en [Iniciar].
3 “¿Descarga la versión más reciente? Para acceder al sitio
se requiere un entorno de internet.” se visualiza. Haga clic en
[Si].
El navegador Web se inicia y se visualiza el sitio de asistencia Pioneer DJ.
4 Haga clic en [Software Download] bajo [DJM-900SRT] en el
sitio de asistencia Pioneer DJ.
5 Haga clic en [Driver Software].
6 Desde la página de descarga, descargue el software
controlador para Windows (DJM-900SRT_X.XXX.exe).
7 Haga doble clic en el archive descargado.
La pantalla de instalación del controlador aparece.
8 Lea cuidadosamente el Contrato de Licencia del Software
y, si acepta las disposiciones, ponga una marca de verificación
en [Acepto.] y haga clic en [OK].
Si no acepta las disposiciones del Contrato de Licencia del Software, haga clic en
[Cancelar] y detenga la instalación.
9 Siga con la instalación según las instrucciones de la
pantalla.
Si aparece [Seguridad de Windows] en la pantalla mientras se realiza la insta-
lación, haga clic en [Instalar este software de controlador de todas formas] y
continúe con la instalación.
Cuando lo instale en Windows XP
Si aparece [Instalación de hardware] en la pantalla mientras se realiza la
instalación, haga clic en [Continuar] y continúe con la instalación.
Cuando termina la instalación del programa aparece un mensaje de
terminación.
Procedimiento de instalación (Mac OS X)
Lea cuidadosamente Cuidados para la instalación antes de instalar el software
controlador.
Para instalar o desinstalar el software controlador necesitará la autorización del
administrador de su ordenador. Prepare de antemano el nombre y la contraseña
del administrador de su ordenador.
1 Inserte el CD-ROM incluido en la unidad de CD del
ordenador.
La carpeta del CD-ROM aparece.
Haga doble clic en el icono CD del escritorio cuando la carpetas no se visualicen
después de haber cargado el CD-ROM.
2 Haga doble clic en [CD_menu.app].
3 Desde el menú que aparece, seleccione [Instale el software
del controlador musical], y luego haga clic en [Iniciar].
4 “¿Descarga la versión más reciente? Para acceder al sitio
se requiere un entorno de internet.” se visualiza. Haga clic en
[Si].
El navegador Web se inicia y se visualiza el sitio de asistencia Pioneer DJ.
5 Haga clic en [Software Download] bajo [DJM-900SRT] en el
sitio de asistencia Pioneer DJ.
6 Haga clic en [Driver Software].
7 Desde la página de descarga, descargue el software
controlador para Mac OS (DJM-900SRT_M_X.X.X.dmg).
8 Haga doble clic en el archive descargado.
La pantalla de menú [DJM-900SRT_AudioDriver] aparece.
9 Haga doble clic en [DJM-900SRT_AudioDriver.pkg].
La pantalla de instalación del controlador aparece.
10 Verifique los detalles en la pantalla y haga clic en
[Continuar].
11 Cuando aparezca el acuerdo de licencia del usuario final,
lea cuidadosamente Contrato de Licencia del Software, y
luego haga clic en [Continuar].
12 Si no acepta las disposiciones del Contrato de Licencia del
Software, haga clic en [Acepto.].
Si no acepta las disposiciones del Contrato de Licencia del Software, haga clic en [En
desacuerdo] y detenga la instalación.
13 Siga con la instalación según las instrucciones de la
pantalla.
Haga clic en [Cancelar] para cancelar la instalación después de iniciarse ésta.
Instalación del software Serato DJ
Serato DJ es una aplicación de software DJ de Serato. Las actuaciones de DJ
son posibles conectando a esta unidad el ordenador en el que está instalado este
software.
Consulte la “Guía de inicio rápido - Edición Serato DJ” para conocer el procedi-
miento para realizar la configuración inicial necesaria para utilizar CONTROL
CD o CONTROL VINYL para utilizar Serato DJ. La “Guía de inicio rápido - Edición
Serato DJ” se puede descargar en el sitio web de asistencia de Pioneer DJ
(http://pioneerdj.com/support/). Para conocer las instrucciones de descarga, con-
sulte, Descarga de las versiones más recientes de los manuales de instrucciones y
de la Guía de inicio rápido - Edición Serato DJ en este manual (pág.27).
Para la versión más reciente del software Serato DJ, acceda a Serato.com y des-
cargue el software desde allí. En el CD-ROM incluido también se ha provisto un
enlace para descargar software.
Tenga en cuenta que las pantallas de software y las especificaciones usadas para
las explicaciones de este manual están en proceso de desarrollo y puede que sean
diferentes de las especificaciones finales.
Para instrucciones de la operación del software Serato DJ, vea el manual del
software Serato DJ.
El manual del software Serato DJ se puede descargar desde “Serato.com”.
Para detalles, vea Descarga del manual del software Serato DJ (pág.27).
77
Es
Español
Ambiente de operación mínimo
Sistemas operativos compatiblesCPU y memoria necesaria
Mac OS X: 10.6.8, 10.7.4 y 10.8
versión de
32 bits
Procesador Intel
®
, Core™ 2 Duo a 2,0 GHz
o mejor
RAM de 1 GB o más
versión de
64 bits
Procesador Intel
®
, Core™ 2 Duo a 2,4 GHz
o mejor
RAM de 4 GB o más
Windows: Windows 7
versión de
32 bits
Procesador Intel
®
, Core™ 2 Duo a 2,0 GHz
o mejor
RAM de 2 GB o más
versión de
64 bits
Procesador Intel
®
, Core™ 2 Duo a 2,4 GHz
o mejor
RAM de 4 GB o más
Otros
Puerto USB
Para conectar el ordenador con esta unidad se requiere un
puerto USB 2.0.
Resolución de la pantallaResolución de 1 280 x 720 o más
Conexión a Internet
Para registrar la cuenta del usuario “Serato.com” y descargar el
software se necesita una conexión a Internet.
Para la información más reciente del ambiente de operación necesario y la compatibilidad
así como para adquirir el último sistema operativo, consulte “Software Info” bajo “DJM-
900SRT” en el sitio de asistencia Pioneer DJ siguiente:
http://pioneerdj.com/support/
La operación no se garantiza en todos los ordenadores, aunque se cumplan todas las condi-
ciones indicadas aquí para el ambiente de operación necesario.
Dependiendo de la configuración de ahorro de energía del ordenador, etc., la CPU y el disco
duro pueden no proveer la capacidad de procesamiento suficiente. Para los ordenadores por-
tátiles en particular, asegúrese de que estén en condiciones apropiadas para ofrecer un alto
rendimiento constante (por ejemplo, manteniendo la alimentación de CA conectada) cuando
se usa Serato DJ.
Para usar Internet se necesita firmar un contrato separado con un proveedor que ofrezca
servicios de Internet y pagar los honorarios de dicho proveedor.
Procedimiento de instalación (Windows)
No conecte esta unidad y el ordenador hasta completar la instalación.
Inicie la sesión como el usuario que fue establecido como administrador del
ordenador antes de hacer la instalación.
Si está ejecutándose cualquier otro programa en el ordenador, abandónelo.
1 Inserte el CD-ROM en la unidad de CD del ordenador.
El menú del CD-ROM se visualiza.
Si el menú del CD-ROM no aparece cuando se inserta el CD-ROM, abra la uni-
dad de CD desde [Equipo (o Mi PC)] en el menú [Iniciar], y luego haga doble
clic en el icono [CD_menu.exe].
2 Cuando aparezca el menú del CD-ROM, seleccione
[Descargue el software Serato DJ.], y luego haga clic en
[Iniciar].
Para cerrar el menú CD-ROM, haga clic en [Salir].
3 “Para acceder al sitio se requiere un entorno de internet.
¿Conectado a internet?” se visualiza. Haga clic en [Si].
El navegador Web se inicia y se visualiza el sitio de asistencia Pioneer DJ.
4 Haga clic en [Software Info] bajo [DJM-900SRT] en el sitio
de asistencia Pioneer DJ.
[Serato DJ Support Information] se visualiza.
5 Haga clic en el enlace con la página de descarga de Serato
DJ.
La página de descarga de Serato DJ se visualiza.
6 Entre en su cuenta de usuario “Serato.com”.
Si ya ha registrado una cuenta de usuario en “Serato.com”, vaya al paso 8.
Si no ha completado el registro de su cuenta de usuario, hágalo siguiendo el
procedimiento de abajo.
—Siguiendo las instrucciones de la pantalla, introduzca su dirección de
correo electrónico y contraseña que quiera establecer y luego seleccione
la región donde vive.
—Si marca [E-mail me Serato newsletters] se le enviarán desde Serato
boletines con la información más reciente de los productos Serato.
—Una vez completado el registro de la cuenta del usuario, usted recibirá
un correo electrónico en la dirección de correo electrónico que haya
introducido. Verifique el contenido del correo electrónico enviado desde
“Serato.com”.
Tenga cuidado para no olvidar la dirección de correo electrónico y la contra-
seña especificadas al hacer el registro del usuario. Éstas serán necesarias
para actualizar el software.
La información personal introducida al registrar una cuenta de usuario
nueva puede recopilarse, procesarse y usarse basándose en la política de
privacidad del sitio Web de Serato.
7 Haga clic en el vínculo en el mensaje de correo electrónico
enviado desde “Serato.com”.
Esto le lleva a la página de descarga Serato DJ. Vaya al paso 9.
8 Inicie la sesión.
Introduzca la dirección de correo electrónico y la contraseña que ha registrado para
entrar en “Serato.com”.
9 Descargue el software Serato DJ desde la página de
descarga.
Descomprima el archivo descargado y luego haga doble clic en el archivo descom-
primido para iniciar el instalador.
10 Lea con cuidado los términos del acuerdo de licencia y, si
está de acuerdo, seleccione [I agree to the license terms and
conditions] y luego haga clic en [Install].
Si no acepta el contenido del acuerdo de uso, haga clic en [Close] para
cancelar la instalación.
La instalación empieza.
El mensaje de instalación satisfactoria aparece una vez terminada la instalación.
11 Haga clic en [Close] para salir del instalador Serato DJ.
Procedimiento de instalación (Mac OS X)
No conecte esta unidad y el ordenador hasta completar la instalación.
Si está ejecutándose cualquier otro programa en el ordenador, abandónelo.
1 Inserte el CD-ROM en la unidad de CD del ordenador.
El menú del CD-ROM se visualiza.
Haga doble clic en el icono CD del escritorio cuando la carpetas no se visualicen
después de haber cargado el CD-ROM.
2 Haga doble clic en [CD_menu.app].
3 Seleccione [Descargue el software Serato DJ.] desde el
menú del CD-ROM y luego haga clic en [Iniciar].
4 “Para acceder al sitio se requiere un entorno de internet.
¿Conectado a internet?” se visualiza. Haga clic en [Si].
El navegador Web se inicia y se visualiza el sitio de asistencia Pioneer DJ.
5 Haga clic en [Software Info] bajo [DJM-900SRT] en el sitio
de asistencia Pioneer DJ.
[Serato DJ Support Information] se visualiza.
6 Haga clic en el enlace con la página de descarga de Serato
DJ.
La página de descarga de Serato DJ se visualiza.
7 Entre en su cuenta de usuario “Serato.com”.
Si ya ha registrado una cuenta de usuario en “Serato.com”, vaya al paso 8.
88
Es
Si no ha completado el registro de su cuenta de usuario, hágalo siguiendo el
procedimiento de abajo.
—Siguiendo las instrucciones de la pantalla, introduzca su dirección de
correo electrónico y contraseña que quiera establecer y luego seleccione
la región donde vive.
—Si marca [E-mail me Serato newsletters] se le enviarán desde Serato
boletines con la información más reciente de los productos Serato.
—Una vez completado el registro de la cuenta del usuario, usted recibirá
un correo electrónico en la dirección de correo electrónico que haya
introducido. Verifique el contenido del correo electrónico enviado desde
“Serato.com”.
Tenga cuidado para no olvidar la dirección de correo electrónico y la contra-
seña especificadas al hacer el registro del usuario. Éstas serán necesarias
para actualizar el software.
La información personal introducida al registrar una cuenta de usuario
nueva puede recopilarse, procesarse y usarse basándose en la política de
privacidad del sitio Web de Serato.
8 Haga clic en el vínculo en el mensaje de correo electrónico
enviado desde “Serato.com”.
Esto le lleva a la página de descarga Serato DJ. Vaya al paso 9.
9 Inicie la sesión.
Introduzca la dirección de correo electrónico y la contraseña que ha registrado para
entrar en “Serato.com”.
10 Descargue el software Serato DJ desde la página de
descarga.
Descomprima el archivo descargado y luego haga doble clic en el archivo descom-
primido para iniciar el instalador.
11 Lea con cuidado los términos del acuerdo de licencia y, si
está de acuerdo, haga clic en [Agree].
Si no acepta el contenido del acuerdo de uso, haga clic en [Disagree] para
cancelar la instalación.
12 Si aparece la pantalla siguiente, arrastre y coloque el icono
[Serato DJ] en el icono de carpeta [Applications].
99
Es
Español
Conexiones
Asegúrese de desconectar la alimentación y desenchufar el cable de alimentación de la toma de corriente siempre que haga o cambie conexiones.
Conecte el cable de alimentación después de terminar las conexiones entre los aparatos.
Asegúrese de usar el cable de alimentación incluido.
Consulte el manual de instrucciones del componente que va a ser conectado.
Cuando cree un DVS (sistema de vinilo digital) combinando un ordenador, interfaz de audio, etc., tenga cuidado en la conexión de la interfaz de audio a los terminales de
entrada de esta unidad y en los ajustes de los conmutadores selectores de entrada.
Consulte también el manual de instrucciones del software DJ y de la interfaz de audio.
Panel trasero
OFF
RETURN
L
L
L
1 GND
2 HOT
3 COLD
L
R
L
L
IN
CH3
CH4
CH1CH2
R
R
R
R
L
R
R
PHONOPHONOPHONO
CH 4CH 3
CD/LINE
L
R
PHONO
CH 1
CD/LINE
SIGNAL GNDSIGNAL GND
TRS
CD/LINE
MASTER1MASTER2
REC OUT
BOOTH
MIC2
MIDI OUT
DIGITAL
MASTER
OUT
LINK
L
R
CH 2
CD/LINE
(MONO)
LR
(MONO)
SEND
POWER
AC IN
ON
134344343556782
deabh9cgf
1 Botón POWER (página 13)
Conecta y desconecta la alimentación de esta unidad.
2 Terminales RETURN (página 10)
Conecte al terminal de salida de un efector externo. Cuando sólo está conectado
el canal [L (MONO)], la entrada del canal [L (MONO)] entra simultáneamente
al canal [R].
3 Terminales PHONO (página 10)
Conecte a un aparato con salida fonográfica (cápsula MM). No introduzca seña-
les de nivel de línea.
Para conectar un aparato a los terminales [PHONO], retire la clavija de cortocir-
cuito insertada en los terminales.
Inserte esta clavija de cortocircuito en los terminales [PHONO] cuando no haya
nada conectado a ellos para cortar el ruido externo.
4 Terminales CD/LINE (página 10)
Conecte a un reproductor DJ o a un componente de salida de nivel de línea.
5 Terminal SIGNAL GND (página 10)
Conecta aquí el cable de tierra de un reproductor analógico. Esto ayuda a redu-
cir el ruido cuando se conecta un reproductor analógico.
6 Terminal MIC2 (página 10)
Conecta un micrófono aquí.
7 Terminal MIDI OUT (página 10)
Conecta esto al terminal MIDI IN de un secuenciador MIDI externo.
8 Ranura de seguridad Kensington
9 Terminal DIGITAL IN (página 10)
Conecte estos a los terminales de salida coaxial digital de los reproductores DJ,
etc. El sonido puede interrumpirse momentáneamente cuando se conmuta la
frecuencia de muestreo de la señal de salida.
a Terminal DIGITAL MASTER OUT (página 10)
Da salida a las señales de audio del canal maestro.
b Terminal LINK (página 10)
Conecte estos a los terminales LINK de los reproductores DJ de Pioneer o a los
puertos LAN de los ordenador que tienen instalado rekordbox (PRO DJ LINK).
Para conectar múltiples aparatos, use un concentrador de conmutación (de
venta en el comercio).
Use un concentrador de conmutación compatible con 100Base-TX. Algunos
concentradores de conmutación pueden no funcionar bien.
c Terminales BOOTH (página 10)
Éstos son terminales de salida para un monitor de cabina.
d Terminales REC OUT (página 10)
Éstos son terminales de salida para grabación.
e Terminales MASTER2 (página 10)
Conecte a un amplificador de potencia, etc.
f Terminales MASTER1 (página 10)
Conecte a un amplificador de potencia, etc.
Asegúrese de usar éstas como salidas balanceadas. Tenga cuidado para no
conectar por error el cable de alimentación de otra unidad.
g Terminales SEND (página 10)
Conecte al terminal de entrada de un efector externo. Cuando sólo está conec-
tado el canal [L (MONO)] sale una señal de audio monofónico.
h AC IN
Conecta a una toma de corriente con el cable de alimentación incluido. Espere
hasta que todas las conexiones entre el equipo estén terminadas antes de
conectar el cable de alimentación.
Asegúrese de usar el cable de alimentación incluido.
ADVERTENCIA
Las clavijas de cortocircuito deberán guardarse fuera del alcance de los niños y
los bebés. Si alguien traga una de ellas por accidente, póngase en contacto inme-
diatamente con un médico.
1010
Es
Conexión de terminales de entrada
Cuando cree un DVS (sistema de vinilo digital) combinando un ordenador, interfaz de audio, etc., tenga cuidado en la conexión de la interfaz de audio a los terminales de
entrada de esta unidad y en los ajustes de los conmutadores selectores de entrada.
Consulte también el manual de instrucciones del software DJ y de la interfaz de audio.
1Para conocer detalles de PRO DJ LINK, vea Acerca de PRO DJ LINK en la página 14.
2Para usar la función de inicio de fader con PRO DJ LINK, conecte un cable LAN (pág. 15).
Conexión de terminales de salida
OFF
RETURN
L
L
L
1 GND
2 HOT
3 COLD
L
R
L
L
IN
CH3
CH4
CH1CH2
R
R
R
R
L
R
R
PHONO
CH 4CH 3
CD/LINE
L
R
PHONO
CH 1
CD/LINE
SIGNAL GNDSIGNAL GND
TRS
CD/LINEPHONO
MASTER1MASTER2
REC OUT
BOOTH
MIC2
MIDI OUT
DIGITAL
MASTER
OUT
LINK
L
R
CH 2
CD/LINEPHONO
(MONO)
LR
(MONO)
SEND
POWER
AC IN
ON
L
R
L
R
Amplificador de
potencia
2
A una toma de
corriente
Aparato de entrada
de audio digital
Amplificador de
potencia (para
monitor de cabina)
Efector externo
1
Secuenciador
MIDI
Platina de casete, etc.
(aparato de grabación
de entrada analógica)
Amplificador de
potencia
2
3
1Conecte también el efector externo al terminal [RETURN] (terminal de entrada).
2Asegúrese de usar los terminales [MASTER1] sólo para una salida equilibrada. La conexión con una entrada desequilibrada (tal como RCA) usando un XLR a un cable de
convertidor RCA (o adaptador de convertidor), etc., puede reducir la calidad del sonido y/o crear ruido.
Para la conexión con una entrada desequilibrada (tal como RCA), use los terminales [MASTER2].
3Tenga cuidado para no conectar por error el cable de alimentación de otra unidad al terminal [MASTER1].
1111
Es
Español
Conexión al panel de control
B
ATHRU
MASTER
0
MIXING
LEVEL
PHONES
CUE
LEVEL
DIGITAL
CD/ LINEPHO
HI
MIC 1
MIC 2
0
0
TRIM
OVER
10
7
4
2
1
0
MICUSB
MIC1
Asegúrese de conectar usando
el cable USB incluido.
Auriculares
Micrófonos
Ordenadores
1
2
3
4
1 Terminal MIC1 (página 14)
Conecta un micrófono aquí.
2 Terminal USB (página 11)
Conecte el ordenador.
3 Indicador de conexión USB
Se enciende cuando se intercambian señales con el ordenador.
4 Terminal PHONES (página 13)
Conecte aquí los auriculares.
Conexión de esta unidad y un ordenador
Para instrucciones de la operación en combinación con Serato DJ, vea la “Guía
de inicio rápido – Edición Serato DJ”. Para detalles, vea Descarga de las versiones
más recientes de los manuales de instrucciones y de la Guía de inicio rápido -
Edición Serato DJ (pág.27).
1 Conecte esta unidad a su ordenador con un cable USB.
Esta unidad funcione como un aparato de audio conforme a las normas ASIO.
Esta operación no funciona con ordenadores no compatibles con USB 2.0.
Cuando usa aplicaciones compatibles con ASIO se pueden usar como entradas
Cambia cómo se distribuye la salida de sonido de monitoreo de los auriculares.
9 Control MIXING (página 13)
Éste ajusta el balance del volumen de monitoreo del sonido de los canales para
los que se pulsa el botón [CUE] y el sonido del canal [MASTER].
a Control LEVEL (página 13)
Ajusta la salida del nivel de sonido desde los auriculares.
b Indicador de entrada de audio USB
Se enciende cuando se introduce sonido del ordenador en varios canales.
c Conmutadores selectores de entrada (página 13)
Selecciona la fuente de entrada de cada canal desde los componentes conecta-
dos a esta unidad.
d Control TRIM (página 13)
Ajusta el nivel de las señales de audio introducidas en cada canal.
e Controles EQ/ISO (HI, MID, LOW) (página 13)
Éstos ajustan la calidad del sonido de diferentes canales.
f Indicador de nivel de canal (página 13)
Visualiza el nivel del sonido de los diferentes canales antes de pasar por los
fader de canales.
1313
Es
Español
g Control COLOR (página 15)
Éste cambia los parámetros del SOUND COLOR FX de los diferentes canales.
h Fader de canal (página 13)
Ajusta el nivel de las señales de audio que salen en cada canal.
i Conmutador selector CROSS FADER ASSIGN (A, THRU, B)
(página 13)
Establezca el destino de salida de cada canal en [A] o [B].
j Crossfader (página 13)
Envía señales de audio asignadas por el conmutador de asignación de
crossfader correspondiente a las características de curva seleccionadas por
[CROSS FADER] (conmutador selector de curva de crossfader).
k Control MASTER LEVEL (página 13)
Ajusta la salida de nivel de audio de los terminales [MASTER1] y [MASTER2].
l Indicador de nivel maestro (página 13)
Visualiza la salida de nivel de audio de los terminales [MASTER1] y [MASTER2].
m Control BALANCE (página 14)
Ajusta el balance derecho/izquierdo de la salida de sonido desde los terminales
[MASTER1], etc.
n Conmutador selector MONO, STEREO (página 14)
Cambia la salida de sonido desde los terminales [MASTER1], etc. entre mono y
estéreo.
o Control BOOTH MONITOR (página 14)
Ajusta el nivel de las señales de audio que salen por el terminal [BOOTH].
p Conmutador selector EQ CURVE (ISOLATOR, EQ) (página 13)
Cambia la función de los controles [EQ/ISO (HI, MID, LOW)].
q Conmutador selector CH FADER (, , ) (página 14)
Cambia las características de la curva del fader de canales.
r Conmutador selector CROSS FADER (, , ) (página 14)
Cambia las características de curva de crossfader.
s Botón ON/OFF (UTILITY)
—ON/OFF: Activa/desactiva la función MIDI (página 16).
—UTILITY: Visualiza la pantalla [USER SETUP] o [CLUB SETUP] (página 23).
t Botón START/STOP (página 17)
Envía las señales de inicio de MIDI/parada de MIDI.
u Botón LFO FORM (WAKE UP)
—LFO FORM: Cuando se selecciona [MIDI LFO] en BEAT EFFECT, la forma de
onda de la señal MIDI cambia cada vez que se pulsa el botón (página 20).
—WAKE UP: Cancela el modo de espera automático.
v Pantalla de la unidad principal
w X-PAD (página 16)
Ajusta los parámetros cuantitativos de la función BEAT EFFECT.
x Botones BEAT , (página 15)
Establezca la fracción de tiempo de compás para sincronizar el sonido de efecto.
y Botón TAP (ENTER)
—TAP: Cuando el modo de medición de BPM se pone en [TAP], las BPM se
introducem manualmente golpeando suavemente el botón con un dedo
(página 15).
—ENTER: Se usa para cambiar los ajustes de esta unidad (página 23).
z Botón QUANTIZE
Cuando se activa la función QUANTIZE para BEAT EFFECT, el efecto se aplica al
sonido sin salir del tempo cuando la pista está reproduciéndose actualmente.
(página 14).
A Botón AUTO/TAP (página 15)
Cambia el modo de medición de BPM.
B Conmutador selector de efectos de tiempos de compás (página
15)
Cambia el tipo de efecto BEAT EFFECT.
C Conmutador selector de canal de efectos (página 15)
Cambia el canal al que se va a aplicar el BEAT EFFECT.
D Control TIME (página 15)
Ajusta el parámetro de tiempo del BEAT EFFECT.
E Control LEVEL/DEPTH (página 15)
Ajusta el parámetro cuantitativo del BEAT EFFECT.
F Botón ON/OFF (página 15)
Activa/desactiva la función BEAT EFFECT.
No tire del fader de canales ni de los controles crossfader con una fuerza excesiva.
Los controles tienen una estructura que no permite extraerlos fácilmente. Tirar
con fuerza de los controles podría dañar la unidad.
Funcionamiento básico
Salida de sonido
1 Pulse el botón [POWER].
Conecte la alimentación de esta unidad.
2 Cambia los conmutadores selectores de entrada.
Selecciona las fuentes de entrada para los canales diferentes de entre los aparatos
conectados a esta unidad.
— [DIGITAL]: Selecciona el reproductor DJ conectado a los terminales
[DIGITAL].
— [PHONO]: Selecciona el reproductor analógico conectado a los terminales
[PHONO].
— [CD/LINE]: Selecciona la platina de casete o el reproductor CD conectado a
los terminales [CD/LINE].
— [USB]: Selecciona el sonido del ordenador conectado al puerto [USB].
3 Gire el control [TRIM].
Ajusta el nivel de las señales de audio introducidas en cada canal.
El indicador de nivel de canal correspondiente se enciende cuando las señales de
audio están entrando correctamente en ese canal.
4 Mueva el fader de canal alejándolo de usted.
Ajusta el nivel de las señales de audio que salen en cada canal.
5 Cambie el conmutador selector [CROSS FADER ASSIGN (A,
THRU, B)].
Cambia el destino de salida de cada canal.
— [A]: Asigna a [A] (izquierda) del crossfader.
— [B]: Asigna a [B] (derecha) del crossfader.
— [THRU]: Selecciona esto cuando no quiera usar el crossfader. (Las señales
no pasan a través del crossfader.)
6 Ajuste el crossfader.
Esta operación no es necesaria cuando el conmutador selector
[CROSS FADER ASSIGN (A, THRU, B)] se pone en [THRU].
7 Gire el control [MASTER LEVEL].
Las señales de audio salen por los terminales [MASTER1] y [MASTER2].
El indicador de nivel maestro se enciende.
Ajuste de la calidad del sonido
1 Cambie el conmutador selector [EQ CURVE (ISOLATOR,
EQ)].
— [ISOLATOR]: Funciona como un aislador.
— [EQ]: La función de ecualizador se establece.
2 Gire los controles [EQ/ISO (HI, MID, LOW)] de los diferentes
canales.
Las gamas ajustables de los controles respectivos se muestran abajo.
—HI: –26 dB a +6 dB (13 kHz)
—MID: –26 dB a +6 dB (1 kHz)
—LOW: –26 dB a +6 dB (70 Hz)
Monitoreo de sonido con auriculares
1 Conecte los auriculares al terminal [PHONES].
2 Pulse el botón, o botones, [CUE] del canal, o canales, que
quiera monitorear.
3 Cambie el conmutador selector [MONO SPLIT, STEREO].
— [MONO SPLIT]: El sonido de los canales para los que se pulsa el botón [CUE]
sale por el canal izquierdo de la salida de los auriculares, mientras que el
sonido del canal [MASTER] sale por el canal derecho.
— [STEREO]: El sonido de los canales para los que se pulsa el botón [CUE] sale
por los auriculares en estéreo.
4 Gire el control [MIXING].
Éste ajusta el balance del volumen de monitoreo del sonido de los canales para los
que se pulsa el botón [CUE] y el sonido del canal [MASTER].
1414
Es
5 Gire el control [LEVEL] para [HEADPHONES].
El sonido de los canales para los que se pulsa el botón [CUE] sale por los
auriculares.
Cuando se pulsa de nuevo el botón [CUE], el monitoreo se cancela.
Cambio de la curva de fader
䢢Seleccione las características de la curva de fader de
canales
Cambie el conmutador selector [CH FADER (, , )].
— []: La curva sube bruscamente en el lado posterior.
— []: Se establece una curva entre las de arriba y las de abajo.
— []: La curva sube gradualmente (el sonido aumenta gradualmente al
alejar el fader de canal del lado delantero).
䢢Seleccione las características de curva de crossfader
Cambie el conmutador selector [CROSS FADER (, , )].
— []: Hace una curva que aumenta bruscamente (si el crossfader se separa
del lado [A] salen inmediatamente señales de audio desde el lado [B]).
— []: Hace una curva que está a medias de las dos curvas de arriba y abajo.
— []: Hace una curva que aumenta gradualmente (si el crossfader se separa
del lado [A], el sonido del lado [B] aumenta gradualmente, mientras que el
sonido del lado [A] se reduce gradualmente).
Uso de un micrófono
1 Conecte un micrófono al terminal [MIC1] o [MIC2].
2 Ponga el conmutador selector [OFF, ON, TALK OVER] en
[ON] o [TALK OVER].
— [ON]: El indicador se enciende.
— [TALK OVER]: El indicador parpadea.
Cuando se pone en [TALK OVER], el sonido que no es el del canal [MIC] se
atenúa 18 dB (predeterminado) cuando se introduce un sonido de –10 dB o más
por el micrófono.
El nivel de atenuación de sonido [TALK OVER] se puede cambiar en
[USER SETUP]. Para conocer instrucciones del cambio, vea Cambio de los ajus-
tes en la página 23.
El modo de talk over se puede poner en el modo normal o avanzado. Para cono-
cer instrucciones del cambio, vea Cambio de los ajustes en la página 23.
3 Gire el control [MIC1 LEVEL] o [MIC2 LEVEL].
Ajusta el nivel de la salida de sonido desde el canal [MIC].
Tenga en cuenta que girar hasta la posición del extremo derecho da salida a un
sonido muy alto.
4 Introduzca señales de audio en el micrófono.
䢢Ajuste de la calidad del sonido
Gire los controles [EQ (HI, LOW)] de los canales [MIC].
Las gamas ajustables de los controles respectivos se muestran abajo.
—HI: –12 dB a +12 dB (10 kHz)
—LOW: –12 dB a +12 dB (100 Hz)
Cambio entre audio mono y estéreo
Esto cambia el sonido que sale por los terminales [MASTER1], [MASTER2],
[BOOTH], [REC OUT], [PHONES], [DIGITAL MASTER OUT] y [USB] entre mono y
estéreo.
Para ajustar la salida de sonido de los terminales [USB], seleccione [MIX (REC
OUT)] en [Mixer Audio Output] en la utilidad de ajuste.
Cambie el conmutador selector [MONO, STEREO].
— [MONO]: Envía audio mono.
— [STEREO]: Envía audio estéreo.
䢢Ajuste de balance L/R de audio
El balance derecho/izquierdo de la salida de sonido por los terminales [MASTER1],
[MASTER2], [BOOTH], [REC OUT], [PHONES], [DIGITAL MASTER OUT] y [USB] se
puede ajustar.
Para ajustar la salida de sonido de los terminales [USB], seleccione [MIX (REC
OUT)] en [Mixer Audio Output] en la utilidad de ajuste.
1 Ponga el conmutador selector [MONO, STEREO] en
[STEREO].
2 Gire el control [BALANCE].
El balance derecho/izquierdo del sonido cambia según el sentido de giro del control
[BALANCE] y su posición.
El giro a la posición del extremo derecho sólo envía sonido del canal derecho de
audio estéreo. El giro a la posición del extremo izquierdo sólo envía sonido del
canal izquierdo de audio estéreo.
Sale audio del terminal [BOOTH]
Gire el control [BOOTH MONITOR].
Ajusta el nivel de las señales de audio que salen por el terminal [BOOTH].
Operaciones avanzadas
Usando las funciones compatibles con Serato DJ
Cuando esta unidad y un ordenador en el que se ejecuta el Serato DJ están conecta-
dos mediante cable USB se pueden usar las funciones de abajo.
䢢QUANTIZE
Cuando se usan pistas que han sido analizadas con el Serato DJ, las pistas se
ponen en tiempo de compás incluso si se pulsa el botón [BEAT EFFECTS] [ON/OFF]
o se toca con fuerza el [X-PAD].
䢢FADER START
La reproducción de pistas en el Serato DJ se puede iniciar operando el fader de esta
unidad (Inicio de reproducción con fader).
Acerca de PRO DJ LINK
Cuando se conectan mediante un cable LAN un reproductor DJ de Pioneer compati-
ble con PRO DJ LINK (p. ej. CDJ-2000nexus, CDJ-2000, CDJ-900), un ordenador que
tiene instalado rekordbox y esta unidad se pueden usar las funciones PRO DJ LINK
siguientes.
Para conocer más detalles de la función PRO DJ LINK, consulte también las instruc-
ciones de manejo del reproductor DJ y el manual de instrucciones del rekordbox.
Para conocer instrucciones de conexión, vea Conexión de terminales de entrada en
la página 10.
Cuando conecte usando un concentrador de conmutación se pueden conectar
hasta 4 reproductores DJ y 2 ordenadores.
Use un concentrador de conmutación compatible con 100Base-TX. Algunos
concentradores de conmutación pueden no funcionar bien.
Ponga el número de reproductor del reproductor DJ que sea el mismo que el del
canal al que está conectado el cable de audio.
䢢QUANTIZE
Cuando se usan pistas analizadas con rekordbox, la pista se pone en tiempo de
compás incluso cuando se pulse el botón [ON/OFF] de [BEAT EFFECTS] o se toque
[X-PAD].
䢢FADER START
La reproducción en el reproductor DJ se puede iniciar operando el fader de esta
unidad (Inicio de reproducción con fader).
䢢LINK MONITOR
Con esta función, los archivos de música rekordbox guardados en el ordenador se
pueden monitorear rápidamente con los auriculares.
䢢STATUS INFORMATION
Esta función informa a los reproductores DJ del estado de los canales conectados
(estado del programa, número de canal, etc.).
Uso de la función QUANTIZE
Los efectos se pueden aplicar al sonido en tempo con la pista que está reproducién-
dose basándose en la información de pistas GRID que han sido analizadas con el
Serato DJ o el rekordbox.
Para usar la función QUANTIZE con PRO DJ LINK, conecte de antemano esta uni-
dad y un reproductor DJ de Pioneer compatible con PRO DJ LINK. Para conocer
instrucciones de conexión, consulte Conexión de terminales de entrada en la página
10.
Además, los archivos de música deberán haber sido analizados de antemano con
el rekordbox para usar la función QUANTIZE. Para conocer instrucciones acerca
1515
Es
Español
del análisis de los archivos de música con el rekordbox, vea también el manual de
instrucciones del rekordbox.
Cuando se use en combinación con el CDJ-2000nexus, actualice primero el
firmware a la versión 1.02 ó posterior.
Para usar en combinación con el CDJ-2000 o CDJ-900, actualice primero el
firmware a la versión 4.0 ó posterior.
1 Pulse el botón [QUANTIZE].
La función QUANTIZE se enciende.
[GRID] se enciende en la pantalla de unidad principal de esta unidad cuando la
información GRID ha sido recibida correctamente desde el Serato DJ o el reproduc-
tor DJ y la función QUANTIZE se pueden usar. [GRID] parpadea si la información
GRID no ha sido recibida correctamente.
Dependiendo del estado de la reproducción del Serato DJ o del reproductor DJ
(off air, scratching, reproducción invertida, etc.) puede que no sea posible reci-
bir la información GRID.
2 Pulse el botón [ON/OFF] de [BEAT EFFECTS] o toque el
[X-PAD].
El efecto se añade al sonido en tempo con la pista que está siendo reproducida.
Cuando se pulsa de nuevo un botón [QUANTIZE], la función QUANTIZE se
apaga.
Uso de la función FADER START
Cuando esta unidad y un ordenador en el que se ejecuta el Serato DJ están conec-
tados mediante cable USB, las operaciones tales como el inicio de reproducción de
las pistas en el Serato DJ se pueden controlar con el fader de esta unidad.
Conecte de antemano esta unidad y un ordenador en el que se ejecuta el Serato DJ.
De igual forma, cuando se conecta esta unidad y un reproductor DJ de Pioneer
mediante cable LAN, las operaciones tales como el inicio de reproducción en el
reproductor DJ se pueden controlar con el fader de esta unidad.
Conecte de antemano el reproductor DJ de Pioneer y esta unidad. Para conocer ins-
trucciones de conexión, consulte Conexión de terminales de entrada en la página 10.
Para conocer instrucciones sobre cómo poner números de reproductor de repro-
ductores DJ de Pioneer, vea Acerca de PRO DJ LINK en la página 14.
La función de inicio del fader se puede activar y desactivar de una vez para todos los
reproductores DJ. Para conocer el procedimiento de conmutación, vea Cambio de
los ajustes en la página 23.
La función FADER START no se puede usar cuando se intenta realizar el control
DVS mientras el Serato DJ está en el modo Absolute. Cuando se pulsa uno
de los botones [FADER START (1, 2, 3, 4)] mientras está establecido el modo
Absolute, ese botón parpadea y luego se apaga.
䢢Inicie la reproducción usando un fader de canales
1 Ponga el conmutador selector [CROSS FADER ASSIGN (A,
THRU, B)] en [THRU].
2 Pulse uno de los botones [FADER START (1, 2, 3, 4)].
Seleccione el canal que va a ser iniciado con la función de inicio del fader.
Para Serato DJ
— Botón [Fader Start 1]: Selecciona [DECK 3].
— Botón [Fader Start 2]: Selecciona [DECK 1].
— Botón [Fader Start 3]: Selecciona [DECK 2].
— Botón [Fader Start 4]: Selecciona [DECK 4].
3 Ponga el fader de canales en la posición más próxima a
usted.
4 Ponga un cue en el Serato DJ o en el reproductor DJ.
La pista hace cue hasta el punto cue y se establece el modo de pausa.
5 Mueva el fader de canal alejándolo de usted.
La reproducción de la pista en el Serato DJ o en el reproductor DJ empieza.
Si vuelve a ajustar el fader de canal en la posición original, el reproductor vuelve
instantáneamente al punto cue ya establecido y hace una pausa en la reproduc-
ción (vuelta a punto cue).
䢢Inicie la reproducción usando el crossfader
1 Ponga el conmutador selector [CROSS FADER ASSIGN (A,
THRU, B)] en [A] o [B].
2 Pulse uno de los botones [FADER START (1, 2, 3, 4)].
Seleccione el canal que va a ser iniciado con la función de inicio del fader.
Para Serato DJ
— Botón [Fader Start 1]: Selecciona [DECK 3].
— Botón [Fader Start 2]: Selecciona [DECK 1].
— Botón [Fader Start 3]: Selecciona [DECK 2].
— Botón [Fader Start 4]: Selecciona [DECK 4].
3 Ajuste el crossfader.
Póngalo en el borde opuesto al lado en el que está establecido el canal que quiera
usar con la función de inicio de fader.
4 Ponga un cue en el Serato DJ o en el reproductor DJ.
La pista hace cue hasta el punto cue y se establece el modo de pausa.
5 Ajuste el crossfader.
La reproducción de la pista en el Serato DJ o en el reproductor DJ empieza.
Si vuelve a ajustar el crossfader en la posición original, el reproductor vuelve
instantáneamente al punto cue ya establecido y hace una pausa en la reproduc-
ción (vuelta a punto cue).
Uso de la función LINK MONITOR
Verifique de antemano [Use “LINK MONITOR” de los mezcladores DJ de
Pioneer.] en [Archivo] > [Preferencias] > [Audio] en el rekordbox. Consulte
también el manual de instrucciones del rekordbox.
1 Conecte los auriculares al terminal [PHONES].
2 Conecte un ordenador que tenga instalado rekordbox.
Para conocer instrucciones de conexión, vea Conexión de terminales de entrada en
la página 10.
3 Selección de la pista que va a monitorearse con rekordbox.
4 Pulse el botón [CUE] para [LINK].
La pista seleccionada con rekordbox sale por los auriculares.
Cuando se pulsa de nuevo el botón [CUE], el monitoreo se cancela.
Se puede realizar la misma operación que en Monitoreo de sonido con auricula-
res (pasos 3 a 5).
Uso de la función SOUND COLOR FX
Éstos son efectos que cambian en asociación con el control [COLOR].
1 Pulse uno de los botones selectores [SOUND COLOR FX].
Esto selecciona el tipo de efecto.
El botón que fue pulsado parpadea.
Aunque ya esté seleccionado uno de los botones selectores
[SOUND COLOR FX], cuando se selecciona y pulsa un botón diferente, ese
botón es el que se selecciona.
Para conocer los tipos de efectos, vea Tipos de los efectos SOUND COLOR FX en
la página 18.
El mismo efecto se establece para [CH1] a [CH4].
2 Gire el control [COLOR].
El efecto se aplica al canal para el que se pulsó el control, o a los canales para los
que se pulsaron los controles.
䢢Cancelación del efecto SOUND COLOR FX
Pulse el botón selector [SOUND COLOR FX] que está
parpadeando.
El efecto se cancela.
Uso de la función BEAT EFFECT
Esta función le permite establecer instantáneamente varios efectos según el tempo
(BPM = pulsaciones por minuto) de la pista que está reproduciéndose.
Pantalla de la unidad principal
1
2
3
7
9
a
5
4
6
8
AUTO
GRID
TAPBPM
%
ms
CH SELECT
PARAMETER
1234
MICMST
AB
1
Sección de
visualización de
efectos
El nombre del efecto seleccionado se visualiza.
2
Sección de visuali-
zación de selec-
ción de canales
El nombre del canal al que se aplica el efecto se visualiza.
1616
Es
3
AUTO (TAP)
[AUTO] se enciende cuando el modo de medición de BPM se pone
en el modo automático.
[TAP] se enciende en el modo de entrada manual.
4
Visualización del
valor de BPM (3
dígitos)
En el modo automático, esto visualiza el valor de BPM detectado
automáticamente.
Cuando no se pueden detectar las BPM, el valor de BPM detectado
previamente se visualiza y parpadea.
En el modo de entrada manual, esto visualiza el valor de BPM que
fue introducido manualmente.
5
GRID
Esto se enciende cuando el Serato DJ está ejecutándose y la fun-
ción QUANTIZE se puede usar. Esto también se enciende cuando
se reproduce una pista que ha sido analizada con el rekordbox y la
función QUANTIZE se pueden usar en combinación con el repro-
ductor DJ. Esto parpadea o se apaga cuando no se puede usar la
función QUANTIZE.
6
BPM
Esto está siempre encendido.
7
Sección de
visualización de
parámetros
Esto visualiza los parámetros especificados para los efectos
individuales.
Cuando se pulsa el botón [BEAT, ], la fracción de tiempo de
compás correspondiente se visualiza durante 1 segundo.
Cuando se especifica con el botón [BEAT, ] un valor que está
fuera de la gama de parámetros, el valor no cambia y la visualiza-
ción parpadea.
8
% (ms)Estos se encienden según las unidades para los efectos diferentes.
9
Sección de visuali-
zación de tiempo
de compás
Esto se enciende según la posición del número de tiempo de
compás seleccionado.
a
Sección de visuali-
zación táctil
Se enciende cuando se toca el [X-PAD].
1 Pulse el botón [AUTO/TAP].
Seleccione el modo de medición de BPM.
— [AUTO]: Las BPM se miden automáticamente de la señal de audio que está
siendo introducida. El modo [AUTO] se establece cuando se conecta la
alimentación de esta unidad.
— [TAP]: Las BPM se introducen manualmente pulsando rápida y brevemente
el botón [TAP] con un dedo.
El margen de medición de BPM [AUTO] es BPM = 70 a 180. Con algunas pistas
puede que no sea posible medir bien las BPM. Si las BPM no se pueden medir,
el valor de BPM parpadea en la pantalla. En tales casos, use el botón [TAP] para
introducir manualmente las BPM.
2 Gire el conmutador selector de efectos de tiempos de
compás.
Esto selecciona el tipo de efecto.
Para conocer los tipos de efectos, vea Tipos de BEAT EFFECT en la página 18.
Para usar [SND/RTN], vea Uso del efector externo más abajo.
Para usar [MIDI LFO], vea Usando el MIDI LFO en la página 17.
3 Gire el conmutador selector de canales de efectos.
Esto selecciona el canal al que se aplica el efecto.
— [1] – [4]: El efecto se aplica al sonido del canal respectivo.
— [MIC]: El efecto se aplica al sonido del canal [MIC].
— [CF.A], [CF.B]: El efecto se aplica al sonido del lado [A] (izquierdo) o [B]
(derecho) del crossfader.
— [MASTER]: El efecto se aplica al sonido del canal [MASTER].
Esta operación no es necesaria cuando se selecciona [MIDI LFO].
4 Pulse el botón [BEAT , ].
Establezca la fracción de tiempo de compás para sincronizar el sonido de efecto.
El tiempo de efecto correspondiente a la fracción de tiempo de compás se ajusta
automáticamente.
5 Pulse el botón [ON/OFF] para [BEAT EFFECTS].
El efecto se aplica al sonido.
El parámetro de tiempo del efecto se puede ajustar girando el control [TIME].
El parámetro cuantitativo del efecto se puede ajustar girando el control [LEVEL/
DEPTH].
El botón [ON/OFF] parpadea cuando se activa el efecto.
Cuando se pulsa de nuevo un botón [ON/OFF], el efecto se apaga.
䢢Introducción manual de las BPM
Pulse rápida y brevemente el botón [TAP] un mínimo de 2
veces, en ritmo con el tiempo de compás (en cuartos de nota)
del sonido que se reproduce actualmente.
El valor medio del intervalo con el que se pulsó el botón [TAP] con el dedo se esta-
blece como BPM.
Cuando las BPM se establecen usando el botón [TAP], la fracción de tiempo de
compás se establece en 1/1 y el tiempo de un compás (cuarto de nota) se esta-
blece como tiempo de efecto.
Las BPM se pueden establecer manualmente girando el control [TIME] mientras
se pulsa el botón [TAP].
Las BPM se pueden establecer en unidades de 0,1 pulsando el botón
[AUTO/TAP] mientras se pulsa el botón [TAP] y girando el control [TIME] mien-
tras se pulsan los dos botones.
䢢Uso del efector externo
1 Conecte esta unidad y un efector externo.
Para conocer instrucciones de conexión, vea Conexión de terminales de salida en la
página 10.
2 Gire el conmutador selector de efectos de tiempos de
compás.
Seleccione [SND/RTN (MIDI LFO)].
3 Gire el conmutador selector de canales de efectos.
Esto selecciona el canal al que se aplica el efecto.
4 Pulse el botón [ON/OFF] para [BEAT EFFECTS].
El sonido que ha pasado a través del efector externo sale por el canal [MASTER].
Cuando se pulsa de nuevo un botón [ON/OFF], el efecto se apaga.
Operación del [X-PAD]
Procedimiento
de operación
Botón [ON/OFF] Estado de
[BEAT EFFECTS]
X-PAD
Efecto
1
Apagado (encendido)
Soltar K Tocar
Apagado K
Encendido
2
Encendido (parpadeando)
Soltar K Tocar
Encendido K
Encendido
䢢Procedimiento de operación 1
1 Siga los pasos 1 a 4 del procedimiento Uso de la función
BEAT EFFECT.
2 Toque el [X-PAD].
El [X-PAD] enciende y apaga el efecto y cambia el parámetro cuantitativo.
Cuando retira su dedo del [X-PAD], el efecto se apaga.
Para mantener el efecto encendido cuando retira su dedo del [X-PAD], mientras
toca el [X-PAD] pulse el botón [ON/OFF] de [BEAT EFFECTS] y luego retire su
dedo del [X-PAD].
䢢Procedimiento de operación 2
1 Siga los pasos 1 a 5 del procedimiento Uso de la función
BEAT EFFECT.
2 Toque el [X-PAD].
El [X-PAD] cambia el parámetro cuantitativo del efecto.
Operación del software DJ usando la función
MIDI
Esta unidad envía la información de operación de los botones y controles en el
formato MIDI universal.
Cuando se conecta con un cable USB a un ordenador en el que se ha instalado un
software de DJ compatible con MIDI, el software de DJ se puede controlar desde
esta unidad.
Instale de antemano el software DJ en su ordenador. Además, haga los ajustes de
audio y MIDI para el software DJ.
Para conocer instrucciones del canal MIDI, vea Cambio de los ajustes en la
página 23.
Para el envío de mensajes por esta unidad, vea Mapa de asignación MIDI en la
página 21.
1 Conecte el terminal [USB] de esta unidad al ordenador.
Para conocer detalles de las conexiones, vea Conexión al panel de control en la
página 11.
2 Inicie el software DJ.
3 Pulse el botón [ON/OFF (UTILITY)].
Active la función MIDI.
La transmisión del mensaje MIDI empieza.
Cuando se mueva un fader o control se enviará un mensaje correspondiente a la
posición.
Cuando se pulsa el botón [START/STOP] y se mantiene pulsado más de 2 segun-
dos se envía una serie de mensajes MIDI correspondiente a las posiciones del
botón, fader o control (instantánea).
Cuando se pulsa de nuevo el botón [ON/OFF (UTILITY)], el envío de mensajes
MIDI se detiene.
La señal de reloj de sincronización MIDI (información BPM) se envía indepen-
dientemente del estado del botón [ON/OFF (UTILITY)].
1717
Es
Español
䢢Preparativos para usar la función MIDI LFO
El software, los aparatos, etc. compatibles con MIDI (“lado de recepción de señales
MIDI” más abajo) deberán prepararse (“aprenderse”) antes de usar la función MIDI
LFO.
Haga las operaciones de aprendizaje en el lado de recepción de señales MIDI.
Para el envío de mensajes por esta unidad, vea Mapa de asignación MIDI en la
página 21.
1 Pulse el botón [ON/OFF (UTILITY)].
Active la función MIDI.
2 Gire el conmutador selector de efectos de tiempos de
compás.
Seleccione [SND/RTN (MIDI LFO)].
[S/RELFO] parpadea en la sección de visualización de efectos y luego se visualiza
[SND/RTN].
3 Pulse el botón [ON/OFF] para [BEAT EFFECTS].
Aprenda el mensaje MIDI del botón [ON/OFF] del [BEAT EFFECTS] en el lado de
recepción de señales MIDI.
El mensaje MIDI enviado desde el botón [ON/OFF] del [BEAT EFFECTS] es
diferente cuando se selecciona [SND/RTN (MIDI LFO)] y cuando se selecciona
cualquier otra opción que no sea [SND/RTN (MIDI LFO)].
El mensaje MIDI del botón [ON/OFF] de [BEAT EFFECTS] cuando se selecciona
[SND/RTN (MIDI LFO)] sólo se envía cuando la operación se realiza siguiendo
este procedimiento.
4 Pulse el botón [LFO FORM (WAKE UP)].
Aprenda el mensaje MIDI del botón [LFO FORM] (WAKE UP) en el lado de recep-
ción de señales MIDI.
[1/7
] y [1/7LFO] se visualizan de forma alternativa en la sección de visualiza-
ción de efectos.
Si es necesario, establezca el mapeado MIDI para otros botones y controles.
Como el mensaje MIDI del botón [LFO FORM (WAKE UP)] se envía secuen-
cialmente, dependiendo de los ajustes del lado de recepción de señales MIDI,
puede que no sea posible aprender el mensaje MIDI.
Para establecer el mapeado MIDI para otros botones y controles, pulse el botón
[LFO FORM(WAKE UP)] para cambiar a [SND/RTN].
䢢Usando el MIDI LFO
Haga los preparativos de antemano siguiendo el procedimiento de Preparativos para
usar la función MIDI LFO.
1 Gire el conmutador selector de efectos de tiempos de
compás.
Seleccione [SND/RTN (MIDI LFO)].
[S/RELFO] parpadea en la sección de visualización de efectos y luego se visualiza
[SND/RTN].
2 Pulse el botón [LFO FORM (WAKE UP)].
La transmisión de las señales MIDI empieza.
El patrón de forma de onda de señal MIDI cambia cada vez que se pulsa el botón
[LFO FORM (WAKE UP)].
SND/RTN1/7 2/7 3/7
4/7 5/7 6/7 7/7
3 Pulse el botón [BEAT , ].
Establezca el tiempo de salida de la forma de onda de la señal MIDI.
4 Pulse el botón [ON/OFF] de [BEAT EFFECTS] o toque el
[X-PAD].
El mensaje MIDI para activar el efecto se envía.
Cuando se pulsa el botón [LFO FORM (WAKE UP)] y se selecciona un ajuste
de [1/7] – [7/7], el mensaje MIDI para los botones y los controles de
abajo se puede enviar aunque el modo MIDI esté desactivado.
— [X-PAD] (Tocar K Soltar)
— Botón [CUE] de [BEAT EFFECTS]
—Conmutador selector de canal de efectos
— Control [LEVEL/DEPTH]
— Botón [ON/OFF] de [BEAT EFFECTS]
Cuando se pulsa el botón [LFO FORM (WAKE UP)] para cambiar entre
[SND/RTN] y [MIDI LFO], BEAT EFFECT se desactiva automáticamente.
No es posible cambiar entre [SND/RTN] y [MIDI LFO] mientras se toca [X-PAD].
䢢Envió de mensajes de inicio y parada de MIDI
Pulse el botón [START/STOP] para [MIDI].
Los mensajes de inicio y parada de MIDI se envían alternativamente cada vez
que se pulsa el botón [START/STOP], independientemente de si la función MIDI
está activa o desactivada.
Utilización de un secuenciador MIDI externo
Esta unidad envía la información de operación de los botones y controles en el
formato MIDI universal.
Esta unidad envía el tempo de la fuente que se reproduce (información BPM) como
señal de reloj de sincronización MIDI. Esto se puede usar para sincronizar un
secuenciador MIDI externo con el tempo de la fuente.
Para el envío de mensajes por esta unidad, vea Mapa de asignación MIDI en la
página 21.
Los secuenciadores MIDI incompatibles con las señales de sincronización MIDI
no se pueden sincronizar.
Los secuenciadores MIDI externos no se pueden sincronizar para las fuentes en
las que las BPM no se pueden medir de forma estable.
La señal del reloj de sincronización MIDI sale incluso con los valores BPM
introducidos manualmente pulsando rápida y brevemente con un dedo el botón
[TAP]. El margen de salida de las señales de reloj de sincronización MIDI es de
40 BPM a 250 BPM.
1 Conecte el terminal [MIDI OUT] al terminal MIDI IN del
secuenciador MIDI usando un cable MIDI de venta en tiendas
especializadas.
2 Ponga el modo de sincronización del secuenciador MIDI en
el modo Slave.
3 Pulse el botón [START/STOP] para [MIDI].
El mensaje de inicio de MIDI se envía.
4 Pulse [ON/OFF] en la sección [MIDI].
La transmisión del mensaje MIDI empieza.
1818
Es
Tipos de efectos
Tipos de los efectos SOUND COLOR FX
Nombre de efectoDescripcionesControl [COLOR]
SPACE
Aplica un efecto de reverberación
al sonido original.
Gire hacia la izquierda: Aplica
el efecto de reverberación a las
gamas medias y bajas.
Giro hacia la derecha: Aplica
el efecto de reverberación a las
gamas medias y altas.
DUB ECHO
Aplica un efecto de eco, con
el sonido un poco retrasado
después de salir el sonido ori-
ginal varias veces y atenuado
gradualmente.
Gire hacia la izquierda: Aplica el
efecto de eco a la gama media
solamente.
Giro hacia la derecha: Aplica
el efecto de eco a la gama alta
solamente.
GATE/COMP
Cambia la tesitura del sonido
general.
Gire hacia la izquierda: Un efecto
de puerta crea un sonido más
apretado, con una sensación de
volumen reducido.
Giro hacia la derecha: Un efecto
de compresor crea un sonido más
grueso, con una sensación de
volumen aumentado.
NOISE
El ruido blanco generado dentro
de esta unidad se mezcla con
el sonido del canal a través del
filtro y sale.
El volumen se puede ajustar
girando los controles [TRIM]
para los canales respectivos.
La calidad del sonido se
puede ajustar girando los
controles [EQ/ISO (HI, MID,
LOW)].
Gire hacia la izquierda: La frecuen-
cia de corte del filtro por el que
pasa el ruido blanco disminuye
gradualmente.
Giro hacia la derecha: La frecuen-
cia de corte del filtro por el que
pasa el ruido blanco aumenta
gradualmente.
CRUSH
Cambia el sonido original a un
sonido apagado para la salida.
Gire hacia la izquierda: Aumenta la
distorsión del sonido.
Giro hacia la derecha: El sonido se
apaga antes de pasar a través del
filtro pasaaltos.
FILTER
Da salida al sonido que ha pasado
a través de un filtro.
Gire hacia la izquierda: Disminuye
gradualmente la frecuencia de
corte del filtro pasabajos.
Giro hacia la derecha: Aumenta
gradualmente la frecuencia de
corte del filtro pasaaltos.
Tipos de BEAT EFFECT
DELAY
1
Sale una vez un sonido de retardo según la fracción de tiempo de compás estable-
cida con los botones [BEAT, ].
Cuando se añade un sonido de retardo de 1/2 tiempo de compás, 4 tiempos de
compás se convierten en 8 tiempos de compás.
Original
(4 tiempos
de compás)
1/2 retardo
(8 tiempos
de compás)
Botones BEAT, (paráme-
tro 1)
Use éstos para establecer un tiempo de retardo de 1/8 – 16/1
con respecto al tiempo de un tiempo de compás de las BPM.
Control TIME (parámetro 2)
Use esto para establecer el tiempo de retardo.
1 a 4000 (ms)
Control LEVEL/DEPTH (pará-
metro 3)
Use esto para establecer el balance entre el sonido original y
el sonido de retardo.
X-PAD (parámetro 4)Use esto para establecer el tiempo de retardo.
ECHO
1
2
Sale varias veces un sonido de retardo que se atenúa gradualmente según la frac-
ción de tiempo de compás establecida con los botones [BEAT, ].
Con ecos de tiempo de compás de 1/1, los sonidos de retardo se atenúan según el
tempo de la pista incluso después de haber sido cortado el sonido de entrada.
Sonido de entrada apagado
Tiempo
Desvanecimiento
1 tiempo de compás
Botones BEAT, (paráme-
tro 1)
Use éstos para establecer un tiempo de retardo de 1/8 – 16/1
con respecto al tiempo de un tiempo de compás de las BPM.
Control TIME (parámetro 2)
Use esto para establecer el tiempo de retardo.
1 a 4000 (ms)
Control LEVEL/DEPTH (pará-
metro 3)
Use esto para establecer el balance entre el sonido original y
el sonido de eco.
X-PAD (parámetro 4)Use esto para establecer el tiempo de retardo.
SPIRAL
1
2
Esta función añade un efecto de reverberación al sonido de entrada.
Cuando cambia el tiempo de retardo el pitch cambia simultáneamente.
Sonido de entrada apagado
Tiempo
Desvanecimiento
1 tiempo de compás
Botones BEAT, (paráme-
tro 1)
Use éstos para establecer un tiempo de retardo de 1/8 – 16/1
con respecto al tiempo de un tiempo de compás de las BPM.
Control TIME (parámetro 2)
Use esto para establecer el tiempo de retardo.
10 a 4000 (ms)
Control LEVEL/DEPTH (pará-
metro 3)
Use esto para establecer el balance entre el sonido original y el
sonido de efecto, y para establecer el parámetro cuantitativo.
X-PAD (parámetro 4)Use esto para establecer el tiempo de retardo.
REVERB
1
2
Esta función añade un efecto de reverberación al sonido de entrada.
Nivel
Sonido directo
Sonido reflejado pronto
Reverberaciones
1%
100%
Tiempo
Botones BEAT, (paráme-
tro 1)
Use éstos para establecer el grado del efecto de reverberación,
desde 1 – 100 %.
Control TIME (parámetro 2)
Use esto para establecer el grado de efecto de reverberación.
1 – 100 (%)
Control LEVEL/DEPTH (pará-
metro 3)
Ajusta el balance entre el sonido original y el sonido de efecto.
X-PAD (parámetro 4)Establece la frecuencia de corte del filtro.
TRANS
1
El sonido se corta según la fracción de tiempo de compás establecida con los boto-
nes [BEAT, ].
CorteCorte
1/1 compás de tiempo
Tiempo
Botones BEAT, (paráme-
tro 1)
Use éstos para establecer un tiempo de corte de 1/16 – 16/1
con respecto al tiempo de un tiempo de compás de las BPM.
Control TIME (parámetro 2)
Use esto para establecer el tiempo de efecto.
10 a 16000 (ms)
Control LEVEL/DEPTH (pará-
metro 3)
Ajusta el balance entre el sonido original y el sonido de efecto.
X-PAD (parámetro 4)Esto establece el tiempo de corte.
FILTER
1
La frecuencia de corte del filtro cambia según la fracción de tiempo de compás
establecida con los botones [BEAT, ].
Frecuencia
1919
Es
Español
Botones BEAT, (paráme-
tro 1)
Use éstos para establecer el ciclo para mover la frecuencia de
corte como un tiempo de 1/4 – 64/1 con respecto al tiempo de
un tiempo de compás de las BPM.
Control TIME (parámetro 2)
Use esto para establecer el ciclo con el que se mueve la
frecuencia de corte.
10 a 32000 (ms)
Control LEVEL/DEPTH (pará-
metro 3)
Cuanto más se gira el control a la derecha más se aplica el
efecto.
X-PAD (parámetro 4)
El ciclo de movimiento de la frecuencia de corte fluctúa
ligeramente.
FLANGER
1
Se produce un efecto de flanger de 1 ciclo según la fracción de tiempo de compás
establecida con los botones [BEAT, ].
Ciclo
Tiempo
Retardo breve
Botones BEAT, (paráme-
tro 1)
Use éstos para establecer el tiempo de efecto 1/4 – 64/1 con
respecto al tiempo de un tiempo de compás de las BPM.
Control TIME (parámetro 2)
Use esto para establecer el ciclo mediante el que se mueve el
efecto de flanger.
10 a 32000 (ms)
Control LEVEL/DEPTH (pará-
metro 3)
Cuanto más se gira el control a la derecha más se aplica el
efecto.
Cuando se gira completamente a la izquierda sólo sale el
sonido original.
X-PAD (parámetro 4)
El ciclo de movimiento del efecto de flanger fluctúa
ligeramente.
PHASER
1
El efecto de phaser cambia según la fracción de tiempo de compás establecida con
los botones [BEAT, ].
Ciclo
Desplazamiento de fase
Tiempo
Botones BEAT, (paráme-
tro 1)
Use éstos para establecer el ciclo para mover el efecto de
phaser como un tiempo de 1/4 – 64/1 con respecto al tiempo
de un tiempo de compás de las BPM.
Control TIME (parámetro 2)
Esto ajusta el ciclo por el que se mueve el efecto de phaser.
10 a 32000 (ms)
Control LEVEL/DEPTH (pará-
metro 3)
Cuanto más se gira el control a la derecha más se aplica el
efecto.
Cuando se gira completamente a la izquierda sólo sale el
sonido original.
X-PAD (parámetro 4)
El ciclo de movimiento del efecto de phaser fluctúa
ligeramente.
ROBOT
1
El sonido original cambia a un sonido como el producido por un robot.
Botones BEAT, (paráme-
tro 1)
Use esto para establecer el grado del sonido de efecto.
-100–100 (%)
Control TIME (parámetro 2)
Use esto para establecer el grado del sonido de efecto.
-100–100 (%)
Control LEVEL/DEPTH (pará-
metro 3)
Ajusta el balance entre el sonido original y el sonido de efecto.
X-PAD (parámetro 4)Esto cambia el grado del sonido de efecto.
MELODIC
1
2
La gama media del sonido que está siendo introducido en el punto cuando se pulsa
el botón [ON/OFF] se graba, y el sonido grabado sale según el nivel del sonido que
está siendo introducido.
Botones BEAT, (paráme-
tro 1)
Esto establece la forma de reproducción del sonido grabado.
Control TIME (parámetro 2)Esto establece la forma de reproducción del sonido grabado.
Control LEVEL/DEPTH (pará-
metro 3)
Esto ajusta el balance entre el sonido original y el sonido
grabado.
X-PAD (parámetro 4)Esto establece la forma de reproducción del sonido grabado.
SLIP ROLL
1
2
El sonido que está siendo introducido en el punto cuando se pulsa [ON/OFF] se
graba, y el sonido grabado sale repetidamente según la fracción de tiempo de com-
pás establecida con los botones [BEAT, ].
Cuando el tiempo del efecto cambia, el sonido de entrada se vuelve a grabar.
1/1 repetido1/2 repetido
Original
Redoble
Cambiado de 1/2 a 1/1
Efecto encendido
Botones BEAT, (paráme-
tro 1)
Use éstos para establecer un tiempo de efecto de 1/16 – 16/1
con respecto al tiempo de un tiempo de compás de las BPM.
Control TIME (parámetro 2)
Use esto para establecer el tiempo de efecto.
10 a 4000 (ms)
Control LEVEL/DEPTH (pará-
metro 3)
Use esto para establecer el balance entre el sonido original
y ROLL.
X-PAD (parámetro 4)Use esto para establecer el tiempo de efecto.
ROLL
1
2
El sonido que está siendo introducido en el punto cuando se pulsa [ON/OFF] se
graba, y el sonido grabado sale repetidamente según la fracción de tiempo de com-
pás establecida con los botones [BEAT, ].
Efecto encendido
Repetido
Original
1/1 redoble
Botones BEAT, (paráme-
tro 1)
Use éstos para establecer un tiempo de efecto de 1/16 – 16/1
con respecto al tiempo de un tiempo de compás de las BPM.
Control TIME (parámetro 2)
Use esto para establecer el tiempo de efecto.
10 a 4000 (ms)
Control LEVEL/DEPTH (pará-
metro 3)
Use esto para establecer el balance entre el sonido original
y ROLL.
X-PAD (parámetro 4)Use esto para establecer el tiempo de efecto.
REV ROLL
1
2
El sonido que está siendo introducido en el punto cuando se pulsa el botón
[ON/OFF] se graba, y el sonido grabado se invierte y luego sale repetidamente
según la fracción de tiempo de compás establecida con los botones [BEAT, ].
Efecto encendido
Invertido y repetido
Original
1/1 redoble
invertido
Botones BEAT, (paráme-
tro 1)
Use éstos para establecer un tiempo de efecto de 1/16 – 16/1
con respecto al tiempo de un tiempo de compás de las BPM.
Control TIME (parámetro 2)
Use esto para establecer el tiempo de efecto.
10 a 4000 (ms)
Control LEVEL/DEPTH (pará-
metro 3)
Use esto para establecer el balance entre el sonido original
y ROLL.
X-PAD (parámetro 4)Use esto para establecer el tiempo de efecto.
2020
Es
SND/RTN (MIDI LFO)
Conecte aquí un efector externo, etc.
Pulsando el botón [LFO FORM (WAKE UP)], el software y los aparatos compatibles
con MIDI se pueden controlar usando señales MIDI.
䢢SND/RTN
1
Conecte aquí un efector externo, etc.
SEND
RETURN
Efector
DJM-900SRT Serato DJ Edition
1212
1212
0
0
ON
TALK
OVER
OFF
9
6
-
26
/
6
-
26
/
6
-
26
/
9
6
-
26
/
6
-
26
/
6
-
26
/
9
6
-
26
/
6
-
26
/
6
-
26
/
9
6
-
26
/
6
-
26
/
6
-
26
/
0
Botones BEAT, (paráme-
tro 1)
—
Control TIME (parámetro 2)—
Control LEVEL/DEPTH (pará-
metro 3)
Ajusta la entrada de nivel de sonido al terminal [RETURN].
X-PAD (parámetro 4)—
䢢MIDI LFO
La forma de onda de señal MIDI (0 – 127) cambia según el tempo de la pista.
El patrón de forma de onda de señal MIDI cambia cada vez que se pulsa el botón
[LFO FORM (WAKE UP)].
Botones BEAT, (paráme-
tro 1)
Use éstos para establecer un tiempo de salida de forma de
onda de 1/4 – 64/1 con respecto a un tiempo de un beat del
BPM.
Control TIME (parámetro 2)Use esto para establecer el tiempo de salida de forma de onda.
Control LEVEL/DEPTH (pará-
metro 3)
—
X-PAD (parámetro 4)Esto cambia el patrón de la forma de onda de la señal MIDI.
Cuando se selecciona [MIDI LFO], el sonido del efector externo conectado al terminal
[RETURN] no se introduce.
1Cuando se selecciona [CF.A], [CF.B] o [MASTER] con el conmutador selector de
canales de efectos, si el sonido del canal que usted quiere monitorear no está
siendo emitido al canal [MASTER], el sonido de efecto no podrá ser monitoreado
aunque se pulse el botón [CUE] para [BEAT EFFECTS].
2Si el efecto está apagado, el sonido del efecto no se puede monitorear aunque
se pulse el botón [CUE] para [BEAT EFFECTS].
2121
Es
Español
Mapa de asignación MIDI
Mapa de asignación MIDI
“CC” es la abreviatura de “control change”. Un cambio de control es un tipo de señal MIDI usada para transmitir varios tipos de información de control, tal como timbre,
volumen, etc.
En esta unidad, los valores de 0 a 127 salen como CC principalmente cuando se utilizan los controles y los faders. CC también salen cuando se utilizan ciertos botones.
“Note” es un término MIDI usado cuando se pulsan o liberan notas en un piano u otro instrumento de teclado.
Fader de canales 1 o crossfaderNote 102—BACK CUE = 0, PLAY = 127
Fader de canales 2 o crossfaderNote 103—BACK CUE = 0, PLAY = 127
Fader de canales 3 o crossfaderNote 104—BACK CUE = 0, PLAY = 127
Fader de canales 4 o crossfaderNote 105—BACK CUE = 0, PLAY = 127
MIDI
START
BotónSTART——
STOP
BotónSTOP——
1Cuando al encender un botón se apaga otro, los mensajes de encendido y apagado de MIDI se envían desde los dos botones.
Cuando no hay un botón que se apague, el mensaje de encendido de MIDI se envía desde el botón que fue pulsado.
2Cuando se cambia de una posición a otra, las señales MIDI ON y OFF se envian respectivamente desde ambas posiciones.
—Cuando se pulsa el botón [START/STOP] durante más de 1 segundo, los mensajes MIDI correspondientes a las posiciones de los botones, faders y controles se envían en un grupo (instantánea).
La instantánea MIDI envía todos los mensajes MIDI, excepto el inicio y la parada de MIDI.
3La operación cambia según la configuración del conmutador selector [CROSS FADER ASSIGN (A, THRU, B)].
—Cuando el conmutador selector [CROSS FADER ASSIGN (A, THRU, B)] se pone en [THRU]: Los mensajes MIDI se envían cuando el botón [FADER START] se pone en [ON] y el fader de canales se
aleja de usted, a partir de la posición más próxima a usted, y se vuelve a poner en la posición más próxima a usted.
—Cuando el conmutador selector [CROSS FADER ASSIGN (A, THRU, B)] se pone en [A]: Los mensajes MIDI se envían cuando el botón [FADER START] se pone en [ON] y el crossfader se mueve
desde el extremo más alejado del lado [B] y cuando se vuelve a poner en el extremo más alejado del lado [B].
—Cuando el conmutador selector [CROSS FADER ASSIGN (A, THRU, B)] se pone en [B]: Los mensajes MIDI se envían cuando el botón [FADER START] se pone en [ON] y el crossfader se mueve
desde el extremo más alejado del lado [A] y cuando se vuelve a poner en el extremo más alejado del lado [A].
2323
Es
Español
Cambio de los ajustes
1 Pulse elbotón [ON/OFF (UTILITY)] durante más de 1
segundo.
Se visualiza la pantalla de ajuste de modo [USER SETUP].
Para visualizar la pantalla de ajuste de modo [CLUB SETUP], desconecte pri-
mero la alimentación de esta unidad y luego pulse el botón [POWER] mientras
pulsa [ON/OFF (UTILITY)].
2 Pulse el botón [BEAT , ].
Seleccione el elemento de ajuste.
3 Pulse el botón [TAP].
La pantalla cambia a la pantalla de cambio del valor de ajuste del elemento de
ajuste.
4 Pulse el botón [BEAT , ].
Cambie el valor de ajuste.
5 Pulse el botón [TAP].
Introduzca el valor de ajuste.
La pantalla anterior reaparece.
Para volver a la pantalla anterior sin cambiar los ajustes, pulse el botón
[QUANTIZE].
6 Pulse el botón [ON/OFF (UTILITY)].
Cierre de la pantalla de ajuste de modo [USER SETUP].
Para cerrar la pantalla de ajuste de modo [CLUB SETUP], pulse el botón
[POWER] para desconectar la alimentación de esta unidad.
Acerca de la función de espera automática
Cuando [Auto Standby] se pone en [ON], el modo de espera se activa automática-
mente si pasan 4 horas bajo las condiciones mostradas a continuación.
—Que no se utilicen ninguno de los botones o controles de la unidad.
—Que no entren señales de audio de –10 dB o más por los terminales de entrada
de esta unidad.
—Que no se hagan conexiones a PRO DJ LINK.
Cuando se pulsa el botón [LFO FORM (WAKE UP)], el modo de espera se
cancela.
Esta unidad sale de fábrica con la función de espera automática activada. Si no
quiere usar la función de espera automática, ponga [Auto Standby] en [OFF].
Acerca de la función talk-over
La función talk-over tiene los dos modos descritos a continuación.
— [ADV] (talk-over avanzado): Sólo la gama media del sonido de los canales que
no son el canal [MIC] se atenúa según el valor de ajuste [Talk Over LEVEL] y
luego sale.
dB
Frecuencia
— [NOR] (talk-over normal): El sonido de los canales que no son el canal [MIC] se
atenúa según el valor de ajuste [Talk Over LEVEL] y luego sale.
dB
Frecuencia
Configuración de preferencias
*: Ajuste al hacerse la compra
ModoAjustes opcionalesVisualización en pantallaValor de ajusteDescripciones
USER SETUP
Fader StartF.S.
ON, OFF*Activa y desactiva al mismo tiempo la función de inicio del fader.
MIDI CHMIDI CH
1* a 16Ajusta el canal MIDI.
MIDI Button TypeMIDI BT
TGL*, TRGSelecciona el modo de transmisión de señales MIDI, [TGL (TOGGLE)] o [TRG (TRIGGER)].
Talk Over ModeTLK MOD
ADV*, NORSelecciona el modo de la función talk-over, [ADV(ADVANCED)] o [NOR(NORMAL)].
Talk Over LEVELTLK LVL
–6 dB, –12 dB,
–18 dB*, –24 dB
Establece el nivel de atenuación del sonido de la función talk-over.
CLUB SETUP
Digital Master Out LevelDOUT LV
–19 dB*, –15 dB,
–10 dB, –5 dB
Establece el nivel máximo del sonido que sale de los terminales [DIGITAL MASTER OUT].
1
Digital Master Out Sampling
Rate
DOUT FS
48 kHz, 96 kHz*Establece la frecuencia de muestreo de la señal digital.
MASTER ATT.MST ATT
–6 dB, –3 dB,
0 dB*
Establece el nivel de atenuación del sonido que sale de los terminales [MASTER1] y
[MASTER2].
Auto StandbyAUTOSTB
ON*, OFFActiva y desactiva la función de espera automática.
Mic Output To Booth
Monitor
MIC BTH
ON*, OFFEstablece si van a salir o no señales de audio de micrófono por los terminales [BOOTH].
PC UTILITYPC UTLY
ON, OFF*
Establece si se va a iniciar o no automáticamente el software de utilidad de ajuste del
ordenador cuando se conecta un cable USB.
Peak LimiterPKLIMIT
ON*, OFFDisminuye el desagradable y repentino corte digital de la salida maestra.
Factory ResetINITIAL
YES, NO*Restaura todos los ajustes a los ajustes de fábrica.
1Note que el sonio de la salida puede que se distorsione si el indicador de nivel maestro no se enciende hasta la parte más alta.
Acerca del software de utilidad de ajustes
La utilidad de ajustes se puede usar para hacer las verificaciones y ajustes descritos
más abajo.
—Verificación del estado de los conmutadores selectores de entrada de esta
unidad
—Ajuste de la salida de datos de audio de esta unidad al ordenador
—Ajuste del tamaño de la memoria intermedia (cuando se usa Windows ASIO)
—Verificación de la versión del software controlador
Visualización de la utilidad de ajustes
Para Windows
Haga clic en el menú [Iniciar] > [Todos los programas] > [Pioneer] > [DJM-
900SRT] > [Utilidad de configuración delDJM-900SRT].
Para Mac OS X
Haga clic en el icono [Macintosh HD] > [Application] > [Pioneer] > [DJM-
900SRT] > [Utilidad de configuración delDJM-900SRT].
2424
Es
Verificación del estado de los conmutadores
selectores de entrada de esta unidad
Visualice la utilidad de ajustes antes de empezar.
Haga clic en la ficha [MIXER INPUT].
Ajuste de la salida de datos de audio de esta
unidad al ordenador
Cuando Serato DJ esté ejecutándose y usando esta unidad como aparato de audio
predeterminado, establezca la salida de datos de audio en Serato DJ.
Visualice la utilidad de ajustes antes de empezar.
1 Haga clic en la ficha [MIXER OUTPUT].
2 Haga clic en el menú desplegable [Mixer Audio Output].
Seleccione y establezca los datos de audio que va a enviar al ordenador desde el
flujo de señales de audio del interior de esta unidad.
CH1CH2CH3CH4
CH1 Control Tone
PHONO
1
CH2 Control Tone
PHONO
1
CH3 Control Tone
PHONO
1
CH4 Control Tone
PHONO
1
CH1 Control Tone
CD/LINE
1
CH2 Control Tone
CD/LINE
1
CH3 Control Tone
CD/LINE
1
CH4 Control Tone
CD/LINE
1
CH1 Control Tone
DIGITAL
1
CH2 Control Tone
DIGITAL
1
CH3 Control Tone
DIGITAL
1
CH4 Control Tone
DIGITAL
1
Post CH1 Fader
2
Post CH2 Fader
2
Post CH3 Fader
2
Post CH4 Fader
2
Cross Fader A
2
Cross Fader A
2
Cross Fader A
2
Cross Fader A
2
Cross Fader B
2
Cross Fader B
2
Cross Fader B
2
Cross Fader B
2
MICMICMICMIC
MIX (REC OUT)
2
MIX (REC OUT)
2
MIX (REC OUT)
2
MIX (REC OUT)
2
1Los datos de audio salen con el mismo volumen que entran en esta unidad, independiente-
mente del ajuste [USB Output Level].
2Cuando se usa para aplicaciones que no son la grabación, ponga atención a los ajustes de
la aplicación DJ para que no se generen bucles de audio. Si se generan bucles de audio, el
sonido puede entrar o salir con volúmenes no deseados.
3 Haga clic en el menú desplegable [USB Output Level].
Ajuste el volumen de la salida de datos de audio de esta unidad.
El ajuste [USB Output Level] se aplica igualmente a todos los datos de audio.
Sin embargo, cuando se selecciona 1 en la tabla del paso 2, los datos de audio
salen con el mismo volumen con el que entran en esta unidad.
Si no se puede lograr un volumen suficiente usando sólo el ajuste de volumen
del software del DJ, cambie el ajuste [USB Output Level] para ajustar el volu-
men de los datos de audio que salen de esta unidad. Note que el sonido se
distorsionará si el volumen se sube demasiado.
Ajuste del tamaño de la memoria intermedia
(cuando se usa Windows ASIO)
Si está ejecutándose una aplicación usando esta unidad como aparato de audio
predeterminado (software de DJ, etc.), salga de esa aplicación antes de ajustar la
capacidad de la memoria intermedia.
Visualice la utilidad de ajustes antes de empezar.
Haga clic en la ficha [ASIO].
Una memoria intermedia lo suficientemente grande reduce la posibilidad
de que se pierda sonido (interrupción de sonido) pero aumenta el retardo de
transmisión de la señal de audio (latencia).
Verificación de la versión del software
controlador
Visualice la utilidad de ajustes antes de empezar.
Haga clic en la ficha [About].
Verificación de la información más
reciente en el software controlador
Visite nuestro sitio web indicado abajo para conocer la información más reciente
del software controlador que se va a usar exclusivamente con esta unidad.
http://pioneerdj.com/support/
La operación no se puede garantizar cuando hay múltiples unidades de este
mezclador conectadas a un solo ordenador.
2525
Es
Español
Información adicional
Solución de problemas
La operación incorrecta se confunde a menudo con un problema o un fallo de funcionamiento. Si piensa que algo funciona mal con este componente, compruebe los
puntos de abajo. Algunas veces, el problema puede estar en otro componente. Inspeccione los otros componentes y los aparatos eléctricos que esté utilizando. Si no se
puede corregir el problema después de comprobar los elementos de abajo, pida al servicio de Pioneer autorizado más cercano o a su concesionario que realice el trabajo
de reparación.
El reproductor puede no funcionar bien debido a la electricidad estática o a otras influencias externas. En tales casos, el funcionamiento normal se puede restaurar des-
enchufando el cable de alimentación y volviéndolo a enchufar.
ProblemaVerificaciónRemedio
La alimentación no se conecta.¿Está bien conectado el cable de alimentación?Enchufe el cable de alimentación a una toma de CA.
No hay sonido o éste está muy bajo.¿Está el conmutador selector de entrada en la posición
apropiada?
Cambie el conmutador selector de entrada a la fuente de entrada del canal. (página 13)
¿Están bien conectados los cables de conexión?Conecte correctamente los cables de conexión. (página 10)
¿Están sucios los terminales y las clavijas?Limpie los terminales y las clavijas antes de hacer conexiones.
¿Está [MASTER ATT.] en [–6 dB], etc.?En la pantalla [USER SETUP], active [MASTER ATT.]. (página 23)
No puede salir el sonido digital.¿Es la frecuencia de muestreo (fs) de la salida de audio
digital adecuada a las especificaciones del aparato
conectado?
En la pantalla [CLUB SETUP], ajuste [Digital Master Out Sampling Rate] según las especifi-
caciones del equipo conectado. (página 23)
Sonido distorsionado.¿Está bien ajustada la salida del nivel de sonido del canal
[MASTER]?
Ajuste el control [MASTER LEVEL] de forma que el indicador de nivel de canal maestro se
encienda a unos [0 dB] en el nivel de pico. (Página 13)
Ponga [MASTER ATT.] en [–3 dB] o [–6 dB]. (página 23)
¿Está bien ajustado el nivel de audio introducido en cada
canal?
Ajuste el control [TRIM] de forma que el indicador de nivel del canal se encienda cerca de
[0 dB] al nivel de pico. (Página 13)
No se puede usar crossfade.¿Están bien ajustados los connutadores selectores
[CROSS FADER ASSIGN (A, THRU, B)]?
Ajuste bien los conmutadores selectores [CROSS FADER ASSIGN (A, THRU, B)] para los
diferentes canales. (Página 13)
No se puede iniciar un reproductor DJ con
fader.
¿Está [FADER START] en [OFF]?En la pantalla [USER SETUP] ponga [FADER START] en [ON]. (página 23)
¿Está el reproductor DJ bien conectado al terminal [LINK]?Conecte bien el reproductor DJ al terminal [LINK] con un cable LAN. (página 10)
¿Están bien conectados los cables de audio?Conecte los terminales de entrada de audio de esta unidad y los terminales de salida de
audio del reproductor DJ con un cable de audio. (página 10)
¿Está bien puesto el número de reproductor del reproduc-
tor DJ?
Ponga el número de reproductor del reproductor DJ que sea el mismo que el del canal al que
está conectado el cable de audio.
[BEAT EFFECTS] no funciona.¿Está el conmutador selector de canales de efectos en la
posición apropiada?
Gire el conmutador selector de canales de efectos para seleccionar el canal al que desea
aplicar el efecto.
[SOUND COLOR FX] no funciona.¿Está el control [
COLOR] en una posición apropiada?Gire el control [COLOR] a la derecha o a la izquierda. (página 15)
No se puede usar un efector externo.¿Está el botón [ON/OFF] para [BEAT EFFECTS] en [ON]?Pulse el botón [ON/OFF] para [BEAT EFFECTS] para poner [SND/RTN] en [ON]. (página 15)
¿Está el efector externo bien conectado al terminal [SEND]
o [RETURN]?
Conecte un efector externo a los terminales [SEND] y [RETURN]. (página 10)
Sonido distorsionado de un efector externo.¿Está el nivel de salida de audio del efector externo ajus-
tada a un nivel apropiado?
Ajuste el nivel de salida de audio del efector externo.
El tempo (BPM) no se puede medir o el valor
de la medición del tempo (BPM) resulta
inverosímil.
¿Está el nivel de entrada de audio demasiado alto o bajo?Ajuste el control [TRIM] de forma que el indicador de nivel del canal se encienda cerca de
[0 dB] al nivel de pico. (Página 13)
Para algunas pistas puede que no sea posible medir el tempo (BPM). Use el botón [TAP] para
introducir manualmente el tempo. (página 15)
El tempo medido (BPM) es diferente del
tempo indicado en el CD.
—Los valores pueden cambiar un poco debido a las diferentes formas de medir BPM.
El secuenciador MIDI no sincroniza.¿Está el modo de sincronización del secuenciador MIDI en
el modo Slave?
Ponga el modo de sincronización del secuenciador MIDI en el modo Slave.
¿Es compatible el secuenciador MIDI que está usado con
las señales de reloj de sincronización MIDI?
Los secuenciadores MIDI incompatibles con las señales de reloj de sincronización MIDI no
se pueden sincronizar.
El control MIDI no funciona.¿Está activado el canal MIDI?Pulse el botón [ON/OFF] para [MIDI]. (página 16)
¿Están bien hechos los ajustes MIDI?Para usar software DJ con esta unidad, los mensajes MIDI de esta unidad deberán asignarse
al software DJ que esté utilizando. Para conocer instrucciones de la asignación de mensajes,
vea el manual de instrucciones del Software DJ.
Esta unidad no se reconoce después de ser
conectada a un ordenador.
El indicador USB se apaga o parpadea.
¿Está bien instalado el software controlador en su
ordenador?
Instale el software controlador. Si ya está instaldo, reinstálelo. (página 5)
El sonido de un ordenador no puede salir de
esta unidad.
¿Están esta unidad y el ordenador bien conectados?Conecte directamente esta unidad y el ordenador con el cable USB incluido. (página 11)
¿Están bien hechos los ajustes del aparato de salida de
audio?
Seleccione esta unidad con los ajustes del aparato de salida de audio. Para conocer ins-
trucciones de cómo hacer los ajustes para su aplicación, vea las instrucciones de funciona-
miento de la aplicación.
¿Está el conmutador selector de entrada en la posición
apropiada?
Ponga el conmutador selector de entrada en la posición [USB]. (Página 13)
El sonido de efecto no se puede monitorear
aunque se pulse el botón [CUE] para [BEAT
EFFECTS].
—El circuito que genera el eco para los sonidos de efecto [ECHO], [
REVERB], [ROLL],
[SLIP ROLL] y [REV ROLL] se posiciona después del circuito de efecto, por lo que el sonido de
efecto no se puede monitorear. Esto no es señal de mal funcionamiento.
El sonido se distorsiona cuando se conecta
un reproductor analógico a los terminales
[PHONO] de esta unidad.
O, el encendido del indicador de nivel de
canal no cambia a pesar de girar el control
[TRIM].
¿Ha conectado un reproductor analógico con ecualizador
fonográfico incorporado?
Conecte el reproductor analógico con ecualizador fonográfico incorporado a los terminales
[CD/LINE]. (página 10)
Si el reproductor analógico con ecualizador fonográfico incorporado tiene un conmutador
selector PHONO/LINE, póngalo en PHONO.
¿Está una interfaz de audio para ordenadores conectada
entre el reproductor analógico y esta unidad?
Si la salida de la interfaz de audio para ordenadores está en el nivel de línea, conéctela a los
terminales [CD/LINE]. (página 10)
Si el reproductor analógico tiene un conmutador selector PHONO/LINE, póngalo en PHONO.
2626
Es
Diagrama en bloques
Master
Limiter
[BEAT EFFECT
(
SND/RTN]
Effect CH Select
Effect CH Select
Effect Out
CableCheck
RETURN
SEND Out
CHx
CF A/B
MIC
Master
CHx
CF A/B
MIC
Master
Return Level
No Cable
Effect SW
Cable Exist
Effect_CUE
Effect_CUE
[Mono Split / Stereo SWITCH & MIXING]
Mono Split
Stereo
2posi
MIXING
MONO SPLIT/
STEREO SWITCH
[BEAT EFFECT(Others)]
Effect CH Select
Effect CH Select
Effect Out
CHx
CF A/B
MIC
Master
CHx
CF A/B
MIC
Master
Effect SW
Level Depth
CHx Cue On/Off SW
CHx_CUE
Effect Cue On/Off SW
Effect_CUE
Link Cue On/Off SW
Link_CUE
CUE
Mixing
L
R
SEL
Mono Split
Stereo
Master Cue On/Off SW
Master_CUE
Master
Mixing
L
R
H.P. MIX R Out
H.P. MIX L Out
SEL
SEL
3posi
2posi
SOUND
COLOR
EFFECT
CHx
SOUND
COLOR
EFFECT
CHx
3Band
EQ/
ISOLATOR
CHx
BEAT
EFFECT
CHx
BEAT
EFFECT
CHx
BEAT
EFFECT
CHx
BPM Detect CHx Select
Level meter CHx
BEAT
Effect
(SND/RTN)
Send/
Return
CHx
CUE
Monitor
CHx
Link
CUE
Phono
AMP
Analog_PHONO
Analog_CD LINE
Digital/USB
CF Assign
3posi
Assign A
CHx
Assign Thru
CH1-4
Assign B
CHx
CH Fader
3posi
CH
Fader
Curve
Switch
3posi
2posi
2para4para
Cross
Fader
Curve
Switch
Thru
CF A
CF B
MIC Monitor SW
CHx in
CHx Control Tone
2Band
MIC EQ
MIC1,2
MIC1/2 in
LINK in
Return in
Send out
Post CHx Fader
TalkOver ON/OFF
MIX (REC OUT)
Master_CUE
MIC_Out
MIC
MIC_Out
Cross Fader B
Cross Fader A
BPM Detect Master
Level meter Master
CH1-4 COMMON
CH1-4 COMMON
MIC1,2 COMMON
Digital Trim
CHx _CUE
Link_CUE
BPM Detect CF A
BPM Detect CF B
BPM Detect MIC
Send/
Return
CF A
BEAT
EFFECT
MIC
Send/
Return
MIC
BEAT
EFFECT
CF B
Send/
Return
CF B
Cross
Fader
BEAT
EFFECT
Master
Talk
Over
Master
CUE
Talk
Over
Level
Talk Over
Mode
Advanced
/Normal
Master
Mono/
STEREO
Send/
Return
Master
Master
Balance
Master
Balance
Master
Level
HP Level
Booth
Level
SEL
MIC Output
to Booth Monitor
On/Off SW
Booth Out
REC out
USB Common out
Digital out
Master
H.P. out
CHx_CUE
Effect_CUE
Link_CUE
CHx Control Tone
Post CHx Fader
Cross Fader A
Cross Fader B
MIC
MIX (REC OUT)
Master_CUE
Boost
Boost
ATT
Mono Split/
Stereo
SWITCH
& MIXING
Mixer
Audio
Output
Select
MIC
FILTER
MIC In
Level
detect
TalkOver ON/OFF
MIC 1,2
MIX
Off
On
TalkOver
MIC1
MIC2
LANDigital MASTER
RETURN
CH_1_Digital/USB1/2
PHONES
MASTER
BOOTH
REC
SEND
USB1/2
USB3/4
USB5/6
USB7/8
DSP
MIC
ADC
ETHER SW IC
I/Fcom
USB
I/Fcom
Ether
DAC
DAC
PHONES
LAN
MASTER 1
REC
DAC
SEND
MUTE
DAC
BOOTH
MUTE
DAC
MUTE
MASTER 2
MUTE
DIGITAL
MASTER
SRC
DIT
MIC1 LEVEL
MIC2 LEVEL
CH1_Analog
ADC
CD/LINE
PHONO
DIGITAL
ADC
DIR
CH1
TRIM
Control Tone
ADC
CD/LINE
PHONO
DIGITAL
ADC
DIR
CH2
TRIM
Control Tone
ADC
CD/LINE
PHONO
DIGITAL
ADC
DIR
CH3
TRIM
Control Tone
ADC
CD/LINE
PHONO
DIGITAL
ADC
DIR
CH4
TRIM
Control Tone
CH2_Analog
CH3_Analog
CH4_Analog
SRC
SRC
SRC
SRC
RETURN
CH_2_Digital/USB3/4
CH_3_Digital/USB5/6
CH_4_Digital/USB7/8
USB
CH1 Digital IN
Control Tone
Control Tone
Control Tone
Control Tone
CH2 Digital IN
CH3 Digital IN
CH4 Digital IN
CH1 USB1/2 IN
CH1 USB1/2 OUT
CH2 USB3/4 IN
CH3 USB5/6 IN
CH4 USB7/8 IN
CH2 USB3/4 OUT
CH3 USB5/6 OUT
CH4 USB7/8 OUT
SRC
SRC
SRC
SRC
USB
Type B
BEAT
EFFECT
CF A
ADC
BEAT
EFFECT
Processing
SOUND
COLOR
EFFECT
CHx
2727
Es
Español
Adquisición del manual
El manual de instrucciones puede que esté en un archivo del formato PDF.
Adobe
®
Reader
®
deberá estar instalado para leer los archivos del formato PDF.
Si no tiene Adobe Reader, instálelo desde el enlace de descarga de la pantalla del
menú del CD-ROM.
Descarga de las versiones más recientes de los
manuales de instrucciones y de la Guía de inicio
rápido - Edición Serato DJ
1 Inserte el CD-ROM en la unidad de CD del ordenador.
El menú del CD-ROM se visualiza.
Si el menú del CD-ROM no aparece cuando se inserta el CD-ROM, haga las opera-
ciones de abajo.
Para Windows
Desde el menú [Iniciar] – [Equipo] (o [Mi PC]), abra la unidad de CD y haga
doble clic en el icono [CD_menu.exe].
Para Mac OS X
En Finder, haga doble clic directamente en el icono [CD_menu.app].
2 Cuando se visualiza el menú del CD-ROM, seleccione [DJM-
900SRT: Descarga del manual de instrucciones (archivo PDF)] y
luego haga clic en [Iniciar].
3 “Para acceder al sitio se requiere un entorno de internet.
¿Conectado a internet?” se visualiza. Haga clic en [Si].
El navegador Web se inicia y se visualiza el sitio de asistencia Pioneer DJ.
http://pioneerdj.com/support/
4 En el sitio de asistencia Pioneer DJ, haga clic en “Manuals”
bajo “DJM-900SRT”.
5 Desde la página de descarga, haga clic en el idioma de los
documentos que necesite.
La descarga del manual de instrucciones/Guía de inicio rápido - Edición Serato DJ
empieza.
Descarga del manual del software Serato DJ
1 Inserte el CD-ROM en la unidad de CD del ordenador.
El menú del CD-ROM se visualiza.
Si el menú del CD-ROM no aparece cuando se inserta el CD-ROM, haga las opera-
ciones de abajo.
Para Windows
Desde el menú [Iniciar] – [Equipo] (o [Mi PC]), abra la unidad de CD y haga
doble clic en el icono [CD_menu.exe].
Para Mac OS X
En Finder, haga doble clic directamente en el icono [CD_menu.app].
2 Cuando se visualiza el menú del CD-ROM, seleccione
[Serato DJ: Descarga del manual del software (archivo PDF)] y
luego haga clic en [Iniciar].
3 “Para acceder al sitio se requiere un entorno de internet.
¿Conectado a internet?” se visualiza. Haga clic en [Si].
El navegador Web se inicia y se visualiza el sitio de asistencia Pioneer DJ.
4 Haga clic en [Software Info] bajo [DJM-900SRT] en el sitio
de asistencia Pioneer DJ.
[Serato DJ Support Information] se visualiza.
5 Haga clic en el enlace con la página de descarga de Serato
DJ.
La página de descarga de Serato DJ se visualiza.
http://serato.com/
6 Entre en su cuenta de usuario “Serato.com”.
Introduzca la dirección de correo electrónico y la contraseña que ha registrado para
entrar en “Serato.com”.
7 Desde “More Downloads” en el lado derecho de la página
de descarga, haga clic en “Serato DJ x.x User Manual”.
La descarga del manual del software Serato DJ empieza.
Acerca de las marcas de fábrica y marcas
registradas
Pioneer y rekordbox son marcas de fábrica o marcas registradas de PIONEER
CORPORATION.
Microsoft, Windows y Windows Vista son marcas comerciales o marcas comer-
ciales registradas de Microsoft Corporation en los Estados Unidos y/o en otros
países.
Apple, Macintosh y Mac OS son marcas comerciales de Apple Inc., registradas
en los EE.UU. y en otros países.
ASIO es una marca de fábrica de Steinberg Media Technologies GmbH.
Serato DJ es una marca registrada de Serato Audio Research Ltd., registrada en
los EE. UU. y en otros países.
Los nombres de compañías y productos mencionados aquí son marcas de fábrica
de sus respectivos propietarios.
2828
Es
Especificaciones
Generales
Requisitos de potencia .....................................................CA 110 V a 240 V, 50 Hz/60 Hz
Consumo de energía..................................................................................................41 W
Consumo de energía (modo de espera) ..................................................................0,4 W
Peso de la unidad principal .................................................................................... 7,1 kg
Dimensiones máximas ..........................331 mm (An) × 107,9 mm (Al) × 404 mm (Pr)
Temperatura de funcionamiento tolerable ..............................................+5 °C a +35 °C
Humedad de funcionamiento tolerable ........................5 % a 85 % (sin condensación)
Sección de audio
Frecuencia de muestreo ........................................................................................96 kHz
Gebruikershandleiding.com neemt misbruik van zijn services uitermate serieus. U kunt hieronder aangeven waarom deze vraag ongepast is. Wij controleren de vraag en zonodig wordt deze verwijderd.
Product:
Spelregels forum
Om tot zinvolle vragen te komen hanteren wij de volgende spelregels:
lees eerst de handleiding door;
controleer of uw vraag al eerder door iemand anders is gesteld;
probeer uw vraag zo duidelijk mogelijk te stellen;
heeft u een probleem en al geprobeerd om dit op te lossen, vermeld dit erbij aub;
heeft u een oplossing gekregen van een bezoeker dan horen wij dat graag in dit forum;
wilt u een reactie geven op een vraag of antwoord, gebruik dan niet dit formulier maar klik op de knop 'reageer op deze vraag';
uw vraag wordt direct op de website gezet; vermijd daarom persoonlijke gegevens in te vullen;
Belangrijk! Als er een antwoord wordt gegeven op uw vraag, dan is het voor de gever van het antwoord nuttig om te weten als u er wel (of niet) mee geholpen bent! Wij vragen u dus ook te reageren op een antwoord.
Belangrijk! Antwoorden worden ook per e-mail naar abonnees gestuurd. Laat uw emailadres achter op deze site, zodat u op de hoogte blijft. U krijgt dan ook andere vragen en antwoorden te zien.
Abonneren
Abonneer u voor het ontvangen van emails voor uw Pioneer DJM-900SRT bij:
nieuwe vragen en antwoorden
nieuwe handleidingen
U ontvangt een email met instructies om u voor één of beide opties in te schrijven.
Ontvang uw handleiding per email
Vul uw emailadres in en ontvang de handleiding van Pioneer DJM-900SRT in de taal/talen: Nederlands, Duits, Engels, Frans, Italiaans, Spaans als bijlage per email.
De handleiding is 3,62 mb groot.
U ontvangt de handleiding per email binnen enkele minuten. Als u geen email heeft ontvangen, dan heeft u waarschijnlijk een verkeerd emailadres ingevuld of is uw mailbox te vol. Daarnaast kan het zijn dat uw internetprovider een maximum heeft aan de grootte per email. Omdat hier een handleiding wordt meegestuurd, kan het voorkomen dat de email groter is dan toegestaan bij uw provider.
Stel vragen via chat aan uw handleiding
Stel uw vraag over deze PDF
Uw handleiding is per email verstuurd. Controleer uw email
Als u niet binnen een kwartier uw email met handleiding ontvangen heeft, kan het zijn dat u een verkeerd emailadres heeft ingevuld of dat uw emailprovider een maximum grootte per email heeft ingesteld die kleiner is dan de grootte van de handleiding.
Er is een email naar u verstuurd om uw inschrijving definitief te maken.
Controleer uw email en volg de aanwijzingen op om uw inschrijving definitief te maken
U heeft geen emailadres opgegeven
Als u de handleiding per email wilt ontvangen, vul dan een geldig emailadres in.
Uw vraag is op deze pagina toegevoegd
Wilt u een email ontvangen bij een antwoord en/of nieuwe vragen? Vul dan hier uw emailadres in.