!Incorrect operation is often mistaken for trouble or malfunction. If you think that there is something wrong with this component, check the points
below. Sometimes the trouble may lie in another component. Inspect the other components and electrical appliances being used. If the trouble
cannot be rectified after checking the items below, ask your nearest Pioneer authorized service center or your dealer to carry out repair work.
!This unit may not operate properly due to static electricity or other external influences. In this case, proper operation may be restored by turning the
power off, waiting 1 minute, then turning the power back on.
ProblemCheckRemedy
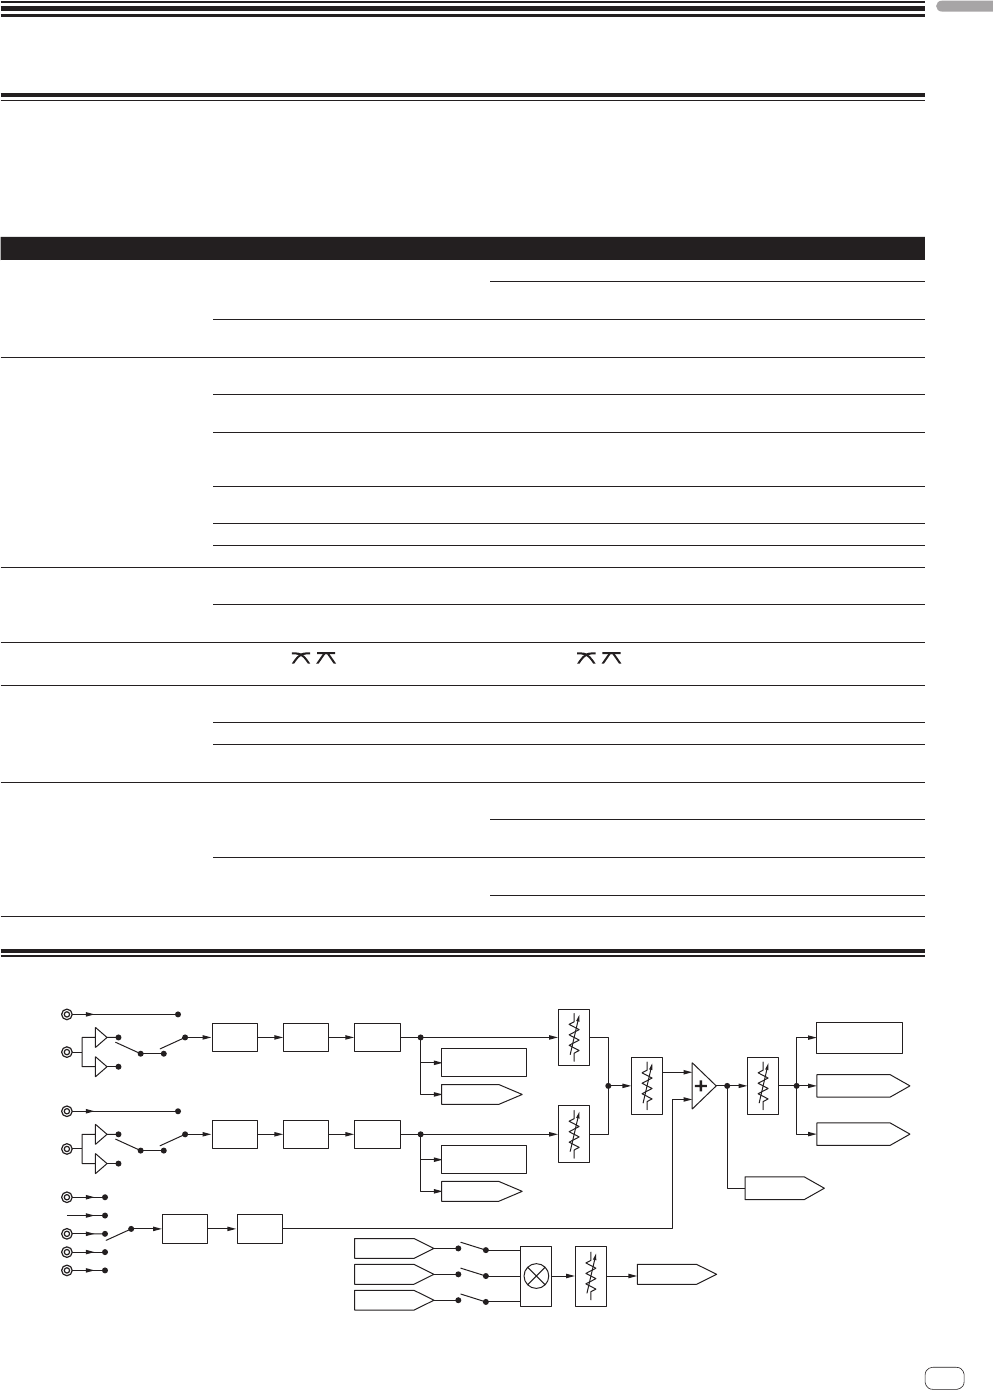
The power is not turned on.Is the included AC adapter properly connected?Connect the included AC adapter properly to the power outlet. (page 6)
Properly attach the included AC adapter’s power cord to this unit’s cord hook.
(Page 6)
Is the [ON/OFF] switch for power supply set to
[ON]?
Set the [ON/OFF] switch for power supply to [ON]. (Page 9)
No sound or small sound.Is the [CD, PHONO/LINE] input selector switch set
to the proper position?
Switch the [CD, PHONO/LINE] input selector switch to the channel’s input
source. (Page 10)
Is the [PHONO/LINE] selector switch on this unit’s
rear panel set to the proper position?
Switch the terminals’ function using the [PHONO/LINE] selector switch on this
unit’s rear panel. (Page 5)
Are the [TRIM], [channel fader], [crossfader]
and [MASTER LEVEL] controls set to the proper
positions?
Set the [TRIM], [channel fader], [crossfader] and [MASTER LEVEL] controls to
the proper positions. (Page 10)
Are the connected powered speakers, etc., prop-
erly set?
Properly set the external input selection, volume, etc., on the powered speakers,
etc.
Are the connection cables properly connected?Connect the connection cables properly. (page 6)
Are the terminals and plugs dirty?Clean the terminals and plugs before making connections.
Distorted sound.Is [MASTER LEVEL] set at the proper position?Adjust the [MASTER LEVEL] control so that the master level indicator’s orange
indicator lights at the peak level. (Page 10)
Is [TRIM] set at the proper position?Adjust the [TRIM] control so that the channel level indicator’s orange indicator
lights at the peak level. (Page 10)
Can’t crossfade.
Is the [THRU,
, ] (crossfader curve selector)
switch set to [THRU]?
Set the [THRU, , ] (crossfader curve selector) switch to a position other
than [THRU]. (Page 10)
Can’t fader start a DJ player.Is the [CH-1] or [CH-2] button in the fader start
section set to the off position?
Set the [CH-1] or [CH-2] button in the fader start section to the on position. (page
11)
Is the control cord properly connected?Connect this unit and DJ player with a control cord. (page 6)
Are the audio cables properly connected?Connect this unit to the audio output terminal of a DJ player with an audio cable.
(page 6)
Sound is distorted when an analog
player is connected to this unit’s
[PHONO/LINE] terminals.
Or, lighting of the channel level
indicator does not change even when
the [TRIM] control is turned.
Have you connected an analog player with a built-
in phono equalizer?
If the analog player is equipped with a built-in phono equalizer, connect it to the
[CD] terminals. (page 6)
If the analog player with built-in phono equalizer has a PHONO/LINE selector
switch, switch it to PHONO.
Is an audio interface for computers connected
between the analog player and this unit?
If the computer audio interface’s output is line level, connect it to the [CD]
terminals. (page 6)
If the analog player has a PHONO/LINE selector switch, switch it to PHONO.
Hey dat is niet zo moeilijk. Breng je master out van je mengpaneel met cinch (tulp) kabel naar je line in van je equalizer. Daarna nog een cinch (tulp) kabel je line out van je equalizer naar de line in kanaal bv. cd, tape, md naar je versterker. Het staat nu dus in serie. Zo kun je nu de equalizer van je mengpaneel en je tonen van je aparte equalizer gebruiken. Succes
Gebruikershandleiding.com neemt misbruik van zijn services uitermate serieus. U kunt hieronder aangeven waarom deze vraag ongepast is. Wij controleren de vraag en zonodig wordt deze verwijderd.
Product:
Spelregels forum
Om tot zinvolle vragen te komen hanteren wij de volgende spelregels:
lees eerst de handleiding door;
controleer of uw vraag al eerder door iemand anders is gesteld;
probeer uw vraag zo duidelijk mogelijk te stellen;
heeft u een probleem en al geprobeerd om dit op te lossen, vermeld dit erbij aub;
heeft u een oplossing gekregen van een bezoeker dan horen wij dat graag in dit forum;
wilt u een reactie geven op een vraag of antwoord, gebruik dan niet dit formulier maar klik op de knop 'reageer op deze vraag';
uw vraag wordt direct op de website gezet; vermijd daarom persoonlijke gegevens in te vullen;
Belangrijk! Als er een antwoord wordt gegeven op uw vraag, dan is het voor de gever van het antwoord nuttig om te weten als u er wel (of niet) mee geholpen bent! Wij vragen u dus ook te reageren op een antwoord.
Belangrijk! Antwoorden worden ook per e-mail naar abonnees gestuurd. Laat uw emailadres achter op deze site, zodat u op de hoogte blijft. U krijgt dan ook andere vragen en antwoorden te zien.
Abonneren
Abonneer u voor het ontvangen van emails voor uw Pioneer DJM-250 bij:
nieuwe vragen en antwoorden
nieuwe handleidingen
U ontvangt een email met instructies om u voor één of beide opties in te schrijven.
Ontvang uw handleiding per email
Vul uw emailadres in en ontvang de handleiding van Pioneer DJM-250 in de taal/talen: Nederlands, Duits, Engels, Frans, Italiaans, Spaans als bijlage per email.
De handleiding is 19,8 mb groot.
U ontvangt de handleiding per email binnen enkele minuten. Als u geen email heeft ontvangen, dan heeft u waarschijnlijk een verkeerd emailadres ingevuld of is uw mailbox te vol. Daarnaast kan het zijn dat uw internetprovider een maximum heeft aan de grootte per email. Omdat hier een handleiding wordt meegestuurd, kan het voorkomen dat de email groter is dan toegestaan bij uw provider.
Stel vragen via chat aan uw handleiding
Stel uw vraag over deze PDF
Uw handleiding is per email verstuurd. Controleer uw email
Als u niet binnen een kwartier uw email met handleiding ontvangen heeft, kan het zijn dat u een verkeerd emailadres heeft ingevuld of dat uw emailprovider een maximum grootte per email heeft ingesteld die kleiner is dan de grootte van de handleiding.
Er is een email naar u verstuurd om uw inschrijving definitief te maken.
Controleer uw email en volg de aanwijzingen op om uw inschrijving definitief te maken
U heeft geen emailadres opgegeven
Als u de handleiding per email wilt ontvangen, vul dan een geldig emailadres in.
Uw vraag is op deze pagina toegevoegd
Wilt u een email ontvangen bij een antwoord en/of nieuwe vragen? Vul dan hier uw emailadres in.