492326
1
Verklein
Vergroot
Pagina terug
1/34
Pagina verder
Philips continuously strives to improve its products. Due to software upgrading, some contents in this user guide
may be different from your product. Philips reserves the rights to revise this user guide or withdraw it at any
time without prior notice. Please take your product as standard.
TFT LCD
Headphone
jack
Right soft key
Hang-up and
Power key
Alphanumeric
keypad
Left soft key
Navigation
and , keys
Pick-up key
Lock/unlock
key; Symbol
input
Back of phone:
3.2MP
camera lens
Charger &
USB port
Side volume key
Your phone
Your phone 1
Home screen
Your phone’s home screen consists of the following
areas:
Keys
Learn about the main keys.
Shortcut menu
The shortcut on home screen can open the
applications tab you often used.
Select shortcut menu:
1
Go to Menu>Settings>General>Shortcut to
enter shortcut list.
2
Press ,Enable/Disable to change shortcut
menu.
3
Press LOptions to enter shortcut settings.
Key Definition Function
(
Dial Make or answer a call.
, Confirm Select or confirm an option.
) Hang-up/
Power/
Exit
End a call;
Hold to turn on/off the phone;
Return to home screen.
L Left soft
key
Select the options on the
screen.
Status Bar
Shortcut
SIM1 & SIM2, and
Clock display
R Right soft
key
Select the options on the
screen.
* Lock/
unlock
Long press to lock or unlock
keys on home screen.
2 Your phone
Icons & symbols
Learn about the icons and symbols on the screen.
Icons Definition Function
Silent
Your phone will not ring
when receiving a call.
Vibration
only
Your phone will vibrate when
receiving a call.
Battery
The bars indicate the battery
level.
SMS
You have a new message.
MMS
You have a new multimedia
message.
Wap
message
You have received a Wap
push message.
Missed call
You have missed a call.
Call diverts
All your incoming voice calls
are being forwarded to a
number.
Bluetooth
Bluetooth is activated.
Bluetooth
headset
The Bluetooth headset is
connected.
Headset
The headset is plugged into
the phone.
Alarm
The alarm clock is activated.
Roaming
Displayed when your phone
is registered to a network
other than your own
(especially when you’re
abroad).
Home zone
A zone designated by your
network operator. Contact
your service provider for
details.
GSM
network
Your phone is connected to a
GSM network. The more
bars are shown the better the
reception is.
GPRS
attach
Your phone is connected to
the GPRS network.
EDGE
attach
Your phone is connected to
the EDGE network.
Blacklist
Indicates that blacklist feature
is activated.
Key lock
The keypad has been locked.
Memory
card
The memory card is in use.
Table of contents 3
Getting started . . . . . . . . . . . . . . . . . . . . . . . . . 4
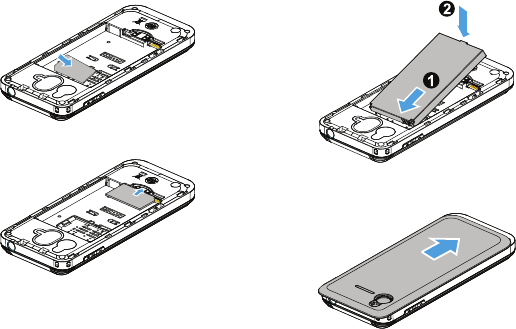
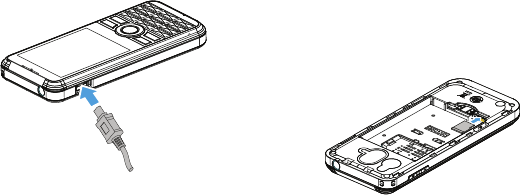
Insert SIM card and Charge the battery . . . . . . . 4
Insert a Micro SD card (Memory card) . . . . . . . 6
Connect to your PC . . . . . . . . . . . . . . . . . . . . . . 6
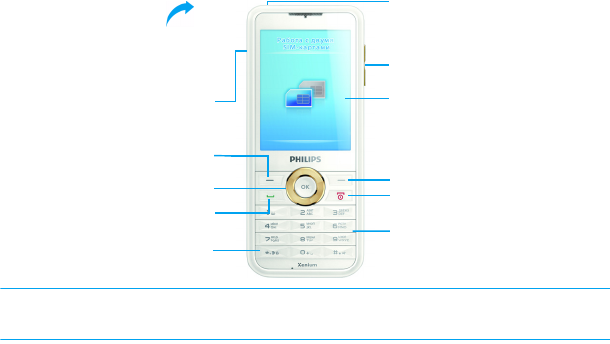
Customize your phone . . . . . . . . . . . . . . . . . . . . 7
Basic function . . . . . . . . . . . . . . . . . . . . . . . . . . 9
Use basic call functions . . . . . . . . . . . . . . . . . . . . 9
Receive and send messages. . . . . . . . . . . . . . . . 10
Enter text . . . . . . . . . . . . . . . . . . . . . . . . . . . . . 11
Manage your phonebook . . . . . . . . . . . . . . . . . 12
MultiMedia. . . . . . . . . . . . . . . . . . . . . . . . . . . . 14
Media player . . . . . . . . . . . . . . . . . . . . . . . . . . . 14
Camera . . . . . . . . . . . . . . . . . . . . . . . . . . . . . . . 15
Video recorder . . . . . . . . . . . . . . . . . . . . . . . . . 16
FM radio . . . . . . . . . . . . . . . . . . . . . . . . . . . . . . 17
Business applications . . . . . . . . . . . . . . . . . . . 18
Manage your calendar . . . . . . . . . . . . . . . . . . . . 18
Alarm . . . . . . . . . . . . . . . . . . . . . . . . . . . . . . . . . 18
Bluetooth. . . . . . . . . . . . . . . . . . . . . . . . . . . . . . 19
Read E-books . . . . . . . . . . . . . . . . . . . . . . . . . . 19
File management . . . . . . . . . . . . . . . . . . . . . . . . 20
Use blacklist . . . . . . . . . . . . . . . . . . . . . . . . . . . 20
Check world clock . . . . . . . . . . . . . . . . . . . . . . 21
Calculator . . . . . . . . . . . . . . . . . . . . . . . . . . . . . 21
Currency converter . . . . . . . . . . . . . . . . . . . . . 21
Web applications & Java . . . . . . . . . . . . . . . . .22
Browser . . . . . . . . . . . . . . . . . . . . . . . . . . . . . . . 22
Java applications . . . . . . . . . . . . . . . . . . . . . . . . . 22
Settings. . . . . . . . . . . . . . . . . . . . . . . . . . . . . . .24
SIM setting . . . . . . . . . . . . . . . . . . . . . . . . . . . . . 24
General setting . . . . . . . . . . . . . . . . . . . . . . . . . 24
Call settings . . . . . . . . . . . . . . . . . . . . . . . . . . . . 25
Network settings. . . . . . . . . . . . . . . . . . . . . . . . 25
Sound settings . . . . . . . . . . . . . . . . . . . . . . . . . . 26
Security settings. . . . . . . . . . . . . . . . . . . . . . . . . 26
Restore factory settings . . . . . . . . . . . . . . . . . . 26
Safety & Precaution . . . . . . . . . . . . . . . . . . . . .27
Precaution . . . . . . . . . . . . . . . . . . . . . . . . . . . . . 27
Tips . . . . . . . . . . . . . . . . . . . . . . . . . . . . . . . . . . 28
Troubleshooting . . . . . . . . . . . . . . . . . . . . . . . . 28
Trademark Declaration. . . . . . . . . . . . . . . . . . . 29
Specific Absorption Rate Information. . . . . . . . 30
Limited warranty . . . . . . . . . . . . . . . . . . . . . . . . 30
Declaration of Conformity . . . . . . . . . . . . . . . . 32
Tips & tricks. . . . . . . . . . . . . . . . . . . . . . . . . . .33
Table of contents
4 Getting started
Congratulations on your purchase and welcome to
Philips!
To get the most of your product and enjoy all
Philips has to offer, register your product at:
www. philips. com/welcome
More details about your product, please access:
www.philips.com/support
Note: Please read the safety instructions in the "Safety &
Precaution" section before use.
Insert SIM card and Charge the
battery
Learn about installing SIM card and charging the
battery for the first use.
Insert SIM card
Follow the steps below to insert your SIM card.
Remember to turn off your mobile phone before
removing the back cover.
1
Remove the back cover.
2
Take out the battery.
Getting started
Getting started 5
3
Insert SIM1/SIM2.
4
Install the battery.
5
Replace the back cover.
6 Getting started
Charge the battery
A new battery is partially charged. The battery icon
in the upper-right corner shows the battery level of
charging status.
Note:
You can user the phone while it is charging.
Keeping the charger plugged to the mobile phone when
the battery is fully charged will not damage the battery.
The only way to turn off the charger is to unplug it, so it
is advisable to use an easily accessible power socket.
If you do not intend to use your phone for several days,
we recommend that you remove the battery.
Insert a Micro SD card (Memory
card)
You can expand the memory of your phone by
adding a micro-SD card.
1
Align your micro-SD card with the slot. Put it in
place.
2
To remove the micro-SD card, press on the card
and pull it out.
Getting started 7
Connect to your PC
Data communication software (Mobile Phone
Tools) offers instant sychronization between your
phone and your computer. You can use the
software for the data synchronization between your
phone and PC, like phonebook, calendar, SMS
messages, and audio/video/picture files. With the
software and GPRS service, you can also connect
your PC to the Internet through your phone.
Install MobilePhoneTools on your PC
1
Insert the supplied Data communication
software into the CD drive.
2
Run the autorun.exe program.
3
Make selections as prompted, and installation
starts automatically.
Connecting your Phone to the PC
1
Connect your phone to the PC using the
supplied USB cable or through the Bluetooth.
2
When using the USB cable for connection,
select COM port on your phone.
3
On your PC, double click the MobilePhoneTools
icon, then the connected icon is displayed.
Customize your phone
Customize your phone to match your preferences.
Set clock
1
On the home screen, go to Menu>Settings>
General>Time and date.
2
Select Set time/date: Enter the digits or long
press navigation key
+ or - until you reach the
desired digits.
SIM settings
1
Check that your phone is turned on. Enter the
PIN code if required.
2
Go to Settings>SIM settings>Dual SIM
setting
>SIM1/SIM2 setup, name your SIM card.
3
Select SIM1 or SIM2 to be the primary card.
4
Go to SIM settings>Mode setting, select your
desired options.
Note:
The PIN code is preconfigured and communicated to
you by your network operator or retailer.
8 Getting started
If you enter an incorrect PIN code three times in
succession, your SIM card will be blocked. To unblock it,
you must request the PUK code from your operator.
If you enter an incorrect PUK code ten times in
succession, the SIM card will be locked permanently.
When this happens, please contact your network
operator or retailer.
Profiles
The profiles are defined for several scenes. They
consist of the settings for ringtone, volume, and
others. With preset profiles, you can easily adjust
the settings for incoming calls and messages as
desired.
1
Go to Profiles, press ,Select to activate the
profile.
2
Press L to modify ringtone, volume and
others.
To activate
Meeting mode, long press # on
the home screen.
Note: If you select Flight mode, you disable the connection
between your phone and your mobile phone network.
Basic function 9
Use basic call functions
Learn to make or answer a call and use basic call
functions.
Make a call
1
Enter the phone number.
2
Press
(
to dial the number.
3
Press )
to hang up.
Note: For international calls, long press
0
to enter the
"+" sign for the international prefix.
Answer and end a call
1
Press
(
to answer the call (Press the side
volume key to adjust the volume).
2
Press , to select handsfree mode.
3
Press ) to hang up.
Note: You can use the supplied headset to answer or end a
call.
Make a conference call
If network applicable, you can handle two or more
calls, or make a conference call.
1
During a call, enter a phone number, and then
press
(
to dial the number. The second
number is dialled.
2
The first call is put on hold at this time.
3
You can press LOptions>Swap to toggle
between 2 calls.
4
To end the call, select Options>End single or
End all.
Use speed dial
On the home screen, you can call a number by long
pressing a numeric key.
To assign a contact to a speed-dial key:
1
Select Settings > General > Speed dial > Set
number
.
2
Choose a numeric key.
3
Press L to add a number.
Basic function
10 Basic function
Make an emergency call
Without a SIM card in phone, you can press R to
make the emergency call.
In Europe, the standard emergency number is 112;
in the UK, it is 999.
Receive and send messages
You can use the Messages menu to send text
message, multimedia message and E-mails.
Send a SMS message
1
Select Menu>Messages> Create message>
SMS.
2
Write your text message.
3
Press , to send the message.
Send a MMS message
1
Select Menu>Messages> Create message>
MMS.
2
Edit contents, and press LOptions to add
multimedia contents (photo, audio, video,
attachment or bookmark text).
3
Enter a number or select a contact from
phonebook.
4
Press , to send the Multimedia message.
Note: Copyright protected pictures and sound cannot be
sent by MMS.
Send an E-mail
1
Go to E-mail>E-mail accounts, select a profile,
and then select
Options > Edit. After setting up
a new account, press ,
to activate it.
2
Go to Write E-mail, enter the address (To), a
copy (
Cc), a blind copy (Bcc), subject and
attachment.
3
Edit the E-mail contents.
4
Press R to send the E-mail.
Note: Consult your mail service provider for the mail
server configuration.
Receive E-mails
Select E-mail>Send and receive, you can receive
E-mails from the Internet.
To receive E-mails automatically:
1
Go to E-mail > E-mail accounts > Options >
Edit > Advanced settings.
1

Hulp nodig? Stel uw vraag in het forum

Spelregels

Misbruik melden

Gebruikershandleiding.com neemt misbruik van zijn services uitermate serieus. U kunt hieronder aangeven waarom deze vraag ongepast is. Wij controleren de vraag en zonodig wordt deze verwijderd.

Product:

Bijvoorbeeld antisemitische inhoud, racistische inhoud, of materiaal dat gewelddadige fysieke handelingen tot gevolg kan hebben.

Bijvoorbeeld een creditcardnummer, een persoonlijk identificatienummer, of een geheim adres. E-mailadressen en volledige namen worden niet als privégegevens beschouwd.

Spelregels forum

Om tot zinvolle vragen te komen hanteren wij de volgende spelregels:

Belangrijk! Als er een antwoord wordt gegeven op uw vraag, dan is het voor de gever van het antwoord nuttig om te weten als u er wel (of niet) mee geholpen bent! Wij vragen u dus ook te reageren op een antwoord.

Belangrijk! Antwoorden worden ook per e-mail naar abonnees gestuurd. Laat uw emailadres achter op deze site, zodat u op de hoogte blijft. U krijgt dan ook andere vragen en antwoorden te zien.

Abonneren

Abonneer u voor het ontvangen van emails voor uw Philips Xenium F511 bij:


U ontvangt een email met instructies om u voor één of beide opties in te schrijven.


Ontvang uw handleiding per email

Vul uw emailadres in en ontvang de handleiding van Philips Xenium F511 in de taal/talen: Engels als bijlage per email.

De handleiding is 2,02 mb groot.


U ontvangt de handleiding per email binnen enkele minuten. Als u geen email heeft ontvangen, dan heeft u waarschijnlijk een verkeerd emailadres ingevuld of is uw mailbox te vol. Daarnaast kan het zijn dat uw internetprovider een maximum heeft aan de grootte per email. Omdat hier een handleiding wordt meegestuurd, kan het voorkomen dat de email groter is dan toegestaan bij uw provider.

Stel vragen via chat aan uw handleiding

Stel uw vraag over deze PDF

Uw handleiding is per email verstuurd. Controleer uw email

Als u niet binnen een kwartier uw email met handleiding ontvangen heeft, kan het zijn dat u een verkeerd emailadres heeft ingevuld of dat uw emailprovider een maximum grootte per email heeft ingesteld die kleiner is dan de grootte van de handleiding.

Er is een email naar u verstuurd om uw inschrijving definitief te maken.

Controleer uw email en volg de aanwijzingen op om uw inschrijving definitief te maken

U heeft geen emailadres opgegeven

Als u de handleiding per email wilt ontvangen, vul dan een geldig emailadres in.

Uw vraag is op deze pagina toegevoegd

Wilt u een email ontvangen bij een antwoord en/of nieuwe vragen? Vul dan hier uw emailadres in.


Info