484807
30
Verklein
Vergroot
Pagina terug
1/38
Pagina verder
www.philips.com/welcome
Extended user
documentation
Always there to help you
Register your product and get support at
M550
M555
Question?
Contact
Philips
1EN
Contents
1 Important safety instructions 3
2 Your phone 4
What is in the box 4
Overview of the phone 4
Overview of the base station 6
Display icons 6
3 Get started 7
Connect the base station 7
Install the handset 7
Set the date and time 8
Change the remote access PIN code 8
Charge the handset 8
Check the battery level 8
What is standby mode? 9
Check the signal strength 9
4 Calls 10
Make a call 10
Answer a call 10
End a call 10
Mute the microphone 11
Adjust the earpiece/speaker volume 11
Make a second call 11
Answer a second call 11
Switch between two calls 11
Make a conference call with the
external callers 11
5 Text and numbers 12
Enter text and numbers 12
Switch between uppercase and
lowercase 12
6 Phonebook 13
View the phonebook 13
Search a record 13
Call from the phonebook 13
Access the phonebook during a call 13
Add a record 13
Edit a record 14
Delete a record 14
Delete all records 14
7 Call log 15
Call list type 15
View the call records 15
Save a call record to the phonebook 15
Return a call 15
Delete a call record 15
Delete all call records 16
8 Redial list 17
View the redial records 17
Redial a call 17
Save a call record to the phonebook 17
Delete a redial record 17
Delete all redial records 17
9 Phone settings 18
Sound settings 18
ECO+ mode 18
Name the handset 19
Set the date and time 19
Set the display language 19
10 Telephone answering machine 20
Turn the answering machine on or off 20
Set the answering machine language 20
Set the answer mode 20
Announcements 20
Incoming messages 21
Set the ring delay 22
Remote access 22
11 Services 24
Call list type 24
Auto conference 24
Select the recall duration 24
Dial mode 24
Register additional handsets 25
Unregister the handsets 25
2 EN
Restore default settings 25
12 Technical data 26
13 Notice 27
Declaration of conformity 27
Use GAP standard compliance 27
Compliance with EMF 27
Disposal of your old product and
batteries 27
14 Frequently asked questions 29
15 Appendix 31
Text and number input tables 31
16 Index 33
3EN
1 Important safety
instructions
Power requirements
• This product requires an electrical supply
of 100-240 volts AC. In case of power
failure, the communication can be lost.
• Thevoltageonthenetworkisclassied
as TNV-3 (Telecommunication Network
Voltages),asdenedinthestandardEN
60950.
Warning
TheElectricalnetworkisclassiedashazardous.The
only way to power down the charger is to unplug the
power supply from the electrical outlet. Ensure that the
electrical outlet is always easily accessible.
To avoid damage or malfunction
Caution
Use only the power supply listed in the user
instructions.
Use only the batteries listed in the user instructions.
Risk of explosion if battery is replaced by an incorrect
type.
Dispose of used batteries according to the instructions.
Donotdisposeofbatteriesinre.
Always use the cables provided with the product.
Do not allow the charging contacts or the battery to
come into contact with metal objects.
Do not let small metal objects come into contact with
the product. This can deteriorate audio quality and
damage the product.
Metallic objects may be retained if placed near or on
the handset receiver.
Do not use the product in places where there are
explosivehazards.
Do not open the handset, base station or charger as
you could be exposed to high voltages.
For pluggable equipment, the socket-outlet shall
be installed near the equipment and shall be easily
accessible.
Handsfree activation could suddenly increase the
volume in the earpiece to a very high level: make sure
the handset is not too close to your ear.
This equipment is not designed to make emergency
calls when the power fails. An alternative has to be
made available to allow emergency calls.
Do not allow the product to come into contact with
liquids.
Do not use any cleaning agents containing alcohol,
ammonia,benzene,orabrasivesasthesemayharm
the set.
Do not expose the phone to excessive heat caused by
heating equipment or direct sunlight.
Do not drop your phone or allow objects to fall on
your phone.
Active mobile phones in the vicinity may cause
interference.
About operating and storage temperatures
• Operate in a place where temperature is
always between 0°C to +40°C (up to 90%
relative humidity).
• Store in a place where temperature is
always between -20°C and +45°C (up to
95% relative humidity).
• Battery life may be shorter in low
temperature conditions.
4 EN
2 Your phone
Congratulations on your purchase and welcome
to Philips!
TofullybenetfromthesupportthatPhilips
offers, register your product at www.philips.
com/welcome.
What is in the box
Base station
Handset
Power adapter
Line cord*
Guarantee
Short user manual
Note
* In some countries, you have to connect the line
adapter to the line cord, then plug the line cord to the
telephone socket.
Overview of the phone
4XLFNVWDUWJXLGH
g
f
e
d
c
b
a
n
m
l
k
j
i
h
5EN
a Earpiece
b REDIAL/C
• Delete text or digits.
• Cancel operation.
• Access the redial list.
c
• End the call.
• Exit the menu/operation.
• Press and hold to switch the handset
on or off.
d
• Scroll down on the menu.
• Decrease the earpiece/speaker volume.
• Access the call log in standby mode.
e
• Press and hold to enter a pause.
• Switch to upper/lower case during
editing.
f
Mute or unmute the microphone.
g Microphone
h Battery door opening
i
• Turn the speaker phone is on/off.
• Make and receive calls through the
speaker.
o
p
q
j
• Press and hold to make an intercom
call (for multi-handset versions only).
• Set the dial mode (pulse mode or
temporary tone mode).
k
• Press to enter a space during text
editing.
• Press and hold to lock the keypad in
standby mode.
l
• Make and receive calls.
• Recall key
m MENU/OK
• Access the main menu.
• Conrmselection.
• Enter the options menu.
• Select the function displayed on the
handset screen directly above the key.
n
• Scroll up on the menu.
• Increase the earpiece/speaker volume.
• Access the phonebook in standby
mode.
o Loudspeaker
p LED indicator
• Off: no new event
• On: for two seconds when putting the
handset on the base station.
• Flashing: new miss calls/new messages
on answering machine, new voice mails,
new text messages (if applicable)
• Flashing quickly: new incoming call
q Handset back cover
6 EN
Overview of the base station
a
• Find handsets.
• Press and hold to enter registration
mode.
Display icons
In standby mode, the icons shown on the main
screen tell you what features are available on
your handset.
Icon Descriptions
When the handset is off the base
station/charger, the bars indicate the
battery level (from full to low).
When the handset is on the base
station/charger, the bars keep scrolling
until charging is complete.
Theemptybatteryiconashesand
you hear an alert tone.
The battery is low and needs
recharging.
The number of bar indicates the
connection status between the
handset and base station. The more
bars are shown, the better the signal
or the connection is.
It remains steadily on when browsing
answered incoming calls in the call log.
It indicates an outgoing call in the
redial list.
a
Itasheswhenthereisanewmissed
call or when browsing the unread
missed calls in call log.
It remains steadily on when browsing
the read missed calls in call log.
Itasheswhenreceivingincomingcall.
It remains steadily on during a call.
The speaker is on.
The ringer is off.
Answeringmachine:itasheswhen
there is a new message or when
the memory is full. It displays when
the telephone answering machine is
turned on.
Itasheswhenthereisanewvoice
message.
It remains steadily on when the voice
messages are already viewed in the
call log.
The icon is not shown when there is
no voice message.
This feature is network dependent.
/
It is displayed when you scroll up/
down a list/increase and decrease the
volume.
There are more digits on the right.
Press REDIAL/C to read.
ECO+ The ECO+ mode is activated.
7EN
3 Get started
Caution
Make sure that you have read the safety instructions in
the 'Important safety instructions' section before you
connect and install your handset.
Connect the base station
Warning
Risk of product damage! Ensure that the power supply
voltage corresponds to the voltage printed on the back
or the underside of the phone.
Use only the supplied power adapter to charge the
batteries.
Note
If you subscribe to the digital subscriber line (DSL) high
speed internet service through your telephone line,
ensureyouinstallaDSLlterbetweenthetelephone
linecordandthepowersocket.Thelterprevents
noise and caller ID problems caused by the DSL
interference.FormoreinformationontheDSLlters,
contact your DSL service provider.
The type plate is located on the bottom of the base
station.
1 Connect each end of the power adapter
to:
• the DC input jack at the bottom of the
base station;
• the power socket on the wall.
2 Connect each end of the line cord to:
• the telephone socket at the bottom of
the base station;
• the telephone socket on the wall.
Install the handset
The batteries are pre-installed in the handset.
Pull the battery tape off from the battery door
before charging.
Caution
Risk of explosion! Keep batteries away from heat,
sunshineorre.Neverdiscardbatteriesinre.
Use only the supplied batteries.
Risk of decreased battery life! Never mix different
brands or types of batteries.
Note
Chargethebatteriesfor8hoursbeforerstuse.
If the handset becomes warm when the batteries are
being charged, it is normal.
8 EN
Warning
Check the battery polarity when inserting in the
battery compartment. Incorrect polarity may damage
the product.
Set the date and time
Tip
To set the date and time later, press REDIAL/C to skip
this setting.
1 Press MENU/OK.
2 Select [Phone setup] > [Date & time],
then press MENU/OKtoconrm.
3 Press the numeric buttons to enter the
date, then press MENU/OKtoconrm.
» The time setting menu is displayed on
the handset.
4 Press the numeric buttons to enter the
time.
• If the time is in 12-hour format, press
/ to select [am] or [pm] (Country
dependent).
5 Press MENU/OKtoconrm.
Change the remote access
PIN code
Note
The default answering machine remote access PIN
code is 0000 and it is important to change it to ensure
the security.
1 Press MENU/OK.
2 Select [Answ. Machine] > [Remote
access] > [Change PIN], then press
MENU/OKtoconrm.
3 Enter the old PIN/passcode, then press
MENU/OKtoconrm.
4 Enter the new PIN/passcode, then press
MENU/OKtoconrm.
5 Enter the new PIN/passcode again, then
press MENU/OKtoconrm.
» The setting is saved.
Charge the handset
Charge your handset by docking it in either
direction. When the handset is placed correctly
on the base station, you hear a docking tone
(see 'Set the docking tone' on page 18). The
LEDatthebackofthehandsetashesonce.
» The handset starts charging.
Note
Chargethebatteriesfor8hoursbeforerstuse.
If the handset becomes warm when the batteries are
being charged, it is normal.
Over time, capacity of batteries decreases. This is a
normal battery behavior.
Your phone is now ready to use.
Check the battery level
The battery icon displays the current battery
level.
When the handset is off the
base station, the bars indicate the
battery level (full, medium and
low).
9EN
Theemptybatteryiconashes.
The battery is low and needs
recharging.
If you are on the phone, you hear warning
tones when the batteries are almost empty.
The handset turns off when the batteries are
completely empty.
What is standby mode?
Your phone is in standby mode when it is idle.
The standby screen displays the handset name,
handset number, date and time.
Check the signal strength
The number of bars indicates
the connection status between
the handset and base station. The
more bars are shown, the better
the connection is.
• Make sure the handset is connected to the
base station before you make or receive
calls and carry out the phone functions
and features.
• If you hear warning tones when you are
on the phone, the handset is almost out
of battery or the handset is out of range.
Charge the battery or move the handset
nearer to the base station.
Note
When ECO+ is on, the signal strength is not displayed.
10 EN
4 Calls
Note
When the power fails, the phone cannot access
emergency services.
Tip
Check the signal strength before you make a call or
when you are in a call (see 'Check the signal strength'
on page 9).
Make a call
You can make a call in these ways:
• Normal call
• Predial call
You can also make a call from the redial list (see
'Redial a call' on page 17), phonebook list (see
'Call from the phonebook' on page 13) and call
log (see 'Return a call' on page 15).
Normal call
1 Press or .
2 Dial the phone number.
» The number is dialed out.
» The duration of your current call is
displayed.
Predial call
1 Dial the phone number
• To erase a digit, press REDIAL/C.
• To erase all digits, press and hold
REDIAL/C.
• To enter a pause, press and hold .
2 Press or to dial out the call.
Note
The call timer displays the talk time of your current call.
If you hear warning tones, the phone is almost out of
battery or out of range. Charge the battery or move
the phone close to the base station.
Answer a call
When the phone rings, you can select from the
following options:
• press or to answer the call.
• press REDIAL/C to turn off the ringer of
this call.
Warning
When the handset rings or when the handsfree is
activated, keep the handset away from your ear to
avoid ear damage.
Note
If you have subscribed for a caller ID service with
the service provider, you will see the caller number
displayed on the handset. If the number is saved in the
phonebook, the name will be displayed.
Tip
Whenthereisamissedcall,anoticationmessage
appears.
End a call
You can end a call in these ways:
• Press ;
• Place the handset to the base station
or charging cradle.
11EN
Mute the microphone
1 Press during a call.
» The handset displays [Mute on].
» The caller cannot hear you, but you
can still hear his voice.
2 Press again to unmute the microphone.
» You can now communicate with the
caller.
Adjust the earpiece/speaker
volume
Press / to adjust the volume during a call.
» The earpiece/speaker volume is
adjusted and the phone is back to the
call screen.
Make a second call
Note
This service is network dependent.
1 Press during a call.
» Therstcallisputonhold.
2 Dial the second number.
» The number displayed on the screen is
dialed out.
Answer a second call
Note
This service is network dependent.
When there is a periodical beep to notify you
of an incoming call, you can answer the call in
these ways:
1 Press and to answer the call.
» Therstcallisputonhold,andyou
are now connected to the second call.
2 Press and to end the current call and
answertherstcall.
Switch between two calls
Press and .
» The current call is put on hold, and you
are now connected to the other call.
Note
This feature is country dependent.
Make a conference call with
the external callers
Note
This service is network and country dependent. Check
with the service provider for additional charges.
When you are connected to two calls, press
, then .
» The two calls are combined and a
conference call is established.
12 EN
5 Text and
numbers
You can enter text and numbers for handset
name, phonebook records, and other menu
items.
Enter text and numbers
1 Press once or several times on the
alphanumeric key to enter the selected
character.
2 Press REDIAL/C to delete a character.
Press and hold REDIAL/C to delete all
characters. Press and to move the
cursor left and right.
3 Press to add a space.
Note
For information on key mapping of characters and
numbers, see the chapter 'Appendix'.
Switch between uppercase
and lowercase
Bydefault,therstletterofeachwordina
sentence is uppercase and the rest is lowercase.
Press and hold to switch between the
uppercase and lowercase letters.
13EN
6 Phonebook
This phone has a phonebook that stores up
to 100 records. You can access the phonebook
from the handset. Each record can have a name
up to 14 characters long and a number up to
24 digits long.
There are 2 direct access memories (keys
and ). Depending on your country, keys
and are preset to the voice mail number
and information service number of your service
provider respectively. When you press and hold
on the key in standby mode , the saved phone
number is dialed automatically.
View the phonebook
Note
You can view the phonebook on one handset only
each time.
1 Press or press MENU/OK >
[Phonebook] > [View] to access the
phonebook list.
2 Select a contact and view the available
information.
Search a record
You can search the phonebook records in these
ways:
• Scroll the contacts list.
• Entertherstcharacterofthecontact.
Scroll the contact list
1 Press or press MENU/OK >
[Phonebook] > [View] to access the
phonebook list.
2 Press and to scroll through the
phonebook list.
Enter the rst character of a contact
1 Press or press MENU/OK >
[Phonebook] > [View] to access the
phonebook list.
2 Press the alphanumerical key that matches
the character.
» Therstrecordthatstartswiththis
character is displayed.
Call from the phonebook
1 Press or press MENU/OK >
[Phonebook] > [View] to access the
phonebook list.
2 Select a contact in the phonebook list.
3 Press to make the call.
Access the phonebook during
a call
Press MENU/OK, select the contact, then press
MENU/OK to view the number.
Add a record
Note
If your phonebook memory is full, the handset displays
anoticationmessage.Deletesomerecordstoadd
new ones.
1 Press MENU/OK.
2 Select [Phonebook] > [Add new].
3 Enter the name, then press MENU/OK to
conrm.
4 Enter the number, then press MENU/OK
toconrm
» Your new record is saved.
14 EN
Tip
Press and hold to insert a pause.
Note
The phonebook overwrites the old number with the
new number.
Tip
Press once or several times on the alphanumeric key to
enter the selected character.
Press REDIAL/C to delete the character. Press and
to move the cursor left and right.
Edit a record
1 Press MENU/OK.
2 Select [Phonebook] > [Edit].
3 Select a contact, then press MENU/OK to
conrm.
4 Edit the name, then press MENU/OK to
conrm.
5 Edit the number, then press MENU/OK to
conrm.
» The record is saved.
Delete a record
1 Press MENU/OK.
2 Select [Phonebook] > [Delete].
3 Select a contact, then press MENU/OK to
conrm.
» Thehandsetdisplaysaconrmation
request.
4 Press MENU/OKtoconrm.
» The record is deleted.
Delete all records
1 Press MENU/OK.
2 Select [Phonebook] > [Delete all].
» Thehandsetdisplaysaconrmation
request.
3 Press MENU/OKtoconrm.
» All records (except the 2 direct access
memory records) are deleted.
15EN
7 Call log
The call log stores the call history of all missed
or received calls. The incoming call history
includes the name and number of the caller,
call time and date. This feature is available if you
have registered to the caller ID service with
your service provider.
Your phone can store up to 50 call records. The
calllogicononthehandsetashestoremind
you of any unanswered calls. If the caller allows
the display of his identity, you can view his
name or number. The call records are displayed
in chronological order with the most recent
received call at the top of the list.
Note
Make sure that the number in the call list is valid before
you can call back directly from the call list.
The icons shown on the screen tell you
whether they are missed/received calls.
Icons Description
It remains steadily on when browsing
answered incoming calls in the call log.
Itasheswhenthereisanewmissed
call or when browsing the unread
missed calls in call log.
It remains steadily on when browsing
the read missed calls in call log.
Call list type
You can set if you can see all calls or missed
calls from the call log.
Select the call list type
1 Press MENU/OK.
2 Select [Services] > [Call list type], then
press MENU/OKtoconrm.
3 Select an option, then press MENU/OK to
conrm.
View the call records
1 Press .
» The incoming call log is displayed.
2 Select a record, then press MENU/OK
and [View] select for more available
information.
Save a call record to the
phonebook
1 Press .
» The incoming call log is displayed.
2 Select a record, then press MENU/OK to
conrm.
3 Select [Save number], then press MENU/
OKtoconrm.
4 Enter and edit the name, then press
MENU/OKtoconrm.
5 Enter and edit the number, then press
MENU/OKtoconrm.
» The record is saved.
Return a call
1 Press .
2 Select a record on the list.
3 Press to make the call.
Delete a call record
1 Press .
» The incoming call log is displayed.
16 EN
2 Select a record, press MENU/OK to
conrm.
3 Select [Delete], then press MENU/OK to
conrm
» Thehandsetdisplaysaconrmation
requests.
4 Press MENU/OKtoconrm.
» The record is deleted.
Delete all call records
1 Press .
» The incoming call log is displayed.
2 Press MENU/OK to enter the options
menu.
3 Select [Delete all], then press MENU/OK
toconrm
» Thehandsetdisplaysaconrmation
requests.
4 Press MENU/OKtoconrm.
» All records are deleted.
17EN
8 Redial list
The redial list stores the call history of dialed
calls. It includes the names and/or numbers you
have called. This phone can store up to 20 redial
records.
View the redial records
Press REDIAL/C.
Redial a call
1 Press REDIAL/C.
2 Select a record, then press .
» The number is dialed out.
Save a call record to the
phonebook
1 Press REDIAL/C to enter the list of dialed
calls.
2 Select a record, press MENU/OK to
conrm.
3 Press MENU/OK again to enter the menu.
4 Select [Save number], then press MENU/
OKtoconrm.
5 Enter and edit the name, then press
MENU/OKtoconrm.
6 Enter and edit the number, then press
MENU/OKtoconrm.
» The record is saved.
Delete a redial record
1 Press REDIAL/C to enter the list of dialed
calls.
2 Select a record, press MENU/OK to
conrm.
3 Press MENU/OK again to enter the menu.
4 Select [Delete], then press MENU/OK to
conrm.
» Thehandsetdisplaysaconrmation
request.
5 Press MENU/OKtoconrm.
» The record is deleted.
Delete all redial records
1 Press REDIAL/C to enter the list of dialed
calls.
2 Select a record, press MENU/OK to
conrm.
3 Press MENU/OK again to enter the menu.
4 Select [Delete all], then press MENU/OK
toconrm.
» Thehandsetdisplaysaconrmation
request.
5 Press MENU/OKtoconrm.
» All records are deleted.
18 EN
9 Phone settings
Youcancustomizethesettingstomakeityour
own phone.
Sound settings
Set the handset's ringtone volume
You can select among 5 ringtone volume levels
or [Off].
1 Press MENU/OK.
2 Select [Phone setup] > [Sounds] >
[Ring volume], then press MENU/OK to
conrm.
3 Select a volume level, then press MENU/
OKtoconrm.
» The setting is saved.
Set the handset's ringtone
You can select from 10 ringtones.
1 Press MENU/OK.
2 Select [Phone setup] > [Sounds] > [Ring
tones], then press MENU/OKtoconrm.
3 Select a ringtone, then press MENU/OK
toconrm.
» The setting is saved.
Set the key tone
Key tone is the sound made when you press a
key on the handset.
1 Press MENU/OK.
2 Select [Phone setup] > [Sounds] > [Key
tone], then press MENU/OKtoconrm.
3 Select [On]/[Off], then press MENU/OK
toconrm.
» The setting is saved.
Set the docking tone
Docking tone is the sound made when you
place the handset on the base station or
charger.
1 Press MENU/OK.
2 Select [Phone setup] > [Sounds] >
[Docking tone], then press MENU/OK to
conrm.
3 Select [On]/[Off], then press MENU/OK
toconrm.
» The setting is saved.
ECO+ mode
When the ECO+ mode is activated, it
eliminates the radiation of the handset and base
station in standby mode.
1 Press MENU/OK.
2 Select [Phone setup] >[ECO+ mode],
then press MENU/OKtoconrm.
3 Select [On]/[Off], and press MENU/OK to
conrm.
» The setting is saved.
Note
Make sure that all the handsets registered to the base
station are M550/M555 in order to have the ECO+
feature functioning properly.
When ECO+ is activated, the standby time is reduced.
This is because in ECO+ mode the base station is not
transmitting any signal in standby mode; therefore the
handset needs to “listen” more frequently for signals
from the base station to detect incoming calls or other
requests from the base station. The time it takes for the
handset to access features like call setup, call log, paging,
and phonebook browsing is also delayed. The handset
will not alert you to link loss in case of power loss or
moving out of range.
19EN
Name the handset
The name of the handset can be up to 14
characters. It is displayed on the handset screen
in standby mode.
1 Press MENU/OK.
2 Select [Phone setup] > [Phone name],
then press MENU/OKtoconrm.
3 Enter or edit the name. To erase a
character, press REDIAL/C. To erase all
characters, press and hold REDIAL/C.
4 Press MENU/OKtoconrm.
» The setting is saved.
Set the date and time
For information, see 'Set the date and time' in
the Get started section.
Set the display language
Note
This feature only applies to models with multiple-
language support.
Languages available vary from country to country.
1 Press MENU/OK.
2 Select [Phone setup] > [Language], then
press MENU/OKtoconrm.
3 Select a language, then press MENU/OK
toconrm.
» The setting is saved.
20 EN
10 Telephone
answering
machine
Note
Available only for M555.
Your phone includes a telephone answering
machine that records unanswered calls when it
is on. By default, the answering machine is set
to the [Record also] mode. You can access the
answering machine remotely and change the
settings through the answering machine menu
on the handset.
Turn the answering machine
on or off
1 Press MENU/OK.
2 Select [Answ. Machine] > [Voice answer],
then press MENU/OKtoconrm.
3 Select [Answer only]/[Record also]/[Off],
then press MENU/OKtoconrm.
» The setting is saved.
Set the answering machine
language
Note
This feature only applies to models with multiple-
language support.
The answering machine language is the language
for the announcements.
1 Press MENU/OK.
2 Select [Answ. Machine] > [Voice
language], then press MENU/OK to
conrm.
3 Select a language, then press MENU/OK
toconrm.
» The setting is saved.
Set the answer mode
You can set the answering machine and select if
the callers can leave messages. Select [Record
also]if you allow the callers to leave messages.
Select [Answer only] if you forbid the callers to
leave messages.
1 Press MENU/OK.
2 Select [Answ. Machine] > [Voice answer],
then press MENU/OKtoconrm.
3 Select an answer mode, then press MENU/
OKtoconrm.
» The setting is saved.
Note
If the memory is full, the answering machine switches to
[Answer only] mode automatically.
Announcements
The announcement is the message your caller
hears when the answering machine picks up
the call. The answering machine has 2 default
announcements: the [Record also] mode and
[Answer only] mode.
Record an announcement
The maximum length of the announcement you
can record is 3 minutes. The newly recorded
announcement automatically replaces the old
one.
1 Press MENU/OK.
21EN
2 Select [Answ. Machine] >
[Announcement], then press MENU/OK
toconrm.
3 Select [Record also] or [Answer only],
then press MENU/OKtoconrm.
4 Select [Record], then press MENU/OK to
conrm.
5 Start recording close to the microphone
after the beep.
6 Press MENU/OK to stop recording or the
recording stops after 3 minutes.
» You can listen to the newly recorded
announcement on the handset.
Note
Make sure that you speak close to the microphone
when you record an announcement.
Listen to the announcement
1 Press MENU/OK.
2 Select [Answ. Machine] >
[Announcement], then press MENU/OK
toconrm.
3 Select [Record also] or [Answer only],
then press MENU/OKtoconrm.
4 Select [Play], then press MENU/OK to
conrm.
» You can listen to the current
announcement.
Note
You can no longer listen to the announcement when
you pick up an incoming call.
Restore the default announcement
1 Press MENU/OK.
2 Select [Answ. Machine] >
[Announcement], then press MENU/OK
toconrm.
3 Select [Record also] or [Answer only],
then press MENU/OKtoconrm.
4 Select [Use default], then press MENU/
OKtoconrm.
» Thehandsetdisplaysaconrmation
request.
5 Press MENU/OKtoconrm.
» The default announcement is restored.
Incoming messages
Each message can be up to 3 minutes long.
When you receive new messages, the new
messageindicatorashesontheanswering
machineandthehandsetdisplaysanotication
message.
Note
If you pick up the phone when the caller leaves a
message, the recording stops and you can talk to the
caller directly.
If the memory is full, the answering machine switches
to [Answer only] automatically. Delete old messages to
receive new ones.
Listen to the incoming message
You can listen to the incoming messages in the
sequence they are recorded.
Select MENU/OK > [Answ. Machine] > [Play],
then press MENU/OKtoconrm.
» New messages start playing. Old
messages start playing if there is no
new message.
• Press REDIAL/C to stop listening.
• Press MENU/OK to enter the options
menu.
• Press / to increase/decrease the
volume.
22 EN
Tip
Themessagecounterisdisplayedontherstline
(while the date is displayed on the second line). It
indicates the current message you are viewing against
the total number of messages you received.
Delete an incoming message
1 When you listen to the message, press
MENU/OK to enter the options menu.
2 Select [Delete], then press MENU/OK to
conrm.
» The current message is deleted.
Delete all old incoming messages
1 Press MENU/OK.
2 Select [Answ. Machine] > [Delete all],
then press MENU/OKtoconrm.
» Thehandsetdisplaysaconrmation
request.
3 Press MENU/OKtoconrm.
» All old messages are permanently
deleted.
Note
You can delete the read messages only. No deleted
messages can be recovered.
Set the ring delay
You can set the number of times the phone
rings before the answering machine picks up
the call.
1 Press MENU/OK.
2 Select [Answ. Machine] > [Ring delay],
then press MENU/OKtoconrm.
3 Select a new setting, then press MENU/
OKtoconrm.
» The setting is saved.
Note
Make sure that the answering machine is switched on
before this feature can be applied.
Tip
When you access the answering machine remotely,
you are recommended to set the ring delay to [Toll
saver] mode. This is a cost effective way to manage
your messages. When there are new messages, the
answering machine picks up the call after 3 rings; When
there is no messages, it picks up the call after 5 rings.
Remote access
You can operate your answering machine when
you are away from home. Simply make a call to
your phone with a touch tone phone and enter
your 4-digit PIN code.
Note
The remote access PIN code is the same as your
system PIN. The preset PIN is 0000.
Activate/deactivate the remote access
You can allow or block remote access to the
answering machine.
1 Press MENU/OK.
2 Select [Answ. Machine] > [Remote
access], then press MENU/OKtoconrm.
3 Select [Activate]/[Deactivate], then press
MENU/OKtoconrm.
» The setting is saved.
Change the PIN/passcode
1 Press MENU/OK.
23EN
2 Select [Answ. Machine] > [Remote
access] > [Change PIN], then press
MENU/OKtoconrm.
3 Enter the old PIN/passcode, then press
MENU/OKtoconrm.
4 Enter the new PIN/passcode, then press
MENU/OKtoconrm.
5 Enter the new PIN/passcode again, then
press MENU/OKtoconrm.
» The setting is saved.
Access the answering machine
remotely
1 Make a call to your home number with a
touch tone phone.
2 Enter # when you hear the announcement.
3 Enter your PIN code.
» You now have access to your
answering machine, and you can listen
to the new messages.
Note
You have 2 chances to enter the correct PIN code
before your phone hangs up.
4 Press a key to carry out a function. See the
Remote access commands table below for
a list of available functions.
Note
When there is no message, the phone hangs up
automatically if no key is pressed for 8 seconds.
Remote access commands
Key Function
1 Repeat the current or listen to the
previous message.
2 Listen to messages.
3 Skip to the next message.
6 Delete the current message.
7 Switch the answering machine on.
(not available when you listen to the
messages).
8 Stop listening to the message.
9 Switch the answering machine off.
(not available when you listen to the
messages).
24 EN
11 Services
The phone supports a number of features that
help you handle and manage the calls.
Call list type
You can set if you can see all calls or missed
calls from the call log.
View the call records
1 Press .
» The incoming call log is displayed.
2 Select a record, then press MENU/OK
and [View] select for more available
information.
Auto conference
To join an external call with another handset,
press .
Note
This feature is available only for multi-handset versions.
Activate/Deactivate auto conference
1 Press MENU/OK.
2 Select [Services] > [Conference], then
press MENU/OKtoconrm.
3 Select [Auto]/[Off], then press MENU/OK
toconrm.
» The setting is saved.
Select the recall duration
Make sure that the recall time is set correctly
before you can answer a second call. In normal
case, the phone is already preset for the recall
duration. You can select among 3 options:
[Short], [Medium] and [Long]. The number of
available options varies with different countries.
For details, consult your service provider.
1 Press MENU/OK.
2 Select [Services] > [Recall time], then
press MENU/OKtoconrm.
3 Select an option, then press MENU/OK to
conrm.
» The setting is saved.
Dial mode
Note
This feature is country dependent and only applies to
models that support both tone and pulse dial.
Dial mode is the telephone signal used in your
country. The phone supports tone (DTMF) and
pulse (rotary) dial. Consult the service provider
for detailed information.
Set the dial mode
1 Press MENU/OK.
2 Select [Services] > [Dial mode], then
press MENU/OKtoconrm.
3 Select a dial mode, then press MENU/OK
toconrm.
» The setting is saved.
Note
If your phone is in pulse dial mode, press * during a call
for temporary tone mode. Digits entered for this call
are then sent out as tone signals.
25EN
Register additional handsets
You can register additional handsets to the base
station. The base station can register up to 3
handsets.
1 Press MENU/OK on the handset.
2 Select [Services] > [Register].
3 Press and hold on the base station for 5
seconds, then press MENU/OKtoconrm.
4 Enter the system PIN/passcode. Press
REDIAL/C to make corrections. Press
MENU/OKtoconrmthePIN/passcode.
Note
For models with an answering machine, you hear a
conrmationbeep.
» Registration is complete in less than 2
minutes. The base automatically assigns
a handset number to the handset.
Note
If the PIN/passcode is incorrect or no base is found
within a certain period, your handset displays a
noticationmessage.Repeattheaboveprocedureif
registration fails.
Note
The preset PIN/passcode is 0000. No change can be
made on it.
Unregister the handsets
1 If two handsets share the same base
station, you can unregister a handset with
another handset.
2 Press MENU/OK.
3 Select [Services] > [Unregister], then
press MENU/OKtoconrm.
4 Enter the system PIN/passcode. (The
preset PIN/passcode is 0000). Press
REDIAL/C to remove the number.
5 Select the handset number to be
unregistered.
6 Press MENU/OKtoconrm.
» The handset is unregistered.
Tip
The handset number displays beside the handset name
in standby mode.
Restore default settings
You can reset your phone settings to the
original factory settings.
1 Press MENU/OK.
2 Select [Services] > [Reset], then press
MENU/OKtoconrm.
» Thehandsetdisplaysaconrmation
request.
3 Press MENU/OKtoconrm.
» All settings except the phonebook are
reset.
26 EN
12 Technical data
General specication and features
• Maximum talk time: 16 hours
• Maximum standby time: 250 hours (LED
is off)
• Range indoor: 50 meters
• Range outdoor: 300 meters
• Phonebook list with 100 entries
• Redial list with 20 entries
• Call log with 50 entries
• Answering machine with up to 30 minutes
recording time
• Calleridenticationstandardsupport:FSK,
DTMF
Battery
• Philips: 2 x AAA Ni-MH 1.2V 550 mAh
rechargeable batteries
Power adapter
Base and charger:
• Philips: S003EB06000302, Input: 100-
240Vac50/60Hz200mA;Output:(i)6V
300mA, (ii) 6V 200 mA
Power consumption
• Power consumption in standby mode:
0.6W (M550), 0.65W (M555)
Weight and dimensions
• Handset: 171 grams
• 213.0 x 50 x 44 mm (H x W x D)
• Base: 157 grams
• 215 x 50 x 35 mm (H x W x D)
27EN
13 Notice
Declaration of conformity
Hereby Philips Consumer Lifestyle, declares
that the M550/M555 is in compliance with
the essential requirements and other relevant
provisionsofDirective1999/5/EC.Youcannd
the Declaration of Conformity on www.p4c.
philips.com.
This product has been designed, tested and
manufactured according the European R&TTE
directive 1999/5/EC.
Use GAP standard
compliance
The GAP standard guarantees that all DECT™
GAP handsets and base stations comply with
a minimum operating standard irrespective of
their make. The handset and base station are
GAP compliant, which means they guarantee
the minimum functions: register a handset,
take the line, make a call and receive a call. The
advanced features may not be available if you
use them with other makes. To register and use
this handset with a GAP compliant base station
ofdifferentmake,rstfollowtheprocedure
described in the manufacturer's instructions,
then follow the procedure described in this
manual for registering a handset. To register a
handset from different make to the base station,
put the base station in registration mode, then
follow the procedure described in the handset
manufacturer's instructions.
Compliance with EMF
Koninklijke Philips Electronics N.V. manufactures
and sells many products targeted at consumers,
which, like any electronic apparatus, in
general have the ability to emit and receive
electromagnetic signals.
One of Philips’ leading Business Principles is to
take all necessary health and safety measures
for our products, to comply with all applicable
legal requirements and to stay well within
the EMF standards applicable at the time of
producing the products.
Philips is committed to develop, produce and
market products that cause no adverse health
effects.Philipsconrmsthatifitsproductsare
handled properly for their intended use, they
aresafetouseaccordingtoscienticevidence
available today.
Philips plays an active role in the development
of international EMF and safety standards,
enabling Philips to anticipate further
developmentsinstandardizationforearly
integration in its products.
Disposal of your old product
and batteries
Your product is designed and manufactured
with high quality materials and components,
which can be recycled and reused.
When this crossed-out wheeled bin symbol is
attached to a product it means that the product
is covered by the European Directive 2002/96/
EC. Please inform yourself about the local
separate collection system for electrical and
electronic products.
Please act according to your local rules and
do not dispose of your old products with your
normal household waste.
Correct disposal of your old product helps to
prevent potential negative consequences for the
environment and human health.
28 EN
Your product contains batteries covered by the
European Directive 2006/66/EC, which cannot
be disposed with normal household waste.
Please inform yourself about the local rules
on separate collection of batteries because
correct disposal helps to prevent negative
consequences for the environmental and
human health.
When this logo is attached to a product, it
meansanancialcontributionhasbeenpaidto
the associated national recovery and recycling
system.
Environmental information
All unnecessary packaging has been omitted.
We have tried to make the packaging easy to
separate into three materials: cardboard (box),
polystyrene foam (buffer) and polyethylene
(bags, protective foam sheet.)
Your system consists of materials which can
be recycled and reused if disassembled by
aspecializedcompany.Pleaseobservethe
local regulations regarding the disposal of
packaging materials, exhausted batteries and old
equipment.
29EN
14 Frequently
asked questions
No signal bar is displayed on the screen.
The handset is out of range. Move it closer
to the base station.
If the handset displays [Register your
Handset], register your handset.
Tip
For further information, see the chapter 'Services',
section 'Register additional handsets'.
My handset is in searching status, what do I
do?
Make sure that the base station has power
supply.
Register the handset to the base station.
Move the handset closer to the base
station.
If I fail to pair (register) the additional
handsets to the base station, what do I do?
Your base memory is full. Unregister the unused
handsets and try again.
Tip
For further information, see the chapter 'Services',
section 'Unregister the handsets'.
No dialing tone
Check your phone connections.
The handset is out of range. Move it closer
to the base station.
No docking tone
The handset is not placed properly on the
base station/charger.
The charging contacts are dirty. Disconnect
thepowersupplyrstandcleanthe
contacts with a damp cloth.
I cannot change the settings of my voice mail,
what do I do?
The voice mail service is managed by your
service provider but not the phone itself.
Contact your service provider to change the
settings.
The handset on the charger does not charge.
Make sure the batteries are inserted
correctly.
Make sure the handset is placed properly
on the charger. The battery icon animates
when charging.
Make sure the docking tone setting is
turned on. When the handset is placed
correctly on the charger, you can hear a
docking tone.
The charging contacts are dirty. Disconnect
thepowersupplyrstandcleanthe
contacts with a damp cloth.
Batteries are defective. Purchase new ones
withthesamespecications.Toremovethe
battery door, refer to the instruction in the
following picture.
No display
Make sure the batteries are charged.
Make sure there is power and the phone is
connected.
Bad audio (crackles, echo, etc.)
The handset is nearly out of range. Move it
closer to the base station.
The phone receives interference from the
nearby electrical appliances. Move the base
station away from them.
The phone is at a location with thick walls.
Move the base away from them.
The handset does not ring.
Make sure the handset ringtone is turned on.
The caller ID does not display.
The service is not activated. Check with
your service provider.
30 EN
The caller's information is withheld or
unavailable.
Note
If the above solutions do not help, disconnect the
power supply from both the handset and base station.
Try again after 1 minute.
31EN
15 Appendix
Text and number input tables
Key Upper case characters (for English/
French/ German/ Italian/Turkish/
Portuguese/Spanish/Dutch/Danish/
Finnish/Norwegian/ Swedish/ Romanian/
Polish/Czech/Hungarian/Slovakian/
Slovenian/Croatian/Lithuanian/Estonian/
Lativian/Bulgarian)
0 Space . 0 , / : ; " ' ! ¡ ? ¿ * + - % |
1 1@_#=<>()&£$¥¤§...
2 ABC2ÂÆÁÃÄÅÇČ
3 DEF3ÉÊĖĘΔΦ
4 GHI4ĞÍÏİΓ
5 JKL5Λ
6 M N O 6 Ñ Ó Ô Õ Ö
7 PQRS7ŞŠΠΘΣ
8 T U V 8 Ù Ú Ü
9 WXYZ9ØΩΞΨŽ
Key Lower case characters (for English/
French/ German/ Italian/Turkish/
Portuguese/Spanish/Dutch/Danish/
Finnish/Norwegian/ Swedish)
0 Space . 0 , / : ; " ' ! ¡ ? ¿ * + - % |
1 1@_#=<>()&£$¥[]{}¤§…
2 abc2àâæáãäåçč
3 def3èéêëΔΦ
4 ghi4ğíìïįıΓ
5 jkl5Λ
6 m n o 6 ñ ó ô õ ö ò
7 pqrs7βşšΠΘΣ
8 t u v 8 ù ú ü
9 wxyz9øΩΞΨž
Key Upper case characters (for Greek)
0 Space . 0 , / : ; " ' ! ¡ ? ¿ * + - % \^ ~|
1 1@_#=<>()&€£$¥[]{}¤§...
2 ABГ2ABCÆÅÇ
3 ΔΕΖ3DEFÉ
4 ΗΘΙ4GHI
5 ΚΛΜ5JKL
6 ΝΞΟ6MNOÑÖ
7 ΠΡΣ7PQRSß
8 ΤΥΦ8TUVÜ
9 ΧΨΩ9WXYZØ
Key Lower case characters (for Greek)
0 Space . 0 , / : ; " ' ! ¡ ? ¿ * + - % \ ^ ~ |
1 1@_#=<>()&€£$¥[]{}¤§
2 αβγ2abcàæäå
3 δεζ3defèé
4 ηθι4ghiì
5 κλμ5jklΛ
6 νξο6mnoñöò
7 πρσς7pqrsß
8 τυφ8tuvùü
9 χψω9wxyzø
Key Upper case characters (for Serbian)
0 Space . 0 , / : ; " ' ! ¡ ? ¿ * + - % \^ ~|
1 1@_#=<>()&€£$¥[]{}¤§...
2 ABCЂ ĆČ2А БВГ
3 DEFЈĐ3ДЕЖЗΔΦ
4 GHIЉ 4ИЙКЛΓ
5 JKLЊ 5МНОПΛ
6 MNOЋ6РСТ У
7
P Q R S ҖŠ7ФХЦЧΠΘΣß
8 TUV8ШЩЪЫ
9 WXYZŽ9ЬЭ ЮЯΩΞΨ
Key Lower case characters (for Serbian)
0 Space . 0 , / : ; " ' ! ¡ ? ¿ * + - % \ ^ ~ |
1 1@_#=<>()&€£$¥[]{}¤§
2 abcЂĆČ2АБВГ
3 defЈĐ 3ДЕЖЗ
4 ghiЉ4ИЙКЛ
5 jklЊ5МНОП
6 mnoЋ 6РСТУ
32 EN
7
p q r S ҖŠ7ФХЦЧΠΘΣß
8 tuvij8ШЩЪЫ
9 wxyZŽ9ЬЭЮЯΩΞ Ψ
33EN
16 Index
A
additional handsets 25
announcements 20
answer a call 10
answering machine 20
auto conference 24
B
base station
installation 7
overview 6
battery 8
C
call log 15
caller ID 15
calling 10
charging 8
conference 11
contacts 13
D
default settings 25
delete messages 22
dial mode 24
disposal 27
F
nd handsets/paging 6
G
GAP 27
H
handset name 19
I
incoming messages 21
L
language setting
answering machine 20
handset 19
listen to messages 21
M
missed calls 15
mute 11
O
on/off 20
P
phone
overview 4
set up 7
phone settings 18
phonebook 15
PIN
answering machine 22
power adapter 26
R
recall time 24
redial 17
register/unregister 25
remote access to answering machine 22
ring delay 22
ringtone 18
S
safety 3
save a number 15
setup 7
signal strength 9
sounds
34 EN
docking 18
keytone 18
standby mode 9
T
text entry 12
time setting 8
troubleshooting/FAQ 29
two calls/call on hold 11
V
volume adjustment 11
Specifications are subject to change without notice
© 2012 Koninklijke Philips Electronics N.V.
All rights reserved.
UM_M55x_90_EN_V1.0
WK12321
0168
30

Hulp nodig? Stel uw vraag in het forum

Spelregels
1

Forum

Philips-M550
  • Beste ,
    ik kan mijn gemiste oproepen op mijn Philips M550-M555 niet meer wissen ! ....gekocht in 2014
    Graag bijstand a.u.b.
    vriendelijke groeten,
    Thouet Aimé
    aime.thouet@telenet.be

    Gesteld op 17-5-2021 om 20:30

    Reageer op deze vraag Misbruik melden
  • hoe moet je de voicemails beluisteren
    want ik heb al verschillende manieren geprobeerd maar het lukt niet Gesteld op 30-3-2021 om 19:50

    Reageer op deze vraag Misbruik melden
  • Geachte,
    Hoe kan ik de batterij klep open krijgen ?
    Ik zie daar wel een pijltje maar meer niet ! Gesteld op 16-10-2020 om 12:06

    Reageer op deze vraag Misbruik melden
  • de baterijen en instellingen werken nog toch kan ik niet meer bellen en kan mij ook niet bereiken geen oproep
    of opbel geluid Gesteld op 7-10-2020 om 14:04

    Reageer op deze vraag Misbruik melden
  • Batterij laad niet meer op ,kan ik die vervangen en hoe dat te doen Gesteld op 20-9-2020 om 19:35

    Reageer op deze vraag Misbruik melden
  • Hoe in ‘ s hemelsnaam dat toestel openen?. Geantwoord op 25-10-2024 om 21:16

    Waardeer dit antwoord Misbruik melden
  • Ik krijg op de telefoon sedert enkele weken dag en nacht zeer onregelmatig (erg vaak) een bericht "Nieuwe voicemail", samen met een icoon van een kleine envelop én een flitsend lampje .
    Daarna kan Ik het wel atijd "wissen" en krijg ik het gewone beginscherm.
    Gesteld op 10-9-2020 om 12:22

    Reageer op deze vraag Misbruik melden
6
  • Ik wil duidelijkheid hebben over degene die mij hebben gebeld. Gesteld op 9-9-2020 om 14:13

    Reageer op deze vraag Misbruik melden
  • ik heb verschillende gemiste oproepen. Hoe kan ik achterhalen wie dat zijn. Gesteld op 9-9-2020 om 14:00

    Reageer op deze vraag Misbruik melden
  • Men kan mij wel bellen maar ik kan een ander niet bellen Gesteld op 9-6-2020 om 11:57

    Reageer op deze vraag Misbruik melden
  • Telefoon werkt niet meer en op display staat “zoeken”
    Gesteld op 15-6-2019 om 10:59

    Reageer op deze vraag Misbruik melden
  • mijn tst 2 geeft bezet toon als ik er mee wil bellen.
    Krijg geen gehoor. Gesteld op 24-7-2017 om 12:50

    Reageer op deze vraag Misbruik melden
    • Ik had hetzelfde probleem en heb met Philips gechat.
      stroom van toestel afhalen en ook de verbindingslijn loskoppelen van het basisstation.
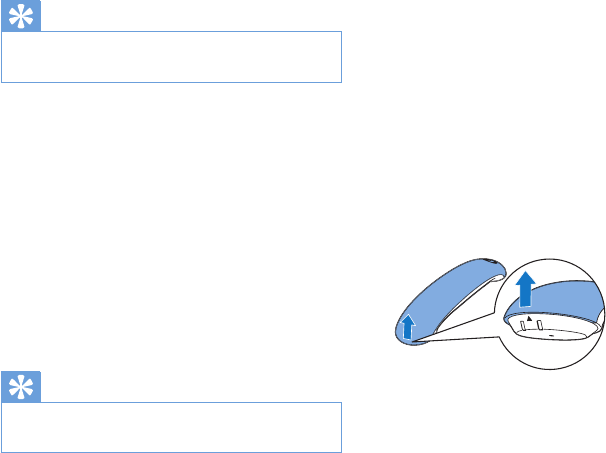
      2.Batterijen uit het toelstel halen.Deze zitten in de hoorn.Gaat niet makkelijk.Wij hebben er een mes tussen het donkere en witte gedeelte gezet en zo losgewrongen.
      3.Als de batterijen eruit zijn dan 2 minuiten wachten dan is hij gereset.
      4.Het basisstation weer aansluiten aan stroom enz.
      5. Batterijen erdoen en hij doet het weer. Geantwoord op 26-1-2018 om 20:02

      Waardeer dit antwoord (7) Misbruik melden
  • aan de letters in de display van toestel 1 gaan stukjes ontbreken, met name aan de onderzijde van de woorden zoals "Philips" en de tijdaanduiding. Gesteld op 7-6-2017 om 12:08

    Reageer op deze vraag Misbruik melden
12
  • Wat betekend het als display zoeken aangeeft.. dit is spontaan ontstaan
    Gesteld op 23-1-2017 om 20:06

    Reageer op deze vraag Misbruik melden
    • Kon hierop ook geen antwoord vinden hier. Zelf onderzoek heeft mij het volgende geleerd. Mijn 2e toestel had dit probleem en gaf aan dat de batterij vol was. Resetten op het toestel had geen zin. Dus hij moest open. Dit kan riskant zijn m.b.t. beschadiging. Dit is vermoedelijk ook de reden dat Philips niet ingaat op dit probleem. gebruik bij voorkeur geen mes. Als je te ver gaat kan de inhoud/bedrading beschadigen. Ik heb een tooltje voor het verwijderen van de achterkant voor tablet gebruikt, maar een plastic mesje (barbecue bestek) kan ook. Begin bij de bovenkant en dan van de ene kant naar de andere. Niet over de lengte. Wanneer eenmaal open zie je de batterijen. Die heb ik verwijderd en na 10 sec weer terug gezet. Het toestel bleek hersteld maar gaf nu aan doormiddel van maar 1 streepje dat de batterijen bijna leeg waren. Dus het probleem is waarschijnlijk dat de batterijen niet goed meer zijn. Omdat de achterkant er toch af is gelijk maar de batterijen vervangen. LET OP het zijn OPLAADBARE batterijen van het type AAA 2 stuks. Eerst opladen voor gebruik. Succes. Geantwoord op 24-11-2018 om 12:22

      Waardeer dit antwoord Misbruik melden
  • Hallo,
    Toetsenbord is geblokkeerd. Hoe kan ik het toetsenbord deblokkeren?
    dank. Gesteld op 23-10-2016 om 23:19

    Reageer op deze vraag Misbruik melden
  • er blijft altijd een envelopje en nieuw voicemal op mijn display als ik die verwijder komt het altijd terug heeft er iemand ervaring mee

    Mvg ;-) Gesteld op 27-9-2016 om 08:21

    Reageer op deze vraag Misbruik melden
  • Hoe verwijder ik een nummer in mijn telefoonboek
    Gesteld op 28-3-2016 om 13:33

    Reageer op deze vraag Misbruik melden
  • Hoe kan ik het antwoordapparaat van m550 uitzetten? Gesteld op 19-9-2015 om 22:19

    Reageer op deze vraag Misbruik melden
  • Geen antwoordapparaat? De voorgeprogrammeerde stem zegt van wel. Bovendien staat in de diplay ook een Menu Antwoordapparaat Settingen, waarin helaas niet uitzetten. Geantwoord op 26-9-2015 om 18:42

    Waardeer dit antwoord Misbruik melden
  • mijn toetsenbord van m550 is geblokkeerd, wat te doen? Gesteld op 11-6-2015 om 15:21

    Reageer op deze vraag Misbruik melden
18
24

Misbruik melden

Gebruikershandleiding.com neemt misbruik van zijn services uitermate serieus. U kunt hieronder aangeven waarom deze vraag ongepast is. Wij controleren de vraag en zonodig wordt deze verwijderd.

Product:

Bijvoorbeeld antisemitische inhoud, racistische inhoud, of materiaal dat gewelddadige fysieke handelingen tot gevolg kan hebben.

Bijvoorbeeld een creditcardnummer, een persoonlijk identificatienummer, of een geheim adres. E-mailadressen en volledige namen worden niet als privégegevens beschouwd.

Spelregels forum

Om tot zinvolle vragen te komen hanteren wij de volgende spelregels:

Belangrijk! Als er een antwoord wordt gegeven op uw vraag, dan is het voor de gever van het antwoord nuttig om te weten als u er wel (of niet) mee geholpen bent! Wij vragen u dus ook te reageren op een antwoord.

Belangrijk! Antwoorden worden ook per e-mail naar abonnees gestuurd. Laat uw emailadres achter op deze site, zodat u op de hoogte blijft. U krijgt dan ook andere vragen en antwoorden te zien.

Abonneren

Abonneer u voor het ontvangen van emails voor uw Philips M550 bij:


U ontvangt een email met instructies om u voor één of beide opties in te schrijven.


Ontvang uw handleiding per email

Vul uw emailadres in en ontvang de handleiding van Philips M550 in de taal/talen: Engels als bijlage per email.

De handleiding is 1,35 mb groot.


U ontvangt de handleiding per email binnen enkele minuten. Als u geen email heeft ontvangen, dan heeft u waarschijnlijk een verkeerd emailadres ingevuld of is uw mailbox te vol. Daarnaast kan het zijn dat uw internetprovider een maximum heeft aan de grootte per email. Omdat hier een handleiding wordt meegestuurd, kan het voorkomen dat de email groter is dan toegestaan bij uw provider.

Stel vragen via chat aan uw handleiding

Stel uw vraag over deze PDF

Andere handleiding(en) van Philips M550

Philips M550 Gebruiksaanwijzing - Nederlands - 40 pagina's

Philips M550 Gebruiksaanwijzing - Deutsch - 42 pagina's

Philips M550 Gebruiksaanwijzing - Français - 42 pagina's


Uw handleiding is per email verstuurd. Controleer uw email

Als u niet binnen een kwartier uw email met handleiding ontvangen heeft, kan het zijn dat u een verkeerd emailadres heeft ingevuld of dat uw emailprovider een maximum grootte per email heeft ingesteld die kleiner is dan de grootte van de handleiding.

Er is een email naar u verstuurd om uw inschrijving definitief te maken.

Controleer uw email en volg de aanwijzingen op om uw inschrijving definitief te maken

U heeft geen emailadres opgegeven

Als u de handleiding per email wilt ontvangen, vul dan een geldig emailadres in.

Uw vraag is op deze pagina toegevoegd

Wilt u een email ontvangen bij een antwoord en/of nieuwe vragen? Vul dan hier uw emailadres in.


Info