502341
35
Verklein
Vergroot
Pagina terug
1/84
Pagina verder
!!!"#$%&%#'"()*+!,&()*,
-,.%'/,012)301#0)43(/15641.,/1'3##)0 /15/ 7%6,*5189:;1<)&41',0 %,'1=*50/1>?@1AB
CDEF>G;CH
I',01*5635&
1
1.1
1.2
1.3
1.4
1.5
2
2.1
2.2
2.3
2.4
2.5
2.6
3
3.1
3.2
3.3
3.4
3.5
3.6
4
4.1
4.2
4.3
4.4
4.5
4.6
4.7
5
5.1
5.2
5.3
5.4
5.5
5.6
5.7
6
6.1
6.2
6.3
6.4
6.5
6.6
6.7
7
7.1
7.2
7.3
7.4
7.5
7.6
7.7
7.8
Contents
Getting started 3
TV tour 3
Setting up 7
Keys on the TV 9
Register your TV 10
Help and support 11
Basics 12
Remote control 12
Menus 15
Watch TV 17
3D 22
Connected devices 23
Subtitles, timers and locks 24
Smart TV 25
Net TV 25
Interactive TV 28
Videos, photos and music 29
Pause TV and recording 31
Games 33
Text 34
Setup 36
Picture and sound 36
Ambilight 38
Channels 40
Network 42
Devices 44
Universal access 45
Software 46
Connections 47
First connections 47
Cables and connections 48
Connect devices 50
Connect more devices 58
Network 63
SD card 64
Common interface CAM 65
Troubleshooting 66
Contact information 66
TV and remote control 67
TV channels 68
Picture and sound 69
Devices 70
Videos, photos and music 71
Network 72
Specifications 73
Software 73
Environmental 74
Power and reception 76
Display and sound 77
Display resolutions 78
Multimedia 79
Connectivity 80
Dimensions and weights 81
Index 82
2 Contents
1
1.1
Getting started
TV tour
Cinema 21:9
This Cinema 21:9 TV perfectly matches the original movie format
and is equipped with a full High Definition (HD) display. A full
HD 2560x1080p, the highest resolution of HD sources.
This display offers a brilliant flickerfree progressive scan picture
with optimum brightness and superb colours. Advanced
formatting technology continuously analyses the incoming signals
and progressively stretches non 21:9 images to full screen and
avoids distortion.
Smart TV
Connect your Smart TV to the Internet and you can rent a
movie from your home, browse the Net TV apps, watch
programmes you missed or check the TV guide. View your
photos and videos from your PC, tablet PC or phone.
Connect a USB Hard Drive and pause a TV broadcast or record
your favourite show.
Read more about Smart TV in Help > Smart TV.
Read more about setting up the Internet connection in Help >
Setup > Network.
3D
On this TV, you can watch 3D programmes and movies with
Easy 3D.
When 3D programmes are broadcast or you start a 3D movie,
the TV switches to 3D. All you need to do is to put on your
passive 3D glasses.
Read more about 3D in Help > Basics > Watch 3D.
The remote control
To adjust the volume.
To switch TV channels.
To open or close the Home menu h.
Open the Home menu as a starting point to operate the TV.
In the Home menu, you can start or stop a TV activity, such as
watching TV - Watch TV - or watching a movie from a
connected DVD player.
Getting started / TV tour 3
To open or close the FIND menu ¬.
Open the Find menu to open the list of channels while you are
watching TV channels or the list of videos and music while you
browse your PC on TV.
To open or close the ADJUST menu t
Open the Adjust menu to quickly adjust the picture and sound
settings.
You can set the Smart picture setting to Game, which is ideal for
gaming, or change the Smart sound setting of the TV
loudspeakers.
To open or close the OPTIONS menu r.
Open the Options menu to select optional settings related to
what you are watching or doing on TV.
Back È.
With Back, you can go back to the previous TV channel or go
one step back in a menu.
Red
With the red key, you can select the red option or open digital
Interactive TV or some TV demonstration clips.
Green
With the green key, you can select the green option or the Eco
settings.
4 Getting started / TV tour
Yellow
With the yellow key, you can select the yellow option.
Blue
With the blue key, you can select the blue option.
Read more about the remote control in Help > Basics >
Remote control > Overview.
Or go to the ¬ Search page in this Help to look for any topic.
Press u to select the next TV tour.
Connecting devices
Use the HDMI™ connection to connect a DVD, Blu-ray Disc
player or game console.
The HDMI connection offers the best picture and sound quality
and, if your device has EasyLink (HDMI-CEC), the TV can add
the device to the Home menu automatically.
When a device is added to the Home menu, you can select it to
watch its programme. If the device has no EasyLink or you do
not use the HDMI connection, you must add the connected
device in the Home menu using Add your devices.
Read more about Add your devices in Help > Basics > Menus >
h Home.
Read more about using EasyLink in Help > Basics > Remote
control > Operate devices.
In the chapter Help > Connections, drawings like these will help
you to connect most common devices.
Getting started / TV tour 5
HD TV
This TV can display High Definition programmes, but to enjoy
HD TV you need to get programmes in HD first. If you are not
watching HD programmes, the picture quality will be that of a
normal TV.
Watch HD TV programmes from . . .
a Blu-ray Disc player
a digital HD receiver connected with HDMI and with a
subscription to HD programmes
over-the-air HD broadcasts
channels offering HD on a digital network
an HD game console connected with HDMI and playing an
HD game
HD video clip
To experience the stunning sharpness and picture quality of HD
TV, you can start the High Definition video clip from the Home
menu. Press Home > Setup > Watch demos (on the second
page of the Setup menu).
Contact your dealer for more information.
Go to www.philips.com/support to find FAQs featuring the list of
HD channels or providers in your country.
6 Getting started / TV tour
1.2 Setting up
Stand or wall mounting
Always make sure to position the TV on a solid surface when it
is mounted on the TV stand.
Wall mounting
With the foot and neck of the TV stand, you can mount the TV
to the wall. Combine the foot and neck to make a swivel mount
or alternatively use only the foot to mount the TV close to the
wall.
Find all mounting instructions in the Quick Start Guide that came
with the TV. In case you lost this guide, you can download the
guide from www.philips.com
Use the product type number of the TV to look for the Quick
Start Guide to download.
Caution
Wall mounting the TV requires special skills and should only be
performed by qualified personnel. The TV wall mounting should
meet safety standards according to the TV's weight. Read also the
safety precautions before positioning the TV.
TP Vision Netherlands B.V. bears no responsibility for improper
mounting or any mounting that results in accident or injury.
VESA info
Your TV is prepared for a VESA-compliant wall mount bracket
(sold separately).
VESA codes to purchase the bracket:
VESA MIS -F 400,400,M6
Use a screw length as shown in the drawing.
Position the TV
Carefully read the safety precautions before you position the TV.
Position the TV where light does not shine directly on the
screen.
Dim lighting conditions in the room for best Ambilight effect.
Position the TV up to 25 cm away from the wall for the best
Ambilight effect.
Getting started / Setting up 7
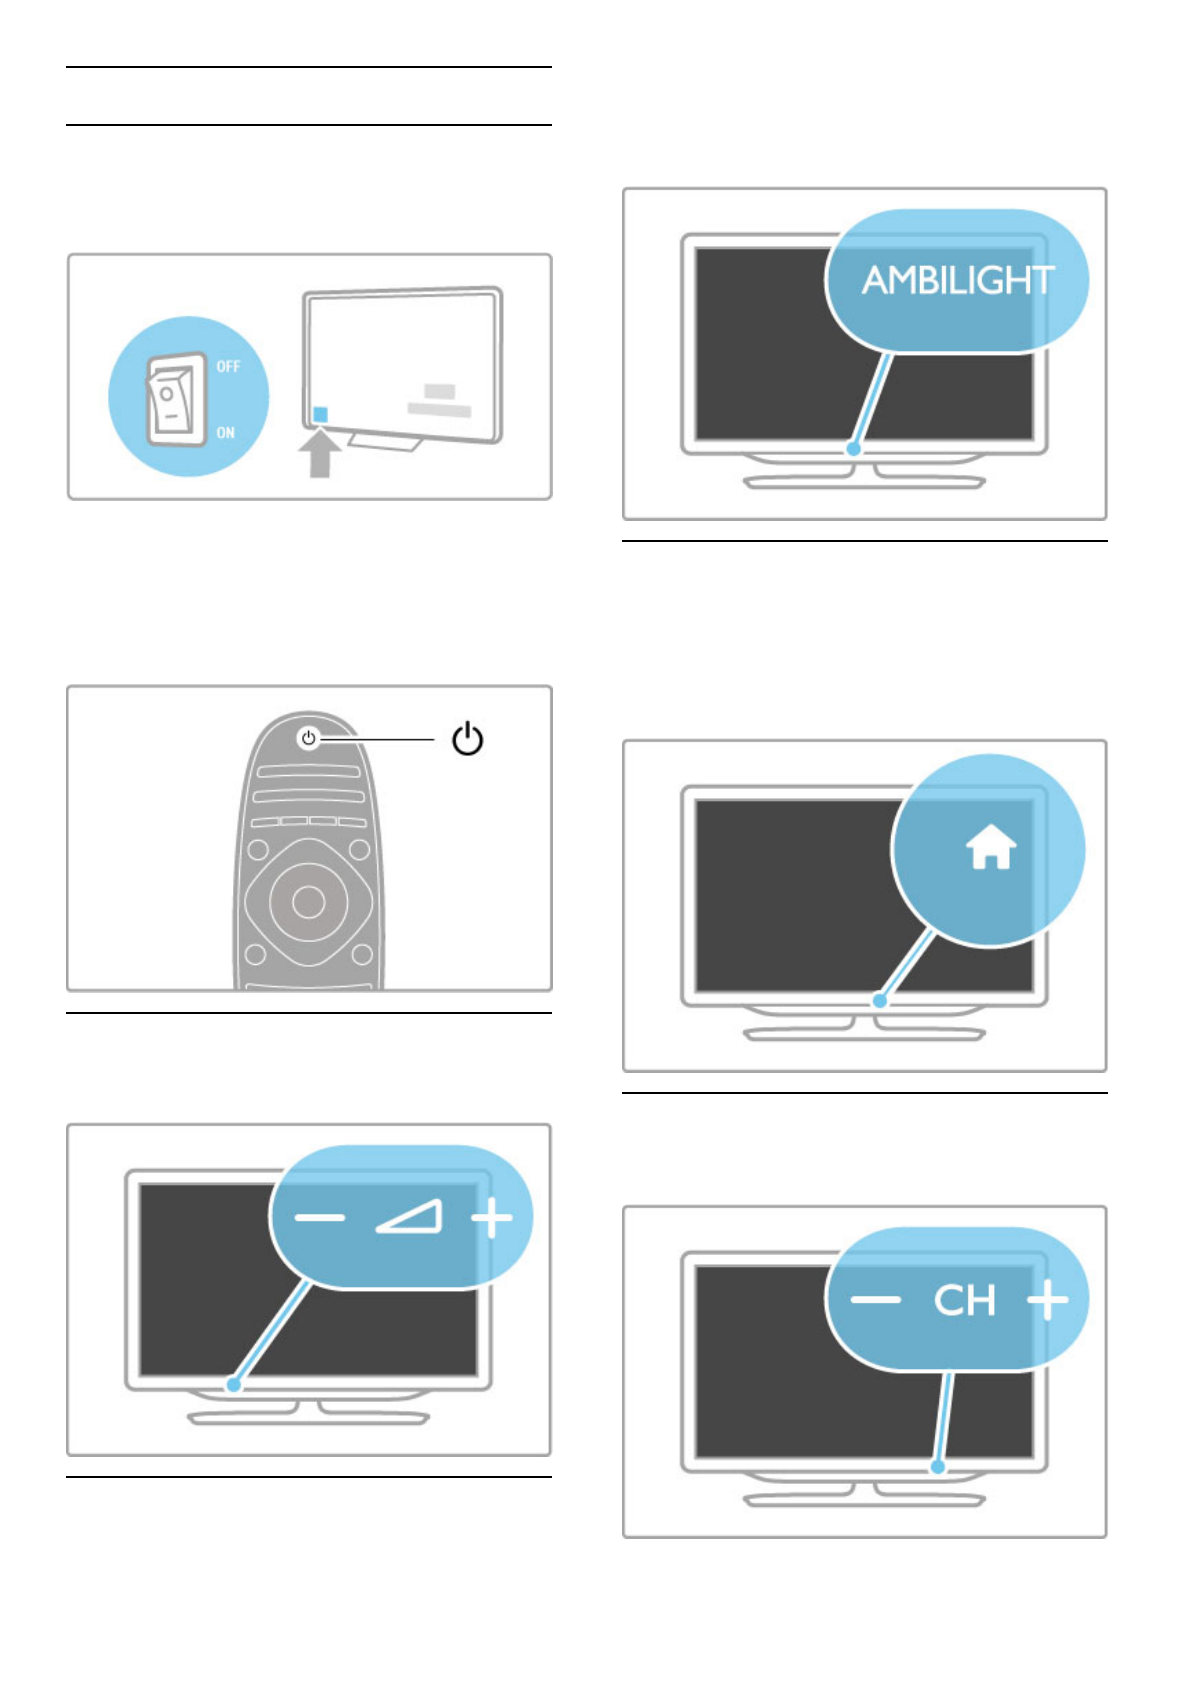
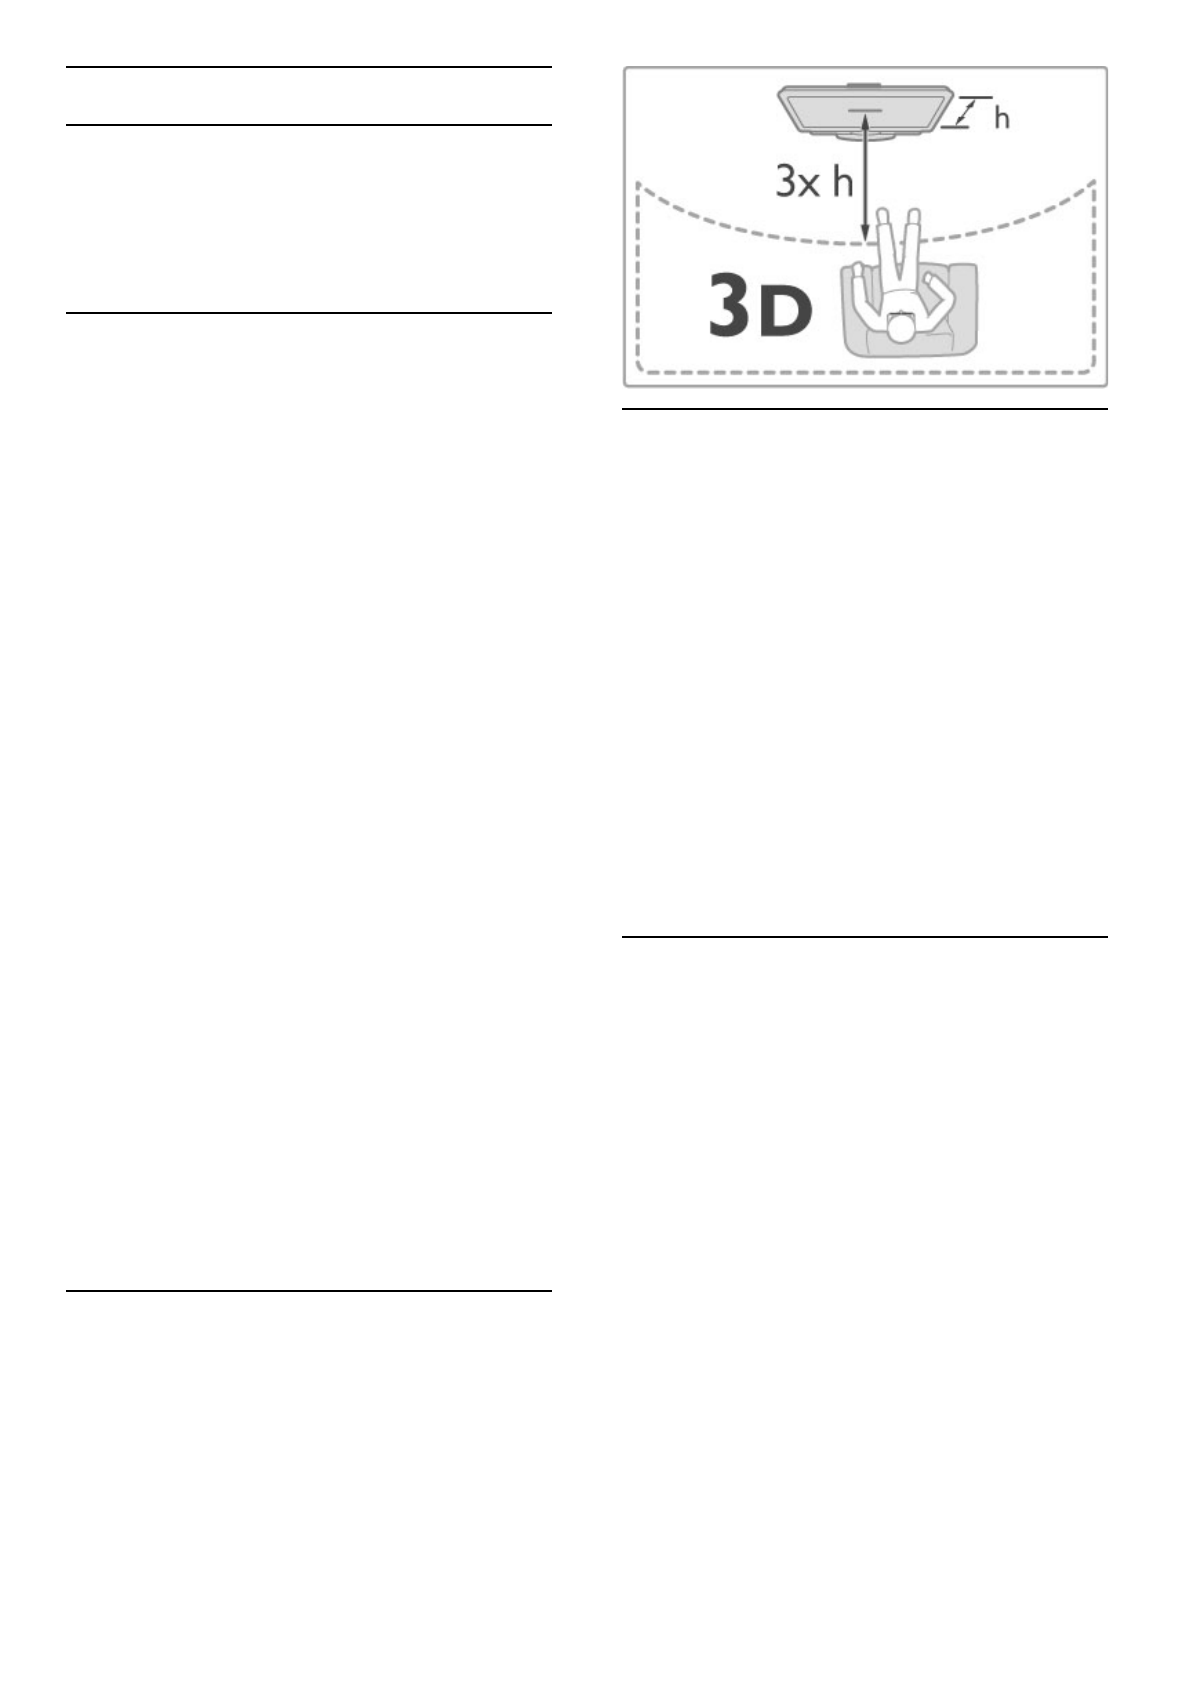
Position the TV at the ideal viewing distance. Get more from
HD TV picture or any picture without straining your eyes. Find
the 'sweet spot', right in front of the TV, for the best possible
TV experience and relaxed viewing.
The ideal distance to watch TV from is three times its diagonal
screen size. When seated, your eyes should be level with the
centre of the screen.
For best sound, place the TV on a hard surface.
Safety
Read and understand all instructions before you use the TV. If
damage is caused by failure to follow instructions, the warranty
does not apply.
Risk of electric shock or fire!
Never expose the TV to rain or water. Never place liquid
containers, such as vases, near the TV. If liquids are spilt on or
into the TV, disconnect the TV from the power outlet
immediately. Contact Consumer Care to have the TV checked
before use.
Never expose the TV, remote control or batteries to excessive
heat. Never place them near burning candles, naked flames or
other heat sources, including direct sunlight.
Never insert objects into the ventilation slots or other openings
on the TV.
Never place heavy objects on the power cord.
Avoid force coming onto power plugs. Loose power plugs can
cause arcing or fire. Ensure that no strain is exerted on the
power cord when you swivel the TV screen.
To disconnect the TV from the mains power, the power plug
of the TV must be disconnected. When disconnecting the power,
always pull the power plug, never the cord. Ensure that you have
full access to the power plug, power cord and outlet socket at all
times.
Risk of injury or damage to the TV!
Two people are required to lift and carry a TV that weighs
more than 25 kg or 55 lbs.
If you mount the TV on a stand, only use the supplied stand.
Secure the stand to the TV tightly. Place the TV on a flat, level
surface that can support the weight of the TV and the stand.
When wall mounted, ensure that the wall mount can safely
bear the weight of the TV set. TP Vision Netherlands B.V. bears
no responsibility for improper wall mounting that results in
accident, injury or damage.
Parts of this product are made of glass. Handle with care to
avoid injury or damage.
Risk of damage to the TV!
Before you connect the TV to the power outlet, ensure that the
power voltage matches the value printed on the back of the TV.
Never connect the TV to the power outlet if the voltage is
different.
Risk of injury to children!
Follow these precautions to prevent the TV from toppling over
and causing injury to children:
Never place the TV on a surface covered by a cloth or other
material that can be pulled away.
Ensure that no part of the TV hangs over the edge of the
mounting surface.
Never place the TV on tall furniture, such as a bookcase,
without anchoring both the furniture and TV to the wall or a
suitable support.
Teach children about the dangers of climbing on furniture to
reach the TV.
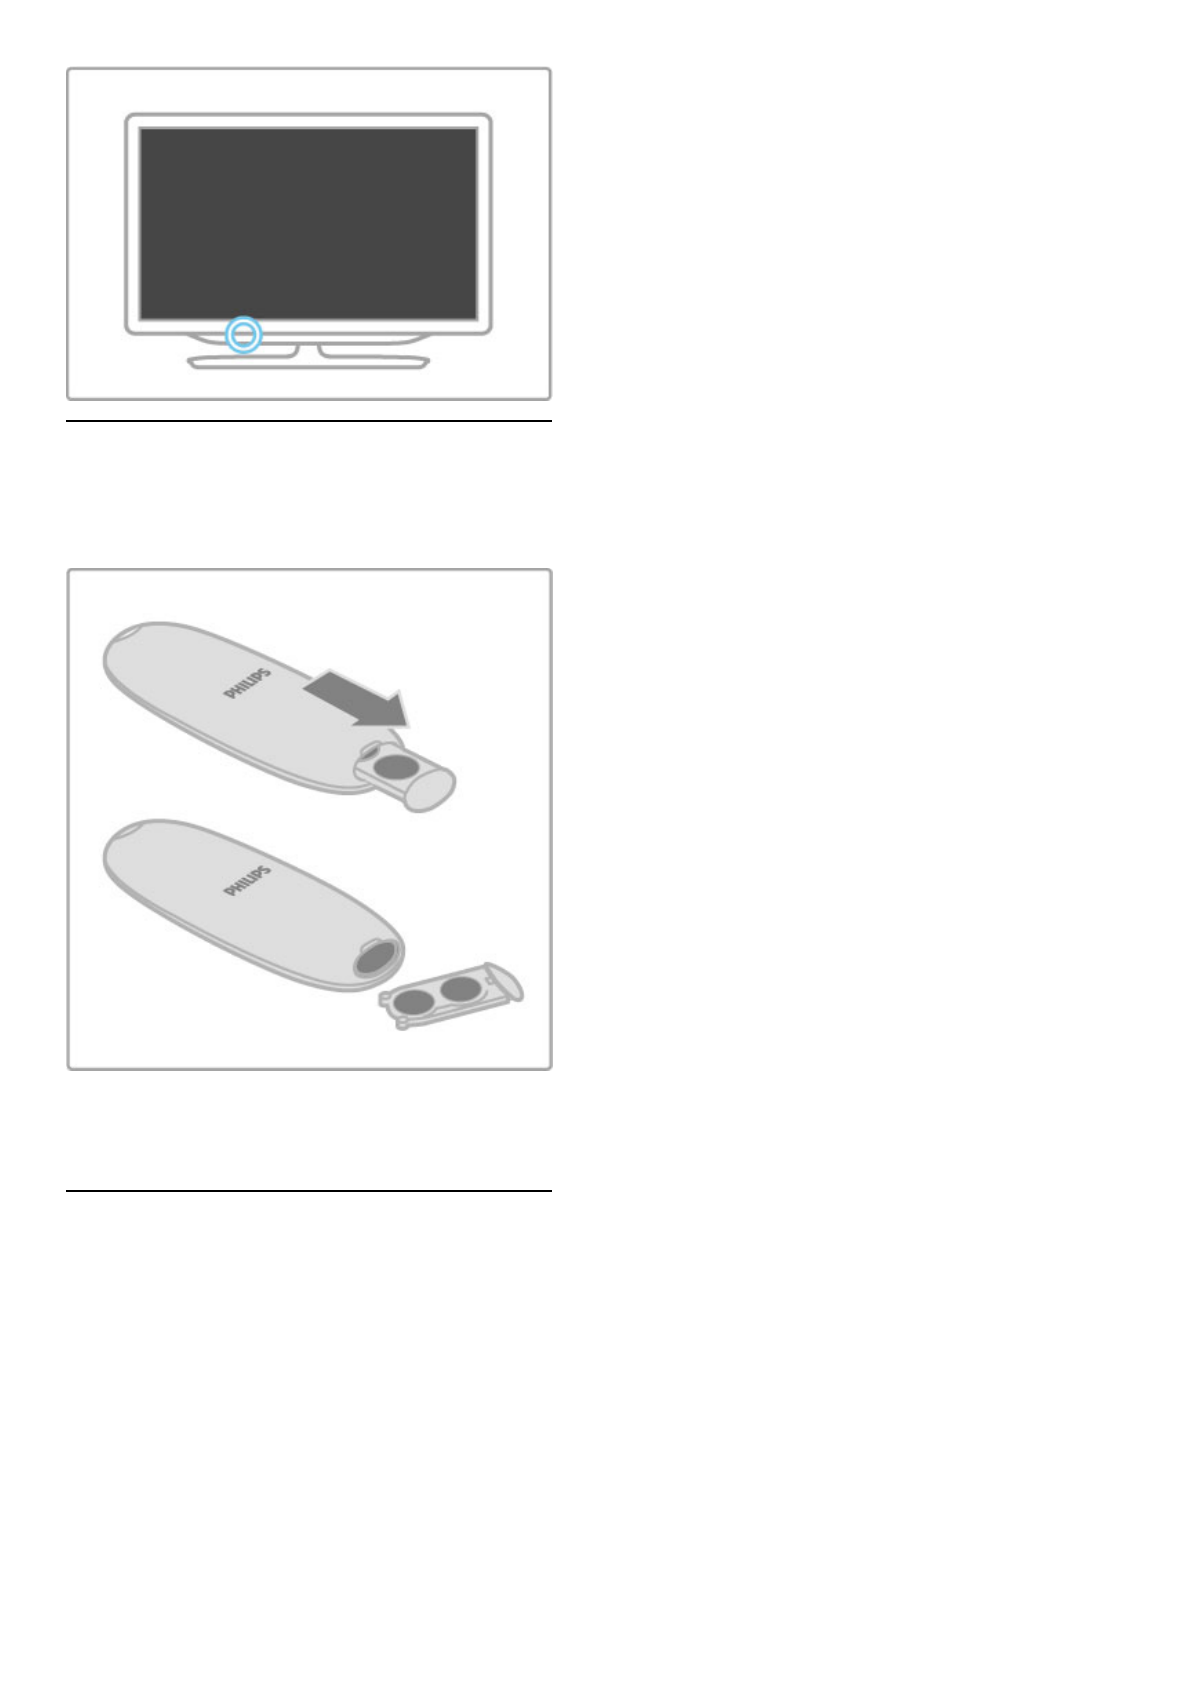
Risk of swallowing batteries!
The remote control may contain coin-type batteries which can
easily be swallowed by small children. Keep these batteries out of
reach of children at all times.
Risk of overheating!
Never install the TV in a confined space. Always leave a space of
at least 10 cm or 4 inches around the TV for ventilation. Ensure
curtains or other objects never cover the ventilation slots on the
TV.
Lightning storms
Disconnect the TV from the power outlet and antenna before
lightning storms. During lightning storms, never touch any part of
the TV, power cord or antenna cable.
Risk of hearing damage!
Avoid using earphones or headphones at high volumes or for
prolonged periods of time.
Low temperatures
If the TV is transported in temperatures below 5°C or 41°F,
unpack the TV and wait until the TV temperature reaches room
temperature before connecting the TV to the power outlet.
Care
Never touch, push, rub or strike the screen with any object.
Unplug the TV before cleaning.
Clean the TV and frame with a soft damp cloth. Never use
substances such as alcohol, chemicals or household cleaners on
the TV.
To avoid deformations and colour fading, wipe off water drops
as quickly as possible.
Avoid stationary images as much as possible. Stationary images
are images that remain onscreen for extended periods of time.
Stationary images include onscreen menus, black bars, time
displays, etc. If you must use stationary images, reduce screen
contrast and brightness to avoid screen damage.
Temperature and humidity
In rare occasions, depending on temperature and humidity, minor
condensation can occur on the inside of the TV glass front (on
some models). To prevent this, do not expose the TV to direct
sunlight, heat or extreme humidity. If condensation occurs, it will
disappear spontaneously while the TV is playing for a few hours.
The condensation moisture will not harm the TV or cause
malfunction.
8 Getting started / Setting up
1.3 Keys on the TV
Power switch
Switch the TV on or off with the power switch at the right-hand
side of the TV. When switched off, the TV does not consume
any energy.
If the red indicator light is off, switch on the TV with the power
switch.
If the red indicator is on (standby indication), press O on the
remote control to switch on the TV. Alternatively, you can
switch on the TV from standby with CH+, CH- or h. It takes a
few seconds for the TV to start up.
V Volume
Press V (Volume) - or + to adjust the volume. Or use the +
or - keys on the remote control.
Ambilight
Press Ambilight, to switch Ambilight on or off.
While the TV is on standby, you can switch Ambilight on and
create an Ambilight Lounge light effect in your room. Read more
about Ambilight and Lounge light in Help > Setup > Ambilight
h Home
Press h (Home) to open the Home menu on screen. You can
navigate the Home menu with the volume - or + (left or right)
and the channel - or + (down or up) keys on the TV. To
confirm your choice, press h again.
Read more about Home in Help > Basics > Menus > h Home
CH Channel
Press CH (Channel) - or + to switch channels. Or use the W or
X keys on the remote control.
Getting started / Keys on the TV 9
1.4 Register your TV
Congratulations on your purchase and welcome to Philips.
Register your TV and enjoy a range of benefits including full
support (including downloads), privileged access to information
about new products, exclusive offers and discounts, the chance to
win prizes and even participate in special surveys about new
releases.
Go to www.philips.com/welcome
10 Getting started / Register your TV
1.5 Help and support
Using Help and Search
Help
You can open Help from the Home menu. In most cases, you
can also press the yellow key on your remote control to open
or close Help directly. For some activities, like Text, the colour
keys have specific functions and cannot open Help.
Before you follow the Help instructions, close Help. Press the
yellow key or press h to close Help. When you press the
yellow key again, Help will open on the page where you closed
it.
¬ Search
In Help, use ¬ Search to find a topic you need. Select a topic
from the list with the navigation keys and press OK. The topic
you are looking for might not be on the first page but a few
pages further on. Press x to go to the next page.
Online support
To solve any Philips TV related problem, you can consult our
online support. You can select your language and enter your
product model number.
Go to www.philips.com/support
On the support site you can find your country's telephone
number to contact us as well as answers to frequently asked
questions (FAQs).
You can download new TV software or the manual to read on
your PC. You can email a specific question or, in some countries,
chat online to one of our collaborators.
Consumer Care
For support, you can call the Consumer Care hotline in your
country. Find the telephone number in the printed documentation
that came with the TV.
Or consult our website www.philips.com/support
TV model number and serial number
You might be asked to provide the TV product model number
and serial number. Find these numbers on the packaging label or
on the type label on the back or bottom of the TV.
Getting started / Help and support 11
2
2.1
Basics
Remote control
Overview
1 Standby O
To switch the TV on or back to standby.
2 Home h
To open or close the Home menu.
3 Navigation key
To navigate up, down, left or right.
4 OK key
To activate a selection.
5 Find ¬
To open or close the channel list or your list of photos, music or
movies.
6 Adjust t
To open or close the most used settings for picture, sound,
Ambilight or 3D.
7 CH+ / Next W
To switch to the next channel, page or chapter.
8 CH- / Previous X
To switch to the previous channel, page or chapter.
9 Source Ú
To switch directly to a TV connection.
10 Options r
To open or close the Options menu.
11 Back È
To go back to the previous channel. To exit a menu without
changing a setting. To go back to the previous Text or Net TV
page.
12 Volume V
To adjust the volume level.
13 Mute m
To mute the sound or to restore it.
12 Basics / Remote control
14 Red colour key
To open interactive TV or to select a Text page.
15 Green colour key
To open the Eco settings or to select a Text page.
16 Yellow colour key
To select a Text page.
17 Blue colour key
To select a Text page.
18 Number keys and text keypad
To select a TV channel directly or to enter text.
19 Exit
To exit MHP. / Keep this key pressed for 3 seconds to open or
close the Format menu.
20 Teletext / Info
To open or close text. / Keep this key pressed for 3 seconds to
open or close information on next programmes.
Operate devices
The remote control of the TV can also operate a connected
device. The device must have EasyLink (HDMI -CEC) and have it
switched on. The device must also be connected with an HDMI
cable.
Operate an EasyLink device
To operate such a device with the TV remote control, select the
device -or its activity- in the h Home menu and press OK.
The commands of all keys, except the h key, the t ADJUST
key and the r OPTIONS key, are forwarded to the device.
Switch back to TV
To switch the remote control back to operate the TV, press h
(Home) and select Watch TV and press OK.
Show device keys
When operating a device, some of the keys might not be
available on the TV remote control. To make these keys
selectable on TV, press r OPTIONS and select Show device
keys. Select the key you need and press OK.
To hide the device keys, press È (Back).
In general, these keys open the following device menus:
1 Home menu
2 Setup menu
3 Disc menu (disc content)
4 Pop-up menu
5 Options menu
6 Programme guide
7 Media selection
One Touch Play
Insert a disc into an EasyLink HDMI-CEC device and press Play
on the device. The TV switches on from standby and starts
playing the disc.
System Audio Control
If you connect an EasyLink audio system, you can listen to the
audio from the TV through the audio system. The TV speakers
are muted automatically. You can control the volume of the
audio system with the TV remote control.
Surround mode
With recent Philips devices, you can change the surround sound
setting of the device on the TV. To change this setting, press t
ADJUST, select Surround mode and press OK. On Next mode,
press OK to toggle through the available modes on the device.
Smart sound
With recent Philips devices, you can change the Smart sound
setting of the device on the TV. To change this setting, press t
ADJUST, select Smart sound and press OK. Select a sound
mode from the list.
Screen off
If a recent Philips audio device only sends audio to the TV, the
device may suggest switching off the TV screen. To switch off
the screen when this message appears, select Screen off and
press OK. To switch the screen back on, press h (Home).
System Standby
Press O on the remote control to switch the TV and all
EasyLink devices to standby.
Read more about EasyLink in Help > Setup > Devices >
EasyLink HDMI-CEC.
IR sensor
Always make sure you point the remote control at the remote
control infrared sensor on the front of the TV.
Basics / Remote control 13
Batteries
To open the battery cover, press the small button on the edge
of the remote control inwards and lift the cover. Use 2 type
AAA-LR03-1.5V batteries. Make sure the + and the - ends of the
batteries line up correctly.
Remove the batteries if you are not using the remote control for
a long time.
Dispose of batteries according to the end of use directives. Read
Help > Specifications > Environmental > End of use.
Cleaning
Your remote control is treated with a scratch-resistant coating.
To clean the remote control, use a soft damp cloth. Never use
substances such as alcohol, chemicals or household cleaners on
the TV or remote control.
14 Basics / Remote control
2.2 Menus
h Home
In the Home menu, you start watching TV or start watching a
movie disc or any other TV activity.
Press h to open the Home menu.
To start an activity, select it with the navigation keys and press
OK.
To close the Home menu, press h again.
Add your devices
A connected device should be added to the Home menu for
easy selection.
If your connected device does not have EasyLink (HDMI-CEC)
or is not connected with an HDMI cable, you need to manually
add your device to the Home menu with Add your devices.
Devices with EasyLink (HDMI-CEC) and connected with an
HDMI cable automatically show their activity in the Home menu.
A single device can add several activities.
If an EasyLink device does not appear automatically, EasyLink on
the device may be switched off.
Add a device manually
In the Home menu, select Add your devices and press OK.
Follow the instructions on screen.
The TV asks you to select the device and the connection to
which the device is connected.
The device or its activities are now added to the Home menu.
Rename a device
To rename an added device or activity, select the device in the
Home menu and press r OPTIONS and select Rename. Use
the keypad on the remote control as you do for SMS/text
messaging to enter the new name.
Remove a device
To remove a device or activity from the Home menu, select it
and press r OPTIONS and then select Remove this device. If
a device or activity keeps appearing in the Home menu after you
deleted it, switch off the EasyLink setting on the device to
prevent the icon from being automatically added again.
Read more about EasyLink in Help > Basics > Remote control >
Operate devices.
Reorder
To reorder a device or an activity in the Home menu, select it
and press r OPTIONS.
1 Select Reorder.
2 With the navigation keys, reposition the device or activity
where you want it. You can only reorder the sequence of the
added devices and activities.
3 Press OK to confirm the position. All devices and activities shift
to the right.
You can highlight another device or activity and reposition it.
To stop Reorder, press r OPTIONS and select Exit reorder.
Restore device activities
To recall a deleted activity from a device with several activities,
select the device or one of its activities and press r OPTIONS.
Select Restore device activities and press OK. All deleted
activities of this device appear again.
¬ FIND
With ¬ FIND you open the Channel list while you are
watching TV channels or you open the list of pictures, music and
videos while browsing your PC or connected USB device.
Press ¬ FIND to open the list.
To close the list, press ¬ again.
t ADJUST
With the ADJUST menu, you can adjust picture, sound,
Ambilight and 3D settings quickly.
Press t ADJUST to open the Adjust menu.
Select your choice with the navigation keys and press OK.
To close the menu, press t ADJUST again.
Basics / Menus 15
In the Adjust menu you can adjust these settings:
3D
3D depth
Two player gaming
Ambilight On or Off
Ambilight dynamics
Picture format
Smart picture (presets)
Smart sound (presets)
Speakers
Surround
Picture shift
Ambilight
Read more about the Ambilight settings in Help > Setup >
Ambilight.
Picture format
Read more about the Picture format settings in Help > Basics >
Watch TV > Picture format.
Smart picture, Smart sound
You can set the TV to the pre-defined setting that best suits
what you're watching.
Read more about Smart settings in Help > Basics > Watch TV
> Smart picture and sound.
Speakers
To hear the sound through the TV speakers, close Help, press t
ADJUST, select Speakers and select TV.
Select Amplifier if you want to hear the sound through a
connected Home Theatre System or Amplifier.
These settings temporarily override any EasyLink settings.
Surround
To switch the TV automatically to the best surround sound mode
(only available when a Home Theatre System is connected), close
Help, press t ADJUST, select Surround and select On.
Picture shift
You can shift the picture on screen in a vertical or a horizontal
direction to view subtitles fully (depending on the TV input).
While watching TV, press t ADJUST, select Picture shift and
press OK. Shift the picture with the navigation keys. Press OK to
stop Picture shift.
r OPTIONS
With the OPTIONS menu, you select optional settings related to
what you are watching or doing on TV.
Press r OPTIONS at any time to see which options are
available.
To close the menu, press r OPTIONS again.
16 Basics / Menus
2.3 Watch TV
Switch channels
To watch TV and switch channels, make sure the Watch TV
option is selected in the Home menu.
To watch TV, press h, select Watch TV and press OK.
To switch channels, press CH+ or CH- on the remote control.
You can use the number keys if you know the channel number
or press ¬ FIND to open the Channel list to select a channel.
To switch back to the previous channel, press È (Back).
Radio channels
If digital broadcasting is available, digital radio stations are installed
during installation. Switch to a radio channel just like you switch
to a TV channel. A DVB-C channel installation usually places radio
stations from channel number 1001 onwards.
Options for watching TV channels
If you watch digital broadcast TV channels, press r OPTIONS
to view the available options:
What's on
• Status
Video selection
What's on
This option shows information on the current and next
programme on this channel. Use the navigation keys to scroll
through text or to go to the next column.
Status
Depending on the broadcast, the Status page will show relevant
information. You can use this information to improve the channel
signal or to check if certain services are available.
Video selection
Digital TV channels can offer multi video signals (multi-feed
broadcasts), different camera viewpoints or angles of the same
event or different programmes on one TV channel. The TV
shows a message to advise if any such TV channels are available.
When available, press r OPTIONS and select Video selection
to select your choice.
Channel list
In the Channel list, you can look up all installed TV and radio
channels.
While watching TV, press ¬ FIND to open the Channel list.
Press ¬ FIND again or È (Back) to close the Channel list
without changing the channel.
In the Channel list, you can navigate to a TV channel or radio
station and press OK to watch the TV channel or listen to the
radio station.
The Channel list can have several pages. To view the next or
previous Channel list page, press W or X.
Channel list options
With the Channel list on screen, press r OPTIONS to select
the following options:
Select list
Mark as favourite
Reorder
Rename
Select list
Use this option to select which channels are shown in the
Channel list. The list you select here determines which channels
you flick through with CH+ and CH-.
Mark as favourite
When a channel is highlighted in the Channel list, you can set it
as a favourite channel.
Read Basics > Watch TV > Favourite channels.
Reorder
You can reposition channels within the list.
1 Press r OPTIONS and select Reorder to start reordering
channels.
2 Highlight a channel and press OK.
3 Reposition the channel where you want it with the navigation
keys. Alternatively, enter the new position directly with the
number keys.
Basics / Watch TV 17
4 Press OK to confirm the position. You can insert the channel
or swap it.
You can highlight another channel and do the same.
To stop Reorder, press r OPTIONS and select Exit reorder.
Rename
You can rename a channel in the Channel list.
1 In the channel list, highlight the channel you want to rename.
2 Press r OPTIONS and select Rename to start renaming. You
can enter text directly with the remote control keypad or open a
full keyboard on top of the text entry menu.
Enter text with the remote control keypad
Use the navigation keys to position the cursor in the text. Press
È (Back) to delete a character.
Use the remote control keypad as you do for SMS/text
messaging to enter a character. Use the 1 key to select a special
character. Select Clear to delete a character.
Select Done to end Rename.
Enter text with the on-screen keyboard
To open the on-screen keyboard on top of the text entry menu,
press OK when the cursor in the text flashes.
On the keyboard, use the navigation keys to highlight a character
and press OK to enter it. To delete a character, press È (Back)
or highlight ! and press OK.
To switch from uppercase to lowercase or to a set of special
characters, press W (Next) or X (Previous).
To edit a character within a line of text, position the cursor on
this character and use the z and Z keys at both ends of the
on-screen spacebar.
To close the on-screen keyboard, highlight Done and press OK.
USB keyboard
You can use a connected USB keyboard to rename channels. To
connect a USB keyboard, read Help > Connections > Connect
more devices > Keyboard and mouse.
Favourite channels
In the Channel list you can mark a channel as a favourite. You
can set the Channel list to only zap through your list of favourite
channels.
To open the Channel list, while you are watching TV channels,
press ¬ FIND.
Mark a channel as favourite
While watching TV, press ¬ FIND to open the Channel list.
Navigate to the channel you want to mark as favourite and press
r OPTIONS. Select Mark as favourite.
In the Channel list, the favourite channel is marked with a F.
You can unmark a favourite channel with Unmark favourite.
Channel list of favourites
You can set the Channel list to only flick through your favourite
channels.
With the list on screen, press r OPTIONS and select Select
list. Select Favourites from the list and press OK. With this list
selected, you will only flick through your favourites.
Programme guide
If programme guide information is available in your area, you can
open an on-screen programme guide with scheduled TV
programmes.
The Programme guide is provided by the broadcaster or Internet.
18 Basics / Watch TV
Open the Programme guide
While watching TV, press h, select Programme guide and press
OK.
To quit the Programme guide without changing a setting, press
È (Back).
First use
The first time you open the Programme guide, the TV scans all
TV channels for programme guide information. This can take
several minutes. The data is stored in the TV. The TV can store
programme data for up to eight days.
Programme guide options
With a programme selected in the guide, press r OPTIONS to
select the following:
Set reminder
To set an on-screen reminder for when a programme is due to
start, select Set reminder and press OK. The programme is
marked with a © (Clock). To cancel this reminder, select Clear
reminder and press OK.
Change day
View the previous or next day's programmes.
More info
Shows the programme details and summary.
Search by genre
View all programmes selected by genre.
Scheduled reminders
If a reminder is set, you can view a list of all scheduled
reminders.
Update programme guide
After the first scan, the TV stores the programme guide data. If
you update or reinstall channels or reorder the Channel list, you
will need to update the Programme guide.
To update, select Update programme guide. Reminders are
cleared.
Broadcaster or Network
To select where the Programme guide information comes from,
press h > Setup > TV settings > Preferences > Programme
guide.
Select From the network or From the broadcaster.
From the network
Until you link up with Net TV, programme guide information
comes from the broadcaster. Once you are connected with Net
TV, the TV switches automatically to the Internet for programme
guide information.
From the broadcaster
Guide information comes from the broadcaster/operator.
Smart picture and sound settings
For easy picture or sound adjustment, you can select a preset
setting for each.
While watching TV, press t ADJUST to open the Adjust menu
and select Smart picture or Smart sound. Make a selection from
the list and press OK.
Smart picture and Smart sound
Smart settings are a combination of preset settings suited to a
specific use such as gaming or daylight viewing.
You can adjust a specific setting, like Brightness or Contrast, Bass
or Treble, of a chosen smart setting. The smart setting will
remember the adjustments you made.
Adjust smart settings
To adjust a specific setting of a smart setting, select the smart
setting and press OK. Then press h and select Setup. Select
TV settings, navigate to the individual setting and adjust it.
To return to the original smart setting values, undo the
adjustments you made by first setting the TV in the smart setting
you want to reset. Then press h > Setup > TV settings, select
Reset and press OK.
Read more about adjusting separate settings in Help > Setup >
Picture and Sound and Ambilight.
Smart picture list
Personal - Your choices made in Personalise picture and sound
Vivid - Ideal for daylight viewing
Natural - Natural picture settings
Cinema - Ideal for watching movies
Game - Ideal for gaming
Energy saving - Energy-conscious settings
Standard - Factory standard settings
Photo - Ideal for viewing photos
ISF Day and ISF Night - ISF Calibration settings
Smart sound list
Personal - Your personal choices made in Personalise picture
and sound
Standard - Factory standard
News - Ideal for speech
Movie - Ideal for watching movies
Game - Ideal for gaming
Drama - Ideal for TV soaps
Sports - Ideal for sports programmes
Picture format
Basics / Watch TV 19
If black bars appear on the screen, you can adjust the picture
format to a format that fills the screen.
While watching TV, press t ADJUST to open the Adjust menu
and select Picture format. Select a format from the list and press
OK.
Picture formats
The following formats are available according to the picture on
screen:
Auto fill
Automatically enlarges the picture to fill the screen. Minimal
picture distortion, subtitles remain visible. Not fit for PC input.
Auto zoom
Automatically zooms the picture in to fill the screen as much as
possible without distortion. Black bars may be visible. Not fit for
PC input.
16:9
Sets the picture in 16:9 format for HD 16:9 broadcast.
Super zoom
Removes the black bars on the side of 4:3 broadcasts. The
picture is adjusted to fit the screen.
Super zoom 16:9
Sets the picture in 16:9 format with minimal distortion for 4:3
broadcast.
Movie expand 16:9
Scales the picture to a 16:9 format.
Cinema 21:9
Sets the picture in cinema 21:9 format for original 21:9 movies.
Cinema 21:9 subtitle
Sets the picture in cinema 21:9 format but subtitles in the
bottom black bar are visible.
Unscaled
Expert mode for HD or PC input. Pixel for pixel display. Black
bars may appear with pictures from a PC.
Wide screen
Stretches the picture to a 16:9 format.
Multi view
With Multi view, you can watch two screens simultaneously.
When you open Multi view, the TV shows two screens, one
main and one small screen.
Open Multi view
To open Multi view, press h (Home), select Multi view and
press OK. With the remote control you can operate the main
screen.
To close Multi view, press EXIT or press h (Home) and select
another activity.
Main screen picture
To change the main screen picture, press ¬ FIND. In the list,
select what you want to watch and press OK.
In the main screen, you can watch a TV channel, a connected
device (connected with HDMI), the Text pages of the TV
channel you are watching, a Net TV app or Internet page, the TV
Programme guide or Help.
When you close and open Multi view again, the last selected
main screen is shown.
Switch to standby
If the TV is on, press O on the remote control to switch to
standby. The red standby key indicator is on.
Although the TV consumes very little power when on standby,
energy does continue to be consumed.
When you do not use the TV for an extended period of time,
switch the TV off completely with the power switch.
Auto switch off
If you use the TV as a monitor or use a digital receiver to watch
TV (a set top box - STB) and you do not use the remote
control of the TV, switch off the automatic switch off.
This will prevent the TV from switching off automatically after a
4-hour period without a key press on the remote control of the
TV.
20 Basics / Watch TV
To switch off the automatic switch off, press the green key while
you are watching TV channels and select Auto switch off and
select Off.
Basics / Watch TV 21
2.4 3D
What you need
To watch 3D on this TV, simply put on the 3D glasses. Two
pairs of passive 3D glasses are included.
For an extra pair of glasses order the Philips Passive 3D glasses
PTA426 or PTA416. The 3D performance of other 3D glasses is
not guaranteed.
Watch 3D
To start watching a 3D movie or programme, insert a 3D movie
into a 3D Blu-ray Disc player or tune to a TV channel that
broadcasts programmes in 3D.
Press h (Home) and select the 3D Blu-ray Disc player or
select Watch TV and tune to the TV channel.
Start 3D
The TV can detect when 3D is available. When the 3D message
appears, select Start 3D and press OK. Put on the 3D glasses.
If the TV cannot detect the 3D signal (the 3D signal tag is
missing), the 3D programme is shown as a double image on
screen.
To switch the double image to 3D, press t ADJUST, select 3D
and select Side by side or Top / bottom according to the double
image positions.
You might need to select the inverted format if the normal
format results in strange 3D effects.
Stop 3D
To stop watching 3D, press t ADJUST and select 2D in the
3D menu.
You can also stop 3D when you switch to another channel or
connected device.
2D to 3D conversion
You can convert any 2D programme to watch it in 3D.
To convert a 2D programme to 3D, press t ADJUST, select
3D and select 2D to 3D conversion.
To stop the 2D to 3D conversion, select 2D in the 3D menu or
switch to another activity in the Home menu. The conversion will
not stop if you switch between TV channels.
3D depth
You can change the depth of 3D for a weaker or stronger 3D
effect.
To set the 3D depth, press t ADJUST and select 3D depth.
Use the slider bar to set the 3D depth and press OK.
Specifics
If a 3D TV broadcast is switched to 2D, the TV shows only
the 3D-left picture.
3D is not available in Multi view
Optimal 3D viewing
For an optimal 3D viewing experience, we recommend that you:
sit at least 3 times the height of the TV screen away from the
TV, but no further than 6 metres away.
avoid fluorescent lighting (such as TL lighting or certain energy
saving light bulbs which operate on a low frequency) and direct
sunlight as they may interfere with the 3D experience.
Health warning
If you or your family has a history of epilepsy or photosensitive
seizures, consult a medical professional before exposing yourself
to flashing light sources, rapid image sequences or 3D viewing.
To avoid discomfort such as dizziness, headache or
disorientation, we recommend not watching 3D for extended
periods of time.
If you experience any discomfort, stop watching 3D and do not
immediately engage in any potentially hazardous activity (for
example driving a car) until your symptoms have disappeared. If
symptoms persist, do not resume watching 3D without consulting
a medical professional first.
Parents should monitor their children during 3D viewing and
ensure they do not experience any discomfort as mentioned
above. Watching 3D is not recommended for children under 6
years of age as their visual system is not fully developed yet.
Do not use the 3D glasses for any purpose other than
watching 3D TV.
CHOKING HAZARD - Do not let children under 6 years of
age play with the 3D glasses, they could choke on the battery lid
or battery (if present).
Cleaning and care
Do not expose the 3D glasses to direct sunlight, heat, fire or
water. This may result in a product malfunction or fire.
Use a clean soft cloth (microfibre or cotton flannel) to clean
the lenses to avoid scratching them. Never spray cleaner directly
onto the 3D glasses. This may damage the electronics.
Do not drop, bend or apply force to the lenses of the 3D
glasses.
Do not use cleaning chemicals containing alcohol, solvent,
surfactant, or wax, benzene, thinner, mosquito repellent or
lubricant. Using these chemicals can cause discoloration or cracks.
22 Basics / 3D
2.5 Connected devices
Select a device
Select from the Home menu
To select and watch a connected device or activity, press h to
open the Home menu and select the device or its activity and
press OK. Make sure the device is switched on.
Add a connected device to the Home menu for easy selection.
Read more about Add your devices in Help > Basics > Menus >
Home menu.
Select from the list of connections
To open the list of connections, press Ú SOURCE. Select the
TV connection and press OK to switch to the device on that
connection. Make sure the device is switched on.
Operate devices
The remote control of the TV can also operate a connected
device. The device must have EasyLink (HDMI -CEC) and have it
switched on. The device must also be connected with an HDMI
cable.
Operate an EasyLink device
To operate such a device with the TV remote control, select the
device -or its activity- in the h Home menu and press OK.
The commands of all keys, except the h key, the t ADJUST
key and the r OPTIONS key, are forwarded to the device.
If the key you need is not on the TV remote control, you can
show extra keys on screen with Show device keys.
Show device keys
To show the device keys on screen, press r OPTIONS and
select Show device keys. Select the key you need and press OK.
To hide the device keys, press È (Back).
In general, these keys open the following device menus:
1 Home menu
2 Setup menu
3 Disc menu (disc content)
4 Pop-up menu
5 Options menu
6 Programme guide
7 Media selection
Read more about EasyLink in Help > Setup > Devices >
EasyLink HDMI-CEC.
Basics / Connected devices 23
2.6 Subtitles, timers and locks
Subtitles
Programme subtitles are available most of the time. You can
switch subtitles on or off. How to set subtitles depends on
whether a channel is analogue or digital.
Switch on subtitles
To open the Subtitle menu, press SUBTITLE. You can switch
subtitles On or Off. Select On during mute to show subtitles only
when the sound is muted with m.
For analogue channels
To make subtitles available for a channel, switch to the channel
and press TEXT to open Text. Enter the page number for
subtitles, usually 888, and press TEXT again to close Text. With
subtitles switched on in the Subtitle menu, subtitles will be shown
if available. Each analogue channel must be set up separately.
For digital channels
There is no need to activate subtitles in Text for digital channels.
You can set a preferred primary and secondary subtitle language.
If these subtitle languages are not available for a channel, you can
select another available subtitle language.
To set the primary and secondary subtitle language, press h and
select Setup > Channel settings and select Languages > Primary
and Secondary subtitles.
To select a subtitle language when none of your preferred
languages is shown, press r OPTIONS, select Subtitle language
and select a language you want temporarily.
Audio languages
Digital TV channels can broadcast audio that transmits several
languages for a programme. You can set the TV to switch to
your preferred language if it is available.
Set your language
To set your preferred audio language, press h and select Setup
> Channel settings and select Languages > Primary and
Secondary audio. The TV will automatically switch to one of your
languages, if one of them is available.
To check if an audio language is available, press r OPTIONS
and select Audio language. You can select another audio language
from the list.
Some digital TV channels broadcast special audio and subtitles
adapted for people who are hearing or visually impaired. Read
Help > Setup > Universal access.
Child locks
To prevent children from watching a channel or a programme,
you can lock channels or lock age-rated programmes.
Parental rating
Some digital broadcasters have rated their programmes. When
the rating is equal or higher than the rating you have set for your
child's age, the programme will be locked.
To watch a locked programme you must enter the child lock
code. The parental age rating is set for all channels.
Set an age rating
Press h and select Setup > Channel settings and select Child
lock > Parental rating.
To select an age rating, you must first enter your 4-digit child
lock code. If no child lock code is set, you can set the code
now.
When the code is entered, you can select the age rating. When
the rating of a programme is equal or higher than the rating you
have set for your child's age, the programme will be locked. The
TV will ask for the code to unlock the programme. For some
operators, the TV only locks programmes with a higher rating.
Lock a channel
To lock a channel, press h and select Setup > Channel settings
and select Child lock > Channel lock. In the list of channel
numbers, select a channel and press OK to lock a channel.
In the list, a locked channel is marked with an X. Now, you can
select another channel to lock or unlock. The lock is activated as
soon as you close the menu.
You cannot lock programmes from connected devices.
Change code
To change the current lock code, press h and select Setup >
Channel settings and select Child lock > Change code.
Enter the current code and then enter the new code twice. The
new code is set.
Forgotten your code?
If you have forgotten your code to unlock, call Consumer Care
in your country. Find the telephone number on the
documentation that came with the TV or go to
www.philips.com/support.
Sleep timer
With the sleep timer, you can set the TV to switch to standby
automatically after a specified time.
To set the sleep timer, press h > Setup > TV settings >
Preferences > Sleep timer. With the slider bar you can set the
time up to 180 minutes in increments of 5 minutes. If set to 0
minutes, the sleep timer is switched off.
You can always switch off your TV earlier or reset the time
during the countdown.
24 Basics / Subtitles, timers and locks
3
3.1
Smart TV
Net TV
What is Net TV?
Net TV offers Internet applications called apps. These apps are
tailored for your TV. With these apps you can read your
national newspaper, look at infotainment, or rent a movie from a
video store or watch programmes you missed with catch-up TV
apps. A wide range of Net TV apps are available depending on
your country.
Smart USB Recording
With your TV connected to the Internet, you can also record
programmes from the TV programme guide. To record
programmes, you must connect a USB Hard Disk Drive to your
TV. (Only in selected countries.)
Net TV specifics
The availability of Net TV apps varies per country.
With Net TV, you can view any Internet website you like but
most of them are not tailored for a TV screen and some plug-ins
(e.g. to view pages or videos) are not available on your TV.
Net TV apps can be added, changed or stopped.
Net TV shows one page at a time and full screen.
You cannot download and save files or install plug-ins.
Net TV forum website
Find out more on Net TV apps at the Net TV forum website.
www.supportforum.philips.com
TP Vision Netherlands B.V. bears no responsibility regarding the
content and the quality of the content provided by the content
service providers.
What you need
To enjoy Net TV you must connect the TV to a router with a
high-speed (broadband) connection the Internet. You can use a
home network connected to the Internet. You do not need a
computer.
Read more about connecting to your home network in Help >
Setup > Network.
Keyboard and mouse
To enter text or to navigate a page, you can connect a USB
keyboard and a USB mouse to the TV. The USB mouse can only
navigate pages on the Internet, it cannot navigate Net TV app
pages.
Read more about connecting a keyboard or mouse in Help >
Connections > Connect more devices > Keyboard and mouse.
Configure
The first time you open Net TV, you must agree to the terms
and conditions before you can continue. Press OK to agree.
Press È (Back) to quit Net TV.
Register
If you agree, you can register with Club Philips. Select Register
and press OK. Enter your email address, select Continue and
press OK. Confirm the email address.
Smart TV / Net TV 25
Parental control
To lock Adult 18+ rated apps, switch on Net TV parental
control by selecting Enable and then press OK. Enter an unlock
PIN code of your choice. Confirm your PIN code.
Adult 18+ rated apps are now locked.
To open a locked app, select the app and press OK. The TV will
ask you to enter your 4-digit code.
Clear Net TV memory
To redo the Net TV configuration and to clear all passwords, PIN
codes, history and cookies, press h (Home), select Setup >
Network settings > Clear Net TV memory.
Net TV apps
Open Net TV
To open Net TV, press h (Home), select Browse Net TV and
press OK.
To close Net TV, press h (Home) and select another TV
activity.
The Net TV home page
When you open Net TV, the home page is shown.
To navigate the page, press u, v, w or x.
To open an app, select the app and press OK.
To go back 1 step, press È (Back).
The home page
1 The App Gallery
2 Your Apps
3 The Internet App
4 Current TV channel
The App Gallery
To look for apps to add to your home page, select App Gallery
and press OK.
To add an app to the home page, select an app in the list and
press Add.
To search per category, select the category field (All) and press
OK.
To open the on-screen keyboard, select a text entry field and
press OK.
To switch to the app gallery of another country, select the
country field and press OK.
Lock or remove an app
To lock or remove an app, select the app and press r
OPTIONS. Select the option and press OK.
Reload an app or page
To retry loading an app or an Internet page, press r
OPTIONS and select Reload page.
Security info
To view the level of security of the page you're on, press r
OPTIONS and select Security info.
Internet websites
To browse Internet websites, select the Internet app on the Net
TV home page and press OK.
To open the on-screen keyboard, select a text entry field and
press OK.
To remove a visited website from the list, press r OPTIONS
and select Remove from History.
Rent a movie
With the video store apps in Net TV, you can rent your
favourite movie from an online rental video store. You can pay
securely with your credit card.
1 Open a video store app.
2 Select a video.
3 Make the online payment.
4 Download the video.
5 Start watching.
What you need
To rent and download a video, you need a high-speed
(broadband) Internet connection to the TV. You also need an SD
memory card.
Read more about connecting to the network in Help > Setup >
Network.
Video memory
To download a video, you must format an SD memory card as
video memory. Insert the SD card into the SD card slot on the
side of the TV. The TV starts formatting the SD card
automatically. The SD card may be rejected if the write speed is
insufficient for video transfer. Once formatted, leave the card
permanently in the slot.
SD memory card size
Use a SD HC (High Capacity) memory card with at least 4GB of
storage capacity.
For high-definition (HD) video, use an SD card with at least 8GB
of storage capacity. Use a speed class 2 card or more.
Open a video store app
To open a video store, press h (Home), select Net TV and
press OK. Select a video store app from the Net TV home
page. Select the video store and press OK. You can add a video
store app on your home page from the app gallery. Availability
of video stores varies by country.
26 Smart TV / Net TV
Rent a video
When you open a video store you will be asked to log in or to
create a log in account. With a text entry field selected, press
OK to open the on-screen keyboard.
Consult the video store website for more information.
Online TV
With the online TV apps in Net TV you can watch programmes
you missed. Most often, you can recognise such an online TV
app by its broadcaster’s logo.
What you need
To watch online TV programmes, you need a high-speed
(broadband) Internet connection to the TV.
Read more about connecting to the network in Help > Setup >
Network.
Watch online TV
To watch an online TV programme in Net TV, press h
(Home), select Browse Net TV and press OK. Select the
broadcaster app on the Net TV home page and press OK. You
can add a online TV broadcaster app on your home page from
the app gallery.
Start a programme
Select a programme from the online TV app page and press OK.
Most often, you can use the x (Play) or U (Pause) keys on your
remote control.
Smart TV / Net TV 27
3.2 Interactive TV
What is iTV?
With interactive TV, some digital broadcasters combine their
normal TV programme with information or entertainment pages.
On some pages, you can respond to a programme or vote, do
online shopping or pay for a video-on-demand programme.
HbbTV, MHEG, MHP, DTVi, . . .
Broadcasters use various interactive TV systems : HbbTV (Hybrid
Broadcast Broadband TV) or iTV (Interactive TV - MHEG).
Interactive TV is sometimes referred to as Digital Text or Red
button. But each system is distinct.
Visit the broadcasters Internet website for more information.
What you need
Interactive TV is only available on digital TV channels. To enjoy
the full benefits of Interactive TV, you need a high-speed
(broadband) Internet connection to the TV.
Read more about connecting to the network in Help > Setup >
Network.
Open iTV pages
Most channels that offer HbbTV or iTV invite you to press the
red key or OK key to open their interactive programme.
Close iTV pages
Most iTV pages inform you which key to use to close.
For Digital Text and Red button, press È (Back).
To force an iTV page to close, switch to the next TV channel
and switch back.
Navigate iTV pages
You can use the navigation and colour keys, the number keys and
the È (Back) key to navigate the iTV pages. You can use the x
(Play), U (Pause) and S (Stop) keys to watch videos within iTV
pages.
Digital Text (UK only)
To open Digital Text, press TEXT. To close, press È (Back).
HbbTV links
Some HbbTV pages have links to the Internet. Your TV switches
to Net TV to view these Internet websites. To switch back to
normal TV viewing, you might need to press h (Home) and
select Watch TV again to continue watching the TV channel.
Block HbbTV pages
To block the HbbTV pages from a specific channel, tune to the
channel, press r OPTIONS and select HbbTV on this channel
and select Off.
To block HbbTV on all channels, press h (Home), select Setup
and select TV settings > HbbTV and select Off.
Open MHP pages
If you install the TV for the country of Italy, the MHP
(Multimedia Home Platform) interactive applications are available.
When you tune to a TV channel that offers MHP, wait for the
MHP loading icon to fully load the application.
To open the MHP pages, press the red colour key or press
Teletext, depending on the application.
To close MHP, press Exit.
Navigate MHP pages
You can use the navigation and colour keys, the number keys and
the È (Back) key to navigate the MHP pages. You can use the
keypad on the remote control as you do for SMS/text messaging
to enter text. Or press OK on a text entry field to open the
on-screen keyboard.
Auto start
The TV is set to load the MHP pages automatically. To avoid the
automatic loading, you can switch off the MHP auto start.
To switch off auto start, press r OPTIONS, select MHP
applications and press OK. Select Disable MHP auto start to
switch off the automatic loading.
Select MHP applications
Some MHP pages might not launch. If so, you can try to launch
the application from the MHP application list.
Press r OPTIONS, select MHP applications and select Disable
MHP auto start. This setting makes the individual application
selectable. Select the desired application in the list and press OK
to launch the application.
28 Smart TV / Interactive TV
3.3 Videos, photos and music
Browse USB
You can view photos or play your music and videos from a USB
memory device.
Insert a USB device into the USB connection on the left-hand
side of the TV while the TV is switched on. The TV detects the
device and opens a list showing its content. If the list does not
appear automatically, press h, select Browse USB and press
OK.
To close Browse USB, press h and select another activity or
disconnect the USB device.
View photos
To view photos, select a photo in the list and press OK. If there
are more photos in the folder, the TV starts a slideshow with
these photos.
To stop, press r OPTIONS and select Stop.
To pause or play the slideshow again, press OK.
To view the next photo, press W.
To view the previous photo, press X .
Options for photos
Press r OPTIONS to select the following:
Show info
Stop
Play once / Repeat
Rotate
Shuffle on / off
Slideshow speed
Slideshow transition
Set as Scenea
Shuffle on
Plays the files randomly.
Set as Scenea
Sets the current photo as a wallpaper photo for Scenea.
Play videos or music
To play videos or music, select the file in the list and press OK.
If there are more music or video files in the folder, the TV plays
the files one after the other. To stop, press r OPTIONS.
To pause or play, press OK.
To play the next file in the folder, press W.
To play to the previous file, press X.
To fast forward, press x.
To rewind, press w.
Options for music and videos
Press r OPTIONS to select the following:
Stop
Play once / Repeat
Shuffle on / off
Music with photos
You can play music and show photos at the same time. Start the
photo slideshow after you started the music.
1 Select a folder with music files and press OK.
2 Select a folder with photo files and press OK.
To stop, press r OPTIONS and select Stop.
Screen off
If you only listen to music, you can mute the TV screen to save
energy.
To mute the screen, press the green key, select Screen off and
press OK. To switch the screen back on, press any key on the
remote control.
See the list of compatible playback formats in Help >
Specifications > Multimedia.
Browse PC
You can view photos or play your music and videos from a PC in
your home network.
The TV is DLNA certified and is compatible with other DLNA
certified devices.
What you need
To browse your PC files, you need to connect the TV to your
home network. Also, do not forget to set your media server
software to share the files with the TV.
Browse PC
To browse your PC files, press h , select Browse PC and press
OK.
To close Browse PC, press h and select another activity.
If the network is not yet installed when you select Browse PC,
the Network installation starts automatically. Follow the
instructions on screen.
To select, view and play your files, read Help > Smart TV >
Videos, photos and music > Browse USB.
Find the list of compatible playback formats and compatible media
server software in Help > Specifications > Multimedia.
Read more about connecting to a network in Help > Setup >
Network.
Scenea
With Scenea, you can set a photo as a painting on your TV
screen. Select your favourite photo from your collection.
To open Scenea, press h, select Scenea and press OK. If you
did not yet select a photo of your own, a preset photo is shown.
To close the Scenea photo, press a key on the remote control.
Smart TV / Videos, photos and music 29
Select a photo for Scenea
1 Select a photo from a connected USB device or from a
connected PC. This photo must be in JPEG format.
2 With the photo highlighted in the Browse USB or Browse PC
list, press r OPTIONS, select Set as Scenea and press OK. By
agreeing to overwrite the current photo, the new photo is set.
Scenea lounge light
To switch off Ambilight when Scenea is on, press t ADJUST.
Or press Ambilight on the front of the TV.
Energy saving
To switch the TV to the energy saving mode, press t ADJUST,
select Smart picture and press OK. Select Energy saving.
Specifics
With Scenea switched on, the TV will automatically switch to
standby after 4 hours. You will be warned 1 minute before
switch off. This automatic switch to standby prevents unnecessary
energy use in case you forget that Scenea is on.
If the sleep timer is set, the TV will also switch to standby after
the set time has elapsed.
Scenea has no sound.
Wi-Fi Media Connect
With Wi-Fi MediaConnect you can bring up (project) your PC
screen on to the TV screen wirelessly. You can project video,
music, presentations or other content playing on your laptop or
desktop PC.
Before you can project the PC screen on to TV, you must install
the Wi-Fi MediaConnect software on your PC.
Read more about installing the Wi-Fi MediaConnect software in
Help > Setup > Network > Wi-Fi MediaConnect.
Start projecting
To start projecting the PC screen on to the TV, click on the
small TV icon in the taskbar at the bottom right of the PC
screen. Your PC screen appears on your TV screen.
Stop projecting
To stop projecting, click on the TV icon again.
Wi-Fi MediaConnect Help
To read the Wi-Fi MediaConnect Help, right-click the TV icon in
the taskbar of the PC and select Help.
Specifics
The playback of video can be affected by your PC performance
and your wireless network bandwidth.
You can project high definition (HD) or standard definition (SD)
video, depending on the processing power of your PC.
The content protection on most DVD or Blu-ray Disc movies
might restrict watching the movie on a TV when the disc is
playing on a PC.
The TV shows PC media files with a small delay.
30 Smart TV / Videos, photos and music
3.4 Pause TV and recording
Smart USB recording
With this TV you can pause a TV broadcast from a digital
channel. You can pause a TV broadcast to watch it later.
Simply connect a USB Hard Drive device to your TV and you
can pause the broadcast.
If your TV is connected to the Internet, you can also record or
set a programmed recording of a digital broadcast. In some
countries, recording is not supported.
What you need
Smart USB recording and Pause TV only work with digital TV
channels (DVB broadcast or similar).
To pause
To pause a digital broadcast you need to connect a USB Hard
Drive. Use a USB 2.0 compatible Hard Drive device with a
minimum of 32GB Hard Drive space and a minimum writing
speed of 30MB/s. Connect the USB Hard Drive to one of the
two USB connectors on the side of the TV.
To record
First, check if the Programme guide supports recording. With the
Internet connected, press h and select Programme guide. If
there is a Recordings button on the Programme guide page, you
can record programmes.
To record programmes, you need a USB 2.0 compatible Hard
Drive with 250GB and a high-speed (broadband) Internet
connection to the TV.
Read more about connecting to the network in Help > Setup >
Network.
USB Hard Drive installation
Before you can pause or record a broadcast, you must format
the connected USB Hard Drive.
1 Connect the USB Hard Drive to one of the two USB ports on
the side of the TV. Do not connect another USB device to the
other USB port when formatting.
2 Switch on the device and the TV.
3 When the TV is tuned to a digital TV channel, press U (Pause)
to start formatting. Formatting will remove all data from the
connected USB Hard Drive. Follow the instructions on screen.
When the USB Hard Drive is formatted, leave the device
connected permanently.
Warning
The USB Hard Drive is formatted exclusively for this TV, you
cannot use the stored recordings on another TV or PC. Do not
copy or change recording files on the USB Hard Drive with any
PC application. This will corrupt your recordings. When you
format another USB Hard Drive, the content on the former will
be lost.
Pause TV
While watching a TV broadcast from a digital channel, you can
pause the broadcast and continue watching later on. Answer a
phone call or take a break. Meanwhile, the broadcast is stored on
the USB Hard Drive. You can pause a broadcast for a maximum
time span of 90 minutes.
To pause a TV broadcast, press U (Pause). A progress bar
appears briefly on screen.
To call up the progress bar, press U (Pause) again.
To continue watching, press x (Play).
To switch to TV broadcast again, press S (Stop).
Once you switch to a digital channel, the USB Hard Drive starts
storing the broadcast. When you switch to another channel, the
new channel broadcast is stored and the broadcast of the former
channel is cleared. Also when you switch the TV to standby, the
stored broadcast is cleared.
When you start watching a programme of another device - a
connected Blu-ray Disc player or digital receiver - the USB Hard
Drive clears all broadcast storage.
Whilst recording a programme on the USB Hard Drive, you
cannot pause a TV broadcast.
Instant replay
Whilst watching a TV broadcast from a digital channel, you can
easily instant replay the broadcast.
To replay the last 10 seconds of a TV broadcast, press U
(Pause) and press w (Left).
You can press w repeatedly until you reach the start of the
broadcast storage or the maximum time span.
Progress bar
With the progress bar on screen, press T (Rewind) or press Q
(Forward) to select from where you want to start viewing the
stored broadcast. Press these keys repeatedly to change their
speed.
Smart TV / Pause TV and recording 31
Specifics
The Audio Description audio (commentary) for the visually
impaired is not available for playback in Smart USB Recording.
Recording
If the TV is connected to the Internet and there is a Recordings
button on the Programme guide page, you can record a digital
TV broadcast on the USB Hard Drive.
You can manage all recordings in the Programme guide on TV.
If the Recordings button is not available, check if the Programme
guide data is set to update from the network. Press h (Home)
and select Setup > TV settings > Preferences > Programme
guide > From network.
Record now
To record the programme you are watching, press R (Record).
While the recording has already started, you can adjust the end
time of the recording in the pop-up window of the Programme
guide. Press Schedule to confirm the end time.
To stop recording immediately, press S.
Schedule a recording
You can schedule a recording of an upcoming programme for
today or a few days from today (maximum of 8 days away).
1 To schedule a recording, press h (Home) and select
Programme guide. On the Programme guide page, select the
channel and programme you wish to record.
You can enter the channel number to jump to the channel in the
list. Press x (Right) or w (Left) to scroll the programmes of a
channel.
To change the date of the list, select the date at the top of the
page and press OK. Select the day you want and press OK
again.
2 With the programme highlighted, press r OPTIONS and
select Record. The TV adds some time buffer at the end of the
program. You can add some extra buffer if needed.
3 Select Schedule and press OK. The programme is scheduled
for recording. A warning will show automatically when
overlapping recordings are scheduled.
If you plan to record a programme in your absence, remember
to leave the TV on standby and the USB Hard Drive switched
on.
List of recordings
To view the list of recordings and scheduled recordings, select
Recordings on the Programme guide page and press OK. In this
list, you can select a recording to watch, remove recorded
programmes, check the free drive space or schedule a recording
not linked to a specific TV programme.
Expired recording
Broadcasters can limit the number of days a recording can be
viewed. A recording in the list can show the number of days
before it expires.
Failed recording
When a scheduled recording was prevented by the broadcaster
or when the download was interrupted, a recording is marked as
Failed.
Watch a recording
In the list of recordings, select the arrow in front of the
recording and press OK. The playback of the recording starts.
You can use the x (Play), Q (Forward), T (Rewind), U
(Pause) or S (Stop) keys on the remote control.
Set a timed recording
To set a recording not linked to a programme, select Schedule
recording above the list of recordings and press OK. Set the
channel, date and time span. To confirm the recording, select
Schedule and press OK.
Remove a scheduled recording
To remove a scheduled recording, select the red circle in front
of the recording and press OK.
Delete a recording
To remove a recording, select the recording in the list and press
r OPTIONS and select Delete recording.
Programme information
To view more information on a programme, select the
programme in any programme guide list and press OK.
Depending on the status of this programme you can start
watching, schedule its recording, playback the recording or delete
the recording from this page.
Specifics
While recording a programme, you can watch a previously
recorded programme.
While recording, you cannot switch TV channels.
While recording, you cannot pause the TV broadcast.
The Audio Description audio (commentary) for the visually
impaired is not available for playback in Smart USB Recording.
32 Smart TV / Pause TV and recording
3.5 Games
Play a game
Add a game console
In the Home menu, start Add your devices to add the console
to the Home menu for easy selection later on. When adding a
game console to the Home menu, select Game when the TV
asks for the device type. If your game console is an EasyLink
HDMI-CEC device it might add itself to the Home menu.
Smart setting - Game
The Smart picture setting Game sets the TV to the ideal Game
settings without picture lag.
If your game console is added as Game in the Home menu, the
TV switches to the Game setting automatically.
If your game console has added itself in the Home menu as a
Blu-ray Disc player or DVD player, you need to switch the
Smart picture setting to Game before you start playing.
To switch the Smart picture setting to Game, press t ADJUST
and select Smart picture > Game and press OK. The TV is ready
for gaming. Do not forget to switch back to your normal Smart
picture setting when you stop gaming.
Read more about how to connect a game console in Help >
Connections > Connect more devices > Game or HD Game.
Two-player games
Some games offer multi-player and split screen gaming. On this
TV, you can set the split screen as two full screen views. Two
players watch the same TV but see two different screens to play
the game. The TV uses 3D technology to do this. To watch each
screen, you need a pair of 3D glasses for each player.
What you need
With this TV, use the two-player kit with 2 passive 3D glasses -
Philips PTA436 (sold separately).
For two-player split screen gaming, the game console must be
connected with HDMI.
Start a two-player game
1 Select the game console in the Home menu and press OK.
2 On the game console, start the game and select the multi or
two-player mode. Select the mode for split screen viewing.
3 On the TV, press t ADJUST and select Two-player game.
4 Select the format in which the split screen game is shown on
screen, Side by side or Top / bottom and press OK. The TV
shows the 2 screens as full screens.
To watch the 2 different screens, each player puts on one of the
glasses - player 1 or player 2.
In and out of split screen view
In two-player split screen view, you can switch back and forth
from split screen to combined view, to be able to read the game
menu or game scores.
To switch views back and forth, press OK on the remote
control of the TV.
Stop Two-player game
To stop the two-player split screen view, press h (Home) and
select another activity.
Specifics
To make Two-player gaming available in the menu, select 3D in
the same menu, select 2D in the list and press OK.
Smart TV / Games 33
3.6 Text
Text pages
Open Text
To access Text while you are watching TV channels, press
TEXT.
To close Text, press TEXT again.
Select a Text page
To select a page
Enter the page number with the number keys.
Press W or X
Press u or v.
Press a colour key to select a colour-coded subject at the
bottom of the screen.
Text sub-pages
A Text page number can hold several subpages. The subpage
numbers are shown on a bar next to the main page number.
To select a subpage, press w or x.
T.O.P. Text pages
Some broadcasters offer T.O.P. Text.
To open T.O.P. Text pages within Text, press r OPTIONS
and select T.O.P. overview.
Search Text
You can select a word and scan Text for all occurrences of this
word.
Open a Text page and press OK. Select a word or number with
the navigation keys. Now press OK again to jump immediately to
the next occurrence of this word or number. Press OK again to
jump to the subsequent occurrence.
To stop the search, press u until nothing is selected.
Text from a connected device
Some connected devices that receive TV channels can also offer
Text.
To open Text from a connected device, press h, select the
device and press OK. While watching a channel on the device,
press r OPTIONS, select Show device keys and select the
B key and press OK. Press È (Back) to hide the device keys.
To close Text, press È (Back) again.
Digital Text (UK only)
Some digital TV broadcasters offer dedicated Digital Text or
interactive TV on their digital TV channels. This includes normal
Text using the number, colour and navigation keys to select and
navigate.
To close Digital Text, press È (Back).
Text options
In Text, press r OPTIONS to select the following:
Freeze page
Dual screen
T.O.P. overview
Enlarge
Reveal
Cycle subpages
• Language
Freeze page
To stop the automatic rotation of subpages, press r OPTIONS
and select Freeze page.
Dual screen / Full screen
To show the TV channel and Text alongside each other, press
r OPTIONS and select Dual screen. Select Full screen to
switch back to full screen view.
T.O.P. overview
To open T.O.P. Text, press r OPTIONS and select T.O.P.
overview.
Enlarge
To enlarge the Text page for more comfortable reading, press
r OPTIONS and select Enlarge. To scroll down the page,
press v or u.
Reveal
To unhide hidden information on a page, press r OPTIONS
and select Reveal.
Cycle subpages
To cycle subpages when these are available, press r OPTIONS
and select Cycle subpages.
Language
To switch the group of characters that Text uses to display
correctly, press r OPTIONS and select Language .
Text setup
34 Smart TV / Text
Text language
Some digital TV broadcasters have several Text languages
available.
To set your primary and secondary Text language, press h >
Set up > Channel settings and select Primary or Secondary Text
and select your preferred Text languages.
Text 2.5
If available, Text 2.5 offers more colours and better graphics. Text
2.5 is activated as a standard factory setting.
To switch it off, select h > Setup > TV settings > Preferences
> Text 2.5.
Smart TV / Text 35
35

Hulp nodig? Stel uw vraag in het forum

Spelregels
1

Forum

Philips-50PFL7956T

Misbruik melden

Gebruikershandleiding.com neemt misbruik van zijn services uitermate serieus. U kunt hieronder aangeven waarom deze vraag ongepast is. Wij controleren de vraag en zonodig wordt deze verwijderd.

Product:

Bijvoorbeeld antisemitische inhoud, racistische inhoud, of materiaal dat gewelddadige fysieke handelingen tot gevolg kan hebben.

Bijvoorbeeld een creditcardnummer, een persoonlijk identificatienummer, of een geheim adres. E-mailadressen en volledige namen worden niet als privégegevens beschouwd.

Spelregels forum

Om tot zinvolle vragen te komen hanteren wij de volgende spelregels:

Belangrijk! Als er een antwoord wordt gegeven op uw vraag, dan is het voor de gever van het antwoord nuttig om te weten als u er wel (of niet) mee geholpen bent! Wij vragen u dus ook te reageren op een antwoord.

Belangrijk! Antwoorden worden ook per e-mail naar abonnees gestuurd. Laat uw emailadres achter op deze site, zodat u op de hoogte blijft. U krijgt dan ook andere vragen en antwoorden te zien.

Abonneren

Abonneer u voor het ontvangen van emails voor uw Philips 50PFL7956T bij:


U ontvangt een email met instructies om u voor één of beide opties in te schrijven.


Ontvang uw handleiding per email

Vul uw emailadres in en ontvang de handleiding van Philips 50PFL7956T in de taal/talen: Engels als bijlage per email.

De handleiding is 6,31 mb groot.


U ontvangt de handleiding per email binnen enkele minuten. Als u geen email heeft ontvangen, dan heeft u waarschijnlijk een verkeerd emailadres ingevuld of is uw mailbox te vol. Daarnaast kan het zijn dat uw internetprovider een maximum heeft aan de grootte per email. Omdat hier een handleiding wordt meegestuurd, kan het voorkomen dat de email groter is dan toegestaan bij uw provider.

Stel vragen via chat aan uw handleiding

Stel uw vraag over deze PDF

Andere handleiding(en) van Philips 50PFL7956T

Philips 50PFL7956T Gebruiksaanwijzing - Nederlands - 88 pagina's

Philips 50PFL7956T Snelstart handleiding - Nederlands - 24 pagina's

Philips 50PFL7956T Gebruiksaanwijzing - Deutsch - 90 pagina's

Philips 50PFL7956T Snelstart handleiding - Deutsch, English - 24 pagina's

Philips 50PFL7956T Gebruiksaanwijzing - Français - 89 pagina's

Philips 50PFL7956T Snelstart handleiding - Français - 24 pagina's


Uw handleiding is per email verstuurd. Controleer uw email

Als u niet binnen een kwartier uw email met handleiding ontvangen heeft, kan het zijn dat u een verkeerd emailadres heeft ingevuld of dat uw emailprovider een maximum grootte per email heeft ingesteld die kleiner is dan de grootte van de handleiding.

Er is een email naar u verstuurd om uw inschrijving definitief te maken.

Controleer uw email en volg de aanwijzingen op om uw inschrijving definitief te maken

U heeft geen emailadres opgegeven

Als u de handleiding per email wilt ontvangen, vul dan een geldig emailadres in.

Uw vraag is op deze pagina toegevoegd

Wilt u een email ontvangen bij een antwoord en/of nieuwe vragen? Vul dan hier uw emailadres in.


Info