3056
35
Verklein
Vergroot
Pagina terug
1/131
Pagina verder
electronic user's manual
file:///D|/EDFU/crt_17_6/edoc/english/107S/manual.html2005-04-08 ¤W¤È 11:29:06
Safety & Troubleshooting
Safety and Troubleshooting Information
Safety Precautions and MaintenanceTroubleshootingRegulatory InformationOther
Related Information
Safety precautions and maintenance
WARNING: Use of controls, adjustments, or procedures other than those
specified in this documentation may result in exposure to shock, electrical
hazards, and/or mechanical hazards.
Read and follow these instructions when connecting and using your computer monitor:
Disconnect the monitor from the power supply if the monitor is not to be used for an
extended period of time.
Do not attempt to remove the back cover, as you will be exposed to a shock hazard. The
back cover should only be removed by qualified service personnel.
Do not place objects on top of the monitor cabinet, objects could fall into vents or cover them
and prevent proper cooling of the monitor's electronic devices.
To avoid the risk of shock or permanent damage to the set, do not expose the monitor to rain
or excessive moisture.
Do not use alcohol or ammonia-based liquid to clean the monitor. If necessary, clean with a
slightly damp cloth. Disconnect the monitor from the power supply before cleaning.
When positioning the monitor, make sure the power plug and outlet are easily accessible.
Consult a service technician if the monitor does not operate normally when operating instructions of
this manual are followed.
RETURN TO TOP OF THE PAGE
file:///D|/EDFU/crt_17_6/edoc/english/107S/SAFETY/SAFETY.HTM2005-04-08 ¤W¤È 11:29:10
About This Electronic User's Manual
About This GuideOther Documents You May NeedNotational Descriptions
About This Guide
This electronic user's guide is intended for anyone who uses the Philips Color Monitor. It describes
the monitor's features, setup, operation and all other information, which is the same exact
information described in our printed version.
The sections are as follows:
Safety and Troubleshooting Information provides tips and solutions for common problems,
and other related information you may need.
About This Electronic User's Manual gives overview of what information are included as well
as notation icon descriptions and other documentation you can refer to.
Product Information gives an overview of the monitor's features and as well as the technical
specifications for this monitor.
Installing Your Monitor describes the initial setup process and gives an overview of how to
use the monitor.
On Screen Display provides information on adjusting the settings on your monitor.
Customer Care and Warranty is a list of worldwide Philips consumer information centers
along with the help desk phone numbers and information on the applicable warranty of your
product.
Glossary provides more information for technical terms.
Download allows users to install the entire manual on their hard drive.
Frequently Asked Questions provides answers to commonly asked questions.
RETURN TO TOP OF THE PAGE
Other Documents You May Need
In addition to this Electronic User's Guide, you may need to refer to the following documentation:
file:///D|/EDFU/crt_17_6/edoc/english/107S/ABOUT/ABOUT.HTM (1 of 3)2005-04-08 ¤W¤È 11:29:10
About This Electronic User's Manual
Philips Color Monitor Quick Start Guide which summarizes the steps for setting up the
monitor. This is included with this product.
RETURN TO TOP OF THE PAGE
Notational Descriptions
The following subsections describe notational conventions used in this document.
Notes, Cautions, and Warnings
Throughout this guide, blocks of text may be accompanied by an icon and printed in bold type or in
italic type. These blocks are notes, cautions, and warnings, and they are used as follows:
NOTE: This icon indicates important information and tips that help you make
better use of your computer system.
CAUTION: This icon indicates information that tells you how to avoid either
potential damage to hardware or loss of data.
WARNING: This icon indicates the potential for bodily harm and tells you how
to avoid the problem.
SMART HELP: This icon indicates helpful information when adjusting the On
Screen Display of your monitor.
Some warnings may appear in alternate formats and may be unaccompanied by an icon. In such
cases, the specific presentation of the warning is mandated by regulatory authority.
RETURN TO TOP OF THE PAGE
file:///D|/EDFU/crt_17_6/edoc/english/107S/ABOUT/ABOUT.HTM (2 of 3)2005-04-08 ¤W¤È 11:29:10
About This Electronic User's Manual
©2005 Koninklijke Philips Electronics N.V.
All rights reserved. Reproduction, copying, usage, modifying, hiring, renting, public performance, transmission and/or
broadcasting in whole or in part is prohibited without written consent of Philips Electronics N.V.
file:///D|/EDFU/crt_17_6/edoc/english/107S/ABOUT/ABOUT.HTM (3 of 3)2005-04-08 ¤W¤È 11:29:10
107S Product Information
Product Information
Product FeaturesLead-free product Technical SpecificationsAutomatic Power Saving
Physical SpecificationPin AssignmentProduct Views
Product Features
Model Regulation Color
107S61 MPRII Gray
107S66 MPRII Black
107S67 MPRII Blue/Silver
107S6
17-inch (16.0" VIS) color monitor with excellent front of screen performance for use with MACs
and PCs
Autoscan covers horizontal frequencies up to 71 kHz offering a maximum resolution of 1280 x
1024 with flicker free display of 1024 x 768 at up to 89 Hz
.
Real Flat High Contrast CRT with high-resolution 0.25 mm dot pitch (0.21 hdp).
Large screen display in a small footprint: 17-inch conventional monitor with maximum depth of
only 424 mm/16.7"
Multimedia Base option.
sRGB for true on screen color representation.
FCC, CE (in selected countries only) and ISO9241, ISO14001 certified
High Bright hot key dleivers 4 suitable brightness instantly for text, internet, game and
multimedia.
RETURN TO TOP OF THE PAGE
file:///D|/EDFU/crt_17_6/edoc/english/107S/PRODUCT/PRODUCT.HTM (1 of 7)2005-04-08 ¤W¤È 11:29:11
107S Product Information
Lead-free product
Philips eliminated toxic substances like lead from its displays. Lead-free display helps protect your
health and promotes environmentally sound recovery and disposal of waste from electrical and
electronic equipment. Philips complies with the European Community stringent RoHS Directive
mandating restrictions on hazardous substances in electrical and electronic equipment. With Philips,
you can be confident that your display device does not harm the environment.
Technical Specifications*
CRT
• Size and deflection 17 inch / 41 cm ; 90° deflection angle
• Dot pitch 0.25 mm
• Horizontal pitch 0.21 mm
• Tube type
Shadow mask, real flat, high contrast, anti-glare, anti-static,
anti-reflection
• Phosphor P22
• Recommended display area 12.0" x 9.0" / 306 x 230 mm
• Maximum display area 12.8" x 9.6" / 325 x 244 mm
SCANNING
• Horizontal scanning 30 - 71 KHz
• Vertical scanning 50-160 Hz
VIDEO
• Video dot rate 120 MHz
• Input impedance
- Video 75 ohm
- Sync 4.7 kOhm
• Input signal levels 0.7 Vpp
• Sync input signal Separate sync
• Sync polarities Positive and negative
file:///D|/EDFU/crt_17_6/edoc/english/107S/PRODUCT/PRODUCT.HTM (2 of 7)2005-04-08 ¤W¤È 11:29:11
107S Product Information
WHITE COLOR TEMPERATURE
Chromaticity CIE coordinates:
• at 9300 degrees K x = 0.283 / y = 0.297
• at 6500 degrees K x = 0.313 / y = 0.329
• at sRGB x = 0.313 / y = 0.329
PRESET MODES
720 x 400 @ 70 Hz
640 x 480 @ 60 Hz
640 x 480 @ 85 Hz
800 x 600 @ 75 Hz
800 x 600 @ 85 Hz
1024 x 768 @ 75 Hz
1024 x 768 @ 85 Hz
1280 x 1024 @ 60 Hz
sRGB
file:///D|/EDFU/crt_17_6/edoc/english/107S/PRODUCT/PRODUCT.HTM (3 of 7)2005-04-08 ¤W¤È 11:29:11
107S Product Information
sRGB is a standard for ensuring correct exchange of colors between different devices (e.g.
digital cameras, monitors, printers, scanners, etc.)
Using a standard unified color space, sRGB will help represent pictures taken by an sRGB
compatible device correctly on your sRGB enabled Philips monitors. In that way, the colors are
calibrated and you can rely on the correctness of the colors shown on your screen.
Important with the use of sRGB is that the brightness and contrast of your monitor is fixed to a
predefined setting as well as the color gamut. Therefore it is important to select the sRGB
setting in the monitor's OSD.
To do so, open the OSD by pressing the OK button on the front of your monitor. Use the down
button to go to Color temperature and press OK again. Then move the down button to go to
sRGB and press OK again.
Exit this OSD.
After this, please don't change the brightness or contrast setting of your monitor. If you change
either of these, the monitor will exit the sRGB mode and go to a color temperature setting of
6500K.
* These information are subject to change without notice.
RETURN TO TOP OF THE PAGE
Automatic Power Saving
If you have VESA's DPMS compliance display card or software installed in your PC, the monitor can
automatically reduce its power consumption when not in use. And if an input from a keyboard, mouse
or other input device is detected, the monitor will automatically "wake up". The following table shows
the power consumption and signaling of this automatic power saving features:
Power Management Definition
VESA's
Mode
Video H-sync V-sync Power Used Power Saving (%) LED color
file:///D|/EDFU/crt_17_6/edoc/english/107S/PRODUCT/PRODUCT.HTM (4 of 7)2005-04-08 ¤W¤È 11:29:11
107S Product Information
Active
ON
Yes Yes Typical 68 W 0 % Green
Sleep
OFF
No No < 1W 99%
Flashing
Green
Switch Off OFF
--
-- < 1W 99%
Off
This monitor is
ENERGY STAR
®
compliant. As an ENERGY STAR
®
Partner, PHILIPS has
determined that this product meets the
ENERGY STAR
®
guidelines for energy efficiency.
RETURN TO TOP OF THE PAGE
Physical Specifications
• Dimensions
15.6" x 15.1" x 16.7" / 397 x 383 x 424 mm (including base)
15.6" x 13.1" x 16.7" / 397 x 333 x 424 mm (excluding base)
• Weight 15.0 kg
• Power supply
100-240 VAC, 60-50Hz
(Please refer to rating label)
• Temperature (operating) 0° to 40°C / 32° to 104°F
• Temperature (storage) -25° to +65°C / -13° to +149°F
• Relative humidity(storage) 5% to 95%
* Resolution 1280 x 1024, standard size, contrast max., brightness 50%, 9300°, full white pattern.
* These information are subject to change without notice.
RETURN TO TOP OF THE PAGE
file:///D|/EDFU/crt_17_6/edoc/english/107S/PRODUCT/PRODUCT.HTM (5 of 7)2005-04-08 ¤W¤È 11:29:11
107S Product Information
Pin Assignment
The 15-pin D-sub connector (male) of the signal cable (IBM systems):
Pin
No.
Assignment
Pin
No.
Assignment
1 Red video input 9 +5V DDC supply
2 Green video input 10 Logic ground
3 Blue video input 11
Identical output - connected
to pin 10
4
Identical output - connected
to pin 10
12 Serial data line (SDA)
5 Ground 13 H. Sync / H+V
6 Red video ground 14 V. Sync (VCLK for DDC)
7 Green video ground 15 Data clock line (SCL)
8 Blue video ground
RETURN TO TOP OF THE PAGE
Views
Follow the links to see various views of the monitor and its components.
file:///D|/EDFU/crt_17_6/edoc/english/107S/PRODUCT/PRODUCT.HTM (6 of 7)2005-04-08 ¤W¤È 11:29:11
107S Product Information
Front View
Rear View
RETURN TO TOP OF THE PAGE
file:///D|/EDFU/crt_17_6/edoc/english/107S/PRODUCT/PRODUCT.HTM (7 of 7)2005-04-08 ¤W¤È 11:29:11
Installing your Monitor
Front ViewRear View6G3B11 Multimedia Base (option)
Front View
Power button switches your monitor on.
OK button which when pressed will take you to the OSD controls
Contrast hotkey. When the "-" button is pressed, the adjustment
controls for the CONTRAST will show up.
Brightness hotkey. When the "+" button is pressed, the adjustment
controls for BRIGHTNESS will show up.
file:///D|/EDFU/crt_17_6/edoc/english/install_7/INSTALL.htm (1 of 3)2005-04-08 ¤W¤È 11:29:12
Installing your Monitor
"-" and "+" buttons, are used for adjusting the OSD of your monitor.
High Bright hot key delivers 4 suitable brightness instantly for text,
internet, game and multimedia.
RETURN TO TOP OF THE PAGE
Rear View
file:///D|/EDFU/crt_17_6/edoc/english/install_7/INSTALL.htm (2 of 3)2005-04-08 ¤W¤È 11:29:12
Installing your Monitor
1. Power in - attach power cable here.
2. Video In - this is a cable which is already attached to your monitor. Connect the other
end of the cable to your PC.
RETURN TO TOP OF THE PAGE
file:///D|/EDFU/crt_17_6/edoc/english/install_7/INSTALL.htm (3 of 3)2005-04-08 ¤W¤È 11:29:12
On-Screen Display
On-Screen Display
Description of the On-Screen DisplayThe OSD TreeThe OSD Controls
Description of the On Screen Display
What is the On-Screen Display?
This is a feature in all Philips monitors which allows an end-user to adjust screen performance of
monitors directly through an on-screen instruction window. The user interface provides user-
friendliness and ease-of-use when operating the monitor.
Basic and simple instruction on the control keys.
On the front controls of your monitor, once you press the
button, the On Screen Display (OSD)
Main Controls window will pop up and you can now start making adjustments to your monitor's
various features. Use the
to make your adjustments within.
file:///D|/EDFU/crt_17_6/edoc/english/OSD_2/OSDDESC.HTM (1 of 4)2005-04-08 ¤W¤È 11:29:13
On-Screen Display
RETURN TO TOP OF THE PAGE
The OSD Tree
Below is an overall view of the structure of the On-Screen Display. You can use this as reference
when you want to later on work your way around the different adjustments.
Your monitor may not include all the items in the OSD tree shown below.
file:///D|/EDFU/crt_17_6/edoc/english/OSD_2/OSDDESC.HTM (2 of 4)2005-04-08 ¤W¤È 11:29:13
On-Screen Display
RETURN TO TOP OF THE PAGE
file:///D|/EDFU/crt_17_6/edoc/english/OSD_2/OSDDESC.HTM (3 of 4)2005-04-08 ¤W¤È 11:29:13
On-Screen Display
file:///D|/EDFU/crt_17_6/edoc/english/OSD_2/OSDDESC.HTM (4 of 4)2005-04-08 ¤W¤È 11:29:13
Customer Care and Warranty
Customer Care & Warranty
PLEASE SELECT YOUR COUNTRY/AREA TO READ THE WARRANTY COVERED:
WESTERN EUROPE:
Austria • Belgium • Cyprus • Denmark • France • Germany • Greece •
Finland • Ireland • Italy • Luxembourg • the Netherlands • Norway • Portugal • Sweden •
Switzerland • Spain • United Kingdom
EASTERN EUROPE: Czech Republic • Hungary • Poland • Russia • Turkey • Bulgaria •
Slovakia • Slovenia
LATIN AMERICA: Antilles • Argentina • Brazil • Chile • Colombia • Mexico • Paraguay •
Peru • Uruguay • Venezuela
NORTH AMERICA: USA & Canada
PACIFIC: Australia • New Zealand
ASIA: Bangladesh • China • Hong Kong • India • Indonesia • Japan • Korea • Malaysia •
Pakistan • Philippines • Singapore • Taiwan • Thailand
AFRICA: Morocco • South Africa
MIDDLE EAST: Dubai • Egypt
file:///D|/EDFU/crt_17_6/edoc/english/WARRANTY/WARRANTY.HTM2005-04-08 ¤W¤È 11:29:13
Frequently Asked Questions
1. What does the "Designed for Windows" logo signify?
The "Designed for Windows" logo means your Philips monitor fulfills the requirements and
recommendations of the PC9x (97, 98, or 99) System Design Guide and passes stringent WHQL tests.
2. What models are Mac compatible?
All listed Philips monitors are Mac compatible. BUT, you may need an adapter to connect the monitor to
your Mac system. Please contact your dealer/reseller for details.
3. What is TCO?
TCO is a Swedish abbreviation for the Swedish Confederation of Professional Employees.
4. What is MPR?
MPR is a Swedish abbreviation for the Swedish National Board of Measurement and Testing.
5. What are the differences between MPRII, TCO92, TCO95, TCO99 and TCO'03?
In the general hierarchy of standards, TCO'03/TCO99 is the highest level of certification. Next is TCO95,
which is "better" than TCO92, which, in turn, is better than MPRII. Below, we compare the standards in
each category.
-TCO 92 Phase out: June 30, 2000
-TCO 95 Will be end December 31, 2003
Emissions:
MPRII: Set low emission rules for visual displays.
TCO92: Imposed more stringent standards than MPRII.
file:///D|/EDFU/crt_17_6/edoc/english/FAQ.HTM (1 of 13)2005-04-08 ¤W¤È 11:29:14
Frequently Asked Questions
TCO95: Further toughened TCO92 rules.
TCO99: Delineated even more severe standards and test procedures than TCO95.
TCO'03: Same as TCO99 standard + Testing uncertainty.
Safety:
MPRII: No requirement.
TCO92/95/99/03: All set requirements.
Energy Saving:
MPRII: No requirement.
TCO92: Standby mode < 30W, Off mode < 8W
TCO95: Standby mode < 30W, Off mode < 8W
TCO99: Standby mode < 15W, Off mode < 5W
TCO'03:Standby mode < 15W, Off mode < 5W
Visual Ergonomics:
MPRII: No requirement.
TCO92: No requirement.
TCO95: Set ergonomic rules including minimum contrast level, flicker and jitter.
TCO99: Tightened TCO95 rules.
TCO'03: Tighten TCO99 rule for CRT and new requirement of screen color for TFT LCD Monitors.
Ecology:
MPRII: No requirement.
TCO92: No requirement.
TCO95: Set general ecological standards including recycling preparation, environmental policy and
environmental certification.
TCO99: Further tightened TCO95 norms.
TCO'03:Require the recycling information to users.
6. How do I enable the energy saving function?
file:///D|/EDFU/crt_17_6/edoc/english/FAQ.HTM (2 of 13)2005-04-08 ¤W¤È 11:29:14
Frequently Asked Questions
Go to 'My Computer' and select 'Control Panel' followed by "Monitor Control". Select "All default
selection" and choose your Philips monitor model from the default driver list. Plug and Play will
automatically enable the EPA tick box for you. In DOS or Windows 3.1, you must first make sure your
PC supports power saving.
7. What is refresh rate?
"Refresh rate" describes the number of times an entire screen is vertically scanned each second. In
other words: If a monitor's refresh rate is 85 Hz, its screen is refreshed - or vertically scanned - 85 times
per second. A higher refresh rate means better image stability and less flicker. A high refresh rate helps
users who work long hours in front of a monitor avoid eye fatigue and stress. To change the refresh
rate, go into "Start/Settings / Control Pannel / Display / Properties / Setting/Advance/Adaptor" Windows
settings of the computer, the monitor will automatically adjust itself to the video card.
8. Why does the picture on the screen appear to flicker?
A low refresh rate or electrical interference typically causes flickering in the picture. Possible solutions
include the following:
Verify that the proper drivers are installed for your video card
Make sure that all electrical devices (such as mobile phones) are at least 1m from the monitor
Place the monitor in another physical location away from electrical interference
Adjust the refresh rate to 75hz or higher.
9. How do I adjust my monitor's resolution?
Available resolutions are determined by the capabilities of your video card and graphic driver. Under
Windows '95, you may select the desired available resolution through the 'Display properties/Settings'
menu.
file:///D|/EDFU/crt_17_6/edoc/english/FAQ.HTM (3 of 13)2005-04-08 ¤W¤È 11:29:14
Frequently Asked Questions
10. How can I adjust the size, position and rotation of my screen?
Depending on the model you own, you can use your CustoMax Software, On Screen Display (OSD) or
control knobs located on the monitor.
11. What if I get lost when making monitor adjustments?
Simply press OK button then select "Reset to factory settings" to restore all settings.
12. What is LightFrame
?
LightFrame
is a Philips technology breakthrough which offers a unique and revolutionary solution for
boosting a monitor 's brightness and sharpness. With LightFrame
TM
, the user experiences TV quality
performance for video or photos without deterioration to the monitor 's performance in windows used for
other applications.
13. How does LightFrame
work?
LightFrame
consists of a software application and an Integrated Circuit (IC) embedded in the monitor.
Together, they boost brightness and sharpness in a user defined window or screen area. Unique
LightFrame
TM
technology dramatically improves photo and video display quality.
file:///D|/EDFU/crt_17_6/edoc/english/FAQ.HTM (4 of 13)2005-04-08 ¤W¤È 11:29:14
Frequently Asked Questions
14. Why is LightFrame
important to me?
With LightFrame
, selected Philips monitors deliver TV quality video and photo display while
maintaining monitor performance for text-based applications. The result is that movies and other video
are brighter and livelier; photos are more vibrant and lifelike.
15. Will anyone else have this?
LightFrame
was invented, developed and patented by Philips. It is a unique feature that you will find
exclusively in Philips monitors.
16. Will LightFrame
shorten the life of a monitor?
No. Extensive testing has confirmed LightFrame
does not adversely affect monitor life. Today's state-
of-the-art Philips monitors employ improved phosphors and are designed for high light output.
LightFrame
normally highlights photos and videos. Though the peak brightness of the highlighted area
is strongly increased, the average brightness - a determining factor for cathode deterioration - is not
normally increased. In any case, a special Automatic Beam Limiter (ABL) circuit keeps a monitor 's
maximum average brightness within acceptable levels.
17. I get a message warning that my monitor 'may not support LightFrame
'. I am certain my
monitor does. What is wrong?
file:///D|/EDFU/crt_17_6/edoc/english/FAQ.HTM (5 of 13)2005-04-08 ¤W¤È 11:29:14
Frequently Asked Questions
Only a Philips driver can determine if your monitor is equipped with LightFrame
; a generic Windows
driver cannot. Install the special Philips driver that came with your monitor. If the warning continues to
flash after your Philips driver is installed, ignore the message. LightFrame
TM
will function properly.
18. What will happen when my system is no longer connected to a LightFrame™ enabled
monitor - for example, when I take my notebook on the road?
Philips exclusive LightFrame
feature requires the combined operation of hardware that resides in your
monitor and software installed on your system. It only works when a monitor with built-in hardware
receives commands from system software. Without both the LightFrame
TM
hardware equipped monitor
and system software, the LightFrame
does not function.
19. What is "XtraSpace Design" (XSD)?
XSD stands for XtraSpace Design, a Philips breakthrough that reduces a CRT display device's footprint.
Philips XSD monitors combine the world's smallest front-to-back footprint with excellent front of screen
performance.
20. How did Philips achieve XtraSpace Design?
Philips achieved this breakthrough in reduced footprint CRT display devices through short depth tubes
and a focused design process that squeezed every excess millimeter out of XSD monitor desk space
requirements.
file:///D|/EDFU/crt_17_6/edoc/english/FAQ.HTM (6 of 13)2005-04-08 ¤W¤È 11:29:14
Frequently Asked Questions
21. What is Philips monitors' solution for audio?
Not all users need multimedia capabilities. To give users freedom of choice, Philips provides an optional
Multimedia Base (type number: 6G3B10). The Multimedia Base replaces the easily removable standard
pedestal of the monitor.
22. Which models can be incorporated with the Multimedia Base?
The following models can be incorporated with the Multimedia Base: 107B5, 107E6,107F6, 107S6,
107T6.
23. What are Philips Multimedia Base's specifications?
See detailed Multimedia Base specifications on the product information page.
24. Why is a Multimedia Base better than separate speakers?
The major advantage of the Multimedia Base is its minimal space requirements. In fact, it hardly uses
any extra space at all: monitor depth and width are unchanged. Only the monitor's height is increased
by only 3 centimeters.
25. Where can I buy a multimedia base to incorporate with my Philips monitor?
file:///D|/EDFU/crt_17_6/edoc/english/FAQ.HTM (7 of 13)2005-04-08 ¤W¤È 11:29:14
Frequently Asked Questions
Please contact your dealer/reseller for details.
26. What does Auto Calibrate do?
It makes your monitor perform better and last longer. As a monitor becomes older, brightness gradually
deteriorates and its colors change. This well-known process effects all monitors. Eventually after a
number of years, the monitor's brightness deteriorates to below 50% of its original value. At this stage,
the usable life of a monitor is considered ended. Auto Calibrate regularly readjusts color temperature
and luminance to their original values.
27. How does Philips Auto Calibrate feature benefit me?
With Auto Calibrate, it takes a monitor's luminance 33 percent longer to deteriorate to the 50 percent
level that marks the end of a display device's useful life. Thanks to Auto Calibrate, a monitor with a
normal life of 10,000 hours, for example, would last for 13,300 hours, a full one third longer.
28. How does Auto Calibrate work?
During the calibration process, different predefined black and white images are displayed on the screen.
The beam currents of the red, green and blue cannon are accurately measured and compared to the
original values stored in the monitor. By readjusting gain values of the individual cannons, deviation is
reduced to zero. Default values are stored during production. If the user sets a new color temperature,
this new value is saved as the new default value.
29. When should calibration be performed?
file:///D|/EDFU/crt_17_6/edoc/english/FAQ.HTM (8 of 13)2005-04-08 ¤W¤È 11:29:14
Frequently Asked Questions
The calibration process takes less than six seconds. During this period, different specific images are
displayed. After the process is finalized, the original image is redisplayed. Constant re-calibration is not
required. Calibration should be performed after the monitor is warmed up. Auto Calibration takes place
when a monitor receives a signal indicating an imminent switch to its sleep mode/stand-by mode.
30. Which models of Philips monitors are equipped with Auto Calibrate feature?
Auto Calibrate is currently available in the new 202P, 201B and 109P.
31. The Main Menu displays OSD MAIN MENU LOCKED . Pressing the front control panels
hasno effect. How can I unlock this function?
Press and hold the OSD menu key for about 15 seconds until picture displays "OSD MAIN MENU
UNLOCKED"
32. My screen shows NO SYNC INPUT , how can I get rid of this?
Check the following for possible solutions:
Bent pins on the video cable
Make sure the computer is turned on
Ensure the VGA Cable is properly connected
Ensure the BNC/D-Sub connector on the rear of the monitor is in the correct position, newer
models have this option in the On Screen Display under Input Signal Selection.
Video card may be not a VESA standard (try the monitor with another computer)
file:///D|/EDFU/crt_17_6/edoc/english/FAQ.HTM (9 of 13)2005-04-08 ¤W¤È 11:29:14
Frequently Asked Questions
33. Why does my monitor display "Out of Range"?
The video card installed in your computer may be too high for the monitor 's specifications. Please
contact your computer manufacturer for details on how to lower resolution for your operating system.
34. What is Moire? Why does my monitor have this wavy phenomenon?
Moire is a natural effect or phenomenon of CRT that has the appearance of a wavy pattern, which is
repetitive and superimposed on the screen as ripple images. These are a few suggestions to help
reduce or minimize the effects:
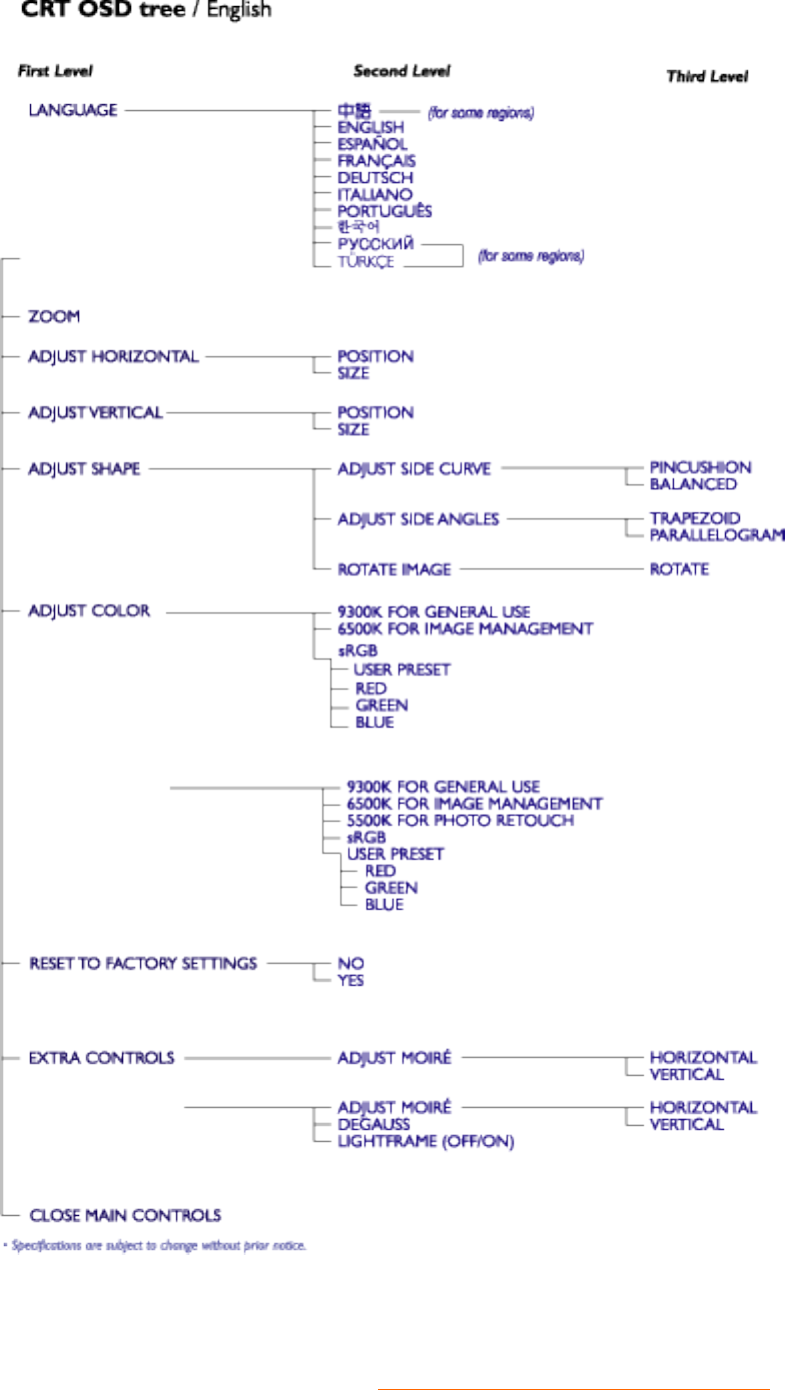
Some monitors have a Moire cancellation feature, activate it to the on position or adjust the
Moire cancellation function via the OSD on the monitor.
Change resolution to the recommended standard for the specific monitor size.
Change Window viewing pattern/scheme to a pattern where the Moire is less visible.
Change horizontal and vertical size to optimize the reduction of the Moire effect.
35. My monitor appears to be missing one or more colors. How do I correct this?
If the OSD menu is also missing a color, please contact service for details
Set color temperature to 9300 color coordination
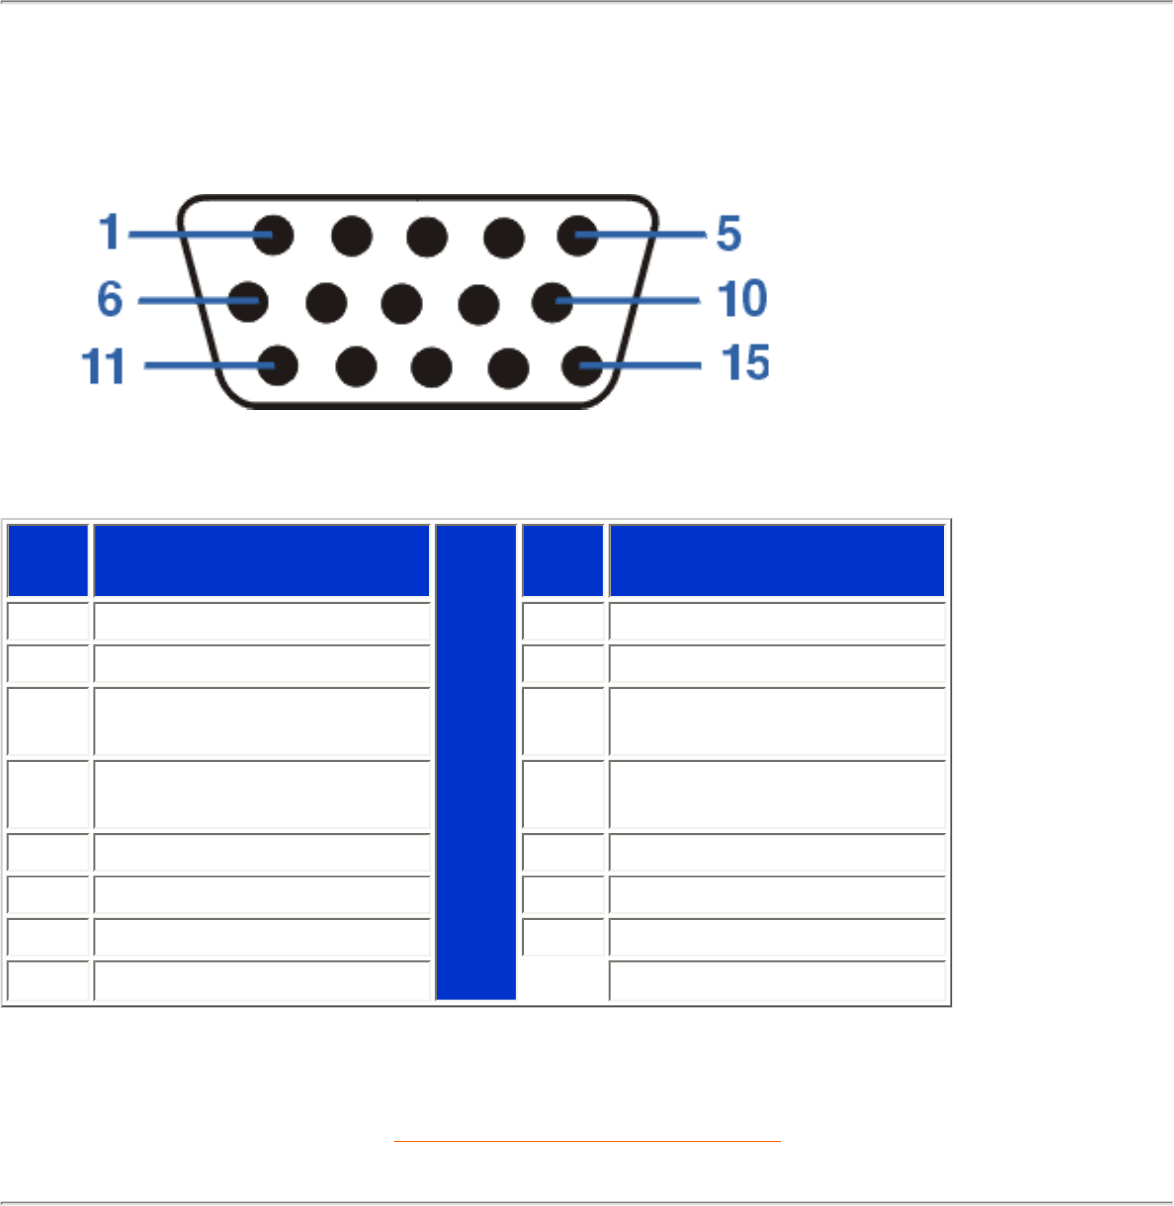
Check the video cable for any bent pins
Video card could be defective (try the monitor with another computer).
36. When I degauss my monitor, it makes a loud noise. Is this normal?
Yes, when degaussing your monitor via the OSD, it is normal for the monitor to make a relatively loud
noise. Please be aware that many models will not degauss more than once within any given time period
(up to 10 minutes). This is due to the unit having a temperature sensitive resistor. While the unit is
degaussing, the resistor increases in value with heat and once it reaches a certain temperature, the
resistance will rise and prevent voltage from reaching the degaussing coil. This is what stops the
degausser, and this device's resistance will decrease as it cools back off, enabling the degauss function
to operate again. This is an intentional design and is an industry standard, not just for Philips monitors.
Please be aware that not all models in the Philips range has this manual degauss function. Some
models are built with an auto degauss feature which automatically degausses the monitor when it is
switched on.
file:///D|/EDFU/crt_17_6/edoc/english/FAQ.HTM (10 of 13)2005-04-08 ¤W¤È 11:29:14
Frequently Asked Questions
37. How do I adjust the picture on the screen?
Please perform the following to correct the picture image:
Reset your monitor via the OSD menu
Adjust the Horz (width) and/or Vert size (height) in the OSD
Change monitor timing to work at the recommended resolution
38. The edge of the picture on the screen appears to be distorted. How can I correct this?
Please perform the following to correct the picture image:
A magnetic or electrical interference typically causes poor geometry in the picture. Place the
monitor in a different physical location
Reset the monitor to the factory preset via the OSD menu
Access the Geometry Menu in the OSD of the Monitor and perform the necessary adjustments
Change the monitor timing to the recommended resolution
39. The picture appears too dim. How can I correct this?
Adjust Brightness and/or Contrast via the monitor 's OSD. Some models have a Video Input Select
under Advanced Controls in the monitor 's OSD. Most computers require it to be set at 0.7V.
Please review the following for possible solutions:
If the OSD menu is also dim, please contact service for repair
Reset the monitor via the OSD menu
Change the color temperature settings to 9300 color coordination via the OSD menu
file:///D|/EDFU/crt_17_6/edoc/english/FAQ.HTM (11 of 13)2005-04-08 ¤W¤È 11:29:14
Frequently Asked Questions
Set the Contrast to maximum level (100) and Brightness to middle level (50)
Video card could be defective (try the monitor with another computer)
40. I have noticed two thin horizontal lines on the screen of my Philips monitor. Is this normal?
This phenomenon can occur with Philips 107P, 109P and 202P monitors and is normal. Your monitor is
using an Aperture Grille, which consists of fine vertical wires to align the electron beams with the
phosphors on the screen. To prevent these vertical wires from vibrating and to keep them properly
aligned with the picture tube, two horizontal damper wires are required. These are located on one-third
and on two-third from the top of the screen. The result is that you will see two very thin horizontal lines
over your screen since the two wires are casting a slight shadow on the screen surface. You will find
these wires (line) in any monitor from Philips and other brands using the Aperture Grille technology.
41. How can I increase the color display of my monitor?
The amount of video memory your video card holds determines the amount of colors that can be
displayed on your computer screen. To get the most out of your video card, you will need to either install
the latest drivers onto your computer or upgrade the video cards memory. Please check with your
computer or video card manufacturer for further details.
42. Why is there no picture on my monitor?
Check the wall socket for power. Verify that there is power by connecting another product.
Ensure the power cable is correctly attached to both the wall socket and the monitor.
Check that the power button is switched on.
Unplug the monitor for approx. 1 minute and plug it in again. Switch the monitor back on.
43. Why is there no picture on my monitor even though the power LED is yellow/amber or
flashing green?
Reboot your computer while holding the Ctrl key on your computer. If you see any picture during
the boot procedure, please verify the settings of your video card (for Windows go to Control
Panel and select Display).
Check that the video cable is not damaged, bent or that any of the pins in the connector are
damaged (please be aware that some VGA connectors have one missing pin). If damaged,
replace with a new cable.
file:///D|/EDFU/crt_17_6/edoc/english/FAQ.HTM (12 of 13)2005-04-08 ¤W¤È 11:29:14
Frequently Asked Questions
Check that the cable is attached correctly to the computer.
Press any key on the keyboard to wake-up the computer from power saving mode.
44. Why is there no picture on my monitor even though the power LED is green?
Verify the Contrast and Brightness setting of the monitor. First press and hold the 5 (-) button to
increase Contrast and then press and hold the
4 (+) button to increase Brightness. These
buttons are located on the front of your monitor.
Press both the 5(-) button and the OK button at the same time to switch input A|B.
Try and repeat step 48 above.
45. Why does the picture disappear after I press the on/off button quickly?
This is a unique Philips feature designed to preserve the life of your monitor. Please allow 5 seconds
between powering off and on your monitor, your picture will then be restored.
file:///D|/EDFU/crt_17_6/edoc/english/FAQ.HTM (13 of 13)2005-04-08 ¤W¤È 11:29:14
Glossary
Glossary
A B C D E F G H I J K L M N O P Q R S T U V W X Y Z
A
Autoscan
A microprocessor-based feature of Philips Brilliance monitors is able to detect automatically
horizontal and vertical frequencies of input signals with those of the installed video card. An
autoscan monitor can thus operate with a wide range of video cards. MultiSync, a registered
trademark of NEC, provides a similar function.
RETURN TO TOP OF THE PAGE
B
Balanced pincushion
See Geometric distortion
BNC connection
A special construction of connector used in some monitors with higher horizontal scanning
frequency. The BNC connection can provide the optimum shielding and matching characteristic
impedance of video signal path to ensure the best video performance.
file:///D|/EDFU/crt_17_6/edoc/english/GLOSSARY/GLOSSARY.HTM (1 of 22)2005-04-08 ¤W¤È 11:29:16
Glossary
RETURN TO TOP OF THE PAGE
C
CE Mark
CE mark is displayed on products per EMC and LV ( low Voltage Device ) directives in compliance
with European Community safety, EMI and EMS requirements and is compulsory on products for
sale in the European Community.
Color temperature
A way of describing the color of a radiating source in terms of the temperature (in degrees Kelvin) of
a black body radiating with the same dominant frequency as the source.
Most Philips monitors offer the possibility of setting the color temperature to any desired value.
Contrast
The ratio between the brightness of the brightest and darkest parts of a picture. The darkest part of
file:///D|/EDFU/crt_17_6/edoc/english/GLOSSARY/GLOSSARY.HTM (2 of 22)2005-04-08 ¤W¤È 11:29:16
35

Hulp nodig? Stel uw vraag in het forum

Spelregels

Misbruik melden

Gebruikershandleiding.com neemt misbruik van zijn services uitermate serieus. U kunt hieronder aangeven waarom deze vraag ongepast is. Wij controleren de vraag en zonodig wordt deze verwijderd.

Product:

Bijvoorbeeld antisemitische inhoud, racistische inhoud, of materiaal dat gewelddadige fysieke handelingen tot gevolg kan hebben.

Bijvoorbeeld een creditcardnummer, een persoonlijk identificatienummer, of een geheim adres. E-mailadressen en volledige namen worden niet als privégegevens beschouwd.

Spelregels forum

Om tot zinvolle vragen te komen hanteren wij de volgende spelregels:

Belangrijk! Als er een antwoord wordt gegeven op uw vraag, dan is het voor de gever van het antwoord nuttig om te weten als u er wel (of niet) mee geholpen bent! Wij vragen u dus ook te reageren op een antwoord.

Belangrijk! Antwoorden worden ook per e-mail naar abonnees gestuurd. Laat uw emailadres achter op deze site, zodat u op de hoogte blijft. U krijgt dan ook andere vragen en antwoorden te zien.

Abonneren

Abonneer u voor het ontvangen van emails voor uw Philips 107s61 bij:


U ontvangt een email met instructies om u voor één of beide opties in te schrijven.


Ontvang uw handleiding per email

Vul uw emailadres in en ontvang de handleiding van Philips 107s61 in de taal/talen: Engels als bijlage per email.

De handleiding is 1,46 mb groot.


U ontvangt de handleiding per email binnen enkele minuten. Als u geen email heeft ontvangen, dan heeft u waarschijnlijk een verkeerd emailadres ingevuld of is uw mailbox te vol. Daarnaast kan het zijn dat uw internetprovider een maximum heeft aan de grootte per email. Omdat hier een handleiding wordt meegestuurd, kan het voorkomen dat de email groter is dan toegestaan bij uw provider.

Stel vragen via chat aan uw handleiding

Stel uw vraag over deze PDF

Andere handleiding(en) van Philips 107s61

Philips 107s61 Gebruiksaanwijzing - Nederlands - 129 pagina's

Philips 107s61 Gebruiksaanwijzing - Deutsch - 131 pagina's

Philips 107s61 Gebruiksaanwijzing - Français - 135 pagina's


Uw handleiding is per email verstuurd. Controleer uw email

Als u niet binnen een kwartier uw email met handleiding ontvangen heeft, kan het zijn dat u een verkeerd emailadres heeft ingevuld of dat uw emailprovider een maximum grootte per email heeft ingesteld die kleiner is dan de grootte van de handleiding.

Er is een email naar u verstuurd om uw inschrijving definitief te maken.

Controleer uw email en volg de aanwijzingen op om uw inschrijving definitief te maken

U heeft geen emailadres opgegeven

Als u de handleiding per email wilt ontvangen, vul dan een geldig emailadres in.

Uw vraag is op deze pagina toegevoegd

Wilt u een email ontvangen bij een antwoord en/of nieuwe vragen? Vul dan hier uw emailadres in.


Info