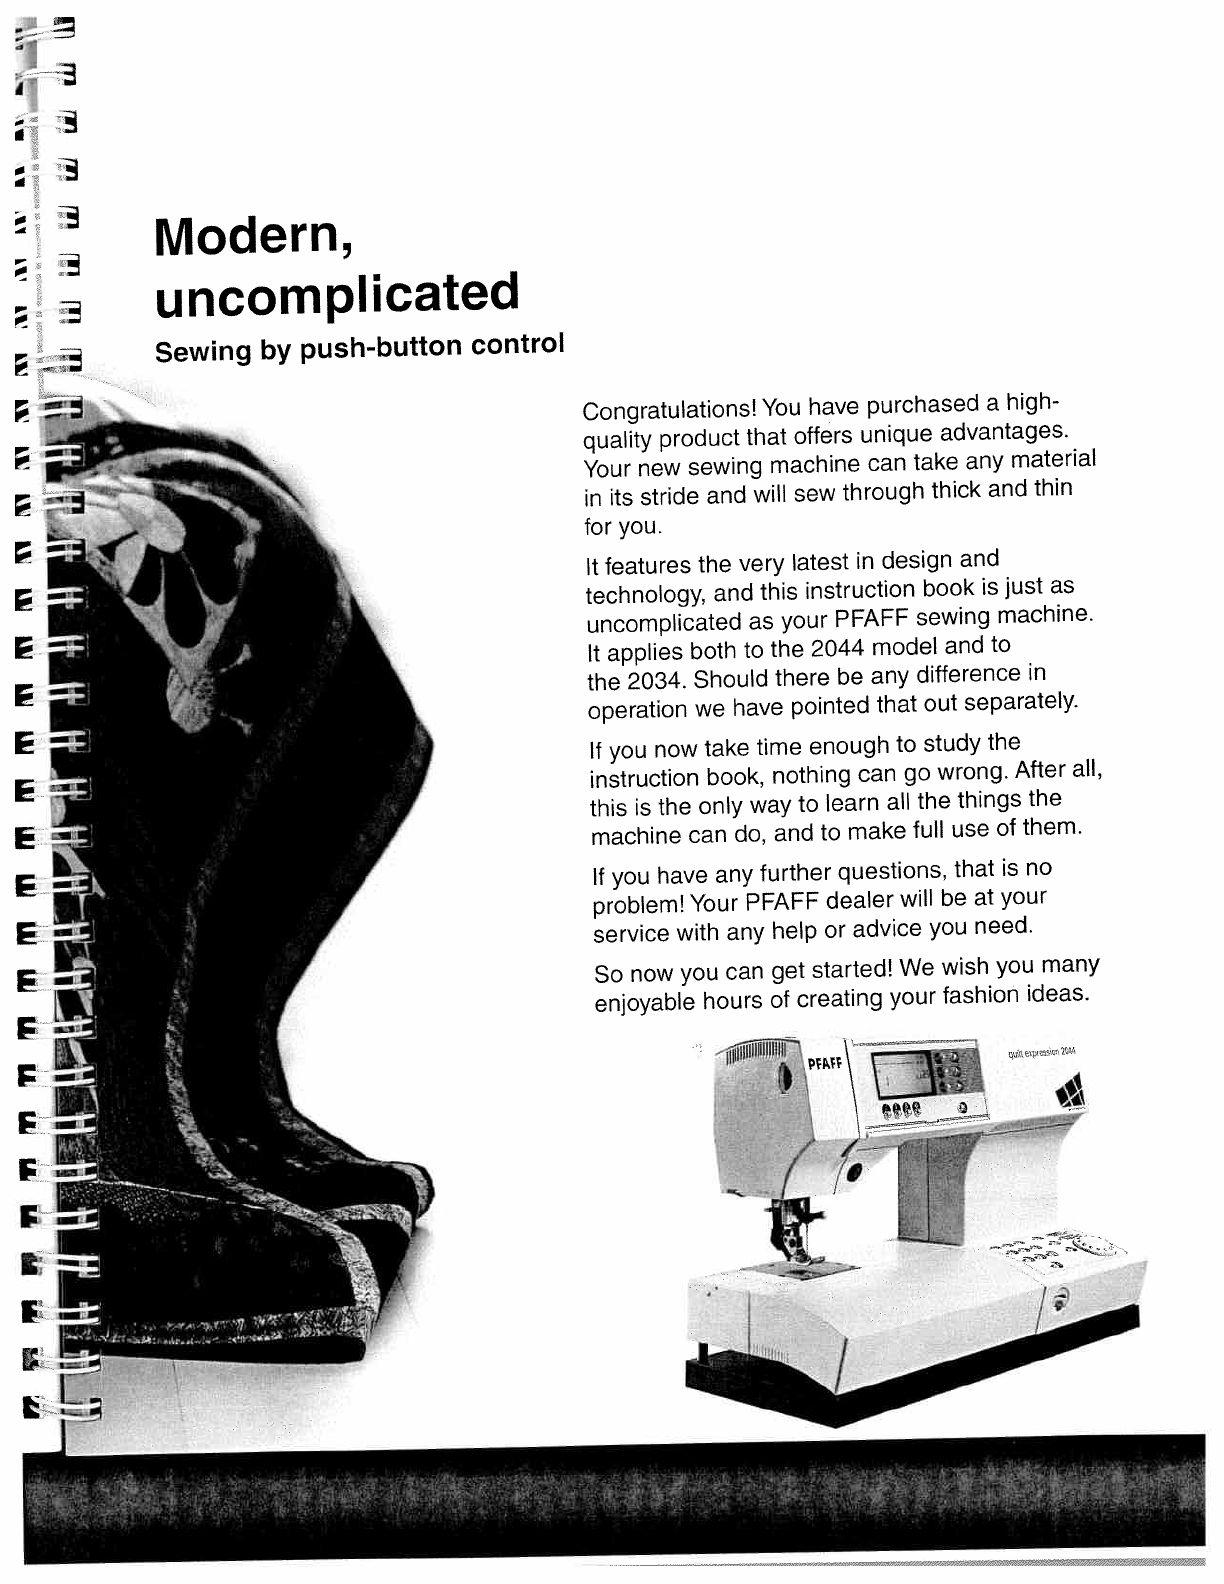
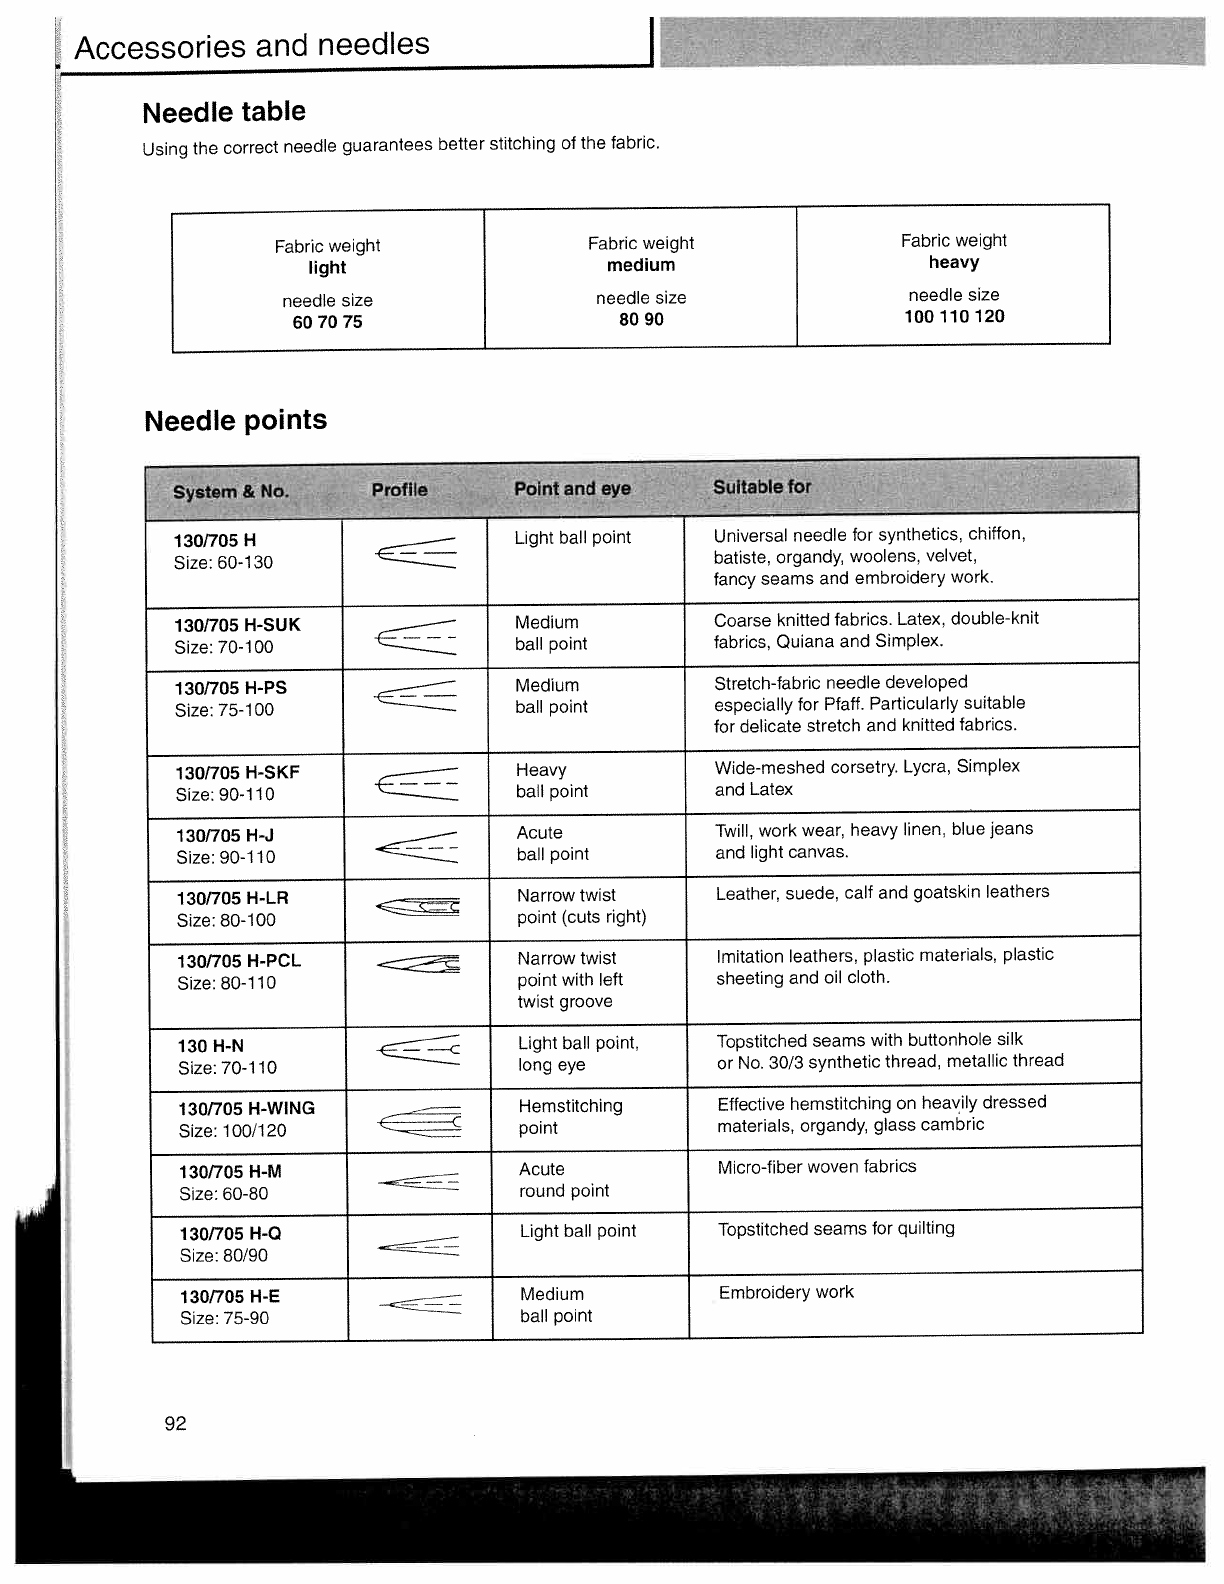
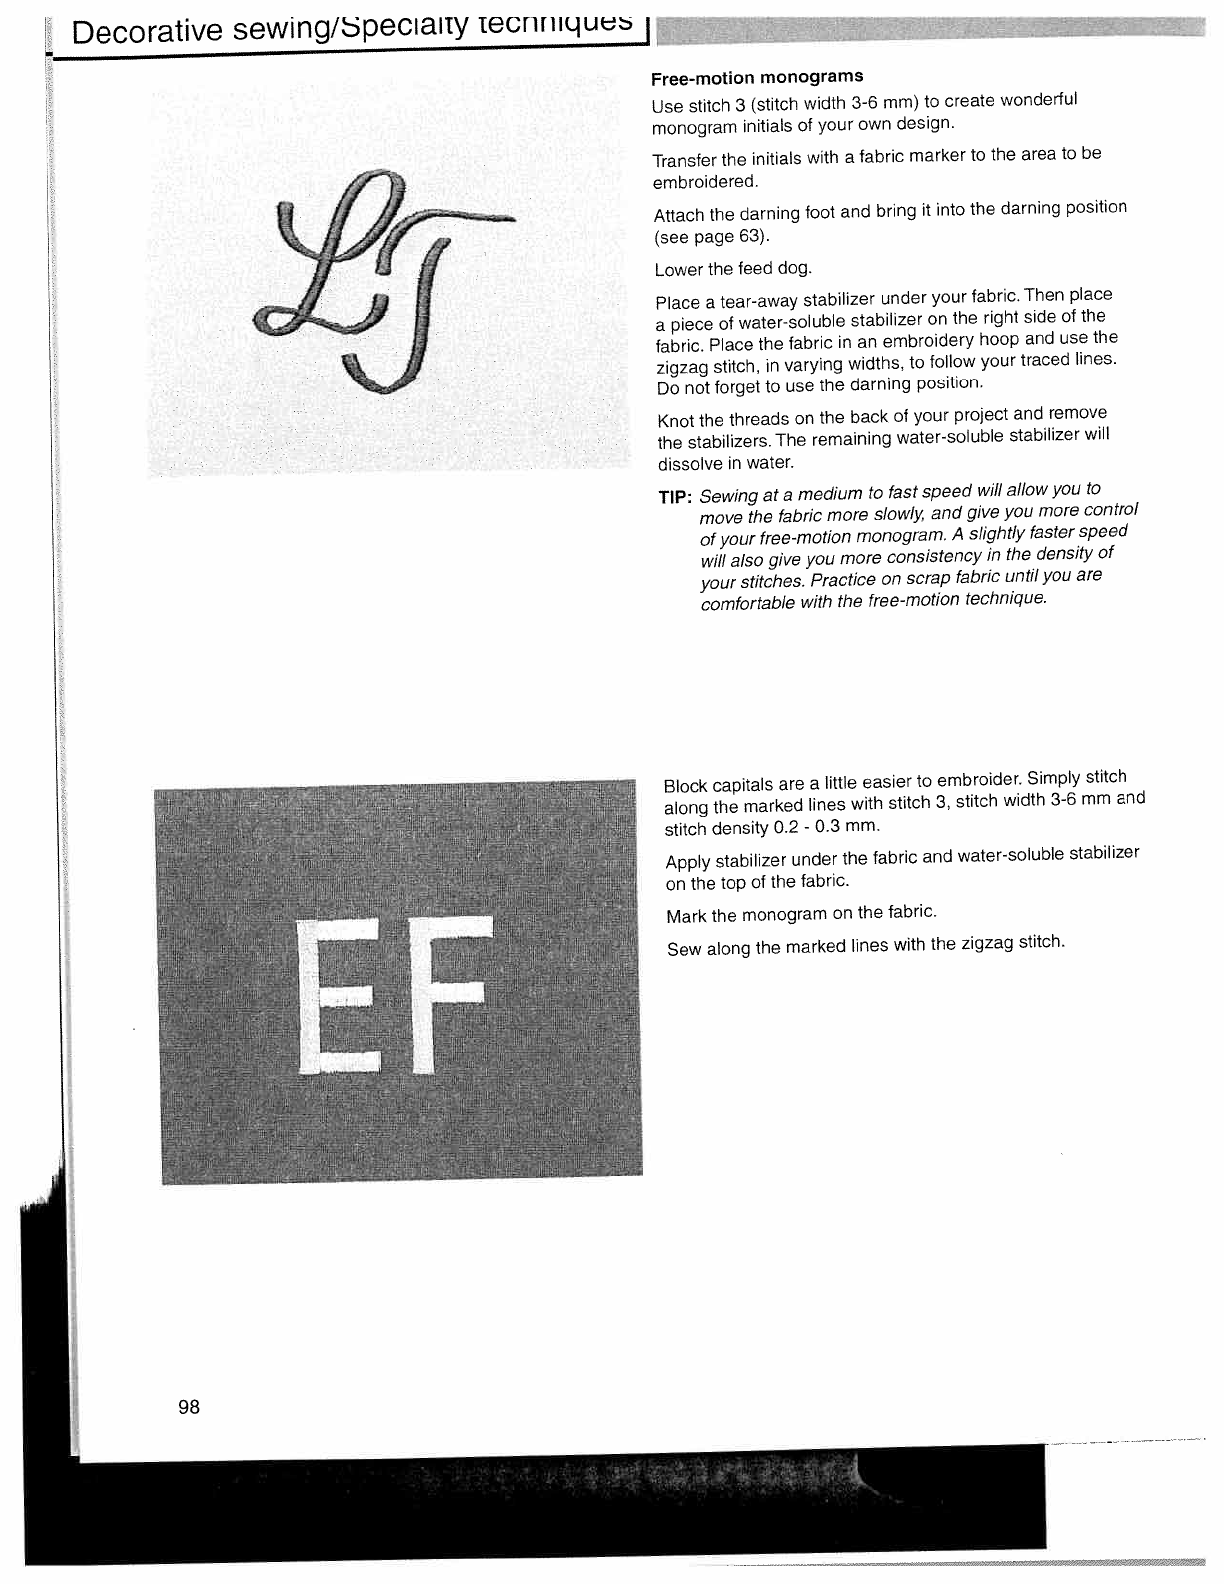
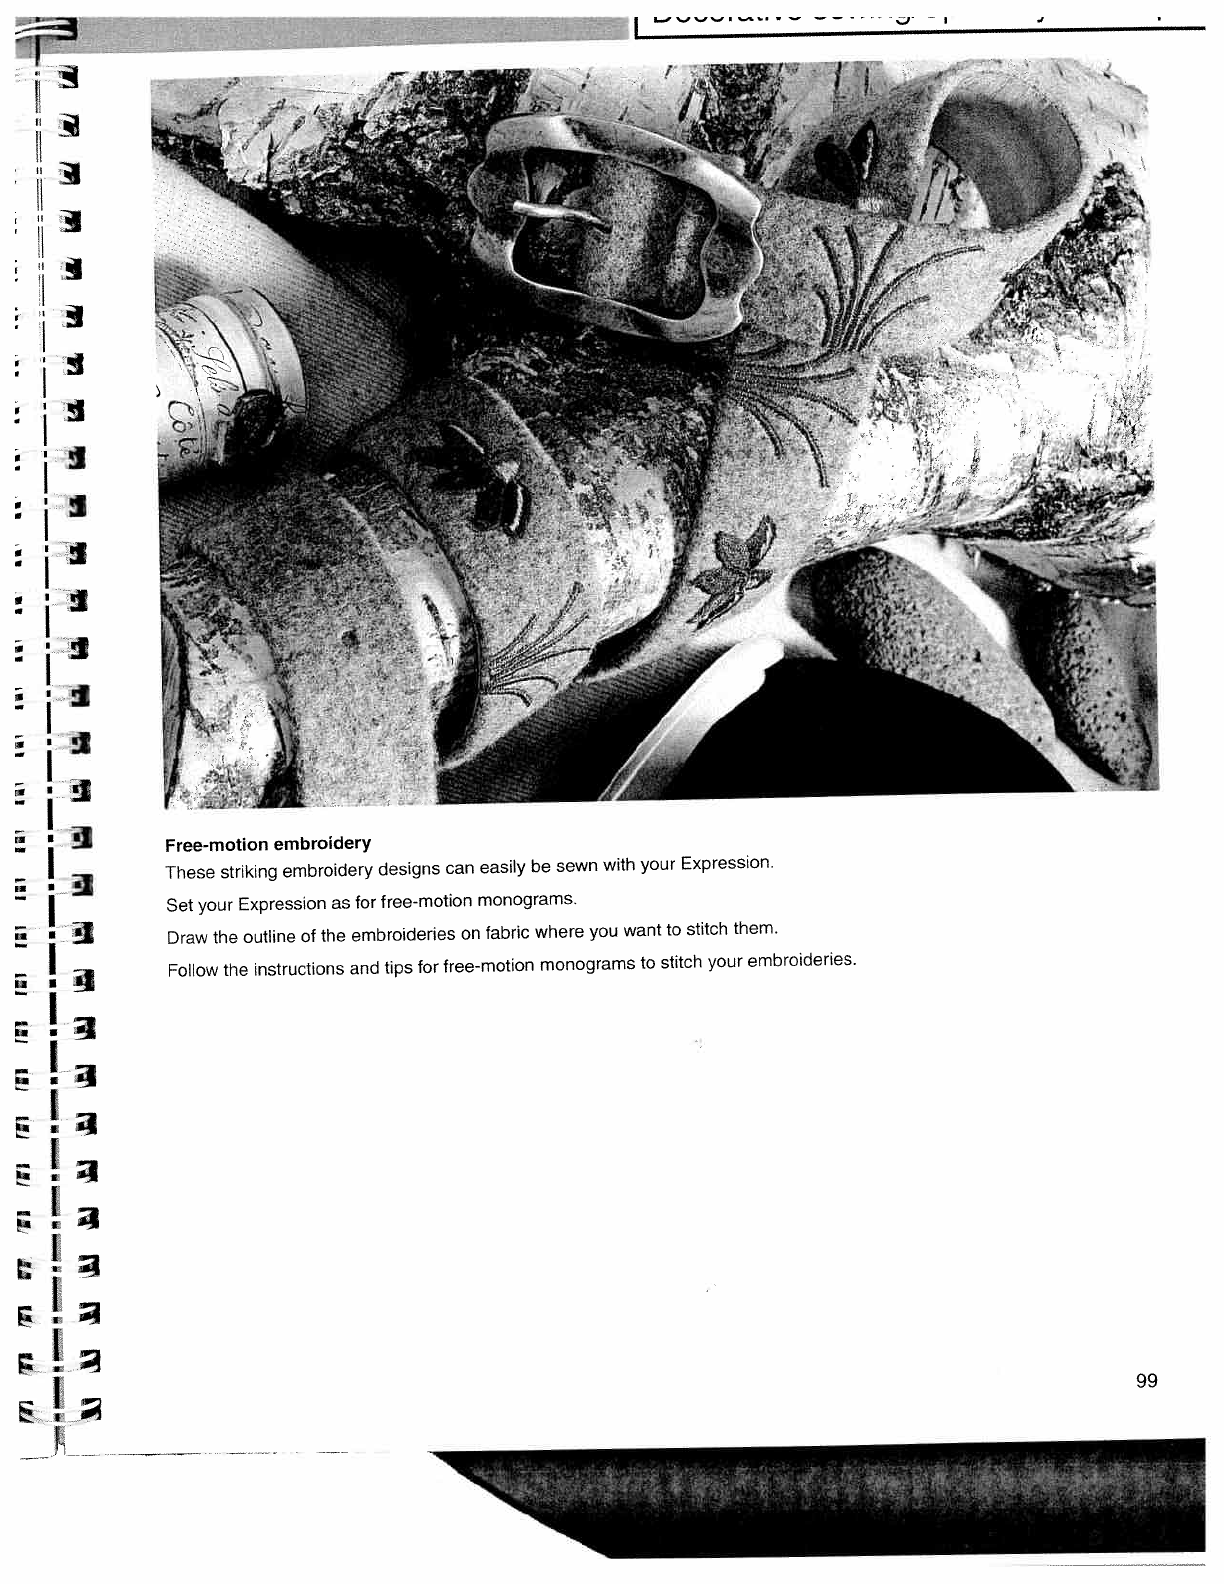
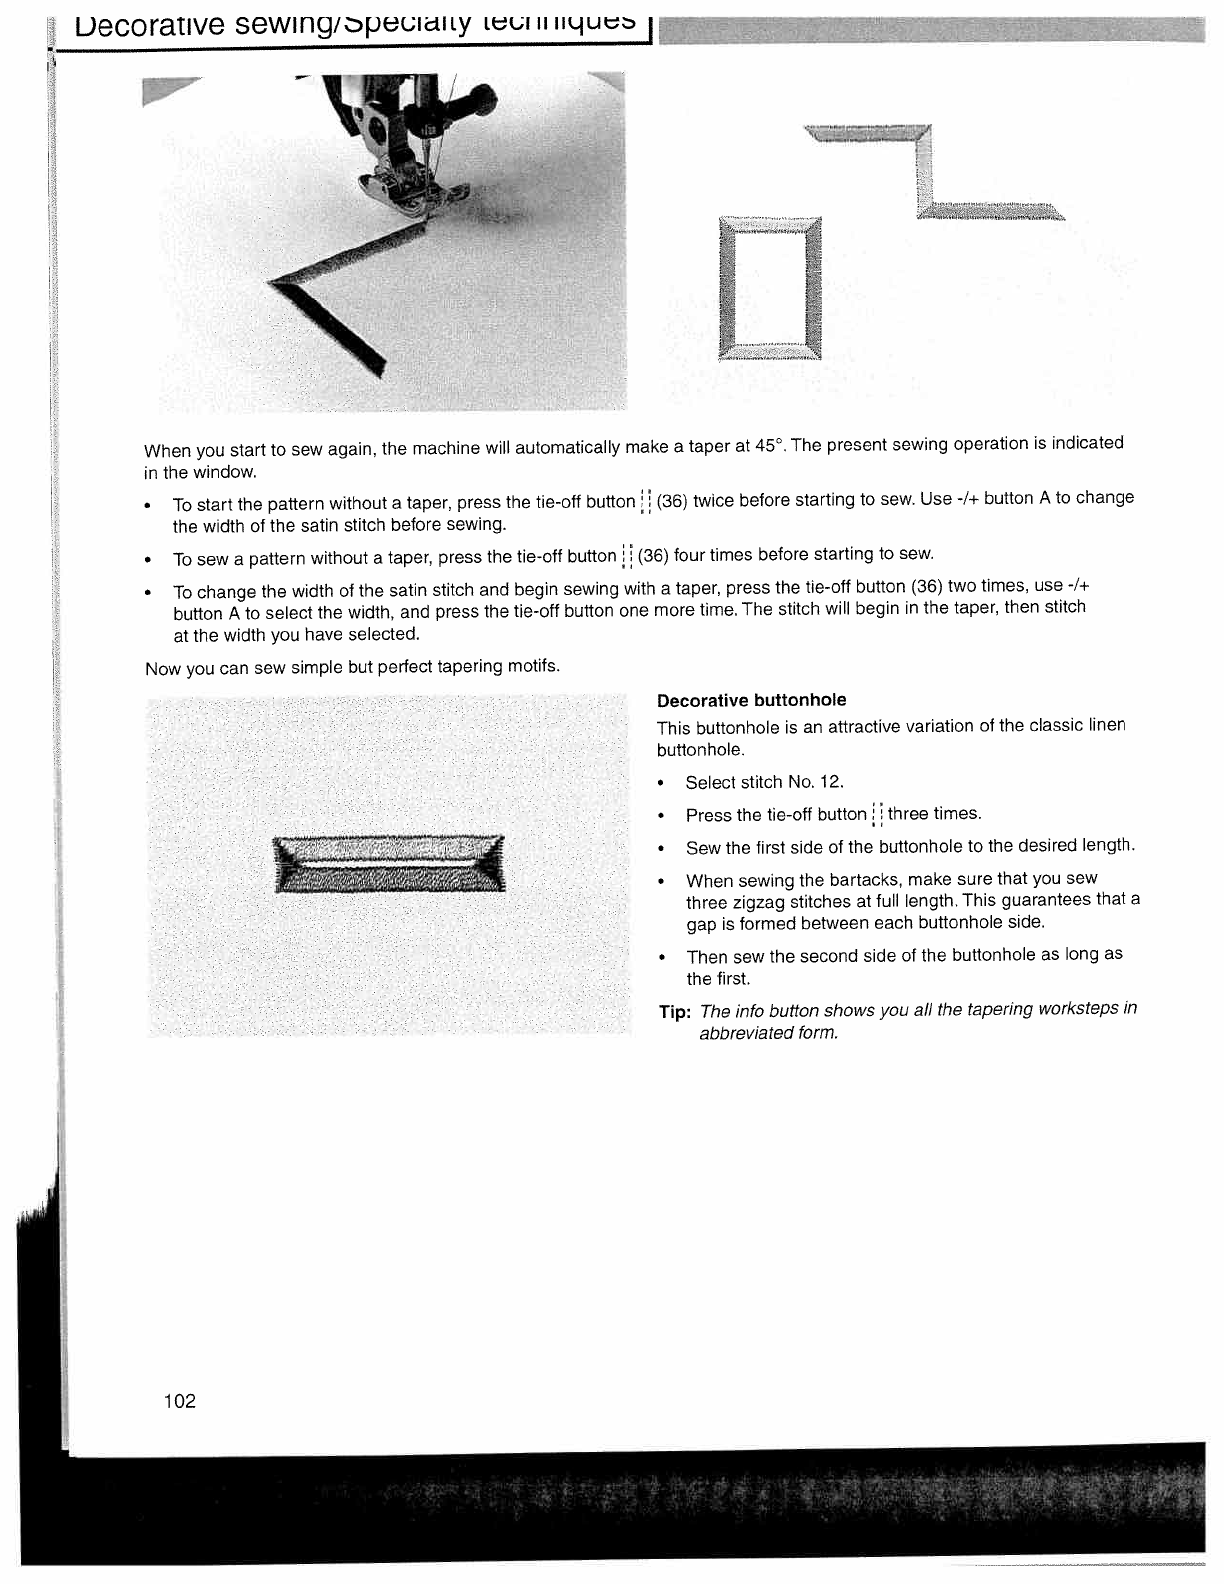
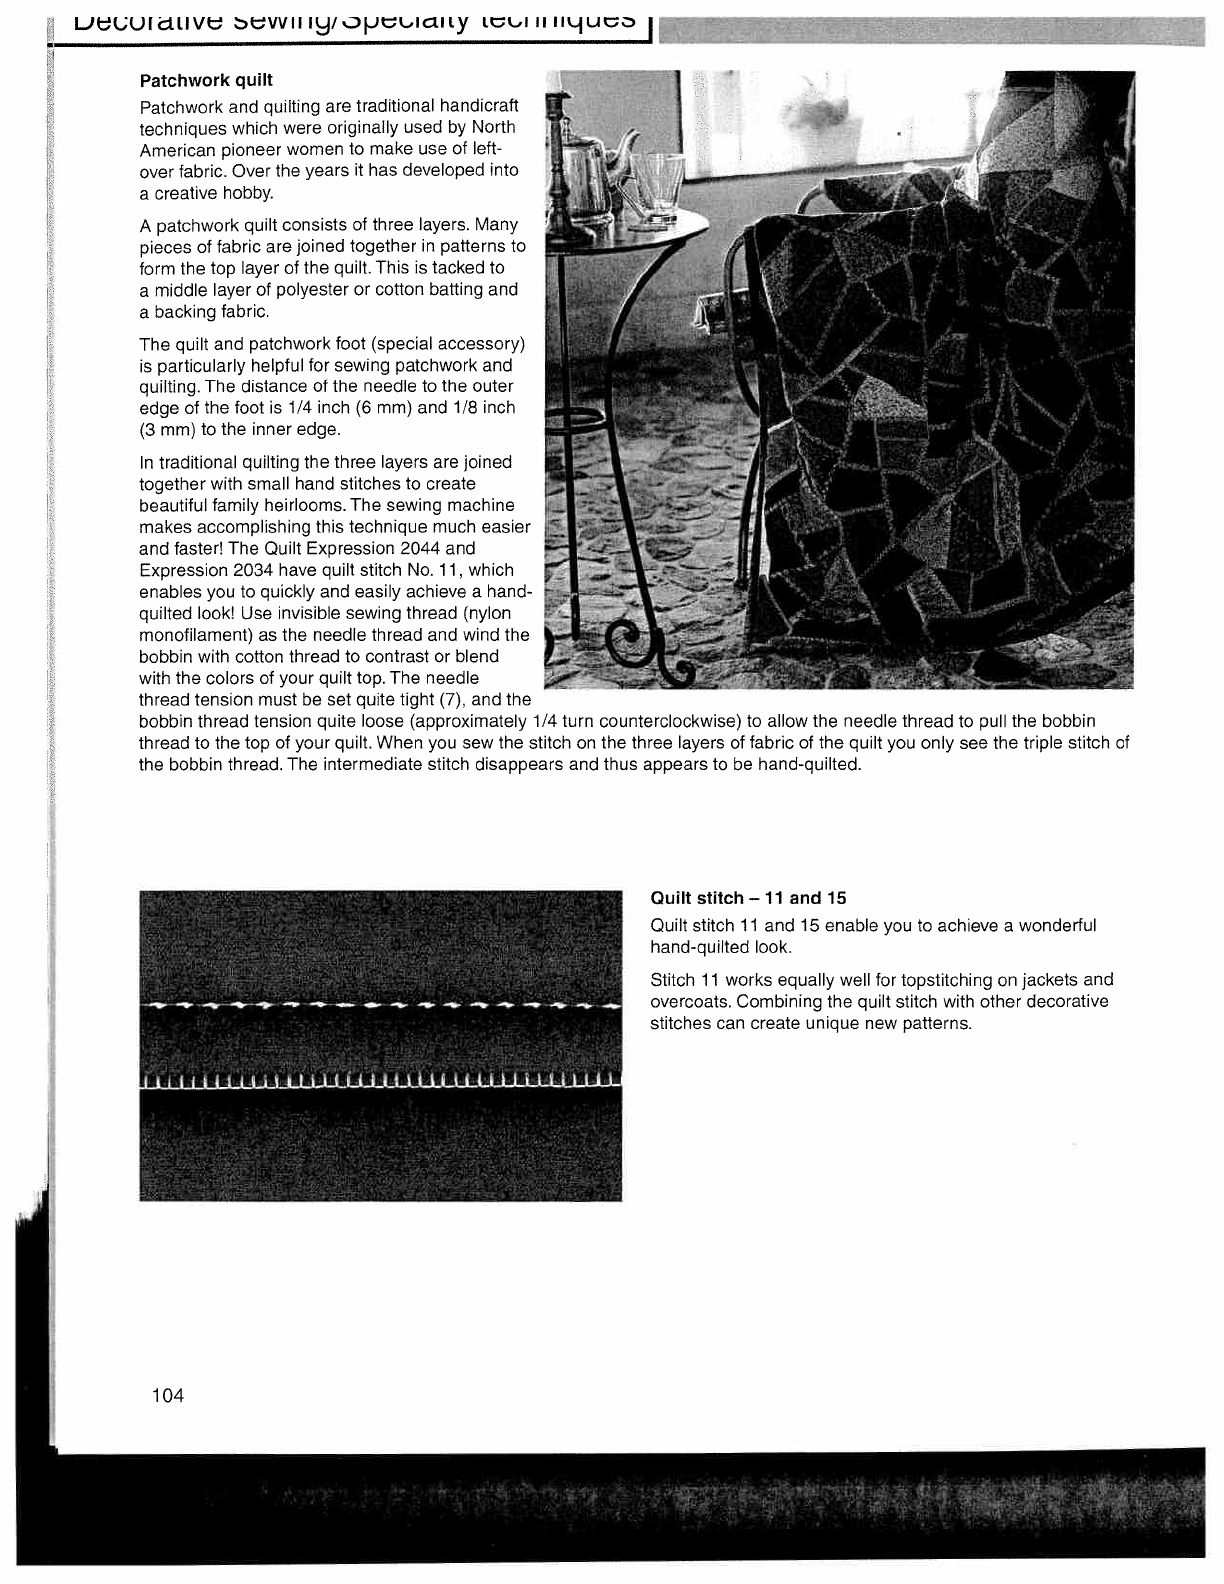
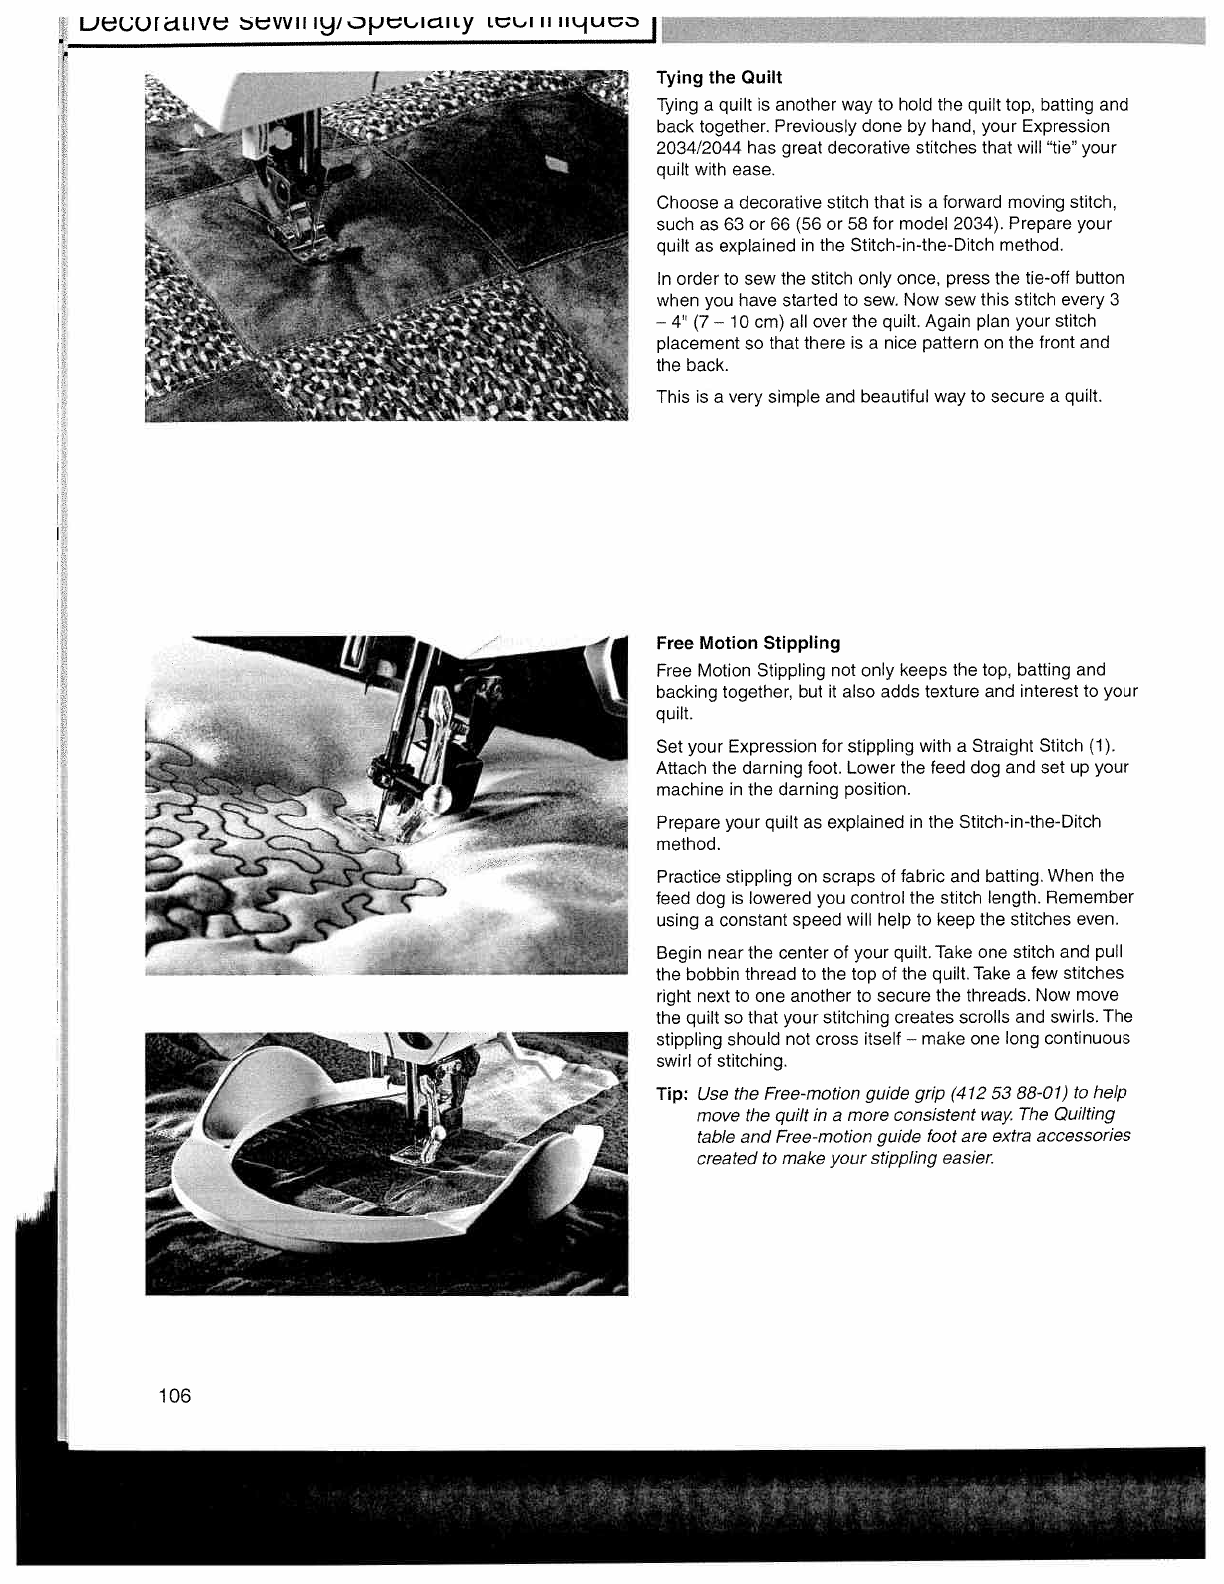
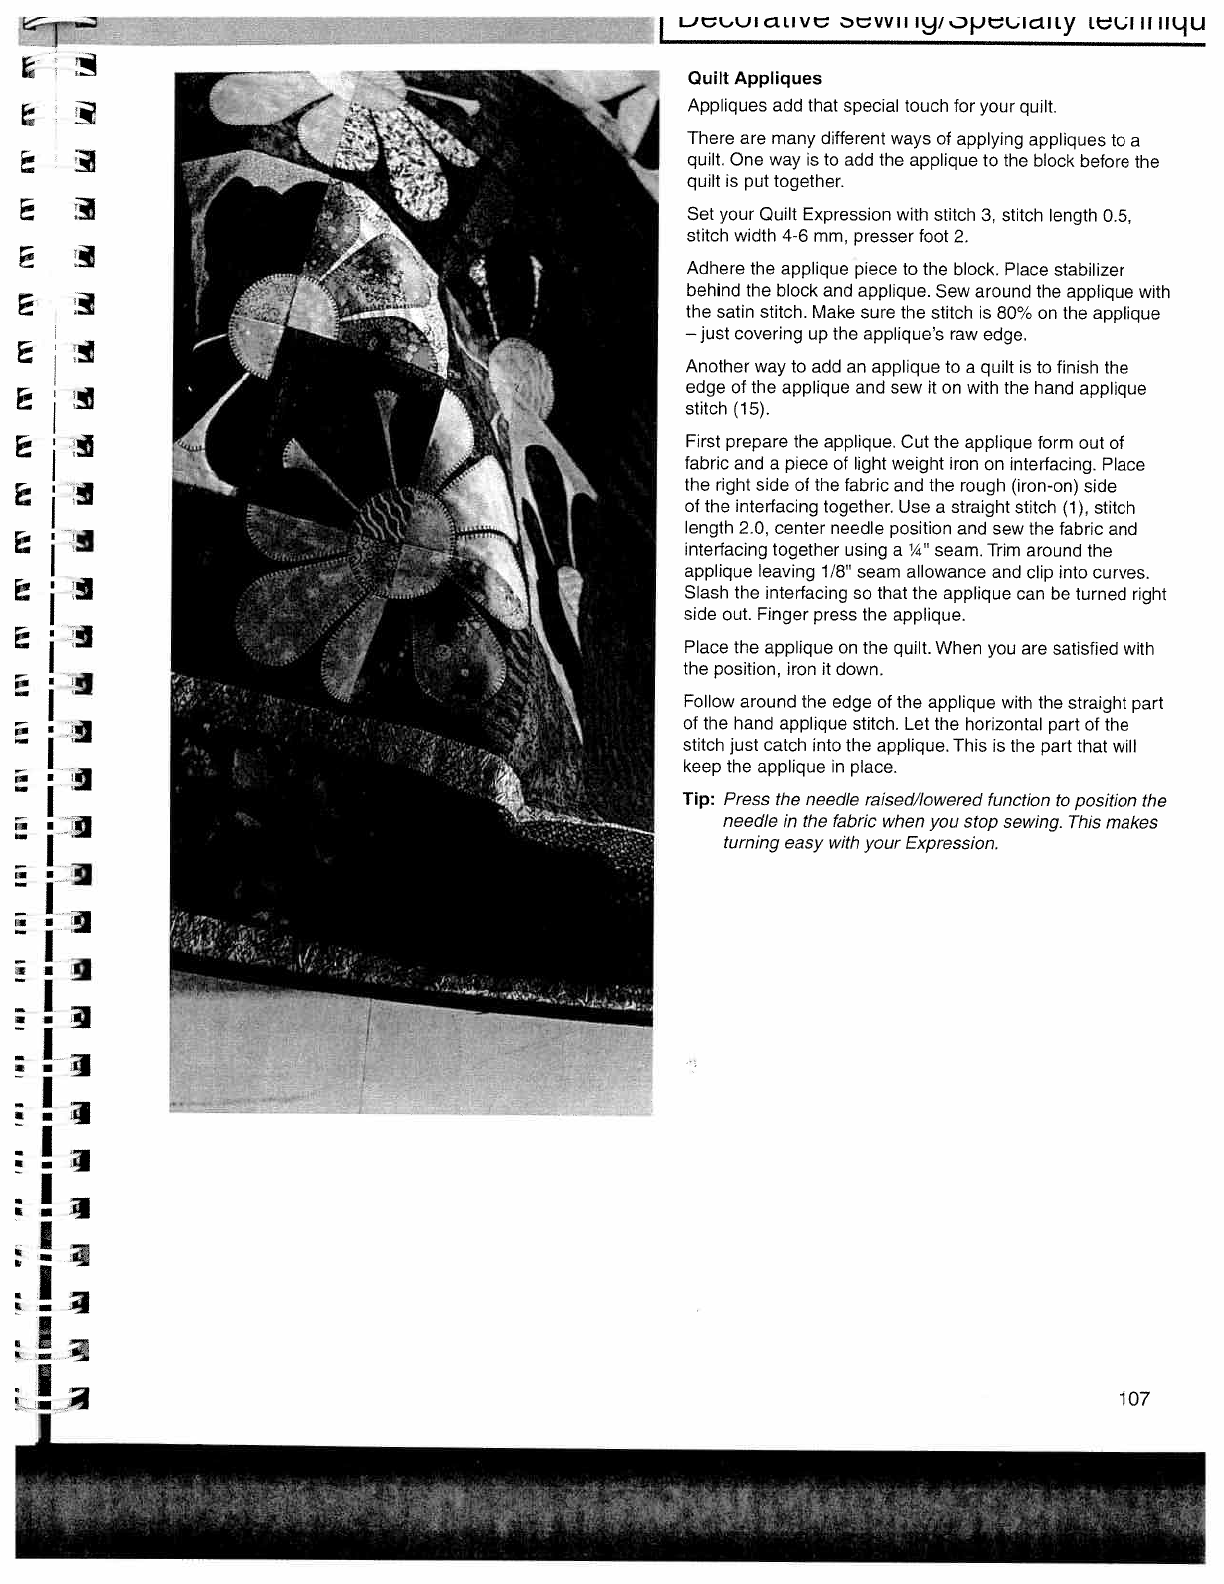
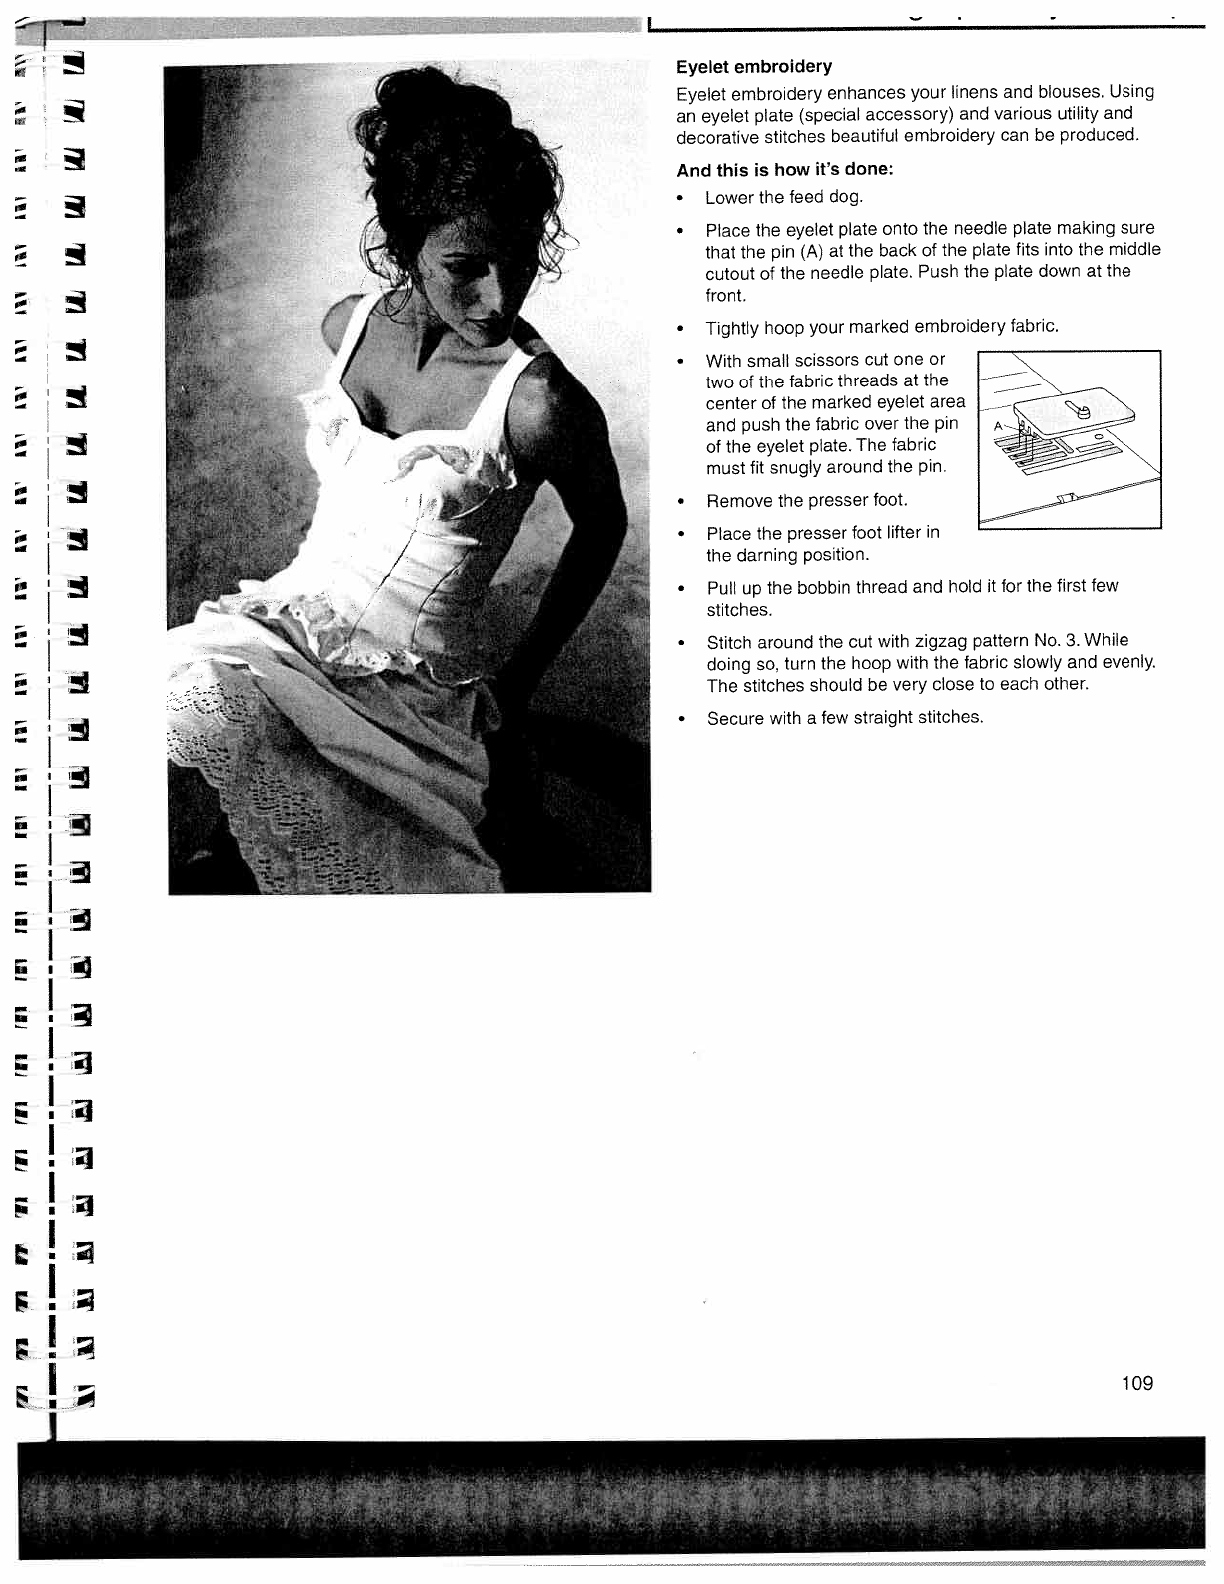
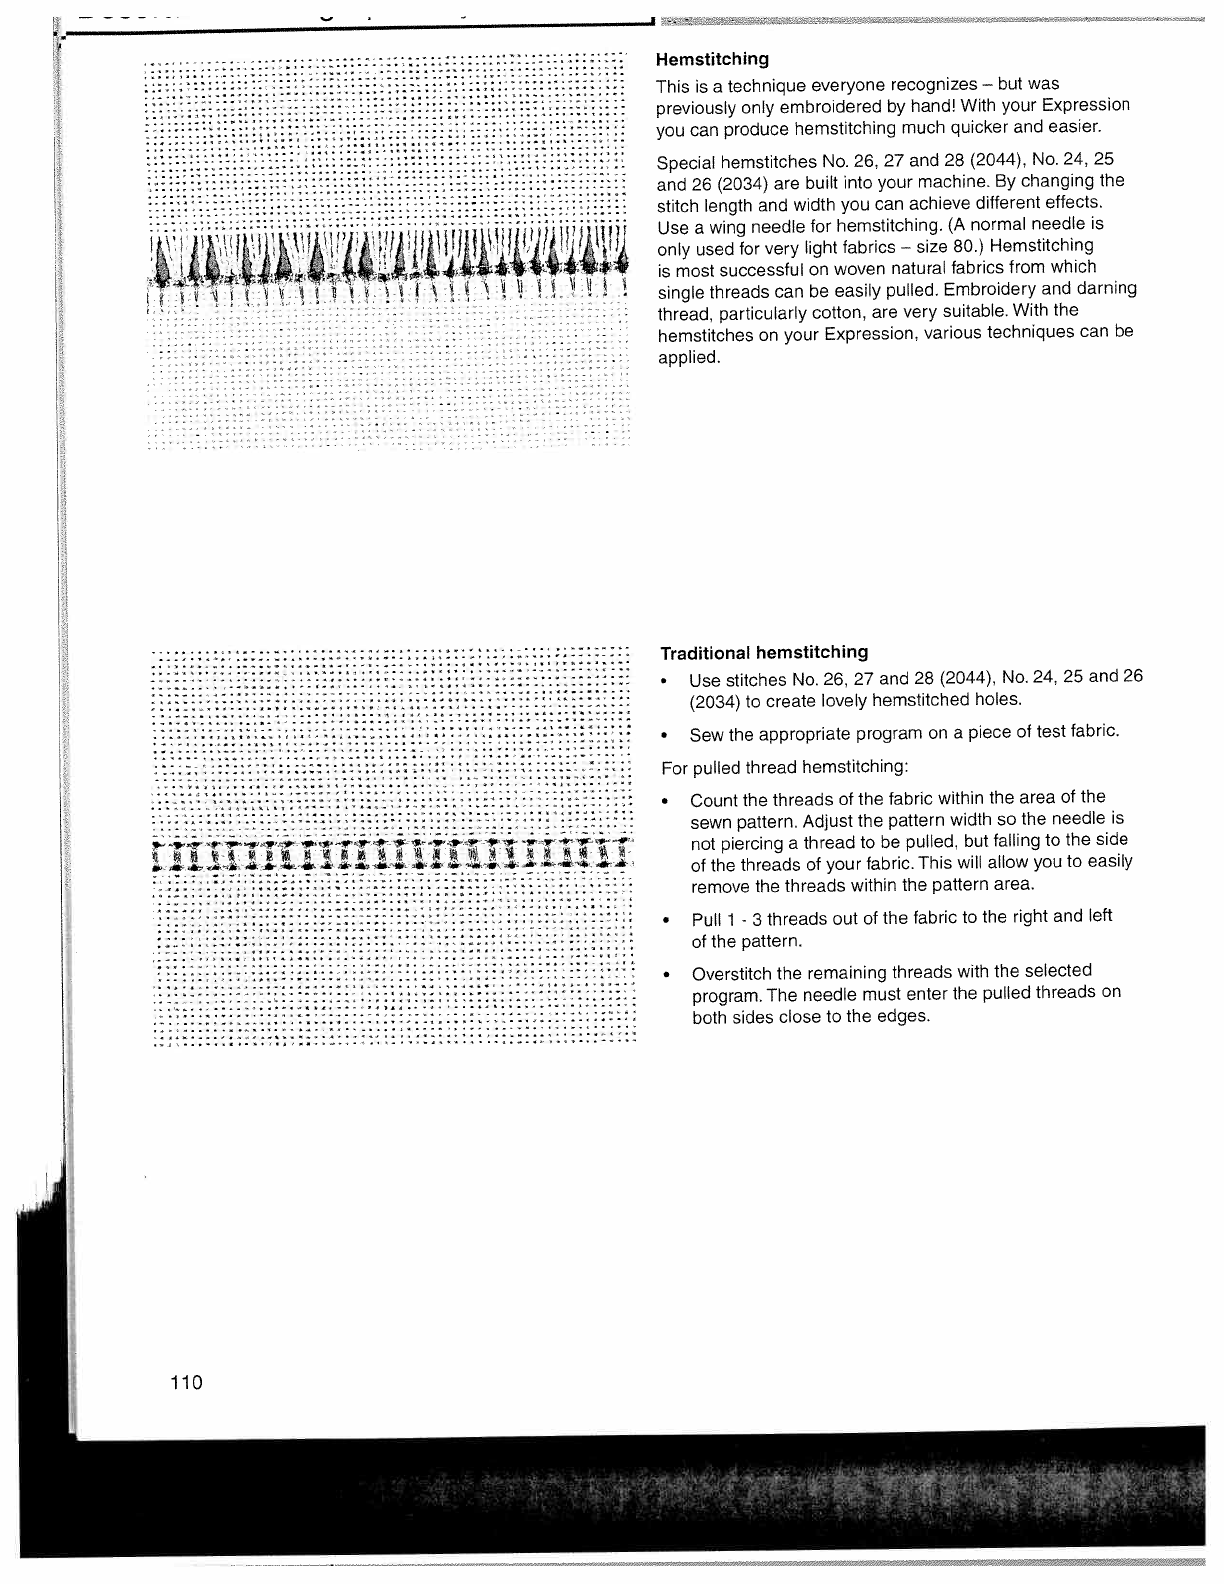
478184
119
Verklein
Vergroot
Pagina terug
1/121
Pagina verder
:
ii
w
PFAFF
Instruction
manua
expresS0fl2
4
PFAFF
r
-t
quilt
expreSS0fl
2044
V
1
I
I
IMPORTANT
SAFETY
INSTRUCTIONS
When
using
an
electrical
appliance,
basic
safety
precautions
should
always
be
followed,
including
the
following:
Read
all
instructions
before
using
this
household
sewing
machine.
DANGER
—To
reduce
the
risk
of
electric
shock:
A
sewing
machine
should
never
be
left
unattended
when
plugged
in.
Always
unplug
this
sewing
machine
from
the
electric
outlet
immediately
after
using
and
before
cleaning.
Always
unplug
before
relamping.
Replace
bulb
with
same
type
rated
max
5
Watt.
WARNING
—To
reduce
the
risk
of
burns,
fire,
electric
shock,
or
injury
to
person:
Do
not
allow
to
be
used
as
a
toy.
Close
attention
is
necessary
when
this
sewing
machine
is
used
by
or
near
children.
Use
this
sewing
machine
only
for
its
intended
use
as
described
in
this
manual.
Use
only
attachments
recommended
by
the
manufacturer
as
contained
in
this
manual.
Never
operate
this
sewing
machine
if
it
has
a
damaged
cord
or
plug,
if
it
is
not
working
properly,
if
it
has
been
dropped
or
damaged,
or
dropped
into
water.
Return
the
sewing
machine
to
the
nearest
authorized
dealer
or
service
center
for
examination,
repair,
electrical
or
mechanical
adjustment.
Never
operate
the
sewing
machine
with
any
air
openings
blocked.
Keep
ventilation
openings
of
the
sewing
machine
and
foot
controller
free
from
the
accumulation
of
lint,
dust,
and
loose
cloth.
Keep
fingers
away
from
all
moving
parts.
Special
care
is
required
around
the
sewing
machine
needle.
Always
use
the
proper
needle
plate.
The
wrong
plate
can
cause
the
needle
to
break.
F
Do
not
use
bent
needles.
F
Do
not
pull
or
push
fabric
while
stitching.
It
may
deflect
the
needle
causing
it
to
break.
Switch
the
sewing
machine
off
(0”)
when
making
any
adjustment
in
the
needle
area,
such
as
threading
needle,
changing
needle,
threading
bobbin,
or
changing
presser
foot,
etc.
I
Always
unplug
the
sewing
machine
from
the
electrical
outlet
when
removing
covers,
lubricating,
or
when
making
any
F
other
user
servicing
adjustments
mentioned
in
the
instruction
manual.
F
Never
drop
or
insert
any
object
into
any
opening.
I
Do
not
use
outdoors.
F
a
Do
not
operate
where
aerosol
(spray)
products
are
being
used
or
where
oxygen
is
being
administered.
F
To
disconnect,
turn
all
controls
to
the
off
(“0”)
position,
then
remove
plug
from
outlet.
I
Do
not
unplug
by
pulling
on
cord.
To
unplug,
grasp
the
plug,
not
the
cord.
F
a
Please
also
observe
the
general
safety
notes
on
page
2.
j
SAVE
THESE
INSTRUCTIONS
F
For
the
USA
and
Canada
F
This
sewing
machine
has
a
polarized
plug
(one
blade
wider
than
the
other).
To
reduce
the
risk
of
electric
shock,
this
plug
is
I
.
intended
to
fit
in
a
polarized
outlet
only
one
way.
If
the
plug
does
not
fit
fully
in
the
outlet,
reverse
the
plug.
If
it
still
does
not
fit,
..
contact
a
qualified
electrician
to
install
the
proper
outlet.
Do
not
modify
the
plug
in
any
way.
iL
—I
Notes
on
safety
for
domestic
sewing
machines
in
accordance
with
EN
60335-2-28
and/or
IEC
335-2-28
1.
The
user
must
exercise
adequate
caution
with
regard
to
the
up
and
down
movement
of
the
needle
and
constantly
observe
the
sewing
area
while
working.
2.
When
leaving
the
machine,
during
maintenance
work
or
when
changing
mechanical
parts
or
accessories,
always
disconnect
the
machine
from
the
mains
by
pulling
out
the
mains
plug.
3.
The
maximum
permissable
wattage
for
the
sewing
lamp
is
5
watts.
4.
The
tension
of
the
drive
belt
may
only
be
adjusted
by
a
PFAFF
mechanic.
5.
The
machine
is
to
be
put
into
operation
according
to
the
indications
on
the
specification
plate.
6.
Do
not
place
any
objects
in
openings
on
the
machine.
7.
Do
not
use
the
sewing
machine
if:
there
is
visible
damage
its
function
is
disturbed
it
is
wet,
e.g.
with
condensation
that
may
be
caused
by
introducing
a
cold
machine
into
a
warm
room.
8.
Do
not
pull
the
mains
plug
out
of
the
socket
by
its
cord.
9.
No
liability
will
be
accepted
for
any
damage
caused
if
this
machine
is
used
for
any
purpose
other
than
that
for
which
it
is
intended
or
if
it
is
operated
incorrectly.
10.
To
avoid
the
risk
of
electric
shock,
do
not
open
the
machine.
There
are
no
parts
inside
the
machine
which
the
user
can
repair.
This
is
solely
the
responsibility
of
our
qualified
service
staff.
11.
Only
original
PFAFF
parts
may
be
used.
12.
The
machine
is
designed
for
a
mains
supply
with
a
mains
rated
voltage
of
+1-
10%
and
a
rated
frequency
of
+1-
4%.
13.
According
to
the
laws
concerning
electromagnetic
compatibility,
no
liability
can
be
accepted
for
any
mains
interruptions
caused,
should
the
mains
power
line
be
changed
or
should
changes
be
made
to
it.
Environment
The
recommended
environment
is:
Ambient
temperature
10C
(50°F)
to
40°C
(104°F)
Air
humidity
20%
to
80%.
Storage
temperature
-
25C
(-13°F)
to
+
60°C
(+140°F)
The
machine
is
suppressed
and
insensitive
to
interference
according
to
international
conventions;
however,
it
shoLild
not
be
operated
in
the
direct
vicinity
of
electronic
devices.
This
sewing
machine
is
a
high-quality
electronic-mechanical
appliance;
it
is
a
machine
for
supervised
use
in
the
home,
It
should
be
operated
in
such
a
way
that
it
is
not
subjected
to:
dust,
severe
dampness,
direct
sunlight,
static
electricity,
heat-producing
objects,
corrosive
chemicals
or
liquids.
The
machine
is
to
be
used
on
a
firm
and
even
surface
which
is
open
for
ventilation
purposes.
Treatment
Always
protect
the
machine
against
damage
which
could
be
caused
by
it
being
hit
or
dropped.
Cleaning
Housing
and
display:
To
clean
the
housing
use
a
dry,
clean,
soft.
lint-free
cloth.
To
remove
any
stubborn
dirt,
use
a
soft
cloth
moistened
with
plastic
cleanser
with
maximum
38°’
alcohol.
Please
note!
Do
not
use
any
insecticides
or
chemical
products
such
as
petrol
or
liquid
chemicals
to
clean
the
housing.
Modern,
uncomplicated
Sewing
by
push-button
control
Congratulations!
You
have
purchased
a
high-
quality
product
that
offers
unique
advantages.
Your
new
sewing
machine
can
take
any
material
in
its
stride
and
will
sew
through
thick
and
thin
for
you.
It
features
the
very
latest
in
design
and
technology,
and
this
instruction
book
is
just
as
uncomplicated
as
your
PFAFF
sewing
machine.
It
applies
both
to
the
2044
model
and
to
the
2034.
Should
there
be
any
difference
in
operation
we
have
pointed
that
out
separately.
If
you
now
take
time
enough
to
study
the
instruction
book,
nothing
can
go
wrong.
After
all,
this
is
the
only
way
to
learn
all
the
things
the
machine
can
do,
and
to
make
full
use
of
them.
If
you
have
any
further
questions,
that
is
no
problem!
Your
PFAFF
dealer
will
be
at
your
service
with
any
help
or
advice
you
need.
So
now
you
can
get
started!
We
wish
you
many
enjoyable
hours
of
creating
your
fashion
ideas.
o
2M
Jntroaucuori
Index
of
headings
Decorative
sewing,
general
notes
96
A
Decorative
stitches,
Quilt
Expression
2044
10
Decorative
stitches,
Expression
2034
11
Accessories
20,
78-79
Applique
foot
82
E
Applique
designs
1
03
Elastic
utility
stitches
56-60,
65
Automatic
tapering
101,
102
Electrical
connection
19
B
Eyelet
embroidery
109
Eyelets
61
Balance
40
Basting
55
F
Bias
binder
87
Feed
dog,
lowering
34
Blind
hem
56
Felling
foot
82
Bobbin
case
24,
25
Foot
control,
connecting
19
Bobbin
thread
monitor
(model
2044)
37
Free
motion
embroidery
99
Bobbin
thread
tension
25
Free
motion
quilting
foot
87
Bobbin
thread,
drawing
up
28
Fringe
foot
91
Bobbin
winding
21-23
Bobbin
winding
through
the
needle
30
Gathering
64,
84
Braiding
foot
89
Bridging
65
H
Buttonhole,
fully-automatic
72
Hemming,
rolled
66
Buttonholes
70-76
Hemstitching
110
Buttonholes
with
gimp
thread
75
Buttonhole
tips
76
Buttonholes,
types
71
IDT
(Integrated
Dual
Feed)
32,
33
Buttons,
sewing
on
61
Info
menu
41
Invisible
hems,
blind
stitch
56
Carrying
case
18
K
Changing
a
pattern
within
Knit
edge
foot
85
the
stitch
sequence
52
L
Circular
embroidery
guide
90
Lid
with
stitch
chart
18
Cleaning
and
oiling
112
Light
bulb,
changing
113
Combined
borders
97
“Lock”
button
43
Combined
borders
with
twin
needle
97
Cording
foot
84
M
Cross
hem
stitch
65
M-memories,
deleting
all
52
Cross-stitch
108
Master
switch
19
D
Monograms,
Free
motion
98
Darning,
automatic
darning
(model
2044)
62
Darning,
sewing
on
patches
59,
62-63
4
II
ILl
l.JUUL.11U
N
Narrow
edge
foot
Needle
plate,
changing
Needle
table
Needle
threader,
Integrated
Needle,
changing
Needle,
threading
Needle/bobbin
thread
tension
Non-elastic/elastic
stitches
Non-stick
fancy
stitch
foot
for
leather
0
Overlock
stitches
P
Parts
of
the
sewing
machine
(2044)
Parts
of
the
sewing
machine
(2034)
Patchwork
and
quilting
“Pattern
start”
“Pattern
start”
within
stitch
sequence
Pattern
length/pattern
width,
changing
for
decorative
stitches
Pattern
length/stitch
density
Pattern
mirroring
Pattern
settings,
altering
Pattern
sizes,
altering
Pattern
width/stitch
length,
altering
Patterns,
storing
Pintuck
foot
Pintuck
foot
with
guide
Presser
feet
(special
accessories)
Presser
feet
(standard
accessories)
Presser
foot
lifter
Presser
foot,
changing
R
Removable
accessory
tray
Repairing
tears
Reverse
sewing
Roll
hemming
Ruffler
T
Tapering
with
satin-stitch
zigzag
Technical
data
Thread
cutter
Thread
tension,
general
notes
Threading
Tie-off
Tips
for
a
perfect
buttonhole
Top
feed
(integrated
dual
feed)
Twin
needle
Twin
needle,
threading
U
Utility
stitches,
Quilt
Expression
2044
Utility
stitches,
Expression
2034
80-81
78,
79
Voltage
switch
w
Window,
adjusting
the contrast
z
Zippers,
sewing
in
1/4
inch
quilt
and
patchwork
foot
7/9
hole
foot
S
Sewing
function
buttons
Sewing
problems
and
their
solutions
Sewing
programs,
selecting
Shell
edging
Shirring
foot
Stitch
patterns,
formation
Stitch
sequence
buttons
Stitch
sequence,
deleting
Stitch
sequence,
deleting
from
Stitch
sequence,
inserting
into
Stitch
sequences,
general
notes
Stitch
width/needle
position,
altering
91
112
92,
93
27
31
26-27
24-26
54-58
88
14-15
16-17
104-107
49
52
96
39
42
37-40
37
38,
39
49,
50
83
88
42
114,
115
36
67
84
45
49
51
50
51
48
38
100-1
01
116
28
24
26,
27
42
76
32,
33
44
31
6,
7
8,
9
19
36
54
86
89
V
28
29
21
59
41
66
85
5
Introduction
Utility
stitches
I
III
I
III
I
III
<—>
<—>
1
2
3
Zigzag
stitch,
Center
needle
position
Elastic stitch
Blind
hem
stitch
Elastic
blind
hem
stitch
Closed
overlock stitch
Bridging
stitch
Linen
buttonhole
Button
attaching
program
Basting
stitch
Quilt
stitch
Zigzag
stitch
Right/Left
needle
position
Stem
stitch,
narrow
Decorative
elastic
stitch
For
seaming
and
topstitching
up
to
6
mm.
13
needle
positions
available
for
edgestitching
or
sewing
in
zippers.
For
reinforced
seams
such
as
trousers,
under
arm
seams
or
decorative
topstitching.
With
13
needle
positions.
For
finishing
seams
on
fabrics,
applique,
and
inserting
lace.
Strong
stitch
for
seam
finishes,
sewing
elastic,
darning
tears,
and
patches.
For
securing hems
invisibly
on
woven
fabrics
For
securing hems
invisibly
and
finishing
the
edge
on
stretch
fabrics.
For
joining
and overcasting
stretch
fabrics
in
one
operation.
For
bridging,
decorative
hemstitching
and
crazy
quilting.
Buttonhole
for
blouses,
shirts
and
linen.
For
two-hole
or
four-hole
buttons.
For
basting
project
pieces
together.
For
topstitching
quilt
projects
with
a
handlook
stitch.
For
applique,
couching
over
cords
and
creating
eyelets.
For
decorative
sewing such
as
flower
stems
and
underlining
letters.
For
joining
overlapped
seams
on
bulky
fabrics
such
as
leathers
and
terry
cloth.
Quilt
Expression
2044
<>
<i
WI
-...
/\\
H
I
-.,-.
I
//
=
I
I
>
//\
<
/\\
8
lol
;>
<
/\
=
I
4
5
6
7
8 9
0
10
11
12
Stitch
Description.
pplication
Width
No.
. .
upto
.
.
mm
Straight
stitch
Stretch
triple
straight
stitch
2
3
4
5
6
7
8
9
0
10
11
12
13
14
6
6
6
6
6
6
6
6
3
6
6
II
11.1
%..A.A1l.i%_I
Utility
stitches
Quilt
Expression
2044
o=
1
z
7
15
16
17
18
19
20
21
22
23
24
25
26
27
28
Stitch
Description
Application
Width
No
dpto
.
nlm
15
Quilting,
appliqué
For
handlook
quilt
applique
or
pinstitching.
6
or
pinstitching
16
Stem
stitch,
wide
For
decorative
sewing
such
as
flower
stems
and
3
underlining
letters.
17
Stretch
triple
Elastic
stitch
for
decorative
hems
and
topstitching.
6
zigzag
stitch
18
Open
overlock
stitch
For
joining
and
overcasting
stretch
fabrics
in
one
operation.
6
19
Honeycomb
stitch
Elastic,
decorative
stitch
for
ornamental
hem
finishing
on
6
stretch
fabric,
for
decorative
elastic
application
and
sewing
with
elastic
thread
in
the
bobbin.
20
Cross
hem
stitch
Provides
a
highly
elastic
decorative
seam
for
hems
on
6
sportswear
and
casual
wear.
21
Closed
overlock
For
joining
and
overcasting
stretch
and
easily
fraying
fabrics
6
stitch
with
in
one
operation.
The
selvage
thread
prevents
the
fabric
selvage
thread
edges
from
fraying.
22
Pullover
stitch
Join
and
overcast
open
knit
fabrics
and
jersey.
6
23
Light-knit
fabric
For
sewing
and
patching
light
knit
wear
6
patching
stitch
(undergarments
etc.)
24
Cross
stitch
Classic
decorative
stitch
for
garments,
linen
6
and
kitchen
towels.
25
Cross
stitch
Classic
decorative
stitch
for
garments,
linen
4
and
kitchen
towels.
26
Hem
stitching
For
ornamental
hem
stitching.
Can
be
used
6
27
Hem
stitching
with
wing
needle.
28
Hem
stitching
7
Zigzag
stitch,
Center
needle
position
Elastic
stitch
Blind
hem
stitch
Elastic
blind
hem
stitch
Closed
overlock
stitch
Bridging
stitch
Linen
buttonhole
Button
attaching
program
Basting
stitch
Quilt
stitch
Zigzag
stitch
Right/Left
needle
position
Stem
stitch,
narrow
II
III
!0i
10
11
For
seaming
and
topstitching
up
to
6
mm.
13
needle
positions
available
for
edgestitching
or
sewing
in
zippers.
For
reinforced
seams
such
as
trousers,
under
arm
seams
or
decorative
topstitching.
With
13
needle
positions.
For
finishing
seams
on
fabrics,
applique,
and
inserting
lace.
Strong
stitch
for
seam
finishes,
sewing
elastic.
darning
tears,
and
patches.
For
securing
hems
invisibly
on
woven
fabrics
For
securing
hems
invisibly
and
finishing
the
edge
on
stretch
fabrics.
For
joining
and
overcasting
stretch
fabrics
in
one
operation.
For
bridging,
decorative
hemstitching
and
crazy
quilting.
Buttonhole
for
blouses,
shirts and
linen.
For
two-hole
or
four-hole
buttons.
For
basting
project
pieces
together.
For
topstitching
quilt
projects
with
a
handlook
stitch.
For
applique,
couching
over
cords
and
creating
eyelets.
For
decorative
sewing
such
as
flower
stems
and
underlining
letters.
Utility
stitches
Expression
2034
—,
<
,
i2t
/“
fle
-
I..-{
/N
‘---‘
I
iz:1
\\
<_>
<1
>
l
,/\
<
/\\
<
I
i
_—4
/\
=
2
3
4
5
6
7
8
9
0
C
-
-.
Sfltch
Description.
App’ication
Width
No.
-
upto
.
mm
Straight
stitch
Stretch
triple
straight
stitch
1
2
3
4
5
6
7
8
9
0
10
11
12
6
6
6
6
6
6
6
13
6
3
8
-]
L
F
E
F
F
Fl
F
F
Utility
stitches
Expression
2034
7=1
II
14
15
16
17
18
19
20
21
22
23
24
II II
II
26
25
Stitch
Description
Application
Width
I’4o
tipto
mm
14
Decorative
elastic
stitch
For
joining
overlapped
seams
on
bulky
fabrics
6
such
as
leathers
and
terry
cloth.
15
Quilting,
appliqué
For
handlook
quilt
applique
or
pinstitching.
6
or
pinstitching
16
Stem
stitch,
wide
For
decorative
sewing
such
as
flower
stems
and
3
underlining
letters.
17
Stretch
triple
Elastic
stitch
for
decorative
hems
and
topstitching.
6
zigzag
stitch
18
Open
overlock
stitch
For
joining
and
overcasting
stretch
fabrics
in
one
operation.
6
19
Honeycomb
stitch
Elastic,
decorative
stitch
for
ornamental
hem
finishing
on
6
stretch
fabric,
for
decorative
elastic
application
and
sewing
with
elastic
thread
in
the
bobbin.
20
Cross
hem
stitch
Provides
a
highly
elastic
decorative
seam
for
hems
on
6
sportswear
and
casual
wear.
21
Closed
overlock
For
joining
and
overcasting
stretch
and
easily
fraying
fabrics
6
stitch
with
in
one
operation.
The
selvage
thread
prevents
the
fabric
selvage
thread
edges
from
fraying.
22
Pullover
stitch
Join
and
overcast
open
knit
fabrics
and
jersey.
6
23
Cross
stitch
Classic
decorative
stitch
for
garments,
linen
6
and
kitchen
towels.
24
Hem
stitching
For
ornamental
hem
stitching.
Can
be
used
6
25
Hem
stitching
with
wing
needle.
26
Hem
stitching
9
w
m
o
I
-c-cb-
‘<
0•1
CD
Co
Ii
ii
_
‘‘IiiiiI
0
o
_
(1)
C)
01
.
C
C
o
I
___
CD
_______
(I)
0)
Cl)
2
ilIIIIIIjliIIIIIIII
__________________________
I
0)
C,
CD
0)
iI’’I’’’’’’1l
liii!
“1111111
-J
Cl)
C.)
C’)
iIliIIIIlIIIIIIIIIIl
C.’)
4PI”
.
I’ll’
lib
C,)
m
x
C)
,I’h’’’h’’’
CO
CD
01
iijii
lIjili
C,’
C)
IlIli
1111111
01
Cl)
o.
C)
.iii,
1
,ii,
______________________________
C)
I’ii
II
hI’’uhII’hII
II1
C)
0
V
C.)
-
1111111
iii
01
-
C.)
EEE
i
riiiii
iiiIIIIIIIII
ç
E2
CD
4u
—.
iIHIIjjjIIlIIIIII
0
‘I’
01
iii
III
_______
—.J
11111
11111
11111
01
C)
___
‘•
a’
i
ru
ni
mm
ru
u
r”
‘i’
i
iu
LL
i)
LJ
J
LJ
Li
La]
ía]
La]
J
.aJ
J
*aJ
..J
iAi
,al
ía]
ai
La]
íieJ
i
L
1
i
t
11111
9
UIIl
Lili
1
______
1111!
T1
IIIIII,IIIIIIlIIIlIIIIII
jj
I
KD-KD-
tIIIIIIIIIiIIIllhIIIIl
‘ii
________
.IIIIIiII.IIIIIIIIr
4.
‘‘‘‘‘‘‘i’iBIBBB
_______________________
HIIF1IIII1—
IlIIIIIIIIII
°)
1IIlI
I
Technical
section
Parts
of
the
sewing
machine
(2044)
14-15
Parts
of
the
sewing
machine
(2034)
16-17
Carrying
case
18
Lid
with
stitch
chart
18
Electrical
connection
1
9
Voltage
switch
19
Accessories
20
Removable
accessory
tray
21
Bobbin
winding
21-23
Bobbin
case
24-25
Needle/bobbin
thread
tension
24-25
Threading
the
needle
thread
26
Integrated
needle
threader
27
Drawing
up
the
bobbin
thread
28
Presser
foot
lifter
28
Thread
cutter
28
Changing
the
presser
feet
29
Winding
a
bobbin
through
the
needle
30
Changing
needles
31
Threading
twin
needle
Integrated
Dual
Feed/IDT
Lowering
feed
dog
Parts
of
the
sewing
machine
(mod&
2044)
1
-1+
button
A
(stitch
width/pattern
width
controls)
2
-7+
button
B
(stitch
length/pattern
length
controls)
3
-7+
button
C
(stitch
density/balance
controls)
4
Info
button
5
Carrying
handle
6
Handwheel
7
M
button
8
Cursor
buttons
9
Clear/pattern
start
button
10
Stitch
selection
wheel
11
Connection
socket
“lead
cord”
12
Connection
socket
“foot
control”
13
Master
switch
14
m÷button
15
Direct
selection
button
“Alphabet”
16
Direct
selection
button
“Alphabet”
17
Direct
selection
button
“Linen
buttonhole”
18
Direct
selection
button
“Elastic
blind
hem
stitch”
19
Direct
selection
button
“Zigzag
stitch”
20
Direct
selection
button
“Stretch
triple
straight
stitch”
21
Direct
selection
button
“Blind
hem
stitch”
22
Direct
selection
button
“Bridging
stitch”
23
Direct
selection
button
“Button
attaching
program”
24
Direct
selection
button
“Straight
stitch”
25
Direct
selection
button
“Elastic
stitch”
26
Direct
selection
button
“Closed
overlock
stitch”
27
Slide
for
lowering
the
feed
dog
28
Base
plate
29
Removable
accessory
tray
30
Presser
foot
holder
with
presser
foot
31
Integrated
dual
feed/IDT
32
Integrated
needle
threader
33
Reverse
sewing”
button
34
Threading
slots
35
Needle
thread
tension
36
“Tie-off”
button
37
“Needle
up/down”
button
38
“Slow
sewing”
button
39
“Pattern
mirror”
button/
“Lock”
button
40
Take-up
lever
41
Thread
guide
42
Spool
holder
with
spool
cap
43
Hole
for
second
spool
holder
44
Lid
with
stitch
program
chart
45
Bobbin
winder
46
Bobbin
door
47
Free
arm
48
Sewing
bulb
(max.
5
W)
49
Thread
cutter
50
Thread
take-up
51
Presser
foot
lifter
52
Needle
holder
with
retaining
(set)
screw
53
Needle
plate
54
Contrast
control
I
1
14
1
H
0)
Cfl
4
3
0)
%j
a,
01
C
F’)
CD
(3C)
C)
0)
0)
-3
0)
3
.0
)j..t4*.3
E.
*.*na
e
(1D
X
W)):tV
flU)
0
U)
o
0
N.)
C
44
0
c-fl
Parts
of
the
sewing
machine
(model
2034)
1
-1+
button
A
(stitch
width/pattern
width
controls)
2
-1+
button
B
(stitch
length/pattern
length
controls)
3
-/+
button
C
(stitch
density/balance
controls)
4
Info
button
5
Carrying
handle
6
Handwheel
7
‘M
button
8
Cursor
buttons
9
Clear/pattern
start
button
10
Stitch
selection
button
11
Connection
socket
“lead
cord”
12
Connection
socket
“foot
control”
13
Master
switch
14
m+button
16
Direct
selection
button
“Alphabet”
17
Direct
selection
button
“Linen
buttonhole”
18
Direct
selection
button
“Elastic
blind
hem
stitch”
19
Direct
selection
button
“Zigzag
stitch”
20
Direct
selection
button
“Stretch
triple
straight
stitch”
21
Direct
selection
button
“Blindhem
stitch”
22
Direct
selection
button
“Bridging
stitch”
23
Direct
selection
button
“Button
attaching
program”
24
Direct
selection
button
“Straight
stitch”
25
Direct
selection
button
“Elastic
stitch”
26
Direct
selection
button
“Closed
overlock
stitch”
27
Slide
for
lowering
the
feed
dog
28
Base
plate
29
Removable
accessory
tray
30
Presser
foot
holder
with
presser
foot
31
Integrated
dual
feed/IDT
32
Integrated
needle
threader
33
Reverse
sewing”
button
34
Threading
slots
35
Needle
thread
tension
36
“Tie-off”
button
37
“Needle
up/down”
button
38
“Slow
sewing”
button
39
“Pattern
mirror”
button/
“Lock”
button
40
Take-up
lever
41
Thread
guide
42
Spool
holder
with
spool
cap
43
Hole
for
second
spool
holder
44
Lid
with
stitch
program
chart
45
Bobbin
winder
46
Bobbin
door
47
Free
arm
48
Sewing
bulb
(max.
5
W)
49
Thread
cutter
50
Thread
take-up
51
Presser
foot
lifter
52
Needle
holder
with
retaining
(set)
screw
53
Needle
plate
54
Contrast
control
16
.
—.
.
,.
,.i
.
.*
r.
ri
rn
Fr
mm
m
rt
ic
ci
ii
it
01
C
CA)
x
cf
C,,
o
I
Co
x
Co
C,,
C,,
0
0
jr’J
OD
/
L
[0
Co
CA)
CA)
CA)
-
[0
C)
CA)[0-C
II
Iii
-
-
L
—.jcyco
Co
Carrying
case
Lid
Place
the
enclosed
lead
cord,
the
foot
control
and
instruction
Open
the
folding
lid
(44)
upwards.
book
into
the
compartment
of
the
carrying
case.
__________________________
RH
r::
The
stitches
of
the
sewing
machine
are
illustrated
on
the
inside
of
the
lid.
The
appropriate
presser
foot
to
use
for
each
stitch
is
also
illustrated,
e.g.
Stitch
No.
2,
use
presser
foot
No.
0.
PFAFF
I
fl
.
PFAFF
quilt
expression
2044
I
18
-
;
Voltage
switch
22OV..24OV/11OV...
120V
The
sewing
machine
is
set
to
the
mains
voltage
for
Europe
220
V...
240
V.
If
you
require
a
mains
voltage
of
120
‘1,
you
must
reset
the
voltage
switch
on
the
underside
of
the
machinetolloV..120V.
19
I
Technical
sectio
Operating
Instructions
Electrical
connection
Connect
the
lead
cord
between
the
socket
(11)
of
the
sewing
machine
and
the
wall
outlet.
Connecting
the
foot
control
Connect
the
plug
of
the
foot
control
to
the
connection
socket
(12)
of
the
sewing
machine.
The
sewing
speed
is
controlled
by
pressing
the
foot
control.
The
foot
control
tvd
ATK
0070
has
to
be
used
for
this
sewing
machine.
.
11OV..
120V
220
‘L.
zzz:z
Master
switch
When
the
master
switch
(13)
is
switched
on
(switch
function
I)
the
sewing
lamp
lights
up
and
program
No.
1
is
indicated
in
the
Expression
window.
The
sewing
machine
is
now
ready
to
function.
“0”
=
OFF
“I”
=
ON
iecnnicai
section
Open
the
accessory
tray
by
placing
your
left
index
finger
on
the
ridged
area
on
the
left
of
the
lid
and
open
the
lid
upwards
and
towards
you.
4!—
1
Arranging
the
accessories
The
standard
accessories
are
marked
with
numbers.
Arrange
the
parts
in
the
respective
compartments
of
the
accessory
tray.
Accessories
2034/2044
(see
also
pages
78-79)
Accessory
tray
w
L
ft
20
F.
r
I
I
I
I
j
]
I
/6
Technical
sectic
-
-.
.
.
-,
i•g
U
7O
71
73
74,
75,W
Removing
the
accessory
tray
(free
arm)
In
order
to
sew
using
the
free
arm,
swing
the
accessory
tray
to
the
left
and
lift
it
upwards
out
of
the
hole.
When
replacing
the
tray,
make
sure
it
is
flush
with
the
free
arm
of
the
sewing
machine.
Preparing
the
machine
for
bobbin
winding
Place
an
empty
bobbin
so
that
the
black
pin
of
the
bobbin
winder
snaps
into
the
slot
of
the
bobbin.
Push
the
bobbin
to
the
right.
Note:
The
bobbin
can
only
be
wound
if
it
is
moved
fully
to
the
right.
21
68
69
7Q
72
73
NI
Technical
section
Place
the
sewing
thread
on
the
spool
holder.
To
obtain
free
movement
of
the
thread
and
hold
the
thread
spool
firmly,
fit
a
spool
cap
of
the
right
size
for
the
thread
spool.
Place
the
thread
into
guide
A
from
the
front
and
pull
it
counterclockwise
through
the
pre-tension
device
B.
Pull
the
thread
under
the
thread
guide
C
(from
back
to
front).
Wind
the
start
of
the
thread
around
the
bobbin
several
times
in
a
clockwise
direction.
Switch
on
the
master
switch
Hold
the
end
of
the
thread
firmly
and
press
the
foot
control.
As
soon
as
the
bobbin
is
full,
the
winding
action
will
be
stopped
automatically.
Push
the
bobbin
to
the
left,
cut
the
thread
and
remove
bobbin
from
the
winder.
1.
,.
i
I.
4.,.
,
.
.
.
!.
.
!LJ
I
-
,
C
if
*.,
lit
i,
2øat
ia
15
;
2.n
*,
b
t044
4
J
ii
n
Winding
the
bobbin
from
the
spool
pin
1
2
b3
‘-
Threading
B
22
Winding
from
the
second
spool
holder
Insert
the
second
spool
holder
in
the
hole
provided.
Threading
_____
Thread
as
shown
on
page
22.
Switch
on
the
master
switch
Hold
the
end
of
the
thread
firmly
and
press
the
foot
control.
As
soon
as
the
bobbin
is
full,
the
winding
action
will
be
stopped
automatically.
Cut
the
thread,
push
the
bobbin
to
the
left
and
remove
bobbin
from
the
winder.
Technical
secti
-
s
E’
9
V
:
t.
——
1.;
‘\
II
h
.
i
Kr
,—
jr,
r
\
i--—
o)o)o)
cj
c)
(
-4
?
jO
1
2
P’R#F
o44
tXI
DtJ
DC
B
3
3
3
3
I
j
j
j
I
I
I
I
I
I
23
Bobbin
door
Taking
out
the
bobbin
case
Switch
off
main
switch
Lift
the
latch
of
the
bobbin
case
and
pull
the
bobbin
case
out
Hold
the
bobbin
door
(46)
at
the
left
side
and
open
it
towards
of
the
machine.
Release
the
latch
and
take
the
empty
bobbin
the
front
out
of
the
bobbin
case.
tiIIiiiI
Thread
tension
To
obtain
a
perfect
seam
appearance
and
durability
make
sure
the
needle
and
bobbin
thread
tensions
are
correctly
adjusted
with
regard
to
each
other,
i.e.
the
threads
evenly
meet
between
the
two
fabric
layers.
The
following
is
valid
for
general
sewing:
Bobbin
thread
is
visible
on
the
top
side
of
the
fabric:
The
needle
thread
tension
is
too
tight
or
the
bobbin
thread
tension
is
too
loose.
The
thread
tension
must
be
corrected.
rrrnTnI
Top
thread
is
visible
on
the
underside
of
the
fabric:
The
needle
thread
tension
is
too
loose
or
the
bobbin
thread
tension
is
too
tight.
The
thread
tension
must
be
corrected.
For
decorative
stitches
and
buttonholes
the
top
thread
should
be
visible
on
the
underside
of
the
fabric.
1
r
24
Inserting
the
bobbin
Insert
the
full
bobbin
in
the
bobbin
case.
When
doing
so,
pull
the
thread
sideways
through
slot
A,
then
under
tension
spring
B
until
it
rests
in
the
opening
(see
arrow).
Checking
the
bobbin
thread
tension:
Hold
the
bobbin
case
by
the
thread
and
move
your
hand
sharply
upwards.
The
bobbin
case
must
slip
downwards
a
little
with
each
hand
movement
Correcting
the
tension:
Turn
adjusting
screw
C
just
a
little
to
the
left
to
decrease
the
bobbin
thread
tension.
Turn
the
adjusting
screw
C
just
a
little
to
the
right
to
increase
the
bobbin
thread
tension.
Inserting
the
bobbin
case
Lift
latch
F
and
push
the
bobbin
case
fully
onto
pin
D
of
the
sewing
hook.
Opening
E
of
the
bobbin
case
must
face
upwards.
Check:
Pull
the
bobbin
thread
sharply.
The
bobbin
case
must
not
fall
out
of
the
hook.
TI
Check:
When
you
pull
the
thread,
the
bobbin
must
turn
clockwise.
t
E
25
Technical
section
Threading
the
needle
Switch
off
the
master
switch.
Raise
the
presser
foot
lifter
(51).
Place
the
thread
on
the
spool holder
and
fit
a
spooi
cap
of
the
right
size.
Using
both
hands,
pull
the
thread
into
thread
guide
A
from
the
front.
Place
the
thread
from
right
io
left
into
the
pre
tension
device
B.
Now
pass
it
through
the
left
threading
slot
downwards.
Pull
the
thread
around
the
stop
C
in
the
right
threading
slot
and
upwards
to
the
take-up
lever
(40).
The
thread
must
be
pulled
into
the
take-up
lever
from
left
to
right.
Pass
the
thread
downwards
in
the
right-hand
threading
slot.
Pull
the
thread
from
the
side
behind
one
of
the
two
thread
guides
D.
To
thread
the
needle,
please
refer
to
the
next
page.
I
III
4—>
<-->
10/4
20
>
3
0/3
40
14
0/3
53
C
15o
4L
1/
>
r
/
>>>
16o
170/1
183
i9
PFAFF
2044
!012
1
B
PFAFF
C
‘0
j
Is
3
le
I.-
I
26
iei,i
ii
IJL.,ctJ
,eutji
3
3
L1
#\
L
Integrated
Needle
threader
In
order
to
make
threading
the
needle
easier
and
quicker,
use
the
PFAFF
Integrated
Needle
threader.
Lower
the
presser
foot.
Press
the
threader
down
with
the
handle.
Threader
hook
R
swivels
through
the
needle
eye.
Place
the
thread
over
hook
0
and
under
the
thread
hook
R
and
hold
the
end
of
the
thread
taut.
Reduce
the
pressure
so
that
the
needle
threader
slowly
moves
upwards.
At
the
same
time
the
threader
hook
swivels
out
of
the
needle
eye
and
pulls
the
thread
through
the
eye.
Release
the
end
of
the
thread
so
a
thread
loop
forms
behind
the
needle.
Release
the
threader
and
pull
the
rest
of
the
thread
end
through
the
needle
eye.
0
El
El
El
]
27
I
tftE
IF
IJUdI
SULlUI
I
Presser
foot
lifter
The
presser
foot
is
raised
or
lowered
with
the
presser
foot
lifter
(51).
Bobbin
thread
Close
the
bobbin
door
(46)
and
pull
the
thread
under
the
presser
foot
to
the
left
Drawing-up
the
bobbin
thread
Raise
the
presser
foot.
While
holding
the
end
of
the
needle
thread,
press
the
foot
control
so
the
needle
moves
down
and
up.
Pull
the
needle
thread
to
draw
up
the
bobbin
thread.
I
t
Thread
cutter
Pull
the
thread
from
the
back
to
the
front
over
the
thread
cutter
(49).
)
/
I,
28
I
I
I
j
I
j
j
j
I
I
I
I
R
Removing
the
presser
foot
Switch
off
the
master
switch
Press
the
front
part
of
the
presser
foot
upwards
and
at
the
same
time
the
rear
part downwards
until
it
disengages
from
the
presser
foot
holder
(30).
:1
A
Attaching
the
presser
foot
Place
the
presser
foot
under
the
presser
foot
holder
(30),
so
that
when
the
presser
foot
lifter
(51)
is
lowered,
the
pins
of
the
foot
engage
in
the
presser
foot
holder.
1
pFAFF
Setting
the needle
thread tension
Set
the required
amount
of
the
needle thread
tension
(35)
using
the
markings
on
the
tension
dial.
The
normal
setting
for
sewing
is
4
-
5.
For
decorative
sewing,
darning
and
buttonhole
sewing
3.
Check:
Please
check
that
the
presser
foot
is
properly
attached
by
raising
the
presser
foot
lifter.
29
I
I
PVAcF
2044
0
1
2
Winding
a
bobbin
through
the
needle
It
is
possible
to
wind
bobbins
even
when
the
machine
is
fully
threaded.
Raise
the
presser
foot
lifter
(51)
to
the
top
position.
Pull
the
needle
thread
underneath
the
presser
foot
and
upward
through
the
right-hand
threader
slot
(34).
Place
the
thread
from
left
to
right
through
the
take-up
lever
(40).
Important:
The
take-up
lever
must
be
at
its
highest
position.
-
_
rC))
Guide
the
thread
to
the
right
under
thread
guide
C.
Wind
the
beginning
of
the
thread
several
times
around
the
bobbin
in
a
clockwise
direction.
Push
the
bobbin
to
the
right.
Hold
the
end
of
the
thread
firmly
and
press
the
foot
control.
\-
‘-
-
—--C
[
l-t
,
r425icr,
30
Changing
the
needle
Switch
off
the
master
switch
To
remove:
Lower
the
presser
foot
and
set
the
needle
to
its
highest
position.
Loosen
the
needle
screw
(52)
and
pull
the
needle
out
downwards.
To
insert:
The
flat
side
A
of
the
needle
must
face
to
the
rear.
Lower
the
presser
foot
and
insert
the
needle,
pushing
it
up
as
far
as
it
will
go.
Hold
the
needle
and
tighten
the
needle
screw
(52)
firmly.
!A
E
Threading
the
twin
needle:
Replace
the
sewing
needle
with
a
twin
needle.
Insert
the
second
spool
holder
and
place
one
spool
of
thread
on
each
of
the
spool
holders.
During
threading
in
the
left
threading
slot
(34),
make
sure
that
you
pass
one
thread
each
to
the
left
and
right
sides
of
tension
disk
B.
Continue
threading
in
the
usual
manner,
making
sure
the
threads
do
not
become
twisted
together.
Pull
the
threads
right
and
left
into
the
thread
guide
and
thread
the
needles
(for
additional
details,
see
‘Decorative
stitches
with
the
twin
needle”
p.
97).
Note:
It
is
not
possible
to
use
the
integrated
needle
threader
with
a
twin
needle.
1
¶1
VP
31
,,
I
The
IDT
(Integrated
Dual
Feed)
For
sewing
any
fabric
precisely
PFAFF
provides
the
ideal
solution:
the
Integrated
Dual
Feed,
IDT
system.
As
on
industrial
machines,
the
IDT
feeds
the
fabric
from
the
top
and
bottom
at
the
same
time.
The
material
is
fed
precisely.
On
light
fabrics
such
as
silk
or
rayon
the
dual
feed
prevents
puckering
of
the
seam.
The
even
feeding
action
also
ensures
perfect
matching
of
checked
and
striped
fabrics.
The
IDT
keeps
all
layers
of
quilt
projects
aligned
to
prevent
stretching
of
the
top
layers.
32
Engaging
the
lOT
Important:
For
all
work
with
the
Dual
Feed
IDT.
use
presser
feet
with
the
center
back
cut-out.
Raise
the
presser
foot.
Press
the
IDT
(31)
down
until
it
engages.
Technical
sec
Disengaging
the
IDT
Hold
the
Dual
Feed
with
two
fingers
at
the
ribbed
ankle.
Press
the
IDT
(31)
down,
then
pull
it
away
from
you
and
release
the
IDT
slowly
upward.
Stripes
and
plaids
match
perfectly
due
to
the
even
feed
of
the
material
to
be
sewn.
V
I
f:
33
I
LI
H
IR;ëtI
euuon
PFAFF
L
pa
—‘
__7/
/
fe
Lowering
the
feed
dog
For
certain
sewing
work
such
as
free-motion
quilting
or
darning
and
when
the
machine
must
be
cleaned,
the
feed
dog
has
to
be
lowered.
Raise
the
presser
foot
before
lowering
the
feed
dog.
Push
slide
A
to
the
left.
To
engage
the
feed
dog
move
the
slide
to
the
right.
Raise
the
presser
foot
before
engaging
the
feed
dog.
pAcF
-.
11
,,hW/4t’*”.
It
10
-1
t
You
can
also
lower
the
feed
dog
by
opening
the
bobbin
door
and
moving
slide
B
to
the
right.
To
engage
the
feed
dog
move
the
slide
to
the
left.
Raise
the
presser
foot
before
lowering
or
raising
the
feed
dog.
A
-.
I’
34
ii
:
Seithig
functions
Adjusting
the
contrast
in
the
Expression
window
Stitch
selection
Bobbin
thread
monitor
(model
2044)
Altering
pattern
sizes
Altering
the
stitch
width/needle
position
‘1ng
the
pattern
length
mg
the
pattern
*Th
density
36
36
37
37
38
38,
39
39
40
41
42
43
44
45
‘reverse
sewing
button
ion
buttons
A
I
j
z
‘Jc;vvii
Ij
ILII
I.jLIJI
Adjusting
the
contrast
on
the
Expression
window
The
contrast
setting
in
the
window
may
be
changed
for
different
lighting
situations.
This
setting
can
be
readjusted
with
the
contrast
control
(54).
Stitch
selection
c
Stitch
selection
on
model 2044
There
are three
ways
of
selecting
your
desired
stitch:
1.
With
the
selection
wheel
(selection
buttons,
model
2034):
for
scrolling
backward
and
forward
in
the
stitches.
Clockwise
=
in
ascending
order
Counterclockwise
=
in
descending
order
Model
2034:
>
in
ascending
order
<in
descending
order
If
you
are
in
the
last
stitch,
No.
76,
(No.
61
in
the
case
of
model
2034)
and continue
to
scroll
you
will
return
to
stitch
No.
0.
2.
With
the
direct
selection
buttons
for
instant
selection
of
the
most commonly
used stitches
(0
-
9)
and
for
the
selection
of
the
alphabets.
3.
With
the
direct
selection
buttons
to
choose
the
stitch
number:
To
select
program
No.
23,
press
button
2
then
press
button
3.
The
stitch
number
appears
in
the
window.
wwww
QO
oo
oEp
Stitch
selection
on
model
2034
36
H
I
I
PFAFF
Instruction
manual
B
pFAFF
expression
2034
quilt
exPreSSOfl
2044
PFAFF
t
j
H
.jcvvii
1LAI
IL,LJLII
I
Bobbin
thread
monitor
(model
2044)
If
the
bobbin
is
nearing
its
end
[2
¾
yd
(2
m)-3
¾
yd
(3
m)].
or
there
is
no
thread
on
the
bobbin,
the
bobbin
symbol
appears
in
the
window.
The
symbol
disappears
after
a
full
bobbin
is
inserted
and
you
start
to
sew
again.
Altering
stitches
Adjust
the
length,
width,
balance,
density
or
needle
position
of
stitches
by
touching
the
appropriate
-1+
buttons
to
the
right
of
the
window.
Each
change
is
visible
in
the
window.
To
change:
Use
-1+
buttons
Stitch
width
Pattern
width
Needle
position
for
straight
stitches
A
Stitch
length
<
Pattern
length
B
Stitch
density
<III>
Pattern
density
Balance
C
37
Altering
the
stitch
width
The
selected
stitch
can
be
sewn
in
various
widths,
e.g.
zigzag
stitch
No.
3.
Altering
the
needle
position
Straight
stitch
No.
1,
stitch
No. 2
and
stitch
No.
11
can
be
sewn
in
any
of
13
different
needle
positions.
Press
1+
button
A
to
move
the
needle
to
left
or
right
of
center.
Altering
the
pattern
width,
e.g.
Stitch
63
(Stitch
56
on
model
2034)
For
decorative
stitches,
the
overall
width
of
the
pattern
is
shown
in
the
window.
When
entered,
stitch
63
comes
up
in
a
standard
width
and
can
be
altered
using
-1+
button
A.
38
4f
Fj
p
Altering
the
stitch
length
The
stitch
length
of
a
stitch
can
be
altered
using
+1-
button
B.
Altering
the
pattern
length
The
pattern
length
of
decorative
stitches
can
be
altered
using
-1+
button
B.
The
density
of
the
stitch
will
not
change.
Altering
the
stitch
density
The
stitch
density
of
various
stitches
(buttonholes,
satin
stitches,
etc.)
can
be
changed.
The
pattern
length
will
remain
constant,
but
the
pattern
will
be
sewn
more
densely
or
less
densely.
Use
-1+
button
C
to
adjust
the
density,
when
available.
39
fl
Balance
Decorative
stitches
can
vary
on
different
fabric
types
heavy
fabric
is
fed
differently
than
fine
silk.
The
balance
adjusts
the
reverse
feed
of
the
stitch
so
it
is
sewn
in
the
best
way
for
different
fabrics.
After
having
selected
a
stitch,
you
will
see
the
balance
symbol
with
a
“0
after
it
in
the
bottom
right-hand
corner
of
the
Expression
window.
This
symbol
indicates
that
the
balance
can
be
altered
on
this
stitch.
The
standard
balance
setting
is
“0”.
With
button
C
you
can
change
the
reverse
feed
of
the
machine
from
-9
to
(+)9.
In
the
minus
range
the
stitches
are
sewn
shorter,
and
thus
the
overall
length
will
be
sewn
shorter.
In
the
plus
range
the
stitches
are
sewn
longer
or
stretched
out.
I
“4”
“4”
40
Reverse
sewing
This
button
has
the
following
functions:
when
pressed,
will
reverse
sew
manual
finish
of
a
buttonhole
(see
page
72)
programming
the
buttonhole
determines
the
length
of
the
darning
program
(model
2044)
(see
page
62)
engages
automatic
tapering
(see
page
101-102)
Sewing
functioi
Info
button
Touch
the
info
button
to
receive
information
about
the
selected
stitch.
Info
menu
The
info
menu
gives
you
the
following
information:
needle
size/type
recommendation,
needle
thread
tension
setting.
to
engage
or
disengage
the
lDT
lower
the
feed
dogs,
page
number
of
the
info
menu.
I
I
I
Ii
!I
‘5
‘1
I
‘3
‘3
3
3
A
41
DtWlEJ
IULIULIUFIS
Sewing
function
buttons
There
are
four
sewing
function
buttons
below
the
Expression
window.
With
these
buttons
you
can
choose
between
“tie-off”
at
the
beginning
and/or
the
end
of
a
stitch,
set
“needle
up/down”,
‘sew
slow”
and
“pattern
mirror”.
Tie-off
button
(36)
When
you
press
this button
before
starting
to
sew,
the
symbol
appears
in
the
window.
Once the
machine
has
tied
off,
the
symbol
disappears
from
the
window.
Press
the
button
while
sewing
so
you
can
tie
off
at
the
end
of
a
seam
or
pattern.
The
symbol
appears
in
the
window.
The
pattern
will
then
be
completed
and
tied
off.
The
machine
will
stop
and the
symbol
will
disappear.
“Needle
up/down”
button
(37)-a-
Use
the
“up/down’
button
to
determine whether
the
needle
should
be
in
its
highest
position
or
in
the
fabric
when
you
stop
sewing. The
symbol
appears
above
the
button
in
the
window
when
the
button
is
pressed.
Press
the
foot
control
and
the
needle
is
lowered
into
the
fabric.
The
needle
will
remain
in
the
fabric
each
time
you
stop
sewing.
To
remove
the
needle
from
the
fabric,
press
the “needle
up/down”
button.
The
needle
lifts
out
of
the
fabric,
and
the
symbol
disappears
from
the
window.
“Sew
slow”
button
(38)
When
you
press
the
“sew
slow”
button
the
speed
of
the machine
is
reduced
by
half.
The symbol
appears
in
the
window
and
disappears
when
the
button
is
pressed
again.
“Pattern
mirror”
button
(39)
4g
This
symbol
will
appear
in
the
window
for
any
stitch
that
can
be
mirrored.
When
the
“pattern
mirror”
button
has
been
pressed,
a
point
will
appear
below
the
symbol
indicating
the
pattern
will
be mirrored.
I
“99
I
42
“Lock”
button
“Pattern
mirror”
button:
(39)
You
can
safeguard
your
sewing
machine
against
the
unintentional
selection
of
another
sewing
program
or
another
pattern
sequence
by
means
of
the
“lock”
button.
Switching
on
the
“lock”
button:
Press
the
button
until
the
locking
symbol
appears
in
the
window.
The
symbol
disappears
when
the
button
is
released.
The
direct
selection
buttons
(15
to
26),
as
well
as
the
rr
button
(7)
and
the
selection
dial
are
now
locked.
The
machine
is
now
safeguarded
against
any
unintentional
selection
of
another
sewing
program
or
another
pattern
sequence.
The
memory
button
m+
(14),
the
cursor
button
(8)
and
the
clear
/
pattern
start
button
(9)
remain
active,
If
the
“lock”
button
is
switched
on
and
a
pattern
sequence
has
already
been
selected,
it
is
still
possible
to
alter
this
sequence.
You
can
scroll
within
the
pattern
sequence
at
any
time.
The
sewing
function
buttons
can
still
be
selected.
The
stitch
length
/
width,
pattern
length
I
width
and
pattern
density!
balance
can
be
altered.
Note:
You
can
still
mirror
a
pattern
if
you
quickly
tap
the
button
(39).
Switching
off
the
“lock”
button:
Press
the
button
(39)
until
the
unlocking
symbol
appears.
The
locking
function
is
now
switched
off.
This
j
symbol
disappears
after
the
button
is
released.
I
I
43
‘I
Twin
needle
Depending
on
the
needle
position
or
the
width
of
a
stitch.
the
twin
needle
warning
will
appear
in
the
window.
This
symbol
indicates
that
a
twin
needle
cannot
be
used
to
sew
the
stitch
at
the
currently
set
width.
Reduce
the
pattern
width
until
the
warning
symbol
disappears.
The
stitch
may
now
be
sewn
with
a
twin
needle
of
2.0
mm
or
less.
44
Formation
of
the
stitches
The
stitch
formation
varies.
Some
patterns
are
formed
from
the
left,
so
only
the
right
side
of
the
stitch
changes
when
the
width
is
adjusted.
The
left-hand
side
of
the
stitch
is
always
retained.
,..
The
patterns
that
are
formed
from
the
right
will
,*.7i)
always
retain
the
right
side
of
the
stitch,
regardless
of
any
changes
in
width.
Note:
Do
not
use
a
twin
needle
to
sew
patterns
that
are
formed
from
one side!
Do
not
use
a
twin
needle
if
this
symbol
in
the
window
lights
up
(see
page
44).
.s
Patterns
that
are
formed
from
the
center
will
change
equally
from
the
right
and
the
left
when
the
width
is
adjusted.
I
I
3
3
45
p
r.
;
Stitch
Sequenc
48
49
49,
50
50
51
51
52
52
52
Stitch
sequences
Buttons
for
the
stitch
sequence
Storing
Stitches
Deleting
from
the
stitch
sequence
Inserting
into
the
stitch
sequence
Deleting
a
stitch
sequence
Deleting
all
M-memories
Changing
a
stitch
within
a
sequence
“Pattern
start”
function
uth
exprsson
T-A
,
I
I’
if
11
outuii
squeii
*4
LULL4
c*
:
*
Stitch
sequences
Your
Expression
offers
you
the
possibility
of
storing
stitch
and
word
sequences
in
the
memories
of
the
machine.
The
stitch
sequences
remain
in
the
memory
until
you
overwrite
or
delete
it.
The
Quilt
Expression
2044
has
6
m-memories,
the
Expression
2034
has
3
m-memories.
Up
to
20
patterns
or
letters
can
be
stored
in
each
memory.
48
011LLr1
sequtriu
3
Buttons
for
the
stitch
sequence
The
following
buttons
can
be
found
next
to
the
selection
wheel
(selection
button
on
the
model
2034)
“M”
button:
r
for
opening
or
closing
an
rn-memory
m+:
for
storing
selected
stitches
in
the
rn-memory
cl/pattern
start
button:
use
the
cI
button
for
deleting
stitches
in
the
rn-memory.
When
an
rn-memory
is
not
activated,
the
pattern
start
restarts
the
stitch
from
the
beginning.
Cursor
buttons:
for
selecting
an rn-memory!
scrolling
through
the
rn-memories
which
are
activated.
A-Z
buttons
(2
x
on
the
2044,
1
x
on
the
2034):
for
the
direct
selection
of
the
fonts
Opening
an
rn-memory
Press
the
“M”
button
m
All
the
rn-memories
appear
in
the
Expression
window.
Select
an
empty
rn-memory
by
scrolling
using
the
cursor
button
(8).
I
)
()
E
I,
II
a
I
Open
a
free
rn-memory
by
pressing
“M”
button
m)
(7)
again.
49
iitcri
sequences
The
symbol
rr
appears
in
the
window.
Select
the
stitch
using
the
direct
selection
buttons
(1
5-26),
or
scroll
to
the
desired
stitch
or
letter
with
the
selection
wheel.
Store
the
stitches
by
pressing
the
button
(14).
Once
you
have
entered
the
stitch
sequence,
you
can
start
to
sew
immediately.
All
stitches
that
have
been
sewn
are
automatically
stored
and
remain
in
the
machine’s
memory
even
after
you
switch
oft
the
machine.
Tip:
In
order
to
sew
a
stitch
sequence
once,
press
the
tie-off
button
(36)
when
you
have
started
to
sew.
The
embroidery
is
tied-off
on
completion
and
the
machine
stops
automatically
Deleting
a
pattern
within
the
stitch
sequence
If
you
wish
to
delete
one
stitch
in
the
stitch
sequence,
scroll
using
the
cursor
buttons
to
the
desired
position
in
the
stitch
sequence.
The
cursor
....
must
be
below
the
stitch
which
is
to
be
deleted.
Press
the
clear
button
(9).
After
deleting
the
stitch,
the
rest
of
the
memory
moves
up
to
the
cursor
position.
50
Stitch
sequenc
Inserting
a
stitch
into
the
stitch
sequence
If
you
wish
to
insert
a
stitch
into
a
sequence,
scroll
using
the
cursor
buttons
to
the
desired
position
in
the
sequence.
The
cursor
..
must
be
in
front
of
the
pattern
where
the
stitch
is
to
be
inserted
(the
position
of
the
tip
of
the
cursor).
Select
the
new
stitch
and
store
it
using
the
button
(14).
After
having
inserted
the
stitch,
the
cursor
moves
to
the
position
of
the
inserted
stitch.
Inserting
a
pattern
at
the
beginning
of
the
stitch
sequence
If
you
wish
to
insert
a
stitch
at
the
beginning
of
a
sequence,
scroll
to
the
left
using
the
cursor
button.
Once
the
cursor
is
positioned
at
the
beginning
of
the
sequence,
the
symbol
for
the
beginning
of
the
sequence
appears
in
the
window.
Select
the
new
stitch
and
store
it
using
the
m+
button
(14).
The
new
stitch
will
be
inserted
at
the
beginning
of
the
sequence.
Deleting
the
sitch
sequence
You
can
delete
the
stitch
sequence
by
pressing
the
clear
button
(9)
until
the
memory
is
completely
empty.
““p
“‘9
51
tIrcn
sequeriutts
Deleting
all
M-memories
You
can
delete
all
M-memories
at
once
by
holding
down
the
clear
button
(9)
while
turning
on
the
machine.
Changing
a
pattern
within
the
stitch
sequence
To
change
the
length
or
width
of
a
stitch
within
the
sequence,
position
the
cursor
below
the
stitch
to
be
changed.
Now
the
stitch
can
be
altered.
“Pattern
start”
function
If
you
have
interrupted
the
sewing
operation
and
would
like
to
start
the
stitch
sequence
again,
position
the
cursor
as
far
to
the
left
as
possible,
until
the
symbol
appears
in
the
window.
Then
press
the
cl/pattern
start
button
(9).
9
90
*0
52
Utility
stitches
Non-elastic/elastic
stitches
54-58
Zippers
54
Overlock
stitches
60
Sewing
on
buttons
61
Darning/inserting
patches
59,
62,
63
Gathering
64
Bridging
stitches
65
Cross
hem
stitches
65
Hemming
66
Shell
edging
67
:3
:3
:3
:3
:3
I
I
I
I
I
j
j
i
N
ii
%.LJJILJ
S.1LI%tI
I%.’
Straight
stitch
1
Stitch
1
is
the
basic
straight
stitch
in
center
needle
position.
The
stitch
length
can
be
increased
up
to
6
mm.
Change
the
needle
position
of
the
straight
stitch
to
sew
in
a
zipper
or
topstitch
along
the
edge
of
a
collar.
The
2044
and 2034
have
13
needle
positions
that
can
be
adjusted
with
the
-1+
button
“A”.
Tip:
Use
the
“needle
up/down”
button
to
easily
pivot
at
collar
points.
Sewing
in
zippers
1
There
are
different
ways
to
sew
in
zippers.
Follow
the
directions
included
with
your
pattern
for
best
results.
For
all
types
of
zippers
it
is
important
to
sew
close
to
the
teeth
of
the
zipper.
The
zipper
foot
can
be
snapped
to
the
presser
foot
ankle
on
the
left
or
right,
depending
on
how
you
will
insert
your
zipper.
Then
set
the
needle
position
so
that
it
enters
close
to
the
edge
of
the
zipper
teeth
by
using
one
of
the
13
needle
positions
available.
If
the
presser
foot
is
attached
on
the
right
side,
the
needle
must
only
be
moved
to
the
right,
If
the
foot
is
attached
on
the
left,
the
needle
must
only
be
moved
to
the
left.
•,
-•
54
•IhIJ
%JLII.’..,II
I
Basting
stitch
10
With
stitch
10
you
can
baste
a
garment
before
trying
it
on.
When
you
press
the
foot
control,
the
machine
will
sew
one
stitch
at
a
time.
Press
the
foot
control
again
for
each
stitch.
Lower
the
feed
dog
and
disengage
the
IDT.
Place
the
fabric
under
the
presser
foot.
Sew
one
stitch,
then
move
the
fabric
the
required
amount
to
the
rear.
Continue
to
sew
one
stitch
at
a
time
until
you
finish
basting.
Tip:
Light
fabrics
are
easier
to
baste
with
long
straight
stitches
(6
mm).
In
this
case
the
bottom
feed
need
not
be
lowered.
Use
stitch
1,
stitch
length
6
mm.
Topstitching
The
straight
stitch
can
be
sewn
in
13
different
needle
positions
allowing
you
to
guide
the
fabric
edge
along
the
presser
foot
for
top
stitching.
The
distance
between
the
rows
of
topstitching
can
be
determined
by
the
needle
positions.
You
can
also
space
your
rows
of
topstitching
by
the
width
of
the
presser
foot.
Begin
topstitching
further
from
the
fabric
edge,
by
using
the
guide
marks
on
the
needle
plate,
or
the
edge
guide.
The
guide
marks
are
given
in
cm
and
inches.
The
edge
guide
is
inserted
into
hole
C
and
is
secured
with
set
screw
F
Feed
aid
for
thick
seams
To
ensure
precise
feeding
at
the
beginning
of
a
thick
seam,
place
a
piece
of
fabric
of
the
same
thickness
as
the
seam
under
the
presser
foot
to
support
it.
55
Blind
hem
stitch
5
The
blind
hem
stitch
is
used
to
make
invisible
hems
on
skirts,
trousers
and
home
decorating.
Finish
the
edge
of
the
hem.
Fold
and
press
the
hem
allowance
inwards.
Fold
the
hem
back
on
itself
so
approximately
1/4
inch
(6
mm)
of
the
finished
edge
extends
beyond
the
fold.
The
wrong
side
of
your
project
should
now
be
facing
up.
Place
the
fabric
under
the
presser
foot
so
that
the
fold
runs
along
edge
guide
B.
When
the
needle
swings
into
the
fold
it
should
catch
a
small
amount
of
fabric.
If
the
stitches
are
visible
on
the
right
side,
adjust
edge
guide
B
by
turning
adjusting
screw
A.
Elastic
blind
hem
stitch
6
The
elastic
blind
hem
stitch
is
especially
suitable
for
stretchy
fabrics.
The
hem
is
finished
and
sewn
at
the
same
time.
There
is
no
need
to
finish
the
raw
edge
first.
Create
the
blind
hem
as
described
above.
56
t
t
t
,
‘.
Zigzag
stitch
3
Raw
edges
can
be
finished
easily
with
zigzag
stitch
3.
Make
sure
the
needle
pierces
the
fabric
on
the
left
swing
of
the
needle
and
overcasts
the
edge
of
the
fabric
on
the
right
swing
of
the
needle.
Stretch
triple
zigzag
stitch
17
The
stretch
triple
zigzag
stitch
produces
a
highly
elastic
and
decorative
seam.
This
stitch
can
be
used
for
T-shirt
hems
and
with
decorative
threads
on
denim.
Fold
up
a
hem
the
correct
width.
Topstitch
the
hem
from
the
right
side,
or
thread
the
top
with
decorative
thread
and
sew.
Tip
Lower
needle
thread
tension
for
decorative
threads.
57
Stretch
triple
straight
stitch
2
This
stitch
is
used
for
sewing
seams
where
strength
is
needed,
such
as
underarm
and
crotch
seams.
The
heavier
the
fabric,
the
longer
the
stitch
length
required.
Elastic
stitch
4
Use
stitch
4
to
add
elastic
to
pajamas.
skirts
and
sportswear.
To
create
a
waistband,
finish
the
top
edge
of
the
garment.
Cut
elastic
to
comfortably
fit
around
waist.
Sew
the
ends
of
the
elastic
together.
Divide
the
garment
edge
and
elastic
into
quarters.
Stretch
the
elastic
to
fit
the
fabric.
Sew
on
elastic.
Honeycomb
stitch
19
The
honeycomb
stitch
is
an
elastic
and
decorative
hem,
which
is
very
suitable
for
children
s
clothes
and
lingerie.
•!•
58
Darning
with
the
elastic
stitch
4
Use
the
elastic
stitch
to
repair
holes,
tears
and
damaged
areas.
If
the
area
is
only
slightly
damaged,
sew
over
it
with
several
rows
of
stitching
until
it
is
well
covered.
For
tears,
frayed
edges
or
small
holes,
place
a
piece
of
fabric,
slightly
larger
than
the
damaged
area
and
of
the
same
color,
on
the
wrong
side
of
the
fabric.
Stitch
over
the
damaged
area,
then
cut
away
the
excess
fabric
close
to
the
stitching
on
the
back
side
of
your
repair.
4
a
Sewing-on
patches
—4
The
best
way
to
repair
larger
holes
is
to
patch
the
damaged
area
with
a
new
piece
of
fabric.
Cut
a
piece
of
fabric
slightly
larger
than
the
damaged
area
or
hole.
Stitch
over
the
fabric
edges
with
the
elastic
stitch.
Cut
back
the
damaged
fabric
on
the
reverse
side
close
to
the
seam.
Repairing
tears
On
tears,
frayed
edges
or
small
holes
it
is
useful
to
lay
a
piece
of
material
under
the
reverse
side
of
the
fabric.
The
underlayed
fabric
reinforces
the
workpiece
and
ensures
perfect
repair.
Lay
a
piece
of
fabric
underneath
the
damaged
fabric.
It
must
be
a
little
larger
than
the
damaged
area.
Now
sew
over
the
damaged
area.
Cut
the
under
layed
piece
of
material
back
to
the
seam.
59
utiiiiy
iiu.ile
Overlock
stitches
For
elastic,
knits
and
stretch
fabrics,
the 2034
and
2044
provide
a
selection
of
overlock
stitches.
These
stitches
join
multiple
layers
of
fabric
and
overcast
them
in
one
operation.
These
stitches
have
built-in
stretch
and
are
more
durable
than
standard
stitches.
Tip:
Use
blind
stitch
foot
No.
3
when
sewing
overlock
seams.
This
guides
the
fabric
more
precisely
and
prevents
tunneling
of
the
seam
at
wider
stitch
widths.
Adjust
the
stitch
width
and
guide
of
the
foot
to
ensure
that the
right-hand
swing
of
the
needle
clears
the
raw
edge
of
the
fabric
and
the
pin
of
the
presser
foot.
Closed
overlock
stitch
7
This
stitch,
in
a
single operation,
is
suitable
for
sewing
and
serging
fabrics
that
fray
easily.
The
closed
overlock
is
also
a
good
stitch
for
attaching
knit
cuffs
and
collars
to
garments.
If
you
wish
to
sew
a
fabric
that
frays
easily.
select
stitch
21.
With
this
stitch
an
additional
edge
thread
protects
the
fabric
edge
against
further
fraying.
The
open
overlock
stitch
works
well
when
joining
or
edge-
finishing
fabrics
that
do
not
fray
excessively.
Used
together
with
the
knit-edge
foot
(special
accessories),
this
stitch
can
be
used
for
open-knit
and
heavy
knit
fabrics.
Garments
can be
joined
effortlessly
with
this
stitch.
Tip:
To
prevent
the
seam
from
stretching
while
sewing,
overcast
a
woolen
thread
or
twill
tape
in
the
seam.
Open
overlock
stitch
18
Closed
overlock
stitch
with
selvage
thread
—21
Pullover
stitch
22
60
LJLIIIL
LILLiI
IC
Sewing
on
buttons
—0
With
Button
sewing
program
0
you
can
easily
sew
on
two
and
four-hole
buttons.
Remove
the
presser
foot
and
lower
the
feed
dog.
(Make
sure
the
IDT
is
disengaged.)
Mark
the
button
position
on
your
fabric.
Place
the
button
on
the
marked
fabric.
Turn
the
handwheel
towards
you
and
position
the
button
so
the
needle
enters
the
left
hole
in
the
button.
Lower
the
presser
foot
lifter.
The
button
will
be
held
in
place
by
the
shank
of
the
foot.
Turn
the
handwheel
to
make
sure
the
needle
also
enters
the
right
hole
of
the
button.
Continue
sewing
on
the
button.
The
machine
will
complete
the
program
for
you.
Sewing
on
buttons
with
shanks
0
Attach
the
presser
foot.
Leave
the
feed
dogs
lowered.
Place
a
toothpick
between
the
holes
of
the
button
and
sew
it
on
as
described
above.
4
14
JI3
Remove
the
toothpick
and
pull
the
button
and
fabric
apart.
Wrap
the
stem
with
sewing
thread
and
knot
it.
Eyelets
—72
(Model
2044)
To
stitch
eyelets
on
a
belt
or
linen
items,
select
stitch
72.
61
uuiiiy
suicnes
j
Automatic
darning
—73
(Model 2044)
Stitch
73
is
for
strengthening
damaged
areas
of
fabric
and
repairing
tears.
Stitch
over
the
damaged
area
at
the
required
length.
Press
the
reverse
button;
the
machine
finishes
sewing
the
darning
program
and
the
darning
length
is
saved.
The
saved
darning
length
can
now
be
repeated
as
often
as
needed.
Depending
on
the
type
of
fabric,
the
darning pattern
may
shift
slightly
out
of
square.
You
can
straighten
the
pattern
using
the
balance
adjustment
capability
(see
chapter
‘Balance”,
page
40>.
If
the
pattern
shifts
this
way
you
have
to
correct the
balance
in
the
plus-section.
If
the
pattern
shifts
this
way
you
have
to
correct
the
balance
in
the minus-section.
62
__..._J
Darning
with
the
straight
stitch
1
Attach
darning
foot
No.
6.
Turn
the
handwheel
toward
you
until
the
needle
is
set
at
its
highest
position.
With
thumb
and
index
finger
press
the
darning
foot
together.
Insert
the
pin
of
the
darning
foot
as
far
as
it
will
go
into
the
hole
of
the
presser
foot
holder.
The
“C-shaped”
guide
should
place
itself
around
the
presser
bar.
The
long,
plastic
arm
must
be
behind
the
needle
clamp/needle
set
screw.
Tighten
the
set
screw.
Darning
position:
Lower
the
presser
bar
lifter
slowly
and
push
it
to
the
rear
until
it
engages
in
the
darning
position.
In
this
position
the
thread
tension
is
engaged
for
darning.
Lower
the
feed
dog.
Draw
up
the
bobbin
thread
and
hold
the
threads
when
you
start
sewing.
.4
-
I
Repair
the
damaged
area/hole
by
guiding
the
fabric
evenly
forwards
and
backwards.
The
length
of
the
seam
is
determined
by
the
size
of
the
hole.
When
you
have
covered
the
width
of
the
damaged
area,
turn
the
fabric
90
degrees
and
stitch
over
the
area
again.
Darning
in
both
directions
over
a
tear
will
produce
a
stronger
repair.
Tip:
Remember
when
sewing
with
the
feed
dogs
lowered.
the
stitch
length
is
determined
by
you.
An
even,
medium-to-fast
sewing
speed
will
allow
you
to
sew
a
more
consistent
length
of
straight
stitch.
Sewing
too
slowly
may
cause
small
knots
to
appear
on
the
reverse
side
of
your
work
63
4+
1
-J
-
-:-‘-
ArtH
LJUIIL
LIL’...iI
I’’j
Gathering
with
straight
stitch
1
A
straight
stitch
can
be
used
to
gather
sleeves,
cuffs,
skirts
or
valances.
To
obtain
neat
and
even
gathers
you
should
sew
two
or
three
rows
of
gathering
stitches.
Set
your
stitch
length
to
6.0
mm.
Lower
needle
thread
tension
to
3.
Mark
the
first
gathering
line
on
the
right
side
of
the
fabric.
Sew
along
this
line.
Leave
about
4-5
inches
(10-13
cm)
of
thread
at
the
beginning
and
end
of
the
seam.
Sew
1
or
2
more
rows
of
stitching,
using
the
edge
of
the
presser
foot
as
a
guide.
Gather
the
fabric
by
pulling
the
bobbin
(bottom)
threads
to
the
desired
fullness.
Distribute
the
gathers
evenly
and
knot
the
thread
ends
together
to
secure
the
gathering.
Tip:
It
is
important
to
use
a
strong
thread
when
gathering
to
avoid
thread
breakage
when
pulling
on
the
gathering
threads.
Gathering
with
elastic
threads
19
Gathering
with
elastic
thread
is
particularly
suitable
for
visible,
elastic
gathering
seams
such
as
blouse
sleeves,
waist
seams
or
necklines.
Mark
the
first
gathering
row
on
the
fabric.
Sew
a
few
stitches
until
the
needle
is
in
the
middle
of
the
presser
foot.
Turn
the
hand-wheel
towards
yourself
until
the
needle
is
in
the
lowest
position.
Raise
the
presser
foot
and
place
the
elastic
thread
around
the
back
of
the
needle.
Lower
the
presser
foot
and
sew
a
few
more
stitches
to
secure
the
elastic
thread
to
the
fabric.
Continue
attaching
elastic
threads
to
fabric.
Make
sure
you
do
not
catch
the
elastic
thread
in
the
stitching.
When
you
are
finished
attaching
the
elastic
thread,
pull
on
the
ends
of
the
elastic
threads
to
gather.
The
amount
of
gathering
is
determined
by
the
amount
you
pull
on
the
elastic
thread.
Secure
all
thread
ends.
Tip:
Use
the
cording
foot
(special
accessory)
to
help
guide
the
elastic
thread.
64
Bridging
stitches
—8
or
14
The
bridging
stitch
creates
a
hemstitching
effect.
It
is
often
used
for
connecting
two
finished
fabric
edges.
Finish
the
fabric
edges
and
press
the
seam
allowance
to
the
wrong
side.
Place
the
fabric
under
the
presser
foot
with
the
edges
approximately
1/8
inch
(3
mm)
apart.
Stitch
from
the
right
side
of
the
fabric,
making
sure
that
the
needle
catches
the
fabric
on
the
right
and
left
sides.
Tip:
To
make
guiding
the
fabric
easier
use
the
bridging
guide
(special
accessory).
It
is
available
in
3
mm
and
5
mm
widths.
The
small
post
on
the
bottom
of
the
guide
is
inserted
in
the
small
hole
at
the
front
of
the
needle
plate.
Light-knit
mending
stitch
23
(Model
2044)
The
light-knit
mending
stitch
is
a
stretchy
covering
stitch.
It
is
very
suitable
for
overstitching
cuff
and
collar
seams
in
stretch
materials,
especially
for
sportswear.
Finish
the
sportswear
as
directed
in
the
pattern.
Now
the
seam
allowance
can
be
overstitched
from
the
right
side
of
the
garment.
This
will
add
strength
and
keep
the
seams
falt.
Cross
hem
stitch
—20
This
highly
elastic
stitch
is
very
suitable
for
decorative
hems.
Fold
the
hem
allowance
to
the
reverse
side.
Stitch
the
hem
from
the
right
side
of
the
fabric.
Trim
any
excess
hem
fabric
up
to
the
stitching.
Ei
h4
I
65
Rolled
hem
with
hemmer
No.
7—
1
Use
the
rolled
hemmer
to
finish
the
edges
of
blouses,
scarves,
or
ruffles
without
having
to
iron
the
edges
beforehand.
Hemming
prevents
the
edges
from
fraying
and
produces
a
neat
and
durable
edge
finish.
Double-fold
the
fabric
edge
(about
1/8
inch
/
2
mm
per
fold).
Place
the
folded
fabric
edge
under
the
hemmer
and
sew
a
few
stitches
to
secure.
Turn
the
handwheel
towards
you
until
the
needle
is
at
its
lowest
point.
Raise
the
presser
foot
and
slide
the
fabric
into
the
scroll
of
the
hemmer.
Lower
the
presser
foot
and
while
sewing, guide
the
fabric
edge
evenly
into
the
hemmer. When
roll-hemming,
make
sure
the
raw
edge
of
the
fabric
butts
against
the
left
edge
of
the hemmer
opening.
Ensure
the
fabric
does
not run
underneath
the
right
side
of
the
presser
foot.
Stitch
3
A
narrow
zigzag
stitch
also
makes
a
nice
rolled
hem
on
lighter
stretch
fabrics.
66
Shell
edging
5
Shell
edging
is
a
very
effective
finish
for
thin,
soft
fabrics
such
as
silk
and
rayon
fabrics.
It
is
frequently
used
as
a
hem
finish
on
lingerie.
Select
blind
stitch
No.
5
and
mirror
it
with
the
“Pattern
mirror”
button
.
Tighten
the
needle
thread
tension
to
create
a
deeper
shell
tuck.
Finish
the
raw
edge
and
press
the
seam
allowance
to
the
left.
While
sewing,
make
sure
the
fabric
runs
under
the
presser
foot
at
half
of
the
foot
width,
and
the
blind
hem
swings
over
the
folded
edge.
Tip:
Add
a
colored
pearl
cotton
thread
on
the
folded
edge
as
you
sew
the
shell
tuck.
This
creates
a
pretty
contrast
and
strengthens
the
hem.
I
I
•1
.1
67
BUttonHoles
Geflerai
notes
on
buttOnh0
70
insertflQ
the
b
ttOflh0
guide
70
sertiflg
the
buttonh000t
70
TVpeS0tt00
71
Fully
autOmat
butt0nh0
72
SemiaUt0matc
bUttOflI0
manual
inSh
72-73
Manual
buttOnh0
74
8uttOfl0
with
gimP
thread
75
Tips
tor
a
peeCt
buttOnh0
76
I
uuonnoies
7.
Buttonholes
Your
Expression
has
the
perfect
buttonhole
for
every
fabric
and
garment.
Whether
you
wish
to
sew
buttonholes
on
jackets,
pants
(trousers),
blouses
or
stretch
fabrics.
4
different
buttonholes
(3
on
the
model
2034)
give
your
garments
the
professional
touch.
The
Expression
uses
sensormatic
buttonhole
guide
No.
10
and
sensors
to
ensure
that
every
buttonhole
is
sized
accurately.
Perfect
buttonholes
can
be
sewn
on
even
the
most
difficult
of
fabrics
such
as
velvet,
plush,
knitted
fabrics
and
heavy
knits.
Your
Expression
offers
you
three
ways
of
sewing
a
buttonhole:
fully
automatically
semiautomatically
manual
Inserting
the
sensormatic
buttonhole
guide:
Push
the
metal
part
of
the
buttonhole
guide
into
the
slot
(between
the
two
arrows)
on
the
back
of
the
needle
plate.
The
white
part
extends
over
the
needle
plate.
Press
the
guide
towards
the
front
as
far
as
it
will
go.
It
must
spring
back
slightly
so
that
there
is
a
small
gap
between
the
guide
and
the
back
of
the
machine.
Attaching
buttonhole
foot
No.
5:
Use
buttonhole
foot
No.
5
to
sew
buttonholes.
Before
starting
to
sew,
pull
the
runner
of
the
foot
toward
the
front
to
the
second
red
mark
(also
see
“Changing
the
presser
foot”
page
29).
Snap
on
buttonhole
foot
No.
5.
4
70
I_,_II,’,I
II
Ej
4
74
74
74
Choose
from
the
following
buttonholes:
1)
Linen
buttonhole
No.
9
for
blouses,
shirts,
dresses,
etc.
2)
Stretch
buttonhole
No.
75
(No
60
on
the
model
2034)
for
stretch
fabrics
3)
Keyhole
buttonhole
No.
76
(No
61
on
the
model
2034)
for
jackets.
coats
and
pants
(trousers)
4)
Round
buttonhole
No.
74
(only
on
model
2044)
for
ladies’
outer
garments,
especially
blouses
and
dresses
71
I
Buttonholes
Fully
automatic
buttonhole
Select
the
desired
buttonhole
(e.g.
No.
9).
Adjust
the
size
of
the
buttonhole
by
using
the
-1+
button
B.
You
can also
adjust
the
buttonhole
width
(-1÷
button
A)
and the
buttonhole
density
(-1+
button
C).
Sew
as
many
buttonholes
as
you
wish.
Your
Expression
will
continue
to
sew
the
same
size
buttonhole
until
you
make
adjustments.
Semi-automatic
buttonhole
You
can
also
finish
a
buttonhole
manually
by
pressing
the
“reverse
sewing”
button
(33)
one
time
after
you
have
stitched
the
first
bartack
of
the
buttonhole.
This
will
allow
you
to
place
the
last
or
back
bartack
where
you
want
it.
The
word
“man”
appears
in
the
Expression
window,
after
you
have
touched
reverse.
This
indicates
a
manual
finish
of
the
buttonhole
is
desired.
Before
the
left
side
of
the
buttonhole
ends,
the
machine
will
slow
down.
When
the
left
side
of
the
buttonhole
is
the
same
length
as
the
right
side
of
the buttonhole
press
the
“reverse
sewing”
button
(33)
once
again.
4
72
I
•1
s4
.
1;
.4
1,-i
I-i-—
“,,
I
U
DUD
The
second
bartack
will
be
sewn
and
complete
the
buttonhole.
The
word
“auto”
appears
in
the
window.
All
remaining
buttonholes
will
now
be
sewn
automatically.
Note:
If
the
length
or
stitch
density
of
a
programmed
buttonhole
is
changed,
the
programming
is
cancelled.
Reprogramming
with
a
new
length
value
or
a
new
density
is
required.
73
Manual
buttonhole
You
can
also
set
the
length
of
the
buttonhole
while
sewing.
Select
the
desired
buttonhole.
Press
the
“reverse
sewing”
button.
The
word
“man”
appears
in
the
window.
The
buttonhole
length,
set
previously,
disappears.
Once
you
have
reached
the
desired
length.
press
the
“reverse
sewing”
button
once
again.
The
machine
will
now
sew
the
first
bartack
and
the
left
side
of
the
buttonhole.
Before
the
left
side
of
the
buttonhole
is
completed,
the
machine
will
slow
down.
To
complete
the
buttonhole
with
a
second
bartack,
press
the
“reverse
sewing”
button
once
again.
The
machine
will
sew
the
second
bartack
and
complete
the
buttonhole.
The
word
“auto”
appears
in
the
window.
All
remaining
buttonholes
can
now
be
repeated
fully
automatically.
Note:
The
programming
of
the
buttonhole
is
deleted
when
another
program
is
selected.
You
can
also
place
the
last
bartack
manually,
even
after
the
buttonhole
has
been
programmed.
Press
the
‘reverse
sewing”
button
one
time
after
you
have
stitched
the
first
bartack.
The
word
“man”
appears
in
the
window.
This
indicates
a
manual
finish
of
the
buttonhole
is
desired.
Before
the
left
side
of
the
buttonhole
ends,
the
machine
will
slow
down.
When
the
left
side
of
the
buttonhole
is
the
same
length
as
the
right
side
of
the
buttonhole
press
the
“reverse
sewing”
button
(33)
once
again.
The
second
bartack
will
be
sewn
and
complete
the
buttonhole.
The
word
“auto”
appears
in
the
window.
Keyhole
buttonhole
—76
Keyhole
buttonholes,
up
to
a
length
of
40
mm
can
be
sewn
with
the
buttonhole
foot.
Warning:
The
keyhole
buttonhole
must
be
sewn
with
the
rounded
end
towards
the
edge
of
your
garment!
project.
Howe
ver
the
buttonhole
will
begin
sewing
from
the
bartack
end.
It
is
important
to
first
mark
the
length,
measuring
from
the
starting
point
inwards.
Always
sew
the
buttonhole
from
the
inside
to
the
outside
towards
the
edge.
The
keyhole
buttonhole
is
sewn
fully
automatically
Choose
stitch
76.
A
standard
keyhole
buttonhole
will
appear
in
the
window
along
with
the
width,
length
and
stitch
density
indications.
These
settings
can
be
altered,
Tip:
Cut
open
all
buttonholes
with
the
seam
ripper
Open
the
curve
of
the
keyhole
buttonhole
with
a
belt
punch
or
awl.
“I
74
4
I
I
PFAFF
Instruction
manual
0
6
expression
20
quilt
expression
2044
I
£
I
I
I
0__
J
L
Buttonhole
with
gimp
thread
Buttonholes
that
are
sewn
with
gimp
threads
are
more
durable
and
will
not
stretch.
Use
pearl
cotton
or
a
regular
gimp
thread
approximately
the
same
color
as
the
sewing
thread
to
stitch
over.
Place
the
center
of
a
length
of
gimp
thread
over
the
metal
bar
extending
from
the
center,
back
of
the
buttonhole
foot.
Pass
the
thread
ends
under
the
foot
and
pull
up
into
the
right
and
left
guides
on
the
clamp
at
the
front
of
the
presser
foot.
Buttonhole
No.
9
can
now
be
sewn.
After
completing
the
buttonhole,
pull
the
ends
of
the
gimp
thread
until
the
loop
of
thread
is
hidden
below
the
buttonhole
bartack.
Cut
off
the
gimp
threads
just
behind
the
final
bartack.
Keyhole
buttonhole
with
gimp
thread
Place
the
center
of
a
length
of
gimp
thread
over
the
metal
bar
extending
from
the
center,
front
of
the
buttonhole
foot.
Pass
the
thread
ends
under
the
foot
and
pull
up
into
the
right
and
left
guides
on
the
clamp
at
the
back
of
the
presser
foot,
Guide
the
gimp
thread
along
the
foot
at
the
side.
Sew
the
right-hand
seam
of
the
buttonhole.
After
the
machine
sews
the
first
few
stitches
of
the
curved
end
pull
the
gimp
thread
down
from
the
clamp
with
a
straight
pin.
surface.
Pull
the
gimp
thread
on
the
left
towards
the
rear
until
the
loop
is
just
in
front
of
the
needle.
Carefully
sew
the
curve.
After
sewing
the
curve,
hold
the
gimp
thread
a
little
more
taut
and
finish
sewing
the
buttonhole.
Cut
off
the
excess
gimp
thread.
I
Warning:
The
presser
foot
must
not
be
raised
from
the
fabric
75
bUuOflnoies
Buttonhole
tips:
A
wider,
less
dense
buttonhole
is
recommended
on
heavy
fabrics.
Use
presser
foot
No.
1
for
buttonholes
that
are
to
be
sewn
very
close
to
a
reinforced
edge.
Materials
that
shift
or
stretch
easily
should
be
reinforced
with
water-soluble,
tissue
paper
or
other
lightweight
stabilizer.
Keyhole
buttonholes
are
particularly
stable
and
durable
if
a
gimp
thread
is
inserted
while
sewing
(see
“Keyhole
buttonhole
with
gimp
thread).
Linen
buttonholes
are
particularly
dense
and
attractive
if
you
use
buttonhole
twist
thread.
Buttonholes
are
normally
selected
a
little
larger
than
the
button
diameter.
It
is
important
to
always
sew
a
test
buttonhole
on
the
same
fabric/stabilizer
as
your
project
76
I
Accessories
and
needles
I
Presser
feet
j
(standard
accessories)
78-79
Special
accessory
table
80-8
1
Felling
foot/appliqué
foot
82
Pintuck
foot
83
r
Cording
foot/shirring
foot
84
I
Knit
edge
foot/ruffler
85
I
1/4
inch
quilt
and
patchwork
foot
86
-
Free
motion
quilting
foot!
I
bias
binder
87
I
Pintuck
foot
with
guide
88
j
Non-stick
fancy
stitch
foot
for
leather
88
7/9
Hole
foot/braiding
foot
89
4.
Circular
embroidery
guide
90
I
Fringe
foot/narrow
edge
foot
91
Needle
chart
92,
93
Ij
ii
I
Mccessorie
ëIEIU
Presser
feet
(normal
accessories)
Standard
presser
foot
No.0
Order
No.:
98-694
816-00/000
Fancy
stitch
foot
(for
dual
feed)
No.
1
Order
No.:
98-694
814-00/000
Fancy
stitch
foot
(not
for
dual
feed)
No.
2
Order
No.:
98-694
897-00/000
Blind
stitch
and
overlock
foot
No.
3
Order
No.:
98-694
890-00/000
Zipper
and
edge
presser
foot
No.
4
Order
No.:
98-694
884-00/000
Buttonhole
foot
No.
5
Order
No.:
93-036
990-91/000
Darning
foot
No.
6
Order
No.:
93-035
960-91/000
Roll
hemmer
No.7
J...—
Order
No.:
98-694
818-00/000
2
4
78
-
-.
.
e
Sensormatic
buttonhole
guide
No.
10
Order
No.:
93-037
595-91/000
Edge
guide
No.
8
Order
No.:
98-802
422-00/000
1171
II
i4
Second
spool
holder
Seam
ripper
Brush
Bulb
remover/Needle
plate
changer
Order
No.:
93-038
920-91/000
/
SCHMETZ
IJNIVEF9SAL
130705H
00
80
90
100
70
921214
1611
.
7.
Oil
Order
No.:
93-033
063-44/000
Order
No.:
99-053
01
6-91/000
Order
No.:
93-847
979-91/000
Order
No.:
93-035
91
0-91/000
1
Needle
box
Order
No.:
48-020
804-32/000
2
Felt
pad
Order
No.:
93-033
064-05/000
2
/
1
3
Bobbins
Order
No.:
93-040
970-45/000
4-6
Spool
cap
4.
Order
No.:
93-035
050-44/000
5.
Order
No.:
93-036
048-44/000
6.
Order
No.:
93-036
049-44/000
Accessories
and
neeaies
I
Special
accessories/preSser
feet
(available
from
your
dealer):
egnat1oi
OrdetNo
Sewing
work
Appliqué
foot
93-042
941-91/000
For
appliqué
work
Open toe
appliqué
foot
93-036
931-91/000
Allows
full
view
of
work
surface
Bias
binder
98-053
484-91/000
For
binding
edges
with
bias
tape
Pintuck
foot
5
grooves
(size
80
twin
93-042
950-91/000
For
creating
pintucks
on
needles
with
needle
spacing
2.0
-
2.5)
light
to
medium weight
fabrics
Pintuck
foot
7
grooves
(size
80
twin
93-042
953-91/000
For
creating
pintucks
on
needles
with
needle spacing
1
.6
-
2.0)
lightweight
fabrics
Pintuck
blade
(2)
93-035
952-45/000
Enhances
the
effect
of
an
uncorded
pintuck
Fringe
foot
93-042-943-91/000
For
creating
fringe/loop
embroidery
effects
Straight
stitch
foot
with
round hole
98-694
821
-00/000
Warning!
Only
use
straight
stitch
in
center
needle
position.
Needle
plate
with
round
hole
98-694
822-00/000
For
top-stitching
seams,
quilting
and
sewing
very
light
and
soft
materials
(silk,
jersey
etc.)
Warning!
Only
use
straight
stitch
in
center
needle
position.
Felling
foot
4.5
mm
93-042
946-91/000
For flat-felled
seams
on
Felling
foot
6.5
mm
93-042
948-91/000
light
to
medium
weight
fabrics
Shirring
foot/Gathering
foot
93-036
998-91
/000
For
gathering
on
very
light
weight
fabrics
Shirring
foot/Gathering
foot
(metal)
93-036
967-91/000
For
gathering
on
light
to
medium
weight
fabrics
Ruffler
98-999
650-00/000
For
placing
dense
or
loose
pleats
at
regular
intervals.
Warning!
Only
use
straight
stitch
in
center needle
position.
Cording
foot
(3
groove)
93-036
915-91/000
For
cording
Eyelet
plate
dia.
4
mm
93-036
976-45/000
For
eyelet
embroidery
Eyelet
plate
dia.
6
mm
93-036
947-45/000
For
eyelet
embroidery
Roll
hemmer
2
mm
(without
dual
feed)
98-694
873-00/000
For
hemming
edges
Hemmer
4
mm
(for
dual
feed)
98-694
823-00/000
For
hemming
edges
Hemmer
3
mm
(without
dual
feed)
98-694
818-00/000
For
hemming
edges
Knit-edge
foot
93-042
957-91/000
For
sewing
knitted
fabrics
Non-stick
foot
(for
dual
feed)
93-036
91
7-91/000
For
sewing
leather
and
synthetics
Non-stick
foot
(without
dual
feed)
93-036
922-91/000
For
embroidering
leather
Non-stick
fancy
stitch
foot
93-036
962-91/000
For
embroidering
leather
Circular
embroidery
guide
93-036
953-91/000
Circular
embroidery
80
I
14
I
i
I
‘I
I
Accessories
and
needk
Designation
Order
No.
Sewing
work
Bridging
guide
93-036
952-46/000
For
sewing
together
two
edges
of
fabrics
with
a
hemstitch
seam
effect
1/4
Quilting
and
patchwork
foot
93-036
925-91/000
For
quilting
and
patchwork
jobs
(without
dual
feed)
1/4
Quilting
and
patchwork
foot
(for
dual feed)
93-036
927-91/000
For
quilting
and
patchwork
jobs
Pintuck
foot
with
guide
6
mm
93-036
942-91/000
For
embroidering
areas
between
pintucks
Braiding
foot
(for
dual
feed)
93-036
936-91/000
For
oversewing
cords
7/9
hole
foot
(for
dual
feed)
93-036
946-91/000
For
oversewing
decorative
threads
Narrow-edge
foot!
93-036
939-91/000
For
topstitching
narrow
edges,
sewing
Stitch-in-the-ditch
foot
lace
or
second
fabric
edge
to
main
fabric
and
stitch-in-the-ditch
quilting
Free
motion
quilt
foot
93-036
963-91/000
For
quilt
and
embroidery
work
Quilt
work
finger
guard
93-036
910-91/000
For
all
sewing
work
Quilt
guide
93-036
909-91/000
For
quilt
work
The
following
pages
contain
application
examples
of
some
special
accessory
feet.
81
Accessories
and
needles
Flat
felled
seams
are
particularly
strong
and
are
commonly
known
as
jeans
seams.
Seams
on
sportswear
and
children’s
wear,
blouses
and
shirts
are
more
durable
with
this
technique.
You
can
make
these
seams
particularly
decorative
by
using
a
sewing
thread
of
a
contrasting
color.
The
felling
foot
is
available
in
two
different
widths.
Attach
the
felling
foot
to
the
presser
foot
holder.
Place
the
fabrics
wrong
sides
together.
Overlap
the
raw
edge
of
the
lower
ply
by
about
3/8
“to
5/8(1
-1.5cm).
Place
this
overlapping
edge
over
the
tongue
of
the
felling
foot.
The
fabric
must
be
placed
fully
under
the
presser
foot.
Sew
along
the
folded
edge
with
a
straight
stitch.
Separate
the
fabric
and
feed/the
protruding
hem
into
the
felling
foot.
The
hem
is
turned
over
by
the
foot
and
is
overstitched
along
the
edge.
Pull
the
two
fabric
layers
taut
during
sewing.
Stitch:
1
Stitch
length:
3
Tension:
4-5
Appliqués
are
easily
sewn
and
always
produce
a
beautiful
effect.
By
using
different
materials
and
patterns
you
can
create
countless
new
designs.
You
can
make
a
perfect
densely
stitched
seam
with
the
appliqué
foot,
which
has
a
special
cutout
on
its
sole
for
the
satin
stitch
seam.
Attach
the
appliqué
foot.
Transfer
your
drafted
pattern
to
the
paper
side
of
a
fusible,
paper-backed
webbing.
Remember
that
any
letters
or
numbers
have
to
be
drawn
as
mirror
images.
Iron
the
fusible
webbing
onto
the
appliqué
material.
Cut
out
your
motif
and
peel
the
paper
from
the
back
of
the
appliqué.
Position
and
press
your
appliqué
pieces
in
place
on
your
base
fabric.
Place
a
stabilizer
under
your
work
area.
Stitch
over
all
contours
with
a
narrow
satin
stitch
zigzag.
Make
sure
that
the
needle
sews
over
the
outer
edge
so
that
no
fraying
occurs
later.
Stitch:
3
Stitch
length:
0.35
Stitch
width:
L5-4.O
Tension:
2
-
3
ih’
Felling
foot
Appliqué
foot
f
82
‘_)
I I
ç
c
i
i
i i
i..,
L,
‘...
This
classic
heirloom
sewing
technique
can
be
easily
duplicated
on
many
types
of
fabric
such
as
light
cotton
and
linens.
Undergarments
and
children’s
clothes
are
given
a
nostalgic
touch
by
pintucking.
Attach
the
pintuck
foot.
Insert
a
twin
needle
on
your
machine
(e.g.
130/705
H-ZWI;
1.6
or
2.0
mm
needle
spacing:
size
80).
Thread
the
two
needles
(see
page
31).
Using
a
water-soluble
marker,
draw
a
placement
line
for
your
first
pintuck.
Increase
the
bobbin
thread
tension
by
turning
the
adjusting
screw
of
the
bobbin
case
slightly
to
the
right
(see
chapter
on
“Bobbin
thread
tension”).
This
will
help
form
well-defined
pintucks.
Sew
your
first
pintuck.
When
you
start
on
the
second
pintuck,
allow
the
first
pintuck
to
run
parallel
in
a
groove
in
the
foot.
This
will
produce
evenly
spaced
pintucks.
Stitch:
1
Stitch
length:
2.5
Tension:
5
Tip:
If
you
would
like
to
emphasise
the
pintuck
effect,
you
can
attach
a
pintuck
blade
(special
accessory)
on
the
front
edge
of
the
needle
plate.
The
pintuck
blade
pre
shapes
the
fabric
prior
to
sewing
and
produces
a
better-defined
pintuck.
For
thin
fabrics
use
the
pintuck
foot
with
7
grooves
and
the
small
pintuck
blade,
for
heavier
materials
use
the
pintuck
foot
with
5
grooves
and
the
large
pintuck
blade.
Inserting
a
gimp
thread
creates
a
similar
optical
effect
by
making
the
pintuck
appear
even
more
raised.
A
cording
tongue
is
not
used
when
inserting
a
gimp
thread
in
your
pintucks.
Remove
the
needle
plate.
Thread
the
gimp
thread
from
below
through
the
hole
at
the
center
front
of
the
needle
plate.
Replace
the
needle
plate.
The
notch
between
the
needle
plate
and
the
sewing
machine
provides
space
for
the
gimp
thread
while
sewing.
Feed
the
gimp
thread
under
the
work
support
so
that
it
does
not
become
knotted
during
sewing.
Gently
pull
the
fabric
taut
while
sewing
the
pintucks.
Pintuck
foot
I
83
Cording
foot
Cording
is
a
technique
in
which
pearl
thread
or
a
fine
cord
is
overstitched
to
produce
a
purl
seam.
With
this
you
can
obtain
an
effect
similar
to
braiding.
Appliqués
can
also
be
made
more
effective
with
this
seam.
Attach
the
cording
foot.
Place
the
pearl
thread
in
the
foot
so
it
leads
through
one
of
the
grooves
at
the
front
and
lies
under
the
presser
foot
at
the
back.
Overstitch
the
pearl
thread
with
a
narrow
satin
stitch.
This
produces
what
is
known
as
the
purl
seam.
Tip:
You
can
also
obtain
a
remarkable
effect
by
overstitching
a
medium
pearl
thread
with
a
thread
of
a
different
color.
Stitch
12
Stitch
length:
0.4
-
0.6
Stitch
width:
1.5
-2
Tension:
3
Shirring
foot/Gathering
foot
Beautiful
gathering
effects
can
be
achieved
quickly
and
easily
with
the
shirring
foot,
e.g.
on
lightweight
children’s
wear
or
home
decorating
projects.
Attach
the
shirring
foot
by
hooking
the
rear
bar
of
the
foot
into
the
rear
groove
of
the
foot
holder.
Push
the
foot
upwards
until
it
snaps
into
the
front
bar.
Place
the
fabric
to
be
gathered,
face
up,
under
the
presser
foot,
and
the
fabric
to
remain
flat,
face
down,
on
the
top
through
the
foot
cutout.
Hold
the
top
fabric
slightly
taut
while
sewing.
The
harder
you
pull,
the
greater
the
gathering
effect
you
achieve.
Be
sure
to
guide
the
fabric
edges
evenly
through
the
foot.
Disengage
the
shirring
foot
by
pushing
it
down
at
the
front
and
remove
it
in
the
direction
of
the
groove
of
the
presser
foot
holder
at
the
back.
Tip:
Tighter
gathers
can
be
achieved
by
increasing
the
needle
thread
tension
and
the
stitch
length.
Stitch:
1
Stitch
length:
3
Tension:
3-5
84
Knit
edge/piping/beading
foot
Thick
seams
in
knitted
fabrics
or
imitation
furs
can
be
sewn
easily
with
the
knit
edge
foot.
In
order
to
obtain
a
perfect
seam
on
knit
fabrics
(e.g.
shoulder
seams),
we
recommend
sewing
over
a
wool
thread,
pulled
slightly
taut
into
the
seam.
This
will
give
the
seam
additional
strength
and
keep
it
from
stretching
out
of
shape.
Stitch:
18
Stitch
length:
3.0
Stitch
width:
6.0
Tension:
3-5
Ruffler
With
the
ruffler
you
can
make
closely
or
widely
spaced
pleats
automatically
while
sewing.
This
is
very useful
for
ruffles,
frills,
home
textiles,
etc.
The
ruffler
can
be
used
in
three
different
ways:
1.
Folding
and
securing
pleats
in
fabric.
2.
Folding
pleats
in
fabric
and
securing
to
a
second
fabric
in
one
operation.
3.
Folding
pleats
in
fabric,
attaching
lace
and
securing
to
another
fabric
in
one
operation.
When
you
buy
the
ruffler
from
your
PFAFF
dealer,
lull
operating
instructions
are
included.
Stitch
1
Stitch
length:
3
Tension:
3-5
I’t,,ul
ItS
dl
ILl
I
IUI
S
I
I
I
85
A
quilt
consists
of
two
layers
of
fabric
with
a
layer
of
batting
sandwiched
between.
Many
geometric
pieces
of
fabric
are
joined
together
in
continually
changing
patterns
to
form
the
top
layer
of
the
quilt.
This
is
tacked
to
a
middle
layer
of
polyester
or
cotton
batting
and
a
backing
layer.
The
1/4
inch
quilt
and
patchwork
foot
is
particularly
suitable
for
joining
your
pieces
of
fabric.
The
clearance
between
the
needle
and
the
outer
edge
of
the
foot
is
1
/4
(6.3
mm)
and
between
the
needle
and
the
inner
edge
of
the
foot
1/8
(3.15
mm).
Attach
the
1/4
inch quilt
and
patchwork
foot.
Engage
the
dual
feed
(IDT).
Sew
together
your
pieces
of
fabric
using
stitch
1.
For
a
seam
allowance
of
1
/4
guide
your
fabric
along
the
outer
edge
of
the
foot.
For
a
seam
allowance
of
1/8
guide
your
fabric
along
the inner
edge
of
the
foot.
Stitch:
1
Stitch
length:
2.5
Tension:
3
-
5
In
traditional
quilting
the
three
layers
of
fabric
are
joined
with
small
hand
stitches.
This
hand-stitched
look
can
be
accomplished faster
and
easier
with
the
sewing
machine
(stitch
11).
Use
invisible
(monofilament)
thread
in
the
needle.
Use
a contrast
or
complementary
polyester
or
cotton
thread
in
the
bobbin.
Set
the,needle
thread
tension
to 7-9.
Loosen
the
bobbin
thread
tension
approximately
1/4
turn
counterclockwise
to
allow
the
needle
thread
to
pull
the
bobbin
thread
to
the
top
side
of
your
work.
You
may
find
it
beneficial
to
purchase
a
second
bobbin
case
(available
from
your
PFAFF
dealer)
for
working
with
specialty
techniques
and
threads.
When
you
sew
the
stitch
on
the
three
layers
of
your
quilt.
you
should
only
see
the
triple
stitch
of
your
bobbin
thread.
The
intermediate
stitch
disappears
and
thus
produces
a
hand-stitched
appearance.
Adjust
your
needle
and
bobbin
thread
tensions
as
needed
to
produce
the
desired
effect
Stitch:
11
Stitch
length:
3
-
4
Tension:
9
1/4
inch
Quilt
and
patchwork
foot
Quilting
of
the
fabric
layers
86
Free-motion
quilt
foot
S
The
free-motion
quilt
foot
in
combination
with
the
straight
stitch
is
well
suited
for
free-motion
quilting.
The
three
layers
5
of
your
quilt
are
guided
manually
during
free-motion
quilting.
The
faster
you
sew,
the
more
consistent
and
uniform
your
stitches
will
become.
Try
this
technique
out
first
on
a
test
piece.
Free-motion
quilting
is
possible
in
both
curved
and
S
straight
lines.
For
free-motion,
straight-line
quilting
(center
needle
position),
with
a
spacing
of
1/4 inch
(6.35
mm),
use
S
the
four
red
markings
on
the
corners
of
the
foot
as
a
guide.
Loosen
the
screw
on
the
back
of
the
presser
foot
holder.
5
Press
the
free-motion
quilt
foot
gently
together
with
thumb
and
index
finger.
S
Guide
the
pin
of
the
free-motion
quilt
foot
into
the
hole
of
the
presser
foot
holder
as
far
as
it
will
go.
The
long
fork
S
of
the
free-motion
quilt
foot
must be
positioned
behind
the
needle
clamp.
Tighten
the
screw.
5
Bring
the
free
motion
quilt
foot
into
the
darning
position
(see
page
63)
and
lower
the feed
dog
(see
page
34).
Tip:
Free-motion
embroidery
can
also
be
completed
using
the free-motion
quilt
foot.
Stitch:
1
Stitch
length:
25
Tension:
3-5
Bias
binder
Binding
with
bias
tape
is
a
very
easy
method
of
giving
fabric
edges
a
smooth and
neat
appearance.
For
this
you
need
unfolded
bias
tape
about
1’
(24
mm)
wide.
Remove the
presser
foot
and
holder. Attach
the bias
binder.
Cut
the
beginning
of
the
bias
tape
at
a
diagonal.
Feed
the
tape
into
the
scroll
of
the
binder
and
pull
out
to
the
back.
Adjust
the
binder
and/or
the
needle
position
so
that the
needle
pierces
the
fabric
approximately
1/16
(1
-
1.5
mm)
from
the
folded
edge
of
the
bias
tape.
Stitch
about
1’
(2.5
cm)
along
the bias
tape.
Insert
the
edge
of
the
fabric
to
be
bound
between
the
bias
tape
edges
into
the
slot
of
the
binder.
The
bias
tape
will
enclose
the
raw
edge
automatically
during
sewing.
Tip:
You
can
obtain
an
additional
decorative
effect
by
using
a
zigzag
or
fancy
stitch.
Stitch:
optional
Tension:
3-5
—I
I
:i
I6
Li
I
87
With
this
foot
you
can
accurately
sew
pintucks
with
a
spacing
of
5
or
1 1
mm.
The
same
foot
allows
you
to
precisely
space
decorative
stitches
up
to
6
mm
wide
between
the
pintucks.
Attach
the
pintuck
foot
with
guide.
The
foot
can
be
attached
with
the
guide
pointing
to
the
left
or
the
right.
Insert
a
twin
needle
(2.0
or
2.5
mm
space
between
needles).
Thread
the
two
needles
(see
page
31).
Set
the
needle
thread
tension
tight
(4
-
5)
and
sew
one
pintuck
(see
also
page
83)
with
or
without
gimp
thread.
Place
the
first
pintuck
under
the
groove
in
the
extended
guide.
Sew
a
second
pintuck.
The
second
pintuck
will
automatically
be
spaced
to
allow
a
decorative
stitch
to
be
sewn
in
the
area
between
pintucks.
Sew
all
remaining
pintucks.
Replace
the
twin
needles
with
a
normal
sewing
needle.
The
synthetic
coating
on
the
underside
of
this
foot
makes
it
particularly
suitable
for
sewing
decorative
and
utility
stitches
of
up
to
6
mm
wide
on
leather,
synthetic
leather
and
vinyl.
It
may
be
helpful
to
back
these
fabrics
with
a
fusible
woven
or
knit
interfacing.
Due
to
the
stretch
of
these
fabrics,
it
is
important
to
use
a
stabilizer
under
the
fabric
when
embroidering.
A
needle
with
a
longer
eye
(system
130
N)
is
recommended
for
thicker
leather.
On
softer
leathers
an
embroidery
needle
works
well.
Attach
non-stick
fancy
stitch
foot.
Embroider
leather
as
desired.
Remove
stabilizer.
WARNING!
Very
closely
set
stitch,
i.e.
short
stitch
length!
tight
stitch
density,
may
cause
leathers,
synthetic
leathers
and
vinyls
to
perforate
and
tear.
It
is
important
to
remember
that
needle
piercing
points
will
remain
visible
in
leather.
Stitch:
optional
Set
the
needle
thread
tension
to
3.
Place
stabilizer
under
work
area.
Place
two
pintucks
in
the
guides
on
either
side
of
the
center
of
the
foot.
Stitch
your
desired
decorative
stitches
in
this
space.
Stitch:
1
Stitch
length:
25
Tension:
3-5
1”
/
Pintuck
foot
with
guide
Non-stick
fancy
stitch
foot
(for
leather)
88
7/9
hole
foot
Beautiful
decorative
effects
can
easily
be
achieved
with
this
presser
foot.
Up
to
9
cords
may
be
stitched
over
using
decorative
stitches
and
a
variety
of
embroidery
threads.
Cut
your
cords
to
the
desired
length.
Thread
the
cords
through
the
holes
in
the
foot
from
the
top
to
the
bottom.
Lead
the
cords
under
the
presser
foot
and
out
the
back.
Leave
the
thread
tails
extending
about
1
1/2
inches
to
2
inches
(4
-
5
cm)
at
the
back.
Attach
the
7/9
hole
foot
Sew
over
the
threads
with
a
stitch
and
thread
of
your
choice.
Tip:
Pearl
thread
or
embroidery
twist
is
well
suited.
Tie
the
cord
tails
together
to
prevent
the
cords
from
slipping
out
of
the
foot.
Stitch:
optional
Tension:
3
I
I
-
—,
—.
Braiding
foot
This
special
foot
is
best
suited
for
overstitching
heavy/bulky
cords
(e.g.
loosely
twisted
wool)
or
a
narrower
tape/ribbon.
Thread
your
cord
or
ribbon
through
the
wire
loop/guide
at
the
front
of
the
foot.
Feed
it
down
through
the
hole
in
the
center
of
the
foot
and
guide
under
the
foot
and
to
the
back.
Attach
the
braiding
foot
to
the
machine.
Select
a
stitch
and
decorative
thread
of
your
choice
and
stitch
over
the
cord
or
ribbon.
Stitch:
optional
Tension:
3
0
IC
H
1
H
1
I
89
Circular
embroidery
guide
The
circular
embroidery
guide
allows
you
to
create
perfect
embroidered
circles.
The
creative
possibilities
are
endless!
Your
fabric
is
automatically
fed
in
a
circle,
allowing
you
to
embellish
your
clothing
and
household
items.
The
guide
is
marked
in
1
cm
increments.
Mark
a
center
point
with
a
fabric
marker
on
your
fabric.
Insert
the
circular
embroidery
guide
from
the
left
into
the
hole
at
the
back
of
the
presser
foot
holder.
The
radius
of
the
circle
is
determined
by
the
placement
of
the
guide
in
the
holder.
The
full
width
of
the
circle
will
be
equal
to
twice
the
distance
between
the
needle
and
the
rubber
guide
point.
The
guide
is
secured
with
the
screw
on
the
presser
foot
holder.
Stabilize
your
fabric.
Place
the
center
marked
point
of
your
fabric
directly
below
the
rubber
point
of
the
embroidery
guide.
Select
the
desired
decorative
stitch
and
begin
sewing.
Change
the
radius
with
every
new
circle
by
loosening
the
screw
and
sliding
the
circular
embroidery
guide
to
another
mark
on
the
guide
arm.
Stitch:
optional
90
Fringe
foot
With
this
special
foot
for
fringe
embroidery
you
can
produce
fantastic
effects
in
no
time.
This
foot
is
particularly
effective
on
terry
cloth.
Mark
your
desired
pattern
with
a
fabric
marking
pen.
Place
a
piece
of
stabilizer
under
the
fabric.
Attach
the
fringe
foot.
Set
the
upper
thread
tension
to
2
3.
Embroider
the
motif
row
by
row.
For
circles
you
must
work
from
the
outside
inwards.
When
using
heavier
threads,
you
should
select
a
slightly
longer
stitch
length.
Always
sew
a
test
seam
first.
When
you
have
finished,
pull
the
work
carefully
from
the
machine
by
holding
the
last
loops.
If
you
pull
too
quickly,
you
will
pull
the
end
loops
flat/tight.
Knot
the
beginning
and
end
threads
on
the
reverse
side.
Stitch:
3
I
I
Stitch
length:
0.5
-
1
Stitch
width:
1.5
-
2.5
Tension:
2
-
3
Narrow
edge
foot/Stitch-in-the-ditch
foot
This
presser
foot
makes
narrow-edge
topstitching
easier.
It
is
excellently
suited
to
edge-joining
separate
fabric
pieces,
i.e.
attaching
lace
to
a
finished
fabric
edge.
The
metal
guide
in
the
center
of
the
foot
acts
to
keep
the
two
fabrics
separated.
The
center
guide
also
makes
quilting
neat
and
easy.
The
metal
guide
follows
the
seam
for
perfect
quilting.
Topstitching
with
a
narrow
edge
For
narrow-edge
topstitching
place
the
fabric
edge
against
the
center
guide
of
the
presser
foot.
Move
the
needle
into
the
desired
left
hand
position
and
topstitch.
The
center
guide
allows
for
perfect
topstitch
spacing.
Stitch:
1
Stitch
length:
2.5
Tension:
3-5
Sewing
on
lace
Place
the
folded/pressed
edge
of
your
fabric
to
the
left
of
the
center
guide
and
the
finished
edge
of
your
lace
to
the
right
of
the
center
guide.
Both
fabric
and
lace
should
be
placed
under
the
foot
right
side
up.
The
center
guide
will
keep
the
fabrics
properly
separated
allowing
for
more
precise
stitching.
Choose
zigzag
stitch
No.
3
and
sew
catching
the
edge
of
the
fabric
and
the
lace.
Adjust
the
width
and
length
E
of
your
zigzag
as
desired.
Stitch:
3
Stitch
length:
1
-
3.0
Stitch
width:
1.5
-
3.5
Tension:
3-5
91
Accessories
and
needles
Needle
table
Using
the
correct
needle
guarantees
better
stitching
of
the
fabric.
Fabric
weight
Fabric
weight
Fabric
weight
light
medium
heavy
needle
size
needle
size
needle
size
607075
8090
100110120
Needle
points
ye4No
yoffle
,iitandeye
SiitabIej
130/705
H
Light
ball
point
Universal
needle
for
synthetics,
chiffon,
Size:
60-130
:::.Ez:::
batiste,
organdy,
woolens,
velvet.
fancy
seams
and
embroidery
work.
Medium
Coarse
knitted
fabrics.
Latex,
double-knit
130/705
H-SUK
Size:
70-100
ball
point
fabrics,
Quiana
and
Simplex.
1301705
H-PS
Medium
Stretch-fabric
needle
developed
Size:
75-100
—-----
ball
point
especially
for
Pfaff.
Particularly
suitable
for
delicate
stretch
and
knitted
fabrics.
130/705
H-SKF
,._—
Heavy
Wide-meshed
corsetry.
Lycra,
Simplex
Size:
90-110
ball
point
and
Latex
130/705
H-J
Acute
Twill,
work
wear,
heavy
linen,
blue
jeans
Size:
90-110
ball
point
and
light
canvas.
130/705
H-LR
Narrow
twist
Leather,
suede,
calf
and
goatskin
leathers
Size:
80-100
point
(cuts
right)
130/705
H-PCL
Narrow
twist
Imitation
leathers,
plastic
materials,
plastic
Size:
80-110
point
with
left
sheeting
and
oil
cloth
twist
groove
130
H-N
Light
ball
point,
Topstitched
seams
with
buttonhole
silk
Size:
70-110
long
eye
or
No.
30/3
synthetic
thread,
metallic
thread
130/705
H-WING
Hemstitching
Effective
hemstitching
on
heavily
dressed
Size:
100/1
20
point
materials,
organdy.
glass
cambric
1301705
H-M
Acute
Micro-fiber
woven
fabrics
Size:
60-80
round
point
130)705
H-Q
Light
ball
point
Topstitched
seams
for
quilting
Size:
80/90
130/705
H-E
Medium
Embroidery
work
Size:
75-90
ball
point
92
i
.
4*
H
1
I.
I
ri
I
R
Triple
needle
Before
sewing
the
desired
decorative
stitches.
check
whether
the
needles
can
penetrate
freely
by
turning
the
handwheel.
In
this
way,
needle
breakage
is
avoided
as
much
as
possible.
130/705
H
Size:
80
0.5-1.5
mm
very
narrow
2.5
mm
decorative
stitching
Size:
80
0.5-1.5
mm
very
narrow
3.0
mm
decorative
stitching
Needle
chart
Classification
Stitch
Stitch
Needle
-
Suitable
for
q
length
width
spacing
130/705
H-ZWI
2.5mm
1.6mm
normal
pintucks
Size:
80
2.5
mm
2.0
mm
normal
pintucks
130/705
H-ZWI
Size:
80
2.5
mm
2.5
mm
wide
pintucks
Size:
90
2.5
mm
3.0
mm
extra
wide
pintucks
Size:
100
3.0
mm
4.0
mm
topstitch
hem
for
knits
Fancy
patterns
with
twin
needles
Before
sewing
the
desired
decorative
stitches,
check
whether
the
needles
can
penetrate
freely
by
turning
the
handwheel.
In
this
way,
needle
breakage
is
avoided
as
much
as
possible.
q
nintat
sJtch
pngz
-.
.-
-
-
.-
130/705
H-ZWI
Size:
80
0.5-1.5
mm
wide
1.6
mm
decorative
stitching
Size:
80
0.5-1.5
mm
narrow
2.0
mm
decorative
stitching
Size:
80
0.5-1.5
mm
narrow
2.5
mm
decorative
stitching
t1emstitlVpcia1
twin
needile
J.L
.
-
130/705
H-ZWI-HO
II
Size:
80
2.3-3.0
mm
very
narrow
Decorative
hemstitch
I
Size:
100
2.0-3.0
mm
very
narrow
effect.
Well
finished
woven
fabric
and
fine
batiste
are
particularly
suitable.
93
Decorative
sewing!
Specialty
techniques
General
notes
on
decorative
sewing
96
Altering
pattern
width/length
for
combined
borders
96
Combined
borders
97
Combined
borders
using
twin
needle
97
Free-motion
monograms
98
Free-motion
embroidery
99
Tapering
with
satin-stitch
zigzag
100-101
Automatic
tapering
101
-1
02
Appliqué
103
Patchwork/Quilting
104-107
Cross-stitch
108
Eyelet
embroidery
109
Hemstitching
110
JUIdLlV
evvii
u-’’
i
General
notes
on
decorative
sewing
To
enhance
your
own
home
textiles
or
garments
your
Expression
offers
you
a
wide
variety
of
fancy
and
decorative
stitches.
Create
a
greater
variety
of
embellishments
by
combining
different
patterns,
colors
and
sizes.
Use
specialty
decorative
threads
to
enhance
the
lovely
stitching.
Always
use
stabilizers
under
fabric
when
sewing
decorative
stitches.
Properly
stabilizing
your
fabric
will
help
eliminate
distortion
of
your
decorative
stitches.
The
following
recommendations
apply
to
all
decorative
sewing:
The
stitch
length
and
width
can
be
altered
as
desired.
Lower
the
upper
thread
tension
to
between
2-3.
Adjust
as
needed
so
bobbin
thread
does
not
pull
to
the
top
side
of
your
project.
Your
embroidery
results
will
be
much
prettier
if
your
tension
is
properly
adjusted.
Presser
foot
No.
1
(for
dual
feed)
and
No.
2
(without
dual
feed)
are
most
suitable
for
decorative
work.
We
recommend
presser
foot.
No.
2
for
heavier
fabrics.
)
ki
Changing
the
pattern
width
The
pattern
width
can
be
altered
using
button
pair
A
(1).
The
width
can
also
be
adjusted
while
sewing.
Changing
the
pattern
length
The
pattern
length
can
be
altered
using
button
pair
B
(2).
The
length
can
also
be
adjusted
while
sewing.
L
96
_p
_;
r—
J—
,.,
——.
4.fr.
%;p
.—
--
4u
Combined
Borders
Create
borders
of
any
width
by
combining
different
decorative
stitches.
Rayon
embroidery
threads
give
shiny,
smooth
stitching
results
and
come
in
many
colors
and
weights.
Place
stabilizer
under
fabric.
Mark
the
center
of
your
fabric
with
a
fabric
marking
pen!
pencil.
Sew
stitch
57
(model
2034
stitch
50);
stitch
width
6
mm
along
your
line.
Next
press
the
“Pattern
mirror
button”
(39).
Position
your
fabric
even
with
the
top
of
the
first
row
of
stitching.
Sew
the
second
row
of
stitching
directly
across
from
the
first.
Sew
stitch
3;
stitch
density
0.2
mm
and
stitch
60
(model
2034
stitch
53)
along
each
side
of
your
center
embroidery.
Your
completed
border
should
now
have
six
rows
of
decorative
stitching.
Twin
needle
Additional
decorative
effects
can
be
achieved
using
a
twin
needle.
The
illustration
shows
what
beautiful
borders
can
be
created
with
just
a
little
imagination!
Note:
DO
NOT
use
a
twin
needle
when
the
warning
symbol
appears
in
the
window
(see
page
44).
/
,.
/
:
Ii
IaI
174
a
_
I
-—
Wj
1
WvWMW\NMJW\JWJW
•!v
V
•VV
JV
V
97
Decorative
sewing/peciaiiy
zecrlniquets
98
Free-motion
monograms
Use
stitch
3
(stitch
width
3-6
mm)
to
create
wonderful
monogram
initials
of
your
own
design.
Transfer
the
initials
with
a
fabric
marker
to
the
area
to
be
embroidered.
Attach
the
darning
foot
and
bring
it
into
the
darning
position
(see
page
63).
Lower
the
feed
dog.
Place
a
tear-away
stabilizer
under
your
fabric.
Then
place
a
piece
of
water-soluble
stabilizer
on
the
right
side
of
the
fabric.
Place
the
fabric
in
an
embroidery
hoop
and
use
the
zigzag
stitch,
in
varying
widths,
to
follow
your
traced
lines.
Do
not
forget
to
use
the
darning
position.
Knot
the
threads
on
the
back
of
your
project
and
remove
the
stabilizers.
The
remaining
water-soluble
stabilizer
will
dissolve
in
water.
TIP:
Sewing
at
a
medium
to
fast
speed
will
allow
you
to
move
the
fabric
more
slowly
and
give
you
more
control
of
your
free-motion
monogram.
A
slightly
faster
speed
will
also
give
you
more
consistency
in
the
density
of
your
stitches.
Practice
on
scrap
fabric
until
you
are
comfortable
with
the
free-motion
technique.
Block
capitals
are
a
little
easier
to
embroider.
Simply
stitch
along
the
marked
lines
with
stitch
3,
stitch
width
3-6
mm
and
stitch
density
0.2
-
0.3
mm.
Apply
stabilizer
under
the
fabric
and
water-soluble
stabilizer
on
the
top
of
the
fabric.
Mark
the
monogram
on
the
fabric.
Sew
along
the
marked
lines
with
the
zigzag
stitch.
I
I_
s
-
I
h1
J
4
I.
1;4
I
Free-motion
embroidery
These
striking
embroidery
designs
can
easily
be
sewn
with
your
Expression.
Set
your
Expression
as
for
free-motion
monograms.
Draw
the
outline
of
the
embroideries
on
fabric
where
you
want
to
stitch
them.
Follow
the
instructions
and
tips
for
free-motion
monograms
to
stitch
your
embroideries.
99
With
your
Expression
you
also
have
the
option
of
increasing
or
decreasing
the
width
of
the
zigzag
stitch
in
0.5
mm
increments.
This
technique
of
adjusting
the
width
of
a
zigzag
seam
is
called
TAPERING.
You
can
achieve
great
effects
by
adjusting
the
size
of
a
wide
zigzag
stitch.
Manual
change?
Regular
pattern
Place
stabilizer
under
fabric.
Set
needle
thread
tension
to
3.
Select
the
zigzag
stitch
needle
position
(stitch
12).
Pressing
the
“Pattern
mirror
button”
(39)
will
change
the
stitch
from
a
right
(C)
to
left
(A)
needle
position
stitch.
Zigzag
stitch
3
is
used
I
when
a
center
(B)
needle
position
motif
is
desired.
Set
stitch
length
to
0.2
-
0.3
mm.
Begin
sewing.
With
-1+
button
A
increase
the
width
from
0
to
6
mm
and
reduce
it
again
to
0
mm.
I
i
I
Note:
If
you
have
selected
the
right
or
left
needle
position,
the
stitch
width
only
changes
in
one
direction.
A
B
C
Decorative
sewing/Specialty
techniques
Tapering
with
the
satin-stitch
zigzag
100
I
I
t
,‘,.
I
I
i.
V
11
L:\
c
1
>
1
iJ
iI
I
—I
A
B
C
,I,
Manual
change!
Irregular
pattern
Place
stabilizer
under
fabric.
Set
needle
thread
tension
to
3.
Select
zigzag
stitch
12
for
motifs
with
a
right
or
left
needle
position
or
zigzag
stitch
3
for
motifs
with
a
center
needle
position.
Set
stitch
length
to
0.2
-
0.3
mm.
Using
-1+
button
A
increase
and
reduce
the
width
while
sewing.
Note:
If
you
have
selected
the
right
or
left
needle
position,
the
stitch
width
only
changes
in
one
direction.
Try
creating
flowers
and
leaves
with
this
technique.
These
larger
embroideries
are
perfect
for
home
decorating
projects
like
placemats,
cushions
and
valances.
Automatic
tapering
You
can
use
both
stitch
No.
3
and
stitch
No.
12
for
automatic
tapering.
If
you
would
like
to
embroider
the
corners
of
a
border,
select
zigzag
stitch
No.
12.
Press
the
tie-off
button
(36)
three
times.
A
dense
zigzag
stitch
appears
in
the
Expression
window
and
beside
it
the
word
“tapering”
with
an
arrow
pointing
to
the
taper
of
the
corner
on
the
left.
Start
sewing
the
point.
Continue
to
sew
to
the
length
you
desire,
then
press
the
reverse
sewing
button
(33)
while
sewing.
The
taper
will
be
sewn
automatically
at
an
angle
of
45°.
The
machine
stops
at
the
taper
and
the
needle
remains
in
the
fabric
so
that
you
can
turn
the
fabric
90°.
101
““
-
uecorative
sewing/peuldlLy
L
III
lIU
When
you
start
to
sew
again,
the
machine
will
automatically
make
a
taper
at
45°.
The
present
sewing
operation
is
indicated
in
the
window.
To
start
the
pattern
without
a
taper,
press
the
tie-off
button
1(36)
twice
before
starting
to
sew.
Use
-1+
button
A
to
change
the
width
of
the
satin
stitch
before
sewing.
To
sew
a
pattern
without
a
taper,
press
the
tie-off
button
1(36)
four
times
before
starting
to
sew.
To
change
the
width
of
the
satin
stitch
and
begin
sewing
with
a
taper,
press
the
tie-off
button
(36)
two
times,
use
-1÷
button
A
to
select
the
width,
and
press
the
tie-off
button
one
more
time.
The
stitch
will
begin
in
the
taper,
then
stitch
at
the
width
you
have
selected.
Now
you
can
sew
simple
but
perfect
tapering
motifs.
Decorative
buttonhole
This
buttonhole
is
an
attractive
variation
of
the
classic
linen
buttonhole.
Select
stitch
No.
12.
Press
the
tie-off
button
three
times.
Sew
the
first
side
of
the
buttonhole
to
the
desired
length.
When
sewing
the
bartacks,
make
sure
that
you
sew
three
zigzag
stitches
at
full
length.
This
guarantees
that
a
gap
is
formed
between
each
buttonhole
side.
Then
sew
the
second
side
of
the
buttonhole
as
long
as
the
first.
Tip:
The
info
button
shows
you
all
the
tapering
worksteps
in
abbreviated
form.
102
I
Appliqué
designs
Appliqués
are
easily
created
and
produce
a
beautiful
effect.
By
using
a
variety
of
materials
and
patterns
you
can
obtain
many
different
effects.
You
can
make
a
perfect
densely
stitched
seam
with
the
applique
foot
(special
accessories).
The
special
cutout
on
the
sole
allows
the
extra
thickness
of
a
satin
stitch
zigzag
to
pass
smoothly
under
the
foot.
Fusible
webbing
keeps
the
appliqué
in
place
so
you
can
easily
stitch
around
the
form.
Snap
on
the
applique
foot.
Transfer
your
pattern
to
the
paper
side
of
the
fusible
webbing
-
remember
that
any
letters
or
numbers
have
to
be
drawn
as
a
mirror
image.
Iron
the
paper-backed
webbing
to
the
back
side
of
the
I
appliqué
fabric.
Cut
the
motif
out
and
pull
off
the
paper.
Place
the
appliqué
pieces
on
base
fabric
and
iron
I
securely.
I
Stitch
around
all
appliqués
with
appliqué
stitch
(No.
15)
or
with
a
narrow,
satin-stitch
zigzag,
stitch
width
2
-
4
I
mm,
stitch
length
0.2
to
0.6
mm.
Make
sure
the
stitch
covers
the
outer
edge
of
the
appliqué
so
that
no
fraying
I
occurs
later.
TIP:
If
a
taper
is
required
you
can
narrow
the
satin
stitch
zigzag
in
0.5
mm
increments
with
the
-/+
button
A
(see
I
Tapering,
page
100).
1
t
I
103
Lt,Q1dLIVt7
tVVIl
iyijictiy
tI
II
JI’..fU
Patchwork
quilt
Patchwork
and
quilting
are
traditional
handicraft
techniques
which
were
originally
used
by
North
American
pioneer
women
to
make
use
of
left
over
fabric.
Over
the
years
it
has
developed
into
a
creative
hobby.
A
patchwork
quilt
consists
of
three
layers.
Many
pieces
of
fabric
are
joined
together
in
patterns
to
form
the
top
layer
of
the
quilt.
This
is
tacked
to
a
middle
layer
of
polyester
or
cotton
batting
and
a
backing
fabric.
The
quilt
and
patchwork
foot
(special
accessory)
is
particularly
helpful
for
sewing
patchwork
and
quilting.
The
distance
of
the
needle
to
the outer
edge
of
the
foot
is
1/4
inch
(6
mm)
and
1/8
inch
(3
mm)
to
the
inner
edge.
In
traditional
quilting
the
three
layers
are
joined
together
with
small
hand
stitches
to
create
beautiful
family
heirlooms.
The
sewing
machine
makes
accomplishing
this
technique
much
easier
and
faster!
The
Quilt
Expression
2044
and
Expression
2034
have
quilt
stitch
No.
11,
which
enables
you
to
quickly
and easily
achieve
a
hand-
quilted
look!
Use
invisible
sewing
thread
(nylon
monofilament)
as
the
needle
thread
and
wind
the
bobbin
with
cotton
thread
to
contrast
or
blend
with
the
colors
of
your
quilt
top.
The
needle
thread
tension
must
be
set
quite
tight
(7),
and the
bobbin
thread
tension
quite
loose
(approximately
1/4
turn
counterclockwise)
to
allow
the
needle
thread
to
pull
the
bobbin
thread
to
the
top
of
your
quilt.
When
you
sew
the
stitch
on
the
three
layers
of
fabric
of
the
quilt
you
only
see
the
triple
stitch
of
the
bobbin
thread.
The
intermediate
stitch
disappears
and
thus
appears
to
be
hand-quilted.
Quilt
stitch—il
and
15
Quilt
stitch
11
and
15
enable
you
to
achieve a
wonderful
hand-quilted
look.
Stitch
11
works
equally
well for
topstitching
on
jackets
and
overcoats.
Combining
the
quilt
stitch
with
other
decorative
stitches
can
create
unique
new
patterns.
104
LJZL1JI
aiv
vvit
ii
_%_I
II
‘•‘-1’--•’
And
this
is
what
you
do
Cut
the
pieces
necessary
for
your
quilt
top
using
templates
you
have
bought
or
made
yourself.
making
sure
to
include
a
seam
allowance
of
¼’
(6
mm).
Your
Expression
is
perfect
for
piecing
quilts.
Set
up
your
Expression
with
a
straight
stitch
(1),
stitch
length
2.5,
needle
position
4
to
the
right
and
your
IDT
is
engaged.
The
fabric
pieces
should
just
follow
under
the
right
of
presser
foot
0.
Moving
the
needle
position
gives
you
a
scant
‘4”
seam.
Sew
the
pieces
together
as
required
by
the
block
chosen.
These
squares
will
then
be
sewn
together
and
will
form
the
top
of
the
quilt.
Tip:
Use
the
¼”
foot
(93.036
927-91)
as
an
easy
guide
for
your
quilting.
Set
your
2034’2044
for
center
needle
straight
stitch
and
engage
the
IDT
I
ii
I
Stitch-in-the-Ditch
One
way
to
hold
the
quilt
top,
batting
and
backing
all
I
together
is
using
the
stitch-in-the-ditch
method
of
quilting.
Stitching
in
the
Ditch
means
following
the
seams
in
the
quilt
blocks.
Set
your
Expression
with
a
straight
stitch
(1),
stitch
length
2.5,
center
needle
position,
IDT
engaged.
4
Tip:
Use
stitch
11
to
make
your
stitch-in-the-ditch
look
I
4
Begin
by
pin
basting
your
quilt
through
all
layers
starting
I
from
the
middle
of
your
quilt
and
working
out.
Place
a
safety
4
pin
about
every
6—8
inches
(15—20
cm).
I
To
begin
quilting,
start
sewing
from
the
middle
of
the
quilt
s
4
and
continue
out.
Starting
from
the
middle
and
sewing
out
I
will
help
keep
layers
in
place.
Plan
which
seams
you
will
actually
follow.
This
stitching
will
not
only
hold
the
quilt
together,
it
will
also
create
the
pattern
on
the
quilt
back.
You
do
not
need
to
follow
every
seam
in
the
quilt,
sew
every
3
I
4
inches
to
keep
the
quilt
in
place.
Of
course,
you
can
sew
more
to
create
a
decorative
pattern
for
the
back.
1
Tip:
Change
to
a
quilting
or
jeans
needle
when
sewing
through
thick
quilts.
Test
sew
to
ensure
balanced
I
stitching
before
starting
to
quilt.
I
!
105
L
I
UUU[dLlVt
tVVIlIy/peLIaILy
iiiiiiu
i
Tying
the
Quilt
Tying
a
quilt
is
another
way
to
hold
the
quilt
top,
batting
and
back
together.
Previously
done
by
hand,
your
Expression
2034/2044
has
great
decorative
stitches
that
will
“tie”
your
quilt with
ease.
Choose
a
decorative
stitch
that
is
a
forward
moving
stitch,
such
as
63
or
66
(56
or
58
for
model
2034).
Prepare
your
quilt
as
explained
in
the
Stitch-in-the-Ditch
method.
In
order
to
sew
the
stitch
only
once,
press
the
tie-off
button
when
you
have
started
to
sew.
Now
sew
this
stitch
every
3
4
(7—
10
cm)
all
over
the
quilt.
Again
plan your stitch
placement
so
that
there
is
a
nice
pattern
on
the
front
and
the
back.
This
is
a
very
simple
and
beautiful
way
to
secure
a
quilt.
Free
Motion
Stippling
Free
Motion
Stippling
not
only
keeps
the
top,
batting
and
backing
together,
but
it
also
adds
texture and interest
to
your
quilt.
Set
your
Expression
for
stippling
with
a
Straight
Stitch
(1).
Attach
the darning
foot.
Lower
the
feed
dog
and
set
up
your
machine
in
the
darning
position.
Prepare
your
quilt
as
explained
in
the
Stitch-in-the-Ditch
method.
Practice
stippling
on
scraps
of
fabric
and
batting.
When
the
feed
dog
is
lowered
you
control
the
stitch
length.
Remember
using
a
constant
speed
will
help
to
keep
the
stitches
even.
Begin
near
the
center
of
your
quilt.
Take
one
stitch
and
pull
the
bobbin
thread
to
the
top
of
the
quilt.
Take
a
few
stitches
right
next
to
one
another
to
secure
the
threads.
Now
move
the
quilt
so
that
your
stitching
creates
scrolls
and
swirls.
The
stippling
should
not
cross
itself
make
one
long
continuous
swirl
of
stitching.
Tip:
Use
the
Free-motion
guide
grip
(4125388-01)
to
help
move the
quilt
in
a
more
consistent
way The
Quilting
table
and
Free-motion
guide
foot
are
extra
accessories
created
to
make your
stippling
easier
106
I
,iJJGtLiV
VVII
Iy/JJei.lctlLy
1tl
II
llU
Quilt
Appliques
Appliques
add
that
special
touch
for
your
quilt.
There
are
many
different
ways
of
applying
appliques
to
a
quilt.
One
way
is
to
add
the
applique
to
the
block
before
the
quilt
is
put
together.
Set
your
Quilt
Expression
with
stitch
3,
stitch
length
0.5,
stitch
width
4-6
mm,
presser
foot
2.
Adhere
the
applique
piece
to
the
block.
Place
stabilizer
behind
the
block
and
applique.
Sew
around
the
applique
with
the
satin
stitch.
Make
sure
the
stitch
is
80%
on
the
applique
just
covering
up
the
applique’s
raw
edge.
Another
way
to
add
an
applique
to
a
quilt
is
to
finish
the
edge
of
the
applique
and
sew
it
on
with
the
hand
applique
stitch
(15).
First
prepare
the
applique.
Cut
the
applique
form
out
of
I
fabric
and
a
piece
of
light
weight
iron
on
interfacing.
Place
the
right
side
of
the
fabric
and
the
rough
(iron-on)
side
of
the
interfacing
together.
Use
a
straight
stitch
(1),
stitch
length
2.0,
center
needle
position
and
sew
the
fabric
and
interfacing
together
using
a
14”
seam.
Trim
around
the
applique
leaving
1/8’
seam
allowance
and
clip
into
curves.
Slash
the
interfacing
so
that
the
applique
can
be
turned
right
I
side
out.
Finger
press
the
applique.
Place
the
applique
on
the
quilt.
When
you
are
satisfied
with
the
position,
iron
it
down.
I
Follow
around
the
edge
of
the
applique
with
the
straight
part
of
the
hand
applique
stitch.
Let
the
horizontal
part
of
the
stitch
just
catch
into
the
applique.
This
is
the
part
that
will
keep
the
applique
in
place.
Tip:
Press
the
needle
raised/lowered
function
to
position
the
needle
in
the
fabric
when
you
stop
sewing.
This
makes
I
turning
easy
with
your
Expression.
--ii
m
a
m
107
I
—I
I
I
Cross-stitch
Cross-stitch
embroidery
has
always
been
a
wonderful
traditional,
embroidery
technique.
What
used
to
be
stitched
by
hand
with
a
great
deal
of
effort
can
now
be
sewn
with
the
2034
and
2044
with
astonishing
ease
and
speed.
With
cross-stitch
No.
24
and
No.
25
(2044)
or
No.
23
(2034),
design
your
own
cross-stitch
combinations.
These
patterns
look
as
if
they
were
hand-embroidered
and
give
a
special
touch
to
table
linen,
towels
or
garments.
Tips
for
cross-stitching:
Sew
slowly.
UsetootNo.2.
Place
stabilizer
under
the
fabric.
You
can
embroider
on
Aida
cloth
as
used
for
hand
cross-stitching.
The
length
and
width
of
the
cross-stitches
of
your
Expression
can
be
altered
depending
on
the
count/size
of
the
Aida
cloth
squares.
Use
decorative
threads
to
make
your
cross-stitch
look
more
professional.
108
1
0
0
0
0
II
a
IJ
Ii1
S
Eyelet
embroidery
Eyelet
embroidery
enhances
your
linens
and
blouses.
Using
an
eyelet
plate
(special
accessory)
and various
utility
and
decorative
stitches
beautiful
embroidery
can
be
produced.
And
this
is
how
it’s
done:
Lower
the
feed
dog.
Place
the
eyelet
plate
onto
the
needle
plate
making
sure
that
the
pin
(A)
at
the
back
of
the
plate
fits
into
the
middle
cutout
of
the
needle
plate.
Push
the
plate
down
at
the
front.
Tightly
hoop
your
marked
embroidery
fabric.
With
small
scissors
cut
one
or
N
two
of
the
fabric
threads
at
the
center
of
the
marked
eyelet
area
and
push
the
fabric
over
the
pin
A
theeetplThebdc
Remove
the
presser
foot.
Place
the
presser
foot
lifter
in
the
darning
position.
Pull
up
the
bobbin
thread
and
hold
it
for
the
first
few
stitches.
Stitch
around
the
cut
with
zigzag
pattern
No.
3.
While
doing
so,
turn
the
hoop
with
the
fabric
slowly
and
evenly.
The
stitches
should
be
very
close
to
each
other.
Secure
with
a
few
straight
stitches.
109
Hernstitching
!
Traditional
hemstitching
For
pulled
thread
hemstitching:
This
is
a
technique
everyone
recognizes
but
was
previously
only
embroidered
by
hand!
With
your
Expression
you
can
produce
hemstitching
much
quicker
and
easier.
Special
hemstitches
No.
26,
27
and
28
(2044),
No.
24,
25
and
26
(2034)
are
built
into
your
machine.
By
changing
the
stitch
length
and
width
you
can
achieve
different
effects.
Use
a
wing
needle
for
hemstitching.
(A
normal
needle
is
only
used
for
very
light
fabrics
size
80.)
Hemstitching
is
most
successful
on
woven
natural
fabrics
from
which
single
threads
can
be
easily
pulled.
Embroidery
and
darning
thread,
particularly
cotton,
are
very
suitable.
With
the
hemstitches
on
your
Expression,
various
techniques
can
be
applied.
Use
stitches
No.
26,
27
and
28
(2044),
No.
24,
25
and
26
(2034)
to
create
lovely
hemstitched
holes.
Sew
the
appropriate
program
on
a
piece
of
test
fabric.
--,,,.
.
‘*
..,..,
.*
‘V.
110
Count
the
threads
of
the
fabric
within
the
area
of
the
sewn
pattern.
Adjust
the
pattern
width
so
the
needle
is
not
piercing
a
thread
to
be
pulled,
but
falling
to
the
side
of
the
threads
of
your
fabric.
This
will
allow
you
to
easily
remove
the
threads
within
the
pattern
area.
Pull
1
-
3
threads
out
of
the
fabric
to
the
right
and
left
of
the
pattern.
Overstitch
the
remaining
threads
with
the
selected
program.
The
needle
must
enter
the
pulled
threads
on
both
sides
close
to
the
edges.
I
I
I
I
I
a
4,
Chging
the
needle
plate
Cldáning
and
oiling
Changing
the
sewing
lamp
Sewing
problems
and
their
solutiops
/
112
112
113
114-115
Changing
the
needle
plate
Switch
off
the
main
switch.
Removal
Raise
the
presser
foot.
Position
the
needle
plate
changer
(lamp
changer)
as
shown
and
press
the
needle
plate
up
on
the
right,
then
on
the
left.
It
can
now
be
easily
removed
_-
Replacing
Place
the
needle
plate
against
the
rear
edge
of
the
cut-
out
then
press
down
at
the
front
until
you
hear
it
snap
in
place.
Before
you
start
sewing,
check
that
the
needle
plate
is
lying
flat.
Tip
Lower
the
feed
dog
to
make
removing
the
needle
plate
easier.
Cleaning
and
oiling
Switch
off
the
main
switch.
Remove
the
needle
plate
and
lower
the
feed
dog.
Clean
the
feed
dog
and
hook
area
with
the
brush.
Apply
only
one
drop
of
oil
to
the
area
in
the
hook
shown
above.
The
machine
otherwise
requires
no
maintenance
and
must
not
be
oiled
at
any
other
points.
Clean
and
oil
the
sewing
machine
every
10-
15
hours
of
operation.
Cleaning
the
display
Wipe
the
display
with
a
soft,
lint-free
dry
cloth.
DO
NOT
use
aggressive
cleansers
or
solvents!
I
IL
112
I
lI
:F
I
iviaintenar
I
Changing
the
light
bulb
Switch
off
the
main
switch.
Disconnect
the
lead
cord
and
the
foot
control
plug
from
the
machine.
Remove
the
accessory
tray.
The
light
bulb
is
located
inside
the
sewing
machine
near
the
needle
threader.
Bulb
removal
Push
the
bulb
remover,
as
shown
in
the
figure,
up
as
far
as
it
will
go.
Now
turn
the
bulb
half
a
rotation
counterclockwise
and
remove
the
bulb.
Insertion
of
the
bulb
Insert
the
bulb
in
the
lamp
changer.
Guide
the
bulb
into
the
diagonal
holder
and
turn
it
until
the
pins
of
the
bulb
engage.
Push
the
bulb
upward
into
the
holder
as
far
as
it
will
go
and
turn
it
half
a
rotation
in
a
clockwise
direction.
Remove
the
bulb
changer
from
the
bulb,
the
bulb
is
held
firmly.
Important:
The
maximum
wattage
of
the
bulb
is
5
watts.
Bulbs
can
be
purchased
from
your
PFAFF
dealer
(order
No.
92-329
975-05/000).
113
Sewing
problems
and
their
solutions
ProblemlCause
Remedy
The
machine
skips
stitches
The
needle
is
not
properly
inserted.
Wrong
needle
is
in
use.
Needle
is
bent
or
blunt.
The
machine
is
not
properly
threaded.
Needle
is
too
small
for
thread.
Push
needle
fully
upwards.
Flat
side
facing
the
back.
Use
needle
system
130/705
H.
Insert
a
new
needle.
Check
how
the
machine
is
threaded.
Use
a
larger
needle.
Needle
thread
breaks
See
reasons
above.
Thread
tension
is
too
tight.
Thread
is
poor
or
has
slubs
in
it,
or
has
become
dry
after
overlong
storage.
Thread
is
too
thick.
See
above.
Adjust
thread
tension.
Only
use
good
quality
threads.
Needle
breaks
off
Needle
is
not
pushed
fully
in.
Needle
is
bent.
Needle
is
too
thick
or
too
thin.
Needle
is
bent,
and
has
hit
the
needle
plate
because
you
are
pulling
or
pushing
the
fabric.
The
bobbin
case
is
not
properly
inserted.
Use
needle
with
large
eye
(system
130
N).
Insert
new
needle
and
push
fully
in.
Insert
different
type
of
needle.
See
needle
table
(Page
92, 93).
Only
guide
the
fabric
lightly.
The
seam
is
sewn
unevenly
The
tension
needs
adjusting.
Thread
is
too
thick,
stubbed
or
hard.
The
bobbin
thread
is
unevenly
wound.
When
you
insert
the
bobbin
case,
push
it
fully
into
the
stop.
Pull lightly
on
the end
of
the
thread
to
make
sure
bobbin
case
is
secure.
Thread
loops
at
top
or
underside
of
fabric.
Check
needle
and
bobbin
thread
tensions.
Only
use
good
quality
threads.
Do
not
wind
thread
by
hand.
Make
sure
thread
is
pulled
solidly
into
bobbin
tension
spring.
Check
bobbin
threading
path.
Re-thread
machine,
making
sure
presser
foot
is
raised
to
its
highest
position.
This
ensures
that
needle
thread
is
securely
in
thread
tension
system.
Adjust
bobbin
thread
tension
as needed.
114
I
!‘
Problem/Cause
1emedy
The
machine
does
not
feed
or
feeds
irregularly
Sewing
lint
has
collected
between
Remove
needle
plate,
remove
lint
with
brush.
the
feed
dog
teeth
rows.
Feed
dog
is
lowered.
Slide
A
is
at
the
left
or
slide
B
is
at
the
right
Push
slide
A
to
the
right
or
slide
B
to
the
left.
(see
page
34)
The
needle
plate
is
not
lying
flat.
Press
downwards
at
the
front
of
the
needle
plate
until
you
hear
it
snap
into
place.
The
machine
is
running
with
difficulty
There
are
thread
remnants
in
the
hook
ways.
Remove
the
threads
and
apply
a
drop
of
oil
to
the
hook.
The
machine
does
not
sew
the
selected
stitch
Switch
off
the
machine,
wait
10
seconds
and
switch
on
again.
Select
the
desired
stitch
again.
Before
changing
presser
feet
and
needle
the
main
switch
must
be
switched
off.
Do
not
attempt
to
sew
without
fabric
under
the
presser
foot.
When
leaving
the
machine,
even
for
only
a
short
time,
switch
off
the
main
switch.
This
is
important
if
there
are
any
children
nearby.
Display
incorrect
or
no
display
When
static
electricity
is
being
discharged
Switch
off
the
machine
on
completion
of
the sewing
some
segments
of
the
display
will
fail.
operation
and
then
turn
it
back
on
again
after
approx.
10
seconds.
All
segments
must
appear
again
on
the
display.
Select
the
desired
stitch
again.
The
contrast
on
the
display
may
be
disturbed
Set
the
contrast
using
the
contrast
control.
when
the
machine
is
cleaned
or
is
transported
(display
is
illegible
or
dark)
I
I
I
I
I
:4
115
Technical
data
Dimensions
(w
x
h
x
d)
408
x
290
x
187
mm
Weight
8.3
kg
Nominal
voltage
(reversible)
120
V
/
220
..
240
V
Power
consumption
75
W
Sewinglamp
12V/max.5W
Sewing
speed
max.
950
stitches/mm
mm.
80
stitches/mm
Stitching
width
0
..
6
mm
Stitching
length
0
...
6
mm
Presser
foot
lift
8mm
Max.
presser
foot
height
10.5
mm
Needle
system
130
/
705
H
Package
contents
Sewing
machine
Carrying
case
Foot
control
Lead
cord
Accessories
Instruction
manual
71
71
77
n
rn
rn
rn
rn
ri
IT
m
rr
IT
ri,
IT
IT’
IT
IT
a
a
a
-
-
I
i
_
_
_
a
119

Hulp nodig? Stel uw vraag in het forum

Spelregels
1

Forum

Pfaff-Expression-2044

Misbruik melden

Gebruikershandleiding.com neemt misbruik van zijn services uitermate serieus. U kunt hieronder aangeven waarom deze vraag ongepast is. Wij controleren de vraag en zonodig wordt deze verwijderd.

Product:

Bijvoorbeeld antisemitische inhoud, racistische inhoud, of materiaal dat gewelddadige fysieke handelingen tot gevolg kan hebben.

Bijvoorbeeld een creditcardnummer, een persoonlijk identificatienummer, of een geheim adres. E-mailadressen en volledige namen worden niet als privégegevens beschouwd.

Spelregels forum

Om tot zinvolle vragen te komen hanteren wij de volgende spelregels:

Belangrijk! Als er een antwoord wordt gegeven op uw vraag, dan is het voor de gever van het antwoord nuttig om te weten als u er wel (of niet) mee geholpen bent! Wij vragen u dus ook te reageren op een antwoord.

Belangrijk! Antwoorden worden ook per e-mail naar abonnees gestuurd. Laat uw emailadres achter op deze site, zodat u op de hoogte blijft. U krijgt dan ook andere vragen en antwoorden te zien.

Abonneren

Abonneer u voor het ontvangen van emails voor uw Pfaff Expression 2044 bij:


U ontvangt een email met instructies om u voor één of beide opties in te schrijven.


Ontvang uw handleiding per email

Vul uw emailadres in en ontvang de handleiding van Pfaff Expression 2044 in de taal/talen: Engels als bijlage per email.

De handleiding is 9,21 mb groot.


U ontvangt de handleiding per email binnen enkele minuten. Als u geen email heeft ontvangen, dan heeft u waarschijnlijk een verkeerd emailadres ingevuld of is uw mailbox te vol. Daarnaast kan het zijn dat uw internetprovider een maximum heeft aan de grootte per email. Omdat hier een handleiding wordt meegestuurd, kan het voorkomen dat de email groter is dan toegestaan bij uw provider.

Stel vragen via chat aan uw handleiding

Stel uw vraag over deze PDF

Uw handleiding is per email verstuurd. Controleer uw email

Als u niet binnen een kwartier uw email met handleiding ontvangen heeft, kan het zijn dat u een verkeerd emailadres heeft ingevuld of dat uw emailprovider een maximum grootte per email heeft ingesteld die kleiner is dan de grootte van de handleiding.

Er is een email naar u verstuurd om uw inschrijving definitief te maken.

Controleer uw email en volg de aanwijzingen op om uw inschrijving definitief te maken

U heeft geen emailadres opgegeven

Als u de handleiding per email wilt ontvangen, vul dan een geldig emailadres in.

Uw vraag is op deze pagina toegevoegd

Wilt u een email ontvangen bij een antwoord en/of nieuwe vragen? Vul dan hier uw emailadres in.


Info