478893
5
Verklein
Vergroot
Pagina terug
1/55
Pagina verder
w
iNSTRUCTION
BOOK
CPFAFFD
360
INSTRUCTIONS
Foreword
Your
dream
has
come
true!
You
are
now
the
proud
owner
of
a
PFAFF
360
the
sewing
machine
with
countless
creative
possibilities.
This
instruction
book
will
help
you
understand
the
machine
and
give
you
valuable
tips
to
make
sewing
more
fun
for
you.
Even
if
you
are
an
experienced
seamstress,
you
will
find
this
book
a
valuable
guide
to
easy
sewing.
Follow
these
simple
instructions
and
familiarize
yourself
with
the
exclusive
automatic
features
of
your
machine.
You
will
find
sewing
exciting
on
your
easy-to-operate
PFAFF
360.
If
you
have
any
sewing
problems,
please
contact
your
PFAFF
dealer.
He
will
be
glad
to
help
you
at
any
time.
G.M.
PFAFF
AG
Sewing
Machine
Factory
Kaiserslautern
I
Thread
take-up
ever
2
Thread
retainer
stud
3
Zigzag
finger-tip
control
4
Bobbin
winder
S
Step
motion
knob
6
Stitch
length
dial
7
Reverse
feed
control
6
Light
switch
9
Drop
feed
central
10
Needle
plate
11
Free
arm
cover
(enclosing
transverse
rotary
sewing
hook)
2
12
Needle
13
Automatic
needle
threader
14
Needle
thread
tension
15
Sewlight
16
Stitch
width
dial
17
Needle
position
lever
R
8152
R
8137
18
Balance
wheel
19
Collapsible
spool
pins
20
Top
cover
21
Needle
threoder
control
22
Presser
bar
lifter
23
Face
cover
24
Sewing
foot
thumb
screw
25
Sewing
foot
26
Snap-out
workplote
27
Free
orm
28
Double
receptacle
for
speed
control
and
power
cords
29
Free
arm
fop cover
30
Needle
set
screw
28—
3
Place
the
foot
control
under
the
cabinet
within
easy
reach
of
your
foot,
Rest
the
right
foot
on
the
speed
control
and
press.
The
harder
you
press,
the
faster
the
machine
will
run.
During
pauses
in
stitching,
completely
remove
your
foot
from
the
control
do
not
allow
it
to
rest
there.
Push
plug
I
into
receptacle
2,
and
plug
3
at
other
end
of
cord
into
the
wall
outlet.
Cord
4
connects
the
foot
control
with
the
machine.
R81S1
R7132
4
R
7506
9un’auntaLc
c6
/ilahilu
Qiatiô,,
Make
sure
stop
motion
knob
b
is
tightened
before
you
begin
sewing
(clockwise
as
indicated
by
white
arrow).
Whenever
you
hove
to
turn
balance
wheel
a,
turn
it
toward
you
(counter-clockwise
as
shown
by
black
orrow).
Never
run
o
threaded
machine
unless
you
have
fabric
under
the
presser
foot.
The
machine
will
feed
the
material
under
the
sewing
foot
automatically.
All
you
have
to
do
is
guide
the
work.
Never
try
to
boston
feeding
by
pushing
or
pulling
the
fabric
while
stitching
because
the
needle
may
bend
or
break.
Always
turn
the
balance
wheel
toward
you
until
take-up
lever
d
is
at
its
highest
posi
tion
before
you
begin
and
after
you
have
completed
a
seam.
Failure
to
observe
this
rule
may
cause
the
thread
to
slip
out
of
the
needle
eye.
Also,
it
is
easier
to
remove
the
work
with
the
take-up
lever
up.
•1
-
5
R
6609
R
8007A
Dial
G
regulates
the
stitch
length
(the
higher
the
number
on
the
dial,
the
longer
the
stitch).
To
bock-
tack
the
end
of
a
seam,
simply
depress
the
finger-tip
control.
$&4if/ht
$iuhiq
.4
Set:
DiolA—O
Lever
B
6
R
7998
R
7999
If
you
want
to
sew
a
few
wide
zigzag
stitches
while
the
machine
is
set
for
straight
stitching
(A
on
0),
merely
press
down
the
finger-tip
control.
When
the
lever
is
released,
the
machine
resumes
straight
stitching
automatically.
To
sew
longer
zigzag
seams,
turn
dial
A
to
desired
stitch
width
(indicated
by
numbers
I
to
4).
When
dial
A
is
set
between
1/2
and
2,
you
can
double
the
stitch
width
by
depress
ing
the
finger-tip
control
(important
for
buttonholing
and
fancy
stitching).
When
you
push
the
control
up,
the
machine
will
sew
straight,
regardless
of
the
stitch
width
set
(ideal
for
tying
off
zigzag
seams).
Lever
B
changes
the
position
of
the
needle
in
the
needle
plate
slot.
Thus
the
stitch
ing
can
be
moved
from
the
center
to
the
left
or
right
of
the
slot,
as
desired.
Dial
G
lengthens
zigzag
stitches
or
packs
them
more
closely
to
gether
(satin
stitch).
The
position
of
lever
B
(left,
center,
right)
mdi
cafes the
position
of
the
needle
in
the
needle
plate
slot.
cp
cip
7
R7995
I
fJOifl1119
th
7366z
Hold
balance
wheel
a
and
turn
stop
motion
knob
b
all
the
way
to
the
left
(counter-clockwise).
Place
spool
of
thread
on
right-hand
spool
pin.
The
bobbin
thread
should
always
be
the
some
size
as
that
used
on
the
spool,
or
a
little
finer.
Pull
thread
from
spool
and
lead
it
clockwise
around
thread
retainer
stud
g,
crossing
the
thread.
R
8064
R
6036
2
R
7101
R
7219
Pass
end
of
thread
through
slot
in
bobbin,
from
inside.
Set
bobbin
on
bobbin
winder
spindle
so
that
key
at
base
of
spindle
enters
slot
in
bobbin.
Press
in
lever
i.
Hold
end
of
thread
and
slowly
start
machine.
Having
wound
a
few
turns,
break
off
end
of
thread
and
continue
winding
at
a
faster
pace.
Bobbin
winder
will
stop
automatically
when
bobbin
is
full.
If
you
don’t
want
a
full
bobbin,
press
out
lever
I
when
sufficient
amount
of
thread
has
been
wound.
You
may
continue
sewing
while
you
are
winding
bobbin
without
disconnecting
balance
wheel.
5
6
R7067
7
R
7097
R
7099
the
73
c
66
in
Ca$e
Raise
needle
to
its
highest point
and
open free
arm
cover.
Lift
latch
k
with
your
forefinger.
Pull
out
bobbin
case
with
bobbin
by
holding
the
latch. When
you
release
latchk,
the
empty
bobbin
drops
out.
R
8157
L?n3etinfy
a
9u11
73
c
661n
intt
73c66i,i
Caie
As
shown
in
illustration
1,
hold
bobbin
in
left
hand
so
that
the
thread
end
falls
from
the
top
down
toward
you,
and
insert
bobbin
into
bobbin
case.
Hold
the
bobbin
firmly
in
the
bobbin
case
and
pull
the
thread
into
the
case
slot.
Hold
the
case
by
its
open
latch,
so
that
the
bobbin
cannot
fall
out.
R5867
I
Pull
the
thread
under
the
tension
spring
until
it
emerges
from
the
opening
at
the
end
of
the
spring.
Leave
about
three
inches
of
thread
hanging
from
the
bobbin
case.
V
A
R
5869
2
10
R
8159
L3n.c&tin
9
th
73
c
6
L
4
mn
C43e
Make
sure
the
needle
is
still
in
its
highest
position.
With
thumb
and
forefinger
of
left
hand,
lift
latch
k
and
turn
bobbin
case
until
slot
at
end
of
latch
points
up
(see
arrow).
Then
place
it
on
center
stud
s
of
hook.
In
replacing
the
bobbin
case,
it
is
best
to
hold
the
loose
end
of
thread
so
that
it
will
not
get
jammed
between
bobbin
case
and
hook.
Release
latch
k.
3
R5870
4
R5868
A
Press
against
bobbin
case
until
you
hear
it
snap
into
place.
An
improperly
inserted
bobbin
case
will
cause
needle
break
age.
Close
free
arm
cover.
11
Types
of
Fabrics
Mercerized
Silk
Needle
Cotton
j
Size
0
Fine
Fabrics
80
60
to
such
as
georgette,
chiffon,
batiste,
to
000
or
voile,
lawn,
silk.
100
70
twist
Lightweight
Fabrics
70
such
as
dress
silks
and
cottons,
A
&
B
to
80
sheer
woolens,
shirting,
dra-
twist
80
peries.
Medium
Fabrics
50
such
as
lightweight
woolens,
to
B
&
C
90
madras,
muslin,
brocades,
heavy
twist
70
silks
and
rayon,
gabardine.
Heavy
Fabrics
40
such
as
coating,
denim,
corduroy,
to
C
&
D
100
slipcover
fabrics,
bed
tickings,
twist
50
lightweight
canvas.
Very
Heavy
Fabrics
24
90
such
as
heavy
tickings,
canvas,
to
E
to
overcoating,
sailcloth,
up-
twist
40
110
holstery.
Synthetics,
Rayon,
Acetate
Determined
by
Determined
including
nylon,
orIon,
dacron,
weight
of
fabric
bythreodsize
plastics,
etc.
40
to
50
60
to
80
i’ssmene
an’
‘7ha?
$ies
The
appearance
of
the
finished
seam
is
dependent
on
the
correct
relationship
between
needle,
thread
and
fabric.
Select
the
proper
thread
sizes
and
needles
from
this
chart.
The
some
size
threads
should
be
used
in
the
needle
and
on
the
bobbin.
Some
experienced
seamstresses
prefer
a
somewhat
thinner
bobbin
thread.
However,
the
bobbin
thread
never
should
be
thicker
than
the
needle
thread.
12
Lmi,tant
9atts
a
6
,ut
/Vee?1e5
On
PFAFF
360
sewing
machine,
System
130
R,
flat-shank
needles
are
used
for
all
ordinary
sewing
and
embroidery
work.
The
needle
system
is
stamped
on
the
needle
plate. Genuine
Pfaff
nedles,
System
130R,
are
available
from
every
Pfaff
dealer.
Bent
or
blunt
needles
should
not
be
used.
Cnjtnj
the
/Vee?te
R6798
Bring
needle
bor
to
its
highest
point
and
lower
sewing
foot.
Loosen
needle
set
screw
oholfa
turn
and
pull
old
needle
out
of
needle
clamp,
Insert
new
needle
into
opening
of
needle
clamp
and
push
it
up
as
for
as
it
will
go.
Make
sure
that
flat side
of
shank
faces
toward
the
back
and
long
groove
toward
you.
Tighten
needle
set
screw
o.
13
t1heain
9
Place
spool
of
thread
on
spool
pin
I
and
lead
thread
end
through
both
thread
retainer
openings
2
(see
illustration opposite).
Lead
thread
clockwise
around
tension
and
pull
it
between
any
two
of
the
tension
discs
3.
Bring
take-up
lever
4
as
high
as
it
will
go
and
pass
thread
from
right
to
left
through
one
of
the
holes
at
its
end.
Pull
thread
into
slots
at
left
of
thread
guides
5
and
6
and
then
into
the
stot
at
left
of
needle clamp
7.
Then
thread
needle,
front
to
back.
The
automatic
needle
threader
will
do
this
for
you
easily
and
quickly.
14
—I
I,
I
I
‘I
Ii
I
I?
8136
Is
Ceatin9
the
1
’Vee?te
‘heae
Before
you
begin
make
sure
that
the
needle
is
at
its
highest
position,
i.e.
that
the
lower
hole
of
the
ascending
take-up
lever
d
is
in
line
with
the
bottom
edge
of
the
top
cover.
Now
lower
the
sewing
footand——
With
your
left
hand
push
needle
threader
control
down
until
threader
prong
w
(see
opposite
page)
penetrates
needle
eye.
Keep
control
in
this
position.
Hold
thread
loosely
and
lead
it
from
left
around
the
small
pin,
then
place
it
behind
hook
of
threader
prong.
Release
control
slightly
until
prong
w
reverses
and
pulls
thread
through
needle
eye.
Jerk
control
down
again
so
the
thread
loop
will
fall
off
the
prong.
Pull
thread
through
needle
eye
and
release
control.
R8008
I
R8013
2
R8009
3
R8010
4
R
8158
When
you
have
had
sufficient
needle
threading
practice,
you
may
shorten
the
procedure
as
follows:
Push
needle
threader
control
down.
Place
thread
behind
hook
of
prong
w
so
thai
its
end
is
about
1/
inch
to
the
right
of
the
prong.
Slowly
re
teose
control.
Prong
w
now
pulls
end
of
the
thread
instead
of
the
toop
through
needle
eye.
Since
take-up
lever
d
is
not
at
its
highest
point
when
you
thread
the
needle,
pull
about
four
inches
of
thread
through
the
needle
eye
before
you
begin
sewing.
V
Z’awinq
t4
tk
73’66in’7hea?
A
Hold
needle
thread
lightly
in
your
left
hand.
Turn
balance
whe&
toward
you
until
the
needle
moves
down
and
up
again
and
take-up
lever
reaches
its
highest
position.
Lightly
pull
needle
thread
to
draw
bobbin
thread
up
through
needle
plate
slot.
Place
both
threads
back
under
sewing
foot
before
you
put
fabric
into
machine.
w
17
R
8150
To
check
whether
the
tensions
are
correctly
bol
anced,
take
a
closely
woven
piece
of
fabric
and
sew
a
few
straight
and
zigzag
seams.
If
the
straight
stitches
are
tightly
drawn
in
on
bath
sides
of
the
fabric
(see
seam
sketch
III),
the
tensions
are
correct.
The
surest
way
to
double-check
this
is
by
examining
a
zigzag
seam.
If
the
zigzag
seam
is
equally
wide
on
surface
and
underside
of
the
fabric,
that
is,
if
the
threads
are
locked
exactly
at
the
zigs
and
zags
of
the
seam,
the
tension
adjust
ment
is
correct.
‘V
Ccea.t
7n.cicn
9
tdatj,n
Balanced
tensions
are
essential
for
sewing.
If
your
tension
is
correct,
you
will
have
perfect
seams
as
sketched
below
(III).
Sketch
I
The
threads
interlock
on
the
underside
of
the
fabric.
Cause:
Upper
tension
too
loose
or
lower
tension
too
tight.
Sketch
II
The
threads
interlock
on
the
surface
of
the
fabric.
Cause:
Upper
tension
too
tight
or
lower
tension
too
loose.
A
18
8003
2?
9
titun
9
‘7;
4
e
‘7nsun
The
bobbin
thread
tension
rarely
needs
adjusting,
except
for
embroidery
when
ii
should
be
a
little
tighter
than
for
ordinary
sewing.
Adjustment
is
made
by
a
small
knurled
screw
on
the
bobbin
case
which
can
be
turned
with
the
thumb
tip.
Turn
it
left
E(
for
looser
tension.
Turn
it
right
for
tighter
tension.
Determine
correct
bobbin
tension
by
holding
the
thread
end
between
thumb
and
forefinger
and
letting
the
bobbin
case
hang
freely.
The
tension
should
be
strong
enough
to
keep
the
bobbin
case
from
being
pulled
down
by
its
own
weight.
However,
as
you
jerk
your
hand
slightly,
the
bobbin
case
should
grad
ually
slide
down.
V
Thefinal
stitch
appearance
can
be
regulated
by
the
upper
tension
dial,
as
follows:
Turn
left
for
looser
tension.
Turn
right
for
tighter
tension.
The
upper
tension
is
so
designed
thot
all
grades
of
ten
sion
loose
to
tight
con
be
covered
with
one
complete
turn
of
the
tension
dial.
The
numbers
on
the
tension
dial
indicate
different
degrees
of
tension.
The
higher
the
num
ber,
the
greater
the
tension.
For
ordinary
sewing,
the
upper
tension
should
be
set
between
3
and
5.
Your
upper
tension
has
a
third
tension
disc
for
two-needle
A
work.
R8029
19
R
7996
4
i&h
iqth
7J1.14titn
Turn
dial
G
until
the
number
indicating
the
desired
stitch
length
is
opposite
the
mark
on
the
dial
housing
(see
straight
arrow).
Or
sew
a
few
stitches
and
regulate
stitch
length
as
required.
Ta
facilitate
satin
stitching,
the
0—I
range
on
the
scale
is
just
as
large
as
the
1—4
section.
The
setting
depends
on
the
type
of
fabric
and
thread
size
used.
For
normal
satin
stitching,
set
dial
on
0.2.
To
backtack
the
beginning
or
end
of
a
seam,
simply
press
the
finger-tip
control
down.
When
the
control
is
released,
the
machine
resumes
forward
sewing
automatically.
This
feature
is
ideal
for
darning
rips
with
the
ordinary
sewing
foot.
To
do
this,
operate
the
control
in
rhythm
and
move
the
fabric
slightly
sideways.
In
this
way,
one
seam
is
placed
neatly
beside
the
other.
The
reverse
stitches
will
be
about
the
same
length
as
forward
stitches.
R
7998
20
‘711mn9
£h
12
/i1.uhuw
9e?
The
machine
feed
is
dropped
for
darning
hoop
embroidery
and
button
sewing.
To
lower
feed
below
the
needle
plate,
turn
drop
feed
control
clockwise,
Fabric
will
cease
feeding.
When
the
control
is
turned
to
the
right
as
far
as
it
will
go
feeding
of
the
fabric
resumes
automatically
when
you
start
sewing.
21
R
7086
Chaqinfy
th
$win9
9ôôe
Lift
both
needle
and
presser
bars
to
their
highest
positions
and
turn
the
sewing
foot
thumb
screw
to
the
left.
Tilt
the
foot
sideways
and
pull
it
down.
Slip
on
new
foot
and
tighten
the
screw
securely.
.4
Remove
the sewing
foot.
Attach
darning
foot
from
the
rear.
Hold
spring
clip
n
so
that
it
is
behind
the
needle
set
screw,
and
tighten
screw
c.
Attach
darning
hook
d
as
illustrated
so
that
when
you
lower
presser
bar
lifter
e,
the
darning
foot
will
stay
in
position.
Remember
to
lower
presser
bar
lifter
e
so
that
the
upper
tension
is
activated.
22
R
8005
R
8147
Ca
4,,?
/biainEenasue
Longevity
and
smooth
machine
performance
are
dependent
on
regular
and
proper
cleaning
and
oiling.
Use
Pfaff
sewing
machine
oil
only.
Never
lubricate
machine
with
animal
or
vegetable
oils.
Remove
all
lint
before
oiling.
All
moving
and
rotating
parts
require
regular
lubrication.
It
is
advisable
to
establish
a
pattern
when
oiling
your
machine.
Begin
by
removing
the
needle
plate
and
oiling
the
mechanism
in
the
free
arm.
The
principal
oiling
points
are
marked
by
arrows.
R
8143
A
The
raceway
in
the
sewing
hook
is
the
most
important
oiling
point.
Put
one
drop
of
oil
into
the
raceway
each
day
you
sew.
A
dry
raceway
will
cause
rapid
wear.
Don’t
forget
to
put
a
drop
of
oil
into
each
of
the
two
oil
holes
behind
the
sewing
foot.
This
is
essential
to
keep
the
hook
shaft
bearing
oiled.
V
R
8261
23
The
oiling
points
in
the
machine
arm
can
be
reached
easily
by
removing
the
top
cover.
Oil
should
be
applied
sparingly.
Excessive
quantities
of
oil
may
soil
the
work
and
cause
machine
sluggishness.
One
or
two
drops
of
oil
usually
wilt
suffice.
To
pull
cover
up,
tilt
it
back
and
lift.
R
8142
24
L
I)
R
8061
Oiling
points
in
the
machine
Zyuta
/ilathine
Care
Accumulations
of
lint
packed
between
the
tooth
rows
of
the
feed
cause
noisy
operation
of
the
machine.
Therefore,
from
time
to
time,
remove
the
needle
plate
and
clean
the
feed
with
a
toothpick
or
similar
wooden
object.
The
needle
plate
is
held
in
place
by
a
press
stud
and
can
be
removed
without
a
screwdriver.
To
do
this,
lift
back
end
first
and
tilt
out.
V
A
Open
the
free
arm
cover
and
take
out
bobbin
case
and
bobbin.
With
a
soft
brush
remove
the
lint
which
has
accumulated
in
the
vicinity
of
the
sewing
hook.
Once
in
a
while
your
PFAFF
should
be
given
a
thorough
checkup
by
your
Pfatf
dealer.
25
R
8237
$Otifjht
91Wt5
The
15-watt
sewlight
is
recessed
under
the
machine
arm
and
can
be
swung
out
by
pulling
down
the
grille.
To
change
the
light
bulb:
Push
bulb
into
socket,
turn
left,
and
pull
out.
When
inserting
new
PFAFF
light
bulb,
be
sure
to
slide
bulb
pins
into
bayonet
socket
slots.
Press
bulb
in
and
turn
right.
Close
grille.
Note
voltage
of
electric
circuit.
R8160A
Press
the button
on
the
front
of
the
machine
base
to
switch
the
sewlight
on
and
off.
26
R
6085
‘7h
4
$nai-Qui
fOckr1at
Your
PFAFF
360
has
a
snap-out
workplaie
which can
be
raised
to
give
you
a full-size
work
oreo
for
fbi
sewing
ond
embroidery.
To
raise
workplate,
pull
it
out
to
the
left
os
for
os
it
will
go,
then
lift
it
until
it
is
flush
with
the
needle
plote. Now
let
it
snop
into
position.
When
you
wont
to
use
the
free
arm
for
doming,
lower
the
workplote,
proceed
ing
in
reverse
order.
Larger
articles
may
require
o
larger
work surface.
To
further
increase
the
sewing
area,
attach
the
workpbote
extension
which
is
in
the
carrying
case.
Swing
out
the
collapsible
legs.
R
6084
27
R
6063
t.cunj
th
11tc
&tt
7i.cicn
Your
PFAFF
360
is
equipped
with
a
30-watt
electric
motor
(Type
PE
360),
which
is
housed
in
the
machine
base and
drives the
main shaft
by
means
of
a driving
belt.
If
the
driving
belt
tension
needs
adjustment,
take
out
the
four
screws
in
cover
t
and
remove.
Loosen
screw x
and
adjust
idler
r
until
correct
tension
is
obtained.
Idler
r
should
be
set
just
far
enough
left
that
it
synchronizes
with
the
belt
clips
and
revolves
evenly.
The
electric
motor
requires
no
special
atten
tion,
except
that
the
brushes
should
be
re
placed
after
400
hours
of
service.
When
you
tighten
screw
x,
make
sure
the
washer
is
in
the
correct
position.
‘7cut1e
$hotItinfJ
1.
Machine
Skips
Stitches
Wrong
needle.
Needle
bent.
Machine
threaded
improperly.
Needle
too
fine
or
too
thick
for
the
thread.
2.
Needle
Thread
Breaks
Cause:
The
above
mentioned
may
cause
thread
breakage.
Thread
tension
too
tight.
Poor
or
knotty
thread
used.
Remedy:
Push
needle
up
as
far
as
it
will
go
and
be
sure
that
the
long
groove
faces
toward
you,
and
flat
side
of
shank
away
from
you.
The
correct
needle
system
is
stamped
on
needle
plate.
(For
ordinary
sewing,
use
System
130R
needles.)
Insert
new
needle.
Check
and
correct
threading
as
instructed
on
pages
14
and
15.
Use
correct
needle
and
thread.
Remedy:
See
remedies
listed
under
1.
above.
Adjust
tensions
as
instructed.
Use
good
quality
threads
only.
Cause:
Needle
incorrectly
inserted.
29
Hook
raceway
is
jammed
with
thread
or
needs
oiling.
Burrs
or
sharp
edges
on
needle
plate
slot.
3.
Needle
Breaks
Ca
use:
Bent
needle
strikes
point
of
sewing
hook.
Needle
too
thin
or
thread
too
heavy.
Fabric
pulls
needle
so
it
bends
and
strikes
needle
plate.
Bobbin
case
inserted
incorrectly.
4.
Faulty
Stitch
Formation
Cause:
Improper
tension.
Thread
too
heavy,
knotty
or
hard.
Bobbin
unevenly
wound.
Pieces
of
thread
between
tension
discs.
Clean
and
oil
hook
raceway.
Polish
needle
plate
slot
with
fine
emery
cloth.
Remedy:
Replace
needle
at
once
to
prevent
further
damage.
Use
correct
needle
and
thread
sizes.
Don’t
force
the
feeding
motion.
Guide
the
material
lightly.
Push
bobbin
case
until
you
hear
it
snap
into
place.
Remedy:
Adjust
tensions
as
instructed.
Use
only
first-rate
thread
the
correct
size
for
the
needle
and
fabric.
Don’t
run
thread
over
finger
when
winding
the
bobbin,
but
lead
it
around
thread
retainer
stud
on
top
cover
and
through
thread
guide.
Raise
presser
bar
lifter
and
remove
thread.
30
il[.
5.
Machine
Feeds
Improperly
Cause:
Remedy:
Feed
dog
set
too
low,
does
not
rise
up
enough
obove
Hove
your
Pfoff
dealer
make
the
necessary
adjustment.
needle
plate
level.
Accumulations
of
lint
pocked
between
feed
teeth.
Take
off
needle
plate
and
remove
lint
with
a
stiff
brush.
6.
Machine
Works
Heavily
Cause:
Remedy:
Motor
belt
has
shrunk
and
causes
excessive
pressure
Loosen
motor
belt
by
adjusting
idler
(see
page
28).
on
bearings.
Hook
raceway
lacks
oil
or
is
obstructed
by
pieces
of
Clean
and
oil
hook
raceway.
thread.
Mechanism
clogged
by
inferior
oil.
Use
only
Pfaff
sewing
machine
oil
never
salad
oil
or
glycerine.
Bobbin
winder
working
while
sewing
(when
a
Stop
bobbin
winder.
bobbin
is
not
being
filled.>
Thread
Jamming
The
new
PFAFF
rotary
hook
will
not
normally
Earn,
even
if
the
machine
should
be
handled
improperly.
If
thread
should
happen
to
jam
in
the
raceway
of
the
sewing
hook,
the
power
of
the
motor
will
be
sufficient
to
over
come
hard
working
of
the
mechanisiii.
Thread
jamming
can
be
avoided,
however,
by
following
the
instructions
on
page
5.
31
.
V
R8033
Edge
Stitching
Machine
Setting:
A
—0
to
4
B
4
Sew
parallel
rows
of
straight
or
zigzag
stitches
at
various
distances
from
the
fobric
edge
by
using
adlustable
seam
guide
No.
53077
and
the
edge
stitcher
(without
quilting
gauge).
The
seam
guide
is
fastened
to
the
machine
bed
with
the
long
thumb
screw.
For
wider
marginal
stitching,
turn
edge
guide
half
a
turn
and
use
low
end
as
a
guide.
Quilting
Machine
Setting:
A
—0
or
2
.
B
4
Edge
stitcher
No.
41
350
used
with
the
quilting
gauge
sews
parallel
rows
of
stitching
over
the
entire
surface
of
the
fabric.
Always
guide
the
gauge
finger
along
the
preceding
row
of
stitches.
Attractive
teo
cosies,
slippers
seat
pads
and
covers
can
be
quilted.
32
R
8032
Zipper
Insertion
Machine
Setting:
A—0
.
Pin
or
baste
closed
zipper
on
wrong
side
of
fabric.
Position
of
zipper
depends
on
whether
or
not
you
want
the
edge
of
the
fabric
to
overlap
the
zipper.
Turn
fabric
to
right
side.
Run
a
straight
seam
close
to
left
edge
of
zipper,
stitch
across
end
and
up
the
other
side
in
one
continuous
opera
tion.
Use
right
edge
of
foot
as
a
guide.
For
other
types
of
zipper
insertion,
follow
direc
tions
in
your
zipper
packoge.
41242
Flat
Felled
Seams
Machine
Setting:
A
—0
or
2
(optional)
B
4
Flat
felled
seams
are
used
to
durably
join
two
pieces
of
fabric.
They
are
made
in
two
operations.
Flat
felled
seams
usually
are
straight
stitched.
Narrow
zigzag
stitches
are
used
far
felling
on
elasticized
fabrics
only.
4
First
Seam
Lay
pieces
together
with
the
wrong
sides
facing
and
the
bottom
piece
protruding
1
/a
inch.
Feed
both
pieces
into
felling
foot,
as
illustrated,
so
that
the
bottom
fabric
is
folded
over
edge
of
top
piece
and
stitched
down. Make
sure
that
pro
truding
seam
allowance
is
notfolded
twice.
Second
Seam
Open
the
two
pieces,
place
them
under
the
needle
right
side
up,
insert
seam
ridge
into
felling
foot
opening,
and
stitch
down
to
the
left.
Make
sure
that
second
seam
is
placed
close
to
the
edge
but
not
beyond
it.
The
felling
foot
has
a
needle
slot,
rather
than
a
needle
hole,
to
permit
zigzag
felling.
33
R7154
1248
Hemming
Machine
Setting:
A—Oor2to4
.
B—
4
The
hemmer
foot
is
indispensable
if
you
want
to
sew
a
uniform
hem.
You
can
hem
with
straight
or
zigzag
stitches,
depending
on
the
type
of
fabric
you
are
using.
Clip
off
the
corner
of
the
fabric
to
facilitate
inser
tion
into
the
hemmer
foot.
Feed
fabric
so
that
the
raw
edge
is
in
line
with
the
left
edge
of
the
hemmer
foot
opening.
If
you
feed
less,
the
fabric
will
not be
folded
twice
and
the
raw
edge
will
show.
Avoid
ugly
ends
by
slowing down
feeding.
To
do
this,
press
the
fabric
against
the
needle
plate
on
the
left
side
of
the
foot
before
you
come
to
the
end
of
the
hem.
34
R5915
46267
h
Rolled
Hems
Machine
Setting:
A—2
to
4
.
B—
4
Rolled
hems
are
used
to
finish
sheer or
delicate
fabrics.
For
a
smooth,
unpuckered
hem,
ease
thread
tension
slightly
and
set
dial
A
on
2
or
3,
To
hem
tricot
fabrics,
increase
the
tension
and
use
the
widest
zigzag
stitch so
the
hem
has
a
rolled
shell
effect.
V
*
.
57378
Overcasting
Edges
Machine
Setting:
A—
2
to
4
B—
4
Overcasting
prevents
frayed
edges.
Use
a
long,
wide
zigzag
stitch
and
sew
edge
with
the
needle
taking
one
stitch
into
the
fabric
and
the
other
over
its
edge.
You
may
over-
.4
cast
edges
after
fabric
is
cut
and
before
the
pieces
are
loined.
Two
similar
pieces
of
fabric
which
do
not
ravel
easily
may
be
butted
together
and
loined
with
zigzag
stitches.
Worn
bed
sheets
may
be
mended
this
way.
Cut
out
worn
center
strip.
Place
the
selvaged
edges
of
the
remaining
pieces
of
sheet
under
the
sewing
foot
so
that
the
abutted
edges
are
centered
under
the
needle.
Join
them
with
closes
wide
zigzag
stitches.
Hem
raw
edges
of
sheet.
R
7169
Butt
Seaming
MachineSetting:
A—3or4
51378
35
51378
Inserting
Lace
Attaching
Lace
Machine
Setting:
A
Ito
3
B—
4
You
con
attach
lace
edging
in
one
simple
operation.
First
fold
fabric
down
/e
inch
with
the
fabric
groin.
Press
fold.
Overlap
lace
on
folded
edge.
Sew
together
with
narrow
zigzog
stitches.
Trim
excess
fobric
on
wrong
side
close
to
seam.
V
Machine
Setting:
A—I
to
3
B—
4
This
sewing
job
takes
two
operations.
Place
the
lace
over
the
desired
area
of
the
fabric
and
attach
with
a
line
of
straight
stitching
along
both
edges
of
the
lace.
Turn
the
work
over
and
slit
the
fabric
about
half
way
between
the
two
rows
of
stitching
under
the
insertion.
Fold
edges
of
material
back
and
press.
R7161
Turn
work
to
right
side,
set
machine
for
a
narrow
zigzag
stitch
of
medium
length,
and
overcast
edges,
making
a
firm,
elastic
seam.
Trim
away
excess
material
as
out
lined
in
the
preceding
section.
r
R7170
36
R7177
-
5137
tnserting
Patches
Machine
Setting
A—4
B
Large
holes
can
be
patched
quickly.
The
following
method
may
be
used
for
jersey
fabrics.
Cut
patch
so
that
its
grain
will
match
the
rest
of
the
fabric.
Place
the
patch
over
the
damaged
area.
Sew
it
down
with
a
wide
zigzag
stitch
of
medium
length.
For
additional
strength
stitch
over
corners
twice.
Turn
over
and
trim
close
to
seams.
‘CS
37
R7157
“I
46121
SingIeNeedIe
Cording
Machine
Setting:
A
—2
B
4
Trace
cording
pattern
on
fabric
and
pull
a
filler
thread
through
the
groove
in
the
sole
of
the
sewing
foot.
Follow
your
pattern
with
a
satin
stitch
and
hold
the
filler
thread
lightly.
The
satin
stitch
is
used
for
many
sewing
lobs,
For
added
effects
sew
over
embroidery
with
contrasting
thread.
Set
stitch
length
between
1/2
and
1.
V
Shirring
Machine
Setting:
A
—2
to
2hz
.
B
4
Follow
above
directions
for
shirring,
but
place
filler
thread
under
rather
than
on
top
of
the
fabric.
Fabric
and
filler
thread
both
are
guided
in
the
groove
of
the
foot.
Width
of
zigzag
depends
on
thickness
of
filler
thread
used.
When
you
have
finished
the
zigzag
seam,
slide
material
along
the
filler
thread
to
distribute
fullness.
Finish
the
shirring
with
a
line
of
straight
stitching.
Leave
filler
thread
in
the
shirring
or
pull
it
out,
piece
by
piece,
as
you
straight-stitch,
depending
on
the
stress
to
which
the
shirr
ing
will
be
exposed.
R
7159
38
Applique
Work
Machine
Setting:
A
11
Jz
to
2
-
B
Appliqusing
is
easy
and
modern,
Trace
design
on
wrong
side
of
fabric
and
baste
a
piece
of
contrasting
material
to
right
side.
Outline
design
on
wrong
side
with
a
narrow
zigzag
stitch
——
and
the
motif
will
appear
on
the
right
side.
Trim
excess
material
close
to
the
seam
and
sew
over
edges
of
applique
with
a
medium-wide
satin
stitch.
If
you
want
to
give
the
design
a
plastic
effect,
satin-stitch
over
a
filler
thread.
Applique
is
very
effective
on
buster
suits,
pinafores,
bibs,
frocks,
covers,
wall
hang
ings,
or
wherever
a
gay
note
is
desired.
Fill
in
small,
but
essential
sections
of
the
design
with
granite
stitches.
V
R
7163
6121
R7167
39
R7220
46121
Openwork
Embroidery
Machine
Setting:
A
—0
and
21/a
B—
4
There
are
hundreds
ef
patterns
excellent
for
openwork
embroidery.
Although
similar
in
appearance
to
applique,
openwork
embroidery
is
much
simpler.
Let’s
embroider
the
25
-square
box
illustrated.
First,
sew
over
all
traced
lines
twice,
using
short
straight
stitches.
Then
sew
over
straight-stitch
lines
with
a
medium-wide
satin
stitch.
Make
sure
that
your
rows
of
satin
stitching
are
even
so
the
corners
of
your
squares
look
neat.
I
9
9
-‘
V
R7179
7
R
7166
C
4
When
you
finish
sewing,
cut
out
every
other
square.
Be
careful
that
you
don’t
injure
the
seams.
Flowers
or
free
forms
make
very
attractive
designs.
R
7221
51378
Making
Stuffed
Animals
Machine
Setting:
A
VJz
B—
+
Stuffed
animals
are
wonderful
toys
for
the
little
folk
and
they
are
so
easy
to
make.
Some
scraps
of
fabric
or
oilcloth
and
a
piece
of
cardboard
is
all
you
need
for
this
elephant,
for
instance.
Outline
pattern
on
material
and
cut
out
pieces
without
a
seam
allowance.
Insert
some
cotton
wadding
into
the
ears
before
you
fold
and
close
them
with
a
zigzag
seam.
Attach
ears
and
oin
pieces
by
overcasting
edges
with
a
medium-wide
satin
stitch,
leaving
openings
for
the
tusks.
Set
in
tusks,
glue
on
eyes
and
tack
on
tail.
Stuff
elephant
with
cotton,
inserting
wadding
through
open
soles
and
tip
of
trunk.
Close
openings
with
cardboard
covered
with
oilcloth.
46121
Scroliwork
MachineSetting:
A—4
.
B—I-
Draw
design
on
fabric.
Clamp
work
into
em
broidery
hoops.
As
you
are
following
the
scroll-
work
outline
with
a
wide
satin
stitch,
move
hoops
right,
then
left,
alternating
the
rhythm
and
the
direction
of
your
movements.
An
exciting
note
may
be
added
by
using
variegated
thread.
R7222
41
R7150
51378
(mitation
Hemsfifcbing
Machine
Setting:
A
V/s
.
B
4
Stitch
Length:
11
/s
Increase
Tension
Beautiful
hemstitching
effects
on
handkerchiefs,
blouses,
dresses,
and
so
forth,
can
be
mode
with
Pfaff’s
System
130
(wing)
needle
available
at
Pfaff
stores
at
extra
cast.
Loosely
woven
fabrics,
such
as
batiste,
organdy,
georgette,
etc.,
are
well
suited
to
hemstitching
while
woolly
fabrics
are
not
recommended
because
needle
penetrations
close
up.
Since
the
hemstitching
needle
has
a
slightly
thicker
shank,
the
needle
set
screw
must
be
turned
out
far
enough
for
insertion.
The
hemstitching
needle
cannot
be
threaded
with
the
automatic
needle
threader.
Hemstitching
is
very
simple
(see
sketch).
I
Sew
first
raw
on
the
left
of
the
area
to
be
hemstitched.
2
Stop
machine
when
needle
is
in
fabric
on
the
right.
3
Lift
sewing
foot,
turn
fabric
in
the
direction
of
arrow,
and
lower
foot
again.
4
Sew
second
row
as
shown
in
sketch,
guiding
material
parallel
to
first
row
so
that
needle
penetrates
needle
holes
of
previous
zigzag
stitches
as
it
descends
on
the
right.
S
If
you
are
making
more
than
two
lines
of
hemstitching,
alternately
leave
needle
in
fabric
on
the
left
and
right
at
turning
points,
pivot
fabric
on
needle,
and
proceed
as
directed
above.
1
R
7138
42
r
R
7140
R
7173
.4
Hemstitching
Hemstitching
is
successful
on
linen
and
twilled
fabrics.
For
this
type
of
work
use
an
ordinary
needle.
Draw
several
threads
out
of
the
fabric.
Set
machine
for
a
medium-wide
zigzag
stitch
and
sew
along
both
edges
of
the
strip,
making
sure
that
“zigs”
and
zags”
in
both
rows
are
exactly
opposite
each
other.
Set
stitch
length
according
to
thread
bar
width
you
desire.
Draw
threads
from
the
edge
until
your
fringe
is
the
length
you
wont.
Zigzag
along
this
line
——
and
you
will
have
picot
edging.
45669
Biindstitching
Machine
Setting:
B—
Stitch
Length:
Maximum
Hemming
dresses
and
skirts
by
hand
is
a
laborious
task.
You
con
do
it
easily
on
your
PFAFF
on
medium
and
heavy
fabrics.
Use
zigzag
foot
No.
51378
with
blindstitch
guide
No.
46669,
which
you
can
buy
at
your
Pfaff
store.
Attach
the
guide
so
that
its
vertical
flange
goes
through
the
sewing
foot
slot.
Use
a
No.
70
needle,
a
loose
upper
tension
and
thin
thread
in
needle.
Next
follow
this
procedure:
Turn
fabric
wrong
sidel
up.
Fold
selvaged
material
once
(Fig.
1),
uriselvaged
fabric
twice
(Fig.
2).
It
is
advisable
to
press
or
baste
hem.
Guide
work
evenly,
holding
top
hem
edge
against
the
vertical
flange
of
the
blindstitch
guide.
Set
dial
A
so
that
needle
takes
left
stitch
in
the
folded
edge
and
right
stitch
up
to
or
over
the
hem
edge.
When
hem
is
finished,
stitches
will
not
be
visible
on
top
I
2
side.
R7139
43
R
8145
Sewing
Buttonholes
Machine
Setting:
A
11/2
.
B
Stitch
Length:
0.2
Attach
buttonhole
foot
No.
51016
and
set
slide
on
buttonhole
gouge
to
buttonhole
length
desired.
The
buttonhole
is
the
right
length
when
beginning
of
first
seam
reaches
red
end
of
slide
indicator
(see
arrow).
The
basic
machine
settings
need
not
be
changed
in
sewing
a
buttonhole.
All
special
settings
are
made
by
simply
pushing
lever
F
up
(for
tying
oft)
or
down
(for
bartacking).
V
If
you
prefer
more
prominent
but
tonholes,
pull
a
filler
cord
through
the
hole
in
left
toe
of
foot.
To
get
the
correct
stitch
length,
sew
on
a
piece
of
scrap
material.
In
making
buttonholes
in
soft
or
loosely
woven
fabrics,
it
is
advisable
to
place
a
piece
of
tissue
paper
under
the
material.
To
strengthen
buttonholes
in
tricot
and
knit
fabrics,
insert
a
piece
of
firmly
woven
cotton
material
between
the
fabric
layers.
R
8042
R7994
44
Instructions
for
Buttonholing
p
I
Sew
first
side
over
a
filler
cord.
When
beginning
of
seam
reaches
slide
indicator
on
buttonhole
gauge,
it
is
the
right
length.
Leave
needle
in
fabric
on
right
side
of
its
throw.
2
Lift
foot,
turn
fabric
around
clockwise,
using
needle
as
a
pivot.
Lower
foot,
take
one
stitch to
the
left,
pull
filler
cord
taut
and
lay
ii
parallel
to
completed
line
of
stitch
ing.
0
0
3
Press
lever
F
down.
Make
4
to
6
bortack
stitches,
slight
ly
closing
together
buttonhole
end
to
reduce
length
of
bar.
4
Release
lever
F.
Trim
filler
cord
at
end
of
first
stitch
row.
Sew
second
row
and
stop
about
4
to
6
stitches
from
end
of
first
row.
5
Press
lever
F
down. Make
second
tack,
as
instructed
above.
6
Push
lever
F
up
and
make
3
to
4
tying
stitches.
7
Trim
both
the
sewing
and
filler
threads.
Open
the
buttonhole
with
your
seam
ripper.
Be
careful
not
to
injure
the
bartacks.
45
46120
R7160
Button
Sewing
Don’t
be
ofroid
to
sew
on
buttons,
hooks,
eyes
or
rings
with
your
PFAFF.
Attach
button
sewing
foot
No.
46120
ond
drop
machine
feed.
Mochine
Setting
A
—0
B
Place
button
under
button
sewing
foot
and align
so
thot needle
will
enter
left
hole.
Let
needle
titch
through
hole
and
make
one
or
two
tying
stitches.
Roise
needle.
Turn
dial
A
to
the
right,
usually
to
3,
until
needle
on
the
right
of
its
throw
is
centered
over
right
hole.
Start
machine
and
sew as
many
zigzag
stitches
as
you
deem
necessary
to
fasten
button
securely.
Push
lever
F
up
and
make
two
or
three
tying
stitches.
When sewing
on
four-hole
buttons,
lift
foot,
reposition
button
and
repeat
the
above
process,
stitching
through
the
second
pair
of
holes.
Hooks,
eyes
or
rings
are
attached
in
the
same
manner.
46
Darning
You
will
really
appreciate
the
free
arm
of
your
PFAFF
360
when
you
darn
sleeves
and
socks.
Remove
presser
foot
and
drop
machine
feed.
Use
feed
cover
plate
No.60407
to
increase
tautness
of
fabric
and
permit
free
R
6121
movement.
Ta
fasten
the
feed
cover
plate
to
the
machine,
slip
its
spring
into
the
slot
in
the
front
edge
of
the
needle
plate,
as
illustrated.
Attach
darning
foot
as
instructed
on
page
24,
and
suspend
presser
bar
from
the
rear
of
the
face
cover
with
darning
hook
No.46128.
Even
though
the
presser
bar
is
suspend
ed,
the
presser
bar
lifter
must
be
lowered
to
activate
the
tension,
or
the
upper
tension
will
be
released
and
the
thread
will
jam
in
the
machine.
Machine
Setting:
A
—3
.
B
4’
Use
special
darning
foot
No.51050
(available
at
extra
cost)
for
darning
woolen
socks,
sweater
sleeves
and
other
woolen
articles.
Lace
filler
thread
through
the
hole
in
the
foot.
Place
thread
back
and
forth
across
damaged
spot
(top
picture)
and
anchor
if
in
unworn
area.
Sew
across
filler
thread
with
zigzag
stitches
(bottom
picture).
47
R6122
Tubular
Articles
Machine
Setting
A
—0
B
4
Drop
feed.
You
need
no
darning
hoop
to
mend
sleeves.
trouser
legs
or
socks
on
your
PFAFF
360.
Simply
slip
them
over
the
free
arm.
Stitch
back
and
forth
across
the
hole,
first
length
wise,
then
crosswise.
Use
a
thin
No.
70
needle.
Thin
Spots
Remember
that
“a
stitch
in
time
saves
nine”
and
reinforce
spots
that
have
worn
thin
with
short
stitches
made
lengthwise
and
across
worn
section.
Clamp
fabric
into
darning
hoop
and
move
it
freely
under
the
needle.
Long
rips
may
be
darned
with
the
normal
sewing
foot
and
without
hoop.
Raise
ma
chine
feed
and
use
forward-reverse
stitch
control.
Small
Holes
Darn
small
and
medium-size
holes
by
trimming
ragged
edges
with
the
fabric
grain.
First
stitch
back
and
forth
across
the
hale
from
one
side
to
the
other
with
the
machine
running
at
high
speed.
Then
turn
the
fabric
at
right
angles
and
sew
back
and
forth
over
preceding
work
with
short
stitches.
This
anchors
threads
in
the
unworn
area
around
the
hole.
48
R6115
R
5913
R
5924
R
5926
Monogram
Embroidery
Machine
Setting:
A
according
to
desired
width
B
4
4
Script
letters
are
best
for
monogram embroidery
without
a
sewing
foot.
It
requires
a
little
practice.
You
will
soon
enjoy
creative
embroidery
once
you
have
learned
to
move
the
material
at
a
uniform
rote.
The
fabric
should
be held
taut
in
the
hoops,
the
presser
bar
suspended
and
the
presser
bar
lifter
lowered,
Drop
machine
feed,
Lower
needle
into
fabric at
the
beginning
of
your
design
and
draw
bobbin
thread
up
through
the
fabric.
Hold
both
thread
ends
and
sew
over
outline,
moving
hoops
slowly
and
evenly.
To
give
your
monogram
dimensional
quality,
embroider
outline
twice.
Be
sure
stitches
are
closely
spaced.
46121
Sewing
Monograms
Machine
Setting:
A
21/2
to
3
.
B
4
The
procedure
below
is
primarily
used
for
block letters.
Raise
machine
feed
and
set
machine for satin
stitch.
Attach
cord
stitcher
and
sew
outlines
of
monogram.
Watch
that
seams
do
not
overlap
at
joints
of
letters.
To
raise monogram,
insert
a
filler
thread.
Ask
your
Pfaff
dealer
to
show
you
PFAFF’s
Ornamentograph,
the ingenious.
ly
designed
monogram
and
ornamental
stitch
attachment.
You
will
marvel
at
its
versatility
and delight
in
the
countless
creative
possibilities
which
it
adds
to
your
Automatic.
49
R7165
Changing
the
Needle
Holder
Bring
take-up
lever
to
highest
point,
loosen
small
setscrew
and
change
needle
holders.
Tighten
set
screw
securely.
The
large
needle
set
screw
must
always
point
toward
the
right.
Use
System
130
B
round-shank
needles
in
1/to
and
5
/64-inch
double-needle
holders,
and
System
130
R
flat-shank
needles
in
3/
and
7
/oa-inch
needle
holders.
To
attach
carding
plate,
refer
to
instructions
an
page
47
for
mounting
feed
cover
plate.
Cording
Ta
card
on
your
PFAFF
Automatic,
use
Cording
Kit
No.
50177
which
is
available
at
extra
cost.
The
Cording
Kit
comprises:
R
8146
4
double-needle
holders
for
needle
dis
tances
of
‘/io,
°/e,
/a
and
7/
inch;
3
cording
feet;
3
carding
plates
(2
with
cord
ducts
and
I
with
center
claw>;
1
package
af
System
130B
needles;
and
I
screwdriver.
Additional
parts
for
heavier
cording
are
available
at
extra
cost.
The
interchangeable
double-needle
holder
is
easy
ta
attach.
R
7370
I
R
7373
50
Increase
the
bobbin
thread
tension
slightly
for
cording.
Pfaff
recommends
you
fill
your
cording
so
it
keeps
its
shape
in
the
laundry.
Filler
cord
thickness
depends
on
cording
size
you
want.
To
sew
filled
cording,
use
the
two
cording
plates
with
cord
ducts.
Only
very
narrow
tucks
are
made
without
filler
cord.
Machine
Setting:
A—0
B—.
+
Additional
Information
on
Cording
Ordinary
cording
in
medium-heavy
fabric
is
made
with
cording
foot
No.
41791
and
cording
plate
No.
60417.
For
thicker
cording
use
foot
No.
41790
with
cording
plate
No.
60419.
R
8156
Cording
foot
No.
41792
ond
plate
No.60417
(with
center
claw,
but
without
cord
duct)
serve
to
make
narrow
air
tucks
in
lightweight
material.
Pin
tucks
also
are
made
with
cording
foot
No.
41792,
but
without
cording
plate.
Cording
plate
No.
60415
with
high
center
claw
is
used
chiefly
for
cording
in
thick
felt.
Cording
height
and
width
are
determined
by
the
distance
between
the
two
needles,
the
cord
diameter
and
the
height
of
the
ridge
on
the
cording
plate.
Thread
tensions.
also
influence
cording
size.
For
uniform
spacing
of
parallel
tucks,
attach
an
adjustable
guide
to
the
cording
foot.
When
space
between
tucks
is
very
narrow,
place
the
preced
ing
seam
into
one
of
the
grooves
of
the
foot
and
use
it
as
a
guide.
This
procedure
insures
uniform
and
parallel
rows
of
cording.
51
R6945
-
5137Q
Ornamental
Sewing
You
can make
exciting
fashion
stitch
designs
by
alternating
straight
and
zigzag
stitching,
varying
stitch
length,
stitch
width
or needle
position.
To
do
this,
press
control
F
down
in
rhythm.
Some
of
these
designs
are
illustrated
below.
Surely
you
will
be
pleased
to
know
that
your
PFAFF
360
can
be
converted
into
a
PFAFF
360-261
Automatic
at
any
time. Just
see
your
Pfaff
dealer
who
will
be
glad
to
do
this
lob
for
you.
With
the
PFAFF
Automatic
you
can
sew
an
endless
variety
of
beautiful
decorative
designs
completely
automatically
and
as
simply
as
any
plain
seam.
V
R
5414
R
8069
The
PFAFF36O-261
Automatic
A
Operation
of
this
versatile
machine
is
surprisingly
simple
and
does
not
require
any
special
skill.
With
the
aid
of
the
embroidery
design
dial
(see
above
illustration) the
machine
can
be
set
for any
desired
stitch
in
a
matter
of
seconds.
Pictured
on
both
sides
of
the
dial
are
only
the
primary
designs
the
machine can
do.
In
addition,
countless
variations
are
possible
by
changing
the
length
of
the
pattern
or
using
one
or
two
needles.
The
range
of
possible
combinations
is
staggering
even
to
imagine.
52
The
Transverse
Spool
Holder
To
ensure
that
ihe
thread
will
unwind
evenly
from
a
crosswound
spool,
use
the
transverse
spool
holder
which
is
part
of
the
standard
equipment
of
your
machine.
To
attach
the
spooi
holder,
slip
position
spring
I
over
the
vertical
spooi
pin,
the
bent
portion
of
the
spring
pointing
toward
you. Push
the
spool
of
thread
on spool
pin
2.
Press
the
position
spring
together,
and
push
pin
2
into
the
spring
slot. With
the
spring
pressed
together,
adjust
its
position
on
the
vertical
spool
pin,
as
required.
When
you
release
the
spring,
the
transverse
pin
will
be held
in
place
firmly. Pass
the
thread
through
eyelet
3,
and
thread
the
machine as
instructed.
R
6533
53
Contents
Foreword
.
Essential
Ports
of
Machine
Electrical
Information
Fundamentals
of
Machine
Operation
Straight
Stitching
Zigzag
Sewing
Winding
the
Bobbin
Inserting
a
Full
Bobbin
into
Bobbin
Case
Removing
the
Bobbin
Case
Inserting
the
Bobbin
Case
Recommended
Needle
and
Thread
Sizes
Important
Facts
about
Needles
Upper
Threading
Operating
the
Needle
Threader
Drawing
Up
the
Bobbin
Thread
Correct
Tension
Regulation
Regulating
the
Thread
Tension
Stitch
Length
Regulation
Reverse
Sewing
Dropping
the
Machine
Feed
Changing
the
Sewing
Foot
The
Darning
Foot
Care
and
Maintenance
Regular
Machine
Care
Sewlight
Facts
The
Snap-Out
Workplate
Adjusting
the
Motor
Belt
Tension
Trouble
Shooting
Zipper
Insertion
Page
.2
4
5
.6
.7
.8
10
10
11
12
13
14
16
17
18
19
20
20
21
22
22
23
25
26
27
28
29
32
Edge
Stitching
Quilting
Flat
Felled
Seams
Rolled
Hems
Hemming
Overcasting
Edges
.
Butt
Seaming
Attaching
Lace
Inserting
Lace
Inserting
Patches
Single-Needle
Cording
.
Shirring
Applique
Work
Openwork
Embroidery
.
Making
Stuffed
Animals
.
Scrollwork
Imitation
Hemstitching
.
Hemstitching
Blindstitching
Sewing
Buttonholes
.
.
Button
Sewing
Darning
Monogram
Embroidery
.
Sewing
Monograms
.
.
Cording
Ornamental
Sewing
.
.
The
PFAFF
360-261
Automatic
The
Transverse
Spool
Holder
Page
32
32
33
34
34
35
35
36
36
37
38
38
39
40
41
41
42
43
43
44
46
47
49
49
50
52
52
53
5

Hulp nodig? Stel uw vraag in het forum

Spelregels
1

Forum

Pfaff-360
  • Ik heb deze naaimachine van m'n schoonmoeder geërfd, heb geen handleiding en hier vind ik ze enkel in het Duits of Engels. Kan iemand mij helpen aub. Gesteld op 8-2-2021 om 18:13

    Reageer op deze vraag Misbruik melden
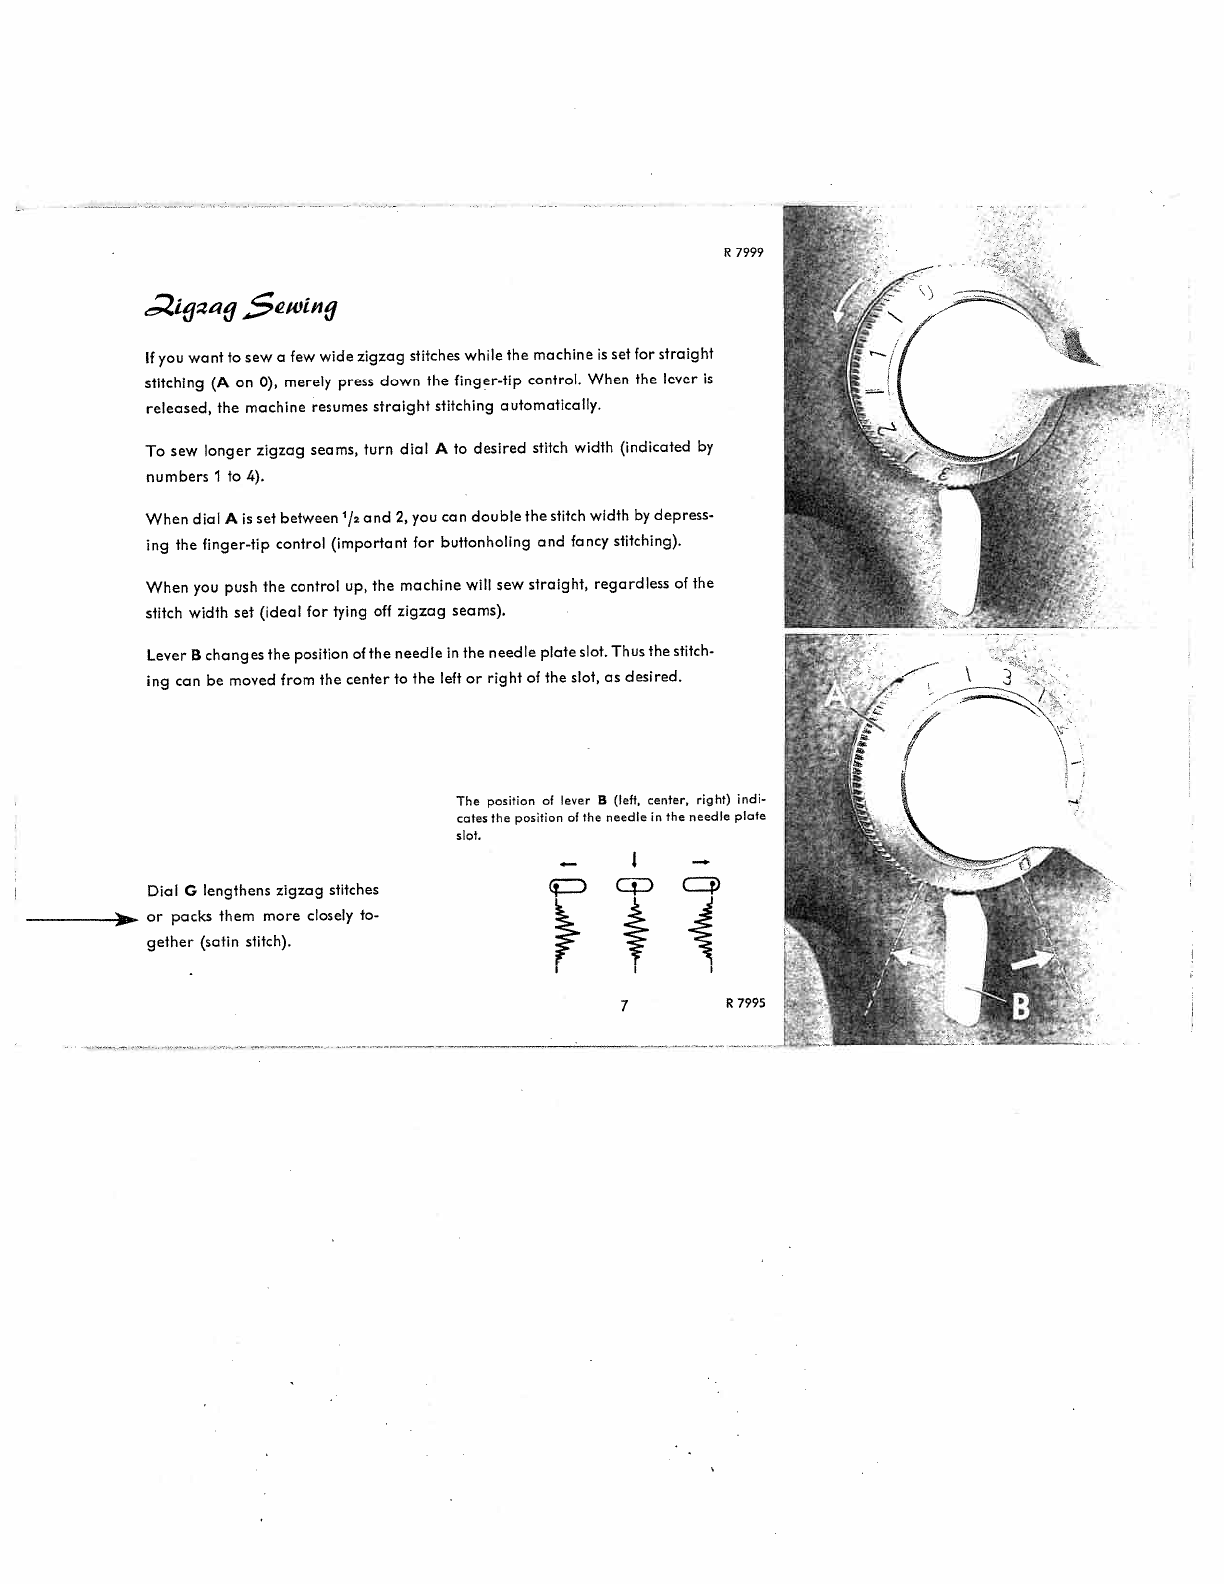
  • Hallo mijn toestel wil niet meer zig zag kan iemand mij raad geven alvast bedankt Gesteld op 14-10-2020 om 12:25

    Reageer op deze vraag Misbruik melden
    • Hallo, kan je de knop nog bewegen om zig zag in te stellen? Of zit tie vast? Zo ja, beetje wd40 er tussen spuiten, tussen knop en machine en dan draait hij wel weer! Succes! Geantwoord op 14-10-2020 om 12:45

      Waardeer dit antwoord Misbruik melden
  • Mijn machine wil niet van zigzag af
    Geantwoord op 6-2-2025 om 19:21

    Waardeer dit antwoord Misbruik melden
  • wat als de steekinstellingsknop niet reageert (dus blijft altijd sttaan op dezelfde steekgrootte Gesteld op 20-8-2020 om 22:58

    Reageer op deze vraag Misbruik melden
  • Weet iemand als deze machine geschikt voor lederen handtassen te maken? Gesteld op 17-6-2020 om 18:38

    Reageer op deze vraag Misbruik melden
    • Hoi, voor zover ik weet kan je hier wel leernaalden in gebruiken, maar voor dik stug leer zou ik het niet aanraden....de machine is niet zwaar genoeg denk ik! Dan heen je meer iets nodig wat een schoenmaker gebruikt! Geantwoord op 18-6-2020 om 23:17

      Waardeer dit antwoord (1) Misbruik melden
  • ik kan de zigzag niet verwijderen om trug recht te stikken hoe kot dit?? dank u Gesteld op 29-4-2020 om 10:53

    Reageer op deze vraag Misbruik melden
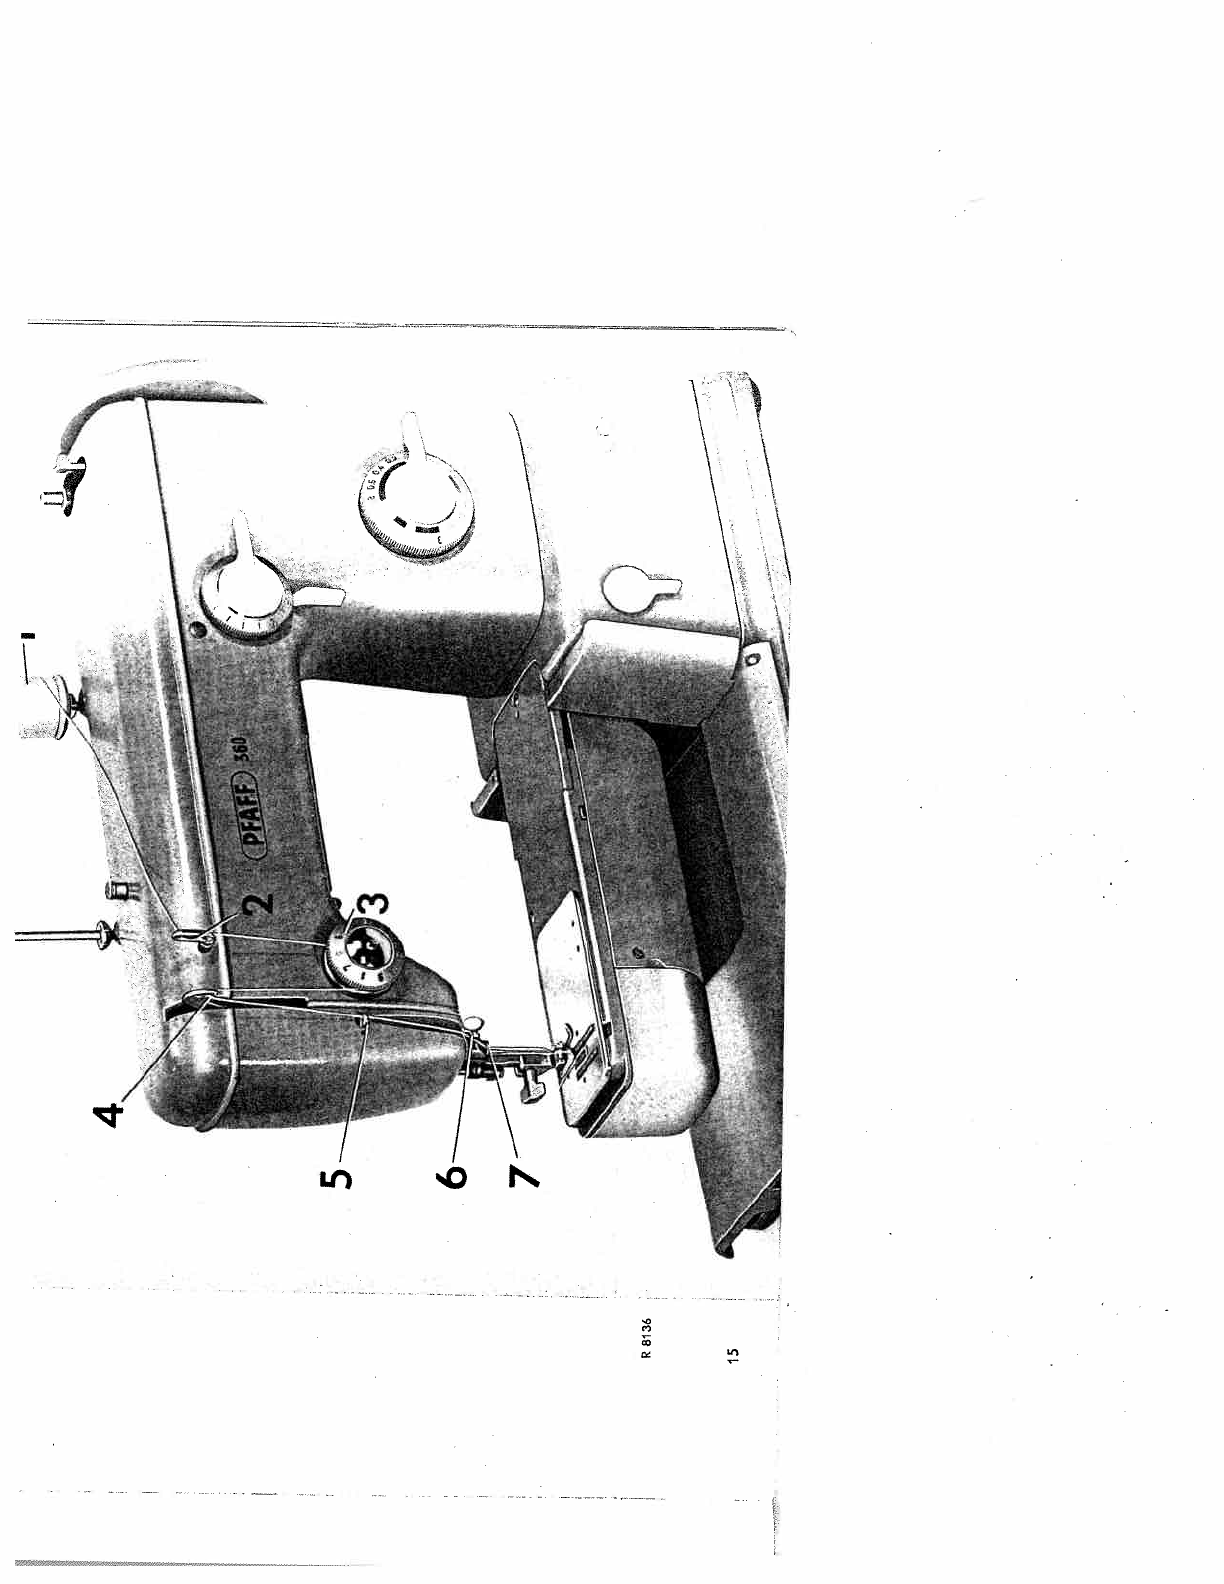
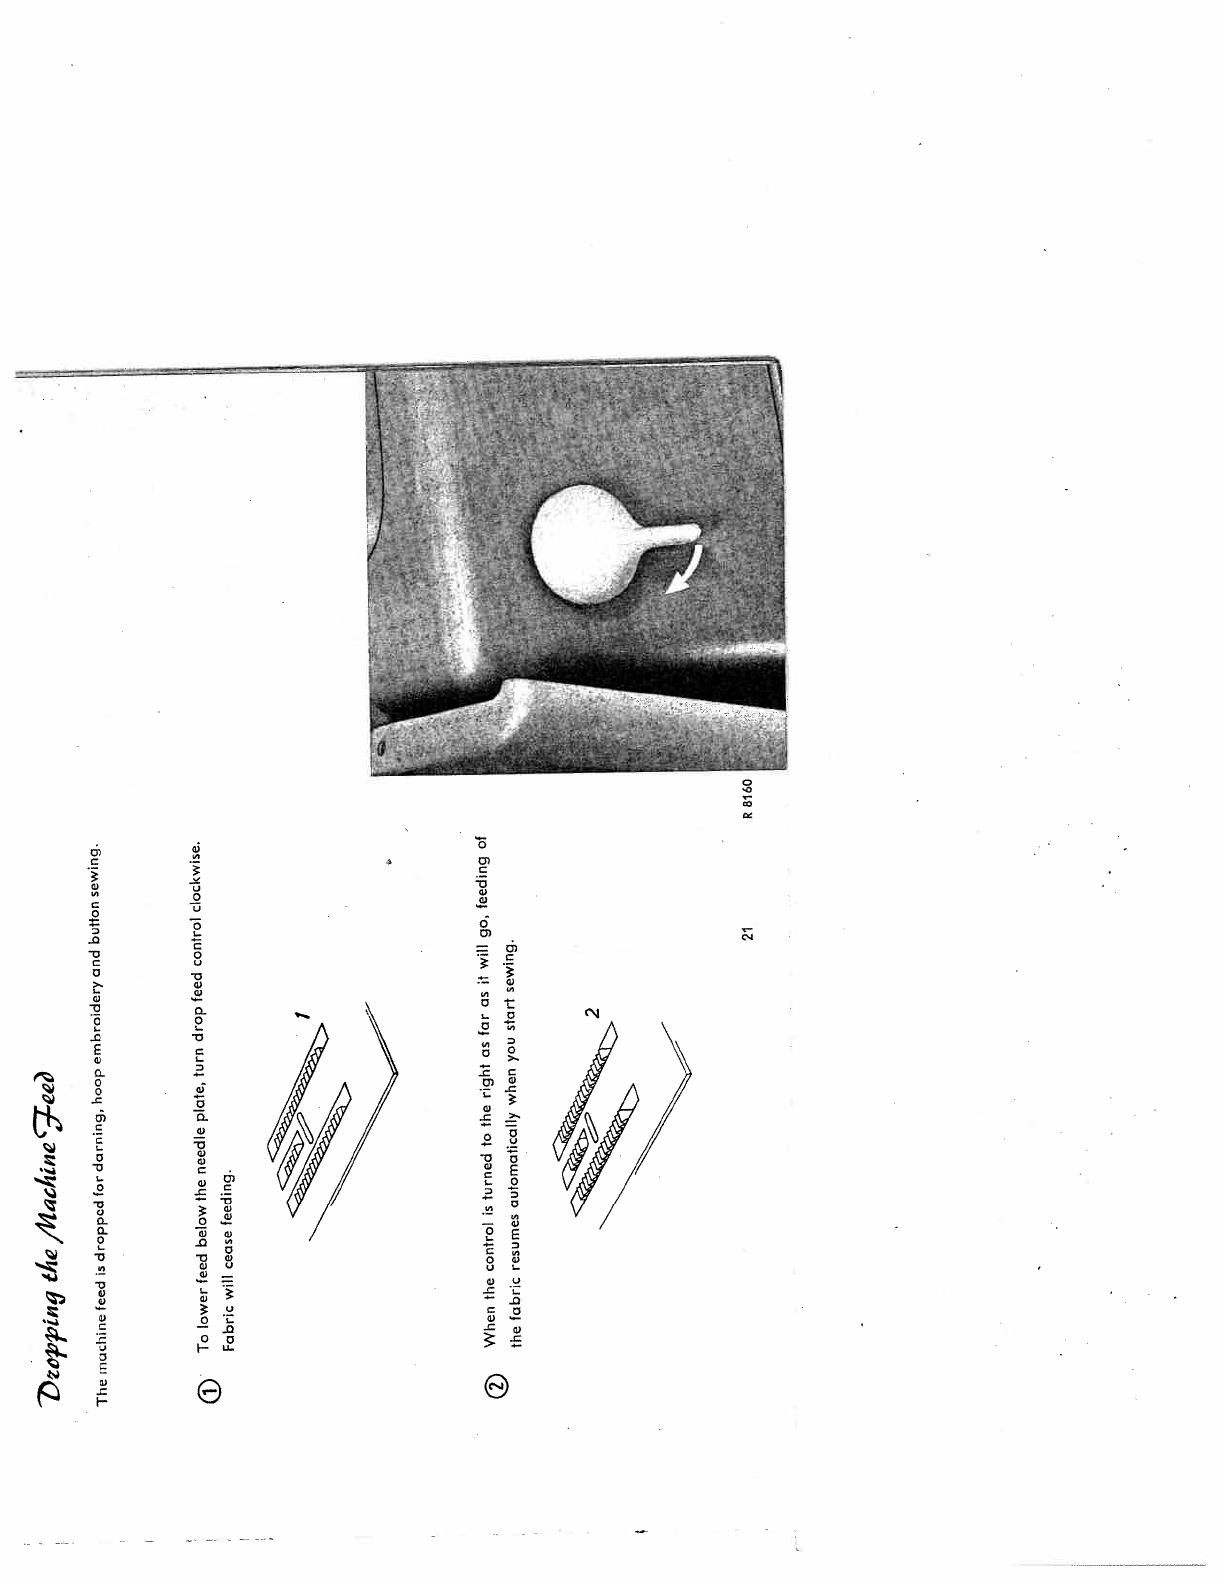
    • Hallo, er zit een grote knop rechts op de machine met een witte hendel eraan. Deze moet je links of rechtsom draaien en dan komt het goed. Je ziet het vanzelf aan het stiksel.
      Groet René Geantwoord op 29-4-2020 om 11:08

      Waardeer dit antwoord Misbruik melden
  • Maar de hendel zit los ,hoe krijg ik die vast? Geantwoord op 12-1-2022 om 09:05

    Waardeer dit antwoord Misbruik melden
  • Kan iemand mij de handleiding voor naaimachine phaff 360 automatic bezorgen aub heb dit toestel geerfd zonder handleiding .
    Mvg
    Marc Gesteld op 2-9-2019 om 13:48

    Reageer op deze vraag Misbruik melden
    • ik heb hetzelfde probleem, geërfd, geen handleiding, en hier vind ik enkel de Duitse of Engelse handleiding. Heeft u inmiddels een handleiding gevonden mijnheer ? Geantwoord op 8-2-2021 om 18:09

      Waardeer dit antwoord Misbruik melden
6

Misbruik melden

Gebruikershandleiding.com neemt misbruik van zijn services uitermate serieus. U kunt hieronder aangeven waarom deze vraag ongepast is. Wij controleren de vraag en zonodig wordt deze verwijderd.

Product:

Bijvoorbeeld antisemitische inhoud, racistische inhoud, of materiaal dat gewelddadige fysieke handelingen tot gevolg kan hebben.

Bijvoorbeeld een creditcardnummer, een persoonlijk identificatienummer, of een geheim adres. E-mailadressen en volledige namen worden niet als privégegevens beschouwd.

Spelregels forum

Om tot zinvolle vragen te komen hanteren wij de volgende spelregels:

Belangrijk! Als er een antwoord wordt gegeven op uw vraag, dan is het voor de gever van het antwoord nuttig om te weten als u er wel (of niet) mee geholpen bent! Wij vragen u dus ook te reageren op een antwoord.

Belangrijk! Antwoorden worden ook per e-mail naar abonnees gestuurd. Laat uw emailadres achter op deze site, zodat u op de hoogte blijft. U krijgt dan ook andere vragen en antwoorden te zien.

Abonneren

Abonneer u voor het ontvangen van emails voor uw Pfaff 360 bij:


U ontvangt een email met instructies om u voor één of beide opties in te schrijven.


Ontvang uw handleiding per email

Vul uw emailadres in en ontvang de handleiding van Pfaff 360 in de taal/talen: Engels als bijlage per email.

De handleiding is 3,11 mb groot.


U ontvangt de handleiding per email binnen enkele minuten. Als u geen email heeft ontvangen, dan heeft u waarschijnlijk een verkeerd emailadres ingevuld of is uw mailbox te vol. Daarnaast kan het zijn dat uw internetprovider een maximum heeft aan de grootte per email. Omdat hier een handleiding wordt meegestuurd, kan het voorkomen dat de email groter is dan toegestaan bij uw provider.

Stel vragen via chat aan uw handleiding

Stel uw vraag over deze PDF

Andere handleiding(en) van Pfaff 360

Pfaff 360 Gebruiksaanwijzing - Deutsch - 54 pagina's


Uw handleiding is per email verstuurd. Controleer uw email

Als u niet binnen een kwartier uw email met handleiding ontvangen heeft, kan het zijn dat u een verkeerd emailadres heeft ingevuld of dat uw emailprovider een maximum grootte per email heeft ingesteld die kleiner is dan de grootte van de handleiding.

Er is een email naar u verstuurd om uw inschrijving definitief te maken.

Controleer uw email en volg de aanwijzingen op om uw inschrijving definitief te maken

U heeft geen emailadres opgegeven

Als u de handleiding per email wilt ontvangen, vul dan een geldig emailadres in.

Uw vraag is op deze pagina toegevoegd

Wilt u een email ontvangen bij een antwoord en/of nieuwe vragen? Vul dan hier uw emailadres in.


Info