You can determine the distance from the ISO sensitivity and aperture settings.
Example: If the ISO sensitivity = 200, aperture = F11, then the distance range is about 0.18 to 2.0 m.
* The ranges of distance given in the table are guidelines. The range of distances for taking photos varies depending on the subject and shooting conditions.
We recommend taking test shots to check the shot.
4Bijlage
Richtlijnen voor automatisch flitsen en berekeningsmethoden
Richtlijnen voor afstandsbereik bij fotograferen met automatische flits (Eenheid: m)
U kunt de afstand afleiden uit de instellingen voor ISO-gevoeligheid en diafragma.
Voorbeeld: als de ISO-gevoeligheid = 200, diafragma = F11, dan is het afstandsbereik ongeveer 0,18 tot 2,0 m.
*De afstandsbereiken in de tabel zijn benaderingen. Het afstandsbereik voor het maken van opnamen varieert met de opnameomstandigheden
en de omstandigheden van het onderwerp. We raden u aan proefopnamen te maken.
4
AF160FC.book Page 32 Wednesday, February 11, 2009 3:35 PM
33
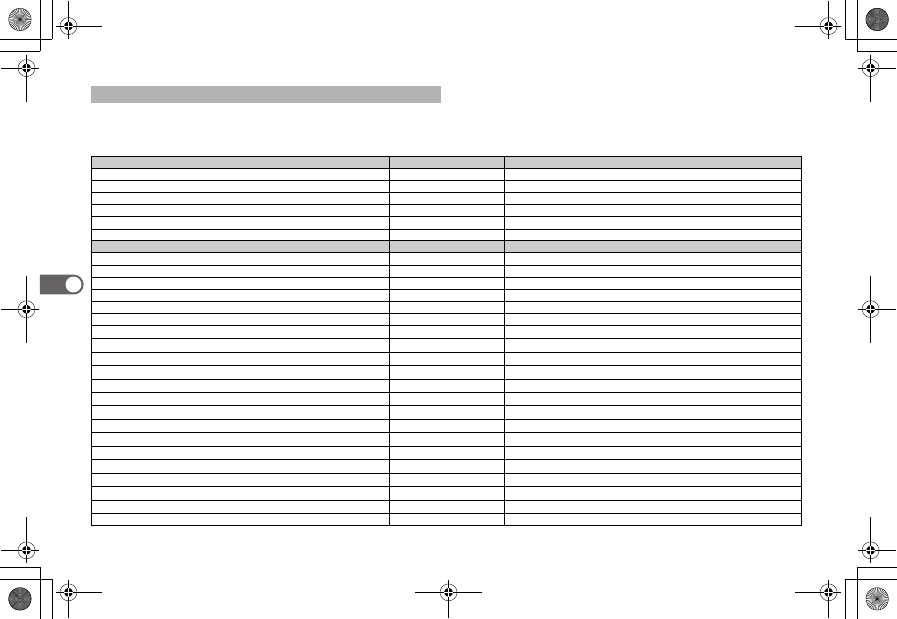
Subject distance guideline
How to use the flash guidelines
You can determine the distance from the ISO sensitivity, the flash mode dial setting (FULL, 1/4, 1/16), and the aperture settings.
Example: If the ISO sensitivity = 200, the mode dial setting = 1/4, and the aperture = F11, then the distance is about 1.0 m. (Exposure = 1x)
You can also determine a combination of aperture, mode dial setting, and ISO sensitivity by figuring backwards from the distance.
*The values in the guideline are for 1x exposure. The exposure for taking photos varies depending on the subject and shooting conditions. We recommend taking test
shots to check the exposure for the shot. (Try opening the aperture and increasing the exposure.)
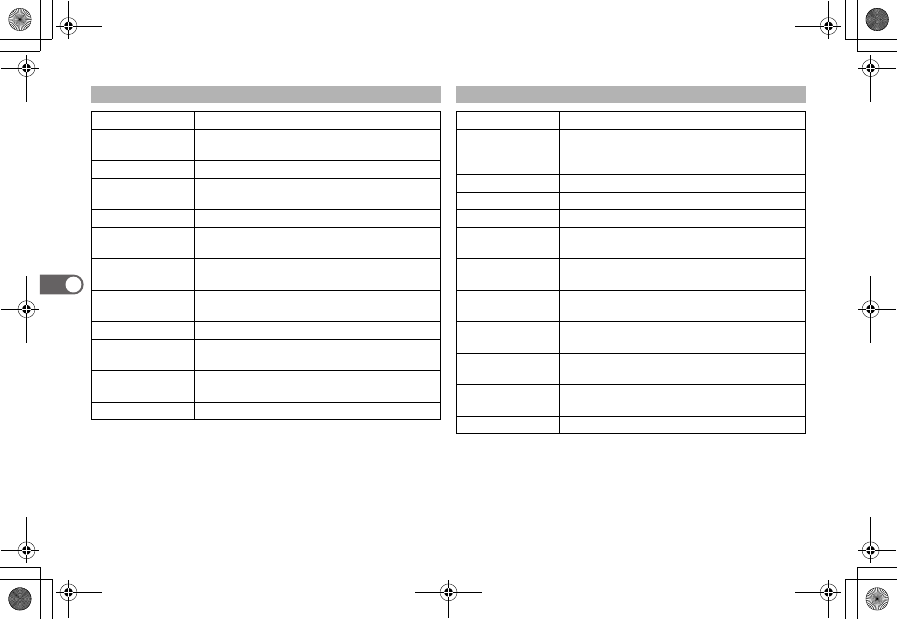
Manual flash guidelines and calculation methods
Unit: m
ISOmodeGNF2.8F4F5.6F8F11F16F22F32F45
100
FULL16.05.74.02.82.01.41.00.710.500.35
1/48.02.82.01.41.00.710.500.350.250.18
1/164.01.41.00.710.500.350.250.180.130.09
200
FULL22.68.05.74.02.82.01.41.00.710.50
1/411.34.02.82.01.41.00.710.500.350.25
1/165.72.01.41.00.710.500.350.250.180.13
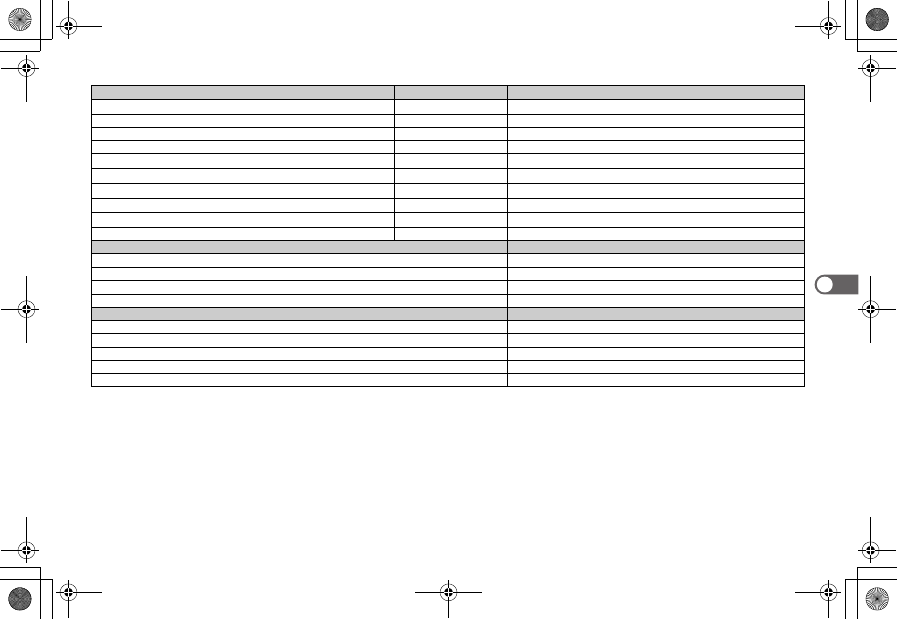
400
FULL32.0118.05.74.02.82.01.41.00.71
1/416.05.74.02.82.01.41.00.710.500.35
1/168.02.82.01.41.00.710.500.350.250.18
800
FULL45.316118.05.74.02.82.01.41.0
1/422.68.05.74.02.82.01.41.00.710.50
1/1611.34.02.82.01.41.00.710.500.350.25
1600
FULL64.02316118.05.74.02.82.01.4
1/432.0118.05.74.02.82.01.41.00.71
1/1616.05.74.02.82.01.41.00.710.500.35
3200
FULL90.5322316118.05.74.02.82.0
1/445.316118.05.74.02.82.01.41.0
1/1622.68.05.74.02.82.01.41.00.710.50
6400
FULL128.045322316118.05.74.02.8
1/464.02316118.05.74.02.82.01.4
1/1632.0118.05.74.02.82.01.41.00.71
4
AF160FC.book Page 33 Wednesday, February 11, 2009 3:35 PM
34
Richtlijn onderwerpsafstand
De flitsrichtlijnen gebruiken
U kunt de afstand afleiden uit de instellingen voor ISO-gevoeligheid, de stand van de functiekiezer (FULL, 1/4, 1/16) en diafragma.
Voorbeeld: als de ISO-gevoeligheid = 200, de stand van de functiekiezer = 1/4 en het diafragma = F11, dan is de afstand ongeveer 1,0 m. (Belichting = 1x)
U kunt ook een combinatie van diafragma, functiekiezerstand en ISO-gevoeligheid afleiden uit de afstand.
*De waarden in de richtlijn zijn geldig bij 1x belichting. De belichting voor het maken van opnamen varieert met de opnameomstandigheden en de omstandigheden
van het onderwerp. We raden u aan proefopnamen te maken om de belichting voor de opname te bepalen. (Probeer het diafragma verder te openen en de belichting
te intensiveren.)
Richtlijnen voor handmatig flitsen en berekeningsmethoden
(Eenheid: m)
ISOStandGNF2.8F4F5.6F8F11F16F22F32F45
100
FULL16.05.74.02.82.01.41.00.710.500.35
1/48.02.82.01.41.00.710.500.350.250.18
1/164.01.41.00.710.500.350.250.180.130.09
200
FULL22.68.05.74.02.82.01.41.00.710.50
1/411.34.02.82.01.41.00.710.500.350.25
1/165.72.01.41.00.710.500.350.250.180.13
400
FULL32.0118.05.74.02.82.01.41.00.71
1/416.05.74.02.82.01.41.00.710.500.35
1/168.02.82.01.41.00.710.500.350.250.18
800
FULL45.316118.05.74.02.82.01.41.0
1/422.68.05.74.02.82.01.41.00.710.50
1/1611.34.02.82.01.41.00.710.500.350.25
1600
FULL64.02316118.05.74.02.82.01.4
1/432.0118.05.74.02.82.01.41.00.71
1/1616.05.74.02.82.01.41.00.710.500.35
3200
FULL90.5322316118.05.74.02.82.0
1/445.316118.05.74.02.82.01.41.0
1/1622.68.05.74.02.82.01.41.00.710.50
6400
FULL128.045322316118.05.74.02.8
1/464.02316118.05.74.02.82.01.4
1/1632.0118.05.74.02.82.01.41.00.71
4
AF160FC.book Page 34 Wednesday, February 11, 2009 3:35 PM
35
MEMO
4
AF160FC.book Page 35 Wednesday, February 11, 2009 3:35 PM
36
The flash head can be mounted on the following lenses using the adapter ring, but there may be some problems when using them.
Basically, a lens cannot be used if the front ring turns during focusing.
Lenses with compatibility issues
For DA lenses + digital SLR camerasFront ring turnsDescription of problem
smc PENTAX-DA 16-45mm F4 ED AL-Vignetting occurs (from 16-24 mm)
Gebruikershandleiding.com neemt misbruik van zijn services uitermate serieus. U kunt hieronder aangeven waarom deze vraag ongepast is. Wij controleren de vraag en zonodig wordt deze verwijderd.
Product:
Spelregels forum
Om tot zinvolle vragen te komen hanteren wij de volgende spelregels:
lees eerst de handleiding door;
controleer of uw vraag al eerder door iemand anders is gesteld;
probeer uw vraag zo duidelijk mogelijk te stellen;
heeft u een probleem en al geprobeerd om dit op te lossen, vermeld dit erbij aub;
heeft u een oplossing gekregen van een bezoeker dan horen wij dat graag in dit forum;
wilt u een reactie geven op een vraag of antwoord, gebruik dan niet dit formulier maar klik op de knop 'reageer op deze vraag';
uw vraag wordt direct op de website gezet; vermijd daarom persoonlijke gegevens in te vullen;
Belangrijk! Als er een antwoord wordt gegeven op uw vraag, dan is het voor de gever van het antwoord nuttig om te weten als u er wel (of niet) mee geholpen bent! Wij vragen u dus ook te reageren op een antwoord.
Belangrijk! Antwoorden worden ook per e-mail naar abonnees gestuurd. Laat uw emailadres achter op deze site, zodat u op de hoogte blijft. U krijgt dan ook andere vragen en antwoorden te zien.
Abonneren
Abonneer u voor het ontvangen van emails voor uw Pentax AF 160 FC bij:
nieuwe vragen en antwoorden
nieuwe handleidingen
U ontvangt een email met instructies om u voor één of beide opties in te schrijven.
Ontvang uw handleiding per email
Vul uw emailadres in en ontvang de handleiding van Pentax AF 160 FC in de taal/talen: Engels als bijlage per email.
De handleiding is 1,5 mb groot.
U ontvangt de handleiding per email binnen enkele minuten. Als u geen email heeft ontvangen, dan heeft u waarschijnlijk een verkeerd emailadres ingevuld of is uw mailbox te vol. Daarnaast kan het zijn dat uw internetprovider een maximum heeft aan de grootte per email. Omdat hier een handleiding wordt meegestuurd, kan het voorkomen dat de email groter is dan toegestaan bij uw provider.
Uw handleiding is per email verstuurd. Controleer uw email
Als u niet binnen een kwartier uw email met handleiding ontvangen heeft, kan het zijn dat u een verkeerd emailadres heeft ingevuld of dat uw emailprovider een maximum grootte per email heeft ingesteld die kleiner is dan de grootte van de handleiding.
Er is een email naar u verstuurd om uw inschrijving definitief te maken.
Controleer uw email en volg de aanwijzingen op om uw inschrijving definitief te maken
U heeft geen emailadres opgegeven
Als u de handleiding per email wilt ontvangen, vul dan een geldig emailadres in.
Uw vraag is op deze pagina toegevoegd
Wilt u een email ontvangen bij een antwoord en/of nieuwe vragen? Vul dan hier uw emailadres in.