785715
1
Verklein
Vergroot
Pagina terug
1/36
Pagina verder
art.nr. 8007244
10 min. 1 min. 10 sec.
stop
quick start
123
1
1 0,1
23
4
1 2 3 4
kg
5678
auto cook
auto roast
defrost
MAG555
Pelgrim confère 5 années de garantie sur l'appareil à condition que celui-ci ait été raccordé
selon les règles de l'art par un installateur agréé conformément aux prescriptions
d'installation.
Pelgrim s'engage à remplacer gratuitement et ce pendant 5 années à dater de l'achat les
pièces.
Pendant l'année suivant la date de l'achat il ne sera pas porté en compte de frais de
déplacement ni de main-d'oeuvre.
Tombent sous la garantie tous les vices et dysfonctionnements résultant de fautes de
construction ou de pièces défectueuses.
Les fautes d'installation et d'utilisation ne sont pas couvertes par la présente garantie.
Nom et adresse de l'installateur:
Date d'achat:
Pelgrim gibt 5 Jahr Garantie auf dieses Gerät, falls es fachkundig durch einen anerkannten
Installateur und in Übereinstimmung mit den Installationsvorschriften angeschlossen wurde.
Pelgrim verpflichtet sich, 5 Jahr lang nach Ankaufdatum kostenlos Ersatzteile auszuwechseln.
1 Jahr lang nach Ankaufdatum werden keine Fahrtkosten und kein Arbeitslohn berechnet.
Unter die Garantie fallen alle Reparaturen, infolge von Konstruktionsfehlern oder fehlerhaften
Ersatzteilen.
Beim Service müssen Bezahlungsbeweis und Garantiezertifikat vorgezeigt werden.
Schäden, die durch unsachgemäßen Gebrauch-/Installation entstanden sind,gehören nicht zur
Garantie.
Name und Adresse Installateur:
Ankaufdatum:
CERTIFICAT DE GARANTIE
GARANTIEZERTIFIKAT
Handleiding
Manual
Notice d’utilisation
Anleitung
Toestelbeschrijving
Bedieningspaneel
1. tijdsinstelling (10 sec.)
2. tijdsinstelling (1 min.)
3. tijdsinstelling (10 min.)
4. klok
5. automatisch kookprogramma met
gewichtsinstelling
6. gewichtsinstelling
7. automatisch ontdooiprogramma met
gewichtsinstelling
8. magnetronfunctie
9. grillfunctie
10. display
11. heteluchtfunctie
12. combifunctie
13. -/+ toetsen temperatuurinstelling / tijd bij/af
14. automatisch grillprogramma met
gewichtsinstelling
15. stop / clear
16. start / quick start
17. deurontgrendeling
Toebehoren en gebruik
1. rooster hoog: bij combinatiestand en voor
grillen van vlakke gerechten.
2. rooster laag: bij combinatiestand, grill en
hetelucht.
3. metalen bakplaat: lekbak tijdens het grillen;
bakplaat op het lage rooster bij hetelucht.
4. geleidering: altijd gebruiken onder glazen
draaiplateau
5. glazen draaiplateau: bij magnetronstand; om
de roosters en bakplaat op te plaatsen.
Woord vooraf
In deze handleiding vindt u informatie over de
installatie, veiligheid, bediening en onderhoud
van uw toestel.
Als u de informatie doorleest, bent u snel op
de hoogte van alle mogelijkheden van het
toestel.
Bewaar dit boekje. Een eventueel volgende
gebruiker van dit toestel kan daar zijn
voordeel mee doen.
Veel plezier.
Interactief display
Dit toestel is uitgerust met een interactief
display. Nadat u een functie hebt gekozen
vertelt het display welke handelingen u
vervolgens moet verrichten. De met deze
handelingen corresponderende
toetssymbolen lichten op. U kunt dan diè
toetsen bedienen waarvan het symbool in het
display zichtbaar is. De andere toetsen
reageren niet wanneer u er op drukt. Alleen
de stoptoets ( ) is nog te bedienen.
Met de stoptoets worden alle gekozen
instellingen gewist.
1 2 3 4
12 3
45
Bedieningspaneel / Control panel / Tableau de commande /
Bedienungsblende
Toebehoren / Accessories / Les accessoires / Zubehör
VEILIGHEID / PLAATSEN
AANSLUITING / WERKING
NL 2
NL 3
Waar u op moet letten
Maak het toestel spanningsloos voordat met
reparatie of schoonmaken wordt gestart. Bij
voorkeur door de stekker uit het stopcontact
te halen.
Dit toestel mag uitsluitend worden gebruikt
voor het doel waartoe het werd ontworpen,
namelijk het bereiden van eetwaren. Al het
andere gebruik dient te worden beschouwd
als oneigenlijk en gevaarlijk. Wij wijzen elke
aansprakelijkheid van de hand in geval van
schade wegens onjuist, verkeerd of
irrationeel gebruik van het toestel.
Kinderen zien de gevaren niet die kunnen
ontstaan bij het bedienen van elektrische
apparatuur. Laat de magnetron derhalve niet
door kinderen bedienen.
Uw magnetron is alleen veilig als de deur
goed sluit! Plaats nooit een voorwerp tussen
de deur van de oven en zorg dat de deur en
de afdichting altijd schoon zijn.
Gebruik de magnetron niet als er
beschadigingen zijn aan de deur (verbogen),
het hang- en sluitwerk (defect of los) of de
afdichting.
Gebruik de magnetron alleen voor het
ontdooien en bereiden van voedsel en niet
voor bijvoorbeeld het drogen van kleding of
papier. Deze kunnen vlamvatten.
Schakel de magnetron uit en haal de stekker
uit het stopcontact indien iets in de oven
vlam vat. Houd de ovendeur dicht.
Plaatsen
Plaats de magnetron op een stevige en
vlakke ondergrond.
Zorg voor voldoende ventilatie rondom de
magnetron. Houd aan de bovenzijde 30 cm
ruimte vrij. Houd aan de achterzijde en
zijkanten minimaal 10 cm ruimte vrij.
Dek de ventilatieopeningen niet af.
De stelvoetjes mogen niet verwijderd
worden.
Plaats de magnetron niet in de buurt van
warmtebronnen.
Zend- en ontvangstapparatuur zoals radio’s
en televisietoestellen kunnen de werking van
de magnetron beïnvloeden.
Het toestel kan ook ingebouwd worden.
Elektrische aansluiting
Voor dit apparaat is een netvoeding vereist van
230 V, 50 Hz wisselstroom.
Het toestel dient altijd geaard te zijn en mag
onder geen beding aangesloten worden op een
gelijkstroomvoeding.
Plaats het toestel in de buurt van een
wandcontactdoos met randaarde.
Hoe werkt de magnetron
Een magnetron is een kooktoestel dat door
middel van micro-golven voedsel verhit.
Micro-golven zijn elektromagnetische golven,
net zoals radio- en tv-golven. Een radio zet deze
golven om in geluid. In een magnetron worden
de golven omgezet in warmte.
De warmte ontstaat doordat de micro-golven
water- en vetmoleculen, die altijd in voedsel
aanwezig zijn, snel laten bewegen. Hierdoor
schuren de moleculen snel langs elkaar heen en
ontstaat er wrijving. En wrijving veroorzaakt
warmte (wrijf maar eens snel met uw handen
langs elkaar).
De magnetron verhit voedsel zeer intensief,
omdat de golven direct het voedsel
binnendringen. De golven verwarmen dus niet
alleen de buitenkant van het gerecht, zoals bij
de traditionele manier van koken het geval is,
maar dringen er in door. Ten opzichte van de
conventionele manier van koken is de
bereidingstijd bij kleine hoeveelheden veel
korter.
322
530
500
10 min. 1 min. 1 min. 10 sec. 10 sec.
stop
quick start
kg
1234
defrostdefrost
auto cook
10 min. 1 min. 10 sec.
stop
quick start
123
1
10,1
23
4
1234
kg
5678
auto cook
auto roast
defrost
VOOR GEBRUIK
VOOR GEBRUIK
NL 4
NL 5
Vóór het eerste gebruik
Open de deur en verwijder het
verpakkingsmateriaal.
Reinig de ovenruimte en het toebehoren
met een vochtige doek. Gebruik geen
schuurmiddel of sterk geurende
schoonmaakmiddelen.
Plaats de geleidering in het midden van de
ovenruimte. Leg het glazen draaiplateau op
de geleidering.
De magnetron mag niet gebruikt worden
zonder geleidering en draaiplateau.
Schakel de magnetron niet in als deze leeg
is. De oven kan beschadigd raken.
Test de magnetron op juiste werking.
Plaats een glas water in de ovenruimte.
Schakel de magnetron één minuut in op de
hoogste stand (zie pagina 7, koken). Het
water moet na afloop heet zijn.
Let op:
Als u vloeistof (bijvoorbeeld water) wilt koken,
zet dan een kunststof lepeltje in het kopje. Het
kan gebeuren dat de vloeistof kookt zonder
dat u belletjes ziet. Zodra u het kopje uit de
oven haalt, kan de vloeistof opeens heftig
gaan koken en uit het kopje spatten met het
risico dat u zich brandt.
Als u kleine hoeveelheden poedervormige
producten in de magnetron verwarmt (zoals
bij het drogen van kruiden) bestaat de kans
op zelfontbranding.
Mocht er brand in de magnetron ontstaan,
houd dan de deur gesloten, schakel de
magnetron uit en maak het toestel stroomloos.
Waar u op moet letten
De magnetron is niet geschikt voor:
– Inmaken van voedsel.
– Eieren in de schaal koken, deze spatten
uit elkaar door de druktoename.
– Verhitten van frituurolie.
Verwijder metalen sluitstrips van plastic
zakken en gebruik schalen en schotels die
geschikt zijn voor de magnetron.
Vloeistoffen in luchtdichte verpakking mag
u alleen opwarmen indien u een paar
gaatjes in de verpakking prikt. Dit in
verband met toename van de druk tijdens
het opwarmen.
Verwarm nooit langer dan noodzakelijk is,
houdt rekening met het “nagaren”.
Gebruik zo weinig mogelijk water bij de
voedselbereiding en wees zuinig met zout.
Gerechten halverwege de bereidingstijd
roeren of keren.
Prik met een vork of ander puntig voorwerp
even in het vel van vlees, kip of vis.
Hiermee voorkomt u dat deze gerechten
gaan spetteren.
Houd als stelregel aan dat bij gebruik van
de magnetron een verdubbeling van de
hoeveelheid een verdubbeling van de
kooktijd inhoudt.
Gerechten afdekken voorkomt spetteren,
verkort de gaartijd en helpt de
vochtigheidsgraad te behouden.
Als de magnetron ingeschakeld is, mag de
deur geopend worden; de magnetron
schakelt automatisch uit en de ingestelde
tijd wordt stilgezet.
Niet alle materialen kunnen in de combi-
magnetron. In de onderstaande tabel is
aangegeven welke materialen u wel en
niet kunt gebruiken.
Materiaal Magnetron Hetelucht Combinatie Grill
papier ja nee nee nee
aluminiumfolie om af te dekken* ja om af te dekken* ja
huishoudfolie ja nee nee nee
aluminium bakjes nee ja nee ja
diepvries / magnetron servies ja nee nee nee
hittebestendig plastic ja nee nee nee
ongeglazuurd aardewerk nee ja nee ja
metalen kookgerei nee ja nee ja
normaal glas ja nee nee nee
Pyrex, ander ovenvast glas
en keramiek ja ja ja ja
borden met metaalhoudende sierrand nee ** nee **
metalen sluitstrip nee ja nee nvt
kwikthermometer nee ja nee ja
afgesloten pot nee nvt nvt nvt
fles met een nauwe hals nee nvt nvt nvt
braadzakken ja ja ja nee
* Door dunnere gedeelten van gerechten (zoals kippenpoten) af te dekken voorkomt u dat ze te snel garen.
** Raadpleeg bij twijfel de aanwijzingen van de fabrikant op de verpakking van het kookgerei.
BEDIENING - ALGEMEEN
BEDIENING - MAGNETRON
NL 6
NL 7
U kunt kiezen uit 5 vermogens. U activeert de
vermogensfunctie door op te drukken.
Hierdoor wordt automatisch het maximale
vermogen ingesteld. Vervolgens kunt u het
gewenste vermogen kiezen door meermalen
op te drukken.
Voorbeeld:
U wilt vis koken op midden vermogen (60%)
gedurende 5 minuten en 30 seconden.
1. Druk op .
2. Druk op om de magnetronfunctie te
selecteren.
3. Druk 2x op om midden vermogen (60%)
in te stellen.
4. Druk 5x op en 3x op om een
kooktijd van 5 minuten en 30 seconden in
te stellen.
5. Druk op .
De magnetron is ingeschakeld.
1 2 3 4
1
2
34
Koken
Vermogen Druk op
Hoog (100%) 850 W 1x
Midden-hoog (80%) 680 W 2x
Midden (60%) 510 W 3x
Ontdooien (40%) 340 W 4x
Ontdooien gevoelig (20%) 170 W 5x
Hoog (100%) 850 W 6x
De klok loopt zolang de oven op de
netspanning is aangesloten. Wanneer er
geen tijd is ingesteld, geeft het display "0"
weer.
U kunt de klok op een 12-uurs of een 24-uurs
instelling afstellen. Tijdens het instellen van
de klok knippert er een dubbele punt. De
dubbele punt stopt met knipperen als de klok
is ingesteld.
Voorbeeld:
U wilt de klok instellen op 13:25 uur.
Klok instellen
1. Druk op .
2. Druk op .
Het display geeft "24 H" weer.
Druk nogmaals op als u de klok op de
12-uurs instelling wilt afstellen.
3. Stel het uur in met de toets.
Druk 13x op de toets of houd de
toets ingedrukt tot "13" in het display
verschijnt.
Stel de minuten in met de en
toetsen.
Druk 2x op de toets of houd de
toets ingedrukt tot "2" in het display
verschijnt.
Druk 5x op de toets of houd de
toets ingedrukt tot "5" in het display
verschijnt.
4. Druk nogmaals op .
De klok begint te lopen.
Klok
12 3
4
1
2 / 4
3
Opmerkingen
Trek de stekker uit de wandcontactdoos als
het display vreemde tekens vertoont.
Als u de klok nadat u deze hebt ingesteld, in
plaats van op een 12-uurs telling, op een
24-uurs telling wilt instellen moet u het toestel
eerst stroomloos maken. Sluit het toestel
vervolgens weer aan en stel de klok in.
BEDIENING - MAGNETRON
BEDIENING - MANGETRON
NL 8
NL 9
Gedurende het 2-fasen kookprogramma mag
de ovendeur geopend worden om het gerecht
te controleren. Nadat u de deur hebt gesloten
en op start hebt gedrukt, vervolgt het toestel
het kookprogramma.
Voorbeeld:
U wilt 5 minuten koken op hoog vermogen
(1ste fase) en daarna 13 minuten op midden-
laag vermogen (40%, 2de fase):
1ste fase:
1. Druk op .
2. Druk 1x op om de magnetronfunctie te
selecteren.
Druk 5x op om een kooktijd van
5 minuten in te stellen.
2de fase:
3. Druk 4x op om een
magnetronvermogen van 40% in te stellen.
Druk 1x op en 3x op om een
kooktijd van 13 minuten in te stellen.
4. Druk op .
De magnetron is ingeschakeld.
De instellingen voor fase 1 verschijnen in het
display, totdat programma 2 begint.
Er klinken 2 pieptonen tussen de 2 fasen.
Koken in 2 fasen
1 2 3 4
1
2 / 3
2 / 3 4
Opmerking
U kunt het kookprogramma onderbreken door
1x op te drukken.
Sluit de deur en druk op om
verder te gaan.
Druk 2x op om het programma te wissen.
Met één druk op de starttoets kunt u
30 seconden op maximaal vermogen koken.
Door herhaaldelijk op de toets te drukken
kunt u de kooktijd in stappen van
30 seconden verlengen.
U kunt tot maximaal 10 minuten kooktijd
instellen.
Voorbeeld:
U wilt een gerecht gedurende 2 minuten
koken op hoog vermogen.
1. Druk op .
2. Druk op 4x op om een
bereidingstijd van 2 minuten op hoog
vermogen te in te stellen.
3. U kunt de kooktijd tussentijds verlengen
door één of meerdere keren op
te drukken.
De magnetron is ingeschakeld.
Snelstart
12 3
4
1
2
BEDIENING - MAGNETRON
L 10
L 11
Kooktabel automatisch koken
* Rijst na afloop van het programma goed
doorroeren en 5 tot 10 minuten afgedekt laten
staan.
Pasta na afloop van het programma afspoelen
met koud water.
** Verhouding rijst/pasta en water:
hoeveelheid water water
(rijst / pasta) rijst pasta
1/2 kopje (100 g / 50 g) 240 ml 360 ml
1 kopje (200 g / 100 g) 480 ml 600 ml
1 1/2 kopje (300 g / 150 g) 720 ml 840 ml
(240 ml = 1 kopje water)
Programma Accessoire Bereidingswijze Aantal x drukken Min./max.
op toets gewicht
1. gepofte glazen Was en droog de aardappels. Leg ze op 1x 0,2 / 1,0 kg
aardappels draaiplateau het glazen draaiplateau. Prik een aantal
(20 °C) + keren met een vork in de aardappels.
keukenrol Na afloop van het programma de aardappels
- bedekt met aluminiumfolie - 5 minuten
laten staan.
2. rijst/pasta glazen Strooi rijst of pasta* in een diepe oven- 2x 0,1 / 0,3 kg
(20 °C) draaiplateau schaal. Voeg water** en 1/4 tot 1 theelepel
zout toe. Zet een deksel op de ovenschaal
of bedek deze met magnetronfolie.
3. verse groente/ glazen Leg de groente of aardappels in een oven- 1x 0,2 / 0,8 kg
geschilde draaiplateau schaal. Voeg 30 cc water toe per 0,2 kg.
aardappels Bedek de schaal met magnetronfolie of
(20 °C) deksel. Na afloop van het programma het
gerecht afgieten en 2 tot 3 minuten afgedekt
laten staan.
4. bevroren groente glazen Leg de groente in een ovenschaal. 2x 0,2 / 0,8 kg
(-10 °C) draaiplateau Bedek de schaal met magnetronfolie of deksel.
Het gerecht na afloop van het programma
2 tot 3 minuten afgedekt laten staan.
5. koude pizza glazen Leg de koude pizza op het hoge rooster. 1x 0,2 / 0,4 kg
(5 °C) draaiplateau Plaats de metalen bakplaat, met daarop
+ metalen het rooster, op het glazen draaiplateau.
bakplaat Na het opwarmen direct uit de oven nemen
+ hoge rooster en 2 tot 3 minuten laten staan.
6. bevroren pizza glazen Verwijder de verpakking. 2x 0,1 / 0,5 kg
(-10 °C) draaiplateau Leg de pizza op het hoge rooster. Plaats de
+ metalen metalen bakplaat, met daarop het rooster,
bakplaat op het glazen draaiplateau. De pizza na afloop
+ hoge rooster van het programma 2 tot 3 minuten laten staan.
7. pommes frites glazen Verspreid de pommes frites op de metalen 1x 0,2 / 0,4 kg
(-10 °C) draaiplateau bakplaat die op het hoge rooster wordt
+ metalen geplaatst. Na het geluidssignaal de frites
bakplaat omdraaien. Zorg ervoor dat de frites niet op
+ hoge rooster elkaar liggen. De frites na afloop van het
programma 1 tot 2 minuten laten staan.
8. gratineren glazen Gebruik deze stand voor zelfgemaakte 2x 0,5 / 1,2 kg
(20 °C) draaiplateau gratins. Na afloop van het programma
+ lage rooster het gerecht 1 tot 3 minuten onafgedekt
laten staan.
Automatisch koken (auto cook) biedt u de
mogelijkheid uw favoriete gerechten simpel
te bereiden. U kunt kiezen uit 4 kook-
programma's. U hoeft alleen maar het soort
gerecht en het gewicht te selecteren. De
magnetron doet de rest.
Voorbeeld:
U wilt 0,6 kg gepofte aardappels bereiden.
1. Druk op .
2. Druk 1x op om het kookprogramma
voor gepofte aardappels te selecteren.
3. Stel het gewicht in met .
Druk 6x op om een gewicht van
600 gram in te stellen.
4. Druk op .
De programmaduur verschijnt in het display.
De magnetron is ingeschakeld.
In de tabel op de volgende pagina leest u
welke kookprogramma's u kunt kiezen. U kunt
ook lezen hoe en voor welke gerechten u
deze programma's selecteert.
Automatisch koken
12 3
4
1
2
3
4
Opmerking
Als u of ingedrukt houdt telt de
gewichtsweergave in het display snel door.
BEDIENING - MAGNETRON
L 12
L 13
Ontdooitabel
Tips
Verwijder, voor het beste resultaat, eerst de
verpakking om vlees en vis. Verpakkingen
kunnen het ontdooiproces negatief
beïnvloeden. Door de aanwezigheid van vis-
of vleesvocht kan stoomvorming optreden.
Hierdoor wordt, ongewild, de buitenkant van
het gerecht aan de kook gebracht.
Als de verpakking moeilijk te verwijderen is
kunt u het gerecht het best gedurende een
kwart van de ontdooitijd, die aan het begin
van het ontdooiprogramma in het display
weergegeven wordt, laten ontdooien. Haal
het gerecht uit de magnetron, verwijder de
verpakking en plaats het gerecht weer terug.
Leg het gerecht in een ondiepe glazen
ovenschaal om eventueel vrijkomend vocht
op te vangen.
De kern van het gerecht moet nog wat
bevroren aanvoelen als u het uit de
magnetron haalt.
Leg sneetjes brood tussen vellen keukenrol.
Snijd broodjes eerst half door.
Programma Soort Aantal x drukken Min./max.
gerecht op toets gewicht
1. vlees rundvlees: gehakt, blokjes vlees, lapjes, rollade 1x 0,1 / 4,0 kg
varkensvlees: gehakt, blokjes vlees, lapjes, rollade
kalfsvlees: gehakt, blokjes vlees, lapjes, rollade
2. gevogelte kip: hele kip (< 2 kg), kippenborst, 2x 0,1 / 4,0 kg
kippenpoten
kalkoen: kalkoenborst (< 2 kg), kalkoenpoten
3. vis vis: filets, moten, hele vis 1x 0,1 / 4,0 kg
schaaldieren: krabvlees, kreeft, garnalen, mosselen
4. brood gesneden bruin/wit, kadetjes, 2x 0,1 / 0,5 kg
stokbrood, croissants
Voor het ontdooien van bevroren voedsel kunt
u gebruik maken van 4 ontdooiprogramma’s
(auto defrost), waarbij u alleen het gewicht
van het te ontdooien voedsel hoeft in te
stellen.
Voorbeeld:
U wilt 1,4 kg kip ontdooien.
1. Druk op .
2. Druk 2x op om het ontdooi-
programma voor gevogelte te selecteren.
3. Stel het gewicht in met .
Druk 1x op en 4x op om een
gewicht van 1400 gram in te stellen.
4. Druk op .
De magnetron is ingeschakeld.
In de tabel op de volgende pagina leest u
welke ontdooiprogramma's u kunt kiezen. U
kunt ook lezen hoe en voor welke gerechten
u deze programma's selecteert.
Automatisch ontdooien
1 2 3 4
1
2
3
4
Opmerking
Halverwege de ontdooitijd klinkt er een
signaal. Het gerecht kan nu omgedraaid
worden. Verwijder de reeds ontdooide delen.
Druk op om verder te gaan.
BEDIENING - MAGNETRON
BEDIENING - GRILL
L 14
L 15
Dit toestel is uitgerust met een kwartsgrill.
Hierdoor hoeft u niet voor te verwarmen en
zijn gerechten snel bruin en knapperig.
Voorbeeld:
U wilt 12 minuten en 30 seconden grillen.
1. Druk op .
2. Druk 1x op om de grillfunctie te
selecteren.
3. Stel de grilltijd in.
Druk 1x op ,2x op en 3x op
om een grilltijd van 12 minuten en
30 seconden in te stellen.
4. Druk op .
De grill is ingeschakeld.
Grillstand
1
34
2
Opmerkingen
Voorverwarmen van de oven is niet nodig.
Gebruik het (hoge) rooster om het beste
resultaat te krijgen.
Plaats het rooster op het glazen draaiplateau
(zie ook "omschrijving en gebruik
accessoires").
De automatische kookprogramma’s en
grillprogramma's (auto roast) werken met een
vast ingestelde tijd. U kunt deze tijd tijdens
het programma langer of korter maken met de
“-” of “+” toets. Ook bij handbediend koken
(zie pagina 7) kunt u deze toetsen gebruiken
om de bereidingstijd bij te stellen.
Een kortere kooktijd:
1. Druk op .
2. Selecteer een automatisch
kookprogramma met , ,
of .
3. Stel het gewicht in met .
4. Druk op .
5. Druk op .
Bij iedere druk op de toets wordt de kooktijd
met 10 seconden verkort.
Een langere kooktijd:
1. Druk op .
2. Selecteer een automatisch
kookprogramma met , ,
of .
3. Stel het gewicht in met .
4. Druk op .
5. Druk op .
Bij iedere druk op de toets wordt de kooktijd
met 10 seconden verlengd.
“-” en “+” toetsen
1
2
35
2
4
Opmerking
Stel de kooktijd naar wens bij met de en
toetsen als het gerecht korter of langer
in de oven moet staan bij gecombineerd
koken of gebruik van de automatische
kookprogramma's.
BEDIENING - HETELUCHT
L 16
L 17
Bij de heteluchtoven kunt u automatisch
voorverwarmen en vervolgens bakken.
Voorbeeld:
U verwarmt de oven eerst voor en bakt
vervolgens een gerecht gedurende 50
minuten op een temperatuur van 200 °C.
Voorverwarmen
1. Druk op .
2. Druk 1x op om de heteluchtfunctie te
selecteren.
3. Druk 2x op om een temperatuur van
200 °C in te stellen.
4. Druk op .
De oven begint met voorverwarmen en in het
display verschijnt de melding "Pr-H".
Na het vooverwarmen hoort u een pieptoon.
De oven is nu op temperatuur.
Bakken
Zet het gerecht in de oven.
5. Druk 5x op om een baktijd van
50 minuten in te stellen.
6. Druk op .
De heteluchtoven is ingeschakeld.
Bakken met voorverwarmen
1
54 / 6
2
3
Bij de heteluchtoven kunt u temperaturen
kiezen tussen de 100 °C en 250 °C. Daarnaast
kunt u een temperatuur van 40 °C kiezen voor
het rijzen van deeg.
Als u de heteluchtfunctie kiest schakelt de
oven automatisch in op 180 °C.
Voorbeeld:
U bakt een gerecht gedurende 50 minuten op
een temperatuur van 200 °C.
1. Druk op .
2. Druk 1x op om de heteluchtfunctie te
selecteren.
3. Druk 2x op om een temperatuur van
200 °C in te stellen.
4. Druk 5x op om een baktijd van
50 minuten in te stellen.
5. Druk op .
De oven is ingeschakeld.
Bakken
Opmerkingen
Op het moment dat de oven de ingestelde
temperatuur heeft bereikt hoort u een korte
pieptoon.
Gebruik het lage rooster (zie ook
"omschrijving en gebruik accessoires").
1
5
4
2
3
Opmerking
Gebruik het lage rooster (zie ook
"omschrijving en gebruik accessoires").
BEDIENING - GECOMBINEERD KOKEN
L 18
L 19
Met deze functie kunt u uw favoriete
grillgerechten simpel bereiden. U kunt kiezen
uit 3 gecombineerde grill-/magnetron-
programma's (auto roast).
Het toestel kiest hierbij zelf het gewenste
magnetronvermogen. U hoeft alleen maar het
soort gerecht en het gewicht te selecteren.
Voorbeeld:
U wilt 1,4 kg kip grillen.
1. Druk op .
2. Druk 3x op om het automatische
grill-/magnetronprogramma voor kip te
selecteren.
3. Stel het gewicht met .
Druk 1x op en 4x op om een
gewicht van 1400 gram in te stellen.
4. Druk op .
In de tabel op de volgende pagina leest u
welke grill-/magnetronprogramma's u kunt
kiezen. U kunt ook lezen hoe en voor welke
gerechten u deze programma's selecteert.
Magnetron en grill automatisch
1
3
4
2
Bij deze combinatie wordt gebruik gemaakt
van de grill- en de magnetronfunctie. De
magnetron kunt u hierbij instellen op
3 vermogens: 20%, 40% en 60%.
Voorbeeld:
U wilt met de grill en een
magnetronvermogen van 40% gedurende
25 minuten grillen.
1. Druk op .
2. Druk 1x op om de combistand te
selecteren.
U kunt nu de gewenste combinatie kiezen.
3. Druk 1x op om de grillfunctie te
selecteren.
4. Druk 2x op om een
magnetronvermogen van 40% in te stellen.
5. Druk 2x op en 5x op om een
grilltijd van 25 minuten in te stellen.
6. Druk op .
De magnetron- en grillfunctie zijn
ingeschakeld.
7. Tijdens het koken kunt u de kooktijd van het
programma verlengen of verkorten. Het
kookproces wordt hierdoor niet onderbroken.
Druk op om de kooktijd te verkorten.
Druk op om de kooktijd te verlengen
(zie voor meer informatie pag. 14).
Magnetron en grill
1
4
6
2
3
5
Opmerkingen
Combinatiestanden verkorten de kooktijd.
Wees voorzichtig wanneer u het gerecht uit
de oven haalt. Het ovengerei is heet!
BEDIENING - GECOMBINEERD KOKEN
L 20
L 21
Bij deze combinatie wordt gebruik gemaakt van
de hetelucht- en de magnetronfunctie. De
magnetron kunt u hierbij instellen op
3 vermogens: 20%, 40% en 60%.
Voorbeeld:
U wilt bakken met een magnetronvermogen
van 40% en een oventemperatuur van 200 °C
gedurende 25 minuten.
1. Druk op .
2. Druk 1x op om de combistand te
selecteren.
U kunt nu de gewenste combinatie kiezen.
3. Druk 1x op om hetelucht te selecteren.
4. Druk 2x op om een oventemperatuur
van 200 °C in te stellen.
5. Druk 2x op om een magnetronvermogen
van 40% in te stellen.
6. Druk 2x op en 5x op om een
kooktijd van 25 minuten in te stellen.
7. Druk op .
De magnetron- en heteluchtfunctie zijn
ingeschakeld.
8. Tijdens het koken kunt u de kooktijd van het
programma verlengen of verkorten. Het
kookproces wordt hierdoor niet
onderbroken.
Druk op om de kooktijd te verkorten.
Druk op om de kooktijd te verlengen (zie
voor meer informatie pag. 14).
1
4 / 8
4
7
2
3
6
Opmerkingen
Indien er eerst voorverwarmd moet worden
moet u de oven voorverwarmen zoals
beschreven op pagina 17. Schakel hierna de
magnetron/heteluchtcombinatie in.
Combinatiestanden verkorten de kooktijd.
Wees voorzichtig wanneer u het gerecht uit
de oven haalt. Het ovengerei is heet!
Grilltabel
programma keuken- bereidingswijze aantal x drukken min./max.
gerei op toets gewicht
1. rundvlees glazen Wrijf het vlees in met gesmolten margarine, 1x 0,5 / 1,5 kg
draaiplateau + boter, bakolie of kruiden. Plaats de glazen
metalen bakplaat bakplaat met daarop de metalen bakplaat in
+ laag rooster de oven. Leg het vlees op het lage rooster en
of spit plaats dit rooster op de metalen bakplaat.
Na afloop van het programma het gerecht
- bedekt met magnetronfolie - 10 minuten
laten staan.
2. varkensvlees glazen Wrijf het vlees in met gesmolten margarine, 2x 0,5 / 1,5 kg
draaiplateau + boter, bakolie of kruiden. Plaats de glazen
metalen bakplaat bakplaat met daarop de metalen bakplaat in
+ laag rooster de oven. Leg het vlees op het lage rooster en
of spit plaats dit rooster op de metalen bakplaat.
Na afloop van het programma het gerecht
- bedekt metmagnetronfolie - 10 minuten
laten staan.
3. hele kip glazen Wrijf het vlees in met gesmolten margarine, 3x 0,8 / 1,5 kg
draaiplateau + boter, bakolie of kruiden. Leg de kip op
metalen bakplaat de metalen bakplaat. Plaats deze bakplaat op
of spit de glazen bakplaat in de oven.
Als het geluidssignaal klinkt de kip omdraaien
en bedruipen met het eigen braadvet. Na afloop
van het programma het gerecht - bedekt met
magnetronfolie - 10 minuten laten staan.
Magnetron en hetelucht
ONDERHOUD / STORINGEN
L 23
Houd uw toestel mooi
Neem de stekker uit de contactdoos of draai de
schakelaar in de meterkast op nul voordat u
begint met het reinigen van de magnetron.
Maak de binnenzijde direct na gebruik schoon.
Gebruik een vochtige doek om overgekookt
vocht en voedselresten te verwijderen.
Achtergebleven kruimels en vocht absorberen
magnetronenergie en verlengen de kooktijden.
Reinig de binnen- en buitenzijde regelmatig;
gebruik een sopje van afwasmiddel en maak de
oven met een droge doek goed droog.
Zorg dat de afdekking van de microgolfverdeler
(rechterzijde van de ovenruimte) schoon is.
Vervuiling van de afdekking kan leiden tot
vonkvorming.
Reinig het toebehoren regelmatig; gebruik een
sopje van afwasmiddel met een borstel en
maak het toebehoren met een droge doek goed
droog. Het toebehoren mag ook afgewassen
worden in de vaatwasmachine.
Geurtjes verdwijnen als u een glas azijn of
water met citroen in de ovenruimte zet.
Schakel de magnetron gedurende twee
minuten in op vol vermogen. Daarna afnemen
met een vochtige doek.
Controleer de deursluiting en het deurrubber
regelmatig op beschadigingen.
Gebruik de oven niet als de deur of
deursluiting beschadigd zijn.
BEDIENING - OP SLOT
L 22
U kunt uw magnetron “op slot” zetten,
waardoor het starten van de magnetron niet
meer mogelijk is.
In werking stellen van het kinderslot
1. Druk op en houd deze toets vast totdat
llinks in het display verschijnt en er twee
korte piepjes klinken. Als lin het display
verschijnt verdwijnt de tijdweergave
gedurende enkele seconden.
Alle bedieningsfuncties zijn buiten werking
gesteld.
Druk op een willekeurige toets en l
verschijnt in het display.
Uitschakelen van het kinderslot
1. Druk op en houd deze toets vast totdat
luit het display verdwijnt en er twee korte
piepjes klinken.
De magnetron kan weer normaal worden
gebruikt.
Kinderslot
1
Storingen
Als de kookresultaten niet naar wens zijn, er
vonken overspringen in de magnetron, de
magnetron niet start etc., probeer dan eerst
zelf de oorzaak van de storing te vinden
voordat u de servicedienst belt.
Dit kunt u doen aan de hand van
onderstaande punten.
– Zit de stekker in het stopcontact?
– Is de deur goed gesloten?
– Zijn het vermogen en de bereidingsduur
goed ingesteld?
– Staan er voorwerpen in de magnetron die er
niet thuishoren?
– Heeft u het juiste keukengerei gebruikt?
– Zijn de geleidering en het draaiplateau in de
magnetron?
– Zijn de ventilatieopeningen niet
geblokkeerd?
– Is het voedsel voldoende ontdooid?
– Heeft u het voedsel tijdens de bereiding
gekeerd of geroerd?
– Is het kinderslot ingeschakeld?
VERPAKKING / TECHNISCHE GEGEVENS
L 24
Verpakking en toestel afvoeren
Afgedankte apparaten direct onbruikbaar
maken. Dat wil zeggen stekker uit het
stopcontact trekken en de aansluitkabel
doorknippen.
Het is belangrijk dat een oude magnetron op
verantwoorde wijze en conform de
overheidsbepalingen wordt afgevoerd.
Ook de verpakking van uw nieuwe magnetron
dient op verantwoorde wijze afgevoerd te
worden.
De overheid kan u informatie verschaffen over
het op verantwoorde wijze afvoeren van
afgedankte toestellen.
Technische gegevens
Voeding 230 V 50 Hz
Aansluitwaarde 2650 W
Frequentie microgolven 2450 MHz
Magnetron output (IEC 705) 850 W
Afmetingen (bxhxd) 530 x 322 x 500 mm
APPLIANCE DESCRIPTION
CONTENTS
GB 1
Introduction
Cooking with your new microwave oven is
safe and relaxing. You can have the tastiest
dishes on the table in no time at all.
The appliance is extremely easy to use, partly
thanks to the automatic cooking and defrost
programs.
The microwave oven is also very easy to
clean.
Appliance description
Control panel
1. time setting (10 sec)
2. time setting (1 min.)
3. time setting (10 min.)
4. clock
5. automatic cooking program with weight
setting
6. weight setting
7. automatic defrost by entering the weight
8. microwave function
9. grill function
10. display
11. hot-air function
12. combination function
13. -/+ buttons for temperature setting / time
added/subtracted
14. automatic grilling program with weight
setting
15. stop / clear
16. start / quick start
17. door release
Accessories and use
1. high grid: for combination setting and for
grilling flat dishes.
2. low grid: for combination setting, grill and hot-
air function.
3. metal baking tray: drip-tray during grilling;
baking tray on the low grid with hot-air
function.
4. roller stay: always use underneath the glass
turntable.
5. glass turntable: for microwave setting; for
placing the grids and baking tray on.
Preface
You will find information about the installation,
safety, operation and maintenance of your
appliance in this instruction booklet.
By reading this information, you will quickly
learn all about the facilities the appliance
offers.
Keep this booklet safely. Anyone using the
appliance after you will find it very useful.
We wish you much pleasure using your
microwave oven.
Interactive display
This appliance is equipped with an interactive
display. Once you have chosen a function, the
display tells you what action you should then
carry out.
The button symbols corresponding to these
actions light up.
You can then press the buttons whose
symbols are visible in the display.
The other buttons do not respond if you press
them. Only the stop button ( ) will still
respond.
All of the settings selected can be cancelled
using the stop button.
Table of contents
Safety . . . . . . . . . . . . . . . . . . . . . . . . . . . . . . . 2
Points for your attention . . . . . . . . . . . . . . . . 2
Positioning . . . . . . . . . . . . . . . . . . . . . . . . . . . 2
Connection . . . . . . . . . . . . . . . . . . . . . . . . . . . 3
Electrical connection . . . . . . . . . . . . . . . . . . . 3
General . . . . . . . . . . . . . . . . . . . . . . . . . . . . . . 3
How the microwave works . . . . . . . . . . . . . . 3
Before use . . . . . . . . . . . . . . . . . . . . . . . . . 4 - 5
Before first use . . . . . . . . . . . . . . . . . . . . . . . . 4
Points for your attention . . . . . . . . . . . . . . . . 4
Operation - general . . . . . . . . . . . . . . . . . . . . 6
Clock . . . . . . . . . . . . . . . . . . . . . . . . . . . . . . . . 6
Operation - microwave . . . . . . . . . . . . . 7 - 14
Cooking . . . . . . . . . . . . . . . . . . . . . . . . . . . . . . 7
Quick start . . . . . . . . . . . . . . . . . . . . . . . . . . . . 8
Cooking in 2 stages . . . . . . . . . . . . . . . . . . . . 9
Automatic cooking . . . . . . . . . . . . . . . . . . . 10
Automatic defrost . . . . . . . . . . . . . . . . . . . . . 12
"-" and "+" buttons . . . . . . . . . . . . . . . . . . . . . 14
Operation - grill . . . . . . . . . . . . . . . . . . . . . . 15
Grill setting . . . . . . . . . . . . . . . . . . . . . . . . . . 15
Operation - hot air . . . . . . . . . . . . . . . . 16 - 17
Baking . . . . . . . . . . . . . . . . . . . . . . . . . . . . . . 16
Baking with preheating . . . . . . . . . . . . . . . . 17
Operation - combined cooking . . . . . . 18 - 21
Microwave oven and grill . . . . . . . . . . . . . . 18
Microwave and grill automatic . . . . . . . . . . 19
Microwave and hot air function . . . . . . . . . 21
Operation - lock . . . . . . . . . . . . . . . . . . . . . . 22
Childproof lock . . . . . . . . . . . . . . . . . . . . . . . 22
Maintenance . . . . . . . . . . . . . . . . . . . . . . . . 23
Keep your appliance looking good . . . . . . . 23
Faults . . . . . . . . . . . . . . . . . . . . . . . . . . . . . . . 23
Packaging . . . . . . . . . . . . . . . . . . . . . . . . . . . 24
Disposal of packaging and appliance . . . . 24
Technical information . . . . . . . . . . . . . . . . . 24
SAFETY / POSITIONING
CONNECTION / GENERAL
GB 2
GB 3
Electrical connection
This appliance requires a mains power supply
of 230 V, 50 Hz alternating current.
The appliance must be grounded and under
no circumstances should it be connected to a
direct current supply.
Place the appliance near to a grounded wall
socket.
How the microwave works
A microwave oven is a cooking appliance that
uses microwaves to heat food. Microwaves
are electromagnetic waves, just like radio and
television waves. A radio converts these
waves into sound, whereas a microwave oven
converts them into heat.
The heat arises because the microwaves
cause water and fat molecules, which are
always present in food, to move quickly. The
molecules slide past each other quickly and
friction occurs. And friction causes heat (just
try rubbing your hands together quickly).
The microwave oven heats food very
intensively, because the waves penetrate the
food directly. The waves do not just heat the
outside of the food, as in traditional methods
of cooking, but get right inside the food.
Compared to conventional methods of
cooking, with small quantities cooking time is
much shorter.
Points for your attention
Turn the power supply off before cleaning
or repairing the appliance, preferably by
removing the plug from the socket.
This appliance may only be used for the
purpose for which it was designed, namely
cooking food.
All other uses should be considered
improper and dangerous. We do not
accept responsibility in the event of
damage due to improper, incorrect or
irrational use of the appliance.
Children are not aware of the dangers that
can arise when operating electrical
equipment. For this reason do not allow
children to use the microwave oven.
Your microwave oven is only safe if the
door closes properly! Never place an
object in the door opening of the oven and
make sure that the seal is always clean.
Do not use the microwave oven if there is
any damage to the door (bent), the hinges
and catch (defective or loose) or the seal.
Only use the microwave oven for
defrosting and cooking food and not, for
example, for drying clothes or paper. These
can catch fire.
Switch the microwave oven off and remove
the plug from the socket if something in
the oven catches fire. Keep the oven door
closed.
Positioning
Place the microwave oven on a firm, flat
surface.
Make sure that there is sufficient ventilation
around the microwave oven. Keep a 30 cm
space free at the top. At the rear and sides
keep at least 10 cm free.
Do not cover the air vents.
The adjustable feet should not be removed.
Do not place the microwave oven near a heat
source.
Transmitting and receiving equipment such
as radios and televisions can affect the
operation of the microwave oven.
The appliance can also be built in.
322
530
500
10 min. 1 min. 1 min. 10 sec. 10 sec.
stop
quick start
kg
1234
defrostdefrost
auto cook
10 min. 1 min. 10 sec.
stop
quick start
123
1
10,1
23
4
1234
kg
5678
auto cook
auto roast
defrost
BEFORE USE
GB 5
A useful rule when using the microwave
oven is: doubling the quantity of food
means doubling the cooking time.
Covering the food prevents it spattering,
shortens the cooking time and helps to
retain moisture.
The door may be opened if the microwave
oven is switched on: the microwave oven
then switches itself off automatically and
the cooking time is stopped.
Not all materials are suitable for use in the
combi-microwave oven. The table below
shows which materials you can use and
which you cannot.
Material Microwave Hot-air function Combination Grill
paper yes no no no
aluminium foil to cover* yes to cover* yes
cling film yes no no no
aluminium trays no yes no yes
freezer / microwave dishes yes no no no
heat-resistant plastic yes no no no
unglazed earthenware no yes no yes
metal cooking utensils no yes no yes
normal glass yes no no no
Pyrex, other ovenproof glass
and ceramics yes yes yes yes
dishes with metallic decoration no ** no **
metallic twists no yes no n/a
mercury thermometer no yes no yes
sealed pots no n/a n/a n/a
bottle with narrow neck no n/a n/a n/a
roasting bags yes yes yes no
* By covering thinner pieces of food (such as chicken legs) you prevent them cooking too quickly.
** If in doubt, consult the manufacturer’s instructions on the packaging of the cooking utensil.
BEFORE USE
GB 4
Before first use
Open the door and remove the packaging
material.
Clean the inside of the oven and the
accessories with a damp cloth. Do not use
an abrasive cleaner or any strongly-
smelling detergents.
Place the roller stay in the middle of the
oven. Place the turntable on top of the
roller stay.
The microwave oven may not be used
without the roller stay or turntable.
Do not operate the oven when empty.
Check that the microwave oven is working
correctly. Put a glass of water inside it.
Switch the microwave oven on for one
minute on its highest setting (see page 7,
cooking). At the end of this time, the water
should be hot.
NB:
If you want to boil a liquid (e.g. water), put a
plastic spoon in the cup. It is possible that the
liquid will boil without you seeing any
bubbles. When you remove the cup from the
oven, the liquid may start to boil violently and
splash out of the cup, with the risk of
scalding.
If you heat small amounts of powdery
products in the microwave oven (for example,
when drying herbs), there is a chance that
they will spontaneously combust. Should a
fire start in the microwave oven, keep the
door closed, switch the microwave oven off
and disconnect the appliance from the power
supply.
Points for your attention
The microwave oven is not suitable for:
– Making preserves.
– Cooking eggs in their shells, because
these burst due to the increase in
pressure.
– Heating oil for deep-frying.
Remove metal closures from plastic bags
and use dishes and plates which are
suitable for the microwave oven.
You may only heat liquids in airtight
packaging if you first prick the packaging.
This is because of the increase in pressure
which occurs during heating.
Never heat things for longer than is
necessary; take the "standing time" into
account.
Use as little water as possible when
cooking food and be sparing with salt.
Stir or turn dishes halfway through the
cooking time.
Prick the packaging of meat, chicken and
fish with a fork or any other pointed object.
This prevents these foods bursting.
OPERATION - GENERAL
OPERATION - MICROWAVE
GB 6
GB 7
You can choose from five power levels.
You activate the power function by pressing
. This automatically sets the power level to
maximum. You can then select the power
level you require by pressing several
times.
For example:
You want to cook fish on the medium power
level (60%) for 5 minutes 30 seconds.
1. Press .
2. Press to select the microwave function.
3. Press twice to set the power level to
medium (60%).
4. Press 5 times and 3 times to
set the cooking time to 5 minutes
30 seconds.
5. Press .
The microwave oven is switched on.
1 2 3 4
1
2
34
Cooking
Power level Press
High (100%) 850 W 1x
Medium-high (80%) 680 W 2x
Medium (60%) 510 W 3x
Defrost (40%) 340 W 4x
Defrost delicate (20%) 170 W 5x
High (100%) 850 W 6x
The clock will work as long as the oven is
connected to the mains. If the time has not
been set, the display will show "0". You can
choose a 12-hour or 24-hour display for the
clock.
While the clock is being set, a colon flashes.
The colon stops flashing when the clock has
been set.
For example:
You want to set the clock to 13:25.
Setting the clock
1. Press .
2. Press .
The display shows "24 H".
Press again if you want to set the clock
to the 12-hour setting.
3. Set the hour using the button. Press
the button 13 times or keep the
button depressed until "13" appears in
the display.
Set the minutes using the and
buttons.
Press the button 2 times or keep the
button depressed until "2" appears in
the display.
Press the button 5 times or keep the
button depressed until "5" appears
in the display.
4. Press again.
The clock begins working.
Clock
Note
Pull the plug out of the wall socket if any
strange signs appear in the display.
Once you have set the clock, if you want to
switch from the 12-hour clock to the 24-hour
clock you must first disconnect the appliance
from the power supply. Then reconnect the
appliance and set the time.
12 3
4
1
2 / 4
3
OPERATION - MICROWAVE
GB 8
GB 9
The oven door may be opened during the
2 stage cooking program to check the food.
After you have closed the door again and
pressed start, the appliance will continue
with the cooking program.
For example:
You want to cook on high power for 5 minutes
(1st stage) and then on medium-low power
(40%) for 13 minutes (2nd stage).
1st stage
1. Press .
2. Press once to select the microwave
function.
Press 5 times to set the cooking time
to 5 minutes.
2nd stage
3. Press 4 times to set the microwave
power level to 40%.
Press once and 3 times to set
the cooking time to 13 minutes.
4. Press .
The microwave is switched on.
The settings for stage 1 are shown in the
display until program 2 starts.
The appliance beeps twice between the two
stages.
Cooking in 2 stages
Notes
You can interrupt the cooking program by
pressing once.
Close the door and press to
continue.
Press twice to cancel the program.
With just one press on the start button you
can cook for 30 seconds on maximum power.
By pressing the button repeatedly you can
increase the cooking time in steps of
30 seconds. You can set the cooking time to a
maximum of 10 minutes.
For example:
You want to cook a dish for 2 minutes on high
power.
1. Press .
2. Press 4 times to set the
cooking time to 2 minutes on high power.
3. You can increase the cooking time in the
interim by pressing one or
more time.
The microwave oven is switched on.
Quick start
12 3
4
1
2
1 2 3 4
1
2 / 3
2 / 3 4
OPERATION - MICROWAVE
B 10
B 11
* Stir the rice well when the program has
finished and allow it to stand for
5 to 10 minutes covered. Rinse the pasta
with cold water when the program has
finished.
**Proportions of rice/pasta and water:
quantity water water
(rice/pasta) rice pasta
1/2 cup (100 g / 50 g) 240 ml 360 ml
1 cup (200 g / 100 g) 480 ml 600 ml
1 1/2 cups (300 g / 150 g) 720 ml 840 ml
(240 ml = 1 cup of water)
Program Utensils Preparation No. of times Min./max.
to press button weight
1. jacket potatoes glass Wash and dry the potatoes. 1x 0.2 / 1.0 kg
(20 °C) (oven) dish Put them in the oven dish. Prick the
+ potatoes a few times with a fork.
kitchen roll When the program has finished, wrap
the potatoes in aluminium foil and allow
them to stand for 5 minutes.
2. rice/pasta deep glass Pour rice or pasta* into a deep oven dish. 2x 0.1 / 0.3 kg
(20 °C) (oven) dish Add water** and 1/4 to 1 teaspoonful of salt.
Put a lid on the oven dish or cover it with
microwave cling film.
3. fresh vegetables/ glass Put the vegetables or potatoes in the oven 1x 0.2 / 0.8 kg
peeled (oven) dish dish. Add 30 cc water per 0.2 kg. Cover the
potatoes dish with microwave cling film or a lid.
(20 °C) When the program has finished, drain the
vegetables and allow them to stand for
2 to 3 minutes covered.
4. frozen glass Put the vegetables in the oven dish. Cover the 2x 0.2 / 0.8 kg
vegetables (oven) dish dish with microwave cling film or a lid. When
(-10 °C) the program has finished, allow the vegetables
to stand for 2 to 3 minutes covered.
5. cold pizza glass Place the cold pizza on the high grid. 1x 0,2 / 0,4 kg
(5 °C) turntable Place the metal baking tray, with the grid
+ metal on it, on the glass turntable Remove from oven.
baking tray immediately after heating up and allow to
+ high grid stand for 2 to 3 minutes.
6. frozen pizza glass Remove the packaging. Place the pizza on the 2x 0,1 / 0,5 kg
(-10 °C) turntable high grid. Place the metal baking tray, with the
+ metal grid on it, on the glass turntable. When the
baking tray program has finished, allow the pizza to stand
+ high grid for 2 to 3 minutes.
7. chips glass Spread the chips on the metal baking tray 1x 0,2 / 0,4 kg
(-10 °C) turntable which is placed on the high grid. Turn the chips
+ metal after the sound signal. Make sure that the chips
baking tray are not on top of each other. When the program
+ hoge rooster has finished, allow the chips the stand for 1 to
2 minutes.
8. au gratin glass Use this setting for home-made "au gratin" 2x 0,5 / 1,2 kg
(20 °C) turntable dishes. When the program has finished, allow
+ low grid the dish to stand uncovered for 1 to 3 minutes.
Automatic cooking (auto cook) enables you to
cook your favourite foods easily. You can
choose from 4 cooking programs. You only
have to select the type of food and the
weight. The microwave does the rest.
For example:
You want to cook 0.6 kg of jacket potatoes.
1. Press .
2. Press once to select the cooking
program for jacket potatoes.
3. Enter the weight using .
Press 6 times to enter a weight of
600 grams.
4. Press .
The program time appears in the display.
The microwave is switched on.
In the table on the following page you can
see which cooking programs you can select.
You can also read how to select the programs
and for which dishes.
Automatic cooking
Note
If you keep or depressed, the
display runs through the weights quickly.
12 3
4
1
2
3
4
Cooking table – automatic cooking
OPERATION - MICROWAVE
B 12
B 13
Defrost table
Tips
For best results, first remove the packaging
from meat and fish. Packaging can have an
adverse effect on the defrosting process. The
presence of liquid from the fish or meat can
lead to the formation of steam, which then
cooks the outside of the food.
If the packaging is difficult to remove, it is
best to defrost the food for one quarter of the
defrosting time, which is shown in the display
at the start of the defrosting program. Then
take the food out of the microwave oven,
remove the packaging and put the food back.
Put the food in a shallow glass oven dish to
catch any liquid that comes out of it.
The centre of the food should still feel slightly
frozen when you take it out of the microwave
oven.
Place slices of bread between sheets of
kitchen paper. Cut rolls in half first.
Program Type of food No. of times to Min./max.
press button weight
1. meat beef: mince, cubes of meat, steaks, rolled meat 1x 0.1 / 4.0 kg
pork: mince, cubes of meat, escalopes, rolled meat
veal: mince, cubes of meat, escalopes, rolled meat
2. poultry chicken: whole chicken (< 2 kg), chicken breast, 2x 0.1 / 4.0 kg
chicken legs
turkey: turkey breast (< 2 kg), turkey legs
3. fish fish: fillets, steaks, whole fish 1x 0.1 / 4.0 kg
shellfish: crabmeat, lobster, prawns, mussels
4. bread cut brown/white, rolls, 2x 0.1 / 0.5 kg
French stick, croissants
There are 4 defrost programs (auto defrost)
you can use to defrost frozen food; all you
have to do is enter the weight of the food to
be defrosted.
For example:
You want to defrost 1.4 kg of chicken.
1. Press .
2. Press twice to select the defrost
program for poultry.
3. Enter the weight using .
Press once and 4 times to
enter a weight of 1400 grams.
4. Press .
The microwave is now switched on.
In the table on the following page you can
see which defrost programs you can select.
You can also read how to select the programs
and for which dishes.
Automatic defrost
Note
Halfway through the defrosting time, a signal
can be heard. The dish can now be turned.
Remove any parts already defrosted.
Press to continue.
1 2 3 4
1
2
3
4
OPERATION - MICROWAVE
OPERATION - GRILL
B 14
B 15
This appliance is fitted with a quartz grill, and
so you do not need to preheat it and food
quickly becomes brown and crispy.
For example:
You want to grill for 12 minutes and
30 seconds.
1. Press .
2. Press once to select the grill function.
3. Set the grilling time.
Press once, twice and
3 times to set the grilling time to
12 minutes and 30 seconds.
4. Press .
The grill is switched on.
Grill setting
Notes
It is not necessary to preheat the oven.
Use the (high) grid for the best results.
Place the grid on the glass turntable (see also
"description and use of accessories").
The automatic cooking programs and grilling
programs (auto roast) work with a fixed set
time. You can shorten or increase this time
during the program using the "-" or "+" buttons.
You can use these buttons to adjust the
cooking time for manually operated cooking
as well (see page 7).
A shorter cooking time:
1. Press .
2. Select an automatic cooking program
using , , or .
3. Enter the weight using .
4. Press .
5. Press .
Each time the button is pressed, the cooking
time is decreased by 10 seconds.
A longer cooking time:
1. Press .
2. Select an automatic cooking program using
, , or .
3. Enter the weight using .
4. Press .
5. Press .
Each time the button is pressed, the cooking
time is increased by 10 seconds.
"-" and "+" buttons
Note
If the dish needs to be in the oven for a longer
or shorter time in combined cooking or when
using the automatic cooking programs, adjust
the cooking and buttons.
1
2
35
2
4
1
34
2
OPERATION - HOT AIR
OPERATION - HOT AIR
B 16
B 17
You can automatically preheat the hot-air
oven and then bake in it.
For example:
You first preheat the oven and then bake a
dish for 50 minutes at a temperature of
200 °C.
Preheating
1. Press .
2. Press once to select the hot-air
function.
3. Press twice to set the temperature to
200 °C.
4. Press .
The oven begins to preheat and the message
"Pr-H" appears in the display.
After the preheating you will hear a beep.
The oven is now at the temperature set.
Baking
Put the dish in the oven.
5. Press five times to set the baking
time to 50 minutes.
6. Press .
The hot-air oven is switched on.
Baking with preheating
Notes
When the oven reaches the temperature set,
you will hear a short beep.
Use the low grid (see also "description and
use of accessories").
With the hot-air function, you can select
temperatures between 100 °C and 250 °C. You
can also select a temperature of 40 °C for
letting dough prove.
When you select the hot-air function, the
oven automatically switches on at 180 °C.
For example:
You want to bake a dish for 50 minutes at a
temperature of 200 °C.
1. Press .
2. Press once to select the hot-air
function.
3. Press twice to set the temperature
to 200 °C.
4. Press five times to set the baking
time to 50 minutes.
5. Press .
The oven is ready for use.
Baking
1
5
4
2
3
1
54 / 6
2
3
Note
Use the low grid (see also "description and
use of accessories").
OPERATION - COMBINED COOKING
B 18
B 19
Using this function you can prepare your
favourite grilled foods very easily. You can
choose from 3 combined grill/microwave
programs (auto roast).
The appliance selects the microwave power
level required itself. You only have to select
the type of food and the weight.
For example:
You want to grill chicken weighing 1.4 kg.
1. Press .
2. Press 3 times to select the
automatic grill/microwave program for
chicken.
3. Enter the weight using .
Press once and 4 times to enter a
weight of 1400 grams.
4. Press .
In the table on the following page, you can
see which grill/microwave programs you can
select. You can also read how to select the
programs and for which foods.
Microwave and grill automatic This combination makes use of the grill and
microwave functions. The microwave can be
set to three power levels: 20%, 40% and 60%.
For example:
You want to grill for 25 minutes using the grill
and the microwave function at a power level
of 40%.
1. Press .
2. Press once to select the combination
setting.
You can now select the combination you
want.
3. Press once to select the grill function.
4. Press twice to set the microwave
function to a power level of 40%.
5. Press twice and 5 times to set
the grilling time to 25 minutes.
6. Press .
The microwave and grill functions are
switched on.
7. During cooking, you can increase or decrease
the cooking time of the program. This does
not interrupt the cooking process. Press
to decrease the cooking time and
press
to increase it (see page 14 for more
information).
Microwave oven and grill
Notes
Combination settings shorten the cooking
time.
Take care when taking the dish out of the
oven. The oven utensils are hot!
1
4
6
2
3
5
1
3
4
2
OPERATION - COMBINED COOKING
B 20
B 21
This combination makes use of the hot-air and
microwave functions. The microwave can be
set to 3 power levels: 20%, 40% and 60%.
For example:
You want to bake at a microwave power level
of 40% and an oven temperature of 200 °C for
25 minutes.
1. Press .
2. Press once to select the combination
setting.
You can now select the combination required.
3. Press once to select the hot-air
function.
4. Press twice to set the oven
temperature to 200 °C.
5. Press twice to set the microwave power
level to 40%.
6. Press twice and 5 times to set
the cooking time to 25 minutes.
7. Press .
The microwave and hot-air functions are
switched on.
8. During cooking, you can increase or
decrease the cooking time of the program.
This does not interrupt the cooking
process. Press to decrease the
cooking time and to increase it (see
page 14 for more information).
Microwave and hot-air function
Notes
If the oven first has to be preheated, you
should do this as described on page 17. Then
switch the microwave/hot-air combination on.
Combination settings shorten the cooking
time.
Take care when you take the food out of the
oven. The oven utensil is hot!
Grilling table
Program Cooking Preparation No. of times to Min./max.
utensils press button weight
1. beef glass Rub the meat with melted margarine, butter, 1x 0.5 / 1.5 kg
turntable + oil or seasoning. Place the metal baking
metal baking tray tray on the glass turntable in the oven.
+ low grid or Put the meat on the low grid and place this
spit grid on the metal baking tray. When the
program has finished, allow the food to stand
for 10 minutes, covered with microwave
cling film.
2. pork glass Rub the meat with melted margarine, butter, 2x 0.5 / 1.5 kg
turntable + oil or seasoning. Place the metal baking
metal baking tray tray on the glass turntable in the oven.
+ low grid or Put the meat on the low grid and place this
spit grid on the metal baking tray. When the
program has finished, allow the food to stand
for 10 minutes, covered with microwave
cling film.
3. whole glass Rub the meat with melted margarine, butter, 3x 0.8 / 1.5 kg
chicken turntable + oil or seasoning. Put the chicken on the metal
metal baking tray baking tray. Place this baking tray on
or spit the glass turntable in the oven.
When you hear the audio signal, turn the chicken
over and baste it with its own fat. When the
program has finished, allow the food to stand for
10 minutes, covered with microwave cling film.
1
4 / 8
4
7
2
3
6
MAINTENANCE / FAULTS
B 23
Keep your appliance looking good
Before starting to clean the microwave oven,
remove the plug from the socket or turn the
switch in the meter cupboard to zero.
Clean the inside immediately after use. Use a
damp cloth to remove any condensation,
liquid that has boiled over and food remains.
Crumbs and liquid that remain behind absorb
microwave energy and lengthen cooking
times.
Clean the inside and outside of the oven
regularly using soapy water and dry it
thoroughly with a dry cloth.
Make sure that the microwave distributer
cover (inside the oven on the right) is clean. A
cover which is not clean may cause sparking.
Clean the accessories regularly; use soapy
water and a brush and dry the accessories
thoroughly with a dry cloth. The accessories
may also be washed in a dishwasher.
Odours will disappear if you put a glass of
vinegar or water - with lemon juice added - in
the oven space. Switch the microwave on for
two minutes on full power. Then wipe with a
damp cloth.
Check the door closure and the door seal
regularly for damage.
Do not use the oven if the door or the door
closure is damaged.
OPERATION - LOCK
B 22
You can "lock" your microwave oven, so that it
is no longer possible to start it.
Activating the childproof lock
1. Press and keep it depressed until l
appears in the left of the display and two
short beeps are heard. When lappears in
the display, the time disappears for a few
seconds.
All of the controls have been made
inoperative.
Press any button and lappears in the
display.
Turning the childproof lock off
1. Press and keep it depressed until l
disappears from the display and two short
beeps are heard.
The microwave can be used normally again.
Childproof lock
1
Faults
If the microwave oven does not cook as well
as it should do, if there is sparking inside it, or
if it does not start, etc., first try to find the
reason for the problem yourself before
phoning the service department.
You can do this by referring to the points
listed below.
– Is the plug in the socket?
– Is the door closed properly?
– Have the power level and the cooking time
been set properly?
– Are there any objects in the microwave
oven which shouldn't be there?
– Are you using the correct cooking utensils?
– Are both the roller stay and the turntable in
the microwave oven?
– Are the ventilation openings blocked?
– Has the food been defrosted sufficiently?
– Did you stir or turn the food during cooking?
– Is the childproof lock turned on?
PACKAGING - TECHNICAL INFORMTATION
B 24
Technical information
Power supply 230 V – 50 Hz
Connected load 2650 W
Frequency of microwaves 2450 MHz
Microwave output (IEC 705) 850 W
Dimensions (wxhxd) 530 x 322 x 500 mm
Render discarded appliances unusable
immediately by removing the plug from the
socket and cutting the cable.
It is important that an old microwave oven is
disposed of in a responsible manner and in
accordance with the regulations.
The packaging materials used for your new
microwave oven should also be disposed of in
a responsible way.
You can obtain information about the
responsible disposal of discarded household
appliances from the relevant authorities.
Disposal of packaging and appliance
DESCRIPTION DE L'APPAREIL
MATIÈRES
FR 1
Introduction
La cuisson qui va se produire dans votre nouveau
four à micro-ondes est sans danger et confortable.
En un rien de temps, vous pouvez servir les mets
les plus succulents.
La commande de l'appareil est très simple,
également grâce aux programmes automatiques
de cuisson et de décongélation.
De plus, le four à micro-ondes se nettoie très
facilement.
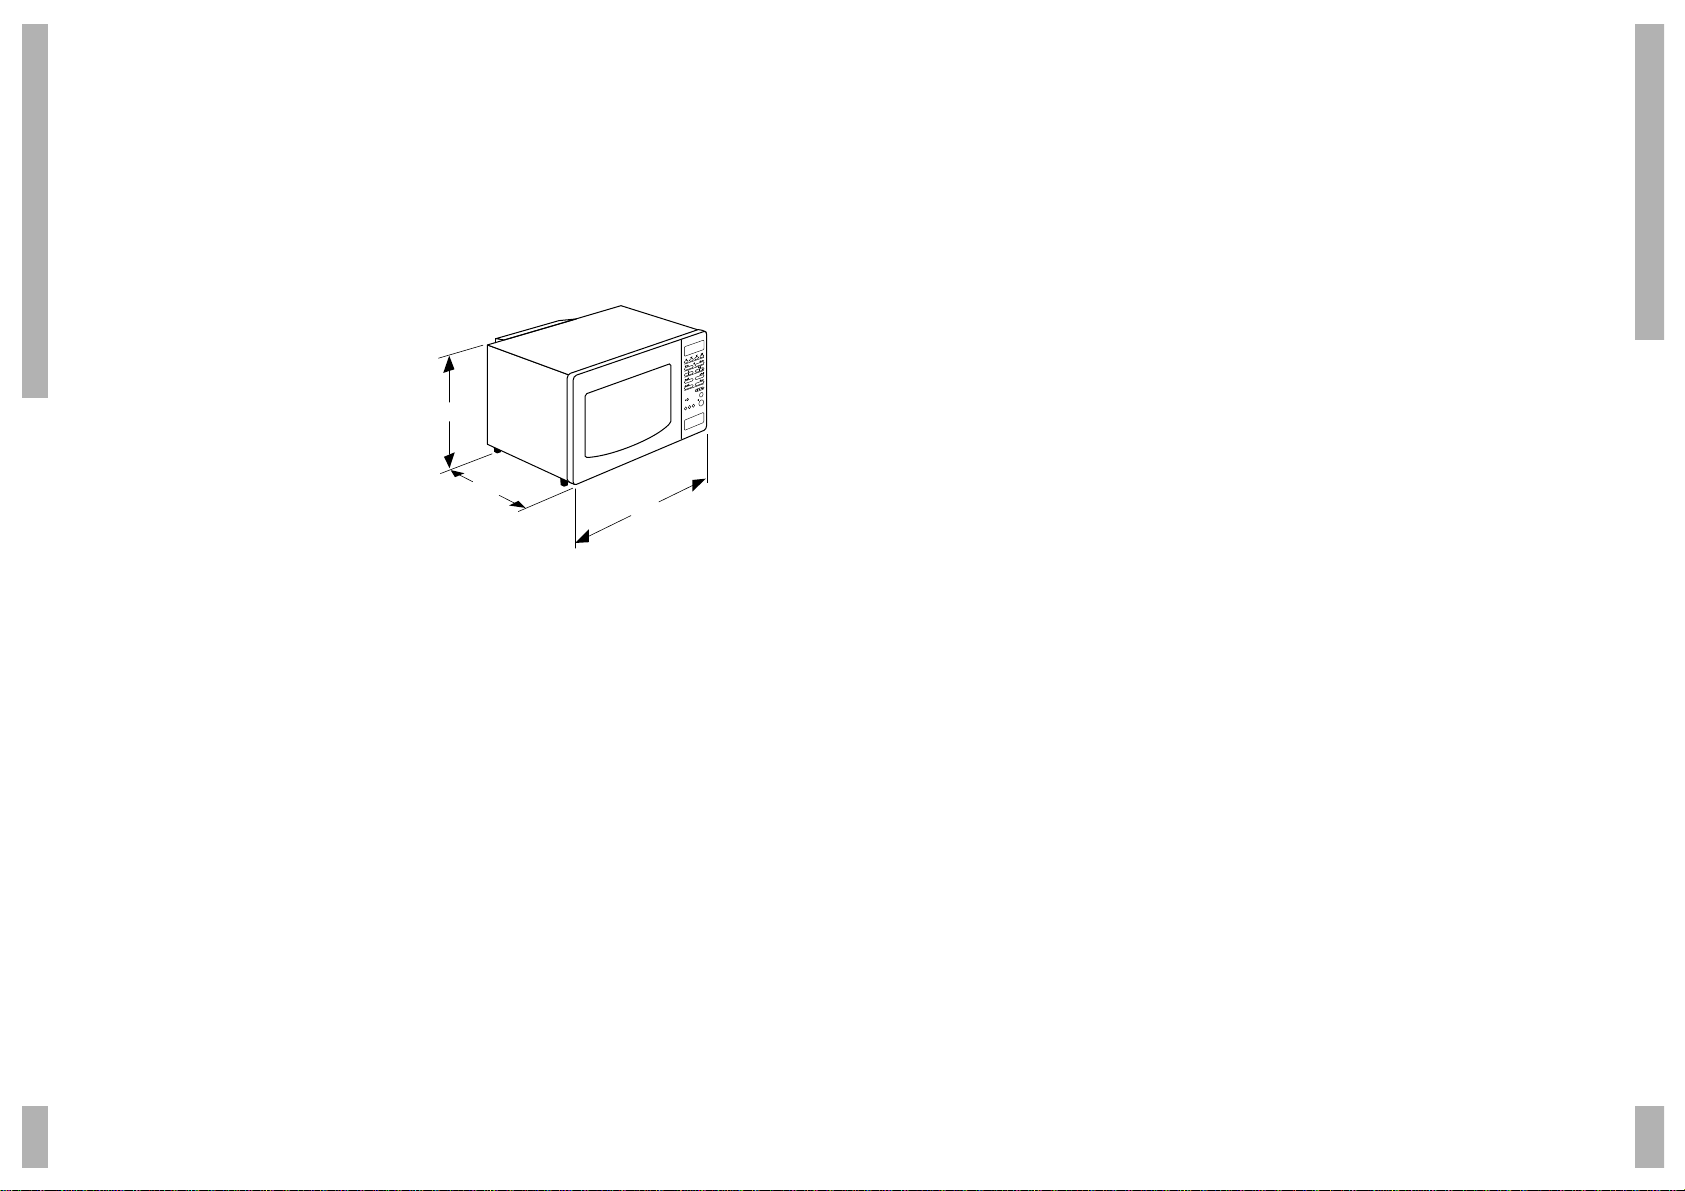
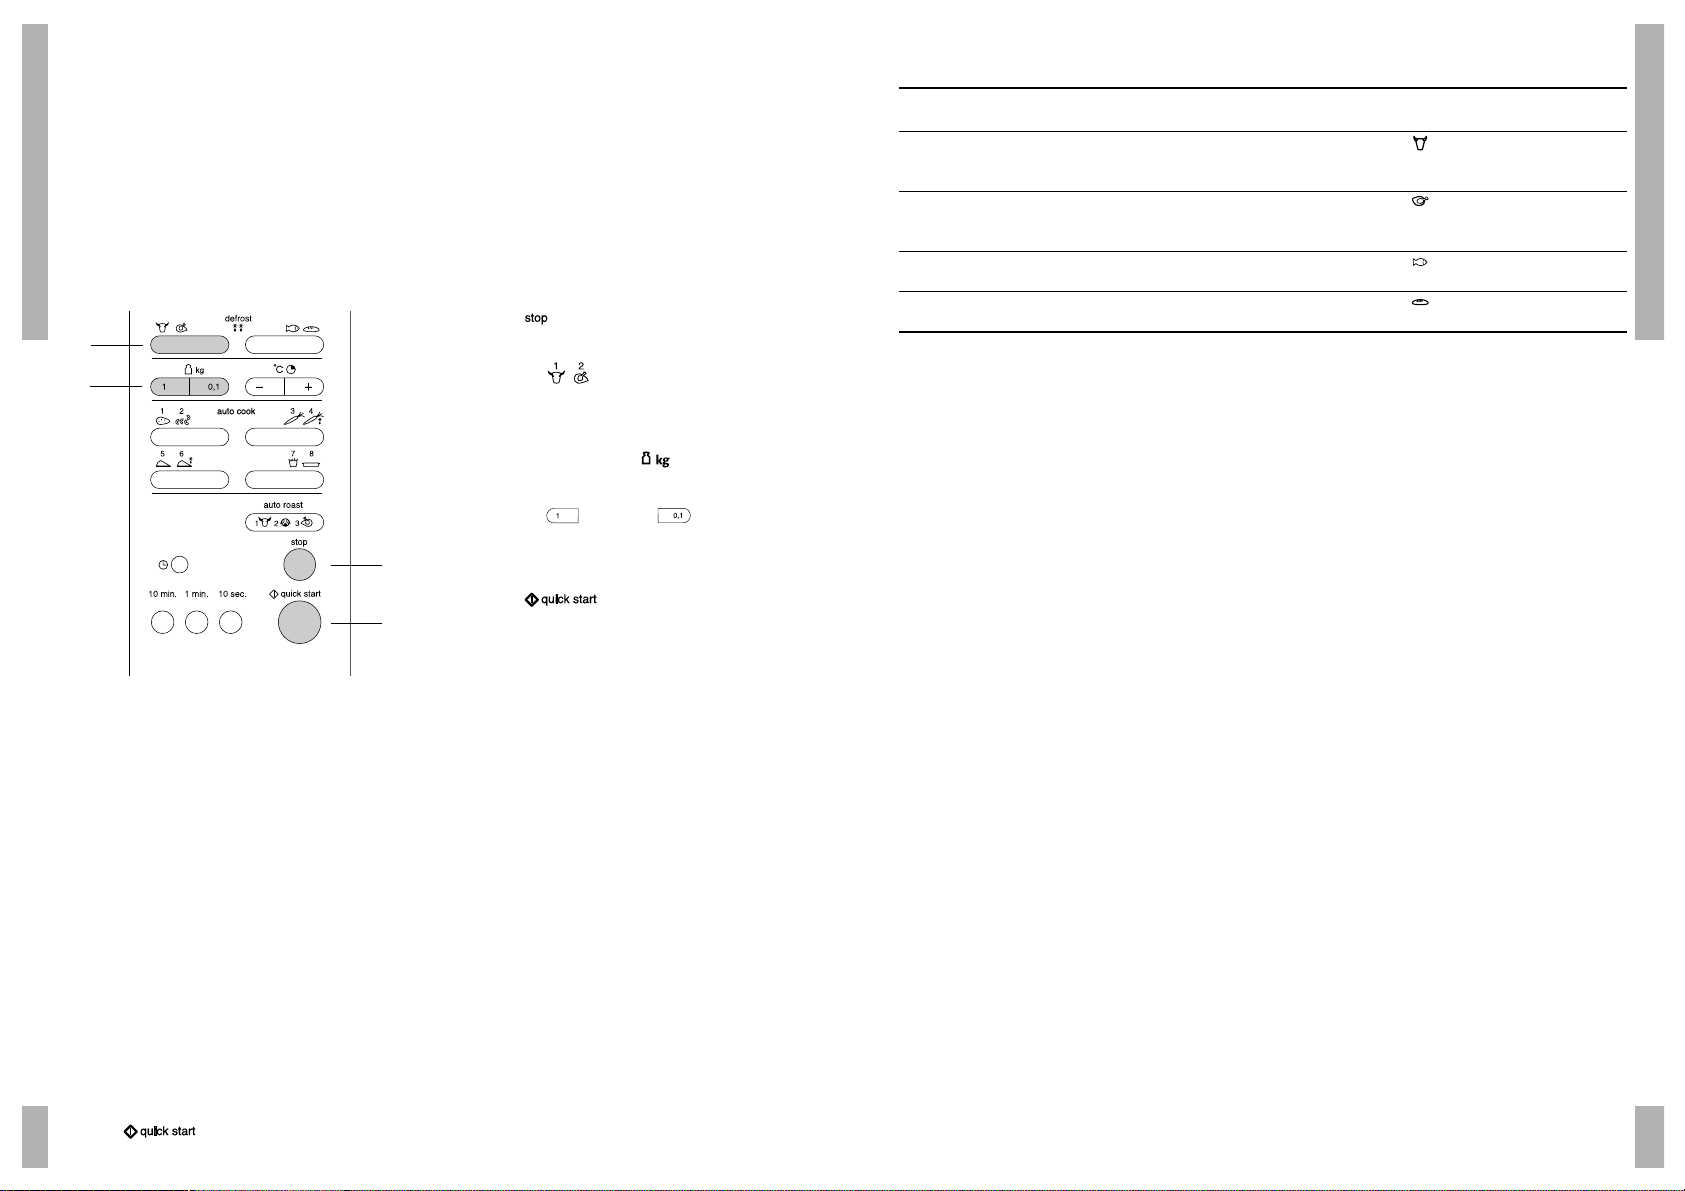
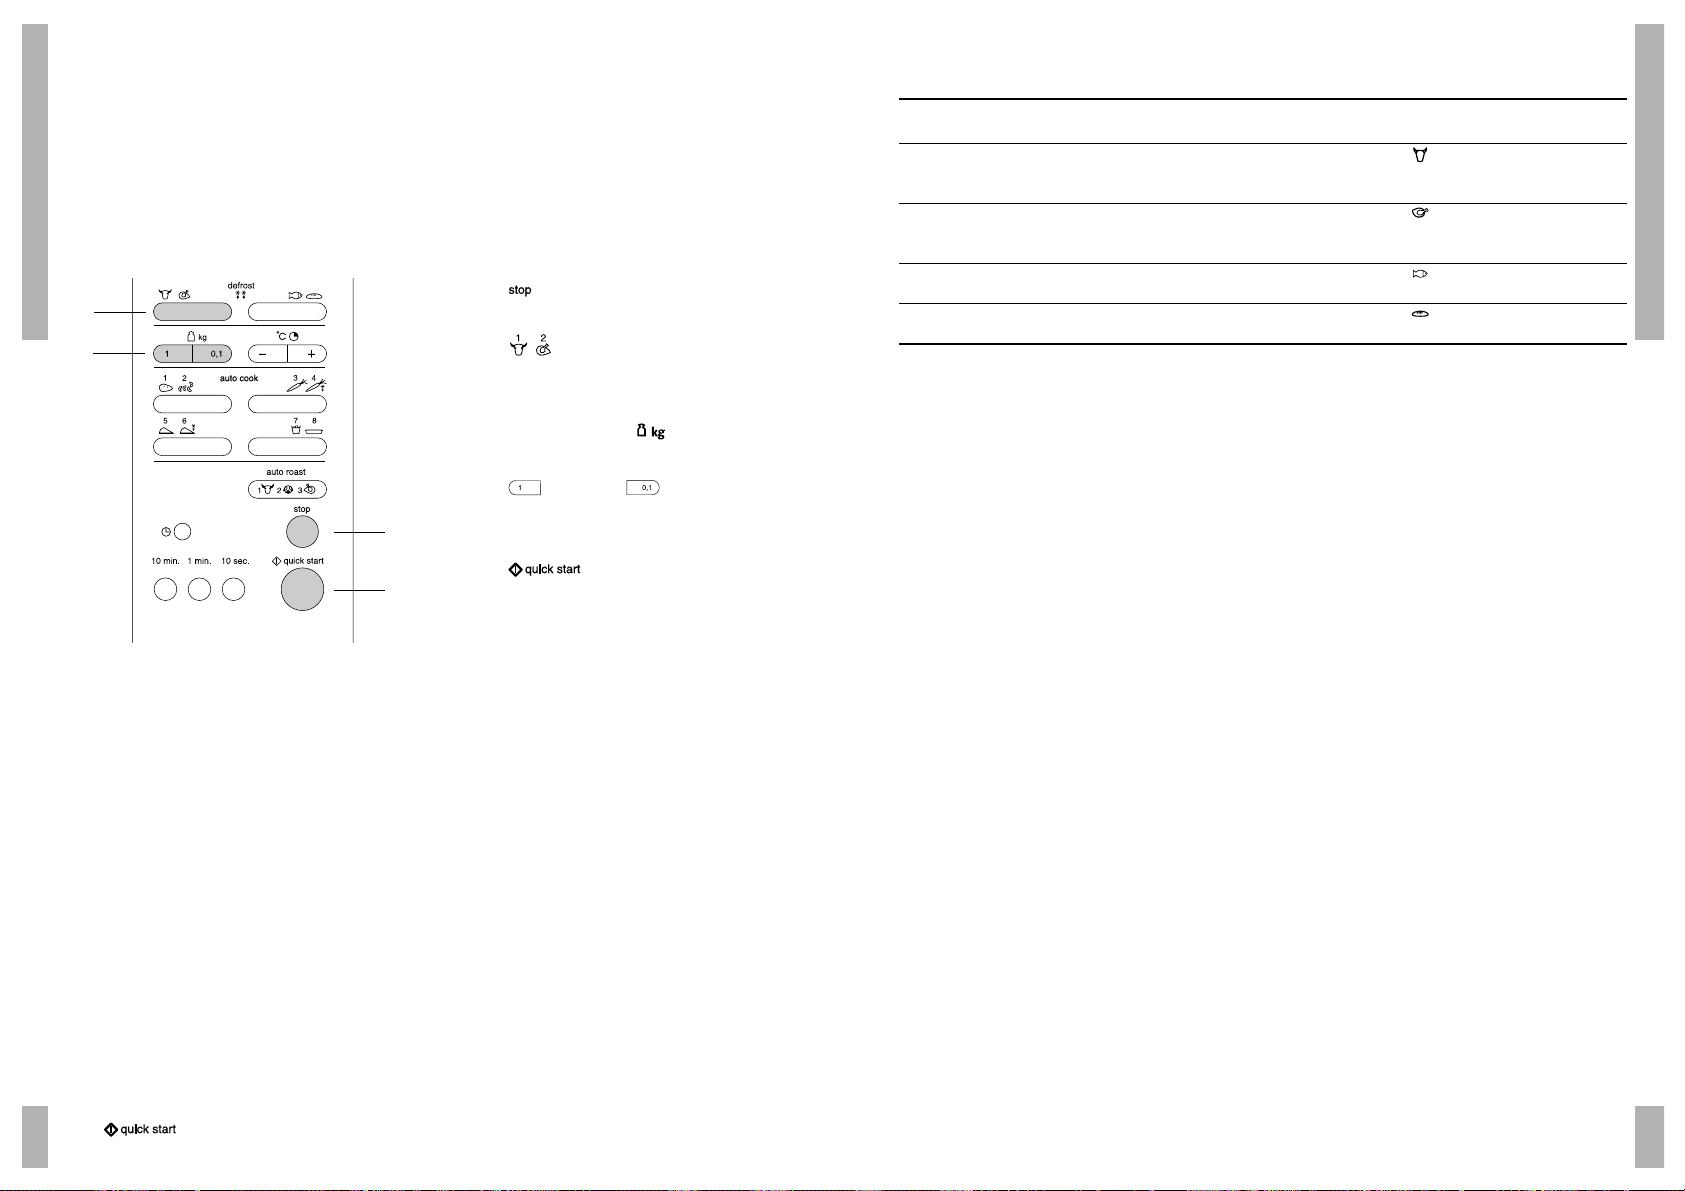
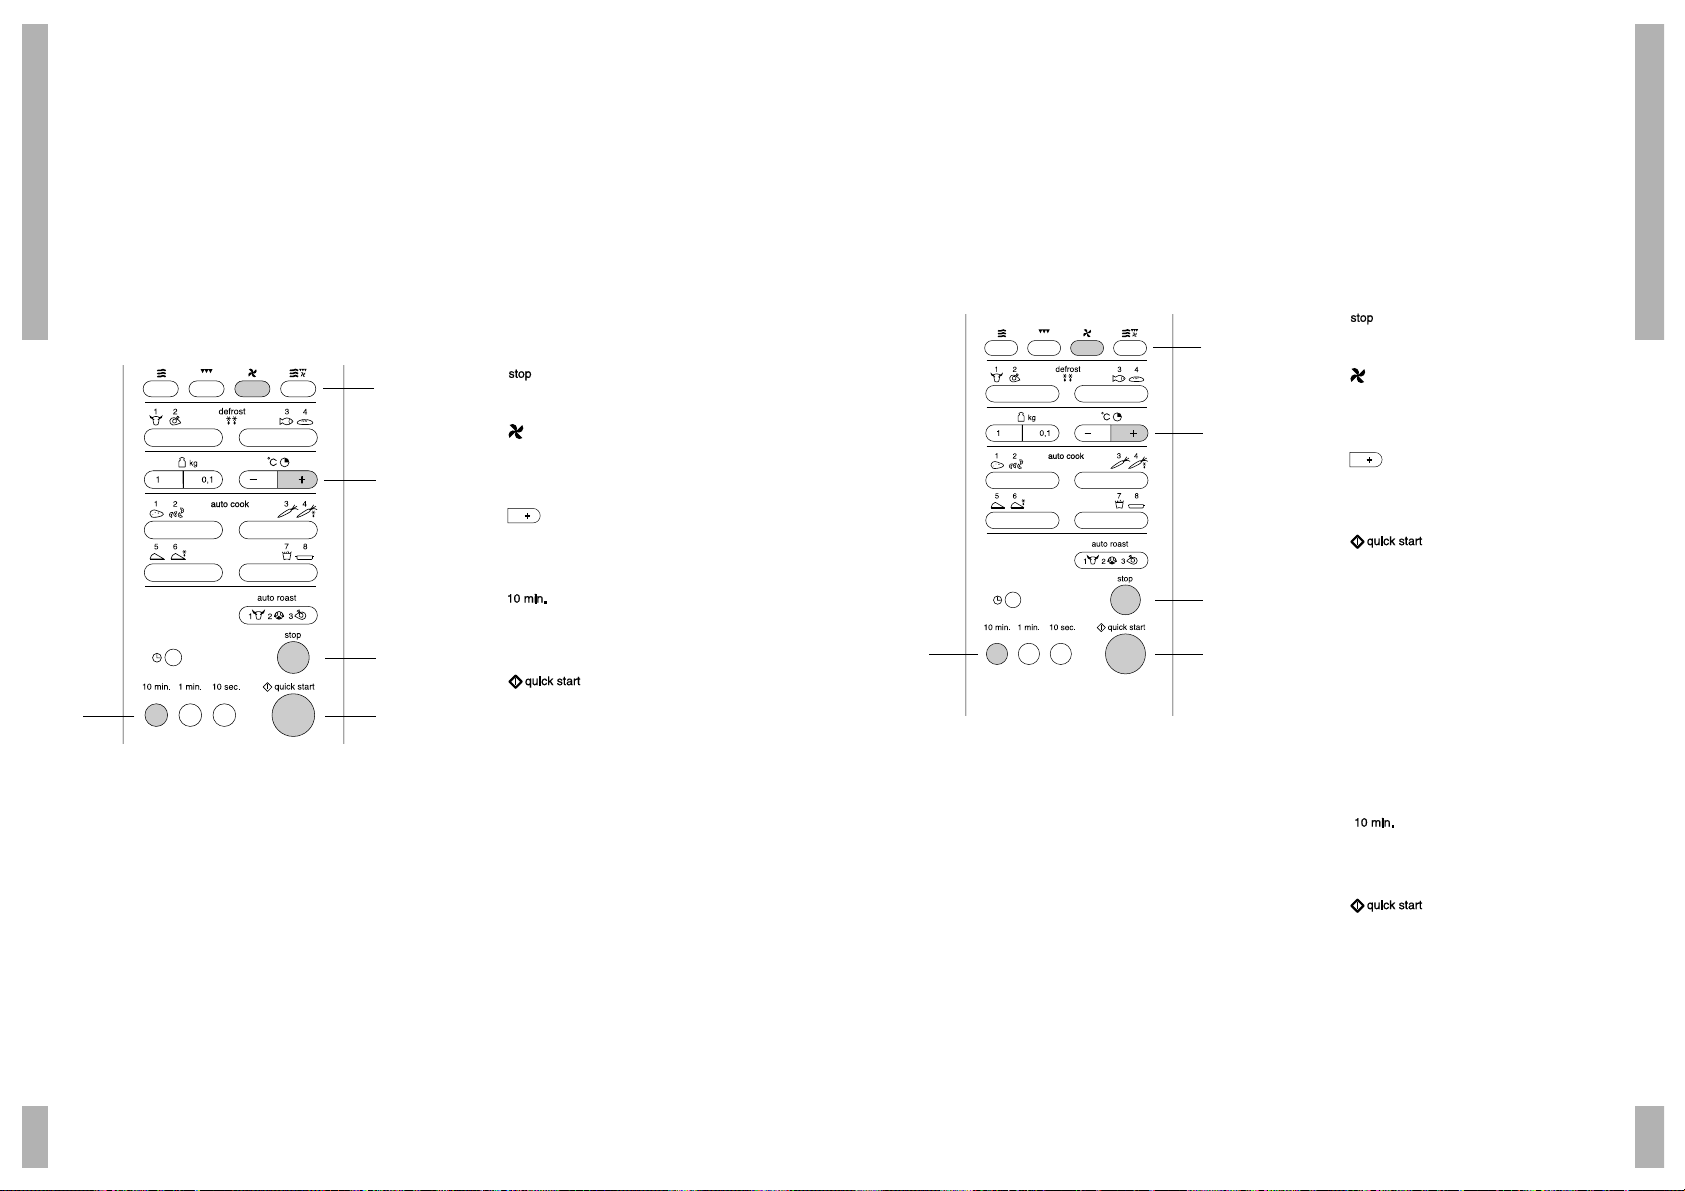
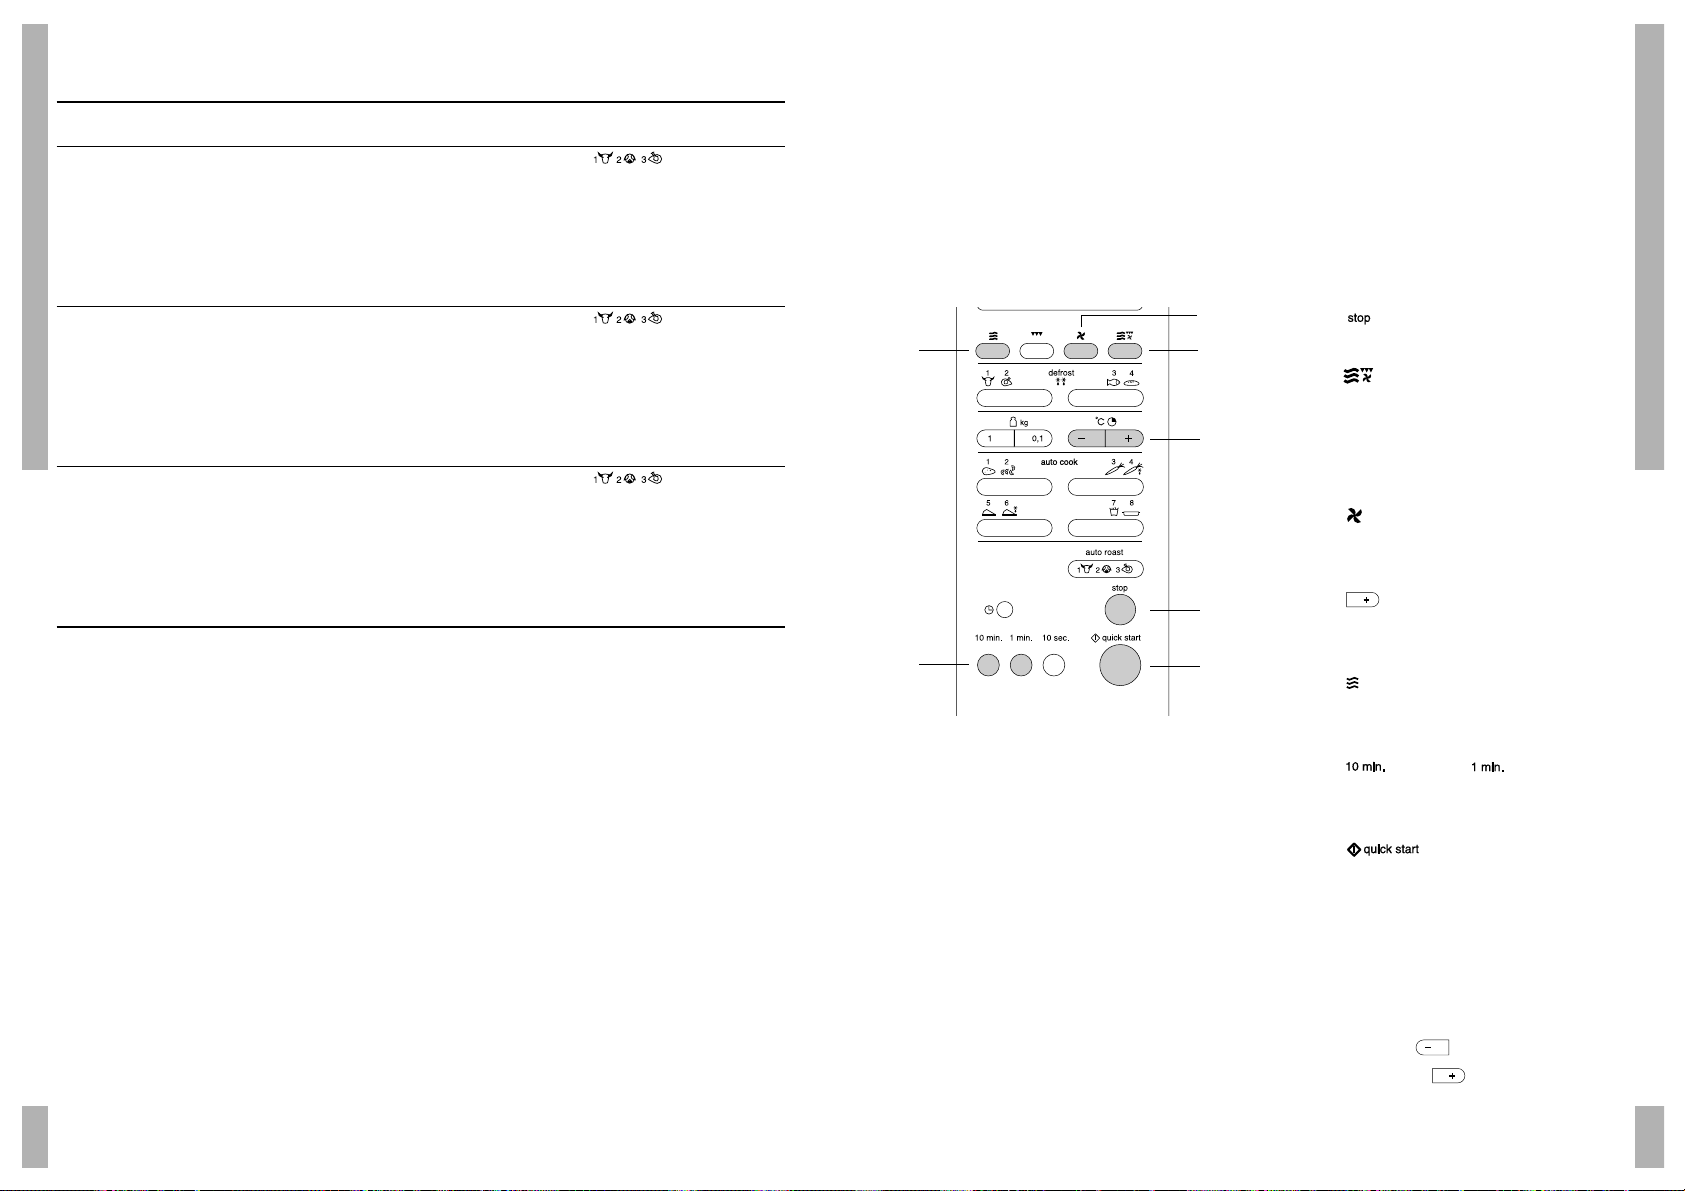
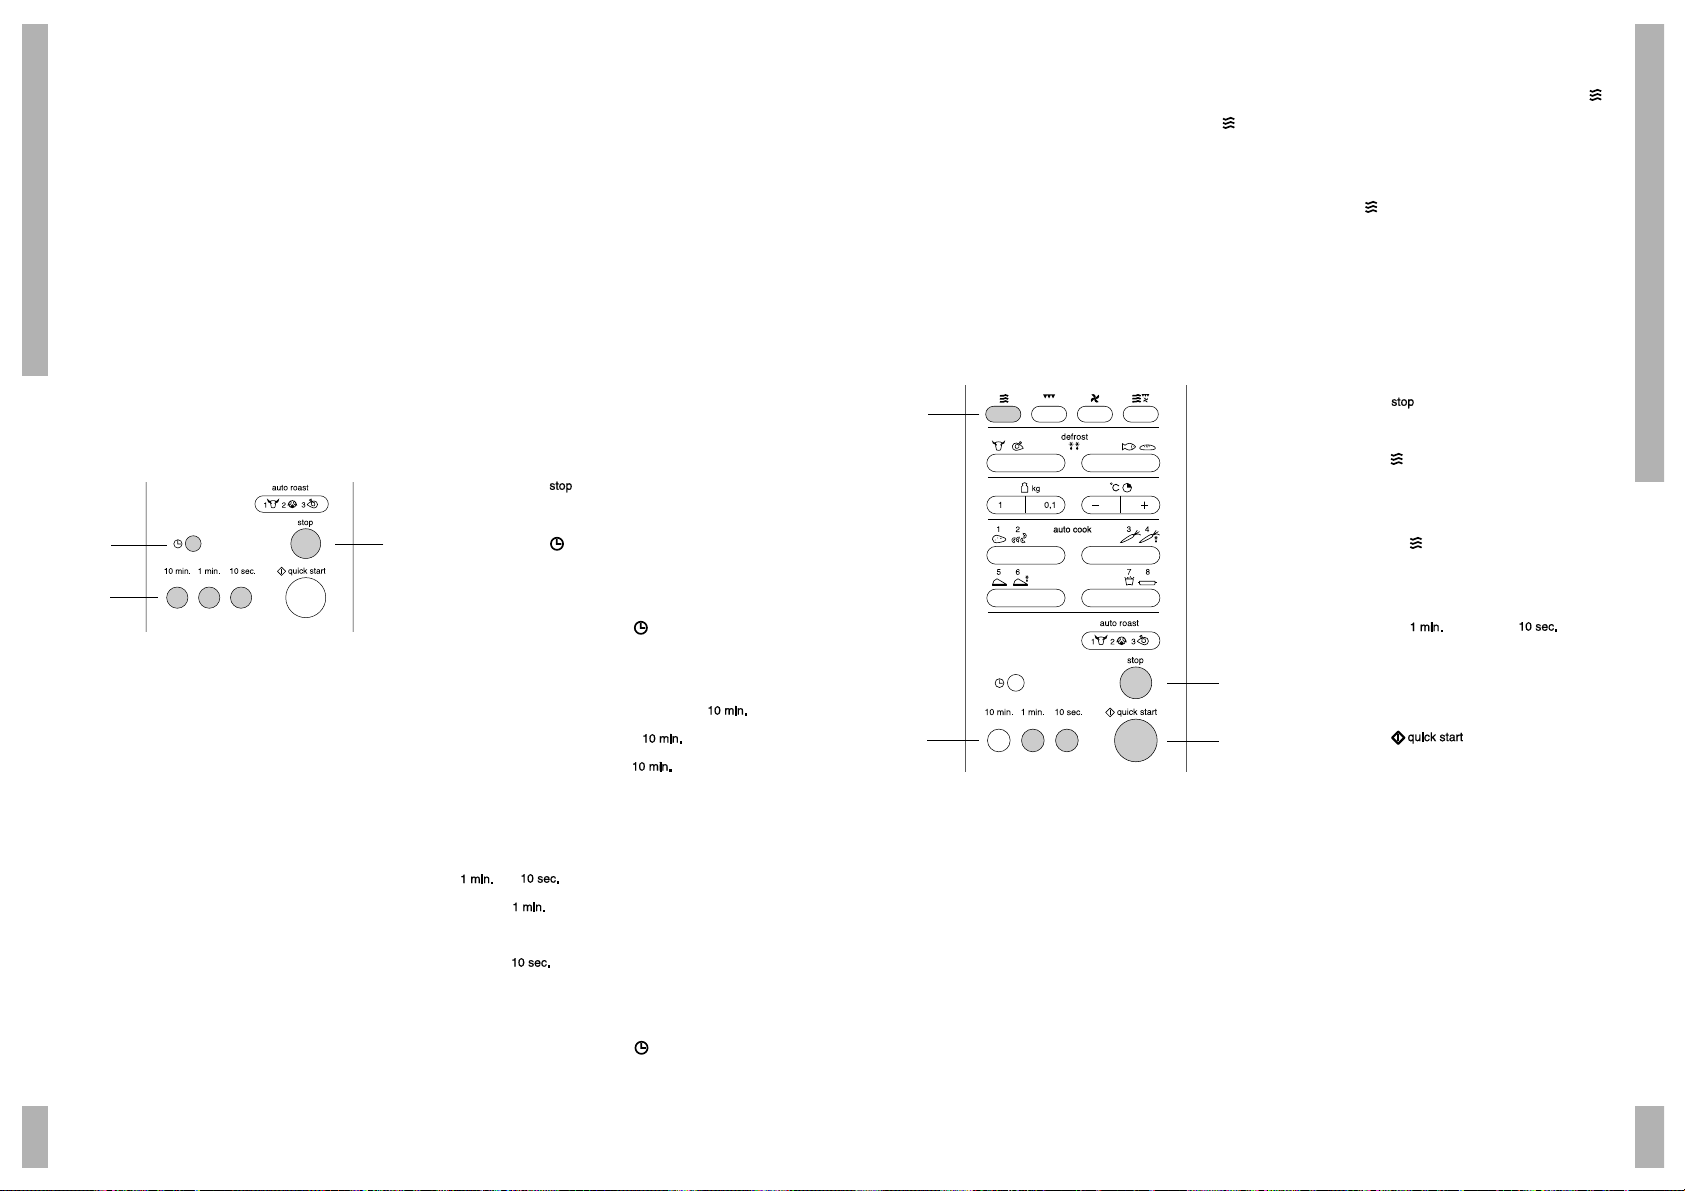
Description de l’appareil
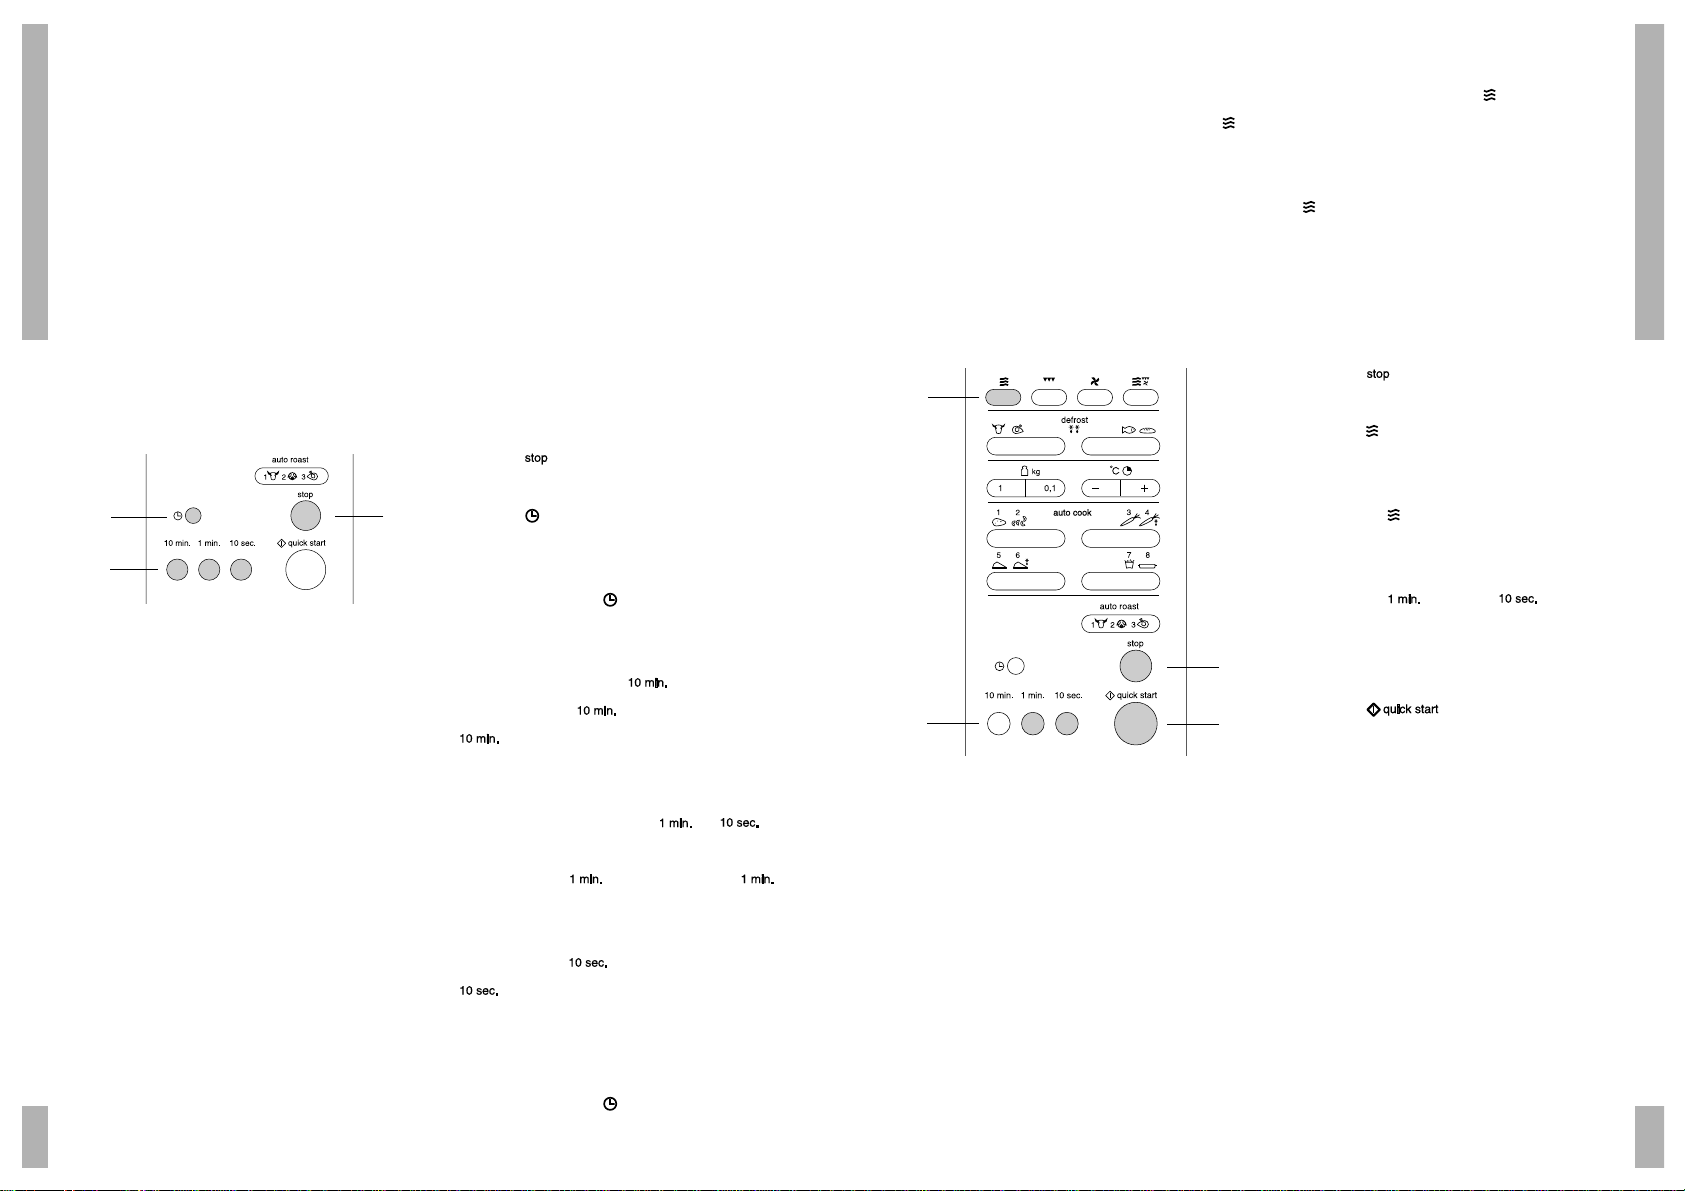
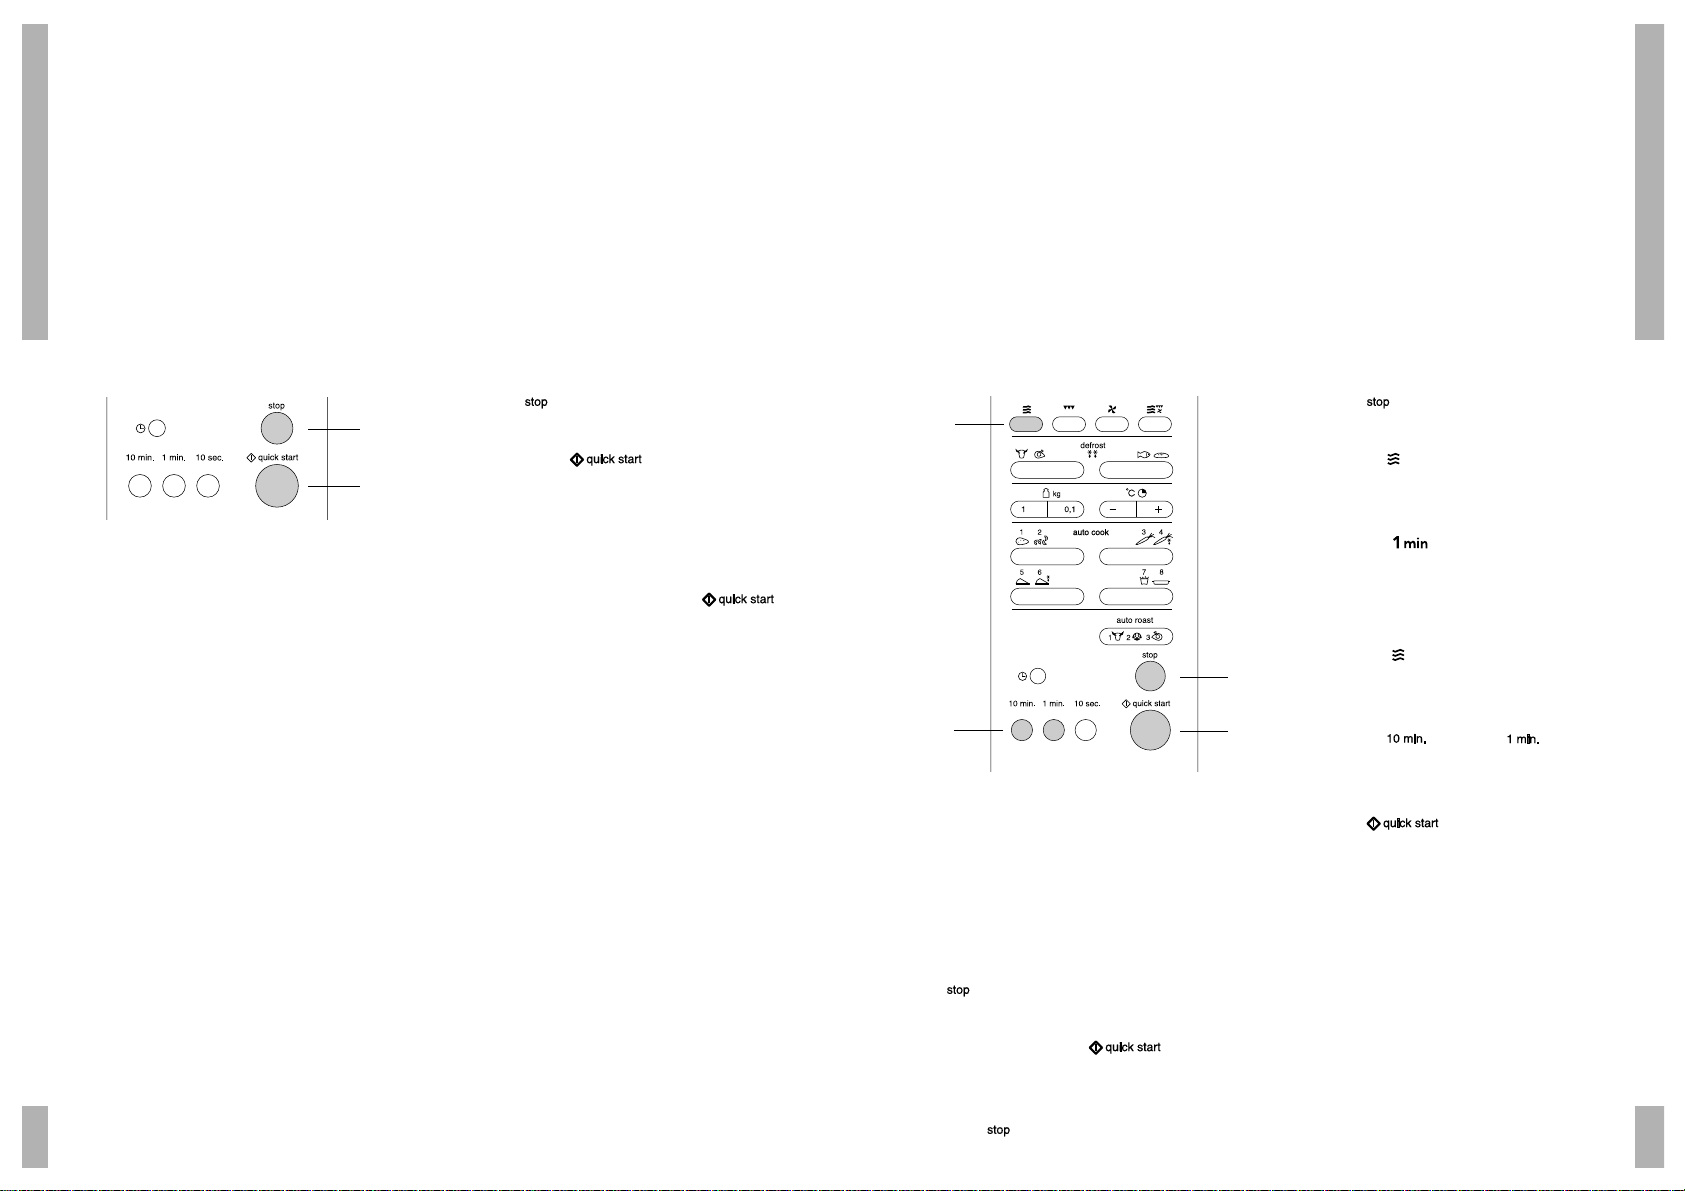
Tableau de commande
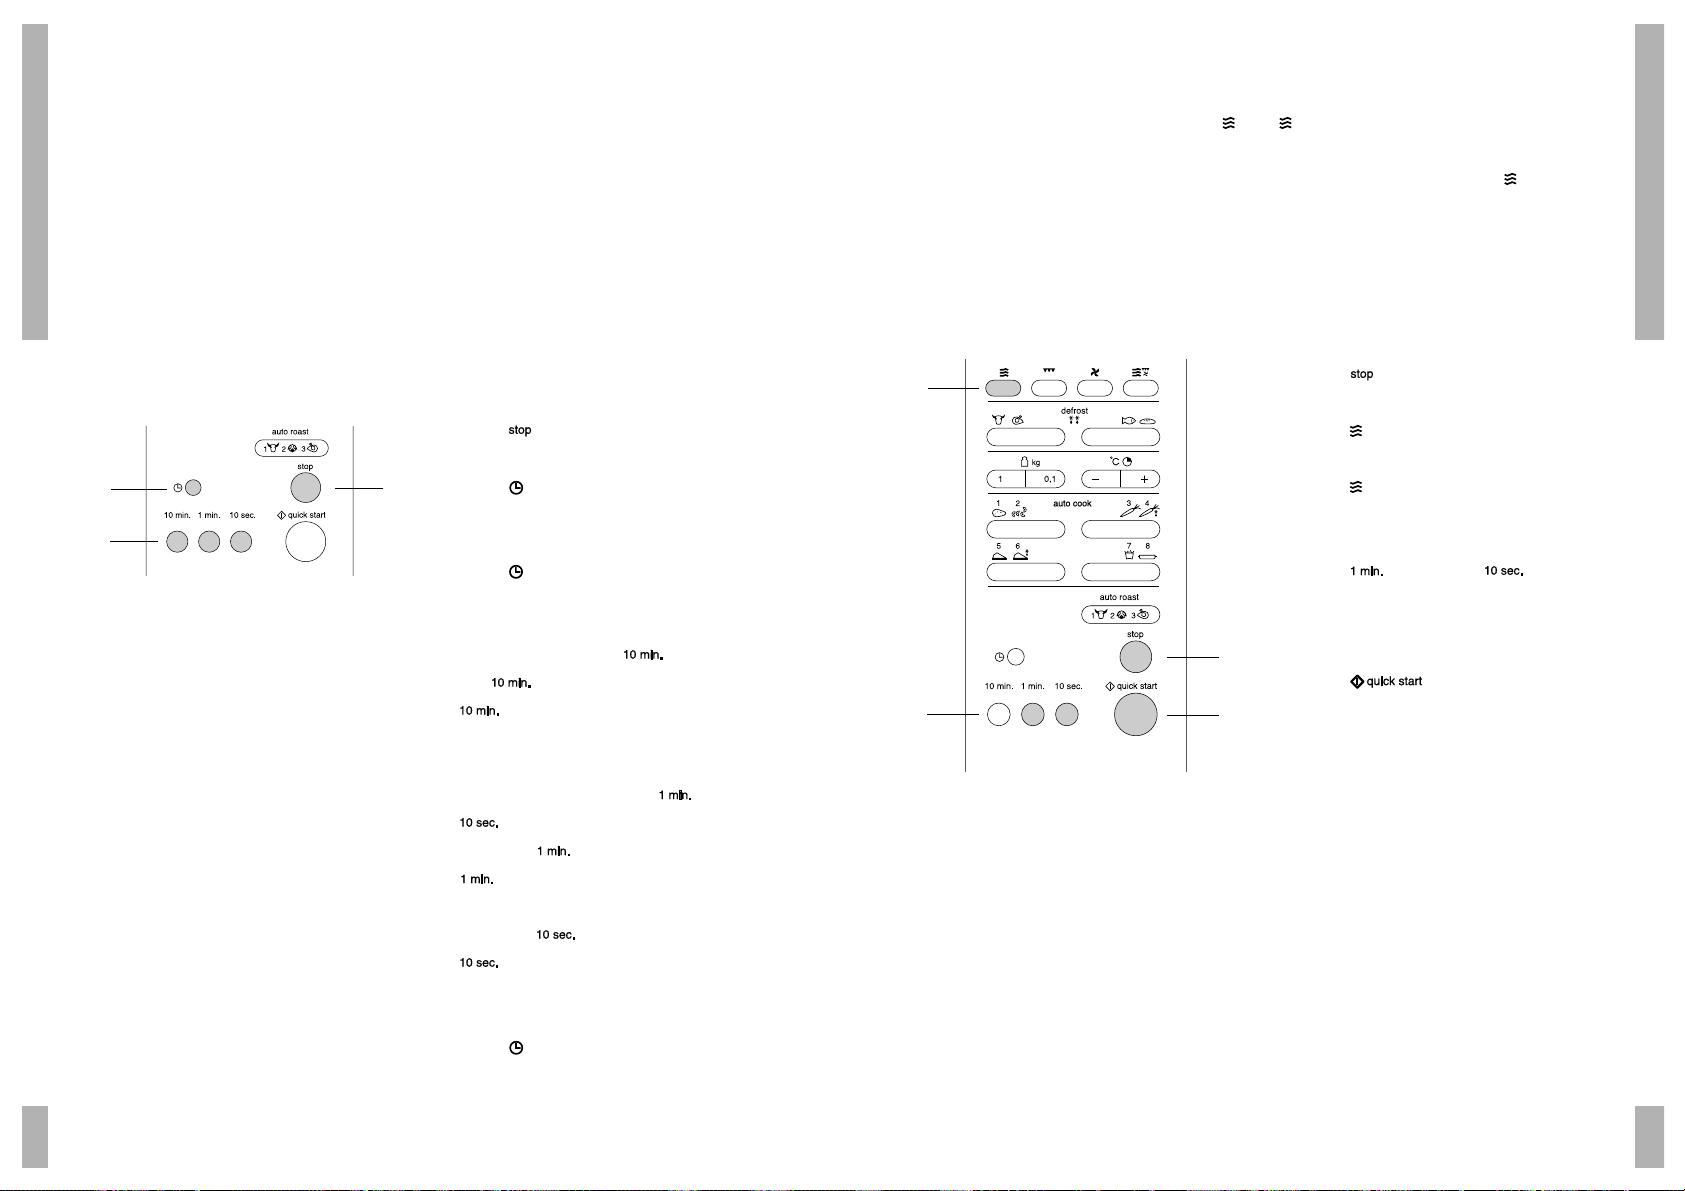
1. réglage du temps (10 sec.)
2. programmation du temps (1 mn)
3. programmation du temps (10 mn)
4. horloge
5. programme cuisson automatique avec
programmation du poids
6. programmation du poids
7. programme décongélation automatique avec
programmation du poids
8. fonction du four à micro-ondes
9. fonction gril
10. écran
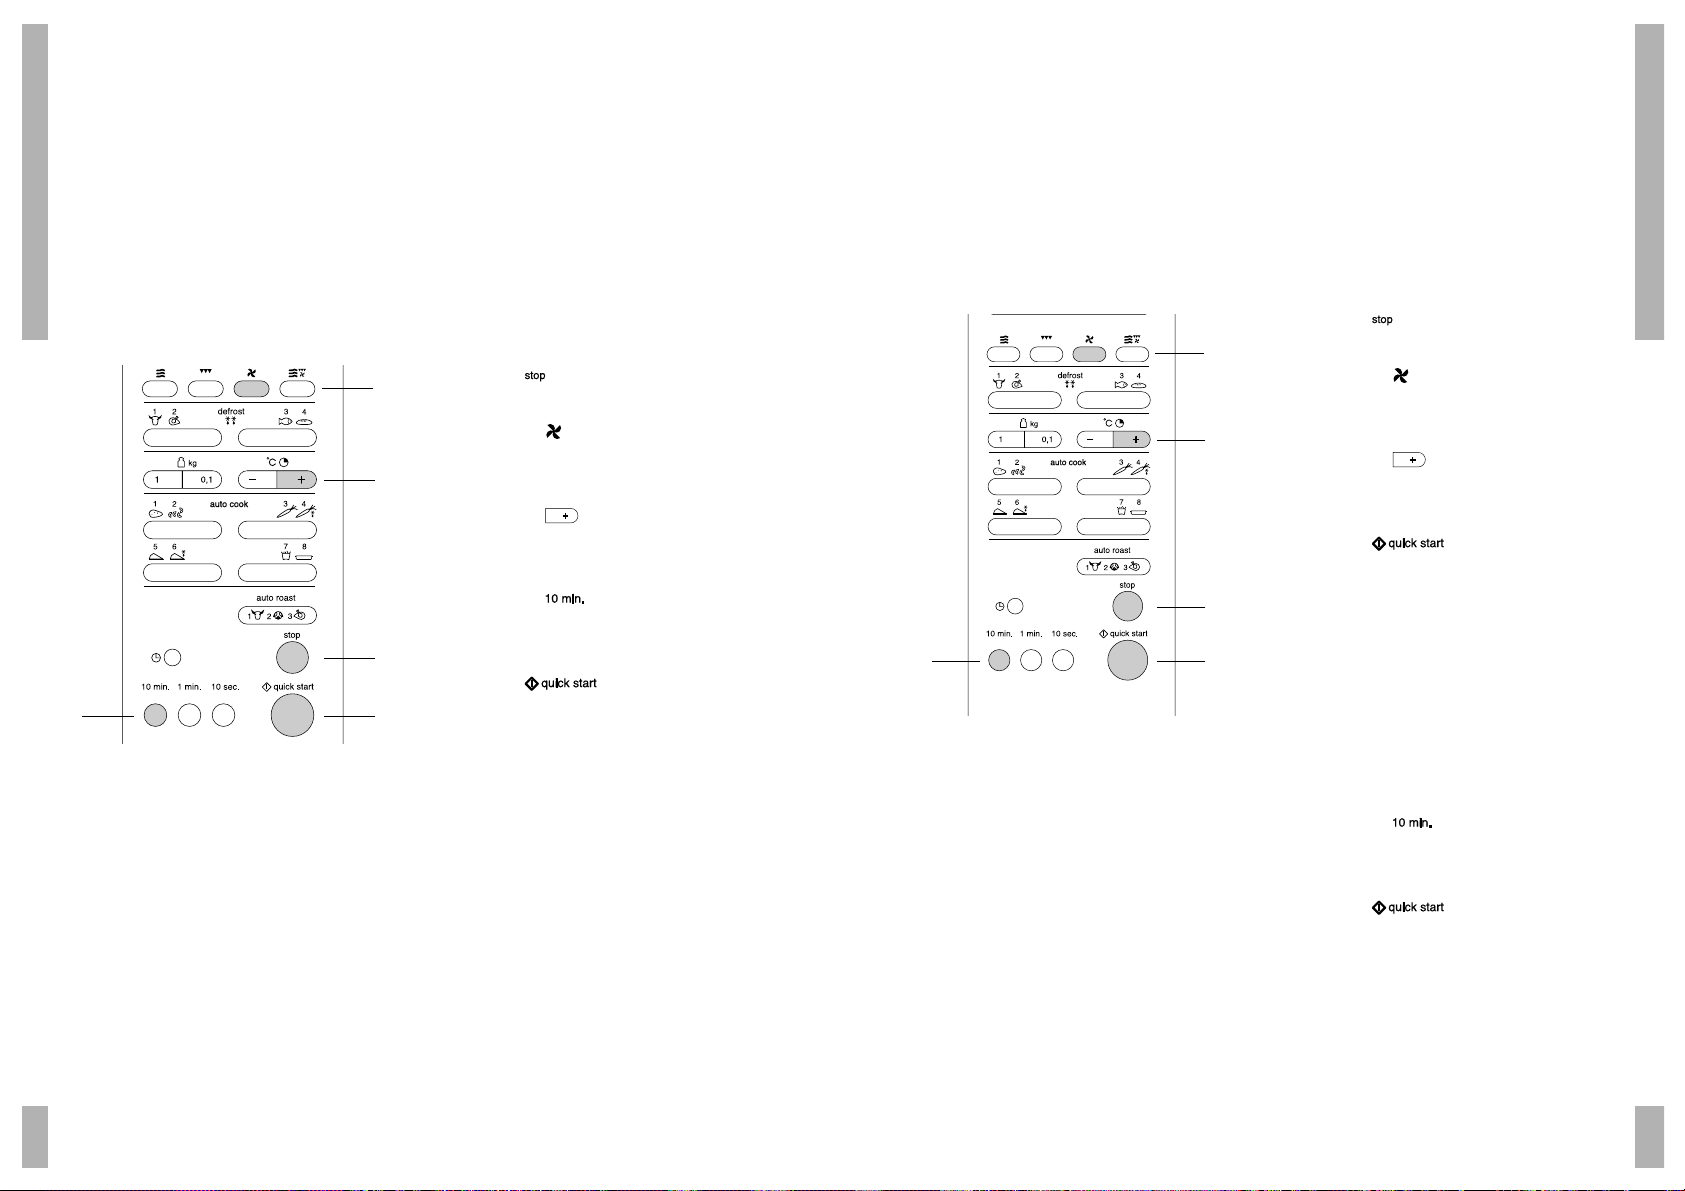
11. fonction chaleur pulsée
12. fonction combi
13. touches -/+ pour la programmation du poids /
temps en plus/en moins
14. programme gril automatique avec
programmation du poids
15. stop/clear ou stop/effacement
16. start / quick start pour la mise en service
17. déverrouillage de la porte
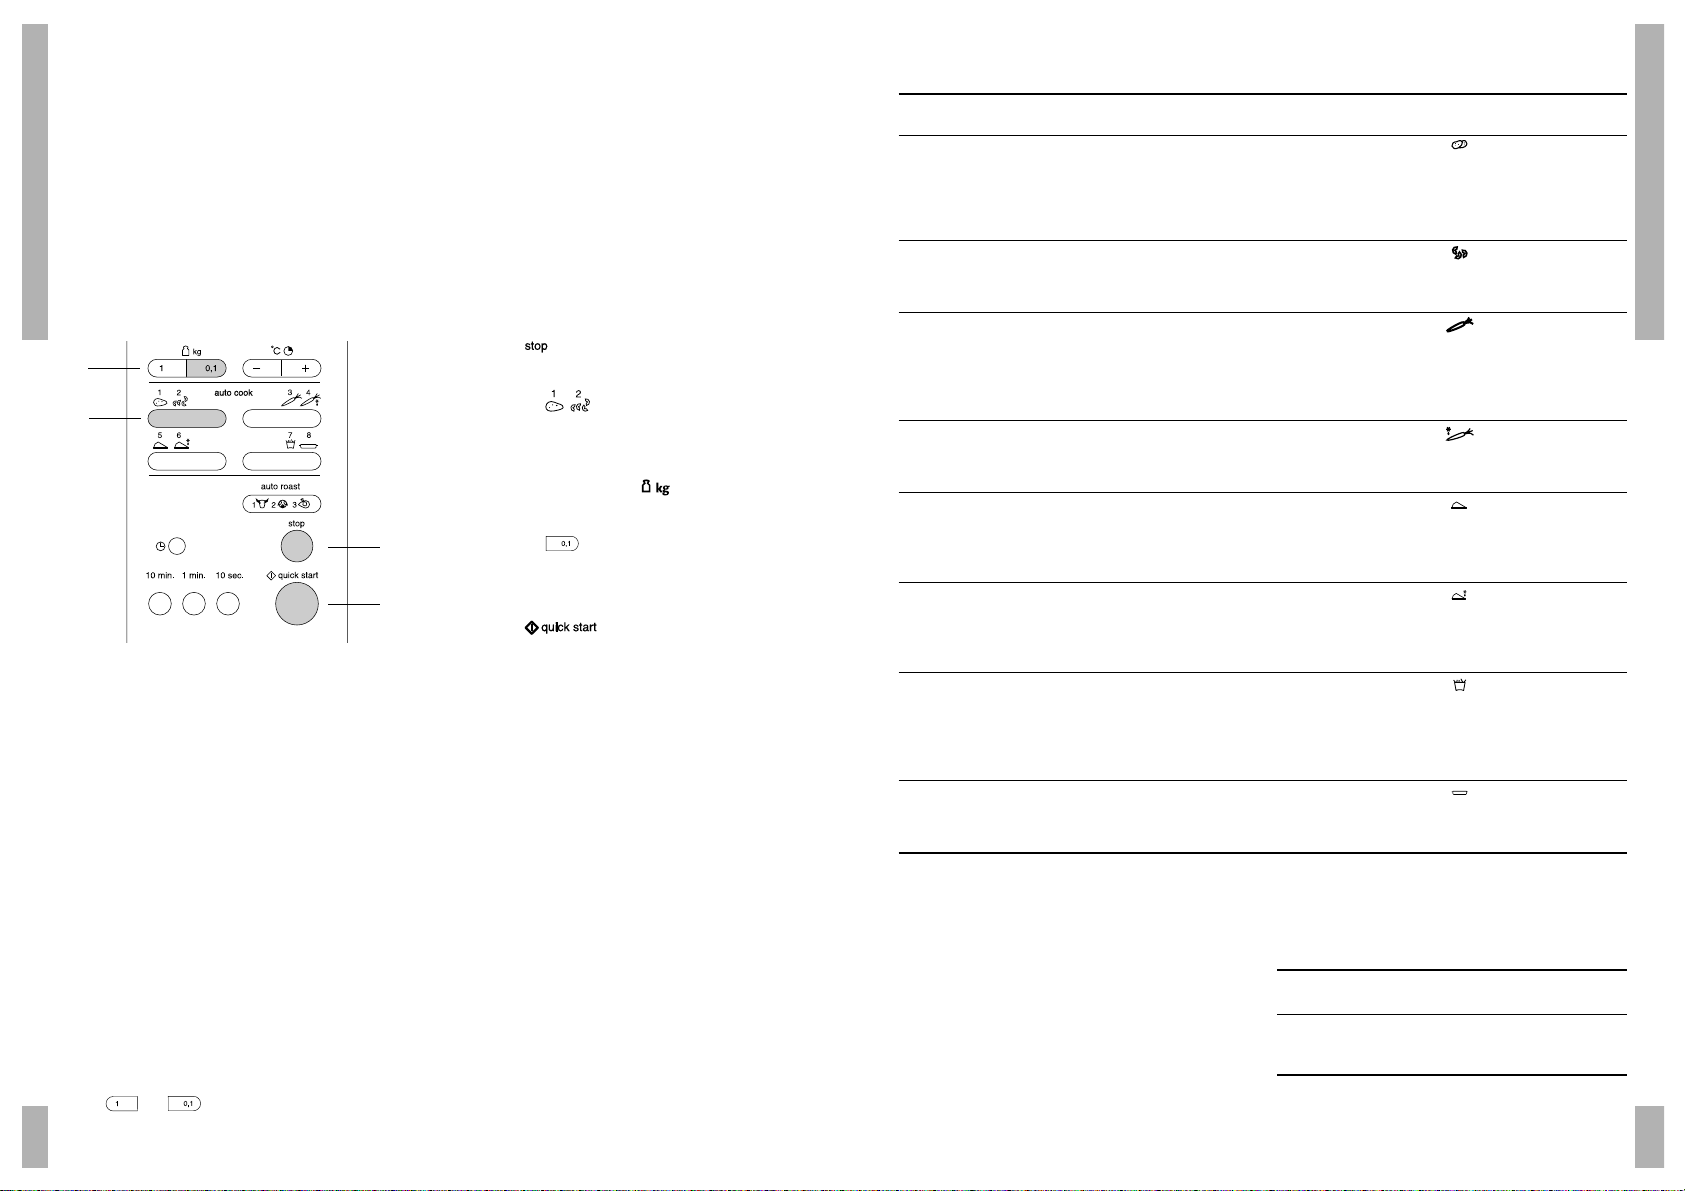
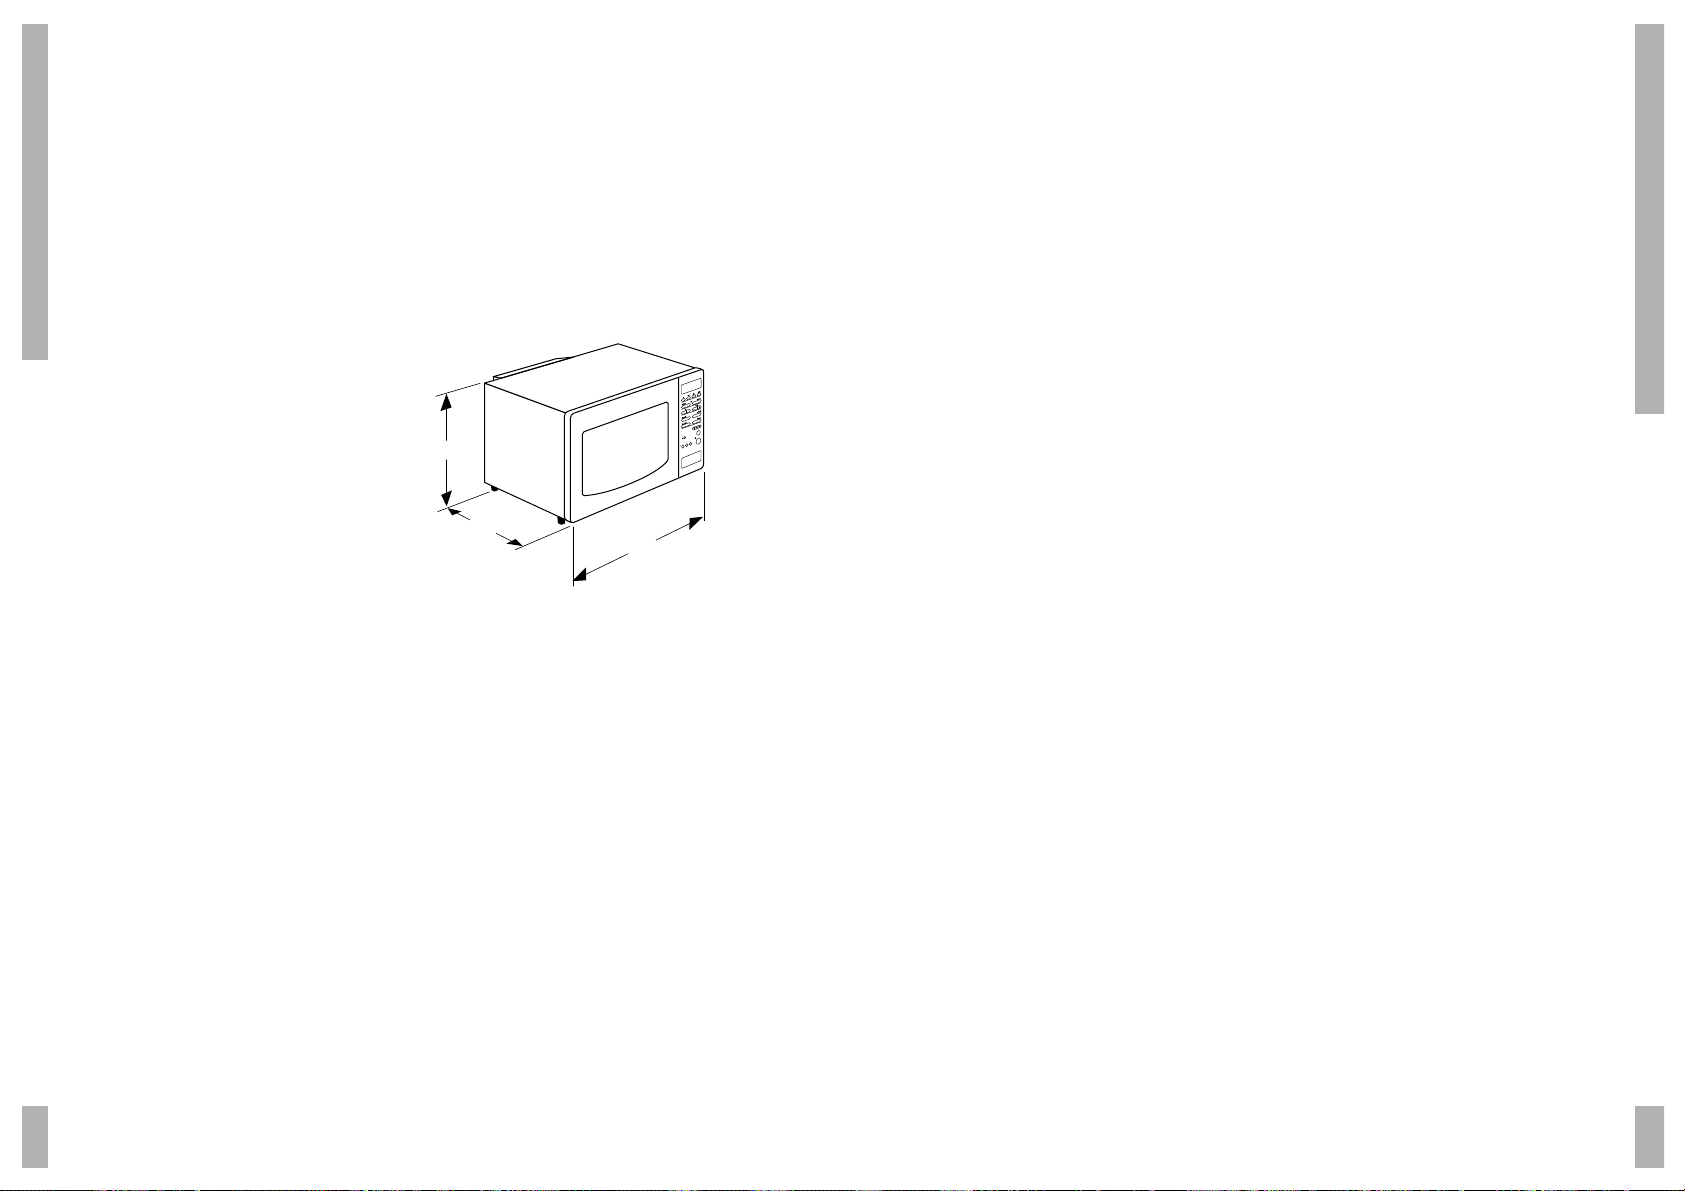
Accessoires et utilisation
1. grille pour position élevée : en cas de position
combinée et pour faire gratiner des plats plats.
2. grille pour position basse : en cas de position
combinée, de gril et de chaleur pulsée.
3. plaque de four en métal : bac collecteur
pendant la cuisson de la grillade ; plaque de
four sur la grille basse en cas de chaleur
pulsée.
6. plateau pivotant en verre : en cas de position
four à micro-ondes ; pour placer les grilles et la
plaque de four.
7. anneau conducteur : s'utilise toujours sous le
plateau pivotant.
Préambule
Ce mode d'emploi détient une information sur
l'installation, la sécurité, la commande et
l'entretien de votre appareil.
La lecture de cette information vous permettra
d'être rapidement informé sur les possibilités que
détient votre appareil.
Conservez ce manuel. Il pourrait être utile à un
prochain utilisateur.
Nous vous souhaitons beaucoup de plaisir en
utilisant cet appareil.
Ecran interactif
Cet appareil est équipé d'un écran interactif. Après
avoir choisi une fonction, l'écran vous énoncera
les opérations que vous devez suivre. Les symboles
des touches correspondant à ces opérations
s'allument.
Vous pouvez utiliser les touches dont le symbole
est affiché sur l'écran. Les autres touches ne
réagiront pas lorsque vous allez appuyer dessus. Il
est seulement possible d'utiliser la touche stop
().
Avec la touche stop, vous effacez tous les
programmes sélectionnés.
Table des matières
Sécurité . . . . . . . . . . . . . . . . . . . . . . . . . . . . . 2
Les points qui méritent votre attention . . . . 2
Emplacement . . . . . . . . . . . . . . . . . . . . . . . . . 2
Branchement . . . . . . . . . . . . . . . . . . . . . . . . . 3
Branchement electrique . . . . . . . . . . . . . . . . 3
Généralités . . . . . . . . . . . . . . . . . . . . . . . . . . . 3
Comment fonctionne
le four à micro-ondes . . . . . . . . . . . . . . . . . . . 3
Avant utilisation . . . . . . . . . . . . . . . . . . . . 4 - 5
Avant la première utilisation . . . . . . . . . . . . . 4
Les points qui méritent votre attention . . . . 4
Commande - généralités . . . . . . . . . . . . . . . . 6
Horloge . . . . . . . . . . . . . . . . . . . . . . . . . . . . . . 6
Commande - four à micro-ondes . . . . . 7 - 14
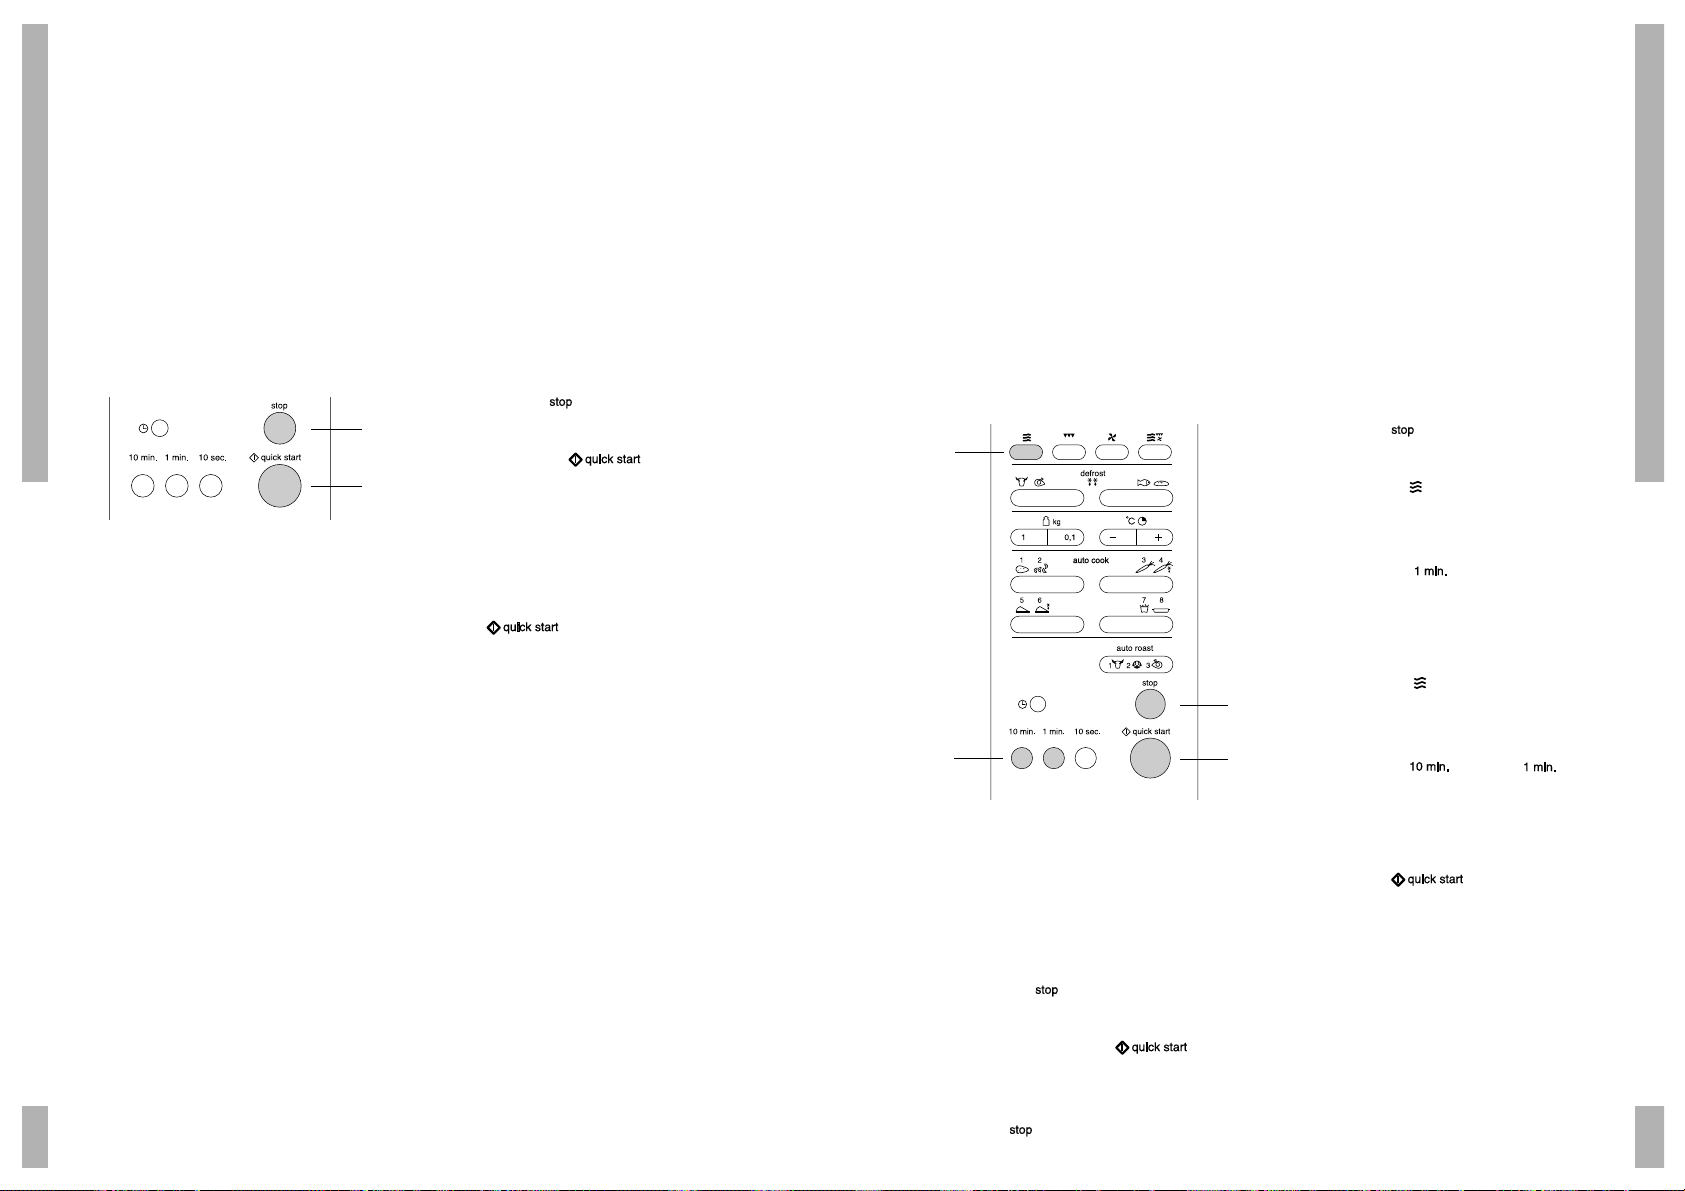
Cuisson . . . . . . . . . . . . . . . . . . . . . . . . . . . . . . 7
Démarrage rapide . . . . . . . . . . . . . . . . . . . . . 8
Cuire en 2 phases . . . . . . . . . . . . . . . . . . . . . . 9
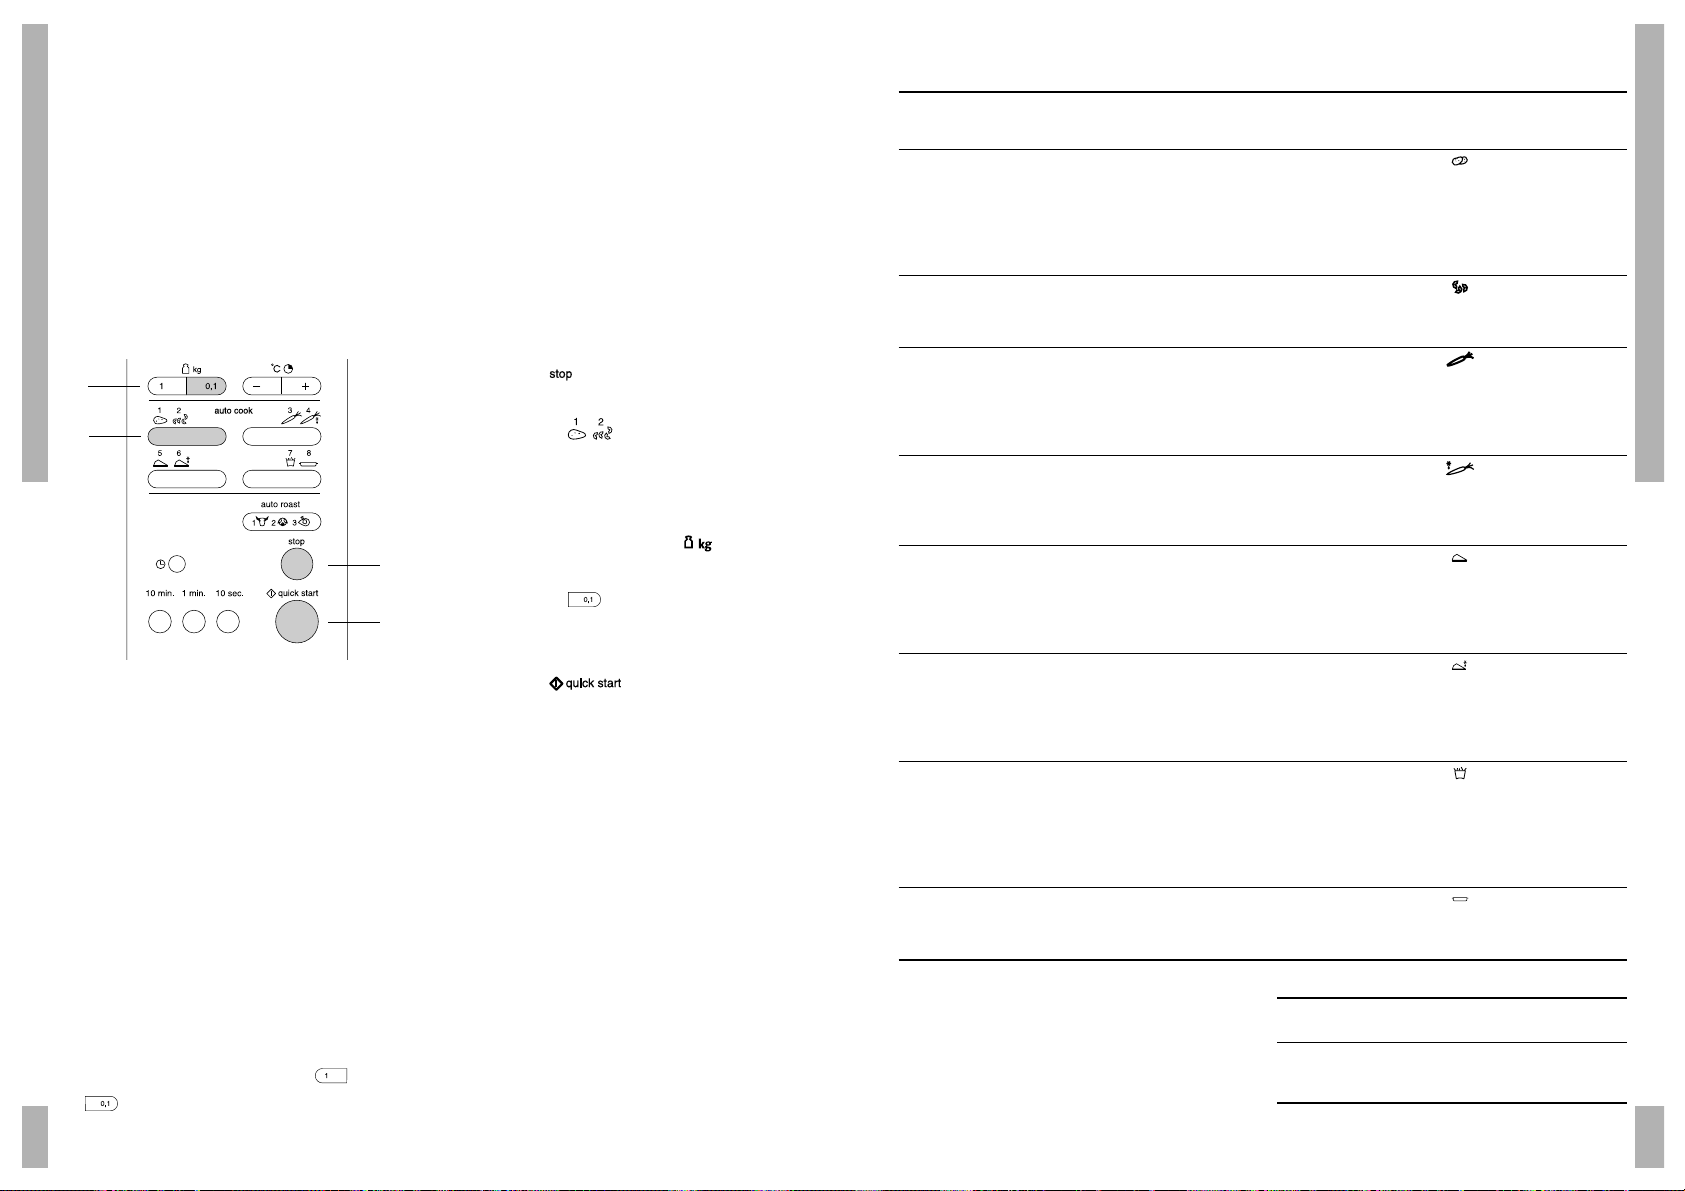
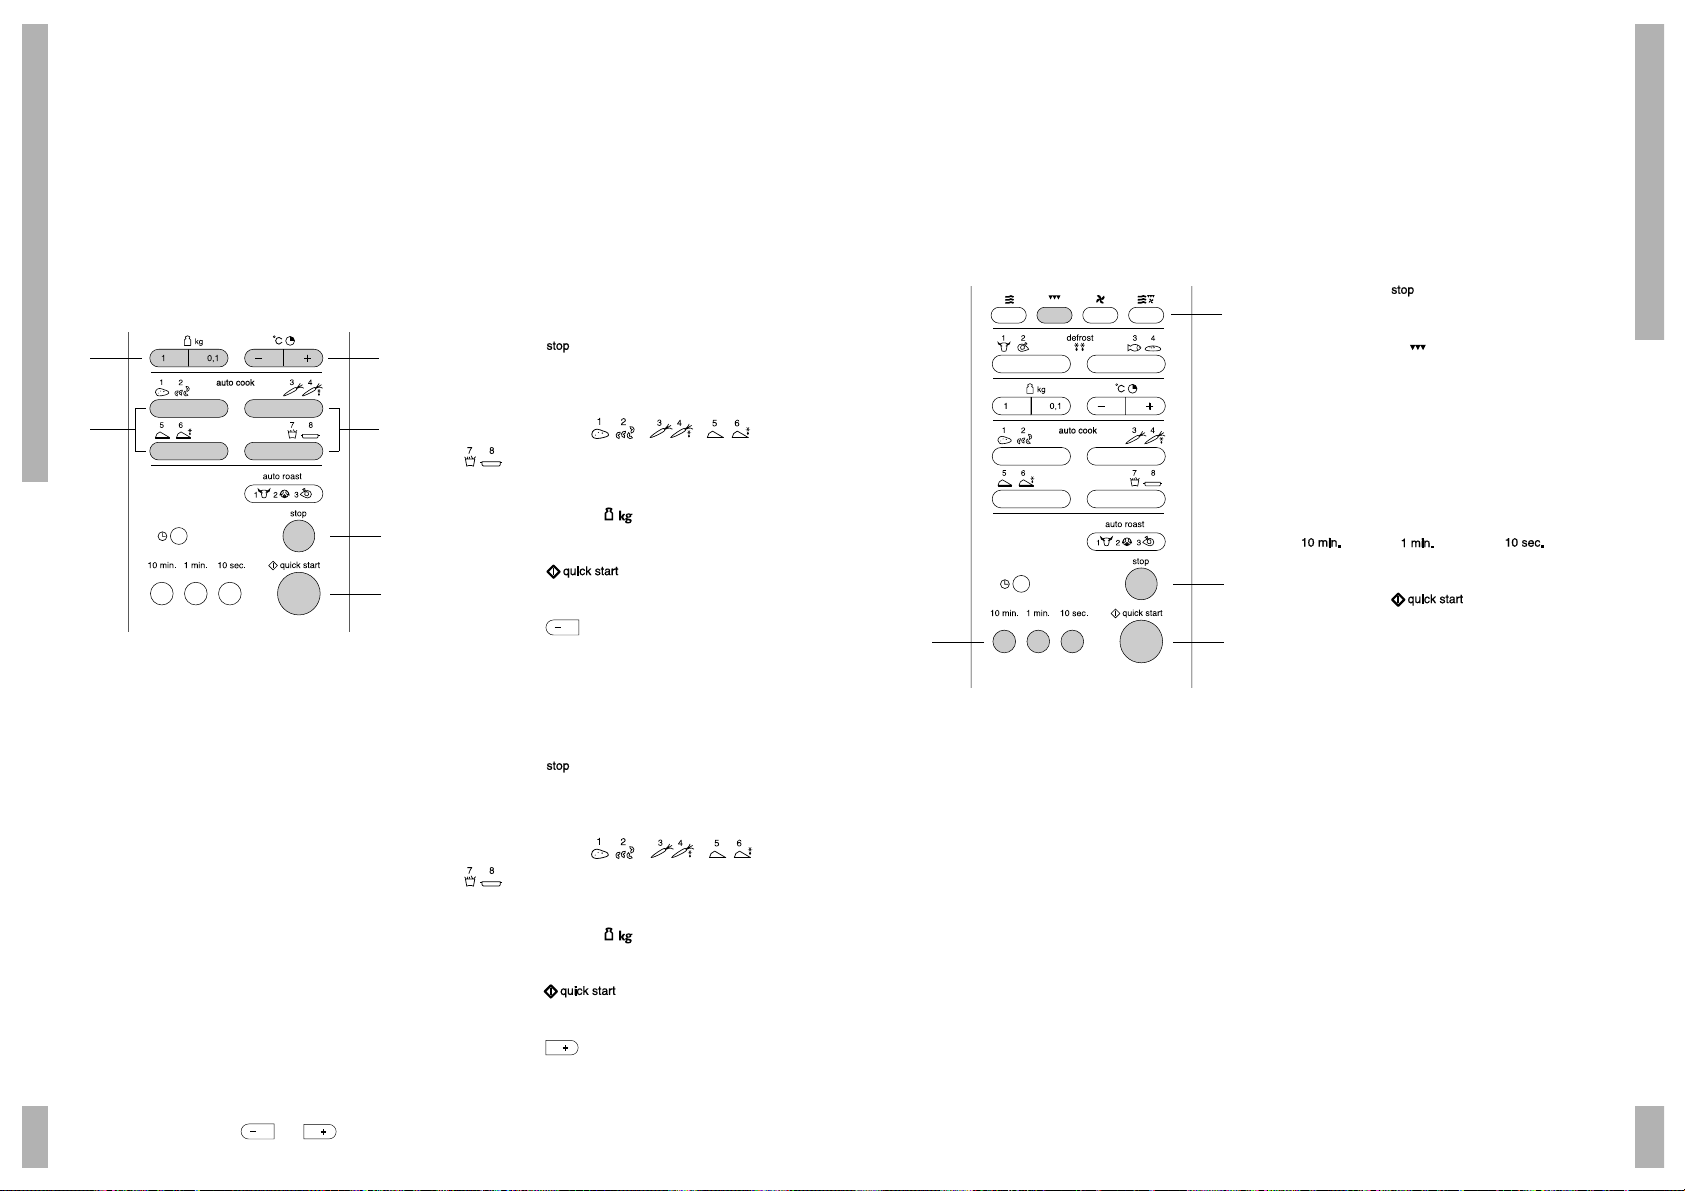
Cuisson automatique . . . . . . . . . . . . . . . . . . 10
Décongélation automatique . . . . . . . . . . . . 12
Touches "-" et "+" . . . . . . . . . . . . . . . . . . . . . . 14
Commande - gril . . . . . . . . . . . . . . . . . . . . . . 15
Position gril . . . . . . . . . . . . . . . . . . . . . . . . . . 15
Commande - chaleur pulsée . . . . . . . . 16 - 17
Cuisson au four . . . . . . . . . . . . . . . . . . . . . . . 16
Cuire avec préchauffage . . . . . . . . . . . . . . . 17
Commande - cuisson combinée . . . . . 18 - 21
Four à micro-ondes et gril . . . . . . . . . . . . . . 18
Programme automatique micro-ondes
et gril . . . . . . . . . . . . . . . . . . . . . . . . . . . . . . . 19
Micro-ondes et chaleur pulsée . . . . . . . . . 21
Commande - verouillage . . . . . . . . . . . . . . . 22
Sécurité enfants . . . . . . . . . . . . . . . . . . . . . . 22
Entretien . . . . . . . . . . . . . . . . . . . . . . . . . . . . 23
Conservez la beauté de votre appareil . . . 23
Anomalies . . . . . . . . . . . . . . . . . . . . . . . . . . . 23
Pannes . . . . . . . . . . . . . . . . . . . . . . . . . . . . . . 23
Emballage . . . . . . . . . . . . . . . . . . . . . . . . . . . 24
Que faire de l'emballage et de l'appareil . . 24
Données techniques . . . . . . . . . . . . . . . . . . 24
SÉCURITÉ / EMPLACEMENT
BRANCHEMENT / GÉNÉRALITÉS
FR 2
FR 3
Branchement électrique
Cet appareil exige un branchement sur le réseau
de 230 V, 50 Hz courant alternatif.
L'appareil doit toujours être mis à la terre et il ne
faut en aucun cas le brancher sur une alimentation
à courant continu.
Placez l'appareil à proximité d'une prise de terre
fixe.
Les points qui méritent votre
attention
Mettez l'appareil toujours hors tension avant
d'accomplir des réparations ou un nettoyage.
De préférence, débranchez l'appareil.
Cet appareil ne doit être utilisé que pour
répondre à l'objectif pour lequel il a été créé,
c'est-à-dire pour préparer des denrées. Toute
autre utilisation doit être considérée comme
impropre et dangereuse. Nous déclinons toute
responsabilité en cas de dommage provenant
d'une utilisation incorrecte, erronée ou
irrationnelle de l'appareil.
Les enfants ne voient pas le danger qui peut se
présenter lors de l'utilisation d'un appareil
électrique. Par conséquent, ne laissez pas
l'appareil entre les mains des enfants.
Votre four micro-ondes n'est sûr que si la porte
est bien fermée! Ne placez jamais un objet
entre la porte du four et le four. Veillez à une
propreté toujours correcte de la porte et du
joint.
N'utilisez pas le four micro-ondes en cas de
dommages à la porte (tordue), à l'armature, à la
fermeture (cassées ou détachées) ou au joint.
Utilisez le four micro-ondes seulement pour la
décongélation ou la cuisson de denrées
alimentaires et non, par exemple, pour sécher
des vêtements ou du papier. Ces derniers
risquent de prendre feu.
Arrêtez et débranchez l'appareil si un produit
prend feu dans l'enceinte. N'ouvrez pas la porte.
Emplacement
Mettez le four micro-ondes sur une surface
solide et plate.
Veillez à une aération suffisante autour du four
à micro-ondes. Observez un espace de 30 cm
en hauteur et de 10 cm à l'arrière et sur les
côtés.
Ne couvrez pas les volets d'aération.
Les pieds de réglage ne doivent pas être
enlevés.
Ne mettez pas le four micro-ondes à proximité
de sources de chaleur.
Des émetteurs ou des récepteurs tels que
radios et téléviseurs peuvent influencer le
fonctionnement du four micro-ondes.
L'appareil peut être encastré.
322
530
500
10 min. 1 min. 1 min. 10 sec. 10 sec.
stop
quicquick start
kg
1234
defrost
auto cookauto cook
10 min. 1 min. 10 sec.
stop
quick start
123
1
10,1
23
4
1234
kg
5678
auto cook
auto roast
defrost
Comment fonctionne le four à
micro-ondes
Un four à micro-ondes est un appareil de cuisson
qui chauffe l'aliment par le truchement de micro-
ondes.
Les micro-ondes sont des ondes
électromagnétiques, tout comme les ondes
radiophoniques et télévisées. Une radio transforme
ces ondes en son. Dans un four à micro-ondes, ces
ondes sont converties en chaleur.
La chaleur se déploie en raison du mouvement
oscillatoire que les micro-ondes font subir aux
molécules de graisse et d'eau qui se trouvent
toujours dans les aliments. Les molécules sont
donc amenées à se frotter les unes contre les
autres. Et c'est ce frottement qui produit de la
chaleur (frottez, par exemple, rapidement vos
mains l'une contre l'autre).
Le four à micro-ondes réchauffe l'aliment d'une
manière très intensive du fait que les ondes
s'introduisent directement dans l'aliment.
Les ondes ne réchauffent donc pas seulement
l'extérieur du produit, comme c'est le cas dans la
cuisine traditionnelle, mais s'infiltre à l'intérieur.
Par rapport à la méthode conventionnelle de
cuisson, le temps de préparation est beaucoup plus
court en cas de petites quantités.
AVANT ULTILISATION
AVANT UTILISATION
FR 4
FR 5
n'ouvrez pas la porte. Arrêtez le fonctionnement du
four et débranchez-le.
Les points qui méritent votre
attention
Le four micro-ondes n'est pas approprié pour :
– Faire des conserves.
– Cuire des oeufs dans leur coquille, ils volent
en éclats en raison de l'élévation de pression.
– Chauffer de l'huile pour friteuse.
Débarrassez les sacs en plastique de leur
fermeture en métal. Utilisez des plats et des
assiettes qui sont appropriés pour le four
micro-ondes.
Vous ne pouvez réchauffer des liquides dans
des emballages hermétiques qu'après avoir fait
des petits trous dans l'emballage. Ceci en
rapport avec la prise de pression pendant la
chauffe.
Ne cuisez pas plus qu'il n'est nécessaire, tenez
compte de l'après cuisson.
Utilisez une très petite quantité d'eau pour la
cuisson des aliments et n'abusez pas du sel.
Mélangez ou retournez les aliments à mi-temps
de la cuisson.
En utilisant une fourchette ou autre objet
pointu, piquez un petit peu le morceau de
viande, de poulet ou de poisson pour éviter tout
risque d'éclatement.
Avant la première utilisation
Ouvrez la porte. Enlevez l'emballage.
Nettoyez l'enceinte du four et les accessoires
avec un chiffon humide. N'utilisez pas d'abrasif
ou de produits d'entretien dégageant une forte
odeur.
Placez l'anneau de guidage au centre de
l'enceinte du four. Mettez le plateau pivotant
sur l'anneau de guidage.
Le four micro-ondes ne doit pas être utilisé sans
l'anneau de guidage et le plateau pivotant.
N'enclenchez pas le four micro-ondes à vide.
Vous risquez d'endommager le four.
Testez le four à micro-ondes pour savoir s'il
fonctionne correctement. Placez un verre d'eau
dans l'enceinte du four. Enclenchez le four sur
la position la plus élevée pour qu'il fonctionne
une minute (voir page 9, cuisson). A terme, l'eau
doit être chaude.
Attention :
Si vous souhaitez faire bouillir un liquide (par
exemple, de l'eau), mettez une petite cuiller
synthétique dans la tasse. Le liquide peut bouillir
sans que vous puissiez voir une formation de
bulles. A sa sortie du four, le liquide peut
brusquement se mettre à bouillir et gicler, risquant
ainsi de vous brûler.
Si vous devez réchauffer dans le four à micro-
ondes des petites quantités de poudre (séchage
des herbes), sachez que ces produits risquent de
s'enflammer. En cas d'incendie dans le four,
Lors de l'utilisation du four à micro-ondes,
adoptez la règle de conduite suivante : si vous
doublez la quantité, doublez le temps de
cuisson.
Si vous couvrez les plats, les éclaboussures
seront évitées, le temps de cuisson sera plus
rapide, le degré d'humidité sera préservé.
Si le four micro-ondes est en fonction, vous
pouvez ouvrir la porte. L'appareil s'arrête
automatiquement et le temps programmé est
mis à l'arrêt.
Certains matériaux ne sont pas admis dans le
four à micro-ondes. Le tableau ci-dessous
indique quels sont les matériaux que vous
pouvez utiliser ou non.
Matériaux Micro-ondes Chaleur pulsée Combi Gril
papier oui non non non
alu pour couvrir* oui pour couvrir* oui
film étirable oui non non non
bacs en alu non oui non oui
service congélateur/ micro-ondes oui non non non
plastique thermorésistant oui non non non
poterie brute non oui non oui
ustensiles de cuisine en métal non oui non oui
verre normal oui non non non
Pyrex, autre plat à four et céramique oui oui oui oui
assiettes avec bord décoratif en métal non ** non **
bande de fermeture en métal non oui non -
thermomètre non oui non oui
pot fermé non - - -
bouteille à goulet étroit non - - -
sacs de cuisson oui oui oui non
* Si vous couvrez les parties plus petites des produits (pattes de poulet), leur cuisson sera moins rapide.
** En cas de doute, consultez les recommandations du fabricant sur l'emballage des ustensiles de cuisine.
COMMANDE - GÉNÉRALITÉS
COMMANDE - FOUR À MICRO-ONDES
FR 6
FR 7
Vous pouvez choisir entre 5 puissances. Pour
actionner la fonction puissance, appuyez sur .
De cette manière, la puissance maximale est ainsi
programmée. Vous pouvez ensuite programmer la
puissance souhaitée en appuyant à plusieurs
reprises sur .
Exemple :
Vous souhaitez faire cuire du poisson à une
puissance moyenne (60%) pendant 5 minutes et
30 secondes.
1. Appuyez sur .
2. Appuyez sur pour sélectionner la fonction
four à micro-ondes.
3. Appuyez 2x sur pour programmer la
puissance moyenne (60%).
4. Appuyez 5x sur et 3 x sur pour
programmer un temps de cuisson de 5 minutes
et 30 secondes.
5. Appuyez sur .
Le four à micro-ondes est enclenché.
Cuisson
Puissances Appuyez sur
Forte (100%) 850 W 1x
Moyennement forte (80%) 680 W 2x
Moyenne (60%) 510 W 3x
Décongélation (40%) 340 W 4x
Décongélation sensible (20%) 170 W 5x
Forte (100%) 850 W 6x
L'horloge fonctionnera tant que l'horloge sera
branchée sur le réseau. Si l'heure n'est pas
programmée, l'écran affichera "O".
Vous pouvez programmer l'horloge sur une
programmation de 12 heures ou de 24 heures.
Pendant la programmation de l'horloge, les deux
points se mettront à clignoter. Les deux points
s'arrêteront de clignoter lorsque l'horloge sera
programmée.
Exemple :
Vous voulez que l'horloge soit réglée sur
13:25 heures.
Programmation de l'horloge
1. Appuyez sur .
2. Appuyez sur .
L'écran affichera "24 H".
Appuyez de nouveau sur si vous souhaitez
avoir la programmation 12 heures.
3. Réglez l'heure en utilisant la touche
Appuyez 13x sur la touche ou maintenez
la pression sur la touche jusqu'à ce que
le chiffre "13" apparaisse à l'écran.
Réglez les minutes en utilisant les touches
et . Maintenez la pression sur la
touche jusqu'à ce que "2" s'affiche sur
l'écran. Maintenez ensuite la pression sur la
touche jusqu'à ce que "5" s'affiche sur
l'écran.
4. Appuyez de nouveau sur .
L'horloge va entrer en fonction.
Horloge
Remarque
Débranchez l'appareil si l'écran affiche d'étranges
symboles.
Si après avoir programmé l'horloge, vous souhaitez
changer le comptage de 12 heures par un
comptage de 24 heures, commencez par
débrancher l'appareil. Branchez-le de nouveau,
puis programmez l'horloge.
12 3
4
1
2 / 4
3
1 2 3 4
1
2
34
COMMANDE - FOUR À MICRO-ONDES
FR 8
FR 9
Pendant le programme de cuisson à 2 phases, la
porte du four peut rester ouverte pour contrôler le
plat. Après avoir fermé la porte et avoir appuyé sur
start, l'appareil va poursuivre son programme de
cuisson.
Exemple :
Vous souhaitez cuire pendant 5 minutes à une forte
puissance (1ère phase) et ensuite 13 minutes à
une puissance moyennement basse (40%) (2ème
phase).
1ère phase :
1. Appuyez sur .
2. Appuyez 1x sur pour sélectionner la fonction
micro-ondes.
Appuyez 5x sur pour programmer un
temps de cuisson de 5 minutes.
2ème phase :
3. Appuyez 4x sur pour programmer une
puissance micro-ondes de 40%.
Appuyez 1x sur et 3x sur pour
programmer un temps de cuisson de
13 minutes.
4. Appuyez sur .
Le four à micro-ondes est enclenché. L'écran
affiche les réglages pour la phase 1 jusqu'à ce que
le programme 2 commence.
Vous devez entendre deux bips entre les deux
phases.
Cuire en 2 phases
Remarque
Vous pouvez interrompre le programme de cuisson
en appuyant 1x sur .
Fermez la porte et appuyez sur pour
que le programme se poursuive.
Appuyez 2x sur pour effacer le programme.
En effectuant une simple pression sur la touche
rapide, vous pouvez cuire en 30 secondes à une
puissance maximale. En appuyant à plusieurs
reprises sur la touche, vous pouvez prolonger la
cuisson par étapes de 30 secondes.
Vous pouvez programmer un temps de cuisson de
10 minutes au maximum.
Exemple :
Vous souhaitez cuire un mets pendant 2 minutes
en utilisant une forte puissance.
1. Appuyez sur .
2. Appuyez 4x sur pour programmer
un temps de préparation de 2 minutes sur une
forte puissance.
3. Entre-temps, vous pouvez programmer le temps
de cuisson en appuyant une ou plusieurs fois
sur .
Le four à micro-ondes est enclenché.
Démarrage rapide
12 3
4
1
2
1 2 3 4
1
2 / 3
2 / 3 4
COMMANDE - FOUR À MICRO-ONDES
R 10
R 11
* Mélangez bien le riz lorsque le programme est
terminé. Couvrez. Laissez reposer 5-10 minutes.
Lorsque le programme est terminé, rincez
correctement les pâtes à l'eau froide.
** Rapport riz/pâtes et eau :
quantité eau eau
(riz / pâtes) riz pâtes
1/2 tasse (100 g / 50 g) 240 ml 360 ml
1 tasse (200 g / 100 g) 480 ml 600 ml
1 1/2 tasse (300 g / 150 g) 720 ml 840 ml
(240 ml = 1 tasse d'eau)
Programme Accessoires Mode de préparation Nombre de fois qu'il Poids
faut appuyer sur min./max.
la touche
1. pommes de terre en plat (four) Lavez et nettoyez les pommes de terre. 1x 0,2 / 1,0 kg
robe des champs (en verre Mettez-les dans le plat allant au four.
(20 °C) + A l'aide d'une fourchette, piquez les
essuie-tout pommes de terre à plusieurs endroits. Dès
que le programme est terminé, laissez reposer
5 minutes les pommes de terre. Couvrez-les
avec de l'alu.
2. riz/pâtes plat (four) Mettez du riz ou des pâtes* dans un plat allant 2x 0,1 / 0,3 kg
(20 °C) en verre au four. Ajoutez de l'eau** et 1/4 – 1 cuillère à
profond thé de sel. Couvrez le plat d'un couvercle ou
d'un film pour four à micro-ondes.
3. légumes frais / plat (four) Déposez les légumes ou les pommes de terre 1x 0,2 / 0,8 kg
pommes de terre en verre dans un plat allant au four. Ajoutez 30 cc
épluchés d'eau par 0,2 kg. Couvrez le plat d'un
(20 °C) couvercle ou d'un film à micro-ondes. Dès que
le programme est terminé, égouttez le contenu.
Couvrez. Laissez reposer 2-3 minutes.
4. légumes congelés plat (four) Mettez les légumes dans un plat allant au four. 2x 0,2 / 0,8 kg
(-10 °C) en verre Couvrez le plat d'un couvercle ou d'un film à
micro-ondes. Lorsque le programme est terminé,
attendez 2-3 minutesavant d'enlever le film qui se
trouve sur le plat.
5. pizza froide plateau Posez la pizza sur la grille supérieure. Placez la 1x 0,2 / 0,4 kg
(5 °C) tournant en plaque de cuisson métallique, surmontée de la
verre + plaque grille, sur le plateau tournant en verre. Une fois
de cuisson réchauffée, retirez immédiatement la pizza du four
metallique + et laissez-la reposer 2 à 3 minutes.
grille supérieure
6. pizza congelée plateau Posez la pizza sur la grille supérieure. Placez la 2x 0,1 / 0,5 kg
(-10 °C) tournant en plaque de cuisson métallique, surmontée de la
verre + plaque grille, sur le plateau tournant en verre. A la fin
de cuisson du programme, retirez immédiatement la pizza du
metallique + four et laissez-la reposer 2 à 3 minutes.
grille supérieure
7. pommes frites plateau Répartissez les pommes frites sur la plaque 1x 0,2 / 0,4 kg
(-10 °C) tournant en métallique placée sur la grille supérieure.
verre + plaque Après le signal sonore, retournez les frites.
de cuisson Veillez à ce qu'elles ne se chevauchent pas.
metallique + A la fin du programme, laissez les frites
grille reposer 1 à 2 minutes.
supérieure
8. gratin plateau Utilisez cette position pour les gratins maison. 2x 0,5 / 1,2 kg
(20 °C) tournant en A la fin du programme, laissez reposer le plat
verre + grille non couvert 1 à 3 minutes.
inférieure
La cuisson automatique (auto cook) vous
offre la possibilité de préparer simplement
vos plats préférés. Vous avez le choix entre
4 programmes de cuisson. Il vous suffit de
sélectionner le type de plat et le poids. Le
four à micro-ondes fera le reste.
Exemple :
Vous souhaitez préparer 0,6 kg de pommes de
terre.
1. Appuyez sur .
2. Appuyez 1x sur pour sélectionner le
programme de cuisson pour les pommes de
terre en robe des champs.
3. Programmez le poids à l'aide de .
Appuyez 6x sur pour programmer un
poids de 600 grammes.
4. Appuyez sur .
La durée de programmation s'affiche sur l'écran.
Le four à micro-ondes est actionné.
Le tableau qui se trouve à la page suivante vous
indiquera les programmes de cuisson que vous
pourrez choisir. Vous pourrez aussi y lire comment
sélectionner ces programmes et savoir à quels
produits ceux-ci correspondent.
Cuisson automatique
Remarque
Si vous maintenez votre pression sur ou
sur le calcul du poids se fera très
rapidement à l'écran.
Tableau de cuisson : cuisson automatique
12 3
4
1
2
3
4
COMMANDE - FOUR À MICRO-ONDES
R 12
R 13
Tableau de décongélation
Conseils
Vous obtiendrez un très bon résultat si vous
commencez par enlever l'emballage qui
recouvre la viande et le poisson.
Les emballages peuvent influencer
négativement le processus de décongélation.
Une production de vapeur peut se présenter
en raison de l'eau contenue dans le poisson
ou la viande. En raison de cela, il se peut que
la partie externe de l'aliment subisse
involontairement une cuisson.
S'il est difficile d'enlever l'emballage, vous
pouvez faire décongeler le produit pendant
un quart du temps de décongélation qui est
indiqué au commencement du programme de
décongélation sur l'écran. Enlevez le produit
du four à micro-ondes, éliminez l'emballage,
remettez ensuite le produit.
Déposez le produit dans un plat en verre
allant au four pouvant recueillir l'eau qui se
libère éventuellement.
Le centre du produit doit être encore quelque
peu congelé lorsque vous le sortez du four à
micro-ondes.
Déposez les tranches de pain entre des
feuilles d'essuie-tout. Coupez d'abord le pain
en deux.
programmes type de nombre de fois qu'il poids
produits faut appuyer sur min./max.
la touche
1. viande boeuf: viande hachée, morceaux de viande, tranches, roulade 1x 0,1 / 4,0 kg
porc: viande hachée, morceaux de viande, tranches, roulade
veau: viande hachée, morceaux de viande, tranches, roulade
2. volaille poulet: poulet entier (< 2kg), blanc de poulet, cuisses de poulet 2x 0,1 / 4,0 kg
dinde: blanc de dinde (< 2 kg), cuisses de dinde
3. poisson poisson: filets, tranches, poisson entier 1x 0,1 / 4,0 kg
crustacés: crabe, homard, crevettes, moules
4. pain pain blanc/bis en tranche, petits pains, 2x 0,1 / 0,5 kg
baguette, croissants
Pour décongeler l'aliment congelé, vous pouvez
utiliser 4 programmes de décongélation (auto
defrost). Il vous suffit pour cela de programmer le
poids de l'aliment à décongeler.
Exemple :
Vous voulez décongeler un poulet de 1,4 kg.
1. Appuyez sur .
2. Appuyez 2x sur pour sélectionner le
programme de décongélation pour les volailles.
3. Programmez le poids avec .
Appuyez 1x sur et 4x sur pour
pouvoir programmer un poids de
1400 grammes.
4. Appuyez sur .
Le four à micro-ondes est enclenché.
Le tableau qui se trouve à la page suivante vous
indiquera les programmes de décongélation que
vous pourrez choisir. Vous pourrez aussi y lire
comment sélectionner ces programmes et savoir à
quels produits ceux-ci correspondent.
Décongélation automatique
Remarque
A mi-chemin du temps de décongélation, un signal
sonore se fera entendre. Vous pouvez maintenant
retourner le produit. Retirez les éléments qui sont
déjà décongelés. Appuyez sur pour
que l'opération se poursuive.
1 2 3 4
1
2
3
4
COMMANDE - FOUR À MICRO-ONDES
COMMANDE - GRIL
R 14
R 15
Cet appareil est équipé d'un gril quartz. Il est donc
inutile de préchauffer. Les aliments seront vite
dorés et croustillants.
Exemple :
Vous souhaitez utiliser le gril 12 minutes et
30 secondes.
1. Appuyez sur .
2. Appuyez 1x sur pour sélectionner la
fonction gril.
3. Programmez le temps pour le gril.
Pour programmer un temps pour le gril de
12 minutes et de 30 secondes, appuyez 1x sur
, 2x sur et 3x sur .
4. Appuyez sur .
Le gril est enclenché.
Position gril
Remarques
Il est inutile de préchauffer le four.
Utilisez la grille (élevée) pour obtenir les meilleurs
résultats.
Placez la grille sur le plateau pivotant en verre (voir
aussi "description et utilisation des accessoires").
Les programmes de cuisson automatiques et les
programmes gril (auto roast) fonctionnent avec un
temps de préparation programmé fixe. Il vous est
possible de prolonger ou de réduire ce temps
pendant le programme en utilisant les touches “-”
ou“+”. Si vous programmez la cuisson manuelle-
ment (voir page 7), vous pouvez programmer ces
touches en réglant le temps de préparation.
Un temps de cuisson plus court :
1. Appuyez sur .
2. Sélectionnez un programme de cuisson
automatique, avec , , ou
.
3. Réglez le poids avec .
4. Appuyez sur .
5. Appuyez sur .
A chaque fois que vous appuyez sur la touche, le
temps de cuisson sera réduit de 10 secondes.
Un temps de cuisson plus long :
1. Appuyez sur .
2. Sélectionnez un programme de cuisson
automatique, avec , , ou
.
3. Réglez le poids avec .
4. Appuyez sur .
5. Appuyez sur .
A chaque fois que vous appuyez sur la touche, le
temps de cuisson sera prolongé de 10 secondes.
Touches "-" et "+"
Remarque
Si en cas de cuisson combinée ou d'utilisation des
programmes de cuisson automatiques, le produit
devait rester plus longtemps ou moins longtemps
dans le four, réglez le temps de cuisson selon vos
souhaits avec les touches et .
1
2
35
2
4
1
34
2
COMMANDE - CHALEUR PULSÉE
R 16
R 17
En cas de four à chaleur pulsée, vous pouvez
préchauffer automatiquement et cuire ensuite.
Exemple :
Préchauffez d'abord le four. Faites cuire ensuite
votre plat pendant 50 minutes à une température
de 220 °C.
Préchauffer
1. Appuyez sur .
2. Appuyez 1x sur pour sélectionner la
fonction chaleur pulsée.
3. Appuyez 2x sur pour programmer une
température de 200 °C.
4. Appuyez sur .
Le four commence le préchauffage.
L'écran affiche la mention "Pr-H".
Après préchauffage, vous devez entendre un bip.
Le four a atteint la température voulue.
Cuire
Mettez le plat dans le four.
5. Appuyez 5x sur pour programmer un
temps de cuisson de 50 minutes.
6. Appuyez sur .
Le four à chaleur pulsée est enclenché.
1

Hulp nodig? Stel uw vraag in het forum

Spelregels
1

Forum

Pelgrim-555
  • mijn dochter heeft een huis gekocht met pelgrim inductie stroom maar wij kunnen hem niet aan zetten moet je die knoppen in drukken of zo iets ik vraag jullie omraad gr mevr van loon Gesteld op 12-1-2023 om 13:03

    Reageer op deze vraag Misbruik melden

Misbruik melden

Gebruikershandleiding.com neemt misbruik van zijn services uitermate serieus. U kunt hieronder aangeven waarom deze vraag ongepast is. Wij controleren de vraag en zonodig wordt deze verwijderd.

Product:

Bijvoorbeeld antisemitische inhoud, racistische inhoud, of materiaal dat gewelddadige fysieke handelingen tot gevolg kan hebben.

Bijvoorbeeld een creditcardnummer, een persoonlijk identificatienummer, of een geheim adres. E-mailadressen en volledige namen worden niet als privégegevens beschouwd.

Spelregels forum

Om tot zinvolle vragen te komen hanteren wij de volgende spelregels:

Belangrijk! Als er een antwoord wordt gegeven op uw vraag, dan is het voor de gever van het antwoord nuttig om te weten als u er wel (of niet) mee geholpen bent! Wij vragen u dus ook te reageren op een antwoord.

Belangrijk! Antwoorden worden ook per e-mail naar abonnees gestuurd. Laat uw emailadres achter op deze site, zodat u op de hoogte blijft. U krijgt dan ook andere vragen en antwoorden te zien.

Abonneren

Abonneer u voor het ontvangen van emails voor uw Pelgrim 555 bij:


U ontvangt een email met instructies om u voor één of beide opties in te schrijven.


Ontvang uw handleiding per email

Vul uw emailadres in en ontvang de handleiding van Pelgrim 555 in de taal/talen: Duits als bijlage per email.

De handleiding is 1.29 mb groot.


U ontvangt de handleiding per email binnen enkele minuten. Als u geen email heeft ontvangen, dan heeft u waarschijnlijk een verkeerd emailadres ingevuld of is uw mailbox te vol. Daarnaast kan het zijn dat uw internetprovider een maximum heeft aan de grootte per email. Omdat hier een handleiding wordt meegestuurd, kan het voorkomen dat de email groter is dan toegestaan bij uw provider.

Stel vragen via chat aan uw handleiding

Stel uw vraag over deze PDF

Uw handleiding is per email verstuurd. Controleer uw email

Als u niet binnen een kwartier uw email met handleiding ontvangen heeft, kan het zijn dat u een verkeerd emailadres heeft ingevuld of dat uw emailprovider een maximum grootte per email heeft ingesteld die kleiner is dan de grootte van de handleiding.

Er is een email naar u verstuurd om uw inschrijving definitief te maken.

Controleer uw email en volg de aanwijzingen op om uw inschrijving definitief te maken

U heeft geen emailadres opgegeven

Als u de handleiding per email wilt ontvangen, vul dan een geldig emailadres in.

Uw vraag is op deze pagina toegevoegd

Wilt u een email ontvangen bij een antwoord en/of nieuwe vragen? Vul dan hier uw emailadres in.


Info