… / Cleaning and Care / Information about warranty and service processing… / Before use / Start-up / After initial use / Changing spare parts / Maintenance
Ensure not to exceed the maximum pressure
specified on the machine.
Never carry pneumatic tools by the hose.
Before use
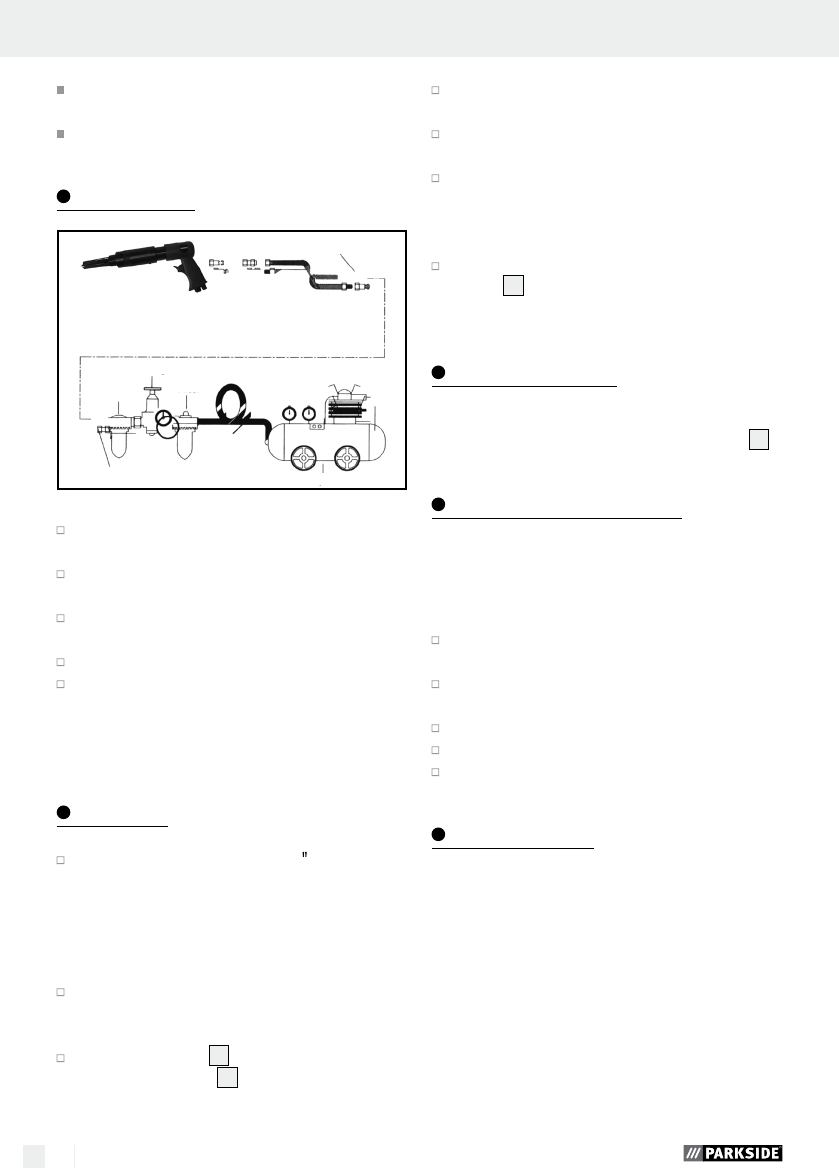
Quick-release socket
Compressed air hose
Quick-release socket
Pressure regulator
Oils
Filter
Quick-opening sleeve
Compressor
ATTENTION! Never start up the air tool with-
out oiling it.
Verify the compressor is positioned on solid
ground.
Check if all hose connections are connected
and secured correctly.
Connect the tool with the air hose.
If no function is detected after switching on de-
spite reaching the maximum pressure, switch the
device back off. Immediately contact the ser-
vice hotline.
Start-up
Screw a threaded plug fitting ¼ (6.35 mm)
into the air tool.
Note: We recommend using Teflon tape to
achieve maximum leak-tightness. Otherwise the
equipment may potentially be unable to produce
its full capacity.
To connect the device to the air hose, never point
the front end (needle head) of the tool at your-
self or others.
Pulling the trigger
6
will start the device.
Release the trigger
6
to stop the device.
Use the needle scaler to remove rust, paint,
lacquier and similar items (see Fig. A).
Never use excess force to push the equipment
onto the tool, as this may cause damage.
Applying the equipment at a slight angle and
sliding it across the surface to be cleaned with
a little pressure across the area to be cleaned
for optimal results.
Regulate the air pressure using the air adjusting
screw
4
(next to the air inlet at the bottom of
the device) for optimal results.
After initial use
Once the task has been finished the equipment must
be disconnect from the compressed air supply
5
.
Changing spare parts
The head of the needle scaler must be replaced if
it shows damage or is severely worn. Proceed as
follows:
Using the included hexagon socket screw, loosen
the 4 screws for the head (see Fig. B).
Unscrew the old head using minimal force (see
Fig. C).
Properly dispose of the old head.
Screw in the new head hand tight (see Fig. F).
tighten the 4 screws on the head (see Fig. G).
Maintenance
Following the maintenance information specified
here will ensure a long service life for the product
Gebruikershandleiding.com neemt misbruik van zijn services uitermate serieus. U kunt hieronder aangeven waarom deze vraag ongepast is. Wij controleren de vraag en zonodig wordt deze verwijderd.
Product:
Spelregels forum
Om tot zinvolle vragen te komen hanteren wij de volgende spelregels:
lees eerst de handleiding door;
controleer of uw vraag al eerder door iemand anders is gesteld;
probeer uw vraag zo duidelijk mogelijk te stellen;
heeft u een probleem en al geprobeerd om dit op te lossen, vermeld dit erbij aub;
heeft u een oplossing gekregen van een bezoeker dan horen wij dat graag in dit forum;
wilt u een reactie geven op een vraag of antwoord, gebruik dan niet dit formulier maar klik op de knop 'reageer op deze vraag';
uw vraag wordt direct op de website gezet; vermijd daarom persoonlijke gegevens in te vullen;
Belangrijk! Als er een antwoord wordt gegeven op uw vraag, dan is het voor de gever van het antwoord nuttig om te weten als u er wel (of niet) mee geholpen bent! Wij vragen u dus ook te reageren op een antwoord.
Belangrijk! Antwoorden worden ook per e-mail naar abonnees gestuurd. Laat uw emailadres achter op deze site, zodat u op de hoogte blijft. U krijgt dan ook andere vragen en antwoorden te zien.
Abonneren
Abonneer u voor het ontvangen van emails voor uw Parkside IAN 275683 PDNE 4000 A1 bij:
nieuwe vragen en antwoorden
nieuwe handleidingen
U ontvangt een email met instructies om u voor één of beide opties in te schrijven.
Ontvang uw handleiding per email
Vul uw emailadres in en ontvang de handleiding van Parkside IAN 275683 PDNE 4000 A1 in de taal/talen: Nederlands, Duits, Engels als bijlage per email.
De handleiding is 1,07 mb groot.
U ontvangt de handleiding per email binnen enkele minuten. Als u geen email heeft ontvangen, dan heeft u waarschijnlijk een verkeerd emailadres ingevuld of is uw mailbox te vol. Daarnaast kan het zijn dat uw internetprovider een maximum heeft aan de grootte per email. Omdat hier een handleiding wordt meegestuurd, kan het voorkomen dat de email groter is dan toegestaan bij uw provider.
Andere handleiding(en) van Parkside IAN 275683 PDNE 4000 A1
Uw handleiding is per email verstuurd. Controleer uw email
Als u niet binnen een kwartier uw email met handleiding ontvangen heeft, kan het zijn dat u een verkeerd emailadres heeft ingevuld of dat uw emailprovider een maximum grootte per email heeft ingesteld die kleiner is dan de grootte van de handleiding.
Er is een email naar u verstuurd om uw inschrijving definitief te maken.
Controleer uw email en volg de aanwijzingen op om uw inschrijving definitief te maken
U heeft geen emailadres opgegeven
Als u de handleiding per email wilt ontvangen, vul dan een geldig emailadres in.
Uw vraag is op deze pagina toegevoegd
Wilt u een email ontvangen bij een antwoord en/of nieuwe vragen? Vul dan hier uw emailadres in.