568689
8
Verklein
Vergroot
Pagina terug
1/24
Pagina verder
®
HIGH-DEFINITION SOUND
OWNERS MANUAL
OM-121
Thank you for choosing award-winning Paradigm
®
speakers and congratulations.
You are about to hear the difference our sonically accurate Stylus
®
outdoor speakers
will make in your listening experience. These speakers are the product of countless
hours of comprehensive research and development. They will stand up exceptionally
well to the rigors of Mother Nature and reward you with high-quality sound for many years.
To ensure proper installation please read this manual and follow all instructions. If
you have further questions contact your Authorized Paradigm
®
Dealer or visit the
Q&A page on our website at www.paradigm.com.
outdoor
Paradigm Electronics Inc. In Canada: 205 Annagem Blvd., Mississauga, ON L5T 2V1. In U.S.: MPO Box 2410, Niagara Falls, NY 14302
YOUR NEW SPEAKERS
Paradigm
®
Stylus
®
speakers are designed for use outdoors where they will provide true high-performance
sound. Advanced, reinforced PolyGlass
mineral-filled enclosures, aluminum grilles, stainless steel and
brass hardware, gold-plated binding posts, and stainless-steel/polymer brackets are weather, water,
and UV-resistant, even under adverse weather conditions.
All models are equipped with brackets for easy wall mounting. Stylus
®
speakers also have holes
spaced 60 mm apart in the backs of their enclosures to fit a wide variety of mounting brackets
(see dealer).
If wall mounting take extra care in installation—we strongly recommend the use of safety straps as
secondary restraints.
Care of Speakers
A damp, soft cloth or the gentle
spray from a garden hose may be used to clean the speakers’ exterior.
Do not use strong or abrasive cleaners on speakers
Do not spray directly through the grilles into the drive unit
Do not use a pressure (power) washer to clean speakers—the powerful force of the spray will
damage the drivers and the finish
Do not place speakers in direct line with an underground sprinkler
Do not place speakers in an area where they will be drenched with pool splash—over time
heavy doses of chlorine and other pool chemicals may affect the finish
Do not allow lawn and garden chemicals to come into contact with speakers
Where possible, avoid placing speakers in direct sunlight—over time this may cause the
finish to fade
1
TABLE OF CONTENTS
Your New Speakers . . . . . . . . . . . . . . . . . . . . . . . . 1
How To Avoid Speaker Damage
. . . . . . . . . . 2
Listening Outdoors
. . . . . . . . . . . . . . . . . . . . . . . . . 2
Speaker Placement Guidelines
. . . . . . . . . . . 2
About Speaker Cable
. . . . . . . . . . . . . . . . . . . . . . 4
Wall-Mounting the Speakers
. . . . . . . . . . . . . 5
Connecting the Speakers
. . . . . . . . . . . . . . . . . . 6
Troubleshooting Guide
. . . . . . . . . . . . . . . . . . . . . 7
Speaker Placement
And Connection (pictorial)
. . . . . . . . . . . . . . . . 8
Limited Warranty
. . . . . . . . . . . . . . . . . . . . . . . . . . 11
HOW TO AVOID SPEAKER DAMAGE
Use an appropriate amplifier. At high volumes, a very powerful amplifier can overdrive your
speakers and damage them. On the other hand, if your amplifier isn’t powerful enough, it can produce
clipping distortion that can easily damage high-frequency drivers.
(See dealer.)
Don’t be fooled by your amplifier’s volume control. It adjusts listening level—it does not indicate
power output. If your speakers begin to sound harsh or grating, or if you hear the bass breaking up,
turn the volume down immediately or you will damage your speakers! This type of damage constitutes
abuse and is not covered by the warranty!
Tone controls and equalizers can demand even more power from an amplifier, lowering the
point at which it produces clipping distortion. Use them sparingly, if at all, and do not use them when
listening at loud levels.
LISTENING OUTDOORS
Outdoors there are no walls to contain sound. Background noise is louder and the distance listeners
are from the speakers is usually greater. Achieving a reasonable listening level can be more difficult.
The tendency is to turn up the volume, however this may disturb neighbors and when turned up too
high can seriously damage the speakers or your amplifier. Stylus
®
speakers are designed to address
these unique challenges, making them ideal for use in the majority of outdoor stereo applications.
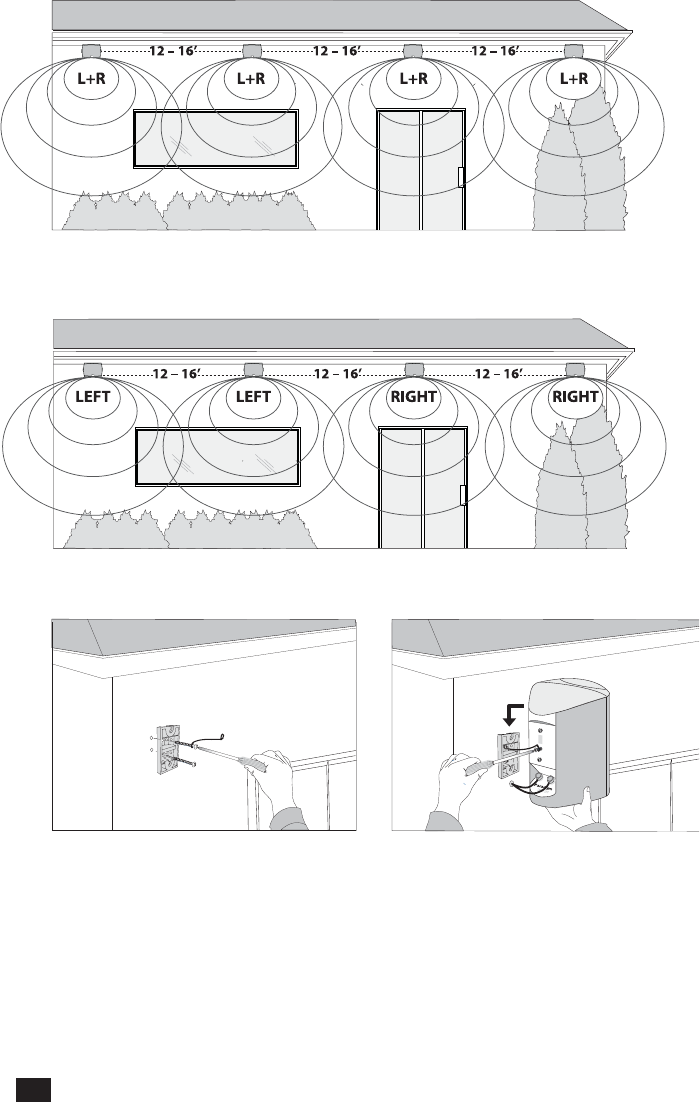
In certain outdoor situations Stylus
®
‘SM’ speakers, with their Dual-Directional Soundfield
, offer alternative
options. In small areas not well suited to a stereo pair one ‘SM’ speaker is ideal. In larger, or unusually
shaped areas we recommend using multiple ‘SM’ speakers. Using more speakers ensures that sound
is evenly distributed, allowing for reasonable listening levels at lower volumes. Demand on the
amplifier is reduced and neighbors are not disturbed. Think of it this way: When lighting a large out-
door area, using multiple floodlights on a dimmer set to a low setting is far more effective than using
a single floodlight with the dimmer set to high. For more information on where and how to use ‘SM’
speakers turn to page 3.
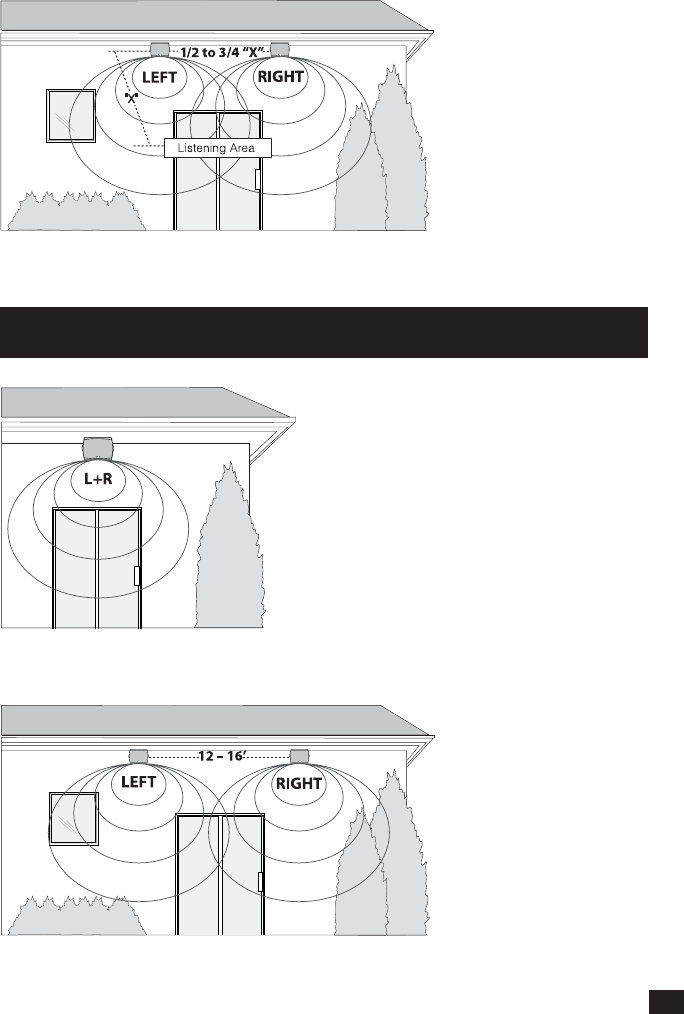
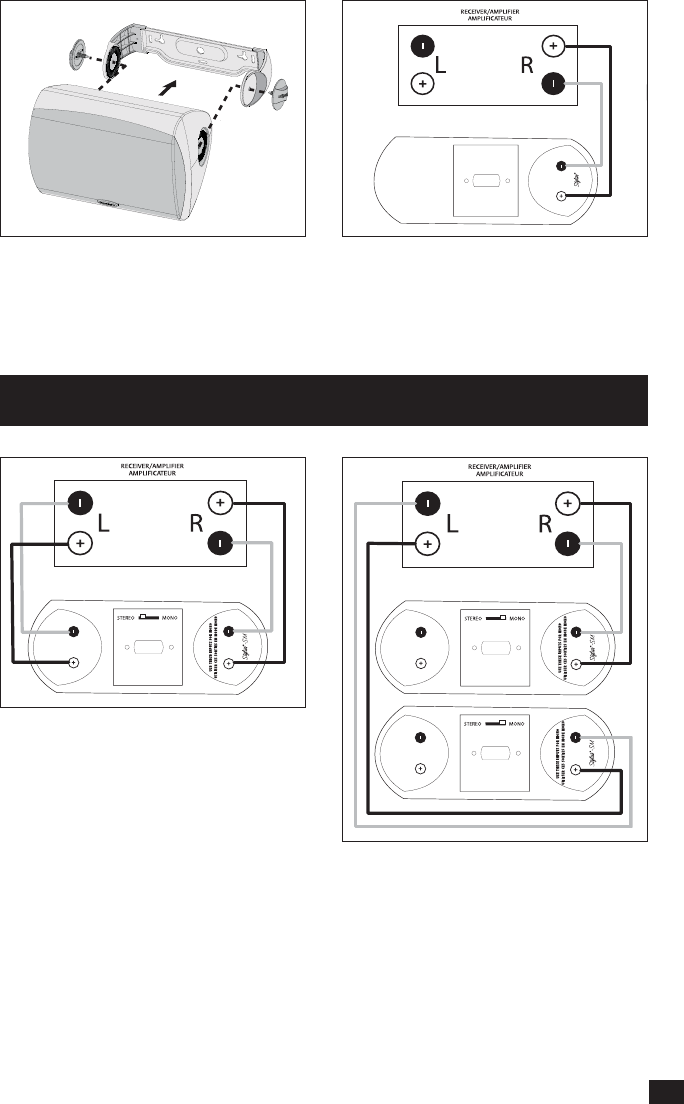
SPEAKER PLACEMENT GUIDELINES
The mounting brackets provided with Stylus
®
speakers allow for a wide variety of placement
options. For example:
• Under a roof soffit, mounted to the exterior wall for strength
• Open area of an exterior wall
• Gazebo or other garden structure designed for sitting
• Deck or railing
Placement
(all models except those with ‘SM’ in their name)
To achieve the best quality of sound, place Stylus
®
speakers far enough apart to achieve good stereo
separation, but not so far apart that you won’t be able to hear both speakers throughout most of the listening
area. For optimum results, measure the approximate distance from your listening area to your speakers
(Fig. 1, “X”). Then position the speakers about 1/2 to 3/4 of that distance from each other (1/2 to 3/4 ofX”).
2
Placement Options for ‘SM’ Models
Your Stylus
®
‘SM’ speaker offers two options for connection:
Stereo Input: Wide dispersion “Left plus Right” channel sound from a single speaker.
Mono Input: Very wide dispersion stereo sound from two
speakers, one for the left, one for the right.
With their Dual-Directional Soundfield
, ‘SM’ speakers provide wider than normal dispersion, allowing
them to be used in a variety of outdoor applications:
Single Speaker, Wide Dispersion “Left plus Right” Channel Sound (Stereo Input) (Fig. 2a)
Ideal in small areas less suited to a stereo pair of speakers or where a single speaker is the preferred
choice. The speaker is connected to both Left and Right amplifier channels. Place the speaker so that
it is “aimed” toward the listening area.
Two Speakers, Very Wide Dispersion Stereo Sound (Mono Input) (Fig. 2b)
Ideal for stereo coverage in small to medium sized areas. One speaker is connected to the Left amplifier
channel and the other to the Right channel (each wired for Mono). Place speakers about 12 – 16 feet
apart to achieve good stereo imaging throughout your listening area.
Multiple Speakers, Distributed “Left plus Right” Channel Sound (Stereo Input) (Fig. 2c)
In larger areas, multiple speakers (each wired for “Left plus Right” channel sound) may be used to
eliminate the sound imbalances that occur with stereo sound as people move around, or are seated
closer to one speaker than the other.
Multiple Speakers, Ultra-Wide Stereo Coverage (Mono Input) (Fig. 2d)
In larger areas multiple speakers (each wired for Mono) can be used to provide ultra-wide stereo
coverage and broader imaging.
Speaker Impedance with Multiple Speakers
If you are planning to use multiple speakers, first determine the number of
speakers your amplifier is capable of driving safely. Check your amplifier’s
specifications to determine minimum safe speaker impedance load (in ohms).
The MINIMUM load impedance of one
Stylus
®
speaker is:
• 8 ohms per channel
The MINIMUM load impedance of one Stylus
®
‘SM’ speaker is:
• 8 ohms per channel
when wired for Stereo Input
• 4 ohms per speaker
when wired for Mono Input
Each additional speaker you connect will drop nominal impedance by half.
We strongly recommend using a Paradigm
®
VC-150 volume control when
connecting more than two speakers. See “Using a Volume Control,” or see
dealer for more information.
3
4
ABOUT SPEAKER CABLE
PRECAUTION: Before proceeding, read and follow the safety precautions below.
Before running speaker cable through walls, under walkways, patios, etc., check
local building code requirements or contact a qualified installer
(see dealer).
Before digging, verify location of gas lines and buried cables with local utility
companies.
Information on running speaker cable through walls, under walkways, patios, etc. is not provided in this
manual. If you are not comfortable with this type of installation, contact a qualified installer
(see dealer)
.
Preparing the Cable
Always use high-quality, moisture-resistant speaker cable
(see dealer)
.
1. Measure and mark the path from amplifier to speaker(s) and/or speaker to speaker to determine
length of cable required.
2. Add 2´ to 3´ feet extra to allow some play when installing.
3. Select correct gauge using the chart below.
4. If cable is to run underground it must be rated for direct burial and/or enclosed in PVC pipe to
prevent deterioration over time. Contact a qualified installer before commencing installation in
this case
(see dealer)
.
5. Cut cable to required length.
6. Using wire strippers, strip the outer casing of the cable back about 2˝ at either end.
7. Strip inner insulation on both wires back about 1/2˝ at either end.
The following chart identifies the minimum gauge requirements for various cable lengths:
LENGTH DIAMETER GAUGE
Under 4.5 m (15 feet) 1.3 mm (0.05 in) 16 awg
Under 9 m (30 feet) 1.6 mm (0.06 in) 14 awg
Over 9 m (30 feet) 2.0 mm (0.08 in) 12 awg
MINIMUM GAUGE REQUIREMENTS
WALL-MOUNTING THE SPEAKERS
PRECAUTION! Mount speakers securely enough that they do not fall and cause personal
injury or damage to property.
MOUNTING SURFACES: Carefully evaluate the composition, construction
and strength of the surface on which you are mounting the speaker. When
mounting in masonry, wood, and/or other solid surfaces, consult with a
professional regarding the proper hardware for mounting the brackets
provided with your Stylus
®
speakers.
SPECIFIC USE: Brackets provided with Stylus
®
speakers are only suitable
for the speaker they come with. Do not use them with any other speaker.
Always use secondary restraining hardware to prevent personal injury or
damage to property.
NON-LIABILITY: We are aware that the mounting assembly provided with Stylus
®
speakers could
be used for purposes and in ways other than those for which it was intended. The Manufacturer,
Distributor, Retailer, and their respective Agents cannot be held responsible or liable for injuries or
property damage—direct, indirect, or consequential—arising from the use of, or inability to use, this
product safely and properly.
Every effort has been made to provide accurate and error-free installation instructions.
Paradigm Electronics Inc. disclaims liability for difficulties that may arise from the misinterpretation
of information contained in these instructions.
If you are not comfortable performing the following mounting procedures, contact a qualified
installer
(see dealer)
.
Wall-Mounting with Supplied ‘Hanger Bracket’
(For Stylus
®
170 only)
Stylus
®
speakers can be mounted horizontally or vertically.
1. Using appropriate screws/mounting hardware
(not included)
, mount the bracket with the supplied
safety strap on the wall at the desired location (Fig. 3a) and at the desired angle. Make sure
the bracket is straight.
2. Screw two 1-inch #12 screws
(included)
into the upper and lower holes (spaced 60 mm, 2-3/8˝
apart) on the back of the speaker’s enclosure. Do not screw them all the way in—make sure
they remain about 3 mm (1/8 in) proud.
3. Bring the speaker to the bracket and connect the cables as outlined in the “Connecting the
Speakers,” page 6. Connect the safety strap to the speaker using the middle hole (Fig. 3b).
Mount the speaker onto the bracket using an ‘in and down’ motion.
4. This bracket may also be used for horizontal mounting. Simply mount bracket horizontally with
key hole slots facing up
. Follow steps 1 to 3
(above)
to complete horizontal installation.
5
6
Wall-Mounting with Supplied ‘U-Bracket’
Stylus
®
speakers can be mounted horizontally or vertically with the ‘U’ bracket.
1. Unscrew the knobs from either end of the speaker.
2. Using appropriate screws/mounting hardware
(not included)
, mount the bracket and a safety
strap
(not included, see dealer)
on the wall in the desired location. Make sure the bracket is
straight. In-wall speaker wire can then be directed through the large opening in this bracket
which allows connection from behind the speaker terminals to hide the speaker wire as much
as possible.
3. Bring the speaker up to the bracket and connect the speaker cable as outlined in “Connecting
the Speakers” below.
4. Pull the bracket slightly apart and carefully fit the speaker into the bracket, one end at a time
to avoid scratching the surface of the enclosure (Fig. 4).
5. Screw the knobs through the holes in the mounting bracket and into the speaker, using the
unthreaded ends of the knob screws as guides to find the screw-holes on the speakers. Angle
the speaker at the desired position. Tighten the knobs snugly, but do not over-tighten them.
CONNECTING THE SPEAKERS
Turn your receiver/amplifier OFF before connecting speakers. This will
avoid damage which could result from accidental shorting of speaker
cables.
Your Stylus
®
speakers are equipped with high-quality binding posts that can be used with banana,
pin or spade connectors, as well as with bare wire.
Connecting All Models
(except those with ‘SM’ in their name, see below)
(Fig. 5a)
Connect one speaker at a time to your amplifier.
Connect the red (+) amplifier terminal to the red (+) speaker terminal and the black (-) amplifier terminal
to the black (-) speaker terminal. Tighten the posts firmly by hand, but don’t over-tighten them.
Repeat entire procedure for other speaker.
Connecting ‘SM’ Models
Stereo Input (Single Speaker, “left plus right” channel sound) (Fig. 5b)
Connect one speaker channel at a time to your receiver/amplifier.
Slide the switch on the back of the speaker all the way over to the ‘Stereo’ position.
Connect the Right red (+) amplifier terminal to the Right red (+) speaker terminal and the Right black
(-) amplifier terminal to the Right black (-) speaker terminal. Connect the Left red (+) amplifier
terminal to the Left red (+) speaker terminal and the Left black (-) amplifier terminal to the Left black
(-) speaker terminal.
Mono Input (Wide dispersion stereo sound from two speakers) (Fig. 5c)
Connect one speaker at a time to the left and right channels of your receiver/amplifier …
Slide the switch on the back of the speaker all the way over to the ‘Mono’ position.
Connect the Right red (+) amplifier terminal to the Mono
red (+) speaker terminal and the Right black
(-) amplifier terminal to the Mono black (-) speaker terminal.
Repeat entire procedure for other speaker, using the Mono Input.
If a speaker is not working correctly, refer to the “Troubleshooting Guide” at the bottom of this page.
Using a Volume Control
Using a Paradigm
®
VC-150 volume control
(sold separately)
eliminates the need for additional amplifiers,
and compensates for the impedance drop that results when connecting multiple speakers. You can
also use the Paradigm
®
VC-150 on individual speakers or groups of speakers, to control volume at
various points on your property—further promoting even and spacious coverage. Follow the directions
included with the VC-150 Volume Control.
When used outdoors, the Paradigm
®
VC-150 must be enclosed in a weather-
proof box designed for use with electrical switches
(see dealer).
7
TROUBLESHOOTING GUIDE
PROBLEM SOLUTION
No Sound
Make sure receiver, preamp or amplifier is plugged in and turned on. Check power
outlet at the wall is working. Are headphones plugged in, or is system on Mute?
Re-check all connections. On ‘SM’ models, check to ensure that the Stereo/Mono
switch is all the way over to the desired “Stereo” or “Mono” position.
No Sound from One or
More Speakers
Check your balance control or VC-150 Volume Control (if using). Check that all
power cords are properly plugged in and functioning. Swap a non-working speaker
with one that works to determine if the problem is with the speaker or something
else (i.e. wiring, amplifier).
Lack of Bass or Dislocated
Image (Stereo)
One or more speakers may be connected out of phase (their polarity is reversed).
Re-check to ensure that each speaker’s cable is connected with correct polarity:
red (+) to red (+) and black (-) to black (-).
8
Fig. 1
Fig. 2a
SPEAKER PLACEMENT AND CONNECTION
(pictorial)
POSITIONNEMENT ET RACCORDEMENT DES ENCEINTES
(figures)
Two Speakers (each wired for Mono), Very Wide Dispersion Stereo Sound
Couverture stéréophonique très large à deux enceintes (raccordées en mode mono)
Single Speaker, Wide Dispersion “Left plus Right” Channel Sound (Stereo Input)
Couverture large à une seule enceinte, canaux Gauche+Droit (sortie stéréophonique)
All models (except those with “SM’ in their model name)
Tous les modèles (sauf ceux dont « SM » figure dans le nom)
Fig. 2b
‘SM’ Models
Modèles « SM »
9
Multiple Speakers (each wired for Mono), Ultra-Wide Stereo Coverage
Couverture stéréophonique ultra-large à enceintes multiples (raccordées en mode mono)
Multiple Speakers, Distributed “Left plus Right” Channel Sound (Stereo Input)
Couverture distribuée à enceintes multiples, canaux Gauche+Droit (sortie stéréophonique)
Fig. 2c
Fig. 2d
Fig. 3a
Fig. 3b
10
Fig. 4
Fig. 5b
Fig. 5c
Wiring for “Left plus Right” sound
from a Single Speaker (Stereo Input)
Câblage pour couverture à une seule
enceinte, canaux Gauche+Droit
(sortie stéréophonique)
Wiring for all models, Left or Right
speaker (except ‘SM’ models)
Câblage pour tous les modèles,
enceinte gauche ou droite (sauf
les modèles « SM »).
Fig. 5a
Wiring two speakers for Wide
Dispersion Stereo sound using the
Mono inputs on each speaker
Raccordement de deux enceintes
pour couverture stéréophonique
large à partir des sorties Monos
de chacune des enceintes
Wiring for ‘SM’ Models
Câblage pour modèles « SM »
8

Hulp nodig? Stel uw vraag in het forum

Spelregels

Misbruik melden

Gebruikershandleiding.com neemt misbruik van zijn services uitermate serieus. U kunt hieronder aangeven waarom deze vraag ongepast is. Wij controleren de vraag en zonodig wordt deze verwijderd.

Product:

Bijvoorbeeld antisemitische inhoud, racistische inhoud, of materiaal dat gewelddadige fysieke handelingen tot gevolg kan hebben.

Bijvoorbeeld een creditcardnummer, een persoonlijk identificatienummer, of een geheim adres. E-mailadressen en volledige namen worden niet als privégegevens beschouwd.

Spelregels forum

Om tot zinvolle vragen te komen hanteren wij de volgende spelregels:

Belangrijk! Als er een antwoord wordt gegeven op uw vraag, dan is het voor de gever van het antwoord nuttig om te weten als u er wel (of niet) mee geholpen bent! Wij vragen u dus ook te reageren op een antwoord.

Belangrijk! Antwoorden worden ook per e-mail naar abonnees gestuurd. Laat uw emailadres achter op deze site, zodat u op de hoogte blijft. U krijgt dan ook andere vragen en antwoorden te zien.

Abonneren

Abonneer u voor het ontvangen van emails voor uw Paradigm Stylus 370 bij:


U ontvangt een email met instructies om u voor één of beide opties in te schrijven.


Ontvang uw handleiding per email

Vul uw emailadres in en ontvang de handleiding van Paradigm Stylus 370 in de taal/talen: Frans als bijlage per email.

De handleiding is 0,74 mb groot.


U ontvangt de handleiding per email binnen enkele minuten. Als u geen email heeft ontvangen, dan heeft u waarschijnlijk een verkeerd emailadres ingevuld of is uw mailbox te vol. Daarnaast kan het zijn dat uw internetprovider een maximum heeft aan de grootte per email. Omdat hier een handleiding wordt meegestuurd, kan het voorkomen dat de email groter is dan toegestaan bij uw provider.

Stel vragen via chat aan uw handleiding

Stel uw vraag over deze PDF

Uw handleiding is per email verstuurd. Controleer uw email

Als u niet binnen een kwartier uw email met handleiding ontvangen heeft, kan het zijn dat u een verkeerd emailadres heeft ingevuld of dat uw emailprovider een maximum grootte per email heeft ingesteld die kleiner is dan de grootte van de handleiding.

Er is een email naar u verstuurd om uw inschrijving definitief te maken.

Controleer uw email en volg de aanwijzingen op om uw inschrijving definitief te maken

U heeft geen emailadres opgegeven

Als u de handleiding per email wilt ontvangen, vul dan een geldig emailadres in.

Uw vraag is op deze pagina toegevoegd

Wilt u een email ontvangen bij een antwoord en/of nieuwe vragen? Vul dan hier uw emailadres in.


Info