Before connecting, operating or adjusting this product, please read
the instructions completely.
Please keep this manual for future reference.
As an ENERGY STAR
®
Partner
∗
, Panasonic
has determined that this product meets the
ENERGY STAR
®
guidelines for energy
efficiency.
∗For Canada only: The word “Participant” is used in
place of the word “Partner”.
If you have any questions, contact
1-800-211-PANA (7262) in the U.S.A. or 1-800-561-5505 in
Canada.
For the U.S.A. only
The warranty can be found on page 50.
For Canada only
The warranty can be found on page 51.
Operating Instructions
AV Control Receiver
Model No. SA-XR700
2
RQT8739
IMPORTANT SAFETY INSTRUCTIONS
Read these operating instructions carefully before using the unit. Follow the safety instructions on the unit and the applicable safety instructions listed
below. Keep these operating instructions handy for future reference.
1)Read these instructions.
2)Keep these instructions.
3)Heed all warnings.
4)Follow all instructions.
5)Do not use this apparatus near water.
6)Clean only with dry cloth.
7)Do not block any ventilation openings. Install in accordance with
the manufacturer’s instructions.
8)Do not install near any heat sources such as radiators, heat
registers, stoves, or other apparatus (including amplifiers) that
produce heat.
9)Do not defeat the safety purpose of the polarized or grounding-type
plug. A polarized plug has two blades with one wider than the
other. A grounding-type plug has two blades and a third grounding
prong. The wide blade or the third prong are provided for your
safety. If the provided plug does not fit into your outlet, consult an
electrician for replacement of the obsolete outlet.
10)Protect the power cord from being walked on or pinched
particularly at plugs, convenience receptacles, and the point where
they exit from the apparatus.
11)Only use attachments/accessories specified by the manufacturer.
12)Use only with the cart, stand, tripod, bracket, or
table specified by the manufacturer, or sold with
the apparatus. When a cart is used, use caution
when moving the cart/apparatus combination to
avoid injury from tip-over.
13)Unplug this apparatus during lightning storms or when unused for
long periods of time.
14)Refer all servicing to qualified service personnel. Servicing is
required when the apparatus has been damaged in any way, such
as power-supply cord or plug is damaged, liquid has been spilled
or objects have fallen into the apparatus, the apparatus has been
exposed to rain or moisture, does not operate normally, or has
been dropped.
The lightning flash with arrowhead symbol, within
an equilateral triangle, is intended to alert the user
to the presence of uninsulated “dangerous
voltage” within the product’s enclosure that may be
of sufficient magnitude to constitute a risk of
electric shock to persons.
The exclamation point within an equilateral triangle
is intended to alert the user to the presence of
important operating and maintenance (servicing)
instructions in the literature accompanying the
appliance.
FCC Note:
This equipment has been tested and found to comply with the
limits for a Class B digital device, pursuant to Part 15 of the FCC
Rules. These limits are designed to provide reasonable protection
against harmful interference in a residential installation. This
equipment generates, uses and can radiate radio frequency
energy and, if not installed and used in accordance with the
instructions, may cause harmful interference to radio
communications. However, there is no guarantee that interference
will not occur in a particular installation. If this equipment does
cause harmful interference to radio or television reception, which
can be determined by turning the equipment off and on, the user
is encouraged to try to correct the interference by one or more of
the following measures:
•Reorient or relocate the receiving antenna.
•Increase the separation between the equipment and receiver.
• Connect the equipment into an outlet on a circuit different from
that to which the receiver is connected.
•Consult the dealer or an experienced radio/TV technician for
help.
Any unauthorized changes or modifications to this equipment
would void the user’s authority to operate this device.
This device complies with Part 15 of the FCC Rules. Operation is
subject to the following two conditions: (1) This device may not
cause harmful interference, and (2) this device must accept any
interference received, including interference that may cause
undesired operation.
Responsible Party:
Panasonic Corporation of North America
One Panasonic Way
Secaucus, NJ 07094
Telephone No.: 1-800-211-7262
THE FOLLOWING APPLIES ONLY IN THE U.S.A.
WARNING:
TO REDUCE THE RISK OF FIRE, ELECTRIC SHOCK OR
PRODUCT DAMAGE, DO NOT EXPOSE THIS APPARATUS TO
RAIN, MOISTURE, DRIPPING OR SPLASHING AND THAT NO
OBJECTS FILLED WITH LIQUIDS, SUCH AS VASES, SHALL
BE PLACED ON THE APPARATUS.
The socket outlet shall be installed near the equipment and easily
accessible.
The mains plug of the power supply cord shall remain readily
operable.
To completely disconnect this apparatus from the AC Mains,
disconnect the power supply cord plug from AC receptacle.
CAUTION
RISK OF ELECTRIC SHOCK
DO NOT OPEN
CAUTION:TO REDUCE THE RISK OF ELECTRIC
SHOCK, DO NOT REMOVE SCREWS.
NO USER-SERVICEABLE PARTS
INSIDE.
REFER SERVICING TO QUALIFIED
SERVICE PERSONNEL.
3
RQT8739
Enjoying the Home Theater has become easy!
Supplied accessories
Use numbers indicated in parentheses when asking for replacement parts.
(Product numbers correct as of July 2006. These may be subject to change.)
Only for the U.S.A.: to order accessories, refer to “Accessory Purchases” on page 50.
Only for Canada: to order accessories, call the dealer from whom you have made your purchase.
AB
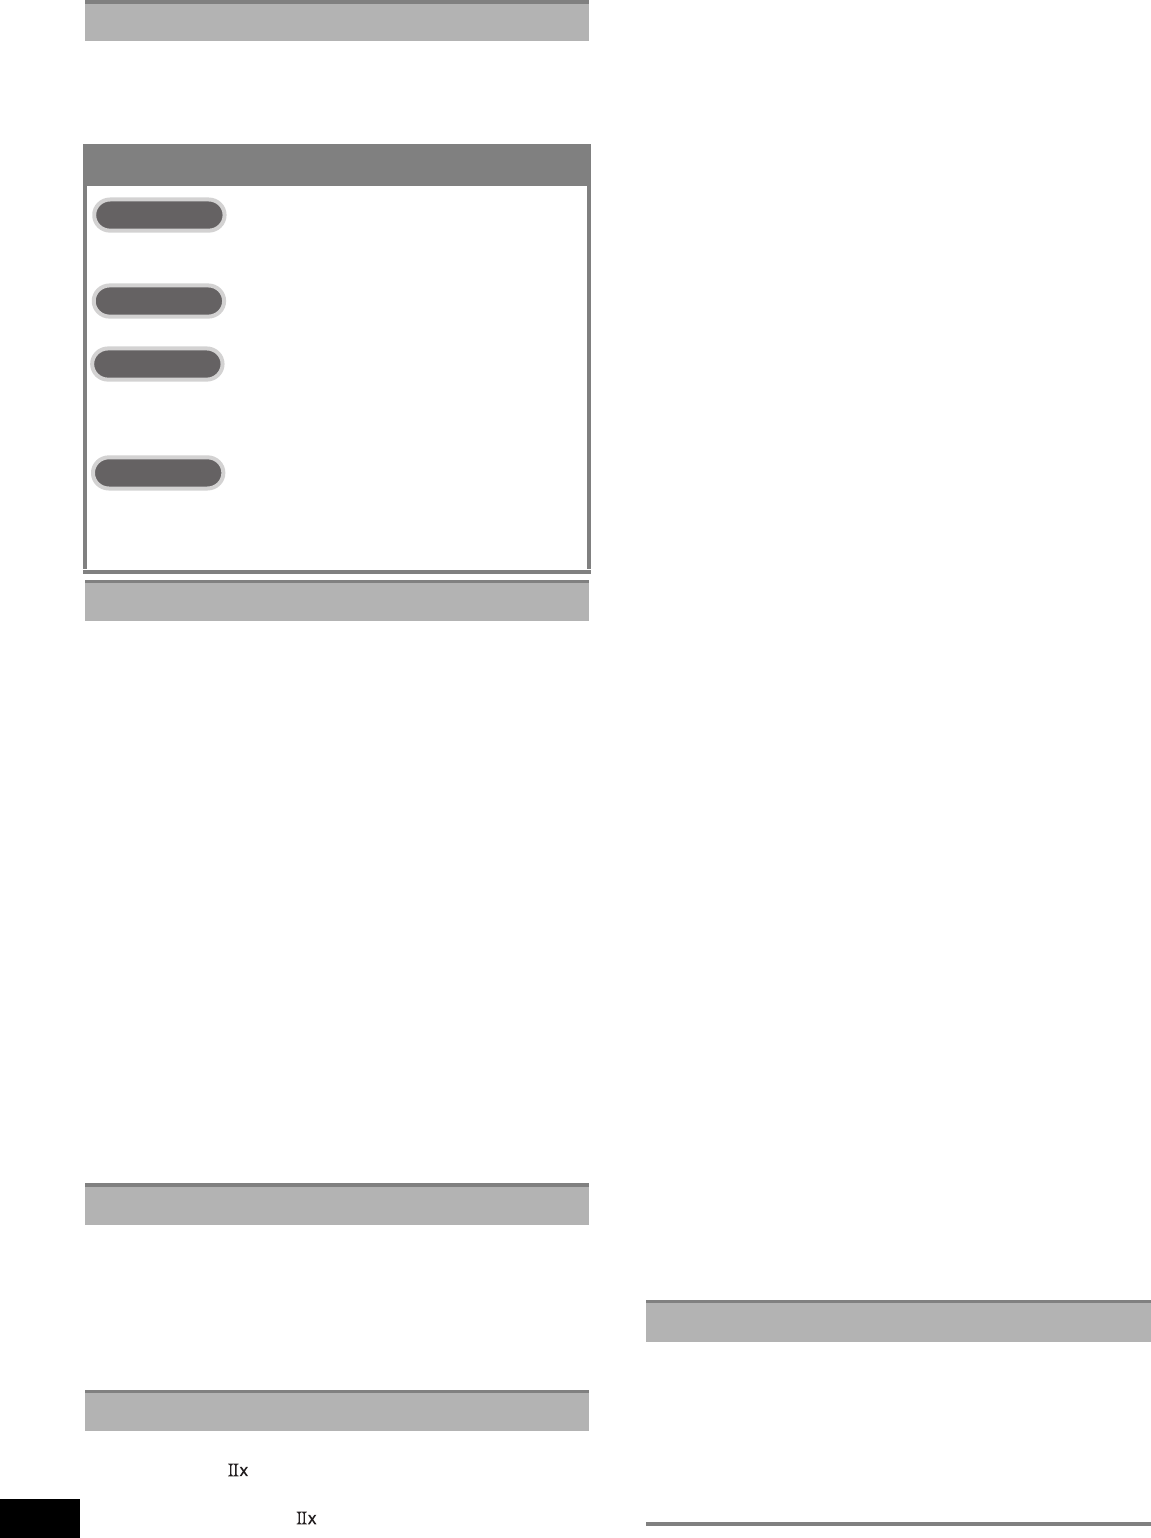
Connections
Settings
Playback
Until now...
Until now...
Until now...
With SA-XR700!
With SA-XR700!
With SA-XR700!
With SA-XR700!
With SA-XR700!
With SA-XR700!
With SA-XR700!
With SA-XR700!
With SA-XR700!
Until now...
Until now...
Until now...
Until now...
Until now...
Until now...
Many different
cables were
necessary
Previous Home Theater systems required multiple
operations.
Manual setting for
each speaker
We must
make speaker
settings...
It’s
difficult.
Remote control
operations for
surround playback
The
Home
Theater
begins.
One-touch
playback
Automatic setting
with simple
operations!
It
’
s easy.
Ez Sync HDAVI Control
TM
Press just one button and enjoy the Home Theater. (➡ page 13)
Other connections
are also possible.
∗
Speakers provide surround
sound when you just play
DVDs or receive TV
broadcast. (➡ page 12)
Speakers are set
with just one press.
(➡ page 10)
Simple connections using
HDMI cables. (➡ page 7)
How can we get
sound from speakers
behind us?
When you connect the unit to your TV (VIERA) and DVD
recorder (DIGA) compatible with Ez Sync HDAVI Control
TM
1 AC power supply cord
(K2CB2CB00018)
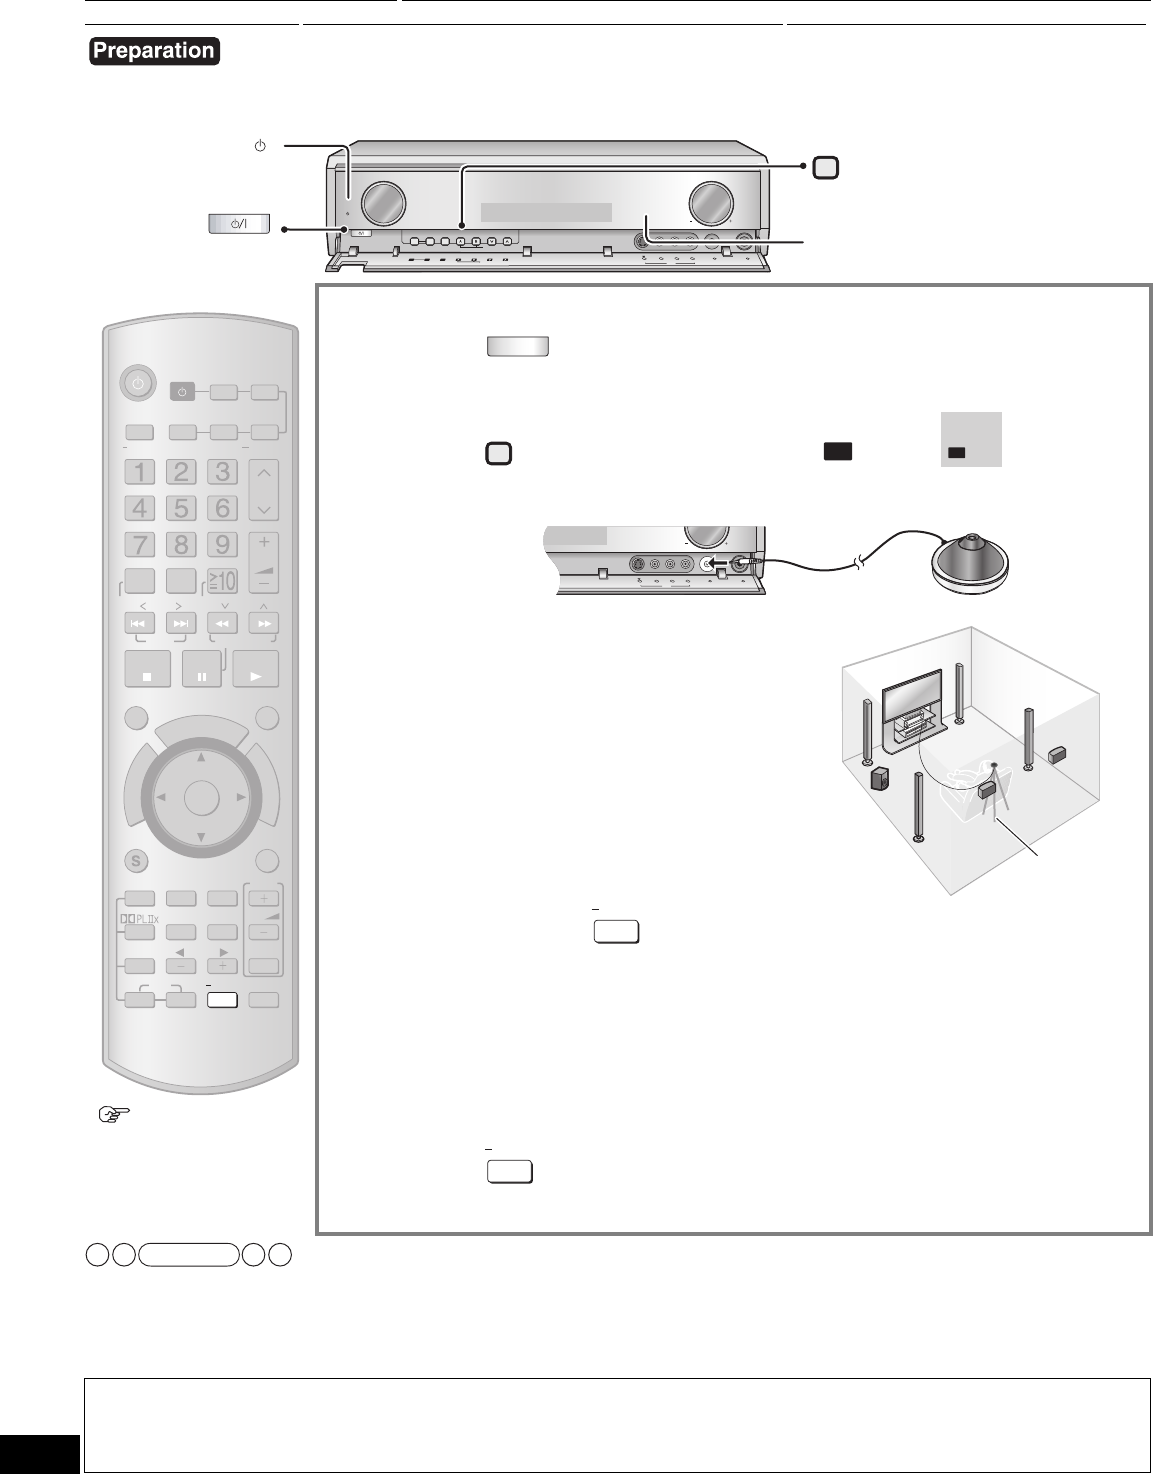
1 Setup microphone
(L0CBAB000123)
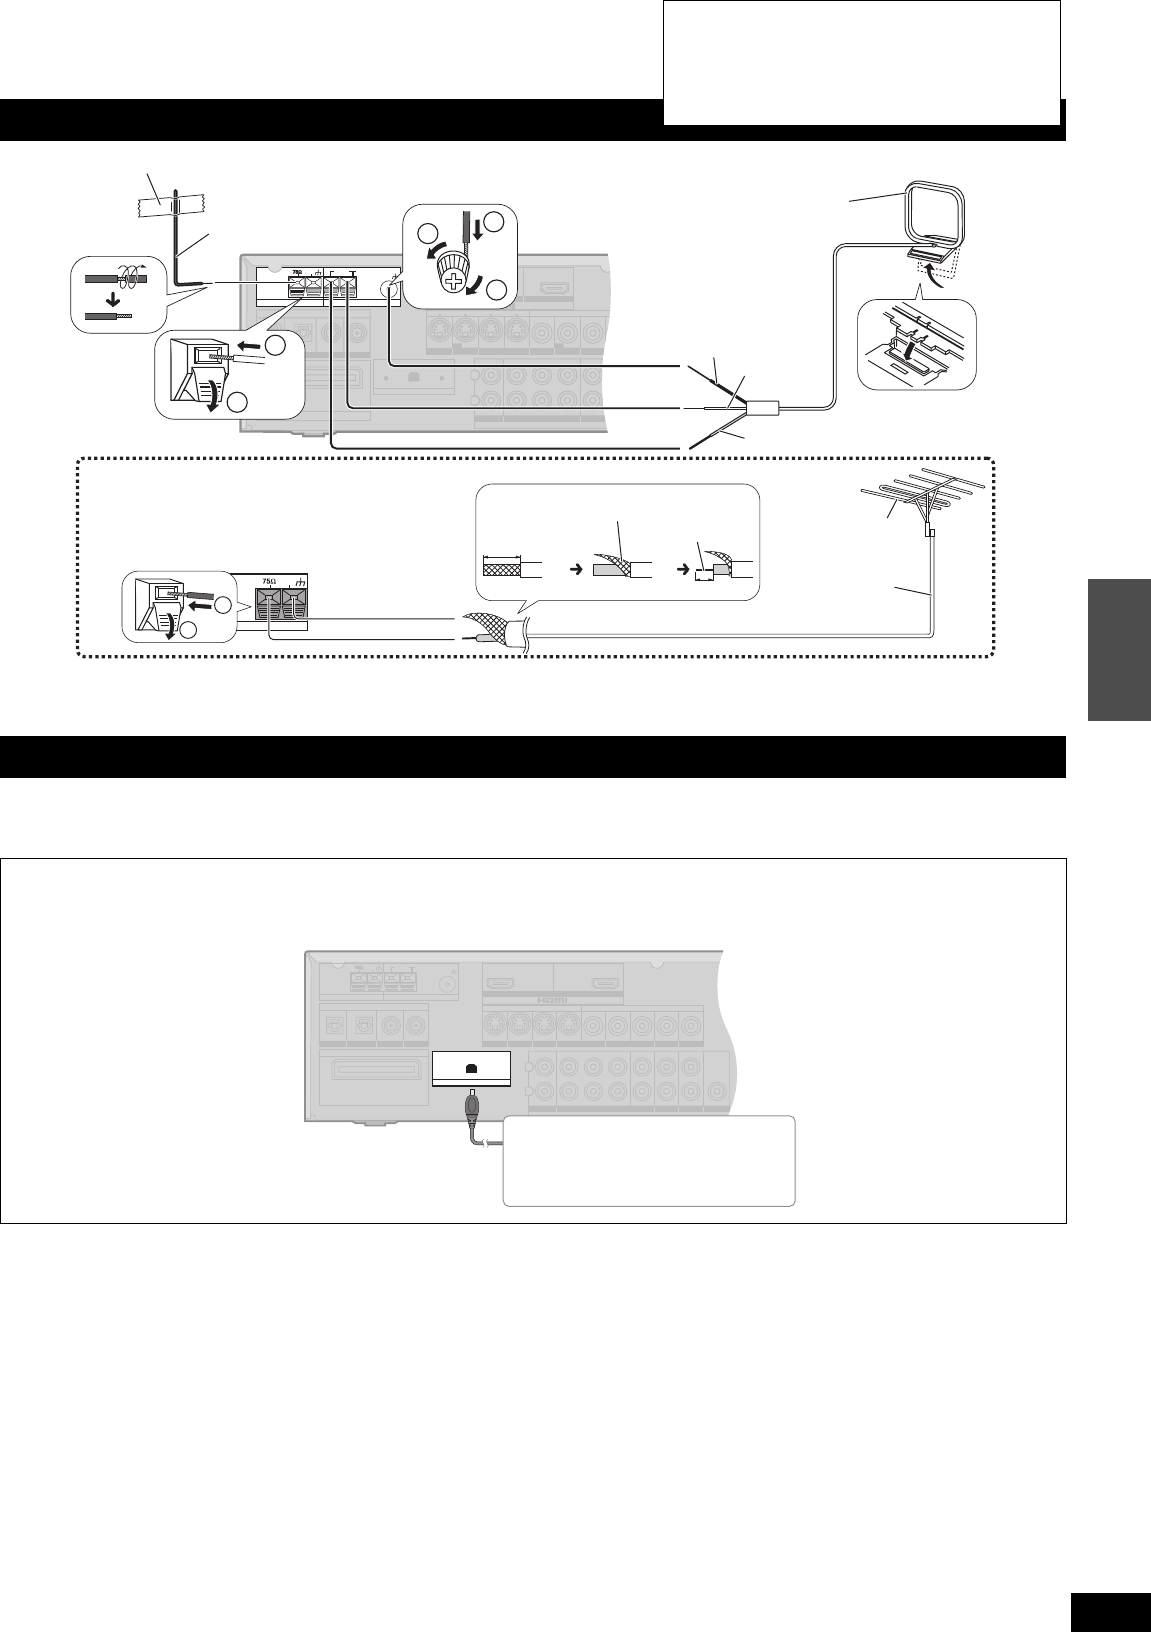
1 FM indoor antenna
(RSA0006-L)
1 AM loop antenna
(RSA0037)
1 Remote control
(EUR7662YR0)
2 Batteries
Please check and identify the supplied accessories.
Before use
IMPORTANT SAFETY INSTRUCTIONS/Enjoying the Home Theater has become easy! /Supplied accessories
4
RQT8739
Table of contents
IMPORTANT SAFETY INSTRUCTIONS................................ 2
Enjoying the Home Theater has become easy!..................3
• To return to the previous digit: Press [≧10, ENTER].
Press
• Hold down the button to change channels faster.
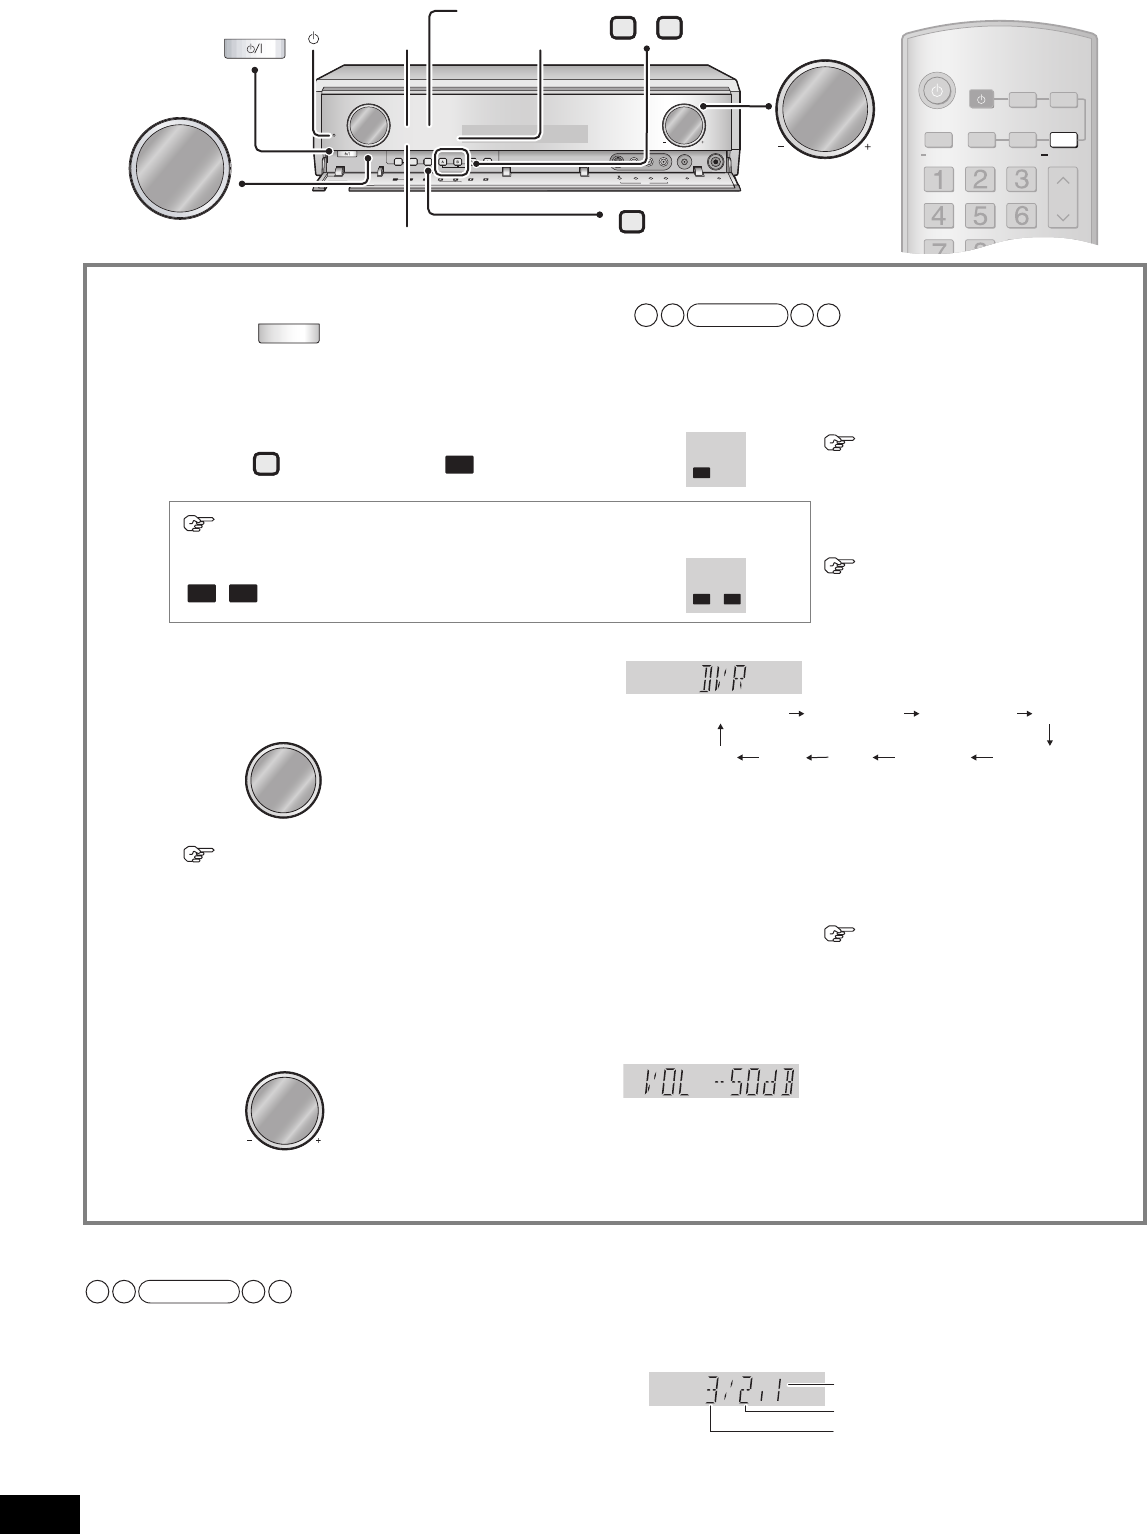
Operation on the unit
1Turn [INPUT SELECTOR] to select “TUNER XM ”.
2Press [TUNE 2 or 1].
• Hold down the button to change channels faster.
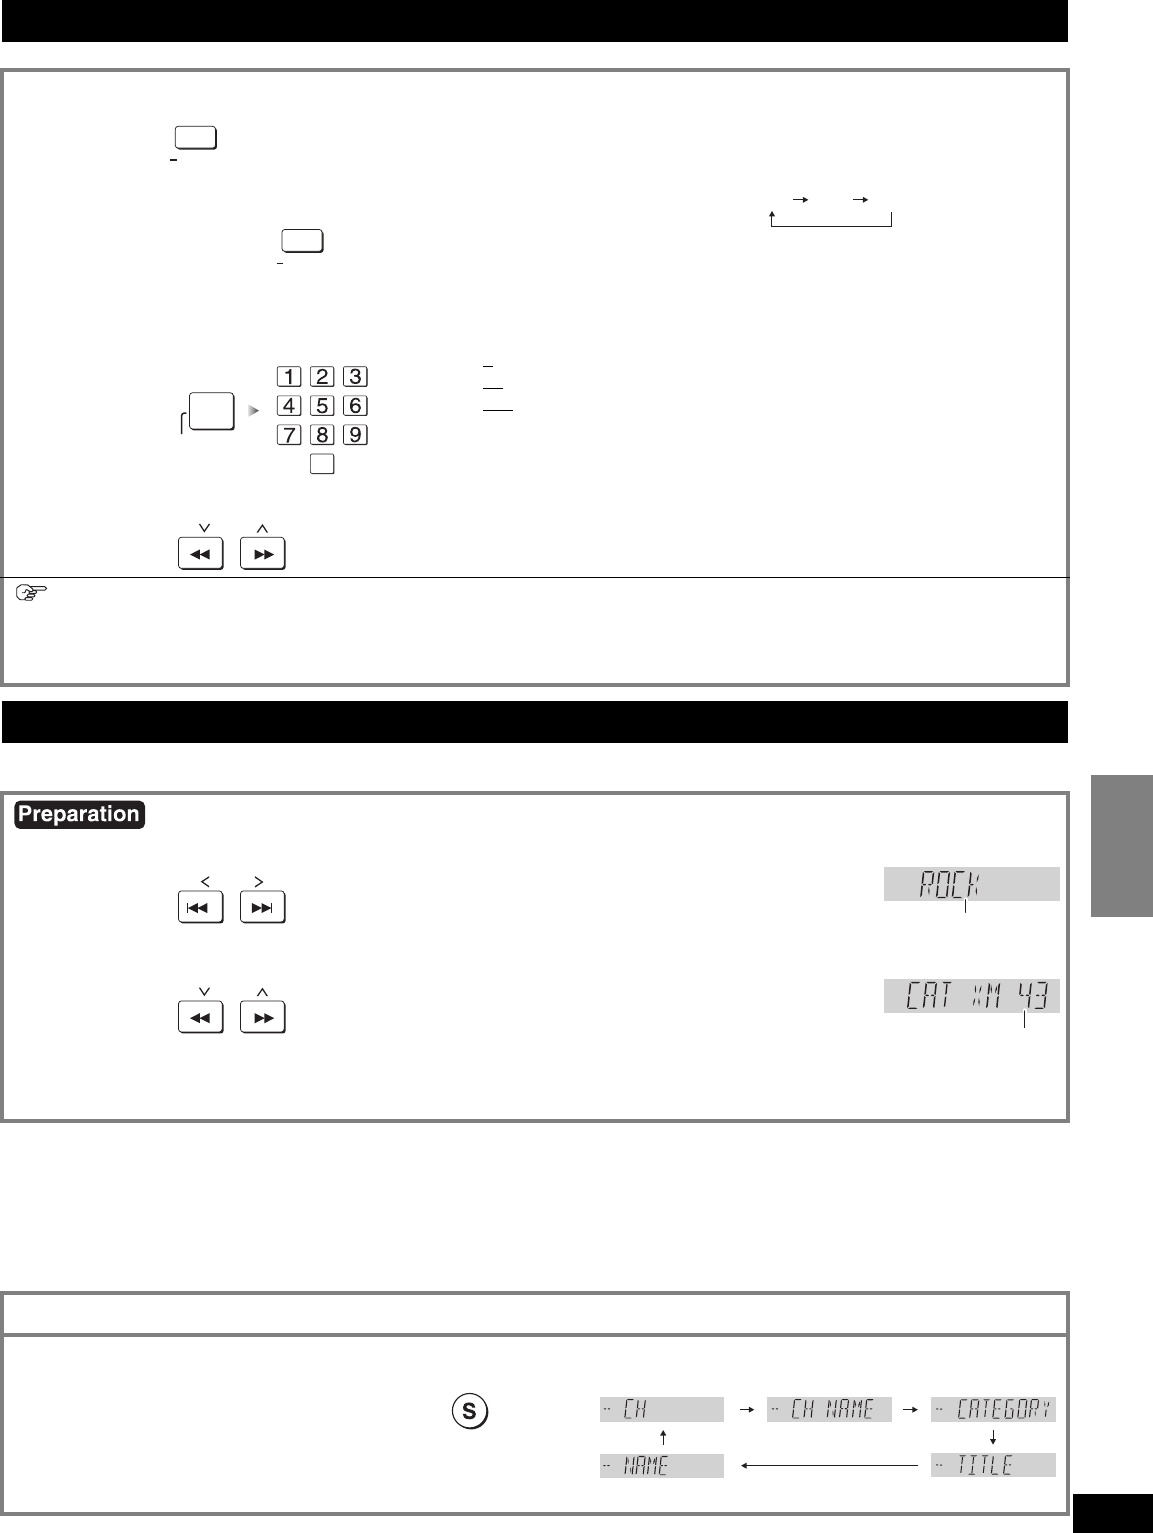
Selecting XM channels by category (using the remote control)
Select “TUNER XM ”. (above)
1
To select a category
Press
•Hold down the buttons to change
categories quickly.
e.g.
2
To select an XM channel
Press
• To change the channels, repeat steps 1 and 2.
• You cannot select XM channel 0.
•Hold down the buttons to change XM
channels quickly.
e.g.
• To cancel: press [ENTER] in step 1.
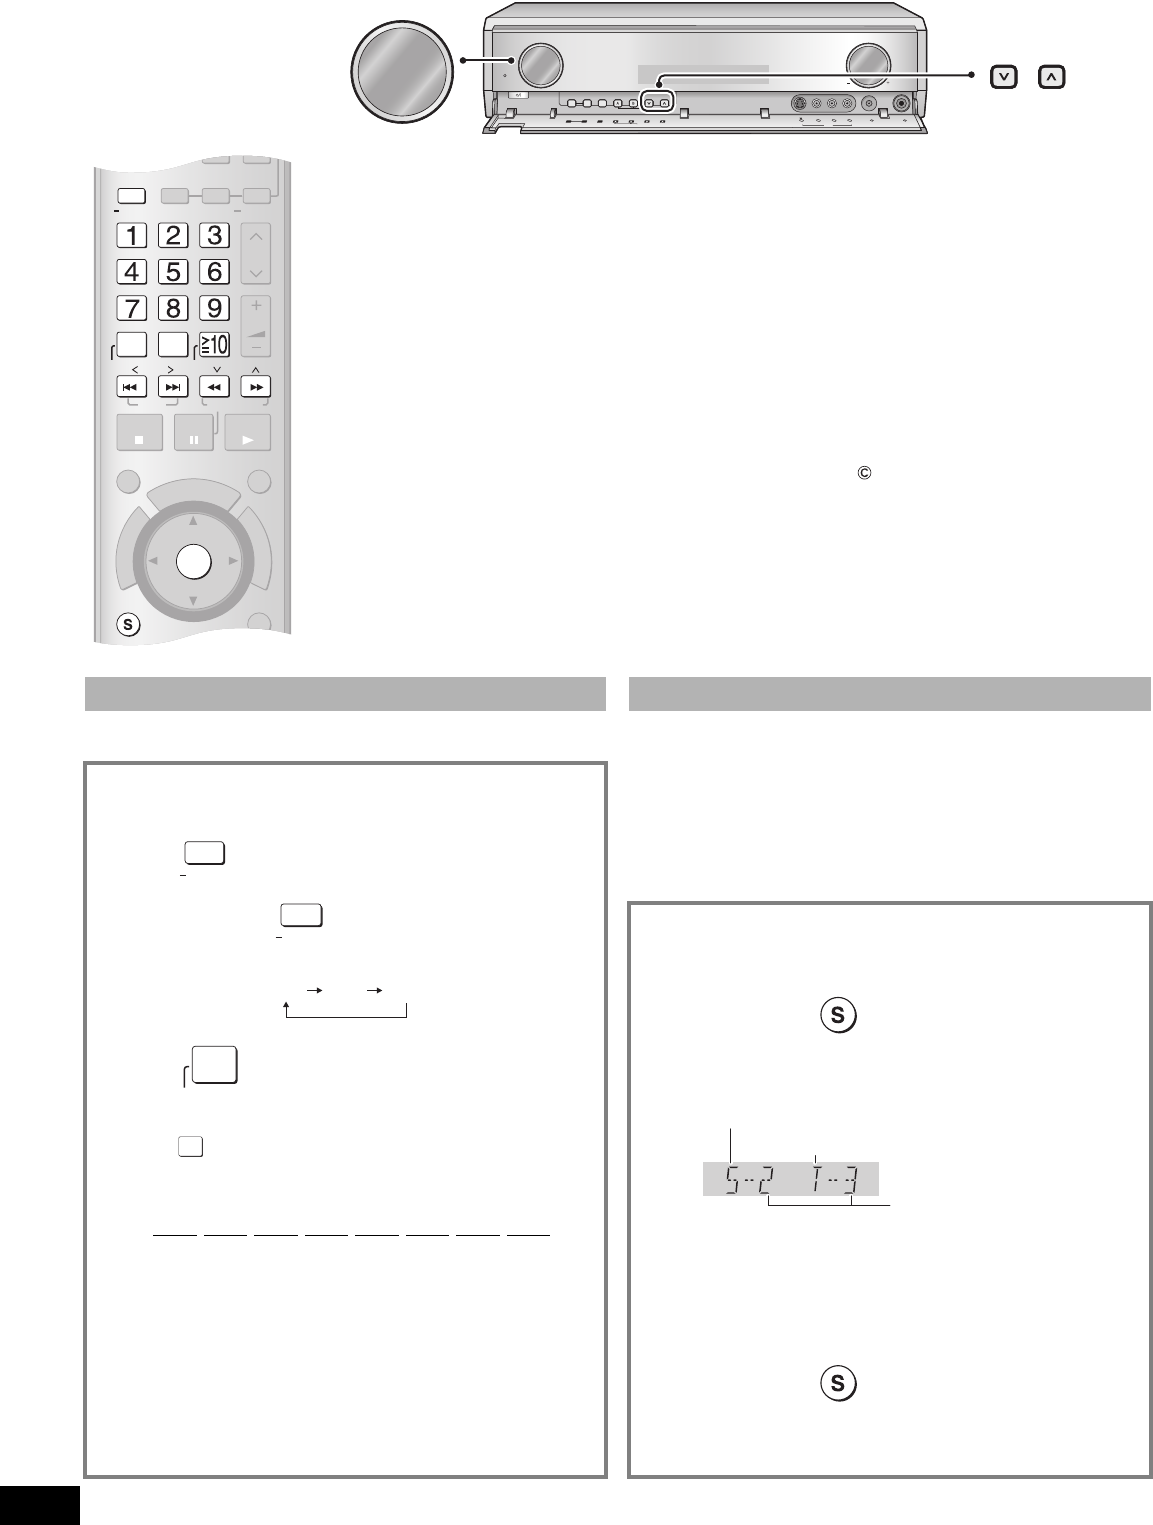
Displaying the XM channel information
The display can be changed to inform broadcast contents such as XM channel number, channel name, category, song title (program
title) and artist name (feature).
The display changes each time you press
while receiving XM broadcast.
• The unit memorizes the display item even if you turn it off.
TUNER
BAND
FMAMXM
TUNER
BAND
0
DISC
DIRECT
TUNING
XM CH
XM CAT
Category
XM CH
Channel number
(Factory setting)
XM DISPLAY
Operations
XM
®
Satellite Radio
44
RQT8739
XM
®
Satellite Radio
• Preset channels (XM CH) 1 to 15 all contain XM channel 1 in the factory setting.
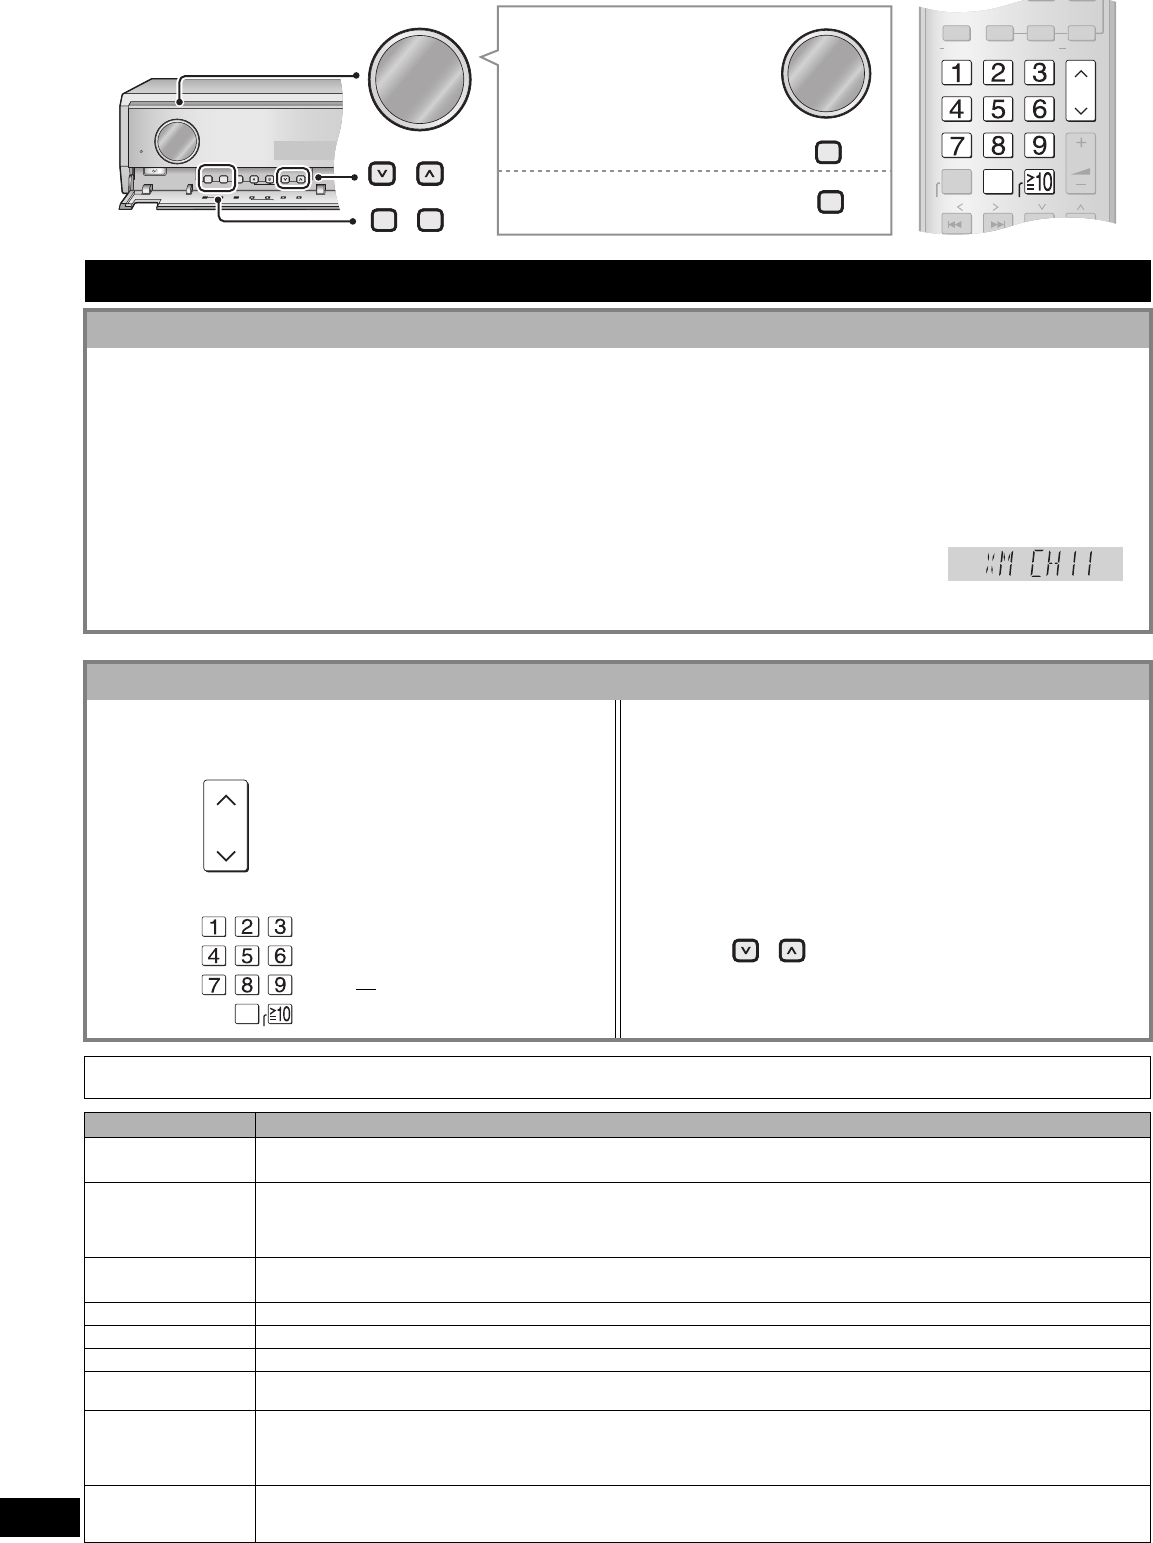
Preset tuning
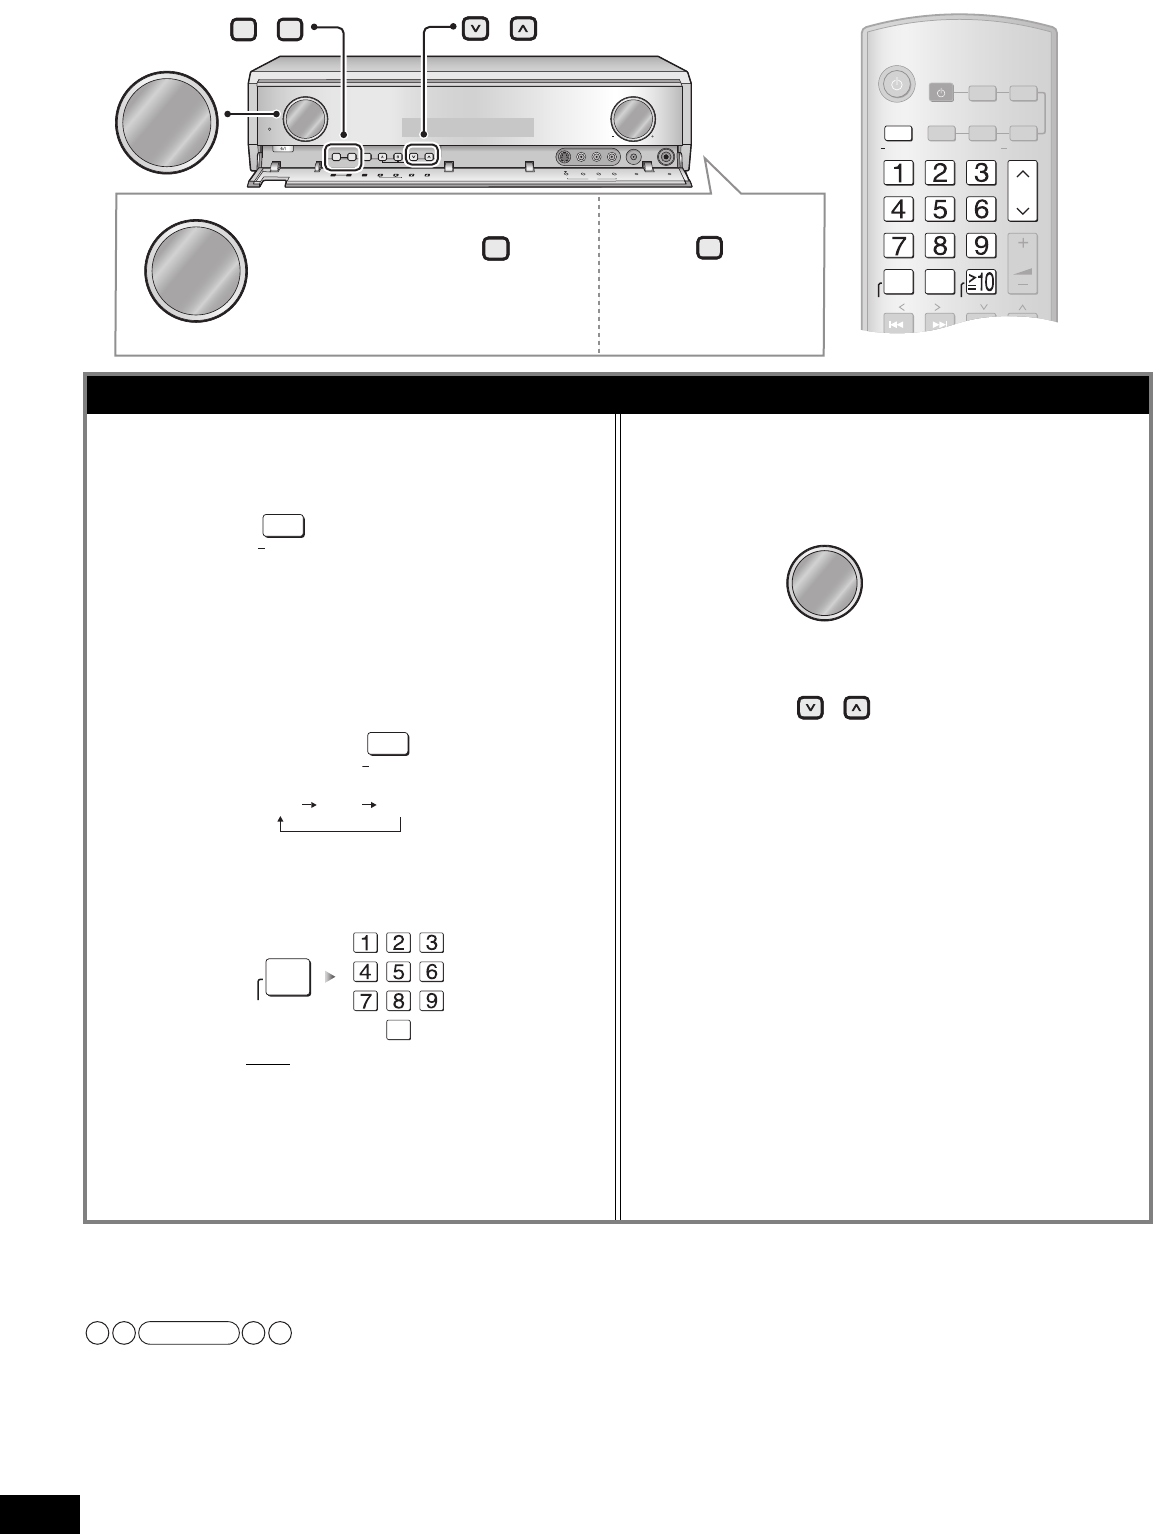
Presetting your favorite XM channels (using the unit)
Channel presets allow you to quickly and conveniently select your favorite XM channels. Up to 15 XM channels can be stored as channel presets.
1Tune to the channel you want to preset.(á page 43)
• You cannot preset XM channel 0. Select other channels.
2Press [-MENU/–SETUP, RETURN] to enter the MENU.
3
Select “TUNER ”
and confirm the setting.
4
Select “MEMORY ”
and confirm the setting.
5Select a preset channel (XM CH) and press [ENTER].
•“STORED ” is displayed.
• To return to step 1 (and continue presetting), press [TUNE 2 or 1].
6
Press [-MENU/–SETUP, RETURN] twice to select “EXIT ” and press [ENTER].
e.g.
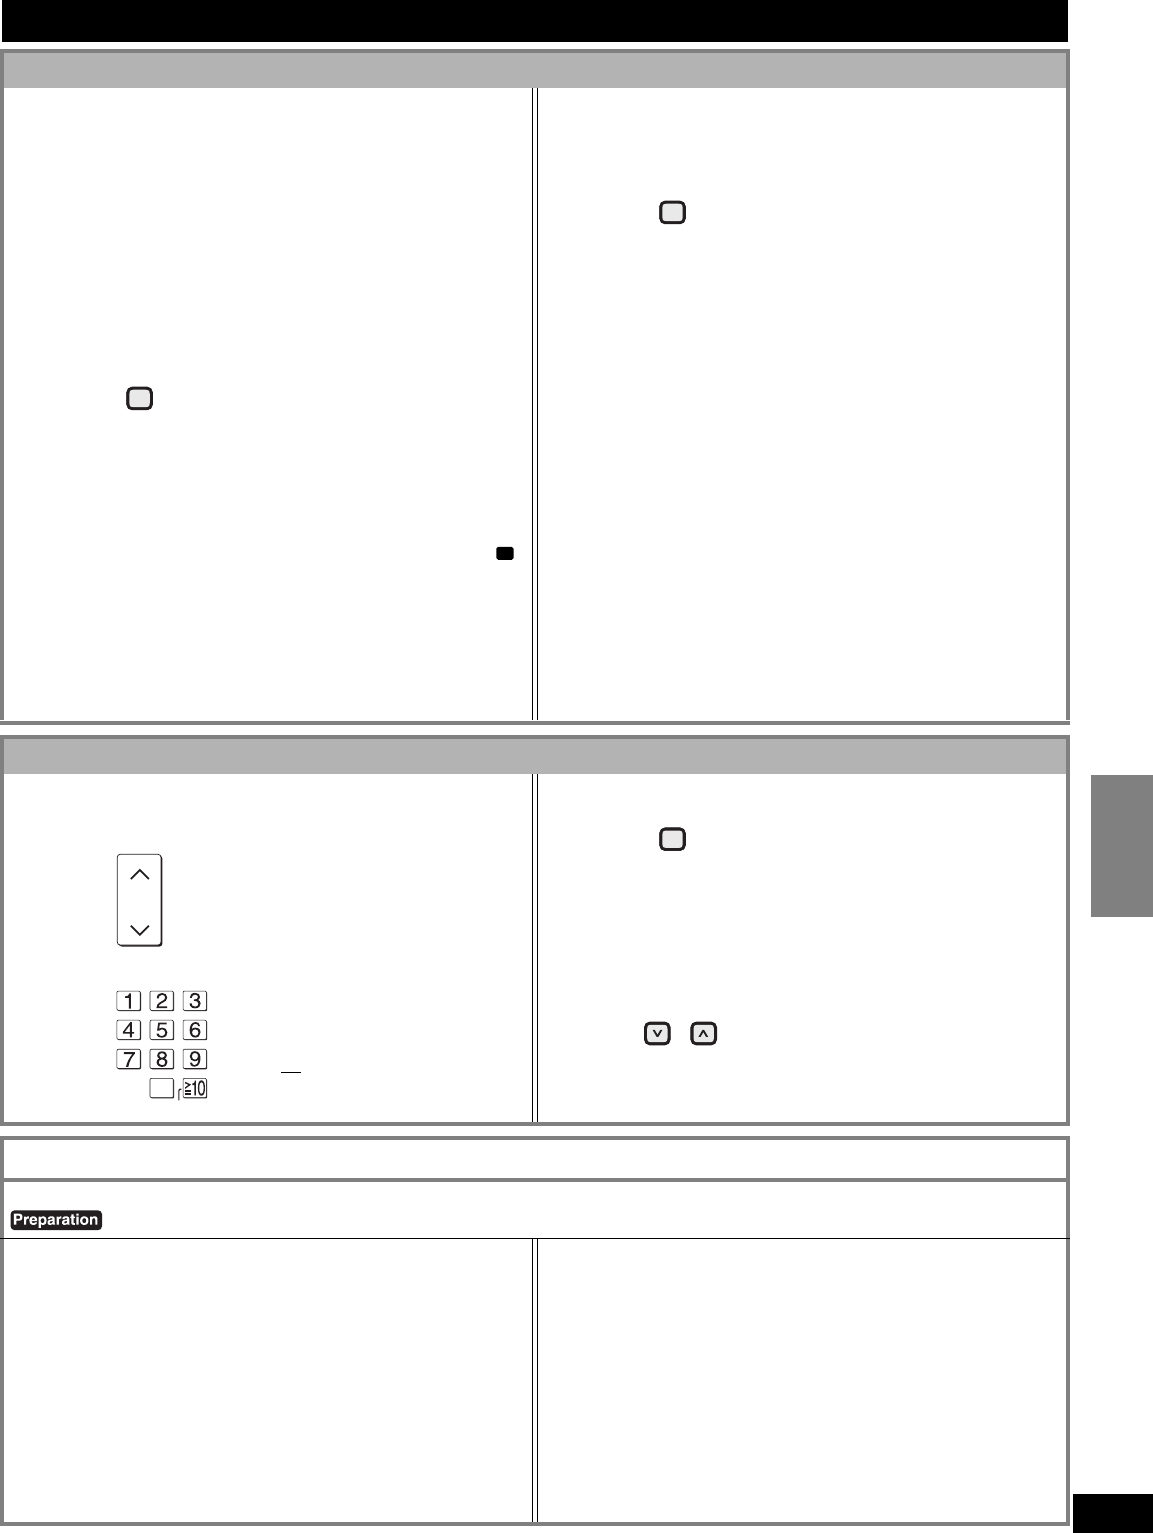
Selecting the channel presets
(Using the remote control) (Using the unit)
nTo search a channel up and down
1Press [-MENU/–SETUP, RETURN] to enter the MENU.
2
Select “TUNER ”
and confirm the setting.
3
Select “TUNE MODE ”
and confirm the setting.
4
Select “PRESET ”
and confirm the setting.
5Press [-MENU/–SETUP, RETURN] twice to
select “EXIT ” and press [ENTER].
6Press to select a preset channel.
• Hold down the button to change channels faster.
•Select “MANUAL ” in step 4 when you wish to perform manual
tuning (á page 43).
Press
•Hold down the button to change
channels faster.
nTo select preset channels (XM CH) directly
Press
To select a two digit number
e.g. 15
: [ ≧10, ENTER] → [1] → [5]
XM advisory messages
MessageStatus and remedy
ANTENNA
(flashing)
•The XM Connect & Play antenna, or XM Mini-Tuner and Home Dock is not properly connected.
Check the connection and make sure the antenna cable is not damaged.
UPDATING
(flashing)
•
The XM Connect & Play antenna, or XM Mini-Tuner and Home Dock is being updated with the latest encryption code. Wait a few seconds for the update to complete.
•You may have selected an XM channel that has been blocked, or is no longer available with your subscription package.
If you want to inquire about receiving the channel, call XM’s Listener Care at 1-800-XMRADIO (1-800-967-2346) in the
U.S.A. In Canada, call XM’s Listener Care at 1-877-GET-XMSR (1-877-438-9677).
NO SIGNL
(flashing)
•The XM signal is too weak. Reorient the XM Connect & Play antenna, or XM Mini-Tuner and Home Dock for better reception.
•Make sure the antenna is properly connected.
LOADING
(flashing)
•
The XM Connect & Play antenna, or XM Mini-Tuner and Home Dock is receiving and decoding the broadcast information. Wait a few seconds for loading to complete.
OFF AIR (flashing)
•The selected XM channel is not broadcast now. Select a different channel.
XM ---
•The selected XM channel is not available. Select a different channel.
---
•Supplemental text information, such as the song title or artist name is not available for that particular broadcast.
You can change the type of XM channel information that is displayed by pressing [S, XM DISPLAY].
(You can receive only
promotional XM
channels)
•
Your XM Connect & Play antenna, or XM Mini-Tuner and Home Dock has not been activated, or your subscription has expired.
•To activate your XM Connect & Play antenna, or XM Mini-Tuner and Home Dock, or to renew your subscription, visit XM on
the Web at www.xmradio.com or call XM’s Listener Care at 1-800-XMRADIO (1-800-967-2346) in the U.S.A. In Canada, visit
www.xmradio.ca or call XM’s Listener Care at 1-877-GET-XMSR (1-877-438-9677). You should have your Radio ID ready.
(Sometimes “
TUNER
XM
” stays on the
display for a long time)
•When this happens, the unit is taking time to receive broadcast. Please wait for a while.
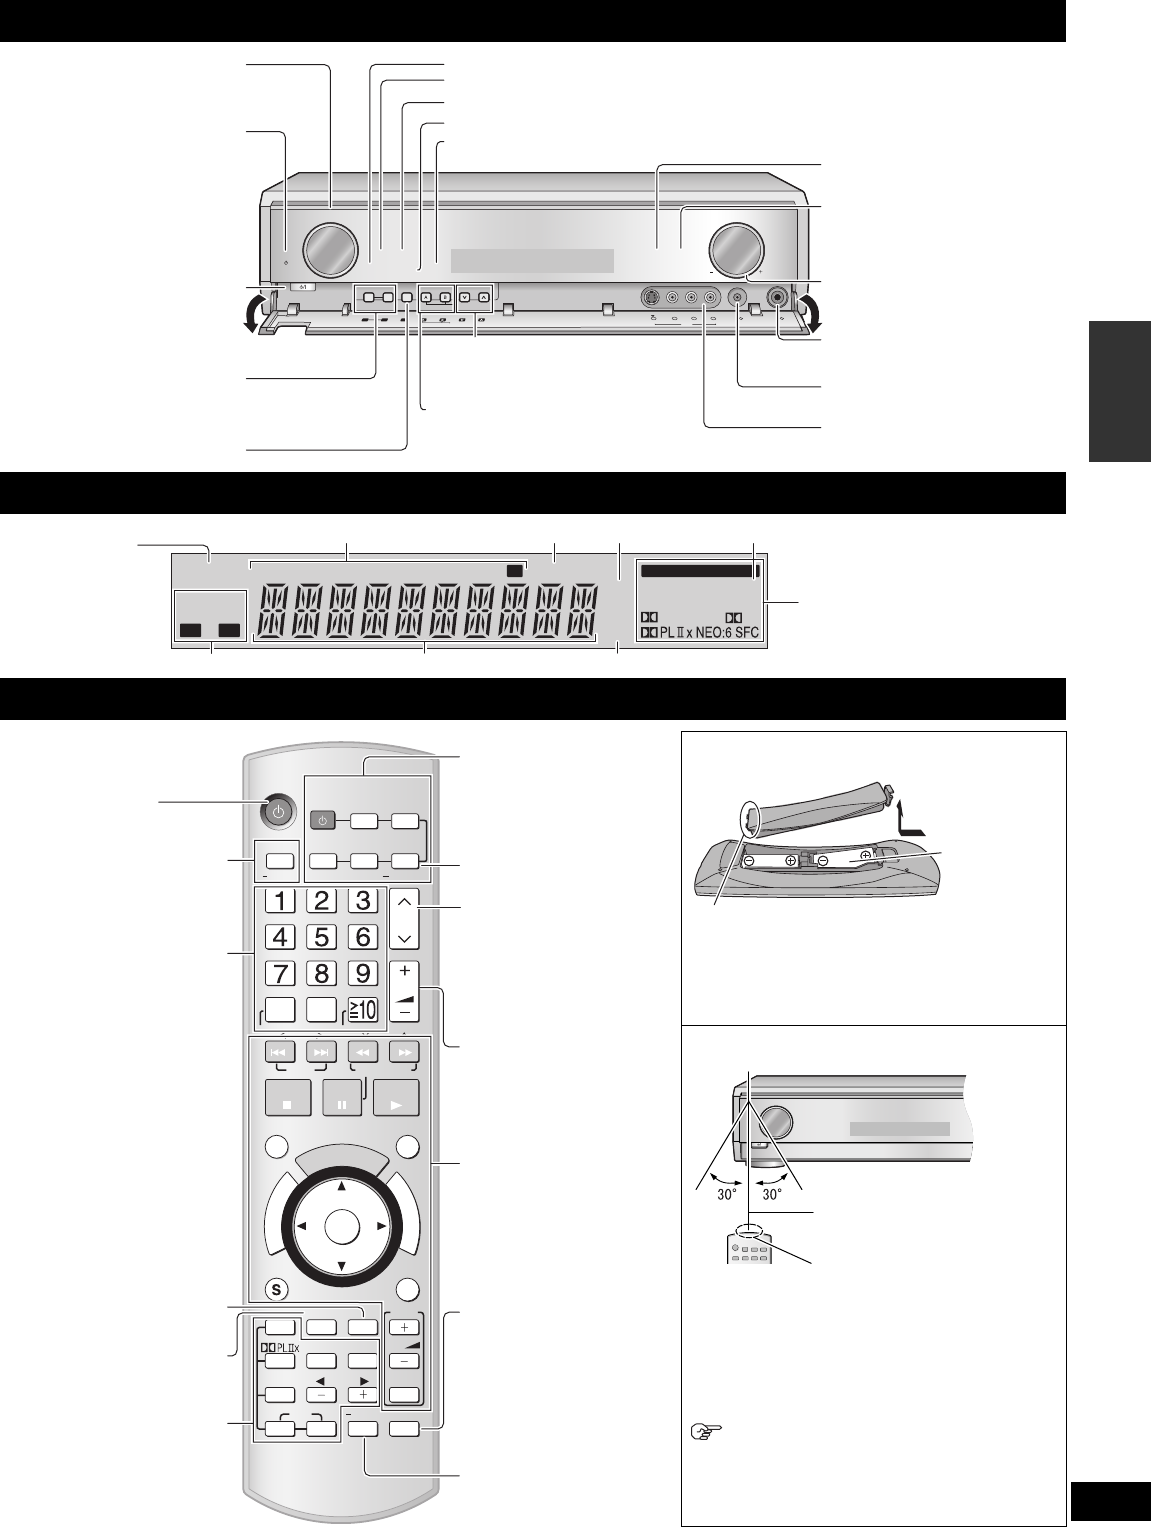
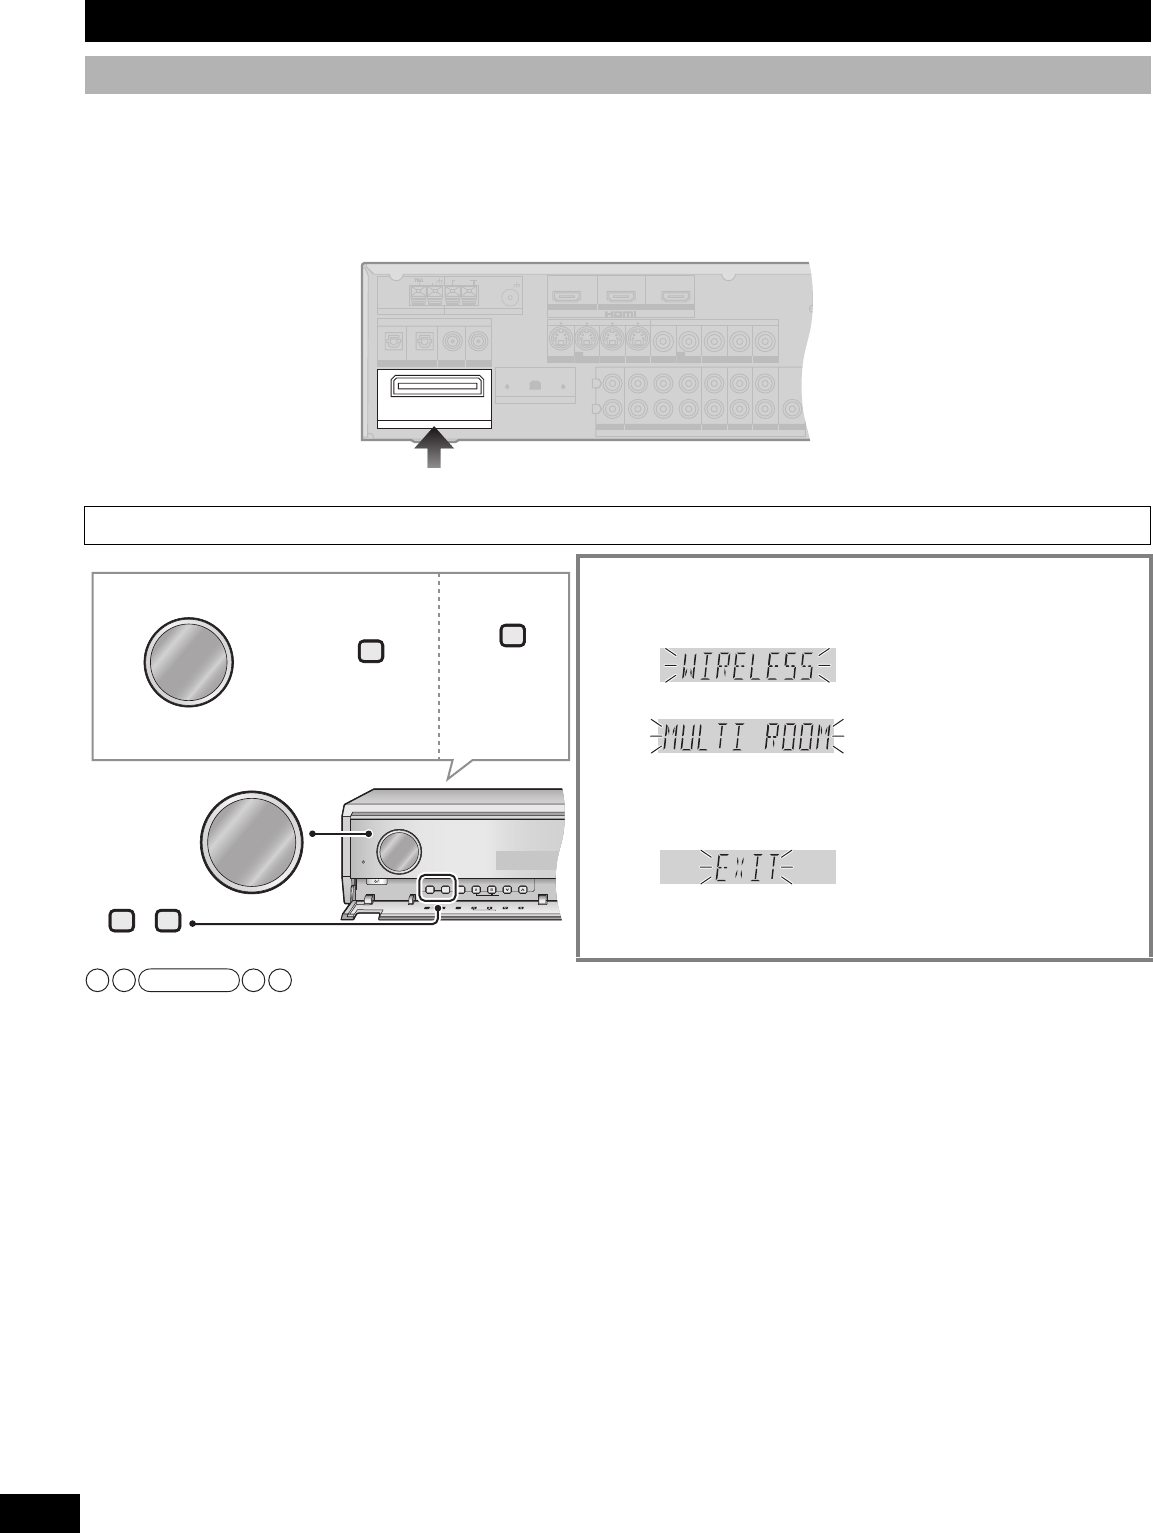
SPEAKERS
-MENU/
-
SETUP
ENTER
INPUT SELECTOR
BI-AMP
SURROUND
SURROUND
SPEAKERS
AUTO DETECTOR
-
MULTI ROOM
TUNE
ADVANCED DUAL AMP
POWER
WIRELESS READY
MULTI ROOM
RETURN
SURROUND
SPEAKERS
ENTER
-
MENU/
-
SETUP
AUTO DETECTOR
-
MULTI ROOM
RETURN
TUNE
INPUT SELECTOR
-
MENU/
-
SETUP
ENTER
RETURN
ENTER
-
MENU/
-
SETUP
RETURN
0
BD/DVD
PLAYER
ANALOG 6CH
VCRCD
TUNER
BAND
CH
VOLUME
DISC
ENTER
DIRECT
TUNING
XM CAT
XM CH
INPUT SELECTOR
TUNE
Basic operation
Press to confirm your
choice.
To return to the previous
display/To cancel
Turn to select.
TUNE
CH
0
ENTER
45
RQT8739
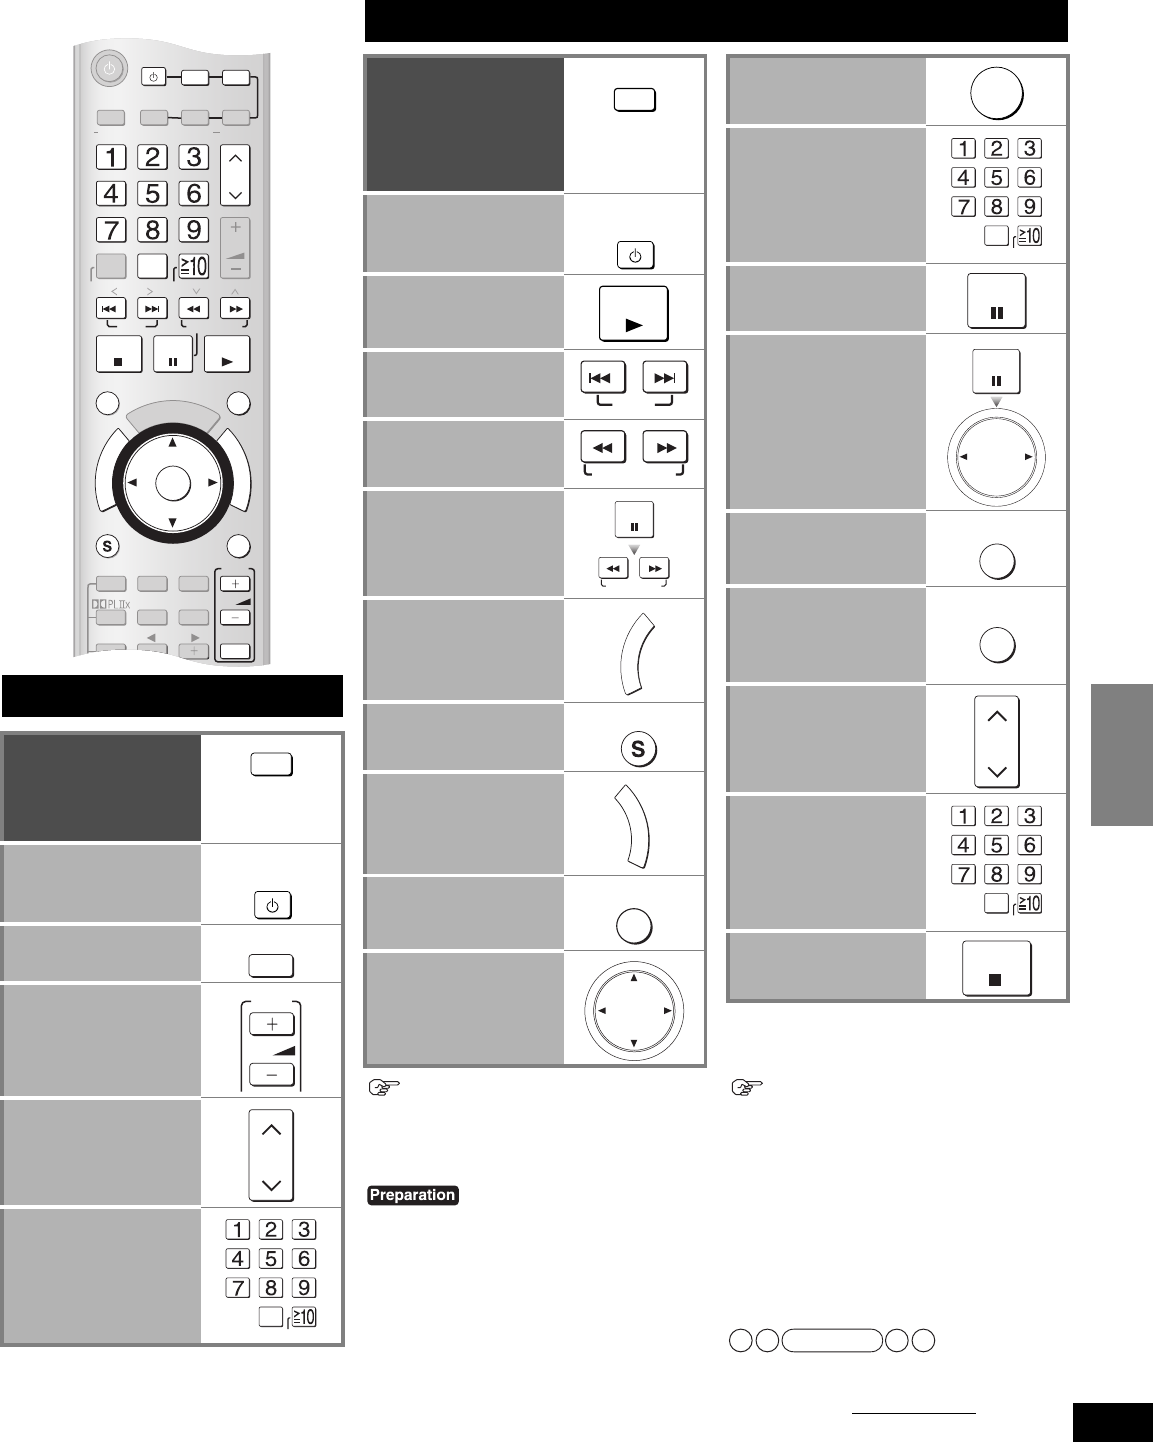
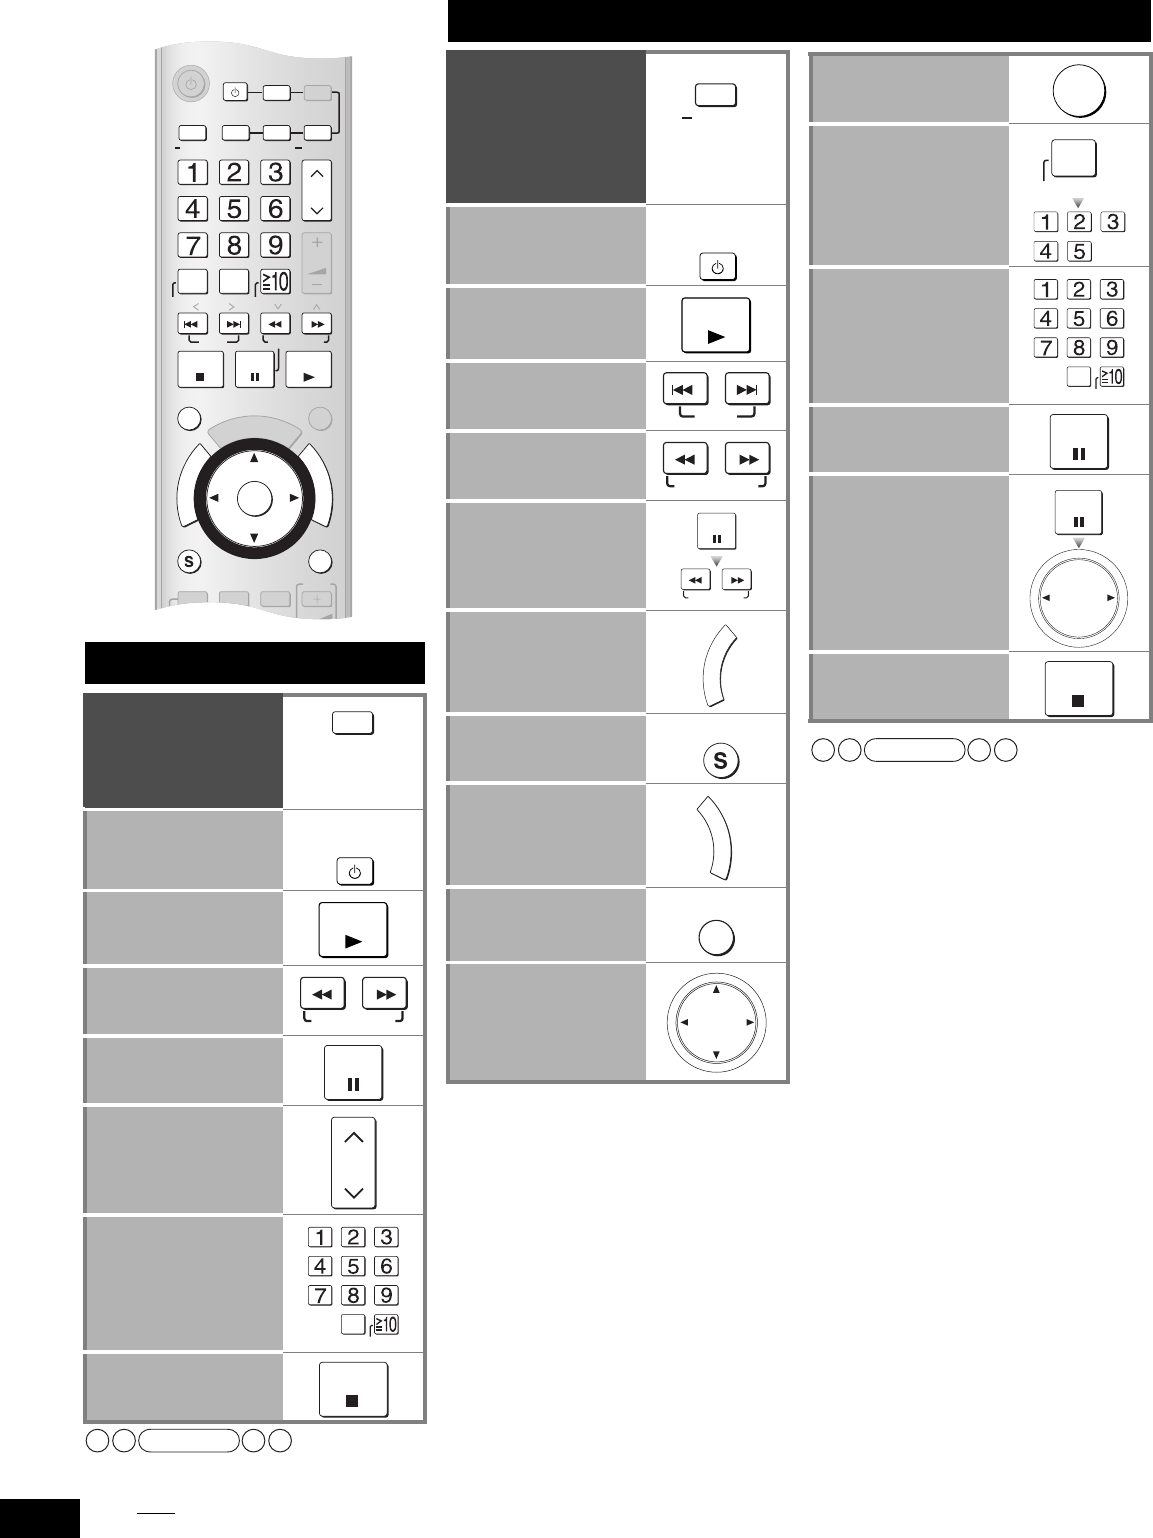
Remote controlling a TV or DVD recorder etc.
Besides this unit, you can operate a Panasonic TV, DVD recorder, DVD player, VCR or CD player (excluding certain models) using the
supplied remote control. See respective equipment’s operating instructions for detailed operations.
You may need to enter a code to operate some equipment (á page 47).
Remote controlling a TV
To switch the unit’s
input to “TV/STB ”/
To switch the remote
control to the TV
operation mode
Do not forget to
press this before
operating a TV.
To turn the TV on or
off
To switch the TV’s
input mode (TV/video)
To adjust the TV
volume
To select a channel
(When you make a
selection in rising or falling
order)
To select a channel
(When you select a
channel directly)
O
N
E
T
O
U
C
H
P
L
A
Y
D
I
R
E
C
T
N
A
V
I
G
A
T
O
R
T
O
P
M
E
N
U
F
U
N
C
T
I
O
N
S
0
RECEIVER
AV
SYSTEM
TV
RECORDER
DVD
BD/DVD
PLAYER
ANALOG 6CH
VCRCD
TUNER
BAND
CH
VOLUME
DISC
SKIP
SLOW/SEARCH
STOP
PAUSE
PLAY
DRIVE SELECT
CM SKIP
ENTER
SUB MENURETURN
OFF
SUBWOOFER
TV
LEVEL
EFFECT
VOL
NEO
:
6
SFC
TV/VIDEO
XM DISPLAY
ENTER
DIRECT
TUNING
XM CAT
XM CH
AUTO
DIMMER
Ai
m t
h
e remote contro
l
at t
h
e
equipment you wish to operate.
TV
AV
SYSTEM
TV/VIDEO
TV
VOL
CH
0
ENTER
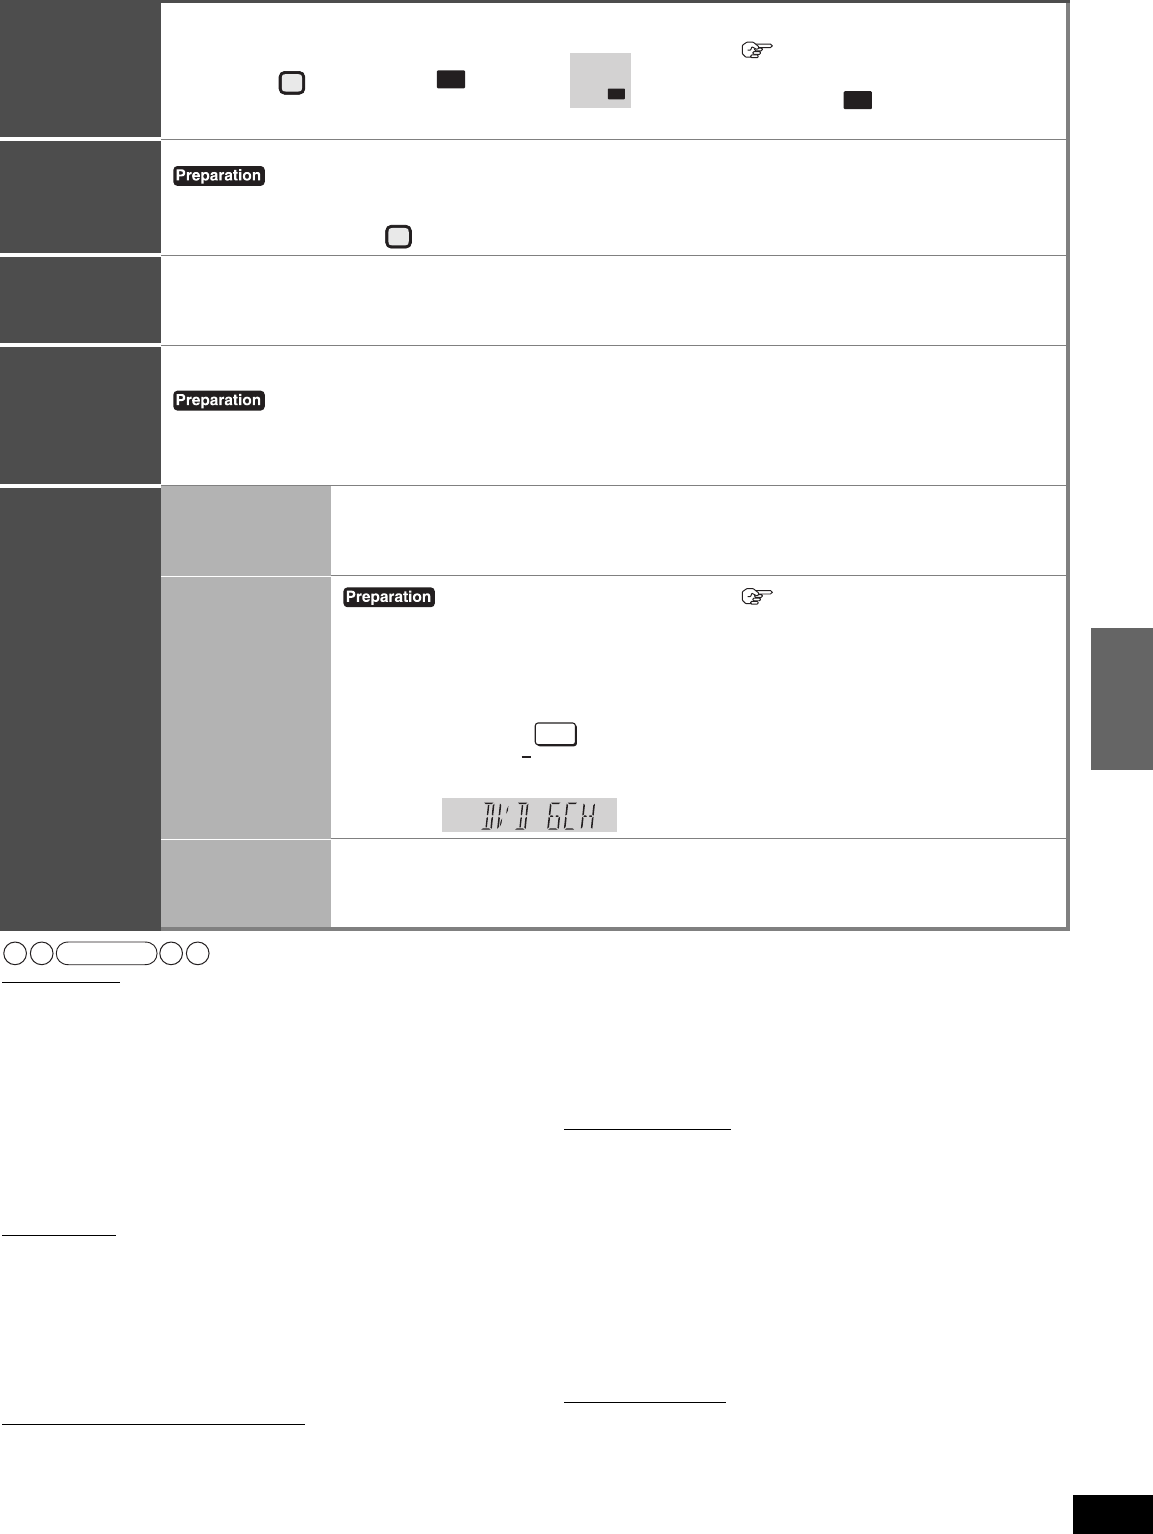
Remote controlling a DVD recorder
To switch the unit’s
input to “DVR ”/
To switch the remote
control to the DVD
recorder operation
mode
Do not forget to
press this before
operating a DVD
recorder.
To turn the DVD
recorder on or off
To start playback
To skip a track or
chapter
To search through the
disc
To play in
slow-motion
To show the direct
navigator
(or the top menu)
To show a sub menu
To show the
FUNCTIONS window
(while stopped)
To return to the
previous screen
To select an item
Press to select after pressing
[DIRECT NAVIGATOR, TOP
MENU], [S, SUB MENU, XM
DISPLAY], or [FUNCTIONS].
When operating a Panasonic DVD recorder
using the supplied remote control
Change the control setting on the supplied
remote control to match the DVD
recorder’s remote control mode.
Confirm the DVD recorder’s remote
control mode in its operating instructions.
1Press [DVD RECORDER].
2Press and hold [ENTER] together with
[1], [2], or [3] for 2 seconds or longer.
•[Mode 1], [Mode 2], or [Mode 3] is set on
the remote control according to the
pressed button.
• The factory setting is [Mode 1].
When DVD recorder drives do not switch
The condition may mean the DVD recorder does not
recognize the signal this unit’s remote control transmits.
Switch the drives again after changing the
signal in the following procedure.
1Press [DVD RECORDER].
2Press and hold [ENTER] together
with [8] for 2 seconds or longer.
• To return: In step 2 above, press and hold
[ENTER] together with [9] for 2 seconds
or longer.
When you operate a DVD recorder with
built-in VCR, press [DRIVE SELECT] to
select a choice other than VCR
.
RECORDER
DVD
AV
SYSTEM
PLAY
SKIP
SLOW/SEARCH
PAU SE
SLOW/SEARCH
D
I
R
E
C
T
N
A
V
I
G
A
T
O
R
T
O
P
M
E
N
U
SUB MENU
F
U
N
C
T
I
O
N
S
RETURN
Note
To confirm the
selected item
To select a track or
chapter directly
•Some of the models
require you to press
[ENTER] to confirm after
pressing number buttons.
To pause
To move forward or
backward frame by
frame
To skip a minute
forward
To switch DVD
recorder drives (HDD,
DVD drive, and SD
drive etc.)
To select a channel
(When you make a
selection in rising or falling
order)
To select a channel
(When you select a
channel directly)
To stop playback
ENTER
0
ENTER
PAUSE
PAUSE
CM SKIP
DRIVE SELECT
CH
0
ENTER
STOP
XM
®
Satellite Radio/Remote controlling a TV or DVD recorder etc.
Operations
46
RQT8739
Remote controlling a TV or DVD recorder etc.
When you operate a DVD recorder with
built-in VCR, press [DRIVE SELECT] to
select VCR
.
Remote controlling a VCR
To switch the unit’s
input to “VCR ”/
To switch the remote
control to the VCR
operation mode
Do not forget to
press this before
operating a VCR.
To turn the VCR on or
off
To start playback
To fast forward/rewind
a tape
To pause
To select a channel
(When you make a
selection in rising or falling
order)
To select a channel
(When you select a
channel directly)
To stop playback
O
N
E
T
O
U
C
H
P
L
A
Y
D
I
R
E
C
T
N
A
V
I
G
A
T
O
R
T
O
P
M
E
N
U
F
U
N
C
T
I
O
N
S
0
RECEIVER
AV
SYSTEM
TV
RECORDER
DVD
BD/DVD
PLAYER
ANALOG 6CH
VCRCD
TUNER
BAND
CH
VOLUME
DISC
SKIP
SLOW/SEARCH
STOP
PAUSE
PLAY
DRIVE SELECT
CM SKIP
ENTER
SUB MENURETURN
OFF
SUBWOOFER
TV
LEVEL
EFFECT
VOL
DIMMER
XM DISPLAY
ENTER
DIRECT
TUNING
XM CAT
XM CH
Aim the remote control at the
equipment you wish to operate.
VCR
AV
SYSTEM
PLAY
SLOW/SEARCH
PAUSE
CH
0
ENTER
STOP
Note
Remote controlling a DVD player
To switch the unit’s
input to “BD/DVD ”/
To switch the remote
control to the DVD
player operation mode
Do not forget to
press this before
operating a DVD
player.
To turn the DVD player
on or off
To start playback
To skip a track or
chapter
To search through the
disc
To play in
slow-motion
To show the direct
navigator
(or the top menu)
To show a sub menu
To show the
FUNCTIONS window
(while stopped)
To return to the
previous screen
To select an item
Press to select after pressing
[DIRECT NAVIGATOR, TOP
MENU], [S, SUB MENU, XM
DISPLAY], or [FUNCTIONS].
BD/DVD
PLAYER
ANALOG 6CH
AV
SYSTEM
PLAY
SKIP
SLOW/SEARCH
PAU SE
SLOW/SEARCH
D
I
R
E
C
T
N
A
V
I
G
A
T
O
R
T
O
P
M
E
N
U
SUB MENU
F
U
N
C
T
I
O
N
S
RETURN
[FUNCTIONS] activates display functions
on some of the Panasonic DVD players.
To confirm the
selected item
To specify a disc
(5-disc changer only)
To select a track or
chapter directly
•Some of the models
require you to press
[ENTER] to confirm after
pressing number buttons.
To pause
To move forward or
backward frame by
frame
To stop playback
ENTER
DISC
DIRECT
TUNING
0
ENTER
PAUSE
PAUSE
STOP
Note
47
RQT8739
Remote controlling a CD player
To switch the unit’s
input to “CD ”/
To switch the remote
control to the CD
player operation
mode
Do not forget to
press this before
operating a CD
player.
To turn the CD player
on or off
To start playback
To skip a track
To search through the
disc
To pause
To specify a disc
(3-or 5-disc changer)
To start play from a
specified disc [MEGA
CD changer] (holds
more than 50 discs)
To select a track
directly
To stop playback
CD
AV
SYSTEM
PLAY
SKIP
SLOW/SEARCH
PAUSE
DISC
DIRECT
TUNING
0
PLAY
DISC
DIRECT
TUNING
0
ENTER
STOP
Two or more Panasonic audio equipment
may start functioning when you operate
the unit using the supplied remote control.
Set the unit’s remote control mode to
“REMOTE 2” in such cases.
Do the following to set the same number
(2) as the remote control code.
Using two or more Panasonic equipment
(a mini component system, an AV amp etc.)
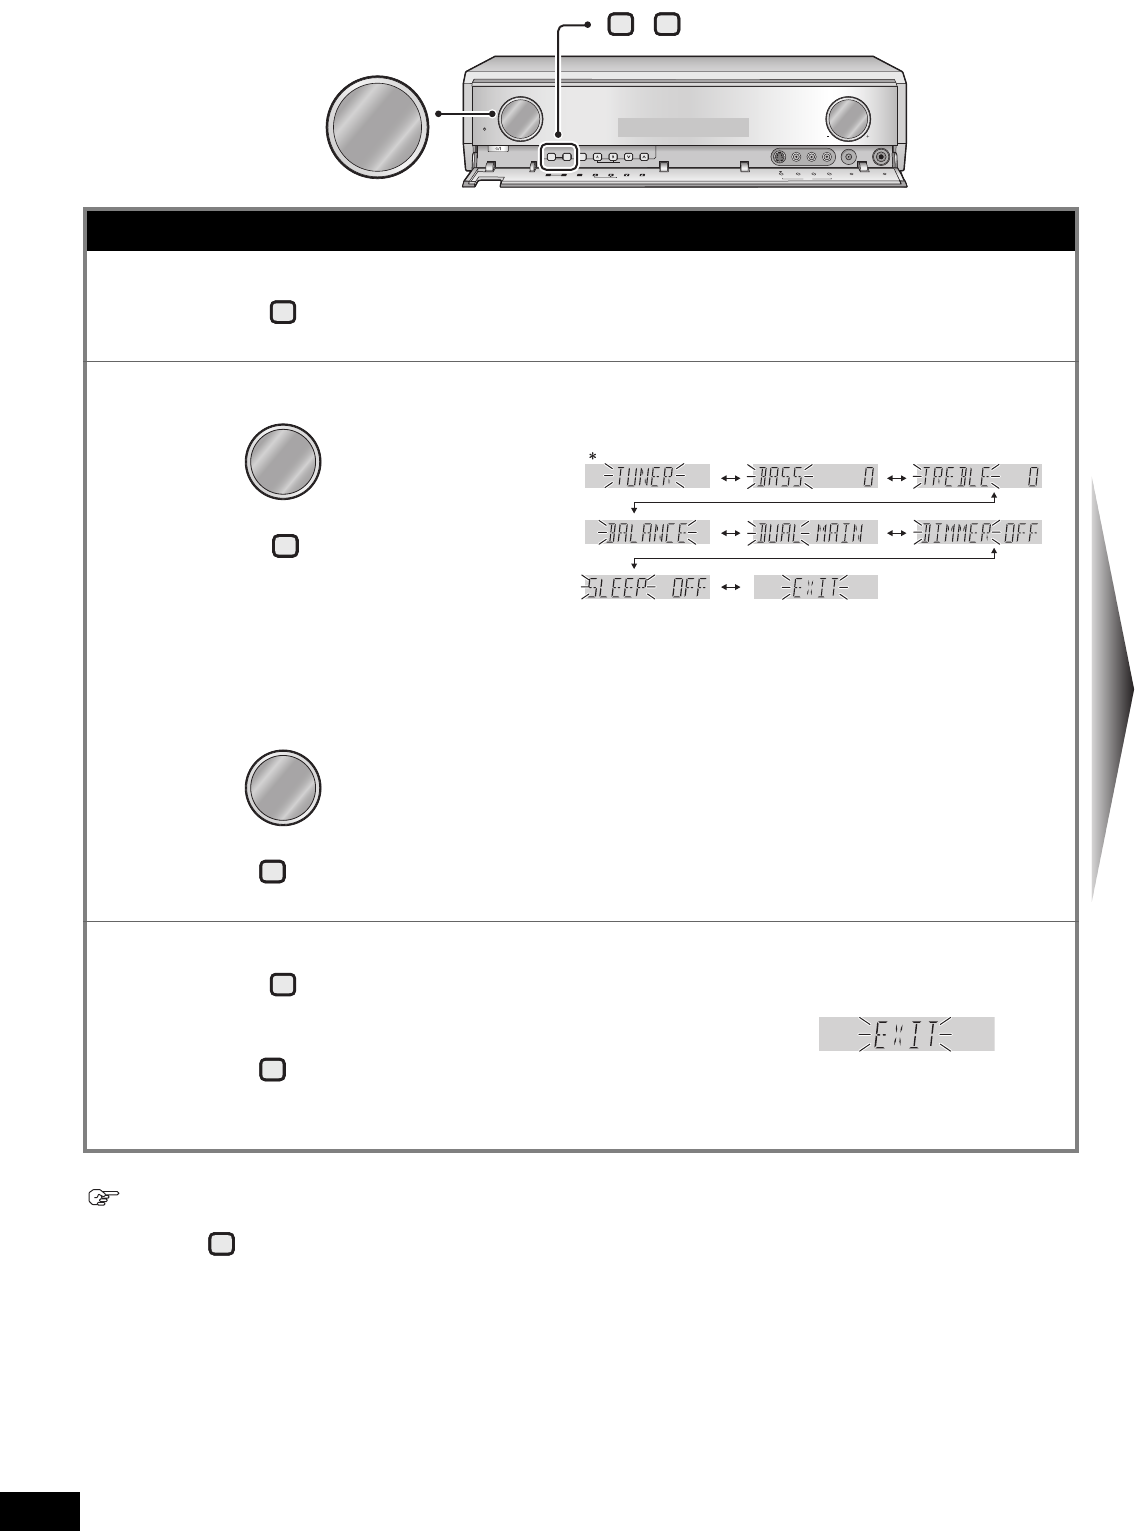
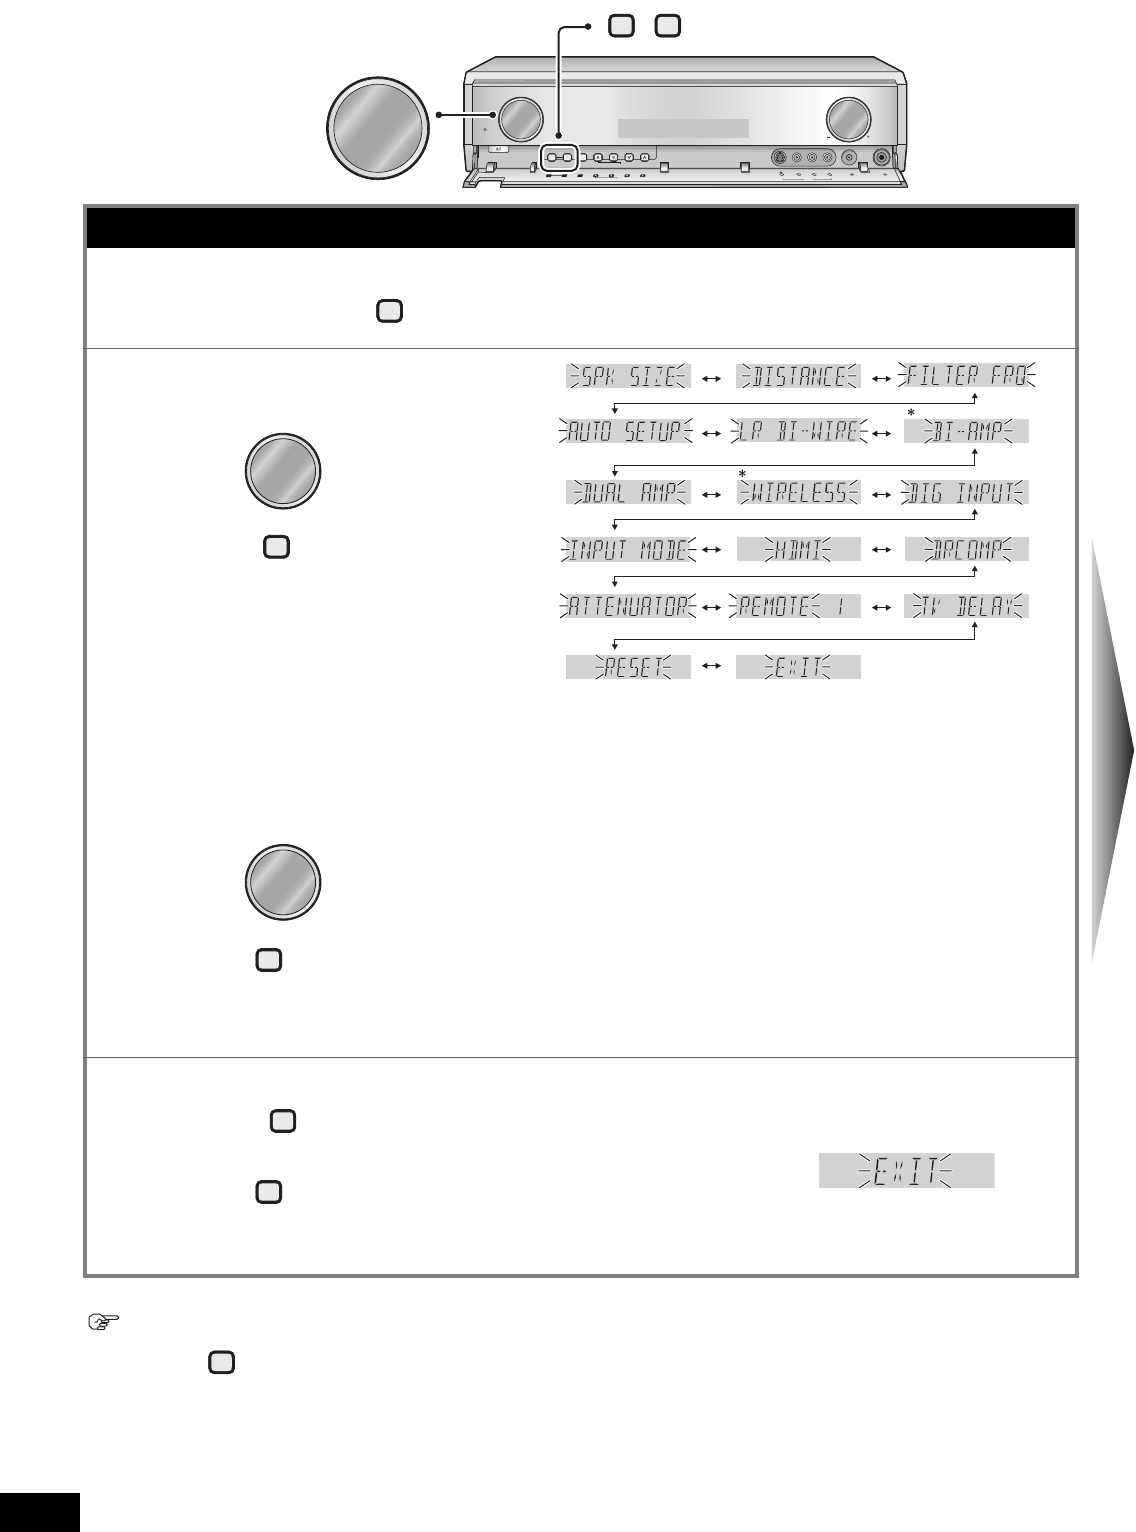
Operation on the unit
1
Press and hold [-MENU/
–SETUP, RETURN] for about
2 seconds to enter the SETUP.
2
Select and confirm the choice.
3
Select and confirm the choice.
4Select and finish the setting.
Operation on the remote control
5Press
6Press and
simultaneously and hold
them in the position for
about 2 seconds.
When you return the remote
control code to “1 ”
•
Operation on the unit: select “
1
” in step
3
.
•
Operation on the remote control: in step
6
, press [ENTER] and [1] simultaneously
and hold them in the position for about 2
seconds.
SPEAKERS
-MENU/
-
SETUP
ENTER
INPUT SELECTOR
BI-AMP
SURROUND
SURROUND
SPEAKERS
AUTO DETECTOR
-
MULTI
ADVANCED DUAL AMP
POWER
WIRELESS READY
MULTI ROOM
RETURN
SURROUND
SPEAKERS
ENTER
-
MENU/
-
SETUP
AUTO DETECTOR
-
MULTI R
RETURN
INPUT SELECTOR
INPUT SELECTOR
-
MENU/
-
SETUP
ENTER
RETURN
ENTER
-
MENU/
-
SETUP
RETURN
Basic operation
Turn to select.
Press to confirm
your choice.
To return to the
previous display/
To cancel
TUNER
BAND
ENTER
This remote control can operate Panasonic audio-
visual equipment that has remote control sensors.
You may need to change the remote control code.
It can also operate some other brands of TVs,
VCRs, and DVD players. Check the table for the
brand and enter the code as follows.
•Note that this remote control cannot
operate some equipment and that it may
not be able to perform some operations.
•Re-enter the codes after you change the
batteries.
Code table
Entering a code to operate other equipment
Changing the codes
The remote control outputs the on/off signal.
If the code is correct, the equipment
turns on or off.
If it doesn’t, try entering another code.
TVVCR
DVD player
PANASONIC0051/0250/
1492
0227/12440490/0491
AIWA––0641
APEX––0856/1352
BOSE––2023
DENON––0634
FISHER10960046/0047/
0054/0066
–
FUNAI–0184–
G.E.0047/0051/
0747
0760/0761/
1613
–
GOLD STAR12401237–
HARMAN KARDON
––0702
HITACHI11450042/16130664
JVC10530008/0067/
0384/0486
0623
KENWOOD––0737/1579
KONKA––0711
KOSS––1608
MAGNAVOX0056/0694/
1308/1694
0035/0226/
0563
–
MINTEK––1472
MITSUBISHI01500043/0075/
0196/1617
1521
NEC–0038/0050–
NEXTBASE
––0826
ONKYO
––0627/1891
ORITRON
––0651
PHILIPS–05630539
PIONEER1487–0571
QUASAR0051––
RAITE––0665
RCA0747/1047/
1490/1491
0042/00510522
SAMPO––0698
SAMSUNG––0573
SANYO–0104–
SHARP0093/01650048/00621606
SHINTOM–0753–
SILVANIA––0675
SMC––0811
SONY08100033/0034/
0586/0639/
0640/1232
1033/1604/
1607/1633
SYNPHONIC01800000–
TOSHIBA14880057/02101459
VENTURER––1821
WAVE––0709
YAMAHA––0817
ZENITH0016/001700390741/1605
VCR
TV
BD/DVD
PLAYER
ANALOG 6CH
0
TVVCRDVD player
Press and hold the button
corresponding to the equipment.
e.g. 0250
, Press [0] → [2] → [5] → [0]
Remote controlling a TV or DVD recorder etc.
Operations
48
RQT8739
Troubleshooting guide
Before requesting service, make the following checks. If you are in doubt about some of the check points, or if the remedies indicated in the chart do not solve the
problem, refer to “Customer Services Directory” on page 50 if you reside in the U.S.A., or refer to “Product information” on page 52 if you reside in Canada
.
nCommon problems
Pages
No power.
•Ensure the AC power supply cord is connected.9
No sound.
Sound is distorted.
•Turn the volume up.
•Check connections to speakers and other equipment.
•Turn on the speakers.
•Select the correct source.
•Change DIG INPUT setting to suit the type of connection you have made.
•Check that the digital signals can be decoded by this unit.
•Turn the muting off.
•Turn PCM FIX off.
•Recording of some DVD-Audio may not be possible due to copyright protection.
12, 26
7 to 9, 14 to 23
12, 26, 27
12, 26
37
39
31
37
–
Sound stops.
“OVERLOAD ” appears on the
display for about a second, and
the unit turns off.
•Determine and correct the cause, then turn the unit on.
Causes include:
- Shorting (bare wires touching) of positive and negative speaker wires.
- Using speakers with an impedance lower than that rated for this unit.
- Straining of the speakers through excessive volume or power.
- Using the unit in a hot environment without proper ventilation.
á
Consult your dealer if the problem occurs again after switching the unit on.
8
9, 20, 21
–
–
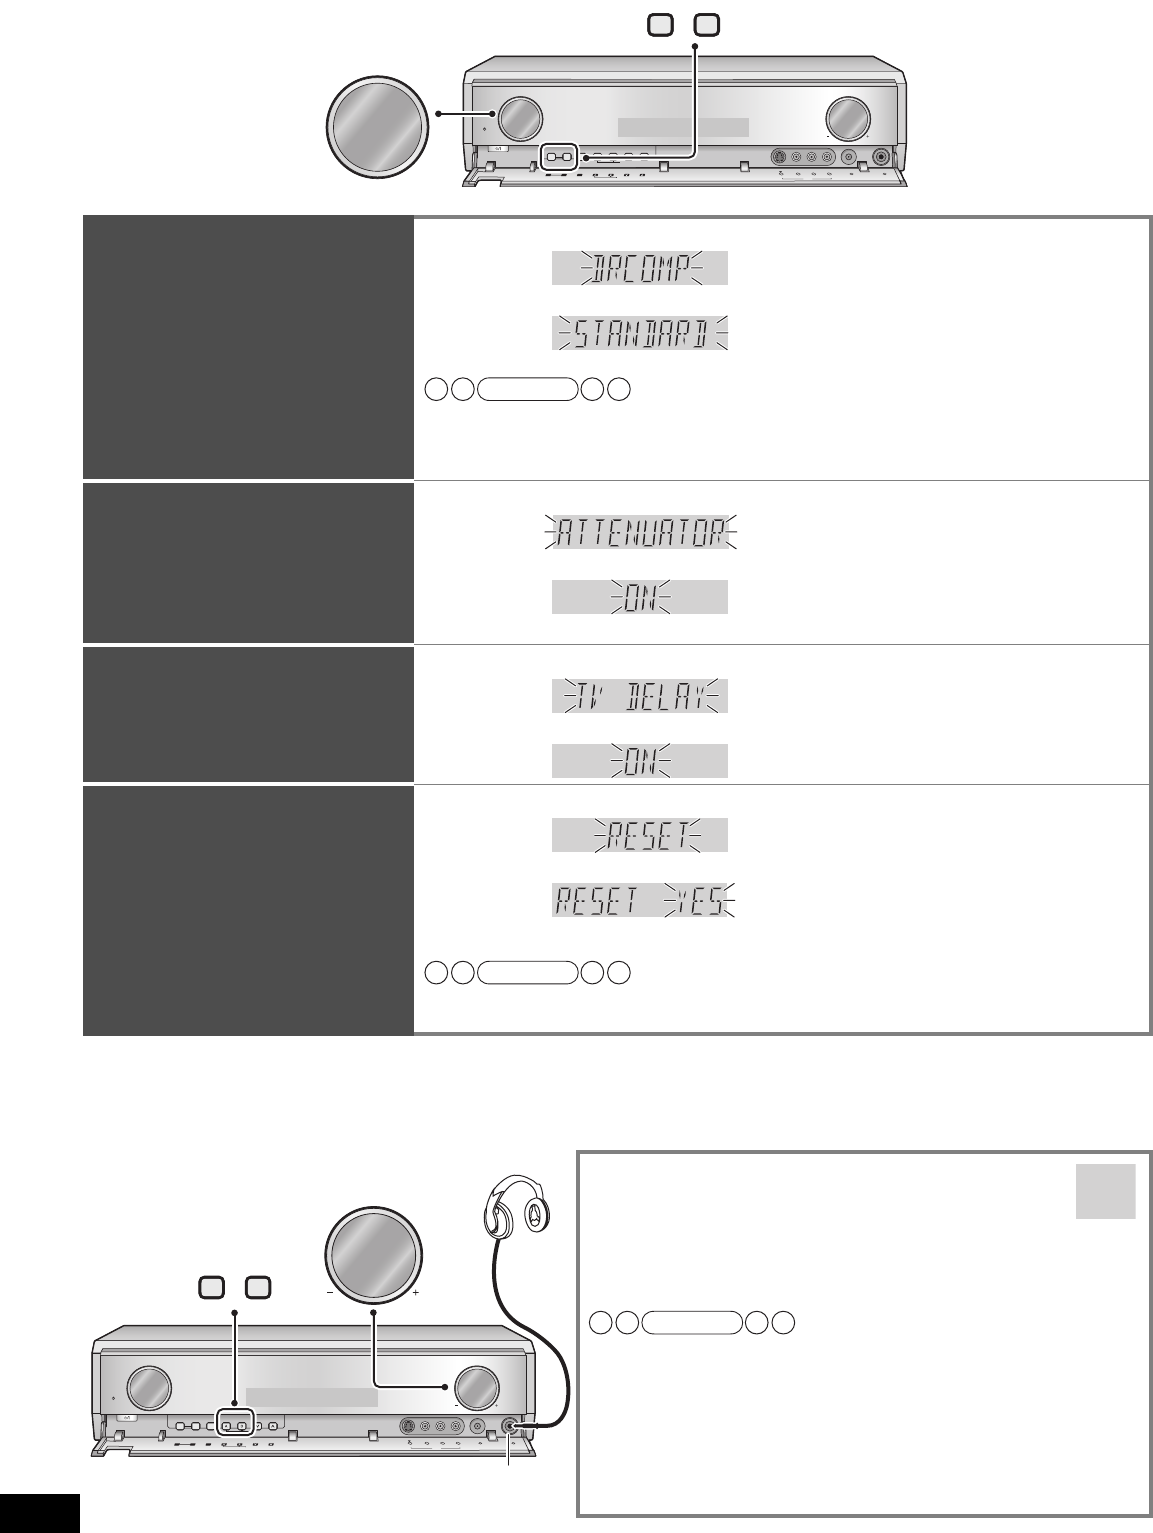
Analog input becomes distorted and
the message “OVERFLOW ” appears
on the display during playback.
•Switch the attenuator on.38
“F76 ” appears on the display and the unit turns off.
•Turn the unit off, disconnect the AC power supply cord, and consult your dealer.–
“F70 ” appears on the display.
•
Turn the unit off and on. When the message still appears, disconnect the AC power supply cord and consult your dealer.
–
“REMOTE 2 ” or “REMOTE 1 ”
appears on the display.
•Match the codes on the main unit and the remote control.47
Display is dim.
•Cancel “DIMMER ”.31, 33
Clicking sound is heard during
play.
• Depending on the input signal when playing DVD etc., the ADVANCED DUAL AMP function changes
automatically. A clicking sound is heard when it changes. This does not mean a problem with the unit.
á
You can also set the unit against automatic ADVANCED DUAL AMP operations.
–
36
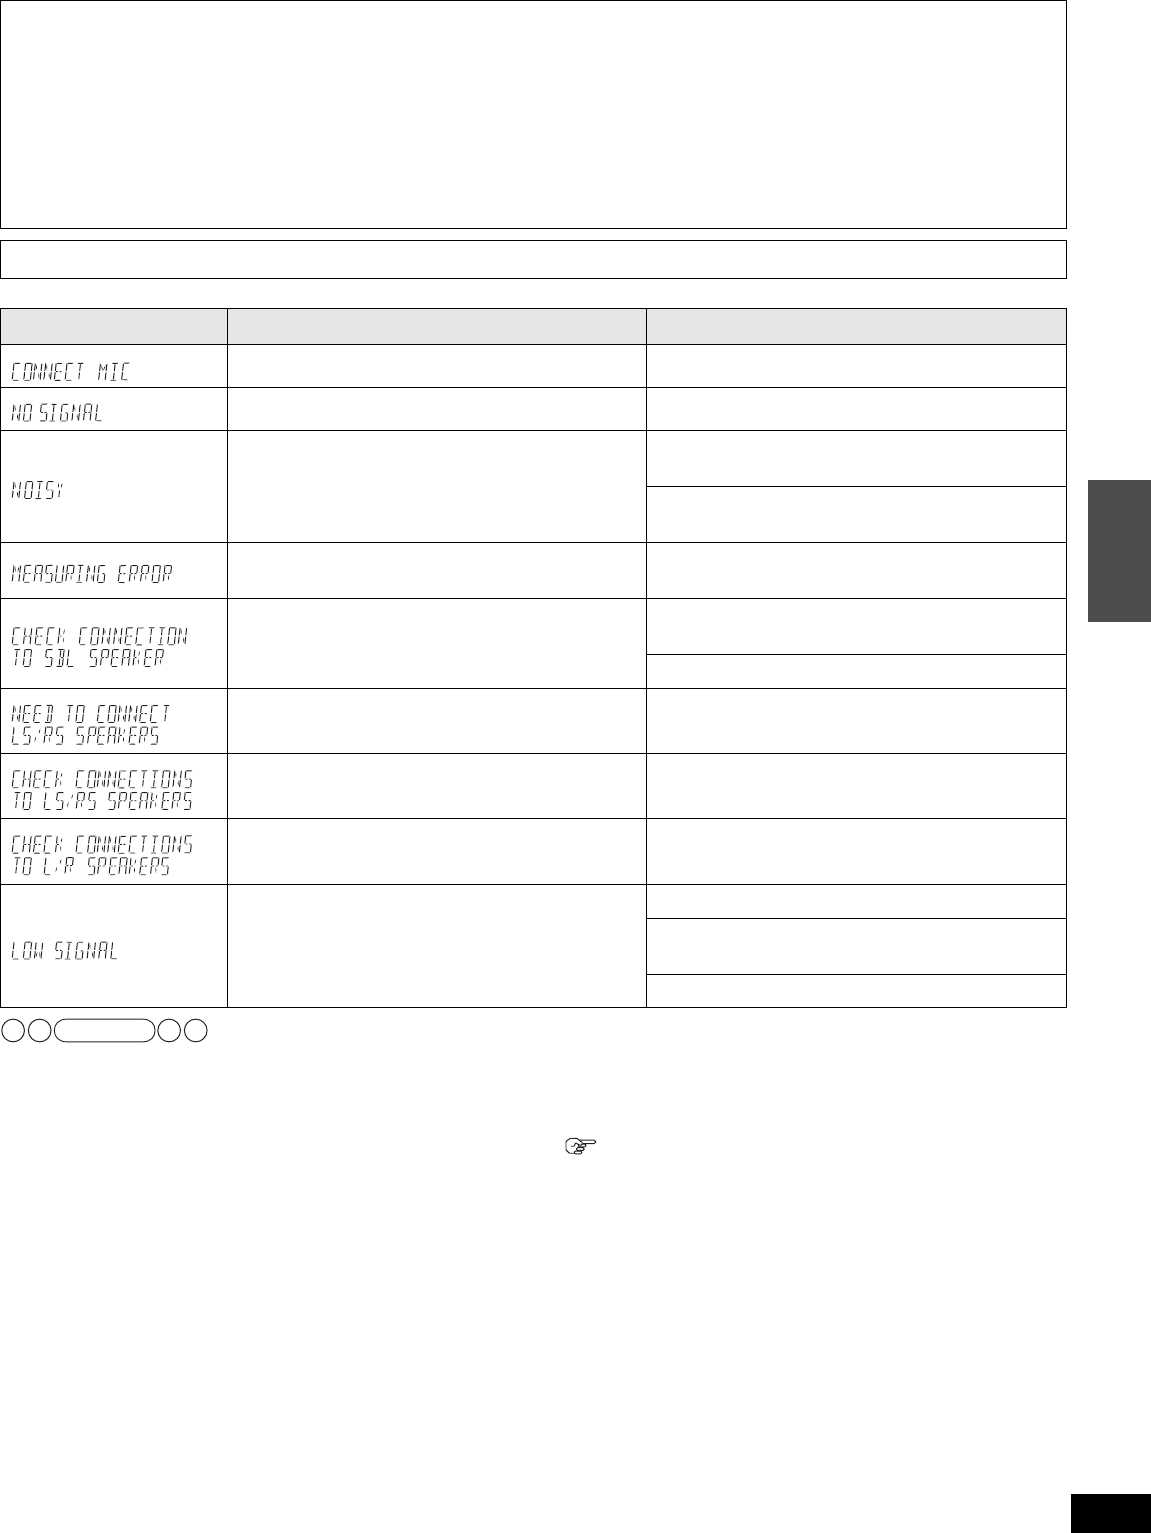
nSetup microphone
Pages
“MEASURING ERROR ” appears on the display.
•A speaker is too far. Check speaker locations.
•An error occurred from a cause that cannot be identified. Perform the auto speaker setup again.
24, 25
–
When speaker distances are set (
á
page
35), “
–
” appears on the display with the
speaker name such as “
L 10.0 –
”.
•It appears when polarity of a speaker is automatically adjusted.
á
You can set speakers against automatic polarity adjustment.36
When speaker distances are set (
á
page
35), “OVER
” appears on the display.
•It appears when the measured distance exceeds 45 feet (15 meters).
Check the speaker location.
–
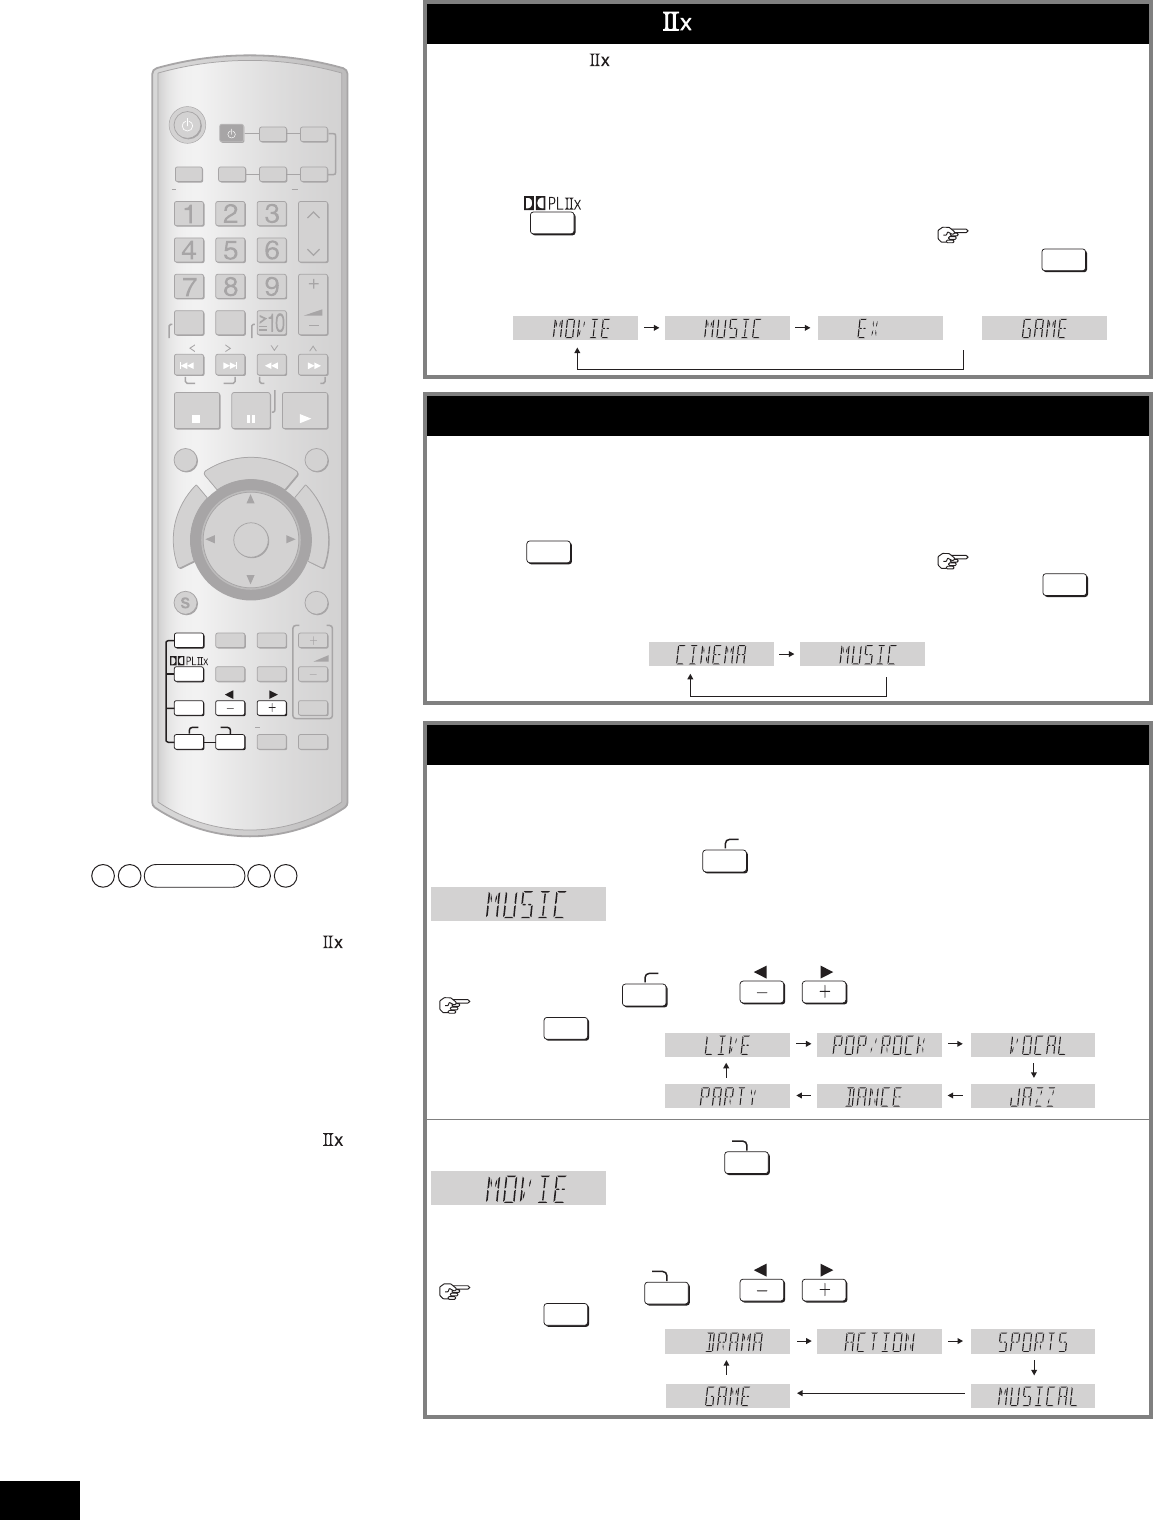
nSurround effects
Pages
Sound is not heard from the
center, surround or subwoofer
speakers.
•Ensure the speaker settings for your speakers are correct.
•Confirm Dolby Pro Logic , NEO:6, or SFC settings, and select an adequate mode.
•Press [SURROUND] on when you play 2-channel stereo sources.
10, 24, 25, 35
28 to 30
12, 26
Sound is not heard from the
surround back speaker.
•Ensure the speaker settings for your speakers are correct.
•Press [SURROUND] on.
10, 24, 25, 35
12, 26
Dolby Pro Logic , NEO:6, and
SFC are unavailable.
•Check if the center speaker, surround speakers, and surround back speakers are connected properly.
•Press [SPEAKERS A] on.
•You cannot use Dolby Pro Logic, NEO:6 or SFC on sources containing PCM signals with the sampling
frequency of 192 kHz.
•Cancel DVD ANALOG 6CH playback.
•You cannot use the effect when the input source contains dual audio signals in Dolby Digital or DTS formats.
9
12, 26
–
27
–
There is no DTS audio output.
There is audio output, but the DTS
decoder indicator is not lit.
•Set the DTS Digital Audio Output setting on the DVD player or DVD recorder to “Bitstream”.–
Sound is distorted when using the
Sound Field Control (SFC).
• Depending on the input source, sound may be distorted if you increase the SFC effect level. If this
happens, decrease the SFC effect level.
30
nRadio
Pages
The radio cannot be tuned in or
there is a lot of noise and
interference.
•Connect the appropriate antenna. (You may need an outdoor antenna or one with more elements.)
•Adjust the position of the FM or AM antenna.
•Reduce the treble.
•Turn off nearby televisions, video decks, DVD recorders, DVD players, and satellite receivers.
•Separate the antenna from other cables, cords, and appliances.
23
23
33
–
–
There is a lot of noise when listening to AM.
•Try changing the BEAT PROOF mode.41
nHDMI
Pages
When using an HDMI connection,
the first few seconds of sound is
cut off.
•Should you be playing a chapter on a DVD:
- Change the audio output setting on the DVD player or DVD recorder from “Bitstream” to “PCM”.
(6.1-channel sources will however be played as 5.1-channel.)
- Select “PCMFIX ” as instructed in “Setting input signals” when you play 2-channel stereo sources.
–
37
“U70-1-1 ” appears on the display.
•The equipment connected by the HDMI cable is not compatible with the unit’s copyright protection technology.
–
“U70-1-2 ” appears on the display.
•The unit has received a signal for a picture format that is incompatible with the HDMI connection. Check
the settings of the connected equipment.
–
“U70- 3 ” appears on the display.
•Should anything unusual happen using an HDMI connection:
Consult your dealer if the sign remains on the display after these steps.
- Turn the connected equipment off and on again.
- Pull out the HDMI cable then reinsert it.
- Reduce the number of equipment connected in series to the HDMI terminal if exceeding 2 units.
–
7, 13
–
The unit does not work properly.
•The unit does not work properly when wrong cords are in HDMI input and output terminals. Turn the unit
off, unplug the AC power supply cord, and make connections again.
7, 13
Ez Sync HDAVI Control does not
function properly.
•Connect the unit to your TV (VIERA) using the HDMI cable, switch the TV on, unplug the unit’s AC power
supply cord, and insert it into a household AC outlet again.
–
nRemote control
Pages
The remote control doesn’t work.
•Replace the batteries if they are worn.5
Other products respond to the
remote control.
•Change this unit’s remote control code to “REMOTE 2 ”.47
49
RQT8739
Help message
Specifications (IHF’78)
nAMPLIFIER SECTION
Rated minimum sine wave RMS power output
20 Hz-20 kHz both channels driven
0.09 % total harmonic distortion100 W per channel (6 Ω)
1 kHz continuous power output both channels driven
0.09 % total harmonic distortion105 W per channel (6 Ω)
Total harmonic distortion
rated power at 20 Hz-20 kHz0.09 % (6 Ω)
Power bandwidth
both channels driven, –3 dB4 Hz to 88 kHz (6 Ω, 0.9 %)
Power output each channel driven
0.9 % total harmonic distortion at 1 kHz
Front (L/R)100 W (6 Ω)
Center 100 W (6 Ω)
Surround (L/R)100 W (6 Ω)
Surround Back (L/R)100 W (6 Ω)
Load impedance
Front (L/R)
A or B6 to 8 Ω
A and B6 to 8 Ω
BI-WIRE6 to 8 Ω
Center 6 to 8 Ω
Surround (L/R)6 to 8 Ω
Surround Back (L/R)6 to 8 Ω
Frequency response
CD, AUX, TV/STB, VCR, DVD RECORDER, BD/DVD PLAYER
4 Hz to 88 kHz, ±3 dB
DVD 6CH4 Hz to 44 kHz, ±3 dB
Input sensitivity
CD, AUX, TV/STB, VCR, DVD RECORDER, BD/DVD/DVD 6CH
27 mV (200 mV, IHF ’66)
Input impedance
CD, AUX, TV/STB, VCR, DVD RECORDER, BD/DVD/DVD 6CH22 kΩ
S/N (IHF A)
CD, TV/STB, BD/DVD PLAYER, DVD RECORDER (Digital Input)
85 dB (103 dB, IHF ’66)
Tone controls
BASS50 Hz, +10 to –10 dB
TREBLE20 kHz, +10 to –10 dB
Subwoofer frequency response (– 6 dB)7 Hz to 200 Hz
nFM TUNER SECTION
Frequency range87.9 to 107.9 MHz
Sensitivity11.2 dBf (2 µV, IHF ’58)
50 dB quieting sensitivity
MONO18.3 dBf (4.5 µV, IHF ’58)
STEREO38.3 dBf (45 µV, IHF ’58)
Total harmonic distortion
MONO0.2 %
STEREO0.3 %
S/N
MONO73 dB
STEREO67 dB
Frequency response20 Hz to 15 kHz, +1 dB, –2 dB
Alternate channel selectivity65 dB
Capture ratio1.5 dB
Image rejection at 98 MHz40 dB
Spurious response rejection at 98 MHz75 dB
AM suppression50 dB
Stereo separation
1 kHz40 dB
10 kHz30 dB
Antenna terminal75 Ω (unbalanced)
nAM TUNER SECTION
Frequency range530 to 1710 kHz
Sensitivity20 µV, 330 µV/m
Selectivity55 dB
IF rejection at 1000 kHz50 dB
nVIDEO SECTION
Output voltage at 1 V input (unbalanced)1±0.1 Vp-p
Maximum input voltage1.5 Vp-p
Input/output impedance75 Ω
S-VideoInputBD/DVD PLAYER, DVD RECORDER, TV/STB
Output TV MONITOR
Component VideoInput DVD RECORDER, TV/STB
Output TV MONITOR
nGENERAL
Power supplyAC 120 V, 60 Hz
Power consumption140 W
Dimensions (W x H x D)430 mm x 107.5 mm x 390 mm
(16-15/16'' x 4-7/32'' x 15-11/32'')
MassApprox. 5.3 kg (11.7 lb.)
nDIN POWER
1 kHz, T. H. D. 1 %2 x 100 W (6 Ω)
Notes:
1.Specifications are subject to change without notice.
2.Total harmonic distortion is measured by the digital spectrum analyzer.
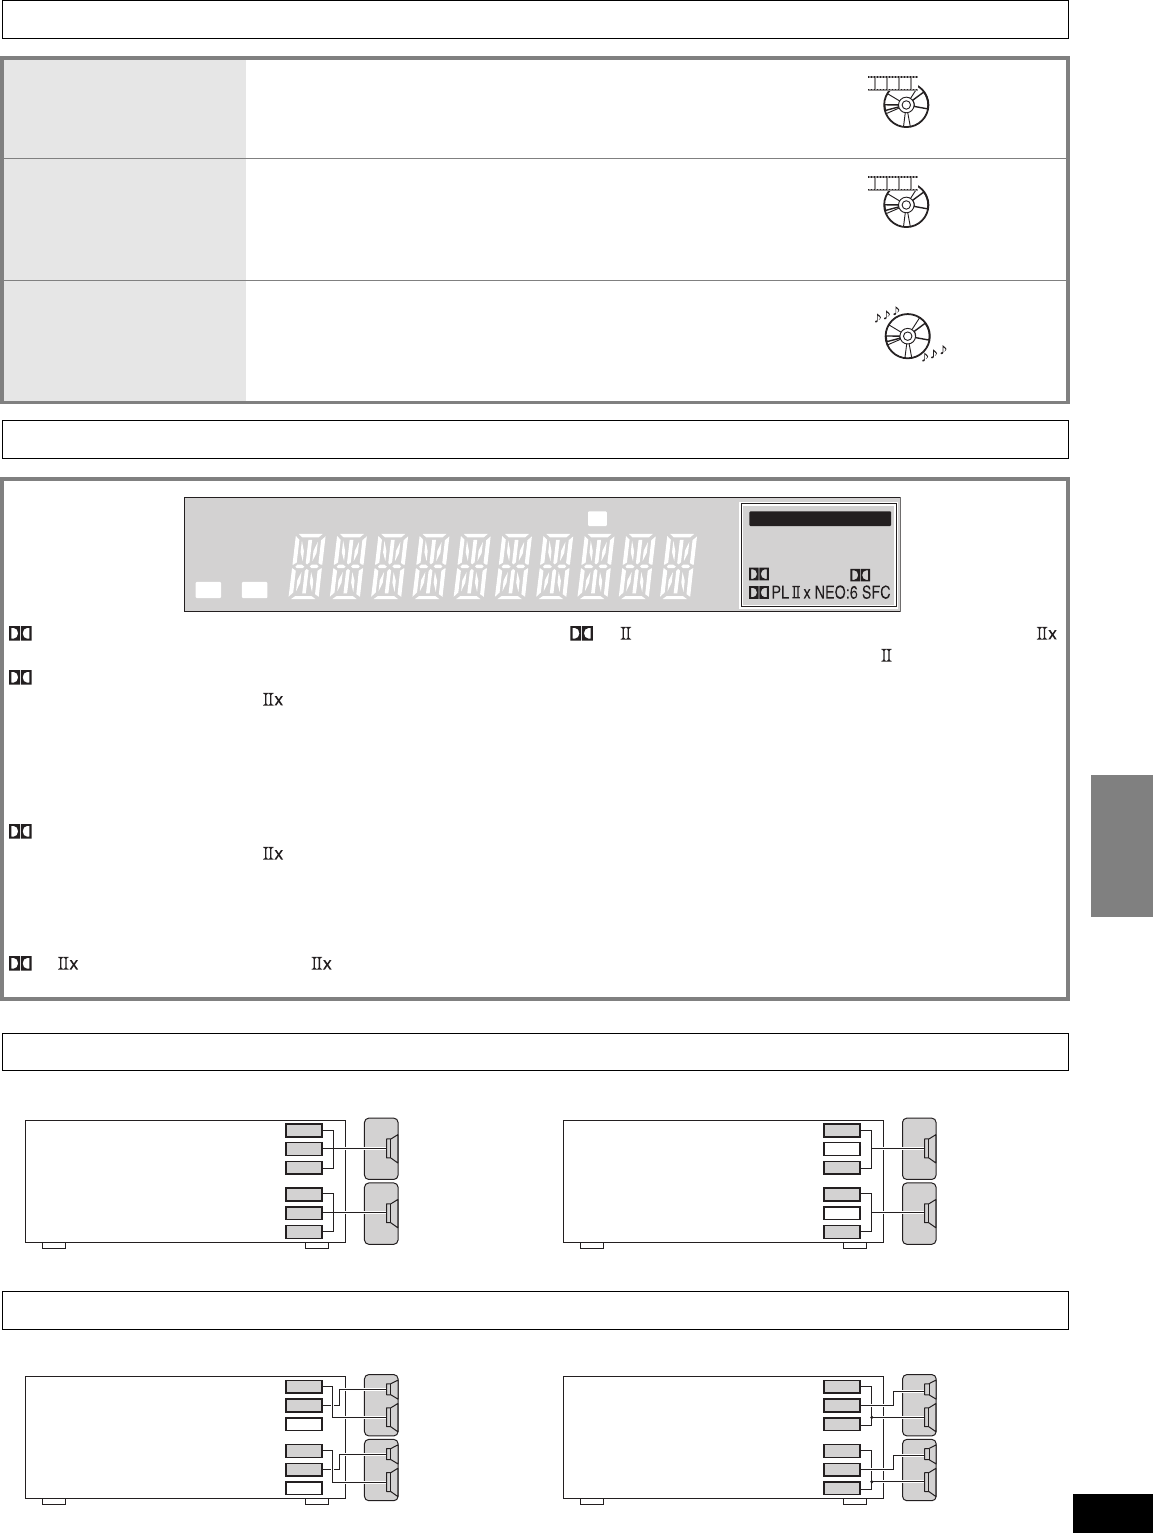
MessageCause/countermeasure
1
Muting is on.
Press [MUTING] on the remote
control to cancel the function
(á page 31).
2
The selected mode is not “
MUSIC
”.
Change the mode to “MUSIC ”
(á pages 28 and 29).
3
Center and surround speakers are
not connected, or they are set as
absent. Connect the speakers
(á page 9) or change their setting
to present (á page 35).
4
Surround and surround back
speakers are not connected, or
they are set as absent. Connect
the speakers (á page 9) or change
their setting to present
(á page 35).
5
Surround back speakers are not
connected, or they are set as
absent. Connect the speakers
(á page 9) or change their setting
to present (á page 35).
MessageCause/countermeasure
6
You are trying to use the effect
unavailable for DTS-ES sources.
7
You are trying to use the effect
unavailable for DVD-Audio sources.
8
You are trying to use the effect
unavailable for DVD analog
6-channel playback.
9
You are trying to use the effect
unavailable for the current input
source.
10
(flashing)
The unit is in the “PCMFIX ” mode.
Cancel this mode (á page 37).
11
“SPEAKERS A” is off. Select
“SPEAKERS A” (á pages 12 and
26).
12
“SPEAKERS A” and “SPEAKERS
B” are off. Select “SPEAKERS A”
or “SPEAKERS B” (á pages 12, 26
and 27).
Digital input(OPTICAL)2
(COAXIAL)2
HDMI (Version 1.2a)Input2
Output1
Power consumption in standby mode:0.7W
Power consumption in HDMI off mode:0.3 W
Marking sign is located on bottom of the unit.
Troubleshooting guide/Help message/Specifications
Reference
50
RQT8739
Limited Warranty (Only for the U.S.A.)
51
RQT8739
Limited Warranty (Only for Canada)
Maintenance
To clean this unit, wipe with a soft, dry cloth.
• Never use alcohol, paint thinner or benzine to clean this unit.
• Before using chemically treated cloth, read the instructions that came with the cloth carefully.
If the surfaces are dirty
PANASONIC PRODUCT – LIMITED WARRANTY
Panasonic Canada Inc. warrants this product to be free from defects in material and workmanship and agrees to remedy any
such defect for a period as stated below from the date of original purchase.
Technics Audio Product One (1) year, parts and labour
Panasonic Portable / Clock Radio (without Tape, CD, MD) One (1) year, parts and labour
Panasonic Audio / SD Audio Product One (1) year, parts and labour
Panasonic DVD Product One (1) year, parts and labour
Panasonic Combination DVD Player / VCR One (1) year, parts and labour
Panasonic Combination DVD Recorder / VCR One (1) year, parts and labour
Accessories including rechargeable batteries Ninety (90) days
LIMITATIONS AND EXCLUSIONS
This warranty does not apply to products purchased outside Canada or to any product which has been improperly installed,
subjected to usage for which the product was not designed, misused or abused, damaged during shipping, or which has
been altered or repaired in any way that affects the reliability or detracts from the performance, nor does it cover any product
which is used commercially. Dry cell batteries are also excluded from coverage under this warranty.
This warranty is extended to the original end user purchaser only. A purchase receipt or other proof of date of original
purchase is required before warranty service is performed.
THIS EXPRESS, LIMITED WARRANTY IS IN LIEU OF ALL OTHER WARRANTIES, EXPRESS OR IMPLIED,
INCLUDING ANY IMPLIED WARRANTIES OF MERCHANTABILITY AND FITNESS FOR A PARTICULAR PURPOSE.
IN NO EVENT WILL PANASONIC CANADA INC. BE LIABLE FOR ANY SPECIAL, INDIRECT OR CONSEQUENTIAL
DAMAGES.
In certain instances, some jurisdictions do not allow the exclusion or limitation of incidental or consequential damages, or the
exclusion of implied warranties, so the above limitations and exclusions may not be applicable.
WARRANTY SERVICE
FOR PRODUCT OPERATION ASSISTANCE, please contact:
Our Customer Care Centre: Telephone #: (905) 624-5505
1-800 #: 1-800-561-5505
Fax #: (905) 238-2360
Email link: “Customer support” on www.panasonic.ca
FOR PRODUCT REPAIRS, please locate your nearest Authorized Servicentre at www.panasonic.ca
:
Link : "Servicentres
TM
locator" under "Customer support"
IF YOU SHIP THE PRODUCT TO A SERVICENTRE
Carefully pack and send prepaid, adequately insured and preferably in the original carton.
Include details of the defect claimed, and proof of date of original purchase.
Limited Warranty (Only for the U.S.A.)/Limited Warranty (Only for Canada)/Maintenance
Reference
Panasonic Consumer Electronics
Company, Division of Panasonic
Corporation of North America
One Panasonic Way Secaucus,
New Jersey 07094
http://www.panasonic.com
Panasonic Puerto Rico, Inc.
Ave. 65 de Infantería, Km. 9.5
San Gabriel Industrial Park, Carolina,
Puerto Rico 00985
Panasonic Canada Inc.
5770 Ambler Drive
Mississauga, Ontario
L4W 2T3
www.panasonic.ca
2006 Matsushita Electric Industrial Co., Ltd.
Printed in Malaysia
52
RQT8739
Product Service
1.Damage requiring service — The unit should be serviced by
qualified service personnel if:
(a)The AC power supply cord or the plug has been damaged; or
(b)Objects or liquids have gotten into the unit; or
(c) The unit has been exposed to rain; or
(d)The unit does not operate normally or exhibits a marked change in
performance; or
(e)The unit has been dropped or the cabinet damaged.
2.Servicing — Do not attempt to service the unit beyond that
described in these operating instructions. Refer all other servicing to
authorized servicing personnel.
3.Replacement parts — When parts need replacing ensure the
servicer uses parts specified by the manufacturer or parts that have
the same characteristics as the original parts. Unauthorized
substitutes may result in fire, electric shock, or other hazards.
4.Safety check — After repairs or service, ask the servicer to perform
safety checks to confirm that the unit is in proper working condition.
For product information or assistance with product operation:
In the U.S.A., refer to “Customer Services Directory” on page 50.
In Canada, contact the Panasonic Canada Inc. Customer Care Centre
at 1-800-561-5505, or visit the website (www.panasonic.ca), or an
authorized Servicentre closest to you.
User memo:
Listening caution
Selecting fine audio equipment such as the unit you’ve just purchased is
only the start of your musical enjoyment. Now it’s time to consider how
you can maximize the fun and excitement your equipment offers. This
manufacturer and the Electronic Industries Association’s Consumer
Electronics Group want you to get the most out of your equipment by
playing it at a safe level. One that lets the sound come through loud and
clear without annoying blaring or distortion-and, most importantly,
without affecting your sensitive hearing.
We recommend that you avoid prolonged exposure to excessive noise.
Sound can be deceiving. Over time your hearing “comfort level” adapts
to higher volumes of sound. So what sounds “normal” can actually be
loud and harmful to your hearing.
Guard against this by setting your equipment at a safe level BEFORE
your hearing adapts.
To establish a safe level:
•Start your volume control at a low setting.
•Slowly increase the sound until you can hear it comfortably and
clearly, and without distortion.
Once you have established a comfortable sound level:
•Set the dial and leave it there.
Taking a minute to do this now will help to prevent hearing damage or
loss in the future. After all, we want you listening for a lifetime.
-If you see this symbol-
Product information
DATE OF PURCHASE
DEALER NAME
DEALER ADDRESS
TELEPHONE NUMBER
The model number and serial number of this product can be
found on either the back or the bottom of the unit.
Please note them in the space provided below and keep for
future reference.
MODEL NUMBER SA-XR700
SERIAL NUMBER
Manufactured under license from Dolby Laboratories.
“Dolby”, “Pro Logic” and the double-D symbol are trademarks
of Dolby Laboratories.
“DTS”, “DTS-ES”, “Neo:6” and “DTS 96/24” are trademarks of
Digital Theater Systems, Inc.
The XM name and related logos are registered trademarks of
XM Satellite Radio Inc. All rights reserved.
EST. 1924
CAUTION!
DO NOT INSTALL OR PLACE THIS UNIT IN A BOOKCASE, BUILT-
IN CABINET OR IN ANOTHER CONFINED SPACE. ENSURE THE
UNIT IS WELL VENTILATED. TO PREVENT RISK OF ELECTRIC
SHOCK OR FIRE HAZARD DUE TO OVERHEATING, ENSURE
THAT CURTAINS AND ANY OTHER MATERIALS DO NOT
OBSTRUCT THE VENTILATION VENTS.
CAUTION!
Do not place anything on top of this unit or block the heat radiation
vents in any way. In particular, do not place tape decks or CD/DVD
players on this unit as heat radiated from it can damage your
software.
HDMl, the HDMI logo and High-Definition Multimedia Interface are
trademarks or registered trademarks of HDMI Licensing LLC.
HDAVI Control
™ is a trademark of Matsushita Electric Industrial Co., Ltd.
Information on Disposal in other Countries outside the
European Union
This symbol is only valid in the European Union.
If you wish to discard this product, please contact your
local authorities or dealer and ask for the correct
Gebruikershandleiding.com neemt misbruik van zijn services uitermate serieus. U kunt hieronder aangeven waarom deze vraag ongepast is. Wij controleren de vraag en zonodig wordt deze verwijderd.
Product:
Spelregels forum
Om tot zinvolle vragen te komen hanteren wij de volgende spelregels:
lees eerst de handleiding door;
controleer of uw vraag al eerder door iemand anders is gesteld;
probeer uw vraag zo duidelijk mogelijk te stellen;
heeft u een probleem en al geprobeerd om dit op te lossen, vermeld dit erbij aub;
heeft u een oplossing gekregen van een bezoeker dan horen wij dat graag in dit forum;
wilt u een reactie geven op een vraag of antwoord, gebruik dan niet dit formulier maar klik op de knop 'reageer op deze vraag';
uw vraag wordt direct op de website gezet; vermijd daarom persoonlijke gegevens in te vullen;
Belangrijk! Als er een antwoord wordt gegeven op uw vraag, dan is het voor de gever van het antwoord nuttig om te weten als u er wel (of niet) mee geholpen bent! Wij vragen u dus ook te reageren op een antwoord.
Belangrijk! Antwoorden worden ook per e-mail naar abonnees gestuurd. Laat uw emailadres achter op deze site, zodat u op de hoogte blijft. U krijgt dan ook andere vragen en antwoorden te zien.
Abonneren
Abonneer u voor het ontvangen van emails voor uw Panasonic SA-XR700 bij:
nieuwe vragen en antwoorden
nieuwe handleidingen
U ontvangt een email met instructies om u voor één of beide opties in te schrijven.
Ontvang uw handleiding per email
Vul uw emailadres in en ontvang de handleiding van Panasonic SA-XR700 in de taal/talen: Engels als bijlage per email.
De handleiding is 4,51 mb groot.
U ontvangt de handleiding per email binnen enkele minuten. Als u geen email heeft ontvangen, dan heeft u waarschijnlijk een verkeerd emailadres ingevuld of is uw mailbox te vol. Daarnaast kan het zijn dat uw internetprovider een maximum heeft aan de grootte per email. Omdat hier een handleiding wordt meegestuurd, kan het voorkomen dat de email groter is dan toegestaan bij uw provider.
Uw handleiding is per email verstuurd. Controleer uw email
Als u niet binnen een kwartier uw email met handleiding ontvangen heeft, kan het zijn dat u een verkeerd emailadres heeft ingevuld of dat uw emailprovider een maximum grootte per email heeft ingesteld die kleiner is dan de grootte van de handleiding.
Er is een email naar u verstuurd om uw inschrijving definitief te maken.
Controleer uw email en volg de aanwijzingen op om uw inschrijving definitief te maken
U heeft geen emailadres opgegeven
Als u de handleiding per email wilt ontvangen, vul dan een geldig emailadres in.
Uw vraag is op deze pagina toegevoegd
Wilt u een email ontvangen bij een antwoord en/of nieuwe vragen? Vul dan hier uw emailadres in.