R T
his product is unable to make calls when:
– the handset batteries need recharging or
have failed.
– there is a power failure.
– the key lock feature is turned on.
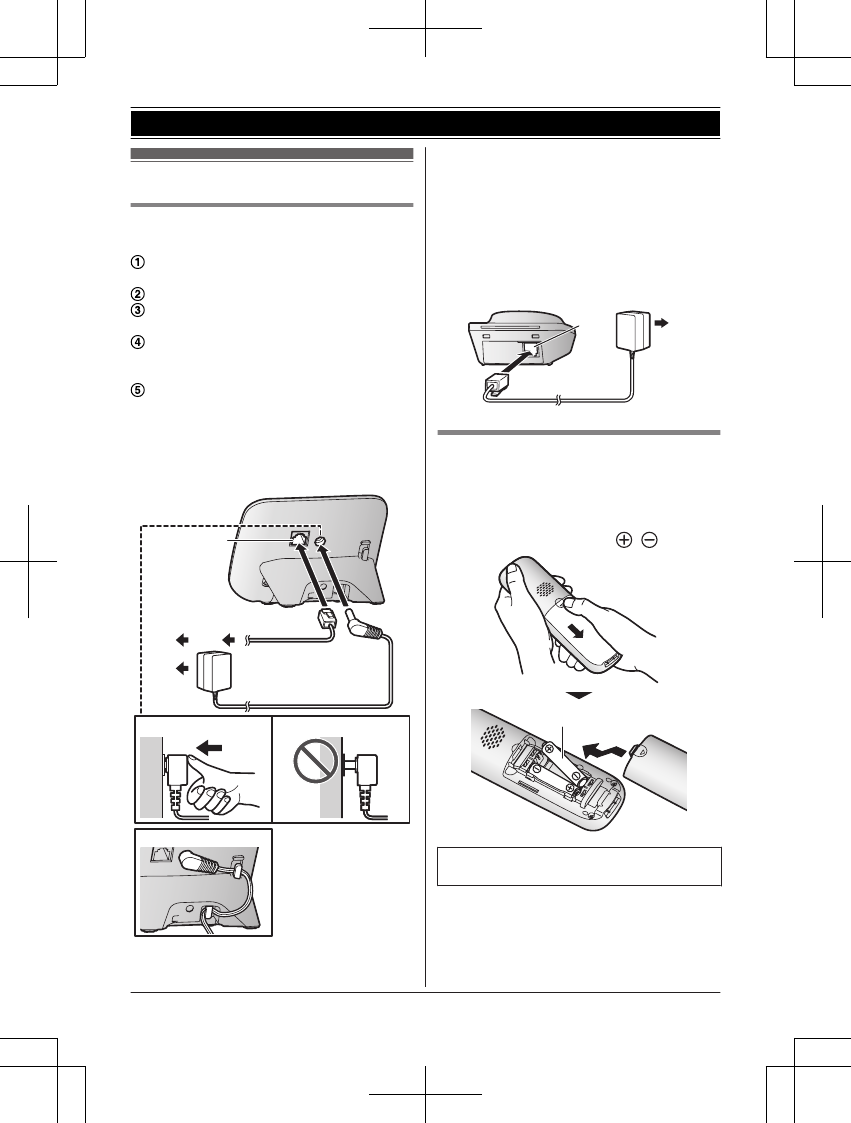
Battery
R W
e recommend using the batteries noted
on page 4. USE ONLY rechargeable
Ni-MH batteries AAA (R03) size.
R Do not mix old and new batteries.
R Do not open or mutilate the batteries.
Released electrolyte from the batteries is
corrosive and may cause burns or injury to
the eyes or skin. The electrolyte is toxic and
may be harmful if swallowed.
R Exercise care when handling the batteries.
Do not allow conductive materials such as
rings, bracelets, or keys to touch the
batteries, otherwise a short circuit may
cause the batteries and/or the conductive
material to overheat and cause burns.
R Charge the batteries provided with or
identified for use with this product only, in
accordance with the instructions and
limitations specified in this manual.
R Only use a compatible base unit (or
charger) to charge the batteries. Do not
tamper with the base unit (or charger).
Failure to follow these instructions may
cause the batteries to swell or explode.
Important safety
i
nstructions
When using your product, basic safety
precautions should always be followed to
reduce the risk of fire, electric shock, and
injury to persons, including the following:
1. Do not use this product near water for
example, near a bathtub, washbowl,
kitchen sink, or laundry tub, in a wet
basement or near a swimming pool.
2. Avoid using a telephone (other than a
cordless type) during an electrical storm.
There may be a remote risk of electric
shock from lightning.
3. Do not use the telephone to report a gas
leak in the vicinity of the leak.
4. Use only the power cord and batteries
i
ndicated in this manual. Do not dispose of
batteries in a fire. They may explode.
Check with local codes for possible special
disposal instructions.
SAVE THESE INSTRUCTIONS
For best performance
Base unit location/avoiding noise
T
he base unit and other compatible Panasonic
units use radio waves to communicate with
each other.
R For maximum coverage and noise-free
communications, place your base unit:
– at a convenient, high, and central
location with no obstructions between
the handset and base unit in an indoor
environment.
– away from electronic appliances such as
TVs, radios, personal computers,
wireless devices, or other phones.
– facing away from radio frequency
transmitters, such as external antennas
of mobile phone cell stations. (Avoid
putting the base unit on a bay window or
near a window.)
R Coverage and voice quality depends on the
local environmental conditions.
R If the reception for a base unit location is
not satisfactory, move the base unit to
another location for better reception.
Environment
R K
eep the product away from electrical noise
generating devices, such as fluorescent
lamps and motors.
R The product should be kept free from
excessive smoke, dust, high temperature,
and vibration.
R The product should not be exposed to
direct sunlight.
R Do not place heavy objects on top of the
product.
R When you leave the product unused for a
long period of time, unplug the product from
the power outlet.
R The product should be kept away from heat
sources such as radiators, cookers, etc. It
Helpline Tel. No.: U.K. 0844 844 3899 Ireland 01289 8333
7
Important Information