659191
20
Verklein
Vergroot
Pagina terug
1/64
Pagina verder
DVQX1151ZA
M0117KZ0
Basic Operating Instructions
Digital Camera
Model No.
DC-FZ82
Please read these instructions carefully before using this product, and
save this manual for future use.
More detailed operating instructions are available in “Operating
Instructions for advanced features (PDF format)”. To read it, download
it from the website. (→61)
Web Site: http://www.panasonic.com
EB
Model number suffix “EB” denotes UK model.
2
DVQX1151 (ENG)
Dear Customer,
We would like to take this opportunity to thank you for purchasing this Panasonic
Digital Camera. Please read these Operating Instructions carefully and keep them
handy for future reference. Please note that the actual controls and components,
menu items, etc. of your Digital Camera may look somewhat different from those
shown in the illustrations in these Operating Instructions.
Carefully observe copyright laws.
Recording of pre-recorded tapes or discs or other published or broadcast
material for purposes other than your own private use may infringe copyright
laws. Even for the purpose of private use, recording of certain material may be
restricted.
Information for Your Safety
WARNING:
To reduce the risk of fire, electric shock or product damage,
Do not expose this unit to rain, moisture, dripping or splashing.
Use only the recommended accessories.
Do not remove covers.
Do not repair this unit by yourself. Refer servicing to qualified service
personnel.
The socket outlet shall be installed near the equipment and shall be easily
accessible.
Product identification marking
Product Location
Digital camera Bottom
3
DVQX1151 (ENG)
About the battery pack
CAUTION
Danger of explosion if battery is incorrectly replaced. Replace only with the
type recommended by the manufacturer.
When disposing of the batteries, please contact your local authorities or dealer
and ask for the correct method of disposal.
Do not heat or expose to flame.
Do not leave the battery(ies) in a car exposed to direct sunlight for a long period
of time with doors and windows closed.
Warning
Risk of fire, explosion and burns. Do not disassemble, heat above 60 °C or
incinerate.
About the AC adaptor (supplied)
CAUTION!
To reduce the risk of fire, electric shock or product damage,
Do not install or place this unit in a bookcase, built-in cabinet or in
another confined space. Ensure this unit is well ventilated.
The unit is in the standby condition when the AC adaptor is connected. The
primary circuit is always “live” as long as the AC adaptor is connected to an
electrical outlet.
4
DVQX1151 (ENG)
Cautions for Use
Do not use any other USB connection cables except the supplied one.
Use a “High Speed HDMI micro cable” with the HDMI logo. Cables that do not
comply with the HDMI standards will not work.
“High Speed HDMI micro cable” (Type D-Type A plug, up to 2 m (6.6 feet) long)
Keep this unit as far away as possible from electromagnetic equipment (such
as microwave ovens, TVs, video games etc.).
If you use this unit on top of or near a TV, the pictures and/or sound on this unit
may be disrupted by electromagnetic wave radiation.
Do not use this unit near cell phones because doing so may result in noise
adversely affecting the pictures and/or sound.
Recorded data may be damaged, or pictures may be distorted, by strong
magnetic fields created by speakers or large motors.
Electromagnetic wave radiation may adversely affect this unit, disturbing the
pictures and/or sound.
If this unit is adversely affected by electromagnetic equipment and stops
functioning properly, turn this unit off and remove the battery or disconnect AC
adaptor (supplied)/AC adaptor (DMW-AC10E: optional). Then reinsert the battery
or reconnect AC adaptor and turn this unit on.
Do not use this unit near radio transmitters or high-voltage lines.
If you record near radio transmitters or high-voltage lines, the recorded pictures
and/or sound may be adversely affected.
Declaration of Conformity (DoC)
Hereby, “Panasonic Corporation” declares that this product is in
compliance with the essential requirements and other relevant provisions
of Directive 1999/5/EC.
Customers can download a copy of the original DoC to our R&TTE
products from our DoC server:
http://www.doc.panasonic.de
Contact to Authorized Representative:
Panasonic Marketing Europe GmbH, Panasonic Testing Centre,
Winsbergring 15, 22525 Hamburg, Germany
This product on purpose to connect to access point of 2.4 GHz WLAN.
5
DVQX1151 (ENG)
To clean your camera, remove the battery, the DC coupler (DMW-DCC6:
optional) or a card, or disconnect the power plug from the outlet, and wipe
with a soft, dry cloth.
Do not press the monitor with excessive force.
Do not press the lens with excessive force.
Do not allow camera to come into contact with pesticides or volatile
substances (can cause surface damage or coating to peel).
Do not keep rubber or plastic products in contact with the camera for a
long period of time.
Do not use solvents such as benzine, thinner, alcohol, kitchen detergents,
etc., to clean the camera, since it may deteriorate the external case or the
coating may peel off.
Do not leave the camera with the lens facing the sun, as rays of light from
the sun may cause it to malfunction.
Always use the supplied cords and cables.
Do not extend the supplied cord or cable.
While the camera is accessing the card (for an operation such as picture
writing, reading, deletion, or formatting), do not turn off the camera or
remove the battery, card, AC adaptor (DMW-AC10E: optional) or DC coupler
(DMW-DCC6: optional).
Furthermore, do not subject the camera to vibration, impact or static
electricity.
The data on the card may be damaged or lost due to electromagnetic waves,
static electricity or breakdown of the camera or the card. We recommend storing
important data on a PC etc.
Do not format the card on your PC or other equipment. Format it on the camera
only to ensure proper operation.
6
DVQX1151 (ENG)
The battery is not charged when the camera is shipped. Charge the battery
before use.
The battery is a rechargeable lithium ion battery. If the temperature is too
high or too low, the operating time of the battery will become shorter.
The battery becomes warm after using and during and after charging. The
camera also becomes warm during use. This is not a malfunction.
Do not leave any metal items (such as clips) near the contact areas of the
power plug or near the batteries.
Store the battery in a cool and dry place with a relatively stable temperature.
(Recommended temperature: 15 °C to 25 °C (59 °F to 77 °F), Recommended
humidity: 40%RH to 60%RH)
Do not store the battery for a long time while fully charged. When storing the
battery for a long period of time, we recommend charging it once a year. Remove
the battery from the camera and store it again after it has completely discharged.
These symbols indicate separate collection of
waste electrical and electronic equipment or
waste batteries.
More detailed information is contained in
“Operating Instructions for advanced features
(PDF format)”.
7
DVQX1151 (ENG)
Contents
Information for Your Safety ...................... 2
Preparations
Before use.................................................. 8
Standard accessories ............................... 9
Names and Functions of Main Parts ..... 10
Attaching the Lens Cap/
Shoulder Strap ........................................ 12
Inserting and removing the battery
or SD memory card (optional) ................ 14
Charging the battery ............................... 15
Setting the clock ..................................... 17
Basics
Basic operations ..................................... 18
Setting the menu ..................................... 24
Recording
Taking pictures with automatic settings
(Intelligent Auto Mode) ........................... 25
Taking pictures with Manual Focus ....... 26
Taking pictures with Exposure
Compensation ......................................... 27
Recording with the 4K Photo function
... 28
Adjusting the focus after recording
([Post Focus] / [Focus Stacking]) .......... 31
Taking Pictures While Adjusting
a Setting Automatically
(Bracket Recording) ................................ 34
Recording Motion Picture/
4K Motion Picture .................................... 35
[4K Live Cropping] .................................. 37
Playback
Viewing your pictures ............................. 39
[Light Composition] ................................ 40
Menu
Menu list ................................................... 42
Wi-Fi
What you can do with the
Wi-Fi
®
function ........................................ 44
Operating the camera by connecting
it to a smartphone ................................... 45
Others
Downloading software ............................ 48
List of monitor/viewfinder displays ....... 49
Q&A Troubleshooting ............................ 53
Specifications .......................................... 55
Digital Camera Accessory System ........ 59
Reading the Operating Instructions
(PDF format) ............................................ 61
Recording mode icons
Recording mode:
In Recording modes that show icons in black, you can select and execute indicated
menus and functions.
has different functions depending on the recording mode that is registered.
8
DVQX1151 (ENG)
Preparations
Before use
Camera handling
Keep the camera away from excessive vibration, force, or pressure.
Avoid using the camera under the following conditions, which may damage the
lens, monitor, viewfinder, or camera body.
This may also cause the camera to malfunction or prevent recording.
Dropping or hitting the camera against a hard surface
Pushing with excessive force on the lens or monitor
Do not hold the lens barrel as you take pictures. There is a risk that your
finger will be trapped as the lens retracts.
When camera is not in use or when using the playback feature, ensure that
the lens is in the stored position.
There are times when rattling sounds or vibrations will come from the
camera, but these are due to the motion of the aperture, the zoom and the
motor and do not indicate a defect.
The camera is not dust resistant, splash resistant, or waterproof.
Avoid using the camera in places with excessive dust or sand, or where
water can come into contact with the camera.
Condensation (When the lens, the monitor, or viewfinder, is
fogged up)
Condensation may occur when the camera is exposed to sudden changes of
temperature or humidity. Avoid these conditions, which may make the lens,
monitor, or viewfinder dirty, cause mould, or damage the camera.
If condensation does occur, turn off the camera and wait about two hours before
using it. Once the camera adjusts to the surrounding temperature, the fogging
will clear naturally.
Indicates that the menu can be set by pressing [MENU/SET] button.
In this Operating Instructions, steps for setting a menu item are described as
follows:
[Rec] → [Quality] → [ ]
In this manual, dial and lever operations are illustrated as below.
Rotate the rear dial
Press the rear dial
Rotate the zoom lever
9
DVQX1151 (ENG)
Preparations
Standard accessories
Check that all the accessories are supplied before using the camera. Part numbers
are as of February 2017. These may be subject to change.
Battery pack
DMW-BMB9E
Charge the battery before use.
Battery pack is indicated as battery
pack or battery in the text.
AC adaptor
SAE0012F
USB connection cable
K1HY04YY0106
Lens Cap/
Lens Cap String
VYQ8752
Shoulder Strap
VFC4453
Cards are optional. (SD Memory Card, SDHC Memory Card and SDXC
Memory Card are indicated as card in the text.)
This unit is compatible with UHS-
UHS Speed Class 3 standard SDHC/SDXC
memory cards.
The following SD standard-based cards can be used.
SD Memory Card (512 MB to 2 GB)/SDHC Memory Card (4 GB to 32 GB)/
SDXC Memory Card (48 GB to 128 GB)
Depending on recording conditions, the required card differs.
Consult the dealer or your nearest Service Centre if you lose the supplied
accessories. (You can purchase the accessories separately.)
Please dispose of all packaging appropriately.
The illustrations and screens in this manual may differ from the actual product.
A lens hood is not supplied with this unit.
10
Preparations
DVQX1151 (ENG)
Names and Functions of Main Parts
1
2
3
4
5
6 7 8
9
10
11
12 13 14 15 16
21 20 19 18 17
22
23
24
25
26 27
29
30
17
28
31
32
33
34
35
11
DVQX1151 (ENG)
Preparations
1 Zoom lever (→18)
2 Shutter button (→19)
3 Motion picture button (→35)
4
[
] (4K photo mode) button
(→28) / [Fn1] button
5
[
] ([Post Focus]) button (→31) /
[Fn2] button
6 Charging lamp (→16) /
Wi-Fi
®
connection lamp
7 Camera [ON/OFF] switch (→17)
8 Mode dial (→20)
9 Flash
10 Stereo microphone
11 Hot shoe
12 [AF/AE LOCK] button
13 [LVF] button (→21)
14 Diopter adjustment dial (→21)
15 Viewfinder (→21, 49)
16
[
] (Flash open) button
The flash opens, and recording
with the flash becomes possible.
17 Shoulder strap eyelet (→12, 13)
18 Speaker
19 Lens barrel
20 Lens
21 Self-timer indicator /
AF Assist Lamp
22
[AF/AF
/MF] button (→21)
23 [
] (Playback) button (→39)
24 Cursor button (→22)
25 [MENU/SET] button (→24)
26 [DISP.] button
Use this to change display.
27
[Q.MENU/
] (Cancel) button /
[
] (Delete) button (→39) /
[Fn3] button
You can easily call some of the
menu items and set them during
recording.
28 Rear dial (→22)
29 [HDMI] socket
You can view pictures on a
TV screen by connecting your
camera to your TV with the HDMI
micro cable.
30 [USB/CHARGE] socket (→15)
31 DC coupler cover (→59)
32 Card/Battery door (→14)
33 Release lever (→14)
34 Tripod mount
Do not attach this unit to tripods
that have screws with a length
of 5.5 mm (0.22 inch) or more.
Doing so may damage this unit
or the unit may not be secured
properly on the tripod.
35 Touch screen (→23) /
monitor (→49)
Always use a genuine Panasonic
AC adaptor (DMW-AC10E: optional).
(→59)
When using an AC adaptor (DMW-
AC10E: optional), ensure that the
Panasonic DC coupler (DMW-DCC6:
optional) and AC adaptor (DMW-
AC10E: optional) are used.
[Fn4] to [Fn8] (→23) are touch icons.
They are displayed by touching the
[
] tab on the recording screen.
12
Preparations
DVQX1151 (ENG)
Attaching the Lens Cap
Cover the lens with the lens cap to protect it when you are not taking pictures.
Do not hang or swing around the camera with the lens cap string.
Make sure to detach the lens cap when turning this unit on.
Be careful that the lens cap string does not become entangled with the shoulder
strap.
1
Pass the string through the
shoulder strap eyelet on the
camera
Shoulder strap eyelet
2
Pass the same string through the hole on the lens cap
3
Attach the lens cap
Pinch here to attach or detach the cap.
Attaching the Lens Cap/Shoulder Strap
13
DVQX1151 (ENG)
Preparations
Attaching the Shoulder Strap
We recommend attaching the shoulder strap when using the camera to
prevent it from dropping.
1
Pass the shoulder strap through the hole at
the shoulder strap eyelet
Attach the shoulder strap so that the “LUMIX” Logo is
on the outside.
Shoulder strap eyelet
2
Pass the end of the shoulder strap through
the stopper
3
Pass the end of the shoulder strap through
the hole on the other side of the stopper
Pull the shoulder strap 2 cm (0.066 feet) or more.
4
Pull the shoulder strap and then
check that it will not come out
Perform steps
1
to
4
and then attach
the other side of the shoulder strap.
Use the shoulder strap around your
shoulder.
Do not wrap the strap around your
neck. It may result in injury or
accident.
Do not leave the shoulder strap where
an infant can reach it.
It may result in an accident by
mistakenly wrapping around the
neck.
14
Preparations
DVQX1151 (ENG)
Inserting and removing the battery or SD memory
card (optional)
Make sure that the camera is turned off.
1
Slide the release lever ( ) to the
[OPEN] position and open the
card/battery door
[OPEN] [LOCK]
2
Insert the battery and card,
making sure that their orientation
is correct
Battery: Insert the battery all the way firmly
and check that it is locked by lever
(
).
Card: Insert the card all the way firmly until it
clicks. Do not touch the terminal.
3
Close the door
Slide the release lever to the [LOCK] position.
To remove
To remove battery
Move lever (
) in direction of
arrow.
To remove card
Push the card until it clicks, then pull
the card out.
Press
Pull out
Always use genuine Panasonic batteries (DMW-BMB9E).
If you use other batteries, we cannot guarantee the quality of this product.
Keep the Memory Card out of reach of children to prevent swallowing.
15
DVQX1151 (ENG)
Preparations
The battery that can be used with this unit is DMW-BMB9E.
We recommend charging in a location where the ambient temperature is
between 10 °C and 30 °C (50 °F to 86 °F).
Make sure that the camera is turned off.
1
Insert the battery to this unit, and then connect this unit
to the AC adaptor (supplied) (
) or a PC ( )
USB connection cable (supplied)
AC adaptor (supplied)
To the electrical outlet
Computer
Getting ready: Turn on the computer.
[USB/CHARGE] socket
This terminal is located at the bottom when the
camera is in an upright position.
Always check the direction of the pins and hold the plug straight to insert
or remove it. (If the cable is inserted in the wrong direction, the pins could
become deformed and cause faulty operation.) Also, do not insert into the
wrong socket. Doing so may cause damage to this unit.
Charging the battery
16
Preparations
DVQX1151 (ENG)
Charging lamp indications
Charging lamp
On: Charging in progress
Off: Charging complete (After
charging stops, disconnect
the camera from the
electrical outlet or your
computer.)
Flashing: Charging error (→53)
Notes on charging time
When using the AC adaptor (supplied) Approx. 170 min.
The charging time indicated above is the time required for charging in case
when the battery is completely used up. The time required for charging differs
depending on conditions of battery usage. Charging takes longer in cases when
temperatures are either high or low and when the battery has not been used for
a long period of time.
The time required for charging through the computer varies depending on the
power supply capacity of the computer.
Do not use any other USB connection cables except the supplied one.
Do not use any other AC adaptors except the supplied one.
Do not use the AC adaptor (supplied) or the USB connection cable (supplied)
with other devices.
17
DVQX1151 (ENG)
Preparations
The clock is not set when the camera is shipped.
1
Turn the camera on
2
Press [MENU/SET]
3
Press to select the items (year,
month, day, hour, minute), and press
to set
4
Press [MENU/SET]
5
When [The clock setting has been completed.] is
displayed, press [MENU/SET]
6
When [Please set the home area] is displayed, press
[MENU/SET]
7
Press to set your home area and
press [MENU/SET]
Setting the clock
18
DVQX1151 (ENG)
Basics
Basic operations
Zoom lever (Use zoom)
Capture a wider area
(wide-angle)
Enlarge the subject
(telephoto)
Zoom types and use
Optical Zoom:
You can zoom in without degrading the picture quality.
Maximum magnification: 60x
Extra optical zoom:
This function works when picture sizes with [
] have been selected in [Picture
Size]. Extra optical zoom allows you to zoom in using a higher zoom ratio than
optical zoom, without degrading the picture quality.
Maximum magnification: 122x
Including the optical zoom ratio. The maximum zoom ratio varies depending on the picture
size.
[i.Zoom]:
You can use the camera’s intelligent resolution technology to increase the zoom
ratio up to 2x higher than the original zoom ratio with limited deterioration of
picture quality. (Up to 1.5x the original zoom ratio when [Picture Size] is set to
[S]) Set the [i.Zoom] in the [Rec] menu to [ON].
[Digital Zoom]:
Zoom 4x further than Optical/Extra optical zoom. When [Digital Zoom] is used
simultaneously with [i.Zoom], you can only increase the zoom ratio up to 2x.
Note that, with Digital Zoom, enlarging will decrease picture quality. Set the
[Digital Zoom] in the [Rec] menu to [ON].
When [Live View Mode] (→43) is set to [ECO 30fps], Digital Zoom is not
available (default setting).
19
DVQX1151 (ENG)
Basics
Shutter button (Taking pictures)
1
Press the shutter button halfway (press lightly) to focus
on the subject
The aperture value and shutter speed are displayed. (If the
aperture value and shutter speed are shown in red and flashing,
you do not have the appropriate exposure, unless you are using
the flash.)
Focus display
( When focus is aligned: illuminated
When focus is not aligned: flashing)
Aperture value
Shutter speed
2
Press the shutter button fully (push the button all the
way), and take the picture
Pictures can be taken only when the image is correctly focused as long as
the [Focus/Release Priority] (→43) is set to [FOCUS].
Estimated number of recordable pictures
1610
(When [Aspect Ratio] is set to [4:3], [Quality] is set to [ ], [Picture Size] is set to [L] (18M),
and using a card of 16 GB)
Check the picture you have taken
[Auto Review] displays the pictures you have taken after taking still pictures.
Press the [
] (Playback) button to display the picture. (→39)
20
Basics
DVQX1151 (ENG)
Mode dial (Select the recording mode)
1
Set to the desired recording mode
Rotate the mode dial slowly to select the desired
mode.
Intelligent Auto Mode (→25)
Intelligent Auto Plus Mode (→25)
Programme AE Mode
Take pictures with automatic shutter speed and aperture value settings.
Aperture-Priority AE Mode
Determine aperture, then take pictures.
Shutter-Priority AE Mode
Determine shutter speed, then take pictures.
Manual Exposure Mode
Determine aperture and shutter speed, then take pictures.
Creative Video Mode
Determine aperture and shutter speed, then record motion pictures.
You cannot take still pictures.
Custom Mode
Take pictures using pre-registered settings.
Panorama Shot Mode
Take panorama pictures.
Scene Guide Mode
Take pictures that match the scene being recorded.
Creative Control Mode
Take pictures by selecting your preferred picture effect.
21
DVQX1151 (ENG)
Basics
[AF/AF /MF] button (Switching the focus mode)
1
Press [AF/AF /MF] button
[AF]
Focus is set automatically when the shutter button
is pressed halfway. To switch [AF Mode] (→22)
[
] ([AF Macro])
You can take pictures of a subject as close as 1 cm
(0.033 feet) from the lens by rotating the zoom lever
upmost to Wide.
[ ] ([Macro Zoom])
Use this setting to get close to the subject and then further enlarge when
taking the picture. You can take a picture with the digital zoom up to 3x
while maintaining the distance to the subject for the extreme Wide position
(1 cm (0.033 feet)).
[MF] (→26)
2
Press to select the focus mode and press [MENU/SET]
[LVF] button (Switching the Monitor/Viewfinder)
1
Press [LVF] ( ) button
Viewfinder display Monitor display
If [Monitor Priority (Play)] of the [Setup] menu is set to [ON], pictures will be
played back on the monitor after switching to playback mode.
About diopter adjustment
Rotate the diopter adjustment dial ( ) to adjust until you
are able to clearly see the characters displayed in the
viewfinder.
22
Basics
DVQX1151 (ENG)
Rear dial
There are 2 ways to operate the rear dial, rotating left or right, and deciding by
pressing.
Rotating:
Selection of items or setting of values is performed during the various
settings.
Pressing:
Operations that are the same as [MENU/SET] button, such as
determine settings, etc., are performed during the various settings.
You can use the rear dial to compensate the exposure (→27) or adjust the
aperture value and shutter speed. The items that can be adjusted differ
according to the recording mode.
Cursor button
Selection of items or setting of values etc., is performed.
These operating instructions expresses the up, down, left, and right of the cursor
button as
.
You can perform the following operations while recording. (Some items or settings
cannot be selected depending on the mode or display style the camera is in.)
[
] (ISO sensitivity) ( )
Set ISO sensitivity (sensitivity to lighting). We recommend higher settings to take
clear pictures in darker locations.
[ ] (White balance) ( )
Adjusts the colour depending on the light source to ensure natural colour.
[ ] (Drive mode) ( )
[
] ([Burst])
Records a burst of still pictures while you press the shutter button fully.
[
] ([4K PHOTO])
(→28)
[
] ([Post Focus])
(→31)
[
] ([Self Timer])
To cancel drive mode, select [ ] ([Single]) or [ ] .
[ ] (AF Mode) ( )
This allows the focusing method that suits the positions and number of the
subjects to be selected.
23
DVQX1151 (ENG)
Basics
Function buttons
[Fn1] to [Fn3] are buttons on the camera.
[Fn4] to [Fn8] are touch icons. They are displayed by touching the [
] tab on the
recording screen.
You can assign frequently-used functions to particular buttons or icons with [Fn
Button Set] in [Custom] menu.
Touch screen (Touch operations)
Touch screen of this unit is capacitive. Touch the panel directly with your bare
finger.
Touch
To touch and release the touch screen. Be sure to
touch the centre of the desired icon.
Drag
To touch and slide your finger across the touch
screen. This can also be used to forward or
rewind a picture during playback, etc.
Pinch (spread/pinch)
On the touch screen, spread (pinch out) your
2 fingers to zoom in, and pinch (pinch in) your
2 fingers to zoom out.
24
Basics
DVQX1151 (ENG)
Setting the menu
1
Press [MENU/SET] to bring up the menu
2
Press to select the menu item and press
[MENU/SET]
3
Press to select the setting and
press [MENU/SET]
The setting methods vary depending on the
menu item.
4
Press [Q.MENU/ ] button repeatedly until the recording
or playback screen reappears
During recording, the menu screen can also be exited by pressing the
shutter button halfway.
Switching menu type
Press after performing step
1
above
Press to select a tab such as [ ]
Press [MENU/SET]
Menu types (→42)
[Rec]
[Setup]
[Motion Picture]
[Playback]
[Custom]
25
DVQX1151 (ENG)
Recording
Taking pictures with automatic settings
(Intelligent Auto Mode)
Recording mode:
This mode is recommended for those who want to point and shoot as the camera
optimises settings to match the subject and recording environment.
1
Set mode dial to [ ]
The camera will switch to either the most
recently used of Intelligent Auto Plus Mode [
]
or Intelligent Auto Mode [
] .
2
Point the camera at the subject
When the camera identifies the optimal scene,
the icon for each scene turns blue for 2 seconds
and then changes to the normal red indication.
50
p
Switching between Intelligent Auto Plus Mode and Intelligent Auto
Mode
Touch the recording mode icon at the upper left in
recording screen
Select [ ] or [ ] and touch [Set]
[
] allows you to adjust some settings such as the
brightness and colour tone while also using [
] for
other settings so that you can record pictures more
suited to your preferences.
50
p
Auto Focus (Face/Eye Detection)
[AF Mode] is automatically set to [ ]. If you touch
the subject, the camera switches to [
] and the AF
tracking function starts operating.
You can also switch to [
] by pressing . Align the
AF tracking area with the subject and press the shutter
button halfway to operate the AF tracking function.
26
Recording
DVQX1151 (ENG)
Taking pictures with Manual Focus
Recording mode:
Manual Focus is convenient when you want to lock the focus to take pictures or
when it is difficult to adjust focus using Auto Focus.
1
Press [AF/AF /MF] button
2
Press to select [MF] and press [MENU/SET]
3
Press [ ] button ( )
The focus adjusting screen will be displayed.
When [MF Assist] is set to [ON], MF Assist (enlarged screen) is displayed
(→43). You can move the enlarged part by dragging the screen (→23).
4
Adjust the focus
MF Assist (Enlarged screen)
MF Guide
Peaking
Slide bar
Focuses on nearby subject
Focuses on distant subjects
Pressing and holding will increase the focus speed.
Focus can also be adjusted by dragging the slide bar.
Colour is added to the portions of the image that are in focus. (Peaking)
Operation Touch operation Description
Pinch in /
Pinch out
Enlarges/reduces the screen in small steps.
Enlarges/reduces the screen in large steps.
Switches the enlarged display. (windowed/full screen)
This setting is not available in Intelligent Auto Mode.
5
Press the shutter button halfway
The recording screen will be displayed.
27
DVQX1151 (ENG)
Recording
Taking pictures with Exposure Compensation
Recording mode:
Corrects the exposure when there is a backlight or when the subject is too dark or
too bright.
1
Press the rear dial to switch to
Exposure Compensation operation
2
Rotate the rear dial to compensate
the exposure
Exposure Bracket
Exposure Compensation
Operation Description
Compensates the exposure
Sets the exposure bracket (→34)
OFF
3
Press the rear dial to set
You can also press the shutter button halfway to set.
You can set the exposure compensation value in the range between –5 EV and
+5 EV.
Settings can be made within a range of –3 EV to +3 EV while recording motion
pictures, recording 4K photos, or recording in [Post Focus].
Depending on the brightness, this may not be possible in some cases.
28
Recording
DVQX1151 (ENG)
Recording with the 4K Photo function
Recording mode:
You can take burst pictures of approximately 8 million pixels with a burst rate of
30 fps. You can select and save a frame from the burst file.
To record pictures, use a UHS Speed Class 3 card.
When recording, the angle of view becomes narrower.
1
Press [ ] button
2
Press to select the recording method and press
[MENU/SET]
[4K Burst]
For capturing the best shot of a fast-moving subject
Burst recording is performed while the
shutter button is pressed and held.
Recording will start approximately
0.5 seconds after you press the shutter
button fully. Therefore, press the button
fully as soon as possible.
Press and hold
Recording is performed
[4K Burst(S/S)]
“S/S” is an
abbreviation of
“Start/Stop”.
For capturing unpredictable photo opportunities
Burst recording starts when the shutter
button is pressed and stops when pressed
again.
Start (First)
Stop (Second)
Recording is performed
[4K Pre-Burst]
For recording as needed whenever a photo opportunity arises
Burst recording is performed for
approximately 1 second before and after
the moment that the shutter button is
pressed.
Approximately 1 second
Recording is performed
29
DVQX1151 (ENG)
Recording
3
Record a 4K photo
When you perform 4K burst photo recording, a 4K burst file will be saved in
the MP4 format.
When [Auto Review] is enabled, the picture selection screen will be
displayed automatically.
You can compare multiple frames captured in a 4K burst file, overlay the
bright areas, and combine them into one picture. ([Light Composition])
(→40)
To cancel the 4K Photo functions
In step
2
, select [ ] .
If the surrounding temperature is high or 4K photos are recorded continuously,
[
] may be displayed and recording may be stopped halfway through. Wait
until the camera cools down.
When [ ] ([4K Pre-Burst]) is set, the battery drains faster and the camera
temperature rises. (to protect itself, the camera may switch to [
] ([4K
Burst]))
Select [
] ([4K Pre-Burst]) only when recording.
Recording stops when the continuous recording time exceeds 15 minutes.
When using an SDHC memory card, files are split into smaller picture files for
recording and playback if the file size exceeds 4 GB. (You can continue to record
pictures without interruption.)
If using an SDXC Memory Card, you can record pictures in a single file even if
the size is greater than 4 GB.
30
Recording
DVQX1151 (ENG)
Selecting pictures from 4K burst file and saving
1
Select a picture with the [ ] on the
playback screen, and press
In the case of recording with [ ] ([4K Pre-
Burst]), proceed to the step
3
.
2
Drag the slide bar to perform rough scene
selection
3
Drag to select the frame you want to save
as a picture
Touch [ ]/[ ] to display the previous or next set
of frames (45) in slide view.
4
Touch [ ] to save the picture
The picture will be saved in JPEG format.
For details, refer to “Operating Instructions for advanced features (PDF format)”
or “Quick Guide for 4K Photo (supplied)”.
[4K PHOTO Bulk Saving]
If you use [4K PHOTO Bulk Saving] in the [Playback] menu, you can
bulk save 5 seconds’ worth of 4K recording.
1
Use to select the 4K burst files and press [MENU/SET]
If the burst time is 5 seconds or less, all the frames can be saved as a
picture.
2
Select the first frame to be bulk saved as a picture
The selection method is the same as the operation to choose the frame you
want to save as a picture from a 4K burst file. (above)
The picture will be saved in JPEG format as a single burst picture group.
31
DVQX1151 (ENG)
Recording
Adjusting the focus after recording
([Post Focus] / [Focus Stacking])
Recording mode:
You can record 4K burst pictures while changing the focus point and then select a
focus point after recording. This function is best for non-moving subjects.
You can select multiple focus points and combine them into one picture. ([Focus
Stacking])
We recommend using a tripod to perform [Focus Stacking].
To record pictures, use a UHS Speed Class 3 card.
During recording, the angle of view will be narrower.
1
Press [ ] button
2
Press to select [ON] and press [MENU/SET]
3
Determine the composition and
press the shutter button halfway
Auto Focus activates and automatically detects
the focus point on the screen.
If there is no focus point on the screen, the Focus indicator ( ) blinks and
you cannot record.
From halfway pressing the shutter button to completion of recording
Do not change the distance to subject or the composition.
4
Press the shutter button fully to start
recording
The focus point changes automatically while
recording. When the recording progress bar (
)
disappears, recording automatically ends.
A motion picture will be recorded in MP4 format. (No audio is recorded.)
If Auto Review is set, a screen will automatically appear that lets you select
the focus point. (→32)
Cancelling [Post Focus]
Select [OFF] in step
2
.
If the surrounding temperature is high or [Post Focus] recording is performed
continuously, [
] may be displayed and recording may be stopped halfway
through. Wait until the camera cools down.
32
Recording
DVQX1151 (ENG)
Select the focus point and save the picture
([Post Focus])
1
On the playback screen, select the image
with the [ ] icon and press
2
Touch the focus point
If there are no pictures with the focus on the
selected point, a red frame will be displayed, and
pictures cannot be saved.
The edge of the screen cannot be selected.
Operation Touch operation Description
Touch
Select focus point
No selection can be made while display is
enlarged.
/
Enlarge display /
Shrink display (when in enlarged display)
[Fn1]
Switches to [Focus Stacking] operation (→33)
[Fn2]
In-focus portions are highlighted with colour.
([Peaking])
Switches in order of [
] → [ ]
([LOW]) → [
] ([HIGH]).
[MENU/SET]
Save picture
You can make fine adjustments to the focus by
dragging the slide bar during enlarged display.
3
Touch [ ] to save the picture
The picture will be saved in JPEG format.
You cannot choose and save the picture from a TV screen even if the camera is
connected to a TV through an HDMI micro cable.
33
DVQX1151 (ENG)
Recording
Select the focus range to combine and create a single
picture ([Focus Stacking])
Near
Focus Distant
1
Touch [ ] on screen in step
2
of “Select the focus point and
save the picture ([Post Focus])” (→32)
2
Choose a stacking method and touch it
[Auto Merging]
Automatically select photos suitable for stacking and combine them
into one picture.
Choose by giving preference to near-focus pictures.
Perform the focus stacking and save the picture.
[Range Merging] Combine the pictures with the selected focus position into one picture.
3
(When selecting [Range Merging])
Touch the focus point
Select positions at two or more points.
Focus points between the selected two
positions will be selected.
Positions that cannot be selected, or that would
produce an unnatural result will be greyed out.
Touch a position again to deselect it.
ResetReset
Set/CancelSet/Cancel
ResetReset
Set/CancelSet/Cancel
4
Touch [ ] to combine and save the
picture
The picture will be saved in JPEG format.
Only pictures taken using [Post Focus] are eligible for [Focus Stacking].
34
Recording
DVQX1151 (ENG)
Taking Pictures While Adjusting a Setting
Automatically
(Bracket Recording)
Recording mode:
You can take multiple pictures while automatically adjusting a setting by pressing
the shutter button.
1
Set the menu (→24)
[Rec] → [Bracket] → [Bracket Type]
(Exposure Bracket)
Press the shutter button to perform recording while
adjusting the exposure.
(White Balance Bracket)
Press the shutter button once to take three pictures with
different white balance settings automatically.
2
Press to select [More settings] and then press
[MENU/SET]
If [ ] is set, rotate the rear dial to set the adjustment range.
Press the shutter button halfway to exit the menu.
3
Focus on the subject and take a picture
To cancel [Bracket]
Select [OFF] in step
1
.
Exposure Bracket
About [More settings] (step
2
above)
[Step]
Sets the number of pictures to be taken and the exposure
compensation range.
[Sequence] Sets the order in which pictures are taken.
[Single Shot Setting]
[ ]: Takes one picture each time you press the shutter button.
[
]: Takes all the pictures set to be taken when you press the
shutter button once.
Not available for burst recording.
35
DVQX1151 (ENG)
Recording
Recording Motion Picture/4K Motion Picture
Recording mode:
You can record full high-definition quality images that comply with the AVCHD
standard, as well as motion pictures or 4K motion pictures recorded in MP4.
1
Press the motion picture button to
start recording
Recording (flashes red)
Elapsed recording time
Remaining recording time
Recording of motion picture appropriate for each motion picture mode is
possible.
Immediately release the motion picture button after pressing it.
If you press the shutter button down fully, you can take still pictures while
recording motion pictures. (Except for in Creative Video Mode)
2
Press the motion picture button again to end recording
If the surrounding temperature is high, or a motion picture is recorded
continuously, [
] is displayed and recording may be stopped halfway through.
Wait until the camera cools down.
With recording in a quiet environment, the sound of aperture, focus
and other actions may be recorded in motion pictures. This is not a
malfunction.
To record 4K motion pictures, use a UHS Speed Class 3 card.
When you record 4K motion pictures, the angle of view will be narrower than
motion pictures of other sizes.
To ensure highly accurate focus, 4K motion pictures are recorded at reduced
Auto Focus speeds. It may be difficult to focus on the subject with Auto Focus,
but this is not a malfunction.
36
Recording
DVQX1151 (ENG)
Setting the format, picture size and recording frame rate
[Motion Picture] → [Rec Format]
Settings: [AVCHD] / [MP4]
[Motion Picture] → [Rec Quality]
When [AVCHD] is selected:
[FHD/28M/50p]
1
/ [FHD/17M/50i] / [FHD/24M/25p]
[AVCHD] motion pictures:
Recording stops when the continuous recording time exceeds 29 minutes and
59 seconds.
Files are split into smaller motion picture files for recording when the file size
exceeds 4 GB.
When [MP4] is selected:
[4K/100M/30p]
2
/ [4K/100M/25p]
2
/ [FHD/28M/60p] / [FHD/28M/50p] /
[FHD/20M/30p] / [FHD/20M/25p] / [HD/10M/30p] / [HD/10M/25p]
Motion pictures with their file size set to [FHD] or [HD] in [MP4]:
Recording stops when the continuous recording time exceeds 29 minutes and
59 seconds.
Files are split into smaller motion picture files for recording and playback when
the file size exceeds 4 GB. (You can continue to record motion pictures without
interruption.)
Motion pictures with their file size set to [4K] in [MP4]:
Recording stops when the continuous recording time exceeds 15 minutes.
When using an SDHC memory card, files are split into smaller motion picture
files for recording and playback if the file size exceeds 4 GB. (You can continue
to record motion pictures without interruption.)
If using an SDXC Memory Card, you can record a motion picture in a single file
even if the size is greater than 4 GB.
1
AVCHD Progressive
2
4K motion pictures
37
DVQX1151 (ENG)
Recording
[4K Live Cropping]
Recording mode:
By cropping your motion picture down from the 4K angle of view to Full High
Definition, you can record a motion picture that pans and zooms in/out while
leaving the camera in a fixed position.
Hold the camera firmly in place while recording.
A motion picture will be recorded at [FHD/20M/25p] under [MP4].
Pan Zoom in
When you want to zoom in/out, set different angles of view for the cropping start
and end frames. For example, to zoom in, set a larger angle of view for the start
frame and a smaller angle of view for the end frame.
1
Set mode dial to [ ]
2
Set the menu (→24)
[Motion Picture] → [4K Live Cropping]
Settings: [40SEC] / [20SEC] / [OFF]
The angle of view narrows.
3
Set the crop start frame
When making settings for the first time, a crop
start frame of size 1920×1080 is displayed.
(After setting the crop start frame and end frame,
the start frame and end frame that you set
immediately before will be displayed.)
SetSet
SizeSize
ResetReset
StartStart
38
Recording
DVQX1151 (ENG)
Operation Touch operation Description
Touch Moves the frame
Pinch out /
Pinch in
Enlarges/reduces the frame
(The range of settings allowed is from 1920×1080 to
3840×2160.)
[DISP.] [Reset]
Returns the position of the frame to the centre and its
size to the default setting.
[MENU/SET] [Set] Decides the position and size of the frame
4
Repeat step
3
, and then set the crop
end frame
ResetReset
EndEnd
SetSet
SizeSize
5
Press the motion picture button (or
the shutter button) to start recording
Elapsed recording time
Set operating time
Immediately release the motion picture button
(or the shutter button) after pressing it.
When the set operating time has elapsed,
recording automatically ends. To end recording
midway, press the motion picture button (or the
shutter button) again.
Changing the position and size of a crop frame
Press [Fn1] button while the recording screen is displayed, and perform steps
3
and
4
.
To cancel [4K Live Cropping] recording
Set [OFF] in step
2
.
Focus is adjusted and fixed in the crop start frame.
[Continuous AF] is set to [OFF].
[Metering Mode] will be [ ] (Multi Metering).
39
DVQX1151 (ENG)
Playback
Viewing your pictures
1
Press [ ] (Playback) button
2
Press to select a picture to be displayed
The playback screen appears if the camera is turned on while pressing [ ]
(Playback) button.
When [Lens Retraction] (→43) is set to [ON], the lens barrel is retracted after
approx. 15 seconds as the camera is switched to the playback screen from the
recording screen.
Viewing motion pictures
This unit was designed to play motion pictures using the AVCHD and MP4 formats.
Motion pictures are displayed with the motion picture icon ([
]).
Press to start playback
If you press [MENU/SET] during a pause, you can
create a picture from a motion picture.
Deleting pictures
Deleted pictures cannot be recovered.
Press [ ] button to delete displayed picture
Use to select [Delete Single] and press [MENU/SET]
Ending Playback
Press [ ] (Playback) button again or press the motion picture button.
The playback can also be ended by pressing the shutter button halfway.
Sending pictures to the WEB services
If you press while a single picture is being displayed, you can send the picture to
the WEB service quickly.
40
Playback
DVQX1151 (ENG)
Select multiple frames from 4K burst files that you wish to combine. Parts of the
image that are brighter than the preceding frame will be superimposed on the
preceding frame to combine the frames into one picture.
When using [Light Composition], it is recommended to use a tripod or use a
smartphone instead of the shutter and do remote recording (→47) to control
camera shaking.
[Playback] → [Light Composition]
1
Use to select the 4K burst files and press
[MENU/SET]
2
Choose the combining method and press [MENU/SET]
[Composite Merging]: Selecting frames to combine
Drag the slide bar or use to select the frames to combine
Press [MENU/SET]
The selected frames are remembered, and
the display goes to the preview screen.
Use
to select items and press
[MENU/SET] to perform the following
operations.
[Next]: Lets you select more frames for combining.
[Reselect]: Discards the frame selected immediately before and lets
you select a different image.
Repeat steps - to select more frames to combine (up to 40 frames)
Press to select [Save] and press [MENU/SET]
[Light Composition]
41
DVQX1151 (ENG)
Playback
[Range Merging]: Selecting a range to combine
Select the frame of the first picture and then press [MENU/SET]
The selection method is the same as in step
of [Composite Merging]
setting. (→40)
Select the frame of the last picture and then press [MENU/SET]
3
Select [Yes] at the confirmation screen and press
[MENU/SET]
The picture will be saved in JPEG format.
42
DVQX1151 (ENG)
Menu
Menu list
The [Photo Style], [Filter Settings], [AFS/AFF/AFC], [Metering Mode], [Highlight
Shadow], [i.Dynamic], [i.Resolution], [Diffraction Compensation], [i.Zoom], [Digital
Zoom], [Stabilizer], and [Conversion] menu items are common for both [Rec] and
[Motion Picture] menus. If a setting in one menu is changed, the setting with the
same name in other menu will also be changed automatically.
To display explanations of the menu items
When [Menu Information] in the [Setup] menu is set to
[ON], explanations of the menu items and settings are
displayed on the menu screen.
Explanations of the menu items and settings
[Motion Picture]
[4K Live Cropping]
[Snap Movie]
[Rec Format]
[Rec Quality]
[Exposure Mode]
[High Speed Video]
[Continuous AF]
[Flkr Decrease]
[Silent Operation]
[Wind Noise Canceller]
[Zoom Mic]
[Photo Style]
[Filter Settings]
[Aspect Ratio]
[Picture Size]
[Quality]
[AFS/AFF/AFC]
[Metering Mode]
[Burst Rate]
[4K PHOTO]
[Bracket]
[Self Timer]
[Highlight Shadow]
[i.Dynamic]
[i.Resolution]
[iHandheld Night Shot]
[iHDR]
[HDR]
[Multi Exp.]
[Time Lapse Shot]
[Stop Motion Animation]
[Panorama Settings]
[Shutter Type]
[Flash]
[Red-Eye Removal]
[ISO Limit Set]
[ISO Increments]
[Extended ISO]
[Diffraction
Compensation]
[i.Zoom]
[Digital Zoom]
[Conversion]
[Color Space]
[Stabilizer]
[Face Recog.]
[Profile Setup]
[Rec]
43
DVQX1151 (ENG)
Menu
[Setup]
[Online Manual]
[Clock Set]
[World Time]
[Travel Date]
[Wi-Fi]
[Beep]
[Live View Mode]
[Monitor Display]/
[Viewfinder]
[Monitor Luminance]
[Monitor Priority (Play)]
[Economy]
[USB Mode]
[TV Connection]
[Menu Resume]
[Menu Background]
[Menu Information]
[Language]
[Version Disp.]
[Exposure Comp. Reset]
[Self Timer Auto Off]
[No.Reset]
[Reset]
[Reset Wi-Fi Settings]
[Demo Mode]
[Format]
[Slide Show]
[Playback Mode]
[Location Logging]
[RAW Processing]
[4K PHOTO Bulk Saving]
[Light Composition]
[Clear Retouch]
[Title Edit]
[Text Stamp]
[Video Divide]
[Time Lapse Video]
[Stop Motion Video]
[Resize]
[Cropping]
[Rotate]
[Rotate Disp.]
[Favorite]
[Print Set]
[Protect]
[Face Rec Edit]
[Picture Sort]
[Playback]
[Cust.Set Mem.]
[Silent Mode]
[AF/AE Lock]
[AF/AE Lock Hold]
[Shutter AF]
[Half Press Release]
[Quick AF]
[Pinpoint AF Time]
[Pinpoint AF Display]
[AF Assist Lamp]
[Direct Focus Area]
[Focus/Release Priority]
[AF+MF]
[MF Assist]
[MF Assist Display]
[MF Guide]
[Peaking]
[Histogram]
[Guide Line]
[Center Marker]
[Highlight]
[Zebra Pattern]
[Monochrome Live View]
[Constant Preview]
[Expo.Meter]
[Dial Guide]
[LVF Disp.Style]
[Monitor Disp. Style]
[Monitor Info. Disp.]
[Rec Area]
[Remaining Disp.]
[Auto Review]
[Fn Button Set]
[Zoom lever]
[Lens Position Resume]
[Lens Retraction]
[Q.MENU]
[Video Button]
[Touch Settings]
[Touch Scroll]
[Menu Guide]
[Custom]
44
DVQX1151 (ENG)
Wi-Fi
What you can do with the Wi-Fi
®
function
Operating the camera by connecting it to a smartphone
Taking pictures via a smartphone (→47)
Playing back pictures in the camera on a smartphone (→47)
Saving pictures in the camera to a smartphone
Sending pictures in the camera to social networking services
Adding location information to pictures in the camera from a smartphone
Combining motion pictures recorded with Snap Movie according to your
preference on a smartphone
Displaying still pictures on a TV
Wireless printing
Sending pictures to AV device
Sending pictures to a PC
Using WEB services
This manual uses the term “smartphone” for both smartphones and tablets
unless it is necessary to distinguish between them.
The camera cannot be used to connect to a public wireless LAN connection.
For details, refer to “Operating Instructions for advanced features (PDF format)”.
About the [Wi-Fi] button
In this Operating Instructions, a function button to which [Wi-Fi] is assigned is
referred to as the [Wi-Fi] button. (At the time of purchase, [Wi-Fi] is assigned to
[Fn4] button in recording mode, and [Fn1] in playback mode.)
For details on the function button, refer to (→23).
To start up the Wi-Fi function (When in recording mode):
Touch [ ]
Touch [ ]
45
DVQX1151 (ENG)
Wi-Fi
Operating the camera by connecting it to a
smartphone
Installing the smartphone app “Panasonic Image App”
The “Image App” is an application provided by Panasonic.
Supported OS Android™: Android 4.0 or later
iOS: iOS 7.0 or later
Installation procedure
Connect your device to a network
(Android) Select “Google Play™ Store”
(iOS) Select “App Store”
Enter “Panasonic Image App” or “LUMIX” to search
for the app
Select “Panasonic Image App” and install it
Use the latest version.
Supported OS versions as of February 2017. Supported OS versions may be
changed without prior notice.
The service may not be able to be used properly depending on the type of
smartphone being used.
For the latest information on the “Image App”, refer to the support site
below.
http://panasonic.jp/support/global/cs/dsc/
(This site is available in English only.)
When downloading the app on a mobile network, high packet communication
fees may be incurred depending on the details of your contract.
For details about the operating procedure, etc., refer to [Help] in the “Image App”
menu.
When you operate the “Image App” on the smartphone that is connected to the
camera via Wi-Fi, [Help] in the “Image App” may not be displayed depending on
the smartphone. In this case, after terminating the connection to the camera,
reconnect the smartphone to a mobile phone network such as the 3G or LTE
network or to a Wi-Fi router, and then display [Help] in the “Image App”.
Some of the screens and information provided in this document may be different
depending on the supported operating system and “Image App” version.
46
Wi-Fi
DVQX1151 (ENG)
Connecting to a smartphone
You can easily establish a Wi-Fi connection on this unit without entering a
password on your smartphone.
(On the camera)
[Setup] → [Wi-Fi] → [Wi-Fi Function] → [New Connection]
→ [Remote Shooting & View]
The information required for directly connecting your
smartphone to this unit (SSID (
)) is displayed.
You can also display the information by pressing the
function button that [Wi-Fi] function is assigned.
(On your smartphone)
1
Turn on the Wi-Fi function in the setting menu
2
Select the SSID displayed on the screen of
the camera
3
Start “Image App” (→45)
When the connection confirmation screen appears
on the camera, select [Yes] and press [MENU/SET].
(Only when making a connection for the first time.)
[Wi-Fi Password] is set to [OFF] at the time of purchase. When you start a
Wi-Fi connection, be sure to verify that the device displayed on the camera’s
connection confirmation screen is really the device you want to connect to. Even
if the wrong device is displayed, you will still be connected to it if you select “Yes”.
If there seem to be other Wi-Fi enabled devices in the vicinity, we recommend
that you set [Wi-Fi Password] to [ON]. For details, refer to “Operating Instructions
for advanced features (PDF format)”.
47
DVQX1151 (ENG)
Wi-Fi
Closing the connection
1
Set the camera to Recording Mode
Press the shutter button halfway to return to recording mode.
2
Select the camera’s menu items to
terminate the Wi-Fi connection
[Setup] → [Wi-Fi]
→ [Wi-Fi Function] → [Yes]
3
On the smartphone, close “Image App”
For details on how to close the application, refer to the operating instructions
of your device.
Taking pictures via a smartphone (remote recording)
1
Connect to a smartphone (→46)
2
Operate the smartphone
Select [ ]
Take pictures
The recorded images are saved in the camera.
Some settings are not available.
Playing back pictures in the camera on a smartphone
1
Connect to a smartphone (→46)
2
Operate the smartphone
Select [ ]
When the picture is touched, it is played back at a
larger size.
48
DVQX1151 (ENG)
Others
Downloading software
Still/motion pictures can be copied from the camera to your computer by
connecting the two together. If you wish to play back or edit pictures on a PC,
download software from the supplier’s website and install it on your PC.
To download the software, your PC must be connected to the Internet.
It may take time to download the software in some communication environments.
PHOTOfunSTUDIO 9.9 PE
You can capture still pictures or motion pictures to your PC, or organise captured
pictures by categorising by recording date, model name of the digital camera used
to record, etc. You can also correct still pictures, edit motion pictures, or write to
DVD.
Check the website below to download/install the software.
The software is available for download until the end of February 2022.
http://panasonic.jp/support/global/cs/soft/download/d_pfs99pe.html
Supported OS: Windows
®
10 / 8.1 / 8 / 7
“PHOTOfunSTUDIO” is not compatible with Mac.
For details, refer to “Operating Instructions for advanced features (PDF
format)”.
SILKYPIX Developer Studio SE
This software develops and edits RAW file pictures. Edited pictures can be saved
in a file format such as JPEG or TIFF that can be displayed on a PC, etc.
Check the website below to download/install the software.
http://www.isl.co.jp/SILKYPIX/english/p/
Supported OS: Windows
®
10 / 8.1 / 8 / 7
Mac OS X v10.6 - v10.12
For details on the operating environment and how to use the SILKYPIX
Developer Studio, refer to the “Help” or the Ichikawa Soft Laboratory’s support
website.
LoiLoScope 30 day full trial version
Motion pictures can be edited easily.
Check the website below to download/install the software.
http://loilo.tv/product/20
Supported OS: Windows
®
10 / 8.1 / 8 / 7
For more information on how to use LoiLoScope and its operating environment,
read the LoiLoScope manual available for download at the website.
“LoiLoScope” is not compatible with Mac.
49
DVQX1151 (ENG)
Others
List of monitor/viewfinder displays
Recording mode (→20)
Custom Set
[Photo Style]
[Flash]
50p
[Rec Format]/
[Rec Quality]
[Snap Movie]
[Aspect Ratio]/
[Picture Size]
Image size (Panorama
Shot Mode)
Picture effect (Filter)
adjustment display
EXPS
Types of picture effects
(Filter)
Card (displayed only
during recording)
XXmXXs
Elapsed recording
time
1
Simultaneous recording
indicator (When taking
still pictures while
recording a motion
picture)
[Peaking]
[Highlight Shadow]
[HDR]/[iHDR]
[Multi Exp.]
[Conversion]
Electronic shutter
Overheat indicator
(→29, 31, 35)
The following images are examples of when the display screen is set to [ ]
(monitor style) in the monitor.
In recording
50
p
50
Others
DVQX1151 (ENG)
[Quality]
200fps 100fps
[High Speed Video]
AFS [AFS/AFF/AFC]/MF
AF Mode
[Pull Focus]
[Face Recog.]
AFL AF Lock
Burst
[4K PHOTO] (→28)
[Post Focus] (→31)
[Self Timer]
Remaining battery
Macro recording (→21)
[Stabilizer]
Jitter alert
Recording state
(Flashes red.) (→35)/
Focus (Lights green.)
(→19)
Focus (Under low
illumination)
Wi-Fi connection status
Histogram
Name
2
Travel elapsed days
3
Age in years/months
2
Location
3
Current date/time
3
Travel destination setting
3
:
Exposure meter
Zoom (→18)
AF area
Spot metering target
[Center Marker]
[Self Timer]
[Zoom Mic]
[Silent Mode]
AEL AE Lock
[Metering Mode]
Programme Shift
2.8 Aperture value
60 Shutter speed
Exposure compensation
(→27)
Exposure Bracket (→34)
Brightness (exposure)
Manual Exposure Assist
ISO sensitivity
51
DVQX1151 (ENG)
Others
[Dial Guide]
White Balance Bracket
(→34)
White Balance Fine
Adjustment
White Balance
Colouring
98
Number of recordable
pictures
RXXmXXs
Available recording
time
1
Touch tab
Touch zoom
Touch Shutter
[Touch AE]
[Peaking]
Function buttons (→23)
Colouring
Defocus control
function
Brightness (exposure)
Type of defocus
([Miniature Effect])
[One Point Color]
[Sunshine]
Picture effect (Filter)
adjustment display
Picture effects ON or
OFF
Picture effects (Filter)
Aperture value
Shutter speed
ISO sensitivity
1
[m] and [s] indicate “minute” and “second”.
2
This is displayed for about 5 seconds when the camera is turned on if the [Profile Setup]
(→42) setting is set.
3
This is displayed for about 5 seconds when the camera is turned on, after setting the clock
and after switching from Playback Mode to Recording mode.
The information displayed, such as histograms, magnifications, and numeric
values, are only for the purpose of reference.
52
Others
DVQX1151 (ENG)
Recording mode (→20)
F2.8 Aperture value
1/60 Shutter speed
Remaining battery
ISO sensitivity
Exposure compensation
(→27)
Exposure Bracket (→34)
Brightness (exposure)
Manual Exposure Assist
[Flash]
Single
Burst
[4K PHOTO] (→28)
[Self Timer]
AFS [AFS/AFF/AFC]/MF
AF Mode
[Quality]
[Aspect Ratio]/
[Picture Size]
Wi-Fi Wi-Fi (→44)
Function button setting
(→23)
[Photo Style]
White Balance Bracket
(→34)
White Balance Fine
Adjustment
AWB White Balance
[i.Dynamic]
[Metering Mode]
98
Number of recordable
pictures
RXXmXXs
Available recording time
On-monitor recording information
[m] and [s] indicate “minute” and “second”.
53
DVQX1151 (ENG)
Others
Q&A
Troubleshooting
Performing [Reset] in the [Setup] menu may resolve the issue.
Further information is provided in the “Operating Instructions for advanced
features (PDF format)”. Check it together with the information in this section.
The charging lamp blinks.
Charging is being performed in a place with extremely high or low temperature.
Reconnect the USB connection cable (supplied) and retry charging in a place where
ambient temperature is 10 °C to 30 °C (50 °F to 86 °F) (temperature conditions also
apply to the battery itself).
Charging is not possible if the power supply capacity of the computer is low.
The battery runs down quickly.
[4K PHOTO] is set to [ ] ([4K Pre-Burst]).
When [
] ([4K Pre-Burst]) has been selected, the battery drains faster.
Select [
] ([4K Pre-Burst]) only when recording.
Focus not aligned correctly.
Subject outside of focus range.
[Focus/Release Priority] is set to [RELEASE]. (→43)
[Shutter AF] is set to [OFF]. (→43)
AF Lock is set inappropriately.
If there are fingerprints or dirt on the lens, the focus may be set to the lens and not the
subject.
Subject appears skewed in pictures.
If you take a picture of a moving subject in the electronic shutter mode, motion picture
recording mode, or 4K photo recording mode, the subject in the picture may be skewed
in some cases. This is characteristic of MOS sensors which serve as the camera’s pickup
sensors. This is not a malfunction.
Striping or flicker may appear under lighting such as fluorescent lighting
and LED lighting fixture.
This is characteristic of MOS sensors which serve as the camera’s pickup sensors. This is
not a malfunction.
If you are taking still pictures using the electronic shutter, the striping may be reduced by
setting a slower shutter speed.
When noticeable flicker or striping is seen under lighting such as a fluorescent or LED lighting
fixture in the motion picture recording mode, you can reduce the flicker or striping by setting
up [Flkr Decrease] (→42) and fixing the shutter speed. It is possible to select a shutter speed
from [1/50], [1/60], [1/100], or [1/120]. You can set the shutter speed manually in the Creative
Video Mode. (→20)
54
Others
DVQX1151 (ENG)
4K photo recording stops before finishing.
When the ambient temperature is high or recording of the 4K Photo function is performed
continuously, the camera may display [
] and stop the recording. Wait until the camera
cools down.
Cannot record motion pictures.
When a large capacity card is used, you may not be able to take a picture for a while after
you turn on the camera.
Sometimes focus adjustment with auto focus mode is difficult while
recording 4K motion pictures.
This may occur when taking a picture by reducing the auto focus speed in order to adjust the
focus at high precision. This is not a malfunction.
No flash emitted.
The flash becomes unavailable in the following cases.
The flash is closed.
Set [Shutter Type] to [AUTO] or [MSHTR]. (→42)
Set [Silent Mode] to [OFF]. (→43)
It cannot connect to the wireless LAN. Radio waves get disconnected.
General tips for using a Wi-Fi connection
Use within the communication range of the wireless LAN network.
If any device, such as microwave oven, cordless phone, etc., that uses 2.4 GHz frequency
are used nearby this unit simultaneously, radio waves may get interrupted.
Use them sufficiently away from the device.
When the battery indicator is flashing red, the connection with other equipment may not
start or the connection may be disrupted. (A message such as [Communication error] is
displayed.)
When this unit is placed on a metal table or shelf, the connection may not be established
easily because the camera is affected by radio waves. Use the camera away from metal
surfaces.
The lens makes a clicking noise.
When the camera is turned on or off, the lens is moved, or an aperture operation is
performed, such a noise may be heard. This is not a malfunction.
When the brightness changes after a zooming operation or moving the camera, the lens may
make a noise while adjusting the aperture. This is not a malfunction.
Zooming stops instantaneously.
When using the Extra Optical Zoom, the zooming action will stop temporarily. This is not a
malfunction.
55
DVQX1151 (ENG)
Others
Specifications
Digital Camera: Information for your safety
Power Source DC 8.4 V ( 8.4 V)
Power
Consumption
1.9 W (When recording with monitor)
2.7 W (When recording with viewfinder)
1.5 W (When playing back with monitor)
1.6 W (When playing back with viewfinder)
Camera effective
pixels
18,100,000 pixels
Image sensor 1/2.3″ MOS sensor,
total pixel number 18,900,000 pixels
Primary colour filter
Lens Optical 60x zoom
f=3.58 mm to 215 mm
(35 mm film camera equivalent: 20 mm to 1,200 mm)
Max. Wide: F2.8 to F8.0
Max. Tele: F5.9 to F8.0
Image Stabiliser Optical method
Focus range AF:
30 cm (0.98 feet) (Max. Wide)/
1.5 m (4.9 feet) (Max. Tele) to
AF Macro/MF/Intelligent Auto/Motion picture:
1 cm (0.033 feet) (Max. Wide)/
1.5 m (4.9 feet) (Max. Tele) to
Shutter system Electronic shutter + Mechanical shutter
Minimum
Illumination
Approx. 9 lx (when i-Low light is used, the shutter speed is
1/25th of a second)
56
DVQX1151 (ENG)
Others
Shutter speed Still picture:
60 seconds to 1/2000th of a second
(When the mechanical shutter is used and [Artistic
Nightscape] is selected as the Scene Guide Mode),
4 seconds to 1/2000th of a second
(When the mechanical shutter is used, in cases other than
the above),
1 second to 1/16000th of a second
(When the electronic shutter is used)
Motion picture:
1/2 second to 1/16000th of a second
(When [Exposure Mode] is set to [M] in Creative Video
Mode and [MF] is selected),
1/25th of a second to 1/16000th of a second
(Other than the above)
Exposure (AE) Programme AE (P)/Aperture-priority AE (A)/
Shutter-priority AE (S)/Manual exposure (M)/AUTO
Exposure Compensation (1/3 EV steps, -5 EV to +5 EV)
[Metering Mode] Multiple/Centre weighted/Spot
Monitor 3.0″ TFT LCD (3:2) (Approx. 1,040,000 dots)
(field of view ratio about 100%)
Touch screen
Viewfinder 0.2″ Colour LCD Live Viewfinder (4:3)
(Approx. 1,170,000 dots equivalent)
(field of view ratio about 100%)
[Magnification approx. 2.59x, 0.46x (35 mm film camera
equivalent), with 50 mm lens at infinity; -1.0 m
-1
]
(with diopter adjustment -4.0 to +4.0 diopter)
Flash Built-in pop up flash
AUTO, AUTO/Red-Eye Reduction, Forced ON,
Forced ON/Red-Eye Reduction, Slow Sync.,
Slow Sync./Red-Eye Reduction, Forced OFF
Microphones Stereo
Speaker Monaural
57
DVQX1151 (ENG)
Others
Recording media
SD Memory Card/SDHC Memory Card
/
SDXC Memory Card
UHS- UHS Speed Class 3
Recording file
format
Still picture RAW/JPEG (based on Design rule for Camera File
system, based on Exif 2.3 standard/DPOF corresponding)
Motion picture AVCHD Progressive/AVCHD/MP4
Audio compression
format
AVCHD: Dolby Audio™ (2 ch)
MP4: AAC (2 ch)
Interface
[HDMI] Micro HDMI Type D
[USB/CHARGE] USB 2.0 (High Speed) Micro-B
Data from the PC cannot be written to the camera using
the USB connection cable.
Dimensions Approx. 130.2 mm (W) x 94.3 mm (H) x 119.2 mm (D)
[5.13″ (W) x 3.71″ (H) x 4.69″ (D)]
(excluding the projection part)
Mass With card and battery: Approx. 616
(1.36 lb)
Excluding card and battery: Approx. 572
(1.26 lb)
Operating
temperature
0 °C to 40 °C (32 °F to 104 °F)
Operating humidity 10%RH to 80%RH
58
DVQX1151 (ENG)
Others
Wi-Fi
Compliance
standard
IEEE 802.11b/g/n (standard wireless LAN protocol)
Frequency range
used
(central frequency)
2412 MHz to 2462 MHz (1 to 11 ch)
Encryption method Wi-Fi compliant WPA™/WPA2™
Access method Infrastructure mode
AC adaptor
(Panasonic SAE0012F): Information for your safety
Input: 110 V – 240 V 50/60 Hz 0.2 A
Output: 5 V
1.0 A
Battery pack (lithium-ion)
(Panasonic DMW-BMB9E): Information for your safety
Voltage/capacity: 7.2 V/895 mAh
The symbols on this product (including the accessories) represent the following:
AC
DC
Class II equipment (The construction of the product is double-insulated.)
Specifications are subject to change without notice.
59
DVQX1151 (ENG)
Others
Digital Camera Accessory System
Description Accessory#
Battery pack
1
DMW-BMB9
AC adaptor
2
DMW-AC10
DC coupler
2
DMW-DCC6
Lens adaptor DMW-LA8
Tele conversion lens
3
DMW-LT55
Close-up lens
3
DMW-LC55
MC protector DMW-LMCH55
ND filter DMW-LNDH55
PL filter (Circular type) DMW-LPL55
Flash DMW-FL200L / DMW-FL360L / DMW-FL580L
LED video light VW-LED1
1
The battery pack can be charged from the camera using the AC adaptor (supplied).
2
By using the AC adaptor (DMW-AC10: optional) and DC coupler (DMW-DCC6: optional), you
can record and play back without worrying about the remaining battery charge.
When using an AC adaptor (optional), use the AC mains lead supplied with the AC adaptor.
The AC adaptor (optional) can only be used with the designated Panasonic DC coupler
(optional). The AC adaptor (optional) cannot be used by itself.
3
The lens adaptor (DMW-LA8: optional) is necessary to attach a tele conversion lens or close-
up lens.
Part numbers are as of February 2017. These may be subject to change.
Some optional accessories may not be available in some countries.
60
DVQX1151 (ENG)
Others
Sales and Support Information
Customer Communications Centre
For customers within the U.K.: 0344 844 3899
For customers within Ireland: 01 289 8333
Monday - Friday 9:00am - 5:00pm (Excluding public holidays).
For further support on your product, please visit our website:
www.panasonic.co.uk
Direct Sales at Panasonic U.K.
Order accessory and consumable items for your product with ease and
confidence by phoning our Customer Communications Centre
Monday - Friday 9:00am - 5:00pm (Excluding public holidays).
Or go on line through our Internet Accessory ordering application at
www.pas-europe.com.
Most major credit and debit cards accepted.
All enquiries transactions and distribution facilities are provided directly by
Panasonic U.K.
It couldn’t be simpler!
Also available through our Internet is direct shopping for a wide range of finished
products. Take a browse on our website for further details.
61
DVQX1151 (ENG)
Others
Reading the Operating Instructions
(PDF format)
More detailed operating instructions are available in “Operating Instructions for
advanced features (PDF format)”. To read it, download it from the website.
http://panasonic.jp/support/dsc/oi/index.html?model=DC-FZ82&dest=EB
Click the desired language.
Confirming URLs and QR codes with the camera
[Setup] → [Online Manual]
Settings: [URL display] / [QR Code display]
The URL or QR code will be displayed on the camera monitor.
You will need Adobe Reader to browse or print the Operating Instructions (PDF
format). You can download and install a version of Adobe Reader that you can
use with your OS from the following website. (As of February 2017)
http://www.adobe.com/products/acrobat/readstep2.html
62
DVQX1151 (ENG)
SDXC Logo is a trademark of SD-3C, LLC.
The terms HDMI and HDMI High-Definition Multimedia Interface, and the HDMI
Logo are trademarks or registered trademarks of HDMI Licensing, LLC in the
United States and other countries.
HDAVI Control™ is a trademark of Panasonic Corporation.
“AVCHD”, “AVCHD Progressive” and the “AVCHD Progressive” logo are
trademarks of Panasonic Corporation and Sony Corporation.
Dolby, Dolby Audio, and the double-D symbol are trademarks of Dolby
Laboratories.
Pentium is a trademark of Intel Corporation in the U.S. and/or other countries.
Windows is either registered trademark or trademark of Microsoft Corporation
in the United States and/or other countries.
iMovie, Mac and Mac OS are trademarks of Apple Inc., registered in the U.S.
and other countries.
iPad, iPhone, iPod, and iPod touch are trademarks of Apple Inc., registered in
the U.S. and other countries.
App Store is a service mark of Apple Inc.
Android and Google Play are trademarks or registered trademarks of Google
Inc.
The Wi-Fi CERTIFIED™ Logo is a certification mark of Wi-Fi Alliance
®
.
The Wi-Fi Protected Setup™ Identifier mark is a certification mark of Wi-Fi
Alliance
®
.
“Wi-Fi
®
” is a registered trademark of Wi-Fi Alliance
®
.
“Wi-Fi Protected Setup™”, “WPA™”, and “WPA2™” are trademarks of Wi-Fi
Alliance
®
.
DLNA, the DLNA Logo and DLNA CERTIFIED are trademarks, service marks,
or certification marks of the Digital Living Network Alliance.
QR Code is a registered trademark of DENSO WAVE INCORPORATED.
This product uses “DynaFont” from DynaComware Corporation. DynaFont is a
registered trademark of DynaComware Taiwan Inc.
Other names, company names, and product names mentioned in these
instructions are trademarks or registered trademarks of the companies
concerned.
63
DVQX1151 (ENG)
EU
Web Site: http://www.panasonic.com
© Panasonic Corporation 2017
Manufactured by: Panasonic Corporation
Kadoma, Osaka, Japan
Importer for Europe: Panasonic Marketing Europe GmbH
Panasonic Testing Centre
Winsbergring 15, 22525 Hamburg, Germany
20

Hulp nodig? Stel uw vraag in het forum

Spelregels
2

Forum

Panasonic-DC-FZ82
  • Camera geeft plotseling de melding "systeemfout (Zoom)" en nu de melding "systeemfout (O.I.S.).
    Iemand een idee hoe dit is op te lossen? Gesteld op 7-3-2025 om 13:17

    Reageer op deze vraag Misbruik melden
    • een bekend probleem bij deze Camera ...ik heb het ook gehad ,gelukkig was hij nog in garantie en hebben ze gratis de herstelling gedaan ... Geantwoord op 7-3-2025 om 13:29

      Waardeer dit antwoord (1) Misbruik melden
  • Helaas hij is uit de garantie, toch vreemd dat dit zomaar ineens optreed.
    Dan maar eerst informeren wat het oplossen gaat kosten ?? Geantwoord op 7-3-2025 om 15:06

    Waardeer dit antwoord Misbruik melden
  • altijd jammer dat hij buiten garantie is .....de normale garantie is hier in Belgie 2 jaar ...maar bij bepaalde winkels in NL en ook in een vestiging in Belgie krijg je 5 jaar garantie !! ik kocht er 2 bij Camera Nu in Nederland .Mijn Lumix was net geen 2 jaar oud ,ik mocht van Panasonic deze versturen naar een erkent herstelpunt in Belgie ...moest de nodige gegevens invullen en de factuur van aankoop inscannen ...kreeg ook gratis een verzend label , en exact een week later had ik hem terug .Is hij ouder dan 2 jaar dan had ik moeten verzenden op mijn kosten naar Camera Nu in Nederland en zij doen dan verder het nodige . ik zou zeker als hij echt buiten garantie is een prijs offerte vragen , want je zou wel eens kunnen schrikken dat de herstelling niet ver van de aankoop is ...of zelfs duurder .... hopelijk lees ik je verhaal verder ,hoe het is afgelopen. Geantwoord op 7-3-2025 om 19:50

    Waardeer dit antwoord Misbruik melden
  • Panasonic heeft een offerte voor het herstellen doorgegeven, ergens tussen de 350 en 400 Euro.
    Ze hebben wel kort al even gekeken en blijkbaar zat er een los schroefje in de lens, mogelijk bij de vorige reparatie iets niet goed gegaan, toen zat hij nog in de garantie.
    Niet over nadenken en heb meteen een nieuwe gekocht, want ben erg tevreden over de camera. Geantwoord op 15-3-2025 om 11:13

    Waardeer dit antwoord Misbruik melden
  • in feite allemaal triest , herstellingen ( kosten ) komen meestal in de buurt van een nieuw toestel ,toch niet normaal ...maar het is dus zoals ik eerder schreef over herstelkosten. Geantwoord op 15-3-2025 om 17:05

    Waardeer dit antwoord Misbruik melden
  • wat was dan het vorige probleem ? ...welk type heb je dan nu gekocht ...volgens ik dacht de D uitvoering nu de opvolger van de DCFZ-82 ...beter scherm en betere oogzoeker ...maar andere functies hebben ze weggenomen . Geantwoord op 15-3-2025 om 17:21

    Waardeer dit antwoord Misbruik melden
  • Nou ,echt snel in het contact zoeken bij het vragen van een probleem , om een antwoord heeft het (vorig jaar,mei 2024) gesteld.
    Helaas heb ik noodgedwongen een nieuwe moeten kopen (300.00 euro, terwijl de andere camera net uit de 2 jaar garantie was) Hij koste ook 300,00 euro.
    Reken uit voor iemand met een uitkering...
    NEE Helaas...ik vind het geen fijne service. Geantwoord op 15-3-2025 om 21:11

    Waardeer dit antwoord Misbruik melden
  • Ja klopt, heb nu de DC-FZ82D gekocht. Geantwoord op 16-3-2025 om 12:23

    Waardeer dit antwoord Misbruik melden
  • Is het mogelijk om in de automatische stand zwart/wit foto’s te makdn Gesteld op 27-11-2024 om 14:47

    Reageer op deze vraag Misbruik melden
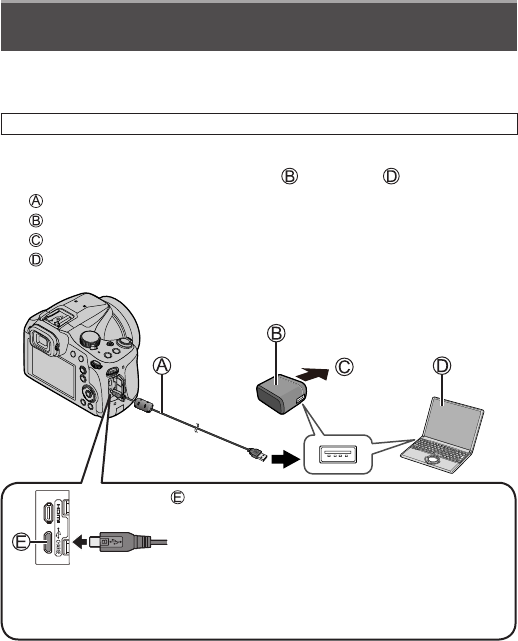
  • Hoe kan ik de foto's die op de camera staan overzetten op de computer? Voorheen lukte mij dat maar nu krijg ik het met geen mogelijkheid meer voor elkaar.

    Met groet,
    Wietske info@keepingtouch.nl Gesteld op 14-3-2024 om 20:37

    Reageer op deze vraag Misbruik melden
    • 1 >>> camera verbinden via een usb kabel naar je computer ..en je ziet de foto's staan , deze dan copiëren naar een mapje
      2 >>> ofwel ( zo doe ik het altijd ) sd kaartje uit de camera nemen en in de laptop steken in het daar voorziene kaartslot ...je ziet ze dan staan en dan copieren naar eenmapje op je pc of laptop Geantwoord op 14-3-2024 om 20:42

      Waardeer dit antwoord (3) Misbruik melden
  • Graag wil ik de belichtingstijd van d fz82 handmatig instellen tot 8 seconde. Kan iemand mij helpen? Gesteld op 19-1-2024 om 14:12

    Reageer op deze vraag Misbruik melden
  • Vroeger kreeg ik bij het bekijken van mijn foto's op camera, altijd een nummer te zien vb foto 10/320. Hoe krijg ik dit terug? Gesteld op 7-12-2023 om 09:06

    Reageer op deze vraag Misbruik melden
  • Ik heb de panason8c fz82.
    Sinds vandaag zie ik, wanneer ik door de zoeker kijk, een soort tunnel effect. Ik zie eerst de binnenkant van de camera en vervolgens op een afstandje het beeld (scherm). Alsof je in de verte naar een bioscoop film zit te kijken zeg maar. Hoe kan ik dit oplossen? Heb de hele handleiding doorgelezen en kan er niks over vinden. Ik hoop dat het door een simpele handeling (instelling) weer normaal beeld kan worden. Op het display is het beeld gewoon goed volledig in beeld maar door de zoeker zie ik het dus 'op afstand' wie weet wat dit is en hoe ik dit kan verhelpen? Gesteld op 12-11-2023 om 21:46

    Reageer op deze vraag Misbruik melden
    • Ik denk dat ik weet wat je bedoelt. Het lijkt alsof het displaytje de hele binnenkant van de camera verlicht en je kan rondkijken in de camera. Ik weet niet of dit normaal is dat de binnenkant verlicht is. Het is wel storend. Toch is het display scherp.
      Het vreemde is dat mijn vrouw het niet opvalt. Maar als ik het haar zeg dan ziet ze het pas. Ik ervoer dit probleem anderhalf jaar geleden maar afgelopen zomer is het mij niet opgevallen.
      Net als je in de bioscoop zit, dan worden de muren ook verlicht, maar je let er niet op.
      Dus.. het kan tussen de oren zitten (bij jou en bij mij) of er is inderdaad licht wat er niet hoort. Laat het eens aan iemand anders zien, zonder Ier te vertellen.
      Geantwoord op 12-11-2023 om 23:24

      Waardeer dit antwoord Misbruik melden
6
  • denk dat het komt ,naargelang je in de zoeker kijkt m.a.w. dichter of verder van het kijkvenster en of je echt recht in de zoeker kijkt ...ik heb het nu ook nagezien ...en naar gelang je kijkt ,kan het scherm inderdaad ver weg zijn .Ik heb deze camera 3 jaar en ik had er nog niet op gelet !! Geantwoord op 13-11-2023 om 10:03

    Waardeer dit antwoord Misbruik melden
  • Heb t toevallig op vakantie ook gehad.
    Kijk eens in je camera menu onder instellingen> Live zoeker.
    Hier zie je scherm disp.stijl, scherm info stijl, LVF disp.stijl. vermoedelijk heeft t daar iets mee te maken.
    Succes, Yvonne Geantwoord op 13-11-2023 om 18:35

    Waardeer dit antwoord Misbruik melden
  • Hoi Yvonne. Ik heb het geprobeerd (tegen beter weten in) maar dit is niet de oplossing. Als je je oog tegen het glaasje aandrukt, dan zie je het display, maar ook kun je naast het display kijken. Net alsof je achterin de bioscoop zit en je ziet ook het plafond en muur, maar in dit geval zie je het plastic rondom het display. En dit is ook nog eens behoorlijk verlicht.
    Op Dpreview lopen een tweetal draadjes (Googlen op: Dpreview fz82 evf). Daar zijn zelfs mensen die de camera uit elkaar gehaald hebben, maar niks konden vinden.
    Als je je oog niet tegen het glas aandrukt, maar er iets vanaf houdt, dan zie je alleen het display, alleen komt er dan licht in je oog.
    Een oplossing kan zijn om een Nikon dk-20 eye cup te installeren, zodat je oog niet tegen het glas aankomt. Op YouTube is iemand die dit erop gelijmd heeft. Ene Graham Houghton legt het uit op 2m15s. Zo is je oog iets verder verwijderd.
    Ik denk nog steeds dat het tussen de oren zit.
    Zoals ik al zei, afgelopen zomer is het mij niet opgevallen. Pas nu ik de vraag zag, dacht ik oh ja dat heb ik ook (al jaren).
    Geantwoord op 13-11-2023 om 23:02

    Waardeer dit antwoord Misbruik melden
  • Dank allemaal, tegen beter weten in werkte jouw optie ook niet Yvonne, ik had die instelling voordat ik de vraag stelde ook al geprobeerd maar helaas.

    Ik heb nog geen oplossing gevonden. Ik zal het draadje even opzoeken wat iemand hierboven ook als tip gaf maar ik ga niks op mijn camera eye plakken uiteraard.

    Wat ik wel raar vind is dat je precies zegt wat het is, alsof je achter in de bioscoop zit en de muren, onder en plafond ziet en het scherm in de verte voor je.
    Alsof het in een kasje geplaatst is.
    Maar tevens benoem je dat het tussen de oren zit, die snap ik niet helemaal.
    Ik zie precies wat jij omschrijft en het was toen ik hem kocht gewoon goed.

    Ik hoop dat iemand anders dit nog herkend en wel de oplossing heeft. Anders vraag ik ook bij een winkel maar dat gaat geld kosten en dacht mss weet iemand hier wat het kan zijn.

    Mvg, sylvia. Geantwoord op 14-11-2023 om 00:08

    Waardeer dit antwoord Misbruik melden
  • Hoi Silvia,
    Wat ik bedoel is dat het mij 2 jaar geleden al opviel en ik heb me eraan gestoord (nu weer). Maar als ik het aan mijn vrouw of kinderen laat zien, valt het ze niet op, totdat ik het zeg.
    En afgelopen zomervakantie heb ik het ook niet gezien. Het was er waarschijnlijk wel, maar ik was me er niet van bewust.

    Wat ik op Dpreview lees, is dat men het vermoeden had dat een vergrootglaasje verschoven of gevallen was, maar niemand kon iets vinden.

    Omdat ik afgelopen zomer heel veel leuke dingen gefotografeerd heb en gefocust was op wat ik zag, de compositie, viel de rest rondom het display mij niet op en ook het bioscoop effect. Daarom denk ik dat het er altijd al was, maar dat het mij nooit was opgevallen.


    Geantwoord op 14-11-2023 om 08:49

    Waardeer dit antwoord Misbruik melden
  • ik gebruik ook zo'n eye cup ....omdat ik dat ook vond op internet (Graham Houghton) ik gebruik er dubbelzijdige tape van 3m voor , lijmen vond ik nogal drastisch .Persoonlijk vind ik het wel beter ...maar zoals ik deze week ook schreef ...ik heb er nu op gelet en zie het fenomeen nu ook .Misschien dat ik wel eens de vraag stel aan Graham ,heb hem al een paar keer gemaild en zal zijn email adr. nog wel kunnen terug vinden .Hij werkte vroeger bij Kodak in Engeland ...ik bij Kodak Belgie .
    grt,
    françois Geantwoord op 14-11-2023 om 09:07

    Waardeer dit antwoord Misbruik melden
  • Hoi François,
    Ik heb net nogmaals de camera aangehad en ik merk dat ik mijn wenkbrauw tegen de viewfinder aandrukt, dus niet mijn oog tegen het glaasje. Door heb ik een bepaalde afstand en valt het me niet meer op. Precies de afstand die je creëert met een eyecup.
    Nadeel is wel dat er vanaf de zijkant (dus zonder eyecup) veel licht naar binnen kan valken en je de neiging gaat krijgt om je oogbal bijna letterlijk tegen het glas aan te drukken. Lichtinval voorkom je natuurlijk met zo'n eyecup. Zo'n eyecup maakt de camera wel wat dikker en ik weet niet of dit in mijn fototasje past en of het niet storend is als de camera om mijn nek hangt. Het is het proberen waard.

    Een andere reden om iets afstand te houden van het glas is dat mijn neus het grote display bedient waardoor je het gele vierkantje ziet verplaatsen. Geen idee of dit uitgeschakeld kan worden. Geantwoord op 14-11-2023 om 09:18

    Waardeer dit antwoord Misbruik melden
  • Ik heb weinig of geen problemen met de eye cup ,ik gebruik geen tasje , hij steekt 9 mm verder uit ..m.a.w; de dikte van de eye cup ...één keer heb ik gehad dat door de warmte de dubbelzijdige tape losliet ,maar weet nu niet meer of het de tape is die ik nu gebruik ...die tape is ook ongeveer 1mm dik en een beetje veerkrachtig .Kan ik hier ook foto's plaatsen en op welke manier te doen ...dan plaats ik een paar foto's .

    grt,

    françois Geantwoord op 14-11-2023 om 10:16

    Waardeer dit antwoord Misbruik melden
  • Hi, ik heb het vervelende euvel dat mijn camera telkens 5 of 6 foto's achter elkaar maakt als ik de ontspanningsknop indruk. Heeft iemand enig idee waar in het menu en welke knop ik dan uit moet zetten. Ik heb de camera nog niet zo lang. Gesteld op 23-9-2023 om 15:52

    Reageer op deze vraag Misbruik melden
    • Het kan zijn dat je "burst" hebt aanstaan of "bracket". Via het menu kan je dat uitzetten, zal zo even kijken welke handelingen je dan moet doen Geantwoord op 23-9-2023 om 16:26

      Waardeer dit antwoord Misbruik melden
  • Bracket kun je uitzetten door in het menu te drukken op het cameraatje en dan even zoeken naar bracket en off zetten.
    Burst staat als het goed is in hetzelfde rijtje Geantwoord op 23-9-2023 om 17:03

    Waardeer dit antwoord (1) Misbruik melden
  • Dank je wel! Vreemde alleen dat ik bij Burst niet een Uitknop heb maar het is gelukt! Geantwoord op 23-9-2023 om 18:53

    Waardeer dit antwoord (1) Misbruik melden
  • Kan ik het toestel instellen zodat ik in het zoekscherm de lijnen kan zien voor de regel van 3 kan zien. Gesteld op 14-9-2023 om 16:58

    Reageer op deze vraag Misbruik melden
  • Hier hetzelfde probleem. Moet de camera uitzetten en opnieuw aan, daarna is het probleem even weg. Batterij eruit gehaald, een nacht laten liggen naast de camera. Camera opnieuw opgeladen, foutmelding blijft komen. Dan weer een melding met zoom-fout. Iemand nog tips of suggesties? Camera is nog geen 4 jaar oud... Gesteld op 10-8-2023 om 17:21

    Reageer op deze vraag Misbruik melden
    • Ik heb hetzelfde nu met mijn 2e FZ-82. Heb (mijn tweede) opgestuurd via de zaak waar ik hem heb gekocht (CameraNU). Ze hebben de camera opgestuurd naar Panasonic en het probleem was verholpen voor ca. 1,5 jaar, maar nu weer terug. Bij komt het probleem wat minder vaak voor. Een paar keer aan en uit dan doet het wel weer. Maar vervelend is het wel. Ben al op zoek naar een camera met dezelfde kwaliteiten, afmetingen en gewicht. Ben er nu wel een beetje klaar mee. Geantwoord op 10-8-2023 om 17:38

      Waardeer dit antwoord (1) Misbruik melden
  • blijkbaar een bekend probleem , die van mij was amper 1 jaar oud , de herstelling is gedaan in Belgie bij een erkend Panasonic center ...en na een 7-8 dagen terug verzonden naar mij....onder de garantie ,niettegenstaande in deze had gekocht bij Camera nu.ze hebben de lens unit vervangen en hij doet het weer .bepaalde winkels geven 5 jaar garantie ....denk ook Cameranu . Heb er een tweede gekocht voor de kleinzoon , ..hopelijk doet die het beter ,maar heb nu wel mijn twijfels aann de kwaliteit van het zoom gedeelte. Geantwoord op 10-8-2023 om 17:45

    Waardeer dit antwoord Misbruik melden
  • Hoe zet ik mijn flitser aan? In het menu staat de knop ook uit, niet actief, evenzo de Panorama instellingen, dus ik kan ook niets instellen omdat de 'touch' niet werkt. Hij doet het ook niet automatisch Gesteld op 9-8-2023 om 17:25

    Reageer op deze vraag Misbruik melden
  • k heb wel eens ergens iets gelezen dat er op de DC-FZ 2000 een voorzetlens geplaatst kon worden. Weet iemand er wat van? Gesteld op 18-7-2023 om 08:56

    Reageer op deze vraag Misbruik melden
  • Hi, het lukt mij niet als je een foto maakt, om de datum op de foto te zetten.. Ik heb al bij de reisdatum gekeken en de vertrekdatum en terugdatum erin gezet. maar je ziet helemaal geen datum op de foto verschijnen.. Wie kan mij helpen!! Ik heb een Panasonic Lumix camera FZ82 . Alvast bedankt.. gr. HvE Gesteld op 15-7-2023 om 11:47

    Reageer op deze vraag Misbruik melden
12
  • Mijn Panasonic GH4 geef t een gele driehoek met uitroepteken zodra ik hem uischakel , camera werkt verder goed hoe kan dit verwijderen,,al veel gezocht op het net maar niks werkt tot nu toe. Gesteld op 18-4-2023 om 21:39

    Reageer op deze vraag Misbruik melden
  • Hoe moet ik de min en plus correctie veranderen op het schermpje . Gesteld op 11-4-2023 om 12:17

    Reageer op deze vraag Misbruik melden
  • Wie weet hoe ik mijn f 3.5 weer kan veranderen in f 2.8
    Als ik het instelwieltje indrukt staat het op 4.0 en 5.6 en 8.0
    Maar ik weet dus niet niet hoe ik het op f 2.8 zet....
    Ik ben mijn camera DC-FZ82 aan het uitproberen. alvast bedankt.. hve Gesteld op 15-2-2023 om 18:50

    Reageer op deze vraag Misbruik melden
    • Ik denk dat je minder moet inzoomen. Je kleinste diafragamagetal (2.8) is als je helemaal hebt uitgezoomd en hoe meer je inzoomt, des te groter wordt je minimum getal. (Losse) telelenzen van andere camera's beginnen vaak ook met f 4 of f 5.6. Hopelijk heb je iets aan dit antwoord. Geantwoord op 17-2-2023 om 13:04

      Waardeer dit antwoord (1) Misbruik melden
  • Hoe zet ik de draadloze flitsers op de (RC)-modus. Ik heb een externe flitser Panasonic DMW-FL200L voor mijn camera DC-FZ82 maar weet niet hoe ik bovenstaande RC-modus krijg op mijn menu van mij camera... help... groetjes HvE Gesteld op 10-2-2023 om 19:58

    Reageer op deze vraag Misbruik melden
  • Hoe stel ik mijn toestel in om foto's (afbeeldingen) te maken Gesteld op 27-1-2023 om 16:58

    Reageer op deze vraag Misbruik melden
  • Hallo, hier weer een vraag van mij.. Wie weet of er misschien een hoesje voor mijn filtser op mijn DC-FZ82 camera te koop is, want het is best wel fel om zo'n lichtflits in je ogen te krijgen als je een foto maakt met flits... graag een antwoord op mijn vraag.. groetjes HvE... alvast bedankt.... Gesteld op 26-1-2023 om 12:32

    Reageer op deze vraag Misbruik melden
18
  • Hallo.., ik heb ook een Panasonic DC-FZ82. En nu wil ik mijn flitser Panasonic DMW-FL200L weer hierop gaan gebruiken. Maar kan ik dan ook met de flitser een foto maken op standje iA (automatisch.. ik heb de flitser al een tijdje in de la liggen omdat ik er niet mee overweg kon. Wil het nu weer proberen op standje iA.. Is dat mogelijk.. Wie kan mij helpen... Groetjes HvE Gesteld op 22-1-2023 om 22:31

    Reageer op deze vraag Misbruik melden
  • ik wil de foto van de camera verwijderen, hoe doe ik dat Gesteld op 22-1-2023 om 11:32

    Reageer op deze vraag Misbruik melden
    • camera aanzetten....druk op groene pijltje ( driehoekje)...op het scherm komt het vuilbakje te staan ...druk hierop...kies voor te verwijderen ...let op ...kiezen voor alleen deze foto's of alles verwijderen ...dus jij zal dan kiezen voor enkel deze foto verwijderen Geantwoord op 22-1-2023 om 11:37

      Waardeer dit antwoord Misbruik melden
  • hoe schakel ik het schermpje weer in van mijn LUMIX DC FZ82 Gesteld op 12-11-2022 om 14:18

    Reageer op deze vraag Misbruik melden
  • Wat een eenvoudige handeling, heb veel knopjes geprobeerd, maar naar nu blijkt deze niet,Veel dank,Peter Geantwoord op 12-11-2022 om 16:38

    Waardeer dit antwoord Misbruik melden
  • Hoe stel ik in om foto's te maken in plaats van video Gesteld op 3-10-2022 om 19:56

    Reageer op deze vraag Misbruik melden
  • Hoe ik ik de Nederlandse taal instellen op de camera Gesteld op 16-9-2022 om 12:28

    Reageer op deze vraag Misbruik melden
  • Als ik mijn video opnieuw wil bekijken. Hoe verzet ik het geluidsvolume? Gesteld op 19-8-2022 om 19:48

    Reageer op deze vraag Misbruik melden
    • Als je het filmpje wil zien , druk je toch op het symbooltje ( gekantelde driehoek ) de film speelt en daaronder krijg je toch ..het luidspreker symbool ...de verticale streepje wat volume aangeeft en den de plus en min voor meer of minder volume ...dus de - of + aanraken hé. Geantwoord op 20-8-2022 om 11:47

      Waardeer dit antwoord Misbruik melden
24
  • Hallo,

    Ik heb perongeluk de taal op Duits gezet hoe kan ik dat veranderen naar Nederlands?

    Alvast bedankt Annet Gesteld op 2-8-2022 om 16:44

    Reageer op deze vraag Misbruik melden
  • waarschijnlijk door vocht staan er fijne gekleurde vertikale lijnen op het screen en in de zoeker.
    verder werkt de camera wel zoals menuinfo Gesteld op 16-7-2022 om 10:59

    Reageer op deze vraag Misbruik melden
  • Apparaat fotografeert direkt en kan niet fijn stellen Gesteld op 15-7-2022 om 09:36

    Reageer op deze vraag Misbruik melden
  • Ik heb per ongeluk 4K op mijn camera , en krijg het niet meer weg ,? Gesteld op 6-6-2022 om 18:48

    Reageer op deze vraag Misbruik melden
  • krijg steeds melding van systeemfout of dat ik hem weer aan en uit moet zetten. heb hem nu anderhalf jaar maar heb geen kassabon omdat ik hem heb gekregen als kado. wat nu. vriendelijke groeten van mevr. A. Overkamp. Gesteld op 26-3-2022 om 16:28

    Reageer op deze vraag Misbruik melden
    • dag mevr. Overkamp,
      geen kassabon is natuurlijk een probleem ...maar je kan misschien vragen waar de camera is gekocht ,of misschien weet je het .ik zou dan toch de winkel een mail sturen en dit aankaarten dat hij anderhalf jaar oud is etc en het SNr vermelden .Je kan misschien ook aangeven wie ( naam van de koper ) de camera heeft gekocht.
      Mijn Camera heeft hetzelfde probleem ,bij uitschakelen gaat de lens netjes in het toestel en bij aanschakelen doet hij het weer terug .Ik kocht het toestel bij CameraNu .nl online en die geven zelfs 5 jaar garantie ,2 jaar de wettelijke en de 3 jaar zullen ze het intern regelen denk/hoop ik dan .Ik stuur na het paasverlof de camera in herstelling en dan zit ik nog net binnen de jaar .Ongelooflijk dat zoveel dit probleem hebben , het moet dan toch een bekend probleem zijn ...ik stelde de vraag bij CameraNu en die weten het niet ,kennen het probleem niet !! wat wel niet netjes is .
      grt,

      françois Geantwoord op 26-3-2022 om 16:46

      Waardeer dit antwoord Misbruik melden
  • Hallo,

    betreft de Lumix DCFZ 82 ...al meerdere keren gehad dat de camera vast loopt , het beeld blijft wel aan en ik krijg de melding gelieve camera uit te schakelen en terug in te schakelen en ja nadien doet hij het wel ,maar wat is de oorzaak .ik gebruik de camera voor vliegtuigen te spotten, als bv de landing wordt ingezet en je krijgt dit voor ...dan is na het uit en inschakelen het vliegtuig al geland ...

    wie heeft dit al voorgehad en wie weet raad en daad ?
    grt,

    françois Gesteld op 19-3-2022 om 19:24

    Reageer op deze vraag Misbruik melden
30
  • goede avond,

    heb je enig idee wat de oorzaak was ,of wat men heeft gedaan of vervangen ?ik stelde de vraag aan CameraNu .nl waar ik het toestel kocht en die weten het niet ...makkelijk , dan zijn ze ervanaf hé !! ik stelde ook de vraag aan een service ount in Belgie ( waar hij al in herstelling is geweest voor problemen met de aan/uit schakelaar ) en die schrijven mij het volgende >>>>
    Beste,

    Doordat de lens blokkeert, krijg je deze melding. Waarschijnlijk zit er stof/zand tussen de delen van de lens die over elkaar schuiven.
    Soms is het probleem verholpen door zelf een beetje aan de lens te trekken als die uit het toestel komt.
    Hopelijk is het probleem hiermee verholpen.

    Met vriendelijke groeten / Cordialement / Kind regards,

    easyRepair.be

    ik kan dit moeilijk geloven omdat ik te veel zorg draag voor deze camera .
    Geantwoord op 19-3-2022 om 20:04

    Waardeer dit antwoord Misbruik melden
  • Beste,

    Ik heb mijn camera gekocht bij Camera Nu (online). Ben naar de vestiging in Eindhoven gegaan en daar ingeleverd. Ik kreeg netjes berichten waarin ik elke stap kon volgen. Na een maand had ik mijn camera gerepareerd weer terug. Geantwoord op 19-3-2022 om 20:15

    Waardeer dit antwoord Misbruik melden
  • ik kocht mijn Lumix ook online bij CameraNu in NL in juni 2020 en ik kocht dezelfde voor de kleinzoon in feb 2022 . is de naam van het service centrum in Eindhoven Je nog bekend ?


    grt,

    françois Geantwoord op 19-3-2022 om 21:38

    Waardeer dit antwoord (1) Misbruik melden
  • Ik heb een mailtje gestuurd naar service@cameranu.nl met het probleem en kon kiezen. Zelf opsturen of naar het dichtst bijzijnde filiaal brengen. Wat uiteindelijk de oorzaak is geweest weet ik niet. Ik weet wel dat het probleem vaker voorkomt, want dit is niet de eerste keer dat deze vraag hier gesteld wordt. Geantwoord op 19-3-2022 om 21:46

    Waardeer dit antwoord Misbruik melden
  • Na de camera op Off gezet te hebben, gaat deze nadat je 'm weer aanzet, niet op standaard instellingen?! Ik zie geen beeld? Ook kan ik niets zien door de lens?! (Ondanks dat lenskapje eraf is) Kan dus geen foto's maken Gesteld op 25-2-2022 om 13:38

    Reageer op deze vraag Misbruik melden
  • Hoera het werkt. Bedankt. Nu zoeken als ik foto`s maak en de zon schijnt heb ik een blauw fotobeeld dus wb instellen? of iets anders Geantwoord op 1-3-2022 om 10:33

    Waardeer dit antwoord Misbruik melden
  • Panasonic heeft mij verteld ga even resetten en dat deed ik. Daarna weer geprobeerd en zie daar de mooiste foto`s. Alles weer in orde. Geantwoord op 5-3-2022 om 08:28

    Waardeer dit antwoord (1) Misbruik melden
  • bij opladen gaat rode lampje knipperen weet niet wat dat kan zijn is er iemand die dit weet
    gerrit
    Gesteld op 14-1-2022 om 13:20

    Reageer op deze vraag Misbruik melden
  • Hallo,

    Ik heb deze camera pas. Bij het afsluiten van de camera krijg ik een geel driehoek met zwart uitroepteken. Ik las dat je hem dan naar de fabrieksinstellingen moet zetten, maar dat lukt me niet.

    Kan iemand me helpen met tips? Gesteld op 27-11-2021 om 15:40

    Reageer op deze vraag Misbruik melden
  • We hebben geprobeerd in een sportzaal met volgens mij voldoende kunstlicht foto's te maken. Helaas zijn alle foto's niet scherp. We komen er niet uit met de bruiksaanwijzing of tips op internet. Weet iemand hier een instelling die ons kan helpen? Gesteld op 22-11-2021 om 10:05

    Reageer op deze vraag Misbruik melden
  • Als ik een foto neem met wit erin, flikkert dat gedeelte op de display. Hoe haal ik dat weg? Gesteld op 26-10-2021 om 21:43

    Reageer op deze vraag Misbruik melden
    • Je hebt het zebrapatroon ingeschakeld. Ff zoeken in de manual hoe dit uit te schakelen.
      Het zebrapatroon laat overbelichte plekken zien. Geantwoord op 26-10-2021 om 22:01

      Waardeer dit antwoord Misbruik melden
  • Ik heb een panasonic dc-fz82. Als ik 1 foto wil maken neemt hij er heel veel achter elkaar. Hoe haal ik dit er uit? Gesteld op 26-9-2021 om 12:56

    Reageer op deze vraag Misbruik melden
36
  • Dat komt omdat het 4K (FN1)knopje boven op de camera aanstaat. Als je het nogmaals indrukt maakt hij niet meer zoveel foto's tegelijk. Geantwoord op 5-11-2021 om 18:49

    Waardeer dit antwoord (2) Misbruik melden
  • Ik heb hetzelfde probleem, maar het 4K knopje staat uit en toch maakt de camera elke keer 3 foto’s, hoe zet ik dat uit? Geantwoord op 1-7-2023 om 14:39

    Waardeer dit antwoord Misbruik melden
  • vreemd ...toch nog even de test doen ...knopje Fn1 indrukken en dan scrollen naar rechts en op ok drukken ..dus zeker bevestigen door op ok te drukken ....geef even reactie als het is opgelost Geantwoord op 1-7-2023 om 14:46

    Waardeer dit antwoord Misbruik melden
  • 4K staat echt off, maar nog maar een keer gedaan en bevestigd, maar het toestel blijft meerdere foto’s maken elke keer als ik de knop in druk Geantwoord op 1-7-2023 om 14:50

    Waardeer dit antwoord Misbruik melden
  • Ik heb hetzelfde probleem Geantwoord op 1-7-2023 om 15:06

    Waardeer dit antwoord Misbruik melden
  • Hoe kan ik door het kleine schermpje kijken als ik een foto wil nemen? Gesteld op 18-9-2021 om 16:34

    Reageer op deze vraag Misbruik melden
    • Als je de zoeker bedoelt boven het LCD scherm: Door op het knopje te drukken rechts naast de zoeker. Je kunt dan ook nog je oogafwijking aanpassen met het wieltje rechts op de zoeker. Geantwoord op 18-9-2021 om 16:40

      Waardeer dit antwoord Misbruik melden
  • Hi, ik heb een DC-FZ82 Lumix panasonic camera, Probleem is, als ik inzoom dan gebeurt het vaak dat ik op het display scherm van mijn camera een tekst krijgt: "Aub camera uit- en inschakelen". En dan kan ik niks meer doen dan de camera uit te zetten en dan weer aan.. Weet iemand waarom ik dit telkens gebeurt... !! en hoe ik het kan oplossen... Het is echt vervelend als je een paar mooie foto's wil maken en dan krijg ik het probleem weer... Wie kan mij helpen... Of wie heeft dit ook meegemaakt met de camera DC-FZ82... Graag een reaktie... Alvast bedankt.. groetjes HvE Gesteld op 20-8-2021 om 16:05

    Reageer op deze vraag Misbruik melden
    • dat had ik ook, maar had nog garantie en heb hem laten repareren. het was anders niet te verhelpen dacht ik, er moest een onderdeel vervangen worden. Geantwoord op 20-8-2021 om 16:13

      Waardeer dit antwoord Misbruik melden
  • Je kan de camera op stille modus zetten. Nu hoor je helemaal geen geklik meer. Te vinden onder menu functie 4 Geantwoord op 21-8-2021 om 15:49

    Waardeer dit antwoord (5) Misbruik melden

Misbruik melden

Gebruikershandleiding.com neemt misbruik van zijn services uitermate serieus. U kunt hieronder aangeven waarom deze vraag ongepast is. Wij controleren de vraag en zonodig wordt deze verwijderd.

Product:

Bijvoorbeeld antisemitische inhoud, racistische inhoud, of materiaal dat gewelddadige fysieke handelingen tot gevolg kan hebben.

Bijvoorbeeld een creditcardnummer, een persoonlijk identificatienummer, of een geheim adres. E-mailadressen en volledige namen worden niet als privégegevens beschouwd.

Spelregels forum

Om tot zinvolle vragen te komen hanteren wij de volgende spelregels:

Belangrijk! Als er een antwoord wordt gegeven op uw vraag, dan is het voor de gever van het antwoord nuttig om te weten als u er wel (of niet) mee geholpen bent! Wij vragen u dus ook te reageren op een antwoord.

Belangrijk! Antwoorden worden ook per e-mail naar abonnees gestuurd. Laat uw emailadres achter op deze site, zodat u op de hoogte blijft. U krijgt dan ook andere vragen en antwoorden te zien.

Abonneren

Abonneer u voor het ontvangen van emails voor uw Panasonic DC-FZ82 bij:


U ontvangt een email met instructies om u voor één of beide opties in te schrijven.


Ontvang uw handleiding per email

Vul uw emailadres in en ontvang de handleiding van Panasonic DC-FZ82 in de taal/talen: Engels als bijlage per email.

De handleiding is 2,39 mb groot.


U ontvangt de handleiding per email binnen enkele minuten. Als u geen email heeft ontvangen, dan heeft u waarschijnlijk een verkeerd emailadres ingevuld of is uw mailbox te vol. Daarnaast kan het zijn dat uw internetprovider een maximum heeft aan de grootte per email. Omdat hier een handleiding wordt meegestuurd, kan het voorkomen dat de email groter is dan toegestaan bij uw provider.

Stel vragen via chat aan uw handleiding

Stel uw vraag over deze PDF

Andere handleiding(en) van Panasonic DC-FZ82

Panasonic DC-FZ82 Snelstart handleiding - Nederlands - 64 pagina's

Panasonic DC-FZ82 Gebruiksaanwijzing - Nederlands - 311 pagina's

Panasonic DC-FZ82 Snelstart handleiding - Deutsch - 64 pagina's

Panasonic DC-FZ82 Gebruiksaanwijzing - Deutsch - 311 pagina's

Panasonic DC-FZ82 Gebruiksaanwijzing - English - 311 pagina's

Panasonic DC-FZ82 Snelstart handleiding - Français - 64 pagina's

Panasonic DC-FZ82 Gebruiksaanwijzing - Français - 311 pagina's


Uw handleiding is per email verstuurd. Controleer uw email

Als u niet binnen een kwartier uw email met handleiding ontvangen heeft, kan het zijn dat u een verkeerd emailadres heeft ingevuld of dat uw emailprovider een maximum grootte per email heeft ingesteld die kleiner is dan de grootte van de handleiding.

Er is een email naar u verstuurd om uw inschrijving definitief te maken.

Controleer uw email en volg de aanwijzingen op om uw inschrijving definitief te maken

U heeft geen emailadres opgegeven

Als u de handleiding per email wilt ontvangen, vul dan een geldig emailadres in.

Uw vraag is op deze pagina toegevoegd

Wilt u een email ontvangen bij een antwoord en/of nieuwe vragen? Vul dan hier uw emailadres in.


Info