523525
57
Verklein
Vergroot
Pagina terug
1/64
Pagina verder
PENTAGRAM Designer (P 2700)
2009-11-26
EN
PL
DE
Installation and Operation Manual
Installations- und Bedienungsanleitung
Instrukcja instalacji i obsługi
PENTAGRAM Designer (P 2700)
PL
Instrukcja instalacji i obsługi
PENTAGRAM Designer (P 2700)
1
PL
Najnowsze wersje instrukcji, sterowniw i oprogramowania dostępne są na stronie
www.pentagram.pl .
PL
PENTAGRAM Designer (P 2700)
2
PL
PENTAGRAM Designer (P 2700)
Spis treści
WAŻNE INFORMACJE......................................................................................4
ŚRODKI OSTROŻNOŚCI........................................................................................4
INFORMACJA DOT. ZUŻYTEGO SPRZĘTU ELEKTRONICZNEGO...........4
WPROWADZENIE..............................................................................................5
ZAWARTOŚĆ PUDEŁKA........................................................................................5
MINIMALNE WYMAGANIA SYSTEMOWE........................................................5
ELEMENTY TABLETU.............................................................................................5
Panele dotykowe i przyciski trybów.......................................................6
Pola funkcyjne..................................................................................................6
Przyciski boczne..............................................................................................7
WYMIANA RYSIKA..................................................................................................7
INSTALACJA TABLETU....................................................................................8
KORZYSTANIE Z TABLETU...........................................................................9
KONFIGURACJA TABLETU..........................................................................10
WINDOWS VISTA/7..............................................................................................10
WINDOWS 2000/XP...........................................................................................10
Okno Diagnostic...........................................................................................10
Zakładka Pen..................................................................................................11
Zakładka Mapping........................................................................................13
Zakładka ExpressKeys...............................................................................15
APLIKACJA MACRO KEY MANAGER...............................................................17
Menu kontekstowe aplikacji....................................................................17
Okno Settings................................................................................................17
Główne okno aplikacji.................................................................................18
3
PL
PENTAGRAM Designer (P 2700)
Ważne informacje
Środki ostrożności
Unikaj używania oraz przechowywania urządzenia w miejscach silnie zapylonych, o wysokiej
wilgotności lub o bardzo niskiej lub wysokiej temperaturze.
Nie używaj urządzenia, gdy masz mokre ręce, aby uniknąć zniszczenia urządzenia lub
porażenia prądem.
Do czyszczenia urządzenia nie używaj środków chemicznych takich jak benzyna lub
detergenty - zawsze czyść urządzenie miękką, suchą ściereczką.
Przed czyszczeniem odłącz urządzenie od komputera.
Nie dokonuj na własną rękę żadnych zmian i napraw, ponieważ możesz stracić prawo do
gwarancji.
Nie narażaj urządzenia na upadki i wstrząsy.
Nie kładź ciężkich przedmiotów na powierzchni tabletu oraz na piórku.
Upewnij się, że tablet jest oddalony od monitora CRT (kineskopowego) i innych źródeł
silnego pola elektromagnetycznego, gdyż mogą one zakłócić pracę tabletu.
Informacja dot. zużytego sprzętu elektronicznego
Oznaczenia na urządzeniu i załączonej dokumentacji wskazują na fakt, że
urządzenie nie może zostać wyrzucone razem z nieposegregowanymi
odpadami komunalnymi po jego zużyciu. Urządzenie należy poddać procesowi
recyklingu lub innego przetworzenia w celu odzyskania materiałów, które
mogą zostać ponownie wykorzystane a także unieszkodliwiania składników
niebezpiecznych.
Użytkownicy powinni skontaktować się z organami odpowiadającymi za
recykling / odzysk, w celu ustalenia sposobu wycofania urządzenia z użycia w
sposób przyjazny dla środowiska.
4
UWAGA! Wszystkie informacje i dane techniczne mogą ulec zmianie bez wcześniejszego
powiadomienia i/lub zaznaczenia tego w niniejszej instrukcji.
Copyright ©2009 PENTAGRAM
Wszelkie prawa zastrzeżone, powielanie i kopiowanie zabronione.
PL
PENTAGRAM Designer (P 2700)
Wprowadzenie
Dziękujemy za zakup tabletu PENTAGRAM Designer. Przy użyciu tabletu możesz zrobić dużo
więcej, niż do tej pory przy użyciu myszki. Tablet został zaprojektowany jako narzędzie dla
grafików do zastosowań profesjonalnych, jednak tablety Pentagram dzięki niewyrowanej
cenie oraz dużym możliwościom nadają się również do zastosowań domowych.
Zawartość pudełka
1. Tablet
2. Piórko
3. Podstawka na piórko
4. Zapasowe końcówki do piórka – 2 szt.
5. Pęseta do wyciągania końcówki piórka
6. 2 płyty CD ze sterownikami i oprogramowaniem
7. Płyta DVD z programem Adobe Photoshop Elements 7
8. Instrukcja instalacji i obsługi
9. Kabel USB
Minimalne wymagania systemowe
PC – System Windows 2000 / XP / Vista / 7
Mac – System MacOS X 10.4 lub wyższy
Wolny port USB
Napęd (lub napędy) optyczny odtwarzający płyty CD i DVD do instalacji sterowników i
oprogramowania
Elementy tabletu
1. Przyciski trybów
2. Panele dotykowe
3. Pola funkcyjne
4. Przyciski boczne
5. Obszar roboczy
Tablet nie posiada oddzielnej diody stanu zasilania - po podłączeniu tabletu do komputera,
podświetlony zostanie jeden z przycisków trybów.
5
1
3
2
2
4
4
5
PL
PENTAGRAM Designer (P 2700)
Panele dotykowe i przyciski trybów
Panele dotykowe (touchpady) znajdujące się z lewej i prawej strony tabletu mogą pełnić szereg
funkcji, które zostały przydzielone do sześciu trybów. Tryby te można zmienić korzystając z
przycisków trybów. Trzy pierwsze przyciski (od lewej) posiadają przypisane dwa tryby:
podstawowy i pomocniczy. Naciśnięcie przycisku powoduje jego podświetlenie oraz aktywację
jego podstawowego trybu. Do przełączania między głównym a pomocniczym trybem
aktywnego przycisku służy ostatni przycisk (prawy skrajny). W tabeli poniżej znajduje się opis
dostępnych trybów każdego z tych przycisków. W niektórych aplikacjach, zachowanie paneli
dotykowych może się różnić od podanego w tabeli.
Tryb podstawowy: przewijanie w pionie
Tryb pomocniczy: przewijanie w poziomie
Aby użyć panelu dotykowego w którymś z tych trybów, dotknij palcem
panelu przy jego krawędzi, a następnie nie odrywając palca, przesuń nim po
obwodzie panelu. Reakcja na ruch palca jest zależna od jego kierunku:
kierunek zgodny z ruchem wskazówek zegara - zwiększenie wartości
kierunek przeciwny do ruchu wskazówek zegara - zmniejszenie wartości.
Tryb podstawowy: zmiana powiększenia (zoom)
Tryb pomocniczy: regulacja głośności systemowej
Sposób korzystania z paneli dotykowych w obu trybach tego przycisku jest
identyczny jak w przypadku poprzedniego przycisku.
Tryb podstawowy: przypisanie do panelu klawiszy klawiatury
Tryb pomocniczy: przypisanie do panelu klawiszy klawiatury
symbol na panelu tryb podstawowy tryb pomocniczy
klawisz klawisz Page Up
klawisz klawisz Page Down
klawisz klawisz Home
klawisz klawisz End
Przełączenie między podstawowym a pomocniczym trybem aktywnego
przycisku. Podświetlenie tego przycisku oznacza, że aktywny jest
pomocniczy tryb przycisku.
Pola funkcyjne
Pola funkcyjne znajdują się tuż nad obszarem roboczym tabletu i oznaczone K1-K10. Po
zainstalowaniu sterowników tabletu, w aplikacji Macro Key Manager można przypisać do tych
pól różne funkcje, np. skróty klawiszowe. Pola funkcyjne obsługuje się piórkiem. Przytrzymanie
piórka nad polem spowoduje wyświetlenie jego opisu na ekranie monitora. Stuknięcie piórkiem
w pole spowoduje uruchomienie przypisanej mu akcji.
6
PL
PENTAGRAM Designer (P 2700)
Przyciski boczne
Tablet posiada dziesięć dodatkowych przycisków (po pięć z lewej i prawej
strony obszaru roboczego), które dodatkowo zwiększają jego
funkcjonalność. Górny przycisk w większości aplikacji graficznych wywołuje
funkcję gumki do wycierania. Pozostałe przyciski domyślnie działają jak
klawisze klawiatury (jak pokazano na schematach obok) i możliwa jest
zmiana przypisanej im funkcji w sterowniku tabletu.
Wymiana rysika
Po dłuższym okresie używania piórka, jego końcówka ulegnie skróceniu na skutek ścierania się
o powierzchnię tabletu. Stępiona końcówka nie będzie dokładnie odzwierciedlać pozycji oraz
siły nacisku, dlatego należy wymienić. Do tabletu zostały dołączone dwa dodatkowe rysiki a
także pęseta ułatwiająca ich wymianę. Wykonaj poniższe kroki aby wymienić rysik:
1. Złap dołączoną pęsetą rysik i delikatnie wyciągnij go z obudowy piórka.
2. óż nowy rysik na miejsce starego.
3. Dokładnie dociśnij nowy rysik trzymając piórko poziomo.
7
PL
PENTAGRAM Designer (P 2700)
Instalacja tabletu
Aby zainstalować poprawnie tablet, wykonaj poniższe kroki. Sterowniki tabletu przeznaczone
dla systemów Windows 2000, XP, Vista i 7. Zaleca się zainstalować sterowniki przed
podłączeniem tabletu do komputera.
1. Włóż dostarczoną płytę DVD/CD ze sterownikami do napędu optycznego w komputerze.
2. Wyświetlone zostanie menu startowe płyty DVD/CD (w systemach Windows Vista i 7 może
być konieczne dodatkowe kliknięcie na przycisku Uruchom: setup.exe w oknie
Autoodtwarzanie.
3. Jeśli okno menu nie uruchomi się automatycznie wybierz menu Start > Uruchom (w
systemach Windows Vista i 7: Start > Wszystkie programy > Akcesoria > Uruchom),
następnie w polu Otwórz okna Uruchom wpisz X:\setup (gdzie X to litera napędu
optycznego) i naciśnij klawisz Enter.
4. W oknie menu kliknij Tablet Driver, aby uruchomić instalator sterowników i aplikacji.
5. Postępuj zgodnie z instrukcjami pojawiającymi się na ekranie, aby zainstalować sterowniki i
aplikację Macro Key Manager.
6. Po zakończonej instalacji, jeśli wyświetli się okno z prośbą o ponowne uruchomienie
komputera, zamknij wszystkie otwarte aplikację i kliknij na przycisku OK.
7. Gdy komputer uruchomi się ponownie podłącz dołączony kabel USB do tabletu oraz do
wolnego portu USB w komputerze i poczekaj aż system zainstaluje tablet.
8. Sprawdź czy wszystkie funkcje tabletu działają prawidłowo. Ruch piórka nad powierzchnią
tabletu powinien powodować ruch kursora na ekranie.
8
PL
PENTAGRAM Designer (P 2700)
Korzystanie z tabletu
Praca z tabletem jest bardzo intuicyjna i komfortowa, lecz wymaga przyzwyczajenia.
Kluczem do sukcesu podczas posługiwania się tabletem jest trzymanie piórka trocbardziej w
pionie niż podczas posługiwania się długopisem, a także śledzenie ruchu kursora na monitorze
zamiast patrzenia się na piórko.
Zbliżenie piórka na odpowiednią odległość do powierzchni tabletu powoduje śledzenie
ruchu piórka przez tablet i przemieszczanie się kursora. Dotknięcie piórkiem powierzchni tabletu
jest traktowane jako kliknięcie lewym przyciskiem myszy. Kliknięcie prawym przyciskiem myszy
jest wykonywane poprzez naciśnięcie dolnego bocznego przycisku piórka. Aby wykonać
dwuklik (podwójne kliknięcie lewym przyciskiem myszy) należy albo bardzo szybko dwa razy
dotknąć piórkiem powierzchni tabletu w jednym miejscu (starając się nie przesunąć piórka) lub
nacisnąć górny boczny przycisk piórka. Funkcje bocznych przycisków piórka mogą zostać
zmienione w sterowniku tabletu.
Po podłączeniu tabletu do komputera, w systemach Windows Vista i 7 włączona zostanie
także systemowa obsługa tabletu. Jeśli sterowniki nie zostały zainstalowane przed
podłączeniem tabletu do komputera oraz w niektórych przypadkach również po zainstalowaniu
sterowników, gdy tablet już został podłączony do komputera, mogą zostać włączone dodatkowe
opcje systemowej obsługi tabletu. W tym przypadku, aby wykonać kliknięcie prawym
przyciskiem myszy można także dotknąć i przytrzymać piórkiem w jednym miejscu
powierzchnię tabletu i poczekać na pojawienie się efektu wizualnego. Włączenie niektórych
opcji systemowej obsługi tabletu może spowodować nieprawidłowe działanie bocznych
przycisków piórka. Opis systemowej obsługi tabletu i poszczególnych jej funkcji znajdują się w
dokumentacji (także elektronicznej) do niego dołączonej.
Jeśli nie używasz piórka przez dłuższy czas umieść je w dołączonej podstawce lub połóż
płasko w miejscu, w którym nie będzie naciśnięta ani końcówka, ani przyciski piórka. Tablet
może nie reagować na zbliżenie piórka, jeśli przez dłuższy czas nie było ono używane. W tej
sytuacji wystarczy dotknąć piórkiem powierzchni tabletu.
9
PL
PENTAGRAM Designer (P 2700)
Konfiguracja tabletu
Windows Vista/7
Systemy Windows Vista i 7 posiadają wbudowaną obsługę tabletu. Jeśli sterowniki tabletu nie
zostały zainstalowane, podstawowe opcje piórka (włączenie/wyłączenie oraz funkcje
przycisków piórka) można skonfigurować w aplecie Pióro i urządzenia wejściowe (Windows
Vista) lub Pióro i urządzenia dotykowe (Windows 7), który znajduje się w wyglądzie klasycznym
(małe/duże ikony) systemowego Panelu sterowania. Po zainstalowaniu sterowników należy
korzystać z opcji konfiguracyjnych sterownika. Odbywa się to w taki sam sposób jak w
przypadku systemów Windows 2000 oraz XP i jest opisane poniżej. Aby ikona sterownika
tabletu w Panelu sterowania była widoczna może być konieczne włączenie klasycznego widoku
(małe/duże ikony) Panelu sterowania.
Windows 2000/XP
Dostęp do konfiguracji sterownika tabletu można uzyskać poprzez iko Pen Pad w
systemowym Panelu sterowania lub poprzez wybranie pozycji Pen Pad... w menu
kontekstowym ikony aplikacji Macro Key Manager. Niezależnie od wybranej zakładki, na dole
okna dostępny jest przycisk About, który otwiera okno Diagnostic, zawierające informacje o
sterowniku i tablecie.
Okno Diagnostic
Driver Info - informacje o sterowniku:
Version - wersja sterownika.
Tablet Info - informacje o tablecie:
Tablet - systemowa nazwa tabletu.
10
PL
PENTAGRAM Designer (P 2700)
Model - nazwa/wymiary (w calach) tabletu.
Version - wersja oprogramowania firmware tabletu.
Pointing Device Info - informacje o stanie piórka:
Proximity - określa czy piórko znajduje się w zasięgu sczytywania jego pozycji przez tablet
(In) czy jest poza nim (Out).
X Data / Y Data - aktualna pozycja piórka względem obszaru roboczego (ostatnia znana jeśli
piórko znajduje się poza polem sczytywania tabletu).
Switches - stan przycisków piórka:
All Switches Open - żaden przycisk nie jest wciśnięty.
1 - końcówka piórka dotyka powierzchni tabletu.
2 - naciśnięty dolny boczny przycisk.
3 - naciśnięty górny boczny przycisk.
Pressure - aktualna, procentowa wartość poziomu nacisku piórka.
X Tilt / Y Tilt - aktualne pochylenie piórka względem obszaru roboczego (ostatnie znane jeśli
piórko znajduje się poza polem sczytywania tabletu).
Close - zamyka okno Diagnostic.
Zakładka Pen
Na tej zakładce możliwa jest konfiguracja ustawień piórka tabletu.
Tilt Sensitivity - zmiana czułości, z którą tablet będzie reagował na pochylenie piórka. Skala
czułości pochylenia zawiera się między wartościami Normal (normalna) a High (wysoka).
Tip Feel zmiana twardości końcówki piórka, czyli stosunku faktycznej siły nacisku piórka na
powierzchnię tabletu do siły nacisku rejestrowanej przez tablet. Skala twardości końcówki
piórka zawiera się między wartościami Soft (miękka) a Firm (twarda).
Details - otwiera Okno Feel Details, umożliwiające zaawansowaną regulację czułości nacisku.
Current Pressure - aktualnie rejestrowany przez tablet nacisk kcówki piórka na jego
powierzchnię, ułatwiający ustalenie twardości końcówki piórka (Tip Feel).
Konfiguracja przycisków - umożliwia przypisanie bocznym przyciskom piórka funkcji przycisków
myszy. Do wyboru są następujące funkcje:
11
PL
PENTAGRAM Designer (P 2700)
None - brak przypisania
Left Click - kliknięcie lewym przyciskiem myszy
Left Double Click - dwuklik lewym przyciskiem myszy
Right Click - kliknięcie prawym przyciskiem myszy
Right Double Click - dwuklik prawym przyciskiem myszy
Scroll - kliknięcie środkowym przyciskiem myszy/przewijanie
Tip Double Click Distance - zmiana największego dopuszczalnego przesunięcia między dwoma
dotknięciami końcówką piórka powierzchni tabletu, aby zarejestrowane zostało podwójne
kliknięcie. Zmiana tej wartości jest zalecana w przypadku problemów z wykonywaniem
podwójnych kliknięć przy pomocy końcówki piórka. Skala największego dopuszczalnego
przesunięcia zawiera się między wartościami Off (wyłączone) a Large (duże).
Default – przywrócenie ustawień domyślnych na tej zakładce.
Okno Feel Details
Sensitivity zmiana twardości końcówki piórka, czyli stosunku faktycznej siły nacisku piórka na
powierzchnię tabletu do siły nacisku rejestrowanej przez tablet. Skala twardości końcówki
piórka zawiera się między wartościami Soft (miękka) a Firm (twarda).
Click Threshold - zmiana progu kliknięcia, czyli faktycznej siły nacisku piórka na powierzchnię
tabletu wymaganej do zarejestrowania kliknięcia przez tablet. Skala progu kliknięcia zawiera się
między wartościami Low (niska) a High (wysoka).
Profile - pole reprezentujące aktualne ustawienia czułości nacisku. Oś X odpowiada faktycznej
sile nacisku piórka na powierzchnię tabletu, Y zaś sile nacisku rejestrowanej przez tablet.
Krzywa przedstawia twardość kcówki piórka (Tip Feel/Sensitivity) a czerwona, pionowa linia -
próg kliknięcia (Click Threshold).
Try Here - pole umożliwiające przetestowanie aktualnych ustawień czułości nacisku. Pole to
jest samoczynnie czyszczone po kilku sekundach nieużywania.
OK - zapisanie aktualnych ustawień i zamknięcie okna.
Cancel - odrzucenie aktualnych ustawień zamknięcie okna.
Default – przywrócenie ustawień domyślnych.
12
PL
PENTAGRAM Designer (P 2700)
Zakładka Mapping
Na tej zakładce możliwa jest konfiguracja ustawień obszaru roboczego tabletu. Wygląd tej
zakładki zależy od trybu śledzenia piórka wybranego w ramce Mode.
Orientation - zmiana orientacji obszaru roboczego względem normalnego położenia tabletu.
W zależności od wybranej tu opcji wymagane jest obrócenie tabletu o odpowiedni kąt, aby
obszar roboczy odpowiadał obszarowi ekranu:
Landscape Portrait Landscape Flipped Portrait Flipped
Mode - zmiana trybu śledzenia piórka na bezwzględny Pen (piórko) lub względny Mouse (mysz).
Tryb Pen
W trybie śledzenia Pen (pióro), obszar roboczy tabletu jest na stałe przypisany do obszaru
ekranu. Umieszczenie piórka nad konkretnym punktem obszaru roboczego tabletu spowoduje
przemieszczenie kursora na ekranie monitora do punktu przypisanego punktowi obszaru
roboczego.
Working Area Setting - pole to reprezentuje cały obszar ekranu, czerwona ramka zaś obszar
ekranu, do którego przypisany jest obszar roboczy tabletu.
Monitor Area - wybór obszaru ekranu, do którego będzie przypisany obszar roboczy tabletu.
All Screens - obszar roboczy tabletu odpowiada obszarowi ekranu wszystkich monitorów.
Monitor - obszar roboczy tabletu odpowiada tylko obszarowi ekranu wybranego monitora
(aktywne tylko w niektórych trybach konfiguracji wielomonitorowej). Po wybraniu tej funkcji,
po prawej stronie pojawia się pole umożliwiające wybór monitora. Wybrany monitor w polu
13
PL
PENTAGRAM Designer (P 2700)
Working Area Setting jest oznaczony czarnym tłem.
Portion - obszar roboczy tabletu odpowiada wycinkowi obszaru ekranu wszystkich
monitorów, który można ustalić za pomocą pola Working Area Setting.
Force Proportions - wymuszenie zachowania proporcji obszaru ekranu. Po zaznaczeniu tej
opcji część obszaru roboczego staje się nieaktywna, dzięki czemu proporcje jego aktywnej
części odpowiadają proporcjom obszaru ekranu.
Default – przywrócenie ustawień domyślnych na tej zakładce.
Tryb Mouse
W trybie śledzenia Mouse (mysz), obszar roboczy tabletu jest przypisywany do obszaru ekranu
za każdym razem gdy piórko zostanie umieszczone nad obszarem roboczym tabletu. Zbliżenie
piórka do obszaru roboczego przypisuje aktualną pozycję kursora na ekranie do tego punktu
obszaru roboczego a ruch piórkiem powoduje ruch kursora z ostatniego miejsca, w którym się
on znajdował. Dzięki temu, piórko może być używane w taki sam sposób jak zwykła mysz.
Mouse Acceleration - zmiana przyśpieszenia wskaźnika myszy. Skala przyśpieszenia zawiera się
między wartościami Off (wyłączone) a High (wysokie).
Mouse Speed - zmiana szybkości wskaźnika myszy. Skala szybkości zawiera się między
wartościami Slow (wolno) a Fast (szybko).
Default – przywrócenie ustawień domyślnych na tej zakładce.
14
PL
PENTAGRAM Designer (P 2700)
Zakładka ExpressKeys
Na tej zakładce możliwa jest konfiguracja ustawień bocznych przycisków tabletu.
Aby zmienić funkcję jednego z bocznych przycisków tabletu, należy wybr z przypisanej mu
rozwijanej listy funkcję jaką ma spełniać. Po wybraniu funkcji z listy, wyświetlone zostanie okno
ze szczegółowymi jej ustawieniami. Do wyboru są trzy funkcje:
Modifier - przydzielenie do przycisku funkcji jednego lub więcej klawiszy modyfikujących
klawiatury (Ctrl, Alt, Shift, Tab). Wybranie z listy tej funkcji otwiera Okno Define Modifier. Po
skonfigurowaniu tej funkcji, pod rozwijaną listą przycisku wymienione będą przypisane
klawisze modyfikujące.
KeyStroke - przydzielenie do przycisku kombinacji lub ciągu klawiszy klawiatury. Wybranie z
listy tej funkcji otwiera Okno Define KeyStroke. Po skonfigurowaniu tej funkcji, pod
rozwijaną listą przycisku widoczna będzie nazwa kombinacji/ciągu nadana podczas jego
konfiguracji.
Open/Run... - wybór aplikacji, która zostanie uruchomiona po naciśnięciu tego przycisku.
Wybranie z listy tej funkcji otwiera Okno Open/Run. Po skonfigurowaniu tej funkcji, pod
rozwijaną listą przycisku widoczna będzie nazwa pliku wybranej aplikacji.
Left Click - przydzielenie do przycisku kliknięcia lewym przyciskiem myszy.
Left Double Click - przydzielenie do przycisku podwójnego kliknięcia lewym przyciskiem
myszy.
Right Click - przydzielenie do przycisku kliknięcia prawym przyciskiem myszy.
Scroll - przydzielenie do przycisku kliknięcia środkowym przyciskiem myszy.
Default – przywrócenie ustawień domyślnych na tej zakładce.
15
PL
PENTAGRAM Designer (P 2700)
Okno Define Modifier
Zaznaczenie w tym oknie jednego lub więcej klawiszy modyfikujących i kliknięcie OK powoduje
przypisanie funkcji tych klawiszy do konfigurowanego bocznego przycisku tabletu. Funkcję
prawego klawisza Alt można uzyskać po zaznaczeniu pól Ctrl i Alt. Kliknięcie Cancel powoduje
zamknięcie okna bez wprowadzania zmian do aktualnej funkcji przycisku.
Okno Define KeyStroke
Naciśnięcie klawisza lub kombinacji klawiszy na klawiaturze powoduje dodanie ich do listy
Keys. Możliwe jest także dodanie specjalnej kombinacji klawiszy korzystając z listy Add Special.
Kliknięcie OK powoduje przejście do okna umożliwiającego nadanie nazwy skonfigurowanej
kombinacji/ciągowi. Kliknięcie Cancel powoduje zamknięcie okna bez wprowadzania zmian do
aktualnej funkcji przycisku. Kliknięcie Delete kasuje ostatni wpis z listy, a Clear - wszystkie.
Okno Open/Run
Kliknięcie Browse... powoduje otwarcie okna umożliwiającego wybranie aplikacji, która ma być
uruchamiana po naciśnięciu konfigurowanego bocznego przycisku tabletu. Po wybraniu
aplikacji, ścieżka do niej jest widoczna w polu Open/Run. Kliknięcie OK powoduje zamknięcie
16
PL
PENTAGRAM Designer (P 2700)
okna i przypisanie wybranej aplikacji do tego bocznego przycisku tabletu. Kliknięcie Cancel
powoduje zamknięcie okna bez wprowadzania zmian do aktualnej funkcji przycisku.
Aplikacja Macro Key Manager
Ta aplikacja umożliwia konfigurację pól funkcyjnych i przypisanie im funkcji w zależności od
aktywnej aplikacji. Domyślnie skonfigurowane są najczęściej używane skróty klawiszowe.
Menu kontekstowe aplikacji
Po kliknięciu prawym przyciskiem myszy na ikonie aplikacji Macro Key Manager, znajdującej się
w systemowym obszarze powiadamiania (obok zegara), pojawi się menu kontekstowe. Poniżej
opisane są poszczególne pozycje tego menu:
About... Otwiera okno z informacjami o wersji aplikacji (Software Version),
wersji sterownika (Driver Version) i wersji oprogramowania Firmware (Firmware
Version).
Show Wyświetla główne okno aplikacji. Ten sam efekt można osiągnąć
wykonując dwuklik na ikonie aplikacji.
Disable / Enable – Wyłącza / włącza pola funkcyjne tabletu.
Setting – Otwiera okno z ustawieniami aplikacji.
Pen Pad... – Otwiera okno konfiguracyjne sterownika.
Help – wyświetla plik pomocy aplikacji.
Okno Settings
MacroKey Response time Czas dotykania przez piórko pola funkcyjnego, po którym zostanie
wykonana funkcja przypisana do tego pola. Po wybraniu wartości 0 dotknięcie piórkiem pola
funkcyjnego wystarcza do wykonania jego funkcji.
Pointing Sound Wybierz czy dotknięcie piórkiem powierzchni tabletu ma być sygnalizowane
dźwiękiem (ON) czy nie (OFF).
17
PL
PENTAGRAM Designer (P 2700)
Główne okno aplikacji
Lista aplikacji – Wybierz z listy aplikację, dla której chcesz skonfigurować pola funkcyjne.
New – Dodanie nowej aplikacji do listy aplikacji.
Delete Usunięcie wybranej aplikacji z listy aplikacji (niemożliwe jest usunięcie aplikacji
domyślnie skonfigurowanych).
Lista pól funkcyjnych Wybierz pole, którego ustawienia chcesz zmienić (niemożliwa jest
modyfikacja pól domyślnie skonfigurowanych). Jeśli pole zostało już skonfigurowane, można je
także modyfikować klikając na przycisku symbolizującym to pole na podglądzie.
Setting – Zaznacz to pole, żeby włączyć wybrane pole funkcyjne.
Hint Wpisz w pole zawartość dymka, który będzie wyświetlany na monitorze gdy piórko
znajdzie się nad wybranym polem funkcyjnym.
Use hot key – Wybierz kombinację klawiszy, która będzie symulowana po naciśnięciu
wybranego pola funkcyjnego.
Linking Wpisz ścieżkę do pliku, który dzie uruchomiony po naciśnięciu wybranego pola
funkcyjnego. Aby przeglądać foldery w poszukiwaniu pliku naciśnij przycisk ... .
Confirm – naciśnij ten przycisk, aby zapisać ustawienia wybranego pola funkcyjnego.
Enable this manager Zaznacz to pole, aby włączyć pola funkcyjne. Odznacz to pole, aby
wyłączyć pola funkcyjne.
OK Zamknięcie okna głównego z przypomnieniem, jeżeli bieżąca konfiguracja nie została
zapisana.
Cancel – Zamknięcie okna głównego z pominięciem niezapisanych zmian w konfiguracji.
18
Lista
aplikacji
Lista
l
Podgd
PL
PENTAGRAM Designer (P 2700)
Dodawanie nowej aplikacji do listy
1. Kliknij przycisk New w głównym oknie aplikacji.
2. W oknie New w polu File Name wpisz nazwę aplikacji, która wyświetlana będzie na liście
aplikacji.
3. W polu Open(*.exe) wpisz nazwę pliku wykonywalnego aplikacji lub kliknij przycisk ..., aby
wyświetlić listę aplikacji zainstalowanych w systemie. Podanie pliku wykonywalnego
aplikacji nie jest wymagane a w niektórych przypadkach może powodować, że aplikacja ta
będzie uruchamiana przy każdym użyciu pola funkcyjnego, gdy ta aplikacja będzie wybrana
na liście aplikacji.
4. Po kliknięciu przycisku ... wyświetlone zostanie okno Installed Software zawierające listę
zainstalowanych w systemie aplikacji. Zaznacz aplikację, którą chcesz dodać do listy i kliknij
przycisk OK, aby wybr aplikację i zamknąć to okno. Kliknij przycisk Cancel, aby zamknąć to
okno bez wybierania aplikacji.
5. Po wybraniu nazwy wyświetlanej aplikacji i nazwy jej pliku kliknij OK, aby dodać aplikację
do listy i zamknąć okno lub Cancel, aby zamknąć okno bez dodawania aplikacji.
19
PL
PENTAGRAM Designer (P 2700)
20
PL
EN
Installation and Operation Manual
PENTAGRAM Designer (P 2700)
EN
The latest versions of manual, drivers and applications are available on www.pentagram.eu .
EN
PENTAGRAM Designer (P 2700)
2
EN
PENTAGRAM Designer (P 2700)
Table of contents
IMPORTANT INFORMATION.........................................................................4
SAFETY PRECAUTIONS........................................................................................4
INFORMATION CONCERNING WASTE ELECTRONIC EQUIPMENT........4
INTRODUCTION................................................................................................5
BOX CONTENTS.......................................................................................................5
MINIMUM SYSTEM REQUIREMENTS...............................................................5
TABLET COMPONENTS.........................................................................................5
Touch pads and mode buttons..................................................................6
Function fields.................................................................................................6
Side buttons......................................................................................................7
STYLUS REPLACEMENT.......................................................................................7
TABLET INSTALLATION.................................................................................8
USING THE TABLET.........................................................................................9
TABLET CONFIGURATION..........................................................................10
WINDOWS VISTA/7..............................................................................................10
WINDOWS 2000/XP...........................................................................................10
Diagnostic window......................................................................................10
Pen tab.............................................................................................................11
Mapping tab...................................................................................................13
ExpressKeys tab...........................................................................................15
MACRO KEY MANAGER APPLICATION.........................................................17
Application context menu........................................................................17
Setting window............................................................................................17
Application main window.........................................................................18
3
EN
PENTAGRAM Designer (P 2700)
Important information
Safety precautions
Do not use or store the device in dusty places, where the humidity is high or in extreme
temperatures.
Do not operate the device with wet hands to avoid the risk of device damage or electric
shock.
Do not clean the device with chemicals, such as benzine or detergents always clean the
device with a soft, dry cloth.
Disconnect the device from the computer prior to cleaning.
Do not modify or fix the device yourself in any way, it might void the guarantee.
Do not drop or shake the device.
Do not put heavy items on the tablet surface and the pen.
Make sure there is sufficient distance between the tablet and a CRT monitor and other
strong electromagnetic field sources, which might interfere with the tablet operation.
Information concerning waste electronic equipment
The markings on the device and in the attached documentation indicate
that it cannot be disposed of along with unsegregated general black bag
waste when withdrawn from use. The device must be recycled or processed in
another way to recover reusable materials and neutralize hazardous
components.
The users should contact recycling/recovery authorities to determine how
the device is to be disposed of in an environment-friendly manner.
4
NOTE: All information and technical data is subject to change without previous notice and/or
indication in this manual.
Copyright ©2009 PENTAGRAM
All rights reserved; copying and reproduction is strictly forbidden.
EN
PENTAGRAM Designer (P 2700)
Introduction
Thank you for purchasing the PENTAGRAM Designer tablet. Using the tablet, you can perform
much better than earlier with a mouse. The tablet has been designed for graphics
professionals, however, Pentagram tablets, thanks to affordable price and great capabilities, are
also suitable for home applications.
Box contents
1. Tablet
2. Pen
3. Pen stand
4. Spare styluses (pen tips) – 2 pcs
5. Tweezers for removing stylus
6. 2 CDs with drivers and software
7. DVD with Adobe Photoshop Elements 7 program
8. Installation and operation manual
9. USB cable
Minimum system requirements
PC – Windows 2000 / XP / Vista / 7 operating system
Mac – MacOS X 10.4 or higher operating system
Free USB port
Optical drive(s) for playing CDs and DVDs in order to install drivers and software
Tablet components
1. Mode buttons
2. Touch pads
3. Function fields
4. Side buttons
5. Working area
There is no separate power LED. When the tablet is connected to the computer, one of the
mode buttons will highlight.
5
1
3
2 2
4
4
5
EN
PENTAGRAM Designer (P 2700)
Touch pads and mode buttons
The touch pads on the tablet left and right side can perform a variety of functions, assigned to
6 modes. You can change the modes using the mode buttons. Three first buttons (from the left)
have two modes assigned: main and auxiliary. Pressing a button makes it highlight and activate
its main mode. To toggle the active button modes, press the last (rightmost) button. The table
below describes the available modes for each button. In some applications, the touch pads can
act differently.
Main mode: vertical scrolling
Auxiliary mode: horizontal scrolling
To use the touch pad in any mode: touch the pad with a finger close to its
edge. Without releasing the finger, drag it along the pad perimeter. The
reaction to the finger movement depends on the direction:
CW – increases the value
CCW – decreases the value.
Main mode: magnification change (zoom)
Auxiliary mode: system volume adjustment
For the way of touch pad operation in both button modes – see above.
Main mode: assignment of keyboard keys to the panel
Auxiliary mode: assignment of keyboard keys to the panel
symbol on the panel main mode auxiliary mode
key Page Up key
key Page Down key
key Home key
key End key
Toggling between the active button main and auxiliary mode. When
highlighted, it means the button’s auxiliary mode is active.
Function fields
The function fields are located directly above the tablet working area and marked K1-K10.
When you install the tablet drivers, you can use the Macro Key Manager application to assign
various functions, e.g. keyboard shortcuts, to those fields. You operate the function fields with
the pen. Holding the pen above a field will make its description display on the screen. Tapping a
field with the pen will run the assigned action.
6
EN
PENTAGRAM Designer (P 2700)
Side buttons
The tablet has ten additional buttons (five on the left and five on the right
side of the working area), which add to its functionality. The top button, in
most graphics applications, launches the eraser function. Other buttons
work as the keyboard keys by default (as shown on the drawings beside).
You can assign them different functions using the tablet drivers.
Stylus replacement
When the pen is used for a longer period, its tip (stylus) will shorten because of rubbing off
against the tablet surface. The blunt tip does not precisely reflect the position and pressure
level, so you should replace it. The tablet is supplied with two additional tips and tweezers
facilitating the replacement. To replace the stylus, perform the following steps:
1. Hold the stylus with the tweezers (included) and delicately pull it out from the pen
housing.
2. Insert a new stylus in the place of the old one.
3. Carefully press the stylus as far as it will go, holding the pen horizontally.
7
EN
PENTAGRAM Designer (P 2700)
Tablet installation
To install the tablet properly, perform the following steps. The tablet drivers are meant for
Windows 2000, XP, Vista and 7 operating systems. It is recommended to install the drivers prior
to connecting the tablet to the computer.
1. Insert the supplied DVD/CD into the optical drive in the computer.
2. The DVD/CD start menu will display (in Windows Vista and 7 systems, you may have to
additionally click the Run: setup.exe button in the Autoplay window).
3. If the menu window does not start automatically, select menu Start > Run (in Windows
Vista and 7 systems: Start > All programs > Accessories > Run). In the Open field of the
Run window, enter X:\setup (where X is the optical drive letter) and press Enter.
4. In the menu window, click Tablet Driver to launch the drivers and application installer.
5. Follow the on-screen instructions to install the drivers and Macro Key Manager application.
6. After the installation, the dialog window will display, asking you to reboot the computer.
Close all open applications and click OK.
7. When the computer reboots, connect the included USB cable to the tablet and a free USB
port of the computer, and wait for the system to install the tablet.
8. Check if all the tablet functions operate properly. Moving the pen above the tablet surface
should cause the cursor movement on the screen.
8
EN
PENTAGRAM Designer (P 2700)
Using the tablet
Working with the tablet is very intuitive and comfortable once you get used to it. The
key to success when working with the tablet is holding the pen a little bit more vertically than
when writing with a ball pen. You should also keep looking at the cursor on the screen instead
of looking at the pen.
Moving the pen to appropriate distance from the tablet surface will make it track the
pen movement and move the cursor accordingly. Touching the tablet surface with the pen is
recognized as a mouse left click. Mouse right click is performed by pressing the bottom side
button on the pen. To double-click (double left button click), either tap the same point of the
tablet surface with the pen twice very quickly (make sure not to move the pen sideways) or
press the top side button on the pen. You can assign different functions to the pen side
buttons using the tablet driver.
When you connect the tablet to a computer with Windows Vista and 7, the system
tablet support will be activated. If you did not install the drivers prior to connecting the tablet
to the computer, or in some cases after installing the drivers with the tablet already connected,
some additional system support functions may become active. In such a case, to perform a right
click, you can tap and hold the pen on the tablet surface for a while and wait for the visual
effect. Activation of some system support functions might cause pen side buttons to work
incorrectly. You can find the description of the system tablet support and its individual
functions in its documentation (also electronic) included.
If you are not going to use the pen for a longer time, place it in the included stand or
lay flat in a place, in which neither the tip nor the pen side buttons are pressed. The tablet
might not react to the pen proximity if it has not been used for a longer time. If it happens, just
tap the tablet surface with the pen.
9
EN
PENTAGRAM Designer (P 2700)
Tablet configuration
Windows Vista/7
Tablet support is included with Windows Vista and 7 system. If the drivers have not been
installed, basic pen option (switching on/off and pen button functions) can be operated in the
Pen and Input Devices (Windows Vista) or Pen and Touch (Windows 7), visible in the Classic
view (large/small icons) of the system Control panel. After installing the drivers, use the driver
configuration options. This is performed in the same way as in Windows 2000 and XP systems,
and is described below. To make the tablet driver icon visible in the Control panel, you may have
to switch to the Control panel Classic view.
Windows 2000/XP
You can access the tablet driver configuration with the Pen Pad icon of the system Control
Panel or by selecting the Pen Pad... item in the Macro Key Manager icon context menu.
Regardless of the selected tab, the About button at the window bottom opens the Diagnostic
window with the information about the driver and the tablet.
Diagnostic window
Driver Info – information about the driver:
Version - driver version.
Tablet Info - information about the tablet:
Tablet - system tablet name.
Model - tablet name and dimensions (in inches).
Version - tablet firmware version.
10
EN
PENTAGRAM Designer (P 2700)
Pointing Device Info - information about the pen status:
Proximity - shows if the pen is in the position reading range by the tablet (In), or out of the
range (Out).
X Data / Y Data - current pen position with regard to the working area (last known, if the pen
is out of the tablet reading range).
Switches - pen buttons status:
All Switches Open - no button is pressed.
1 - the pen tip is touching the tablet surface.
2 - bottom side button pressed.
3 - top side button pressed.
Pressure - current pen pressure level value in percents.
X Tilt / Y Tilt - current pen inclination with regard to the working area (last known, if the pen
is out of the tablet reading range).
Close - closes the Diagnostic window.
Pen tab
You can configure the tablet pen settings here.
Tilt Sensitivity change of the sensitivity, with which the tablet reacts to the pen tilt. The tilt
sensitivity level ranges from Normal to High.
Tip Feel – pen tip hardness change, i.e. the ratio of the real pen pressure level against the tablet
surface to the pressure level registered by the tablet. The pen tip hardness scale ranges
from Soft to Firm.
Details – opens the Feel Details window, enabling advanced pressure sensitivity adjustment.
Current Pressure the pen tip pressure against the tablet surface, which is currently being
registered. It facilitates the pen tip hardness (Tip Feel).
Buttons configuration enables the assignment of mouse buttons functions to the pen side
buttons. You can assign the following functions:
None – no assignment
Left Click – left mouse button click
Left Double Click – left mouse button double click
11
EN
PENTAGRAM Designer (P 2700)
Right Click – right mouse button click
Right Double Click – right mouse button double click
Scroll – middle mouse button click/scrolling
Tip Double Click Distance change of the longest allowable shift between two pen tip touches
of the tablet surface, which are registered as a double click. Change this value if you experience
problems with performing double clicks with the pen tip. The longest allowable shift ranges
from Off to Large.
Default – restoring the default settings on this tab.
Feel Details window
Sensitivity change of the pen tip hardness, i.e. the ratio of the real pen pressure level against
the tablet surface to the pressure level registered by the tablet. The pen tip hardness scale
ranges from Soft to Firm.
Click Threshold – change of the click threshold, i.e. the real pen tip pressure level on the tablet
surface which is currently registered as a click by the tablet. The click threshold scale ranges
from Low to High.
Profile field representing the current pressure sensitivity settings. The X axis corresponds to
the real pen tip pressure on the tablet surface, and the Y axis corresponds to the pressure the
tablet is registering. The curve represents the Tip Feel/Sensitivity, and the red vertical line
the Click Threshold.
Try Here in this field, you can test the current pressure sensitivity settings. The field clears
itself automatically when not in use for several seconds.
OK – saves the current settings and closes the window.
Cancel – discards the current settings and closes the window.
Default – restores the default settings.
12
EN
PENTAGRAM Designer (P 2700)
Mapping tab
On this tab, you can configure the tablet working area settings. The tab view depends on the
pen tracking mode, selected in the Mode frame.
Orientation change of the working area orientation in relation to normal tablet position.
Depending on the selected option, you need to rotate the tablet by the appropriate angle so
that the working area corresponds to the screen area:
Landscape Portrait Landscape Flipped Portrait Flipped
Mode - change of the pen tracking mode to absolute (Pen) or relative (Mouse).
Pen mode
In the Pen tracking mode, the tablet working area is permanently assigned to the screen area.
Locating the pen above a particular tablet working area point causes moving the cursor on the
screen to the point assigned to the working area point.
Working Area Setting this field represents the whole screen area. The red frame represents
the screen area, to which the tablet working area is assigned.
Monitor Area – selection of the screen area that the tablet working area will be assigned to.
All Screens – the tablet working area corresponds to the screen area of all the monitors.
Monitor the tablet working area corresponds only to the screen area of the selected
monitor (it is active only in some multi monitor configuration modes). When selected, on the
right there appears the field for selecting the monitor. The monitor selected in the Working
Area Setting field is marked with black background.Portion the tablet working area
13
EN
PENTAGRAM Designer (P 2700)
corresponds to a section of all the monitors screen area, which can be set with the Working
Area Setting field.
Force Proportions forced screen aspect ratio. When selected, part of the working area
becomes inactive, and the aspect ratio of the active part corresponds to the screen aspect
ratio.
Default – restores the default settings on this tab.
Mouse mode
In the Mouse tracking mode, the tablet working area is assigned to the screen area each time
the pen is located above the tablet working area. Moving the pen close to the working area
assigns the current screen cursor position to this working area point. The pen movement
causes the cursor movement from the last position it was at. Thus, the pen can be used as the
normal mouse.
Mouse Acceleration change of the mouse pointer acceleration. The acceleration scale ranges
from Off to High.
Mouse Speed – change of the mouse pointer speed. The speed scale ranges from Slow to Fast.
Default – restores the default settings on this tab.
14
EN
PENTAGRAM Designer (P 2700)
ExpressKeys tab
On this tab, you can configure the tablet side buttons settings.
To change the function of a tablet side button, select its function from the assigned drop-down
list. When you select the function, the window with its detailed settings will display. You can
select one of three functions:
Modifier – assign the function of one or more of the modifying keyboard keys (Ctrl, Alt, Shift,
Tab) to the button. Selecting a function from the list opens the Define Modifier window.
When this function is configured, below the button drop-down list the assigned modifying
keys will be shown.
KeyStroke assign a key combination or stroke to a button. Selecting this function opens
the Define KeyStroke window. When configured, the name of the combination or stroke,
given during the configuration, will be visible under the button drop-down list.
Open/Run... select the application which will launch after pressing this button. Selecting a
function from the list opens the Open/Run window. When configured, the selected
application name will be shown under the button drop-down list.
Left Click – assign the mouse left click to the button.
Left Double Click – assign the mouse double left click to the button.
Right Click – assign the mouse right click to the button.
Scroll – assign the mouse middle click to the button.
Default – restore the default settings on this tab.
15
EN
PENTAGRAM Designer (P 2700)
Define Modifier window
When you tick one or more modifying keys and click OK, it will assign those keys' functions to
the tablet configurable side button. You can activate the right Alt function by selecting the Ctrl
and Alt fields. Click Cancel to close the window without changing the current button function.
Define KeyStroke window
When you press a key or a key combination on the keyboard, you will add them to the Keys list.
You can also add a special keys combination using the Add Special list. Click OK to advance to
the window in which you can give a name to the configured combination/stroke. Click Cancel to
close the window without changing the current button function. Click Delete to delete the last
entry from the list. Clear deletes all entries.
Open/Run window
Click Browse... to open the window in which you can select the application to launch when the
configured tablet side button is pressed. After selecting the application, its path will be shown
in the Open/Run field. Click OK to close the window and assign the selected application to this
tablet side button. Click Cancel to close the window without changing the current button
16
EN
PENTAGRAM Designer (P 2700)
function.
Macro Key Manager application
This application enables configuring of the function fields and assigning them functions, which
depend on the active application. By default, the most common key shortcuts are configured.
Application context menu
When you right-click the Macro Key Manager application icon, in the system tray (next to the
clock), the context menu appears. Its items are described below:
About... – opens the window with the application software, driver and firmware
version information.
Show displays the main application window. You can also do it by double-
clicking the application icon.
Disable / Enable – disables/enables the tablet function fields.
Setting – opens the application settings window.
Pen Pad... – opens the driver configuration window.
Help – displays the application help file.
Setting window
MacroKey Response time – the time for which the pen touches a function field, after which the
function assigned to this field will be run. If you select 0 value, it is enough to touch the
function field with the pen to run the function.
Pointing Sound select if touching the tablet surface with the pen is to be announced with a
beep (ON) or not (OFF).
17
EN
PENTAGRAM Designer (P 2700)
Application main window
List of applications select from the list the applications for which you want to configure the
function fields.
New – add a new application to the list.
Delete delete the selected application from the list (you cannot delete the applications
configured by default).
List of function fields select the field whose settings you want to change (you cannot modify
the fields configured by default). If the field has already been configured, you can modify it as
well by clicking the button symbolizing this field in the preview.
Setting – select this field to enable the selected function field.
Hint – enter into the field the tool tip content, which will be displayed on the monitor when the
pen is located above the selected function field.
Use hot key select the key combination, which will be simulated after pressing the selected
function field.
Linking enter the path to the file, which will be run after pressing the selected function field.
To browse the folder for the file, click the ... button.
Confirm – press this button to save the selected function field settings.
Enable this manager – select this field to enable function fields. Unselect it to disable them.
OK – close the main window. A prompt will display to save the current configuration if you have
not done so.
Cancel – close the main window, discarding any unsaved changes to the configuration.
18
List of
applications
List of
fields
Preview
EN
PENTAGRAM Designer (P 2700)
Adding a new application to the list
1. Click the New button in the application main window.
2. In the New window, in the File Name field enter the application name that will be displayed
on the list of applications.
3. In the Open(*.exe) field, enter the application executable file name or click the ... button to
display the list of applications installed on the system. It is not required to give the
executable file name, and in some cases this application might be run each time the
function field is used, if the application is selected on the list of applications.
4. After clicking the ... button, the Installed Software will display. It contains the list of
applications installed on the system. Select the application you want to add to the list and
click OK to select it and close the window. Click Cancel to close the window without
selecting the application.
5. .When you select the displayed application name and its file name, click OK, to add the
application to the list and close the window or Cancel to close the window without adding
the application.
19
EN
PENTAGRAM Designer (P 2700)
20
EN
DE
Installations- und Bedienungsanleitung
PENTAGRAM Designer (P 2700)
DE
Die neueste Fassung der Anleitung, Treiber und Software sind auf der Seite
www.pentagram.eu erhältlich.
DE
PENTAGRAM Designer (P 2700)
2
DE
PENTAGRAM Designer (P 2700)
Inhaltsverzeichnis
WICHTIGE INFORMATIONEN.......................................................................4
VORSICHTSMASSNAHMEN.................................................................................4
INFORMATION ÜBER ELEKTRO-ALTGERÄTE...............................................4
EINLEITUNG.......................................................................................................5
INHALT DER VERPACKUNG.................................................................................5
MINDESTSYSTEMVORAUSSETZUNGEN........................................................5
TABLETTBESTANDTEILE......................................................................................5
Berührungspanels und Tasten für Betriebsmodi..............................6
Funktionsfelder...............................................................................................7
Seitentasten.....................................................................................................7
AUSWECHSELN DER SPITZE..............................................................................7
INSTALLATION DES TABLETTS..................................................................8
BENUTZUNG DES TABLETTS......................................................................9
KONFIGURATION DES TABLETTS...........................................................10
WINDOWS VISTA/7..............................................................................................10
WINDOWS 2000/XP...........................................................................................10
Diagnostic Fenster......................................................................................10
Pen Registerkarte........................................................................................11
Mapping Registerkarte..............................................................................13
ExpressKeys Registerkarte......................................................................15
MACRO KEY MANAGER......................................................................................17
Kontextmenü der Anwendung...............................................................17
Fenster Setting.............................................................................................18
Hauptfenster der Anwendung...............................................................18
3
DE
PENTAGRAM Designer (P 2700)
Wichtige Informationen
Vorsichtsmaßnahmen
Einsatz und Aufbewahren des Gerätes an Stellen mit starker Verstaubung, hoher
Feuchtigkeit bzw. sehr niedriger oder hoher Temperatur vermeiden.
Das Gerät mit nassen Händen nicht benutzen, um Geräteschaden oder Stromschlag zu
vermeiden.
Zur Reinigung des Gerätes keine chemischen Mittel wie Benzin oder Detergenzien
verwenden; das Gerät immer mit einem weichen und trockenen Tuch reinigen.
Vor Reinigung das Gerät vom Computer trennen.
Keine Änderungen und Reparaturen auf eigene Faust durchführen, sonst verlieren Sie den
Anspruch auf Garantieleistungen.
Keinen Sturz und keine Erschütterung des Gerätes riskieren.
Keine schwierigen Gegenstände auf die Oberfläche des Tabletts und auf den Stift legen.
Stellen Sie sicher, dass Ihr Tablett vom CRT-Monitor (Bildröhrenmonitor) und anderen
Quellen starken elektromagnetischen Feldes entfernt steht, denn sie können den Betrieb
des Tabletts beeinträchtigen.
Information über Elektro-Altgeräte
Die Angaben am Gerät und in der mitgelieferten Dokumentation deuten
darauf hin, dass das Gerät nach seiner Abnutzung mit dem ungetrennten
Haushaltsmüll nicht entsorgt werden darf. Das Gerät soll entsorgt bzw. anders
verwertet werden, um Materialien zurückzugewinnen, die erneut verwendet
werden können und um Gefahrstoffe unschädlich zu machen.
Die Benutzer sollen sich mit den für Entsorgung / Verwertung zuständigen
Einrichtungen in Verbindung setzen, um die umweltfreundliche
Außerbetriebsetzung des Gerätes festzulegen.
4
ACHTUNG! Alle Informationen und technische Angaben können sich ändern, ohne dass es zuvor
angekündigt und/oder in dieser Anleitung vermerkt wird.
Copyright ©2009 PENTAGRAM
Alle Rechte vorbehalten, Vervielfältigung und Kopieren verboten.
DE
PENTAGRAM Designer (P 2700)
Einleitung
Wir bedanken uns für den Erwerb des PENTAGRAM Designer Tabletts. Mit dem Tablett können
Sie viel mehr leisten, als zuvor mit der Maus. Das Grafiktablett wurde als ein Werkzeug für
Grafiker zum professionellen Einsatz entwickelt, dennoch sind die Tabletts von Pentagram dank
erschwinglichem Preis und breiten Anwendungsmöglichkeiten auch für
Haushaltsanwendungen geeignet.
Inhalt der Verpackung
1. Tablett
2. Stift
3. Stifthalter
4. Ersatzspitzen für den Stift – 2 St.
5. Pinzette zum Herausziehen der Stiftspitze
6. 2 CDs mit Treiber und Software
7. DVD mit der Anwendung Adobe Photoshop Elements 7
8. Installations- und Bedienungsanleitung
9. USB-Kabel
Mindestsystemvoraussetzungen
PC mit Windows 2000 / XP / Vista / 7
Mac mit MacOS X 10.4 oder höher
unbelegter USB-Port
optisches Laufwerk (bzw. Laufwerke) zur Wiedergabe von CDs und DVDs für Installation des
Treibers und Anwendungen
Tablettbestandteile
1. Tasten für Betriebsmodi
2. Touch-Panels
3. Funktionsfelder
4. Seitentasten
5. Arbeitsfläche
Das Tablett verfügt über keine gesonderte LED zur Anzeige des Stromversorgungsstatus; nach
dem Anschluss des Tabletts an einen Computer wird der Hintergrund einer der Tasten
beleuchtet.
5
1
3
2 2
4
4
5
DE
PENTAGRAM Designer (P 2700)
Berührungspanels und Tasten für Betriebsmodi
Die Berührungspanels (touchpads), die sich an der linken und rechten Tablettseite befinden,
können eine Reihe von Funktionen ausüben, die den 6 Betriebsmodi zugewiesen wurden. Diese
Betriebsmodi können mittels Tasten der Betriebsmodi eingestellt werden. Die ersten drei
Tasten (von links) verfügen über je zwei zugewiesene Betriebsmodi: Basis- und Hilfsmodus.
Durch Betätigung einer Taste wird ihr Hintergrund beleuchtet und der Basismodus aktiviert.
Zum Umschalten zwischen dem Basis- und dem Hilfsmodus der jeweiligen Taste dient die
letzte Taste (ganz rechts). In der nachstehenden Tabelle befindet sich die Beschreibung der
verfügbaren Modi jeder der Tasten. Bei einigen Anwendungen kann das Funktionsverhalten der
Berührungspanels von dem in der Tabelle beschriebenen abweichen.
Basismodus: vertikal scrollen
Hilfsmodus: horizontal scrollen
Um das Berührungspanel mit einem der Betriebsmodi zu benutzen, mit dem
Finger das Panel an seinem Rand berühren, danach ohne den Finger vom
Panel zu trennen, den Finger am Umfang des Panels entlang schieben. Die
Reaktion auf die Fingerbewegung hängt von der Bewegungsrichtung ab:
im Uhrzeigersinn – Werterhöhung
gegen Uhrzeigersinn – Wertsenkung.
Basismodus: Einstellung der Vergrößerung (Zoomen)
Hilfsmodus: Einstellen der Lautstärke
Die Art und Weise der Benutzung des Berührungspanels in beiden
Betriebsmodi wie bei vorgenannter Taste.
Basismodus: Zuweisung der Tastaturtasten zum Panel
Hilfsmodus: Zuweisung der Tastaturtasten zum Panel
Symbol auf dem Panel Basismodus Hilfsmodus
Taste Taste Page Up
Taste Taste Page Down
Taste Taste Home
Taste Taste End
Umschalten zwischen dem Basis- und dem Hilfsmodus der jeweils aktiven
Taste. Die Hintergrundbeleuchtung der Taste bedeutet, dass der Hilfsmodus
der Taste aktiv ist.
6
DE
PENTAGRAM Designer (P 2700)
Funktionsfelder
Die Funktionsfelder sind knapp über der Arbeitsfläche des Tabletts angeordnet und sind
als K1-K10 gekennzeichnet. Nach der Installation des Tabletttreibers können den Feldern in
der Macro Key Manager Anwendung diverse Funktionen, z.B. Tastenkombinationen zugewiesen
werden. Die Funktionsfelder werden mit dem Stift betätigt. Das Verharren des Stifts über dem
Feld bewirkt das Einblenden seiner Info auf dem Bildschirm. Das Stoßen mit dem Stift auf das
Feld bewirkt das Aufrufen der dem Feld zugewiesenen Funktion.
Seitentasten
Das Tablett verfügt über zehn zusätzliche Tasten (je fünf an der linken und
der rechten Seite der Arbeitsfläche), die seine Funktionalität erweitern. Die
obere Taste ruft in den meisten grafischen Anwendungen die
Radiergummi-Funktion auf. Die übrigen Tasten fungieren standardmäßig
als Tastaturtasten (siehe Abbildungen nebenan); eine Umstellung auf eine
andere Funktion ist in der Treiberanwendung des Tabletts möglich.
Auswechseln der Spitze
Nach längerem Stifteinsatz verkürzt sich die Spitze infolge der Reibung an der
Tablettoberfläche. Eine abgestumpfte Stiftspitze kann die Position und den Anpressdruck nicht
genau wiedergeben, deswegen soll sie ersetzt werden. Dem Tablett liegen zwei zusätzliche
Spitzen sowie eine Pinzette zum leichten Wechsel der Spitze bei. Führen Sie nachfolgende
Schritte durch, um die Spitze auszuwechseln:
1. Mit der beiliegenden Pinzette an der Spitze fassen und die Spitze sorgfältig aus dem Stift
herausziehen.
2. Eine neue Spitze an die Stelle der abgenutzten einsetzen.
7
DE
PENTAGRAM Designer (P 2700)
3. Die neue Spitze genau reinstecken, während der Stift horizontal gehalten wird.
Installation des Tabletts
Um das Grafiktablett korrekt zu installieren, führen Sie folgende Schritte aus: Die Treiber des
Tabletts sind für Windows 2000, XP, Vista und 7 bestimmt. Es wird empfohlen, Treiber vor dem
Anschließen des Tabletts an den Computer zu installieren.
1. Die mitgelieferte Treiber-DVD/-CD in das optische Laufwerk im Computer einlegen.
2. Das Startmenü der DVD/CD wird eingeblendet (unter Windows Vista und 7 kann es
erforderlich sein, zusätzlich auf die Schaltfläche Ausführen: setup.exe im Fenster Autostart
zu klicken).
3. Wird das Menüfenster nicht automatisch eingeblendet, Start > Ausführen (unter Windows
Vista und 7: Start > Alle Programme > Zubehör > Ausführen) wählen, anschließend im Feld
Öffnen im Ausführen-Fenster X:\setup (X steht für den Buchstaben Ihres optischen
Laufwerks) eingeben und die Eingabetaste drücken.
4. Im Menüfenster auf Tablet Driver klicken, um die Installationssoftware für Treiber und
Anwendungen zu starten.
5. Den eingeblendeten Anweisungen folgen, um Treiber und die Anwendung Macro Key
Manager zu installieren.
8
DE
PENTAGRAM Designer (P 2700)
6. Nachdem die Installation fertig gestellt ist, erscheint das Fenster mit einer Anweisung, das
System erneut zu starten; daraufhin alle Anwendungen schließen und auf die Schaltfläche
OK klicken.
7. Wenn der Computer erneut hochgefahren ist, das mitgelieferte USB-Kabel an das Tablett
und an einen unbelegten USB-Port am Computer anschließen und abwarten, bis das
System das Tablett installiert hat.
8. Überprüfen, ob alle Funktionen des Tabletts aktiv sind. Die Bewegungen des Stiftes über
der Tablettoberfläche sollten Bewegungen des Cursors am Bildschirm auslösen.
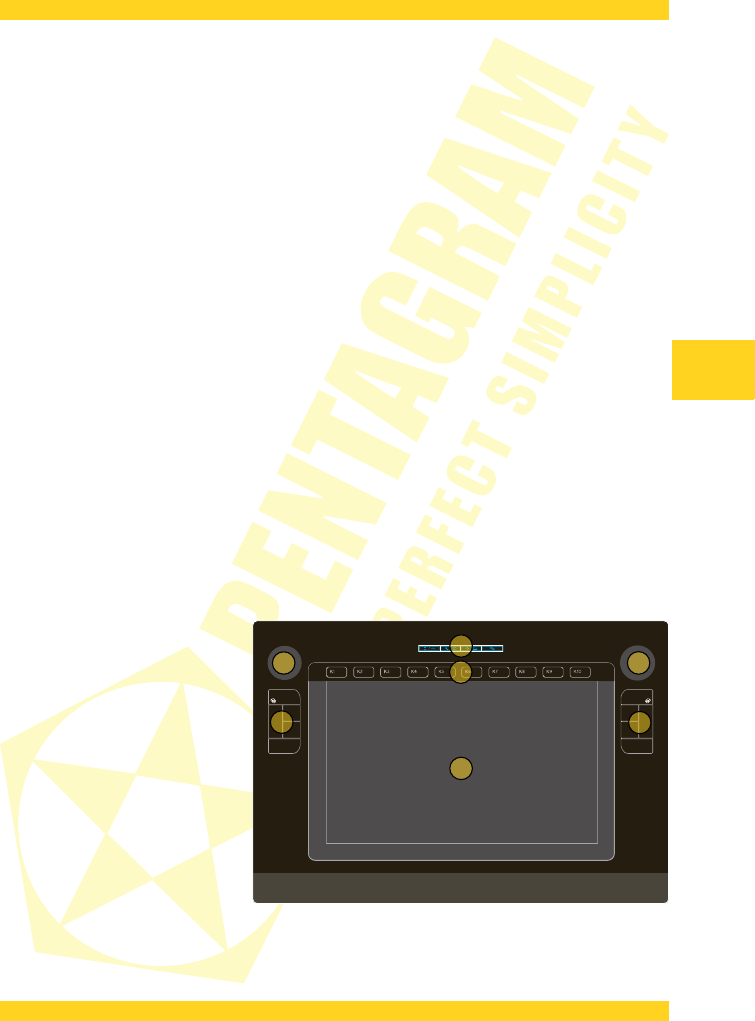
Benutzung des Tabletts
Die Arbeit mit dem Tablett ist sehr intuitiv und komfortabel, sie erfordert allerdings
Eingewöhnung. Der Schlüssel zum Erfolg beim Umgang mit dem Tablett ist das Halten des
Stiftes senkrechterer als beim Umgang mit einem Kugelschreiber sowie Verfolgung der
Bewegungen des Cursors am Bildschirm, statt den Stift selbst anzuschauen.
Die Annäherung des Stiftes an die Arbeitsfläche des Tabletts auf eine bestimmte
Entfernung löst die Verfolgung der Stiftbewegung durch das Tablett und Bewegung des
Bildschirmcursors aus. Die Berührung der Tablettoberfläche mit dem Stift wird als ein Klick mit
der linken Maustaste behandelt. Ein Klick mit der rechten Maustaste wird durch Betätigung der
unten seitlich angeordneten Taste am Stift ausgeführt. Um einen Doppelklick (zweimaliges
Anklicken mit der linken Maustaste) auszuführen, müssen Sie entweder sehr schnell zwei Mal
nacheinander die Tablettoberfläche an einer Stelle antippen (dabei den Stift nicht verschieben)
oder die obere Seitentaste am Stift drücken. Die Funktionsweise der am Stift seitlich
angeordneten Tasten kann im Treiberprogramm des Tabletts geändert werden.
Nachdem das Tablett an den Computer angeschlossen worden ist, wird unter Windows
Vista und 7 auch die systembedingte Unterstützung des Tabletts eingeschaltet. Ist der Treiber
vor dem Anschließen des Tabletts nicht installiert worden und in einigen Fällen auch nach der
Installation des Treibers, nachdem das Tablett bereits an den Computer angeschlossen worden
ist, können zusätzliche Optionen für systembedingte Unterstützung des Tabletts aktiviert
werden. In diesem Fall, um einen Klick mit der rechten Maustaste auszuführen, können Sie auch
die Tablettoberfläche an einer Stelle antippen und den Stift gedrückt halten, bis eine Wirkung
am Bildschirm ausgelöst wird. Das Aktivieren einiger Optionen der systembedingten
Unterstützung des Tabletts kann eine fehlerhafte Funktion der Seitentasten am Stift
verursachen. Die Beschreibung der systembedingten Unterstützung des Tabletts und der
einzelnen Funktionen befindet sich in der beiliegenden Dokumentation (auch der
elektronischen).
Wenn Sie den Stift über längere Zeit nicht benutzen, unterbringen Sie ihn in dem
mitgelieferten Stifthalter oder legen Sie ihn waagerecht an einer Stelle, wo weder die Spitze
noch die Tasten des Stiftes gedrückt bleiben. Das Tablett kann auf die Annäherung des Stiftes
nicht reagieren, wenn er über längere Zeit nicht benutzt worden ist. In diesem Fall reicht es mit
dem Stift die Tablettoberfläche zu berühren.
9
DE
PENTAGRAM Designer (P 2700)
Konfiguration des Tabletts
Windows Vista/7
Das Betriebssystem Windows Vista und 7 verfügen über integrierte Unterstützung für das
Tablett. Wurde der Treiber für das Tablett nicht installiert, können die grundlegenden
Funktionen des Stiftes (Ein-/Ausschalten und Funktionen der Stifttasten) in dem Applet Stift
und Eingabegeräte (Windows Vista) bzw. Stift und Berührungsgeräte (Windows 7) konfiguriert
werden, das sich in der klassischen Ansicht (kleine/große Ikonen) der Systemsteuerung
befindet. Nach der Installation des Treibers sind Konfigurationsoptionen des Treibers in
Anspruch zu nehmen. Dies erfolgt auf die gleiche Art und Weise wie unter Windows 2000 und
XP und ist nachstehend beschrieben. Damit die Ikone für den Tabletttreiber in der
Systemsteuerung sichtbar wird, kann es notwendig sein, auf die klassische Ansicht
(kleine/große Ikonen) der Systemsteuerung umzuschalten.
Windows 2000/XP
Zum Konfigurationsfenster des Tabletttreibers bekommen Sie Zugang über die Ikone Pen Pad in
der Systemsteuerung bzw. durch Anwählen von Pen Pad... im Kontextmenü der Ikone
der Macro Key Manager Anwendung. Unabhängig von der gewählten Registerkarte ist unten
am Fenster die Schaltfläche About verfügbar, die das Fenster Diagnostic aufruft, das Angaben
zum Treiber und Tablett beinhaltet.
Diagnostic Fenster
Driver Info – Angaben zum Treiber:
Version – Treiberversion.
10
DE
PENTAGRAM Designer (P 2700)
Tablet Info – Angaben zum Tablett:
Tablet – systembedingte Bezeichnung des Tabletts.
Model – Bezeichnung/Abmessungen des Tabletts (in Zoll).
Version – Firmwareversion des Tabletts.
Pointing Device Info – Angaben zum Betriebsstatus des Stiftes:
Proximity gibt an, ob sich der Stift innerhalb (In) oder außerhalb (Out) der Lesereichweite
des Tabletts befindet.
X Data / Y Data jeweilige Stiftposition gegenüber der Arbeitsfläche (die letztlich erkannte
falls sich der Stift außerhalb der Lesereichweite des Tabletts befindet).
Switches – Status der Stifttasten:
All Switches Open – keine Taste gedrückt.
1 – Stiftspitze berührt die Tablettoberfläche.
2 – untere Seitentaste gedrückt.
3 – obere Seitentaste gedrückt.
Pressure – jeweiliger, prozentmäßiger Wert des Anpressdrucks des Stiftes.
X Tilt / Y Tilt jeweilige Stiftneigung gegenüber der Arbeitsfläche (die letztlich erkannte
falls sich der Stift außerhalb der Lesereichweite des Tabletts befindet).
Close – Diagnostic Fenster schließen.
Pen Registerkarte
Auf dieser Registerkarte können Einstellungen des Tablettstiftes konfiguriert werden.
Tilt Sensitivity Einstellung der Empfindlichkeit, mit der das Tablett auf die Stiftneigung
reagiert. Der Empfindlichkeitsbereich für die Stiftneigung liegt zwischen den Werten Normal
(Standard) und High (hoch).
Tip Feel Einstellung der Spitzenhärte, d.i. des Verhältnisses des Stiftandrucks auf die
Tablettoberfläche zur Druckkraft, die vom Tablett erkannt wird. Der Härtebereich der Stiftspitze
liegt zwischen den Werten Soft (weich) und Firm (hart).
Details – ruft das Feel Details Fenster auf, in dem eine erweiterte Einstellung der
Druckempfindlichkeit vorgenommen werden kann.
11
DE
PENTAGRAM Designer (P 2700)
Current Pressure der jeweils vom Tablett erkannte Andruck der Stiftspitze, der Erkennung der
Spitzenhärte (Tip Feel) erleichtert.
Konfiguration der Tasten ermöglicht das Zuweisen von Maustastenfunktionen den
Seitentasten des Stiftes. Zur Wahl stehen folgende Funktionen:
None – keine Zuweisung
Left Click – ein Klick mit der linken Maustaste
Left Double Click – ein Doppelklick mit der linken Maustaste
Right Click – ein Klick mit der rechten Maustaste
Right Double Click – ein Doppelklick mit der rechten Maustaste
Scroll – ein Klick mit der mittigen Maustaste/Scrollen
Tip Double Click Distance Einstellung der größtmöglichen Verschiebung zwischen zwei
Berührungen der Tablettoberfläche mit der Stiftspitze, damit ein Doppelklick erkannt wird. Eine
Änderung des Parameters ist bei Problemen mit dem Doppelklick mit der Stiftspitze empfohlen.
Der Bereich für die größtmögliche Verschiebung liegt zwischen den Werten Off (Aus) und Large
(groß).
Default – Zurücksetzung auf Voreinstellungen auf dieser Registerkarte.
Feel Details Fenster
Sensitivity Einstellung der Spitzenhärte, d.i. des Verhältnisses des Stiftandrucks auf die
Tablettoberfläche zur Druckkraft, die vom Tablett erkannt wird. Der Härtebereich der Stiftspitze
liegt zwischen den Werten Soft (weich) und Firm (hart).
Click Threshold Einstellung des Klickgrenzwertes, d.i. der tatsächlichen Andruckkraft des
Stiftes auf die Tablettoberfläche, die erforderlich ist, damit das Tablett einen Klick erkennt. Der
Bereich des Klickgrenzwertes liegt zwischen den Werten Low (niedrig) und High (hoch).
Profile ein Feld, das die jeweilige Einstellung der Druckempfindlichkeit darstellt. Die X-Achse
entspricht der tatsächlichen Andruckkraft des Stiftes auf die Tablettoberfläche, die Y-Achse
entspricht hingegen der Andruckkraft, die vom Tablett erkannt wird. Die Kurve stellt die Härte
der Stiftspitze (Tip Feel/Sensitivity) dar und die rote vertikal verlaufende Linie den
Klickgrenzwert (Click Threshold).
Try Here ein Feld, in dem die jeweils eingegebenen Werte der Druckempfindlichkeit getestet
werden können. Das Feld wird nach einigen Sekunden von Untätigkeit automatisch geleert.
OK – aktuelle Einstellungen übernehmen und das Fenster schließen.
12
DE
PENTAGRAM Designer (P 2700)
Cancel – aktuelle Einstellungen ablehnen und das Fenster schließen.
Default – Zurücksetzen auf Voreinstellungen.
Mapping Registerkarte
Auf dieser Registerkarte können Einstellungen der Arbeitsfläche konfiguriert werden. Das
Erscheinungsbild dieser Registerkarte hängt vom Erkennungsmodus ab, der in dem
Rahmen Mode aktiviert worden ist.
Orientation Einstellung der Ausrichtung der Arbeitsfläche gegenüber der normalen Lage des
Tabletts. Je nach der jeweiligen Option ist es notwendig, das Tablett um einen bestimmten
Winkel zu drehen, damit die Arbeitsfläche der Bildschirmfläche entspricht:
Landscape Portrait Landscape Flipped Portrait Flipped
Mode – Umstellung des Erkennungsmodus des Stiftes auf den absoluten Pen-Modus (Stift) bzw.
den relativen Mouse-Modus (Maus).
Pen-Modus
In dem Pen-Erkennungsmodus (Stift) ist die Arbeitsfläche des Tabletts dem Bildschirmbereich
fest zugewiesen. Das Setzen des Stiftes auf einen bestimmten Punkt der Arbeitsfläche des
Tabletts bewirkt die Verschiebung des Cursors auf dem Bildschirm zum Punkt, der dem Punkt
der Arbeitsfläche zugewiesen ist.
Working Area Setting dieses Feld stellt den ganzen Bildschirmbereich dar, der rote Rahmen
hingegen den Bildschirmbereich, dem die Arbeitsfläche des Tabletts zugewiesen ist.
Monitor Area dient zur Auswahl des Bildschirmbereichs, dem die Arbeitsfläche des Tabletts
13
DE
PENTAGRAM Designer (P 2700)
zugewiesen wird.
All Screens – die Arbeitsfläche des Tabletts entspricht dem Bildschirmbereich aller Monitore.
Monitor – die Arbeitsfläche des Tabletts entspricht nur dem Bildschirmbereich des jeweiligen
Monitors (wirksam nur in einigen Konfigurationsmodi bei mehreren Monitoren). Nach
Aufrufen dieser Funktion erscheint an der rechten Seite das Feld zur Auswahl des Monitors.
Der gewählte Monitor wird im Feld Working Area Setting mit schwarzem Hintergrund
unterlegt.
Portion die Arbeitsfläche des Tabletts entspricht einem Teil des Bildschirmbereichs aller
Monitore, der im Feld Working Area Setting festgelegt werden kann.
Force Proportions die Einhaltung des Verhältnisses der Bildschirmabmessungen wird
erzwungen. Nach Aktivierung dieser Option wird ein Teil der Arbeitsfläche inaktiv, dadurch
entspricht das Verhältnis der Abmessungen des aktiven Bereichs dem Verhältnis der
Abmessungen des Bildschirmbereichs.
Default – Zurücksetzung auf Voreinstellungen auf dieser Registerkarte.
Mouse-Modus
In dem Mouse-Erkennungsmodus (Maus) wird die Arbeitsfläche des Tabletts dem
Bildschirmbereich jedes Mal zugewiesen, wenn der Stift über der Arbeitsfläche des Tabletts
gehalten wird. Die Annäherung des Stiftes an die Arbeitsfläche weist die jeweilige Position des
Cursors am Bildschirm diesem Punkt der Arbeitsfläche zu und die Stiftbewegung bewirkt die
Cursorbewegung von der letzten Stelle an, an der er sich befand. Dadurch kann der Stift wie
eine herkömmliche Maus benutzt werden.
Mouse Acceleration Einstellung der Beschleunigung des Mauszeigers. Der
Beschleunigungsbereich liegt zwischen den Werten Off (Aus) und High (hoch).
Mouse Speed Einstellung der Geschwindigkeit des Mauszeigers. Der Geschwindigkeitsbereich
liegt zwischen den Werten Slow (langsam) und Fast (schnell).
Default – Zurücksetzung auf Voreinstellungen auf dieser Registerkarte.
14
DE
PENTAGRAM Designer (P 2700)
ExpressKeys Registerkarte
Auf dieser Registerkarte können Einstellungen der Seitentasten des Tabletts konfiguriert
werden.
Um die Funktionsweise einer der Seitentasten zu ändern, ist aus der vordefinierten Popup-
Liste die auszuübende Funktion zu wählen. Nachdem die Funktion aus der Liste gewählt
worden ist, wird ein Fenster mit detaillierten Einstellungen der Funktion eingeblendet. Zur Wahl
stehen drei Funktionen:
Modifier der Taste wird die Funktion einer oder mehrerer Modifikationstasten aus der
Tastatur (Ctrl, Alt, Shift, Tab) zugewiesen. Die Auswahl dieser Funktion aus der Liste öffnet
das Define Modifier Fenster. Nach der Konfiguration dieser Funktion erscheinen unter der
Popup-Liste der jeweiligen Taste die zugewiesenen Modifikationstasten.
KeyStroke Zuweisung zu der Taste einer Tastenkombination bzw. einer Reihe von Tasten
aus der Tastatur. Die Auswahl dieser Funktion aus der Liste öffnet das Define KeyStroke
Fenster. Nach der Konfiguration dieser Funktion ist unter der Popup-Liste der jeweiligen
Taste die Bezeichnung der Tastenkombination/Reihe von Tasten sichtbar, die während der
Konfiguration definiert wird.
Open/Run... Auswahl einer Anwendung, die nach dem Drücken dieser Taste aufgerufen
wird. Die Auswahl dieser Funktion aus der Liste öffnet das Open/Run Fenster. Nach der
Konfiguration dieser Funktion ist unter der Popup-Liste der jeweiligen Taste der Dateiname
der gewählten Anwendung sichtbar.
Left Click – der Taste wird der Klick mit der linken Maustaste zugewiesen.
Left Double Click – der Taste wird der Doppelklick mit der linken Maustaste zugewiesen.
Right Click – der Taste wird der Klick mit der rechten Maustaste zugewiesen.
Scroll – der Taste wird der Klick mit der mittigen Maustaste zugewiesen.
Default – Zurücksetzung auf Voreinstellungen auf dieser Registerkarte.
15
DE
PENTAGRAM Designer (P 2700)
Define Modifier Fenster
Die Markierung von einer oder mehreren Modifikationstasten und Übernahme der Auswahl
bewirkt die Zuweisung der Funktionsweise der jeweiligen Taste der zu konfigurierenden
Seitentaste des Tabletts. Die Funktion Alt Gr kann durch Wählen des Ctrl- und Alt-Feldes erzielt
werden. Das Anklicken von Cancel bewirkt das Schließen des Fensters, ohne dass die
Änderungen für die jeweilige Tastenfunktion übernommen werden.
Define KeyStroke Fenster
Das Drücken auf eine Taste oder Tastenkombination auf der Tastatur bewirkt deren Hinzufügen
zur Keys-Liste. Möglich ist auch das Hinzufügen einer besonderen Tastenkombination mittels
Add Special Liste. Durch einen Klick auf OK gelangt man zum Fenster, in dem die konfigurierte
Tastenkombination/-reihe benannt werden kann. Das Anklicken von Cancel bewirkt das
Schließen des Fensters, ohne dass die Änderungen für die jeweilige Tastenfunktion
übernommen werden. Ein Klick auf Delete entfernt die letzte Eintragung, auf Clear alle
Eintragungen aus der Liste.
16
DE
PENTAGRAM Designer (P 2700)
Open/Run Fenster
Ein Klick auf Browse... bewirkt das Öffnen eines Fensters zur Wahl einer Anwendung, die
aufgerufen werden soll, nachdem die zu konfigurierende Seitentaste des Tabletts betätigt
worden ist. Nach der Auswahl der Anwendung ist der Pfad zu der Anwendung im Feld
Open/Run sichtbar. Ein Klick auf OK bewirkt das Schließen des Fensters und die Zuweisung der
gewählten Anwendung der jeweiligen Seitentaste des Tabletts. Das Anklicken von Cancel
bewirkt das Schließen des Fensters, ohne dass die Änderungen für die jeweilige
Tastenfunktion übernommen werden.
Macro Key Manager
Diese Anwendung ermöglicht die Konfiguration der Funktionsfelder und die Zuweisung von
Funktionen je nach aktiver Anwendung. Voreingestellt sind die meist benutzten
Tastenkombinationen.
Kontextmenü der Anwendung
Nachdem Sie mit der rechten Maustaste auf die Ikone der Anwendung Macro Key Manager im
Infobereich (neben der Systemuhr) geklickt haben, erscheint das Kontextmenü. Nachfolgend
sind einzelne Posten des Menüs beschrieben:
About... - Fenster mit Angaben über die Version der Anwendung (Software
Version), des Treibers (Driver Version) und der Firmware (Firmware Version)
werden angezeigt.
Show das Hauptfenster der Anwendung wird eingeblendet. Die gleiche
Wirkung wird erzielt, indem ein Doppelklick auf die Ikone der Anwendung
ausgeführt wird.
Disable / Enable – Aus- / Einschalten der Funktionsfelder des Tabletts.
Setting – das Fenster mit Einstellungen der Anwendung wird geöffnet.
Pen Pad... – das Konfigurationsfenster des Treibers wird geöffnet.
Help – Hilfe-Datei der Anwendung wird angezeigt.
17
DE
PENTAGRAM Designer (P 2700)
Fenster Setting
MacroKey Response time Dauer der Berührung des Funktionsfeldes durch den Stift, nach der
die zugewiesene Funktion ausgeführt wird. Nach Eingabe von 0 reicht das Antippen des
Funktionsfeldes mit dem Stift aus, damit die Funktion ausgeführt wird.
Pointing Sound Wählen Sie, ob die Berührung der Tablettoberfläche mit dem Stift mit einem
Sound (ON) oder nicht (OFF) angezeigt werden soll.
Hauptfenster der Anwendung
Liste der Anwendungen Wählen Sie aus der Liste eine Anwendung, für die Funktionsfelder
konfiguriert werden sollen.
New – Neue Anwendung zur Liste der Anwendungen hinzufügen.
Delete Eine Anwendung aus der Liste der Anwendungen entfernen (Entfernung der
voreingestellten Anwendungen ist nicht möglich).
18
Liste der
Anweldungen
Liste der
Felder
Ansicht
DE
PENTAGRAM Designer (P 2700)
Liste der Funktionsfelder Wählen Sie ein Feld, dessen Einstellungen Sie ändern möchten
(Änderung der voreingestellten Felder ist nicht möglich). Ist das Feld bereits konfiguriert, kann
es ebenfalls modifiziert werden, indem auf eine Taste geklickt wird, die in der Ansicht für
dieses Feld steht.
Setting – Markieren Sie das Feld, um ein gewähltes Funktionsfeld aktiv zu schalten.
Hint Geben Sie in dieses Feld den Inhalt einer Blase ein, die am Bildschirm erscheint, wenn
sich der Stift über dem gewählten Funktionsfeld befindet.
Use hot key – Wählen Sie eine Tastenkombination, die simuliert werden soll, wenn das gewählte
Funktionsfeld angetippt wird.
Linking Geben Sie den Pfad für eine Datei ein, die gestartet wird, wenn das gewählte
Funktionsfeld angetippt wird. Um Verzeichnisse in der Suche nach einer Datei durchzusuchen,
klicken Sie die Schaltfläche ... an.
Confirm Diese Schaltfläche anklicken, um Einstellungen des gewählten Funktionsfeldes zu
speichern.
Enable this manager Dieses Feld markieren, um Funktionsfelder zu aktivieren. Die Markierung
entfernen, um Funktionsfelder abzuschalten.
OK Das Hauptfenster wird geschlossen und eine Warnung eingeblendet, falls die jeweilige
Konfiguration nicht gespeichert worden ist.
Cancel Das Hauptfenster wird geschlossen und die Änderungen der Konfiguration werden
abgelehnt.
19
DE
PENTAGRAM Designer (P 2700)
Neue Anwendung zur Liste hinzufügen
1. Auf die Schaltfläche New im Hauptfenster der Anwendung klicken.
2. Im Fenster New in das Feld File Name den Namen der Anwendung eintragen, die in der
Liste der Anwendungen angezeigt werden soll.
3. Im Feld Open(*.exe) den Namen einer ausführbaren Datei der Anwendung eintragen bzw.
auf die Schaltfläche ... klicken, um die Liste von Anwendungen anzeigen zu lassen, die im
Computer installiert sind. Die Eingabe der ausführbaren Datei der Anwendung ist nicht
erforderlich. In manchen Fällen kann die Eingabe dazu führen, dass die Anwendung bei
jeder Betätigung des Funktionsfeldes aufgerufen wird, falls die jeweilige Anwendung in der
Liste der Anwendungen gewählt bleibt.
4. Nachdem Sie die Schaltfläche ... angeklickt haben, wird das Fenster Installed Software mit
einer Liste der im Betriebssystem installierten Anwendungen eingeblendet. Anwendung
markieren, die Sie zur Liste hinzufügen wollen und auf OK klicken, um die Anwendung zu
übernehmen und das Fenster zu schließen. Klicken Sie auf die Schaltfläche Cancel, um das
Fenster zu schließen, ohne eine Anwendung zu übernehmen.
5. Nachdem Sie den Namen der angezeigten Anwendung und den Namen ihrer Datei
eingegeben haben, klicken Sie auf OK, um die Anwendung zur Liste hinzuzufügen und das
Fenster zu schließen bzw. klicken Sie auf Cancel, um das Fenster zu schließen, ohne dass
eine Anwendung hinzugefügt wird.
20
DE
DEKLARACJA ZGODNOŚCI
Importer: PENTAGRAM Europe Sp. z o.o.
Adres: ul. Szyszkowa 35/37, 02-285 Warszawa
jako upoważniony przedstawiciel producenta deklaruje, że poniższy produkt:
Nazwa produktu: Tablet graficzny
Model: PENTAGRAM Designer
został wyprodukowany przy zastosowaniu następujących norm zharmonizowanych:
EN55022:2006,Klasa B
EN61000-3-2:2006
EN61000-3-3:1995+A1:2001+A2:2005
EN55024:1998+A1:2001+A2:2003,IEC61000-4Seria
Niniejszy produkt spełnia zasadnicze wymagania zawarte w:
- ustawie z dnia 13 kwietnia 2007 r. o kompatybilności elektromagnetycznej (Dz.U. Nr 82 poz.
556), wdrażającej postanowienia europejskiej dyrektywy nr 2004/108/WE, odnoszącej się do
kompatybilności elektromagnetycznej;
i w następstwie nosi oznakowanie CE.
Zgodność z zasadniczymi wymaganiami została potwierdzona certyfikatem nr 0903091E-01
wystawionym przez GESTEK EMC LAB, NO. 3, Pau-Tou-Tsuo Valley, Chia-Pau Tsuen, Lin Kou
Hsiang, Taipei Country, Taiwan, R.O.C.
Miejsce i data: Warszawa, 07.10.2009
Imię i nazwisko osoby upoważnionej: Michał Sienniak
Stanowisko: Product Manager
57

Hulp nodig? Stel uw vraag in het forum

Spelregels

Misbruik melden

Gebruikershandleiding.com neemt misbruik van zijn services uitermate serieus. U kunt hieronder aangeven waarom deze vraag ongepast is. Wij controleren de vraag en zonodig wordt deze verwijderd.

Product:

Bijvoorbeeld antisemitische inhoud, racistische inhoud, of materiaal dat gewelddadige fysieke handelingen tot gevolg kan hebben.

Bijvoorbeeld een creditcardnummer, een persoonlijk identificatienummer, of een geheim adres. E-mailadressen en volledige namen worden niet als privégegevens beschouwd.

Spelregels forum

Om tot zinvolle vragen te komen hanteren wij de volgende spelregels:

Belangrijk! Als er een antwoord wordt gegeven op uw vraag, dan is het voor de gever van het antwoord nuttig om te weten als u er wel (of niet) mee geholpen bent! Wij vragen u dus ook te reageren op een antwoord.

Belangrijk! Antwoorden worden ook per e-mail naar abonnees gestuurd. Laat uw emailadres achter op deze site, zodat u op de hoogte blijft. U krijgt dan ook andere vragen en antwoorden te zien.

Abonneren

Abonneer u voor het ontvangen van emails voor uw PENTAGRAM Designer P 2700 bij:


U ontvangt een email met instructies om u voor één of beide opties in te schrijven.


Ontvang uw handleiding per email

Vul uw emailadres in en ontvang de handleiding van PENTAGRAM Designer P 2700 in de taal/talen: Duits, Engels, Pools als bijlage per email.

De handleiding is 1,71 mb groot.


U ontvangt de handleiding per email binnen enkele minuten. Als u geen email heeft ontvangen, dan heeft u waarschijnlijk een verkeerd emailadres ingevuld of is uw mailbox te vol. Daarnaast kan het zijn dat uw internetprovider een maximum heeft aan de grootte per email. Omdat hier een handleiding wordt meegestuurd, kan het voorkomen dat de email groter is dan toegestaan bij uw provider.

Stel vragen via chat aan uw handleiding

Stel uw vraag over deze PDF

Uw handleiding is per email verstuurd. Controleer uw email

Als u niet binnen een kwartier uw email met handleiding ontvangen heeft, kan het zijn dat u een verkeerd emailadres heeft ingevuld of dat uw emailprovider een maximum grootte per email heeft ingesteld die kleiner is dan de grootte van de handleiding.

Er is een email naar u verstuurd om uw inschrijving definitief te maken.

Controleer uw email en volg de aanwijzingen op om uw inschrijving definitief te maken

U heeft geen emailadres opgegeven

Als u de handleiding per email wilt ontvangen, vul dan een geldig emailadres in.

Uw vraag is op deze pagina toegevoegd

Wilt u een email ontvangen bij een antwoord en/of nieuwe vragen? Vul dan hier uw emailadres in.


Info