NOTE Reception takes 2-10 minutes. If the signal is weak, it can take up to 24 hours
to get a valid signal.
To enable / disable signal reception:
Press and hold Clock area to enable / disable signal reception. A beep will
sound to confirm action.
NOTE For best reception, the base station should be placed on a flat, non-metallic
surface near a window in an upper floor of your home. The antenna should be placed
away from electrical appliances and not be moved around when searching for a
signal.
MANUALLY SET CLOCK
1. Press Clock area to activate.
2. Press SET to toggle between time zone offset, 12/24 hr format, hour, minute,
year, day / month, month, day, time zone.
3. Once in desired setting, press UP or DWN to change the settings.
4. Press:
• SET to confirm and continue to next setting OR
• touch panel area (except tool bar) to confirm and exit.
WMR200: Time zone offset sets the clock +/- 23 hours from the received clock signal
time.
WMR200A: Select the time zone: (PA) Pacific, (EA) Eastern, (CE) Central or (MO)
Mountain.
NOTE The language options are English (E), German (D), French (F), Italian (I),
and Spanish (S).
To select clock display mode:
Press clock area repeatedly to toggle between:
• Clock with seconds
• Clock with weekday
• Date with year
• Data logger (please refer to Memory / Data logger section)
PRESSURE
To toggle barometer unit:
1. Press barometer area to toggle between Altitude / current barometer.
2. Press UNIT to select FEET / M or inHg / mmHg / mb / hPA.
SET ALTITUDE
Set the altitude to reflect distance from sea level at your position.
1. Press barometer area to display ALT.
2. Press SET.
3. Press UP / DWN to set the altitude in 10 m (33 ft) increments from -100 m (-328
ft) to 2500 m (8202 ft).
4. Press SET or touch panel area (except tool bar / forecast area) to confirm.
RAINFALL
To select rainfall display mode:
Press rain area to toggle between:
• Rain rate
• Hourly Rainfall
• Accumulated rainfall
• Rainfall recorded in the past 24 hours
Press UNIT to select mm / in.
ACCUMULATED RAINFALL
To display SINCE DATE:
1. Press rain area repeatedly until Accumulated Rainfall display. (Clock area
will display the start date / time of rainfall recording).
To reset SINCE DATE:
Press and hold MEM to set current time as start of accumulated rainfall records.
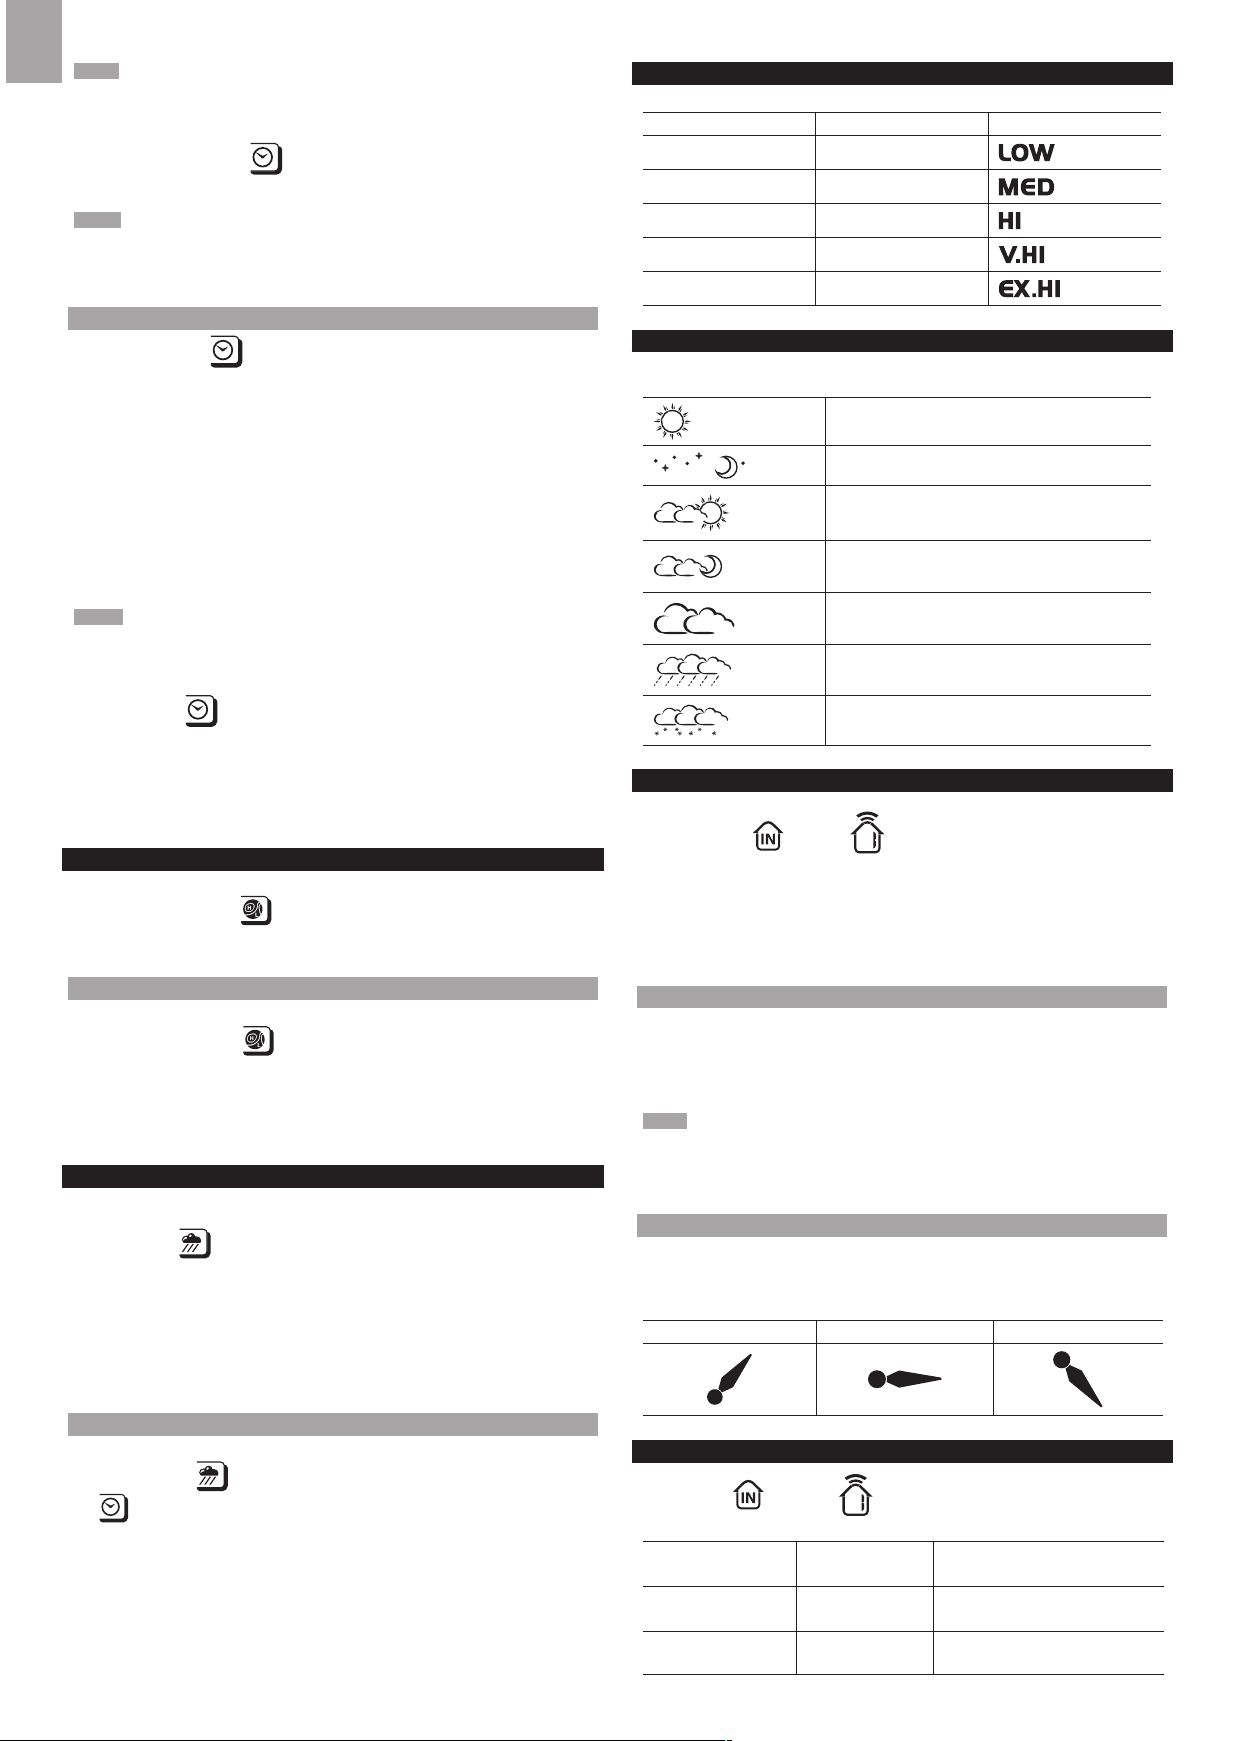
UV
The UV index levels are as follows:
UV INDEX DANGER LEVEL ICON
0-2 Low
3-5 Moderate
6-7 High
8-10 Very high
11 and above Extremely high
WEATHER FORECAST
This product forecasts the next 12 to 24 hours of weather within a 30-50 km (19-31
mile) radius (US- with a 75% accuracy).
Sunny
Clear night
Partly cloudy
Partly cloudy at night
Cloudy
Rainy
Snowy
TEMPERATURE AND HUMIDITY
To toggle temperature unit:
1. Press Indoor / Outdoor Temperature / Humidity area.
2. Press UNIT to select °C / °F.
To auto-scan between sensors (Outdoor):
1. Press Outdoor Temperature / Humidity area.
2. Press and hold CH to display data for each sensor.
AUTO SCANNING FUNCTION
To activate the outdoor temperature and humidity auto-scan function:
1. Press and hold CH to activate auto-scan. The temperature and humidity display
will scroll from indoor to ch1 through to ch10.
2. Press CH / MEM to stop the auto-scan.
NOTE Channel 1 is used for the outdoor temperature and humidity sensor provided in
this package. Additional temperature and humidity sensors can use other channels.
To change channel:
Press CH to change channel.
TEMPERATURE AND HUMIDITY TRENDS
The temperature and humidity trend icons are based on recent sensor readings.
The trend lines are shown next to the temperature and humidity readings. The trend
is shown as follows:
RISING STEADY FALLING
HEAT INDEX
Press Indoor / Outdoor Temperature / Humidity area to display the
actual temperature felt:
TEMPERATURE
RANGE WARNING MEANING
27°C to 32°C
(80°F to 89°F) Caution Possibility of heat exhaustion
32°C to 40°C
(90°F to 104°F) Extreme Caution Possibility of heat dehydration