Before any home theatre component can be THX Ultra certified, it
must pass a rigorous series of quality and performance tests. Only
then can product feature the THX Ultra logo, which is your
guarantee that the Home Theatre products you purchase will give
you superb performance for many years to come.
Audio/video connection cable [1]
Supplied Accessories
Make sure your box contains everything listed below.
If any pieces are missing, contact your nearest Onkyo dealer.
The number of accessories is indicated in brackets [ ].
Features
THX*
1
Ultra Certified
Plays DVD-Audio & Video Discs, Video CDs, CD-Rs & CDs
54 MHz/10-bit Video DAC
192 kHz/24-bit DACs
DB-25 and RCA-6ch Multichannel Outputs
2 Gold-Plated Progressive Component-Video Outputs
4 Digital Outputs pass DTS
®
*
2
, Dolby
®
*
3
Digital and PCM Signals
Dolby
®
Digital decoder Built In
Separate Transformers for Digital and Analog Sections
Electrical and Magnetic Shielded Mechanism
Heavy-Duty Mechanical Tray Door
Full-function remote controller with “Learning” function for control
of other component
Power cord [1]
S-video cable [1]
DB-25cable [1]
DV-S939(US_E)p08-09.p6510/2/00, 3:23 PM8
9
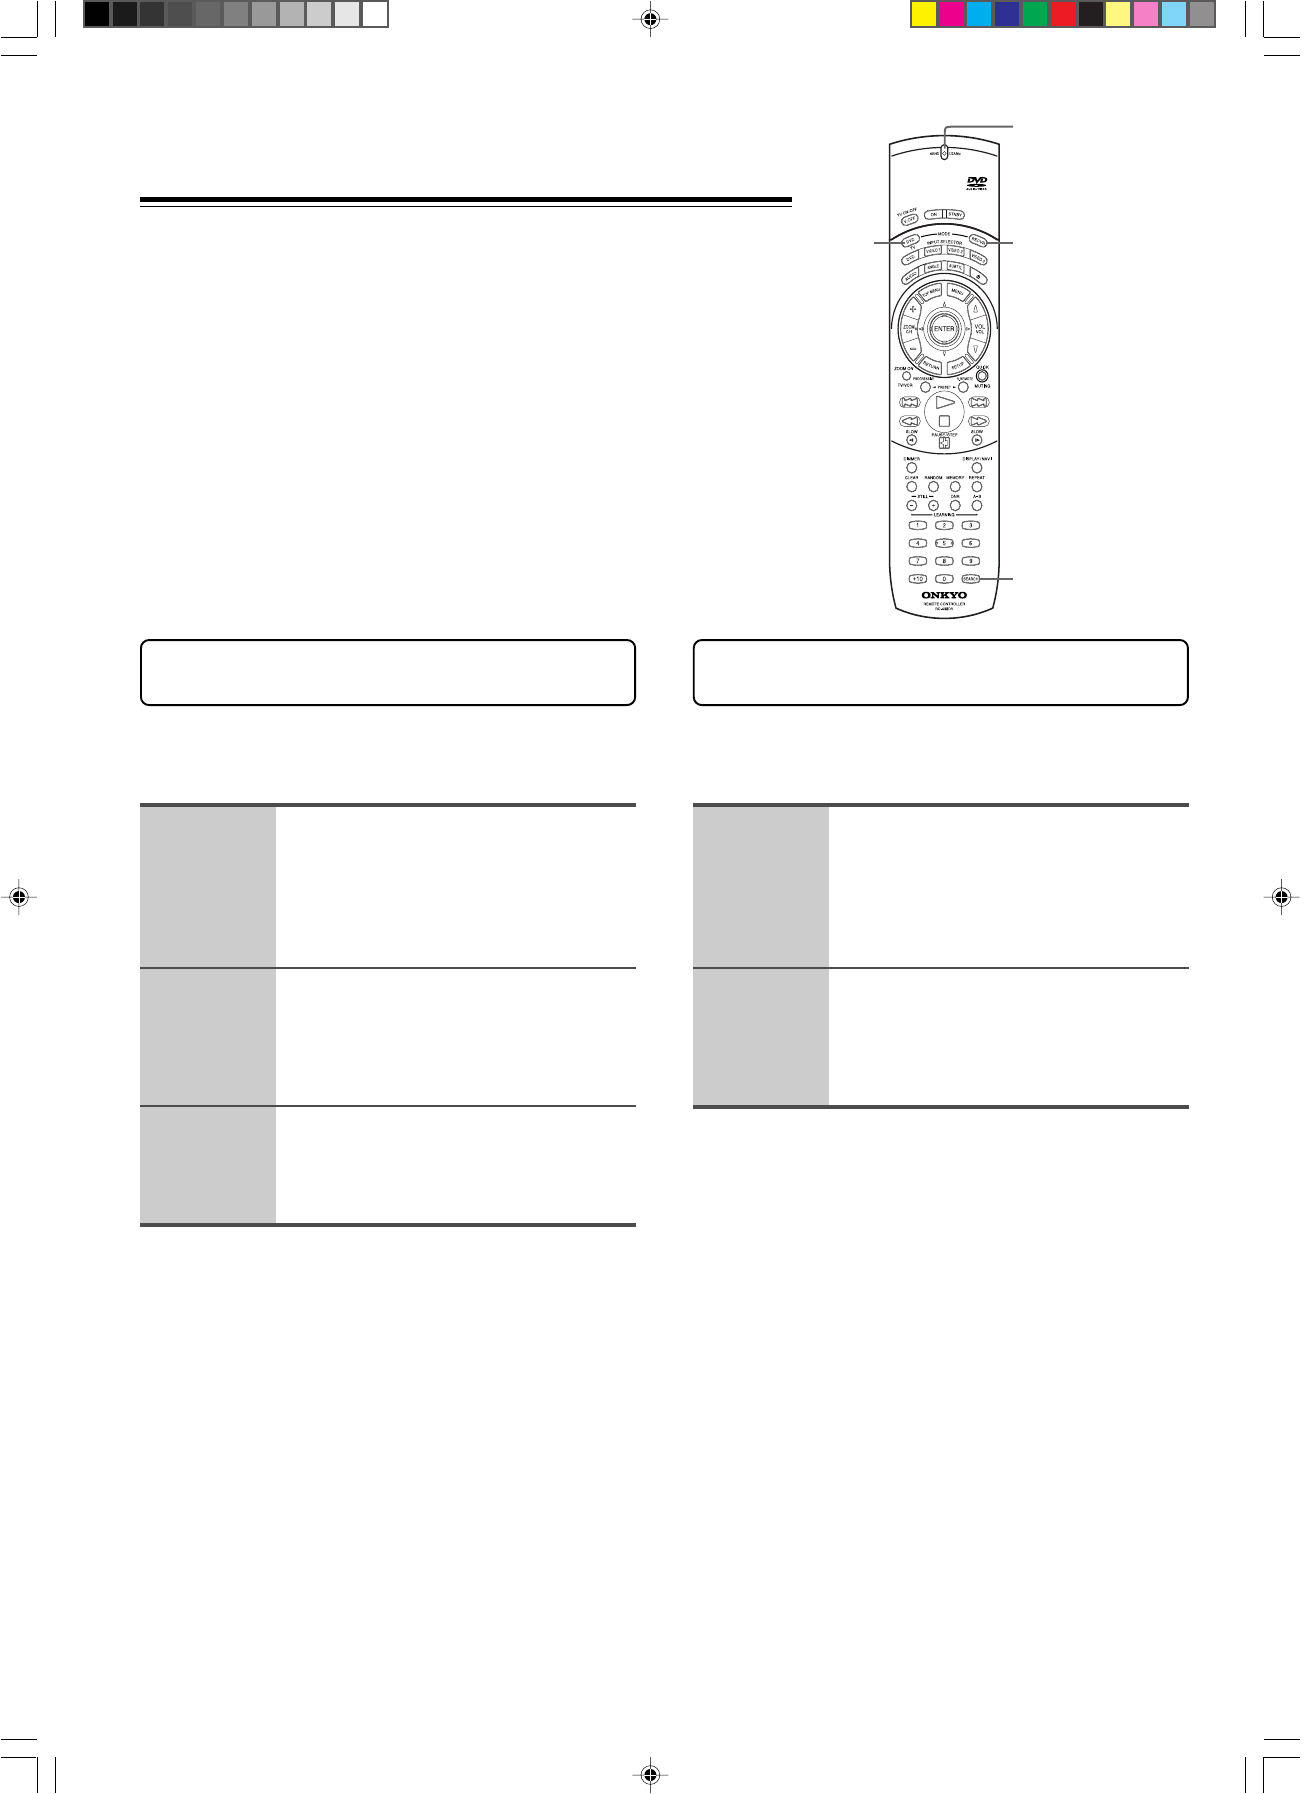
Preparing the Remote Controller
Open the battery compartment cover.
Insert the two R6 (size AA) batteries.
Be sure to match the + and – ends of the batteries
with the diagram inside the battery compartment.
Close the battery compartment cover.
Notes
•Do not mix new batteries with old batteries or different kinds of
batteries.
•To avoid corrosion, remove the batteries if the remote controller
is not to be used for a long time.
•Remove dead batteries immediately to avoid damage from
corrosion. If the remote controller does not operate smoothly,
replace both batteries at the same time.
•The life of the batteries supplied is about six months but this
will vary depending on usage.
Inserting the Batteries
Using the Remote Controller
Point the remote controller toward the remote control sensor.
Notes
•Place the unit away from strong light such as direct sunlight or inverted
fluorescent light which can prevent proper operation of the remote
controller.
•Using another remote controller of the same type in the same room or using
the unit near equipment which uses infrared rays may cause operational
interference.
•Do not put any object such as a book on the remote controller. The buttons
of the remote controller may be pressed by mistake and drain the batteries.
•Make sure the audio rack doors do not have colored glass. Placing the unit
behind such doors may prevent proper remote controller operation.
•If there is any obstacle between the remote controller and the remote
control sensor, the remote controller will not operate.
30˚
30˚
About 5 m (16 feet)
Remote control sensor
DV-S939(US_E)p08-09.p6510/2/00, 3:23 PM9
10
Making Connections
To accommodate a wide range of home entertainment systems, this player features numerous connection types for both audio and video. Please
refer to the instructions on this and the following pages to determine the best possible type of connections for your system.
Incomplete
Inserted completely
Before Connecting
•Refer to the instruction manuals supplied with any and all components that
you plan to connect the DVD Player to.
•Be sure to turn off the power of all components to be connected and unplug
them from the wall outlet before making any connections.
•Connect the DVD Player to the TV directly. If you connect the DVD Player
to a VCR, TV/VCR combination, or video selector, the playback picture may
be distorted as DVD Video images are copy protected.
•Please note that video connections to a TV or monitor are necessary because
some discs require on-screen menu interaction before they can be played.
•Connect the plugs securely.
Using the supplied audio/video connection
cable
Using the supplied audio/video cable, make audio connections from
the ANALOG OUTPUT CH1 or CH2 L and R jacks to the
corresponding audio input jacks on the TV. In the same manner,
make video connection from the VIDEO OUTPUT VIDEO CH1 or
CH2 jack to the corresponding video input jack on the TV.
Be sure to set Audio Out Select to “Analog 2Ch” using the on-
screen menu explained in “Customizing the Function Settings”
starting on page 44. See page 48 for direct information.
Note
Be sure to match the colors of the plugs on the cable with the corresponding
jacks on the DVD Player and the TV: yellow for video, red for R (right)
audio and white for L (left) audio.
: Signal flow
To audio inputs
R (Red)
L (White)
Audio/video cable (supplied)
(Yellow)
VIDEOS VIDEO
VIDEO
OUTPUT
COAXIAL
COAXIAL
OPTICAL
OPTICAL
CENTER
SURRFRONTCH
1CH
2
SUBWOOFER
COMPONENT
YP
BPR
RS 232MULTI CHANNEL OUTPUT
ANALOG
OUTPUT
DIGITAL
OUTPUT
CH
1
CH
2
R
L
CH 1
CH 2
AC INLET
DO NOT connect the
power cord until all
connections are
complete.
R (Red)
L (White)
(Yellow)
If the TV audio input is monaural, leave the
red plug disconnected.
To video input
Connections to a TV
The diagram below shows how to make connections to a TV with built-in stereo speakers using the supplied audio/video cable. After making the
connections on this page, you will be able to start using the DVD Player.
DV-S939(US_E)p10-19.p6510/2/00, 3:23 PM10
11
Optional Video Connections
Visible improvements in DVD-Video quality can be achieved by making either S-video or component video connections to a TV or monitor
compatible with these types of connections.
Note
When either S-video or component video connection is made, it is not necessary to make composite video connections using the yellow cord of the audio-video
cable.
Making S-video connections
If the TV or monitor has an S-video input, making this type of
video connection will produce improved picture quality. Using an
S-video cable, connect the VIDEO OUTPUT S VIDEO CH1 or
CH2 jack to the corresponding S-video input jack on the TV.
Be sure to set Audio Out Select to “Analog 2Ch” using the on-
screen menu explained in “Customizing the Function Settings”
starting on page 44. See page 48 for direct information.
Making component video connections
If the TV or monitor has component video inputs, making this type
of video connection will produce the ideal picture quality for the
presentation of DVD-Video. Using a componect video cable (sold
separately), connect the VIDEO OUTPUT COMPONENT CH1 or
CH2 jacks to the corresponding component video input jacks on the
TV.
Actual labels for component video inputs may vary depending on
the TV manufacturer. (e.g. Y, R-Y, B-Y or Y, C
B, CR)
In some TVs or monitors, the color levels of the playback picture
may be reduced slightly or the tint may change. In such a case,
adjust the TV or monitor for optimum performance.
Be sure to set Audio Out Select to “Analog 2Ch” using the on-screen
menu explained in “Customizing the Function Settings” starting on
page 44. See page 48 for direct information.
S-video cable
(supplied)
To S-video
input
Component video cable
(not supplied)
To component video
inputs
: Signal flow
: Signal flow
Y
PB
PR
DO NOT connect the
power cord until all
connections are
complete.
PROGRESSIVE outputs/inputs
Some TVs or monitors are equipped with component video inputs that
are capable of reproducing a progressively scanned video signal.
Connecting to these inputs allows you to view the highest quality
pictures with less flicker.
Interlaced outputs/inputs
Some TVs or monitors are equipped with component video inputs.
Connecting to these inputs allows you to enjoy higher quality picture
playback.
In some TVs or monitors, the color levels of the playback picture may
be reduced slightly or the tint may change. In such a case, adjust the
TV or monitor for optimum performance.
To switch the output signal (Progressive/Interlaced)
Press PROGRESSIVE on the remote control.
The output signal alternates between component progressive and
component interlaced. For details, refer to “Selecting Progressive
Scan Video Output” on page 42.
VIDEOS VIDEO
VIDEO
OUTPUT
COAXIAL
COAXIAL
OPTICAL
OPTICAL
CENTER
SURRFRONTCH
1CH
2
SUBWOOFER
COMPONENT
YP
BPR
RS 232MULTI CHANNEL OUTPUT
ANALOG
OUTPUT
DIGITAL
OUTPUT
CH
1
CH
2
R
L
CH 1
CH 2
AC INLET
DV-S939(US_E)p10-19.p6510/2/00, 3:23 PM11
12
VIDEOS VIDEO
VIDEO
OUTPUT
COAXIALCOAXIAL
OPTICAL
OPTICAL
CENTER
SURRFRONTCH
1CH
2
SUBWOOFER
COMPONENT
YP
BPR
RS 232MULTI CHANNEL OUTPUT
ANALOG
OUTPUT
DIGITAL
OUTPUT
CH
1
CH
2
R
L
CH 1
CH 2
AC INLET
Optional Audio Connections
This DVD Player provides numerous ways to take full advantage of the digital multi channel sound recorded on DVD media.
When listening to DVD-Audio
For full enjoyment of DVD-Audio media, it is recommended to make connections to the 6-channel ANALOG OUTPUT jacks. Audio output of DVD-Audio cannot
be played back efficiently when output as a bitstream or PCM from the DIGITAL OUTPUT jacks.
Analog connections
In addition to offering two stereo outputs for connection to a stereo system, two types of multi channel analog output allow you to make connections to an AV
component that features multi channel analog input for full enjoyment of multi channel DVD-Audio discs.
Audio cable
(not supplied)
To audio inputs
: Signal flow
: Signal flow
Audio cables
(not supplied)
Making stereo audio connections
By making connections to a stereo system, you can improve the
quality of the sound of cinematic presentations as well as make
effective use of the DVD Player’s ability to play back CDs.
Using an audio cable (sold separately), make audio connections
from the ANALOG OUTPUT CH1 or CH2 L and R jacks to the
corresponding jacks on the stereo component.
Be sure to set Audio Out Select to “Analog 2Ch” using the on-
screen menu explained in “Customizing the Function Settings”
starting on page 44. See page 48 for direct information.
Notes
•Be sure to match the colors of the plugs on the cable with the
corresponding jacks on the DVD Player and the stereo component: red for
R (right) audio and white for L (left) audio.
•Do not make connections to the PHONO or TUNER jacks on the stereo
component.
•When this type of connection is made, be sure to set Audio Out Select to
“Analog 2Ch” in order to enjoy the Dolby Pro Logic surround sound.
Making discrete 6-channel ANALOG
OUTPUT connections
The discrete ANALOG OUTPUT jacks are intended to deliver up to
5.1 channels of multi channel audio from DVD-Video and DVD-
Audio sources. Connections can be made from the ANALOG
OUTPUT FRONT, SURR (surround), CENTER, and SUBWOOFER
jacks to the corresponding input jacks on an AV component with
multi channel discrete audio input jacks.
Be sure to set Audio Out Select to “Analog 6Ch” using the on-
screen menu explained in “Customizing the Function Settings”
starting on page 44. See page 48 for direct information.
Notes
•To ensure proper delivery of sound, be sure to match the names of the jacks
on the DVD Player and the component being connected to.
An amplifier with six
channel discrete input
An amplifier with
stereo inputs
L (White)L (White)
R (Red)R (Red)
DO NOT connect the
power cord until all
connections are
complete.
Making Connections
SUBWOOFER
CENTER
SURROUND R
SURROUND L
FRONT R
FRONT L
To audio inputs
DV-S939(US_E)p10-19.p6510/2/00, 3:23 PM12
13
VIDEOS VIDEO
VIDEO
OUTPUT
COAXIALCOAXIAL
OPTICAL
OPTICAL
CENTER
SURRFRONTCH
1CH
2
SUBWOOFER
COMPONENT
YP
B
P
R
RS 232MULTI CHANNEL OUTPUT
ANALOG
OUTPUT
DIGITAL
OUTPUT
CH
1
CH
2
R
L
CH 1
CH 2
AC INLET
Digital connections
Make digital connections from the DVD Player to an AV component
that features digital input capability or one or more multi-channel
audio decoders to realize the full cinematic experience made
possible by the DVD format. This DVD Player features two sets of
optical and coaxial digital audio output jacks and can output Dolby
Digital, DTS, and MPEG2* bitstreams as well as outputting
standard PCM.
Make connections from the DIGITAL OUTPUT OPTICAL CH1 or
CH2 jacks to the digital optical input jack on the AV component
using an optical fiber cable (sold separately). Make connections
from the DIGITAL OUTPUT COAXIAL CH1 or CH2 jacks to the
digital coaxial input jack on the AV component using a coaxial cable
(sold separately). It is not necessary to make more than one type of
digital connection to a single component.
When you are making connections to an amp or receiver that has
internal Dolby Digital, DTS, or MPEG decoding capabilities, set
Audio Out Select to “Bitstream” using the on-screen menu
explained in “Customizing the Function Settings” starting on page
44. See page 48 for direct information.
When you are making connections to an amp or receiver that has
digital input capabilities, but no internal decoder, set Audio Out
Select to “PCM” using the on-screen menu explained in
“Customizing the Function Settings” starting on page 44. See page
48 for direct information. Setting Audio Out Select to any other
setting could result in digital noise being output that
could cause harm your hearing and may also damage your speakers.
Making MULTI CHANNEL OUTPUT
connection
The MULTI CHANNEL OUTPUT is a DB-25 port that can output
up to 5.1 channels of decoded analog audio from DVD-Video and
DVD-Audio sources to a receiver or other AV component that
features a similar input port. Ideally you want to connect two
identical ports together via a single DB-25 cable.
Be sure to set Audio Out Select to “Analog 6Ch” using the on-
screen menu explained in “Customizing the Function Settings”
starting on page 44. See page 48 for direct information.
Notes
•When connecting the cable, be sure to secure the locking screws on the
DB-25 connectors.
•The output from this port is the same as from the 6-channel ANALOG
OUTPUT jacks.
: Signal flow
Tighten
locking
screws
DB-25 cable
(supplied)
To digital audio
input (coaxial)
To digital audio
input (optical)
Coaxial cable
(not supplied)
Optical cable
(not supplied)
An amplifier with a multi channel
input jack
: Signal flow
DO NOT connect the
power cord until all
connections are
complete.
Notes
•Refer to the instructions supplied with the AV component for details on
what digital audio formats it is compatible with.
•After making digital audio connections, be sure to set Audio Out Select
appropriately for the type of digital signal the connected AV component is
compatible with using the on-screen menu explained in “Customizing the
Function Settings” starting on page 44. See page 48 for direct information.
•Even if digital audio connections are made, it is also recommended to
make analog connections, because some conditions or media may prohibit
digital audio output.
An amplifier with a Dolby
Digital, DTS, MPEG1, or
MPEG2* decorder or digital
input jacks
* Not applicable for USA and Canadian models
DV-S939(US_E)p10-19.p6510/2/00, 3:23 PM13
14
Control Position and Names
Rear panel
For operational instructions, see the page indicated in brackets [ ].
5.1-Channel SURROUND AUDIO OUT MULTI CHANNEL OUTPUT terminal [13]
5.1-Channel ANALOG OUTPUT [12]
2-Channel ANALOG OUTPUT [10,12]
DIGITAL OUTPUT COAXIAL, OPTICAL [13]
AC INLET [17]
VIDEO output [10]
S VIDEO output [11]
COMPONENT (PROGRESSIVE) VIDEO output (Y/PB/PR) [11]
RS 232 port (This port is to be used in conjunction with an external controller to control the operation of
the DV-S939 using an external device.)
VIDEOS VIDEO
VIDEO
OUTPUT
COAXIALCOAXIAL
OPTICAL
OPTICAL
CENTER
SURRFRONTCH
1CH
2
SUBWOOFER
COMPONENT
YP
BPR
RS 232MULTI CHANNEL OUTPUT
ANALOG
OUTPUT
DIGITAL
OUTPUT
CH
1
CH
2
R
L
CH 1
CH 2
AC INLET
DV-S939(US_E)p10-19.p6510/2/00, 3:23 PM14
15
Front Panel
POWER button [17]
SYANDBY indicator [17]
STANDBY/ON button [17]
VIDEO CIRCUIT OFF button [43]
Front panel display [16]
DISPLAY button [16, 38]
button [26]
button [26]
PLAY button [20]
STOP button [21]
OPEN/CLOSE button [20]
Disc tray [20]
Audio sampling rate indicators [20]
For operational instructions, see the page indicated in brackets [ ].
VIDEO CIRCUIT
OFF
DV-S939(US_E)p10-19.p6510/2/00, 3:23 PM15
16
GROUPTRACK
DVD - AUDIO
TITLE CHP
DVD
VCD
TRACK
CD
TRACK
Display
TITLE/GROUP indicator
RANDOM indicator [29]
CHP (Chapter)/TRACK indicator
REPEAT indicators [27]
MEMORY indicator [28]
VIDEO OFF indicator [43]
TOTAL playing time/REMAINING time elapsed
time indicator
PROGRESSIVE indicator [42]
Angle icon indicator [32]
Play mode indicators
Inserted disc indicator [20]
192 kHz Processing indicator
Multifunction indicator (Indicates operating
status, messages, etc.)
DVD-Video
During playback:
Example
Notes
•Some discs may not display chapter numbers.
•A time indication not accompanied with a chapter number shows elapsed
time of a segment within the current time.
Video CD
During playback:
Example
Note
Some discs may not display track numbers or elapsed time.
Playing chapter
3 of title 2
Elapsed time of
the current
chapter
Playing track 3Elapsed time of
the current track
Playing track 3
of group 2
Elapsed time of
the current track
Playing track 3
Elapsed time of
the current track
CD
During playback:
Example
For operational instructions, see the page indicated in brackets [ ].
DVD-Audio
During playback:
Example
Repeatedly pressing DIMMER on
the remote controller changes the
brightness of the display
→Normal→Dim→Very Dim→OFF
Control Position and Names
By repeatedly pressing DISPLAY on the front panel of the DVD Player, you can switch between the elapsed time and remaining time
displays.
DV-S939(US_E)p10-19.p6510/2/00, 3:23 PM16
17
Before connecting the POWER
•The DV-S939 is shipped with the main power
(POWER) switch in the on position (
ON).
When the power cord is plugged in for the first
time, the DV-S939 will automatically enter the
standby state and the STANDBY indicator will
light (same condition after step 2 below).
•Make sure that all appropriate connections have been
completed as described on pages 10 to 13.
•Turning on the DVD Player may cause a momentary
power surge, which might interfere with other electrical
equipment such as computers. To prevent interference,
use a wall outlet on a different circuit.
Connecting the Power/
Turning on the DVD Player
DISPLAY
OPEN/CLOSESTOPPLAY
48/44.1 96/88.2 192/176.4
VIDEO CIRCUIT
OFF
STANDBY/ON
STANDBY
POWER
ON OFF
1Plug the supplied power cord into
the AC INLET and then into the
power outlet on the wall.
Notes
•Do not use a power cord other than the one supplied with the DV-S939. The
power cord supplied is designed for use with the DV-S939 and should not be
used with any other device.
•Never have the power cord disconnected from the DV-S939 while the other
end is plugged into the wall outlet. Doing so may cause an electric shock.
Always connect by plugging into the wall outlet last and and disconnect by
unplugging from the wall outlet first.
2Press POWER to switch on the
main power.
The DVD Player enters standby mode.
The STANDBY indicator lights up.
Notes
•The buttons on the remote controller do not operate if the POWER switch is
set to OFF.
•To switch off the main power, press POWER again.
3Press STANDBY/ON on the DVD
Player or ON on the remote controller.
The DVD Player turns on and the STANDBY indicator turns off.
The first time you turn on the DVD Player, the Initial Setup screen
appears.
Press ENTER, then follow the procedure on page 54 to set up your DVD Player for
the first time.
Notes
•To put the DVD Player in the standby mode, press STANDBY/ON on the DVD Player, or
STNBY (or ON) on the remote controller. Be sure to set the volume to minimum before
putting the DVD Player in the standby mode for the next use to avoid sudden loud sound
reproduction.
•While the STANDBY indicator lights up, the DVD Player can receive signals from the remote
controller. However, if you press POWER on the DVD Player to switch off the main power,
the remote controller cannot be used to turn on the DVD Player.
•You can change the First Setup later with “Customizing the Function Settings” starting from
page 44.
•Setting the STANDBY button to standby does not shut off the power completely.
AC INLET
To a wall outlet
Power cord
(supplied)
DV-S939(US_E)p10-19.p6510/2/00, 3:23 PM17
18
Setting up the DVD Player for
Optimal Performance
Using the Remote Control to Navigate On-screen Displays
On-screen navigation is a simple procedure that is done mostly by using ///and ENTER on the supplied remote controller. To move the
highlighted section on the screen (cursor), simply press the edge of the button that corresponds to the direction you wish to move in (
///).
Press the center of the button (ENTER) to enter settings or selections.
About the disc menu
DVD-A
DVD-V
A DVD-Video or DVD-Audio may include more than one language and more
than one sound system. In many instances, such DVD let you choose the
language (e.g. disc menu language/audio language/subtitle language), sound
system, and so on using the menu.
Depending on the disc, the name of the disc menu varies and the disc menu may
be included in the main menu.
About the title menu
VCD
DVD-A
DVD-V
DVD-Video, DVD-Audio, or Video CD with PBC (Playback Control) function
(see “About Video CDs” on page 7) may let you locate a title, chapter, group, or
track (see page 7) using the menu.
Depending on the disc, the name of the title menu varies and the title menu may
be included in the main menu.
The following buttons are also used in conjunction with on-
screen navigation.
SETUP:Press to display the Setup screen when you wish to
make changes or adjustments in the DVD Player
performance settings. For details of the DVD Player
settings, refer to “Customizing the Function Settings”
starting from page 44.
MENU and TOP MENU:These button select the menu screen(s) recorded on
DVD media.
DISPLAY/NAVI:This button displays information about the current
settings of the disc loaded in the player and also
offers a variety of playback options (see page 38).
RETURN:Press to return to a previous screen or setting. This
button is convenient when you do not wish to change
a setting or selection.
DV-S939(US_E)p10-19.p6510/2/00, 3:23 PM18
19
Various sound formats and sound effects
Minimum speaker configuration for
DTS/Dolby Digital/MPEG2* surround sounds
Right
surround
speaker
Left
surround
speaker
Right
front
speaker
Center Speaker
Left
front
speaker
The 5.1-channel digital surround format of DOLBY DIGITAL/DTS/
MPEG2* enables you to individually play five full-range (20 Hz-20
kHz) channels (left and right front, center, two surround channels) plus
an LFE (Low Frequency Effect) channel for the low-range effect sound.
It will create a realistic sound as heard in theaters and concert halls.
DOLBY DIGITAL Surround
DVD Video that have the
DIGITAL
mark are recorded using this system.
DTS Surround
DVD Video and CD that have the mark are recorded using this system.
MPEG2*
DVD Video that have the mark are recorded using this
system. MPEG2* may have 8 channels. In this case, left and right center
speakers in addition to the above speaker configuration are used.
DOLBY PRO LOGIC Surround
This surround format consists of 4 channels (left and right front, center, and
monaural surround channel) and emphasizes the center channel. This format is
very effective for panning music, conversation, and three-dimensional sound
movement output from three front channels. It also simulates the atmosphere
and surround effects of the sound reflected from the side and rear walls of the
theater.
DVD Video that have the mark are recorded using this system.
DVD-A
DVD-V
* Not applicable for USA and Canadian models
DV-S939(US_E)p10-19.p6510/2/00, 3:23 PM19
20
DISPLAY
OPEN/CLOSESTOPPLAY
48/44.1 96/88.2 192/176.4
VIDEO CIRCUIT
OFF
STANDBY/ON
STANDBY
POWER
ON OFF
DISPLAY
OPEN/CLOSE
48/44.1 96/88.2 192/176.4
VIDEO CIRCUIT
OFF
48/44.1 96/88.2 192/176.4
DVD
Playing DVD-Video/Audio,
Video CD, and CD
Basic Playback
Before playing
•DVD-Video, DVD-Audio, Video CD, CD, CD-R and CD-RW can be played with the DVD Player (see
“Playable Discs” on page 6). Do not play anything else.
•When playing DVD-Video, Video CD, or DVD-Audio with video features, turn on the TV and set the TV
to the DVD Player's input.
•If an audio system is connected to the DVD Player, turn on the audio system and set it to the DVD
Player’s input.
About the
DVD-V
,
DVD-A
,
VCD
and
CD
marks in the pages related to disc operation
DVD-A
means the function or title is related to DVD-Audio operation.
DVD-V
means the function or title is related to DVD-Video operation.
VCD
means the function or title is related to Video CD operation.
CD
means the function or title is related to audio CD operation.
1Press .
The disc tray opens.
3Press .
The disc tray closes and playback starts.
If you press
to close the tray after step 2, playback
may automatically start depending on the disc.
The appropriate disc indicator lights, and the audio
sampling rate indicator also lights.
For the other information that appears in the display,
see page 35.
If the DVD Player is in standby mode
when the button is pressed
The DVD Player turns on and the disc tray opens.
In this case, it takes several seconds until the disc
tray opens.
2Place a disc on the disc tray.
Warning
If the DVD Player is connected to the TV or
amplifier through the analog audio jacks, do not
play DTS-encoded discs. Excessive noise may
be output from the analog stereo jacks, which
may damage the connected equipment.
To reproduce DTS surround sounds, digital
connection to an amplifier with a DTS decoder
is needed.
Put the disc in the tray with the label
side facing up.
There are two different disc sizes.
Place the disc in the correct guide on
the disc tray.
CAUTION
Keep your fingers well clear of the disc tray as it is closing.
Neglecting to do so may cause serious personal injury.
Whenever a disc is loaded in the
player, indicators above and
light up.
VCD
CD
DVD-A
DVD-V
DV-S939(US_E)p20-26.p6510/2/00, 3:23 PM20
21
1
3
If the screen on the right
appears - Screen Saver
If you pause for a long time, the screen
saver operates.
To resume normal playback, press
(You can set this function to Off using
the menu explained in “Customizing the
Function Settings” starting from page
44. See page 51 for direct information.)
Notes
•Do not move the DVD Player during playback. Doing so may
damage the disc.
•Use on the remote controller or DVD Player to open and
close the disc tray. Do not touch the disc tray while it is
moving. Doing so may cause the DVD Player to malfunction.
•Do not press down on the disc tray or put any objects other
than playable discs on the disc tray. Doing so may cause the
DVD Player to malfunction.
•In many instances, a menu screen appears when playback of a
movie is complete. Prolonged display of an on-screen menu
may damage your television set, permanently etching that
image onto its screen. To avoid this, be sure to press once
the movie is complete.
Tip to obtain a higher quality picture
Occasionally, some picture noise not usually visible during a normal
broadcast may appear on the TV screen while playing a DVD-Video
because the high resolution pictures on these discs include a lot of
information. While the amount of noise depends on the TV you use,
you should generally adjust the TV to reduce sharpness when viewing
DVD-Videos.
To play NTSC discs (Multisystem TV is needed)*
Set “PAL/Auto” to “Auto” using the menu explained in “Customizing
the Function Settings” starting from page 44. See page 47 for direct
information.
To remove the disc
Press to open the disc tray.
Remove the disc after the disc tray opens completely.
After removing the disc, be sure to press the button again to close the tray.
To pause playback (still mode)/
Playing frame by frame
Press during playback.
To start playback, press .
To play frame by frame
VCD
DVD-V
Press the button repeatedly during pause. Each time you press the button the picture
advances one frame.
To resume normal playback, press .
Notes
•The sound is muted during still mode and frame by frame playback.
•When using a DVD-Audio that includes pictures, this operation may be permitted
in some picture segments.
To stop playback
Press .
When you press
to restart playback, playback starts from the location
where you stopped playback because the location index is stored in memory.
Note
The location where playback resumes may vary depending on the disc or the scene
where you stopped.
Resuming playback from the beginning
Press again after stopping playback to clear the location index memory, then press
to start playback.
DVD-V
Playback starts from the beginning of the current title.
DVD-A
Playback starts from the beginning of the current group.
VCD
CD
Playback starts from the beginning of the disc.
To start playback from the beginning of the DVD-Video or DVD-Audio, press to
open the disc tray then press to close the disc tray and start playback.
Notes
The location index memory will also be cleared when:
•The power cord is unplugged.
•The disc tray is opened.
•The parental lock setting is changed (see page 52) or a disc menu language is
selected (see page 50).
•The location where playback resumes may vary depending on the disc or the scene
where you stopped. With DVD-Audio, playback may restart from the beginning of
the track.
•To change the Audio Out Select (see page 48) or the On-Screen Language (see
page 50) settings, press after stopping playback to clear the location index.
Please note that resumed playback is not possible after this is done.
* Not applicable for USA and Canadian models
DV-S939(US_E)p20-26.p6510/2/00, 3:24 PM21
22
Playing DVD-Video/Audio, Video CD, and CD
To play in fast reverse or fast forward
VCD
CD
DVD-A
DVD-V
During normal playback, press for fast reverse playback or for
fast forward playback.
Each press of the same button changes the playback speed.
The rate and direction of playback is indicated by arrow marks (
or ) in the corner
of the screen.
To resume normal playback.
Press .
Notes
•The DVD Player mutes sounds and omits subtitles during reverse and forward scan of DVD-
Video.
•The playback speed may differ depending on the disc.
•Fast reverse and fast forward playback may not be possible with some DVD-Audio.
To play in slow-motion
VCD
DVD-V
Press SLOW during playback.
:Each time you press , the slow-motion speed changes.
:If you press during playback, you can view the picture in reverse slow
motion. (Only when using a DVD-Video.)
Each time you press
, the slow motion speed changes.
To resume normal playback.
Press .
Notes
•The sound is muted during slow-motion playback.
•The playback speed may differ depending on the disc.
•When using a DVD-Audio that includes pictures, this operation may be permitted in some
picture segments.
To control still pictures
DVD-A
DVD-Audio may include still pictures, which are classified into two large groups.
Slideshow:Still pictures appear one after another automatically consistent
with the disc program.
Browsable pictures:You can display your favorite still picture selected with the buttons
on the remote control.
STILL +/–:To select a picture. (The order of pictures vary depending on the
disc.)
RETURN:To return to an initial one programmed on the disc.
DV-S939(US_E)p20-26.p6510/2/00, 3:24 PM22
23
DV-S939(US_E)p20-26.p6510/2/00, 3:24 PM23
24
Locating a Specific Title/Group/
Chapter/Track/Location
1
2
3
Press TOP MENU. (Depending on
the DVD-Video, press MENU.)
The title menu appears on the TV screen.
Example of a title menu.
Press /// to select the title
you want.
If the titles in the title
menu are assigned a
number, you can also
directly locate a
specific title using the
number buttons.
Press ENTER.
The DVD Player starts playback from chapter
1 of the selected title.
Title 1Title 2
Chapter 1Chapter 2
Chapter 1
Chapter 2Chapter 3
DVD-Video
Normally, the contents of DVD-Video are divided into
titles, and the titles are subdivided into chapters.
Group 1
Group 2
Track 1Track 2
Track 1Track 2
Track 3
DVD-Audio
The contents of DVD-Audio are divided into groups, and the
groups are subdivided into tracks.
The structure of the disc content
TITLE
4
TITLE
3
2
TITLE
1
TITLE
DVD-V
Locating a Title Using the Title Menu
If a DVD-Video contains a title menu, you can locate a specific title using the title menu function.
Notes
•The instructions above describe basic procedures which may vary
depending on the contents of the DVD-Video. If different instructions
appear on the TV screen, follow those instructions.
•If you display the title menu during playback and press TOP MENU
again without selecting any title, the DVD Player usually resumes
playback from the point where you first pressed TOP MENU. (There
may be exceptional cases depending on the disc.)
•This method of locating a title is available only on a disc that contains a
top menu.
•The name of the button in the instruction notes of discs varies depending
on the disc.
DV-S939(US_E)p20-26.p6510/2/00, 3:24 PM24
25
Group:
Track :
Title:
Chapter:
1
1
1
11
Group:
Track :
Title:
Chapter:
1
1
1
1
MENU
TOP MENU
ENTER
CLEAR
SEARCH
Repeat steps 2 and 3 if necessary.
Press .
The DVD Player starts playback from the
selected section.
Notes
•Pressing CLEAR resets the numbers. To clear the display, press
SEARCH several times.
•This method of locating a title/group is available only on a disc that
contains title/group numbers.
Playing bonus groups of DVD-Audio
Some DVD-Audio may include an extra content called “Bonus
Group”.
If you select it to play, a display appears to enter a key number.
Press the number buttons on the remote control to enter the key
number.
When the number is entered correctly, playback of the bonus group
starts.
To get key numbers, refer to instruction note of discs.
Notes
•A key number may be called in some cases such as when removing the
disc. Enter the key number again if necessary.
•When you use a bonus group in a programmed play such as memory
playback, enter the key number beforehand.
5
Press SEARCH.
Skip steps 1 and 2 if you are using a Video
CD/CD.
The following display appears.
e.g.
Press / to select a section you
want to locate.
e.g.When you want to locate a chapter or
track.
e.g.
Press the corresponding number
buttons for the section you want.
e.g. To select chapter or track 25.
1
2
3
4
Number
buttons
or
Video CD/CD
Video CD and CD are divided into tracks.
Track 1Track 2Track 3Track 4
Track 5
Locating a specific title and chapter or group and track by entering the numbers
If a DVD-Video or DVD-Audio contains the numbers corresponding to the titles and chapters, or group and tracks you can locate a specific
chapter in a specific title directly by entering the numbers.
VCD
CD
DVD-A
DVD-V
DVD-V
DVD-A
DVD-V
DVD-A
DV-S939(US_E)p20-26.p6510/2/00, 3:24 PM25
26
1:25:30
Time
Time
-
:
-
-
:
-
-
1
2
3
Locating a Specific Chapter or Track
Consecutively
You can locate consecutive chapters or tracks.
Press or (repeatedly) to
select the chapter or track you wish
to start playing.
Press once to start playback from the
beginning of the current chapter or track.
Press
repeatedly to select the former
chapters or tracks in reverse order.
Press repeatedly to select the next
chapter or track in order.
Notes
•Some titles may not display chapter numbers. Some groups may not
display track numbers.
•When you set “Title/Group Stop” to “Off” (see page 53), you can locate
consecutive chapters in another title or tracks in another group. If you go
back to the preceding title or group by pressing , the DVD Player
locates the first chapter of the title or the first track of the group. When
“Title/Group Stop” is set to “On”, you can locate consecutive chapters or
tracks only within the current title or group.
Locating a Specific Title/
Group/Chapter/Track/Location
DVD Player
Number
buttons
Remote controller
VCD
CD
DVD-A
DVD-V
VCD
CD
DVD-V
DISPLAY
OPEN/CLOSESTOPPLAY
48/44.1 96/88.2 192/176.4
VIDEO CIRCUIT
OFF
STANDBY/ON
STANDBY
POWER
ON OFF
HoursMinutesSeconds
SEARCH
Locating a Specific Location by
Entering the Time
You can locate a specific location by entering its corresponding
time (hours, minutes, and seconds).
Press SEARCH twice.
You may need to press the button more than
twice (depending on the disc) until the
following display appears.
Press the number buttons to enter
the location’s time.
The entered number appears on the right end
of the field, then shifts to the left each time
the next number is entered.
e.g.
Note
If the location time you enter exceeds the total
playing time of the disc, the setting will be
cancelled.
Press .
The DVD Player starts playback from the
entered location.
Notes
•Some discs may not respond to this procedure.
•Some scenes may not be located precisely.
•This method for accessing specific locations is available only within the
current title of the DVD-Video or within the current track of the Video
CD/CD.
DV-S939(US_E)p20-26.p6510/2/00, 3:24 PM26
27
A–B
A–
Playing Repeatedly
You can play a specific title, group, chapter, track, or segment
Gebruikershandleiding.com neemt misbruik van zijn services uitermate serieus. U kunt hieronder aangeven waarom deze vraag ongepast is. Wij controleren de vraag en zonodig wordt deze verwijderd.
Product:
Spelregels forum
Om tot zinvolle vragen te komen hanteren wij de volgende spelregels:
lees eerst de handleiding door;
controleer of uw vraag al eerder door iemand anders is gesteld;
probeer uw vraag zo duidelijk mogelijk te stellen;
heeft u een probleem en al geprobeerd om dit op te lossen, vermeld dit erbij aub;
heeft u een oplossing gekregen van een bezoeker dan horen wij dat graag in dit forum;
wilt u een reactie geven op een vraag of antwoord, gebruik dan niet dit formulier maar klik op de knop 'reageer op deze vraag';
uw vraag wordt direct op de website gezet; vermijd daarom persoonlijke gegevens in te vullen;
Belangrijk! Als er een antwoord wordt gegeven op uw vraag, dan is het voor de gever van het antwoord nuttig om te weten als u er wel (of niet) mee geholpen bent! Wij vragen u dus ook te reageren op een antwoord.
Belangrijk! Antwoorden worden ook per e-mail naar abonnees gestuurd. Laat uw emailadres achter op deze site, zodat u op de hoogte blijft. U krijgt dan ook andere vragen en antwoorden te zien.
Abonneren
Abonneer u voor het ontvangen van emails voor uw Onkyo dv s 939 bij:
nieuwe vragen en antwoorden
nieuwe handleidingen
U ontvangt een email met instructies om u voor één of beide opties in te schrijven.
Ontvang uw handleiding per email
Vul uw emailadres in en ontvang de handleiding van Onkyo dv s 939 in de taal/talen: Engels als bijlage per email.
De handleiding is 8,37 mb groot.
U ontvangt de handleiding per email binnen enkele minuten. Als u geen email heeft ontvangen, dan heeft u waarschijnlijk een verkeerd emailadres ingevuld of is uw mailbox te vol. Daarnaast kan het zijn dat uw internetprovider een maximum heeft aan de grootte per email. Omdat hier een handleiding wordt meegestuurd, kan het voorkomen dat de email groter is dan toegestaan bij uw provider.
Stel vragen via chat aan uw handleiding
Stel uw vraag over deze PDF
Uw handleiding is per email verstuurd. Controleer uw email
Als u niet binnen een kwartier uw email met handleiding ontvangen heeft, kan het zijn dat u een verkeerd emailadres heeft ingevuld of dat uw emailprovider een maximum grootte per email heeft ingesteld die kleiner is dan de grootte van de handleiding.
Er is een email naar u verstuurd om uw inschrijving definitief te maken.
Controleer uw email en volg de aanwijzingen op om uw inschrijving definitief te maken
U heeft geen emailadres opgegeven
Als u de handleiding per email wilt ontvangen, vul dan een geldig emailadres in.
Uw vraag is op deze pagina toegevoegd
Wilt u een email ontvangen bij een antwoord en/of nieuwe vragen? Vul dan hier uw emailadres in.