•Always Limit Your Dive to the Level of Your Training
and Experience
•Always Make Your Deepest Dive First
•Always Make The Deepest Part of Every Dive First
•Check Your Computer Often During the Dive
•Do A Safety Stop on Every Dive
•Allow Adequate Surface Interval Between Each Dive
•Allow Adequate Surface Interval Between Each Day of
Diving (12 Hours or Until Your Computer Clears)
Read And Understand This Owner's Guide
Thoroughly Before Using the Pro Plus.
Responsible
Datamax Pro Plus
iii
WARNINGS and SAFETY RECOMMENDATIONS
• The Pro Plus is intended for use by recreational divers who have successfully completed a
nationally recognized course in scuba diving, and diving with enriched nitrogen-oxygen
(nitrox) mixtures.
• It is intended only for no decompression diving, NOT intentional decompression diving.
• It must not be used by untrained persons who may not have knowledge of the potential risks
and hazards of scuba diving, and diving with enriched nitrogen-oxygen (nitrox) mixtures.
• You must obtain scuba certification, and certfication in diving with enriched nitrogen-oxy-
gen (nitrox) mixtures before using the Pro Plus if you have not already done so.
• It is NOT for use by military and commercial divers.
• It should NOT be utilized for any competitive, or repetitive square wave or decompression
diving, as it is intended solely for recreational use and no decompression multilevel diving.
• As with all underwater life support equipment, improper use or misuse of this product can
cause serious injury or death.
• Never participate in sharing or swapping of a dive computer.
• Conduct your dives in such a manner so as to insure that you continuously check the
computer's proper function.
• Read and understand this owner’s guide completely before diving with the Pro Plus.
• If you do not fully understand how to use this dive computer, or if you have any questions,
you should seek instruction in its use from your Authorized Oceanic Dealer before you uti-
lize this product.
®
iv
LIMITED TWO-YEAR WARRANTY
For details, refer to the Product Warranty Registration Card provided.
COPYRIGHT NOTICE
This owner’s guide is copyrighted, all rights are reserved. It may not, in whole or in part, be copied, photocopied, reproduced, translated, or reduced to any
electronic medium or machine readable form without prior consent in writing from Oceanic / 2002 Design. The Surface Time/Mode, Plan Mode, No Decom-
pression Time, Decompression Stop Time, Dive Log, Low Battery, Elapsed Dive Time, Maximum Depth, Ascent Rate, and Caution Zone icons are protected by
copyright, and are trademarks of Oceanic.
Datamax Pro Plus Owner's Guide, Doc. No. 12-2141 (5/99)
Oceanic, the Oceanic logo, Datamax Pro Plus, the Pro Plus logo, Oceanglo, Smart Glo, Graphic Diver Interface, Tissue Loading Bar Graph, Pre Dive Planning
Sequence, Variable Ascent Rate Indicator, Set Point, Control Console, Turn Gas Alarm, and OceanLog are all registered and unregistered trademarks of Oce-
anic. All rights are reserved.
PATENT NOTICE
U.S. Patents have been issued, or applied for, to protect the following design features:
Graphic Diver Interface, Pre Dive Planning Sequence, Dive Time Remaining, Depth Alarm Set Point, Smart Glo, Main Menu Structure, Turn Gas Alarm Set
Point, End Gas Alarm Set Point, Depth Alarm Set Point, Breathing Gas Time Remaining Bar Graph, Data Sensing and Processing Device (U.S. Patent no.
4,882,678), Breathing Gas Time Remaining (U.S. Patent no. 4,586,136), and Variable Ascent Rate Indicator Bar Graph (U.S. Patent no. 5,156,055).
DECOMPRESSION MODEL
The programs within the Pro Plus simulate the absorption of nitrogen into the body by using a mathematical model. This model is merely a way to apply a
limited set of data to a large range of experiences. The Pro Plus dive computer model is based upon the latest research and experiments in decompression
theory. Still, using the Pro Plus, just as using the U.S. Navy (or other) No Decompression Tables, is no guarantee of avoiding decompression
sickness, i.e. “the bends.” Every diver’s physiology is different, and can even vary from day to day. No machine can predict how your body will react to a
particular dive profile.
R1
Datamax Pro Plus
v
FEATURES and DISPLAYS....................................................................................... 1
• To Set: Alternate On/Off................................................................................................................... 21
• To Set: Audible Alarm On/Off ........................................................................................................... 22
• To Set: Depth Alarm Set Point......................................................................................................... 22
• To Set: Turn Pressure Alarm Set Point............................................................................................ 23
• To Set: End Pressure Alarm Set Point ............................................................................................. 24
• To Set: Date/Hour Format/Time ....................................................................................................... 24
• To Set: Sampling Rate.....................................................................................................................26
• To Set: Units of Measure................................................................................................................. 27
• To Set: FO2 50% Default On/Off......................................................................................................27
EA Mode................................................................................................................................................. 28
Summary of Access to Set Modes .......................................................................................................... 30
PRE DIVE and DIVE MODES.................................................................................. 31
After the First 2 Hours ............................................................................................................................. 50
Downloading Data to PC......................................................................................................................... 50
Summary of Access to Post Dive Modes ................................................................................................ 52
HANDLING THE EXTREMES .................................................................................. 53
Avoiding and Managing Decompression................................................................................................. 54
• Tissue Loading Bar Graph............................................................................................................... 54
• Partial Pressure of Oxygen.............................................................................................................. 63
• High PO2 Dive Mode ....................................................................................................................... 63
• High Oxygen Accumulation.............................................................................................................. 64
Unexpected Loss of Displayed Information............................................................................................ 65
CARE and MAINTENANCE..................................................................................... 69
Care and Cleaning .................................................................................................................................. 70
Annual Inspections and Service .............................................................................................................. 70
• To Obtain Service............................................................................................................................ 71
Service Record....................................................................................................................................... 90
1
Datamax Pro Plus
FEATURES
and
DISPLAYS
refer to page 16 for - WARNINGS and SAFETY RECOMMENDATIONS
2
®
INTRODUCTION
Welcome to Oceanic and thank you for choosing the Pro Plus !
The Pro Plus has a wide array of features described in detail throughout the
pages that follow. Due to the importance that they be understood thoroughly
prior to using the Pro Plus, information will be expanded upon and some re-
freshed as you proceed. Relax and read through the complete guide.
It is extremely important that you read this owner's guide in se-
quence and understand it completely before attempting to use the
Pro Plus.
Remember that technology is no substitute for common sense, and a dive com-
puter only provides the person using it with data, not the knowledge to use it.
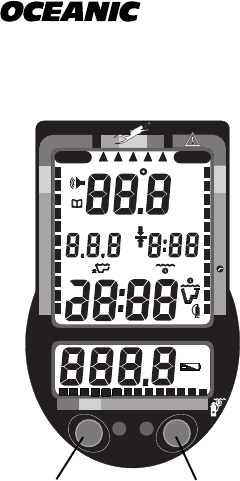
INTERACTIVE CONTROL CONSOLE
The Interactive Control Console, consisting of the Advance (Left) button and
Select (Right) button (Fig. 1), allows you to select various display options and
access specific information when you choose to see it. The buttons can be
pressed repeatedly, or held in to scroll.
Fig. 1 - Interactive
Control Console
SelectAdvance
OCEANIC
20051030405060
Smart
Glo
NO DECO
C Z
Pro PLUS
DECO
C ZO
2
™
®
PSI
MAX
FT
BAR
M
FT
M
2
O
MAX
3
Datamax Pro Plus
20051030405060
NO DECO
C Z
DECO
C ZO
2
2
O
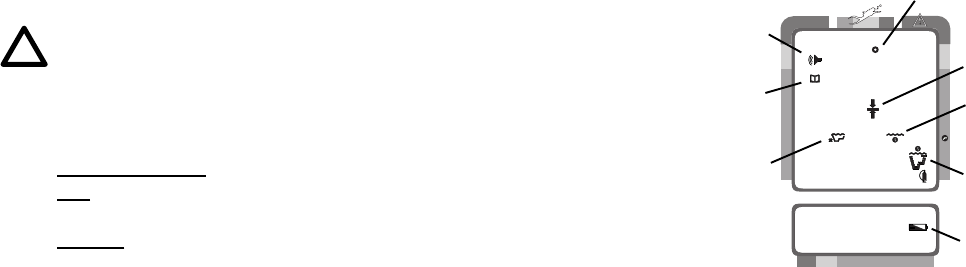
INFORMATIONAL DISPLAYS
Operational modes and status information are visually represented numeri-
cally and/or graphically and can be understood at a glance with the aide of uni-
versal icons (Fig. 2) that identify and bring quick focus to the displays. Seg-
mented bar graphs will show how close you are to critical limits.
Each Pro Plus numeric and graphic display represents a unique piece
of information. It is imperative that you understand the formats,
ranges, and values of the information represented to avoid any pos-
sible misunderstanding that could result in error.
NOTE: Throughout this owner's guide reference is made to the
term ''breathing gas'. The rational being that the Pro Plus can
be used for 'air' dives or 'nitrox' dives. For clarity these terms
are defined as -
Breathing Gas - the gaseous mixture breathed during a dive.
Air - a breathing gas that contains approximately 21% oxygen
and 79% nitrogen (nature's common nitrogen-oxygen mixture).
Nitrox - a nitrogen-oxygen breathing gas that contains a higher
fraction of oxygen (22 to 50%) than air.
Fig. 2 - Universal Icons
a. Operating Mode
b. Elapsed Dive Time
c. Deco Stop
d. Temperature
e. Audible
f. Log
g. Maximum Depth
h. Low Battery
a
b
c
d
e
f
g
h
4
®
UNIVERSAL GRAPHIC DIVER INTERFACE
™
Four bar graphs referred to as the Universal Graphic Diver Interface
™
appear
around the perimeter of the screens (Fig. 3). These segmented bar graphs are
located next to green, yellow, and red color coded portions of the peripheral
decal that denote normal, caution, and danger zones, respectively.
When underwater, you can quickly focus on the bar graphs to make sure that
they are in the green. You can quickly verify that you're not getting too close
to the no decompression limit or the limit for exposure to oxygen (accumula-
tion), or ascending too fast.
Tissue Loading Bar Graph
™
The Tissue Loading Bar Graph
™
(TLBG) represents nitrogen loading (Fig. 4),
showing your relative no decompression or decompression status. As your
depth and elapsed dive time increase, segments will add to the graph begin-
ning in the lower left portion of the screen. As you ascend to shallower depths,
this bar graph will begin to recede, indicating that additional no decompres-
sion time is allowed for multilevel diving.
The Tissue Loading Bar Graph monitors 12 different nitrogen compartments
simultaneously and displays the one that is in control of your dive. It is di-
vided into a green No Decompression zone (NO DECO), a yellow Caution zone
(C.Z.), and a red Decompression zone (DECO). The bar graph gives a visual
Fig. 3 - Bar Graphs
Fig. 4 - Tissue Loading
Bar Graph
20051030405060
NO DECO
C Z
DECO
C ZO
2
NO DECO
C Z
DECO
C ZO
2
5
Datamax Pro Plus
representation of just how close you are to the no decompression limit with a
yellow Caution (C.Z.) Zone that allows you to make a decision regarding safety
stop duration or necessity. The Tissue Loading Bar Graph
™
has been granted
U.S. Patent No. 4,882,687.
The Tissue Loading Bar Graph
™
also assists you with managing decompres-
sion (explained later) by filling a large red 'ceiling stop required' segment.
Oxygen Accumulation (O2) Bar Graph
NOTE: Displays associated with oxygen and the O2 bar graph
will only appear if FO2 has been set at a value other than 'Air'.
The Oxygen Accumulation (O2) Bar Graph (Fig. 5) represents oxygen loading,
your relative oxygen tolerance dosage (OTU), showing the maximum of either
per dive accumulated oxygen, or 24 hour period accumulated oxygen. As your
exposure (accumulation of oxygen) increases during the dive, segments will
add to the bar graph starting in the lower right portion of the screen. As oxy-
gen loading decreases, the bar graph will begin to recede, indicating that addi-
tional exposure (accumulation) is allowed for that dive, and 24 hour period.
The O2 bar graph also assists you with managing high partial pressure of oxy-
gen (PO2) by flashing the large red Danger zone segment as a warning when
the level of PO2 exceeds the maximum allowed limit of 1.60 ATA.
Fig. 5 - Oxygen Accumulation
(O2) Bar Graph
NO DECO
C Z
DECO
C ZO
2
6
®
20051030405060
NO DECO
C Z
DECO
C ZO
2
Variable Ascent Rate Indicator
™
(VARI)
The Variable Ascent Rate Indicator™ (Fig. 6a) is provided to help you avoid
excessive ascent rates by displaying a visual representation of ascent speed,
rather than just showing that you are ascending too fast. The Variable Ascent
Rate Indicator has been granted U.S. Patent no. 5,156,055.
The 5 triangular segments of the bar graph, located beside green, yellow, and
red reference zones, appear beginning from the left and may be considered an
ascent rate speedometer. Green is a 'normal' rate, yellow is a 'caution' rate,
and red is 'Too Fast'.
In the event that your ascent rate exceeds the maximum recommended rate of
60 feet (18 meters) per minute, the bar graph segments will enter the red zone
and all 5 segments will flash once per second until your ascent speed is slowed.
If this occurs, you should immediately slow your ascent.
Breathing Gas Time Remaining Bar Graph
The Breathing Gas Time Remaining Bar Graph located along the bottom of
the lower display (Fig. 6b) provides a graphic representation of the time that
you can remain at your present depth and then, following a safe ascent, sur-
face with a predetermined breathing gas reserve. This calculation and display
is based on your breathing gas consumption rate that is continually monitored
Fig. 6 - Variable Ascent
Rate Indicator and Breathing
Gas Time Remaining Bar
Graph
Segments = Speed (rate)
0 = 0 - 20 fpm (0 - 6 mpm)
1 = 21 - 30 fpm (6.5 - 9 mpm)
2 = 31 - 40 fpm (9.5 - 12 mpm)
3 = 41 - 50 fpm (12.5 - 15 mpm)
4 = 51 - 60 fpm (15.5 - 18 mpm)
5 = 61+ fpm (18.5+ mpm)
(when 5, all will flash)
a
b
7
Datamax Pro Plus
by the Pro Plus, and it takes into account the breathing gas required for a safe
ascent including any required decompression stops.
The green, yellow, and red zones adjacent to the bar graph enable you to
quickly focus on remaining breathing gas times of 60 minutes or less, based on
your pre selected End Gas Alarm Set Point. The bar graph is more precise as
time remaining decreases toward the red zone.
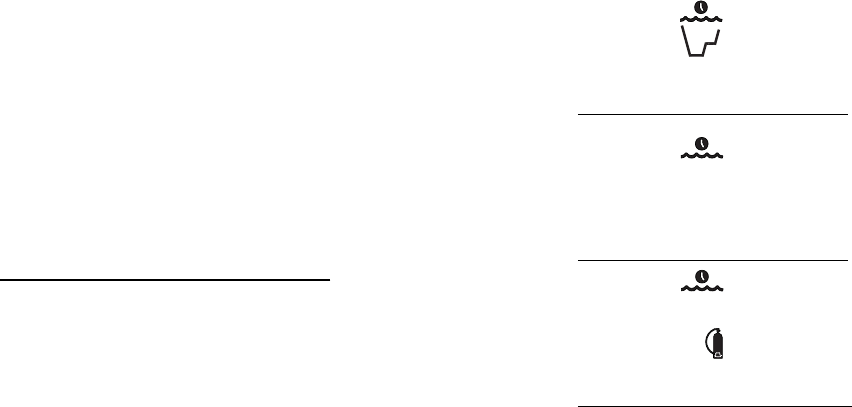
DIVE TIME REMAINING
One of the most important pieces of information on the Pro Plus is the 'Dive
Time Remaining numeric display'. The Pro Plus constantly monitors three
critical pieces of information; no decompression status, oxygen accumulation
status, and rate of breathing gas consumption. The Dive Time Remaining dis-
play will indicate the time that is more critical for you at that particular mo-
ment (i.e.; whichever time is the least amount available of the three). The spe-
cific time being displayed is identified by the No Decompression Dive Time
icon, or the O2 Time icon, or the Gas Time Remaining icon (Fig. 7). This
unique feature has been granted U.S. Patent No. 4,586,136.
No Decompression Dive Time Remaining
No Decompression Dive Time Remaining is the maximum amount of time that
you can stay at your present depth before entering a decompression situation.
Fig. 7 - Dive Time Remaining
Identification
2
O
(No Decompression Time)
(Oxygen Accumulation Time)
(Breathing Gas Time)
8
®
It is calculated based on the amount of nitrogen absorbed by twelve hypotheti-
cal tissue compartments. The rates each of these compartments absorb and
release nitrogen is mathematically modeled and compared against a maximum
allowable nitrogen level. Whichever one of the twelve is closest to this maxi-
mum level is the controlling compartment for that depth. Its resulting value
will be displayed numerically (Fig. 8a) along with the No Decompression Dive
icon and graphically as the Tissue Loading Bar Graph.
As you ascend from depth following a dive that has approached the no decom-
pression limit, the Tissue Loading Bar Graph will recede as control shifts to
slower compartments. This is a feature of the decompression model that is the
basis for multilevel diving, one of the most important advantages the Pro Plus
offers.
The no decompression algorithm is based upon Haldane’s theory using maxi-
mum allowable nitrogen levels developed by Merrill Spencer. Repetitive diving
control is based upon experiments designed and conducted by Dr. Ray Rogers
and Dr. Michael Powell in 1987. Diving Science and Technology
®
(DSAT), a
corporate affiliate of PADI
®
, commissioned these experiments.
Oxygen Accumulation Time Remaining
Oxygen accumulation (exposure) during a dive, or 24 hour period, appears
graphically as the Oxygen Accumulation (O2) Bar Graph. As time remaining
Fig. 8 - No Decompression
Dive Time Remaining
NO DECO
C Z
DECO
C ZO
2
FT
FT
MAX
a
9
Datamax Pro Plus
20051030405060
NO DECO
C Z
DECO
C ZO
2
PSI
FT
FT
MAX
before reaching the oxygen exposure limit decreases, segments are added to
the O2 bar graph. When the amount of time remaining before reaching the
oxygen limit becomes less than the No Decompression Dive Time Remaining,
or Breathing Gas Time Remaining, calculations for that depth will be con-
trolled by oxygen. Oxygen Time Remaining will then appear as the main nu-
meric time display (Fig. 9a) as signified by the O
2
Time icon (Fig. 9b) appear-
ing on the display. As oxygen accumulation continues to increase, the O2 bar
graph will enter the yellow Caution Zone (described later).
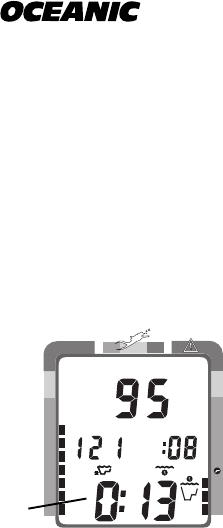
Breathing Gas Time Remaining
Breathing Gas Time Remaining will appear as the numeric Dive Time Remain-
ing display (Fig. 10) only when it is less than No Decompression Time Remain-
ing and Oxygen Accumulation Time Remaining. Breathing Gas Time Remain-
ing of 60 minutes, or less, will be displayed continuously as the Gas Time Re-
maining Bar Graph (Fig. 10a) regardless of which time is being displayed as
the numeric Dive Time Remaining. The bar graph represents only Breathing
Gas Time information and it will be the only indication of breathing gas time
remaining if you are in a decompression or violation mode.
The Pro Plus calculates Breathing Gas Time Remaining using a patented algo-
rithm that is based on a diver's individual breathing gas consumption rate and
depth. Tank pressure is measured once each second, and an average rate of
consumption is calculated over a 90 second period. This rate of consumption is
Fig. 10 - Breathing Gas Time
Remaining
a
Fig. 9 - O2 Time Remaining
NO DECO
C Z
DECO
C ZO
2
FT
FT
2
O
MAX
a
b
10
®
then used in conjunction with a knowledge of the depth dependence to predict
the breathing gas required for a safe ascent including any required decompres-
sion stops.
Breathing gas consumption and depth are continuously monitored, and
Breathing Gas Time Remaining reflects any change in your circumstances.
For example, when a buddy starts breathing from your octopus or you sud-
denly find yourself swimming against a strong current and begin breathing
more rapidly, the Pro Plus will recognize this change and adjust your Breath-
ing Gas Time Remaining accordingly.
Remember, the Breathing Gas Time Remaining is the time you can remain at
the present depth and still surface with the tank pressure reserve (Gas Alarm
Set Point) that you set during setup. When Gas Time Remaining indicates
zero, you should immediately initiate a controlled ascent. There is no reason
to panic, the Pro Plus has allowed for the breathing gas necessary for a safe
ascent including any emergency decompression stops.
R
E
S
P
O
N
S
I
B
L
E
D
I
V
E
R
11
Datamax Pro Plus
ALPHA/NUMERIC DISPLAYS
Cylinder Pressure Display
The Cylinder Pressure display appears in the lower screen (Fig. 11a) any time
the Pro Plus is connected to a pressurized cylinder and in an active mode. Val-
ues of pressure are displayed from 10 PSI (.5 BAR) up to 5000 PSI (352 BAR)
in increments of 10 PSI (.5 BAR).
Depth Displays
During a dive, CurrentDepth (Fig. 11b) and Maximum Depth reached
during that dive (Fig. 11c) are displayed from 0 to 330 feet (99.5 meters) in 1
foot (.5 meter) increments.
During a Decompression Dive, the required Ceiling Stop Depth is displayed
from 60 to 10 feet (20 to 3 meters) in 10 foot (3 meter) increments.
Time Displays
Time displays (Fig. 11 d & e) are shown in hour:minute format (i.e., 1:02 rep-
resents one hour and two minutes, not 102 minutes!). An exception to this is
Decompression Stop Time that displays 0 to 99 minutes (:00 to :99).
Fig. 11 - Pressure/Depth/
Time Displays
20051030405060
NO DECO
C Z
DECO
C ZO
2
PSI
FT
FT
MAX
a
c
b
e
d
12
®
The colon that separates hours and minutes blinks once per second when the
display is indicating real time such as elapsed Surface Time, Elapsed Dive
Time, or Time of Day. Dive Time Available, Dive Time Remaining, Decom-
pression Stop Time, Total Ascent Time required, Time to Fly, or Desaturation
Time are calculated projections of time and use a solid (non-blinking) colon to
indicate that they are counting down, rather than up.
Depth and Time displays will be illustrated and described in more detail as ap-
plicable for each of the operating modes.
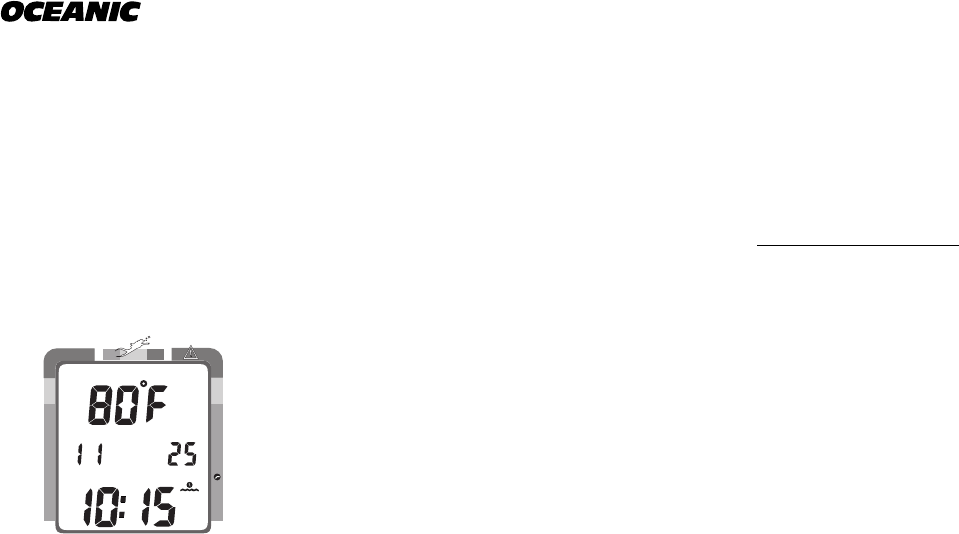
Temperature Displays
Ambient Temperatures from 0° to 99°F (-9 to 60°C) are displayed together with
date and time (Fig. 12) when the Advance (Left) button is pressed while in the
Surface Mode or a dive mode (described later).
AUDIBLE ALARM
During situations that may pose potential danger, one Double Beep is emit-
ted. These situations are:
• Entry into decompression.
• Decreasing to 5 minutes of Breathing Gas Dive Time Remaining.
• Partial pressure of oxygen equal to or greater than 1.40 ATA.
Fig. 12 - Temperature Dis-
play (on surface)
NO DECO
C Z
DECO
C ZO
2
13
Datamax Pro Plus
When the Pro Plus senses immediate danger to you, it emits One Beep per
Second until the situation is corrected (if the Audible Alarm feature is set
ON). If the Audible Alarm feature is set OFF (described later), you will be
alerted instead by one Double Beep. Situations are:
• Descent deeper than the Depth Alarm Set Point.
• Ascent to a depth shallower than a required stop depth.
• Ascent rate that exceeds 60 ft./min (18 m/min).
• Gas Time Remaining equals zero (0:00).
• Partial pressure of oxygen equal to or greater than 1.60 ATA.
• Oxygen accumulation equal to or greater than the allowed per dive or 24
hour limit.
If you enter a Delayed or Immediate Violation Mode, a Single Long Beep will
be emitted. This will occur if:
• Depth is shallower than the required stop depth for more than 5 minutes.
• Required Decompression exceeds a 60 FT/ 18 M ceiling.
Immediately following activation and a diagnostic check the Pro Plus will emit
a Short Beep.
Upon reaching the Turn Gas Alarm set point (described later), Six Beeps will
be emitted.
Responsible
14
®
BACKLIGHT FEATURE
In addition to using a high contrast LCD for easy readability in low light condi-
tions, the backlight features evenly illuminate the full upper and lower dis-
plays.
Smart Glo™, the surface mode backlight, senses the intensity of light that is
passing through small ports located between the control buttons (Fig. 13). If a
low level of light is sensed, the Smart Glo™ backlight will illuminate the dis-
play for button depression time plus 10 seconds when either button is pressed.
Oceanglo
®
, the dive mode backlight, will illuminate the displays for button de-
pression time plus 5 seconds when the Select (Right) control button is pressed.
Additional illumination time can be obtained by pressing the button again.
NOTE: Extensive use of the backlight reduces estimated bat-
tery life. Also, the backlight will not activate during a 'low bat-
tery condition', or when downloading data to a PC.
OPERATING TEMPERATURE
The Pro Plus will operate in almost any temperature diving environment in
the world between 32 and 140 °F (0 and 60 °C).
Fig. 13 - Smart Glo Sensors
O
C
20051030405060
Smart
Glo
P
r
™
15
Datamax Pro Plus
At extremely low temperatures, the LCD may become sluggish, but this will
not affect it's accuracy. If stored or transported in extremely low temperature
areas (below freezing), you should warm the module and its battery with body
heat before diving.
Even though the Pro Plus will operate in this wide range of temperatures, it is
possible to damage the electronics if left exposed to direct sunlight,
or in a hot confined space (like a car trunk). After the dive, cover the
Pro Plus and keep it out of the sun. If inadvertently left in the direct sun-
light for a long period, the LCD display may become totally black. If this oc-
curs, immediately immerse the Pro Plus in water. The display should recover
its normal appearance after a few minutes. Damage from excess heat, or
cold, is not covered by the Pro Plus two year limited warranty.
Be a -
RESPONSIBLE DIVER
at all times.
R
E
S
P
O
N
S
I
B
L
E
D
I
V
E
R
16
®
WARNINGS and SAFETY RECOMMENDATIONS
• Inspect your Pro Plus prior to every dive, checking for any signs of the entrance of moisture,
damage to the housing, or damage to the LCD display. If these or other signs of damage are
found, return the unit to an Authorized Oceanic Dealer. DO NOT attempt to use it until it
has received factory service.
• Oceanic advocates responsible diving practices consistent with your individual level of for-
mal training and experience, and does not recommend decompression diving or diving below
130 feet (39 m).
• Always carry primary and backup dive lights when conducting dives that could include low
light situations.
• You should never, under any circumstances, swap your computer with another unit between
dives, or share your computer with another diver underwater. It is impossible for two divers
to stay precisely together underwater, and your computer's dive profile tracking of previous
dives will be pertinent to you only. Nitrogen and oxygen loading of a second user may be sig-
nificantly different and thus swapping dive computers could lead to inaccurate and poten-
tially dangerous predictions of decompression and oxygen accumulation status. This rule
applies to the use of all dive computers, but is especially important when using the Pro Plus,
due to the personal information it provides.
17
Datamax Pro Plus
ACTIVATION
and
SETUP
refer to page 29 for - WARNINGS and SAFETY RECOMMENDATIONS
18
®
ACTIVATION
Connect the regulator assembly to a full cylinder and pressurize by slowly
opening the cylinder valve. Note that to enter settings, access information
such as the log, or to download data it is not necessary to pressurize the unit.
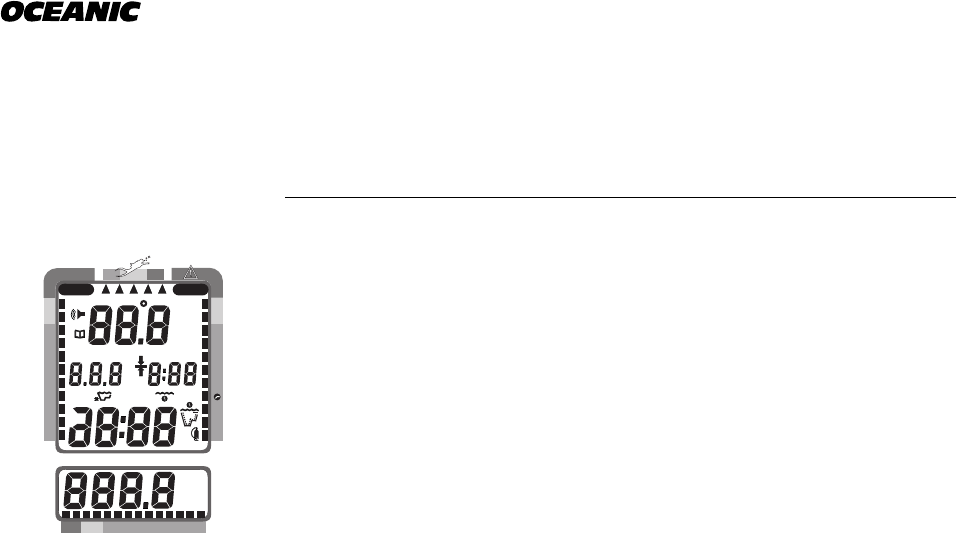
To activate the Pro Plus, press the Select (Right) button once and release. It
will immediately enter Diagnostic Mode, displaying all “8’s” (Fig. 14), followed
by “dashes”, and a countdown from 9 to 0. While conducting diagnostics, the
displays are illuminated by the Smart Glo™ backlight as display functions and
battery voltage are checked to ensure that everything is working correctly.
Upon activation, the Pro Plus will also check the ambient barometric pressure,
and calibrate its present depth as zero. At elevations of 2,000 feet (610
meters), or higher, it will recalibrate itself to measure depth in feet of fresh
water instead of feet of sea water.
If no dive is made within 2 hours after initial activation, the Pro Plus will au-
tomatically deactivate to conserve its battery power. Always check the dis-
play before entering the water to ensure that it is activated.
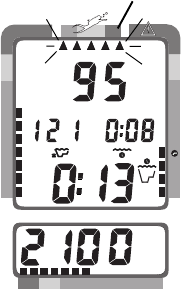
Fig. 14 - Diagnostic Mode
20051030405060
NO DECO
C Z
DECO
C ZO
2
PSI
MAX
FT
BAR
M
FT
M
MAX
2
O
19
Datamax Pro Plus
20051030405060
NO DECO
C Z
DECO
C ZO
2
PSI
20051030405060
NO DECO
C Z
DECO
C ZO
2
Fig. 16 - Low Battery
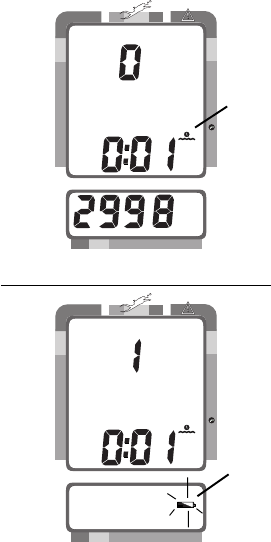
SURFACE MODE
Surface Mode, identified by the Surface Time icon (Fig. 15a), immediately fol-
lows Diagnostic Mode after initial activation. Information displayed includes
the Dive Number '0' (no dive made yet), Surface Time with flashing colon, and
cylinder pressure.
If battery voltage is below the level sufficient for a day's operation, the Battery
icon will be displayed (Fig. 16a). Below 15% of rated voltage, all graphic dis-
plays will shut off except the Battery icon that will flash for 4 seconds, then
the unit will shutdown.
MAIN MODE MENU
Using the control buttons while on the surface, you can access:
• Temperature/Date/Time mode
• FO2 Set mode
• Pre Dive Planning Sequence
• Time to Fly/Desaturate
• Log mode
• Set mode
Fig. 15 - Surface Mode
a
a
20
®
The menu structure of the Set Mode enables you to:
• set Dive Mode Alternate Display (On or Off)
• set Audible Alarm (On or Off)
• select Depth Alarm value
• select Turn Pressure Alarm value
• select End Pressure Alarm value
• set Year/Month/Day
• select Hour Format (12 or 24 hour)
• set Hour/Minute
• select Dive Profile Sampling Rate (for PC download data)
• set Units of Measure (Imperial or Metric)
• set FO2 Default (On or Off)
• initiate download of data (External Access)
Before going diving, enter settings that will be common for each of your dives
(e.g., Units of Measure, etc.). This will save you time at the dive site.
Setting the FO2 value for a nitrox mix is a 'pre dive' setting that is entered be-
fore nitrox dives. This is described on page 34.
As described later, some of the settings will have to be reentered when the bat-
tery is replaced
Be a -
RESPONSIBLE DIVER
at all times.
R
E
S
P
O
N
S
I
B
L
E
D
I
V
E
R
21
Datamax Pro Plus
ENTERING SETTINGS
• The Advance (Left) button is used to gain access to settings.
• The Select (Right) button is used to toggle between, or scroll through, the
individual set points available for each of the settings.
• The Advance (Left) button is then used to accept and save the set point
and revert to Surface Mode, or continue to the next setting.
• See page 30 for a 'Summary of Access to Set Modes' that also
notes 'settings entered by the factory'.
NOTE: While in the Set Mode, if neither button is pressed, the
unit will automatically revert to Surface Mode in 2 minutes.
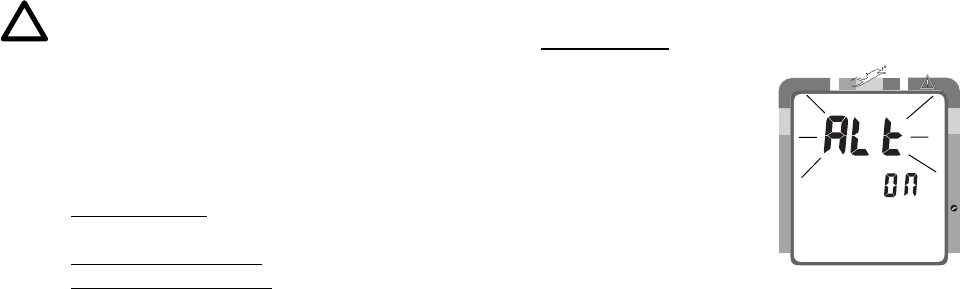
TO SET: ALTERNATE DISPLAY ON/OFF
'OFF' - Dive Modes 'will display' Max Depth and Elapsed Dive Time
'ON' - Max Depth and Elapsed Dive Time are 'accessed' by pressing a button
• press BOTH buttons simultaneously, while in Surface Mode
• 'Alt' appears with 'On', or 'Off', flashing (Fig. 17)
• press Select (Right) button to toggle between 'On' and 'Off'
• press Advance (Left) button to accept the setting displayed, and either -
• revert to Surface Mode (if this setting was changed), or -
• advance to Set:Audible Alarm (if this setting was not changed)
Fig. 17 - Set Alternate
Display On/Off
NO DECO
C Z
DECO
C ZO
2
22
®
NO DECO
C Z
DECO
C ZO
2
FT
MAX
TO SET: AUDIBLE ALARM ON/OFF
'OFF' - if the unit senses a condition that poses immediate danger (page 13), it
emits a double beep. Other alarms are silenced
'ON' - alarms will be sounded for all conditions as listed on pages 12 and 13.
• press BOTH buttons simultaneously, while in Surface Mode
• press Advance (Left) button 1 time
• the Audible Alarm icon appears with 'On', or 'Off', flashing (Fig. 18)
• press Select (Right) button to toggle between 'On' and 'Off'
• press Advance (Left) button to accept the setting displayed, and either -
• revert to Surface Mode (if this setting was changed), or -
• advance to Set:Depth Alarm (this setting was not changed)
TO SET: DEPTH ALARM SET POINT
The Depth Alarm can be set to values between 30 feet (10 meters) and 320 feet
(97.5 meters) in 10 foot (3/3.5 meter) increments.
• press BOTH buttons simultaneously, while in Surface Mode
• press Advance (Left) button 2 times
• Max Depth and Audible Alarm icons appear with the Max Depth value
flashing (Fig. 19)
Fig. 18 - Set Audible Alarm
On/Off
Fig. 19 - Set Depth Alarm
NO DECO
C Z
DECO
C ZO
2
23
Datamax Pro Plus
• press Select (Right) button until the desired Max Depth value appears
• press Advance (Left) button to accept the setting displayed, and either -
• revert to Surface Mode (if this setting was changed), or -
• advance to Set: Turn Pressure Alarm (this setting was not changed)
Example of Pressure Alarm Set Points: Starting with 3000 psi, set the
Turn Pressure Alarm for 2000 psi and the End Pressure Alarm for 1000 psi
(e.g., 1000 psi used going out, 1000 psi used coming back, 1000 psi reserve).
TO SET: TURN PRESSURE ALARM SET POINT
The Turn Pressure Alarm can be set to values between 1000 psi (68.5 BAR)
and 3000 psi (206.5 BAR) in 250 psi (17 BAR) increments to alert you. To dis-
able the alarm feature, set the value at 00 psi (00 BAR).
• press BOTH buttons simultaneously, while in Surface Mode
• press Advance (Left) button 3 times
• Breathing Gas Time and Audible Alarm icons appear with the Pressure
value flashing (Fig. 20)
• press Select (Right) button until the desired Pressure value appears
• press Advance (Left) button to accept the setting displayed, and either -
• revert to Surface Mode (if this setting was changed), or -
• advance to Set: End Pressure Alarm (this setting was not changed)
Fig. 20 - Set Turn Pressure
Alarm Set Point
20051030405060
NO DECO
C Z
DECO
C ZO
2
PSI
24
®
TO SET: END PRESSURE ALARM SET POINT
The End Pressure Alarm can be set to values between 300 psi (20 BAR) and
1500 psi (68 BAR) in 100 psi (6 BAR) increments to warn you.
• press BOTH buttons simultaneously, while in Surface Mode
• press Advance (Left) button 4 times
• Gas Time and Audible icons appear with Pressure value flashing (Fig. 21)
• press Select (Right) button until the desired Pressure value appears
• press Advance (Left) button to accept the setting displayed, and either -
• revert to Surface Mode (if this setting was changed), or -
• advance to Set: Year (this setting was not changed)
TO SET: DATE/HOUR FORMAT/TIME
• press BOTH buttons simultaneously, while in Surface Mode
• press Advance (Left) button 5 times
• the Date appears with the Year setting (Fig. 22a) flashing
• press Select (Right) button until the correct Year appears
• press Advance (Left) button 1 time to accept the setting displayed
• the Month setting (Fig. 22b) flashes
• press Select (Right) button until the correct Month appears.
• press Advance (Left) button 1 time to accept the setting displayed
• the Day setting (Fig. 22c) flashes
Fig. 22 - Set Date
Fig. 21 - Set End Pressure
Alarm Set Point
20051030405060
NO DECO
C Z
DECO
C ZO
2
PSI
NO DECO
C Z
DECO
C ZO
2
a
b
c
25
Datamax Pro Plus
• press Select (Right) button until the correct Day appears.
• press Advance (Left) button 1 time to accept the setting displayed
• the Hour Format appears flashing (Fig. 23)
• 12 Hr format = 12: Am to 11: Pm
• 24 Hr format = 0: to 24: (hours)
• press Select (Right) button to toggle between '12' and '24'
• press Advance (Left) button 1 time to accept the setting displayed
• the Time appears with the Hour setting (Fig. 24a) flashing
• press Select (Right) button until the correct Hour appears.
• press Advance (Left) button 1 time to accept the setting displayed
• the Minute setting (Fig. 24b) flashes
• press Select (Right) button until the correct Minute appears.
• press Advance (Left) button to accept the setting displayed, and either -
• revert to Surface Mode (if this setting was changed), or -
• advance to Set: Sampling Rate (Date/Time settings not changed)
Fig. 24 - Set Time
Fig. 23 - Set Hour Format
NO DECO
C Z
DECO
C ZO
2
NO DECO
C Z
DECO
C ZO
2
M
a
b
26
®
TO SET: SAMPLING RATE
Sampling Rate is the Time, or Depth, interval at which data samples will be
recorded for subsequent download to the OceanLog™ PC software program. It
has 'no effect' upon displayed data or data stored in the unit's viewable Log.
Rates available are 2 FT (.5M), 5 FT (1.5 M), 10 FT (3 M), 2 SEC, 5 SEC, 10
SEC, 15 SEC, 20 SEC, 25 SEC, 30 SEC.
Lower rates = more samples and more memory 'used' per dive. Fewer dives
can be stored for download, however profile graphs will be smoother.
• press BOTH buttons simultaneously, while in Surface Mode
• press Advance (Left) button 11 times
• the Rate setting appears flashing (Fig. 25)
• press Select (Right) button until the desired Rate appears.
• press Advance (Left) button to accept the setting displayed, and either -
• revert to Surface Mode (if this setting was changed), or -
• advance to Set: Unit (this setting was not changed)
Fig. 25 - Set Sampling Rate
NO DECO
C Z
DECO
C ZO
2
FT
27
Datamax Pro Plus
TO SET: UNITS OF MEASURE
• press BOTH buttons simultaneously, while in Surface Mode
• press Advance (Left) button 12 times
• the Units of Measure icons appear flashing (Fig. 26)
• press Select (Right) button to toggle between 'FT, °F' and 'M, °C'
• press Advance (Left) button to accept the setting displayed, and either -
• revert to Surface Mode (if this setting was changed), or -
• advance to Set: FO2 Default (this setting was not changed)
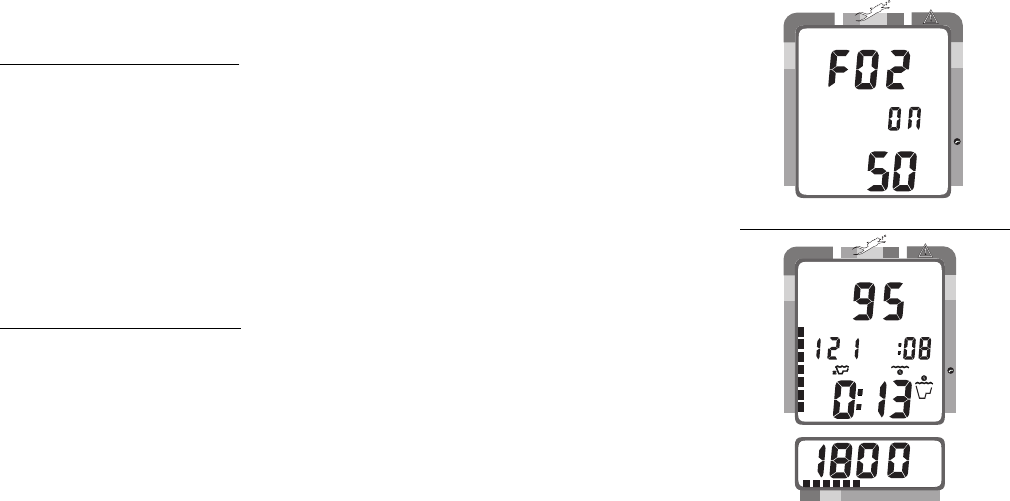
TO SET: FO2 50% DEFAULT (described on page 33) ON/OFF
'Off' - FO2 value set point remains at the % set until changed or shut down
'On' - FO2 value set point reverts to 50% after dives (must be set each dive)
• press BOTH buttons simultaneously, while in Surface Mode
• press Advance (Left) button 13 times
• FO2 50 appears with On or Off flashing (Fig. 27)
• press Select (Right) button to toggle between 'On' and 'Off'
• press Advance (Left) button to accept the setting displayed, and either -
• revert to Surface Mode (if this setting was changed), or -
• advance to EA Mode (this setting was not changed)
Fig. 27 - Set FO2
50% Default On/Off
Fig. 26 - Set Units of Measure
20051030405060
NO DECO
C Z
DECO
C ZO
2
PSI
FT
FT
NO DECO
C Z
DECO
C ZO
2
28
®
EA MODE
Although included in the menu structure, External Access (EA) Mode has no
settings. It is accessed only when data is being downloaded (copied) to the
OceanLog™ PC software program for storage and viewing. This is described
on page 50.
• press Advance (Left) button to 'bypass EA Mode' (Fig. 28) and revert to
Surface Mode
Fig. 28 - EA Mode
Responsible
NO DECO
C Z
DECO
C ZO
2
29
Datamax Pro Plus
WARNINGS and SAFETY RECOMMENDATIONS
• Never activate the Pro Plus underwater. This may result in inaccurate depth and no-decom-
pression time displays. If the unit is activated when deeper than 4 feet (1 meter) underwa-
ter, or at elevations higher than 14,000 feet (4,267 meters), it will perform a diagnostic check
followed by immediate shutdown.
• During activation and diagnostics, if any display or function varies from the information
presented here, return the Pro Plus to your Authorized Oceanic Dealer for inspection.
• If a Low Battery condition is indicated following diagnostics, Oceanic strongly recommends
that you DO NOT dive until the battery is replaced.
R
E
S
P
O
N
S
I
B
L
E
D
I
V
E
R
30
®
SUMMARY OF ACCESS TO SET MODES
(
settings entered by the factory appear in italics
)
To access a specific Set mode from the Surface Mode, press the button(s) as follows:
SET MODETO ACCESSTO VIEWTO SAVE
To access/set>Both '1' time>
• Alternate Display
(Off)
Left '0' time>Right - toggle (On/Off)>Left - to Surface* or Audible
• Audible Alarm
(On)
Left '1' time>Right - toggle (On/Off)>Left - to Depth Alarm
• Depth Alarm
(330 ft)
Left '2' times>Right - 10 ft (3 m)/sec>Left - to Turn Pressure
• Turn Pressure
(3000 psi)
Left '3' times>Right - 250 psi (17 BAR)/sec>Left - to End Pressure
• End Pressure
(1500 psi)
Left '4' times>Right - 100 psi (7 BAR)/sec>Left - to Year
• Year
(1999)
Left '5' time>Right - 1 year/sec>Left - to Month
• Month
(1)
Left '6' times>Right - 1 month/sec>Left - to Day
• Day
(1)
Left '7' times>Right - 1 day/sec>Left - to Hour Format
• Hour Format
(12)
Left '8' times>Right - toggle 12/24>Left - to Hour
• Hour
(12)
Left '9' times>Right - 1 hour/sec>Left - to Minute
• Minute
(00)
Left '10' times>Right - 1 minute/sec>Left - to Surface* or Rate
• Sample Rate
(10 FT)
Left '11' times>Right - 1 rate/sec>Left - to Surface* or Units
• Units (
Imperial
)Left '12' times>Right - toggle>Left - to Surface* or Default
• FO2 Default
(On)
Left '13' times>Right - toggle (On/Off)>Left - to Surface* or EA
• EA (download)Left '14' times>>>>Left - to Surface
* If the setting was altered
31
Datamax Pro Plus
PRE DIVE
and
DIVE MODES
refer to page 42 for - WARNINGS and SAFETY RECOMMENDATIONS
32
®
OPERATIONAL MODES
While on the surface, the Interactive Control Console enables you to access six
operational modes and activate the backlight. During a dive, it enables you to
view 'alternate' displays of information and activate the backlight.
TEMPERATURE/DATE/TIME MODE
To view Ambient Temperature/Date/Time (Fig. 29) while in Surface Mode:
• press the Advance (Left) button 1 time
• During low light conditions, the Smart Glo™ backlight will illuminate the
display for button depression time plus 10 seconds.
• The unit reverts to Surface Mode after 10 seconds, unless the Advance
(Left) button is pressed to access FO2 Mode.
Set for Imperial units of measure, Month is on the left and Day on the right.
Set for Metric, Day is on the left and Month on the right. Year doesn't appear.
FO2 MODE
The Pro Plus can be used either as an Air computer or as a Nitrox computer.
After activation, it will operate as an Air computer without displaying informa-
tion associated with oxygen calculations, unless the percentage of oxygen
(FO2) is set for a value other than 'Air' (i.e., a numerical value of 21 to 50 %).
Fig. 29 - Temperature/
Date/Time
NO DECO
C Z
DECO
C ZO
2
33
Datamax Pro Plus
FO2 50% Default
If the Default is set to 'On' and FO2 is set to a value 'greater than 21%', the
FO2 value will automatically revert to 50% 10 minutes after that dive.
• FO2 must be reset for each repetitive nitrox dive, or the value will auto-
matically 'default' to 50 (Fig. 30) and the dives will be calculated based on
50% O2 for oxygen calculations and 21% O2 (79% nitrogen) for nitrogen
calculations.
• If you surface for greater than 10 minutes during a dive, a subsequent
descent will be considered a new dive and the FO2 value must be reen-
tered.
If the Default is set to 'Off', the FO2 value for repetitive dives remains the
same until the FO2 set point is manually changed.
FO2 Set for an Air Dive
When set with an FO2 value of 'Air', the Pro Plus will perform calculations the
same as if FO2 were set for 21% oxygen, internally accounting for oxygen load-
ing for any subsequent Nitrox dives. However, oxygen related displays, warn-
ings, and the O2 Bar Graph will not appear on the display for that dive (Fig.
31), or subsequent dives, unless FO2 is set for a numerical value (21 to 50%).
Fig. 31 - Dive Mode
(FO2 Set for 'Air')
Fig. 30 - FO2 Default
NO DECO
C Z
DECO
C ZO
2
20051030405060
NO DECO
C Z
DECO
C ZO
2
PSI
FT
FT
MAX
34
®
NO DECO
C Z
DECO
C ZO
2
FT
MAX
2
O
Fig. 32 - Setting FO2
Setting FO2
To access FO2 Mode while in the Surface Mode and set the unit for Air or the
percentage (%) of oxygen (FO2) in your nitrox mix:
• press the Advance (Left) button 2 times
• press the Select (Right) button repeatedly, or press and hold it, until the
value of FO2 for the nitrox mix being used is displayed
• the FO2 value displayed (Fig. 32a) will advance from 21 to 50 (%) in in-
crements of 1 (%), then display 'Air' again.
• the Maximum Depth that can be achieved with an oxygen partial pres-
sure (PO2) of 1.60 ATA will be displayed (Fig. 32b) for each FO2 value.
No value will appear for Air.
The unit reverts to Surface Mode after 10 seconds, unless the Advance (Left)
button is pressed to access the Pre Dive Planning Sequence.
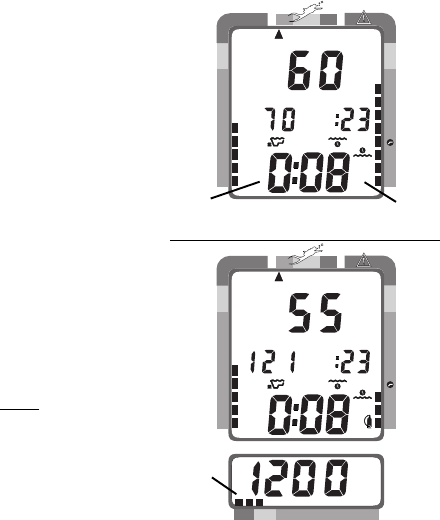
FO2 Set for a Nitrox Dive
You can set the Pro Plus for nitrogen-oxygen (nitrox) mixtures of 21% to 50%
oxygen (O2). If FO2 is set at a value of 21% (Fig. 33), the unit will remain set
as a '21% nitrox computer' for subsequent nitrox dives until FO2 is set to a
higher value, or until it automatically turns off and is reactivated.
Fig. 33 - FO2 21%
a
b
NO DECO
C Z
DECO
C ZO
2
FT
MAX
2
O
35
Datamax Pro Plus
Once a dive is made with the Pro Plus set as a nitrox computer (FO2 set for a
numerical value), it cannot be set for 'Air' until 24 hours after the last nitrox
dive. However, you can set FO2 for 21% for use with air.
PRE DIVE PLANNING SEQUENCE™
Oceanic strongly recommends that you review the Pre Dive Planning
Sequence (PDPS) prior to every dive to help you plan your dive as re-
quired to avoid exceeding no decompression or oxygen exposure lim-
its. This is especially important for repetitive dives, when the Pre Dive Plan-
ning Sequence (Fig. 34) will indicate for you the no decompression dive times
that are available to you on your next dive, based on any residual nitrogen or
oxygen accumulation (whichever is in control) following your last dive and sur-
face interval.
To access the Pre Dive Planning Sequence while in the Surface Mode:
• press the Advance (Left) button 3 times
• press repeatedly, or press and hold, the Select (Right) button
• a sequence of depths from 30 to 160 feet (9 to 48 meters) in 10 foot (3
meter) increments will be displayed
The unit reverts to Surface Mode 10 seconds after the Select (Right) button is
released, unless the Advance (Left) button is pressed to access the Log Mode.
Fig. 34 - Pre Dive
Planning Sequence
NO DECO
C Z
DECO
C ZO
2
FT
36
®
With each depth display, you will see either 'predicted' no decompression limits
based upon your previous dive profiles (if calculated to be nitrogen controlled),
or 'predicted' oxygen tolerance limits based upon accumulation of oxygen (if
calculated to be oxygen controlled).
No decompression times are only displayed for depths where there is at least 3
minutes of dive time available at the depth, taking into account a descent rate
of 120 feet (36 meters) per minute. Depths greater than the maximum depth
that can be achieved with a partial pressure of oxygen (PO2) of 1.60 ATA will
not be displayed.
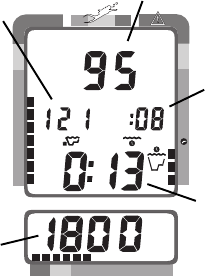
Prior to a Repetitive Nitrox Dive
If the segments of the Tissue Loading Bar Graph are displayed (Fig 35) during
the Pre Dive Planning Sequence, that next dive is calculated to be controlled
by nitrogen loading.
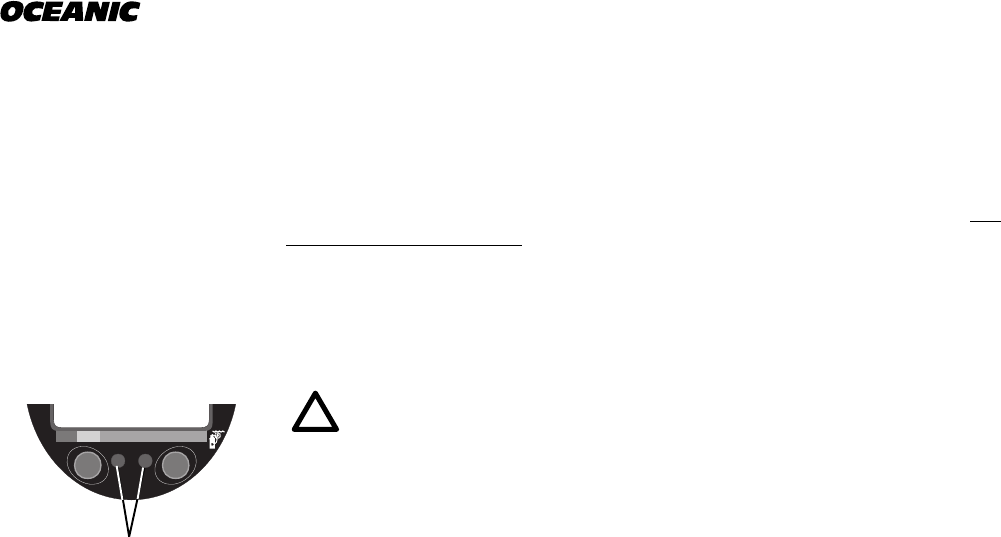
If the segments of the O2 bar graph are displayed (Fig. 36), that next dive is
calculated to be controlled by oxygen loading.
The Pro Plus will store oxygen accumulation for up to 10 dives conducted dur-
ing a 24 hour period. In the event that the maximum limit for oxygen loading
has been exceeded for that day, all of the segments of the O2 bar graph will be
displayed (Fig. 37).
Fig. 36 - Oxygen Control
Fig. 35 - Nitrogen Control
NO DECO
C Z
DECO
C ZO
2
FT
NO DECO
C Z
DECO
C ZO
2
FT
2
O
Fig. 37 - O2 Limit Exceeded
NO DECO
C Z
DECO
C ZO
2
2
O
37
Datamax Pro Plus
Depth and Time displays will not appear until the O2 bar graph recedes into
the green (normal) zone (e.g., your daily oxygen dosage decreases an amount
equivalent to the amount accumulated during the latest dive completed).
NO DECOMPRESSION DIVE MODE
As long as it is activated on the surface, the Pro Plus will enter the No Decom-
pression Dive Mode when you descend deeper than 5 feet (1.5 meters), regard-
less of the operating mode it is in. If activated below 4 feet (1 meter), the unit
will perform a diagnostic check and shutdown.
To activate the Oceanglo
®
backlight underwater, press the Select (Right) but-
ton. The display will be illuminated for button depression time plus 5 seconds.
It will not activate if a Low Battery condition exists.
Main Display (data shown depends on Alternate ON/OFF setting)
If the Alternate Display is set to 'OFF', information (Fig. 38) includes -
Current Depth, Elapsed Dive Time (and icon), Dive Time Remaining (and
icon), Maximum Depth for that dive (and icon), and tank Pressure.
If the Alternate Display is set to 'ON', information (Fig. 39) includes:
Current Depth, Dive Time Remaining (and icon), and Pressure. Elapsed Dive
Time and Maximum Depth are 'accessed' in Large Format, as described next.
Fig. 38 - Main Display
(Alternate Off)
20051030405060
NO DECO
C Z
DECO
C ZO
2
PSI
FT
FT
MAX
Fig. 39 - Main Display (Alt On)
20051030405060
NO DECO
C Z
DECO
C ZO
2
PSI
FT
38
®
Secondary Display (access if Alternate is set ON or OFF)
To view water Temperature, Time of Day, and if FO2 was set for a numerical
value, display the current level of PO2 (Fig. 40):
• press the Advance (Left) button 1 time
• the unit will revert to the Main Display after 10 seconds, if the Advance
(Left) button is not pressed again.
Alternate Display (access only if Alternate is set ON)
To view water Elapsed Dive Time and Maximum Depth in Large Format in
place of Current Depth and Dive Time Remaining (Fig. 41):
• press the Advance (Left) button 2 times, or -
• press the Advance (Left) button 1 time, if viewing Temp/Time/PO2.
• the unit will revert to the Main Display after 10 seconds, or if the Ad-
vance (Left) button is pressed.
The Graphic Diver Interface (bar graphs) will be active with each display
representing nitrogen loading, oxygen accumulation (if FO2 was set for a value
other than Air), ascent rate, and breathing gas time remaining.
Fig. 41 - Alternate Display
Fig. 40 - Secondary Display
20051030405060
NO DECO
C Z
DECO
C ZO
2
PSI
20051030405060
NO DECO
C Z
DECO
C ZO
2
PSI
MAX
FT
39
Datamax Pro Plus
DECOMPRESSION DIVE MODE
The Pro Plus provides information that will help you avoid, or if necessary,
manage emergency decompression.
The Decompression Dive Mode activates when the Tissue Loading Bar Graph
enters the red 'DECO' zone (Fig. 42a).
VIOLATION MODES
The Pro Plus enters Violation Modes when it is unable to predict an ascent
procedure.
GAUGE MODE
If the Pro Plus enters a Permanent Violation Mode, it will not display informa-
tion relating to nitrogen or oxygen loading for the remainder of that dive or for
subsequent dives conducted during the 24 hour period after surfacing.
NOTE: Decompression Dive Mode, Violation Modes, and Gauge
Mode are described on pages 54 - 62.
Fig. 42 - Entering Into
Decompression Mode
20051030405060
NO DECO
C Z
DECO
C ZO
2
PSI
FT
FT
a
40
®
ASCENDING TO THE SURFACE
While ascending to shallower depths, the segments that have filled up the Tis-
sue Loading Bar Graph will begin to recede (Fig. 43), offering a graphic repre-
sentation of your multilevel diving capability. By 'backing off' on the bar graph
(fewer segments), you can establish a personal level of conservatism and mar-
gin of protection.
If you entered Decompression Mode, you must not complete your ascent until
the Tissue Loading Bar Graph is at least inside the yellow Caution Zone.
If you have not entered Decompression Mode, a safety stop made be-
tween 15-20 feet (5-6.5 meters) is strongly recommended as a stan-
dard procedure before completing your ascent.
You should make every effort to complete all of your ascents with the Tissue
Loading Bar Graph inside of the green zone.
While you cannot provide a guarantee against the occurrence of de-
compression sickness, you may choose your own personal zone of
caution based upon your individual age, physique, excessive weight,
training, experience, etc. to reduce the statistical risk.
Fig. 43 - Tissue Loading Bar
Graph (receding)
20051030405060
NO DECO
C Z
DECO
C ZO
2
PSI
FT
FT
MAX
41
Datamax Pro Plus
20051030405060
NO DECO
C Z
DECO
C ZO
2
PSI
FT
FT
MAX
The Variable Ascent Rate Indicator™ shows how fast you are ascending.
When you exceed the maximum recommended ascent rate of 60 feet per
minute (18 meters per minute), the bar graph will enter the red (Too Fast)
zone (Fig. 44a). You will be alerted by all segments of the bar graph flashing.
The flashing will stop when your ascent rate is slowed.
ALTITUDE DIVING
The mathematical model within the Pro Plus accounts for the reduced No De-
compression dive time available at higher elevations based on NOAA (National
Oceanic and Atmospheric Administration) guidelines. When diving in high
altitude lakes or rivers from 2,000 to 14,000 feet (610 to 4,268 meters), the Pro
Plus will adjust automatically, providing corrected depth and reduced No De-
compression and Oxygen Exposure times.
Also, when above 2,000 feet (610 meters), depth calibration is automatically
changed to read in feet of freshwater rather than feet of seawater. If activated
above 14,000 feet (4,268 meters), the unit will perform a diagnostic check and
shutdown.
Fig. 44 - Ascent 'Too Fast'
a
42
®
WARNINGS and SAFETY RECOMMENDATIONS
• The percentage of oxygen (FO2) in the nitrox mix being used must be set 'before each' nitrox
dive, unless the FO2 50% Default is set to 'Off'.
• The Pre Dive Planning Sequence provides predicted times for subsequent dives. Depending
on cylinder size, breathing gas consumption, and oxygen accumulation you may have less
time available than indicated because of breathing gas quantity or other limitations.
• The Pro Plus must be manually activated and be in an operating mode prior to start of a
dive. The unit will not activate automatically by immersion in water.
• Every effort should be made to keep each of the bar graphs in the green throughout your
dives to reduce your risk of exposure to decompression sickness and oxygen toxicity.
• Until it has shut itself off, you must not use the Pro Plus at a different altitude than the alti-
tude where it was originally activated. Doing so will result in an error equal to the differ-
ence in barometric pressure, and possibly a false dive mode with erroneous data.
43
Datamax Pro Plus
POST
DIVE
MODES
refer to page 51 for - WARNINGS and SAFETY RECOMMENDATIONS
44
®
FIRST 2 HOURS AFTER A DIVE
When you ascend to 3 feet (1 meter) or shallower, the Pro Plus will enter Sur-
face Mode and begin counting your surface interval.
TRANSITION PERIOD
The first 10 minutes is, in affect, a Transition Period during which time the
following information is displayed (Fig. 45):
• Surface Mode icon (flashing).
• 'Number' of that dive
• Surface Interval (colon flashing).
• Tissue Loading Bar Graph indicating current nitrogen loading.
• O2 Bar Graph indicating current oxygen loading (if a nitrox dive)
If you descend during the 10 minute transition period, time underwater will be
considered a continuation of that dive. The time at the surface (if less than 10
minutes) will not be added as Elapsed Dive Time.
To view the Temperature/Date/Time (Fig. 46):
• press the Advance (Left) button 1 time
• the unit will revert to Surface Mode after 10 seconds, if no button is
pressed
Fig. 46 - Temperature/
Date/Time
Fig. 45 - Post Dive
Surface Mode (<10 min)
NO DECO
C Z
DECO
C ZO
2
NO DECO
C Z
DECO
C ZO
2
45
Datamax Pro Plus
To view that Dive's Log (during the Transition Period):
• press the Advance (Left) button 2 times, or -
• press the Advance (Left) button 1 time, if viewing Temp/Date/Time
• the unit will revert to Surface Mode after 2 minutes, if no button is
pressed
Data will not be stored in the unit's memory until the 10 minute Transition
Period is completed.
Once 10 minutes have elapsed, that dive and Transition Period are completed,
and a subsequent descent will be considered a new dive.
AFTER THE TRANSITION PERIOD
For the remainder of the first 2 hours after surfacing, the information de-
scribed above will continue to be displayed as Surface Mode (Fig. 47), and you
will have full access to other modes.
To view the Temperature/Date/Time:
• press the Advance (Left) button 1 time
• During low light conditions, the Smart Glo™ backlight illuminates the dis-
play for button depression time plus 10 seconds.
• the unit will revert to Surface Mode after 10 seconds, if no button is
pressed
Fig. 47 - Surface Mode
(first 2 hours)
NO DECO
C Z
DECO
C ZO
2
46
®
To access FO2 Mode:
• press the Advance (Left) button 2 times (while in Surface Mode)
• If the FO2 Default was set OFF, the FO2 setting displayed will be the
same value previously set (Fig. 48).
• If the FO2 Default was set ON, the FO2 value displayed (Fig. 49) will be
the 'default value' of 50 (%) and will have to be set for the breathing gas
used for the next dive.
• press the Select (Right) button to alter the setting, if required.
• the unit reverts to Surface Mode after 2 minutes, unless the Advance
(Left) button is pressed to access the Pre Dive Planning Sequence.
To access Pre Dive Planning Sequence™:
• press the Advance (Left) button 3 times (while in Surface Mode)
• press the Select (Right) button to scroll through the sequence
• The unit reverts to Surface Mode after 2 minutes, unless the Advance
(Left) button is pressed to access the Fly Mode.
The Pre Dive Planning Sequence will now show 'adjusted' No Decompression
Limits (Fig. 50) based on residual nitrogen calculated to be remaining from the
previous dives. Calculated dive times and the maximum allowed depth dis-
played will increase as the real time surface interval increases after completion
of a dive.
Fig. 48 - FO2 (Default OFF)
Fig. 50 - Adjusted NDLs
Fig. 49 - FO2 (Default ON)
NO DECO
C Z
DECO
C ZO
2
FT
MAX
2
O
NO DECO
C Z
DECO
C ZO
2
FT
NO DECO
C Z
DECO
C ZO
2
FT
MAX
2
O
47
Datamax Pro Plus
NO DECO
C Z
DECO
C ZO
2
NO DECO
C Z
DECO
C ZO
2
NO DECO
C Z
DECO
C ZO
2
The Pre Dive Planning Sequence will only scroll to the maximum depth al-
lowed by the nitrogen or oxygen limit, whichever is in control. The respective
bar graph will be displayed to indicate which is in control.
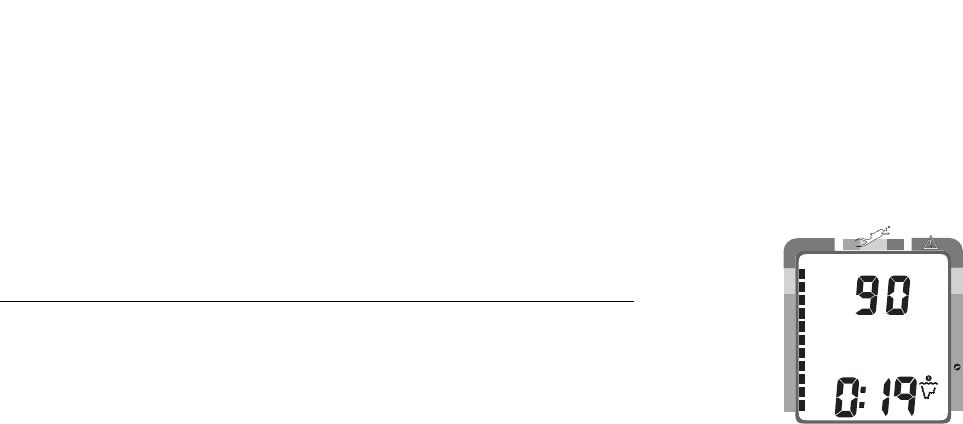
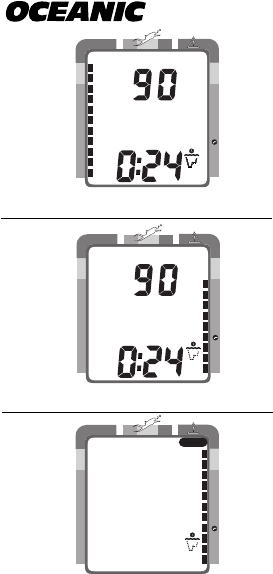
To access Time to Fly and Desaturate Countdowns:
• press the Advance (Left) button 4 times (while in Surface Mode)
• press the Select (Right) button to view the sequence
• The unit reverts to Surface Mode after 2 minutes, unless the Advance
(Left) button is pressed to access the Log Mode.
The Time To Fly counter begins counting down 10 minutes after the last dive
has ended (after the 10 minute Transition Period) displaying the word 'FLY'
with a countdown (Fig. 51a) that starts at 23:50 (hr:min) and counts down to
0:00 (hr:min).
The Time to Desaturate counter (Fig. 51b), provides calculated time for tissue
desaturation at sea level. The countdown starts at 9:59 (hours:minutes) maxi-
mum and counts down to 0:00. If the time is calculated to be greater than
9:59, the display will indicate 9:- - (Fig. 52a) until it decreases to 9:59.
If a violation occurred during the dive, Time to Desaturate will not be dis-
played and a single dash ( - ) will appear (Fig. 53a) instead of the letters FLY.
Fig. 51 - Time to Fly/Desaturate
Fig. 53 - After Violation
Fig. 52 - Desaturate (>9:59)
a
b
a
a
48
®
LOG MODE
Information from your 12 latest dives is stored in the Log for viewing. After
12 dives are accumulated, each subsequent dive will overwrite the oldest dive
in the log (i.e., the most recent dive deletes the oldest). Log information will
not be lost when batteries are removed, but factory service will delete the logs.
Dives are displayed in a reverse sequence that starts with the dive most re-
cently recorded back to the oldest of the 12 dives stored. Thus, your most re-
cent dive will always be the first shown in the sequence. Each dive has three
log screens - Date/Time started, Nitrogen data, and Oxygen data.
Dives are identified by the Date/Time and number. The first dive of a new day
(after midnight) will be #1.
The Advance (Left) button is used to access each dive's log.
The Select (Right) button is used to view second and third screens for that dive
(Nitrogen and Oxygen related data).
To access the Log Mode:
• press the Advance (Left) button 5 times (while in Surface Mode)
• the first screen (Fig. 54) of the most recent dive will appear
• Log Mode icon and Dive Number
• Date and Time of Day that the dive started (and icon)
Fig. 54 - Log Mode
(first screen - date/time)
NO DECO
C Z
DECO
C ZO
2
49
Datamax Pro Plus
To access a specific dive's log, press the Advance (Left) button repeatedly.
To view the second screen for that dive (Nitrogen Log- Fig. 55):
• press the Select (Right) button 1 time
• Log Mode icon
• Dive number
• Maximum Depth reached for the dive (and icon)
• Elapsed Dive Time (and icon)
• Surface Interval prior to that dive (and icon)
• Variable Ascent Rate Indicator - showing the maximum ascent rate
maintained for 4 consecutive seconds during the dive
• Tissue Loading Bar Graph - showing tissue nitrogen loading at the
end of the dive
To view the third screen for that dive (Oxygen Log - Fig. 56):
• press the Select (Right) button 1 time
• Log Mode icon
• FO2 value - set for that dive (and 'FO2' symbol)
• Maximum PO2 level - reached during that dive (and 'PO2' symbol)
• O2 bar graph - showing oxygen loading at the time you surfaced.
• If FO2 was set for 'Air' for that dive, the O2 screen will only display 'FO2'
and 'Air'.
• press the Advance (Left) button 1 time to view the first screen of the pre-
vious dive's log.
Fig. 55 - Log Mode
(second screen - nitrogen)
Fig. 56 - Log Mode
(third screen - oxygen)
NO DECO
C Z
DECO
C ZO
2
FT
NO DECO
C Z
DECO
C ZO
2
2
O
50
®
To exit Log Mode and return to the Surface Mode:
• press the Advance (Left) button repeatedly to proceed through the re-
maining recorded dives.
• the unit will automatically revert to Surface Mode after 2 minutes, if no
button is pressed
AFTER THE FIRST 2 HOURS
Two hours after the last dive the Surface Mode will no longer be displayed.
The Time to Fly and Desaturate countdown timers will be displayed con-
tinuously, giving the final countdowns from 22:00 and 9:xx to 0:00 (Fig. 57).
To access other modes or enter settings:
• press the Select (Right) button to enter Surface Mode
• the unit will revert to Fly Mode after 2 hours, if no button is pressed
DOWNLOADING DATA TO PC
Using special infrared linking hardware and a unique PC software program,
data from your dives can be downloaded (copied) from your Pro Plus into an
IBM compatible PC program running on a Windows
®
95 or 98 operating sys-
tem. Instructions for performing the interface and download are provided
with the OceanLog™ for Pro Plus hardware and software package. The
OceanLog™ program provides profile data sampled throughout the dive.
Fig. 57 - Display
(after 2 hours on surface)
NO DECO
C Z
DECO
C ZO
2
51
Datamax Pro Plus
To access the External Access (EA) Mode:
• press both buttons simultaneously while in Surface Mode
• press the Advance (Left) button 14 times
• the letters EA appear, flashing (Fig. 58)
• press the Advance (Left) button to revert to Surface Mode, or -
• press the Select (Right) button to initiate download
• the unit will automatically revert to Surface Mode after download is com-
plete, or in 2 minutes if no button is pressed
• the backlight will not operate while in EA Mode
Fig. 58 - EA Mode
WARNING and SAFETY RECOMMENDATION
• The longer you wait to fly (or travel to higher elevations) after diving, the more you will re-
duce your exposure to decompression sickness.
NO DECO
C Z
DECO
C ZO
2
52
®
SUMMARY OF ACCESS TO POST DIVE MODES
During the first 2 hours after a dive* (
after the 10 minute Transition Period has ended
):
MODESTO ACCESSTO VIEW
Backlightpress Either '1 time'
Temperature/Date/Timepress Left '1 time'
FO2 setpress Left '2 times'> press Right (hold or repetitive)
Pre Dive Plan Sequencepress Left '3 times'> press Right (hold or repetitive)
Fly/Desaturatepress Left '4 times'
Log Modepress Left '5 times'> press Right (hold or repetitive)
Set Modepress Both '1 time'> Refer to page 30 of this Guide
EA Modepress Both '1 time'> press Left '14 times' > Right '1 time'
*After the First 2 Hours, the unit will remain in Fly/Desaturate Mode. To access other Modes:
• press the Right button to return to the Surface Mode, then press the buttons as indicated above.
53
Datamax Pro Plus
HANDLING
THE
EXTREMES
refer to pages 66-68 for - WARNINGS and SAFETY RECOMMENDATIONS
54
®
AVOIDING AND MANAGING DECOMPRESSION
The Pro Plus is a sophisticated instrument designed with capabilities that go
beyond the range of recreational diving with compressed air. It will help you
to avoid and, if necessary, manage decompression.
TISSUE LOADING BAR GRAPH™
The Tissue Loading Bar Graph™ offers you a convenient way to consistently
monitor how close you are coming to the No Decompression Limit. As you use
the Pro Plus and become familiar with the Tissue Loading Bar Graph, you will
notice that it displays fewer segments for shorter dive times and shallower
depths. Use this feature to adjust conservatism to your diving needs.
Use the yellow Caution (C.Z.) Zone (Fig. 59a) as a visual reference to
place a wider margin of protection between you and the No Decom-
pression Limit.
Oceanic suggests keeping the Tissue Loading Bar Graph in the green
No Decompression (NO DECO) zone during all of your dives, and that
it be in the green when leaving the water.
Fig. 59 - Caution Zone
a
20051030405060
NO DECO
C Z
DECO
C ZO
2
PSI
FT
FT
MAX
55
Datamax Pro Plus
20051030405060
NO DECO
C Z
DECO
C ZO
2
PSI
FT
FT
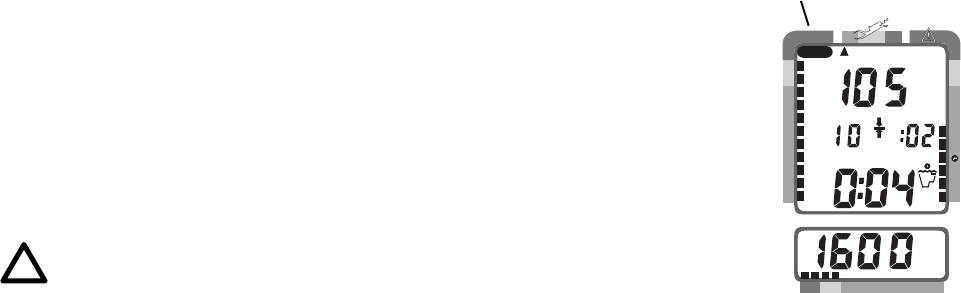
DECOMPRESSION DIVE MODE
The Pro Plus is designed to help you by providing a complete representation of
how close you are to entering decompression. Decompression Dive Mode acti-
vates when theoretical no decompression time/depth limits are exceeded.
In the event that you enter Decompression Mode, as indicated by a double
beep, the large red segment of the Tissue Loading Bar Graph (Fig. 60a) flash-
ing, and ceiling bar of the Decompression Mode icon flashing, immediately be-
gin a safe controlled ascent to a depth slightly deeper than, or equal to, the Re-
quired Ceiling Stop Depth indicated (Fig. 60b) and decompress for the Stop
Time indicated (Fig. 60c).
Main Display (data shown is the same if Alternate is set ON or OFF)
Information displayed in addition to Stop Depth/Time includes:
• current Depth and tank Pressure
• Total Ascent Time (Fig. 60d) - that includes stop times required at all
ceilings and vertical ascent time calculated at 60 ft (18 m) per minute.
• O2 bar graph (if a nitrox dive), Variable Ascent Rate Indicator, and
Breathing Gas Time Remaining bar graph
Additional data can be accessed using the Advance (Left) button, and the
Oceanglo
®
backlight can be activated using the Select (Right) button.
Fig. 60 - Main Display
(Alternate set ON or OFF)
b
c
a
d
56
®
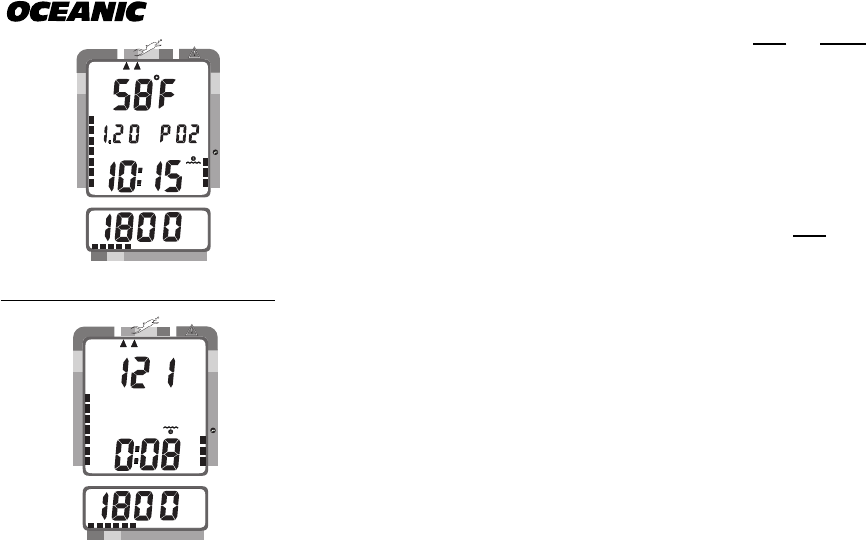
Secondary Display (access if Alternate is set ON or OFF)
To view water Temperature, Time of Day, and 'if FO2 was set for a numerical
value', display the current level of PO2 (Fig. 61):
• press the Advance (Left) button 1 time
• the unit will revert to the Main Display after 10 seconds if the Advance
(Left) button is not pressed again.
Alternate Display (access only if Alternate is set ON)
To view Maximum Depth and Elapsed Dive Time, in Large Format, in place of
Current Depth and Total Ascent Time (Fig. 62):
• press the Advance (Left) button 2 times, or -
• press the Advance (Left) button 1 time, if viewing Temp/Time/PO2.
• the unit will revert to the Main Display after 10 seconds, or if the Ad-
vance (Left) button is pressed.
BREATHING GAS TIME REMAINING DURING DECOMPRESSION
Breathing Gas Time Remaining will fluctuate throughout your dive, decreas-
ing as you dive deeper or breath heavier, and increasing as you ascend to shal-
lower depths or relax your breathing efforts. If you inadvertently exceed no
decompression limits, the Pro Plus will provide critical information regarding
your remaining breathing gas supply.
Fig. 61 - Secondary Display
Fig. 62 - Alternate Display
20051030405060
NO DECO
C Z
DECO
C ZO
2
PSI
20051030405060
NO DECO
C Z
DECO
C ZO
2
PSI
MAX
FT
57
Datamax Pro Plus
Once you enter Decompression Mode, you will need to refer to the Gas Time
Remaining bar graph for Breathing Gas Time Remaining information.
The rationale being that Dive Time Remaining is not displayed numerically in
Decompression Mode (No Decompression time is zero and in control).
When Breathing Gas Time Remaining decreases to 5 minutes, the tank Pres-
sure numerals will flash and a Double Beep will sound (Fig. 63). This means
that only 5 minutes remain before your breathing gas supply will be reduced to
the minimum level necessary to perform the required decompression stops and
still provide a tank pressure reserve upon surfacing.
When the Breathing Gas Time Remaining decreases to zero minutes, the Au-
dible Alarm will continuously beep once per second* (Fig. 64), signaling the
need for an immediate safe ascent to your first decompression stop.
*If the audible alarm feature was set to OFF, only a double beep will be
emitted to alert you.
There is no need to panic. The Pro Plus has allowed for (calculated) the
breathing gas you will consume while making a safe controlled ascent, includ-
ing that required for decompression stops, and still provide the surfacing tank
pressure reserve you chose (set) as the End Pressure Alarm Set Point.
Fig. 64 - Breathing Gas Time
Remaining (zero minutes)
Fig. 63 - Breathing Gas Time
Remaining (5 minutes)
20051030405060
NO DECO
C Z
DECO
C ZO
2
PSI
FT
20051030405060
NO DECO
C Z
DECO
C ZO
2
PSI
FT
58
®
20051030405060
NO DECO
C Z
DECO
C ZO
2
PSI
FT
FT
MANAGING DECOMPRESSION STOPS
The amount of decompression credit time that you receive is dependent on
depth, with slightly less credit given the deeper you are.
You should stay slightly deeper (Fig. 65a) than the Required Stop Depth indi-
cated (Fig. 65b) until the next shallower Stop Depth appears. Then, you can
slowly ascend to, but not shallower than, that indicated ceiling Stop Depth.
Once all required decompression has been completed, the Pro Plus will switch
to the No Decompression Dive Mode. This is indicated by Total Ascent Time
= 0:00, and the Tissue Loading Bar Graph receding into the Caution Zone.
Dive Time Remaining now appears in place of Total Ascent Time displaying
No Decompression Dive Time remaining, or Oxygen Accumulation Time re-
maining, or Breathing Gas Time remaining (whichever time is the least).
VIOLATION MODES
While in Violation Modes, the secondary and Alternate displays previously de-
scribed can be accessed using the Advance (Left) button, and the Oceanglo®
backlight can be activated using the Select (Right) button.
Fig. 65 - Managing a Decom-
pression Stop
b
a
59
Datamax Pro Plus
CONDITIONAL VIOLATION MODE
The Pro Plus will enter the Conditional Violation Mode if you ascend shal-
lower(Fig. 66a) than the Required Decompression Ceiling Stop Depth
displayed (Fig. 66b).
The audible alarm will beep once per second* and the Total Ascent Time dis-
play (Fig. 66c) will flash until you descend below the Required Stop Depth.
*If the audible alarm feature was set to OFF, only a double beep will be
emitted to alert you.
If you descend below the required decompression ceiling before 5 minutes have
elapsed, the Pro Plus will continue to function as if no violation had occurred.
In this case, no off-gassing credit will be given, and for each minute above the
ceiling 1
1
/
2
minutes of penalty time is added to Required Stop Time.
The added penalty decompression time will have to be 'worked off' first, before
obtaining off-gassing credit. Once the penalty time is worked-off, and off-gas-
sing credit begins, required decompression Stop Depths and Time will decrease
toward zero, then the Tissue Loading Bar Graph will recede into the caution
zone and the Pro Plus will revert to the No Decompression Dive Mode.
Fig. 66 - Conditional Viola-
tion
20051030405060
NO DECO
C Z
DECO
C ZO
2
PSI
FT
FT
b
a
c
60
®
DELAYED VIOLATION MODE
Three conditions cause the Pro Plus to enter the Delayed Violation Mode:
1. Above the Required Ceiling Stop Depth for 'more than 5 minutes'.
The Audible Alarm will emit one long beep and the Total Ascent Time display
(Fig. 67a) will flash until you descend below the Required Stop Depth.
You would then need to follow the Stop Depths and Times toward the surface
until the Tissue Loading Bar Graph recedes into the caution zone.
Gebruikershandleiding.com neemt misbruik van zijn services uitermate serieus. U kunt hieronder aangeven waarom deze vraag ongepast is. Wij controleren de vraag en zonodig wordt deze verwijderd.
Product:
Spelregels forum
Om tot zinvolle vragen te komen hanteren wij de volgende spelregels:
lees eerst de handleiding door;
controleer of uw vraag al eerder door iemand anders is gesteld;
probeer uw vraag zo duidelijk mogelijk te stellen;
heeft u een probleem en al geprobeerd om dit op te lossen, vermeld dit erbij aub;
heeft u een oplossing gekregen van een bezoeker dan horen wij dat graag in dit forum;
wilt u een reactie geven op een vraag of antwoord, gebruik dan niet dit formulier maar klik op de knop 'reageer op deze vraag';
uw vraag wordt direct op de website gezet; vermijd daarom persoonlijke gegevens in te vullen;
Belangrijk! Als er een antwoord wordt gegeven op uw vraag, dan is het voor de gever van het antwoord nuttig om te weten als u er wel (of niet) mee geholpen bent! Wij vragen u dus ook te reageren op een antwoord.
Belangrijk! Antwoorden worden ook per e-mail naar abonnees gestuurd. Laat uw emailadres achter op deze site, zodat u op de hoogte blijft. U krijgt dan ook andere vragen en antwoorden te zien.
Abonneren
Abonneer u voor het ontvangen van emails voor uw Oceanic DataMax Pro Plus bij:
nieuwe vragen en antwoorden
nieuwe handleidingen
U ontvangt een email met instructies om u voor één of beide opties in te schrijven.
Ontvang uw handleiding per email
Vul uw emailadres in en ontvang de handleiding van Oceanic DataMax Pro Plus in de taal/talen: Engels als bijlage per email.
De handleiding is 1,09 mb groot.
U ontvangt de handleiding per email binnen enkele minuten. Als u geen email heeft ontvangen, dan heeft u waarschijnlijk een verkeerd emailadres ingevuld of is uw mailbox te vol. Daarnaast kan het zijn dat uw internetprovider een maximum heeft aan de grootte per email. Omdat hier een handleiding wordt meegestuurd, kan het voorkomen dat de email groter is dan toegestaan bij uw provider.
Stel vragen via chat aan uw handleiding
Stel uw vraag over deze PDF
Andere handleiding(en) van Oceanic DataMax Pro Plus
Uw handleiding is per email verstuurd. Controleer uw email
Als u niet binnen een kwartier uw email met handleiding ontvangen heeft, kan het zijn dat u een verkeerd emailadres heeft ingevuld of dat uw emailprovider een maximum grootte per email heeft ingesteld die kleiner is dan de grootte van de handleiding.
Er is een email naar u verstuurd om uw inschrijving definitief te maken.
Controleer uw email en volg de aanwijzingen op om uw inschrijving definitief te maken
U heeft geen emailadres opgegeven
Als u de handleiding per email wilt ontvangen, vul dan een geldig emailadres in.
Uw vraag is op deze pagina toegevoegd
Wilt u een email ontvangen bij een antwoord en/of nieuwe vragen? Vul dan hier uw emailadres in.