he OCC 2 thermostat is capable of switching on your heating system at pre determined times on different days of the week. It is possible to set 4 periods
called events each day with different temperatures. From factory a default schedule is programmed suitable for most installations. Unless you change these
s
ettings the thermostat will operate to this default program.
W
orking with lower temperatures during times that the room is unoccupied will lower your energy costs without reducing the comfort. The thermostat has an
adaptive function that automatically changes the start time of a heating period so that the desired temperature is reached at the time that you set. After 3
d
ays the adaptive function has learned when the heating must be switched on.
Type OCC2-1991H1 has an external temperature sensor that is normally placed in the floor construction. In this configuration the thermostat controls the
temperature of the floor and not the temperature within the room.
T
ype OCC2-1999H1 has a built-in temperature sensor. In this configuration the thermostat controls the temperature of the room, and the external
temperature sensor should not be installed.
T
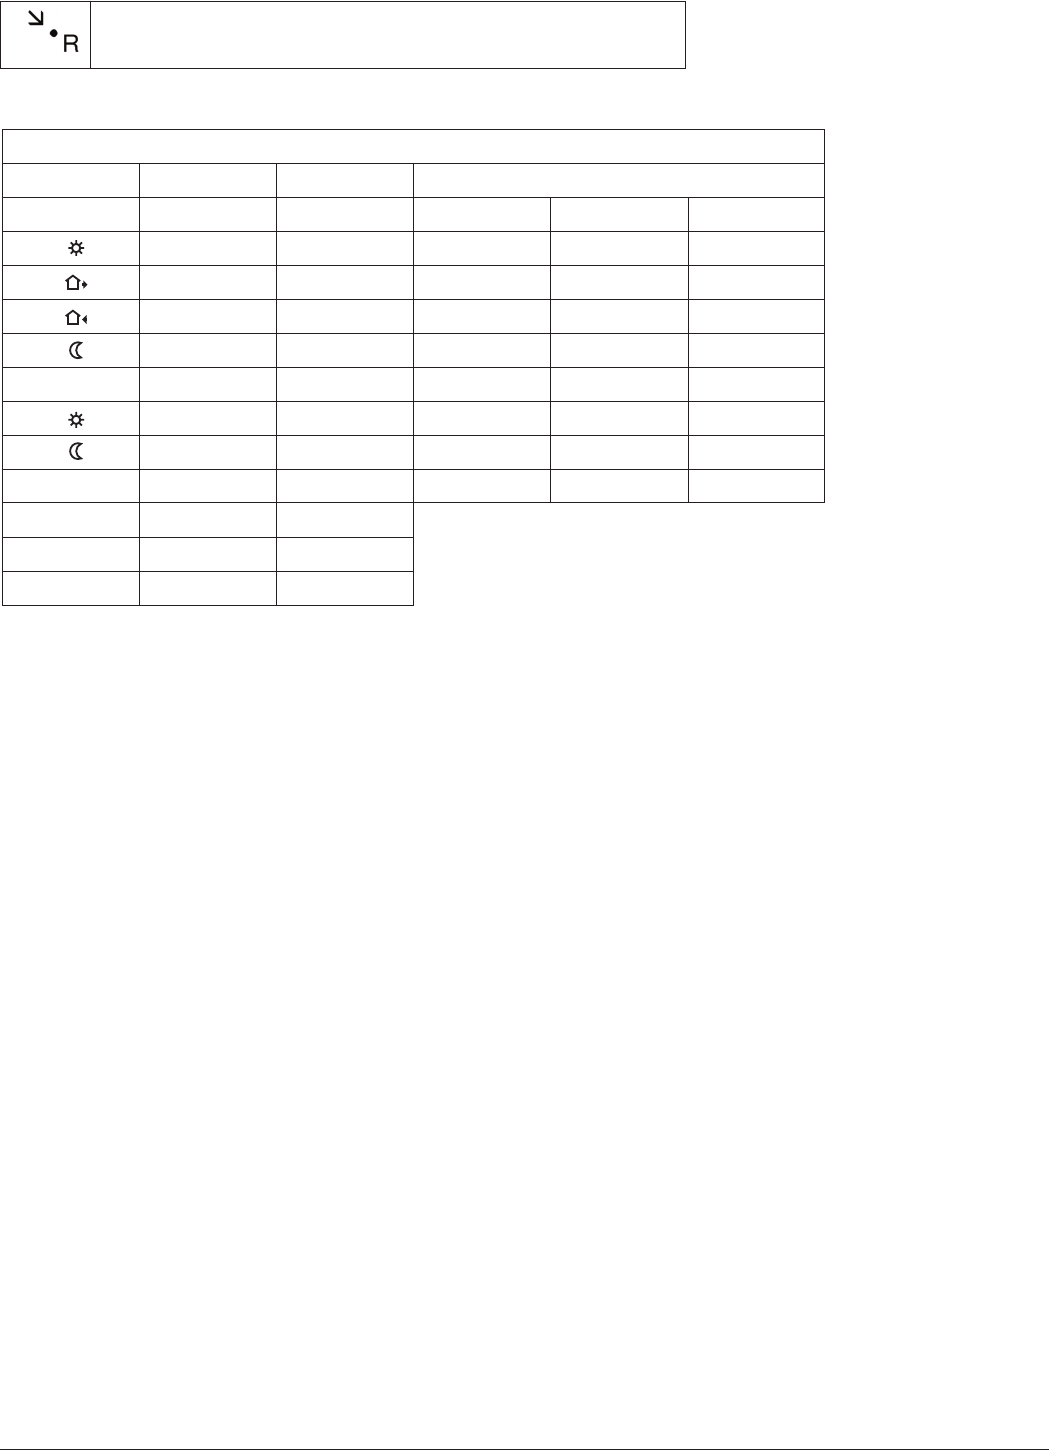
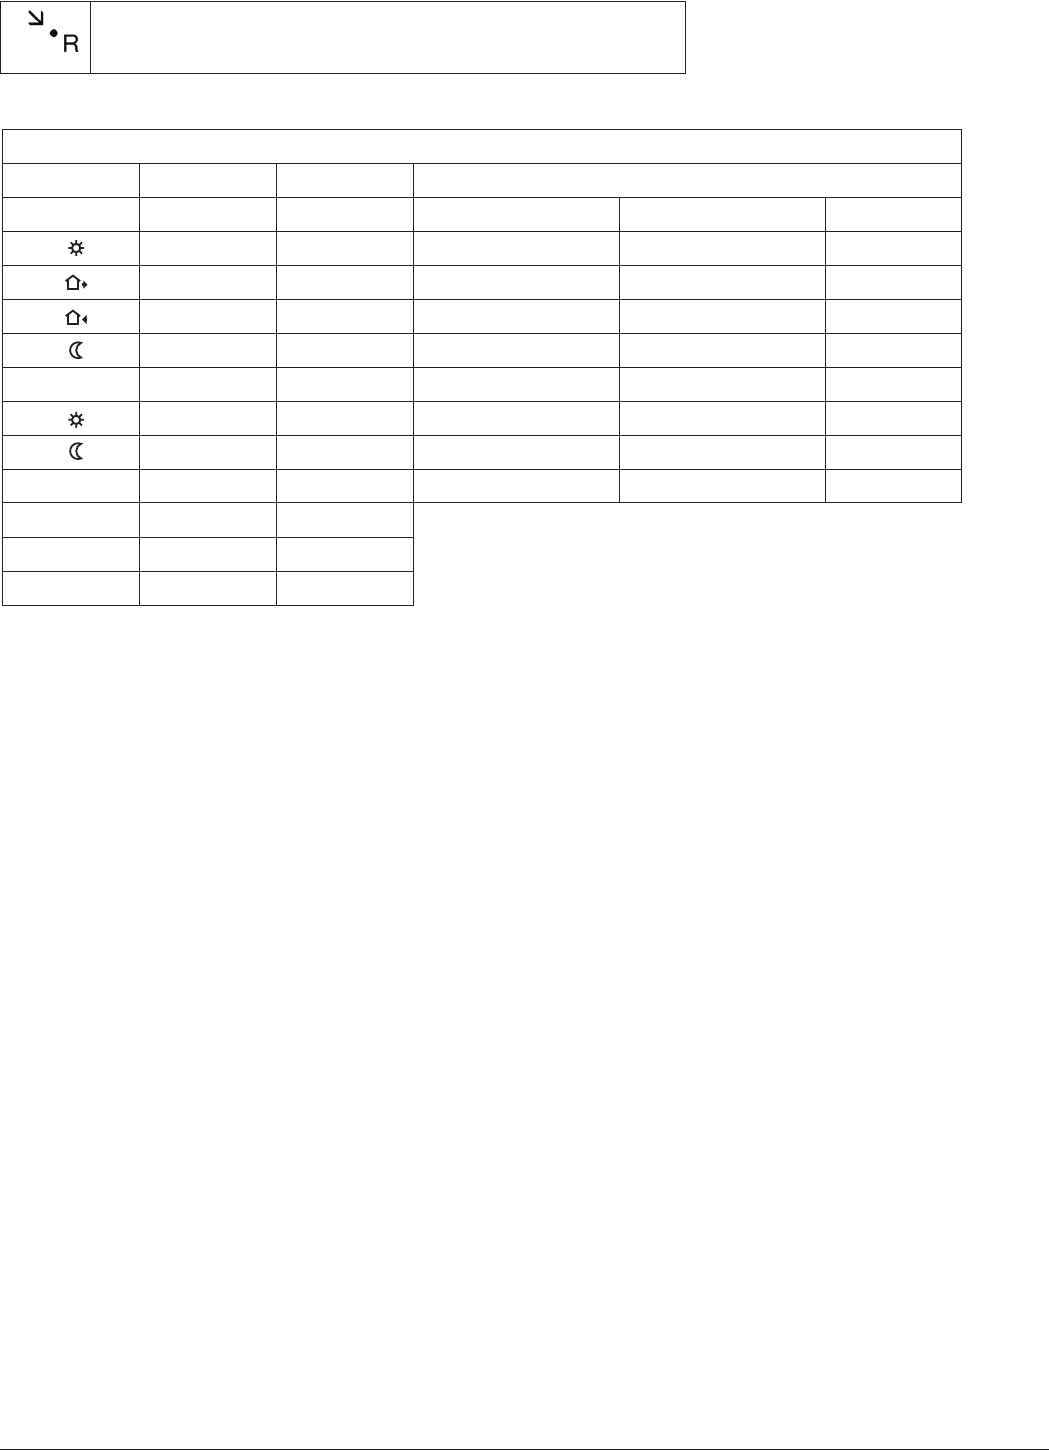
he thermostat has a pin button marked R, allowing you to reset the thermostat to factory settings. These are listed at the end of this manual with space for
y
ou to record your own weekly schedule.
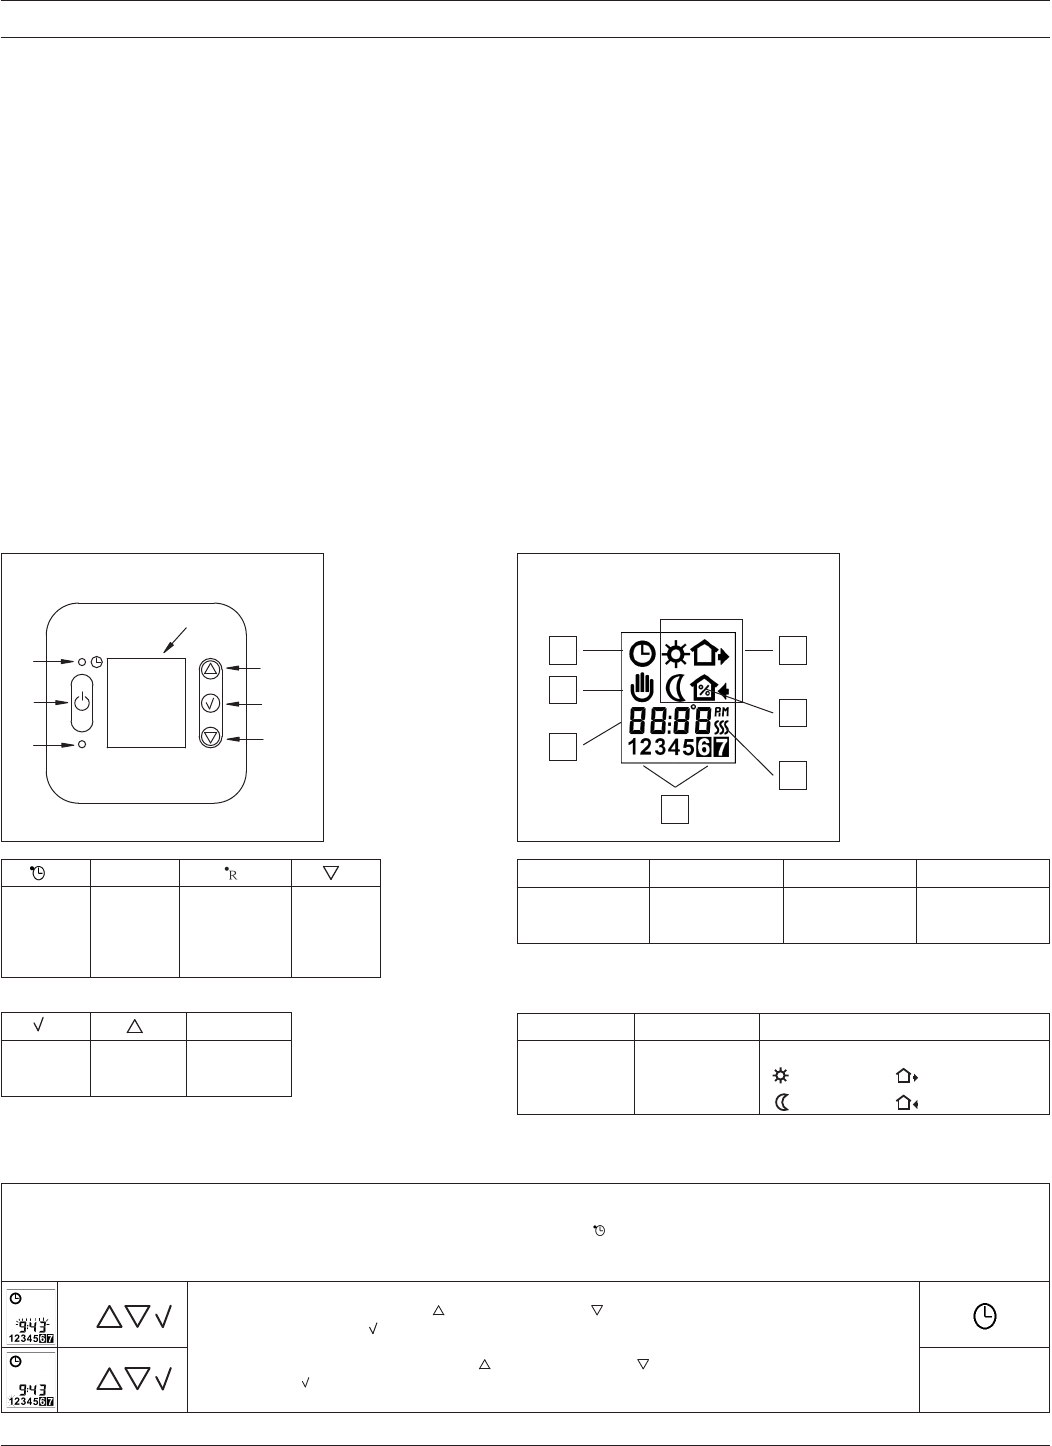
The display is backlit when operating the buttons. The heating element is switched off when the light is on in the display.
The heating system can be switched off on the built-in interrupter. The Microprocessor taking care of the time will still be supplied with power whereby time
and day will be maintained. When the heating is required and the thermostat is switched on, it will continue the 4-event programme based on present time
a
nd day.
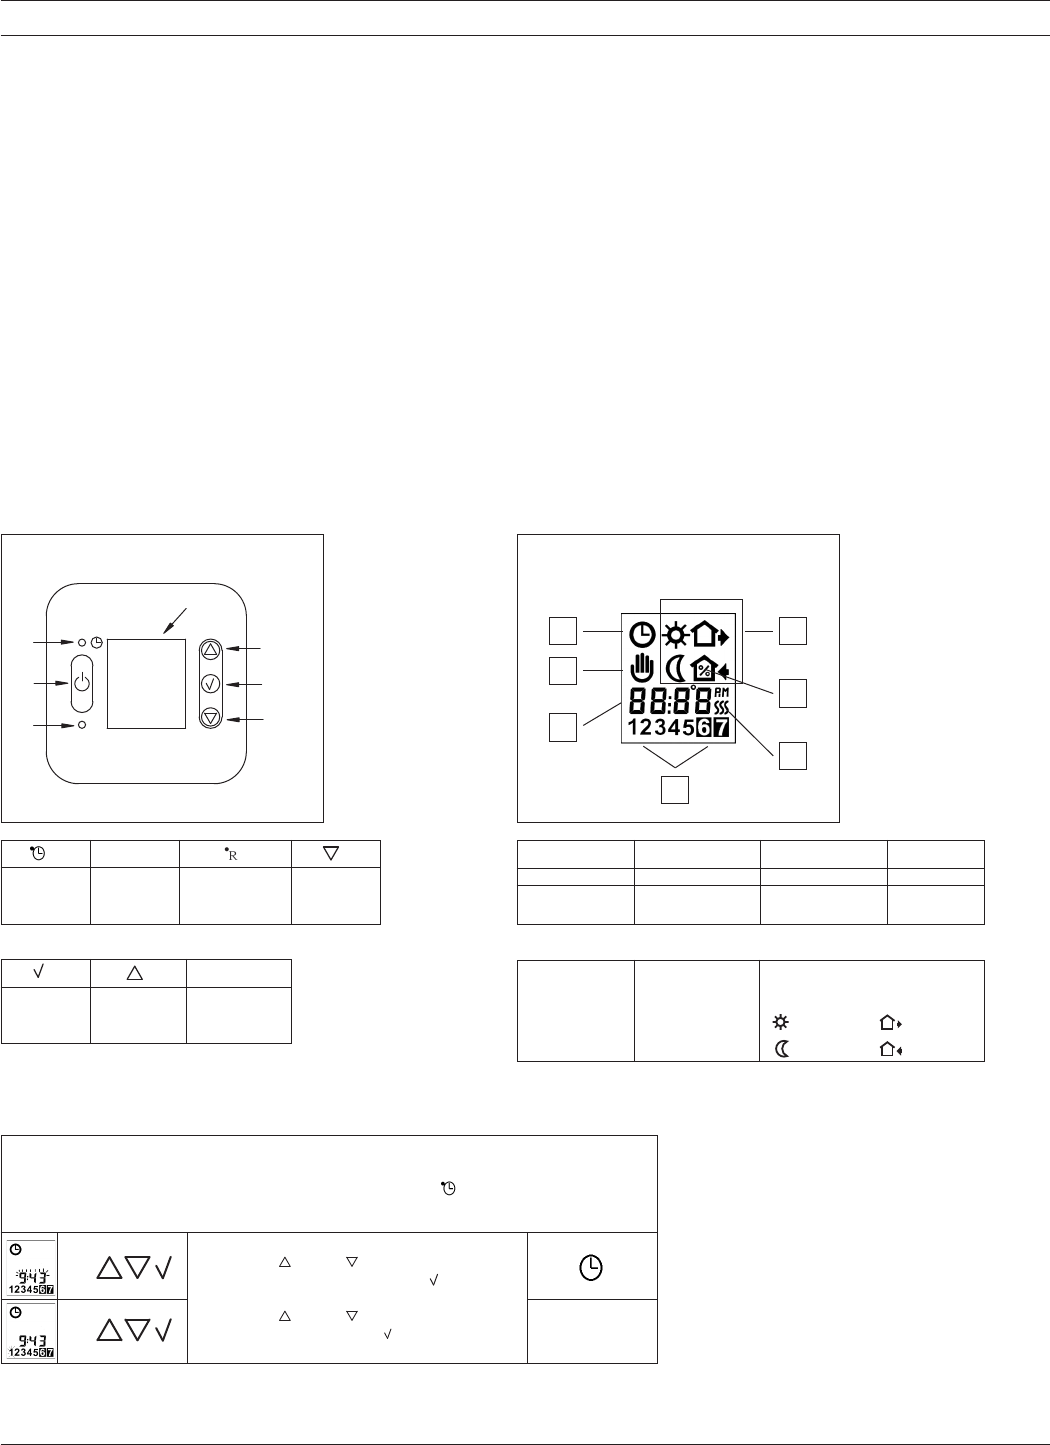
Setting the thermostat into operation
☞
☞
1-7
Press the UP () or DOWN () buttons to
select the correct time and press OK button ().
Then press the UP () or DOWN () button to
select the correct day and press OK () button.
First time power is connected the clock and day will be flashing and must be set. If you need to
adjust the time of the thermostat at a later date, insert a pin into the hole for setting of time
and day. Adjustment must be made for summer and winter time.
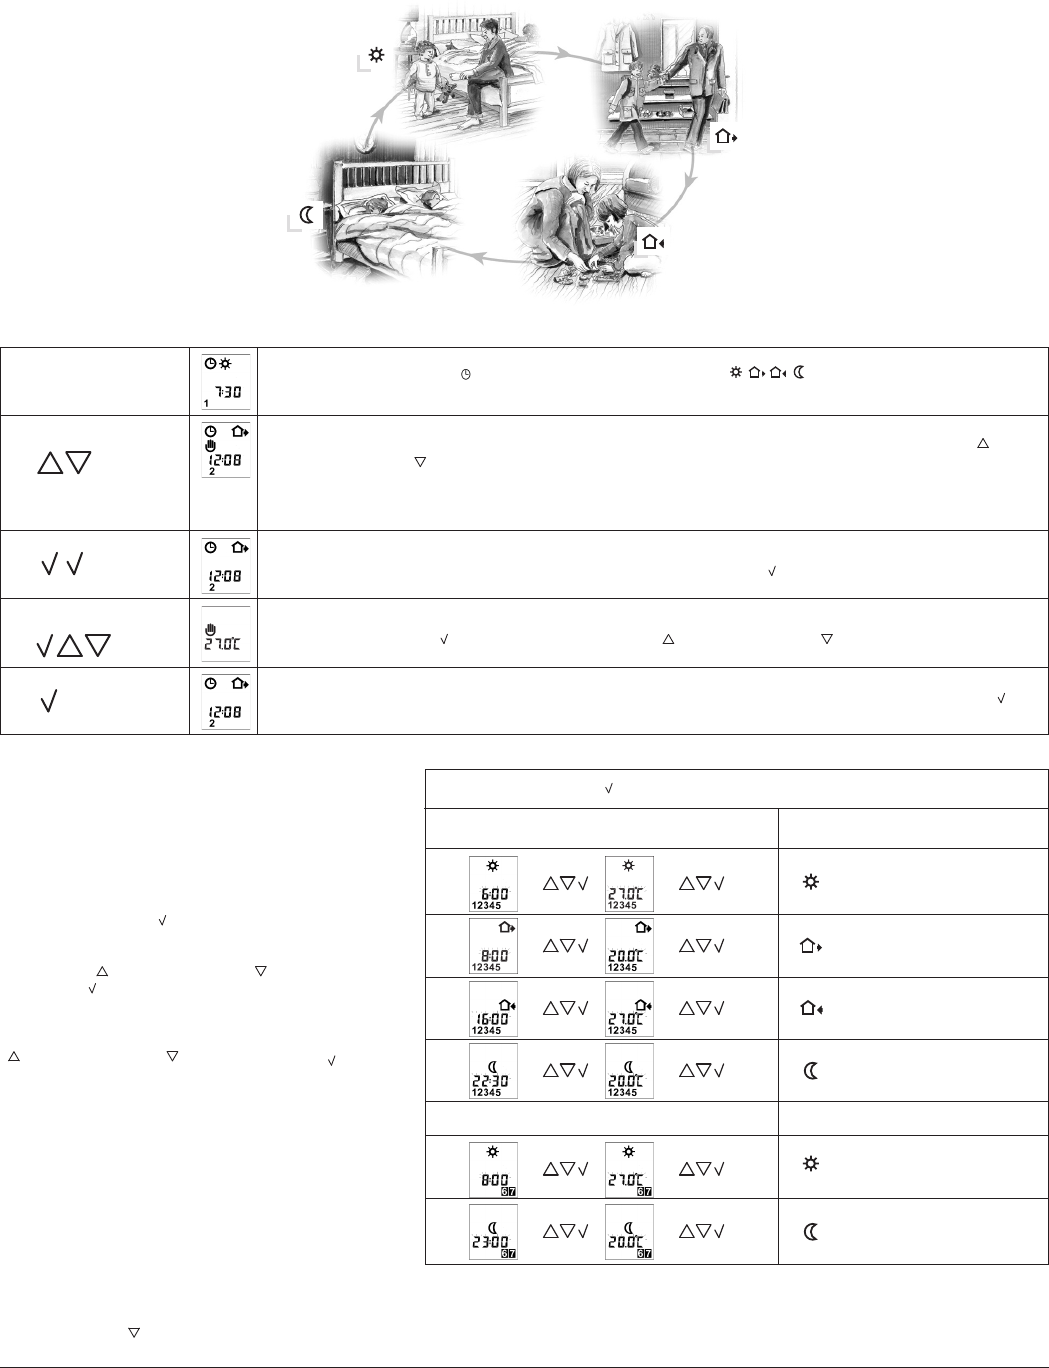
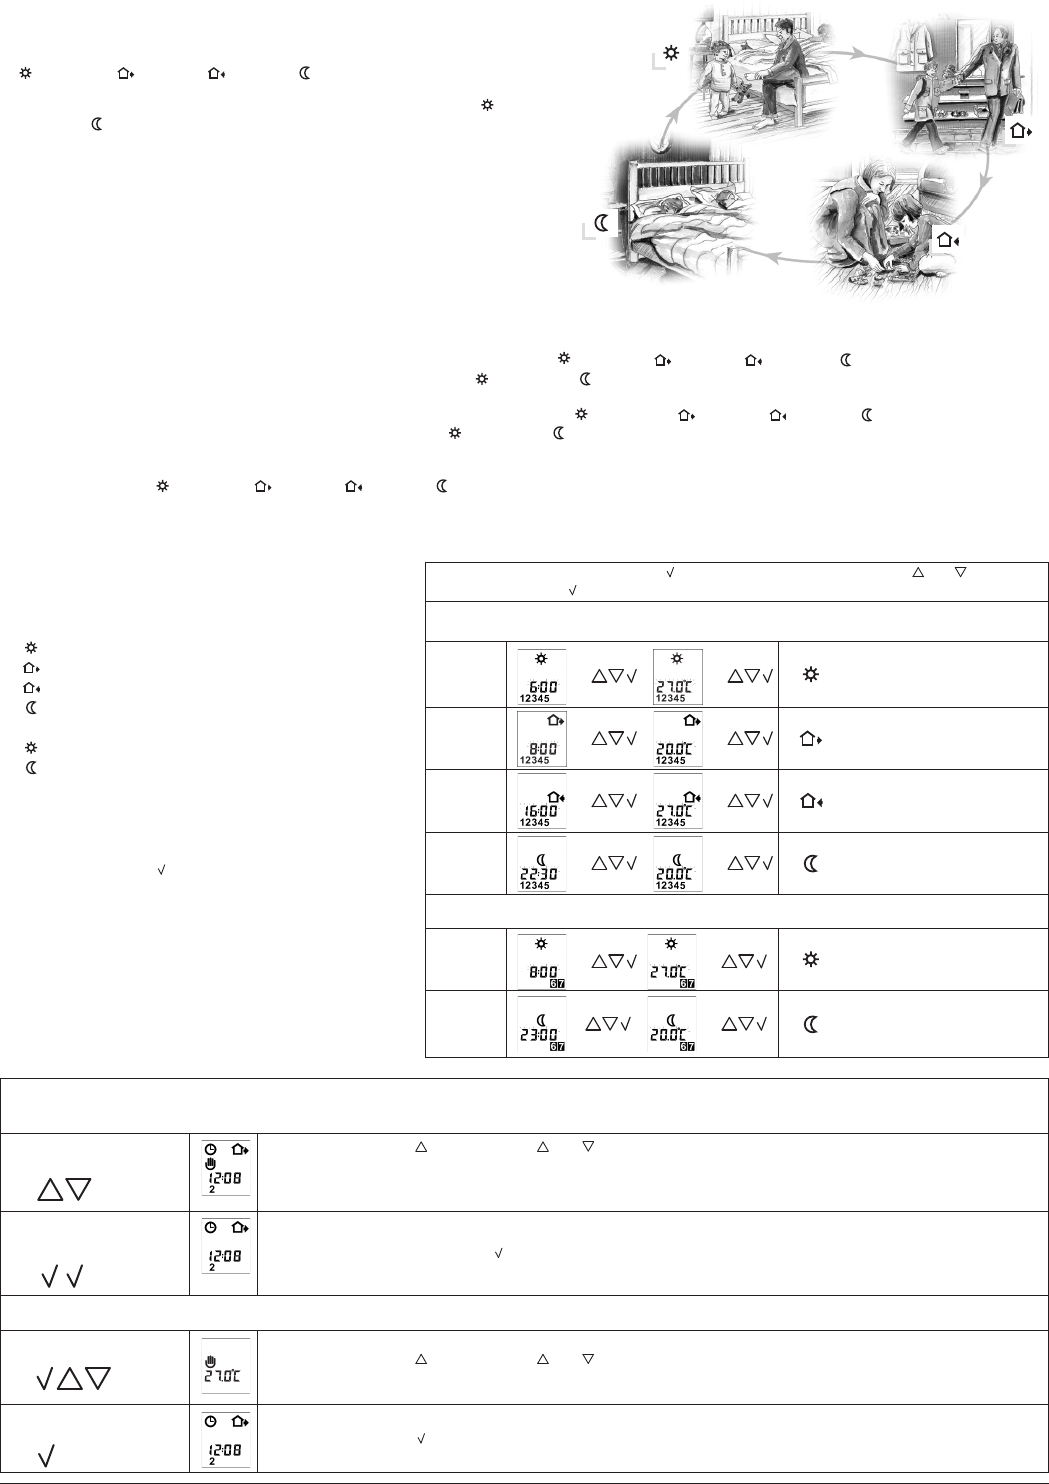
The day has been split into 4 events describing a typical day. When the thermostat is in 4-event mode it will automatically adjust the temperature according
t
o the required temperature to the required time. As standard the thermostat has 5 days with 4 events, and 2 days with 2 events. Programming see 3.
4
-event clock mode:
C
omfort mode:
☞
☞
Manual mode:
☞
☞
Temporary override
To temporarily override the temperature in the 4-event schedule program, press the UP () or DOWN () button
o
nce, to show the temperature, and press again to increase or decrease the temperature. The display will flash for
5 seconds, and will then revert to the time. The override will operate until the next programmed event when the
unit will resume the automatic programme.
The clock function symbol () and one of the 4-event symbols () will be indicated.
Programming see 3.
Cancel comfort mode
To cancel the override state, press the OK () button twice.
Permanent override:
During holidays, the scheduled 4-event program can be overridden.
Press the OK () button, and then the UP () or DOWN () button until the override temperature is set.
The unit will now operate to this temperature permanently.
Cancel manual mode
To cancel the permanent override state press the OK () button once, and the unit will resume automatic function.
5 secs.
5 secs.
☞
☞
☞
☞
☞
☞
☞
☞
Press OK () button for 3 secs. to begin programming
: Time and temperature
: Time and temperature
: Time and temperature
: Time and temperature
Day 1 - 5
Day 6 - 7
☞
☞
: Time and temperature
☞
☞
: Time and temperature
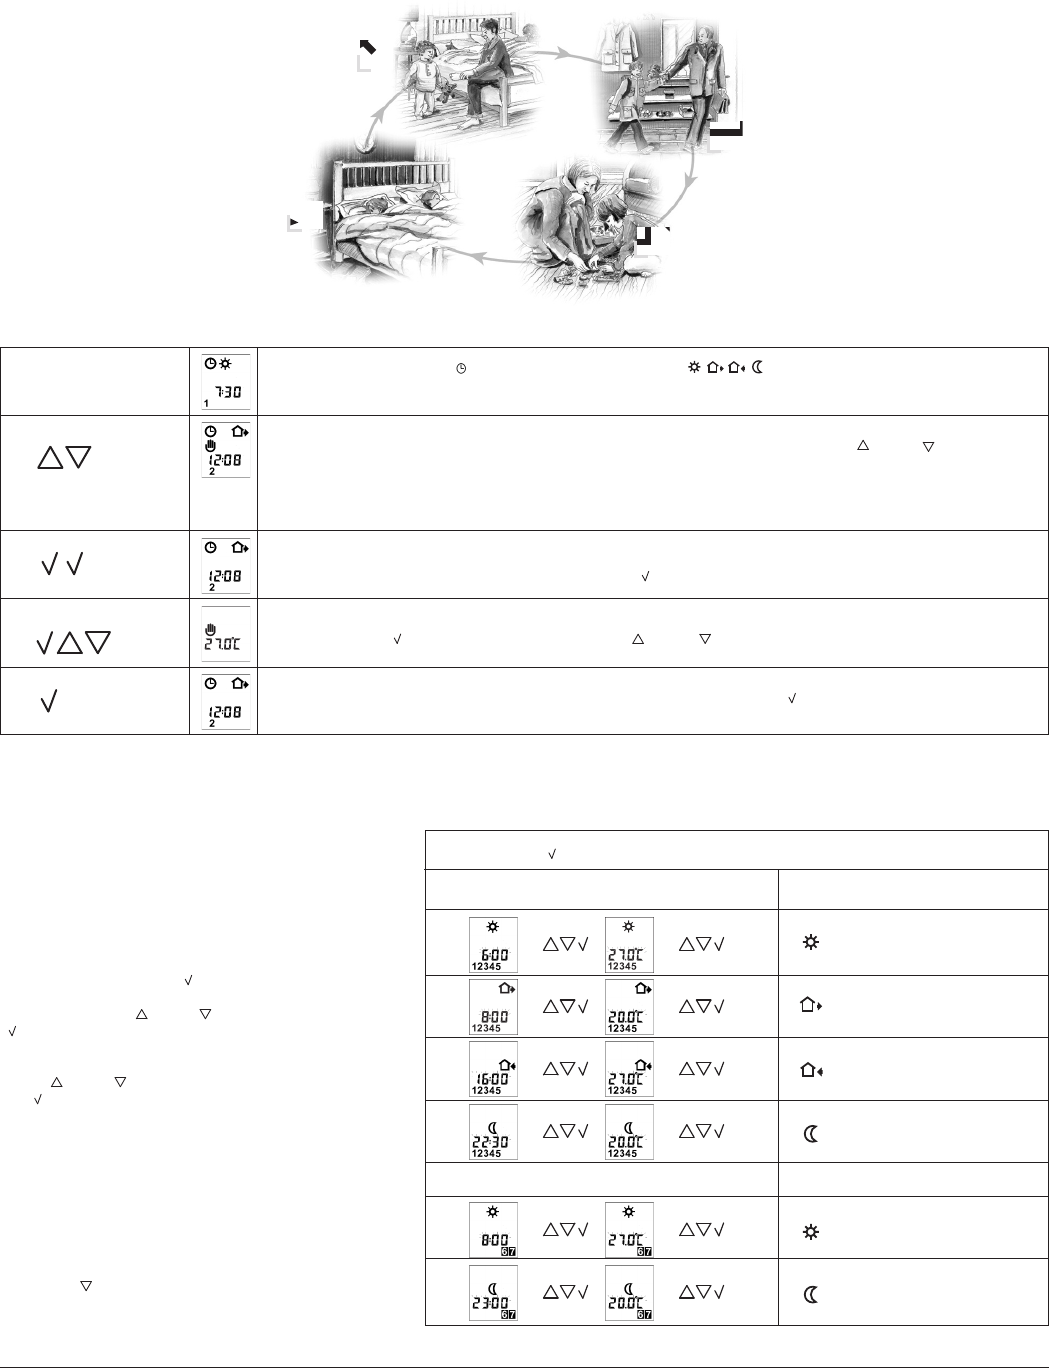
3. Programming
4-event time and temperature
For each event, the start time and required
temperature must be set.
For example, in the morning you wish the heating to
start at 07:00 and the temperature to rise to 25˚C.
Press OK () button for 3 seconds and the start time
is displayed. Change this to 07:00 with the
UP () or DOWN () button. Press OK () to
confirm.
The temperature is now displayed. Change this to 25˚C
with the UP () or DOWN () button.
Press OK () button to confirm. This action can now
be repeated for the second event.
These settings will be valid with days 1-5 showing on
the display. To program the days 6 and 7, repeat the
above. Days 6 and 7 are usually Saturday and Sunday,
and only have two events.
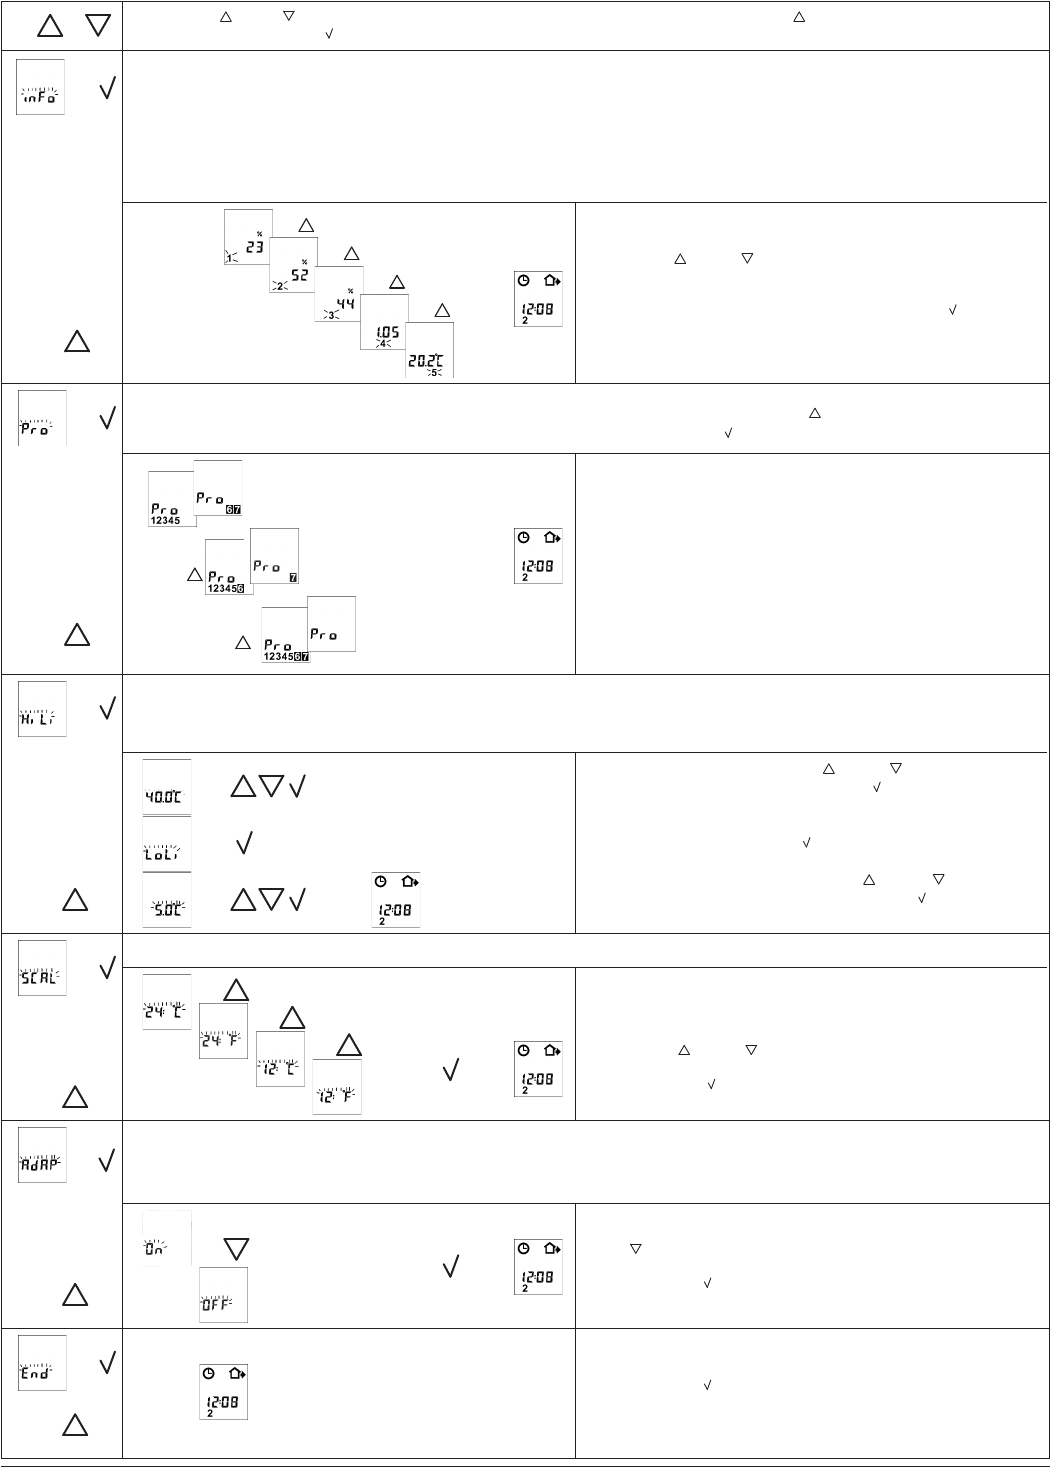
The temperature can be set within the range of +5 to
+40˚C. It is also possible to select the heating OFF at
that event by reducing the setting to 5˚C, and then
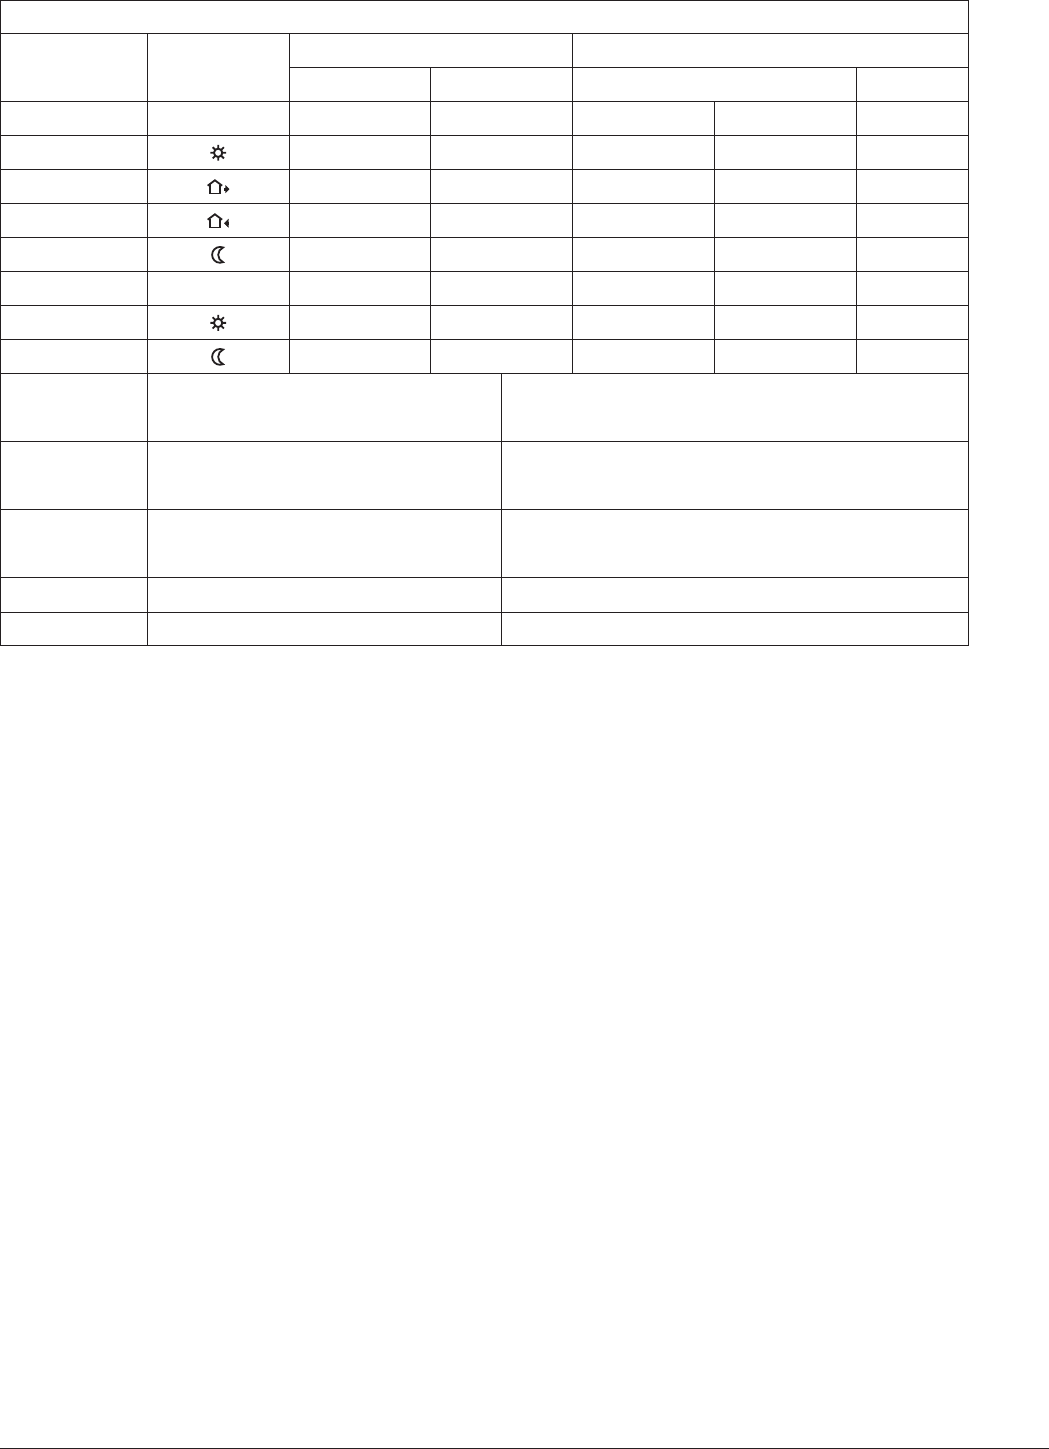
Funkcja zegaraTryb ręcznyCzas i temperaturaOkreślenie dnia
Ogrzewanie
włączone
%
Odczyt czasu
pracy
Symbole czterech zdarzeń
1
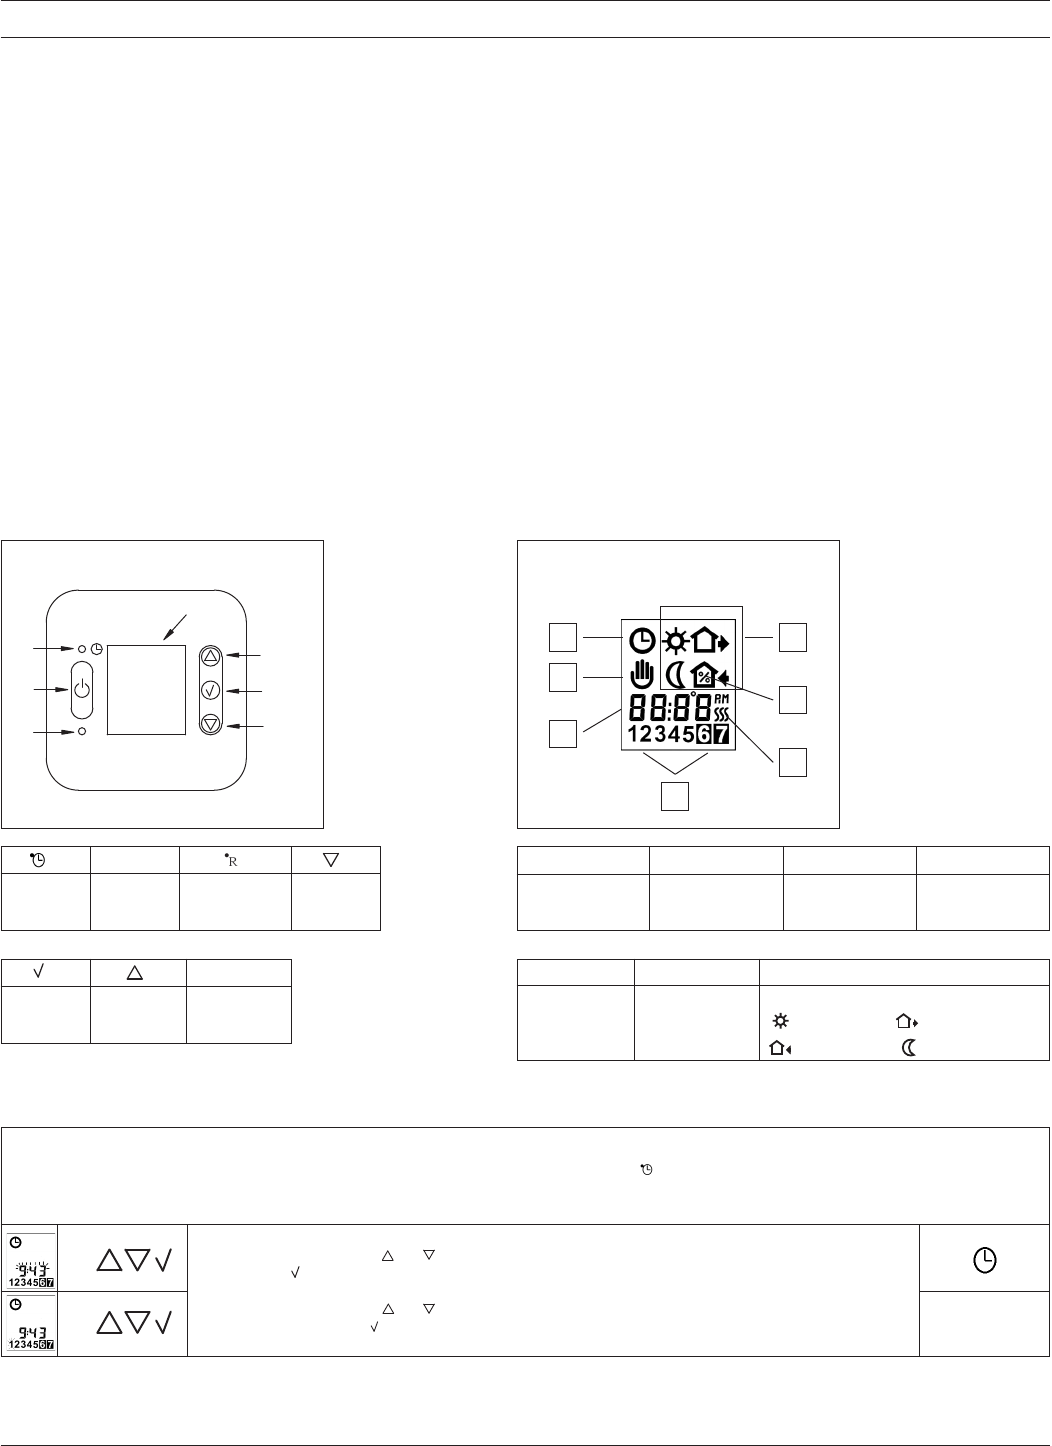
. Wstęp
Programowalny regulator temperatury OCC2 służy do załączania obwodu grzejnego o zadanych porach, w poszczególne dni tygodnia. Modyfikacji
p
rogramu można dokonać poprzez zmianę czterech, wstępnie zaprogramowanych zdarzeń. To nowatorskie rozwiązanie pozwala na zaprogramowanie
r
egulatora, niemal z “dziecinną łatwością“. Procesor regulatora został tak zaprogramowany, aby poprzez duży wyświetlacz i za pomocą symboli graficznych,
p
oprowadzić użytkownika przez proces programowania.
K
ażdorazowe użycie przycisków powoduje podświetlenie wyświetlacza. Gdy wyświetlacz jest podświetlony element grzejny jest odłączony.
OCC2 został wyposażony w funkcję adaptacyjną, która automatycznie zmienia czas załączenia ogrzewania w taki sposób, aby o nastawionej przez
użytkownika porze, została osiągnięta zadana temperatura. Po trzech dniach funkcja adaptacyjna zostaje zapisana w pamięci regulatora. Funkcję
a
daptacyjną można wyłączyć (patrz pkt 5).
Regulator OCC2-1991 wyposażony jest w czujnik podłogowy przystosowany do montażu w podłodze. W tej konfiguracji regulator mierzy temperaturę
podłogi.
R
egulator OCC2-1999 wyposażony jest w czujnik powietrzny. W tej konfiguracji regulator mierzy temperaturę otoczenia.
P
odstawową zaletą programowalnego regulatora temperatury OCC2 jest możliwość zaprogramowania czasu i temperatury dla każdego zdarzenia
i
ndywidualnie. Dzięki takiemu rozwiązaniu można znacznie zredukować koszty energii, nie tracąc przy tym (dzięki funkcji adaptacyjnej) jednej z
najważniejszych zalet przy ogrzewaniu jaką jest “komfort cieplny“.
O
CC2 występuje w dwóch typach: OCC2-1991 (wyposażony w czujnik podłogowy) oraz OCC2-1999 (wyposażony we wbudowany czujnik powietrzny).
R
egulator i czujnik należy zamontować zgodnie z instrukcją obsługi.
2. Załączenie regulatora
☞
☞
1-7
Za pomocą przycisków () i () należy ustawić aktualną godzinę i zaakceptować poprzez naciśnięcie
przycisku ().
Za pomocą przycisków () i () należy ustawić odpowiedni dzień i zaakceptować poprzez
naciśnięcie przycisku ().
Po pierwszym załączeniu regulatora na wyświetlaczu pojawią się pulsujące symbole: zegara () i dni. Każdy dzień ma przypisaną cyfrę od 1 do 7
(poniedziałek-1, wtorek-2, itd. ...). Pamiętając o tym należy ustawić aktualny czas i odpowiedni dzień tygodnia.
Przez pięć dni (poniedziałek-piątek) pracuje w trybie cztero-zdarzeniowym, czyli: () pobudka, () wyjście, () powrót, () noc.
- Przez dwa dni (sobota, niedziela) w trybie dwu-zdarzeniowym, czyli: () pobudka i ()noc.
W
ariant 2. 6(4)-1(2) -123456 / 7
- Przez sześć dni (poniedziałek-sobota) pracuje w trybie cztero-zdarzeniowym, czyli: () pobudka, () wyjście, () powrót, () noc.
- Przez jeden dzień (niedziela) w trybie dwu-zdarzeniowym, czyli: () pobudka i () noc.
W
ariant 3. 7(4)-0(2) - 1234567
- Przez siedem dni (poniedziałek-niedziela) pracuje w trybie cztero-zdarzeniowym z tym wyjątkiem, że w tym trybie, każdy dzień można zaprogramować
i
ndywidualnie, czyli: () pobudka, () wyjście, () powrót, ()noc - dla każdego dnia tygodnia mogą występować różne czasy i temperatura.
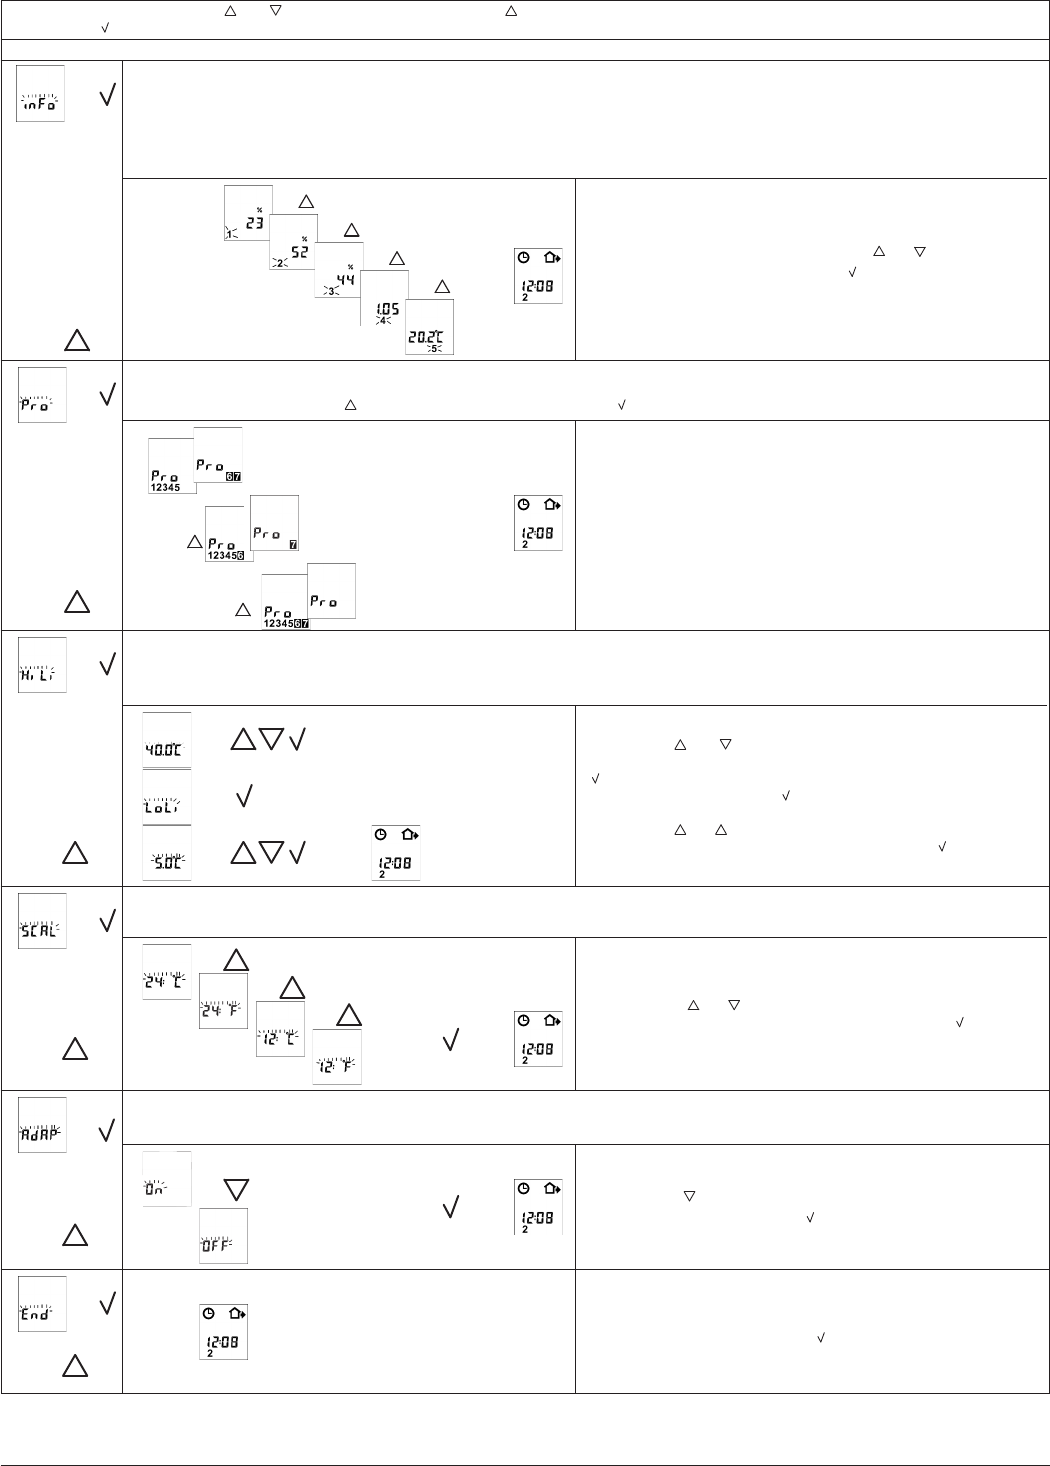
Ważne jest także, aby zastanowić się jaki rodzaj zegara będzie dla nas odpowiedni i jakiej skali chcemy używać (programowanie zegara i skali patrz pkt 5):
- rodzaj zegara - 12-sto lub 24-ro godzinny,
-
rodzaj skali - ˚C lub ˚F.
3
. Obsługa regulatora
Tryb komfortowy /
ekonomiczny
☞
☞
Tryb ręczny:
☞
☞
Nacisnąć przycisk (). Przyciskami () i () należy zwiększyć lub zmniejszyć temperaturę. Nastawiona
wartość temperatury będzie pulsować przez 5 sekund. Po tym czasie regulator powróci do wyświetlania
godziny. Nastawiona wartość będzie obowiązywała do rozpoczęcia następnego zaprogramowanego zda-
rzenia. Regulator będzie pracował wg zaprogramowanych ustawień.
Tymczasowa zmiana ustawień
Podczas normalnej pracy regulatora w trybie cztero-zdarzeniowym, może zaistnieć potrzeba, chwilowego przestawienia temperatury z ekonomicznej
na komfortową np. przedłużające się przyjęcie lub z komfortowej na ekonomiczną np. niezaplanowane wyjście.
Nacisnąć dwukrotnie przycisk ().
Nacisnąć przycisk (). Przyciskami () i () należy ustawić temperaturę. Od tego momentu regulator
będzie utrzymywać nastawioną temperaturę.
Nacisnąć przycisk ().
☞
☞
☞
☞
☞
☞
☞
☞
N
aciśnij i przytrzymaj przycisk () przez 3 sekundy. Przyciskami () i () zmieni-
aj, a przyciskiem () zatwierdzaj dokonane zmiany.
:Godzinę i temperaturę
:Godzinę i temperaturę
:Godzinę i temperaturę
:Godzinę i temperaturę
D
ni 1 do 5Ustaw
Dni 6 i 7
☞
☞
:Godzinę i temperaturę
☞
☞
:Godzinę i temperaturę
4
. Programowanie
Przykład.
Wybrany został wariant “1“ (patrz pkt 3).
Od poniedziałku do piątku:
- () pobudka, o godz. 6:00 temperatura wzrosła do 25˚C.
- () wyjście, o godz. 8:00 temperatura zmalała do 20˚C.
-() powrót, o godz. 16:00 temperatura wzrosła do 27˚C.
- () noc, o godz. 22:30 temperatura zmalała do 20˚C.
Natomiast od soboty do niedzieli:
- () pobudka, o godz. 8:00 temperatura wzrosła do 27˚C.
- () noc, o godz. 23:00 temperatura zmalała do 20˚C.
UWAGA:
Temperaturę można ustawiać co 0,5˚, w zależności od
“rodzaju skali (˚C lub ˚F)“ (wybór: patrz pkt 5.), w przedziale
od +5˚ do +40˚. Po ustawieniu temperatury na poziomie +5˚ i
naciśnięciu przycisku () na wyświetlaczu pojawi się napis
“OFF“. Takie ustawienie spowoduje wyłączenie ogrzewania
w programowanym zdarzeniu.
Godzinę można ustawiać co 15 min, w zależności od “ro-
dzaju zegara (12-sto lub 24-ro godzinny)“(wybór: patrz
pkt 5.), w przedziale od 0:00 do 11:45 lub od 0:00 do 23:45.
W
regulatorze OCC2 dzień został podzielony na cztery zdarzenia. Fabrycznie
z
aprogramowany na pracę 5(4)-2(2) tzn:
-
Przez pięć dni (poniedziałek-piątek) pracuje w trybie cztero-zdarzeniowym, czyli:
() pobudka, () wyjście, () powrót, ()noc.
-
Przez dwa dni (sobota, niedziela) w trybie dwu-zdarzeniowym, czyli: ()
pobudka i () noc. Ustawienia fabryczne można zmienić (patrz pkt 4).
Dla ułatwienia modyfikacji programów w instrukcji przewidziano miejsce na
w
pisanie własnego tygodniowego harmonogramu użytkownika (patrz pkt 6.).
Regulator wyposażony jest w przycisk “R“ (reset). Naciśnięcie i przytrzymanie tego
p
rzycisku przez ok. trzy sekundy spowoduje wyzerowanie godziny i dnia tygodnia,
n
atomiast programy powrócą do ustawień fabrycznych. Ponowne ustawienie godz. i
d
nia patrz pkt 2. W celu zmiany programów patrz pkt 4.
P
rzed przystąpieniem do programowania należy zastanowić się, który z trzech
w
ariantów podziału tygodnia najbardziej nam odpowiada (programowanie
wariantów patrz pkt 5):
Pobudka
Wyjście
Powrót
Noc
Pobudka
Noc
Anulowanie trybu
komfortowego /
ekonomicznego
Program wakacyjny
Zaprogramowany cykl pracy możemy zastąpić innym ustawieniem, np. na czas urlopu.
Beste lezer, Mijn thermostaat de OCC 2 is normaal verlicht. Geeft geen storing aan.. Kan het zijn dat ergens een zekering in dit apparaat zit?? Of moet ik de mat doormeten of evt. de voeler?? Kunt mij op weg helpen. Ik hoor het graag. Mijn email henkbennica@gmail.com Alvast bedankt
Gesteld op 9-12-2018 om 21:05
Ik zou het niet weten. Die van mij ligt al 1,5 jaar open in de garage. Dit i.v.m. een hernia. Ik zou ook graag de Ohms willen meten om de vloer mat en de voeler te meten? Ik weet niet hoeveel volt de vloermat moet hebben? of ik er gewoon 220volt op kan zetten. Mocht u deze gegevens hebben dan zou ik ze ook wel willen hebben.
m. vr. grt. Roberth
Geantwoord op 11-12-2018 om 14:13
Gebruikershandleiding.com neemt misbruik van zijn services uitermate serieus. U kunt hieronder aangeven waarom deze vraag ongepast is. Wij controleren de vraag en zonodig wordt deze verwijderd.
Product:
Spelregels forum
Om tot zinvolle vragen te komen hanteren wij de volgende spelregels:
lees eerst de handleiding door;
controleer of uw vraag al eerder door iemand anders is gesteld;
probeer uw vraag zo duidelijk mogelijk te stellen;
heeft u een probleem en al geprobeerd om dit op te lossen, vermeld dit erbij aub;
heeft u een oplossing gekregen van een bezoeker dan horen wij dat graag in dit forum;
wilt u een reactie geven op een vraag of antwoord, gebruik dan niet dit formulier maar klik op de knop 'reageer op deze vraag';
uw vraag wordt direct op de website gezet; vermijd daarom persoonlijke gegevens in te vullen;
Belangrijk! Als er een antwoord wordt gegeven op uw vraag, dan is het voor de gever van het antwoord nuttig om te weten als u er wel (of niet) mee geholpen bent! Wij vragen u dus ook te reageren op een antwoord.
Belangrijk! Antwoorden worden ook per e-mail naar abonnees gestuurd. Laat uw emailadres achter op deze site, zodat u op de hoogte blijft. U krijgt dan ook andere vragen en antwoorden te zien.
Abonneren
Abonneer u voor het ontvangen van emails voor uw OJ ELECTRONICS OCC2 bij:
nieuwe vragen en antwoorden
nieuwe handleidingen
U ontvangt een email met instructies om u voor één of beide opties in te schrijven.
Ontvang uw handleiding per email
Vul uw emailadres in en ontvang de handleiding van OJ ELECTRONICS OCC2 in de taal/talen: Engels als bijlage per email.
De handleiding is 0,59 mb groot.
U ontvangt de handleiding per email binnen enkele minuten. Als u geen email heeft ontvangen, dan heeft u waarschijnlijk een verkeerd emailadres ingevuld of is uw mailbox te vol. Daarnaast kan het zijn dat uw internetprovider een maximum heeft aan de grootte per email. Omdat hier een handleiding wordt meegestuurd, kan het voorkomen dat de email groter is dan toegestaan bij uw provider.
Uw handleiding is per email verstuurd. Controleer uw email
Als u niet binnen een kwartier uw email met handleiding ontvangen heeft, kan het zijn dat u een verkeerd emailadres heeft ingevuld of dat uw emailprovider een maximum grootte per email heeft ingesteld die kleiner is dan de grootte van de handleiding.
Er is een email naar u verstuurd om uw inschrijving definitief te maken.
Controleer uw email en volg de aanwijzingen op om uw inschrijving definitief te maken
U heeft geen emailadres opgegeven
Als u de handleiding per email wilt ontvangen, vul dan een geldig emailadres in.
Uw vraag is op deze pagina toegevoegd
Wilt u een email ontvangen bij een antwoord en/of nieuwe vragen? Vul dan hier uw emailadres in.