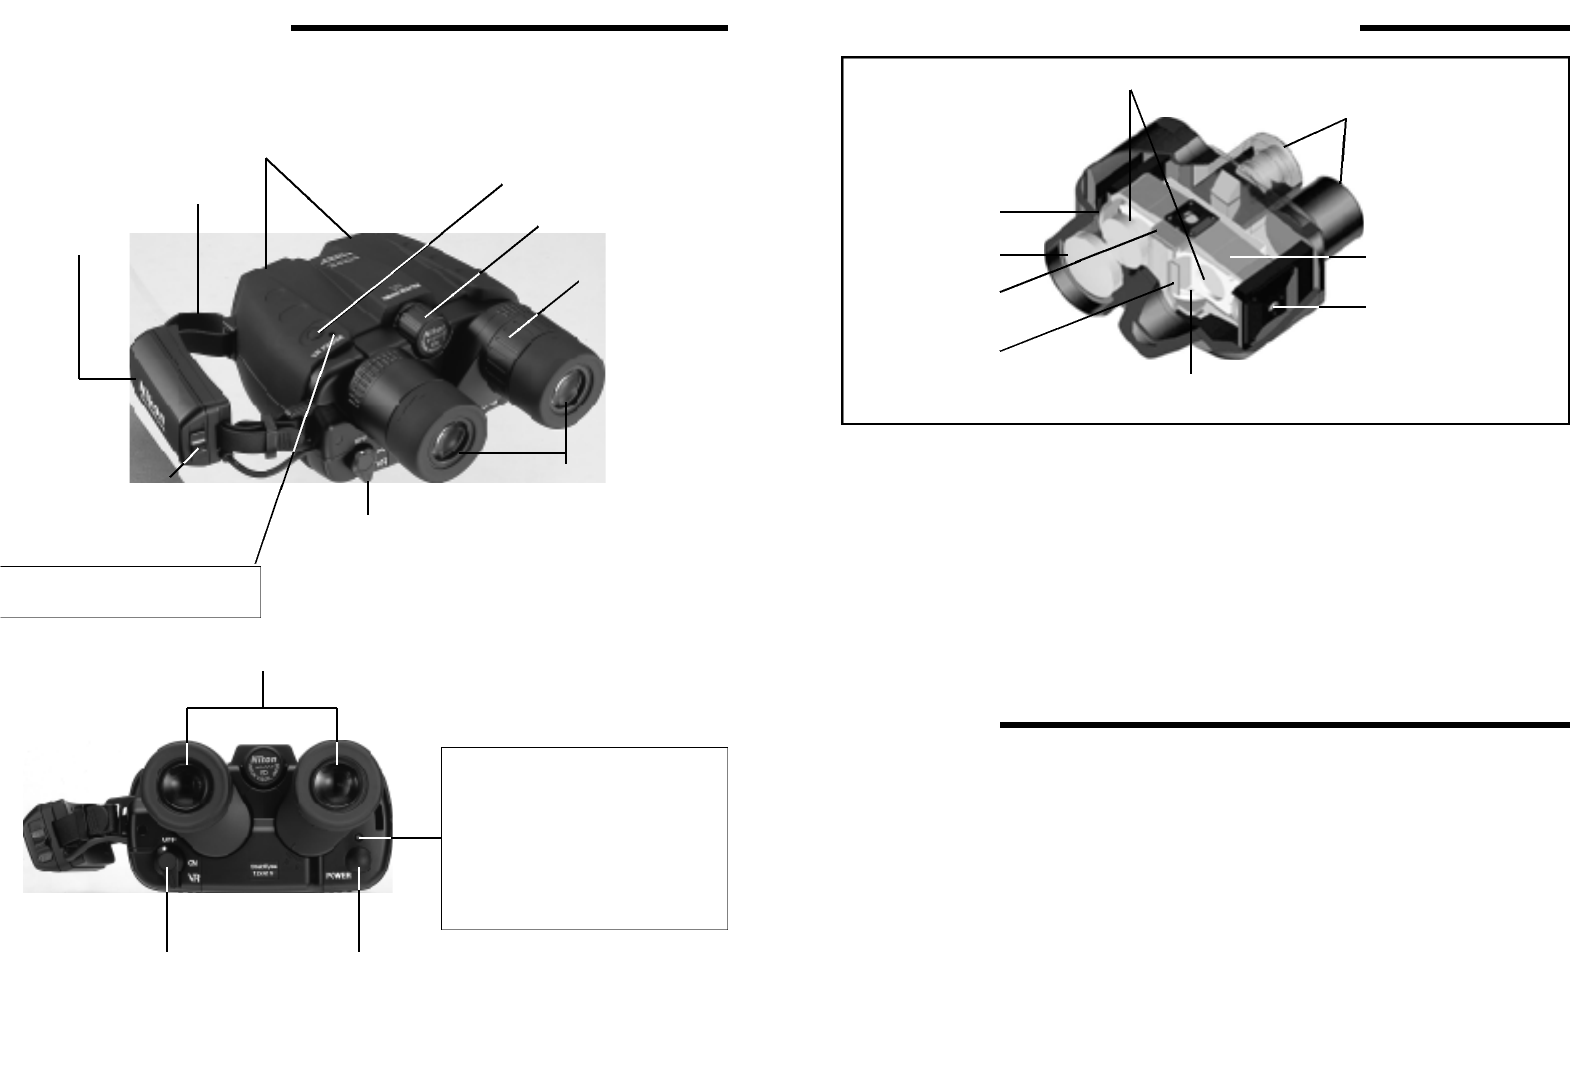
501680
8
Verklein
Vergroot
Pagina terug
1/33
Pagina verder
1514
Getting Acquainted
LED I:
Flashing orange: Power is turned on and
the unit is in standby
Glows orange: Stabilization is in standby
Glows green: Stabilization is active
Flashing orange and green:
Weak batteries
Glowing red: Batteries are exhausted and
should be replaced
Flashing red: System problem
Turns off: Power is turned off
(1) Power button
(2) Eyepiece lenses
LED II:
Glows orange: VR PAUSE on
(stabilization is paused)
Focus control knob
Eyepiece lenses
Objective lens
Handstrap
Battery holder
(6) VR PAUSE button
(4) Diopter
adjustment ring
Battery holder lock lever
(5) Stabilization lever
Fast Start
StabilEyes Digital Image Stabilizing
— Here's How It Works
The piezo gyro vibration sensors and direct-drive motors work together to move a gimbaled
assembly with erecting prism to counteract vibration and keep the binoculars steady, which offers
shake-free viewing even from a moving vehicle.
The position sensor activates the stabilization feature as it detects vertical and horizontal motion.
The newly designed lenses are multicoated for bright images.
The prisms have a special coating that gives sharper images than even before.
The eyepieces incorporate advanced optical technology that offers a wide field of view and reduces
eye fatigue. They can be pivoted up and down for use with glasses.
The StabilEyes 12x32 binoculars are waterproof and filled with dry nitrogen to prevent fogging of
the optical components.
1) Press the Power button (1) to turn on. The electronic system will start up, and the binoculars will go
to Standby mode after about five seconds.
2) Adjust the eyepiece span (2) to match the distance between your two eyes.
3) Use your left eye as you adjust the focus control knob (3). When the image becomes sharp, use
your right eye and turn the diopter adjustment ring (4) to focus for the right eye. Once you have
performed the diopter correction, use only the control knob (3) to check focus again.
4) Turn the stabilization lever (5) to the ON position to activate the stabilization feature. While
stabilization is activated, you can pause it by pressing the VR PAUSE button to minimize image
instability while panning, shifting among objects in view, or viewing moving objects.
5) When finished, turn the stabilization lever (5) to the OFF position and press the Power button (1) to
turn off.
6) Replace the lens caps, and return the binoculars to their case.
Prism Assembly
Position Sensor
Objective Lens
Position Sensor
Piezo Gyro Sensor
AZ Direct Motor
EL Direct Motor
Gimbal Assembly
Eyepiece Lenses
8

Hulp nodig? Stel uw vraag in het forum

Spelregels

Misbruik melden

Gebruikershandleiding.com neemt misbruik van zijn services uitermate serieus. U kunt hieronder aangeven waarom deze vraag ongepast is. Wij controleren de vraag en zonodig wordt deze verwijderd.

Product:

Bijvoorbeeld antisemitische inhoud, racistische inhoud, of materiaal dat gewelddadige fysieke handelingen tot gevolg kan hebben.

Bijvoorbeeld een creditcardnummer, een persoonlijk identificatienummer, of een geheim adres. E-mailadressen en volledige namen worden niet als privégegevens beschouwd.

Spelregels forum

Om tot zinvolle vragen te komen hanteren wij de volgende spelregels:

Belangrijk! Als er een antwoord wordt gegeven op uw vraag, dan is het voor de gever van het antwoord nuttig om te weten als u er wel (of niet) mee geholpen bent! Wij vragen u dus ook te reageren op een antwoord.

Belangrijk! Antwoorden worden ook per e-mail naar abonnees gestuurd. Laat uw emailadres achter op deze site, zodat u op de hoogte blijft. U krijgt dan ook andere vragen en antwoorden te zien.

Abonneren

Abonneer u voor het ontvangen van emails voor uw Nikon stabileyes 12x32 bij:


U ontvangt een email met instructies om u voor één of beide opties in te schrijven.


Ontvang uw handleiding per email

Vul uw emailadres in en ontvang de handleiding van Nikon stabileyes 12x32 in de taal/talen: Duits, Engels, Frans, Italiaans, Spaans als bijlage per email.

De handleiding is 3,17 mb groot.


U ontvangt de handleiding per email binnen enkele minuten. Als u geen email heeft ontvangen, dan heeft u waarschijnlijk een verkeerd emailadres ingevuld of is uw mailbox te vol. Daarnaast kan het zijn dat uw internetprovider een maximum heeft aan de grootte per email. Omdat hier een handleiding wordt meegestuurd, kan het voorkomen dat de email groter is dan toegestaan bij uw provider.

Stel vragen via chat aan uw handleiding

Stel uw vraag over deze PDF

loading

Uw handleiding is per email verstuurd. Controleer uw email

Als u niet binnen een kwartier uw email met handleiding ontvangen heeft, kan het zijn dat u een verkeerd emailadres heeft ingevuld of dat uw emailprovider een maximum grootte per email heeft ingesteld die kleiner is dan de grootte van de handleiding.

Er is een email naar u verstuurd om uw inschrijving definitief te maken.

Controleer uw email en volg de aanwijzingen op om uw inschrijving definitief te maken

U heeft geen emailadres opgegeven

Als u de handleiding per email wilt ontvangen, vul dan een geldig emailadres in.

Uw vraag is op deze pagina toegevoegd

Wilt u een email ontvangen bij een antwoord en/of nieuwe vragen? Vul dan hier uw emailadres in.


Info