744896
24
Verklein
Vergroot
Pagina terug
1/852
Pagina verder
DIGITAL CAMERA
Reference Manual
En
Read this manual thoroughly before using the camera.
To ensure proper use of the camera, be sure to read
“For Your Safety” (page xxxv).
After reading this manual, keep it in a readily accessible
place for future reference.
ii When Your First Photo Can’t Wait
❚❚ Getting Ready
1
Insert the battery (
0
43).
For information on charging the
battery, see “Charging the Battery”
(038).
2
Insert a memory card (
0
45).
3
Attach a lens (
0
50).
Align the white dot on the lens with
the white dot on the camera body
(q) and rotate the lens in the
direction shown (w).
A strap can be attached to the
camera. For more information, see
“Attaching the Strap” (037).
4
Turn the camera on and then
choose a language and set the
clock (
0
52).
When Your First Photo Can’t Wait
64
GB
Z 7II Model Name: N1932
Z 6II Model Name: N1929
iii
When Your First Photo Can’t Wait
❚❚ Take (056) and View (069) Pictures
1
Rotate the mode dial to
b
.
2
To focus, press the shutter-
release button halfway (i.e,
lightly press the shutter-
release button, stopping when
it is pressed halfway).
3
Without lifting your finger
from the shutter-release
button, press the button the
rest of the way down to take
the picture.
4
View the picture.
iv Package Contents
Be sure all items listed here were included with your camera.
Memory cards are sold separately.
Package Contents
Camera
BF-N1 body cap
DK-29 rubber eyecup
(comes attached to
camera, 0704)
EN-EL15c rechargeable
Li-ion battery with terminal
cover
MH-25a battery charger
(comes with either an AC
wall adapter or power
cable of a type and shape
that varies with the country
or region of sale)
HDMI/USB cable clip
(0708)
EH-7P charging AC adapter
(Z 7II only; supplied with a
plug adapter attached in
countries or regions where
required; shape depends
on country of sale— 040)
AN-DC19 strap (037)
Warranty
User’s Manual
UC-E24 USB cable (0492,
599)
BS-1 accessory shoe cover
(0709)
v
Package Contents
DThe Nikon Download Center
Visit the Nikon download center to download firmware updates, ViewNX-i
and other Nikon software, and manuals for Nikon products including
cameras, NIKKOR lenses, and flash units.
https://downloadcenter.nikonimglib.com/
vi About This Manual
❚❚ Symbols
The following symbols and conventions are employed in this
manual. Use them to help locate the information you need.
❚❚ Conventions
This manual is for use with both the Z 7II and Z 6II. The
illustrations show the Z 6II.
This camera uses CFexpress (Type B), XQD, SD, SDHC, and
SDXC memory cards. Memory cards of all types are referred to
throughout this manual as “memory cards”. Where it is
necessary to distinguish between the different types, the
terms “CFexpress memory card”, “XQD memory card”, and “SD
memory card” may be used.
Throughout this manual, battery chargers are referred to as
“battery chargers” or “chargers”.
Throughout this manual, the display in camera monitor and
viewfinder during shooting is referred to as the “shooting
display”; in most cases, the illustrations show the monitor.
Throughout this manual, smartphones and tablets are referred
to as “smart devices”.
Throughout this manual, the term “default settings” is used to
refer to the settings in effect at shipment. The explanations in
this manual assume that default settings are used.
About This Manual
DThis icon marks notes, information that should be read before
using this product.
AThis icon marks tips, additional information you may find
helpful when using this product.
0This icon marks references to other sections in this manual.
vii
About This Manual
AFor Your Safety
“For Your Safety” contains important safety instructions. Be sure to read
them before using the camera. For more information, see “For Your
Safety” (0xxxv).
viii Table of Contents
When Your First Photo Can’t Wait ..................................................... ii
Package Contents................................................................................... iv
About This Manual ................................................................................. vi
Menu List ............................................................................................ xxviii
For Your Safety .................................................................................. xxxv
Notices........................................................................................................ xl
Getting to Know the Camera 1
Parts of the Camera................................................................................. 1
Camera Body ...................................................................... 1
The Control Panel ............................................................. 6
The Monitor ........................................................................ 7
The Viewfinder................................................................ 10
Camera Controls ................................................................................... 13
Viewfinder ........................................................................ 13
The M (Monitor Mode) Button ................................ 14
The Mode Dial................................................................. 15
The Command Dials...................................................... 16
The S Button .............................................................. 16
The E (Exposure Compensation) Button.............. 18
Touch Controls ............................................................... 19
The DISP Button ............................................................. 25
The X and W (Q) Buttons .......................................... 27
The Sub-Selector............................................................ 27
The AF-ON Button ......................................................... 28
The G Button.............................................................. 28
The i Button (the i Menu)......................................... 33
The Fn1 and Fn2 Buttons............................................ 35
Table of Contents
ix
Table of Contents
First Steps 37
Attaching the Strap.............................................................................. 37
Charging the Battery ........................................................................... 38
The Battery Charger...................................................... 38
Charging AC Adapters ................................................. 40
Inserting the Battery............................................................................ 43
Removing the Battery .................................................. 43
Battery Level.................................................................... 44
Inserting Memory Cards..................................................................... 45
Removing Memory Cards ........................................... 46
Number of Exposures Remaining ............................ 47
Attaching a Lens ................................................................................... 50
Detaching Lenses........................................................... 51
Choose a Language and Set the Clock ......................................... 52
Basic Photography and Playback 56
Taking Photographs (b Mode) ....................................................... 56
Shooting Movies (b Mode) .............................................................. 63
Taking Photos in Movie Mode................................... 67
Playback ................................................................................................... 69
Viewing Photos............................................................... 69
Viewing Movies .............................................................. 70
Deleting Unwanted Pictures...................................... 72
Basic Settings 74
Focus ......................................................................................................... 74
Focus Mode...................................................................... 74
AF-Area Mode ................................................................. 77
The Touch Shutter......................................................... 88
Manual Focus .................................................................. 91
xTable of Contents
White Balance......................................................................................... 94
Adjusting White Balance ............................................. 94
Silent Photography............................................................................ 100
Rating Pictures .................................................................................... 102
Protecting Pictures from Deletion ............................................... 104
Shooting Controls 106
The Mode Dial ..................................................................................... 106
Using the Mode Dial................................................... 106
P (Programmed Auto)................................................ 107
S (Shutter-Priority Auto)............................................ 108
A (Aperture-Priority Auto)........................................ 108
M (Manual)..................................................................... 109
U1, U2, and U3 (User Settings Modes) ................. 115
The S Button................................................................................... 118
Adjusting ISO Sensitivity........................................... 118
Auto ISO Sensitivity Control .................................... 120
The E (Exposure Compensation) Button .................................. 122
Adjusting Exposure Compensation...................... 122
The c/E (Release Mode/Self-Timer) Button .......................... 125
Choosing a Release Mode ........................................ 125
The Self-Timer............................................................... 131
The Sub-Selector ................................................................................ 133
Focus-Point Selection ................................................ 133
Exposure Lock............................................................... 133
Focus Lock ..................................................................... 133
Locking Focus and Exposure................................... 134
xi
Table of Contents
The i Menu 136
The i Menu........................................................................................... 136
Still Images............................................................................................ 138
Set Picture Control ...................................................... 139
White Balance ............................................................... 145
Image Quality................................................................ 152
Image Size ...................................................................... 154
Flash Mode..................................................................... 156
Metering.......................................................................... 157
Wi-Fi Connection ......................................................... 158
View Memory Card Info............................................. 159
Release Mode ................................................................ 160
Vibration Reduction.................................................... 161
AF-Area Mode ............................................................... 163
Focus Mode.................................................................... 164
Movies..................................................................................................... 165
Set Picture Control ...................................................... 167
White Balance ............................................................... 167
Frame Size and Rate/Image Quality...................... 168
Microphone Sensitivity.............................................. 174
Choose Image Area..................................................... 175
Metering.......................................................................... 177
Wi-Fi Connection ......................................................... 177
Destination..................................................................... 177
Electronic VR.................................................................. 178
Vibration Reduction.................................................... 179
AF-Area Mode ............................................................... 179
Focus Mode.................................................................... 179
xii Table of Contents
Playback 180
Viewing Pictures ................................................................................. 180
Full-Frame Playback ................................................... 180
Thumbnail Playback................................................... 181
Photo Information ............................................................................. 183
File Information............................................................ 184
Exposure Data............................................................... 185
Highlight Display......................................................... 185
RGB Histogram ............................................................. 186
Shooting Data............................................................... 188
Location Data................................................................ 191
Overview......................................................................... 191
The i Button (Playback Mode)...................................................... 193
Photos.............................................................................. 193
Movies ............................................................................. 196
Movies (Playback Paused)........................................ 196
Playback Zoom.................................................................................... 204
Using Playback Zoom ................................................ 204
Deleting Pictures ................................................................................ 206
Using the Delete Button ........................................... 206
Deleting Multiple Pictures ....................................... 208
xiii
Table of Contents
Menu Guide 212
Defaults .................................................................................................. 212
Playback Menu Defaults............................................ 212
Photo Shooting Menu Defaults.............................. 213
Movie Shooting Menu Defaults.............................. 217
Custom Settings Menu Defaults............................. 219
Setup Menu Defaults.................................................. 226
D The Playback Menu: Managing Images................................ 232
Delete ...............................................................................................233
Playback Folder.............................................................................234
Playback Display Options..........................................................234
Dual-Format Recording PB Slot ..............................................235
Image Review ................................................................................235
After Delete ....................................................................................236
After Burst, Show..........................................................................237
Rotate Tall .......................................................................................237
Copy Image(s)................................................................................238
Copying Pictures.......................................................... 238
Slide Show ......................................................................................245
Viewing Slide Shows................................................... 246
Rating ...............................................................................................247
C The Photo Shooting Menu: Shooting Options.................. 248
Reset Photo Shooting Menu....................................................249
Storage Folder...............................................................................250
Renaming Folders........................................................ 250
Select Folder by Number .......................................... 252
Select Folder from List ............................................... 254
xiv Table of Contents
File Naming.................................................................................... 256
Primary Slot Selection................................................................ 257
Secondary Slot Function........................................................... 258
Deleting Copies............................................................ 259
Choose Image Area..................................................................... 260
Image Quality................................................................................ 260
Image Size ...................................................................................... 261
NEF (RAW) Recording................................................................. 264
NEF (RAW) Compression........................................... 264
NEF (RAW) Bit Depth .................................................. 265
ISO Sensitivity Settings.............................................................. 265
White Balance ............................................................................... 267
The White Balance Menu: Fine-Tuning ............... 267
The White Balance Menu: Choosing a Color
Temperature............................................................. 270
Preset Manual: Copying White Balance from a
Photograph............................................................... 272
Set Picture Control ...................................................................... 275
Modifying Picture Controls from the Menus..... 275
Manage Picture Control ............................................................ 278
Creating Custom Picture Controls ........................ 278
Color Space.................................................................................... 282
Active D-Lighting......................................................................... 283
Long Exposure NR ....................................................................... 285
High ISO NR ................................................................................... 286
Vignette Control .......................................................................... 287
Diffraction Compensation........................................................ 288
Auto Distortion Control............................................................. 288
xv
Table of Contents
Flicker Reduction Shooting ......................................................289
Metering..........................................................................................290
Flash Control..................................................................................291
Flash Control Mode..................................................... 292
Wireless Flash Options............................................... 293
Remote Flash Control................................................. 294
Radio Remote Flash Info............................................ 294
Flash Mode .....................................................................................295
Flash Compensation ...................................................................295
Focus Mode....................................................................................295
AF-Area Mode................................................................................296
Vibration Reduction ....................................................................296
Auto Bracketing............................................................................297
Exposure and Flash Bracketing............................... 298
White Balance Bracketing......................................... 303
ADL Bracketing ............................................................. 306
Multiple Exposure........................................................................309
Creating a Multiple Exposure .................................. 312
HDR (High Dynamic Range) .....................................................319
Taking HDR Photographs ......................................... 321
Interval Timer Shooting.............................................................326
Interval-Timer Photography .................................... 329
Time-Lapse Movie........................................................................340
Recording Time-Lapse Movies................................ 342
Focus Shift Shooting...................................................................352
Focus Shift Photography........................................... 354
Silent Photography .....................................................................362
xvi Table of Contents
1 The Movie Shooting Menu: Movie Shooting Options..... 363
Reset Movie Shooting Menu ................................................... 364
File Naming.................................................................................... 364
Destination .................................................................................... 364
Choose Image Area..................................................................... 365
Frame Size/Frame Rate.............................................................. 365
Movie Quality................................................................................ 365
Movie File Type ............................................................................ 365
ISO Sensitivity Settings.............................................................. 366
White Balance ............................................................................... 367
Set Picture Control ...................................................................... 367
Manage Picture Control ............................................................ 367
Active D-Lighting......................................................................... 368
High ISO NR ................................................................................... 368
Vignette Control .......................................................................... 369
Diffraction Compensation........................................................ 369
Auto Distortion Control............................................................. 369
Flicker Reduction ......................................................................... 370
Metering ......................................................................................... 371
Focus Mode ................................................................................... 371
AF-Area Mode ............................................................................... 371
Vibration Reduction.................................................................... 371
Electronic VR.................................................................................. 372
Microphone Sensitivity.............................................................. 372
Attenuator...................................................................................... 373
Frequency Response .................................................................. 373
Wind Noise Reduction ............................................................... 374
Headphone Volume ................................................................... 374
Timecode........................................................................................ 375
xvii
Table of Contents
A Custom Settings: Fine-Tuning Camera Settings................ 377
Reset Custom Settings ...............................................................381
a: Autofocus .................................................................................. 381
a1: AF-C Priority Selection .................................................381
a2: AF-S Priority Selection..................................................382
a3: Focus Tracking with Lock-On....................................382
a4: Focus Points Used .........................................................383
a5: Store Points by Orientation .......................................384
a6: AF Activation...................................................................386
Out-of-Focus Release ................................................. 386
a7: Limit AF-Area Mode Selection ..................................387
a8: Focus Point Wrap-Around..........................................387
a9: Focus Point Options .....................................................388
Manual Focus Mode.................................................... 388
Dynamic-Area AF Assist............................................. 388
a10: Low-Light AF.................................................................389
a11: Built-in AF-Assist Illuminator...................................390
a12: Manual Focus Ring in AF Mode..............................391
b: Metering/Exposure................................................................ 392
b1: EV Steps for Exposure Cntrl .......................................392
b2: Easy Exposure Compensation ..................................392
b3: Center-Weighted Area ................................................393
b4: Fine-Tune Optimal Exposure ....................................393
xviii Table of Contents
c: Timers/AE Lock........................................................................ 394
c1: Shutter-Release Button AE-L..................................... 394
c2: Self-Timer ......................................................................... 394
c3: Power Off Delay ............................................................. 395
d: Shooting/Display ................................................................... 396
d1: CL Mode Shooting Speed.......................................... 396
d2: Max. Continuous Release........................................... 396
d3: Sync. Release Mode Options .................................... 397
d4: Exposure Delay Mode ................................................. 397
d5: Shutter Type ................................................................... 398
d6: Extended Shutter Speeds (M)................................... 399
d7: Limit Selectable Image Area..................................... 399
d8: File Number Sequence ............................................... 400
d9: Apply Settings to Live View ...................................... 402
d10: Framing Grid Display ................................................ 402
d11: Focus Peaking.............................................................. 403
Peaking Level................................................................ 403
Peaking Highlight Color............................................ 403
d12: View All in Continuous Mode ................................ 403
e: Bracketing/Flash..................................................................... 404
e1: Flash Sync Speed........................................................... 404
e2: Flash Shutter Speed ..................................................... 406
e3: Exposure Comp. for Flash .......................................... 406
e4: Auto c ISO Sensitivity Control.................................. 407
e5: Modeling Flash............................................................... 407
e6: Auto Bracketing (Mode M)......................................... 408
e7: Bracketing Order ........................................................... 409
xix
Table of Contents
f: Controls....................................................................................... 410
f1: Customize i Menu.......................................................410
View Memory Card Info............................................. 411
Split-Screen Display Zoom ....................................... 412
Bluetooth Connection................................................ 413
MB-N11 Info................................................................... 413
f2: Custom Controls .............................................................414
f3: OK Button..........................................................................427
Shooting Mode............................................................. 427
Playback Mode.............................................................. 428
f4: Shutter Spd & Aperture Lock......................................429
f5: Customize Command Dials ........................................430
Reverse Rotation .......................................................... 430
Change Main/Sub........................................................ 431
Menus and Playback................................................... 432
Sub-Dial Frame Advance........................................... 433
f6: Release Button to Use Dial ..........................................434
f7: Reverse Indicators ..........................................................436
f8: Reverse Ring for Focus..................................................436
f9: Assign MB-N11 Buttons................................................437
Same as Camera AF-ON Button.............................. 439
Same as Camera Multi Selector .............................. 439
xx Table of Contents
g: Movie.......................................................................................... 440
g1: Customize i Menu ..................................................... 440
g2: Custom Controls ........................................................... 441
g3: OK Button ........................................................................ 448
g4: AF Speed.......................................................................... 449
g5: AF Tracking Sensitivity................................................ 449
g6: Highlight Display .......................................................... 450
Display Pattern ............................................................. 450
Highlight Display Threshold.................................... 450
g7: Assign MB-N11 Buttons.............................................. 451
Same as Camera AF-ON Button.............................. 452
B The Setup Menu: Camera Setup ............................................... 453
Format Memory Card................................................................. 455
Save User Settings....................................................................... 455
Reset User Settings ..................................................................... 455
Language........................................................................................ 456
Time Zone and Date................................................................... 456
Monitor Brightness ..................................................................... 457
Monitor Color Balance ............................................................... 458
Viewfinder Brightness................................................................ 459
Viewfinder Color Balance.......................................................... 460
Control Panel Brightness .......................................................... 460
Limit Monitor Mode Selection ................................................ 461
Information Display .................................................................... 461
AF Fine-Tuning Options ............................................................ 462
Creating and Saving Fine-Tuning Values ........... 464
Choosing a Default Fine-Tuning Value................ 465
xxi
Table of Contents
Non-CPU Lens Data.....................................................................466
Save Focus Position.....................................................................466
Clean Image Sensor.....................................................................467
Image Dust Off Ref Photo .........................................................468
Acquiring Image Dust Off Reference Data ......... 468
Pixel Mapping................................................................................471
Image Comment ..........................................................................473
Input Comment............................................................ 473
Attach Comment.......................................................... 473
Copyright Information ...............................................................474
Artist/Copyright ........................................................... 474
Attach Copyright Information................................. 474
Beep Options.................................................................................476
Beep On/Off................................................................... 476
Volume ............................................................................ 477
Pitch.................................................................................. 477
Touch Controls..............................................................................477
Enable/Disable Touch Controls .............................. 477
Full-Frame Playback Flicks........................................ 477
HDMI.................................................................................................478
Location Data ................................................................................478
Wireless Remote (WR) Options ...............................................479
LED Lamp........................................................................ 479
Link Mode....................................................................... 480
Assign Remote (WR) Fn Button...............................................482
Airplane Mode...............................................................................482
xxii Table of Contents
Connect to Smart Device.......................................................... 483
Pairing (Bluetooth)...................................................... 483
Select to Send (Bluetooth) ....................................... 484
Wi-Fi Connection......................................................... 484
Send While Off.............................................................. 485
Location Data (Smart Device) ................................. 485
Connect to PC ............................................................................... 486
Wi-Fi Connection......................................................... 486
Network Settings......................................................... 486
Options............................................................................ 488
MAC Address................................................................. 489
Wireless Transmitter (WT-7)..................................................... 490
Wireless Transmitter................................................... 490
Conformity Marking ................................................................... 490
Battery Info .................................................................................... 491
USB Power Delivery .................................................................... 492
Energy Saving (Photo Mode)................................................... 494
Slot Empty Release Lock ........................................................... 495
Save/Load Menu Settings......................................................... 496
Save Menu Settings.................................................... 500
Load Menu Settings ................................................... 500
Reset All Settings ......................................................................... 501
Firmware Version......................................................................... 501
N The Retouch Menu: Creating Retouched Copies.............. 502
Creating Retouched Copies..................................... 503
NEF (RAW) Processing: Converting NEF (RAW) to
JPEG ............................................................................................. 506
Trim................................................................................................... 511
xxiii
Table of Contents
Resize................................................................................................512
Resizing Multiple Images.......................................... 512
D-Lighting.......................................................................................517
Red-Eye Correction......................................................................518
Straighten .......................................................................................519
Distortion Control........................................................................520
Perspective Control.....................................................................521
Monochrome.................................................................................522
Image Overlay ...............................................................................523
Add.................................................................................... 523
Lighten and Darken .................................................... 528
Trim Movie......................................................................................532
O My Menu/m Recent Settings.................................................... 533
O My Menu: Creating a Custom Menu................ 533
m Recent Settings: Accessing
Recently-Used Settings ......................................... 538
Establishing Wireless Connections to Computers
or Smart Devices 539
Camera and Network System Chart............................................. 539
Connecting to Computers via Wi-Fi............................................. 541
What Wi-Fi Can Do for You....................................... 541
The Wireless Transmitter Utility.............................. 541
Infrastructure and Access-Point Modes............... 542
Connecting in Access-Point Mode ........................ 544
Connecting in Infrastructure Mode....................... 550
Uploading Pictures...................................................... 559
Disconnecting and Reconnecting ......................... 563
xxiv Table of Contents
Connecting to Smart Devices ........................................................ 565
The SnapBridge App .................................................. 565
What SnapBridge Can Do for You ......................... 566
Wireless Connections................................................. 567
Connecting via Wi-Fi (Wi-Fi Mode) ....................... 568
Connecting via Bluetooth ........................................ 577
Connecting to Networks Using the WT-7.................................. 594
The WT-7......................................................................... 594
What the WT-7 Can Do for You .............................. 595
Connecting Using the WT-7 .................................... 597
Troubleshooting................................................................................. 598
Cabled Connections to Computers and HDMI
Devices 599
Connecting to Computers Via USB.............................................. 599
Installing ViewNX-i...................................................... 600
Copying Pictures to a Computer Using
ViewNX-i..................................................................... 601
Connecting to HDMI Devices......................................................... 604
TVs..................................................................................... 605
Recorders........................................................................ 606
On-Camera Flash Photography 611
“On-Camera” Versus “Remote”...................................................... 611
Camera-Mounted Flash Units ................................. 611
Remote Flash Photography..................................... 612
Using an On-Camera Flash ............................................................. 613
Flash Control Mode ........................................................................... 616
Flash Modes ......................................................................................... 619
xxv
Table of Contents
Flash Compensation.......................................................................... 622
FV Lock ................................................................................................... 623
Flash Info for On-Camera Units ..................................................... 626
Flash Control Mode Displays ................................... 626
Remote Flash Photography 629
What Is Remote Flash Photography?........................................... 629
Using Remote Flash Units......................................... 630
Radio AWL ............................................................................................. 631
Establishing a Wireless Connection ...................... 631
Remote Flash Photography ..................................... 636
Adding a Shoe-Mounted Flash Unit...................... 644
Optical AWL .......................................................................................... 645
Using Optical AWL with the SB-5000 or
SB-500.......................................................................... 646
Optical/Radio AWL............................................................................. 656
Flash Info for Remote Units............................................................. 657
Flash Control Mode Displays ................................... 657
Troubleshooting 660
Before Contacting Customer Support ........................................ 660
Problems and Solutions ................................................................... 662
Battery/Display ............................................................. 662
Shooting.......................................................................... 663
Playback .......................................................................... 669
Bluetooth and Wi-Fi (Wireless Networks)............ 671
Miscellaneous................................................................ 672
xxvi Table of Contents
Alerts and Error Messages............................................................... 673
Alerts................................................................................ 673
Error Messages ............................................................. 676
Technical Notes 680
Compatible Lenses and Accessories ........................................... 680
The Camera Display and Control Panel...................................... 681
The Monitor................................................................... 681
The Viewfinder ............................................................. 688
The Control Panel........................................................ 692
Compatible Flash Units.................................................................... 693
The Nikon Creative Lighting System (CLS)......... 693
Other Compatible Accessories...................................................... 701
Optional MB-N11 Power Battery Packs ............... 710
Attaching a Power Connector and
AC Adapter................................................................ 733
Software................................................................................................. 735
Caring for the Camera ...................................................................... 737
Storage............................................................................ 737
Cleaning.......................................................................... 738
Image Sensor Cleaning ............................................. 739
Manual Cleaning.......................................................... 741
Caring for the Camera and Battery: Cautions .......................... 743
Camera Care.................................................................. 743
Battery Care................................................................... 747
Using the Charger ....................................................... 750
Using the Charging AC Adapter............................. 750
xxvii
Table of Contents
Specifications....................................................................................... 751
Nikon Z 7II/Z 6II Digital Camera.............................. 751
Approved Memory Cards................................................................. 770
Portable Chargers (Power Banks) ................................................. 771
Memory Card Capacity ..................................................................... 773
Battery Endurance.............................................................................. 777
AF-Assist Illumination ....................................................................... 780
Trademarks and Licenses................................................................. 781
Notices.................................................................................................... 785
Bluetooth and Wi-Fi (Wireless LAN) ............................................. 788
Kit Lens Manual 794
NIKKOR Z 24–70mm f/4 S Lens Manual...................................... 794
Using the Lens .............................................................. 794
Precautions for Use ..................................................... 799
Lens Care......................................................................... 800
Accessories..................................................................... 801
Specifications ................................................................ 802
Index 803
xxviii Menu List
The camera offers the following menus. For a more complete
description of individual menu items, refer to the “Menu Guide”
chapter in the Online Manual.
Menu List
PLAYBACK MENU
Delete
Playback folder
Playback display options
Dual-format recording PB slot
Image review
After delete
After burst, show
Rotate tall
Copy image(s)
Slide show
Rating
PHOTO SHOOTING MENU
Reset photo shooting menu
Storage folder
File naming
Primary slot selection
Secondary slot function
Choose image area
Image quality
Image size
NEF (RAW) recording
ISO sensitivity settings
White balance
Set Picture Control
Manage Picture Control
Color space
Active D-Lighting
Long exposure NR
High ISO NR
Vignette control
xxix
Menu List
Diffraction compensation
Auto distortion control
Flicker reduction shooting
Metering
Flash control
Flash mode
Flash compensation
Focus mode
AF-area mode
Vibration reduction
Auto bracketing
Multiple exposure
HDR (high dynamic range)
Interval timer shooting
Time-lapse movie
Focus shift shooting
Silent photography
PHOTO SHOOTING MENU MOVIE SHOOTING MENU
Reset movie shooting menu
File naming
Destination
Choose image area
Frame size/frame rate
Movie quality
Movie file type
ISO sensitivity settings
White balance
Set Picture Control
Manage Picture Control
Active D-Lighting
High ISO NR
Vignette control
Diffraction compensation
Auto distortion control
Flicker reduction
xxx Menu List
Metering
Focus mode
AF-area mode
Vibration reduction
Electronic VR
Microphone sensitivity
Attenuator
Frequency response
Wind noise reduction
Headphone volume
Timecode
MOVIE SHOOTING MENU CUSTOM SETTING MENU
Reset custom settings
a Autofocus
a1 AF-C priority selection
a2 AF-S priority selection
a3 Focus tracking with lock-on
a4 Focus points used
a5 Store points by orientation
a6 AF activation
a7 Limit AF-area mode
selection
a8 Focus point wrap-around
a9 Focus point options
a10 Low-light AF
a11 Built-in AF-assist
illuminator
a12 Manual focus ring in AF
mode
xxxi
Menu List
b Metering/exposure
b1 EV steps for exposure cntrl
b2 Easy exposure
compensation
b3 Center-weighted area
b4 Fine-tune optimal
exposure
c Timers/AE lock
c1 Shutter-release button
AE-L
c2 Self-timer
c3 Power off delay
CUSTOM SETTING MENU
d Shooting/display
d1 CL mode shooting speed
d2 Max. continuous release
d3 Sync. release mode options
d4 Exposure delay mode
d5 Shutter type
d6 Extended shutter speeds
(M)
d7 Limit selectable image area
d8 File number sequence
d9 Apply settings to live view
d10 Framing grid display
d11 Focus peaking
d12 View all in continuous
mode
CUSTOM SETTING MENU
xxxii Menu List
e Bracketing/flash
e1 Flash sync speed
e2 Flash shutter speed
e3 Exposure comp. for flash
e4 Auto c ISO sensitivity
control
e5 Modeling flash
e6 Auto bracketing (mode M)
e7 Bracketing order
CUSTOM SETTING MENU
f Controls
f1 Customize i menu
f2 Custom controls
f3 OK button
f4 Shutter spd & aperture lock
f5 Customize command dials
f6 Release button to use dial
f7 Reverse indicators
f8 Reverse ring for focus
f9 Assign MB-N11 buttons
g Movie
g1 Customize i menu
g2 Custom controls
g3 OK button
g4 AF speed
g5 AF tracking sensitivity
g6 Highlight display
g7 Assign MB-N11 buttons
CUSTOM SETTING MENU
xxxiii
Menu List
SETUP MENU
Format memory card
Save user settings
Reset user settings
Language
Time zone and date
Monitor brightness
Monitor color balance
Viewfinder brightness
Viewfinder color balance
Control panel brightness
Limit monitor mode selection
Information display
AF fine-tuning options
Non-CPU lens data
Save focus position
Clean image sensor
Image Dust Off ref photo
Pixel mapping
Image comment
Copyright information
Beep options
Touch controls
HDMI
Location data
Wireless remote (WR) options
Assign remote (WR) Fn button
Airplane mode
Connect to smart device
Connect to PC
Wireless transmitter (WT-7)
Conformity marking
Battery info
USB power delivery
Energy saving (photo mode)
Slot empty release lock
Save/load menu settings
Reset all settings
Firmware version
SETUP MENU
xxxiv Menu List
RETOUCH MENU
NEF (RAW) processing
Trim
Resize
D-Lighting
Red-eye correction
Straighten
Distortion control
Perspective control
Monochrome
Image overlay
Trim movie
MY MENU
Add items
Remove items
Rank items
Choose tab
xxxv
For Your Safety
To prevent damage to property or injury to yourself or to others, read “For
Your Safety” in its entirety before using this product.
Keep these safety instructions where all those who use this product will
read them.
For Your Safety
A DANGER: Failure to observe the precautions marked with this icon
carries a high risk of death or severe injury.
A WARNING: Failure to observe the precautions marked with this icon
could result in death or severe injury.
A CAUTION: Failure to observe the precautions marked with this icon
could result in injury or property damage.
A WARNING
Do not use while walking or operating a vehicle.
Failure to observe this precaution could result in accidents or other
injury.
Do not disassemble or modify this product. Do not touch internal
parts that become exposed as the result of a fall or other accident.
Failure to observe these precautions could result in electric shock or
other injury.
Should you notice any abnormalities such as the product producing
smoke, heat, or unusual odors, immediately disconnect the battery
or power source.
Continued operation could result in fire, burns or other injury.
Keep dry. Do not handle with wet hands. Do not handle the plug
with wet hands.
Failure to observe these precautions could result in fire or electric shock.
xxxvi For Your Safety
Do not let your skin remain in prolonged contact with this product
while it is on or plugged in.
Failure to observe this precaution could result in low-temperature burns.
Do not use this product in the presence of flammable dust or gas
such as propane, gasoline or aerosols.
Failure to observe this precaution could result in explosion or fire.
Do not directly view the sun or other bright light source through the
lens.
Failure to observe this precaution could result in visual impairment.
Do not aim the flash or AF-assist illuminator at the operator of a
motor vehicle.
Failure to observe this precaution could result in accidents.
Keep this product out of reach of children.
Failure to observe this precaution could result in injury or product
malfunction. In addition, note that small parts constitute a choking
hazard. Should a child swallow any part of this product, seek immediate
medical attention.
Do not entangle, wrap or twist the straps around your neck.
Failure to observe this precaution could result in accidents.
Do not use batteries, chargers, or AC adapters not specifically
designated for use with this product. When using batteries,
chargers, and AC adapters designated for use with this product, do
not:
Damage, modify, forcibly tug or bend the cords or cables, place
them under heavy objects, or expose them to heat or flame.
Use travel converters or adapters designed to convert from one
voltage to another or with DC-to-AC inverters.
Failure to observe these precautions could result in fire or electric shock.
xxxvii
For Your Safety
Do not handle the plug when charging the product or using the AC
adapter during thunderstorms.
Failure to observe this precaution could result in electric shock.
Do not handle with bare hands in locations exposed to extremely
high or low temperatures.
Failure to observe this precaution could result in burns, or frostbite.
A CAUTION
Do not leave the lens pointed at the sun or other strong light
sources.
Light focused by the lens could cause fire or damage to product’s
internal parts. When shooting backlit subjects, keep the sun well out of
the frame. Sunlight focused into the camera when the sun is close to the
frame could cause fire.
Turn this product off when its use is prohibited. Disable wireless
features when the use of wireless equipment is prohibited.
The radio-frequency emissions produced by this product could interfere
with equipment onboard aircraft or in hospitals or other medical
facilities.
Remove the battery and disconnect the AC adapter if this product
will not be used for an extended period.
Failure to observe this precaution could result in fire or product
malfunction.
Do not fire the flash in contact with or in close proximity to the skin
or objects.
Failure to observe this precaution could result in burns or fire.
xxxviii For Your Safety
Do not leave the product where it will be exposed to extremely high
temperatures, for an extended period such as in an enclosed
automobile or in direct sunlight.
Failure to observe this precaution could result in fire or product
malfunction.
Do not look directly at the AF-assist illuminator.
Failure to observe this precaution could have adverse effects on vision.
Do not transport cameras or lenses with tripods or similar
accessories attached.
Failure to observe this precaution could result in injury or product
malfunction.
Do not touch the memory card when a high-temperature
warning is displayed in the monitor or viewfinder.
The memory card will be hot, potentially causing burns or
causing the card to be dropped and damaged when
removed.
A DANGER (Batteries)
Do not mishandle batteries.
Failure to observe the following precautions could result in the batteries
leaking, overheating, rupturing, or catching fire:
Use only rechargeable batteries approved for use in this product.
Do not expose batteries to flame or excessive heat.
Do not disassemble.
Do not short-circuit the terminals by touching them to necklaces,
hairpins, or other metal objects.
Do not expose batteries or the products in which they are inserted to
powerful physical shocks.
Do not step on batteries, pierce them with nails, or strike them with
hammers.
Charge only as indicated.
Failure to observe this precaution could result in the batteries leaking,
overheating, rupturing, or catching fire.
xxxix
For Your Safety
If battery liquid comes into contact with the eyes, rinse with plenty
of clean water and seek immediate medical attention.
Delaying action could result in eye injuries.
Follow the instructions of airline personnel.
Batteries left unattended at high altitudes in an unpressurized
environment may leak, overheat, rupture, or catch fire.
A WARNING (Batteries)
Keep batteries out of reach of children.
Should a child swallow a battery, seek immediate medical attention.
Keep batteries out of reach of household pets and other animals.
The batteries could leak, overheat, rupture, or catch fire if bitten,
chewed, or otherwise damaged by animals.
Do not immerse batteries in water or expose to rain.
Failure to observe this precaution could result in fire or product
malfunction. Immediately dry the product with a towel or similar object
should it become wet.
Discontinue use immediately should you notice any changes in the
batteries, such as discoloration or deformation. Cease charging
EN-EL15c rechargeable batteries if they do not charge in the
specified period of time.
Failure to observe these precautions could result in the batteries leaking,
overheating, rupturing, or catching fire.
When batteries are no longer needed, insulate the terminals with
tape.
Overheating, rupture, or fire may result should metal objects come into
contact with the terminals.
If battery liquid comes into contact with a person's skin or clothing,
immediately rinse the affected area with plenty of clean water.
Failure to observe this precaution could result in skin irritation.
xl Notices
No part of the manuals included with this product may be reproduced,
transmitted, transcribed, stored in a retrieval system, or translated into
any language in any form, by any means, without Nikon’s prior written
permission.
Nikon reserves the right to change the appearance and specifications of
the hardware and software described in these manuals at any time and
without prior notice.
Nikon will not be held liable for any damages resulting from the use of
this product.
While every effort has been made to ensure that the information in
these manuals is accurate and complete, we would appreciate it were
you to bring any errors or omissions to the attention of the Nikon
representative in your area (address provided separately).
Notice Concerning Prohibition of Copying or Reproduction
Note that simply being in possession of material that has been digitally
copied or reproduced by means of a scanner, digital camera, or other
device may be punishable by law.
Items prohibited by law from being copied or reproduced
Do not copy or reproduce paper money, coins, securities, government
bonds, or local government bonds, even if such copies or reproductions
are stamped “Sample”.
The copying or reproduction of paper money, coins, or securities which
are circulated in a foreign country is prohibited.
Unless the prior permission of the government has been obtained, the
copying or reproduction of unused postage stamps or post cards issued
by the government is prohibited.
The copying or reproduction of stamps issued by the government and
of certified documents stipulated by law is prohibited.
Notices
xli
Notices
Cautions on certain copies and reproductions
The government has issued cautions on copies or reproductions of
securities issued by private companies (shares, bills, checks, gift
certificates, etc.), commuter passes, or coupon tickets, except when a
minimum of necessary copies are to be provided for business use by a
company. Also, do not copy or reproduce passports issued by the
government, licenses issued by public agencies and private groups, ID
cards, and tickets, such as passes and meal coupons.
Comply with copyright notices
Under copyright law, photographs or recordings of copyrighted works
made with the camera cannot be used without the permission of the
copyright holder. Exceptions apply to personal use, but note that even
personal use may be restricted in the case of photographs or recordings
of exhibits or live performances.
Use Only Nikon Brand Electronic Accessories
Nikon cameras are designed to the highest standards and include
complex electronic circuitry. Only Nikon brand electronic accessories
(including lenses, chargers, batteries, AC adapters, and flash accessories)
certified by Nikon specifically for use with this Nikon digital camera are
engineered and proven to operate within the operational and safety
requirements of this electronic circuitry.
The use of non-Nikon electronic accessories could damage
the camera and may void your Nikon warranty. The use of
third-party rechargeable Li-ion batteries not bearing the
Nikon holographic seal shown at right could interfere with normal
operation of the camera or result in the batteries overheating, igniting,
rupturing, or leaking.
For more information about Nikon brand accessories, contact a local
authorized Nikon dealer.
xlii Notices
DBefore Taking Important Pictures
Before taking pictures on important occasions (such as at weddings or
before taking the camera on a trip), take a test shot to ensure that the
camera is functioning normally. Nikon will not be held liable for damages
or lost profits that may result from product malfunction.
DLife-Long Learning
As part of Nikon’s “Life-Long Learning” commitment to ongoing product
support and education, continually-updated information is available
on-line at the following sites:
For users in the U.S.A.: https://www.nikonusa.com/
For users in Europe: https://www.europe-nikon.com/support/
For users in Asia, Oceania, the Middle East, and Africa:
https://www.nikon-asia.com/
Visit these sites to keep up-to-date with the latest product information,
tips, answers to frequently-asked questions (FAQs), and general advice on
digital imaging and photography. Additional information may be
available from the Nikon representative in your area. See the following
URL for contact information: https://imaging.nikon.com/
1
Parts of the Camera
Getting to Know the Camera
Camera Body
Parts of the Camera
4
10
7
6
5
11
9
8
1491312
3
21
1Mode dial (015, 106)
2Mode dial lock release (015,
106)
3Stereo microphone (063)
4Movie-record button (063)
5Power switch (052, 56)
6Shutter-release button (056)
7E button (018, 122)
8S button (016, 118)
9Eyelet for camera strap (037)
10 E (focal plane mark; 093)
11 Main command dial (016)
12 Speaker (071)
13 Control panel (06, 692)
14 Accessory shoe (for optional
flash unit; 0613, 693)
2Parts of the Camera
123
13
6
4
5
9
8
10
11
7
12
1Image sensor (0739)
2M button (014, 461)
3AF-assist illuminator (060,
390)
Red-eye reduction lamp
(0156, 619)
Self-timer lamp (0131)
4Cover for accessory terminal
and USB and HDMI connectors
5Cover for headphone and
microphone connectors
6Lens mounting mark (050)
7Headphone connector
(0374)
8Charge lamp (040)
9USB connector (0492, 599)
10 HDMI connector (0604)
11 Accessory terminal
12 Connector for external
microphone (0706)
13 Body cap (050)
3
Parts of the Camera
14 13 1112
7
6
5
8
9
10
20
15
19
17
18
16
2134
1Diopter adjustment control
(013)
2DISP button (025)
3Photo/movie selector (056,
63)
4AF-ON button (028)
5Sub-selector (027, 133)
6i button (033, 136)
7Memory card slot cover (045)
8Memory card access lamp
(061, 65)
9J button (029)
10 Multi selector (029)
11 G button (028, 212)
12 c (E) button (0125, 131)
13 W (Q) button (027, 32, 181,
204)
14 X button (027, 91, 181, 204)
15 Monitor (019, 88)
16 O button (072, 206)
17 K button (069, 180)
18 Rubber eyecup (0704)
19 Viewfinder (013)
20 Eye sensor (013)
4Parts of the Camera
6
7
9
8
3
5
4
10
1
2
1Lens mount (050, 93)
2Lens release button (051)
3CPU contacts
4Tripod socket
5Power connector cover
(0733)
6Battery-chamber cover
7Battery-chamber cover latch
8Fn2 button (035, 74)
9Fn1 button (035, 94)
10 Sub-command dial (016)
5
Parts of the Camera
DDo Not Touch the Image Sensor
Under no circumstances should you exert pressure on the image sensor,
poke it with cleaning tools, or subject it to powerful air currents from a
blower. These actions could scratch or otherwise damage the sensor. For
information on cleaning the image sensor, see “Image Sensor Cleaning”
(0739).
DNotes on the Monitor
The angle of the monitor can be adjusted.
DProduct Serial Number
The serial number for this product can be
found by opening the monitor.
6Parts of the Camera
The Control Panel
The control panel lights when the camera is on. At default
settings, the following indicators are displayed. For a full list of
the indicators that appear in the control panel, see “The Camera
Display and Control Panel” (0681) in “Technical Notes”.
12
7
65
3
4
1Shutter speed (0108, 109)
2Aperture (0108, 109)
3Battery indicator (044)
4“k” (appears when memory
remains for over 1000
exposures; 047)
5Number of exposures
remaining (047, 773)
6Release mode (0125)
7ISO sensitivity (0118)
7
Parts of the Camera
The Monitor
At default settings, the following indicators appear in the
monitor. For a full list of indicators, see “The Camera Display and
Control Panel” (0681) in “Technical Notes”.
❚❚ Photo Mode
2
12
43 5 6 7 8 9 10
11
1
1AF-area brackets (077)
2Shooting mode (0106)
3Focus point (077)
4Release mode (0125)
5Focus mode (074)
6AF-area mode (077)
7Active D-Lighting (0283)
8Picture Control (0139, 275)
9White balance (094, 145, 267)
10 Image area (0260)
11 Image size (0154)
12 Image quality (0152)
8Parts of the Camera
4
3
12
57 6
10 9 8
14
15
13
11
2
1
1i icon (0136)
2Exposure indicator
Exposure (0110)
Exposure compensation
(0122)
3“k” (appears when memory
remains for over 1000
exposures; 047)
4Number of exposures
remaining (047, 773)
5ISO sensitivity (0118)
6ISO sensitivity indicator
(0118)
Auto ISO sensitivity indicator
(0120)
7Aperture (0108, 109)
8Shutter speed (0108, 109)
9Subject-tracking AF (086)
10 Metering (0157)
11 Battery indicator (044)
12 Shutter type (0398)
13 “Clock not set” indicator
(055)
14 Vibration reduction indicator
(0161)
15 Touch shooting (088)
9
Parts of the Camera
❚❚ Movie Mode
1 3 42
6
5
8
7
9
1Recording indicator (063)
“No movie” indicator (065)
2Destination (0177)
3Frame size and rate/image
quality (0168)
4Image area (0175)
5Time remaining (063)
6Release mode (still
photography; 0130)
7Sound level (0174)
8Microphone sensitivity
(0174)
9Frequency response (0373)
10 Parts of the Camera
The Viewfinder
At default settings, the following indicators appear in the
viewfinder. For a full list of indicators, see “The Camera Display
and Control Panel” (0681) in “Technical Notes”.
❚❚ Photo Mode
2 4 5 6789101 3 1211
1Battery indicator (044)
2“Clock not set” indicator
(055)
3Vibration reduction indicator
(0161)
4Release mode (0125)
5Focus mode (074)
6AF-area mode (077)
7Active D-Lighting (0283)
8Picture Control (0139, 275)
9White balance (094, 145, 267)
10 Image quality (0152)
11 Image size (0154)
12 Image area (0260)
11
Parts of the Camera
3 25 4910 7 68 1
12
13
11
1“k” (appears when memory
remains for over 1000
exposures; 047)
2Number of exposures
remaining (047, 773)
3ISO sensitivity (0118)
4ISO sensitivity indicator
(0118)
Auto ISO sensitivity indicator
(0120)
5Exposure indicator
Exposure (0110)
Exposure compensation
(0122)
6Aperture (0108, 109)
7Shutter speed (0108, 109)
8Shutter type (0398)
9Shooting mode (0106)
10 Metering (0157)
11 Subject-tracking AF (086)
12 Focus point (077)
13 AF-area brackets (077)
12 Parts of the Camera
❚❚ Movie Mode
123
5
7
984
6
1Recording indicator (063)
“No movie” indicator (065)
2Frame size and rate/image
quality (0168)
3Image area (0175)
4Destination (0177)
5Release mode (still
photography; 0130)
6Time remaining (063)
7Frequency response (0373)
8Microphone sensitivity
(0174)
9Sound level (0174)
13
Camera Controls
Viewfinder
Placing your eye to the viewfinder
activates the eye sensor, switching the
display from the monitor to the
viewfinder. Note that the eye sensor
will also respond to other objects, such
as your fingers.
The viewfinder can be used for menus and playback if desired.
DThe Diopter Adjustment Control
The viewfinder can be focused by lifting and
rotating the diopter adjustment control.
Be careful not to put your fingers or
fingernails in your eye.
After adjusting diopter, push the diopter
adjustment control back into its original
position.
AExtended Use
When using the viewfinder for extended periods, you can select [Off] for
Custom Setting d9 [Apply settings to live view] to ensure that
viewfinder brightness and hue are adjusted for ease of viewing.
Camera Controls
14 Camera Controls
The M (Monitor Mode) Button
Press the M button to cycle between
viewfinder and monitor displays.
Press the M button to cycle through the displays as follows.
[Automatic display switch]: The camera automatically
switches between the viewfinder and monitor displays
based on information from the eye sensor.
[Viewfinder only]: The monitor remains blank. The
viewfinder is used for shooting, menus, and playback.
[Monitor only]: The monitor is used for shooting, menus,
and playback. The viewfinder display will remain blank
even if you put your eye to the viewfinder.
[Prioritize viewfinder]: The camera functions in a manner
similar to existing digital SLR cameras.
During photo mode, placing your eye to the viewfinder
turns the viewfinder on; the monitor remains off after
you take your eye away.
During movie mode or playback or while menus are displayed, the
camera automatically switches between the viewfinder and the
monitor based on information from the eye sensor.
15
Camera Controls
ATilting the Monitor
Putting your eye to the camera when the monitor is tilted will not trigger
the viewfinder if both the following conditions are met:
[Automatic display switch] or [Prioritize viewfinder] is selected for
monitor mode, and
a menu, picture, or other display currently appears in the monitor.
AMonitor Mode
You can limit the choice of monitor modes available using the [Limit
monitor mode selection] item in the setup menu.
The Mode Dial
Press the mode dial lock
release and rotate the mode
dial to choose a shooting
mode.
Mode Description
bAuto A simple, “point-and-shoot” mode that leaves
the camera in charge of settings (056, 63).
PProgrammed
auto
The camera sets shutter speed and aperture for
optimal exposure.
SShutter-
priority auto
You choose the shutter speed; the camera
selects the aperture for best results.
AAperture-
priority auto
You choose the aperture; the camera selects the
shutter speed for best results.
MManual You control both shutter speed and aperture.
U1
U2
U3
User settings
modes
Assign frequently-used settings to these
positions for quick recall.
16 Camera Controls
The Command Dials
Rotate the command dials to choose
settings for shutter speed, aperture, or
the functions assigned to other camera
controls.
The S Button
Adjust the camera’s sensitivity to light
(ISO sensitivity) in accord with lighting
conditions.
❚❚ Photo Mode
ISO sensitivity can be adjusted by holding the S button and
rotating the main command dial.
In modes P, S, A, and M, you can hold the S button and
rotate the sub-command dial to choose from “ISO AUTO
(auto ISO sensitivity control enabled) or “ISO” (auto ISO
sensitivity control disabled).
In b mode, “ISO AUTO” (auto ISO sensitivity control enabled)
is selected by default. Hold the S button and rotate the
main command dial to cycle between “ISO AUTO” and “ISO
(auto ISO sensitivity control disabled).
17
Camera Controls
❚❚ Movie Mode
ISO sensitivity can be adjusted by holding the S button and
rotating the main command dial. ISO sensitivity for movie
recording can be adjusted in mode M only.
The value selected for [ISO sensitivity settings] > [ISO
sensitivity (mode M)] applies when [Off] is selected for [ISO
sensitivity settings] > [Auto ISO control (mode M)].
You can choose between “ISO AUTO” (auto ISO sensitivity
control enabled) and “ISO” (auto ISO sensitivity control
disabled) by holding the S button and rotating the sub-
command dial.
18 Camera Controls
The E (Exposure Compensation) Button
Alter exposure from the value suggested by the camera.
Exposure compensation can be used to make pictures brighter
or darker.
Exposure compensation can be
adjusted by holding the E button and
rotating either command dial.
Higher values make the subject
brighter, lower values darker.
−1 EV No exposure
compensation
+1 EV
19
Camera Controls
Touch Controls
The touch-sensitive monitor offers a
variety of controls that can be operated
by touching the display with your
fingers. During viewfinder photography,
touch controls are disabled and cannot
be used for focus or the like.
❚❚ Focusing and Releasing the Shutter
Touch the monitor to focus on the
selected point (touch AF).
In photo mode, the shutter will be
released when you lift your finger from
the display (touch shutter).
Touch shutter/AF settings can be
adjusted by tapping the W icon
(088).
❚❚ Adjusting Settings
Tap highlighted settings in the display.
You can then choose the desired
option by tapping icons or sliders.
20 Camera Controls
Tap Z or press J to select the chosen
option and return to the previous
display.
❚❚ Playback
Flick left or right to view other pictures
during full-frame playback.
In full-frame playback, touching the bottom of the display
brings up a frame-advance bar. Slide your finger left or right
over the bar to scroll rapidly to other pictures.
To zoom in on a picture displayed
during full-frame playback, use a
stretch gesture or give the display two
quick taps. You can adjust the zoom
ratio using stretch gestures to zoom in
and pinch gestures to zoom out.
21
Camera Controls
Use slide gestures to view other parts of the image during
zoom.
Giving the display two quick taps while zoom is in effect
cancels zoom.
To “zoom out” to a thumbnail view, use
a pinch gesture during full-frame
playback. Use pinch and stretch to
choose the number of images
displayed from 4, 9, and 72 frames.
❚❚ Viewing Movies
Movies are indicated by a 1 icon; to
start playback, tap the on-screen guide.
Tap the display to pause. Tap again to
resume.
Tap Z to exit to full-frame playback.
22 Camera Controls
❚❚ The i Menu
Tap the i icon to display the i menu
during shooting (033, 136).
Tap items to view and change options.
❚❚ Text Entry
When a keyboard is displayed, you can enter text by tapping
the keys.
To position the cursor, tap e or f or tap directly in the text
display area.
To cycle through the upper- and lower-case and symbol
keyboards, tap the keyboard selection button.
1
2
3
1Text display area
2Keyboard area
3Keyboard selection
23
Camera Controls
❚❚ Navigating the Menus
Slide up or down to scroll.
Tap a menu icon to choose a menu.
Tap menu items to display options.
You can then choose the desired
option by tapping icons or sliders.
To exit without changing settings, tap
Z.
24 Camera Controls
DThe Touch Screen
The touch screen responds to static electricity. It may not respond when
touched with fingernails or gloved hands.
Do not touch the screen with sharp objects.
Do not use excessive force.
The screen may not respond when covered with third-party protective
films.
The screen may not respond when touched simultaneously in multiple
locations.
AEnabling or Disabling Touch Controls
Touch controls can be enabled or disabled using the [Touch controls]
item in the setup menu.
25
Camera Controls
The DISP Button
Use the DISP button to cycle through
the following displays:
❚❚ Photo Mode
1 Displayed when [On] is selected for Custom Setting d9 [Apply
settings to live view].
2 Not displayed if [On] is selected for [Overlay shooting] during
multiple exposure photography.
123
654
1Indicators on
2Simplified display
3Histogram 1, 2
4Virtual horizon
5Information display (0681)
6Flash info (0626, 657) 3
26 Camera Controls
3 Displayed when an optional SB-5000, SB-500, SB-400, or SB-300 flash
unit is mounted on the accessory shoe or a WR-R10 wireless remote
controller commands a flash unit via radio flash control.
AThe Viewfinder
The DISP button can also be used to choose the information displayed in
the viewfinder. Note, however, that the information display and flash info
do not appear in the viewfinder.
AHiding the Information Display
The information display can be hidden by pressing the control to which
[Live view info display off] has been assigned using Custom Setting f2
[Custom controls]. Press the control again to reactivate the display.
❚❚ Movie Mode
12
43
1Indicators on
2Simplified display
3Histogram
4Virtual horizon
27
Camera Controls
The X and W (Q) Buttons
Zoom the display in the monitor in or
out during shooting or playback.
❚❚ Shooting
Press X to zoom in on the view through the lens during
shooting. Press X to increase the zoom ratio, W (Q) to zoom
out.
❚❚ Playback
Press X to zoom in on pictures during full-frame playback. Press
X to increase the zoom ratio, W (Q) to zoom out. Pressing
W(Q) when the picture is displayed full frame “zooms out” to
the thumbnail list.
The Sub-Selector
Press the sub-selector up, down, left, or
right to select the focus point. Press and
hold the center of the selector to lock
focus and exposure (0133).
28 Camera Controls
The AF-ON Button
The AF-ON button can be used for focus
in autofocus mode.
The G Button
Press the G button to view the menus.
* You can choose the menu displayed. The default is [MY MENU].
9
1
2
3
4
5
6
7
8
1D [PLAYBACK MENU]
(0232)
2C [PHOTO SHOOTING
MENU] (0248)
31 [MOVIE SHOOTING MENU]
(0363)
4A [CUSTOM SETTING MENU]
(0377)
5B [SETUP MENU] (0453)
6N [RETOUCH MENU] (0502)
7O [MY MENU]/
m [RECENT SETTINGS]*
(0533)
8The d Help icon (032)
9Current settings
29
Camera Controls
❚❚ Using the Menus
You can navigate the menus using the multi selector and J
button.
1
Highlight the icon for the current menu.
Press 4 to place the cursor in the menu-selection area.
2
Select a menu.
Press 1 or 3 to select the desired menu.
1Move cursor up
2Select highlighted item
3Display sub-menu, select
highlighted item, or move
cursor right
4Move cursor down
5Cancel and return to previous
menu, or move cursor left
30 Camera Controls
3
Position the cursor in the selected menu.
Press 2 to position the cursor in the selected menu.
4
Highlight a menu item.
Press 1 or 3 to highlight a menu item.
5
Display options.
Press 2 to display options for the selected menu item.
31
Camera Controls
6
Highlight an option.
Press 1 or 3 to highlight an option.
7
Select the highlighted option.
Press J to select the highlighted
option.
To exit without making a selection,
press the G button.
To exit the menus and return to shooting mode, press the
shutter-release button halfway.
32 Camera Controls
DGrayed-Out Items
Some items and menu options may be unavailable depending on the
mode and camera status. Unavailable items are displayed in gray.
AThe d (Help) Icon
Where available, a description of the currently-selected item can be
viewed by pressing the W (Q) button.
Press 1 or 3 to scroll.
Press W (Q) again to return to the menus.
ATouch Controls
You can also navigate the menus using touch controls (019).
33
Camera Controls
The i Button (the i Menu)
For quick access to frequently-used settings, press the i button
or tap the i icon to view the i menu.
Different menus are displayed during
photo mode and movie mode.
Options can be viewed by tapping
items in the display or by highlighting
items and pressing J; selections can
then be made using the multi selector.
Items for which the camera displays an
on-screen guide can be adjusted by
highlighting them in the i menu and
rotating a command dial. In some
cases, adjustments can be made using
both the main and sub-command dials.
AThe Playback i Menu
Pressing the i button during playback displays
a context-sensitive i menu of frequently-used
playback options.
34 Camera Controls
❚❚ Customizing the i Menu
The items displayed in the photo-mode i menu can be chosen
using Custom Setting f1 or g1 [Customize i menu].
1
Highlight Custom Setting f1 or
g1 [Customize
i
menu] and
press
J
.
See “The G Button” (028) for
information on using the menus.
2
Highlight the position you
want to change and press
J
.
A list of the items available for the
selected position will be displayed.
3
Highlight the desired item and
press
J
.
The item will be assigned to the
selected position and the options
shown in Step 2 will be displayed.
Repeat Steps 2 and 3 as desired.
4
Press the
G
button.
Changes will be saved and the Custom Settings menu will be
displayed.
35
Camera Controls
The Fn1 and Fn2 Buttons
Use the Fn1 or Fn2 button for quick
access to selected settings.
By default, the Fn1 button is assigned
white balance (094) and the Fn2
button focus- and AF-area–mode
selection (074).
The assigned setting can be adjusted by holding the Fn1 or
Fn2 button and rotating the command dials. In some cases,
adjustments can be made using both the main and sub-
command dials.
❚❚ Choosing Roles for the Fn1 and Fn2 Buttons
The roles played by the Fn1 and Fn2 buttons can be selected
using Custom Setting f2 or g2 [Custom controls] > [Fn1
button] and [Fn2 button].
1
Highlight Custom Setting f2 or
g2 [Custom controls] and press
J
.
See “The G Button” (028) for
information on using the menus.
2
Highlight the option for the
desired button and press
J
.
A list of the items available for the
selected button will be displayed.
36 Camera Controls
3
Highlight the desired item and
press
J
.
The item will be assigned to the
selected button and the options
shown in Step 2 will be displayed.
Repeat Steps 2 and 3 to assign a role to the remaining
button.
4
Press the
G
button.
Changes will be saved and the Custom Settings menu will be
displayed.
37
Attaching the Strap
First Steps
To attach a strap (whether the supplied strap or one that has
been purchased separately):
Attaching the Strap
38 Charging the Battery
Charge the supplied EN-EL15c battery before use.
DThe Battery and Charger
Read and follow the warnings and cautions in “For Your Safety” (0xxxv)
and “Caring for the Camera and Battery: Cautions” (0743).
The Battery Charger
Depending on the country or region, the charger comes with
either an AC wall adapter or a power cable.
AC wall adapter: After inserting the AC wall adapter into the
charger AC inlet (q), slide the AC wall adapter latch as shown
(w) and rotate the adapter 90 ° to fix it in place (e).
Charging the Battery
39
Charging the Battery
Power cable: After connecting the power cable with the plug
in the orientation shown, insert the battery and plug the cable
in.
An exhausted battery will fully charge in about 2 hours and
35 minutes.
DIf the CHARGE Lamp Flashes Rapidly
If the CHARGE lamp flashes rapidly (8 times a second):
A battery charging error has occurred: Unplug the charger and
remove and reinsert the battery.
The ambient temperature is too hot or too cold: Use the battery
charger at temperatures within the designated temperature range (0–
40 °C/+32–104 °F).
If the problem persists, unplug the charger and end charging. Bring the
battery and charger to a Nikon-authorized service representative.
Battery charging (flashes) Charging complete (steady)
40 Charging the Battery
Charging AC Adapters
When a battery is inserted in the camera, an EH-7P charging AC
adapter (available separately for the Z 6II, supplied with the
Z 7II) can be used to charge the battery or power the camera.
EN-EL15a or EN-EL15 batteries cannot be charged using a
charging AC adapter. Use an MH-25a battery charger instead.
If [Enable] is selected for [USB power delivery] in the setup
menu, the charging AC adapter can be used to power the
camera. The batteries will not charge while the camera is
powered by an outside source. For more information, see
“‘Power Delivery’ Versus ‘Charging’” (0493).
1
Insert the EN-EL15c into the
camera (
0
43).
41
Charging the Battery
2
After confirming that the camera is off, connect
the charging AC adapter (
q
) and plug the adapter
in.
Keep the plug straight during insertion and removal.
Charging
The battery charges while the camera is off.
The camera charge lamp (w) lights amber while charging is
in progress. The lamp turns off when charging is complete.
An exhausted battery will fully charge in about 2 hours and
45 minutes.
Power Delivery
The camera will draw power from the adapter while on.
42 Charging the Battery
3
Unplug the charging AC adapter when charging is
complete or when it is no longer needed to power
the camera.
DThe Charging AC Adapter
If the battery cannot be charged using the charging AC adapter, for
example because the battery is not compatible or the temperature of the
camera is elevated, the charge lamp will flash rapidly for about
30 seconds and then turn off. If the charge lamp is off and you did not
observe the battery charging, turn the camera on and check the battery
level.
AComputer USB Power Delivery and Battery Charging
Computers will supply current to power the camera or charge the
battery only when connected via a UC-E25 USB cable (available
separately). The supplied USB cable cannot be used for this purpose.
Depending on the model and product specifications, some computers
will not supply current to power the camera or charge the battery.
43
Inserting the Battery
Turn the camera off before inserting or removing the battery.
Using the battery to keep the orange battery latch pressed to
one side, slide the battery into the battery chamber until the
latch locks it in place.
Removing the Battery
To remove the battery, turn the camera
off and open the battery-chamber cover.
Press the battery latch in the direction
shown by the arrow to release the
battery and then remove the battery by
hand.
Inserting the Battery
44 Inserting the Battery
Battery Level
The battery level is shown in the shooting display and control
panel while the camera is on.
The battery level display changes as the battery level
diminishes, from L through K, J, I, and H. When the
battery level falls to H, suspend shooting and charge the
battery or ready a spare battery.
If the message [Shutter release disabled. Recharge battery.]
is displayed, charge or exchange the battery.
Monitor Viewfinder Control panel
45
Inserting Memory Cards
The camera is equipped with two
memory card slots: a slot that takes one
CFexpress or XQD memory card (q) and
another that takes one SD memory card
(w), for a total of two cards, one of each
type.
Turn the camera off before inserting or removing memory
cards.
Holding the memory card in the orientation shown, slide it
straight into the slot until it clicks into place.
-CFexpress and XQD memory cards:
-SD memory cards:
Inserting Memory Cards
128GB
64
GB
46 Inserting Memory Cards
Removing Memory Cards
After confirming that the memory card
access lamp is off, turn the camera off,
open the memory card slot cover, and
press the card in to eject it (q). The card
can then be removed by hand (w).
16
GB
47
Inserting Memory Cards
Number of Exposures Remaining
When the camera is on, the shooting display and control panel
show the number of photographs that can be taken at current
settings.
When memory cards are inserted in both slots and the default
option—[Overflow]—is selected for [Secondary slot
function], the camera will record pictures first to the card in
the slot chosen using [Primary slot selection] (the primary
slot), switching to the card in the remaining slot (the
secondary slot) when the card in the primary slot is full.
If two memory cards are inserted, the camera will show the
number of additional photographs that can be recorded to
the card in the primary slot. When the card in the primary slot
is full, the display will show the number of exposures
remaining on the card in the secondary slot.
Values over 1000 are rounded down to the nearest hundred.
For example, values between 1500 and 1599 are shown as
1.5 k.
Monitor Viewfinder Control panel
48 Inserting Memory Cards
DMemory Cards
Memory cards may be hot after use. Observe due caution when
removing memory cards from the camera.
Do not perform the following operations during formatting or while
data are being recorded, deleted, or copied to a computer or other
device. Failure to observe these precautions could result in loss of data
or in damage to the camera or card.
- Do not remove or insert memory cards
- Do not turn the camera off
- Do not remove the battery
- Do not disconnect AC adapters
Do not touch the card terminals with your fingers or metal objects.
Do not use excessive force when handling memory cards. Failure to
observe this precaution could damage the card.
Do not bend or drop memory cards or subject them to strong physical
shocks.
Do not expose memory cards to water, heat, or direct sunlight.
Do not format memory cards in a computer.
DMemory Card High-Temperature Warning
As indicated on the inside of the memory card
slot cover, memory cards inserted in the
camera may become hot. Do not attempt to
remove memory cards if a high-temperature
warning appears in the shooting display;
instead, wait for the camera to cool and the
warning to clear from the display.
49
Inserting Memory Cards
DNo Memory Card Inserted
If no memory card is inserted, a “no memory card” indicator will appear in
the shooting display and [–E–] will appear in both the control panel and
the shooting display.
AThe Write Protect Switch
SD memory cards are equipped
with a write-protect switch. Sliding
the switch to the “lock” position
write-protects the card, protecting
the data it contains.
A “–––” indicator and a [Card] warning appear in the shooting display
when a write-protected card is inserted.
If you attempt to release the shutter while a write-protected card is
inserted, a warning will be displayed and no picture will be recorded.
Unlock the memory card before attempting to take or delete pictures.
50 Attaching a Lens
The camera can be used with Z mount lenses. The lens
generally used in this manual for illustrative purposes is a
NIKKOR Z 24–70mm f/4 S.
Be careful to prevent dust entering the camera.
Confirm that the camera is off before attaching the lens.
- Remove the camera body cap (q, w) and rear lens cap (e, r).
- Align the mounting marks on the camera (t) and lens (y).
Do not touch the image sensor or lens contacts.
Attaching a Lens
51
Attaching a Lens
- Rotate the lens as shown until it clicks into place (u).
Remove the front lens cap before taking pictures.
DF Mount Lenses
Be sure to attach the FTZ mount adapter (available separately) before
using F mount lenses.
Attempting to attach F mount lenses directly to the camera could
damage the lens or image sensor.
Detaching Lenses
After turning the camera off, press and
hold the lens release button (q) while
turning the lens in the direction shown
(w).
After removing the lens, replace the
lens caps and camera body cap.
52 Choose a Language and Set the Clock
The language option in the setup menu is automatically
highlighted the first time menus are displayed. Choose a
language and set the camera clock.
1
Turn the camera on.
2
Highlight [Language] in the
setup menu and press
2
.
The [Language] item is
automatically highlighted in the
setup menu the first time the G
button is pressed after purchase.
For information on using the
menus, see “Using the Menus”
(029).
Choose a Language and Set the Clock
53
Choose a Language and Set the Clock
3
Select a language.
Press 1 or 3 to highlight the desired language and press J
(the languages available vary with the country or region in
which the camera was originally purchased).
4
Highlight [Time zone and date]
and press
2
.
5
Choose a time zone.
Select [Time zone] in the [Time
zone and date] display.
Highlight a time zone in the [Time
zone] display and press J.
The display shows a time zone map listing the selected
cities in the chosen zone and the difference between the
time in the chosen zone and UTC.
54 Choose a Language and Set the Clock
6
Turn daylight saving time on or
off.
Select [Daylight saving time] in
the [Time zone and date] display.
Highlight [On] (daylight saving time
on) or [Off] (daylight saving time off) and press J.
Selecting [On] advances the clock one hour; to undo the
effect, select [Off].
7
Set the clock.
Select [Date and time] in the [Time
zone and date] display.
Press J after using the multi
selector to set the clock to the date
and time in the selected time zone (note that the camera
uses a 24-hour clock).
8
Choose a date format.
Select [Date format] in the [Time
zone and date] display.
Highlight the desired date (year,
month, and day) display order and
press J.
55
Choose a Language and Set the Clock
9
Exit the menus.
Lightly press the shutter-release
button halfway to exit to shooting
mode.
DThe t Icon
A flashing t icon in the shooting display indicates that the camera clock
has been reset. The date and time recorded with new photographs will
not be correct; use the [Time zone and date] > [Date and time] option in
the setup menu to set the clock to the correct time and date. The camera
clock is powered by an independent clock battery. The clock battery
charges when the main battery is inserted in the camera. It takes about 2
days to charge. Once charged, it will power the clock for about a month.
ASnapBridge
Use the SnapBridge app to synchronize the camera clock with the clock
on a smartphone or tablet (smart device). See SnapBridge online help for
details.
56 Taking Photographs (b Mode)
Basic Photography and
Playback
Select b (auto) mode for simple “point-and-shoot”
photography.
DLenses with Retractable Barrels
Lenses with retractable barrels must be
extended before use. Rotate the lens zoom ring
as shown until the lens clicks into the extended
position.
1
Turn the camera on.
The monitor and control panel will
light.
Taking Photographs (b Mode)
57
Taking Photographs (b Mode)
2
Select photo mode by
rotating the photo/
movie selector to
C
.
3
Pressing the mode
dial lock release on
top of the camera,
rotate the mode dial
to
b
.
58 Taking Photographs (b Mode)
4
Ready the camera.
Holding the handgrip in your right hand and cradling the
camera body or lens with your left, bring your elbows in
against the sides of your chest.
Framing photos in the viewfinder:
Framing photos in the monitor:
Landscape (wide)
orientation
Portrait (tall) orientation
Landscape (wide)
orientation
Portrait (tall) orientation
59
Taking Photographs (b Mode)
5
Frame the photograph.
Position the main subject in the AF-
area brackets.
If the camera detects a human face,
the AF-area brackets will be
replaced by a yellow border around
the subject’s face indicating the
focus point. If eyes are detected, the
yellow focus point will instead
appear over one or the other of the subject’s eyes.
60 Taking Photographs (b Mode)
6
Press the shutter-release
button halfway to focus.
The focus point will be displayed in
green when the camera focuses. If
the camera is unable to focus, the
AF-area brackets will flash.
The AF-assist illuminator may light
to assist the focus operation if the
subject is poorly lit.
You can also focus by pressing the AF-ON button.
If the camera detects the faces or
eyes of human portrait subjects, the
active focus point will be displayed
in green. The focus point will flash
red if the camera is unable to focus.
DThe AF-Assist Illuminator
Do not obstruct the AF-assist illuminator while it is lit.
61
Taking Photographs (b Mode)
7
Smoothly press the shutter-
release button the rest of the
way down to take the
photograph.
You can also take a photograph by
touching the monitor. Touch your
subject to focus and lift your finger
to release the shutter (088).
DThe Memory Card Access Lamp
The memory card access lamp will light while
the photograph is being recorded. Do not
remove the memory card or battery.
DThe Standby Timer
The camera uses a standby timer to help
reduce the drain on the battery. If no
operations are performed for about
30 seconds, the standby timer will expire and
the monitor, viewfinder, and control panel will
turn off. A few seconds prior to turning off, the
monitor and viewfinder will dim. They can be
reactivated by pressing the shutter-release button halfway. The length of
time before the standby timer expires automatically can be selected using
Custom Setting c3 [Power off delay] > [Standby timer].
62 Taking Photographs (b Mode)
AUsing Zoom in Photo Mode
To zoom in on the display in photo mode (to a maximum of
approximately 12×), press the X button.
Press X to zoom in, W (Q) to zoom out.
A navigation window will appear at the bottom right corner of the
display.
Use the multi selector to scroll to areas of the frame not visible in the
monitor.
63
Shooting Movies (b Mode)
b (auto) mode can also be used for simple, “point-and-shoot”
movie recording.
1
Turn the camera on.
The monitor and control panel will
light.
2
Select movie mode by
rotating the photo/
movie selector to
1
.
Note that optional flash
units cannot be used
when the camera is in movie mode.
3
Pressing the mode
dial lock release on
top of the camera,
rotate the mode dial
to
b
.
Shooting Movies (b Mode)
64 Shooting Movies (b Mode)
4
Press the movie-record button
to start recording.
A recording indicator will be displayed in the monitor. The
monitor also shows the time remaining, or in other words
the approximate amount of new footage that can be
recorded to the memory card.
The camera can be refocused during recording by pressing
the AF-ON button.
Sound is recorded via the built-in microphone. Do not
cover the microphone during recording.
If you tap your subject in the monitor during recording, the
focus point will track the subject as it moves through the
frame (086).
2
1
1Recording indicator
2Time remaining
65
Shooting Movies (b Mode)
5
Press the movie-record button
again to end recording.
DThe Memory Card Access Lamp
The memory card access lamp will light while
the movie is being recorded. Do not remove the
memory card or battery.
DThe 0 Icon
A 0 icon indicates that movies cannot be recorded.
66 Shooting Movies (b Mode)
DRecording Movies
Movie recording will end automatically if:
- The maximum length is reached
- Another mode is selected
- The photo/movie selector is rotated to C
- The lens is removed
Sounds made by the camera may be audible in footage recorded:
-During autofocus
- During vibration reduction
- When power aperture is used
DMemory Card High-Temperature Warning
During movie recording, memory cards may
become hot and a high-temperature warning
may appear in the shooting display. Do not
attempt to remove the memory card; instead,
wait for the camera to cool and the warning to
clear from the display.
67
Shooting Movies (b Mode)
Taking Photos in Movie Mode
Photos can be taken in movie mode by pressing the shutter-
release button all the way down. The release mode (single-
frame or continuous) can be selected before shooting begins
using the c (E) button.
A C icon will flash in the display when
a photo is taken.
The frame advance rate for
[Continuous] release mode varies with
the option selected for [Frame size/
frame rate]. Note, however, that while
movie recording is in progress, only one photo will be taken
each time the shutter-release button is pressed, even if
[Continuous] is selected for release mode.
Taking photos does not interrupt movie recording.
DTaking Photos in Movie Mode
Photo-mode settings do not apply to photos taken in movie mode.
Up to 50 (Z 7II) or 40 (Z 6II) photographs can be taken with each movie.
Note that photos can be taken even when the subject is not in focus.
Photos are recorded at the dimensions currently selected for movie
frame size.
Photos are recorded in [JPEG finem] format, regardless of the option
selected for image quality.
Photos taken during movie recording are saved to the memory card in
the slot selected for [Destination] in the movie shooting menu or in the
i menu for movie mode.
A N icon indicates that photos cannot be taken.
68 Shooting Movies (b Mode)
DPhotography and Movie Recording
You may notice the following in the shooting display. These
phenomena will also be visible in any photos or footage recorded with
the camera.
- Flicker or banding in scenes lit by such sources as fluorescent,
mercury vapor, or sodium lamps
- Moving objects in the display appear distorted (individual subjects
such as trains or cars moving at high speed through the frame may be
distorted, or the entire frame may appear distorted when the camera
is panned horizontally)
- Jagged edges, color fringing, moiré, and bright spots may appear in
the display
- Bright regions or bands may appear in scenes lit by flashing signs and
other intermittent light sources or when the subject is briefly
illuminated by a strobe or other bright, momentary light source
- Flicker occurring when power aperture is used during movie
recording
Note that noise (randomly-spaced bright pixels, fog, or lines) and
unexpected colors may appear if you use the X button to zoom in on
the view through the lens during filming.
When recording, avoid pointing the camera at the sun or other strong
light sources. Failure to observe this precaution could result in damage
to the camera’s internal circuitry.
AUsing Zoom in Movie Mode
Press the X button to zoom in on the display in movie mode (062).
Pressing X during recording zooms the display in to 100%. Press W (Q) to
cancel zoom.
69
Playback
Press the K button to view photos and movies recorded with
the camera.
Viewing Photos
Photos can be viewed by following the steps below.
1
Press the
K
button.
A picture will be displayed in the
monitor or viewfinder.
The memory card containing the
picture currently displayed is shown
by an icon.
2
Press
4
or
2
to view
additional pictures.
When pictures are displayed in the
monitor, you can view other
pictures by flicking a finger left or
right over the display.
To end playback and return to shooting mode, press the
shutter-release button halfway.
Playback
70 Playback
Viewing Movies
Movies are indicated by a 1 icon. Tap the a icon in the display
or press the J button to start playback (a progress bar shows
your approximate position in the movie).
4
675
11 icon
2Length
3a icon
4Current position/total length
5Progress bar
6Volume
7Guide
71
Playback
❚❚ Movie Playback Operations
Operation Description
Pause Press 3 to pause playback.
Resume Press the J button to resume playback when
playback is paused or during rewind/advance.
Rewind/ advance
Press 4 to rewind, 2 to advance. Speed
increases with each press, from 2× to 4× to 8×
to 16×.
Keep 4 or 2 pressed to skip respectively to
the first frame or last frame.
The first frame is indicated by a h in the top
right corner of the display, the last frame by a
i.
Start slow-motion
playback
Press 3 while the movie is paused to start slow-
motion playback.
Jog rewind/advance
Press 4 or 2 while the movie is paused to
rewind or advance one frame at a time.
Keep 4 or 2 pressed for continuous rewind
or advance.
Skip 10 s Rotate the main command dial one stop to skip
ahead or back 10 s.
Skip to last or first
frame
Rotate the sub-command dial to skip to the last
or first frame.
Adjust volume Press X to increase volume, W (Q) to decrease.
Trim movie To display the [EDIT MOVIE] menu, pause
playback and press the i button.
Exit Press 1 or K to exit to full-frame playback.
Exit to shooting
mode
Press the shutter-release button halfway to end
playback.
72 Playback
Deleting Unwanted Pictures
Pictures can be deleted as described below. Note that once
deleted, pictures cannot be recovered.
1
Display the picture.
Press the K button to start
playback and press 4 or 2 until the
desired picture is displayed.
The location of the current image is
shown by an icon at the bottom left
corner of the display.
2
Delete the picture.
Press the O button; a confirmation
dialog will be displayed. Press the O
button again to delete the image
and return to playback.
To exit without deleting the picture,
press K.
73
Playback
AThe Playback Menu [Delete] Item
Use [Delete] in the playback menu to:
Delete multiple pictures
Delete pictures taken on selected dates
Delete all pictures in selected folders
74 Focus
Basic Settings
Focus Mode
Choose how the camera focuses.
❚❚ Choosing a Focus Mode
The focus mode can be selected using
the [Focus mode] items in the i menu
and the photo and movie shooting
menus (0164, 295, 371).
At default settings, the focus mode can also be selected by
holding the Fn2 button and rotating the main command dial
(035).
Focus
75
Focus
Option Description
AF-S [Single AF]
Use with stationary subjects. When you press the
shutter-release button halfway to focus, the
focus point will turn from red to green and focus
will lock. If the camera fails to focus, the focus
point will flash red and the shutter release will be
disabled.
At default settings, the shutter can only be
released if the camera is able to focus (focus
priority).
AF-C [Continuous
AF]
For moving subjects. The camera adjusts focus
continuously in response to changes in the
distance to the subject while the shutter-release
button is pressed halfway.
At default settings, the shutter can be released
whether or not the subject is in focus (release
priority).
AF-F [Full-time
AF]
The camera adjusts focus continuously in
response to subject movement or changes in
composition.
When the shutter-release button is pressed
halfway, the focus point will turn from red to
green and focus will lock.
This option is only available in movie mode.
MF [Manual
focus]
Focus manually (091). The shutter can be
released whether or not the subject is in focus.
76 Focus
DAutofocus
The camera may be unable to focus if:
- The subject contains lines parallel to the long edge of the frame
- The subject lacks contrast
- The subject in the focus point contains areas of sharply contrasting
brightness
- The focus point includes night-time spot lighting or a neon sign or
other light source that changes in brightness
- Flicker or banding appears under fluorescent, mercury-vapor,
sodium-vapor, or similar lighting
- A cross (star) filter or other special filter is used
- The subject appears smaller than the focus point
- The subject is dominated by regular geometric patterns (e.g., blinds
or a row of windows in a skyscraper)
The monitor may brighten or darken while the camera focuses.
The focus point may sometimes be displayed in green when the camera
is unable to focus.
The camera may take longer to focus when lighting is poor.
AStoring the Focus Position
To save the focus position when the camera is turned off, select [On] for
[Save focus position] in the setup menu. Note that this increases camera
startup times (in addition, if the temperature, zoom position, or other
conditions change while the camera is off, focus may resume from a
different position when the camera is turned on).
ALow-Light AF
For improved focus when shooting under low light, select AF-S and
choose [On] for Custom Setting a10 [Low-light AF]. In photo mode, this
option takes effect only in modes P, S, A, and M.
77
Focus
AF-Area Mode
Choose how the camera selects the focus-point for autofocus.
In modes other than [Auto-area AF], [Auto-area AF
(people)], and [Auto-area AF (animals)], the focus point can
be positioned using the sub-selector (0133) or multi selector.
❚❚ Choosing an AF-Area Mode
AF-area mode can be selected using
the [AF-area mode] items in the i
menu and the photo and movie
shooting menus (0163, 296, 371).
At default settings, AF-area mode can also be selected by
holding the Fn2 button and rotating the sub-command dial
(035).
Option Description
3[Pinpoint AF]
With a focus area smaller than that employed
for single-point AF, pinpoint AF is used for
pinpoint focus on a selected spot in the frame.
Focusing may be slower than with single-point
AF.
Recommended for shots involving static
subjects, such as buildings, in-studio product
photography, or close-ups.
This option is only available when photo mode
is selected and [Single AF] is chosen for focus
mode.
78 Focus
d[Single-point
AF]
The camera focuses on a point selected by the
user.
Use with stationary subjects.
e[Dynamic-
area AF]
The camera focuses on a point selected by the
user. If the subject briefly leaves the selected
point, the camera will focus based on
information from surrounding focus points.
Use for photographs of athletes and other
active subjects that are hard to frame using
single-point AF.
This option is only available when photo mode
is selected and [Continuous AF] is chosen for
focus mode.
Option Description
79
Focus
f[Wide-area AF
(S)]
As for single-point AF except that the camera
focuses on a wider area.
Choose for snapshots, subjects that are in
motion, and other subjects that are difficult to
photograph using single-point AF.
During movie recording, wide-area AF can be
used for smooth focus when making panning or
tilting shots or filming moving subjects.
If the selected focus area contains subjects at
different distances from the camera, the camera
will assign priority to the closest subject.
The focus areas for [Wide-area AF (L)] are
larger than those for [Wide-area AF (S)].
If [Wide-area AF (L-people)] is selected, the
camera will detect and focus on the faces or
eyes of human portrait subjects (face/eye-
detection AF, 082).
If [Wide-area AF (L-animals)] is selected, the
camera will detect and focus on the faces or
eyes of dogs and cats (animal-detection AF,
084).
g[Wide-area AF
(L)]
1[Wide-area AF
(L-people)]
2[Wide-area AF
(L-animals)]
Option Description
80 Focus
h[Auto-area
AF]
The camera automatically detects the subject
and selects the focus area.
Use on occasions when you don’t have time to
select the focus point yourself, for portraits, or
for snapshots and other spur-of-the-moment
photos.
If [Auto-area AF (people)] is selected, the
camera will detect and focus on the faces or
eyes of human portrait subjects (face/eye-
detection AF, 082).
If [Auto-area AF (animals)] is selected, the
camera will detect and focus on the faces or
eyes of dogs and cats (animal-detection AF,
084).
Subject tracking (086) can be initiated by
pressing the J button. Custom Setting f2 or g2
[Custom controls] can be used to configure the
Fn1 or Fn2 button to start subject-tracking AF
(0414, 441). Subject-tracking AF can also be
assigned to the lens Fn or Fn2 button using
Custom Setting f2 [Custom controls].
5[Auto-area AF
(people)]
6[Auto-area AF
(animals)]
Option Description
81
Focus
As: The Center Focus Point
In all AF-area modes except [Auto-area AF], [Auto-area AF (people)],
and [Auto-area AF (animals)], a dot appears in the focus point when it is
in the center of the frame.
AQuick Focus-Point Selection
For quicker focus-point selection, choose [Every other point] for
Custom Setting a4 [Focus points used] to use only a quarter of the
available focus points. The number of points available for [Pinpoint AF],
[Wide-area AF (L)], [Wide-area AF (L-people)], and [Wide-area AF
(L-animals)] does not change.
If you prefer to use the sub-selector for focus-point selection, you can
choose [Select center focus point] for Custom Setting f2 [Custom
controls] > [Sub-selector center] to allow the center of the sub-
selector to be used to quickly select the center focus point.
82 Focus
❚❚ Focusing on the Faces or Eyes of Portrait Subjects
(Face/Eye-Detection AF)
The camera detects the faces and eyes of
human portrait subjects when [Wide-
area AF (L-people)] or [Auto-area AF
(people)] is selected for [AF-area mode]
in the photo and movie shooting menus
(face/eye-detection AF).
When the camera detects a human
face, a yellow border indicating the
focus point will appear around the
subject’s face. If the camera detects the
subject’s eyes, the yellow focus point
will instead appear over one or the
other of their eyes.
If AF-C is selected for focus mode, the focus point will light
yellow when faces or eyes are detected.
If AF-S is selected for focus mode, the focus point will turn
green when the camera focuses.
If more than one human face or eye is detected when [Auto-
area AF (people)] is selected, e and f icons will appear on
the focus point. You will be able to position the focus point
over a different face or eye by pressing 4 or 2.
83
Focus
If the subject looks away after their face is detected, the focus
point will move to track their motion.
During playback, you can zoom in on the face or eye used for
focus by pressing J.
DFace/Eye-Detection AF
Eyes or faces may not be detected as expected if:
- the subject’s face occupies a very large or very small proportion of the
frame,
- the subject’s face is lit too brightly or too poorly,
- the subject is wearing glasses or sunglasses,
- the subject’s face or eyes are obscured by hair or other objects, or
- the subject moves excessively during shooting.
The performance of face- and eye-detection may drop if:
-[3840×2160; 60p] or [3840×2160; 50p] is selected for [Frame size/
frame rate] in the movie shooting menu during movie recording,
- the camera is connected to an HDMI device with [10 bit] selected for
[HDMI] > [Advanced] > [Output data depth] in the setup menu, or
-[N-Log] or [HDR (HLG)] is selected for [HDMI] > [Advanced] >
[N-Log/HDR (HLG) output options] in the setup menu.
84 Focus
❚❚ Focusing on the Faces or Eyes of Animals (Animal-
Detection AF)
The camera detects the faces and eyes of
dogs and cats when [Wide-area AF
(L-animals)] or [Auto-area AF
(animals)] is selected for [AF-area
mode] in the photo and movie shooting
menus (animal-detection AF).
When the camera detects a face of a
dog or cat, a yellow border indicating
the focus point will appear around the
subject’s face. If the camera detects the
subject’s eyes, the yellow focus point
will instead appear over one or the
other of their eyes.
If AF-C is selected for focus mode, the focus point will light
yellow when faces or eyes are detected.
While if AF-S is selected, the focus point will turn green when
the camera focuses.
If more than one face or eye of a dog or cat is detected when
[Auto-area AF (animals)] is selected, e and f icons will
appear on the focus point. You will be able to position the
focus point over a different face or eye by pressing 4 or 2.
During playback, you can zoom in on the face or eye used for
focus by pressing J.
85
Focus
DAnimal-Detection AF
Eyes or faces may not be detected as expected if:
- the subject’s face occupies a very large or very small proportion of the
frame,
- the subject’s face is lit too brightly or too poorly,
- the subject’s face or eyes are obscured by fur or other objects,
- the subject’s eyes are similar in color to the rest of their face, or
- the subject moves excessively during shooting.
Depending on shooting conditions, the camera may fail to detect the
faces or eyes of some breeds when [Wide-area AF (L-animals)] or
[Auto-area AF (animals)] is enabled. Alternatively, the camera may
display a border around subjects that are not the faces or eyes of dogs
or cats.
The performance of face- and eye-detection may drop if:
-[3840×2160; 60p] or [3840×2160; 50p] is selected for [Frame size/
frame rate] in the movie shooting menu during movie recording,
- the camera is connected to an HDMI device with [10 bit] selected for
[HDMI] > [Advanced] > [Output data depth] in the setup menu, or
-[N-Log] or [HDR (HLG)] is selected for [HDMI] > [Advanced] >
[N-Log/HDR (HLG) output options] in the setup menu.
The light from the AF-assist illuminator may adversely affect the eyes of
some animals; when using animal-detection AF, select [Off] for Custom
Setting a11 [Built-in AF-assist illuminator].
86 Focus
❚❚ Subject-Tracking AF
When [Auto-area AF], [Auto-area AF (people)], or [Auto-area
AF (animals)] is selected for AF-area mode, the camera can
track the subject in the selected focus point.
Press J to enable focus tracking; the
focus point will change to a targeting
reticle.
Position the reticle over the target and press the AF-ON
button or press J again to start tracking; the focus point will
track the selected subject as it moves through the frame. To
end tracking and select the center focus point, press J again.
In photo mode, if subject tracking was initiated in focus mode
AF-C by pressing the shutter-release button halfway or by
pressing the AF-ON button, the camera will track the subject
only while the button is pressed; releasing the button ends
tracking and restores the focus point selected before tracking
started.
To exit subject-tracking mode, press the W (Q) button.
87
Focus
DSubject Tracking
The camera may be unable to track subjects if they:
are similar in color or brightness to the background,
change visibly in size, color, or brightness,
are too large or too small,
are too dark or too bright,
move quickly, or
leave the frame or are obscured by other objects.
88 Focus
The Touch Shutter
Touch the display to focus on the
selected point. The shutter will be
released when you lift your finger from
the display.
Tap the icon shown in the illustration to
choose the operation performed by
tapping the display.
Option Description
W
[Touch
shutter/
touch AF]
Touch the display to focus on the selected point and
lift your finger to release the shutter. If [Wide-area
AF (L-people)], [Wide-area AF (L-animals)], [Auto-
area AF (people)], or [Auto-area AF (animals)] is
selected for AF-area mode and the camera detects
human faces or eyes or the faces or eyes of dogs or
cats, the camera will focus on the face or eye *
closest to the selected point.
Available only in photo mode.
89
Focus
* When choosing an eye using touch controls, note that the camera may
not focus on the eye on the side you intend. Use the multi selector to
choose the desired eye.
V[Touch
AF]
Touch the display to focus on the selected point.
Lifting your finger from the display does not release
the shutter.
If [Auto-area AF], [Auto-area AF (people)], or
[Auto-area AF (animals)] is selected for AF-area
mode, the camera will track the selected subject as
it moves through the frame. To switch to a different
subject, tap it in the display. If the camera detects
human faces or eyes or the faces or eyes of dogs or
cats, the camera will focus on and track the face or
eye * closest to the selected point.
X[Off] Touch shutter disabled.
f
[Position
focus
point]
Touch the display to position the focus point. The
camera will not focus and lifting your finger from
the display will not release the shutter.
If [Auto-area AF], [Auto-area AF (people)], or
[Auto-area AF (animals)] is selected for AF-area
mode, the camera will track the selected subject as
it moves through the frame. To switch to a different
subject, tap it in the display. If the camera detects
human faces or eyes or the faces or eyes of dogs or
cats, the camera will track the face or eye * closest to
the selected point.
Option Description
90 Focus
DTaking Pictures Using Touch Shooting Options
Touch controls cannot be used for manual focus.
The shutter-release button can be used to take pictures when the W
icon is displayed.
Touch controls cannot be used to take photographs during movie
recording.
During burst photography, touch controls can be used only to take one
picture at a time. Use the shutter-release button for burst photography.
In self-timer mode, focus locks on the selected subject when you touch
the monitor and the shutter is released about 10 seconds after you lift
your finger from the display. If the number of shots selected is greater
than 1, the remaining shots will be taken in a single burst.
91
Focus
Manual Focus
Manual focus is available in manual focus mode. Use manual
focus when, for example, autofocus does not produce the
desired results.
Position the focus point over your
subject and rotate the focus or control
ring until the subject is in focus.
For greater precision, press the
Xbutton to zoom in on the view
through the lens.
92 Focus
The focus indicator (I) in the shooting display can be used to
confirm whether the subject in the selected focus point is in
focus (electronic rangefinding). The focus point will also light
green when the subject is in focus.
When using manual focus with subjects not suited to
autofocus, note that the in-focus indicator (I) may be
displayed when the subject is not in focus. Zoom in on the
view through the lens and check focus. Use of a tripod is
recommended when the camera is having trouble focusing.
1
2
1Focus distance indicator
2Focus indicator
Focus
indicator Description
(steady) The subject is in focus.
(steady) The focus point is in front of the subject.
(steady) The focus point is behind the subject.
(flashes) The camera is unable to focus.
93
Focus
DLenses with Focus-Mode Selection
Manual focus mode can be chosen using focus-mode selection controls
on the lens (where available).
DThe Focal Plane Mark and Flange-Back Distance
Focus distance is measured from the focal
plane mark (E) on the camera body, which
shows the position of the focal plane inside the
camera (q). Use this mark when measuring the
distance to your subject for manual focus or
macro photography. The distance between the
focal plane and the lens mounting flange is
known as the “flange-back distance” (w). On
this camera, the flange-back distance is 16 mm (0.63 in.).
AFocus Peaking
If an option other than [Off] is selected for
Custom Setting d11 [Focus peaking] >
[Peaking level], objects that are in focus will
be indicated by colored outlines that appear
when focus is adjusted manually (focus
peaking).
Note that the focus peaking display may not
appear if the camera is unable to detect outlines. Check focus in the
shooting display.
94 White Balance
White balance ensures that white objects appear white,
regardless of the color of the light source. The default setting
(auto white balance, or j) is recommended with most light
sources; if the desired results cannot be achieved with auto
white balance, choose another option as described below.
Adjusting White Balance
White balance can be selected using
the [White balance] items in the
imenu and the photo and movie
shooting menus (0145, 267, 367).
At default settings, white balance can also be selected by
holding the Fn1 button and rotating the main command dial
(035).
White Balance
95
White Balance
When 4 [Auto] or I [Fluorescent] is selected, you can
choose a sub-option by holding the Fn1 button and rotating
the sub-command dial.
Option Color
temperature * Description
4[Auto]
White balance is adjusted
automatically for optimal
results with most light
sources. If an optional flash
unit is used, white balance
will be adjusted in accord
with the conditions in effect
when the flash fires.
i
[Keep white
(reduce warm
colors)]
Approx.
3500–8000 K
Eliminate the warm color cast
produced by incandescent
lighting.
j[Keep overall
atmosphere]
Approx.
3500–8000 K
Partially preserve the warm
color cast produced by
incandescent lighting.
k[Keep warm
lighting colors]
Approx.
3500–8000 K
Preserve the warm color cast
produced by incandescent
lighting.
96 White Balance
D[Natural light
auto]
Approx.
4500–8000 K
When used under natural
light in place of 4 [Auto],
this option produces colors
closer to those seen by the
naked eye.
H[Direct sunlight] Approx. 5200 K Use with subjects lit by direct
sunlight.
G[Cloudy] Approx. 6000 K Use in daylight under
overcast skies.
M[Shade] Approx. 8000 K Use in daylight with subjects
in shade.
J[Incandescent] Approx. 3000 K Use under incandescent
lighting.
I[Fluorescent]
Use under fluorescent
lighting; choose the bulb
type according to the light
source.
[Sodium-vapor
lamps]Approx. 2700 K
[Warm-white
fluorescent]Approx. 3000 K
[White fluorescent] Approx. 3700 K
[Cool-white
fluorescent]Approx. 4200 K
[Day white
fluorescent]Approx. 5000 K
[Daylight
fluorescent]Approx. 6500 K
[High temp. mercury-
vapor]Approx. 7200 K
Option Color
temperature * Description
97
White Balance
* Values when fine-tuning is set to 0.
5[Flash] Approx. 5400 K Use for flash photography.
K[Choose color
temperature]
Approx.
2500–10000 K
Choose the color
temperature directly.
To choose a color
temperature, hold the Fn1
button and rotate the sub-
command dial.
L[Preset manual]
Measure white balance for
the subject or light source
or copy white balance from
an existing photograph.
To choose a white balance
preset, hold the Fn1 button
and rotate the sub-
command dial.
To enter direct
measurement mode, press
and hold the Fn1 button
(0148).
Option Color
temperature * Description
98 White Balance
DD [Natural Light Auto]
D [Natural light auto] may not produce the desired results under
artificial light. Choose 4 [Auto] or an option that matches the light
source.
DWhite Balance Fine-Tuning
At settings other than K [Choose color temperature], white balance can
be fine-tuned. Use the [White balance] items in the i menu and the
photo and movie shooting menus (0146, 267).
DStudio Flash Lighting
4 [Auto] may not produce the desired results with large studio flash
units. Use preset manual white balance or set white balance to
5[Flash] and use fine-tuning to adjust white balance.
99
White Balance
A4 [Auto]
The photo info for pictures shot using 4
[Auto] lists the color temperature selected by
the camera at the time the picture was taken.
You can use this as reference when choosing
a value for K [Choose color temperature].
To view shooting data during playback,
select [Playback display options] >
[Additional photo info] in the playback menu and place a check (M)
next to [Shooting data].
AColor Temperature
The perceived color of a light source varies with the viewer; some may
have a red cast while others appear blue. Color temperature is an
objective measure of the color of a light source, expressed in Kelvins (K).
The lower the color temperature, the redder the cast (q); the higher the
temperature, the bluer the cast (w).
AChoosing a Color Temperature
In general, choose lower values if your pictures have a red cast or to
intentionally make pictures bluer, higher values if your pictures are tinged
blue or to intentionally make pictures redder.
3000 4000 5000 6000 8000 10000 [ K ]
100 Silent Photography
To enable the electronic shutter and
eliminate the noise and vibration caused
by operation of the mechanical shutter,
select [On] for [Silent photography] in
the photo shooting menu.
An icon is displayed while silent
photography is in effect.
There is no limit to the number of
photos that can be taken in a single
burst, regardless of the option chosen
for Custom Setting d2 [Max.
continuous release].
Note that the electronic shutter will be used regardless of the
option selected for Custom Setting d5 [Shutter type].
In release modes other than [Continuous H (extended)], the
display will briefly go dark when the shutter is released. This
signals that a photo has been taken.
Regardless of the setting chosen for [Beep options] in the
setup menu, no beep will sound when the camera focuses or
while the self-timer is counting down.
Enabling silent photography disables some features,
including:
- the flash,
- long exposure noise reduction,
- flicker reduction, and
- high ISO sensitivities (Hi 0.3–Hi 2.0).
Silent Photography
101
Silent Photography
DSilent Photography
Selecting [On] for [Silent photography] does not completely silence
the camera. Camera sounds may still be audible, for example during
autofocus or aperture adjustment, in the latter case most noticeably at
apertures smaller (i.e., at f-numbers higher) than f/5.6.
You may notice the following in photographs and in the shooting
display:
- Flicker or banding in scenes lit by such sources as fluorescent,
mercury vapor, or sodium lamps
- Distortion associated with motion (moving subjects may be distorted,
or the entire frame may appear distorted if the camera is moved
during shooting)
- Jagged edges, color fringing, moiré, and bright spots in the display
- Bright regions or bands in scenes lit by flashing signs and other
intermittent light sources or when the subject is briefly illuminated by
a strobe or other bright, momentary light source
The frame advance rate for burst photography changes when [On] is
selected for [Silent photography] (0127).
If an option other than [Off] is selected for [Vibration reduction] in the
photo shooting menu, sounds made by the camera may be audible
when the G or K button is pressed.
Silent photography mutes the shutter, but this does not absolve
photographers of the need to respect their subjects’ privacy and image
rights.
102 Rating Pictures
Selected pictures can be rated or marked as candidates for later
deletion. Ratings can also be viewed in Capture NX-D and
ViewNX-i. Protected pictures cannot be rated.
1
Press the
K
button to start
playback.
2
Select the desired picture and
press the
i
button.
The playback i menu will be
displayed.
3
Highlight [Rating] and press
J
.
Rating Pictures
103
Rating Pictures
4
Choose a rating.
Rotate the main command dial to
choose a rating of from zero to five
stars, or select d to mark the picture
as a candidate for later deletion.
Press J to select the highlighted option.
104 Protecting Pictures from Deletion
Pictures can be protected to prevent their being deleted
accidentally. Protected pictures will however be deleted when
the memory card is formatted.
1
Press the
K
button to start
playback.
2
Select the desired picture and
press the
i
button.
The playback i menu will be
displayed.
3
Highlight [Protect] and press
J
.
Protected pictures are marked with
a P icon.
To remove protection, display or
highlight the picture and select
[Protect] again.
Protecting Pictures from Deletion
105
Protecting Pictures from Deletion
ARemoving Protection from All Pictures
To remove protection from all pictures in the folder or folders currently
selected for [Playback folder] in the playback menu, select [Unprotect
all] in the i menu.
106 The Mode Dial
Shooting Controls
Use the mode dial to choose whether shutter speed and/or
aperture can be adjusted manually or are set automatically by
the camera.
Using the Mode Dial
Press the mode dial lock
release and rotate the mode
dial to choose from the
following modes:
The Mode Dial
Mode Description
bAuto A simple, “point-and-shoot” mode that leaves
the camera in charge of settings (056, 63).
PProgrammed
auto
The camera sets shutter speed and aperture for
optimal exposure.
SShutter-
priority auto
Use to freeze or blur motion. You choose the
shutter speed; the camera selects the aperture
for best results.
107
The Mode Dial
P (Programmed Auto)
In this mode, the camera automatically adjusts shutter speed
and aperture according to a built-in program to ensure
optimal exposure in most situations.
Different combinations of shutter speed and aperture that
produce the same exposure can be selected by rotating the
main command dial (“flexible program”).
- While flexible program is in effect, a
flexible program indicator (U) is
displayed.
- To restore default shutter speed and
aperture settings, rotate the main
command dial until the indicator is
no longer displayed. Flexible program also ends when the
mode dial is rotated to another setting or the camera is
turned off.
AAperture-
priority auto
Use to blur backgrounds or bring both
foreground and background into focus. You
choose the aperture; the camera selects the
shutter speed for best results.
MManual
You control both shutter speed and aperture.
Set shutter speed to “bulb” or “time” for long
time-exposures.
U1
U2
U3
User setting
mode
Assign frequently-used settings to these
positions. The settings can be recalled simply by
rotating the mode dial.
Mode Description
108 The Mode Dial
S (Shutter-Priority Auto)
In shutter-priority auto, you choose the
shutter speed while the camera
automatically adjusts aperture for
optimal exposure. Choose fast shutter
speeds to “freeze” motion, slow shutter
speeds to suggest motion by blurring
moving objects.
Rotate the main command dial to set the shutter speed.
Shutter speed can be set to values between 1/8000 s and 30 s, or
x200.
Shutter speed can be locked at the selected value (0429).
A (Aperture-Priority Auto)
In aperture-priority auto, you choose
the aperture while the camera
automatically adjusts shutter speed for
optimal exposure.
Aperture can be adjusted by rotating
the sub-command dial.
The minimum and maximum values for aperture vary with the
lens.
Aperture can be locked at the selected value (0429).
109
The Mode Dial
M (Manual)
You control both shutter speed and aperture. Choose this
mode for long time-exposures of such subjects as fireworks or
the night sky (“Bulb” or “Time” photography, 0112).
Shutter speed and aperture can be adjusted with reference to
the exposure indicators by rotating the command dials.
Rotate the main command dial to
choose the shutter speed. Shutter
speed can be set to values between
1/8000 s and 30 s, to “Bulb” or “Time”,
or to x200.
Aperture can be adjusted by rotating
the sub-command dial.
The minimum and maximum values
for aperture vary with the lens.
Shutter speed and aperture can be
locked at the selected values (0429).
110 The Mode Dial
DExposure Indicators
The exposure indicators in the monitor and viewfinder show whether the
photograph would be under- or over-exposed at current settings. The
exposure indicators can be read as follows (the display varies with the
option selected for Custom Setting b1 [EV steps for exposure cntrl]):
DExposure Warning
The displays will flash if the selected settings exceed the limits of the
exposure metering system.
Display
[1/3 step] selected for [EV steps for exposure cntrl]
Optimal
exposure
Underexposed
by 1/3 EV
Overexposed by
over 3 1/3 EV
Monitor
Viewfinder
111
The Mode Dial
AExtended Shutter Speeds
For shutter speeds as slow as 900 s (15 minutes), select [On] for Custom
Setting d6 [Extended shutter speeds (M)].
AAuto ISO Sensitivity Control (Mode M)
If auto ISO sensitivity control (0120) is enabled, ISO sensitivity will
automatically be adjusted for optimal exposure at the selected shutter
speed and aperture.
AMovie Mode Exposure Settings
The following movie shooting settings can be adjusted during filming:
1 Exposure control in shooting mode S is the same as in mode P.
2 The upper limit for ISO sensitivity can be selected using the [ISO
sensitivity settings] > [Maximum sensitivity] item in the movie
shooting menu.
3If [On] is selected for [ISO sensitivity settings] > [Auto ISO control
(mode M)] in the movie shooting menu, the upper limit for ISO
sensitivity can be selected using [Maximum sensitivity].
Mode Aperture Speed ISO sensitivity
P, S 1 ——
2
A4——
2
M444
3
112 The Mode Dial
❚❚ Long Time-Exposures
The camera offers two options for long time-exposures: “Bulb”
and “Time”. Long time-exposures can be used for pictures of
fireworks, night scenery, the stars, or moving lights.
1
Keep the camera steady, for example by using a
tripod.
2
Rotate the mode dial
to M.
A 35-second exposure shot at a shutter speed of
“Bulb” and an aperture of f/25
Shutter
speed Description
Bulb The shutter remains open while the shutter-release button
is held down.
Time
The exposure starts when the shutter-release button is
pressed and ends when the button is pressed a second
time.
113
The Mode Dial
3
Rotate the main command dial to choose a shutter
speed of Bulb (“Bulb”) or Time (“Time”).
4
Focus and start the exposure.
“Bulb”: Press the shutter-release button all the way down
to start the exposure. Keep the shutter-release button
pressed during the exposure.
“Time”: Press the shutter-release button all the way down
to start the exposure.
5
End the exposure.
“Bulb”: Lift your finger from the shutter-release button.
“Time”: Press the shutter-release button all the way down
a second time.
Bulb Time
114 The Mode Dial
DLong Time-Exposures
Note that “noise” (bright spots, randomly-spaced bright pixels or fog)
may be present in long exposures.
Bright spots and fog can be reduced by choosing [On] for [Long
exposure NR] in the photo shooting menu.
Nikon recommends using a fully-charged battery, a charging AC
adapter (available separately for the Z 6II, supplied with the Z 7II), or an
optional AC adapter and power connector to prevent loss of power
during long exposures.
To prevent blur, use of a tripod or a device such as an optional wireless
remote controller is recommended.
115
The Mode Dial
U1, U2, and U3 (User Settings Modes)
Frequently-used settings can be assigned to user setting
positions U1 through U3 and later recalled simply by rotating
the mode dial.
❚❚ Save User Settings
1
Adjust settings.
The settings that can be saved include:
photo shooting menu options,
movie shooting menu options,
Custom Settings, and
shooting mode, shutter speed (modes S and M), aperture
(modes A and M), flexible program (mode P), exposure
compensation, and flash compensation.
2
Highlight [Save user settings]
in the setup menu.
Highlight [Save user settings] in the
setup menu and press 2.
3
Select a position.
Highlight [Save to U1], [Save to U2], or [Save to U3] and
press 2.
116 The Mode Dial
4
Save user settings.
Highlight [Save settings] using 1 or 3 and press J to
assign current settings to the selected position.
5
Take pictures using
the saved settings.
Rotating the mode dial to
U1, U2, or U3 recalls the
settings last saved to that
position.
DUser Settings U1, U2, and U3
The release mode is not saved. In addition, the following settings are not
saved.
PHOTO SHOOTING MENU
-[Storage folder]
-[Manage Picture Control]
-[Multiple exposure]
-[Interval timer shooting]
-[Time-lapse movie]
-[Focus shift shooting]
MOVIE SHOOTING MENU
-[Manage Picture Control]
117
The Mode Dial
❚❚ Resetting User Settings
1
Highlight [Reset user settings]
in the setup menu.
Highlight [Reset user settings] in the
setup menu and press 2.
2
Select a position.
Highlight [Reset U1], [Reset U2], or [Reset U3] and press 2.
3
Reset user settings.
Highlight [Reset] and press J to restore default settings for
the selected position (the camera will function in mode P).
118 The S Button
The camera’s sensitivity to light (ISO sensitivity) can be adjusted
according to the amount of light available. In general, choosing
higher values allows faster shutter speeds at the same aperture.
Adjusting ISO Sensitivity
Hold the S button and rotate the
main command dial.
Choose from the following settings.
Z7II: Choose from settings of ISO 64 to
25600; the camera also supports
settings below ISO 64 by about 0.3, 0.5,
0.7, and 1 EV (ISO 32 equivalent) and
above ISO 25600 by about 0.3, 0.5, 0.7,
1, and 2 EV (ISO 102400 equivalent).
Z6II: Choose from settings of ISO 100 to 51200; the camera
also supports settings below ISO 100 by about 0.3, 0.5, 0.7, and
1 EV (ISO 50 equivalent) and above ISO 51200 by about 0.3,
0.5, 0.7, 1, and 2 EV (ISO 204800 equivalent).
At default settings, adjustments are made in steps of 1/3 EV.
Steps of 1/2 EV are also available via Custom Setting b1 [EV
steps for exposure cntrl].
b offers an ISO AUTO option.
The option currently selected is shown
in the shooting display and control
panel.
The S Button
119
The S Button
DHigh ISO Sensitivities
The higher the ISO sensitivity, the less light needed to make an exposure,
allowing pictures to be taken when lighting is poor and helping prevent
blur when the subject is in motion. Note, however, that the higher the
sensitivity, the more likely the image is to be affected by “noise” in the
form of randomly-spaced bright pixels, fog, or lines.
DHi 0.3–Hi 2.0
A setting of [Hi 0.3] corresponds to an ISO sensitivity approximately
0.3 EV higher than the camera’s highest numeric ISO value (25600 in the
case of the Z 7II, 51200 in the case of the Z 6II), equivalent to ISO 32000 in
the case of the Z 7II or ISO 64000 in the case of the Z 6II. [Hi 2.0]
corresponds to an ISO sensitivity approximately 2 EV higher (102400 in
the case of the Z 7II, 204800 in the case of the Z 6II). Note that pictures
taken at these settings are particularly prone to “noise” in the form of
randomly-spaced bright pixels, fog, or lines.
DLo 0.3–Lo 1.0
[Lo 0.3] corresponds to an ISO sensitivity about 0.3 EV below the camera’s
lowest numeric ISO value (64 in the case of the Z 7II, 100 in the case of the
Z 6II), equivalent to ISO 50 in the case of the Z 7II or ISO 80 in the case of
the Z 6II. [Lo 1.0] is roughly 1 EV below the lowest numeric ISO value,
equivalent to ISO 32 in the case of the Z 7II or ISO 50 in the case of the
Z 6II. Use for larger apertures or slower shutter speeds when lighting is
bright. Highlights may be overexposed. In most cases, ISO sensitivities of
ISO [64] (Z 7II) or [100] (Z 6II) or above are recommended.
120 The S Button
Auto ISO Sensitivity Control
Auto ISO sensitivity control automatically adjusts ISO sensitivity
if optimal exposure cannot be achieved at the value selected by
the user in modes P, S, A, and M. You can select an upper limit
for auto ISO sensitivity control (100–Hi 2.0 in the case of the
Z 7II, 200–Hi 2.0 in the case of the Z 6II) to prevent ISO sensitivity
being raised too high.
Hold the S button and rotate the
sub-command dial to select from
ISO AUTO (auto ISO sensitivity control
enabled) and ISO (auto ISO sensitivity
control disabled).
When auto ISO sensitivity control is enabled, the shooting
display will show ISO AUTO and control panel ISO-A. When
sensitivity is altered from the value selected by the user, the
ISO sensitivity will be shown in the displays.
Maximum sensitivity can be adjusted using the [ISO
sensitivity settings] item in the photo shooting menu.
Monitor Control panel
121
The S Button
DAuto ISO Sensitivity Control
If value currently selected for [ISO sensitivity settings] is higher than
that chosen for [Maximum sensitivity], the value chosen for [ISO
sensitivity settings] will serve as the upper limit for auto ISO sensitivity
control.
During flash photography, shutter speed is limited to the range defined
by the values selected for Custom Settings e1 [Flash sync speed] and
e2 [Flash shutter speed].
122 The E (Exposure Compensation) Button
Use this button to alter exposure from the value suggested by
the camera. Exposure compensation can be used to make
pictures brighter or darker.
Adjusting Exposure Compensation
Hold the E button and rotate the main
command dial.
Choose from values between –5 EV
(underexposure) and +5 EV
(overexposure). Values between –3 EV
and +3 EV are available in movie mode.
By default, changes are made in
increments of 1/3EV. The size of the
increments can be changed using Custom Setting b1 [EV
steps for exposure cntrl] to 1/2EV.
Higher values make the subject brighter, lower values darker.
Exposure compensation is not available in b mode.
The E (Exposure Compensation) Button
–1 EV No exposure
compensation
+1 EV
123
The E (Exposure Compensation) Button
Adjustments to exposure
compensation are shown in the control
panel.
Normal exposure can be restored by
setting exposure compensation to ±0.
Exposure compensation is not reset when the camera is
turned off.
At values other than ±0.0, the camera displays a E icon (movie
mode) or a E icon and the exposure indicator (photo mode)
after you release the E button. The current value for exposure
compensation can be confirmed by pressing the E button.
Monitor Viewfinder
124 The E (Exposure Compensation) Button
DMode M
In shooting mode M, exposure compensation affects only the exposure
indicator; shutter speed and aperture do not change.
The exposure indicator and the current value for exposure
compensation can be displayed by pressing the E button.
When auto ISO sensitivity control (0120) is in effect, ISO sensitivity is
automatically adjusted according to the value selected for exposure
compensation.
DUsing a Flash
When an optional flash unit is used, exposure compensation affects both
flash level and exposure, altering the brightness of both the main subject
and the background. Custom Setting e3 [Exposure comp. for flash] can
be used to restrict the effects of exposure compensation to the
background only.
125
The c/E (Release Mode/Self-Timer) Button
Choose the operation performed when the shutter is released.
Choosing a Release Mode
After pressing the c (E) button, highlight a release mode
using the multi selector and then press J to select the
highlighted option.
The option currently selected is shown
in the shooting display and control
panel.
The c/E (Release Mode/Self-Timer)
Button
126 The c/E (Release Mode/Self-Timer) Button
❚❚ Photo Mode
DThe Shooting Display
In continuous low-speed and continuous high-speed modes, the
display is updated in real time even while shooting is in progress.
The upper portion of the shooting display may dim when the
mechanical shutter is used during burst photography, but photographs
are unaffected.
Option Description
U[Single frame]The camera takes one photograph each time the
shutter-release button is pressed.
V[Continuous L]
The camera takes photographs at a selected
rate while the shutter-release button is
pressed.
The frame rate can be chosen by pressing 3
when [Continuous L] is highlighted in the
release-mode menu.
Choose from rates of from 1 to 5 fps.
W[Continuous H]The camera takes photos at up to about 5.5 fps
while the shutter-release button is pressed.
X[Continuous H
(extended)]
While the shutter-release button is held down,
the camera records up to about 10 (Z 7II) or 14
(Z 6II) frames per second.
Flicker reduction has no effect.
E[Self-timer] Take pictures with the self-timer (0131).
127
The c/E (Release Mode/Self-Timer) Button
DFrame Advance Rate
Frame advance rate varies with camera settings.
Release mode Image
quality
NEF
(RAW) bit
depth
Silent photography
Off On
[Continuous L]
JPEG
User-selected
frame advance
rate
User-selected
frame advance
rate 1
NEF
(RAW)
12 bit
14 bit
User-selected
frame advance
rate 2
[Continuous H]
JPEG
Approx. 5.5 fps
Z7II:
approx. 4 fps
Z 6II:
approx. 4.5 fps
NEF
(RAW)
12 bit
14 bit
Z7II:
approx. 5 fps
Z 6II:
approx. 5.5 fps
Z7II:
approx. 3.5 fps
Z 6II:
approx. 4 fps
[Continuous H
(extended)]
JPEG Z 7II:
approx. 10 fps 3
Z 6II:
approx. 14 fps 3
Z7II:
approx. 8 fps
Z 6II:
approx. 12 fps
NEF
(RAW)
12 bit
14 bit
Z7II:
approx. 9 fps 4
Z 6II:
approx. 10 fps 4
Z7II:
approx. 6.5 fps
Z 6II:
approx. 8 fps
128 The c/E (Release Mode/Self-Timer) Button
1 In the case of the Z 7II, the rate when 5 fps is selected is approximately
4 fps. In the case of the Z 6II, the rate when 5 fps is selected is
approximately 4.5 fps.
2 In the case of the Z 7II, the rate when 4 fps or faster is selected is
approximately 3.5 fps. In the case of the Z 6II, the rate when 5 fps is
selected is approximately 4 fps.
3 Maximum rate in focus mode MF or AF-S, or with [Single-point AF]
selected for AF-area mode in focus mode AF-C. Maximum rate in all
other cases is approximately 9 fps (Z 7II) or 12 fps (Z 6II).
4 Maximum rate in focus mode MF or AF-S, or with [Single-point AF]
selected for AF-area mode in focus mode AF-C. Maximum rate in all
other cases is approximately 8 fps (Z 7II) or 9 fps (Z 6II).
DBurst Photography
Depending on shooting conditions and memory card performance, the
memory card access lamp may light for anywhere from a few tens of
seconds to around a minute. Do not remove the memory card while the
memory card access lamp is lit. Not only could any unrecorded images
be lost, but the camera or memory card could be damaged.
If the camera is switched off while the memory card access lamp is lit, it
will not power off until all images in the buffer have been recorded.
If the battery is exhausted while images remain in the buffer, the shutter
release will be disabled and the images transferred to the memory card.
129
The c/E (Release Mode/Self-Timer) Button
DContinuous H (Extended)
Depending on camera settings, exposure may vary erratically during each
burst. This can be prevented by locking exposure (0133).
DThe Memory Buffer
While the shutter-release button is pressed
halfway, the frame-count display will show
the number of pictures that can be stored in
the memory buffer.
When the buffer is full, the display will show
r00 and the frame rate will drop.
The number shown is approximate. The
actual number of photos that can be stored in the memory buffer varies
with camera settings and shooting conditions.
130 The c/E (Release Mode/Self-Timer) Button
❚❚ Movies
In movie mode, you can choose the operation performed when
the shutter-release button is pressed (067).
Option Description
U[Single frame]
The camera takes one photograph each time the
shutter-release button is pressed. Up to 50 (Z 7II)
or 40 (Z 6II) photographs can be taken with each
movie.
c[Continuous]
The camera takes photos for up to 3 s (Z 7II) or
2 s (Z 6II) while the shutter-release button is
pressed.
The frame rate varies with the option selected
for [Frame size/frame rate] in the movie
shooting menu.
While movie shooting is in progress, only one
photo will be taken each time the shutter-
release button is pressed.
131
The c/E (Release Mode/Self-Timer) Button
The Self-Timer
In self-timer mode, pressing the shutter-release button starts a
timer, and a photo is taken when the timer expires.
1
Press the
c
(
E
) button,
highlight [Self-timer] using the
multi selector, and press
3
.
2
Choose the desired shutter-
release delay and number of
shots using the multi selector.
Press J to select the highlighted
option.
3
Frame the photograph and
focus.
The timer will not start if the shutter
cannot be released, as may be the
case, for example, if the camera is unable to focus when
AF-S is selected for focus mode.
132 The c/E (Release Mode/Self-Timer) Button
4
Start the timer.
A E icon appears in the shooting display when the self-
timer is enabled.
Press the shutter-release button all the way down to start
the timer; the self-timer lamp will begin to flash. The lamp
stops flashing two seconds before the timer expires.
DTaking Multiple Shots
The number of shots taken and the interval between shots can be
selected using Custom Setting c2 [Self-timer].
133
The Sub-Selector
Use the sub-selector to choose the focus
point. The center of the sub-selector can
also be used to lock exposure and focus.
Focus-Point Selection
The sub-selector can be used to choose
the focus point when an option other
than [Auto-area AF], [Auto-area AF
(people)], and [Auto-area AF (animals)]
is selected for AF-area mode (077).
Exposure Lock
Exposure lock can be used to recompose shots after metering
a subject that will not be in the selected focus area in the final
composition.
Exposure lock is particularly effective with spot and center-
weighted metering.
Focus Lock
Use focus lock to lock focus on the current subject when AF-C
is selected for focus mode.
When using focus lock, choose an AF-area mode other than
[Auto-area AF], [Auto-area AF (people)], and [Auto-area AF
(animals)].
The Sub-Selector
134 The Sub-Selector
Locking Focus and Exposure
1
Position the subject in the selected focus point
and press the shutter-release button halfway to
set focus and exposure.
2
Press the center of the sub-
selector.
Focus and exposure will lock while
pressing the center of the sub-
selector. Exposure will not change
even when the composition is
altered.
An AE-L icon will be displayed in
the monitors.
135
The Sub-Selector
3
Keeping the center of the sub-
selector pressed, recompose
the photograph and shoot.
Do not change the distance between
the camera and the subject. If the
distance to the subject changes,
release the lock and focus again at
the new distance.
DLocking Focus When AF-S Is Selected for Focus Mode
Focus locks while the shutter-release button is pressed halfway. You can
also lock focus by pressing the center of the sub-selector.
DLocking Exposure with the Shutter-Release Button
If [On (half press)] is selected for Custom Setting c1 [Shutter-release
button AE-L], exposure will lock while the shutter-release button is
pressed halfway.
DTaking Multiple Shots at the Same Focus Distance
If you locked focus by pressing the center of the sub-selector, focus will
remain locked between shots if you keep the center of the sub-selector
pressed.
Focus will also remain locked if you keep the shutter-release button
pressed halfway between shots.
136 The i Menu
The i Menu
This menu is used for quick access to
frequently-used settings. To view the
menu, press the i button.
Highlight items using the multi selector and press J to view
options. Highlight the desired option and press J to select
and return to the i menu.
To cancel and return to the previous display, press the
ibutton.
The i Menu
137
The i Menu
AThe Command Dials
In some cases, the setting for the item
currently highlighted in the i menu can be
chosen by rotating the main command dial.
Options for the selected setting, if any, can be
selected by rotating the sub-command dial.
Some items can be adjusted by rotating
either dial.
Press J to save changes. You can also save changes by pressing the
shutter-release button halfway or highlighting another item.
138 Still Images
Still Images
1357911
42681012
1Set Picture Control (0139)
2White balance (0145)
3Image quality (0152)
4Image size (0154)
5Flash mode (0156)
6Metering (0157)
7Wi-Fi connection (0158)
8View memory card info
(0159)
9Release mode (0160)
10 Vibration reduction (0161)
11 AF-area mode (0163)
12 Focus mode (0164)
139
Still Images
Set Picture Control
Choose image processing (“Picture Control”) options for new
photos according to the scene or your creative intent.
Option Description
n[Auto]
The camera automatically adjusts hues and
tones based on the [Standard] Picture
Control.
The complexions of portrait subjects will
appear softer than in pictures taken with the
[Standard] Picture Control.
In outdoor shots, elements such as the foliage
and sky will appear more vivid than in pictures
taken with the [Standard] Picture Control.
Q[Standard] Standard processing for balanced results.
Recommended for most situations.
R[Neutral]
Minimal processing for natural results. Choose
for photographs that will later be processed or
retouched.
S[Vivid]
Pictures are enhanced for a vivid, photoprint
effect. Choose for photographs that emphasize
primary colors.
T[Monochrome] Take monochrome photographs.
o[Portrait]Smooth complexions for natural-looking
portraits.
p[Landscape] Shoot vibrant landscapes and cityscapes.
q[Flat]
Details are preserved over a wide tone range,
from highlights to shadows. Choose for
photographs that will later be extensively
processed or retouched.
140 Still Images
To view Picture Control settings,
highlight a Picture Control and press
3. Any changes to fine-tuning options
can be previewed in the display
(0141).
The option currently selected is shown
in the display during shooting.
k01–
k20
[Creative
Picture
Control]
(Creative
Picture Control)
Creative Picture Controls offer unique
combinations of hue, tone, saturation, and
other settings tuned for particular effects.
Choose the type from [Dream], [Morning],
[Pop], [Sunday], [Somber], [Dramatic],
[Silence], [Bleached], [Melancholic], [Pure],
[Denim], [Toy], [Sepia], [Blue], [Red], [Pink],
[Charcoal], [Graphite], [Binary], or [Carbon].
Option Description
141
Still Images
❚❚ Modifying Picture Controls
Highlighting [Set Picture Control] in the
i menu and pressing J displays a
Picture Control list. Highlight a Picture
Control and press 3 to preview the
effect in the display.
Press 1 or 3 to highlight settings.
Press 4 or 2 to choose a value in increments of 1, or rotate
the sub-command dial to choose a value in increments of 0.25.
The options available vary with the Picture Control selected.
To abandon any changes and start over from default settings,
press the O button.
Press J to save changes and return to the i menu.
Picture Controls that have been
modified from default settings are
indicated by an asterisk (“U”).
142 Still Images
DThe j Indicator
The j indicator under the value display in the
Picture Control setting menu indicates the
previous value for the setting.
D[A] (Auto)
Selecting the A (auto) option available for some settings lets the camera
adjust the setting automatically.
Results vary with exposure and the position of the subject in the frame.
AThe “n Auto” Picture Control
Settings can be adjusted in the range [A−2] to
[A+2].
143
Still Images
❚❚ Picture Control Settings
Option Description
[Effect level]Mute or heighten the effect of Creative Picture
Controls.
[Quick sharp]
Quickly adjust levels for balanced [Sharpening],
[Mid-range sharpening], and [Clarity]. These
parameters can also be adjusted individually.
[Sharpening] Control the sharpness of details and outlines.
[Mid-range
sharpening]
Adjust the sharpness of patterns and lines in the
range between [Sharpening] and [Clarity].
[Clarity]
Adjust overall sharpness and the sharpness of thicker
outlines without affecting brightness or dynamic
range.
[Contrast]Adjust contrast.
[Brightness]Raise or lower brightness without loss of detail in
highlights or shadows.
[Saturation] Control the vividness of colors.
[Hue]Adjust hue.
[Filter effects]Simulate the effect of color filters on monochrome
pictures.
[Toning]
Choose the tint used in monochrome pictures.
Pressing 3 when an option other than [B&W] (black-
and-white) is selected displays saturation options.
[Toning]
(Creative Picture
Control)
Choose the shade of color used for Creative Picture
Controls.
144 Still Images
DMid-Range Sharpening
In the case of movies, the value selected for mid-range sharpening applies
only to footage recorded with either [3840×2160; 60p] or [3840×2160;
50p] selected for [Frame size/frame rate] or [High quality] selected for
[Movie quality] in the movie shooting menu.
D[Filter Effects]
Choose from the following [Filter effects]:
* The term in parentheses is the name of the corresponding third-party
color filter for black-and-white photography.
Option Description
[Y] (yellow) * These options enhance contrast and can be used to
tone down the brightness of the sky in landscape
photographs. Orange [O] produces more contrast
than yellow [Y], red [R] more contrast than orange.
[O] (orange) *
[R] (red) *
[G] (green) * Green softens skin tones. Use for portraits and the
like.
145
Still Images
White Balance
Adjust white balance. For more information, see “Basic Settings”
under “White Balance” (094).
Pressing 3 when 4 [Auto] or
I[Fluorescent] is highlighted
displays sub-options for the
highlighted item.
The option currently selected is shown
in the display during shooting.
Option
4 [Auto]
i [Keep white (reduce warm
colors)]
j [Keep overall
atmosphere]
k [Keep warm lighting
colors]
D [Natural light auto]
H [Direct sunlight]
G [Cloudy]
M [Shade]
J [Incandescent]
I [Fluorescent]
[Sodium-vapor lamps]
[Warm-white fluorescent]
[White fluorescent]
[Cool-white fluorescent]
[Day white fluorescent]
[Daylight fluorescent]
[High temp. mercury-vapor]
5 [Flash]
K [Choose color temperature]
L [Preset manual]
Option
146 Still Images
❚❚ Fine-Tuning White Balance
Pressing J when [White balance] is
highlighted in the i menu displays a list
of white balance options. If an option
other than K [Choose color
temperature] is highlighted, fine-tuning
options can be displayed by pressing 3.
Any changes to fine-tuning options can be previewed in the
display.
Tap the arrows in the display or use the multi selector to fine-
tune white balance.
Press J to save changes and return to the i menu.
If white balance has been fine-tuned,
an asterisk (“U”) will be displayed in the
white balance icon.
GIncrease green
BIncrease blue
AIncrease amber
MIncrease magenta
147
Still Images
❚❚ Choosing a Color Temperature
Pressing J when [White balance] is highlighted in the i menu
displays a list of white balance options. When K [Choose color
temperature] is highlighted, color temperature options can be
viewed by pressing 3.
Press 4 or 2 to highlight digits on the A–B (amber–blue) axis.
You can also highlight the G–M (green–magenta) axis.
Press 1 or 3 to edit the selected item.
Press J to save changes and return to the i menu.
If a value other than 0 is selected for the green (G)–magenta
(M) axis, an asterisk (“U”) will appear in the white balance icon.
DColor-Temperature Selection
Do not use color-temperature selection with fluorescent light sources;
instead, use the I [Fluorescent] option.
When using color-temperature selection with other light sources, take a
test shot to determine if the selected value is appropriate.
Value for Amber–Blue
axis
Value for Green–
Magenta axis
148 Still Images
❚❚ Preset Manual
White balance settings such as 4 [Auto], J [Incandescent],
and K [Choose color temperature] may fail to produce the
desired results under mixed lighting or lighting with a strong
color cast. Should this occur, white balance can be set to a value
measured under the light source used in the final photograph.
The camera can store up to six values for preset manual white
balance.
1
Select [White balance] in the
i
menu, then highlight
L
[Preset manual] and press
3
.
2
Select a preset.
Select from presets [d-1] through
[d-6].
Press J to save changes and return
to the i menus.
149
Still Images
3
Highlight [White balance] in
the
i
menu and hold the
J
button to initiate direct
measurement mode.
A L indicator will flash in the
shooting display and control panel.
The white balance target (r)
appears in the center of the frame.
150 Still Images
4
Position the white balance
target (
r
) over a white or gray
object and measure a value for
preset manual white balance.
Position the target (r) using the
multi selector.
To measure white balance, press the shutter-release
button all the way down or press J.
You can also position the target and measure white
balance by tapping the display.
Target selection will not be available if an optional flash
unit is attached. Frame the shot so that the white or gray
reference object is in the center of the display.
If the camera is unable to measure white balance, a
message will be displayed and the camera will return to
direct measurement mode. Try measuring white balance
again, for example with the target (r) positioned over a
different area of the subject.
5
Press the
i
button to exit direct measurement
mode.
151
Still Images
DThe Preset Manual White Balance Menu
The preset manual white balance menu can be accessed by selecting
[White balance] > L [Preset manual] in the photo shooting menu. The
preset manual white balance menu offers options for copying values for
preset manual white balance from an existing photograph or adding
comments to or protecting white balance presets.
DProtected Presets
White balance presets indicated by g icons are protected and cannot be
changed.
DPreset Manual: Selecting a Preset
At shipment, presets d-1 through d-6 are set to 5200 K, equivalent to the
H [Direct sunlight] white balance option.
White balance presets can be viewed by
selecting [White balance] > L [Preset
manual] in the photo shooting menu. To
recall a stored value, highlight a preset using
the multi selector and press J.
DDirect Measurement Mode
Direct measurement mode will end if no operations are performed in the
time selected for Custom Setting c3 [Power off delay] > [Standby timer].
DMeasuring White Balance
Preset manual white balance cannot be measured during multiple
exposures.
152 Still Images
Image Quality
Choose a file format for photographs.
The option currently selected is shown in
the display during shooting.
Option Description
[NEF (RAW) + JPEG
finem]
Record two copies of each photo: an NEF (RAW)
image and a JPEG copy.
For the JPEG copy, you can choose from options
prioritizing image quality or file size. Choose
options with a star (“m”) to maximize image
quality. Choose options without a star (“m”) to
ensure that the JPEG copies all have more or less
the same file size.
Only the JPEG copy is displayed during playback.
The NEF (RAW) copies can only be viewed using
a computer.
Deleting the JPEG copies on the camera also
deletes the NEF (RAW) images.
[NEF (RAW) + JPEG
fine]
[NEF (RAW) + JPEG
normalm]
[NEF (RAW) + JPEG
normal]
[NEF (RAW) + JPEG
basicm]
[NEF (RAW) + JPEG
basic]
[NEF (RAW)] Record photos in NEF (RAW) format.
[JPEG finem] Record photos in JPEG format. ”Fine” produces
higher quality pictures than ”normal” and
”normal” higher quality pictures than “basic”.
Choose options with a star (“m”) to maximize
image quality. Choose options without a star
(“m”) to ensure that the JPEG copies all have
more or less the same file size.
[JPEG fine]
[JPEG normalm]
[JPEG normal]
[JPEG basicm]
[JPEG basic]
153
Still Images
ANEF (RAW)
NEF (RAW) image files contain the raw data output from the image
sensor. They have the extension “*.nef”.
Using Nikon’s ViewNX-i or Capture NX-D software, you can adjust and
re-adjust settings such as exposure compensation and white balance.
Such adjustments can be performed as often as you please without
degrading image quality, making this the ideal format for photos that
will be processed in multiple different ways. ViewNX-i and Capture NX-D
are available free-of-charge from the Nikon Download Center.
The process of converting NEF (RAW) images to other formats such as
JPEG is referred to as “NEF (RAW) processing”. You can save NEF (RAW)
images in other formats using the ViewNX-i and Capture NX-D
computer applications or the [NEF (RAW) processing] item in the
camera retouch menu.
A“NEF (RAW) + JPEG”
The camera displays only the JPEG copies of photos recorded at image
quality settings of “NEF (RAW) + JPEG”. If only one memory card was
inserted in the camera when the photos were recorded, the NEF (RAW)
copies can only be viewed using a computer.
In the case of photos recorded with only one memory card inserted,
deleting the JPEG copies on the camera also deletes the NEF (RAW)
images.
If [RAW primary - JPEG secondary] is selected for [Secondary slot
function], the NEF (RAW) copies will be recorded to the card in the
primary slot and the JPEG copies to the card in the secondary slot
(0258).
154 Still Images
Image Size
Choose the size at which photographs are recorded.
The option currently selected is shown
in the display during shooting.
Option Description
NEF
(RAW)
[Large]Choose the size for photos recorded in NEF (RAW)
format. The NEF (RAW) option is available only
when an NEF (RAW) option is selected for [Image
quality].
[Medium]
[Small]
JPEG
[Large]Choose the size for photos recorded in JPEG
format.
[Medium]
[Small]
155
Still Images
❚❚ Image Size Versus Number of Pixels
The physical dimensions of the photos in pixels vary with the
option selected for [Choose image area] in the photo shooting
menu.
Z7II:
Z6II:
Image area Image size
Large Medium Small
[FX (36×24)] 8256 × 5504 6192 × 4128 4128 × 2752
[DX (24×16)] 5408 × 3600 4048 × 2696 2704 × 1800
[5:4 (30×24)] 6880 × 5504 5152 × 4120 3440 × 2752
[1:1 (24×24)] 5504 × 5504 4128 × 4128 2752 × 2752
[16:9 (36×20)] 8256 × 4640 6192 × 3480 4128 × 2320
Image area Image size
Large Medium Small
[FX (36×24)] 6048 × 4024 4528 × 3016 3024 × 2016
[DX (24×16)] 3936 × 2624 2944 × 1968 1968 × 1312
[1:1 (24×24)] 4016 × 4016 3008 × 3008 2000 × 2000
[16:9 (36×20)] 6048 × 3400 4528 × 2544 3024 × 1696
156 Still Images
Flash Mode
Choose a flash mode for optional flash units. The options
available vary with the shooting mode.
The option currently selected is shown in
the display during shooting.
Option Available in
I[Fill flash]b, P, S, A, M
J[Red-eye reduction]b, P, S, A, M
L[Slow sync]P, A
K[Slow sync + red-eye]P, A
M[Rear-curtain sync]P, S, A, M
s[Flash off]b, P, S, A, M
157
Still Images
Metering
Metering determines how the camera sets exposure.
Option Description
L[Matrix
metering]
The camera meters a wide area of the frame and
sets exposure according to tone distribution,
color, composition, and distance for results close
to those seen by the naked eye.
M
[Center-
weighted
metering]
The camera assigns the greatest weight to the
center of the frame. It can be used with
subjects that dominate the composition, for
example.
Center-weighted metering is also
recommended when using filters with an
exposure factor (filter factor) over 1×.
The size of the area assigned the greatest
weight can be selected using Custom Setting
b3 [Center-weighted area].
N[Spot
metering]
The camera meters a circle with a diameter of
4 mm/0.16 in. (equivalent to approximately
1.5% of the frame). This ensures that the
subject will be correctly exposed even when
the background is much brighter or darker.
The metered area is centered on the current
focus point. If [Auto-area AF], [Auto-area AF
(people)], or [Auto-area AF (animals)] is
selected for AF-area mode (077), the camera
will instead meter the center focus point.
158 Still Images
The option currently selected is shown
in the display during shooting.
Wi-Fi Connection
Enable or disable Wi-Fi.
Enable Wi-Fi to establish wireless connections to computers or
between the camera and smartphones or tablets (smart
devices) running the SnapBridge app (0568).
The camera displays a Wi-Fi icon when
Wi-Fi is enabled.
To turn Wi-Fi off, highlight [Wi-Fi connection] in the i menu
and press J; if Wi-Fi is currently enabled, a [Close Wi-Fi
connection] prompt will be displayed. Press J to end the
connection.
t
[Highlight-
weighted
metering]
The camera assigns the greatest weight to
highlights. Use this option to reduce loss of
detail in highlights, for example when
photographing spotlit performers on stage.
Option Description
159
Still Images
View Memory Card Info
View the slot currently selected as the destination for new
pictures and options used to record pictures when two memory
cards are inserted. This option can be used to view but not to
change the option selected.
The options used to record pictures when two memory cards
are inserted can be selected using [Secondary slot function]
in the photo shooting menu.
160 Still Images
Release Mode
Choose the operation performed when the shutter is released.
For more information, see “The c/E (Release Mode/Self-Timer)
Button” (0125).
Pressing 3 when [Continuous L] is
highlighted displays frame advance
rate options.
Pressing 3 when [Self-timer] is
highlighted displays options for the
shutter-release delay and the number
of shots taken when the timer expires.
The option currently selected is shown
in the shooting display and control
panel.
Option
U[Single frame]
V[Continuous L]
W[Continuous H]
X[Continuous H (extended)]
E[Self-timer]
Option
161
Still Images
Vibration Reduction
Choose whether to enable vibration reduction. The options
available vary with the lens.
Options other than [Off] are shown by
an icon in the display during shooting.
Option Description
C[On]Choose for enhanced vibration reduction when
photographing static subjects.
[Normal]
D[Sport]Choose when photographing athletes and other
subjects that are moving rapidly and unpredictably.
E[Off] Vibration reduction is disabled.
162 Still Images
DUsing Vibration Reduction: Notes
Vibration reduction may be unavailable with some lenses.
We recommend that you wait for the image in the display to stabilize
before shooting.
Depending on the lens, when vibration reduction is active, the image in
the viewfinder may jiggle after the shutter is released, but this does not
indicate a malfunction.
[Sport] or [On] is recommended for panning shots. In [Sport], [Normal],
and [On] modes, vibration reduction applies only to motion that is not
part of the pan. If the camera is panned horizontally, for example,
vibration reduction will be applied only to vertical shake.
To prevent unintended results, select [Off] when the camera is mounted
on a tripod. Note that settings for VR lenses may differ; consult the lens
manual for more information. Note, however, that [Normal], [Sport], or
[On] is recommended if the tripod head is unsecured or the camera is
mounted on a monopod.
If an F mount lens with a vibration reduction switch is attached via an
optional FTZ mount adapter, [Vibration reduction] will be grayed out
and unavailable. Use the lens switch for vibration reduction.
163
Still Images
AF-Area Mode
AF-area mode controls how the camera selects the focus-point
for autofocus. For more information, see “Focus” under “AF-Area
Mode” in “Basic Settings” (077).
The option currently selected is shown in
the display during shooting.
Option
3[Pinpoint AF]
d[Single-point AF]
e[Dynamic-area AF]
f[Wide-area AF (S)]
g[Wide-area AF (L)]
1[Wide-area AF (L-people)]
2[Wide-area AF (L-animals)]
h[Auto-area AF]
5[Auto-area AF (people)]
6[Auto-area AF (animals)]
Option
164 Still Images
Focus Mode
Focus mode controls how the camera focuses. For more
information, see “Focus” under “Focus Mode” in “Basic Settings”
(074).
The option currently selected is shown in
the display during shooting.
Option
AF-S [Single AF]
AF-C [Continuous AF]
MF [Manual Focus]
165
Movies
Movies
1357911
42681012
1Set Picture Control (0167)
2White balance (0167)
3Frame size and rate/image
quality (0168)
4Microphone sensitivity
(0174)
5Choose image area (0175)
6Metering (0177)
7Wi-Fi connection (0177)
8Destination (0177)
9Electronic VR (0178)
10 Vibration reduction (0179)
11 AF-area mode (0179)
12 Focus mode (0179)
166 Movies
A[Same as Photo Settings]
If [Same as photo settings] is selected for [Set
Picture Control], [White balance], [Active
D-Lighting], or [Vibration reduction] in the
movie shooting menu, a h icon will appear
at the top left corner of the i menu. Changes
made to the setting from the i menu in photo
mode will also apply in movie mode and vice-
versa.
167
Movies
Set Picture Control
Choose a Picture Control for movie recording. For more
information, see “Still Images” (0139).
White Balance
Adjust white balance for movie recording. For more
information, see “Still Images” (0145).
168 Movies
Frame Size and Rate/Image Quality
Select the movie frame size (in pixels), frame rate, and movie
quality.
❚❚ Movie Quality
Choose from [High quality] and [Normal]. A star (“m”) appears
in the icon for [Frame size/frame rate] when [High quality] is
selected. Some frame size/rate options support both settings,
while others support only [High quality] or only [Normal].
169
Movies
❚❚ Frame Size/Frame Rate
The maximum bit rate and recording time for each [Frame size/
frame rate] option are shown below. The bit rate varies with the
option selected for movie quality.
Option 1
Max. bit rate Max.
recording
time
High
quality Normal
4[3840×2160; 60p]
(Z 7II only) 2, 3, 4
5 360 Mbps 29 min.
59 s 6
5[3840×2160; 50p]
(Z 7II only) 2, 3, 4
r[3840×2160; 30p] 2
144 Mbps 9
29 min.
59 s 10
s[3840×2160; 25p] 2
t[3840×2160; 24p] 2
w[1920×1080; 120p] 3, 7, 8
x[1920×1080; 100p] 3, 7, 8
y/y[1920×1080; 60p]56 Mbps 28 Mbps
z/z[1920×1080; 50p]
1/1[1920×1080; 30p]
28 Mbps 14 Mbps
2/2[1920×1080; 25p]
3/3[1920×1080; 24p]
A[1920×1080; 30p ×4
(slow-motion)] 7, 8
36 Mbps
9 3min.
B[1920×1080; 25p ×4
(slow-motion)] 7, 8
C[1920×1080; 24p ×5
(slow-motion)] 7, 8 29 Mbps
170 Movies
1 The frame rates for 120p, 100p, 60p, 50p, 30p, 25p, and 24p are
respectively 119.88 fps, 100 fps, 59.94 fps, 50 fps, 29.97 fps, 25 fps, and
23.976 fps.
2Movies are recorded in 4K UHD.
3 The frame rate selected for [Frame size/frame rate] differs from the
rate displayed in the monitor during shooting and playback. At frame
sizes/rates of 3840 × 2160; 60p and 3840 × 2160; 50p, the frame rate of
footage output via HDMI will differ from the selected value.
4 Not available when a DX lens is attached.
5 Movie quality fixed at [Normal].
6 If the memory card has a capacity of over 32 GB, recording for each
movie will continue up to the maximum movie length. Movies
recorded to cards with capacities of 32 GB or less reach their
maximum length when 4 GB of footage is recorded, and this is
reflected in the value for time remaining shown in the monitor.
7 Not available on the Z 6II when a DX lens is attached.
8 Image area fixed at [DX] (Z 7II) or [FX] (Z 6II). Selecting [Wide-area AF
(L-people)], [Wide-area AF (L-animals)], [Auto-area AF (people)], or
[Auto-area AF (animals)] for AF-area mode does not enable face/eye-
detection or animal-detection AF.
9 Movie quality fixed at [High quality].
10 If the memory card has a capacity of over 32 GB, recording for each
movie will continue up to the maximum movie length. If the card’s
capacity is 32 GB or less, recording will continue up to the maximum
movie length, but each movie may be saved across up to 8 files. Each
of these files will be a maximum of 4 GB in size. The number of files
and the length of each file vary with the options selected for [Frame
size/frame rate] and [Movie quality].
171
Movies
The option currently selected for [Frame
size/frame rate] is shown in the display
during shooting.
D3840 × 2160; 60p and 3840 × 2160; 50p (Z 7II Only)
When 3840 × 2160; 60p or 3840 × 2160; 50p is selected for frame size/
frame rate:
Image area is fixed at [FX]. The actual crop, however, is approximately
equivalent to 93% of that when [FX] is selected at frame sizes/rates of
3840 × 2160; 30p, 3840 × 2160; 25p, and 3840 × 2160; 24p.
Photographs cannot be taken in movie mode (067).
172 Movies
❚❚ Slow-Motion Movies
To record slow-motion movies, select [1920×1080; 30p ×4
(slow-motion)], [1920×1080; 25p ×4 (slow-motion)], or
[1920×1080; 24p ×5 (slow-motion)] for [Frame size/frame
rate]. Sound is not recorded.
Movies shot using [1920×1080; 30p ×4 (slow-motion)], for
example, are recorded at a frame rate of 120p and play back at
a rate of 30p. It takes around 10 seconds of recording to
produce about 40 seconds of footage. Slow-motion movies
can be used to view events of brief duration, such as a bat
striking a ball, in slow motion.
Recording and playback speeds are shown below.
* Actual frame rate is 119.88 fps for values listed as 120p, 29.97 fps for
values listed as 30p, and 23.976 fps for values listed as 24p.
Frame size/frame rate Rate frames
are read at *
Rate frames
are recorded/
play at *
[1920 × 1080; 30p ×4 (slow-motion)] 120p 30p
[1920 × 1080; 25p ×4 (slow-motion)] 100p 25p
[1920 × 1080; 24p ×5 (slow-motion)] 120p 24p
173
Movies
DSlow-Motion Movies
Features that cannot be used during slow-motion movie recording
include:
flicker reduction,
electronic vibration reduction, and
timecode output
174 Movies
Microphone Sensitivity
Turn built-in or external microphones on or off or adjust
microphone sensitivity.
At settings other than bA, the option
currently selected is shown in the
display.
If the sound level is displayed in red,
the volume is too high. Reduce
microphone sensitivity.
DMovies Without Sound
Movies recorded with [Microphone off]
selected for microphone sensitivity are
indicated by a 2 icon.
Option Description
bAAdjust microphone sensitivity automatically.
[Microphone
off]Turn sound recording off.
b1 - b20
Select microphone sensitivity manually. Choose from
values of from [1] to [20]. The higher the value, the
higher the sensitivity; the lower the value, the lower the
sensitivity.
175
Movies
Choose Image Area
Choose the size of the area on the image sensor used to record
movies (the “movie crop”). The options are [FX] and [DX]. Select
[FX] to shoot movies in what is referred to as “FX-based movie
format”, [DX] to shoot in “DX-based movie format”. The
differences between the two formats are shown in the
illustration.
When 3840 × 2160; 60p or 3840 × 2160; 50p is selected for
frame size/frame rate, image area is fixed at [FX]. The actual
crop, however, is approximately equivalent to 93% of that
when [FX] is selected at frame sizes of 3840 × 2160; 30p,
3840 × 2160; 25p, and 3840 × 2160; 24p.
176 Movies
The sizes of the areas recorded in FX- and DX-based movie
formats differ. The differences are shown below.
The option currently selected is shown
by an icon in the display.
Format Frame size Area recorded
FX-based movie
format
3840 × 2160
(60p/50p)
Z 7II: approx. 33.4 × 18.8 mm/
1.3 × 0.7 in.
Z 6II: —
3840 × 2160
(30p/25p/24p)
Z 7II: approx. 35.9 × 20.2 mm/
1.4 × 0.8 in.
Z 6II: approx. 35.9 × 20.2 mm/
1.4 × 0.8 in.
1920 × 1080
Z 7II: approx. 35.8 × 20.1 mm/
1.4 × 0.8 in.
Z 6II: approx. 35.9 × 20.1 mm/
1.4 × 0.8 in.
DX-based movie
format
3840 × 2160
(30p/25p/24p)
Z 7II: approx. 23.5 × 13.2 mm/
0.9 × 0.5 in.
Z 6II: approx. 23.4 × 13.2 mm/
0.9 × 0.5 in.
1920 × 1080
Z 7II: approx. 23.5 × 13.2 mm/
0.9 × 0.5 in.
Z 6II: approx. 23.4 × 13.1 mm/
0.9 × 0.5 in.
177
Movies
Metering
Choose how the camera sets exposure during movie recording.
For more information, see “Still Images” (0157).
DMetering
[Spot metering] is not available in movie mode.
Wi-Fi Connection
Enable or disable Wi-Fi. For more information on Wi-Fi, see “Still
Images” (0158). For information on adjusting settings and the
like, see “Connect to Smart Device” under the heading “Wi-Fi
Connection” (0484).
Destination
Choose the slot to which movies are recorded when two
memory cards are inserted.
The menu shows the time available on each card.
Recording ends automatically when no time remains.
178 Movies
Electronic VR
Choose whether to enable electronic vibration reduction in
movie mode.
An icon appears in the display when
[On] is selected.
Electronic vibration reduction does
not apply to footage:
- shot with 3840 × 2160; 60p, 3840 ×
2160; 50p, 1920 × 1080; 120p, 1920 ×
1080; 100p, or 1920 × 1080 (slow motion) selected for frame
size/frame rate or
- output to an HDMI device with [10 bit] selected for [HDMI] >
[Advanced] > [Output data depth] in the setup menu at a
frame size of 3840 × 2160.
The maximum sensitivity for movie recording when electronic
vibration reduction is enabled is fixed at ISO 25600 (Z 7II) or
51200 (Z 6II).
Option Description
[On]
Enable electronic vibration reduction during movie
recording.
Note that when [On] is selected, the angle of view will
be reduced, slightly increasing the apparent focal
length.
[Off] Electronic vibration reduction is disabled.
179
Movies
Vibration Reduction
Choose whether to enable vibration reduction in movie mode.
For more information, see “Still Images” (0161).
AF-Area Mode
AF-area mode controls how the camera selects the focus-point
for autofocus. For more information, see “Focus” under “AF-Area
Mode” in “Basic Settings” (077).
Focus Mode
Focus mode controls how the camera focuses. For more
information, see “Focus” under “Focus Mode” in “Basic Settings”
(074).
Option
d[Single-point AF]
f[Wide-area AF (S)]
g[Wide-area AF (L)]
1[Wide-area AF (L-people)]
2[Wide-area AF (L-animals)]
h[Auto-area AF]
5[Auto-area AF (people)]
6[Auto-area AF (animals)]
Option
Option
AF-S [Single AF]
AF-C [Continuous AF]
AF-F [Full-time AF]
MF [Manual Focus]
Option
180 Viewing Pictures
Playback
Full-Frame Playback
Press the K button to view the most recent picture full frame in
the display.
Press 4 to return to the previous frame, 2 to skip to the next
frame.
Press 1, 3, or the DISP button to view more information on
the current picture (0183).
Viewing Pictures
181
Viewing Pictures
Thumbnail Playback
To view multiple pictures, press the
W(Q) button when a picture is
displayed full frame.
The number of pictures displayed increases from 4 to 9 to 72
each time the W (Q) button is pressed, and decreases with
each press of the X button.
Highlight pictures using 1, 3, 4, or 2.
182 Viewing Pictures
DTouch Controls
Touch controls can be used when pictures are displayed in the monitor
(020).
DRotate Tall
To display “tall” (portrait-orientation)
photographs in tall orientation, select [On] for
[Rotate tall] in the playback menu.
DImage Review
When [On] is selected for [Image review] in the playback menu,
photographs are automatically displayed after shooting; there is no need
for you to press the K button.
If [On (monitor only)] is selected, photos will not be displayed in the
viewfinder.
In continuous release modes, display begins when shooting ends, with
the first photograph in the current series displayed.
Images are not rotated automatically during image review even when
[On] is selected for [Rotate tall] in the playback menu.
ATwo Memory Cards
If two memory cards are inserted, [Choose slot and folder] options can
also be viewed by pressing the W (Q) button when 72 thumbnails are
displayed.
183
Photo Information
Photo information is superimposed on images displayed in full-
frame playback. Press 1, 3, or the DISP button to cycle
through photo information as shown below.
1 Displayed only if the corresponding option is selected for [Playback
display options] in the playback menu.
2 The shooting data list has multiple pages, which can be viewed by
pressing 1 or 3.
3 Location data are displayed only if embedded in the picture at the
time it was taken.
Photo Information
1File information
2Exposure data 1
3Highlight display 1
4RGB histogram 1
5Shooting data 1, 2
6Location data 3
7Overview data 1
8None (image only) 1
184 Photo Information
File Information
* Displayed only if [Focus point] is selected for [Playback display
options] in the playback menu.
134 5
6
910 87
2
13
11
12
14
1Protect status (0104)
2Retouch indicator (0502)
3Upload marking (0197)
4Focus point * (056)
5Frame number/total number
of frames
6Image quality (0152)
7Image size (0154)
8Image area (0260)
9Time of recording (0456)
10 Date of recording (0456)
11 Current card slot
12 Rating (0102)
13 Folder name (0250)
14 File name (0256)
185
Photo Information
Exposure Data
* Displayed in red if the picture was taken in mode P, S, A, or M with auto
ISO sensitivity control enabled.
Highlight Display
54367
21
1Current card slot
2Folder number–frame number
(0250)
3Shooting mode (0106)
4Shutter speed (0108, 109)
5Aperture (0108, 109)
6Exposure compensation value
(0122)
7ISO sensitivity * (0118)
132
1Highlights (areas that may be
overexposed)
2Current card slot
3Folder number–frame number
(0250)
186 Photo Information
RGB Histogram
DPlayback Zoom
To zoom in on the picture in the histogram
display, press X. The histogram will be updated
to show only the data for the portion of the
image visible in the display. Use the multi
selector to scroll to areas of the frame not
visible in the monitor. Press W (Q) to zoom
out.
4
5
6
7
3
2
1
1Folder number–frame number
(0250)
2Current card slot
3White balance (094, 145, 267)
Color temperature (0147)
Preset manual (0148)
White balance fine-tuning
(0146)
4Histogram (RGB channel)
5Histogram (red channel)
6Histogram (green channel)
7Histogram (blue channel)
187
Photo Information
DHistograms
Histograms show tone distribution. Pixel brightness (tone) is plotted on
the horizontal axis and the number of pixels on the vertical axis.
If the image contains objects
with a wide range of
brightnesses, the distribution of
tones will be relatively even.
If the image is dark, the
distribution will be shifted to
the left.
If the image is bright, the
distribution will be shifted to
the right.
Increasing exposure compensation shifts the distribution of tones to the
right, while decreasing exposure compensation shifts the distribution to
the left.
Histograms can provide a rough idea of overall exposure when bright
ambient lighting makes it difficult to see pictures in the monitor.
DThe Histogram Display
RGB histograms show tone distribution.
Camera histograms may differ from those displayed in imaging
applications. Use them as a guide to actual tone distribution.
188 Photo Information
Shooting Data
View the settings in effect at the time the picture was taken. The
shooting data list has multiple pages, which can be viewed by
pressing 1 or 3.
❚❚ Basic Shooting Data
1 Displayed in red if the picture was taken in mode P, S, A, or M with
auto ISO sensitivity control enabled.
2 Displayed if Custom Setting b4 [Fine-tune optimal exposure] has
been set to a value other than zero for any metering method.
3 Also includes the color temperature for pictures taken using
4[Auto].
1Metering (0157)
Shutter type (0398)
Shutter speed (0108, 109)
Aperture (0108, 109)
2Shooting mode (0106)
ISO sensitivity 1 (0118)
3Exposure compensation value
(0122)
Optimal exposure tuning 2
(0393)
1413
6
5
4
3
2
1
7
8
9
10 1211
4Focal length
5Lens data
6Focus mode (074)
AF-area mode (077)
7Vibration reduction (0161)
8White balance 3 (094, 145,
267)
9White balance fine-tuning
(0146)
10 Color space (0282)
11 Camera name
12 Image area (0260)
13 Current card slot
14 Folder number–frame number
(0250)
189
Photo Information
❚❚ Flash Data
Flash data are displayed only for pictures taken with optional
flash units (0611, 629).
❚❚ Picture Control Data
The items displayed vary with the Picture Control in effect when
the picture was taken.
3
2
1
4
1Flash type
2Remote flash control
3Flash mode (0619)
4Flash control mode (0616)
Flash compensation (0622)
1
1Picture Control (0139, 275)
190 Photo Information
❚❚ Other Shooting Data
❚❚ Copyright Information
Copyright information is only displayed if recorded using the
[Copyright information] item in the setup menu at the time
the picture was taken.
4
3
2
1
5
6
1High ISO noise reduction
(0286)
Long exposure noise
reduction (0285)
2Active D-Lighting (0283)
3HDR exposure differential
(0319)
HDR smoothing (0319)
4Vignette control (0287)
5Retouch history (0502).
Changes are listed in the order
applied.
6Image comment (0473)
1
2
1Photographer (0474)
2Copyright holder (0474)
191
Photo Information
Location Data
The location data page lists the latitude, longitude, and other
location data downloaded from smartphones, tablets, or
optional GPS devices.
The items listed vary with the device supplying the location
data.
The location data displayed with movies are those reported at
the start of recording.
Note that the camera may be unable to download or display
location data from smart devices depending on the version of
the device operating system and/or SnapBridge app used.
Overview
15
8
9
14 13 12 11
17
7
32 4
6
10
16
15
1Frame number/total number
of frames
2Upload marking (0197)
3Protect status (0104)
4Retouch indicator (0502)
5Camera name
6Image comment indicator
(0473)
7Location data indicator
8Histogram (0187)
9Image quality (0152)
10 Image size (0154)
11 Image area (0260)
12 File name (0256)
13 Time of recording (0456)
14 Date of recording (0456)
15 Current card slot
16 Folder name (0250)
17 Rating (0102)
192 Photo Information
1 Displayed in red if the picture was taken in mode P, S, A, or M with
auto ISO sensitivity control enabled.
2 Flash data are displayed only for pictures taken with optional flash
units (0611, 629).
7
12
13
12 3 4 5 6
10 9 8
11
1Metering (0157)
2Shooting mode (0106)
3Shutter speed (0108, 109)
4Aperture (0108, 109)
5ISO sensitivity 1 (0118)
6Focal length
7Active D-Lighting (0283)
8Picture Control (0139, 275)
9Color space (0282)
10 Flash mode 2 (0619)
11 White balance (094, 145, 267)
Color temperature (0147)
Preset manual (0148)
White balance fine-tuning
(0146)
12 Flash compensation 2 (0622)
Commander mode 2
13 Exposure compensation value
(0122)
193
The i Button (Playback Mode)
Pressing the i button during playback zoom or full-frame or
thumbnail playback displays the i menu for playback mode.
Highlight items and press J or 2 to select.
Press the i button again to return to playback.
Photos
The i Button (Playback Mode)
Option Description
[Quick crop] 1
Save a copy of the current image cropped to the
area visible in the display. This option is not
available when RGB histograms are displayed
(0186).
[Rating] Rate the current picture (0102).
[Select to send to
smart device]Select the current picture for upload (0197). The
option displayed varies with the type of device
connected.
[Select to send to
computer]
[Select to send
(WT)]
194 The i Button (Playback Mode)
1 Available only during playback zoom.
2 Not available during playback zoom.
3 Available only when a retouched copy (indicated by a p icon) or the
source picture for a retouched copy is selected.
[Retouch]Create a retouched copy of the current picture
(0502).
[Jump to copy on
other card]
If the current picture is one of a pair created with
[Backup] or [RAW primary - JPEG secondary]
selected for [Secondary slot function], choosing
this option displays the copy on the card in the
other slot.
[Choose slot and
folder]
Choose a slot and folder for playback. Highlight a
slot and press 2 to display a list of the folders on
the memory card in the selected slot. You can then
highlight a folder and press J to view the pictures
it contains.
[Protect]Add protection to or remove protection from the
current picture (0104).
[Unprotect all] 2
Remove protection from all pictures in the folder
currently selected for [Playback folder] in the
playback menu.
[Side-by-side
comparison] 3 Compare retouched copies to the originals.
Option Description
195
The i Button (Playback Mode)
A[Side-by-Side Comparison]
Choose [Side-by-side comparison] to compare retouched copies with
the unretouched originals.
The source image is displayed on the left, the retouched copy on the
right.
The options used to create the copy listed at the top of the display.
Press 4 or 2 to switch between the source image and the retouched
copy.
If the copy is an overlay created from multiple source images, press 1 or
3 to view the other images.
If the source has been copied multiple times, press 1 or 3 to view the
other copies.
To view the highlighted picture full screen, press and hold the X button.
Press J to return to playback with the highlighted image displayed full-
frame.
To exit to playback, press the K button.
The source image will not be displayed if the copy was created from a
photograph that is now protected.
The source image will not be displayed if the copy was created from a
photograph that has since been deleted.
1
23
1Options used to create copy
2Source image
3Retouched copy
196 The i Button (Playback Mode)
Movies
Movies (Playback Paused)
Option Description
[Rating] Rate the current picture (0102).
[Select to send to
computer]Select the current picture for upload (0197).
[Select to send
(WT)]
[Volume control] Adjust playback volume.
[Trim movie]Trim footage from the current movie and save the
edited copy in a new file (0199).
[Choose slot and
folder]
Choose a slot and folder for playback. Highlight a
slot and press 2 to display a list of the folders on
the memory card in the selected slot. You can then
highlight a folder and press J to view the pictures
it contains.
[Protect]Add protection to or remove protection from the
current picture (0104).
[Unprotect all]
Remove protection from all pictures in the folder
currently selected for [Playback folder] in the
playback menu.
Option Description
9
[Choose
start/end
point]
Trim footage from the current movie and save the
edited copy in a new file (0199).
4
[Save
current
frame]
Save a selected frame as a JPEG still (0203).
197
The i Button (Playback Mode)
❚❚ Select to Send
Follow the steps below to select the current picture for upload
to a smart device or computer.
The i menu items used to select pictures for upload vary with
the type of device connected:
-[Select to send to smart device]: Displayed when the
camera is connected to a smart device via built-in Bluetooth
using [Connect to smart device] in the setup menu (0483).
-[Select to send to computer]: Displayed when the camera is
connected to a computer via built-in Wi-Fi using [Connect to
PC] in the setup menu (0486).
-[Select to send (WT)]: Displayed when the camera is
connected to a computer via an WT-7 wireless transmitter
(available separately) using the [Wireless transmitter
(WT-7)] item in the setup menu (0490).
Movies cannot be selected for upload when the camera is
connected to a smart device via the SnapBridge app.
The maximum file size for movies uploaded by other means is
4 GB.
198 The i Button (Playback Mode)
1
Select the desired picture and press the
i
button.
2
Highlight [Select to send to
smart device], [Select to send
to computer], or [Select to send
(WT)] and press
J
.
The picture will be marked with a W
icon.
DRemoving Upload Marking
To remove upload marking, repeat Steps 1 and 2.
199
The i Button (Playback Mode)
❚❚ Choose Start/End Point
Trim footage from the current movie and save the edited copy
in a new file.
1
Display a movie full frame.
2
Pause the movie on the new opening frame.
Press the J button to start playback movies. Press 3 to
pause.
Your approximate position in the
movie can be ascertained from the
movie progress bar.
Press 4 or 2 or rotate the main command dial to locate
the desired frame.
3
Select [Choose start/end
point].
Press the i button, highlight
[Choose start/end point], and press
J.
200 The i Button (Playback Mode)
4
Choose the start point.
To create a copy that begins from the
current frame, highlight [Start point]
and press J.
5
Confirm the new start point.
If the desired frame is not currently
displayed, press 4 or 2 to advance
or rewind.
Rotate the main command dial one
stop to skip ahead or back 10 s.
Rotate the sub-command dial to skip to the last or first
frame.
201
The i Button (Playback Mode)
6
Choose the end point.
Press the center of the sub-selector to
switch to the end-point selection tool
(x) and then select the closing frame
(x) as described in Step 5.
7
Press
1
to create the copy.
8
Preview the copy.
To preview the copy, highlight
[Preview] and press J (to interrupt
the preview and return to the save
options menu, press 1).
To abandon the current copy and return to Step 5,
highlight [Cancel] and press J.
202 The i Button (Playback Mode)
9
Choose a save option.
Choose [Save as new file] and
press the J button to save the
edited copy as a new file.
To replace the original movie with
the edited copy, highlight [Overwrite existing file], press
J, and then highlight [Yes] and press J.
DTrimming Movies
The copy will not be saved if there is insufficient space available on the
memory card.
Movies less than two seconds long cannot be edited using [Choose
start/end point].
Copies have the same time and date of creation as the original.
DRemoving Opening or Closing Footage
To remove only the closing footage from a movie, choose [End point] in
Step 4, select the closing frame, and proceed to Step 7 without pressing
the center of sub-selector in Step 6.
To remove only the opening footage, proceed to Step 7 without
pressing the center of sub-selector in Step 6.
DThe [Trim Movie] Option (Retouch Menu)
Movies can also be edited using the [Trim movie] item in the retouch
menu.
203
The i Button (Playback Mode)
❚❚ Save Current Frame
Save a selected frame as a JPEG still.
1
Pause the movie on the desired
frame.
Press 3 to pause playback.
Press 4 or 2 to locate the desired
frame.
2
Choose [Save current frame].
Press the i button, then highlight
[Save current frame] and press J to
create a JPEG copy of the current
frame.
D[Save Current Frame]
Stills are saved at the dimensions selected for [Frame size/frame rate]
in the movie shooting menu when the movie was recorded.
They cannot be retouched.
Some categories of photo information are not displayed during
playback.
204 Playback Zoom
Press X or J to zoom in on photos
displayed in full-frame playback. The
maximum zoom factors for [FX (36×24)]
format photos are approximately:
Z7II: 32× ([Large]), 24× ([Medium]), and
16× ([Small])
Z6II: 24× ([Large]), 18× ([Medium]), and 12× ([Small])
Using Playback Zoom
Playback Zoom
To Description
Zoom in/
zoom out
Press the X button
or use stretch
gestures to zoom
in.
To zoom out, press
W (Q) or use pinch
gestures.
A navigation window is
displayed during the zoom ratio
is altered, with the area
currently visible indicated by a
yellow border. A bar below the
navigation window shows the
zoom ratio, turning green at 1:1
(100%). The navigation window
clears from the display after a
few seconds.
205
Playback Zoom
View other
areas of image
Use the multi selector or glide gestures to view areas of
image not visible in the monitor. Keep the multi
selector pressed to scroll rapidly to other areas of
frame.
Select faces
Faces detected during zoom
are indicated by white
borders in the navigation
window. Rotate the sub-
command dial or tap the on-
screen guide to view other
faces.
View other
pictures
Rotate the main command dial to view the same
location in other photos without changing the zoom
ratio (selecting a movie cancels zoom). You can also
view other photos by tapping the e or f icon at the
bottom of the display.
Exit to
shooting mode
Press the shutter-release button halfway or press the
K button to exit.
View menus Press the G button to view the menus.
To Description
206 Deleting Pictures
Follow the steps below to delete pictures from memory cards.
Note that pictures cannot be recovered once deleted. Pictures
that are protected, however, cannot be deleted.
Using the Delete Button
Press the O button to delete the current picture.
1
Select the desired picture with
the multi selector and press the
O
button.
A confirmation dialog will be
displayed.
To exit without deleting the picture, press K.
2
Press the
O
button again.
The picture will be deleted.
Deleting Pictures
207
Deleting Pictures
ADeleting Copies
If the picture selected in the playback display
when the O button is pressed was recorded
with two memory cards inserted and [Backup]
or [RAW primary - JPEG secondary] selected
for [Secondary slot function], you will be
prompted to choose whether to delete both
copies or only the copy on the card in the
current slot (0259).
208 Deleting Pictures
Deleting Multiple Pictures
Use [Delete] in the playback menu to delete multiple pictures at
once. Note that depending on the number of images, some
time may be required for deletion.
Option Description
Q[Selected images] Delete selected pictures.
i[Images shot on
selected dates]
Delete all pictures taken on selected dates
(0210).
R[All images]
Delete all pictures in the folder currently
selected for [Playback folder] in the
playback menu.
If two memory cards are inserted, you can
select the card from which pictures will be
deleted.
209
Deleting Pictures
❚❚ Deleting Selected Pictures
1
Select pictures.
Highlight pictures using the multi selector and press the
W (Q) button to select; selected pictures are marked with
O icons. Selected pictures can be deselected by pressing
the W (Q) button again.
Repeat until all the desired pictures are selected.
To view the highlighted picture full screen, press and hold
the X button.
2
Delete the pictures.
Press J; a confirmation dialog will
be displayed.
Highlight [Yes] and press J to
delete the selected pictures.
210 Deleting Pictures
❚❚ Images Shot on Selected Dates
1
Select dates.
Highlight dates using the multi
selector and press 2 to select;
selected dates are marked with M
icons. Selected dates can be
deselected by pressing 2 again.
Repeat until you have selected all the desired dates.
2
Delete the pictures.
Press J; a confirmation dialog will
be displayed.
Highlight [Yes] and press J to
delete all the pictures taken on the
selected dates.
211
Deleting Pictures
❚❚ Deleting All Pictures
1
Choose a memory card.
Press 1 or 3 to highlight the slot
containing the memory card from
which the pictures will be deleted
and press J.
2
Delete the pictures.
A confirmation dialog will be
displayed showing the name of the
folder containing the photos to be
deleted. Highlight [Yes] and press
J to delete all pictures from the
folder. The folder is that previously selected via [Playback
folder] in the playback menu.
Note that depending on the number of images, some time
may be required for deletion.
212 Defaults
Menu Guide
The defaults for the playback, photo shooting, movie shooting,
Custom Settings, and setup menus are listed below.
Playback Menu Defaults
Defaults
Playback menu option Default
[Delete]—
[Playback folder]All
[Playback display options]
[Focus point]U
[Exposure info]U
[Highlights]U
[RGB histogram]U
[Shooting data]U
[Overview]U
[None (image only)]U
[Dual-format recording PB slot] CFexpress/XQD card slot
[Image review]Off
[After delete] Show next
[After burst, show] Last image in burst
[Rotate tall]On
[Copy image(s)]—
213
Defaults
Photo Shooting Menu Defaults
[Slide show]
[Image type] Still images and movies
[Frame interval]2 s
[Rating]—
Photo shooting menu option Default
[Reset photo shooting menu]—
[Storage folder]
[Rename]Z 7II: NZ7_2
Z 6II: NZ6_2
[Select folder by number]100
[Select folder from list]—
[File naming]DSC
[Primary slot selection] CFexpress/XQD card slot
[Secondary slot function]Overflow
[Choose image area] FX (36×24)
[Image quality] JPEG normal
[Image size]
[JPEG]Large
[NEF (RAW)]Large
[NEF (RAW) recording]
[NEF (RAW) compression] Lossless compressed
[NEF (RAW) bit depth] 14-bit
Playback menu option Default
214 Defaults
[ISO sensitivity settings]
[ISO sensitivity]b: Auto
P, S, A, M: 100
[Auto ISO sensitivity control]On
[Maximum sensitivity]Z 7II: 25600
Z 6II: 51200
[Maximum sensitivity with c] Same as without flash
[Minimum shutter speed]Auto
[White balance]j: Keep overall
atmosphere
[Fine-tune] A-B: 0, G-M: 0
[Choose color temperature] 5000 K
[Preset manual]d-1
[Set Picture Control]Auto
[Manage Picture Control]—
[Color space]sRGB
[Active D-Lighting]Off
[Long exposure NR]Off
[High ISO NR]Normal
[Vignette control]Normal
[Diffraction compensation]On
[Auto distortion control]On
[Flicker reduction shooting]Off
[Metering] Matrix metering
Photo shooting menu option Default
215
Defaults
[Flash control]
[Flash control mode]TTL
[Wireless flash options]Off
[Remote flash control]Group flash
[Flash mode]Fill flash
[Flash compensation]0.0
[Focus mode]Single AF
[AF-area mode] Auto-area AF (people)
[Vibration reduction] (Varies with lens)
[Auto bracketing]
[Auto bracketing set] AE & flash bracketing
[Number of shots]0
[Increment]1.0
[Multiple exposure]
[Multiple exposure mode]Off
[Number of shots]2
[Overlay mode]Average
[Save individual images (NEF)]On
[Overlay shooting]On
[Select first exposure (NEF)]—
[HDR (high dynamic range)]
[HDR mode]Off
[Exposure differential]Auto
[Smoothing]Normal
[Save individual images (NEF)]Off
Photo shooting menu option Default
216 Defaults
[Interval timer shooting]
[Choose start day/time]Now
[Interval]1 min.
[Intervals×shots/interval] 0001×1
[Exposure smoothing]On
[Silent photography]On
[Interval priority]Off
[Focus before each shot]Off
[Options]Off
[Starting storage folder]
[New folder]U
[Reset file numbering]U
[Time-lapse movie]
[Interval]5 s
[Shooting time] 25 min.
[Exposure smoothing]On
[Silent photography]On
[Choose image area]FX
[Frame size/frame rate] 1920×1080; 60p
[Interval priority]Off
[Focus before each shot]Off
[Destination]CFexpress/XQD card slot
Photo shooting menu option Default
217
Defaults
Movie Shooting Menu Defaults
[Focus shift shooting]
[No. of shots]100
[Focus step width]5
[Interval until next shot]0
[First-frame exposure lock]On
[Silent photography]On
[Starting storage folder]
[New folder]U
[Reset file numbering]U
[Silent photography]Off
Movie shooting menu option Default
[Reset movie shooting menu]—
[File naming]DSC
[Destination]CFexpress/XQD card slot
[Choose image area]FX
[Frame size/frame rate] 1920×1080; 60p
[Movie quality]High quality
[Movie file type]MOV
[ISO sensitivity settings]
[Maximum sensitivity]Z 7II: 25600
Z 6II: 51200
[Auto ISO control (mode M)]On
[ISO sensitivity (mode M)]100
Photo shooting menu option Default
218 Defaults
[White balance] Same as photo settings
[Fine-tune] A-B: 0, G-M: 0
[Choose color temperature] 5000 K
[Preset manual]d-1
[Set Picture Control] Same as photo settings
[Manage Picture Control]—
[Active D-Lighting]Off
[High ISO NR]Normal
[Vignette control]Normal
[Diffraction compensation]On
[Auto distortion control]On
[Flicker reduction]Auto
[Metering]Matrix metering
[Focus mode]Full-time AF
[AF-area mode] Auto-area AF (people)
[Vibration reduction] Same as photo settings
[Electronic VR]Off
[Microphone sensitivity]Auto
[Attenuator]Disable
[Frequency response]Wide range
[Wind noise reduction]Off
[Headphone volume]15
[Timecode]
[Record timecodes]Off
[Count-up method]Record run
[Timecode origin]—
[Drop frame]On
Movie shooting menu option Default
219
Defaults
Custom Settings Menu Defaults
Custom Settings menu option Default
[Reset custom settings]—
a1 [AF-C priority selection] Release
a2 [AF-S priority selection]Focus
a3 [Focus tracking with lock-on]3
a4 [Focus points used] All points
a5 [Store points by orientation]No
a6 [AF activation] Shutter/AF-ON
a7 [Limit AF-area mode selection]
[Pinpoint AF]M
[Single-point AF]L (cannot be deselected)
[Dynamic-area AF]M
[Wide-area AF (S)]M
[Wide-area AF (L)]M
[Wide-area AF (L-people)]M
[Wide-area AF (L-animals)]M
[Auto-area AF]M
[Auto-area AF (people)]M
[Auto-area AF (animals)]M
a8 [Focus point wrap-around]No wrap
a9 [Focus point options]
[Manual focus mode]On
[Dynamic-area AF assist]On
a10 [Low-light AF]Off
a11 [Built-in AF-assist illuminator]On
a12 [Manual focus ring in AF mode]Enable
220 Defaults
b1 [EV steps for exposure cntrl]1/3 step
b2 [Easy exposure compensation]Off
b3 [Center-weighted area12 mm
b4 [Fine-tune optimal exposure]
[Matrix metering]0
[Center-weighted metering]0
[Spot metering]0
[Highlight-weighted metering]0
c1 [Shutter-release button AE-L]Off
c2 [Self-timer]
[Self-timer delay]10 s
[Number of shots]1
[Interval between shots]0.5 s
c3 [Power off delay]
[Playback]10 s
[Menus]1 min.
[Image review]4 s
[Standby timer]30 s
d1 [CL mode shooting speed]3 fps
d2 [Max. continuous release]200
d3 [Sync. release mode options]Sync
d4 [Exposure delay mode]Off
d5 [Shutter type]Auto
d6 [Extended shutter speeds (M)]Off
Custom Settings menu option Default
221
Defaults
d7 [Limit selectable image area]
[FX (36×24)]L (cannot be deselected)
[DX (24×16)]M
[5:4 (30×24)] (Z 7II only) M
[1:1 (24×24)]M
[16:9 (36×20)]M
d8 [File number sequence]On
d9 [Apply settings to live view]On
d10 [Framing grid display]Off
d11 [Focus peaking]
[Peaking level]Off
[Peaking highlight color]Red
d12 [View all in continuous mode]On
e1 [Flash sync speed] 1/200 s
e2 [Flash shutter speed]1/60 s
e3 [Exposure comp. for flash]Entire frame
e4 [Auto c ISO sensitivity control] Subject and background
e5 [Modeling flash]On
e6 [Auto bracketing (mode M)]Flash/speed
e7 [Bracketing order] MTR > under > over
Custom Settings menu option Default
222 Defaults
f1 [Customize i Menu] Set Picture Control,
White balance,
Image quality,
Image size,
Flash mode,
Metering,
Wi-Fi connection,
View memory card info,
Release mode,
Vibration reduction,
AF-area mode,
Focus mode
f2 [Custom controls]
[Fn1 button] White balance
[Fn2 button] Focus mode/AF-area mode
[AF-ON button]AF-ON
[Sub-selector] Focus point selection
[Sub-selector center]AE/AF lock
[Movie record button] Live view info display off
[Lens Fn button]AE/AF lock
[Lens Fn2 button]AF-ON
[Lens control ring](Varies with lens)
Custom Settings menu option Default
223
Defaults
f3 [OK button]
[Shooting mode] Select center focus point
[Playback mode] Zoom on/off
[Zoom on/off]1 : 1 (100%)
f4 [Shutter spd & aperture lock]
[Shutter speed lock]Off
[Aperture lock]Off
f5 [Customize command dials]
[Reverse rotation]Exposure compensation: U,
Shutter speed/aperture: U
[Change main/sub] Exposure setting: Off,
Autofocus setting: Off
[Menus and playback]Off
[Sub-dial frame advance]10 frames
f6 [Release button to use dial]No
f7 [Reverse indicators]
f8 [Reverse ring for focus]Off
f9 [Assign MB-N11 buttons]
[Fn button] AE lock (Reset on release)
[AF-ON button]Same as camera AF-ON
button
[Multi selector] Same as camera multi
selector
[Photo info/playback]Info
D/Playback C
Custom Settings menu option Default
224 Defaults
g1 [Customize i Menu] Set Picture Control,
White balance,
Frame size and rate/image
quality,
Microphone sensitivity,
Choose image area,
Metering,
Wi-Fi connection,
Destination,
Electronic VR,
Vibration reduction,
AF-area mode,
Focus mode
g2 [Custom controls]
[Fn1 button] White balance
[Fn2 button] Focus mode/AF-area mode
[AF-ON button]AF-ON
[Sub-selector center]AE/AF lock
[Shutter-release button] Take photos
[Lens control ring](Varies with lens)
g3 [OK button] Select center focus point
g4 [AF speed]0
[When to apply]Always
g5 [AF tracking sensitivity]4
Custom Settings menu option Default
225
Defaults
g6 [Highlight display]
[Display pattern]Off
[Highlight display threshold]248
g7 [Assign MB-N11 buttons]
[Fn button]None
[AF-ON button]Same as camera AF-ON
button
Custom Settings menu option Default
226 Defaults
Setup Menu Defaults
Setup menu option Default
[Format memory card]—
[Save user settings]—
[Reset user settings]—
[Language](Default varies with
country of purchase)
[Time zone and date]
[Time zone](Default varies with
country of purchase)
[Date and time]—
[Date format](Default varies with
country of purchase)
[Daylight saving time]Off
[Monitor brightness]0
[Monitor color balance] A-B: 0, G-M: 0
[Viewfinder brightness]Auto
[Viewfinder color balance] A-B: 0, G-M: 0
[Control panel brightness]Auto
[Limit monitor mode selection]
[Automatic display switch]M
[Viewfinder only]M
[Monitor only]M
[Prioritize viewfinder]M
[Information display] Dark on light
227
Defaults
[AF fine-tuning options]
[AF fine-tune on/off]Off
[Fine-tune and save lens]—
[Default]—
[List saved values]—
[Non-CPU lens data]
[Lens number]1
[Focal length (mm)]–
[Maximum aperture]–
[Save focus position]Off
[Clean image sensor]
[Automatic cleaning]Clean at shutdown
[Image Dust Off ref photo]—
[Pixel mapping]—
[Image comment]
[Attach comment]U
[Copyright information]
[Attach copyright information]U
[Beep options]
[Beep on/off]Off
[Volume]2
[Pitch] Low
[Touch controls]
[Enable/disable touch controls]Enable
[Full-frame playback flicks]Left
V Right
Setup menu option Default
228 Defaults
[HDMI]
[Output resolution]Auto
[Advanced]
[Output range]Auto
[External recording control]Off
[Output data depth]8 bit
[N-Log/HDR (HLG) output options]Off
[View assist]Off
[Location data]
[Standby timer]Enable
[Position]—
[Set clock from satellite]Yes
[Wireless remote (WR) options]
[LED lamp]On
[Link mode]Pairing
[Assign remote (WR) Fn button]None
[Airplane mode]Disable
Setup menu option Default
229
Defaults
[Connect to smart device]
[Pairing (Bluetooth)]
[Bluetooth connection]Disable
[Select to send (Bluetooth)]
[Auto select to send]Off
[Wi-Fi connection]—
[Send while off]On
[Location data (smart device)]
[Latitude]—
[Longitude]—
[Altitude]—
[UTC]—
[Connect to PC]
[Wi-Fi connection]Disable
[Network settings]—
[Options]
[Auto send]Off
[Delete after send]No
[Send file as] NEF (RAW) + JPEG
[Deselect all?]—
[MAC address]—
Setup menu option Default
230 Defaults
[Wireless transmitter (WT-7)]
[Wireless transmitter]Do not use
[Choose hardware]Wired LAN
[Network settings]—
[Options]
[Auto send]Off
[Delete after send]No
[Send file as] NEF (RAW) + JPEG
[Overwrite if same name]No
[Protect if marked to send]No
[Send marking]Off
[Send folder]—
[Deselect all?]—
[HTTP user settings]—
[Battery info]—
[Power saving] Prioritize network speed
[Auto power off delay]—
[MAC address]—
[Firmware version]—
Setup menu option Default
231
Defaults
[Conformity marking]—
[Battery info]—
[USB power delivery]Enable
[Energy saving (photo mode)]Disable
[Slot empty release lock]Enable release
[Save/load menu settings]—
[Reset all settings]—
[Firmware version]—
Setup menu option Default
232 D The Playback Menu: Managing Images
To display the playback menu, select the
D (playback menu) tab in the camera
menus.
The playback menu contains the following items:
DSee Also
“Playback Menu Defaults” (0212).
D The Playback Menu: Managing
Images
Item 0
[Delete] 233
[Playback folder] 234
[Playback display options] 234
[Dual-format recording PB
slot]235
[Image review] 235
[After delete]236
[After burst, show]237
[Rotate tall]237
[Copy image(s)]238
[Slide show]245
[Rating]247
Item 0
233
D The Playback Menu: Managing Images
Delete multiple images. For more information, see “Deleting
Multiple Pictures” (0208).
Delete
G button U D playback menu
Option Description
Q[Selected images] Delete selected pictures.
i[Images shot on
selected dates]Delete all pictures taken on selected dates.
R[All images]
Delete all pictures in the folder currently
selected for [Playback folder] in the
playback menu.
If two memory cards are inserted, you can
select the card from which pictures will be
deleted.
234 D The Playback Menu: Managing Images
Choose a folder for playback.
Choose whether the focus points used when the photograph
was taken are displayed during full-frame playback. You can
also choose the types of photo information that can be viewed
during full-frame playback.
Highlight options and press 2 to select (M) or deselect (U).
To complete the operation, press J.
Playback Folder
G button U D playback menu
Option Description
(Folder name)
Pictures in all folders with the selected name will
be visible during playback. Folders can be
renamed using the [Storage folder] > [Rename]
option in the photo shooting menu.
[All]Pictures in all folders will be visible during
playback.
[Current]Only pictures in the current folder will be visible
during playback.
Playback Display Options
G button U D playback menu
235
D The Playback Menu: Managing Images
Choose the slot from which dual-format pictures recorded with
[RAW primary - JPEG secondary] selected for [Secondary slot
function] in the photo shooting menu are played back.
Choose whether pictures are automatically displayed in the
monitor immediately after shooting.
Dual-Format Recording PB Slot
G button U D playback menu
Image Review
G button U D playback menu
Option Description
[On]Pictures appear in the currently-selected display
(monitor or viewfinder) as they are taken.
[On (monitor
only)]
Pictures are displayed after shooting only when the
monitor is used to frame shots. Pictures are not
displayed in the viewfinder when [Viewfinder
only] is selected for monitor mode.
[Off]Pictures can only be viewed by pressing the K
button.
236 D The Playback Menu: Managing Images
Choose the picture displayed after an image is deleted.
After Delete
G button U D playback menu
Option Description
S[Show next]
The following picture is displayed.
If the deleted image was the last picture, the
preceding picture will be displayed.
T[Show
previous]
The preceding picture is displayed.
If the deleted image was the first picture, the
next picture will be displayed.
U[Continue as
before]
If you were scrolling through pictures in the
order recorded, the following picture will be
displayed as described for [Show next].
If you were scrolling through pictures in reverse
order, the next picture will be displayed as
described for [Show previous].
237
D The Playback Menu: Managing Images
Choose whether the photo displayed immediately after a burst
of shots is taken in continuous mode is the first or last shot in
the burst.
This option takes effect only when [Off] is selected for [Image
review] in the playback menu.
When [On] is selected, “tall” (portrait-orientation) pictures will
be automatically rotated for display during playback.
DRotate Tall
Images are not rotated automatically during image review even when
[On] is selected for [Rotate tall].
After Burst, Show
G button U D playback menu
DSC_0001.jpg DSC_0002.jpg DSC_0003.jpg DSC_0004.jpg DSC_0014.jpg DSC_0015.jpg
1
23
1Most recent shots (burst)
2Displayed if [First image in
burst] is selected
3Displayed if [Last image in
burst] is selected
Rotate Tall
G button U D playback menu
238 D The Playback Menu: Managing Images
Copy pictures from one memory card to another when two
memory cards are inserted.
Copying Pictures
1
Choose [Select source].
Highlight [Select source] and press
2 to display the [Select source]
dialog.
2
Select the card containing the
pictures to be copied.
Highlight the slot for the card
containing the pictures to be copied
and press J to select the highlighted
slot and return to the [Copy image(s)] menu.
Copy Image(s)
G button U D playback menu
Option Description
[Select source]Choose the card from which pictures will be
copied.
[Select image(s)] Select pictures to be copied.
[Select destination
folder]
Select the destination folder on the remaining
card (the card not selected for [Select source]).
[Copy image(s)?] Copy the pictures.
239
D The Playback Menu: Managing Images
3
Choose [Select image(s)].
Highlight [Select image(s)] and press
2 to view the [Select image(s)]
display.
4
Select the source folder.
Highlight the folder containing the
images to be copied and press 2 to
select the highlighted folder and
display the [Images selected by
default] menu.
To copy all pictures from the card in the selected slot,
highlight [All images in slot], press J, and proceed to
Step 10.
240 D The Playback Menu: Managing Images
5
Make the initial selection.
Choose the pictures that will be
selected by default.
Option Description
[Deselect all]
None of the pictures in the chosen folder will be
selected by default.
Choose this option when you want to select
pictures individually.
[Select all
images]
All of the pictures in the chosen folder will be
selected by default.
Choose this option if you want to copy all or most
of the pictures in the folder.
[Select
protected
images]
Only the protected images in the folder will be
selected by default.
241
D The Playback Menu: Managing Images
6
Select additional images.
Highlight pictures and press the
W(Q) button to select; selected
pictures are marked with a L. To
deselect the current picture, press
the W (Q) button again; the L will
no longer be displayed.
To view the highlighted picture full screen, press and hold
the X button.
After confirming that all the pictures you want to copy
have L marks, press J to return to the [Copy image(s)]
menu.
7
Choose [Select destination
folder].
Highlight [Select destination folder]
and press 2 to display [Select
destination folder] options.
242 D The Playback Menu: Managing Images
8
Choose a destination folder.
Choose one of the following options
and press 2.
Option Description
[Select folder
by number]
Enter the number of the
destination folder
(0252). If the folder with
the selected number
does not already exist, a
new folder will be
created.
[Select folder
from list]
Choose the destination
folder from a list of
existing folders.
243
D The Playback Menu: Managing Images
9
Select the folder.
After entering a folder number or highlighting the folder
name, press J to select the folder and return to the [Copy
image(s)] menu.
10
Choose [Copy image(s)?].
Highlight [Copy image(s)?] and
press J to display a confirmation
dialog.
11
Choose [Yes].
The camera will display the
message “[Copy?]” together with
the number of pictures that will be
copied.
Highlight [Yes] and press J to copy the selected pictures.
Press J again to exit when copying is complete.
244 D The Playback Menu: Managing Images
DCopying Pictures
Pictures will not be copied if there is
insufficient space on the destination card.
If the destination folder contains a file with
the same name as one of the pictures to be
copied, a confirmation dialog will be
displayed. Select [Replace existing image]
or [Replace all] to replace the existing file or
files. Protected files in the destination folder will not be replaced. Select
[Skip] to continue without replacing existing files. Select [Cancel] to
exit without copying any further pictures.
Ratings and protected status are copied with the pictures.
To prevent loss of power while copying is in progress, be sure the
battery is fully charged or connect a charging AC adapter (available
separately for the Z 6II, supplied with the Z 7II) or an optional AC
adapter and power connector before copying movies.
245
D The Playback Menu: Managing Images
View a slide show; pictures are displayed in the order recorded.
The pictures in the folder currently selected for [Playback
folder] (0234) will be displayed one-by-one in the order
recorded.
Slide Show
G button U D playback menu
Option Description
[Start] Start the slide show.
[Image type]
Choose the type of picture displayed.
Select [By rating] to view only pictures with
selected ratings. Highlight ratings and press 2 to
select (M) or deselect (U).
[Frame interval] Choose how long each picture will be displayed.
246 D The Playback Menu: Managing Images
Viewing Slide Shows
To start the slide show, highlight [Start]
and press J. The following operations
can be performed while the show is in
progress:
To Description
Skip back/skip
ahead
Press 4 to return to the previous frame, 2 to skip to
the next frame.
View additional
photo info
Press 1 or 3 to choose the photo info displayed. To
hide photo info, select [None (image only)].
Pause Press J to pause the slide show. To restart, highlight
[Restart] and press J.
Adjust volume Press X to increase volume, W (Q) to decrease.
Exit to the
playback menu
Press G to end the slide show and return to the
playback menu.
Exit to playback
mode
Press K to end the slide show and return to the
playback display.
Resume shooting Press the shutter-release button halfway to return to
shooting mode.
247
D The Playback Menu: Managing Images
A dialog is displayed when the show
ends. To restart, highlight [Restart] and
press J. To end the show, highlight
[Exit] and press J.
Rate pictures.
Highlight pictures using the multi
selector 4 or 2.
Press 1 or 3 to choose a rating of from
zero to five stars, or select d to mark
the picture as a candidate for later
deletion.
To view the highlighted picture full screen, press and hold the
X button.
Press J to save changes.
Rating
G button U D playback menu
248 C The Photo Shooting Menu: Shooting Options
To view the photo shooting menu,
select the C tab in the camera menus.
The photo shooting menu contains the following items:
C The Photo Shooting Menu: Shooting
Options
Item 0
[Reset photo shooting
menu]249
[Storage folder] 250
[File naming] 256
[Primary slot selection] 257
[Secondary slot function] 258
[Choose image area] 260
[Image quality] 260
[Image size] 261
[NEF (RAW) recording] 264
[ISO sensitivity settings] 265
[White balance] 267
[Set Picture Control] 275
[Manage Picture Control] 278
[Color space] 282
[Active D-Lighting]283
[Long exposure NR]285
[High ISO NR]286
[Vignette control]287
[Diffraction compensation]288
[Auto distortion control]288
[Flicker reduction
shooting]289
[Metering]290
[Flash control]291
[Flash mode]295
[Flash compensation]295
[Focus mode]295
[AF-area mode]296
[Vibration reduction]296
[Auto bracketing]297
Item 0
249
C The Photo Shooting Menu: Shooting Options
DSee Also
“Photo Shooting Menu Defaults” (0213)
Restore photo shooting menu options to their default values.
Photo shooting menu reset is not available while a multiple
exposure is in progress.
[Multiple exposure]309
[HDR (high dynamic range)]319
[Interval timer shooting]326
Item 0
[Time-lapse movie] 340
[Focus shift shooting] 352
[Silent photography] 362
Item 0
Reset Photo Shooting Menu
G button U C photo shooting menu
250 C The Photo Shooting Menu: Shooting Options
Choose the folder in which subsequent pictures will be stored.
Renaming Folders
The default folder name, which appears after the folder number,
is “NZ7_2” (Z 7II) or “NZ6_2” (Z 6II). To change the name
assigned to new folders, select [Rename].
Existing folders cannot be renamed.
If desired, the default name can be restored for subsequent
folders by pressing and holding the O button while the
keyboard is displayed.
Storage Folder
G button U C photo shooting menu
3
1
2
1Folder
2Folder number
3Folder name
251
C The Photo Shooting Menu: Shooting Options
DText Entry
A keyboard is displayed when text entry is required.
Tap letters on the screen to insert them at the current cursor position.
You can also enter characters by highlighting them with the multi
selector and pressing J.
To move the cursor to a new position, tap the display or rotate the main
command dial.
If a character is entered when the text display area is full, the rightmost
character will be deleted.
To delete the character under the cursor, press the O button.
To complete entry, press X.
To exit without completing text entry, press G.
1
2
1Text display area
2Keyboard area
252 C The Photo Shooting Menu: Shooting Options
Select Folder by Number
The folder in which subsequent pictures will be stored can be
selected by number. If a folder with the specified number does
not already exist, a new folder will be created.
1
Choose [Select folder by
number].
Highlight [Select folder by
number] and press 2 to display the
[Select folder by number] dialog.
The card on which the new folder will be created is
underlined in the card slot display area at the top right
corner of the [Select folder by number] dialog. The card
used for new folders depends on the option currently
selected for [Secondary slot function] in the photo
shooting menu.
2
Choose a folder number.
Press 4 or 2 to highlight digits.
To change the highlighted digit, press 1 or 3.
253
C The Photo Shooting Menu: Shooting Options
3
Save changes and exit.
If a folder with the selected number already exists, a W, X,
or Y icon will be displayed to the left of the folder number.
Press J to complete the operation and return to the main
menu; if you chose a folder marked W or X, it will be
selected as the folder for new pictures.
If you chose a folder number that does not already exist, a
new folder will be created with that number when you
press J.
In either case, subsequent pictures will be stored in the
chosen folder.
To exit without changing the storage folder, press the G
button.
DFolder Icons
Folders in the [Select folder by number] dialog are shown by W if empty,
by Y if full (containing either 5000 pictures or a picture numbered 9999),
or by X if partially full. A Y icon indicates that no further pictures can be
stored in the folder.
254 C The Photo Shooting Menu: Shooting Options
Select Folder from List
To choose from a list of existing folders:
1
Choose [Select folder from list].
Highlight [Select folder from list]
and press 2 to display the [Select
folder from list] dialog.
2
Highlight a folder.
Press 1 or 3 to highlight a folder.
3
Select the highlighted folder.
Press J to select the highlighted folder and return to the
main menu.
Subsequent photographs will be stored in the selected
folder.
255
C The Photo Shooting Menu: Shooting Options
DFolder and File Numbers
Once the folder number has reached 999, the camera will stop creating
new folders automatically and disable the shutter release if:
- the current folder contains 5000 pictures (in addition, movie
recording will be disabled if the camera calculates that the number of
files needed to record a movie of the maximum length would result in
the folder containing over 5000 files), or
- the current folder contains a picture numbered 9999 (in addition,
movie recording will be disabled if the camera calculates that the
number of files needed to record a movie of the maximum length
would result in a file numbered over 9999).
If there is space on the memory card, you will nevertheless be able to
continue shooting by:
- creating a folder with a number less than 999 and selecting it as the
storage folder, or
- changing the options selected for [Frame size/frame rate] and
[Movie quality] before recording movies.
DStartup Time
Additional time may be required for camera startup if the memory card
contains a very large number of files or folders.
256 C The Photo Shooting Menu: Shooting Options
Pictures are saved using file names consisting of “DSC_”
followed by a four-digit number and a three-letter extension.
[File naming] is used to select three letters to replace the “DSC”
portion of the file name. For information on text entry, see “Text
Entry” (0251).
DFile Names
File names take the form “DSC_nnnn.xxx”. nnnn is a number from 0001
to 9999. xxx is one of the following extensions, assigned according to
the options selected for image quality and file type:
- NEF: NEF (RAW) photos
- JPG: JPEG (fine, normal, or basic) photos
-MOV: MOV movies
-MP4: MP4 movies
- NDF: Dust off reference data
Images created with [Adobe RGB] selected for [Color space] in the
photo shooting menu have file names of the form “_DSCnnnn.xxx”.
In each pair of photographs recorded at image-quality settings of NEF
(RAW)+JPEG, the NEF and JPEG images have the same file names but
different extensions.
File Naming
G button U C photo shooting menu
257
C The Photo Shooting Menu: Shooting Options
Choose the slot that serves as the primary slot when memory
cards are inserted in both the CFexpress/XQD and SD memory
card slots.
AMovie Destination
The slot to which movies are recorded is selected using [Destination] in
the movie shooting menu (0364).
Primary Slot Selection
G button U C photo shooting menu
Option Description
[CFexpress/
XQD card slot]
The CFexpress/XQD memory card slot serves as the
primary slot.
[SD card slot] The SD memory card slot serves as the primary slot.
258 C The Photo Shooting Menu: Shooting Options
Choose the role played by the card in the secondary slot when
two memory cards are inserted in the camera.
D[RAW primary - JPEG secondary]
If [On] is selected for [Multiple exposure] > [Save individual images
(NEF)] in the photo shooting menu, or if [On] is selected for [HDR (high
dynamic range)] > [Save individual images (NEF)] in the photo
shooting menu, unprocessed copies of the individual NEF (RAW) photos
that make up each multiple exposure or HDR image will be recorded to
both memory cards together with the JPEG composite, regardless of the
option selected for image quality.
Secondary Slot Function
G button U C photo shooting menu
Option Description
P[Overflow]The card in the secondary slot is used only
when the card in the primary slot is full.
Q[Backup]
Each picture is recorded twice, once to the card
in the primary slot and again to the card in the
secondary slot.
R[RAW primary -
JPEG secondary]
NEF (RAW) copies of photos taken at settings
of NEF (RAW) + JPEG are recorded only to the
card in the primary slot, JPEG copies only to
the card in the secondary slot.
Pictures taken at other image quality settings
are recorded twice at the same setting, once
to the card in the primary slot and again to
the card in the secondary slot.
259
C The Photo Shooting Menu: Shooting Options
A[Backup] and [RAW primary - JPEG secondary]
The shutter release is disabled when either card is full.
AViewing Dual-Format Photos
Use the [Dual-format recording PB slot] item in the playback menu to
choose the slot from which dual-format photos are played back.
When viewing dual-format photos, you can view the other copy using
[Jump to copy on other card] in the i menu.
Deleting Copies
When deleting pictures recorded using [Backup] or [RAW
primary - JPEG secondary], you have the choice of erasing
either both copies or only the copy on the card in the current
slot.
Pressing O when a picture created
using either of these options is selected
during playback displays a
confirmation message.
To delete only the copy on the card in
the current slot, highlight [Selected
image] and press O again. The copy on the remaining card is
not deleted.
To delete both copies, highlight [Same images on w and x]
and press O.
260 C The Photo Shooting Menu: Shooting Options
The camera offers a choice of the following image areas:
Choose a file format for photographs. For more information, see
“The i Menu” under “Image Quality” (0152).
Choose Image Area
G button U C photo shooting menu
Option Description
c[FX (36×24)]
Record pictures in FX format with an angle of
view equivalent to a 35 mm format camera. Use
this option when taking photographs with
NIKKOR lenses for 35 mm format cameras.
a[DX (24×16)]
Images are recorded in DX format. To calculate
the approximate focal length of the lens in
35 mm format, multiply by 1.5.
Image-area selection is fixed at [DX (24×16)]
when a DX lens is attached.
b[5:4 (30×24)]Pictures are recorded with an aspect ratio of 5:4.
Available only with Z 7II.
m[1:1 (24×24)] Pictures are recorded with an aspect ratio of 1:1.
Z[16:9 (36×20)]Pictures are recorded with an aspect ratio of
16:9.
Image Quality
G button U C photo shooting menu
261
C The Photo Shooting Menu: Shooting Options
Choose the size, in pixels, of pictures recorded with the camera.
Select [JPEG] to choose the size of JPEG images, [NEF (RAW)] to
choose the size of NEF (RAW) images. Note that image size
varies with the option selected for image area.
Z7II:
Image Size
G button U C photo shooting menu
Image area Image size Size when printed at 300 dpi *
[FX (36×24)]
Large
(8256 × 5504 pixels)
Approx. 69.9 × 46.6 cm/
27.5 × 18.3 in.
Medium
(6192 × 4128 pixels)
Approx. 52.4 × 35.0 cm/
20.6 × 13.8 in.
Small
(4128 × 2752 pixels)
Approx. 35.0 × 23.3 cm/
13.8 × 9.2 in.
[DX (24×16)]
Large
(5408 × 3600 pixels)
Approx. 45.8 × 30.5 cm/
18.0 × 12.0 in.
Medium
(4048 × 2696 pixels)
Approx. 34.3 × 22.8 cm/
13.5 × 9.0 in.
Small
(2704 × 1800 pixels)
Approx. 22.9 × 15.2 cm/
9.0 × 6.0 in.
262 C The Photo Shooting Menu: Shooting Options
* Print size in inches equals image size in pixels divided by printer
resolution in dots per inch (dpi; 1 inch = 2.54 cm).
[5:4 (30×24)]
Large
(6880 × 5504 pixels)
Approx. 58.3 × 46.6 cm/
22.9 × 18.3 in.
Medium
(5152 × 4120 pixels)
Approx. 43.6 × 34.9 cm/
17.2 × 13.7 in.
Small
(3440 × 2752 pixels)
Approx. 29.1 × 23.3 cm/
11.5 × 9.2 in.
[1:1 (24×24)]
Large
(5504 × 5504 pixels)
Approx. 46.6 × 46.6 cm/
18.3 × 18.3 in.
Medium
(4128 × 4128 pixels)
Approx. 35.0 × 35.0 cm/
13.8 × 13.8 in.
Small
(2752 × 2752 pixels)
Approx. 23.3 × 23.3 cm/
9.2 × 9.2 in.
[16:9
(36×20)]
Large
(8256 × 4640 pixels)
Approx. 69.9 × 39.3 cm/
27.5 × 15.5 in.
Medium
(6192 × 3480 pixels)
Approx. 52.4 × 29.5 cm/
20.6 × 11.6 in.
Small
(4128 × 2320 pixels)
Approx. 35.0 × 19.6 cm/
13.8 × 7.7 in.
Image area Image size Size when printed at 300 dpi *
263
C The Photo Shooting Menu: Shooting Options
Z6II:
* Print size in inches equals image size in pixels divided by printer
resolution in dots per inch (dpi; 1 inch = 2.54 cm).
Image area Image size Size when printed at 300 dpi *
[FX (36×24)]
Large
(6048 × 4024 pixels)
Approx. 51.2 × 34.1 cm/
20.2 × 13.4 in.
Medium
(4528 × 3016 pixels)
Approx. 38.3 × 25.5 cm/
15.1 × 10.1 in.
Small
(3024 × 2016 pixels)
Approx. 25.6 × 17.1 cm/
10.1 × 6.7 in.
[DX (24×16)]
Large
(3936 × 2624 pixels)
Approx. 33.3 × 22.2 cm/
13.1 × 8.7 in.
Medium
(2944 × 1968 pixels)
Approx. 24.9 × 16.7 cm/
9.8 × 6.6 in.
Small
(1968 × 1312 pixels)
Approx. 16.7 × 11.1 cm/
6.6 × 4.4 in.
[1:1 (24×24)]
Large
(4016 × 4016 pixels)
Approx. 34.0 × 34.0 cm/
13.4 × 13.4 in.
Medium
(3008 × 3008 pixels)
Approx. 25.5 × 25.5 cm/
10.0 × 10.0 in.
Small
(2000 × 2000 pixels)
Approx. 16.9 × 16.9 cm/
6.7 × 6.7 in.
[16:9
(36×20)]
Large
(6048 × 3400 pixels)
Approx. 51.2 × 28.8 cm/
20.2 × 11.3 in.
Medium
(4528 × 2544 pixels)
Approx. 38.3 × 21.5 cm/
15.1× 8.5 in.
Small
(3024 × 1696 pixels)
Approx. 25.6 × 14.4 cm/
10.1 × 5.7 in.
264 C The Photo Shooting Menu: Shooting Options
Choose a compression type and bit depth for NEF (RAW)
photographs.
NEF (RAW) Compression
NEF (RAW) Recording
G button U C photo shooting menu
Option Description
N[Lossless
compressed]
NEF pictures are compressed using a reversible
algorithm. The resulting files are about 60% to
80% the size of pictures recorded using
[Uncompressed]. Image quality is the same as
pictures recorded using [Uncompressed].
O[Compressed]
NEF images are compressed using a non-
reversible algorithm. The resulting files are about
45% to 65% the size of pictures recorded using
[Uncompressed]. Image quality is nearly the
same as pictures recorded using
[Uncompressed].
[Uncompressed]
NEF pictures are not compressed; the resulting
files are larger than those for pictures recorded
using [Lossless compressed] or [Compressed].
265
C The Photo Shooting Menu: Shooting Options
NEF (RAW) Bit Depth
Adjust ISO sensitivity settings for photographs.
Option Description
q[12-bit]NEF (RAW) images are recorded at a bit depth of
12 bits.
r[14-bit]
NEF (RAW) images are recorded at a bit depth of
14 bits. Files recorded at a bit depth of 14 bits
contain more color data than pictures recorded
using [12-bit]. Files recorded at a bit depth of
14 bits are also larger than pictures recorded
using [12-bit].
ISO Sensitivity Settings
G button U C photo shooting menu
Option Description
[ISO
sensitivity]
Choose from the following settings.
Z7II: Choose from settings of ISO 64 to 25600; the
camera also supports settings below ISO 64 by about
0.3, 0.5, 0.7, and 1 EV (ISO 32 equivalent) and above ISO
25600 by about 0.3, 0.5, 0.7, 1, and 2 EV (ISO 102400
equivalent).
Z6II: Choose from settings of ISO 100 to 51200; the
camera also supports settings below ISO 100 by about
0.3, 0.5, 0.7, and 1 EV (ISO 50 equivalent) and above ISO
51200 by about 0.3, 0.5, 0.7, 1, and 2 EV (ISO 204800
equivalent).
b offers an ISO AUTO option.
266 C The Photo Shooting Menu: Shooting Options
[Auto ISO
sensitivity
control]
Highlight [On] and press J to enable auto ISO sensitivity
control. If [Off] is selected, [ISO sensitivity] will remain
fixed at the value selected by the user. The following
options are available when [On] is selected.
[Maximum sensitivity]: Choose an upper limit for ISO
sensitivity to prevent it being raised too high.
[Maximum sensitivity with c]: Choose the upper ISO
sensitivity limit for photos taken using an optional
flash unit.
[Minimum shutter speed]: Choose the shutter speed
below which auto ISO sensitivity control will kick in to
prevent underexposure in modes P and A. If [Auto] is
selected, the camera will choose the minimum shutter
speed based on lens focal length. For example, the
camera will automatically choose faster minimum
shutter speeds to prevent blur caused by camera shake
when a long lens is attached.
- To view auto shutter-speed selection options,
highlight [Auto] and press 2. Auto shutter-speed
selection can be fine-tuned by choosing faster or
slower minimums. Faster settings can be used to
reduce blur when photographing fast-moving
subjects.
- Shutter speeds may drop below the selected
minimum if optimal exposure cannot be achieved at
the ISO sensitivity chosen for [Maximum sensitivity].
Option Description
267
C The Photo Shooting Menu: Shooting Options
Adjust white balance to match the color
of the light source. For more information,
see “Basic Settings” under “White
Balance” (094) and “The i Menu” under
“White Balance” (0145).
The White Balance Menu: Fine-Tuning
1
Select [White balance] in the
photo shooting menu,
highlight the desired option,
and press
2
as often as
necessary to display fine-
tuning options.
For information on fine-tuning L [Preset manual] white
balance, see “Fine-Tuning Preset Manual White Balance”
(0274).
White Balance
G button U C photo shooting menu
268 C The Photo Shooting Menu: Shooting Options
2
Fine-tune white balance.
The multi selector can be used to
move the cursor up to six steps
from the center of the grid along
either of the A (amber)–B (blue) and
G (green)–M (magenta) axes. The
selected value is displayed to the right of the grid.
The A (amber)–B (blue) axis corresponds to color
temperature and is ruled in increments of 0.5. A change of
1 is equivalent to approximately 5 mired.
The G (green)–M (magenta) axis has effects similar to color
compensation filters and is ruled in increments of 0.25. A
change of 1 is equivalent to approximately 0.05 diffuse
density units.
3
Save changes.
Press J to save changes and exit to the menus.
If white balance has been fine-
tuned, an asterisk (“U”) will be
displayed in the icon.
269
C The Photo Shooting Menu: Shooting Options
DWhite Balance Fine-Tuning
The colors on the fine-tuning axes are relative, not absolute. Selecting
more of a color on a given axis does not necessarily result in that color
appearing in pictures. For example, moving the cursor to B (blue) when a
“warm” setting such as J [Incandescent] is selected will make pictures
slightly “colder” but will not actually make them blue.
D“Mired”
Values in mired are calculated by multiplying the inverse of the color
temperature by 106. Any given change in color temperature produces a
greater difference in color at low color temperatures than it would at
higher color temperatures. For example, a change of 1000 K produces a
much greater change in color at 3000 K than at 6000 K. Mired is a measure
of color temperature that takes such variation into account, and as such is
the unit used in color-temperature compensation filters.
E.g.: Change in color temperature (in Kelvin): Value in mired
4000 K – 3000 K = 1000 K: 83 mired
7000 K – 6000 K = 1000 K: 24 mired
270 C The Photo Shooting Menu: Shooting Options
The White Balance Menu: Choosing a Color
Temperature
Choose a color temperature by entering values for the A
(amber)–B (blue) and G (green)–M (magenta) axes.
1
Select [White balance] in the photo shooting
menu, then highlight
K
[Choose color
temperature] and press
2
.
2
Choose a color temperature.
Press 4 or 2 to highlight digits on the A–B (amber–blue)
axis. You can also highlight the G–M (green–magenta) axis.
Press 1 or 3 to edit the selected item.
A–B (amber–blue) axis G–M (green–magenta)
axis
271
C The Photo Shooting Menu: Shooting Options
3
Save changes.
Press J to save changes and exit to the menus.
If a value other than 0 is selected for
the green (G)–magenta (M) axis, an
asterisk (“U”) will appear in the icon.
DColor-Temperature Selection
Do not use color-temperature selection with fluorescent light sources;
instead, use the I [Fluorescent] option.
When using color-temperature selection with other light sources, take a
test shot to determine if the selected value is appropriate.
272 C The Photo Shooting Menu: Shooting Options
Preset Manual: Copying White Balance from a
Photograph
The white balance values for existing photographs can be
copied to selected presets. For information on measuring new
values for preset manual white balance, see “Preset Manual“
(0148).
1
Select [White balance] in the
photo shooting menu, then
highlight
L
[Preset manual]
and press
2
.
2
Select a destination.
Using the multi selector, highlight
the destination preset (d-1 to d-6).
Press X; a confirmation dialog will
be displayed.
3
Choose [Select image].
Highlight [Select image] and press
2 to view the pictures on the current
memory card.
273
C The Photo Shooting Menu: Shooting Options
4
Highlight the source image.
Use the multi selector to highlight
the desired picture.
To view the highlighted picture full
screen, press and hold the X
button.
5
Copy white balance.
Press J to copy the white balance value for the
highlighted photograph to the selected preset.
If the highlighted photograph has a comment, the
comment will be copied to the comment for the selected
preset.
274 C The Photo Shooting Menu: Shooting Options
DFine-Tuning Preset Manual White Balance
The selected preset can be fine-tuned by
selecting [Fine-tune] in the preset manual
white balance menu (0267).
D“Edit Comment”
To enter a descriptive comment of up to
36 characters for the current white-balance
preset, select [Edit comment] in the preset
manual white balance menu.
D“Protect”
To protect the current white-balance preset,
select [Protect] in the preset manual white
balance menu. Highlight [On] and press J; the
current white balance preset is now protected.
Protected presets cannot be modified.
275
C The Photo Shooting Menu: Shooting Options
Choose image processing (“Picture Control”) options for new
photos according to the scene or your creative intent. For more
information, see “The i Menu” under “Set Picture Control”
(0139).
Modifying Picture Controls from the Menus
Existing preset or custom Picture Controls can be modified to
suit the scene or the user’s creative intent.
1
Select a Picture Control.
Highlight the desired Picture Control
in the Picture Control list and press
2.
Set Picture Control
G button U C photo shooting menu
276 C The Photo Shooting Menu: Shooting Options
2
Edit the selected Picture
Control.
Press 1 or 3 to highlight the
desired setting (0143). Press 4 or
2 to choose a value in increments
of 1, or rotate the sub-command dial to choose a value in
increments of 0.25.
The options available vary with the Picture Control
selected.
To quickly adjust levels for balanced [Sharpening], [Mid-
range sharpening], and [Clarity], highlight [Quick sharp]
and press 4 or 2.
To abandon any changes and start over from default
settings, press the O button.
3
Save changes and exit.
Press J to save changes.
277
C The Photo Shooting Menu: Shooting Options
DThe i Menu
To select Picture Controls in the i menu,
highlight [Set Picture Control] and press J.
Press 4 and 2 to choose a Picture Control
and press 3 to display Picture Control
settings. The effect of any changes can be
previewed in the display.
DManage Picture Control
Modifications to existing Picture Controls can be saved using the
[Manage Picture Control] item in the photo or movie shooting menu,
creating custom Picture Controls that can then be copied to a memory
card and used in compatible software or shared among cameras of the
same model.
278 C The Photo Shooting Menu: Shooting Options
Save modified Picture Controls as custom Picture Controls.
Creating Custom Picture Controls
1
Select [Save/edit].
Highlight [Save/edit] and press 2 to
view [Choose Picture Control]
options.
Manage Picture Control
G button U C photo shooting menu
Option Description
[Save/edit]
Create a new custom Picture Control based on an
existing preset or custom Picture Control, or edit
existing custom Picture Controls.
[Rename] Rename custom Picture Controls.
[Delete] Delete custom Picture Controls.
[Load/save]Copy custom Picture Controls to and from the memory
card.
279
C The Photo Shooting Menu: Shooting Options
2
Select a Picture Control.
Highlight an existing Picture
Control and press 2 to display edit
options.
To save a copy of the highlighted
Picture Control without further modification, press J.
[Save as] options will be displayed; proceed to Step 4.
3
Edit the selected Picture
Control.
The settings available and the
techniques for editing them are the
same as for [Set Picture Control].
Press J to display [Save as] options when settings are
complete.
To abandon any changes and start over from default
settings, press the O button.
4
Select a destination.
Choose a destination for the custom
Picture Control (C-1 through C-9).
280 C The Photo Shooting Menu: Shooting Options
5
Name the Picture Control.
Pressing 2 when a destination is
highlighted in the previous step
displays the [Rename] text-entry
dialog.
By default, new Picture Controls are named by adding a
two-digit number to the name of the existing Picture
Control. The two-digit number is assigned automatically.
Custom Picture Control names can be up to nineteen
characters long. New characters are added at the cursor
position.
To cycle through the upper- and lower-case and symbol
keyboards, tap the keyboard selection button.
For information on editing Picture Control names, see
“Text Entry” (0251).
When entry is complete, press X to save the new Picture
Control.
The new Picture Control will be added to the Picture
Control list.
DThe Original Picture Control Icon
The original preset Picture Control on which
the custom Picture Control is based is indicated
by an icon in the edit display.
281
C The Photo Shooting Menu: Shooting Options
DCustom Picture Control Options
The options available with custom Picture Controls are the same as those
on which the custom Picture Control was based.
DLoad/Save
The [Load/save] item in the [Manage Picture
Control] menu can be used to copy custom
Picture Controls from the camera to a memory
card. You can also delete custom Picture
Controls or copy them from a memory card to
the camera (if two memory cards are inserted,
the card in the slot chosen using the [Primary
slot selection] option in the photo shooting menu will be used).
[Copy to camera]: Copy (import) custom Picture Controls from the
memory card to the camera. The Picture Controls are copied to custom
Picture Controls C-1 through C-9 on the camera and can be named as
desired.
[Delete from card]: Delete selected custom Picture Controls from the
memory card.
[Copy to card]: Copy (export) a custom Picture Control from the camera
to a memory card. Highlight a destination (1 through 99) for the
selected Picture Control and press J to export it to the memory card.
282 C The Photo Shooting Menu: Shooting Options
The color space determines the gamut of colors available for
color reproduction. [sRGB] is recommended for general-
purpose printing and display. With a broader gamut of colors
than [sRGB], [Adobe RGB] is a better choice for professional
publication and commercial printing.
DColor Space
Capture NX-D and ViewNX-i automatically select the correct color space
when opening photographs created with this camera. Results cannot be
guaranteed with third-party software.
DAdobe RGB
For accurate color reproduction, Adobe RGB images require applications,
displays, and printers that support color management.
Color Space
G button U C photo shooting menu
283
C The Photo Shooting Menu: Shooting Options
Preserve details in highlights and shadows, creating pictures
with natural contrast. Use for high-contrast scenes, for example
when photographing brightly-lit outdoor scenery through a
door or window or taking pictures of shaded subjects on a
sunny day. Active D-Lighting is most effective when used with
matrix metering.
Active D-Lighting
G button U C photo shooting menu
[Off][
Y Auto]
Option Description
Y[Auto]The camera automatically adjusts Active D-Lighting
in response to shooting conditions.
Z[Extra high]
Choose the amount of Active D-Lighting
performed from [Extra high], [High], [Normal],
and [Low].
P[High]
Q[Normal]
R[Low]
c[Off] Active D-Lighting off.
284 C The Photo Shooting Menu: Shooting Options
The option currently selected is shown in
the display during shooting.
DActive D-Lighting
“Noise” in the form of randomly-spaced bright pixels, fog, or lines may
appear in photos taken with Active D-Lighting.
In mode M, [Y Auto] is equivalent to [Q Normal].
Uneven shading may be visible with some subjects.
This function does not apply at high ISO sensitivities (Hi 0.3–Hi 2.0),
including high sensitivities selected via auto ISO sensitivity control.
285
C The Photo Shooting Menu: Shooting Options
Reduce “noise” (bright spots or fog) in photographs taken at
slow shutter speeds.
Long-exposure noise reduction is performed after the photo is
taken. During processing, the message, “[Performing noise
reduction]” will appear in the shooting display and “Job NR
will flash in the control panel. Pictures cannot be taken until the
message has cleared from the display. The time required to
process photos after shooting roughly doubles.
DLong-Exposure Noise Reduction
If the camera is turned off before processing is complete, the picture will
be saved but noise reduction will not be performed.
Long Exposure NR
G button U C photo shooting menu
Option Description
[On]Reduce noise in photographs taken at shutter speeds
slower than 1 s.
[Off] Long-exposure noise reduction disabled.
Control panel Monitor
286 C The Photo Shooting Menu: Shooting Options
Photographs taken at high ISO sensitivities can be processed to
reduce “noise” (randomly-spaced bright pixels).
High ISO NR
G button U C photo shooting menu
Option Description
[High] Reduce noise in photographs taken at all ISO
sensitivities. The higher the sensitivity, the greater the
effect. Choose the amount of noise reduction
performed from [High], [Normal], and [Low].
[Normal]
[Low]
[Off]
Noise reduction is performed only as required. The
amount of noise reduction performed is always lower
than when [Low] is selected.
287
C The Photo Shooting Menu: Shooting Options
Vignette control reduces “vignetting”—a drop in brightness at
the edges of a photograph—by an amount that varies from lens
to lens. Its effects are most noticeable at maximum aperture.
DVignette Control
Depending on the scene, shooting conditions, and type of lens, JPEG
images may exhibit “noise” (fog) or over-processing at the edge of the
frame that introduces variations in peripheral brightness. In addition,
custom Picture Controls and preset Picture Controls that have been
modified from default settings may not produce the desired effect. Take
test shots and view the results in the monitor.
Vignette Control
G button U C photo shooting menu
Option Description
e[High]Choose the amount of vignette control performed
from (in order from high to low) [High], [Normal],
and [Low].
g[Normal]
f[Low]
[Off] Vignette control disabled.
288 C The Photo Shooting Menu: Shooting Options
Select [On] to reduce diffraction at small apertures (high
f-numbers).
Select [On] as required to reduce barrel distortion when
shooting with wide-angle lenses and to reduce pin-cushion
distortion when shooting with long lenses. Note that [On] may
be selected automatically with some lenses, in which case this
item will be grayed out and unavailable.
Diffraction Compensation
G button U C photo shooting menu
Auto Distortion Control
G button U C photo shooting menu
289
C The Photo Shooting Menu: Shooting Options
When [On] is selected, reduce the effects of flicker from such
light sources as fluorescent or mercury-vapor lamps.
Flicker can cause uneven exposure or (in photographs taken in
continuous release modes) inconsistent exposure or
coloration.
Note that the frame rate for burst shooting may drop or
become erratic when [On] is selected.
DFlicker Reduction Shooting in the Photo Shooting Menu
Depending on the light source, flicker reduction may slightly delay
shutter response.
Flicker reduction can detect flicker at 100 and 120 Hz (associated
respectively with AC power supplies of 50 and 60 Hz). The desired
results may not be achieved if the frequency of the power supply
changes during burst photography.
Flicker may not be detected or the desired results may not be achieved
depending on the light source and shooting conditions, for example
with scenes that are brightly lit or feature dark backgrounds.
The desired results may also not be achieved with decorative lighting
displays and other non-standard lighting.
Flicker Reduction Shooting
G button U C photo shooting menu
290 C The Photo Shooting Menu: Shooting Options
D[Flicker Reduction Shooting] in the Photo Shooting Menu:
Restrictions
The [Flicker reduction shooting] item in the photo shooting menu does
not take effect under some conditions, including when:
[Continuous H (extended)] is selected for release mode
[On] is selected for [Silent photography] in the photo shooting menu
[On] is selected for [Silent photography] in the respective sub-menu
during interval-timer photography, time-lapse movie recording, or
focus shift
HDR is enabled
Exposure delay mode is on
Metering determines how the camera sets exposure. For more
information, see “The i Menu” under “Metering” (0157).
Metering
G button U C photo shooting menu
291
C The Photo Shooting Menu: Shooting Options
Adjust settings for wireless remote flash
units or optional flash units mounted on
the camera accessory shoe.
For information on adjusting settings
for optional flash units mounted on the
camera accessory shoe, see “On-
Camera Flash Photography” (0611).
For information on adjusting settings for wireless remote flash
units, see “Remote Flash Photography” (0629).
Flash Control
G button U C photo shooting menu
292 C The Photo Shooting Menu: Shooting Options
Flash Control Mode
Choose a flash control mode and flash
level and adjust other settings for
SB-5000, SB-500, SB-400, or SB-300 flash
units mounted on the camera accessory
shoe.
The options available in the flash
control display vary with the option selected for [Flash
control mode].
Settings for flash units other than the SB-5000, SB-500, SB-400,
and SB-300 can only be adjusted using flash unit controls.
Settings for an SB-5000 mounted on the accessory shoe can
also be adjusted using the controls on the flash unit.
Option Description
[TTL]Flash output is adjusted automatically in response to
shooting conditions.
[Auto external
flash]
Light from the flash is reflected from the subject to an
auto external flash sensor and flash output adjusted
automatically.
[Distance-
priority
manual]
Choose the distance to the subject; flash output will be
adjusted automatically.
[Manual] Choose the flash level manually.
[Repeating
flash]
The flash fires repeatedly while the shutter is open,
producing a multiple-exposure effect.
293
C The Photo Shooting Menu: Shooting Options
Wireless Flash Options
Adjust settings for simultaneous wireless
control of multiple remote flash units.
This option is available only when an
SB-5000 or SB-500 flash unit or a WR-R10
wireless remote controller is mounted
on the camera.
Option Description
Y[Optical
AWL]
The remote flash units are controlled using low-
intensity flashes emitted by the master flash
(0645).
Y/Z[Optical/
radio AWL]
Choose this option when using both optically-
and radio-controlled flash units (0656).
Z[Radio AWL]
The remote flash units are controlled by radio
signals from a WR-R10 attached to the camera
(0631).
[Off] Remote flash photography disabled.
294 C The Photo Shooting Menu: Shooting Options
Remote Flash Control
Choose the remote flash control mode. Flash options can be
adjusted in the flash control display; the options available vary
with the option selected for [Remote flash control].
Radio Remote Flash Info
View the flash units currently controlled
via radio AWL.
Option Description
[Group flash]Choose a separate flash control mode for each group
of remote flash units (0636, 646).
[Quick wireless
control]
Choose the balance between groups A and B and
adjust output for group C manually (0639, 649).
[Remote
repeating]
The flash units fire repeatedly while the shutter is
open, producing a multiple-exposure effect (0642,
652).
295
C The Photo Shooting Menu: Shooting Options
Choose a flash mode for optional flash units. For more
information, see “On-Camera Flash Photography” under “Flash
Modes” (0619).
Adjust flash output to control the brightness of the main
subject relative to the background. Flash output can be
increased to make the main subject appear brighter, reduced to
prevent glare, or otherwise fine-tuned to produce the desired
result (0622).
Focus mode controls how the camera focuses. For more
information, see “Focus” under “Focus Mode” in “Basic Settings”
(074).
Flash Mode
G button U C photo shooting menu
Flash Compensation
G button U C photo shooting menu
Focus Mode
G button U C photo shooting menu
296 C The Photo Shooting Menu: Shooting Options
Choose how the camera selects the focus point for autofocus.
For more information, see “Focus” under “AF-Area Mode” in
“Basic Settings” (077).
Choose whether to enable vibration reduction. For more
information, see “The i Menu” under “Vibration Reduction”
(0161).
AF-Area Mode
G button U C photo shooting menu
Vibration Reduction
G button U C photo shooting menu
297
C The Photo Shooting Menu: Shooting Options
Vary exposure, flash level, Active D-Lighting (ADL), or white
balance slightly with each shot, “bracketing” the current value.
Bracketing can be used in situations in which getting the right
settings is difficult and there is not time to check results and
adjust settings with each shot, or to experiment with different
settings for the same subject.
Auto Bracketing
G button U C photo shooting menu
Option Description
[Auto bracketing
set]
Choose the setting or settings bracketed when
auto bracketing is in effect.
[AE & flash bracketing]: Perform both
exposure and flash-level bracketing.
[AE bracketing]: Bracket only exposure.
[Flash bracketing]: Perform only flash-level
bracketing.
[WB bracketing]: Perform white-balance
bracketing.
[ADL bracketing]: Perform bracketing using
Active D-Lighting.
[Number of shots]Choose the number of shots in the bracketing
sequence.
[Increment]
Choose the amount the selected settings vary
with each shot when an option other than [ADL
bracketing] is selected for [Auto bracketing
set].
[Amount]
Choose how Active D-Lighting varies with each
shot when [ADL bracketing] is selected for [Auto
bracketing set].
298 C The Photo Shooting Menu: Shooting Options
Exposure and Flash Bracketing
1
Select [AE & flash bracketing], [AE bracketing], or
[Flash bracketing] for [Auto bracketing set].
[Number of shots] and [Increment] options will be
displayed.
2
Choose the number of shots.
Highlight [Number of shots] and
press 4 or 2 to choose the
number of shots in the bracketing
sequence.
At settings other than [0F], a
bracketing icon will appear in the
display.
No exposure
compensation
Exposure modified by:
–1 EV
Exposure modified by:
+1 EV
299
C The Photo Shooting Menu: Shooting Options
3
Select an exposure increment.
Highlight [Increment] and press 4 or 2 to choose the
bracketing increment.
When [1/3 step] is selected for Custom Setting b1 [EV
steps for exposure cntrl], the size of the increment can be
chosen from 0.3 (1/3), 0.7 (2/3), 1.0, 2.0, and 3.0 EV.
Bracketing programs with an increment of 2.0 or 3.0 EV
offer a maximum of 5 shots. If a value of 7 or 9 was selected
in Step 2, the number of shots will automatically be set to
5.
The bracketing programs with an increment of 0.3 EV are
listed below.
[Number
of shots]
Exposure and flash
bracketing
indicator
No. of
shots Bracketing order (EVs)
0F 00
+3F 30/+0.3/+0.7
-3F 3 0/-0.7/-0.3
+2F 20/+0.3
-2F 20/-0.3
3F 30/-0.3/+0.3
5F 5 0/-0.7/-0.3/+0.3/+0.7
7F 70/-1.0/-0.7/-0.3/
+0.3/+0.7/+1.0
9F 90/-1.3/-1.0/-0.7/-0.3/
+0.3/+0.7/+1.0/+1.3
300 C The Photo Shooting Menu: Shooting Options
4
Take pictures.
Take the number of pictures in the bracketing program.
The modified values for shutter speed and aperture are
shown in the display.
While bracketing is in effect, the display shows a
bracketing icon, a bracketing progress indicator, and the
number of shots remaining in the bracketing sequence.
After each shot, a segment will disappear from the
indicator and the number of shots remaining will be
reduced by one.
Exposure changes due to bracketing are added to those
made with exposure compensation.
❚❚ Cancelling Bracketing
To cancel bracketing, select [0F] for [Number of shots].
No. shots: 3
Increment: 0.7
Display after first shot
301
C The Photo Shooting Menu: Shooting Options
DBracketing Options
When [AE & flash bracketing] is selected, the camera varies both
exposure and flash level. Select [AE bracketing] to vary only exposure,
[Flash bracketing] to vary only flash level. Note that flash bracketing is
available in i-TTL and, where supported, auto aperture (qA) flash control
modes only (0615, 693).
DExposure and Flash Bracketing
In continuous release modes, shooting will pause after the number of
shots specified in the bracketing program have been taken. Shooting
will resume the next time the shutter-release button is pressed.
If the camera is turned off before all shots in the sequence have been
taken, bracketing will resume from the first shot in the sequence when
the camera is turned on.
If the memory card fills before all shots in the sequence have been
taken, shooting can be resumed from the next shot in the sequence
after the memory card has been replaced.
302 C The Photo Shooting Menu: Shooting Options
DExposure Bracketing
The settings (shutter speed and/or aperture) altered during exposure
bracketing vary with the shooting mode.
1If [On] is selected for [ISO sensitivity settings] > [Auto ISO
sensitivity control] in the photo shooting menu, the camera will
automatically vary ISO sensitivity for optimum exposure when the
limits of the camera exposure system are exceeded.
2If [On] is selected for [ISO sensitivity settings] > [Auto ISO
sensitivity control] in the photo shooting menu, the camera will first
use auto ISO sensitivity control to bring exposure as close as possible
to the optimum and then bracket this exposure by varying shutter
speed.
3 Use Custom Setting e6 [Auto bracketing (mode M)] to choose
whether the camera varies shutter speed, aperture, or both shutter
speed and aperture.
Mode Setting
PShutter speed and aperture1
SAperture1
AShutter speed1
MShutter speed2, 3
303
C The Photo Shooting Menu: Shooting Options
White Balance Bracketing
1
Select [WB bracketing] for [Auto bracketing set].
[Number of shots] and [Increment] options will be
displayed.
2
Choose the number of shots.
Highlight [Number of shots] and
press 4 or 2 to choose the
number of shots in the bracketing
sequence.
At settings other than [0F], a
bracketing icon will appear in the
display.
304 C The Photo Shooting Menu: Shooting Options
3
Select a white balance increment.
Highlight [Increment] and press 4 or 2 to choose the
bracketing increment.
The size of the increment can be chosen from 1 (1 step), 2
(2 steps), or 3 (3 steps).
Each step is equivalent to 5 mired. Higher “A” values
correspond to increased amounts of amber. Higher “B”
values correspond to increased amounts of blue.
The bracketing programs with an increment of 1 are listed
below.
[Number
of shots]
White balance
bracketing
indicator
No.
of
shots
White
balance
increment
Bracketing
order
0F 01 0
B3F 31B 0/B1/B2
A3F 31A 0/A2/A1
B2F 21B 0/B1
A2F 21A 0/A1
3F 3 1A, 1B 0/A1/B1
5F 51A, 1B
0/A2/A1/B1/
B2
7F 71A, 1B
0/A3/A2/A1/
B1/B2/B3
9F 91A, 1B
0/A4/A3/A2/
A1/B1/B2/B3/
B4
305
C The Photo Shooting Menu: Shooting Options
4
Take pictures.
Each shot will be processed to create the number of copies
specified in the bracketing program, and each copy will
have a different white balance.
Modifications to white balance are added to the white
balance adjustment made with white balance fine-tuning.
If the number of shots in the bracketing program is greater
than the number of exposures remaining, the shutter
release will be disabled. Shooting can begin when a new
memory card is inserted.
❚❚ Cancelling Bracketing
To cancel bracketing, select [0F] for [Number of shots].
DWhite Balance Bracketing Restrictions
White balance bracketing is not available at image quality settings of NEF
(RAW) or NEF (RAW) + JPEG.
DWhite Balance Bracketing
White balance bracketing affects only color temperature (the amber–
blue axis in the white balance fine-tuning display). No adjustments are
made on the green–magenta axis.
If the camera is turned off while the memory card access lamp is lit, the
camera will power off only after all photographs in the sequence have
been recorded.
In self-timer mode, the number of copies specified in Step 2 of “White
Balance Bracketing” (0303) will be created each time the shutter is
released, regardless of the option selected for Custom Setting c2 [Self-
timer] > [Number of shots].
306 C The Photo Shooting Menu: Shooting Options
ADL Bracketing
1
Select [ADL bracketing] for [Auto bracketing set].
[Number of shots] and [Amount] options will be displayed.
2
Choose the number of shots.
Highlight [Number of shots] and
press 4 or 2 to choose the
number of shots in the bracketing
sequence.
At settings other than [0F], a
bracketing icon will appear in the
display.
The number of shots determines the bracketing sequence:
If you chose more than two shots, proceed to Step 4.
No. of shots Bracketing sequence
2[Off] Value selected in Step 3
3[Off] [Low] [Normal]
4[Off] [Low] [Normal] [High]
5[Off] [Low] [Normal] [High] [Extra high]
307
C The Photo Shooting Menu: Shooting Options
3
If you selected 2 shots, choose the Active
D-Lighting amount.
When the number of shots is 2, the Active D-Lighting
setting for the second shot can be selected by highlighting
[Amount] and pressing 4 or 2.
The following options are available.
4
Take pictures.
Take the number of pictures in the
bracketing program.
While bracketing is in effect, the
display shows an ADL bracketing
icon and the number of shots
remaining in the bracketing
sequence. After each shot, the
number of shots remaining will be
reduced by one.
❚❚ Cancelling ADL Bracketing
To cancel bracketing, select [0F] for [Number of shots].
[Amount] Bracketing sequence
OFF L [Off] [Low]
OFF N [Off] [Normal]
OFF H [Off] [High]
OFF H+[Off] [Extra high]
OFF AUTO [Off] [Auto]
308 C The Photo Shooting Menu: Shooting Options
DADL Bracketing
In continuous release modes, shooting will pause after the number of
shots specified in the bracketing program have been taken. Shooting
will resume the next time the shutter-release button is pressed.
If the camera is turned off before all shots in the sequence have been
taken, bracketing will resume from the first shot in the sequence when
the camera is turned on.
If the memory card fills before all shots in the sequence have been
taken, shooting can be resumed from the next shot in the sequence
after the memory card has been replaced.
309
C The Photo Shooting Menu: Shooting Options
Record two to ten NEF (RAW) exposures as a single photograph.
Multiple Exposure
G button U C photo shooting menu
Option Description
[Multiple
exposure
mode]
[On (series)]: Take a series of multiple exposures. To
end multiple exposure photography, select
[Multiple exposure mode] again and choose [Off].
[On (single photo)]: Create one multiple exposure.
[Off]: End multiple exposure photography.
[Number of
shots]
Choose the number of exposures that will be
combined to form a single photograph.
310 C The Photo Shooting Menu: Shooting Options
[Overlay
mode]
[Add]: The exposures are overlaid without
modification; gain is not adjusted.
[Average]: Gain is adjusted before the exposures are
overlaid. The gain for each exposure is equal to 1
divided by the total number of exposures taken. For
example, in a photo made by combining two
exposures, the gain for each exposure will be set to
1/2, while in a photo combining three exposures, gain
will be set to 1/3.
[Lighten]: The camera compares the pixels in each
exposure and uses only the brightest.
[Darken]: The camera compares the pixels in each
exposure and uses only the darkest.
[Save
individual
images (NEF)]
[On]: Save both the multiple exposure and the shots
that make it up; the pictures are saved in NEF (RAW)
format.
[Off]: Discard the individual shots and save only the
multiple exposure.
Option Description
311
C The Photo Shooting Menu: Shooting Options
[Overlay
shooting]
[On]: Earlier exposures are superimposed on the view
through the lens. The earlier exposures aid
composition of the next shot.
[Off]: Earlier exposures are not displayed while
shooting is in progress.
[Select first
exposure
(NEF)]
Choose the first exposure from the NEF (RAW) images
on the memory card.
Option Description
312 C The Photo Shooting Menu: Shooting Options
Creating a Multiple Exposure
1
Highlight [Multiple exposure]
in the photo shooting menu
and press
2
.
2
Choose an option for [Multiple
exposure mode].
Highlight [Multiple exposure
mode] and press 2.
Highlight a multiple exposure
mode using 1 or 3 and press J.
If [On (series)] or [On (single
photo)] is selected, an icon will
appear in the display.
3
Choose a value for [Number of
shots] (number of exposures).
Highlight [Number of shots] and
press 2.
Choose the number of exposures
using 1 or 3 and press J.
313
C The Photo Shooting Menu: Shooting Options
4
Choose an option for [Overlay
mode].
Highlight [Overlay mode] and
press 2.
Highlight an option using 1 or 3
and press J.
5
Choose a setting for [Save
individual images (NEF)].
Highlight [Save individual images
(NEF)] and press 2.
Highlight an option using 1 or 3
and press J.
To save both the multiple exposure and the shots that
make it up, select [On]; the individual shots are saved in
NEF (RAW) format. To save only the multiple exposure,
select [Off].
314 C The Photo Shooting Menu: Shooting Options
6
Choose an option for [Overlay
shooting].
Highlight [Overlay shooting] and
press 2.
Highlight an option using 1 or 3
and press J.
Select [On] to superimpose earlier exposures on the view
through the lens. You can use the earlier exposures as a
guide when composing subsequent shots.
7
Choose an option for [Select
first exposure (NEF)].
To choose the first exposure from
existing NEF (RAW) photos,
highlight [Select first exposure
(NEF)] and press 2.
Only pictures taken with [Large] chosen for [Image size] >
[NEF (RAW)] in the photo shooting menu will be available
for selection.
Use the multi selector to highlight the desired picture.
To view the highlighted picture full screen, press and hold
the X button.
After highlighting the desired picture, press J.
315
C The Photo Shooting Menu: Shooting Options
8
Start shooting.
Take the selected number of shots.
If you used [Select first exposure
(NEF)] to select an existing NEF
(RAW) image as the first exposure in Step 7, shooting will
start from the second exposure.
Once you have taken the selected number of shots, the
pictures will be overlaid to create a multiple exposure.
Multiple exposures are recorded in JPEG format regardless
of the option selected for image quality.
If [On (series)] is selected for [Multiple exposure mode],
you can continue to take additional multiple exposures
until [Off] is selected.
If [On (single photo)] is selected,
the camera will exit multiple
exposure mode once the number
of shots selected in Step 3 has been
taken.
316 C The Photo Shooting Menu: Shooting Options
❚❚ The i Menu
Pictures can be viewed by pressing the K button while a
multiple exposure is in progress. The most recent shot in the
current multiple exposure is indicated by a $ icon; pressing the
i button when this icon is present displays the multiple
exposure i menu.
Highlight items and press J to select.
You can also have the option of using touch controls after
pressing the i button.
Option Description
[View progress]View a preview created from the exposures
recorded to the current point.
[Retake last
exposure]Retake the most recent exposure.
[Save and exit]Create a multiple exposure from the exposures
taken to current point.
[Discard and exit]
Exit without recording a multiple exposure.
If [On] is selected for [Save individual images
(NEF)], the individual exposures will be saved
separately.
317
C The Photo Shooting Menu: Shooting Options
DMultiple Exposure
If you use the menus or view pictures in the display while shooting a
multiple exposure, remember that shooting will end and the multiple
exposure will be recorded if no operations are performed for about
40 seconds (or in the case of menus, about 90 seconds). The time
available to record the next exposure can be extended by choosing
longer times for Custom Setting c3 [Power off delay] > [Playback] or
[Menus].
Multiple exposures may be affected by “noise” in the form of randomly-
spaced bright pixels, fog, or lines.
In continuous shooting modes, the camera records all exposures in a
single burst. If [On (single photo)] is selected, multiple exposure
shooting will end after the first multiple exposure is recorded. If [On
(series)] is selected, an additional multiple exposure will be recorded
each time the shutter-release button is pressed.
In self-timer mode, the interval between each shot in the exposure is
selected using Custom Setting c2 [Self-timer] > [Interval between
shots]. Regardless of the value selected for the c2 [Number of shots]
option, shooting will however end after the number of shots selected
for the multiple exposure.
Multiple exposures may end if settings are changed while shooting is in
progress.
Shooting settings and photo info for multiple exposure photographs
are those for the first exposure.
Do not remove or replace the memory card while a multiple exposure is
in progress.
Memory cards cannot be formatted while a multiple exposure is in
progress. Some menu items will be grayed out and unavailable.
318 C The Photo Shooting Menu: Shooting Options
DMultiple Exposure: Restrictions
Multiple exposure cannot be combined with some camera features,
including:
modes other than P, S, A, and M,
movie recording,
bracketing,
HDR (high dynamic range),
interval-timer photography,
time-lapse movie recording, and
focus shift
❚❚ Ending Multiple Exposures
To end a multiple exposure before the
specified number of exposures have
been taken, select [Off] for multiple
exposure mode. A multiple exposure will
be created from the exposures that have
been recorded to that point (if [Average]
is selected for [Overlay mode], gain will be adjusted to reflect
the number of exposures actually recorded).
The multiple exposure will also end if:
the standby timer expires after the first exposure has been
taken, or
you press the K button followed by the i button and select
either [Save and exit] or [Discard and exit]
319
C The Photo Shooting Menu: Shooting Options
Used with high contrast subjects, High Dynamic Range (HDR)
preserves details in highlights and shadows by combining two
shots taken at different exposures. Use with high-contrast
scenes and other subjects to preserve a wide range of details,
from highlights to shadows.
HDR (High Dynamic Range)
G button U C photo shooting menu
320 C The Photo Shooting Menu: Shooting Options
Option Description
[HDR mode]
[On (series)]: Take a series of HDR photographs. To
end HDR photography, select [HDR mode] again and
choose [Off].
[On (single photo)]: Take a single HDR photograph.
[Off]: End HDR photography.
[Exposure
differential]
Choose the difference in exposure between the two
shots. The higher the value, the greater the dynamic
range. If [Auto] is selected, the camera will
automatically adjust the exposure differential to suit
the scene.
[Smoothing]Choose how much the boundaries between the two
images are smoothed.
[Save
individual
images (NEF)]
Choose [On] to save each of the individual shots used
to create the HDR image; the shots are saved in NEF
(RAW) format. The shots are saved at an image size of
[Large], regardless of the option selected for [Image
size] > [NEF (RAW)] in the photo shooting menu.
321
C The Photo Shooting Menu: Shooting Options
Taking HDR Photographs
We recommend that you use the matrix metering option when
shooting with HDR.
1
Highlight [HDR (high dynamic
range)] in the photo shooting
menu and press
2
.
2
Select an [HDR mode].
Highlight [HDR mode] and press 2.
Highlight one of the following
options using 1 or 3 and press J.
Option Description
0[On (series)]
Take a series of HDR photographs. HDR
shooting will continue until you select [Off]
for [HDR mode].
[On (single
photo)]
Normal shooting will resume after you have
taken a single HDR photograph.
[Off]Proceed without taking additional HDR
photographs.
322 C The Photo Shooting Menu: Shooting Options
If [On (series)] or [On (single
photo)] is selected, an icon will
appear in the display.
3
Choose a value for [Exposure
differential].
Highlight [Exposure differential]
and press 2.
Highlight an option using 1 or 3
and press J.
Choose higher values for high-
contrast subjects.
Note, however, that choosing a
higher value than required may not
produce the desired results. Match your choice to the level
of contrast in the scene.
If [Auto] is selected, the camera will automatically adjust
the exposure differential to suit the scene.
323
C The Photo Shooting Menu: Shooting Options
4
Adjust [Smoothing].
Highlight [Smoothing] and press
2.
Highlight an option using 1 or 3
and press J; the selected option
represents the amount the
boundaries between the two
images are smoothed.
Higher values produce a smoother
composite image.
5
Choose a setting for [Save
individual images (NEF)].
Highlight [Save individual images
(NEF)] and press 2.
Highlight an option using 1 or 3
and press J.
Choose [On] to save each of the individual shots used to
create the HDR image; the shots are saved in NEF (RAW)
format.
324 C The Photo Shooting Menu: Shooting Options
6
Frame the photograph, focus, and shoot.
The camera takes two exposures when the shutter-release
button is pressed all the way down.
Busy” will flash in the control panel while
the images are combined. No
photographs can be taken until recording
is complete.
If [On (series)] is selected for [HDR
mode], you can continue to take HDR
photographs until [Off] is selected.
If [On (single photo)] is selected, HDR will turn off
automatically after a single shot.
HDR photographs are recorded in JPEG format regardless
of the option selected for image quality.
325
C The Photo Shooting Menu: Shooting Options
DHDR Photography
The edges of the image will be cropped out.
The desired results may not be achieved if the camera or subject moves
during shooting. Use of a tripod is recommended.
Depending on the scene, you may notice shadows around bright
objects or halos around dark objects. This can be mitigated using
[Smoothing].
Uneven shading may be visible with some subjects.
With spot or center-weighted metering, an [Exposure differential] of
[Auto] is equivalent to [2 EV].
Optional flash units will not fire.
In continuous release modes, only one photograph will be taken each
time the shutter-release button is pressed all the way down.
Shutter speeds of “Bulb” and “Time” are not available.
DHDR Restrictions
HDR cannot be combined with some camera features, including:
b mode,
flicker reduction,
bracketing,
multiple exposures,
interval-timer photography,
time-lapse movie recording, and
focus shift
326 C The Photo Shooting Menu: Shooting Options
Take photographs at the selected interval until the specified
number of shots has been recorded. When using the interval
timer, select a release mode other than E.
Interval Timer Shooting
G button U C photo shooting menu
Option Description
[Start]
Start interval timer shooting. Shooting will begin either
after 3 s ([Now] selected for [Choose start day/time])
or at a selected date and time ([Choose day/time]).
Shooting will continue at the selected interval until all
shots have been taken.
[Choose start
day/time]
Choose a start option. Select [Now] to start shooting
immediately, [Choose day/time] to start shooting at a
chosen date and time.
[Interval]Specify the interval between shots in hours, minutes,
and seconds.
[Intervals×
shots/interval]
Choose the number of intervals and the number of
shots per interval.
[Exposure
smoothing]
Selecting [On] allows the camera to adjust exposure to
match the previous shot.
Large changes in subject brightness during shooting
may result in apparent variations in exposure. This
can be addressed by shortening the interval between
shots.
Exposure smoothing will not take effect in mode M if
[Off] is selected for [ISO sensitivity settings] >
[Auto ISO sensitivity control] in the photo shooting
menu.
327
C The Photo Shooting Menu: Shooting Options
[Silent
photography]
Select [On] to silence the shutter and eliminate the
vibrations it produces during shooting.
Selecting [On] does not completely silence the
camera. Camera sounds may still be audible, for
example during autofocus or aperture adjustment, in
the latter case most noticeably at apertures smaller
(i.e., at f-numbers higher) than f/5.6.
[Interval
priority]
[On]: Enable interval priority to ensure that frames
shot in modes P and A are taken at the chosen
interval.
- Flash photography is disabled.
- The number of shots per interval is set to 1, even if
the number of shots chosen for [Intervals×shots/
interval] is 2 or more.
-If AF-S is selected for focus mode, select [Release]
for Custom Setting a2 [AF-S priority selection]. If
AF-C is selected, select [Release] for Custom
Setting a1 [AF-C priority selection].
-If [On] is selected for [ISO sensitivity settings]>
[Auto ISO sensitivity control] and the time chosen
for [Minimum shutter speed] is longer than the
interval, the time selected for the interval will take
priority over the selected shutter speed.
[Off]: Disable interval priority to ensure that photos
are correctly exposed.
[Focus before
each shot]If [On] is selected, the camera will focus between shots.
Option Description
328 C The Photo Shooting Menu: Shooting Options
[Options]
Combine interval-timer photography with other
options.
[AE bracketing]: Perform exposure bracketing
during interval-timer photography.
[Time-lapse movie]: Use the photos taken during
interval-timer photography to create a time-lapse
movie with an aspect ratio of 16:9.
- The camera saves both the photos and the time-
lapse movie.
-Selecting [5:4 (30×24)] (Z 7II only) or [1:1 (24×24)]
for [Choose image area] in the photo shooting
menu disables the shutter release.
- Movies created using [Time-lapse movie] are
recorded in the [sRGB] color space, regardless of
the option selected for [Color space] in the photo
shooting menu.
[Off]: Do not perform additional operations during
interval-timer photography.
[Starting
storage folder]
Highlight either of the following options and press 2
to select; selected items are marked with a check (M).
To deselect (remove the check from: U) a selected
option, highlight it and press 2 again.
[New folder]: A new folder is created for each new
sequence.
[Reset file numbering]: File numbering is reset to
0001 whenever a new folder is created.
Option Description
329
C The Photo Shooting Menu: Shooting Options
Interval-Timer Photography
DBefore Shooting
Take a test shot at current settings.
Before proceeding, select [Time zone and date] in the setup menu and
make sure that the camera clock is set to the correct time and date.
To ensure that shooting is not interrupted, use a fully-charged battery, a
charging AC adapter (available separately for the Z 6II, supplied with the
Z 7II), or an optional AC adapter and power connector.
1
Highlight [Interval timer
shooting] in the photo
shooting menu and press
2
.
330 C The Photo Shooting Menu: Shooting Options
2
Adjust interval timer settings.
Choose the start day and time.
- To start shooting immediately, select [Now].
- To start shooting at a chosen date and time, select
[Choose day/time]. Choose the date and time and press
J.
Choose the interval between shots.
Highlight [Choose start
day/time] and press 2.
Highlight an option and
press J.
Highlight [Interval] and
press 2.
Choose an interval (in
hours, minutes, and
seconds) and press J.
331
C The Photo Shooting Menu: Shooting Options
Choose the number of shots per interval.
- In single frame release mode, the photographs for each
interval will be taken at the rate for continuous high-
speed release mode.
- When [Off] is selected for [Silent photography], the
maximum number of intervals will vary with the number
of shots per interval.
Enable or disable exposure smoothing.
- Selecting [On] allows the camera to adjust exposure to
match the previous shot.
Highlight
[Intervals×shots/
interval] and press 2.
Choose the number of
intervals and the
number of shots per
interval and press J.
Highlight [Exposure
smoothing] and press
2.
Highlight an option and
press J.
332 C The Photo Shooting Menu: Shooting Options
Enable or disable silent photography.
Choose an interval priority option.
Choose whether the camera focuses between shots.
Highlight [Silent
photography] and
press 2.
Highlight an option and
press J.
Highlight [Interval
priority] and press 2.
Highlight an option and
press J.
Highlight [Focus before
each shot] and press 2.
Highlight an option and
press J.
333
C The Photo Shooting Menu: Shooting Options
Choose additional options.
- If you selected [AE bracketing], choose values for
[Number of shots] and [Increment]; if you selected
[Time-lapse movie], choose settings for [Frame size/
frame rate] and [Destination].
Choose starting folder options.
Highlight [Options] and
press 2.
Highlight [AE
bracketing] or [Time-
lapse movie] and press
J.
Highlight [Starting
storage folder] and
press 2.
Select the desired
options and press J to
proceed.
334 C The Photo Shooting Menu: Shooting Options
3
Highlight [Start] and press
J
.
If [Now] was selected for [Choose
start day/time] in Step 2, shooting
will start after three seconds.
Otherwise shooting will start at the
time selected for [Choose start day/time] > [Choose day/
time].
The display turns off during shooting.
Shooting will continue at the selected interval until all
shots have been taken.
DDuring Shooting
During interval timer photography, the
memory card access lamp will flash.
If the display is turned on by pressing the
shutter-release button halfway, the message
[Interval timer shooting] will be displayed
and the Q icon will flash.
335
C The Photo Shooting Menu: Shooting Options
❚❚ Pausing Interval-Timer Photography
Interval-timer photography can be paused between intervals by
pressing J or by selecting [Interval timer shooting] in the
photo shooting menu, highlighting [Pause], and pressing J.
Note that the menus may not be displayed when the G
button is pressed if the time selected for [Interval] is very short.
If [Time-lapse movie] is selected for [Options], pressing J
between intervals will end interval-timer photography.
❚❚ Resuming Interval Timer Shooting
Interval timer shooting can be resumed as described below.
To resume shooting immediately:
To resume shooting at a specified time:
Highlight [Restart]
and press J.
Highlight [Restart
option] and press 2,
then highlight
[Choose day/time]
and press 2.
Choose a starting
date and time and
press J.
Highlight [Restart]
and press J.
336 C The Photo Shooting Menu: Shooting Options
❚❚ Ending Interval Timer Shooting
To end interval-timer photography before all the photos are
taken, select [Interval timer shooting] in the photo shooting
menu, highlight [Off], and press J. Note that the menus may
not be displayed when the G button is pressed if the time
selected for [Interval] is very short. In this case you will need to
press J to pause interval-timer photography and then select
[Interval timer shooting] in the photo shooting menu,
highlight [Off], and press J.
337
C The Photo Shooting Menu: Shooting Options
DInterval-Timer Photography
Choose an interval longer than the time needed to take the selected
number of shots at the predicted shutter speed. Note that during actual
interval-timer photography, the camera must not only take shots at the
selected interval but must also have sufficient time to complete the
exposures and perform such tasks as processing the photographs. If the
interval is too short to take the selected number of photos, the camera
may skip to the next interval without shooting.
If the interval is too short, the total number of shots taken may be less
than that selected for [Intervals×shots/interval].
If you are using a flash, choose an interval longer than the time needed
for the flash to charge. If the interval is too short, the flash may fire at
less than the power needed for full exposure.
If shooting cannot proceed at current settings—for example, if shutter
speed is set to “Bulb” or “Time”, the [Interval] is [00:00'00"], or the start
time is in less than a minute—a warning will be displayed in the
monitor.
Interval-timer photography will not start if [On] is selected for both
[Silent photography] and [Interval priority] and [00:00'0.5"] is
selected for [Interval].
In the case of the Z 7II, interval-timer photography will not start if all
options are set as described below. To record a time-lapse movie under
these conditions, use [Time-lapse movie] in the photo shooting menu.
Note that in this case, the individual frames will not be recorded
separately.
-[Interval priority]: [On]
-[Interval]: [00:00'0.5"]
-[Options]: [Time-lapse movie]
338 C The Photo Shooting Menu: Shooting Options
If [On] is selected for [Silent photography] or [Time-lapse movie] is
selected for [Options], the standby timer will not expire during interval-
timer photography, regardless of the option selected for Custom
Setting c3 [Power off delay] > [Standby timer].
If the memory card is full, the interval timer will remain active but no
pictures will be taken. Insert another memory card and resume shooting
(0335).
Depending on memory card performance and shooting conditions,
shooting may end before the selected number of shots have been taken
or the selected number of intervals is complete.
Interval timer shooting will pause if:
- The camera is turned off and then on again (when the camera is off,
batteries and memory cards can be replaced without ending interval-
timer photography)
-E is selected for release mode
Changing camera settings while the interval timer is active may cause
shooting to end.
DRelease Mode
Regardless of the release mode selected, the camera will take the
specified number of shots at each interval.
DAdjusting Settings Between Shots
Pictures can be viewed and shooting and menu settings adjusted
between shots. Note, however, that the monitor will turn off and shooting
will resume a few seconds before the next shot is taken.
339
C The Photo Shooting Menu: Shooting Options
DInterval-Timer Photography: Restrictions
Interval-timer photography cannot be combined with some camera
features, including:
movie recording,
long time-exposures (“Bulb” or “Time”),
the self-timer,
bracketing,
HDR (high dynamic range),
multiple exposures, and
focus shift
DWhen [On] Is Selected for [Silent Photography]
Selecting [On] for [Silent photography] disables some camera features,
including:
ISO sensitivities of Hi 0.3 through Hi 2.0,
flash photography,
long-exposure noise reduction, and
flicker reduction.
DInterval Timer Settings
Turning the camera off or selecting a new release mode does not affect
interval-timer photography settings.
340 C The Photo Shooting Menu: Shooting Options
The camera automatically takes photos at selected intervals to
create a time-lapse movie.
Time-Lapse Movie
G button U C photo shooting menu
Option Description
[Start]
Start time-lapse recording. Shooting starts after about
3 s and continues at the interval selected for [Interval]
for the time selected for [Shooting time].
[Interval]Choose the interval between shots, in minutes and
seconds.
[Shooting
time]
Choose how long the camera will continue to take
pictures, in hours and minutes.
[Exposure
smoothing]
Selecting [On] smooths abrupt changes in exposure.
Large changes in subject brightness during shooting
may result in apparent variations in exposure. This
can be addressed by shortening the interval between
shots.
Exposure smoothing will not take effect in mode M if
[Off] is selected for [ISO sensitivity settings] >
[Auto ISO sensitivity control] in the photo shooting
menu.
[Silent
photography]
Select [On] to silence the shutter and eliminate the
vibrations it produces during shooting.
Selecting [On] does not completely silence the
camera. Camera sounds may still be audible, for
example during autofocus or aperture adjustment, in
the latter case most noticeably at apertures smaller
(i.e., at f-numbers higher) than f/5.6.
341
C The Photo Shooting Menu: Shooting Options
[Choose image
area]
Choose the image area for time-lapse movies from [FX]
and [DX].
[Frame size/
frame rate]Choose the frame size and rate for the final movie.
[Interval
priority]
[On]: Enable interval priority to ensure that frames
shot in modes P and A are taken at the chosen
interval.
-Select [Release] for Custom Setting a2 [AF-S
priority selection] when AF-S is selected for focus
mode and for Custom Setting a1 [AF-C priority
selection] when AF-C is selected.
-If [On] is selected for [ISO sensitivity settings] >
[Auto ISO sensitivity control] and the time chosen
for [Minimum shutter speed] is longer than the
interval, the time selected for the interval will take
priority over the selected shutter speed.
[Off]: Disable interval priority to ensure that photos
are correctly exposed.
[Focus before
each shot]If [On] is selected, the camera will focus between shots.
[Destination]Choose the slot used to record time-lapse movies
when two memory cards are inserted.
Option Description
342 C The Photo Shooting Menu: Shooting Options
Recording Time-Lapse Movies
DBefore Shooting
Time-lapse movies are shot using the movie crop.
Take test shots and check the results in the monitor.
Before proceeding, select [Time zone and date] in the setup menu and
make sure that the camera clock is set to the correct time and date.
To ensure that shooting is not interrupted, use a fully-charged battery, a
charging AC adapter (available separately for the Z 6II, supplied with the
Z 7II), or an optional AC adapter and power connector.
1
Highlight [Time-lapse movie]
in the photo shooting menu
and press
2
.
343
C The Photo Shooting Menu: Shooting Options
2
Adjust time-lapse movie settings.
Choose the interval between shots.
- Choose an interval longer than the slowest anticipated
shutter speed.
Choose the total shooting time.
- The maximum shooting time is 7 hours and 59 minutes.
Highlight [Interval] and
press 2.
Choose an interval (in
minutes and seconds)
and press J.
Highlight [Shooting
time] and press 2.
Choose a shooting time
(in hours and minutes)
and press J.
344 C The Photo Shooting Menu: Shooting Options
Enable or disable exposure smoothing.
- Selecting [On] smooths abrupt changes in exposure.
Enable or disable silent photography.
Choose the image area.
Highlight [Exposure
smoothing] and press
2.
Highlight an option and
press J.
Highlight [Silent
photography] and
press 2.
Highlight an option and
press J.
Highlight [Choose
image area] and press
2.
Highlight an option and
press J.
345
C The Photo Shooting Menu: Shooting Options
Choose the frame size and rate.
Choose an interval priority option.
Highlight [Frame size/
frame rate] and press
2.
Highlight an option and
press J.
Highlight [Interval
priority] and press 2.
Highlight an option and
press J.
346 C The Photo Shooting Menu: Shooting Options
Choose whether the camera focuses between shots.
-If [On] is selected for [Focus before each shot], the
camera will focus before each shot according to the
option currently selected for focus mode.
Choose a destination.
Highlight [Focus before
each shot] and press 2.
Highlight an option and
press J.
Highlight [Destination]
and press 2.
Highlight the slot that
will be used to record
time-lapse movies when
two memory cards are
inserted and press J.
347
C The Photo Shooting Menu: Shooting Options
3
Highlight [Start] and press
J
.
Shooting starts after about 3 s.
The display turns off during
shooting.
The camera takes pictures at
interval selected for [Interval] for the time selected for
[Shooting time] in Step 2.
❚❚ Ending Shooting
To end shooting before all the photos are taken, press J or
select [Time-lapse movie] in the photo shooting menu,
highlight [Off], and press J. Note that the menus may not be
displayed when the G button is pressed if the time selected
for [Interval] is very short.
A movie will be created from the frames shot to the point
where shooting ended and normal photography will resume.
348 C The Photo Shooting Menu: Shooting Options
DCalculating the Length of the Final Movie
The total number of frames in the final movie can be calculated by
dividing the shooting time selected in Step 2 by the interval, rounding
up, and adding 1.
The length of the final movie can then be calculated by dividing the
number of shots by the frame rate selected for [Frame size/frame rate]
(for example, a 48-frame movie recorded with [1920×1080; 24p]
selected for [Frame size/frame rate] will be about two seconds long).
The maximum length for time-lapse movies is 20 minutes.
DImage Review
The K button cannot be used to view pictures while shooting is in
progress. The current frame will however be displayed for a few seconds
after each shot if [On] or [On (monitor only)] is selected for [Image
review] in the playback menu. Note that other playback operations
cannot be performed while the frame is displayed. The current frame may
not be displayed if the interval is very short.
1
2
3
1Frame size/frame rate
2Length recorded/maximum
length
3Memory card indicator
349
C The Photo Shooting Menu: Shooting Options
DTime-Lapse Movies
Sound is not recorded with time-lapse movies.
The shutter speed and the time needed to record the image to the
memory card may vary from shot to shot. As a result, the interval
between a shot being recorded and the start of the next shot may vary.
Shooting will not begin if a time-lapse movie cannot be recorded at
current settings, for example if:
- The value selected for [Interval] is longer than that selected for
[Shooting time]
-[00:00'00"] is selected for [Interval] or [Shooting time]
-[On] is selected for both [Silent photography] and [Interval
priority] and [00:00'0.5"] is selected for [Interval]
- The memory card is full
The K button cannot be used to view pictures while time-lapse
recording is in progress.
For consistent coloration, choose a white balance setting other than
4[Auto] or D [Natural light auto] when recording time-lapse
movies.
Regardless of the option selected for Custom Setting c3 [Power off
delay] > [Standby timer], the standby timer will not expire while
recording is in progress.
Shooting may end if camera controls are used, settings are changed, or
an HDMI cable is connected. A movie will be created from the frames
shot to the point where shooting ended.
The following end shooting without a beep sounding or a movie being
recorded:
- Disconnecting the power source
- Ejecting the memory card
350 C The Photo Shooting Menu: Shooting Options
DDuring Shooting
During shooting, the time-lapse recording
indicator will be displayed in the control panel.
The memory card access lamp will light.
DAdjusting Settings Between Shots
Shooting and menu settings can be adjusted between shots. Note,
however, that the monitor will turn off approximately 2 s before the next
shot is taken.
DTime-Lapse Movies: Restrictions
Time-lapse movie recording cannot be combined with some camera
features, including:
movie recording,
long time-exposures (“Bulb” or “Time”),
the self-timer,
bracketing,
HDR (high dynamic range),
multiple exposures,
interval-timer photography, and
focus shift.
351
C The Photo Shooting Menu: Shooting Options
DWhen [On] Is Selected for [Silent Photography]
Selecting [On] for [Silent photography] disables some camera features,
including:
ISO sensitivities of Hi 0.3 through Hi 2.0,
flash photography,
exposure delay mode,
long-exposure noise reduction, and
flicker reduction.
352 C The Photo Shooting Menu: Shooting Options
Focus shift automatically varies focus over a series of shots. Use
it to take photos that will later be combined using focus
stacking to create a single image with increased depth of field.
Before using focus shift, choose a focus mode of AF-S or AF-C
and a release mode other than E.
Focus Shift Shooting
G button U C photo shooting menu
Option Description
[Start]
Start shooting. The camera will take the selected
number of shots, changing the focus distance by the
selected amount with each shot.
[No. of shots] Choose the number of shots (maximum 300).
[Focus step
width]
Focus shift varies the focus distance over a series of
photographs. Choose the amount the focus distance
changes with each shot.
[Interval until
next shot]
The time between shots, in seconds.
Select [00] to take photos at up to about 5 fps.
To ensure correct exposure when using a flash,
choose an interval long enough for the flash to
charge.
[First-frame
exposure lock]
[On]: The camera locks exposure for all shots at the
setting for the first frame.
[Off]: The camera adjusts exposure before each shot.
353
C The Photo Shooting Menu: Shooting Options
[Silent
photography]
Select [On] to eliminate shutter sounds during
shooting.
Selecting [On] does not completely silence the
camera. Camera sounds may still be audible, for
example during autofocus or aperture adjustment, in
the latter case most noticeably at apertures smaller
(i.e., at f-numbers higher) than f/5.6.
[Starting
storage folder]
Highlight either of the following options and press 2
to select (M) or deselect (U).
[New folder]: A new folder is created for each new
sequence.
[Reset file numbering]: File numbering is reset to
0001 whenever a new folder is created.
Option Description
354 C The Photo Shooting Menu: Shooting Options
Focus Shift Photography
DBefore Shooting
Take a test shot at current settings.
To ensure that shooting is not interrupted, use a fully-charged battery, a
charging AC adapter (available separately for the Z 6II, supplied with the
Z 7II), or an optional AC adapter and power connector.
1
Focus.
During focus shift, the camera takes a series of shots
starting from a selected focus position and continuing
toward infinity. Given that shooting ends when infinity is
reached, the starting focus position should be slightly in
front of (i.e., closer to the camera than) the closest point on
the subject.
Do not move the camera after focusing.
2
Highlight [Focus shift
shooting] in the photo
shooting menu and press
2
.
355
C The Photo Shooting Menu: Shooting Options
3
Adjust focus shift settings.
Choose the number of shots.
- The maximum number of shots is 300.
- We recommend taking more shots than you think you’ll
need. You can winnow them down during focus stacking.
- More than 100 shots may be required for photographs of
insects or other small objects. On the other hand, only a
few may be needed to photograph a landscape from
front to back with a wide-angle lens.
Highlight [No. of shots]
and press 2.
Choose the number of
shots and press J.
356 C The Photo Shooting Menu: Shooting Options
Choose the amount the focus distance changes with
each shot.
-Press
4 to reduce the focus step width, 2 to increase.
- Note that high settings increase the risk that some areas
will be out of focus when the shots are stacked. A value of
5 or less is recommended.
- Try experimenting with different settings before
shooting.
Highlight [Focus step
width] and press 2.
Choose a focus step
width and press J.
357
C The Photo Shooting Menu: Shooting Options
Choose the interval until next shot.
- Choose the interval between shots, in seconds.
- Select [00] to take photos at up to about 5 fps.
- To ensure correct exposure when using a flash, choose an
interval long enough for the flash to charge. A setting of
[00] is recommended when shooting without a flash.
Highlight [Interval until
next shot] and press 2.
Choose the interval
between shots and
press J.
358 C The Photo Shooting Menu: Shooting Options
Enable or disable first-frame exposure lock.
-[Off] is recommended if lighting and other conditions will
not change during shooting, [On] when photographing
landscapes and the like under variable lighting.
- Selecting [On] locks exposure at the value for the first
shot, ensuring that all photos have the same exposure.
Large changes in subject brightness during shooting may
however result in apparent variations in exposure. This
can be addressed by selecting [Off].
Enable or disable silent photography.
Highlight [First-frame
exposure lock] and
press 2.
Highlight an option and
press J.
Highlight [Silent
photography] and
press 2.
Highlight an option and
press J.
359
C The Photo Shooting Menu: Shooting Options
Choose starting folder options.
- Highlight either of the following options and press 2 to
select; selected items are marked with a check (M). To
deselect (remove the check from: U) a selected option,
highlight it and press 2 again.
- Place a check (M) next to [New folder] to create a new
folder for each new sequence.
- Place a check (M) next to [Reset file numbering] to reset
file numbering to 0001 whenever a new folder is created.
4
Highlight [Start] and press
J
.
Shooting starts after about 3 s.
The display turns off during
shooting.
The camera takes photographs at
the selected interval, starting at the focus distance selected
at the start of shooting and progressing out toward infinity
by the selected focus step distance with each shot.
Shooting ends when the selected number of shots has
been taken or focus reaches infinity.
Highlight [Starting
storage folder] and
press 2.
Select the desired
options and press J to
proceed.
360 C The Photo Shooting Menu: Shooting Options
❚❚ Ending Focus Shift Photography
To end shooting before all shots have been taken, either:
select [Focus shift shooting] in the photo shooting menu,
highlight [Off], and press J, or
press the shutter-release button halfway or press the J
button between shots.
DAperture
Given that pictures shot at very small apertures (high f-numbers) may lack
definition, we recommend that you choose apertures wider (f-numbers
lower) than f/8–f/11.
DDuring Shooting
During focus shift photography, the release mode indicator in the control
panel will turn off. The memory card access lamp will flash.
DFocus Shift Photography
The shutter speed and the time needed to record the image may vary
from shot to shot. As a result, the interval between a shot being
recorded and the start of the next shot may vary.
Shooting ends when focus reaches infinity, and consequently
depending on the focus position at the start of shooting, shooting may
end before the selected number of shots has been taken.
Regardless of the option selected for Custom Setting c3 [Power off
delay] > [Standby timer], the standby timer will not expire while
shooting is in progress.
If you are using a flash, choose an interval longer than the time needed
for the flash to charge. If the interval is too short, the flash may fire at
less than the power needed for full exposure.
If shooting cannot proceed at current settings, for example because
shutter speed is set to “Bulb” or “Time”, a warning will be displayed.
Changing camera settings while focus shift photography is in progress
may cause shooting to end.
361
C The Photo Shooting Menu: Shooting Options
DFocus Shift Photography: Restrictions
Focus-shift photography cannot be combined with some camera
features, including:
movie recording,
long time-exposures (“Bulb” or “Time”),
the self-timer,
bracketing,
HDR (high dynamic range),
multiple exposures,
interval-timer photography, and
time-lapse movie recording.
DWhen [On] Is Selected for [Silent Photography]
Selecting [On] for [Silent photography] disables some camera features,
including:
ISO sensitivities of Hi 0.3 through Hi 2.0,
flash photography,
exposure delay mode,
long-exposure noise reduction, and
flicker reduction.
AClose-ups
Because focus depth is reduced at short focus distances, we recommend
choosing smaller focus steps and increasing the number of shots when
photographing subjects close to the camera.
362 C The Photo Shooting Menu: Shooting Options
Eliminate shutter sounds during shooting (0100).
Silent Photography
G button U C photo shooting menu
Option Description
[On]
Eliminate vibrations produced by the shutter. Use for
landscapes, still lifes, and other static subjects. Use of a
tripod is recommended.
Selecting [On] for [Silent photography] does not
completely silence the camera. Camera sounds may still
be audible, for example during autofocus or aperture
adjustment, in the latter case most noticeably at
apertures smaller (i.e., at f-numbers higher) than f/5.6.
Flash photography is disabled.
Long-exposure noise reduction is disabled.
There is no limit to the number of photos that can be
taken in a single burst, regardless of the option chosen
for Custom Setting d2 [Max. continuous release].
The electronic shutter is used, regardless of the option
selected for Custom Setting d5 [Shutter type].
Regardless of the settings selected for [Beep options] in
the setup menu, beeps will not sound when the camera
focuses or while the self-timer is in operation.
Enabling silent photography changes the frame advance
rates for continuous release modes (0127).
[Off] Disable silent photography.
363
1 The Movie Shooting Menu: Movie Shooting Options
To view the movie shooting menu,
select the 1 tab in the camera menus.
The movie shooting menu contains the following items:
1 The Movie Shooting Menu: Movie
Shooting Options
Item 0
[Reset movie shooting
menu]364
[File naming]364
[Destination]364
[Choose image area]365
[Frame size/frame rate]365
[Movie quality]365
[Movie file type]365
[ISO sensitivity settings]366
[White balance]367
[Set Picture Control]367
[Manage Picture Control]367
[Active D-Lighting]368
[High ISO NR]368
[Vignette control]369
[Diffraction compensation] 369
[Auto distortion control] 369
[Flicker reduction] 370
[Metering] 371
[Focus mode] 371
[AF-area mode] 371
[Vibration reduction] 371
[Electronic VR] 372
[Microphone sensitivity] 372
[Attenuator] 373
[Frequency response] 373
[Wind noise reduction] 374
[Headphone volume] 374
[Timecode] 375
Item 0
364 1 The Movie Shooting Menu: Movie Shooting Options
DSee Also
“Movie Shooting Menu Defaults” (0217).
Highlight [Yes] and press J to restore movie shooting menu
options to their default values (0217).
Choose the three-letter prefix used in naming the image files in
which movies are stored; the default prefix is “DSC” (0256).
Choose the slot to which movies are recorded when two
memory cards are inserted.
The menu shows the time available on each card.
Recording ends automatically when no time remains on the
current card.
Reset Movie Shooting Menu
G button U 1 movie shooting menu
File Naming
G button U 1 movie shooting menu
Destination
G button U 1 movie shooting menu
365
1 The Movie Shooting Menu: Movie Shooting Options
Choose a movie crop (image area) from FX or DX.
Choose the movie frame size (in pixels) and frame rate. For more
information, see “The i Menu” under “Frame Size and Rate/
Image Quality” (0168).
Choose from [High quality] and [Normal]. For more
information, see “The i Menu” under “Frame Size and Rate/
Image Quality” (0168).
Record movies in MOV or MP4 format.
The audio recording format varies with movie file format.
Linear PCM is used for MOV files and AAC for MP4 files.
Choose Image Area
G button U 1 movie shooting menu
Frame Size/Frame Rate
G button U 1 movie shooting menu
Movie Quality
G button U 1 movie shooting menu
Movie File Type
G button U 1 movie shooting menu
366 1 The Movie Shooting Menu: Movie Shooting Options
Adjust the following ISO sensitivity
settings for use in movie mode.
DAuto ISO Sensitivity Control
At high ISO sensitivities, “noise” (randomly-spaced bright pixels, fog, or
lines) may increase.
At high ISO sensitivities, the camera may have difficulty focusing.
The foregoing can be prevented by choosing a lower value for [ISO
sensitivity settings]> [Maximum sensitivity].
ISO Sensitivity Settings
G button U 1 movie shooting menu
Option Description
[Maximum
sensitivity]
Choose the upper limit for auto ISO sensitivity control
from values between ISO 200 and Hi 2.0.
The selected value serves as the upper limit for ISO
sensitivity in modes P, S, and A and when [On] is
selected for [Auto ISO control (mode M)] in mode M.
[Auto ISO
control
(mode M)]
[On]: Enable auto ISO sensitivity control in mode M.
[Off]: Use the value selected for [ISO sensitivity
(mode M)].
Regardless of the option selected, auto ISO sensitivity
control is used in modes other than M.
[ISO
sensitivity
(mode M)]
Choose the ISO sensitivity for mode M from values
between ISO 64 (Z 7II) or 100 (Z 6II) and Hi 2.0.
367
1 The Movie Shooting Menu: Movie Shooting Options
Choose the white balance for movies. Select [Same as photo
settings] to use the option currently selected for photos
(0267).
Choose a Picture Control for movies. Select [Same as photo
settings] to use the option currently selected for photos
(0275).
Save modified Picture Controls as custom Picture Controls
(0278).
White Balance
G button U 1 movie shooting menu
Set Picture Control
G button U 1 movie shooting menu
Manage Picture Control
G button U 1 movie shooting menu
368 1 The Movie Shooting Menu: Movie Shooting Options
Preserve details in highlights and shadows, creating movies
with natural contrast. Select [Same as photo settings] to use
the option currently selected for photos (0283).
D[Same as photo settings]
Note that if [Same as photo settings] is selected for Active D-Lighting in
the movie shooting menu and [Auto] is selected in the photo shooting
menu, movies will be shot at a setting equivalent to [Normal].
Reduce “noise” (randomly-spaced bright pixels) in movies
recorded at high ISO sensitivities (0286).
Active D-Lighting
G button U 1 movie shooting menu
High ISO NR
G button U 1 movie shooting menu
369
1 The Movie Shooting Menu: Movie Shooting Options
Reduce vignetting in movies. Select [Same as photo settings]
to use the option currently selected for photos (0287).
Reduce diffraction in movies (0288).
Reduce barrel and pin-cushion distortion in movies (0288).
Vignette Control
G button U 1 movie shooting menu
Diffraction Compensation
G button U 1 movie shooting menu
Auto Distortion Control
G button U 1 movie shooting menu
370 1 The Movie Shooting Menu: Movie Shooting Options
Reduce flicker and banding when shooting under fluorescent or
mercury-vapor lighting during movie recording. Choose [Auto]
to allow the camera to automatically choose the correct
frequency. If [Auto] fails to produce the desired results, select
[50 Hz] or [60 Hz] according to the frequency of the local power
supply. Choose [50 Hz] for areas with a 50 Hz power supply,
[60 Hz] for areas with a 60 Hz power supply.
DFlicker Reduction in the Movie Shooting Menu
If [Auto] fails to produce the desired results and you are unsure as to the
frequency of the local power supply, test both the 50 and 60 Hz options
and choose the one that produces the best results.
Flicker reduction may not produce the desired results if the subject is
very bright. If this is the case, try choosing a smaller aperture (higher
f-number).
Flicker reduction may fail to produce the desired results in modes other
than M. If this is the case, select mode M and choose a shutter speed
adapted to the frequency of the local power supply:
-50Hz:
1/100 s, 1/50 s, 1/25 s
-60Hz:
1/125 s, 1/60 s, 1/30 s
Flicker Reduction
G button U 1 movie shooting menu
371
1 The Movie Shooting Menu: Movie Shooting Options
Choose how the camera meters exposure in movie mode. [Spot
metering] is not available in the movie shooting menu (0157).
Choose a focus mode for movie recording (074).
Choose how the camera focuses in movie mode (077).
Adjust vibration reduction settings for movie mode. Select
[Same as photo settings] to use the option currently selected
for photos (0161).
Metering
G button U 1 movie shooting menu
Focus Mode
G button U 1 movie shooting menu
AF-Area Mode
G button U 1 movie shooting menu
Vibration Reduction
G button U 1 movie shooting menu
372 1 The Movie Shooting Menu: Movie Shooting Options
Choose whether to enable electronic vibration reduction in
movie mode (0178).
Turn built-in or external microphones on or off or adjust
microphone sensitivity.
DMovies Without Sound
Movies recorded with [Microphone off]
selected for [Microphone sensitivity] are
indicated by a 2 icon.
Electronic VR
G button U 1 movie shooting menu
Microphone Sensitivity
G button U 1 movie shooting menu
Option Description
[Auto] Adjust microphone sensitivity automatically.
[Manual]
Adjust microphone sensitivity
manually. Choose from values
of from [1] to [20]. The higher
the value, the higher the
sensitivity; the lower the
value, the lower the
sensitivity.
[Microphone
off]Turn sound recording off.
373
1 The Movie Shooting Menu: Movie Shooting Options
Select [Enable] to reduce microphone gain and prevent audio
distortion when recording movies in loud environments.
Choose the range of frequencies to which built-in and external
microphones respond.
Attenuator
G button U 1 movie shooting menu
Frequency Response
G button U 1 movie shooting menu
Option Description
S[Wide range]
Record a wide range of frequencies. Choose for
everything from music to the bustling hum of a city
street.
T[Vocal
range]Choose for human voices.
374 1 The Movie Shooting Menu: Movie Shooting Options
Select [On] to enable the low-cut filter, reducing noise
produced by wind blowing over the built-in microphone. Note
that other sounds may also be affected.
Selecting [On] for [Wind noise reduction] has no effect on
optional stereo microphones. Wind-noise reduction for optional
stereo microphones that support this feature can be enabled or
disabled using microphone controls.
Press 1 or 3 to adjust headphone volume.
Wind Noise Reduction
G button U 1 movie shooting menu
Headphone Volume
G button U 1 movie shooting menu
375
1 The Movie Shooting Menu: Movie Shooting Options
Choose whether to record time codes giving the hour, minute,
second, and frame number for each frame when shooting
movies. Time codes are available only with movies recorded in
MOV format.
Timecode
G button U 1 movie shooting menu
Option Description
[Record
timecodes]
[On]: Record time codes. The time code appears in the
shooting display.
[On (with HDMI output)]: Time codes will be
included with footage saved to external recorders
connected to the camera via an HDMI cable. The
camera supports Atomos SHOGUN, NINJA, and
SUMO-series Monitor recorders.
[Off]: Time codes are not recorded.
[Count-up
method]
[Record run]: Time codes are incremented only while
recording is in progress.
[Free run]: Time codes are incremented continuously.
Time codes continue to be incremented while the
camera is off.
376 1 The Movie Shooting Menu: Movie Shooting Options
DHDMI Devices
Selecting [On (with HDMI output)] for [Record timecodes] may disrupt
footage output to HDMI devices.
[Timecode
origin]
[Reset]: Reset the time code to 00:00:00.00.
[Enter manually]: Enter the hour, minute, second,
and frame number manually.
[Current time]: Set the time code to the current time
as reported by the camera clock. Before proceeding,
select [Time zone and date] in the setup menu and
make sure that the camera clock is set to the correct
time and date.
[Drop frame]
Select [On] to compensate for discrepancies between
the frame count and the actual recording time at frame
rates of 30 and 60 fps.
Option Description
377
A Custom Settings: Fine-Tuning Camera Settings
To view Custom Settings, select the A
tab in the camera menus.
Custom Settings are used to customize camera settings to suit
individual preferences. The Custom Settings menu is divided
into two levels.
A Custom Settings: Fine-Tuning
Camera Settings
378 A Custom Settings: Fine-Tuning Camera Settings
The following Custom Settings are available: 1
Item 0
[Reset custom settings] 381
a [Autofocus]
a1 [AF-C priority
selection]381
a2 [AF-S priority
selection]382
a3 [Focus tracking with
lock-on]382
a4 [Focus points used] 383
a5 [Store points by
orientation]384
a6 [AF activation] 386
a7 [Limit AF-area mode
selection]387
a8 [Focus point wrap-
around]387
a9 [Focus point options] 388
a10 [Low-light AF] 389
a11 [Built-in AF-assist
illuminator]390
a12 [Manual focus ring in
AF mode] 2 391
b [Metering/exposure]
b1 [EV steps for exposure
cntrl]392
b2 [Easy exposure
compensation]392
b3 [Center-weighted
area]393
b4 [Fine-tune optimal
exposure]393
c [Timers/AE lock]
c1 [Shutter-release
button AE-L]394
c2 [Self-timer]394
c3 [Power off delay]395
Item 0
379
A Custom Settings: Fine-Tuning Camera Settings
d [Shooting/display]
d1 [CL mode shooting
speed]396
d2 [Max. continuous
release]396
d3 [Sync. release mode
options]397
d4 [Exposure delay
mode]397
d5 [Shutter type]398
d6 [Extended shutter
speeds (M)]399
d7 [Limit selectable
image area]399
d8 [File number
sequence]400
d9 [Apply settings to live
view]402
d10 [Framing grid display]402
d11 [Focus peaking]403
d12 [View all in continuous
mode]403
Item 0
e [Bracketing/flash]
e1 [Flash sync speed] 404
e2 [Flash shutter speed] 406
e3 [Exposure comp. for
flash]406
e4 [Auto c ISO sensitivity
control]407
e5 [Modeling flash] 407
e6 [Auto bracketing
(mode M)]408
e7 [Bracketing order] 409
Item 0
380 A Custom Settings: Fine-Tuning Camera Settings
1 Items modified from default values are indicated by asterisks (“U“).
2 Available with compatible lenses only.
DSee Also
“Custom Settings Menu Defaults” (0219)
f [Controls]
f1 [Customize i menu] 410
f2 [Custom controls] 414
f3 [OK button] 427
f4 [Shutter spd &
aperture lock]429
f5 [Customize command
dials]430
f6 [Release button to use
dial]434
f7 [Reverse indicators] 436
f8 [Reverse ring for
focus]436
f9 [Assign MB-N11
buttons]437
Item 0
g [Movie]
g1 [Customize i menu]440
g2 [Custom controls]441
g3 [OK button]448
g4 [AF speed]449
g5 [AF tracking
sensitivity]449
g6 [Highlight display]450
g7 [Assign MB-N11
buttons]451
Item 0
381
A Custom Settings: Fine-Tuning Camera Settings
Restore Custom Settings to their default values.
Choose whether photos can be taken before the camera
focuses when AF-C is selected.
Reset Custom Settings
G button U A Custom Settings menu
a: Autofocus
a1: AF-C Priority Selection
G button U A Custom Settings menu
Option Description
G[Release]Photos can be taken whenever the shutter-
release button is pressed (release priority).
F[Focus]Photos can be taken only when the camera is in
focus (focus priority).
382 A Custom Settings: Fine-Tuning Camera Settings
Choose whether photos can be taken before the camera
focuses when AF-S is selected.
Choose how quickly focus responds if
something passes between the subject
and the camera when AF-C is selected
for the focus mode.
Choose [5 (Delayed)] to help maintain
focus on your original subject.
Choose [1 (Quick)] to make it easier to shift focus to objects
crossing your field of view.
If [Auto-area AF], [Auto-area AF (people)], or [Auto-area AF
(animals)] is selected for AF-area mode, blocked shot AF
response will function in mode [3] when [2] or [1 (Quick)] is
selected.
a2: AF-S Priority Selection
G button U A Custom Settings menu
Option Description
G[Release]Photos can be taken whenever the shutter-
release button is pressed (release priority).
F[Focus]Photos can be taken only when the camera is in
focus (focus priority).
a3: Focus Tracking with Lock-On
G button U A Custom Settings menu
383
A Custom Settings: Fine-Tuning Camera Settings
Choose the number of focus points available for manual focus-
point selection when an option other than [Auto-area AF],
[Auto-area AF (people)], and [Auto-area AF (animals)] is
selected for AF-area mode.
a4: Focus Points Used
G button U A Custom Settings menu
Option Description
R[All points]
Every focus point available in the current AF-area
mode can be selected. The number of points
available varies with the AF-area mode.
I[Every other
point]
The number of available focus points is reduced to
one quarter of the number available when [All
points] is selected. Use for quick focus-point
selection. The number of focus points available in
[Pinpoint AF], [Wide-area AF (L)], [Wide-area AF
(L-people)], and [Wide-area AF (L-animals)]
modes does not change.
384 A Custom Settings: Fine-Tuning Camera Settings
Choose whether separate focus points can be selected for
“wide” (landscape) orientation, for “tall” (portrait) orientation
with the camera rotated 90° clockwise, and for “tall” orientation
with the camera rotated 90° counterclockwise.
Select [No] to use the same focus point regardless of camera
orientation.
a5: Store Points by Orientation
G button U A Custom Settings menu
Camera rotated
90°counter-clockwise
Landscape (wide)
orientation
Camera rotated
90°clockwise
385
A Custom Settings: Fine-Tuning Camera Settings
Select [Yes] to enable separate focus-point selection.
Camera rotated
90°counter-clockwise
Landscape (wide)
orientation
Camera rotated
90°clockwise
386 A Custom Settings: Fine-Tuning Camera Settings
Choose whether the shutter-release button can be used to
focus. If [AF-ON only] is selected, the camera will not focus
when the shutter-release button is pressed halfway. Focus can
only be adjusted using the AF-ON button or other controls to
which AF-ON has been assigned using Custom Setting f2
[Custom controls].
Out-of-Focus Release
To choose whether the shutter can be released even in
circumstances in which it would normally be disabled, select
Custom Setting a6 [AF activation], highlight [AF-ON only], and
press 2. Selecting [Enable] allows the shutter to be released at
any time.
a6: AF Activation
G button U A Custom Settings menu
Option Description
[Enable] Shutter-release enabled.
[Disable] Shutter-release disabled.
387
A Custom Settings: Fine-Tuning Camera Settings
Choose the AF-area modes that can be selected using the
imenu or custom controls.
Highlight either of the following
options and press 2 to select (M) or
deselect (U). Modes marked with a
check (M) are available for selection via
the sub-command dial.
To complete the operation, press J.
Choose whether focus-point selection “wraps around” from one
edge of the display to another. If [Wrap] is selected, focus-point
selection will “wrap around” from top to bottom, bottom to top,
right to left, and left to right, so that, for example, pressing the
sub-selector right when a focus point at the right edge of the
viewfinder display is highlighted selects the corresponding
focus point at the left edge of the display.
a7: Limit AF-Area Mode Selection
G button U A Custom Settings menu
a8: Focus Point Wrap-Around
G button U A Custom Settings menu
388 A Custom Settings: Fine-Tuning Camera Settings
Choose from the focus point display options below.
Manual Focus Mode
Dynamic-Area AF Assist
Choose whether both the selected focus point and the
surrounding focus points are displayed in dynamic-area AF
mode.
a9: Focus Point Options
G button U A Custom Settings menu
Option Description
[On]The focus point is displayed at all times in manual focus
mode.
[Off]The focus point is displayed only during focus point
selection.
Option Description
[On]Display both the selected focus point and surrounding focus
points.
[Off] Display only the selected focus point.
389
A Custom Settings: Fine-Tuning Camera Settings
Choose [On] for more accurate focus under low-light conditions
when AF-S is selected for focus mode.
In photo mode, this option takes effect only in modes P, S, A,
and M.
Low-light AF is disabled during interval-timer photography
and time-lapse movie recording.
The camera may require more time to focus when [On] is
selected.
While low-light AF is in effect, “Low-
light” will appear in the display. The
display refresh rate may drop.
a10: Low-Light AF
G button U A Custom Settings menu
390 A Custom Settings: Fine-Tuning Camera Settings
Choose whether the built-in AF-assist illuminator lights to assist
the focus operation in photo mode when lighting is poor.
DThe AF-Assist Illuminator
The AF-assist illuminator has a range of about 1–3 m (3 ft 4 in.–9 ft
10 in.).
Remove lens hoods when using the illuminator.
Do not obstruct the AF-assist illuminator while it is lit.
a11: Built-in AF-Assist Illuminator
G button U A Custom Settings menu
Option Description
[On]In photo mode, the illuminator will light as required when
AF-S is selected for focus mode.
[Off]The illuminator does not light to assist the focus operation.
The camera may not be able to focus when lighting is poor.
391
A Custom Settings: Fine-Tuning Camera Settings
Choose whether the lens focus ring can be used for manual
focus in autofocus mode.
a12: Manual Focus Ring in AF Mode
G button U A Custom Settings menu
Option Description
[Enable]
Autofocus can be over-ridden by rotating the lens focus ring
(autofocus with manual override). The focus ring can be
used for manual focus while the shutter-release button is
pressed halfway. To refocus using autofocus, lift your finger
from the shutter-release button and then press it halfway
again.
[Disable]The lens focus ring cannot be used for manual focus while
autofocus mode is selected.
392 A Custom Settings: Fine-Tuning Camera Settings
Select the increments used for adjustments to shutter speed,
aperture, ISO sensitivity, bracketing, and exposure and flash
compensation.
Choose whether the E button is needed for exposure
compensation.
This option takes effect in modes P, S, and A. Easy exposure
compensation is not available in other modes.
The command dial used varies with the shooting mode.
b: Metering/Exposure
b1: EV Steps for Exposure Cntrl
G button U A Custom Settings menu
b2: Easy Exposure Compensation
G button U A Custom Settings menu
Option Description
[On (Auto
reset)]
Exposure compensation can be adjusted using only a
command dial. The setting selected with the command
dial is reset when the camera turns off or the standby
timer expires.
[On]
Exposure compensation can be adjusted using only a
command dial. Exposure compensation is not reset when
the camera turns off or the standby timer expires.
[Off]Exposure compensation is set by pressing the E button
and rotating the main command dial.
393
A Custom Settings: Fine-Tuning Camera Settings
When [Center-weighted metering] is selected, the camera
assigns the greatest weight to an area in the center of the
shooting display when setting exposure. Custom Setting b3
[Center-weighted area] is used to choose the size of the area
given the greatest weight when [Center-weighted metering]
is selected.
Use this option to fine-tune the exposure
value selected by the camera; exposure
can be fine-tuned separately for each
metering method. Exposure can be
adjusted up for brighter exposures or
down for darker exposures in the range
+1 to –1 EV in steps of 1/6EV. The default is 0.
DFine-Tuning Exposure
Regardless of the option selected for Custom Setting b4 [Fine-tune
optimal exposure], the exposure compensation icon (E) will not be
displayed. The only way to determine how much exposure has been
altered is to view the amount in the fine-tuning menu for Custom Setting
b4.
b3: Center-Weighted Area
G button U A Custom Settings menu
b4: Fine-Tune Optimal Exposure
G button U A Custom Settings menu
394 A Custom Settings: Fine-Tuning Camera Settings
Choose whether exposure locks when the shutter-release
button is pressed.
Choose the length of the shutter release delay, the number of
shots taken, and the interval between shots in self-timer mode.
c: Timers/AE Lock
c1: Shutter-Release Button AE-L
G button U A Custom Settings menu
Option Description
O[On (half press)]Pressing the shutter-release button halfway
locks exposure.
P[On (burst mode)]Exposure only locks while the shutter-release
button is pressed all the way down.
[Off]Pressing the shutter-release button does not
lock exposure.
c2: Self-Timer
G button U A Custom Settings menu
Option Description
[Self-timer
delay]Choose the length of the shutter-release delay.
[Number of
shots]
Press 1 and 3 to choose the number of shots taken
each time the shutter-release button is pressed;
choose from values of from 1 to 9.
[Interval
between
shots]
Choose the interval between shots when [Number of
shots] is more than 1.
395
A Custom Settings: Fine-Tuning Camera Settings
Choose how long the monitor or viewfinder remains on when
no operations are performed.
Different settings can be chosen for [Playback], [Menus],
[Image review], and [Standby timer].
[Standby timer] determines how long the control panel and
the monitor or viewfinder display remain on after the shutter-
release button is pressed halfway. The monitor and viewfinder
dim a few seconds before the standby timer expires. If [10 s] is
selected, the timer will be extended to 20 seconds while the i
menu is displayed.
With the exception of [Image review], each of the power-off
delays is extended by one minute in self-timer mode.
Longer power-off delays reduce battery endurance.
c3: Power Off Delay
G button U A Custom Settings menu
396 A Custom Settings: Fine-Tuning Camera Settings
Choose the frame advance rate for low-speed continuous
release mode; options range from [5 fps] to [1 fps].
The maximum number of shots that can be taken in a single
burst in continuous release modes can be set to any value
between 1 and 200.
Note that regardless of the option selected, there is no limit to
the number of photos that can be taken in a single burst
during silent photography or when a shutter speed of 1 s or
slower is selected in mode S or M.
DThe Memory Buffer
Custom Setting d2 [Max. continuous release] is used to select the
number of shots that can be taken in a single burst. The number of shots
that can be taken before the memory buffer fills and shooting slows varies
with image quality and other settings. When the buffer is full, the camera
will display “r00” and the frame advance rate will drop.
d: Shooting/Display
d1: CL Mode Shooting Speed
G button U A Custom Settings menu
d2: Max. Continuous Release
G button U A Custom Settings menu
397
A Custom Settings: Fine-Tuning Camera Settings
Choose whether the shutters on the remote cameras are
synchronized with the shutter on the master camera when
using an optional wireless remote controller.
In situations where the slightest camera movement can blur
pictures, shutter release can be delayed by from about 0.2 to
3 seconds after the shutter-release button is pressed.
d3: Sync. Release Mode Options
G button U A Custom Settings menu
d4: Exposure Delay Mode
G button U A Custom Settings menu
398 A Custom Settings: Fine-Tuning Camera Settings
Choose the type of shutter used for photographs.
D“Mechanical Shutter”
[Mechanical shutter] is not available with some lenses.
DThe Electronic Front-Curtain Shutter
The fastest shutter speed available when [Electronic front-curtain
shutter] is selected is 1/2000 s.
d5: Shutter Type
G button U A Custom Settings menu
Option Description
O[Auto]
The camera chooses the shutter type
automatically according to shutter speed.
The electronic front-curtain shutter is
used to reduce blur caused by camera
shake at slow shutter speeds.
P[Mechanical shutter]The camera uses the mechanical shutter
for all photos.
x[Electronic front-
curtain shutter]
The camera uses the electronic front-
curtain shutter for all photos.
399
A Custom Settings: Fine-Tuning Camera Settings
Extend the range of shutter speeds available in mode M; the
slowest shutter speed available when [On] is selected is 900 s
(15 minutes). Extended shutter speeds can be used for pictures
of the night sky and other long exposures.
To use extended shutter speeds, choose [On] and select a
shutter speed of 60 s or slower.
Choose the options that can be accessed by rotating a
command dial in the i menu or while pressing a control to
which image area has been assigned.
Highlight an option and press 2 to
select (M) or deselect (U). Image area
options marked with a check (M) are
available for selection via a command
dial.
Press J to save changes when settings
are complete.
d6: Extended Shutter Speeds (M)
G button U A Custom Settings menu
d7: Limit Selectable Image Area
G button U A Custom Settings menu
400 A Custom Settings: Fine-Tuning Camera Settings
Choose a file numbering option.
d8: File Number Sequence
G button U A Custom Settings menu
Option Description
[On]
When a new folder is created or a new memory card is
inserted in the camera, file numbering will continue from
the last number used. This simplifies file management by
minimizing the occurrence of duplicate file names when
multiple cards are used.
[Off]
When a new folder is created or a new memory card is
inserted, file numbering restarts from 0001. If the current
folder already contains images, file numbering will instead
continue from the highest file number in the current
folder.
If you select [Off] after selecting [On], the camera will store
the current file number. File numbering will resume from
the previously-stored value the next time [On] is selected.
[Reset]
Reset the file numbering for [On]. If the current folder is
empty, file numbering will restart from 0001 with the next
picture taken. If the current folder contains images, the
next picture taken will be assigned a file number by
adding one to the highest file number in the current
folder.
401
A Custom Settings: Fine-Tuning Camera Settings
DFile Number Sequence
If a picture is taken when the current folder contains a picture
numbered 9999, a new folder will be created and file numbering will
restart from 0001.
When the current folder number reaches 999, the camera will no longer
be able to create new folders and the shutter release will be disabled if:
- the current folder contains 5000 pictures (in addition, movie
recording will be disabled if the camera calculates that the number of
files needed to record a movie of the maximum length would result in
the folder containing over 5000 files), or
- the current folder contains a picture numbered 9999 (in addition,
movie recording will be disabled if the camera calculates that the
number of files needed to record a movie of the maximum length
would result in a file numbered over 9999).
To resume shooting, choose [Reset] for Custom Setting d8 [File number
sequence] and then either format the current memory card or insert a
new memory card.
DFolder Numbering
If a picture is taken when the current folder contains 5000 pictures or a
picture numbered 9999, a new folder will be created and selected as the
current folder.
The new folder is assigned a number one higher than current folder
number. If a folder with that number already exists, the new folder will
be assigned the lowest available folder number.
402 A Custom Settings: Fine-Tuning Camera Settings
Choose whether the camera adjusts the preview in the
viewfinder or monitor to reflect how shooting settings will
affect the hue and brightness of the final picture. Regardless of
the option selected, the effects of camera settings are always
visible in movie mode.
Choose whether to display a grid for reference when framing
shots.
d9: Apply Settings to Live View
G button U A Custom Settings menu
Option Description
[On]
The effects of changes to settings such as white balance,
Picture Controls, and exposure compensation are visible in
the shooting display.
[Off]
The effects of changes to settings such as white balance,
Picture Controls, and exposure compensation are not
visible in the shooting display. The hue and brightness of
the display can be adjusted for ease of viewing during
extended photo shoots.
A g icon appears in the shooting display.
d10: Framing Grid Display
G button U A Custom Settings menu
403
A Custom Settings: Fine-Tuning Camera Settings
When focus peaking is enabled in manual focus mode, objects
that are in focus are indicated by colored outlines in the display.
You can choose the color.
Peaking Level
Choose from [3 (high sensitivity)], [2 (standard)], [1 (low
sensitivity)], and [Off]. The higher the value, the greater the
depth that will be shown as being in focus.
Peaking Highlight Color
Choose the highlight color.
If [Off] is selected, the display will go blank during burst
photography.
d11: Focus Peaking
G button U A Custom Settings menu
d12: View All in Continuous Mode
G button U A Custom Settings menu
404 A Custom Settings: Fine-Tuning Camera Settings
Choose the flash sync speed.
e: Bracketing/Flash
e1: Flash Sync Speed
G button U A Custom Settings menu
Option Description
[1/200 s
(Auto FP)]
Auto FP high-speed sync is enabled with compatible flash
units and the maximum sync speed for other flash units is
set to 1/200 s.
In modes P and A, auto FP high-speed sync will be
activated if the actual shutter speed is faster than 1/200 s.
If the flash supports auto FP high-speed sync, the
camera can select shutter speeds as fast as 1/8000 s.
In modes S and M, the user can select shutter speeds as
fast as 1/8000 s when using flash units that support auto
FP high-speed sync.
[1/200 s]
Flash sync speed set to selected value, which can be from
1/200 to 1/60 s.
[1/160 s]
[1/125 s]
[1/100 s]
[1/80 s]
[1/60 s]
405
A Custom Settings: Fine-Tuning Camera Settings
DFixing Shutter Speed at the Flash Sync Speed Limit
In modes S and M, shutter speed can be fixed at the value selected for
Custom Setting e1 [Flash sync speed] by selecting the next shutter speed
after the slowest possible shutter speed (30 s or “Time”). An X (flash sync
indicator) will appear in the shooting display and control panel together
with the flash sync speed.
DAuto FP High-Speed Sync
Auto FP high-speed sync allows the flash to be used at the highest
shutter speed supported by the camera. When [1/200 s (Auto FP)] is
selected, the camera automatically enables auto FP high-speed sync at
shutter speeds faster than the flash sync speed. This makes it possible to
choose the maximum aperture for reduced depth of field even when
the subject is backlit in bright sunlight.
The flash information display shows “FP” when [1/200 s (Auto FP)] is
selected.
406 A Custom Settings: Fine-Tuning Camera Settings
Choose the slowest shutter speed available with a flash in mode
P or A.
Regardless of the setting chosen for Custom Setting e2 [Flash
shutter speed], shutter speeds can be as slow as 30 s in modes
S and M or at flash settings of slow sync, slow rear-curtain sync,
or red-eye reduction with slow sync.
Choose how the camera adjusts flash level when exposure
compensation is used.
e2: Flash Shutter Speed
G button U A Custom Settings menu
e3: Exposure Comp. for Flash
G button U A Custom Settings menu
Option Description
YE[Entire
frame]
The camera adjusts both the flash level and
exposure. This changes the exposure for the
entire frame.
E[Background
only]
Exposure compensation is adjusted for the
background only.
407
A Custom Settings: Fine-Tuning Camera Settings
Choose how the camera adjusts flash level when auto ISO
sensitivity control is enabled.
If [On] is selected when the camera is used with an optional
flash unit that supports the Nikon Creative Lighting system,
pressing a control to which [Preview] has been assigned using
Custom Setting f2 [Custom controls] will emit a modeling flash.
e4: Auto c ISO Sensitivity Control
G button U A Custom Settings menu
Option Description
e[Subject and
background]
The camera takes both the main subject and
background lighting into account when
adjusting ISO sensitivity.
f[Subject
only]
ISO sensitivity is adjusted only to ensure that the
main subject is correctly exposed.
e5: Modeling Flash
G button U A Custom Settings menu
408 A Custom Settings: Fine-Tuning Camera Settings
The settings affected when bracketing is enabled in mode M are
determined by the options selected for [Auto bracketing] >
[Auto bracketing set] in the photo shooting menu and the
option chosen for Custom Setting e6 [Auto bracketing (mode
M)].
* If a flash is not used when [On] is selected for [Auto ISO sensitivity
control] and [Flash/speed], [Flash/speed/aperture], or [Flash/
aperture] is selected for e6 [Auto bracketing (mode M)], ISO
sensitivity will be fixed at the value for the first shot in each bracketing
sequence.
DFlash Bracketing
Flash bracketing is performed only with i-TTL or qA (auto aperture) flash
control.
e6: Auto Bracketing (Mode M)
G button U A Custom Settings menu
Custom Setting e6
[Auto bracketing (mode M)]
Photo shooting menu
[Auto bracketing set]
AE & flash
bracketing*AE bracketing*
F[Flash/speed]Shutter speed and
flash level Shutter speed
G[Flash/speed/
aperture]
Shutter speed,
aperture, and flash
level
Shutter speed and
aperture
H[Flash/aperture]Aperture and flash
level Aperture
I[Flash only] Flash level
409
A Custom Settings: Fine-Tuning Camera Settings
Choose the order in which the shots in the bracketing program
are taken.
Custom Setting e7 [Bracketing order] has no effect on the
order of the shots taken when [ADL bracketing] is selected for
[Auto bracketing] > [Auto bracketing set] in the photo
shooting menu.
e7: Bracketing Order
G button U A Custom Settings menu
Option Description
H[MTR > under >
over]
The unmodified shot is taken first,
followed by the shot with the lowest
value, followed by the shot with the
highest value.
I[Under > MTR >
over]
Shooting proceeds in order from the
lowest to the highest value.
410 A Custom Settings: Fine-Tuning Camera Settings
Choose the items listed in the i menu displayed when the
ibutton is pressed in photo mode.
Highlight a position in the i menu, press J, and select the
desired item.
The following items can be assigned to the i menu.
f: Controls
f1: Customize i Menu
G button U A Custom Settings menu
Item 0
J[Choose image area]260
8[Image quality]152
o[Image size]154
N[View memory card
info]411
E[Exposure
compensation]122
9[ISO sensitivity
settings]118
m[White balance]94
h[Set Picture Control]139
p[Color space]282
y[Active D-Lighting]283
q[Long exposure NR]285
r[High ISO NR]286
w[Metering] 157
c[Flash mode] 619
Y[Flash
compensation]622
m[Group flash
options]
636,
646
s[Focus mode]74
t[AF-area mode]77
u[Vibration
reduction]161
t[Auto bracketing] 297
$[Multiple exposure] 309
2[HDR (high dynamic
range)]319
7[Interval timer
shooting]326
8[Time-lapse movie] 340
Item 0
411
A Custom Settings: Fine-Tuning Camera Settings
View Memory Card Info
View the slot currently selected as the destination for new
pictures and the options used to record pictures when two
memory cards are inserted. This option can be used to view but
not to change the option selected.
The options used to record pictures when two memory cards
are inserted can be selected using [Secondary slot function]
in the photo shooting menu.
9[Focus shift
shooting]352
L[Silent photography]100
v[Release mode]125
w[Custom controls]414
z[Exposure delay
mode]397
O[Shutter type]398
y[Apply settings to
live view]402
Item 0
z[Split-screen display
zoom]412
W[Focus peaking] 403
3[Monitor/viewfinder
brightness]
457,
459
Z[Bluetooth
connection]
413,
483
U[Wi-Fi connection] 158
a[MB-N11 info] 413
Item 0
412 A Custom Settings: Fine-Tuning Camera Settings
Split-Screen Display Zoom
If [Split-screen display zoom] is
assigned to the i menu, you can select
[Split-screen display zoom] to
simultaneously zoom in on two areas
that are aligned horizontally but are in
different parts of the frame (split-screen
display zoom). The locations of the areas
are indicated by the two frames (r) in
the navigation window in the bottom
right corner of the display.
Zooming in simultaneously on two
widely-separated but horizontally-aligned areas of the frame
makes it easier to level pictures of buildings or other wide
objects.
Use the X and W (Q) buttons to zoom in and out.
Press 4 or 2 to scroll the selected area left or right. Use the J
button to switch between the two areas.
Press 1 or 3 to scroll both areas up or down simultaneously.
To focus on the subject at the center of the selected area, press
the shutter-release button halfway.
To exit split-screen display zoom, press the i button.
413
A Custom Settings: Fine-Tuning Camera Settings
Bluetooth Connection
Enable or disable Bluetooth.
MB-N11 Info
View information on the batteries in optional MB-N11 power
battery packs connected to the camera (0727).
414 A Custom Settings: Fine-Tuning Camera Settings
Choose the operations performed in photo mode using camera
or lens controls or by pressing camera controls and rotating
command dials.
Choose the roles played by the controls
below. Highlight the desired control
and press J.
f2: Custom Controls
G button U A Custom Settings menu
Control
w[Fn1 button]
y[Fn2 button]
V[AF-ON button]
7[Sub-selector]
8[Sub-selector center]
z[Movie record button]
S[Lens Fn button]
3[Lens Fn2 button]
l[Lens control ring]
415
A Custom Settings: Fine-Tuning Camera Settings
The roles that can be assigned to these controls are as follows:
Option w y V 7 8 z S 3 l
K[Select center focus
point]—— 44———
A[AF-ON]444
444
F[AF lock only]444
444
E[AE lock (Hold)]444
4444
D[AE lock (Reset on
release)]444
4444
C[AE lock only]444
444
B[AE/AF lock]444
444
r[FV lock]44
——444
h[cDisable/enable]44
——444
q[Preview]44
——4444
L[Matrix metering]44
——444
M[Center-weighted
metering]44
——444
N[Spot metering]44
——444
t[Highlight-weighted
metering]44
——444
1[Bracketing burst]44
——444
c[Sync. release
selection]44
——444
4[+ NEF (RAW)]44
——4444
416 A Custom Settings: Fine-Tuning Camera Settings
n[Subject tracking]44
———— 44
L[Silent photography]44
——————
b[Live view info
display off]444
44
——
b[Framing grid
display]44
——4444
p[Zoom on/off]444
——444
O[MY MENU]44
———444
3[Access top item in
MY MENU]44
———444
K[Playback]44
———— 44
g[Protect]44
——————
J[Choose image area]44
——44
——
8[Image quality/size]44
———4——
m[White balance]44
———4——
h[Set Picture Control]44
———4——
y[Active D-Lighting]44
———4——
w[Metering]44
———4——
I/Y[Flash mode/
compensation]44
———4——
z[Focus mode/AF-area
mode]44
———4——
t[Auto bracketing]44
———4——
Option w y V 7 8 z S 3 l
417
A Custom Settings: Fine-Tuning Camera Settings
1 Available with compatible lenses only.
2 Regardless of the option selected, in manual focus mode the control
ring can only be used to adjust focus.
$[Multiple exposure]44
——— 4——
2[HDR (high dynamic
range)]44
——— 4——
z[Exposure delay
mode]44
——— 4——
$[Shutter spd &
aperture lock]44
——— 4——
W[Focus peaking]44
——————
c[Rating]44
——————
w[Choose non-CPU
lens number]44
——44
——
Y[Same as multi
selector]———4————
x[Focus point
selection]—— 4————
X[Focus (M/A)] ————————41, 2
q[Aperture] ———————— 42
E[Exposure
compensation]———————— 42
9[ISO sensitivity] ———————— 42
[None]444
44444
2
Option w y V 7 8 z S 3 l
418 A Custom Settings: Fine-Tuning Camera Settings
The following options are available:
Role Description
K[Select center
focus point]
Pressing the control selects the center focus
point.
A[AF-ON]Pressing the control initiates autofocus,
duplicating the function of the AF-ON button.
F[AF lock only] Focus locks while the control is pressed.
E[AE lock (Hold)]
Exposure locks when the control is pressed.
Exposure lock does not end when the shutter
is released. Exposure remains locked until the
control is pressed a second time or the
standby timer expires.
D[AE lock (Reset
on release)]
Exposure locks when the control is pressed.
Exposure remains locked until the control is
pressed a second time, the shutter is released,
or the standby timer expires.
C[AE lock only] Exposure locks while the control is pressed.
B[AE/AF lock]Focus and exposure lock while the control is
pressed.
r[FV lock]
Press the control to lock flash value for
optional flash units; press again to cancel FV
lock.
h[c Disable/
enable]
If the flash is currently enabled, it will be
disabled while the control is pressed. If the
flash is currently off, front-curtain sync will be
selected while the control is pressed.
419
A Custom Settings: Fine-Tuning Camera Settings
q[Preview]Keep the control pressed to preview photo
color, exposure, and depth of field.
L[Matrix
metering]
[Matrix metering] is activated while the
control is pressed.
M
[Center-
weighted
metering]
[Center-weighted metering] is activated
while the control is pressed.
N[Spot
metering]
[Spot metering] is activated while the control
is pressed.
t
[Highlight-
weighted
metering]
[Highlight-weighted metering] is activated
while the control is pressed.
1[Bracketing
burst]
If the control is pressed when an option
other than [WB bracketing] is selected for
[Auto bracketing]> [Auto bracketing set]
in the photo shooting menu in continuous
release mode, the camera will take all the
shots in the current bracketing program and
repeat the bracketing burst while the
shutter-release button is pressed. In single-
frame release mode, shooting will end after
the first bracketing burst.
If [WB bracketing] is selected for [Auto
bracketing set], the camera will take
pictures while the shutter-release button is
pressed and apply white balance bracketing
to each shot.
Role Description
420 A Custom Settings: Fine-Tuning Camera Settings
c[Sync. release
selection]
When an optional wireless remote controller is
connected, the control can be used to toggle
between remote release and master or
synchronized release. The options available
depend on the setting chosen for Custom
Setting d3 [Sync. release mode options].
The following options are available when
[Sync] is selected for [Sync. release mode
options]:
-[Master release only] (c): Keep the
control pressed to take pictures with the
master camera only.
-[Remote release only] (d): Keep the
control pressed to take pictures only with
the remote cameras.
The following options are available when
[No sync] is selected for [Sync. release
mode options]:
-[Synchronized release] (6): Keep the
control pressed to synchronize the releases
on the master and remote cameras.
-[Remote release only] (d): Keep the
control pressed to take pictures only with
the remote cameras.
Role Description
421
A Custom Settings: Fine-Tuning Camera Settings
4[+ NEF (RAW)]
If a JPEG option is currently selected for
image quality, “RAW” will appear in the
shooting display and an NEF (RAW) copy will
be recorded with the next picture taken after
the control is pressed. The original image
quality setting will be restored when you
remove your finger from the shutter-release
button or press the control again, canceling
[+ NEF (RAW)].
NEF (RAW) copies are recorded at the
settings currently selected for [NEF (RAW)
recording] and [Image size] > [NEF (RAW)]
in the photo shooting menu.
n[Subject
tracking]
Pressing the control when [Auto-area AF],
[Auto-area AF (people)], or [Auto-area AF
(animals)] is selected for AF-area mode
enables subject tracking; the focus point will
change to a targeting reticle and the monitor
and viewfinder to subject-tracking displays.
To end subject-tracking AF, press the control
again or press the W (Q) button.
b[Framing grid
display]
Press the control to display a framing grid.
Press the control again to turn the display off.
L[Silent
photography]
Press the control to start silent photography.
Press again to end.
Role Description
422 A Custom Settings: Fine-Tuning Camera Settings
b[Live view info
display off]
Press the control to hide the indicators in the
live view display. Press again to view
indicators.
p[Zoom on/off]
Press the control to zoom the display in on the
area around the current focus point. Press
again to cancel zoom.
O[MY MENU] Press the control to display “MY MENU”.
3
[Access top
item in MY
MENU]
Press the control to jump to the top item in
“MY MENU”. Select this option for quick access
to a frequently-used menu item.
K[Playback] Press the control to start playback.
g[Protect]Press the control during playback to protect
the current picture.
J[Choose image
area]
Press the control and rotate a command dial
to choose the image area.
8[Image quality/
size]
Press the control and rotate the main
command dial to choose an image quality
option and the sub-command dial to select
image size.
m[White
balance]
To choose a white balance option, hold the
button and rotate the main command dial.
Some options offer sub-options that can be
selected by rotating the sub-command dial.
Role Description
423
A Custom Settings: Fine-Tuning Camera Settings
h[Set Picture
Control]
Press the control and rotate a command dial
to choose a Picture Control.
y[Active
D-Lighting]
Press the control and rotate a command dial
to adjust Active D-Lighting.
w[Metering]Press the control and rotate a command dial
to choose a metering option.
I/Y[Flash mode/
compensation]
Press the control and rotate the main
command dial to choose a flash mode and the
sub-command dial to adjust flash output.
z[Focus mode/
AF-area mode]
Hold the control and rotate the main
command dial to choose the focus mode, the
sub-command dial to choose the AF-area
mode.
t[Auto
bracketing]
Press the control and rotate the main
command dial to choose the number of shots
and the sub-command dial to select the
bracketing increment or Active D-Lighting
amount.
$[Multiple
exposure]
Press the control and rotate the main
command dial to choose the mode and the
sub-command dial to choose the number of
shots.
Role Description
424 A Custom Settings: Fine-Tuning Camera Settings
2
[HDR (high
dynamic
range)]
Press the control and rotate the main
command dial to choose the mode and the
sub-command dial to choose the exposure
differential.
z[Exposure
delay mode]
Press the control and rotate a command dial
to choose the shutter-release delay.
$[Shutter spd &
aperture lock]
Press the control and rotate the main
command dial to lock shutter speed (modes S
and M). To lock aperture (modes A and M),
press the control and rotate the sub-
command dial.
W[Focus
peaking]
Press the control and rotate the main
command dial to choose a peaking level and
the sub-command dial to select the peaking
color.
c[Rating]
To rate the current picture in playback mode,
press the control and rotate the main
command dial.
To display rating options, highlight [Rating]
and press 2. If an option other than [None]
is selected, the chosen rating can be
assigned to pictures simply by pressing the
selected control. Pressing the control again
selects a “no star” rating.
w
[Choose non-
CPU lens
number]
Press the control and rotate a command dial
to choose a lens number saved using the
[Non-CPU lens data] item in the setup menu.
Role Description
425
A Custom Settings: Fine-Tuning Camera Settings
Y[Same as multi
selector]
Pressing the sub-selector up, down, left, or
right during shooting or playback has the
same effect as pressing 1, 3, 4, or 2 on the
multi selector. To choose the role played by
the sub-selector during focus or playback
zoom, highlight [Same as multi selector] and
press 2.
Select [Scroll] to use the sub-selector to
scroll the display.
Select [Display next/previous frame] to use
the sub-selector to page through pictures
without altering the zoom ratio.
x[Focus point
selection]
Use the control to select the focus point. Using
the control during playback ends playback
and enables focus-point selection.
X[Focus (M/A)]
Autofocus can be over-ridden by rotating the
lens control ring (autofocus with manual
override). The control ring can be used for
manual focus while the shutter-release button
is pressed halfway. To refocus using autofocus,
lift your finger from the shutter-release button
and then press it halfway again.
Role Description
426 A Custom Settings: Fine-Tuning Camera Settings
q[Aperture] Rotate the lens control ring to adjust aperture.
E[Exposure
compensation]
Rotate the lens control ring to adjust exposure
compensation.
9[ISO
sensitivity]
Rotate the lens control ring to adjust ISO
sensitivity.
[None] The control has no effect.
Role Description
427
A Custom Settings: Fine-Tuning Camera Settings
Choose the role assigned to the J
button in photo mode and during
playback.
Shooting Mode
Regardless of the option selected, when [Auto-area AF], [Auto-
area AF (people)], or [Auto-area AF (animals)] is chosen for
AF-area mode, the button functions only to initiate subject-
tracking AF (086).
f3: OK Button
G button U A Custom Settings menu
Role Description
K[Select center focus
point]Pressing J selects the center focus point.
p[Zoom on/off]
Press J to zoom the display in on the area
around the current focus point. Press J
again to return to the previous display. To
choose the zoom ratio, highlight [Zoom
on/off] and press 2.
[None]Pressing
J during shooting has no effect.
428 A Custom Settings: Fine-Tuning Camera Settings
Playback Mode
Regardless of the option selected, pressing J when a movie is
displayed full frame starts movie playback.
Role Description
n[Thumbnail on/off]Press J to toggle between full-frame and
4-, 9-, or 72-frame thumbnail playback.
o[View histograms]
A histogram is displayed while the J
button is pressed. The histogram display is
available in both full-frame and thumbnail
playback.
p[Zoom on/off]
Press J to zoom the display in on the area
around the active focus point. Press J
again to return to the previous display.
To choose the zoom ratio, highlight
[Zoom on/off] and press 2.
Zoom is available in both full-frame and
thumbnail playback.
u[Choose slot and
folder]
Press J to display the [Choose slot and
folder] dialog, where you can then choose
a slot and folder for playback.
429
A Custom Settings: Fine-Tuning Camera Settings
Selecting [On] for [Shutter speed lock] locks shutter speed at
the value currently selected in mode S or M. Selecting [On] for
[Aperture lock] locks aperture at the value currently selected in
mode A or M.
While shutter speed or aperture lock is in effect, a O icon will
appear in the shooting display and control panel.
Shutter speed and aperture lock are not available in the
shooting mode P.
f4: Shutter Spd & Aperture Lock
G button U A Custom Settings menu
430 A Custom Settings: Fine-Tuning Camera Settings
Customize the operation of the main and sub-command dials.
The selected settings also apply to the command dials on
optional MB-N11 power battery packs.
Reverse Rotation
Reverse the direction of rotation of the command dials for
selected operations.
Highlight [Exposure compensation] or [Shutter speed/
aperture] and press 2 to select (M) or deselect (U).
Press J to save changes and exit.
f5: Customize Command Dials
G button U A Custom Settings menu
431
A Custom Settings: Fine-Tuning Camera Settings
Change Main/Sub
Reverse the roles of the main- and sub-command dials.
Option Description
[Exposure
setting]
If [On] is selected, the main command dial will control
aperture and the sub-command dial shutter speed. If [On
(Mode A)] is selected, the main command dial will be used
to set aperture in mode A only.
[Autofocus
setting]
If [On] is selected and [Focus mode/AF-area mode] has
been assigned to a control using Custom Setting f2
[Custom controls], you can choose the AF-area mode by
holding the control and rotating the main command dial
and focus mode by holding the control and rotating the
sub-command dial.
432 A Custom Settings: Fine-Tuning Camera Settings
Menus and Playback
Choose the roles played by the multi selector and command
dials during playback and menu navigation.
* The sub-command dial cannot be used to select highlighted items. To
select highlighted items, press J or 2.
Option Description
[On]
Playback:
The main command dial can be used to choose
the picture displayed during full-frame playback.
The sub-command dial can be used to skip
forward or back according to the option selected
for [Sub-dial frame advance].
During thumbnail playback, the main command
dial can be used to highlight thumbnails and the
sub-command dial to page up or down.
Menus*:
Use the main command dial to highlight menu
items. Rotating the sub-command dial right
displays the sub-menu for the highlighted option.
Rotating it left displays the previous menu.
2
[On (image
review
excluded)]
As for [On] except that the command dials cannot
be used for playback during image review.
[Off]
Use the multi selector to choose the picture
displayed during full-frame playback or to
highlight pictures or menu items.
433
A Custom Settings: Fine-Tuning Camera Settings
Sub-Dial Frame Advance
Choose the number of frames that can be skipped by rotating
the sub-command dial during full-frame playback. This option
only takes effect when [On] or [On (image review excluded)] is
selected for [Menus and playback].
Option Description
[10 frames] Skip forward or back 10 frames at a time.
[50 frames] Skip forward or back 50 frames at a time.
c[Rating]
Skip to the next or previous pictures with the
selected rating. To choose the rating, highlight
[Rating] and press 2.
P[Protect] Skip to the next or previous protected picture.
C[Still images
only]Skip to the next or previous photo.
1[Movies only] Skip to the next or previous movie.
u[Folder] Rotate the sub-command dial to select a folder.
434 A Custom Settings: Fine-Tuning Camera Settings
Selecting [Yes] allows adjustments that are normally made by
holding a button and rotating a command dial to be made by
rotating the command dial after the button is released. This
ends when the button is pressed again, the shutter-release
button is pressed halfway, or the standby timer expires.
[Release button to use dial] applies to the E and S
buttons.
[Release button to use dial] also applies to controls to which
certain roles have been assigned using Custom Settings f2 or
g2 [Custom controls] and f9 or g7 [Assign MB-N11 buttons].
The roles in question are indicated in the table below.
f6: Release Button to Use Dial
G button U A Custom Settings menu
Role
Can be assigned using Custom
Setting
f2 f9 g2 g7
J[Choose image area]444
8[Image quality/size]4——
m[White balance]44
h[Set Picture Control]44
y[Active D-Lighting]44
w[Metering]444
435
A Custom Settings: Fine-Tuning Camera Settings
I/Y[Flash mode/
compensation]44
——
z[Focus mode/AF-area
mode]444
t[Auto bracketing]4———
$[Multiple exposure]4———
2[HDR (high dynamic
range)]4———
z[Exposure delay
mode]44
——
$[Shutter spd &
aperture lock]44
——
W[Focus peaking]44
w[Choose non-CPU
lens number]4———
H[Microphone
sensitivity]——4
E[Exposure
compensation]44
9[ISO sensitivity]—
44
Role
Can be assigned using Custom
Setting
f2 f9 g2 g7
436 A Custom Settings: Fine-Tuning Camera Settings
Choose whether the exposure indicator is displayed with
negative values on the left and positive values on the right, or
with positive values on the left and negative values on the right.
Select [On] to reverse the direction of rotation for focus or
control rings on Z mount lenses during manual focus.
This option does not support:
- certain Z mount lenses that can only be focused manually, or
- F mount lenses connected via an FTZ mount adapter.
f7: Reverse Indicators
G button U A Custom Settings menu
Option Description
V
The indicator is displayed with positive
values on the left and negative values on
the right.
W
The indicator is displayed with negative
values on the left and positive values on
the right.
f8: Reverse Ring for Focus
G button U A Custom Settings menu
437
A Custom Settings: Fine-Tuning Camera Settings
Choose the roles played by the controls on optional MB-N11
power battery packs in photo mode.
The controls to which roles can be
assigned are listed below. Highlight the
desired control and press J.
The roles that can be assigned to these controls are listed
below. For information on the listed roles, see the section on
Custom Setting f2 [Custom controls].
f9: Assign MB-N11 Buttons
G button U A Custom Settings menu
Control
[Fn button]
[AF-ON button]
[Multi selector]
Option Fn AF-ON Multi
selector
E[AE lock (Hold)]44
D[AE lock (Reset on
release)]44
r[FV lock]4——
q[Preview]4——
4[+ NEF (RAW)]4——
438 A Custom Settings: Fine-Tuning Camera Settings
n[Subject tracking]4——
L[Silent photography]4——
b[Live view info
display off]44
K[Playback]4——
J[Choose image area]4——
w[Metering]4——
I/Y[Flash mode/
compensation]4——
z[Focus mode/AF-area
mode]4——
z[Exposure delay
mode]4——
$[Shutter spd &
aperture lock]4——
E[Exposure
compensation]4——
9[ISO sensitivity]4——
e[Same as camera
AF-ON button]4
Option Fn AF-ON Multi
selector
439
A Custom Settings: Fine-Tuning Camera Settings
Same as Camera AF-ON Button
The control performs the same function as the camera AF-ON
button.
Same as Camera Multi Selector
The control performs the same function as the 1, 3, 4, and 2
buttons on the camera multi selector.
Press 2 to display [Photo info/playback] options. If [Info C/
Playback D] is selected, you can press the control up or down
to display other pictures, left or right to cycle through photo
information.
K[Select center focus
point]4
A[AF-ON]—
4
F[AF lock only]—
4
C[AE lock only]—
4
B[AE/AF lock]—
4
p[Zoom on/off]—
4
Y[Same as camera
multi selector]——4
x[Focus point
selection]——4
[None]44
Option Fn AF-ON Multi
selector
440 A Custom Settings: Fine-Tuning Camera Settings
Choose the items listed in the i menu displayed when the
ibutton is pressed in movie mode.
Highlight a position in the i menu, press J, and select the
desired item.
The following items can be assigned to the i menu.
g: Movie
g1: Customize i Menu
G button U A Custom Settings menu
Item 0
J[Choose image area]175
G[Frame size and rate/
Image quality]168
N[Destination]177
E[Exposure
compensation]122
9[ISO sensitivity
settings]118
m[White balance]167
h[Set Picture Control]167
y[Active D-Lighting]283
w[Metering]177
s[Focus mode]179
t[AF-area mode]179
u[Vibration
reduction]179
4[Electronic VR]178
H[Microphone
sensitivity]174
5[Attenuator] 373
6[Frequency
response]373
7[Wind noise
reduction]374
8[Headphone
volume]374
W[Focus peaking] 403
9[Highlight display] 450
3[Monitor/viewfinder
brightness]
457,
459
Z[Bluetooth
connection]
413,
483
U[Wi-Fi connection]158,
177
a[MB-N11 info] 413
Item 0
441
A Custom Settings: Fine-Tuning Camera Settings
Choose the operations performed in movie mode using camera
or lens controls or by pressing camera controls and rotating
command dials.
Choose the roles played by the controls
below. Highlight the desired control
and press J.
g2: Custom Controls
G button U A Custom Settings menu
Control
w[Fn1 button]
y[Fn2 button]
V[AF-ON button]
8[Sub-selector center]
G[Shutter-release button]
l[Lens control ring]
442 A Custom Settings: Fine-Tuning Camera Settings
The roles that can be assigned to these controls are as follows:
Option w y V 8 Gl
t[Power aperture (open)]4————
q[Power aperture (close)]—
4———
i[Exposure compensation
+]4————
h[Exposure
compensation -]4———
n[Subject tracking]44
———
b[Live view info display off]4444
——
b[Framing grid display]44
4——
p[Zoom on/off]4444
——
g[Protect]44
———
K[Select center focus point]— 44
——
A[AF-ON]—
4——
F[AF lock only]—
44
——
E[AE lock (Hold)]—
44
——
C[AE lock only]—
44
——
B[AE/AF lock]—
44
——
C[Take photos]—
4
1[Record movies]—
444
J[Choose image area]44
4——
m[White balance]44
———
h[Set Picture Control]44
———
443
A Custom Settings: Fine-Tuning Camera Settings
1 Available with compatible lenses only.
2 Regardless of the option selected, in manual focus mode the control
ring can only be used to adjust focus.
y[Active D-Lighting]44
———
w[Metering]44
———
z[Focus mode/AF-area
mode]44
———
H[Microphone sensitivity]44
———
W[Focus peaking]44
———
c[Rating]44
———
X[Focus (M/A)] —————41, 2
q[Power aperture] ————— 42
E[Exposure compensation]————— 42
9[ISO sensitivity] ————— 42
[None]4444
42
Option w y V 8 Gl
444 A Custom Settings: Fine-Tuning Camera Settings
The following options are available:
Role Description
t
[Power
aperture
(open)]
Aperture widens while the Fn1 button is
pressed. Use in combination with Custom
Setting g2 [Custom controls]> [Fn2
button]> [Power aperture (close)] for
button-controlled aperture adjustment.
q
[Power
aperture
(close)]
Aperture narrows while the Fn2 button is
pressed. Use in combination with Custom
Setting g2 [Custom controls]> [Fn1
button]> [Power aperture (open)] for
button-controlled aperture adjustment.
i
[Exposure
compensation
+]
Exposure compensation increases while the
Fn1 button is pressed. Use in combination
with Custom Setting g2 [Custom controls]>
[Fn2 button]> [Exposure compensation −]
for button-controlled exposure compensation.
h
[Exposure
compensation
]
Exposure compensation decreases while the
Fn2 button is pressed. Use in combination
with Custom Setting g2 [Custom controls]>
[Fn1 button]> [Exposure compensation +]
for button-controlled exposure compensation.
n[Subject
tracking]
Pressing the control when [Auto-area AF],
[Auto-area AF (people)], or [Auto-area AF
(animals)] is selected for AF-area mode
enables subject tracking; the focus point will
change to a targeting reticle and the monitor
and viewfinder to subject-tracking displays.
To end subject-tracking AF, press the control
again or press the W (Q) button.
445
A Custom Settings: Fine-Tuning Camera Settings
b[Live view info
display off]
Press the control to hide the indicators in the
live view display. Press again to view
indicators.
b[Framing grid
display]
Press the control to display a framing grid.
Press the control again to turn the display off.
g[Protect]Press the control during playback to protect
the current picture.
K[Select center
focus point]
Pressing the control selects the center focus
point.
A[AF-ON]Pressing the control initiates autofocus,
duplicating the function of the AF-ON button.
F[AF lock only] Focus locks while the control is pressed.
E[AE lock (Hold)]
Exposure locks when the control is pressed.
Exposure lock does not end when the shutter
is released. Exposure remains locked until the
control is pressed a second time or the
standby timer expires.
C[AE lock only] Exposure locks while the control is pressed.
B[AE/AF lock]Focus and exposure lock while the control is
pressed.
p[Zoom on/off]
Press the control to zoom the display in on the
area around the current focus point (the zoom
ratio is selected in advance). Press again to
cancel zoom.
Role Description
446 A Custom Settings: Fine-Tuning Camera Settings
C[Take photos]
Press the shutter-release button all the way
down to take a photograph with an aspect
ratio of 16:9.
1[Record
movies]
Press the control to start recording. Press
again to end recording.
J[Choose image
area]
Press the control and rotate a command dial
to choose the image area for movies. Note that
the image area cannot be changed while
recording is in progress.
m[White
balance]
Hold the control and rotate the main
command dial to adjust white balance for
movies. Some options offer sub-options that
can be selected by rotating the sub-command
dial.
h[Set Picture
Control]
Press the control and rotate a command dial
to choose a Picture Control.
y[Active
D-Lighting]
Press the control and rotate a command dial
to adjust Active D-Lighting for movies.
w[Metering]Press the control and rotate a command dial
to choose a movie metering option.
z[Focus mode/
AF-area mode]
Hold the control and rotate the main
command dial to choose the focus mode, the
sub-command dial to choose the AF-area
mode.
H[Microphone
sensitivity]
Press the control and rotate a command dial
to adjust microphone sensitivity.
Role Description
447
A Custom Settings: Fine-Tuning Camera Settings
DPower Aperture
Power aperture is available only in modes A and M.
A 6 icon in the shooting display indicates that power aperture cannot
be used.
The display may flicker while aperture is adjusted.
W[Focus
peaking]
Press the control and rotate the main
command dial to choose a peaking level and
the sub-command dial to select the peaking
color.
c[Rating]
To rate the current picture in playback mode,
press the control and rotate the main
command dial.
To display rating options, highlight [Rating]
and press 2. If an option other than [None]
is selected, the chosen rating can be
assigned to pictures simply by pressing the
selected control. Pressing the control again
selects a “no star” rating.
X[Focus (M/A)]
The lens control ring can be used for manual
focus regardless of the option selected for
focus mode. To refocus using autofocus, press
the shutter-release button halfway or press a
control to which AF-ON has been assigned.
q[Power
aperture]Rotate the lens control ring to adjust aperture.
E[Exposure
compensation]
Rotate the lens control ring to adjust exposure
compensation.
9[ISO
sensitivity]
Rotate the lens control ring to adjust ISO
sensitivity.
[None] The control has no effect.
Role Description
448 A Custom Settings: Fine-Tuning Camera Settings
Choose the role assigned to the J
button in movie mode. Regardless of the
option selected, the J button can be
used for focus tracking (086) when
[Auto-area AF], [Auto-area AF
(people)], or [Auto-area AF (animals)]
is selected for AF-area mode.
g3: OK Button
G button U A Custom Settings menu
Role Description
K[Select center focus
point]Pressing J selects the center focus point.
p[Zoom on/off]
Press J to zoom the display in on the area
around the active focus point. Press J
again to return to the previous display.
To choose the zoom ratio, highlight
[Zoom on/off] and press 2. Note,
however, that the zoom ratio is fixed at
[1:1 (100%)] during movie recording.
1[Record movies]Press J to start recording. Press J again
to end movie recording.
[None]Pressing
J during shooting has no effect.
449
A Custom Settings: Fine-Tuning Camera Settings
Choose the focus speed for movie mode.
Use [When to apply] to choose when the selected option
applies.
The AF tracking sensitivity for movie
mode can be set to values of from 1 to 7.
Choose [7 (Low)] to help maintain
focus on your original subject.
If the subject leaves the selected focus
area when [1 (High)] is selected, the
camera will respond by quickly shifting focus to a new subject
in the same area.
g4: AF Speed
G button U A Custom Settings menu
Option Description
D[Always]The camera focuses at the selected speed at all
times in movie mode.
E[Only while
recording]
Focus is adjusted at the selected speed only
during movie recording. At other times, the
focus speed is “+5”, or in other words as fast
possible.
g5: AF Tracking Sensitivity
G button U A Custom Settings menu
450 A Custom Settings: Fine-Tuning Camera Settings
Choose whether shading is used to indicate highlights (bright
areas of the frame) during movie recording.
Display Pattern
To enable the highlight display, select [Pattern 1] or [Pattern
2].
Highlight Display Threshold
Choose the brightness needed to trigger the movie highlight
display. The lower the value, the greater the range of
brightnesses that will be shown as highlights. If [255] is
selected, the highlight display will show only areas that are
potentially overexposed.
DHighlight Display
If both the highlight display and focus peaking are enabled in manual
focus mode, only focus peaking will take effect. To view the highlight
display in manual focus mode, select [Off] for Custom Setting d11 [Focus
peaking]> [Peaking level].
g6: Highlight Display
G button U A Custom Settings menu
Pattern 1 Pattern 2
451
A Custom Settings: Fine-Tuning Camera Settings
Choose the roles played by the controls on optional MB-N11
power battery packs in movie mode.
The controls to which roles can be
assigned are listed below. Highlight the
desired control and press J.
g7: Assign MB-N11 Buttons
G button U A Custom Settings menu
Control
[Fn button]
[AF-ON button]
452 A Custom Settings: Fine-Tuning Camera Settings
The roles that can be assigned to these controls are listed
below. For information on the listed roles, see the section on
Custom Setting g2 [Custom controls].
Same as Camera AF-ON Button
The control performs the same function as the camera AF-ON
button.
Option Fn AF-ON
b[Live view info
display off]44
1[Record movies]44
E[Exposure
compensation]4
9[ISO sensitivity]4
e[Same as camera
AF-ON button]4
K[Select center focus
point]4
A[AF-ON]—
4
F[AF lock only]—
4
E[AE lock (Hold)]— 4
C[AE lock only]—
4
B[AE/AF lock]—
4
p[Zoom on/off]—4
[None]44
453
B The Setup Menu: Camera Setup
To view the setup menu, select the B tab
in the camera menus.
The setup menu contains the following items:
B The Setup Menu: Camera Setup
Item 0
[Format memory card]455
[Save user settings]455
[Reset user settings]455
[Language]456
[Time zone and date]456
[Monitor brightness]457
[Monitor color balance]458
[Viewfinder brightness]459
[Viewfinder color balance]460
[Control panel brightness]460
[Limit monitor mode
selection]461
[Information display]461
[AF fine-tuning options] 462
[Non-CPU lens data] 466
[Save focus position] 466
[Clean image sensor] 467
[Image Dust Off ref photo] 468
[Pixel mapping] 471
[Image comment] 473
[Copyright information] 474
[Beep options] 476
[Touch controls] 477
[HDMI] 478
Item 0
454 B The Setup Menu: Camera Setup
* Displayed only when a GPS device is connected.
DSee Also
“Setup Menu Defaults” (0226)
[Location data]*478
[Wireless remote (WR)
options]479
[Assign remote (WR) Fn
button]482
[Airplane mode] 482
[Connect to smart device] 483
[Connect to PC] 486
[Wireless transmitter
(WT-7)]490
[Conformity marking] 490
Item 0
[Battery info]491
[USB power delivery]492
[Energy saving (photo
mode)]494
[Slot empty release lock]495
[Save/load menu settings]496
[Reset all settings]501
[Firmware version]501
Item 0
455
B The Setup Menu: Camera Setup
Format memory cards. To begin
formatting, choose a memory card slot
and select [Yes]. Note that formatting
permanently deletes all pictures and other
data on the card. Before formatting, be
sure to make backup copies as required.
DDuring Formatting
Do not turn the camera off or remove memory cards until the message
[Formatting memory card] clears from the display.
Frequently-used combinations of settings can be assigned to
the U1 to U3 positions on the mode dial (0115).
Reset settings for U1 to U3 to default values (0117).
Format Memory Card
G button U B setup menu
Save User Settings
G button U B setup menu
Reset User Settings
G button U B setup menu
456 B The Setup Menu: Camera Setup
Choose a language for camera menus and messages. The
languages available vary with the country or region in which the
camera was originally purchased.
Change time zones and set the camera clock. We recommend
that the camera clock be adjusted regularly.
A flashing t icon in the shooting display indicates that the
clock has not been set.
Language
G button U B setup menu
Time Zone and Date
G button U B setup menu
Option Description
[Time zone]Choose a time zone. [Date and time] is automatically
set to the time in the new time zone.
[Date and
time]
Set the camera clock to the time in the selected [Time
zone].
[Date format]Choose the order in which the day, month, and year are
displayed.
[Daylight
saving time]
Select [On] to turn daylight saving time on, [Off] to turn
it off. Selecting [On] automatically advances the clock
one hour. The default setting is [Off].
457
B The Setup Menu: Camera Setup
Press 1 or 3 to adjust monitor brightness. Choose higher
values for increased brightness, lower values for reduced
brightness.
[Monitor brightness] can only be adjusted when the monitor
is the active display. It cannot be adjusted when [Viewfinder
only] is selected for monitor mode or when your eye is to the
viewfinder.
Higher values increase the drain on the battery.
Monitor Brightness
G button U B setup menu
458 B The Setup Menu: Camera Setup
Adjust monitor color balance to your taste.
[Monitor color balance] can only be adjusted when the
monitor is the active display. It cannot be adjusted when
[Viewfinder only] is selected for monitor mode or when your
eye is to the viewfinder.
Color balance is adjusted using the
multi selector. Press 1, 3, 4, or 2 to
adjust color balance as shown below.
Press J to save changes.
Monitor color balance applies only to menus, playback, and
the shooting display; photos and movies taken with the
camera are not affected.
Monitor Color Balance
G button U B setup menu
1Increase green
2Increase amber
3Increase magenta
4Increase blue
459
B The Setup Menu: Camera Setup
The reference image is either the last picture taken or, in
playback mode, the picture last displayed. If the memory card
contains no pictures, an empty frame will be displayed
instead.
To choose a different picture, press the
W (Q) button. Highlight the desired
picture and press J to select it as the
reference image.
To view the highlighted picture full
frame, press and hold X.
Adjust viewfinder brightness. [Viewfinder brightness] can
only be adjusted when the viewfinder is the active display. It
cannot be adjusted when the monitor is on or when [Monitor
only] is selected for monitor mode.
Higher values increase the drain on the battery.
Viewfinder Brightness
G button U B setup menu
Option Description
[Auto]Viewfinder brightness is adjusted automatically in
response to lighting conditions.
[Manual]
Press 1 or 3 to adjust brightness manually. Choose
higher values for increased brightness, lower values for
reduced brightness.
460 B The Setup Menu: Camera Setup
Adjust viewfinder color balance to your taste. [Viewfinder color
balance] can only be adjusted when the viewfinder is the active
display. It cannot be adjusted in the monitor or when [Monitor
only] is selected for monitor mode. Otherwise the procedure is
the same as for [Monitor color balance] (0458).
Adjust the brightness of the control panel.
Raising control panel brightness increases the drain on the
battery.
Viewfinder Color Balance
G button U B setup menu
Control Panel Brightness
G button U B setup menu
Option Description
[Auto]Control panel brightness is adjusted automatically in
response to ambient lighting.
[Manual]Press
1 or 3 to adjust control panel brightness.
[Off] Turn the control panel off.
461
B The Setup Menu: Camera Setup
Choose the monitor modes that can be selected using the
Mbutton.
Highlight options and press 2 to select (M) or deselect (U).
Options marked with a check (M) are available for selection.
To complete the operation, press J.
Adjust the appearance of the information display according to
lighting conditions.
Limit Monitor Mode Selection
G button U B setup menu
Information Display
G button U B setup menu
Dark on light Light on dark
Option Description
w[Dark on
light]
To make the display easier to read in bright
locations, the monitor lights and the lettering is
displayed in black.
x[Light on
dark]
To make the display easier to read in dark locations,
the monitor dims and the lettering is displayed in
white.
462 B The Setup Menu: Camera Setup
Fine-tune focus for the current lens.
Use only as required.
We recommend that you perform fine-tuning at a focus
distance you use frequently. If you perform focus-tuning at a
short focus distance, for example, you may find it less effective
at longer distances.
AF Fine-Tuning Options
G button U B setup menu
Option Description
[AF fine-tune
on/off]
[On]: Turn AF fine-tuning on.
[Off]: Turn AF fine-tuning off.
[Fine-tune
and save lens]
Fine-tune focus for the current lens. Press 1 or 3 to
highlight items and press 4 or 2 to choose from values
between +20 and –20.
The larger the fine-tuning value, the farther the focal
point is from the lens; the smaller the value, the closer
the focal point.
The display shows the current and previous values.
The camera can store values for up to 40 lens types.
New values overwrite existing values.
[Default]
Choose the fine-tuning values for lenses for which no
values have previously been saved using [Fine-tune
and save lens]. Press 4 or 2 to choose from values
between +20 and –20.
463
B The Setup Menu: Camera Setup
DDeleting Saved Values
To delete values saved using [Fine-tune and save lens], highlight the
desired lens in the [List saved values] list and press O.
[List saved
values]
List values saved using [Fine-
tune and save lens].
Highlighting a lens in the list
and pressing 2 displays a
[Choose lens number]
dialog.
The [Choose lens number]
dialog is used to enter the lens identifier.
In the case of Z mount lenses and some F mount
lenses, the lens serial number is entered
automatically.
Option Description
464 B The Setup Menu: Camera Setup
Creating and Saving Fine-Tuning Values
1
Attach the lens to the camera.
2
Select [AF fine-tuning options] in the setup menu,
then highlight [Fine-tune and save lens] and press
2
.
An AF fine-tuning dialog will be displayed.
3
Press
4
or
2
to fine-tune autofocus.
Choose from values between +20 and –20.
The current value is shown by g, the previously-selected
value by j.
If a zoom lens is attached, you can choose separate fine-
tuning values for maximum angle (WIDE) and maximum
zoom (TELE). Use 1 and 3 to choose between the two.
The larger the fine-tuning value, the farther the focal point
from the lens; the smaller the value, the closer the focal
point.
4
Press
J
to save the new value.
465
B The Setup Menu: Camera Setup
Choosing a Default Fine-Tuning Value
1
Select [AF fine-tuning options] in the setup menu,
then highlight [Default] and press
2
.
2
Press
4
or
2
to fine-tune autofocus.
Choose from values between +20 and –20.
The current value is shown by g, the previously-selected
value by j.
The larger the fine-tuning value, the farther the focal point
from the lens; the smaller the value, the closer the focal
point.
3
Press
J
to save the new value.
466 B The Setup Menu: Camera Setup
Record data for non-CPU lenses attached using an optional
mount adapter. Recording the focal length and maximum
aperture of non-CPU lenses allows them to be used with some
camera features normally reserved for CPU lenses, such as on-
board vibration reduction.
When [On] is selected, the camera will save the current focus
position when turned off and restore it when next turned on.
Note that this increases camera startup times (in addition, if the
temperature, zoom position, or other conditions change while
the camera is off, focus may resume from a different position
when the camera is turned on).
Non-CPU Lens Data
G button U B setup menu
Option Description
[Lens number] Choose a lens identifier.
[Focal length
(mm)]Enter the focal length.
[Maximum
aperture]Enter the maximum aperture.
Save Focus Position
G button U B setup menu
467
B The Setup Menu: Camera Setup
Dirt or dust entering the camera when lenses are exchanged or
the body cap is removed may adhere to the image sensor and
affect your photographs. The “clean image sensor” option
vibrates the sensor to remove dust.
Clean Image Sensor
G button U B setup menu
Option Description
[Clean now] Perform image sensor cleaning immediately.
[Automatic
cleaning]
[Clean at shutdown]: The image sensor is
automatically cleaned during shutdown each time
the camera is turned off.
[Cleaning off]: Automatic image sensor cleaning
off.
468 B The Setup Menu: Camera Setup
Acquire reference data for the Image Dust Off option in
Capture NX-D. Image Dust Off processes NEF (RAW) images to
mitigate effects caused by dust adhering in front of the camera
image sensor. For more information, refer to Capture NX-D
online help.
Acquiring Image Dust Off Reference Data
1
Choose a start option.
Highlight [Start] and press J to
immediately display the [Image
Dust Off ref photo] dialog.
Highlight [Clean sensor and then
start] and press J to clean the
image sensor before starting. The
[Image Dust Off ref photo] dialog
will be displayed when image
sensor cleaning is complete.
To exit without acquiring Image Dust Off reference data,
press G.
Image Dust Off Ref Photo
G button U B setup menu
469
B The Setup Menu: Camera Setup
2
With the lens about ten centimeters (four inches)
from a well-lit, featureless white object, frame the
object so that it fills the display and then press the
shutter-release button halfway.
In autofocus mode, focus will automatically be set to
infinity.
In manual focus mode, set focus to infinity manually.
3
Press the shutter-release button the rest of the
way down to acquire Image Dust Off reference
data.
The monitor turns off when the shutter-release button is
pressed.
If the reference object is too bright
or too dark, the camera may be
unable to acquire Image Dust Off
reference data and a message will
be displayed and the camera will
return to the display shown in Step
1. Choose another reference object and press the shutter-
release button again.
470 B The Setup Menu: Camera Setup
DImage Sensor Cleaning
Dust off reference data recorded before image sensor cleaning is
performed cannot be used with photographs taken after image sensor
cleaning is performed. Select [Clean sensor and then start] only if the
Image Dust Off reference data will not be used with existing photographs.
DAcquiring Image Dust Off Reference Data
An FX-format lens with a focal length of at least 50 mm is
recommended.
When using a zoom lens, zoom all the way in.
The same reference data can be used for photographs taken with
different lenses or at different apertures.
The Capture NX-D Image Dust Off option cannot be used with NEF
(RAW) pictures recorded at an image size of [Medium] or [Small].
Reference images cannot be viewed using computer imaging software.
A grid pattern is displayed when reference
images are viewed on the camera.
471
B The Setup Menu: Camera Setup
Pixel mapping checks and optimizes the camera image sensor.
If you notice unexpected bright spots appearing in pictures
taken with the camera, perform pixel mapping as described
below.
Pixel mapping is available only when a Z mount lens or an
optional FTZ mount adapter is attached.
To prevent unexpected loss of power, use a fully-charged
battery, a charging AC adapter (available separately for the
Z 6II, supplied with the Z 7II), or an optional AC adapter and
power connector.
1
Select [Pixel mapping] in the setup menu.
Turn the camera on, press the G button, and select [Pixel
mapping] in the setup menu.
2
Select [Start].
Pixel mapping will start. A message is displayed while the
operation is in progress.
3
Turn the camera off when pixel mapping is
complete.
Pixel Mapping
G button U B setup menu
472 B The Setup Menu: Camera Setup
DPixel Mapping
Do not attempt to operate the camera while pixel mapping is in
progress. Do not turn the camera off or remove or disconnect the power
source.
Pixel mapping may not be available if the camera’s internal temperature
is elevated.
473
B The Setup Menu: Camera Setup
Add a comment to new photographs as they are taken.
Comments can be viewed as metadata in ViewNX-i or
Capture NX-D.
Input Comment
Input a comment of up to 36 characters. Highlight [Input
comment] and press 2 to display a text-entry dialog. For
information on text entry, see “Text Entry” (0251).
Attach Comment
To attach the comment to subsequent
photographs, highlight [Attach
comment], press 2, and confirm that a
check (M) appears in the adjacent check
box. Press J to save changes and exit;
the comment will be attached to all
subsequent photographs.
DPhoto Info
Comments can be viewed on the shooting data page in the photo
information display.
Image Comment
G button U B setup menu
474 B The Setup Menu: Camera Setup
Add copyright information to new photographs as they are
taken. Copyright information can be viewed as metadata in
ViewNX-i or Capture NX-D.
Artist/Copyright
Enter the names of the photographer (maximum 36 characters)
and copyright holder (maximum 54 characters). Highlight
[Artist] or [Copyright] or press 2 to display a text-entry dialog.
For information on text entry, see “Text Entry” (0251).
Attach Copyright Information
To attach copyright information to
subsequent photographs, highlight
[Attach copyright information], press
2, and confirm that a check (M) appears
in the adjacent check box. Press J to
save changes and exit; copyright
information will be attached to all subsequent photographs.
Copyright Information
G button U B setup menu
475
B The Setup Menu: Camera Setup
DCopyright Information
To prevent unauthorized use of the artist or copyright holder names,
make sure that [Attach copyright information] is not selected before
lending or transferring the camera to another person. You will also need
to make sure that the artist and copyright fields are blank.
Nikon does not accept liability for any damages or disputes arising from
the use of the [Copyright information] option.
DPhoto Info
Copyright information is included in the shooting data shown in the
photo information display.
476 B The Setup Menu: Camera Setup
Beep On/Off
Turn the beep speaker on or off.
If [On] is selected for [Beep on/off], beeps sound when:
- the self-timer counts down,
- interval-timer photography, time-lapse movie recording, or
focus shift ends,
- the camera focuses in photo mode (note that this does not
apply if AF-C is selected for focus mode or if [Release] is
selected for Custom Setting a2 [AF-S priority selection]),
- touch controls are used, or
- the shutter-release button is pressed with a write-protected
SD memory card inserted in the camera.
Select [Off (touch controls only)] to disable the beep for
touch controls while enabling it for other purposes.
When [On] is selected for [Silent photography] in the photo
shooting menu, a beep will not sound when the camera
focuses or while the self-timer is in operation, regardless of the
settings selected for [Beep options].
Beep Options
G button U B setup menu
477
B The Setup Menu: Camera Setup
Volume
Adjust beep volume.
Pitch
Choose the pitch of the beep from [High] and [Low].
Adjust settings for monitor touch controls.
Enable/Disable Touch Controls
Enable or disable touch controls. Select [Playback only] to
enable touch controls in playback mode only.
Full-Frame Playback Flicks
Choose whether the next image in full-frame playback is
displayed by flicking left or by flicking right.
Touch Controls
G button U B setup menu
Option Description
S[LeftURight] Flick left to display the next picture.
T[LeftVRight] Flick right to view the next picture.
478 B The Setup Menu: Camera Setup
Adjust settings for connection to HDMI devices (0606).
Adjust settings for use when the camera is connected to a GPS
receiver.
HDMI
G button U B setup menu
Location Data
G button U B setup menu
Option Description
[Standby timer]
If [Enable] is selected when a GPS receiver is
connected, the standby timer will expire if no
operations are performed for the time selected for
Custom Setting c3 [Power off delay] > [Standby
timer]. Choose this option to reduce the drain on the
battery.
[Position]View the location data supplied by the GPS receiver.
The items displayed vary with the source.
[Set clock from
satellite]
Select [Yes] to synchronize the camera clock with the
time reported by the GPS device.
479
B The Setup Menu: Camera Setup
Adjust status LED and link mode settings for optional WR-R10
wireless remote controllers. You can also choose a link mode for
connection to optional radio-controlled flash units that support
Advanced Wireless Lighting.
LED Lamp
Enable or disable the status LEDs on a WR-R10 wireless remote
controller mounted on the camera. For more information, see
the documentation supplied with the wireless remote
controller.
Wireless Remote (WR) Options
G button U B setup menu
480 B The Setup Menu: Camera Setup
Link Mode
Choose a link mode for WR-R10 wireless remote controllers
mounted on other cameras or radio-controlled flash units that
support Advanced Wireless Lighting. Be sure that the same
mode is selected for the other devices.
Option Description
[Pairing]
The camera connects only to devices with which it has
previously been paired. Press the pairing button on
the wireless remote controller connected to the
camera to pair it with other devices.
As camera will not communicate with devices with
which it has not been paired, this option can be
used to prevent signal interference from other
devices in the vicinity.
Given that each device must be paired separately,
however, PIN is recommended when connecting to
a large number of devices.
481
B The Setup Menu: Camera Setup
Regardless of the option selected for [Link mode], signals
from paired wireless remote controllers will always be
received by the WR-R10. Users of the WR-1 wireless remote
controller will need to select pairing as the WR-1 link mode.
DThe WR-R10 Wireless Remote Controller
Be sure the firmware for the WR-R10 has been updated to the latest
version (version 3.0 or later). For information on firmware updates, see the
Nikon website for your area.
[PIN]
Communication is shared
among all devices with the
same four-digit PIN.
Connect using a four-digit
PIN. Press 4 or 2 to
highlight digits and press
1 or 3 to change. Press J
to enter and display the selected PIN.
This option is a good choice for photography
featuring a large number of remote devices.
If there are multiple cameras present that share the
same PIN, the flash units will be under the sole
control of the camera that connects first, preventing
all other cameras from connecting (the LEDs on the
wireless remote controllers connected to the
affected cameras will blink).
Option Description
482 B The Setup Menu: Camera Setup
Choose the role played by the Fn button on optional wireless
remote controllers equipped with an Fn button. See Custom
Setting f2 [Custom controls] for more information.
Select [Enable] to disable the camera’s built-in Bluetooth and
Wi-Fi functions.
The wireless functions of optional peripheral devices
connected to the camera can only be disabled by
disconnecting the devices.
Assign Remote (WR) Fn Button
G button U B setup menu
Option
A[AF-ON]
F[AF lock only]
D[AE lock (Reset on release)]
C[AE lock only]
B[AE/AF lock]
r[FV lock]
h[c Disable/enable]
q[Preview]
4[+ NEF (RAW)]
b[Live view info display off]
[None]
Option
Airplane Mode
G button U B setup menu
483
B The Setup Menu: Camera Setup
Connect to smartphones or tablets
(smart devices) via Bluetooth or Wi-Fi.
Pairing (Bluetooth)
Pair with or connect to smart devices using Bluetooth.
Connect to Smart Device
G button U B setup menu
Option Description
[Start pairing] Pair the camera with a smart device (0577).
[Paired devices]List paired smart devices. To connect, select a
device from the list.
[Bluetooth
connection]Select [Enable] to enable Bluetooth.
484 B The Setup Menu: Camera Setup
Select to Send (Bluetooth)
Select pictures for upload to a smart device. You can also opt to
upload pictures as they are taken.
Wi-Fi Connection
Connect to smart devices via Wi-Fi.
❚❚ Establish Wi-Fi Connection
Initiate a Wi-Fi connection to a smart device.
The camera SSID and password will be displayed. To connect,
select the camera SSID on the smart device and enter the
password (0568).
Once a connection is established, this option will change to
[Close Wi-Fi connection].
Use [Close Wi-Fi connection] to end the connection when
desired.
Option Description
[Auto select to
send]
Select [On] to mark pictures for upload as they are
taken. Photos are uploaded in JPEG format at a
size of 2 megapixels, even if other upload size and
format options are selected with the camera.
Photos taken in movie mode will not be uploaded.
They must be uploaded manually.
[Manual select to
send]
Upload selected pictures. Transfer marking
appears on the selected pictures.
[Deselect all] Remove transfer marking from all pictures.
485
B The Setup Menu: Camera Setup
❚❚ Wi-Fi Connection Settings
Access the following Wi-Fi settings:
Send While Off
If [On] is selected, upload of images to smart devices connected
via Bluetooth will continue even when the camera is off.
Location Data (Smart Device)
Display latitude, longitude, altitude, and UTC (Universal
Coordinated Time) data downloaded from a smart device. Note
that the camera may be unable to download or display location
data from smart devices depending on the version of the device
operating system and/or SnapBridge app used.
Option Description
[SSID] Choose the camera SSID.
[Authentication/
encryption]Choose [OPEN] or [WPA2-PSK-AES].
[Password] Choose the camera password.
[Channel]
Choose a channel.
Select [Auto] to have the camera choose the
channel automatically.
Select [Manual] to choose the channel
manually.
[Current settings] View current Wi-Fi settings.
[Reset connection
settings]
Select [Yes] to reset Wi-Fi settings to default
values.
486 B The Setup Menu: Camera Setup
Connect to computers via Wi-Fi.
Wi-Fi Connection
Select [Enable] to connect using the settings currently selected
for [Network settings].
Network Settings
Select [Create profile] to create a new network profile (0544,
550).
If more than one profile already exists, you can press J to
select a profile from a list.
To edit an existing profile, highlight it and press 2.
Connect to PC
G button U B setup menu
Option Description
[General]
[Profile name]: Rename the profile. The default profile
name is the same as the network SSID.
[Password protection]: Select [On] to require that a
password be entered before the profile can be
changed. To change the password, highlight [On] and
press 2.
487
B The Setup Menu: Camera Setup
[Wireless]
Infrastructure mode: Adjust settings for connection
to a network via a router.
-[SSID]: Enter the network SSID.
-[Channel]: Selected automatically.
-[Authentication/encryption]: Choose [OPEN] or
[WPA2-PSK-AES].
-[Password]: Enter the network password.
Access-point mode: Adjust settings for direct wireless
connection to the camera.
-[SSID]: Choose the camera SSID.
-[Channel]: Choose [Auto] or [Manual].
-[Authentication/encryption]: Choose [OPEN] or
[WPA2-PSK-AES].
-[Password]: If [WPA2-PSK-AES] is selected for
[Authentication/encryption], you can choose the
camera password.
[TCP/IP]
Adjust TCP/IP settings for infrastructure connections. An
IP address is required.
If [Enable] is selected for [Obtain automatically], the
IP address and sub-net mask for infrastructure mode
connections will be acquired via a DHCP server or
automatic IP addressing.
Select [Disable] to enter the IP address ([Address])
and sub-net mask ([Mask]) manually.
Option Description
488 B The Setup Menu: Camera Setup
Options
Adjust upload settings.
❚❚ Auto Send
Select [On] to upload new photos as they are taken.
Upload begins only after the photo has been recorded to the
memory card. Be sure a memory card is inserted in the camera.
Movies and photos taken during movie mode are not
uploaded automatically when recording is complete. They
must instead be uploaded from the playback display (0559).
❚❚ Delete After Send
Select [Yes] to delete photographs from the camera memory
card automatically once upload is complete.
Files marked for transfer before you selected [Yes] are not
deleted.
Deletion may be suspended during some camera operations.
❚❚ Send File As
When uploading NEF + JPEG images, choose whether to upload
both the NEF (RAW) and JPEG files or only the JPEG copy.
When [RAW primary - JPEG secondary] is selected for
[Secondary slot function] in the photo shooting menu, the
option chosen for [Send file as] applies only to photos
uploaded automatically by selecting [On] for [Auto send].
489
B The Setup Menu: Camera Setup
❚❚ Deselect All?
Select [Yes] to remove transfer marking from all images. Upload
of images with a “sending” icon will immediately be terminated.
MAC Address
View the MAC address.
490 B The Setup Menu: Camera Setup
Adjust settings for connection to computers or ftp servers via
wireless or Ethernet networks using an optional WT-7 wireless
transmitter. This item is available only when an optional WT-7
wireless transmitter is connected.
The options selected for [Connect to smart device] and
[Connect to PC] are automatically disabled when the WT-7 is
connected and turned on.
Information on [Wireless transmitter] can be found below;
for information on [Choose hardware], [Network settings],
and [Options], see the manual provided with the WT-7.
Wireless Transmitter
Select [Use] to enable WT-7 when it is connected to the camera.
View some of the standards with which the camera complies.
Wireless Transmitter (WT-7)
G button U B setup menu
Conformity Marking
G button U B setup menu
491
B The Setup Menu: Camera Setup
View information on the battery
currently inserted in the camera.
DNumber of Shots
[No. of shots] shows the number of times the shutter has been released.
Note that the camera may sometimes release the shutter without
recording a photograph, for example when measuring preset manual
white balance.
DCharging Batteries at Low Temperatures
Batteries in general exhibit a drop in capacity at low ambient
temperatures. Even fresh batteries charged at temperatures under about
C (4F) may show a temporary increase from “0” to “1” in the value
shown for [Battery age], but the display will return to normal once the
battery has been recharged at a temperature of about 20 °C (68 °F) or
higher.
Battery Info
G button U B setup menu
Option Description
[Charge] The current battery level, expressed as a percentage.
[No. of
shots]
The number of times the shutter has been released since
the battery was last charged.
[Battery
age]
A five-level display showing battery age.
A value of “0” (k) indicates that battery performance is
unimpaired.
A value of “4” (l) indicates that the battery has reached
the end of its charging life. Replace the battery.
492 B The Setup Menu: Camera Setup
Choose whether charging AC adapters (available separately for
the Z 6II, supplied with the Z 7II) or computers connected via
USB can be used to power the camera (USB power delivery).
USB power delivery allows the camera to be used while limiting
the drain on the battery.
Power will only be supplied to the camera when the battery is
inserted.
A USB power delivery icon appears in
the shooting display and the control
panel when the camera is powered by
an external source.
For more information, see “Charging
AC Adapters” (040).
USB Power Delivery
G button U B setup menu
Option Description
[Enable]
The camera draws power from connected devices while
on. Connected devices will also supply power when the
camera is off if Bluetooth upload is in progress or the
memory card access lamp is lit.
[Disable]The camera does not draw power from connected devices
at any time.
493
B The Setup Menu: Camera Setup
DComputer USB Power Delivery
Before using a computer to supply power to the camera, check that the
computer is equipped with a Type C USB connector. Use a UC-E25 USB
cable (available separately) to connect the camera to the computer.
Depending on the model and product specifications, some computers
will not supply current to power the camera.
D“Power Delivery” Versus “Charging”
The supply of power for camera operations is referred to as “power
delivery”, while the term “charging” is used when power is supplied only
to charge the camera battery. The conditions under which the power
supplied by external devices is used to power the camera or charge the
battery are shown below.
1 Includes instances in which the power switch is in the “OFF” position
but Bluetooth upload is in progress or the memory card access lamp is
lit.
2 EN-EL15c and EN-EL15b batteries inserted in the camera will charge
when the camera is connected to a charging AC adapter (available
separately for the Z 6II, supplied with the Z 7II) or via USB to a
computer.
Option selected for
[USB power delivery] Camera External power
source used for
[Enable]On 1Power delivery
Off Charging 2
[Disable]On 1
Off Charging 2
494 B The Setup Menu: Camera Setup
In photo mode, the shooting display will dim to save power
approximately 15 seconds before the standby timer expires.
DEnergy Saving (Photo Mode)
Note that even when [Enable] is selected, energy saving will not function:
if [No limit] is selected for Custom Setting c3 [Power off delay] >
[Standby timer] or if the delay selected is less than 30 seconds,
during zoom,
while the camera is connected to another device via HDMI,
while the camera is connected to and exchanging data with a computer
via USB,
during USB charging or USB power delivery, or
while the camera is connected to an AC adapter.
Energy Saving (Photo Mode)
G button U B setup menu
Option Description
[Enable] Enable energy saving. The display refresh rate may drop.
[Disable]
Disable energy saving. Note selecting [Disable] does not
stop the shooting display dimming a few seconds before
the standby timer expires.
495
B The Setup Menu: Camera Setup
Choose whether the shutter can be released when no memory
card is inserted in the camera.
Slot Empty Release Lock
G button U B setup menu
Option Description
a[Release
locked]
The shutter cannot be released when no memory
card is inserted.
b[Enable
release]
The shutter can be released with no memory card
inserted. No pictures will be recorded; during
playback, the camera displays [Demo].
496 B The Setup Menu: Camera Setup
Save current camera menu settings to a memory card. You can
also load saved settings, allowing menu settings to be shared
among cameras of the same model.
If two memory cards are inserted, the settings will be saved to
the card in the slot selected using [Primary slot selection] in
the photo shooting menu.
The following settings are saved:
Save/Load Menu Settings
G button U B setup menu
Settings that can be saved and loaded
PLAYBACK MENU
[Playback display options]
[Dual-format recording PB slot]
[Image review]
[After delete]
[After burst, show]
[Rotate tall]
497
B The Setup Menu: Camera Setup
PHOTO SHOOTING
MENU
[File naming]
[Primary slot selection]
[Secondary slot function]
[Choose image area]
[Image quality]
[Image size]
[NEF (RAW) recording]
[ISO sensitivity settings]
[White balance]
[Set Picture Control] (Custom Picture Controls are
saved as [Auto])
[Color space]
[Active D-Lighting]
[Long exposure NR]
[High ISO NR]
[Vignette control]
[Diffraction compensation]
[Auto distortion control]
[Flicker reduction shooting]
[Metering]
[Flash control]
[Flash mode]
[Flash compensation]
[Focus mode]
[AF-area mode]
[Vibration reduction] (the options available vary
with the lens)
[Auto bracketing]
Settings that can be saved and loaded
498 B The Setup Menu: Camera Setup
MOVIE SHOOTING
MENU
[File naming]
[Destination]
[Choose image area]
[Frame size/frame rate]
[Movie quality]
[Movie file type]
[ISO sensitivity settings]
[White balance]
[Set Picture Control] (Custom Picture Controls are
saved as [Auto])
[Active D-Lighting]
[High ISO NR]
[Vignette control]
[Diffraction compensation]
[Auto distortion control]
[Flicker reduction]
[Metering]
[Focus mode]
[AF-area mode]
[Vibration reduction] (the options available vary
with the lens)
[Electronic VR]
[Microphone sensitivity]
[Attenuator]
[Frequency response]
[Wind noise reduction]
[Headphone volume]
[Timecode] (excepting [Timecode origin])
Settings that can be saved and loaded
499
B The Setup Menu: Camera Setup
CUSTOM SETTING
MENU All items
SETUP MENU
[Language]
[Time zone and date] (excepting [Date and time])
[Limit monitor mode selection]
[Information display]
[Non-CPU lens data]
[Clean image sensor]
[Image comment]
[Copyright information]
[Beep options]
[Touch controls]
[HDMI]
[Location data] (excepting [Position])
[Wireless remote (WR) options]
[Assign remote (WR) Fn button]
[USB power delivery]
[Energy saving (photo mode)]
[Slot empty release lock]
Settings that can be saved and loaded
500 B The Setup Menu: Camera Setup
Save Menu Settings
Save settings to a memory card. If the card is full, an error will be
displayed and settings will not be saved. Saved settings can
only be used with other cameras of the same model.
Load Menu Settings
Load saved settings from a memory card. Note that [Load
menu settings] is available only when a memory card
containing saved settings is inserted.
DSaved Settings
Settings are saved to files named “NCSET***”. “***” is an identifier that
varies from camera to camera. The camera will not be able to load settings
if the file name is changed.
501
B The Setup Menu: Camera Setup
Reset all settings except [Language] and [Time zone and date]
to their default values. Copyright information and other user-
generated entries are also reset. Once reset, settings cannot be
restored.
We recommend that you save settings using the [Save/load
menu settings] item in the setup menu before performing a
reset.
View the current camera firmware version.
Reset All Settings
G button U B setup menu
Firmware Version
G button U B setup menu
502 N The Retouch Menu: Creating Retouched Copies
To view the retouch menu, select the N
tab in the camera menus.
The items in the retouch menu are used to trim or retouch
existing pictures.
The retouch menu is only displayed when a memory card
containing pictures is inserted in the camera.
Retouched copies are saved to new files, separate from the
original pictures.
The retouch menu contains the following items:
* Not displayed when [Retouch] is selected in the playback i menu.
N The Retouch Menu: Creating
Retouched Copies
Item 0
7[NEF (RAW)
processing]506
k[Trim] 511
8[Resize] 512
i[D-Lighting] 517
j[Red-eye correction] 518
Z[Straighten] 519
a[Distortion control]520
e[Perspective control]521
l[Monochrome]522
o[Image overlay] *523
9[Trim movie]532
Item 0
503
N The Retouch Menu: Creating Retouched Copies
Creating Retouched Copies
1
Select an item in the retouch
menu.
Press 1 or 3 to highlight an item, 2
to select.
2
Select a picture.
Highlight a picture using the multi
selector.
To view the highlighted picture full
screen, press and hold the
Xbutton.
Press J to select the highlighted picture.
3
Select retouch options.
For more information, see the section for the selected item.
To exit without creating a retouched copy, press G. The
retouch menu will be displayed.
4
Create a retouched copy.
Press J to create a retouched copy.
Retouched copies are indicated by a
p icon.
504 N The Retouch Menu: Creating Retouched Copies
DRetouching the Current Picture
To create a retouched copy of the current image, press i and select
[Retouch].
DRetouch
The camera may not be able to display or retouch images that were
taken or retouched using other cameras or that have been retouched
on a computer.
If no actions are performed for a brief period, the display will turn off
and any unsaved changes will be lost. To increase the time the display
remains on, choose a longer menu display time using Custom Setting c3
[Power off delay] > [Menus].
DRetouching Copies
Most items can be applied to copies created using other retouch
options, although multiple edits may result in reduced image quality or
faded colors.
With the exception of [Trim movie], each item can be applied only
once.
Some items may be unavailable depending on the items used to create
the copy.
Items that cannot be applied to the current image are grayed out and
unavailable.
505
N The Retouch Menu: Creating Retouched Copies
DImage Quality
Copies created from NEF (RAW) pictures are saved at an [Image quality]
of [JPEG fine m].
Copies created from JPEG pictures are the same quality as the original.
In the case of dual-format pictures recorded to the same memory card
at image-quality settings of NEF + JPEG, only the NEF (RAW) copy will be
retouched.
DImage Size
Except in the case of copies created with [NEF (RAW) processing], [Trim],
and [Resize], copies are the same size as the original.
506 N The Retouch Menu: Creating Retouched Copies
The process of converting NEF (RAW) images to other formats
such as JPEG is referred to as “NEF (RAW) processing”. JPEG
copies of NEF (RAW) pictures can be created on the camera as
described below.
1
Select [NEF (RAW) processing]
in the retouch menu.
Highlight [NEF (RAW) processing]
and press 2.
2
Choose a destination.
If two memory cards are inserted,
highlight [Choose destination]
and press 2.
[Choose destination] is not
available when only one memory
card is inserted. Proceed to Step 3.
Press 1 or 3 to highlight a card slot
and press J.
NEF (RAW) Processing: Converting NEF
(RAW) to JPEG
G button U N retouch menu
507
N The Retouch Menu: Creating Retouched Copies
3
Choose how images are
selected.
If you chose [Select image(s)], proceed to Step 5.
4
Select the source slot.
Highlight the slot with the card
containing the NEF (RAW) images
and press 2.
You will not be prompted to select
the slot if only one memory card is inserted.
Option Description
[Select
image(s)]
Create JPEG copies of
selected NEF (RAW) images.
Multiple NEF (RAW) images
can be selected.
[Select
date]
Create JPEG copies of all NEF
(RAW) pictures taken on
selected dates.
[Select
folder]
Create JPEG copies of all NEF
(RAW) pictures in a selected
folder.
508 N The Retouch Menu: Creating Retouched Copies
5
Select photographs.
If you chose [Select image(s)]:
Highlight pictures using the multi
selector.
To view the highlighted picture full
screen, press and hold the X
button.
To select the highlighted image, press the W (Q) button.
Selected pictures are marked by a $ icon. To deselect the
current picture, press the W (Q) button again; the $ will
no longer be displayed. All images will be processed using
the same settings.
Press J to proceed once selection is complete.
If you chose [Select date]:
Highlight dates using the multi
selector and press 2 to select (M)
or deselect (U).
All images taken on dates marked
with a check (M) will be processed
using the same settings.
Press J to proceed once selection is complete.
If you chose [Select folder]:
Highlight a folder and press J to select; all images in the
selected folder will be processed using the same settings.
509
N The Retouch Menu: Creating Retouched Copies
6
Choose settings for the JPEG copies.
The settings in effect when the photograph was taken
appear below a preview.
To use the setting in effect when the photograph was
taken, if applicable, select [Original].
To exit without copying the photographs, press the K
button.
4
3
2
1
5
9
8
7
6
10
1Image quality (0260)
2Image size (0261)
3White balance (0267)
4Exposure compensation
(0122)
5Set Picture Control (0275)
6High ISO NR (0286)
7Color space (0282)
8Vignette control (0287)
9Active D-Lighting (0283)
10 Diffraction compensation
(0288)
510 N The Retouch Menu: Creating Retouched Copies
7
Copy the photographs.
Highlight [EXE] and press J to
create JPEG copies of the selected
photographs.
If multiple photos are selected, a
confirmation dialog will be displayed after you highlight
[EXE] and press J; highlight [Yes] and press J to create
JPEG copies of the selected photos.
To cancel the operation before all copies have been
created, press the G button; when a confirmation dialog
is displayed, highlight [Yes] and press J.
DNEF (RAW) Processing
NEF (RAW) processing is available only with NEF (RAW) images created
with this camera. Pictures in other formats and NEF (RAW) photos taken
with other cameras or Camera Control Pro 2 cannot be selected.
[Exposure compensation] can only be set to values between –2 and +2
EV.
511
N The Retouch Menu: Creating Retouched Copies
Create a cropped copy of the selected photograph. The
photograph is displayed with the selected crop shown in
yellow; create a cropped copy as described below.
DCropped Pictures
Depending on the size of the cropped copy, playback zoom may not be
available when cropped copies are displayed.
The crop size appears at upper left in the crop
display. The size of the copy varies with crop
size and aspect ratio.
Trim
G button U N retouch menu
To Description
Size the crop Press X or W (Q) to choose the crop size.
Change the crop
aspect ratio
Rotate the main command dial to choose the
crop aspect ratio.
Position the crop Use the multi selector to position the crop.
Save the crop Press J to save the current crop as a separate
file.
512 N The Retouch Menu: Creating Retouched Copies
Create small copies of selected photographs. If two memory
cards are inserted, you can choose the card used to store the
resized copies.
Resizing Multiple Images
If you accessed the retouch menu via the G button, you can
resize multiple selected images.
1
Select [Resize] in the retouch
menu.
Highlight [Resize] and press 2.
2
Choose a destination.
If two memory cards are inserted,
highlight [Choose destination]
and press 2.
[Choose destination] is not
available when only one memory
card is inserted. Proceed to Step 3.
Press 1 or 3 to highlight a card slot
and press J.
Resize
G button U N retouch menu
513
N The Retouch Menu: Creating Retouched Copies
3
Choose a size.
Highlight [Choose size] and press
2.
Highlight the desired size (length in
pixels) using 1 and 3 and press J.
4
Choose how pictures are
selected.
If you chose [Select image(s)], proceed to Step 6.
Option Description
[Select
image(s)]
Resize selected pictures.
Multiple pictures can be
selected.
[Select
date]
Resize all pictures taken on
selected dates.
[Select
folder]
Resize all pictures in a
selected folder.
514 N The Retouch Menu: Creating Retouched Copies
5
Select the source slot.
Highlight the slot with the card
containing the desired pictures and
press 2.
You will not be prompted to select
the slot if only one memory card is inserted.
515
N The Retouch Menu: Creating Retouched Copies
6
Choose pictures.
If you chose [Select image(s)]:
Highlight pictures using the multi
selector.
To view the highlighted picture full
screen, press and hold the
Xbutton.
To select the highlighted picture, press the W (Q) button.
Selected pictures are indicated by a 8 icon. To deselect
the current picture, press the W (Q) button again; the 8
will no longer be displayed. The selected pictures will all be
copied at the size selected in Step 3.
Press J to proceed once selection is complete.
If you chose [Select date]:
Highlight dates using the multi
selector and press 2 to select (M)
or deselect (U).
All pictures taken on dates marked
with a check (M) will be copied at
the size selected in Step 3.
Press J to proceed once selection is complete.
If you chose [Select folder]:
Highlight a folder and press J to select; all pictures in the
selected folder will be copied at the size selected in Step 3.
516 N The Retouch Menu: Creating Retouched Copies
7
Save the resized copies.
A confirmation dialog will be
displayed; highlight [Yes] and press
J to save the resized copies.
To cancel the operation before all
copies have been created, press the G button; when a
confirmation dialog is displayed, highlight [Yes] and press
J.
DResize
Depending on the copy size, playback zoom may not be available when
resized copies are displayed.
517
N The Retouch Menu: Creating Retouched Copies
D-Lighting brightens shadows. It is ideal for dark or backlit
photographs.
The edit display shows before and after images.
Press 4 or 2 to choose the amount of
correction performed. The effect can be
previewed in the edit display.
Press J to save the retouched copy.
D-Lighting
G button U N retouch menu
Before After
518 N The Retouch Menu: Creating Retouched Copies
Correct “red-eye” caused by light from the flash reflecting from
the retinas of portrait subjects.
Red-eye correction is available only with photographs taken
using a flash.
Red-eye that cannot be detected by the camera will not be
corrected.
Press J to save the retouched copy.
DRed-Eye Correction
Note the following:
- Red-eye correction may not always produce the expected results.
- In very rare circumstances, red-eye correction may be applied to
portions of the image that are not affected by red-eye.
Check the preview thoroughly before proceeding.
Red-Eye Correction
G button U N retouch menu
519
N The Retouch Menu: Creating Retouched Copies
Rotate pictures by up to ±5° in
increments of approximately 0.25°.
The effect can be previewed in the edit
display.
The greater the rotation, the more will
be trimmed from the edges.
Press 4 or 2 to choose the amount of straightening
performed.
Press J to save the retouched copy.
Straighten
G button U N retouch menu
520 N The Retouch Menu: Creating Retouched Copies
Create copies with reduced peripheral
distortion; this can reduce barrel
distortion in pictures taken with wide-
angle lenses or pin-cushion distortion in
pictures taken with telephoto lenses.
Select [Auto] to let the camera correct
distortion automatically and then make fine adjustments using
the multi selector. Select [Manual] to reduce distortion
manually.
The effect can be previewed in the edit display.
Note that [Manual] must be used with copies created using
the [Auto] option and with photos taken using the [Auto
distortion control] option in the photo shooting menu.
Manual distortion control cannot be further applied to copies
created using [Manual].
Press 4 to reduce pincushion distortion, 2 to reduce barrel
distortion.
Press J to save the retouched copy.
DDistortion Control
Note that greater amounts of distortion control result in more of the
edges being cropped out.
Distortion Control
G button U N retouch menu
521
N The Retouch Menu: Creating Retouched Copies
Create copies that reduce the effects of
perspective in photos taken looking up
from the base of a tall object.
The effect can be previewed in the edit
display.
Note that greater amounts of
perspective control result in more of the edges being cropped
out.
Use the multi selector (1, 3, 4, or 2) to adjust perspective.
Press J to save the retouched copy.
Perspective Control
G button U N retouch menu
Before After
522 N The Retouch Menu: Creating Retouched Copies
Copy photographs in monochrome. [Monochrome] gives you a
choice of the following monochrome tints:
The effect can be previewed in the edit
display.
In the case of [Sepia] or [Cyanotype],
color saturation can be adjusted using
the multi selector. Press 1 to increase,
3 to decrease. The changes are
reflected in the preview.
Press J to save the retouched copy.
Monochrome
G button U N retouch menu
Option Description
[Black-and-
white]Copy photographs in black-and-white.
[Sepia] Copy photographs in sepia.
[Cyanotype] Copy photographs in blue-and-white monochrome.
523
N The Retouch Menu: Creating Retouched Copies
Image overlay combines existing photographs to create a single
picture that is saved separately from the originals. One NEF
(RAW) image can be overlaid on another using additive
blending ([Add]), or multiple images can be combined using
[Lighten] or [Darken].
Add
Overlay two NEF (RAW) images to create a single new JPEG
copy.
1
Select [Image overlay] in the
retouch menu.
Highlight [Image overlay] and press
2.
Image Overlay
G button U N retouch menu
524 N The Retouch Menu: Creating Retouched Copies
2
Select [Add].
Highlight [Add] and press 2 to
display image overlay options with
[Image 1] highlighted.
3
Highlight the first image.
Press J to display a picture-
selection dialog listing only NEF
(RAW) images, where you can use
the multi selector to highlight the
first photograph in the overlay.
To view the highlighted picture full screen, press and hold
the X button.
4
Select the first image.
Press J to select the highlighted
photograph and return to the
preview display; the selected image
will appear as [Image 1].
525
N The Retouch Menu: Creating Retouched Copies
5
Select the second image.
Press 2 and select [Image 2], then
select the second photo as described
in Steps 3 and 4.
6
Adjust gain.
The overlay of [Image 1] and
[Image 2] can be previewed in the
“Preview” column. Highlight
[Image 1] or [Image 2] and
optimize exposure for the overlay
by pressing 1 or 3 to adjust gain.
Choose from values between 0.1 and 2.0 in increments of
0.1.
The effects are relative to the default value of 1.0 (no gain).
For example, selecting 0.5 halves gain.
7
Select the “Preview” column.
Press 4 or 2 to place the cursor in
the “Preview” column.
To proceed without previewing the
overlay, highlight [Save] and press
J.
526 N The Retouch Menu: Creating Retouched Copies
8
Preview the overlay.
To preview the overlay, highlight
[Overlay] and press J.
To select new photos or adjust gain,
press W (Q). You will be returned to
Step 6.
9
Save the overlay.
Press J while the preview is
displayed to save the overlay and
display the resulting image.
527
N The Retouch Menu: Creating Retouched Copies
D[Add]
Colors and brightness in the preview may differ from the final image.
Image overlay is available only with NEF (RAW) images taken with this
camera with [Large] selected for [Image size] > [NEF (RAW)] in the
photo shooting menu. Images created with other cameras or in other
formats cannot be selected.
The overlay is saved at an [Image quality] of [JPEG fine m].
NEF (RAW) pictures can be combined only if they were created with the
same options selected for:
-[Choose image area]
-[NEF (RAW) recording]> [NEF (RAW) bit depth]
The overlay has the same photo info (including date of recording,
metering, shutter speed, aperture, shooting mode, exposure
compensation, focal length, and image orientation) and values for white
balance and Picture Control as the photograph selected for [Image 1].
Copyright information, however, is not copied to the new image. The
comment is similarly not copied; instead, the comment currently active
on the camera, if any, is appended.
528 N The Retouch Menu: Creating Retouched Copies
Lighten and Darken
The camera compares multiple selected pictures and selects
only the brightest or darkest pixels at each point in the image to
create a single new JPEG copy.
1
Select [Lighten] or [Darken].
After selecting [Image overlay] in the retouch menu,
highlight either [Lighten] or [Darken] and press 2.
[Lighten]: The camera compares the pixels in each picture
and uses only the brightest.
[Darken]: The camera compares the pixels in each picture
and uses only the darkest.
529
N The Retouch Menu: Creating Retouched Copies
2
Choose how pictures are selected.
3
Select the source slot.
Highlight the slot with the card containing the desired
pictures and press 2.
You will not be prompted to select the slot if only one
memory card is inserted.
4
Select pictures.
If you chose [Select individual images]:
Highlight pictures using the multi selector.
To view the highlighted picture full screen, press and hold
the X button.
To select the highlighted picture, press the W (Q) button.
Selected pictures are marked by a $ icon. To deselect the
current picture, press the W (Q) button again; the $ icon
will no longer be displayed. The selected pictures will be
combined using the option selected in Step 1.
Press J to proceed once selection is complete.
Option Description
[Select individual
images]Select pictures for the overlay one-by-one.
[Select consecutive
images]
Select two pictures; the overlay will include
the two pictures and all images between
them.
[Select folder]The overlay will include all pictures in the
selected folder.
530 N The Retouch Menu: Creating Retouched Copies
If you chose [Select consecutive images]:
All pictures in a range chosen using the multi selector will
be combined using the option selected in Step 1.
-Use the W (Q) to select the first and last pictures in the
desired range.
- The first and last pictures are indicated by % icons and
the pictures between them by $ icons.
- You can alter your selection by using the multi selector to
highlight different pictures to serve as the first or last
frame. Press the center of the sub-selector to choose the
current picture as the new start or end point.
To view the highlighted picture full screen, press and hold
the X button.
Press J to proceed once selection is complete.
If you chose [Select folder]:
Highlight the desired folder and press J to overlay all
pictures in the folder using the option selected in Step 1.
531
N The Retouch Menu: Creating Retouched Copies
5
Save the overlay.
A confirmation dialog will be displayed; highlight [Yes] and
press J to save the overlay and display the resulting
picture.
To interrupt the process and display a confirmation dialog
before the operation is complete, press the G button; to
save the current overlay “as is” without adding the
remaining pictures, highlight [Save and exit] and press J.
To exit without creating an overlay, highlight [Discard and
exit] and press J.
D[Lighten]/[Darken]
The overlay will include only pictures created with this camera. Pictures
created with other cameras cannot be selected.
The overlay will include only pictures created with the same options
selected for [Choose image area] in the photo shooting menu.
The image quality setting for the completed overlay is that of the
highest quality picture it contains.
Overlays that include NEF (RAW) pictures will be saved at an image
quality of [JPEG finem].
All JPEG pictures in the overlay must be the same size.
The size of overlays that include both NEF (RAW) and JPEG images is
determined by the JPEG picture. An overlay will not be created if the
NEF (RAW) image is smaller than the JPEG picture.
532 N The Retouch Menu: Creating Retouched Copies
Create a copy from which unwanted footage has been removed
(0199).
Trim Movie
G button U N retouch menu
533
O My Menu/m Recent Settings
To view [MY MENU], select the O tab in
the camera menus.
O My Menu: Creating a Custom Menu
My Menu can be used to create and edit a customized list of up
to 20 items from the playback, photo shooting, movie shooting,
Custom Settings, setup, and retouch menus. Options can be
added, deleted, and reordered as described below.
❚❚ Adding Items to My Menu
1
Select [Add items] in [
O
MY
MENU].
Highlight [Add items] and press 2.
O My Menu/m Recent Settings
534 O My Menu/m Recent Settings
2
Select a menu.
Highlight the name of the menu
containing the item you wish to add
and press 2.
3
Select an item.
Highlight the desired menu item and
press J.
4
Position the new item.
Press 1 or 3 to position the new
item and press J to add it to My
Menu.
5
Add more items.
The items currently displayed in My
Menu are indicated by a check mark
(L).
Items indicated by a V icon cannot
be selected.
Repeat Steps 1–4 to select additional items.
535
O My Menu/m Recent Settings
❚❚ Removing Items from My Menu
1
Select [Remove items] in [
O
MY MENU].
Highlight [Remove items] and press 2.
2
Select items.
Highlight items and press 2 to
select (M) or deselect.
Continue until all the items you
wish to remove are selected (L).
3
Remove the selected items.
Press J; a confirmation dialog will be
displayed. Press J again to remove
the selected items.
DRemoving Items While in My Menu
Items can also be removed by highlighting them in [O MY MENU] and
pressing the O button; a confirmation dialog will be displayed. Press O
again to remove the selected item.
536 O My Menu/m Recent Settings
❚❚ Reordering Items in My Menu
1
Select [Rank items] in [
O
MY MENU].
Highlight [Rank items] and press 2.
2
Select an item.
Highlight the item you wish to move
and press J.
3
Position the item.
Press 1 or 3 to move the item up
or down in My Menu and press J.
Repeat Steps 2–3 to reposition
additional items.
4
Exit to [
O
MY MENU].
Press the G button to return to
[OMY MENU].
537
O My Menu/m Recent Settings
❚❚ Displaying [RECENT SETTINGS]
1
Select [Choose tab] in [
O
MY
MENU].
Highlight [Choose tab] and press 2.
2
Select [
m
RECENT SETTINGS].
Highlight [m RECENT SETTINGS] in
the [Choose tab] menu and press
J.
The name of the menu will change
from [MY MENU] to [RECENT SETTINGS].
538 O My Menu/m Recent Settings
m Recent Settings: Accessing Recently-Used
Settings
❚❚ How Items Are Added to [RECENT SETTINGS]
Menu items are added to the top of the
[RECENT SETTINGS] menu as they are
used. The twenty most recently-used
settings are listed.
DRemoving Items from the Recent Settings Menu
To remove an item from the [RECENT SETTINGS] menu, highlight it and
press the O button; a confirmation dialog will be displayed. Press
Obutton again to remove the selected item.
DDisplaying My Menu
Selecting [Choose tab] in the [RECENT SETTINGS] menu displays the
items shown in Step 2 of “Displaying [RECENT SETTINGS]” (0537).
Highlight [O MY MENU] and press J to view My Menu.
539
Camera and Network System Chart
Establishing Wireless
Connections to Computers or
Smart Devices
The camera can connect:
to computers via Wi-Fi (0541),
to smartphones via Wi-Fi or Bluetooth (0567), and
Camera and Network System Chart
540 Camera and Network System Chart
to networks via an attached WT-7 wireless transmitter (0597)
541
Connecting to Computers via Wi-Fi
What Wi-Fi Can Do for You
Connect using the camera’s
built-in Wi-Fi to upload selected
pictures to a computer.
The Wireless Transmitter Utility
Before you will be able to upload images via Wi-Fi, you will need
to pair the camera with the computer using Nikon’s Wireless
Transmitter Utility software.
Once the devices are paired, you will be able to connect to the
computer from the camera.
The Wireless Transmitter Utility is available for download from
the Nikon Download Center. Be sure to download the latest
version after reading the release notes and system
requirements.
https://downloadcenter.nikonimglib.com/
Connecting to Computers via Wi-Fi
542 Connecting to Computers via Wi-Fi
Infrastructure and Access-Point Modes
Either of the following two methods can be used to establish
wireless connections between the camera and a computer.
❚❚ Direct Wireless Connection (Access-Point Mode)
The camera and computer
connect via direct wireless link.
The camera acts as a wireless
LAN access point, letting you
connect when working outdoors and in other situations in
which the computer is not already connected to a wireless
network and eliminating the need for complicated adjustments
to settings. The computer cannot connect to the Internet while
connected to the camera.
To create a new host profile, select
[Direct connection to PC] in the
connection wizard.
543
Connecting to Computers via Wi-Fi
❚❚ Infrastructure Mode
The camera connects to a
computer on an existing
network (including home
networks) via a wireless router.
The computer can still connect to the Internet while connected
to the camera.
To create a new network profile, select
[Search for Wi-Fi network] in the
connection wizard.
DInfrastructure Mode
Connection to computers beyond the local area network is not
supported. You can connect only to computers on the same network.
544 Connecting to Computers via Wi-Fi
Connecting in Access-Point Mode
1
Select [Connect to PC] in the
camera setup menu, then
highlight [Network settings]
and press
2
.
2
Highlight [Create profile] and
press
J
.
3
Highlight [Direct connection to
PC] and press
J
.
The camera SSID and encryption key
will be displayed.
545
Connecting to Computers via Wi-Fi
4
Establish a connection to the camera.
Windows:
Click the wireless LAN icon
in the taskbar.
Select the SSID displayed
by the camera in Step 3.
When prompted to enter
the network security key,
enter the encryption key
displayed by the camera in
Step 3. The computer will
initiate a connection to the camera.
macOS:
Click the wireless LAN icon
in the menu bar.
Select the SSID displayed
by the camera in Step 3.
When prompted to enter
the network security key,
enter the encryption key
displayed by the camera in
Step 3. The computer will
initiate a connection to the camera.
546 Connecting to Computers via Wi-Fi
5
Start pairing.
When prompted, launch the Wireless
Transmitter Utility on the computer.
6
Select the camera in
the Wireless
Transmitter Utility.
Select the name displayed
by the camera in Step 5 and
click [Next].
547
Connecting to Computers via Wi-Fi
7
In the Wireless Transmitter
Utility, enter the
authentication code displayed
by the camera.
The camera will display an
authentication code.
Enter the authentication
code in the dialog
displayed by the Wireless
Transmitter Utility and
click [Next].
548 Connecting to Computers via Wi-Fi
8
Complete the pairing process.
When the camera displays a
message stating that pairing is
complete, press J.
In the Wireless Transmitter
Utility, click [Next]; you
will be prompted to
choose a destination
folder. For more
information, see online
help for the Wireless
Transmitter Utility.
A wireless connection will be established between the
camera and computer when pairing is complete.
549
Connecting to Computers via Wi-Fi
9
Check the connection.
When a connection is established,
the network SSID will be displayed in
green in the camera [Connect to PC]
menu.
If the camera SSID is not displayed in green, connect to the
camera via the wireless network list on your computer.
A wireless connection has now been established between the
camera and the computer.
Pictures taken with the camera can be uploaded to the computer
as described in“Uploading Pictures” (0559).
550 Connecting to Computers via Wi-Fi
Connecting in Infrastructure Mode
1
Select [Connect to PC] in the
camera setup menu, then
highlight [Network settings]
and press
2
.
2
Highlight [Create profile] and
press
J
.
551
Connecting to Computers via Wi-Fi
3
Highlight [Search for Wi-Fi
network] and press
J
.
The camera will search for networks
currently active in the vicinity and list
them by name (SSID).
D[Easy Connect]
To connect without entering an SSID or
encryption key, press X in Step 3. Next,
press J and choose from the following
options:
After connecting, proceed to Step 6.
Option Description
[Push-
button WPS]
For routers that support push-button WPS. Press
the WPS button on the router and then press the
camera J button to connect.
[PIN-entry
WPS]
The camera will display a PIN. Using a computer,
enter the PIN on the router. For more information,
see the documentation provided with the router.
552 Connecting to Computers via Wi-Fi
4
Choose a network.
Highlight a network SSID and press
J.
Encrypted networks are indicated
by a h icon. If the selected network
is encrypted (h), you will be prompted to enter the
encryption key. If the network is not encrypted, proceed to
Step 6.
If the desired network is not displayed, press X to search
again.
DHidden SSIDs
Networks with hidden SSIDs are indicated
by blank entries in the network list.
To connect to a network with a hidden
SSID, highlight a blank entry and press J.
Next, press J; the camera will prompt
you to provide an SSID.
Enter the network name and press X.
Press X again; the camera will now prompt you to enter the
encryption key.
553
Connecting to Computers via Wi-Fi
5
Enter the encryption key.
Press J and enter the encryption
key for the wireless router.
For more information, see the
documentation for the wireless
router.
Press X when entry is complete.
Press X again to initiate the
connection. A message will be
displayed for a few seconds when
the connection is established.
554 Connecting to Computers via Wi-Fi
6
Obtain or select an IP address.
Highlight one of the following
options and press J.
Press J to proceed when the “configuration complete”
message is displayed.
Option Description
[Obtain
automatically]
Select this option if the network is configured to
supply the IP address automatically. A
“configuration complete” message will be
displayed once an IP address has been assigned.
[Enter
manually]
Enter the IP address and sub-net mask manually.
Rotate the main command dial to highlight
segments.
Press 4 or 2 to change the highlighted
segment and press J to save changes.
Next, press X; a “configuration complete”
message will be displayed. Press X again to
display the sub-net mask.
Press 1 or 3 to edit the sub-net mask and
press J; a “configuration complete” message
will be displayed.
555
Connecting to Computers via Wi-Fi
7
Start pairing.
When prompted, launch the Wireless
Transmitter Utility on the computer.
8
Select the camera in
the Wireless
Transmitter Utility.
Select the name displayed
by the camera in Step 7 and
click [Next].
556 Connecting to Computers via Wi-Fi
9
In the Wireless Transmitter
Utility, enter the
authentication code displayed
by the camera.
The camera will display an
authentication code.
Enter the authentication
code in the dialog
displayed by the Wireless
Transmitter Utility and
click [Next].
557
Connecting to Computers via Wi-Fi
10
Complete the pairing process.
When the camera displays a
message stating that pairing is
complete, press J.
In the Wireless Transmitter
Utility, click [Next]; you
will be prompted to
choose a destination
folder. For more
information, see online
help for the Wireless
Transmitter Utility.
A wireless connection will be established between the
camera and computer when pairing is complete.
558 Connecting to Computers via Wi-Fi
11
Check the connection.
When a connection is established,
the network SSID will be displayed in
green in the camera [Connect to PC]
menu.
If the camera SSID is not displayed in green, connect to the
camera via the wireless network list on your computer.
A wireless connection has now been established between the
camera and the computer.
Pictures taken with the camera can be uploaded to the computer
as described in“Uploading Pictures” (0559).
559
Connecting to Computers via Wi-Fi
Uploading Pictures
Pictures can be selected for upload during playback. They can
also be uploaded automatically as they are taken.
DDestination Folders
By default, images are uploaded to the following folders:
Windows: \Users\(user name)\Pictures\Wireless Transmitter Utility
macOS: /Users/(user name)/Pictures/Wireless Transmitter Utility
The destination folder can be selected using the Wireless Transmitter
Utility. For more information, see online help for the Wireless Transmitter
Utility.
DAccess Point Mode
Computers cannot access the Internet while connected to the camera in
access point mode. To access the Internet, terminate the connection to
the camera and then reconnect to a network with Internet access.
❚❚ Selecting Pictures for Upload
1
Press the
K
button on the camera and select full-
frame or thumbnail playback.
2
Select a picture and press the
i
button.
560 Connecting to Computers via Wi-Fi
3
Highlight [Select to send to
computer] and press
J
.
A white “send” icon will appear on
the picture. If the camera is
currently connected to a network,
upload will begin immediately and
the icon will turn green.
Otherwise, upload will begin when a connection is
established.
Repeat Steps 2–3 to upload additional pictures.
DRemoving Upload Marking
Repeat Steps 2–3 to remove transfer marking from selected images.
To remove transfer marking from all pictures, select [Connect to PC] >
[Options] > [Deselect all?] in the setup menu.
561
Connecting to Computers via Wi-Fi
❚❚ Uploading Photos as They Are Taken
To upload new photos as they are taken,
select [On] for [Connect to PC] >
[Options] > [Auto send] in the setup
menu.
Upload begins only after the photo has
been recorded to the memory card. Be
sure a memory card is inserted in the camera.
Movies and photos taken during movie mode are not
uploaded automatically when recording is complete. They
must instead be uploaded from the playback display.
❚❚ The Transfer Icon
Upload status is indicated by the transfer
icon.
W (white): Send
The picture has been selected for
automatic upload but upload has not yet
begun.
X (green): Sending
Upload in progress.
Y (blue): Sent
Upload complete.
562 Connecting to Computers via Wi-Fi
❚❚ The Status Display
The [Connect to PC] display shows the following:
DLoss of Signal
Wireless transmission may be interrupted if the signal is lost. Upload of
pictures with “send” marking can be resumed by turning the camera off
and then on again once the signal has been re-established.
1
2
3
1Status: The status of the
connection to the host. The
host name is displayed in
green when a connection is
established.
While files are being
transferred, the status display
shows “Now sending”
preceded by the name of the
file being sent. Errors are also
displayed here.
2Signal strength: Wireless
signal strength.
3Pictures/time remaining: The
number of pictures remaining
and the time needed to send
them. The time remaining is
an estimate only.
563
Connecting to Computers via Wi-Fi
Disconnecting and Reconnecting
❚❚ Disconnecting
You can end the connection by:
turning the camera off,
selecting [Disable] for [Connect to PC] > [Wi-Fi connection]
in the setup menu,
selecting [Wi-Fi connection] > [Close Wi-Fi connection] in
the photo-mode i menu, or
connecting to a smart device via Wi-Fi or Bluetooth.
DAccess-Point Mode
An error will occur if the computer’s wireless connection is disabled
before the camera’s. Disable camera Wi-Fi first.
564 Connecting to Computers via Wi-Fi
❚❚ Reconnecting
To reconnect to an existing network:
select [Enable] for [Connect to PC] > [Wi-Fi connection] in
the setup menu, or
select [Wi-Fi connection] > [Establish
Wi-Fi connection with PC] in the
photo-mode i menu.
DAccess-Point Mode
Enable camera Wi-Fi before connecting.
DMultiple Network Profiles
If the camera has profiles for more than one network, it will reconnect to
the last network used. Other networks can be selected using the
[Connect to PC] > [Network settings] option in the setup menu.
565
Connecting to Smart Devices
The SnapBridge App
Use the SnapBridge app for wireless connections
between the camera and your smartphone or tablet
(“smart device”).
SnapBridge apps can be downloaded from the Apple App
Store® or on Google Play™.
Visit the Nikon website for the latest SnapBridge news.
Connecting to Smart Devices
566 Connecting to Smart Devices
What SnapBridge Can Do for You
The tasks that can be performed using the SnapBridge app are
outlined below. For details, see the SnapBridge app online help:
https://nikonimglib.com/snbr/onlinehelp/en/index.html
❚❚ Downloading Pictures from the Camera
Download existing pictures to your smart device. Pictures can
be uploaded as they are taken.
❚❚ Remote Photography
Control the camera and take pictures from the smart device.
567
Connecting to Smart Devices
Wireless Connections
Use the SnapBridge app for wireless connections between the
camera and your smart device. You can connect via either Wi-Fi
(0568) or Bluetooth (0577). Connecting using Bluetooth
allows pictures to be uploaded automatically as they are taken.
568 Connecting to Smart Devices
Connecting via Wi-Fi (Wi-Fi Mode)
DBefore Connecting
Enable Wi-Fi on the smart device. For details, see the documentation
provided with the device.
Ensure that the batteries in the camera and smart device are fully
charged to prevent the devices turning off unexpectedly.
Check that there is space available on the camera memory card.
1
Smart device: Launch the
SnapBridge app.
If this is the first time you have
launched the app, tap [Connect to
camera] and proceed to Step 2.
569
Connecting to Smart Devices
If you have launched the app before, open the tab and
select > [Wi-Fi mode] before proceeding to Step 3.
2
1
3
570 Connecting to Smart Devices
2
Smart device: When prompted to choose the
camera type, tap [Mirrorless camera] and then tap
[Wi-Fi connection].
3
Camera/smart device: Turn the
camera on when prompted.
Do not tap [Next] until you have
completed the next step.
1
2
571
Connecting to Smart Devices
4
Camera: Select [Connect to
smart device] > [Wi-Fi
connection] in the setup menu,
then highlight [Establish Wi-Fi
connection] and press
J
.
The camera SSID and password will
be displayed.
DEnabling Wi-Fi
You can also enable Wi-Fi by selecting
[Wi-Fi connection] > [Establish Wi-Fi
conn. with smart device] in the i menu
for shooting mode.
572 Connecting to Smart Devices
5
Smart device: Return to the
smart device and tap [Next].
573
Connecting to Smart Devices
6
Smart device: After reading the
instructions displayed by the
smart device, tap [Open the
device settings app].
Android devices: Wi-Fi settings will
be displayed.
iOS devices: The “Settings” app will launch. Tap
[< Settings] to open [Settings], then scroll up and tap
[Wi-Fi], which you’ll find near the top of the settings list.
574 Connecting to Smart Devices
7
Smart device: Enter the SSID and password
displayed by the camera in Step 4.
The prompt displayed by the device varies with model and
operating system.
-Android device:
575
Connecting to Smart Devices
-iOS device:
You will not be required to enter the password when next
you connect to the camera.
576 Connecting to Smart Devices
8
Smart device: Return to the
SnapBridge app.
Once a Wi-Fi connection is
established, Wi-Fi mode options will
be displayed.
See online help for information on
using the SnapBridge app.
DTerminating Wi-Fi Mode
To end the Wi-Fi connection, tap . When
the icon changes to , tap and select
[Exit Wi-Fi mode].
577
Connecting to Smart Devices
Connecting via Bluetooth
Before connecting via Bluetooth for the first time, you will need
to pair the camera and smart device as described below. The
procedure for iOS differs slightly from that for Android devices.
DBefore Pairing
Enable Bluetooth on the smart device. For details, see the
documentation provided with the device.
Ensure that the batteries in the camera and smart device are fully
charged to prevent the devices turning off unexpectedly.
Check that there is space available on the camera memory card.
❚❚ Connecting to an Android Device for the First
Time: Pairing
For information on connecting to iOS devices, see “Connecting
to an iOS Device for the First Time: Pairing” (0584).
1
Camera: Select [Connect to
smart device] > [Pairing
(Bluetooth)] in the setup menu,
then highlight [Start pairing]
and press
J
.
The camera name will be displayed in
the monitor.
578 Connecting to Smart Devices
2
Android device: Launch the
SnapBridge app.
If this is the first time you have
launched the app, tap [Connect to
camera].
If you have launched the app
before, open the tab and tap
[Connect to camera].
579
Connecting to Smart Devices
3
Android device: Tap [Mirrorless camera] and then
tap [Pairing (Bluetooth)].
This step can be omitted once the devices have been
paired.
You must grant access to location data when using
Bluetooth. If prompted to provide access to location data,
follow the on-screen instructions.
1
2
580 Connecting to Smart Devices
4
Android device: Tap the
camera name.
5
Camera/Android device: Confirm that the camera
and Android device display the same
authentication code.
The authentication code is shown circled in the illustrations.
581
Connecting to Smart Devices
6
Camera/Android device: Initiate pairing.
Camera: Press J.
Android device: Tap the button
indicated in the illustration. The
button in the illustration is labeled
[PAIR], but the label may differ
depending on the type of device
and version of Android you are
using.
DPairing Error
If you wait too long between pressing the button on the camera and
tapping the button on the Android device, the device will display an
error message and pairing will fail. Tap [OK] and return to Step 2.
582 Connecting to Smart Devices
7
Camera/Android device: Follow the on-screen
instructions to complete pairing.
Camera: Press J. The camera will
display the message shown in the
illustration when pairing is
complete.
Android device: Pairing is complete. Tap [OK] to exit to
the tab.
583
Connecting to Smart Devices
DPairing for the First Time
The first time you pair the Android device with a camera after
installing the SnapBridge app, you may be prompted to select auto
link (auto upload and auto clock and location synchronization)
options.
This prompt will not be displayed a second time. Auto link settings
can however be accessed at any time using [Auto link] in the
tab.
DDisabling Bluetooth
To disable Bluetooth, select [Disable] for [Connect to smart device]
> [Pairing (Bluetooth)] > [Bluetooth connection] in the camera
setup menu.
584 Connecting to Smart Devices
❚❚ Connecting to an iOS Device for the First Time:
Pairing
For information on connecting to Android devices, see
“Connecting to an Android Device for the First Time: Pairing”
(0577).
1
Camera: Select [Connect to
smart device] > [Pairing
(Bluetooth)] in the setup menu,
then highlight [Start pairing]
and press
J
.
The camera name will be displayed in
the monitor.
585
Connecting to Smart Devices
2
iOS device: Launch the
SnapBridge app.
If this is the first time you have
launched the app, tap [Connect to
camera].
If you have launched the app
before, open the tab and tap
[Connect to camera].
586 Connecting to Smart Devices
3
iOS device: Tap [Mirrorless camera] and then tap
[Pairing (Bluetooth)].
This step can be omitted once the devices have been paired.
1
2
587
Connecting to Smart Devices
4
iOS device: Tap the camera
name.
5
iOS device: Read the pairing
instructions.
Pairing instructions will be displayed.
Read the instructions carefully and
tap [Understood].
588 Connecting to Smart Devices
6
iOS device: Tap the camera
name again.
The iOS device prompt you to select
an accessory. Tap the camera name
again.
589
Connecting to Smart Devices
7
Camera/iOS device: Initiate pairing.
Camera: Press J.
iOS device: Tap the button
indicated in the illustration. The
button in the illustration is labeled
[Pair], but the label may differ
depending on the version of iOS
you are using.
590 Connecting to Smart Devices
DPairing Error
If you wait too long between pressing the button on the camera and
tapping the button on the iOS device, the device will display an error
message and pairing will fail. Dismiss the SnapBridge app and check
that it is not running in the background, then open the iOS “Settings”
app and request iOS to “forget” the camera before returning to Step 1.
“Forget” the camera using the iOS “Settings” app.
591
Connecting to Smart Devices
8
Camera/iOS device: Follow the on-screen
instructions to complete pairing.
Camera: Press J. The camera will
display the message shown in the
illustration when pairing is
complete.
iOS device: Pairing is complete. Tap [OK] to exit to the
tab.
592 Connecting to Smart Devices
DPairing for the First Time
The first time you pair the iOS device with a camera after installing
the SnapBridge app, you may be prompted to select auto link (auto
upload and auto clock and location synchronization) options.
This prompt will not be displayed a second time. Auto link settings
can however be accessed at any time using [Auto link] in the
tab.
DDisabling Bluetooth
To disable Bluetooth, select [Disable] for [Connect to smart device]
> [Pairing (Bluetooth)] > [Bluetooth connection] in the camera
setup menu.
593
Connecting to Smart Devices
❚❚ Connecting to a Paired Device
Connecting to a smart device that has already been paired with
the camera is quick and easy.
1
Camera: In the setup menu,
select [Connect to smart
device] > [Pairing (Bluetooth)]
> [Bluetooth connection], then
highlight [Enable] and press
J
.
2
Smart device: Launch the
SnapBridge app.
A Bluetooth connection will be
established automatically.
594 Connecting to Networks Using the WT-7
The WT-7
When attached to the camera, the optional WT-7 wireless
transmitter can be used to connect to computers, ftp servers, or
other devices over Ethernet or wireless networks.
DBefore Connecting the WT-7
Before connecting the WT-7, confirm that the firmware for the camera
and WT-7 have been updated to the latest versions.
For more information, visit the Nikon website for your region (0xlii).
Connecting to Networks Using the WT-7
595
Connecting to Networks Using the WT-7
What the WT-7 Can Do for You
Using the WT-7, you can:
❚❚ Upload existing photos and movies to an ftp
server or computer
Not only can you copy pictures
to computers (image transfer
mode), you can also upload
them to ftp servers (ftp upload
mode). Pictures can be
uploaded as they are taken.
❚❚ Control the camera and take pictures remotely
from a computer
Installing Camera Control Pro2
(available separately) on a
network computer gives you
complete control over camera
settings and lets you take
pictures remotely and save
them directly to the computer
hard disk (camera control mode).
596 Connecting to Networks Using the WT-7
❚❚ Control the camera and take pictures remotely
from a web browser
Using a web browser, you can
control the camera from
network computers and smart
devices for remote control that
requires no dedicated app or
computer software (http server
mode).
597
Connecting to Networks Using the WT-7
Connecting Using the WT-7
Connect the WT-7 using the USB cable supplied with the
camera.
Turn the transmitter on and select
[Wireless transmitter (WT-7)]>
[Wireless transmitter]> [Use] in the
camera setup menu.
For information on connecting to networks using a WT-7
wireless transmitter, see the manual supplied with the WT-7.
AMenu Options for the WT-7
All menu options for the WT-7 can be found in the setup menu under
[Wireless transmitter (WT-7)]. For more information, see the manual
provided with the WT-7.
598 Troubleshooting
Solutions to some common issues are listed below.
Troubleshooting information for the SnapBridge app can be
found in the app’s online help, which can be viewed at:
https://nikonimglib.com/snbr/onlinehelp/en/index.html
For information on the Wireless Transmitter Utility, see the
utility’s online help.
Troubleshooting
Problem Solution
The camera displays a
TCP/IP error.
Connection settings require adjustment. Check
settings for the host computer or wireless
router and adjust camera settings appropriately
(0486).
The camera displays a
“no memory card”
error.
The memory card is inserted incorrectly or not
at all. Confirm that the memory card is correctly
inserted (045).
Upload is interrupted
and fails to resume.
Upload will resume if the camera is turned off
and then on again (0559).
The connection is
unreliable.
If [Auto] is selected for [Channel] when you are
connecting to a smart device, choose [Manual]
and select the channel manually (0485).
If the camera is connected to a computer in
infrastructure mode, check that the router is set
to a channel between 1 and 8 (0486).
599
Connecting to Computers Via USB
Cabled Connections to
Computers and HDMI Devices
Connect the camera using the supplied USB cable. You can then
use Nikon ViewNX-i software to copy pictures to the computer
for viewing and editing. For information on establishing
wireless connections to computers, see “Connecting to
Computers via Wi-Fi” (0541) in “Establishing Wireless
Connections to Computers or Smart Devices”.
Connecting to Computers Via USB
600 Connecting to Computers Via USB
Installing ViewNX-i
You will need an Internet connection when installing ViewNX-i.
Visit the Nikon website for system requirements and other
information.
Download the latest ViewNX-i installer from the website
below and follow the on-screen instructions to complete
installation.
https://downloadcenter.nikonimglib.com/
Note that you may be unable to download pictures from the
camera using earlier versions of ViewNX-i.
DCapture NX-D
Use Nikon’s Capture NX-D software to fine-tune photos or to change
settings for NEF (RAW) pictures and save them in other formats.
Capture NX-D is available for download from:
https://downloadcenter.nikonimglib.com/
601
Connecting to Computers Via USB
Copying Pictures to a Computer Using
ViewNX-i
See online help for detailed instructions.
1
Connect the camera to the computer.
After turning the camera off and ensuring that a memory
card is inserted, connect the supplied USB cable as shown.
2
Turn the camera on.
The Nikon Transfer 2 component of ViewNX-i will start.
If a message is displayed prompting you to choose a
program, select Nikon Transfer 2.
If Nikon Transfer 2 does not start automatically, launch
ViewNX-i and click the “Import” icon.
602 Connecting to Computers Via USB
3
Click [Start
Transfer].
Pictures on the memory
card will be copied to
the computer.
4
Turn the camera off.
Disconnect the USB cable when transfer is complete.
DWindows 10 and Windows 8.1
Windows 10 and Windows 8.1 may
display an AutoPlay prompt when the
camera is connected.
Click the dialog and then click [Nikon
Transfer 2] to select Nikon Transfer 2.
603
Connecting to Computers Via USB
DmacOS
If Nikon Transfer 2 does not start automatically, confirm that the camera is
connected and then launch Image Capture (an application that comes
with macOS) and select Nikon Transfer 2 as the application that opens
when the camera is detected.
DTransferring Movies
Do not attempt to transfer movies from the memory card while it is
inserted in a camera of a different make or model. Doing so could result in
the movies being deleted without being transferred.
DConnecting to Computers
Do not turn the camera off or disconnect the USB cable while transfer is
in progress.
Do not use force or attempt to insert the connectors at an angle. Be sure
also to keep the connectors straight when disconnecting the cable.
Always turn the camera off before connecting or disconnecting a cable.
To ensure that data transfer is not interrupted, be sure the camera
battery is fully charged.
DUSB Hubs
Connect the camera directly to the computer; do not connect the cable
via a USB hub or keyboard.
604 Connecting to HDMI Devices
The camera can be connected to TVs, recorders, and other
devices featuring HDMI connectors. Use the optional HDMI
cable (0704) or a third-party type C HDMI cable. These items
must be purchased separately. Always turn the camera off
before connecting or disconnecting an HDMI cable.
* Choose a cable with a connector that matches the connector on the
HDMI device.
Connecting to HDMI Devices
1
2
1HDMI connector for
connection to camera
2HDMI connector for
connection to external
device *
605
Connecting to HDMI Devices
TVs
After tuning the TV to the HDMI input channel, turn the
camera on and press the K button to view pictures on the
television screen.
Audio playback volume can be adjusted using the controls on
the TV. Camera controls cannot be used.
If the camera is paired with a smart device running the
SnapBridge app, the device can be used to control playback
remotely while the camera is connected to a TV. See the
SnapBridge app online help for details.
606 Connecting to HDMI Devices
Recorders
The camera can record video directly to
connected HDMI recorders. Use the
[HDMI] item in the setup menu to adjust
settings for HDMI output. Some
recorders will start and stop recording in
response to camera controls.
❚❚ Output Resolution
Choose the format for images output to the HDMI device. If
[Auto] is selected, the camera will automatically choose the
appropriate format.
❚❚ Advanced
Adjust settings for connection to the HDMI device.
Option Description
[Output
range]
The RGB video signal input range varies with the HDMI
device. [Auto], which matches the output range to the
HDMI device, is recommended in most situations. If the
camera is unable to determine the correct RGB video
signal output range for the HDMI device, you can choose
from the following options:
[Limited range]: For devices with an RGB video signal
input range of 16 to 235. Choose this option if you
notice a loss of detail in shadows.
[Full range]: For devices with an RGB video signal
input range of 0 to 255. Choose this option if you
notice that shadows are “washed out” or too bright.
607
Connecting to HDMI Devices
[External
recording
control]
Choosing [On] allows camera controls to be used to start
and stop recording when the camera is connected via
HDMI to a third-party recorder that supports the Atomos
Open Protocol.
External recording control is available with Atomos
SHOGUN, NINJA, and SUMO-series Monitor recorders.
For more information on device features and
operation, contact the manufacturer or refer to the
documentation provided with the recorder.
The camera display will turn off automatically when
the time selected for Custom Setting c3 [Power off
delay] > [Standby timer] expires, ending HDMI
output. When recording movies to an external device,
select [Standby timer] and choose [No limit] or a time
longer than the anticipated recording time.
An icon will be displayed in the camera monitor when
[On] is selected: A is displayed during filming,
B while movies are being recorded. During
recording, check the recorder and recorder display to
ensure that footage is being saved to the device.
Note that selecting [On] may disrupt the footage
output to the device.
[Output data
depth]Choose a bit depth for HDMI output.
Option Description
608 Connecting to HDMI Devices
[N-Log/HDR
(HLG) output
options]
Preserve details in highlights and shadows and avoid
over-saturated colors when recording movies. [N-Log] is
intended for footage that will be color graded during
post-production. [HDR (HLG)] is used to record footage
in HLG format for such applications as HDR
broadcasting.
The selected options appear
in the shooting display.
The footage will be
recorded directly to the
external device. It cannot be
saved to the camera
memory card.
This option is available only when [10 bit] is selected
for [Output data depth].
The minimum values available for the [ISO sensitivity
settings] > [Maximum sensitivity] and [ISO
sensitivity (Mode M)] items in the movie shooting
menu are respectively ISO 1600 and ISO 800; the
maximum for both is ISO 25600 (Z 7II) or 51200 (Z 6II).
[View assist]
Choose [On] for a live preview of video footage recorded
with [N-Log] or [HDR (HLG)] selected for [N-Log/HDR
(HLG) output options], but note that the colors in the
preview are simplified for enhanced contrast. This has no
effect on the footage actually recorded.
Option Description
609
Connecting to HDMI Devices
DNo HDMI Output
HDMI output is not available when:
1920 × 1080 120p, 1920 × 1080 100p, or 1920 × 1080 slow-motion is
selected for frame size/frame rate, or
the camera is in movie mode and connected to a computer running
Camera Control Pro 2
D[10 Bit] Selected for [Output Data Depth]
The HDMI signal will be output at a bit depth of 10 bits only to HDMI
recorders that support this option.
Regardless of the option selected for monitor mode, the display will
switch to the camera monitor and the viewfinder will turn off.
When 3840 × 2160 is selected for movie frame size:
- movies will not be recorded to memory cards inserted in the camera,
and
- the angle of view when shooting in DX format with the Z 7II will be
reduced to about 90%. The angle of view for the Z 6II is reduced to
about 90% regardless of format.
The indicators in the camera monitor will be displayed at low resolution.
No photos will be recorded when the shutter-release button is pressed
all the way down.
Electronic vibration reduction is disabled.
Frame size/frame rate settings of 3840 × 2160; 60p or 3840 × 2160; 50p
are not available for footage output via HDMI. If 3840 × 2160; 60p or
3840 × 2160; 50p was selected before recording began, the footage will
be output at 3840 × 2160; 30p or 3840 × 2160; 25p, respectively.
610 Connecting to HDMI Devices
D3840 × 2160; 60p/50p (Z 7II Only)
Footage output to external recorders with 3840 × 2160; 60p or 3840 ×
2160; 50p selected for frame size/frame rate is not output at a frame rate
of 60 or 50 fps. The camera automatically selects [1080p (progressive)]
for [HDMI] > [Output resolution] in the setup menu, even if the option
last selected by the user is [2160p (progressive)].
DHLG Output
Optimal color reproduction can only be achieved if your storage device,
computer, monitor, operating system, software, and other equipment
support HDR (HLG). If a signal is received from the connected device
indicating that it supports HDR (HLG), the camera will respond with a
“gamma: HLG” identifier.
DZoom
Zooming in on the display in movie mode automatically causes the
camera to select [1080p (progressive)] for [HDMI] > [Output
resolution] in the setup menu, even if the option last selected by the
user is [2160p (progressive)].
Display zoom will not be available during movie recording if all the
following conditions are met:
- HDMI output is enabled with [10 bit] selected for [Output data
depth],
- 3840 × 2160 is selected for frame size or [N-Log] or [HDR (HLG)]
selected for [N-Log/HDR (HLG) output options], and
- the footage is being recorded to an external recorder.
611
“On-Camera” Versus “Remote”
On-Camera Flash
Photography
You can take pictures using an optional flash unit mounted on
the camera accessory shoe or one or more remote flash units.
When using a flash, select [Off] for [Silent photography] in
the photo shooting menu.
Camera-Mounted Flash Units
Take pictures using a flash unit mounted on the camera. See the
following pages for more information.
“On-Camera” Versus “Remote”
612 “On-Camera” Versus “Remote”
Remote Flash Photography
Take pictures with one or more remote flash units using wireless
flash control (Advanced Wireless Lighting, or AWL). For more
information, see “Remote Flash Photography” (0629).
613
Using an On-Camera Flash
1
Mount a flash unit on the
camera accessory shoe.
See the manual provided with the
unit for details.
2
Turn on the camera and flash unit.
The flash will begin charging; the flash-ready indicator (c)
will appear in the shooting display when charging is
complete.
3
Choose the flash control mode (
0
616) and flash
mode (
0
619).
4
Adjust shutter speed and aperture.
5
Take pictures.
Using an On-Camera Flash
614 Using an On-Camera Flash
DShutter Speed
Shutter speed can be set as follows when an optional flash unit is used:
* Shutter speed may be set as slow as 30 s if slow sync, slow rear-curtain
sync, or slow sync with red-eye reduction is selected for flash mode.
DThird-Party Flash Units
The camera cannot be used with flash units that would apply voltages
over 250 V to the camera’s X contacts or short-circuit contacts on the
accessory shoe. Use of such flash units could not only interfere with
normal operation of the camera but also damage the flash sync circuits of
the camera and/or flash.
Mode Shutter speed
bSet automatically by camera (1/200 s–1/60 s)
P, ASet automatically by camera (1/200 s–1/60 s) *
S1/200 s–30 s
M1/200 s–30 s, Bulb, Time
615
Using an On-Camera Flash
Di-TTL Flash Control
When an optional flash unit that supports the Nikon Creative Lighting
System is attached and set to TTL, the camera uses monitor pre-flashes for
balanced or standard “i-TTL fill-flash” flash control. i-TTL flash control is
not available with flash units that do not support the Nikon Creative
Lighting System. The camera supports the following types of i-TTL flash
control:
Standard i-TTL fill-flash is activated automatically when [Spot
metering] is selected.
Flash control Description
i-TTL balanced
fill-flash
The camera uses “i-TTL balanced fill-flash” flash control
for a natural balance between the main subject and
ambient background lighting. After the shutter-release
button is pressed and immediately before the main
flash, the flash unit emits a series of monitor pre-
flashes which the camera uses to optimize flash output
for a balance between the main subject and ambient
background lighting.
Standard i-TTL
fill-flash
Flash output is adjusted to bring lighting in the frame
to a standard level; the brightness of the background is
not taken into account. Recommended for shots in
which the main subject is emphasized at the expense
of background details, or when exposure
compensation is used.
616 Flash Control Mode
When a flash unit that supports unified
flash control (an SB-5000, SB-500,
SB-400, or SB-300) is mounted on the
camera, the flash control mode, flash
level, and other flash settings can be
adjusted using the [Flash control] >
[Flash control mode] item in the photo shooting menu. The
flash control modes available vary with the flash used. The
options available in the flash control display vary with the
option selected for [Flash control mode].
Settings for flash units other than the SB-5000, SB-500, SB-400,
and SB-300 can only be adjusted using flash unit controls.
Settings for an SB-5000 mounted on the accessory shoe can
also be adjusted using the controls on the flash unit.
Flash Control Mode
Option Description
[TTL]
Flash output is adjusted automatically in response to
shooting conditions.
Output can be adjusted using [Flash compensation
(TTL)]. In the cases of the SB-500, SB-400, and SB-300,
flash compensation can be adjusted using the [Flash
compensation] item in the photo shooting menu.
617
Flash Control Mode
[Auto external
flash]
Light from the flash is reflected from the subject to
an auto external flash sensor and flash output
adjusted automatically.
Output can be adjusted using [Auto external flash
compensation].
Auto external flash supports “auto aperture” (qA)
and “non-TTL auto” (A) modes. See the flash unit
manual for details.
[Distance-
priority
manual]
Choose the distance to the subject; flash output will
be adjusted automatically.
The distance to the subject is selected using
[Distance-priority options] > [Distance], while flash
output can be adjusted using [Flash compensation].
[Manual]
Choose the flash level manually.
Flash output is selected using [Manual output
amount].
[Repeating
flash]
The flash fires repeatedly while the shutter is open,
producing a multiple-exposure effect.
Use [Repeating flash] > [Output] to adjust flash
output and [Times] to choose the number of times
the unit fires. [Frequency] controls how often the
unit fires per second, measured in Hz.
The maximum number of times the flash will fire
varies with [Output] and [Frequency]. See the flash
unit manual for details.
Option Description
618 Flash Control Mode
DUnified Flash Control
Unified flash control allows the camera and flash unit to share settings.
Changes to flash settings made with either the camera or flash unit are
reflected on both devices, as are changes made using optional Camera
Control Pro 2 software. The flash unit must support unified flash control.
619
Flash Modes
Use the [Flash mode] item in the photo shooting menu to
choose the effect produced by the flash. The options available
vary with the shooting mode.
Flash Modes
Option Description Available
in
I
[Fill flash]
(front-curtain
sync)
This mode is recommended in
most situations. In modes P and A,
shutter speed will automatically be
set to values between 1/200 s (or
1/8000 s with auto FP high-speed
sync) and 1/60 s.
b, P, S, A,
M
J[Red-eye
reduction]
Use for portraits. The red-eye
reduction lamp on the camera or
flash unit lights before the flash
fires, reducing “red-eye”.
A flash unit with red-eye
reduction is required.
The desired results may not be
achieved if the subject or camera
moves before the shutter is
released (this setting is not
recommended with moving
subjects or in other situations
requiring a quick shutter
response).
b, P, S, A,
M
620 Flash Modes
L[Slow sync]
(Slow sync)
As for “fill flash”, except that shutter
speed slows automatically to
capture background lighting at
night or under low light.
Note that photos may be prone
to blurring due to camera shake
at slow shutter speeds.
Use of a tripod is recommended.
P, A
K
[Slow sync +
red-eye]
(red-eye
reduction with
slow sync)
Use to include background lighting
in portraits. Red-eye reduction is
combined with slow shutter speeds
to capture background lighting at
night or under low light.
Note that photos may be prone
to blurring due to camera shake
at slow shutter speeds.
Use of a tripod is recommended.
P, A
M[Rear-curtain
sync]
The flash fires just before the
shutter closes, creating the effect of
a stream of light behind moving
light sources.
Selecting P or A after choosing
this option sets the flash mode to
slow sync.
Note that photos may be prone
to blurring due to camera shake
at slow shutter speeds.
Use of a tripod is recommended.
P, S, A, M
s[Flash off] The flash does not fire. b, P, S, A,
M
Option Description Available
in
621
Flash Modes
DStudio Strobe Lighting
Rear-curtain sync cannot be used with studio flash systems, as the correct
synchronization cannot be obtained.
622 Flash Compensation
Flash compensation is used to
deliberately alter flash output, for
example in order to change the
brightness of the subject relative to the
background. Via the [Flash
compensation] item in the photo
shooting menu, flash output can be increased to make the main
subject appear brighter, reduced to prevent glare, or otherwise
fine-tuned to produce the desired result.
Choose from values of from –3 to +1.
By default, changes are made in increments of 1/3 EV. The size
of the increments can be changed using Custom Setting b1
[EV steps for exposure cntrl] to 1/2 EV.
Higher values make the subject brighter, lower values darker.
At values other than ±0.0, a Y icon will appear in the
shooting display and the control panel.
Normal flash output can be restored by setting flash
compensation to ±0.0. Flash compensation is not reset when
the camera is turned off.
Flash Compensation
623
FV Lock
This feature is used to lock flash output for CLS-compatible flash
units, letting you take multiple photos or recompose shots
without changing the flash level. Your subject need not be in
the center of the frame, giving you more freedom when
composing shots.
Flash output is adjusted automatically for any changes in ISO
sensitivity and aperture.
FV lock is not available in b mode.
1
Assign [FV lock] to a control
using Custom Setting f2
[Custom controls].
2
Mount a CLS-compatible flash unit on the camera
accessory shoe.
FV Lock
624 FV Lock
3
Turn the flash unit on and choose a flash control
mode of monitor pre-flash
q
A or A.
If you are using an SB-5000, SB-500, SB-400, or SB-300
mounted on the camera accessory shoe, choose [TTL] or
[Auto external flash] for [Flash control] > [Flash control
mode].
For information on other flash units, see the
documentation provided with the unit.
4
Focus.
Position the subject in the center of the frame and press the
shutter-release button halfway to focus.
625
FV Lock
5
Lock flash level.
After confirming that the flash-ready indicator (c) appears
in the shooting display, press the [FV lock] control; the
flash unit will emit a monitor pre-flash to determine the
appropriate flash level.
Flash output will lock and an FV lock
icon (r) will appear in the
shooting display.
6
Recompose the shot.
7
Press the shutter-release button the rest of the
way down to shoot.
If desired, additional pictures can be taken without releasing
FV lock. Repeat Steps 6 to 7 to take additional shots.
8
Release FV lock.
Press the [FV lock] control to release FV lock and confirm
that the FV lock icon (r) is no longer displayed in the
shooting display.
626 Flash Info for On-Camera Units
When a unit that supports unified flash control (the SB-5000,
SB-500, SB-400, or SB-300) is mounted on the camera accessory
shoe, flash info can be viewed in the camera display. To view
flash info, press the DISP button in photo mode (025).
Flash Control Mode Displays
❚❚ TTL
Flash Info for On-Camera Units
5
7
8
6
4
213
1Flash-ready indicator (0613)
2Bounce icon (displayed if flash
head is tilted up)
3Zoom head position warning
(displayed if zoom head is not
in correct position)
4Flash control mode (0616)
FP indicator (0404)
5TTL flash compensation
(0616)
6Flash mode (0619)
7FV lock indicator (0623)
8Flash compensation (0622)
627
Flash Info for On-Camera Units
❚❚ Auto External Flash
❚❚ Distance-Priority Manual
❚❚ Manual
2
1
1Flash control mode (0616)
FP indicator (0404)
2Auto external flash
compensation (0616)
2
3
1
1Flash control mode (0616)
FP indicator (0404)
2Distance-priority manual flash
compensation (0616)
3Distance (0616)
2
1
1Flash control mode (0616)
FP indicator (0404)
2Flash level (0616)
628 Flash Info for On-Camera Units
❚❚ Repeating Flash
DFlash Info and Camera Settings
The flash information display shows select
camera settings, including shooting mode,
shutter speed, aperture, and ISO sensitivity.
DChanging Flash Settings
Flash settings can be changed by pressing the
i button in the flash info display. The options
available vary with the flash unit and the
settings selected. You can also test-fire the
flash.
2
3
1
1Flash control mode (0616)
2Output (0616)
3Times (0616)
Frequency (0616)
629
What Is Remote Flash Photography?
Remote Flash Photography
Take pictures with one or more remote flash units using wireless
flash control (Advanced Wireless Lighting, or AWL). For
information on using a flash unit mounted on the camera
accessory shoe, see “On-Camera Flash Photography” (0611).
Throughout this chapter, operations involving an accessory connected to
the camera are indicated by C, operations involving remote flash units
by f. For more information on using remote flash units (f), see the
manual provided with the flash unit.
What Is Remote Flash Photography?
630 What Is Remote Flash Photography?
Using Remote Flash Units
Remote flash units can be controlled via:
radio signals * (0631),
optical signals from a flash unit mounted
on the camera accessory shoe (0645),
radio signals, with additional lighting
provided by a shoe-mounted flash unit *
(0644), or
combined radio and optical signals *
(0656).
* Radio flash control is available only when a WR-R10 is connected to the
camera.
631
Radio AWL
Remote flash control provided via radio
signals from a WR-R10 connected to the
camera is termed “radio Advanced Wireless
Lighting”, or “radio AWL”. Radio AWL is
available with SB-5000 flash units.
Establishing a Wireless Connection
Before using radio AWL, establish a wireless connection
between the WR-R10 and the remote flash units.
DThe WR-R10 Wireless Remote Controller
Be sure to update the firmware for the optional WR-R10 wireless remote
controller to version 3.0 or later before using radio AWL. For information
on firmware updates, see the Nikon website for your area.
1
C
: Connect the WR-R10.
For more information, see the documentation provided with
the WR-R10.
Radio AWL
632 Radio AWL
2
C
: Select [Radio AWL] for
[Flash control] > [Wireless flash
options] in the photo shooting
menu.
3
C
: Choose a channel for the
WR-R10.
Set the WR-R10 channel selector to
the desired channel.
633
Radio AWL
4
C
: Choose a link mode for the
WR-R10.
Select [Wireless remote (WR)
options] > [Link mode] in the
camera setup menu and choose from
the following options:
Option Description
[Pairing]
The camera connects only to devices with which it
has previously been paired.
As camera will not communicate with devices with
which it has not been paired, this option can be
used to prevent signal interference from other
devices in the vicinity.
Given that each device must be paired separately,
however, PIN is recommended when connecting
to a large number of devices.
[PIN]
Communication is shared among all devices with the
same four-digit PIN.
This option is a good choice for photography
featuring a large number of remote devices.
If there are multiple cameras present that share the
same PIN, the flash units will be under the sole
control of the camera that connects first,
preventing all other cameras from connecting (the
LEDs on the WR-R10 units connected to the
affected cameras will blink).
634 Radio AWL
5
f
: Establish a wireless connection between the
WR-R10 and the remote flash units.
Set the remote units to radio AWL remote mode.
Set the remote units to the channel you selected for the
WR-R10 in Step 3.
Pair each of the remote units with the WR-R10 according to
the option selected in Step 4:
-[Pairing]: Initiate pairing on the remote unit and press the
WR-R10 pairing button. Pairing is complete when the
LINK lamps on the WR-R10 and flash unit flash orange and
green. Once a connection is established, the LINK lamp on
the remote flash unit will light green.
-[PIN]: Use the controls on the remote flash unit to enter
the PIN you selected in the previous step. Pairing begins
when the PIN is entered. Once a connection is
established, the LINK lamp on the remote flash unit will
light green.
6
f
: Repeat Step 5 for the remaining remote units.
635
Radio AWL
7
f
: Confirm that the flash-ready lights for all flash
units are lit.
In radio AWL, the flash-ready indicator will light in the
camera shooting or flash information display when all flash
units are ready.
DListing Remote Flash Units
To view the flash units currently controlled using radio AWL, select [Flash
control] > [Radio remote flash info] in the camera photo shooting
menu.
The identifier (remote flash unit name) for each unit can be changed
using flash unit controls.
DReconnecting
As long as the channel, link mode, and other settings remain the same,
the WR-R10 will automatically connect to previously paired flash units
when you select remote mode, and Steps 3–6 can be omitted. The flash
unit LINK lamp lights green when a connection is established.
32
1
1Connected flash unit
2Group
3Flash-ready indicator
636 Radio AWL
Remote Flash Photography
Settings are adjusted using [Flash
control] > [Remote flash control] in the
photo shooting menu. Choose a remote
flash control mode and take pictures as
described below.
❚❚ Group Flash
Select this item if you want to adjust settings separately for the
flash units in each group.
1
C
: Select [Group flash] for
[Flash control] > [Remote flash
control].
2
C
: Highlight [Group flash
options] in the [Flash control]
display and press
2
.
637
Radio AWL
3
C
: Choose a flash control
mode and flash level.
Choose a flash control mode and
flash level for the flash units in each
group.
The following options are available:
4
f
: Group the remote flash units.
Choose a group (A–F) for each of the remote flash units.
The master flash can control up to 18 flash units in any
combination.
Option Description
TTL i-TTL flash control.
qAAuto aperture. Available only with compatible flash
units.
MChoose the flash level manually.
––
(off)
The remote units do not fire. [Comp.] cannot be
adjusted.
638 Radio AWL
5
C
/
f
: Compose the shot and arrange the flash
units.
See the documentation provided with the flash units for
more information.
Test-fire the units and confirm that they are functioning
normally. To test-fire the units, press the i button in the
flash info display, highlight [c Test flash], and press J
(0659).
6
C
: Take the photograph.
639
Radio AWL
❚❚ Quick Wireless Control
Select this item to control the relative balance between the
remote flash units in groups A and B and adjust flash output for
group C. Output for group C is adjusted manually.
1
C
: Select [Quick wireless
control] for [Flash control] >
[Remote flash control].
2
C
: Highlight [Quick wireless
control options] in the [Flash
control] display and press
2
.
640 Radio AWL
3
C
: Adjust quick wireless control settings.
Choose the balance between
groups A and B.
Adjust flash compensation for
groups A and B.
Adjust settings for group C:
- Select [M] to enable or [––] to
disable the units in group C.
- When [M] is selected, the units in
group C will fire at the chosen
output.
641
Radio AWL
4
f
: Group the remote flash units.
Choose a group (A, B, or C).
The master flash can control up to 18 flash units in any
combination.
5
C
/
f
: Compose the shot and arrange the flash
units.
See the documentation provided with the flash units for
more information.
Test-fire the units and confirm that they are functioning
normally. To test-fire the units, press the i button in the
flash info display, highlight [c Test flash], and press J
(0659).
6
C
: Take the photograph.
642 Radio AWL
❚❚ Remote Repeating
The flash units fire repeatedly while the shutter is open,
producing a multiple-exposure effect.
1
C
: Select [Remote repeating]
for [Flash control] > [Remote
flash control].
2
C
: Highlight [Remote
repeating options] in the [Flash
control] display and press
2
.
3
C
: Adjust remote repeating options.
Adjust “output”, “times”, and
“frequency”.
Enable or disable selected
groups.
- Select [ON] to enable the selected
group, [––] to disable the selected
group.
643
Radio AWL
4
f
: Group the remote flash units.
Choose a group (A–F) for each of the remote flash units.
The master flash can control up to 18 flash units in any
combination.
5
C
/
f
: Compose the shot and arrange the flash
units.
See the documentation provided with the flash units for
more information.
Test-fire the units and confirm that they are functioning
normally. To test-fire the units, press the i button in the
flash info display, highlight [c Test flash], and press J
(0659).
6
C
: Take the photograph.
644 Radio AWL
Adding a Shoe-Mounted Flash Unit
Radio-controlled flash units (0631) can be
combined with any of the following flash
units mounted on the camera accessory
shoe:
SB-5000: Before attaching the flash unit, set
it to radio-controlled master flash mode (a d icon will appear
at the top left corner of the display) and choose group or
remote-repeating flash control. Once the unit is attached,
settings can be adjusted from the camera menus or using the
controls on the SB-5000. In the case of the camera menus, use
the options listed under [Group flash options] > [Master
flash] or under [M] in the [Remote repeating options]
display.
SB-910, SB-900, SB-800, SB-700, SB-600: Configure the flash for
standalone use. Use the controls on the flash unit to adjust
flash settings.
SB-500, SB-400, SB-300: Mount the unit on the camera. Adjust
settings using the [Group flash options] > [Master flash]
item in the camera menus.
645
Optical AWL
Remote flash units can be controlled via
optical signals from an optional flash unit
mounted on the camera accessory shoe and
functioning as a master flash (optical AWL).
For information on compatible flash units,
see “Features Available with CLS-Compatible Flash Units”
(0693).
If the flash unit in question is an SB-5000 or SB-500, settings
can be adjusted from the camera. For more information, see
“Using Optical AWL with the SB-5000 or SB-500” (0646). See
the documentation provided with the flash units for more
information.
Settings for other flash units must be adjusted using flash unit
controls. For more information, see the documentation
provided with the flash unit in question.
Optical AWL
646 Optical AWL
Using Optical AWL with the SB-5000 or SB-500
Mount the flash unit on the camera
accessory shoe. Select [Optical AWL] for
[Flash control] > [Wireless flash
options] in the photo shooting menu
and choose a remote flash control mode
(the SB-500 supports only [Group
flash]). Choose a remote flash control mode and take pictures
as described below.
DThe SB-5000
When an SB-5000 is mounted on the camera accessory shoe, [Flash
control] settings can also be changed using the controls on the flash unit.
❚❚ Group Flash
Select this item if you want to adjust settings separately for the
flash units in each group.
1
C
: Select [Group flash] for
[Flash control] > [Remote flash
control].
2
C
: Highlight [Group flash
options] in the [Flash control]
display and press
2
.
647
Optical AWL
3
C
: Adjust flash output and
choose the channel and flash
control mode.
Choose the flash control mode and
flash level for the master flash and
the remote flash units in each group.
The following options are available:
For [Channel], choose the channel
(1–4) the master flash will use for
optical remote flash control.
If the remote flash units include an
SB-500, you must choose channel
[3].
Option Description
TTL i-TTL flash control.
qAAuto aperture. Available only with compatible flash
units.
MChoose the flash level manually.
––
(off)
The remote units do not fire. [Comp.] cannot be
adjusted.
648 Optical AWL
4
f
: Choose a channel for the remote flash units.
Set the remote flash units to the channel selected for
[Channel] in Step 3.
5
f
: Group the remote flash units.
Choose a group (A, B, or C).
If you are using an SB-500 as the master flash, choose from
groups A and B.
There is no limit on the number of remote flash units that
may be used. The practical maximum, however, is three per
group, as the light emitted by the remote flash units will
interfere with performance if more flash units are used.
6
C
/
f
: Compose the shot and arrange the flash
units.
See the documentation provided with the flash units for
more information.
Test-fire the units and confirm that they are functioning
normally. To test-fire the units, press the test button on the
master flash or press the i button in the flash info display
and select [c Test flash], and press J (0659).
7
C
/
f
: Take the photograph after confirming that
the flash-ready lights for all flash units are lit.
649
Optical AWL
❚❚ Quick Wireless Control (SB-5000 Only)
Select this item to control the relative balance between the
remote flash units in groups A and B and adjust flash output for
group C. Output for group C is adjusted manually.
1
C
: Select [Quick wireless
control] for [Flash control] >
[Remote flash control].
2
C
: Highlight [Quick wireless
control options] in the [Flash
control] display and press
2
.
650 Optical AWL
3
C
: Adjust quick wireless control settings.
Choose the balance between
groups A and B.
Adjust flash compensation for
groups A and B.
Adjust settings for group C:
- Select [M] to enable or [––] to
disable the units in group C.
- When [M] is selected, the units in
group C will fire at the chosen
output.
Choose the channel.
-For [Channel], choose the channel
(1–4) the master flash will use for
optical remote flash control.
- If the remote flash units include an
SB-500, you must choose channel
[3].
651
Optical AWL
4
f
: Choose a channel for the remote flash units.
Set the remote flash units to the channel selected for
[Channel] in Step 3.
5
f
: Group the remote flash units.
Choose a group (A, B, or C).
There is no limit on the number of remote flash units that
may be used. The practical maximum, however, is three per
group, as the light emitted by the remote flash units will
interfere with performance if more flash units are used.
6
C
/
f
: Compose the shot and arrange the flash
units.
See the documentation provided with the flash units for
more information.
Test-fire the units and confirm that they are functioning
normally. To test-fire the units, press the test button on the
master flash or press the i button in the flash info display
and select [c Test flash], and press J (0659).
7
C
/
f
: Take the photograph after confirming that
the flash-ready lights for all flash units are lit.
652 Optical AWL
❚❚ Remote Repeating (SB-5000 Only)
The flash units fire repeatedly while the shutter is open,
producing a multiple-exposure effect.
1
C
: Select [Remote repeating]
for [Flash control] > [Remote
flash control].
2
C
: Highlight [Remote
repeating options] in the [Flash
control] display and press
2
.
653
Optical AWL
3
C
: Adjust remote repeating options.
Adjust “output”, “times”, and
“frequency”.
Enable or disable selected
groups.
- Select [ON] to enable the selected
group, [––] to disable the selected
group.
Choose the channel.
-For [Channel], choose the channel
(1–4) the master flash will use for
optical remote flash control.
- If the remote flash units include an
SB-500, you must choose channel
[3].
654 Optical AWL
4
f
: Choose a channel for the remote flash units.
Set the remote flash units to the channel selected for
[Channel] in Step 3.
5
f
: Group the remote flash units.
Choose a group (A, B, or C).
There is no limit on the number of remote flash units that
may be used. The practical maximum, however, is three per
group, as the light emitted by the remote flash units will
interfere with performance if more flash units are used.
6
C
/
f
: Compose the shot and arrange the flash
units.
See the documentation provided with the flash units for
more information.
Test-fire the units and confirm that they are functioning
normally. To test-fire the units, press the test button on the
master flash or press the i button in the flash info display
and select [c Test flash], and press J (0659).
7
C
/
f
: Take the photograph after confirming that
the flash-ready lights for all flash units are lit.
655
Optical AWL
DOptical AWL
Position the sensor windows on the remote flash units to pick up the
light from the master flash. Particular care is required if the master flash
is mounted on a hand-held camera.
Be sure that direct light or strong reflections from the remote flash units
do not enter the camera lens (in [TTL] mode) or the photocells on the
remote flash units ([qA] mode). Otherwise light from the flash units
may interfere with exposure.
Even if [--] is selected for [Master flash] > [Mode], the master flash may
emit low-intensity timing flashes. These flashes may appear in
photographs taken at short range. This can be prevented by choosing
low ISO sensitivities or small apertures (high f-numbers).
After positioning the remote flash units, take a test shot and view the
results in the camera display.
656 Optical/Radio AWL
For simultaneous optical and radio AWL,
attach a WR-R10 and mount an SU-800 or a
master flash that supports optical flash
control (the SB-910, SB-900, SB-800, SB-700,
or SB-500) on the accessory shoe.
Establish connections between the WR-R10 and all radio-
controlled flash units (0631).
If an SB-500 is mounted on the camera accessory shoe, select
[Optical/radio AWL] for [Wireless flash options]. With other
flash units or the SU-800, [Wireless flash options] is set to
[Optical/radio AWL] automatically.
The only option available for [Remote
flash control] will be [Group flash].
The remote flash units can be placed in
up to six groups (A through F). Place
optically-controlled units in groups A
through C and radio-controlled units in
groups D through F. To display options for groups D through
F, press 1 or 3 in the [Group flash options] display.
Optical/Radio AWL
657
Flash Info for Remote Units
The camera can display flash info for a SB-5000 or SB-500 flash
unit mounted on the camera accessory shoe and configured as
a master flash for optical AWL, as well as for remote flash units
controlled via radio AWL using a WR-R10. To view flash info,
press the DISP button in photo mode (025).
Flash Control Mode Displays
❚❚ Group Flash
Flash Info for Remote Units
3
64
5
21
1Flash-ready indicator 1
2Remote flash control (0294)
FP indicator (0404)
3Channel 2 (0631, 646)
4Link mode 3 (0480)
5Group flash control mode 4
Group flash mode (0636,
646)
Flash compensation/flash
level (output; 0636, 646)
6Remote flash control mode 2
(0293)
658 Flash Info for Remote Units
❚❚ Quick Wireless Control
❚❚ Remote Repeating
3
84
21
5
6
7
1Flash-ready indicator 1
2Remote flash control (0294)
FP indicator (0404)
3Channel 2 (0631, 649)
4Link mode 3 (0480)
5Group C flash control mode
and flash level (output; 0639,
649)
6Flash compensation (0639,
649)
7A:B ratio (0639, 649)
8Remote flash control mode 2
(0293)
4
85
6
231
7
1Flash-ready indicator 1
2Remote flash control (0294)
3Output (0642, 652)
4Channel 2 (0631, 652)
5Link mode 3 (0480)
6Group status (enabled/
disabled; 0642, 652)
7Times (0642, 652)
Frequency (0642, 652)
8Remote flash control mode 2
(0293)
659
Flash Info for Remote Units
1 Displayed in radio AWL when all flash units are ready.
2 Optical AWL is indicated by Y, radio AWL by Z, joint optical and
radio AWL by both icons together. Optical AWL channel for joint
optical and radio AWL is displayed only when SB-500 is used as master
flash.
3 Displayed only when radio AWL or joint optical and radio AWL is used.
4 Icons are displayed for each group only when joint optical and radio
AWL is used.
DFlash Info and Camera Settings
The flash information display shows select
camera settings, including shooting mode,
shutter speed, aperture, and ISO sensitivity.
DThe i Button
Flash settings can be changed by pressing the
i button in the flash info display. The options
available vary with the flash unit and the
settings selected. You can also test-fire the
flash.
660 Before Contacting Customer Support
Troubleshooting
You may be able to resolve any issues with the camera by
following the steps below. Check this list before consulting your
retailer or Nikon-authorized service representative.
Before Contacting Customer Support
STEP 1
Check the list of common problems.
Common problems and solutions are listed in the following
sections:
“Problems and Solutions” (0662)
“Alerts and Error Messages” (0673)
STEP 2
Turn the camera off and remove the battery, then wait
about a minute, re-insert the battery and turn the camera
on.
DThe camera may continue to write data to the memory
card after shooting. Wait at least a minute before
removing the battery.
STEP 3
Search Nikon websites.
For support information and answers to frequently asked
questions, visit the website for your country or region
(0xlii).
To download the latest firmware for your camera, visit:
https://downloadcenter.nikonimglib.com/
STEP 4Consult a Nikon-authorized service representative.
661
Before Contacting Customer Support
DRestoring Default Settings
Depending on current settings, some menu items and other features
may be unavailable. To access menu items that are grayed out or
features that are otherwise unavailable, try restoring default settings
using the [Reset all settings] item in the setup menu.
Note, however, that wireless network profiles, copyright information,
and other user-generated entries will also be reset. Once reset, settings
cannot be restored.
662 Problems and Solutions
Solutions to some common issues are listed below.
Battery/Display
Problems and Solutions
The camera is on but does not respond:
Wait for recording and other operations to end.
If the problem persists, turn the camera off.
If the camera does not turn off, remove and reinsert the battery.
If you are using an AC adapter, disconnect and reconnect the AC
adapter.
- Any data currently being recorded will be lost.
- Data that have already been recorded are not affected by
removing or disconnecting the power source.
The viewfinder or monitor does not turn on:
Have you changed the monitor mode? Choose a different monitor
mode using the M button.
Have you limited the choice of monitor modes available using the
[Limit monitor mode selection] item in the setup menu? Adjust
settings as required.
Dust, lint, or other foreign matter on the eye sensor may prevent it
functioning normally. Clean the eye sensor with a blower.
The viewfinder is out of focus:
Rotate the diopter adjustment control to adjust viewfinder focus.
If adjusting viewfinder focus does not correct the problem, set the
focus mode to AF-S and the AF-area mode to single-point AF. Next,
select the center focus point, choose a high-contrast subject, and
focus using autofocus. With the camera in focus, use the diopter
adjustment control to bring the subject into clear focus in the
viewfinder.
663
Problems and Solutions
Shooting
The display in the control panel, viewfinder, or monitor turns off
without warning:
Choose longer delays for Custom Setting c3 [Power off delay].
The control panel is unresponsive and dim:
Control panel response times and brightness vary with temperature.
The camera takes time to turn on:
More time will be needed to find files if the memory card contains
large numbers of files or folders.
The shutter cannot be released:
Is a memory card inserted, and if so, does it have space available?
Is the memory card write-protected?
If you selected mode S after selecting a shutter speed of “Bulb” or
Time” in mode M, choose a different shutter speed.
Is [Release locked] selected for [Slot empty release lock] in the
setup menu?
The camera is slow to respond to the shutter-release button:
Select [Off] for Custom Setting d4 [Exposure delay mode].
Burst shooting is unavailable:
Burst shooting cannot be used in conjunction with HDR.
664 Problems and Solutions
Photos are out of focus:
Is the camera in manual focus mode? To enable autofocus, select
AF-S, AF-C, or AF-F for focus mode.
Autofocus does not perform well under the following conditions. In
these cases, use manual focus or focus lock. Autofocus does not
perform well if: there is little or no contrast between the subject and
the background, the focus point contains objects at different
distances from the camera, the subject is dominated by regular
geometric patterns, the focus point contains areas of sharply
contrasting brightness, background objects appear larger than the
subject, or the subject contains many fine details.
In focus mode AF-C, the focus point may flash while the shutter-
release button is pressed halfway or the AF-ON button is pressed,
indicating that the camera is no longer able to focus. The focus
operation can be resumed by releasing and then pressing the
button again.
The beep does not sound:
Is [On] selected for [Silent photography] in the photo shooting
menu?
A beep does not sound when the camera focuses with AF-C
selected for focus mode.
Select an option other than [Off] for [Beep options] > [Beep on/off]
in the setup menu.
The beep does not sound in movie mode.
The full range of shutter speeds is not available:
Using a flash restricts the range of shutter speeds available. Flash sync
speed can be set to values of 1/2001/60 s using Custom Setting e1
[Flash sync speed]. When using flash units that support auto FP high-
speed sync, choose [1/200 s (Auto FP)] for a full range of shutter
speeds.
665
Problems and Solutions
Focus does not lock when the shutter-release button is pressed
halfway:
When AF-C is selected for focus mode, focus can be locked by
pressing the center of the sub-selector.
Focus-point selection is not available:
Focus-point selection is not available when [Auto-area AF], [Auto-
area AF (people)], or [Auto-area AF (animals)] is selected for AF-area
mode.
The camera is slow to record photos:
Is [On] selected for [Long exposure NR] in the photo shooting menu?
Photographs and movies do not appear to have the same
exposure as the preview shown in the display:
The effects of changes to settings that affect exposure and color are
not visible in the display when [Off] is selected for Custom Setting
d9 [Apply settings to live view].
Note that changes to [Monitor brightness] and [Viewfinder
brightness] have no effect on images recorded with the camera.
Flicker or banding appears in movie mode:
Select [Flicker reduction] in the movie shooting menu and choose an
option that matches the frequency of the local AC power supply.
Bright regions or bands appear:
Bright regions or bands may occur if the subject is lit by a flashing
sign, flash, or other light source with brief duration.
666 Problems and Solutions
Smudges appear in photographs:
Are there smudges on the front or rear (mount-side) lens elements?
Is there foreign matter on the image sensor? Perform image sensor
cleaning.
Bokeh is irregular:
With fast shutter speeds and/or fast lenses, you may notice
irregularities in how bokeh is shaped. The effect can be mitigated by
choosing slower shutter speeds and/or higher f-numbers.
Shooting ends unexpectedly or does not start:
Shooting may end automatically to prevent the camera
overheating, for example if:
- The ambient temperature is high
- The camera has been used for extended periods to record movies
- The camera has been used in continuous release modes for
extended periods
If photographs cannot be taken because the camera is running hot,
turn the camera off and wait for it to cool before trying to take
photographs again. Note that the camera may feel warm to the
touch, but this does not indicate a malfunction.
667
Problems and Solutions
Image artifacts appear in the display during shooting:
To reduce noise, adjust settings such as ISO sensitivity, shutter
speed, or Active D-Lighting.
At high ISO sensitivities, noise may become more noticeable in long
exposures or in pictures recorded when the camera temperature is
elevated.
Randomly-spaced bright pixels, fog, or bright spots may arise as a
result of increases in the temperature of the camera’s internal
circuits. Turn the camera off when it is not in use.
Randomly-spaced bright pixels, fog, lines or unexpected colors may
appear if you press the X button to zoom in on the view through the
lens during shooting.
Note that the distribution of noise in the display may differ from that
in the final picture.
The upper portion of the shooting display dims during burst
photography:
This phenomenon may occur when the mechanical shutter is used
but has no effect on the pictures taken.
The camera cannot measure a value for preset manual white
balance:
The subject is too dark or too bright.
Certain pictures cannot be selected as sources for preset manual
white balance:
Pictures created with cameras of other types cannot serve as sources
for preset manual white balance.
White balance (WB) bracketing is unavailable:
White balance bracketing is not available when an NEF (RAW) or NEF
+ JPEG option is selected for image quality.
White balance bracketing cannot be used in multiple exposure and
HDR modes.
668 Problems and Solutions
The effects of [Set Picture Control] differ from image to image:
[Auto] is selected for [Set Picture Control] or as the basis for a
custom Picture Control created using [Manage Picture Control], or
[A] (auto) is selected for [Quick sharp], [Contrast], or [Saturation].
For consistent results over a series of photographs, choose a setting
other than [A] (auto).
The option selected for metering cannot be changed:
The option selected for metering cannot be changed during exposure
lock.
Exposure compensation is not available:
Changes to exposure compensation in mode M apply only to the
exposure indicator and have no effect on shutter speed or aperture.
Uneven shading may appear in long exposures:
Uneven shading may appear in long exposures shot at shutter speeds
of “Bulb” or “Time”. The effect can be mitigated by selecting [On] for
[Long exposure NR] in the photo shooting menu.
The AF-assist illuminator does not light:
Is [Off] selected for Custom Setting a11 [Built-in AF-assist
illuminator]?
The illuminator does not light in movie mode.
The illuminator does not light when AF-C or MF is selected for focus
mode.
Sound is not recorded with movies:
Is [Microphone off] selected for [Microphone sensitivity] in the
movie shooting menu?
Was the movie recorded with [Manual] chosen for [Microphone
sensitivity] in the movie shooting menu and a low sensitivity
selected?
669
Problems and Solutions
Playback
NEF (RAW) pictures are not visible during playback:
The camera displays only the JPEG copies of pictures taken with [NEF
(RAW) + JPEG finem], [NEF (RAW) + JPEG fine], [NEF (RAW) + JPEG
normalm], [NEF (RAW) + JPEG normal], [NEF (RAW) + JPEG basicm],
or [NEF (RAW) + JPEG basic] selected for [Image quality].
Pictures taken with other cameras are not displayed:
Pictures recorded with other types of camera may not display
correctly.
Not all photos are visible during playback:
Select [All] for [Playback folder] in the playback menu.
“Tall” (portrait) orientation photos are displayed in “wide”
(landscape) orientation:
Is [Off] selected for [Rotate tall] in the playback menu?
Auto image rotation is not available during image review.
Camera orientation may not be correctly recorded in photos taken
with the camera pointing up or down.
Pictures cannot be deleted:
Is the memory card write-protected?
Are the pictures protected?
Pictures cannot be retouched:
The pictures cannot be further edited with this camera.
There is insufficient space on the memory card to record the
retouched copy.
The camera displays the message, [Folder contains no images.]:
Select [All] for [Playback folder] in the playback menu.
NEF (RAW) pictures cannot be printed:
Print JPEG copies of the pictures created using a tool such as the
[NEF (RAW) processing] item in the retouch menu.
Copy the pictures to a computer and print them using Capture NX-D
or other software that supports the NEF (RAW) format.
670 Problems and Solutions
Pictures are not displayed on HDMI devices:
Confirm that an HDMI cable is correctly connected.
Output to HDMI devices does not function as expected:
Confirm that an HDMI cable is correctly connected.
Is [On] selected for [HDMI] > [Advanced] > [External recording
control] in the setup menu?
Pictures may display correctly if default settings are restored using
the [Reset all settings] item in the setup menu.
The Image Dust Off option in Capture NX-D does not have desired
effect:
Image sensor cleaning changes the position of dust on the image
sensor and will not have the desired effect if:
Dust off reference data recorded after image sensor cleaning is
performed are used with photographs taken before image sensor
cleaning is performed
Dust off reference data recorded before image sensor cleaning is
performed are used with photographs taken after image sensor
cleaning is performed
The effects of [Set Picture Control], [Active D-Lighting], or
[Vignette control] are not visible:
In the case of NEF (RAW) images, the effects can only be viewed using
Nikon software. View NEF (RAW) images using Capture NX-D or
ViewNX-i.
Pictures cannot be copied to a computer:
Depending on the operating system, you may be unable to upload
pictures when the camera is connected to a computer. Copy pictures
from the memory card to a computer using a card reader or other
device.
671
Problems and Solutions
Bluetooth and Wi-Fi (Wireless Networks)
Smart devices do not display the camera SSID (network name):
Navigate to the setup menu and confirm both that [Disable] is
selected for [Airplane mode] and that [Enable] is selected for
[Connect to smart device] > [Pairing (Bluetooth)] > [Bluetooth
connection].
Confirm that [Connect to smart device] > [Wi-Fi connection] is
enabled in the setup menu.
Try disabling and re-enabling wireless network features on the
smart device.
The camera cannot connect to printers and other wireless
devices:
The camera cannot establish wireless connections with devices other
than smartphones, tablets, and computers.
Pictures cannot be uploaded to smart devices via auto upload:
Be sure the smart device displays the SnapBridge app when using
auto upload.
Check that the camera is paired with the smart device.
Check that the camera and smart device are connected via
Bluetooth.
The camera cannot download location data from the smart
device:
The camera may be unable to download or display location data from
smart devices depending on the version of the operating system and/
or SnapBridge app used.
672 Problems and Solutions
Miscellaneous
The date of recording is not correct:
Is the camera clock set correctly? The clock is less accurate than most
watches and household clocks; check it regularly against more
accurate timepieces and reset as necessary.
Menu items cannot be selected:
Some items are not available at certain combinations of settings.
673
Alerts and Error Messages
This section lists the alerts and error messages that appear in
the control panel and camera display.
Alerts
The following alerts appear in the control panel and camera
display:
Alerts and Error Messages
Alert
Problem Solution
Camera
display
Control
panel
HLow battery. Ready spare battery.
lLens is not correctly
attached.
Ensure that the lens is
correctly attached.
Ensure that retractable
lenses are extended.
This indicator is also
displayed when a non-
CPU lens is attached via a
mount adapter, but in this
case no action need be
taken.
Bulb
(flashes)
Bulb” selected in
mode S.
Change shutter speed.
Select mode M.
Time
(flashes)
Time” selected in
mode S.
Change shutter speed.
Select mode M.
Busy
(flashes)
Processing in
progress.
Wait until processing is
complete.
674 Alerts and Error Messages
(Exposure indicators
and shutter speed or
aperture display
flash)
Subject too bright;
limits of camera
exposure metering
system exceeded.
Lower ISO sensitivity.
Shooting mode P: Use
third-party ND (neutral
density) filter (filter can
also be used if alert is still
displayed after following
settings are adjusted in
mode S or A).
Shooting mode S: Choose
faster shutter speed.
Shooting mode A: Choose
smaller aperture (higher
f-number).
Subject too dark;
limits of camera
exposure metering
system exceeded.
Increase ISO sensitivity.
Shooting mode P: Use
optional flash unit (flash
can also be used if alert is
still displayed after
following settings are
adjusted in mode S or A).
Shooting mode S: Choose
slower shutter speed.
Shooting mode A: Choose
wider aperture (lower
f-number).
Alert
Problem Solution
Camera
display
Control
panel
675
Alerts and Error Messages
c
(flashes)
Flash has fired at full
power.
Photo may be
underexposed. Check
distance to subject and
settings such as aperture,
flash range, and ISO
sensitivity.
Subjects appear
dark and
underexposed.
Use optional flash unit.
Full
(flashes)
Memory
insufficient to
record further
photos.
Camera has run
out of file
numbers.
Delete pictures from
memory card until there is
room for additional
pictures to be recorded.
Copy pictures you wish to
keep to computer or other
device before proceeding.
Insert new memory card.
Err
(flashes)
Camera
malfunction.
Press shutter-release button
again. If error persists or
appears frequently, consult
Nikon-authorized service
representative.
Card
(flashes)
The memory card is
write-protected
(“locked”).
Slide the lock switch to the
“write” position (049).
Alert
Problem Solution
Camera
display
Control
panel
676 Alerts and Error Messages
Error Messages
The following error messages may appear in the camera display:
Messages
Problem Solution
Camera
display
Control
panel
Shutter release
disabled.
Recharge
battery.
Battery
exhausted.
Replace with spare
battery.
Charge battery.
This battery
cannot be used.
It does not
communicate
properly with
this camera. To
use the camera
safely, choose a
battery
designated for
use in this
camera.
Battery info not
available.
Battery cannot be used.
Contact Nikon-
authorized service
representative.
Battery level is
extremely low; charge
battery.
Battery cannot
supply data to
camera.
Replace third-party
batteries with genuine
Nikon batteries.
No memory
card. [-E-]
Memory card not
inserted or
inserted
incorrectly.
Check that card is
inserted correctly.
677
Alerts and Error Messages
Cannot access
this memory
card. Insert
another card.
Card,
Err
(flashes)
Error accessing
memory card.
Check that camera
supports memory card.
If error persists after
card has been
repeatedly ejected and
reinserted, card may be
damaged. Contact
retailer or Nikon-
authorized service
representative.
Unable to create
new folder.
Delete pictures from
memory card until
there is room for
additional pictures to
be recorded. Copy
pictures you wish to
keep to computer or
other device before
proceeding.
Insert new memory
card.
Memory card is
locked. Slide
lock to "write"
position.
Card,
---
(flashes)
The memory card
is write-protected
(“locked”).
Slide the lock switch to
the “write” position
(049).
Messages
Problem Solution
Camera
display
Control
panel
678 Alerts and Error Messages
This card is not
formatted.
Format the
card.
For
(flashes)
Memory card is
not correctly
formatted.
Format memory card.
Replace with correctly-
formatted memory
card.
FTZ mount
adapter
firmware
version not
supported.
Upgrade FTZ
firmware.
Mount adapter
firmware out of
date.
Update to the latest
version of the mount
adapter firmware. For
more information, visit
the Nikon website for
your country or region.
Recording
interrupted.
Please wait.
Memory card
does not support
required movie
write speed.
Use card that supports
required write speed or
change option selected
for [Frame size/frame
rate] in movie shooting
menu.
The camera is
too hot. It
cannot be used
until it cools.
Please wait.
Camera will
turn itself off.
Camera’s internal
temperature is
elevated.
Suspend shooting until
camera has cooled.
High battery
temperature.
Remove battery and wait
for it to cool.
Messages
Problem Solution
Camera
display
Control
panel
679
Alerts and Error Messages
Folder contains
no images.
Folder contains
no images.
Insert memory card that
contains pictures.
No pictures in
folder selected
for playback.
Use [Playback folder]
item in playback menu to
select folder that contains
pictures.
Cannot display
this file.
File has been
modified using
computer
application or
does not
conform to DCF
file standard.
File is corrupt.
Do not overwrite images
using computer
applications.
Cannot select
this file.
Selected picture
cannot be
retouched.
Retouch options are
available only with
pictures taken with or
previously retouched on
camera.
This movie
cannot be
edited.
Selected movie
cannot be edited.
Movies created with
other devices cannot be
edited.
Movies under two
seconds long cannot be
edited.
Messages
Problem Solution
Camera
display
Control
panel
680 Compatible Lenses and Accessories
Technical Notes
The camera can be used with all Z mount lenses.
ACompatible F Mount Lenses
F mount lenses can be mounted on Z mount cameras using an FTZ mount
adapter.
Some features may not be available depending on the lens used.
Information on the F mount lenses that can be used with Z mount
cameras and on any restrictions that may apply can be found in
Compatible F Mount Lenses, available from the Nikon Download Center:
https://downloadcenter.nikonimglib.com/en/products/491/FTZ.html
Compatible Lenses and Accessories
Confirm that the lens name includes “NIKKOR Z”.
681
The Camera Display and Control Panel
For illustrative purposes, the displays are shown with all
indicators lit.
The Monitor
❚❚ Photo Mode
The Camera Display and Control Panel
41
40
42
43
46
47
48
45
44
21
39
38
35 1386142791011121415
19
20
18
17
16
23293034 253237 272836 35 22243133 26
1Shooting mode (0106)
2Flexible program indicator
(0107)
3User setting mode (0115)
4AF-area brackets (077)
5Flash mode (0619)
6Interval timer indicator
(0326)
t icon (055)
“No memory card” indicator
(045, 49)
Memory card high-
temperature warning (048)
682 The Camera Display and Control Panel
7Release mode (0125, 160)
8Focus point (056, 77)
9Focus mode (074)
10 AF-area mode (077)
11 Active D-Lighting (0283)
12 Picture Control (0139)
13 Bluetooth connection
indicator (0483)
Airplane mode (0482)
14 White balance (094, 145, 267)
15 Image area (0260)
16 Image size (0154)
17 Image quality (0152)
18 i icon (0136)
19 Exposure and flash bracketing
indicator (0298)
WB bracketing indicator
(0303)
ADL bracketing indicator
(0306)
HDR indicator (0321)
Multiple exposure indicator
(0312)
20 Number of shots in exposure
and flash bracketing sequence
(0298)
Number of shots in WB
bracketing sequence (0303)
Number of shots in ADL
bracketing sequence (0306)
HDR exposure differential
(0321)
Number of multiple exposure
(0312)
21 Exposure indicator
Exposure (0110)
Exposure compensation
(0122)
Auto bracketing (0297)
22 Flash-ready indicator (0613)
23 “k” (appears when memory
remains for over 1000
exposures; 047)
24 Number of exposures
remaining (047, 773)
25 Wi-Fi connection indicator
(0158)
683
The Camera Display and Control Panel
DTemperature Warnings
If the camera temperature becomes elevated, a temperature warning
and count-down timer will be displayed. When the timer reaches zero,
the shooting display will turn off.
The timer turns red when the thirty second mark is reached. In some
cases, the timer may be displayed immediately after the camera is
turned on.
DMemory Card High-Temperature Warning
A high-temperature warning appears in the shooting display when the
temperature of the memory card rises. Do not attempt to remove the
memory card; instead, wait for the camera to cool and the warning to
clear from the display.
26 ISO sensitivity (0118)
27 ISO sensitivity indicator
(0118)
Auto ISO sensitivity indicator
(0120)
28 Exposure compensation
indicator (0122)
29 Flash compensation indicator
(0622)
30 Subject-tracking AF (086)
31 Aperture (0108, 109)
32 Aperture lock icon (0429)
33 Shutter speed (0108, 109)
34 Flash sync indicator (0404)
35 Shutter speed lock icon
(0429)
36 FV lock indicator (0623)
37 Metering (0157)
38 Autoexposure (AE) lock
(0133)
39 Battery indicator (044, 727)
40 USB power delivery (0492)
41 Flicker detection (0289)
42 Shutter type (0398)
Silent photography (0100)
43 Exposure delay mode (0397)
44 Focus indicator (091)
45 Vibration reduction indicator
(0161)
46 Touch shooting (019, 88)
47 Live view preview indicator
(0402)
48 Temperature warning
684 The Camera Display and Control Panel
The Information Display
57312 4 6
89
1Shooting mode (0106)
2Flexible program indicator
(0107)
3User setting mode (0115)
4Shutter speed lock icon
(0429)
5Shutter speed (0108, 109)
6Aperture lock icon (0429)
7Aperture (0108, 109)
8Exposure indicator
Exposure (0110)
Exposure compensation
(0122)
Auto bracketing (0297)
9Flash sync indicator (0404)
685
The Camera Display and Control Panel
12 3
4
5
6
8
9
7
10
1Flash compensation indicator
(0622)
2Exposure compensation
indicator (0122)
Exposure compensation value
(0122)
3Exposure and flash bracketing
indicator (0298)
WB bracketing indicator
(0303)
ADL bracketing indicator
(0306)
HDR indicator (0321)
Multiple exposure indicator
(0312)
4“k” (appears when memory
remains for over 1000
exposures; 047)
5Number of exposures
remaining (047, 773)
6i icon (0136)
7ISO sensitivity (0118)
8ISO sensitivity indicator
(0118)
Auto ISO sensitivity indicator
(0120)
9FV lock indicator (0623)
10 Autoexposure (AE) lock
(0133)
686 The Camera Display and Control Panel
123 56 748910
17
18
16
22 11
15
21 12
19
23
14
20 13
1Bluetooth connection
indicator (0483)
Airplane mode (0482)
2Wi-Fi connection indicator
(0158)
3Long exposure noise
reduction indicator (0285)
4Shutter type (0398)
Silent photography (0100)
5Exposure delay mode (0397)
6Interval timer indicator
(0326)
t icon (055)
7Flash control mode (0616)
8“Beep” indicator (0476)
9Battery indicator (044, 727)
10 USB power delivery (0492)
11 Wi-Fi connection (0158)
12 Release mode (0125, 160)
13 AF-area mode (077)
14 Focus mode (074)
15 Vibration reduction indicator
(0161)
16 View memory card info
(0159)
17 Metering (0157)
18 Image size (0154)
19 White balance (094, 145, 267)
20 Set Picture Control (0139)
21 Image quality (0152)
22 Flash mode (0619)
23 Temperature warning
687
The Camera Display and Control Panel
❚❚ Movie Mode
12
13
14
15
16
12 4 53
7
8
6
10
9
11
1Recording indicator (063)
“No movie” indicator (065)
2External recording control
(0606)
3Destination (0177)
4Frame size and rate/image
quality (0168)
5Image area (0175)
6Time remaining (063)
7Timecode (0375)
8File name (0364)
9Wind noise reduction (0374)
10 Headphone volume (0374)
11 Release mode (still
photography; 0130)
12 Sound level (0174)
13 Microphone sensitivity
(0174)
14 Frequency response (0373)
15 Electronic VR indicator (0178)
16 Highlight display (0450)
688 The Camera Display and Control Panel
The Viewfinder
❚❚ Photo Mode
40
41
42 20
39
43
44
45
46 16
14 15312 4 65 7 8 9 10 11 12 13
17
22
21
18
19
2834
2733 3135 24
3637 32 30 2338 2529 26
1Battery indicator (044, 727)
2USB power delivery (0492)
3Live view preview indicator
(0402)
4Vibration reduction indicator
(0161)
5Interval timer indicator
(0326)
t icon (055)
“No memory card” indicator
(045, 49)
Memory card high-
temperature warning (048)
6Flash mode (0619)
7Release mode (0125, 160)
8Focus mode (074)
9AF-area mode (077)
10 Active D-Lighting (0283)
11 Picture Control (0139)
12 White balance (094, 145, 267)
13 Image quality (0152)
14 Image size (0154)
689
The Camera Display and Control Panel
15 Image area (0260)
16 Bluetooth connection
indicator (0483)
Airplane mode (0482)
17 Wi-Fi connection indicator
(0158)
18 Focus point (056, 77)
19 Exposure and flash bracketing
indicator (0298)
WB bracketing indicator
(0303)
ADL bracketing indicator
(0306)
HDR indicator (0321)
Multiple exposure indicator
(0312)
20 Number of shots in exposure
and flash bracketing sequence
(0298)
Number of shots in WB
bracketing sequence (0303)
Number of shots in ADL
bracketing sequence (0306)
HDR exposure differential
(0321)
Number of multiple exposure
(0312)
21 Subject-tracking AF (086)
22 Flash compensation indicator
(0622)
23 Flash-ready indicator (0613)
24 “k” (appears when memory
remains for over 1000
exposures; 047)
25 Number of exposures
remaining (047, 773)
26 ISO sensitivity (0118)
27 ISO sensitivity indicator
(0118)
Auto ISO sensitivity indicator
(0120)
28 Exposure compensation
indicator (0122)
29 Exposure indicator
Exposure (0110)
Exposure compensation
(0122)
Auto bracketing (0297)
30 Aperture (0108, 109)
31 Aperture lock icon (0429)
32 Shutter speed (0108, 109)
33 Flash sync indicator (0404)
34 FV lock indicator (0623)
35 Autoexposure (AE) lock
(0133)
36 User setting mode (0115)
37 Metering (0157)
690 The Camera Display and Control Panel
38 Focus indicator (091)
39 Exposure delay mode (0397)
40 Shutter type (0398)
Silent photography (0100)
41 Shooting mode (0106)
42 Flexible program indicator
(0107)
43 Flicker detection (0289)
44 Shutter speed lock icon
(0429)
45 AF-area brackets (077)
46 Temperature warning
691
The Camera Display and Control Panel
❚❚ Movie Mode
11
12
10
13
14
16
15
8
12
3
4
5
7
6
9
1Frame size and rate/image
quality (0168)
2Image area (0175)
3File name (0364)
4External recording control
(0606)
5Recording indicator (063)
“No movie” indicator (065)
6Timecode (0375)
7Time remaining (063)
8Destination (0177)
9Release mode (still
photography; 0130)
10 Sound level (0174)
11 Microphone sensitivity
(0174)
12 Frequency response (0373)
13 Wind noise reduction (0374)
14 Headphone volume (0374)
15 Highlight display (0450)
16 Electronic VR indicator (0178)
692 The Camera Display and Control Panel
The Control Panel
23145
11
12
13
10 9
6
7
8
1Shutter speed lock icon
(0429)
2Shutter speed (0108, 109)
3Exposure compensation
indicator (0122)
Exposure compensation value
(0122)
4Aperture lock icon (0429)
5Aperture (0108, 109)
6USB power delivery (0492)
7Battery indicator (044, 727)
8“k” (appears when memory
remains for over 1000
exposures; 047)
9Number of exposures
remaining (047, 773)
10 Release mode (0125, 160)
11 ISO sensitivity (0118)
12 Flash compensation indicator
(0622)
“Flash off” icon (0619)
13 Flash sync indicator (0404)
693
Compatible Flash Units
The Nikon Creative Lighting System (CLS)
Nikon’s advanced Creative Lighting System (CLS) supports a
variety of features thanks to improved communication between
the camera and compatible flash units.
❚❚ Features Available with CLS-Compatible Flash
Units
Compatible Flash Units
Supported features
Flash unit
SB-5000
SB-910/
SB-900/
SB-800
SB-700
SB-600
SB-500
SU-800
SB-R200
SB-400
SB-300
Single flash
i-TTL
i-TTL
balanced fill-
flash1
44444
——44
Standard
i-TTL fill-flash 4 2 4 2 44
2 4—— 44
qAAuto aperture 44
3 ———————
ANon-TTL auto 4 3 ———————
GN
Distance-
priority
manual
444
——————
MManual 44444
4 ——
4 4 4 4
RPT Repeating
flash 44
———————
694 Compatible Flash Units
Optical Advanced Wireless Lighting
Master
Remote flash control 444
4 4 4———
i-TTL i-TTL 444
4 4 ————
[A : B]
Quick
wireless flash
control
44——
4 5 ———
qAAuto aperture 44
———————
ANon-TTL auto ———————
MManual 444
4 4 ————
RPT Repeating
flash 44
———————
Remote
i-TTL i-TTL 44444
4——
[A : B]
Quick
wireless flash
control
44444
4——
qA/A
Auto
aperture/
non-TTL auto
4 6 4 6 ———————
MManual 44444
4——
RPT Repeating
flash 44444
————
Supported features
Flash unit
SB-5000
SB-910/
SB-900/
SB-800
SB-700
SB-600
SB-500
SU-800
SB-R200
SB-400
SB-300
695
Compatible Flash Units
1 Not available with spot metering.
2 Can also be selected via the flash unit.
3qA/A mode selection is performed on the flash unit using custom
settings.
4 Can be selected using the [Flash control] item in the camera menus.
5 Available during close-up photography only.
6Choice of qA and A depends on the option selected with the
master flash.
7 Supports the same features as remote flash units with optical AWL.
8 Available only in i-TTL, qA, A, GN, and M flash-control modes.
Radio-controlled Advanced
Wireless Lighting 4 7 ———————
Color Information
Communication (flash) 44444
——44
Color Information
Communication (LED light) ———
4————
Auto FP high-speed sync 84444444
——
FV lock 94 4 4444444
Red-eye reduction 44444
——4
Camera modeling
illumination 4444444
——
Unified flash control 4——
4——44
Camera flash unit firmware
update 44
10 44———4
Supported features
Flash unit
SB-5000
SB-910/
SB-900/
SB-800
SB-700
SB-600
SB-500
SU-800
SB-R200
SB-400
SB-300
696 Compatible Flash Units
9 Available only in i-TTL flash control mode or when the flash is
configured to emit monitor preflashes in qA or A flash control
mode.
10 Firmware updates for the SB-910 and SB-900 can be performed from
the camera.
❚❚ The SU-800 Wireless Speedlight Commander
When mounted on a CLS-compatible camera, the SU-800 can be
used as a commander for SB-5000, SB-910, SB-900, SB-800,
SB-700, SB-600, SB-500, or SB-R200 flash units. Group flash
control is supported for up to three groups. The SU-800 itself is
not equipped with a flash.
DFlash Photography
Flash photography cannot be combined with some camera features,
including:
silent photography,
movie recording, and
HDR (high dynamic range)
697
Compatible Flash Units
DOther Flash Units
The following flash units can be used in non-TTL auto (A) and manual
modes. The options available do not vary with the lens used.
1 Mounting an SB-27 on the camera automatically sets the flash mode
to TTL, but setting the flash mode to TTL disables the shutter release.
Set the SB-27 to A.
2 Available when the camera is used to select the flash mode.
DUsing FV Lock with Optional Flash Units
FV lock is available with optional flash units in TTL and (where
supported) monitor pre-flash qA and monitor pre-flash A flash control
modes (see the manual provided with the flash unit for more
information).
Note that when Advanced Wireless Lighting is used to control remote
flash units, you will need to set the flash control mode for the master or
at least one remote group to TTL, qA, or A.
Supported features
Flash unit
SB-80DX
SB-28DX
SB-28
SB-26
SB-25
SB-24
SB-50DX
SB-23
SB-29
SB-21B
SB-29S
SB-30
SB-27 1
SB-22S
SB-22
SB-20
SB-16B
SB-15
Flash mode
ANon-TTL auto 44
MManual 444
GRepeating flash 4——
REAR 2 Rear-curtain sync 444
698 Compatible Flash Units
DMetering Areas for FV Lock
The areas metered when FV lock is used with optional flash units are as
follows:
DNotes on Optional Flash Units
Refer to the flash unit manual for detailed instructions.
If the unit supports CLS, refer to the section on CLS-compatible digital
SLR cameras. This camera is not included in the “digital SLR” category in
the SB-80DX, SB-28DX, and SB-50DX manuals.
If the flash-ready indicator (c) flashes for about three seconds after a
photograph is taken in i-TTL or non-TTL auto mode, the flash has fired at
full power and the photograph may be underexposed (CLS-compatible
flash units only).
i-TTL flash control can be used at ISO sensitivities between 64 and 12800
(Z 7II) or between 100 and 12800 (Z 6II).
At ISO sensitivities over 12800, the desired results may not be achieved
at some ranges or aperture settings.
Picture taken with Flash control mode Metered area
Stand-alone flash unit
i-TTL 6-mm circle in center of
frame
Auto aperture (qA)Area metered by flash
exposure meter
Remote flash units
controlled via
Advanced Wireless
Lighting
i-TTL Entire frame
Auto aperture (qA)Area metered by flash
exposure meter
Non-TTL auto (A)
699
Compatible Flash Units
In mode P, the maximum aperture (minimum f-number) is limited
according to ISO sensitivity, as shown below:
* If the maximum aperture of the lens is smaller than given above, the
maximum value for aperture will be the maximum aperture of the lens.
The SB-5000, SB-910, SB-900, SB-800, SB-700, SB-600, SB-500, and
SB-400 provide red-eye reduction in red-eye reduction and slow-sync
with red-eye reduction flash modes.
“Noise” in the form of lines may appear in flash photographs taken with
an SD-9 or SD-8A high-performance battery pack attached directly to
the camera. Reduce ISO sensitivity or increase the distance between the
camera and the battery pack.
The camera provides AF-assist illumination as required. AF-assist
illuminators on optional flash units will not light.
When an SC-series 17, 28, or 29 sync cable is used for off-camera flash
photography, correct exposure may not be achieved in i-TTL mode. We
recommend that you select standard i-TTL fill-flash. Take a test shot and
view the results in the camera display.
In i-TTL, do not use any form of flash panel (diffusion panel) other than
the flash unit’s built-in flash panel or supplied bounce adapter. Using
other panels may produce incorrect exposure.
DFlash Compensation for Optional Flash Units
In i-TTL and auto aperture (qA) flash control modes, the flash
compensation selected with the optional flash unit or the camera [Flash
control] item is added to the flash compensation selected with the [Flash
compensation] item in the photo shooting menu.
Maximum aperture (f-number) at ISO equivalent of:
100 200 400 800 1600 3200 6400 12800
455.67.18101113
700 Compatible Flash Units
AModeling Illumination
Pressing the control to which [Preview] has been assigned using
Custom Setting f2 [Custom controls] causes CLS-compatible flash units
to emit a modeling flash.
This feature can be used with Advanced Wireless Lighting to preview
the total lighting effect achieved with multiple flash units.
The effects of shadows cast by the flash are best observed directly rather
than in the shooting display.
Modeling illumination can be turned off by selecting [Off] for Custom
Setting e5 [Modeling flash].
AStudio Strobe Lighting
To adjust the color and brightness of the view through the lens so that
shots are easier to frame, select [Off] for Custom Setting d9 [Apply
settings to live view].
701
Other Compatible Accessories
A variety of accessories are available for your Nikon camera.
DCompatible Accessories
Availability may vary with country or region.
See our website or brochures for the latest information.
Power Sources
EN-EL15c Rechargeable Li-ion Battery: EN-EL15c batteries can be
used with Nikon Z 7II/Z 6II digital cameras.
- EN-EL15b/EN-EL15a/EN-EL15 batteries can also be used. Note,
however, that fewer pictures can be taken on a single charge than with
the EN-EL15c (0777).
MH-25a Battery Charger: The MH-25a can be used to recharge
EN-EL15c batteries.
Other Compatible Accessories
702 Other Compatible Accessories
MB-N11 Power Battery Pack/MB-N10 Battery Pack: Battery packs for
Nikon mirrorless cameras. Attached to the camera, both allow the use of
up to two EN-EL15c rechargeable Li-ion batteries as a power source.
- The MB-N11 is equipped with a shutter-release button, main and sub-
command dials, a multi selector, and Fn and AF-ON buttons for use
when the camera is rotated to take pictures in portrait (“tall”)
orientation.
- EN-EL15b/EN-EL15a/EN-EL15 batteries can be used in place of the
EN-EL15c. The number of pictures that can be taken on a single charge
(i.e., battery endurance) will however drop compared to the EN-EL15c
(0777).
- An EH-7P charging AC adapter connected to the battery pack’s
charging connector can be used to charge batteries inserted in the
pack. When connected to an MB-N11, it can also supply power to the
camera.
- Information on connecting and removing the battery pack and
instructions on its use and care are available either via the manual
supplied with the MB-N10 or, in the case of the MB-N11, in “Optional
MB-N11 Power Battery Packs” (0710).
EH-7P Charging AC Adapter: The EH-7P can be used to charge
batteries inserted in the camera.
- The battery will not charge while the camera is on.
- It cannot be used to charge EN-EL15a/EN-EL15 batteries.
- The charging AC adapter can be used to power the camera; to do so,
select [Enable] for [USB power delivery] in the setup menu. For more
information, see “USB Power Delivery” (0492).
703
Other Compatible Accessories
EP-5B Power Connector, EH-5d/EH-5c/EH-5b AC Adapter: Use AC
adapters to power the camera for extended periods.
- The EP-5B is needed to connect the EH-5d/EH-5c/EH-5b to the camera.
See “Attaching a Power Connector and AC Adapter” (0733) for details.
Filters
Neutral Color (NC) filters can be used to protect the lens.
Filters may cause ghosting when the subject is framed against a bright
light, or when a bright light source is in the frame. Filters can be
removed if ghosting occurs.
Matrix metering may not produce the desired results with filters with
exposure factors (filter factors) over 1× (Y44, Y48, Y52, O56, R60, X0, X1,
C-PL, ND2S, ND4, ND4S, ND8, ND8S, ND400, A2, A12, B2, B8, B12); we
suggest that [Center-weighted metering] be selected instead. See the
filter manual for details.
Filters intended for special-effects photography may interfere with
autofocus or the in-focus indicator (I).
Remote Cords
MC-DC2 Remote Cord (length 1 m/3 ft 4 in.): When connected to the
camera accessory terminal, the MC-DC2 can be used to release the shutter
remotely.
USB Cables
UC-E24 USB Cable: A USB cable with a type C connector for connection
to the camera and a type A connector for connection to the USB device.
UC-E25 USB Cable: A USB cable with two type C connectors.
704 Other Compatible Accessories
HDMI Cables
HC-E1 HDMI Cable: An HDMI cable with a type C connector for
connection to the camera and a type A connector for connection to HDMI
devices.
Hot Shoe Adapters
AS-15 Sync Terminal Adapter: Mount the AS-15 on the camera hot shoe
to connect studio strobe lights or other flash equipment via a sync
terminal.
Accessory Shoe Covers
BS-1 Accessory Shoe Cover: A cover protecting the accessory shoe when
no flash unit is attached.
Body Caps
BF-N1 Body Cap: The body cap prevents dust entering the camera when
no lens is in place.
Viewfinder Eyepiece Accessories
DK-29 Rubber Eyecup: A rubber eyecup that can be fitted to the camera
viewfinder. The DK-29 makes the image in the viewfinder easier to see,
preventing eye fatigue.
Remove Replace
705
Other Compatible Accessories
Flash Units
SB-5000, SB-910, SB-900, SB-800, SB-700, SB-600, SB-500, SB-400,
SB-300, and SB-R200 Speedlights: These units can be mounted on the
camera for flash photography. Some also support wireless remote
control for off-camera flash photography with multiple flash units.
- See the manual supplied with each Speedlight for information on
mounting the unit on the camera.
- For more information on flash photography, see “On-Camera Flash
Photography” (0611), “Remote Flash Photography” (0629), and
“Compatible Flash Units” (0693).
SU-800 Wireless Speedlight Commander: A wireless commander for
use with SB-5000, SB-910, SB-900, SB-800, SB-700, SB-600, SB-500, and
SB-R200 flash units. Flash units can be divided into up to three groups
for remote flash control. The SU-800 itself is not equipped with a flash.
Mount Adapters
FTZ Mount Adapter: An adapter that allows NIKKOR F mount lenses to
be used with digital cameras that support interchangeable Z mount
lenses.
For information on attaching, removing, maintaining, and using FTZ
mount adapters, refer to the mount adapter manual.
* Update to the latest version of the mount adapter firmware if so
prompted after attaching the adapter. Information on performing
firmware updates is available via the Nikon website for your country or
region.
706 Other Compatible Accessories
Microphones
ME-1 Stereo Microphone: Connect the ME-1 to the camera
microphone jack to record stereo sound. Using an external microphone
also reduces the chance of picking up equipment noise, such as the
sounds produced during movie recording when focus is achieved using
autofocus.
ME-W1 Wireless Microphone: A wireless Bluetooth microphone. Use
the ME-W1 for off-camera recording.
Wireless Transmitters
WT-7 Wireless Transmitter: Use the WT-7 to upload pictures over a
wireless network or control the camera from a computer running Camera
Control Pro 2 (available separately). You can also take and browse pictures
remotely from a computer or smart device.
* Requires a wireless network and some basic network knowledge. Be
sure to update the wireless transmitter software to the latest version.
707
Other Compatible Accessories
Wireless Remote Controllers
WR-R10 and WR-T10 Wireless Remote Controllers
- When a WR-R10 wireless remote controller is attached to the accessory
terminal, the camera can be controlled wirelessly using a WR-T10
wireless remote controller.
- WR-R10 wireless remote controllers can also be used to control radio-
controlled flash units.
- For synchronized release involving more than one camera, ready
multiple cameras with paired WR-R10 units attached.
* When connecting the WR-R10, be sure the cover for the accessory
terminal and the USB and HDMI connectors is fully open.
WR-1 Wireless Remote Controller: WR-1 units are used with WR-R10 or
WR-T10 wireless remote controllers or with other WR-1 remote
controllers, with the WR-1 units functioning as either transmitters or
receivers. When a WR-R10 or a WR-1 configured as a receiver is
connected to the camera accessory terminal, a second WR-1 configured
as a transmitter can be used to take pictures and adjust camera settings
remotely.
* When using a wireless remote controller with the WR-R10, be sure the
firmware for the WR-R10 and WR-1 have been updated to the latest
versions (WR-R10 firmware version 3.0 or later and WR-1 firmware
version 1.0.1 or later). For information on firmware updates, see the
Nikon website for your area. Consult a Nikon-authorized service
representative when updating the firmware for the WR-R10 from
versions prior to version 2.0 to version 3.0 or later.
708 Other Compatible Accessories
DThe HDMI/USB Cable Clip
To prevent accidental disconnection, attach the supplied clip to USB
cables or optional HDMI cables as shown (note that the clip may not fit all
third-party HDMI cables).
The illustrations show the USB cable. Pass HDMI cables through the
other channel.
Keep the monitor in the storage position when using the cable clip.
* Insert the projection on the HDMI/USB cable clip into the matching
indentation on the camera before plugging the cable in.
709
Other Compatible Accessories
DAttaching and Removing the Accessory Shoe Cover
The cover slides into the shoe as shown. To remove the cover, hold the
camera firmly, press the cover down with a thumb and slide it in the
direction shown.
USB cable HDMI cable and USB cable
used simultaneously
710 Other Compatible Accessories
Optional MB-N11 Power Battery Packs
❚❚ Parts of the MB-N11: Names and Functions
The name and function of each part of the MB-N11 are listed
below.
1Contact cap Protects the MB-N11’s power/signal
contacts.
2Signal contacts
3Power contacts
4Multi selector for
vertical shooting
Performs the role selected using Custom
Setting f9 [Assign MB-N11 buttons].
5AF-ON button for
vertical shooting
Performs the role selected using Custom
Setting f9 or g7 [Assign MB-N11 buttons].
6Main command dial
for vertical shooting
Performs the same role as the matching
control on the camera.
7Holder-chamber
latch See “Inserting Batteries in the MB-N11”
(0716) and “If the Holder-Chamber Cover
Detaches” (0730).
8Holder-chamber
cover
5
4
3
2
1
8
7
6
711
Other Compatible Accessories
9Charging connector
cover
Used when connecting an EH-7P charging
AC adapter (available separately for the
Z 6II, supplied with the Z 7II).
10 Charging connector
11 LED lamp (×2) Light while batteries are charging.
12 Mounting screw Used when attaching the MB-N11 to the
camera.
13 Attachment wheel
14 Battery-holder
chamber Where the battery holder is inserted.
15 Battery-holder latch Locks the battery holder in place after
insertion.
16 Power connector
cover
For use with optional EP-5B power
connectors.
17 Tripod socket
12 13 14 15 16 17
10 11
9
712 Other Compatible Accessories
18 Battery-chamber
cover holder
Holds the camera battery-chamber cover
while it is removed from the camera.
19 Sub-command dial
for vertical shooting
Performs the same role as the matching
control on the camera.
20 Control lock
Locks the controls on the MB-N11 to
prevent accidental operation.
The control lock is not a power switch. Use
the power switch on the camera to turn
the camera on or off.
21
Shutter-release
button for vertical
shooting
Performs the same role as the matching
control on the camera.
22 Fn button for
vertical shooting
Performs the role selected using Custom
Setting f9 or g7 [Assign MB-N11 buttons].
18
22
21 20 19
713
Other Compatible Accessories
23 Battery Chamber A Holds one EN-EL15c rechargeable Li-ion
battery.
24 Battery power
terminals (×2)
See “Inserting Batteries in the MB-N11”
(0716).
25 Battery Chamber B Holds one EN-EL15c rechargeable Li-ion
battery.
26 Battery holder
power terminals
See “Inserting Batteries in the MB-N11”
(0716)
27 Battery latch Locks the battery in Chamber A in place
after insertion.
28 Battery holder See “Inserting Batteries in the MB-N11”
(0716).
27
28
26
23 24
25
714 Other Compatible Accessories
❚❚ Attaching the MB-N11
Before attaching the MB-N11, turn the camera off. To prevent
unintended operation while attachment is in progress, leave the
control lock on the MB-N11 in the L (locked) position until the
process is complete.
1
Remove the contact cap from the battery pack.
Keep the contact cap in a safe place.
2
Remove the battery-chamber cover from the
bottom of the camera and place it in the battery-
chamber cover holder on the MB-N11.
If a battery is inserted in the camera, remove it.
60°
715
Other Compatible Accessories
3
Attach the MB-N11 to the camera.
Rotate the attachment wheel in the direction shown by the
FLOCK arrow to secure the battery pack in place.
DRemoving the MB-N11
To remove the MB-N11, turn the camera off, then loosen the attachment
wheel by turning it in the direction opposite to that shown by the arrow.
After removing the MB-N11, remove the battery-chamber cover from the
battery-chamber cover holder and replace it on the camera.
Be sure to replace the contact cap on the MB-N11 when the battery
pack is not in use.
716 Other Compatible Accessories
❚❚ Inserting Batteries in the MB-N11
The MB-N11 can be used with up to two ENEL15c rechargeable
Li-ion batteries. Before inserting the batteries, turn the camera
off. To prevent unintended operation while the batteries are
being exchanged, you will also need to leave the control lock on
the MB-N11 in the L (locked) position until the exchange is
complete.
1
Keeping the holder-chamber latch pressed, slide
the holder-chamber cover in the direction shown,
and then swing the cover open.
2
Press the battery-holder latch in the direction
shown and remove the battery holder.
717
Other Compatible Accessories
3
Insert the batteries in the battery holder.
Insert the batteries as shown. The battery latch will click into
place when the battery in Chamber A is fully inserted.
4
Insert the battery holder terminals-first.
Using the bottom of the battery holder to depress the
battery-holder latch, slide the battery holder into the
chamber terminals-first. The latch will click back into place
when the holder is fully inserted.
B
A
718 Other Compatible Accessories
5
Close the holder-chamber cover and latch it by
pressing and sliding it in the direction shown.
ARemoving the Batteries
Remove the holder and then remove the batteries as shown.
719
Other Compatible Accessories
AExchanging the Battery in Chamber A
The battery in Chamber A can be exchanged without removing the
battery holder. Slide the battery into the chamber, stopping when the
latch clicks into place.
The battery can be removed by pressing the latch as shown and sliding
the battery from the holder.
720 Other Compatible Accessories
AExchanging Batteries While Shooting
When two batteries are inserted, you can
replace the battery in Chamber A without
turning the camera off. You may find this useful
when using the camera continuously for
extended periods. Be careful not to press the
battery-holder latch or remove the battery
holder while exchanging batteries.
ABattery Order
If you are using only one battery, it can be inserted in either chamber.
When two batteries are inserted, the battery in Chamber A will be used
first. The camera will switch to the battery in Chamber B when the
battery in Chamber A is exhausted.
721
Other Compatible Accessories
❚❚ Charging Batteries Using a Charging AC Adapter
Batteries inserted in the MB-N11 can be charged using an EH-7P
charging AC adapter (available separately for the Z 6II, supplied
with the Z 7II).
1
Connect an EH-7P charging AC adapter to the
charging connector on the MB-N11.
Turn the camera off. The batteries will not charge while the
camera is on.
Batteries can be charged in the MB-N11 even when the
pack is removed from the camera. Be sure to attach the
contact cap to the MB-N11 before proceeding.
722 Other Compatible Accessories
2
Plug the charging AC adapter into a household
power outlet.
The batteries charge while the camera is off.
The LED lamp for the battery that is
currently charging will light while
charging is in progress. The LED
lamp turns off when charging is
complete.
The time needed to charge two
fully-exhausted batteries is about 5 hours and 30 minutes.
If two batteries are inserted, the battery in Chamber B will
charge first.
The shape of the EH-7P varies with the country or region of
sale.
3
When charging is complete, unplug the charging
AC adapter and disconnect it from the MB-N11.
723
Other Compatible Accessories
DCharging Batteries
The EH-7P will not charge the batteries if connected to the camera USB
port while the MB-N11 is attached. Connect the EH-7P to the charging
connector on the MB-N11.
The EH-7P can be used to charge EN-EL15c and EN-EL15b batteries only.
EN-EL15a and EN-EL15 batteries cannot be charged using the EH-7P.
Use an MH-25a battery charger instead.
If the battery cannot be charged using the charging AC adapter, for
example because the battery is not compatible or the temperature of
the battery pack is elevated, the LED lamp will flash rapidly for 30
seconds and then turn off.
724 Other Compatible Accessories
❚❚ Using a Charging AC Adapter as a Power Source
The camera can be powered by an EH-7P charging AC adapter
(available separately for the Z 6II, supplied with the Z 7II)
connected to the MB-N11’s charging connector.
DPower Supply
The charging AC adapter will supply power to the camera only if a
battery is inserted in one or both of Chambers A and B. The EH-7P will
supply power when EN-EL15c, EN-EL15b, EN-EL15a, or EN-EL15 batteries
are inserted.
The batteries in the battery pack will not charge while the camera is
powered by an outside power source. For more information, see
“‘Power Delivery’ Versus ‘Charging’” (0493).
1
Connect an EH-7P charging AC adapter to the
MB-N11’s charging connector.
Turn the camera off before proceeding.
725
Other Compatible Accessories
2
Plug in the charging AC adapter into a household
power outlet.
The shape of the EH-7P varies with the country or region of
sale.
3
To begin the supply of power to the camera, turn
the camera on and select [Enable] for [USB power
delivery] in the setup menu.
4
To end the supply of power to the camera, unplug
the charging AC adapter and disconnect it from
the MB-N11.
726 Other Compatible Accessories
DUsing an Optional AC Adapter and Power Connector
The optional EH-5d AC adapter and EP-5B power connector provide a
steady supply of power when the camera must be left on for extended
periods. When using the adapter with the MB-N11, insert the EP-5B in
Chamber A before connecting it to the EH-5d.
An EH-5c or EH-5b can be used in place of the EH-5d.
The EP-5B can be inserted only in Chamber A.
After connecting the EP-5B, open the power connector cover on the
MB-N11, position the power connector cable so that it passes through
the power connector slot and close the holder-chamber cover.
There is no need to insert a battery in Chamber B. Batteries inserted in
Chamber B are not used while the camera is being powered by an AC
adapter and power connector.
If the EP-5B is inserted while a battery is inserted in Chamber B, the
battery will not charge and the EP-5B will not supply power to the
camera when a charging AC adapter is connected.
727
Other Compatible Accessories
❚❚ Checking the Level of the Batteries in the MB-N11
When the MB-N11 is connected, the
level of the battery currently providing
power to the camera is shown in the
shooting display and control panel
while the camera is on (044).
The chamber containing the battery
currently in use is indicated by an icon
next to the battery level in the
shooting display.
Additional information, including the
battery age and precise battery level,
can be viewed using the [Battery info]
item in the setup menu.
728 Other Compatible Accessories
❚❚ Precautions for Use
Observe the following precautions when using the MB-N11.
Touching the power/signal contacts with metal objects could
cause a short-circuit; replace the contact cap before storing or
transporting the battery pack.
The camera memory card access lamp may light when the
MB-N11 is attached to or removed from the camera.
When using the camera with both the MB-N11 and an optional
FTZ mount adapter attached, connect tripods to the tripod
mount on either the lens or the MB-N11, not to the tripod
mount on the FTZ.
The MB-N11 is not equipped with a power switch. Use the
camera power switch to turn the camera on and off.
Lens MB-N11 FTZ
729
Other Compatible Accessories
DCamera Warning Messages
If the camera displays one of the following messages, take the steps
described below.
If the camera displays the message [Shutter release disabled.
Recharge battery.], insert a spare battery. Turn the camera off before
proceeding if the battery in question is inserted in Chamber B or if there
is only one battery in the holder and it is inserted in Chamber A.
If the camera displays the message [Error. Press shutter-release
button to reset.], press the shutter-release button. If the problem
persists or recurs frequently, consult a Nikon-authorized service
representative.
730 Other Compatible Accessories
❚❚ If the Holder-Chamber Cover Detaches
In order to protect the holder-chamber cover from damage, it
may detach if force is applied while it is open. The holder-
chamber cover can be re-attached as shown.
Before re-attaching the holder-chamber cover, slide the cover
so that the hinge is visible.
731
Other Compatible Accessories
❚❚ Specifications
* Nikon reserves the right to change the appearance, specifications, and
performance of the product described in this manual at any time and
without prior notice.
Power source
Up to two EN-EL15c rechargeable Li-ion batteries*
* EN-EL15b/EN-EL15a/EN-EL15 batteries can also be
used, but note that the number of pictures that
can be taken or length of movie footage that can
be recorded on a single charge (battery
endurance) is less than with the EN-EL15c.
Charging time
Approx. 5 hours and 30 minutes
Time required to charge two EN-EL15c batteries
using an EH-7P charging AC adapter. Assumes an
ambient temperature of 25 °C (77 °F) and that the
batteries are exhausted.
EN-EL15a and EN-EL15 batteries cannot be charged
using the EH-7P. Use a compatible battery charger.
Charging
connector
USB Type C. Can only be used to connect the EH-7P
charging AC adapter and not for uploading pictures
or other purposes.
Operating
temperature 0 °C–40 °C (+32 °F–104 °F)
Dimensions
(W × H × D)
Approx. 138.5× 113.5× 76 mm/5.5× 4.5× 3 in.,
excluding projections
Weight
Approx. 455 g/1 lb 0.1 oz (with two EN-EL15c
batteries)
Approx. 295 g/10.5 oz (without batteries)
732 Other Compatible Accessories
DLow Ambient Temperatures
The camera may not function at low temperatures (approximately 10 °C/
50 °F or below) when powered by partially-charged batteries. In cold
weather, charge one set of batteries before use and keep another in a
warm place, ready to be exchanged as necessary. Once warmed, cold
batteries may recover some of their charge.
ABattery Endurance with a Battery Pack
Attaching an optional battery pack with two fully-charged EN-EL15c
batteries increases the number of shots and length of movie footage that
can be recorded (battery endurance) by approximately 1.9 times over the
amount that can be shot with the camera alone.
733
Other Compatible Accessories
Attaching a Power Connector and AC Adapter
Turn the camera off before attaching an optional power
connector and AC adapter.
1
Open the battery-
chamber (
q
) and
power connector (
w
)
covers.
2
Insert the EP-5B power
connector.
Be sure to insert the connector in
the correct orientation.
Using the connector to keep the
orange battery latch pressed to one
side, slide the connector into the
battery chamber until the latch
locks the connector in place.
734 Other Compatible Accessories
3
Close the battery-
chamber cover.
Position the power
connector cable so that it
passes through the power
connector slot and close the battery-chamber cover.
4
Connect the EH-5d/EH-5c/EH-5b AC adapter to the
EP-5B power connector.
Connect the AC adapter power cable to the AC socket on
the AC adapter (e).
Insert the DC plug into the DC IN connector (r).
A P icon is displayed when the camera is powered by the
AC adapter and power connector.
735
Software
The following Nikon software can be used with the camera:
Computer Software
Nikon computer software is available from the Nikon Download Center.
Check the version and system requirements and be sure to download the
latest version.
https://downloadcenter.nikonimglib.com/
Camera Control Pro 2 (available for purchase): Control the camera
remotely from a computer and save photographs directly to the
computer hard disk.
ViewNX-i *: More than a tool for viewing and editing photos and movies
shot with Nikon digital cameras, ViewNX-i can be used in combination
with other Nikon imaging applications to help you get the most from
your pictures. It also offers smooth access to online services.
* Existing users should be sure to download the latest version, as earlier
versions may not support the camera.
Capture NX-D: Fine-tune photos shot in Nikon’s unique NEF/NRW
(RAW) formats or convert them to JPEG or TIFF (NEF/RAW processing).
Capture NX-D can be used not only with NEF/NRW (RAW) pictures but
also with JPEG and TIFF photos shot with Nikon digital cameras for such
tasks as editing tone curves and enhancing brightness and contrast.
Wireless Transmitter Utility: The Wireless Transmitter Utility is
required if the camera is to be connected to a network. Pair the camera
with the computer and download pictures via Wi-Fi.
Software
736 Software
Smartphone (Tablet) Apps
SnapBridge: Download photos and movies from the camera to your
smart device via a wireless connection.
SnapBridge apps can be downloaded from the Apple App Store® or on
Google Play™.
Visit the Nikon website for the latest SnapBridge apps information.
737
Caring for the Camera
Storage
When the camera will not be used for an extended period,
remove the battery. Before removing the battery, confirm that
the camera is off.
Do not store the camera in locations that:
are poorly ventilated or subject to humidities of over 60%
are next to equipment that produces strong electromagnetic
fields, such as televisions or radios
are exposed to temperatures above 50 °C (122 °F) or below
−10 °C (14 °F)
Caring for the Camera
738 Caring for the Camera
Cleaning
The procedure varies with the part that requires cleaning. The
procedures are detailed below.
Do not use alcohol, thinner, or other volatile chemicals.
❚❚ Camera Body
Use a blower to remove dust and lint, then wipe gently with a
soft, dry cloth. After using the camera at the beach or seaside,
wipe off sand or salt with a cloth lightly dampened in distilled
water and dry the camera thoroughly.
Important: Dust or other foreign matter inside the camera may
cause product malfunction. Damage due to the presence of foreign
matter inside the camera is not covered under warranty.
❚❚ Lens and Viewfinder
These glass elements are easily damaged: remove dust and lint
with a blower. If using an aerosol blower, keep the can vertical
to prevent the discharge of liquid that could damage glass
elements. To remove fingerprints and other stains, apply a small
amount of lens cleaner to a soft cloth and clean with care.
❚❚ Monitor
Remove dust and lint with a blower. When removing
fingerprints and other stains, wipe the surface lightly with a soft
cloth or chamois leather. Do not apply pressure, as this could
result in damage or malfunction.
739
Caring for the Camera
Image Sensor Cleaning
Dirt or dust entering the camera when lenses are exchanged or
the body cap is removed may adhere to the surface of the
image sensor and affect your photographs. The “clean image
sensor” option vibrates the sensor to remove dust.
The image sensor can be cleaned at any time from the menus,
or cleaning can be performed automatically when the camera is
turned off. If image sensor cleaning fails to resolve the problem,
contact a Nikon-authorized service representative.
❚❚ Using the Menus
For maximum effect, hold the camera
in normal orientation (base down).
Select [Clean image sensor] in the
setup menu, then highlight [Clean
now] and press J to begin cleaning.
Camera controls cannot be used while
cleaning is in progress. Do not remove
or disconnect the power source.
The setup menu will be displayed when cleaning is complete.
740 Caring for the Camera
❚❚ Cleaning the Image Sensor at Shutdown
1
Select [Automatic cleaning] for
[Clean image sensor].
Pressing 2 when [Automatic
cleaning] is highlighted displays
[Automatic cleaning] options.
2
Highlight an option.
Press J to select the highlighted
option.
DImage Sensor Cleaning
Using camera controls interrupts any image sensor cleaning begun in
response to the operation of the power switch.
If image sensor cleaning is performed several times in succession, image
sensor cleaning may be temporarily disabled to protect the camera’s
internal circuitry. Cleaning can be performed again after a short wait.
Option Description
6[Clean at
shutdown]
The image sensor is automatically cleaned
during shutdown each time the camera is
turned off.
[Cleaning off] Automatic image sensor cleaning off.
741
Caring for the Camera
Manual Cleaning
If foreign matter cannot be removed from the image sensor
using image sensor cleaning, the sensor can be cleaned
manually as described below. Note, however, that the sensor is
extremely delicate and easily damaged; we recommend that
manual cleaning be performed only by a Nikon-authorized
service representative.
1
Turn the camera off and remove the lens.
2
Holding the camera so that
light can enter the camera,
examine the image sensor for
dust or lint.
If no foreign objects are present,
proceed to Step 4.
3
Remove any dust and lint from
the sensor with a blower.
Do not use a blower-brush. The
bristles could damage the sensor.
Dirt that cannot be removed with a
blower can only be removed by
Nikon-authorized service personnel. Under no
circumstances should you touch or wipe the sensor.
4
Replace the lens or supplied body cap.
742 Caring for the Camera
DForeign Matter on the Image Sensor
Foreign matter entering the camera when lenses or body caps are
removed or exchanged (or in rare circumstances lubricant or fine particles
from the camera itself) may adhere to the image sensor, where it may
appear in photographs taken under certain conditions. To prevent entry
of foreign matter when attaching the body cap or exchanging lenses,
avoid dusty environments and be sure to remove all dust and other
foreign matter that may be adhering to the camera mount, lens mount, or
body cap. To protect the camera when no lens is in place, be sure to
replace the supplied body cap. Should you encounter foreign matter that
cannot be removed using the image sensor cleaning option (0739),
clean the image sensor as described in “Manual Cleaning” (0741), or
have the sensor cleaned by authorized Nikon service personnel.
Photographs affected by the presence of foreign matter on the sensor can
be retouched using the clean image options available in some imaging
applications.
DServicing the Camera and Accessories
The camera is a precision device and requires regular servicing; Nikon
recommends that the camera be inspected once every one to two years,
and that it be serviced once every three to five years (note that fees apply
to these services).
Frequent inspection and servicing are particularly recommended if the
camera is used professionally.
Any accessories regularly used with the camera, such as lenses or
optional flash units, should be included when the camera is inspected
or serviced.
743
Caring for the Camera and Battery: Cautions
Camera Care
Do Not Drop
Do not drop the camera or lens or subject them to blows. The product
may malfunction if subjected to strong shocks or vibration.
Keep Dry
Keep the camera dry. Rusting of the internal mechanism caused by water
inside the camera can not only be expensive to repair but can in fact
cause irreparable damage.
Avoid Sudden Changes in Temperature
Sudden changes in temperature, such as those that occur when entering
or leaving a heated building on a cold day, can cause condensation inside
or outside the device. To prevent condensation, place the device in a
carrying case or plastic bag before exposing it to sudden changes in
temperature.
Keep Away from Strong Magnetic Fields
Static charges or the magnetic fields produced by equipment such as
radio transmitters could interfere with the monitor, corrupt data stored
on the memory card, or affect the product’s internal circuitry.
Do Not Leave the Lens Pointed at the Sun
Do not leave the lens pointed at the sun or other strong light source for
extended periods. Intense light may damage the image sensor or cause
fading or “burn in”. Photographs taken with the camera may exhibit a
white blur effect.
Caring for the Camera and Battery:
Cautions
744 Caring for the Camera and Battery: Cautions
Lasers and Other Bright Light Sources
Do not direct lasers or other extremely bright light sources toward the
lens, as this could damage the camera’s image sensor.
Cleaning
When cleaning the camera body, use a blower to gently remove dust and
lint, then wipe gently with a soft, dry cloth. After using the camera at the
beach or seaside, wipe off any sand or salt using a cloth lightly dampened
in fresh water and then dry the camera thoroughly. In rare instances,
static electricity may cause the LCD displays to light up or go dark; this
does not indicate a malfunction. The display will soon return to normal.
Cleaning the Lens and Viewfinder
These glass elements are easily damaged: remove dust and lint with a
blower. If using an aerosol blower, keep the can vertical to prevent the
discharge of liquid that could damage glass elements. To remove
fingerprints and other stains from the lens, apply a small amount of lens
cleaner to a soft cloth and wipe the lens carefully.
Do Not Touch the Image Sensor
Under no circumstances should you exert
pressure on the image sensor, poke it with
cleaning tools, or subject it to powerful air
currents from a blower. These actions could
scratch or otherwise damage the sensor.
Cleaning the Image Sensor
For information on cleaning the image sensor, see “Image Sensor
Cleaning” (0739) and “Manual Cleaning” (0741).
745
Caring for the Camera and Battery: Cautions
The Lens Contacts
Keep the lens contacts clean. Avoid touching them with your fingers.
Store in a Well-Ventilated Area
To prevent mold or mildew, store the camera in a dry, well-ventilated
area. Do not store the camera with naphtha or camphor moth balls, next
to equipment that produces strong electromagnetic, or where it will be
exposed to extremely high temperatures, for example near a heater or in
an enclosed vehicle on a hot day. Failure to observe these precautions
could result in product malfunction.
Long-Term Storage
To prevent damage caused by, for example, leaking battery fluid, remove
the battery if the product will not be used for an extended period. Store
the camera in a plastic bag containing a desiccant. Do not, however, store
the leather camera case in a plastic bag, as this may cause the material to
deteriorate. Store the battery in a cool, dry place. Note that desiccant
gradually loses its capacity to absorb moisture and should be replaced at
regular intervals. To prevent mold or mildew, take the camera out of
storage at least once a month, insert the battery, and release the shutter a
few times.
Turn the Product Off Before Removing or Disconnecting the Power
Source
Removing or disconnecting the power source while the camera is on
could damage the product. Particular care should be taken not to remove
or disconnect the power source while images are being recorded or
deleted.
746 Caring for the Camera and Battery: Cautions
Monitor/Viewfinder
The monitors (including viewfinder) are constructed with extremely
high precision; at least 99.99% of pixels are effective, with no more than
0.01% being missing or defective. Hence while these displays may
contain pixels that are always lit (white, red, blue, or green) or always off
(black), this is not a malfunction. Images recorded with the device are
unaffected. Your understanding is requested.
Images in the monitor may be difficult to see in a bright light.
Do not apply pressure to the monitor. The monitor could malfunction or
suffer damage. Dust or lint on the monitor can be removed with a
blower. Stains can be removed by wiping the monitor lightly with a soft
cloth or chamois leather. Should the monitor break, care should be
taken to avoid injury from broken glass. Be careful that liquid crystal
from the monitor does not touch the skin or enter the eyes or mouth.
Should you experience any of the following symptoms while framing
shots in the viewfinder, discontinue use until your condition improves:
- nausea, eye pain, eye fatigue,
- dizziness, headache, stiffness in your neck or shoulders,
- queasiness or loss of hand-eye coordination, or
- motion sickness.
The display may rapidly flicker on and off during burst photography.
Watching the flickering display could cause you to feel unwell.
Discontinue use until your condition improves.
Bright Lights and Back-Lit Subjects
Noise in the form of lines may in rare cases appear in pictures that include
bright lights or back-lit subjects.
747
Caring for the Camera and Battery: Cautions
Battery Care
Precautions for Use
If improperly handled, batteries may rupture or leak, causing the
product to corrode. Observe the following precautions when handling
batteries:
- Turn the product off before replacing the battery.
- Batteries may be hot after extended use.
- Keep the battery terminals clean.
- Use only batteries approved for use in this equipment.
- Do not short or disassemble batteries or expose them to flame or
excessive heat.
- Replace the terminal cover when the battery is not inserted in the
camera or charger.
If the battery is hot, for example immediately after use, wait for it to cool
before charging. Attempting to charge the battery while its internal
temperature is elevated will impair battery performance, and the
battery may not charge or charge only partially.
If the battery will not be used for some time, insert it in the camera and
run it flat before removing it from the camera for storage. The battery
should be stored in a cool, dry location with an ambient temperature of
15 °C to 25 °C (59 °F to 77 °F). Avoid hot or extremely cold locations.
Batteries should be charged within six months of use. During long
periods of disuse, charge the battery and use the camera to run it flat
once every six months before returning it to a cool location for storage.
Remove the battery from the camera or charger when not in use. The
camera and charger draw minute amounts of charge even when off and
could draw the battery down to the point that it will no longer function.
748 Caring for the Camera and Battery: Cautions
Do not use the battery at ambient temperatures below 0 °C (32 °F) or
above 40 °C (104 °F). Failure to observe this precaution could damage
the battery or impair its performance. Charge the battery indoors at
ambient temperatures of 5 °C–35 °C (41 °F–95 °F). The battery will not
charge if its temperature is below 0 °C (32 °F) or above 60 °C (140 °F).
Capacity may be reduced and charging times increase at battery
temperatures from 0 °C (32 °F) to 15 °C (59 °F) and from 45 °C (113 °F) to
60 °C (140 °F).
Batteries in general exhibit a drop in capacity at low ambient
temperatures. Even fresh batteries charged at temperatures under
about 5 °C (41 °F) may show a temporary increase from “0” to “1” in the
setup menu [Battery info] age display, but the display will return to
normal once the battery has been recharged at a temperature of about
20 °C (68 °F) or higher.
Battery capacity drops at low temperatures. The change in capacity with
temperature is reflected in the camera battery-level display. As a result,
the battery display may show a drop in capacity as the temperature
drops, even if the battery is fully charged.
Batteries may be hot after use. Observe due caution when removing
batteries from the camera.
Charge Batteries Before Use
Charge the battery before use. The supplied battery is not fully charged at
shipment.
Ready Spare Batteries
Before taking photographs, ready a spare battery and keep it fully
charged. Depending on your location, it may be difficult to purchase
replacement batteries on short notice.
749
Caring for the Camera and Battery: Cautions
Have Fully-Charged Spare Batteries Ready on Cold Days
Partially-charged batteries may not function on cold days. In cold
weather, charge one battery before use and keep another in a warm
place, ready to be exchanged as necessary. Once warmed, a cold battery
may recover some of its charge.
Battery Level
Turning the camera on or off repeatedly when the battery is fully
discharged will shorten battery life. Batteries that have been fully
discharged must be charged before use.
A marked drop in the time a fully charged battery retains its charge
when used at room temperature indicates that it requires replacement.
Purchase a new rechargeable battery.
Do Not Attempt to Charge Fully-Charged Batteries
Continuing to charge the battery after it is fully charged can impair
battery performance.
Recycling Used Batteries
Recycle rechargeable batteries in accord with local regulations, being
sure to first insulate the terminals with tape.
750 Caring for the Camera and Battery: Cautions
Using the Charger
Do not move the charger or touch the battery during charging; failure
to observe this precaution could in very rare instances result in the
charger showing that charging is complete when the battery is only
partially charged. Remove and reinsert the battery to begin charging
again.
Do not short the charger terminals. Failure to observe this precaution
could result in overheating and damage to the charger.
Unplug the charger when it is not in use.
Use the MH-25a with compatible batteries only.
Do not use chargers with damage that leaves the interior exposed or
that produce unusual sounds when used.
The symbols on this product represent the following:
m AC, p DC, q Class II equipment (the construction of the product is
double-insulated)
Using the Charging AC Adapter
Do not move the camera or touch the battery during charging. Failure
to observe this precaution could in very rare instances result in the
camera showing that charging is complete when the battery is only
partially charged. Disconnect and reconnect the adapter to begin
charging again.
Do not short the adapter terminals. Failure to observe this precaution
could result in overheating and damage to the charger.
Unplug the adapter when it is not in use.
Do not use adapters with damage that leaves the interior exposed or
that produce unusual sounds when used.
The symbols on this product represent the following:
m AC, p DC, q Class II equipment (the construction of the product is
double-insulated)
751
Specifications
Nikon Z7II/Z6II Digital Camera
Specifications
Type
Type Digital camera with support for interchangeable
lenses
Lens mount Nikon Z mount
Lens
Compatible
lenses
Z mount NIKKOR lenses
F mount NIKKOR lenses (mount adapter required;
restrictions may apply)
Effective pixels
Effective pixels Z7II: 45.7 million
Z6II: 24.5 million
Image sensor
Type 35.9 × 23.9 mm CMOS sensor (Nikon FX format)
Total pixels Z7II: 46.89 million
Z6II: 25.28 million
Dust-reduction
system
Image sensor cleaning, Image Dust Off reference data
(Capture NX-D software required)
752 Specifications
Storage
Image size
(pixels)
Z7II
[FX (36 × 24)] selected for image area:
- 8256 × 5504 (Large: 45.4 M)
- 6192 × 4128 (Medium: 25.6 M)
- 4128 × 2752 (Small: 11.4 M)
[DX (24 × 16)] selected for image area:
- 5408 × 3600 (Large: 19.5 M)
- 4048 × 2696 (Medium: 10.9 M)
- 2704 × 1800 (Small: 4.9 M)
[5:4 (30 × 24)] selected for image area:
- 6880 × 5504 (Large: 37.9 M)
- 5152 × 4120 (Medium: 21.2 M)
- 3440 × 2752 (Small: 9.5 M)
[1:1 (24 × 24)] selected for image area:
- 5504 × 5504 (Large: 30.3 M)
- 4128 × 4128 (Medium: 17.0 M)
- 2752 × 2752 (Small: 7.6 M)
[16:9 (36 × 20)] selected for image area:
- 8256 × 4640 (Large: 38.3 M)
- 6192 × 3480 (Medium: 21.5 M)
- 4128 × 2320 (Small: 9.6 M)
Photographs taken while filming movies at a
frame size of 3840 × 2160: 3840 × 2160
Photographs taken while filming movies at other
frame sizes: 1920 × 1080
753
Specifications
Image size
(pixels)
Z6II
[FX (36 × 24)] selected for image area:
- 6048 × 4024 (Large: 24.3 M)
- 4528 × 3016 (Medium: 13.7 M)
- 3024 × 2016 (Small: 6.1 M)
[DX (24 × 16)] selected for image area:
- 3936 × 2624 (Large: 10.3 M)
- 2944 × 1968 (Medium: 5.8 M)
- 1968 × 1312 (Small: 2.6 M)
[1:1 (24 × 24)] selected for image area:
- 4016 × 4016 (Large: 16.1 M)
- 3008 × 3008 (Medium: 9.0 M)
- 2000 × 2000 (Small: 4.0 M)
[16:9 (36 × 20)] selected for image area:
- 6048 × 3400 (Large: 20.6 M)
- 4528 × 2544 (Medium: 11.5 M)
- 3024 × 1696 (Small: 5.1 M)
Photographs taken while filming movies at a
frame size of 3840 × 2160: 3840 × 2160
Photographs taken while filming movies at other
frame sizes: 1920 × 1080
File format
(image quality)
NEF (RAW): 12 or 14 bit (lossless compressed,
compressed, or uncompressed); large, medium, and
small available (medium and small images are
recorded at a bit depth of 12 bits using lossless
compression)
JPEG: JPEG-Baseline compliant with fine (approx.
1:4), normal (approx. 1:8), or basic (approx. 1:16)
compression; size-priority and optimal-quality
compression available
NEF (RAW)+JPEG: Single photograph recorded in
both NEF (RAW) and JPEG formats
Storage
754 Specifications
Picture Control
System
Auto, Standard, Neutral, Vivid, Monochrome, Portrait,
Landscape, Flat, Creative Picture Controls (Dream,
Morning, Pop, Sunday, Somber, Dramatic, Silence,
Bleached, Melancholic, Pure, Denim, Toy, Sepia, Blue,
Red, Pink, Charcoal, Graphite, Binary, Carbon);
selected Picture Control can be modified; storage for
custom Picture Controls
Media CFexpress (Type B), XQD, SD (Secure Digital), and
UHS-II compliant SDHC and SDXC memory cards
Dual card slots
Either card can be used for primary or backup storage
or for separate storage of NEF (RAW) and JPEG
images; pictures can be copied between cards.
File system DCF 2.0, Exif 2.31
Viewfinder
Viewfinder
1.27-cm/0.5-in. approx. 3690k-dot (Quad VGA) OLED
electronic viewfinder with color balance and auto and
11-level manual brightness controls
Frame coverage Approx. 100% horizontal and 100% vertical
Magnification Approx. 0.8× (50 mm lens at innity, −1.0 m−1)
Eyepoint 21 mm (−1.0 m−1; from center surface of viewfinder
eyepiece lens)
Diopter
adjustment −4 – +2 m−1
Eye sensor Automatically switches between monitor and
viewfinder displays
Storage
755
Specifications
Monitor
Monitor
8-cm/3.2-in., approx. 2100k-dot tilting TFT touch-
sensitive LCD with 170° viewing angle, approximately
100% frame coverage, and color balance and 11-level
manual brightness controls
Shutter
Type
Electronically-controlled vertical-travel focal-plane
mechanical shutter; electronic front-curtain shutter;
electronic shutter
Speed 1/8000 – 30 s (choose from step sizes of 1/3 and 1/2 EV,
extendable to 900 s in mode M), bulb, time, X200
Flash sync
speed
X=1/200 s; synchronizes with shutter at 1/200 s or slower;
auto FP high-speed sync supported
Release
Release mode Single frame, Continuous L, Continuous H,
Continuous H (extended), Self-timer
Approximate
frame advance
rate
Z7II
Continuous L: Approx. 1 – 5 fps
Continuous H: Approx. 5.5 fps (14-bit NEF/RAW:
Approx. 5 fps)
Continuous H (extended): Approx. 10 fps (14-bit
NEF/RAW: Approx. 9 fps)
Z6II
Continuous L: Approx. 1 – 5 fps
Continuous H: Approx. 5.5 fps
Continuous H (extended): Approx. 14 fps (14-bit
NEF/RAW: Approx. 10 fps)
* Maximum frame advance rate as measured by in-
house tests.
756 Specifications
Self-timer 2 s, 5 s, 10 s, 20 s; 1–9 exposures at intervals of 0.5, 1, 2,
or 3 s
Exposure
Metering
system TTL metering using camera image sensor
Metering mode
Matrix metering
Center-weighted metering: Weight of 75% given
to 12 mm circle in center of frame; weighting can
instead be based on average of entire frame
Spot metering: Meters 4 mm circle (about 1.5% of
frame) centered on selected focus point
Highlight-weighted metering
Range
Z7II: −3 – +17 EV
Z6II: −4 – +17 EV
* Figures are for ISO 100 and f/2.0 lens at 20 °C/68 °F
Mode
b: Auto, P: programmed auto with flexible
program, S: shutter-priority auto, A: aperture-
priority auto, M: manual
U1, U2 and U3: user settings modes
Exposure
compensation
−5 – +5 EV (choose from step sizes of 1/3 and 1/2 EV)
available in modes P, S, A, and M
Exposure lock Luminosity locked at detected value
ISO sensitivity
(Recommended
Exposure
Index)
Z7II: ISO 64–25600 (choose from step sizes of 1/3
and 1/2 EV); can also be set to approx. 0.3, 0.5, 0.7, or
1 EV (ISO 32 equivalent) below ISO 64 or to approx.
0.3, 0.5, 0.7, 1, or 2 EV (ISO 102400 equivalent) above
ISO 25600; auto ISO sensitivity control available
Z6II: ISO 100–51200 (choose from step sizes of 1/3
and 1/2 EV); can also be set to approx. 0.3, 0.5, 0.7, or
1 EV (ISO 50 equivalent) below ISO 100 or to approx.
0.3, 0.5, 0.7, 1, or 2 EV (ISO 204800 equivalent) above
ISO 51200; auto ISO sensitivity control available
Release
757
Specifications
Active
D-Lighting Auto, Extra high, High, Normal, Low, and Off
Multiple
exposure Add, average, lighten, darken
Other options HDR (high dynamic range), photo mode flicker
reduction
Autofocus
Type Hybrid phase-detection/contrast AF with AF assist
Detection
range
Z7II: −3 – +19 EV (with low-light AF: −4 – +19 EV)
Z6II: −4.5 – +19 EV (with low-light AF:
−6 – +19 EV)
* Measured in photo mode at ISO 100 and a
temperature of 20 °C/68 °F using single-servo AF
(AF-S) and a lens with a maximum aperture of f/2.0
Lens servo
Autofocus (AF): Single-servo AF (AF-S); continuous-
servo AF (AF-C); full-time AF (AF-F; available only in
movie mode); predictive focus tracking
Manual focus (M): Electronic rangefinder can be
used
Focus points
Z7II: 493 focus points
Z6II: 273 focus points
* Number of focus points available in photo mode
with single-point AF selected for AF-area mode and
FX selected for image area
AF-area mode
Pinpoint (available in photo mode only), single-point,
and dynamic-area AF (available in photo mode only);
wide-area AF (S); wide-area AF (L); wide-area AF
(L-people); wide-area AF (L-animals); auto-area AF;
auto-area AF (people); auto-area AF (animals)
Focus lock
Focus can be locked by pressing shutter-release
button halfway (single-servo AF/AF-S) or by pressing
the center of the sub-selector
Exposure
758 Specifications
Vibration reduction (VR)
Camera on-
board VR 5-axis image sensor shift
Lens on-board
VR Lens shift (available with VR lenses)
Flash
Flash control
TTL: i-TTL flash control; i-TTL balanced fill-flash is used
with matrix, center-weighted, and highlight-weighted
metering, standard i-TTL fill-flash with spot metering
Flash mode Front-curtain sync, slow sync, rear-curtain sync, red-
eye reduction, red-eye reduction with slow sync, off
Flash
compensation
–3 – +1 EV (choose from step sizes of 1/3 and 1/2 EV)
available in modes P, S, A, and M
Flash-ready
indicator
Lights when optional flash unit is fully charged;
flashes as underexposure warning after flash is fired at
full output
Accessory shoe ISO 518 hot-shoe with sync and data contacts and
safety lock
Nikon Creative
Lighting
System (CLS)
i-TTL flash control, radio-controlled Advanced
Wireless Lighting, optical Advanced Wireless Lighting,
modeling illumination, FV lock, Color Information
Communication, auto FP high-speed sync, unified
flash control
White balance
White balance
Auto (3 types), natural light auto, direct sunlight,
cloudy, shade, incandescent, fluorescent (7 types),
flash, choose color temperature (2500 K–10,000 K),
preset manual (up to 6 values can be stored), all with
fine-tuning except choose color temperature
759
Specifications
Bracketing
Bracketing Exposure and/or flash, white balance, and ADL
Movie
Metering
system TTL metering using camera image sensor
Metering mode Matrix, center-weighted, or highlight-weighted
Frame size
(pixels) and
frame rate
3840 × 2160 (4K UHD): 60p (progressive; Z 7II only)/
50p (Z 7II only)/30p/25p/24p
1920 × 1080: 120p/100p/60p/50p/30p/25p/24p
1920×1080 (slow-motion): 30p ×4/25p ×4/24p ×5
* Actual frame rates for 120p, 100p, 60p, 50p, 30p,
25p, and 24p are 119.88, 100, 59.94, 50, 29.97, 25,
and 23.976 fps respectively
File format MOV, MP4
Video
compression H.264/MPEG-4 Advanced Video Coding
Audio
recording
format
Linear PCM (for movies recorded in MOV format) or
AAC (for movies recorded in MP4 format)
Audio
recording
device
Built-in stereo or external microphone with
attenuator option; sensitivity adjustable
Exposure
compensation
–3 – +3 EV (choose from step sizes of 1/3 and 1/2 EV)
available in modes P, S, A, and M
760 Specifications
ISO sensitivity
(Recommended
Exposure
Index)
Z7II
M: Manual selection (ISO 64–25600; choose from
step sizes of 1/3 and 1/2 EV); with additional options
available equivalent to approximately 0.3, 0.5, 0.7, 1,
or 2 EV (ISO 102400 equivalent) above ISO 25600;
auto ISO sensitivity control (ISO 64–Hi 2.0) available
with selectable upper limit
P, S, A: Auto ISO sensitivity control (ISO 64–Hi 2.0)
with selectable upper limit
b: Auto ISO sensitivity control (ISO 64–25600)
Z6II
M: Manual selection (ISO 100–51200; choose from
step sizes of 1/3 and 1/2 EV); with additional options
available equivalent to approximately 0.3, 0.5, 0.7, 1,
or 2 EV (ISO 204800 equivalent) above ISO 51200;
auto ISO sensitivity control (ISO 100–Hi 2.0)
available with selectable upper limit
P, S, A: Auto ISO sensitivity control (ISO 100–Hi 2.0)
with selectable upper limit
b: Auto ISO sensitivity control (ISO 100–51200)
Active
D-Lighting
Same as photo settings, Extra high, High, Normal,
Low, and Off
Other options
Time-lapse movie recording, electronic vibration
reduction, time codes, logarithmic (N-Log) and HDR
(HLG) movie output
Movie
761
Specifications
Playback
Playback
Full-frame and thumbnail (4, 9, or 72 images) playback
with playback zoom, playback zoom cropping, movie
playback, photo and/or movie slide shows, histogram
display, highlights, photo information, location data
display, auto image rotation, and picture rating
Interface
USB Type C USB connector (SuperSpeed USB); connection
to built-in USB port is recommended
HDMI output Type C HDMI connector
Accessory
terminal
Built-in (can be used with MC-DC2 remote cords and
other optional accessories)
Audio input Stereo mini-pin jack (3.5 mm diameter; plug-in power
supported)
Audio output Stereo mini-pin jack (3.5 mm diameter)
762 Specifications
Wi-Fi/Bluetooth
Wi-Fi
Standards:
- IEEE 802.11b/g/n (Africa, Asia, Bolivia, and Oceania)
- IEEE 802.11b/g/n/a/ac (Europe, U.S.A., Canada,
Mexico)
- IEEE 802.11b/g/n/a (other countries in the
Americas)
Operating frequency:
- 2412–2462 MHz (channel 11; Africa, Asia, Bolivia,
and Oceania)
- 2412–2462 MHz (channel 11) and 5180–5825 MHz
(U.S.A., Canada, Mexico)
- 2412–2462 MHz (channel 11) and 5180–5805 MHz
(other countries in the Americas)
- 2412–2462 MHz (channel 11) and 5745–5805 MHz
(Georgia)
- 2412–2462 MHz (channel 11) and 5180–5320 MHz
(other European countries)
Maximum output power (EIRP):
- 2.4 GHz band: 5.2 dBm
- 5 GHz band: 5.3 dBm (Georgia)
- 5 GHz band: 8.3 dBm (other countries)
Authentication: Open system, WPA2-PSK
763
Specifications
Bluetooth
Communication protocols: Bluetooth Specification
Version 4.2
Operating frequency:
- Bluetooth: 2402–2480 MHz
- Bluetooth Low Energy: 2402–2480 MHz
Maximum output power (EIRP):
- Bluetooth: –0.3 dBm
- Bluetooth Low Energy: –1.8 dBm
Range (line of
sight)
Approximately 10 m (32 ft) *
* Without interference. Range may vary with signal
strength and presence or absence of obstacles.
Power source
Battery
One EN-EL15c rechargeable Li-ion battery *
* EN-EL15b/EN-EL15a/EN-EL15 batteries can also be
used. Note, however, that fewer pictures can be
taken on a single charge than with the EN-EL15c
(0777). The EH-7P charging AC adapter can be
used to charge EN-EL15c/EN-EL15b batteries only.
Battery pack
MB-N11 power battery packs and MB-N10 battery
packs (available separately); each takes two EN-EL15c *
batteries
* EN-EL15b/EN-EL15a/EN-EL15 batteries can be used
in place of the EN-EL15c. The number of pictures
that can be taken on a single charge (i.e., battery
endurance) will however drop compared to the
EN-EL15c (0777).
Wi-Fi/Bluetooth
764 Specifications
Unless otherwise stated, all measurements are performed in conformity
with Camera and Imaging Products Association (CIPA) standards or
guidelines.
All figures are for a camera with a fully-charged battery.
The sample images displayed on the camera and the images and
illustrations in the manuals are for expository purposes only.
Nikon reserves the right to change the appearance and specifications of
the hardware and software described in this manual at any time and
without prior notice. Nikon will not be held liable for damages that may
result from any mistakes that this manual may contain.
Charging AC
adapter
EH-7P charging AC adapter (supplied with the Z 7II
only)
AC adapter EH-5d/EH-5c/EH-5b AC adapter; requires EP-5B power
connector (available separately)
Tripod socket
Tripod socket 1/4 in. (ISO 1222)
Dimensions/weight
Dimensions
(W × H × D) Approx. 134 × 100.5 × 69.5 mm/5.3 × 4 × 2.8 in.
Weight
Approx. 705 g (1 lb. 8.9 oz.) with battery and memory
card but without body cap; approx. 615 g/1 lb. 5.7 oz.
(camera body only)
Operating environment
Temperature 0 °C–40 °C (+32 °F–104 °F)
Humidity 85% or less (no condensation)
Power source
765
Specifications
❚❚ MH-25a Battery Charger
The symbols on this product represent the following:
m AC, p DC, q Class II equipment (the construction of the product is
double-insulated)
Rated input AC 100 to 240 V, 50/60 Hz, 0.23–0.12 A
Rated output DC 8.4 V/1.2 A
Supported
batteries
EN-EL15c/EN-EL15b/EN-EL15a/EN-EL15 Rechargeable
Li-ion Battery
Charging time
Approx. 2 hours 35 minutes
* Time required to charge battery at an ambient
temperature of 25 °C (77 °F) when no charge
remains
Operating
temperature 0 °C–40 °C (+32 °F–104 °F)
Dimensions
(W × H × D)
Approx. 95 × 33.5 × 71 mm/3.7 × 1.3 × 2.8 in.,
excluding projections
Length of
power cable Approx. 1.5 m (4.9 ft), if supplied
Weight Approx. 115 g (4.1 oz), excluding supplied power
connector (power cable or AC wall adapter)
766 Specifications
❚❚ EH-7P Charging AC Adapter (Supplied with the
Z 7II Only)
The EH-7P comes with a plug adapter attached in countries or regions
where required; the shape of the plug adapter varies with the country of
sale. Do not attempt to remove the plug adapter, as this could damage
the product.
The symbols on this product represent the following:
m AC, p DC, q Class II equipment (the construction of the product is
double-insulated)
Rated input AC 100–240 V, 50/60 Hz, MAX 0.5 A
Rated output DC 5.0 V/3.0 A, 15.0 W
Supported
batteries
Nikon EN-EL15c/EN-EL15b rechargeable Li-ion
batteries
Operating
temperature 0 °C–40 °C (+32 °F–104 °F)
Average active
efficiency 81.80%
Efficiency at
low load (10%) 72.50%
No-load power
consumption 0.075 W
Dimensions
(W × H × D)
Approx. 65.5 × 26.5 × 58.5 mm/2.6 × 1.1 × 2.4 in.,
excluding plug adapter
Weight Approx. 125 g (4.5 oz), excluding plug adapter
767
Specifications
ANotice for Customers in Europe
Distributor (Importer for EU Countries)
Nikon Europe B.V.
Tripolis 100, Burgerweeshuispad 101, 1076 ER Amsterdam, The
Netherlands
+31-20-7099-000
Commercial registration number: 34036589
❚❚ EN-EL15c Rechargeable Li-ion Battery
Type Rechargeable lithium-ion battery
Rated capacity 7.0 V/2280 mAh
Operating
temperature 0 °C–40 °C (+32 °F–104 °F)
Dimensions
(W × H × D) Approx. 40 × 56 × 20.5 mm/1.6 × 2.2 × 0.8 in.
Weight Approx. 80 g (2.9 oz), excluding terminal cover
768 Specifications
DDisposing of Data Storage Devices
Please note that deleting images or formatting memory cards or other
data storage devices does not completely erase the original image data.
Deleted files can sometimes be recovered from discarded storage devices
using commercially available software, potentially resulting in the
malicious use of personal image data. Ensuring the privacy of such data is
the user’s responsibility.
Before discarding a data storage device or transferring ownership to
another person, erase all data using commercial deletion software, or
format the device and then completely refill it with images containing no
private information (for example, pictures of empty sky). Care should be
taken to avoid injury when physically destroying data storage devices.
Before discarding the camera or transferring ownership to another
person, you should also use the [Reset all settings] item in the camera
setup menu to delete network settings and other personal information.
769
Specifications
DSupported Standards
DCF Version 2.0: The Design Rule for Camera File System (DCF) is a
standard widely used in the digital camera industry to ensure
compatibility among different makes of camera.
Exif version 2.31: The camera supports Exif (Exchangeable Image File
Format for Digital Still Cameras) version 2.31, a standard introduced
with the goal of improving the interoperability of printers and digital
cameras, making it easier to produce high-quality prints. Information
stored with photographs is used for optimal color reproduction when
the images are output on Exif-compliant printers. See the printer
manual for details.
HDMI: High-Definition Multimedia Interface is a standard for
multimedia interfaces used in consumer electronics and AV devices.
This standard ensures that audiovisual data and control signals can be
transmitted to HDMI-compliant devices via a single cable connection.
770 Approved Memory Cards
The camera can be used with CFexpress (Type B), XQD, SD,
SDHC, and SDXC memory cards.
UHS-I and UHS-II SD cards are supported.
CFexpress or XQD cards with a maximum data transfer rate of
at least 45 MB/s (300×), or UHS Speed Class 3 or better SD
cards, are recommended for movie recording and playback.
CFexpress or XQD cards with a maximum data transfer rate of
at least 250 MB/s, or UHS Speed Class 3 or better SD cards with
a maximum data transfer rate of at least 250 MB/s, are
recommended for recording and playback of movies at a
frame size/rate of 3840 × 2160; 60p or 3840 × 2160; 50p.
Slower speeds may result in recording or playback being
interrupted.
When choosing cards for use in card readers, be sure they are
compatible with the device.
Contact the manufacturer for information on features,
operation, and limitations on use.
Approved Memory Cards
771
Portable Chargers (Power Banks)
Portable chargers can be used to power the camera or charge
the camera battery. The following table lists the portable
chargers that have been tested and approved for use, together
with the approximate number of shots that can be taken with,
and the approximate number of times the camera battery can
be charged using, each device.
1 Camera and Imaging Products Association (CIPA) standard.
[Viewfinder only] selected for monitor mode. Measured at 23 °C/
73.4 °F (±2 °C/3.6 °F) with a NIKKOR Z 24–70mm f/4 S lens and a SONY
CEB-G128 memory card under the following test conditions: one
photograph taken at default settings once every 30 s. The “number of
shots” is the number of shots that can be taken using a fully-charged
portable charger to supply power to a camera with a fully-charged
battery (EN-EL15c).
2 The number of times the camera battery (EN-EL15c) can be fully
charged using a portable charger at full charge.
Portable Chargers (Power Banks)
Manufacturer Model number Number of shots 1Number of
charges 2
Anker PowerCore+
26800 PD 45W
Z 7II: approx. 1930
Z 6II: approx. 1840 Approx. 3
772 Portable Chargers (Power Banks)
The only batteries that can be charged from portable chargers
are the EN-EL15c and EN-EL15b.
See the documentation provided with the portable charger for
information on use.
Use a USB cable with two Type C connectors supplied with the
portable charger when employing the device to power the
camera or charge the camera battery.
Up-to-date information on portable chargers is available on
the website of the manufacturers. Availability may vary with
country or region.
773
Memory Card Capacity
The following table shows buffer capacity and the approximate
number of pictures that can be stored on a 128 GB 1 card at
different image qualities and sizes when [FX (36 × 24)] is
selected for [Choose image area]. Actual capacity varies with
shooting conditions and the type of card.
Z7II:
Memory Card Capacity
Image quality Image size File size
Number of
exposures
remaining 2
Buffer
capacity 2, 3
NEF (RAW),
Lossless
compressed,
12-bit
Large Approx.
36.8 MB 1600 frames 77 frames
Medium Approx.
26.8 MB 2200 frames 46 frames
Small Approx.
20.4 MB 3000 frames 49 frames
NEF (RAW),
Lossless
compressed,
14-bit
Large Approx.
47.3 MB 1400 frames 63 frames
NEF (RAW),
Compressed,
12-bit
Large Approx.
32.7 MB 2200 frames 82 frames
NEF (RAW),
Compressed,
14-bit
Large Approx.
40.8 MB 1800 frames 70 frames
774 Memory Card Capacity
NEF (RAW),
Uncompressed,
12-bit
Large Approx.
66.3 MB 1600 frames 56 frames
NEF (RAW),
Uncompressed,
14-bit
Large Approx.
76.8 MB 1400 frames 48 frames
JPEG fine 4
Large Approx.
15.7 MB 4000 frames 113 frames
Medium Approx.
10.5 MB 7000 frames 200 frames
Small Approx.
6.0 MB 14,100 frames 200 frames
JPEG normal 4
Large Approx.
11.2 MB 8100 frames 118 frames
Medium Approx.
6.6 MB 13,700 frames 200 frames
Small Approx.
3.3 MB 27,000 frames 200 frames
JPEG basic 4
Large Approx.
3.3 MB 15,900 frames 133 frames
Medium Approx.
2.2 MB 26,300 frames 200 frames
Small Approx.
1.4 MB 51,300 frames 200 frames
Image quality Image size File size
Number of
exposures
remaining 2
Buffer
capacity 2, 3
775
Memory Card Capacity
Z6II:
Image quality Image size File size
Number of
exposures
remaining 2
Buffer
capacity 2, 3
NEF (RAW),
Lossless
compressed,
12-bit
Large Approx.
20.6 MB 3000 frames 124 frames
Medium Approx.
15.2 MB 4000 frames 124 frames
Small Approx.
11.7 MB 5400 frames 131 frames
NEF (RAW),
Lossless
compressed,
14-bit
Large Approx.
26.4 MB 2600 frames 200 frames
NEF (RAW),
Compressed,
12-bit
Large Approx.
18.4 MB 4000 frames 145 frames
NEF (RAW),
Compressed,
14-bit
Large Approx.
22.8 MB 3300 frames 200 frames
NEF (RAW),
Uncompressed,
12-bit
Large Approx.
36.4 MB 3000 frames 98 frames
NEF (RAW),
Uncompressed,
14-bit
Large Approx.
42.0 MB 2600 frames 126 frames
776 Memory Card Capacity
1 Figures are for a SONY CEB-G128 CFexpress memory card (as of
August 2020).
2 Number of pictures that can be saved to memory card or stored in
memory buffer varies with scene recorded.
3 Maximum number of exposures that can be stored in memory buffer
at ISO 100. May drop in some situations, including when:
An optimal-compression ([m]) JPEG option is selected for [Image
quality]
[On] is selected for [Auto distortion control]
4 Figures assume a size-priority option (an option not marked with [m])
is selected for [Image quality]. Selecting an optimal-compression
([m]) option increases file size; the number of images and buffer
capacity drop accordingly.
JPEG fine 4
Large Approx.
9.3 MB 7300 frames
200 frames
Medium Approx.
6.4 MB 12,100 frames
Small Approx.
3.9 MB 22,600 frames
JPEG normal 4
Large Approx.
6.3 MB 14,300 frames
Medium Approx.
3.8 MB 23,700 frames
Small Approx.
2.0 MB 42,400 frames
JPEG basic 4
Large Approx.
2.4 MB 27,800 frames
Medium Approx.
1.7 MB 44,300 frames
Small Approx.
1.1 MB 81,200 frames
Image quality Image size File size
Number of
exposures
remaining 2
Buffer
capacity 2, 3
777
Battery Endurance
The movie footage or number of shots that can be recorded
with a fully-charged EN-EL15c rechargeable Li-ion battery 1 is
given below. Actual endurance varies with such factors as the
condition of the battery, the interval between shots, and the
options selected in the camera menus.
Photo Mode: Number of Shots 2
[Viewfinder only] selected for monitor mode with
-[Enable] selected for [Energy saving (photo mode)] in the
setup menu: Approx. 380 shots (Z 7II), 400 shots (Z 6II)
-[Disable] selected for [Energy saving (photo mode)] in the
setup menu: Approx. 360 shots (Z 7II), 340 shots (Z 6II)
[Monitor only] selected for monitor mode with
-[Enable] selected for [Energy saving (photo mode)] in the
setup menu: Approx. 440 shots (Z 7II), 450 shots (Z 6II)
-[Disable] selected for [Energy saving (photo mode)] in the
setup menu: Approx. 420 shots (Z 7II), 410 shots (Z 6II)
Movie Mode: Length of Footage 3
[Viewfinder only] selected for monitor mode: Approx.
100 minutes
[Monitor only] selected for monitor mode: Approx.
105 minutes (Z 7II), 100 minutes (Z 6II)
Battery Endurance
778 Battery Endurance
Actions such as the following can reduce battery endurance:
Keeping the shutter-release button pressed halfway
Repeated autofocus operations
Taking NEF (RAW) photographs
Slow shutter speeds
Using camera Wi-Fi (wireless LAN) and Bluetooth features
Using the camera with optional accessories connected
Repeatedly zooming in and out
Taking pictures at low ambient temperatures
779
Battery Endurance
To ensure that you get the most from rechargeable Nikon
EN-EL15c batteries:
Keep the battery contacts clean. Soiled contacts can reduce
battery performance.
Use batteries immediately after charging. Batteries will lose
their charge if left unused.
1 EN-EL15b/EN-EL15a/EN-EL15 batteries can also be used. Note,
however, that fewer pictures can be taken on a single charge than
with the EN-EL15c.
2 Camera and Imaging Products Association (CIPA) standard. Measured
at 23 °C/73.4 °F (±2 °C/3.6 °F) with a NIKKOR Z 24–70mm f/4 S lens and
a SONY CEB-G128 memory card under the following test conditions:
one photograph taken at default settings once every 30 s.
3 Actual battery endurance as measured under conditions specified by
CIPA. Measured at 23 °C/73.4 °F (±2 °C/3.6 °F) with a NIKKOR Z 24–
70mm f/4 S lens and a SONY CEB-G128 memory card. Measurement
performed at default settings.
Each shot can be up to 29 minutes 59 seconds in length.
If camera temperature rises, recording may end before maximum
length or size is reached.
780 AF-Assist Illumination
The AF-assist illuminator has a range of about 1.0–3.0 m (3 ft
4 in.–9 ft 10 in.). Some lenses may block the illuminator at
certain focus distances.
Remove lens hoods when using the illuminator.
The following lenses interfere with AF-assist illumination:
For the latest information concerning limitations on AF-assist
illumination, visit the Nikon Download Center:
https://downloadcenter.nikonimglib.com/
AF-Assist Illumination
Lenses that limit the range at which AF-assist illumination can be
used for autofocus
NIKKOR Z 24–70mm f/2.8 S AF-assist illumination cannot be used
for autofocus at distances under 1.5 m
(4 ft 12 in.)
NIKKOR Z 50mm f/1.2 S
NIKKOR Z 70–200mm f/2.8 VR S
AF-assist illumination cannot be used
for autofocus at distances under 2.0 m
(6 ft 7 in.)
781
Trademarks and Licenses
CFexpress is a trademark of the CompactFlash Association in
the United States and other countries.
NVM Express is a trademark of NVM Express Inc. in the United
States and other countries.
XQD is a trademark of Sony Corporation.
The SD, SDHC, and SDXC logos are trademarks of SD-3C, LLC.
Windows is either a registered trademark or a trademark of
Microsoft Corporation in the United States and/or other
countries.
Apple®, App Store®, the Apple logos, iPhone®, iPad®, Mac, and
macOS are trademarks of Apple Inc. registered in the U.S. and/
or other countries.
Android, Google Play and the Google Play logo are trademarks
of Google LLC. The Android robot is reproduced or modified
from work created and shared by Google and used according
to terms described in the Creative Commons 3.0 Attribution
License.
IOS is a trademark or registered trademark of Cisco Systems,
Inc., in the United States and/or other countries and is used
under license.
HDMI, the HDMI logo and High-Definition Multimedia
Interface are trademarks or registered trademarks of HDMI
Licensing, LLC.
Trademarks and Licenses
782 Trademarks and Licenses
The Bluetooth® word mark and logo are registered trademarks
owned by Bluetooth SIG, Inc., and any use of such marks by
Nikon is under license.
Wi-Fi and the Wi-Fi logo are trademarks or registered
trademarks of the Wi-Fi Alliance.
All other trade names mentioned in this manual or the other
documentation provided with your Nikon product are
trademarks or registered trademarks of their respective
holders.
DFreeType License (FreeType2)
Portions of this software are copyright © 2012 The FreeType Project
(https://www.freetype.org). All rights reserved.
DMIT License (HarfBuzz)
Portions of this software are copyright © 2018 The HarfBuzz Project
(https://www.freedesktop.org/wiki/Software/HarfBuzz). All rights
reserved.
Use of the Made for Apple badge means that an accessory has been
designed to connect specifically to the Apple products identified in the
badge, and has been certified by the developer to meet Apple
performance standards. Apple is not responsible for the operation of this
device or its compliance with safety and regulatory standards. Please
note that the use of this accessory with an Apple product may affect
wireless performance.
783
Trademarks and Licenses
DUnicode® Character Database License (Unicode® Character
Database)
The software for this product uses the Unicode® Character Database
License open-source software. The terms of the software license are as
follows:
COPYRIGHT AND PERMISSION NOTICE
Copyright © 1991-2020 Unicode, Inc. All rights reserved.
Distributed under the Terms of Use in
https://www.unicode.org/copyright.html.
Permission is hereby granted, free of charge, to any person obtaining a
copy of the Unicode data files and any associated documentation (the
"Data Files") or Unicode software and any associated documentation (the
"Software") to deal in the Data Files or Software without restriction,
including without limitation the rights to use, copy, modify, merge,
publish, distribute, and/or sell copies of the Data Files or Software, and to
permit persons to whom the Data Files or Software are furnished to do so,
provided that either
(i) this copyright and permission notice appear with all copies of the
Data Files or Software, or
(ii) this copyright and permission notice appear in associated
Documentation.
784 Trademarks and Licenses
THE DATA FILES AND SOFTWARE ARE PROVIDED "AS IS", WITHOUT
WARRANTY OF ANY KIND, EXPRESS OR IMPLIED, INCLUDING BUT NOT
LIMITED TO THE WARRANTIES OF MERCHANTABILITY, FITNESS FOR A
PARTICULAR PURPOSE AND NONINFRINGEMENT OF THIRD PARTY
RIGHTS. IN NO EVENT SHALL THE COPYRIGHT HOLDER OR HOLDERS
INCLUDED IN THIS NOTICE BE LIABLE FOR ANY CLAIM, OR ANY SPECIAL
INDIRECT OR CONSEQUENTIAL DAMAGES, OR ANY DAMAGES
WHATSOEVER RESULTING FROM LOSS OF USE, DATA OR PROFITS,
WHETHER IN AN ACTION OF CONTRACT, NEGLIGENCE OR OTHER
TORTIOUS ACTION, ARISING OUT OF OR IN CONNECTION WITH THE USE
OR PERFORMANCE OF THE DATA FILES OR SOFTWARE.
Except as contained in this notice, the name of a copyright holder shall
not be used in advertising or otherwise to promote the sale, use or other
dealings in these Data Files or Software without prior written
authorization of the copyright holder.
DAVC Patent Portfolio License
THIS PRODUCT IS LICENSED UNDER THE AVC PATENT PORTFOLIO LICENSE FOR THE
PERSONAL AND NON-COMMERCIAL USE OF A CONSUMER TO (i) ENCODE VIDEO IN
COMPLIANCE WITH THE AVC STANDARD (“AVC VIDEO”) AND/OR (ii) DECODE AVC
VIDEO THAT WAS ENCODED BY A CONSUMER ENGAGED IN A PERSONAL AND NON-
COMMERCIAL ACTIVITY AND/OR WAS OBTAINED FROM A VIDEO PROVIDER LICENSED TO
PROVIDE AVC VIDEO. NO LICENSE IS GRANTED OR SHALL BE IMPLIED FOR ANY OTHER
USE. ADDITIONAL INFORMATION MAY BE OBTAINED FROM MPEG LA, L.L.C. SEE
https://www.mpegla.com
DBSD License (NVM Express Driver)
The license for the open-source software included in the camera’s NVM
Express driver is as follows:
https://imaging.nikon.com/support/pdf/LicenseNVMe.pdf
785
Notices
Notices for Customers in the U.S.A.
Federal Communications Commission (FCC) Radio Frequency
Interference Statement
This equipment has been tested and found to comply with the limits for a
Class B digital device, pursuant to Part 15 of the FCC rules. These limits are
designed to provide reasonable protection against harmful interference
in a residential installation. This equipment generates, uses, and can
radiate radio frequency energy and, if not installed and used in
accordance with the instructions, may cause harmful interference to radio
communications. However, there is no guarantee that interference will
not occur in a particular installation. If this equipment does cause harmful
interference to radio or television reception, which can be determined by
turning the equipment off and on, the user is encouraged to try to correct
the interference by one or more of the following measures:
Reorient or relocate the receiving antenna.
Increase the separation between the equipment and receiver.
Connect the equipment into an outlet on a circuit different from that to
which the receiver is connected.
Consult the dealer or an experienced radio/television technician for
help.
Notices
The Battery Charger
IMPORTANT SAFETY INSTRUCTIONS—SAVE THESE
INSTRUCTIONS
DANGER—TO REDUCE THE RISK OF FIRE OR ELECTRIC
SHOCK, CAREFULLY FOLLOW THESE INSTRUCTIONS
For connection to a supply not in the U.S.A., use an attachment plug adapter
of the proper configuration for the power outlet if needed. This power unit
is intended to be correctly oriented in a vertical or floor mount position.
786 Notices
CAUTIONS
Modifications
The FCC requires the user to be
notified that any changes or
modifications made to this device that are not expressly approved by
Nikon Corporation may void the user’s authority to operate the
equipment.
Interface Cables
Use the interface cables sold or provided by Nikon for your equipment.
Using other interface cables may exceed the limits of Class B Part 15 of the
FCC rules.
Nikon Inc., 1300 Walt Whitman Road, Melville, New York 11747-3064,
U.S.A.
Tel.: 631-547-4200
Power Cable
At voltages over AC 125 V (U.S.A. only): The power cable must be rated
for the voltage in use, be at least AWG no. 18 gauge, and have SVG
insulation or better with a NEMA 6P-15 plug rated for AC 250 V 15 A.
Notice for Customers in Canada
CAN ICES-3 B / NMB-3 B
Z 7II/Z 6II
787
Notices
Notices for Customers in Europe
This symbol indicates that electrical and electronic equipment
is to be collected separately.
The following apply only to users in European countries:
This product is designated for separate collection at an
appropriate collection point. Do not dispose of as household
waste.
Separate collection and recycling helps conserve natural resources and
prevent negative consequences for human health and the environment
that might result from incorrect disposal.
For more information, contact the retailer or the local authorities in
charge of waste management.
This symbol on the battery indicates that the battery is to be
collected separately.
The following apply only to users in European countries:
All batteries, whether marked with this symbol or not, are
designated for separate collection at an appropriate collection point. Do
not dispose of as household waste.
For more information, contact the retailer or the local authorities in
charge of waste management.
CAUTION: RISK OF EXPLOSION IF BATTERY IS REPLACED BY AN INCORRECT
TYPE. DISPOSE OF USED BATTERIES ACCORDING TO THE INSTRUCTIONS.
788 Bluetooth and Wi-Fi (Wireless LAN)
This product is controlled by the United States Export
Administration Regulations (EAR). The permission of the United
States government is not required for export to countries other
than the following, which as of this writing are subject to
embargo or special controls: Cuba, Iran, North Korea, Sudan,
and Syria (list subject to change).
The use of wireless devices may be prohibited in some countries
or regions. Contact a Nikon-authorized service representative
before using the wireless features of this product outside the
country of purchase.
The Bluetooth transmitter in this device operates in the 2.4 GHz
band.
Notice for Customers in the U.S.A. and Canada
This device complies with part 15 of FCC Rules and Innovation, Science
and Economic Development Canada’s licence-exempt RSSs. Operation is
subject to the following two conditions: (1) this device may not cause
harmful interference, and (2) this device must accept any interference
received, including interference that may cause undesired operation.
FCC WARNING
The FCC requires the user to be notified that any changes or
modifications made to this device that are not expressly approved by
Nikon Corporation may void the user’s authority to operate the
equipment.
Bluetooth and Wi-Fi (Wireless LAN)
789
Bluetooth and Wi-Fi (Wireless LAN)
Compliance with FCC requirement 15.407(c)
Data transmission is always initiated by software, which is the passed
down through the MAC, through the digital and analog baseband, and
finally to the RF chip. Several special packets are initiated by the MAC.
These are the only ways the digital baseband portion will turn on the RF
transmitter, which it then turns off at the end of the packet. Therefore, the
transmitter will be on only while one of the aforementioned packets is
being transmitted. In other words, this device automatically discontinue
transmission in case of either absence of information to transmit or
operational failure.
Frequency Tolerance: ±20 ppm
FCC Radio Frequency Interference Statement
Note: This equipment has been tested and found to comply with the
limits for a Class B digital device, pursuant to part 15 of the FCC Rules.
These limits are designed to provide reasonable protection against
harmful interference in a residential installation. This equipment
generates, uses and can radiate radio frequency energy and, if not
installed and used in accordance with the instructions, may cause harmful
interference to radio communications. However, there is no guarantee
that interference will not occur in a particular installation. If this
equipment does cause harmful interference to radio or television
reception, which can be determined by turning the equipment off and
on, the user is encouraged to try to correct the interference by one or
more of the following measures:
Reorient or relocate the receiving antenna.
Increase the separation between the equipment and receiver.
Connect the equipment into an outlet on a circuit different from that to
which the receiver is connected.
Consult the dealer or an experienced radio/TV technician for help.
Co-location
This transmitter must not be co-located or operated in conjunction with
any other antenna or transmitter.
Nikon Inc., 1300 Walt Whitman Road, Melville, New York 11747-3064,
U.S.A.
Tel.: 631-547-4200
790 Bluetooth and Wi-Fi (Wireless LAN)
FCC/ISED RF Exposure Statement
The available scientific evidence does not show that any health problems
are associated with using low power wireless devices. There is no proof,
however, that these low power wireless devices are absolutely safe. Low
power Wireless devices emit low levels of radio frequency energy (RF) in
the microwave range while being used. Whereas high levels of RF can
produce health effects (by heating tissue), exposure of low-level RF that
does not produce heating effects causes no known adverse health effects.
Many studies of low-level RF exposures have not found any biological
effects. Some studies have suggested that some biological effects might
occur, but such findings have not been confirmed by additional research.
This product has been tested and found to comply with FCC/ISED
radiation exposure limits set forth for an uncontrolled environment and
meets the FCC radio frequency (RF) Exposure Guidelines and RSS-102 of
the ISED radio frequency (RF) Exposure rules. Please refer to the SAR test
report that was uploaded to FCC website.
Compliance with RSS-247 Issue 2 §6.4
Data transmission is always initiated by software, which is the passed
down through the MAC, through the digital and analog baseband, and
finally to the RF chip. Several special packets are initiated by the MAC.
These are the only ways the digital baseband portion will turn on the RF
transmitter, which it then turns off at the end of the packet. Therefore, the
transmitter will be on only while one of the aforementioned packets is
being transmitted. In other words, this device automatically discontinue
transmission in case of either absence of information to transmit or
operational failure.
Notice for Customers in Canada
For indoor use only (5150-5350MHz).
791
Bluetooth and Wi-Fi (Wireless LAN)
Notice for Customers in Europe and in Countries Complying with
the Radio Equipment Directive
Hereby, Nikon Corporation declares that the radio equipment
types Z 7II and Z 6II are in compliance with Directive 2014/53/
EU.
The full texts of the EU declarations of conformity are available at the
following internet addresses:
Z7II:
https://imaging.nikon.com/support/pdf/DoC_N1932.pdf
Z6II:
https://imaging.nikon.com/support/pdf/DoC_N1929.pdf
Wi-Fi
Operating frequency:
- 2412–2462 MHz (channel 11; Africa, Asia, Bolivia, and Oceania)
- 2412–2462 MHz (channel 11) and 5180–5825 MHz (U.S.A., Canada,
Mexico)
- 2412–2462 MHz (channel 11) and 5180–5805 MHz (other countries in
the Americas)
- 2412–2462 MHz (channel 11) and 5745–5805 MHz (Georgia)
- 2412–2462 MHz (channel 11) and 5180–5320 MHz (other European
countries)
Maximum output power (EIRP):
- 2.4 GHz band: 5.2 dBm
- 5 GHz band: 5.3 dBm (Georgia)
- 5 GHz band: 8.3 dBm (other countries)
Bluetooth
Operating frequency:
- Bluetooth: 2402–2480 MHz
- Bluetooth Low Energy: 2402–2480 MHz
Maximum output power (EIRP):
- Bluetooth: –0.3 dBm
- Bluetooth Low Energy: –1.8 dBm
792 Bluetooth and Wi-Fi (Wireless LAN)
Notice for Customers in Singapore
This device complies with radio-frequency regulations. The content of
certification labels not affixed to the device is given below.
Notice for Customers in Thailand
Security
Although one of the benefits of this product is that it allows others to
freely connect for the wireless exchange of data anywhere within its
range, the following may occur if security is not enabled:
Data theft: Malicious third-parties may intercept wireless transmissions
to steal user IDs, passwords, and other personal information.
Unauthorized access: Unauthorized users may gain access to the
network and alter data or perform other malicious actions. Note that
due to the design of wireless networks, specialized attacks may allow
unauthorized access even when security is enabled.
Unsecured networks: Connecting to open networks may result in
unauthorized access. Use secure networks only.
AConformity Marking
The standards with which the camera complies can be viewed using the
[Conformity marking] option in the setup menu.
Trade Name:
Model: Z 7II
Trade Name:
Model: Z 6II
Complies with
IMDA Standards
DA103423
793
Bluetooth and Wi-Fi (Wireless LAN)
ACertificates
794 NIKKOR Z 24–70mm f/4 S Lens Manual
Kit Lens Manual
This section is included as a lens manual for purchasers of the
NIKKOR Z 24–70mm f/4 S lens kit.
Note that lens kits may not be available in some countries or
regions.
Using the Lens
❚❚ Parts of the Lens: Names and Functions
The parts of the NIKKOR Z 24–70mm f/4 S are listed below.
NIKKOR Z 24–70mm f/4 S Lens Manual
45678
12
91011
12
3
13
14
795
NIKKOR Z 24–70mm f/4 S Lens Manual
1Lens hood
Lens hoods block stray light that would
otherwise cause flare or ghosting. They also
serve to protect the lens.
2Lens hood lock
mark
Use when attaching the lens hood.3Lens hood
alignment mark
4Lens hood
mounting mark
5Zoom ring Rotate to zoom in or out. Be sure to extend the
lens before use.
6Focal length scale Determine the approximate focal length when
zooming the lens in or out.
7Focal length mark
8Control ring
Autofocus mode selected: In autofocus
mode, you can rotate this customizable ring
to perform a function selected with the
camera.
Manual focus mode selected: Rotate to
focus.
9Lens mounting
mark Use when mounting the lens on the camera.
10 Rubber lens-
mount gasket
11 CPU contacts Used to transfer data to and from the camera.
12 Focus-mode
switch
Choose A for autofocus, M for manual focus.
Note that regardless of the setting chosen,
focus must be adjusted manually when manual
focus mode is selected using camera controls.
13 Front lens cap
14 Rear lens cap
796 NIKKOR Z 24–70mm f/4 S Lens Manual
❚❚ Attachment and Removal
Attaching the Lens
1
Turn the camera off, remove the body cap, and
detach the rear lens cap.
2
Position the lens on the camera body, keeping the
mounting mark on the lens aligned with the
mounting mark on the camera body, and then
rotate the lens counterclockwise until it clicks into
place.
Removing the Lens
1
Turn the camera off.
2
Press and hold the lens release button while
turning the lens clockwise.
797
NIKKOR Z 24–70mm f/4 S Lens Manual
❚❚ Before Use
The lens is retractable and must be extended before use. Rotate
the zoom ring as shown until the lens clicks into the extended
position. Pictures can only be taken when the focal length mark
points to positions between 24 and 70 on the focal length scale.
To retract the lens, rotate the zoom ring in the opposite
direction, stopping when you reach the (I) position on the
focal length scale.
If the camera is turned on with the lens retracted, a warning
will be displayed. Extend the lens before use.
798 NIKKOR Z 24–70mm f/4 S Lens Manual
❚❚ Attaching and Removing the Lens Hood
Align the lens hood mounting mark (I) with the lens hood
alignment mark (I) and then rotate the hood (w) until the I
mark is aligned with the lens hood lock mark (K).
To remove the hood, reverse the above steps.
When attaching or removing the hood, hold it near the I
symbol on its base and avoid gripping it too tightly. The hood
can be reversed and mounted on the lens when not in use.
❚❚ When the Lens Is Attached
The focus position may change if you turn the camera off and
then on again after focusing. Refocus before shooting. If you
have focused on a pre-selected location while waiting for your
subject to appear, we recommend that you do not turn the
camera off until the picture is taken.
799
NIKKOR Z 24–70mm f/4 S Lens Manual
Precautions for Use
Do not pick up or hold the lens or camera using only the lens
hood.
Keep the CPU contacts clean.
Should the rubber lens-mount gasket be damaged, cease use
immediately and take the lens to a Nikon-authorized service
center for repair.
Replace the lens caps when the lens is not in use.
To protect the interior of the lens, store it out of direct
sunlight.
Keep the lens dry. Rusting of the internal mechanism can
cause irreparable damage.
Leaving the lens in extremely hot locations could damage or
warp parts made from reinforced plastic.
Rapid changes in temperature may cause damaging
condensation inside and outside the lens. Before taking the
lens from a warm to a cold environment or vice versa, place it
in its case or a plastic bag to slow the change in temperature.
We recommend that you place the lens in its case to protect it
from scratches during transport.
800 NIKKOR Z 24–70mm f/4 S Lens Manual
Lens Care
Removing dust is normally sufficient to clean the glass
surfaces of the lens.
Smudges and fingerprints can be removed from fluorine-
coated lens elements using a soft, clean cotton cloth or lens
cleaning tissue; clean from the center outwards using a
circular motion. To remove stubborn stains, wipe gently using
a soft cloth lightly dampened with a small amount of distilled
water, ethanol, or lens cleaner. Any drop-shaped marks left
from this process on the water- and oil-repellent surface can
subsequently be removed with a dry cloth.
When cleaning lens elements that are not fluorine-coated,
remove smudges and fingerprints using a soft, clean cotton
cloth or lens cleaning tissue lightly dampened with a small
amount of ethanol or lens cleaner. Wipe gently from the
center outwards in a circular motion, taking care not to leave
smears or touch the lens with your fingers.
Never use organic solvents such as paint thinner or benzene to
clean the lens.
Neutral Color (NC) filters (available separately) and the like can
be used to protect the front lens element.
If the lens will not be used for an extended period, store it in a
cool, dry location to prevent mold and rust. Do not store in
direct sunlight or with naphtha or camphor moth balls.
801
NIKKOR Z 24–70mm f/4 S Lens Manual
Accessories
❚❚ Supplied Accessories
LC-72B 72 mm snap-on Front Lens Cap
LF-N1 Rear Lens Cap
HB-85 Bayonet Hood
CL-C1 Lens Case
DUsing the Lens Case
The case is intended to protect the lens from scratches, not from falls or
other physical shocks.
The case is not water resistant.
The material used in the case may fade, bleed, shrink, or change color
when rubbed or wet.
Remove dust with a soft brush.
Water and stains can be removed from the surface with a soft, dry cloth.
Do not use alcohol, benzene, thinner, or other volatile chemicals.
Do not store in locations exposed to direct sunlight or high
temperatures or humidity.
Do not use the case to clean the monitor or lens elements.
Be careful that the lens does not fall from the case during transport.
Material: Polyester
❚❚ Compatible Accessories
72 mm screw-on filters
DFilters
Use only one filter at a time. Remove the lens hood before attaching filters
or rotating circular polarizing filters.
802 NIKKOR Z 24–70mm f/4 S Lens Manual
Specifications
Nikon reserves the right to change the appearance, specifications, and
performance of this product at any time and without prior notice.
Mount Nikon Z mount
Focal length 24 – 70 mm
Maximum aperture f/4
Lens construction
14 elements in 11 groups (including 1 ED lens
element, 1 aspherical ED element, 3 aspherical
elements, elements with Nano Crystal Coat, and a
fluorine-coated front lens element)
Angle of view FX format: 84° – 34° 20´
DX format: 61° – 22° 50´
Focal length scale Graduated in millimeters (24, 28, 35, 50, 70)
Focusing system Internal focusing system
Minimum focus
distance
0.3 m (0.99 ft) from focal plane at all zoom
positions
Diaphragm blades 7 (rounded diaphragm opening)
Aperture range f/4 – 22
Filter-attachment
size 72 mm (P = 0.75 mm)
Dimensions
Approx. 77.5 mm maximum diameter × 88.5 mm
(distance from camera lens mount flange when
lens is retracted)
Weight Approx. 500 g (1 lb 1.7 oz)
803
Index
Index
Symbols
b (Auto)....................................................56, 63
P (Programmed auto)..........................107
S (Shutter-priority auto)......................108
A (Aperture-priority auto) .................108
M (Manual).....................................................109
U1, U2, U3 (User setting mode)......115
U (Single frame)...........................126, 130
V (Continuous L)................................126
W (Continuous H)...............................126
X (Continuous H (extended)) 126
E (Self-timer) ..............................................126
c (Continuous)........................................130
L (Silent photography).....................100
x (Electronic front-curtain shutter).
398
P (Mechanical shutter)......................398
3 (Pinpoint AF)...........................................77
d (Single-point AF)................................78
e (Dynamic-area AF) ...........................78
f (Wide-area AF (S)) ............................79
g (Wide-area AF (L)).............................79
1 (Wide-area AF (L-people))..........79
2 (Wide-area AF (L-animals)).........79
h (Auto-area AF)......................................80
5 (Auto-area AF (people))................80
6 (Auto-area AF (animals))..............80
L (Matrix metering)..............................157
M (Center-weighted metering)..157
N (Spot metering)..................................157
t (Highlight-weighted metering)..
158
M (Monitor mode) button ...............14
G button .....................................................28
i button .................................................33, 136
K button ..........................................................69
O button.............................................................72
S button...................................................118
E (Exposure compensation) button
122
c (Release mode) button..............125
E (Self-timer) button...........................125
W button.........................................................27
X button.............................................................27
d Help.................................................................32
i menu....................................................33, 136
A
AC adapter.....................................................733
Access-point mode ...................542, 544
Active D-Lighting ....................................283
ADL bracketing..........................................306
AE & flash bracketing ...........................298
AE bracketing..............................................298
AE lock...............................................................134
AF activation................................................386
AF fine-tuning options .......................462
AF speed..........................................................449
AF tracking sensitivity..........................449
AF-area mode................................................77
AF-C (Continuous AF)................................75
AF-C priority selection.........................381
AF-F (Full-time AF).......................................75
AF-ON button....................................................28
AF-S (Single AF)..............................................75
AF-S priority selection .........................382
After burst, show......................................237
After delete ...................................................236
804 Index
Airplane mode .......................................... 482
All images...................................................... 211
Animal-detection AF................................84
Aperture.............................................. 108, 109
Apply settings to live view ............. 402
Assign MB-N11 buttons........ 437, 451
Assign remote (WR) Fn button... 482
Attaching a lens...........................................50
Attenuator..................................................... 373
Auto (Set Picture Control)............... 139
Auto (White balance) ..............................95
Auto bracketing ....................................... 297
Auto bracketing (mode M)............. 408
Auto c ISO sensitivity control...... 407
Auto distortion control.......... 288, 369
Auto ISO sensitivity control ........... 120
Auto send...................................................... 561
Auto-area AF...................................................80
Auto-area AF (animals)...........................80
Auto-area AF (people)............................80
B
Backup (Secondary slot function)......
258
Battery..........................................................38, 43
Battery charger..............................................38
Battery info ................................................... 491
Beep options............................................... 476
Bluetooth....................................................... 577
Bracketing order...................................... 409
Brightness (Set Picture Control).143
Built-in AF-assist illuminator.......... 390
Built-in microphone .................................64
Bulb..................................................................... 112
C
Camera-mounted flash units ....... 611
Center-weighted area......................... 393
Center-weighted metering............ 157
Charger ............................................................... 38
Charging AC adapter.............................. 40
Choose color temperature (White
balance) ......................................................... 97
Choose image area ................... 175, 260
Choose start/end point..................... 199
CL mode shooting speed................ 396
Clarity (Set Picture Control)............ 143
Clean image sensor .................. 467, 739
Cloudy (White balance)........................ 96
Color space................................................... 282
Color temperature............ 99, 147, 270
Command dial.............................................. 16
Conformity marking............................. 490
Connect to PC............................................ 486
Connect to smart device..... 483, 577,
593
Continuous................................................... 130
Continuous AF.............................................. 75
Continuous H ............................................. 126
Continuous H (extended)................ 126
Continuous L .............................................. 126
Contrast (Set Picture Control)...... 143
Control panel brightness................. 460
Control ring..................................................... 91
Copy image(s)............................................ 238
Copyright information ....................... 474
Creative Picture Control.................... 140
Custom controls.......................... 414, 441
Custom Settings ...................................... 377
Customize command dials............ 430
Customize i menu........ 34, 410, 440
D
Delete........................................... 72, 206, 233
Destination....................................... 177, 364
805
Index
Detaching lenses........................................51
Diffraction compensation....288, 369
Diopter adjustment control..............13
Direct connection to PC....................544
Direct sunlight (White balance).....96
DISP button.......................................................25
Distortion control....................................520
D-Lighting......................................................517
Dual-format recording PB slot .....235
Dynamic-area AF ........................................78
E
Easy Connect...............................................551
Easy exposure compensation ......392
Effect level (Set Picture Control).143
Electronic VR....................................178, 372
Encryption key ...............................544, 553
Energy saving..............................................494
Error (wireless connection) .............598
EV steps for exposure cntrl .............392
Exposure comp. for flash..................406
Exposure compensation...................122
Exposure delay mode..........................397
Exposure indicators...............................110
Extended shutter speeds (M)........399
Eye-detection AF ........................................82
F
Face-detection AF .....................................82
File information.........................................184
File naming.......................................256, 364
File number sequence........................400
Fill flash.................................................156, 619
Filter effects (Set Picture Control)143
Fine-tune optimal exposure..........393
Firmware version .....................................501
Flange-back distance..............................93
Flash (White balance)..............................97
Flash bracketing .......................................298
Flash compensation..................295, 622
Flash control ................................................291
Flash control mode................................616
Flash information display .....626, 657
Flash mode........................................156, 619
Flash off................................................156, 620
Flash shutter speed ...............................406
Flash sync speed......................................404
Flat (Set Picture Control) ...................139
Flexible program......................................107
Flicker reduction...........................289, 370
Fluorescent (White balance).............96
Fn1 button................................................35, 94
Fn2 button................................................35, 74
Focal plane mark.........................................93
Focus indicator.............................................92
Focus lock ......................................................134
Focus mode.............................74, 164, 179
Focus peaking...................................93, 403
Focus point options..............................388
Focus point wrap-around................387
Focus points used..........................81, 383
Focus ring..........................................................91
Focus shift shooting..............................352
Focus tracking with lock-on...........382
Format memory card...........................455
Frame size/frame rate..............168, 365
Framing grid display.............................402
Frequency response .............................373
Full-frame playback...............................180
Full-time AF .....................................................75
FV lock ...............................................................623
H
HDMI.......................................................478, 604
HDR (high dynamic range).............319
806 Index
Headphone volume............................. 374
Hi (ISO).............................................................. 119
High ISO NR ..................................... 286, 368
High sensitivity (Hi) ............................... 119
Highlight display ..................................... 450
Highlights...................................................... 185
Highlight-weighted metering..... 158
Histogram.....................................25, 26, 186
Hue (Set Picture Control)................. 143
I
Image comment...................................... 473
Image Dust Off ref photo ................ 468
Image overlay............................................. 523
Image quality.............................................. 260
Image review.............................................. 235
Image size.......................................... 154, 261
Images shot on selected dates... 210
Incandescent (White balance) ........96
Information display............................... 461
Infrastructure mode ................. 543, 550
Interval timer shooting...................... 326
IP address....................................................... 554
ISO sensitivity ............................................. 118
ISO sensitivity settings............ 265, 366
L
Landscape (Set Picture Control) 139
Language....................................................... 456
Limit AF-area mode selection ..... 387
Limit monitor mode selection .... 461
Limit selectable image area........... 399
Lo (ISO)............................................................. 119
Location data.................................. 191, 478
Long exposure NR ................................. 285
Long time-exposures.......................... 112
Low sensitivity (Lo)................................ 119
Low-light AF................................................ 389
M
MAC address............................................... 489
Main command dial ................................ 16
Manage Picture Control........ 278, 367
Manual (Shooting mode)................ 109
Manual focus .........................................75, 91
Manual focus ring in AF mode.... 391
Matrix metering........................................ 157
Max. continuous release................... 396
Memory buffer.......................................... 129
Memory card...................................... 45, 770
Memory card capacity........................ 773
Metering ......................................................... 157
MF (Manual focus)...................................... 75
Microphone sensitivity........... 174, 372
Mid-range sharpening (Set Picture
Control)....................................................... 143
Mode dial......................................15, 57, 106
Modeling flash........................................... 407
Monitor brightness................................ 457
Monitor color balance........................ 458
Monochrome ............................................. 522
Monochrome (Set Picture Control) ..
139
Movie file type........................................... 365
Movie quality.................................. 168, 365
Movie shooting menu........................ 363
Movie-record button.............................. 64
Multiple exposure .................................. 309
My Menu ........................................................ 533
N
Natural light auto (White balance)96
NEF (RAW) processing........................ 506
NEF (RAW) recording........................... 264
807
Index
Network settings..............486, 544, 550
Neutral ..............................................................139
Non-CPU lens data.................................466
O
OK button...........................................427, 448
Overflow (Secondary slot function) .
258
Overview.........................................................191
P
Pairing (Bluetooth) .................................483
Perspective control................................521
Photo information..................................183
Photo shooting menu.........................248
Photo/movie selector.................... 57, 63
PIN-entry WPS ............................................551
Pinpoint AF ......................................................77
Pixel mapping ............................................471
Playback display options ..................234
Playback folder ..........................................234
Playback menu..........................................232
Portrait (Set Picture Control)..........139
Power battery pack....................702, 710
Power connector.....................................733
Power off delay.................................61, 395
Preset manual (White balance).....97,
148, 272
Press the shutter-release button all
the way down...........................................61
Press the shutter-release button
halfway............................................................60
Primary slot selection...........................257
Programmed auto..................................107
Protect...............................................................104
Push-button WPS....................................551
Q
Quick crop......................................................193
Quick sharp (Set Picture Control)143
R
Rating.....................................................102, 247
Rear-curtain sync .........................156, 620
Recent settings..........................................538
Rechargeable Li-ion battery..............38
Red-eye correction.................................518
Red-eye reduction......................156, 619
Release button to use dial...............434
Release mode.................................125, 160
Remote flash photography ............629
Remote photography..........................566
Reset all settings.......................................501
Reset custom settings.........................381
Reset movie shooting menu.........364
Reset photo shooting menu.........249
Reset user settings..................................455
Resize..................................................................512
Retouch menu...........................................502
Reverse indicators...................................436
Reverse ring for focus..........................436
Rotate tall........................................................237
S
Saturation (Set Picture Control)..143
Save current frame.................................203
Save focus position................................466
Save user settings........................115, 455
Save/load menu settings..................496
Search for Wi-Fi network...................551
Secondary slot function.....................258
Select to send (Bluetooth)...............484
Select to send to computer ...........560
808 Index
Selected images....................................... 209
Selecting pictures for upload....... 197
Self-timer................................ 126, 131, 394
Send while off............................................ 485
Set Picture Control..................... 139, 275
Set the clock....................................................52
Setup menu................................................. 453
Shade (White balance)...........................96
Sharpening (Set Picture Control)143
Shooting data ............................................ 188
Shutter spd & aperture lock........... 429
Shutter speed................................. 108, 109
Shutter type................................................. 398
Shutter-release button AE-L.......... 394
Silent photography................... 100, 362
Single AF.............................................................75
Single frame..................................... 126, 130
Single-point AF.............................................78
Slide show..................................................... 245
Slot empty release lock ..................... 495
Slow sync........................................... 156, 620
Slow-motion movie.............................. 172
SnapBridge................................................... 565
Spot metering............................................ 157
SSID......................................................... 544, 552
Standard (Set Picture Control) .... 139
Standby timer ................................................61
Storage folder ............................................ 250
Store points by orientation............ 384
Straighten...................................................... 519
Sub-command dial ...................................16
Subject-tracking AF ..................................86
Sub-selector.........................................27, 133
Sync. release mode options.......... 397
T
Thumbnail..................................................... 181
Time.................................................................... 112
Time zone and date..................... 52, 456
Timecode....................................................... 375
Time-lapse movie................................... 340
Toning (Set Picture Control).......... 143
Touch controls.......................................... 477
Touch shutter................................................ 88
Trim ..................................................................... 511
Trim movie.................................................... 532
U
USB cable ............................................................ iv
USB power delivery............................... 492
User setting mode ................................. 115
V
Vibration reduction............................... 161
View all in continuous mode........ 403
View memory card info..................... 159
Viewfinder ........................................................ 13
Viewfinder brightness......................... 459
Viewfinder color balance................. 460
Vignette control........................... 287, 369
Virtual horizon ......................................25, 26
Vivid (Set Picture Control) ............... 139
W
WB bracketing ........................................... 303
White balance....................... 94, 145, 267
Wide-area AF (L).......................................... 79
Wide-area AF (L-animals).................... 79
Wide-area AF (L-people)...................... 79
Wide-area AF (S).......................................... 79
Wi-Fi connection.158, 177, 484, 486
Wi-Fi mode................................................... 568
Wind noise reduction ......................... 374
Wireless remote (WR) options..... 479
809
Index
Wireless transmitter (WT-7)490, 594,
706
Wireless Transmitter Utility .............541
WR-R10 .................................................479, 631
WT-7............................................490, 594, 706
Z
Zoom..................................................................204
No reproduction in any form of this manual, in whole or in part (except
for brief quotation in critical articles or reviews), may be made without
written authorization from NIKON CORPORATION.
SB0K01(11)
6MOA7111-01
24

Hulp nodig? Stel uw vraag in het forum

Spelregels
1

Forum

Nikon-Z6-II
  • Hallo, ik fotografeer met een Z62 + FTZ2 + AF-p 70-300/4.5-5.6 VR2 (de FX-variant). De lens en camera werken prima samen, op één heel belangrijk dingetje na: Als ik door de zoeker kijk, via back-button-focus scherp stel en vervolgens afdtruk, dan lijkt het net of het scherpstelpunt, in de zoekr, naar beneden verspringt.
    Op het display ziet het er wel redelijk scherp uit, éénmaal op de computer is het allemaal redelijk "zacht" en moet ik de raw's behoorlijk verscherpen. Ik heb de lens gecalibreerd op +2, hetgeen tot nu toe het minst slechtse resulaat geeft. Iemand een idee waar ik het zoeken moet? Ligt het aan de camera, de lens of is mijn techniek gewoon niet goed? Iso vaak rond de 2500, tijd meestal 1/3200, F8.
    Dank alvast.
    Tinus Gesteld op 26-5-2024 om 13:40

    Reageer op deze vraag Misbruik melden
  • hoe kan ik de Beeldstabilisator activeren en of afzetten Gesteld op 28-7-2023 om 18:44

    Reageer op deze vraag Misbruik melden
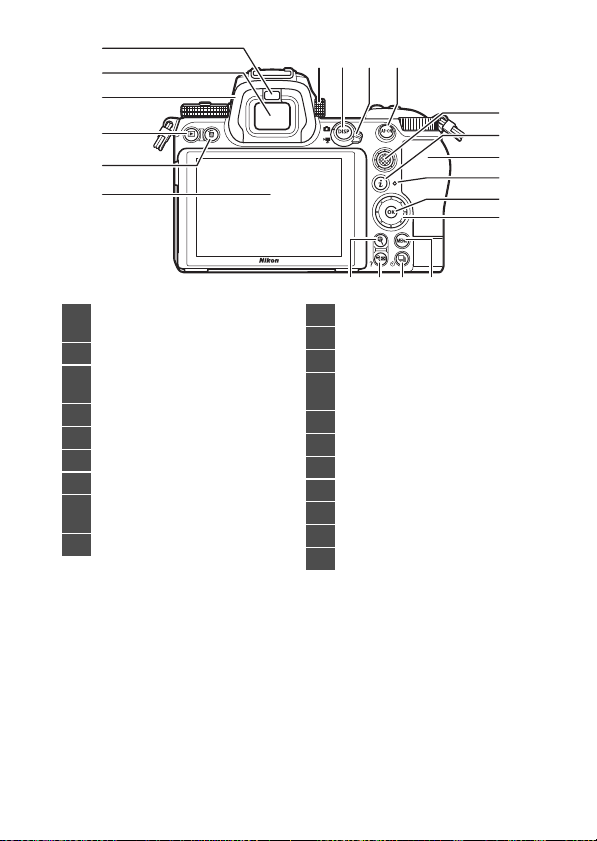
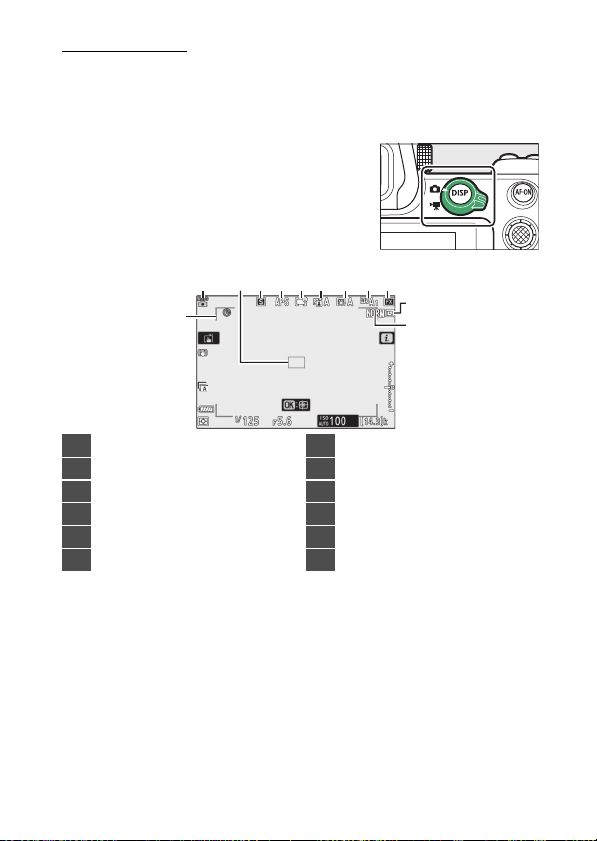
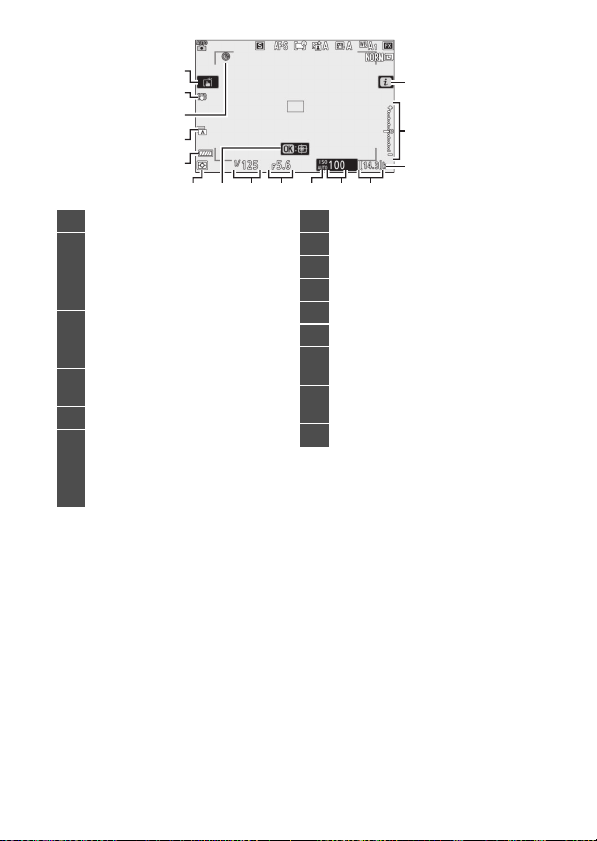
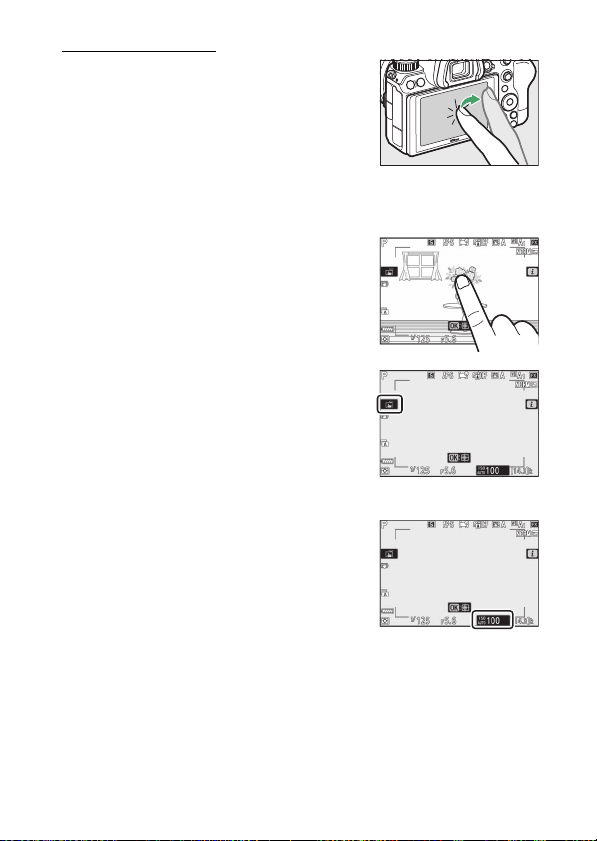
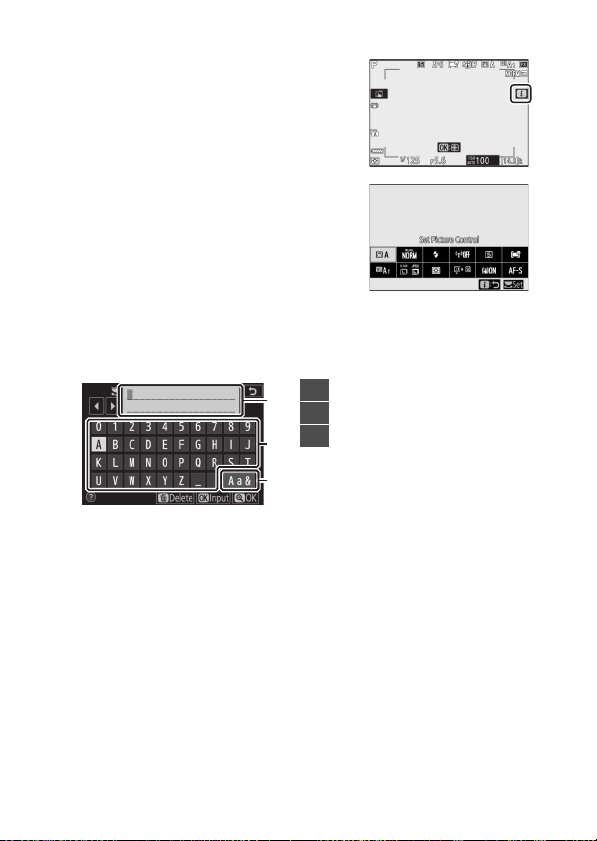
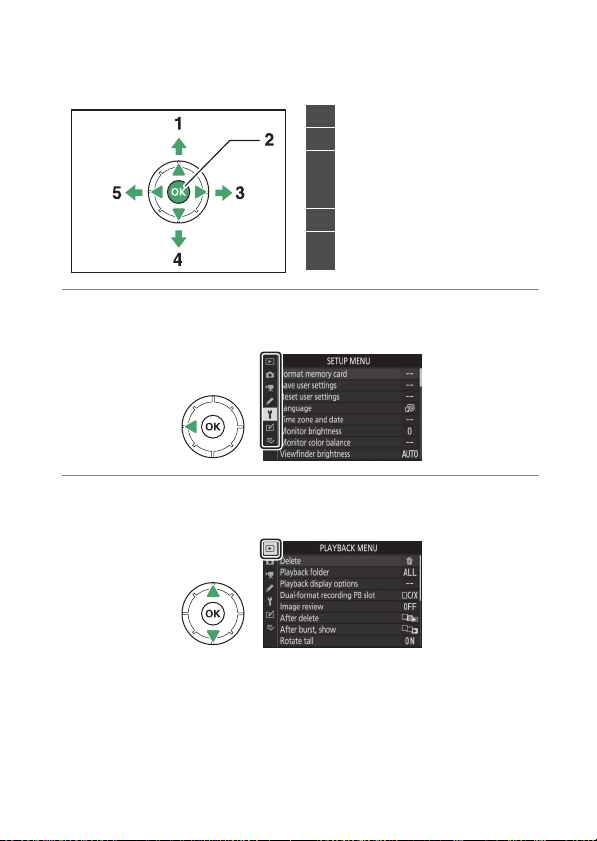
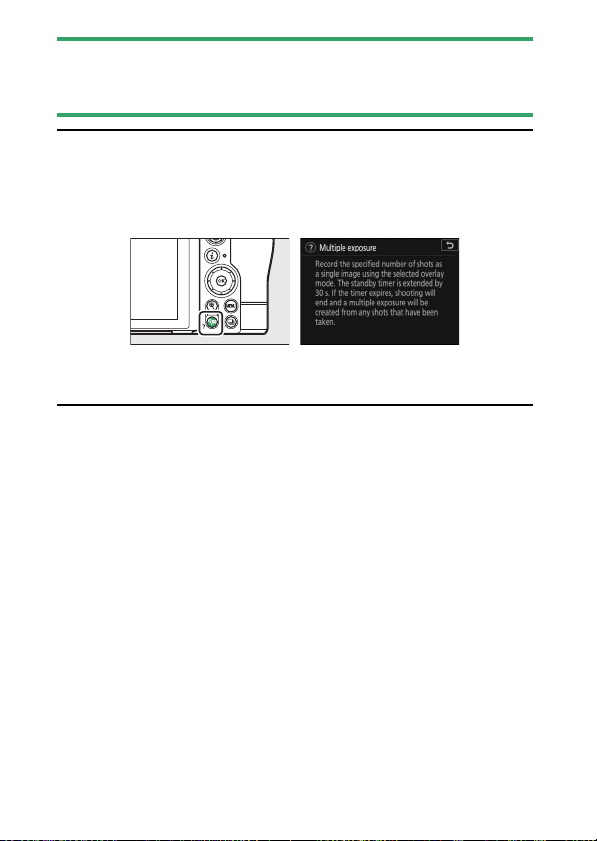
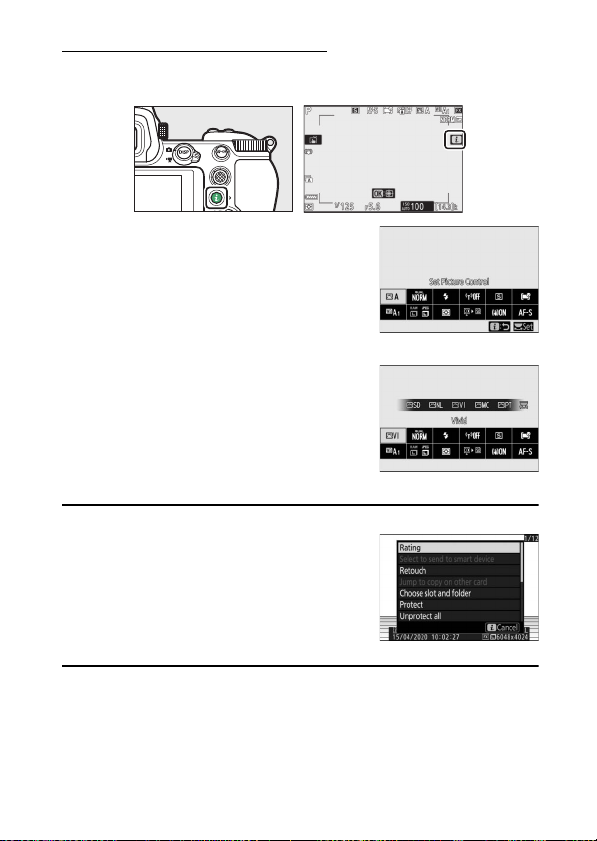
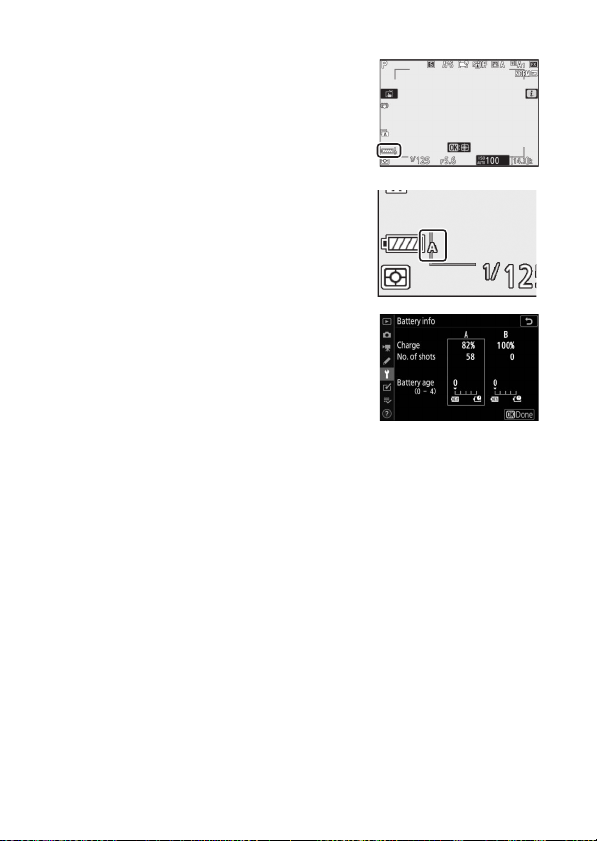
    • Rechts naast het scherm heb je een drukknop met het letter i van info. Als je daar op drukt dan krijg alle info instellingen te zien. Daar kan je een keuze maken met de cursor knop. Op de onderste regel 2e ikoon van rechts kan je de vibratiereductie aan en uitzetten. Geantwoord op 28-7-2023 om 19:21

      Waardeer dit antwoord Misbruik melden
  • mijn toestel geeft geen automatische omschakelin tussen zoeker en display.
    is dit een fout in het toesel of migt dit ergens aan een instelling?
    Gesteld op 15-2-2023 om 15:03

    Reageer op deze vraag Misbruik melden
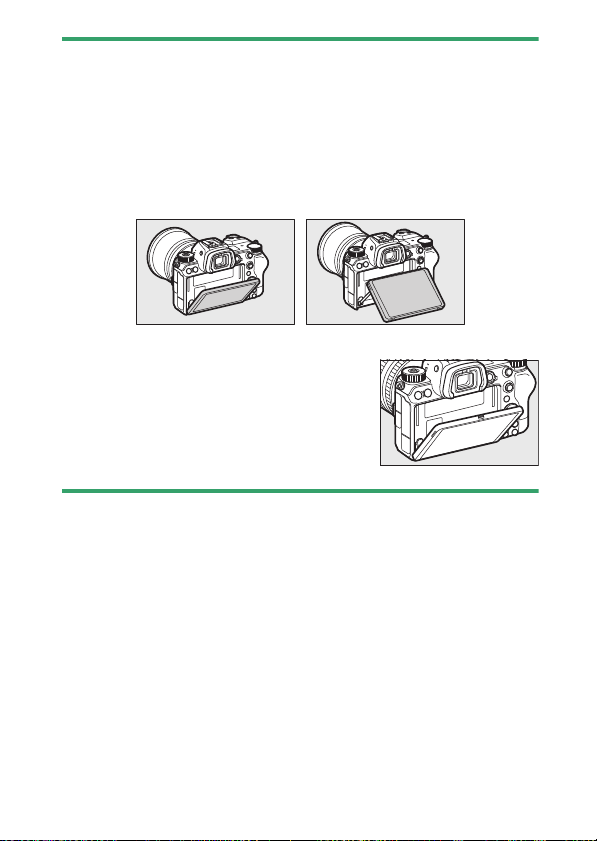
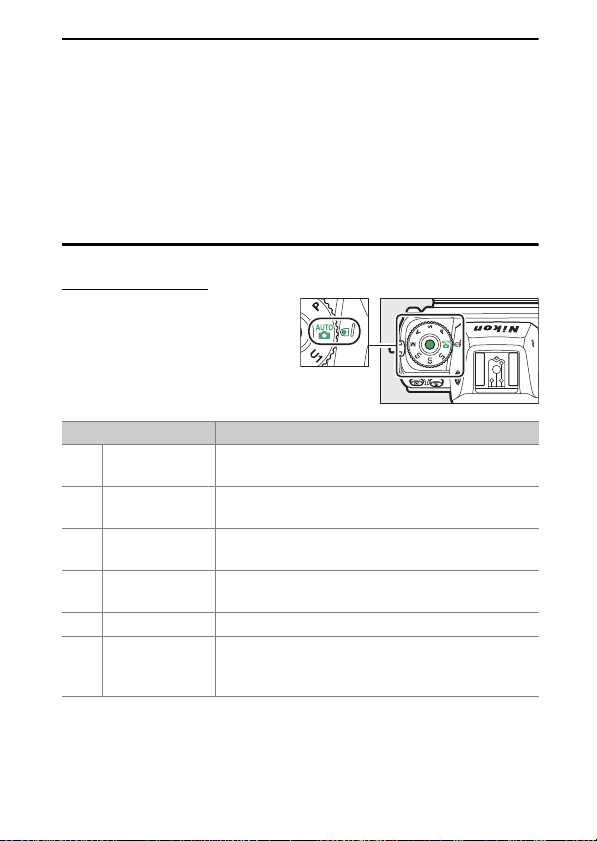
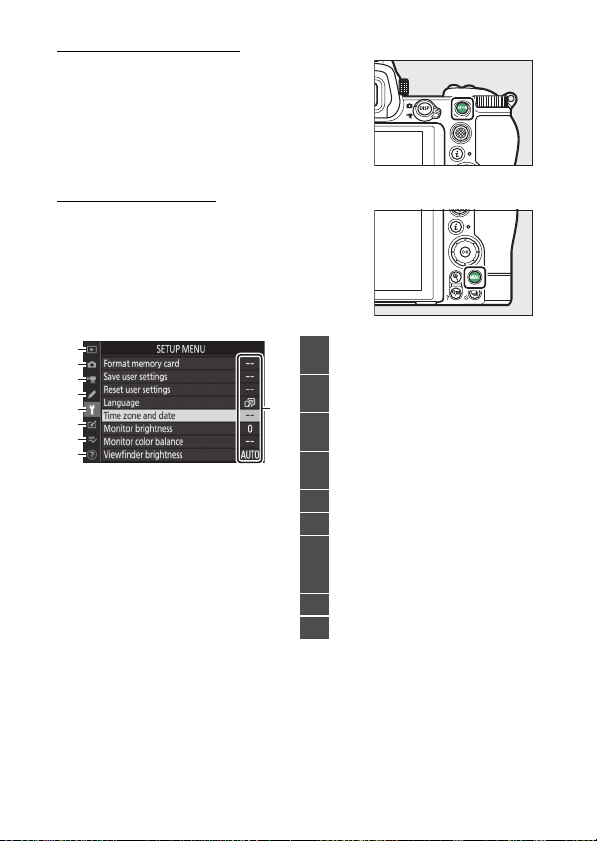
    • Aan de linkerkant van de zoeker zit een drukknopje en daarmee kan je 5 verschillende instellingen kiezen voor de zoeker en scherm. Niven. Geantwoord op 28-7-2023 om 23:34

      Waardeer dit antwoord Misbruik melden
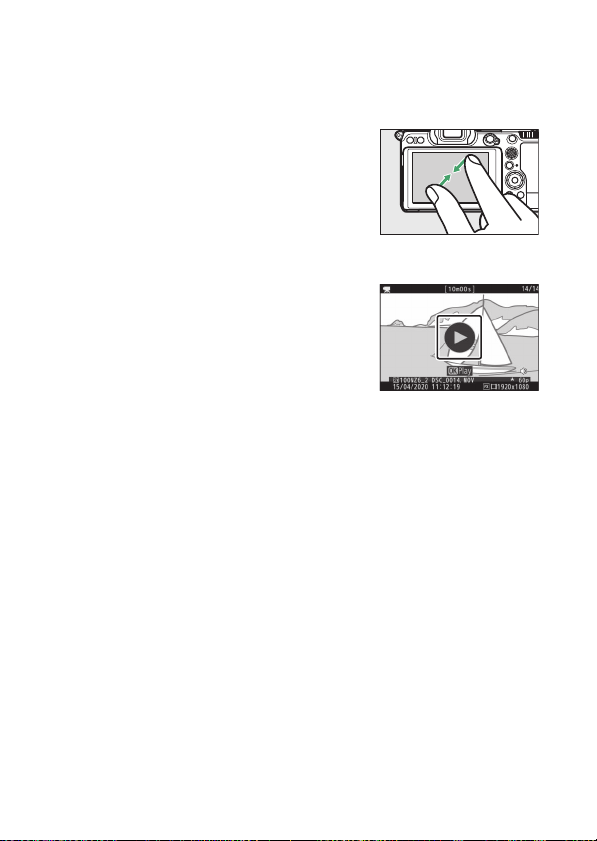
  • Is er een nederlandse weergave 'hoe maak ik een video met handmatige instellingen' ? Gesteld op 10-1-2023 om 21:57

    Reageer op deze vraag Misbruik melden
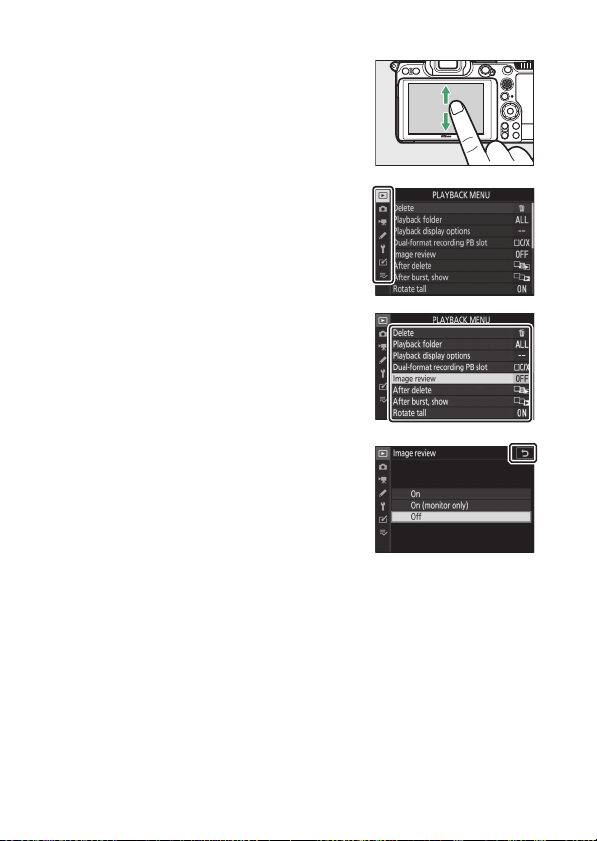
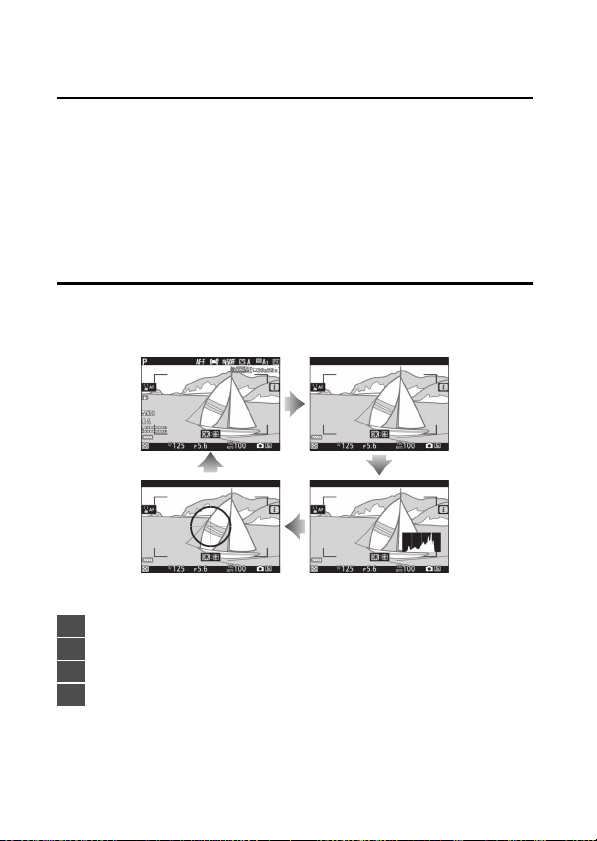
  • Bij weergave van de foto's op de monitor van de Z6II blijft ook de scherstelpunten zichtbaar. Idee waar ik dit kan uitschakelen? Bvd. Gesteld op 9-5-2022 om 10:52

    Reageer op deze vraag Misbruik melden
  • Ik kan na het formatteren van mijn geheugenkaart geen foto’s meer downloaden naar Lightroom classic. Wat doe ik verkeerd. Gesteld op 11-3-2022 om 22:26

    Reageer op deze vraag Misbruik melden
6
  • Hallo allen
    Wie kan mij vertellen hoe ik mijn z50 mm zo kan instellen dat ik via het objectief mijn diafragma kan instellen.
    Dit in combinatie met de Nikon z62

    Alvast bedankt
    Gesteld op 11-2-2022 om 17:20

    Reageer op deze vraag Misbruik melden

Misbruik melden

Gebruikershandleiding.com neemt misbruik van zijn services uitermate serieus. U kunt hieronder aangeven waarom deze vraag ongepast is. Wij controleren de vraag en zonodig wordt deze verwijderd.

Product:

Bijvoorbeeld antisemitische inhoud, racistische inhoud, of materiaal dat gewelddadige fysieke handelingen tot gevolg kan hebben.

Bijvoorbeeld een creditcardnummer, een persoonlijk identificatienummer, of een geheim adres. E-mailadressen en volledige namen worden niet als privégegevens beschouwd.

Spelregels forum

Om tot zinvolle vragen te komen hanteren wij de volgende spelregels:

Belangrijk! Als er een antwoord wordt gegeven op uw vraag, dan is het voor de gever van het antwoord nuttig om te weten als u er wel (of niet) mee geholpen bent! Wij vragen u dus ook te reageren op een antwoord.

Belangrijk! Antwoorden worden ook per e-mail naar abonnees gestuurd. Laat uw emailadres achter op deze site, zodat u op de hoogte blijft. U krijgt dan ook andere vragen en antwoorden te zien.

Abonneren

Abonneer u voor het ontvangen van emails voor uw Nikon Z6 II bij:


U ontvangt een email met instructies om u voor één of beide opties in te schrijven.


Ontvang uw handleiding per email

Vul uw emailadres in en ontvang de handleiding van Nikon Z6 II in de taal/talen: Engels als bijlage per email.

De handleiding is 14,98 mb groot.


U ontvangt de handleiding per email binnen enkele minuten. Als u geen email heeft ontvangen, dan heeft u waarschijnlijk een verkeerd emailadres ingevuld of is uw mailbox te vol. Daarnaast kan het zijn dat uw internetprovider een maximum heeft aan de grootte per email. Omdat hier een handleiding wordt meegestuurd, kan het voorkomen dat de email groter is dan toegestaan bij uw provider.

Stel vragen via chat aan uw handleiding

Stel uw vraag over deze PDF

Andere handleiding(en) van Nikon Z6 II

Nikon Z6 II Gebruiksaanwijzing - Nederlands - 80 pagina's

Nikon Z6 II Gebruiksaanwijzing - Deutsch - 866 pagina's

Nikon Z6 II Gebruiksaanwijzing - Deutsch - 76 pagina's

Nikon Z6 II Gebruiksaanwijzing - English - 76 pagina's

Nikon Z6 II Gebruiksaanwijzing - Français - 866 pagina's

Nikon Z6 II Gebruiksaanwijzing - Français - 76 pagina's


Uw handleiding is per email verstuurd. Controleer uw email

Als u niet binnen een kwartier uw email met handleiding ontvangen heeft, kan het zijn dat u een verkeerd emailadres heeft ingevuld of dat uw emailprovider een maximum grootte per email heeft ingesteld die kleiner is dan de grootte van de handleiding.

Er is een email naar u verstuurd om uw inschrijving definitief te maken.

Controleer uw email en volg de aanwijzingen op om uw inschrijving definitief te maken

U heeft geen emailadres opgegeven

Als u de handleiding per email wilt ontvangen, vul dan een geldig emailadres in.

Uw vraag is op deze pagina toegevoegd

Wilt u een email ontvangen bij een antwoord en/of nieuwe vragen? Vul dan hier uw emailadres in.


Info