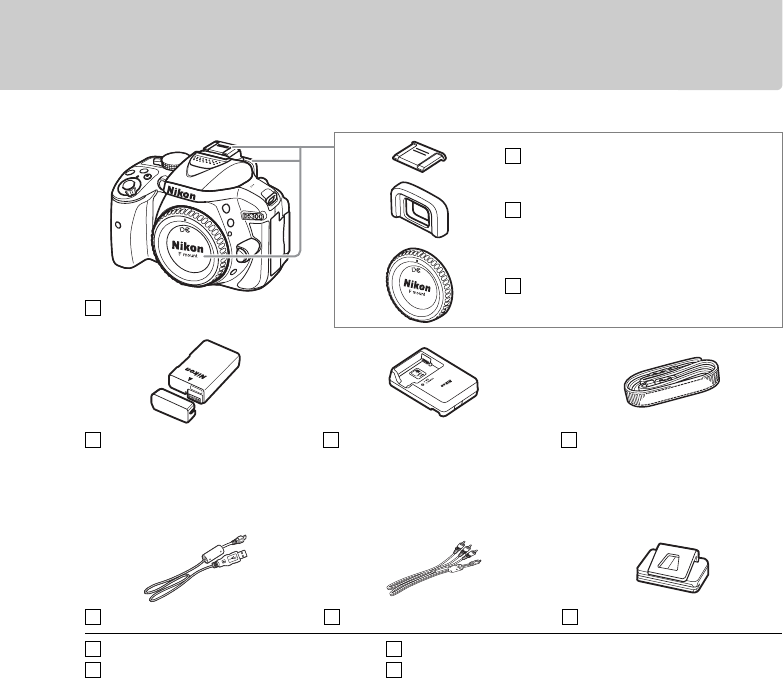
529114
85
Verklein
Vergroot
Pagina terug
1/104
Pagina verder
Printed in Thailand
6MB18611-01
No reproduction in any form of this manual, in whole or in part (except for brief quotation
in critical articles or reviews), may be made without written authorization from NIKON
CORPORATION.
DIGITAL CAMERA
User's Manual
En
Product Documentation
Thank you for your purchase of a Nikon single-lens reflex (SLR) digital camera.
The
documentation for this product consists of a User’s Manual (this booklet) and a
Reference Manual (pdf ).
To get the most from your camera, please be sure to read all
instructions thoroughly and keep them where they will be read by all who use the
product.
The Reference Manual can be viewed using Adobe Reader or Adobe Acrobat Reader
5.0 or later, available for free download from the Adobe website.
1 Start the computer and insert the reference CD.
2 Double-click the CD (Nikon D5300) icon in Computer or My Computer (Windows)
or on the desktop (Macintosh).
3 Double-click the INDEX.pdf icon to display a language selection screen and click a
language to display the Reference Manual.
Symbols and Conventions
To make it easier to find the information you need, the following symbols and conventions are
used:
Menu items, options, and messages displayed in the camera monitor are shown in bold.
Camera Settings
The explanations in this manual assume that default settings are used.
Help
Use the camera’s on-board help feature for help on menu items and other topics.
See page 54
for details.
A For Your Safety
Before using the camera for the first time, read the safety instructions in “For Your Safety
(0 vi–xii).
For information on basic
camera operations, see the
User’s Manual (this
booklet).
For complete product
information, see the
Reference Manual
(available on the
supplied reference CD).
D
This icon marks cautions; information that should be read before use to
prevent damage to the camera.
A
This icon marks notes; information that should be read before using the
camera.
0
This icon marks references to other pages in this manual.
i
Package Contents
Confirm that the package contains the following items:
Purchasers of the lens kit option should confirm that the package also includes a lens.
Memory cards are sold separately (0 66).
Cameras purchased in Japan display menus
and messages in English and Japanese only; other languages are not supported.
We
apologize for any inconvenience this may cause.
D5300 camera
BS-1 accessory shoe cover
DK-25 rubber eyecup
BF-1B body cap
EN-EL14a rechargeable
Li-ion battery (with terminal
cover)
MH-24 battery charger (plug
adapter supplied in countries or
regions where required; shape
depends on country of sale)
AN-DC3 strap
UC-E17 USB cable EG-CP16 audio/video cable DK-5 eyepiece cap
ViewNX 2 CD-ROM
Users Manual (this booklet)
Reference CD (contains the Reference Manual)
Warranty
ii
Quick Start Guide
Follow these steps for a quick start with the D5300.
1 Attach the camera strap (0 9).
Attach the strap as shown. Repeat for the second eyelet.
2 Charge the battery (0 9).
3 Insert the battery and memory card (0 10).
4 Attach a lens (0 11).
5 Open the monitor (0 6, 12).
iii
6 Turn the camera on (0 12).
7 Choose a language and set the camera clock (0 12).
8 Frame the photograph (0 18).
9 Press the shutter-release button halfway (0 18).
10 Shoot (0 19).
v
Special Effects 35
% Night Vision .....................................................................................................................35
g Color Sketch....................................................................................................................35
' Toy Camera Effect..........................................................................................................35
( Miniature Effect .............................................................................................................36
3 Selective Color................................................................................................................36
1 Silhouette.........................................................................................................................36
2 High Key............................................................................................................................36
3 Low Key.............................................................................................................................36
) HDR Painting...................................................................................................................36
Options Available in Live View...........................................................................................37
P, S, A, and M Modes 41
Mode P (Programmed Auto) ..............................................................................................42
Mode S (Shutter-Priority Auto) ..........................................................................................42
Mode A (Aperture-Priority Auto).......................................................................................42
Mode M (Manual)....................................................................................................................42
Exposure Compensation......................................................................................................44
Location Data 45
Embedding Location Data in Photos and Movies.......................................................45
Wi-Fi 48
What Wi-Fi Can Do for You...................................................................................................48
Accessing the Camera............................................................................................................49
Camera Menus 54
Menu Options ...........................................................................................................................55
ViewNX 2 59
Installing ViewNX 2 .................................................................................................................59
Using ViewNX 2 ........................................................................................................................61
Copy Pictures to the Computer .........................................................................................61
View Pictures ............................................................................................................................62
Technical Notes 63
Compatible Lenses..................................................................................................................63
Other Accessories ....................................................................................................................64
Approved Memory Cards.....................................................................................................66
Caring for the Camera............................................................................................................67
Caring for the Camera and Battery: Cautions................................................................68
Error Messages..........................................................................................................................71
Specifications ............................................................................................................................74
vii
A
Do not leave the product where it will be exposed
to extremely high temperatures, such as in an
enclosed automobile or in direct sunlight
Failure to observe this precaution could
cause damage or fire.
A
Do not aim a flash at the operator of a motor
vehicle
Failure to observe this precaution could
result in accidents.
A
Observe caution when using the flash
Using the camera with the flash in close
contact with the skin or other objects
could cause burns.
Using the flash close to the subject’s
eyes could cause temporary visual
impairment.
The flash should be no less
than one meter (3 ft 4 in.) from the
subject.
Particular care should be
observed when photographing infants.
A
Avoid contact with liquid crystal
Should the monitor break, care should be
taken to avoid injury due to broken glass
and to prevent the liquid crystal from the
monitor touching the skin or entering
the eyes or mouth.
A
Do not carry tripods with a lens or camera
attached
You could trip or accidentally strike
others, resulting in injury.
A
Observe proper precautions when handling
batteries
Batteries may leak or explode if
improperly handled.
Observe the
following precautions when handling
batteries for use in this product:
Use only batteries approved for use in
this equipment.
Do not short or disassemble the battery.
Be sure the product is off before
replacing the battery.
If you are using
an AC adapter, be sure it is unplugged.
Do not attempt to insert the battery
upside down or backwards.
Do not expose the battery to flame or to
excessive heat.
Do not immerse in or expose to water.
Replace the terminal cover when
transporting the battery.
Do not
transport or store the battery with
metal objects such as necklaces or
hairpins.
Batteries are prone to leakage when
fully discharged.
To avoid damage to
the product, be sure to remove the
battery when no charge remains.
When the battery is not in use, attach
the terminal cover and store in a cool,
dry place.
The battery may be hot immediately
after use or when the product has been
used on battery power for an extended
period.
Before removing the battery
turn the camera off and allow the
battery to cool.
Discontinue use immediately should
you notice any changes in the battery,
such as discoloration or deformation.
viii
A
Observe proper precautions when handling the
charger
Keep dry.
Failure to observe this
precaution could result in fire or electric
shock.
Do not short the charger terminals.
Failure to observe this precaution could
result in overheating and damage to
the charger.
Dust on or near the metal parts of the
plug should be removed with a dry
cloth.
Continued use could result in fire.
Do not go near the charger during
thunderstorms.
Failure to observe this
precaution could result in electric
shock.
Do not handle the plug or charger with
wet hands.
Failure to observe this
precaution could result in electric shock.
Do not use with travel converters or
adapters designed to convert from one
voltage to another or with DC-to-AC
inverters.
Failure to observe this
precaution could damage the product
or cause overheating or fire.
A
Use appropriate cables
When connecting cables to the input and
output jacks, use only the cables
provided or sold by Nikon for the
purpose to maintain compliance with
product regulations.
A
CD-ROMs
CD-ROMs containing software or
manuals should not be played back on
audio CD equipment.
Playing CD-ROMs
on an audio CD player could cause
hearing loss or damage the equipment.
A
Follow the directions of airline and hospital
personnel
Remove Eye-Fi cards, disable Wi-Fi, and
select Off for Location data > Record
location data before boarding an
aircraft, and turn the product off during
takeoff and landing or when so directed
by airline or hospital staff. Radio waves
emitted by the device could interfere
with aircraft navigation or hospital
medical equipment.
ix
Notices
No part of the manuals included with this
product may be reproduced, transmitted,
transcribed, stored in a retrieval system, or
translated into any language in any form,
by any means, without Nikon’s prior
written permission.
Nikon reserves the right to change the
specifications of the hardware and
software described in these manuals at
any time and without prior notice.
Nikon will not be held liable for any
damages resulting from the use of this
product.
While every effort has been made to
ensure that the information in these
manuals is accurate and complete, we
would appreciate it were you to bring any
errors or omissions to the attention of the
Nikon representative in your area (address
provided separately).
Notice for Customers in Canada
CAN ICES-3 B / NMB-3 B
Notices for Customers in Europe
This symbol indicates that
electrical and electronic
equipment is to be collected
separately.
The following apply only to users in
European countries:
This product is designated for separate
collection at an appropriate collection
point.
Do not dispose of as household
waste.
Separate collection and recycling helps
conserve natural resources and prevent
negative consequences for human health
and the environment that might result
from incorrect disposal.
For more information, contact the retailer
or the local authorities in charge of waste
management.
This symbol on the battery
indicates that the battery is to be
collected separately.
The following apply only to users in
European countries:
All batteries, whether marked with this
symbol or not, are designated for separate
collection at an appropriate collection
point.
Do not dispose of as household
waste.
For more information, contact the retailer
or the local authorities in charge of waste
management.
CAUTION
RISK OF EXPLOSION IF BATTERY IS REPLACED BY AN INCORRECT TYPE.
DISPOSE OF USED
BATTERIES ACCORDING TO THE INSTRUCTIONS.
x
Notices for Customers in the U.S.A.
Federal Communications Commission (FCC) Radio Frequency Interference Statement
This equipment has been tested and found
to comply with the limits for a Class B digital
device, pursuant to Part 15 of the FCC rules.
These limits are designed to provide
reasonable protection against harmful
interference in a residential installation.
This
equipment generates, uses, and can radiate
radio frequency energy and, if not installed
and used in accordance with the instructions,
may cause harmful interference to radio
communications.
However, there is no
guarantee that interference will not occur in
a particular installation.
If this equipment
does cause harmful interference to radio or
television reception, which can be
determined by turning the equipment off
and on, the user is encouraged to try to
correct the interference by one or more of
the following measures:
Reorient or relocate the receiving antenna.
Increase the separation between the
equipment and receiver.
Connect the equipment into an outlet on a
circuit different from that to which the
receiver is connected.
Consult the dealer or an experienced
radio/television technician for help.
CAUTIONS
Modifications
The FCC requires the user be notified that any
changes or modifications made to this device
that are not expressly approved by Nikon
Corporation may void the user’s authority to
operate the equipment.
Interface Cables
Use the interface cables sold or provided by
Nikon for your equipment.
Using other
interface cables may exceed the limits of
Class B Part 15 of the FCC rules.
Notice for Customers in the State of California
WARNING: Handling the cord on this product
may expose you to lead, a chemical known to
the State of California to cause birth defects
or other reproductive harm.
Wash hands
after handling.
Nikon Inc., 1300 Walt Whitman Road,
Melville, New York 11747-3064, U.S.A.
Tel.: 631-547-4200
The Battery Charger
IMPORTANT SAFETY INSTRUCTIONS—SAVE THESE INSTRUCTIONS
DANGERTO REDUCE THE RISK OF FIRE OR ELECTRIC SHOCK, CAREFULLY
FOLLOW THESE INSTRUCTIONS
For connection to a supply not in the U.S.A., use an attachment plug adapter of the proper
configuration for the power outlet if needed.
This power unit is intended to be correctly
oriented in a vertical or floor mount position.
D5300
xi
Notice Concerning Prohibition of Copying or Reproduction
Note that simply being in possession of material that has been digitally copied or reproduced
by means of a scanner, digital camera, or other device may be punishable by law.
Items prohibited by law from being copied or
reproduced
Do not copy or reproduce paper money,
coins, securities, government bonds, or
local government bonds, even if such
copies or reproductions are stamped
“Sample.
The copying or reproduction of paper
money, coins, or securities which are
circulated in a foreign country is prohibited.
Unless the prior permission of the
government has been obtained, the
copying or reproduction of unused postage
stamps or post cards issued by the
government is prohibited.
The copying or reproduction of stamps
issued by the government and of certified
documents stipulated by law is prohibited.
Cautions on certain copies and reproductions
The government has issued cautions on
copies or reproductions of securities issued
by private companies (shares, bills, checks,
gift certificates, etc.), commuter passes, or
coupon tickets, except when a minimum of
necessary copies are to be provided for
business use by a company.
Also, do not
copy or reproduce passports issued by the
government, licenses issued by public
agencies and private groups, ID cards, and
tickets, such as passes and meal coupons.
Comply with copyright notices
The copying or reproduction of
copyrighted creative works such as books,
music, paintings, woodcuts, prints, maps,
drawings, movies, and photographs is
governed by national and international
copyright laws.
Do not use this product for
the purpose of making illegal copies or to
infringe copyright laws.
Disposing of Data Storage Devices
Please note that deleting images or formatting memory cards or other data storage devices
does not completely erase the original image data.
Deleted files can sometimes be recovered
from discarded storage devices using commercially available software, potentially resulting in
the malicious use of personal image data.
Ensuring the privacy of such data is the user’s
responsibility.
Before discarding a data storage device or transferring ownership to another person, select Off
for Location data > Record location data (0 46) in the setup menu and, erase all data using
commercial deletion software, or format the device and then completely refill it with images
containing no private information (for example, pictures of empty sky).
Be sure to also replace
any pictures selected for preset manual.
To delete track log data on a memory card, select
Location data > Log list and delete all logs.
Wi-Fi settings can be reset to default values by
selecting Wi-Fi > Network settings > Reset network settings in the setup menu.
Care should
be taken to avoid injury when physically destroying data storage devices.
AVC Patent Portfolio License
THIS PRODUCT IS LICENSED UNDER THE AVC PATENT PORTFOLIO LICENSE FOR THE PERSONAL AND NON-
COMMERCIAL USE OF A CONSUMER TO (i) ENCODE VIDEO IN COMPLIANCE WITH THE AVC STANDARD (“AVC
VIDEO”) AND/OR (ii) DECODE AVC VIDEO THAT WAS ENCODED BY A CONSUMER ENGAGED IN A PERSONAL AND
NON-COMMERCIAL ACTIVITY AND/OR WAS OBTAINED FROM A VIDEO PROVIDER LICENSED TO PROVIDE AVC
VIDEO.
NO LICENSE IS GRANTED OR SHALL BE IMPLIED FOR ANY OTHER USE.
ADDITIONAL INFORMATION MAY BE
OBTAINED FROM MPEG LA, L.L.C.
SEE http://www.mpegla.com
xvi
Notices for Customers in Europe
Hereby, Nikon, declares that the D5300 is in compliance with the essential
requirements and other relevant provisions of Directive 1999/5/EC.
The declaration
of conformity may be consulted at
http://imaging.nikon.com/support/pdf/DoC_D5300.pdf
Notice for Customers in Singapore
This device complies with radio-frequency regulations. The content of certification labels not
affixed to the device is given below.
Security
Although one of the benefits of this product is that it allows others to freely connect for the
wireless exchange of data anywhere within its range, the following may occur if security is not
enabled:
Data theft: Malicious third-parties may intercept wireless transmissions to steal user IDs,
passwords, and other personal information.
Unauthorized access: Unauthorized users may gain access to the network and alter data or
perform other malicious actions.
Note that due the design of wireless networks, specialized
attacks may allow unauthorized access even when security is enabled.
Trade Name:
Model: D5300
Complies with
IDA Standards
DA104328
1
Introduction
Take a few moments to familiarize yourself with camera controls and displays.
You
may find it helpful to bookmark this section and refer to it as you read through the
rest of the manual.
The Camera Body
Getting to Know the Camera
13
14
15
17
16
4
21
18
19
20
22
23
11
9
8
7
5
4
10
12
3
6
12
24
25
26
27
28
30
29
1 Mode dial...................................3
2 Live view switch
Live view..............................22
Movie....................................26
3 R
(information) button
............7
4 Eyelets for camera strap.........9
5 E/N button
Exposure compensation
....44
Adjusting aperture............42
Flash compensation
6
Shutter-release button
...18, 19
7 Power switch.............................2
8 Movie-record button ............26
9 Infrared receiver for ML-L3
remote control (front) .......65
10 AF-assist illuminator
Self-timer lamp
Red-eye reduction lamp
11 Body cap
12 CPU contacts
13 Built-in flash............................21
14 Speaker...................................... 2
15 Focal plane mark (E)
16 M/ Y button .................. 34, 41
Flash mode
Flash compensation
17 Connector cover
18 Fn button
Using the Fn button.......... 55
19 Mounting mark......................11
20 Lens release button .............. 16
21 s/E/# button ........................ 4
Continuous shooting ......... 4
Self-timer .............................. 4
Remote control.................... 4
22 Mirror
23 Lens mount .............................11
24 Accessory shoe cover
25 Accessory shoe (for optional
flash units)
26 Stereo microphone................28
27 Connector for external
microphone
28 USB and A/V connector
Connecting to a
computer..........................61
29 Accessory terminal ................65
30 HDMI mini-pin connector
2
2
1
7
8 9
10
13
2021
15
16
14
12
11
19
22
18
17
3
5
6
4
1 Viewfinder eyepiece.........5, 13
2 Rubber eyecup
3 G button
Menus.................................. 54
4 Infrared receiver for ML-L3
remote control (rear) ........ 65
5 Monitor
Viewing settings...................7
Live view ............................. 22
Full-frame playback.......... 20
6 Tripod socket
7 Diopter adjustment
control.................................. 13
8 P button
Changing settings in the
information display..........8
9 A/L button ........................55
Protecting photographs
from deletion
10 Command dial
11 K button
Playback...............................20
12 Memory card slot
cover............................... 10, 15
13 J (OK) button .......................57
14 Multi selector..........................57
15 O button
Deleting pictures during
playback ...........................21
16 Memory card access
lamp ......................................19
17 Power connector cover for
optional power connector
18 Battery-chamber cover
latch ................................10, 15
19 Battery-chamber cover
..........................................10, 15
20 W/Q button
Thumbnails......................... 20
Playback zoom out
Help...................................... 54
21 X button ................................. 20
Playback zoom in
22 Battery latch.....................10, 15
D The Speaker
Do not place the speaker in close proximity to magnetic devices.
Failure to observe this
precaution could affect the data recorded on the magnetic devices.
A The Power Switch
Rotate the power switch as shown to turn
the camera on.
Rotate the power switch as shown to turn
the camera off.
3
The Mode Dial
The camera offers a choice of the following shooting modes:
P, S, A, and M Modes
Select these modes for full control over
camera settings.
PProgrammed auto (0 42)
SShutter-priority auto (0 42)
AAperture-priority auto (0 42)
M—Manual (0 42)
Special Effects Modes
Use special effects during shooting.
% Night vision (0 35)
g Color sketch (0 35, 37)
' Toy camera effect (0 35, 38)
( Miniature effect (0 36, 38)
3 Selective color (0 36, 39)
1 Silhouette (0 36)
2 High key (0 36)
3 Low key (0 36)
) HDR painting (0 36)
Auto Modes
Select these modes for simple, point-and-
shoot photography.
i Auto (0 17)
j Auto (flash off) (0 17)
Scene Modes
The camera automatically optimizes settings to suit the scene selected with the mode dial.
Match your selection to the scene being photographed.
k Portrait (0 32)
l Landscape (0 32)
p Child (0 32)
m Sports (0 32)
n Close up (0 32)
h Other scenes (0 33)
4
The s (E/# ) Button
To choose how the shutter is released (release
mode), press the s (E/#) button, then highlight
the desired option and press J.
Mode Description
8
Single frame: Camera takes one photograph each time shutter-release button is pressed.
!
Continuous L: The camera takes photographs at a slow rate while the shutter-release
button is pressed.
9
Continuous H: The camera takes photographs at a fast rate while the shutter-release
button is pressed.
J
Quiet shutter release: As for single-frame, except that camera noise is reduced.
E
Self-timer: Take pictures using the self-timer.
The timer starts when the shutter-release
button is pressed all the way down, and the shutter is released after about 10 seconds.
"
Delayed remote (ML-L3): Shutter is released 2 s after shutter-release button on optional
ML-L3 remote control is pressed.
#
Quick-response remote (ML-L3): Shutter is released when shutter-release button on optional
ML-L3 remote control is pressed.
s (E/#) button
5
Note: Display shown with all indicators lit for illustrative purposes.
The Viewfinder
7
12
3
4
5
6
8
1816
19
2120
11 12 149
17
10 1513
1 Framing grid (displayed when
On is selected for Custom
Setting d2) ...........................55
2 Focus points............................18
3 AF area brackets..............13, 18
4 Low battery warning ............14
5 Monochrome indicator
(displayed in % mode or
when the Monochrome
Picture Control or a Picture
Control based on
Monochrome is
selected) ...............................35
6 “No memory card”
indicator................................10
7 Focus indicator.......................18
8 Autoexposure (AE) lock
indicator
9 Shutter speed .........................43
10 Aperture (f-number).............43
11 Special effects mode
indicator...............................35
12 Bracketing indicator
13 Number of exposures
remaining ............................13
Number of shots remaining
before memory buffer
fills .........................................18
White balance recording
indicator
Exposure compensation
value...................................... 44
Flash compensation value
ISO sensitivity........................... 8
Capture mode indicator
14 “k” (appears when memory
remains for over 1000
exposures) ...........................13
15 Flash-ready indicator ............21
16 Flexible program indicator
17 Exposure indicator.................43
Exposure compensation
display...................................44
Electronic rangefinder
18 Flash compensation indicator
19 Exposure compensation
indicator................................44
20 Auto ISO sensitivity indicator
21 Warning indicator..................71
D The Viewfinder
The response time and brightness of the viewfinder display may vary with temperature.
6
The Monitor
The monitor can be angled and rotated as shown below.
Normal use
Fold the monitor against the camera face out.
This position is recommended for normal
photography.
Low-angle shots
Frame live view shots with the camera close to
the ground.
High-angle shots
Frame live view shots while holding the camera
over your head.
Self-portraits
Use for self-portraits in live view.
The monitor
shows a mirror image of what will appear in the
final picture.
D Using the Monitor
Rotate the monitor gently within the limits shown.
Do not use force.
Failure to observe these
precautions could damage the connection between the monitor and the camera body.
To
protect the monitor when the camera is not in use, fold it back face down against the camera
body.
90°
180°
180°
8
Changing settings: To change the settings at the bottom of the
display, press the P button, then highlight items using the multi
selector and press J to view options for the highlighted item.
1 Image quality Choose a file format and compression ratio.
2 Image size Choose a size for new photos.
3 Auto bracketing Choose the bracketing increment (exposure and white balance
bracketing) or turn ADL bracketing on or off.
4 HDR (High Dynamic Range) The camera combines two photographs taken at different exposures to
enhance details in highlights and shadows.
5 Active D-Lighting Improves the level of detail in highlights and shadows under high-
contrast conditions.
6 White balance Adjust settings for different types of lighting.
7 ISO sensitivity Control the cameras sensitivity to light.
8 Exposure compensation Adjust exposure from the value metered by the camera, making the
entire frame brighter or darker.
9 Flash compensation Adjust flash level.
10 Flash mode Choose the flash mode.
11 Metering Choose how the camera meters exposure.
12 AF-area mode Choose how the focus area is selected.
13 Focus mode Choose how the camera focuses.
14 Picture Control Choose how the camera processes pictures.
P button
1
14
2
13
3
12
4
11
5
10
6
9
7
8
9
First Steps
Always turn the camera off before inserting or removing batteries or memory cards.
1 Attach the strap.
Attach the strap as shown. Repeat for the second eyelet.
2 Charge the battery.
If a plug adapter is supplied, raise the wall plug and connect the plug adapter
as shown below at left, making sure the plug is fully inserted.
Insert the battery
and plug the charger in.
An exhausted battery will fully charge in about an hour
and 50 minutes.
D During Charging
Do not move the charger or touch the battery during charging.
Failure to observe this
precaution could in very rare instances result in the charger showing that charging is
complete when the battery is only partially charged.
Remove and reinsert the battery to
begin charging again.
Battery charging
Charging complete
10
3 Insert the battery and memory card.
Insert the battery in the orientation shown, using the battery to keep the
orange battery latch pressed to one side.
The latch locks the battery in place
when the battery is fully inserted.
Slide the memory card in until it clicks into place.
Battery latch
A The Write Protect Switch
SD memory cards are equipped with a write protect switch to
prevent accidental loss of data.
When this switch is in the
“lock” position, the memory card can not be formatted and
photos can not be deleted or recorded (a beep will sound if
you attempt to release the shutter).
To unlock the memory
card, slide the switch to the “write” position.
D Memory Cards
Memory cards may be hot after use.
Observe due caution when removing memory cards
from the camera.
Turn the power off before inserting or removing memory cards.
Do not remove memory
cards from the camera, turn the camera off, or remove or disconnect the power source
during formatting or while data are being recorded, deleted, or copied to a computer.
Failure to observe these precautions could result in loss of data o in damage to the camera
or card.
Do not touch the card terminals with your fingers or metal objects.
Do not bend, drop, or subject to strong physical shocks.
Do not apply force to the card casing.
Failure to observe this precaution could damage
the card.
Do not expose to water, heat, high levels of humidity, or direct sunlight.
Do not format memory cards in a computer.
16
GB
Write-protect switch
16
GB
11
4 Attach a lens.
Be careful to prevent dust from entering the camera when the lens or body cap
is removed.
Be sure to remove the lens cap before taking pictures.
Remove the camera
body cap
Remove the rear
lens cap
Mounting mark (lens)
Mounting mark (camera)
Align the mounting marks
Rotate the lens as shown until it clicks into place.
12
5 Open the monitor.
Open the monitor as shown.
Do not use force.
6 Turn the camera on.
A language-selection dialog will be displayed.
7 Choose a language and set the camera
clock.
Use the multi selector and J button to
select a language and set the camera clock.
qwe
Select language Select time zone Select date format
rt
Select daylight saving
time option
Set time and date
(note that the camera
uses a 24-hour clock)
Move cursor up
J button: select
highlighted item
Select highlighted
item or display
sub-menu
Move cursor down
13
8 Check the battery level and number of exposures remaining.
Press the R button and check the battery level and
number of exposures remaining.
In the case of exposures
remaining, values over 1000 are shown in thousands,
indicated by the letter “k.
9 Focus the viewfinder.
After removing the lens cap, rotate the diopter
adjustment control until the AF area brackets are
in sharp focus.
When operating the control with
your eye to the viewfinder, be careful not to put
your fingers or fingernails in your eye.
AF area brackets
Viewfinder not in focus Viewfinder in focus
R button
Battery level (0 14)
Number of exposures
remaining
15
A Removing the Battery
To remove the battery, turn the camera off and open the battery-
chamber cover.
Press the battery latch in the direction shown by
the arrow to release the battery and then remove the battery by
hand.
A Formatting Memory Cards
If this is the first time the memory card will be used in the camera or
if the card has been formatted in another device, select Format
memory card in the setup menu and follow the on-screen
instructions to format the card (0 55).
Note that this permanently
deletes any data the card may contain.
Be sure to copy any
photographs and other data you wish to keep to a computer before
proceeding.
A Removing Memory Cards
After confirming that the memory card access lamp is off, turn the
camera off, open the memory card slot cover, and press the card
in to eject it (q).
The card can then be removed by hand (w).
16
GB
16
A A-M, M/A-M, A/M-M, and Vibration Reduction (VR) Switches
When using autofocus with a lens equipped with an A-M
mode switch, slide the switch to A (if the lens has an M/A-M or
A/M-M switch, select M/A or A/M).
For information on other
lenses that can be used with this camera, see page 63.
If the lens has a vibration reduction (VR) switch, select ON to
reduce the effects of vibration.
A Using a Zoom Lens
Use the zoom ring to zoom in on the subject so that it fills a
larger area of the frame, or zoom out to increase the area
visible in the final photograph (select longer focal lengths on
the lens focal length scale to zoom in, shorter focal lengths to
zoom out).
A Detaching the Lens
Be sure the camera is off when removing or exchanging
lenses.
To remove the lens, press and hold the lens release
button (q) while turning the lens clockwise (w).
After
removing the lens, replace the lens caps and camera body
cap.
A The Camera Clock
The camera clock is less accurate than most watches and household clocks.
Check the clock
regularly against more accurate time pieces and reset as necessary.
A The Clock Battery
The camera clock is powered by an independent, rechargeable power source, which is
charged as necessary when the main battery is installed.
Three days of charging will power
the clock for about a month.
If a message warning that the clock is not set is displayed when
the camera is turned on, the clock battery is exhausted and the clock has been reset.
Set the
clock to the correct time and date.
Zoom in
Zoom out
Zoom ring
17
“Point-and-Shoot” Modes
(i and j)
This section describes how to shoot photographs and movies
in i and j modes, automatic “point-and-shoot” modes in
which the majority of settings are controlled by the camera in
response to shooting conditions.
Before proceeding, turn the camera on and rotate the
mode dial to i or j (the only difference between the
two is that the flash will not fire in j mode).
Viewfinder photography
Taking photographs
Viewing photographs
Deleting photographs
0 18
0 20
0 21
Live view
Taking photographs
Viewing photographs
Deleting photographs
0 22
0 25
0 25
Shooting movies
Viewing movies
Deleting movies
0 26
0 29
0 30
Mode dial
18
Framing Photos in the Viewfinder
1 Ready the camera.
When framing photographs in the
viewfinder, hold the handgrip in your
right hand and cradle the camera
body or lens with your left.
When framing photographs in portrait (tall) orientation,
hold the camera as shown at right.
2 Frame the photograph.
Frame a photograph in the viewfinder with the
main subject in the AF area brackets.
3 Press the shutter-release button halfway.
Press the shutter-release button halfway to focus
(if the subject is poorly lit, the flash may pop up
and the AF-assist illuminator may light). When
the focus operation is complete, a beep will
sound (a beep may not sound if the subject is
moving) and the active focus point and in-focus
indicator (I) will appear in the viewfinder.
In-focus indicator Description
I Subject in focus.
I (flashes)
Camera unable to focus using
autofocus.
See page 72.
AF area brackets
Focus point
In-focus
indicator
Buffer
capacity
19
4 Shoot.
Smoothly press the shutter-release button the
rest of the way down to take the photograph.
The memory card access lamp will light and the
photograph will be displayed in the monitor for a
few seconds.
Do not eject the memory card or
remove or disconnect the power source until the
lamp has gone out and recording is complete.
A The Shutter-Release Button
The camera has a two-stage shutter-release button.
The camera focuses when the shutter-
release button is pressed halfway.
To take the photograph, press the shutter-release button
the rest of the way down.
Focus: press halfway Shoot: press all the way down
Pressing the shutter-release button halfway also ends playback and readies the camera for
immediate use.
Memory card access
lamp
20
Viewing Photographs
Pressing K displays a picture in the monitor.
Press 4 or 2 to view additional pictures.
❚❚ Thumbnail Playback
To display images in “contact sheets” of four, 12, or
80 images (thumbnail playback), press the W (Q)
button.
Use the multi selector or command dial to
highlight images and press J to display the
highlighted image full frame.
Press X to reduce
the number of images displayed.
❚❚ Calendar Playback
To view images taken on a selected date (calendar
playback), press the W (Q) button when 80
images are displayed.
Press the W (Q) button to
toggle between the date list and the list of
thumbnails for the selected date.
Use the multi
selector to highlight dates in the date list or to
highlight pictures in the thumbnail list.
Press X
when the cursor is in the date list to return to 80-
frame playback.
K button
W (Q) button
Thumbnail lis
t
Date list
21
Deleting Unwanted Pictures
Display the photograph you wish to delete.
Press O; a confirmation dialog will be displayed.
Press the O button again to delete the picture.
A The Standby Timer
The viewfinder and information display will turn off if no operations are performed for about
eight seconds, reducing the drain on the battery.
Press the shutter-release button halfway to
reactivate the display.
The length of time before the standby timer expires automatically can
be selected using Custom Setting c2 (Auto off timers; 0 55).
Exposure meters on Exposure meters off Exposure meters on
A The Built-in Flash
If additional lighting is required for correct exposure in i mode,
the built-in flash will pop up automatically when the shutter-
release button is pressed halfway (0 19).
If the flash is raised,
photographs can only be taken when the flash-ready indicator (M)
is displayed.
If the flash-ready indicator is not displayed, the flash
is charging; remove your finger briefly from the shutter-release
button and try again.
When the flash is not in use, return it to its closed position by
pressing it gently downward till the latch clicks into place.
K button
O button
67
Caring for the Camera
Storage
When the camera will not be used for an extended period, remove the battery and
store it in a cool, dry area with the terminal cover in place.
To prevent mold or
mildew, store the camera in a dry, well-ventilated area.
Do not store your camera
with naphtha or camphor moth balls or in locations that:
are poorly ventilated or subject to humidities of over 60%
are next to equipment that produces strong electromagnetic fields, such as
televisions or radios
are exposed to temperatures above 50 °C (122 °F) or below –10 °C (14 °F)
Cleaning
Do not use alcohol, thinner, or other volatile chemicals.
Camera
body
Use a blower to remove dust and lint, then wipe gently with a soft, dry cloth.
After
using the camera at the beach or seaside, wipe off sand or salt with a cloth lightly
dampened in distilled water and dry thoroughly.
Important: Dust or other foreign
matter inside the camera may cause damage not covered under warranty.
Lens,
mirror, and
viewfinder
These glass elements are easily damaged.
Remove dust and lint with a blower.
If
using an aerosol blower, keep the can vertical to prevent the discharge of liquid.
To
remove fingerprints and other stains, apply a small amount of lens cleaner to a soft
cloth and clean with care.
Monitor
Remove dust and lint with a blower.
When removing fingerprints and other stains,
wipe the surface lightly with a soft cloth or chamois leather.
Do not apply pressure,
as this could result in damage or malfunction.
D Servicing the Camera and Accessories
The camera is a precision device and requires regular servicing.
Nikon recommends that the
camera be inspected by the original retailer or Nikon-authorized service representative once
every one to two years, and that it be serviced once every three to five years (note that fees
apply to these services).
Frequent inspection and servicing are particularly recommended if
the camera is used professionally.
Any accessories regularly used with the camera, such as
lenses or optional flash units, should be included when the camera is inspected or serviced.
85

Hulp nodig? Stel uw vraag in het forum

Spelregels
1

Forum

Nikon-D5300
6
  • meer foto s schieten achter elkaar welke functie voor nikon 5300 Gesteld op 30-1-2021 om 15:15

    Reageer op deze vraag Misbruik melden
    • Met het icoontje van de sportman,veel gebruikt tijdens sport,denk maar aan opnamen aan de eindmeet,je pikt er de juiste foto uit,hoogspringen enz.,kortom als het rap moet gaan.ook gebruikt in druppel en watersplashesfotografie(zet de scherpte manueel)vogels enz.
      proberen maar,het kost je niets. Geantwoord op 31-1-2021 om 15:10

      Waardeer dit antwoord Misbruik melden
  • Waar staat dat icoon sportman? Geantwoord op 1-2-2021 om 01:01

    Waardeer dit antwoord Misbruik melden
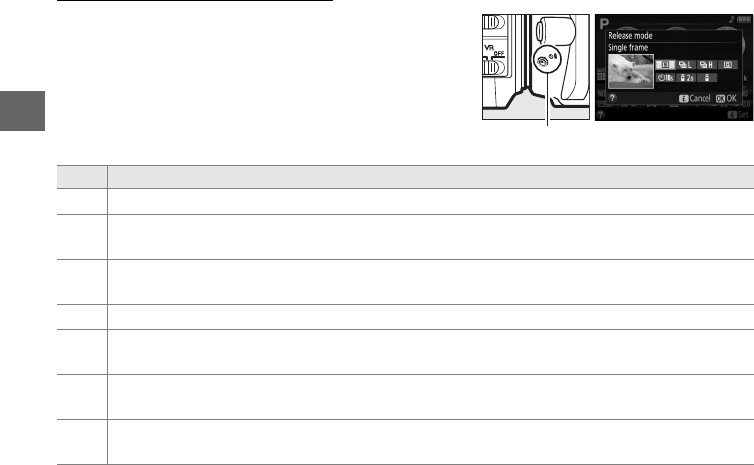
  • Dat icoontje staat op het wieltje, p-s-a-m-effects-tulpje-sprintpoppetje en deze zet je op het streepje. Hou de ontspanknop ingedrukt en je zult zien dat er meerdere foto’s snel achterelkaar gemaakt kunnen worden. Succes er mee! Geantwoord op 1-2-2021 om 08:15

    Waardeer dit antwoord (3) Misbruik melden
  • hoe foto's van camera naar telefoon ios te krijgen? Gesteld op 22-5-2020 om 13:28

    Reageer op deze vraag Misbruik melden
  • Mijn toestel neemt steeds twee foto's, hoe kan ik dat uitschakelen ? Gesteld op 1-4-2020 om 21:01

    Reageer op deze vraag Misbruik melden
    • Staat waarschijnlijk op meerdere opnames? Knopje zit aan de linkerkant, op de body, je kan kiezen voor meerdere foto's per keer Geantwoord op 1-4-2020 om 21:52

      Waardeer dit antwoord (1) Misbruik melden
  • Hel lukt me niet de draadloosontspanner de koppelen aan mijn kamera. Gesteld op 1-2-2020 om 19:38

    Reageer op deze vraag Misbruik melden
  • Beste,als ik de verbinding maakt via het kabeltje van het fototoestel naar de computor begint de pc onmiddelijk de fotos over te zetten,zit er dan in het fototoestel daar een soort programma in ,normaal moet je dat op de klassieke manier doen zoals met het kaartje rechtstreeks in de pc te steken.Graag antwoord aub. Gesteld op 21-1-2020 om 20:53

    Reageer op deze vraag Misbruik melden
    • Ik doe het ook met het snoertje.....ik klik op het pictogram Deze Computer.......dan geeft hij aan Nikon d 5300 wordt herkent .......dan worden de foto's direct geladen .ze zijn dan van het toestel af...ik doe nooit het kaartje erin.
      Hoop dat het duidelijk is...... Geantwoord op 22-1-2020 om 13:36

      Waardeer dit antwoord (1) Misbruik melden
  • Je kan dan bv de map geen naam geven? Geantwoord op 22-1-2020 om 19:46

    Waardeer dit antwoord (1) Misbruik melden
  • er staat een icoontje in het display DLY
    Wat is het en hoe bedien ik deze? Gesteld op 4-1-2020 om 20:28

    Reageer op deze vraag Misbruik melden
12
  • hoe stel ik de camera in bij 999 opnames dat die verder gaat in Gesteld op 9-9-2019 om 17:21

    Reageer op deze vraag Misbruik melden
  • In wat, snap die vraag niet! Geantwoord op 10-9-2019 om 11:26

    Waardeer dit antwoord (3) Misbruik melden
  • Als ik een foto wil maken, zie ik in op het display niet wat ik door de lens zie. Hoe pas ik dit aan? Gesteld op 28-4-2019 om 21:13

    Reageer op deze vraag Misbruik melden
  • Je moet hiervoor de livebeeldschakelaar gebruiken. Deze zit rechts van de standknop. Geantwoord op 29-4-2019 om 21:36

    Waardeer dit antwoord (2) Misbruik melden
  • Mijn ontspanknop werkt niet meer bij instelling autofocus. Alleen als ik live-view doe of manueel instel, lukt het wel. Weet iemand een oplossing? Gesteld op 27-3-2019 om 22:18

    Reageer op deze vraag Misbruik melden
  • Hallo,
    Ik heb gelezen dat er een update is voor de d5300. Ik wist helemaal niet dat dit kon en moest. Mijn camera werk goed. Moet ik dat dan wel doen? Gesteld op 8-2-2019 om 13:24

    Reageer op deze vraag Misbruik melden
  • Sommige camera's kun je een zogenaamde firmware-update geven. Zo'n update zorgt ervoor dat bijvoorbeeld een fout in de besturing van de camera wordt hersteld. Of de camera krijgt extra of verbeterde functies.
    De fabrikant geeft altijd een beschrijving van de wijzigingen in de firmware- update. Installeer de update alleen als je vindt dat deze wijzigingen meerwaarde hebben. Controleer na aankoop van een camera altijd of er een firmware-update is en neem de tijd om deze uit te voeren.
    Stap 1: Website fabrikant
    Controleer op de website van de fabrikant of er een firmware-update is voor jouw camera. Voor nieuwe camera's is het verstandig 1 of 2 keer per jaar te kijken of er een nieuwe update is.
    Canon
    Fujifilm
    Nikon
    Olympus
    Panasonic
    Pentax (Ricoh)
    Samsung
    Sigma
    Sony
    Stap 2: Check huidige firmwareversie
    Check de versie van de firmware die geïnstalleerd is op je camera. Het versienummer is meestal diep verborgen in het menu. De instructies bij de firmware-update helpen je om het versienummer in het menu te vinden. Een firmware-update is alleen nodig als het versienummer op de website van de fabrikant hoger is dat het versienummer op het scherm van de camera.
    Stap 3: Volg de instructies
    Lees de instructies van de fabrikant goed en volg ze op. Een fout tijdens een firmware-update is niet zomaar te herstellen. De procedure is niet bij elke camera hetzelfde. Over het algemeen is het belangrijk dat je de aangeraden accessoires gebruikt, bijvoorbeeld geheugenkaart en usb-kabel. Nog belangrijker is dat de camerabatterij helemaal opgeladen is. Als halverwege de procedure de batterijen leeg zijn, is het mogelijk dat de camera niet meer start.
    Stap 4: Installeer de nieuwe firmware
    Bij de meeste firmware-updates moet je eerst een bestand downloaden en opslaan op een lege, net geformatteerde geheugenkaart. Die geheugenkaart stop je vervolgens in je camera. Na het aanzetten van de camera volg je de instructies die op het scherm staan.
    Sommige merken, zoals Olympus, hebben een speciaal computerprogramma gemaakt om het updaten makkelijker te maken. Je moet dan eerst het programma downloaden en installeren op je computer. Als je de camera daarna aansluit, checkt het programma de firmware versie op de camera en zoekt online naar een eventuele update en helpt bij de installatie.
    Lens updaten
    Firmware-updates zijn er niet alleen voor camera's, maar ook voor lenzen. Zo kunnen camera en lens beter samenwerken. Om een lens te kunnen updaten, moet deze op de camera bevestigd zijn. Geantwoord op 9-2-2019 om 12:29

    Waardeer dit antwoord (2) Misbruik melden
  • Kan je het LCD scherm van de D5300 op zwartwit beeld zetten?
    Gesteld op 8-2-2019 om 12:54

    Reageer op deze vraag Misbruik melden
    • Ga naar het knopje naast de ae-l .....i van informatie, achterop de camera. Je krijgt dan een info scherm.
      Picture controle.....zet hem op MC ....Monochroom .
      Dan op live vieuw ...en je LCD scherm is zwart. Geantwoord op 8-2-2019 om 20:31

      Waardeer dit antwoord (1) Misbruik melden
  • Dit bedoelde ik idd. Dank je wel voor het antwoord. Geantwoord op 9-2-2019 om 09:43

    Waardeer dit antwoord Misbruik melden
  • Ik heb net een nieuwe nikon d5300 en ik vind dat hij binnen heel heftig flitst. De foto’s zijn heel wit uitgebeten. Er zit een 18-250 lens op. KUN je de flits zachter zetten? Gesteld op 22-12-2018 om 14:55

    Reageer op deze vraag Misbruik melden
18
  • Inderdaad, in het menu kun je “flitscompensatie” selecteren en dat enkele stops lager zetten.
    Druk op de i-knop en in het daaropvolgende menu kunt u flitscorrectie uitvoeren.
    Handleiding blz 8 Geantwoord op 22-12-2018 om 15:11

    Waardeer dit antwoord (2) Misbruik melden
  • ik wil de vallende sterren op ot hebben, hoe kan ik dat doen met mijn D5300
    Gesteld op 22-4-2018 om 23:58

    Reageer op deze vraag Misbruik melden
  • Lange sluitertijd geeft door de draaiing van de aarde tov de sterren altijd onscherpe foto's. Maximaal houdt ik 5 a 6 seconden aan bij lage F waarde (scherpte diepte is niet van belang) en een ISO van minimaal 800. Is kwestie van uitproberen. Natuurlijk uitsluitend vanaf statief met VR op de lens uitgeschakeld. Geantwoord op 1-8-2018 om 15:27

    Waardeer dit antwoord (2) Misbruik melden
  • hoi,
    hoe heet het als je een tijd instelt als wachttijd (en dat hij dan na die tijd een foto maakt)?
    en hoe kan je dat instellen(nikon D5300)?
    Gesteld op 4-4-2018 om 13:06

    Reageer op deze vraag Misbruik melden
    • Hoi
      Op je camera kan je de sluitertijden instellen, draai je verder aan het wieltje dan heb je de bulb en de timer. Met deze timer bepaal je zelf wanneer je de knop indrukt om een foto te maken.
      Bij bulb tijd is dat meestal 30 sec probeer dat maar eens!!

      Geantwoord op 4-4-2018 om 19:19

      Waardeer dit antwoord Misbruik melden
  • Hoe vindt ik de AUTO matische instelling van ISO op Nikon D 5300 Gesteld op 23-11-2017 om 20:11

    Reageer op deze vraag Misbruik melden
    • Hallo, zet de camera op menu......dan op camera, bovenste pictogram.
      ISO -gevoeligheid instellen, ok, dan autom inst iso gevoeligheid off naar on !!!! Geantwoord op 23-11-2017 om 20:27

      Waardeer dit antwoord (6) Misbruik melden
  • Hoe zet ik het geluid uit bij het indrukken van de ontspanknop d5300
    Gesteld op 14-10-2017 om 13:54

    Reageer op deze vraag Misbruik melden
  • Ga naar "menu" -> menu persoonlijke instellingen -> d1: signaal -> uitzetten. Geantwoord op 17-7-2018 om 13:44

    Waardeer dit antwoord (14) Misbruik melden
  • Ls
    Is het mogelijk om mij een beschrijving te geven om mijn 39 scherpstelpunten weer in beeld te krijgen.camera Nikon D 5300
    met vriendelijke groet ,Jos Gesteld op 20-6-2017 om 16:48

    Reageer op deze vraag Misbruik melden
    • Hoi Jos,
      Je gaat naar het menu en dan het rode potlood (3e van boven)
      In Autofocus is a2 scherpstelpunten.
      Groetjes, Nico Geantwoord op 20-6-2017 om 17:03

      Waardeer dit antwoord Misbruik melden
  • Hoi Nico
    Dit heeft er alle schijn van dat dit het grote geheim van Nikon is.
    Gisteren bij mijn verkoper geweest,alles op geschreven natuurlijk ,en ik kom tot ongeveer 4 tot 5 punten wel staat mijn instelling nu op spot meting , maar dat maakt niets uit het aantal blijft het zelfde. Bij de instelling via het rode potlood en ik kies voor 39 is het resultaat 1 punt maar dan kan dan weer aan de instelling spotmeting liggen denk ik. in elk geval bedankt voor alle moeite .
    groeten Jos Geantwoord op 21-6-2017 om 12:31

    Waardeer dit antwoord (2) Misbruik melden
  • wat zijn de goeie instellingen om een zonsopgang te fotograferen met interval? Gesteld op 1-6-2017 om 02:57

    Reageer op deze vraag Misbruik melden
24
  • En als dat wel is, dan wil ik dat ook graag weten!!!! Geantwoord op 1-6-2017 om 14:09

    Waardeer dit antwoord (2) Misbruik melden
  • nou ik heb interval gedaan 10 sec en daarna met mijn software een timelapse gemaakt , moest alleen de instellingen weten voor een mooie zonsopgang maar heb het zelf al gevonden Geantwoord op 1-6-2017 om 22:12

    Waardeer dit antwoord Misbruik melden
  • De D5300 heeft wel degelijk de optie timelapse, ga in het menu naar het onderste tabblad
    - tweede van boven: intervalopname
    - kies starttijd, interval, aantal opnames
    zet alle beelden in je videobewerkingsprogramma en klaar! Geantwoord op 26-7-2017 om 13:42

    Waardeer dit antwoord (1) Misbruik melden
  • Hoe kan ik mijn instelgevens zien bij gemaakte foto's
    Groet Annie
    Mailadres anniegerritsen@mgzl.nl Gesteld op 7-5-2017 om 14:09

    Reageer op deze vraag Misbruik melden
    • Je bedoelt de histogram raadplegen. Foto op het scherm, dan op de bovenkant van de ring drukken (deze (om)ring(t) de OK knop. Daar komen alle gegevens naar voren die je hebt ingesteld. Succes ermee. Geantwoord op 7-5-2017 om 15:15

      Waardeer dit antwoord Misbruik melden
  • op mijn terugkijkscherm (play) blijft onderin fotoinformatie staan. hoe krijg ik dit weg? Gesteld op 11-4-2017 om 22:37

    Reageer op deze vraag Misbruik melden
    • Klik aan de onderzijde van de ring die zich rondom de OK knop bevindt. Hier kun je ook de histogram etc.mee verkrijgen. Geantwoord op 12-4-2017 om 07:09

      Waardeer dit antwoord Misbruik melden
  • Hallo,
    Is het mogelijk om mijn foto's die ik van mijzelf maak niet gespiegeld te krijgen? Zo ja, hoe kan ik dit instellen. Gesteld op 10-3-2017 om 23:20

    Reageer op deze vraag Misbruik melden
  • Wanneer ik de camera richt op mezelf dan zie ik op de live stream mijn beeld. Wanneer ik de foto heb gemaakt word het beeld gespiegeld. Geantwoord op 11-3-2017 om 21:57

    Waardeer dit antwoord (1) Misbruik melden
  • Je bedoelt spiegelbeeld !? Geantwoord op 12-3-2017 om 00:25

    Waardeer dit antwoord Misbruik melden
  • Volgens mij zit het probleem niet in de foto, want die is goed, maar de livestream keert om als je het schermpje volledig kantelt. Als ik het beeld volg terwijl ik het scherm kantel, zie ik op een bepaald moment de livestream omkeren. Als je een foto maakt staat het weer even goed, maar zodra dan de livestream weer terug komt, staat het weer gespiegeld. Geantwoord op 28-3-2017 om 22:13

    Waardeer dit antwoord Misbruik melden
  • Hoe kan ik de audio tuut uitschakelen die je hoort bij het nemen van een foto? Toestel Nikon D 5300. Gesteld op 9-2-2017 om 15:17

    Reageer op deze vraag Misbruik melden
    • hallo ,ga naar menu met het potlood, D opnemen/ weergeven, druk op ok.....a1 signaal.....ok......H L uit!!
      Hoop dat je dit bedoelde.

      gr.lenie Geantwoord op 10-2-2017 om 14:08

      Waardeer dit antwoord (1) Misbruik melden
  • Hoe kan ik foto's maken via het kantelbare systeem? Gesteld op 5-1-2017 om 18:56

    Reageer op deze vraag Misbruik melden
  • Kan je de bulb functie zo instellen dat je het knopje niet ingedrukt hoef te houden? Gesteld op 25-11-2016 om 19:23

    Reageer op deze vraag Misbruik melden
    • Nee dat kan niet, op het moment dat je de knop los laat word de foto gemaakt.
      Je kunt wel de sluitertijd zetten op "time" jij bepaald dan wanneer de foto afgedrukt kan worden.
      Met deze functie kan de spiegel wel heel lang open staan!! Tot wel 30min of zelfs langer... Geantwoord op 25-11-2016 om 21:49

      Waardeer dit antwoord (4) Misbruik melden
30
  • automatisch scherpstellen filmen nikon d5300 alles staat op automatisch en wil niet scherp stellen bij in zoemen
    Gesteld op 8-8-2016 om 11:43

    Reageer op deze vraag Misbruik melden
  • Dan zit er een lens op zonder motortje Geantwoord op 11-3-2017 om 21:50

    Waardeer dit antwoord (2) Misbruik melden
  • ik zit ook met dit probleem toestel zet niet meer scherp en ik vind de oplossing niet Geantwoord op 17-10-2021 om 23:25

    Waardeer dit antwoord Misbruik melden
  • Na een herstelling vertoont hetinformatiescherm een handje (handpalm) in ( ). Weet iemand wat dit betekent want ik vind dat niet terug in de handleiding. Gesteld op 18-4-2016 om 18:18

    Reageer op deze vraag Misbruik melden
  • Dit ligt echt aan het feit dat je lens geen knop heeft die insteld op M of A. Ik heb een andere lens erop gezet en toen werkte wel alles goed. Met de vorige lens op een ander toestel werkte het wel. Het lijkt dus dat de 5300 wacht op een seintje van de lens. Krijgt hij dit niet dan is de autofocus niet beschikbaar en kun je ook niet aanvinken in het scherm. Geantwoord op 9-7-2016 om 11:57

    Waardeer dit antwoord (5) Misbruik melden
  • heeft te maken met je vr stand aan of uit. bij vr aan is het handje te zien, zodat je kan zien of je je vr hebt aanstaan of niet. grtjs dejean Geantwoord op 23-8-2016 om 16:54

    Waardeer dit antwoord (12) Misbruik melden
  • Bij de nikon d5000 kon ik direct de efix zien van de foto.
    Krijg dit bij de d5300 niet voor elkaar. Wat zie ik over het hoofd? Gesteld op 5-3-2016 om 15:03

    Reageer op deze vraag Misbruik melden
    • Beste,
      U gaat naar Menu.
      Weergavemenu, weergaveopties, met shuttleknop rechts vervolgens alles aanvinken: V Geen (alleen beeld) V Hoge lichten V RBG-histogram V Opnamegegevens en V Overzicht. wel Ok inklikken als je iets aanvinkt anders onthoud hij dat niet! Als je dat hebt gedaan kun je via de shuttleknop een foto bekijken met daarin de gegevens. Succes. Anders ook nog maar even googlen. Efix fotografie, daar zie je alles hierover staan. M.vr.groet.M.J.A. Geantwoord op 6-3-2016 om 17:13

      Waardeer dit antwoord (6) Misbruik melden
  • Heel erg bedankt voor deze informatie!
    Heb het gevonden en ingesteld!
    Groet, Karin Geantwoord op 6-3-2016 om 20:01

    Waardeer dit antwoord (2) Misbruik melden
  • Als ik foto's vanaf de pc, gemaakt met Nikon D 5300 wil invoegen, in bv een word bestand voegt hij ze in zoals ze zijn gemaakt: liggend of staand. Dit kan ik niet wijzigen. Als ik de foto's in de bestandenmap bekijk staan ze goed, liggend of staand maar bij het invoegen houdt hij vast aan de positie zoals de foto gefotografeerd is. Nog nooit eerder gehad. Gesteld op 30-11-2015 om 21:10

    Reageer op deze vraag Misbruik melden
  • instellen van de camera om zwart wit foto's te nemen Gesteld op 28-10-2015 om 09:45

    Reageer op deze vraag Misbruik melden
  • Je gaat naar menu, vandaaruit naar retoucheermenu, daar keuze maken "monochroom" en daar zie je zwart-wit, sepia en koelblauw staan. Geantwoord op 1-11-2015 om 18:26

    Waardeer dit antwoord (35) Misbruik melden
  • hoe onderdruk ik het geluid bij video opname i.v.m. wind Gesteld op 14-3-2015 om 19:07

    Reageer op deze vraag Misbruik melden
    • Een stukje doe-het-zelf....pak wat schuimrubber en maak deze vast op de microfoon plekken. Wat beter werkt is een richtmicrofoon aan te schaffen (bijv. van Rhodes) Geantwoord op 9-4-2015 om 10:14

      Waardeer dit antwoord (3) Misbruik melden
36
  • Ik heb een D5300, en als ik een foto maak duurt het 2 seconden voordat de lens weer sluit, waarin is dat?
    Gesteld op 7-3-2015 om 11:29

    Reageer op deze vraag Misbruik melden
    • Dan heb je een lange sluitertijd, staat de camera op de automaat? In dat geval zal het alleen binnen voorkomen dat de sluiter langer open staat. Wellicht staat de camera in de S stand, hier kun je de sluitertijd mee instellen (dmv het draaiwieltje), deze kan bij u beter op de automaat. Sowieso is het bij de aanschaf van een spiegelreflexcamera verstandig om een cursus erbij te volgen. Vaak denken mensen dat ze per definitie betere foto's maken met een spiegelreflex maar zolang je het apparaat niet goed kent zul je ook niet alles eruit kunnen halen.... Geantwoord op 9-4-2015 om 10:01

      Waardeer dit antwoord (4) Misbruik melden
  • hoe kan ik een foto maken met een bepaalde kleur en de rest in zwart - wit Gesteld op 5-2-2015 om 14:58

    Reageer op deze vraag Misbruik melden
    • Dit wordt meestal met fotobewerkingssoftware gedaan, als het erop zit kan dat alleen achteraf in het menu waar ook retoucheren staat. Geantwoord op 9-4-2015 om 10:02

      Waardeer dit antwoord (3) Misbruik melden
  • Stel de D5300 in op "effects" en selecteer "selectieve kleuren"-symbooltje.
    Richt de camera op een onderwerp waar je de kleur van wilt en je selecteert de kleur in het kleine rode vierkantje dat je ziet in de zoeker. Pijltje naar boven selecteren dacht ik of OK drukken. Dat moet je maar eens uitzoeken.
    Als je dan een foto trekt worden alle voorwerpen in het geselecteerde kleur in die kleur weergegeven en al de rest in zwart/wit.
    Mooi effect Geantwoord op 14-6-2015 om 12:01

    Waardeer dit antwoord (2) Misbruik melden
  • Hoe kan ik het autofocussysteem opnieuw instellen? Vind dit nergens in de handleiding. Gesteld op 21-1-2015 om 17:22

    Reageer op deze vraag Misbruik melden
    • Staat het objectief niet gewoon op MF ipv AF? (zit aan de zijkant van het objectief), in het menu is alleen in te stellen AF-S, AF-C (continu) of AF-A (kies AF-S als je controle wilt hebben over de scherpstelling, bij AF-A wil hij nog wel eens de mist ingaan. AF-C of continu is vooral bedoeld voor bewegende onderwerpen) Geantwoord op 9-4-2015 om 10:43

      Waardeer dit antwoord (4) Misbruik melden
  • Hoe demonteer ik weer de batterij lader om zo deze in mijn draagtas te kunnen vervoeren Gesteld op 17-1-2015 om 19:07

    Reageer op deze vraag Misbruik melden
    • Je houd de oplader in je handpalm met de stekker over je wijsvinger heen. (je kijkt dus tegen de batterij aan) Aan het stekkergedeelte (wat eraf moet) zit een kleine opening aan de rechterzijde en een bovenop, je hebt een duim op de stekker en met je wijsvinger zet je een beetje kracht, daarna ga je met een klein stiftje in de opening en rustig ietsje indrukken. hierdoor trek de stekker iets los, doordat je een beetje spanning op blijft houden ga je vervolgens met het stiftje op de bovenkant indrukken. vòila los gaat ie. Een paar keer oefenen. succes. Geantwoord op 17-1-2015 om 21:39

      Waardeer dit antwoord (3) Misbruik melden
  • Kan ik met de d5300 zwartwit foto's maken ?. Gesteld op 1-7-2014 om 11:33

    Reageer op deze vraag Misbruik melden
    • Alleen achteraf in het retoucheermenu. Zwart wit foto's zijn veel mooier te maken in Photoshop of andere software, dan is er nog meer aan het zwart wit aan te passen.
      Geantwoord op 9-4-2015 om 10:13

      Waardeer dit antwoord (2) Misbruik melden
  • Ik heb een Nikon d5300 gekocht maar nu kan ik niet automatisch scherp stellen weet iemand hoe ik dat moet doen kan het nergens vinden ik heb een lens van 35-80mm Gesteld op 23-2-2014 om 15:12

    Reageer op deze vraag Misbruik melden
42
  • Ik overweeg om een Nikon D5300 of D7100 te kopen. Maar omdat ik bij een test met de D5200 gemerkt heb dat ik de flits in de semi automatische standen (A, P, S etc.) niet uit kon zetten, wil ik van tevoren weten of je die bij bovengenoemde modellen in elke stand wel uit kunt zetten. Bij het maken van sfeerfoto's wil ik nl. geen flits gebruiken. Bij de 5200 kreeg ik als advies om de flitser dicht te klappen als die opklapte, maar zo wil ik niet fotograferen. Wie kan mij advies geven. Hartelijk dank, Joke Gesteld op 14-2-2014 om 11:47

    Reageer op deze vraag Misbruik melden
    • Tsja, volgens mij is dit wel gebruikelijk methode. En het went snel. Het wordt een handigheidje. Gewoon de flitser ingeklapt houden en de camera past automatisch de instellingen aan.
      Dus, gewoon effe wennen. Geantwoord op 24-4-2014 om 08:50

      Waardeer dit antwoord (4) Misbruik melden
  • Dit kan wel, zolang je de flits niet op inflitsen hebt staan zal de camera ALLEEN in de groene automaat stand meeflitsen, in de P, S, A en M stand niet. Geantwoord op 9-4-2015 om 10:12

    Waardeer dit antwoord (3) Misbruik melden

Misbruik melden

Gebruikershandleiding.com neemt misbruik van zijn services uitermate serieus. U kunt hieronder aangeven waarom deze vraag ongepast is. Wij controleren de vraag en zonodig wordt deze verwijderd.

Product:

Bijvoorbeeld antisemitische inhoud, racistische inhoud, of materiaal dat gewelddadige fysieke handelingen tot gevolg kan hebben.

Bijvoorbeeld een creditcardnummer, een persoonlijk identificatienummer, of een geheim adres. E-mailadressen en volledige namen worden niet als privégegevens beschouwd.

Spelregels forum

Om tot zinvolle vragen te komen hanteren wij de volgende spelregels:

Belangrijk! Als er een antwoord wordt gegeven op uw vraag, dan is het voor de gever van het antwoord nuttig om te weten als u er wel (of niet) mee geholpen bent! Wij vragen u dus ook te reageren op een antwoord.

Belangrijk! Antwoorden worden ook per e-mail naar abonnees gestuurd. Laat uw emailadres achter op deze site, zodat u op de hoogte blijft. U krijgt dan ook andere vragen en antwoorden te zien.

Abonneren

Abonneer u voor het ontvangen van emails voor uw Nikon D5300 bij:


U ontvangt een email met instructies om u voor één of beide opties in te schrijven.


Ontvang uw handleiding per email

Vul uw emailadres in en ontvang de handleiding van Nikon D5300 in de taal/talen: Engels als bijlage per email.

De handleiding is 6,47 mb groot.


U ontvangt de handleiding per email binnen enkele minuten. Als u geen email heeft ontvangen, dan heeft u waarschijnlijk een verkeerd emailadres ingevuld of is uw mailbox te vol. Daarnaast kan het zijn dat uw internetprovider een maximum heeft aan de grootte per email. Omdat hier een handleiding wordt meegestuurd, kan het voorkomen dat de email groter is dan toegestaan bij uw provider.

Stel vragen via chat aan uw handleiding

Stel uw vraag over deze PDF

Andere handleiding(en) van Nikon D5300

Nikon D5300 Gebruiksaanwijzing - Nederlands - 104 pagina's

Nikon D5300 Gebruiksaanwijzing - Nederlands - 300 pagina's

Nikon D5300 Gebruiksaanwijzing - Deutsch - 104 pagina's

Nikon D5300 Gebruiksaanwijzing - Deutsch - 300 pagina's

Nikon D5300 Gebruiksaanwijzing - English - 104 pagina's

Nikon D5300 Gebruiksaanwijzing - Français - 104 pagina's

Nikon D5300 Gebruiksaanwijzing - Français - 300 pagina's


Uw handleiding is per email verstuurd. Controleer uw email

Als u niet binnen een kwartier uw email met handleiding ontvangen heeft, kan het zijn dat u een verkeerd emailadres heeft ingevuld of dat uw emailprovider een maximum grootte per email heeft ingesteld die kleiner is dan de grootte van de handleiding.

Er is een email naar u verstuurd om uw inschrijving definitief te maken.

Controleer uw email en volg de aanwijzingen op om uw inschrijving definitief te maken

U heeft geen emailadres opgegeven

Als u de handleiding per email wilt ontvangen, vul dan een geldig emailadres in.

Uw vraag is op deze pagina toegevoegd

Wilt u een email ontvangen bij een antwoord en/of nieuwe vragen? Vul dan hier uw emailadres in.


Info