Macintosh, Mac OS, and QuickTime are registered trademarks of Apple Computer, Inc. Microsoft and Win-
dows are registered trademarks of Microsoft Corporation. The SD logo is a trademark of the SD Card As-
sociation. Adobe and Acrobat are registered trademarks of Adobe Systems Inc. PictBridge is a trademark.
D-Lighting technology is provided by Apical Limited. Face-priority AF technology is provided by Identix®.
All other trade names mentioned in this manual or the other documentation provided with your Nikon
product are trademarks or registered trademarks of their respective holders.
i
Symbols and Conventions
To make it easier to fi nd the information you need,
the following symbols and conventions are used:
This icon marks tips, additional information
that may be helpful when using the cam-
era.
This icon marks cautions, information that
should be read before use to prevent dam-
age to the camera.
This icon marks notes, information that
should be read before using the camera.
This icon indicates that more information is
available elsewhere in this manual or in the
Quick Start Guide.
Memory Cards
Pictures taken with this camera can be stored in the
camera’s internal memory or on removable memory
cards. If a memory card is inserted, all new pictures
will be stored on the memory card and delete, play-
back, and format operations will apply only to the
pictures on the memory card. The memory card
must be removed before the internal memory can
be formatted or used to store, delete, or view pic-
tures.
Introduction
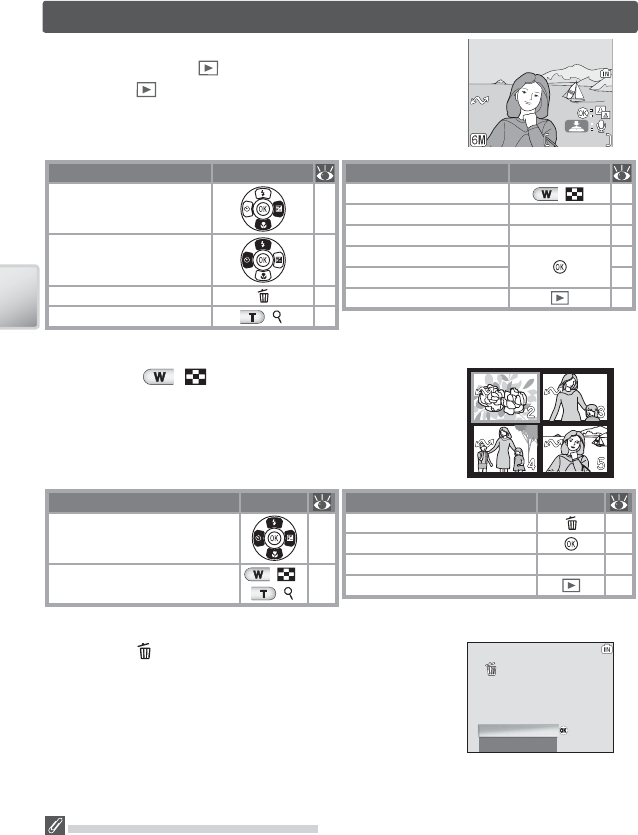
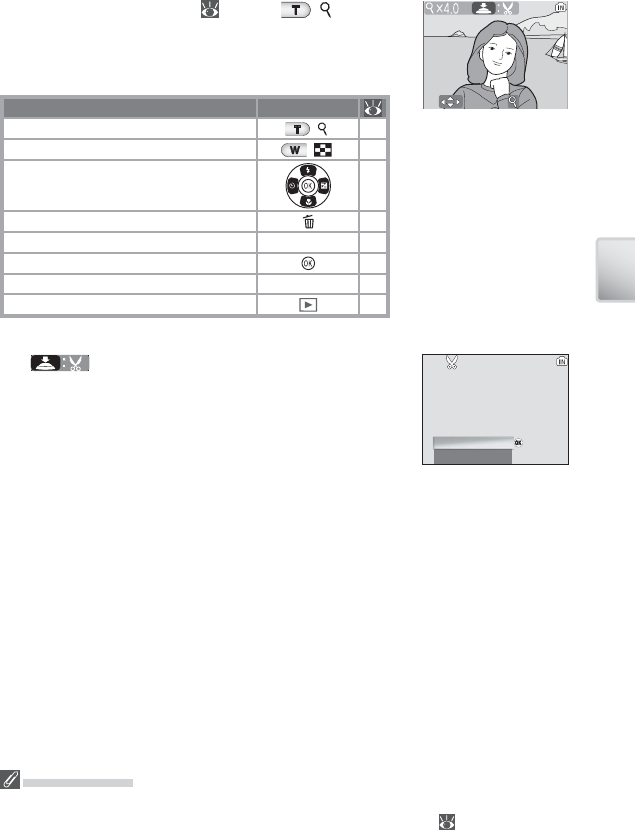
Viewing Pictures on the
Camera
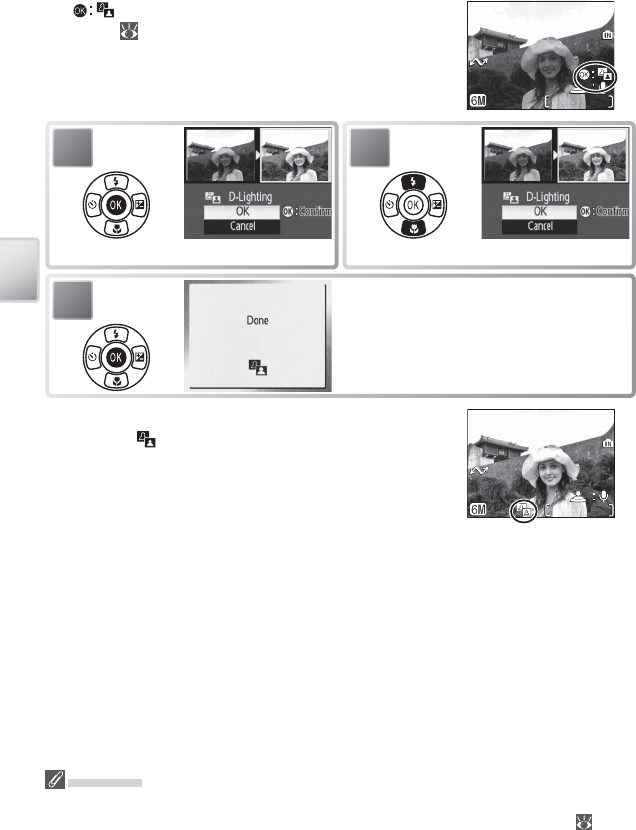
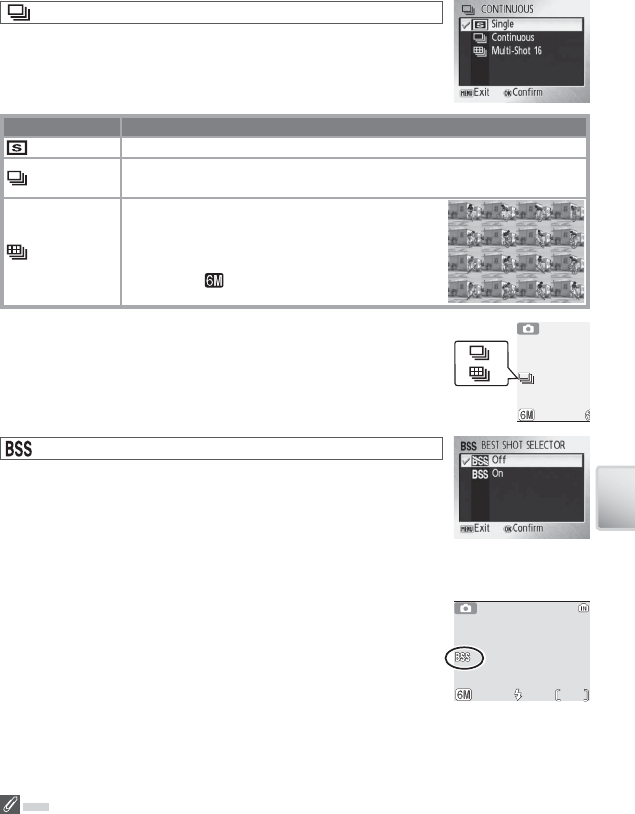
Scene and Movie Modes
Playback Options:
The Playback Menu
Basic Photography and
Playback
Shooting Options:
The Shooting Menu
Movie Options:
The Movie Menu
Connecting to Televisions,
Computers, and Printers
Basic Camera Setup:
The Setup Menu
Technical Notes
ii
To prevent damage to your Nikon product or injury to yourself or to others, read
the following safety precautions in their entirety before using this equipment. Keep
these safety instructions where all those who use the product will read them.
The consequences that could result from failure to observe the precautions listed in
this section are indicated by the following symbol:
This icon marks warnings, information that should be read before using this Nikon
product to prevent possible injury.
WARNINGS
Turn off in the event of malfunction
Should you notice smoke or an unusual
smell coming from the camera or AC
adapter, unplug the AC adapter and re-
move the batteries immediately, taking
care to avoid burns. Continued operation
could result in injury. After removing or
disconnecting the power source, take the
equipment to a Nikon-authorized service
representative for inspection.
Do not disassemble
Touching the product’s internal parts
could result in injury. Repairs should be
performed only by qualifi ed technicians.
Should the camera break open as the result
of a fall or other accident, take the product
to a Nikon-authorized service representa-
tive for inspection after unplugging the
product and / or removing the batteries.
Do not use the camera or AC adapter in the pres-
ence of fl ammable gas
Do not use electronic equipment in the
presence of fl ammable gas, as this could
result in explosion or fi re.
Handle the camera strap with care
Never place the strap around the neck of
an infant or child.
Keep out of reach of children
Particular care should be taken to prevent
infants from putting the batteries or other
small parts into their mouths.
Observe caution when handling batteries
Batteries may leak or explode if improperly
handled. Observe the following precau-
tions when handling batteries for use in
this product:
• Before replacing the batteries, turn the
product off . If you are using an AC adapter,
be sure it is unplugged.
• Use only the batteries listed on page 6 of
this manual. Do not use other types. Do
not mix old and new batteries or batteries
of diff erent makes or types.
• Charge and use each pair of Nikon re-
chargeable Nikon EN-MH1-B2 NiMH bat-
teries together as a set. Do not mix batter-
ies from diff erent pairs.
• Insert batteries in the correct orientation.
• Do not short or disassemble batteries or at-
tempt to remove or break the covering.
• Do not expose batteries to fl ame or to ex-
cessive heat.
• Do not immerse in or expose to water.
• Do not transport or store with metal ob-
jects such as necklaces or hairpins.
• Batteries are prone to leakage when fully
discharged. To avoid damage to the prod-
uct, be sure to remove the batteries when
no charge remains.
• Discontinue use immediately should you
notice any change in the batteries, such as
discoloration or deformation.
• If liquid from damaged batteries comes in
contact with clothing or skin, rinse immedi-
ately with plenty of water.
For Your Safety
iii
Observe the following precaution when handling
the battery charger
If an MH-71 battery charger is provided
with the camera, observe the following
precautions:
• Keep dry. Failure to observe this precau-
tion could result in fi re or electric shock.
• Dust on or near the metal parts of the plug
should be removed with a dry cloth. Con-
tinued use could result in fi re.
• Do not handle the power cable or go near
the battery charger during thunderstorms.
Failure to observe this precaution could re-
sult in electric shock.
• Do not damage, modify, forcibly tug or
bend the power cable, place it under
heavy objects, or expose it to heat or fl ame.
Should the insulation be damaged and the
wires become exposed, take it to a Nikon-
authorized service representative for in-
spection. Failure to observe these precau-
tions could result in fi re or electric shock.
• Do not handle the plug or battery charger
with wet hands. Failure to observe this pre-
caution could result in electric shock.
Use appropriate cables
When connecting cables to the input and
output jacks, use only the cables provided
or sold by Nikon for the purpose, to main-
tain compliance with product regulations.
Handle moving parts with care
Be careful that your fi ngers or other objects
are not pinched by the lens cover or other
moving parts.
CD-ROMs
The CD-ROMs supplied with this device
should not be played back on audio CD
equipment. Playing CD-ROMs on an audio
CD player could cause hearing loss or dam-
age the equipment.
Observe caution when operating the fl ash
Using the fl ash close to your subject’s eyes
could cause temporary visual impairment.
Particular care should be observed if pho-
tographing infants, when the fl ash should
be no less than one meter (39 in.) from the
subject.
Do not fi re the fl ash while it is touching a person
or object
Such use can result in the person being
burned, and / or their clothes igniting from
the heat of the fl ash.
Avoid contact with liquid crystal
Should the monitor break, care should be
taken to avoid injury due to broken glass
and to prevent liquid crystal from the mon-
itor touching the skin or entering the eyes
or mouth.
iv
Notice for Customers in Canada
CAUTION
This class B digital apparatus meets all require-
ments of the Canadian Interference Causing
Equipment Regulations.
ATTENTION
Cet appareil numérique de la classe B respecte
toutes les exigences du Règlement sur le maté-
riel brouilleur du Canada.
Notice for Customers in the U.S.A.
Federal Communications Commission (FCC) Radio Frequency Interference Statement
This equipment has been tested and found to
comply with the limits for a Class B digital de-
vice, pursuant to Part 15 of the FCC rules. These
limits are designed to provide reasonable pro-
tection against harmful interference in a resi-
dential installation. This equipment generates,
uses, and can radiate radio frequency energy
and, if not installed and used in accordance with
the instructions, may cause harmful interference
to radio communications. However, there is no
guarantee that interference will not occur in a
particular installation. If this equipment does
cause harmful interference to radio or television
reception, which can be determined by turning
the equipment off and on, the user is encour-
aged to try to correct the interference by one or
more of the following measures:
• Reorient or relocate the receiving antenna.
• Increase the separation between the equip-
ment and receiver.
• Connect the equipment into an outlet on a cir-
cuit diff erent from that to which the receiver is
connected.
• Consult the dealer or an experienced radio /
television technician for help.
CAUTIONS
Modifi cations
The FCC requires the user to be notifi ed that any
changes or modifi cations made to this device
that are not expressly approved by Nikon Cor-
poration may void the user’s authority to oper-
ate the equipment.
Interface Cables
Use the interface cables sold or provided by
Nikon for your equipment. Using other inter-
face cables may exceed the limits of Class B Part
15 of the FCC rules.
Notice for customers in the State of California
WARNING: Handling the cord on this product will
expose you to lead, a chemical known to the
State of California to cause birth defects or other
reproductive harm. Wash hands after handling.
Nikon Inc.,
1300 Walt Whitman Road, Melville, New York
11747-3064, U.S.A. Tel.: 631-547-4200
• No part of the manuals included with this
product may be reproduced, transmitted, tran-
scribed, stored in a retrieval system, or translat-
ed into any language in any form, by any means,
without Nikon’s prior written permission.
• Nikon reserves the right to change the speci-
fi cations of the hardware and software de-
scribed in these manuals at any time and with-
out prior notice.
• Nikon will not be held liable for any damages
resulting from the use of this product.
• While every eff ort has been made to ensure
that the information in these manuals is ac-
curate and complete, we would appreciate it
were you to bring any errors or omissions to
the attention of the Nikon representative in
your area (address provided separately).
COOLPIX L1
Notices
v
• Items prohibited by law from being copied or reproduced
Do not copy or reproduce paper money, coins,
securities, government bonds, or local govern-
ment bonds, even if such copies or reproduc-
tions are stamped “Sample.”
The copying or reproduction of paper money,
coins, or securities which are circulated in a for-
eign country is prohibited.
Unless the prior permission of the government
has been obtained, the copying or reproduc-
tion of unused postage stamps or post cards
issued by the government is prohibited.
The copying or reproduction of stamps issued
by the government and of certifi ed docu-
ments stipulated by law is prohibited.
• Cautions on certain copies and reproductions
The government has issued cautions on cop-
ies or reproductions of securities issued by
private companies (shares, bills, checks, gift
certifi cates, etc.), commuter passes, or coupon
tickets, except when a minimum of necessary
copies are to be provided for business use by
a company. Also, do not copy or reproduce
passports issued by the government, licenses
issued by public agencies and private groups,
ID cards, and tickets, such as passes and meal
coupons.
• Comply with copyright notices
The copying or reproduction of copyrighted
creative works such as books, music, paint-
ings, woodcut prints, maps, drawings, movies,
and photographs is governed by national and
international copyright laws. Do not use this
product for the purpose of making illegal cop-
ies or to infringe copyright laws.
Symbol for Separate Collection in European Countries
This symbol indicates that this product is to be collected separately.
The following apply only to users in European countries:
• This product is designated for separate collection at an appropriate collection point.
Do not dispose of as household waste.
• For more information, contact the retailer or the local authorities in charge of waste
management.
Notice Concerning Prohibition of Copying or Reproduction
Note that simply being in possession of material that has been digitally copied or reproduced by
means of a scanner, digital camera or other device may be punishable by law.
Disposing of Data Storage Devices
Please note that deleting images or formatting data storage devices such as memory cards or built-
in camera memory does not completely erase the original image data. Deleted fi les can sometimes
be recovered from discarded storage devices using commercially available software, potentially re-
sulting in the malicious use of personal image data. Ensuring the privacy of such data is the user’s
responsibility.
Before discarding a data storage device or transferring ownership to another person, erase all data
using commercial deletion software, or format the device and then completely refi ll it with images
containing no private information (for example, pictures of empty sky). Be sure to also replace
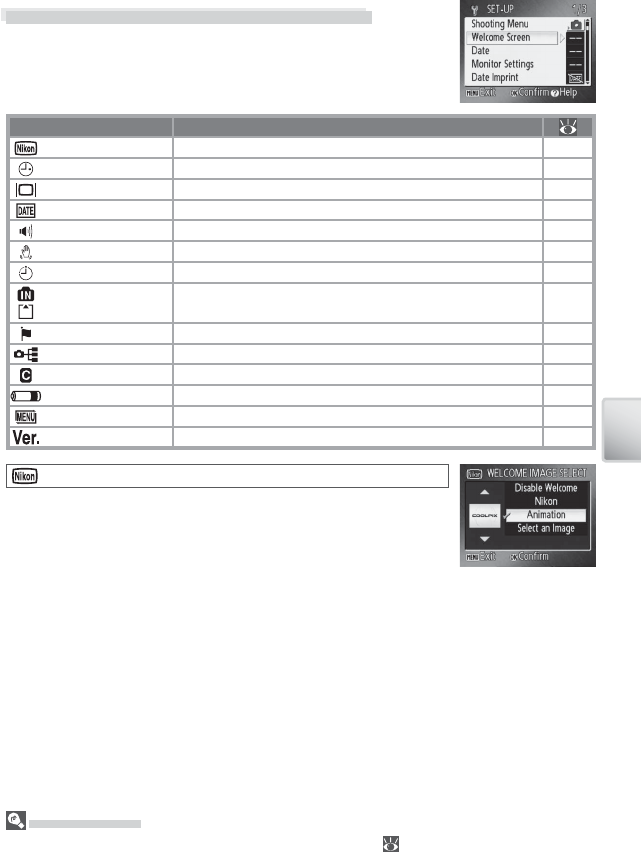
any pictures selected for the welcome screen. Care should be taken to avoid injury or damage to
property when physically destroying data storage devices.
vi
Table of Contents
For Your Safety .......................................................................................................................................................................ii
Introduction 1
Parts of the Camera .....................................................................................................................................2
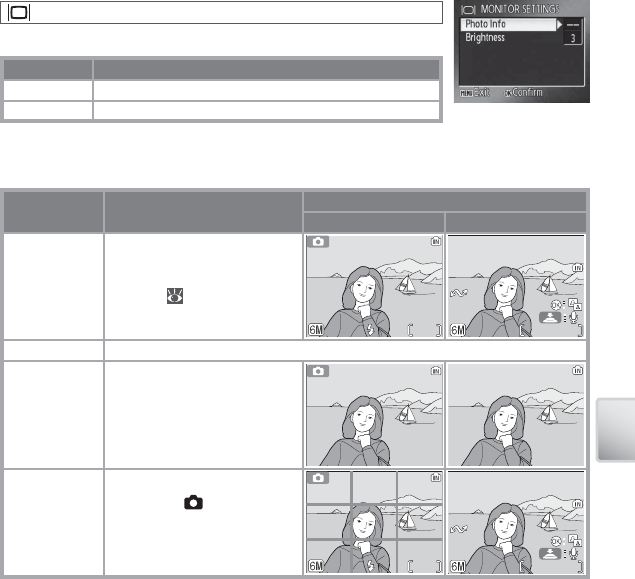
The Monitor ...................................................................................................................................................4
First Steps ........................................................................................................................................................6
Using the Flash ...........................................................................................................................................14
Taking Pictures with the Self-Timer .....................................................................................................15
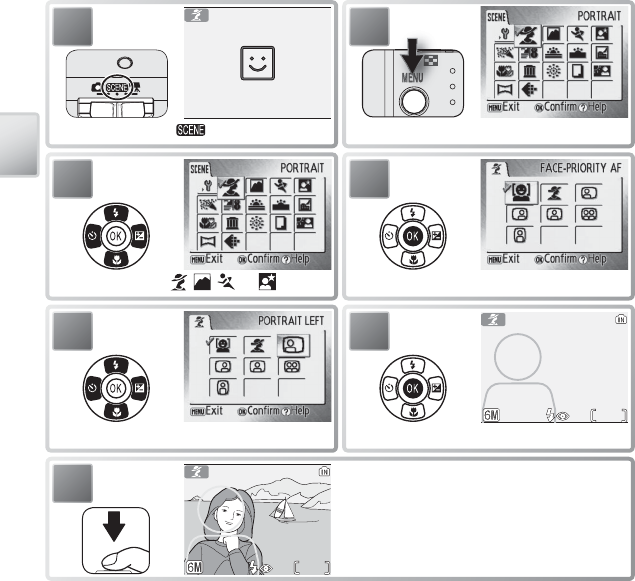
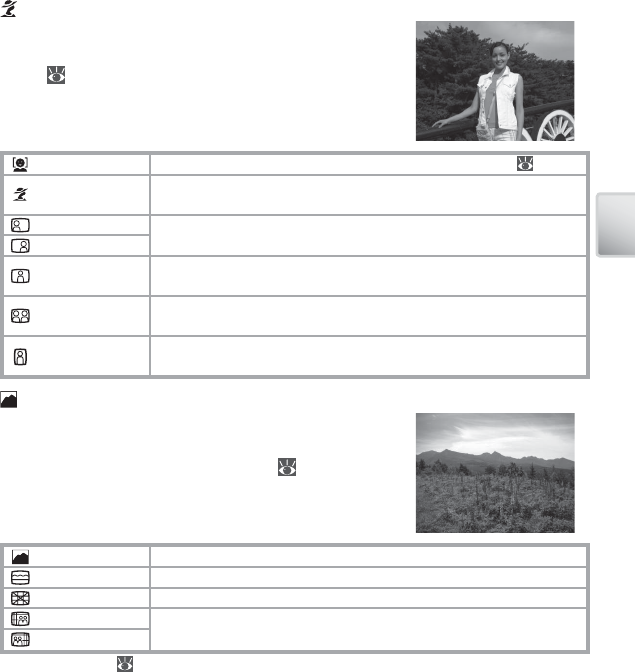
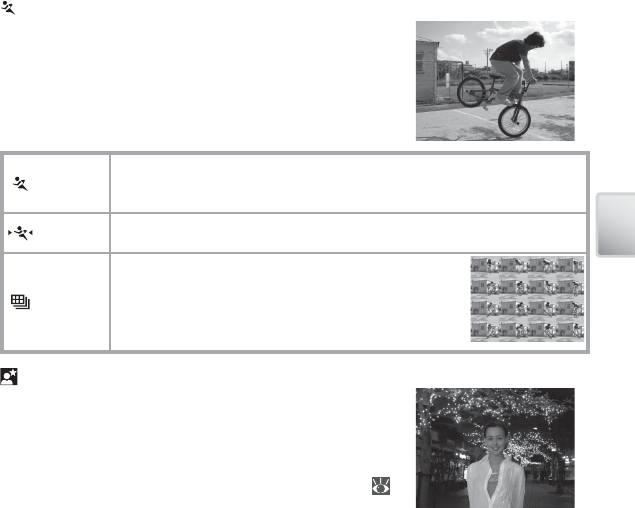
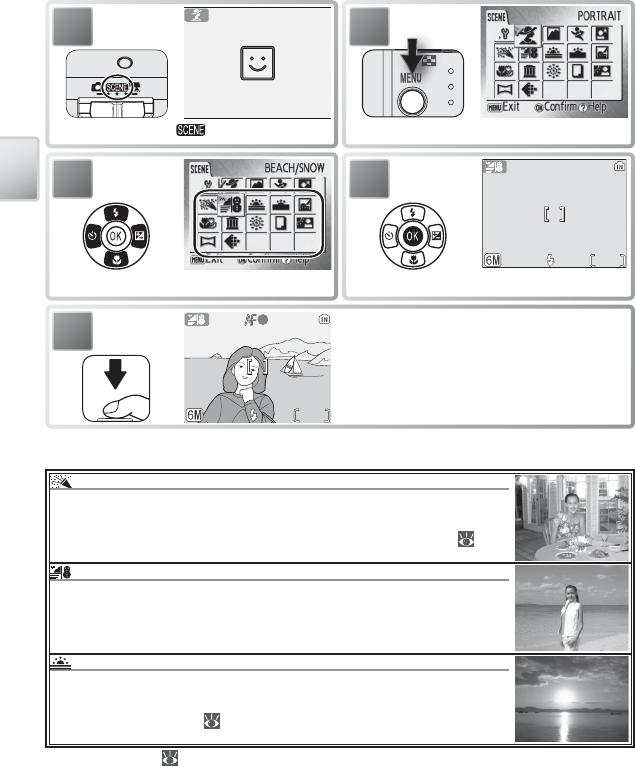
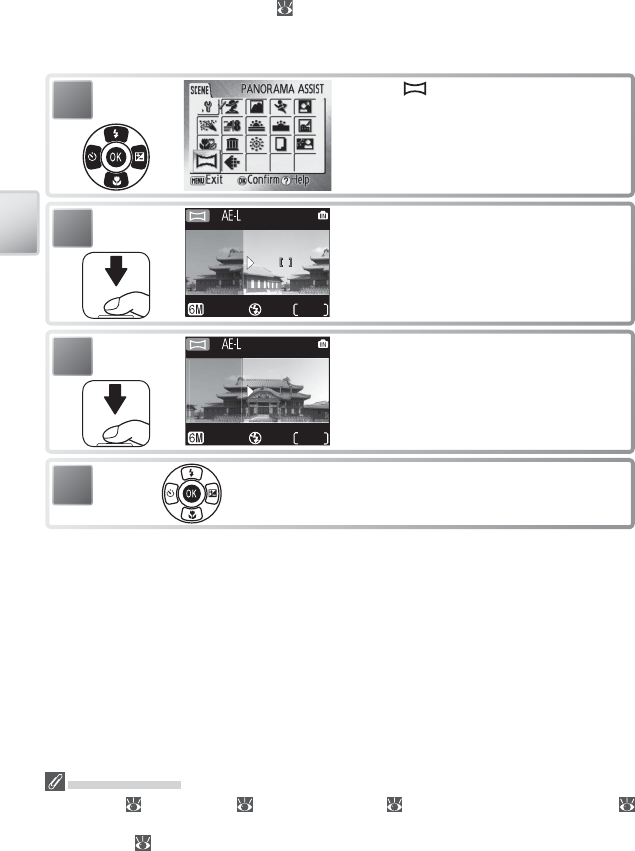
Scene Mode .................................................................................................................................................17
Other Scenes .......................................................................................................................................................................22
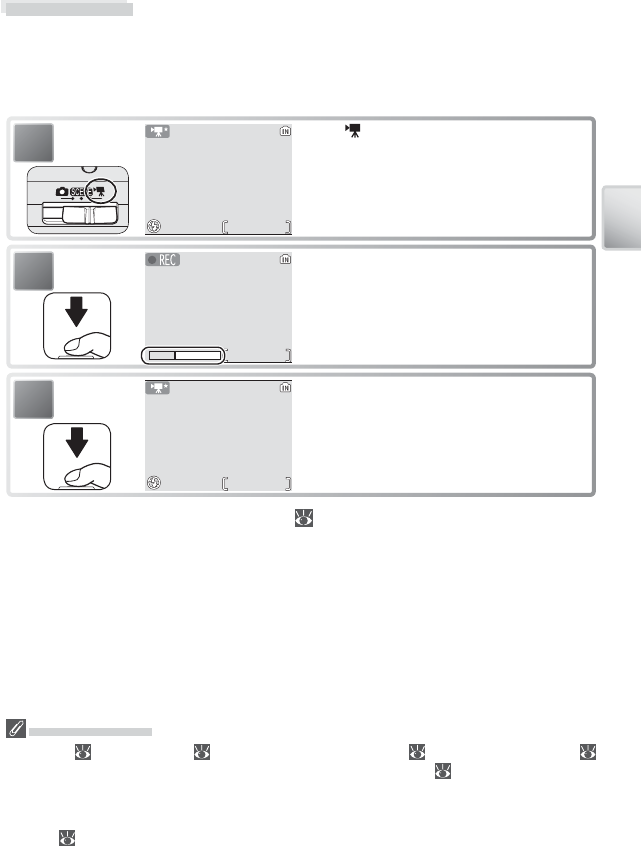
Movie Mode .................................................................................................................................................25
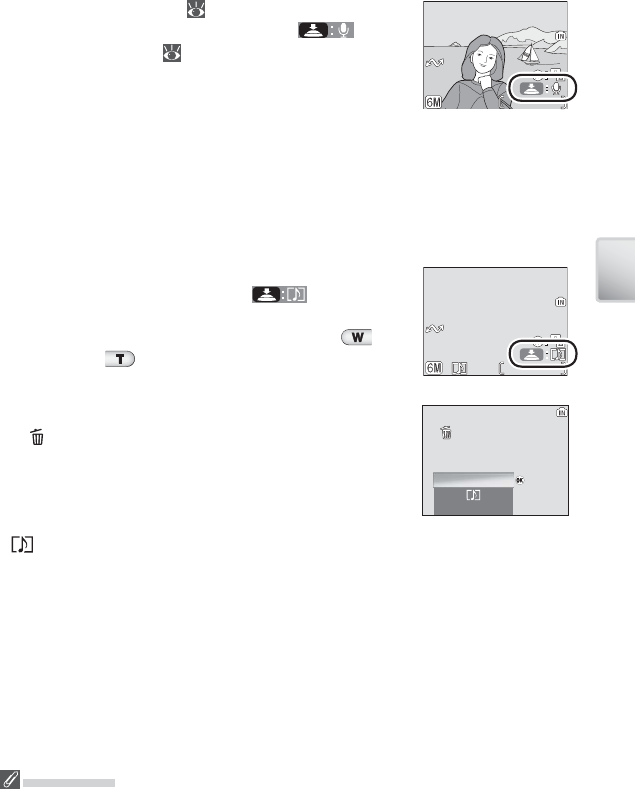
Voice Memos: Recording and Playback ..............................................................................................................29
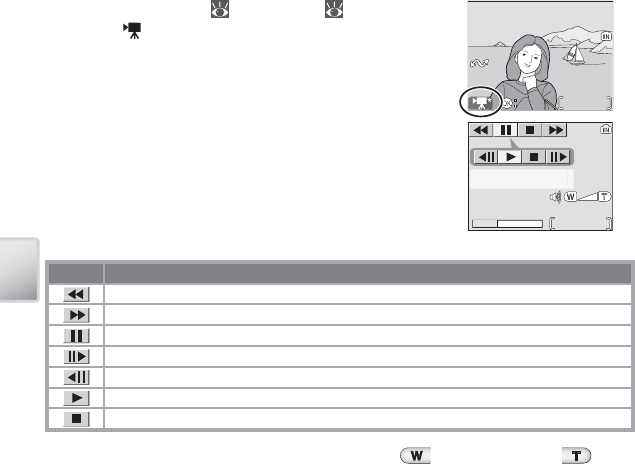
Movie Playback ..................................................................................................................................................................30
Connecting to Televisions, Computers, and Printers 31
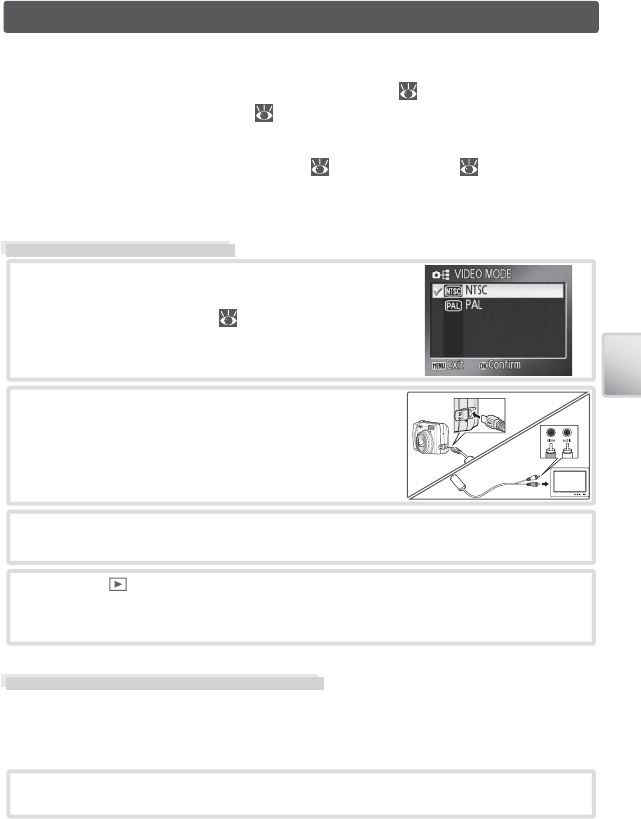
Viewing Pictures on TV ............................................................................................................................31
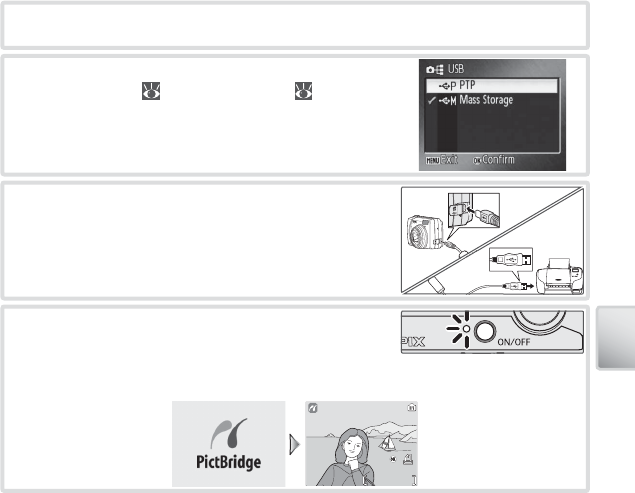
Viewing Pictures on a Computer ..........................................................................................................31
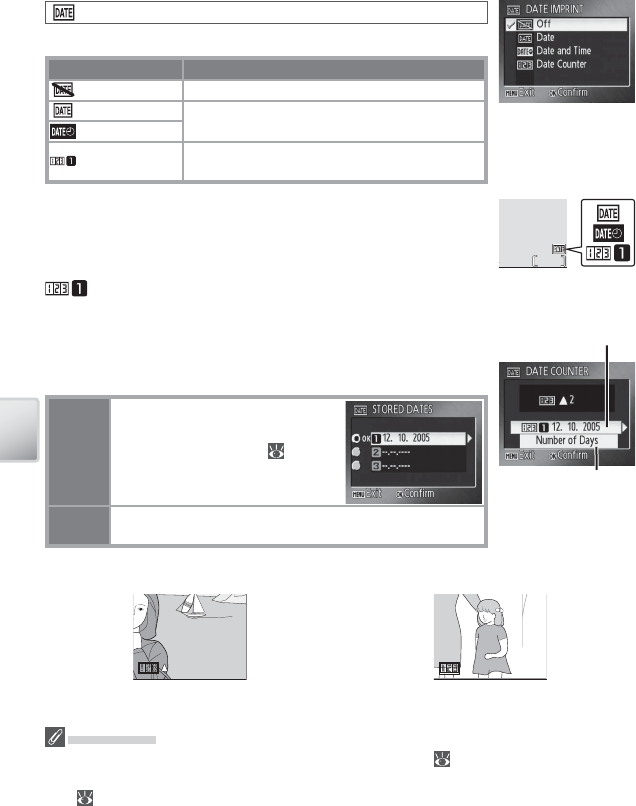
Date ...........................................................................................................................................................................................42
Date Imprint .........................................................................................................................................................................44
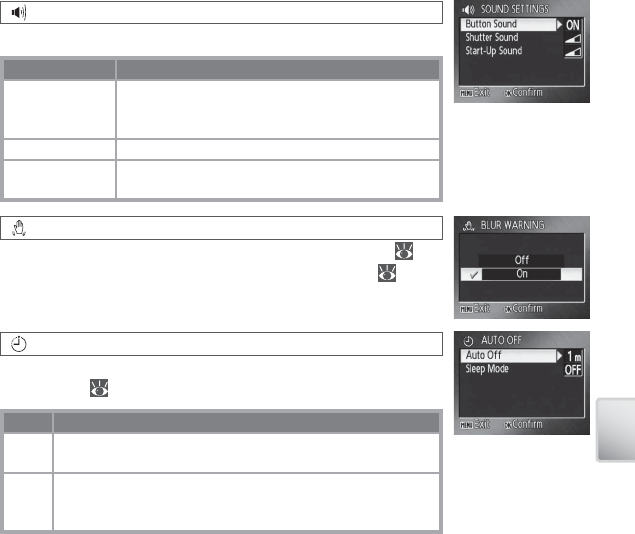
Auto Off ..................................................................................................................................................................................45
vii
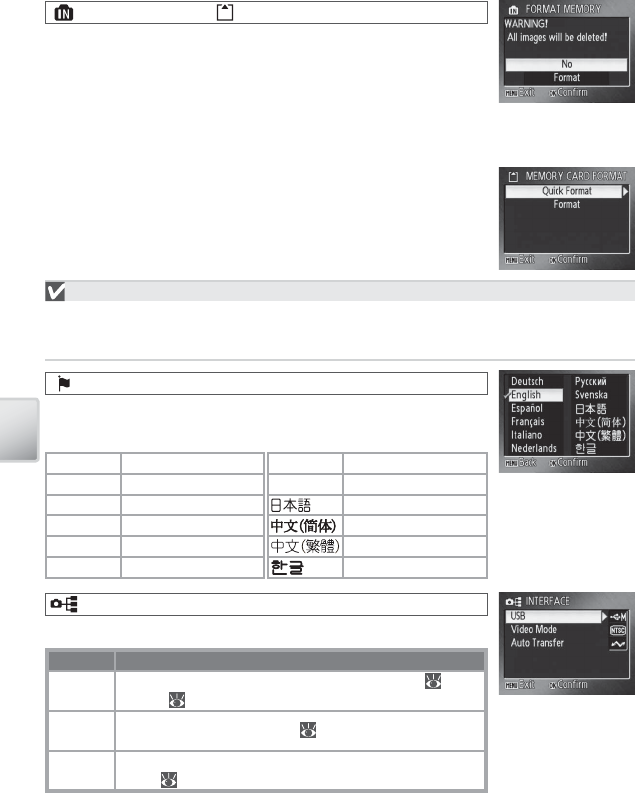
Format Memory/ Format Card .................................................................................................................................46
Language ...............................................................................................................................................................................46
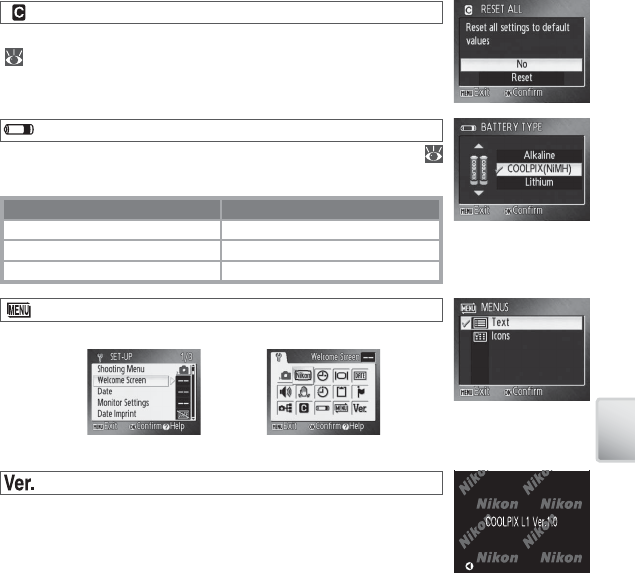
Reset all ...................................................................................................................................................................................47
Battery Type ..........................................................................................................................................................................47
Firmware Version ...............................................................................................................................................................47
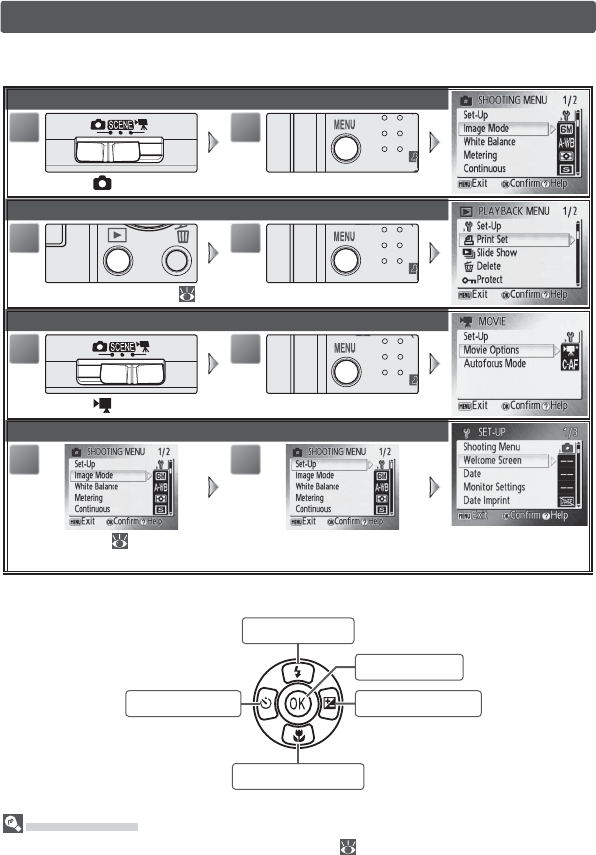
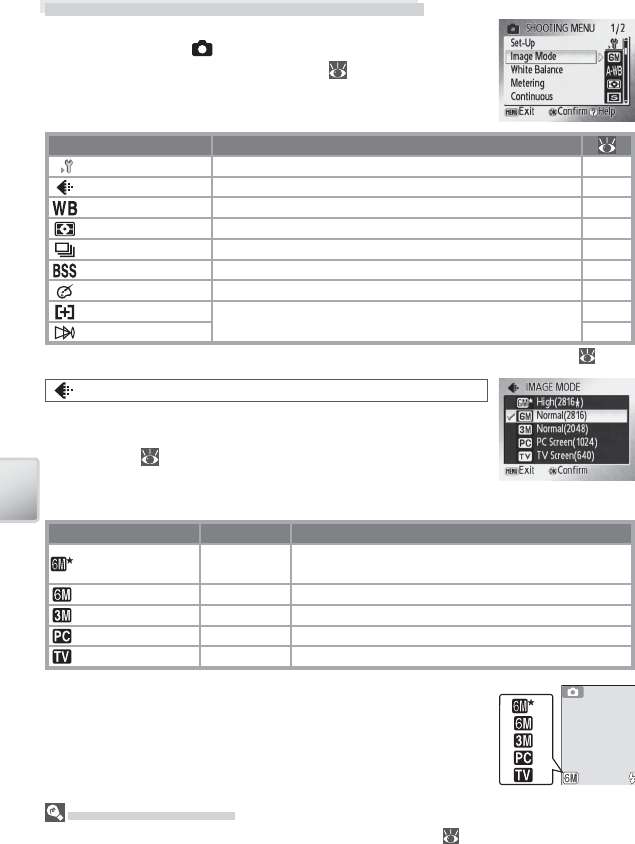
Shooting Options: The Shooting Menu .............................................................................................48
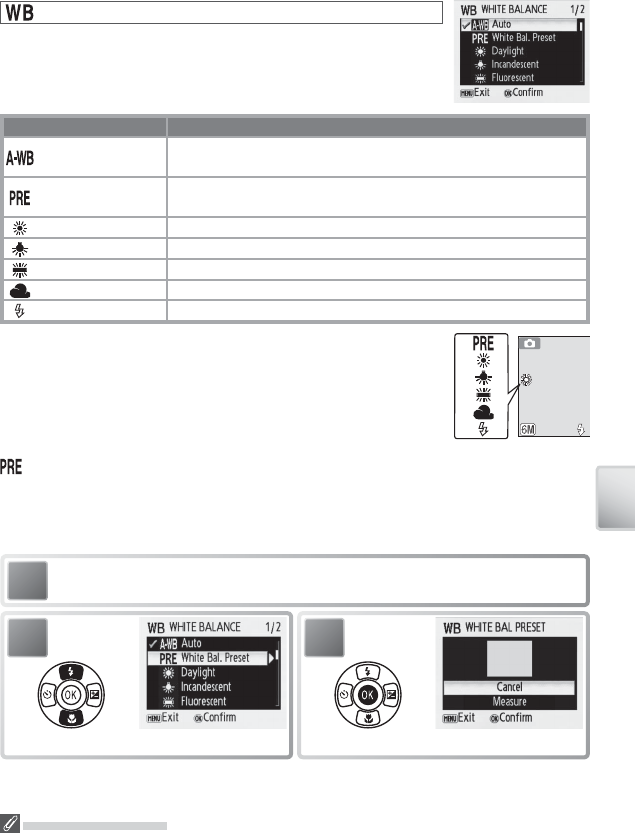
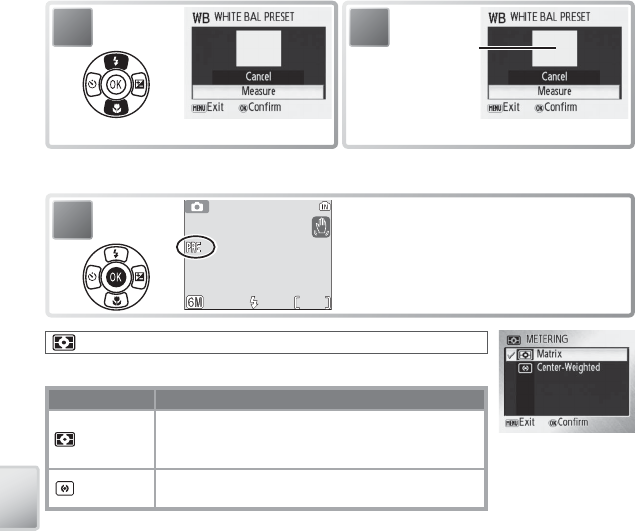
White Balance .....................................................................................................................................................................49
Color Options ......................................................................................................................................................................52
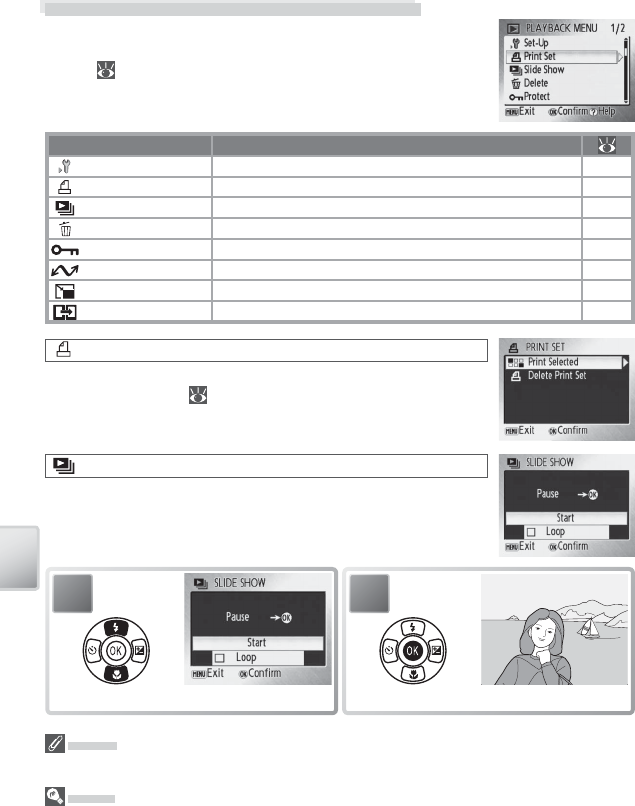
Playback Options: The Playback Menu ..............................................................................................54
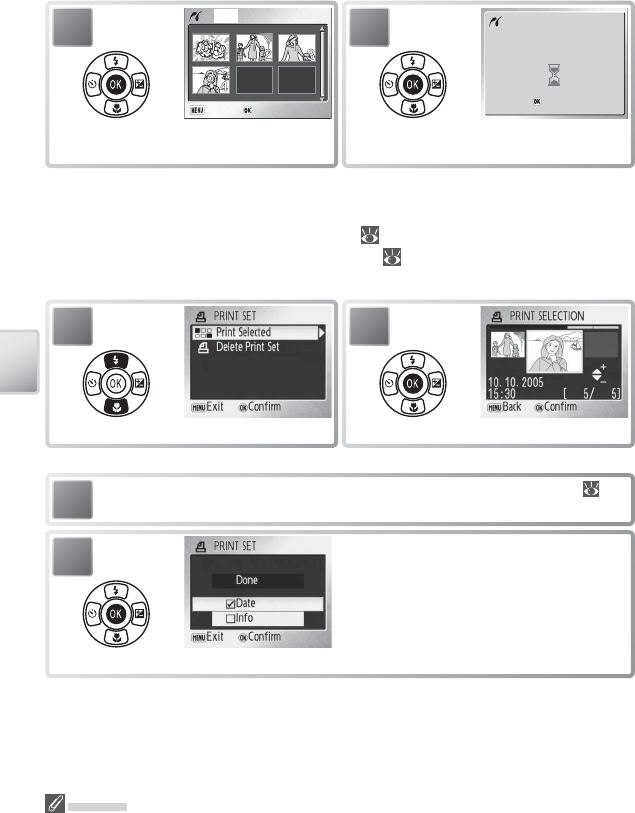
Print Set ...................................................................................................................................................................................54
Slide Show .............................................................................................................................................................................54
Transfer Marking ................................................................................................................................................................55
Small Pic. .................................................................................................................................................................................56
Movie Options: The Movie Menu .........................................................................................................57
Movie Options ....................................................................................................................................................................57
Index ...............................................................................................................................................................72
viii
Use Only Nikon Brand Electronic Accessories
Nikon COOLPIX cameras are designed to the highest standards and include complex elec-
Als ik de camera start komt er op het scherm aan de achterzijde een rood snel knipperend ongeveer 6 mm vierkant beeldje wat op een klokje lijkt. Wat dient dat voor en hoe krijg ik dat uit.
Gesteld op 9-5-2023 om 12:24
Gebruikershandleiding.com neemt misbruik van zijn services uitermate serieus. U kunt hieronder aangeven waarom deze vraag ongepast is. Wij controleren de vraag en zonodig wordt deze verwijderd.
Product:
Spelregels forum
Om tot zinvolle vragen te komen hanteren wij de volgende spelregels:
lees eerst de handleiding door;
controleer of uw vraag al eerder door iemand anders is gesteld;
probeer uw vraag zo duidelijk mogelijk te stellen;
heeft u een probleem en al geprobeerd om dit op te lossen, vermeld dit erbij aub;
heeft u een oplossing gekregen van een bezoeker dan horen wij dat graag in dit forum;
wilt u een reactie geven op een vraag of antwoord, gebruik dan niet dit formulier maar klik op de knop 'reageer op deze vraag';
uw vraag wordt direct op de website gezet; vermijd daarom persoonlijke gegevens in te vullen;
Belangrijk! Als er een antwoord wordt gegeven op uw vraag, dan is het voor de gever van het antwoord nuttig om te weten als u er wel (of niet) mee geholpen bent! Wij vragen u dus ook te reageren op een antwoord.
Belangrijk! Antwoorden worden ook per e-mail naar abonnees gestuurd. Laat uw emailadres achter op deze site, zodat u op de hoogte blijft. U krijgt dan ook andere vragen en antwoorden te zien.
Abonneren
Abonneer u voor het ontvangen van emails voor uw Nikon Coolpix L1 bij:
nieuwe vragen en antwoorden
nieuwe handleidingen
U ontvangt een email met instructies om u voor één of beide opties in te schrijven.
Ontvang uw handleiding per email
Vul uw emailadres in en ontvang de handleiding van Nikon Coolpix L1 in de taal/talen: Engels als bijlage per email.
De handleiding is 3,62 mb groot.
U ontvangt de handleiding per email binnen enkele minuten. Als u geen email heeft ontvangen, dan heeft u waarschijnlijk een verkeerd emailadres ingevuld of is uw mailbox te vol. Daarnaast kan het zijn dat uw internetprovider een maximum heeft aan de grootte per email. Omdat hier een handleiding wordt meegestuurd, kan het voorkomen dat de email groter is dan toegestaan bij uw provider.
Uw handleiding is per email verstuurd. Controleer uw email
Als u niet binnen een kwartier uw email met handleiding ontvangen heeft, kan het zijn dat u een verkeerd emailadres heeft ingevuld of dat uw emailprovider een maximum grootte per email heeft ingesteld die kleiner is dan de grootte van de handleiding.
Er is een email naar u verstuurd om uw inschrijving definitief te maken.
Controleer uw email en volg de aanwijzingen op om uw inschrijving definitief te maken
U heeft geen emailadres opgegeven
Als u de handleiding per email wilt ontvangen, vul dan een geldig emailadres in.
Uw vraag is op deze pagina toegevoegd
Wilt u een email ontvangen bij een antwoord en/of nieuwe vragen? Vul dan hier uw emailadres in.