641185
116
Verklein
Vergroot
Pagina terug
1/123
Pagina verder
The information in this publication is the property of ViewCast Corporation. Users may not use, reproduce or disclose this information
without the implied consent and written approval of the company.
Niagara SCX
®
and
Niagara SCX Explorer
User Guide
Document Number: 40-03240-03A
Date: 12.18.2008
Niagara SCX Release: 5.2.187.SP2
Copyrights, Proprietary, Table of Contents, Notices
ii ViewCast
Niagara SCX User Guide
ViewCast iii
COPYRIGHTS
Copyright© 2008 ViewCast Corporation. All rights reserved. Trademarks or registered trademarks of
ViewCast Corporation or its subsidiaries include:
ViewCast Niagara SCX
The ViewCast logo SimulStream
Niagara GoStream
The Niagara logo EZStream
Osprey
Trademarks or registered trademarks of Microsoft Corporation include:
Microsoft Windows Vista
Windows Windows Media
Windows Server
Trademarks or registered trademarks of RealNetworks, Inc. include:
RealNetworks Helix
RealPlayer RealProducer
Trademarks or registered trademarks of Apple, Inc. include QuickTime and iPod.
Registered trademarks of Adobe Systems Inc. include Adobe and Flash.
CORPORATE CONTACT INFORMATION
ViewCast collaborates and partners with various clients to integrate products into their individual
environments. For additional information, contact info@viewcast.com
. To purchase products, contact
sales@viewcast.com
. For technical support of existing products, contact the following:
Technical Assistance Contact Information
ViewCast USA Support Hours of Operation: Monday through Friday: 9:00am - 5:00pm Central Time.
Typical response time is within one business day for customers without a Priority Support Agreement.
Niagara Technical Support
Phone: 972.488.7157 Fax: 972.488.7111 or submit the technical support online request from the web site.
ViewCast
3701 West Plano Parkway, Suite 300, Plano, TX 75075-7840
Toll Free (U.S. Only): 800.540.4119 Web Site: http://www.viewcast.com
Copyrights, Proprietary, Table of Contents, Notices
iv ViewCast
DISCLAIMERS
ViewCast Corporation makes no representations or warranties with respect to the contents or use of
this manual and specifically disclaims any express or implied warranties of merchantability or fitness
for any particular purpose. Further, ViewCast Corporation reserves the right to revise this
publication to make enhancements in the products described in this manual, at any time, without
obligation to notify any person or entity of such revisions or changes. In no event will ViewCast
Corporation be liable for direct, indirect, special, incidental or consequential damages arising out of
the use or inability to use the product or documentation, even if advised of the possibility of such
damages.
WARRANTIES
For complete warranty details, refer to the specific warranty included with each product. General
warranty information includes the following:
Limited Warranty
V
iewCast warrants that the software performs substantially
according to the accompanying written materials for ninety
(90) days from the date of original purchase. ViewCast
disclaims all other warranties, either express or implied
(including without limitation, implied warranties of
merchantability and fitness for a particular purpose),
concerning this software and its accompanying written
materials.
Reseller Pass Through of
Standard Limited Warranties.
Resellers pass the ViewCast standard limited warranties for
the products through to the customer without
modification. Any modification of any product voids the
V
iewCast warranties or any other existing or available
w
arranty.
Niagara SCX User Guide
ViewCast v
Table of Contents
Preface: About This Guide ............................................................................................ 1
Product Description ................................................................................................. 1
Audience ................................................................................................................... 2
Conventions for This Guide ..................................................................................... 2
Chapter 1: Get Started .................................................................................................... 5
Prerequisites ............................................................................................................. 5
Package Contents .................................................................................................................... 5
Minimum System Requirements .......................................................................................... 5
Chapter 2: Install Niagara SCX ..................................................................................... 7
Install Niagara SCX on the Server ........................................................................... 7
Optional Install Niagara SCX Explorer on Remote Computers ........................... 12
Configure Niagara SCX for Firewall and DCOM .................................................. 15
SCX Server DCOM Settings ............................................................................................... 15
Set the SCX Server Firewall ................................................................................................ 18
SCX Explorer Modifications .................................................................................. 19
Launch Niagara SCX and Ensure It Performs Successfully ................................. 19
Chapter 3: Quick Start Niagara SCX ........................................................................... 21
Set Niagara SCX Environment .............................................................................. 21
Start Niagara SCX .................................................................................................. 21
Chapter 4: Niagara SCX and Explorer Basics ............................................................. 23
Niagara SCX Window Design ................................................................................ 23
Niagara SCX Toolbar ............................................................................................. 23
Use the Menu Bar .................................................................................................. 24
File .......................................................................................................................................... 25
Edit Menu .............................................................................................................................. 26
View ........................................................................................................................................ 27
Insert ....................................................................................................................................... 28
Create a New Niagara SCX Explorer View ............................................................... 28
Sample Encoder Views ................................................................................................. 29
Insert a New Encoder ................................................................................................... 30
Copyrights, Proprietary, Table of Contents, Notices
vi ViewCast
Encoder .................................................................................................................................. 31
Start an Encoder ............................................................................................................ 31
Stop an Encoder ............................................................................................................ 32
Reset an Encoder ........................................................................................................... 32
Help ........................................................................................................................................ 32
Start Niagara SCX Explorer ................................................................................... 32
Stop the Niagara SCX Explorer ............................................................................. 32
Chapter 5: Windows Media Options and Settings ...................................................... 33
Windows Media Encoder Tabs .............................................................................. 33
Windows Media Streaming Options Tabs ............................................................. 39
Chapter 6: DRM for Windows Media .......................................................................... 41
Enable DRM Function ........................................................................................... 41
Chapter 7: RealProducer Options and Settings ........................................................... 45
RealProducer Encoder Tabs .................................................................................. 45
RealProducer Streaming Options Tabs ................................................................. 53
Chapter 8: AVI Capture Options and Settings ............................................................ 55
AVI Capture Encoder Tabs ................................................................................... 55
AVI Capture Streaming Options Tabs ................................................................... 60
Chapter 9: Flash Options and Settings ........................................................................ 63
Flash Encoder Tabs ............................................................................................... 63
Flash Streaming Options Tabs .............................................................................. 69
Chapter 10: MPEG-4 Options and Settings ................................................................. 71
MPEG-4 Encoder Tabs .......................................................................................... 71
MPEG-4 Streaming Options Tabs ......................................................................... 85
Chapter 11: Niagara SCX and SimulStream ................................................................. 87
Set Up a SimulStream Session ............................................................................... 87
Filters ...................................................................................................................... 88
The Enable Checkbox ......................................................................................................... 89
Show N Filters per Device .................................................................................................. 90
Allow Multiple Instances of Each Filter ........................................................................... 90
Chapter 12: Tuning Utilities......................................................................................... 93
Vectorscope ............................................................................................................ 93
Understand the Display ......................................................................................... 94
Waveform Monitor ................................................................................................. 95
Understanding the Display .................................................................................... 96
Appendix A: An Introduction to Streaming Media ..................................................... 97
Streaming Infrastructure ........................................................................................ 97
Niagara SCX User Guide
ViewCast vii
Guide to Streaming Audio and Video Types ......................................................... 98
Appendix B: Terms and Acronyms ............................................................................ 101
Publication Index ....................................................................................................... 107
Copyrights, Proprietary, Table of Contents, Notices
viii ViewCast
Niagara SCX User Guide
ViewCast 1
Preface: About This Guide
This ViewCast Niagara SCX® User Guide provides set up, configuration, and setting information.
Product Description
The exclusive ViewCast Niagara SCX software offers robust monitoring and control of multiple,
remote, or distributed streaming encoders throughout an enterprise or across the Internet. It
includes:
Concurrent view of multiple encoders
Full control of encoding parameters
Video and audio input selection Encoder prole/target audience
Video resolution and format Stream destination and port
Video and audio attributes
Input/output preview
Vectorscope/waveform display for end-to-end color accuracy
Encoder statistics monitoring:
Frame rate, bit rate
CPU load
Audio level
Application integration via XML
This comprehensive system features:
Real-time capture and compression from a live video source.
Support for NTSC, PAL, Wide Screen, CIF, QCIF, SECAM, and all popular resolutions in
addition to custom user-defined picture dimensions.
Support for all widely used bitrates, from 16 kb/s to 4 Mb/s +…
Niagara SCX streaming media management software provides an optimal method for managing live
video broadcasting over the Internet and to mobile devices. It allows you to set up and control
Niagara® streaming systems positioned throughout your enterprise or anywhere in the world – all
from your desktop.
You can instantly view the status of all of your networked encoders, see which ones have active
encode sessions and step through the application to control and monitor each individual stream.
ViewCast delivers two versions of Niagara SCX – Niagara SCX Standard and Niagara SCX Pro.
Preface: About This Guide
2 ViewCast
The major difference between the two versions is that Niagara SCX Pro contains MPEG-4 encoding
technology and Niagara SCX Standard does not. Its basis remains anchored on an international
standard that is rapidly becoming the format of choice for streaming Internet video. Chapter 10 of
this publication more fully explains the MPEG-4 features, available only in Niagara SCX Pro. The
MPEG-4 implementation in SCX follows the guidelines of ISO/IEC 14496-2 specifications that
make the system compatible with the most popular third-party MPEG-4 implementations that use
the MPEG-4, Simple Profile and/or Advanced Simple Profile.
Audience
The audience for this guide includes anyone who uses or administers the Niagara SCX software.
They should have a basic technical understanding of their media-encoding environment and some
basic experience with streaming media principles and practices. They should also understand and use
Microsoft Windows.
Conventions for This Guide
This guide uses the document conventions specified in Table 1 to help you identify different types of
information.
Table 1. Guide Conventions
Convention Description Example
Bold text Characters to enter when
referenced in a procedure. The
name of keys or keys to press.
In the example, enter DTMF as
the group type.
Select CapsLock to make all
letters uppercase
Italics Explanatory text within a
command sample.
Also references chapter and sub
titles.
Enter type of port (Building Ports)
Refer to the section Terms and
Acronyms in Chapter 1
Horizontal Ellipses Horizontal line omissions in a
sequence
...
Vertical Ellipses Vertical line omissions in a
sequence
.
.
.
NOTE:
Provides supplemental
information.
NOTE: The prompt may not
display if …
IMPORTANT!
Provides important data that does
affect how the system or software
responds.
IMPORTANT! You must
install Niagara SCX prior
to configuring SCX
options…
Niagara SCX User Guide
ViewCast 3
Convention Description Example
Provides information to help you
avoid possible damage to
hardware or a system crash
(without data loss).
Use case sensitive
commands to keep from
destroying…
Warning!
Provides information to ensure
that you avoid potential injury,
death, or permanent system
damage.
Warning! Do NOT
touch exposed wires.
Action column Step/action/result tables contain
instructions. Always start
instructions with an active verb.
Type SPAR.
Result column In a step/action/result table,
contains anything important that
the action causes to happen.
The console displays the new
parameter values.
Preface: About This Guide
4 ViewCast
Niagara SCX User Guide
ViewCast 5
Chapter 1: Get Started
Niagara SCX streaming media management software provides an optimal method for managing live
video broadcasting over the Internet and to mobile devices. It allows you to set up and control
Niagara® streaming systems positioned throughout your enterprise or anywhere in the world – all
from your desktop.
You can instantly view the status of all of your networked encoders, see which ones have active
encode sessions and step through the application to control and monitor each individual stream.
ViewCast delivers two versions of Niagara SCX – Niagara SCX Standard and Niagara SCX Pro.
Go to Appendix A: An Introduction to Streaming Media if you need a c
omplete overview on streaming
audio and video over an IP network. Appendix A explains how streaming media works. You may
also access http://www.viewcast.com/support_str
eaming.asp for more information about streaming
media.
Prerequisites
Check the package contents and ensure your system meets the system requirements indicated in
Minimum System Requirements prior t
o configuring the Niagara SCX.
Package Contents
Completely unpack all of the contents from the box, inspect each item for damage, and ensure that
you have all of the components listed below:
Software Niagara SCX software CD
Guides
User Guide (on the CD)
Quick Start Guide
Licensing SCX License Key (located on back of CD case)
Do not continue with the installation if you find any of these components missing or damaged.
Contact ViewCast or the reseller where you purchased your Niagara SCX software for assistance in
obtaining any missing or replacement parts.
Minimum System Requirements
Windows XP or Windows Server 2003
Microsoft .NET Framework version 2.X or higher
Microsoft DirectX 9.0 or higher (for video preview or diagnostics)
Chapter 1: Get Started
6 ViewCast
Dual core processor or better
512 Mb memory
Network connection
10,000 RPM IDE hard drive or better for uncompressed video file capture
Installed Osprey drivers and video capture card
Niagara SCX User Guide
ViewCast 7
Chapter 2: Install Niagara SCX
You must meet the minimum system requirements and perform the specified steps to install Niagara
SCX.
The major steps you must take to install Niagara SCX include:
1. Set up the server or computer and install Niagara SCX.
2. Install Niagara SCX Explorer on all remote laptops or workstations (optional).
NOTE: The version of Niagara SCX on the server and any optional remote clients must be
the same.
Install the Niagara SCX Explorer on each system you wish to use to control the encoders
remotely.
3. Configure DCOM and firewall settings (refer to the section titled Configure Niagara SCX
Settings for Firewall and DCOM and SCX Server DCOM Settings on page 17).
WARNING! You must install Niagara SCX on a Microsoft Windows XP® or
2003 environment. Niagara SCX is not compatible with Microsoft Windows
Vista®.
Install Niagara SCX on the Server
Perform the following steps to install Niagara SCX on the server (encoding computer).
1. Insert the CD and select Install Niagara SCX on the startup window.
Figure 1. SCX CD Startup Window
2. Verify the SCX splash screen (Figure 2) displays.
Figure 2. Niagara SCX Splash Screen
Chapter 2: Install Niagara SCX
8 ViewCast
3. Click Next and verify the ViewCast Niagara SCX Setup Wizard window (Figure 3)
displays.
Figure 3. Niagara SCX Setup Wizard
4. Click Next and verify the License Agreement window (Figure 4) displays.
Figure 4. License Agreement
5. Select I Agree.
NOTE: If you select I Do Not Agree, the installation aborts and you can no longer
continue installing the application.
6. Click Next and verify the Product License Key window (Figure 5) displays.
Figure 5. Product License Key
7. Enter a valid SCX license number.
Niagara SCX User Guide
ViewCast 9
NOTE: If you do not input an SCX license, SCX continues to run in demo mode. You have
full functionality for 30 days when the software no longer allows access unless you
enter a valid SCX license number.
8. Click Next and verify the Product Registration window (Figure 6) displays.
NOTE: Users may optionally enter the Product Registration information.
Figure 6. Product Registration
9. Click Next and verify the Automatic Update Notifications window (Figure 7) displays.
Figure 7. Automatic Update Notifications
10. Click Next and verify the Confirm Installation window (Figure 8) displays.
Figure 8. Confirm Installation
Chapter 2: Install Niagara SCX
10 ViewCast
11. Click Next and verify the installation begins when the Installing ViewCast Niagara SCX
window (Figure 9) displays.
Figure 9. Installing View
Cast Niagara SCX
12. Verify the Windows Media Format 9.5 Runtime Setup dialog box (Figure 10) displays.
Figure 10. Windows Media Format 9.5 Runtime Setup
NOTE: The dialog box may display behind another window since the application has no
control over the focus of the display. If you do not see the dialog box, move the
SCX dialog box to another area of the screen to reveal it.
13. Click Yes and verify the Runtime Setup License dialog box (Figure 11) displays.
Figure 11. Runtime Setup Dialog
Niagara SCX User Guide
ViewCast 11
14. Click Yes and verify the Windows Media Format 9.5 Runtime Setup completion dialog
box (Figure 12) displays to indicat
e completion of the setup.
Figure 12. Runtime Setup Completion Dialog
15. Click OK and verify the Niagara SCX Login Credentials dialog box (Figure 13) displays.
Figure 13. Niagara SCX Login Credentials Dialog
16. Enter the valid User Name and Password for the SCX user.
NOTE: This user must have administrative rights and privileges.
17. Click OK and verify the Service Login Update dialog box (Figure 14) displays.
Figure 14. Service Login Update
18. Click OK when installation completes and verify the ViewCast Niagara SCX restart dialog
box (Figure 15) displays pro
mpting you to reboot.
Figure 15. ViewCast Niagara Restart Dialog
19. Click Yes and verify the machine reboots.
Chapter 2: Install Niagara SCX
12 ViewCast
20. Verify the Windows Desktop now has a shortcut for Niagara SCX (Figure 16).
Figure 16. Niagara SCX Shortcut
Optional Install Niagara SCX Explorer on
Remote Computers
You may choose to install Niagara SCX Explorer on remote computers and connect to the primary
server for managing your encoding options. If you elect to install only on your server or primary
system, you may skip this section.
Install Niagara SCX Explorer on each system that requires remote control accessibility. Prior to
installing the Niagara SCX Explorer, you must install the following:
Windows Service Pack 2
Microsoft .NET Framework
Microsoft DirectX 9.0 or higher
Follow the procedures below to install the full implementation of Niagara SCX Explorer on your
system once you install the above items. If you only want to install the SCX Explorer, see Installing
Niagara SCX Explorer on a Remote Computer.
Install the Niagara SCX Explorer as follows:
1. Insert the installation CD.
Figure 17. Niagara SCX CD
2. Click Install Niagara SCX Explorer on the installation window (Figure 17) when the install
window displays.
3. Click Next when the Niagara SCX splash window (Figure 18) displays.
Niagara SCX User Guide
ViewCast 13
Figure 18. Niagara SCX Splash
4. Click Next when the Welcome to the Niagara SCX Encoder Explorer Setup Wizard
(Figure 19) window displays.
Figure 19. Welcome
5. Select one of the following when the License Agreement window (Figure 20) displays.
I Agree if you wish to continue with the installation.
I Do Not Agree if you wish to discontinue and abort the installation.
Figure 20. License Agreement
NOTE: If you select I Do Not Agree, the installation stops and you can no longer install
Niagara SCX.
Chapter 2: Install Niagara SCX
14 ViewCast
6. Click Next.
7. The system displays the installation window (Figure 21) and begins installing the application
in the default
location C:\Program Files\ViewCast\Niagara SCX Encoder Explorer.
NOTE: This installs SCX in the default folder the system already provides in the Folder
field.
Figure 21. Installing Niagara SCX Encoder Explorer
8. Click Next to confirm that you want to install the application when the Confirm Installation
window (Figure 22) displays.
Fi
gure 22. Confirm Installation
9. Niagara SCX finishes installing, and the Installation Complete window (Figure 23) displays.
Figure 23. Installation Complete
10. Click Close to acknowledge the complete installation.
Niagara SCX User Guide
ViewCast 15
NOTE: You now completely installed the Niagara SCX and SCX Explorer applications.
You must install the SCX version on the Niagara streaming server or your
customized server. You then may optionally load Niagara SCX Explorer on your
remote workstations (laptops and computers) and use it remotely from the Niagara
streaming server or your office.
IMPORTANT! You must restart your computer before you begin to use SCX.
Use Windows Update to check for any critical updates to the Microsoft .NET
Framework. This crucial step allows SCX and SCX Explorer to run properly. The
Microsoft .NET Framework, an infrastructure library, provides the foundation
required for Niagara SCX and Niagara SCX Explorer to operate effectively.
Configure Niagara SCX for Firewall and
DCOM
You must take the next step to configure the application – Niagara SCX – after installing Niagara
SCX and Niagara SCX Explorer (for remote installations).
To do this, you must set the firewall and DCOM configurations first.
The Microsoft Windows XP Service Pack 2 protects the machine from attacks over the network.
These changes also prevent the SCX clients from communicating with the servers. The following
sections outline the steps required to allow this communication.
The two-part changes involve both the server and client. To implement the changes to the server,
open the DCOM to the previous level of authentication. For the clients, Microsoft Windows XP
notifies users when ViewCast applications try to access the network. The user simply needs to select
Unblock to allow the request to complete. Once they do this, users do not receive this request again
for that application.
Browse to the web address http://support.microsoft.com/default.as
px?kbid=875357#5 for
additional information on how to configure the Microsoft Windows XP Service Pack 2 Firewall.
SCX Server DCOM Settings
The system requires users to modify their server environments so that Niagara SCX and Niagara
SCX Explorer run Microsoft Windows XP with Service Pack 2.
Complete the steps below on the servers to allow the SCX clients to communicate with the server:
1. Go to Start ¾ Control Panel ¾ Performance and Maintenance in Category View or
Start ¾ Control Panel ¾ Administrative Tools in Classic View.
2. Double-click Administrative Tools in the Control Panel ¾ Performance and
Maintenance option if you are in Category View.
3. Double-click Component Services in the Administrative Tools option.
Chapter 2: Install Niagara SCX
16 ViewCast
4. Expand the Component Services entry to show the Computers entry.
5. Right-click the My Computer option and choose Properties from the right-mouse menu
(Figure 24).
Figure 24. Control Panel Selections
6. Select the COM Security tab (Figure 25) in the My Computer Properties dialog box.
Figure 25. My Computer ¾ COM Security
7. Click Edit Limits in the Access Permissions pane of My Computer Properties window.
8. Select the ANONYMOUS LOGON user name from the Access Permission window
(Figure 26).
Figure 26. Access Permission
9. Make sure you check Allow on Local Access and Remote Access in the Permission for
ANONYMOUS LOGON field.
10. Click OK in the Access Permissions dialog box.
NOTE: This returns you to the COM Security tab options.
11. Click Edit Limits… in the Launch and Activation Permissions pane of the My
Computer Properties window once it displays.
Niagara SCX User Guide
ViewCast 17
12. Select the ANONYMOUS LOGON user name in the Groups or user names pane on the
Security Limits window (Figure 27).
Figure 27. Launch Per
missions ¾ Security Limits
13. Ensure you check Allow on Local Launch, Remote Launch, Local Activation, and
Remote Activation in the Permissions for ANONYMOUS LOGON pane of the
Security Limits window (Figure 29).
14. Click Add.
15. En
ter the user names ANONYMOUS LOGON; Everyone in the Enter the object
names to select edit pane (Figure 28).
16. Click Check Names
to ensure you entered the names correctly.
17. Click OK in the Security Limits window to accept your selections.
18. Repeat the steps 7 through 17 for Everyone (Figure 29).
Figure 28. Select Users or
Groups
Figure 29. Launch Permission ¾ Default Security
19. Ensure you check Allow on Local Launch, Remote Launch, Local Activation, and
Remote Activation in the Permissions for Everyone pane (or ANONYMOUS LOGON
for non-domain environments).
NOTE: Repeat all steps for both ANONYMOUS LOGON and Everyone. Check that
both names appear when you check the names.
20. Click OK in the Launch Permissions dialog box.
Chapter 2: Install Niagara SCX
18 ViewCast
21. Click OK in the My Computer Properties dialog box.
22. Start / Restart the Niagara SCX service.
Set the SCX Server Firewall
Niagara SCX software applications communicate to the services using DCOM. Windows XP Service
Pack 2 installs a software firewall. DCOM uses a number of dynamic IP ports that make it difficult to
configure the firewall to allow these to pass. You can disable the firewall to allow all of the ports to
pass; otherwise, search the Microsoft support site for information on configure DCOM through firewall.
Some links to this information include:
http://www.microsoft.com/windows/windowsmedia/serve/firew
all.aspx
http://support.microsoft.com/default.as
px?scid=kb;en-us;250367
and http://msdn.microsoft.com/library/default.asp?url=/library/en-
us/wmisdk/wmi/connecting_through_windows_firewall.asp
Perform the following steps to add the applications to the Windows Firewall.
1. Select Start
2. Select Control Panel.
3. Select Security Center ¾ Windows Firewall (Figure 30) to start the Firewall
Configura
tion Utility.
Figure 30. Windows Firewall
4. The primary option (select Off) on the General tab lets you disable the firewall completely.
5. Click OK twice to dismiss the Windows firewall.
6. An alternate option involves setting the Exceptions tab by performing the following:
Select the Exceptions tab (Figure 31).
Figure 31. Windows Firewall ¾ Exceptions
Niagara SCX User Guide
ViewCast 19
Select Add Program from the Windows Firewall ¾ Exceptions tab.
Select Browse from the Add Program window (Figure 32).
Figure 32. Add Program
Locate the following applications and add them to the exceptions list:
Program Files\ViewCast\Niagara SCX\NiagaraSCXEncoderManager.exe
Program Files\ViewCast\Niagara SCX\SCXEncoderExplorer.exe
SCX Explorer Modifications
The SCX clients communicate to the servers through normal DCOM connections as well as a few
static ports (4320 and 4322). Windows XP prompts the user twice, once for the ViewCast Client
Manager. To do this, perform the steps below.
1. Select Unblock to grant access the applications from the Windows Security Alert window.
2. When you complete this once, the system does not ask for permission again (Figure 33).
Figure 33. Windows Security Alert
Windows XP prompts the user to allow access for ViewCast Client Manager depending on the
applications you install.
Launch Niagara SCX and Ensure It
Performs Successfully
1. Log on once the machine reboots.
2. Your desktop should have a shortcut for Niagara SCX (Figure 34) that you now may double
click to l
aunch it successfully.
Figure 34. SCX Desktop Shortcut
Chapter 2: Install Niagara SCX
20 ViewCast
NOTE: The system creates a program group for SCX in the Start Menu during installation.
You may have to connect to the server from your optionally connected remote machine.
3. To connect to the server from your remote desktop perform the following:
Check the IP address of the server (Start ¾ Help and Support Center¾ Use
Tools…view Computer Information ¾ My Computer Information ¾ View General
System Information About This Computer)
Click the link icon ( )
Enter IP address for the server in Computer name: field on Connect To Server window
Figure 35. Connect To Server
NOTE: You may have to wait for the remote workstation to connect to the server.
4. Select Start ¾ All Programs ¾ ViewCast ¾ Niagara SCX.
5. Verify the program group contains links for various applications (Figure 36).
Figure 36. Application Links
6. Open the Help link and look at the manual.
7. Ensure you have all encoder options available to include:
AVI MPEG-4 (Niagara SCX Pro only)
Flash Windows Media (WME)
RealProducer
8. Exit and close Niagara SCX after you validate that all options remain available and function
as they should.
Niagara SCX User Guide
ViewCast 21
Chapter 3: Quick Start
A quick start for Niagara SCX includes configuring the environment then starting and using Niagara
SCX.
Set Niagara SCX Environment
To set the environment for Niagara SCX, you must configure it per the steps in Table 2.
Table 2. Set Up the Niagara SCX Environment
Step Action
1.
Ensure the server includes a ViewCast Osprey card and sits on a DNS network.
2.
Install Niagara SCX on the server.
3.
Install Niagara SCX Explorer on all remote machines (optional).
NOTE: You may optionally choose to install the Niagara SCX Explorer on each
encoding system you wish to control remotely.
If you use remote systems, ensure the servers and remote systems all sit on the
same DNS network and have visibility to each other.
4.
Open Niagara SCX Explorer on the remote workstation you plan to use to control
the encoders (optional).
5.
Connect to the server with Niagara SCX running.
6.
Ensure the server and all optionally connected remote workstations have visibility
to each other.
Start Niagara SCX
Table 3 provides a brief overview of the easiest method to get started with Niagara SCX. Other more
detailed chapters in this guide provide additional information. Table 3 represents the basic steps for
you to
begin encoding.
Table 3. Begin Encoding
Step Action
1.
Start Niagara SCX or verify the service started.
NOTE: Install Niagara SCX on each optional encoding workstation you wish to
use to control encoding remotely.
Chapter 3: Quick Start
22 ViewCast
Step Action
2.
Open Niagara SCX Explorer on any configured remote workstation you plan to
use to control the encoders (optional).
3.
Connect to a server running Niagara SCX.
4.
Insert the desired encoder type you wish to run on the server.
You can choose any of the following:
Flash
®
Video
RealProducer
®
Windows Media
®
Encoder
MPEG-4 (only if you have a
Niagara SCX Pro license)
AVI Capture
5.
Enter a name to identify the encoder.
NOTE: Repeat steps 4 and 5 for each encoder. You can start and stop the
encoders on an as-needed basis.
6.
Select the video and audio input for this encoder on the Input tab.
NOTE: This may also include a file you need to convert to a streaming format.
7.
Configure the video and audio settings, if needed, on the Video and Audio
Settings tab.
8.
Select the output on the Output tab.
NOTE: RealProducer has two output settings. Determine, with the first output, if
the output exists as a live broadcast you plan to save in a file for future use.
The second Output tab establishes the target audience.
Windows Media encoder has only one output tab. It contains both the target
audience and information for saving the video to a file.
9.
Enter the author and copyright information on the Author Info tab under the
streaming options for the encoder if necessary.
10.
Click the View tab under streaming options to preview the video.
NOTE: Steps 9 and 10 are optional.
11.
Click Start on the Operations tab to begin encoding.
NOTE: Click Streaming Options to view statistics for the encoding session.
Select the various tabs to see data about the encoding session.
Niagara SCX User Guide
ViewCast 23
Chapter 4: Niagara SCX and
Explorer Basics
This chapter explores the basics of the SCX service and application. It includes the following topics:
Niagara SCX Window Design
Niagara SCX Toolbar
The Menu Bar
Creating a new Niagara SCX view
Starting and stopping the Niagara SCX service
Niagara SCX Window Design
The Niagara SCX works like the Windows Explorer window.
The left panel of the Niagara SCX (Figure 37) window displays your Niagara SCX Encoder Manager and
a
ssociated encoders. When you select an encoder, its corresponding properties display on the right.
Figure 37. Niagara SCX
Niagara SCX Toolbar
The Niagara SCX toolbar (Figure 38) contains the most frequently used options in the application.
This guide details and explains each option in later sections. On the application, click each of the
buttons to learn more how to use them.
Figure 38. Niagara SCX Explorer Toolbar
Chapter 4: Niagara SCX and Explorer Basics
24 ViewCast
Table 4. Tool Bar Options
Option Description
New
Allows you to create a new Niagara SCX file.
Allows you to group and save different SCX views for monitoring
the status of multiple encoders.
Refer to Creating a New Niagara SCX View for instructions
on how to create a new Niagara SCX file.
Open
Allows you to connect to and use existing Niagara SCX settings.
Save
Allows you to save any SCX combinations you put in Niagara
SCX.
You can save many different combinations with unique file
names.
Connect
The system opens a prompt for you to enter the computer name or IP
address and connect to a server running Niagara SCX.
Encoder
Allows you to add a new or different encoder.
Options may include:
AVI
Flash
RealProducer
Windows Media
MPEG-4 (for Niagara SCX Pro only)
Delete
Allows you to delete files and entries from Niagara SCX.
Help
Provides a copy of the Niagara SCX User Guide.
The toolbar also lists the same options you see on the Niagara SCX menu bar. Refer to the section
Use the Menu Bar fo
r specific details about menu bar options.
Use the Menu Bar
The Menu bar contains some options not available on the Niagara SCX toolbar. The following sub-
sections explain each option in detail.
NOTE: Some menu options also appear on the toolbar.
Niagara SCX User Guide
ViewCast 25
File
The File menu contains some options (Figure 39) not available on the toolbar. Table 5 explains each
option in detail.
Figure 39. File Menu Options
Table 5. Menu Bar File Options
Option Description
File New
Allows you to create a new Niagara SCX file.
This allows you to group and save different SCX views for
monitoring the status of multiple encoders.
For instructions on how to create a new Niagara SCX file, see
Creating a New Niagara SCX View.
File Open Allows you to open an existing Niagara SCX file.
1.
Click File and Open to view the Open window (Figure 40)
that displays.
Figure 40. Open
2.
Highlight the file you want to open; click Open.
NOTE: The Niagara SCX window displays (Figure 41).
Figure 41. Niagara SCX Encoder Selection
NOTE: The previously saved configuration automatically opens when
Niagara SCX launches.
The frame on the left side lists Niagara SCX servers.
Chapter 4: Niagara SCX and Explorer Basics
26 ViewCast
Option Description
File Save
Allows you to save any SCX combinations you put in Niagara
SCX.
You can save different combinations with unique file names.
NOTE: Click File then select Save to save any changes to an
existing file when the system returns to the Niagara SCX
window. This automatically saves the current file name to
the existing location.
File Save As Lets you save changes to existing file and apply a different file name.
NOTE: This also applies when you save the file the first time.
1.
Click File.
2.
Select Save As when the Save As window displays (Figure 42).
Figure 42. Niagara SCX Save As
3.
Type the file name to use for this configuration.
4.
Click Save.
NOTE: The system returns to the Niagara SCX window.
File Recent File The system stores and displays your last four saved files thereby
allowing you to load a Niagara SCX file quickly.
File Exit Exits Niagara SCX.
Edit Menu
The Edit menu provides functions (Figure 43) that allow you to delete, rename, or reconnect
encoders, as set forth in Table 6.
Figure 43. Edit Menu O
ptions
Niagara SCX User Guide
ViewCast 27
Table 6. Menu Bar Edit Options
Option Description
Edit Delete Allows you to remove the connection to SCX or a specific
encoder attached to that SCX application.
NOTE: You can also delete a SCX or encoder by clicking the
right-mouse button and selecting Delete while you have
the specific item highlighted.
Edit
Rename
Allows you to rename the connection to SCX or a specific
encoder.
NOTE: You can also delete Niagara SCX or an encoder by
clicking the right-mouse button and selecting Delete
while you have the specific item highlighted.
Edit
ReConnect
Allows you to reconnect to Niagara SCX.
This becomes useful when you stop the Niagara SCX service
and start it again while running Niagara SCX Explorer.
NOTE: When you launch a Niagara SCX Explorer, it may appear
unresponsive if Niagara SCX becomes unavailable for any
reason.
Wait a minute for the application to become available and
the system to flag the unresponsive Niagara SCX.
You can also reconnect to Niagara SCX by clicking the
right-mouse button and selecting Reconnect while you
continue to highlight the specific item.
View
The View menu contains options to view the toolbar and the status bar. Table 7 explains each option
in detail.
Table 7. Me
nu Bar View Options
Option Description
View Toolbar
Allows you to view the tool bar on the SCX window.
You must check (select) this option.
View Status Bar
Allows you to view the status bar on the SCX window.
You must check (select) this option.
Chapter 4: Niagara SCX and Explorer Basics
28 ViewCast
The View menu (Figure 44) allows you to view or hide certain elements of the interface (Figure 44).
Figure 44. View Menu Options
Insert
The Insert menu contains options to insert the Niagara SCX Encoder Manager or an encoder
(Figure 45). Table 8 explains each option in detail.
Table 8. Menu Bar Inser
t Options
Option Description
Insert Niagara SCX
Encoder Manager
Allows you to insert the SCX Encoder Manager.
Insert Encoder Allows you to insert an encoder.
Figure 45. Insert Menu Options
Create a New Niagara SCX Explorer View
Niagara SCX Explorer views allow you to save a list showing Niagara SCXs where you connect and
display that list later. You save time by recalling a saved view instead of manually connecting to each
individual Niagara SCX.
NOTE: Views essentially act like bookmarks. They do not contain any in-depth information
about your managers (such as the types of encoders you connected).
1. Click File and select New to create a new Niagara SCX Explorer view.
NOTE: The Niagara SCX Explorer window (Figure 46) displays with no Niagara SCX
listed.
Figure 46. Niagara SCX Explorer
Niagara SCX User Guide
ViewCast 29
NOTE: The left panel of SCX Explorer represents the SCX Encoder Manager and the right
panel represents the encoder properties.
2. Select Insert.
3. Select Niagara SCX.
4. Confirm the computer name listed or use Browse to locate your computer name when the
Connect to Server window displays.
5. Select OK.
NOTE: A window displays (Figure 47) listing the Niagara SCX Encoder Manager you insert.
Figure 47. Niagara SCX Encoder Insert Selection
6. To insert encoders, select Insert ¾ Encoder.
7. Select from the drop-down menu of available encoders and click OK.
8. Repeat the process to insert multiple encoders.
9. Each time you insert a new encoder, highlight New Encoder to rename (Figure 48) and
identify
the different encoders.
Figure 48. Name Encoder
10. When you finish inserting all the encoders, select File ¾ Save As and enter a file name for
the new combination of Niagara SCX and encoders.
Sample Encoder Views
Figure 49 provides a sample of the Manual.cex view combination containing one Niagara SCX with
two complete encoders and one encoder being added.
Figure 49. Sample Encoder View (Two Encoders+Add Encoder)
Chapter 4: Niagara SCX and Explorer Basics
30 ViewCast
Insert a New Encoder
After adding Niagara SCX Encoder Manager, you must take the next step and insert any new
encoder(s) that you want the specific Niagara SCX to control.
1. Go to the Insert menu and select Encoder.
NOTE: The New Encoder window displays (Figure 50).
Figure 50. New Encoder
NOTE: You can alternately insert an encoder by clicking the right-mouse button and
selecting Insert a New Encoder while you have the specific item selected.
2. Select the encoder type you want to add from the Encoder Driver drop-down list.
3. Click OK.
NOTE: The Connect to Server window (Figure 51) displays.
Figure 51. Connect to Server
4. Type the machine or computer name where the encoder is running.
NOTE: The design of Niagara SCX allows you to have encoders running on various systems
and have only one iteration of Niagara SCX controlling all of them.
5. Click OK to save the encoder you want to connect. If you do not want to save the encoder,
click Cancel.
NOTE: The Niagara SCX Encoder Manager (Figure 52) with the new encoder displays.
Figure 52. New Encoder Display
6. Click the plus sign (+) next to the Niagara SCX Encoder Manager name.
7. Click to select the new encoder.
8. Go to the Edit menu and select Rename (Figure 53).
Niagara SCX User Guide
ViewCast 31
Figure 53. Rename Encoder Display
9. Type a name for the encoder such as Encoder 1 or Main Auditorium.
10. Repeat the above steps for any additional encoders installed on this sever.
11. Press Enter to save the name change.
Encoder
The Encoder menu contains options to start, stop and reset an encoder. Table 9 explains each
option in detail.
Table 9. Menu Bar Encoder Options
Option Description
Encoder Start Allows you to start an encoder.
Encoder Stop Allows you to stop an encoder.
Encoder Reset Allows you to reset an encoder.
The Encoder menu allows you to start, stop, and reset any encoder displayed in the Niagara SCX
Explorer (Figure 54).
Figure 54. Encoder Menu Options
Start an Encoder
Click to select an encoder in the left side of the Niagara SCX Explorer. Click the Encoder menu
and select Start to start an encoder.
NOTE: The Niagara SCX Explorer starts the encoder.
You can alternately start an encoder by clicking the right-mouse button and selecting Start
Encoder while you have the specific item selected.
Chapter 4: Niagara SCX and Explorer Basics
32 ViewCast
Stop an Encoder
Click to select an encoder in the left side of the Niagara SCX Explorer . Click the Encoder menu
and select Stop to stop an encoder. The Niagara SCX Explorer stops the encoder.
NOTE: You can also stop an encoder by clicking the right-mouse button and selecting Stop
Encoder while you have the specific item selected.
Reset an Encoder
Click to select an encoder in the left side of the Niagara SCX Explorer. Click the Encoder menu and
select Reset to reset an encoder.
NOTE: The Niagara SCX Explorer resets the encoder.
When you reset an encoder, you perform the equivalent of stopping and starting the encoder.
You can also restart an encoder by clicking the right-mouse button and selecting Restart Encoder
while you have the specific item selected.
Help
The Help menu contains options to view the help contents and find information about the Niagara
SCX. Table 9 explains each option in detail.
Table 10. Menu Bar Help Options
Option Description
Help Contents Allows you to see the contents in the help file.
About Niagara
Encoder
Explorer
Allows you view information about the installed Niagara SCX
software (including version release).
Start Niagara SCX Explorer
To start the Niagara SCX Explorer Manager, perform the steps in Table 3 once you completely
configure the environment as specified in Table 2.
Stop the Niagara SCX Explorer
Once you configure all the necessary settings, you may exit the Niagara SCX Explorer application by
selecting File ¾ Exit. You may also click the exit icon ( ) in the upper right of the window.
Niagara SCX User Guide
ViewCast 33
Chapter 5: Windows Media
Options and Settings
Table 11 and Table 12 explain the encoder and streaming options tabs available when using
Windows Media as the encoding option.
NOTE: Niagara SCX now supports Windows Media 9.
Windows Media Encoder Tabs
Table 11 describes the configuration options available on the tabs accessible from the Windows
Media Encoder windows.
Table 11. Windows Media Encoder Tabs
Tab Description
Auto/Name
Allows users to set the name for the encoder and the option to
Automatically Start Device at Service Startup (Figure 55).
The encoder starts when the Niagara SCX service starts if you select this
auto start option.
The Located On field provides the name of the machine where the
encoder resides.
Figure 55. Windows Media Properties
Input Allows the user to set the input sources to use for Live or File encoding and
Transcoding (Figure 56).
Figure 56. Wind
ows Media Input Sources
Chapter 5: Windows Media Options and Settings
34 ViewCast
Tab Description
Live Encoding
Select the Live radio button.
Select the video capture device in the Video field and select the audio
device in the Audio field for live encoding.
The system lists all known video and audio devices in the drop-down
menus.
File Encoding
Select the File Conversion/File Transcode radio button to encode a
previously recorded file (such as .avi or .wav files) into streaming format.
Next, choose from the Input File dropdown menu for a file name to
insert.
Remember the file name applies to the encoder system and not the system
currently running SCX Explorer.
IMPORTANT! When Niagara SCX and SCX Explorer reside on different computers, always start
your browse for files at My Network Places. Then work down or enter the entire file
pathname beginning with the system name (such as \\fileserver\c\videos).
If you simply enter a file name, you may inadvertently browse your local computer when
the media file resides on the remote computer.
Video Settings
Control the capture properties for the selected video device.
The Input field lists all input connectors available for the capture device.
The Signal field lists the various video standards the capture device
supports.
You can adjust capture properties such as proportion, video size, and
width/height using the provided fields.
Adjust additional capture properties of brightness, contrast, saturation,
and hue individually for each input source using the sliding bars.
When making such adjustments, verify your adjustments apply to the
selected input.
Otherwise, your adjustments apply to all the input sources listed.
These capture properties remain available regardless of whether the
encoder starts or remains idle.
Refer to Figure 57.
Figure 57. Windows Media Video Settings
Niagara SCX User Guide
ViewCast 35
Tab Description
Gamma
Corrections
Adjust the gamma of the incoming video.
Gamma refers to the response curve of video cameras/CRTs.
When you capture video with a camera, the camera response remains
deliberately nonlinear – it boosts low lumen values and compresses high
lumen values – based on two reasons:
(1) It increases the effective bandwidth in the low lumen range, where you
need it, at the expense of the high lumen range, where you need it less.
(2) It matches the response characteristics of TV sets and monitors.
The calibration specified in video standards matches the requirements of
cameras and TV sets in broadcast use.
This usually, however, does not match the needs of computer-based
applications or the response curves of computer monitors.
Therefore, you often need a correction inverse to the original bias and
you may want to tune for the characteristics of a particular monitor.
When you disable the gamma correction filters:
Set the gamma correction value to exactly 1.00
The software-based gamma filter works in pass-through mode with no
effect on the video and no processing bandwidth use.
Uncheck the Gamma checkbox
When you enable gamma correction, the text box and graphic show the
factor applied.
If you run preview video while adjusting the filter, you see your adjustment
effects interactively.
You can use one of three methods to adjust the gamma correction value:
(1) Directly enter text in the numeric text box.
(2) Click [+] and [-].
(3) Select Signal field (NTSC, PAL, or SECAM) from the list of options.
NOTE: The value represents the inverses of the gamma bias that you
applied at the video source per the video standard so the resulting
video becomes gamma-neutral.
To enable:
Check the enable field.
When the setting equals 1.00, you make the response characteristics
and the bandwidth identical to the original picture.
Gamma correction applies to all filters and all output pins on each device.
You can have different gamma corrections for different physical devices.
Tuning Utilities
Access the Tuning Utilities for a selected card.
Refer to Chapter 12: Tuning Utilities for additional diagnostics information.
Audio Settings
Lists the input source options for selected audio devices.
Makes left and right volume levels available for adjustments if the audio
capture device supports them.
Chapter 5: Windows Media Options and Settings
36 ViewCast
Tab Description
Fields remain available whether device runs or remains idle (Figure 58).
Figure 58. Windows Media Audio Settings
Output
Allows users to select the encoder profile based on the expected audience
for the created content (Figure 59).
Use the drop-down box to select the desired audience.
The default port setting for Windows Media is 7007.
Each encoder on a machine must use a unique port.
For example, use 7008 for the second encoder, 7009 for the third, etc.
Use the Enable Pull and Push Output settings as follows:
With a pull, the client application (Windows Media player) connects
directly to the SCX service to view a stream
With a push, the SCX service pushes the stream to a Windows Media
server to view the stream.
NOTE: You must enter different ports in the Pull Port and Push Port
fields when using both modes.
Check Save to file if you want to save the content to a file.
Remember the encoder system references the file name and not the system
running SCX Explorer.
When Niagara SCX and SCX Explorer reside on different computers,
always start your browse for files at My Network Places and work down
or enter entire file pathname starting with the system name.
If you simply enter a file name, you may inadvertently browse your local
computer when the media file resides on the remote computer.
Figure 59. Windows Media Output Settings
Niagara SCX User Guide
ViewCast 37
Tab Description
Filters
Use (optionally) to enable SimulStream and deinterlacing (Figure 60).
Refer to Filters on page 88 for more information about this topic.
Figure 60. Windows Media Filters
NOTE: Refer to Chapter 12: Tuning Utilities for more diagnostics information.
Profile Settings Provide options for the Profile Settings, such as Capture Profile, and settings
for Digital Rights Management (Figure 61).
Fi
gure 61. Windows Media Profile Settings
NOTE: The system allows Enable DRM check box to give DRM protection
for this encoder if you imported a DRM Profile (Chapter 6).
Video Cropping
Provides options to set the size and aspect ratio of chosen video output.
When you enable cropping, the system automatically switches the video
size to FULL and the cropping measurements default to the FULL size.
From these settings, you can set a custom cropping size (Figure 62).
Figure 62. Windows Media Video Cropping Settings
Watermarking
Provides options for placing a watermarked graphic over your video
output.
Chapter 5: Windows Media Options and Settings
38 ViewCast
Tab Description
You can adjust the color balance, size, and opacity of the graphic.
Note that you can only watermark a 24-bit bmp.
The system does not accept any other image formats (Figure 63).
Figure 63. Windows Media Video Watermarking Settings
Closed Caption
Allows you to adjust the positioning of closed caption text if applicable, on
your video feed.
You can choose to overlay the closed caption text on the video stream or
you can embed the text so it displays in a specialized space below the video
display in Windows Media Player.
Alternatively, you can choose to capture the closed caption text into a
SAMI file (Figure 64).
NOTE:
The SAMI file path you enter must include a shared directory,
partition, or drive.
Figure 64. Windows Media Closed Caption Settings
Identity Address Provides the Address Type (type of encoder you are using), the Network
Address, and the Computer Name of the machine performing the encoding
(Figure 65).
Figure 65. Wind
ows Media Identity Address Settings
Niagara SCX User Guide
ViewCast 39
Tab Description
Operations
Control the encoder with Start, Stop, and Reset on the Operations tab.
Once you select all the other options:
Select Start to begin encoding.
Select Stop to end the session.
Select Reset to stop then restart an encoding session (Figure 66).
NOTE: Progress reports (Starting Encoder, Encoder started, Stopped) and
error messages appear in the Status section of this window.
Figure 66. Windows Media Operations Settings
Windows Media Streaming Options Tabs
Table 12 explains additional streaming options tabs available with Windows Media encoding.
Table 12. Windows Media Streaming Options Tabs
Tab Description
Statistics
Reports on the current encoder status (Figure 67).
In the first section:
The Current column displays the cumulative packets and bytes
transferred since the encoder started.
The Dropped column displays the number of dropped packets/bytes.
In the next panel see Current and Average bit rate and FPS.
The Clients drop-down box lists the devices currently receiving the stream
from the encoder, including media players and servers.
The bottom panel reports current system CPU load and audio level.
Figure 67. Windows Media Streaming Statistics Settings
View
Allows the user to monitor the output of the encoder.
Chapter 5: Windows Media Options and Settings
40 ViewCast
Tab Description
Select Start Preview to initiate the view following a buffer delay.
Select Stop Preview to stop displaying the video immediately.
Playback stops automatically if you select another encoder.
The system provides two options, Copy LAN URL and Copy Internet
URL, to copy two addresses to the Windows copy buffer.
Launch URL allows the system to launch the Windows Media Player to
view the stream (Figure 68).
Figure 68. Preview the Video while Encoding
Preview while
Encoding
To watch the incoming video or see the output video standards, you must
have installed Osprey
®
SimulStream for the capture.
Osprey SimulStream lets a single card produce multiple outputs.
For more information or to purchase SimulStream for your Osprey capture
card, visit http://viewcast.com/product_SimulStream.asp
.
Authoring Information
Enter information about the video content on this window.
If you choose to enter any information in the fields provided, you must do
so before you start the encoder (Figure 69).
F
igure 69. Windows Media Streaming Options Authoring Information
Niagara SCX User Guide
ViewCast 41
Chapter 6: DRM for Windows
Media
You can protect your content using Digital Rights Management (DRM) technology. Niagara SCX
allows you to encrypt your content with DRM technology while you encode. You can apply DRM
while encoding to a file and when broadcasting a stream. Users must obtain a license to play the
content. This license contains the key to unlock the content and the rights that govern its use.
NOTE: A third-party license provider issues licenses. You must, therefore, set up an account
with a third-party license provider to protect your content.
Enable DRM Function
Niagara SCX automatically detects any available DRM profiles imported on the encoding system. If
you have no DRM profiles installed, the system disables the DRM functions in Niagara SCX.
Perform the steps in Table 13 to enable the DRM function in Niagara SCX.
Table 13. Enable DRM Function in Niagara SCX
Step Action
1.
Set up an account and create a DRM profile with a third-party license provider.
Use the Windows Media Encoder application included with the Niagara streaming
systems or available as a free download from Microsoft (http://www.microsoft.com
) to import the DRM profile.
Restart the encoding system where you install Niagara SCX allowing the software to
auto-detect and enable its DRM functions.
2.
Import a DRM profile.
Set up an account with a licensed provider and create a DRM profile if you do not
already have one.
Use Windows Media Encoder to import the profile on the encoding system once
you create the DRM profile.
3.
Copy the DRM profiles to a protected location (Figure 70) on the encoding system to
ensure nothing accide
ntally removes or erases them.
Figure 70. DRM Profiles Location
Chapter 6: DRM for Windows Media
42 ViewCast
Step Action
4.
Start the Windows Media Encoder application (Figure 71) on the encoder system.
5.
Click Cancel when the New Session Wizard (Figure 72) displays.
Figure 71. E
ncoder Start Up
Figure 72. New Session
6.
Click Properties under the top menu bar.
Figure 73. Properties Option
7.
Click the Security tab (Figure 74).
Figure 74. Security Tab
Niagara SCX User Guide
ViewCast 43
Step Action
8.
Click Import and browse to the location of the DRM profiles on the system’s hard drive.
9.
Select (highlight) the DRM profile (Figure 75) you wish to import and click the Ope
n
option.
Figure 75. Input DRM Profile
10.
Repeat this process for each DRM profile you wish to import.
11.
Exit from the Windows Media Encoder application when you finish.
12.
Select the No option if the system asks if you want to save your encoding session.
13.
Restart the system.
Chapter 6: DRM for Windows Media
44 ViewCast
Niagara SCX User Guide
ViewCast 45
Chapter 7: RealProducer Options
and Settings
Table 14 and Table 15 explain the encoder and streaming options tabs available when using
RealProducer as the encoding option.
RealProducer Encoder Tabs
Table 14 describes the configuration options available on the tabs accessible from the RealProducer
encoder windows.
Table 14. RealProducer Encoder Tabs
Tab Description
Auto/Name
Allows users to set the name for the encoder and select the option to
Automatically Start Device at Service Startup (Figure 76).
The encoder starts when the Niagara SCX service starts if you select this
auto start option.
The Located On field provides the name of the machine where the encoder
resides.
Figure 76. RealProducer Properties
Input Allows the user to set the input sources to use for Live or File
Conversion/File Transcode (Figure 77).
Figure 77. RealProducer
Input Sources
Chapter 7: RealProducer Options and Settings
46 ViewCast
Tab Description
Live Encoding
Select the Live radio button.
Select the video capture device in the Video field and select the audio device
in the Audio field for live encoding.
The system lists all known video and audio devices in the drop-down
menus.
File
Conversion/File
Transcode
Select the File Conversion/File Transcode radio button to encode a
previously recorded file (such as .avi or .wav files) into streaming format.
Next, choose from the Input File dropdown menu for a file name to insert.
Remember the file name applies to the encoder system and not the system
currently running SCX Explorer.
IMPORTANT! When Niagara SCX and SCX Explorer reside on different
computers, always start your browse for files at My Network Places.
Work down or enter the entire pathname beginning with system name.
If you simply enter a file name, you may inadvertently browse your local
computer when the media file resides on the remote computer.
Video Settings
Control the capture properties for the selected video device (Figure 78).
The Input field lists all input connectors available for the capture device.
The Signal field lists the various video standards the capture device
supports.
You can adjust capture properties such as proportion, video size, and
width/height using the provided fields.
Adjust additional capture properties of brightness, contrast, saturation,
and hue individually for each input source using the sliding bars.
When making such adjustments, verify your adjustments apply to the
selected input.
Otherwise, your adjustments apply to all the input sources listed.
These capture properties remain available regardless of whether the encoder
starts or remains idle.
Figure 78. RealProducer Video Settings
Gamma
Corrections
Adjust the gamma of the incoming video.
Allows users to configure both unicast and multicast ports.
Niagara SCX User Guide
ViewCast 47
Tab Description
Unicast communication applies to a piece of information that users send
from one point to another point.
In this case, there is just one sender and one receiver.
Unicast transmission refers to users sending a packet from a single
source to a specified destination.
Unicast represents the predominant form of transmission on LANs and
within the Internet.
All LANs (such as Ethernet) and IP networks support the unicast
transfer mode.
Users should be familiar with the standard unicast applications (such as
http, smtp, ftp and telnet) that employ the TCP transport protocol.
Multicast communication applies to users sending a piece of information
from one or more points to a set of other points.
In this case there may be one or more senders.
The system distributes information to a set of receivers (there may be
from none to N receivers).
A video server sending out networked TV channels represents one
example of a multicast application.
Simultaneous delivery of high quality video to each of a large number of
delivery platforms exhausts the capability of even a high bandwidth
network with a powerful video clip server.
This poses a major salability issue for applications that required
sustained high bandwidth.
One way to ease scaling significantly to larger groups of clients is to
employ multicast networking.
Multicasting, a networking technique, delivers the same packet
simultaneously to a group of clients.
Gamma refers to the response curve of video cameras/CRTs.
When you capture video with a camera, the camera response remains
deliberately nonlinear – it boosts low lumen values and compresses high
lumen values – based on two reasons:
(1) It increases the effective bandwidth in the low lumen range, where you
need it, at the expense of the high lumen range, where you need it less.
(2) It matches the response characteristics of TV sets and monitors.
The calibration specified in video standards matches the requirements of
cameras and TV sets in broadcast use.
This usually, however, does not match the needs of computer-based
applications or the response curves of computer monitors.
Therefore, you often need a correction inverse to the original bias and
you may want to tune for the characteristics of a particular monitor.
When you disable the gamma correction filters:
Set the gamma correction value to exactly 1.00
The software-based gamma filter works in pass-through mode with no
effect on the video and no processing bandwidth use.
Chapter 7: RealProducer Options and Settings
48 ViewCast
Tab Description
Uncheck the Gamma checkbox
When you enable gamma correction, the text box and graphic show the
factor applied.
If you run preview video while adjusting the filter, you see your adjustment
effects interactively.
You can use one of three methods to adjust the gamma correction value:
(1) Directly enter text in the numeric text box.
(2) Click [+] and [-].
(3) Select Signal field (NTSC, PAL, or SECAM) from the list of options.
NOTE: The value represents the inverses of the gamma bias that you
applied at the video source per the video standard so the resulting
video becomes gamma-neutral.
To enable:
Check the enable field.
When the setting equals 1.00, you make the response characteristics and
the bandwidth identical to the original picture.
Gamma correction applies to all filters and all output pins on each device.
You can have different gamma corrections for different physical devices.
Tuning Utilities
Access the Tuning Utilities for a selected card.
Refer to Chapter 12: Tuning Utilities for additional diagnostics information.
Audio Settings
Lists the input source options for selected audio devices (Figure 79).
Makes left and right volume levels available for adjustments if the audio
capture device supports them.
Fields remain available whether device runs or remains idle.
Figure 79. RealProducer Audio Settings
Output
Allows users to select the encoder profile based on the expected audience
for the created content (Figure 80).
Use the drop-down box to select the desired audience.
RealProducer only allows Push Output and Save to file.
Check Save to file if you want to save the content to a file.
Remember the encoder system references the file name and not the system
Niagara SCX User Guide
ViewCast 49
Tab Description
running SCX Explorer.
When Niagara SCX and SCX Explorer reside on different computers,
always start your browse for files at My Network Places and work down or
enter the entire file pathname beginning with the system name.
If you simply enter a file name, you may inadvertently browse your local
computer when the media file resides on the remote computer.
Set the output destination on this tab under Output to Server, Output to
File, or both, simultaneously.
Check Output to Server and fill in the requested information to connect
the stream to a RealNetworks
®
server for live streaming.
Check Output to File to save the encoded content to a file.
Figure 80. RealProducer Output Settings
Output(2)
Exists as a second output tab (Figure 81).
Offers a range of video quality settings and audio content options.
You must designate a target audience on this window.
You may make more than one target audience selection if you select
SureStream.
Lists the Input Source options for the selected Audio/Content.
Makes these fields available whether the encoder starts or remains idle.
NOTE: You cannot use SureStream if you designate one of your selected
audiences as the type VBR.
Figure 81. RealProducer Output(2) Settings
Chapter 7: RealProducer Options and Settings
50 ViewCast
Tab Description
Filters
Use (optionally) to enable SimulStream
®
and deinterlacing (Figure 82).
Refer to Filters on page 88 for more information about this topic.
Figure 82. RealProducer Filters
NOTE: Refer to Chapter 12: Tuning Utilities for additional diagnostics
information.
Options
Allows you to insert the Frame Rate you wish to use to run the video.
Also includes a Video Noise Filter with choices of whether you want to
include Inverse Telecine and De-Interlace Filter (Figure 83).
Figure 83. RealProducer
Encoder Options
Inverse Telecine
You generally photograph movie film at 24 frames per second (fps).
When you convert a film into digital video at 30 fps, the system adds extra
frames by merging frames together or copying entire frames.
Refer to the film-to-video conversion process as telecine.
The inverse-telecine filter looks for frames added during a telecine process
and removes them.
This eliminates redundant encoding and improves the quality of the encoded
frames.
Deinterlace Filter
Removes artifacts that the system can introduce when encoding NTSC or
PAL formatted video.
These artifacts usually manifest as jaggedness surrounding a moving object.
Video Cropping
Provides options for setting the video output size and aspect ratio.
When you enable cropping, the system automatically switches the video size
to FULL and the cropping measurements default to the FULL size.
Niagara SCX User Guide
ViewCast 51
Tab Description
From these settings, you can set a custom cropping size (Figure 84).
Figure 84. RealProducer Video Cropping Settings
Watermarking
Provides options for placing a watermarked graphic over video output.
You can adjust the graphic color balance, size, and opacity (Figure 85).
NOTE: You can only watermark a 24-bit bmp. The system does not accept
any other image formats.
Figure 85. RealProducer Video Watermarking Settings
Closed Caption
Allows you to adjust the positioning of closed caption text, if applicable, on
your video feed.
You can choose to overlay the closed caption text on the video stream or
you can embed the text so it displays in a specialized space below the video
display in RealProducer Player.
Alternatively, you can choose to capture closed caption text into a SAMI file
(Figure 86).
NOTE:
The SAMI File path you enter must include a shared directory,
partition, or drive.
Figure 86. RealProducer Closed Caption Settings
Chapter 7: RealProducer Options and Settings
52 ViewCast
Tab Description
Identity Address Provides the Address Type (type of encoder being used), the Network
Address, and the Computer Name of the machine performing the encoding
(Figure 87).
Figure 87. RealProducer Identity Address Settings
Operations
Use Start, Stop, and Reset on the Operations tab to control the encoder
(Figure 88).
Once you select all the other options:
Select Start to begin encoding.
Select Stop to end the session.
Select Reset to stop then restart an encoding session.
NOTE: Progress reports (Starting Encoder, Encoder started, Stopped)
and error messages appear in the Status section of this window.
Figure 88. RealProducer Operations Settings
Niagara SCX User Guide
ViewCast 53
RealProducer Streaming Options Tabs
Table 15 explains the RealProducer streaming options tabs including statistics (Stats – Target, Video,
and Audio) and view.
Table 15. RealProducer Streaming Options Tabs
Tab Description
Statistics
Reports on the current status (Figure 89) of the encoder to include:
Input
Output
Audio Format
Video Quality
File Type
Duration
Total bit rate
The CPU Utilization field reports the current CPU load.
The last field addresses the audio level on the encoder.
Figure 89. RealProducer Streaming Statistics Options
Target Stats
Include video and audio bitrates and frames per second (Figure 90).
Figure 90. RealProducer Target Statistics Settings
Video Stats
Reports on current video encoder statistics (Figure 91).
Figure 91. RealProducer Video Stats Settings
Chapter 7: RealProducer Options and Settings
54 ViewCast
Tab Description
Audio Stats
Reports on current audio statistics (Figure 92).
Figure 92. RealProducer Audio Stats Settings
View
Allows users to monitor the encoder output.
Select Start Preview to initiate the view following a buffer delay.
Select Stop Preview to stop displaying the video immediately.
Playback stops automatically if you select another encoder.
The system provides two options, Copy LAN URL and Copy
Internet URL, for copying two addresses to the Windows copy buffer.
Launch URL allows you to launch the RealProducer Player to view the
stream (Figure 93).
Figure 93. Preview the RealProducer V
ideo while Encoding
Preview while
Encoding
If you want to watch the incoming video or see the output video, you
must have installed Osprey
®
SimulStream for the capture card.
Osprey SimulStream enables a single card to produce multiple outputs.
For more information or to purchase SimulStream for your Osprey
capture card, visit http://viewcast.com/product_SimulStream.asp
.
Authoring Information
Enter information about the video content on this window (Figure 94).
If you choose to enter any information in the fields provided, you must
do so before you start the encoder.
Figure 94. RealProducer Streaming Options Authoring Information
Niagara SCX User Guide
ViewCast 55
Chapter 8: AVI Capture Options
and Settings
Table 16 and Table 17 explain the options available when using the AVI Capture features of Niagara
SCX.
NOTE: When capturing uncompressed AVI files, be sure that your system’s hard drive speed
can keep up with the data you capture. If not, the capture file drops frames and loses quality.
Developers recommend a 10,000-RPM IDE hard disk or above for full resolution
uncompressed SD capture. You should also defragment your hard drive on a regular basis.
AVI Capture Encoder Tabs
Table 16 describes configuration options available on tabs accessible from AVI Capture windows.
Table 16. AVI Capture Encoder Tabs
Tab Description
Auto/Name
Allows users to set the name for the encoder and select the option to
Automatically Start Device at Service Startup (Figure 95).
The encoder starts when the Niagara SCX service starts if you select this
auto start option.
The Located On field gives the name of the machine where the
encoder resides.
Figure 95. AVI Properties
Chapter 8: AVI Capture Options and Settings
56 ViewCast
Tab Description
Input Allows the user to set the input sources to use (Figure 96).
Figure 96. AVI Input Sources
Video Settings
Control the capture properties for the selected video device (Figure 97).
The Input field lists all input connectors available for capture device.
Signal field lists various video standards the capture device supports.
You can adjust capture properties such as proportion, video size, and
width/height using the provided fields.
Use sliding bars to adjust additional capture properties of brightness,
contrast, saturation, and hue individually for each input.
When making adjustments, verify adjustments apply to chosen input.
Otherwise, your adjustments apply to all the input sources listed.
These capture properties remain available regardless of whether the
encoder starts or remains idle.
Figure 97. AVI Video Settings
Gamma Corrections
Adjust the gamma of the incoming video.
Gamma refers to the response curve of video cameras/CRTs.
When you capture video with a camera, the camera response remains
deliberately nonlinear – it boosts low lumen values and compresses high
lumen values – based on two reasons:
(1) It increases the effective bandwidth in low lumen ranges, where you
need it, at the expense of high lumen ranges, where you need it less.
(2) It matches the response characteristics of TV sets and monitors.
The calibration specified in video standards matches the requirements
of cameras and TV sets in broadcast use.
This usually, however, does not match the needs of computer-based
applications or the response curves of computer monitors.
Therefore, you often need a correction inverse to the original bias
and you may want to tune for the characteristics of a particular
Niagara SCX User Guide
ViewCast 57
Tab Description
monitor.
To enable:
Check the enable field.
When the setting equals 1.00, you make the response characteristics
and the bandwidth identical to the original picture.
When you disable the gamma correction filters:
Set the gamma correction value to exactly 1.00
The software-based gamma filter works in pass-through mode with
no effect on the video and no processing bandwidth use.
Uncheck the Gamma checkbox
When you enable gamma correction, the text box and graphic show the
factor applied.
If you run preview video while adjusting the filter, you see your
adjustment effects interactively.
You can use one of three methods to adjust the gamma correction
value:
(1) Directly enter text in the numeric text box.
(2) Click [+] and [-].
(3) Select Signal field (NTSC, PAL, or SECAM) from the options list.
Gamma correction applies to all filters and output pins on each device.
The gamma correction can be different for different physical devices.
NOTE: These values represent the inverses of the gamma bias that you
applied at the video source per the video standard so the resulting
video becomes gamma-neutral.
Tuning Utilities
Access the Video Diagnostics (Tuning Utilities) for a selected card.
NOTE: Refer to Chapter 12: Tuning Utilities for ad
ded diagnostics data.
Audio Settings
Lists the input source options for selected audio devices (Figure 98).
Makes left and right volume level adjustments available if the audio
capture device supports them.
Fields remain available whether device runs or remains idle.
Figure 98. AVI Audio Settings
Chapter 8: AVI Capture Options and Settings
58 ViewCast
Tab Description
Output
Allows users to set the output frame rate, format, and destination.
Note that Niagara SCX and SCX Explorer reside on different
computers.
Always start your browse for files at My Network Places and work
down or enter the entire file pathname beginning with the system
name (Figure 99).
If you simply
enter a file name, you may inadvertently browse your
local computer when the media file resides on the remote
computer.
Figure 99. AVI Output Capture Settings
Video Cropping Provides options for setting the size and aspect ratio of your chosen video
output (Figure 100).
Figure 100. A
VI Video Cropping Settings
Watermarking
Provides options for placing a watermarked graphic over your video
output (Figure 101).
You can adjust the color balance, size, and opacity of the graphic.
NOTE: You can only watermark a 24-bit bmp. The system does not
accept any other image formats.
Figure 101. AVI Video Watermarking Settings
Niagara SCX User Guide
ViewCast 59
Tab Description
Closed Caption Allows you to adjust the position of any closed-captioned text you want to
add if you use the Osprey 3.X or a later version of the driver for video
capturing (Figure 102).
Figure 102. AVI Closed Caption Settings
Identity Address Provides the Address Type (type of encoder being used), the Network
Address, and the Computer Name of the machine performing the
encoding (Figure 103).
Fi
gure 103. AVI Identity Address Settings
Operations
Use Start, Stop, and Reset on the Operations tab to control the
encoder (Figure 104).
Once you select all the other options:
Select Start to begin encoding.
Select Stop to end the session.
Select Reset to stop then restart an encoding session.
NOTE: Progress reports (Starting Encoder, Encoder started,
Stopped) and error messages appear in Status section of window.
Figure 104. AVI Operations Settings
Chapter 8: AVI Capture Options and Settings
60 ViewCast
AVI Capture Streaming Options Tabs
This section of the manual explains the following options available when utilizing the AVI Capture
Streaming Options Tabs.
Table 17 explains the AVI streaming options tabs including:
Statistics (Stats) Audio Stats
Target Stats View
Video Stats
Table 17. AVI Streaming Options Tabs
Tab Description
Statistics
Reports on the current status (Figure 105) of the encoder to include:
Capture Statistics
Video Statistics
Audio Statistics
The CPU Load field reports the current CPU load percentage.
The last field addresses the audio level on the encoder.
Figure 105. AVI Streaming Statistics Options
View
Allows users to monitor the encoder output (Figure 106).
Select Start Preview to initiate the view following a buffer delay.
Select Stop Preview to stop displaying the video immediately.
Playback stops automatically if you select another encoder.
System provides Copy URL to copy the addresses to Windows buffer.
Launch URL allows you to launch the AVI Player to view the stream.
Figure 106. Preview the AVI Video
Niagara SCX User Guide
ViewCast 61
Tab Description
Preview
while
Encoding
If you want to watch the incoming video or see the output video, you
must have installed Osprey
®
SimulStream for the capture card.
Osprey SimulStream enables a single card to produce multiple outputs.
For more information or to purchase SimulStream for your Osprey
capture card, visit http://viewcast.com/product_SimulStream.asp
.
Chapter 8: AVI Capture Options and Settings
62 ViewCast
Niagara SCX User Guide
ViewCast 63
Chapter 9: Flash Options and
Settings
Flash formats only allow users to capture to a file and does NOT include live streaming.
NOTE: Users who purchase the Niagara Pro, Niagara Pro II or GoStream Surf may license live
streaming capabilities with the Flash option on these encoders.
Table 18 and Table 19 describe Flash tab options and Flash streaming tab options available when you
use Flash encoding features of Niagara SCX. This encoder applies only to Flash files.
Flash Encoder Tabs
Table 18 describes the configuration options available on the tabs accessible from the Flash windows.
Table 18. Flash Encoder Tabs
Tab Description
Auto/Name
Allows users to set the name for the encoder and select the option to
Automatically Start Device at Service Startup (Figure 107).
The encoder starts when Niagara SCX starts if you select auto start option.
The Located On field provides machine name where the encoder resides.
Figure 107. Flash Properties
Input Allows the user to set the input sources to use for Live or File Conversion/
File Transcode (Figure 108).
Figure 108. Flash Inpu
t Sources
Live Encoding
Select the Live radio button.
Select the video capture device in the Video field and select the audio
Chapter 9: Flash Options and Settings
64 ViewCast
Tab Description
device in the
A
udio field for live encodin
g
.
The system lists all known video and audio devices in drop-down menus.
File Encoding
Select the File Conversion/File Transcode radio button to encode a
previously recorded file (such as .avi files) into streaming format.
Click the box to right of Input File field to browse for file name to insert.
Remember the file name applies to the encoder system and not the system
currently running SCX Explorer.
IMPORTANT! When Niagara SCX and SCX Explorer reside on different computers,
always start your browse search for files at My Network Places. Then work down
or enter the entire file pathname beginning with the system name (such as
\\fileserver\c\videos).
If you simply enter a file name, you may inadvertently browse your local computer
when the media file resides on the remote computer.
Video Settings
Control the capture properties for the selected video device.
The Input field lists all input connectors available for the capture device.
The Signal field lists the various video standards the capture device
supports.
You can adjust capture properties such as proportion, video size, and
width/height using the provided fields.
Adjust additional capture properties of brightness, contrast, saturation,
and hue individually for each input source using the sliding bars.
When making such adjustments, verify your adjustments apply to the
selected input.
Otherwise, your adjustments apply to all the input sources listed.
These capture properties remain available regardless of whether the
encoder starts or remains idle (Figure 109).
Figure 109. Flash Video
Settings
Gamma
Corrections
Adjust the gamma of the incoming video.
Gamma refers to the response curve of video cameras/CRTs.
When you capture video with a camera, the camera response remains
deliberately nonlinear – it boosts low lumen values and compresses high
lumen values – based on two reasons:
(1) It increases the effective bandwidth in the low lumen range, where you
need it, at the expense of the high lumen range, where you need it less.
Niagara SCX User Guide
ViewCast 65
Tab Description
(2) It matches the response characteristics of TV sets and monitors.
The calibration specified in video standards matches the requirements of
cameras and TV sets in broadcast use.
This usually, however, does not match the needs of computer-based
applications or the response curves of computer monitors.
Therefore, you often need a correction inverse to the original bias and
you may want to tune for the characteristics of a particular monitor.
When you disable the gamma correction filters:
Set the gamma correction value to exactly 1.00
The software-based gamma filter works in pass-through mode with no
effect on the video and no processing bandwidth use.
Uncheck the Gamma checkbox
When you enable gamma correction, the text box shows the factor applied.
If running preview video while adjusting the filter, you see adjustment
effects interactively.
You can use one of three methods to adjust the gamma correction value:
(1) Directly enter text in the numeric text box.
(2) Click [+] and [-].
(3) Select Signal field (NTSC, PAL, or SECAM) from the options list.
Gamma correction applies to all filters and output pins on each device.
The gamma correction can be different for different physical devices.
NOTE: These values represent the inverses of the gamma bias that you
applied at the video source per the video standard so the resulting
video becomes gamma-neutral.
Tuning Utilities
Access the Tuning Utilities for a selected card.
NOTE: Refer to Chapter 12: Tuning Utilities for ad
ditional diagnostics
information.
Audio Settings
Lists the input source options for selected audio devices (Figure 110).
Makes left and right volume levels available for adjustments if the audio
capture device supports them.
Fields remain available whether device runs or remains idle.
Figure 110. Flash Audio Settings
Chapter 9: Flash Options and Settings
66 ViewCast
Tab Description
Output
Allows users to set the output destination (Figure 111).
Check Save to file if you want to save the content to a file.
Remember the encoder system references the file name and not the system
running SCX Explorer.
When Niagara SCX and SCX Explorer exist on different computers, always
start your browse for files at My Network Places and work down or enter
the entire file pathname beginning with the system name.
If you simply enter a file name, you may inadvertently browse your local
computer when the media file resides on the remote computer.
Figure 111. Flash Output Settings
Filters Use (optionally) to enable SimulStream
®
and deinterlacing (Figure 112).
You can select deinterlace options.
The system accepts settings for inverse telecine and motion
adaptations/thresholds.
Deinterlace Filter
Removes artifacts that the system can introduce when encoding NTSC,
PAL, or SECAM formatted video.
These artifacts usually manifest as jaggedness around a moving object.
Settings include off, auto, inverse telecine, motion adaptations, and motion
threshold
Inverse Telecine
You generally photograph movie film at 24 frames per second (fps).
When you convert a film into digital video at 30 fps, the system adds extra
frames by merging frames together or copying entire frames.
Developers refer to the film-to-video conversion process as telecine.
The inverse-telecine filter looks for frames added during a telecine process
and removes them.
This eliminates redundant encoding and improves the quality of the
encoded frames.
Figure 112. Flash Encoder Filters
Niagara SCX User Guide
ViewCast 67
Tab Description
Video Cropping
Provides options to set size and aspect ratio of chosen video output.
When you enable cropping, the system automatically switches the video
size to FULL and the cropping measurements default to the FULL size.
From these settings, you can set a custom cropping size (Figure 113).
Figure 113. Flash Video Cropping Settings
Watermarking
Provides options for placing watermarked graphic over your video output.
You can adjust color balance, size, and opacity of the graphic (Figure 114).
NOTE: You can only watermark a 24-bit bmp. The system does not
accept any other image formats.
Figure 114. Flash Video Watermarking Settings
Closed Caption
Allows adjusting position of closed caption text, if applicable, on video.
You can choose to overlay the closed caption text on the video stream and
define its position (Figure 115).
Alternatively, you can capture the closed caption text into a SAMI file.
NOTE: The SAMI File path you enter must include a shared directory,
partition, or drive.
Figure 115. Flash Closed Caption Settings
Chapter 9: Flash Options and Settings
68 ViewCast
Tab Description
Identity Address Provides the Address Type (type of encoder used), the Network Address and
the Computer Name of the machine performing the encoding (Figure 116).
Figure 116. Flash Identity Address Settings
Operations
Use Start, Stop, and Reset on the Operations tab to control the encoder.
Once you select all the other options:
Select Start to begin encoding.
Select Stop to end the session.
Select Reset to stop then restart an encoding session.
NOTE: Progress reports (Starting Encoder, Encoder started,
Stopped) and error messages appear in Status on the Operations
window (Figure 117).
Figure 117. Flash Operations Settings
Niagara SCX User Guide
ViewCast 69
Flash Streaming Options Tabs
Table 19 explains the Flash streaming options tabs including: Statistics (Stats) and View
Table 19. Flash Streaming Options Tabs
Tab Description
Statistics
Reports on the current CPU load and audio level encoder status.
The CPU Load field reports the current CPU load.
The last field addresses the audio level on the encoder (Figure 118).
Figure 118. Flash Streaming Statistics Options
View
Allows users to monitor the encoder output (Figure 119).
Select Start Preview to initiate the view following a buffer delay.
Select Stop Preview to stop displaying the video immediately.
Playback stops automatically if you select another encoder.
Figure 119. Preview the Flash Video while Encoding
Preview while Encoding
If you want to watch the incoming video or see the output video, you must
have installed Osprey
®
SimulStream for the capture card.
Osprey SimulStream enables a single card to produce multiple outputs.
For more information or to purchase SimulStream for your Osprey capture
card, visit http://viewcast.com/product_SimulStream.asp
.
Niagara SCX User Guide
ViewCast 71
Chapter 10: MPEG-4 Options and
Settings
This section of the guide explains the options and settings available when using the MPEG-4
Encoding features of Niagara SCX Pro.
NOTE: Niagara SCX Pro contains MPEG-4. Niagara SCX Standard does not. Therefore, this
chapter of the manual refers only to Niagara SCX Pro and not Niagara SCX Standard.
MPEG-4 Encoder Tabs
Table 20 and Table 21 describe the configuration options available on the tabs accessible from
MPEG-4 encoder windows and the corresponding streaming options windows.
The first window you see is the Niagara SCX window (Figure 120). You must first select Niagara
SCX Encode
r Manager from the Insert option before you can create an encoder.
Figure 120. Niagara SCX Encoder Explorer
After selecting the Niagara SCX Encoder Manager, you see your computer’s name inserted on the
right-hand side of the window.
Figure 121. Computer Name Display on Niagara SCX Encoder Explorer
Chapter 10: MPEG-4 Options and Settings
72 ViewCast
You must first select from the Insert option, then select Encoder (Figure 122) to create an encoder.
Figure 122. Insert, Encoder Option
The system provides you a set of options (Figure 123) for the type of encoder you want to create.
Select MPEG4 Encoder Driver. Then, click OK.
Figure 123. Encoder Options List
The window in Figure 124 displays after you select the MPEG4 Encoder Driver.
Figure 124. MPEG4 Encoder Driver Selection
Table 20. MPEG-4 Encoder Tabs
Tab Description
Auto/Name
Allows users to set the name for the encoder and select the option to
Automatically Start Device at Service Startup (Figure 125).
The encoder starts when Niagara SCX service starts if you select auto start.
The Located On field provides the machine name where the encoder resides.
The window now lists MPEG-4 as an available encoder (Figure 126).
Niagara SCX User Guide
ViewCast 73
Tab Description
Figure 125. MPEG-4 Properties
Figure 126. MPEG-4 Encoder Name
Input Allows the user to set the input sources to use for Live or File Conversion/File
Transcode (Figure 77).
Figure
127. MPEG-4 Input Sources
Live Encoding
Select the Live radio button.
Select the video capture device in the Video field and select the audio device in
the Audio field for live encoding.
The system lists all known video and audio devices in the drop-down menus.
File
Conversion/File
Select the File Conversion/File Transcode radio button to encode a
previously recorded AVI file into streaming format.
Chapter 10: MPEG-4 Options and Settings
74 ViewCast
Tab Description
Transcode
Next, choose from the Input File dropdown menu by clicking the box to the
right of the field for a file name to insert.
NOTE: The Niagara SCX video and audio settings remain inactive when you
use File Encoding.
Remember the file name applies to the encoder system and not the system
currently running SCX Explorer.
IMPORTANT! When Niagara SCX and SCX Explorer reside on different computers, always
start your browse for files at My Network Places. Then work down or enter the
entire file pathname beginning with the system name (such as \\fileserver\c\videos).
If you simply enter a file name, you may inadvertently browse your local computer
when the media file resides on the remote computer.
Video Settings
Control the capture properties for the selected video device (Figure 128).
The Input field lists all input connectors available for the capture device.
The Signal field lists the various video standards the capture device supports.
You can adjust capture properties such as proportion, video size, and
width/height using the provided fields.
Adjust additional capture properties of brightness, contrast, saturation, and
hue individually for each input source using the sliding bars.
When making such adjustments, verify your adjustments apply to the selected
input.
Otherwise, your adjustments apply to all the input sources listed.
These capture properties remain available regardless of whether the encoder
starts or remains idle.
Figure 128. MPEG-4 Video Settings
Gamma
Corrections
Adjust the gamma of the incoming video.
Gamma refers to the response curve of video cameras/CRTs.
When you capture video with a camera, the camera response remains
deliberately nonlinear – it boosts low lumen values and compresses high lumen
values – based on two reasons:
(1) It increases the effective bandwidth in the low lumen range, where you need
it, at the expense of the high lumen range, where you need it less.
(2) It matches the response characteristics of TV sets and monitors.
Niagara SCX User Guide
ViewCast 75
Tab Description
The calibration specified in video standards matches the requirements of
cameras and TV sets in broadcast use.
This usually, however, does not match the needs of computer-based
applications or the response curves of computer monitors.
Therefore, you often need a correction inverse to the original bias and you
may want to tune for the characteristics of a particular monitor.
When you disable the gamma correction filters:
Set the gamma correction value to exactly 1.00
The software-based gamma filter works in pass-through mode with no
effect on the video and no processing bandwidth use.
Uncheck the Gamma checkbox
When you enable gamma correction, the text box and graphic show the factor
applied.
If you run preview video while adjusting the filter, you see your adjustment
effects interactively.
You can use one of three methods to adjust the gamma correction value:
(1) Directly enter text in the numeric text box.
(2) Click [+] and [-].
(3) Select Signal field (NTSC, PAL, or SECAM) from the options list.
Gamma correction applies to all filters and all output pins on each device. The
gamma correction can be different for different physical devices.
NOTE: These values represent the inverses of the gamma bias that you applied
at the video source per the video standard so the resulting video becomes
gamma-neutral.
Tuning Utilities
Access the Tuning Utilities option for a selected card.
Shows tuning utilities options for selected devices (Figure 129).
NOTE: Refer to
Chapter 12: Tuning Utilities
for added diagnostics data.
Figure 129. MPEG-4 Tuning Utilities Settings
Audio Settings
Lists the audio input options for selected audio devices.
Makes left and right volume level adjustments available if the audio capture
device supports them.
Chapter 10: MPEG-4 Options and Settings
76 ViewCast
Tab Description
Fields remain available whether device runs or remains idle (Figure 130).
Figure 130. MPEG-4 Audio Settings
Output
Allows users to set output options (Figure 131).
Check Save to File if you want to save the encoded content to a file.
Enter a file destination in the provided field.
Remember the encoder system references the file name and not the system
running SCX Explorer.
Always start your browse for files at My Network Places and work down or
enter the entire file pathname beginning with the system name when Niagara
SCX and SCX Explorer reside on different computers.
If you simply enter a file name, you may inadvertently browse your local
computer when the media file resides on the remote computer.
Set the output destination on this tab under Save to Media Device, Save to
File, or both, simultaneously.
Check Save to Media Device and fill in the requested information to save the
stream to a RealNetworks
®
server for live streaming.
Select Enable Streaming to stream your MPEG-4 content.
NOTE: Selecting Enable Streaming disables the Save to File option.
Adjust the port settings as required.
NOTE: You most likely do NOT need to change the default settings.
Default settings enable multicast streaming. To disable multicast streaming,
change the IP address for the Destination to the IP address of the server
you want to use to stream to from the encoder.
Give your stream a name in the Stream Title field.
Note any additional information in the Stream Info field.
Enter a required name and destination path for the resulting SDP file the system
created when it started the stream in the Save sdp file field.
Refer to online documentation or message boards for setup details specific to
individual stream servers if you stream to a Helix®, Quicktime®, or Darwin®
server.
NOTE: You can stream point-to-point by selecting a share destination directory
Niagara SCX User Guide
ViewCast 77
Tab Description
for the saved SDP file.
Remember to disable multicasting by entering the IP address of the
computer where you want to send the stream in the Destination field.
For example, save the SDP file to a shared folder on the local drive if you want
another computer to view the stream.
The other computer can open the SDP file and play the stream in Quicktime or
other MPEG-4-compatible streaming player.
Developers recommend that you avoid trying to view the stream on the same
system where the Niagara SCX encoder resides unless you have a very powerful
system (dual-core processors or better) since MPEG-4 encoding can be CPU
intensive.
Doing so may overtax the host CPU, cause video quality degradation, and
encode system failure.
Figure 131. MPEG-4 Output Settings
Filters
Use (optionally) to enable SimulStream
®
and deinterlacing (Figure 132).
Figure 132. MPEG-4 Filters
SimulStream
SimulStream, a purchased software option, applies to Osprey Video capture
cards.
It makes a single hardware device appear as several separate devices while
capturing the same input stream.
Each stream can have its own:
Size — Watermark
Color format Caption
Frame rate Size
Chapter 10: MPEG-4 Options and Settings
78 ViewCast
Tab Description
Crop
You can have multiple video capture streams in a single application, or you can
have multiple applications each with one or more capture streams.
For details about purchasing and installing SimulStream, refer to Chapter 11.
The base AVStream driver includes a free evaluation version for you to try.
When you install SimulStream, the controls in this group affect the fully licensed
SimulStream mode.
NOTE: If SimulStream is not installed, you see the watermark that indicates
you are running in evaluation mode. The controls still work.
If you set up a custom watermark, the evaluation watermark preempts it as long
as you have evaluation mode turned on.
Filters,
Deinterlace
Filter
Removes artifacts that the system can introduce when encoding NTSC, PAL, or
SECAM formatted video.
These artifacts usually manifest as a jaggedness surrounding a moving object.
Apply and store these filters per each device.
Applies to all filters and pins associated with a specific device.
Includes four radio button options:
1. Off that disallows interlacing.
2. Motion adaptive that applies motion adaptive interlacing to all video.
3. Inverse telecine that applies inverse telecine deinterlacing to all telecine
video.
a. It performs no deinterlacing of non-telecine video.
b. It is available for NTSC video only.
4. Auto that applies inverse telecine deinterlacing to all telecine video.
a. It applies motion adaptive deinterlacing to all non-telecine video.
b. It switches dynamically between the two modes as the content
changes.
c. It is available for NTSC video only.
Filters, Telecine
NTSC video originally created on 24-frame-per-second film.
Repeats certain fields in a regular, recurring sequence in the telecine conversion
process.
Provides visible interlacing artifacts if you view a telecined sequence on a
progressive window.
Only applies to NTSC video.
Not used for PAL and SECAM video.
If you select PAL or SECAM as the video standard, you disable telecine.
Represents the film-to-video conversion process.
Filters, Inverse
Telecine
The reverse of telecine.
Drops redundant fields and reassembles video in a 24 fps progressive format.
Removes 100% of interlacing artifacts.
Niagara SCX User Guide
ViewCast 79
Tab Description
When you view video at 24 fps, you see the exact timing and sequence on the
original film.
When you view video at 30 fps, the system repeats every fifth frame and
eliminates de-interlacing artifacts
Only applies to NTSC video
Not used for PAL and SECAM video.
If you select PAL or SECAM as the video standard, you disable inverse telecine.
The inverse-telecine filter looks for frames added during a telecine process and
removes them.
This eliminates redundant encoding and improves the quality of encoded frames.
Filters,
Background
Motion Adaptive
Deinterlace
The reverse of telecine.
An algorithm for deinterlacing pure video (non-telecine) content.
It detects the portions of the image that remain still and the portions that remain
in motion then applies different processing to each.
Allows you to set the Motion Threshold and Smooth Motion or Sharp
Motion.
Encode Settings
Provides options for basic settings for the video and audio options of MPEG-4.
The Niagara SCX Pro software MPEG-4 compression engine provides baseline
encoding functionality for:
H.263
MPEG-4 Part 2 SP/ASP
H.264/MPEG-4 Part 10
Allows you to encode streams for:
Internet video
Mobile phones
Set top boxes
Allows you to create media files for other MPEG-4 compatible devices such as
iPods.
Refer to Figure 134.
Figure 133. MPEG-4 Encode Settings
The Basic Settings/MPEG Type drop-down box, provides you with a drop-
down box (Figure 134) that includes the following choices:
H.264 – MP4
Accommodates very high data compression while
Chapter 10: MPEG-4 Options and Settings
80 ViewCast
Tab Description
H.264, MPEG-4,
Part 10 or
Advanced Video
Coding (AVC)
maintaining better quality than its predecessor.
Created to address a broad range of applications from low
bit rate to high bit rate and from low resolution such as cell
phones to high resolution such as broadcast.
The Niagara SCX H.264 is baseline profile.
MPEG-4, Part
2, or H.263
Applies to situations where other conditions of the
applications, like network bandwidth or device size, mandate
low bit rate and low resolution.
Examples of video applications for H.263 include cell
phones, some low-end video conferencing systems, and
surveillance systems.
H.263 remains important for legacy handheld devices that
do not support H.264.
H.263 – MP4
MPEG-4, Part
2, or H.263
For situations where other conditions of the applications,
like network bandwidth or device size mandate low bit rate
and low resolution.
Examples of video applications for H.263 include cell
phones, some low-end video conferencing systems, and
surveillance systems.
H.263 remains important for legacy handheld devices that
do not support H.264.
NOTE: By default, the Niagara SCX H.263 uses Simple Profile
unless you select the Enable B Frames option. If you enable B
frames, the resulting stream becomes Advanced Simple Profile.
H.263 – 3G2 Creates an H.263 stream stored in a 3G2 container.
H.263 – 3GP Creates an H.263 stream stored in a 3GPP container.
MPEG4 –
3GP
Exemplifies a multimedia container format defined by the
Third Generation Partnership Project (3GPP) for use on 3G
mobile phones.
It stores video streams such as MPEG-4 or H.264 and audio
streams such as AMR or AAC.
The two defined standards for this format include:
1) 3GPP for GSM based mobile phones
2) 3GPP2 for CDMA based mobile phones
Creates an H.263 stream stored in a 3GPP container.
H.264 – 3G2 Creates an H.264 stream stored in a 3G2 container.
H.264 – 3GP Creates an H.264 stream stored in a 3GPP container.
Niagara SCX User Guide
ViewCast 81
Tab Description
Figure 134. MPEG-4 Type Options
You can set the frame rate and bit rate under the Video settings (Figure 135).
The Enable B Frame option turns on or off the insertion of B frames in the
video stream.
If you enable B frames and set the MPEG type to MPEG-4, the resulting H.263
file uses Advanced Simple Profile when you encode it.
NOTE: Some players, such as Quicktime player, become incompatible with
streams that include B frames. If your resulting stream has quality issues on
playback, try disabling B frames to ensure compatibility with most players.
The Video/Encode Quality setting currently remains inactive and does not
affect the results of the encoding stream or file.
Figure 135. MPEG-4 Basic Settings
Under the Audio Format settings, you have another drop-down box that
includes several choices as for audio sampling (Figure 136).
It allows you to set whether you want to encode the audio monophonic (mono)
or stereophonic (stereo).
Figure 136. MPEG-4 Audio Format Options
The Audio Encoder settings (Figure 137) provide you with a drop-down box
with two primary choices:
Chapter 10: MPEG-4 Options and Settings
82 ViewCast
Tab Description
AAC (Advanced Audio Coding)
A standardized, lossy compression and encoding scheme for digital audio.
AAC achieves better audio quality than MP3, a Motion Picture Experts
Group (MPEG) standard.
AMR (Adaptive Multi-Rate)
An audio data compression scheme optimized for speech coding.
3GPP adopted AMR as the standard speech codec; it is widely used in GSM.
You can either AMR narrow band (AMR-NB) or AMR wide band (AMR-
WB).
NOTE: When you select AMR Encoder for audio, the audio automatically
encodes using 8 kHz mono for playback on cell phones.
Figure 137. MPEG-4 Audio Encoder Options
The Audio Typesetting (Figure 138) only relates to AAC Encoding.
If you select AMR in the Encoder field, the system does not use this setting.
The Audio Type field provides a drop-down box with two choices:
Low Complexity (LC)
The simplest and most widely used and supported AAC audio format
Main Profile (MAIN)
The same format as LC (above) with an added backward prediction.
NOTE: Depending on the player where you intend to hear the resulting stream,
either choice uses a specific set of tools to encode the audio stream.
You should make your choice based on the requirement of the playback
software or device.
The most widely supported format is LC profile.
Niagara SCX User Guide
ViewCast 83
Tab Description
Figure 138. MPEG-4 Audio Type Options
The Audio Bitrate settings provide a drop-down box with choices shown in
(Figure 139).
Figure 139.
MPEG-4 Audio Bitrate Options
Video Cropping
Provides options for setting the size and aspect ratio of your chosen video
output (Figure 140).
When you enable cropping, the system automatically switches the video size to
FULL and the cropping measurements default to the FULL size.
From these settings, you can set a custom cropping size.
Figure 140. MPEG-4 Video Cropping Settings
Watermarking
Provides options for placing a watermarked graphic over your video output
(Figure 141).
You can adjust the color balance, size, and opacity of the graphic.
NOTE: You can only watermark a 24-bit bmp. The system does not accept any
other image formats.
Chapter 10: MPEG-4 Options and Settings
84 ViewCast
Tab Description
Figure 141. MPEG-4 Video Watermarking Settings
Closed Caption
Allows you to adjust the position of closed caption text, if applicable, on your
video feed (Figure 142).
You can choose to overlay the closed caption text on the video stream and
define the position of the overlaid text
Figure 142. MPEG-4 Closed Caption Settings
Identity Address Provides the Address Type (type of encoder) performing the encoding (Figure 143).
Figure 143. MPEG-4 Identity Address Settings
Operations
Use Start, Stop, and Reset on the Operations tab to control the encoder.
Once you select all the other options:
Select Start to begin encoding.
Select Stop to end the session.
Select Reset to stop then restart an encoding session (Figure 104).
Niagara SCX User Guide
ViewCast 85
Tab Description
Figure 144. MPEG-4 Operations Settings
NOTE: Progress reports (Starting Encoder, Encoder started, Stopped) and
error messages appear in the Status section of this window.
MPEG-4 Streaming Options Tabs
Table 15 explains the MPEG-4 streaming options tabs including:
Statistics (Stats) – Capture, Video, and Audio
View
Call Info
Table 21. MPEG-4 Streaming Options Tabs
Tab Description
Statistics
Reports on the current status of the encoder and includes:
Input
Output
Audio Format
Video Quality
File Type
Duration
Total bitrate
When you click + next to the MPEG-4 option on the left pane, you
see Streaming Options (Figure 145) as a subcategory of the
MPEG-4 pr
ofile.
You have three tab options – Statistics, View, and Call Info
Chapter 10: MPEG-4 Options and Settings
86 ViewCast
Tab Description
Figure 145. MPEG-4 Streaming Options Select
The Streaming Options tab also provides a Statistics tab (Figure
146) that reports on the encoder’s current statistics – Capture, Video,
Audio, and CPU load.
The CPU Utilization field reports the current CPU load.
The last field addresses the audio level on the encoder.
Figure 146. MPEG-4 Streaming Statistics Options
If you choose the View tab, you can preview the video.
The View tab (Figure 147) allows previewing videos as you encode.
The system provides Copy URL for copying the streaming address
to the Windows clipboard. You can then paste it into the appropriate
MPEG-4 player to view the stream.
Launch URL allows you to launch the video into the default
MPEG-4 player installed on the system.
Figure 147. MPEG-4 View (URL) Tab
Niagara SCX User Guide
ViewCast 87
Chapter 11: Niagara SCX and
SimulStream
Niagara SCX and SimulStream represent the perfect team of tools for maximizing resources for
encoding purposes. That means with just one capture card, you can encode a single source into
multiple outputs. Examples include using a single video that you can encode in RealNetworks, Flash,
MPEG-4 (Niagara SCX Pro only), and Windows Media. You can encode these simultaneously by
using SimulStream. SimulStream allows you to take a single input and encode in different formats
and/or bitrates simultaneously.
For more information about SimulStream, please visit the ViewCast web site at:
http://viewcast.com/product_SimulStream.asp
Because there is only one input when using SimulStream, you establish each encoding output as an
encoder in the SCX Explorer.
NOTE: The previous instructions explain how the system adds each board as an encoder in
the SCX Explorer.
For more information or to purchase SimulStream for your Osprey capture card, visit:
http://viewcast.com/product_SimulStream.asp
Set Up a SimulStream Session
To set up a SimulStream session with Niagara SCX, perform the steps in Table 22.
Table 22. Set Up SimulStream Session with Niagara SCX
Step Action
1.
Connect to a server running the Niagara SCX Encoder Manager service.
2.
Insert the desired encoder type you wish to run on the server.
3.
Enter a name to identify the encoder.
NOTE: Repeat steps 4 and 5 for each output. For example, a RealNetworks and
Windows Media. There is only one input but two outputs.
4.
Select the video and audio input for this encoder on the Input tab.
Chapter 11: Niagara SCX and SimulStream
88 ViewCast
Step Action
NOTE: This could also be a file requiring conversion to a streaming format.
Use the same video input for each output. If you have multiple boards in
the system, select the same board for each output desired.
5.
Configure the video and audio settings, if needed, on the Video and Audio
Settings tab.
6.
Select the output on the Output tab.
NOTE: RealProducer requires two output settings. Is the output a live broadcast,
being saved for future use, or both?
On the second Output tab, establish the target audience.
Windows Media Encoder has only one output tab. It contains both the
target audience and information for saving the video to a file.
7.
If required, enter the author and copyright information on the Author Info tab
under the Streaming Options for the encoder.
8.
To view a preview of the video, click the View tab under the Streaming Options.
NOTE: Steps 7 and 8 are optional.
9.
Click Start on the Operations tab to begin encoding.
10.
To view the statistics for the encoding session, click Streaming Options.
11.
Select the various tabs to see information about the encoding session.
WARNING! If you enable or disable SimulStream after you save an encoder profile could disable the
profile you saved.
For instance, if you save a profile using Capture Device 1, then enable SimulStream, SCX no
longer recognizes Capture Device 1 but sees Capture Device(s) 1.n instead.
You see a red X designating a non-recognized capture device by that profile and must reselect
your input device to Capture Device 1.n to clear the red X and use the profile.
Filters
From a practical point of view, filters have two interrelated purposes:
1. They allow applications to enumerate and list DirectShow video capture and preview pins or
streams (each with different settings) as named entries in their video device select list.
You can set up the driver to show 1 to 10 filters per device.
Each filter has one preview pin and one capture pin.
Niagara SCX User Guide
ViewCast 89
Standard applications can access a particular filter without any custom programming
specialized for Osprey devices.
2. Each filter has independent settings for cropping, default output size, watermarks, and
captions that you can store between sessions.
NOTE: Compared to the previous pin-based method, no requirements exist for a particular
startup order, to associate settings with instantiations.
If you are familiar with GraphEdit, you can best visualize SimulStream filters where you:
Construct a multifilter graph with GraphEdit
Apply different crop, watermark, and caption settings to each filter
The Enable Checkbox
The checkbox at the top of the group (Figure 148) turns on SimulStream for the currently selected
device. Table 23 indicates the conditions for SimulStream.
Figure 148. Simul
Stream Checkbox
Table 23. Conditions for SimulStream
When… Then…
You have a full SimulStream license installed This checkbox controls full SimulStream.
You have a SimulStream license installed but
have not turned SimulStream on
The text shows SimulStream as enabled.
You have no purchased SimulStream license This checkbox controls SimulStream evaluation
mode.
You uncheck the Enable check box The text line at the top of the control group
indicates an installed SimulStream evaluation
mode.
You check the Enable check box The text indicates that SimulStream evaluation
mode is enabled.
A message box prompts you to restart the system when you change the SimulStream Enable status
and click Apply or OK. ViewCast strongly recommends that you do so. If you do not, SimulStream
may partly work but the filter names and their pins may remain incorrect without a restart.
When you enable SimulStream (or SimulStream evaluation mode), the driver always works in
Postprocessing mode, as described in the mode control group. In this case, the system forces the mode
control to Postprocessing mode and disables the Direct mode control.
Chapter 11: Niagara SCX and SimulStream
90 ViewCast
Show N Filters per Device
With the Show
N
filters per device control (Figure 149) you can set up the driver to expose 1 to 10
filters per device for applications to specify and select. If, for example, you choose 4 filters per
device, device lists in applications show four entries for the current device. For device 1, the system
designates them as 1.1, 1.2, 1.3, and 1.4.
Figure 149. Show Filters per Device Option
This global setting affects all the Osprey-2XX, -300, -440 or -530/540/560 devices as a group.
IMPORTANT! When you apply this change, a message box prompts you to restart the system.
You must do this. The number of filters you request do not display or work correctly until
you restart the system.
While it is possible to expose and specify up to 10 filters per device, the practical number of working
filters equates to less than this. The practical number of filters depends on:
The capability of the system
The types of filtering turned on in the driver
The types of scaling and color format conversions requested in the driver
The type of processing the downstream application performs
When you directly render video to the window, the video format and type of renderer used can make
a major difference in system performance and in the number of possible streams. If multiple capture
devices exist in the system, the number of filters equals the total across all the devices. In addition,
some types of processing, such as de-interlacing and gamma correction, performed once per device
may, in this case, occur multiple times. In summary, a high-end, multi-core, or multiprocessor, system
can support 5, 6, or more concurrent filters on one device if the processing per filter remains light;
but only 2 or 3 if the processing loads inside or outside of the driver becomes particularly heavy.
Allow Multiple Instances of Each
Filter
This control enables you to run multiple application instances on one device that does not have
device select controls.
ViewCast recommends that you do NOT allow multiple instances of each filter unless you have a
specific need for it. Turning it on affects some of the above description. Specifically, you cannot
keep crop, watermark, and caption settings separately for applications sharing a filter, and might
confuse and interfere with each other. The most recent crop, watermark, or caption setting
Niagara SCX User Guide
ViewCast 91
corresponds to the saved one – it overwrites settings that you might previously have saved from
another application.
This global setting affects all the Osprey-2XX, -300, -400 or -530/540/560 devices as a group.
When you apply this change, a message box prompts you to restart the system. This change does not
work correctly until you do so.
Deinterlace, inverse telecine and gamma correction when set, affect all SimulStream instances on that
specific Osprey card. In other words, all filters on the device and must have the same settings.
You can set crop, watermark, and caption settings differently for each pin of each filter. The driver
also saves settings between sessions separately for each filter.
You can set video size, color format, and frame rate differently for each pin. The application must
save these settings.
Chapter 11: Niagara SCX and SimulStream
92 ViewCast
Niagara SCX User Guide
ViewCast 93
Chapter 12: Tuning Utilities
Some electrical signals convey television pictures. Cables then carry this video signal from one place
to another. Along the way, the signal may pass through various pieces of equipment such as video
tape machines, switchers, character generators, special effects generators, and transmitters. Any of
this equipment can change or distort the signal in undesirable ways.
Since signal quality acts as a major determining factor for picture quality, you need to be able to
detect and correct any signal distortions. The signal must be correct before the picture can be correct.
You can use a waveform monitor to measure luminance or picture brightness as well as a high
frequency color signal called chrominance. You require an instrument called a vectorscope to
control quality of video chrominance (coloring) especially in more complex systems.
Vectorscope
A vectorscope displays (Figure 150) information about only the chrominance (coloring) portion of
the video signal. It does not respond to other parts of the video signal.
Figure 150. Vectorscope Display
Two important parameters of the chrominance signal that may suffer distortions leading to
noticeable picture problems exist.
Table 24. Chrominance Signal Parameters
Parameter Description
Amplitude Gain and phase (timing). Amplitude, an independent measurement, you
can actually make with a waveform monitor.
Phase The relationship between the two signals. In this case, the relationship
between the chrominance signal and reference burst on the video.
Chapter 12: Tuning Utilities
94 ViewCast
The processing within a vectorscope and the display of the processed signals readily detects and
evaluates both phase and gain distortions of the chrominance.
Understand the Display
There are two parts to a vectorscope display: the graticule and the trace.
Table 25. Vectorscope Display Parts
Part Description
Graticule
A scale you use to quantify the parameters of the signal under
examination.
Work with a color bar signal.
Remember, the color bar’s signal consists of brightness
information (luminance) and high frequency color information
(chrominance or chroma).
Trace The video signal itself. The demodulated chrominance signals
electronically generate it.
Each bar of the color bar’s signal creates a dot on the vectorscope's display. The position of these
dots remains relative to the boxes, or targets, on the graticule. The phase of the burst vector
represents the major indicators of the chrominance (color) signal's health.
Within the circle, you see six target shapes each containing smaller, sectioned shapes (Figure 151).
The smalle
r shapes designate where each dot of the color bar’s signal should fall if the chroma gain
and phase relationships are correct.
Figure 151. Vectorscope with Color Outside the Targets
To adjust the source, adjust the saturation on the capture card until you have it positioned inside the
targets. Refer to Figure 152 to see an example.
Niagara SCX User Guide
ViewCast 95
Figure 152. Vectorscope Adjustments (Saturation)
Waveform Monitor
Vectorscopes and waveform monitors (Figure 153) complement one another and provide a full
representation of all information about the video signal.
Figure 153. Waveform Monitor Display
The nominal video signal level for television studios and production facilities equates to one volt (1
V) peak-to-peak.
NOTE: The term peak-to-peak means from the bottom of the signal to the top. You often
see it abbreviated as p-p.
Signals from different sources might not be compatible with each other without such an amplitude
standard. This applies to a nominal signal, one that contains the brightest possible (peak white)
picture information.
Chapter 12: Tuning Utilities
96 ViewCast
Understanding the Display
The waveform consists primarily of a brightness signal (called luminance) and a high-frequency color
signal (called chrominance). The luminance and chrominance added together form the overall
waveform.
The luminance signal, a series of voltages or levels, determines brightness and variations across the
picture. Each of the colors in the color bars signal has a different luminance level, and bars arranged
by level from highest to lowest (white, yellow, cyan, green, magenta, red, blue, and black).
The chrominance signal is a sine wave. Because of this signal's high frequency, the sine wave cycles
appear to run together in most displays. However, you can see individual cycles when you expand the
display horizontally.
Color bar test signals fall into two general categories: 100% bars (full amplitude) or 75% bars
(reduced amplitude).
NOTE: Always use 75% bars for basic testing because 100% bars contain signal levels that
may be too high to pass through a system without distortion.
Adjust the source that you see in Figure 154 by adjusting the brightness and/or contrast on the
capture card until it resembles a flight of stairs.
Figure 154. Vectorscope with Settings to be Adjusted
Niagara SCX User Guide
ViewCast 97
Appendix A: An Introduction to
Streaming Media
Media that users read, hear or view represents streaming media. Streaming refers more to the
property of the delivery system than the media itself. The distinction usually applies to media
distributed over computer networks. Most other delivery systems represent either inherently
streaming (radio, television, Internet TV) or inherently non-streaming (books, video cassettes, audio
CDs).
The ViewCast Niagara encoders deliver streaming audio and video media over an IP network.
Streaming Infrastructure
Before setting up your new Niagara encoder, you should understand live streaming video – from
video capture to streaming video playback.
Many applications exist that allow you to capture video into the computer environment. These range
from DVD authoring to live Web casting. Regardless of the final use of the video, use Table 26 to
categori
ze all into three main workflow processes:
Table 26. Video Workflow Processes
Process Description
Single video/session
capture
Example: one-off file capture for non-real time
delivery.
Typically allow you to process and/or author the
captured file into its final form for delivery.
Batch video/session
capture
Examples: archiving, scheduling and storing.
Multiple source content to digitalize.
Device control requirement for unattended source.
Ability to schedule sessions required to capture
timed events.
Live video capture,
processing and delivery
Example: Webcast
Can be single or multiple sources.
Live event at a specific time.
Can be a remote or local capture.
Final content delivery in real time to viewers.
Appendix A: An Introduction to Streaming Media
98 ViewCast
Each category has its unique set of requirements that also dictate different user interfaces,
functionality and experiences. The Niagara encoders deliver live video capture, processing, and
delivery.
Figure 155 illustrates the video path starting with the sou
rce, like a camera or video player. This
source goes through the Niagara encoders, to the server, across an IP network, to a software player
and displays on a monitor for audience viewing.
Figure 155. Video Streaming Example
Guide to Streaming Audio and Video
Types
Niagara encoders can create several different types of audio and video streams. Although all are a
type of IP video format, each retains properties to make it more suitable to a specific streaming video
application. Niagara encoders create video content in a reduced resolution. This allows users to
stream the content across the Internet and play it back on a computer or a handheld mobile device.
Figure 156 lists all formats supported by Niagara encoders with suggested application uses. You can
use all of t
hese formats for many different applications.
Figure 156. IP Video Compression for Streaming in Full & Lower Resolutions
W
indows Media
®
Streaming Internet video and mobile devices
RealVideo
®
/Helix
®
Streaming Internet video and mobile devices
MPEG-4 Handheld devices and mobile phones (available with
Niagara SCX Pro only)
Niagara SCX User Guide
ViewCast 99
A
dobe
®
Flash
®
File-based Internet video
In choosing the right streaming format for your needs, you should first consider the audience for
your content. What common player will they use to watch your content? This determines the format
of the stream you create for your audience.
To determine the data rate you need for streaming your content; you must determine the IP
bandwidth for your audience access.
For example, if the access method uses an ISDN connection or less, then you stream your video
and/or audio at a low data rate such as QCIF at 56 kbps. If your audience has faster and more
reliable access, like a cable modem or DSL connection, then you can provide a higher quality stream
at full resolution at 2 Mbps.
Niagara encoders provide preconfigured encoding profiles for different bandwidth connections. The
profiles loaded depend on how you configure your Niagara encoder on its initial startup.
For more information on streaming go to http://www.viewcast.com/support_streaming.asp
.
Niagara SCX User Guide
ViewCast 101
Appendix B: Terms and Acronyms
The following terms apply to related information contained in this publication.
Figure 157. Terms, Acronyms, and Definitions
Term Acronym Definition
Audio-Video
Interleaved
AVI
Format for digital video and audio under Windows.
The .AVI file format is cross-platform compatible and it
allows you to play AVI files under Windows and other
operating systems.
Common
Intermediate
Format
CIF
A standard video format used in video conferencing.
Define CIF formats by their resolution, and standards both
above and below the original resolution established.
The original CIF is also known as Full CIF (FCIF).
A frame size of 352 x 288 (width x width in pixels) for PAL
(European Standard).
A frame size of 320 x 240 (width x width in pixels) for NTSC
(U.S. Standard).
Data rate The number of kilobits per second required to replay the
compressed video at the intended frame rate and quality.
Deblocking Filter Deblock
Optional block edge filter within the coding loop.
Reduces the appearance of block like artifacts that appear in
highly compressed video streams.
Use during capture for real-time processing.
Use during conversion or playback to enhance existing media
files.
Delay buffer A memory storage area to accumulate video data for the
compressor & ensure adequate data availability.
Digital Rights
Management
DRM
Hardware manufacturers, publishers, and copyright holders
use this as an access control technology to limit use of digital
media or devices.
Digital rights management allows the media or file issuers to
control in detail what others can and cannot do with a single
instance.
Distributed
Component
Object Model
DCOM A proprietary Microsoft technology for communication among
software components distributed across network computers.
Appendix B: Terms and Acronyms
102 ViewCast
Term Acronym Definition
Dynamic Host
Configuration
Protocol
DHCP
A protocol network devices (clients) use to obtain the
parameters necessary for operation in an Internet protocol
(IP) network.
It reduces system administration workload by allowing users
to add devices to the network with little or no manual
configuration.
Encoder
A hardware device or software that changes a signal (such as
a bitstream) or data into a code.
The code may perform such actions as compressing
information for:
Transmission or storage
Encrypting or adding redundancies to the input code
Translating from one code to another
Examples include:
Compressing audio/video into a smaller form
Multiplexing to combine inputs into one output
Functioning as a rotary encoder to convert rotary
position to an analog electronic signal
Functioning as a linear encoder to convert linear
positions to electronic signals
Flash
Also known as Adobe Flash.
A set of multimedia software originally created by
Macromedia and currently developed and distributed by
Adobe Systems.
Since its introduction in 1996, Flash has become a popular
method for adding animation and interactivity to web pages
Developers commonly use Flash to create animation,
advertisements, and various web page components, to
integrate video into web pages, and more recently, to develop
rich Internet applications.
Frame rate The number of video frames processed per unit of time, usually
frames per second.
Frame size The pixel width and height of video image.
Key frame A full frame of compressed video that the decoder uses as a
reference frame of video for subsequent delta frames.
Lossy
Compression
An encoding or compression method that eliminates
redundant and unnecessary data in a file to compress it more
tightly.
It occurs to data that you compress and then decompress to
retrieve data that may be different from its original but still
close enough to use.
Niagara SCX User Guide
ViewCast 103
Term Acronym Definition
Media Access
Control Address
MAC
A hardware address that uniquely identifies each node of a
network.
In IEEE 802 networks, it interfaces directly with the network
medium.
In OSI Reference model networks, its designation is Data
Link Control (DLC) address.
Moving Picture
Experts Group –
4
MPEG-4
Defines how you transmit multimedia streams – video, audio,
text, data – as individual objects.
A compression/decompression technology that strives to
achieve interactivity, efficiency, and stability in narrow-band
transmissions.
Aims to pave the way toward a uniform, high quality
encoding/decoding standard to replace the many proprietary
streaming technologies used on the Internet today.
Multicast Applies when sending a piece of information from one or more
points to a set of other points.
Multicasting, a networking technique, delivers the same
packet simultaneously to a group of clients.
National
Television System
Committee
NTSC
The analog television system used in the United States,
Canada, Japan, Mexico, the Philippines, South Korea,
Taiwan, and some other countries.
It also refers to the name of the U.S. standardization body
that adopted it.
Network Interface
Card
NIC
A card (hardware) that connects to a wire-based network
such as token ring or Ethernet.
It allows computers to communicate over a computer
network.
Niagara Encoders
ViewCast Niagara® streaming media encoders deliver the
quality, features and ease-of-use convenience that
professional broadcasters demand.
These pre-configured, plug-and-play solutions enable users to
quickly capture and broadcast premium quality audio and
video in multiple formats and at multiple bit rates – all
simultaneously.
Appendix B: Terms and Acronyms
104 ViewCast
Term Acronym Definition
Niagara SCX
A streaming media management software that installs on a
user-encoding device connected with remote SCX Explorer
workstations.
It too allows users to manage live video broadcasting over
the Internet and to mobile devices from their remote
workstations
It coordinates the streaming processes to allow users to set
up and control Niagara® streaming systems positioned
throughout their enterprise or anywhere in the world - all
from their desktops.
It functions as one part of the total encoding solution to
allow users ultimately to control and monitor each individual
stream.
Niagara SCX
Explorer
A streaming media management software that installs on any
user client device.
It lets users manage live video broadcasting over the Internet
and to mobile devices.
It lets users set up and control Niagara® streaming systems
positioned throughout their enterprise or anywhere in the
world - all from their desktops that interface to the server.
Users can instantly see:
The status of all of their networked encoders
Which encoders have active encode sessions
Allows users to navigate through the application to control
and monitor each individual stream.
It can interface with the SCX Explorer Manager to become
part of the total encoding operation.
Phase Alternation
Line
PAL
The standard television broadcast/reception protocol used in
Europe.
PAL scans the video image 625 times horizontally.
Pixel Digital images are composed of an array of individual dots called
picture elements, or pixels.
Real-time video Video from a video source, such as a camera, that the compressor
then processes immediately and sends for decompression and
playback.
Sequential Color
with Memory
SECAM An analog color television system first used in France (in French
it translates to Séquentiel couleur à mémoire).
Unicast Unicast communication applies to a piece of information that
users send from one point to another point.
Unicast transmission refers to users sending a packet from a
single source to a specified destination.
Video-on-demand VOD
Video stored in a file for playing later.
Also, known as Compress Once and Play Many Times.
Niagara SCX User Guide
ViewCast 105
Niagara SCX User Guide
ViewCast 107
Publication Index
About This Guide, 1
Access Permission window, 16
Add Program window, 19
Allow Multiple Instances of Each Filter, 98
allow the SCX clients to communicate with the
server, 15
An Introduction to Streaming Media, 105
Application Links, 20
audience for publication, 2
Audio Settings (AVI) Tab, 63
Audio Settings (Flash) Tab, 71
Audio Settings (RealProducer) Tab, 52, 82
Audio Settings (Windows Media) Tab, 38
Audio-Video Interleaved, 109
Authoring Information (RealProducer)
Streaming Tab, 60
Auto/Name (AVI) Tab, 61
Auto/Name (Flash) Tab, 69
Auto/Name (MPEG-4) Tab, 79
Auto/Name (RealProducer) Tab, 49
Auto/Name (Windows Media) Tab, 35
Automatic Update Notifications window, 9
AVI Audio Settings, 63
AVI Capture Encoder Tabs, 61
AVI Capture Options and Settings, 61
AVI Closed Caption Settings, 65
AVI General Properties Settings, 61
AVI Identity Address Settings, 65
AVI Input Sources Settings, 62
AVI Operations Settings, 65
AVI Output Capture Settings, 64
AVI Streaming Options Tabs, 66
AVI Streaming Statistics Options, 66
AVI Video Cropping Settings, 64
AVI Video Settings, 62
AVI Video Watermarking Settings, 64
AVI, definition, 109
Chrominance Signal Parameters, 101
CIF, definition, 109
Closed Caption (AVI) Tab, 64
Closed Caption (Flash) Tab, 73
Closed Caption (MPEG-4) Tab, 90
Closed Caption (RealProducer) Tab, 56
Index
108 ViewCast
Closed Caption (Windows Media) Tab, 40
Common Intermediate Format, 109
Computer Name Display on Niagara SCX
Encoder Explorer window, 78
Conditions for SimulStream, 97
Configure Niagara SCX for Firewall and DCOM
settings, 15
configure the Niagara SCX, 15
Confirm Installation window, 9, 14
Connect to Server window, 30
Connect To Server window, 20
Control Panel Selections for Windows XP, 16
Conventions Used in This Guide, 2
Create a New Niagara SCX Explorer View, 28
Data rate, 109
DCOM, definition, 110
Deblock, definition, 109
Deblocking Filter, 109
Delay buffer
Definition of, 109
DHCP, definition, 110
Digital Rights Management (DRM) for Windows
Media, 45
Digital Rights Management definition, 109
Disclaimers, iv
Distributed Component Object Model definition,
110
DRM Profiles Location, 45
DRM, definition, 109
Dynamic Host Configuration Protocol
Definition of and acronym, 110
Edit menu, 26
Edit Menu Options, 26
Enable checkbox, 97
enable the DRM function in Niagara SCX, 45
Encode Settings (MPEG-4) Tab, 86
Encode Steps, 21
Encoder menu, 31
Encoder Options List, 78
Encoder Options, Deinterlace Filter
(RealProducer) Tab, 55
Encoder Options, Inverse Telecine
(RealProducer) Tab, 55
Encoder Start Up, 46
File menu, 25
File Menu Options, 25
filters, 96
Filters (Flash) Tab, 72
Filters (MPEG-4) Tab, 84
Filters (RealProducer) Tab, 54
Filters (Windows Media) Tab, 39
Filters, Background Motion Adaptive Deinterlace
(MPEG-4) Tab, 85
Niagara SCX User Guide
ViewCast 109
Filters, deinterlace (Flash) Tab, 72
Filters, Deinterlace Filter (MPEG-4) Tab, 85
Filters, Inverse Telecine (Flash) Tab, 72
Filters, Inverse Telecine (MPEG-4) Tab, 85
Filters, SimulStream (MPEG-4) Tab, 84
Flash Audio Settings, 72
Flash Closed Caption Settings, 74
Flash Encoder Filters Settings, 73
Flash Encoder Tabs, 69
Flash General Properties Settings, 69
Flash Identity Address Settings, 74
Flash Input Sources Settings, 69
Flash Operations Settings, 74
Flash Options and Settings, 69
Flash Output Settings, 72
Flash Streaming Options Tabs, 75
Flash Streaming Statistics Options, 75
Flash Video Cropping Settings, 73
Flash Video Settings, 70
Flash Video Watermarking Settings, 73
Frame rate, definition, 110
Frame size, definition, 111
Get Started, 5
Guide to Streaming Audio and Video Types, 106
Help menu, 32
Identity Address (AVI) Tab, 65
Identity Address (Flash) Tab, 74
Identity Address (MPEG-4) Tab, 91
Identity Address (RealProducer) Tab, 56
Identity Address (Windows Media) Tab, 41
Input (AVI) Tab, 62
Input (Flash) Tab, 69
Input (MPEG-4) Tab, 79
Input (RealProducer) Tab, 49
Input (Windows Media) Tab, 35
Input DRM Profile window, 47
Input Live Encoding (Flash) Tab, 69
Input, File Conversion/File Transcode (MPEG-4)
Tab, 80
Input, File Conversion/File Transcode
(RealProducer) Tab, 50
Input, File Conversion/Transcode (Flash)
Tab, 70
Input, File Encoding (Windows Media) Tab, 36
Input, Live Encoding (MPEG-4) Tab, 80
Input, Live Encoding (RealProducer) Tab, 50
Input, Live Encoding (Windows Media) Tab, 36
insert an encoder, 30
Insert menu, 28
Insert Menu Options, 28
Insert, Encoder Option, 78
Index
110 ViewCast
Install Niagara SCX, 7
Installation Complete window, 14
Installing Niagara SCX Encoder Explorer
window, 14
Installing ViewCast Niagara SCX window, 10
Inverse Telecine (MPEG-4) Tab, 85
IP Video Compression for Streaming in Full &
Lower Resolutions, 106
Key Frame, definition, 111
Launch Niagara SCX and Ensure It Performs
Successfully, 20
Launch Permission ¾ Default Security window,
17
Launch Permissions ¾ Security Limits window, 17
License Agreement window, 8, 13
Lossy compression, definition, 111
luminance, 101
MAC, definition, 111
Media Access Control Address, definition of and
acronym, 111
Menu Bar Edit Options, 27
Menu Bar Encoder Options, 31
Menu Bar File Options, 25
Menu Bar Help Options, 32
Menu Bar Insert Options, 28
Menu Bar View Options, 27
Moving Picture Experts Group – 4, definition of
and acronym, 111
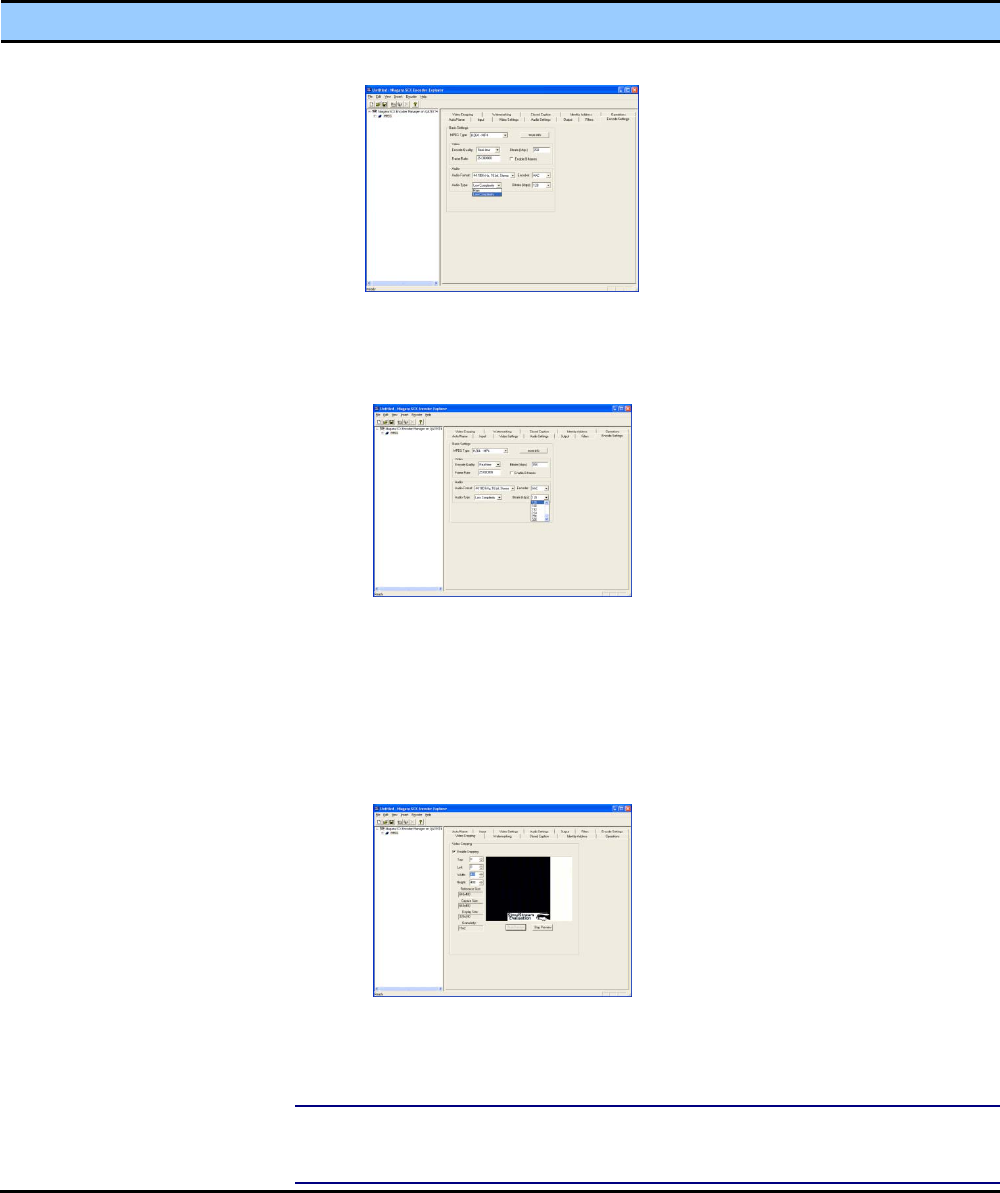
MPEG-4 Audio Bitrate Options, 90
MPEG-4 Audio Encoder Options, 89
MPEG-4 Audio Format Options, 88
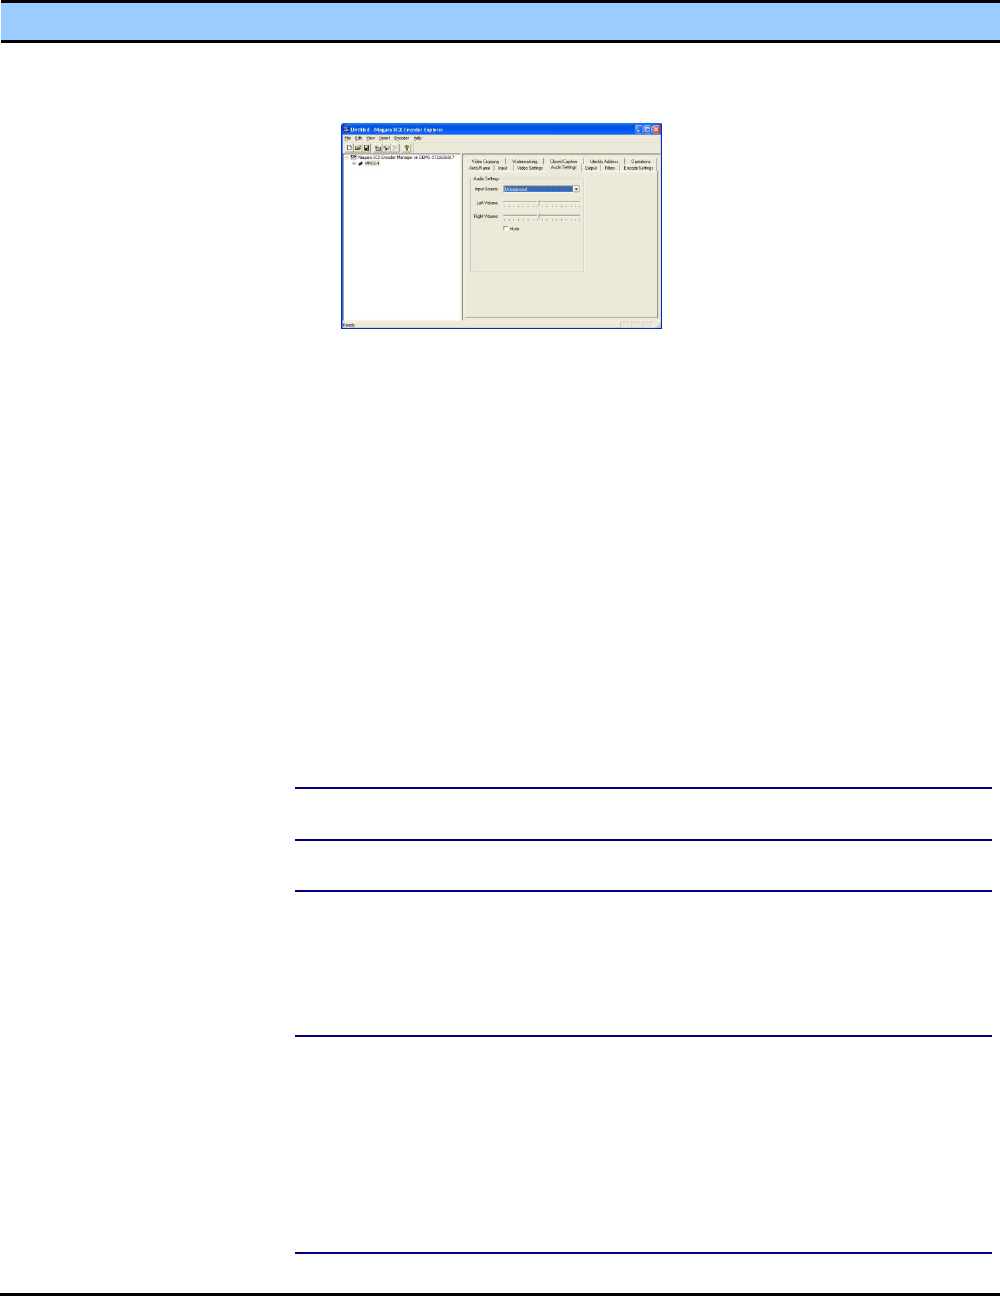
MPEG-4 Audio Settings, 82
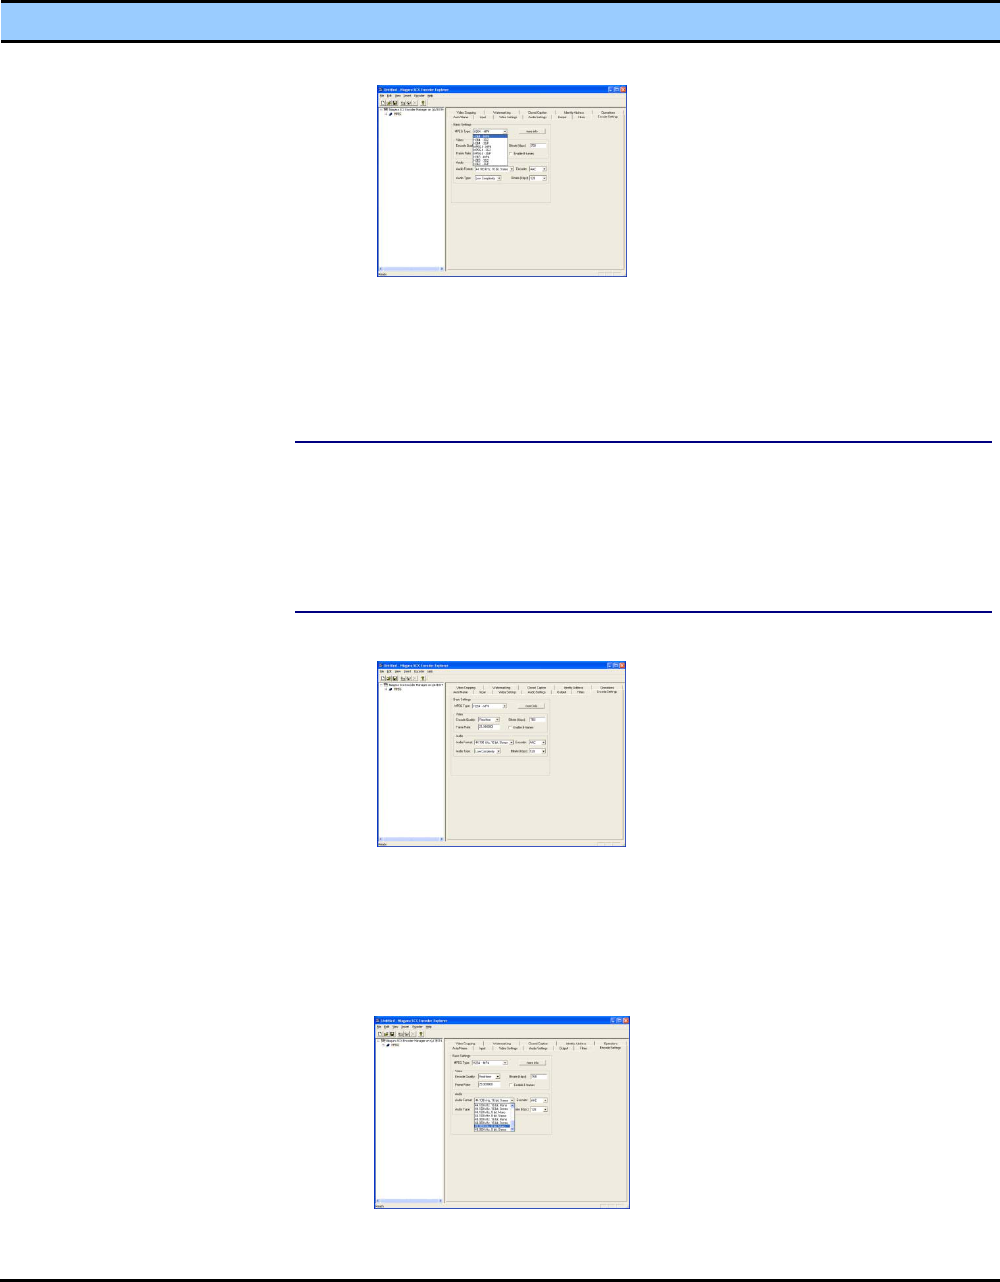
MPEG-4 Audio Type Options, 89
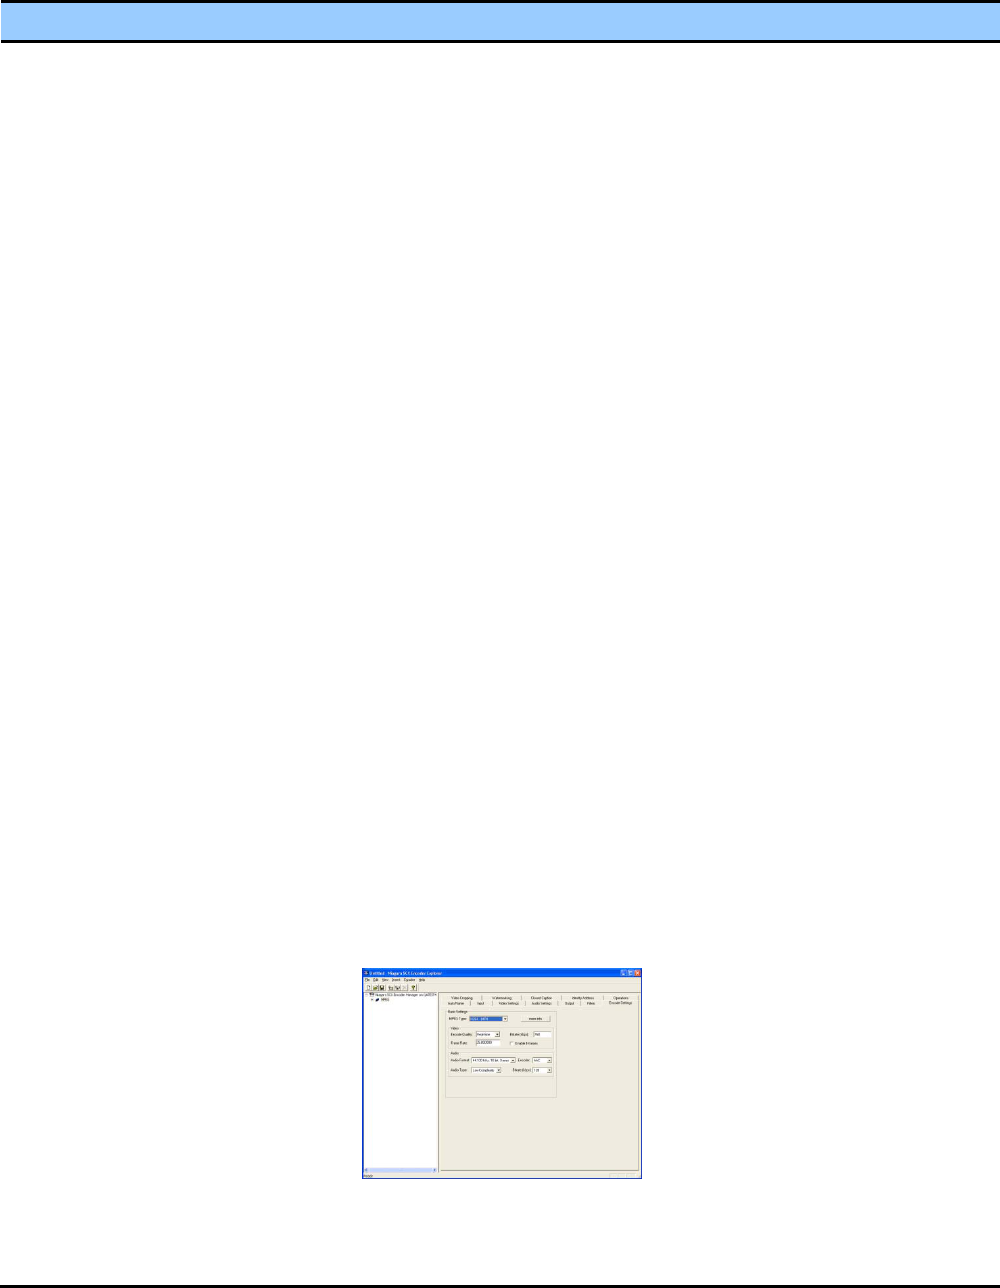
MPEG-4 Basic Settings, 88
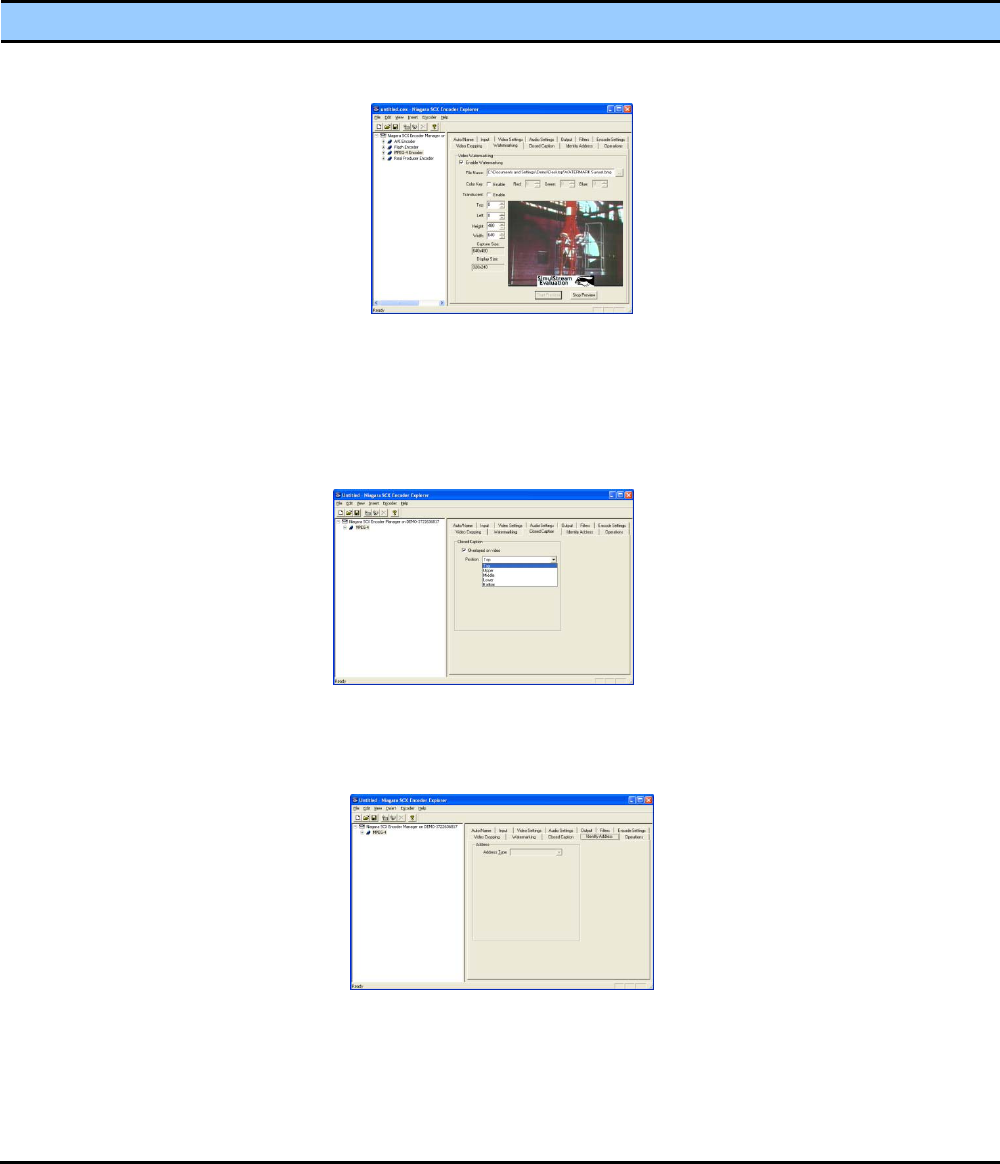
MPEG-4 Closed Caption Settings, 91
MPEG-4 Encode Settings Tab, 86
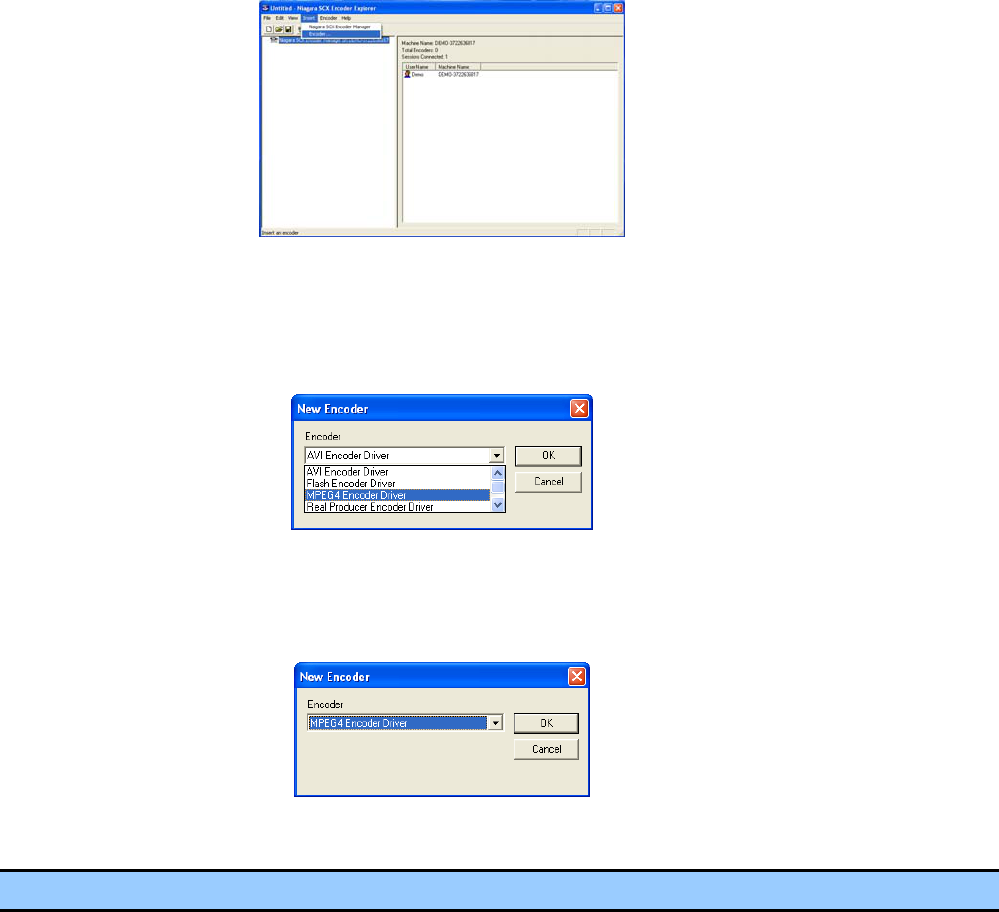
MPEG4 Encoder Driver Selection, 78
MPEG-4 Encoder Name Set, 79
MPEG-4 Encoder Tabs, 79
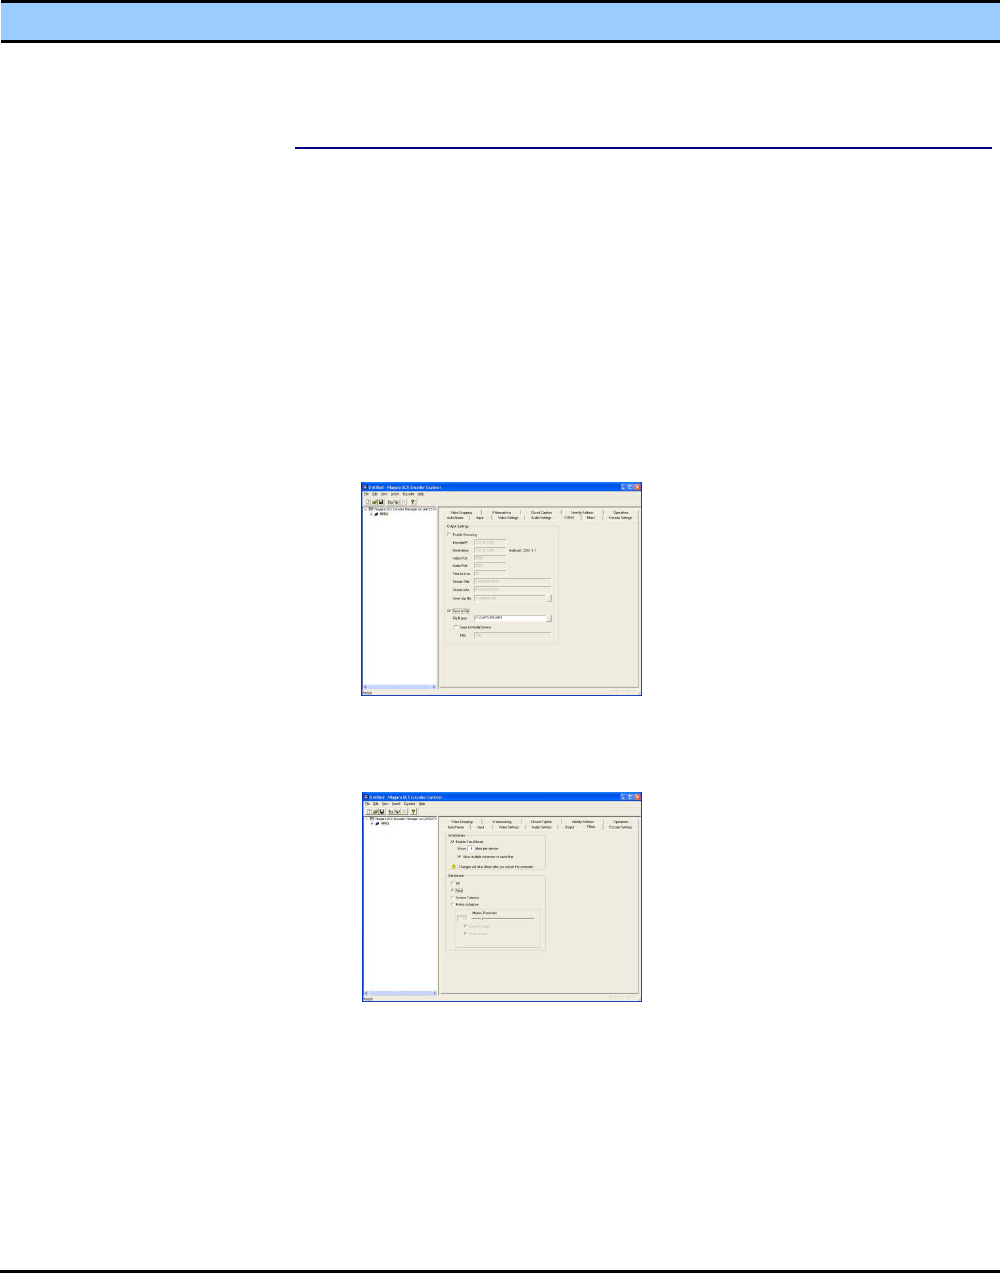
MPEG-4 Filter Settings, 84
MPEG-4 General Properties Settings, 79
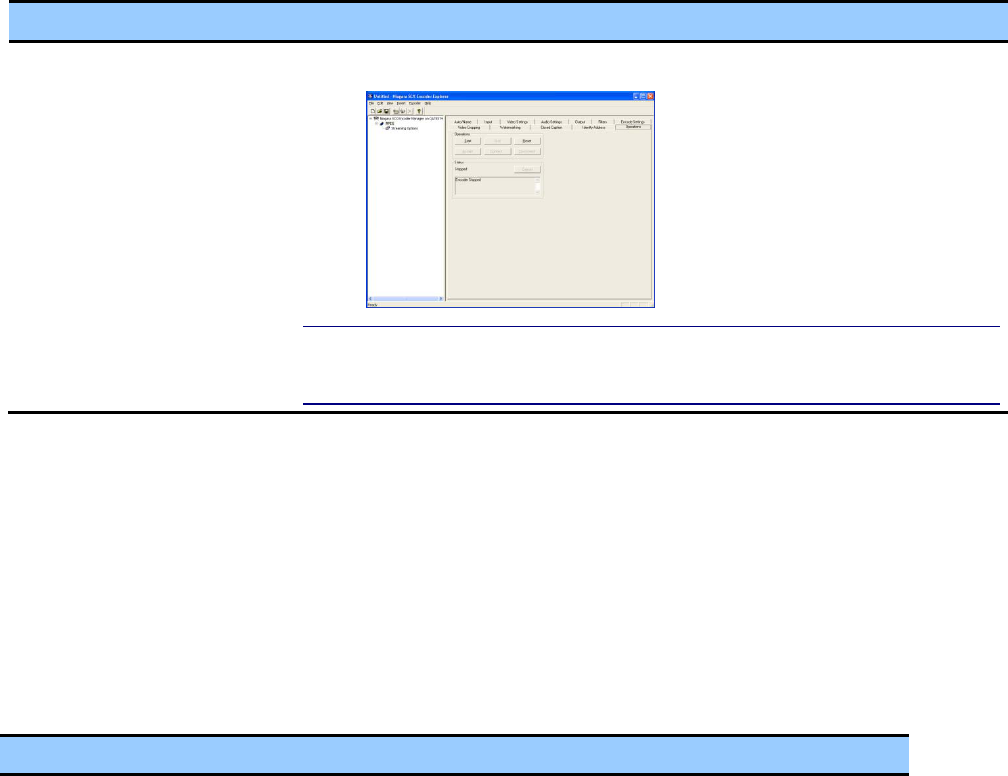
MPEG-4 Identity Address Settings, 91
MPEG-4 Input Sources Settings, 80
MPEG-4 Operations Settings, 91
MPEG-4 Output Settings, 84
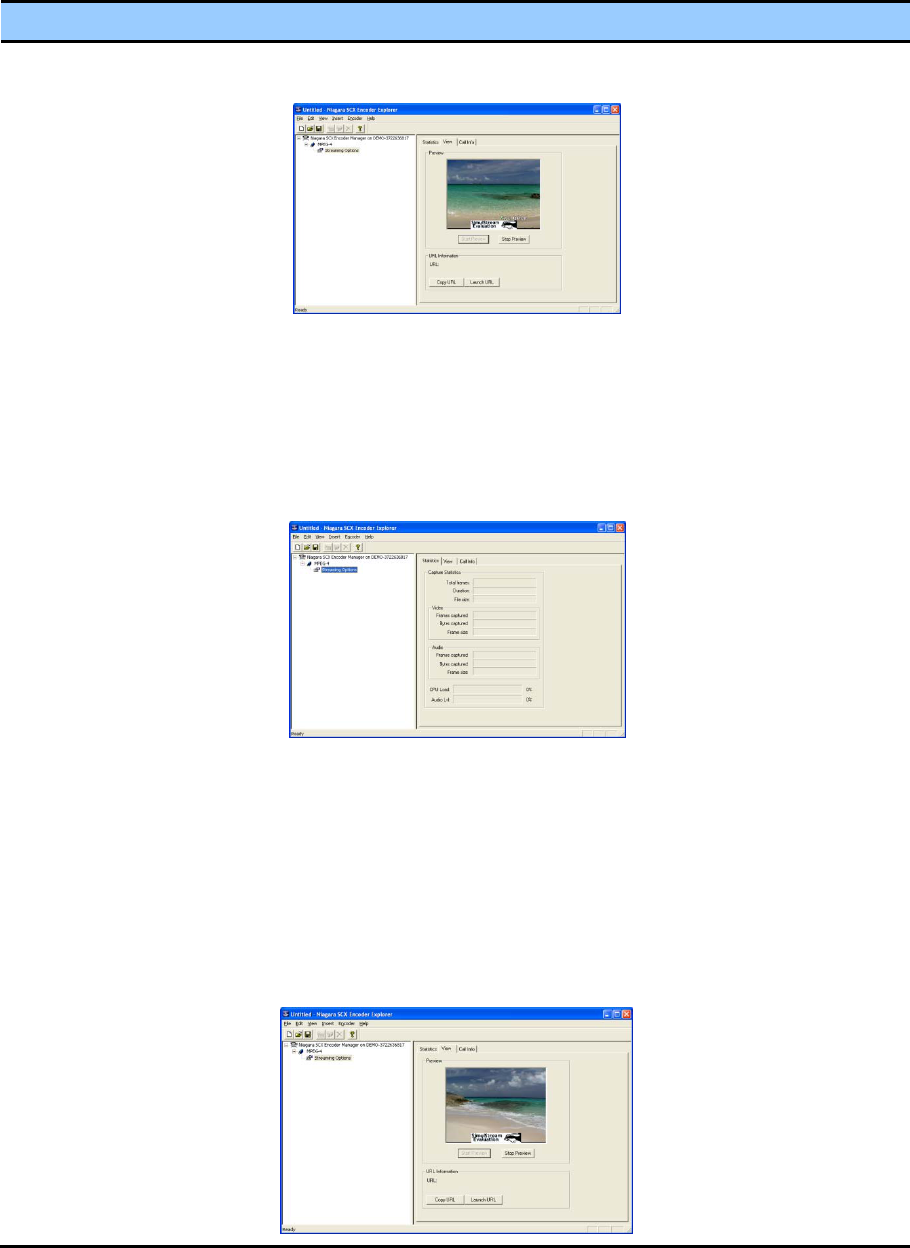
MPEG-4 Streaming Options Select, 92
MPEG-4 Streaming Options Tabs, 92
MPEG-4 Streaming Statistics Options, 93
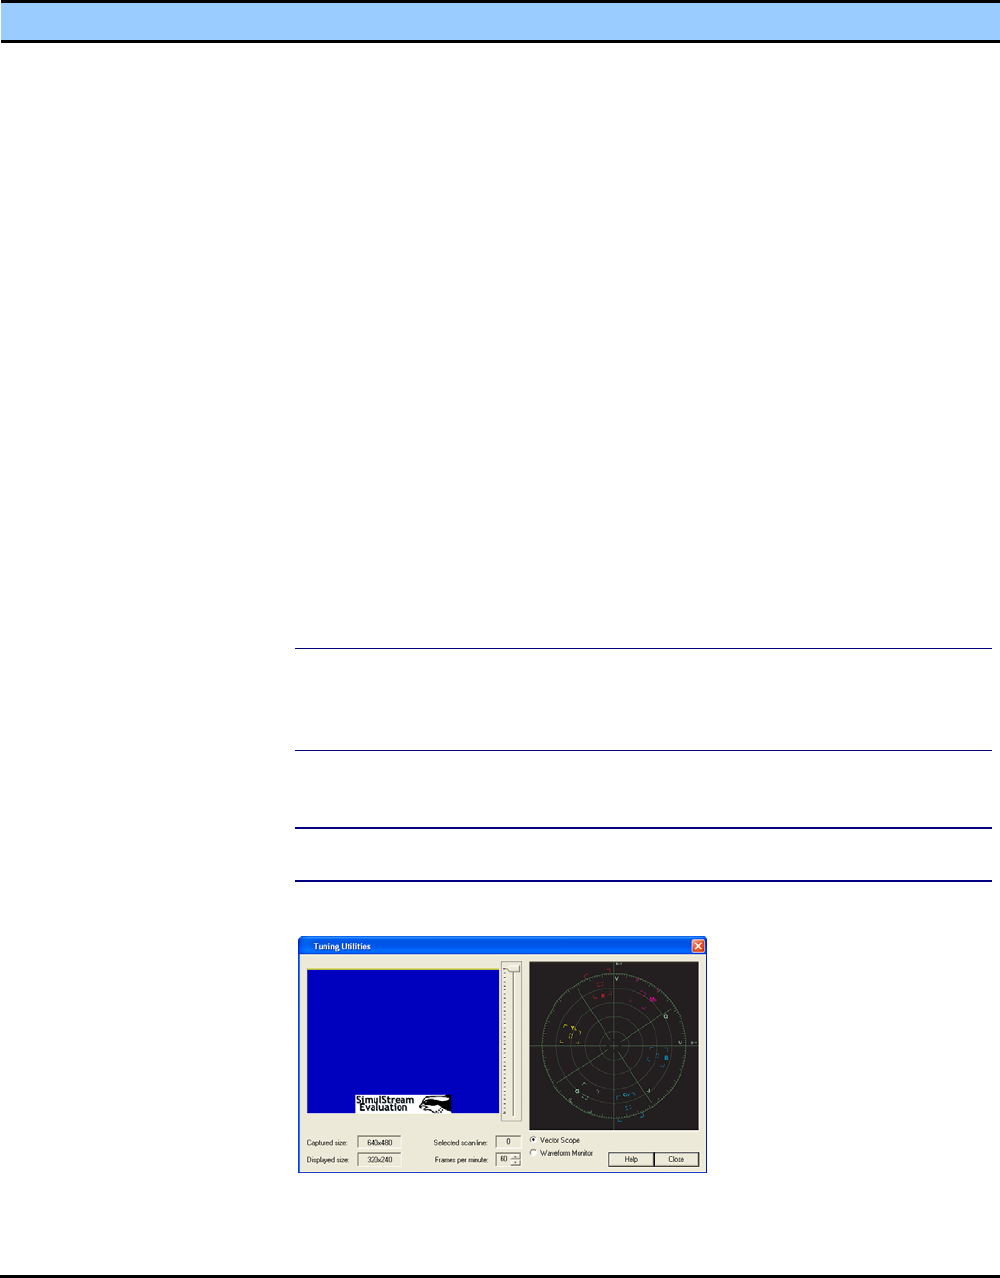
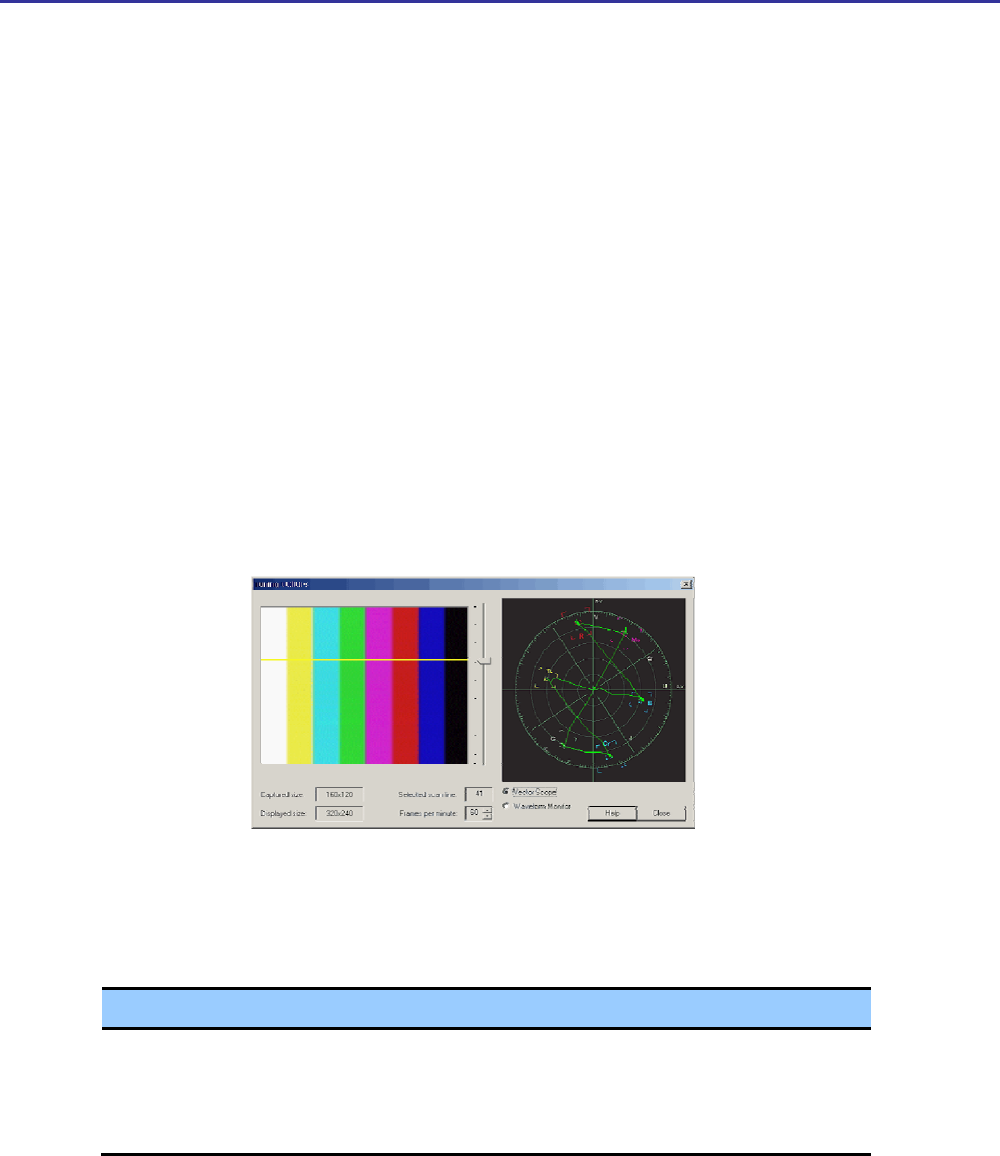
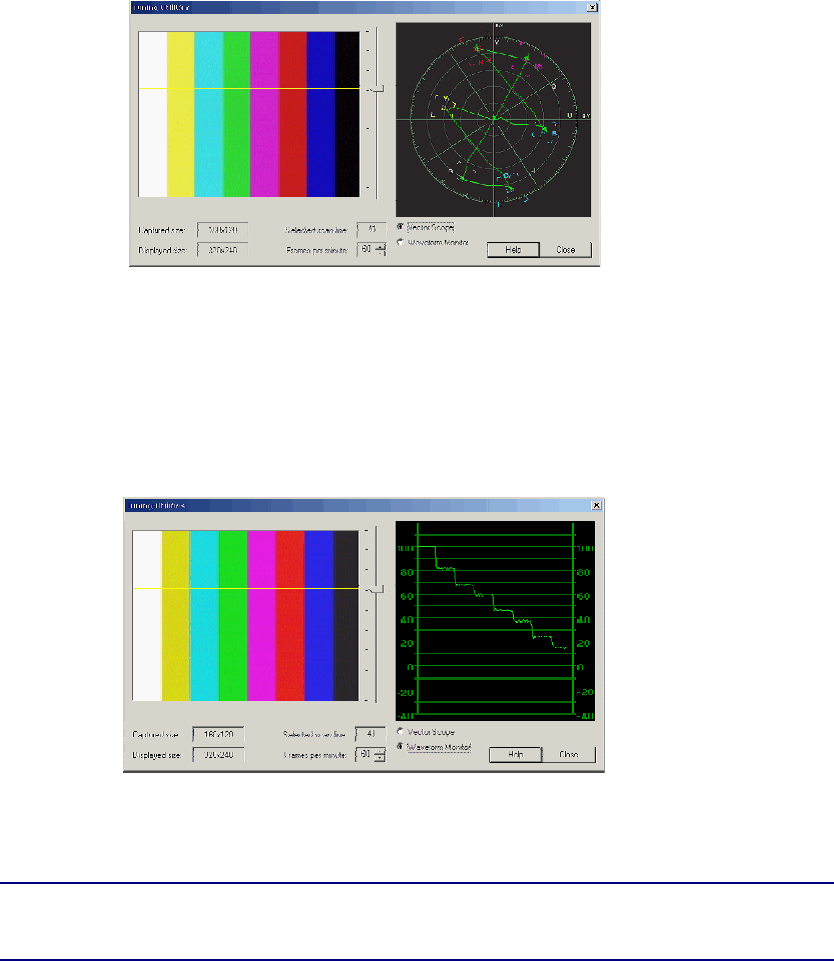
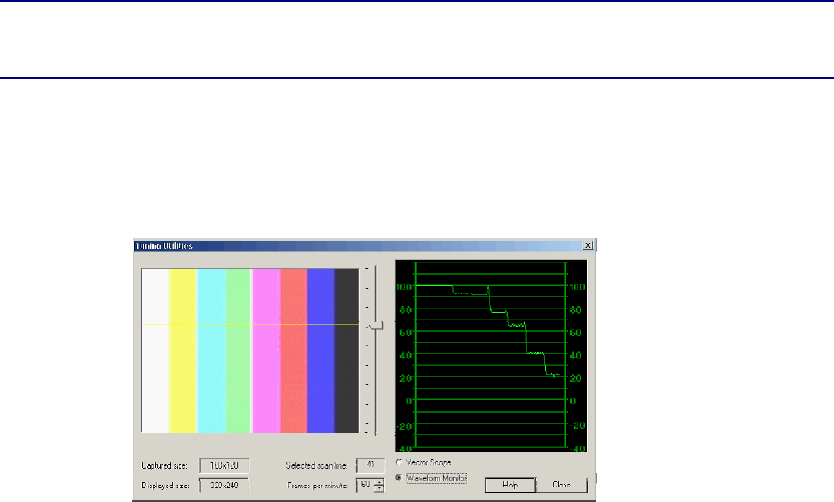
MPEG-4 Tuning Utilities Settings, 82
MPEG-4 Type Options, 87
MPEG-4 Video Cropping Settings, 90
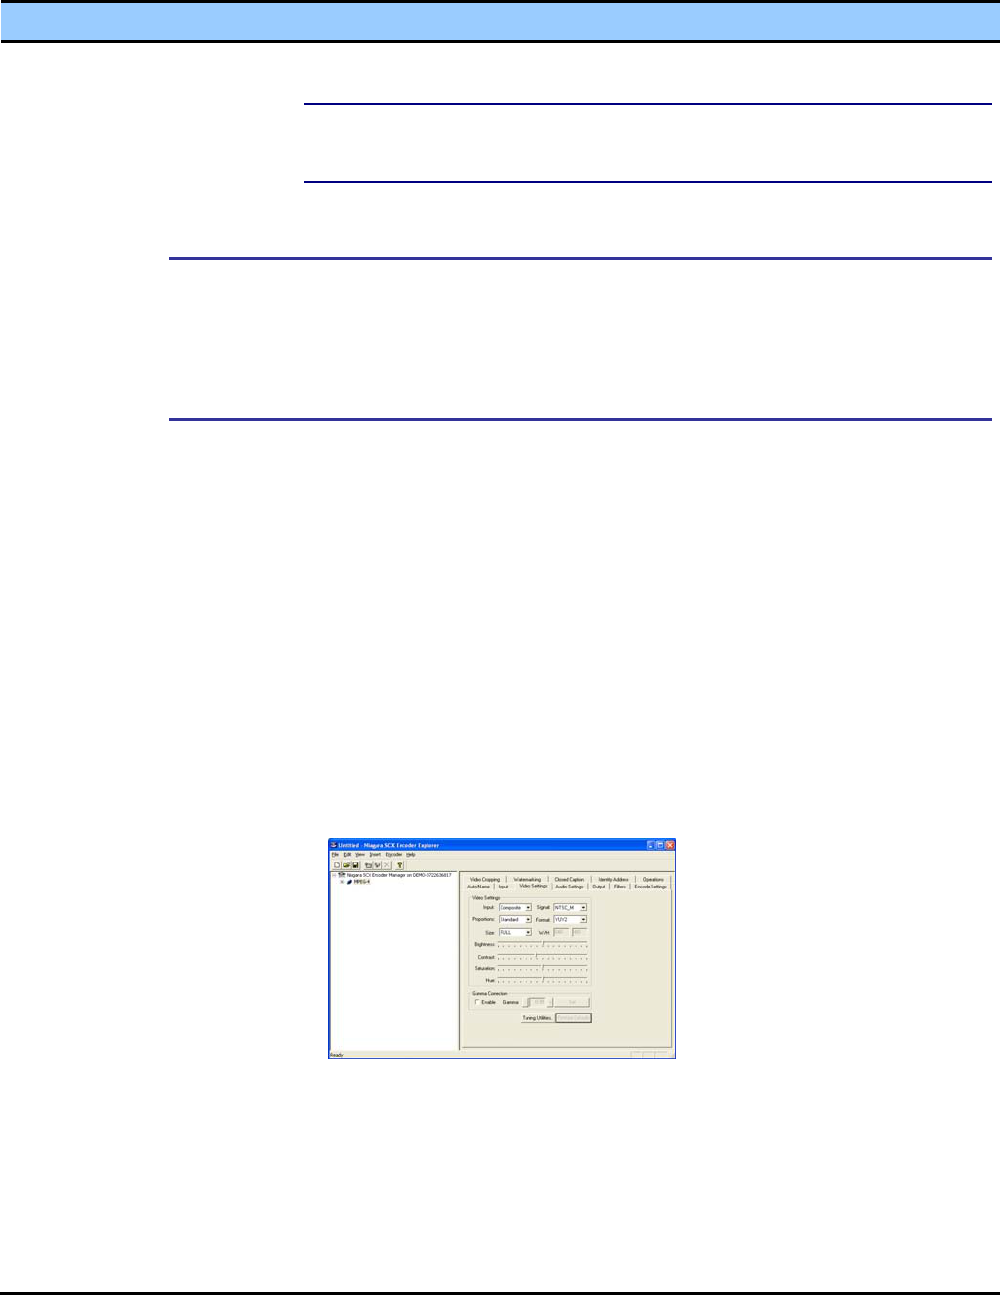
MPEG-4 Video Settings, 81
MPEG-4 Video Watermarking Settings, 90
Niagara SCX User Guide
ViewCast 111
MPEG-4 View (URL) Tab, 93
MPEG-4, definition, 111
Multicast, definition of, 111
My Computer ¾ COM Security options, 16
Name Encoder window, 29
National Television System Committee, definition
of and acronym, 112
Network Interface Card, definition of and
acronym, 112
New Encoder, 30
New Encoder Display, 31
New Session window, 46
Niagara SCX and Explorer Basics, 23
Niagara SCX CD display, 12
Niagara SCX Encoder Explorer window, 77
Niagara SCX Encoder Insert Selection, 29
Niagara SCX Encoder Selection window, 25
Niagara SCX Explorer Display, 28
Niagara SCX Explorer Toolbar, 23
Niagara SCX Explorer Window Design, 23
Niagara SCX Explorer, definition of, 113
Niagara SCX Login Credentials Dialog, 11
Niagara SCX Menu bar, 24
Niagara SCX Save As, 26
Niagara SCX Setup Wizard window, 8
Niagara SCX Shortcut, 12
Niagara SCX Splash Screen window, 7
Niagara SCX Splash window, 13
Niagara SCX window, 23
Niagara SCX, definition of, 112
Niagara SCX, Description of, 1
NIC, definition, 112
NTSC acronym definition, 112
Open window, 25
Operations (AVI) Tab, 65
Operations (Flash) Tab, 74
Operations (MPEG-4) Tab, 91
Operations (RealProducer) Tab, 56
Operations (Windows Media) Tab, 41
Options (RealProducer) Tab, 54
Output (AVI) Tab, 64
Output (Flash) Tab, 72
Output (MPEG-4) Tab, 82
Output (RealProducer) Tab, 53
Output (Windows Media) Tab, 38
Output2 (RealProducer) Tab, 53
Package Contents, 5
PAL acronym, definition, 113
Phase Alternation Line, definition of and
acronym, 113
picture brightness, 101
Index
112 ViewCast
picture quality, 101
Pixel, definition of, 113
Prerequisites, 5
Preview the AVI Video, 66
Preview the Flash Video while Encoding Display,
75
Preview the RealProducer Video while Encoding
Display, 59
Preview the Video while Encoding Display, 42
Preview while Encoding (RealProducer)
Streaming Tab, 59
Product License Key window, 8
Product Registration, 9
Profile Settings (Windows Media) Tab, 39
Properties Option, 46
Publication Index, 117
quality of video chrominance (coloring), 101
Quick Start Niagara SCX, 21
RealProducer Audio Settings, 53
RealProducer Audio Stats Settings, 59
RealProducer Closed Caption Settings, 56
RealProducer Encoder Options Settings, 55
RealProducer Encoder Tabs, 49
RealProducer Filter Settings, 54
RealProducer General Properties Settings, 49
RealProducer Identity Address Settings, 56
RealProducer Input Sources Settings, 49
RealProducer Operations Settings, 57
RealProducer Options and Settings, 49
RealProducer Output Settings, 53
RealProducer Output(2) Settings, 54
RealProducer Streaming Options Authoring
Information, 60
RealProducer Streaming Options Tabs, 58
RealProducer Streaming Statistics Options, 58
RealProducer Target Statistics Settings, 58
RealProducer Video Cropping Settings, 55
RealProducer Video Settings, 51
RealProducer Video Stats Settings, 59
RealProducer Video Watermarking Settings, 56
Real-time video, definition of, 113
Rename Encoder Display, 31
reset an encoder, 32
Runtime Setup Completion Dialog, 11
Runtime Setup License Dialog, 10
Sample Encoder Views, 29
SCX Explorer Modifications, 19
SCX Server DCOM Settings, 15
SECAM acronym, definition, 113
Security Tab, 46
Select Users or Groups window, 17
Niagara SCX User Guide
ViewCast 113
Sequential Color with Memory, definition of, 113
Service Login Update window, 11
set the firewall and DCOM configurations, 15
Set the SCX Server Firewall, 18
Set Up SimulStream Session with Niagara SCX, 95
Set Up the Niagara SCX Environment, 21
Show Filters per Device Option, 98
Show
N
filters per device, 98
signal distortions, 101
SimulStream Checkbox, 97
start an encoder, 31, 32
Start Niagara SCX, 21
Statistics (AVI) Tab, 66
Statistics (MPEG-4) Streaming Tab, 92
Statistics (RealProducer) Streaming Tab, 58
Statistics, Audio (RealProducer) Streaming Tab, 59
Statistics, Target (RealProducer) Streaming
Tab, 58
Statistics, Video (RealProducer) Streaming Tab, 58
Steps (optional) to install the Niagara SCX
Explorer on remote systems, 12
stop an encoder, 32
Streaming Infrastructure, 105
Streaming, Authoring Information (Windows
Media) Tab, 43
Streaming, Preview while Encoding (Windows
Media) Tab, 42
Streaming, Statistics (Flash) Tab, 75
Streaming, Statistics (Windows Media) Tab,
42
Streaming, View (Flash) Tab, 75
Streaming, View (Windows Media) Tab, 42
Streaming, View, Preview while Encoding (Flash)
Tab, 75
television pictures, 101
Terms, Acronyms, and Definitions, 109
ToolBar Options, 24
Tuning Utilities (Diagnostics), 101
Unicast, definition of, 113
vectorscope, 101
Vectorscope Adjustments (Saturation), 103
Vectorscope Display, 101
Vectorscope Display Parts, 102
Vectorscope with Color Outside the Targets, 102
Vectorscope with Settings to be Adjusted, 104
Video Cropping (AVI) Tab, 64
Video Cropping (Flash) Tab, 73
Video Cropping (MPEG-4) Tab, 90
Video Cropping (RealProducer) Tab, 55
Video Cropping (Windows Media) Tab, 39
Video Settings (AVI) Tab, 62
Video Settings (Flash) Tab, 70
Video Settings (MPEG-4) Tab, 80
Index
114 ViewCast
Video Settings (RealProducer) Tab, 50
Video Settings (Windows Media) Tab, 36
Video Settings, Gamma Corrections (AVI)
Tab, 62
Video Settings, Gamma Corrections (Flash) Tab,
70
Video Settings, Gamma Corrections (MPEG-4)
Tab, 81
Video Settings, Gamma Corrections
(RealProducer) Tab, 51
Video Settings, Gamma Corrections
(Windows Media) Tab, 37
Video Settings, Tuning Utilities (AVI) Tab, 63
Video Settings, Tuning Utilities (Flash) Tab, 71
Video Settings, Tuning Utilities (MPEG-4) Tab,
82
Video Settings, Tuning Utilities
(RealProducer) Tab, 52
Video Settings, Tuning Utilities (Windows
Media) Tab, 37
Video Streaming Example, 106
Video Workflow Processes, 105
Video-on-demand, definition of, 114
View (AVI) Tab, 66
View (RealProducer) Streaming Tab, 59
View menu, 27
View Menu Options, 28
View, Preview while Encoding (AVI) Tab, 67
ViewCast Niagara Restart Dialog, 11
VOD, definition, 114
Warranties, iv
Watermarking (AVI) Tab, 64
Watermarking (Flash) Tab, 73
Watermarking (MPEG-4) Tab, 90
Watermarking (RealProducer) Tab, 55
Watermarking (Windows Media) Tab, 40
waveform monitor, 101
Waveform Monitor Display, 103
Welcome to Niagara SCX window, 13
Windows Firewall ¾ Exceptions options, 19
Windows Firewall options, 18
Windows Media Audio Settings, 38
Windows Media Closed Caption Settings, 41
Windows Media Encoder Menu Options, 31
Windows Media Encoder Tabs, 35
Windows Media Filter Settings, 39
Windows Media Format 9.5 Runtime Setup
prompt, 10
Windows Media General Properties Settings, 35
Windows Media Identity Address Settings, 41
Windows Media Input Sources Settings, 35
Windows Media Operations Settings, 41
Windows Media Options and Settings, 35
Windows Media Output Settings, 39
Niagara SCX User Guide
ViewCast 115
Windows Media Profile Settings, 39
Windows Media Sample Encoder View (Two
Encoders+Add Encoder), 30
Windows Media Streaming Options Authoring
Information, 43
Windows Media Streaming Options Tabs, 42
Windows Media Streaming Statistics Settings, 42
Windows Media Video Cropping Settings, 40
Windows Media Video Settings, 36
Windows Media Video Watermarking Settings, 40
Windows Security Alert options, 19
Part #: 40-03240-03A
116

Hulp nodig? Stel uw vraag in het forum

Spelregels

Misbruik melden

Gebruikershandleiding.com neemt misbruik van zijn services uitermate serieus. U kunt hieronder aangeven waarom deze vraag ongepast is. Wij controleren de vraag en zonodig wordt deze verwijderd.

Product:

Bijvoorbeeld antisemitische inhoud, racistische inhoud, of materiaal dat gewelddadige fysieke handelingen tot gevolg kan hebben.

Bijvoorbeeld een creditcardnummer, een persoonlijk identificatienummer, of een geheim adres. E-mailadressen en volledige namen worden niet als privégegevens beschouwd.

Spelregels forum

Om tot zinvolle vragen te komen hanteren wij de volgende spelregels:

Belangrijk! Als er een antwoord wordt gegeven op uw vraag, dan is het voor de gever van het antwoord nuttig om te weten als u er wel (of niet) mee geholpen bent! Wij vragen u dus ook te reageren op een antwoord.

Belangrijk! Antwoorden worden ook per e-mail naar abonnees gestuurd. Laat uw emailadres achter op deze site, zodat u op de hoogte blijft. U krijgt dan ook andere vragen en antwoorden te zien.

Abonneren

Abonneer u voor het ontvangen van emails voor uw Niagara SCX V6.2 bij:


U ontvangt een email met instructies om u voor één of beide opties in te schrijven.


Ontvang uw handleiding per email

Vul uw emailadres in en ontvang de handleiding van Niagara SCX V6.2 in de taal/talen: Engels als bijlage per email.

De handleiding is 4,01 mb groot.


U ontvangt de handleiding per email binnen enkele minuten. Als u geen email heeft ontvangen, dan heeft u waarschijnlijk een verkeerd emailadres ingevuld of is uw mailbox te vol. Daarnaast kan het zijn dat uw internetprovider een maximum heeft aan de grootte per email. Omdat hier een handleiding wordt meegestuurd, kan het voorkomen dat de email groter is dan toegestaan bij uw provider.

Stel vragen via chat aan uw handleiding

Stel uw vraag over deze PDF

Andere handleiding(en) van Niagara SCX V6.2

Niagara SCX V6.2 Gebruiksaanwijzing - English - 152 pagina's


Uw handleiding is per email verstuurd. Controleer uw email

Als u niet binnen een kwartier uw email met handleiding ontvangen heeft, kan het zijn dat u een verkeerd emailadres heeft ingevuld of dat uw emailprovider een maximum grootte per email heeft ingesteld die kleiner is dan de grootte van de handleiding.

Er is een email naar u verstuurd om uw inschrijving definitief te maken.

Controleer uw email en volg de aanwijzingen op om uw inschrijving definitief te maken

U heeft geen emailadres opgegeven

Als u de handleiding per email wilt ontvangen, vul dan een geldig emailadres in.

Uw vraag is op deze pagina toegevoegd

Wilt u een email ontvangen bij een antwoord en/of nieuwe vragen? Vul dan hier uw emailadres in.


Info