This appliance is marked according to the European directive 2012/19/EU on Waste Electrical and Electronic Equipment (WEEE). This symbol indicates
that this appliance may not be treated as household waste. Instead it shall be handed over to the applicable collection point for the recycling of electrical
and electronic equipment. Disposal of the appliance shall be carried out in accordance with the local environment regulations for waste disposal.
The CE mark indicates that the product complies with European directives in relation to 2006/95/CE (low voltage), 2004/108/CE (Compliance with the
Electromagnetic Compatibility), 2011/65/UE (restriction of the use of certain hazardous substances in electrical and electronic equipment), 2009/125/CE
(Ecodesign directive).
EN
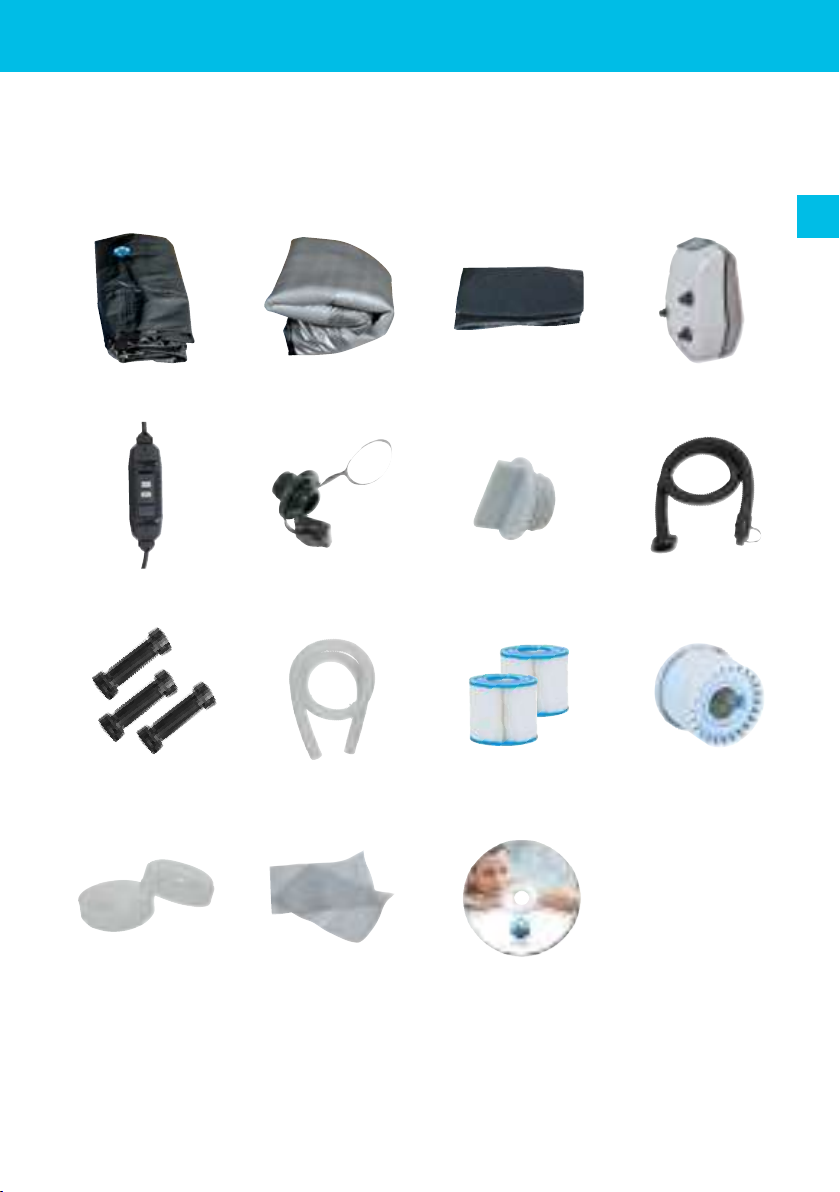
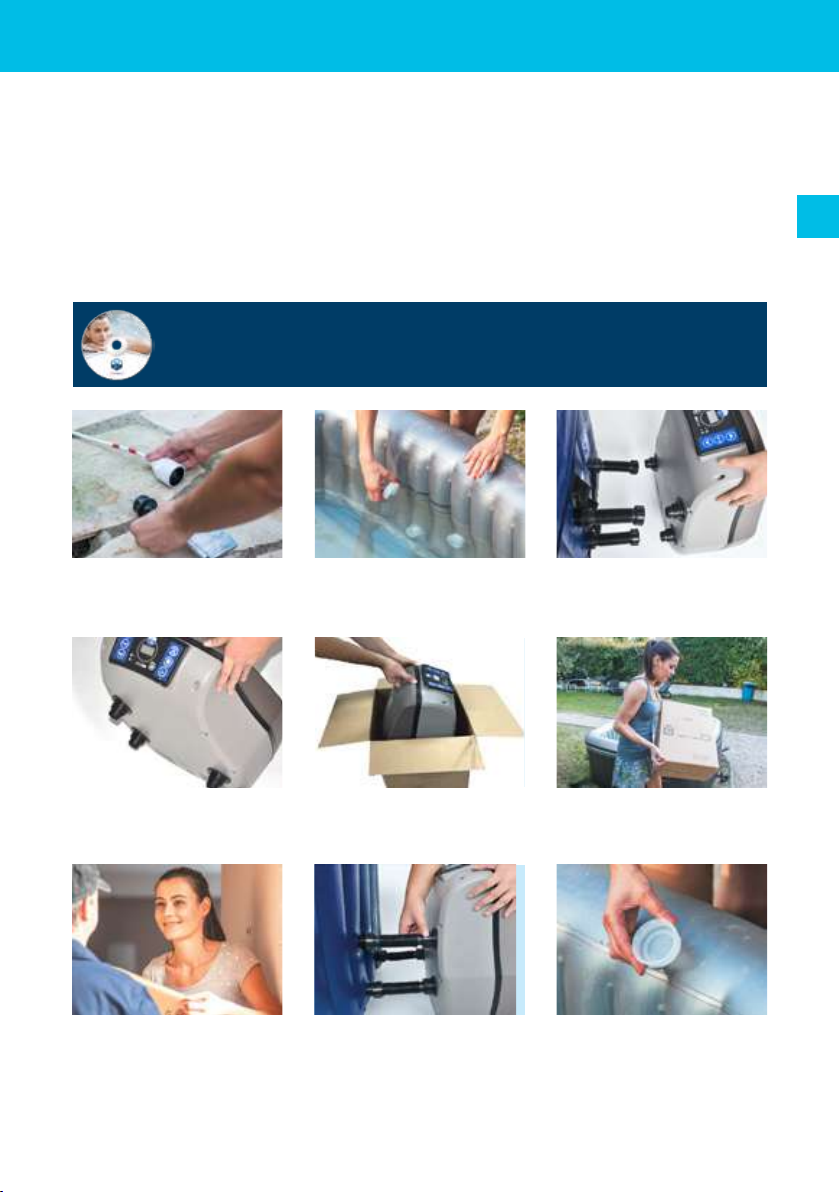
Ensure to check all parts are present:
2. PACKAGE LIST
2.1. Package list
Top coverInflatable structureBase protectorPump unit
RCD plugAirflow valveDrainage capInflating hose
Pump unit connectorsDrain hoseFilter cartridgesFiltration support
CapsRepair kitInstallation DVD
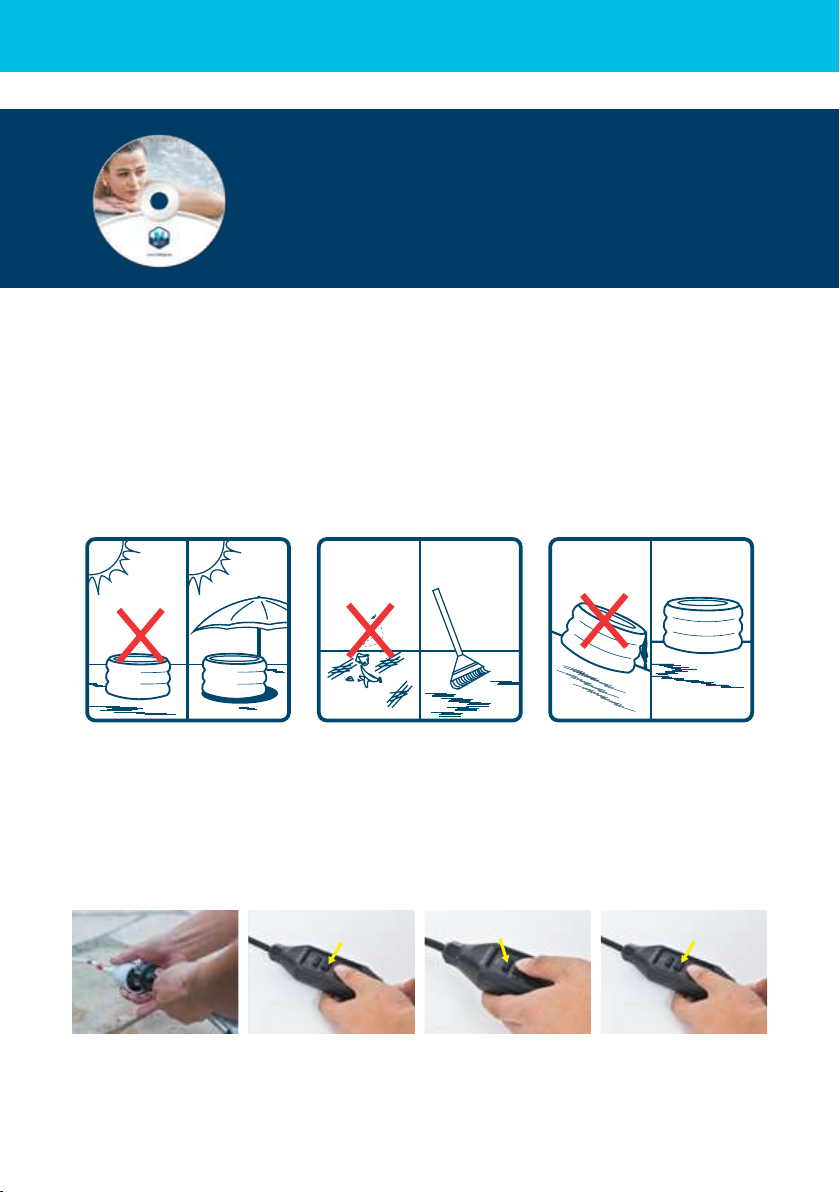
3.2. RCD test
1. Insert the plug into the
power outlet.
2. Press the «RESET» button,
the indicator light turns red.
3. Press the «TEST» button,
the indicator light turns o.
4. Press the «RESET» button,
the indicator light turns red.
The RCD works properly.
3.1. Site selection
Clean the placeA level placeA place with an awning
WARNING : Before proceed to installation your spa, please make sure that the future
location meets the following conditions :
• A level place
• Wide enough to support the pool and its pump unit.
• Able to support more than 500 kg/m².
• Sheltered from the sun and bad weather.
• Clean and free from sharp objects.
3. INSTALLATION
WARNING: The RCD plug must be tested before each use..
Do not use if RCD test fails and see chapter 6.1.
The installation and maintenance instructions described in the
following pages are also detailed on the DVD included.
Our installation and maintenance videos are also available on
our website www.netspa.eu.
EN
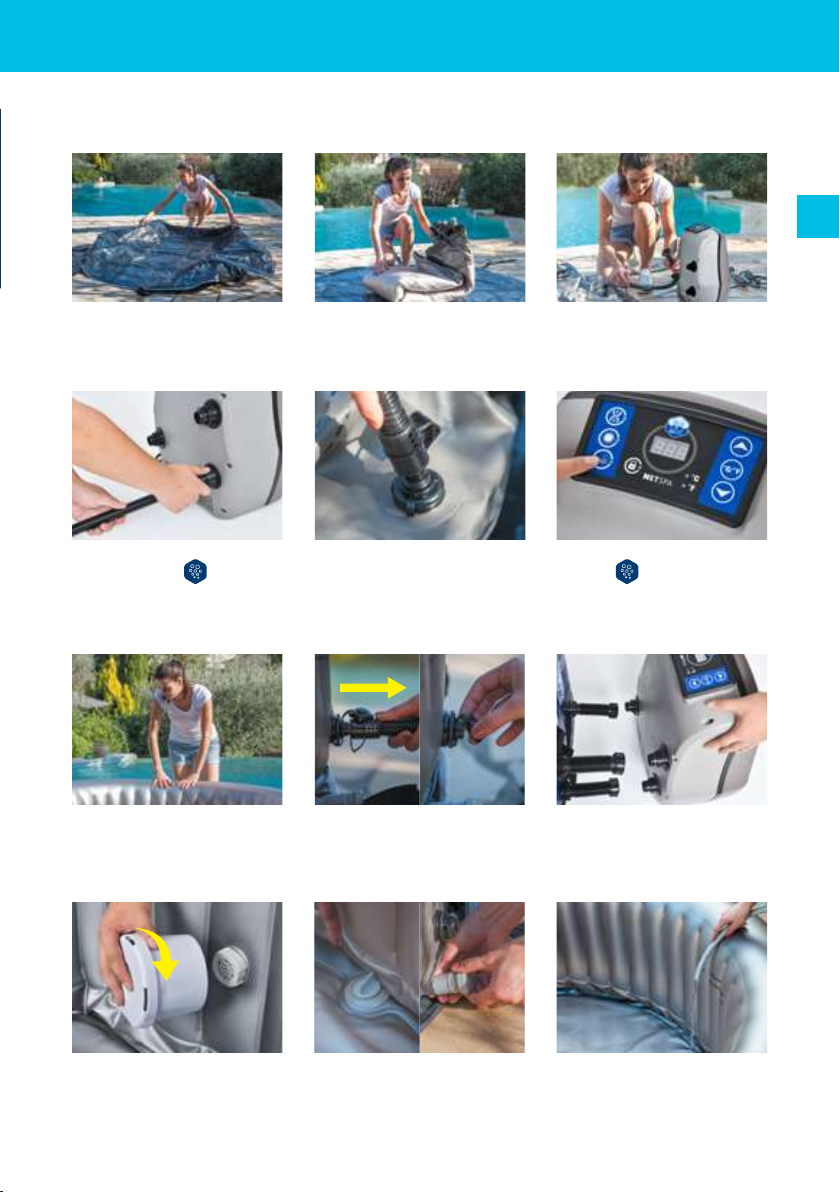
3.3. Assembling
1) Install the base protector to where
you want to install your spa and pull
out the straps.
2) Unfold the inatable spa over the
base protector.
3) Bring the pump unit to the inatable
spa.
4) Connect the ination hose to the
pump on the socket .
7) Inate the inatable spa for about
10 minutes. Ensure that the spa is
rmly inated.
10) Put the sock on the lter cartridge
then screw it onto the lower suction
inside the basin.
8) Remove the ination hose and
screw the cap rmly in place.
11) Ensure that the drain caps are
properly closed before before lling
the spa
9) Connect the unit pump to the pool
using the 3 connectors to screw.
Ensure the icons on the pump and the
pool match up
12) Fill the spa pool until the indicated
ll level is reached.
Your spa is ready to be used.
5) Insert the ination hose into the
inatable spa
6) Connect the pump unit then press
the button to inate the spa.
The air ow valve prevents your spa
from over-inating.
Once powered-up, the LED displays the current water temperature automatically.
The temperature units selector changes the temperature units from Celsius de-
grees to Fahrenheit degrees.
Press the temperature adjustment buttons, then the screen will ash. When it is
ashing, you can set the desired temperature. The value will increase or decrease
1 degree at once. The temperature could be set between 30°C to 42°C (86°F to
107°F).
To lock or unlock the control panel, press the Lock button and hold 3 seconds.
Lock the control panel when you are away to prevent other people come to
change your settings..
Press the massage button to activate the bubble massage system, the green
indicator light turns on. It can be turned o by pressing it again.
Note :
- The massage system will stop automatically after 30 minutes of operation. Re-activate the mas-
sage function by pressing the massage button again.
- When lter button is on, pressing bubble button will exchange lter mode into massage mode: lter
indicator light will turn off and massage indicator light turn on. If press the bubble button again, the
massage mode will be changed back to lter mode.
4. USAGE
4.1. Control panel
4.2. Functions
Filtration
Decrease
temperature
Increase
temperature
Screen
Massage
Lock control
panel
Temperature
units indicator
Temperature
units
selector
Heater
EN
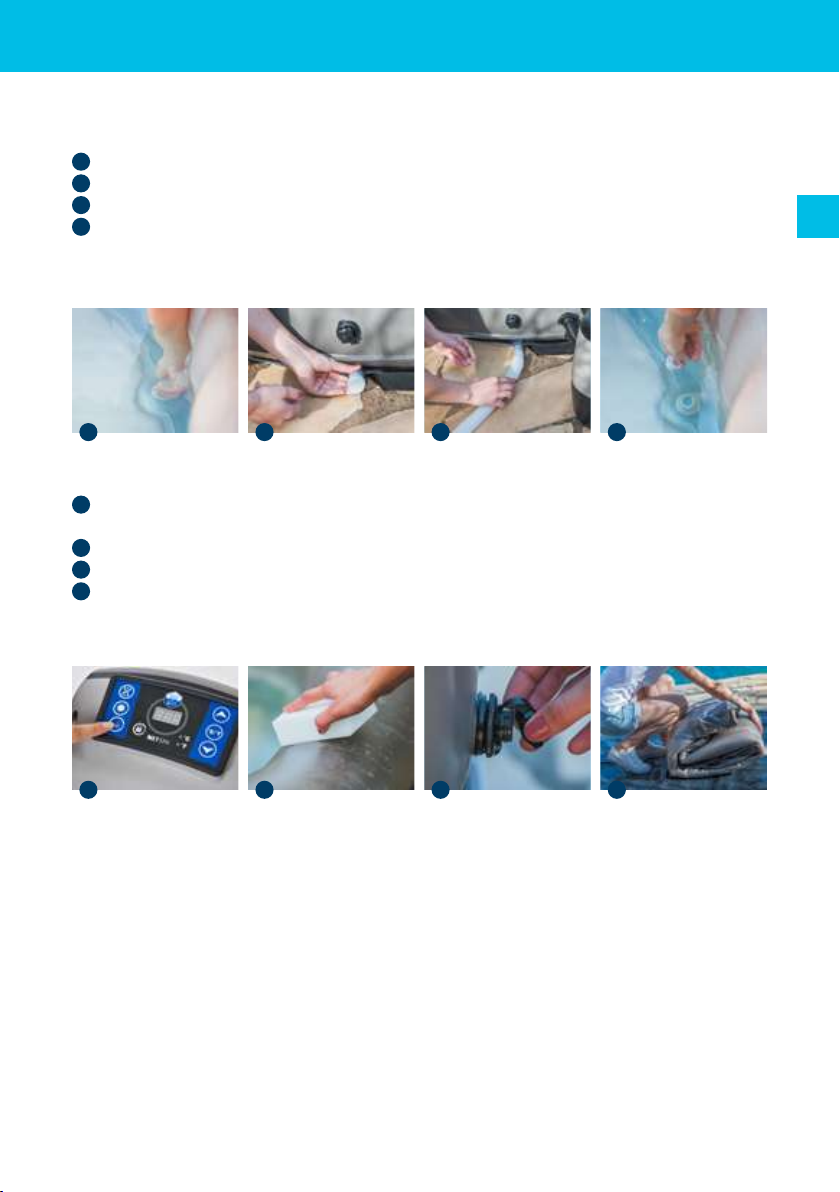
Press the lter button to activate the water ltration. The green indicator light will
turn on when the ltration system is activated.
Note:
- If massage function is on, the ltration can’t be activated.
Press the heating button to activate water heating and ltering system at the
same time. The green indicator light of lter and red indicator light of heating will
turn on at same time
The pump does not stop heating until the current water temperature reaches the
set temperature; and the heating system will restart after the current water tem-
perature drops 2°C below the set temperature automatically.
Maximum heating temperature: 42°C (107°F)
Important :
When the ltering system has worked 150 hours accumulatively, buzzing
will warn to remind you to clean the lter, at the same time, the light of the
ltering function will ash. You can hold the ltering button 5 seconds to
turn o the buzzing. The ltering system will turn o, you can press the
button to active the ltering system again.
Note :
- The heating system is dependent on the ltration system and it can operate without.
- After turning off the heating system, the ltration system will still work.
- If the massage function is active, the ltration and heating functions can be activated.
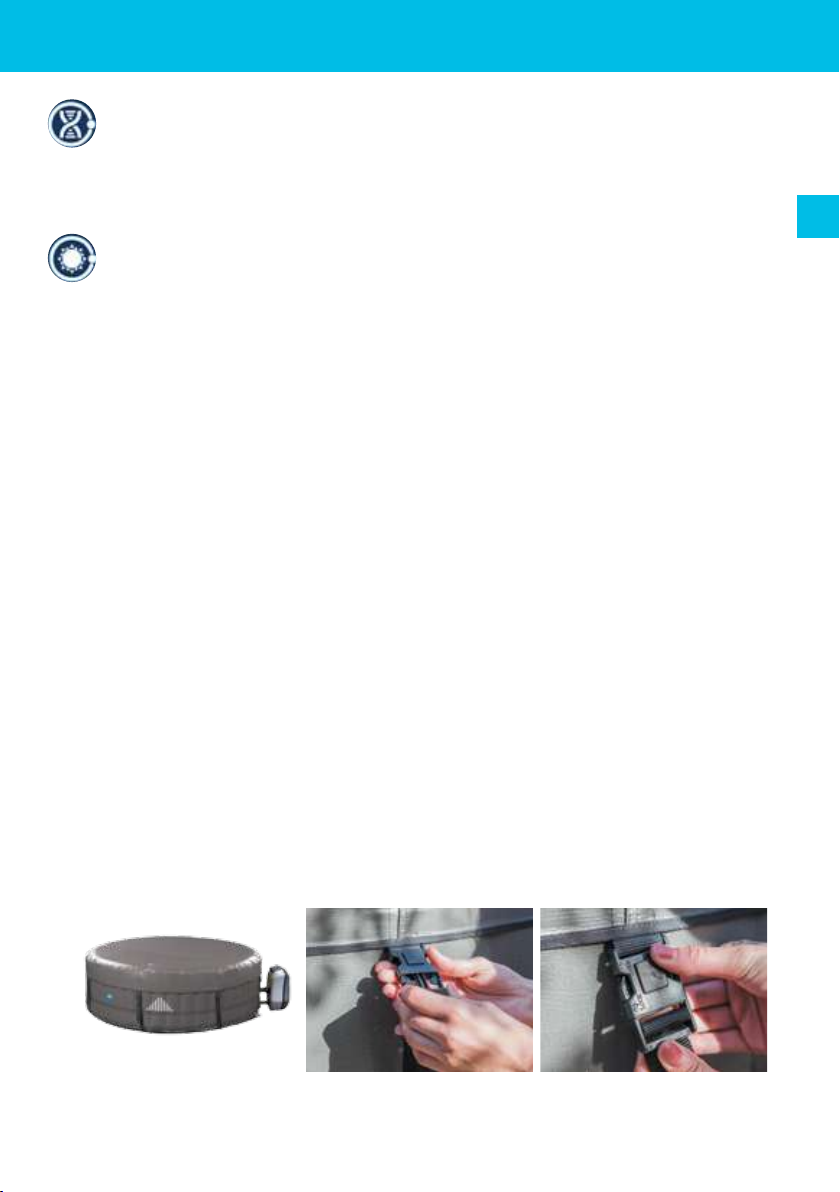
4.3. Pool cover and security
After each use, the control panel must be locked and the pool must be coated with its
top cover and it must be attached to the base protector with the safety buckles.
Each safety buckles has a lock system ; closed buckle, the latch in up position locks
the buckle, the latch in down position unlocks the buckle.
The top cover keeps the heat from the water and secures the pool.
5.1. Water maintenance
WARNING : A bad pool water quality can harm your health.
Depending on the frequency and conditions of use:
- The lter cartridge should be regularly cleaned (150 hours max.).
- The lter cartridge should be replaced every 1 to 2 month.
- The pool water should be changed every 15 to 30 days.
Use a water test kit to control the parameters of the water before using the spa, or at
least once a week.
Use disinfection products for the spa. The treatment products should be used with
caution and it is imperative to refer to their instructions.
Damage resulting from improper use of treatment products is not covered by warranty
(overdose, shock treatment, ...).
1. Water balance
The water balance (pH) must be maintain between 7 and 7.4.
2. Water Sanitation
To sanitize the pool water, we suggest using an active oxygen-based
treatment or bromine placed in a oating dispenser. (Dispenser sold
separately).
5. MAINTENANCE
5.2. Cleaning and replacing lter cartridge
Dirty lter cartridge may contaminate the pool water and cause damage to the heating
function.
1. Unscrew the lter case by turning it counter-clockwise. Take out the lter cartridge
from the case.
2. Rinse o the lter cartridge with a garden hose. If the lter cartridge remains dirty
and discoloured, the lter cartridge should be replaced.
3. Put back the cleaned lter cartridge into his case and screw it to the pool.
EN
5.3. Drainage and storage
Drainage
1 Check the stopper on the bottom of the pool and the drain cap.
2 Unscrew the drain cap.
3 Connect the drainage hose.
4 Remove the stopper on the bottom of the pool. Completely drain all water from the
spa pool.
Once empty, the pool can be cleaned with soap and water.
Storage
5 Press the bubbling button to blow out the water inside the jet holes. Unplug the
pump, remove the lter cartridge from the inner wall of the pool.
6 Use a towel to wipe o the pool, dry 24 hours.
7 Unscrew the valves to deate the pool.
8 Fold the pool.
It is recommended that store the SPA in its original package in a warm dry place.
5.4. Repair kit
Little holes or puncture can be repaired with the repair kit included and glue reserved to
pool liner.
1. Find the leak.
2. Thoroughly clean the area surrounding the leak.
3. Cut a piece of repair material in round shape, which should be larger than the dam-
aged area.
4. Apply adhesive to the underneath side of the patch and around the area to be re-
paired.
5. Put the patch on the damaged area and press down rmly. Allow 12 hours for repair
to dry. After patch has dried, apply glue around the edges for a complete seal (dry 4
hours).
1
5
2
6
3
7
4
8
Do not return the product to the store
Contact your local after sales service
on www.netspa.eu or POOLSTAR FRANCE
ZA Les pielettes - 13740 LE ROVE - FRANCE
IMPORTANT
Here are some useful tips to help you to diagnose and rectify common sources of
trouble.
ProblemCauseSolution
Control panel
screen does not
operate
Check power source
Power failure
Reset the RCD plug / Check if the wiring system is adapted to
the power of the pump unit (1540W)
Call for service if it does not reset
SPA pump does not
heat properly
Temperature set is too lowSet to a higher temperature
Filter Cartridge is dirtyClean or Replace the cartridge (see chapter 5.2)
Too low water levelFill water to minimum water level
Heating element defectiveCall for service
Bubble massage
system does not
work
Pump is overheatingCut o the power and wait until the pump has cooled.
Auto shut-down feature (30min) is
activatedPress the bubble button to reactivate
Malfunction of the pump unitCall for service if it does not reset
Water ltration does
not work
Filter Cartridge is dirtyClean or Replace the cartridge (see chapter 5.2)
Inlet and outlet blockedClean the inlet and outlet
Air inside the pumpFill water to minimum water level
Malfunction of the pump unitCall for service if it does not reset
Pump leakage
Adaptor seal improperlyReplace the seal in the right position
Water leakage from pump bodyCheck the pump body, call for service
Spa pool leakageSpa pool is torn or puncturedUse provided repair kit (see chapter 5.4)
Water is not clean
Insucient ltering timeIncrease the ltering time
Filter Cartridge is dirtyClean or Replace the cartridge (see chapter 5.2)
Pool lled water qualityChange the pool water completely
Improper water treatmentRefer to the chemical manufacturer’s instructions
6. TROUBLE SHOOTING
6.1. Troubleshooting
!
EN
In case of malfunction, please contact the customer service center NetSpa by connec-
ting to the following address: http://support.netspa.eu
After verifying your information, and an online diagnosis of your spa one of our repre-
sentatives will contact you to provide you indicated the procedure.
If necessary, we will ask you to return the pump unit of your spa for a complete diagno-
sis and repair.
6.2. Return procedure
1) Disconnect the spa
4) Empty the remaining water within
the pump unit.
7) After a complete diagnosis in our
center, you will receive the replace-
ment pump unit.
5) Pack appropriately the pump unit
in its original packaging including your
return authorization.
8) Connect the unit pump to the pool
using the 3 connectors to screw.
Ensure the icons on the pump and the
pool match up
6) Ship the pump unit.
9) Unscrew the caps inside the pool.
Your spa is ready to be used.
2) Do not empty the pool by screwing
the caps inside the pool
3) Unscrew the three connectors from
the pump unit.
The procedure described below is also detailed on the DVD included.
NetSpa products have been inspected and found free of defects prior to leaving the factory.
NetSpa warrants this product against defects in material and workmanship for a period of one
(1) year.
The warranty period begins on the date of purchase and NetSpa requires presentation of the
original proof to purchase to ascertain the date. During the warranty period, NetSpa will either
repair or replace, at its discretion, any defective products. Replacement products or repaired
parts will be warranted for only the unexpired portion of the original warranty.
Shipping cost policy
The return of defect parts to the authorized service center is at the charge of the owner. On
warranty period, the return is at the charge of service center.
Warranty policy
● This limited warranty does not apply to any defect resulting from negligence, accident,
misuse, or other reason beyond NetSpa’s reasonable control, included but not limited to:
normal wear and tear, negligence or failure to follow the product instructions, improper or
inadequate maintenance; connection to improper power supply; chemical water damage, loss
of pool water, unauthorized product modication or repair; use for commercial purpose; re,
lightening, ood or other external causes.
● This warranty is valid only in the country of purchase in such countries where NetSpa sells
and services the same model with identical technical specications.
● Warranty service outside the country of purchase is limited to the terms and conditions of
the corresponding warranty in the country of service. Where the cost of repairs or replacement
is not covered by this warranty, NetSpa will advise the owners and the cost shall be charged
to the owner.
● This warranty only applies to the original purchaser and terminates upon any transfer of
ownership.
● All repairs of which warranty claims are made must be pre-authorized by a NetSpa service
center.
● All the authorized selling dealer is responsible for all in-eld service work carried out on your
NetSpa product. NetSpa will not be liable for results of cost of workmanship from unautho-
rized service person.
Warranty registration
To validate your warranty, please register your product on our website NetSpa www.netspa.
eu. It is essential that all informations including customer name, date of purchase, serial num-
ber, spa model are indicated. Without these informations the warranty will be invalid.
Gebruikershandleiding.com neemt misbruik van zijn services uitermate serieus. U kunt hieronder aangeven waarom deze vraag ongepast is. Wij controleren de vraag en zonodig wordt deze verwijderd.
Product:
Spelregels forum
Om tot zinvolle vragen te komen hanteren wij de volgende spelregels:
lees eerst de handleiding door;
controleer of uw vraag al eerder door iemand anders is gesteld;
probeer uw vraag zo duidelijk mogelijk te stellen;
heeft u een probleem en al geprobeerd om dit op te lossen, vermeld dit erbij aub;
heeft u een oplossing gekregen van een bezoeker dan horen wij dat graag in dit forum;
wilt u een reactie geven op een vraag of antwoord, gebruik dan niet dit formulier maar klik op de knop 'reageer op deze vraag';
uw vraag wordt direct op de website gezet; vermijd daarom persoonlijke gegevens in te vullen;
Belangrijk! Als er een antwoord wordt gegeven op uw vraag, dan is het voor de gever van het antwoord nuttig om te weten als u er wel (of niet) mee geholpen bent! Wij vragen u dus ook te reageren op een antwoord.
Belangrijk! Antwoorden worden ook per e-mail naar abonnees gestuurd. Laat uw emailadres achter op deze site, zodat u op de hoogte blijft. U krijgt dan ook andere vragen en antwoorden te zien.
Abonneren
Abonneer u voor het ontvangen van emails voor uw Netspa Canyon bij:
nieuwe vragen en antwoorden
nieuwe handleidingen
U ontvangt een email met instructies om u voor één of beide opties in te schrijven.
Ontvang uw handleiding per email
Vul uw emailadres in en ontvang de handleiding van Netspa Canyon in de taal/talen: Engels als bijlage per email.
De handleiding is 0,56 mb groot.
U ontvangt de handleiding per email binnen enkele minuten. Als u geen email heeft ontvangen, dan heeft u waarschijnlijk een verkeerd emailadres ingevuld of is uw mailbox te vol. Daarnaast kan het zijn dat uw internetprovider een maximum heeft aan de grootte per email. Omdat hier een handleiding wordt meegestuurd, kan het voorkomen dat de email groter is dan toegestaan bij uw provider.
Uw handleiding is per email verstuurd. Controleer uw email
Als u niet binnen een kwartier uw email met handleiding ontvangen heeft, kan het zijn dat u een verkeerd emailadres heeft ingevuld of dat uw emailprovider een maximum grootte per email heeft ingesteld die kleiner is dan de grootte van de handleiding.
Er is een email naar u verstuurd om uw inschrijving definitief te maken.
Controleer uw email en volg de aanwijzingen op om uw inschrijving definitief te maken
U heeft geen emailadres opgegeven
Als u de handleiding per email wilt ontvangen, vul dan een geldig emailadres in.
Uw vraag is op deze pagina toegevoegd
Wilt u een email ontvangen bij een antwoord en/of nieuwe vragen? Vul dan hier uw emailadres in.