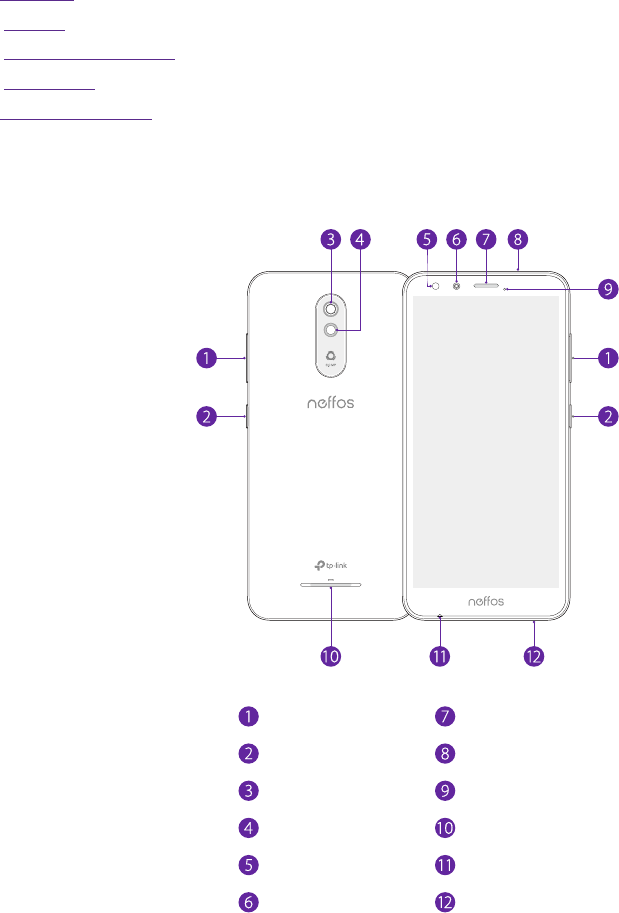
684289
76
Verklein
Vergroot
Pagina terug
1/93
Pagina verder
1910100164 REV1.0.0
Contents
About this guide. . . . . . . . . . . . . . . . . . . . . . . . . . . . . . . . . . . . . . . . . . . . . . . . . . . . i
Chapter 1. Get started. . . . . . . . . . . . . . . . . . . . . . . . . . . . . . . . . . . . . . . . . . . . . 1
1. 1 Overview . . . . . . . . . . . . . . . . . . . . . . . . . . . . . . . . . . . . . . . . . . . . . . . . . . . . . . . . . . . . . . . . . . 1
1. 2 Buttons . . . . . . . . . . . . . . . . . . . . . . . . . . . . . . . . . . . . . . . . . . . . . . . . . . . . . . . . . . . . . . . . . . . . 1
1. 3 Assemble your device . . . . . . . . . . . . . . . . . . . . . . . . . . . . . . . . . . . . . . . . . . . . . . . . . . . . . . 3
1. 4 Initial setup . . . . . . . . . . . . . . . . . . . . . . . . . . . . . . . . . . . . . . . . . . . . . . . . . . . . . . . . . . . . . . . . 4
1. 5 Charge your phone. . . . . . . . . . . . . . . . . . . . . . . . . . . . . . . . . . . . . . . . . . . . . . . . . . . . . . . . . 5
Chapter 2. Basics. . . . . . . . . . . . . . . . . . . . . . . . . . . . . . . . . . . . . . . . . . . . . . . . . . 6
2. 1 Touchscreen gestures . . . . . . . . . . . . . . . . . . . . . . . . . . . . . . . . . . . . . . . . . . . . . . . . . . . . . . 6
2. 2 Home screen. . . . . . . . . . . . . . . . . . . . . . . . . . . . . . . . . . . . . . . . . . . . . . . . . . . . . . . . . . . . . . . 8
2. 3 Access apps . . . . . . . . . . . . . . . . . . . . . . . . . . . . . . . . . . . . . . . . . . . . . . . . . . . . . . . . . . . . . . . 11
2. 4 Status bar . . . . . . . . . . . . . . . . . . . . . . . . . . . . . . . . . . . . . . . . . . . . . . . . . . . . . . . . . . . . . . . . . 12
2. 5 Notification Panel . . . . . . . . . . . . . . . . . . . . . . . . . . . . . . . . . . . . . . . . . . . . . . . . . . . . . . . . . 13
2. 6 Quick Settings Panel. . . . . . . . . . . . . . . . . . . . . . . . . . . . . . . . . . . . . . . . . . . . . . . . . . . . . . . 14
2. 7 Type text. . . . . . . . . . . . . . . . . . . . . . . . . . . . . . . . . . . . . . . . . . . . . . . . . . . . . . . . . . . . . . . . . . 15
2. 8 Take a screenshot . . . . . . . . . . . . . . . . . . . . . . . . . . . . . . . . . . . . . . . . . . . . . . . . . . . . . . . . . 16
Chapter 3. Network and Share . . . . . . . . . . . . . . . . . . . . . . . . . . . . . . . . . . . . 17
3. 1 WLAN. . . . . . . . . . . . . . . . . . . . . . . . . . . . . . . . . . . . . . . . . . . . . . . . . . . . . . . . . . . . . . . . . . . . . 17
3. 2 Mobile data . . . . . . . . . . . . . . . . . . . . . . . . . . . . . . . . . . . . . . . . . . . . . . . . . . . . . . . . . . . . . . . 18
3. 3 Connect to computer. . . . . . . . . . . . . . . . . . . . . . . . . . . . . . . . . . . . . . . . . . . . . . . . . . . . . . 18
3. 4 Bluetooth . . . . . . . . . . . . . . . . . . . . . . . . . . . . . . . . . . . . . . . . . . . . . . . . . . . . . . . . . . . . . . . . . 19
3. 5 Share your mobile data with other devices . . . . . . . . . . . . . . . . . . . . . . . . . . . . . . . . . 20
Chapter 4. Calls and Contacts. . . . . . . . . . . . . . . . . . . . . . . . . . . . . . . . . . . . . 22
4. 1 Make a call . . . . . . . . . . . . . . . . . . . . . . . . . . . . . . . . . . . . . . . . . . . . . . . . . . . . . . . . . . . . . . . . 22
4. 2 Answer or reject a call . . . . . . . . . . . . . . . . . . . . . . . . . . . . . . . . . . . . . . . . . . . . . . . . . . . . . 23
4. 3 Options during a call . . . . . . . . . . . . . . . . . . . . . . . . . . . . . . . . . . . . . . . . . . . . . . . . . . . . . . 24
4. 4 Call log. . . . . . . . . . . . . . . . . . . . . . . . . . . . . . . . . . . . . . . . . . . . . . . . . . . . . . . . . . . . . . . . . . . . 25
4. 5 Call history . . . . . . . . . . . . . . . . . . . . . . . . . . . . . . . . . . . . . . . . . . . . . . . . . . . . . . . . . . . . . . . . 26
4. 6 Call settings . . . . . . . . . . . . . . . . . . . . . . . . . . . . . . . . . . . . . . . . . . . . . . . . . . . . . . . . . . . . . . . 27
4. 7 Contacts . . . . . . . . . . . . . . . . . . . . . . . . . . . . . . . . . . . . . . . . . . . . . . . . . . . . . . . . . . . . . . . . . . 28
Chapter 5. Messages . . . . . . . . . . . . . . . . . . . . . . . . . . . . . . . . . . . . . . . . . . . . . 32
5. 1 Type of messages . . . . . . . . . . . . . . . . . . . . . . . . . . . . . . . . . . . . . . . . . . . . . . . . . . . . . . . . . 32
5. 2 Send, receive and reply to a message . . . . . . . . . . . . . . . . . . . . . . . . . . . . . . . . . . . . . . 32
5. 3 Manage messages. . . . . . . . . . . . . . . . . . . . . . . . . . . . . . . . . . . . . . . . . . . . . . . . . . . . . . . . . 33
5. 4 Message settings. . . . . . . . . . . . . . . . . . . . . . . . . . . . . . . . . . . . . . . . . . . . . . . . . . . . . . . . . . 34
Chapter 6. Camera and Photos. . . . . . . . . . . . . . . . . . . . . . . . . . . . . . . . . . . . 35
6. 1 Camera at a glance . . . . . . . . . . . . . . . . . . . . . . . . . . . . . . . . . . . . . . . . . . . . . . . . . . . . . . . . 35
6. 2 Take a photo . . . . . . . . . . . . . . . . . . . . . . . . . . . . . . . . . . . . . . . . . . . . . . . . . . . . . . . . . . . . . . 36
6. 3 Record a video . . . . . . . . . . . . . . . . . . . . . . . . . . . . . . . . . . . . . . . . . . . . . . . . . . . . . . . . . . . . 36
6. 4 Shooting modes . . . . . . . . . . . . . . . . . . . . . . . . . . . . . . . . . . . . . . . . . . . . . . . . . . . . . . . . . . 36
6. 5 Camera and video settings . . . . . . . . . . . . . . . . . . . . . . . . . . . . . . . . . . . . . . . . . . . . . . . . 37
6. 6 Photos . . . . . . . . . . . . . . . . . . . . . . . . . . . . . . . . . . . . . . . . . . . . . . . . . . . . . . . . . . . . . . . . . . . . 37
Chapter 7. Calendar . . . . . . . . . . . . . . . . . . . . . . . . . . . . . . . . . . . . . . . . . . . . . . 39
7. 1 Use the calendar . . . . . . . . . . . . . . . . . . . . . . . . . . . . . . . . . . . . . . . . . . . . . . . . . . . . . . . . . . 39
7. 2 Calendar settings. . . . . . . . . . . . . . . . . . . . . . . . . . . . . . . . . . . . . . . . . . . . . . . . . . . . . . . . . . 40
Chapter 8. Clock . . . . . . . . . . . . . . . . . . . . . . . . . . . . . . . . . . . . . . . . . . . . . . . . . 41
8. 1 Alarm . . . . . . . . . . . . . . . . . . . . . . . . . . . . . . . . . . . . . . . . . . . . . . . . . . . . . . . . . . . . . . . . . . . . . 41
8. 2 Worldclock. . . . . . . . . . . . . . . . . . . . . . . . . . . . . . . . . . . . . . . . . . . . . . . . . . . . . . . . . . . . . . . . 41
8. 3 Timer . . . . . . . . . . . . . . . . . . . . . . . . . . . . . . . . . . . . . . . . . . . . . . . . . . . . . . . . . . . . . . . . . . . . . 42
8. 4 Stopwatch . . . . . . . . . . . . . . . . . . . . . . . . . . . . . . . . . . . . . . . . . . . . . . . . . . . . . . . . . . . . . . . . 42
8. 5 Screen saver . . . . . . . . . . . . . . . . . . . . . . . . . . . . . . . . . . . . . . . . . . . . . . . . . . . . . . . . . . . . . . 42
8. 6 Settings. . . . . . . . . . . . . . . . . . . . . . . . . . . . . . . . . . . . . . . . . . . . . . . . . . . . . . . . . . . . . . . . . . . 42
Chapter 9. Google Chrome . . . . . . . . . . . . . . . . . . . . . . . . . . . . . . . . . . . . . . . 44
9. 1 Go to a webpage . . . . . . . . . . . . . . . . . . . . . . . . . . . . . . . . . . . . . . . . . . . . . . . . . . . . . . . . . . 44
9. 2 Browser tabs . . . . . . . . . . . . . . . . . . . . . . . . . . . . . . . . . . . . . . . . . . . . . . . . . . . . . . . . . . . . . . 45
Chapter 10. Google Play . . . . . . . . . . . . . . . . . . . . . . . . . . . . . . . . . . . . . . . . . . . 46
10. 1 Add an account to your Google Play . . . . . . . . . . . . . . . . . . . . . . . . . . . . . . . . . . . . . . . 46
10. 2 Download and install apps . . . . . . . . . . . . . . . . . . . . . . . . . . . . . . . . . . . . . . . . . . . . . . . . 46
Chapter 11. Themes . . . . . . . . . . . . . . . . . . . . . . . . . . . . . . . . . . . . . . . . . . . . . . . 47
11. 1 Change the theme . . . . . . . . . . . . . . . . . . . . . . . . . . . . . . . . . . . . . . . . . . . . . . . . . . . . . . . . 47
11. 2 Change the wallpaper . . . . . . . . . . . . . . . . . . . . . . . . . . . . . . . . . . . . . . . . . . . . . . . . . . . . . 47
11. 3 Change the icon style . . . . . . . . . . . . . . . . . . . . . . . . . . . . . . . . . . . . . . . . . . . . . . . . . . . . . 48
Chapter 12. Weather . . . . . . . . . . . . . . . . . . . . . . . . . . . . . . . . . . . . . . . . . . . . . . 49
12. 1 Check the weather . . . . . . . . . . . . . . . . . . . . . . . . . . . . . . . . . . . . . . . . . . . . . . . . . . . . . . . . 49
12. 2 Weather settings . . . . . . . . . . . . . . . . . . . . . . . . . . . . . . . . . . . . . . . . . . . . . . . . . . . . . . . . . . 49
Chapter 13. File Manager . . . . . . . . . . . . . . . . . . . . . . . . . . . . . . . . . . . . . . . . . . 50
13. 1 View folders or files. . . . . . . . . . . . . . . . . . . . . . . . . . . . . . . . . . . . . . . . . . . . . . . . . . . . . . . . 50
13. 2 Manage folders or files . . . . . . . . . . . . . . . . . . . . . . . . . . . . . . . . . . . . . . . . . . . . . . . . . . . . 51
Chapter 14. Tools . . . . . . . . . . . . . . . . . . . . . . . . . . . . . . . . . . . . . . . . . . . . . . . . . 52
14. 1 Downloads. . . . . . . . . . . . . . . . . . . . . . . . . . . . . . . . . . . . . . . . . . . . . . . . . . . . . . . . . . . . . . . . 52
14. 2 SIM Toolkit . . . . . . . . . . . . . . . . . . . . . . . . . . . . . . . . . . . . . . . . . . . . . . . . . . . . . . . . . . . . . . . . 53
14. 3 Feedback . . . . . . . . . . . . . . . . . . . . . . . . . . . . . . . . . . . . . . . . . . . . . . . . . . . . . . . . . . . . . . . . . 53
14. 4 Calculator. . . . . . . . . . . . . . . . . . . . . . . . . . . . . . . . . . . . . . . . . . . . . . . . . . . . . . . . . . . . . . . . . 54
14. 5 Sound Recorder . . . . . . . . . . . . . . . . . . . . . . . . . . . . . . . . . . . . . . . . . . . . . . . . . . . . . . . . . . . 55
14. 6 FM Radio. . . . . . . . . . . . . . . . . . . . . . . . . . . . . . . . . . . . . . . . . . . . . . . . . . . . . . . . . . . . . . . . . . 56
Chapter 15. Settings. . . . . . . . . . . . . . . . . . . . . . . . . . . . . . . . . . . . . . . . . . . . . . . 58
15. 1 Dual SIM settings. . . . . . . . . . . . . . . . . . . . . . . . . . . . . . . . . . . . . . . . . . . . . . . . . . . . . . . . . . 58
15. 2 Data usage. . . . . . . . . . . . . . . . . . . . . . . . . . . . . . . . . . . . . . . . . . . . . . . . . . . . . . . . . . . . . . . . 59
15. 3 VPN. . . . . . . . . . . . . . . . . . . . . . . . . . . . . . . . . . . . . . . . . . . . . . . . . . . . . . . . . . . . . . . . . . . . . . . 60
15. 4 Airplane mode . . . . . . . . . . . . . . . . . . . . . . . . . . . . . . . . . . . . . . . . . . . . . . . . . . . . . . . . . . . . 60
15. 5 Connected devices . . . . . . . . . . . . . . . . . . . . . . . . . . . . . . . . . . . . . . . . . . . . . . . . . . . . . . . . 60
15. 6 Apps and notifications. . . . . . . . . . . . . . . . . . . . . . . . . . . . . . . . . . . . . . . . . . . . . . . . . . . . . 61
15. 7 Battery. . . . . . . . . . . . . . . . . . . . . . . . . . . . . . . . . . . . . . . . . . . . . . . . . . . . . . . . . . . . . . . . . . . . 61
15. 8 Display. . . . . . . . . . . . . . . . . . . . . . . . . . . . . . . . . . . . . . . . . . . . . . . . . . . . . . . . . . . . . . . . . . . . 62
15. 9 Sound . . . . . . . . . . . . . . . . . . . . . . . . . . . . . . . . . . . . . . . . . . . . . . . . . . . . . . . . . . . . . . . . . . . . 63
15. 10 Storage . . . . . . . . . . . . . . . . . . . . . . . . . . . . . . . . . . . . . . . . . . . . . . . . . . . . . . . . . . . . . . . . . . . 64
15. 11 DuraSpeed. . . . . . . . . . . . . . . . . . . . . . . . . . . . . . . . . . . . . . . . . . . . . . . . . . . . . . . . . . . . . . . . 64
15. 12 Security . . . . . . . . . . . . . . . . . . . . . . . . . . . . . . . . . . . . . . . . . . . . . . . . . . . . . . . . . . . . . . . . . . . 64
15. 13 Location . . . . . . . . . . . . . . . . . . . . . . . . . . . . . . . . . . . . . . . . . . . . . . . . . . . . . . . . . . . . . . . . . . 66
15. 14 Accounts. . . . . . . . . . . . . . . . . . . . . . . . . . . . . . . . . . . . . . . . . . . . . . . . . . . . . . . . . . . . . . . . . . 67
15. 15 Languages and input . . . . . . . . . . . . . . . . . . . . . . . . . . . . . . . . . . . . . . . . . . . . . . . . . . . . . . 67
15. 16 Use gestures to open Camera. . . . . . . . . . . . . . . . . . . . . . . . . . . . . . . . . . . . . . . . . . . . . . 68
15. 17 Date and time. . . . . . . . . . . . . . . . . . . . . . . . . . . . . . . . . . . . . . . . . . . . . . . . . . . . . . . . . . . . . 68
15. 18 Reset options . . . . . . . . . . . . . . . . . . . . . . . . . . . . . . . . . . . . . . . . . . . . . . . . . . . . . . . . . . . . . 68
15. 19 System update . . . . . . . . . . . . . . . . . . . . . . . . . . . . . . . . . . . . . . . . . . . . . . . . . . . . . . . . . . . . 69
15. 20 About phone. . . . . . . . . . . . . . . . . . . . . . . . . . . . . . . . . . . . . . . . . . . . . . . . . . . . . . . . . . . . . . 69
Appendix A: Specifications . . . . . . . . . . . . . . . . . . . . . . . . . . . . . . . . . . . . . . . . 70
Appendix B: Technical Support . . . . . . . . . . . . . . . . . . . . . . . . . . . . . . . . . . . . 72
Appendix C: Explanation of the symbols on the product label . . . . . . . 78
Appendix D: Authentication. . . . . . . . . . . . . . . . . . . . . . . . . . . . . . . . . . . . . . . 79
About this guide
This guide is a complement to Quick Start Guide. The Quick Start Guide provides instructions for quick setup, while this guide
provides details of each function and shows how to configure the smart phone appropriate to your needs.
When using this guide, please notice that features of the device may vary slightly depending on the model and software
version you have, and on your location, language, and Internet service provider. All screenshots, images, parameters and
descriptions documented in this guide are used for demonstration only.
Conventions
In this guide, the following conventions are used:
Convention
Description
Smart phone/phone Stands for Neffos C7 Lite without any explanation.
Parameters
Parameters provided in the screenshots are just references for configuring the smart phone, which may be
different from the actual situation. You can set the parameters according to your demand.
Underlined
Italic and underlined words or phrases are hyperlinks. You can click to redirect to a specific section for more
details.
Screenshots
The demonstrated screenshots may look a little different from the actual UI of your smart phone due to the
various firmware versions. Please just configure your phone based on the actual UI.
>
The menu structure which shows the path to enter the corresponding page. For example, Settings > WLAN
means the WLAN function page is under the Settings menu.
Note:
Highlights important information and tips, and provides additional information.
Caution:
Indicates potential problems that may arise if proper care or attention is not given.
1Chapter 1 . Get started
Get started
This chapter introduces the smart phone’s hardware information and guides you how to
assemble your phone when you get started on using your new phone.
Overview
Buttons
Assemble your device
Initial setup
Charge your phone
1. 1 Overview
Earpiece
Headphone jack
Microphone
Speaker
Charging/data port
LED indicator
Volume buttons
Power button
Flash
Flash
Front camera
Rear camera
1. 2 Buttons
The buttons you use with Neffos include virtual ones and physical ones.
Power button
Lock Neffos: Locking your phone makes the phone sleep, saves the battery and prevents unmeant
operations on the screen. You can still receive phone calls, text messages, alarms and notifications as well
1
2Chapter 1 . Get started
as listening to music and adjusting the volume. Press the Power button to manually lock the screen. Neffos
locks the screen automatically in a given period of inactivity.
Unlock Neffos: Press the Power button to wake the screen.
Turn Neffos on: Press and hold the Power button until your phone vibrates and the screen turns on.
Note: If your phone does not respond after holding down the Power button for 10 seconds, the battery may be
empty. Connect your phone to a charger to charge the battery.
Turn Neffos off: Press and hold the Power button, then tap Power off.
Reboot Neffos: Press and hold the Power button, then tap
Restart.
Volume button
Adjust volume
Press the Volume-up or Volume-down button to adjust the audio volume when you’re on the phone,
listening to songs, watching movies or using other media. You can adjust volume in following two ways:
Press and hold the Volume-up or Volume-down button until the ring volume meets your needs.
Press the Volume-up or Volume-down button, and drag the slider for ring volume. Tap
to expand the
panel to adjust media and alarm volume.
Tap to fold the Volume Panel
Tap to expand the Volume Panel
Drag the slider to adjust the volume
Take a picture
Press the Volume button to take a picture. Refer to Take a photo to learn more.
Take a screenshot
Press the Power button and Volume-down button at the same time to take a screenshot.
3Chapter 1 . Get started
Navigation buttons
Home button
Recent apps button
Back button
Home button
Tap Home button to return to the default Home screen.
Tap and hold Home button to open Google
Assistant.
Back button
Tap Back button to return to the previous screen or close an app. When entering text, tap Back button to
close the onscreen keyboard.
Recent apps button
Tap Recent apps button to display recently used apps.
Double-tap Recent apps button to switch to the previous app.
1. 3 Assemble your device
Remove the back cover
Switch the device off and disconnect the charger and any other device before removing any covers. Hold your
phone face down, put a fingernail in the bottom corner hole in the cover and pry the back cover off.
Caution: Do not bend or twist the back cover excessively in case you damage the phone.
Insert cards
Carefully slide the cards into the card slots with the gold contacts facing down. Your phone supports one Nano
SIM card, one Micro SIM card and one MicroSD card. You can use one or two SIM cards by putting them in the
corresponding card slots.
Micro SIM card
Nano SIM card
Micro SD card
4Chapter 1 . Get started
Caution:
1. This device
supports one Nano SIM card and one Micro SIM card. Using incompatible SIM cards may damage the
card or the device, and may corrupt data stored on the card.
Nano SIM card Micro SIM card
2. If the card is not inserted correctly, the phone will not detect it.
3. Your phone supports only dual card dual standby single pass, which means you cannot use both SIM cards for calls or
data services simultaneously.
Insert the battery
Insert the battery into the opening on the back of the phone, aligning the gold contacts on the battery with the
gold contacts in your phone. Then gently press down to secure the battery.
Replace the back cover
Align the cover and press all the way around the cover’s edges, making sure it snaps into place.
1. 4 Initial setup
It is recommended to insert your SIM cards before you start the initial setup.
Press and hold the Power button to turn on your phone, and then follow the onscreen instructions to complete
the initial setup.
Note: To avoid low battery power, your phone will shut down automatically if not operated on initial setup screen in 30
minutes.
1. Select your language and tap START.
2. If you insert only one SIM card, your device will skip this step automatically.
If you insert two SIM cards, your device will proceed to dual-SIM settings. Follow the onscreen instructions
to finish dual-SIM settings. You can always adjust dual-SIM settings in
Settings > Network & Internet
> SIM cards.
If you don’t insert any SIM card, your device will proceed to Connect to mobile network screen. Read the
Insert SIM Card tips and tap SKIP.
3. Proceed to Connect to Wi-Fi screen.
Your phone will automatically list available WLAN networks. Select the network you want to connect to (If
you want to view more Wi-Fi networks, tap See all Wi-Fi networks), and then enter the password to access
the Internet (This can take up to 2 minutes). If you have activated mobile data services with your carrier,
you can tap Use mobile network for setup. Or if you don’t want to connect to network, just tap SKIP >
CONTINUE to skip this step.
Note: Using cellular network for setup may result in additional fees. Contact your carrier for information about your
cellular data plan rates.
4. If your device is connected to the Internet, it will set the data and time automaticlly and skip this step
directly.
If you don’t connect to any networks, your device will proceed to Date & time screen. Set the data and
time, then tap NEXT. You also can tap NEXT directly to skip this step. You can always adjust date and time
in
Settings > System > Date & time.
5. Proceed to Name screen. Add your name to allow your phone to personalize some apps. Your name will be
saved as the owner’s name. Then tap NEXT. If you don’t want to set now, tap NEXT directly. You can always
set your name in
Settings > Users & accounts.
5Chapter 1 . Get started
6. Pcoceed to Protect your phone screen. Select a device protection feature and then follow the onscreen
instructions to complete. If you don’t want to set now, choose Not now and tap SKIP ANYWAY. You can
always set your device protection in Settings > Security & location > Screen lock.
7. Proceed to Google
TM
services screen. Read the Google terms and conditions, then tap ACCEPT.
8. Proceed to Terms And Conditions screen. Carefully read the terms and conditions, then check I have
carefully read and agree to the above terms and tap NEXT.
9. Setup completed. Your phone is ready for use.
1. 5 Charge your phone
Your device displays a low battery warning when the battery is nearly empty, and your phone will turn off
automatically. Charge your device immediately to prevent it from switching off automatically.
Caution:
1. When charging your phone, only use genuine Neffos batteries, chargers, and USB cables. Third-party accessories are a
potential safety hazard and may impair your phone’s performance.
2. Avoid using your phone when it is charging. Do not cover your phone or the power adapter.
3. It is entirely normal that your phone may become warm after prolonged use or when exposed to high ambient
temperatures. If your phone becomes hot to the touch, stop charging it and disable unnecessary features. Place your
phone in a cool location and allow it to cool down to room temperature. Avoid prolonged contact with the surface of
your phone if it becomes hot.
Use the charger to charge your device
Connect your phone to a mains socket using the charger and USB cable that came with your phone.
Use a USB port to charge your device
Charge your device by connecting it to a computer with a USB cable.
If another USB connection mode has been selected, swipe down from the status bar to open the Notification
Panel. Tap the notification of USB connection mode, and then select Charge this device.
View the battery status
The battery status is indicated by the battery icon in the status bar by default. To show remaining battery
percentage in the status bar, go to Settings > Battery and switch on Battery percentage. Refer to Battery
to learn more about battery.
6Chapter 2 . Basics
Basics
Learn about your smart phone’s basic features.
Touchscreen gestures
Home screen
Access apps
Status bar
Notification Panel
Quick Settings Panel
Type text
Take a screenshot
2. 1 Touchscreen gestures
Use simple touchscreen gestures to perform a variety of tasks, such as launch apps, scroll through lists, and
zoom images.
Tap: Simply tap an item once. For example, tap to select an option or open an app.
Double-tap: Tap the target area of the screen twice in quick succession. For example, double-tap an image in
full screen mode to zoom in or out.
2
7Chapter 2 . Basics
Tap and hold: Tap and leave your finger on the screen for 2 seconds or more to activate onscreen items. For
example, tap and hold a widget on the Home screen to move it.
Swipe: Place your finger on the screen, and drag your finger to the direction you want. For example, you can
swipe to scroll through the Home screen or a list.
Drag: Tap and hold an item and then move it to another position. For example, you can rearrange apps and
widgets on the Home screen.
8Chapter 2 . Basics
Pinch fingers together: Pinch two fingers together on the screen. For example, pinch two fingers together
to zoom out on a picture.
Spread fingers apart: Spread two fingers apart on the screen. For example, pinch two fingers out to zoom in
on a picture.
2. 2 Home screen
Use the Home screen to access your apps and widgets.
Status bar: Displays status and notification icons
Widget: Self-contained apps that run on the
Home screen (not shortcuts)
App drawer: Tap to open app list
Dock component bar: Shortcuts to your frequently
used apps
9Chapter 2 . Basics
Organize widgets on the Home screen
Add a widget to the Home screen
Add frequently used widgets to the Home screen for quick access.
1. On the Home screen, tap and hold a blank area (or pinch two fingers together) to access the Home
screen editor.
2. Tap
Widgets. Swipe right or left to view and select a widget. Drag the widget to the target area (Or
tap the widget to configure and add it. Then darg it to the target area).
3. Tap a blank area on the Home screen (or tap Home button or Back button) to quit the Home screen
editor.
Note: You must have enough space on the Home screen to add widgets. If there is not enough space, add another
Home screen (see Add a Home screen) or free up some space.
Move a widget
On the Home screen, tap and hold an widget and then drag it to the desired location.
Adjust a widget size
1. Tap and hold the widget, and then drag a dot on the contour line to adjust the size.
2. Tap a blank area (or tap Home button or Back button) to finish.
Delete a widget
On the Home screen, tap and hold the widget you want to delete and drag it to Remove on the status bar.
Organize apps on the Home screen
App pop up box
On the Home screen, tap and hold an app to open the pop up box.
Widget
App information
Shortcut
View app info: Tap .
Shortcut: Tap the shortcut to go to the target interface quickly. Tap and hold the shortcut and drag it to
the target area to add it on the Home screen, so that you can find it more easily.
10Chapter 2 . Basics
Widget to Home screen: Tap to view the widgets. Tap and hold the widget and drag it to your target
area to add it on the Home screen.
Note: Widget and shortcut only appear when the app includes related content.
App drawer
On the Home screen, tap
or swipe it up on the dock component bar to expand app drawer. You can
enter some key words in search bar to search the app you need.
Add an app icon to the Home screen
1. On the Home screen, tap
or swipe it up on the dock component bar to expand app drawer.
2. Tap and hold an app and drag it to the target area.
Move an app
On the Home screen, tap and hold an app and then drag it to the desired location.
Uninstall an app
On the Home screen, tap and hold the app and then drag it to Uninstall on the status bar.
Note: Some pre-installed system apps cannot be uninstalled.
Remove an app icon
On the Home screen, tap and hold the app you want to remove, then drag it to Remove on the status bar.
Align all the icons quickly
1. On the Home screen, tap and hold a blank area on the screen (or pinch two fingers together) to access
the Home screen editor.
2. Tap
Adjustment and slide upward with two fingers within icon display area.
Batch moving icons
1. On the Home screen, tap and hold a blank area on the screen (or pinch two fingers together) to access
the Home screen editor.
2. Tap
Adjustment. Tap or drag the icons to put them in the adjustment at the bottom.
3. Swipe left or right to choose the target Home screen.
4. Tap or drag the icons in Adjustment to add them to the target Home screen.
5. Tap a blank area on the Home screen (or tap Home button or Back button) to quit the Home screen
editor.
Organize folders on the Home screen
Organize your apps into folders so that you can find them more easily.
Create a folder
1. On the Home screen, drag an icon onto another icon to create a folder containing both apps.
2. To name the new folder, open the folder, tap Unnamed Folder and enter the folder name. Tap a blank
area or tap Home button (or Back button) to finish.
Rename a folder
1. On the Home screen, open the folder.
2. Tap the folder name, and enter the new name you like.
3. Tap a blank area or tap Home button (or Back button) to finish.
Add apps to a folder
On the Home screen, tap and hold the app you want to remove, and then drag it onto the folder you want
to add it to.
Remove apps from a folder
On the Home screen, open the folder. Tap and hold the app you want to remove, and then drag it out of
the folder.
11Chapter 2 . Basics
Delete a folder
You can delete a folder in two ways:
On the Home screen, open the folder. Remove all the apps in it, then the folder will be automatically
deleted.
Tap and hold the folder and drag it to Remove in the status bar. The folder and icons in it will be deleted
together.
Manage Home screen
You can customize Home screens as you like.
On the Home screen, tap and hold a blank area on the screen (or pinch two fingers together) to open the Home
screen editor. You can:
Add a Home screen
Swipe left and tap
on the rightest screen to add a new screen.
Delete a Home screen
Tap
on the Home screen to delete it.
Note: Only blank Home screen can be deleted.
Adjust screen order
Tap and hold the screen you want to move and drag left or right to adjust page order.
Set the default Home screen
Tap
at the top of a Home screen to set it as default Home screen. On the default Home screen, is
displayed at the top.
Home screen settings
On the Home screen, tap and hold a blank area (or pinch two fingers together) on the screen to access the
Home screen editor. Then tap Settings, you can:
Enable or disable app drawer: Tap App drawer and turn on or turn off app drawer. When you turn off the
app drawer, all of your apps will be displayed on the Home screen.
Add icons to the Home screen automatically: When you turn on the switch, the new apps downloaded
from Google Play will be added to Home screen automatically.
2. 3 Access apps
Launch an apps
From the Home screen: Tap an icon to launch the corresponding app.
From the Lock screen: Swipe up
to launch the Camera app. Swipe up to launch the speed dial screen.
Switch between apps
You can switch between apps in following ways :
Tap the Home button to return to the Home screen, and then tap the icon of the app you want to open.
Tap Recent apps button to view the recently used apps, then tap the app you want to open.
Double-tap Recent apps button to switch to the previous app.
Viewing recently used apps
Tap Recent apps button to display the list of recently used apps.
12Chapter 2 . Basics
Close all apps
The number of background apps and memory usage
Close the app
View more apps: Swipe up or down on the screen to view more recently used apps.
Open an app: Tap a thumbnail to open the corresponding app.
Close an app: Swipe left or right on a thumbnail to close the corresponding app, or you can tap
on a
thumbnail to close it.
Close all apps: Tap
to close all the background apps.
2. 4 Status bar
Use the status bar to access the Quick Settings Panel, Notification Panel and check your phone’s status.
Status icons
Status icons are displayed on the right-hand side of the status bar and tell you about your phone’s status,
including network connections, signal strength, battery, and time.
Status icons Indications
Battery low
Charging
Battery full
Battery saver enabled
Signal strength
No signal
Connected over GPRS
Connected over 3G
13Chapter 2 . Basics
Status icons Indications
Connected over 4G
Headset mic inserted
WLAN connected
Vibrate mode enabled
Bluetooth enabled
Hotspot enabled
No SIM card installed
Do not disturb enabled
Airplane mode enabled
Data saver enabled
Alarms enabled
Notification icons
Notification icons are displayed on the left-hand side of the status bar when you receive a new message and
other notifications.
Notifications icons Indications
Downloading status
Uploading data
Download complete
Call in progress
Missed calls
New messages
Screenshots
Tethering or hotspot active
USB tethering active
Upcoming events
2. 5 Notification Panel
Notification Panel collects all the notifications and alerts so that you can review them whenever you like.
14Chapter 2 . Basics
Use Notification Panel
Tap to remove all the notifications at once
Notification
Open Notification Panel: Swipe down from the status bar to open the Notification Panel.
View a notification: When there is a notification reminder, you can open the Notification Panel and tap
the notification item to view the details. From the Lock screen, new notifications, such as missed calls and
messages are displayed on it. From the Lock screen, double-tap it to view the details.
Clear notifications: Swipe the notification left or right to remove it from the list. You can also tap CLEAR ALL
to remove all the notifications at once. From the Lock screen, swipe left or right to remove the notification.
Quickly manage notification: Tap and hold the notification detail to open the quick settings screen. Toggle
the switch to enable or disable notification. You can also tap ALL CATEGORIES (or MORE SETTINGS) to
configure more notification settings on the App & notifications page. For more information about app
notification, see Confiure app notifications.
Close Notification Panel: Swipe up, or tap the Home button or Back button.
2. 6 Quick Settings Panel
Use shortcut switches on the Quick Settings Panel to enable or disable functions quickly without using a
settings menu.
Use Quick Settings Panel
Open the Quick Settings Panel: Swipe down twice from the status bar, or swipe down and tap to open
the Quick Settings Panel. On the Lock screen, swipe only once to open it.
Use shortcut switches: Tap the shortcut switches on the Quick Settings Panel to turn on or turn off the
functions. For WLAN, Bluetooth and Do not disturb, tap
to configure some settings quickly. Tap and
hold the shortcut icon to enter the feature’s settings page.
Close the Quick Settings Panel: Swipe up, or tap the Home button or Back button.
15Chapter 2 . Basics
Brightness slider: Use this slider to adjust the
brightness of the screen
Tap to fold the Quick Settings Panel
Shortcut switches: Tap to enable/disable
functions quickly
Edit: Tap to enter the edit page
Screen indicator: Slide to change to next screen
to view other options
Settings: Tap to go to Settings
Adjust the position of shortcut switches
Open the Quick Settings Panel and tap to enter the edit page. You can:
Rearrange shortcut switches: Tap and hold a shortcut switch, then drag the icon to a position of your choice.
Add a shortcut switch: Drag a shortcut switch from the bottom section of the panel to the top section.
Remove a shortcut switch: Drag a shortcut switch from the top section of the panel to the bottom section.
Reset Quick Settings Panel: Tap
> Reset to reset the Quick Settings Panel to default settings.
2. 7 Type text
Enter text
The keyboard enables you to enter text when needed. Your phone use Touchpal by default.
Edit the content
Choose language
Set the keyboard Choose the theme
Insert emoji
Tap it and then tap a letter to
type uppercase
Double-tap for caps lock
Touch and hold the letter to
enter the number or symbol
next to it
Delete the characters to the
left of the cursor
Start a new line
Change keyboard
Enter numbers, punctuations
and symbols
Enter a comma. Tap and hold
it to turn on/off prediction
Enter a space
Double-tap to end a sentence with a period
Enter a period. Tap and
hold to enter a symbol
Note: The image shows the layout of the American English keyboard. The layout may vary depending on the specific
language used.
16Chapter 2 . Basics
Spell checker
You can turn on the Spell checker feature to help you enter correct words.
1. On the Home screen, tap
> Settings > System > Languages & input > Advanced > Spell checker.
2. Turn on the switch.
Switch input method
1. On the Home screen, tap > Settings > System > Languages & input > Virtual keyboard.
2. Select an input method you need.
Manage keyboards
1. On the Home screen, tap > Settings > System > Languages & input > Virtual keyboard.
2. Tap Manage keyboards and toggle the switch next to the keyboard to enable or disable it.
2. 8 Take a screenshot
Press the Power button and Volume-down button simultaneously for about 1 second to take a screenshot.
17Chapter 3 . Network and Share
Network and Share
Share your phone data with others by various kinds of connections.
WLAN
Mobile data
Connect to computer
Bluetooth
Share your mobile data with other devices
3. 1 WLAN
Connect to a WLAN network to access the Internet and reduce mobile data usage.
Note: Your personal data and financial information may be at risk if you connect to insecure public WLAN networks.
Connect to a WLAN network
Enable WLAN to connect to the Internet using a WLAN access point or hotspot.
When your phone detected available WLAN networks,
will appear in the status bar.
1. Swipe down twice from the status bar to open the Quick Settings Panel.
2. Tap
of WLAN and select the WLAN network you want to connect to:
If the Wi-Fi network does not require a password, just tap it to connect.
If the network is protected, enter the password when prompted and tap CONNECT.
Once your phone is connected to a WLAN network,
will be displayed in the status bar. Your phone will
remember WLAN networks that you have used before and reconnect to them automatically.
If you can’t find the target WLAN network on the list, tap MORE SETTINGS (or tap and hold
WLAN on the
Quick Settings Panel) to proceed to the WLAN screen.
On the WLAN screen, for more WLAN network, you can:
Refresh the list: Swipe down to refresh the available WLAN list.
Add a WLAN network that is not shown in the list: Swipe up to the bottom of the list and tap Add network.
Follow the onscreen instructions to configure the WLAN settings and password.
View and manage saved networks: Swipe up to the bottom of the list and tap Saved networks to view
the saved network list. Tap a network name to view the encryption. If you want to forget the network, tap
FORGET.
Connect to a WLAN network through WPS
Connecting to a WPS-enabled router over WPS allows you to quickly connect to the network without entering
a password.
On the Home screen, tap
> Settings > Network & Internet > WLAN. Swipe up to the bottom of
available WLAN networks list and tap WLAN preferences > Advanced.
You can connect to your router by following two ways:
Tap WPS Push Button and press the router’s WPS button.
Tap WPS Pin Entry to generate a PIN, and then enter the PIN on the router.
3
18Chapter 3 . Network and Share
Install certificates
1. On the Home screen, tap > Settings > Network & Internet > WLAN. Swipe up to the bottom of
available WLAN networks list and tap WLAN preferences > Advanced.
2. Tap Install certificates and follow the onscreen instructions to install certificates you need.
Configure WLAN
On the Home screen, tap > Settings > Network & Internet > WLAN. Swipe up to the bottom of
available WLAN networks list and tap WLAN preferences.
You can configure these settings:
Manage network notification: Switch on Open network notification, and your phone will notify you
when a public network is available.
View your MAC and IP address: Tap Advanced then you can view your MAC address and IP address.
3. 2 Mobile data
Enable mobile data to access the Internet, when WLAN is not available.
Enable mobile data
1. Swipe down twice from the status bar to open the Quick Settings Panel.
2. Swipe left and tap
Mobile data > TURN ON to enable mobile data. If you have inserted two SIM cards
and didn’t set the default SIM for mobile data, tap Mobile data and then choose a SIM card for data
connection.
Note:
1. Before using mobile data, ensure that you have a data plan with your carrier to avoid incurring excessive data charges.
2. If a WLAN connection to the Internet isn’t available, apps and services may transfer data over your carrier’s cellular
network, which may result in additional fees. Contact your carrier for information about you cellular data plan rates.
3. When you don’t need to access the Internet, disable mobile data to save battery power and reduce data usage.
Configure mobile data
On the Home screen, tap > Settings > Network & Internet > Mobile network, you can:
Manage data roaming: Switch on Data roaming to enable your phone connecting to data services when
roaming.
Note: Connecting data services when roaming may result in additional fees.
Choose preferred network type: Tap Preferred networks type to choose 4G, 3G or 2G network.
Enhance 4G LTE Mode: Switch on Enhance 4G LTE Mode to use LTE services to improve voice and other
communications.
Choose APNs: Tap Access Point Names to choose APNs.
Choose network operators: Tap Network operators to choose a network operator.
3. 3 Connect to computer
Use a USB cable to connect your phone to your computer and transfer data.
Select the USB connection mode
1. Use a USB cable to connect your phone to the computer. And your phone will choose Charge this device
mode automatically.
2. Swipe down from the status bar to open the Notification Panel, tap USB charging this device to expand
the notification and tap it to choose one of the following USB connection modes:
19Chapter 3 . Network and Share
Charge this device: Charge your phone only.
Transfer files: Transfer files between your phone and the computer.
Transfer photos (PTP): Transfer images between your phone and the computer.
Use device as MIDI: Use your phone as a MIDI input device and play MIDI files on the computer.
3. 4 Bluetooth
Use Bluetooth to share data on your phone with other devices. And you can use Bluetooth to connect your
phone to Bluetooth headsets and in-car Bluetooth to navigate or listen to music while you drive. You can also
connect your phone to Bluetooth wearables to record and manage fitness data. Connecting Bluetooth devices
to your phone does not increase power consumption significantly.
Enable Bluetooth
Swipe down twice from the status bar to open the Quick Settings Panel and tap Bluetooth to open
Bluetooth quickly. Once Bluetooth is enabled, will be displayed in the status bar.
Tap and hold
Bluetooth to go to the Bluetooth screen.
Bluetooth screen
C7 Lite
C7 Lite
4G
Status display
Switch
Bluetooth address of your device
Paired devices list
Tap to pair a new device
Tap to rename your device name
Tap to view Bluetooth transfer history
Pair your phone with another device
1. Go to the Bluetooth screen, toggle the switch to enable Bluetooth.
2. Tap Pair new device. Your phone will automatically list available devices. If the device you want to pair with
is not displayed, swipe down to refresh available devices list, or check whether the device is discoverable.
3. From Available devices, tap the device you want to pair and then follow the onscreen instructions to
complete pairing.
Manage paired devices
On the Paired devices list, tap the icon next to the paired device to configure followings things:
Rename paired devices: Enter the new name in the name field and tap OK to save your configuration.
20Chapter 3 . Network and Share
Manage permissions: Check or uncheck the premission on the Use for list and tap OK to save your
configuration.
Unpair Bluetooth devices: Tap FORGET.
Send and receive files using Bluetooth
Check that both devices are paired before attempting to transfer files.
Send files: Tap the file you want to send and tap
> Bluetooth. Your device will automatically search
for nearby devices. Select the receiving device.
Receive files: When another device tries to send you files using Bluetooth, select ACCEPT from the dialog
box that appears.
View received files: You can view received files in following ways:
Swipe down from the status bar to open the Notification Panel. Then tap the downloaded notification
to view file transfer progress.
Go to Bluetooth screen and tap Received files.
On the Home screen, go to
Downloads > > Recent.
Rename your device
1. Go to Bluetooth screen and tap Device name.
2. Edit the device name and tap RENAME to complete the configuration.
3. 5 Share your mobile data with other devices
You can use WLAN hotspot, USB cable, or Bluetooth to share your mobile data with other devices (such as
phones, tablets, or computers).
Use WLAN hotspot
Set up a portable WLAN hotspot to share your phone’s mobile Internet with other devices. Compared with
Bluetooth tethering, the portable WLAN hotspot feature offers quicker, longer range connections, but power
consumption is higher.
Note: Your device can’t access the Internet using WLAN when your Portable WLAN hotspot is turned on.
Open WLAN hotsopt
1. On the Home screen, tap
> Settings > Network & Internet > Hotspot & tethering > WLAN
hotspot.
2. Turn on the switch. After enabling your personal WLAN hotspot,
and will be displayed in the
status bar.
Set the time for keeping WLAN on when idle
On WLAN hotspot screen, tap Keep WLAN hotspot on, you can choose Always, or Turn off when idle
for 5 mins, or Turn off when idle for 10 mins.
Configure WLAN hotspot
On WLAN hotspot screen, tap Set up WLAN hotspot, you can configure following settings. After finishing,
tap SAVE.
Change the hotspot name: Enter your hotspot name that is easier to remember and tap SAVE. By
default, the network name is your phone model.
Change the security setting: Tap
of Security to configure security setting. Your phone uses WPA2
PSK encryption by default. Other devices will require a password to connect to the hotspot. If you
choose None, other devices will not require a password to connect to your hotspot.
Configure the password: Tap Password and enter the new password. You can check Show password
to view your password. The default hotspot password is generated randomly by your phone.
21Chapter 3 . Network and Share
Select a AP band: Your device supports 2.4 GHz and 5.0 GHz Band.
Reset: Tap RESET OOB to reset network SSID, security and password to default.
Configure the maximum number of connections: Tap
Maximum connections to change the
maximum number of connections. Your phone will allow up to 10 users to connect to the hotspot.
Manage users
On WLAN hotspot screen, you can view and manage the connected and blocked users. Tap BLOCK/
UNBLOCK to stop or allow the connection.
Use USB tethering
Use a USB cable to share your phone’s mobile Internet with a computer. This is useful if your computer’s Internet
connection stops working. To enable mobile data, see Enable mobile data.
To enable USB tethering:
1. Connect your phone to a computer using a USB cable.
2. On the Home screen, tap
> Settings > Network & Internet > Hotspot & tethering.
3. Switch on USB tethering. After enabling USB tethering,
will be displayed in the status bar. Then you can
use the computer to access the Internet.
Note: Depending on your computer’s operating system, you may need to install phone drivers on the computer or
establish a network connection in order to use USB tethering. Please read the instructions for your operating system.
Use Bluetooth tethering
Use Bluetooth tethering to turn your phone into a wireless router and share your mobile Internet with other
devices. Compared with a portable hotspot, Bluetooth tethering offers a slower Internet connection, but
consumes less power.
1. Establish a Bluetooth connection between two devices and check that they are paired. For more information
about Bluetooth connection, see Pair your phone with another device.
2. On the Home screen, tap
> Settings > Network & Internet > Hotspot & tethering, and switch
on Bluetooth tethering.
3. On your device, swipe down twice to open the Quick Settings Panel, then tap and hold
to go to the
Bluetooth screen. On the Paired devices list, tap the icon next to the paired device and check Internet
access to share your mobile data with the paired device.
22Chapter 4 . Calls and Contacts
Calls and Contacts
Make calls with your phone to contact one quickly.
Make a call
Answer or reject a call
Options during a call
Call log
Call history
Call settings
Contacts
4. 1 Make a call
Search bar
Call log
Google voice typing
More, include Call history,
Clear frequents and Settings
Contact listFavorite contacts
4G
Make a call form dialer screen
1. On the Home screen, tap Phone > .
2. Enter a phone number and tap
to make a call. When entering part of the phone number or the first letter
of the contact’s name, your Phone will automatically search for the relevant contacts and call log. Tap the
contact you want to call in the list. If you have inserted two SIM cards and didn’t set the default SIM for calls
(or set Ask every time), select SIM1 or SIM2 to dial.
Note: Check Always use this for calls and tap SIM1/SIM2 to make SIM1 or SIM2 as the default SIM card to make calls.
If you want to change the default SIM card, or if you want to deactivate one of them, go to
Settings > Network &
Internet > SIM cards to configure. For more information about dual SIM settings, see Dual SIM settings.
Dial a recent number from the Call log
All incoming, outgoing and missed call are in the call log.
1. On the Home screen, tap
Phone > , a list of recent calls will be displayed.
2. Select a number or contact and tap
to make a call.
Dial from Contact list
1. On the Home screen, tap Phone > .
2. Tap the contact you want to call in the list and then tap the number to dial.
Dial from your favorites
1. On the Home screen, tap Phone > .
2. Tap the contact directly to call.
4
23Chapter 4 . Calls and Contacts
Dial from contact list and call log search results
1. On the Home screen, tap Phone.
2. Tap the search bar and enter the name, initials, or number of a contact.
3. Tap the contact to dial. If no contacts appear, you can enter the full phone number and tap
Call to dial
directly, or tap Send SMS to send a message to the number.
Make an international call
1. On the Home screen, tap Phone > .
2. Tap and hold 0 key to enter a + symbol, and then enter the country code, area code, and phone number.
3. Tap
to call.
Make an emergency call without SIM cards
In the event of an emergency, you can make emergency calls from your device, even without a SIM card.
Make an emergency from unlock screen
1. On the Home screen, tap
Phone > .
2. Enter the emergency number for your location in the dialer and tap
.
Make an emergency from Lock screen
If you enabled the device protection (pattern, PIN or password), you can make an emergency from Lock
screen by following way:
1. Wake up the screen and swipe up on the screen.
2. Tap EMERGENCY CALL.
3. Enter the emergency number of your location in the dialer and tap
.
Note:
1. You must be in an area with cellular coverage, when you have to make an emergency call.
2. The ability to make emergency calls depends on local regulations and carriers in your area.
3. Poor network coverage or environmental interference may prevent your call from being connected. Never rely solely
on your device for essential communication during emergencies.
4. 2 Answer or reject a call
Answer or reject a call
Note: When a call comes in, you can press the Volume button or Power button to mute the ringtone.
When the screen is unlocked:
Tap ANSWER to answer the call. Tap DECLINE to reject the call.
When the screen is locked:
Answer a call: Swipe
up or just swipe up on the screen to answer the call.
Reject a call: Swipe
down or just swipe down on the screen to reject the call.
24Chapter 4 . Calls and Contacts
Quick response message: Swipe
up to reject the call and select a quick response message to the
caller. Or you also can tap Write your own and enter your own response message, then tap SEND.
4. 3 Options during a call
In-call menu
During a call, your phone will display an in-call menu.
Mute the call
Start a three-way call
Show/hide dialer
Place the current call on hold
End the call
Enable hands-free mode
25Chapter 4 . Calls and Contacts
Use other apps during a call
During a call, you can hide the in-call menu and use other apps. The Dialer app will continue to run in the
background. And the call is always displayed on the Notification Panel.
Hide the in-call menu
During a call, tap the Home button or Back button to hide the in-call menu, or tap Recent apps button to
open the list of recently used apps. Then your phone will display
icon in the status bar.
Return to the in-call menu
Swipe down from the status bar to open the Notification Panel, tap the call item to return to in-call menu.
End a call when the in-call menu is hidden
To end a call, swipe down from the status bar to open the Notification Panel and tap HANG UP, or return
to in-call menu and tap
.
Adjust the call volume
Press the Volume button to increase or decrease the volume.
Making a conference call
You can make another call while a call is in progress.
1. Call the first participant.
2. While making a call with others, tap
on the in-call menu.
3. Enter another phone number or choose another contact, then tap
to dial.
Note: This function needs the support of local operator. Contact your carrier to find out how to use this feature.
Call Waiting
When you want to answer a new incoming call while you are calling someone, you can use call waiting function.
1. Swipe
up to answer the new call and hold ongoing call.
2. When you want to reactivate the previous call and place the new caller on hold, tap
.
Note: This function needs the support of local operator. Contact your carrier to find out how to use this feature.
4. 4 Call log
All incoming, outgoing and missed calls are recorded in the call log.
View the calls
On the Home screen, tap Phone >
. On the call log list,
means outgoing calls, means incoming
calls, and means missed calls.
26Chapter 4 . Calls and Contacts
Save a recent call to your contact list
1. On the Home screen, tap Phone > , tap the number you want to save.
2. Tap Create new contact to save the number as a new contact, or tap Add to a contact to add the number
to an existing contact.
3. Configure the contact information and tap
.
Send a message from the call log
On the Home screen, tap Phone > , tap the number or contact you want to send a SMS to, and tap Send
a message.
Block/Unblock the call log number
On the Home screen, tap Phone > , tap the number or contact you want to block, and tap Block
number to add the number or contact to blocked number list. You will no longer receive calls or messages
from the number or contact. You can go to Phone > > Settings > Call blocking to view blocked number.
To unblock the number, tap the blocked number or contact, and tap Unblock number.
View call details
On the Home screen, tap Phone > , tap a number or contact and tap Call details, you can:
View the details: The detailed call log information displays on the list.
Make a call with the number: Tap
.
Copy the number: Tap Copy number to copy the number.
Edit the number before call: Tap Edit number before call to open the dialer, and the number will be
entered automatically. You can edit it before making a call.
Delete the call log: Tap
to delete the call log.
4. 5 Call history
On the Home screen, tap Phone > > Call history to go to the Call History screen.
Tap or swipe right to
view all the calls
Tap or swipe left to
view missed calls only
More
4G
On the Call History screen, you can:
27Chapter 4 . Calls and Contacts
Send a message from the call history: Tap the number or contact in the call history, and tap Send a message
to send a message.
Block/Unblock the call log number: Tap the number or contact in the call history, and tap Block number >
BLOCK to add the number or contact to blocked number list. You will no longer receive calls or messages
from the number or contact. Tap the blocked number or contact, and tap Unblock number > UNBLOCK
to unblock it.
Call details: Tap the number or contact in the call history, and tap Call details, you can copy number, edit
number before call and delete the call log.
Delete call history in batch: Tap
> Delete and check the call logs you want to remove, then tap .
Detele all call logs: Tap
> Clear call history > OK to delete all.
4. 6 Call settings
On the Home screen, tap Phone > > Settings to configure the call settings:
Display options
Sort by: Tap to select the phone sort by First name or Last name.
Name format: Tap to select the name fomat by First name first or Last name first.
Sounds and vibration
Set the phone ringtone, vibrate mode and keypad tones.
Ringtone: Tap Phone ringtone 1 or Phone ringtone 2 to set the ringtone you like for SIM1 or SIM2.
Also vibrate for calls: If Also vibrate for calls is enabled, your phone will vibrate when receiving incoming
calls.
Keypad tones: Switch on to enable keypad touch tones.
Quick responses
Set the quick responses you need.
Tap the quick response you want to edit. Tap OK after finishing.
Calling accounts
Configure your SIM card settings, include fixed dialing numbers, turning on video calling, call forwarding, call
barring and additional settings.
These features may vary depending on your carrier. For more information about it, contact your carrier.
1. If you insert two SIM cards and you don’t set the default SIM card for calls, after tapping Call settings, your
device will proceed to Calling accounts screen. You can tap Make calls with to choose SIM1/SIM2 for
making a call, or choose Ask first.
2. Choose the calling accounts you want to configure, and you can configure following settings:
Fixed Dialing Numbers: Use fixed dialing numbers to restrict outgoing calls to whitelisted numbers.
Numbers are added to the FDN list, and when activated, FDN restricts outgoing calls to only those
numbers listed, or to numbers with certain prefixes. When you use the function, you will be asked for
PIN code. To obtain your PIN2 code, contact your carrier. PIN2 must be entered before hand or when
applying such settings, which is unique to each card and initially provided by the network operator.
Turn on video calling: Switch on to enable video calling.
Call forwarding: If your phone can not answer or you do not want to answer the call, you can transfer
the call to another phone number.
Call barring: Check the box to prevent all or certain calls from reaching to or from your phone number.
28Chapter 4 . Calls and Contacts
Additional settings: Set up your Caller ID (display your number in outgoing calls) and call waiting notify
you for incoming calls during a call).
Call blocking
View and manages the number you don’t want to receive texts or calls.
Block a number: Tap ADD A NUMBER and enter the number you want to block, then tap BLOCK.
Unblock a number: On the blacklist, tap
> UNBLOCK beside the number to unblock it.
Voicemail
Divert calls to your voicemail when your phone is switched off or when there is no cellular coverage. Callers can
leave a voice message which you can listen to later. Voicemail must be supported by your carrier. Please ensure
that you have subscribed to this service. Contact your carrier for information about their voicemail service.
If your phone has dual SIM support, tap
or , and then set the following settings.
Notifications
Switch on/off: Switch on or switch off to enable or disble the voicemail’s notification.
Importance: Check the box to set the importance as Urgent, High, Medium or Low.
Sound: Check the box to select the notification sound.
Vibrate: Switch on and your phone will vibrate to alert you of incoming notification.
Override do not disturb: Switch on to let these notifications continue to interrupt when Do not disturb
is set to priority only.
Advanced settings: Set your service as your carrier and set up your voicemail number.
TTY mode
Connect your phone to a TTY (teletypewriter) device and enable TTY mode to send and receive written
messages during a call. TTY is a special device that enables hearing and speech-impaired users to communicate
over the phone.
Tap Accessibility > TTY mode. There are four options:
lTTY Off: Standard voice communication on both sides of the phone call.
lTTY Full: Text-only communication on both sides of the phone call.
lTTY HCO: Hear a voice read the incoming text and type the outgoing text.
lTTY VCO: Speak the outgoing text and receive a text message back.
4. 7 Contacts
Add a contact
You can create a new contact or add a number to a contact in following ways:
Add a contact in
Contacts
1. On the Home screen, tap
>
Contacts > to add a new contact.
2. Select the storage location you want to store the contact to.
3. Enter the contact’s information.
4. Tap
.
Add a contact in
Message
1. On the Home screen, tap
Message.
2. On the message list, tap a conversation, then tap
> Add Contact > ADD CONTACT.
3. Choose a contact to add the number or tap
Create contact.
29Chapter 4 . Calls and Contacts
4. Select the storage location you want to store the contact to.
5. Enter the contact’s information.
6. Tap SAVE.
Add a contact in
Phone
On the call list, tap a number and tap Create new contact, enter the contact’s information and tap
to add the number as a new contact. Or tap Add to a contact and choose a contact to add the number
to the contact.
Tap
> Create new contact, enter the contact’s information and tap .
Tap
, enter the number and tap Create new contact/Add to a contact. Enter the contact’s
information and tap .
Manage a contact
You can view and manage a contact in following to ways:
On the Home screen, tap
>
Contacts, then tap to choose a contact.
On the Home screen, tap
Phone > , then tap to choose a contact.
Add to favorites
Edit
Send a message
Send a message
Make a call
Make a call
Contact name
Back
Recent calls and
messages
More
To manage the contact, on the contact screen, tap and you can:
Delete the contact: Tap Delete to remove the contact.
Share the contact: Tap Share and follow the onscreen instructions to share the contact with others.
Create a shortcut on Home screen: Tap Add to Home screen to add a shortcut of the contact on the Home
screen.
Note: Only phone contacts can be placed on Home screen or added to favorites.
Assign a special ringtone to the contact: Assign a unique ringtone to frequently used contacts so that you
can easily tell who is contacting you. Tap Set ringtone and choose a ringtone you like, then tap OK.
Route to voicemall: Tap Route to voicemall to route it to your voicemail.
Search a contact
On the Home screen, tap >
Contacts. Tap and enter the name, initials, or number of a contact in
the dialer contact.
30Chapter 4 . Calls and Contacts
Manage contacts in batch
1. On the Home screen, tap >
Contacts > , and tap Select to select multiple contacts. You can also
tap Select all to select all the contacts.
2. Then you can:
Tap
, choose a sharing method and follow the onscreen instructions to share the contacts.
Tap
> Delete to remove the contact.
Tap
> Add to label and choose (or create a new label) a label to add the contacts in it.
Manage contact labels
Create a contact label
1. On the Home screen, tap
>
Contacts and tap > Create label.
2. Choose an account.
3. Enter the name in the Label name box. And tap OK to save the label.
4. Tap ADD CONTACTS or
to add contacts in the label. Or tap to create a new contact with the
label.
Switch contact labels
1. On the Home screen, tap
>
Contacts and tap to view the contact labels.
2. Tap to choose a contact label.
Rename the contact label
1. On the Home screen, tap
>
Contacts and tap to choose a contact label.
2. Tap
> Rename label and enter the new name, then tap OK to save the new name.
Delete the contact label
1. On the Home screen, tap
>
Contacts and tap to choose a contact label.
2. Tap
> Delete label to delete the label.
Customize viewing contacts
1. On the Home screen, tap >
Contacts > > Customize view.
2. There are two options:
Choose All contacts, all of your contacts will be displayed on the contact list.
Choose Customize, check the contact label you want to view and tap SAVE. Only the selected contacts
will be displayed.
Switch accounts
On the Home screen, tap >
Contacts and tap . You can choose an account to display the contacts
of it.
Configure Contacts
On the Home screen, tap >
Contacts > > Settings, you can:
Set up your profile: Tap Your info and enter the information. Tap
to save the editor.
Manage accounts: Tap Accounts to view your accounts. If you want to add a new account, tap Add
account and follow the onscreen instructions to add your new account.
Configutre display options: Tap Sort by to select the contacts sort by first name or last name. Tap Name
format to select the name fomat by frst name first or last name first.
Set up default account for new contacts: Tap Default account for new contacts to choose an account as
the default account for new contacts.
31Chapter 4 . Calls and Contacts
Configutre phonetic name display option: Tap Phonetic name to select Always show or Hide if empty.
Import and export contacts: Tap Import or Export and follow the onscreen instructions to import or
output your contacts.
Manage blacklist: Tap Blocked numbers to manage the blacklist. For more information about blacklist, see
Call blocking.
32Chapter 5 . Messages
Messages
Use Messages to keep in touch with your friends through SMS or MMS.
Type of messages
Send, receive and reply to a message
Manage messages
Message settings
5. 1 Type of messages
Text Messages (SMS)
The short messages service (SMS) lets you send and receive text messages to and from other mobile phones.
Multimedia Messages (MMS)
The multimedia messaging service (MMS) lets you send and receive multimedia messages (such as pictures,
videos, and audio messages) to and from other mobile phones.
5. 2 Send, receive and reply to a message
Send messages
1. On the Home screen, tap Messages > to start a new message.
2. Enter a contact name, phone number, or email to search the contact.
3. Start composing your message. Tap
to add an attachment.
4. Then tap
to send out the message. For detailed information about sending messages, refer to the
discrpitions below:
Back to previous screen
Add attachments
Back to keyboard
Swipe up to change
attachment type
More
Add recipients to make
a group conversation
Send a message
Dial the recipient
4G
4G
5
33Chapter 5 . Messages
Make a group conversation
When you make a group conversation with several people, every one in the group can see and reply each
other’s messages. To make a group conversation, you can:
1. On the Home screen, tap
Messages > > Start group conversation.
2. Enter a contact name, phone number, or email to search the contacts. Tap
to finish. For the first time
to make a group conversation, tap FIX on the pop up prompt “Messages needs your phone number” and
enter your own phone number, then tap OK.
3. Compose your message, then tap
to send out.
Receive messages
Messages are saved in the message list. Bold fonts indicate unread messages. You can view received message
in following ways:
On the Home screen, tap
Messages and the new message to view.
Swipe down from the status bar to open the Notification Panel and tap the new arrived message to view
or reply.
On the Lock screen, double-tap the new arrived message to view it.
Reply to a message
You can reply to a message in following ways:
On the Home screen, tap
Messages and the received message to view the conversation thread.
Compose your message, then tap to send out.
Swipe down from the status bar to open the Notification Panel and tap REPLY. Compose your message,
then tap
to send out.
5. 3 Manage messages
Manage messages
1. On the Home screen, tap Messages to go to the conversation list.
2. Tap a conversation, swipe the screen down or up to select the message you want to manage, then tap and
hold the message, and you can:
Share the message: Tap
, and follow the onscreen instructions to complete.
Copy the message: Tap
to copy the message.
Delete the message: Tap
.
Forward the message: Tap
> Forward.
View details about the message: Tap
> View details.
Manage conversations
1. On the Home screen, tap Messages.
2. In the message list, tap and hold the conversation, you can:
Archive the conversation: Tap
. To archive conversations in batch, select multiple conversations and
tap .
Delete the conversation: Tap
. To delete conversations in batch, select multiple conversations and
tap .
Add contacts: This function only appears when you have not set the number as your contacts. Tap
to add the number to a contact or create a new contact.
34Chapter 5 . Messages
Block unwanted conversations: When you block the unwanted messages, you will no longer receive
calls or texts from the blocked number. Tap . Besides, you can also tap > Blocked contacts > ADD
A NUMBER and enter the number you want to block.
Note: On the Home screen, tap Messages > > Archived to view the archived conversations.
Configure more settings for a conversation
On the Home screen, tap Messages to open the conversation list. Tap a conversation and tap , you can:
Add contact: Add the number to a contact or create a new contact.
Details: View more details about this conversation.
Archive/Unarchive: Archive or unarchive the conversations.
Delete: Tap to delete this conversation.
Help & feedback: Tap to view the help of
messages and send feedback if needed.
5. 4 Message settings
On the Home screen, tap Messages > > Settings > General, and you can configure the following settings:
Default SMS app
Tap Default SMS app to change your default SMS app. Messages is default.
Notifications
Tap Notifications, turn on the switch to enable notifications when you receive messages.
Hear outgoing message sounds
Switch on Hear outgoing message sounds to enable the outgoing message sounds.
Set your current country
Tap Your current country to choose the current country. By default, your neffos will automatically detect your
location for current country when you have enabled location service for your phone.
35Chapter 6 . Camera and Photos
Camera and Photos
Use multiple features of your camera to capture your precious moments.
Camera at a glance
Take a photo
Record a video
Shooting modes
Camera and video settings
Photos
6. 1 Camera at a glance
Launch your camera
On the Home screen: Tap Camera.
On the Lock screen: Just swipe
up.
Camera screen
On the Home screen, tap Camera and you can:
Face beauty mode
Nomal mode
Switch HDR (High-Dynamic Ra
nge) mode
Video mode
Switch Flash mode
Toggle rear and front camera
Vi
ew the photos and
videos you’ve taken
Take a photo
Settings
Panorama mode
Tap to switch flash mode:
Automatically enables or disables the flash based on the ambient brightness.
Enables the flash.
Disables the flash.
6
36Chapter 6 . Camera and Photos
6. 2 Take a photo
1. On the Home screen, tap Camera.
2. Pinch two fingers together or spread them apart on the viewfinder to find the area you want.
3. Tap
to switch between the front camera and rear camera.
4. Tap
or press Volume button to take a photo.
6. 3 Record a video
1. On the Home screen, tap Camera > .
2. Pinch two fingers together or spread them apart on the viewfinder to find the area you want.
3. Tap
to start recording. Tap to pause the recording and tap to continue the recording. Tap on
the screen during recording to save the current scene as a photo.
4. Tap
to stop and save recording.
6. 4 Shooting modes
Your phone features a variety of different camera modes for different shooting scenarios.
Normal mode
Your phone is set to use normal mode by default. You can also tap Camera > Normal mode to use
normal mode.
Panorama mode
Use this mode to take wide-angle shots.
1. On the Home screen, tap
Camera > Panorama mode.
2. Select a suitable location and hold your phone steady, and then tap
to start shooting.
3. Follow the onscreen instructions to take the photo. Slowly move your camera horizontally or vertically,
ensuring that the arrow
stays level with the center line .
4. With the capturing, you can:
Tap
to manually stop capturing anytime you want.
Keep capturing until the squares
changes to blue
.
5. The camera will automatically stitch the photos together to create one panoramic photograph.
Note: Excessive deviation and moving too fast will lead to fail in capture.
Face beauty mode
Use beauty mode for stunning selfies and smoother-looking skin.
1. On the Home screen, tap
Camera, tap Face beauty mode to turn it on.
2. Tap
to switch between the front camera and rear camera.
3. Drag the slider to adjust the beauty level.
4. The camera will automatically detect each face in the photo and apply the beauty settings. Tap
or press
Volume button to take a photo.
Continuous shot
Use continuous shot when you want to take a photo of a moving subject, such as during a football match. The
camera will capture several images in quick succession and save the photos.
37Chapter 6 . Camera and Photos
1. Tap and hold the to start the burst sequence. The number of captured photos will be displayed in the
bottom of the viewfinder.
2. Release
to stop the burst shooting.
Note:
1. This feature is not available in Panorama mode and Face beauty mode.
2. You can take up to 40 photos in one burst sequence if there is enough storage space on your phone.
6. 5 Camera and video settings
On the Home screen, tap Camera > to configure the following camera settings:
Camera settings
Tap
to set the camera:
GPS location info: Turn on the switch and the camera will save the location where the photo was taken (only
when your phone is connected to the Internet).
Exposure: This setting changes the brightness of the image. Tap to select the exposure to adjust the
exposure compensation.
Scene mode: Tap to select a scene mode as you want.
White balance: Tap to select a white balance as you want.
Image properties: Tap to adjust the image properties to make your image look more vivid.
Anti-flicker: Tap to select the anti-flicker as you want.
Restore defaults: Tap to restore camera settings.
Capture photos settings
Tap
to set the photos:
Zero shutter delay: Turn on this switch to enable zero shutter delay when taking a photo.
Face detection: Turn on this switch to enable auto-detection when a face is located in your viewfinder.
Auto scene detection: Turn on this switch to get more accurate scene detection.
Self timer: Tap to set self timer.
Capture number: Tap to set capture number.
Picture size: Tap to set picture size as you want.
Preview size: Tap to set preview size as you want.
ISO: The ISO determines the camera's sensitivity to light. Increasing the ISO will create a brighter image, but
there will be a noticeable increase in noise. Tap to select the ISO you want.
Record videos settings
Tap
to set the videos:
EIS: Turn on this switch, you can make a video anti-shake.
Microphone: Turn on this switch, you can record sound when you record a video.
Video quality: Tap to set video quality as you want.
6. 6 Photos
View photos and videos
On the Home screen, tap > Photos to view the following photos and videos:
38Chapter 6 . Camera and Photos
Photos and videos shot with the camera.
Photos and videos that your friends shared with you.
Photos and videos synced from your computer.
Photos and videos saved from messages, emails, or websites, as well as screenshots.
Edit an image
You can use the image editing tools to bring your photos to life.
Select an image you want to edit and tap
.
1. Tap
and select a filter to add a filter.
2. Tap
and you can adjust image parameters to make your image look more vivid.
3. Tap
and you can:
Crop an image: Drag the dotted edges to crop the image to the desired size. Tap
to choose a
proportion.
Straighten an image: Slide the scaleplate to make a slight adjustment to the angle of the photo and crop
the excess part of the photo to maintain the original aspect ratio.
Rotate an image: Tap
to adjust the angle of rotation.
Then tap DONE to save the edit. If the effect is not satisfied, tap RESET to reset.
4. After editing, tap Save copy to save
Edit a video
You can use the photos‘ video editing tools to edit a video.
1. On the Home screen, tap
> Photos and select a video you want to edit.
2. Tap
and you can:
Stabilize: Tap to stabilize the video.
Rotate: Tap to rotate the video.
3. After editing, tap SAVE to save the edit.
Manage photos and videos
On the Home screen, tap > Photos, and you can do the following options:
Share a photo or video: Select a photo or a video, tap
, choose a sharing method and follow the onscreen
instructions to share your it.
Edita photo or video: Select a photo or a video, tap
to edit. For more information about editing a photo
or a video, see Edit an image or Edit a video.
View details: Select a photo or a video, tap
to view the detailed information.
Move to trash: Select a photo or a video, tap
> Move to trash to move it to trash.
Cast a photo or a video to other device: Select a photo or a video, tap
and follow the onscreen instructions
to cast a photo or a video to other device.
View the photos as slideshow: Select a photo, tap
> Sildeshow to view the photos as slideshow. Tap the
screen to stop the slideshow.
Use a photo as wallpaper or contact photo: Select a photo, tap
> Use as to use the selected picture as
wallpaper or contact photo.
Print a photo: Select a photo, tap
> Print. Configure the settings and then print out the photo.
Loop video: Select a video, tap
> Loop video to enable loop playing.
Delete from device: Select a photo or a video, tap
> Delete from device to delete it.
39Chapter 7 .
Calendar
Calendar
Use Google Calendar to capture your precious moments.
Use the calendar
Calendar settings
7. 1 Use the calendar
Refresh
Show events f
or
current day
Tap to expand and
collapse the month
Add events
Menu
Go to today
View the calendar
1. On the Home screen, tap Calendar.
2. Tap
to select Schedule/Day/3 Day/Week/Month to zoom in or out your calendar.
Create an event
Add events and set reminders to help you plan ahead.
1. On the Home screen, tap
Calendar.
2. Tap
to create an event.
3. Swipe the screen up or down to set the detailed information for the event, like title, time, location and so on.
4. Tap
Save
to save the event.
Search an event
1. On the Home screen, tap Calendar.
2. Tap
> Search to search an event.
3. Enter the key words of the event you want to search, and tap Search on the keyboard .
7
40Chapter 7 .
Calendar
Manage an event
On the Home screen, tap Calendar and tap the event you want to manage, and you can:
Tap
to start editing.
Tap
> Delete to delete the event.
Tap
> Duplicate to duplicate the event.
7. 2 Calendar settings
On the Home screen, go to Calendar > > Settings > General and you can congure the following
settings:
Start of the week: Tap to choose the day when a week starts on (Saturday/Sunday/Monday).
Use device time zone: Turn on the switch to use device time zone, or turn off the switch and tap Time zone
to choose a country time zone.
Alternate calendar: Tap to choose an alternate calendar, such as Chinese calendar.
Show week number: Turn on or turn off the switch to show or hide week number.
Show declined events: Turn on or turn off the switch to show or hide declined events.
Default event duration: This is the default duration of a newly created event. For non-Google accounts, the
default is 1 hour.
Notify on this device: Turn on or turn off the switch to enable or disable notifications.
Quick responses: Tap to edit the quick responses.
41Chapter 8 . Clock
Clock
In the Clock app, you can add alarms, view world times, use the stopwatch and timer features.
Alarm
Worldclock
Timer
Stopwatch
Screen saver
Settings
8. 1 Alarm
Set an alarm to wake you up or remind you about important events.
Create an alarm
1. On the Home screen, tap > Clock > .
2. Tap
. Then you can either toggle the pointer to choose a time for the alarm, or you can tap to manually
type the alarm time. After choosing the time, tap OK.
3. Check Repeat to select the days when the alarm clock rings. You can also uncheck Repeat to allow the
alarm to ring once.
4. Tap
to set the alarm ringtones, or tap Add new to add other sounds as your alarm sound.
5. Check or uncheck Vibrate to choose whether the alarm clock rings with vibration or not.
6. Tap Label to add a label for your alarm clock.
7. Configure the alarm settings above and tap
to save.
Manage alarms
Enable or disable an alarm: Toggle the switch next to the alarm to enable or disable the alarm.
Delete an alarm: Select the alarm you want to delete, tap
> . At this moment, a popup menu will
appear at the bottom of the screen, and you can tap UNDO to cancel deleting this alarm.
Snooze: When the screen is locked, double tap the alarm and then drag
left to
Z
Z
Z
, then the alarm will
go off again after 10 minutes; when the screen is on, tap SNOOZE on the pop-up prompts then the alarm
will go off again after 10 minutes.
Dismiss: When the screen is locked, double tap the alarm and then drag
right to
to dismiss the alarm;
when the screen is on, tap DISMISS on the pop-up prompts to stop the alarm.
Note: If there is an alarm clock in the shutdown state, the phone will automatically start up a few minutes in advance, and
then the clock rings normally.
8. 2 Worldclock
Check the time in various cities around the world using Worldclock.
On the Home screen, tap
> Clock > . You can:
Add a city: Tap
.
You can either swipe the screen to check the city you want; or you can tap
, enter a
city name in the search bar and check the city from the search result list.
Delete a city: Tap
. Uncheck the city you want to delete from the Selected Cities.
8
42Chapter 8 . Clock
Sort the cities: Tap > , you can sort the cities by time or name.
8. 3 Timer
Set a timer to count down and alert you when time’s up.
1. On the Home screen, tap
> Clock > .
2. Set a specific time that you want to count down and then tap
. You can:
Tap
to pause counting and tap to continue. Tap RESET to restart the count down.
Tap Label to create a label for the timer.
Tap ADD TIMER to add another timer. When there are two or more timers, swipe the screen up or
down to toggle the timer.
Tap DELETE to delete the timer.
3. When the timer goes off, you can:
Silence the ringtone: Tap
on the screen or press Volume button to silence the ringtone.
Add 1 minute for your timer: Tap ADD 1 MIN on the popup prompt to add 1 minute for your timer.
8. 4 Stopwatch
You can use Stopwatch to keep time or record lap times.
1. On the Home screen, tap
> Clock > .
2. Tap
to start timing. While timing, you can:
Tap LAP to count laps. Laps data will be displayed on the screen.
Tap
to pause timing. When pausing, you can tap SHARE to share the lap timesand. Tap to
continue.
3. Tap RESET to clear the stopwatch records and restart.
8. 5 Screen saver
Screen saver automatically adjusts the screen image with only a time displayed on it.
On the Home screen, tap
> Clock > > Screen saver.
8. 6 Settings
On the Home screen, tap > Clock > > Settings to personalize your clock.
Clock settings
Style: Select the display form of clock: Analog/Digital.
Display time with seconds: Turn on the switch to dispaly the time with seconds.
Automatic home clock: Turn on the switch to enable automatically adding a clock for home while traveling
in different time zones. When you switch on Automatic home clock, tap Home time zone to set the right
time zone.
Home time zone: When Automatic home clock is turned on, you can tap to select a time zone for the
Home time zone.
Change date & time: Choose the way you adjust the date and time for your phone.
43Chapter 8 . Clock
Alarms settings
Silence after: Set the time how long the clock will ring.
Snooze length: Choose a proper interval time for your snoozing mode of alarm.
Alarm volume: Adjust the volume of your alarm ringtone.
Gradually increase volume: Tap to choose the time to enable gradually increasing the alarm volume after
the alarm has rung for the time you have chosen.
Volume buttons: Tap to choose the function of Volume buttons: Control volume/Snooze/Dismiss. When
the the alarm rings, Control volume means you can control the alarm sound through Volume buttons;
Snooze means the alarm will go off again after 10 minutes if you tap the Volume buttons; Dismiss means
the alarm will stop if you tap the Volume buttons.
Start week on: Choose Sunday/Friday/Saturday/Monday as the first day of a week.
Timers settings
Timer sound: Tap to set the timer ringtones, and then check the ringtones to select the system ringtones on
your phone or tap Add new to add other sounds as your timer sound.
Gradually increase volume: Tap to choose the time to enable gradually increasing the timer volume after
the timer has rung for the time you have chosen.
Timer vibrate: Turn on the switch to make the timer ring with vibration.
44Chapter 9 . Google Chrome
Google Chrome
Use Google Chrome to surf the Internet and find out all that you are curious about.
Go to a webpage
Browser tabs
9. 1 Go to a webpage
View a webpage
1. On the Home screen, tap Chrome, then tap the address bar and enter the web address you want to visit.
2. Tap Go on the keyboard.
Do more options about the web page
Tap and choose the options that you want to configure.
Add a bookmark: Tap to add a bookmark for the site you want to collect so that you can quickly find the
site next time by tapping > Bookmarks.
Download a site: Tap
to download the site you want so that you can quickly find the site next time by
tapping > Downloads.
Check the site: Tap
to check whether the website you open is safe or not.
Refresh the site: Tap
to refresh the site.
New tab: Open a new tab.
New incognito tab: Open a new incognito tab.
Bookmarks: View your bookmarks.
Recent tabs: View the recent visited tabs.
History: View your browsing history.
9
45Chapter 9 . Google Chrome
Downloads: View the contents you have downloaded.
Desktop site: Check the option to turn the page to a desktop site.
Settings: Configure the browser settings.
Help & feedback: Search for help or send your feedback.
9. 2 Browser tabs
You can view multiple pages simultaneously using tabs. Tap the icon and all the pages will be displayed. The
number on the icon means the current number of the web pages.
Open a new tab
You can open a tab by the following ways:
On the Home screen, tap
Chrome > > New tab.
On the Home screen, tap
Chrome > > .
On the Home screen, tap
Chrome > > > New tab.
Close tabs
1. On the Home screen, tap Chrome > and choose the tab you want to close.
2. Drag the tab left or right to close the tab or tap
to close the tab. To close all the tabs one time, tap >
Close all tabs.
46Chapter 10 . Google Play
Google Play
Use Google Play to download apps to you phone as desired. Apps are available through
Google Play either free of charge or at a cost.
Add an account to your Google Play
Download and install apps
10. 1 Add an account to your Google Play
To get apps from the Google Play, you’ll need to log in an account on your device. When you add an account,
information associatied with that account automatically syncs with your phone.
On the Home screen, tap
When using Google Play for the first time, you will first enter SIGN IN screen, then
enter your account on the Email or phone line or tap Create account to apply for a new account, then follow
the onscreen instructions to log in your account.
10. 2 Download and install apps
1. Find the app you want. There are three ways:
Use the search bar or voice search to manually find the app you want.
Swipe the screen left to find the category of the app you want and tap the category. Related apps will
display on the screen.
Swipe the screen down to get the latest push app.
Tap to configure more options
Tap to enter the name/key words
of the app you want, then related
information will display
Tap to say the name/key words
of the app you want, then related
information will display
Swipe left to view related apps
2. Tap the app and then tap INSTALL. When downloading, you can always swipe down from the status bar
to view the download progress. When downloading completed, the app will be installed on your phone
automatically. The app will be displayed in App drawer by default.
10
47Chapter 11 . Themes
Themes
Themes helps you to personalize your Home screen by changing the theme, wallpaper, Lock
screen style, and icon style.
Change the theme
Change the wallpaper
Change the icon style
11. 1 Change the theme
1. On the Home screen, tap > Themes.
2. Select a theme, then the preview of the currently selected theme will be displayed on the screen.
3. Tap APPLY to apply the theme.
11. 2 Change the wallpaper
Wallpaper settings let you set an image or photo as wallpaper for the Lock screen or Home screen.
Launch the wallpaper
There are three ways to Launch the wallpaper:
On the Home screen, tap
> Themes > CUSTOM > Lock screen wallpaper/Home screen
wallpaper.
Tap
Settings > Display > Wallpaper.
Tap and hold the Home screen’s blank area or pinch two fingers together on the Home screen, then tap
Wallpapers.
Change the wallpaper with system-provided wallpapers
1. On the Home screen, tap > Themes > CUSTOM > Lock screen wallpaper/Home screen
wallpaper.
2. Select a desired wallpaper from system-provided wallpapers.
3. Tap screen to toggle Lock screen Preview or Home screen Preview which shows a preview of the currently
selected wallpaper without applying it. You can swipe the screen left or right to change the wallpaper.
4. Tap APPLY, and then follow the onscreen instructions to set it as the Home screen or Lock screen wallpaper
or both.
Customize your Wallpaper
1. On the Home screen, tap > Themes > CUSTOM > Lock screen wallpaper/Home screen
wallpaper.
2. Tap
and select an album. Then select a picture and tap it.
3. Tap screen to toggle Lock screen Preview or Home screen Preview which shows a preview of the currently
selected wallpaper without applying it. You can zoom in the picture, swipe it and select the part you want.
On Homescreen Preview screen, check Scroll on the Home screen, and you can zoom and move the
image to adjust the maximum display area of the wallpaper.
4. Tap APPLY, and then follow the onscreen instructions to set it as the Home screen or Lock screen wallpaper
or both.
11
48Chapter 11 . Themes
11. 3 Change the icon style
1. On the Home screen, tap > Themes > CUSTOM > Icons.
2. Tap one of the icon styles and swipe the screen left or right to preview the icon style effect.
3. Select the desired icon style and tap APPLY.
49Chapter 12. Weather
Weather
Use Weather to check the current weather and multi-day forecast for your location and many
other cities around the world.
Check the weather
Weather settings
12. 1 Check the weather
To use Weather, please connect to the mobile data or connect to WLAN.
Add a city
Add multiple cities to the weather app so that you can keep track of the weather in cities of interest to you.
Before adding a city, please enable location-based services. For the first time to use Weather, read popup
promt about Weather Terms of Services carefully, then tap AGREE.
1. On the Home screen, tap
> Weather.
2. Enter a city name in the City field and a list of cities will be displayed on the screen. Or you can tap Add
current location to quickly get the weather of your current location.
3. You can add more cities by tapping
and then enter the city name.
View weather information
1. Tap a city to view its weather information. After adding two or more cities, slide the screen left or right to
view the weather information of different cities.
2. On weather information screen, swipe the screen down to refresh the weather information; swipe the
screen up to view the future weather and detailed information of the day: relative humidity, UV, wind speed,
dew point, visibility and pressure.
Remove a city
1. On the Home screen, tap > Weather > to log into the City list.
2. Swipe left the city you don’t need and tap
to remove the city.
12. 2 Weather settings
On the Home screen, tap > Weather > to configure the weather settings.
Weather alerts: Tap to choose the city from which you want to receive weather alerts. Switch on or switch
off Alert notification, Rain alerts, Snow and hail alerts, Temperature drop alerts to enable or disable
the Weather app to inform you of weather warnings, rain alerts, snow and hail alerts, falling temperature
alerts for the city you choose.
Temperature units: Tap to choose ℃ or ℉ as the temperature unit.
Wind speed unit: Tap to choose km/h, m/s, mph or kts as the wind speed unit.
Air preesure unit: Tap to choose hPa, mb, mm or in as the air pressure unit.
About Weather: Tap to view the version of your
Weather and Neffos Privacy Policy.
12
50Chapter 13 . File Manager
File Manager
Access files stored on your device.
View folders or files
Manage folders or files
13. 1 View folders or files
On the Home screen, tap > File Manager > Internal shared storage, and you can do the following
operations:
Create a folder
Search folders or files
Select files or folder
;
Show hidden files;
Sort files
Swipe scr
een up or down to view
the f
olders; or tap the folder to view
the f
olders or files in it
13
51Chapter 13 . File Manager
13. 2 Manage folders or files
On the Home screen, tap > File Manager > Internal shared storage, tap and hold a folder or file, and
you can do the following operations:
Cut files
Copy files
Show the number of folders
you have selected
Delete the files you have selected
Tap to select all the folders or files
Swipe screen up or down
to view the files
Rename or view the detail of the files
you selected. This function only
appears when you selected one file
The share function only
appears when you selected
files rather than filders
Note: After copying or cutting the folder or file, tap to paste it. You can copy and paste the folders and files in the same
storage location, while cut and paste not.
52Chapter 14. Tools
Tools
Use Tools to enjoy more features of your phone.
Downloads
SIM Toolkit
Feedback
Calculator
Sound Recorder
FM Radio
14. 1 Downloads
On the Home screen, tap > Downloads to view and manage downloaded and downloading information.
View files
On the Home screen, tap > Downloads > , and you can use the following options:
View images: Tap Images to view the images taken by your phone or you have downloaded or received
from other devices.
View videos: Tap Videos to view the videos taken by your phone or you have downloaded or received from
other devices.
View audio: Tap Audio to view audios captured by your phone or you have downloaded or received from
other devices.
View the recent downloads: Tap Recent to view the files generated by your phone or you have downloaded
or received from other devices recently.
Search files
On the Home screen, tap > Downloads > and enter the key words you want to search. Related
results will display under the search bar.
Rank files
1. On the Home screen, tap > Downloads.
2. Toggle
to switch the ranking type to display your files in a list or a tile.
Sort files
1. On the Home screen, tap > Downloads.
2. Tap Modified, select a sorting type (Name/Modified/Size) to arrange files as you like.
Add new windows
On the Home screen, tap > Downloads > > New window to open a new window.
Add new folders
On the Home screen, tap > Downloads > > New folder, enter the folder name, and tap OK to save it.
14
53Chapter 14. Tools
Copy files/folders
1. On the Home screen, tap > Downloads.
2. Tap and hold a file or a folder and tap
> Copy to.
3. Tap another folder and tap COPY.
Move files/folders
1. On the Home screen, tap > Downloads.
2. Tap and hold a file or a folder and tap
> Move to.
3. Tap another folder and tap MOVE.
Rename files/folders
1. On the Home screen, tap > Downloads.
2. Tap and hold a file or a folder and tap
> Rename.
3. Enter a new name for it and tap OK.
Delete files/folders
1. On the Home screen, tap > Downloads.
2. Use one of the following ways to delete folders:
Tap and hold a folder and tap
to delete it.
Tap and hold a file or a folder and then select multiple files and folders, and tap
.
Tap and hold a file or a folder and tap
>Select all and tap to delete all the files and folders.
Show internal storage:
1. On the Home screen, tap > Downloads > > Show internal storage.
2. Go to
> Neffos C7 Lite to see the storage of the files in Downloads.
14. 2 SIM Toolkit
1. Before you launch the SIM toolkit, insert SIM card first.
2. On the Home screen, tap
> SIM Toolkit.
If you have inserted only one SIM card, check the SIM card details directly.
If you have inserted only one SIM cards, choose SIM 1 or SIM 2 to check the SIM card details.
14. 3 Feedback
Provide your feedback
1. On the Home screen, tap > Feedback.
2. When you use the app for the first time, read the User Feedback Service Terms and tap AGREE .
3. Tap the questions you are interested in the frequently asked questions list. If you can not find it, use one of
the following methods:
Tap
See more FAQ to see if your questions is covered.
Tap
Search and enter a keyword to quickly search for your questions.
4. Provide your feedback in two ways:
54Chapter 14. Tools
Tap FEEDBACK and follow the onscreen instrutions to enter your feedback, and then tap SUBMIT.
Tap Contact us > Select your country to find the support.
View feedback report
On the Home screen, tap > Feedback > to view the feedaback reports you have sent.
14. 4 Calculator
1. On the Home screen, tap > Calculator to open the standard calculator.
2. Use one of the following methods to switch between the standard and scientific calculators:
Tap the blue part on the right.
Swipe left the operation part (the area in red dotted box below).
55Chapter 14. Tools
Swipe down from the status bar to open the Quick Settings Panel and tap Portrait to switch to Auto-
rotate; then rotate the screen to access the scientific calculator.
3. Tap numbers and use the arithmetic feature to complete an operation. When using calculator, you can use
following features:
Copy and paste: Enter a number in the blank part. Tap and hold the number and tap COPY or PASTE.
Cut: Enter a number in the blank part. Tap and hold the number and tap CUT to delete the number and
paste elsewhere.
Use number saved in memory: Enter a number in the blank part. Tap and hold the number and tap MS
to save it in memory. While calculating, tap and hold the blank part and tap MR to use the number you
have saved.
Add number to memory: Enter a number in the blank part. Tap and hold the number and tap MS to save
it in memory. Enter another number in the blank part. Tap and hold the number and tap M+ to add the
number to the number that you have saved in memory. Then the sum of these two numbers will be the
new number saved in memory.
Minus number from memory: Enter a number in the blank part. Tap and hold the number and tap MS
to save it in memory. Enter another number in the blank part. Tap and hold the number and tap M- to
minus the number from the number that you have saved in memory. Then the difference between
these two numbers will be the new number saved in memory.
Delete: Tap
to delete the characters to the left of the cursor; tap and hold to delete all calculated
information.
View history: Slide down from the blank part or tap
> History to view the history.
Clear history: Tap
> History > > Clear to clear the calculating history.
Help and feedback: Tap
> Help if you find any problem and tap > Send feedback to tell Google. They
will fix the problem as soon as possible.
14. 5 Sound Recorder
Record sound
1. In order to ensure optimum recording quality, place your phone on a flat surface and do not cover the
microphone.
2. On the Home screen, tap
> Sound Recorder.
56Chapter 14. Tools
3. Tap to start recording.
4. When recording, tap
to pause and tap to continue recording.
5. After recording, you can do the following options:
Tap
> to play the sound record.
Tap
> SAVE to save the sound record.
Tap
> DISCARD to discard the sound record.
Play a record
1. On the Home screen, tap > Sound Recorder > .
2. Tap the record you want to play.
Delete records
1. On the Home screen, tap > Sound Recorder > .
2. Tap and hold a record and check the records you want to delete, then tap
.
Set voice quality
1. On the Home screen, tap > Sound Recorder > > Voice quality.
2. Choose High, Mid or Low to set voice quality.
Set recording mode
1. On the Home screen, tap > Sound Recorder > > Recording mode.
2. Choose Normal, Meeting or Lecture recording mode.
14. 6 FM Radio
For the first time to use FM Radio, follow the onscreen instructions to allow FM Radio to record audio.
Scan for all FM stations
1. Connect a headset to the phone.
2. On the Home screen, tap
> FM Radio > to scan for all FM stations.
3. Tap one station and listen to it.
Listen to FM radio
1. Connect a headset to the phone.
2. On the Home screen, tap
> FM Radio.
3. Tap
> Earphone to listen to the radio with your headphone; tap > Speaker to listen to the radio
through the phone’s speaker.
4. Tap
to play the radio.
5. Tap
to play the next station; tap to play the previous station; tap or to manually adjust the
channel bit by bit.
6. Tap
to pause playing.
Add FM stations to favorites
You can add FM stations to favorites in following ways:
Connect a headset to the phone. On the Home screen, tap
> FM Radio > to open the radio
stations list. Tap of a radio station to add to favorites.
57Chapter 14. Tools
Connect a headset to the phone. When listening radios, you can also tap on FM Radio screen to add
to favorites.
Remove FM stations from favorites
You can remove FM stations from favorites in following ways:
Connect a headset to the phone. On the Home screen, tap
> FM Radio > to open the radio
stations list. Tap of a radio station you want to remove from favorites.
Connect a headset to the phone. When listening radios, you can also tap
on Favorites list.
Connect a headset to the phone. In Favorites list, tap
on the FM station you want to remove from favorites,
and then tap Remove favorite.
Rename FM stations you added to favorites
Note: Only the FM stations you have added to favorites can be renamed.
1. Connect a headset to the phone. In Favorites list, tap on the FM station you want to rename, and then
tap Rename.
2. Enter the new name, and tap SAVE. The new name will be displayed under the channel of the station.
Record radio
1. Connect a headset to the phone.
2. On the Home screen, tap
> FM Radio > > Start recording to start recording the playing radio.
3. Tap STOP RECORDING, enter the name for the recording, and tap SAVE to save the recording. The
recording will be saved in
> Saved recordings.
58Chapter 15 . Settings
Settings
This chapter contains the following sections:
Dual SIM settings
Data usage
VPN
Airplane mode
Connected devices
Apps and notifications
Battery
Display
Sound
Storage
DuraSpeed
Security
Location
Accounts
Languages and input
Use gestures to open Camera
Date and time
Reset options
System update
About phone
15. 1 Dual SIM settings
When two SIM cards are inserted, you can configure the default card for mobile data, phone calls and SMS
messages according to your plan.
Toggle the switch to enable or disable the SIM card
Select a default SIM for mobile data
Select a default SIM for SMS messages
Select a default SIM for phone calls
Toggle the switch to enable or disable the SIM card
15
59Chapter 15 . Settings
1. On the Home screen, tap > Settings > Network & Internet > SIM cards.
2. Toggle the switch next to the SIM card to enable or disable the SIM card. You can tap SIM slot1 or SIM slot
2 to edit the SIM name, change the color, view the carrier and SIM number.
3. Choose the preferred SIM for mobile data, calls or SMS messages.
Note:
1. If you disable a SIM card, you will be unable to use it to make calls, send messages, or use mobile data.
2. You can configure whether you want to select a SIM card manually or use the default SIM card each time you make a
call. If you choose to use the default SIM card, your phone will use that SIM card for all outgoing calls.
3. Your phone supports only dual card dual standby single pass, which means you cannot use both SIM cards for calls or
data services simultaneously.
15. 2 Data usage
On the Home screen, tap > Settings > Network & Internet > Data usage, and you can configure the
following settings:
Enable data saver
Tap Data saver and turn on the switch to enable it, and then some apps will be prevented from sending or
receiving data in the background.
Note: Still, you can have some apps allowed to use unrestricted data when Data saver is on. Tap Unrestricted data and
turn on the switch next to the app you want to enable using unrestricted data.
Enable mobile data
Switch on Mobile data to enable it. You can also swipe down twice from the status bar to open the Quick
Settings Panel, swipe left and tap Mobile data.
View mobile data usage
1. Tap Mobile data usage to see mobile data usage for your phone.
2. Select an app and you can view the app information and configure the following data usage settings.
Background data: Turn on the switch to enable usage of mobile data in the background.
Unrestricted data usage: Turn on the switch to allow unrestricted data access when Data saver is on.
3. Tap
to adjust billing cycle settings, data warning and data limit.
Adjust billing cycle
Tap Billing cycle and you can reset the usage cycle date, set data warning and set data limit.
View WLAN data usage
1. Tap WLAN data usage to view the WLAN data usage of your device.
2. Select an app and you can view the app information and configure the data usage settings.
Set WLAN network restrictions
1. Connect your phone to WLAN before selecting metered networks. See WLAN and follow the instructions.
2. Tap Network restrictions, select WLAN networks as desired and choose Metered. Then the metered
networks are treated like mobile networks when background data is restricted. Apps may warn before using
these networks for large downloads.
60Chapter 15 . Settings
15. 3 VPN
A virtual private network (VPN) is a secure connection that allows you to send and receive data across shared or
public networks. You can use a VPN to connect to your company network and email server.
Connect to a VPN
1. Before using VPN, set a Lock screen PIN, pattern or password on your device first. For more details about
setting a screen lock, see Security. Then contact your VPN administrator to obtain the server information,
username and password.
2. On the Home screen, tap
> Settings > Network & Internet > VPN.
If you have downloaded a VPN, tap it to open it and connect to VPN network. Tap
next to the app to
view or configure settings for this VPN.
If you have not downloaded a VPN, tap
to add a new VPN network, and enter the VPN profile, and
then tap SAVE.
15. 4 Airplane mode
To avoid interference, please enable airplane mode or power off your phone when you are on board a plane.
When enabled, call, mobile data, Bluetooth, and WLAN will be disabled. You can enable Bluetooth and WLAN
manually, and you can still be able to play music, watch videos and use apps that do not require an Internet
connection.
Use any of the following methods to enable or disable airplane mode:
Use the shortcut switch: Swipe down twice from the status bar to open the Quick Settings Panel, swipe
left and tap
Airplane mode to switch on. When airplane mode is enabled, will be displayed in the
status bar.
Go to Settings: On the Home screen, tap
> Settings > Network & Internet and switch on Airplane
mode. When airplane mode is enabled, will be displayed in the status bar.
15. 5 Connected devices
On the Home screen, tap > Settings > Connected devices and you can configure the following
connection settings:
Bluetooth
Tap Bluetooth and you can enable the Bluetooth, pair new device, view the paired devices and received files
via Bluetooth, and rename your device. For more information about using Bluetooth, see Bluetooth.
Printing
1. Make sure your printer and phone connect to the same WLAN network.
2. Tap Printing and your printer will display on the screen, and then follow the onscreen instructions to use it.
USB
Tap USB and use USB to charge your device, transfer files or photos, or use device as MIDI. For more information
about using USB to transfer data, see Connect to computer .
61Chapter 15 . Settings
15. 6 Apps and notifications
Configure app settings
1. On the Home screen, tap > Settings > Apps & notifications and view recently opened apps, all
apps, installed apps, and disabled apps in your phone.
2. Tap an app and you can configure the following options:
Disable apps: Tap DISABLE button to disable an app (Some pre-installed apps cannot be disabled).
Force stop apps: Tap FORCE STOP button to force stop an app.
Uninstall apps: For an installed app, you can tap UNINSTALL button to uninstall the app.
App notifications: Configure the notification settings for the app. See Configure app notifications.
Permissions: Configure permissions for the app. See Configure app permissions.
Storage: Clear data, clear cache and view the status about the used space of your phone.
Data usage: View and configure data usage for the app. See View mobile data usage.
Battery: View and adjust the power use details. You can tap Battery optimization to manage battery
usage. For more information about battery optimization, see Battery optimization.
Open by default: Configure the settings for opening supported links in the app.
View app verison: Slide down to the bottom of the screen to view the app version.
Configure app permissions
Your phone comes with a permission manager that you can use to restrict app permissions and protect your
personal data.
1. On the Home screen, tap
> Settings > Apps & notifications > App Permissions.
2. Select an app and you can enable or disable the relevant permissions for the app.
Configure app notifications
On the Home screen, tap > Settings > Apps & notifications > Notifications to configure the following
settings:
App notifications: Tap and select an app to personalize its notification mode based on your needs. For some
apps, multiple notifications types display in the Categories list, you can select one and turn on the switch
to enable notifications for the category.
Notifications on the Lock screen: Tap On the lock screen and you can choose Show all notification
content, Hide sensitive notification content or Don’t show notifications at all for apps in your phone.
Default notification sound: Tap to choose or add a desired ringtone for notifications.
Configure advanced settings
On the Home screen, tap > Settings > Apps & notifications > Advanced to configure the following
options:
Default apps: Tap to choose the default apps for your device.
Special app access: Select a permission type and configure the access for the apps as desired.
15. 7 Battery
Use Battery to view detailed battery usage statistics and optimize performance as well as reducing power
consumption.
On the Home screen, tap
> Settings > Battery to configure the following settings:
62Chapter 15 . Settings
View battery usage statistics
1. View the remaining capacity of battery and the power usage of screen and apps. You can tap the percentage
to find advanced battery usage. You can also tap > Show full device usage to view more battery usage.
2. Switch on Battery Percentage and the battery percentage will display in the status bar.
Reduce power consumption
Standby intelligent power saving: Turn on the switch to save your phone power when in standby mode.
Battery saver: Turn on the switch to enable Battery saver mode. After enabled, the status bar and the
navigation bar will turn red. You can also choose to turn on Battery saver mode automatically when your
phone is at 5% or 15% battery by tapping Battery saver > Turn on automatically.
Note:
1. To help improve battery life, battery saver reduces your device’s performance and limits vibration, location services and
most background data. Emails, messages and other apps that rely on syncing may not update unless you open them.
2. Battery turns off automatically when your device is charging, and needs to be turned on manually when unpluged.
Battery optimization
1. Tap > Battery optimization > > All apps.
2. Tap an app and choose Optimize for better battery life.
15. 8 Display
Configure the display settings to personalize your phone. For example, you can change the wallpaper, font size,
and screen-off time.
On the Home screen, tap
> Settings > Display, and you can configure the following options:
Adjust screen brightness
1. Tap Brightness level, a slider will display on the screen.
2. Drag the slider left or right to adjust the screen brightness to suit your needs.
Note: To adjust the screen brightness quickly, you can swipe down twice from the status bar, and adjust the slider on the
Quick Settings Panel directly.
Change wallpapers
Tap Wallpaper, choose a wallpaper from Photos, Themes, or Wallpapers, and then follow the onscreen
instructions to change the wallpaper. For information about changing wallpapers, see Change the wallpaper.
Enable/disable LED indicator
Tap Led indicator to enable or disable charging and notification LED indicators.
Charge LED indicator: Turn on the Charge led indicator to display LED indicator when charging your
phone.
Notication LED indicator: Turn on Notication led indicator and the LED indicator blinks when receiving
notifications.
Automatically lock screen
Tap Sleep and select a time to make the phone lock automatically after a certain time of inacticity.
Auto-rotate screen
Tap Advanced and switch on Auto-rotate screen, and your screen’s orientation will switch automatically
depending on how you hold your phone when performing certain operations, such as browsing a web page
or viewing a picture. To quickly enable auto-rotate screen, you can swipe down from the status bar to open the
Quick Settings Panel and tap Auto-rotate.
63Chapter 15 . Settings
Adjust font size
1. Tap Font size, and then tap or drag the slider to set a desired font size (small/default/large/largest). A
thumbnail preview will display on the screen for your reference.
2. After setting the font size, tap the Back button to save and exit.
15. 9 Sound
Change the volume, vibration effects, ringtones and other sounds settings for your device.
On the Home screen, tap
> Settings > Sound, and you can configure the following settings:
Volume
Tap or drag the slider to adjust the media volume, alarm volume or ring volume.
Also vibrate for calls
Turn on the switch to make the phone vibrate for incoming calls.
Do not disturb
Do not disturb mode allows you to work or relax in peace. Your device will only notify you about important calls
or messages. Tap Do Not Disturb preferences to configure the following settings:
Priority only allows
Reminders: Turn on the switch to allow reminders in Do not disturb mode.
Events: Turn on the switch to allow events in Do not disturb mode.
Messages: Tap Messages to set the contact range from whom you want to receive messages.
Calls: Tap Calls to set the contact range from whom you want to receive calls.
Repeat callers: Turn on the switch to allow the call from the same person who calls second time within
15 minutes.
Block visual disturbances
Block when screen is on: Turn on the switch to prevent notifications silenced by Do not disturb mode
from popping on the screen.
Block when screen is off: Turn on the switch to prevent notifications silenced by Do not disturb from
turning on the screen.
Automatic rules
Set automatic rules: Tap a rule and toggle the switch to enable or disable it. Tap Rule name, Days,
Start time, End time, Do Not Disturb preferences to set the rule. Switch on Alarm can override
end time and the alarm ringtones may stop Do not disturb mode before the end time you set for
automatic rules.
Add more rules: Tap Add more and follow the onscreen instructions to complete the rule settings.
Delete rules: Tap
next to the rule which you want to remove, or tap the rule and then tap .
Phone ringtone
Tap Sim1 Phone ringtone or Sim2 Phone ringtone, select one from the list, or tap Add ringtone to select
a desired phone ringtone.
Sounds and vibrations
Tap Advanced, and you can configure the following settings:
Default notification sound: Set a default notification ringtone, or you can tap Add ringtone to select a
desired notification ringtone.
64Chapter 15 . Settings
Default alarm sound: Set a default alarm ringtone, or you can tap Add ringtone to select a desired alarm
ringtone.
Dial pad tones: Turn on the switch to enable dial pad tones.
Screen locking sounds: Turn on the switch to enable screen locking sounds.
Charging sounds: Turn on the switch to enable charging sounds.
Touch sounds: Turn on the switch to enable touch sounds.
Vibrate on tap: Turn on the switch to make your phone vibrate when tapping.
Sound enhancement: Switch on BesLoudness to get volume booster for speaker.
15. 10 Storage
On the Home screen, tap > Settings > Storage to view storage use of your phone.
Free up space
1. Tap FREE UP SPACE button.
2. Select the items you want to remove, and tap FREE UP > REMOVE to free up space.
15. 11 DuraSpeed
DuraSpeed helps boost the foreground app by restricting background apps.
Note: When DuraSpeed is on, some notifications may be postponed or not received.
1. On the Home screen, tap > Settings > DuraSpeed and turn on the switch to enable it. A list of apps
will display on the screen.
2. Turn on the switch next to the app to allow it running in the background. You can also quickly turn on all
the switches by tapping
> Turn all on.
15. 12 Security
Use screen lock method and other features to provide added security to your personal information.
On the Home screen, tap
> Settings > Security & location to configure the following settings:
Add screen lock method
Tap Screen lock, choose one of the following methods and follow the onscreeen instructions to add a screen
lock method.
None: Set no screen lock for your phone.
Swipe: Swipe on the screen to unlock your phone. After you have set swipe as your screen lock method, you
can tap
next to Screen lock and edit the Lock screen message.
Pattern: Use a pattern to unlock your phone. After you have set pattern as your screen lock method, you can
tap
next to Screen lock and switch on Make pattern visible, and then you can see the pattern when
you enter the pattern on the Lock screen.
PIN: Use PIN to unlock your phone.
Password: Use password to unlock your phone.
Manage screen lock method
Tap next to Screen lock and configure the following settings:
Edit Lock screen messages: Tap Lock screen message to edit the message shown on the Lock screen.
65Chapter 15 . Settings
Adjust screen lock interval: Tap Automatically lock and select a time to make the phone lock automatically
after sleep.
Power button instantly locks phone: Switch on Power button instantly locks and then you can press the
Power button to instantly locks your phone.
Note: To display characters and pattern when entering password and PIN on the Lock screen, you can go to Settings >
Security & location and switch on Show passwords.
Manage Lock screen preferences
Tap Lock screen preferences to configure the following settings:
Notifications on the Lock screen: Tap On the lock screen and you can choose Show all notification
content, Hide sensitive notification content or Don’t show notifications at all for apps in your phone.
Add Lock screen messages: Tap Lock screen message, enter the message and tap SAVE. Then the
message will appear on the Lock screen.
Enable Smart lock
1. To use Smart Lock, set a pattern, password or PIN as screen lock first. For more information about setting a
screen lock method, see Add screen lock method.
2. Tap Smart Lock and enter the screenlock method you have set.
3. Read the introduction of Smart Lock. Tap GOT IT to continue.
4. Tap On-body detection, turn on the switch and tap CONTINUE to keep your device unlocked when it is
on you.
Activate device admin apps
Tap Device admin apps to activate the admin apps to help make your device more secure. Your phone
supports the following admin apps:
Find my device: Check Find My Device and tap Activate this device admin app to allow the admin app
to erase all data, change the screen lock, lock the screen and disable some screen lock features.
Google Play: Check Google Play and tap Activate this device admin app, and then it will allow the
admin app to set password rules and lock the screen.
Set up SIM card lock
Enable SIM card lock to prevent others from using your SIM card. You will need to enter your SIM card PIN each
time you turn on your phone or insert your SIM card into another phone.
1. Contact your local carrier to get the default SIM PIN for your SIM card.
2. Tap SIM card lock, and select a SIM card.
3. Swich on Lock SIM card, enter the SIM PIN and tap OK.
Change SIM PIN
1. To change a SIM PIN, you need to set up a SIM card lock first. For how to set up a SIM card lock, see Set up
SIM card lock.
2. Tap SIM card lock, and select a SIM card.
3. Tap Change SIM PIN, enter the old SIM PIN and tap OK.
4. Enter a new SIM PIN twice, and tap OK.
Note: When you change you SIM PIN for the first time, contact your local carrier for the default SIM PIN (old SIM PIN).
Manage encryption and credentials
Tap Encryption & credentials to view your device’s storage type, view and modify trusted system and
user credentials, install certificates from SD card and remove certificates.
Tap Tursted agents to activate or deactivate trust agents.
66Chapter 15 . Settings
Pin the screen
Use Screen pinning to keep the current screen in view.
1. Tap Screen pinning and turn on the switch.
2. Open the screen you want to pin, tap the Recent apps button, and swipe up to the screen you want to pin
and tap the pin icon
.
Unpin the screen
If you turn on Ask for password before unpinning, tap and hold the Back button and Recent apps button
at the same time, enter your Lock screen password to unpin the screen.
If you do not turn on Ask for password before unpinning, tap and hold the Back button and Recent apps
button at the same time to unpin the screen.
Allow usage access
Usage access allows an app to track what other apps you’re using and how often, as well as your carrier,
language settings, and other details.
1. Tap Apps with usage access to view and modify apps with usage access.
2. Tap an app and switch on Permit usage access to allow usage access.
15. 13 Location
Enable location-based services to ensure that map, navigation, weather and other apps can access your location
information.
On the Home screen, tap
> Settings > Security & location > Location, you can view the recent
location requests, your location services and configure the following location settings:
Enable Location service
1. Turn on the switch to enable the location services.
2. Tap Mode and you can choose from three different modes:
High accuracy: Use GPS, WLAN, Bluetooth, or mobile networks to determine location. Select this option
for highly accurate positioning.
Battery saving: Use WLAN, Bluetooth, or mobile networks to determine location. Select this option for
reduced power consumption and longer standby times.
Device only: Use GPS and device sensors to determine location. Select this option to reduce mobile
data usage.
Configure Location permissions
1. Tap App-level permissions.
2. Toggle the switches of the apps to enable or disable the location permissions for the apps in your phone.
Improve Location service
Tap Scanning, and you can select from following two scanning mode:
WLAN scanning: Improve location by allowing system apps and services to detect WLAN networks at any
time.
Bluetooth scanning: Improve location by allowing system apps and services to detect Bluetooth devices at
any time.
67Chapter 15 . Settings
15. 14 Accounts
When you use your phone for the first time, you can set up a connection with your existing account or create
a new account.
On the Home screen, tap
> Settings > Users & accounts to configure the following settings:
Add an account
1. Tap Add account.
2. Select an account type, and then follow the onscreen instructions to enter your account information.
Delete an account
Tap the account that you want to delete, and tap REMOVE ACCOUNT.
Synchronize accounts
Enable the sync feature to keep all of your phone’s data up-to-date and prevent data loss. You can sync emails,
contacts, and other data from your old phone or computer. The type of data that can be synced depends on
the account type. Some apps may not support syncing for all data types.
Synchronize accounts according to your needs:
Auto sync data of all accounts: Switch on Automatically sync data to let apps refresh data automatically.
Then any changes you make to your accounts on the web will be automatically copied to your phone.
Some accounts may also automatically copy any changes you make on the phone to the web. A Google
account works this way.
Auto sync data of certain accounts: Select the account you want to synchronize and tap Account sync.
Turn on the switches of apps you want to sync, and tap
> Sync now.
Emergency information
Adding medical information and emergency contacts can help first responders in an emergency. Anyone can
read this information from your Lock screen, and dial your contacts by tapping their names, without unlocking
your phone.
Medical information: Tap Emergency information > Edit information to customize your medical
information.
Emergency contacts: Tap Emergency information > Add contact to customize your emergency contacts.
15. 15 Languages and input
On the Home screen, tap > Settings > System > Languages & input to manage your phone’s
language and input settings.
Change the system language
1. Tap Languages > Add a language and select the language you need.
2. Drag
of the language you want to the top of the list, and then the system language will change as you
need.
Remove the system language
1. Tap Languages > > Remove.
2. Check the language you don’t want and tap
. If the selected language you remove is your device’s
current system language, text will be displayed in second language on the language list.
68Chapter 15 . Settings
Manage input methods
Virtual keyboard: Tap Virtual keyboard > Manage keyboards and select the keyboards you need.
Spell checker: Tap Advanced > Spell checker and turn on the switch.
Personal dictionary: Tap Advanced > Personal dictionary. Tap
to add a word into your personal
dictionary.
Pointer speed: Tap Advanced > Pointer speed. Slide the slider and tap OK to adjust the pointer speed.
Text-to-speech output: Tap Advanced > Text-to-speed output and set the preferred engine, language,
speech rate and pitch for text-to-speech output.
15. 16 Use gestures to open Camera
1. On the Home screen, tap > Settings > System > Gestures > Jump to camera.
2. Switch on Jump to camera to quickly open Camera by pressing the Power button twice from any screen.
15. 17 Date and time
On the Home screen, tap > Settings > System > Date & time to configure the following settings:
Automatic date & time: Choose to use automatic network-provided time or GPS-provided time. You can
also choose to turn it off and manually adjust date and time by tapping Set date and Set time.
Automatic time zone: Turn on the switch to use the network-provided time zone. You can also turn off the
switch to manually adjust the time zone by tapping Select time zone.
Use 24-hour format: Turn on the switch to enable 24-hour format.
15. 18 Reset options
Restore your phone to its factory settings if it crashes or is slow to respond.
On the Home screen, tap
> Settings > System > Reset options to configure the following settings:
Restore DRM settings
Tap DRM reset > DRM reset > OK to delete all DRM licenses on your device.
Reset network settings
1. Tap Reset WLAN, mobile & Bluetooth.
2. Tap
to select a SIM card.
3. Tap RESET SETTINGS to reset all network settings including WLAN, mobile data and Bluetooth settings. If
you have set a screen lock, you will need to confirm your pattern, PIN, or password first so as to continue.
Reset app preferences
Tap Reset app preferences > RESET APPS.
Reset factory settings
Restore your phone to its factory settings if it crashes or is slow to respond.
Back up important data on your phone before restoring factory settings. Restoring factory settings will erase
all personal data from your phone’s internal storage, including your Google account, system and app data and
settings, downloaded apps, music, photos and other user data.
69Chapter 15 . Settings
Tap Erase all data (factory reset) > RESET PHONE to restore your phone to factory settings. Your phone will
restart automatically when the process is complete. If you have set a screen lock, you will need to confirm your
pattern, PIN, or password first so as to continue.
15. 19 System update
Update your phone’s system to the latest version to enhance performance.
Over-the-Air updates (Recommended)
1. Connect the mobile network or WLAN network, and ensure that your phone has at least 30% battery power
remaining.
2. On the Home screen, tap
> Settings > System > System update, your phone will automatically
download update packages over WLAN by default.
3. Tap DOWNLOAD NOW.
Local updates
1. Go to http://www.neffos.com/en/support and find your phone model; then download the updates
package under Firmware to your phone. You can also go to your nearest Neffos service center to download
the updates package to your phone.
2. Ensure that your phone has at least 30% battery porwer remaining.
3. On the Home screen, tap
> Settings > System > System update > > Local updates, tap the file
and then tap OK to confirm update. During the update process, please do not turn off or restart the phone
manually. After updating, your phone will restart automatically.
Current version
On the Home screen, tap > Settings > System > System update > > Current to obtain the current
version.
Update settings
On the Home screen, tap > Settings > System > System update > > Settings and you can configure
the following settings:
Auto download update packages: Turn on the switch and your phone will automatically download update
packages over WLAN.
Download over mobile network: Turn on the switch and your phone will automatically carry out downloads
over a mobile network when disconnected from WLAN.
15. 20 About phone
On the Home screen, tap > Settings > System > About phone to view information about the status,
Android
TM
version, model number, build number and more.
70
Appendix A: Specifications
Specifications
Size and Weight
Height: 150.7 mm
Width: 72.5 mm
Depth: 10.2 mm
Weight: 164 g
Color Grey
Display
5.45 inches, FWVGA + (960 x 480)
197 PPI
TN
CPU
MTK MT6739WA
4 × Cortex-A53 1.3 GHz
GPU: IMG 8XE 1PPC 450 MHz
Memory 1 GB RAM + 16 GB ROM
External Memory 128 GB
Camera
Front 5 Mega-pixel
Rear 8 Mega-pixel, Auto Focus
Network
Micro SIM + Nano SIM (Dual SIM Dual Standby)
4G LTE/3G WCDMA/2G GSM
TP7041A:
2G: Band 2/3/5/8
3G: Band 1/8
4G: Band 1/3/5/7/8/20
TP7041C:
2G: Band 2/5
3G: Band 2/4/5
4G: Band 2/4/7/28 A&B
Sensors Accelerometer
Audio
Audio formats:
WAV, MP3, MP2, AAC, AMR-NB, AMR-WB, MIDI, Vorbis, APE, AAC-plus v1,
AAC-plus v2, FLAC, WMA, ADPCM
Single MIC
Video
Video formats:
H.264, H.263, MPEG-4 SP/ASP, DIVX4/DIVX5/DIVX6/DIVX HD/XVID
Decoder: 1080 p/30 fps
Encoder: 1080 p/30 fps
Connectivity
Wi-Fi 802.11b/g/n, 2.4G
Micro USB
Bluetooth: 4.2
Location Technology GPS/A-GPS/Glonass
71
Specifications
Cloud Service Supported
Operation System Android 8.1 Oreo (Go edition)
Battery 2150 mAh (rating)/2200 mAh (typical)
In the box
Neffos C7 Lite
Charger
USB Cable
Quick Start Guide, Warranty Card, Safety Notice
72
Appendix B: Technical Support
Contact our technical support if you have any questions related to this product.
Countries/Regions
Support
Global
Website www.neffos.com
Tel +86 755 26504400
E-mail
info@neffos.com
support@neffos.com
Address
South Building, No.5 Keyuan Road, Central Zone, Science &
Technology Park, Nanshan, Shenzhen, P. R. China
Postcode: 518057
Americas
Brazil
Website www.neffos.com.br
Tel
4007-2172 (Capitais e Regiões metropolitanas)
0800-608-9799 (Demais localidades)
11 2222-1245 (SP)
21 3180-0092 (RJ)
E-mail suporte.br@neffos.com
Service
Time
segunda a sexta-feira das 09:00 as 18:00 Sábado das 09:00 as
15:00
Mexico
Website www.neffos.com.mx
Tel +52 55 91388104
E-mail
sales.mx@tp-link.com
support.mx@tp-link.com
Address
Goldsmith 53, Piso 1, Col. Polanco Chapultepec Del. Miguel
Hidalgo, México , Distrito Federal C.P. 11560.
Columbia
Website www.neffos.com/co
Tel +57 (1)8773545
E-mail support.co@tp-link.com
Address
Autop. Medellín Km 1.5 Vía Parque la Florida, Bod. 45 Parque Ind.
Terrapuerto, Cota, Cund.
Peru
Website www.neffos.com.pe
Tel +51 1 2402960 Anexo 2967
E-mail Alejandro.torres@tp-link.com
Address
Avenida Republica de Panamá 3545 Oficina 802. San Isidro.
Lima Perú
73
Countries/Regions
Support
Americas Venezuela
Website www.neffos.com.ve
Tel +86 755 26504400
E-mail
info@neffos.com
support@neffos.com
Address
South Building, No.5 Keyuan Road, Central Zone, Science &
Technology Park, Nanshan, Shenzhen, P. R. China
Postcode: 518057
Middle East &
Africa
United Arab
Emirates
Website www.neffos.ae
Tel
+971-4-396-6356 (UAE)
+966-9200-07658 (Saudi)
E-mail support.mea@neffos.com
Address
Office 501, The Business Center, Khalid Bin Al Waleed Road, P.O.
Box 125857, Dubai, U.A.E
Europe
Germany
Website www.neffos.de
Tel
+49 1806-633367
(Mon-Fr 8: 00-17: 00; 20ct/Anruf aus dem dt. Festnetz)
E-mail
support.de@neffos.com
sales.de@neffos.com
Address
TP-LINK Deutschland GmbH, Robert-Bosch-Straße 9, 65719
Hofheim am Taunus
France
Website
www.neffos.fr
Tel +33 (0)5 63 21 27 41
E-mail
support.fr@neffos.com (Support technique)
info.fr@neffos.com (Questions d’ordres générales)
sales.fr@neffos.com (Commercial)
rma.fr@neffos.com (Service après-vente)
Address
16-18 avenue Morane Saulnier, 78140 Vélizy-Villacoublay,
France.
Greece
Website www.neffos.gr
Tel 210-5197500
E-mail support.gr@neffos.com
Service
time
09.00 - 17.00
Address Λ. Κηφισού38 – 38A, 104-42
74
Countries/Regions
Support
Europe
Portugal
Website
www.neffos.com.pt
Tel +351 707 101 414
E-mail suporte.pt@neffos.com
Service
time
De Segunda a Sexta (excepto feriados), das 09h00 às 13h00 e
das 14h00 às 18h00.
Address Rua Gonçalo Sampaio, Nº271, 1º 4150-367 Porto
Italy
Website www.neffos.it
Tel
+39 0221116579 (Supporto tecnico post vendita)
+39 02 92392211 (Informazioni per il tuo business)
E-mail
support.it@neffos.com (Supporto tecnico post vendita)
sales.it@neffos.com (Informazioni per il tuo business)
Address Via Gobetti 2/A, 20063 Cernusco sul Naviglio (MI)
Russia
Website www.neffos.ru
Tel
8 (495) 228 55 66
8 (495) 228-55-60 (для Москвы и Московской области)
8 (800) 250-55-60 (бесплатно из любого региона РФ)
E-mail
Info.ru@neffos.com
support.ru@neffos.com
service.ru@neffos.com
Address г. Москва, ул. Электрозаводская, 27 стр. 7 офис 501
Spain
Website www.neffos.es
Tel 902 060 365
E-mail
info.es@neffos.com
soporte.es@neffos.com
Address Calle Quintanavides 17, 3ª planta Puerta E, 28050 Madrid
Bulgaria
Website www.neffos.bg
Tel
+40 311 070 963
+40 311 011 290
E-mail
support.ro@neffos.com
info.ro@neffos.com
service.ro@neffos.com
sales.ro@neffos.com
75
Countries/Regions
Support
Europe
Czech
Website cz.neffos.com
Tel
CZ +420 212 812 625
SK +421 233 056 981
E-mail sales.cz@neffos.com
Address Kutvirtova 339/5, Praha 5, 150 00
Romania
Website www.neffos.ro
Tel
+40 311 070 963
+40 311 011 290
E-mail
support.ro@neffos.com
info.ro@neffos.com
service.ro@neffos.com
sales.ro@neffos.com
Poland
Website www.neffos.pl
Tel
+48 (0) 801 002 228
+48 22 360 63 90 (dla połączeń z telefonów komórkowych)
Opłata: Zgodnie z taryfą operatora
Service
time
Od poniedziałku do piątku w godzinach 9:00-17:00
E-mail
neffos.pl@tp-link.com
support.pl@neffos.com (Wsparcie techniczne)
Address ul. Ożarowska 40/42, Duchnice 05-850, Poland
Turkey
Website www.neffos.com/tr
Tel 0212 359 0 359 / 0212 287 27 27
E-mail
support.tr@neffos.com
sales.tr@neffos.com
Address
Genpa Telekomünikasyon ve İletişim Hizmetleri San. Tic. A.Ş.
Etiler Mah. Nispetiye Cad.
No:101 34337 Etiler Beşiktaş / İstanbul
Ukraine
Website
www.neffos.com/ru-ua
Tel
0 (800) 505-508 З вонки бесплатные (стоимость звонков на
горячую линию согласно тарифам вашего оператора) и (044) 590-
51-14 (звонки платные),ПН-ЧТ, с 10:00 до 22:00, ПТ с 10:00 до 21 : 00,
СБ, ВС - нерабочие дни.
+38 (044) 590-51-77(Сервисный центр)
E-mail
service.ua@tp-link.com
sales.ua@tp-link.com
Address
Украина, 04053, Киев, ул. Металлистов, 20, Офисний центр VEDA,
2-й этаж
76
Countries/Regions
Support
Asia-pacific
India
Website www.neffos.in
E-mail marketing.in@neffos.com
Address
401, peninsula heights, C.D. Barfiwala Road, Juhu lane. Andheri
(west) Mumbai 400058 - India.
Indonesia
Website www.neffos.co.id
Tel +86 755 26504400
E-mail
info@neffos.com
support@neffos.com
Address
South Building, No.5 Keyuan Road, Central Zone, Science &
Technology Park, Nanshan, Shenzhen, P. R. China
Postcode: 518057
Malaysia
Website www.neffos.my
Tel 1800 22 8887
E-mail support.my@neffos.com
Address
Lot 3.01 - Lot 3.02, 3rd Floor, Podium Block, Plaza Berjaya, 12,
Jalan Imbi 55100 Kuala Lumpur
Thailand
Website www.neffos.com/th
Tel 02-4400029
Service
time
08:30 - 17:30 
E-mail support.th@neffos.com
Address
77/159
3610600
Vietnam
Website www.neffos.vn
Tel +84 8 66894777 (Gi ờ hành chính)
E-mail
press.vn@neffos.com
support.vn@neffos.com
sales.vn@neffos.com/ sales.vn@tp-link.com
Address
12A-15 Tòa nhà Vincom, 45A T Trọng, Quận 1, TP. Hồ Chí
Minh, Việt Nam
77
Countries/Regions
Support
Asia-pacific
Bangladesh
Website www.neffos.com/bd
Tel +86 755 26504400
E-mail
info@neffos.com
support@neffos.com
Address
South Building, No.5 Keyuan Road, Central Zone, Science &
Technology Park, Nanshan, Shenzhen, P. R. China
Postcode: 518057
Singapore
Website www.neffos.sg
Tel
+65 6727 4987 (Service Centre, 9:00 am – 7:30 pm Mon-Fri)
+65 6727 4973 (Service Centre, 9:00 am – 5:30 pm Mon-Fri)
+65 6727 4980 (24/7 Global Support Hotline)
E-mail sales.sg@tp-link.com
Address
12 Kallang Avenue #03-30 Aperia Singapore 339511,
9:00 am to 7:30 pm (Mon - Fri)
78
Appendix C: Explanation of the symbols
on the product label
The meaning of symbols on the product label is explained below.
Symbol Explanation
RECYCLING
This product bears the selective sorting symbol for Waste electrical and electronic
equipment (WEEE). This means that this product must be handled pursuant to
European directive 2012/19/EU in order to be recycled or dismantled to minimize its
impact on the environment. User has the choice to give his product to a competent
recycling organization or to the retailer when he buys a new electrical or electronic
equipment.
To prevent possible hearing damage, do not listen at hign volume levels for long
periods.
79
Appendix D: Authentication
COPYRIGHT & TRADEMARKS
Specifications are subject to change without notice. is a registered trademark of TP-Link Technologies
Co., Ltd. Other brands and product names are trademarks or registered trademarks of their respective holders.
No part of the specifications may be reproduced in any form or by any means or used to make any derivative
such as translation, transformation, or adaptation without permission from TP-Link Technologies Co., Ltd.
Copyright © 2019 TP-Link Technologies Co., Ltd. All rights reserved.
Google, Android, Google Play and other marks are trademarks of Google LLC; Oreo is a trademark of Mondelez
International, Inc. group.
The Bluetooth® word mark and logos are registered trademarks owned by Bluetooth SIG, Inc. And any use of
such marks by TP-Link Technologies Co., Ltd. is under license.
http://www.neffos.com
80
FCC STATEMENT
This equipment has been tested and found to comply with the limits for a Class B digital device, pursuant
to part 15 of the FCC Rules. These limits are designed to provide reasonable protection against harmful
interference in a residential installation. This equipment generates, uses and can radiate radio frequency energy
and, if not installed and used in accordance with the instructions, may cause harmful interference to radio
communications. However, there is no guarantee that interference will not occur in a particular installation. If
this equipment does cause harmful interference to radio or television reception, which can be determined by
turning the equipment off and on, the user is encouraged to try to correct the interference by one or more of
the following measures:
Reorient or relocate the receiving antenna.
Increase the separation between the equipment and receiver.
Connect the equipment into an outlet on a circuit different from that to which the receiver is connected.
Consult the dealer or an experienced radio/ TV technician for help.
This device complies with part 15 of the FCC Rules. Operation is subject to the following two conditions:
1. This device may not cause harmful interference.
2. This device must accept any interference received, including interference that may cause undesired
operation.
Any changes or modifications not expressly approved by the party responsible for compliance could void the
user’s authority to operate the equipment.
Note: The manufacturer is not responsible for any radio or TV interference caused by unauthorized modifications
to this equipment. Such modifications could void the user’s authority to operate the equipment.
FCC RF Radiation Exposure Statement
The exposure recommendations for mobile phones use a measurement unit known as the Specific Absorption
Rate (SAR). The SAR limit recommended by the ICNIRP for the mobile phones used by the general public is
1.6W/kg averaged over one gram of tissue by IEEE Std 1528 for the head.The highest SAR value for this model
phone when tested was 0.387 W/kg for head, 0.852 W/kg for Body-worn and 0.852 W/kg for hotspot.
For limiting the radio waves exposure, it is recommended to reduce the mobile phone call duration or to use
a headset. The purpose of those precautions is to take the mobile phone away from the head and the body.
For body worn operation, this phone has been tested and meets FCC RF exposure guidelines when used with
an accessory that contains no metal and that positions the handset a minimum of 10mm from the body.
For hotspot operation, the distance is 10mm. Use of other accessories may not ensure compliance with FCC
RFexposure guidelines.
Продукт сертифіковано згідно с правилами системи УкрСЕПРО на відповідність вимогам нормативних
документів та вимогам, що передбачені чинними законодавчими актами України.
Personal information and data security
The use of some functions or third-party applications on your device could result in your personal information
and data being lost or becoming accessible to others. Several measures are recommended to help you protect
personal and confidential information.
Place your device in a safe area to prevent it from unauthorized use.
Set your device screen to lock and create a password or unlock pattern to open it.
81
Periodically back up personal information kept on your USIM card, memory card, or stored in your device
memory. If you change to a different device, be sure to move or delete any personal information on your
old device.
If you are worried about viruses when you receive messages or emails from a stranger, you can delete them
without opening them.
If you use your device to browse the Internet, avoid websites that might pose a security risk to avoid theft
of your personal information.
If you use services such as Wi-Fi tether or Bluetooth, set passwords for these services to prevent unauthorized
access. When these services are not in use, turn them off.
Install or upgrade device security software and regularly scan for viruses.
Be sure to obtain third-party applications from a legitimate source. Downloaded third-party applications
should be scanned for viruses.
Install security software or patches released by Neffos or third-party application providers.
Some applications require and transmit location information. As a result, a third-party may be able to share
your location information.
Your device may provide detection and diagnostic information to third-party application providers. Third
party vendors use this information to improve their products and services.
If you have concerns about the security of your personal information and data, please contact support@
neffos.com.
Legal notice
Copyright © 2018 TP-Link Technologies Co., Ltd. All rights reserved.
Trademarks and permissions
is a registered trademark of TP-Link Technologies Co., Ltd.
The Bluetooth® word mark and logos are registered trademarks owned by Bluetooth SIG, Inc. and any use of
such marks by TP-Link Technologies Co., Ltd. is under license.
Other trademarks, product, service and company names mentioned may be the property of their respective
owners.
Third-Party software statement
Neffos does not own the intellectual property of the third-party software and applications that are delivered
with this product. Therefore, Neffos will not provide any warranty of any kind for third party software and
applications. Neither will Neffos provide support to customers who use third-party software and applications,
nor be responsible or liable for the functions or performance of third-party software and applications.
Third-party software and applications services may be interrupted or terminated at any time, and Neffos
does not guarantee the availability of any content or service. Third-party service providers provide content
and services through network or transmission tools outside of the control of Neffos. To the greatest extent
permitted by applicable law, it is explicitly stated that Neffos shall not compensate or be liable for services
provided by third-party service providers, or the interruption or termination of third-party contents or services.
Neffos shall not be responsible for the legality, quality, or any other aspects of any software installed on this
product, or for any uploaded or downloaded third-party works in any form, including but not limited to texts,
images, videos, or software etc. Customers shall bear the risk for any and all effects, including incompatibility
between the software and this product, which result from installing software or uploading or downloading the
third-party works.
This product is based on the open-source Android platform. Neffos has made necessary changes to the platform.
Therefore, this product may not support all the functions that are supported by the standard Android platform
or may be incompatible with third-party software. Neffos does not provide any warranty or representation in
connect with any such compatibility and expressly excludes all liability in connection with such matters.
82
DISCLAIMER
ALL CONTENTS OF THIS MANUAL ARE PROVIDED “AS IS”. EXCEPT AS REQUIRED BY APPLICABLE LAWS, NO
WARRANTIES OF ANY KIND, EITHER EXPRESS OR IMPLIED, INCLUDING BUT NOT LIMITED TO, THE IMPLIED
WARRANTIES OF MERCHANTABILITY AND FITNESS FOR A PARTICULAR PURPOSE, ARE MADE IN RELATION TO
THE ACCURACY, RELIABILITY OR CONTENTS OF THIS MANUAL.
TO THE MAXIMUM EXTENT PERMITTED BY APPLICABLE LAW, IN NO EVENT SHALL NEFFOS BE LIABLE FOR ANY
SPECIAL, INCIDENTAL, INDIRECT, OR CONSEQUENTIAL DAMAGES, OR LOSS OF PROFITS, BUSINESS, REVENUE,
DATA, GOODWILL SAVINGS OR ANTICIPATED SAVINGS REGARDLESS OF WHETHER SUCH LOSSES ARE
FORSEEABLE OR NOT.
THE MAXIMUM LIABILITY (THIS LIMITATION SHALL NOT APPLY TO LIABILITY FOR PERSONAL INJURY TO
THE EXTENT APPLICABLE LAW PROHIBITS SUCH A LIMITATION) OF NEFFOS ARISING FROM THE USE OF THE
PRODUCT DESCRIBED IN THIS MANUAL SHALL BE LIMITED TO THE AMOUNT PAID BY CUSTOMERS FOR THE
PURCHASE OF THIS PRODUCT.
Privacy policy
To better understand how we protect your personal information, please see the privacy policy at www.neffos.
com.
Safety information
This section contains important information about the operation of your device. It also contains information
about how to use the device safely. Read this information carefully before using your device.
Electronic device
Do not use your device if using the device is prohibited. Do not use the device if doing so causes danger or
interference with other electronic devices.
Interference with medical equipment
Follow rules and regulations set forth by hospitals and health care facilities. Do not use your device where
prohibited.
Some wireless devices may affect the performance of hearing aids or pacemakers. Consult your service
provider for more information.
Avoid using your device within a 15 cm range of a pacemaker if possible, as your device can interfere with
the pacemaker. To minimize possible interference with a pacemaker, use your device only on the side of
your body that is opposite the pacemaker.
If you use medical equipment, contact the equipment manufacturer before using your device to determine
whether or not the equipment will be affected by radio frequencies emitted by the device.
Do not use your device near devices or apparatuses that emit radio frequencies, such as sound systems or
radio towers Radio frequencies may cause your device to malfunction.
Do not use your device near devices or apparatuses that emit radio frequencies, such as sound systems or
radio towers. Radio frequencies may cause your device to malfunction.
Electronic devices in your car may malfunction, due to radio interference from your device. Contact the
manufacturer for more information.
Protecting your hearing when using a headset
To prevent possible hearing damage, do not listen at high volume levels for long periods.
Using a headset at high volumes may damage your hearing. To reduce this risk, lower the headset volume
to a safe and comfortable level.
Exposure to high volumes while driving may cause distraction and increase your risk of an accident.
Do not use a headset while driving or riding. Doing so may distract your attention and cause an accident,
or may be illegal depending on your region.
83
Areas with flammables and explosives
Turn off your device in potentially explosive environments instead of removing the battery. Always comply
with regulations, instructions and signs in potentially explosive environments.
Do not use your device at refueling points (petrol stations), near fuels or chemicals, or in blasting areas.
Do not store or carry flammable liquids, gases, or explosive materials in the same compartment as the
device, its parts, or accessories.
Traffic security
Observe local laws and regulations while using the device. To reduce the risk of accidents, do not use your
wireless device while driving.
Concentrate on driving. Your first responsibility is to drive safely.
Do not hold the device while driving. Use hands-free accessories.
When you must make or answer a call, pull of the road safely and park the vehicle first.
RF signals may affect the electronic systems of motor vehicles. For more information, consult the vehicle
manufacturer.
Do not place the device over the air bag or in the air bag deployment area in a motor vehicle. Doing so may
hurt you because of the strong force when the air bag inflates.
On an aircraft, using electronic devices can interfere with the aircraft’s electronic navigational instruments.
Make sure the device is turned off during takeoff and landing. After takeoff, you can use the device in flight
mode if allowed by aircraft personnel.
Operating environment
Do not expose the device to heavy smoke or fumes. Doing so may damage the outside of the device or
cause it to malfunction.
Do not use or store your device in areas with high concentrations of dust or airborne materials. Dust or
foreign materials can cause your device to malfunction and may result in fire or electric shock.
Do not use your device during thunderstorms to protect your device against any danger caused by lightning.
Avoid exposing your device and battery to very cold or very hot temperatures. Extreme temperatures can
damage the device and reduce the charging capacity and life of your device and battery.
Prevent the battery from coming into contact with metal objects, as this can create a connection between
the + and – terminals of your battery and lead to temporary or permanent battery damage.
Do not expose your device to direct sunlight (such as on a car dashboard) for prolonged periods.
To protect your device or accessories from fire or electrical shock hazards, avoid rain and moisture.
Keep the device away from sources of heat and fire, such as a heater, microwave oven, stove, water heater,
radiator, or candle.
Do not place sharp metal objects, such as pins, near the earpiece or speaker. The earpiece may attract these
objects and result in injury.
Prevent the multipurpose jack and the small end of the charger from contact with conductive materials,
such as liquids, dust, metal powders, and pencil leads. Conductive materials may cause a short circuit or
corrosion of the terminals, which may result in an explosion or fire.
Stop using your device or applications for a while if the device is overheated. If skin is exposed to an
overheated device for an extended period, low temperature burn symptoms, such as red spots and darker
pigmentation, may occur.
Do not touch the device’s antenna. Otherwise, communication quality may be reduced.
Do not allow children or pets to bite or suck the device or accessories. Doing so may result in damage or
explosion.
Observe local laws and regulations, and respect the privacy and legal rights of others.
84
Do not use your device’s camera flash directly in the eyes of people or pets. Otherwise temporary loss of
vision or damage to the eyes may occur.
While using your device, leave some lights on in the room and do not hold the screen too close to your
eyes.
Child’s safety
Comply with all precautions with regard to child’s safety. Letting children play with the device or its
accessories may be dangerous. The device includes detachable parts that may present a choking hazard.
Keep away from children.
The device and its accessories are not intended for use by children. Children should only use the device
with adult supervision.
Accessories
Using an unapproved or incompatible power adapter, charger or battery may cause fire, explosion or other
hazards.
Use manufacturer-approved batteries, chargers, accessories, and supplies
Using generic batteries or chargers may shorten the life of your device or cause the device to malfunction.
They may also cause a fire or cause the battery to explode.
TP-LINK cannot be responsible for the user’s safety when using accessories or supplies that are not approved
by TP-LINK.
Charger safety
For pluggable devices, the socket-outlet shall be installed near the devices and shall be easily accessible.
Unplug the charger from electrical outlets and the device when not in use.
Do not drop or cause an impact to the charger.
Do not use damaged power cords or plugs, or loose electrical sockets. Unsecured connections can cause
electric shock or fire.
Never use a damaged charger or battery.
Do not touch the device or the charger with wet hands. Doing so may lead to short circuits, malfunctions,
or electric shocks.
If your charger has been exposed to water, other liquids, or excessive moisture, take it to an authorized
service center for inspection.
Ensure that the charger meets the requirements of Clause 2.5 in IEC60950-1/EN60950-1 and has been
tested and approved according to national or local standards.
Connect the device only to products with the USB-IF logo or with USB-IF compliance program completion.
Do not bend or damage the power cord. Doing so may cause electric shock or fire.
Do not use your device while it is charging or touch your device with wet hands. Doing so may cause
electric shock.
Do not short-circuit the charger or the device. Doing so may cause electric shock or fire, or the battery may
malfunction or explode.
Battery safety
Do not connect battery poles with conductors, such as keys, jewelry, or other metal materials. Doing so may
short-circuit the battery and cause injuries or burns.
Keep the battery away from excessive heat and direct sunlight. Do not place it on or in heating devices, such
as microwave ovens, stoves, or radiators. Batteries may explode if overheated.
Do not attempt to modify or remanufacture the battery, insert foreign objects into it, or immerse or expose
it to water or other liquids. Doing so may lead to fire, explosion, or other hazards.
85
If the battery leaks, ensure that the electrolyte does not make direct contact with your skins or eyes. If the
electrolyte touches your skins or splashes into your eyes, immediately flush with clean water and consult a
doctor.
In case of battery deformation, color change, or overheating while charging or storing, immediately stop
using the device and remove the battery. Continued use may lead to battery leakage, fire, or explosion.
Do not put batteries in fire as they may explode. Damaged batteries may also explode.
Dispose of used batteries in accordance with local regulations. Improper battery use may lead to fire,
explosion, or other hazards.
Do not bite or suck the device or the battery. Doing so may damage the device or result in an explosion or
fire.
Do not smash or pierce the battery, or expose it to high external pressure. Doing so may lead to a short
circuit or overheating.
Do not drop the device or battery. If the device or battery is dropped, especially on a hard surface, and may
be damaged.
If the device standby time shortens significantly, replace the battery.
Do not handle a damaged or leaking Lithium Ion (Li-Ion) battery. For safe disposal of your Li-Ion battery,
contact your nearest authorized service center.
If you notice strange smells or sounds coming from your device or the battery, or if you see smoke or liquids
leaking from the device or battery, stop using the device immediately and take it to a TP-LINK Service
Centre. Failure to do so may result in fire or explosion.
CAUTION
RISK OF EXPLOSION IF BATTERY IS REPLACED BY AN INCORRECT TYPE. DISPOSE OF USED BATTERIES
ACCORDING TO THE INSTRUCTIONS.
Cleaning and maintenance
Keep the device and accessories dry. Do not attempt to dry it with an external heat source, such as a
microwave oven or hair dryer. Do not turn on your device if it is wet. If your device is already on, turn it off
and remove the battery immediately (if the device will not turn off or you cannot remove the battery, leave
it as-is). Then, dry the device with a towel and take it to a service canter.
Do not expose your device or accessories to extreme heat or cold. These environments may interfere with
proper function and may lead to fire or explosion.
Avoid collision, which may lead to device malfunctions, overheating, fire, or explosion.
Before you clean or maintain the device, stop using it, stop all applications, and disconnect all cables
connected to it.
Do not use any chemical detergent, powder, or other chemical agents (such as alcohol and benzene) to
clean the device or accessories. These substances may cause damage to parts or present a fire hazard. Use
a clean, soft, and dry cloth to clean the device and accessories.
Do not store your device near magnetic fields for extended periods of time. Your device may malfunction or
the battery may discharge from exposure to magnetic fields. Magnetic stripe cards, including credit cards,
phone cards, passbooks, and boarding passes, may be damaged by magnetic fields.
Do not use your device with the back cover removed. The battery may fall out of the device, which may
result in damage or malfunction.
Do not dismantle or remanufacture the device and its accessories. This voids the warranty and releases
the manufacturer from liability for damage. In case of damage, contact an authorized service center for
assistance or repair.
If the device screen is broken in a collision, immediately stop using the device. Do not touch or attempt to
remove the broken parts. Promptly contact an authorized service center.
86
Do not store your device with metal objects, such as coins, keys, and necklaces. Your device may be
scratched or may malfunction. If the battery terminals come into contact with metal objects, this may cause
a fire.
Emergency calls
The availability of emergency calls is subject to your cellular network quality, service provider policy, and local
laws and regulations. Never rely solely on your device for critical communications like medical emergencies.
Environmental protection
The device and its accessories (if included), such as the power adapter, headset, and battery should not be
disposed of with household garbage.
Disposal of the device and its accessories is subject to local regulations. Support proper collection and
recycling.
Disposal and recycling information
This marking on the product, accessories or literature indicates that the product and its electronic
accessories (e.g. charger, batteries, headset, USB cable) should not be disposed of with other household waste.
To prevent possible harm to the environment or human health from uncontrolled waste disposal, please
separate these items from other types of waste and recycle them responsibly to promote the sustainable reuse
of material resources.
Household users should contact either the retailer where they purchased this product, or their local government
office, for details of where and how they can take these items for environmentally safe recycling.
Business users should contact their supplier and check the terms and conditions of the purchase contract. This
product and its electronic accessories should not be mixed with other commercial wastes for disposal.
This product is RoHS compliant.
EU regulatory conformance.
Body worn operation
The device complies with RF specifications when used near your ear or at a distance of 5mm from your body.
Ensure that the device accessories, such as a device case and device holster, are not composed of metal
components. Keep the device away from your body to meet the distance requirement.
Certification information (SAR)
This device meets guidelines for exposure to radio waves. Your device is a low-power radio transmitter and
receiver. As recommended by international guidelines, the device is designed not to exceed the limits for
exposure to radio waves. These guidelines were developed by the International Commission on Non-Ionizing
Radiation Protection (ICNIRP), an independent scientific organization, and include safety measures designed to
ensure the safety of all users, regardless of age and health.
The Specific Absorption Rate (SAR) is the unit of measurement for the amount of radio frequency energy
absorbed by the body when using a device. The SAR value is determined at the highest certified power level
in laboratory conditions, but the actual SAR level during operation can be well below the value. This is because
the device is designed to use the minimum power required to reach the network.
The SAR limit adopted by Europe is 2.0 W/kg averaged over 10 grams of tissue, and the highest SAR value for
this device complies with this limit.
The highest SAR value reported for this device type when tested at the ear is 0.224 W/kg, and when properly
worn on the body is 0.925 W/kg.
Operating Frequency(transmit power):
Operating Frequency:
GSM900 : Tx 880~915, Rx 925~960, Power Class: Class 4
87
GSM1800 : Tx 1710~1785, Rx 1805~1880, Power Class: Class 1
WCDMA Band I: Tx 1920~1980, Rx 2110~2170, Power Class: Class 3
WCDMA Band VIII : Tx 880~915, Rx 925~960, Power Class: Class 3
LTE Band 1: Tx 1920~1980, Rx 2110~2170, Power Class: Class 3
LTE Band 3: Tx 1710~1785, Rx 1805~1880, Power Class: Class 3
LTE Band 7: Tx 2500~2570, Rx 2620~2690, Power Class: Class 3
LTE Band 8: Tx 880~915, Rx 925~960, Power Class: Class 3
LTE Band20: Tx 832~862, Rx 791~821, Power Class: Class 3
WLAN 802.11 b/g/n: 2412~2472, Power: 16 dBm,e.i.r.p.
Bluetooth: 2402~2480, Power: 7 dBm, e.i.r.p.
Declaration of conformity:
TP-Link hereby declares that the device is incompliance with the essential requirements and other relevant
provisions of directives 2014/53/EU and 2011/65/EU.
The original EU declaration of conformity may be found at http://www.neffos.com/en/ce.
The following marking is included in the product:
This device may be operated in all member states of the EU. Observe national and local regulations where the
device is used.
This device may be restricted for use, depending on the local network.
76

Hulp nodig? Stel uw vraag in het forum

Spelregels

Misbruik melden

Gebruikershandleiding.com neemt misbruik van zijn services uitermate serieus. U kunt hieronder aangeven waarom deze vraag ongepast is. Wij controleren de vraag en zonodig wordt deze verwijderd.

Product:

Bijvoorbeeld antisemitische inhoud, racistische inhoud, of materiaal dat gewelddadige fysieke handelingen tot gevolg kan hebben.

Bijvoorbeeld een creditcardnummer, een persoonlijk identificatienummer, of een geheim adres. E-mailadressen en volledige namen worden niet als privégegevens beschouwd.

Spelregels forum

Om tot zinvolle vragen te komen hanteren wij de volgende spelregels:

Belangrijk! Als er een antwoord wordt gegeven op uw vraag, dan is het voor de gever van het antwoord nuttig om te weten als u er wel (of niet) mee geholpen bent! Wij vragen u dus ook te reageren op een antwoord.

Belangrijk! Antwoorden worden ook per e-mail naar abonnees gestuurd. Laat uw emailadres achter op deze site, zodat u op de hoogte blijft. U krijgt dan ook andere vragen en antwoorden te zien.

Abonneren

Abonneer u voor het ontvangen van emails voor uw Neffos C7-Lite bij:


U ontvangt een email met instructies om u voor één of beide opties in te schrijven.


Ontvang uw handleiding per email

Vul uw emailadres in en ontvang de handleiding van Neffos C7-Lite in de taal/talen: Engels als bijlage per email.

De handleiding is 14,73 mb groot.


U ontvangt de handleiding per email binnen enkele minuten. Als u geen email heeft ontvangen, dan heeft u waarschijnlijk een verkeerd emailadres ingevuld of is uw mailbox te vol. Daarnaast kan het zijn dat uw internetprovider een maximum heeft aan de grootte per email. Omdat hier een handleiding wordt meegestuurd, kan het voorkomen dat de email groter is dan toegestaan bij uw provider.

Stel vragen via chat aan uw handleiding

Stel uw vraag over deze PDF

Uw handleiding is per email verstuurd. Controleer uw email

Als u niet binnen een kwartier uw email met handleiding ontvangen heeft, kan het zijn dat u een verkeerd emailadres heeft ingevuld of dat uw emailprovider een maximum grootte per email heeft ingesteld die kleiner is dan de grootte van de handleiding.

Er is een email naar u verstuurd om uw inschrijving definitief te maken.

Controleer uw email en volg de aanwijzingen op om uw inschrijving definitief te maken

U heeft geen emailadres opgegeven

Als u de handleiding per email wilt ontvangen, vul dan een geldig emailadres in.

Uw vraag is op deze pagina toegevoegd

Wilt u een email ontvangen bij een antwoord en/of nieuwe vragen? Vul dan hier uw emailadres in.


Info