•i-mode and i-mode logos are trademarks or registered
trademarks of NTT DoCoMo.
For the purpose of improvement, the specifications for
this product and its accessories are subject to complete
or partial change without prior notice.
iii
Before You Start
User’s manual conventions
The instructions in this user’s manual make use of the shortcuts selection except special cases.
The following markers are used throughout the user’s manual to attract your attention:
/This type of paragraph will contain details of where to find information related to the topic in question.
2This type of paragraph will contain information worth noting.
,This type of paragraph will contain important information.
☛This type of description will contain procedures to operate your phone.
Menu shortcuts selection
The alternative shortcuts method of selection lets you jump straight to a menu or function without highlighting an icon and scrolling through the
intermediate menu options. The selection are made by pressing numbers on the keypad which relate to the displayed menu options.
2The instructions in this user’s manual make use of the shortcuts selection, except in special cases.
Reading the titles
Some titles in this manual contain information on how to access the functions. In these titles, M stands for , the numbers indicate the menu shortcut
numbers (see “Overview of menu function” on page ix for details) and ... (three periods) indicate that there are more operations described in the
paragraph.
Reading the procedures
“Highlight” means to use the four way navigation keys (▲▼) to move the area emphasized with different colouring.
“Select” means to highlight an item and then press
.
Procedures are written omitting the verb “press”, except in some special cases.
For example, 12 means to:
☛ Start from the standby screen ➔ Press to display the Main menu screen
☛ Press 1 to display the Settings screen ➔ Press 2 to display the Phone modes screen
Simple procedures are connected by arrows (➔).
Check box/Radio button
A check box enables/disables an option out of a set of options, and multiple check boxes can be selected at the same time. On the other hand, selecting
a radio button automatically cancels the previous selection, so only one radio button can be selected at one time.
A check box/radio button option can be selected/cancelled by highlighting it and pressing .
▼
▼
iv
Display information
,The Liquid Crystal Displays (LCD) on your phone are manufactured using high-precision technology. Even so, the LCD may contain pixels
(dots) that fail to light or that remain permanently lit. Note that this is normal and does not indicate a problem with your display.
Status bar area
This area contains icons which
indicate the battery strength, new
SMS/MMS message(s), signal
strength, etc. (see page vii).
On screens other than the
standby screen, the clock display
is placed in this area.
Softkey area
This area contains context sensitive descriptions of the
Softkeys’ functions appropriate for the current screen.
Shortcut number
Press the appropriate number to
jump straight to a next menu. The
row colour is changed when
selected (e.g. to activate/deactivate
a facility).
Help icons
Displayed when you can use the key
represented by these icons (see page vii).
Next menu icon
Displayed when you can press or the
shortcut number to show the next menu.
▼
Page scroll bar
Displayed when
you can press ▼
to scroll to the next
page.
Shortcut menu
number
The current menu
number is displayed.
M
enu t
i
t
l
e
Desktop icon area
This area contains the
automatically displayed
and the manually created
desktop icons. They
provide shortcuts to
certain items/functions.
Help area
This area contains help
information appropriate
for the current screen
(e.g. key presses
remaining when
composing a message).
v
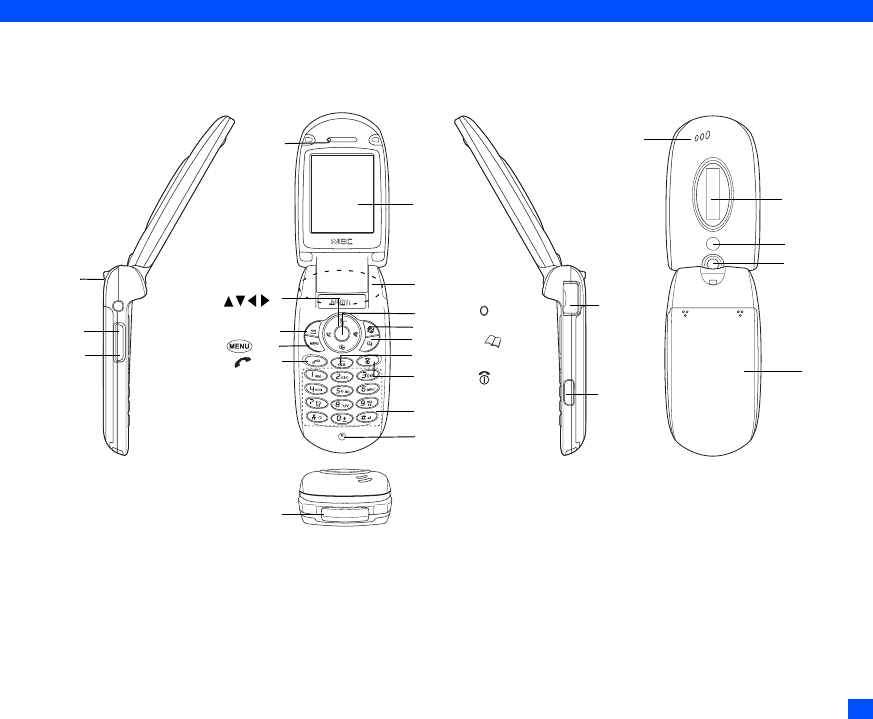
Parts and functions
Main-LCD
Send ( ) key
Softkey2(SK2)
Phonebook ( )key
End/on-off ( ) key
Alphanumeric keys
Mouthpiece
IR port
2nd-LCD
LED & light
Camera
Rear cover
Speaker
Clear (CLR)/Back key
Softkey1(SK1)
Menu ( ) key
Earphone
4 way navigation key
Select key
( )
Charger connector cover
Internal antenna
Side down key
Side up key
Through-hole
for straps
Earpiece
jack cover
for battery
(
)
vi
Keypad shortcuts
The following operations are available from the standby screen.
KeyOperation that involves pressing a keySee pageOperation that involves pressing and holding a keySee page
Accessing the Main menu screenixSetting/Cancelling the Side key lock21
SK1Accessing the Mail screen42Accessing the Inbox screen42
SK2Accessing the i-mode menu screen38Accessing the Java™ applications screen66
Accessing the Phonebook list screen47 Accessing the Message screen27
▲Accessing the Phone modes screen22
Setting the phone to Meeting mode/Returning to the previous
mode
22
▼Accessing the My data screen61Accessing the voice recall7
Accessing the received calls list10Accessing the received calls list10
Accessing the missed calls list10Accessing the missed calls list10
Accessing the dialled calls list10Accessing the dialled calls list10
Highlighting a desktop icon19Accessing the homepage (when Set homepage is set)41
Ending a call or returning to the standby screen–Powering off4
CLRDeleting character or returning to the previous screen–
Deletes all the automatically displayed desktop icons19
Deleting all characters when you enter text–
1Entering phone numbers5Calling the Voice mail centre55
2 to 9Entering phone numbers5
One-touch dial to the corresponding number in the phonebook
(SIM)
7
0Entering phone numbers5Entering + when you make an international call13
#Entering #6Entering a pause–
Entering
6Switching the ALS line 1/2 (if the SIM card supports ALS)21
Side up
Accessing the volume control screen when your phone is open
(Use ▲▼, Side keys or 0 to 9 keys to adjust the volume.)
21
Accessing the camera view finder screen56
Activating the ring silencer function when you receive a call21
Side down
Accessing the volume control screen when your phone is open
(Use ▲▼, Side keys or 0 to 9 keys to adjust the volume.)
21
Turning on the light
(To turn it off, press any key or open/close your phone.)
–
Activating the ring silencer function when you receive a call21
▼
▼
vii
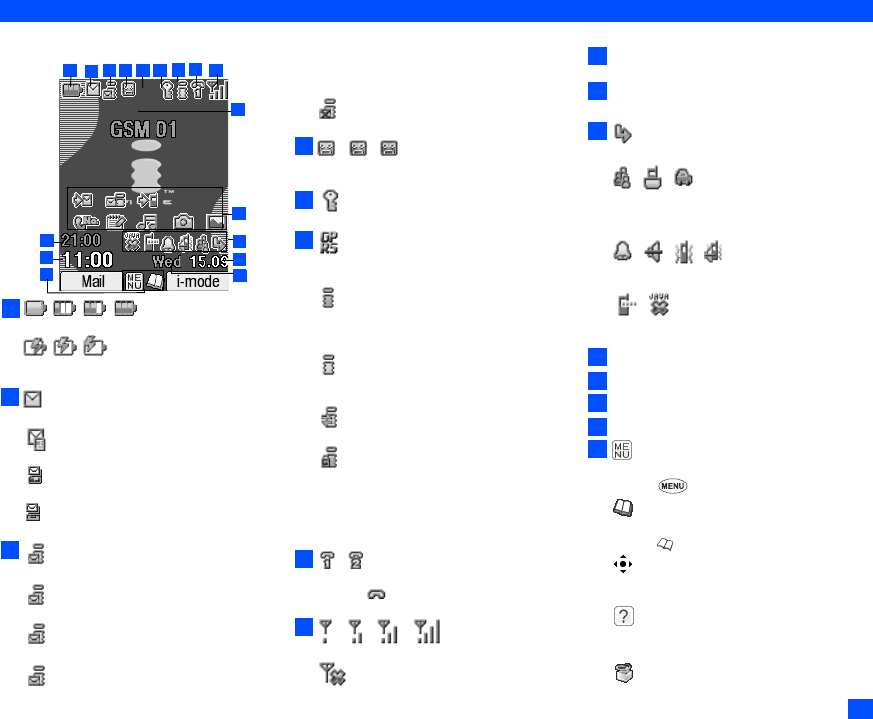
LCD and displayed icons
Main-LCD
Indicates the battery level.
(red, green, blue)
Indicates the battery charging status (fast, slow,
pause).
Indicates that there is a new SMS in your phone.
Indicates that there is a new SMS on the network.
Indicates that the SIM memory is full.
Indicates that the Inbox in your phone is full.
(green)
Indicates that there is a mail on the server.
(blue)
Indicates that there is an MMS on the server.
(pink)
Indicates that there are mail and MMS on the server.
(orange)
Indicates that there is a new mail/MMS in your
phone.
2This orange icon blinks while a mail/MMS
is being downloaded
Indicates that the memory for mail/MMS is full.
(red, green/red, green)
Indicates that new voice mail messages are on the
network (No ALS/ALS Line 1/2).
Indicates secured communication on SSL.
Indicates that GPRS is active for purposes other
than i-mode connections.
(gray)
Indicates that the phone is in the GSM (Global
System for Mobile communication) network service
area and GPRS is active.
(yellow)
Indicates that the GPRS is available and i-mode is
active.
Indicates that the i-mode connection is carried out.
Indicates that the i-mode lock is on.
2No icon appears when the phone is outside
the GSM network service area, or when
the phone is in the GSM network service
area and GPRS is not attached.
Indicates the line status (ALS line 1/2 no ALS).The
icon with displayed in red indicates that the
ALS line 1 or 2 is unencrypted/no ALS.
Indicates the signal strength level.
Appears when you are outside the service area.
Network name (indicated in orange when using
roaming service)
Desktop icons
See “Desktop icons” on page 19 for details.
Indicates
the call diversion is set.
Indicates the Meeting mode, Pocket mode, Car
mode.
2No icon appears for the Normal mode.
Indicates
alarm-on, sound-off, vibrator-on, sound-
off/vibrator-on.
Indicates the IR modem is set to on, the auto start of
a Java™ application has failed.
Date
Day of week
Remote time
Local time
Indicates that you can use the options menu by
pressing
Indicates that you can use the phonebook list by
pressing .
Indicates the usable keys in black, while a Java™
application is in operation.
Indicates that the help display is available when
using SIM toolkit
1
3
6
4
7
8
9
11
12
13
14
15
16
17
10
2
5
1
2
3
4
6
7
8
9
10
11
12
13
14
15
16
17
viii
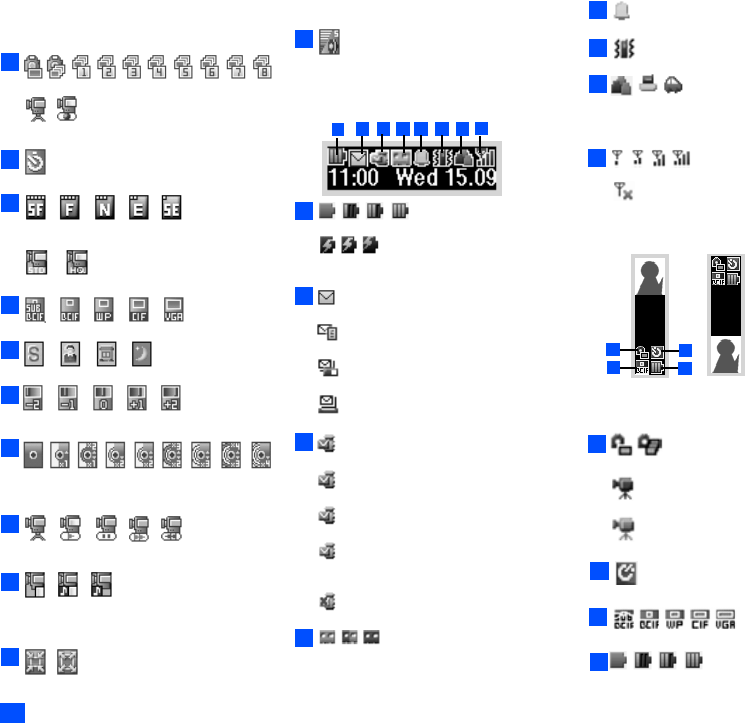
Indicates that a Java™ application is in operation.
<When the camera/video view finder is in
operation>
Indicates single/burst mode (camera).
Indicates the video mode is on or the video is
recording.
Indicates that the self timer is on.
Indicates the quality of the picture (super fine, fine,
normal, economy or super economy).
Indicates the quality of the video.
Indicates the photo/video screen size.
Indicates the shooting environment.
Indicates the brightness setting. The “+2” setting is
the brightest.
Indicates the zoom level.
<When the video preview is in operation>
Indicates the video mode is on, the video is playing,
on pause, fast forwarding, or rewinding.
Indicates the track information of the video (the video
file only, the video and audio file, or the audio file
only).
Indicates the video is played in normal/enlarged
screen size.
Displays the current volume level. The 0 is mute and
9 is the maximum.
2nd-LCD
Indicates the battery level.
(red, green, blue)
Indicates the battery charging status (fast, slow,
pause).
Indicates that there is a new SMS in your phone.
Indicates
that there is a new SMS on the network.
Indicates that the SIM memory is full.
Indicates that the Inbox in your phone is full.
(green)
Indicates that there is a mail on the server.
(blue)
Indicates that there is an MMS on the server.
(pink)
Indicates that there are mail and MMS on the server.
(orange)
Indicates that there is a new mail/MMS in your
phone.
Indicates that the memory for a mail/MMS is full.
(red, green/red, green)
Indicates that a new voice mail message is on the
network (No ALS/ALS Line 1/2).
Indicates that the alarm is set.
Indicates that the vibrator is set.
Indicates that the phone is in the Meeting mode,
Pocket mode, Car mode.
2No icon appears for the Normal mode.
Indicates the signal strength level.
Appears when you are outside the service area.
<When 2nd-LCD is used as the camera view finder
screen>
2The left image is when the phone is folded,
and the right image is when the phone is
open.
Indicates single or burst mode of the camera.
(blue)
Indicates that the video mode.
(red)
Indicates the video is recording.
Indicates that the self timer is on.
Indicates the photo/video screen size.
Indicates the battery level.
2
3
4
5
6
7
8
2
4
7
8
1
2
3
6
4
5
7
8
1
2
3
4
5
6
7
8
9
10
11
12
9
10
11
12
ix
Overview of menu function
KeyMain menuSecond level menu
3i-modei-mode
Settings
4PhonebookLists
Information #
Call options
5CameraCamera
Video recorder
6My dataVideos
Sounds
Pictures
Music
KeyMain menuSecond level menu
1 SettingsPhone
Phone modes
Main-LCD
2nd-LCD
Power saving
Calls
Security
Network
Reset settings
2MessageInbox
Drafts
Outbox
Sent
Folder1
Folder2
CB
KeyMain menuSecond level menu
7JavaPrograms
Prog backlight
8AccessoryMusic player
Calculator
Clock alarm
Scheduler
ToDo list
Notepad
Voice memo
Currency
Infrared
9SIM toolkit
➡
➡
➡
➡
Standby screen
Main menu screen
CLR
or
The Main menu has a set of icons for its top levels of options (examples of the top level are shown right)
which can be selected either using a combination of the 4-way navigation key (▲ ▼
) and (menu
selection), or just the keypad (shortcuts selection).
2The title of the selected option will be displayed in the Help area.
2SIM toolkit icon is displayed only when your SIM card supports this function.
2With the Main menu screen displayed, press 0 to display your own number.
▼
▼
Getting Started1
Basic Calls & Phone Use5
Text Entry14
IR Data Exchange17
Desktop icons19
Settings (M1)21
Message (M2)27
i-mode (M3)33
Phonebook (M4)47
Camera (M5)56
My data (M6)61
Java™ (M7)66
Accessory (M8)68
Index77
xi
Before You Startiii
User’s manual conventions............................................. iii
Display information .........................................................iv
Parts and functions..........................................................v
LCD and displayed icons............................................... vii
Overview of menu function .............................................ix
Getting Started1
Preparing the phone ........................................................1
Standby and talk times.....................................................3
Checking the battery........................................................3
Before trying to use your phone, make sure that a valid Subscriber Identity Module (SIM) card is inserted and the battery is charged.
SIM card
Before using your phone, you must sign-up with one of the digital network service providers. In addition to your subscription details you will receive a
personal SIM (Subscriber Identity Module) card which is inserted into your phone.
If the SIM card is removed, the phone becomes unusable until a valid SIM card is fitted. It is possible to transfer your SIM card to another compatible
phone and resume your network subscription. The screen on your phone will display appropriate messages if no SIM card is fitted.
,If the phone, or the SIM card, is lost or stolen then you should contact your service provider immediately in order to bar it from use.
2The phone supports a number of languages and the keyboard symbols have been chosen for world-wide operation.
2The digital technology of your phone helps to ensure that your conversations are kept secure.
2The SIM card contains personal data such as your electronic phonebook, messages (see “Message (M2)” on page 27) and also details of the network
services you have subscribed to. The phone will not work (except for emergency calls on some networks) unless a valid SIM card is fitted.
,Be sure to turn the phone off before inserting and removing a SIM card. Otherwise damage to the SIM card can occur.
Inserting a SIM card
,Be sure to turn the phone off before removing the battery pack.
☛ While pressing down the areas marked with of the rear cover as indicated by arrows ➀, slide the rear cover about 3 mm in the direction of
arrows ➁ with your finger tips. Then, lift the cover up in the direction of arrow ➂ to remove it.
☛ Lift the finger tab of the battery pack up in the direction of arrow ➃. Then lift the battery pack out in the direction of arrow ➄.
☛ With the metal part facing down, insert the straight end of the SIM card under the holder in the direction of arrow ➅. Slide the SIM card all the way
until it reaches the end.
☛ Align the marks on the battery pack with the marks on the phone. Insert it into the cavity in the phone body in the direction of arrow
➇, making sure that the tabs on the battery pack fit properly into the notches in the phone. Then, press the battery pack down in the direction of
arrow ➈ to clip it into the phone.
☛ Make sure that the battery pack is securely attached to the phone and align the rear cover with the grooves on the phone so that there is a gap
of about 3 mm at the end of the cover. After making sure that there is no gap between the rear cover and the phone body, slide the rear cover in
the direction of arrows ➉ until you hear a click.
2
.
,If the SIM card is not fully inserted when the battery is replaced, damage to the SIM card can occur.
/If the SIM card is already fitted, see “Start-up” on page4.
Removing a SIM card
☛
With the battery removed, push the short and straight end of the SIM card with your thumb to
slide it gently in the direction of arrow ➆➔ Lift the SIM card after it is completely removed from
the holder.
Charging the battery
Before trying to use your phone, insert the phone’s battery, connect the NEC battery charger (AC
adapter) supplied with your phone to a suitable mains power socket.
☛ Pull open the charger connector cover gently.
,Be careful when handling the charger connector cover. Do not pull strongly.
☛ Connect the charger plug (AC adapter) into the charger connector at the bottom of the phone. If
your phone is turned on and charging starts, the battery charging icon will be displayed. LED will
turn on in red while charging. When charging is complete, the LED will turn off.
2You are recommended to switch off the phone while charging. If you need to receive calls, your phone can be switched on and left in standby
while being charged, although the total time taken to charge is then increased.
The colour on the display shows the charging status of battery.
(red) Fast battery charging (green) Slow battery charging while the phone is in use (blue) Battery charging is stopped due to overheat
,Using any battery pack, AC adapter, vehicle power adapter (option) not specified by NEC for use with this phone can be dangerous and
may invalidate any warranty and approval given to the cellphone. Do not leave the charger connected to the mains supply when it is not
in use.
,Do not try to charge the battery if the ambient temperature is below 5°C (41°F) or above 35°C (95°F).
Rear cover
About 3 mm
Battery
Finger tab
Holder
SIM card
Notches
Tabs
About 3 mm
Check that there is no gap
between the rear cover
and the phone body.
Charger connector
Charger plug
Charger connector
cover
3
,DO NOT connect a charger or any other external DC source until the phone’s battery is inserted.
2If the phone does not respond, please wait for a few minutes. The charging will then start.
2If you use the phone while charging, handle the phone carefully since the cable or adapter is connected.
2If you make/receive a call while charging, the charging may temporarily be interrupted.
2Charging takes approximately 3 hours with your phone turned off.
2Even if the phone remains connected to the charger, battery residual capacity may decrease when the phone is used for video recording, playing or
other battery consuming operation.
,IMPORTANT BATTERY CHARGING INFORMATION
Charging a very low battery
The battery’s charge continues to drop after the low battery warning is displayed. In extreme cases where the battery is left uncharged for some
considerable time after this warning, a trickle charge is used to slowly top-up the battery to the safe level at which the fast charging can begin. The
phone can be in trickle charge for a few minutes before the fast charging starts.
Standby and talk times
Your phone works closely with the network you are using to provide the services you need, and the standby and talk times achieved will depend on how
you use the phone and choices made by the network operator.
In particular, factors such as your location within the network, the frequency at which this location is updated, the type of SIM card you have, your
reception of area messages or cell broadcast messages and the use of full rate or enhanced full rate speech, will affect both standby and talk times.
Checking the battery
☛ Check icon at the top of the standby screen.
The block on the display shows the charge of your battery pack.
Full battery power Partial battery power Low battery power Battery empty
Low battery alarm
When the battery voltage falls below the working level, a low battery warning is displayed on the screen accompanied by LED illumination and a short
tone along with an empty battery icon. The phone will automatically power down shortly afterwards.
2Please charge the battery as much as possible when the battery is very low.
Other battery alarms
Your phone may display warnings when the battery temperature is too high, or the voltage of the battery or the charger is over the appropriate level.
Follow the instruction given by these warnings immediately.
4
Attaching and Removing the Emblem
Start-up
Switching the phone on
☛
Hold down for about a second to switch on. The screen will display the selected greeting (see page 23) and the phone is then in standby.
2You may need to charge the battery before using your phone.
2When your phone is turned on, the specified ringer may sound.
2If your phone is accidentally turned off while downloading or deleting Java™ application, it will take longer than usual to start up the phone the next
time you turn on the power.
Switching the phone off
☛
Hold down until the display shows the switch off message.
PIN code
The SIM card issued by your service provider has a security feature called PIN code protection. The Personal Identification Number (PIN) is a number
put on to the card by your service provider, and is 4 to 8 digits long. Some service providers supply SIM cards which will cause your phone to prompt for
Depressions
Depressions
Depressions
Depressions
A
ttac
hi
ng t
h
e em
bl
em
Removing the emblem
Remove the emblem by hooking your finger tips near the
square depressions and lifting in the direction of the
arrows. You can also remove the emblem from the other
side of the phone.
Attach the emblem, aligning the holes to
fit the 2nd-LCD, LED and camera.
Make sure the emblem is fitted over
the square depressions on each side
of the phone.
5
a PIN code when it is turned on. If this is the case, enter your code with the phone’s keypad. If you insert a SIM card other than your own, information
such as call logs may be lost. (See “Security (M17)” on page 24 for details.)
Basic Calls & Phone Use
Making basic calls
You make a simple call in the same way as you would with a normal phone, except that you need to press after entering the area Subscriber Trunk
Dialling (STD) code and the phone number. To make international calls, you must first enter the international dialling code (see page 13).
2Use the full STD area code even if you are calling to a person in the same town. If the numbers are too long to be displayed within one line, after
pressing , excess part is deleted and ‘...’ is added at its end.
2The main-LCD display shows the strength of the radio signal that links your phone to the network. The maximum signal strength is shown by 4 shaded
blocks and the minimum signal strength by 1 block.
Starting a call
☛
Key in the phone number. Check the number on the display ➔ or SK1 to send the input number to start the call
☛ Before the other party answers the call, you can end the call by pressing briefly, pressing SK2 or closing your phone. When you use the
headset, you can also end the call by pressing and holding the button on it.
When the call is sent, the screen displays the number called or the name stored in the phonebook and a connection graphic or a Calling Line Identification
(CLI) picture that has been allocated to the number called (see page 53).
Correcting mistakes
Use the and to move the cursor and then press CLR to clear individual digits, or hold down CLR to completely clear a phone number.
Ending a call
☛ While talking, press briefly or close your phone. The phone returns to the standby screen.
2If is held down, your phone will turn off.
2When you use the headset, you can also end a call by pressing and holding the button on it.
2You cannot end a call by closing your phone when the headset is connected.
Receiving an incoming call
When someone calls your number, the ringer will play (if set - see page 22), the LED glows in the specified colour, and the phone number of the caller
may be displayed if the calling line identification facility is available and the caller has activated the feature. If the caller’s phone number has been related
▼
▼
6
and stored in your phonebook with a name and a CLI picture (see page53), that name and picture will be displayed. If the caller has withheld their identity,
the screen will give a message that the caller’s number is being withheld.
2You also have options for holding and forwarding calls. These options depend on your network and your subscription arrangements.
Accepting an incoming call
☛
While receiving an incoming call, press or SK1.
2When you use the headset, you can also accept an incoming call by pressing the button on it.
Rejecting an incoming call
☛
While receiving an incoming call, press or SK2 briefly or close your phone.
2When you use the headset, you can also reject an incoming call by pressing and holding the button on it.
2You cannot reject a call by closing your phone when the headset is connected.
If your phone receives a call and you do not answer it, the screen will display the phone number (or the name if stored) of the caller (if available). This
information is stored in the missed calls list. Up to 20 missed calls are stored in this list.
2You can set your phone to answer a call when any key is pressed (see “Any key answer” on page 21).
2If you are making a call, the phone gives priority to receiving a call unless you have already pressed .
/See also: “Call diversion (M161)” on page 11 and “Call waiting and holding (M162)” on page 12.
/See also: “Call options (M43)” on page9.
Unsuccessful calls
If dialled call is not successfully connected, the display will give an appropriate message.
If your phone has the auto redial function activated, the number will be automatically called again after a short delay (see page 12).
Emergency calls
The standard emergency number of 112 can be used.
☛ Key in 1 1 2➔ or SK1 to connect the call to the local emergency services.
2On some networks, emergency calls can be made using the 112 number without a SIM card inserted.
Last number redial
You can redial the last number you called.
☛ Ensure that the standby screen is displayed and no phone number is shown ➔ twice to dial the last number you called.
7
/See also: “Call options (M43)” on page 9.
One-touch dial
One-touch dial for the phonebook (SIM) is available by pressing and holding the number keys between 2 and 9.
2A number for the One-touch dial corresponds to the location number in the phonebook (SIM).
2One-touch dial is available only for the phone numbers with the location number 2 to 9 stored in the phonebook (SIM).
Fast dialling
Fast dialling is activated in Abbreviated Dialling Numbers (ADN) by entering a number 1 to 255 (depending on the SIM card), and .
Fast dialling is also activated by entering the location number 1 to 500 of your phonebook (Phone) and then and .
Displaying your own phone number (M0/M416)
☛0 or 416
Voice recall
You can store up to 10 voice recall recordings which can be allocated to a personal data stored in the phonebook (Phone). To store the voice recall
sound, see page 53. To use the voice recall function, use the following procedure:
☛ Press and hold
2When you use the headset, you can also activate the voice recall function by pressing and holding the button on it from the standby screen.
☛ Within 4 seconds, say the word or words you have recorded to identify the record you wish to recall. If the word or words were recognized, the
first phone number of the personal data stored in the phonebook (Phone) will be called automatically.
Options menu (during a call)
☛ During a call, to display the options menu
No.Options menu (during a call)
1Main menuDisplays the Main menu screen. See “Overview of menu function” on page ix for details.
2Hold/RetrievePuts the call(s) on hold or retrieves the call(s).
3Mute/UnmuteMutes or unmutes all active calls.
▼
8
2Depending on the conditions, some options may be displayed in gray and not be available.
Putting a call on hold
☛ Toput the received or dialled call on hold, SK1 or2. To retrieve the call, SK1 or 2 again.
Mute
You can mute the sound from the mouthpiece during a call. When your call is muted, the other party cannot hear any sound from your phone, but you
can still hear the sound from the other party.
☛ To mute the sound during a call, press 3. To retrieve the sound, press 3 again.
2The mute function is automatically released after the call ends.
Transferring a call
When you have an active call and a held call, you can transfer the call and connect the two parties, then you can drop from the line while leaving those
two calls active.
☛ To transfer the call, press 4.
2After dropping from the call with the other two parties, if you have a call waiting, you can proceed the call with it.
,Call transfer facility is SIM dependent.
Multi-party calls
If your SIM card is multi-party enabled, you can make a conference call to more than one caller. You can even leave the call while the remaining
participants carry on with the call.
4Transfer callEnables to transfer the call and connect other parties.
2After transferring the call, your call will be dropped.
5Add to conferenceMerges calls and makes a multi-party call.
6Private callMake a private call to the highlighted party within the multi-party call.
7Record callRecords the call while talking.
8Disconnect partyDisconnects the highlighted party.
No.Options menu (during a call) (Continued)
9
Receiving the second call
☛
SK1 or to accept the second call ➔SK2 or 5 to merge both calls.
2When you accept the second call, the first call will be put on hold.
Making the second call
☛
SK1 to put the first call on hold ➔Key in the phone number ➔SK1 or to make the second call ➔After the second participant answers, SK2
or5 to merge both calls.
Putting the multi-party calls on hold
☛
SK1 or 2 to put both the first and second calls on hold ➔To retrieve the call, SK1 or 2 again.
Making a private call
While on the multi-party call, you can make a private call to a specific party.
☛ Highlight the desired party you want to make a private call to ➔ 6➔To end the private call and return to the normal multi-party call, 5.
2While you are on a private call, other parties can continue with their conversation.
Ending the multi-party calls
☛
To end all calls, or SK2. To disconnect a specific party on a multi-party call, highlight the party you wish to disconnect ➔ 8
,Multi-party call facilities are network dependent.
Recording a call
You can record the conversation during the call.
☛ During a call, press and hold ▼ or 7 to display the Voice memo screen ➔ SK1 to start the recording ➔SK1 to pause and SK2 to stop the
recording ➔To play the recording, see “Recording/playing voice memo or setting speaker” on page 75
Call options (M43)
From Call options, you can display the list of missed, received and dialled calls, the duration of the last call made and all calls, charge information and
the redial blacklist
☛4 3 to display the Call options screen.
No.Call options
1Missed calls Displays the list of missed calls. You can also access this function by pressing from the standby screen.
2Received callsDisplays the list of received calls. You can also access this function by pressing from the standby screen.
▼
▼
10
2Depending on the conditions, some options may be displayed in gray and not be available.
Display missed/received/dialled calls Options menu (M431M/M432M/M433M)
☛
or 431 for missed calls, or432 for received calls, or or433 fordialled calls.
☛ Highlight a number in the list ➔
3Dialled callsDisplays the list of dialled calls. You can also access this function by pressing from the standby screen.
4Last call durationDisplays the duration of the last call made on your phone.
☛ SK1 to reset the display to zero.
5Total calls durationDisplays the duration of the total calls made on your phone.
☛ SK1➔1 to reset the duration of the total dialled calls, 2 to reset the duration of the total received calls,
or 3 to reset the duration of all calls.
6Charge infoDisplays the charge information (Advice of Charge - AOC).
,The AoC facility is SIM card and network dependent.
2To reset the display to zero, set the maximum charges or edit the unit price, you may be prompted to
enter the PIN2 code.
1Total chargeDisplays the total charge.
☛ SK1 to reset the display to zero.
2Maximum chargeDisplays the maximum charge.
☛ Key in the maximum number of units allowed➔SK1
3Unit priceDisplays the unit price.
☛ Highlight the whole number (integer), the decimal number or the currency
field ➔Key in the required value for the whole number and decimal
number fields. For the currency field, key in the currency type using a
maximum of three characters ➔SK1
7Redial blacklistAccesses the numbers in the blacklist.
2If dialled call is not successfully connected (e.g. number busy), the auto redial facility will be offered (see
page 12). If you have set auto redial and the call still fails, the number called will be added to the blacklist.
No.Missed calls/Received calls/Dialled calls Options menu
1Call Calls the current number.
2Create messageCreates a new message to the highlighted phone number.
No.Call options (Continued)
▼
▼
11
2Depending on the conditions, some options may be displayed in gray and not be available.
Call settings (M16)
From the Calls screen, you can change various call settings: the call diversion, call waiting and holding, auto redial and line identification.
Call diversion (M161)
Setting Call diversion
☛1 61➔Highlight the type of call you wish to divert
2 There will be a delay while your phone checks its divert status with your network.
☛ Highlight one of the conditions ➔When the phone number field of a divert condition is highlighted, either enter the phone number to divert to, or
delete any existing phone number.
☛ If you have made any mistake, highlight the appropriate field ➔SK1 to clear any mistakes
☛ If the settings are correct,
,There will be a short delay while the network sends the divert status of your phone.
,There may be an additional charge for this service depending on your network.
,There may be unavailable settings depending on your network.
Call diversion edit options menu
☛ Highlight the required edit field ➔
3Add to phonebookAdds the current number to the phonebook.
☛ 1 to add it as a new personal data, 2 to add it to an existing personal data ➔Press the appropriate
number for the storage destination ➔Press the appropriate number for the phonebook data field to
copy the current number to.
4Delete oneDeletes the current number.
5Delete allDeletes all the numbers in the list.
6InfoDisplays information on the current number.
7Add desktop iconCreates a desktop icon of the selected number.
8Items/PageSelects either to display 4 or 8 phone numbers in one screen.
No.Call diversion edit options menu
1Copy Copies the number in the edit field.
No.Missed calls/Received calls/Dialled calls Options menu (Continued)
12
2Depending on the conditions, some options may be displayed in gray and not be available.
Call waiting and holding (M162)
This facility informs you that another call is being made to your phone while an existing call is in progress.
Setting up call waiting
☛1 62➔11 to activate, 12 to deactivate the call waiting, or 2 to check the status of call waiting.
Using call waiting
☛ If you are on a call and another comes in, you will be alerted by a beep in the earpiece ➔SK1 to accept the incoming call
☛ To switch the calls, SK1
☛ To merge the calls, SK2 (see “Multi-party calls” on page 8)
☛ To end the current call,
☛ To retrieve the held call SK1
Auto redial (M163)
With the auto redial facility, your phone will redial a number up to 10 times if the first attempt fails. A tone will be heard at each redial attempt. Your phone
cannot connect a call if the other party is busy or if there are network problems. Pressing SK2 during a redial attempt will abort it.
☛1 63➔1 to activate or 2 to deactivate the auto redial facility.
Line ID (M164)
,The line ID (identification) facility is network dependent.
The line ID facility enables you to choose whether or not to send your own phone number when you make a call
and also whether or not to display a caller’s phone number when you receive a call.
☛1 64 to display the Line ID screen with a ✔ over an activated line and a ✘ over a deactivated line.
☛ To set the status of each line (see the table on the right), highlight a line (the line will flash when selected).
☛ SK1 to set the line identification on or off ➔ to save the current settings.
2PastePastes the previously copied number.
3Disable all Disables the numbers from all the fields.
4Phonebook Displays the phonebook to insert a number in the edit field.
5Add to phonebookAdds the number to the phonebook as a new personal data or saves the number in an existing personal data.
No.Call diversion edit options menu
Line typeSetting
OutgoingSend own #
Show connected #
IncomingShow Incoming #
Return own #
13
International dialling codes
When you make an international call from any country, you must start by dialling a special international access code. Your phone has the facility to prefix
a + symbol to the numbers, so that you need not enter the access code for the country that you are calling from.
Entering international dialling codes
☛ Hold down 0. The 0 character displayed will change to a + character ➔Key in the country code, area code, and phone number that you wish to call.
The UK country code is always 44, no matter what country you are dialling from. For example, a typical UK number of 0131 1234567 is entered as:
Roaming
,You will be charged for calls forwarded to you while roaming.
The roaming facility enables you to use your phone in many parts of the world and pay all charges through your normal service provider. Your network
operator usually has agreements with named networks in other countries so that automatic roaming can take place with these named networks. The
phone also allows you to set network preferences of your own.
When dialling, you will need to add the international access codes if required. So, storing all numbers with the codes (such as +44 for UK) is helpful (see
page 13).
2Before leaving your home country, you should select any preferences such as bar calls or call diversion.
Setting Automatic or Manual network selection (M181)
☛
181➔1 to select the automatic mode or 2 to select the manual mode.
,Before you manually select a network, ensure it is covered under the agreement you have with your service provider.
New search (M182)
☛
182 to search the available networks➔Highlight the desired network ➔ to connect to it
Viewing/editing network list (M183)
,Before editing your network list, please consult with your service provider.
☛183 to read the network list in the SIM memory ➔Highlight the required network ➔
International access country codearea codephone number
+441311234567
No.SIM list Options menu
1Add Adds a new network to the list.
14
Selecting the frequency band (M184)
You have to select the frequency band to suit the location.
☛184➔Select the required frequency band.
2Frequency bands must be adjusted to suit the location when roaming (Europe, US, etc.), for the phone to work properly.
Text Entry
This section describes how you enter text. The same method of text entry can be used in phonebook editing.
Mode change
☛ With a text entry screen displayed, SK1 to change the text entry mode: T9
®
English text, Normal text (ABC), Numeric input
T9
®
English text input
Your phone incorporates T9
®
Text Input, enabling fast, easy and intuitive text input. For each letter to be keyed in, you only need to press the
alphanumeric key once. The screen will display the word you may require based on the internal English dictionary of your phone.
☛ With a text entry screen displayed, SK1 until the entry mode is T9
®
English input.
i) For example, to enter “Good”:
☛ Press 4 6 6 3, and then press 0 to confirm the word.
ii) To enter “Peter is good”:
☛ Press to shift to upper case (for one letter). You will see a green arrow in the Help area.
☛ Press 7 3 8 3 7 to display “Peter”, and then press 0 to confirm.
☛ Press 4 7 to display “is”, and then press 0 to confirm.
☛ Press 4 6 6 3 to display “good”, and then press 0 to confirm and the sentence is completed
2MoveMoves the highlighted network within the list.
☛ Use ▲ and ▼ to move the network ➔SK1
3RemoveDeletes the highlighted network.
KeyFunction
0Confirms a word and inserts a space.
SK1(List)Displays the list of other matching words.
No.SIM list Options menu
15
Normal text input
☛ With a text entry screen displayed, press SK1 until the entry mode is Normal text (ABC) input.
☛ Use alphanumeric keys to enter letters. For example, to enter “e”, press 3 twice; to enter “f”, press 3 three times. For other functions, see the table
below.
2If you have made a mistake, use ▲ ▼ to place the cursor to the right of the incorrect character and then press CLR.
2When entering normal (ABC) text, and the character you require is displayed, usekey to move to the next character position (if you wait for more
than 1 second, the cursor will move one character to the right automatically).
SK1(Spell?)Activates the spell mode which temporarily deactivates T9 for you to spell the word in Normal text input. The
spell mode ends when you key in 0 to enter a space, or SK1(T9).
SK2(Dismiss)Cancels the T9 matching word list.
SK2(Next) or #Displays the next candidate.
or Places the cursor.
0 to 9 (press and hold)Inserts the number.
CLRDeletes any character.
Toggles between lower case, shift (upper case for one letter) and caps lock (permanent upper case).
(press and hold)Press and hold to activate the highlight mode (see “Highlight mode Options menu” on page 32 for details).
#Activates symbol mode when no word is highlighted.
KeyFunction
Toggles between lower case, shift (upper case for one letter) and caps lock (permanent upper case).
(press and hold)Press and hold to activate the highlight mode (see “Highlight mode Options menu” on page 32 for details).
0Inserts a space.
0 to 9 (press and hold)Inserts the number.
CLRDeletes any character.
or Places the cursor.
#Activates symbol mode.
KeyFunction (Continued)
▼
▼
▼
▼
▼
▼
▼
16
Numeric input
☛ With a text entry screen displayed, press SK1 until the entry mode is Numeric input.
2You can also press and hold the number key to insert the number in T9/Normal text input mode.
☛ Use alphanumeric keys to enter numbers.
Key allocations
Whenever you need to enter text (for short messages, storing names with numbers, etc.), successive presses of an alphanumeric key will display different
characters. Pressing in T9
®
English text input or Normal text (ABC) input toggles between lower case, shift (upper case for one letter) and caps lock
(permanent upper case). When a text entry screen is displayed, pressing SK1 enables you to select Normal text input (ABC), T9
®
Text input (T9) or
Numeric input (123).
2Depending on the types of text entry screens, not all types of text entry modes are available.
Symbol mode
In the symbol mode, pressing each key will input a symbol according to its position on the Symbols screen. By pressing # in a text entry mode, the Symbol
screen will be displayed. Use ▲ and ▼ to select the row, and then press the appropriate number on the column of the required symbol.
17
IR Data Exchange
Your phone is equipped with an InfraRed (IR) data port which enables you to send and receive phonebook/picture/video/sound excluding MP3/schedule/
ToDo list/note data with cellphones or other devices equipped with IR ports.
,Do not aim or direct the IR data port towards your or other people’s eyes when using IR data exchange.
,Do not aim or direct the IR data port towards another IR device as this may cause the device to malfunction.
2Depending on the other party’s cellphone or device, the data may not be received correctly.
Positioning of the phones
,Open both sending and receiving phones vertically and place them as
their IR ports face each other with less than 20cm of interval.
2Do not place anything between IR ports.
2The angle made of two IR ports must be within 30°.
2Do not move the phones until the data exchange is complete.
2The phones may not communicate successfully if they are placed under direct
sunlight or fluorescent light, or close to other infrared devices.
2While sending or receiving data through IR, your phone is automatically placed out of
service, so phone call, message and i-mode access are disabled.
IR send
You can send phonebook/picture/video/sound excluding MP3/schedule/ToDo list/note data as a file through the IR port.
/Before starting to send data, the other party must be ready to receive data.
Phonebook entry (M413...)
2
You can only send Name, Home, Mobile, Work, Fax, 2 Email addresses and 2 pieces of descriptive information.
2Your phone sends data according to the vCard 2.1 specification.
☛ To display the phonebook (Phone), (for required number of times) or 4 13 ➔ Highlight a phonebook entry.
☛ 0 or 3➔ The phonebook entry will be sent through the IR port.
Video/sound/picture file (M6...)
☛
6➔1 (Videos), 2 (Sounds) or 3 (Pictures) ➔Highlight a folder ➔➔Highlight a file ➔2➔3 (for Pictures/Videos) or 4 (for
Sounds)➔ The file will be sent through the IR port.
20cm or less
15
°
or less
18
Schedule entry (M84...)
☛
84➔Highlight a date ➔➔Highlight a schedule entry ➔9➔ The schedule entry will be sent through the IR port.
ToDo entry (M85...)
☛
85➔Highlight Public, Private or All ➔➔Highlight a ToDo entry ➔7➔ The ToDo entry will be sent through the IR port.
Note (M862...)
☛
862➔Highlight a note ➔2 and 2➔ The note entry will be sent through the IR port.
IR receive (M891)
You can standby your phone to receive data (phonebook/picture/video/sound (excluding MP3)/schedule/ToDo list/note data) from other devices or a
phone of the same model.
Receiving data through IR (M891)
☛
89 1➔Start sending data from the other end.
2Once the transmission completes, your phone automatically judges the type of received data and stores the data accordingly.
2If your phone does not have enough space to store the received data, a message will be displayed indicating lack of space. In such a case, delete
unnecessary data and try the data exchange again.
2Received picture/video/sound files are stored in the Download folder of My data (see “My data (M6)” on page 61).
IR modem (M892)
You can use your phone as a modem for a PC via the IR port to establish a dial-up connection to an Internet service provider.
Activating the IR port for modem use
☛89 2 ➔The phone will be in standby status for IR transmission from the external device.
2If the IR transmission is not established within a short while, the standby status will end.
2While on active call or connecting to the external device such as USB, IR modem is not available.
,Your phone consumes a lot of battery power when used as a modem. After using your phone as a modem, be sure to deactivate the
modem function from your PC or press (for the CSD connection only). When the modem function is deactivated, the idle screen will
be displayed without the Infrared icon and GPRS icon.
2Check with your service provider to use your phone as a modem to connect to the Internet.
19
Desktop icons
Desktop icons are shortcuts to functions or items. You can activate a desktop icon on the standby screen (desktop) in stead of following the menu and
pressing the shortcut numbers.
The desktop icons are displayed in two rows on the standby screen. See “LCD and displayed icons” on page vii for the actual location of the desktop
icon area.
There are two types of desktop icons: the automatically displayed and the manually created.
Automatically displayed desktop icons
The following automatically displayed icons are displayed on the upper row of the desktop icon area:
2You can delete all the automatically displayed icons by pressing and holding CLR on the standby screen.
2If you turn the phone off, all the automatically displayed desktop icons are deleted.
Manually created desktop icons
The following manually created icons are displayed on the lower row of the desktop icon area:
Icon nameImageDescription
Missed callDisplayed when there is a new entry in the Missed calls list.
Missed messageDisplayed when there is a new message you have not acknowledged.
Missed MailDisplayed when there is a new Mail you have not acknowledged.
Icon nameImageDescription
Phone number Displays a dialer screen with the registered phone number displayed.
MessageCreates a new message to the registered phone number or Email address.
URLActivates the browser and accesses the registered URL.
PictureDisplays the image file.
NotepadDisplays the Notepad preview screen with the note file displayed.
CameraDisplays the camera view finder screen.
VideoDisplays the video view finder screen.
Music playerDisplays the Music player screen.
20
Creating a desktop icon manually
☛
Activate the required function (camera/video/music player) or display the item (image file/note file/phone number/Email address/URL).
☛ to display the Options menu and select Add desktop icon (for an image/note file, this menu is under Use item, and for camera/video, under
Other settings).
2You can create up to 10 desktop icons.
2If you have more than 5 desktop icons, an arrow will be displayed to indicate that you can scroll for more icons.
2The phone number, mail address or URL desktop icon data will not be updated when the original data is modified. Delete the old desktop icon
and create a new one in such a case.
2When you create a desktop icon of an image file or notepad file, the data will be automatically protected. The default title will be the file name,
even if this title is changed the original file name will remain the same.
2Each manually created desktop icon has a title that you can edit.
Activating a desktop icon
☛
➔Highlight the required desktop icon ➔
2If you do not press any key for three minutes after highlighting a desktop icon, the highlight is cancelled and the screen goes back to the normal
standby screen.
2If you activate an automatically displayed desktop icon, it will be deleted automatically.
Desktop icon Options menu
☛
Highlight a desktop icon ➔
No.Desktop icon Options menu
1Edit titleEdits the title of the highlighted desktop icon.
2Delete oneDeletes the highlighted desktop icon.
3Delete allDeletes all the manually created desktop icons.
21
Settings (M1)
Phone(M11)
☛1 1
No.Phone
1Voice volumeAdjusts the sound volume output from the earpiece.
☛ Use ▲▼, Side keys or alphanumeric keys(0 to 9)to adjust the volume.
2You can also press the Side keys to display the volume control screen and to adjust the volume setting.
2During a call, you can press the Side keys to adjust the setting of the volume as required.
2Answer options1Any key answerOn: Any key (except , SK2, the Side keys) is valid to answer a call
Off: Only and SK1 are valid to answer a call
2Ring silencerOn: Pressing one of the Side keys stops the ringer sound and the vibrator while
receiving a call with the phone closed.
2This function cannot be used if the Side keys are locked.
/See also: “Mute” on page 8.
3Fold answerOn: You can answer an incoming call by opening your phone.
3Side keyDisable: Side keys are locked while your phone is folded.
2You can also lock/unlock the Side keys by pressing and holdingon the standby screen.
4ALS setup,The Alternate Line Service (ALS) facility is SIM card and network dependent.
If your SIM card supports ALS, you can setup which line to use for Outgoing call or Voice mail.
5Clock1Show clockSets to display the local time, both the local and remote times or no time on the
main-LCD.
2Set timeSets the time for the local or remote time.
3Set dateSets the date.
4Set date formatSelects the date display format.
5Set time formatSelects the time display format from 12 hour or 24 hour.
22
Phone modes (M12)
Your phone can be set to one of the following modes: Normal mode, Meeting mode, Pocket mode or Car mode.
,Any changes made to the settings while in a particular mode will be stored and used when that mode is selected again.
Selecting your phone mode
☛
▲ or 12➔ Press the appropriate key for the required mode.
2You can also set the Meeting mode or return to the previous mode by pressing and holding▲ on the standby screen.
Editing the mode settings
☛
▲or 12 ➔Highlight the required mode ➔SK1➔ Press the appropriate number for the required setting in the following table.
☛ For any volume setting, use ▲▼, Side keys or alphanumeric keys(0 to 9).
5Clock (Continued)6Set timezoneSets the timezone. (A ✔ is placed on the currently selected timezone.)
☛ Highlight the required timezone➔Press SK1 to save the change.
2If the highlighted timezone has Daylight Saving, a check box will be
displayed at the bottom of the screen. Press to activate (✔)/deactivate
the setting.
6LanguageSelects the language the phone displays.
2When you have switched the language to be displayed, please wait until the new setting becomes active.
7LEDSelects the Light Emitting Diode (LED) colour for incoming calls/SMS/Mail or during a call.
2If the personal setting or the Group setting for the LED colour is also set in the phonebook, it has priority
over this LED setting. (See “Allocating a LED colour” on page53 for details.)
8Earphone typeSelects the earphone type from Stereo or Monaural, depending on your earphones (headset).
No.Phone mode setting
1
RingerSelects the Sound or Video for incoming calls. (See “Sounds (M62)” on page 62 or “Videos (M61)” on page 61 for
details.)
2Ringer volumeSets the sound volume for incoming calls.
2While receiving a call with your phone open, the ringer volume can also be adjusted by pressing the Side keys.
3SMS toneSelects the ringtone for incoming SMS messages. (See “Sounds (M62)” on page62 for details.)
No.Phone (Continued)
23
2If the selected mode is Car mode, the backlight will always be turned on. This will reduce battery life.
Main-LCD (M13)
☛1 3
2nd-LCD (M14)
☛1 4
4SMS tone volumeSets the sound volume for incoming SMS messages.
5Mail toneSelects the ringtone for incoming Mail or MMS messages. (See “Sounds (M62)” on page 62 for details.)
6Mail tone volumeSets the sound volume for incoming Mail or MMS messages.
7Key toneTurns on/off the key tone.
8Service toneTurns on/off the service tone.
9Alarm volumeSets the sound volume for Clock alarm and Schedule alarm.
0VibratorTurns on/off the vibrator function.
Earphone settingSelects the sound output from Earphone & Speaker or Earphone.
#
Auto answerSelects whether to answer an incoming call automatically.
2To use the Auto answer function, connect the headset to your phone and set the earphone volume to 1 or
higher. If the earphone volume is set to 0, you must turn the vibrator ON to use the Auto answer.
No.Main-LCD
1GreetingsSelects the greeting which is displayed on the main-LCD during phone start-up from No greeting, Text or
Animation.
☛ If you select Text greeting, press SK1 to edit the greeting text. Key in a greeting text and press .
2WallpaperSelects a picture or video file to use as the background for the main-LCD.
3Main menu styleSelects and resets the background and icons for the Main menu screen.
4Colour styleSelects the phone’s colour theme.
No.Phone mode setting (Continued)
24
Power saving (M15)
☛1 5
2 If the selected mode is Car mode, this function is displayed in gray and is not available.
Calls (M16)
☛1 6
/For settings provided on the Calls screen, see “Call settings (M16)” on page 11.
Security (M17)
☛1 7
No.2nd-LCD
1Clock/Event displaySelects which items to display on the 2nd-LCD from Clock & Event, Clock only, Event only or Off.
2Clock orientationSelects whether to display a horizontal clock or a vertical clock.
2When you select to display a vertical clock, it is read from the camera and LED end.
2The event displays and incoming call numbers are shown along the long end according to the Display
direction.
3Incoming call No.Turns on/off the function to display the incoming call number on 2nd-LCD.
4Display directionSelects which direction to display the 2nd-LCD.
2This setting does not effect the vertical clock.
5ContrastSets the contrast level of the 2nd-LCD.
No.Power saving
1Level settingSelects the power saving level from Level 1 (minimum power save setting), Level 2 (moderate) or Level 3
(maximum).
2The main-LCD backlight will turn dim and then turn off after a given amount of time with no operation.
2When the phone is folded, Power saving level also applies to the 2nd-LCD.
2Function key LEDSelects whether to flash the LED of SK1 and SK2when the main-LCD and its backlight are turned off.
2If the selected mode is Car mode or the camera view finder screen is displayed, the main-LCD backlight will
always be on.
25
The security settings will help to protect your phone from improper and unauthorized use. You may be required to enter one of the five codes (shown
below). When the phone prompts you for one of these codes, key in the appropriate number.
•PIN code (provided by your network service provider to protect your SIM card if it is stolen)
•PIN2 code (provided by your network service provider for charge information and Fixed dialling services protection)
•PUK code (personal unblocking key in case you forget PIN code)
•PUK2 code (personal unblocking key in case you forget PIN2 code)
•Security code
,If you forget any of these codes, ALWAYS contact your service provider as they are the ONLY source for your codes.
PIN code
Your phone can be set up so that your PIN code must be entered at power up before the phone can be used at all. If the PIN code is not entered, not
even incoming calls can be answered. Entering your PIN code incorrectly 3 times (not necessarily in the same session) will invalidate the correct PIN
code. In such a case you will have to contact your service provider for a PUK code to unblock your SIM card.
2Some SIM cards are set up so that PIN number entry cannot be turned off.
2When SIM PIN lock is enabled, you can change the PIN code.
PIN2 code
Your phone supports advanced feature that may require a PIN2 code to be entered before they can be accessed or modified. Entering your PIN2 code
incorrectly 3 times (not necessarily in the same session) will invalidate the correct PIN2 code. In this case you will have to contact your service provider
for a PUK2 code.
,The PIN2 code is SIM card related and may only be available from your service provider.
No.Security
1Change PINsChanges the PIN or PIN2 code. (PIN activate setting must be turned on to change the PIN code.)
2PIN activateTurns on/off the PIN code entry required at starting up the phone-up.
3Change security codeChange the security code which is used to set some of functions and unlock the Personal Information
Manager (PIM) features.
2The default setting of the security code is “0000”.
4Phone lockTurns on/off the Phone lock function which will lock the phone: you can only make emergency calls or enter
the security code. After entering the correct security code, you can use the phone normally.
2Upon power-up, you are prompted to enter the security code if the Phone lock was active when the phone
was powered down.
26
Network (M18)
☛1 8
/For settings provided on the Network screen, see “Roaming” on page 13.
Reset settings (M19)
☛1 9
This function will reset your phone to its factory settings.
,By restoring the factory settings, any changes you have made to your phone except the following will return to the factory settings (the
following data/settings will not be reset):
•Settings: Set time other than Remote time, Set date, Language, all settings in Calls other than Auto redial, all Security settings other than Change
security code, SIM list settings in Network.
•All call lists and call information
•Phonebook: All Phonebook entries. The settings for Groups.
•Accessory: All Schedule, ToDo, Notepad and Voice memo entries. All the settings other than Clock alarm, Play list for Music player, View events
for Scheduler and Sort for ToDo.
•i-mode: All Bookmarks, Saved pages, Go to webpage, and Mail settings. All the i-mode related settings.
5Bar callsYou can bar the following calls made/received on your phone: All outgoing (dialled) calls, international
outgoing (dialled) calls, international outgoing (dialled) calls except to home, all incoming (received) calls or
incoming (received) calls when roaming.
1Change settings☛ Highlight the type of restriction and the call type, and then ➔ to save
changes.
☛ Key in your bar calls password to verify user identification to the network
➔SK1 to confirm and save changes to the network.
2The selected settings have red bars over their icons.
2Set password,Bar calls facilities are network services and may require a password.
Changes the bar calls password.
6Fixed diallingTurns on/off the fixed dialling which restricts the use of dialled number to only the Fixed Dialling Numbers
(FDN).
,The FDN facility is network dependent.
/See also: “Fixed dialling numbers (FDN)” on page 48.
No.Security (Continued)
27
•Java: All the Java™ applications.
•Message: All the stored messages. The settings for Msg filter, Msg filter details, and SMS centre number.
•My data: All stored files.
Message (M2)
Message overview
Message services
Your phone supports the following messaging services:
•Short Messaging Service (SMS) allows you to send short messages (160 half-pitch characters max.) to one or more phone numbers. To send an
SMS message, the destination phone number must be a mobile phone with an SMS service subscription. SMS service also supports Enhanced
Messaging Service (EMS) for which the maximum length of the message you can send depends on the number of linked messages (maximum of
10 linked messages are available).
•Mail (i-mode messaging service) allows you to send a message to not only other cellphones but also to PCs and other devices that uses Email
addresses. You can attach files from Pictures, Videos and Sounds in My data (see page 61). Mail facility is available from the Mail screen under
the i-mode facility. For details on the mail service, see “i-mode (M3)” on page 33.
•Multimedia Messaging Service (MMS) is a service that allows you to send messages of a slideshow of text and multimedia files. When you receive
an MMS message, you will be notified by a message from the MMS centre. You can either automatically or manually receive the contents of an
MMS message. MMS facility is available from the Mail screen under the i-mode facility. For details on the mail service, see “i-mode (M3)” on
page 33.
,The Message Services are network dependent.
Sending/Receiving messages
While an SMS message is being sent or received, a name, a number and a CLI picture will be displayed (if a name and CLI picture have been stored
with the number in your phonebook). The received messages are stored on the SIM card or in your phone memory. When you receive a message, your
phone will ring or beep during a call, a new message icon will be shown on your phone’s display and its LED will glow.
2Please delete the unnecessary messages in the folders from time to time. The phone cannot receive any messages when the Inbox folder is full.
Message screen
☛ To display the Message screen, 2 or press and hold ➔ Press the appropriate key for the required option.
No.Message screen menu
1InboxThe received messages are stored here.
2DraftsThe messages currently being edited are stored here.
28
2If there is no message in a message list, the list will be displayed in gray and you cannot select it.
Reading a message (M21)
☛ To display the Message view screen of a new message, 21 or press and holdand press 1 ➔ Highlight the new message ➔
☛ The new (unread) messages are displayed in bold.If the message cannot be displayed in one page, press ▲ and ▼ keys to scroll through the
message.
The following icons will be displayed.
Message Options menu (M2M)
☛
2 or press and hold and press
3OutboxThe messages that failed to be sent are stored here.
4SentThe sent messages are stored here.
5, 6Folder1/Folder2The messages moved by Move msg (see “Message list Options menu” on page29) are stored here.
7CBThe received broadcast messages are saved. See “Cell broadcast (M27)” on page 33 for details.
IconsDescriptionsIconsDescriptions
Message type iconsRead / Unread status icons
SMS messageNew / Unread message(s)
Incomplete SMS messageRead message(s)
Storing location iconsFiltering status icons
Highlighted message stored in SIMSMS messages filtered by status (incomplete)
Highlighted message stored in the phone memorySMS messages filtered by location (SIM)
Sorting status iconsSMS messages filtered by location (the phone memory)
Messages sorted by DateFiltered SMS messages
Messages sorted by NameSent message status icons
Messages sorted by Read/Unread statusSent but failed message
Messages sorted by SizeSent message
Messages sorted by Ascending order
Messages sorted by Descending order
No.Message screen menu (Continued)
29
,The receipt request and linking of SMS messages are network dependant.
2Depending on the selected folder, some options may be displayed in gray and not be available.
Message list Options menu
☛
Display the message list in the Inbox, Drafts, Outbox, Sent, Folder1, Folder2 or CB ➔
No.Message Options menu
1SMS settings1SMS centreEdits the SMS centre number (this number is saved in the SIM card).
2Auto display
Turns on/off the automatic display function that displays the received SMS messages
automatically.
3Receipt requestSelects whether to request a receipt of the sent SMS messages.
4
Max linked msgsSets the maximum number of linked SMS messages. This function divides an SMS with
the message text exceeding the maximum number of characters allowed into multiple
messages.
5
Validity periodSelects the period of time an SMS message is stored at the SMS centre, while trying to
deliver the message.
2CB settings
1
Enable1 to receive none, 2 to receive all, or 3 to specify a list or Cell Broadcast Message
Identifier (CBMI) to receive broadcast from.
2LanguagesSelects which language to receive the cell broadcast messages in.
3View msg statusDisplays the information on the number of messages in the phone, the size of free/used memories, SMS units in the
phone/SIM, and complete/incomplete SMS units.
4Rename folderRenames Folder1 and Folder2 folders.
5View allDisplays all the messages in all folders on the same list.
6Msg filterSets the type(s) of messages to be displayed by selecting the desired filter option.
No.Message list Options menu
1ReplyReplies to the sender of the highlighted message.
2Reply allReplies to the sender and all other recipients of the highlighted message.
3DeleteDeletes the highlighted message.
4Delete allDeletes all the messages in the current folder.
5ForwardForwards the message text of the highlighted message.
6Msgs/pageSelects either to display 3 or 7 messages in one screen.
30
2Depending on the selected folder, the menu number and available options may vary.
2Depending on the selected folder, some options may be displayed in gray and not be available.
Message view Options menu
☛
Display the message list in the Inbox, Drafts, Outbox, Sent, Folder1, Folder2 or CB➔ Highlight a message ➔➔
2Depending on the conditions, some options may be displayed in gray and not be available.
2The reply facility uses the phone number of the person who sent the message.
2The Save object Options menu will be displayed only if an object is highlighted.
☛and to highlight a phone number, Email address or URL in the message ➔
The columns shows the menu numbers for P: Phone number highlighted, E: Email address highlighted and U: URL highlighted.
7Move msgMoves the highlighted message to Inbox or Folder1/2, or copies to SIM or Phone.
8Sort msgBy:Sorts the messages by date, name, read/unread status or size.
Order:Sorts the messages in ascending or descending order.
9SearchSearches messages by alphabets.
0View detailsDisplays the detailed information on the highlighted message.
–Add desktop iconCreates a desktop icon of the highlighted message (Inbox, Sent, Folder1/Folder2 only).
–EditEdits the highlighted message (Drafts and Outbox only).
–ResendResends the highlighted message in the folder (Outbox only).
The entire message or only the packets that failed to reach the recipient(s) can be sent.
No.Message view Options menu
1ReplyReplies to the sender of the highlighted message.
2Reply allReplies to the sender and all other recipients of the highlighted message.
3DeleteDeletes the highlighted message.
4View detailsDisplays detailed information on the highlighted message.
5ForwardForwards the message text of the highlighted message.
6Save objectSaves the highlighted object to a folder in My data.
7Move msgMoves the highlighted message to Inbox or Folder1/2, or copies to SIM or Phone.
8Highlight modeActivates the Highlight mode.
9Add desktop iconCreates a desktop icon of the highlighted message.
No.Message list Options menu (Continued)
▼
▼
31
Creating a message
☛To display the Message composer screen, press 2 SK1 orpress and hold
and press SK1 ( ➔ to display the Message composer Options menu)
☛To address the message, highlight the To field ➔➔ Input the required phone
number ➔
2To scroll the phone numbers in the To field, or
☛To key in the message, highlight the Message field ➔➔ Key in the message
➔
2Pressing while keying in the To/Message field displays the Message edit
Options menu screen.
☛Press SK1 to send the message.
2When you are in the ABC (normal text) mode, any word entered that is not in the
T9 dictionary will be added automatically.
2When you are keying in your message, press SK1 to change the text entry mode.
2If you display another screen or receive a call while you are editing a message
more than 1 character, the message will be saved automatically in Drafts.
Message composer Options menu
☛
2 SK1 orpress and holdand press SK1 ➔ Highlight To or Message field ➔
PEUMessage view Options menu
11–Add to phonebookAdds the highlighted phone number or Email address to a phonebook.
2––Dial phone numberDials the selected phone number.
––1Add to bookmarkAdds the highlighted URL to the bookmarks.
––2Go to URLActivates the web browser to access the highlighted URL.
323Create messageCreates a new message with the highlighted phone number/Email address/URL in the To field,
the message text, or the slide text.
43–Add desktop iconCreates a desktop icon of the highlighted phone number/Email address.
No.Message composer Options menu
1Add/EditAdds or edits a recipient phone number or a message.
2Preview msgDisplays a message preview screen.
3DeleteDeletes the highlighted recipient, message, or object.
Help area
This area contains the
information on the message.
S indicates the size of the
message equivalent to the
number of SMS messages, and
R indicates the remaining
number of characters
available.
(green)
Indicates that an upper case letter will be input next.
(red)
Indicates the capital lock.
(no arrow)
Indicates that a lower case letter will be input next.
▼
▼
32
2Depending on the selected field, some options may be displayed in gray and not be available.
Message edit Options menu
☛
2 SK1 orpress and holdand press SK1 ➔ Highlight To or Message field ➔➔
2Depending on the conditions, some options may be displayed in gray and not be available.
Highlight mode Options menu
☛
2 SK1 orpress and holdand press SK1 ➔ Highlight To or Message field ➔➔5, or press and hold ➔
4Delete allDeletes all the recipients (To field only).
5SaveSaves the message in Drafts folder.
6PhonebookDisplays the phonebook list to insert a recipient phone number.
7
Resend listInserts a phone number from the resend list.
2You can delete the highlighted phone number from the resend list or the entire resend list by pressing
1 or 2 respectively.
8InsertInserts a new recipient phone number (To field only).
9Address listDisplays the recipients of the message (To field only).
No.Message edit Options menu
1Text colourSelects the colour of text and background.
2Text formatSelects the font size (normal, large or small) and font style (bold, italics, underline or strikethrough).
3Text alignmentSets the text alignment (left, centred or right).
4PastePastes the text which has been copied onto the clipboard in the Highlight mode.
2This function can be used only when text has been selected in the Highlight mode.
5Highlight modeActivates the Highlight mode at the cursor position.
2To toggle the highlight mode on/off, SK1 and to go back to the normal mode, CLR
2To display the Highlight mode Options menu, (see “Highlight mode Options menu” on page 32).
6Insert objectInserts Text, Sound, Picture, Animation, Emoticon or Pictograph into the message at the cursor position.
7T9 LanguageSelects the language for T9 text input.
8Edit settingsSets the Write mode (Insert or Overwrite) and Clear mode (Backspace or Delete).
No.Highlight mode Options menu
1Text colourSelects the colour of text and background.
2Text formatSelects the font size (normal, large or small) and font style (bold, italics, underline or strikethrough).
3CopyCopies the highlighted part of text onto the clipboard.
No.Message composer Options menu (Continued)
38
i-mode screen
From the i-mode screen you can change the i-mode related settings of your phone.
☛3➔ The i-mode screen will be displayed.
i-mode menu screen
From the i-mode menu screen you can access to the iMenu/Mail/Message screen, your bookmarks, the entry screen for a URL to be displayed, the
access history, the saved pages and the list of Java™ applications.
☛ SK2 or 31 to display the i-mode menu screen.
No.i-mode screen menus
1i-modeDisplays the i-mode menu screen (For details, see “i-mode menu screen menus” on page 39).
2Settings1Ringer timeSets the ringtone duration to 3-10 seconds for incoming mail/MMS.
2Connection No.Selects the connection number settings to use. The following settings are
available:
1/2Factory setting 1/2Uses the default connection numbers.
3User settingUses and changes the following settings.
1Access point
2i-mode server (Gateway address)
3Portal server (i-mode server)
4MailMail server
2nd Mail server
Confirmation site
5User dataUser name
Password
6Port No.HTTP Port No.
SSL Port No.
3i-mode lockLocks the i-mode function, including mail/MMS.
39
No.i-mode menu screen menus (Sheet 1 of 3)
1iMenuAccesses the iMenu screen. (See “iMenu screen” on page 41.)
2MailDisplays the Mail screen, on which you can display received mail/MMS, saved draft messages and sent messages,
and also create new mail/MMS (see “Mail screen” on page 42).
3Java applicationDisplays the list of Java™ applications (see “Java™ (M7)” on page 66 for details).
4SMSDisplays the Message screen, on which you can read received SMS and create new SMS (see “Message (M2)” on
page 27).
5BookmarksDisplays the list of bookmarked web pages.
Bookmarks Options menu
1OpenDisplays the highlighted bookmark.
2Copy addressCopies the highlighted bookmark address.
3Edit titleEdits the title of the highlighted bookmark.
4Add desktop iconCreates a desktop icon of the URL of the selected bookmark.
5Create messageCreates a new message with the highlighted bookmark address in the message text.
6Delete oneDeletes the highlighted bookmark.
7Delete allDeletes all the bookmarks.
6Go to webpageDisplays the URL you key in, or displays the URL in the address history.
1Enter addressPrompts you to key in a web page address.
2Address historyDisplays the list of addresses in the access history for you to select from.
3Go to homeDisplays the homepage set in Home page of Settings (See page 41).
0BackReturns to the i-mode menu screen.
42
,If you agree to send private information (e.g. production serial No. and SIM No.) to the IPs via the Internet, it may be obtained by others.
2Pressing CLR or may not bring back the previous screen. Screen operations depend on the current screen content.
Mail screen
From the Mail screen you can use the i-mode message services.
☛ SK1 or 31 2 to display the Mail screen.
2The available options differ depending on the operators.
2If an error occurs while sending mail, it will be saved in the Draft folder as an unsent mail.
2The same mail can be sent to up to five addresses.
2If you save a mail while editing, it will be saved in the Draft folder.
–Save pageSaves the current page.
–Add to phonebookSaves the phone number displayed in the current page in the phonebook.
2This option is displayed only when one or more phone numbers are displayed on the current screen.
–Certificate infoDisplays the server certificate of the current page.
2This option is displayed only when the current page is a SSL page.
–Go to webpageDisplays a page by keying in the URL or using the access history (see “Go to webpage” on page 39).
–ReloadUpdates the data on the current page.
–Page infoDisplays the URL of the current page.
–Add desktop iconCreates a desktop icon of the URL of the current page.
–Create messageCreates a new message with the highlighted phone number or Email address in the message text.
No.Mail screen menus (Sheet 1 of 5)
1Compose mailDisplays the Compose mail screen (see “Creating a new mail” on page 35).
2Compose MMSDisplays the Compose MMS screen (see “Creating a new MMS” on page 35).
3InboxDisplays the list of received mail/MMS.
Inbox list Options menu
–Show allDisplays all the received mail/MMS.
–Show unreadDisplays only the unread mail/MMS.
No.Browser options menu (Continued)
47
Phonebook (M4)
Phonebook types
Your phone can have up to 7 directories stored on your SIM card and in your phone memory:
•Complete (a list of all the numbers stored in the ADN and FDN)
•Personal directories (ADN) in the SIM card
•Personal directories (ADN) in the phone memory
•Service dialling numbers (SDN)
•Fixed dialling numbers (FDN)
•Own number
•Voice mail number
2When viewing any of the directories described, you can switch to the other directories (if your SIM card supports them) by pressing .
2The maximum number of phone numbers that can be stored on a SIM card is the total of the ADN, FDN and SDN directories.
2When you activate the phonebook, the directory which you were referring to the last time will open.
Personal directory (ADN)
These numbers are known as abbreviated dialling numbers (ADN). There are two types of ADN, one is the phonebook stored in the phone memory
(the phonebook (Phone)) and the other is the phonebook stored on the SIM card (the phonebook (SIM)).
Phonebook (SIM)
•Up to 255 personal data can be stored in the SIM card.
•Each personal data contains a phone number, a name and a location number.
2The number of phone numbers that can be stored on a SIM card depends on the SIM card capability.
BookmarkA bookmark contains the URL of a web page. You can save up to 50 bookmarks and use them for easier accesses.
Certificate
information
If you are displaying a Secure Sockets Layer (SSL) page designed to enable safe data transmission, you will be able to see
its certificate information.
IPInformation Provider. Your IP provides you the i-mode sites (programs).
Home pageA web page that is set in your profile as the page to connect to when you press and hold from the standby screen.
Saved pagesYou can save up to 20 web pages in your phone memory, for quick off-line access.
TermDefinition
58
Camera Options menu (before taking a picture)
No.Camera Options menu (before taking a picture)
1Single mode/Burst modeSwitches the shooting mode to Single/Burst mode (serial shooting).
2Shoot environmentChanges the camera settings to suit the environment. Select from Standard, Person, Room or Darkness.
3EffectApplies special effect to the picture. Select from Off, Sepia, Monochrome, Negative film, or Posterization.
4Photo sizeSets the picture size to Sub-QCIF (128x96), QCIF (176x144), Wallpaper (176x220), CIF (352x288), or
VGA (640x480).
2You cannot use the Zoom function for VGA, and you can select only x1 or x2 magnification for
Wallpaper and CIF.
2You cannot use the Frame and Burst mode functions for CIF and VGA.
2You cannot use the Full screen function for Sub-QCIF and QCIF.
2If you select Wallpaper, CIF or VGA, the picture on the camera view finder screen will be displayed as
a smaller picture than the actual size. Also on the camera view finder screen, the picture size before
shooting differs from the size after shooting.
5Image qualitySets the image quality to Super fine, Fine, Normal, Economy or Super economy.
6
Frame
Selects whether to use a frame when taking pictures, and sets the desired frame with which a picture will
be taken.
7Self timer/Self timer cancelActivates or deactivates the self-timer function.
8SoundSelects the shutter sound and self timer sound.
9PicturesDisplays the Pictures screen.
0Other settingsAdd desktop icon: Creates a desktop icon of the camera function on the standby screen.
Automatic save: Selects whether to save taken pictures automatically or not.
Light: Turns the light on or off.
Brightness: Changes the brightness level of the picture between -2 and +2.
Zoom: Changes the zoom magnification from x1, x2, x3 or x4.
Thumbnail view: Selects whether to display the pictures taken in the Burst mode as thumbnails or
slides.
Video: Activates the video function.
Flicker control: Selects 50Hz, 60Hz or Auto to prevent flickers when taking a picture under a
fluorescent light.
Switch finderSelects whether to display the camera view finder on the main-LCD or the 2nd-LCD.
2On the 2nd-LCD view finder, the object appears as a mirrored image.
Gebruikershandleiding.com neemt misbruik van zijn services uitermate serieus. U kunt hieronder aangeven waarom deze vraag ongepast is. Wij controleren de vraag en zonodig wordt deze verwijderd.
Product:
Spelregels forum
Om tot zinvolle vragen te komen hanteren wij de volgende spelregels:
lees eerst de handleiding door;
controleer of uw vraag al eerder door iemand anders is gesteld;
probeer uw vraag zo duidelijk mogelijk te stellen;
heeft u een probleem en al geprobeerd om dit op te lossen, vermeld dit erbij aub;
heeft u een oplossing gekregen van een bezoeker dan horen wij dat graag in dit forum;
wilt u een reactie geven op een vraag of antwoord, gebruik dan niet dit formulier maar klik op de knop 'reageer op deze vraag';
uw vraag wordt direct op de website gezet; vermijd daarom persoonlijke gegevens in te vullen;
Belangrijk! Als er een antwoord wordt gegeven op uw vraag, dan is het voor de gever van het antwoord nuttig om te weten als u er wel (of niet) mee geholpen bent! Wij vragen u dus ook te reageren op een antwoord.
Belangrijk! Antwoorden worden ook per e-mail naar abonnees gestuurd. Laat uw emailadres achter op deze site, zodat u op de hoogte blijft. U krijgt dan ook andere vragen en antwoorden te zien.
Abonneren
Abonneer u voor het ontvangen van emails voor uw Nec n401i bij:
nieuwe vragen en antwoorden
nieuwe handleidingen
U ontvangt een email met instructies om u voor één of beide opties in te schrijven.
Ontvang uw handleiding per email
Vul uw emailadres in en ontvang de handleiding van Nec n401i in de taal/talen: Engels als bijlage per email.
De handleiding is 1,68 mb groot.
U ontvangt de handleiding per email binnen enkele minuten. Als u geen email heeft ontvangen, dan heeft u waarschijnlijk een verkeerd emailadres ingevuld of is uw mailbox te vol. Daarnaast kan het zijn dat uw internetprovider een maximum heeft aan de grootte per email. Omdat hier een handleiding wordt meegestuurd, kan het voorkomen dat de email groter is dan toegestaan bij uw provider.
Stel vragen via chat aan uw handleiding
Stel uw vraag over deze PDF
Uw handleiding is per email verstuurd. Controleer uw email
Als u niet binnen een kwartier uw email met handleiding ontvangen heeft, kan het zijn dat u een verkeerd emailadres heeft ingevuld of dat uw emailprovider een maximum grootte per email heeft ingesteld die kleiner is dan de grootte van de handleiding.
Er is een email naar u verstuurd om uw inschrijving definitief te maken.
Controleer uw email en volg de aanwijzingen op om uw inschrijving definitief te maken
U heeft geen emailadres opgegeven
Als u de handleiding per email wilt ontvangen, vul dan een geldig emailadres in.
Uw vraag is op deze pagina toegevoegd
Wilt u een email ontvangen bij een antwoord en/of nieuwe vragen? Vul dan hier uw emailadres in.